Embed Size (px)
Citation preview
MANUALE ISTRUZIONI • INSTRUCTIONS MANUALNOTICE DE MONTAGE ET D’EMPLOI • GEBRAUCHSANWEISUNGEN
MANUAL DE INSTRUCCIONES
VM 038
6,2” TFT/LCD DVD RECEIVER
ENGLISH
ITALIANO
FRANÇAIS
DEUTSCH
ESPAÑOL
2
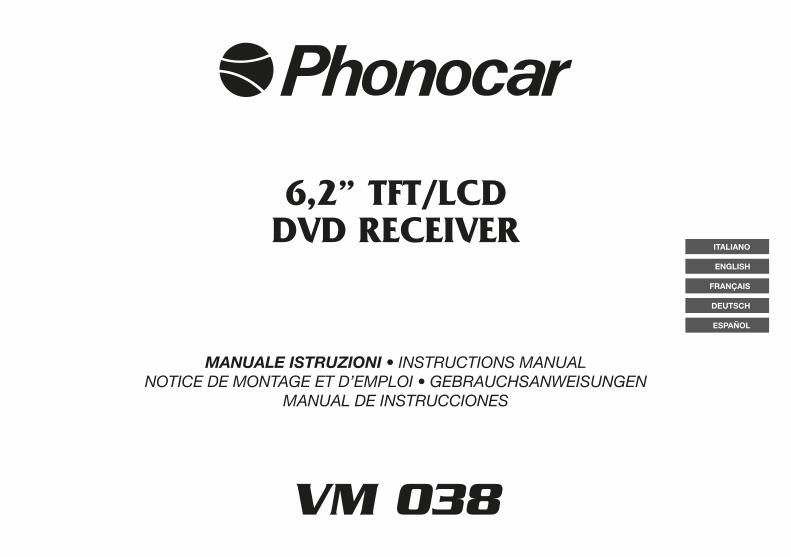
IT/GBCONNESSIONI • CONNECTIONS
INGRESSO A/V 2INPUT A/V 2
INGRESSO ANTERIORE A/VFRONT INPUT A/V
AUX IN R 2AUX IN L 2AUX IN VIDEO 2
4 5
ANTENNA GPSGPS AERIAL
USB
MIC
RADIO ANT
1
2
3FU
SE
3
IT/GBCONNESSIONI • CONNECTIONS
GIALLOYELLOW
VERDEGREEN
CAMERA
REVERSEP.CONTBRAKEKEY GNDKEY AKEY B
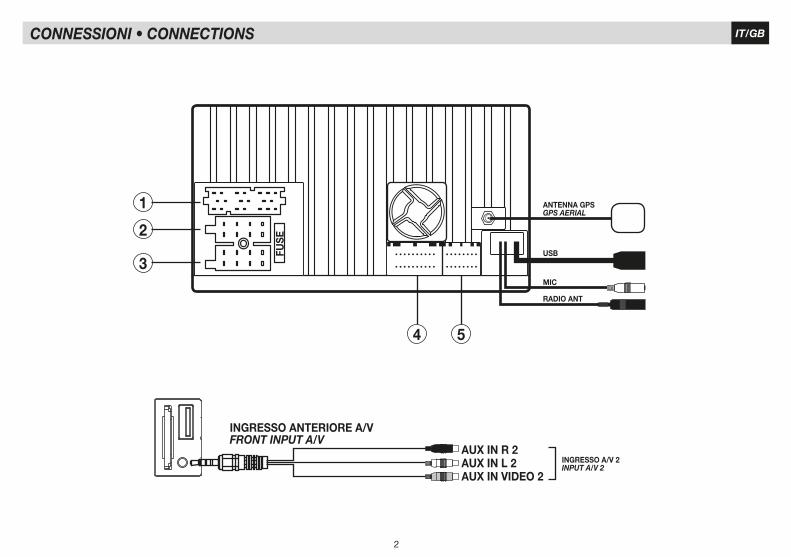
+ Luci di retromarcia / Lights for Reverse-gear
COLLEGAMENTI PER RETROCAMERA / CONNECTIONS FOR REAR-CAMERA
SERVIZIFUNCTIONS
ROSA/PINK
BLU-BIANCO/BLUE-WHITE
VERDE-BIANCO/GREEN-WHITE
MARRONE-NERO/BROWN-BLACK
ARANCIONE-BIANCO/ORANGE-WHITE
MARRONE-BIANCOBROWN-WHITE
REVERSEP.CONTBRAKE
KEY GNDKEY AKEY B
Attivazione retrocameraRemote amplificatoreFreno a mano (collegamento obbligatorio)
Massa Comandi al volanteLinea A Comandi al volanteLinea B Comandi al volante
VERDEGREEN
1
ROSA/PINK
BLU-BIANCO/BLUE-WHITE
VERDE-BIANCO/GREEN-WHITE
MARRONE-NERO/BROWN-BLACK
ARANCIONE-BIANCO/ORANGE-WHITE
MARRONE-BIANCOBROWN-WHITE
Rear-Camera Activation Amplifier Remote Hand-Brake (connection absolutely necessary)
Ground for Steering-wheel Commands Line A Steering-wheel Commands Line B Steering-wheel Commands
4
IT/GBCONNESSIONI • CONNECTIONS
2
5
4
3
GRIGIO/GRAY
MARRONEBROWN
NEROBLACK
VERDE/GREEN
VERDE-NERO/GREEN-BLACK
BIANCO/WHITE
ROSSO/RED
BIANCO-NERO/WHITE-BLACK
NERO/BLACK
ROSA/PINK
VIOLA/PURPLE
MARRONE/BROWN
VIOLA-NERO/PURPLE-BLACK
BLU/BLUE
GRIGIO-NERO/GRAY-BLACK
GIALLO/YELLOW +12V Positivo batteria +12V SottochiaveMassaIIlluminazione / DimmerAccensione antenna elettricaSilenzia audio
ANTERIORE DESTROFRONT RIGHT
MULTIZONA DESTRO / RIGHT
MULTIZONA SINISTRO / LEFT
USCITA VIDEO POSTERIORE 1
DESTRO / RIGHT
SINISTRA / LEFT
INGRESSO VIDEO / VIDEO INPUT
USCITA SUB WOOFER / SUB-WOOFER OUTPUT
ANTERIORE DESTRO / FRONT RIGHT
ANTERIORE SINISTRA / FRONT LEFT
POSTERIORE DESTRO / REAR RIGHT
POSTERIORE SINISTRA / REAR LEFT
USCITA VIDEO POSTERIORE / REAR VIDEO OUTPUT 2
ANTERIORE SINISTROFRONT LEFT
POSTERIORE DESTROREAR RIGHT
POSTERIORE SINISTROREAR LEFT
INGRESSO A/V INPUT A/V
FRONT R +FRONT R -FRONT L +FRONT L -REAR R +REAR R -REAR L +REAR L -
MULTIZONE RMULTIZONE LREAR VIDEO OUT 1AUX IN R AUX IN L AUX VIDEOSUB WOOFERFRONT R FRONT LREAR RREAR L
REAR VIDEO OUT 2
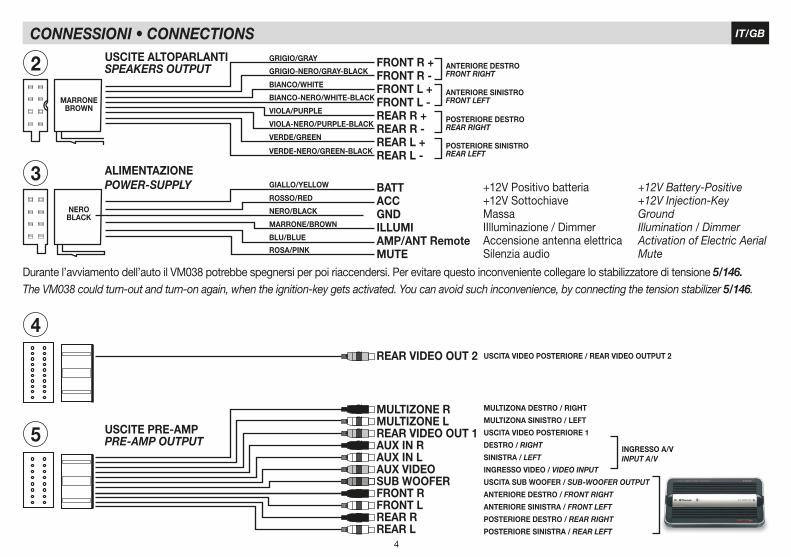
USCITE ALTOPARLANTISPEAKERS OUTPUT
ALIMENTAZIONEPOWER-SUPPLY
USCITE PRE-AMPPRE-AMP OUTPUT
BATTACCGNDILLUMIAMP/ANT RemoteMUTE
Durante l’avviamento dell’auto il VM038 potrebbe spegnersi per poi riaccendersi. Per evitare questo inconveniente collegare lo stabilizzatore di tensione 5/146.The VM038 could turn-out and turn-on again, when the ignition-key gets activated. You can avoid such inconvenience, by connecting the tension stabilizer 5/146.
+12V Battery-Positive +12V Injection-KeyGroundIllumination / DimmerActivation of Electric AerialMute
5
IT/GBCOMANDI AL VOLANTE CONNESSIONI • STEERING-WHEEL COMMANDS CONNECTION
VERDEGREEN
VERDEGREEN
REVERSEP.CONTBRAKE
REVERSEP.CONTBRAKE
ROSA/PINK
ROSA/PINK
BLU-BIANCO/BLUE-WHITE
BLU-BIANCO/BLUE-WHITE
VERDE-BIANCO/GREEN-WHITE
VERDE-BIANCO/GREEN-WHITE
MARRONE-NERO/BROWN-BLACK
MARRONE-NERO/BROWN-BLACK
ARANCIONE-BIANCO/ORANGE-WHITE
MARRONE-BIANCOBROWN-WHITE
MARRONE-BIANCO / BROWN-WHITE
VERDE / GREEN
ROSA / PINK
GRIGIO / GREY
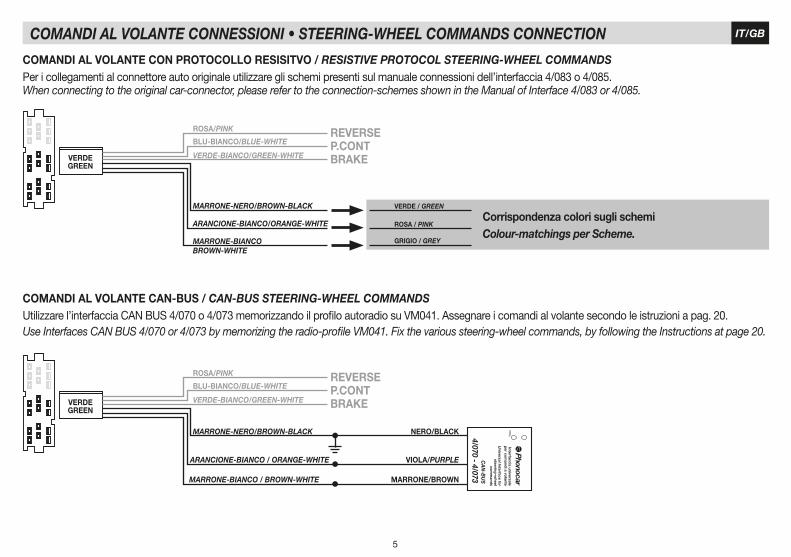
Corrispondenza colori sugli schemiColour-matchings per Scheme.
COMANDI AL VOLANTE CAN-BUS / CAN-BUS STEERING-WHEEL COMMANDSUtilizzare l’interfaccia CAN BUS 4/070 o 4/073 memorizzando il profilo autoradio su VM041. Assegnare i comandi al volante secondo le istruzioni a pag. 20.Use Interfaces CAN BUS 4/070 or 4/073 by memorizing the radio-profile VM041. Fix the various steering-wheel commands, by following the Instructions at page 20.
COMANDI AL VOLANTE CON PROTOCOLLO RESISITVO / RESISTIVE PROTOCOL STEERING-WHEEL COMMANDSPer i collegamenti al connettore auto originale utilizzare gli schemi presenti sul manuale connessioni dell’interfaccia 4/083 o 4/085.When connecting to the original car-connector, please refer to the connection-schemes shown in the Manual of Interface 4/083 or 4/085.
NERO/BLACK
VIOLA/PURPLE
MARRONE/BROWN
ARANCIONE-BIANCO / ORANGE-WHITE
4/070 - 4/073
6
IT/GBFUNZIONI • FUNCTIONS
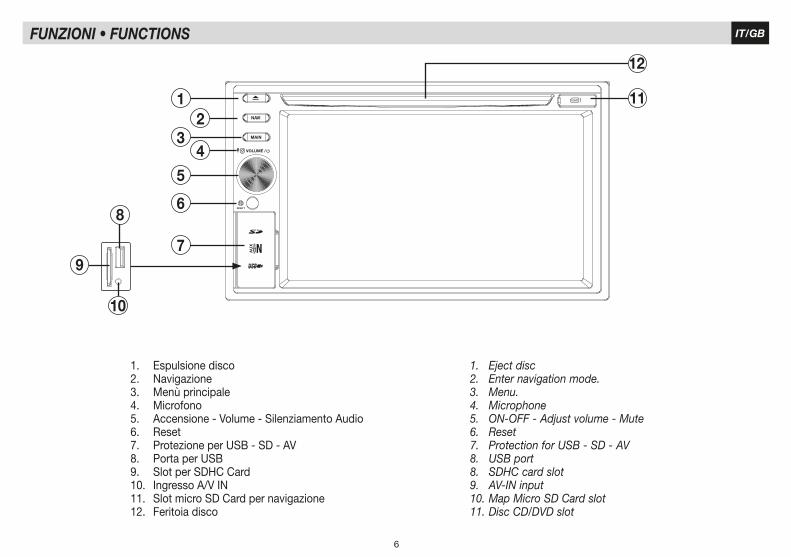
1. Espulsione disco2. Navigazione3. Menù principale4. Microfono5. Accensione - Volume - Silenziamento Audio 6. Reset 7. Protezione per USB - SD - AV8. Porta per USB9. Slot per SDHC Card10. Ingresso A/V IN11. Slot micro SD Card per navigazione12. Feritoia disco
1. Eject disc2. Enter navigation mode.3. Menu.4. Microphone5. ON-OFF - Adjust volume - Mute6. Reset7. Protection for USB - SD - AV8. USB port8. SDHC card slot9. AV-IN input10. Map Micro SD Card slot11. Disc CD/DVD slot
12
34
5
12
6
7
VOLUME /
RESE T
MAIN
NAVI
9
8
10
11
7
IT/GBFUNZIONI TELECOMANDO • REMOTE-CONTROL FUNCTIONS
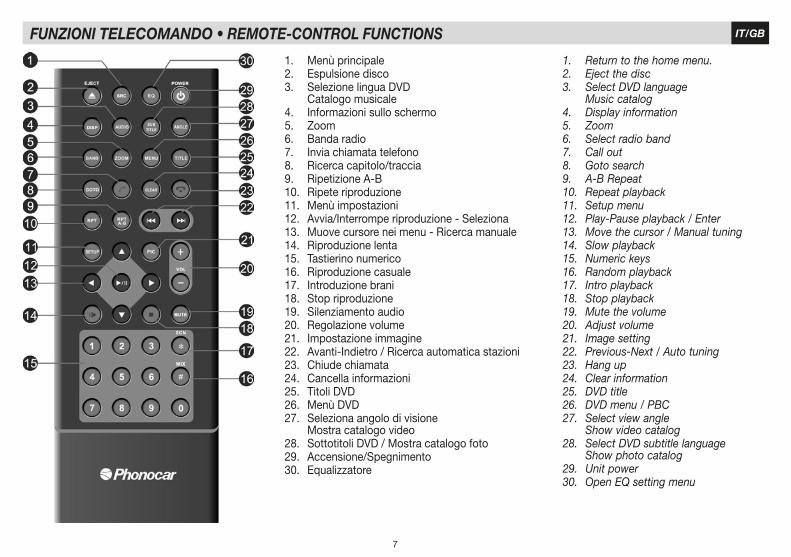
1. Menù principale2. Espulsione disco3. Selezione lingua DVD Catalogo musicale4. Informazioni sullo schermo5. Zoom6. Banda radio7. Invia chiamata telefono8. Ricerca capitolo/traccia9. Ripetizione A-B10. Ripete riproduzione11. Menù impostazioni12. Avvia/Interrompe riproduzione - Seleziona13. Muove cursore nei menu - Ricerca manuale14. Riproduzione lenta15. Tastierino numerico16. Riproduzione casuale17. Introduzione brani18. Stop riproduzione19. Silenziamento audio20. Regolazione volume21. Impostazione immagine22. Avanti-Indietro / Ricerca automatica stazioni23. Chiude chiamata24. Cancella informazioni25. Titoli DVD26. Menù DVD27. Seleziona angolo di visione Mostra catalogo video28. Sottotitoli DVD / Mostra catalogo foto29. Accensione/Spegnimento30. Equalizzatore
1. Return to the home menu.2. Eject the disc3. Select DVD language Music catalog4. Display information5. Zoom6. Select radio band7. Call out8. Goto search9. A-B Repeat10. Repeat playback11. Setup menu12. Play-Pause playback / Enter13. Move the cursor / Manual tuning14. Slow playback15. Numeric keys16. Random playback17. Intro playback18. Stop playback19. Mute the volume20. Adjust volume21. Image setting22. Previous-Next / Auto tuning23. Hang up24. Clear information25. DVD title26. DVD menu / PBC27. Select view angle Show video catalog28. Select DVD subtitle language Show photo catalog29. Unit power30. Open EQ setting menu
8
IT/GBMENÙ • MENU
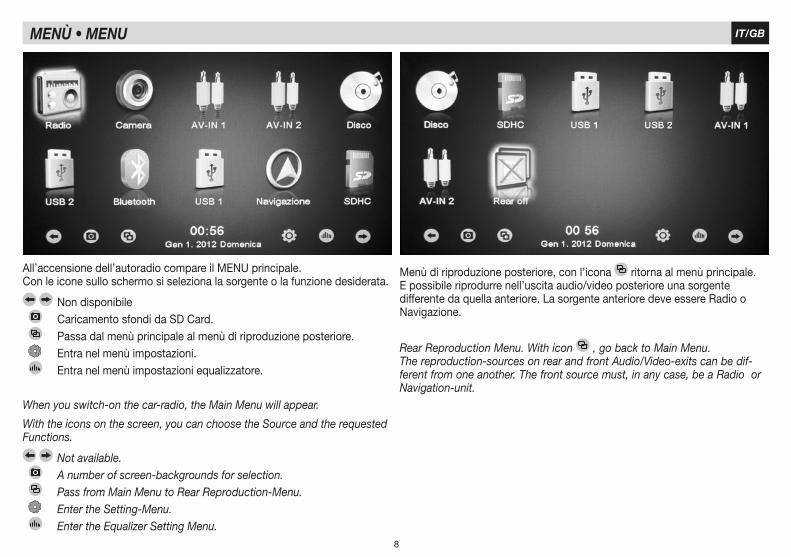
All’accensione dell’autoradio compare il MENU principale. Con le icone sullo schermo si seleziona la sorgente o la funzione desiderata.
Non disponibile Caricamento sfondi da SD Card. Passa dal menù principale al menù di riproduzione posteriore. Entra nel menù impostazioni. Entra nel menù impostazioni equalizzatore.
Menù di riproduzione posteriore, con l’icona ritorna al menù principale.E possibile riprodurre nell’uscita audio/video posteriore una sorgente differente da quella anteriore. La sorgente anteriore deve essere Radio o Navigazione.
Rear Reproduction Menu. With icon , go back to Main Menu.The reproduction-sources on rear and front Audio/Video-exits can be dif-ferent from one another. The front source must, in any case, be a Radio or Navigation-unit.
When you switch-on the car-radio, the Main Menu will appear.
With the icons on the screen, you can choose the Source and the requested Functions.
Not available. A number of screen-backgrounds for selection. Pass from Main Menu to Rear Reproduction-Menu. Enter the Setting-Menu. Enter the Equalizer Setting Menu.
9
IT/GB
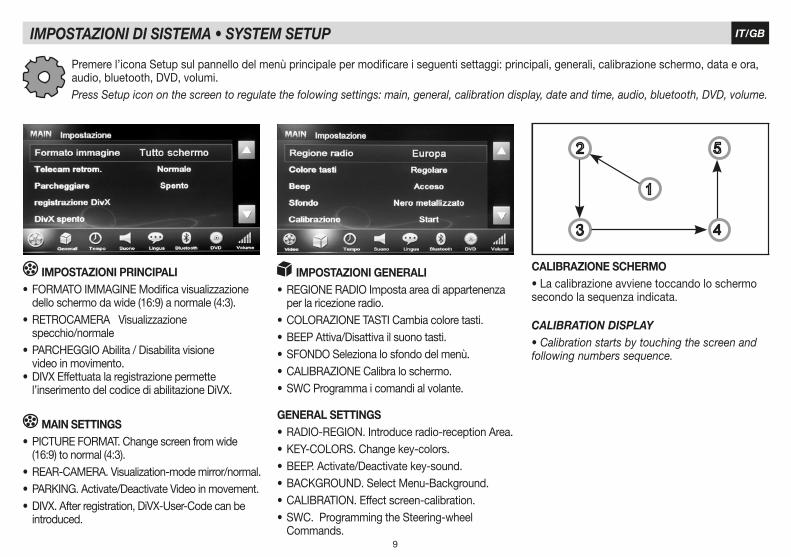
IMPOSTAZIONI PRINCIPALI•FORMATOIMMAGINEModificavisualizzazione dello schermo da wide (16:9) a normale (4:3).•RETROCAMERA Visualizzazione specchio/normale •PARCHEGGIOAbilita/Disabilitavisione video in movimento.•DIVXEffettuatalaregistrazionepermette l’inserimentodelcodicediabilitazioneDiVX.
MAIN SETTINGS•PICTUREFORMAT.Changescreenfromwide (16:9) to normal (4:3).•REAR-CAMERA.Visualization-modemirror/normal.•PARKING.Activate/DeactivateVideoinmovement.•DIVX.Afterregistration,DiVX-User-Codecanbe introduced.
IMPOSTAZIONI DI SISTEMA • SYSTEM SETUP
IMPOSTAZIONI GENERALI•REGIONERADIOImpostaareadiappartenenza per la ricezione radio.•COLORAZIONETASTICambiacoloretasti.•BEEPAttiva/Disattivailsuonotasti.•SFONDOSelezionalosfondodelmenù.•CALIBRAZIONECalibraloschermo.•SWCProgrammaicomandialvolante.
CALIBRAZIONE SCHERMO•Lacalibrazioneavvienetoccandoloschermosecondo la sequenza indicata.
GENERAL SETTINGS•RADIO-REGION.Introduceradio-receptionArea.•KEY-COLORS.Changekey-colors.•BEEP.Activate/Deactivatekey-sound.•BACKGROUND.SelectMenu-Background.•CALIBRATION.Effectscreen-calibration.•SWC.ProgrammingtheSteering-wheel Commands.
CALIBRATION DISPLAY• Calibration starts by touching the screen and following numbers sequence.
Premere l’icona Setup sul pannello del menù principale per modificare i seguenti settaggi: principali, generali, calibrazione schermo, data e ora, audio, bluetooth, DVD, volumi.Press Setup icon on the screen to regulate the folowing settings: main, general, calibration display, date and time, audio, bluetooth, DVD, volume.
10
IT/GBIMPOSTAZIONI DI SISTEMA • SYSTEM SETUP
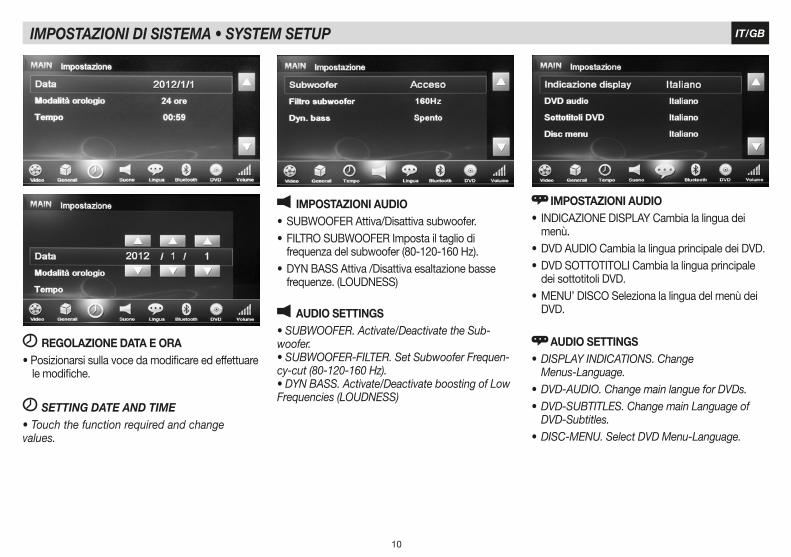
REGOLAZIONE DATA E ORA•Posizionarsisullavocedamodificareedeffettuare le modifiche.
IMPOSTAZIONI AUDIO•SUBWOOFERAttiva/Disattivasubwoofer.•FILTROSUBWOOFERImpostailtagliodi frequenza del subwoofer (80-120-160 Hz).•DYNBASSAttiva/Disattivaesaltazionebasse frequenze.(LOUDNESS)
IMPOSTAZIONI AUDIO• INDICAZIONEDISPLAYCambialalinguadei menù. •DVDAUDIOCambialalinguaprincipaledeiDVD.•DVDSOTTOTITOLICambialalinguaprincipale dei sottotitoli DVD.•MENU’DISCOSelezionalalinguadelmenùdei DVD.
AUDIO SETTINGS• DISPLAY INDICATIONS. Change Menus-Language.• DVD-AUDIO. Change main langue for DVDs. • DVD-SUBTITLES. Change main Language of DVD-Subtitles.• DISC-MENU. Select DVD Menu-Language.
AUDIO SETTINGS• SUBWOOFER. Activate/Deactivate the Sub-woofer.• SUBWOOFER-FILTER. Set Subwoofer Frequen-cy-cut (80-120-160 Hz).• DYN BASS. Activate/Deactivate boosting of Low Frequencies (LOUDNESS)
SETTING DATE AND TIME• Touch the function required and change values.
11
IT/GBIMPOSTAZIONI DI SISTEMA • SYSTEM SETUP
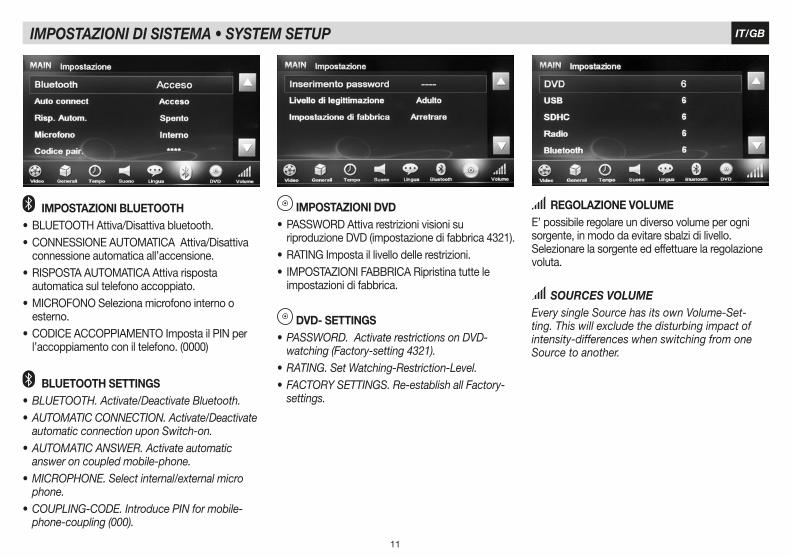
IMPOSTAZIONI BLUETOOTH•BLUETOOTHAttiva/Disattivabluetooth.•CONNESSIONEAUTOMATICAAttiva/Disattiva connessione automatica all’accensione.•RISPOSTAAUTOMATICAAttivarisposta automatica sul telefono accoppiato.•MICROFONOSelezionamicrofonointernoo esterno.•CODICEACCOPPIAMENTOImpostailPINper l’accoppiamento con il telefono. (0000)
BLUETOOTH SETTINGS• BLUETOOTH. Activate/Deactivate Bluetooth. • AUTOMATIC CONNECTION. Activate/Deactivate automatic connection upon Switch-on.• AUTOMATIC ANSWER. Activate automatic answer on coupled mobile-phone.• MICROPHONE. Select internal/external micro phone. • COUPLING-CODE. Introduce PIN for mobile- phone-coupling (000).
IMPOSTAZIONI DVD•PASSWORDAttivarestrizionivisionisu riproduzione DVD (impostazione di fabbrica 4321).•RATINGImpostaillivellodellerestrizioni.• IMPOSTAZIONIFABBRICARipristinatuttele impostazioni di fabbrica.
REGOLAZIONE VOLUMEE’ possibile regolare un diverso volume per ogni sorgente, in modo da evitare sbalzi di livello.Selezionare la sorgente ed effettuare la regolazione voluta.
SOURCES VOLUME Every single Source has its own Volume-Set-ting. This will exclude the disturbing impact of intensity-differences when switching from one Source to another.
DVD- SETTINGS• PASSWORD. Activate restrictions on DVD- watching (Factory-setting 4321). • RATING. Set Watching-Restriction-Level. • FACTORY SETTINGS. Re-establish all Factory- settings.
12
IT/GBRADIO
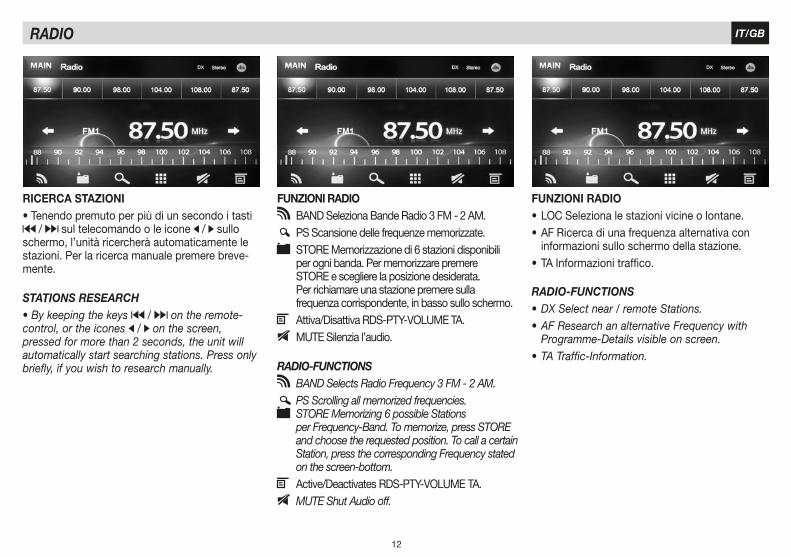
RICERCA STAZIONI•Tenendopremutoperpiùdiunsecondoitasti
/ sul telecomando o le icone / sullo schermo, l’unità ricercherà automaticamente le stazioni. Per la ricerca manuale premere breve-mente.
FUNZIONI RADIO BAND Seleziona Bande Radio 3 FM - 2 AM.
PS Scansione delle frequenze memorizzate. STOREMemorizzazionedi6stazionidisponibili
per ogni banda. Per memorizzare premere STOREesceglierelaposizionedesiderata. Per richiamare una stazione premere sulla frequenza corrispondente, in basso sullo schermo. Attiva/DisattivaRDS-PTY-VOLUMETA. MUTE Silenzia l’audio.
FUNZIONI RADIO•LOCSelezionalestazionivicineolontane.•AFRicercadiunafrequenzaalternativacon informazioni sullo schermo della stazione.•TAInformazionitraffico.
STATIONS RESEARCH • By keeping the keys / on the remote-control, or the icones / on the screen, pressed for more than 2 seconds, the unit will automatically start searching stations. Press only briefly, if you wish to research manually. RADIO-FUNCTIONS
BAND Selects Radio Frequency 3 FM - 2 AM. PS Scrolling all memorized frequencies.
STORE Memorizing 6 possible Stations per Frequency-Band. To memorize, press STORE and choose the requested position. To call a certain Station, press the corresponding Frequency stated on the screen-bottom. Active/DeactivatesRDS-PTY-VOLUMETA. MUTE Shut Audio off.
RADIO-FUNCTIONS• DX Select near / remote Stations. • AF Research an alternative Frequency with Programme-Details visible on screen. • TA Traffic-Information.
13
IT/GBEQUALIZZATORE • EQUALIZER SFONDI • BACKGROUND
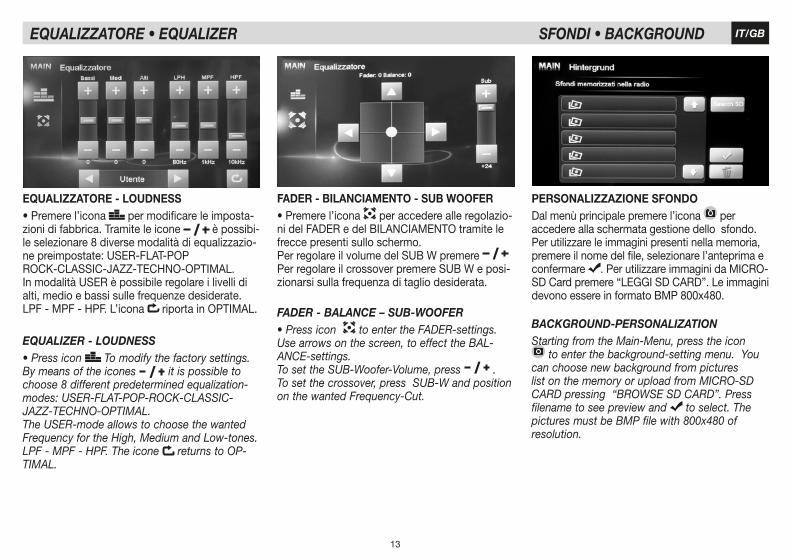
EQUALIZZATORE - LOUDNESS •Premerel’icona per modificare le imposta-zioni di fabbrica. Tramite le icone è possibi-le selezionare 8 diverse modalità di equalizzazio-nepreimpostate:USER-FLAT-POPROCK-CLASSIC-JAZZ-TECHNO-OPTIMAL.In modalità USER è possibile regolare i livelli di alti, medio e bassi sulle frequenze desiderate.LPF - MPF - HPF. L’icona riportainOPTIMAL.
FADER - BILANCIAMENTO - SUB WOOFER•Premerel’icona per accedere alle regolazio-nidelFADERedelBILANCIAMENTOtramitelefrecce presenti sullo schermo. PerregolareilvolumedelSUBWpremerePerregolareilcrossoverpremereSUBWeposi-zionarsi sulla frequenza di taglio desiderata.
EQUALIZER - LOUDNESS • Press icon To modify the factory settings. By means of the icones it is possible to choose 8 different predetermined equalization-modes: USER-FLAT-POP-ROCK-CLASSIC-JAZZ-TECHNO-OPTIMAL.The USER-mode allows to choose the wanted Frequency for the High, Medium and Low-tones.LPF - MPF - HPF. The icone returns to OP-TIMAL.
FADER - BALANCE – SUB-WOOFER• Press icon to enter the FADER-settings. Use arrows on the screen, to effect the BAL-ANCE-settings. To set the SUB-Woofer-Volume, press .To set the crossover, press SUB-W and position on the wanted Frequency-Cut.
PERSONALIZZAZIONE SFONDODal menù principale premere l’icona per accedere alla schermata gestione dello sfondo. Per utilizzare le immagini presenti nella memoria, premere il nome del file, selezionare l’anteprima e confermare .PerutilizzareimmaginidaMICRO-SD Card premere “LEGGISDCARD”.Leimmaginidevono essere in formato BMP 800x480.
BACKGROUND-PERSONALIZATIONStarting from the Main-Menu, press the icon
to enter the background-setting menu. You can choose new background from pictures list on the memory or upload from MICRO-SD CARD pressing “BROWSE SD CARD”. Press filename to see preview and to select. The pictures must be BMP file with 800x480 of resolution.
14
IT/GBRIPRODUZIONE • PLAYBACK DVD-CD-USB-SD CARD
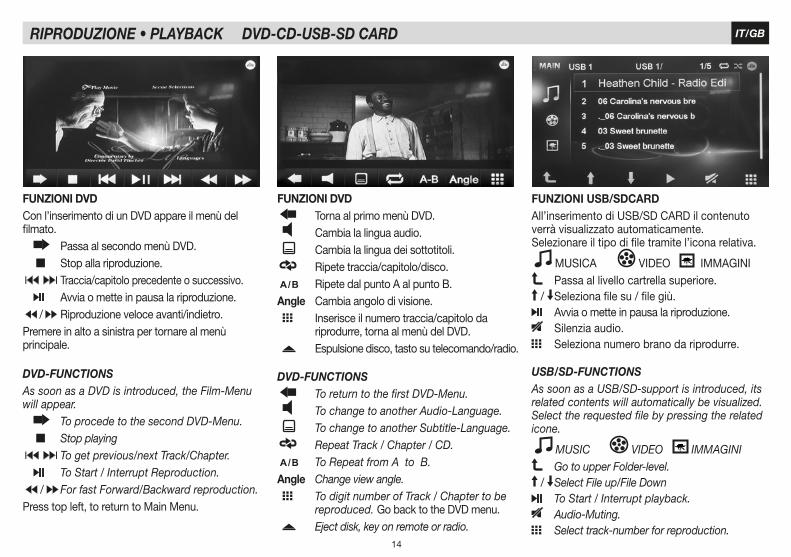
FUNZIONI USB/SDCARDAll’inserimento di USB/SD CARD il contenuto verrà visualizzato automaticamente.Selezionare il tipo di file tramite l’icona relativa.
MUSICA VIDEO IMMAGINI Passa al livello cartrella superiore.
/ Seleziona file su / file giù. Avvia o mette in pausa la riproduzione. Silenzia audio. Seleziona numero brano da riprodurre.
FUNZIONI DVD Torna al primo menù DVD. Cambia la lingua audio. Cambia la lingua dei sottotitoli. Ripete traccia/capitolo/disco. Ripete dal punto A al punto B.Angle Cambia angolo di visione. Inserisce il numero traccia/capitolo da riprodurre, torna al menù del DVD. Espulsione disco, tasto su telecomando/radio.
DVD-FUNCTIONS To return to the first DVD-Menu. To change to another Audio-Language. To change to another Subtitle-Language. Repeat Track / Chapter / CD. To Repeat from A to B. Angle Change view angle. To digit number of Track / Chapter to be reproduced. GobacktotheDVDmenu. Eject disk, key on remote or radio.
FUNZIONI DVDCon l’inserimento di un DVD appare il menù del filmato. Passa al secondo menù DVD. Stop alla riproduzione. Traccia/capitolo precedente o successivo. Avvia o mette in pausa la riproduzione. / Riproduzione veloce avanti/indietro.Premere in alto a sinistra per tornare al menù principale.
DVD-FUNCTIONSAs soon as a DVD is introduced, the Film-Menu will appear. To procede to the second DVD-Menu. Stop playing To get previous/next Track/Chapter. To Start / Interrupt Reproduction. / For fast Forward/Backward reproduction.Press top left, to return to Main Menu.
USB/SD-FUNCTIONSAs soon as a USB/SD-support is introduced, its related contents will automatically be visualized. Select the requested file by pressing the related icone.
MUSIC VIDEO IMMAGINI Go to upper Folder-level.
/ Select File up/File Down To Start / Interrupt playback. Audio-Muting. Select track-number for reproduction.

15
IT/GBRIPRODUZIONE • PLAYBACK DVD-CD-USB-SD CARD
RIPRODUZIONE MUSICASelezionare la traccia desiderata per avviare la riproduzione. Torna all’elenco file. / Traccia successsiva/precedente. Ripete traccia/cartella/disco. Riproduzione casuale. / Avvia/Interrompe la riproduzione. Silenzia l’audio. Inserisce il numero traccia da riprodurre.
MUSIC PLAYBACKSelect the requested Track and start Reproduction. Menu files. / To change to another Track. Repeat Track / Folder / CD. Random playback. / To Start / Interrupt playback. To shut Audio off. To digit number of Track to be reproduced.
RIPRODUZIONE VIDEO Torna al primo menù. Cambia la lingua audio. Cambia la lingua sottotitoli. Ripete traccia video. Riproduzione casuale. Torna all’elenco file. Inserisce il numero traccia video da riprodurre.
VIDEO PLAYBACK To return to the first menu. To change to another Audio-Language. To change to another Subtitle-Language. Repeat track video. Random playback. Menu files. To digit number of track video to be reproduced.
RIPRODUZIONE VIDEOToccare lo schermo per fare apparire il menù quando il filmato è in riproduzione. Passa al secondo menù. Stop alla riproduzione. Traccia video precedente o successivo. Avvia o mette in pausa la riproduzione. / Riproduzione veloce avanti/indietro.Premere in alto a sinistra per tornare al menù principale.
VIDEO PLAYBACK If you touch the screen while film is being shown, the Menu will appear. To procede to the second-Menu. Stopplayback. To get previous/next track video. To Start / Interrupt Reproduction. / For fast Forward/Backward reproduction.Press top left, to return to Main Menu.
16
IT/GB
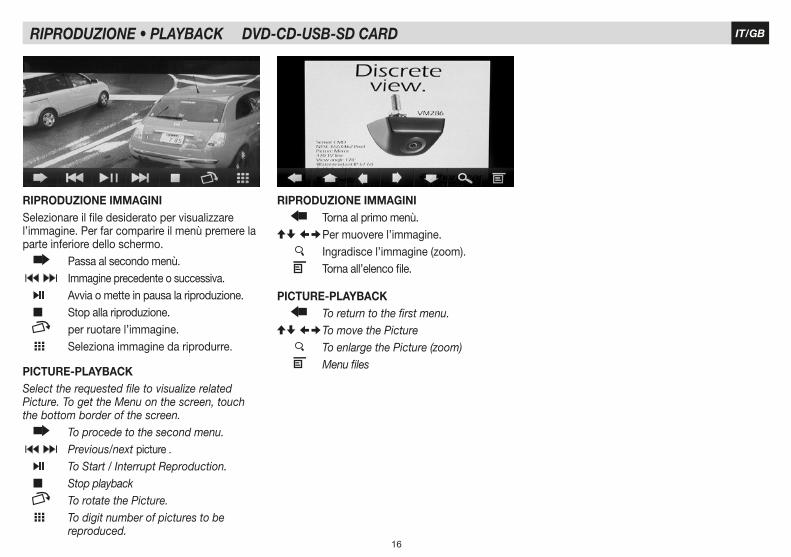
RIPRODUZIONE IMMAGINISelezionare il file desiderato per visualizzare l’immagine. Per far comparire il menù premere la parte inferiore dello schermo. Passa al secondo menù. Immagine precedente o successiva. Avvia o mette in pausa la riproduzione. Stop alla riproduzione. per ruotare l’immagine. Seleziona immagine da riprodurre.
PICTURE-PLAYBACKSelect the requested file to visualize related Picture. To get the Menu on the screen, touch the bottom border of the screen. To procede to the second menu. Previous/next picture . To Start / Interrupt Reproduction. Stop playback To rotate the Picture. To digit number of pictures to be reproduced.
RIPRODUZIONE IMMAGINI Torna al primo menù.
Per muovere l’immagine. Ingradisce l’immagine (zoom). Torna all’elenco file.
PICTURE-PLAYBACK To return to the first menu.
To move the Picture To enlarge the Picture (zoom) Menu files
RIPRODUZIONE • PLAYBACK DVD-CD-USB-SD CARD
17
IT/GBIMPOSTAZIONI BLUETOOTH • BLUETOOTH-SETTINGS
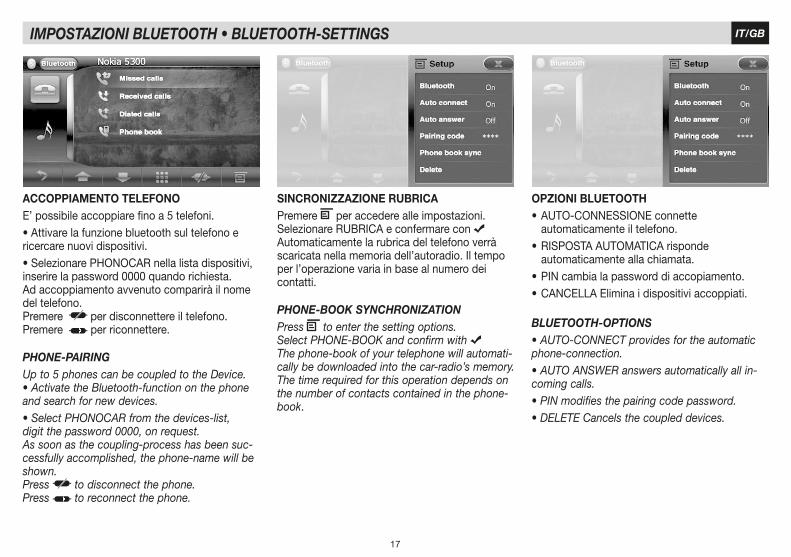
PHONE-PAIRINGUp to 5 phones can be coupled to the Device. • Activate the Bluetooth-function on the phone and search for new devices. • Select PHONOCAR from the devices-list,digit the password 0000, on request. As soon as the coupling-process has been suc-cessfully accomplished, the phone-name will be shown. Press to disconnect the phone. Press to reconnect the phone.
PHONE-BOOK SYNCHRONIZATIONPress to enter the setting options. Select PHONE-BOOK and confirm with The phone-book of your telephone will automati-cally be downloaded into the car-radio’s memory. The time required for this operation depends on the number of contacts contained in the phone-book.
BLUETOOTH-OPTIONS• AUTO-CONNECT provides for the automatic phone-connection.• AUTO ANSWER answers automatically all in-coming calls. • PIN modifies the pairing code password. • DELETE Cancels the coupled devices.
SINCRONIZZAZIONE RUBRICAPremere per accedere alle impostazioni.Selezionare RUBRICA e confermare con Automaticamente la rubrica del telefono verrà scaricata nella memoria dell’autoradio. Il tempo per l’operazione varia in base al numero dei contatti.
OPZIONI BLUETOOTH•AUTO-CONNESSIONEconnette automaticamente il telefono.•RISPOSTAAUTOMATICArisponde automaticamente alla chiamata.•PINcambialapassworddiaccopiamento.•CANCELLAEliminaidispositiviaccoppiati.
ACCOPPIAMENTO TELEFONOE’ possibile accoppiare fino a 5 telefoni. •Attivarelafunzionebluetoothsultelefonoericercare nuovi dispositivi.•SelezionarePHONOCARnellalistadispositivi,inserire la password 0000 quando richiesta. Ad accoppiamento avvenuto comparirà il nome del telefono.Premere per disconnettere il telefono.Premere per riconnettere.
18
IT/GBFUNZIONI BLUETOOTH • BLUETOOTH-FUNCTIONS
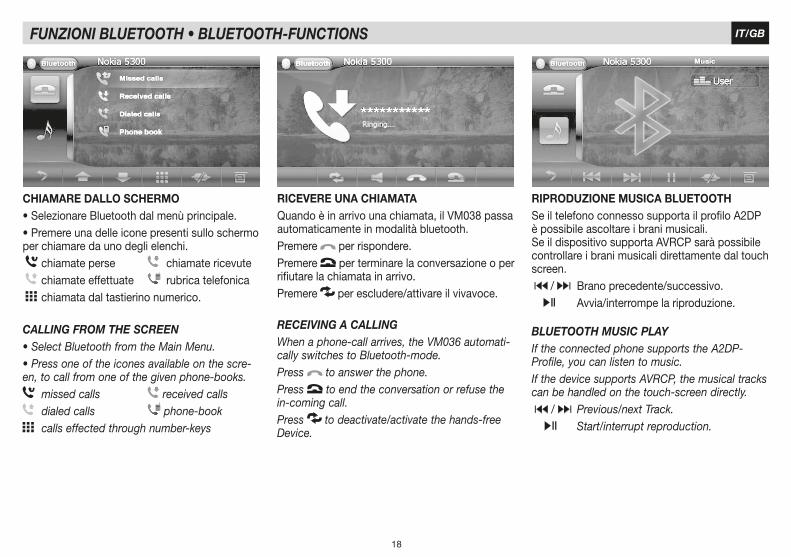
CALLING FROM THE SCREEN• Select Bluetooth from the Main Menu. • Press one of the icones available on the scre-en, to call from one of the given phone-books.
missed calls received calls dialed calls phone-book calls effected through number-keys
RECEIVING A CALLINGWhen a phone-call arrives, the VM036 automati-cally switches to Bluetooth-mode. Press to answer the phone. Press to end the conversation or refuse the in-coming call. Press to deactivate/activate the hands-free Device.
BLUETOOTH MUSIC PLAYIf the connected phone supports the A2DP-Profile, you can listen to music. If the device supports AVRCP, the musical tracks can be handled on the touch-screen directly. / Previous/next Track. Start/interrupt reproduction.
CHIAMARE DALLO SCHERMO•SelezionareBluetoothdalmenùprincipale.•Premereunadelleiconepresentisulloschermoper chiamare da uno degli elenchi. chiamate perse chiamate ricevute chiamate effettuate rubrica telefonica chiamata dal tastierino numerico.
RICEVERE UNA CHIAMATAQuando è in arrivo una chiamata, il VM038 passa automaticamente in modalità bluetooth. Premere per rispondere.Premere per terminare la conversazione o per rifiutare la chiamata in arrivo.Premere per escludere/attivare il vivavoce.
RIPRODUZIONE MUSICA BLUETOOTHSe il telefono connesso supporta il profilo A2DP è possibile ascoltare i brani musicali.Se il dispositivo supporta AVRCP sarà possibile controllare i brani musicali direttamente dal touch screen. / Brano precedente/successivo. Avvia/interrompe la riproduzione.
19
IT/GB
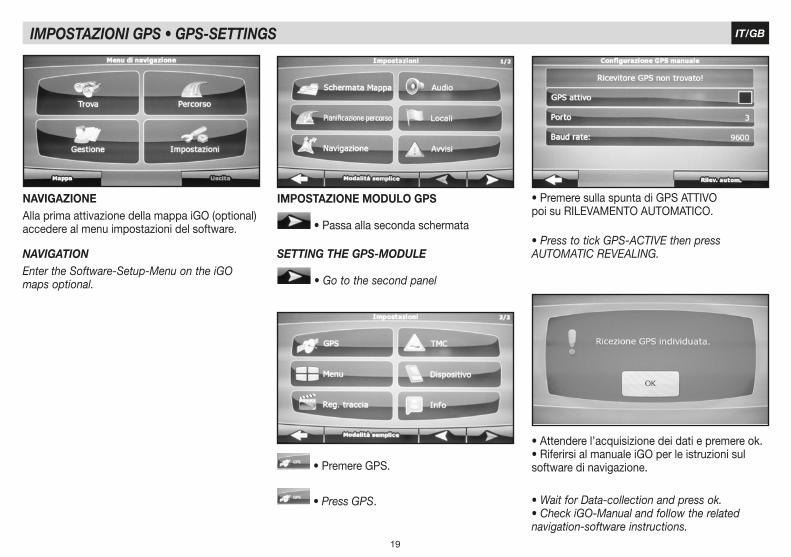
IMPOSTAZIONE MODULO GPS
•Passaallasecondaschermata
SETTING THE GPS-MODULE
• Go to the second panel
NAVIGAZIONEAllaprimaattivazionedellamappaiGO(optional)accedere al menu impostazioni del software.
NAVIGATIONEnter the Software-Setup-Menu on the iGO maps optional.
•PremereGPS.
• Press GPS.
IMPOSTAZIONI GPS • GPS-SETTINGS
•PremeresullaspuntadiGPSATTIVOpoisuRILEVAMENTOAUTOMATICO.
• Press to tick GPS-ACTIVE then press AUTOMATIC REVEALING.
•Attenderel’acquisizionedeidatiepremereok.•RiferirsialmanualeiGOperleistruzionisulsoftware di navigazione.
• Wait for Data-collection and press ok. • Check iGO-Manual and follow the related navigation-software instructions.
20
IT/GBCOMANDI AL VOLANTE • STEERING-WHEEL COMMANDS
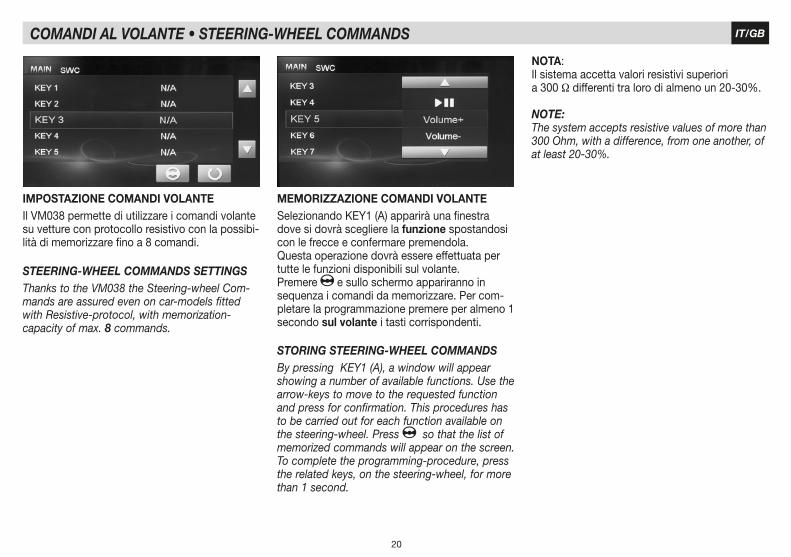
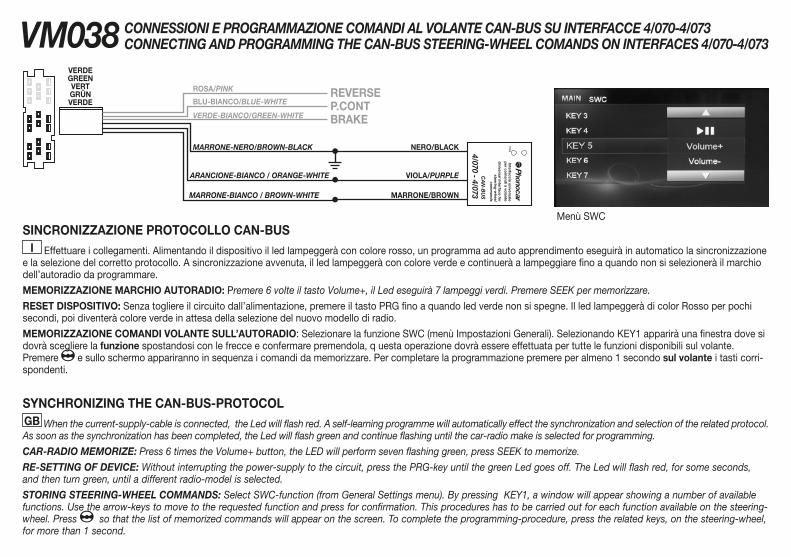
MEMORIZZAZIONE COMANDI VOLANTESelezionandoKEY1(A)appariràunafinestradove si dovrà scegliere la funzione spostandosi con le frecce e confermare premendola. Questa operazione dovrà essere effettuata per tutte le funzioni disponibili sul volante.Premere e sullo schermo appariranno in sequenza i comandi da memorizzare. Per com-pletare la programmazione premere per almeno 1 secondo sul volante i tasti corrispondenti.
STORING STEERING-WHEEL COMMANDS By pressing KEY1 (A), a window will appear showing a number of available functions. Use the arrow-keys to move to the requested function and press for confirmation. This procedures has to be carried out for each function available on the steering-wheel. Press so that the list of memorized commands will appear on the screen. To complete the programming-procedure, press the related keys, on the steering-wheel, for more than 1 second.
NOTA:Il sistema accetta valori resistivi superiori a 300 Ω differenti tra loro di almeno un 20-30%.
NOTE: The system accepts resistive values of more than 300 Ohm, with a difference, from one another, of at least 20-30%.
IMPOSTAZIONE COMANDI VOLANTEIl VM038 permette di utilizzare i comandi volante su vetture con protocollo resistivo con la possibi-lità di memorizzare fino a 8 comandi.
STEERING-WHEEL COMMANDS SETTINGSThanks to the VM038 the Steering-wheel Com-mands are assured even on car-models fitted with Resistive-protocol, with memorization-capacity of max. 8 commands.
21
IT/GBCARATTERISTICHE TECNICHE • TECHNICAL FEATURES
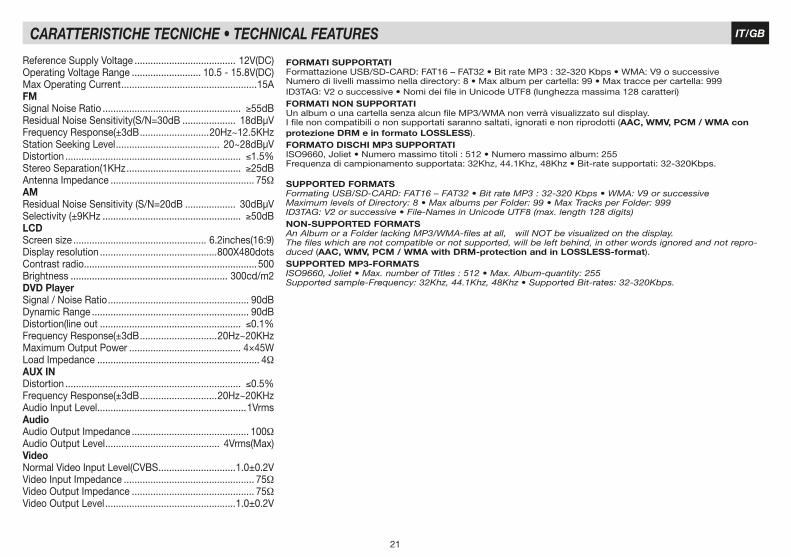
ReferenceSupplyVoltage ...................................... 12V(DC)OperatingVoltageRange .......................... 10.5 - 15.8V(DC)MaxOperatingCurrent ...................................................15AFMSignal Noise Ratio .................................................... ≥55dBResidualNoiseSensitivity(S/N=30dB .................... 18dBμVFrequencyResponse(±3dB ..........................20Hz~12.5KHzStationSeekingLevel ....................................... 20~28dBμVDistortion .................................................................. ≤1.5%StereoSeparation(1KHz ........................................... ≥25dBAntenna Impedance ...................................................... 75ΩAMResidualNoiseSensitivity(S/N=20dB ................... 30dBμVSelectivity(±9KHz .................................................... ≥50dBLCDScreen size .................................................. 6.2inches(16:9)Displayresolution ............................................800X480dotsContrast radio .................................................................500Brightness ........................................................... 300cd/m2DVD PlayerSignal / Noise Ratio ..................................................... 90dBDynamicRange ........................................................... 90dBDistortion(line out ..................................................... ≤0.1%FrequencyResponse(±3dB .............................20Hz~20KHzMaximumOutputPower .......................................... 4×45WLoad Impedance ............................................................. 4ΩAUX INDistortion .................................................................. ≤0.5%FrequencyResponse(±3dB .............................20Hz~20KHzAudio Input Level ........................................................1VrmsAudioAudioOutputImpedance ............................................ 100ΩAudioOutputLevel ........................................... 4Vrms(Max)VideoNormal Video Input Level(CVBS .............................1.0±0.2VVideo Input Impedance ................................................. 75ΩVideoOutputImpedance .............................................. 75ΩVideoOutputLevel .................................................1.0±0.2V
FORMATI SUPPORTATIFormattazioneUSB/SD-CARD:FAT16–FAT32•BitrateMP3:32-320Kbps•WMA:V9osuccessiveNumerodilivellimassimonelladirectory:8•Maxalbumpercartella:99•Maxtraccepercartella:999ID3TAG:V2osuccessive•NomideifileinUnicodeUTF8(lunghezzamassima128caratteri)FORMATI NON SUPPORTATIUnalbumounacartellasenzaalcunfileMP3/WMAnonverràvisualizzatosuldisplay.I file non compatibili o non supportati saranno saltati, ignorati e non riprodotti (AAC, WMV, PCM / WMA con protezione DRM e in formato LOSSLESS).FORMATO DISCHI MP3 SUPPORTATIISO9660,Joliet•Numeromassimotitoli:512•Numeromassimoalbum:255Frequenzadicampionamentosupportata:32Khz,44.1Khz,48Khz•Bit-ratesupportati:32-320Kbps.
SUPPORTED FORMATSFormating USB/SD-CARD: FAT16 – FAT32 • Bit rate MP3 : 32-320 Kbps • WMA: V9 or successiveMaximum levels of Directory: 8 • Max albums per Folder: 99 • Max Tracks per Folder: 999ID3TAG: V2 or successive • File-Names in Unicode UTF8 (max. length 128 digits)NON-SUPPORTED FORMATSAn Album or a Folder lacking MP3/WMA-files at all, will NOT be visualized on the display. The files which are not compatible or not supported, will be left behind, in other words ignored and not repro-duced (AAC, WMV, PCM / WMA with DRM-protection and in LOSSLESS-format).SUPPORTED MP3-FORMATSISO9660, Joliet • Max. number of Titles : 512 • Max. Album-quantity: 255Supported sample-Frequency: 32Khz, 44.1Khz, 48Khz • Supported Bit-rates: 32-320Kbps.
22
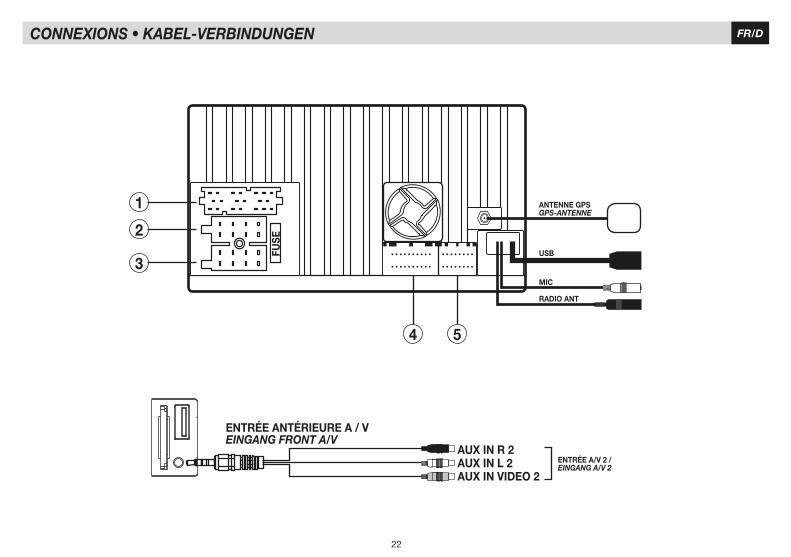
FR/DCONNEXIONS • KABEL-VERBINDUNGEN
ENTRÉE A/V 2 / EINGANG A/V 2
ENTRÉE ANTÉRIEURE A / VEINGANG FRONT A/V
AUX IN R 2AUX IN L 2AUX IN VIDEO 2
4 5
ANTENNE GPSGPS-ANTENNE
USB
MIC
RADIO ANT
1
2
3FU
SE
23
FR/DCONNEXIONS • KABEL-VERBINDUNGEN
JAUNEGELB
VERTGRÜN
CAMERA
REVERSEP.CONTBRAKEKEY GNDKEY AKEY B
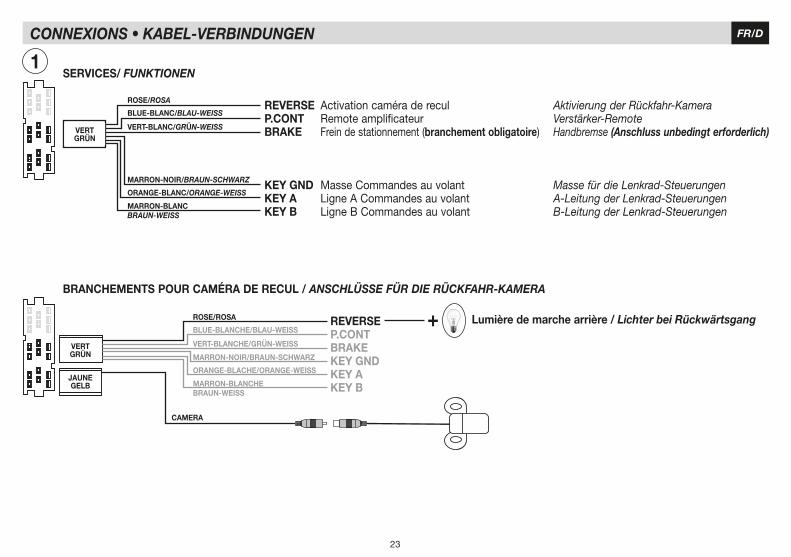
+ Lumière de marche arrière / Lichter bei Rückwärtsgang
BRANCHEMENTS POUR CAMÉRA DE RECUL / ANSCHLÜSSE FÜR DIE RÜCKFAHR-KAMERA
SERVICES/ FUNKTIONEN
REVERSEP.CONTBRAKE
KEY GNDKEY AKEY B
Activation caméra de reculRemote amplificateurFrein de stationnement (branchement obligatoire)
Masse Commandes au volantLigne A Commandes au volantLigne B Commandes au volant
VERTGRÜN
1
Aktivierung der Rückfahr-KameraVerstärker-RemoteHandbremse (Anschluss unbedingt erforderlich)
Masse für die Lenkrad-Steuerungen A-Leitung der Lenkrad-SteuerungenB-Leitung der Lenkrad-Steuerungen
ROSE/ROSA
BLUE-BLANCHE/BLAU-WEISS
VERT-BLANCHE/GRÜN-WEISS
MARRON-NOIR/BRAUN-SCHWARZ
ORANGE-BLACHE/ORANGE-WEISS
MARRON-BLANCHEBRAUN-WEISS
ROSE/ROSA
BLUE-BLANC/BLAU-WEISS
VERT-BLANC/GRÜN-WEISS
MARRON-NOIR/BRAUN-SCHWARZ
ORANGE-BLANC/ORANGE-WEISS
MARRON-BLANCBRAUN-WEISS
24
FR/D
2
5
4
3
CONNEXIONS • KABEL-VERBINDUNGEN
MARRONBRAUN
NOIRSCHWARZ
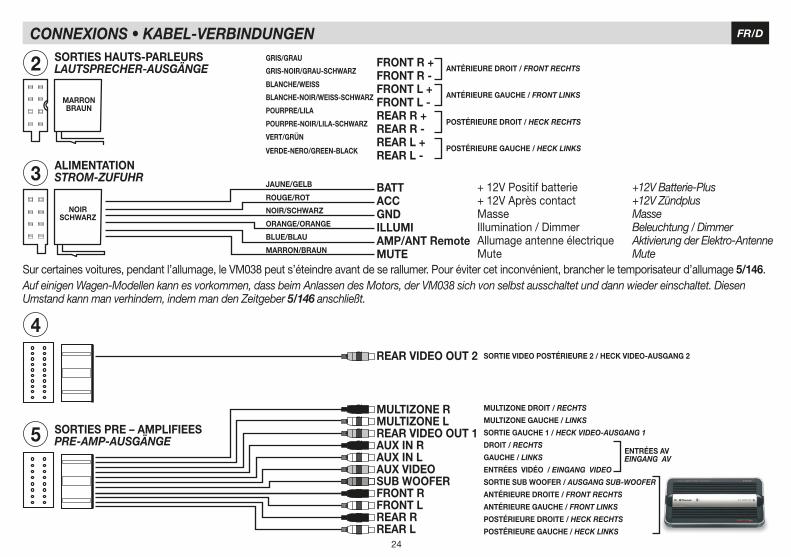
+ 12V Positif batterie+ 12V Après contactMasseIllumination / DimmerAllumage antenne électriqueMute
MULTIZONE DROIT / RECHTS
MULTIZONE GAUCHE / LINKS
SORTIE GAUCHE 1 / HECK VIDEO-AUSGANG 1
DROIT / RECHTS
GAUCHE / LINKS
ENTRÉES VIDÉO / EINGANG VIDEO
SORTIE SUB WOOFER / AUSGANG SUB-WOOFER
ANTÉRIEURE DROITE / FRONT RECHTS
ANTÉRIEURE GAUCHE / FRONT LINKS
POSTÉRIEURE DROITE / HECK RECHTS
POSTÉRIEURE GAUCHE / HECK LINKS
SORTIE VIDEO POSTÉRIEURE 2 / HECK VIDEO-AUSGANG 2
ENTRÉES AV EINGANG AV
FRONT R +FRONT R -FRONT L +FRONT L -REAR R +REAR R -REAR L +REAR L -
MULTIZONE RMULTIZONE LREAR VIDEO OUT 1AUX IN R AUX IN L AUX VIDEOSUB WOOFERFRONT R FRONT LREAR RREAR L
REAR VIDEO OUT 2
SORTIES HAUTS-PARLEURSLAUTSPRECHER-AUSGÄNGE
ALIMENTATIONSTROM-ZUFUHR
SORTIES PRE – AMPLIFIEESPRE-AMP-AUSGÄNGE
BATTACCGNDILLUMIAMP/ANT RemoteMUTE
Sur certaines voitures, pendant l’allumage, le VM038 peut s’éteindre avant de se rallumer. Pour éviter cet inconvénient, brancher le temporisateur d’allumage 5/146.Auf einigen Wagen-Modellen kann es vorkommen, dass beim Anlassen des Motors, der VM038 sich von selbst ausschaltet und dann wieder einschaltet. Diesen Umstand kann man verhindern, indem man den Zeitgeber 5/146 anschließt.
+12V Batterie-Plus +12V ZündplusMasseBeleuchtung / DimmerAktivierung der Elektro-AntenneMute
GRIS/GRAU
VERT/GRÜN
VERDE-NERO/GREEN-BLACK
BLANCHE/WEISS
ROUGE/ROT
BLANCHE-NOIR/WEISS-SCHWARZ
NOIR/SCHWARZ
POURPRE/LILA
ORANGE/ORANGE
POURPRE-NOIR/LILA-SCHWARZ
BLUE/BLAU
GRIS-NOIR/GRAU-SCHWARZ
JAUNE/GELB
ANTÉRIEURE DROIT / FRONT RECHTS
ANTÉRIEURE GAUCHE / FRONT LINKS
POSTÉRIEURE DROIT / HECK RECHTS
POSTÉRIEURE GAUCHE / HECK LINKS
MARRON/BRAUN
25
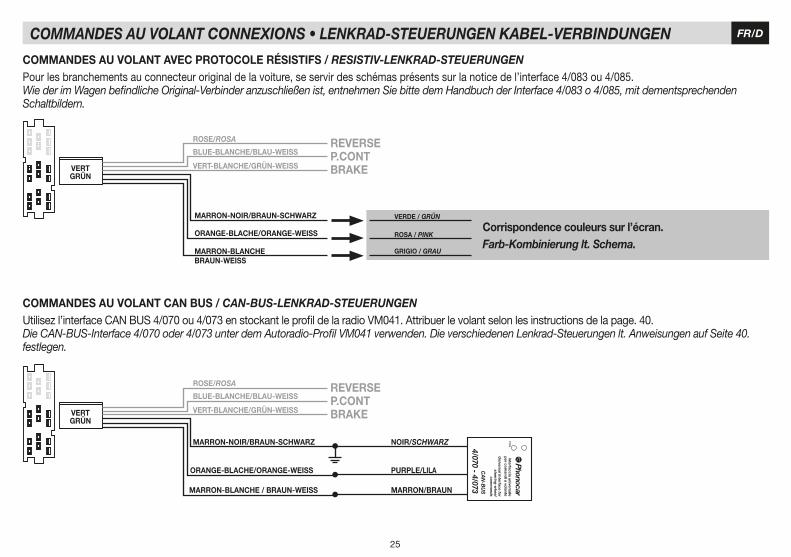
FR/DCOMMANDES AU VOLANT CONNEXIONS • LENKRAD-STEUERUNGEN KABEL-VERBINDUNGEN
VERTGRÜN
VERTGRÜN
REVERSEP.CONTBRAKE
REVERSEP.CONTBRAKE
ROSE/ROSA
ROSE/ROSA
BLUE-BLANCHE/BLAU-WEISS
BLUE-BLANCHE/BLAU-WEISS
VERT-BLANCHE/GRÜN-WEISS
VERT-BLANCHE/GRÜN-WEISS
MARRON-BLANCHE / BRAUN-WEISS
VERDE / GRÜN
ROSA / PINK
GRIGIO / GRAU
Corrispondence couleurs sur l’écran.Farb-Kombinierung lt. Schema.
COMMANDES AU VOLANT CAN BUS / CAN-BUS-LENKRAD-STEUERUNGENUtilisezl’interfaceCANBUS4/070ou4/073enstockantleprofildelaradioVM041.Attribuerlevolantselonlesinstructionsdelapage.40.Die CAN-BUS-Interface 4/070 oder 4/073 unter dem Autoradio-Profil VM041 verwenden. Die verschiedenen Lenkrad-Steuerungen lt. Anweisungen auf Seite 40. festlegen.
COMMANDES AU VOLANT AVEC PROTOCOLE RÉSISTIFS / RESISTIV-LENKRAD-STEUERUNGENPour les branchements au connecteur original de la voiture, se servir des schémas présents sur la notice de l’interface 4/083 ou 4/085.Wie der im Wagen befindliche Original-Verbinder anzuschließen ist, entnehmen Sie bitte dem Handbuch der Interface 4/083 o 4/085, mit dementsprechenden Schaltbildern.
NOIR/SCHWARZ
PURPLE/LILA
MARRON/BRAUN
ORANGE-BLACHE/ORANGE-WEISS
4/070 - 4/073
MARRON-NOIR/BRAUN-SCHWARZ
ORANGE-BLACHE/ORANGE-WEISS
MARRON-BLANCHEBRAUN-WEISS
MARRON-NOIR/BRAUN-SCHWARZ
26
FR/DFONCTIONS • FUNKTIONEN
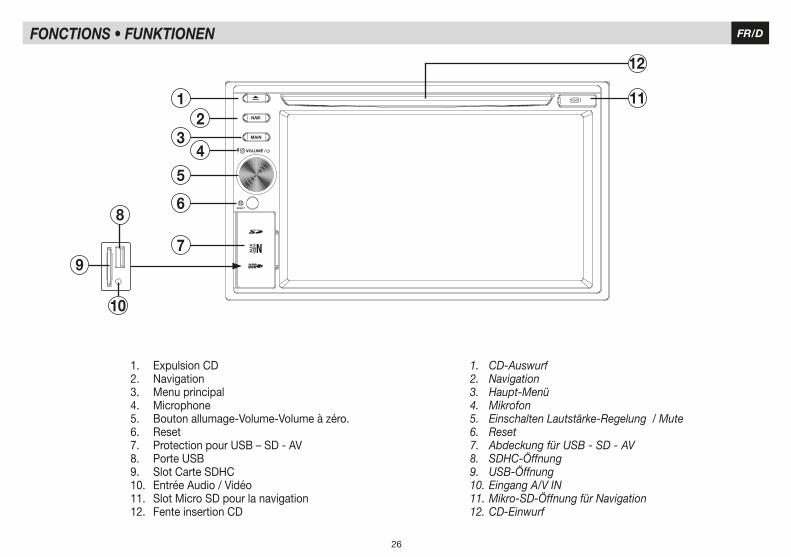
1. Expulsion CD2. Navigation3. Menu principal4. Microphone5. Bouton allumage-Volume-Volume à zéro. 6. Reset 7. Protection pour USB – SD - AV8. Porte USB9. Slot Carte SDHC10. Entrée Audio / Vidéo11. Slot Micro SD pour la navigation12. Fente insertion CD
1. CD-Auswurf 2. Navigation3. Haupt-Menü4. Mikrofon5. Einschalten Lautstärke-Regelung / Mute6. Reset 7. Abdeckung für USB - SD - AV8. SDHC-Öffnung9. USB-Öffnung10. Eingang A/V IN11. Mikro-SD-Öffnung für Navigation12. CD-Einwurf
12
34
5
12
6
7
VOLUME /
RESE T
MAIN
NAVI
9
8
10
11

27
FR/DFONCTIONS TÉLÉCOMMANDE • FERNBEDIENUNGS-TASTEN
1. Menu principal2. Expulsion CD3. Sélectionne langue DVD Voir la liste de chansons4. Menu sur l’écran5. Zoom6. Radio bandes7. Effectue un appel8. Recherche de chapitre / piste9. Répétition A-B10. Répétition reproduction11. Menu réglages12. Lance / Interrompt la reproduction13. Menu curseur - Recherche manuelle14. Lecture au ralenti15. Clavier numérique16. Reproduction aléatoire. 17. Présentation pistes.18. Stop reprodution.19. Réduit l’audio à zéro20. Reglages volume21. Reglages images22. Avance / Revient /Recherche automatique. 23. Interrompt l’appel 24. Cancella informazioni25. Titre DVD26. Menù DVD27. Angle de vision Voir la liste de vidéos28. Sous-titres DVD/ Voir la liste de images29. Allumage / extinction30. Egaliseteur
1. Haupt-Menü2. CD-Auswurf 3. Wahl der DVD-Sprache / Musik-Katalog 4. Infos auf dem Bildschirm5. Zoom6. Radio-Frequenzband7. Anruf starten 8. Suche Kapitel/Stück 9. Wiederhole A-B10. Wiederhole Wiedergabe 11. Einstellungs-Menü12. Wiedergabe Starten/Stoppen - Wählen13. Läufer innerhalb der Menüs verschieben Suche manuell14. Wiedergabe langsam 15. Nummerntasten 16. Wiedergabe wahllos 17. Stück kurz anspielen 18. Wiedergabe-Stopp 19. Stummschaltung (Mute) 20. Lautstärke-Regelung 21. Bild-Einstellung 22. Vorwärts-Rückwärts / Automatische Sender-Suche 23. Telefonat beenden 24. Infos löschen25. DVD-Titel26. DVD-Menü27. Sichtwinkel wählen Video-Katalog aufschlagen28. DVD-Untertitel / Foto-Katalog aufschlagen29. Einschalten / Ausschalten 30. Equalizer
28
FR/DMENU • MENÜ
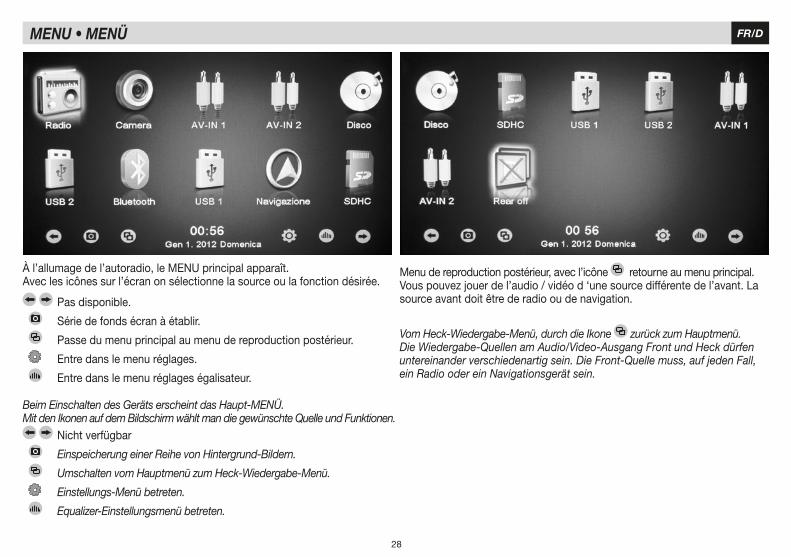
À l’allumage de l’autoradio, le MENU principal apparaît.Avec les icônes sur l’écran on sélectionne la source ou la fonction désirée.
Pas disponible.
Série de fonds écran à établir.
Passe du menu principal au menu de reproduction postérieur.
Entre dans le menu réglages.
Entre dans le menu réglages égalisateur.
Menu de reproduction postérieur, avec l’icône retourne au menu principal.Vous pouvez jouer de l’audio / vidéo d ‘une source différente de l’avant. La source avant doit être de radio ou de navigation.
Vom Heck-Wiedergabe-Menü, durch die Ikone zurück zum Hauptmenü.Die Wiedergabe-Quellen am Audio/Video-Ausgang Front und Heck dürfen untereinander verschiedenartig sein. Die Front-Quelle muss, auf jeden Fall, ein Radio oder ein Navigationsgerät sein.
Beim Einschalten des Geräts erscheint das Haupt-MENÜ. Mit den Ikonen auf dem Bildschirm wählt man die gewünschte Quelle und Funktionen.
Nicht verfügbar
Einspeicherung einer Reihe von Hintergrund-Bildern.
Umschalten vom Hauptmenü zum Heck-Wiedergabe-Menü.
Einstellungs-Menü betreten.
Equalizer-Einstellungsmenü betreten.
29
FR/D
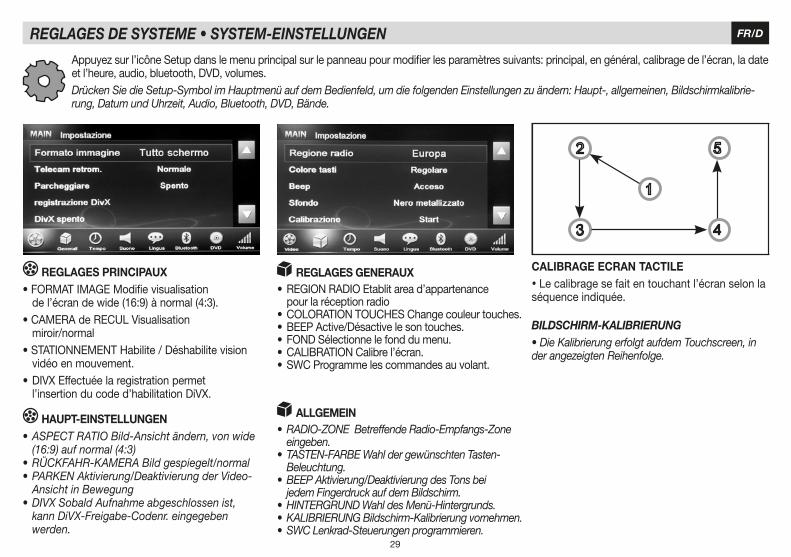
REGLAGES PRINCIPAUX•FORMATIMAGEModifievisualisation de l’écran de wide (16:9) à normal (4:3).•CAMERAdeRECULVisualisation miroir/normal •STATIONNEMENTHabilite/Déshabilitevision vidéo en mouvement.•DIVXEffectuéelaregistrationpermet l’insertionducoded’habilitationDiVX.
HAUPT-EINSTELLUNGEN • ASPECT RATIO Bild-Ansicht ändern, von wide (16:9) auf normal (4:3) • RÜCKFAHR-KAMERA Bild gespiegelt/normal • PARKEN Aktivierung/Deaktivierung der Video- Ansicht in Bewegung • DIVX Sobald Aufnahme abgeschlossen ist, kann DiVX-Freigabe-Codenr. eingegeben werden.
REGLAGES DE SYSTEME • SYSTEM-EINSTELLUNGEN
REGLAGES GENERAUX•REGIONRADIOEtablitaread’appartenance pour la réception radio•COLORATIONTOUCHESChangecouleurtouches.•BEEPActive/Désactivelesontouches.•FONDSélectionnelefonddumenu.•CALIBRATIONCalibrel’écran.•SWCProgrammelescommandesauvolant.
CALIBRAGE ECRAN TACTILE • Le calibrage se fait en touchant l’écran selon la séquence indiquée.
ALLGEMEIN• RADIO-ZONE Betreffende Radio-Empfangs-Zone eingeben.• TASTEN-FARBE Wahl der gewünschten Tasten- Beleuchtung. • BEEP Aktivierung/Deaktivierung des Tons bei jedem Fingerdruck auf dem Bildschirm. • HINTERGRUND Wahl des Menü-Hintergrunds. • KALIBRIERUNG Bildschirm-Kalibrierung vornehmen. • SWC Lenkrad-Steuerungen programmieren.
Appuyezsurl’icôneSetupdanslemenuprincipalsurlepanneaupourmodifierlesparamètressuivants:principal,engénéral,calibragedel’écran,ladateet l’heure, audio, bluetooth, DVD, volumes.Drücken Sie die Setup-Symbol im Hauptmenü auf dem Bedienfeld, um die folgenden Einstellungen zu ändern: Haupt-, allgemeinen, Bildschirmkalibrie-rung, Datum und Uhrzeit, Audio, Bluetooth, DVD, Bände.
BILDSCHIRM-KALIBRIERUNG• Die Kalibrierung erfolgt aufdem Touchscreen, in der angezeigten Reihenfolge.
30
FR/DREGLAGES DE SYSTEME • SYSTEM-EINSTELLUNGEN
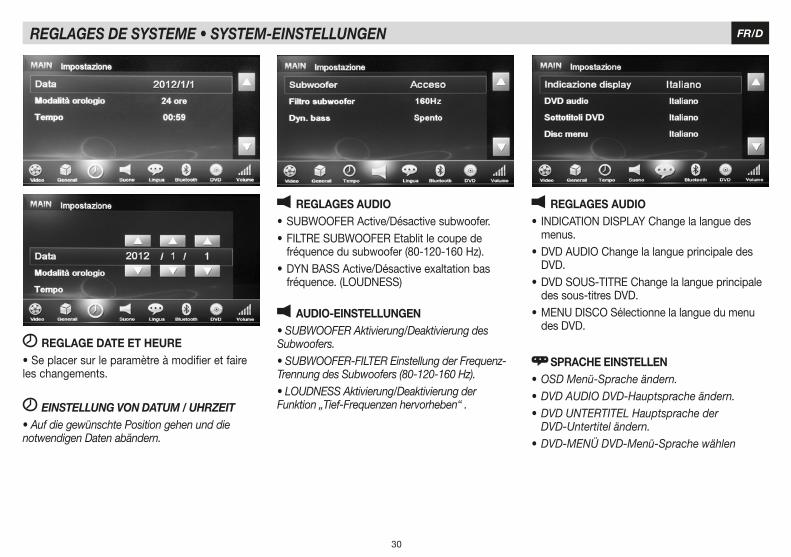
REGLAGE DATE ET HEURE•Seplacersurleparamètreàmodifieretfaireles changements.
REGLAGES AUDIO•SUBWOOFERActive/Désactivesubwoofer.•FILTRESUBWOOFEREtablitlecoupede fréquence du subwoofer (80-120-160 Hz).•DYNBASSActive/Désactiveexaltationbas fréquence.(LOUDNESS)
REGLAGES AUDIO• INDICATIONDISPLAYChangelalanguedes menus. •DVDAUDIOChangelalangueprincipaledes DVD.•DVDSOUS-TITREChangelalangueprincipale des sous-titres DVD.•MENUDISCOSélectionnelalanguedumenu des DVD.
SPRACHE EINSTELLEN• OSD Menü-Sprache ändern. • DVD AUDIO DVD-Hauptsprache ändern. • DVD UNTERTITEL Hauptsprache der DVD-Untertitel ändern.• DVD-MENÜ DVD-Menü-Sprache wählen
AUDIO-EINSTELLUNGEN • SUBWOOFER Aktivierung/Deaktivierung des Subwoofers. • SUBWOOFER-FILTER Einstellung der Frequenz-Trennung des Subwoofers (80-120-160 Hz).• LOUDNESS Aktivierung/Deaktivierung der Funktion „Tief-Frequenzen hervorheben“ . EINSTELLUNG VON DATUM / UHRZEIT
• Auf die gewünschte Position gehen und die notwendigen Daten abändern.
31
FR/DREGLAGES DE SYSTEME • SYSTEM-EINSTELLUNGEN
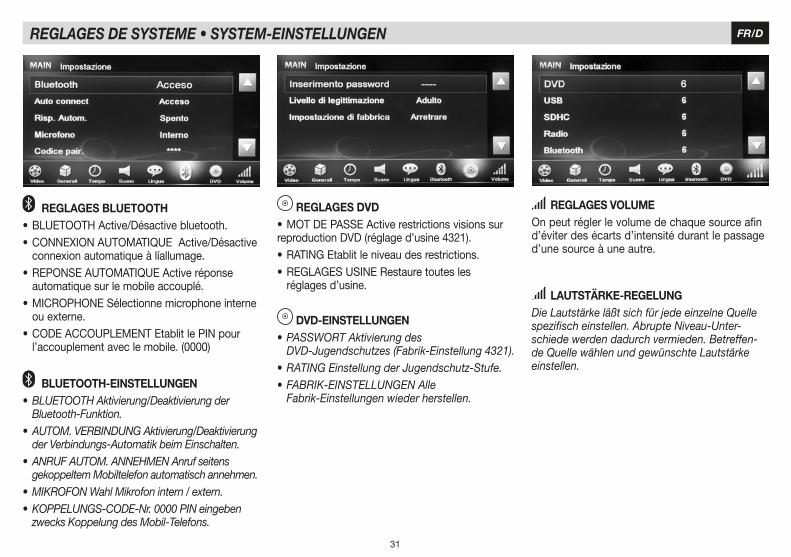
REGLAGES BLUETOOTH•BLUETOOTHActive/Désactivebluetooth.•CONNEXIONAUTOMATIQUEActive/Désactive connexion automatique à líallumage.•REPONSEAUTOMATIQUEActiveréponse automatique sur le mobile accouplé.•MICROPHONESélectionnemicrophoneinterne ou externe.•CODEACCOUPLEMENTEtablitlePINpour l’accouplement avec le mobile. (0000)
BLUETOOTH-EINSTELLUNGEN• BLUETOOTH Aktivierung/Deaktivierung der Bluetooth-Funktion. • AUTOM. VERBINDUNG Aktivierung/Deaktivierung der Verbindungs-Automatik beim Einschalten.• ANRUF AUTOM. ANNEHMEN Anruf seitens gekoppeltem Mobiltelefon automatisch annehmen. • MIKROFON Wahl Mikrofon intern / extern. • KOPPELUNGS-CODE-Nr. 0000 PIN eingeben zwecks Koppelung des Mobil-Telefons.
REGLAGES DVD•MOTDEPASSEActiverestrictionsvisionssurreproduction DVD (réglage d’usine 4321).•RATINGEtablitleniveaudesrestrictions.•REGLAGES USINE Restaure toutes les réglages d’usine.
REGLAGES VOLUMEOnpeutréglerlevolumedechaquesourceafind’éviter des écarts d’intensité durant le passage d’une source à une autre.
LAUTSTÄRKE-REGELUNG Die Lautstärke läßt sich für jede einzelne Quelle spezifisch einstellen. Abrupte Niveau-Unter-schiede werden dadurch vermieden. Betreffen-de Quelle wählen und gewünschte Lautstärke einstellen.
DVD-EINSTELLUNGEN • PASSWORT Aktivierung des DVD-Jugendschutzes (Fabrik-Einstellung 4321).• RATING Einstellung der Jugendschutz-Stufe. • FABRIK-EINSTELLUNGEN Alle Fabrik-Einstellungen wieder herstellen.
32
FR/DRADIO
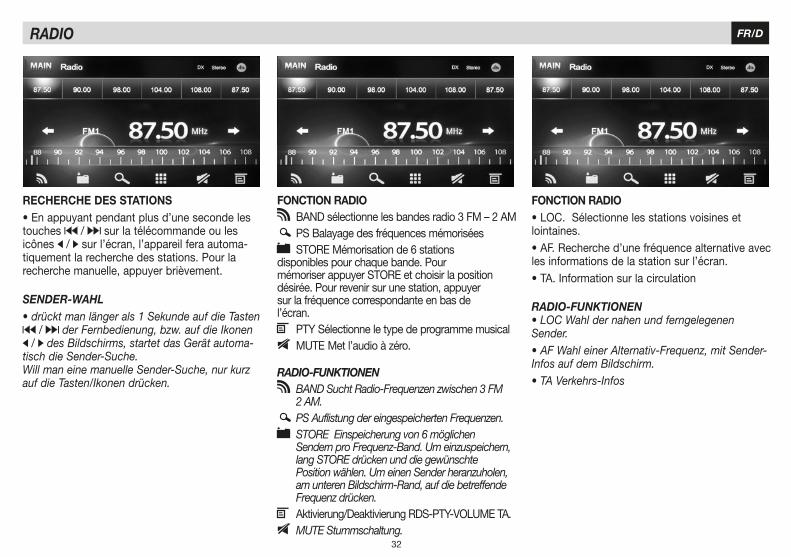
SENDER-WAHL• drückt man länger als 1 Sekunde auf die Tasten
/ der Fernbedienung, bzw. auf die Ikonen / des Bildschirms, startet das Gerät automa-
tisch die Sender-Suche. Will man eine manuelle Sender-Suche, nur kurz auf die Tasten/Ikonen drücken.
RADIO-FUNKTIONEN• LOC Wahl der nahen und ferngelegenen Sender. • AF Wahl einer Alternativ-Frequenz, mit Sender-Infos auf dem Bildschirm. • TA Verkehrs-Infos
RADIO-FUNKTIONEN BAND Sucht Radio-Frequenzen zwischen 3 FM
2 AM. PS Auflistung der eingespeicherten Frequenzen.
STORE Einspeicherung von 6 möglichen Sendern pro Frequenz-Band. Um einzuspeichern, lang STORE drücken und die gewünschte Position wählen. Um einen Sender heranzuholen, am unteren Bildschirm-Rand, auf die betreffende Frequenz drücken. Aktivierung/DeaktivierungRDS-PTY-VOLUMETA. MUTE Stummschaltung.
RECHERCHE DES STATIONS•Enappuyantpendantplusd’unesecondelestouches / sur la télécommande ou les icônes / sur l’écran, l’appareil fera automa-tiquement la recherche des stations. Pour la recherchemanuelle,appuyerbrièvement.
FONCTION RADIO BAND sélectionne les bandes radio 3 FM – 2 AM
PS Balayagedesfréquencesmémorisées STOREMémorisationde6stations
disponibles pour chaque bande. Pour mémoriserappuyerSTOREetchoisirlaposition désirée.Pourrevenirsurunestation,appuyer sur la fréquence correspondante en bas de l’écran. PTYSélectionneletypedeprogrammemusical MUTE Met l’audio à zéro.
FONCTION RADIO•LOC.Sélectionnelesstationsvoisinesetlointaines.•AF.Recherched’unefréquencealternativeavecles informations de la station sur l’écran.•TA.Informationsurlacirculation
33
FR/DEGALISEUR • EQUALIZER
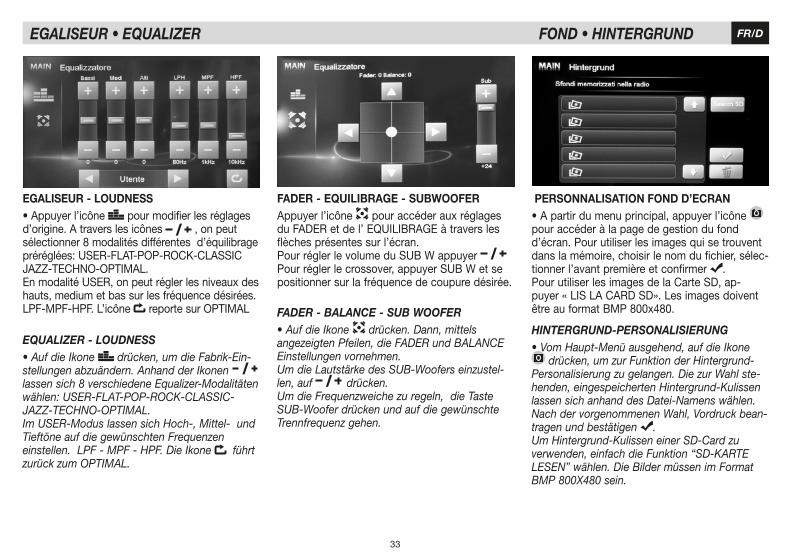
EGALISEUR - LOUDNESS•Appuyerl’icône pour modifier les réglages d’origine. A travers les icônes , on peut sélectionner 8 modalités différentes d’équilibrage préréglées:USER-FLAT-POP-ROCK-CLASSICJAZZ-TECHNO-OPTIMAL.En modalité USER, on peut régler les niveaux des hauts, medium et bas sur les fréquence désirées. LPF-MPF-HPF. L’icône reportesurOPTIMAL
FADER - EQUILIBRAGE - SUBWOOFERAppuyerl’icône pour accéder aux réglages duFADERetdel’EQUILIBRAGEàtraverslesflèches présentes sur l’écran.PourréglerlevolumeduSUBWappuyerPourréglerlecrossover,appuyerSUBWetsepositionner sur la fréquence de coupure désirée.
FOND • HINTERGRUND
PERSONNALISATION FOND D’ECRAN•Apartirdumenuprincipal,appuyerl’icône pour accéder à la page de gestion du fond d’écran. Pour utiliser les images qui se trouvent dans la mémoire, choisir le nom du fichier, sélec-tionner l’avant première et confirmer .Pour utiliser les images de la Carte SD, ap-puyer«LISLACARDSD».Lesimagesdoiventêtre au format BMP 800x480.
HINTERGRUND-PERSONALISIERUNG• Vom Haupt-Menü ausgehend, auf die Ikone
drücken, um zur Funktion der Hintergrund-Personalisierung zu gelangen. Die zur Wahl ste-henden, eingespeicherten Hintergrund-Kulissen lassen sich anhand des Datei-Namens wählen. Nach der vorgenommenen Wahl, Vordruck bean-tragen und bestätigen . Um Hintergrund-Kulissen einer SD-Card zu verwenden, einfach die Funktion “SD-KARTE LESEN” wählen. Die Bilder müssen im Format BMP 800X480 sein.
EQUALIZER - LOUDNESS • Auf die Ikone drücken, um die Fabrik-Ein-stellungen abzuändern. Anhand der Ikonen lassen sich 8 verschiedene Equalizer-Modalitäten wählen: USER-FLAT-POP-ROCK-CLASSIC-JAZZ-TECHNO-OPTIMAL.Im USER-Modus lassen sich Hoch-, Mittel- und Tieftöne auf die gewünschten Frequenzen einstellen. LPF - MPF - HPF. Die Ikone führt zurück zum OPTIMAL.
FADER - BALANCE - SUB WOOFER• Auf die Ikone drücken. Dann, mittels angezeigten Pfeilen, die FADER und BALANCEEinstellungen vornehmen. Um die Lautstärke des SUB-Woofers einzustel-len, auf drücken. Um die Frequenzweiche zu regeln, die Taste SUB-Woofer drücken und auf die gewünschte Trennfrequenz gehen.
34
FR/DREPRODUCTION DVD-CD-USB-CARTE SD • DVD-CD-USB-SD-WIEDERGABE
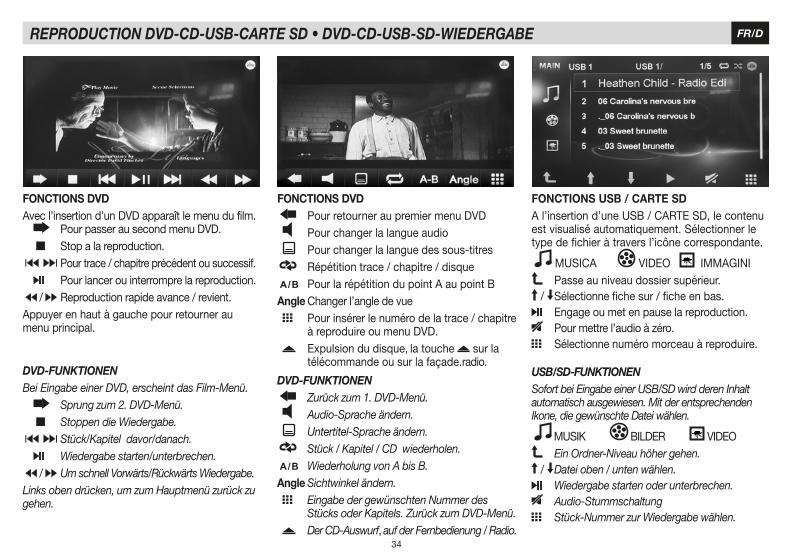
FONCTIONS USB / CARTE SDA l’insertion d’une USB / CARTE SD, le contenu est visualisé automatiquement. Sélectionner le typedefichieràtraversl’icônecorrespondante.
MUSICA VIDEO IMMAGINI Passe au niveau dossier supérieur.
/ Sélectionne fiche sur / fiche en bas. Engage ou met en pause la reproduction. Pour mettre l’audio à zéro. Sélectionne numéro morceau à reproduire.
FONCTIONS DVD Pour retourner au premier menu DVD Pour changer la langue audio Pour changer la langue des sous-titres Répétition trace / chapitre / disque Pour la répétition du point A au point BAngle Changer l’angle de vue Pour insérer le numéro de la trace / chapitre à reproduire ou menu DVD. Expulsion du disque, la touche sur la télécommande ou sur la façade.radio.
FONCTIONS DVDAvec l’insertion d’un DVD apparaît le menu du film. Pour passer au second menu DVD. Stop a la reproduction. Pour trace / chapitre précédent ou successif. Pour lancer ou interrompre la reproduction. / Reproduction rapide avance / revient.Appuyerenhautàgauchepourretourneraumenu principal.
DVD-FUNKTIONENBei Eingabe einer DVD, erscheint das Film-Menü. Sprung zum 2. DVD-Menü. Stoppen die Wiedergabe. Stück/Kapitel davor/danach. Wiedergabe starten/unterbrechen. / Um schnell Vorwärts/Rückwärts Wiedergabe.Links oben drücken, um zum Hauptmenü zurück zu gehen.
DVD-FUNKTIONEN Zurück zum 1. DVD-Menü. Audio-Sprache ändern. Untertitel-Sprache ändern. Stück / Kapitel / CD wiederholen. Wiederholung von A bis B.Angle Sichtwinkel ändern. Eingabe der gewünschten Nummer des Stücks oder Kapitels. Zurück zum DVD-Menü. Der CD-Auswurf, auf der Fernbedienung / Radio.
USB/SD-FUNKTIONENSofort bei Eingabe einer USB/SD wird deren Inhalt automatisch ausgewiesen. Mit der entsprechenden Ikone, die gewünschte Datei wählen.
MUSIK BILDER VIDEO Ein Ordner-Niveau höher gehen.
/ Datei oben / unten wählen. Wiedergabe starten oder unterbrechen. Audio-Stummschaltung Stück-Nummer zur Wiedergabe wählen.
35
FR/DREPRODUCTION DVD-CD-USB-CARTE SD • DVD-CD-USB-SD-WIEDERGABE
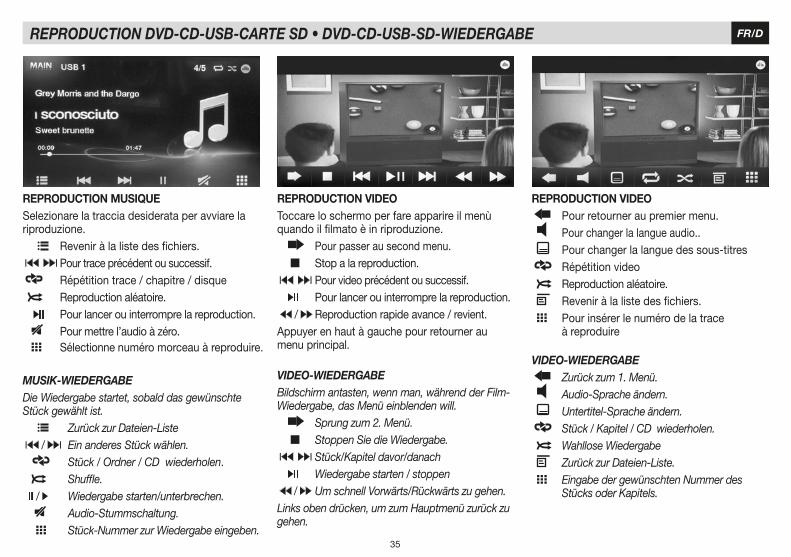
REPRODUCTION MUSIQUESelezionare la traccia desiderata per avviare la riproduzione. Revenir à la liste des fichiers. Pour trace précédent ou successif. Répétition trace / chapitre / disque Reproduction aléatoire. Pour lancer ou interrompre la reproduction. Pour mettre l’audio à zéro. Sélectionne numéro morceau à reproduire.
REPRODUCTION VIDEO Pour retourner au premier menu. Pour changer la langue audio.. Pour changer la langue des sous-titres Répétition video Reproduction aléatoire. Revenir à la liste des fichiers. Pour insérer le numéro de la trace à reproduire
REPRODUCTION VIDEOToccare lo schermo per fare apparire il menù quando il filmato è in riproduzione. Pour passer au second menu. Stop a la reproduction. Pour video précédent ou successif. Pour lancer ou interrompre la reproduction. / Reproduction rapide avance / revient.Appuyerenhautàgauchepourretourneraumenu principal.
VIDEO-WIEDERGABEBildschirm antasten, wenn man, während der Film-Wiedergabe, das Menü einblenden will. Sprung zum 2. Menü. Stoppen Sie die Wiedergabe. Stück/Kapitel davor/danach Wiedergabe starten / stoppen / Um schnell Vorwärts/Rückwärts zu gehen.Links oben drücken, um zum Hauptmenü zurück zu gehen.
VIDEO-WIEDERGABE Zurück zum 1. Menü. Audio-Sprache ändern. Untertitel-Sprache ändern. Stück / Kapitel / CD wiederholen. Wahllose Wiedergabe Zurück zur Dateien-Liste. Eingabe der gewünschten Nummer des Stücks oder Kapitels.
MUSIK-WIEDERGABEDie Wiedergabe startet, sobald das gewünschte Stück gewählt ist. Zurück zur Dateien-Liste / Ein anderes Stück wählen. Stück / Ordner / CD wiederholen. Shuffle. / Wiedergabe starten/unterbrechen. Audio-Stummschaltung. Stück-Nummer zur Wiedergabe eingeben.
36
FR/D
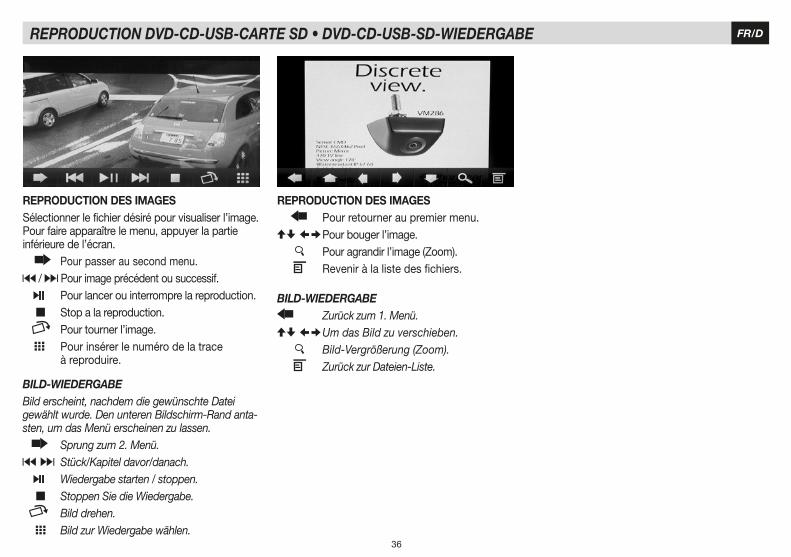
REPRODUCTION DES IMAGESSélectionner le fichier désiré pour visualiser l’image. Pourfaireapparaîtrelemenu,appuyerlapartieinférieure de l’écran. Pour passer au second menu.
/ Pour image précédent ou successif. Pour lancer ou interrompre la reproduction. Stop a la reproduction. Pour tourner l’image. Pour insérer le numéro de la trace à reproduire.
REPRODUCTION DES IMAGES Pour retourner au premier menu.
Pour bouger l’image. Pour agrandir l’image (Zoom). Revenir à la liste des fichiers.
BILD-WIEDERGABE Zurück zum 1. Menü.
Um das Bild zu verschieben. Bild-Vergrößerung (Zoom). Zurück zur Dateien-Liste.
REPRODUCTION DVD-CD-USB-CARTE SD • DVD-CD-USB-SD-WIEDERGABE
BILD-WIEDERGABEBild erscheint, nachdem die gewünschte Datei gewählt wurde. Den unteren Bildschirm-Rand anta-sten, um das Menü erscheinen zu lassen. Sprung zum 2. Menü.
Stück/Kapitel davor/danach. Wiedergabe starten / stoppen. Stoppen Sie die Wiedergabe. Bild drehen. Bild zur Wiedergabe wählen.
37
FR/DREGLAGES BLUETOOTH • BLUETOOTH-EINSTELLUNGEN
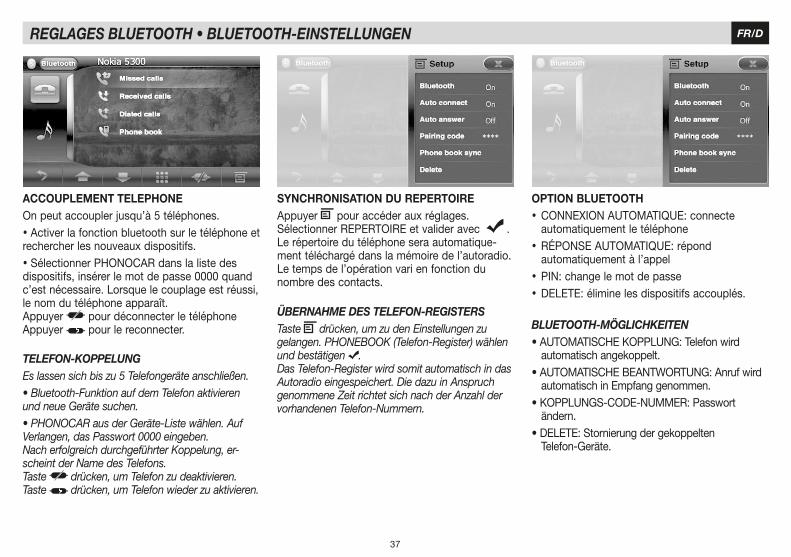
SYNCHRONISATION DU REPERTOIRE Appuyer pour accéder aux réglages.SélectionnerREPERTOIREetvalideravec .Le répertoire du téléphone sera automatique-ment téléchargé dans la mémoire de l’autoradio. Le temps de l’opération vari en fonction du nombre des contacts.
OPTION BLUETOOTH• CONNEXIONAUTOMATIQUE:connecte automatiquement le téléphone• RÉPONSEAUTOMATIQUE:répond automatiquement à l’appel• PIN: change le mot de passe• DELETE: élimine les dispositifs accouplés.
ACCOUPLEMENT TELEPHONEOnpeutaccouplerjusqu’à5téléphones.• Activer la fonction bluetooth sur le téléphone et rechercher les nouveaux dispositifs.• SélectionnerPHONOCARdanslalistedesdispositifs, insérer le mot de passe 0000 quand c’est nécessaire. Lorsque le couplage est réussi, le nom du téléphone apparaît.Appuyer pour déconnecter le téléphoneAppuyer pour le reconnecter.
ÜBERNAHME DES TELEFON-REGISTERSTaste drücken, um zu den Einstellungen zu gelangen. PHONEBOOK (Telefon-Register) wählen und bestätigen .Das Telefon-Register wird somit automatisch in das Autoradio eingespeichert. Die dazu in Anspruch genommene Zeit richtet sich nach der Anzahl der vorhandenen Telefon-Nummern.
BLUETOOTH-MÖGLICHKEITEN•AUTOMATISCHEKOPPLUNG:Telefonwird automatischangekoppelt.•AUTOMATISCHEBEANTWORTUNG:Anrufwird automatisch in Empfang genommen. •KOPPLUNGS-CODE-NUMMER:Passwort ändern. •DELETE:Stornierungdergekoppelten Telefon-Geräte.
TELEFON-KOPPELUNGEs lassen sich bis zu 5 Telefongeräte anschließen.• Bluetooth-Funktion auf dem Telefon aktivieren und neue Geräte suchen. • PHONOCAR aus der Geräte-Liste wählen. Auf Verlangen, das Passwort 0000 eingeben.Nach erfolgreich durchgeführter Koppelung, er-scheint der Name des Telefons. Taste drücken, um Telefon zu deaktivieren. Taste drücken, um Telefon wieder zu aktivieren.
38
FR/DFONCTIONS BLUETOOTH • BLUETOOTH-FUNKTIONEN
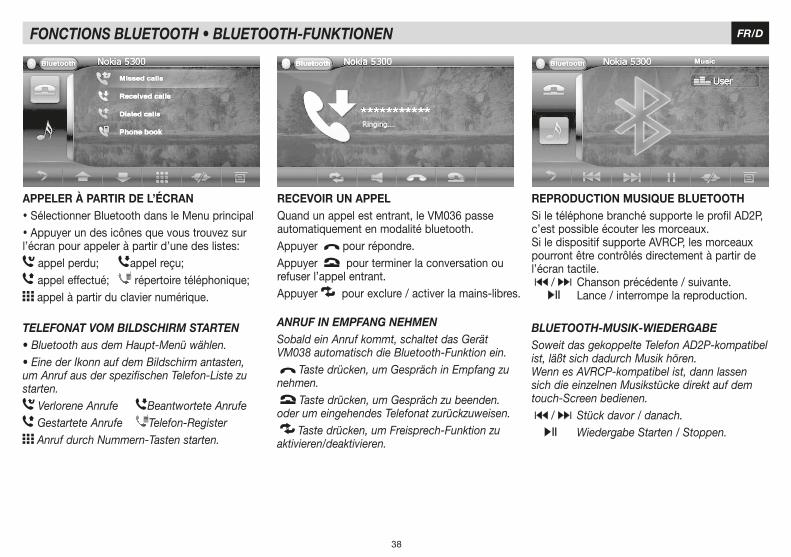
APPELER À PARTIR DE L’ÉCRAN• Sélectionner Bluetooth dans le Menu principal• Appuyerundesicônesquevoustrouvezsurl’écran pour appeler à partir d’une des listes:
appel perdu; appel reçu; appel effectué; répertoire téléphonique; appel à partir du clavier numérique.
RECEVOIR UN APPELQuand un appel est entrant, le VM036 passe automatiquement en modalité bluetooth.Appuyer pour répondre.Appuyer pour terminer la conversation ou refuser l’appel entrant.Appuyer pour exclure / activer la mains-libres.
REPRODUCTION MUSIQUE BLUETOOTHSi le téléphone branché supporte le profil AD2P, c’est possible écouter les morceaux.Si le dispositif supporte AVRCP, les morceaux pourront être contrôlés directement à partir de l’écran tactile. / Chanson précédente / suivante. Lance / interrompe la reproduction.
TELEFONAT VOM BILDSCHIRM STARTEN• Bluetooth aus dem Haupt-Menü wählen. • Eine der Ikonn auf dem Bildschirm antasten, um Anruf aus der spezifischen Telefon-Liste zu starten.
Verlorene Anrufe Beantwortete Anrufe Gestartete Anrufe Telefon-Register Anruf durch Nummern-Tasten starten.
ANRUF IN EMPFANG NEHMENSobald ein Anruf kommt, schaltet das Gerät VM038 automatisch die Bluetooth-Funktion ein. Taste drücken, um Gespräch in Empfang zu nehmen. Taste drücken, um Gespräch zu beenden. oder um eingehendes Telefonat zurückzuweisen. Taste drücken, um Freisprech-Funktion zu aktivieren/deaktivieren.
BLUETOOTH-MUSIK-WIEDERGABESoweit das gekoppelte Telefon AD2P-kompatibel ist, läßt sich dadurch Musik hören. Wenn es AVRCP-kompatibel ist, dann lassen sich die einzelnen Musikstücke direkt auf dem touch-Screen bedienen. / Stück davor / danach. Wiedergabe Starten / Stoppen.
39
FR/D
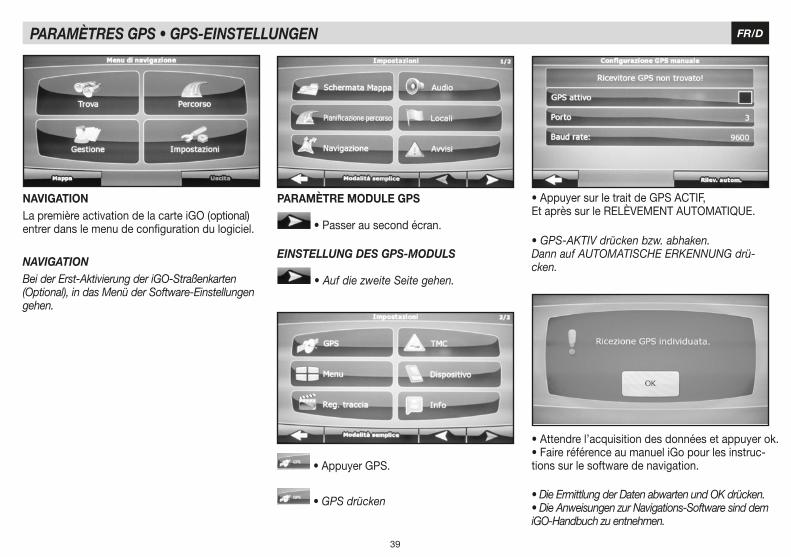
PARAMÈTRE MODULE GPS
•Passerausecondécran. EINSTELLUNG DES GPS-MODULS
• Auf die zweite Seite gehen.
NAVIGATIONBei der Erst-Aktivierung der iGO-Straßenkarten (Optional), in das Menü der Software-Einstellungen gehen.
NAVIGATION LapremièreactivationdelacarteiGO(optional)entrer dans le menu de configuration du logiciel.
•AppuyerGPS.
• GPS drücken
PARAMÈTRES GPS • GPS-EINSTELLUNGEN
• GPS-AKTIV drücken bzw. abhaken. Dann auf AUTOMATISCHE ERKENNUNG drü-cken.
•AppuyersurletraitdeGPSACTIF,EtaprèssurleRELÈVEMENTAUTOMATIQUE.
• Die Ermittlung der Daten abwarten und OK drücken. • Die Anweisungen zur Navigations-Software sind dem iGO-Handbuch zu entnehmen.
•Attendrel’acquisitiondesdonnéesetappuyerok.•FaireréférenceaumanueliGopourlesinstruc-tions sur le software de navigation.
40
FR/DCOMMANDES AU VOLANT • LENKRAD-STEUERUNGEN
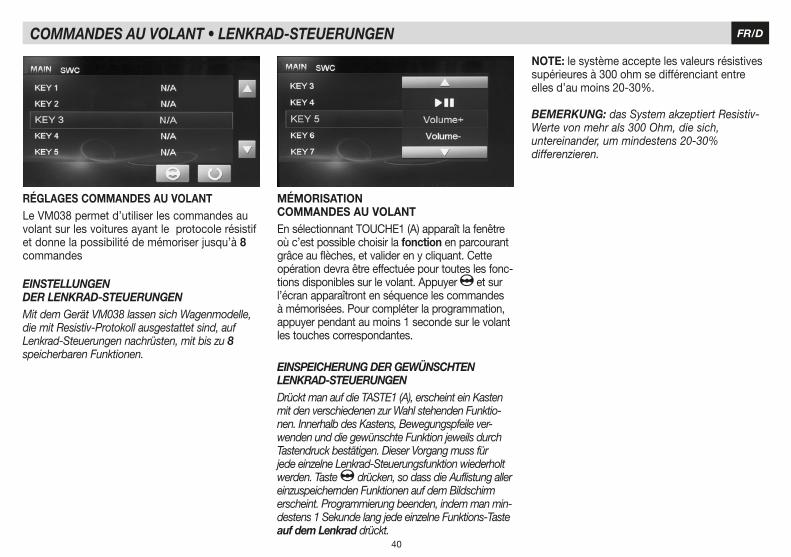
RÉGLAGES COMMANDES AU VOLANTLe VM038 permet d’utiliser les commandes au volantsurlesvoituresayantleprotocolerésistifet donne la possibilité de mémoriser jusqu’à 8 commandes
MÉMORISATION COMMANDES AU VOLANTEnsélectionnantTOUCHE1(A)apparaîtlafenêtreoù c’est possible choisir la fonction en parcourant grâceauflèches,etvaliderenycliquant.Cetteopération devra être effectuée pour toutes les fonc-tionsdisponiblessurlevolant.Appuyer et sur l’écran apparaîtront en séquence les commandes à mémorisées. Pour compléter la programmation, appuyerpendantaumoins1secondesurlevolantles touches correspondantes.
EINSTELLUNGEN DER LENKRAD-STEUERUNGEN Mit dem Gerät VM038 lassen sich Wagenmodelle, die mit Resistiv-Protokoll ausgestattet sind, auf Lenkrad-Steuerungen nachrüsten, mit bis zu 8 speicherbaren Funktionen.
EINSPEICHERUNG DER GEWÜNSCHTEN LENKRAD-STEUERUNGEN Drückt man auf die TASTE1 (A), erscheint ein Kasten mit den verschiedenen zur Wahl stehenden Funktio-nen. Innerhalb des Kastens, Bewegungspfeile ver-wenden und die gewünschte Funktion jeweils durch Tastendruck bestätigen. Dieser Vorgang muss für jede einzelne Lenkrad-Steuerungsfunktion wiederholt werden. Taste drücken, so dass die Auflistung aller einzuspeichernden Funktionen auf dem Bildschirm erscheint. Programmierung beenden, indem man min-destens 1 Sekunde lang jede einzelne Funktions-Taste auf dem Lenkrad drückt.
NOTE:lesystèmeacceptelesvaleursrésistivessupérieures à 300 ohm se différenciant entre elles d’au moins 20-30%.
BEMERKUNG: das System akzeptiert Resistiv-Werte von mehr als 300 Ohm, die sich, untereinander, um mindestens 20-30% differenzieren.
41
FR/DCARACTERISTIQUES TECHNIQUES • TECHNISCHE DATEN
ReferenceSupplyVoltage ...................................... 12V(DC)OperatingVoltageRange .......................... 10.5 - 15.8V(DC)MaxOperatingCurrent ...................................................15AFMSignal Noise Ratio .................................................... ≥55dBResidualNoiseSensitivity(S/N=30dB .................... 18dBμVFrequencyResponse(±3dB ..........................20Hz~12.5KHzStationSeekingLevel ....................................... 20~28dBμVDistortion .................................................................. ≤1.5%StereoSeparation(1KHz ........................................... ≥25dBAntenna Impedance ...................................................... 75ΩAMResidualNoiseSensitivity(S/N=20dB ................... 30dBμVSelectivity(±9KHz .................................................... ≥50dBLCDScreen size .................................................. 6.2inches(16:9)Displayresolution ............................................800X480dotsContrast radio .................................................................500Brightness ........................................................... 300cd/m2DVD PlayerSignal / Noise Ratio ..................................................... 90dBDynamicRange ........................................................... 90dBDistortion(line out ..................................................... ≤0.1%FrequencyResponse(±3dB .............................20Hz~20KHzMaximumOutputPower .......................................... 4×45WLoad Impedance ............................................................. 4ΩAUX INDistortion .................................................................. ≤0.5%FrequencyResponse(±3dB .............................20Hz~20KHzAudio Input Level ........................................................1VrmsAudioAudioOutputImpedance ............................................ 100ΩAudioOutputLevel ........................................... 4Vrms(Max)VideoNormal Video Input Level(CVBS .............................1.0±0.2VVideo Input Impedance ................................................. 75ΩVideoOutputImpedance .............................................. 75ΩVideoOutputLevel .................................................1.0±0.2V
FORMAT-KOMPATIBILITÄTFormatierung USB/SD-CARD: FAT16 – FAT32 • Bit rate MP3 : 32-320 Kbps • WMA: V9 oder höher • Maximale Register-Stufen: 8 • Max Album-Anzahl pro Ordner: 99 • Max Stücke pro Datei: 999 • ID3TAG: V2 oder höherDatei-Namen in Unicode UTF8 (max. Länge 128 Buchstaben)NICHT-KOMPATIBLE FORMATE Ein Album oder ein Ordner, die ganz ohne MP3/WMA-Dateien sind, lassen sich nicht auf dem Display ausweisen.Alle nicht-kompatiblen oder nicht lesbaren Dateien werden ganz einfach übersprungen bzw. ignoriert, d.h. nicht abgespielt (AAC, WMV, PCM / WMA mit DRM-Schutz und in LOSSLESS-Format).KOMPATIBLE MP3-FORMATEISO9660, Joliet • Max. Musikstück-Titel: 512 • Max. Album-Anzahl: 255Kompatible Muster-Frequenz: 32Khz, 44.1Khz, 48Khz • Kompatible Bit-rate: 32-320Kbps.
FORMATS SUPPORTÉSFormatage USB / CARTE SD: FAT 32. BIT rate MP: 32 -320 Kbps. WMA V9 ou successiveNombre des niveaux maximum dans la directory: 8. Max album par dossier: 99. Max trace par dossier: 999 ID3TAG: V2 ou successive. Noms des fichiers en Unicode UTF8 (Longueur maximale 128 caractères)FORMATS PAS SUPPORTÉS Un album ou un dossier sans aucun fichier MP3 / WMA ne sera pas visualisé sur l’afficheurLes fichiers pas compatibles ou pas supportés seront sautés, ignorés et pas reproduits (AAC, WMA, PCM / WMA avec protection DRM et en format LOSSLESS)FORMAT CD MP3 SUPPORTÉSISO09660, Joliet. Nombre maximum de titres: 512. Nombre Maximum d’album: 255Fréquence d’essaie supportée: 32Khz, 44.1Khz, 48Khz. Bit –rate supportés: 32 – 320Kbps.
42
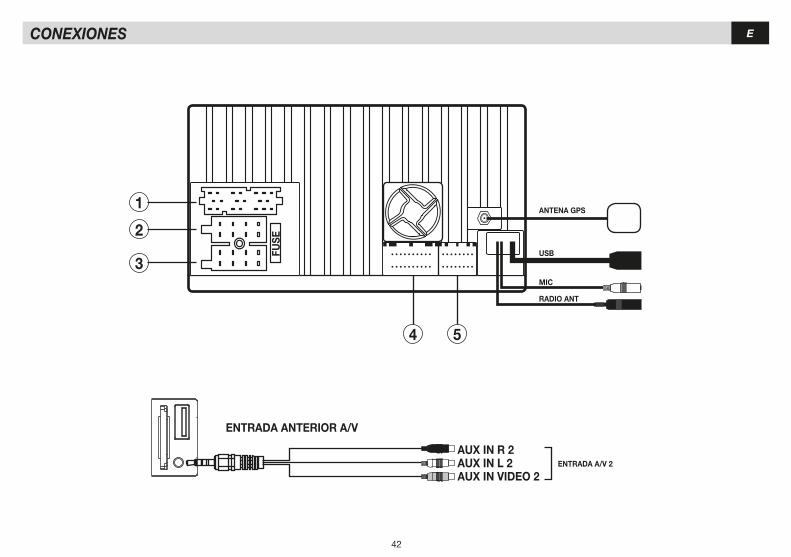
ECONEXIONES
ENTRADA A/V 2
ENTRADA ANTERIOR A/V
AUX IN R 2AUX IN L 2AUX IN VIDEO 2
4 5
ANTENA GPS
USB
MIC
RADIO ANT
1
2
3FU
SE
43
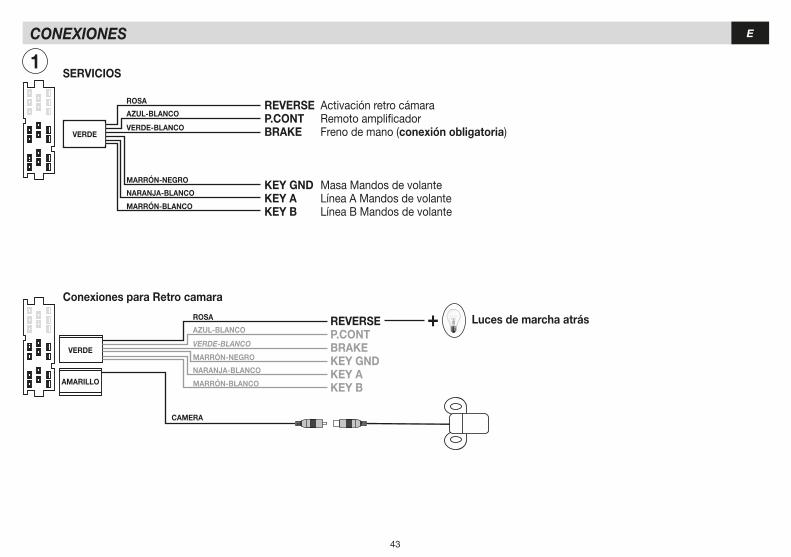
ECONEXIONES
AMARILLO
VERDE
CAMERA
REVERSEP.CONTBRAKEKEY GNDKEY AKEY B
+ Luces de marcha atrás
Conexiones para Retro camara
SERVICIOS
ROSA
AZUL-BLANCO
VERDE-BLANCO
MARRÓN-NEGRO
NARANJA-BLANCO
MARRÓN-BLANCO
REVERSEP.CONTBRAKE
KEY GNDKEY AKEY B
Activación retro cámaraRemoto amplificadorFreno de mano (conexión obligatoria)
Masa Mandos de volanteLínea A Mandos de volanteLínea B Mandos de volante
VERDE
1
ROSA
AZUL-BLANCO
VERDE-BLANCO
MARRÓN-NEGRO
NARANJA-BLANCO
MARRÓN-BLANCO
44
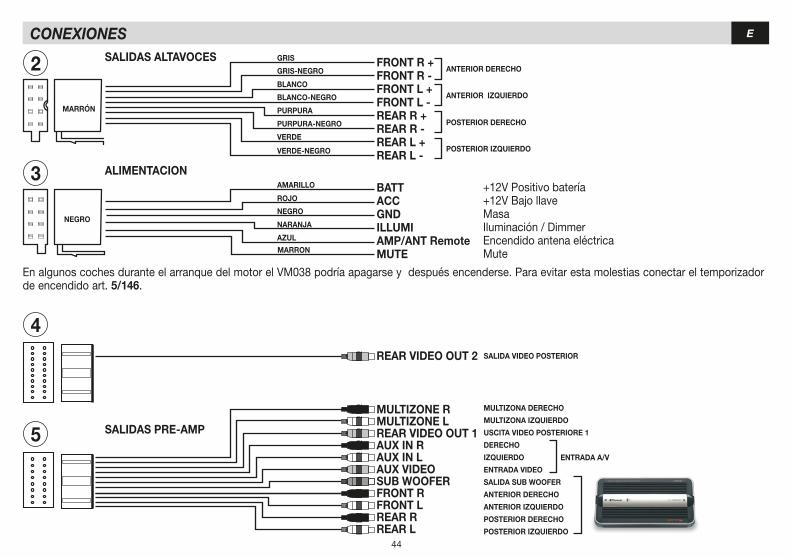
ECONEXIONES
2
5
4
3
MARRÓN
NEGRO
+12V Positivo batería +12V Bajo llaveMasaIluminación / DimmerEncendido antena eléctricaMute
MULTIZONA DERECHO
MULTIZONA IZQUIERDO
USCITA VIDEO POSTERIORE 1
DERECHO
IZQUIERDO
ENTRADA VIDEO
SALIDA SUB WOOFER
ANTERIOR DERECHO
ANTERIOR IZQUIERDO
POSTERIOR DERECHO
POSTERIOR IZQUIERDO
SALIDA VIDEO POSTERIOR
ENTRADA A/V
FRONT R +FRONT R -FRONT L +FRONT L -REAR R +REAR R -REAR L +REAR L -
MULTIZONE RMULTIZONE LREAR VIDEO OUT 1AUX IN R AUX IN L AUX VIDEOSUB WOOFERFRONT R FRONT LREAR RREAR L
REAR VIDEO OUT 2
SALIDAS ALTAVOCES
ALIMENTACION
SALIDAS PRE-AMP
BATTACCGNDILLUMIAMP/ANT RemoteMUTE
EnalgunoscochesduranteelarranquedelmotorelVM038podríaapagarseydespuésencenderse.Paraevitarestamolestiasconectareltemporizadorde encendido art. 5/146.
GRIS
VERDE
VERDE-NEGRO
BLANCO
ROJO
BLANCO-NEGRO
NEGRO
PURPURA
NARANJA
PURPURA-NEGRO
AZUL
GRIS-NEGRO
AMARILLO
ANTERIOR DERECHO
ANTERIOR IZQUIERDO
POSTERIOR DERECHO
POSTERIOR IZQUIERDO
MARRON
45
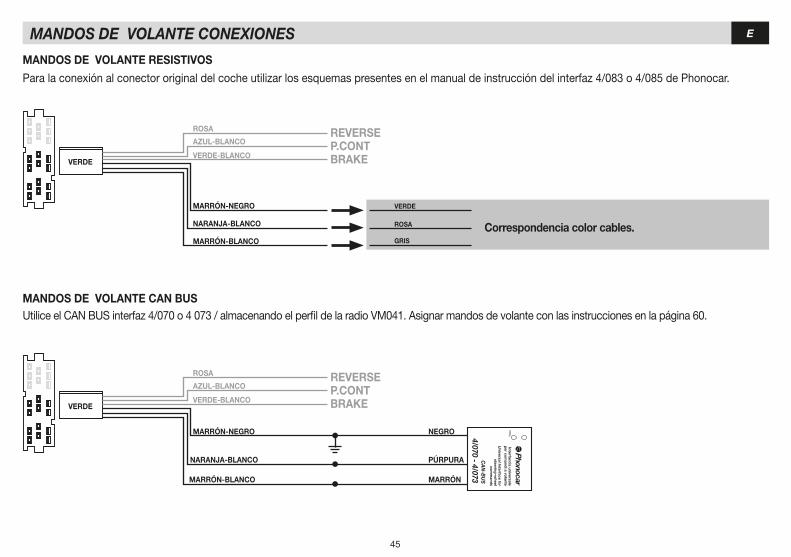
EMANDOS DE VOLANTE CONEXIONES
VERDE
VERDE
REVERSEP.CONTBRAKE
REVERSEP.CONTBRAKE
ROSA
ROSA
AZUL-BLANCO
AZUL-BLANCO
VERDE-BLANCO
VERDE-BLANCO
MARRÓN-NEGRO
MARRÓN-BLANCO
MARRÓN-BLANCO
VERDE
ROSA
GRIS
Correspondencia color cables.
MANDOS DE VOLANTE CAN BUSUtilice el CAN BUS interfaz 4/070 o 4 073 / almacenando el perfil de la radio VM041. Asignar mandos de volante con las instrucciones en la página 60.
MANDOS DE VOLANTE RESISTIVOS
Para la conexión al conector original del coche utilizar los esquemas presentes en el manual de instrucción del interfaz 4/083 o 4/085 de Phonocar.
NEGRO
PÚRPURA
MARRÓN
NARANJA-BLANCO
4/070 - 4/073
NARANJA-BLANCO
MARRÓN-NEGRO
46
EFUNCIONES
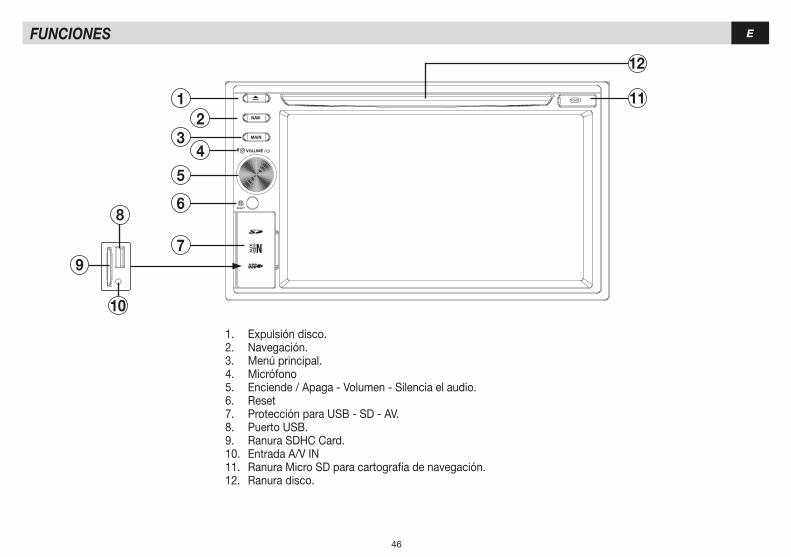
1. Expulsión disco.2. Navegación.3. Menú principal.4. Micrófono5. Enciende / Apaga - Volumen - Silencia el audio.6. Reset 7. Protección para USB - SD - AV.8. Puerto USB.9. Ranura SDHC Card.10. Entrada A/V IN11. Ranura Micro SD para cartografía de navegación.12. Ranura disco.
12
34
5
12
6
7
VOLUME /
RESE T
MAIN
NAVI
9
8
10
11
47
EFUNCIONES MANDO A DISTANCIA
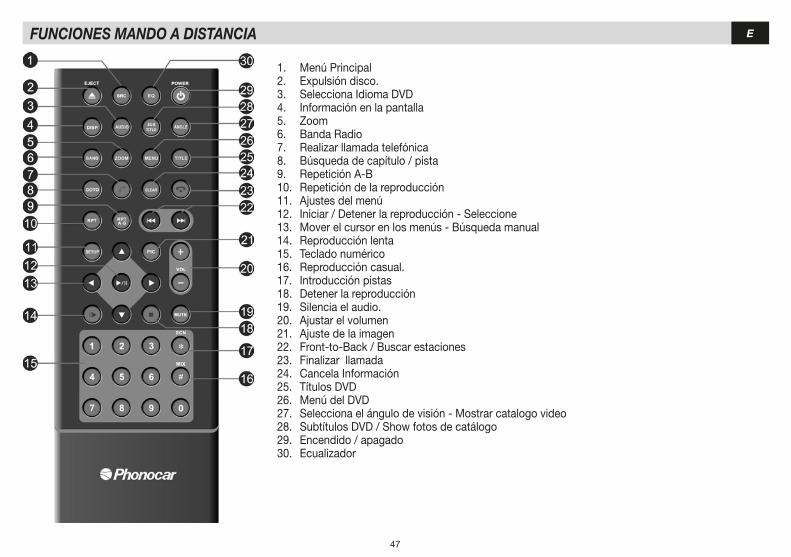
1. Menú Principal2. Expulsión disco.3. Selecciona Idioma DVD 4. Información en la pantalla5. Zoom6. Banda Radio7. Realizar llamada telefónica8. Búsqueda de capítulo / pista9. Repetición A-B10. Repetición de la reproducción11. Ajustes del menú12. Iniciar / Detener la reproducción - Seleccione13. Mover el cursor en los menús - Búsqueda manual14. Reproducción lenta15. Teclado numérico16. Reproducción casual.17. Introducción pistas18. Detener la reproducción19. Silencia el audio.20. Ajustar el volumen21. Ajuste de la imagen22. Front-to-Back/Buscarestaciones23. Finalizar llamada24. Cancela Información 25. Títulos DVD 26. Menú del DVD27. Selecciona el ángulo de visión - Mostrar catalogo video28. Subtítulos DVD / Show fotos de catálogo29. Encendido / apagado30. Ecualizador

48
EMENÚ
Al encender el coche aparece en el menú principal.Con los iconos que aparecen en pantalla para seleccionar la fuente o la función deseada.
No disponible Carga de fondos desde la tarjeta SD Saltar el menú principal para reproducir menú. Entre en el menú de configuración. Introduzca el menú de ajustes del ecualizador.
Menú de reproducción posterior, el icono vuelve al menú principal.Puedes reproducir en el audio / vídeo de nuevo una fuente distinta de la frontal. La fuente delantera debe ser de radio o navegación.
49
ECONFIGURACIONES DEL SISTEMA
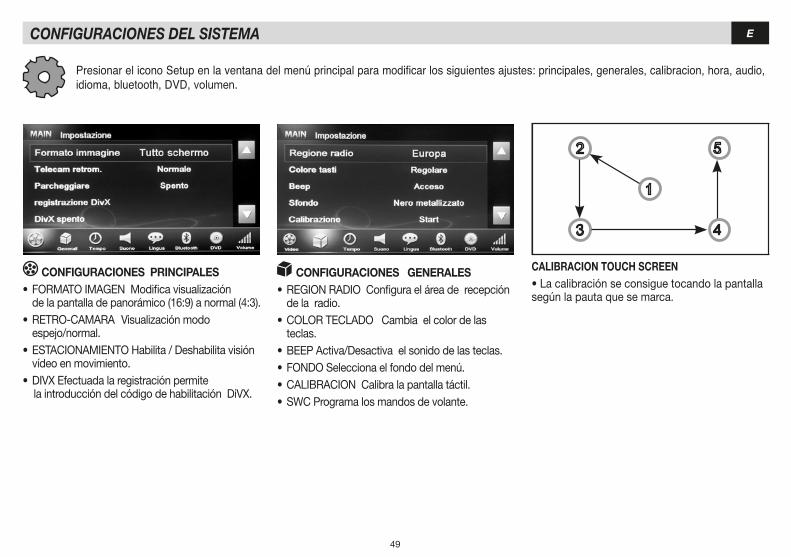
CALIBRACION TOUCH SCREEN•Lacalibraciónseconsiguetocandolapantallasegún la pauta que se marca.
Presionar el icono Setup en la ventana del menú principal para modificar los siguientes ajustes: principales, generales, calibracion, hora, audio, idioma, bluetooth, DVD, volumen.
CONFIGURACIONES PRINCIPALES•FORMATOIMAGENModificavisualización de la pantalla de panorámico (16:9) a normal (4:3).•RETRO-CAMARAVisualizaciónmodo espejo/normal. •ESTACIONAMIENTOHabilita/Deshabilitavisión vídeo en movimiento.•DIVXEfectuadalaregistraciónpermitelaintroduccióndelcódigodehabilitaciónDiVX.
CONFIGURACIONES GENERALES•REGIONRADIOConfiguraeláreaderecepción de la radio.•COLORTECLADOCambiaelcolordelas teclas.•BEEPActiva/Desactivaelsonidodelasteclas.•FONDOSeleccionaelfondodelmenú.•CALIBRACIONCalibralapantallatáctil.•SWCProgramalosmandosdevolante.
50
ECONFIGURACIONES DEL SISTEMA
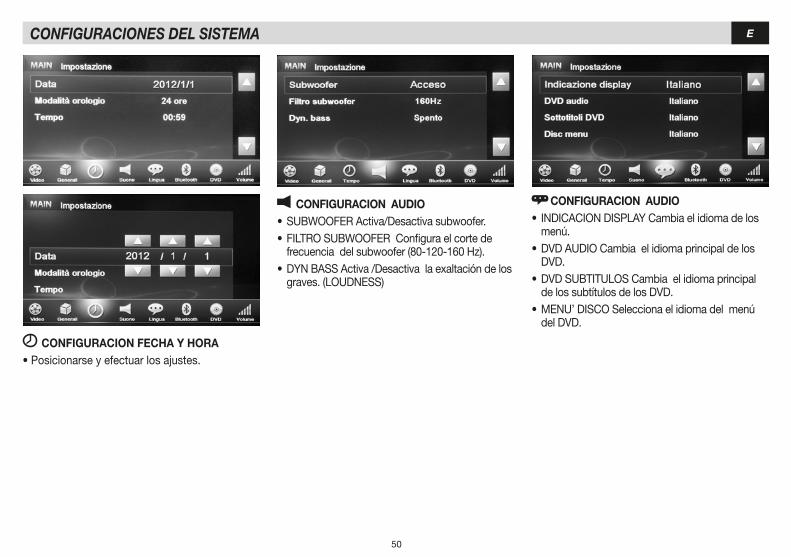
CONFIGURACION FECHA Y HORA•Posicionarseyefectuarlosajustes.
CONFIGURACION AUDIO•SUBWOOFERActiva/Desactivasubwoofer.•FILTROSUBWOOFERConfiguraelcortede frecuencia del subwoofer (80-120-160 Hz).•DYNBASSActiva/Desactivalaexaltacióndelos graves.(LOUDNESS)
CONFIGURACION AUDIO• INDICACIONDISPLAYCambiaelidiomadelos menú. •DVDAUDIOCambiaelidiomaprincipaldelos DVD.•DVDSUBTITULOSCambiaelidiomaprincipal de los subtítulos de los DVD.•MENU’DISCOSeleccionaelidiomadelmenú del DVD.
51
ECONFIGURACIONES DEL SISTEMA
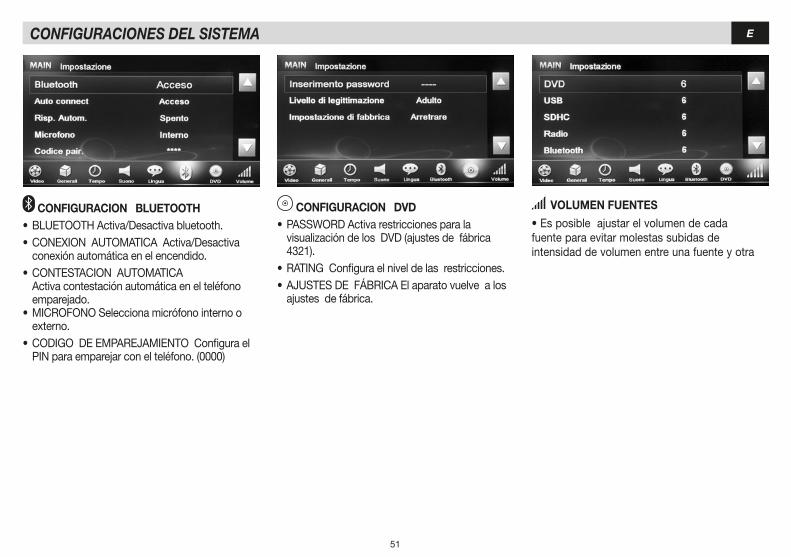
VOLUMEN FUENTES
•Esposibleajustarelvolumendecadafuente para evitar molestas subidas deintensidaddevolumenentreunafuenteyotra
CONFIGURACION BLUETOOTH•BLUETOOTHActiva/Desactivabluetooth.•CONEXIONAUTOMATICAActiva/Desactiva conexión automática en el encendido.•CONTESTACIONAUTOMATICA Activa contestación automática en el teléfono emparejado.•MICROFONOSeleccionamicrófonointernoo externo.•CODIGODEEMPAREJAMIENTOConfigurael PIN para emparejar con el teléfono. (0000)
CONFIGURACION DVD•PASSWORDActivarestriccionesparala visualización de los DVD (ajustes de fábrica 4321).•RATINGConfiguraelniveldelasrestricciones.•AJUSTESDEFÁBRICAElaparatovuelvealos ajustes de fábrica.
52
ERADIO
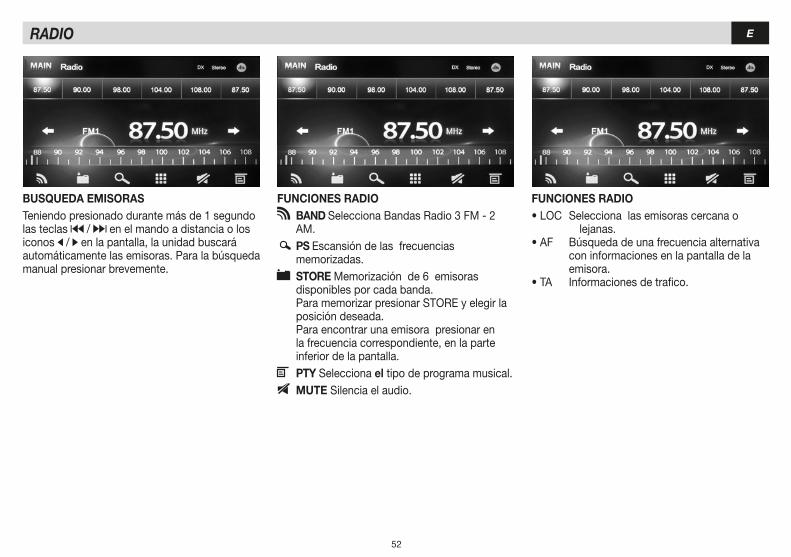
BUSQUEDA EMISORASTeniendo presionado durante más de 1 segundo las teclas / en el mando a distancia o los iconos / en la pantalla, la unidad buscará automáticamente las emisoras. Para la búsqueda manual presionar brevemente.
FUNCIONES RADIO BAND Selecciona Bandas Radio 3 FM - 2
AM. PS Escansión de las frecuencias memorizadas.
STORE Memorización de 6 emisoras disponibles por cada banda. ParamemorizarpresionarSTOREyelegirla posición deseada. Para encontrar una emisora presionar en la frecuencia correspondiente, en la parte inferior de la pantalla.
PTY Selecciona el tipo de programa musical. MUTE Silencia el audio.
FUNCIONES RADIO•LOC Seleccionalasemisorascercanao lejanas.•AF Búsquedadeunafrecuenciaalternativa con informaciones en la pantalla de la emisora.•TA Informacionesdetrafico.

53
EECUALIZADOR FONDOS DE PANTALLA
EQUALIZADOR - LOUDNESS Presionar el icono para modificar los ajustes de fábrica. Mediante los iconos es posible seleccionar 8 diferentes modos de ecualización preajustados:USER-FLAT-POPROCK-CLASSIC-JAZZ-TECHNO-OPTIMAL.En modo USER es posible ajustar los niveles de losagudos,mediosygravesenlasfrecuenciasdeseadas.LPF - MPF - HPF. El icono se pone en OPTIMAL.
FADER - BALANCE - SUB WOOFERPresionar el icono para acceder a los ajustes delFADERydelBALANCEmediantelasflechaspresentes en la pantalla. ParaajustarelvolumendelSUBWOOFERpresionar ParaajustarelcrossoverpresionarSUBWyposicionarse en la frecuencia de corte deseada.
PERSONALIZACION DEL FONDODesde el menú principal presionar el icono para acceder a la ventana de gestión del fondo de pantalla. Para utilizar las imágenes presentesen la memoria, presionar el nombre del archivo,seleccionarelpre-estrenoyconfirmar .Para utilizar imágenes desde una SD Cardpresionar“BROWSESDCARD”.
54
EREPRODUCCION DVD-CD-USB-SD CARD
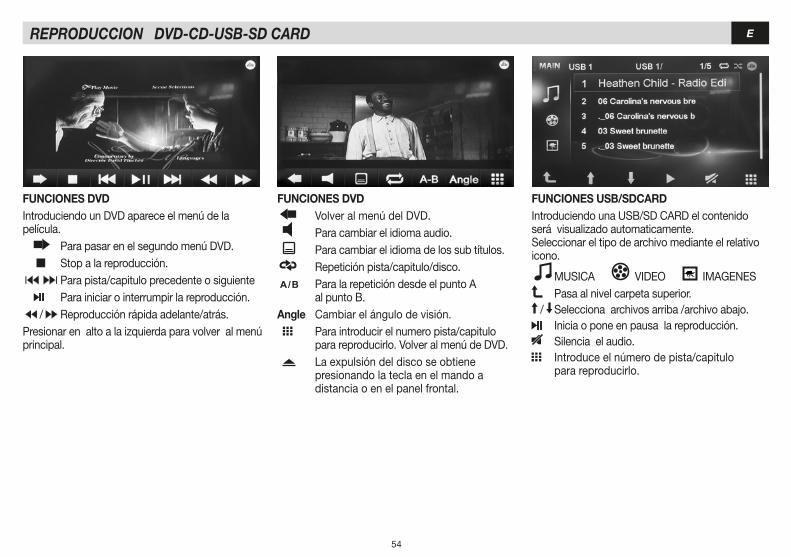
FUNCIONES USB/SDCARDIntroduciendo una USB/SD CARD el contenido será visualizado automaticamente.Seleccionar el tipo de archivo mediante el relativo icono.
MUSICA VIDEO IMAGENES Pasa al nivel carpeta superior.
/ Selecciona archivos arriba /archivo abajo. Inicia o pone en pausa la reproducción. Silencia el audio. Introduce el número de pista/capitulo
para reproducirlo.
FUNCIONES DVD Volver al menú del DVD. Para cambiar el idioma audio. Para cambiar el idioma de los sub títulos. Repetición pista/capitulo/disco. Para la repetición desde el punto A al punto B. Angle Cambiar el ángulo de visión. Para introducir el numero pista/capitulo para reproducirlo. Volver al menú de DVD. La expulsión del disco se obtiene presionando la tecla en el mando a distancia o en el panel frontal.
FUNCIONES DVDIntroduciendo un DVD aparece el menú de la película. Para pasar en el segundo menú DVD. Stop a la reproducción. Para pista/capitulo precedente o siguiente Para iniciar o interrumpir la reproducción. / Reproducción rápida adelante/atrás.Presionar en alto a la izquierda para volver al menú principal.
55
EREPRODUCCION DVD-CD-USB-SD CARD
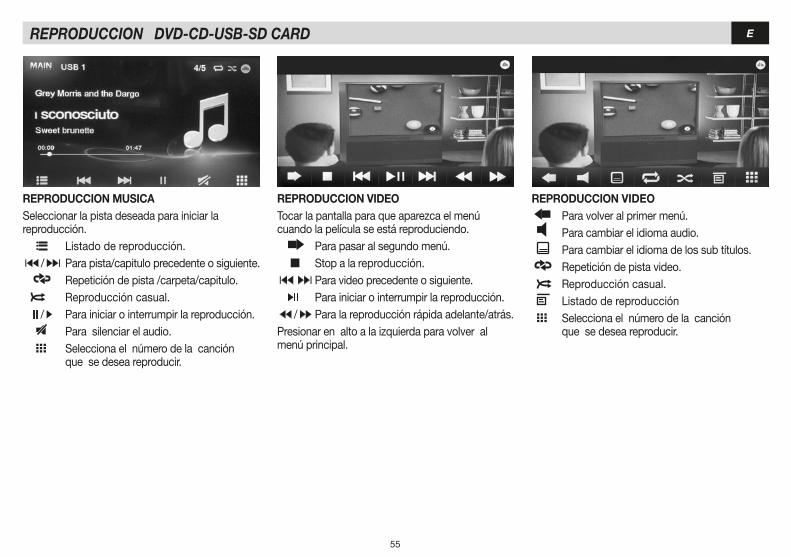
REPRODUCCION MUSICASeleccionar la pista deseada para iniciar la reproducción. Listado de reproducción. / Para pista/capitulo precedente o siguiente. Repetición de pista /carpeta/capitulo. Reproducción casual. / Para iniciar o interrumpir la reproducción. Para silenciar el audio. Selecciona el número de la canción que se desea reproducir.
REPRODUCCION VIDEO Para volver al primer menú. Para cambiar el idioma audio. Para cambiar el idioma de los sub títulos. Repetición de pista video. Reproducción casual. Listado de reproducción Selecciona el número de la canción que se desea reproducir.
REPRODUCCION VIDEOTocar la pantalla para que aparezca el menú cuando la película se está reproduciendo. Para pasar al segundo menú. Stop a la reproducción. Para video precedente o siguiente. Para iniciar o interrumpir la reproducción. / Para la reproducción rápida adelante/atrás.Presionar en alto a la izquierda para volver al menú principal.
56
E
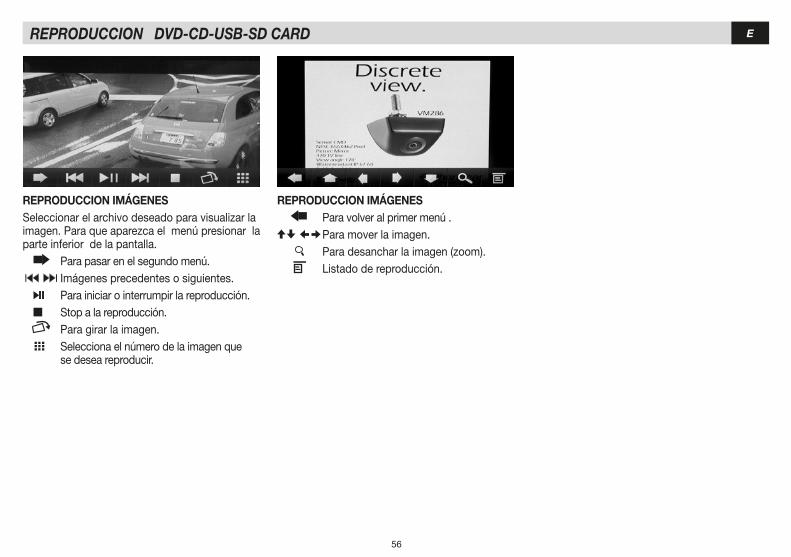
REPRODUCCION IMÁGENES Seleccionar el archivo deseado para visualizar la imagen. Para que aparezca el menú presionar la parte inferior de la pantalla. Para pasar en el segundo menú. Imágenes precedentes o siguientes. Para iniciar o interrumpir la reproducción. Stop a la reproducción. Para girar la imagen. Selecciona el número de la imagen que se desea reproducir.
REPRODUCCION IMÁGENES Para volver al primer menú .
Para mover la imagen. Para desanchar la imagen (zoom). Listado de reproducción.
REPRODUCCION DVD-CD-USB-SD CARD
57
ECONFIGURACION BLUETOOTH
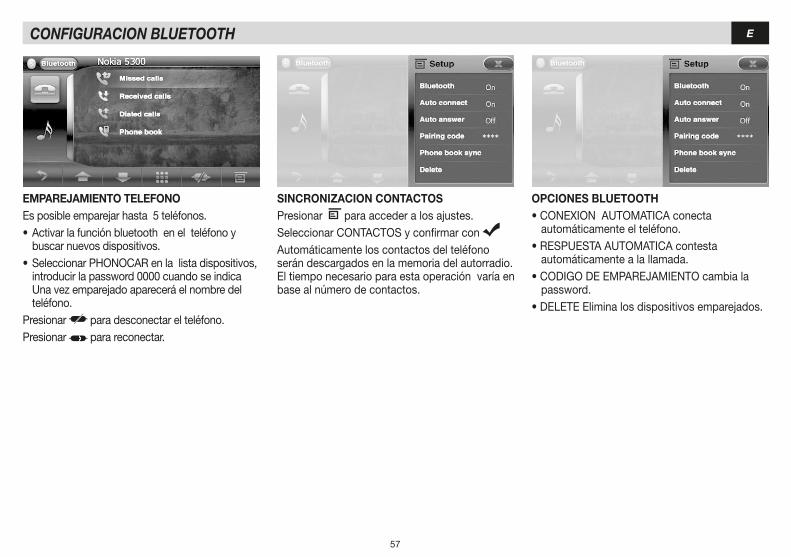
SINCRONIZACION CONTACTOSPresionar para acceder a los ajustes.SeleccionarCONTACTOSyconfirmarcon Automáticamente los contactos del teléfono serán descargados en la memoria del autorradio. El tiempo necesario para esta operación varía en base al número de contactos.
OPCIONES BLUETOOTH•CONEXIONAUTOMATICAconecta automáticamente el teléfono.•RESPUESTAAUTOMATICAcontesta automáticamente a la llamada.•CODIGODEEMPAREJAMIENTOcambiala password. •DELETEEliminalosdispositivosemparejados.
EMPAREJAMIENTO TELEFONOEs posible emparejar hasta 5 teléfonos. •Activarlafunciónbluetoothenelteléfonoy buscar nuevos dispositivos.•SeleccionarPHONOCARenlalistadispositivos, introducir la password 0000 cuando se indica Una vez emparejado aparecerá el nombre del teléfono.Presionar para desconectar el teléfono.Presionar para reconectar.
58
EFUNCIONES BLUETOOTH
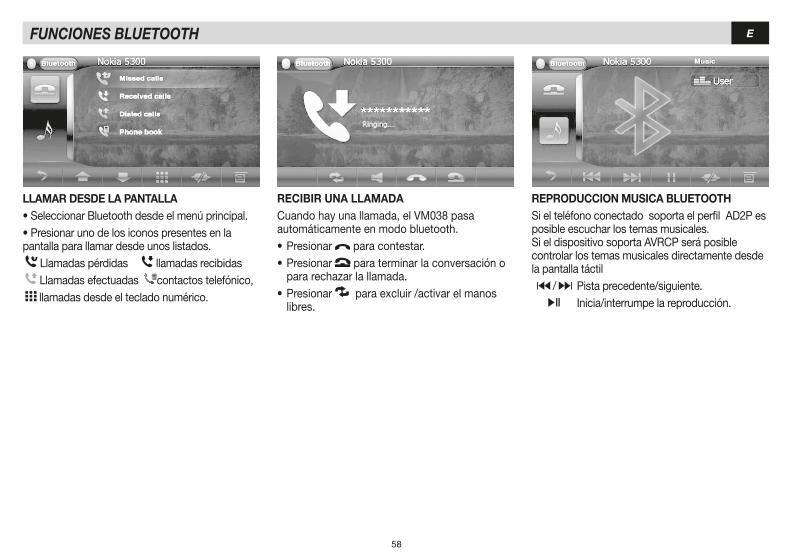
LLAMAR DESDE LA PANTALLA•SeleccionarBluetoothdesdeelmenúprincipal.•Presionarunodelosiconospresentesenlapantalla para llamar desde unos listados. Llamadas pérdidas llamadas recibidas Llamadas efectuadas contactos telefónico, llamadas desde el teclado numérico.
RECIBIR UNA LLAMADACuandohayunallamada,elVM038pasaautomáticamente en modo bluetooth. •Presionar para contestar.•Presionar para terminar la conversación o para rechazar la llamada.•Presionar para excluir /activar el manos libres.
REPRODUCCION MUSICA BLUETOOTHSi el teléfono conectado soporta el perfil AD2P es posible escuchar los temas musicales.Si el dispositivo soporta AVRCP será posible controlar los temas musicales directamente desde la pantalla táctil / Pista precedente/siguiente. Inicia/interrumpe la reproducción.

59
ECONFIGURACION GPS
CONFIGURACION MODULO GPS
•Pasaalasegundaventana
NAVEGACIONEnlaprimeraactivacióndelacartografíaiGO(opcional) seleccionar el archivo ejecutable mobilenavigator.exe en los ajustes. •Accederalmenúajustesdelsoftware.
•PresionarGPS
•PresionarenlacasilladeGPSACTIVADOAcontinuaciónenDETECCIÓNAUTOMATICA
•Esperarlaadquisicióndelosdatosypresionarok.•TomarcomopuntodereferenciaelmanualiGOparalasinstruccionessobreelsoftwaredenavegación.

60
EMANDOS DE VOLANTE
CONFIGURACION MANDOS DE VOLANTEEl VM038 permite utilizar los mandos devolante en los coches con protocolo resistivo,con la posibilidad de memorizar hasta 8funciones.
MEMORIZACION MANDOS DE VOLANTESeleccionandoKEY1(A)apareceráunaventana donde se tiene que elegir la función, desplazarseconlasflechasyconfirmarpresionándola. Esta operación tiene que ser efectuada con todas las funciones disponibles en el volante.Presionar yenlapantallaapareceránensecuencia los mandos para memorizar.Para completar la programación presionar durante más de 1 segundo en el volante las teclas correspondientes.
NOTA: El sistema acepta valores resistivos superiores a 300 ohm diferentes entre ellos en un 20-30%.
61
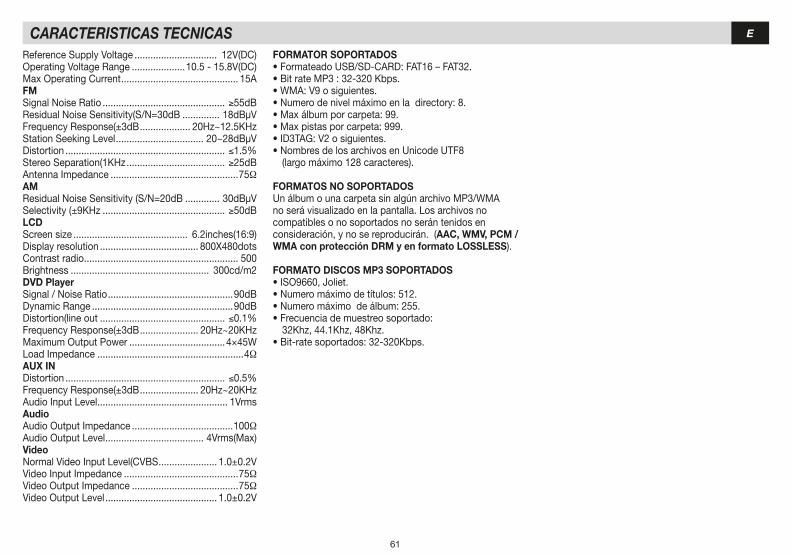
ECARACTERISTICAS TECNICASReferenceSupplyVoltage ............................... 12V(DC)OperatingVoltageRange ....................10.5 - 15.8V(DC)MaxOperatingCurrent ............................................ 15AFMSignal Noise Ratio .............................................. ≥55dBResidualNoiseSensitivity(S/N=30dB .............. 18dBμVFrequencyResponse(±3dB ................... 20Hz~12.5KHzStationSeekingLevel ................................. 20~28dBμVDistortion ............................................................ ≤1.5%StereoSeparation(1KHz ..................................... ≥25dBAntenna Impedance ................................................75ΩAMResidualNoiseSensitivity(S/N=20dB ............. 30dBμVSelectivity(±9KHz .............................................. ≥50dBLCDScreen size ........................................... 6.2inches(16:9)Displayresolution ..................................... 800X480dotsContrast radio .......................................................... 500Brightness .................................................... 300cd/m2DVD PlayerSignal / Noise Ratio ...............................................90dBDynamicRange .....................................................90dBDistortion(line out ............................................... ≤0.1%FrequencyResponse(±3dB ...................... 20Hz~20KHzMaximumOutputPower ....................................4×45WLoad Impedance .......................................................4ΩAUX INDistortion ............................................................ ≤0.5%FrequencyResponse(±3dB ...................... 20Hz~20KHzAudio Input Level ................................................. 1VrmsAudioAudioOutputImpedance ......................................100ΩAudioOutputLevel ..................................... 4Vrms(Max)VideoNormal Video Input Level(CVBS ......................1.0±0.2VVideo Input Impedance ...........................................75ΩVideoOutputImpedance ........................................75ΩVideoOutputLevel ..........................................1.0±0.2V
FORMATOR SOPORTADOS•FormateadoUSB/SD-CARD:FAT16–FAT32.•BitrateMP3:32-320Kbps.•WMA:V9osiguientes.•Numerodenivelmáximoenladirectory:8.•Maxálbumporcarpeta:99.•Maxpistasporcarpeta:999.•ID3TAG:V2osiguientes.•NombresdelosarchivosenUnicodeUTF8 (largo máximo 128 caracteres).
FORMATOS NO SOPORTADOSUnálbumounacarpetasinalgúnarchivoMP3/WMAno será visualizado en la pantalla. Los archivos no compatibles o no soportados no serán tenidos en consideración,ynosereproducirán.(AAC, WMV, PCM / WMA con protección DRM y en formato LOSSLESS).
FORMATO DISCOS MP3 SOPORTADOS•ISO9660,Joliet.•Numeromáximodetítulos:512.•Numeromáximodeálbum:255.•Frecuenciademuestreosoportado: 32Khz,44.1Khz,48Khz.•Bit-ratesoportados:32-320Kbps.
SINCRONIZZAZIONE PROTOCOLLO CAN-BUSI Effettuare i collegamenti. Alimentando il dispositivo il led lampeggerà con colore rosso, un programma ad auto apprendimento eseguirà in automatico la sincronizzazione
e la selezione del corretto protocollo. A sincronizzazione avvenuta, il led lampeggerà con colore verde e continuerà a lampeggiare fino a quando non si selezionerà il marchio dell’autoradio da programmare.
MEMORIZZAZIONE MARCHIO AUTORADIO: Premere 6 volte il tasto Volume+, il Led eseguirà 7 lampeggi verdi. Premere SEEK per memorizzare.
RESET DISPOSITIVO: Senzatogliereilcircuitodall’alimentazione,premereiltastoPRGfinoaquandoledverdenonsispegne.IlledlampeggeràdicolorRossoperpochisecondi, poi diventerà colore verde in attesa della selezione del nuovo modello di radio.
MEMORIZZAZIONE COMANDI VOLANTE SULL’AUTORADIO: SelezionarelafunzioneSWC(menùImpostazioniGenerali).SelezionandoKEY1appariràunafinestradovesidovrà scegliere la funzione spostandosi con le frecce e confermare premendola, q uesta operazione dovrà essere effettuata per tutte le funzioni disponibili sul volante.Premere e sullo schermo appariranno in sequenza i comandi da memorizzare. Per completare la programmazione premere per almeno 1 secondo sul volante i tasti corri-spondenti.
CONNESSIONI E PROGRAMMAZIONE COMANDI AL VOLANTE CAN-BUS SU INTERFACCE 4/070-4/073CONNECTING AND PROGRAMMING THE CAN-BUS STEERING-WHEEL COMANDS ON INTERFACES 4/070-4/073
VERDEGREENVERTGRÜNVERDE
REVERSEP.CONTBRAKE
ROSA/PINK
BLU-BIANCO/BLUE-WHITE
VERDE-BIANCO/GREEN-WHITE
MARRONE-BIANCO / BROWN-WHITE
NERO/BLACK
VIOLA/PURPLE
MARRONE/BROWN
ARANCIONE-BIANCO / ORANGE-WHITE
4/070 - 4/073
MenùSWC
SYNCHRONIZING THE CAN-BUS-PROTOCOLGB When the current-supply-cable is connected, the Led will flash red. A self-learning programme will automatically effect the synchronization and selection of the related protocol. As soon as the synchronization has been completed, the Led will flash green and continue flashing until the car-radio make is selected for programming.
CAR-RADIO MEMORIZE: Press 6 times the Volume+ button, the LED will perform seven flashing green, press SEEK to memorize.
RE-SETTING OF DEVICE: Without interrupting the power-supply to the circuit, press the PRG-key until the green Led goes off. The Led will flash red, for some seconds, and then turn green, until a different radio-model is selected.
STORING STEERING-WHEEL COMMANDS: Select SWC-function (from General Settings menu). By pressing KEY1, a window will appear showing a number of available functions. Use the arrow-keys to move to the requested function and press for confirmation. This procedures has to be carried out for each function available on the steering-wheel. Press so that the list of memorized commands will appear on the screen. To complete the programming-procedure, press the related keys, on the steering-wheel, for more than 1 second.
VM038
MARRONE-NERO/BROWN-BLACK
SYNCHRONISATION PROTOCOLE CAN-BUSFR Alimentater le dispositif, le Led commence à clignoter rouge. La synchronisation et la sélection du protocole se font automatiquement à travers une procédure d’auto apprentissage. Dès que la synchronisation est terminée, le Led commence à clignoter Vert et continuera jusqu’à la sélection de la marque d’autoradio à programmer.
SELECTION AUTORADIO: Appuyez 11 fois Volume+ bouton, la LED clignote 1 fois en rouge + 2 vert, appuyez sur SEEK pour mémoriser.
RE-PROGRAMMATION (RESET): Sans interrompre l’alimentation du circuit, appuyer sur la touche PRG jusqu’à ce que le Led Vert s’éteint. Le Led clignotera Rouge pour quelques secondes, puis il retournera Vert jusqu’au moment où on sélectionnera un autre modèle d’autoradio.
MÉMORISATION COMMANDES AU VOLANT: Sélectionner la fonction swc (menu Réglages Généraux). En sélectionnant TOUCHE1 (A) apparaît la fenêtre où c’est possible choisir la fonction en parcourant grâce au flèches, et valider en y cliquant. Cette opération devra être effectuée pour toutes les fonctions disponibles sur le volant. Appuyer et sur l’écran apparaîtront en séquence les commandes à mémorisées. Pour compléter la programmation, appuyer pendant au moins 1 seconde sur le volant les touches correspondantes.
CAN-BUS-SYNCHRONISIERUNG D Nachdem das Stromkabel der Vorrichtung angeschlossen worden ist, leuchtet das Led rot auf.
Durch ein Selbst-Lern-Programm wird die Synchronisierung und Wahl des notwendigen Protokolls automatisch vorgenommen. Sobald die Synchronisierung stattgefunden hat, beginnt das Led grün zu blinken und hält so lange an, bis die Marke des zu programmierenden Autoradios eingegeben wird.
AUTORADIO-WAHL: Drücken Sie 11 mal die Lautstärke+ Taste, wird die LED ein rotes Blinken + 2 green durchzuführen, drücken Sie SEEK zu speichern.
RE-SET DER VORRICHTUNG: Vorrichtung weiterhin am Strom angeschlossen halten. Taste PRG drücken, bis das grüne Led erlischt. Das Led wird einige Sekunden lang rot blinken, dann auf Grün umschalten, bis ein anderes Radiomodell gewählt wird.
EINSPEICHERUNG DER GEWÜNSCHTEN LENKRAD-STEUERUNGEN: Wahl der SWC-Funktion (siehe Menü Allgemein-Einstellungen). Drückt man auf die TASTE1 (A), erscheint ein Kasten mit den verschiedenen zur Wahl stehenden Funktionen. Innerhalb des Kastens, Bewegungspfeile verwenden und die gewünschte Funktion jeweils durch Tastendruck bestätigen. Dieser Vorgang muss für jede einzelne Lenkrad-Steuerungsfunktion wiederholt werden. Taste drücken, so dass die Auflistung aller einzuspeichernden Funktionen auf dem Bildschirm erscheint. Programmierung beenden, indem man mindestens 1 Sekunde lang jede einzelne Funktions-Taste auf dem Lenkrad drückt.
SINCRONIZACIÓN PROTOCOLO CAN BUSE Conectando el cable de alimentación del dispositivo ,el Led parpadeará en color rojo. Un programa de auto aprendizaje, ejecutará automáticamente la sincronización y la selección de
la correcta señal. A sincronización acaecida, el Led parpadeara en color verde y continuará a parpadear hasta cuando no se seleccione la marca del autoradio para programar.SELECCIÓN AUTORADIO: Presione 11 veces Volumen+ botón, el LED se lleve 1 flash rojo + 2 green, presione SEEK para almacenar.
RESET DISPOSITIVO: Sin quitar la alimentación del circuito, pulsar la tecla PRG hasta que el Led verde no se apague. El Led parpadeará en color rojo durante unos segundos, después cambiará a verde en espera de la selección del nuevo modelo de radio.
MEMORIZACION MANDOS DE VOLANTE: Seleccionar la función swc (menú ajustes generales). Seleccionando KEY1 (A) aparecerá una ventana donde se tiene que elegir la función, desplazarse con las flechas y confirmar presionándola. Esta operación tiene que ser efectuada con todas las funciones disponibles en el volante.Presionar y en la pantalla aparecerán en secuencia los mandos para memorizar. Para completar la programación presionar durante más de 1 segundo en el volante las teclas correspondientes.
CONNEXIONS ET PROGRAMMATION COMMANDES AU VOLANT CAN-BUS AVEC INTERFACES 4/070-4/073VERKABELUNG u. PROGRAMMIERUNG DER CAN-BUS LENKRAD-STEUERUNGEN AUF INTERFACE 4/070-4/073CONEXIONES Y PROGRAMACIÓN MANDOS DE VOLANTE CAN BUS PARA LOS INTERFACES 4/070-4/073
VM038

S.p.A.-ViaF.lliCervi,167/C•42124ReggioEmilia(Italy)•Tel.++390522941621•Fax++390522942452•www.phonocar.com•e-mail:[email protected]