Embed Size (px)
Citation preview
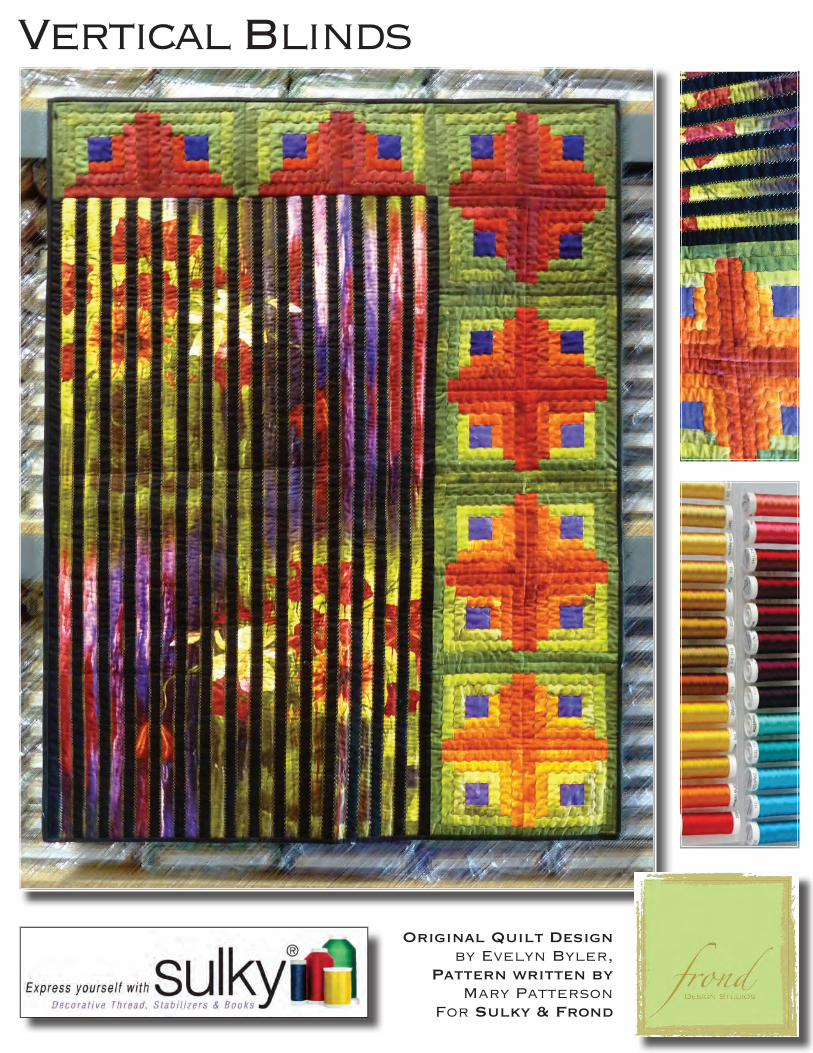
Vertical Blinds
Original Quilt Designby Evelyn Byler,
Pattern written by Mary Patterson
For Sulky & Frond

Page !1
Vertical Blinds Approximately 36” x 48” !
Designed by Evelyn Byler for Sulky of America Read all instructions thoroughly before cutting. All seams are ¼” unless otherwise indicated. WOF is width of fabric. Press all seams as you go. !All fabrics used are from Frond Design Studios collections. !Materials 1 Panel (2/3 yard) Think Outside the Vase focal panel
Plaster of Paris Ink (black) – 1-3/8 yards
!Plaster of Paris fabrics
!!Sulky Soft and Sheer Extra – 24” x 44” (can be pieced) Fusible web – 12” x 44” Backing – 1-1/2 yards !Threads !Sulky 30 wt. Solid Color Cotton in Pea Soup, Cabernet, Royal Purple, and Black Sulky 30 wt. Cotton Blendables in Moss Medley and Sunset !Let’s Get Started Cutting & prep work
1. Stabilize the entire back side of the focal panel with Sulky Soft-n-Sheer Extra. Since you won’t have a piece big enough, butt the edges next to each other or overlap very slightly to cover the entire piece of fabric.
2. Cut a strip of black 12” x length of fabric. Back it with fusible web following the manufacturer’s instructions. Steam a Seam Lite II works well because it can be positioned and moved before permanently fusing, but any fusible can be used. Cut (14) strips ¾” x length of fabric. !!
• Petal 1/8 yard • Fennel 1/8 yard
• Warm 1/8 yard • Stem 1/8 yard
• Terra Cotta 1/8 yard • Garden ¼ yard
• Tuscany 1/8 yard • Reggae ¼ yard
• Nasturtium 1/8 yard • Weeds 1/8 yard
• Garnet 1/8 yard
• Cleome 1/8 yard • Hyacinth 1/8 yard
• Open Rose 1/8 yard • Petunia 1/8 yard

Page !2
3. From the remaining black fabric cut (2) strips 1-1/2” by length of fabric. These will be the right and left sides.
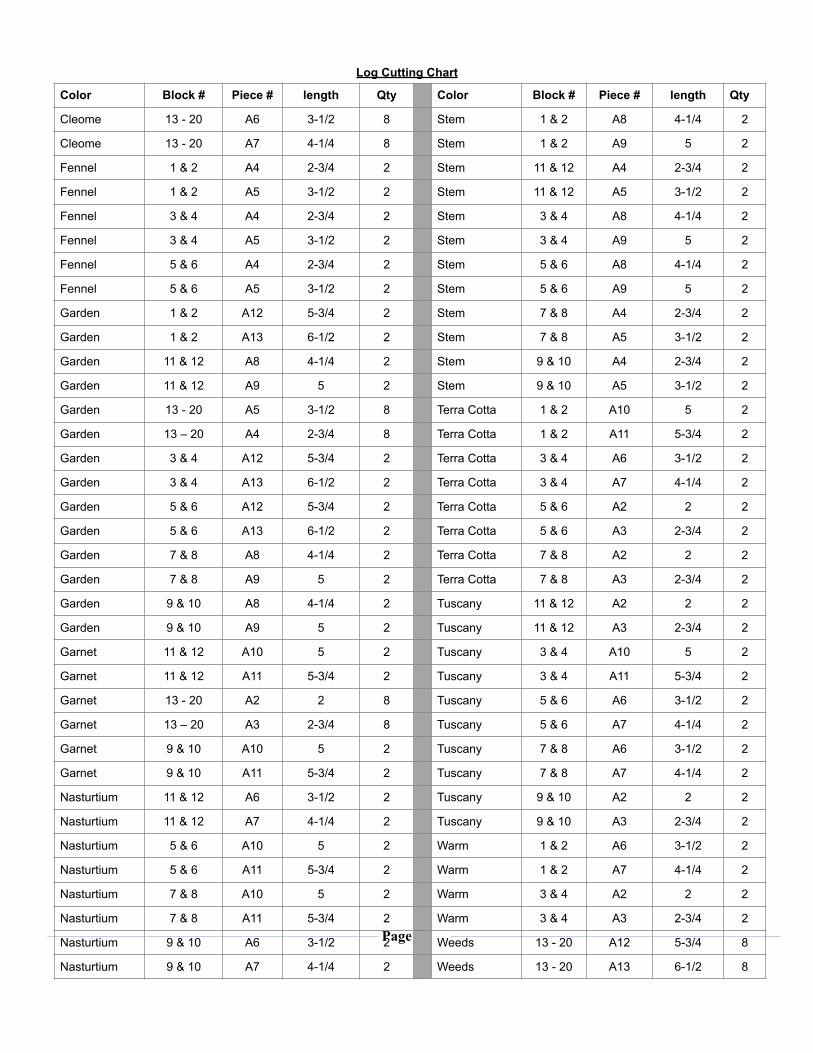
4. From the remaining black fabric cut (5) binding strips 2-1/2” x length of fabric. 5. Referring to the Log Cutting Chart at the end of the pattern, cut the logs for the Log Cabin Blocks.
As you are cutting the logs, place them in 20 different piles numbered 1 through 20. All logs are cut 1-1/4” wide x the length indicated on the chart.
6. Also indicated on the chart are the 2” squares for the center of the log cabin blocks. a. Hyacinth: If there are variegations in the fabric, try cutting the squares in (5) pairs going
from lighter to darker. Place the lightest pair of squares with the block 1 and block 2 log piles, the next lightest with the block 3 and block 4 piles, etc.
b. Petunia: Again, if there are variegations, cut (2) pairs of lighter areas of the fabric and (3) pairs of the darker. Place the lightest pair with the block 11 and 12 piles, and continue as you did in the previous step. !
Make the Log Cabin Blocks 1. Using the diagram below, complete the log cabin blocks. Start with Block 1. Begin by sewing A2 to A1,
press the seam toward A2. Add A3, press toward A3, and continue adding logs and pressing until all (12) logs have been added to the center square. Be attentive to color and placement. Mark the block “block 1”.
# !2. Repeat to complete Block 2. Each pair of blocks will be identical. Mark the block “block 2”. 3. Complete blocks 3 through 20. Number each block as you complete it. Be attentive to color
placement. 4. When you have completed the blocks lay them out on your design wall or the floor as shown. 5. Sew blocks 1 through 16 together. 6. Sew blocks 17 through 20 together.
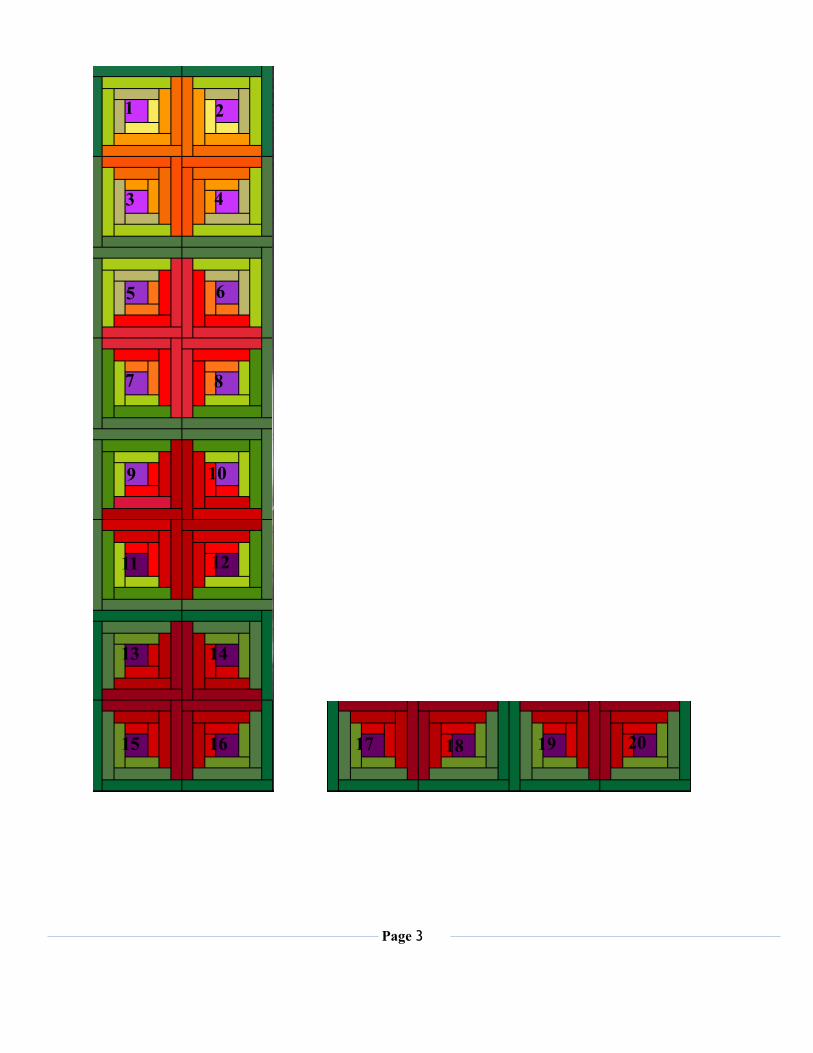
Page !3
# # !!!!!!!!!
1
16
2
13 14
15
1211
109
87
65
43
17 18 19 20
Page !4
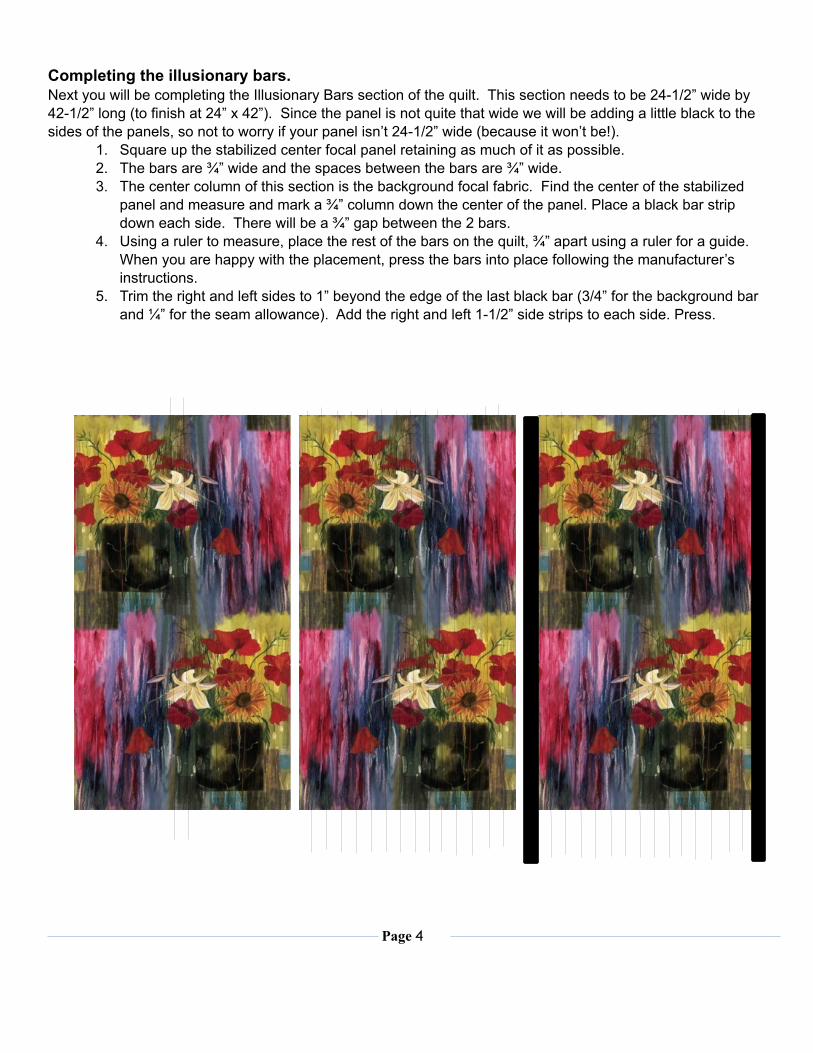
Completing the illusionary bars. Next you will be completing the Illusionary Bars section of the quilt. This section needs to be 24-1/2” wide by 42-1/2” long (to finish at 24” x 42”). Since the panel is not quite that wide we will be adding a little black to the sides of the panels, so not to worry if your panel isn’t 24-1/2” wide (because it won’t be!).
1. Square up the stabilized center focal panel retaining as much of it as possible. 2. The bars are ¾” wide and the spaces between the bars are ¾” wide. 3. The center column of this section is the background focal fabric. Find the center of the stabilized
panel and measure and mark a ¾” column down the center of the panel. Place a black bar strip down each side. There will be a ¾” gap between the 2 bars.
4. Using a ruler to measure, place the rest of the bars on the quilt, ¾” apart using a ruler for a guide. When you are happy with the placement, press the bars into place following the manufacturer’s instructions.
5. Trim the right and left sides to 1” beyond the edge of the last black bar (3/4” for the background bar and ¼” for the seam allowance). Add the right and left 1-1/2” side strips to each side. Press. !
!
! ! ! !!! !!!!!
Page !5
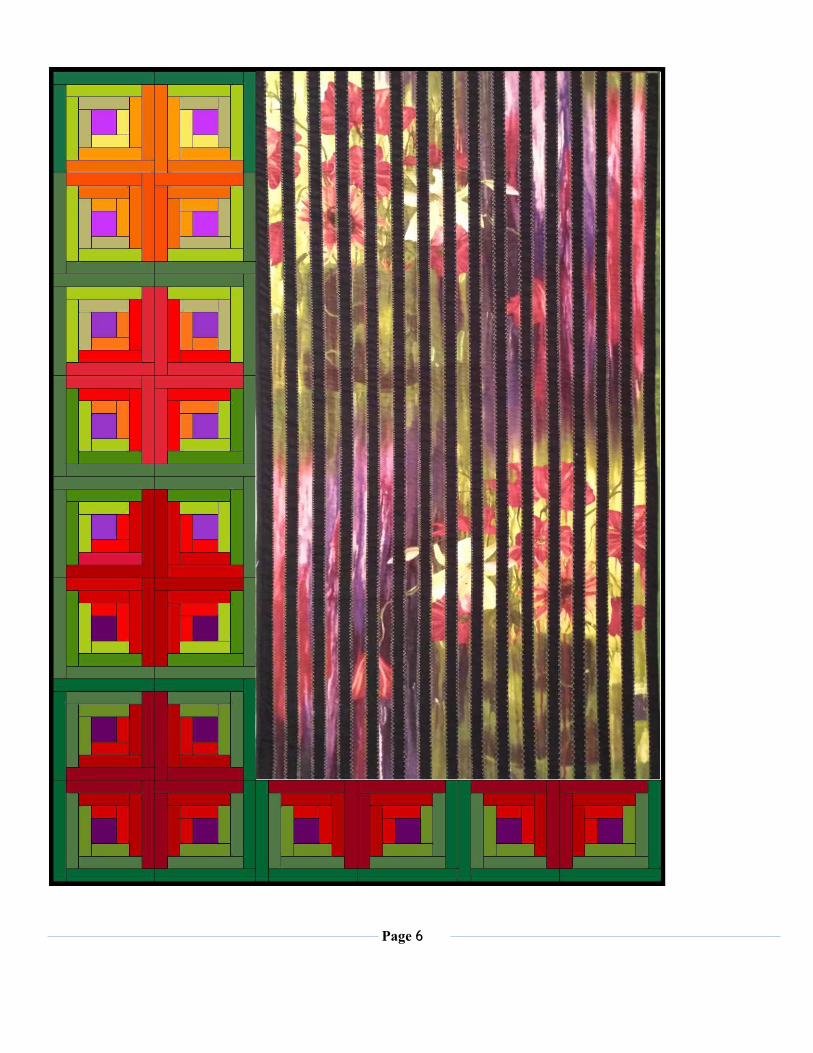
6. Trim the completed section to 24-1/2” x 42-1/2”, making sure to center the middle background column. !
Put It Together 1. Sew the bottom log cabin block section to the panel section. 2. Sew the left log cabin block section to the panel section. 3. Using Sulky Invisible Thread, stitch in the ditch along the vertical seam line between the panel and
row of blocks. Continue stitching in the ditch, longest seam lines first, until all are stitched. This step keeps elements of the design from shifting and design lines straight. !
Almost Done… 1. Layer the quilt top, batting & backing.
2. Quilt as desired or:
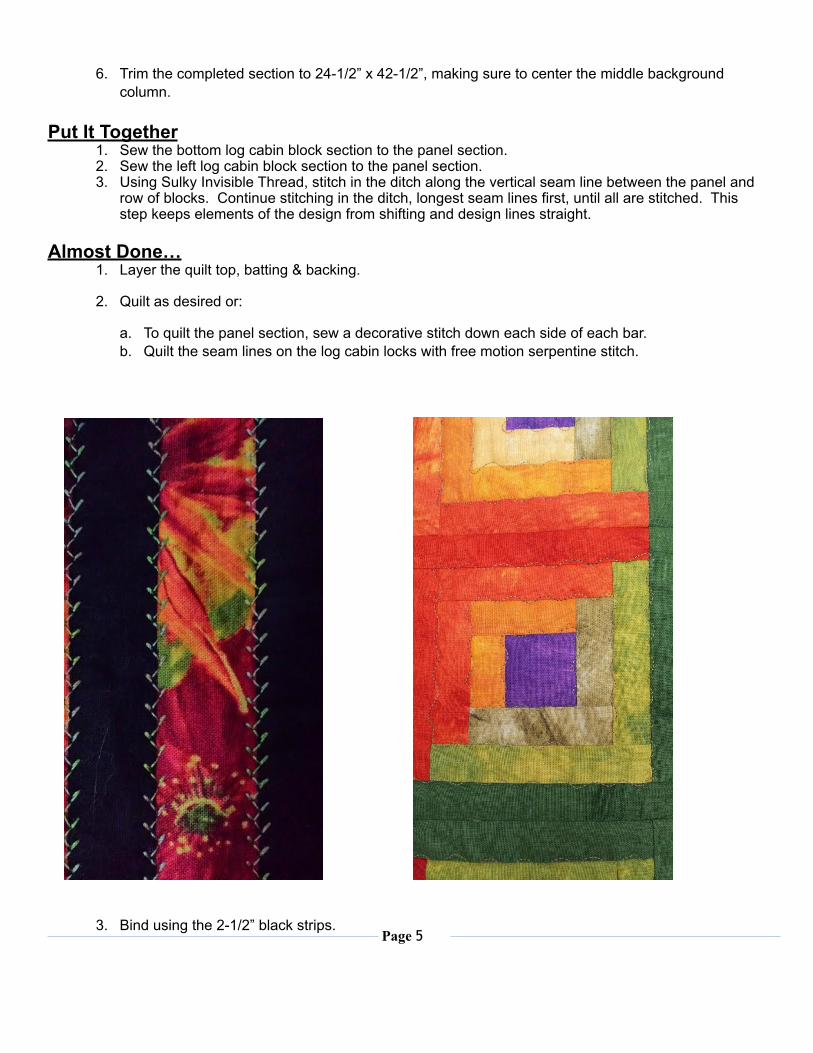
a. To quilt the panel section, sew a decorative stitch down each side of each bar. b. Quilt the seam lines on the log cabin locks with free motion serpentine stitch. !
# # !3. Bind using the 2-1/2” black strips.
!
Page !6
!
!!!!!
Page !7
Log Cutting Chart
Color Block # Piece # length Qty Color Block # Piece # length Qty
Cleome 13 - 20 A6 3-1/2 8 Stem 1 & 2 A8 4-1/4 2
Cleome 13 - 20 A7 4-1/4 8 Stem 1 & 2 A9 5 2
Fennel 1 & 2 A4 2-3/4 2 Stem 11 & 12 A4 2-3/4 2
Fennel 1 & 2 A5 3-1/2 2 Stem 11 & 12 A5 3-1/2 2
Fennel 3 & 4 A4 2-3/4 2 Stem 3 & 4 A8 4-1/4 2
Fennel 3 & 4 A5 3-1/2 2 Stem 3 & 4 A9 5 2
Fennel 5 & 6 A4 2-3/4 2 Stem 5 & 6 A8 4-1/4 2
Fennel 5 & 6 A5 3-1/2 2 Stem 5 & 6 A9 5 2
Garden 1 & 2 A12 5-3/4 2 Stem 7 & 8 A4 2-3/4 2
Garden 1 & 2 A13 6-1/2 2 Stem 7 & 8 A5 3-1/2 2
Garden 11 & 12 A8 4-1/4 2 Stem 9 & 10 A4 2-3/4 2
Garden 11 & 12 A9 5 2 Stem 9 & 10 A5 3-1/2 2
Garden 13 - 20 A5 3-1/2 8 Terra Cotta 1 & 2 A10 5 2
Garden 13 – 20 A4 2-3/4 8 Terra Cotta 1 & 2 A11 5-3/4 2
Garden 3 & 4 A12 5-3/4 2 Terra Cotta 3 & 4 A6 3-1/2 2
Garden 3 & 4 A13 6-1/2 2 Terra Cotta 3 & 4 A7 4-1/4 2
Garden 5 & 6 A12 5-3/4 2 Terra Cotta 5 & 6 A2 2 2
Garden 5 & 6 A13 6-1/2 2 Terra Cotta 5 & 6 A3 2-3/4 2
Garden 7 & 8 A8 4-1/4 2 Terra Cotta 7 & 8 A2 2 2
Garden 7 & 8 A9 5 2 Terra Cotta 7 & 8 A3 2-3/4 2
Garden 9 & 10 A8 4-1/4 2 Tuscany 11 & 12 A2 2 2
Garden 9 & 10 A9 5 2 Tuscany 11 & 12 A3 2-3/4 2
Garnet 11 & 12 A10 5 2 Tuscany 3 & 4 A10 5 2
Garnet 11 & 12 A11 5-3/4 2 Tuscany 3 & 4 A11 5-3/4 2
Garnet 13 - 20 A2 2 8 Tuscany 5 & 6 A6 3-1/2 2
Garnet 13 – 20 A3 2-3/4 8 Tuscany 5 & 6 A7 4-1/4 2
Garnet 9 & 10 A10 5 2 Tuscany 7 & 8 A6 3-1/2 2
Garnet 9 & 10 A11 5-3/4 2 Tuscany 7 & 8 A7 4-1/4 2
Nasturtium 11 & 12 A6 3-1/2 2 Tuscany 9 & 10 A2 2 2
Nasturtium 11 & 12 A7 4-1/4 2 Tuscany 9 & 10 A3 2-3/4 2
Nasturtium 5 & 6 A10 5 2 Warm 1 & 2 A6 3-1/2 2
Nasturtium 5 & 6 A11 5-3/4 2 Warm 1 & 2 A7 4-1/4 2
Nasturtium 7 & 8 A10 5 2 Warm 3 & 4 A2 2 2
Nasturtium 7 & 8 A11 5-3/4 2 Warm 3 & 4 A3 2-3/4 2
Nasturtium 9 & 10 A6 3-1/2 2 Weeds 13 - 20 A12 5-3/4 8
Nasturtium 9 & 10 A7 4-1/4 2 Weeds 13 - 20 A13 6-1/2 8
Page !8
!! !
! ! ! ! !!
! ! ! ! !!!
! !
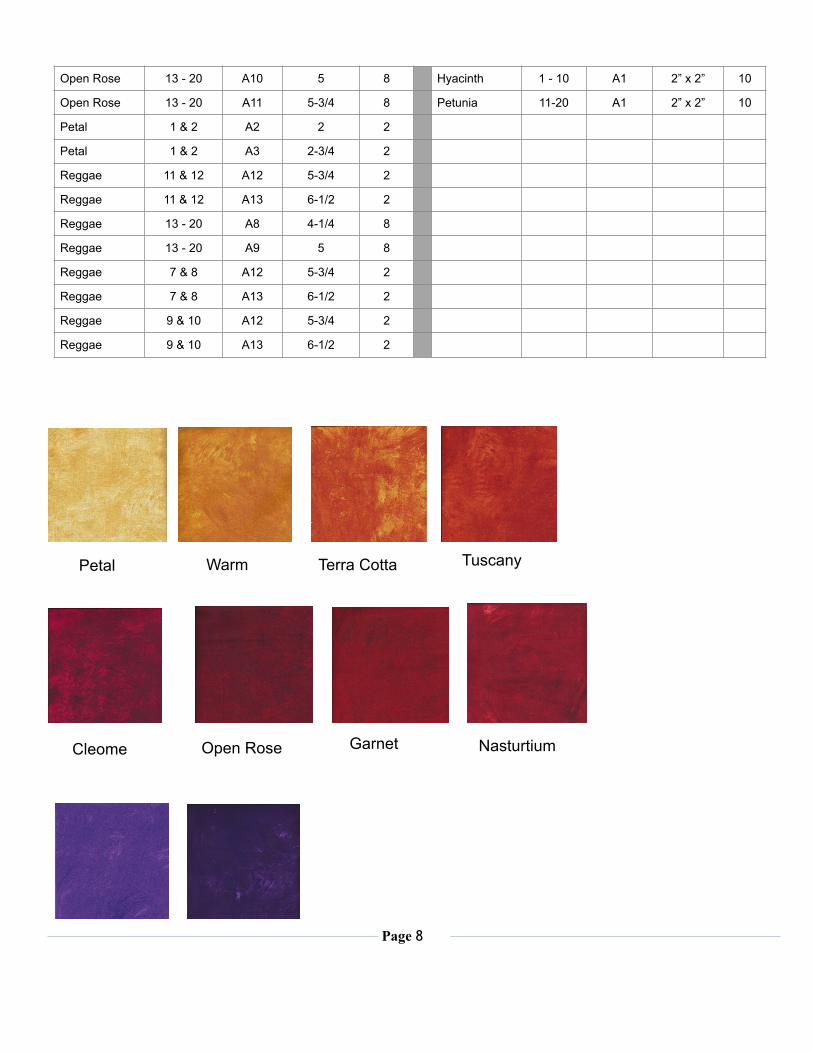
Open Rose 13 - 20 A10 5 8 Hyacinth 1 - 10 A1 2” x 2” 10
Open Rose 13 - 20 A11 5-3/4 8 Petunia 11-20 A1 2” x 2” 10
Petal 1 & 2 A2 2 2
Petal 1 & 2 A3 2-3/4 2
Reggae 11 & 12 A12 5-3/4 2
Reggae 11 & 12 A13 6-1/2 2
Reggae 13 - 20 A8 4-1/4 8
Reggae 13 - 20 A9 5 8
Reggae 7 & 8 A12 5-3/4 2
Reggae 7 & 8 A13 6-1/2 2
Reggae 9 & 10 A12 5-3/4 2
Reggae 9 & 10 A13 6-1/2 2
Petal Warm
NasturtiumCleome
Tuscany
Open Rose Garnet
Terra Cotta

Page !9
!
! ! ! ! !
StemFennelReggaeWeedsGarden
PetuniaHyacinth