Embed Size (px)
Citation preview

| Vertical Blinds1
GETTING STARTED
VERTICAL BLINDS
OPTIONAL HARDWARE
Plastic Corner Aluminum CornerCorner End Cap
Corner Pieces Valance Corner(Closed)
For Vinyl Blinds
valence Return
FabricVane Weight
Outside Mount Valance Clip Fabric Vane Chain
A few simple tools are required:
Included in your order is all the hardware necessary for a normal installation. Depending on the mounting surface, fasteners other than the screws provided may be required. Wall board and plaster require the use of anchors such as expansion or toggle bolts. Bricks, tile and stone need special plugs and drill bits. Wood should always be pre-drilled to avoid splitting.
Professional installation is also available in most areas, call 800-800-3329.
Steel Tape Measure
Power Drill and Drill Bits
Awl (or tool for starting a screw hole)
Level (for outside mount)
Pencil
Flathead & PhillipsScrewdriver
STANDARD HARDWARE
Screws Inside Mount Headrail Clip
Spacers
Bolt and Nut L-Bracket Tension BracketWith Screws
| Vertical Blinds2
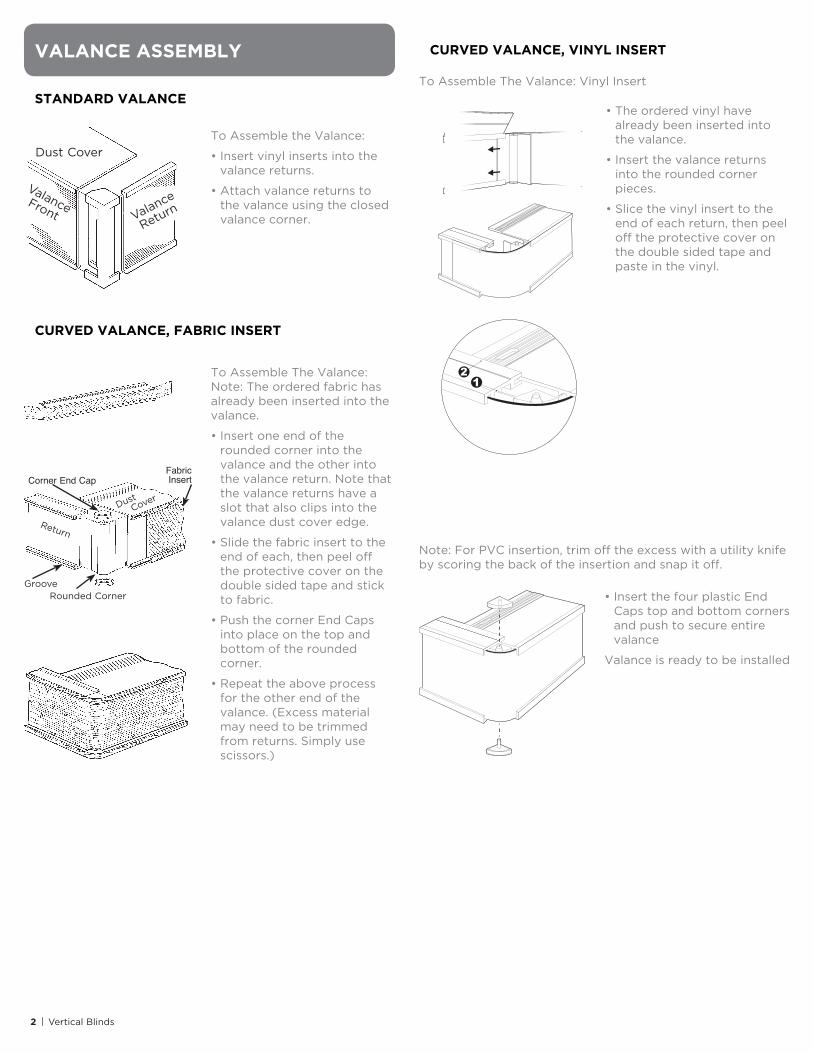
To Assemble the Valance:
• Insert vinyl inserts into the valance returns.
• Attach valance returns to the valance using the closed valance corner.
Dust Cover
ValanceFront Valance
Return
VALANCE ASSEMBLY
To Assemble The Valance: Note: The ordered fabric has already been inserted into the valance.
• Insert one end of the rounded corner into the valance and the other into the valance return. Note that the valance returns have a slot that also clips into the valance dust cover edge.
• Slide the fabric insert to the end of each, then peel off the protective cover on the double sided tape and stick to fabric.
• Push the corner End Caps into place on the top and bottom of the rounded corner.
• Repeat the above process for the other end of the valance. (Excess material may need to be trimmed from returns. Simply use scissors.)
STANDARD VALANCE
CURVED VALANCE, FABRIC INSERT
Dust
Cover
Return
Fabric InsertCorner End Cap
Rounded CornerGroove
• The ordered vinyl have already been inserted into the valance.
• Insert the valance returns into the rounded corner pieces.
• Slice the vinyl insert to the end of each return, then peel off the protective cover on the double sided tape and paste in the vinyl.
• Insert the four plastic End Caps top and bottom corners and push to secure entire valance
Valance is ready to be installed
CURVED VALANCE, VINYL INSERT
To Assemble The Valance: Vinyl Insert
Note: For PVC insertion, trim off the excess with a utility knife by scoring the back of the insertion and snap it off.
| Vertical Blinds3
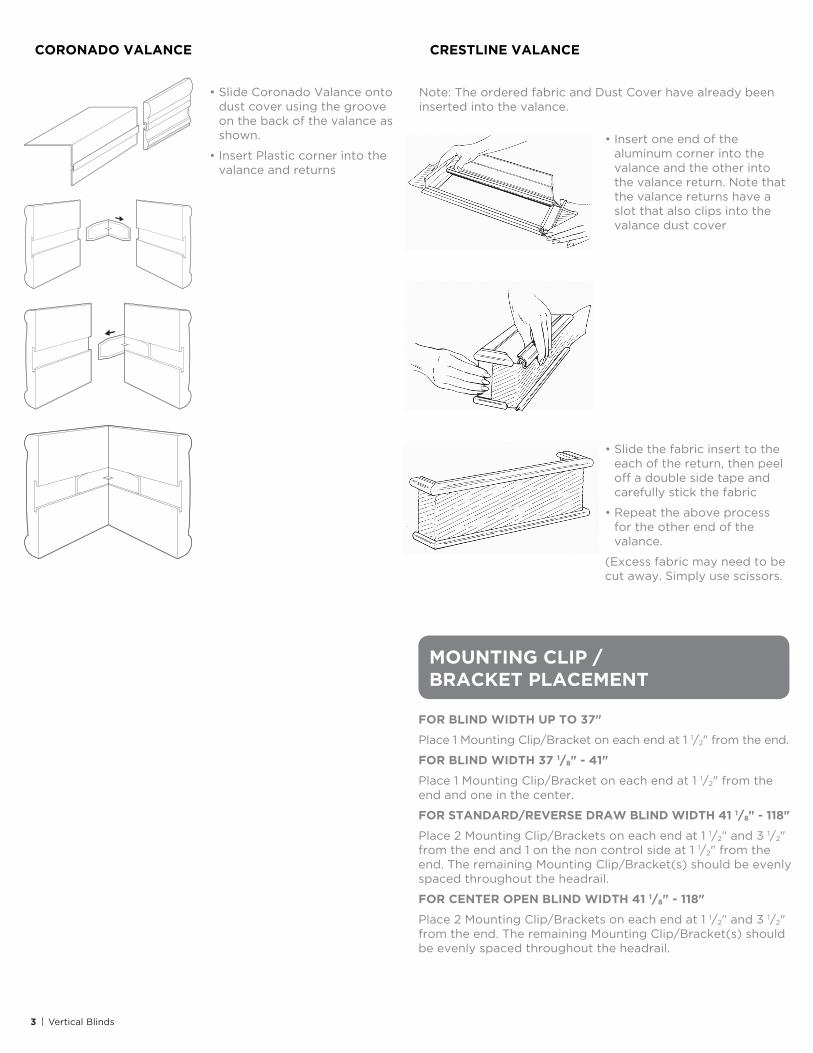
• Slide Coronado Valance onto dust cover using the groove on the back of the valance as shown.
• Insert Plastic corner into the valance and returns
CORONADO VALANCE CRESTLINE VALANCE
• Insert one end of the aluminum corner into the valance and the other into the valance return. Note that the valance returns have a slot that also clips into the valance dust cover
• Slide the fabric insert to the each of the return, then peel off a double side tape and carefully stick the fabric
• Repeat the above process for the other end of the valance.
(Excess fabric may need to be cut away. Simply use scissors.
Note: The ordered fabric and Dust Cover have already been inserted into the valance.
MOUNTING CLIP / BRACKET PLACEMENT
FOR BLIND WIDTH UP TO 37"
Place 1 Mounting Clip/Bracket on each end at 1 1/2" from the end.
FOR BLIND WIDTH 37 1/8" - 41"
Place 1 Mounting Clip/Bracket on each end at 1 1/2" from the end and one in the center.
FOR STANDARD/REVERSE DRAW BLIND WIDTH 41 1/8" - 118"
Place 2 Mounting Clip/Brackets on each end at 1 1/2" and 3 1/2" from the end and 1 on the non control side at 1 1/2" from the end. The remaining Mounting Clip/Bracket(s) should be evenly spaced throughout the headrail.
FOR CENTER OPEN BLIND WIDTH 41 1/8" - 118"
Place 2 Mounting Clip/Brackets on each end at 1 1/2" and 3 1/2" from the end. The remaining Mounting Clip/Bracket(s) should be evenly spaced throughout the headrail.
| Vertical Blinds4
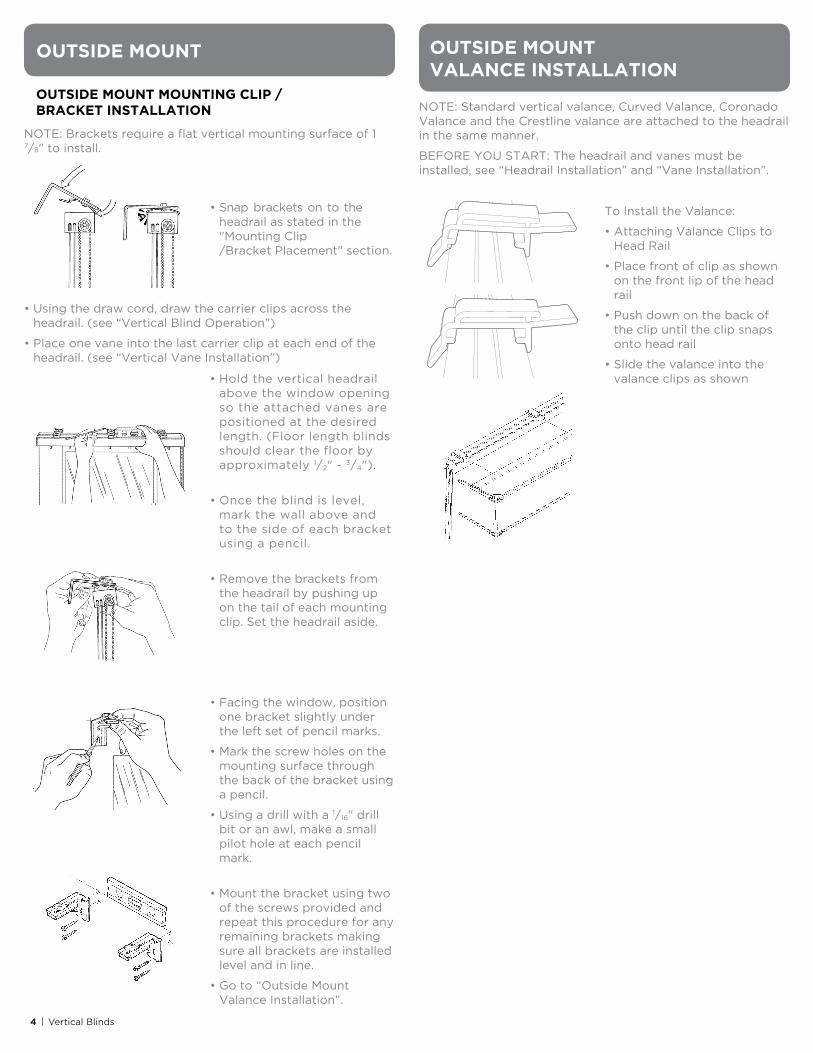
• Using the draw cord, draw the carrier clips across the headrail. (see “Vertical Blind Operation”)
• Place one vane into the last carrier clip at each end of the headrail. (see “Vertical Vane Installation”)
• Hold the vertical headrail above the window opening so the attached vanes are positioned at the desired length. (Floor length blinds should clear the floor by approximately 1/2" - 3/4").
• Once the blind is level, mark the wall above and to the side of each bracket using a pencil.
• Remove the brackets from the headrail by pushing up on the tail of each mounting clip. Set the headrail aside.
• Facing the window, position one bracket slightly under the left set of pencil marks.
• Mark the screw holes on the mounting surface through the back of the bracket using a pencil.
• Using a drill with a 1/16" drill bit or an awl, make a small pilot hole at each pencil mark.
• Mount the bracket using two of the screws provided and repeat this procedure for any remaining brackets making sure all brackets are installed level and in line.
• Go to “Outside Mount Valance Installation”.
OUTSIDE MOUNT MOUNTING CLIP /BRACKET INSTALLATION
OUTSIDE MOUNT
• Snap brackets on to the headrail as stated in the "Mounting Clip /Bracket Placement" section.
NOTE: Brackets require a flat vertical mounting surface of 1 7/8" to install.
To Install the Valance:
• Attaching Valance Clips to Head Rail
• Place front of clip as shown on the front lip of the head rail
• Push down on the back of the clip until the clip snaps onto head rail
• Slide the valance into the valance clips as shown
OUTSIDE MOUNT VALANCE INSTALLATION
NOTE: Standard vertical valance, Curved Valance, Coronado Valance and the Crestline valance are attached to the headrail in the same manner.
BEFORE YOU START: The headrail and vanes must be installed, see “Headrail Installation” and “Vane Installation”.

| Vertical Blinds5
Valance Front
To install the Mounting Clips:
• Mounting clips must be positioned flat against the top of the window casing with the “tail” of the mounting clip positioned closest to the window.
• Mark the casing with a pencil.
• Using a drill and a 1/16" drill bit or an awl, make a small pilot hole at each pencil mark.
• Install the mounting clip using the screw provided.
• Repeat this procedure for the opposite end of the window.
• Install any additional mounting clips provided, making sure that all screw holes are marked 1" from the front edge of the window casing.
INSIDE MOUNT
INSIDE MOUNT WITHOUT A VALANCE BRACKET INSTALLATION
BEFORE YOU START: A minimum window depth of 2 7/8" is required in order for the blind to operate properly. Be sure to check for any obstructions, such as window cranks or door handles that may add to this minimum depth.
INSIDE MOUNT WITH A VALANCE BRACKET INSTALLATION
BEFORE YOU START: A minimum depth of 2 7/8” is required in order for the blind to operate properly. Be sure to check for any obstructions such as window cranks or locks that may add to the minimum depth.
NOTE: Before installing the blind, the valance must be pre-assembled.
To Install the Mounting Clips
and Valance:
• For proper installation, the valance must be positioned BETWEEN the mounting clips and the window casing.
• Using a pencil, mark the top of the valance.
• Repeat this process for the opposite end of the valance.
• Mark the remaining screw holes on the valance.
• Using a drill and a 1/8" drill bit, drill holes through the valance at the pencil marks.
• Hold the valance up inside of the window casing making sure that the valance returns butt up against the wall on either side of the window opening and that the dust cover is flat against the top of the window casing.
• Using a pencil, mark the window casing through the holes in the top of the valance.
• Set the valance aside.
• Using a drill with a 1/16" drill bit or an awl, make a small pilot hole at each pencil mark.
• Position the valance over the screw holes in the window casing and mount the left mounting clip using the screw provided. Make sure that the mounting clip is positioned straight and in line with the “tail” closest to the window.
• Repeat this procedure for any additional mounting clips.

| Vertical Blinds6
HEADRAIL INSTALLATION
To Install the Headrail:
• Position the headrail so the blind controls are on the desired side of the window.
• Hook the front edge of the headrail into the front of the mounting clips (closest to you).
• Using a firm rolling motion while pressing up slightly on the tail of the mounting clips, rotate the headrail up and back until it snaps into the mounting clips.
BEFORE YOU START: If you ordered a valance, follow the instructions for an “Inside Mount with a Valance” Make sure that all holes drilled in the valance and ceiling are done so with a drill bit sized to the fasteners purchased.
NOTE: Most ceiling mounts require special fasteners, available at your local hardware store.
1 1/2"
CEILING MOUNT
• Snap the mounting clips onto the headrail.
• Additional mounting clips should be spaced accordingly.
• Using the draw cord, traverse the carrier clips across the headrail.
• Hold the vertical headrail up to the ceiling at the desired mounting position, making sure that the back edge of the headrail is positioned at least 1 1/2" from the wall or any obstruction.
• Using a pencil, mark the front of the mounting clips on the ceiling surface.
• Remove the mounting clips from the headrail by pushing up on the tail of each mounting clip. Set the blind aside.
• Facing the window, align the front of one mounting clip with the left pencil mark on the ceiling and mark the screw hole.
• Using a drill with a drill bit sized to the fasteners purchased, drill a hole at each pencil mark.
• Mount the bracket using the fasteners purchased.
• Repeat this procedure for any remaining brackets making sure that all brackets are installed straight and in line.
NOTE: If you purchased a valance for an outside mount blind, attach the valance clips to the headrail prior to installing the headrail. Valance clips must be spaced evenly across the width of the headrail to support the weight of the valance. Make sure that the valance clips do not interfere with the mounting brackets.
To Remove the Headrail:
• Push up on the tail of each mounting clip to release the headrail from the brackets.
| Vertical Blinds7
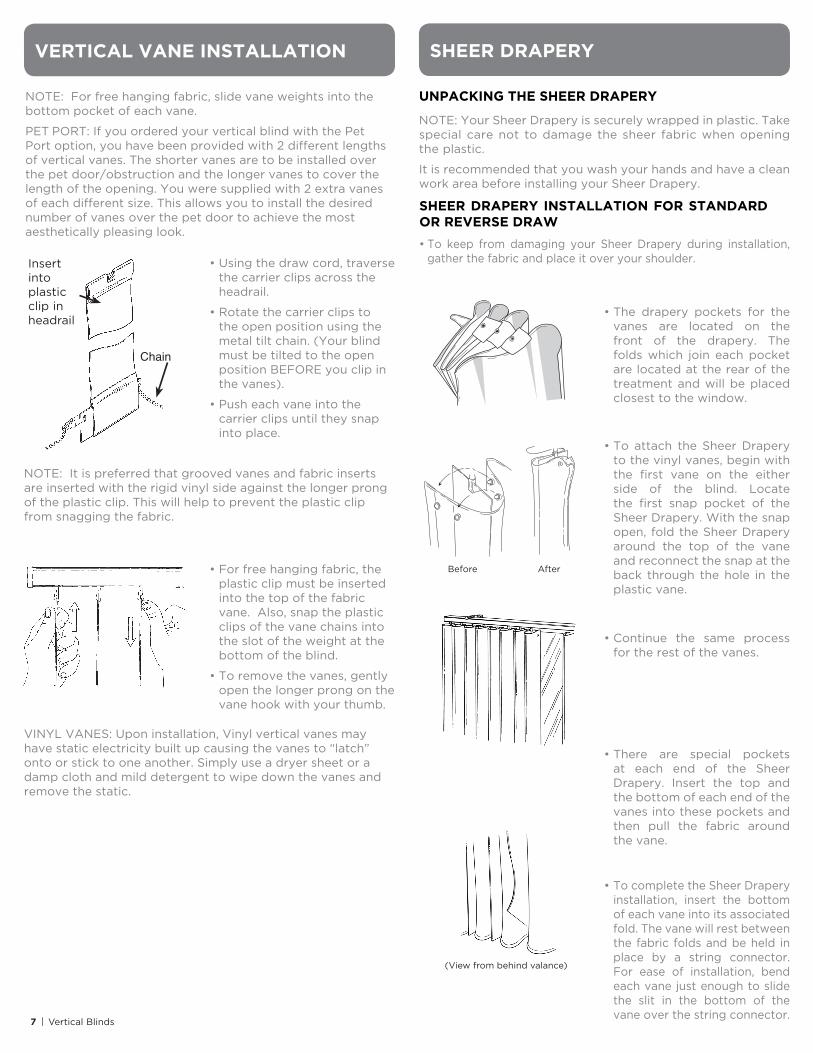
NOTE: For free hanging fabric, slide vane weights into the bottom pocket of each vane.
PET PORT: If you ordered your vertical blind with the Pet Port option, you have been provided with 2 different lengths of vertical vanes. The shorter vanes are to be installed over the pet door/obstruction and the longer vanes to cover the length of the opening. You were supplied with 2 extra vanes of each different size. This allows you to install the desired number of vanes over the pet door to achieve the most aesthetically pleasing look.
Insert into plastic clip in headrail
Chain
VERTICAL VANE INSTALLATION
• Using the draw cord, traverse the carrier clips across the headrail.
• Rotate the carrier clips to the open position using the metal tilt chain. (Your blind must be tilted to the open position BEFORE you clip in the vanes).
• Push each vane into the carrier clips until they snap into place.
NOTE: It is preferred that grooved vanes and fabric inserts are inserted with the rigid vinyl side against the longer prong of the plastic clip. This will help to prevent the plastic clip from snagging the fabric.
• For free hanging fabric, the plastic clip must be inserted into the top of the fabric vane. Also, snap the plastic clips of the vane chains into the slot of the weight at the bottom of the blind.
• To remove the vanes, gently open the longer prong on the vane hook with your thumb.
VINYL VANES: Upon installation, Vinyl vertical vanes may have static electricity built up causing the vanes to “latch” onto or stick to one another. Simply use a dryer sheet or a damp cloth and mild detergent to wipe down the vanes and remove the static.
(View from behind valance)
• The drapery pockets for the vanes are located on the front of the drapery. The folds which join each pocket are located at the rear of the treatment and will be placed closest to the window.
• To attach the Sheer Drapery to the vinyl vanes, begin with the first vane on the either side of the blind. Locate the first snap pocket of the Sheer Drapery. With the snap open, fold the Sheer Drapery around the top of the vane and reconnect the snap at the back through the hole in the plastic vane.
• Continue the same process for the rest of the vanes.
• There are special pockets at each end of the Sheer Drapery. Insert the top and the bottom of each end of the vanes into these pockets and then pull the fabric around the vane.
• To complete the Sheer Drapery installation, insert the bottom of each vane into its associated fold. The vane will rest between the fabric folds and be held in place by a string connector. For ease of installation, bend each vane just enough to slide the slit in the bottom of the vane over the string connector.
• To keep from damaging your Sheer Drapery during installation, gather the fabric and place it over your shoulder.
SHEER DRAPERY
SHEER DRAPERY INSTALLATION FOR STANDARD OR REVERSE DRAW
UNPACKING THE SHEER DRAPERY
NOTE: Your Sheer Drapery is securely wrapped in plastic. Take special care not to damage the sheer fabric when opening the plastic.
It is recommended that you wash your hands and have a clean work area before installing your Sheer Drapery.
Before After
| Vertical Blinds8
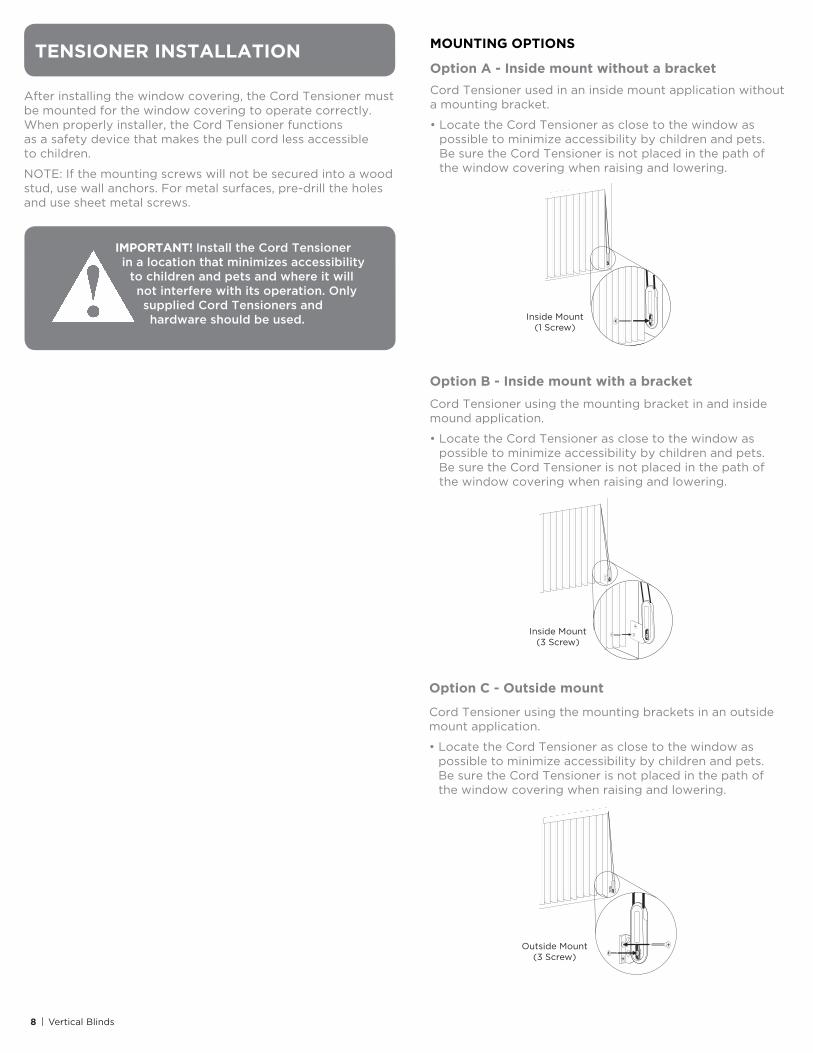
Cord Tensioner used in an inside mount application without a mounting bracket.
• Locate the Cord Tensioner as close to the window as possible to minimize accessibility by children and pets. Be sure the Cord Tensioner is not placed in the path of the window covering when raising and lowering.
Inside Mount(1 Screw)
Cord Tensioner using the mounting bracket in and inside mound application.
• Locate the Cord Tensioner as close to the window as possible to minimize accessibility by children and pets. Be sure the Cord Tensioner is not placed in the path of the window covering when raising and lowering.
Option B - Inside mount with a bracket
Inside Mount(3 Screw)
MOUNTING OPTIONS
Option A - Inside mount without a bracket
Cord Tensioner using the mounting brackets in an outside mount application.
• Locate the Cord Tensioner as close to the window as possible to minimize accessibility by children and pets. Be sure the Cord Tensioner is not placed in the path of the window covering when raising and lowering.
Option C - Outside mount
Outside Mount(3 Screw)
IMPORTANT! Install the Cord Tensioner in a location that minimizes accessibility
to children and pets and where it will not interfere with its operation. Only supplied Cord Tensioners and hardware should be used.
TENSIONER INSTALLATION
After installing the window covering, the Cord Tensioner must be mounted for the window covering to operate correctly. When properly installer, the Cord Tensioner functions as a safety device that makes the pull cord less accessible to children.
NOTE: If the mounting screws will not be secured into a wood stud, use wall anchors. For metal surfaces, pre-drill the holes and use sheet metal screws.
| Vertical Blinds9
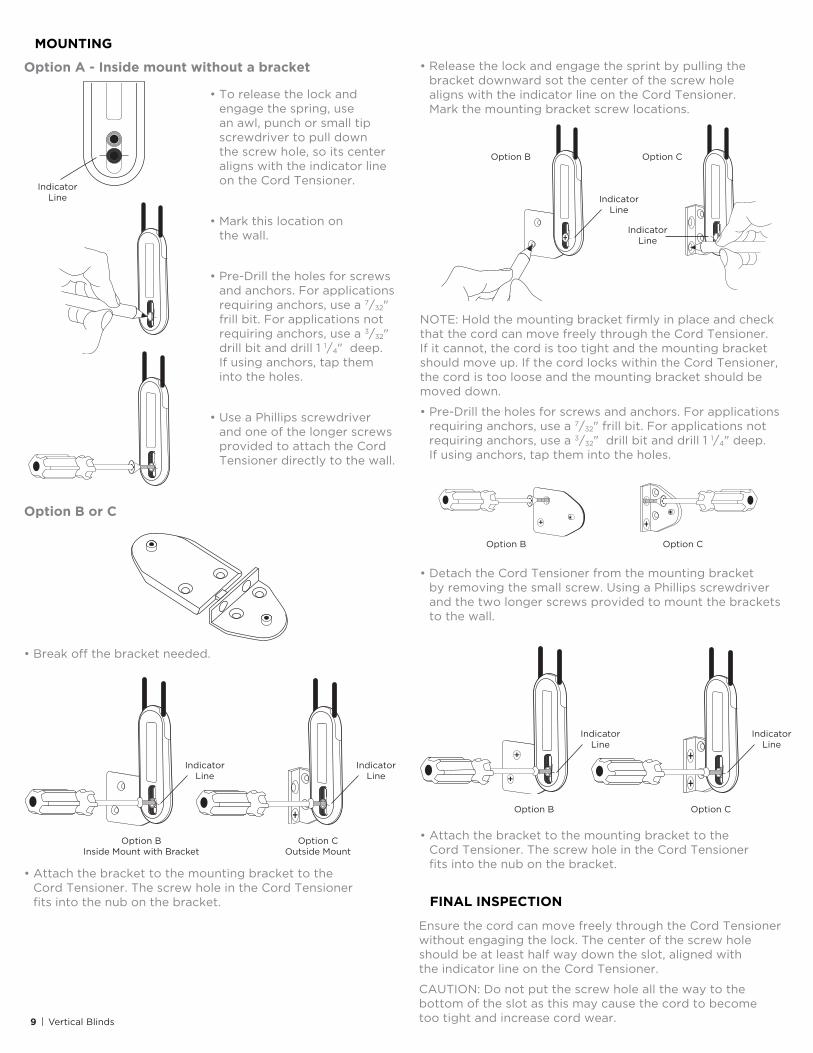
• To release the lock and engage the spring, use an awl, punch or small tip screwdriver to pull down the screw hole, so its center aligns with the indicator line on the Cord Tensioner.
• Mark this location on the wall.
• Pre-Drill the holes for screws and anchors. For applications requiring anchors, use a 7/32" frill bit. For applications not requiring anchors, use a 3/32" drill bit and drill 1 1/4" deep. If using anchors, tap them into the holes.
• Use a Phillips screwdriver and one of the longer screws provided to attach the Cord Tensioner directly to the wall.
• Attach the bracket to the mounting bracket to the Cord Tensioner. The screw hole in the Cord Tensioner fits into the nub on the bracket.
• Attach the bracket to the mounting bracket to the Cord Tensioner. The screw hole in the Cord Tensioner fits into the nub on the bracket.
• Break off the bracket needed.
• Release the lock and engage the sprint by pulling the bracket downward sot the center of the screw hole aligns with the indicator line on the Cord Tensioner. Mark the mounting bracket screw locations.
Option B or C
IndicatorLine
IndicatorLine
IndicatorLine
IndicatorLine
IndicatorLine
IndicatorLine
IndicatorLine
NOTE: Hold the mounting bracket firmly in place and check that the cord can move freely through the Cord Tensioner. If it cannot, the cord is too tight and the mounting bracket should move up. If the cord locks within the Cord Tensioner, the cord is too loose and the mounting bracket should be moved down.
• Pre-Drill the holes for screws and anchors. For applications requiring anchors, use a 7/32" frill bit. For applications not requiring anchors, use a 3/32" drill bit and drill 1 1/4" deep. If using anchors, tap them into the holes.
• Detach the Cord Tensioner from the mounting bracket by removing the small screw. Using a Phillips screwdriver and the two longer screws provided to mount the brackets to the wall.
Ensure the cord can move freely through the Cord Tensioner without engaging the lock. The center of the screw hole should be at least half way down the slot, aligned with the indicator line on the Cord Tensioner.
CAUTION: Do not put the screw hole all the way to the bottom of the slot as this may cause the cord to become too tight and increase cord wear.
MOUNTING
FINAL INSPECTION
Option A - Inside mount without a bracket
Option BInside Mount with Bracket
Option B
Option B
Option B
Option COutside Mount
Option C
Option C
Option C
| Vertical Blinds10
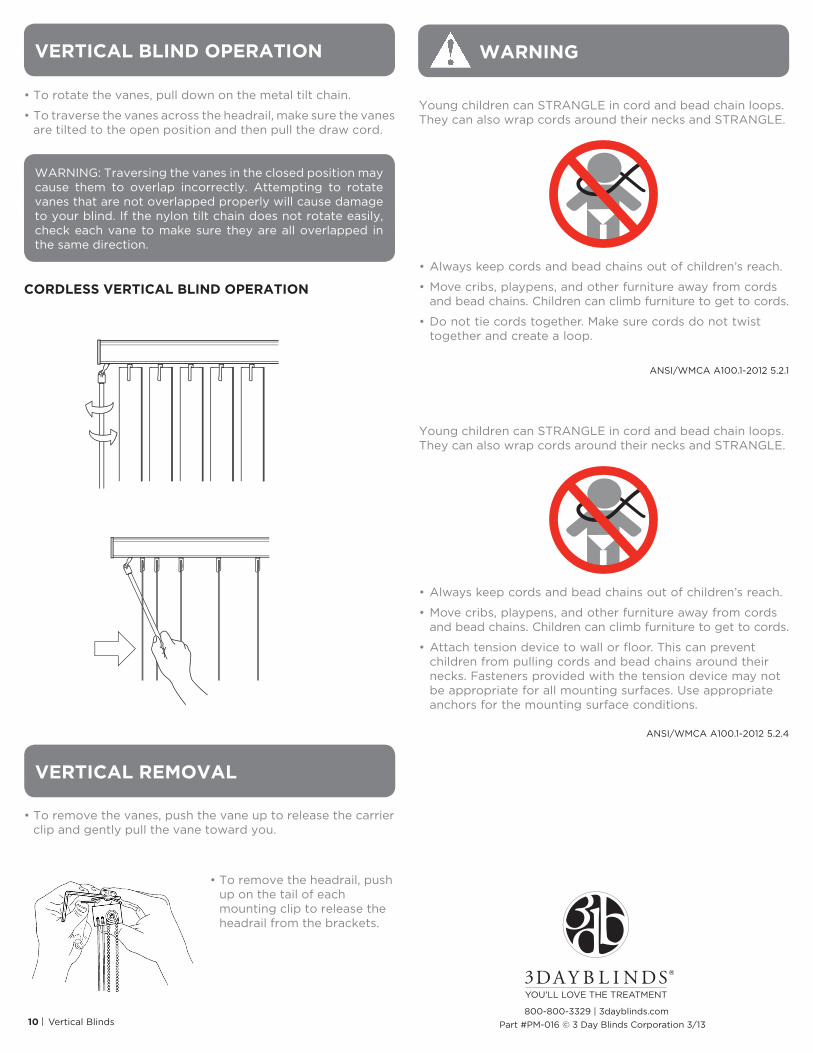
• To rotate the vanes, pull down on the metal tilt chain.
• To traverse the vanes across the headrail, make sure the vanes are tilted to the open position and then pull the draw cord.
WARNING: Traversing the vanes in the closed position may cause them to overlap incorrectly. Attempting to rotate vanes that are not overlapped properly will cause damage to your blind. If the nylon tilt chain does not rotate easily, check each vane to make sure they are all overlapped in the same direction.
VERTICAL BLIND OPERATION
• To remove the headrail, push up on the tail of each mounting clip to release the headrail from the brackets.
• To remove the vanes, push the vane up to release the carrier clip and gently pull the vane toward you.
VERTICAL REMOVAL
CORDLESS VERTICAL BLIND OPERATION
Part #PM-016 © 3 Day Blinds Corporation 3/13
WARNING
Young children can STRANGLE in cord and bead chain loops. They can also wrap cords around their necks and STRANGLE.
• Always keep cords and bead chains out of children’s reach.
• Move cribs, playpens, and other furniture away from cords and bead chains. Children can climb furniture to get to cords.
• Do not tie cords together. Make sure cords do not twist together and create a loop.
ANSI/WMCA A100.1-2012 5.2.1
Young children can STRANGLE in cord and bead chain loops. They can also wrap cords around their necks and STRANGLE.
• Always keep cords and bead chains out of children’s reach.
• Move cribs, playpens, and other furniture away from cords and bead chains. Children can climb furniture to get to cords.
• Attach tension device to wall or floor. This can prevent children from pulling cords and bead chains around their necks. Fasteners provided with the tension device may not be appropriate for all mounting surfaces. Use appropriate anchors for the mounting surface conditions.
ANSI/WMCA A100.1-2012 5.2.4
800-800-3329 | 3dayblinds.com