Embed Size (px)
DESCRIPTION
Digital Slr Photography
Citation preview

SPECIAL ADVICE FOR D70 & 350D
USERS
GEAR ADVICE: RECOMMENDED LENSES & ACCESSORIES
Tips for every D-SLR owner
✔ Shooting checklist
✔ Histogram lessons
✔ Filter advice & technique
✔ Using white balance
✔ JPEG & RAW know-how
AND MORE...
FREE WITHPracticalPracticalPhotography
ESSENTIAL GUIDE

2 | Using your digital SLR Free with Practical Photography | 3
Contents
Welcome from editor Andrew James
■ Five-step digital SLR shooting checklist 6
■ How to hold your digital SLR 8
■ Selecting your exposure modes 12
■ Understanding histograms 16
■ Using fi lters 18
■ Choosing a fi le format 24
■ Using white balance 26
■ Improving your pictures in-camera 30
■ Typical settings for the Canon 350D & Nikon D50 32
■ Keeping your sensor clean 34
■ Inside a digital SLR 36
■ Choosing the right lens 38
■ Recommended lenses 40
■ Digital accessories 42
A digital SLR is the hottest thing around right now. But if you’ve just taken the plunge (or are about to), it can seem scary. There’s new technology to master and words that read like a foreign language. At least at the heart of it all is a desire to shoot great pictures and I know many
people who have had their passion rekindled by digital capture. There is a danger that the freedom offered by digital leads to a gung-ho approach – shoot as much as you can as fast as possible, in the hope that one or two images will be perfect. Don’t let this happen. Enjoy the
THIS GUIDE IS BROUGHT TO YOU BY...Using Your Digital SLR is brought to you by the Practical Photography team and is published by EMAP Active Limited. No part of this booklet can be reproduced without the publisher’s permission. For more information about Practical Photography you can visit: www.practicalphotography.co.uk
Words/photography: Andrew James, Chris Rutter, Bob Martin, Ben Turner and Ben HawkinsDesign: Rob Holmes and Chris RigbyProduction: Shane CollinsMarketing: Christiaan Pinder and Aaron BannieReproduction: Guildenburgh, PeterboroughPrinted by: Precision Colour Printing, Telford
Shot on a budget D-SLR with a 105mm macro lens, these two blades of grass covered in dew have a creative edge.
freedom and benefi ts that owning a D-SLR brings. You can be more creative certainly, but a thoughtful approach to every picture you take is still the best way forward. I hope you fi nd this guide useful. We’ve tried to touch on many of the issues you will encounter on your journey.
Shooting advice
Camera settings & care
Gear advice

Shooting adviceYour digital SLR gives you freedom and fl exibility to explore as many creative avenues as you like. But it also raises a number of different questions from traditional fi lm photography. In this section we’ll explore some of the advantages of digital capture and some of the key points you need to know. ➥
Shooting USING YOUR DIGITAL SLR
Get out with your digital SLR and discover how effective a creative approach is. This lone silver birch was shot mid-morning on the Isle of Skye.

Shooting advice
Free with Practical Photography | 7
Your digital SLR is a highly sophisticated piece of kit but it will only do what
you tell it to do. And if you’ve told it to do one thing on one day it will do exactly the same the next, unless you override those instructions. As a result, perfectly good pictures can be ruined simply because you forgot to press a couple of buttons. It sounds obvious, but running through a simple checklist in your head will prevent silly mistakes from occurring and ultimately mean better pictures. Here are fi ve simple but important things you need to remember every time you plan a photo-session…
Five-step digital SLR shooting checklist
A digital SLR is completely power-reliant, so if your battery is only half-charged or, worse still, completely dead when you come to shoot, then you’ll be down the pub earlier than expected. It’s best to slot batteries into the charger after every trip out and give them a blast. When they’re fully charged pop one set back into the camera itself and tuck a spare
(you should always carry an extra set) safely in
your camera bag.
By formatting the memory card you wipe all the information held on it. So when you do format, be certain that any images on it you want to keep have already been downloaded and safely stored. If you haven’t, you can still shoot as the card will store your new images into a separate folder, but space on the card will be limited. To format your card, simply access the Format Card option in your camera’s menu. Once you’ve hit the Okay button and formatting has started there’s no going back. Once formatted, you will have plenty of free card space on which to store your new images.
Back in the ‘old days’ of fi lm and manual cameras, when you put a roll of fi lm into your camera you needed to set the ISO manually too. Then along came modern electronic fi lm cameras and the DX coding on the fi lm allowed the camera to automatically rate the fi lm at the required ISO. With a D-SLR, of course, there’s no fi lm at all, but ISO rating still plays a role. It effectively alters the sensitivity of the camera’s sensor, allowing you to continue shooting in different light levels. But larger ISO also brings greater visible noise (unwanted graininess) on an image, meaning it’s best to use as low an ISO setting as possible. So if you have used ISO 800 to shoot fast-moving action in low light and then forgot to change back to ISO 100 for a landscape shoot, you may feel your resulting pictures are ruined by excessive noise. Remember, on a D-SLR you can change ISO from shot to shot.
A D-SLR gives you various options as to what format your digital fi le is saved in. The most popular is JPEG, but even this gives you various choices that relate to the fi nal quality of the image itself. All you need to know is how big you are likely to want to print your image at and how much post-capture control you want over it. If, for example, you want a small image for use only on a website or for e-mailing, you may choose to shoot the smallest JPEG option available. On the fl ip side, if you want as big a fi le as possible and as much post-capture control over it, then shooting RAW is the best option. From a shooting checklist perspective, you just need to have the right fi le option selected for the job at hand. More on JPEGs and RAWs later.
There’s a whole issue wrapped up in white balance choice that we will cover later, but at the checklist stage just be sure that you don’t have a completely inappropriate white balance selected that could make your picture look a bit weird. If you’re in any doubt as to which white balance you should use, then go for the fail-safe of auto white balance. The camera will make the decision for you. More on white balance selection and use later.
✔ ✔ Have you charged your batteries?
Have you formatted your memory card?
Have you checked the ISO setting?
✔ ✔ Have you selected the right fi le type?
✔ Have you chosen the white balance?
Check the settings on your digital SLR every time you start shooting to be sure that you’re using the correct settings for the subject you’re tackling.
6 | Using your digital SLR
Most D-SLR users will format their memory card out in the fi eld. But it’s better to get in
the habit of doing this at home. Download your images, check everything is okay, then pop the card back into the camera and format it then and there. This way you know you have a clean card for every outing.
Most D-SLR users will format their memory card out in the fi eld.
the habit of doing this at home.
tip

8 | Using your digital SLR
Shooting advice
Free with Practical Photography | 9
✔
NOR LIKE THIS… If you’re used to holding a compact you may be tempted to hold your digital SLR like this. The weight of the lens will make this unstable and tend to tip it down to the front. You won’t have quick access to the zoom ring to reframe the composition either.
NOT LIKE THIS… Zooming and focusing like this will rely on three fi ngers and the thumb of your other hand to support the weight of your camera and lens. This is not very stable and is hard work with heavier kit. Try to hold the weight of the camera with the palm of your left hand.
✘ ✘
T o improve your chances of getting a fi rst-rate shot, you need to go back to basics and make sure you’re holding your D-SLR properly. Correctly supporting the camera and
bracing yourself where possible will minimise the effects of camera shake and allow you to get more stunning, pin-sharp images and less blurry snaps. Camera shake is the distracting blur that you sometimes see across an image, and is a particular problem in lowlight conditions where long exposures are needed. It’s caused by a slight movement in the camera as the shot is taken, and the longer the shutter is open the greater your chance of having problems.
How to hold your digital SLR
Get it rightRIGHT HAND Your right thumb should sit at the back of the camera, near or over the rear shuttle wheel (if your camera has one).
Your forefi nger should not carry any weight and be free to press the shutter button and use the other controls on the top of the camera.
Your other fi ngers should clasp the grip and bear some of the camera’s weight.
LEFT HAND Bear the majority of the camera’s weight on the palm of your left hand. Position it on the camera body, just below the lens.
Hold the focus ring or the zoom ring with your thumb, forefi nger and middle fi nger, as shown.
PIN-SHARP
CAMERA SHAKE
1
2
3
4
5
Shooting advice
Free with Practical Photography | 1110 | Using your digital SLR
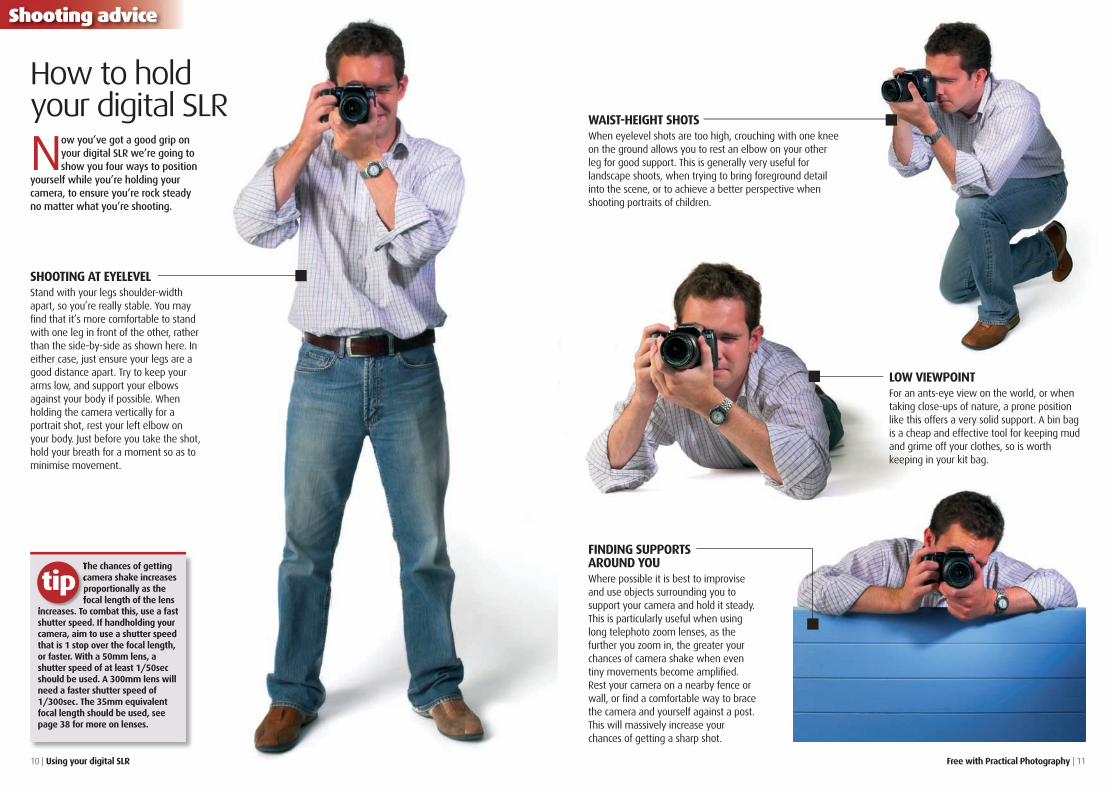
The chances of getting camera shake increases proportionally as the focal length of the lens
increases. To combat this, use a fast shutter speed. If handholding your camera, aim to use a shutter speed that is 1 stop over the focal length, or faster. With a 50mm lens, a shutter speed of at least 1/50sec should be used. A 300mm lens will need a faster shutter speed of 1/300sec. The 35mm equivalent focal length should be used, see page 38 for more on lenses.
The chances of getting camera shake increases
focal length of the lens increases. To combat this, use a fast
tip
N ow you’ve got a good grip on your digital SLR we’re going to show you four ways to position
yourself while you’re holding your camera, to ensure you’re rock steady no matter what you’re shooting.
SHOOTING AT EYELEVEL Stand with your legs shoulder-width apart, so you’re really stable. You may fi nd that it’s more comfortable to stand with one leg in front of the other, rather than the side-by-side as shown here. In either case, just ensure your legs are a good distance apart. Try to keep your arms low, and support your elbows against your body if possible. When holding the camera vertically for a portrait shot, rest your left elbow on your body. Just before you take the shot, hold your breath for a moment so as to minimise movement.
WAIST-HEIGHT SHOTSWhen eyelevel shots are too high, crouching with one knee on the ground allows you to rest an elbow on your other leg for good support. This is generally very useful for landscape shoots, when trying to bring foreground detail into the scene, or to achieve a better perspective when shooting portraits of children.
LOW VIEWPOINTFor an ants-eye view on the world, or when taking close-ups of nature, a prone position like this offers a very solid support. A bin bag is a cheap and effective tool for keeping mud and grime off your clothes, so is worth keeping in your kit bag.
FINDING SUPPORTS AROUND YOUWhere possible it is best to improvise and use objects surrounding you to support your camera and hold it steady. This is particularly useful when using long telephoto zoom lenses, as the further you zoom in, the greater your chances of camera shake when even tiny movements become amplifi ed. Rest your camera on a nearby fence or wall, or fi nd a comfortable way to brace the camera and yourself against a post. This will massively increase your chances of getting a sharp shot.
How to hold your digital SLR

12 | Using your digital SLR
Shooting advice
Free with Practical Photography | 13
350D AND D70S COMPAREDThe mode dials on all digital SLRs share the same basic layout. There are detail differences between models though. The Canon EOS 350D uses a green square to signify full auto and Tv for shutter-priority. The Nikon D70S uses Auto and S for the same modes.
One of the major advantages of a digital SLR over a compact camera is the sheer
number of creative controls it offers. Some creative compact cameras may come close but they still don’t offer the same range of shutter speed and aperture options as even the cheapest of digital SLRs. It follows then, that taking control of these features unlocks the full creative potential of your digital SLR. You’ll fi nd the main mode dial on the top-plate of most D-SLRs, allowing you to select the appropriate setting for your subject.
Selecting your exposure modes
‹Full autoThis completely automatic mode doesn’t allow you to override the settings on the camera. It’s great for point-and-shoot simplicity, but you’re missing out on the benefi ts of using a D-SLR if this is the only mode you ever use, as you’ve got no control over the shutter speed, aperture or exposure. It’s often indicated on the mode dial by being picked out in green.
Alongside the fully automatic setting, these modes are still completely automatic, taking away some of the skills of using the camera, but they’re a good starting point if you’re new to shooting with digital SLRs and want to explore how the shutter speed and aperture effects your images.
Each program mode gears the settings towards a particular subject. Here are the basic settings used by most manufacturers.
● Portrait – Selects a wide aperture to throw the background out of focus in order to isolate the fi gure.
● Landscape – Selects a small aperture where possible, increases colour saturation and turns off the built-in fl ash.
● Close-up – Selects a small aperture to give maximum depth-of-fi eld for close-up images. Unlike the close-up mode on a compact camera this setting has no effect on how close the lens will focus.
● Sport – Selects the highest shutter speed possible to freeze movement, and uses continuous shooting and focusing modes to keep up with moving subjects.
● Night – Optimises the camera for shooting at long shutter speeds and turns off the built-in fl ash.
● Night portrait – Allows the camera to shoot with fl ash and long exposures in order to record both foreground and background detail.
‹ProgramThis mode is still fully automatic, setting both the shutter speed and aperture for you, but gives a little more control than full auto. The main advantage is the ability to set exposure compensation to over or underexpose according to the subject and lighting.
The main mode dial is located on the top-plate of the camera.
“Taking control of these features unlocks the full creative potential of your digital SLR”
➥More on exposure modes over the page
Subject programs
Program mode is ideal for capturing scenes when you don’t need to worry about the shutter
speed or aperture being used.

Shooting advice
14 | Using your digital SLR Free with Practical Photography | 15
MeteringDespite the fact that you can check the exposure on the LCD after you’ve taken a shot, it still pays to get the exposure right as not every image is repeatable. In most cases it’s best to underexpose your shots very slightly to ensure that you retain as much highlight detail as possible.
MULTI-PATTERN This is the default
option on all digital cameras. It takes a range of readings from across the whole image and combines them to determine the correct exposure. These systems are so reliable that they can be used for most of your shots, and you’ll only need to use the other options in very tricky lighting conditions.
CENTRE-WEIGHTEDUnlike the multi-
pattern metering mode, this mode takes a single reading from the whole of the image, although it takes most of the reading from the centre of the frame. This metering mode is more easily fooled by bright or dark backgrounds than the more sophisticated multi-pattern mode. In these situations you need to point the camera at an area that will be recorded as a midtone in your fi nal image. Centre-weighted metering can give more consistent readings than the multi-pattern mode, as there’s no intervention from the camera.
SPOTLike centre-weighted, this mode takes a
single reading from the image. The difference being that this is taken from a tiny area of the frame, so you need to use this metering mode with some care, and is best used in fully manual exposure mode. To get the correct exposure you have to point the centre of the frame on an area that is a midtone and take a meter reading before re-framing your picture.
If you’re just starting out with shutter speeds and apertures, try shooting the same
subject using a range of settings. Check how the different settings affect the results by looking at the EXIF data either in the camera’s software or in Photoshop.
out with shutter speeds and apertures, try shooting the same
subject using a range of settings.
tip
›ManualFully manual exposure gives you the option of selecting both the shutter speed and aperture. This doesn’t give you free reign to select any settings though, as you still need to take a meter reading to determine the correct exposure.
When to use itFor complete control over the exposure you can’t beat manual exposure. It’s particularly useful when you want a consistent exposure across a number of frames, for example if you want to combine images later on.
‹Aperture-priorityWith this semi-automatic setting you choose the aperture, with the camera selecting the appropriate shutter speed.
When to use itControlling the aperture allows you to determine the amount of the image that’s going to be in focus. A wide aperture such as f/4 means that only a small amount of the image will be sharp, whereas a small aperture (f/16) will give maximum depth-of-fi eld.
€Shutter-priorityThis setting allows you to control the amount of time the shutter is open, with the camera selecting the aperture to suit.
When to use itWhen you want to either freeze or blur movement in your subject. To capture fast action you’ll need a fast shutter speed of at least 1/250sec. A slower shutter speed will help add creative blur to moving subjects.
Exposure modes
“For complete control over the exposure you can’t beat manual exposure”

16 | Using your digital SLR
Shooting advice
Free with Practical Photography | 17
One of the best things about digital SLRs is the ability to review your captured images on the back of the camera, in order to assess whether or not you’ve got your shot. Composition and colour are
relatively easy to evaluate by glancing at the LCD screen, and sharpness can be determined by zooming in on your photos. Judging the exposure, however, is a little harder, as it’s not always easy to tell if your images are too bright or dark on the LCD screen. The same picture will appear bright and vibrant viewed in the dark but much duller if you look at it in direct light. A more reliable way to check your exposures is to use the histogram.
Understanding histograms
A histogram is a simple bar chart showing the distribution of pixels in an image, based on brightness. The left-hand side represents the darkest pixels, the middle corresponds to the midtones and the right-hand side the white pixels. The higher the graph is at a given point, the more pixels of that brightness are present in the image. For an average image with no strong highlights or shadows you can expect to see a peak in the graph in the middle, showing an average distribution of tones. With a
darker image, such as a lowlight scene, you can expect to see a peak to the left. A peak to the right would denote a high-key image. That said, there is no such thing as a perfect histogram. You can only judge it to see if the graph looks how you’d expect it to and adjust the exposure to correct it if things don’t tally up.
What’s a histogram?
€Too darkHere you can see the graph is bunched up to the left and there are no midtones, light greys or whites in the shot. Clearly the image needs to be reshot using a slower shutter speed or wider aperture to bring the histogram to the right.
€Too brightHere the peak extends right into the whites. This shows that lots of the pixels are too bright for the camera’s sensor and have burned out to pure white. This shot should be taken again using a darker exposure to bring back this lost detail.
No midtones, light greys or
whites present
Pixels too bright for camera’s sensor to record
Shadows
Midtones
Highlights
Here the exposure is spot-on, neither too bright nor too dark, and this was quickly checked using the histogram.
“It’s not always easy to tell if your images are too bright or too dark on the LCD screen. A more reliable way to check your exposures is to use the histogram”UNDEREXPOSED OVEREXPOSED
AVERAGE HISTOGRAM

Shooting advice
Free with Practical Photography | 19
Recommended fi lters to use with D-SLRs
Shooting with a D-SLR does away with the need for fi lters, right? You can add your fi lter effect at the Photoshop stage, so why bother with the extra hassle and expense? Well, while Photoshop
can do some of the things a fi lter will, it certainly can’t do all of them. And if you can avoid spending more time on the computer by getting it perfect at the taking stage, that’s got to be worth its weight in gold. As a D-SLR user you should invest in a fi lter system from a manufacturer such as Cokin or Lee. Not every fi lter will be of use to you though. Colour correction fi lters are widely used with fi lm but you can simply adjust the white balance on your camera instead (see page 26) and a warm-up fi lter has also been largely superseded by the white balance too. However, a polariser, a couple of neutral density grads and a straight neutral density fi lter are all worth having in your kit bag.
Using fi lters
‹THE FILTER SYSTEM This annotation shows a Cokin fi lter system, although all fi lter systems work to the same basic principle. The holder is attached to the lens via an adapter ring that is bought to match your lens. Each lens has a fi lter size, so check what’s on yours and buy the relevant adapter. With the fi lter holder attached to the lens,
it’s easy to slot the rectangular-shaped fi lters into place. Polarisers are circular, so should be screwed
directly to the lens or a separate fi lter holder designed for screw-in fi lters.
18 | Using your digital SLR
ADAPTER RINGGet one to fi t your lens and then screw it carefully onto the front.
FILTERIt slots into the front of the holder and is held in place. You can fi t more than one at a time.
FILTER HOLDERThe holder itself fi xes onto the adapter and is then ready to take the fi lters.
‹POLARISERA polariser helps to reduce glare, removes refl ections from water and will intensify colours. Blue skies can really sing when you use a polarising fi lter, but be careful not to overdo it or your sky might end up an unwelcome black colour. It does, however, reduce the amount of light entering the camera so make sure you’re still achieving the right shutter speed to prevent camera shake if you’re not using a tripod.
‹NEUTRAL DENSITY (ND)A straight ND (ie non-graduated) fi lter is really only of interest if you want to reduce the amount of light entering the camera. You might want to do this for creative effect, such as when you’re blurring water or other moving subjects. Without a neutral density fi lter it could prove impossible to get the slow shutter speeds required for these techniques.
‹ND GRADA graduated ND fi lter is a real boon for landscape shots. It can help balance exposures between light skies and darker land, so highlight detail is retained in the image. To do this successfully in Photoshop, you’d need to expose one picture for the sky and one for the land, merging the two later. It’s effective but takes time and some precise Photoshop skills to get right.
“ND grads can help balance exposures between light skies and darker land, so that highlight detail is retained in the image”
➥Turn here to see how effective fi lters can be...
A big sky on the Isle of Skye. An ND grad fi lter
proved handy to balance the exposure.
Shooting advice
20 | Using your digital SLR Free with Practical Photography | 21
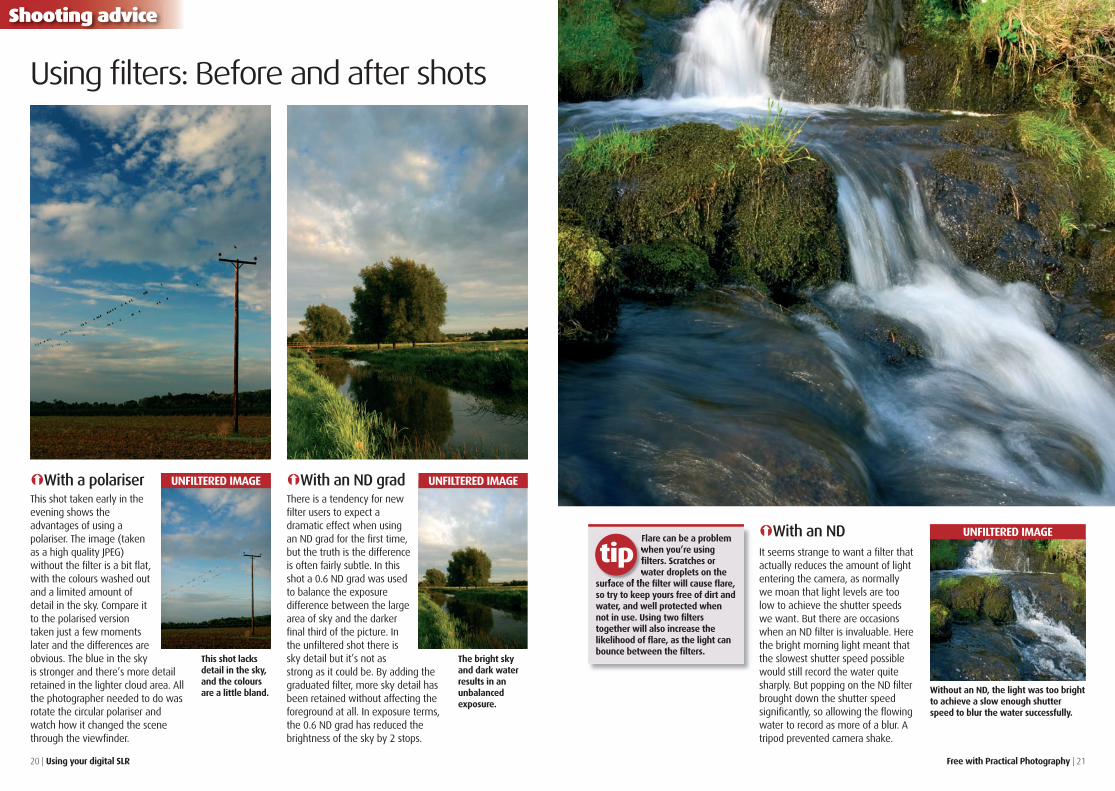
›With a polariser This shot taken early in the evening shows the advantages of using a polariser. The image (taken as a high quality JPEG) without the fi lter is a bit fl at, with the colours washed out and a limited amount of detail in the sky. Compare it to the polarised version taken just a few moments later and the differences are obvious. The blue in the sky is stronger and there’s more detail retained in the lighter cloud area. All the photographer needed to do was rotate the circular polariser and watch how it changed the scene through the viewfi nder.
It seems strange to want a fi lter that actually reduces the amount of light entering the camera, as normally we moan that light levels are too low to achieve the shutter speeds we want. But there are occasions when an ND fi lter is invaluable. Here the bright morning light meant that the slowest shutter speed possible would still record the water quite sharply. But popping on the ND fi lter brought down the shutter speed signifi cantly, so allowing the fl owing water to record as more of a blur. A tripod prevented camera shake.
›With an ND grad There is a tendency for new fi lter users to expect a dramatic effect when using an ND grad for the fi rst time, but the truth is the difference is often fairly subtle. In this shot a 0.6 ND grad was used to balance the exposure difference between the large area of sky and the darker fi nal third of the picture. In the unfi ltered shot there is sky detail but it’s not as strong as it could be. By adding the graduated fi lter, more sky detail has been retained without affecting the foreground at all. In exposure terms, the 0.6 ND grad has reduced the brightness of the sky by 2 stops.
Using fi lters: Before and after shots
›With an ND
UNFILTERED IMAGE UNFILTERED IMAGE
UNFILTERED IMAGE
This shot lacks detail in the sky, and the colours are a little bland.
The bright sky and dark water results in an unbalanced exposure.
Without an ND, the light was too bright to achieve a slow enough shutter speed to blur the water successfully.
Flare can be a problem when you’re using fi lters. Scratches or water droplets on the
surface of the fi lter will cause fl are, so try to keep yours free of dirt and water, and well protected when not in use. Using two fi lters together will also increase the likelihood of fl are, as the light can bounce between the fi lters.
when you’re using fi lters. Scratches or water droplets on the
surface of the fi lter will cause fl are,
tip
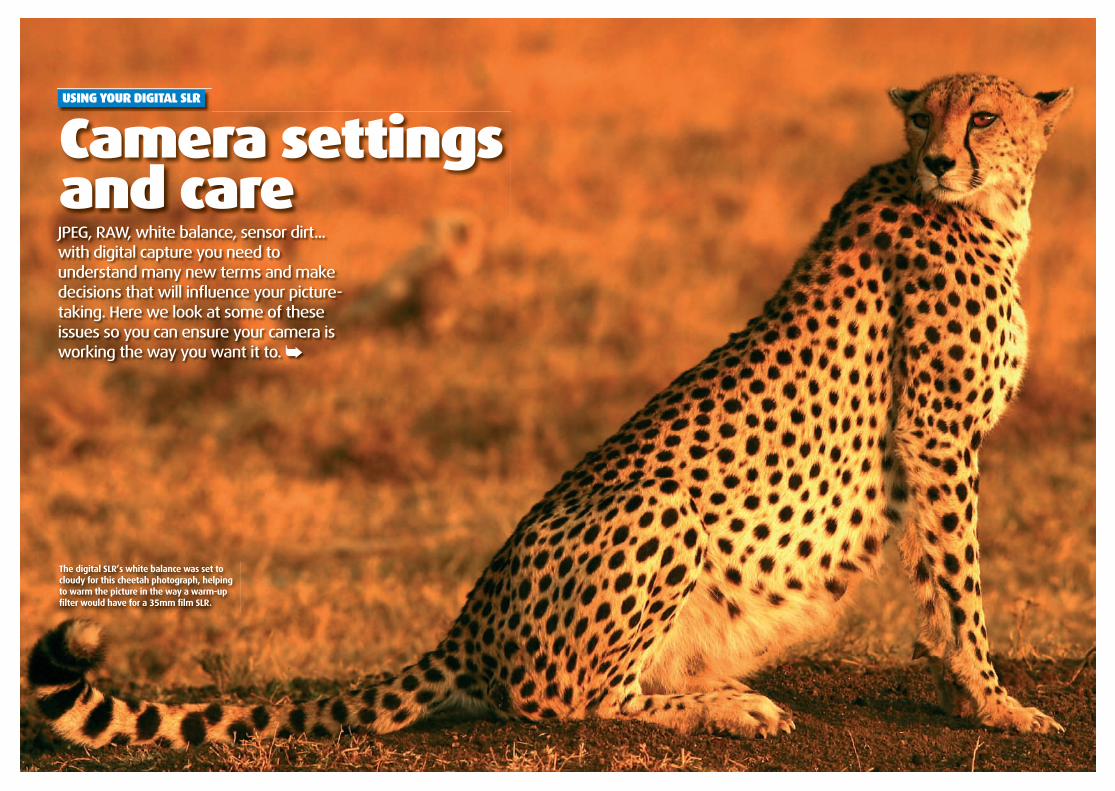
Camera settings and careJPEG, RAW, white balance, sensor dirt...with digital capture you need to understand many new terms and make decisions that will infl uence your picture-taking. Here we look at some of these issues so you can ensure your camera is working the way you want it to. ➥
The digital SLR’s white balance was set to cloudy for this cheetah photograph, helping to warm the picture in the way a warm-up fi lter would have for a 35mm fi lm SLR.
Camera settings USING YOUR DIGITAL SLR

Free with Practical Photography | 25
Camera settings & care
✔ ✘
✔
✔
✔
✔
✔
✔
✘
✘
✘
✘
✘
✘
Before you take a picture with a digital SLR the camera will offer you a choice of formats
that the image fi le can be saved as. There are two main options to choose from, JPEG and RAW, and each has its advantages and disadvantages and is more suited to certain situations.
Choosing a fi le formatJPEG is a very common format that’s compatible with most software, including Internet Explorer and even Microsoft Word. JPEG uses a variable lossy compression, which can really crunch down the fi le size, allowing you to get more shots on a memory card. However, because it’s lossy, some picture data is discarded, causing the image quality to suffer – although with high-quality JPEGs this is hardly noticeable. The smaller fi le size also means that camera write times are much shorter, so the camera buffer is quickly cleared allowing for a greater rate of shots to be taken. This format is ideal where a fast turnover of shots is required, such as press or sports photography. It’s also good when full resolution pictures are not needed, such as web use.
‹What is JPEG?RAW fi les contain the information exactly as it comes off the camera. All the data is intact, which means a smoother tonality and wider range of colours is available than with a JPEG fi le. RAWs offer the ultimate quality. However, RAW fi les need to be converted into a standard fi le format (such as TIFF or JPEG), using a dedicated RAW converter package, in order to extract the best possible image and become compatible with other imaging packages. Every model and make of camera produces it’s own type of RAW fi le, so fi nding a compatible converter can be a problem, particularly with new cameras. This format is best for situations where the ultimate quality and fl exibility is needed but speed is not so critical, such as portrait, landscape and still-life photography.
‹What is RAW?
JPEG v RAW
24 | Using your digital SLR
IN-CAMERA FLEXIBILITY Can I change the image size or processing parameters?
FILE SIZEWhich is the bigger fi le on the memory card?
IMAGE QUALITY How detailed and smooth is the image?
WRITE TIMES Which is quicker to write to the memory card?
FILE COMPATIBILITY How simple is it to open and view the fi le?
ENHANCEMENT OPTIONS How easy is it to tweak the image on my PC?
WORKFLOW SPEED Which is quicker to process, from capture to print?
The end result can be tailored to suit in-camera. You can vary
the compression quality, picture size/resolution, the image sharpness, the contrast and colour balance settings.
Thanks to the lossy compression, high-quality JPEGs are generally
less then half the size of RAWs, but it does also depend on the complexity of the subject.
The lossless compression compromises image quality but
is not always obvious unless contrast/brightness adjustments are made in post-capture software.
The small fi le size means less needs to be written to the card,
so it takes much less time to clear the camera buffer.
The JPEG format is widely used in all software areas.
Every imaging package worth mentioning will allow you to view JPEG fi les.
To alter a JPEG you must open it into an imaging package and
tweak it using the tools provided. Exposure and white balance are not easily changed.
With the image parameters set in-camera to give a
punchy image, all you do is to make a print of your JPEG image as it is.
RAW fi les contain the information as it’s captured, so
can’t be altered. Adjustments must be made in the converter software.
Lossless compression may be applied, but RAW fi les are still very
big. Larger sensors will take up proportionally more space, so expect around 1Mb per megapixel.
All captured data is kept intact, offering the ultimate quality.
Images can be subtly adjusted in the RAW converter to extract the sharpest and most detailed picture.
Large fi le sizes means longer write times, so when a series of shots are
taken in quick succession the camera buffer can fi ll easily.
Every camera model creates a different RAW fi le that has
unique processing requirements, so only compatible RAW converters can view these images.
Most RAW converters offer simple sliders and menus to alter contrast,
exposure, sharpness and white balance. It’s very easy and very photographic.
Images must be converted and saved before prints can be made.
If an image requires work this could still be the quicker method though.
The benefi ts and disadvantages of the two most popular fi le formats.
Subject JPEG RAW
Convert RAW files for freeMost digital SLRs come bundled with their own RAW converter software, but these can often be sluggish to use and only offer limited control. In many cases better results can be achieved – and much more quickly – using third party RAW converters. RawShooter Essentials 2005 is a great piece of software that can be downloaded from www.pixmantec.com and is absolutely free.
“RAW fi les offer the ultimate quality, but they need to be converted into a standard fi le format using a RAW converter to extract the best possible image”

26 | Using your digital SLR Free with Practical Photography | 27
Camera settings & care
T he type of light falling on your subject makes a massive difference to the colour of the scene. The light in the middle of the day is much more blue than it is at sunrise or sunset, while a household bulb
produces light with a strong orange cast. This is due to what’s known as the colour temperature of the light source. Our eyes adjust to these changes automatically, but that’s not necessarily how your digital camera will record the scene. Every digital SLR has a white balance (WB) setting to adjust the way it records colours, so to get the most out of your camera you need to know when to use the settings available.
Using white balance
As the name suggests, this mode adjusts the white balance automatically for different lighting conditions to give neutral results. This mode works well for point-and-shoot situations or if there’s a mixture of light sources. The problem with auto white balance is
that it will try to produce a neutral image, even though you may want the image recorded as a warmer or cooler tone. This is especially true when you’re shooting at the start or the end of the day. Sunrise or sunset shots will be ruined by the neutral results of an automatic setting.
‹Auto
➥Turn for more info on white balance settings to try...
RAW ADVANTAGEUsing the RAW fi le format means that you can change the white balance after shooting when you convert your images. You should still try to choose the right setting when you take the shot though, as this will save you time having to change the setting later on.
Canon EOS 350D: The WB settings are located on the rear command dial.
Nikon D50: The WB button is found on the far-left of the camera’s back.
Camera settings & care
28 | Using your digital SLR Free with Practical Photography | 29
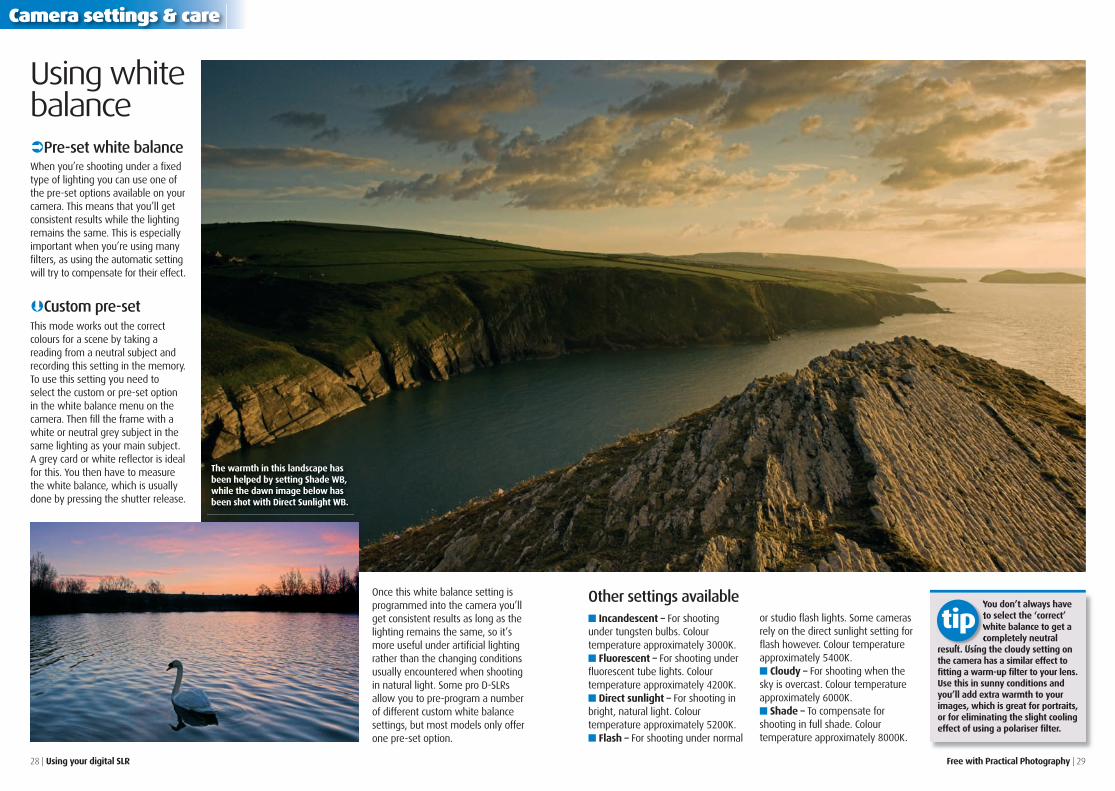
Using white balance‹Pre-set white balance When you’re shooting under a fi xed type of lighting you can use one of the pre-set options available on your camera. This means that you’ll get consistent results while the lighting remains the same. This is especially important when you’re using many fi lters, as using the automatic setting will try to compensate for their effect.
■ Incandescent – For shooting under tungsten bulbs. Colour temperature approximately 3000K.■ Fluorescent – For shooting under fl uorescent tube lights. Colour temperature approximately 4200K.■ Direct sunlight – For shooting in bright, natural light. Colour temperature approximately 5200K.■ Flash – For shooting under normal
or studio fl ash lights. Some cameras rely on the direct sunlight setting for fl ash however. Colour temperature approximately 5400K.■ Cloudy – For shooting when the sky is overcast. Colour temperature approximately 6000K.■ Shade – To compensate for shooting in full shade. Colour temperature approximately 8000K.
fiCustom pre-setThis mode works out the correct colours for a scene by taking a reading from a neutral subject and recording this setting in the memory. To use this setting you need to select the custom or pre-set option in the white balance menu on the camera. Then fi ll the frame with a white or neutral grey subject in the same lighting as your main subject. A grey card or white refl ector is ideal for this. You then have to measure the white balance, which is usually done by pressing the shutter release.
Other settings availableOnce this white balance setting is programmed into the camera you’ll get consistent results as long as the lighting remains the same, so it’s more useful under artifi cial lighting rather than the changing conditions usually encountered when shooting in natural light. Some pro D-SLRs allow you to pre-program a number of different custom white balance settings, but most models only offer one pre-set option.
The warmth in this landscape has been helped by setting Shade WB, while the dawn image below has been shot with Direct Sunlight WB.
You don’t always have to select the ‘correct’ white balance to get a completely neutral
result. Using the cloudy setting on the camera has a similar effect to fi tting a warm-up fi lter to your lens. Use this in sunny conditions and you’ll add extra warmth to your images, which is great for portraits, or for eliminating the slight cooling effect of using a polariser fi lter.
You don’t always have to select the ‘correct’ white balance to get a completely neutral
result. Using the cloudy setting on
tip
30 | Using your digital SLR Free with Practical Photography | 31
Camera settings & care
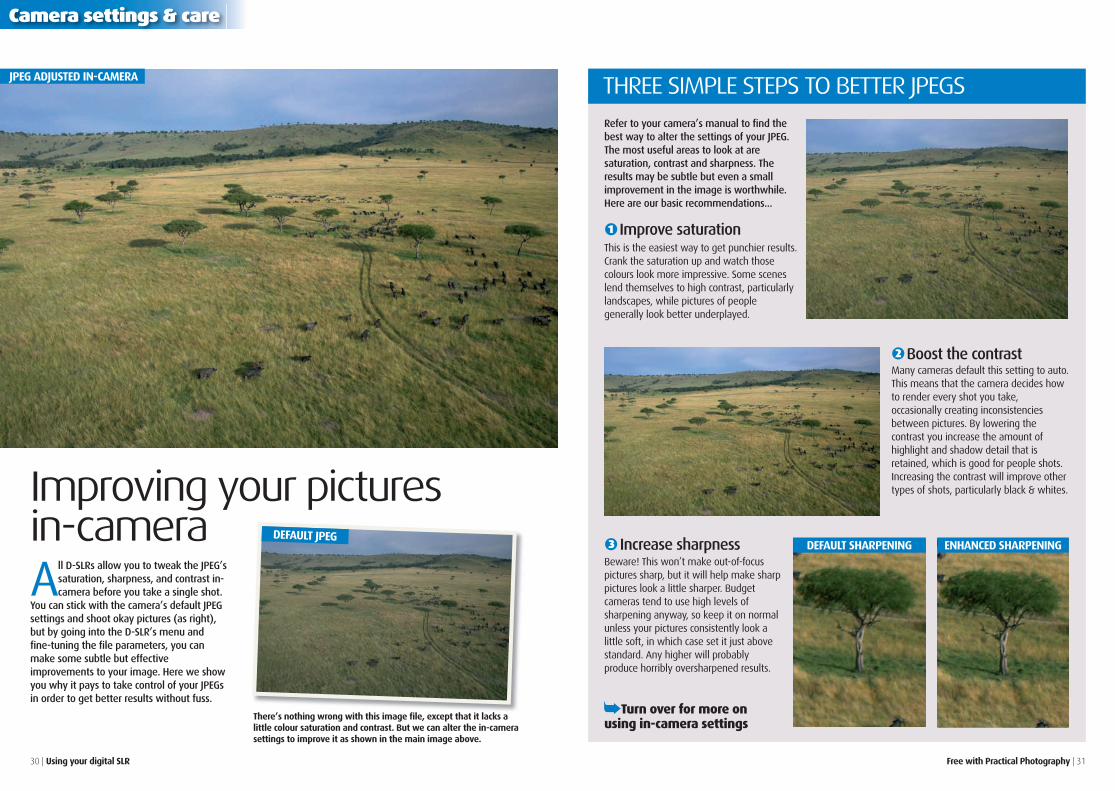
All D-SLRs allow you to tweak the JPEG’s saturation, sharpness, and contrast in-camera before you take a single shot.
You can stick with the camera’s default JPEG settings and shoot okay pictures (as right), but by going into the D-SLR’s menu and fi ne-tuning the fi le parameters, you can make some subtle but effective improvements to your image. Here we show you why it pays to take control of your JPEGs in order to get better results without fuss.
Improving your pictures in-camera
Improve saturation
Boost the contrast
Increase sharpness DEFAULT SHARPENING ENHANCED SHARPENING
JPEG ADJUSTED IN-CAMERA
DEFAULT JPEG
This is the easiest way to get punchier results. Crank the saturation up and watch those colours look more impressive. Some scenes lend themselves to high contrast, particularly landscapes, while pictures of people generally look better underplayed.
Many cameras default this setting to auto. This means that the camera decides how to render every shot you take, occasionally creating inconsistencies between pictures. By lowering the contrast you increase the amount of highlight and shadow detail that is retained, which is good for people shots. Increasing the contrast will improve other types of shots, particularly black & whites.
Beware! This won’t make out-of-focus pictures sharp, but it will help make sharp pictures look a little sharper. Budget cameras tend to use high levels of sharpening anyway, so keep it on normal unless your pictures consistently look a little soft, in which case set it just above standard. Any higher will probably produce horribly oversharpened results.
THREE SIMPLE STEPS TO BETTER JPEGSRefer to your camera’s manual to fi nd the best way to alter the settings of your JPEG. The most useful areas to look at are saturation, contrast and sharpness. The results may be subtle but even a small improvement in the image is worthwhile. Here are our basic recommendations...
1
2
3
➥Turn over for more on using in-camera settings
There’s nothing wrong with this image fi le, except that it lacks a little colour saturation and contrast. But we can alter the in-camera settings to improve it as shown in the main image above.

32 | Using your digital SLR Free with Practical Photography | 33
Camera settings & care
You’ve just learned that it’s important to tweak your JPEG settings to try to get the best results instantly. Your D-SLR’s JPEG default settings are
probably perfectly acceptable but if you’ve got greater control over the image fi le, why not use it? Here we look at the idea of taking your in-camera settings a
stage further, with two different set-ups for each of the most popular budget digital SLRs. If you are using, for example, a Pentax, Sigma, Konica Minolta, Fuji etc, then explore your camera for similar settings that will improve the ‘straight out of the camera’ appearance of your images.
Setting up your D-SLR
SHOOTING MODEUse aperture-priority (Av) and operate the command dial to select the aperture. We’d suggest at least f/8 or higher.
ISO You should always select the lowest ISO possible, so push the ISO button on the back of the camera and scroll down to ISO 100. Press Set.
METERING Press the left button on the multi-selector at the back of the camera. Select the top option (Evaluative). This mode will read the whole scene to take your exposure reading.
EXPOSURE COMPENSATION Press and hold EV +/- button, then use the command dial to change the compensation. + makes the image lighter, - makes it darker. In this case err slightly on the dark side (-) to prevent burning out the highlight detail.
WHITE BALANCE Press the down button on the multi-selector. To warm the image slightly select Cloudy, otherwise use the daylight (Sunny) setting. Press Set.
SETTINGS Enter Menu, go across to Camera Menu 2, go down to Parameters, press Set, press Set again to highlight the menu and highlight Parameter 1, press Set. You have now boosted contrast and saturation as shown on the previous pages.
Landscapes are probably the most popular subject for SLR users – be it fi lm or digital. Once you’ve worked hard to fi nd the perfect vista you’ll want to make sure you get your shots while the weather is still on your side.
AUTOFOCUS Press Menu. Use the multi-selector at the back to select the pencil (symbol). Scroll down until you reach 03 AF-Area Mode. Select Dynamic Area. Now the camera will recognise where your subject is in the frame better and focus accordingly.
WHITE BALANCE Hold the WB button on the rear of the camera and use the command dial to select fl ash on the top LCD display in order to get the right colour balance for healthy-looking skin tones.
CUSTOM COLOUR Press Menu, go to the camera menu and select Optimise Image. Press right, go down and select Portrait Mode which is optimised for people pictures and hopefully your skin tones should improve.
SHOOTING MODE Set the mode dial to A (aperture-priority). Then use the command dial to select f/5.6 to give a relatively shallow depth-of-fi eld to blur backgrounds.
ISO Press and hold the ISO button on the back. Use the command dial to scroll until you reach 200 on the top LCD display. 200 is the lowest setting on this camera.
RED-EYE REDUCTION FLASH Press the fl ash button once to pop it up. Press and hold it again and use the command dial to scroll to the eye symbol on the top LCD display.
fiIndoor portraits with a Nikon D50Many digital SLR users also end up taking loads of pictures of their friends and family, often indoors, which can cause lots of problems. This guide should reduce the likelihood of poor exposures and wasted opportunities.
fiLandscapes with a Canon EOS 350D
54
321
6 54
321
6
You may fi nd yourself in the situation where you have played with so many camera settings you can’t remember how the camera should be set up normally. If this happens, don’t worry. All digital SLRs have a Restore Factory Settings or Restore Defaults option in
the menu. Using this will set the camera back to how it came out of the box.
tip
“Your D-SLR’s default settings are probably
perfectly acceptable but if you’ve got greater
control over the image fi le, why not use it?”

34 | Using your digital SLR Free with Practical Photography | 35
Camera settings & care
1 2 3 4 5
Right, so now you have a great camera and clean lenses. But you may still notice strange
dark blobs on your pictures. It’s likely that this is the result of muck on the camera’s sensor. No matter how careful you are when removing the lens, dust, hairs and even moisture can fall on the sensor, creating these rogue elements. It can take hours of Photoshop work to clean your pictures if the sensor has been affected by lots of grime, so it’s well worth cleaning your sensor fi rst. To prevent sensor dirt, take great care when changing lenses, especially in dusty environments.
Keeping your sensor clean
How to clean the sensor
Carefully read the instructions for both your camera and the cleaning kit you’ve bought. We used IMS DSLRClean sticks. A pack of ten sticks costs £18.95 (see www.intemos.com or phone 01179 055375).
Make sure everything is ready for you to use, then take the lens off the camera. You’ll fi nd the mirror between you and the sensor. It needs to be raised, so check your instruction manual for details on how to do this on your digital SLR.
Hold the camera so the sensor is facing the fl oor and then use a blower to dislodge any loose dust. Don’t use compressed air, as it is too harsh. A blower like this Giottos Rocket is perfect.
Place the tip of your cleaning stick onto the upper right-hand corner of the sensor. Apply pressure until the tip bends at a right angle, then move the stick around the edges, ensuring the whole sensor has been covered.
Close the mirror. Replace the lens or attach a body cap over the front of the camera. Also try Photographic Solutions sensor swabs and cleaning fl uid (see www.photosol.com).
‹WARNINGThe sensor is the most important part of your digital SLR and is very delicate, so only clean it if absolutely necessary. If you can get away without cleaning your sensor then don’t even attempt it – it’s a high-risk operation at the best of times. If you’re at all unsure then look into sending the camera back to the manufacturer to get it cleaned professionally. Every care should be taken when attempting this yourself, and Practical Photography can acceptno responsibility for any damage caused during the process.
‹What does sensor dirt look like?The most common form of sensor grime is specks of dust. You can easily get rid of these with the Spot Healing tool in Photoshop but this can be extremely time-consuming. It’s best to tackle the problem at the root cause instead.

36 | Using your digital SLR
Gear adviceKnowing how your digital SLR works and choosing the right kit for the job could be the difference between competent shots and outstanding photography. Here we take a look inside your camera and discuss how digital sensors can affect focal lengths.
USING YOUR DIGITAL SLR
W hile they may look the same as their fi lm SLR predecessors in terms of
design and feel – and there’s no reason to believe this will change any time soon – they couldn’t be more different under the bonnet. And although it’s not essential to know and understand how every microchip and piece of electronic wizardry actually works, a basic working knowledge of your SLR’s vital ‘organs’ will certainly prove useful in the fi eld. Here’s a brief guide to the absolute essentials to help you get the most from your digital camera...
Inside a digital SLR
POP-UP FLASHMost digital SLRs, much like their analogue predecessors, feature a built-in pop-up fl ash unit. Although on-camera fl ash has its drawbacks, it’s perfect for adding fi ll-in and close-ups.
FLASH HOTSHOEThe camera’s fl ash hotshoe allows for detachable fl ash units to be mounted and used in conjunction with the camera’s TTL (through-the-lens) metering system.
SENSORThere are two main types of sensors used in digital cameras – CCD (charge-coupled device) and CMOS (complementary metal oxide semiconductor). Both capture light on individual light-sensitive cells that convert the resulting signals into digital form.
DIGITAL CONNECTIONSRemove the cover and you’ll fi nd the USB socket needed to connect your SLR to a computer, as well as a remote cable release socket.
IMAGE PROCESSORProbably the single most important part of the camera, the image processor is responsible for noise reduction, colour interpretation, resolution and sharpness, and image creation.
MIRRORMany digital SLRs perform a mirror lock-up (freezing
the mirror in its up position) when cleaning
(or allowing you to clean) the camera’s sensor.
BATTERYDigital cameras are
entirely battery-dependent and are more
power-hungry than conventional fi lm
cameras. Depending on the manufacturer and
model, cameras either have custom batteries or
accept AA batteries.
CONTROL DIALSome things never
change and, thankfully, digital SLRs’ main dial still
controls shutter speed and aperture, which
means that the switch from fi lm to digital
won’t cause too many initial headaches.
LENS MOUNTSWhile each manufacturer employs a lens mount unique to its own system – Canon has relied on its EF mount since 1987, while Nikon has revised and adapted its F mount since 1959 – lens owners are faced with more choice. For example, Nikon lenses fi t two SLR systems – Nikon and Fuji.
Free with Practical Photography | 37

Gear advice
PROTECT YOUR LENSESIf the front element of the lens gets damaged it renders the whole lens useless. To help minimise the risk of any damage buy a skylight fi lter and keep it on the front of the lens all the time. Replacing a fi lter is a lot cheaper and less frustrating than having to buy a whole new lens.
The fl exibility of being able to attach different lenses is what attracts many users to digital
SLRs. However, the massive choice of lenses and the added complexities of shooting digitally can be a little overwhelming to new users and potential buyers.
Choosing the right lensAlways buy the best lens that you can afford. Lens quality will directly affect the
overall quality of your digital images so dig deep if possible.
Always buy the best
afford. Lens quality will directly affect the
overall quality of your digital
tip
‹Focal lengthThe focal length (essentially your zoom range) of SLR lenses is quoted in 35mm equivalent, so when buying a lens you need to remember that most D-SLRs increase the focal length slightly. This amount varies between the available models but is usually around 1.5x. For example, the lens supplied with the Nikon D50 is the 18-55mm. Once mounted on the camera it gives you 27-82mm.
‹Available aperturesAfter the focal length, lenses quote a ratio, for example Canon EF-S 18-55mm f/3.5-f/5.6 (or 1:3.5-5.6). These last numbers are the maximum apertures available throughout the focal range. This lens will give you f/3.5 at the 18mm setting but at 55mm it will change to f/5.6. The lower the numbers are, the more expensive the lens is likely to be. Most professional lenses offer f/2.8 throughout the focal range but obviously at a much higher cost.
LENS HOOD A multi-tasking piece of plastic that will reduce lens fl are. It can also help to protect the lens being damaged should it get dropped and should the worst happen it’s much cheaper to replace than a whole lens too.
LENS MOUNT Make sure that you get the correct lens for your camera, as mounts are not cross-compatible. Whenever you take your lens off the camera make sure you turn the camera off and put the caps back on the camera and lens to keep the dust out.
AF/MF SWITCH This switch allows you to quickly change from autofocus to manual focus. You probably won’t use it much to start with but it can prove invaluable once your confi dence grows and you start using more of the camera’s features.
ZOOM RING SLRs save battery power by making you zoom in and out manually rather than automatically. The feel of the zoom ring is often a quick indication of the overall build-quality of the lens.
FOCUSING RING On cheaper lenses you focus manually by turning the very front part of the lens, while more expensive lenses give you a proper focusing ring. Also be on the lookout for lenses with internal focusing.
“Any grease, grime and dust on your optics will reduce the overall quality of your images, so it pays to keep your lenses clean”
‹Lens choicesThe manufacturers’ own lenses are often pricey compared to the third party lenses produced by companies such as Cosina, Sigma and Tamron, so it’s worth checking what else is available before you buy. Many lenses have been designed specifi cally for D-SLRs and as such they are not suitable to be used on traditional or full-frame SLRs. Look out for initials such as DC (Sigma), Di II (Tamron), DX (Nikon) and EF-S (Canon) that denote digital-only.
‹Keep it cleanAny grease, grime and dust on your optics will reduce the overall quality of your images, so it pays to keep your lenses clean. Use a good cloth, ideally one made from good quality microfi bre. Before you start wiping, blow as much dirt away fi rst to help minimise scratching. It’s also worth getting your hands on some special lens cleaning spray to protect the coating on the glass. Prevention is better than cure, so keep your lens caps on as much as possible and clean your bag regularly because dust will collect in the bottom.
Free with Practical Photography | 39

Gear advice
40 | Using your digital SLR Free with Practical Photography | 41
Arguably the most important weapon in a photographers’ arsenal, lenses are also one of the most variable. From the widest 10mm fi sh-eye to the longest 800mm telephoto, optics
are available in every conceivable size, weight and focal length. Due to the smaller sensors used in many of today’s digital SLRs, however, focal lengths vary depending on the model in question. See the previous page for more lens/focal length advice. But whether you’re a landscaper looking to capture dramatic sunsets or an architectural fanatic looking to isolate fi ne details, there’s a multitude of options that fall into four categories. Here’s the lowdown.
Recommended lenses“From the widest 10mm fi sh-eye to the longest 800mm telephoto, optics are available in every size, weight and focal length”
StandardOn full-frame digital SLRs standard lenses fall between 40mm and 55mm, though 50mm is the accepted norm. You’ll need a 35mm lens to get the same fi eld-of-view on digital SLRs with the smaller APS-sized sensor. Closest to the fi eld-of-view of the human eye, standard lenses offer an undistorted perspective and are often used for fl attering portraits. Just for the record, the true fi eld-of-view of the human eye is 43mm!
Wide-angle With shorter focal lengths and wider angles-of-view than standard lenses, wide-angle lenses are employed by landscape and reportage specialists. Remember you’ll need a shorter focal length on many digital SLRs than a 35mm or full-frame digital model. This need for shorter focal lengths on many digital SLRs has produced a raft of new models. A 17-35mm model, such as the one shown below, gives a fi eld-of-view equivalent to 25-52mm on a full-frame SLR.
TelephotoAny lens that weighs in with a focal length above 50mm is said to be a telephoto lens. Short telephotos (between 70mm and 120mm) are ideal for portraiture, while longer focal lengths (between 135mm and 300mm and above) are perfect for sports and wildlife. Remember, the magnifi cation of a lens on most digital SLRs is increased by around 1.5x, so a 200mm lens is equivalent to a 300mm on a full-frame camera. Macro
If you’ve ever wondered how photographers fi ll the frame with small subjects such as petals and insects, the answer is the humble macro lens. Allowing for 1:1 (life-size) reproduction and focusing from as close as 2in, true macro lenses are specifi cally constructed for close-up photography. They are commonly available in focal lengths between 50mm and 180mm.
For all the lens buying advice you’ll ever need take a look at the all-new Practical Photography website at www.
practicalphotography.co.uk Our ‘Top fi ve of everything’ section rates the top products in 17 categories, including the best wide-angle, macro and telephoto lenses. So take a look before you spend your cash.
you’ll ever need take a look at the all-new Photography
practicalphotography.co.uk Our ‘Top fi ve of
tip

Gear advice
“Get the best quality tripodyou can afford, as cheaper
ones often don’tperform as well”
Once you’ve bought your digital SLR, there are still some items that you need to think about getting your hands on. Check
our list of essential extras to see if there’s anything else you need.
Digital accessories
Spare battery and rechargeable batteriesIf your camera takes a dedicated battery, make sure you have at least one spare. Rather than buying lots of single use AA batteries, save yourself some money and get yourself some decent rechargeable batteries and a charger.
Refl ectorKeeping a refl ector in your bag will prove
invaluable on many occasions. Use it to bounce light into a dark subject, lift shadows
and a whole host of other applications.
Free with Practical Photography |43
Memory cards and wallet
Called ‘digital fi lm’ by some people, memory cards are integral to digital
photography. The more expensive cards usually offer faster and more reliable performance.
Keep your memory cards safe in a memory card wallet. These range from small canvas wallets right up to hardwearing waterproof plastic models. Failing that, keep the cards in the little plastic boxes they come in.
PrinterOnce you start taking a lot of pictures it’s well worth investing in a decent photo printer. Print sizes range from 6x4 right up to A3 size. An A4 inkjet often provides the most suitable solution.
TripodIt’s pretty much essential
for a lot of areas of photography, particularly landscapes and night shots. You
should get the best quality model you can afford, as cheaper ones
often don’t perform as well.
Sensor cleaningIf you feel up to the challenge of cleaning your own sensor, save yourself some time and money by buying a sensor cleaning kit. Remember to follow the instructions as closely as you can or you’ll risk ruining your whole camera.
Portable storageRather than shelling out lots of money on memory cards, you could invest in a portable storage device. You can save images from your memory card onto it, then wipe the card and carry on shooting. They are indispensable to those who take lots of pictures.
Blower brushThe fi rst stage of any cleaning operation should entail blowing the dust and muck off before you wipe it around. A blower can also be used to get dust off close-up subjects.
Cleaning kitYou can’t avoid having to keep your gear clean, so get your hands on a quality lens cloth and special cleaning spray. Make sure that you keep your cloth clean or you’ll just be spreading muck around your lenses.