Embed Size (px)
Citation preview
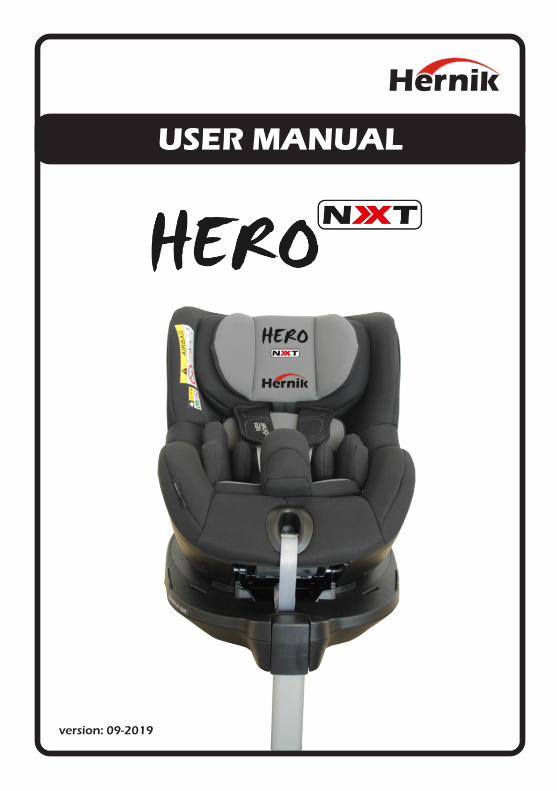
Herni
USER MANUAL
version: 09-2019

Herni
• Page 1 •
I. General information Seite 1.1 Introduction 2 1.2 Purpose and indication 2 1.3 Relevant information 3 1.4 Declaration of conformity 3 1.5 Warranty 3 1.6 Service and repair 3 1.7 Practical instructions 3 II. Safety instructions & Installation in the car 2.1 Get to know the HERO-NXT 4 2.2 Safety instructions 4 2.3 Usage in the car 5 2.4 Installation in the car 5 - 7 2.5 Adjusting the internal 5-point-belt 8 2.6 Adjusting the headrest 9
III. Handling and functions of the basic seat 3.1 Angular adjustment 10 3.2 Using the swivel 10 3.3 Using the exit function 11 3.4 Maintenance & product care 11
IV. Using the optional accessories 4.1 Lateral supports 12 4.2 Abduction block 12 4.3 Security tray 13 4.4 Protection mat 13 V. Guarantee 14
VI. Labeling 14
VII. Technical characteristics 15
TABLE OF CONTENTS

Herni
• Page 2 •
1.1 Introduction
You have chosen the car seat "HERO-NXT" and get hereby a high quality product from our house. We would like to thank you for your trust in us.
To make sure you find joy with this product and to ensure it helps you to make everyday life easier, we present you this manual. It shows you the correct and simple usage and the necessary care and maintenance. To avoid damage due to operator error and to ensure best use, please read the following instructions carefully. If you have any questions or problems, please contact your dealer. We wish you a trouble-free use and hope that our products meet your expectations.
We reserve the right to make technical changes to the version described in this manual.Before installing in your car and using it for the first time, please read and follow the installation instructions on pages 4 - 6. Please ensure that the instructions for use remain with the product and are therefore available to everyone who use the seat.
Yours
HERNIK GmbH
1.2 Purpose and indication
The HERO-NXT was developed for the transport of children with special needs in cars. Children with poor head or trunk control (eg infantile cerebral palsy, muscular dystrophy, hypotension) can be supported in their posture by means of individually positioned thorax pads and special upholstery which ensures a safe transportation.
Important optional accessories can be used to address specific needs such as: the lateral supports or the installation of a stable abduction wedge or a security tray. More in chapter IV.
I. General information
Herni
• Page 3 •
I. General information
1.3 Relevant information
The HERO-NXT car seat for disabled children consists of two modules:
1. A standard child car seat from Römer-Britax (please refer to the manufacturer's manual for use).
2. Adaptation module with accessories, which offers the possibility to equip the car seat according to individual needs. Please observe the instructions for use from HERNIK GmbH.
1.4 Declaration of conformity
HERNIK GmbH declares in sole responsibility that car seat "HERO-NXT" complies with the Essential Requirements (Appendix 1 of Directive 93/42 EEC). The product is marked with the CE mark according to the above mentioned directive.
1.5 Warranty
A warranty can only be accepted if the product is used under the specified conditions and for the intended purposes. The manufacturer is not liable for damage caused by components and spare parts which were not approved by the manufacturer.
1.6 Service and repairService and repairs on the HERO-NXT may only be carried out by specialized dealers. If you have any problems, contact your local dealer. For repairs, you will only receive original spare parts.
1.7 Practical instructionsThe car seat will be delivered fully assembled. Upon delivery, the dealer will instruct the user how to use the device by using the manual. The specialist dealer should install together with the user the car seat in the car.
When installing the car seat, it is best to hold it with one hand in the center of the front and the other at the top. In order to achieve an optimal sitting position, it is necessary to adjust the car seat individually to the circumstances of the child. This should always be done by the dealer.

Herni
II. Safety instructions & Installation in the car
2.1 Get to know the HERO-NXT
2.2 Safety instructions
• Always attach the HERO-NXT to the vehicle in accordance with the installation instructions, even when not in use. An unattached seat can injure other passengers in the event of emergency braking.
• The HERO-NXT should be secured in the car so that it is not trapped by the front seats or the vehicle doors.
• The straps must not be twisted or pinched and must be tightened.
• After an accident, the car seat can not be used again!
• Always put the harness on your child.
• Before each ride, make sure that the belt buckle and the ISOFIX are correctly locked and that the pedestal is correctly positioned.
• Page 4 •

Herni
• Page 5 •
2.3 Usage in the car
Please refer to the instructions for using child restraints in your vehicle owner's manual. Note any airbag restrictions in use. Please refer to the owner's manual of your vehicle for information on vehicle seats approved for use with child restraint systems in accordance with ECE R16.
3)range of applications HERO-NXT (i-SIZE) :
(Please observe the applicable regulations in your country)
1) In the direction of travel 76-105 cm / Against to the direction 61-105 cm2) In the direction of travel 76-105 cm: In the presence of a passenger airbag: Push
the passenger seat far back and follow any instructions in the operating manual of your vehicle. Opposite the direction of travel 61-105 cm: Do not use on passenger seats with active front airbag!
3) Provide enough space for children from 3 years upwards (about 1 hand width to the roof) and forward to the passenger seat back (at least 76 cm front-facing)
2.4 Installation in the car
a) If your vehicle is not equipped with ISOFIX insertion guides as standard, clamp the two insertion guides (02) supplied with the seat, with the cutout pointing upwards, to the two ISOFIX attachment points (01) on your vehicle.
TIP! The ISOFIX attachment points are located between the seat and the backrest of the vehicle seat.
b) Move the headrest of the vehicle seat to the uppermost position.
II. Safety instructions & Installation in the car

Herni
• Page 6 •
1. ADJUST THE DAMPING BRACKET
1.1 Place the rear-facing child seat in the direction of travel on a vehicle seat approved for use.
1.2 Hold the adjustment handle (14) with one hand on the damping bracket (10) and at the same time pull the damping bracket (10) upwards with your other hand until it is unlocked.
1.3 Adjust the angle of the damping bracket (10) to the seat angle of your vehicle seat backrest so that the damping bracket (10) engages with a "click" sound
2. PREPARE THE ISOFIX
2.1 Pull on the gray loop (15) until the ISOFIX locking arms (16) are fully extended.
2.2 Press the green safety button (06) and the red release button (05) against each other on both sides of the seat. This ensures that both hooks of the ISOFIX locking arms (16) are open and ready for use.
3. ATTACH THE ISOFIX
3.1 Position the two ISOFIX locking arms (16) directly in front of the two insertion guides (02).
3.2 Slide both ISOFIX locking arms (16) into the insertion guides (02) until the ISOFIX locking arms (16) click into place on both sides with a "click" sound.
DANGER! The green safety button (06) must be visible on both sides so that the child seat is properly secured.
II. Safety instructions & Installation in the car
Herni
• Page 7 •
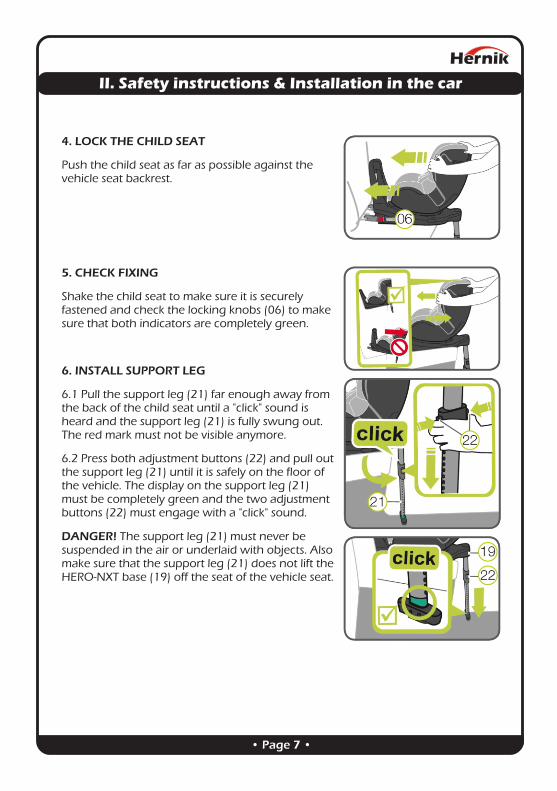
4. LOCK THE CHILD SEAT
Push the child seat as far as possible against the vehicle seat backrest.
5. CHECK FIXING
Shake the child seat to make sure it is securely fastened and check the locking knobs (06) to make sure that both indicators are completely green.
6. INSTALL SUPPORT LEG
6.1 Pull the support leg (21) far enough away from the back of the child seat until a "click" sound is heard and the support leg (21) is fully swung out. The red mark must not be visible anymore.
6.2 Press both adjustment buttons (22) and pull out the support leg (21) until it is safely on the floor of the vehicle. The display on the support leg (21) must be completely green and the two adjustment buttons (22) must engage with a "click" sound.
DANGER! The support leg (21) must never be suspended in the air or underlaid with objects. Also make sure that the support leg (21) does not lift the HERO-NXT base (19) off the seat of the vehicle seat.
II. Safety instructions & Installation in the car

Herni
• Page 8 •
2.5 Putting on the belts
1. SHOULDER STRAPS LOOSE
To loosen the shoulder straps, press the belt adjuster button (11) while simultaneously pulling both shoulder straps (09) forward.
ATTENTION! Do not pull on the shoulder pads (08).
2. OPEN BUCKLE
To open the buckle (04), press the red button on the buckle.
3. PUT CHILD IN CHILD SEAT
Put your child in the child seat. Make sure that the belt buckle (04) is folded forward and put your child in the child seat.
DANGER! Only use the child seat backwards on the front passenger seat when the front airbag is deactivated.
4. PLACE SHOULDER STRAPS
Put the shoulder straps (09) over your child's shoulders.
ATTENTION! The shoulder straps (09) must not be twisted or reversed.
5. CLOSE BUCKLE
Insert the two lock tongues (29) together and snap them into the belt buckle (04) with an audible "click" sound.
5. STRAIN ADJUSTING BELT
Pull on the adjustment strap (12) until the strap lies flat and snug against your child's body.
WARNING! The hip straps should run as low as possible over the groin of your child.
II. Safety instructions & Installation in the car

Herni
• Page 9 •
2.6 Adjusting the headrest
A properly adjusted headrest (03) ensures optimum protection for your child in the child seat: The headrest (03) must be adjusted so that the shoulder straps (09) are at or slightly above your child's shoulder height.
► The shoulder straps (09) must be adjusted so that they are horizontal or just above the shoul-ders of your child.
► The shoulder straps (09) must not run behind the back of the child, at or above the ears.
a) Loosen the harness (8.1)
b) Hold down the release button (07) of the headrest (03) and move the headrest (03) to the correct shoulder strap height.
c) Check that the headrest (03) is properly engaged by moving the headrest (03) slightly downwards.
Note, if lateral supports are installed:At the same time as releasing the lock, the aluminum plate at the bottom of the recessed grip must be slightly detached from the Velcro connection with the other hand!
Thereafter, the back and head part can be easily moved. When the desired position has been reached, the Velcro connection is automatically restored by releasing the aluminum plate.
In order to provide a continuous, comfortable padding, a two-part back cushion was developed. The upper part is connected to the headrest and moves upwards, while a smaller wedge-shaped cushion forms the conclusion downwards.
II. Safety instructions & Installation in the car

Herni
III. Handling and functions of the basic seat
• Page10•
3.1 Angular adjustment
The seat unit of the HERO-NXT can be used forwards and backwards in six different angles of inclination.
To adjust the seat angle:
Pull the adjustment handle (13) forward and push / push the seat unit (18) into the desired position.
DANGER! The seat unit (18) must engage firmly in any position with a "click" sound. Pull on the seat pan (18) to check if it snaps into place.
3.2 Using the swivel
The HERO-NXT can be used as follows:
1. from 61-105 cm (<18 kg) backward
2. from the age of 15 months: 76-105 cm (<18 kg) it can be used in the direction of travel
To change the direction of travel, press the rotation button (20) and turn the seat in the desired direction until it clicks into place.
When used in the direction of travel, the damping bracket (10) must be in the vertical position.
DANGER! Before each ride, make sure that the rotating part of the child seat is fully engaged by trying to turn the child seat in both directions.
DANGER! Do not use the child seat in a forward-looking position if your child is less than 76 cm / 15 months old.

Herni
• Page 11•
3.3 Using the exit function
1. Press the rotation button (20) on the side of the lower part (19) and at the same time turn the seat unit (18) 90° in the direction of the vehicle door.
2. Now you can put your child in or out comfort-ably.
3. Secure your child.
4. Rotate the seat unit (18) 90 ° back to the direction of the child's age until it snaps into place with a "click" sound.
5. Make sure that both indicators (27) show the color black. If any of the indicators indicate the color is red, the seat pan (18) is not properly engaged.
Attention: Before each ride, make sure the rotatable seat unit (18) is fully engaged and both indicators are black.
3.4 Maintenance & Product care
Only use original HERNIK seat covers. The seat cover is an integral part of the child seat and fulfills important functions to ensure the proper functioning of the system. Replacement seat covers are available from your dealer.
• The cover can be removed and washed with a mild detergent in the fine washing program of the washing machine (30 ° C). Please refer to the instruc-tions on the wash label of the cover.
• The padding can be washed like the cover. Remove all foam parts from the upper and lower parts before washing. These must not be washed along.
• The shoulder pads can be removed and washed with lukewarm soapy water.
• The plastic parts and straps can be cleaned with soapy water. Do not use harsh cleaning agents (such as solvents).
III. Handling and functions of the basic seat

Herni
• Page 12 •
4.1 Lateral supports
The lateral supports help your child stabilize the upper body when trunk control is limited. They are adjustable in depth by means of a screw.
The laterals are attached by means of a Velcro connection on a specially bolted mounting plate. They can be solved with light force. If you have found an optimal position, the laterals should be re-fixed with pressure in the direction of the back with a slight turn.
The cover is removable and washable.
4.2 Abduction block
The abduction block helps your child keep his legs in a controlled position. He is not adjustable, but applied to a solid plastic plate, which is located under the cover.
If the cushion is correctly seated, the pusher is easily accessible for loosening the 5-point belt.
IV. Using the optional accessories

4.3 Security tray
Das Stütz- und Sicherheitspolster ermöglicht es ihrem Kind die Arme abzulegen und so den Oberkörper zu stabilisieren.
Es ist auf der Unterseite mit Klettband ausgestattet, damit ein fester Sitz gewährleistet ist. Um es zu montieren, muss der Tisch vorn angehoben und in den Schlitz zwischen Rücken- und Sitzteil geklemmt werden. Danach bitte mit den Bändern am Rückenteil ankletten.
Der Bezug ist abnehm- und waschbar.
4.4 Protection mat
1. Position the mat on the car seat without blocking the ISOFIX connectors.
2. Place the HERO-NXT in the center of the protective mat and secure it as described in chapter 3.1.
Herni
• Page 13 •
IV. Using the optional accessories

Herni
HERNIK products are designed and manufactured in accordance with strict quality standards. If, in exceptional circumstances, you have cause for complaint, HERNIK GmbH guarantee in accordance with the terms and conditions of delivery:
• 24 months warranty on all solid parts, from date of delivery.
• 12 months warranty on all moving parts, from date of delivery.
For parts that were not manufactured by HERNIK GMBH, please refer to the warranty policy of the respective manufacturer (Römer-Britax Kindersicherheit GmbH). Claims under this guarantee are subject to the device being properly installed and used in accordance with the instructions provided.
Warranty is void where modifications or improper repairs, without prior consultation with the manufacturers are carried out. Warranty is void where a device is improperly fitted.
Further claims, for whatever legal reason, in particular, claims for direct or indirect damages are excluded.
On the back you‘ll find the following labeling:
• Page 14 •
Partenhauserweg 14 • 81369 München • Germany
Serien-Nr.: HO-2019-9999
Dualfix HERO-NXT (18 kg)
Lesen Sie bitte vor Gebrauch die Bedienungsanleitung!
Herni GmbH
Rückhalteeinrichtung f. spez. Anforderungen „S“
V. Guarantee
VI. Labeling

• Page 15 •
VII. Technical characteristics

Herni
• Seite 13 •
HERNIK GmbHAuf der Gröb 2 c
83064 Raubling • Germany
+49 8035-9580448 • +49 8035-9580446 [email protected] • www.hernik.de