Embed Size (px)
DESCRIPTION
Nxt Programming
Citation preview
NXT-G Programming
Workshop for FLL Coaches
Developed by Tony Ayad
Updated by LeRoy Nelson
California - Los Angeles Region FLL
September 2012
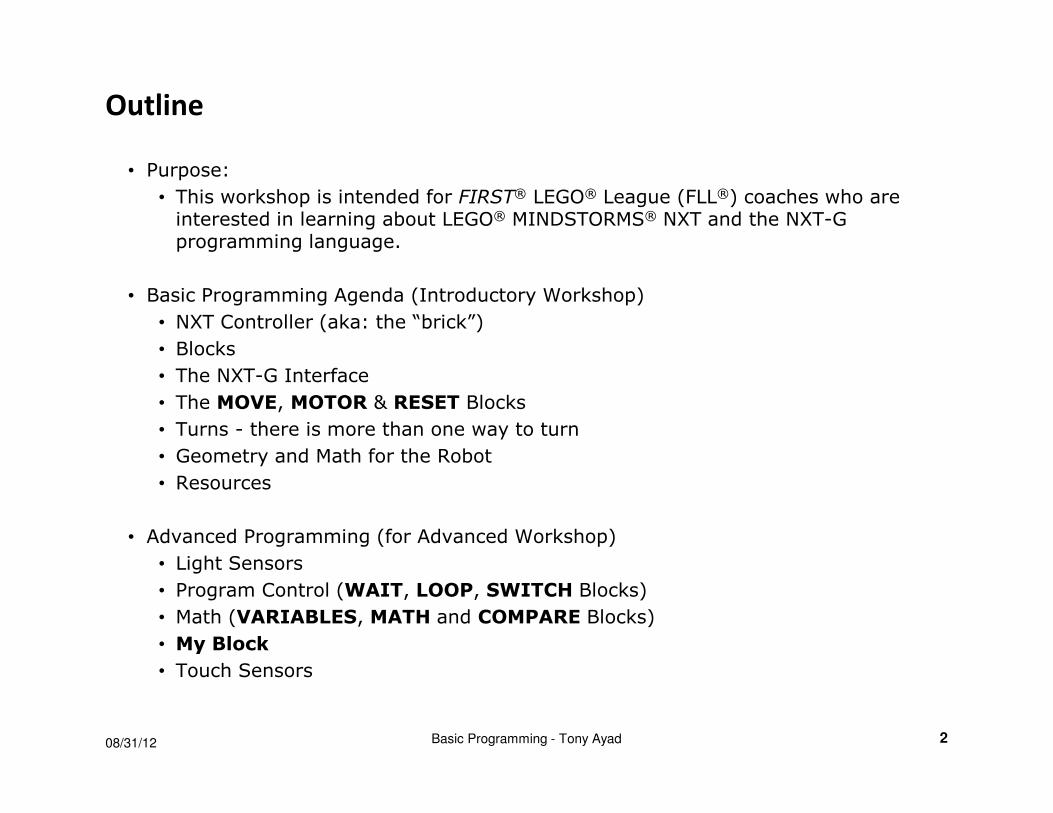
Outline
• Purpose:
• This workshop is intended for FIRST® LEGO® League (FLL®) coaches who are interested in learning about LEGO® MINDSTORMS® NXT and the NXT-G programming language.
• Basic Programming Agenda (Introductory Workshop)
• NXT Controller (aka: the “brick”)
• Blocks
• The NXT-G Interface
• The MOVE, MOTOR & RESET Blocks
• Turns - there is more than one way to turn
• Geometry and Math for the Robot
• Resources
• Advanced Programming (for Advanced Workshop)
• Light Sensors
• Program Control (WAIT, LOOP, SWITCH Blocks)
• Math (VARIABLES, MATH and COMPARE Blocks)
• My Block
• Touch Sensors
208/31/12 Basic Programming - Tony Ayad
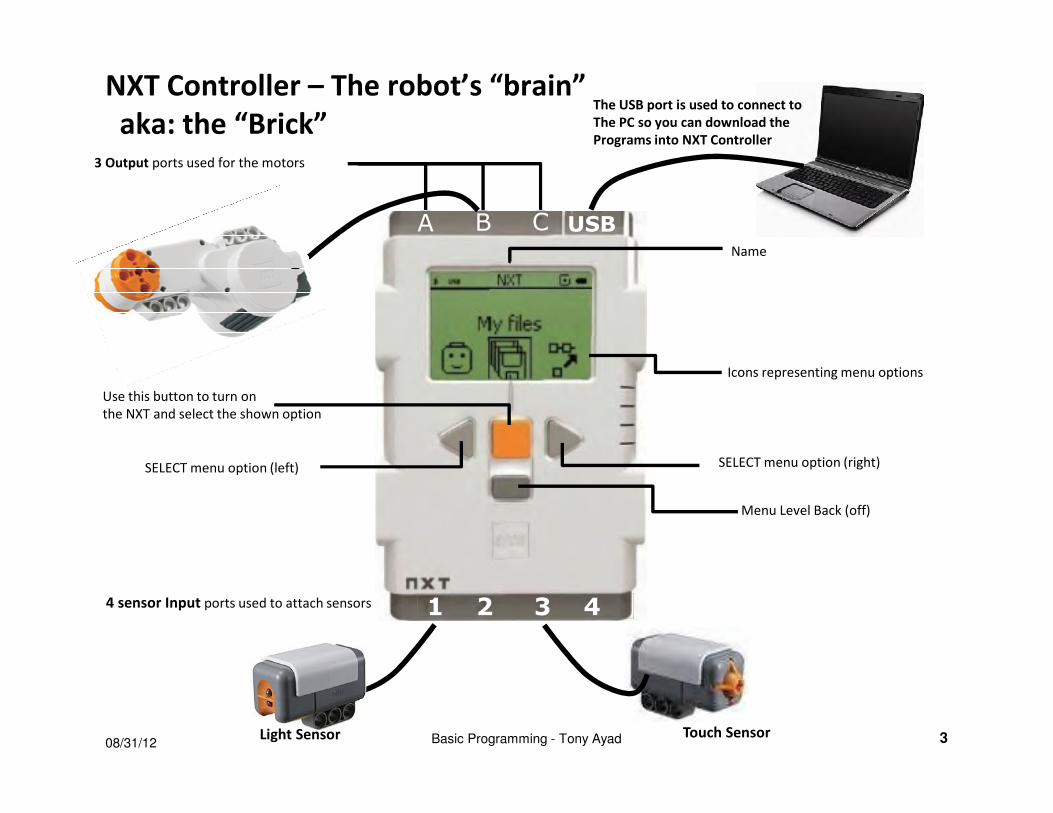
NXT Controller – The robot’s “brain”
aka: the “Brick”
BA C
3 Output ports used for the motors
USB
Use this button to turn on
the NXT and select the shown option
SELECT menu option (left) SELECT menu option (right)
Menu Level Back (off)
Icons representing menu options
08/31/12 3Basic Programming - Tony Ayad
Name
1 2 3 44 sensor Input ports used to attach sensors
Light Sensor Touch Sensor
The USB port is used to connect to
The PC so you can download the
Programs into NXT Controller
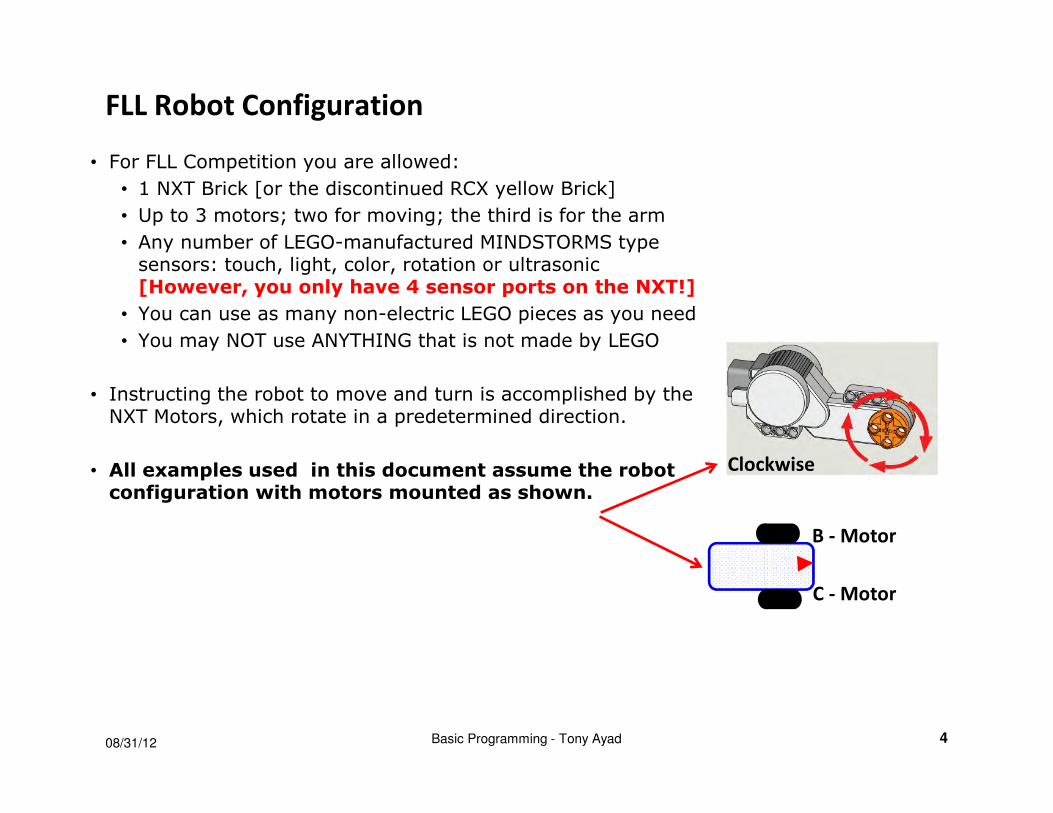
FLL Robot Configuration
• For FLL Competition you are allowed:
• 1 NXT Brick [or the discontinued RCX yellow Brick]
• Up to 3 motors; two for moving; the third is for the arm
• Any number of LEGO-manufactured MINDSTORMS type sensors: touch, light, color, rotation or ultrasonic[However, you only have 4 sensor ports on the NXT!]
• You can use as many non-electric LEGO pieces as you need
• You may NOT use ANYTHING that is not made by LEGO
• Instructing the robot to move and turn is accomplished by the NXT Motors, which rotate in a predetermined direction.
• All examples used in this document assume the robot configuration with motors mounted as shown.
08/31/12 Basic Programming - Tony Ayad 4
B - Motor
C - Motor
Clockwise
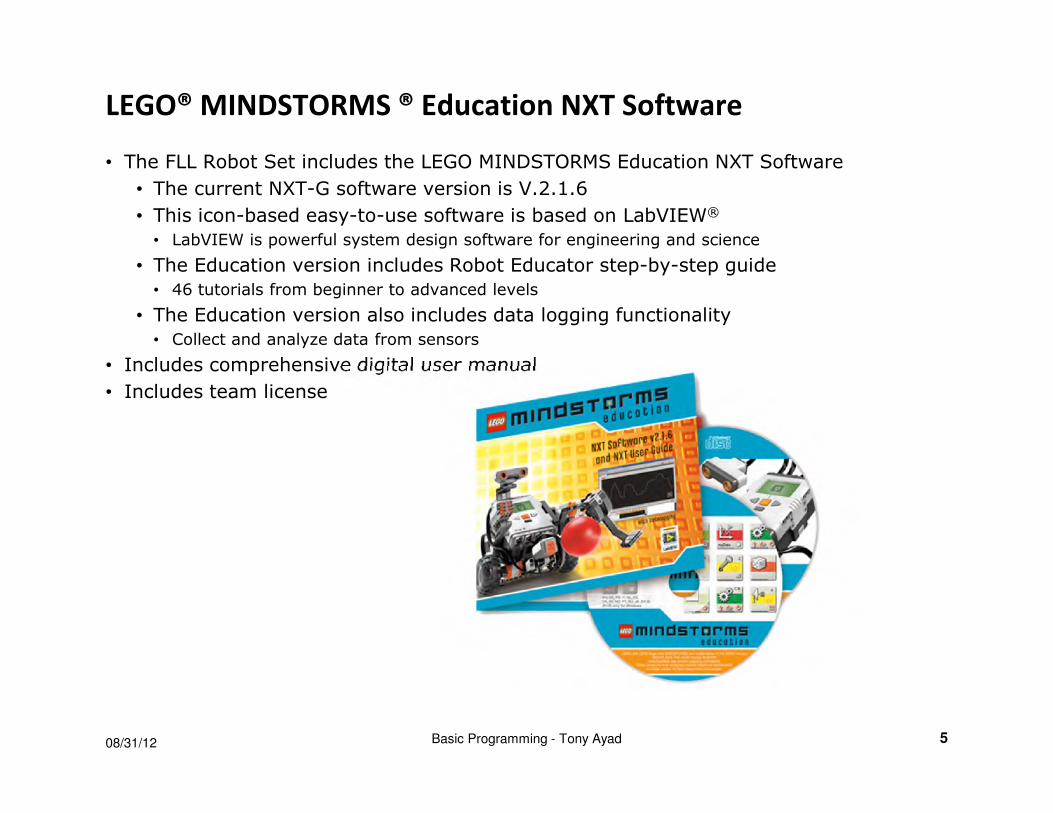
LEGO® MINDSTORMS ® Education NXT Software
• The FLL Robot Set includes the LEGO MINDSTORMS Education NXT Software
• The current NXT-G software version is V.2.1.6
• This icon-based easy-to-use software is based on LabVIEW®
• LabVIEW is powerful system design software for engineering and science
• The Education version includes Robot Educator step-by-step guide
• 46 tutorials from beginner to advanced levels
• The Education version also includes data logging functionality
• Collect and analyze data from sensors
• Includes comprehensive digital user manual
• Includes team license
08/31/12 Basic Programming - Tony Ayad 5
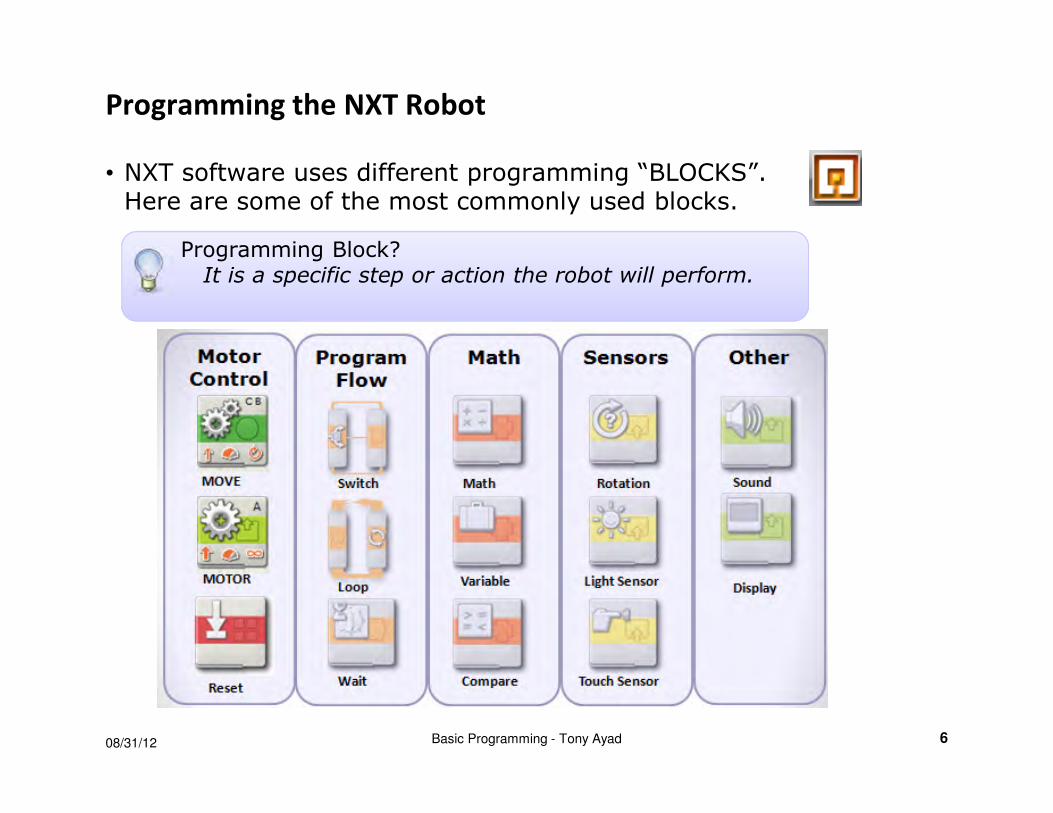
Programming the NXT Robot
• NXT software uses different programming “BLOCKS”. Here are some of the most commonly used blocks.
Programming Block?It is a specific step or action the robot will perform.
08/31/12 6Basic Programming - Tony Ayad
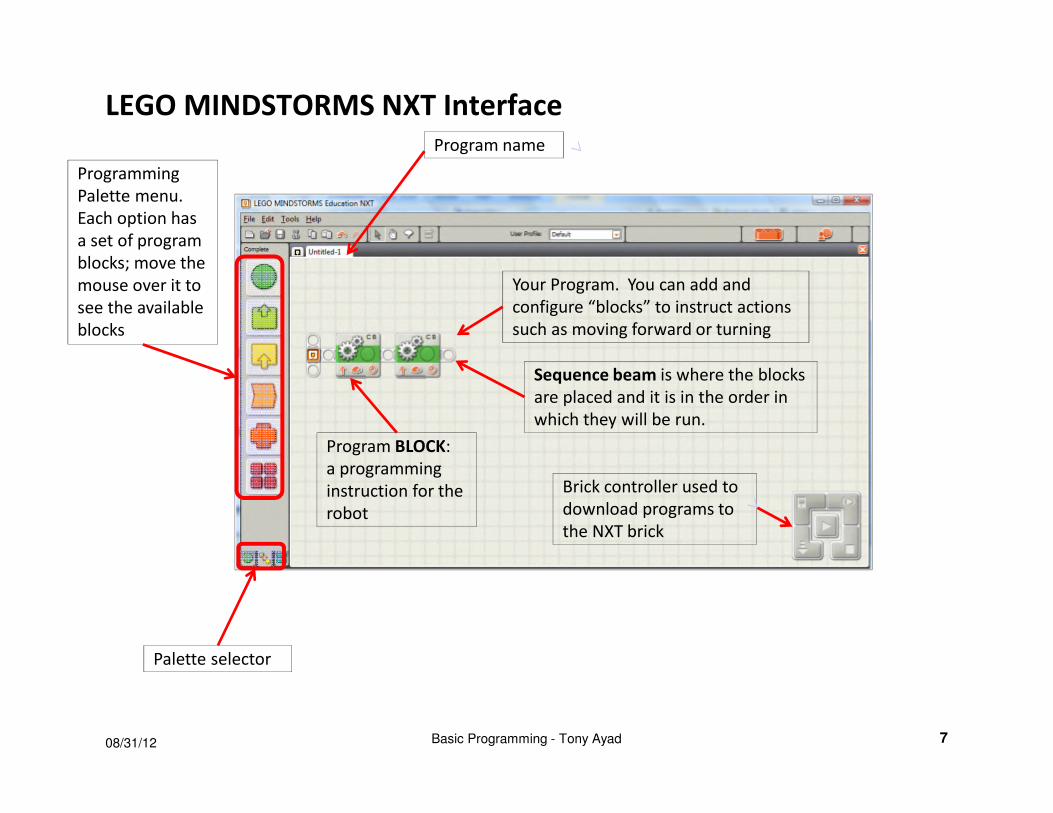
LEGO MINDSTORMS NXT Interface
Programming
Palette menu.
Each option has
a set of program
blocks; move the
mouse over it to
see the available
blocks
Your Program. You can add and
configure “blocks” to instruct actions
such as moving forward or turning
Brick controller used to
download programs to
the NXT brick
Palette selector
Program name
708/31/12
Program BLOCK:
a programming
instruction for the
robot
Basic Programming - Tony Ayad
Sequence beam is where the blocks
are placed and it is in the order in
which they will be run.
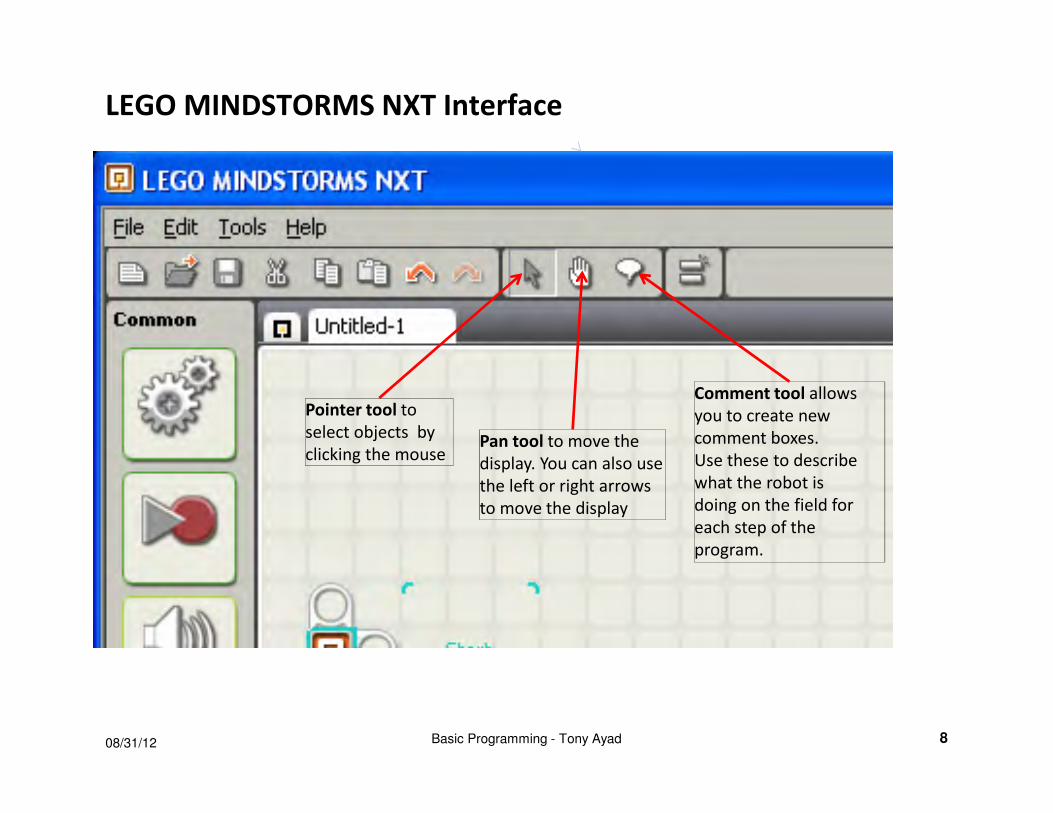
LEGO MINDSTORMS NXT Interface
Pan tool to move the
display. You can also use
the left or right arrows
to move the display
808/31/12 Basic Programming - Tony Ayad
Comment tool allows
you to create new
comment boxes.
Use these to describe
what the robot is
doing on the field for
each step of the
program.
Pointer tool to
select objects by
clicking the mouse
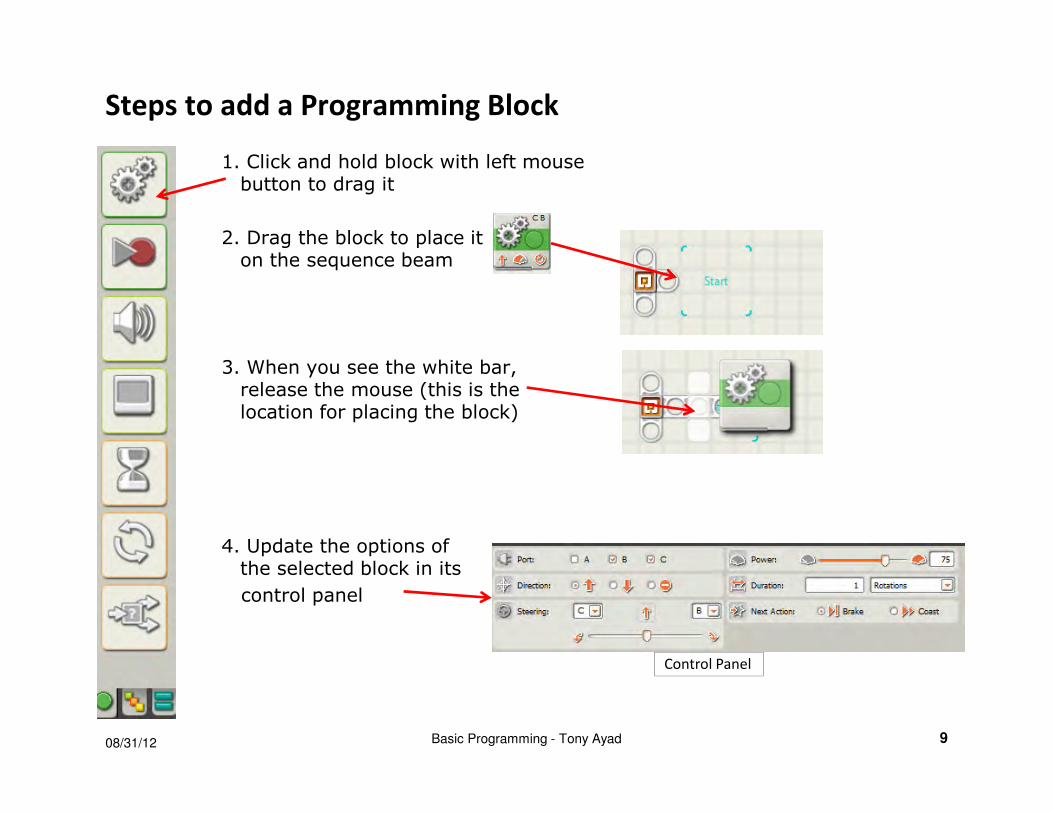
Steps to add a Programming Block
1. Click and hold block with left mouse button to drag it
2. Drag the block to place it on the sequence beam
3. When you see the white bar,release the mouse (this is thelocation for placing the block)
4. Update the options of the selected block in its
control panel
08/31/12 Basic Programming - Tony Ayad 9
Control Panel
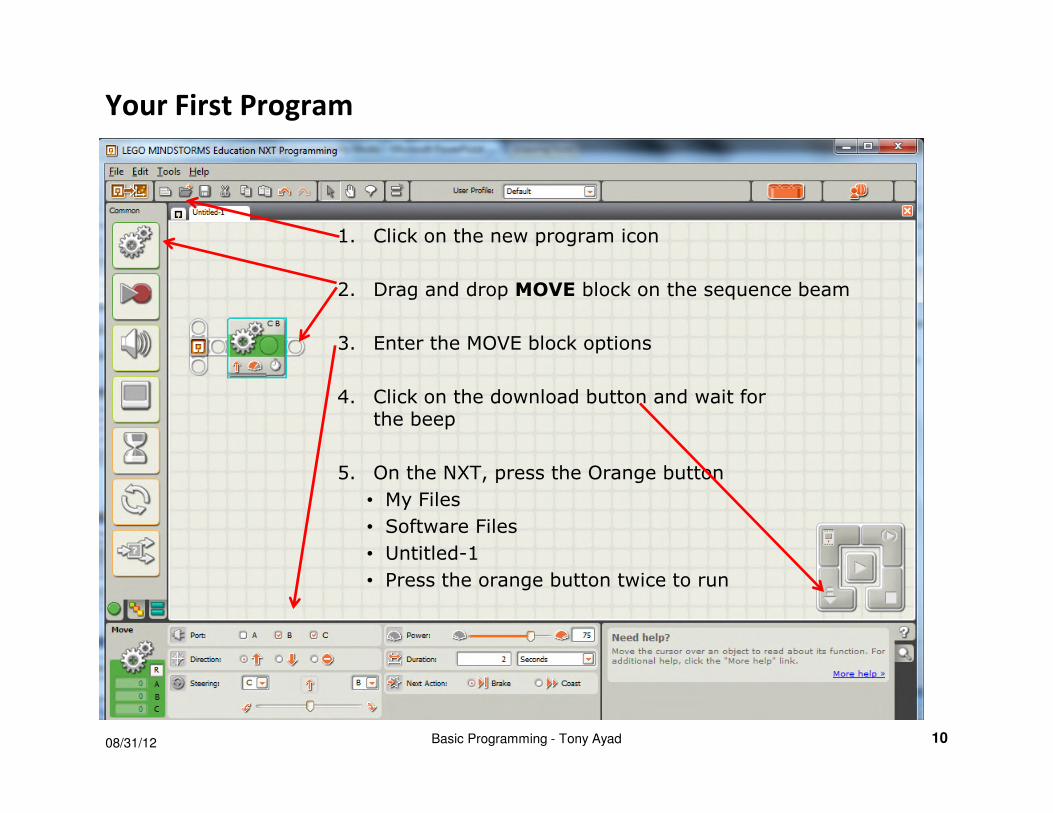
Your First Program
1. Click on the new program icon
2. Drag and drop MOVE block on the sequence beam
3. Enter the MOVE block options
4. Click on the download button and wait for the beep
5. On the NXT, press the Orange button
• My Files
• Software Files
• Untitled-1
• Press the orange button twice to run
08/31/12 Basic Programming - Tony Ayad 10
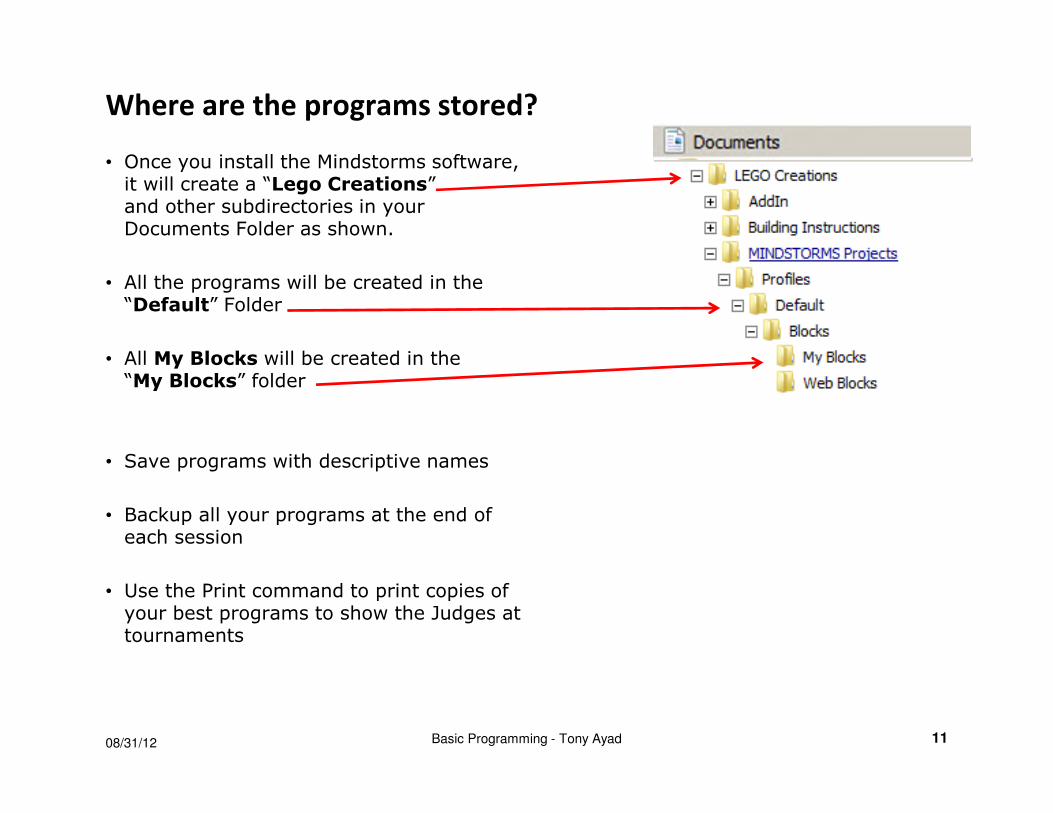
Where are the programs stored?
• Once you install the Mindstorms software, it will create a “Lego Creations” and other subdirectories in your Documents Folder as shown.
• All the programs will be created in the “Default” Folder
• All My Blocks will be created in the “My Blocks” folder
• Save programs with descriptive names
• Backup all your programs at the end of each session
• Use the Print command to print copies of your best programs to show the Judges at tournaments
08/31/12 Basic Programming - Tony Ayad 11
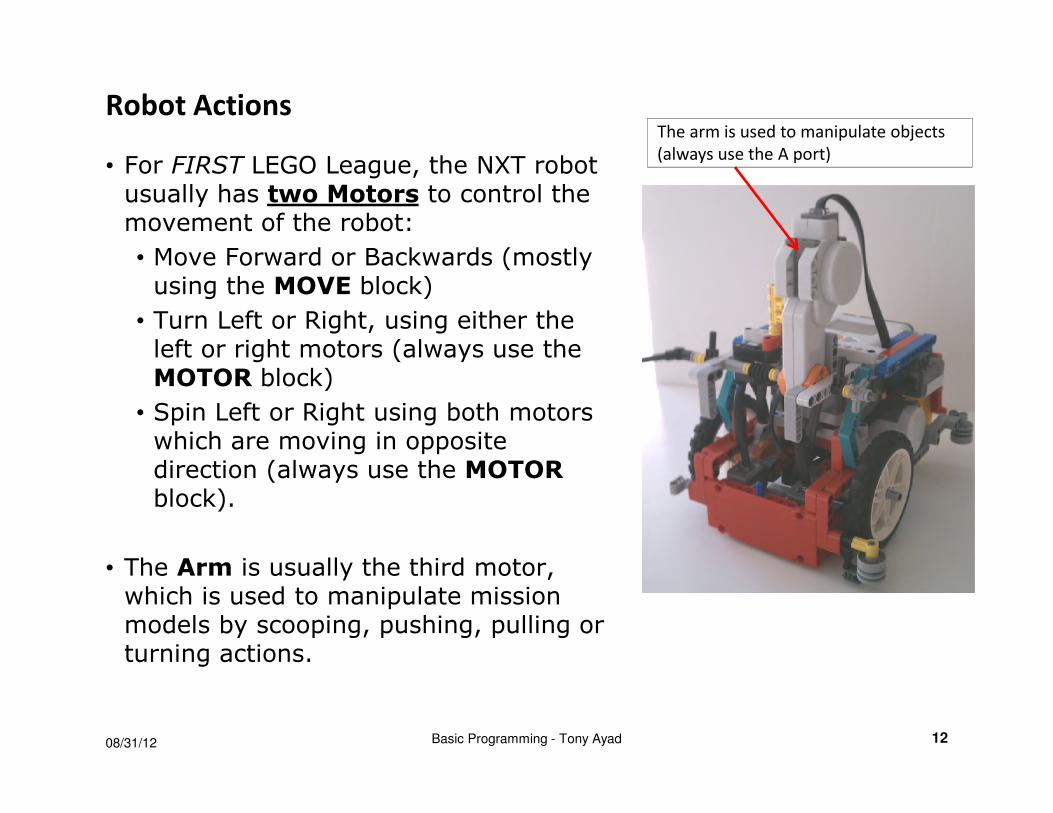
Robot Actions
• For FIRST LEGO League, the NXT robot usually has two Motors to control the movement of the robot:
• Move Forward or Backwards (mostly using the MOVE block)
• Turn Left or Right, using either the left or right motors (always use the MOTOR block)
• Spin Left or Right using both motors which are moving in opposite direction (always use the MOTORblock).
• The Arm is usually the third motor, which is used to manipulate mission models by scooping, pushing, pulling or turning actions.
08/31/12 Basic Programming - Tony Ayad 12
The arm is used to manipulate objects
(always use the A port)
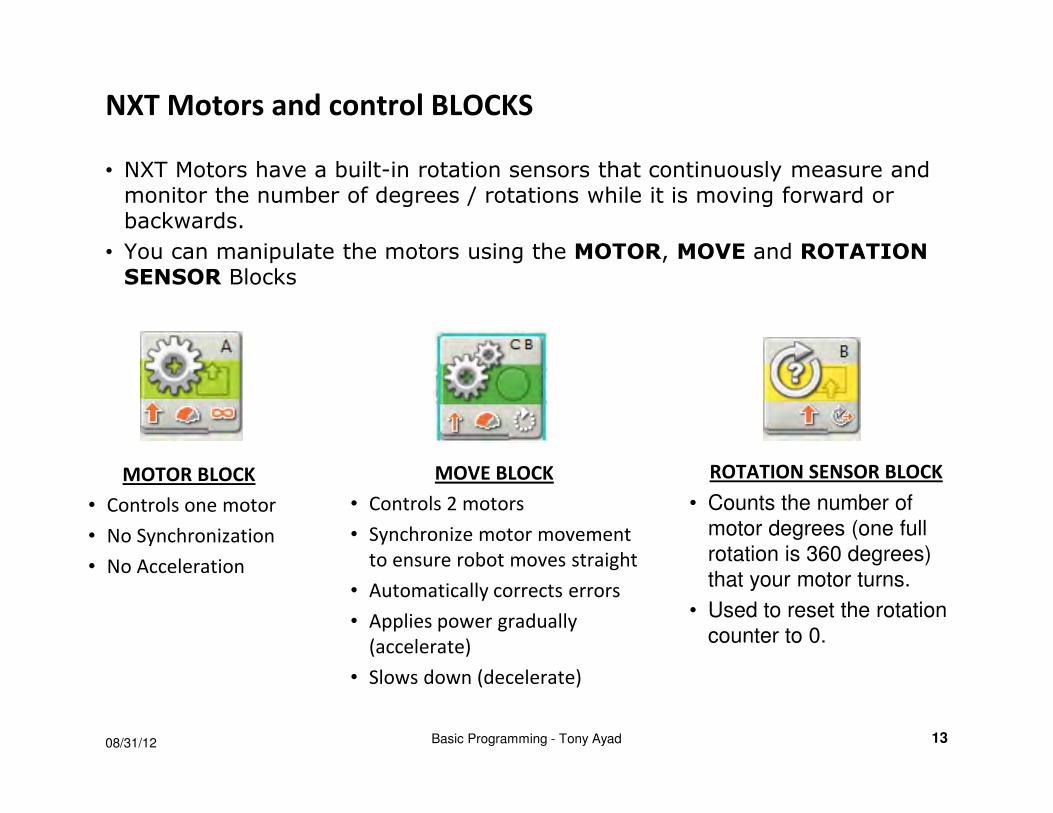
NXT Motors and control BLOCKS
• NXT Motors have a built-in rotation sensors that continuously measure and monitor the number of degrees / rotations while it is moving forward or backwards.
• You can manipulate the motors using the MOTOR, MOVE and ROTATION SENSOR Blocks
MOTOR BLOCK
• Controls one motor
• No Synchronization
• No Acceleration
MOVE BLOCK
• Controls 2 motors
• Synchronize motor movement
to ensure robot moves straight
• Automatically corrects errors
• Applies power gradually
(accelerate)
• Slows down (decelerate)
ROTATION SENSOR BLOCK
• Counts the number of
motor degrees (one full
rotation is 360 degrees)
that your motor turns.
• Used to reset the rotation
counter to 0.
1308/31/12 Basic Programming - Tony Ayad
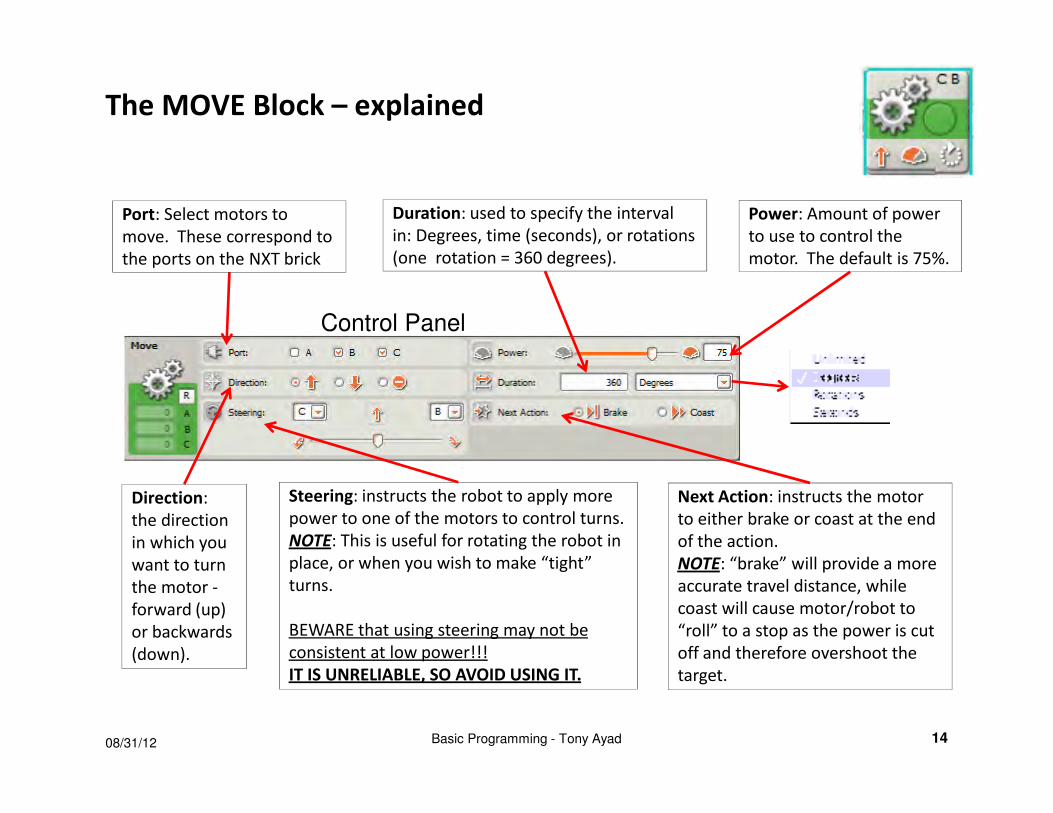
The MOVE Block – explained
Duration: used to specify the interval
in: Degrees, time (seconds), or rotations
(one rotation = 360 degrees).
Port: Select motors to
move. These correspond to
the ports on the NXT brick
Power: Amount of power
to use to control the
motor. The default is 75%.
Direction:
the direction
in which you
want to turn
the motor -
forward (up)
or backwards
(down).
Next Action: instructs the motor
to either brake or coast at the end
of the action.
NOTE: “brake” will provide a more
accurate travel distance, while
coast will cause motor/robot to
“roll” to a stop as the power is cut
off and therefore overshoot the
target.
Steering: instructs the robot to apply more
power to one of the motors to control turns.
NOTE: This is useful for rotating the robot in
place, or when you wish to make “tight”
turns.
BEWARE that using steering may not be
consistent at low power!!!
IT IS UNRELIABLE, SO AVOID USING IT.
1408/31/12 Basic Programming - Tony Ayad
Control Panel
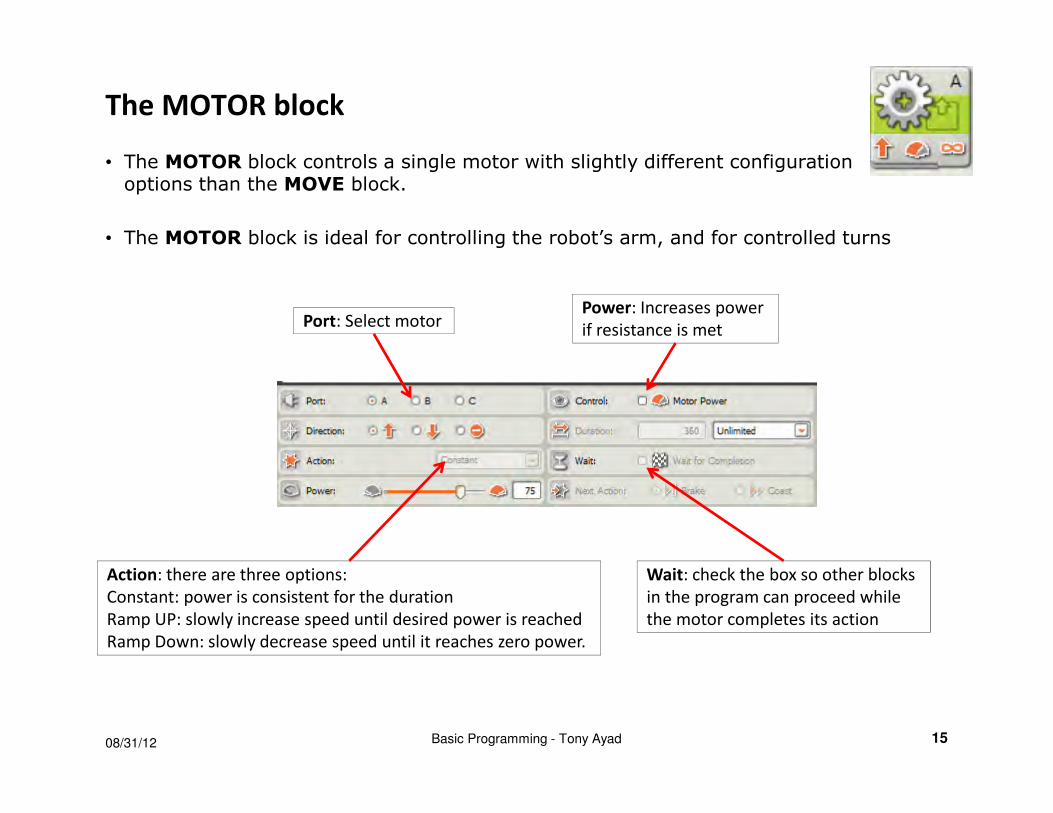
The MOTOR block
• The MOTOR block controls a single motor with slightly different configuration options than the MOVE block.
• The MOTOR block is ideal for controlling the robot’s arm, and for controlled turns
08/31/12 Basic Programming - Tony Ayad 15
Port: Select motor Power: Increases power
if resistance is met
Wait: check the box so other blocks
in the program can proceed while
the motor completes its action
Action: there are three options:
Constant: power is consistent for the duration
Ramp UP: slowly increase speed until desired power is reached
Ramp Down: slowly decrease speed until it reaches zero power.
ROTATION SENSOR block
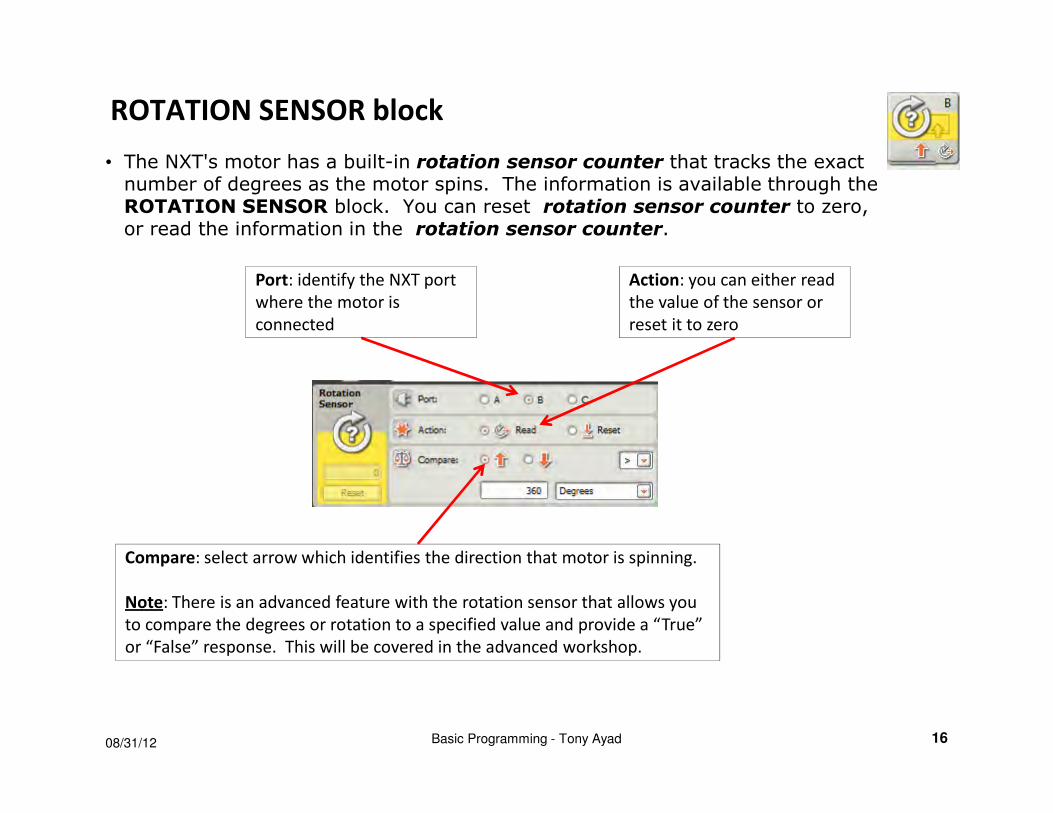
• The NXT's motor has a built-in rotation sensor counter that tracks the exact number of degrees as the motor spins. The information is available through the ROTATION SENSOR block. You can reset rotation sensor counter to zero, or read the information in the rotation sensor counter.
08/31/12 Basic Programming - Tony Ayad 16
Port: identify the NXT port
where the motor is
connected
Action: you can either read
the value of the sensor or
reset it to zero
Compare: select arrow which identifies the direction that motor is spinning.
Note: There is an advanced feature with the rotation sensor that allows you
to compare the degrees or rotation to a specified value and provide a “True”
or “False” response. This will be covered in the advanced workshop.
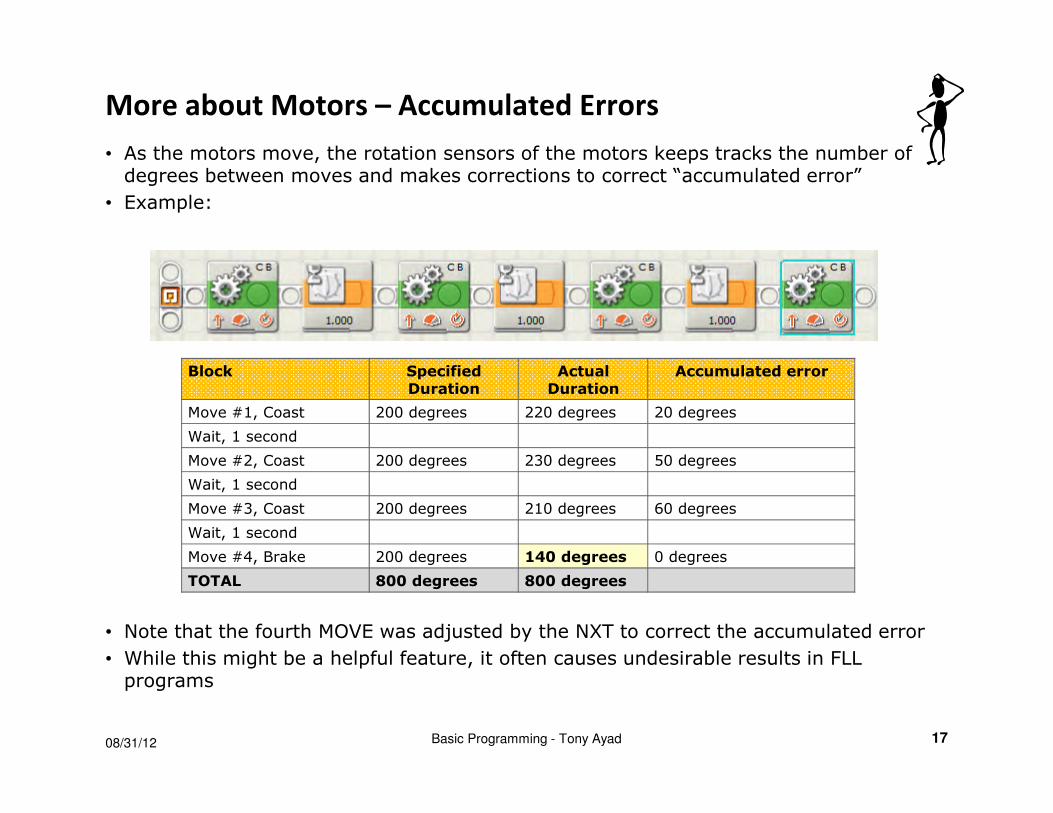
More about Motors – Accumulated Errors
• As the motors move, the rotation sensors of the motors keeps tracks the number of degrees between moves and makes corrections to correct “accumulated error”
• Example:
• Note that the fourth MOVE was adjusted by the NXT to correct the accumulated error
• While this might be a helpful feature, it often causes undesirable results in FLL programs
Block SpecifiedDuration
Actual Duration
Accumulated error
Move #1, Coast 200 degrees 220 degrees 20 degrees
Wait, 1 second
Move #2, Coast 200 degrees 230 degrees 50 degrees
Wait, 1 second
Move #3, Coast 200 degrees 210 degrees 60 degrees
Wait, 1 second
Move #4, Brake 200 degrees 140 degrees 0 degrees
TOTAL 800 degrees 800 degrees
1708/31/12 Basic Programming - Tony Ayad
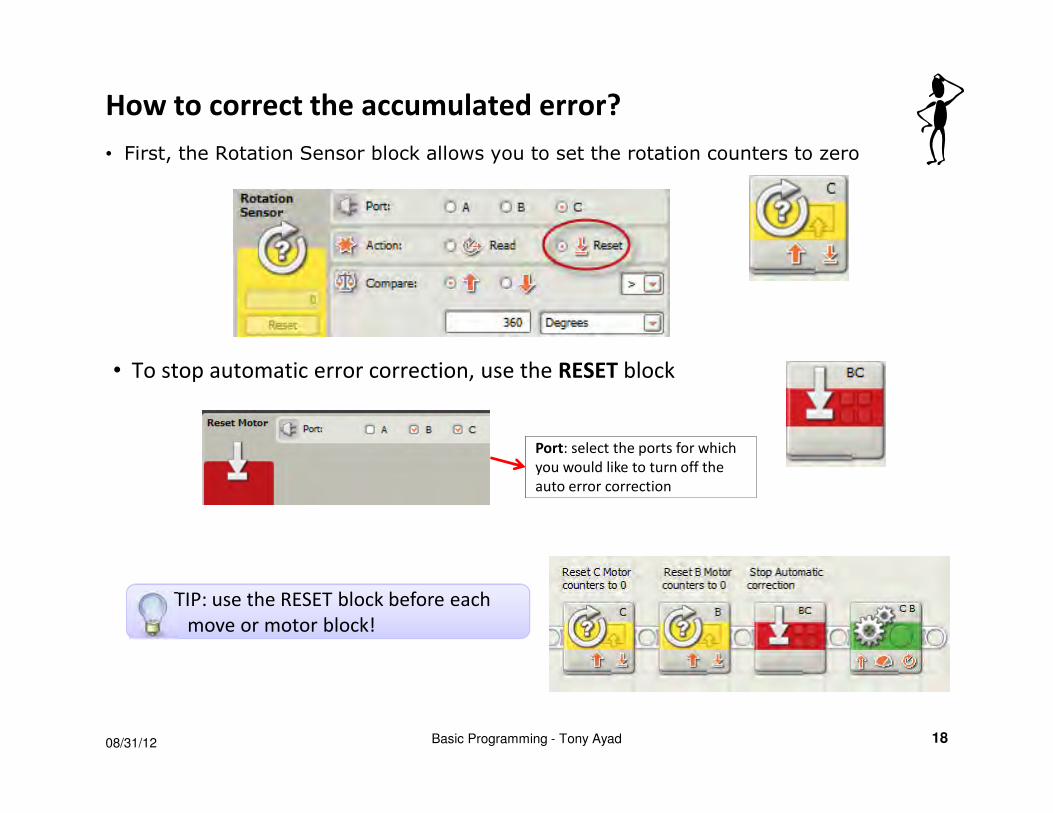
How to correct the accumulated error?
• First, the Rotation Sensor block allows you to set the rotation counters to zero
• To stop automatic error correction, use the RESET block
Port: select the ports for which
you would like to turn off the
auto error correction
TIP: use the RESET block before each
move or motor block!
1808/31/12 Basic Programming - Tony Ayad

Turn vs. Spin
• There are two ways in which you can make the robot turn
• Make ONLY one motor move, or
• Using both motors moving in opposite direction, and this is referred to as “spinning"
• One Motor move:
• Right Turn – Use motor block and select the “B” motor
• In this case the robot’s right wheel will be stationary and the left wheel will move.
• Turning with two motors in opposite direction
• To turn the robot right (spin clockwise), use the MOTOR blocks where the the “C” motor will turn counter clockwise and “B” motor will turn clockwise.
08/31/12 Basic Programming - Tony Ayad 19
B
C brake
Right
B
C Backward
Forward
TIP: for turning in a tight spot, use the two motors.
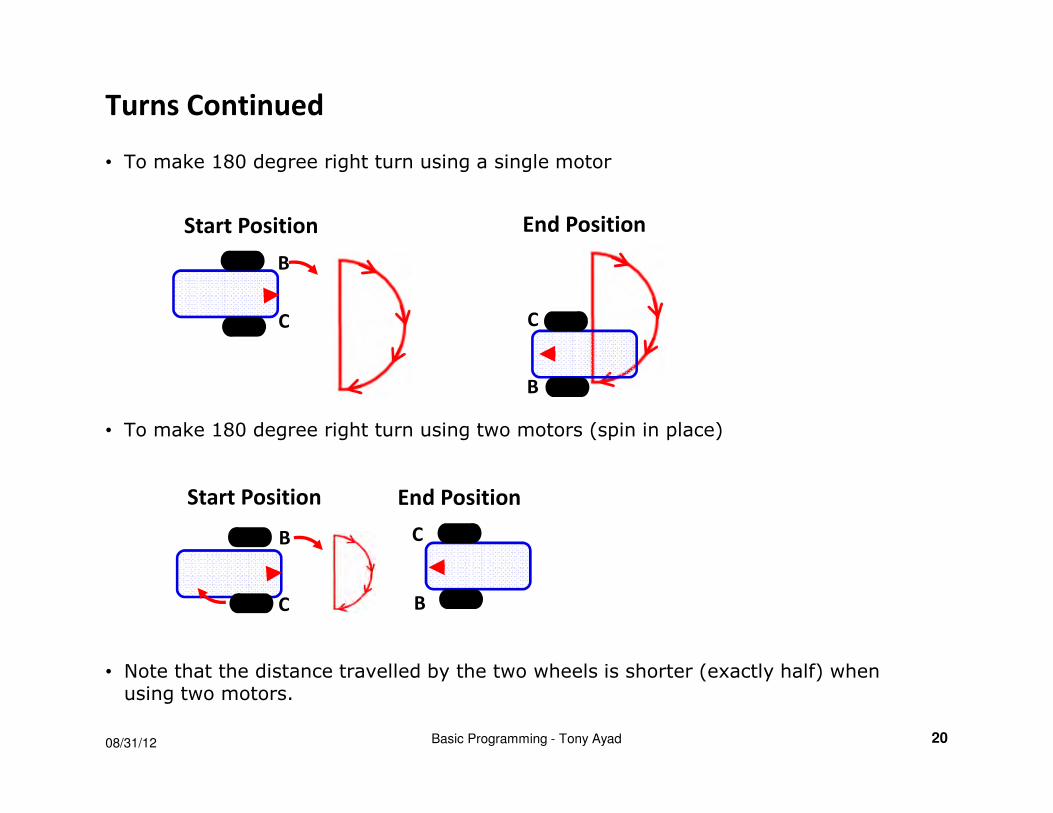
Turns Continued
• To make 180 degree right turn using a single motor
• To make 180 degree right turn using two motors (spin in place)
• Note that the distance travelled by the two wheels is shorter (exactly half) when using two motors.
08/31/12 Basic Programming - Tony Ayad 20
B
Start Position End Position
Start Position End Position
C
B
C
C
B
C
B
08/31/12 Basic Programming - Tony Ayad 21
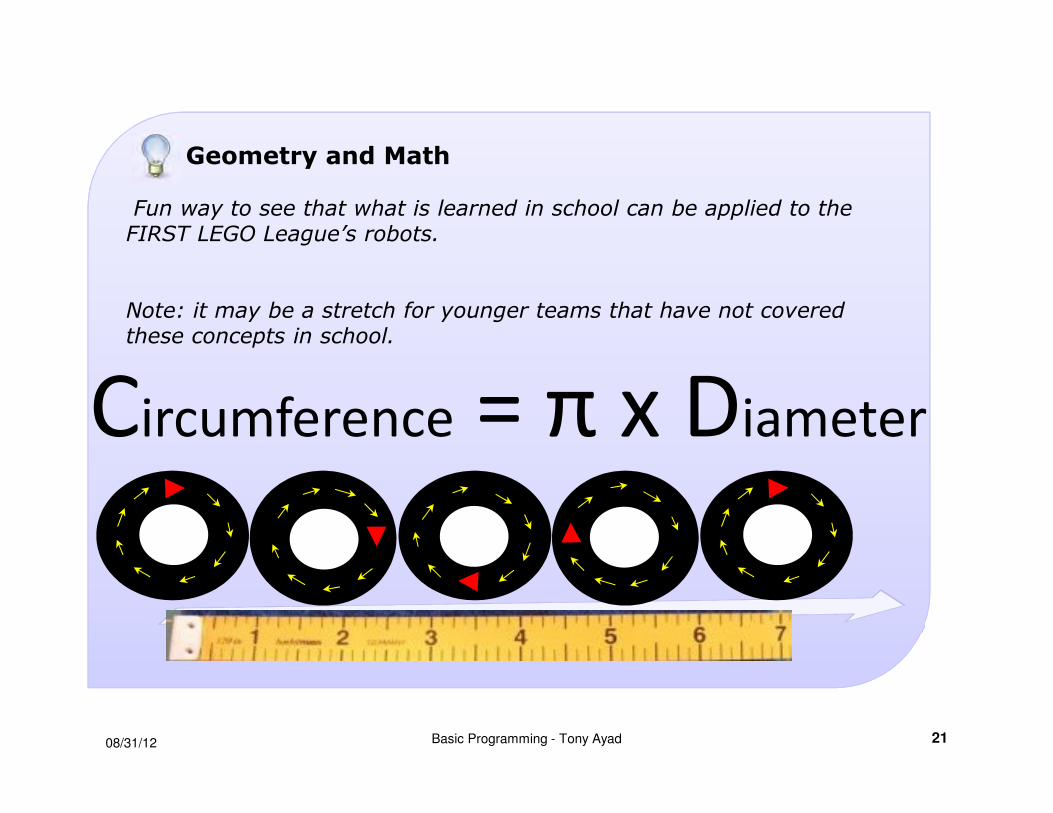
Geometry and Math
Fun way to see that what is learned in school can be applied to the FIRST LEGO League’s robots.
Note: it may be a stretch for younger teams that have not covered these concepts in school.
Circumference = π x Diameter
Inches to Motor Degrees
08/31/12 Basic Programming - Tony Ayad 22
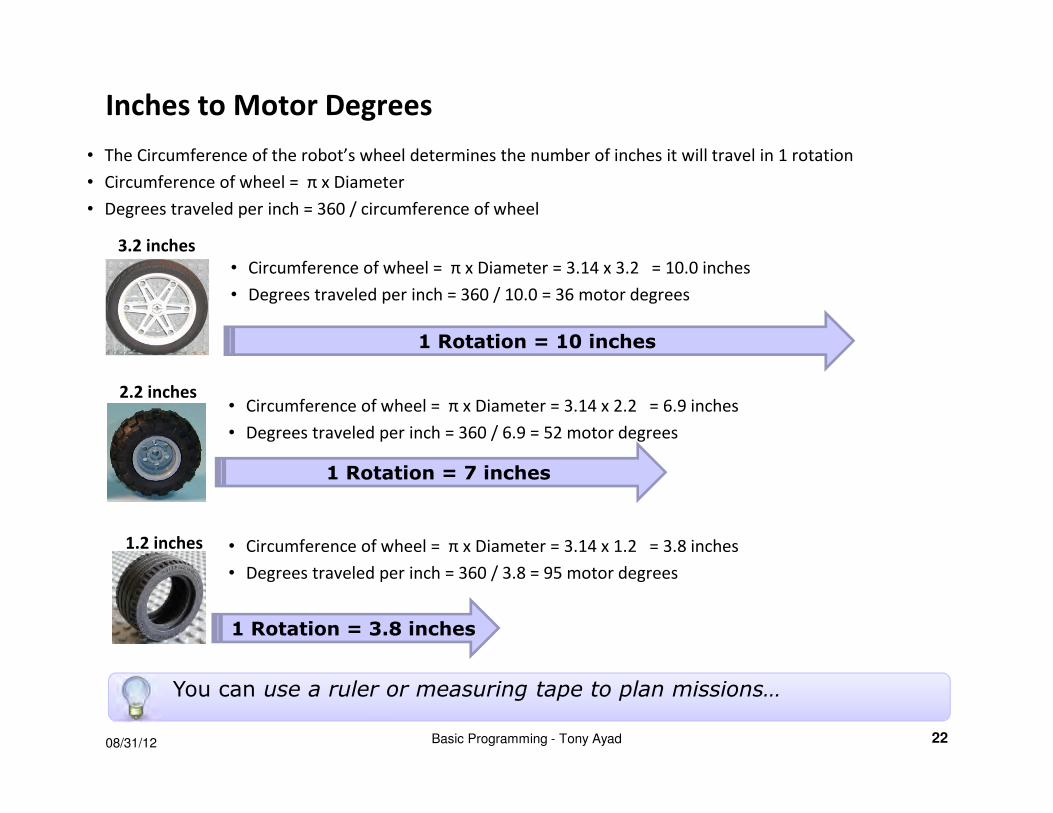
• The Circumference of the robot’s wheel determines the number of inches it will travel in 1 rotation
• Circumference of wheel = π x Diameter
• Degrees traveled per inch = 360 / circumference of wheel
3.2 inches
1.2 inches
2.2 inches
1 Rotation = 10 inches
1 Rotation = 7 inches
1 Rotation = 3.8 inches
• Circumference of wheel = π x Diameter = 3.14 x 3.2 = 10.0 inches
• Degrees traveled per inch = 360 / 10.0 = 36 motor degrees
• Circumference of wheel = π x Diameter = 3.14 x 2.2 = 6.9 inches
• Degrees traveled per inch = 360 / 6.9 = 52 motor degrees
• Circumference of wheel = π x Diameter = 3.14 x 1.2 = 3.8 inches
• Degrees traveled per inch = 360 / 3.8 = 95 motor degrees
You can use a ruler or measuring tape to plan missions…
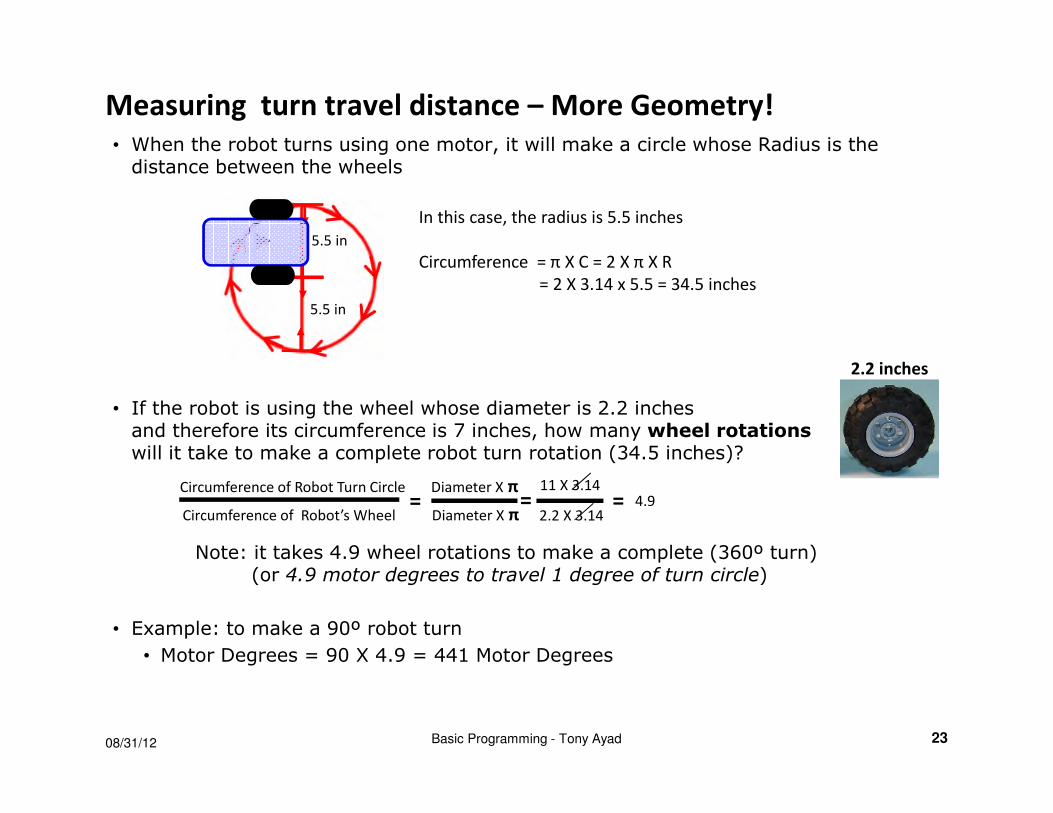
Measuring turn travel distance – More Geometry!
• When the robot turns using one motor, it will make a circle whose Radius is the distance between the wheels
• If the robot is using the wheel whose diameter is 2.2 inches and therefore its circumference is 7 inches, how many wheel rotationswill it take to make a complete robot turn rotation (34.5 inches)?
Note: it takes 4.9 wheel rotations to make a complete (360º turn)(or 4.9 motor degrees to travel 1 degree of turn circle)
• Example: to make a 90º robot turn
• Motor Degrees = 90 X 4.9 = 441 Motor Degrees
08/31/12 Basic Programming - Tony Ayad 23
5.5 in
5.5 in
In this case, the radius is 5.5 inches
Circumference = π X C = 2 X π X R
= 2 X 3.14 x 5.5 = 34.5 inches
2.2 inches
Circumference of Robot Turn Circle Diameter X π
Circumference of Robot’s Wheel Diameter X π
11 X 3.14
2.2 X 3.14= 4.9==
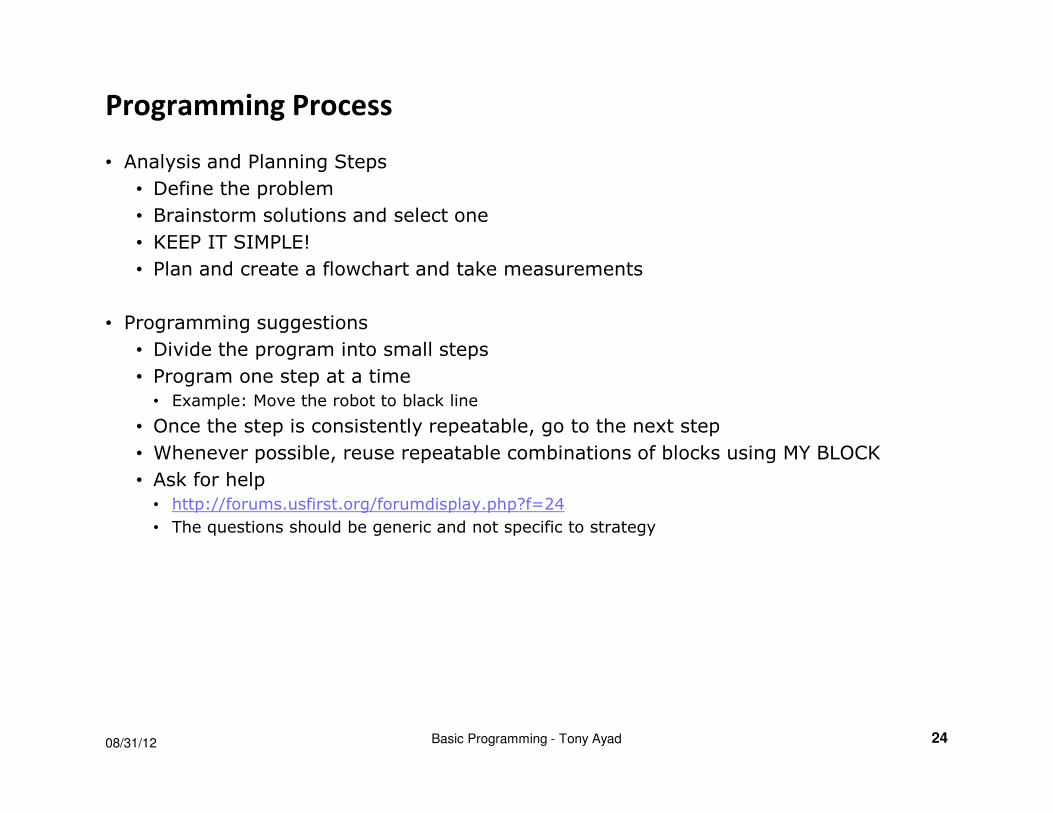
Programming Process
08/31/12 Basic Programming - Tony Ayad 24
• Analysis and Planning Steps
• Define the problem
• Brainstorm solutions and select one
• KEEP IT SIMPLE!
• Plan and create a flowchart and take measurements
• Programming suggestions
• Divide the program into small steps
• Program one step at a time
• Example: Move the robot to black line
• Once the step is consistently repeatable, go to the next step
• Whenever possible, reuse repeatable combinations of blocks using MY BLOCK
• Ask for help
• http://forums.usfirst.org/forumdisplay.php?f=24
• The questions should be generic and not specific to strategy
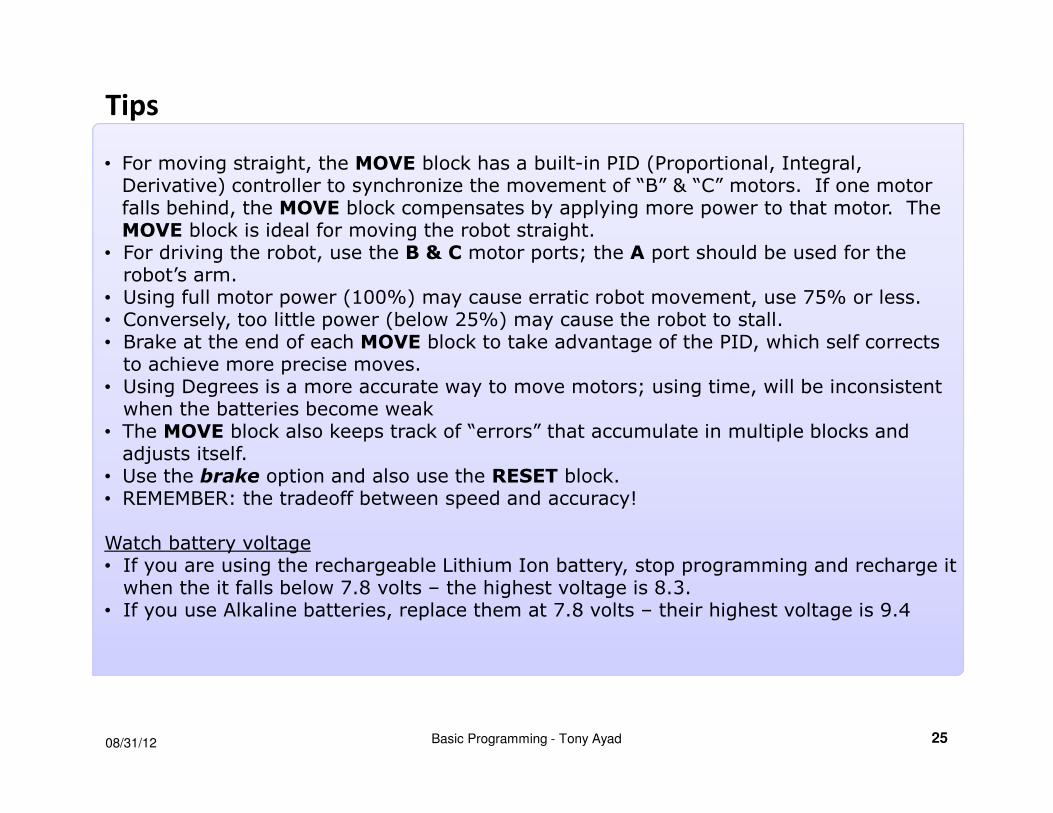
Tips
08/31/12 Basic Programming - Tony Ayad 25
• For moving straight, the MOVE block has a built-in PID (Proportional, Integral, Derivative) controller to synchronize the movement of “B” & “C” motors. If one motor falls behind, the MOVE block compensates by applying more power to that motor. The MOVE block is ideal for moving the robot straight.
• For driving the robot, use the B & C motor ports; the A port should be used for the robot’s arm.
• Using full motor power (100%) may cause erratic robot movement, use 75% or less. • Conversely, too little power (below 25%) may cause the robot to stall.• Brake at the end of each MOVE block to take advantage of the PID, which self corrects to achieve more precise moves.
• Using Degrees is a more accurate way to move motors; using time, will be inconsistent when the batteries become weak
• The MOVE block also keeps track of “errors” that accumulate in multiple blocks and adjusts itself.
• Use the brake option and also use the RESET block.• REMEMBER: the tradeoff between speed and accuracy!
Watch battery voltage• If you are using the rechargeable Lithium Ion battery, stop programming and recharge it when the it falls below 7.8 volts – the highest voltage is 8.3.
• If you use Alkaline batteries, replace them at 7.8 volts – their highest voltage is 9.4

08/31/12 Basic Programming - Tony Ayad 26
Finally, the NXT Programming Resources
• The most popular NXT programming tutorial http://www.ortop.org/NXT_Tutorial/
• Several other excellent NXT Programming tutorials are available on FLL Team Resources http://www.firstlegoleague.org/challenge/teamresources
• Good books on NXT programming are available for beginners and more advanced:• Laurens Valk. The LEGO MINDSTORMS NXT 2.0 Discovery Book: A Beginner's Guide to
Building and Programming Robots. San Francisco: No Starch Press, 2010.• James Floyd Kelly. LEGO Mindstorms NXT-G Programming Guide, 2nd ed. Berkeley CA: Apress, 2010.
• Download great worksheets for planning missions http://www.techbrick.com/
• FLL Forum where you can find answers to your questions from other coacheshttp://forums.usfirst.org/forumdisplay.php?f=24
• Update the NXT firmware to the latest version (currently 1.31)http://mindstorms.lego.com/en-us/support/files/Firmware.aspx
• Purchase or sell extra LEGO pieces www.bricklink.com
08/31/12 Advanced Programming - Tony Ayad 27
for the robot to know its location is to take advantage of the
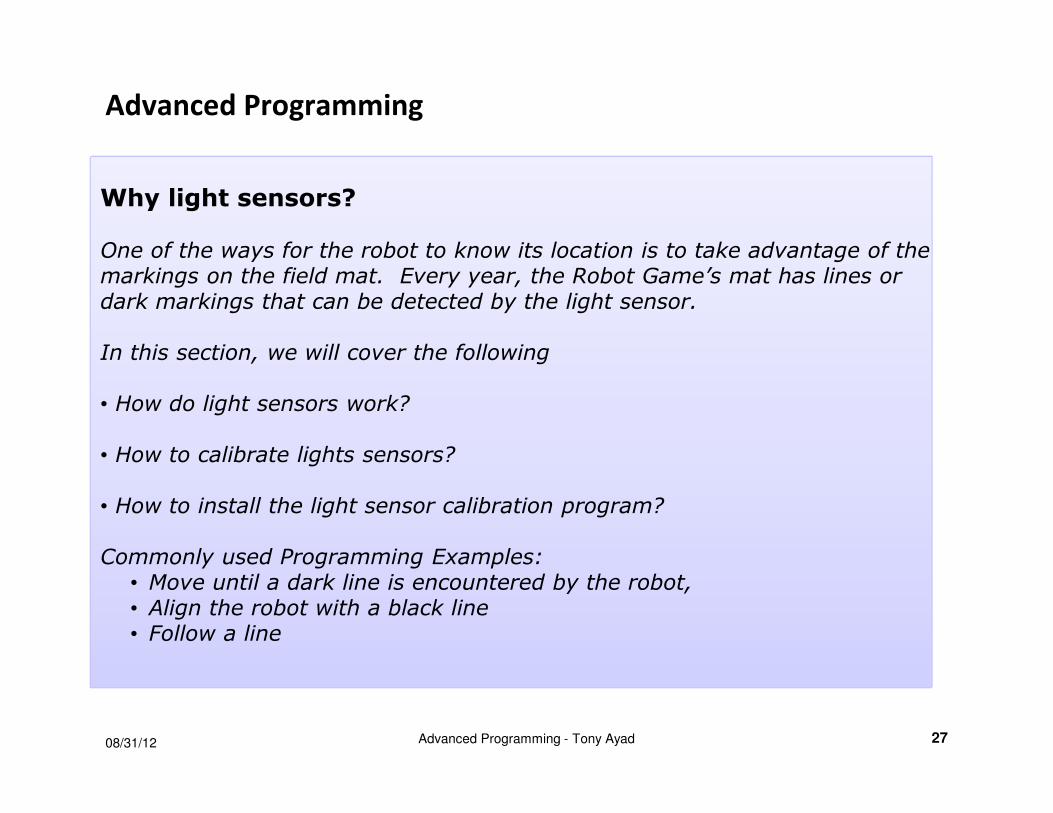
Why light sensors?
One of the ways for the robot to know its location is to take advantage of the markings on the field mat. Every year, the Robot Game’s mat has lines or dark markings that can be detected by the light sensor.
In this section, we will cover the following
• How do light sensors work?
• How to calibrate lights sensors?
• How to install the light sensor calibration program?
Commonly used Programming Examples:• Move until a dark line is encountered by the robot,• Align the robot with a black line • Follow a line
Advanced Programming
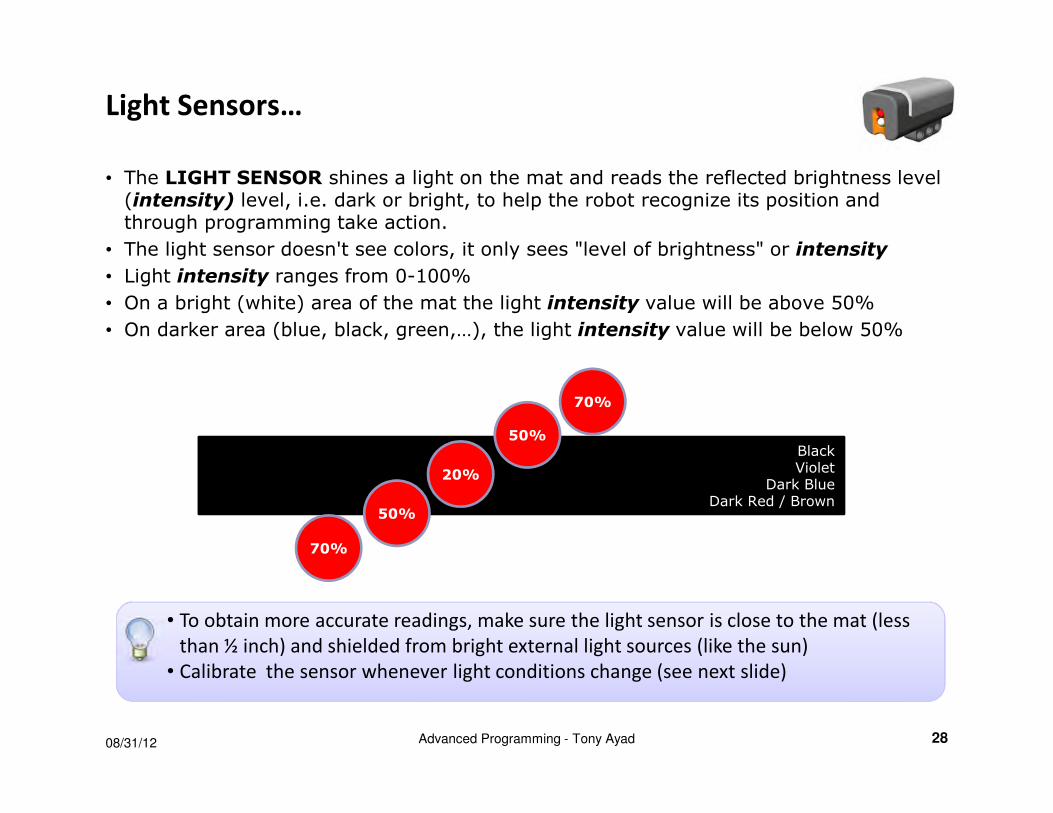
Light Sensors…
• The LIGHT SENSOR shines a light on the mat and reads the reflected brightness level (intensity) level, i.e. dark or bright, to help the robot recognize its position and through programming take action.
• The light sensor doesn't see colors, it only sees "level of brightness" or intensity
• Light intensity ranges from 0-100%
• On a bright (white) area of the mat the light intensity value will be above 50%
• On darker area (blue, black, green,…), the light intensity value will be below 50%
08/31/12 Advanced Programming - Tony Ayad 28
• To obtain more accurate readings, make sure the light sensor is close to the mat (less
than ½ inch) and shielded from bright external light sources (like the sun)
• Calibrate the sensor whenever light conditions change (see next slide)
BlackViolet
Dark BlueDark Red / Brown
70%
50%
20%
50%
70%
Calibrate Sensor
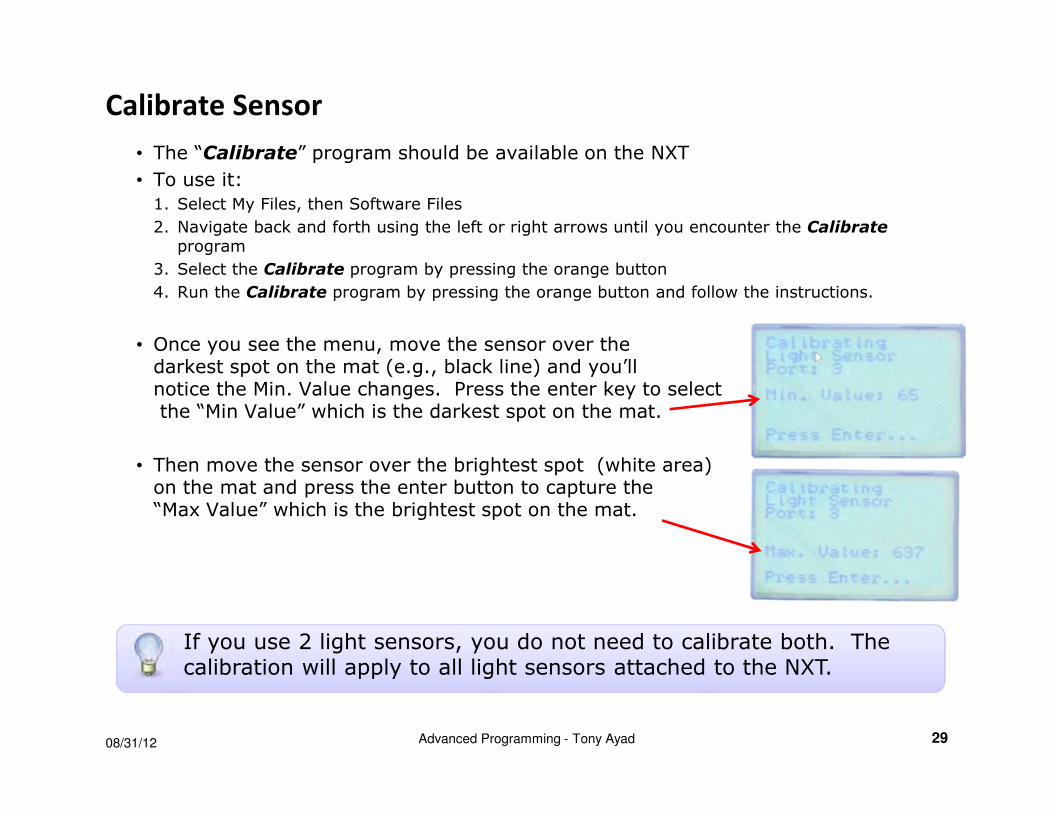
• The “Calibrate” program should be available on the NXT
• To use it:
1. Select My Files, then Software Files
2. Navigate back and forth using the left or right arrows until you encounter the Calibrateprogram
3. Select the Calibrate program by pressing the orange button
4. Run the Calibrate program by pressing the orange button and follow the instructions.
• Once you see the menu, move the sensor over the darkest spot on the mat (e.g., black line) and you’ll notice the Min. Value changes. Press the enter key to selectthe “Min Value” which is the darkest spot on the mat.
• Then move the sensor over the brightest spot (white area)on the mat and press the enter button to capture the“Max Value” which is the brightest spot on the mat.
08/31/12 Advanced Programming - Tony Ayad 29
If you use 2 light sensors, you do not need to calibrate both. The calibration will apply to all light sensors attached to the NXT.
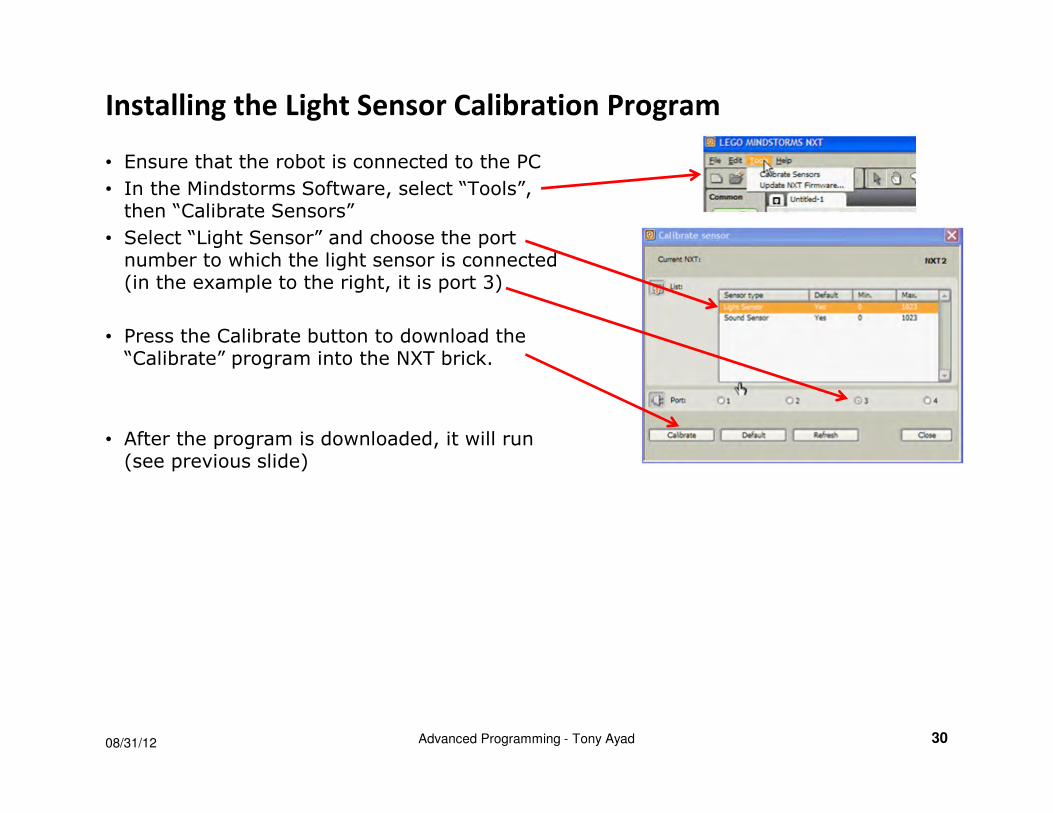
Installing the Light Sensor Calibration Program
• Ensure that the robot is connected to the PC
• In the Mindstorms Software, select “Tools”, then “Calibrate Sensors”
• Select “Light Sensor” and choose the port number to which the light sensor is connected (in the example to the right, it is port 3)
• Press the Calibrate button to download the “Calibrate” program into the NXT brick.
• After the program is downloaded, it will run (see previous slide)
08/31/12 Advanced Programming - Tony Ayad 30
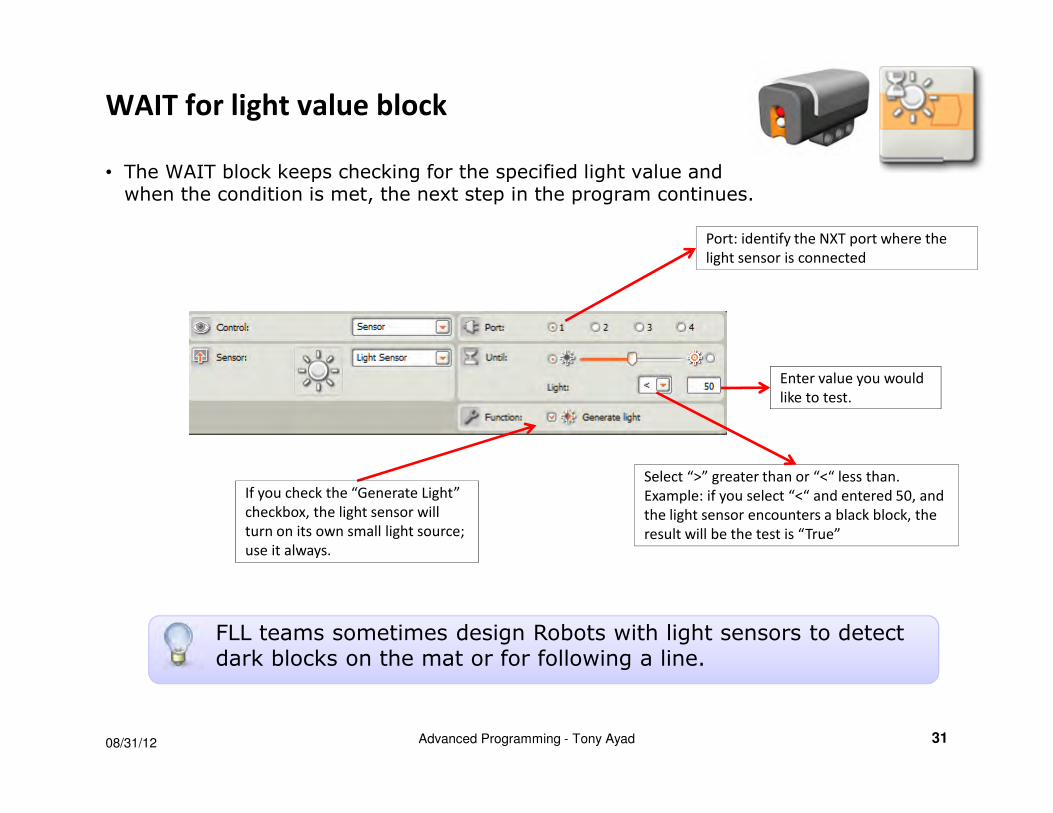
WAIT for light value block
• The WAIT block keeps checking for the specified light value and when the condition is met, the next step in the program continues.
08/31/12 Advanced Programming - Tony Ayad 31
Port: identify the NXT port where the
light sensor is connected
FLL teams sometimes design Robots with light sensors to detect dark blocks on the mat or for following a line.
If you check the “Generate Light”
checkbox, the light sensor will
turn on its own small light source;
use it always.
Enter value you would
like to test.
Select “>” greater than or “<“ less than.
Example: if you select “<“ and entered 50, and
the light sensor encounters a black block, the
result will be the test is “True”
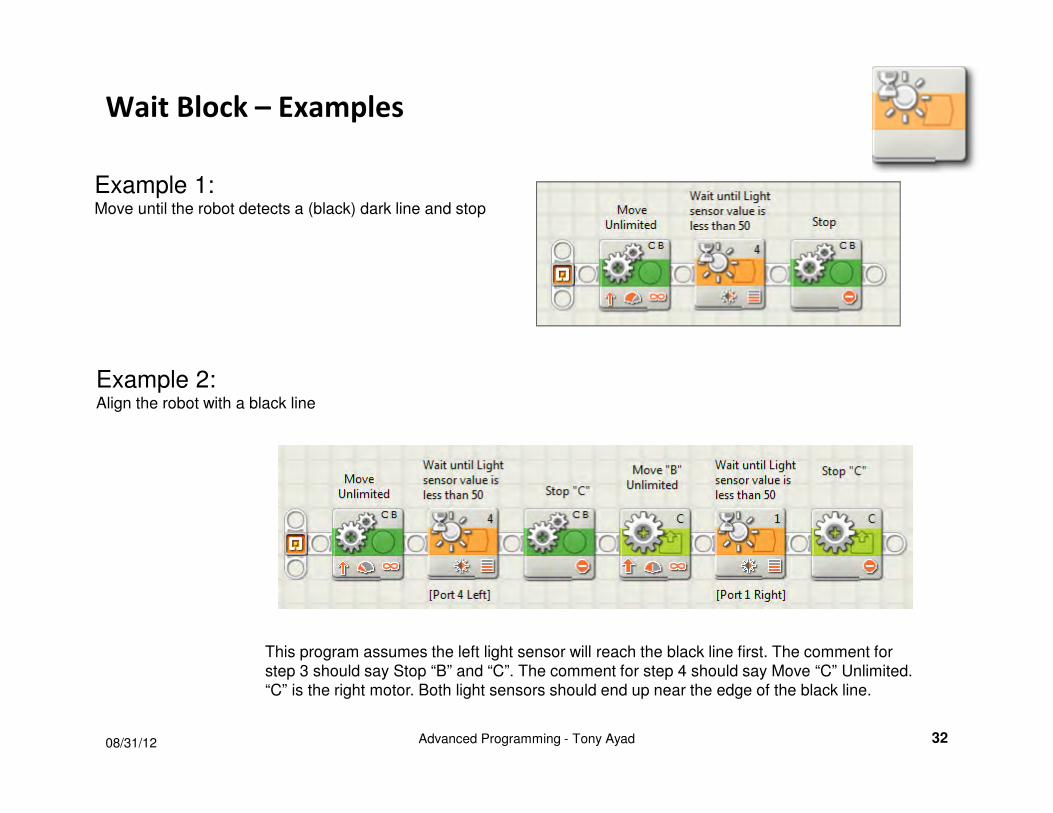
Wait Block – Examples
08/31/12 Advanced Programming - Tony Ayad 32
Example 1:Move until the robot detects a (black) dark line and stop
Example 2:Align the robot with a black line
This program assumes the left light sensor will reach the black line first. The comment for
step 3 should say Stop “B” and “C”. The comment for step 4 should say Move “C” Unlimited.
“C” is the right motor. Both light sensors should end up near the edge of the black line.
08/31/12 Advanced Programming - Tony Ayad 33
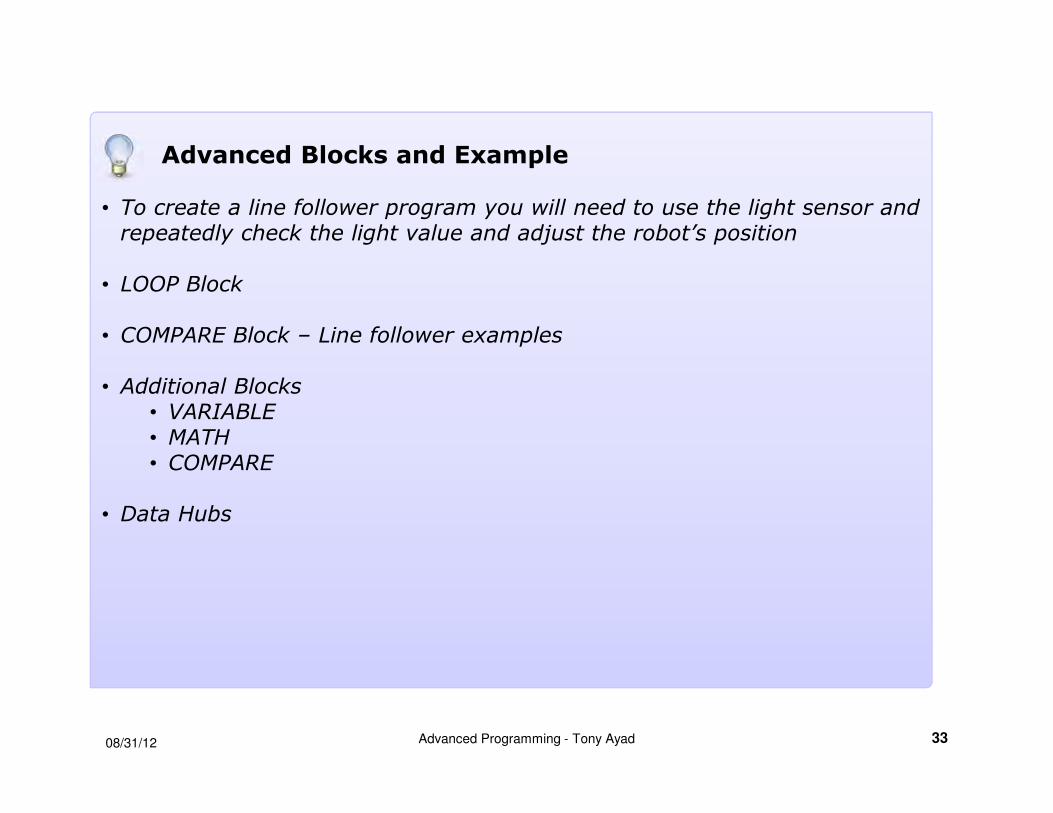
Advanced Blocks and Example
• To create a line follower program you will need to use the light sensor and repeatedly check the light value and adjust the robot’s position
• LOOP Block
• COMPARE Block – Line follower examples
• Additional Blocks• VARIABLE• MATH• COMPARE
• Data Hubs
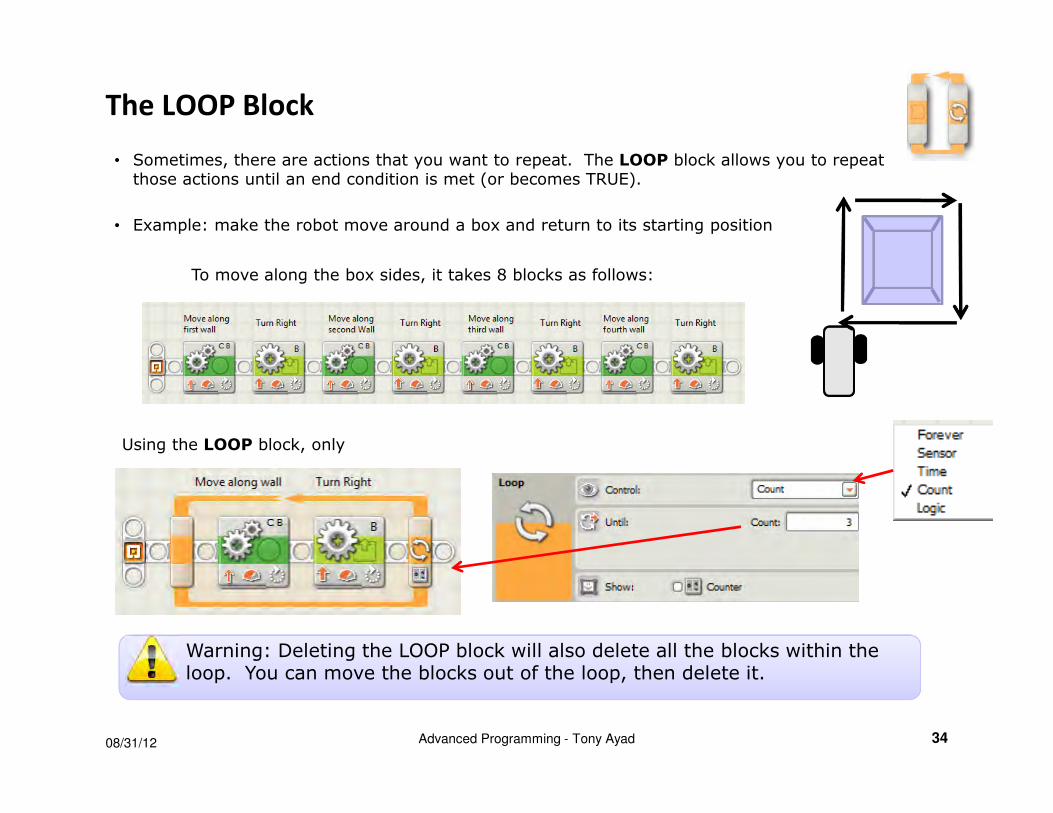
The LOOP Block
08/31/12 Advanced Programming - Tony Ayad 34
• Sometimes, there are actions that you want to repeat. The LOOP block allows you to repeat those actions until an end condition is met (or becomes TRUE).
• Example: make the robot move around a box and return to its starting position
Warning: Deleting the LOOP block will also delete all the blocks within the loop. You can move the blocks out of the loop, then delete it.
To move along the box sides, it takes 8 blocks as follows:
Using the LOOP block, only
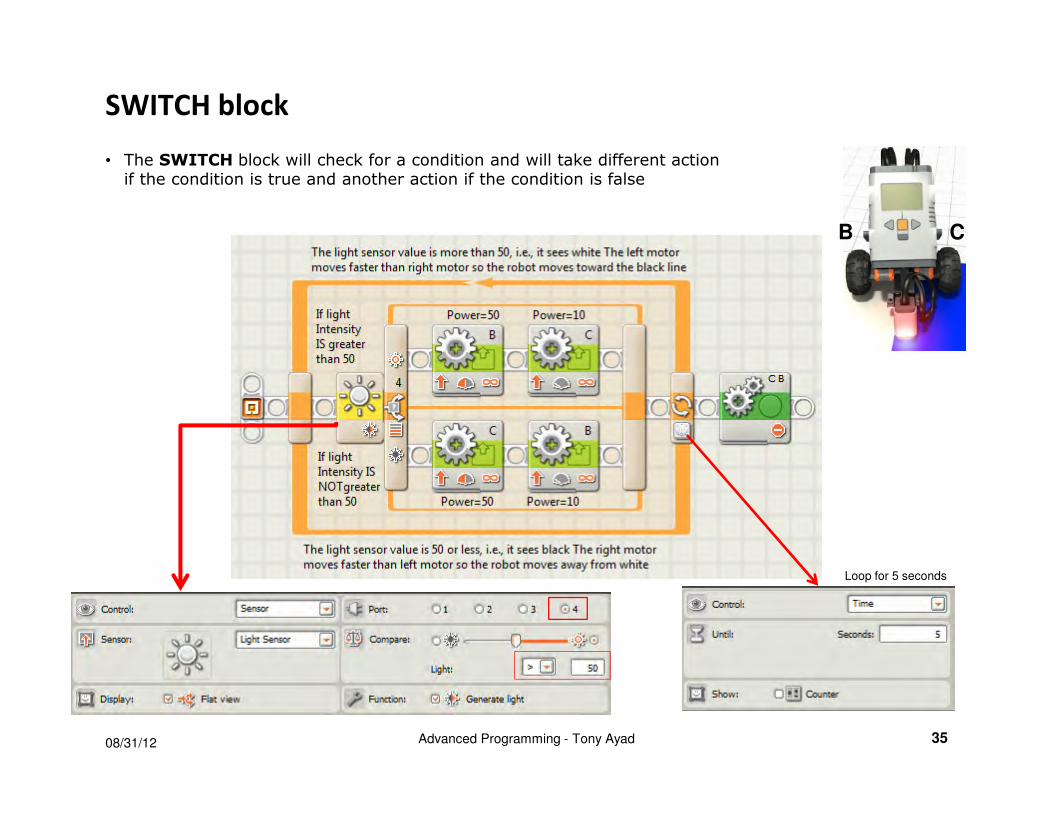
SWITCH block
• The SWITCH block will check for a condition and will take different action if the condition is true and another action if the condition is false
08/31/12 Advanced Programming - Tony Ayad 35
CB
Loop for 5 seconds
08/31/12 Advanced Programming - Tony Ayad 36
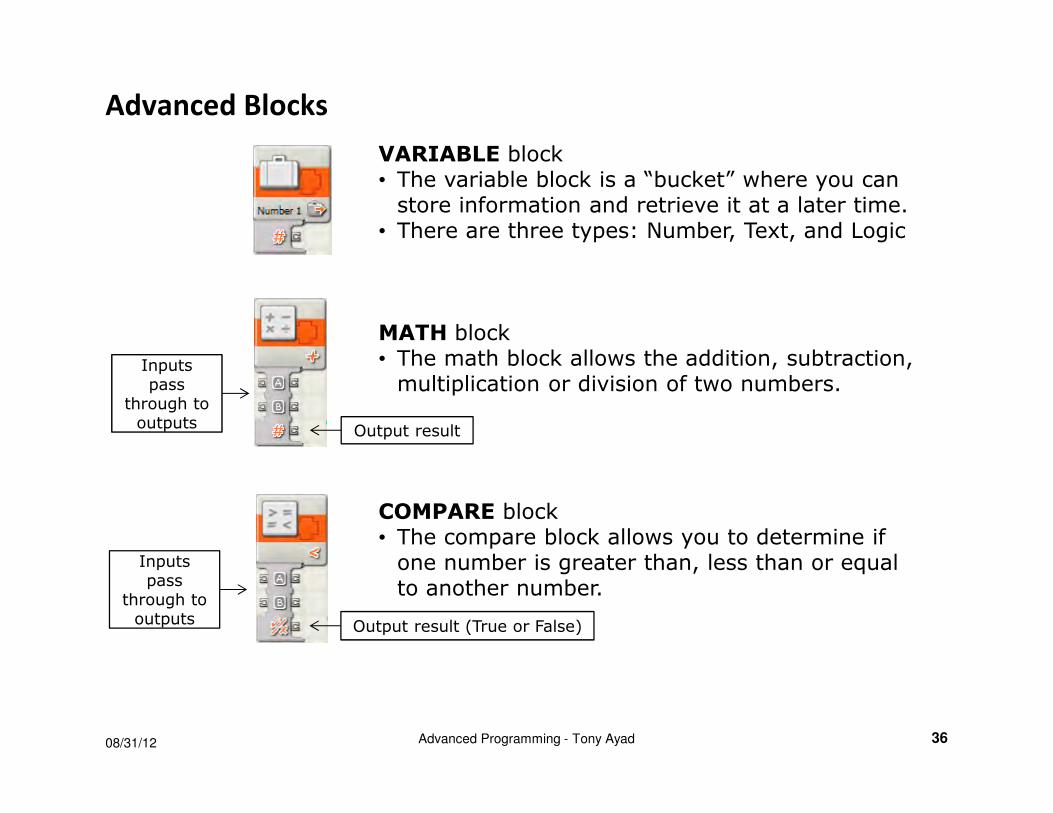
VARIABLE block• The variable block is a “bucket” where you can store information and retrieve it at a later time.
• There are three types: Number, Text, and Logic
MATH block• The math block allows the addition, subtraction, multiplication or division of two numbers.
COMPARE block• The compare block allows you to determine if one number is greater than, less than or equal to another number.
Inputspass
through to outputs
Output result
Output result (True or False)
Advanced Blocks
Inputspass
through to outputs
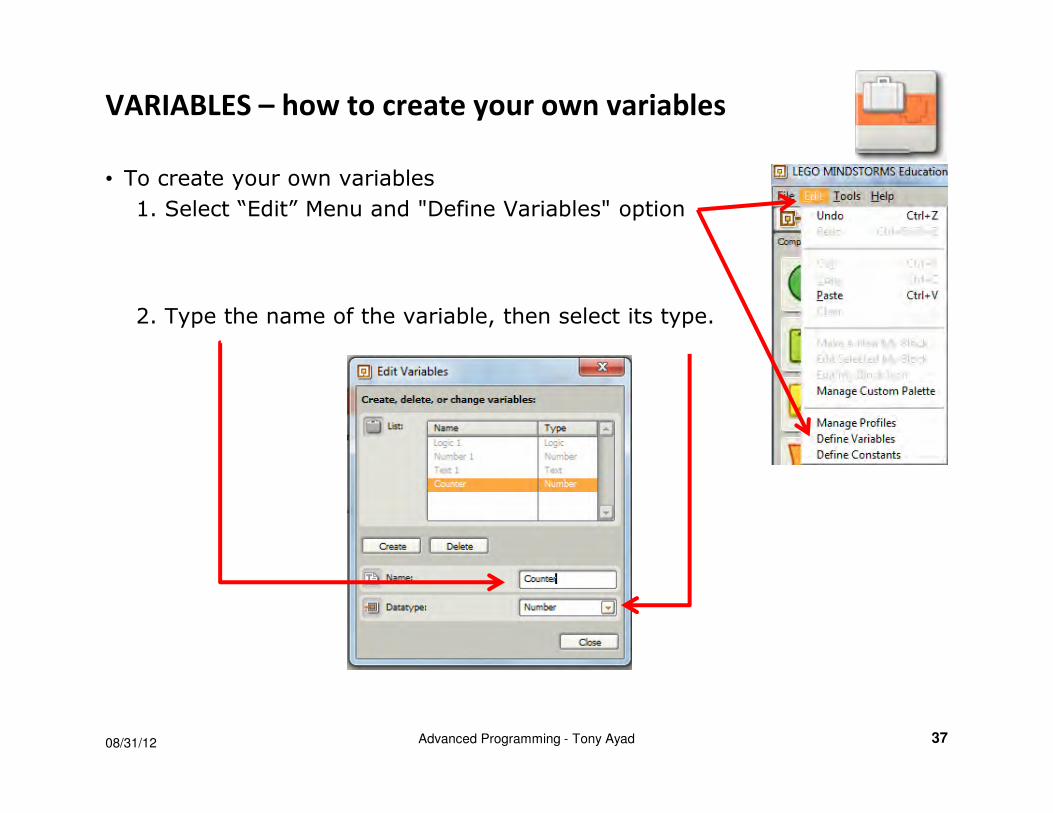
VARIABLES – how to create your own variables
• To create your own variables
1. Select “Edit” Menu and "Define Variables" option
2. Type the name of the variable, then select its type.
08/31/12 Advanced Programming - Tony Ayad 37
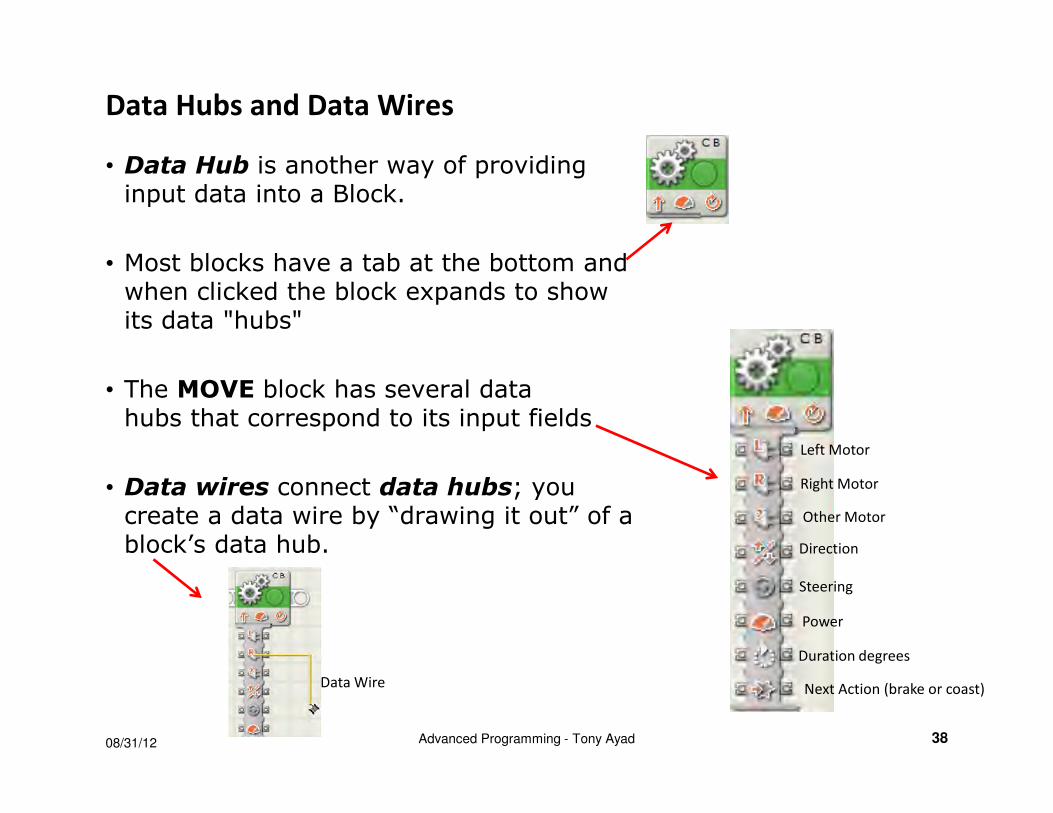
Data Hubs and Data Wires
• Data Hub is another way of providing input data into a Block.
• Most blocks have a tab at the bottom and when clicked the block expands to show its data "hubs"
• The MOVE block has several datahubs that correspond to its input fields
• Data wires connect data hubs; you create a data wire by “drawing it out” of a block’s data hub.
08/31/12 Advanced Programming - Tony Ayad 38
Power
Direction
Duration degrees
Next Action (brake or coast)
Steering
Left Motor
Right Motor
Other Motor
Data Wire
Variable, Math Blocks Examples
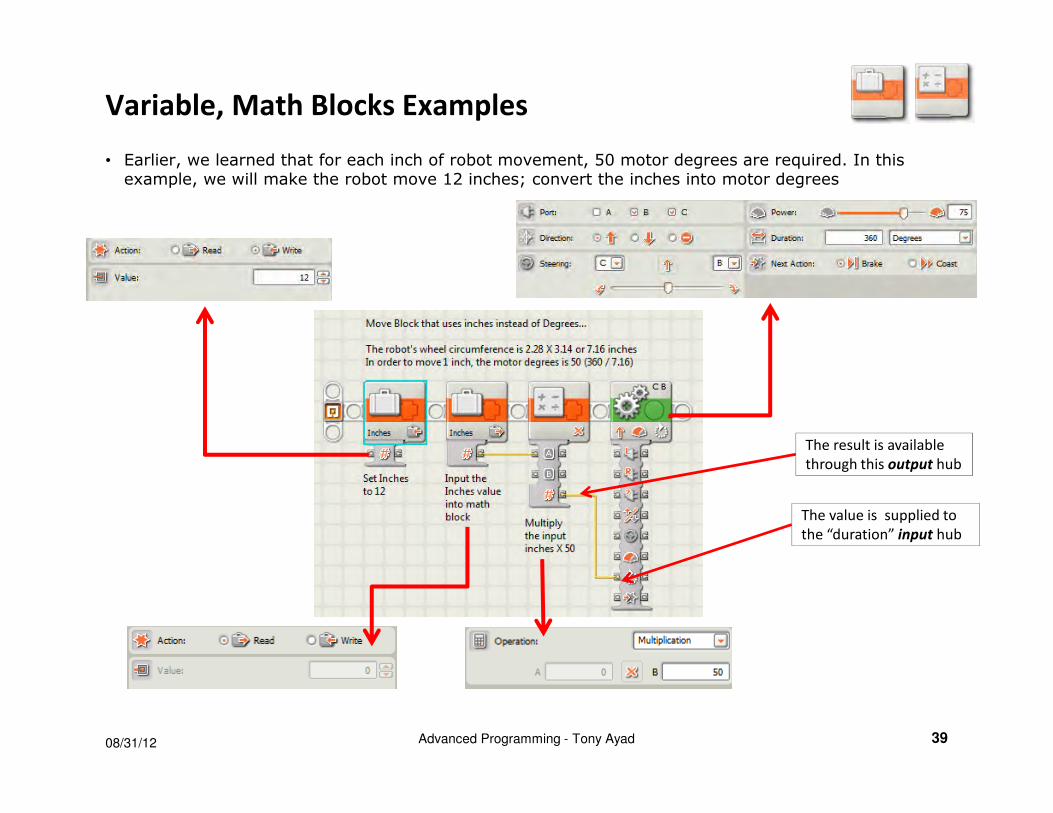
• Earlier, we learned that for each inch of robot movement, 50 motor degrees are required. In this example, we will make the robot move 12 inches; convert the inches into motor degrees
08/31/12 Advanced Programming - Tony Ayad 39
The result is available
through this output hub
The value is supplied to
the “duration” input hub

08/31/12 Advanced Programming - Tony Ayad 40
Now for the best part of NXT-G: My Block
In the previous example, we programmed the robot to move forward 12 inches, what if we wanted to use this and specify different distances?
NXT-G allows you to create your own block and it is called My Block!
What are the typical commands?
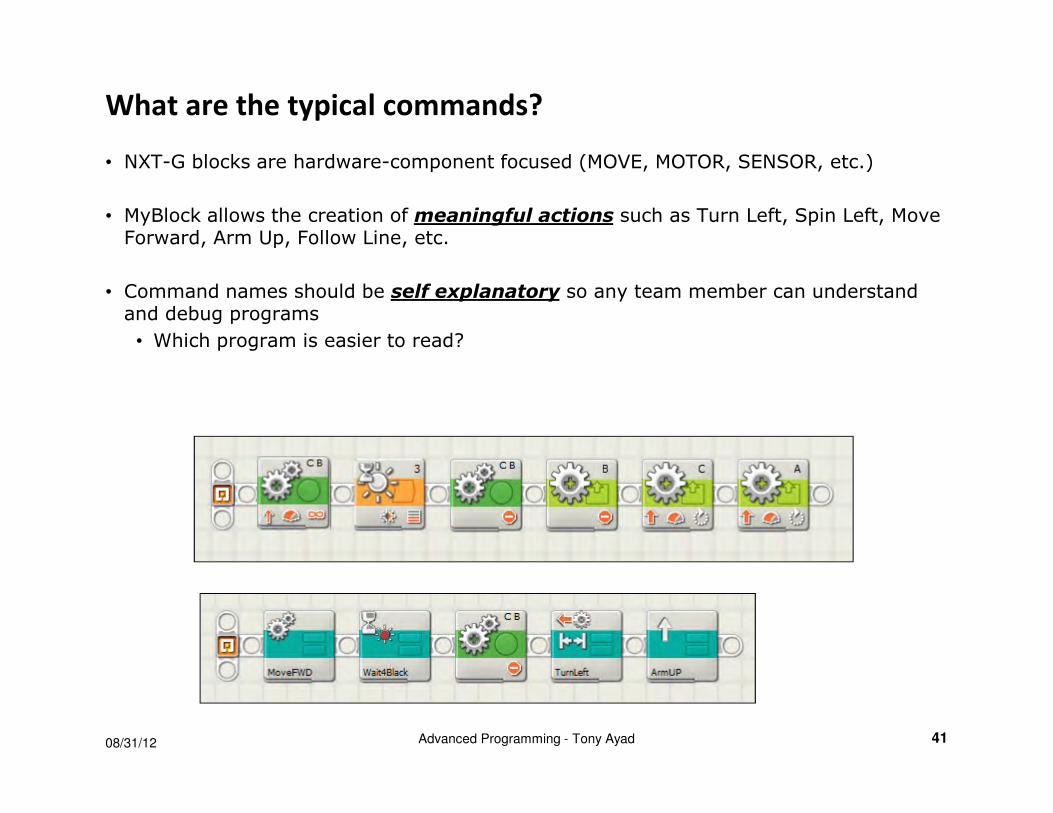
• NXT-G blocks are hardware-component focused (MOVE, MOTOR, SENSOR, etc.)
• MyBlock allows the creation of meaningful actions such as Turn Left, Spin Left, Move Forward, Arm Up, Follow Line, etc.
• Command names should be self explanatory so any team member can understand and debug programs
• Which program is easier to read?
08/31/12 Advanced Programming - Tony Ayad 41
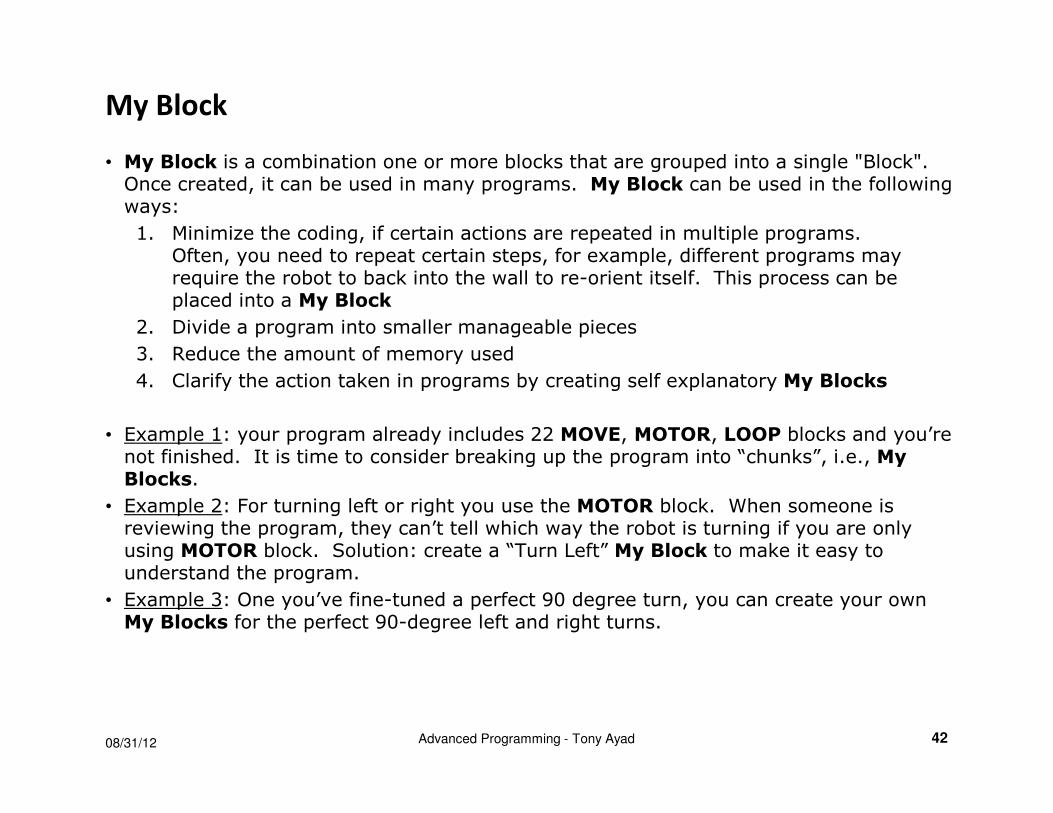
My Block
• My Block is a combination one or more blocks that are grouped into a single "Block". Once created, it can be used in many programs. My Block can be used in the following ways:
1. Minimize the coding, if certain actions are repeated in multiple programs.Often, you need to repeat certain steps, for example, different programs may require the robot to back into the wall to re-orient itself. This process can be placed into a My Block
2. Divide a program into smaller manageable pieces
3. Reduce the amount of memory used
4. Clarify the action taken in programs by creating self explanatory My Blocks
• Example 1: your program already includes 22 MOVE, MOTOR, LOOP blocks and you’re not finished. It is time to consider breaking up the program into “chunks”, i.e., My Blocks.
• Example 2: For turning left or right you use the MOTOR block. When someone is reviewing the program, they can’t tell which way the robot is turning if you are only using MOTOR block. Solution: create a “Turn Left” My Block to make it easy to understand the program.
• Example 3: One you’ve fine-tuned a perfect 90 degree turn, you can create your own My Blocks for the perfect 90-degree left and right turns.
08/31/12 Advanced Programming - Tony Ayad 42
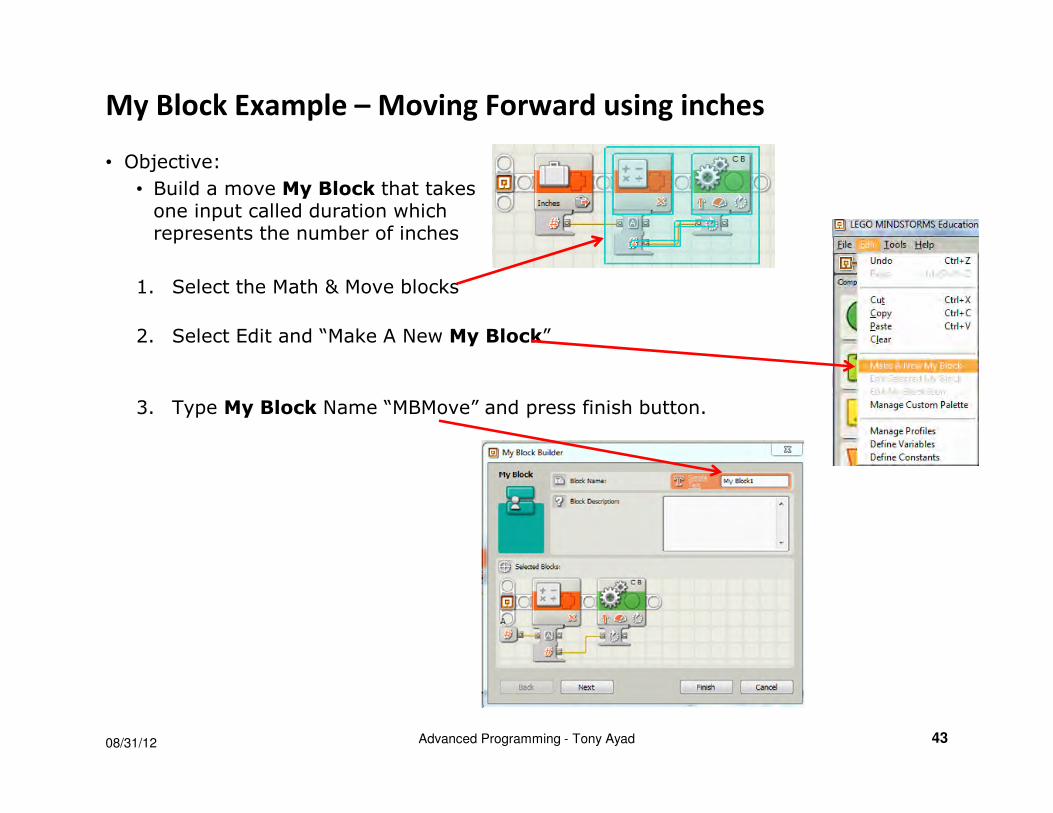
My Block Example – Moving Forward using inches
• Objective:
• Build a move My Block that takes one input called duration whichrepresents the number of inches
1. Select the Math & Move blocks
2. Select Edit and “Make A New My Block”
3. Type My Block Name “MBMove” and press finish button.
08/31/12 Advanced Programming - Tony Ayad 43
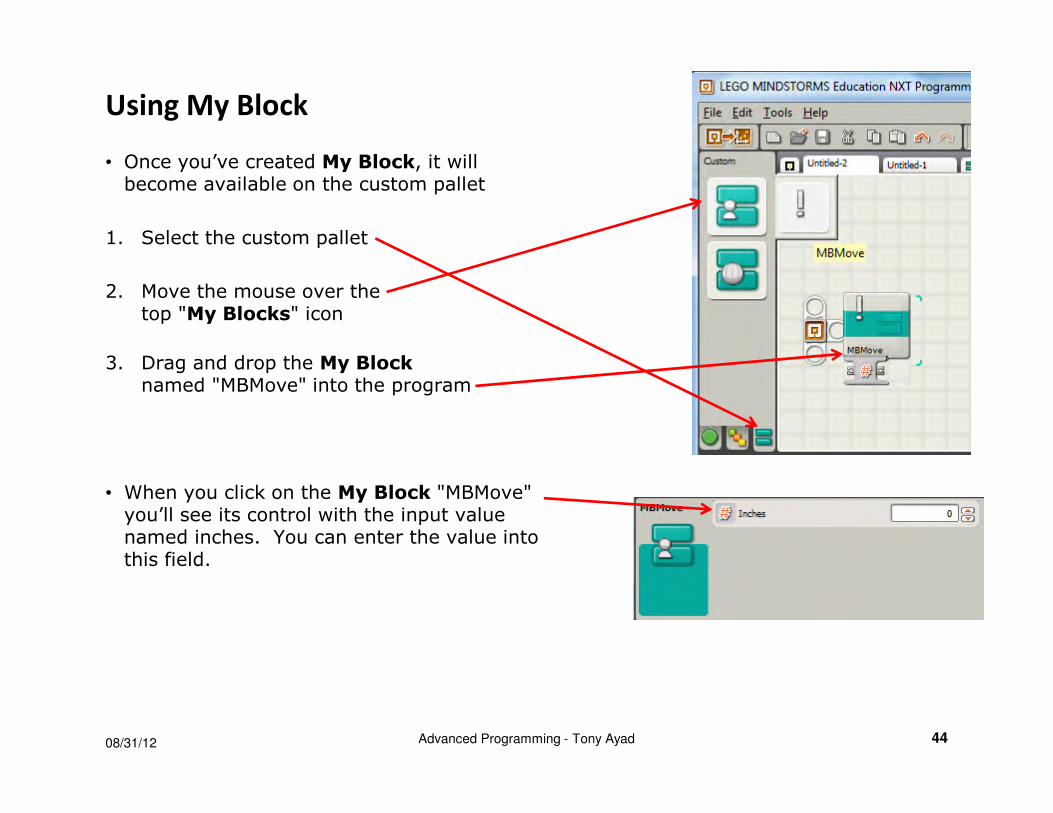
Using My Block
• Once you’ve created My Block, it will become available on the custom pallet
1. Select the custom pallet
2. Move the mouse over the top "My Blocks" icon
3. Drag and drop the My Blocknamed "MBMove" into the program
• When you click on the My Block "MBMove" you’ll see its control with the input value named inches. You can enter the value into this field.
08/31/12 Advanced Programming - Tony Ayad 44
More My Block Examples
• Reset
• Move Forward
• Move Back
• Turn Left
• Turn Right
• Spin Left
• Spin Right
• Curve Forward
• Curve Back
• Line Follower
• Align Robot With Black Line
• Square to Wall
08/31/12 Advanced Programming - Tony Ayad 45
My Block Tips
• Use My Block to break down a large program into two or more My Blocks
• If you create a My Block with one input and decided later to add another input, you’ll have to start over
• If you create a My Block with two inputs and decided later to remove one, you cannot delete the extra input; either start over, or ignore the extra input.
• You can rename a data port by double clicking its text label inside the My Block.
• The order of the inputs and outputs is unpredictable.
• Do not use Save As to create new My Blocks, instead, use the file system to create a copy and edit that one
• If you move a My Block between computers, the program that uses the My Block may not work!
08/31/12 Advanced Programming - Tony Ayad 46
08/31/12 Advanced Programming - Tony Ayad 47
Touch Sensor
• WAIT block for touch sensor and example
• TOUCH SENSOR block
• LIGHT SENSOR block
• ROTATION SENSOR block
• The difference between WAIT blocks (orange) and SENSOR blocks (yellow)
• Advance Line Follower My Block example using Rotation Sensor and compare block
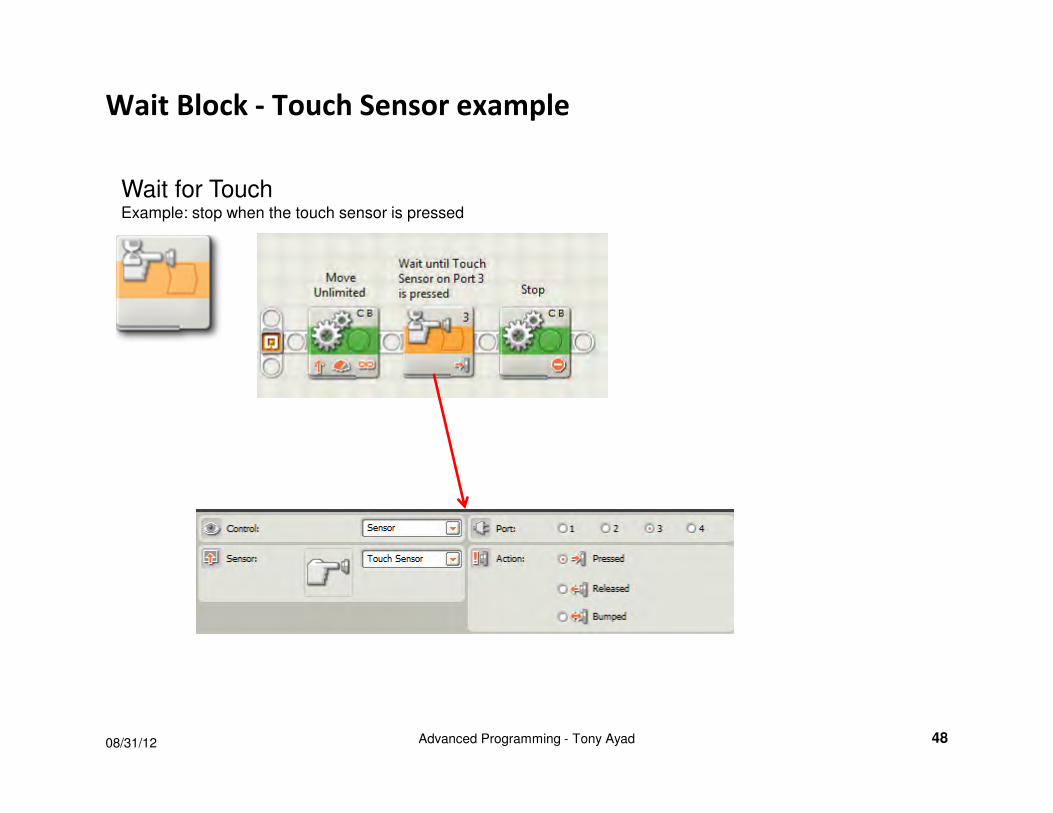
Wait Block - Touch Sensor example
08/31/12 Advanced Programming - Tony Ayad 48
Wait for TouchExample: stop when the touch sensor is pressed
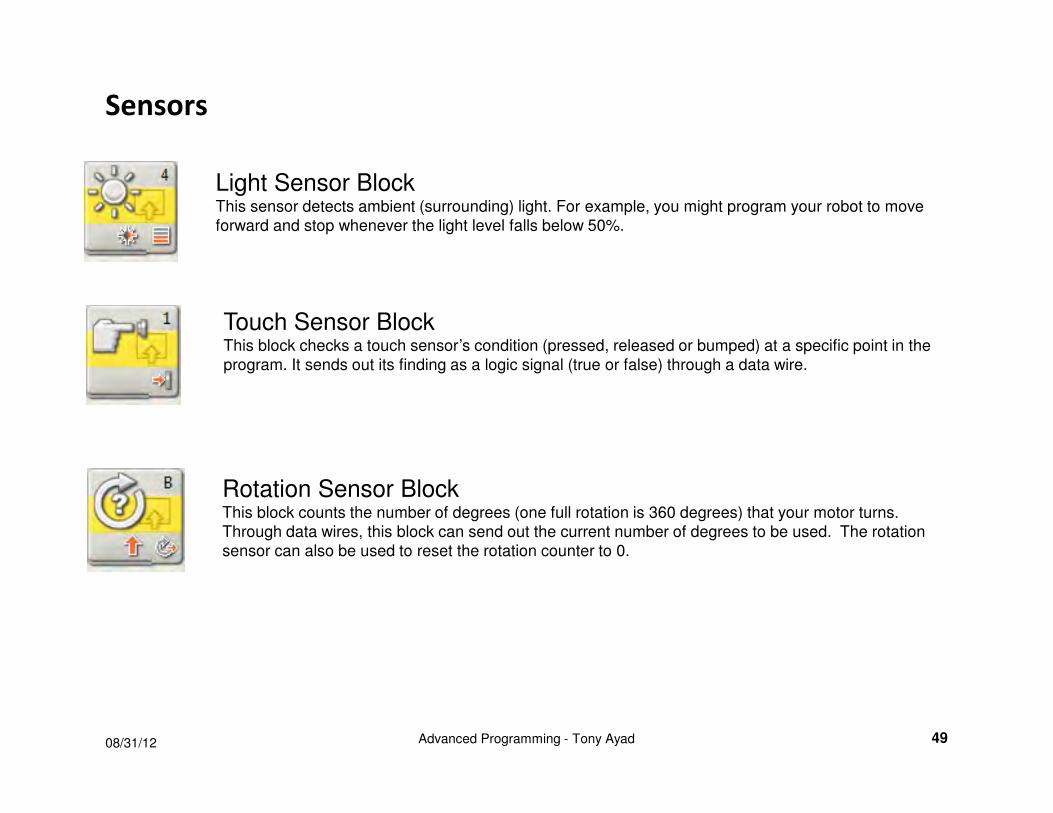
Sensors
08/31/12 Advanced Programming - Tony Ayad 49
Light Sensor BlockThis sensor detects ambient (surrounding) light. For example, you might program your robot to move
forward and stop whenever the light level falls below 50%.
Touch Sensor BlockThis block checks a touch sensor’s condition (pressed, released or bumped) at a specific point in the
program. It sends out its finding as a logic signal (true or false) through a data wire.
Rotation Sensor BlockThis block counts the number of degrees (one full rotation is 360 degrees) that your motor turns.
Through data wires, this block can send out the current number of degrees to be used. The rotation
sensor can also be used to reset the rotation counter to 0.
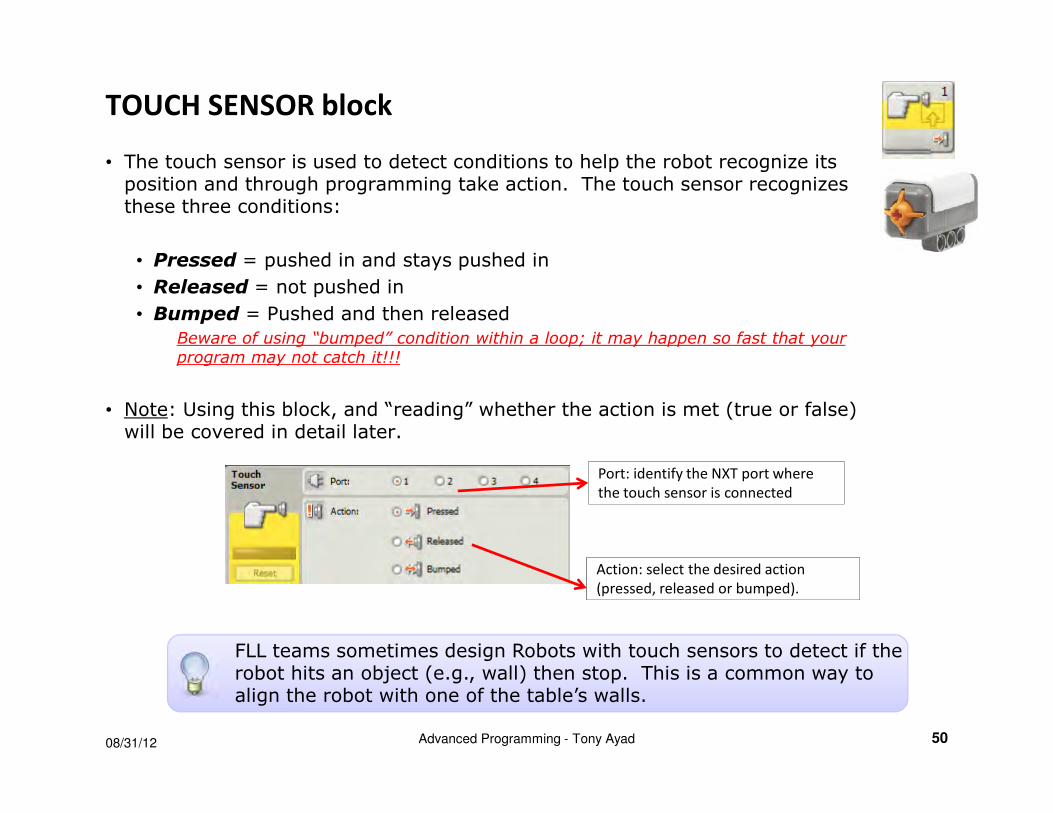
TOUCH SENSOR block
• The touch sensor is used to detect conditions to help the robot recognize its position and through programming take action. The touch sensor recognizes these three conditions:
• Pressed = pushed in and stays pushed in
• Released = not pushed in
• Bumped = Pushed and then released
Beware of using “bumped” condition within a loop; it may happen so fast that your program may not catch it!!!
• Note: Using this block, and “reading” whether the action is met (true or false) will be covered in detail later.
08/31/12 Advanced Programming - Tony Ayad 50
Port: identify the NXT port where
the touch sensor is connected
Action: select the desired action
(pressed, released or bumped).
FLL teams sometimes design Robots with touch sensors to detect if the FLL teams sometimes design Robots with touch sensors to detect if the robot hits an object (e.g., wall) then stop. This is a common way to align the robot with one of the table’s walls.
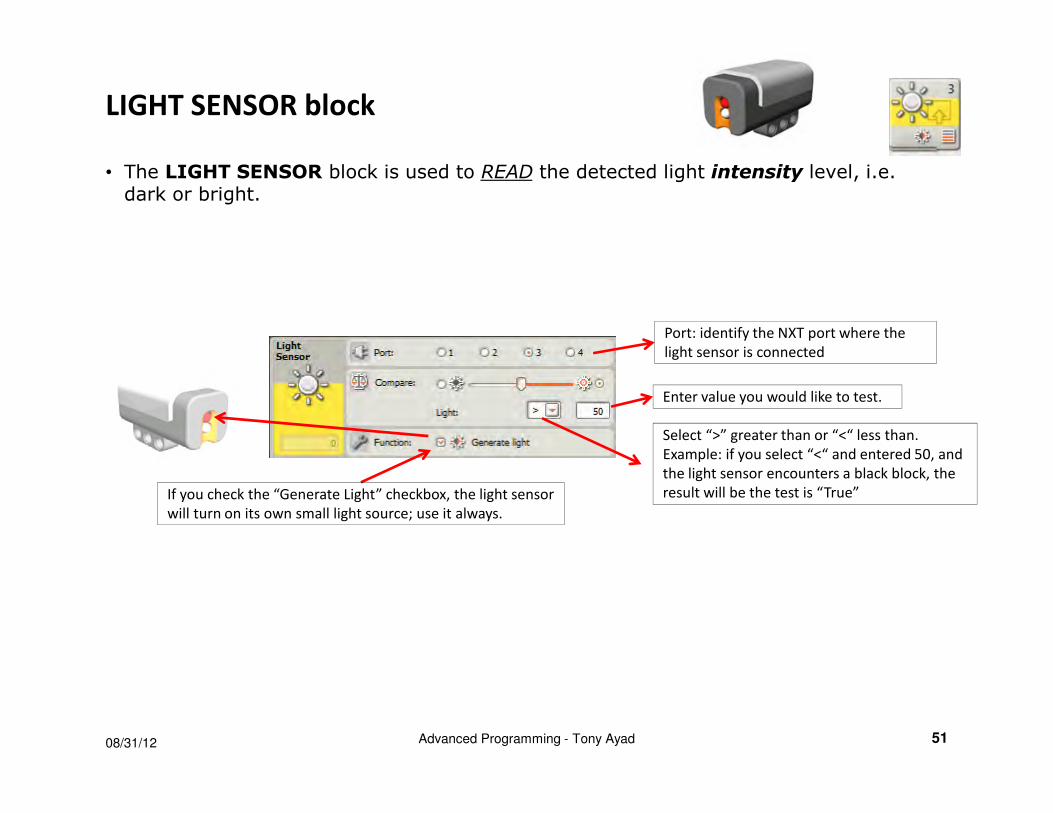
LIGHT SENSOR block
• The LIGHT SENSOR block is used to READ the detected light intensity level, i.e. dark or bright.
08/31/12 Advanced Programming - Tony Ayad 51
Port: identify the NXT port where the
light sensor is connected
If you check the “Generate Light” checkbox, the light sensor
will turn on its own small light source; use it always.
Enter value you would like to test.
Select “>” greater than or “<“ less than.
Example: if you select “<“ and entered 50, and
the light sensor encounters a black block, the
result will be the test is “True”
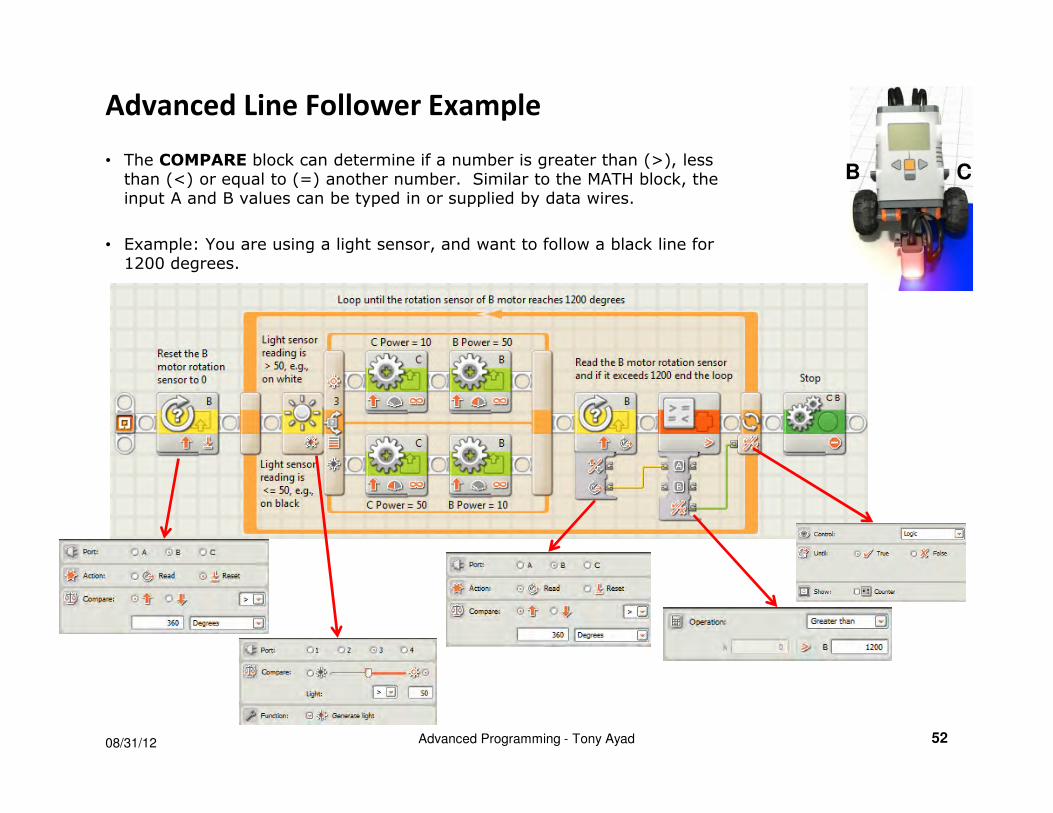
Advanced Line Follower Example
• The COMPARE block can determine if a number is greater than (>), less than (<) or equal to (=) another number. Similar to the MATH block, the input A and B values can be typed in or supplied by data wires.
• Example: You are using a light sensor, and want to follow a black line for 1200 degrees.
08/31/12 Advanced Programming - Tony Ayad 52
CB
Challenges
08/31/12 Advanced Programming - Tony Ayad 53
• What is the fastest way to follow the line to the “T” end?
• A move My Block that can move forward or back at a different power level
• Simultaneously move and raise or lower the arm
• A My Block that moves a certain number of inches as input
• A My Block to turns left using turn angle degrees as input