Embed Size (px)
Citation preview

Document Database Service
User Guide
Issue 07
Date 2018-06-07
HUAWEI TECHNOLOGIES CO., LTD.
Copyright © Huawei Technologies Co., Ltd. 2018. All rights reserved.No part of this document may be reproduced or transmitted in any form or by any means without prior writtenconsent of Huawei Technologies Co., Ltd. Trademarks and Permissions
and other Huawei trademarks are trademarks of Huawei Technologies Co., Ltd.All other trademarks and trade names mentioned in this document are the property of their respectiveholders. NoticeThe purchased products, services and features are stipulated by the contract made between Huawei and thecustomer. All or part of the products, services and features described in this document may not be within thepurchase scope or the usage scope. Unless otherwise specified in the contract, all statements, information,and recommendations in this document are provided "AS IS" without warranties, guarantees orrepresentations of any kind, either express or implied.
The information in this document is subject to change without notice. Every effort has been made in thepreparation of this document to ensure accuracy of the contents, but all statements, information, andrecommendations in this document do not constitute a warranty of any kind, express or implied.
Huawei Technologies Co., Ltd.Address: Huawei Industrial Base
Bantian, LonggangShenzhen 518129People's Republic of China
Website: http://e.huawei.com
Issue 07 (2018-06-07) Huawei Proprietary and ConfidentialCopyright © Huawei Technologies Co., Ltd.
i
Contents
1 Managing DDS DB Instances..................................................................................................... 11.1 DB Instance.................................................................................................................................................................... 11.1.1 Modifying the DB Instance Name...............................................................................................................................11.1.2 Restarting a DB Instance or a Node............................................................................................................................ 21.1.3 Deleting a DB Instance................................................................................................................................................31.2 Backup and Restore........................................................................................................................................................ 41.2.1 Setting Automated Backup Policy...............................................................................................................................41.2.2 Creating a Manual Backup.......................................................................................................................................... 51.2.3 Restoring a DB Instance from a Backup (Cluster)...................................................................................................... 61.2.4 Restoring a DB Instance from a Backup (Replica Set)............................................................................................... 81.2.5 Restoring a DB Instance from a Backup (Single Node)..............................................................................................91.2.6 Deleting a Manual Backup........................................................................................................................................ 101.3 Parameter Group........................................................................................................................................................... 111.3.1 Creating a Parameter Group...................................................................................................................................... 111.3.2 Editing a Parameter Group........................................................................................................................................ 121.3.3 Comparing Two Parameter Groups........................................................................................................................... 131.3.4 Replicating a Parameter Group..................................................................................................................................141.3.5 Changing Associated Parameter Group.....................................................................................................................141.3.6 Resetting a Parameter Group.....................................................................................................................................161.3.7 Deleting a Parameter Group...................................................................................................................................... 171.4 Storage.......................................................................................................................................................................... 171.4.1 Adding Instance Nodes (Cluster).............................................................................................................................. 171.4.2 Reverting Nodes (Cluster)......................................................................................................................................... 191.4.3 Scaling Up Storage Space .........................................................................................................................................201.4.4 Changing the CPU or Memory of a DB Instance (Cluster).......................................................................................221.4.5 Changing the CPU or Memory of a DB Instance (Replica Set)................................................................................231.4.6 Changing the CPU or Memory of a DB Instance (Single Node).............................................................................. 241.5 Security.........................................................................................................................................................................241.5.1 Resetting the Administrator Password...................................................................................................................... 251.5.2 Changing the Database Port...................................................................................................................................... 26
2 Monitoring.................................................................................................................................... 272.1 Interconnecting with Cloud Eye................................................................................................................................... 272.1.1 DDS Metrics.............................................................................................................................................................. 27
Document Database ServiceUser Guide Contents
Issue 07 (2018-06-07) Huawei Proprietary and ConfidentialCopyright © Huawei Technologies Co., Ltd.
ii
2.1.2 Setting Alarm Rules...................................................................................................................................................322.1.3 Viewing DDS Metrics................................................................................................................................................332.2 Interconnecting with CTS.............................................................................................................................................332.2.1 Key Operations Recorded by CTS............................................................................................................................ 342.2.2 Viewing Traces.......................................................................................................................................................... 352.3 Error log........................................................................................................................................................................362.4 Slow Query Log............................................................................................................................................................36
A Change History........................................................................................................................... 38
Document Database ServiceUser Guide Contents
Issue 07 (2018-06-07) Huawei Proprietary and ConfidentialCopyright © Huawei Technologies Co., Ltd.
iii
1 Managing DDS DB Instances
1.1 DB Instance
1.1.1 Modifying the DB Instance Name
Scenarios
This section guides you on how to modify the DB instance name to identify different DBinstances.
The instance name cannot be modified when the instance is being created.
Procedure
Step 1 Log in to the management console.
Step 2 Click in the upper left corner and select a region and a project.
Step 3 Under Database, click Document Database Service.
Step 4 On the Instance Management page, locate the target DB instance and click its name.
Step 5 In the DB Instance Information area on the Basic Information tab, click in the DBInstance Name field to change the instance name.
l If you want to submit the change, click . The DB instance name is a string of 4 to 48characters in length and must start with a letter. It is case-sensitive and contains onlyletters, digits, hyphens (-), and underscores (_).
l If you want to cancel the change, click .
Step 6 View the modification result.
----End
Document Database ServiceUser Guide 1 Managing DDS DB Instances
Issue 07 (2018-06-07) Huawei Proprietary and ConfidentialCopyright © Huawei Technologies Co., Ltd.
1

1.1.2 Restarting a DB Instance or a Node
Scenarios
If the status of a DB instance or a node is abnormal, you can restart the instance or node torestore it to the available state.
NOTICEl After you restart a DB instance, services are interrupted. Exercise caution when
performing this operation.l If you restart a DB instance, all nodes in the instance are also restarted.
Background
If you enable the operation protection function, second authentication is required when youperform sensitive operations to improve the security of your account and cloud product. Fordetails about how to enable operation protection, see the Identity and Access ManagementUser Guide.
Restarting a DB Instance
Step 1 Log in to the management console.
Step 2 Click in the upper left corner and select a region and a project.
Step 3 Under Database, click Document Database Service.
Step 4 On the Instant Management page, locate the target instance and click Restart.
Step 5 If you have enabled the operation protection function, click Start Verification in the RebootDB Instance dialog box. On the displayed page, click Send Code, enter the obtainedverification code, and click Verify. The page is closed automatically.
Step 6 In the displayed dialog box, click OK.
Step 7 View the restart status.
1. On the Instance Management page, the instance status is Restarting.2. On the Basic Information page, all nodes of the instance cannot be restarted.
----End
Restarting a Node (Cluster)
Step 1 Log in to the management console.
Step 2 Click in the upper left corner and select a region and a project.
Step 3 Under Database, click Document Database Service.
Document Database ServiceUser Guide 1 Managing DDS DB Instances
Issue 07 (2018-06-07) Huawei Proprietary and ConfidentialCopyright © Huawei Technologies Co., Ltd.
2
Step 4 On the Instance Management page, click the target DB instance name.
Step 5 In the Node Information area on the Basic Information page, click mongos, shard, orconfig tab, locate the target node, and click Restart in the Operation column.
Step 6 View the node status.
When one node status is Restarting, other nodes of the instance cannot be restarted.
----End
1.1.3 Deleting a DB Instance
Scenarios
This section guides you on how to delete a DB instance no longer used to release resources.
NOTICEl After you delete an instance, all nodes in the instance are also deleted.l After you delete the DB instance, all data in it and all backups are automatically deleted
and cannot be restored. Exercise caution when performing this operation.
Background
If you enable the operation protection function, second authentication is required when youperform sensitive operations to improve the security of your account and cloud product. Fordetails about how to enable operation protection, see the Identity and Access ManagementUser Guide.
Procedure
Step 1 Log in to the management console.
Step 2 Click in the upper left corner and select a region and a project.
Step 3 Under Database, click Document Database Service.
Step 4 On the Instance Management page, locate the target DB instance and choose More > Deletein the Operation column.
Step 5 If you have enabled the operation protection function, click Start Verification in the DeleteDB Instance dialog box. On the displayed page, click Send Code, enter the obtainedverification code, and click Verify. The page is closed automatically.
Step 6 In the displayed dialog box, click OK.
By default, all manual backups are retained in DDS. You can use a backup to restore a deletedinstance.
----End
Document Database ServiceUser Guide 1 Managing DDS DB Instances
Issue 07 (2018-06-07) Huawei Proprietary and ConfidentialCopyright © Huawei Technologies Co., Ltd.
3
1.2 Backup and Restore
1.2.1 Setting Automated Backup Policy
ScenariosDDS backs up data automatically based on the automated backup policy you set. You areadvised to regularly back up data in your database. If the database is faulty or data isdamaged, you can restore it with the backup, ensuring data reliability.
NOTICEDDS checks existing automated backup files. If the retention period of a file exceeds thebackup retention period you set, DDS will delete the file.
l Backups are saved as packages in OBS buckets.l When a DB instance is created, DDS enables the automated backup policy by default.
The default settings of the parameters are as follows. You can modify them after a DBinstance is created.– Backups are retained for 7 days by default.– The time window is in UTC by default.– The backup cycle is from Monday to Sunday.
Procedure
Step 1 Log in to the management console.
Step 2 Click in the upper left corner and select a region and a project.
Step 3 Under Database, click Document Database Service.
Step 4 On the Instance Management page, locate the target DB instance and click its name.
Step 5 On the Backup & Restore tab, click Modify Backup Policy. On the displayed page, specifyRetention Period (days), Time Window, and Backup Cycle and then click OK.
Retention period refers to the number of days that data is kept. You can increase the retentionperiod to improve data reliability.
The backup retention period can range from 0 day to 35 days, and the time window is onehour. The backup policy varies according to the retention period you have set.
l If you set the retention period to 0 days, the backup policy is disabled. Your data will notbe backed up. Exercise caution when performing this operation.
l If you set the retention period to 1 to 6 days. the backup cycle is set to All by default andcannot be changed.
l If you set the retention period to 7 to 35 days, you must select at least two days of theweek for the backup cycle.
Document Database ServiceUser Guide 1 Managing DDS DB Instances
Issue 07 (2018-06-07) Huawei Proprietary and ConfidentialCopyright © Huawei Technologies Co., Ltd.
4
If you set the retention period to one or more days, the backup policy is enabled and a fullautomated backup is triggered instantly.
Step 6 After the backup is successful, you can query the backup on the Backup Management pageor the Backup & Restore tab.
The backup type is Automatic and the backup method is logical backup.
----End
1.2.2 Creating a Manual Backup
Scenarios
Manually create a backup for a DB instance so that you can restore data using the backup,ensuring data reliability.
Method 1
Step 1 Log in to the management console.
Step 2 Click in the upper left corner and select a region and a project.
Step 3 Under Database, click Document Database Service.
Step 4 On the Instance Management page, locate the target instance and click Create Backup inthe Operation column.
Step 5 On the displayed page, specify Backup Name and Description and click OK.
1. The backup name must be 4 to 64 characters in length and start with a letter. It is case-insensitive and contains only letters, digits, hyphens (-), and underscores (_).
2. The description contains a maximum of 256 characters and cannot contain the carriagereturn character and the following special characters: >!<"&'=
Step 6 After the backup is successful, you can query the backup on the Backup Management pageor the Backup & Restore tab.
The backup type is Manual and the backup method is logical backup.
----End
Method 2
Step 1 Log in to the management console.
Step 2 Click in the upper left corner and select a region and a project.
Step 3 Under Database, click Document Database Service.
Step 4 On the Backup Management page, you can click the Cluster, Replica Set or Single Nodetab.
Step 5 click Create Backup. On the displayed page, select an available DB instance, specify DBInstance Name, Backup Name, and Description, and click OK.
Document Database ServiceUser Guide 1 Managing DDS DB Instances
Issue 07 (2018-06-07) Huawei Proprietary and ConfidentialCopyright © Huawei Technologies Co., Ltd.
5
1. The backup name must be 4 to 64 characters in length and start with a letter. It is case-insensitive and contains only letters, digits, hyphens (-), and underscores (_).
2. The description contains a maximum of 256 characters and cannot contain the carriagereturn character and the following special characters: >!<"&'=
Step 6 After the backup is successful, you can query the backup on the Backup Management pageor the Backup & Restore tab.
The backup type is Manual and the backup method is logical backup.
----End
Method 3
Step 1 Log in to the management console.
Step 2 Click in the upper left corner and select a region and a project.
Step 3 Under Database, click Document Database Service.
Step 4 On the Instance Management page, click the target DB instance name.
Step 5 On the Backup & Restore tab, click Create Backup. On the displayed page, specify BackupName and Description and click OK.
1. The backup name must be 4 to 64 characters in length and start with a letter. It is case-insensitive and contains only letters, digits, hyphens (-), and underscores (_).
2. The description contains a maximum of 256 characters and cannot contain the carriagereturn character and the following special characters: >!<"&'=
Step 6 After the backup is successful, you can query the backup on the Backup Management pageor the Backup & Restore tab.
The backup type is Manual and the backup method is logical backup.
----End
1.2.3 Restoring a DB Instance from a Backup (Cluster)
Scenarios
You can use backup data to restore DB instance data. The restored data is the same as thebackup data.
NOTE
l Automated backup files are generated only when you have set a backup policy. For details, seesection Setting Automated Backup Policy.
l Currently, DDS supports restoring to a new DB instance only.
Method 1
Step 1 Log in to the management console.
Step 2 Click in the upper left corner and select a region and a project.
Document Database ServiceUser Guide 1 Managing DDS DB Instances
Issue 07 (2018-06-07) Huawei Proprietary and ConfidentialCopyright © Huawei Technologies Co., Ltd.
6
Step 3 Under Database, click Document Database Service.
Step 4 On the Instance Management page, click the Cluster tab, locate the target DB instance andclick its name.
Step 5 On the Backup & Restore tab, locate the backup to restore in the backup list and clickRestore in the Operation column. In the displayed dialog box, click OK.
Step 6 Create a DB instance the same as the backup.l The quantity of mongos is 2 by default and ranges from 2 to 12. You can specify the
quantity.l The shard quantity is the same as that of the original instance during the backup and
cannot be modified.l The storage type of shard and config is the same as that of the original instance and
cannot be modified.l The storage space is the same as that of the original instance by default. You can only
increase the storage space.l The backup policy is the same as that of the original instance.l Other default parameters can be modified.
----End
Method 2
Step 1 Log in to the management console.
Step 2 Click in the upper left corner and select a region and a project.
Step 3 Under Database, click Document Database Service.
Step 4 On the Backup Management page, click the Cluster tab, locate the backup to restore andclick Restore in the Operation column. In the displayed dialog box, click OK.
Step 5 Create a DB instance the same as the backup.l The quantity of mongos is 2 by default and ranges from 2 to 12. You can specify the
quantity.l The shard quantity is the same as that of the original instance during the backup and
cannot be modified.l The storage type of shard and config is the same as that of the original instance and
cannot be modified.l The storage space is the same as that of the original instance by default. You can only
increase the storage space.l The backup policy is the same as that of the original instance.l Other default parameters can be modified.
----End
Document Database ServiceUser Guide 1 Managing DDS DB Instances
Issue 07 (2018-06-07) Huawei Proprietary and ConfidentialCopyright © Huawei Technologies Co., Ltd.
7
1.2.4 Restoring a DB Instance from a Backup (Replica Set)
ScenariosYou can use backup data to restore DB instance data. The restored data is the same as thebackup data.
NOTE
l Automated backup files are generated only when you have set a backup policy. For details, seesection Setting Automated Backup Policy.
l Currently, DDS supports restoring to a new DB instance only.
Method 1
Step 1 Log in to the management console.
Step 2 Click in the upper left corner and select a region and a project.
Step 3 Under Database, click Document Database Service.
Step 4 On the Instance Management page, click the Replica Set tab, locate the target DB instance,and click its name.
Step 5 On the Backup & Restore tab, locate the backup to restore in the backup list and clickRestore in the Operation column. In the displayed dialog box, click OK.
Step 6 Create a DB instance the same as the backup.l The AZ and performance specifications are the same as those of the original instance.
You can modify them.l The storage type is the same as that of the original instance and cannot be modified.l The storage space is the same as that of the original instance by default. You can only
increase the storage space.l The backup policy is the same as that of the original instance.
----End
Method 2
Step 1 Log in to the management console.
Step 2 Click in the upper left corner and select a region and a project.
Step 3 Under Database, click Document Database Service.
Step 4 On the Backup Management page, click the Replica Set tab, locate the backup to restore,and click Restore in the Operation column. In the displayed dialog box, click OK.
Step 5 Create a DB instance the same as the backup.l The AZ and performance specifications are the same as those of the original instance.
You can modify them.l The storage type is the same as that of the original instance and cannot be modified.l The storage space is the same as that of the original instance by default. You can only
increase the storage space.
Document Database ServiceUser Guide 1 Managing DDS DB Instances
Issue 07 (2018-06-07) Huawei Proprietary and ConfidentialCopyright © Huawei Technologies Co., Ltd.
8
l The backup policy is the same as that of the original instance.
----End
1.2.5 Restoring a DB Instance from a Backup (Single Node)
ScenariosYou can use backup data to restore DB instance data. The restored data is the same as thebackup data.
NOTE
l Automated backup files are generated only when you have set a backup policy. For details, seesection Setting Automated Backup Policy.
l Currently, DDS supports restoring to a new DB instance only.
Method 1
Step 1 Log in to the management console.
Step 2 Click in the upper left corner and select a region and a project.
Step 3 Under Database, click Document Database Service.
Step 4 On the Instance Management page, click the Single Node tab, locate the target DB instance,and click its name.
Step 5 On the Backup & Restore tab, locate the backup to restore in the backup list and clickRestore in the Operation column. In the displayed dialog box, click OK.
Step 6 Create a DB instance the same as the backup.l The AZ and performance specifications are the same as those of the original instance.
You can modify them.l The storage type is the same as that of the original instance and cannot be modified.l The storage space is the same as that of the original instance by default. You can only
increase the storage space.l The backup policy is the same as that of the original instance.
----End
Method 2
Step 1 Log in to the management console.
Step 2 Click in the upper left corner and select a region and a project.
Step 3 Under Database, click Document Database Service.
Step 4 On the Backup Management page, click the Single Node tab, locate the backup to restore,and click Restore in the Operation column. In the displayed dialog box, click OK.
Step 5 Create a DB instance the same as the backup.l The AZ and performance specifications are the same as those of the original instance.
You can modify them.
Document Database ServiceUser Guide 1 Managing DDS DB Instances
Issue 07 (2018-06-07) Huawei Proprietary and ConfidentialCopyright © Huawei Technologies Co., Ltd.
9
l The storage type is the same as that of the original instance and cannot be modified.l The storage space is the same as that of the original instance by default. You can only
increase the storage space.l The backup policy is the same as that of the original instance.
----End
1.2.6 Deleting a Manual Backup
Scenarios
When the automated backup expires, DDS will delete it. You can only delete a manualbackup.
NOTICEThe deletion operation is irreversible. Exercise caution when performing this operation.
Method 1
Step 1 Log in to the management console.
Step 2 Click in the upper left corner and select a region and a project.
Step 3 Under Database, click Document Database Service.
Step 4 On the Instance Management page, locate the target DB instance and click its name.
Step 5 On the Backup & Restore tab, locate the manual backup to be deleted and click Delete.
The backup being used for instance recovery cannot be deleted.
Step 6 In the displayed dialog box, click OK.
----End
Method 2
Step 1 Log in to the management console.
Step 2 Click in the upper left corner and select a region and a project.
Step 3 Under Database, click Document Database Service.
Step 4 On the Backup Management page, locate the manual backup to be deleted and click Deletein the Operation column.
The backup being used for instance recovery cannot be deleted.
Step 5 In the displayed dialog box, click OK.
----End
Document Database ServiceUser Guide 1 Managing DDS DB Instances
Issue 07 (2018-06-07) Huawei Proprietary and ConfidentialCopyright © Huawei Technologies Co., Ltd.
10
1.3 Parameter Group
1.3.1 Creating a Parameter Group
ScenariosDB parameter groups act as a container for engine configuration values that are applied to oneor more DB instances. This section guides you on how to create a parameter group to manageyour DB instance configurations.
NOTE
Each user can create a maximum of 100 parameter groups.
Cluster
Step 1 Log in to the management console.
Step 2 Click in the upper left corner and select a region and a project.
Step 3 Under Database, click Document Database Service.
Step 4 On the Parameter Group Management page, click Create Parameter Group.
Step 5 Specify DB Engine Version, HA Type, Node Type, Parameter Group Name, andDescription and then click OK.l HA Type: Select Cluster.l Node Type: specifies the node type that this parameter group will apply to. For example,
to create a parameter group applying to config, select config.l Parameter Group Name: specifies the parameter group name, which is a string of 1 to
64 characters composed of only letters (case-sensitive), digits, hyphens (-), underscores(_), and periods (.).
l The parameter group description contains a maximum of 256 characters and cannotcontain the carriage return character and the following special characters: >!<"&'=
Step 6 You can view and manage parameter groups on the Cluster tab on the Parameter GroupManagement page.
----End
Replica Set
Step 1 Log in to the management console.
Step 2 Click in the upper left corner and select a region and a project.
Step 3 Under Database, click Document Database Service.
Step 4 On the Parameter Group Management page, click Create Parameter Group.
Step 5 Specify DB Engine Version, HA Type, Node Type, Parameter Group Name, andDescription and then click OK.
Document Database ServiceUser Guide 1 Managing DDS DB Instances
Issue 07 (2018-06-07) Huawei Proprietary and ConfidentialCopyright © Huawei Technologies Co., Ltd.
11
l HA Type: Select Replica Set.l Parameter Group Name: specifies the parameter group name, which is a string of 1 to
64 characters composed of only letters (case-sensitive), digits, hyphens (-), underscores(_), and periods (.).
l The parameter group description contains a maximum of 256 characters and cannotcontain the carriage return character and the following special characters: >!<"&'=
Step 6 You can view and manage parameter groups on the Replica Set tab on the Parameter GroupManagement page.
----End
Single Node
Step 1 Log in to the management console.
Step 2 Click in the upper left corner and select a region and a project.
Step 3 Under Database, click Document Database Service.
Step 4 On the Parameter Group Management page, click Create Parameter Group.
Step 5 Specify DB Engine Version, HA Type, Node Type, Parameter Group Name, andDescription and then click OK.l HA Type: Select Single Node.l Parameter Group Name: specifies the parameter group name, which is a string of 1 to
64 characters composed of only letters (case-sensitive), digits, hyphens (-), underscores(_), and periods (.).
l The parameter group description contains a maximum of 256 characters and cannotcontain the carriage return character and the following special characters: >!<"&'=
Step 6 You can view and manage parameter groups on the Single Node tab on the ParameterGroup Management page.
----End
1.3.2 Editing a Parameter Group
ScenariosThis section guides you on how to edit parameters in the parameter groups that you havecreated to meet your service requirements and achieve optimal performance.
NOTE
Default parameter groups are unchangeable. You can only view them by clicking their names. Ifinappropriate settings of user-created parameter groups lead to a database reboot failure, you can refer tothe settings of default parameter groups to reset them.
Procedure
Step 1 Log in to the management console.
Step 2 Click in the upper left corner and select a region and a project.
Document Database ServiceUser Guide 1 Managing DDS DB Instances
Issue 07 (2018-06-07) Huawei Proprietary and ConfidentialCopyright © Huawei Technologies Co., Ltd.
12
Step 3 Under Database, click Document Database Service.
Step 4 On the Parameter Group Management page, click the Cluster, Replica Set, or SingleNode tab, locate a parameter group you create and click its name.
Step 5 Modify the required parameters.
Related parameters are described as follows:
l For details on parameter descriptions, visit MongoDB official website. For details onparameters you can modify, see What Parameters Can I Modify on the Console?
l The default value of the net.maxIncomingConnections parameter varies according toDB instance specifications. Therefore, this parameter is set to default before beingspecified.
Available operations are as follows:
l If you want to save the modifications, click Save.l If you want to cancel the modifications, click Cancel.l If you want to preview the modifications, click Preview.
NOTE
For details on the description of parameter group status, see Status.
After modifying a parameter, you need to view the associated instance status in the instance list. IfPending-restart is displayed, you need to restart the instance for the modification to take effect.
----End
1.3.3 Comparing Two Parameter Groups
Scenarios
This section guides you on how to compare two parameter groups of the same node type andDB engine version to know their current settings.
Procedure
Step 1 Log in to the management console.
Step 2 Click in the upper left corner and select a region and a project.
Step 3 Under Database, click Document Database Service.
Step 4 On the Parameter Group Management page, click the Cluster, Replica Set, or SingleNode tab, locate a parameter group you create and click Compare in the Operation column.
Step 5 In the displayed Compare Parameter Group dialog box, select a parameter group forGroup2 and click OK.
If the settings of the two parameter groups are different, the parameter names and values ofgroup 1 and group 2 parameter groups are displayed. If the settings are the same, no data isdisplayed.
----End
Document Database ServiceUser Guide 1 Managing DDS DB Instances
Issue 07 (2018-06-07) Huawei Proprietary and ConfidentialCopyright © Huawei Technologies Co., Ltd.
13
1.3.4 Replicating a Parameter Group
Scenarios
This section guides you on how to replicate a parameter group that you create and name itwith a different name.
Procedure
Step 1 Log in to the management console.
Step 2 Click in the upper left corner and select a region and a project.
Step 3 Under Database, click Document Database Service.
Step 4 On the Parameter Group Management page, click the Cluster, Replica Set, or SingleNode tab, locate the target parameter group, and click Replicate in the Operation column.
Step 5 Enter the new parameter group name and description and click OK.l Parameter Group Name: specifies the parameter group name, which is a string of 1 to
64 characters composed of only letters (case-sensitive), digits, hyphens (-), underscores(_), and periods (.).
l The parameter group description contains a maximum of 256 characters and cannotcontain the carriage return character and the following special characters: >!<"&'=
Step 6 After the creation is complete, you can manage the parameter group in the parameter grouplist on the Cluster, Replica Set, or Single Node tab.
----End
1.3.5 Changing Associated Parameter Group
Scenarios
After a DB instance is created, you can change the parameter group associated with the DBinstance to achieve optimal performance.
Cluster
Step 1 Log in to the management console.
Step 2 Click in the upper left corner and select a region and a project.
Step 3 Under Database, click Document Database Service.
Step 4 On the Instance Management page, click the Cluster tab, locate the target instance and clickthe name of the instance.
Step 5 In the Node Information area on the Basic Information page, click mongos, shard, orconfig, locate the target node, and click Change Parameter Group or choose More >Change Parameter Group.
Step 6 On the displayed dialog box, select the parameter group to be modified and click OK.
Document Database ServiceUser Guide 1 Managing DDS DB Instances
Issue 07 (2018-06-07) Huawei Proprietary and ConfidentialCopyright © Huawei Technologies Co., Ltd.
14
l If the static parameter value is changed in the new parameter group, restart the instancefor the modification to take effect.
l If no parameter groups are available for New Parameter Group, create a parametergroup. For details, see section Creating a Parameter Group.
The parameter group associated with the DB instance cannot be changed in any of thefollowing cases:
l The account is frozen.l The user is not authorized.l A DB instance is being restarted.l A backup file is being created.l Instance nodes are being added.l The storage space is increasing.l The instance class is being changed.l An SSL connection is being enabled or disabled.l The port is being changed.
----End
Replica Set
Step 1 Log in to the management console.
Step 2 Click in the upper left corner and select a region and a project.
Step 3 Under Database, click Document Database Service.
Step 4 On the Instance Management page, click the Replica Set tab, locate the target DB instance,and click Change Parameter Group in the Operation column.
Step 5 On the displayed dialog box, select the parameter group to be modified and click OK.l If the static parameter value is changed in the new parameter group, restart the instance
for the modification to take effect.l If no parameter groups are available for New Parameter Group, create a parameter
group. For details, see section Creating a Parameter Group.
The parameter group associated with the DB instance cannot be changed in any of thefollowing cases:
l The account is frozen.l The user is not authorized.l A DB instance is being restarted.l A backup file is being created.l The storage space is increasing.l The instance class is being changed.l An SSL connection is being enabled or disabled.l The port is being changed.
----End
Document Database ServiceUser Guide 1 Managing DDS DB Instances
Issue 07 (2018-06-07) Huawei Proprietary and ConfidentialCopyright © Huawei Technologies Co., Ltd.
15
Single Node
Step 1 Log in to the management console.
Step 2 Click in the upper left corner and select a region and a project.
Step 3 Under Database, click Document Database Service.
Step 4 On the Instance Management page, click the Single Node tab, locate the target DB instance,and choose More > Change Parameter Group in the Operation column.
Step 5 On the displayed dialog box, select the parameter group to be modified and click OK.l If the static parameter value is changed in the new parameter group, restart the instance
for the modification to take effect.l If no parameter groups are available for New Parameter Group, create a parameter
group. For details, see section Creating a Parameter Group.
The parameter group associated with the DB instance cannot be changed in any of thefollowing cases:
l The account is frozen.l The user is not authorized.l A DB instance is being restarted.l A backup file is being created.l The storage space is increasing.l The instance class is being changed.l An SSL connection is being enabled or disabled.l The port is being changed.
----End
1.3.6 Resetting a Parameter Group
Scenarios
This section guides you on how to reset all parameters in a parameter group you create to thedefault settings as needed.
NOTICEResetting the parameter group will restore the default values. Exercise caution whenperforming this operation.
Procedure
Step 1 Log in to the management console.
Step 2 Click in the upper left corner and select a region and a project.
Document Database ServiceUser Guide 1 Managing DDS DB Instances
Issue 07 (2018-06-07) Huawei Proprietary and ConfidentialCopyright © Huawei Technologies Co., Ltd.
16
Step 3 Under Database, click Document Database Service.
Step 4 On the Parameter Group Management page, click the Cluster, Replica Set, or SingleNode tab, locate the parameter group to be reset and choose More > Reset.
Step 5 In the displayed dialog box, click OK.
----End
1.3.7 Deleting a Parameter Group
Scenarios
This section guides you on how to delete a parameter group that is no longer used. Thefollowing parameter groups cannot be deleted.
l Default parameter groups
l Parameter groups associated with DB instances
NOTICEThe deleted parameter group cannot be restored. Exercise caution when performing thisoperation.
Procedure
Step 1 Log in to the management console.
Step 2 Click in the upper left corner and select a region and a project.
Step 3 Under Database, click Document Database Service.
Step 4 On the Parameter Group Management page, click the Cluster, Replica Set, or SingleNode tab, locate the parameter group to be deleted and choose More > Delete.
Step 5 In the displayed dialog box, click OK.
----End
1.4 Storage
1.4.1 Adding Instance Nodes (Cluster)
Scenarios
This section guides you on how to add nodes to a DB instance to meet your servicerequirements.
Document Database ServiceUser Guide 1 Managing DDS DB Instances
Issue 07 (2018-06-07) Huawei Proprietary and ConfidentialCopyright © Huawei Technologies Co., Ltd.
17
NOTE
No node can be added to the DB instance of which the HA type is replica set.
You can add nodes when the instance status is Available, Deleting backup, or Checking restoration.
Add mongos
Step 1 Log in to the management console.
Step 2 Click in the upper left corner and select a region and a project.
Step 3 Under Database, click Document Database Service.
Step 4 On the Instance Management page, click the Cluster tab, locate the target DB instance andclick its name.
Step 5 On the mongos page in the Node Information area, click Add mongos.
Step 6 Specify Node Class and mongos Quantity and click Apply Now.
The maximum number of mongos you can have is 12.
Step 7 On the page for you to confirm specifications, check the specifications.l If you need to modify your settings, click Previous to go back to the page for you to
specify details.l If you do not need to modify your settings, click Submit.
Step 8 View the result of adding DB instance nodes.
On the Instance Management page, click the Cluster tab, locate the target DB instance andclick its name. In the Node Information area on the Basic Information page, click themongos tab and check whether the node is added successfully. This process takes about 10 to15 minutes. If the mongos fail to be added, you can revert them in batches or delete them oneby one. For details, see section Reverting Nodes (Cluster).
----End
Add shard
Step 1 Log in to the management console.
Step 2 Click in the upper left corner and select a region and a project.
Step 3 Under Database, click Document Database Service.
Step 4 On the Instance Management page, click the Cluster tab, locate the target DB instance andclick its name.
Step 5 On the shard page in the Node Information area, click Add shard.
Step 6 If you select MongoDB community edition, specify the required node class, storage space,and shard quantity. If you select enhanced MongoDB edition, specify node class and shardquantity. Then, click Apply Now.l The storage space you applied for will contain the system overhead required for inode,
reserved block, and database operation. The storage space must be an integer multiple of10.
Document Database ServiceUser Guide 1 Managing DDS DB Instances
Issue 07 (2018-06-07) Huawei Proprietary and ConfidentialCopyright © Huawei Technologies Co., Ltd.
18
l The maximum number of shards you can have is 12.
Step 7 On the page for you to confirm specifications, check the specifications.
l If you need to modify your settings, click Previous to go back to the page for you tospecify details.
l If you do not need to modify your settings, click Submit.
Step 8 View the result of adding DB instance nodes.
On the Instance Management page, click the Cluster tab, locate the target DB instance andclick its name. In the Node Information area on the Basic Information page, click the shardtab and check whether the node is added successfully. This process takes about 10 to 15minutes. If the shards fail to be added, you can revert them in batches or delete them one byone. For details, see section Reverting Nodes (Cluster).
----End
1.4.2 Reverting Nodes (Cluster)
Scenarios
This section guides you on how to revert nodes that fail to be added.
Reverting Nodes in Batches
Step 1 Log in to the management console.
Step 2 Click in the upper left corner and select a region and a project.
Step 3 Under Database, click Document Database Service.
Step 4 On the Instance Management page, click the Cluster tab, locate the instance to which nodesfail to be added, choose More > Revert in the Operation column.
Step 5 In the displayed dialog box, click OK. During reversal, the node status is Deleting node. Thisprocess takes about 1 to 3 minutes.
----End
Deleting a Single Node
Step 1 Log in to the management console.
Step 2 Click in the upper left corner and select a region and a project.
Step 3 Under Database, click Document Database Service.
Step 4 On the Instance Management page, click the Cluster tab, locate the target DB instance thatthe node fails to be added and click the instance name.
Step 5 In the Node Information area on the Basic Information tab, click the mongos or shard tab,locate the mongos or shard that fail to be added, and choose More > Delete.
Document Database ServiceUser Guide 1 Managing DDS DB Instances
Issue 07 (2018-06-07) Huawei Proprietary and ConfidentialCopyright © Huawei Technologies Co., Ltd.
19
Step 6 In the displayed dialog box, click OK. The instance status becomes Deleting node. Thisprocess takes about 1 to 3 minutes.
----End
1.4.3 Scaling Up Storage Space
Scenarios
You can increase the storage space of a DB instance to meet your service requirements.
NOTE
l You can scale up a DB instance a maximum of four times.
l You cannot scale up a DB instance in Abnormal status.
l You cannot scale up a DB instance in Creating, Scaling up, Changing instance class, Addingnode, or Deleting node status.
l You cannot delete the DB instance during scaling.
l You cannot scale down the storage space.
l If you scale up a DB instance with disks encrypted, the expanded storage space will be encryptedusing the original encryption key.
l You cannot scale up the storage space of the config for DB instances of which the HA type is cluster.
Cluster
Step 1 Log in to the management console.
Step 2 Click in the upper left corner and select a region and a project.
Step 3 Under Database, click Document Database Service.
Step 4 On the Instance Management page, click the Cluster tab, locate the target DB instance andclick its name.
Step 5 In the Node Information area on the Basic Information page, click the shard tab, locate thetarget node, and click Scale.
Step 6 Click the Storage Space tab on the displayed page, specify the desired storage space, andclick Apply Now.
The minimum storage space you can set is 10 GB and the maximum is 1000 GB. The storagespace you set must be a multiple of 10.
Step 7 On the page for you to confirm specifications, check the specifications.l If you need to modify your settings, click Previous to go back to the page for you to
specify details.l If you do not need to modify your settings, click Submit.
Step 8 Check the scaling-up result.
In the Node Information area on the Basic Information page, click the shard tab and checkwhether the scaling up is successful. This process takes about 3 to 5 minutes.
----End
Document Database ServiceUser Guide 1 Managing DDS DB Instances
Issue 07 (2018-06-07) Huawei Proprietary and ConfidentialCopyright © Huawei Technologies Co., Ltd.
20
Replica Set
Step 1 Log in to the management console.
Step 2 Click in the upper left corner and select a region and a project.
Step 3 Under Database, click Document Database Service.
Step 4 On the Instance Management page, click the Replica Set tab, locate the target DB instance,and click Scale in the Operation column.
Step 5 Click the Storage Space tab on the displayed page, specify the desired storage space, andclick Apply Now.
You must add a minimum of 10 GB each time you scaled up, and you may only specifymultiples of 10 GB. The maximum amount of storage space is 1000 GB.
Step 6 On the page for you to confirm specifications, check the specifications.
l If you need to modify your settings, click Previous to go back to the page for you tospecify details.
l If you do not need to modify your settings, click Submit.
Step 7 Check the scaling-up result.
On the Instance Management page, click the target instance name under the Replica Set tab.Then, in the Storage Space area on the Basic Information page, check whether the scalingup is successful. This process takes about 3 to 5 minutes.
----End
Single Node
Step 1 Log in to the management console.
Step 2 Click in the upper left corner and select a region and a project.
Step 3 Under Database, click Document Database Service.
Step 4 On the Instance Management page, click the Single Node tab, locate the target DB instance,and click Scale in the Operation column.
Step 5 Click the Storage Space tab on the displayed page, specify the desired storage space, andclick Apply Now.
You must add a minimum of 10 GB each time you scaled up, and you may only specifymultiples of 10 GB. The maximum amount of storage space is 300 GB.
Step 6 On the page for you to confirm specifications, check the specifications.
l If you need to modify your settings, click Previous to go back to the page for you tospecify details.
l If you do not need to modify your settings, click Submit.
Step 7 Check the scaling-up result.
Document Database ServiceUser Guide 1 Managing DDS DB Instances
Issue 07 (2018-06-07) Huawei Proprietary and ConfidentialCopyright © Huawei Technologies Co., Ltd.
21
On the Instance Management page, click the target instance name under the Single Nodetab. Then, in the Storage Space area on the Basic Information page, check whether thescaling up is successful. This process takes about 3 to 5 minutes.
----End
1.4.4 Changing the CPU or Memory of a DB Instance (Cluster)
ScenariosThis section guides you on how to change the CPU or memory of a DB instance.
NOTE
If your account balance is less than ¥100, you cannot change the CPU or memory of your DB instances.A DB instance cannot be deleted when you are changing its CPU or memory.
Changing mongos
Step 1 Log in to the management console.
Step 2 Click in the upper left corner and select a region and a project.
Step 3 Under Database, click Document Database Service.
Step 4 On the Instance Management page, click the Cluster tab, locate the target instance and clickthe name of the instance.
Step 5 In the Node Information area on the Basic Information page, click the mongos tab, locatethe target mongos, and click Scale in the Operation column.
Step 6 Specify the desired CPU and memory and click Apply Now.
The DB instance class cannot be scaled down.
Step 7 Confirm the specifications.l If you need to modify your settings, click Previous.l If you do not need to modify your settings, click Submit.
Step 8 View the DB instance CPU or memory modification result.
On the Cluster tab, the instance status changes to Changing instance class. In the NodeInformation area on the Basic Information page, click the mongos tab and check whetherthe modification is successful. This process takes about 10 minutes.
----End
Changing shard
Step 1 Log in to the management console.
Step 2 Click in the upper left corner and select a region and a project.
Step 3 Under Database, click Document Database Service.
Step 4 On the Instance Management page, click the Cluster tab, locate the target instance and clickthe name of the instance.
Document Database ServiceUser Guide 1 Managing DDS DB Instances
Issue 07 (2018-06-07) Huawei Proprietary and ConfidentialCopyright © Huawei Technologies Co., Ltd.
22
Step 5 In the Node Information area on the Basic Information page, click the shard tab, locate thetarget shard, and click Scale in the Operation column.
Step 6 On the displayed page, click CPU/Memory, specify the desired CPU and memory, and clickApply Now.
The DB instance class cannot be scaled down.
Step 7 Confirm the specifications.
l If you need to modify your settings, click Previous.
l If you do not need to modify your settings, click Submit.
Step 8 View the DB instance CPU or memory modification result.
On the Cluster tab, the instance status changes to Changing instance class. In the NodeInformation area on the Basic Information page, click the shard tab and check whether themodification is successful. This process takes about 10 minutes.
----End
1.4.5 Changing the CPU or Memory of a DB Instance (Replica Set)
Scenarios
This section guides you on how to change the CPU or memory of a DB instance.
NOTE
If your account balance is less than ¥100, you cannot change the CPU or memory of your DB instances.
A DB instance cannot be deleted when you are changing its CPU or memory.
Procedure
Step 1 Log in to the management console.
Step 2 Click in the upper left corner and select a region and a project.
Step 3 Under Database, click Document Database Service.
Step 4 On the Instance Management page, click the Replica Set tab, locate the target DB instance,and click Scale in the Operation column.
Step 5 On the displayed page, click CPU/Memory, specify the desired CPU and memory, and clickApply Now.
The DB instance class cannot be scaled down.
Step 6 On the page for you to confirm specifications, check the specifications.
l If you need to modify your settings, click Previous to go back to the page for you tospecify details.
l If you do not need to modify your settings, click Submit.
Step 7 View the DB instance CPU or memory modification result.
Document Database ServiceUser Guide 1 Managing DDS DB Instances
Issue 07 (2018-06-07) Huawei Proprietary and ConfidentialCopyright © Huawei Technologies Co., Ltd.
23
On the Replica Set tab, the instance status changes to Changing instance class. On the BasicInformation page, check whether the modification is successful. This process takes about 10minutes.
----End
1.4.6 Changing the CPU or Memory of a DB Instance (SingleNode)
Scenarios
This section guides you on how to change the CPU or memory of a DB instance.
NOTE
If your account balance is less than ¥100, you cannot change the CPU or memory of your DB instances.
A DB instance cannot be deleted when you are changing its CPU or memory.
Procedure
Step 1 Log in to the management console.
Step 2 Click in the upper left corner and select a region and a project.
Step 3 Under Database, click Document Database Service.
Step 4 On the Instance Management page, click the Single Node tab, locate the target DB instance,and click Scale in the Operation column.
Step 5 On the displayed page, click CPU/Memory, specify the desired CPU and memory, and clickApply Now.
The DB instance class cannot be scaled down.
Step 6 On the page for you to confirm specifications, check the specifications.
l If you need to modify your settings, click Previous to go back to the page for you tospecify details.
l If you do not need to modify your settings, click Submit.
Step 7 View the DB instance CPU or memory modification result.
On the Single Node tab, the instance status changes to Changing instance class. On theBasic Information page, check whether the modification is successful. This process takesabout 16 to 20 minutes.
----End
1.5 Security
Document Database ServiceUser Guide 1 Managing DDS DB Instances
Issue 07 (2018-06-07) Huawei Proprietary and ConfidentialCopyright © Huawei Technologies Co., Ltd.
24
1.5.1 Resetting the Administrator Password
Scenarios
This section guides you on how to reset the password of the database administrator. Thepassword cannot be reset when the DB instance is in any of the following statuses:
l Frozenl Restartingl Adding nodel Switching SSLl Changing portl Changing instance classl Deleting node
Method 1
Step 1 Log in to the management console.
Step 2 Click in the upper left corner and select a region and a project.
Step 3 Under Database, click Document Database Service.
Step 4 On the Instance Management page, click the Cluster tab, locate the target instance and clickReset Password in the Operation column. Alternatively, on the Replica Set or Single Nodetab page, select the specified instance and choose More > Reset Password.
Step 5 Enter the administrator password and click OK.
The password is a string of 8 to 32 characters. It must be a combination of uppercase letters,lowercase letters, digits, and special characters. You can use the following special characters:~!@#%^*-_=+?
----End
Method 2
Step 1 Log in to the management console.
Step 2 Click in the upper left corner and select a region and a project.
Step 3 Under Database, click Document Database Service.
Step 4 On the Instance Management page, locate the target DB instance and click its name.
Step 5 On the displayed Basic Information page, click Reset Password in the Administrator field.In the displayed dialog box, enter a new password and confirm the password.
The password is a string of 8 to 32 characters. It must be a combination of uppercase letters,lowercase letters, digits, and special characters. You can use the following special characters:~!@#%^*-_=+?
----End
Document Database ServiceUser Guide 1 Managing DDS DB Instances
Issue 07 (2018-06-07) Huawei Proprietary and ConfidentialCopyright © Huawei Technologies Co., Ltd.
25

1.5.2 Changing the Database Port
ScenariosThis section guides you on how to modify the database port to ensure system security. Thedatabase port cannot be changed when the instance is in any of the following statuses:
l Frozenl Restartingl Adding nodel Switching SSLl Changing instance classl Deleting node
Procedure
Step 1 Log in to the management console.
Step 2 Click in the upper left corner and select a region and a project.
Step 3 Under Database, click Document Database Service.
Step 4 On the Instance Management page, locate the target DB instance and click its name.
Step 5 In the DB Instance Information area on the Basic Information page, click in theDatabase Port field to change the database port.
The database port range is 2100 to 9500.
l If you want to submit the change, click . This process takes about 1 to 5 minutes.
l If you want to cancel the change, click .
Step 6 Click in the upper right corner on the Basic Information page to view the modificationresult.
----End
Document Database ServiceUser Guide 1 Managing DDS DB Instances
Issue 07 (2018-06-07) Huawei Proprietary and ConfidentialCopyright © Huawei Technologies Co., Ltd.
26
2 Monitoring
2.1 Interconnecting with Cloud Eye
2.1.1 DDS Metrics
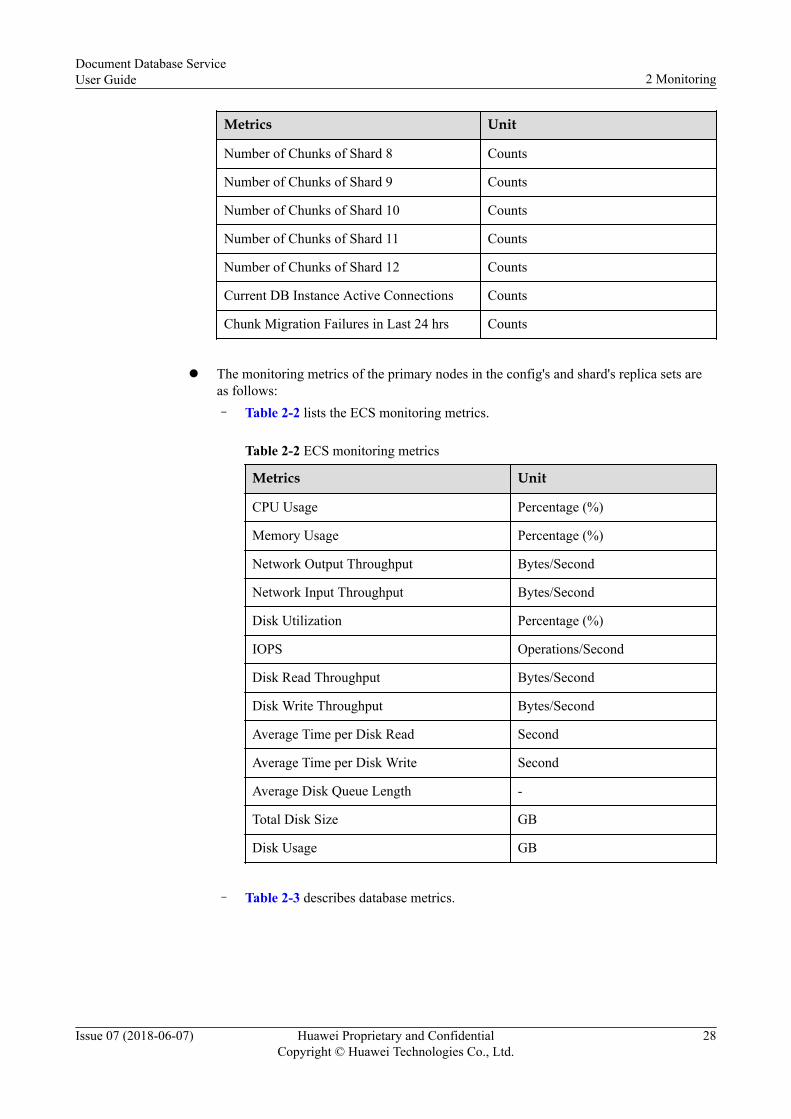
Clusterl Table 2-1 lists the DB instance monitoring metrics.
Table 2-1 DB instance monitoring metrics
Metrics Unit
Commands per Second Executions/Second
Delete Operations per Second Executions/Second
Insert Operations per Second Executions/Second
Query Operations per Second Executions/Second
Update Operations per Second Executions/Second
Getmore Operations per Second Executions/Second
Number of Chunks of Shard 1 Counts
Number of Chunks of Shard 2 Counts
Number of Chunks of Shard 3 Counts
Number of Chunks of Shard 4 Counts
Number of Chunks of Shard 5 Counts
Number of Chunks of Shard 6 Counts
Number of Chunks of Shard 7 Counts
Document Database ServiceUser Guide 2 Monitoring
Issue 07 (2018-06-07) Huawei Proprietary and ConfidentialCopyright © Huawei Technologies Co., Ltd.
27
Metrics Unit
Number of Chunks of Shard 8 Counts
Number of Chunks of Shard 9 Counts
Number of Chunks of Shard 10 Counts
Number of Chunks of Shard 11 Counts
Number of Chunks of Shard 12 Counts
Current DB Instance Active Connections Counts
Chunk Migration Failures in Last 24 hrs Counts
l The monitoring metrics of the primary nodes in the config's and shard's replica sets are
as follows:– Table 2-2 lists the ECS monitoring metrics.
Table 2-2 ECS monitoring metrics
Metrics Unit
CPU Usage Percentage (%)
Memory Usage Percentage (%)
Network Output Throughput Bytes/Second
Network Input Throughput Bytes/Second
Disk Utilization Percentage (%)
IOPS Operations/Second
Disk Read Throughput Bytes/Second
Disk Write Throughput Bytes/Second
Average Time per Disk Read Second
Average Time per Disk Write Second
Average Disk Queue Length -
Total Disk Size GB
Disk Usage GB
– Table 2-3 describes database metrics.
Document Database ServiceUser Guide 2 Monitoring
Issue 07 (2018-06-07) Huawei Proprietary and ConfidentialCopyright © Huawei Technologies Co., Ltd.
28
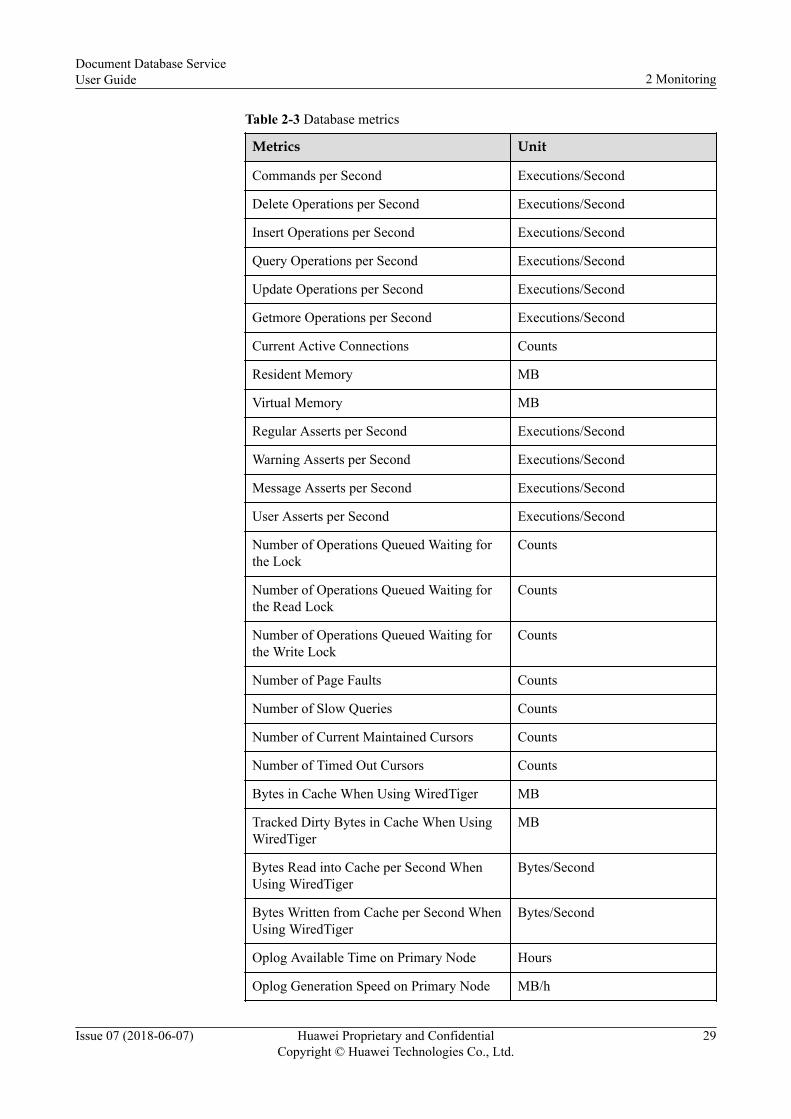
Table 2-3 Database metrics
Metrics Unit
Commands per Second Executions/Second
Delete Operations per Second Executions/Second
Insert Operations per Second Executions/Second
Query Operations per Second Executions/Second
Update Operations per Second Executions/Second
Getmore Operations per Second Executions/Second
Current Active Connections Counts
Resident Memory MB
Virtual Memory MB
Regular Asserts per Second Executions/Second
Warning Asserts per Second Executions/Second
Message Asserts per Second Executions/Second
User Asserts per Second Executions/Second
Number of Operations Queued Waiting forthe Lock
Counts
Number of Operations Queued Waiting forthe Read Lock
Counts
Number of Operations Queued Waiting forthe Write Lock
Counts
Number of Page Faults Counts
Number of Slow Queries Counts
Number of Current Maintained Cursors Counts
Number of Timed Out Cursors Counts
Bytes in Cache When Using WiredTiger MB
Tracked Dirty Bytes in Cache When UsingWiredTiger
MB
Bytes Read into Cache per Second WhenUsing WiredTiger
Bytes/Second
Bytes Written from Cache per Second WhenUsing WiredTiger
Bytes/Second
Oplog Available Time on Primary Node Hours
Oplog Generation Speed on Primary Node MB/h
Document Database ServiceUser Guide 2 Monitoring
Issue 07 (2018-06-07) Huawei Proprietary and ConfidentialCopyright © Huawei Technologies Co., Ltd.
29
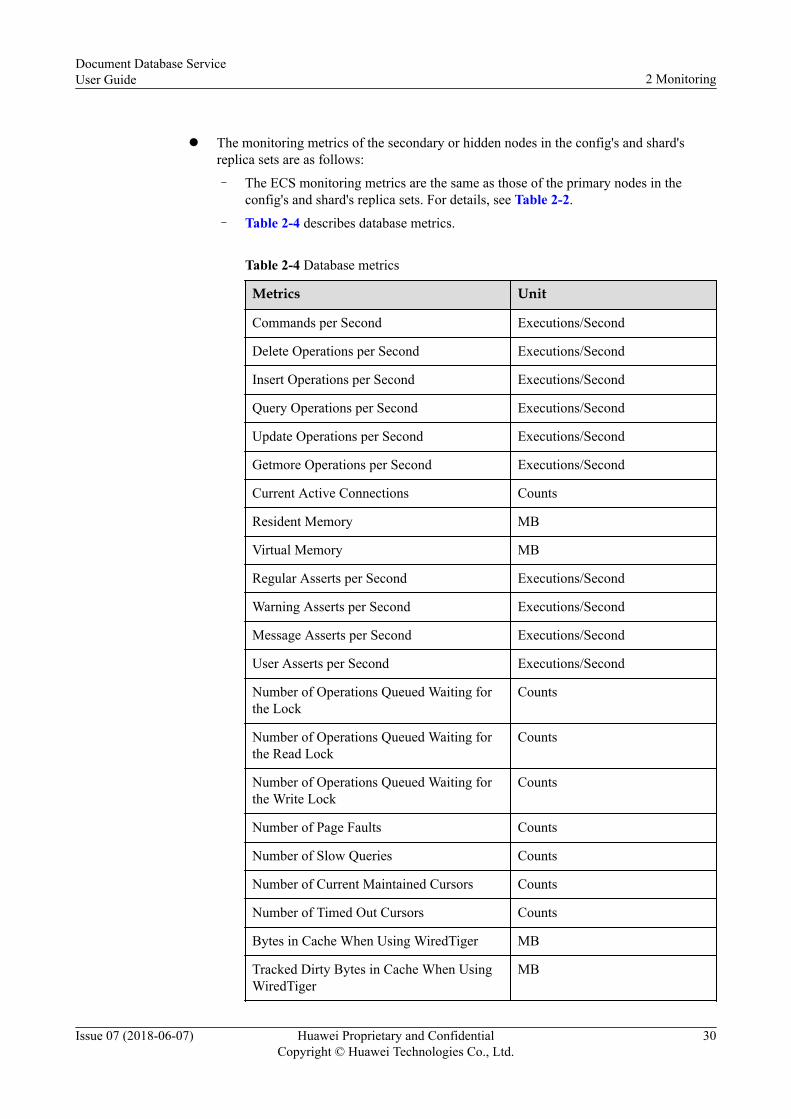
l The monitoring metrics of the secondary or hidden nodes in the config's and shard'sreplica sets are as follows:
– The ECS monitoring metrics are the same as those of the primary nodes in theconfig's and shard's replica sets. For details, see Table 2-2.
– Table 2-4 describes database metrics.
Table 2-4 Database metrics
Metrics Unit
Commands per Second Executions/Second
Delete Operations per Second Executions/Second
Insert Operations per Second Executions/Second
Query Operations per Second Executions/Second
Update Operations per Second Executions/Second
Getmore Operations per Second Executions/Second
Current Active Connections Counts
Resident Memory MB
Virtual Memory MB
Regular Asserts per Second Executions/Second
Warning Asserts per Second Executions/Second
Message Asserts per Second Executions/Second
User Asserts per Second Executions/Second
Number of Operations Queued Waiting forthe Lock
Counts
Number of Operations Queued Waiting forthe Read Lock
Counts
Number of Operations Queued Waiting forthe Write Lock
Counts
Number of Page Faults Counts
Number of Slow Queries Counts
Number of Current Maintained Cursors Counts
Number of Timed Out Cursors Counts
Bytes in Cache When Using WiredTiger MB
Tracked Dirty Bytes in Cache When UsingWiredTiger
MB
Document Database ServiceUser Guide 2 Monitoring
Issue 07 (2018-06-07) Huawei Proprietary and ConfidentialCopyright © Huawei Technologies Co., Ltd.
30
Metrics Unit
Bytes Read into Cache per Second WhenUsing WiredTiger
Bytes/Second
Bytes Written from Cache per Second WhenUsing WiredTiger
Bytes/Second
Overlapping Oplog Time Between Primaryand Secondary Nodes
Second
Delay Between Primary and SecondaryNodes
Second
Replicated Commands per Second Executions/Second
Replicated Update Operations per Second Executions/Second
Replicated Delete Operations per Second Executions/Second
Replicated Insert Operations per Second Executions/Second
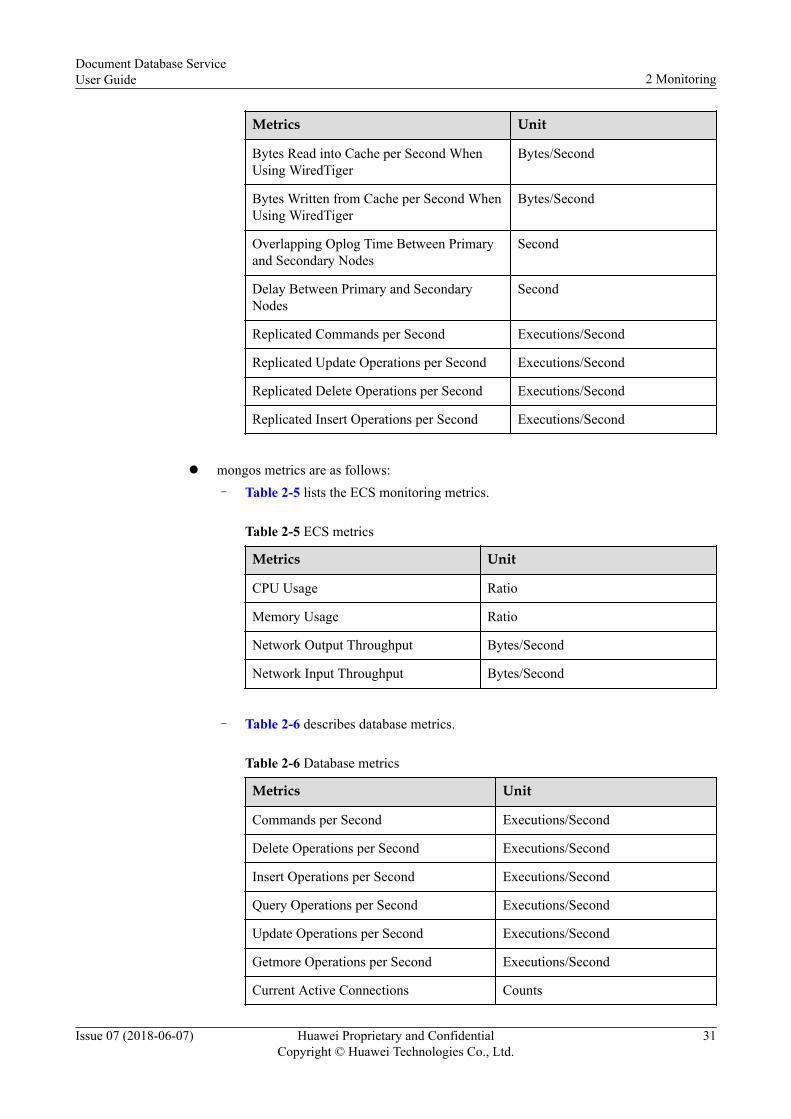
l mongos metrics are as follows:
– Table 2-5 lists the ECS monitoring metrics.
Table 2-5 ECS metrics
Metrics Unit
CPU Usage Ratio
Memory Usage Ratio
Network Output Throughput Bytes/Second
Network Input Throughput Bytes/Second
– Table 2-6 describes database metrics.
Table 2-6 Database metrics
Metrics Unit
Commands per Second Executions/Second
Delete Operations per Second Executions/Second
Insert Operations per Second Executions/Second
Query Operations per Second Executions/Second
Update Operations per Second Executions/Second
Getmore Operations per Second Executions/Second
Current Active Connections Counts
Document Database ServiceUser Guide 2 Monitoring
Issue 07 (2018-06-07) Huawei Proprietary and ConfidentialCopyright © Huawei Technologies Co., Ltd.
31
Metrics Unit
Resident Memory MB
Virtual Memory MB
Regular Asserts per Second Executions/Second
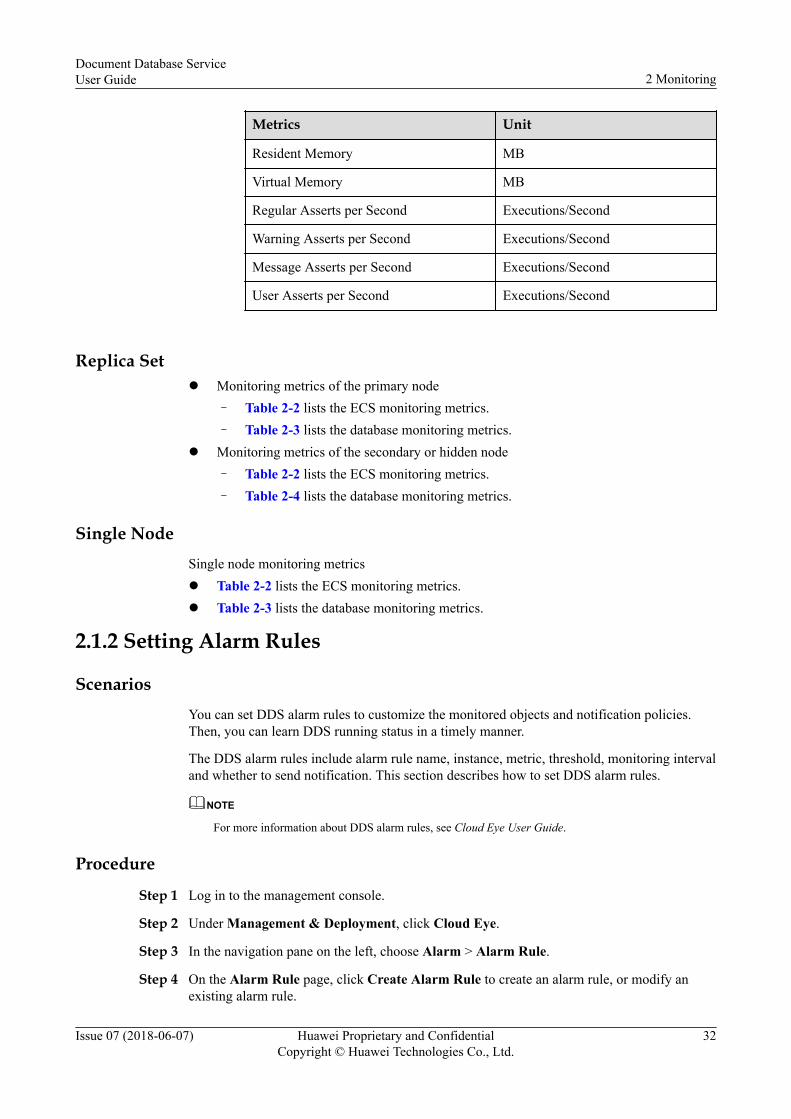
Warning Asserts per Second Executions/Second
Message Asserts per Second Executions/Second
User Asserts per Second Executions/Second
Replica Setl Monitoring metrics of the primary node
– Table 2-2 lists the ECS monitoring metrics.– Table 2-3 lists the database monitoring metrics.
l Monitoring metrics of the secondary or hidden node– Table 2-2 lists the ECS monitoring metrics.– Table 2-4 lists the database monitoring metrics.
Single NodeSingle node monitoring metricsl Table 2-2 lists the ECS monitoring metrics.l Table 2-3 lists the database monitoring metrics.
2.1.2 Setting Alarm Rules
ScenariosYou can set DDS alarm rules to customize the monitored objects and notification policies.Then, you can learn DDS running status in a timely manner.
The DDS alarm rules include alarm rule name, instance, metric, threshold, monitoring intervaland whether to send notification. This section describes how to set DDS alarm rules.
NOTE
For more information about DDS alarm rules, see Cloud Eye User Guide.
Procedure
Step 1 Log in to the management console.
Step 2 Under Management & Deployment, click Cloud Eye.
Step 3 In the navigation pane on the left, choose Alarm > Alarm Rule.
Step 4 On the Alarm Rule page, click Create Alarm Rule to create an alarm rule, or modify anexisting alarm rule.
Document Database ServiceUser Guide 2 Monitoring
Issue 07 (2018-06-07) Huawei Proprietary and ConfidentialCopyright © Huawei Technologies Co., Ltd.
32
The following operations use the modification of an existing alarm rule as an example.
Locate the alarm rule to be modified and click Modify.
Click OK.
Step 5 After the alarm rule is set, the system automatically notifies you when an alarm is triggered.
----End
2.1.3 Viewing DDS Metrics
ScenariosCloud Eye provided by the public cloud monitors DDS running statuses. You can obtain themonitoring metrics of DDS on the management console.
Monitored data requires a period of time for transmission and display. The status of DDSdisplayed on the Cloud Eye page is the status obtained 5 to 10 minutes before. You can viewthe monitored data of a newly created DB instance 5 to 10 minutes later.
Prerequisitesl The DDS instance is running properly.
Cloud Eye does not display the metrics of a faulty or deleted DB instance or node. Youcan view the monitoring information only after the instance is restarted or recovered.
NOTE
Cloud Eye will delete a DDS DB instance or node that becomes faulty for 24 hours from the monitoringlist and will not monitor it any more. However, you need to manually clear its alarm rules.
l The instance has been properly running for at least 10 minutes.The monitoring data and graphics are available for a new DDS DB instance after theinstance runs for at least 10 minutes.
Procedure
Step 1 Log in to the management console.
Step 2 Under Management & Deployment, click Cloud Eye.
Step 3 In the navigation pane on the left, choose Cloud Service Monitoring > Document DatabaseService.
Step 4 On the displayed page, locate the target instance and click View Monitoring Graph in theOperation column.
Step 5 In the DDS monitoring area, you can select a duration to view the monitoring data.
You can view the monitoring data of DDS in the recent 1 hour, 3 hours, or 12 hours. To viewthe monitoring curve of a longer time range, click to enlarge the graph.
----End
2.2 Interconnecting with CTS
Document Database ServiceUser Guide 2 Monitoring
Issue 07 (2018-06-07) Huawei Proprietary and ConfidentialCopyright © Huawei Technologies Co., Ltd.
33
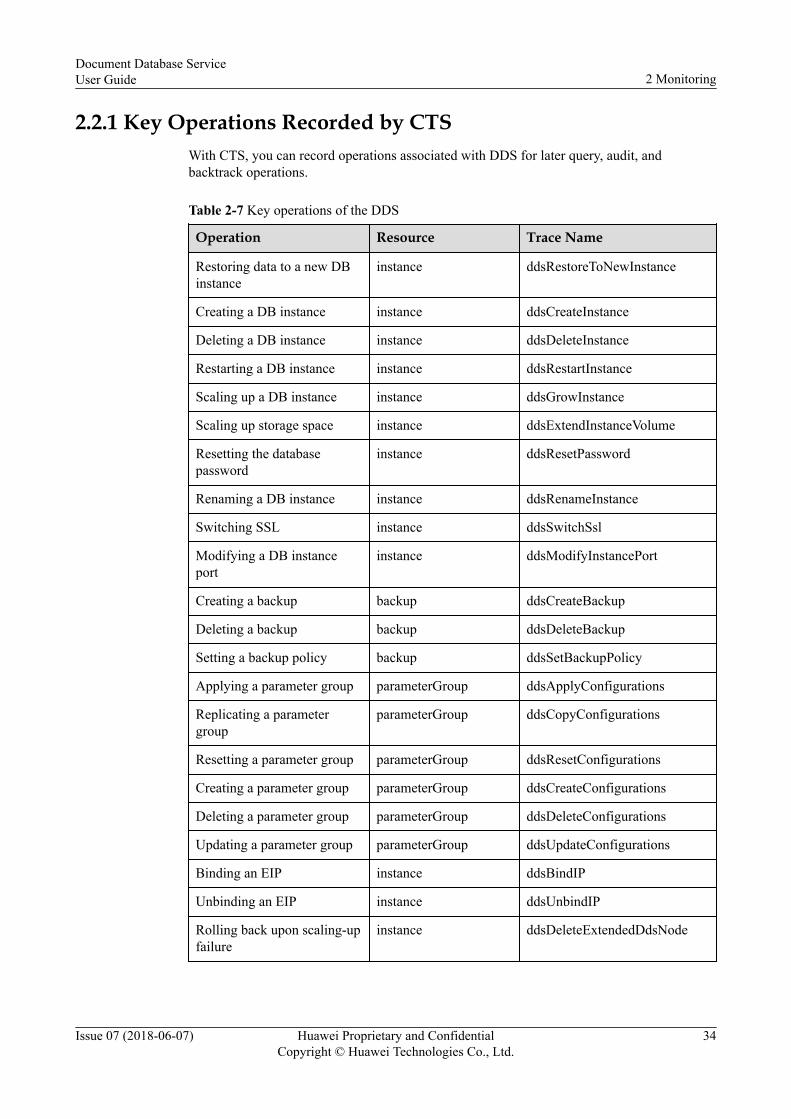
2.2.1 Key Operations Recorded by CTSWith CTS, you can record operations associated with DDS for later query, audit, andbacktrack operations.
Table 2-7 Key operations of the DDS
Operation Resource Trace Name
Restoring data to a new DBinstance
instance ddsRestoreToNewInstance
Creating a DB instance instance ddsCreateInstance
Deleting a DB instance instance ddsDeleteInstance
Restarting a DB instance instance ddsRestartInstance
Scaling up a DB instance instance ddsGrowInstance
Scaling up storage space instance ddsExtendInstanceVolume
Resetting the databasepassword
instance ddsResetPassword
Renaming a DB instance instance ddsRenameInstance
Switching SSL instance ddsSwitchSsl
Modifying a DB instanceport
instance ddsModifyInstancePort
Creating a backup backup ddsCreateBackup
Deleting a backup backup ddsDeleteBackup
Setting a backup policy backup ddsSetBackupPolicy
Applying a parameter group parameterGroup ddsApplyConfigurations
Replicating a parametergroup
parameterGroup ddsCopyConfigurations
Resetting a parameter group parameterGroup ddsResetConfigurations
Creating a parameter group parameterGroup ddsCreateConfigurations
Deleting a parameter group parameterGroup ddsDeleteConfigurations
Updating a parameter group parameterGroup ddsUpdateConfigurations
Binding an EIP instance ddsBindIP
Unbinding an EIP instance ddsUnbindIP
Rolling back upon scaling-upfailure
instance ddsDeleteExtendedDdsNode
Document Database ServiceUser Guide 2 Monitoring
Issue 07 (2018-06-07) Huawei Proprietary and ConfidentialCopyright © Huawei Technologies Co., Ltd.
34
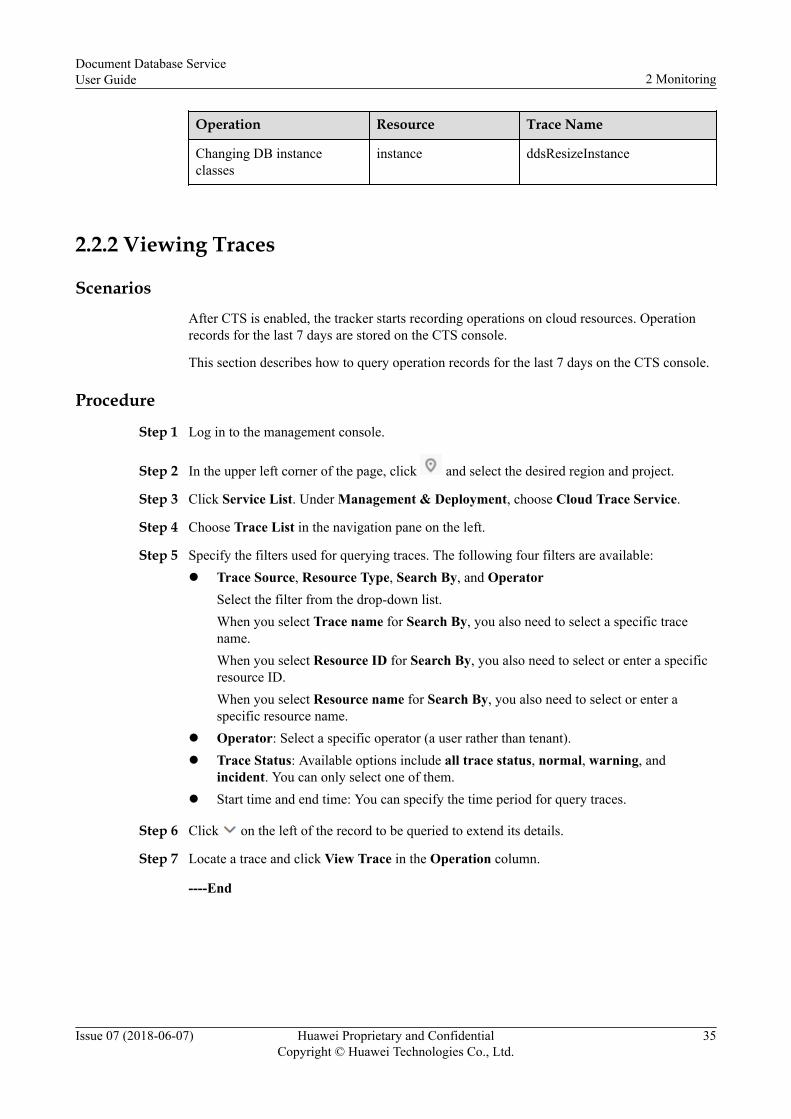
Operation Resource Trace Name
Changing DB instanceclasses
instance ddsResizeInstance
2.2.2 Viewing Traces
ScenariosAfter CTS is enabled, the tracker starts recording operations on cloud resources. Operationrecords for the last 7 days are stored on the CTS console.
This section describes how to query operation records for the last 7 days on the CTS console.
Procedure
Step 1 Log in to the management console.
Step 2 In the upper left corner of the page, click and select the desired region and project.
Step 3 Click Service List. Under Management & Deployment, choose Cloud Trace Service.
Step 4 Choose Trace List in the navigation pane on the left.
Step 5 Specify the filters used for querying traces. The following four filters are available:l Trace Source, Resource Type, Search By, and Operator
Select the filter from the drop-down list.When you select Trace name for Search By, you also need to select a specific tracename.When you select Resource ID for Search By, you also need to select or enter a specificresource ID.When you select Resource name for Search By, you also need to select or enter aspecific resource name.
l Operator: Select a specific operator (a user rather than tenant).l Trace Status: Available options include all trace status, normal, warning, and
incident. You can only select one of them.l Start time and end time: You can specify the time period for query traces.
Step 6 Click on the left of the record to be queried to extend its details.
Step 7 Locate a trace and click View Trace in the Operation column.
----End
Document Database ServiceUser Guide 2 Monitoring
Issue 07 (2018-06-07) Huawei Proprietary and ConfidentialCopyright © Huawei Technologies Co., Ltd.
35
2.3 Error log
Scenarios
Error logs include warning- and error-level logs generated during database running. Thissection guides you on how to locate database problems using error logs.
Procedure
Step 1 Log in to the management console.
Step 2 Click in the upper left corner and select a region and a project.
Step 3 Under Database, click Document Database Service.
Step 4 On the Instance Management page, click the target DB instance name.
Step 5 On the Error Log tab, view the log details.l You can view error log records of a node in different time periods.l You can view the time, levels, and descriptions of the logs.
----End
2.4 Slow Query Log
Scenarios
This section guides you on how to check query statements whose execution period exceedsthe threshold (100 ms by default) in the slow query logs.
Procedure
Step 1 Log in to the management console.
Step 2 Click in the upper left corner and select a region and a project.
Step 3 Under Database, click Document Database Service.
Step 4 On the Instance Management page, click the target DB instance name.
Step 5 On the Slow Query Log tab, view the following related log details.
NOTE
If you select all shards, the logs of all shards in the specified instance are displayed.
l Log records of a node in different time periodsl Statements of the following level
– insert– query
Document Database ServiceUser Guide 2 Monitoring
Issue 07 (2018-06-07) Huawei Proprietary and ConfidentialCopyright © Huawei Technologies Co., Ltd.
36

– update– remove– getmore– command
----End
Document Database ServiceUser Guide 2 Monitoring
Issue 07 (2018-06-07) Huawei Proprietary and ConfidentialCopyright © Huawei Technologies Co., Ltd.
37

A Change History
Release Date What's New
2018-06-07 This issue is the seventh official release, which incorporates thefollowing changes:l Supported MongoDB community edition 3.4.l Supported the second verification when a DB instance is
restarted or deleted.
2018-05-04 This issue is the sixth official release, which incorporates thefollowing changes:l Supported the creation of a replica set in the yearly/monthly
mode.l Supported the open beta test for a single node.l Put replica set into commercial use.
2018-04-13 This issue is the fifth official release, which incorporates thefollowing changes:l Enabled the feature of setting DB instance name on the page for
creating a DB instance.l Supported public accessibility enabling and disabling.l Supported the feature of viewing slow logs of all shards.l Supported the changing of DB instance storage space.l Supported the changing of the minimum capacity of the DB
instance to be expanded.l Supported the creation of a database account for a created DB
instance.l Supported the deletion of node that fails to be added.l Supported changing the CPU or memory of a DB instance.
2017-12-29 This issue is the fourth official release, which incorporates thefollowing change:Customized the document based on changes made to the DDSconsole.
Document Database ServiceUser Guide A Change History
Issue 07 (2018-06-07) Huawei Proprietary and ConfidentialCopyright © Huawei Technologies Co., Ltd.
38
Release Date What's New
2017-11-08 This issue is the third official release, which incorporates thefollowing changes:Commercial use of DDS
2017-08-18 This issue is the second official release, which incorporates thefollowing changes:l Optimized the procedures of buying DB instances based on
changes made to the DDS console.l Optimized the procedures of connecting DB instances using SSL
based on changes made to the DDS console.
2017-03-03 This issue is the first official release.
Document Database ServiceUser Guide A Change History
Issue 07 (2018-06-07) Huawei Proprietary and ConfidentialCopyright © Huawei Technologies Co., Ltd.
39