Embed Size (px)
Citation preview

1511217
USB to HDMI® AdapterUser’s Manual
1
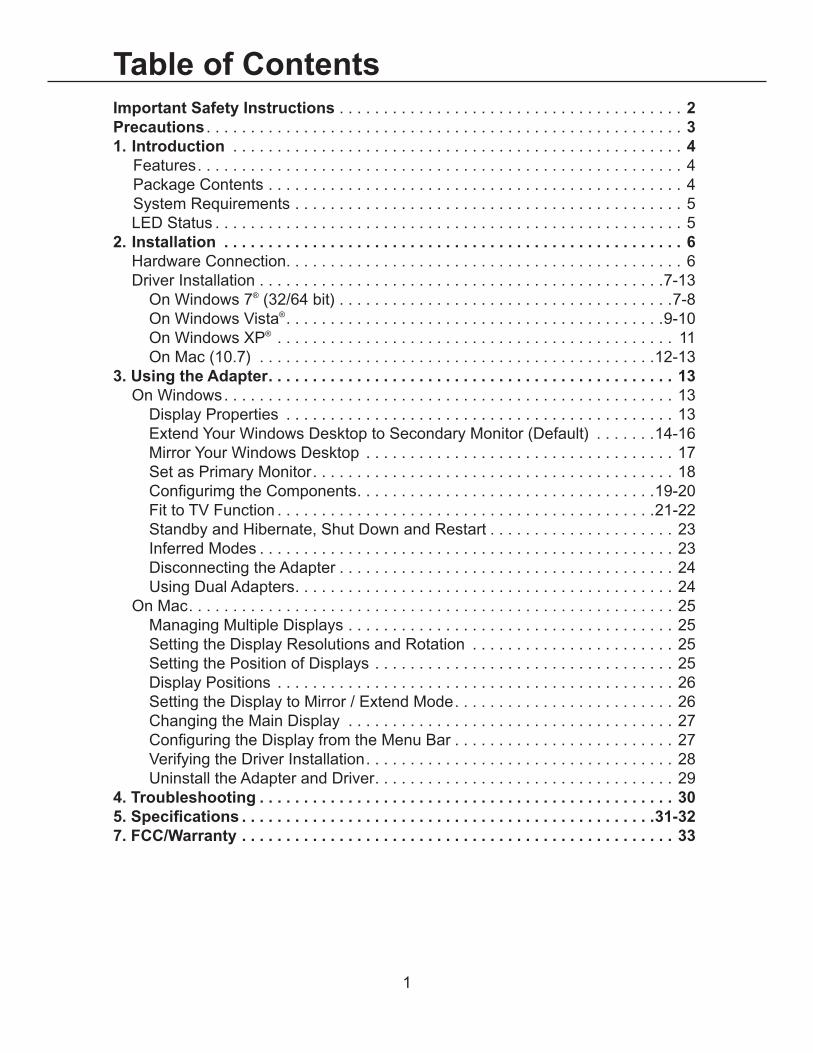
Table of ContentsImportant Safety Instructions . . . . . . . . . . . . . . . . . . . . . . . . . . . . . . . . . . . . . . . 2Precautions . . . . . . . . . . . . . . . . . . . . . . . . . . . . . . . . . . . . . . . . . . . . . . . . . . . . . . 31. Introduction . . . . . . . . . . . . . . . . . . . . . . . . . . . . . . . . . . . . . . . . . . . . . . . . . . . 4 Features . . . . . . . . . . . . . . . . . . . . . . . . . . . . . . . . . . . . . . . . . . . . . . . . . . . . . . . 4 Package Contents . . . . . . . . . . . . . . . . . . . . . . . . . . . . . . . . . . . . . . . . . . . . . . . 4 System Requirements . . . . . . . . . . . . . . . . . . . . . . . . . . . . . . . . . . . . . . . . . . . . 5 LED Status . . . . . . . . . . . . . . . . . . . . . . . . . . . . . . . . . . . . . . . . . . . . . . . . . . . . . 52. Installation . . . . . . . . . . . . . . . . . . . . . . . . . . . . . . . . . . . . . . . . . . . . . . . . . . . . 6 Hardware Connection . . . . . . . . . . . . . . . . . . . . . . . . . . . . . . . . . . . . . . . . . . . . . 6 Driver Installation . . . . . . . . . . . . . . . . . . . . . . . . . . . . . . . . . . . . . . . . . . . . . .7-13 On Windows 7® (32/64 bit) . . . . . . . . . . . . . . . . . . . . . . . . . . . . . . . . . . . . . .7-8 On Windows Vista® . . . . . . . . . . . . . . . . . . . . . . . . . . . . . . . . . . . . . . . . . . .9-10 On Windows XP® . . . . . . . . . . . . . . . . . . . . . . . . . . . . . . . . . . . . . . . . . . . . . 11 On Mac (10 .7) . . . . . . . . . . . . . . . . . . . . . . . . . . . . . . . . . . . . . . . . . . . . .12-133. Using the Adapter. . . . . . . . . . . . . . . . . . . . . . . . . . . . . . . . . . . . . . . . . . . . . . 13 On Windows . . . . . . . . . . . . . . . . . . . . . . . . . . . . . . . . . . . . . . . . . . . . . . . . . . . 13 Display Properties . . . . . . . . . . . . . . . . . . . . . . . . . . . . . . . . . . . . . . . . . . . . 13 Extend Your Windows Desktop to Secondary Monitor (Default) . . . . . . .14-16 Mirror Your Windows Desktop . . . . . . . . . . . . . . . . . . . . . . . . . . . . . . . . . . . 17 Set as Primary Monitor . . . . . . . . . . . . . . . . . . . . . . . . . . . . . . . . . . . . . . . . . 18 ConfigurimgtheComponents . . . . . . . . . . . . . . . . . . . . . . . . . . . . . . . . . .19-20 Fit to TV Function . . . . . . . . . . . . . . . . . . . . . . . . . . . . . . . . . . . . . . . . . . .21-22 StandbyandHibernate,ShutDownandRestart . . . . . . . . . . . . . . . . . . . . . 23 Inferred Modes . . . . . . . . . . . . . . . . . . . . . . . . . . . . . . . . . . . . . . . . . . . . . . . 23 DisconnectingtheAdapter . . . . . . . . . . . . . . . . . . . . . . . . . . . . . . . . . . . . . . 24 UsingDualAdapters . . . . . . . . . . . . . . . . . . . . . . . . . . . . . . . . . . . . . . . . . . . 24 On Mac . . . . . . . . . . . . . . . . . . . . . . . . . . . . . . . . . . . . . . . . . . . . . . . . . . . . . . . 25 Managing Multiple Displays . . . . . . . . . . . . . . . . . . . . . . . . . . . . . . . . . . . . . 25 SettingtheDisplayResolutionsandRotation . . . . . . . . . . . . . . . . . . . . . . . 25 SettingthePositionofDisplays . . . . . . . . . . . . . . . . . . . . . . . . . . . . . . . . . . 25 Display Positions . . . . . . . . . . . . . . . . . . . . . . . . . . . . . . . . . . . . . . . . . . . . . 26 SettingtheDisplaytoMirror/ExtendMode . . . . . . . . . . . . . . . . . . . . . . . . . 26 ChangingtheMainDisplay . . . . . . . . . . . . . . . . . . . . . . . . . . . . . . . . . . . . . 27 ConfiguringtheDisplayfromtheMenuBar . . . . . . . . . . . . . . . . . . . . . . . . . 27 VerifyingtheDriverInstallation . . . . . . . . . . . . . . . . . . . . . . . . . . . . . . . . . . . 28 UninstalltheAdapterandDriver . . . . . . . . . . . . . . . . . . . . . . . . . . . . . . . . . . 294. Troubleshooting . . . . . . . . . . . . . . . . . . . . . . . . . . . . . . . . . . . . . . . . . . . . . . . 305. Specifications . . . . . . . . . . . . . . . . . . . . . . . . . . . . . . . . . . . . . . . . . . . . . . .31-327. FCC/Warranty . . . . . . . . . . . . . . . . . . . . . . . . . . . . . . . . . . . . . . . . . . . . . . . . . 33
2
• Readtheseinstructions.Allthesafetyandoperatinginstructionsshouldbereadbeforethisproductisoperated.• Keeptheseinstructions.Thesafetyandoperatinginstructionsshouldberetainedforfuturereference.• Heedallwarnings.Allwarningsontheapplianceandintheoperatinginstructionsshouldbeadheredto.• Followallinstructions.Alloperatinganduseinstructionsshouldbefollowed.• Donotusethisapparatusnearwater.Theapplianceshouldnotbeusednearwaterormoisture,forexample,inawetbasement
or near a swimming pool .• Cleanonlywithdrycloth.• Donotblockanyventilationopenings.Installinaccordancewiththemanufacturer’sinstructions.• Donotinstallnearanyheatsourcessuchasradiators,heatregisters,stoves,orotherapparatus(includingamplifiers)that
produceheat.• Donotdefeatthesafetypurposeofthepolarizedorgroundingplug.Apolarizedplughastwobladeswithonewiderthantheother.
Agroundingplughastwobladesandathirdgroundingprong.Thewidebladeorthethirdprongisprovidedforyoursafety.Iftheprovidedplugdoesnotfitintoyouroutlet,consultanelectricianforreplacementoftheobsoleteoutlet.
• Protectthepowercordfrombeingwalkedonorpinchedparticularlyattheplugs,conveniencereceptacles,andatthepointwheretheyexitfromtheapparatus.
• Onlyuseattachments/accessoriesspecifiedbythemanufacturer.• Useonlywiththecart,stand,tripod,bracket,ortablespecifiedbythemanufacturer,orsoldwiththeapparatus.
Whenacartorrackisused,usecautionwhenmovingthecart/apparatuscombinationtoavoidinjuryfromtip-over.• Unplugtheapparatusduringlightningstormsorwhenunusedforlongperiodsoftime.• Referallservicingtoqualifiedpersonnel.Servicingisrequiredwhentheapparatushasbeendamagedinanyway,
suchaspowersupplycordorplugisdamaged,liquidhasbeenspilledorobjectshavefallenintotheapparatushasbeenexposedtorainormoisture,doesnotoperatenormally,orhasbeendropped.
• Pleasekeeptheunitinawell-ventilatedenvironment.• WARNING:Toreducetheriskoffireorelectricshock,donotexposethisapparatustorainormoisture. Theapparatusshallnotbeexposedtodrippingorsplashingandthatobjectsfilledwithliquids,suchasvases,shallnotbeplaced
ontheapparatus.• WARNING:Themainpowerplugisusedasadisconnectdevice,thedisconnectdeviceshallremainreadilyoperable.• WARNING:Toreducetheriskofelectricshock,donotremovecover(orback)astherearenouser-serviceablepartsinside.Refer
servicingtoqualifiedpersonnel.• WARNING:Thebatteriesshallnotbeexposedtoexcessiveheatsuchassunshine,fireorthelike.• Theapparatusshouldbeconnectedtoapoweroutletwithaprotectivegroundingconnection.
CAUTIONRISKOFELECTRICSHOCK
DO NOT OPEN
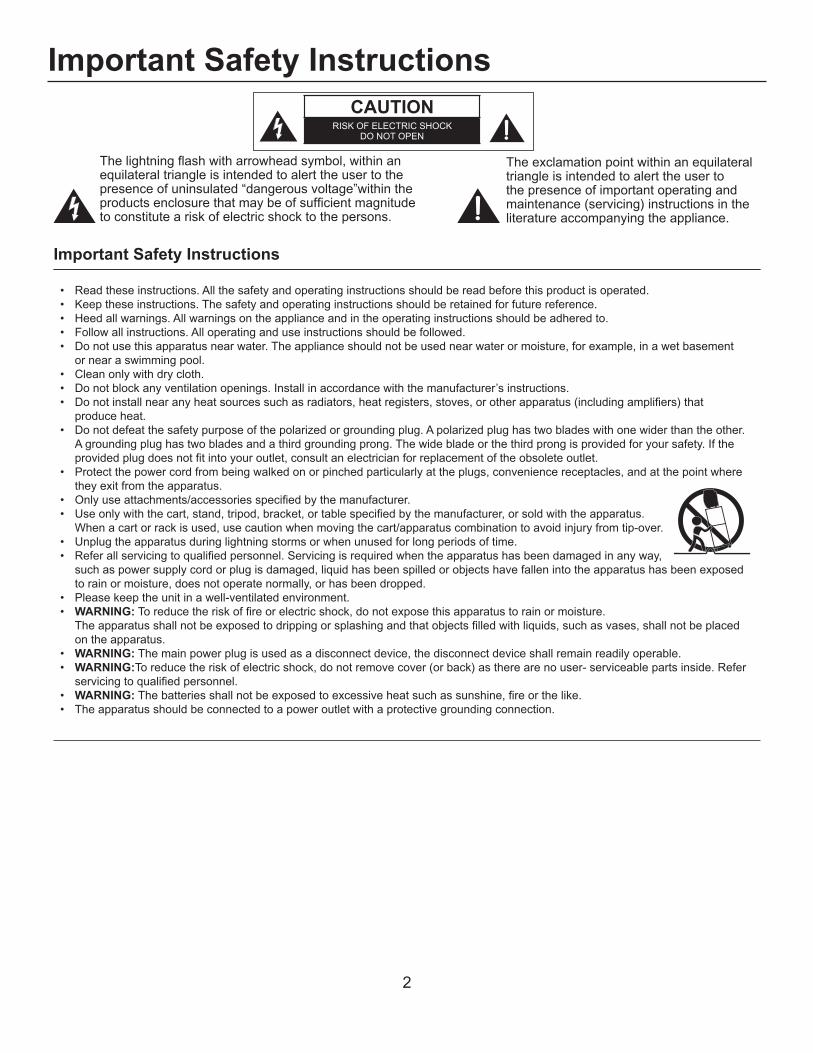
Thelightningflashwitharrowheadsymbol,withinanequilateraltriangleisintendedtoalerttheusertothepresenceofuninsulated“dangerousvoltage”withintheproductsenclosurethatmaybeofsufficientmagnitudetoconstituteariskofelectricshocktothepersons.
Theexclamationpointwithinanequilateraltriangleisintendedtoalerttheusertothepresenceofimportantoperatingandmaintenance(servicing)instructionsintheliteratureaccompanyingtheappliance.
Important Safety Instructions
Important Safety Instructions
3
Pleasereadtheseprecautionsbeforeoperatingtheunit.PlacementAvoidplacingtheunitinareasof:• Directsunlightorheatingradiators,orclosedautomobiles.• Hightemperature(over35˚C)orhighhumidity(over90%).• Dustastheinternalpartsmaybeseriouslydamaged.
Non-use periodsTurntheunitoffwhennotinuse.Whenleftunusedforalongperiodoftime,theunitshouldbeunpluggedfromthehouseholdACoutlet.
No fingers or other objects inside • Touchinginternalpartsoftheunitisdangerousandmaycauseseriousdamagetotheunit.Do
notattempttodisassembletheunit.• Donotputanyforeignobjectsonthedisctray.
Keep away from water/magnet • Keeptheunitawayfromflowervases,tubs,sinks,etc.Ifliquidsarespilledintotheunit,serious
damage could occur . • Neverbringamagnetormagnetizedobjectneartheunit.
Stacking • Placetheunitinahorizontalposition,anddonotplaceanythingheavyonit.
CondensationMoisturemayformonthelensinthefollowingconditions:• Immediatelyafteraheaterhasbeenturnedon.• Inasteamyorveryhumidroom.• Whentheunitissuddenlymovedfromacoldenvironmenttoawarmone.Ifmoistureformsinside
theunit,itmaynotoperateproperly.Inthiscase,turnonthepowerandwaitaboutonehourforthemoisturetoevaporate.
If there is noise interference on the TV while a broadcast is being receivedDependingonthereceptionconditionoftheTV,interferencemayappearontheTVmonitorwhileyouwatchaTVbroadcastandtheunitislefton.ThisisnotamalfunctionoftheunitortheTV.TowatchaTVbroadcast,turnofftheunit.
Precautions

4
1. Introduction ThisUSBtoHDMI®Adapterenablesyoutoconnectmorethanonemonitor,LCDorprojectortoacomputerwithaUSB2.0port.FordesktopusersaddinganextramonitorviaUSBconnectioniseasierthaneverwithouthavingtoinstallaninternalvideocard.Enjoythebenefitsofanadd-onmonitor,suchasmorevisibleapplicationsandalargerdisplayarea.Theadaptersupportshot-swappingandisenergy-efficient.
Features • Add-onmonitor,LCDorprojectorthroughasingleUSB2.0port• Hot-plug;addorremovemonitorwithoutsystemreboot• Smallinsize,workswithallHDMI® displays• Supportshighresolutionupto1920x1080• ExtendandMirrormodesupport• Resumesfromhibernationandsuspendmodes• Supportsupto6USBdisplayadapterssimultaneously
Package Contents Beforeinstallation,pleasechecktheitemsinthepackage.Thepackageshouldcontainthefollowingitems:
• USBtoHDMI®Adapterx1• CD(DriverandUser’sManual)x1• 1mUSBCablex1• QuickInstallationGuidex1

5
System Requirements TheminimumrequirementsforthePCare:
• SingleCoreCPU1.2GHzorhigher.Intel Pentium/Celeron,AMD K6/AthlonTM/DuronTM, or compatible processor• 512MBmemory• AtleastoneUSB2.0port• 30MBofavailablediskspace• Windows® XP Home or Professional (including Table edition) SP2 or SP3, Windows Vista® SP1 or
SP2 (32-bit or 64-bit), and Windows® 7 (32-bit or 64-bit) . • SupportsallIntel-basedMacs(includingSnowLeopard10.6.2,Leopard10.5.8,Tiger10.4.11).• SuperVGA(800x600)orhigherresolutionmonitor
ToplayDVDsontheadapter-attachedmonitor,inadditiontotherequirementsabove,thefollowingrequirementsshouldalsobemet:
• DualcoreCPU2.0GHzprocessor
IfthePCspecificationisbelowthis,performancewillbelower(orCPUloadinghigherthanacceptable).
Windows® XPFor 1-2 monitors
ThismaynotprovidefullframerateDVDplaybackatfullscreen.
• 1.2GHzSingleCoreCPU• 512MBmemory
For 3 monitors(1DVDvideowithotheropenapplications)
Willsupportonly1videoofDVDresolutionatfullscreen:
• 1.8GHzCPU• 1GBmemory
For 6 screens(1DVDvideo):
• 1.6GHzCoreDuo• 1GBmemory
LED Status LED Colour DescriptionLink Green On for power on
Off for power off
6
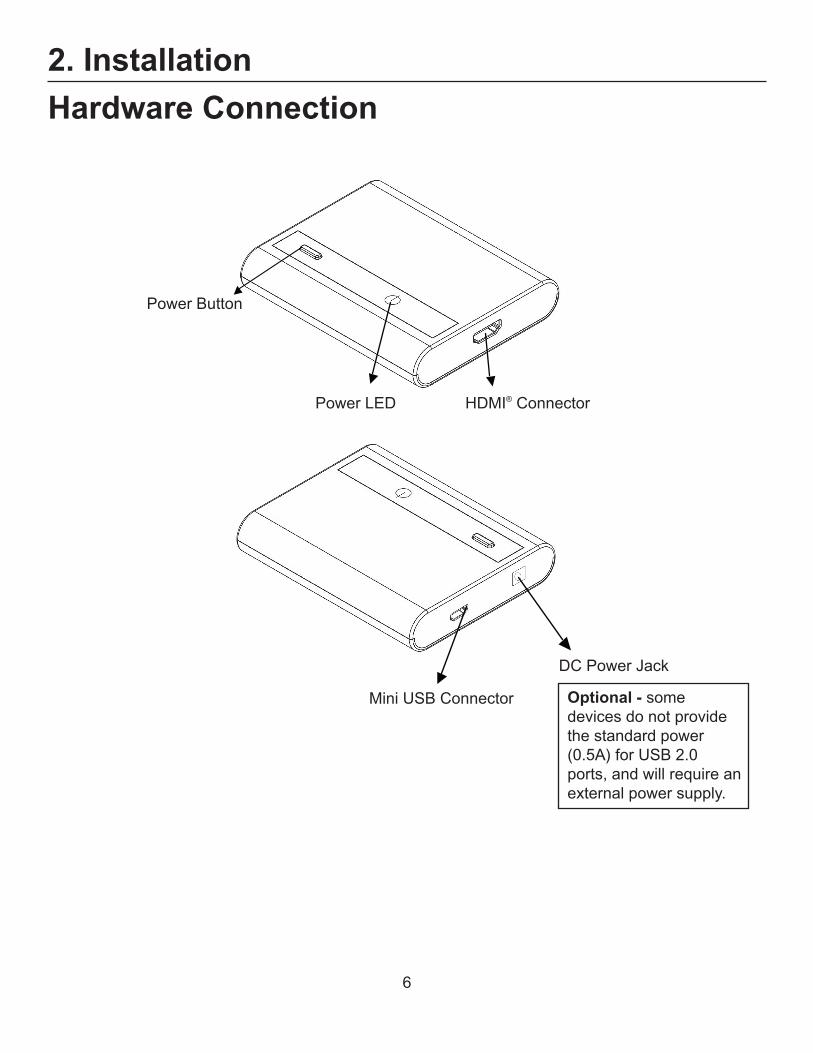
2. Installation
Hardware Connection
Power LED HDMI® Connector
DC Power Jack
MiniUSBConnector
PowerButton
Optional - some devices do not provide thestandardpower(0.5A)forUSB2.0ports, and will require an external power supply .
7
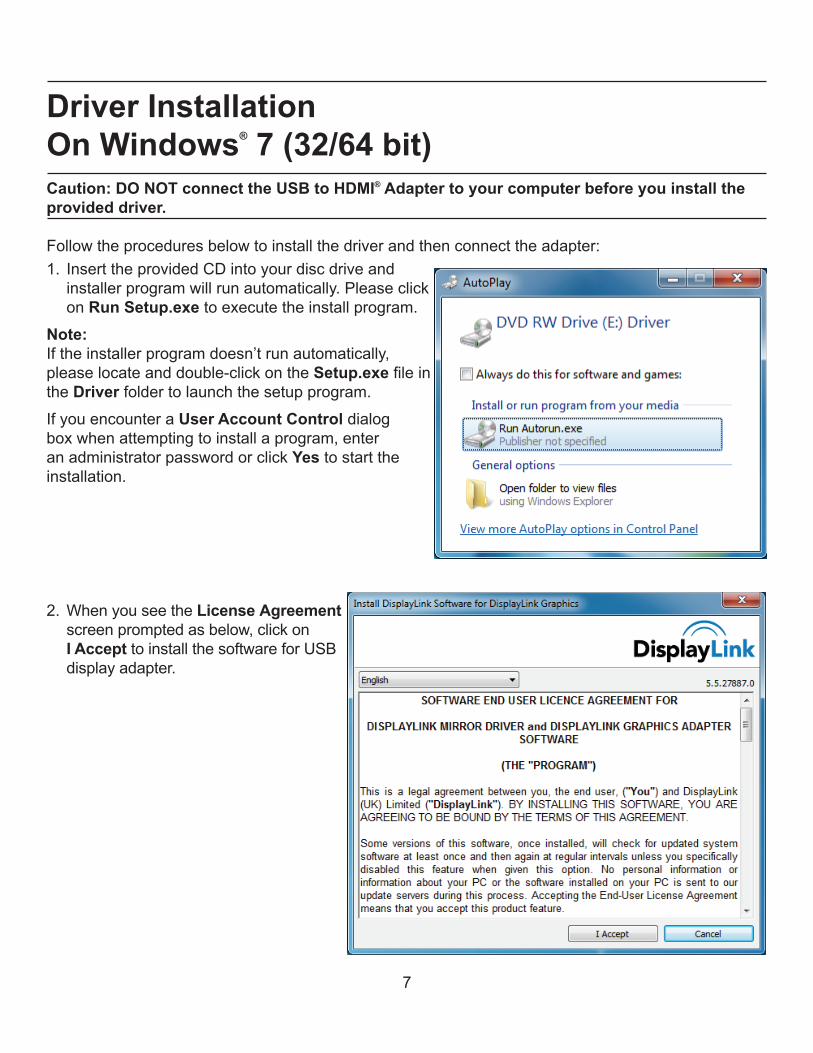
Driver InstallationOn Windows® 7 (32/64 bit)Caution: DO NOT connect the USB to HDMI® Adapter to your computer before you install the provided driver. Followtheproceduresbelowtoinstallthedriverandthenconnecttheadapter:
1. InserttheprovidedCDintoyourdiscdriveandinstaller program will run automatically . Please click on Run Setup.exetoexecutetheinstallprogram.
Note:Iftheinstallerprogramdoesn’trunautomatically,pleaselocateanddouble-clickontheSetup.exefileintheDriverfoldertolaunchthesetupprogram.
If you encounter a User Account Control dialog boxwhenattemptingtoinstallaprogram,enteran administrator password or click Yestostarttheinstallation .
2.WhenyouseetheLicense Agreement screen prompted as below, click on I AccepttoinstallthesoftwareforUSBdisplay adapter .
8
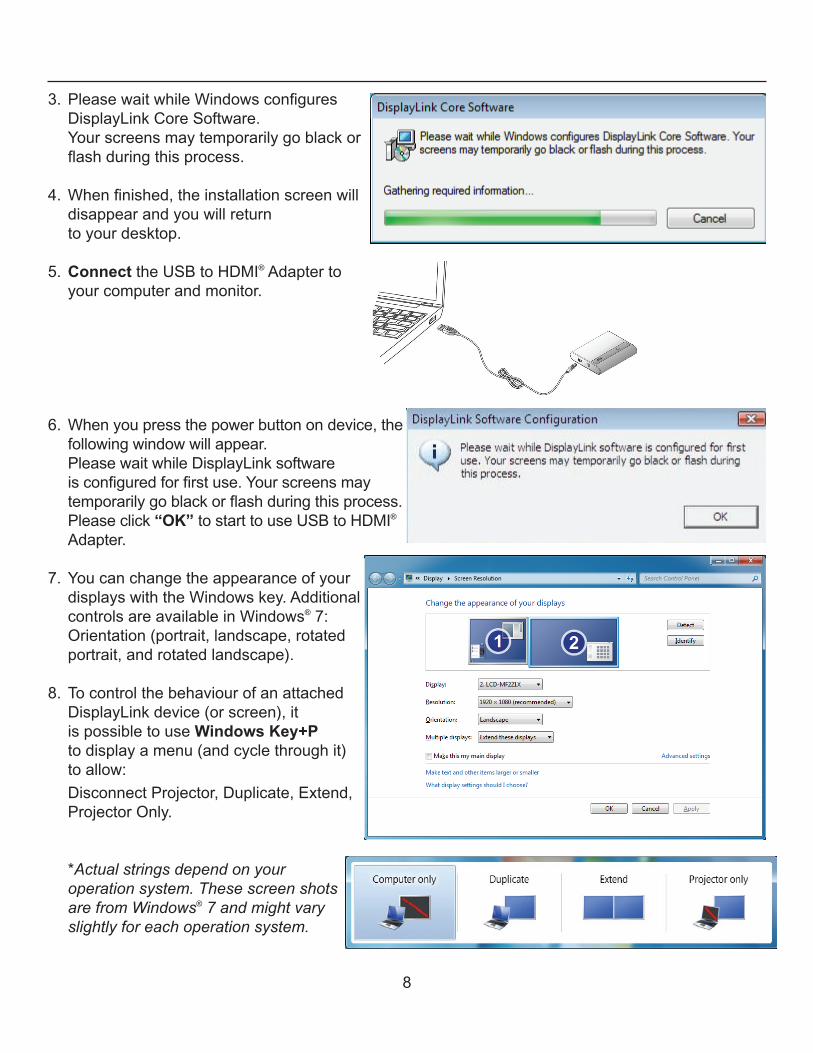
3.PleasewaitwhileWindowsconfiguresDisplayLink Core Software .
Your screens may temporarily go black or flashduringthisprocess.
4.Whenfinished,theinstallationscreenwilldisappear and you will return to your desktop .
5 . ConnecttheUSBtoHDMI®Adapterto your computer and monitor .
6.Whenyoupressthepowerbuttonondevice,thefollowing window will appear .
PleasewaitwhileDisplayLinksoftware isconfiguredforfirstuse.Yourscreensmaytemporarilygoblackorflashduringthisprocess.Please click “OK”tostarttouseUSBtoHDMI® Adapter.
7.Youcanchangetheappearanceofyour
displayswiththeWindowskey.Additionalcontrols are available in Windows®7:Orientation (portrait, landscape, rotated portrait, and rotated landscape) .
8.Tocontrolthebehaviourofanattached
DisplayLink device (or screen), it is possible to use Windows Key+P todisplayamenu(andcyclethroughit) toallow:
DisconnectProjector,Duplicate,Extend,ProjectorOnly.
*Actual strings depend on your operation system. These screen shots are from Windows® 7 and might vary slightly for each operation system.

9
On Windows Vista® (32/64 bit) Caution: DO NOT connect the USB to HDMI® Adapter to your computer before you install the provided driver. Followtheproceduresbelowtoinstallthedriverandthenconnecttheadapter:
1. InserttheprovidedCDintoyourdiscdriveandinstaller program will run automatically . Please click on Run Setup.exetoexecutetheinstallprogram .
Note:Iftheinstallerprogramdoesn’trunautomatically,pleaselocateanddouble-clickontheSetup.exefileintheDriverfoldertolaunchthesetupprogram.
If you encounter a User Account Control dialog boxwhenattemptingtoinstallaprogram,enteranadministrator password or click Allowtostarttheinstallation .
2.WhenyouseetheLicense Agreement screen prompted as below, click on I AccepttoinstallthesoftwareforUSBdisplay adapter .
10
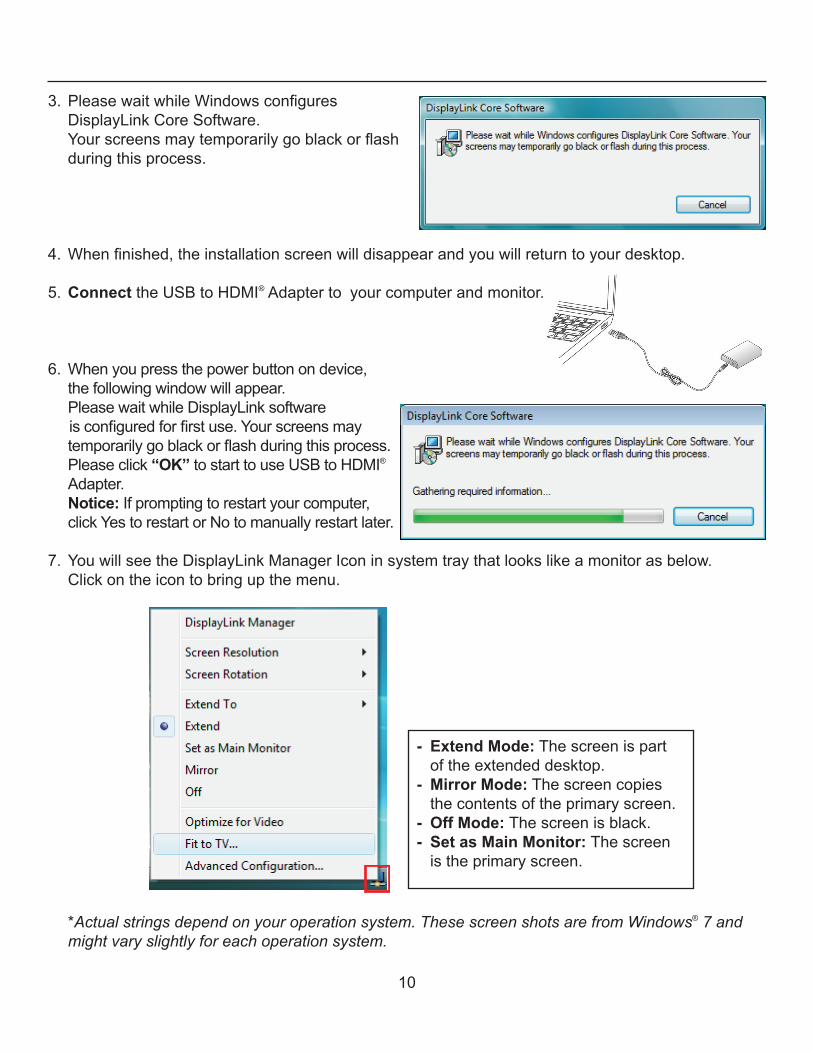
3.PleasewaitwhileWindowsconfiguresDisplayLink Core Software .
Yourscreensmaytemporarilygoblackorflashduringthisprocess.
4.Whenfinished,theinstallationscreenwilldisappearandyouwillreturntoyourdesktop.
5 . ConnecttheUSBtoHDMI®Adapterto your computer and monitor .
6.Whenyoupressthepowerbuttonondevice,thefollowingwindowwillappear.
PleasewaitwhileDisplayLinksoftwareisconfiguredforfirstuse.Yourscreensmaytemporarilygoblackorflashduringthisprocess.Please click “OK”tostarttouseUSBtoHDMI® Adapter.
Notice: If prompting to restart your computer, click Yes to restart or No to manually restart later .
7.YouwillseetheDisplayLinkManagerIconinsystemtraythatlookslikeamonitorasbelow.Clickontheicontobringupthemenu.
*Actual strings depend on your operation system. These screen shots are from Windows® 7 and might vary slightly for each operation system.
- Extend Mode:Thescreenispartoftheextendeddesktop.
- Mirror Mode:Thescreencopiesthecontentsoftheprimaryscreen.
- Off Mode: Thescreenisblack.- Set as Main Monitor: Thescreenistheprimaryscreen.
11
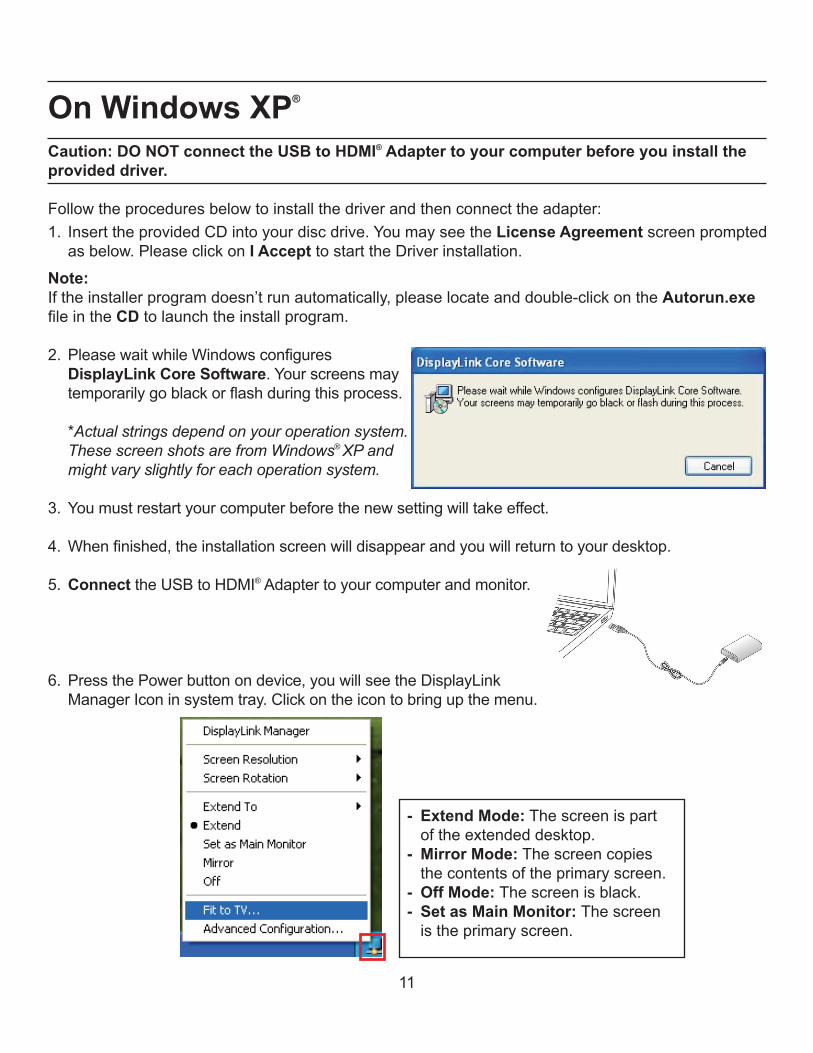
- Extend Mode:Thescreenispartoftheextendeddesktop.
- Mirror Mode:Thescreencopiesthecontentsoftheprimaryscreen.
- Off Mode: Thescreenisblack.- Set as Main Monitor: Thescreenistheprimaryscreen.
On Windows XP® Caution: DO NOT connect the USB to HDMI® Adapter to your computer before you install the provided driver. Followtheproceduresbelowtoinstallthedriverandthenconnecttheadapter:
1. InserttheprovidedCDintoyourdiscdrive.YoumayseetheLicense Agreement screen prompted as below . Please click on I AccepttostarttheDriverinstallation.
Note:Iftheinstallerprogramdoesn’trunautomatically,pleaselocateanddouble-clickontheAutorun.exe fileintheCDtolaunchtheinstallprogram.
2.PleasewaitwhileWindowsconfiguresDisplayLink Core Software . Your screens may temporarilygoblackorflashduringthisprocess.
*Actual strings depend on your operation system. These screen shots are from Windows® XP and might vary slightly for each operation system.
3. Youmustrestartyourcomputerbeforethenewsettingwilltakeeffect.
4.Whenfinished,theinstallationscreenwilldisappearandyouwillreturntoyourdesktop.
5 . ConnecttheUSBtoHDMI®Adaptertoyourcomputerandmonitor.
6. PressthePowerbuttonondevice,youwillseetheDisplayLinkManagerIconinsystemtray.Clickontheicontobringupthemenu.
12
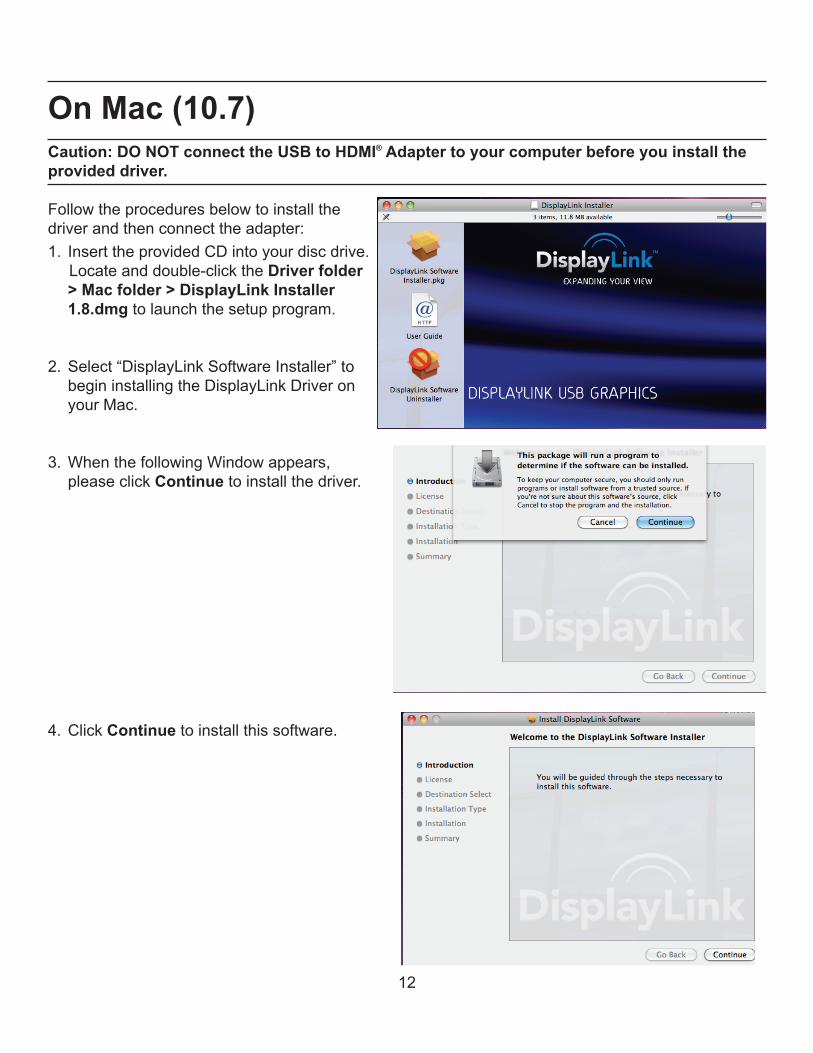
On Mac (10.7)Caution: DO NOT connect the USB to HDMI® Adapter to your computer before you install the provided driver. Followtheproceduresbelowtoinstallthedriverandthenconnecttheadapter:
1. InserttheprovidedCDintoyourdiscdrive.Locateanddouble-clicktheDriver folder > Mac folder > DisplayLink Installer 1.8.dmgtolaunchthesetupprogram.
2 . Select “DisplayLink Software Installer” to begininstallingtheDisplayLinkDriveronyour Mac .
3.WhenthefollowingWindowappears, please click Continuetoinstallthedriver.
4 . Click Continuetoinstallthissoftware.
13
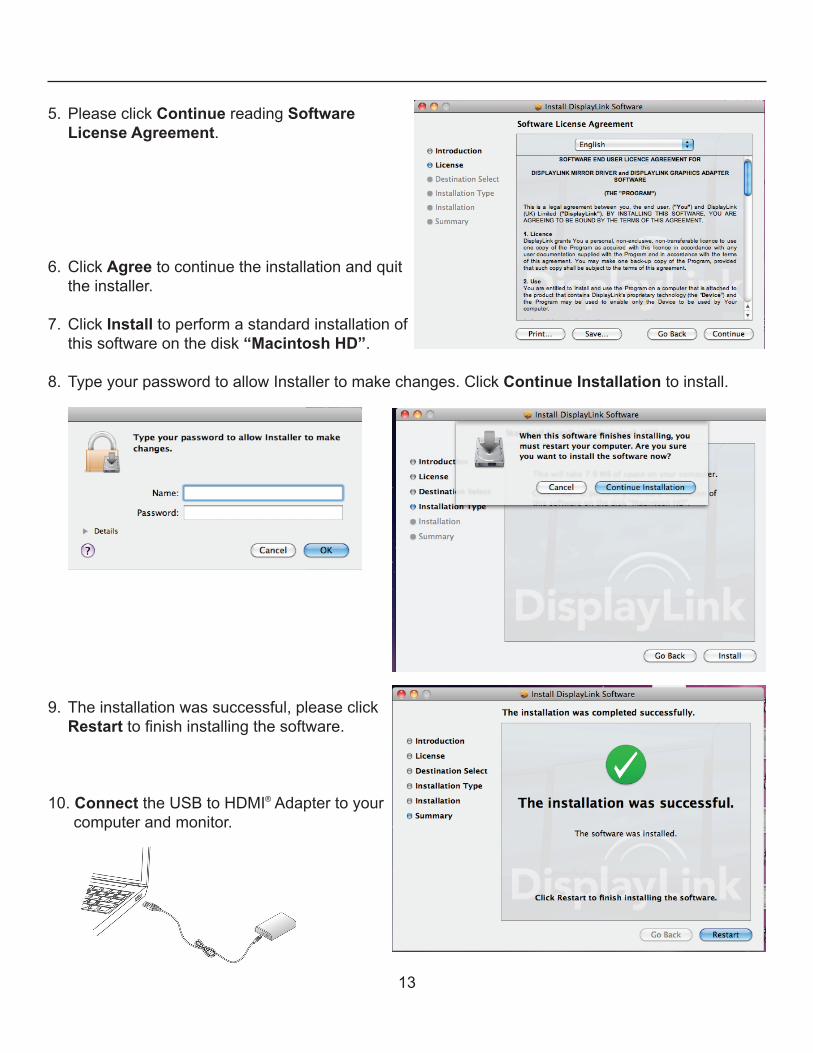
5 . Please click Continue reading Software
License Agreement .
6 . Click Agreetocontinuetheinstallationandquittheinstaller.
7 . Click Install to perform a standard installation of
thissoftwareonthedisk“Macintosh HD” .
8.TypeyourpasswordtoallowInstallertomakechanges.ClickContinue Installation to install .
9.Theinstallationwassuccessful,pleaseclick
Restarttofinishinstallingthesoftware.
10 . ConnecttheUSBtoHDMI®Adaptertoyour computer and monitor .
14
3. Using the Adapter
On Windows
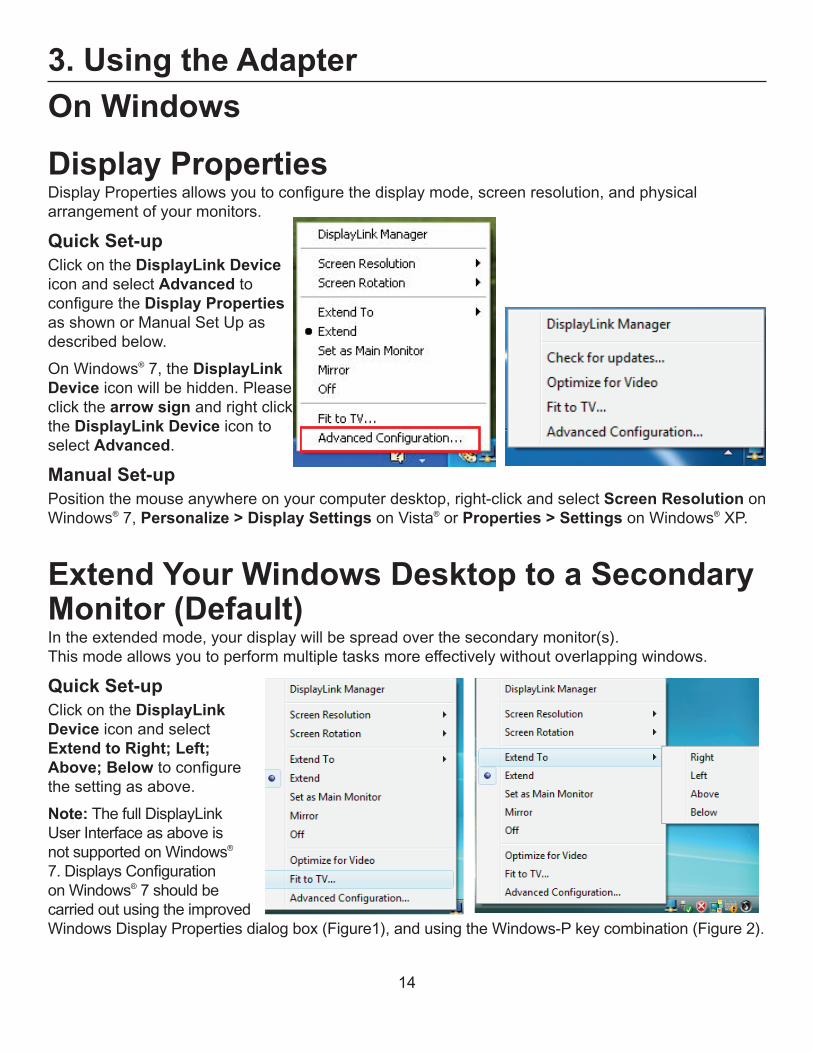
Display Properties DisplayPropertiesallowsyoutoconfigurethedisplaymode,screenresolution,andphysicalarrangement of your monitors .
Quick Set-up ClickontheDisplayLink Device icon and select Advanced to configuretheDisplay Properties asshownorManualSetUpasdescribed below .
On Windows®7,theDisplayLink Deviceiconwillbehidden.Pleaseclickthearrow signandrightclicktheDisplayLink Device icon to select Advanced .
Manual Set-up Positionthemouseanywhereonyourcomputerdesktop,right-clickandselectScreen Resolution on Windows® 7, Personalize > Display Settings on Vista® or Properties > Settings on Windows® XP .
Extend Your Windows Desktop to a Secondary Monitor (Default)Intheextendedmode,yourdisplaywillbespreadoverthesecondarymonitor(s).Thismodeallowsyoutoperformmultipletasksmoreeffectivelywithoutoverlappingwindows.
Quick Set-upClickontheDisplayLink Device icon and select Extend to Right; Left; Above; Belowtoconfigurethesettingasabove.
Note:ThefullDisplayLinkUser Interface as above is not supported on Windows® 7.DisplaysConfigurationon Windows®7shouldbecarriedoutusingtheimprovedWindowsDisplayPropertiesdialogbox(Figure1),andusingtheWindows-Pkeycombination(Figure2).
15
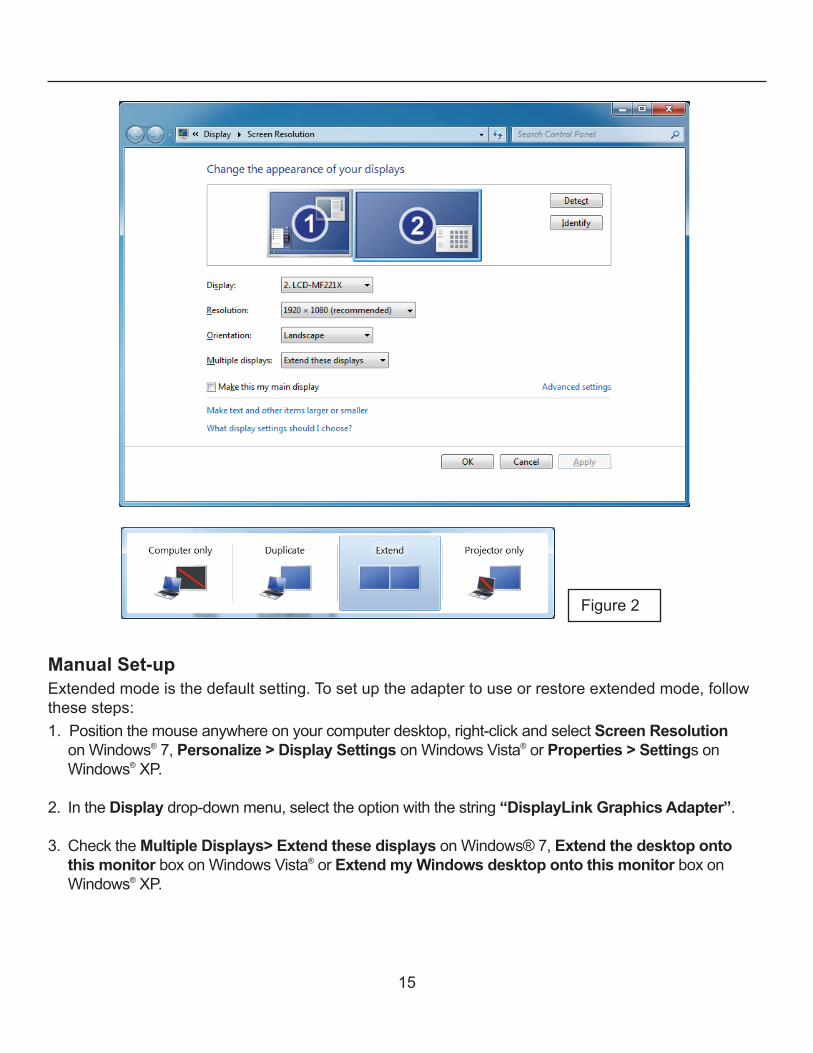
Manual Set-up Extendedmodeisthedefaultsetting.Tosetuptheadaptertouseorrestoreextendedmode,followthesesteps:
1. Positionthemouseanywhereonyourcomputerdesktop,right-clickandselectScreen Resolution on Windows® 7, Personalize > Display Settings on Windows Vista® or Properties > Settings on Windows® XP .
2. IntheDisplaydrop-downmenu,selecttheoptionwiththestring“DisplayLink Graphics Adapter” .
3. ChecktheMultiple Displays> Extend these displays on Windows® 7, Extend the desktop onto this monitor box on Windows Vista® or Extend my Windows desktop onto this monitor box on Windows® XP .
Figure 2
16
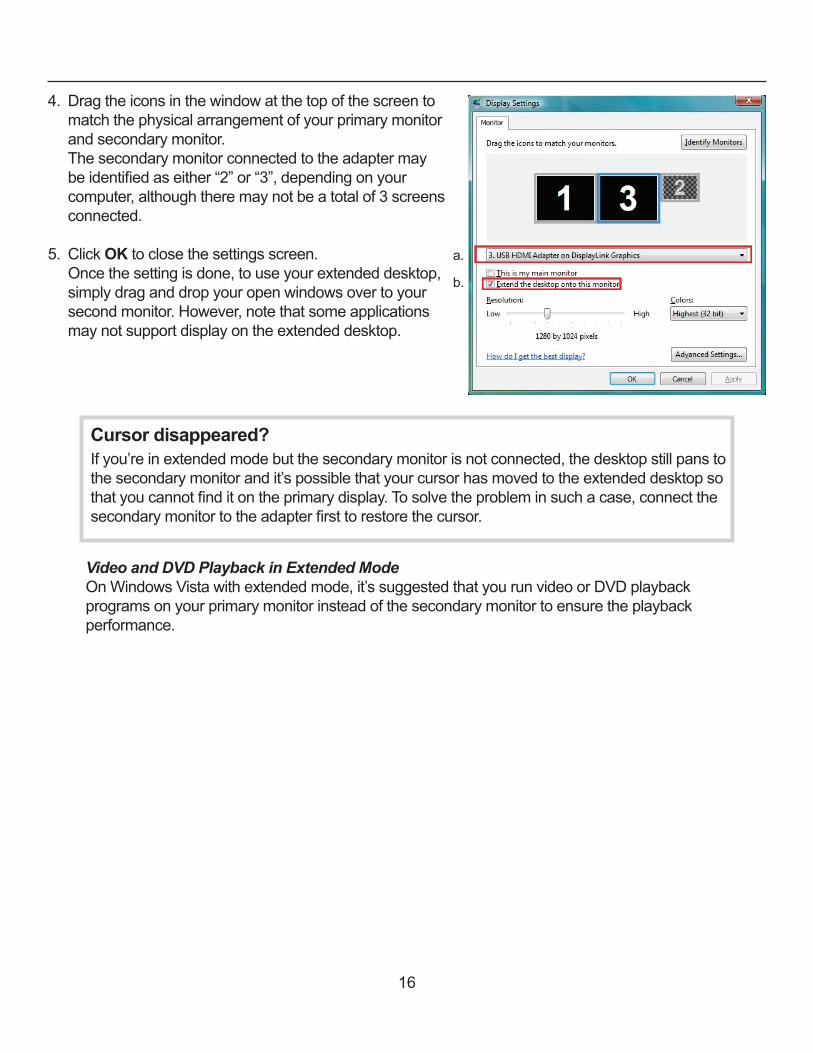
4. Dragtheiconsinthewindowatthetopofthescreentomatchthephysicalarrangementofyourprimarymonitorand secondary monitor .
Thesecondarymonitorconnectedtotheadaptermaybeidentifiedaseither“2”or“3”,dependingonyourcomputer,althoughtheremaynotbeatotalof3screensconnected .
5 . Click OKtoclosethesettingsscreen. Oncethesettingisdone,touseyourextendeddesktop,
simply drag and drop your open windows over to your secondmonitor.However,notethatsomeapplicationsmaynotsupportdisplayontheextendeddesktop.
a .
b .
Cursor disappeared? Ifyou’reinextendedmodebutthesecondarymonitorisnotconnected,thedesktopstillpanstothesecondarymonitorandit’spossiblethatyourcursorhasmovedtotheextendeddesktopsothatyoucannotfinditontheprimarydisplay.Tosolvetheprobleminsuchacase,connectthesecondarymonitortotheadapterfirsttorestorethecursor.
Video and DVD Playback in Extended ModeOnWindowsVistawithextendedmode,it’ssuggestedthatyourunvideoorDVDplaybackprogramsonyourprimarymonitorinsteadofthesecondarymonitortoensuretheplaybackperformance .
17
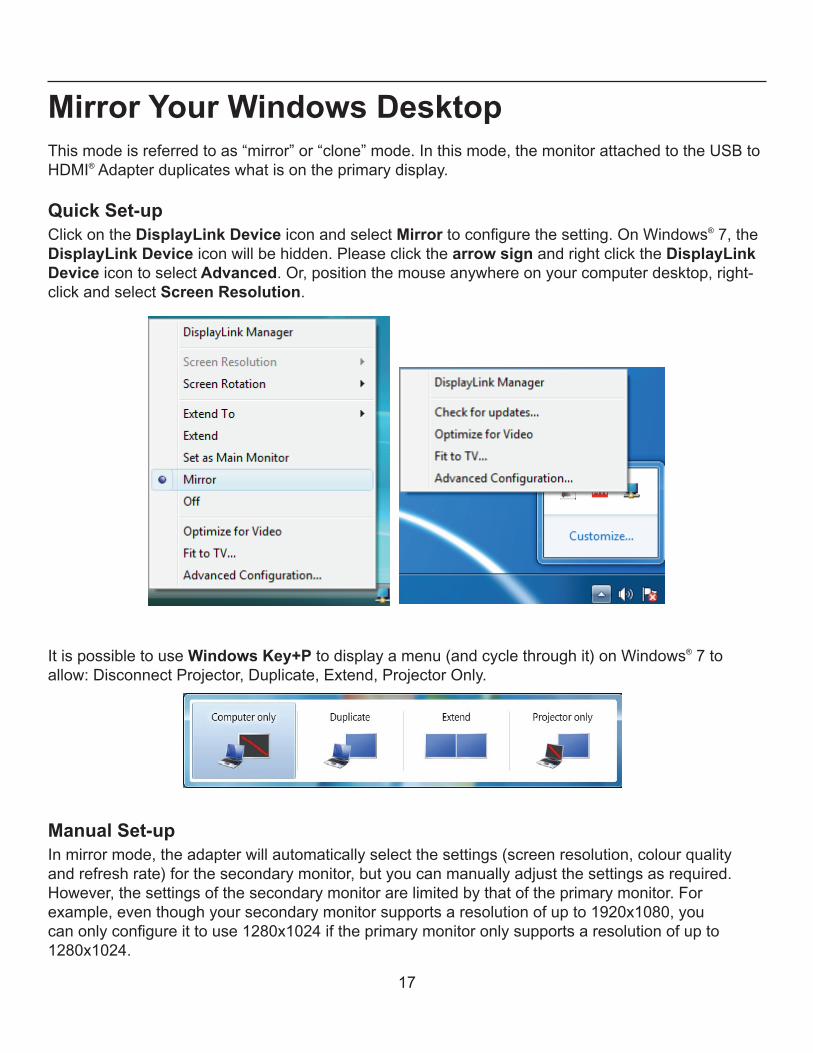
Mirror Your Windows DesktopThismodeisreferredtoas“mirror”or“clone”mode.Inthismode,themonitorattachedtotheUSBtoHDMI®Adapterduplicateswhatisontheprimarydisplay. Quick Set-upClickontheDisplayLink Device icon and select Mirrortoconfigurethesetting.OnWindows®7,theDisplayLink Deviceiconwillbehidden.Pleaseclickthearrow signandrightclicktheDisplayLink Device icon to select Advanced.Or,positionthemouseanywhereonyourcomputerdesktop,right-click and select Screen Resolution .
It is possible to use Windows Key+Ptodisplayamenu(andcyclethroughit)onWindows® 7 to allow:DisconnectProjector,Duplicate,Extend,ProjectorOnly.
Manual Set-upInmirrormode,theadapterwillautomaticallyselectthesettings(screenresolution,colourqualityandrefreshrate)forthesecondarymonitor,butyoucanmanuallyadjustthesettingsasrequired.However,thesettingsofthesecondarymonitorarelimitedbythatoftheprimarymonitor.Forexample,eventhoughyoursecondarymonitorsupportsaresolutionofupto1920x1080,youcanonlyconfigureittouse1280x1024iftheprimarymonitoronlysupportsaresolutionofupto1280x1024 .
18
Set as Primary MonitorTomakethesecondarymonitortheprimarydisplay:
1. Positionthemouseanywhereonyourcomputerdesktop,right-clickandselectScreen Resolution on Windows® 7, Personalize > Display Settings on Windows Vista® or Properties > Settings on Windows® XP .
2. IntheDisplaydrop-downmenu,selecttheoptionwiththestring“DisplayLink Graphics Adapter” .
3. ChecktheThis is my main monitor box on Windows® 7/ Windows Vista® or Use this device as the primary monitor box on Window® XP .
OnsomePCsandlaptopsitisnecessarytodisablethemaindisplay(i.e.unchecktheExtend the desktop onto this monitor or Extend my Windows desktop onto this monitor boxforthemaindisplay)aspartofthesamesettingschange.
4 . Click OKtoclosethesettingsscreen.
Theadd-onmonitorstaysprimaryifthePCentershibernateorsuspendmodeorisrebooted.Iftheadd-onmonitorisunplugged,themaindisplaybecomesprimaryagain.
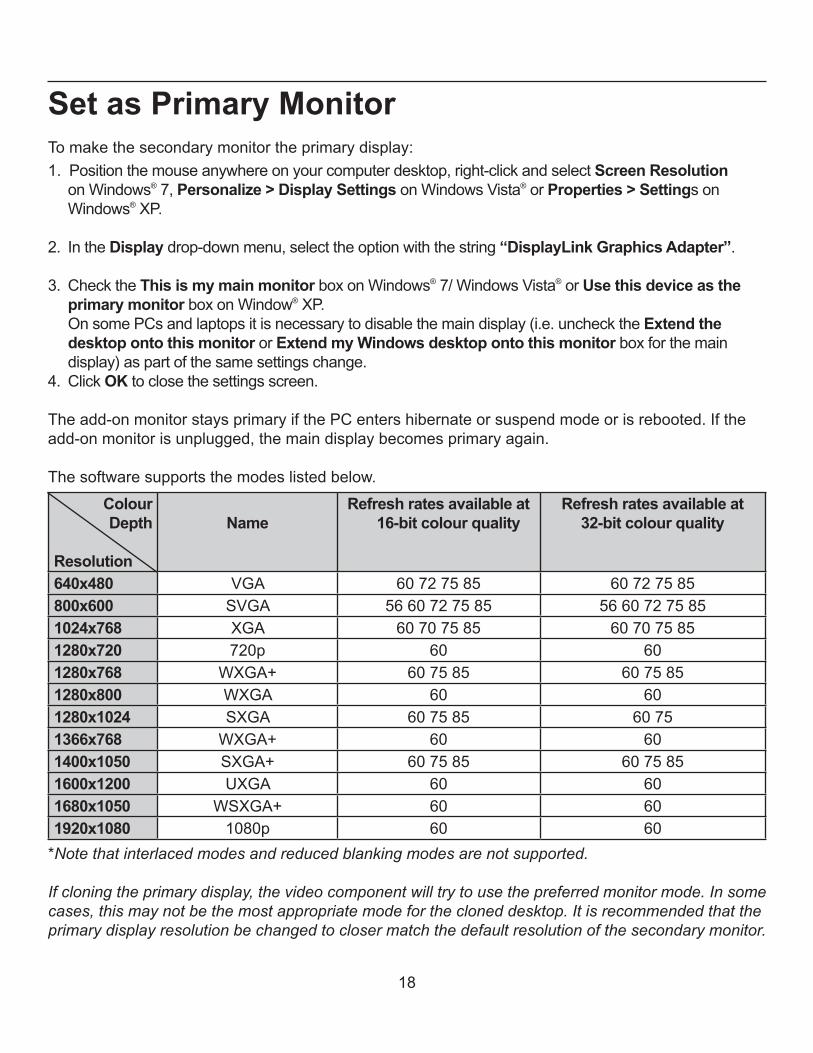
Thesoftwaresupportsthemodeslistedbelow.
Colour Depth
Resolution
NameRefresh rates available at
16-bit colour qualityRefresh rates available at
32-bit colour quality
640x480 VGA 60 72 75 85 60 72 75 85800x600 SVGA 56 60 72 75 85 56 60 72 75 85 1024x768 XGA 60 70 75 85 60 70 75 851280x720 720p 60 601280x768 WXGA+ 60 75 85 60 75 85 1280x800 WXGA 60 601280x1024 SXGA 60 75 85 60 751366x768 WXGA+ 60 601400x1050 SXGA+ 60 75 85 60 75 851600x1200 UXGA 60 601680x1050 WSXGA+ 60 601920x1080 1080p 60 60
*Note that interlaced modes and reduced blanking modes are not supported.
If cloning the primary display, the video component will try to use the preferred monitor mode. In some cases, this may not be the most appropriate mode for the cloned desktop. It is recommended that the primary display resolution be changed to closer match the default resolution of the secondary monitor.

19
Configuring the ComponentsToconfigurethethreecomponents(resolutionandrefreshrate)ofascreenmode,followthesesteps: Quick Set-upClickontheDisplayLink Device icon and select Screen Rotation; Screen Resolutiontoconfigurethesettings.
Screen Rotation:Therearefouroptionsforscreenrotation:Normal, Rotated Left, Rotated RightandUpside-Down.
Screen Resolution:Theresolution will depend on your computer settings, resolution supportedbythemonitor,etc.
20
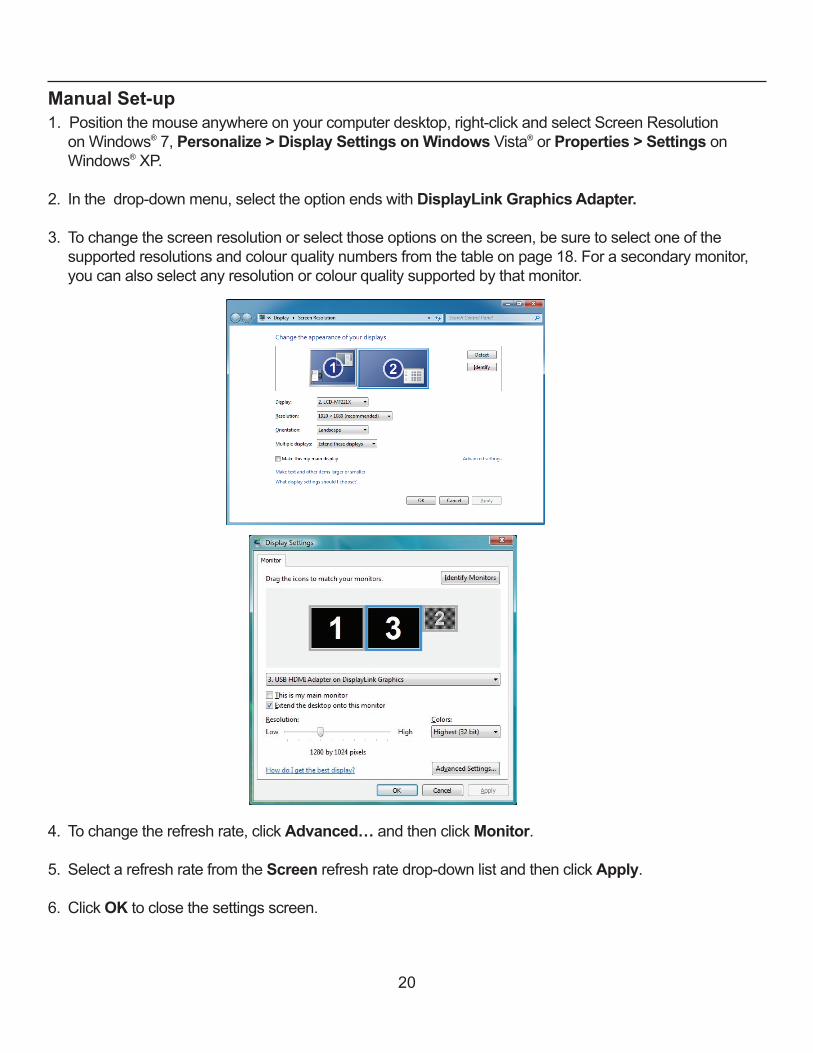
Manual Set-up1. Positionthemouseanywhereonyourcomputerdesktop,right-clickandselectScreenResolution
on Windows® 7, Personalize > Display Settings on Windows Vista® or Properties > Settings on Windows® XP .
2.Inthedrop-downmenu,selecttheoptionendswithDisplayLink Graphics Adapter.
3. Tochangethescreenresolutionorselectthoseoptionsonthescreen,besuretoselectoneofthesupportedresolutionsandcolourqualitynumbersfromthetableonpage18.Forasecondarymonitor,youcanalsoselectanyresolutionorcolourqualitysupportedbythatmonitor.
4. Tochangetherefreshrate,clickAdvanced… andthenclickMonitor .
5. SelectarefreshratefromtheScreenrefreshratedrop-downlistandthenclickApply .
6 . Click OKtoclosethesettingsscreen.

21
Fit to TV FunctionThe“FittoTV”functionisforHDMI®TVconnections.AnewuserinterfaceoptionallowsthecorrectionofoverscanonTVswhenusingaUSBtoHDMI®adapter.The“FittoTV”functionallowsausertochangethesizeoftheirWindowsdesktoptoallowtheentiredesktoptobeviewed.
Setting1. ClickontheDisplayLinkDeviceiconandselect“FittoTV”to
enablethisfunction.
2. Thefollowinginterfaceappears:
3. TheredbordershowsthesizeofthenewWindows desktop .

22
4. Usethe“+”and“-”controlsontheFittoTVmenutochangethesizeoftheredborderuntilitfitsontheTV screen .
Note:FinerconfigurationofthesizeofthebordercanbeachievedbyholdingdowntheCTRLkeyandclicking“+”and“-”.
Before:
5. OncetheredborderisattheedgesoftheTVscreen,click“Apply”toresizetheWindowsdesktop. After:
Note:TheFittoTVfunctiononlyworksinextendmodeanddoesnotsupportrotatedmodes.
23
Standby and Hibernate, Shut Down and RestartWhentheadapterisconnectedtoacomputerandanexternalmonitor,ifthecomputergoesintostandbyorhibernatemode,theexternalmonitordisplaygoesblank.
Whenthecomputerreturnstoanactivestate,theexternalmonitordisplaykeepsthesamesettingsithadbeforethecomputerwentintostandbyorhibernatemode.However,ifthesecondarymonitorwassetforextendedmode,windowsthatwerepreviouslyontheexternalmonitorwillnotmovebacktothatsecondarymonitor.Also,ifthesecondarymonitorisinextendedmodeandthecomputerrequiresaloginafterstandbyorhibernatemode,theloginscreenappearsontheprimarycomputermonitor,nottheexternalmonitor.
Ifthecomputerisshutdown,restartedandloggedinagainthesecondarymonitorreturnstothesamemodeasitwasbeforeshutdown.
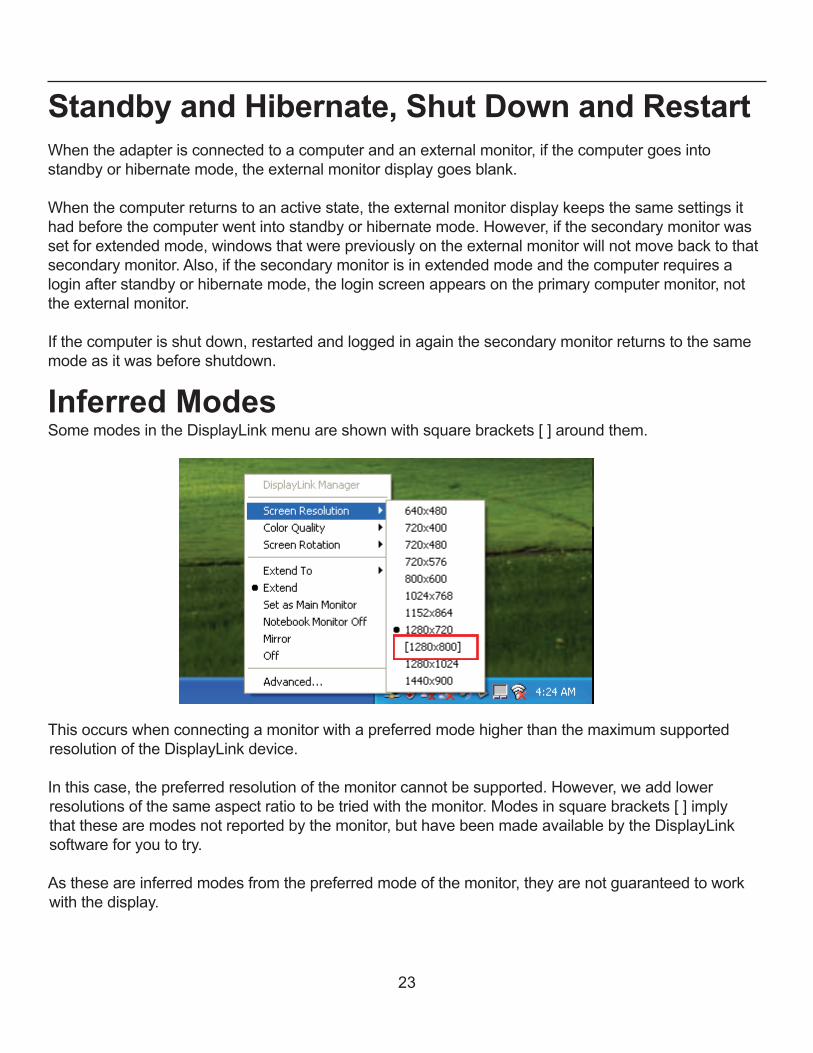
Inferred ModesSomemodesintheDisplayLinkmenuareshownwithsquarebrackets[]aroundthem.
ThisoccurswhenconnectingamonitorwithapreferredmodehigherthanthemaximumsupportedresolutionoftheDisplayLinkdevice.
Inthiscase,thepreferredresolutionofthemonitorcannotbesupported.However,weaddlowerresolutionsofthesameaspectratiotobetriedwiththemonitor.Modesinsquarebrackets[]implythatthesearemodesnotreportedbythemonitor,buthavebeenmadeavailablebytheDisplayLinksoftware for you to try .
Astheseareinferredmodesfromthepreferredmodeofthemonitor,theyarenotguaranteedtoworkwiththedisplay.
24
Disconnecting the AdapterIftheadapterisunpluggedfromthecomputer,thesecondarymonitorgoesblank.Allwindowsandiconsmovetotheprimaryscreen.
Onreconnectionoftheadapter,theadapterreturnstothesamemodeasitwasbeforedisconnection.However,windowsandiconsthatwerepreviouslyonthescreenwillnotbemovedback.
Using Dual AdaptersUptotwoadapterscanbesimultaneouslyattachedtoonecomputer.Tousetwoadapters:
1. Installthedriverasdescribedinthe“2.Installation”sectionandconnectthefirstadaptertoyourcomputer .
2. Thenconnectthesecondadaptertoyourcomputer.Thesystemwillautomaticallycompletetheinstallation .
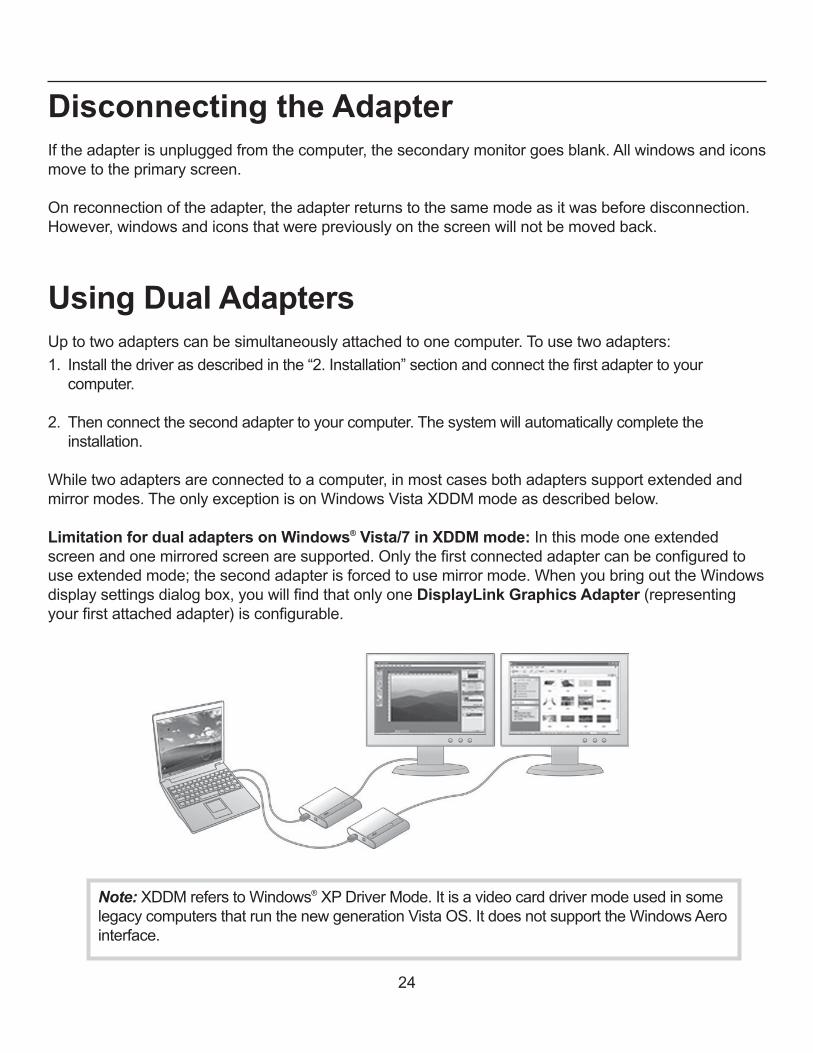
Whiletwoadaptersareconnectedtoacomputer,inmostcasesbothadapterssupportextendedandmirrormodes.TheonlyexceptionisonWindowsVistaXDDMmodeasdescribedbelow.
Limitation for dual adapters on Windows® Vista/7 in XDDM mode:Inthismodeoneextendedscreenandonemirroredscreenaresupported.Onlythefirstconnectedadaptercanbeconfiguredtouseextendedmode;thesecondadapterisforcedtousemirrormode.WhenyoubringouttheWindowsdisplaysettingsdialogbox,youwillfindthatonlyoneDisplayLink Graphics Adapter (representing yourfirstattachedadapter)isconfigurable.
Note: XDDM refers to Windows® XP Driver Mode . It is a video card driver mode used in some legacycomputersthatrunthenewgenerationVistaOS.ItdoesnotsupporttheWindowsAerointerface .

25
On MacManaging Multiple DisplaysWhenattachingadisplaythatthesoftwarehasnotseenbefore,thedisplaywilldefaulttobeingextendedtotherightofthemaindisplay.
Toconfigurethesettingsforeachofyourattacheddisplays,select“Displays”fromthe“SystemPreferences”Menu.Thiswillopena“DisplayPreferences”windowoneachofyourattacheddisplaysallowingyoutoconfigureeachdisplayasrequired.
Itispossibletousethe“GatherWindows”buttontobringallthe“DisplayPreferences”Windowsontothemain display .
Setting the Display Resolutions and RotationTochangethedisplay’sresolution,select an available resolution from theDisplayPreferenceswindowsofthedisplayyouwishtochange.TheresolutionsavailabledependonboththeDisplayLinkenabledproductandthecapabilitiesoftheconnecteddisplay .
Ifyouwishtorotateyourdisplay,youcanconfiguretheorientationusingthe“Rotate”dropdown.Selecttheappropriateangleofrotationtomatchyourdisplay’ssetup.
Eachtimetheuserrotates,anysettingsmadetothemode,resolution,frequencyordeptharerememberedthenexttimetheuserswitchesbacktothatangleofrotation
Setting the Position of DisplaysIfyourcomputerisconnectedtomorethantwodisplays,youcanspecifythatsomearemirroreddisplaysandothersshowtheextendeddesktop.
Amirroreddisplayshowsthesamecontentasthemaindisplaywhereasanextendeddisplaywillbeanextension to your existing desktop .
Youcanarrangeyourdisplayssothattheymatchthephysicallayoutofyourdisplaysbyselectingthe“Arrangement”panewithinDisplayPreferences.Thisensuresthatyoucaneasilynavigatebetweenallconnected displays .
26
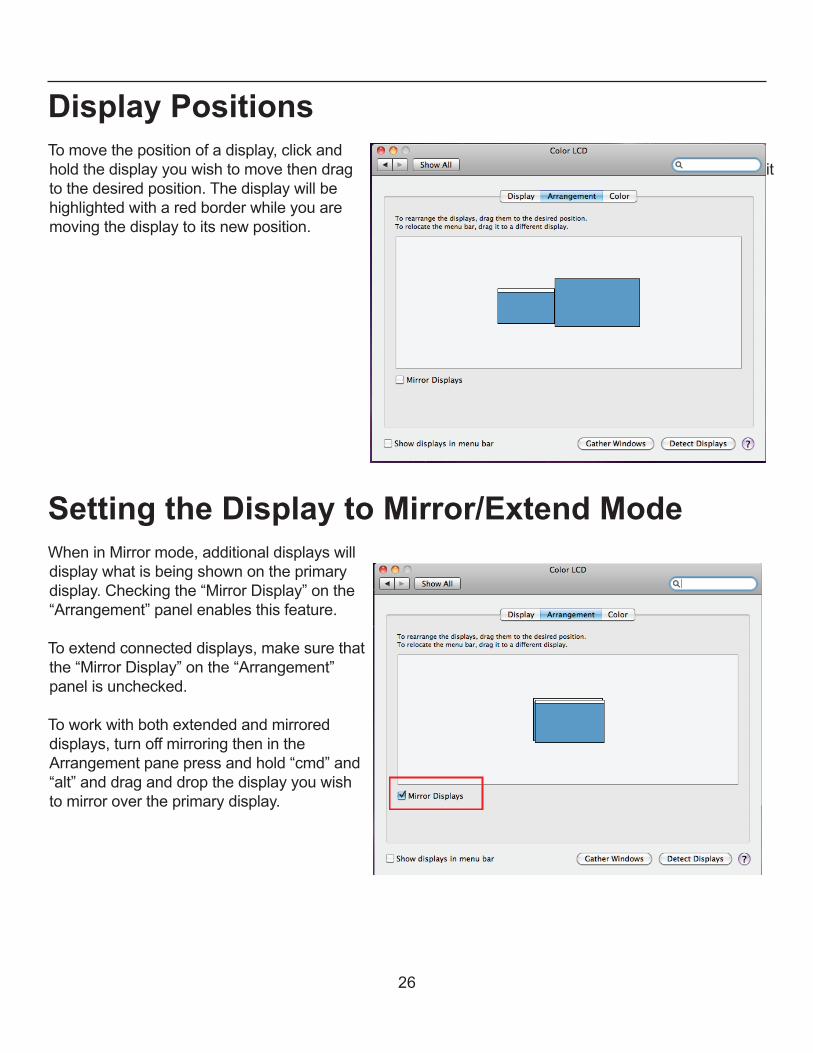
Display PositionsTomovethepositionofadisplay,clickandholdthedisplayyouwishtomovethendrag it tothedesiredposition.Thedisplaywillbehighlightedwitharedborderwhileyouaremovingthedisplaytoitsnewposition.
Setting the Display to Mirror/Extend ModeWheninMirrormode,additionaldisplayswilldisplaywhatisbeingshownontheprimarydisplay.Checkingthe“MirrorDisplay”onthe“Arrangement”panelenablesthisfeature.
Toextendconnecteddisplays,makesurethatthe“MirrorDisplay”onthe“Arrangement”panelisunchecked.
Toworkwithbothextendedandmirroreddisplays,turnoffmirroringthenintheArrangementpanepressandhold“cmd”and“alt”anddraganddropthedisplayyouwishtomirrorovertheprimarydisplay.
27
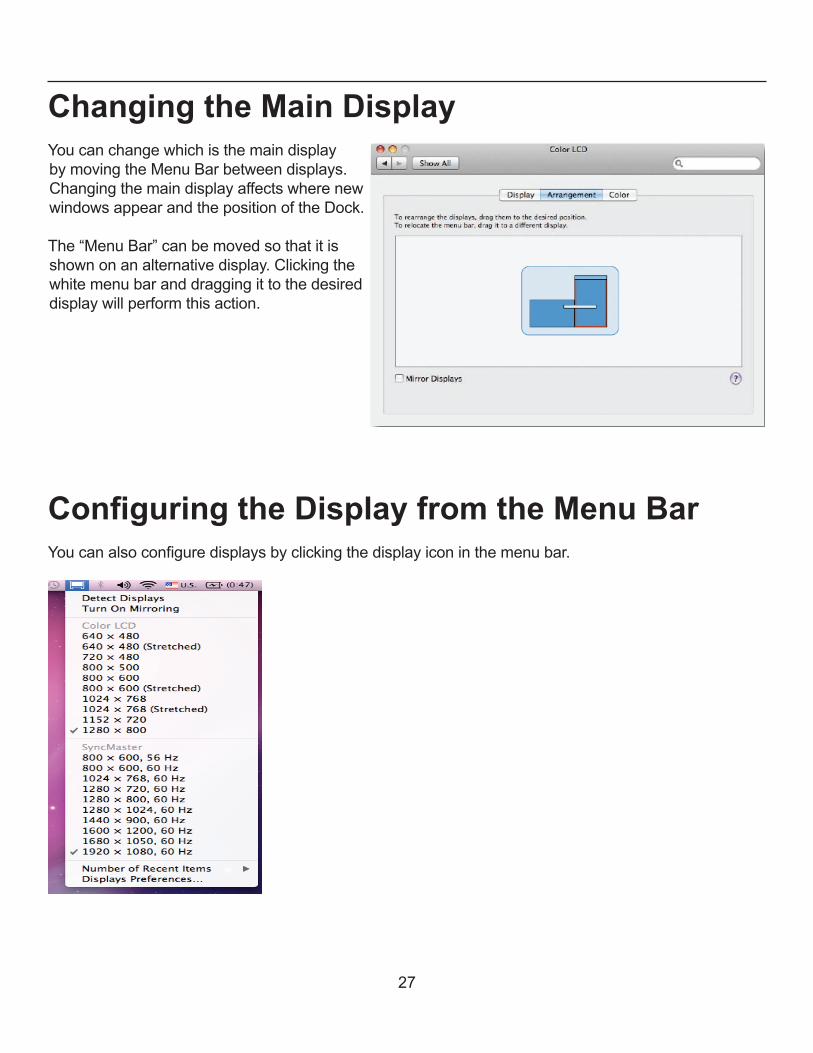
Changing the Main DisplayYoucanchangewhichisthemaindisplaybymovingtheMenuBarbetweendisplays.ChangingthemaindisplayaffectswherenewwindowsappearandthepositionoftheDock.
The“MenuBar”canbemovedsothatitisshownonanalternativedisplay.Clickingthewhitemenubaranddraggingittothedesireddisplaywillperformthisaction.
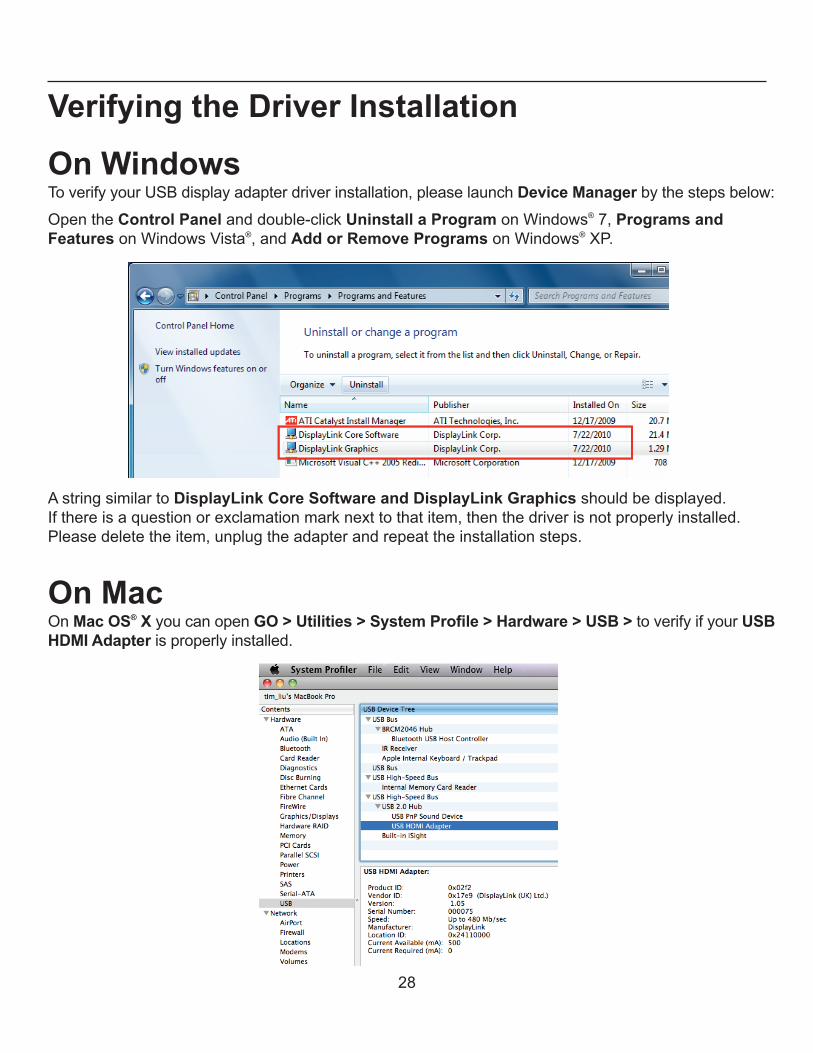
Configuring the Display from the Menu BarYoucanalsoconfiguredisplaysbyclickingthedisplayiconinthemenubar.
28
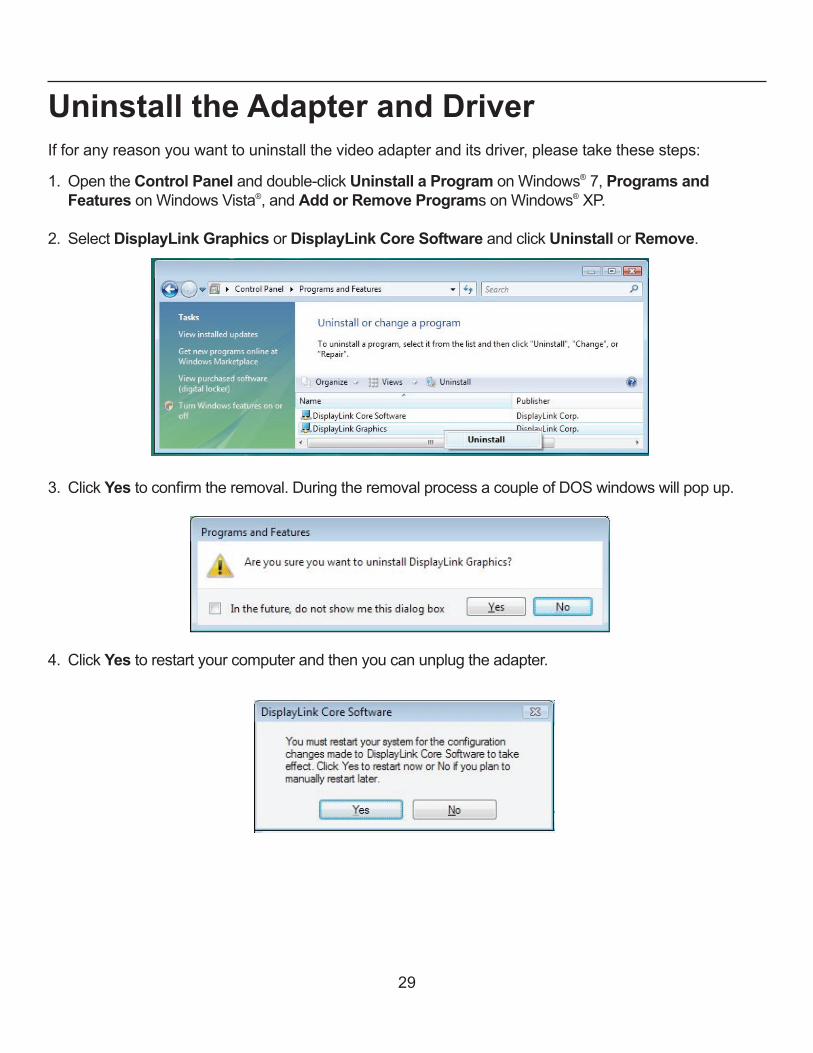
Verifying the Driver Installation
On Windows ToverifyyourUSBdisplayadapterdriverinstallation,pleaselaunchDevice Managerbythestepsbelow:
OpentheControl Panel and double-click Uninstall a Program on Windows® 7, Programs and Features on Windows Vista®, and Add or Remove Programs on Windows® XP .
AstringsimilartoDisplayLink Core Software and DisplayLink Graphicsshouldbedisplayed.Ifthereisaquestionorexclamationmarknexttothatitem,thenthedriverisnotproperlyinstalled.Pleasedeletetheitem,unplugtheadapterandrepeattheinstallationsteps.
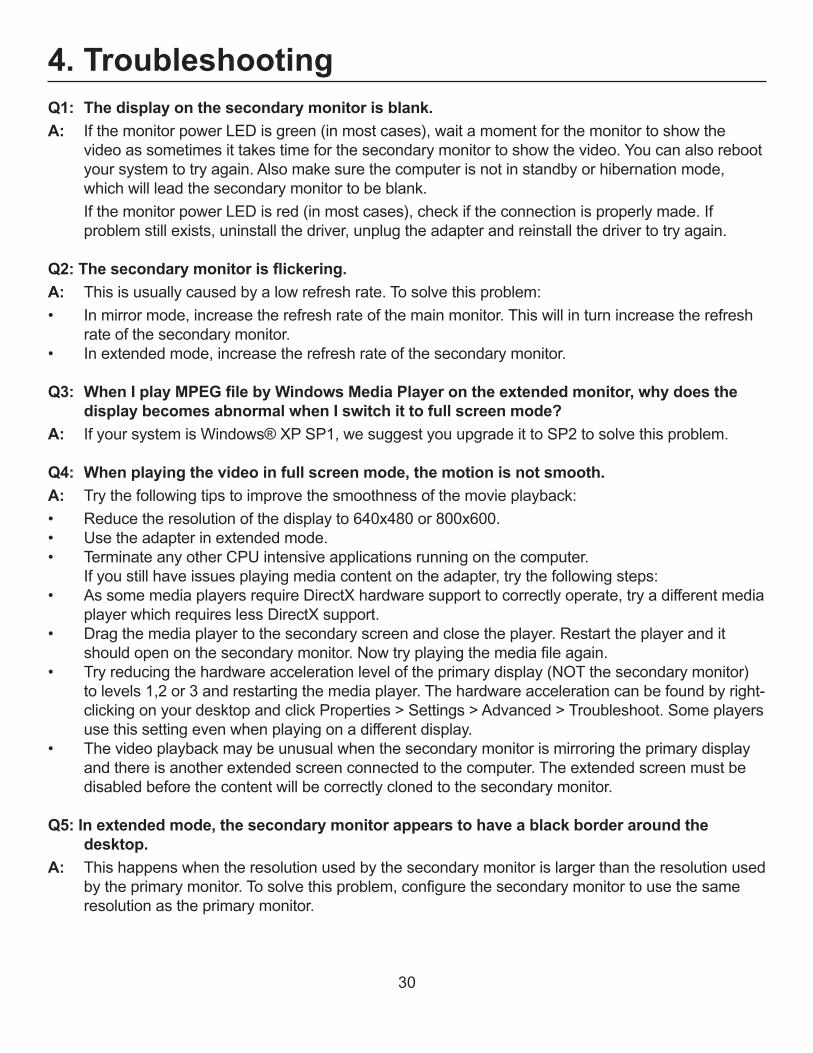
On MacOn Mac OS® X you can open GO > Utilities > System Profile > Hardware > USB > to verify if your USB HDMI Adapter is properly installed .
29
Uninstall the Adapter and Driver Ifforanyreasonyouwanttouninstallthevideoadapteranditsdriver,pleasetakethesesteps:
1. OpentheControl Panel and double-click Uninstall a Program on Windows® 7, Programs and Features on Windows Vista®, and Add or Remove Programs on Windows® XP .
2 . Select DisplayLink Graphics or DisplayLink Core Software and click Uninstall or Remove .
3 . Click Yestoconfirmtheremoval.DuringtheremovalprocessacoupleofDOSwindowswillpopup.
4 . Click Yestorestartyourcomputerandthenyoucanunplugtheadapter.
30
4. Troubleshooting Q1: The display on the secondary monitor is blank.
A: IfthemonitorpowerLEDisgreen(inmostcases),waitamomentforthemonitortoshowthevideoassometimesittakestimeforthesecondarymonitortoshowthevideo.Youcanalsorebootyoursystemtotryagain.Alsomakesurethecomputerisnotinstandbyorhibernationmode,whichwillleadthesecondarymonitortobeblank.
IfthemonitorpowerLEDisred(inmostcases),checkiftheconnectionisproperlymade.Ifproblemstillexists,uninstallthedriver,unplugtheadapterandreinstallthedrivertotryagain.
Q2: The secondary monitor is flickering.
A: Thisisusuallycausedbyalowrefreshrate.Tosolvethisproblem:
• Inmirrormode,increasetherefreshrateofthemainmonitor.Thiswillinturnincreasetherefreshrateofthesecondarymonitor.
• Inextendedmode,increasetherefreshrateofthesecondarymonitor.
Q3: When I play MPEG file by Windows Media Player on the extended monitor, why does the display becomes abnormal when I switch it to full screen mode?
A: IfyoursystemisWindows®XPSP1,wesuggestyouupgradeittoSP2tosolvethisproblem.
Q4: When playing the video in full screen mode, the motion is not smooth.
A: Trythefollowingtipstoimprovethesmoothnessofthemovieplayback:
• Reducetheresolutionofthedisplayto640x480or800x600.• Usetheadapterinextendedmode.• TerminateanyotherCPUintensiveapplicationsrunningonthecomputer. Ifyoustillhaveissuesplayingmediacontentontheadapter,trythefollowingsteps:• AssomemediaplayersrequireDirectXhardwaresupporttocorrectlyoperate,tryadifferentmedia
playerwhichrequireslessDirectXsupport.• Dragthemediaplayertothesecondaryscreenandclosetheplayer.Restarttheplayerandit
shouldopenonthesecondarymonitor.Nowtryplayingthemediafileagain.• Tryreducingthehardwareaccelerationleveloftheprimarydisplay(NOTthesecondarymonitor)
tolevels1,2or3andrestartingthemediaplayer.Thehardwareaccelerationcanbefoundbyright-clickingonyourdesktopandclickProperties>Settings>Advanced>Troubleshoot.Someplayersusethissettingevenwhenplayingonadifferentdisplay.
• Thevideoplaybackmaybeunusualwhenthesecondarymonitorismirroringtheprimarydisplayandthereisanotherextendedscreenconnectedtothecomputer.Theextendedscreenmustbedisabledbeforethecontentwillbecorrectlyclonedtothesecondarymonitor.
Q5: In extended mode, the secondary monitor appears to have a black border around the desktop.
A: Thishappenswhentheresolutionusedbythesecondarymonitorislargerthantheresolutionusedbytheprimarymonitor.Tosolvethisproblem,configurethesecondarymonitortousethesameresolutionastheprimarymonitor.
31
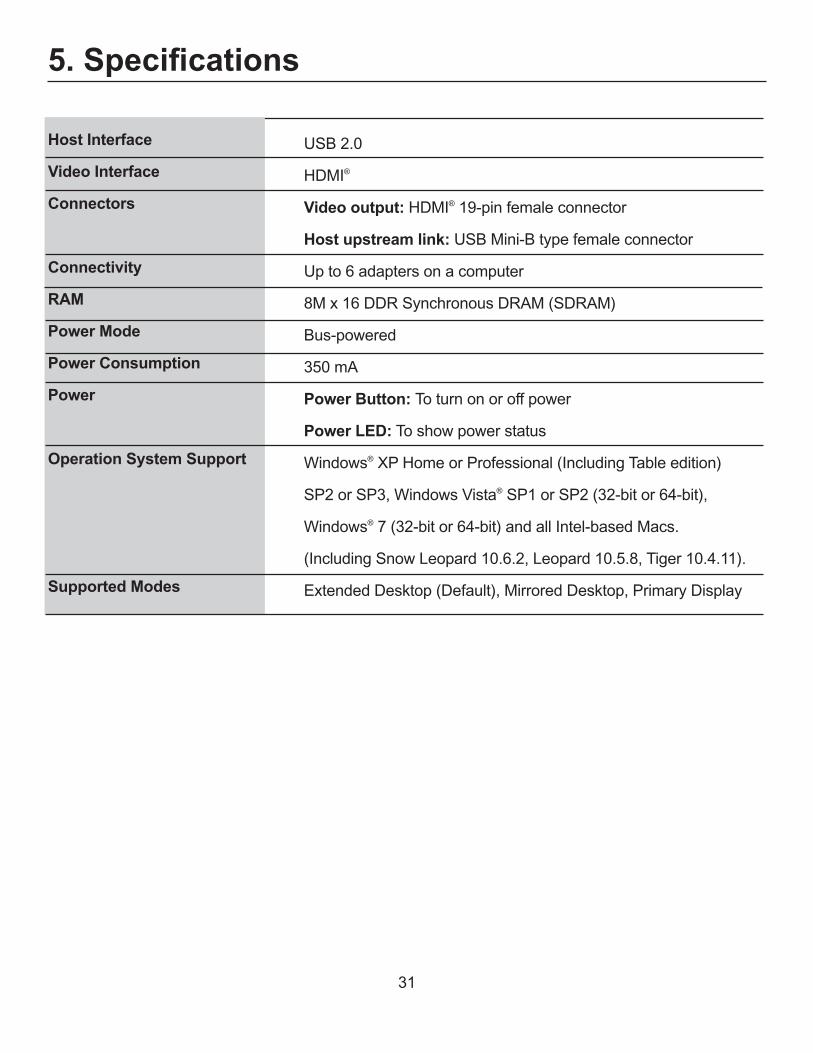
5. Specifications Host Interface
Video Interface
Connectors
Connectivity
RAM
Power Mode
Power Consumption
Power
Operation System Support
Supported Modes
USB2.0
HDMI®
Video output: HDMI® 19-pin female connector
Host upstream link:USBMini-Btypefemaleconnector
Up to 6 adapters on a computer
8Mx16DDRSynchronousDRAM(SDRAM)
Bus-powered
350mA
Power Button: To turn on or off power
Power LED:Toshowpowerstatus
Windows® XP Home or Professional (Including Table edition)
SP2 or SP3, Windows Vista® SP1 or SP2 (32-bit or 64-bit),
Windows® 7 (32-bit or 64-bit) and all Intel-based Macs .
(Including Snow Leopard 10 .6 .2, Leopard 10 .5 .8, Tiger 10 .4 .11) .
Extended Desktop (Default), Mirrored Desktop, Primary Display
32
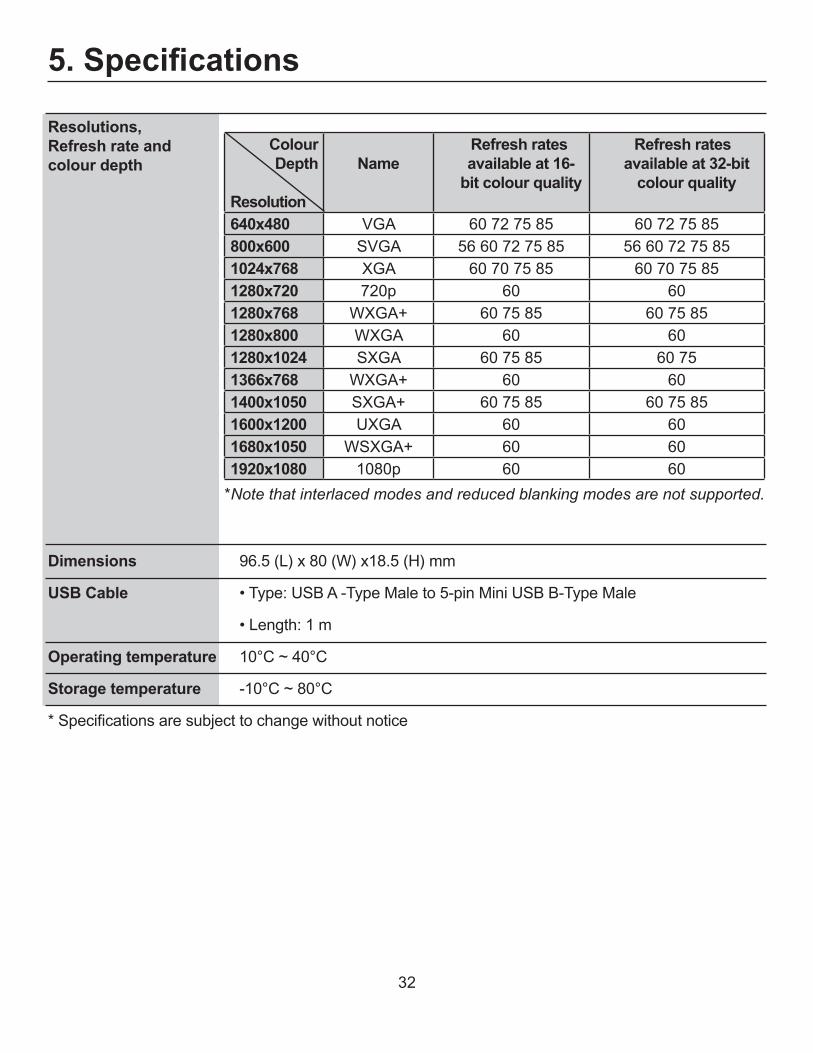
5. Specifications Resolutions,Refresh rate and colour depth
Dimensions 96 .5 (L) x 80 (W) x18 .5 (H) mm
USB Cable •Type:USBA-TypeMaleto5-pinMiniUSBB-TypeMale
•Length:1m
Operating temperature 10°C ~ 40°C
Storage temperature -10°C ~ 80°C
*Specificationsaresubjecttochangewithoutnotice
Colour Depth
Resolution
Name Refresh rates
available at 16-bit colour quality
Refresh rates available at 32-bit
colour quality
640x480 VGA 60 72 75 85 60 72 75 85800x600 SVGA 56 60 72 75 85 56 60 72 75 85 1024x768 XGA 60 70 75 85 60 70 75 851280x720 720p 60 601280x768 WXGA+ 60 75 85 60 75 85 1280x800 WXGA 60 601280x1024 SXGA 60 75 85 60 751366x768 WXGA+ 60 601400x1050 SXGA+ 60 75 85 60 75 851600x1200 UXGA 60 601680x1050 WSXGA+ 60 601920x1080 1080p 60 60
*Note that interlaced modes and reduced blanking modes are not supported.

33
6. FCC/Warranty
The FCC Wants You To KnowThisequipmenthasbeentestedandfoundtocomplywiththelimitsforaClassBdigitaldevice,pursuanttoPart15oftheFCCRules.Theselimitsaredesignedtoprovidereasonableprotectionagainstharmfulinterferenceinaresidentialinstallation.
Thisequipmentgenerates,usesandcanradiateradiofrequencyenergyand,ifnotinstalledandusedinaccordancewiththeinstructions,maycauseharmfulinterferencetoradiocommunications.However,thereisnoguaranteethatinterferencewillnotoccurinaparticularinstallation.
Ifthisequipmentdoescauseharmfulinterferencetoradioortelevisionreception,whichcanbedeterminedbyturningtheequipmentoffandon,theuserisencouragedtotrytocorrecttheinterferencebyoneormoreofthefollowingmeasures:
• Reorientorrelocatethereceivingantenna.• Increasetheseparationbetweentheequipmentandreceiver.• Connecttheequipmentintoanoutletonacircuitdifferentfromthattowhichthereceiveris
connected . • Consultthedealeroranexperiencedradio/TVtechnicianforadditionalsuggestions.
Anychangesormodificationsnotexpresslyapprovedbythepartyresponsibleforcompliancecouldvoidtheuser’sauthoritytooperatetheequipment.Whereshieldedinterfacecableshavebeenprovidedwiththeproductorspecifiedadditionalcomponentsoraccessorieselsewheredefinedtobeusedwiththeinstallationoftheproduct,theymustbeusedinordertoensurecompliancewithFCCregulation.
CAN ICES-3(B).
The Source warrants that this product will be free from defects in materials and workmanship for a period of (1) year from the date of purchase. Within this period, simply take the product and your proof of purchase to any The Source store or participating dealer and the product will be replaced (where available) without charge. Any product which has been subject to misuse or accidental damage is excluded from this warranty. This warranty is only applicable to a product purchased through The Source company-owned stores or participating dealers in Canada where the warranty is included with the product. While this warranty does not confer any legal rights other than those set out above, you may have additional statutory rights which will vary under the laws of the various countries, states, provinces and other governmental entities in which The Source operates. This warranty is subject to all statutory rights you may have in Canada.
©2013TheSourceAllrightsreserved.
Importedby:TheSource,Barrie,Ontario,Canada,L4M4W5
ManufacturedinChina
For product support please visit www.thesource.ca
Please Recycle
THE SOURCE – WARRANTY