Embed Size (px)
Citation preview
1www.geiger.de EN
EN
DE Bedienungsanleitung
Operating Instructions
Manuel d’utilisation
Manual de instrucciones
Istruzioni per l’uso
EN
FR
ES
IT
Tubular motor:
GEIGER-SOLIDlineMotor control:
GEIGER-SoftLock (GU45..E07)For sun protection systems with locking mechanism
2 Gerhard Geiger GmbH & Co. KG | 100W0554 1214V000EN
EN
en
Index
1. CharacteristicsoftheGEIGER-SoftLock.......................3
2. Generalinformation.........................................................4
3. Guarantee..........................................................................4
4. Safetyinformation............................................................4
5. Intendeduse.....................................................................5
6. Operation...........................................................................5
7. Installationinstructions...................................................6
8. Settingoftheendstops...................................................7
9. Correctionoftheendstops.............................................8
10.GEIGERPowertronic........................................................8
11.Obstacledetection...........................................................9
12.Technicaldata.................................................................10
13.Declarationofconformity..............................................10
14.Notesonwastedisposal...............................................10
15.Informationforthespecialistelectrician.....................11
16.Whattodoif…................................................................11
3www.geiger.de EN
EN
1.CharacteristicsoftheGEIGER-SoftLockApplicationrange:Forsunprotectionsystemswithlockingmechanism
Safety
• A safe locking of the cassette through torque shutoff
FabricProtection
• GEIGER Locking power minimisation (automatic function)
• GEIGER Powertronic (manual function: power level)
...for a nice long lasting fabric.
HangingLengthAdjustment
• Modifications in fabric lengths are recognised and compensated for
ObstacleRecognition
• Reversing the rotation direction and obstacle clearance
GEIGER-OperatingRadiusIdentification
• Modern electronic control identifies the equipment’s torque curve and makes available to the motor the exact amount of power needed for extension, operation and closing.
Automaticlockingintheextendedendposition
• For a perfect tensioning of the cloth
4 Gerhard Geiger GmbH & Co. KG | 100W0554 1214V000EN
EN
en
2.GeneralinformationDear customer, By purchasing a GEIGER tubular motor you have decided on a quality product from GEIGER.
Thank you very much for your decision and the confidence placed in us.
Before you put this drive into operation please observe the following safety information. It serves for the prevention of danger and for the avoidance of personal injury and damage to property.
Pleaseretainthisinformationforfuturereference.f Forsunprotectionsystemswithlockingmechanismf Drivesareswitchableinparallelf Automaticidentificationofrighthand/lefthandinstallation
3.GuaranteeIn the case of incorrect installation contrary to the operating instructions and/or constructional modification, the legal and contractual guarantee for property damage and product liability lapses.
4.Safetyinformation
I ATTENTION: Importantsafetyinformation.Forpersonalsafety,itisimportanttofollowtheseinstructions.Theinstructionsshouldbekept.
f Thisapplianceisnottobeusedbypersons(includingchildren)whosephysical,sensorialormentalcapacitiesareimpaired,orwhohavenoexperienceorknow-how,unlesstheyhavebeensupervisedorbeengiveninstructionsontheuseoftheappliancebysomeonewhoisresponsiblefortheirsafety.
f Childrenmustbesupervisedtomakesuretheydonotplaywiththeappliance.
f Theinstallationistobecheckedregularlyfordefectivebalance,wearanddamage.
f DamagedconnectingleadsmustbereplacedbytheGEIGERconnectingleadofthesamewiretype.
f Duringoperationobservethedangerzone.f Ifpeopleorobjectsareinthedangerzone,donotusetheinstallation.f Urgentlyshutdowndamagedinstallationsuntilrepair.f Unconditionallyshutdowntheunitduringmaintenanceandcleaningoperations.
f Pinchingandshearingsitesaretobeavoidedandtobesafeguardedagainst.
f Whenoperatingthemanualactuatorwiththeopensunprotectionsystem,exercisecautionasitcanfalldownquicklyifspringsexpandorarebroken.
f Donotoperatethedeviceifoperationssuchas,forexample,windowcleaningaretobecarriedoutinthevicinity.
f Disconnectthedevicefromthemainspowersupplyifoperationssuchas,forexample,windowcleaningarebeingcarriedoutinthevicinity.
5www.geiger.de EN
EN
I ATTENTION: Importantsafetyinformation.Followallinstallationinstructions,asincorrectinstallationcanleadtoseriousinjuries.
f Connectionmustbecarriedoutbyaskilledelectricianaccordingtotheregulationsinforcelocally.
f Themainsplugofthetubularmotormustbeaccessibleafterinstallation.f Ontheinstallationofthetubularmotorwithoutmechanicalprotectionofthedrivenparts,thetubularmotormustbeinstalledataheightofatleast2.5mabovethegroundorofanotherlevelwhichprovidesaccesstothedrive.
f Beforethetubularmotorisinstalled,allleadswhicharenotneededaretoberemovedandallequipmentwhichisnotneededforactuationistobeputoutofoperation.
f Ifthetubularmotoriscontrolledbyaswitchorpushbutton,theswitchorpushbuttonmustbemountedwithineyeshotofthetubularmotor.Theswitchorpushbuttonmustnotbelocatedinthevicinityofmovingparts.Theheightofinstallationmustbeatleast1.5mabovethefloor.Iftheapparatusisequippedwithoutapinandasocketconnector(STAS3K)intheconnectinglead,orothermeansfordisconnectingfromthemainswithatleasta3mmcontactopeningoneachpole,adisconnectingdeviceofthistypemustbeincorporatedintothepermanentlyinstalledelectricalinstallationaccordingtothewiringrules.
f Permanentlyinstalledcontroldevicesmustbeattachedvisibly.f Thecorrectdimensioningofthedriveistobeobserved.
5. IntendeduseThe tubular motors of the model range SOLIDline(GU45..E07) with the SoftLock system are designed exclusively for the operation of sun protection systems with locking mechanism.
If the tubular motors are used for other applications and/or modifications are performed to the tubular motors, which have not been discussed with GEIGER Antriebstechnik, then the manufacturer is not liable for personal injury and/or damage to property and for consequential damage.
6.Operation
I Preconditionforsafeoperationisproperinstallation(seesection7)andcorrectcommissioning(seesection8).
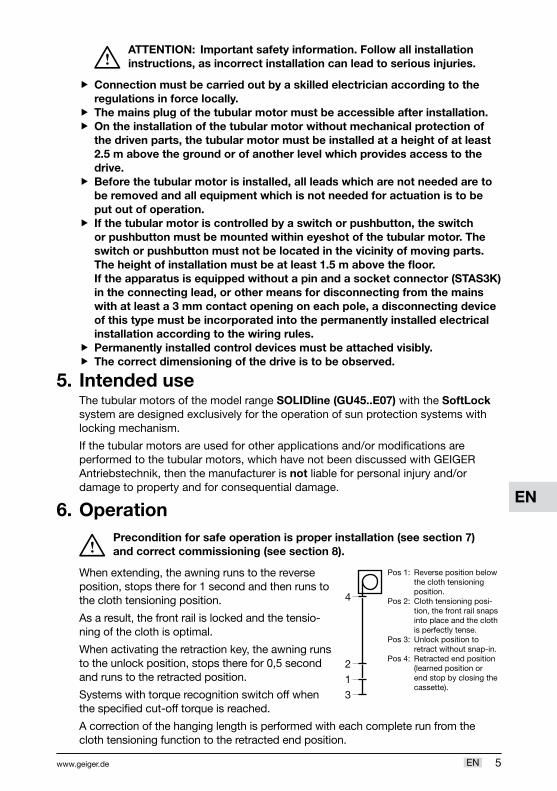
When extending, the awning runs to the reverse position, stops there for 1 second and then runs to the cloth tensioning position.
As a result, the front rail is locked and the tensio-ning of the cloth is optimal.
When activating the retraction key, the awning runs to the unlock position, stops there for 0,5 second and runs to the retracted position.
Systems with torque recognition switch off when the specified cut-off torque is reached.
A correction of the hanging length is performed with each complete run from the cloth tensioning function to the retracted end position.
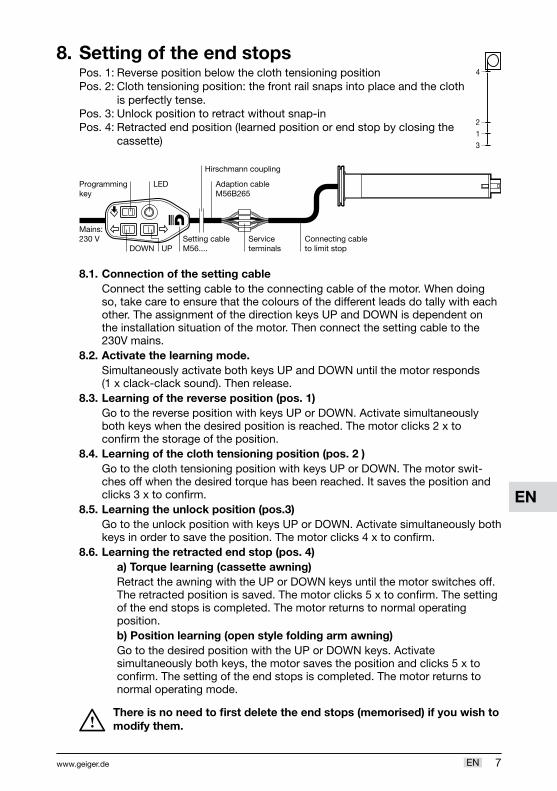
Pos 1: Reverse position below the cloth tensioning position.
Pos 2: Cloth tensioning posi-tion, the front rail snaps into place and the cloth is perfectly tense.
Pos 3: Unlock position to retract without snap-in.
Pos 4: Retracted end position (learned position or end stop by closing the cassette).
312
4
6 Gerhard Geiger GmbH & Co. KG | 100W0554 1214V000EN
EN
en
In case of a free positioning of the end stop, the awning runs to the selected point and stops.
Behaviour of the control after meeting an obstacle or after a manual shut down in the range between the unlock position and somewhat above the cloth tensioning position:
Retraction: the awning runs first to the unlock position and then retracts.
Extension: the awning runs first to the unlock position, then somewhat above the cloth tensioning position to the reverse position and then to the cloth tensioning position. This makes sure that the front rail is on the right side of the hook and guarantees a perfect tensioning of the cloth.
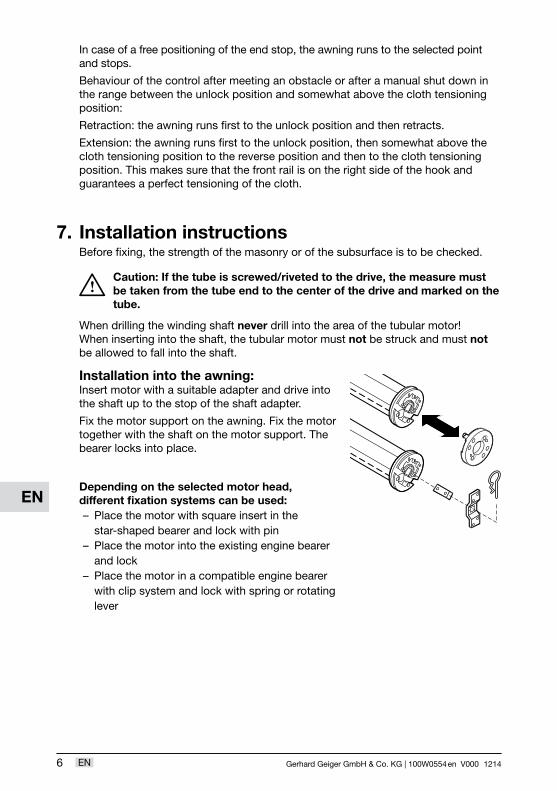
7. InstallationinstructionsBefore fixing, the strength of the masonry or of the subsurface is to be checked.
I Caution:Ifthetubeisscrewed/rivetedtothedrive,themeasuremustbetakenfromthetubeendtothecenterofthedriveandmarkedonthetube.
When drilling the winding shaft never drill into the area of the tubular motor! When inserting into the shaft, the tubular motor must not be struck and must not be allowed to fall into the shaft.
Installationintotheawning:Insert motor with a suitable adapter and drive into the shaft up to the stop of the shaft adapter.
Fix the motor support on the awning. Fix the motor together with the shaft on the motor support. The bearer locks into place.
Dependingontheselectedmotorhead,differentfixationsystemscanbeused:
– Place the motor with square insert in the star-shaped bearer and lock with pin
– Place the motor into the existing engine bearer and lock
– Place the motor in a compatible engine bearer with clip system and lock with spring or rotating lever
7www.geiger.de EN
EN
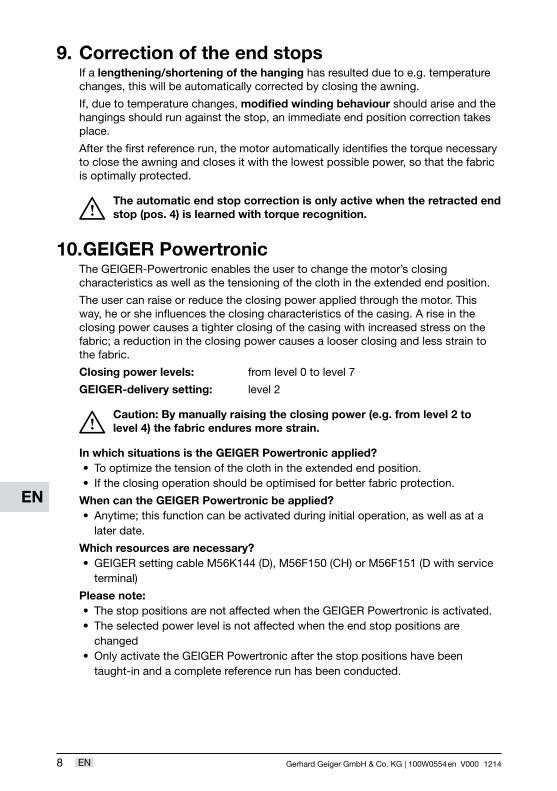
8.SettingoftheendstopsPos. 1: Reverse position below the cloth tensioning positionPos. 2: Cloth tensioning position: the front rail snaps into place and the cloth
is perfectly tense.Pos. 3: Unlock position to retract without snap-in Pos. 4: Retracted end position (learned position or end stop by closing the
cassette)
8.1.ConnectionofthesettingcableConnect the setting cable to the connecting cable of the motor. When doing so, take care to ensure that the colours of the different leads do tally with each other. The assignment of the direction keys UP and DOWN is dependent on the installation situation of the motor. Then connect the setting cable to the 230V mains.
8.2.Activatethelearningmode.Simultaneously activate both keys UP and DOWN until the motor responds (1 x clack-clack sound). Then release.
8.3.Learningofthereverseposition(pos.1)Go to the reverse position with keys UP or DOWN. Activate simultaneously both keys when the desired position is reached. The motor clicks 2 x to confirm the storage of the position.
8.4.Learningoftheclothtensioningposition(pos.2)Go to the cloth tensioning position with keys UP or DOWN. The motor swit-ches off when the desired torque has been reached. It saves the position and clicks 3 x to confirm.
8.5.Learningtheunlockposition(pos.3)Go to the unlock position with keys UP or DOWN. Activate simultaneously both keys in order to save the position. The motor clicks 4 x to confirm.
8.6.Learningtheretractedendstop(pos.4)a)Torquelearning(cassetteawning)Retract the awning with the UP or DOWN keys until the motor switches off. The retracted position is saved. The motor clicks 5 x to confirm. The setting of the end stops is completed. The motor returns to normal operating position.b)Positionlearning(openstylefoldingarmawning)Go to the desired position with the UP or DOWN keys. Activate simultaneously both keys, the motor saves the position and clicks 5 x to confirm. The setting of the end stops is completed. The motor returns to normal operating mode.
I Thereisnoneedtofirstdeletetheendstops(memorised)ifyouwishtomodifythem.
312
4
Mains:230 V Setting cable
M56....Serviceterminals
Connecting cableto limit stopDOWN UP
Programmingkey
LED
Hirschmann coupling
Adaption cableM56B265
8 Gerhard Geiger GmbH & Co. KG | 100W0554 1214V000EN
EN
en
9.CorrectionoftheendstopsIf a lengthening/shorteningofthehanging has resulted due to e.g. temperature changes, this will be automatically corrected by closing the awning.
If, due to temperature changes, modifiedwindingbehaviourshould arise and the hangings should run against the stop, an immediate end position correction takes place.
After the first reference run, the motor automatically identifies the torque necessary to close the awning and closes it with the lowest possible power, so that the fabric is optimally protected.
I Theautomaticendstopcorrectionisonlyactivewhentheretractedendstop(pos.4)islearnedwithtorquerecognition.
10.GEIGERPowertronicThe GEIGER-Powertronic enables the user to change the motor’s closing characteristics as well as the tensioning of the cloth in the extended end position.
The user can raise or reduce the closing power applied through the motor. This way, he or she influences the closing characteristics of the casing. A rise in the closing power causes a tighter closing of the casing with increased stress on the fabric; a reduction in the closing power causes a looser closing and less strain to the fabric.
Closingpowerlevels: from level 0 to level 7
GEIGER-deliverysetting: level 2
I Caution:Bymanuallyraisingtheclosingpower(e.g.fromlevel2tolevel4)thefabricenduresmorestrain.
InwhichsituationsistheGEIGERPowertronicapplied?• To optimize the tension of the cloth in the extended end position.• If the closing operation should be optimised for better fabric protection.
WhencantheGEIGERPowertronicbeapplied?• Anytime; this function can be activated during initial operation, as well as at a
later date.
Whichresourcesarenecessary?• GEIGER setting cable M56K144 (D), M56F150 (CH) or M56F151 (D with service
terminal)
Pleasenote:• The stop positions are not affected when the GEIGER Powertronic is activated.• The selected power level is not affected when the end stop positions are
changed• Only activate the GEIGER Powertronic after the stop positions have been
taught-in and a complete reference run has been conducted.
9www.geiger.de EN
EN
GEIGERPowertronic–changingthepowerlevelsConnect the setting cable to the connecting cable of the motor. When doing so, take care to ensure that the colours of the different leads do tally with each other. Then connect the setting cable to the 230V mains.
ActivatingtheGEIGERPowertronicActivate simultaneously keys UP and DOWN. After approx. 3 seconds the motor confirms with 1 x clack-clack and after 5 seconds with 5 x clack-clack. Release the keys.
ChangingthepowerlevelsActivate the key UP in order to increase the power level. After 3 seconds, the motor confirms with 1 x clack-clack. The key can now be released. If you keep pressing the key, another power level will be reached every 1,5 seconds and the motor confirms each new level with 1 x clack-clack. When the maximum force level is reached the motor confirms with 2 x clack-clack.
In order to reduce the power level activate the key DOWN and repeat the same operation.
The set value is saved with a simultaneous activation of UP and DOWN keys. The motor confirms with 1 x clack-clack and the control returns to normal mode.
11.ObstacledetectionIf, after teaching-in, the first complete, uninterrupted run from one stop position to the other is conducted, the necessary torque will be taught-in.
With each successive complete and uninterrupted run from one stop position to the other, the necessary torque is automatically readjusted. Slow changes to the equipment through aging, contamination, the cold or heat are accounted for in this regard. This process takes place for both running directions independently of one another.
Should UPWARD movement be blocked by an obstruction, the motor turns off and a short reverse movement occurs. The direction of movement in which the obstruction was detected is locked. The device will be unlocked if the motor is run for a short time period in the oppo-site direction. The obstruction must also be removed before the motor can be rerun in the direction of the obstruction.
10 Gerhard Geiger GmbH & Co. KG | 100W0554 1214V000EN
EN
en
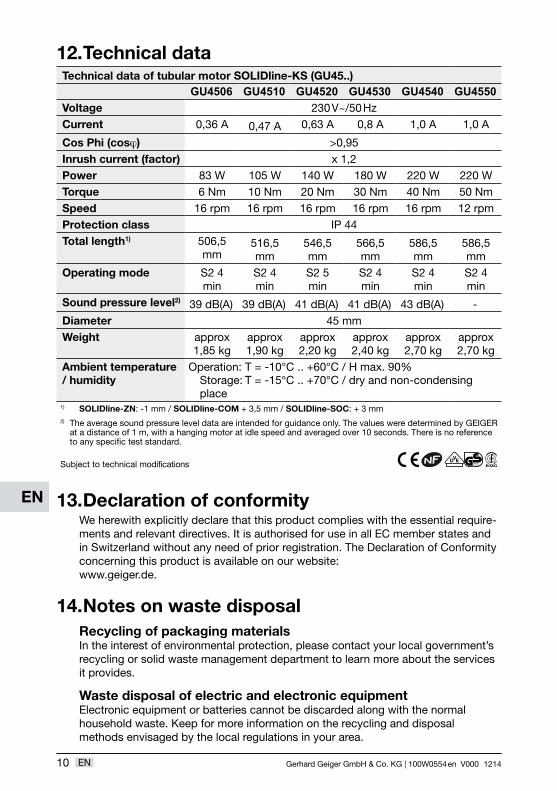
12.TechnicaldataTechnicaldataoftubularmotorSOLIDline-KS(GU45..)
GU4506 GU4510 GU4520 GU4530 GU4540 GU4550Voltage 230 V~/50 HzCurrent 0,36 A 0,47 A 0,63 A 0,8 A 1,0 A 1,0 A
CosPhi(cosj) >0,95Inrushcurrent(factor) x 1,2Power 83 W 105 W 140 W 180 W 220 W 220 WTorque 6 Nm 10 Nm 20 Nm 30 Nm 40 Nm 50 NmSpeed 16 rpm 16 rpm 16 rpm 16 rpm 16 rpm 12 rpmProtectionclass IP 44Totallength1) 506,5
mm516,5 mm
546,5 mm
566,5 mm
586,5 mm
586,5 mm
Operatingmode S2 4 min
S2 4 min
S2 5 min
S2 4 min
S2 4 min
S2 4 min
Soundpressurelevel2) 39 dB(A) 39 dB(A) 41 dB(A) 41 dB(A) 43 dB(A) -Diameter 45 mmWeight approx
1,85 kgapprox 1,90 kg
approx 2,20 kg
approx 2,40 kg
approx 2,70 kg
approx 2,70 kg
Ambienttemperature/humidity
Operation: T = -10°C .. +60°C / H max. 90% Storage: T = -15°C .. +70°C / dry and non-condensing place
1) SOLIDline-ZN: -1 mm / SOLIDline-COM + 3,5 mm / SOLIDline-SOC: + 3 mm2) The average sound pressure level data are intended for guidance only. The values were determined by GEIGER
at a distance of 1 m, with a hanging motor at idle speed and averaged over 10 seconds. There is no reference to any specific test standard.
Subject to technical modifications D EVgeprüfteSicherheit
13.DeclarationofconformityWe herewith explicitly declare that this product complies with the essential require-ments and relevant directives. It is authorised for use in all EC member states and in Switzerland without any need of prior registration. The Declaration of Conformity concerning this product is available on our website: www.geiger.de.
14.NotesonwastedisposalRecyclingofpackagingmaterialsIn the interest of environmental protection, please contact your local government’s recycling or solid waste management department to learn more about the services it provides.
WastedisposalofelectricandelectronicequipmentElectronic equipment or batteries cannot be discarded along with the normal household waste. Keep for more information on the recycling and disposal methods envisaged by the local regulations in your area.
11www.geiger.de EN
EN
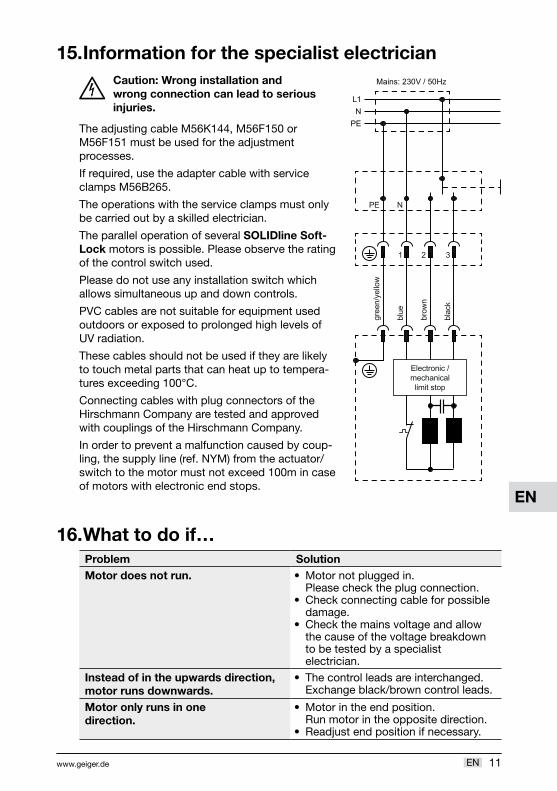
15.Informationforthespecialistelectrician
H Caution:Wronginstallationandwrongconnectioncanleadtoseriousinjuries.
The adjusting cable M56K144, M56F150 or M56F151 must be used for the adjustment processes.
If required, use the adapter cable with service clamps M56B265.
The operations with the service clamps must only be carried out by a skilled electrician.
The parallel operation of several SOLIDlineSoft-Lock motors is possible. Please observe the rating of the control switch used.
Please do not use any installation switch which allows simultaneous up and down controls.
PVC cables are not suitable for equipment used outdoors or exposed to prolonged high levels of UV radiation.
These cables should not be used if they are likely to touch metal parts that can heat up to tempera-tures exceeding 100°C.
Connecting cables with plug connectors of the Hirschmann Company are tested and approved with couplings of the Hirschmann Company.
In order to prevent a malfunction caused by coup-ling, the supply line (ref. NYM) from the actuator/switch to the motor must not exceed 100m in case of motors with electronic end stops.
16.Whattodoif…Problem SolutionMotordoesnotrun. • Motor not plugged in.
Please check the plug connection.• Check connecting cable for possible
damage.• Check the mains voltage and allow
the cause of the voltage break down to be tested by a specialist electrician.
Insteadofintheupwardsdirection,motorrunsdownwards.
• The control leads are interchanged. Exchange black/brown control leads.
Motoronlyrunsinonedirection.
• Motor in the end position. Run motor in the opposite direction.
• Readjust end position if necessary.
1 2 3
PE N
L1N
PE
Electronic /mechanicallimit stop
blue
brow
n
blac
k
gree
n/ye
llow
Mains: 230V / 50Hz
12 Gerhard Geiger GmbH & Co. KG | 100W0554 1214V000EN
EN
en
For technical questions, please call our service team at: +49 (0) 7142 938-333.They will be happy to assist you.
Gerhard Geiger GmbH & Co. KGSchleifmühle 6D-74321 Bietigheim-BissingenTelephone: +49 (0) 7142 938-0Telefax: +49 (0) 7142 938-230E-Mail: [email protected]: www.geiger.de
Problem SolutionAfterrunningseveraltimes,themotorbreaksdownandnolongerresponds.
• The motor became too hot and has switched off. Try it again after a cooling time of about 15 min.
Themotor«hums»whentheprogrammingkeyisactuated.TheLEDlightsweakly.
• Function is not provided.
Motorshouldstoponreversepositionoronunlockpositionformaintenancepurposesbutrunsautomaticallyonclothtensioningposition
• Run the motor to the reverse position (pos. 1) or to the unlock position (pos. 3) and switch off.
Afteramanualstop,themotordoesnotretracttheawningimmediatelybutextendsit.
• The motor is between the unlock position (pos. 3) and somewhat above the cloth tensioning position (pos.2). To make sure that the motor does not snap in when retracting, the motor should run first to the unlock position and then to the retracted end position. (pos.4)
Afteramanualstopthemotordoesnotstoponthereversepositionwhenextendingtheawningbutrunson.
• The motor is between unlock position (pos. 3) and somewhat above the cloth tensioning position (pos.2). To make sure that the motor hits the hooks, go first to the unlock position. Afterwards, the direction rotation is changed automatically and the motor runs somewhat above the cloth tensioning position (pos. 2) . From there, it runs automatically to the reverse position and then to the cloth tensioning position (pos.2)

![Geiger-Müller Countersphysics.uwyo.edu › ~rudim › S20Seminar_Walters_GeigerMuellerCtr.pdf · Geiger-Müller Counters Dexter Walters. Geiger Counter “Ionized Radiation Detector”[7]](https://img.pdfslide.us/doc/110x75/5f14935d601d760b0476d7ab/geiger-mller-a-rudim-a-s20seminarwaltersgeigermuellerctrpdf-geiger-mller.jpg)

![Geiger 2011 Presentation[1]](https://img.pdfslide.us/doc/110x75/555e97f3d8b42a6d068b4d4c/geiger-2011-presentation1.jpg)

![Geiger gets it_2010[1]](https://img.pdfslide.us/doc/110x75/55d539c2bb61eb251b8b4738/geiger-gets-it20101.jpg)