Embed Size (px)
Citation preview

Trip Master Installation for CRF1000L Africa Twin
Kit contents • Trip Master meter assembly • Front wheel sensor • Brake disc Magnet • L/H switch control • 2 x clamps for meter • 2 x 6 mm bolts • 2 x 5mm lock nuts
Page 1 © The KCS Group 2015

Trip Master Installation for CRF1000L Africa Twin
To fit the Trip Master the following parts will need to be removed from the bike. • Right and left side fairing panels • Screen • Headlamp surround panel • R/H side front mudguard cover
Page 2 © The KCS Group 2015

Trip Master Installation for CRF1000L Africa Twin
Remove the right and left side fairing panels Each panel has 3 screws and 4 quick fasteners Bolt locations Quick fasteners located in black inner cover
Page 3 © The KCS Group 2015

Trip Master Installation for CRF1000L Africa Twin
Once the bolts and fasteners are removed the panels will need to be gently pulled from the 4 rubber grommets. Remove the panels as an assembly with the lower trim The fairings have a plastic locator at the front under the headlamp, take care not to damage it when the fairing is removed. Grommet locations
Page 4 © The KCS Group 2015

Trip Master Installation for CRF1000L Africa Twin
Once the fairing panels are removed remove, the 4 screen bolts and screen
Page 5 © The KCS Group 2015

Trip Master Installation for CRF1000L Africa Twin
Remove the right side front indicator and right corner panel by removing the bolt and fastener and the 2 fasteners on the inside of the corner panel
Page 6 © The KCS Group 2015
Trip Master Installation for CRF1000L Africa Twin
Remove the 4 bolts and headlamp outer cover
Page 7 © The KCS Group 2015

Trip Master Installation for CRF1000L Africa Twin
Wheel sensor fitment Remove the 2 right side front mudguard bolts and the retaining bolt for the reflector cover Remove the reflector cover
Page 8 © The KCS Group 2015

Trip Master Installation for CRF1000L Africa Twin
Fit the wheel sensor as shown on the inside of the mudguard using the original bolts Route the wire between the 2 mounts on the fork.
Page 9 © The KCS Group 2015

Trip Master Installation for CRF1000L Africa Twin
Fit the wheel sensor magnet and plate to the right side front brake disc This can be done without removing the wheel using a key socket as shown Apply locking agent on the bolts when they are reinstalled and torque to the correct value
Page 10 © The KCS Group 2015
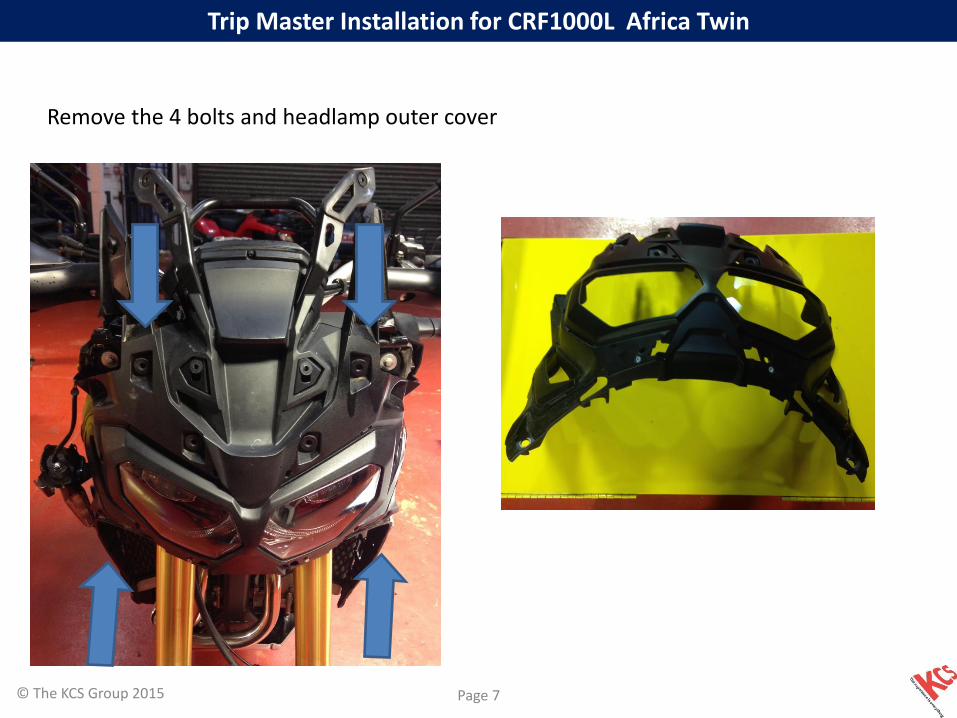
Trip Master Installation for CRF1000L Africa Twin
Route the wire under the reflector cover and use black cable ties to secure it to the brake hose Cable tie the wheel speed sensor wire up to the bottom bridge area and leave loose at this stage as connection details follow after meter assembly is fitted (White cable ties used for Installation photos only)
Page 11 © The KCS Group 2015

Trip Master Installation for CRF1000L Africa Twin
Meter assembly Fit the 2 clamps on the front fairing bar as shown Secure the meter assembly using the 2 nuts on the studs at the bottom of the meter assembly Position the wires to the right side of the meter
Page 12 © The KCS Group 2015

Trip Master Installation for CRF1000L Africa Twin
Locate the OP (optional connector) white connector and remove the blanking plug. Connect the Trip master meter assembly harness to the OP connector and install the blanking plug in the meter harness
Blanking plug
Page 13 © The KCS Group 2015

Trip Master Installation for CRF1000L Africa Twin
Handlebar switch assembly Remove the 2 bolts from the left lever handlebar mount Fit the Trip Master switch using the original black clamp and new bolts
Page 14 © The KCS Group 2015

Trip Master Installation for CRF1000L Africa Twin
Ensure that you realign the handlebar ‘DOT’ mark with the clamp join
Fit Honda clamp with DOT mark at the top
Page 15 © The KCS Group 2015

Trip Master Installation for CRF1000L Africa Twin
Route the switch wire neatly along the original left switch wire Use both original wire clamps to secure and additional cable ties Route the Trip Master switch wire underneath the HISS antenna wire as shown
Page 16 © The KCS Group 2015

Trip Master Installation for CRF1000L Africa Twin
Final cable routing and connection to meter
Route the handlebar switch and front wheel sensor cable above the R/H radiator following the original Honda cable. Guide both cables round to the top of the radiator by the radiator cap
Page 17 © The KCS Group 2015

Trip Master Installation for CRF1000L Africa Twin
Cables routed behind air funnel with cable ties Connections to meter assembly
Once the final connections are made to the meter turn the ignition on to check the Trip Master meter assembly powers up
Page 18 © The KCS Group 2015

Trip Master Installation for CRF1000L Africa Twin
Before reassembly of the bike it is necessary to cut the headlamp cover INNER GUIDE in the location shown by 25mm to allow for the cable to route from the Trip Master meter
Page 19 © The KCS Group 2015

Trip Master Installation for CRF1000L Africa Twin
Adjust the angle of the Trip Master meter before installing the screen and tighten the mounting nuts
Check correct routing of all cables and move handlebars left to right to check movement and that all cables/wiring do not restrict steering or interfere with other components. The bike can now be reassembled
Installation instructions produced by John Hensman KCS Group Ltd If you require assistance or further information for the installation please contact [email protected]
Page 20 © The KCS Group 2015