Embed Size (px)
Citation preview
The application contractor is responsible for this document, the data content, and the application software. The Virtual Data Center contractor is responsible for the hardware and OS software.
National Student Loan Data System
User Guide for Transfer Student Monitoring on the Web
April 2010
April 2010 i User Guide for Transfer Student Monitoring on the Web
Contents
1.0 Introduction ..............................................................................................................................1
2.0 School Transfer Profile............................................................................................................3
2.1 School Transfer Profile Add ................................................................................................3 2.2 School Transfer Profile ........................................................................................................5 2.3 School Transfer Profile Update ...........................................................................................8
3.0 Student Monitor ing ................................................................................................................10
3.1 Student Monitoring Add ....................................................................................................10 3.1.1 Loan History .............................................................................................................11 3.1.2 Grants ........................................................................................................................13
3.2 Transfer Monitoring List....................................................................................................15 3.3 Student Monitoring Detail .................................................................................................19 3.4 Student Monitoring Update................................................................................................20 3.5 Student Monitoring Delete .................................................................................................21
4.0 Transfer Monitor Re-Populate .............................................................................................24
4.1 Transfer Monitor Re-Populate ...........................................................................................24 4.2 Re-Populate Transfer Monitoring List page ......................................................................25
4.2.1 Handling Errors .........................................................................................................28
5.0 Monitor ing Aler t ....................................................................................................................31
5.1 Monitoring Alert Review ...................................................................................................31 5.2 Loan Alert Display .............................................................................................................34 5.3 Grant Alert Display ............................................................................................................35
6.0 Additional Information .........................................................................................................37
6.1 Transfer Monitoring Summary Report ..............................................................................37 6.2 Organization Contact .........................................................................................................39
April 2010 ii User Guide for Transfer Student Monitoring on the Web
Figures
Figure 1–1, NSLDS Professional Access Web site Menu page ......................................................2Figure 2–1, School Transfer Profile Add Page ................................................................................5Figure 2–2, School Transfer Profile Page ........................................................................................7Figure 2–3, School Transfer Profile Update Page ...........................................................................9Figure 3–1, Student Monitoring Add Page ....................................................................................11Figure 3–2, Loan History Page—Add Student to Monitoring List Button ....................................12Figure 3–3, Loan History Page—Student Monitoring Detail Button ............................................13Figure 3–4, Grant History Page—Add Student to Monitoring List Button ...................................14Figure 3–5, Grant History Page—Student Monitoring Detail Button ...........................................15Figure 3–6, Transfer Monitoring List Page ...................................................................................18Figure 3–7, Student Monitoring Detail Page .................................................................................20Figure 3–8, Student Monitoring Update Page ...............................................................................21Figure 3–9, Student Monitoring Delete Page ................................................................................23Figure 4–1, Transfer Monitoring Re-Populate Page ......................................................................25Figure 4–2, Re-Populate Transfer Monitoring List Page ...............................................................28Figure 4–3, Re-Populate Transfer Monitoring List Page – with Error Message ...........................29Figure 4–4, Re-Populate Transfer Monitoring List Page – Updates Complete .............................30Figure 5–1, Monitoring Alert Review Page ...................................................................................33Figure 5–2, Loan Alert Display Page ............................................................................................35Figure 5–3, Grant Alert Display Page ............................................................................................36Figure 6–1, Transfer Monitoring Summary Report Parameters ....................................................38Figure 6–2, Transfer Monitoring Summary Report .......................................................................39Figure 6–3, Organization Contact List Page ..................................................................................39
April 2010 1 User Guide for Transfer Student Monitoring on the Web
1.0 Introduction
The User Guide for Transfer Student Monitoring on the Web (User Guide) explains the functions available on the NSLDS Professional Access Web site (www.nslds.ed.gov/nslds_FAP) to assist you with the NSLDS Transfer Student Monitoring process. It is to be used in conjunction with, or instead of, the NSLDS Transfer Student Monitoring/Financial Aid History Processes and Batch File Layouts Specifications posted on www.ifap.ed.gov. As stated in Dear Colleague Letter GEN 01-09, you must have at least one authorized online NSLDS user at your school. Before you can submit any transfer student information to NSLDS for monitoring, you must establish a School Transfer Profile on the NSLDS Professional Access Web site. Although it is not required, it is recommended that schools first sign up at FSAWebenroll.ed.gov to begin using the “Inform Feature” for the Financial Aid History/Transfer Student Monitoring batch service. This User Guide provides instruction regarding the use of the functions listed on the Tran tab on the NSLDS Professional Access Web site Menu page (Figure 1–1). It includes:
1. Beginning the process by establishing the School Transfer Profile Add page. On this page, information about the school contact for the Transfer Student Monitoring process is displayed. This page also displays information on your school set up for submitting Inform files and receiving Alert notifications. This information is provided and updated by school users, and must be completed prior to submitting your school's first Inform (Section 2.0).
2. Use of the Student Monitoring Add page. On this page, you inform NSLDS which students your school will need to have monitored (Section 3.0).
3. Use of the Transfer Monitoring List page. This page displays detailed transfer monitoring student information that can be updated or deleted (Section 3.2).
4. Use of the Monitoring Alert Review page. On this page, you can monitor the list of changes that NSLDS sends you regarding student aid information that may affect eligibility for the current award year. NSLDS sends an e-mail to the contact listed on the School Transfer Profile page, stating that an alert file for the school is available (Section 5.1).
5. Use of the Transfer Monitoring Re-Populate page.
April 2010 2 User Guide for Transfer Student Monitoring on the Web
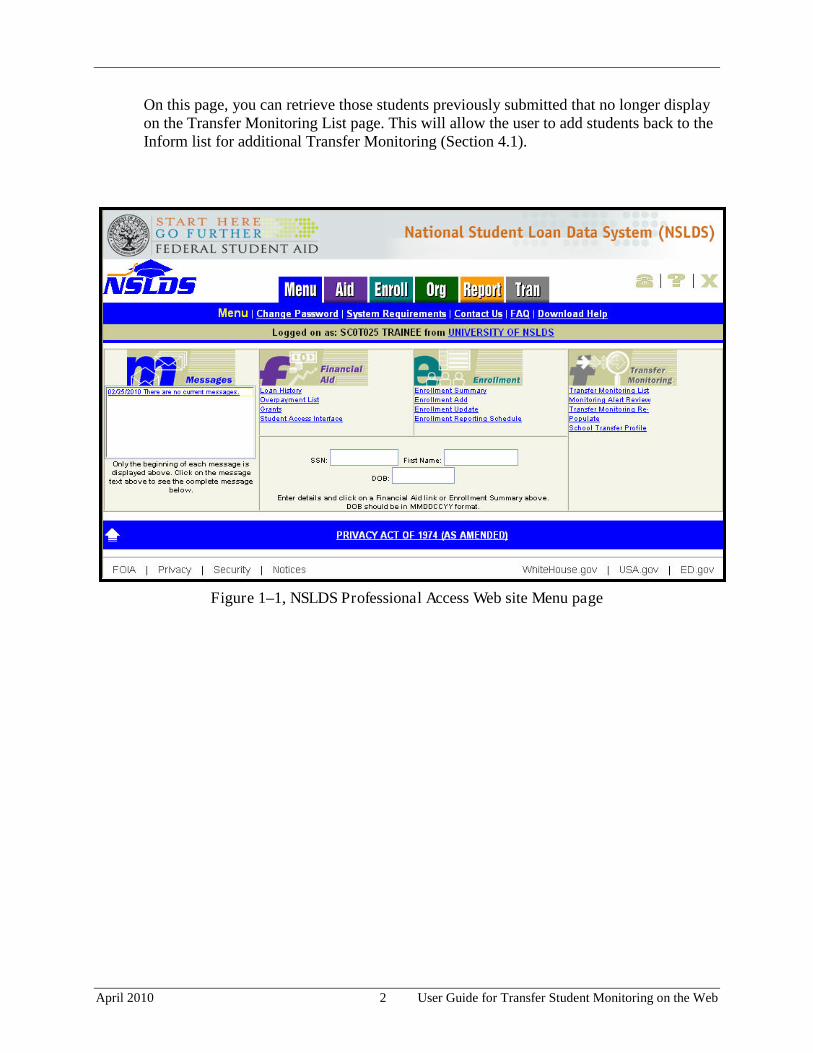
On this page, you can retrieve those students previously submitted that no longer display on the Transfer Monitoring List page. This will allow the user to add students back to the Inform list for additional Transfer Monitoring (Section 4.1).
Figure 1–1, NSLDS Professional Access Web site Menu page
April 2010 3 User Guide for Transfer Student Monitoring on the Web
2.0 School Transfer Profile
2.1 School Transfer Profile Add
The School Transfer Profile Add page is the first page a school must complete before using the Transfer Student Monitoring process. The School Transfer Profile Add page (Figure 2–1) allows you to create your School Transfer Profile information, which includes contact information as well as preferences for submitting Inform files, receiving Alert notifications and selecting the duration of the monitoring (in number of days). You must complete this page before submitting your first Inform data. Note: Some main or branch campus schools may not accept mid-year transfer students. In these cases—at a minimum—it is recommended that your main campus school code (Branch “00”) establish a School Transfer Profile page.
• If a school attempts to add a student to its Transfer Monitoring List via batch before completing this page, NSLDS will reject and send back an error file.
• If a school user tries to access any of the Transfer Monitoring functions before
completing this page, the user will be directed to the School Transfer Profile Add page. This page will only display once. After the information and preferences on this page are completed, a school must use the School Transfer Profile Update page to make any changes. Although every NSLDS online user associated with the 8 digit OPEID level has access to complete the School Transfer Profile page you should designate a specific person who can manage this page to ensure it is always up to date. The School Transfer Profile Add page displays the following fields:
• Title of Page—School Transfer Profile Add.
Below the title, the following entry boxes display and must be completed by the school:
• First Name—The first name of the school contact.
• Last Name—The last name of the school contact.
• Title—The school contact’s title.
• Phone—The school contact’s phone number and extension.
• E-mail—The e-mail address of the person(s) assigned to receive Alert notifications. You may use a group e-mail address established by your school if you would like more than one person to receive Alert messages. If an Alert has been generated for your school, NSLDS sends an Alert e-mail notification to your designated e-mail address instructing you to view your Alert information.

April 2010 4 User Guide for Transfer Student Monitoring on the Web
• Inform—The SAIG mailbox from which Inform Batch Files will be submitted. Anyone with a user ID associated with this school can submit an Inform file via batch. A school also can request that an outside agency, such as a servicer, submits Inform files. However, the school must provide a SAIG mailbox from which those files will be sent. If a servicer is chosen, the “Is this your Servicer for Transfer Monitoring?” box must be checked. These fields are optional for schools that opt to use the NSLDS Professional Access Web site solely for managing their transfer record. Note: A SAIG mailbox is the TG number used to transmit data. It starts with “TG.”
• Monitoring—This field tracks the monitoring time period (in number of days) designated by a school for monitoring their student transfer records.
Note: The Monitoring Duration defaults to 90 days, but can be updated for a number of days that is most appropriate to the school’s monitoring time period.
• Alert—A school must designate whether it wants Alert information via the Web Only or via Web and Batch Files. One of the options must be checked. A SAIG mailbox must be provided by the school if Web and Batch File option is selected. This is the mailbox where the Alert Batch File records are sent.
• SAIG Mailbox—If the school designated Web and Batch File Alerts as the output option, provide the TG number to which those Batch File Alerts will be sent. If the school uses an outside agency, such as a servicer, this TG number must belong to the servicer. If the school requested Web Only Alerts, this box is blank.
• Servicer/Non-Servicer Batch Alert Method—If the school designated Web and Batch File Alerts as the output option, provide the format of the Batch File Alert to be received, in either Extract or Report format. The Extract format is strictly a string of data, usually imported into a spreadsheet format, such as MS Excel or a mainframe. The Report format presents the data in an easy to read report format. If the school uses a servicer, select between the Servicer options, otherwise select one of the Non-Servicer options.
The minimum information required for a School Transfer Profile includes:
• First and Last Names • Phone number and extension • E-mail address • Alert Method • Servicer/Non-Servicer Batch Alert Method (if chosen by the school)
The School Transfer Profile Add page is completed when you click Submit at the bottom of the page. This takes you back to the School Transfer Profile page with a message that the Add has been performed successfully.
April 2010 5 User Guide for Transfer Student Monitoring on the Web
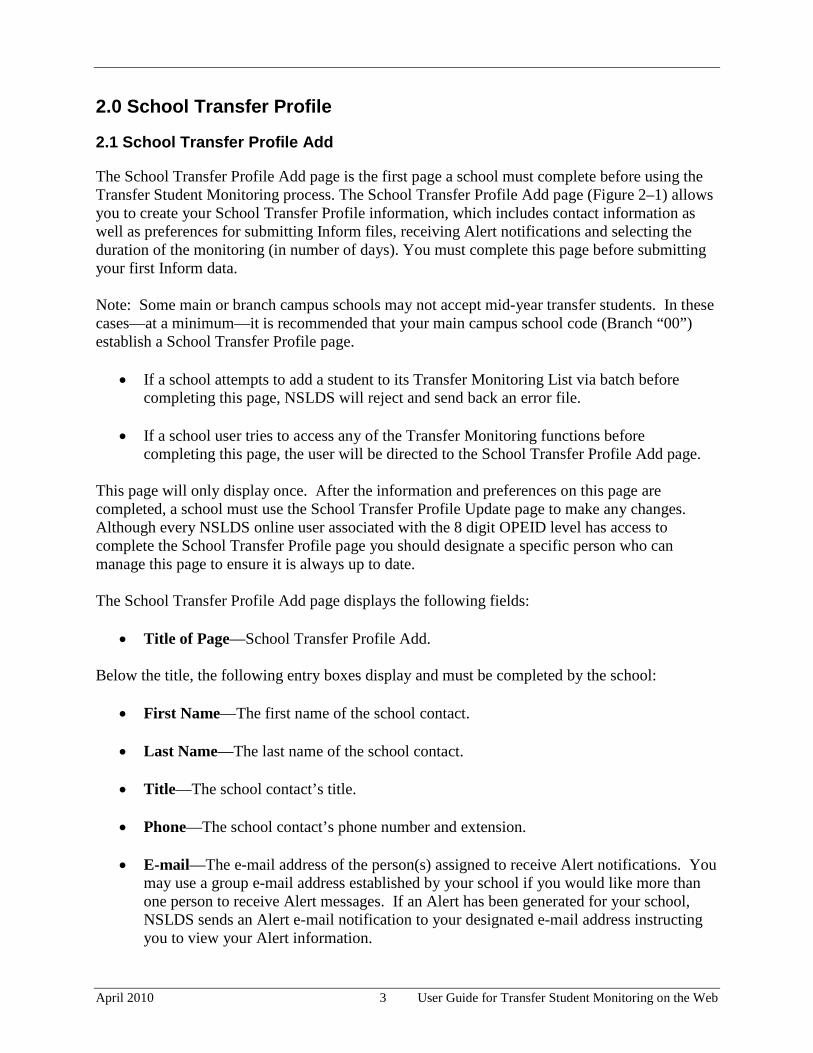
Note: Do not use this page to add students to the school’s Transfer Monitoring List. This is to set up school profile information only.
Figure 2–1, School Transfer Profile Add Page
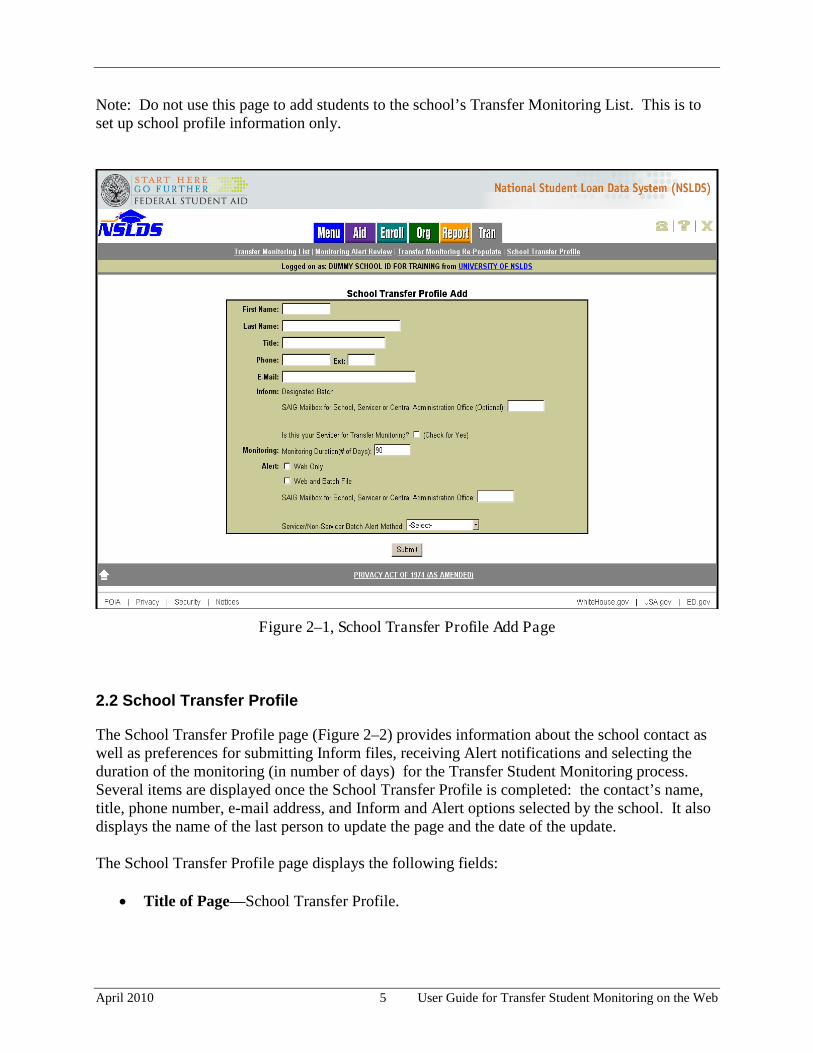
2.2 School Transfer Profile
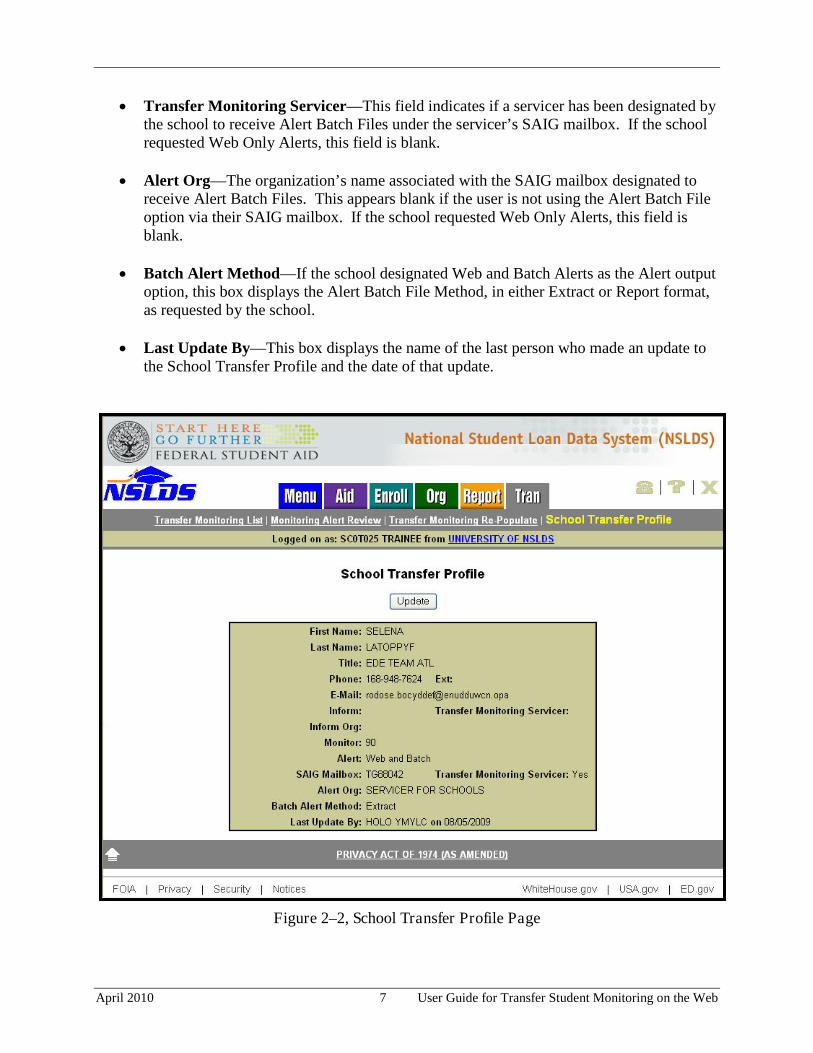
The School Transfer Profile page (Figure 2–2) provides information about the school contact as well as preferences for submitting Inform files, receiving Alert notifications and selecting the duration of the monitoring (in number of days) for the Transfer Student Monitoring process. Several items are displayed once the School Transfer Profile is completed: the contact’s name, title, phone number, e-mail address, and Inform and Alert options selected by the school. It also displays the name of the last person to update the page and the date of the update. The School Transfer Profile page displays the following fields:
• Title of Page—School Transfer Profile.
April 2010 6 User Guide for Transfer Student Monitoring on the Web
• Update Button—Displays below the title. This links to the School Transfer Profile Update page.
Below the Update button, you can find the Transfer Monitoring information on record for the school. This information is provided by the school and includes the following:
• First Name—The first name of the school contact. • Last Name—The last name of the school contact. • Title—The school contact’s title. • Phone—The school contact’s phone number and extension. • E-mail—The e-mail address of the person(s) assigned to receive Alert notifications. You
may use a group e-mail address established by your school if you would like more than one person to receive Alert messages. If an Alert has been generated for your school, NSLDS sends an Alert e-mail notification to your designated e-mail address instructing you to view your Alert information.
• Inform— The SAIG mailbox from which Inform Batch Files will be submitted. If the school does not use the Inform Batch Files process or has not designated anyone outside the school (e.g., servicer) to submit Inform Batch Files (i.e., chooses to manage transfer records solely through the Web), this box is blank. However, if the school or outside agency submits Inform Batch Files via batch, a TG number must display.
• Transfer Monitoring Servicer—This field indicates if a servicer has been designated by the school to submit Inform Batch Files under the servicer’s SAIG mailbox. If the school does not use the Inform Batch Files process or has not designated anyone outside the school to submit the Inform Batch Files, this field is blank.
• Inform Org—The organization’s name associated with the SAIG mailbox designated to submit Inform Batch Files. This appears blank if the user is not using the Inform Batch File process via their SAIG mailbox.
• Monitor— Displays the number of days, designated by the school, for NSLDS to monitor a transfer record beyond a transfer student’s enrollment begin date.
• Alert—Identifies whether the school requested the Alert information to be viewed on the
Web Only, or viewed on the Web and Batch Files sent through SAIG to the school or the school servicer’s mailbox.
• SAIG Mailbox—If the school designated Web and Batch File Alerts as the Alert output
option, this box displays the TG number (school’s or the school servicer’s) where Batch File Alerts will be sent. If the school requested Web Only Alerts, this field is blank.
April 2010 7 User Guide for Transfer Student Monitoring on the Web
• Transfer Monitoring Servicer—This field indicates if a servicer has been designated by the school to receive Alert Batch Files under the servicer’s SAIG mailbox. If the school requested Web Only Alerts, this field is blank.
• Alert Org—The organization’s name associated with the SAIG mailbox designated to
receive Alert Batch Files. This appears blank if the user is not using the Alert Batch File option via their SAIG mailbox. If the school requested Web Only Alerts, this field is blank.
• Batch Alert Method—If the school designated Web and Batch Alerts as the Alert output option, this box displays the Alert Batch File Method, in either Extract or Report format, as requested by the school.
• Last Update By—This box displays the name of the last person who made an update to the School Transfer Profile and the date of that update.
Figure 2–2, School Transfer Profile Page
April 2010 8 User Guide for Transfer Student Monitoring on the Web
2.3 School Transfer Profile Update
The School Transfer Profile Update page (Figure 2–3) allows you to update the School Transfer Profile information. The School Transfer Profile Update page displays the following fields:
• Title of Page—School Transfer Profile Update.
• Left Arrow Icon—Click to return to the School Transfer Profile page.
Below the title, the following entry boxes display. All can be updated except for the Last Update By field. These entry boxes display transfer profile information that has been previously provided by the school:
• First Name—The first name of the school contact. • Last Name—The last name of the school contact. • Title—The school contact’s title. • Phone—The school contact’s phone number and extension. • E-mail—The e-mail address of the person(s) assigned to receive Alert notifications. It
can also be set up as a group e-mail address established by your school if you would like more than one person to receive Alert messages. If an alert has been generated for your school, NSLDS sends an Alert e-mail notification to your designated e-mail address instructing you to view your Alert information.
• Inform—The SAIG mailbox from which Inform Batch Files will be submitted. If the
school uses an outside agency, such as a servicer, the SAIG mailbox must belong to the servicer. You will also need to indicate the SAIG mailbox belongs to a servicer by selecting the check box for the question “Is this your Servicer for Transfer Monitoring?” If the school does not plan to use the Inform Batch File process in lieu of the NSLDS Professional Access Web site for managing the transfer records, leave the Inform fields blank.
• Monitoring—This field tracks the monitoring time period (in number of days)
designated by a school for monitoring their student transfer records. • Alert—Identifies whether the school requested the Alert information via the Web Only,
or via Web and Batch Files through the school’s or the school servicer’s SAIG mailbox.
• SAIG Mailbox—If the school designated Web and Batch File Alerts as the output option, this box displays the TG number to which those Batch File Alerts will be sent. If

April 2010 9 User Guide for Transfer Student Monitoring on the Web
the school uses an outside agency, such as a servicer, this TG number must belong to the servicer. If the school requested Web Only Alerts, this box is left blank.
• Servicer/Non-Servicer Batch Alert Method—If the school designated Web and Batch
File Alerts as the output option, provide the format of the Batch File Alert to be received, in either Extract or Report format.
• Last Update By—This box displays the name of the last person who made an update to
the School Transfer Profile and the date of the update. After changes are submitted, the name of the user and the new update date will display.
To update the School Transfer Profile, click Submit button at the bottom of the page.
Figure 2–3, School Transfer Profile Update Page
April 2010 10 User Guide for Transfer Student Monitoring on the Web
3.0 Student Monitoring
3.1 Student Monitoring Add
The Student Monitoring Add page (Figure 3–1) allows you to use the Web to inform NSLDS of students to be added to the Transfer Monitoring List. If you are adding a student to the Transfer Monitoring List who is not in the NSLDS database, the student is only added to the Transfer Monitoring List and does not display on any other pages of the NSLDS Professional Access Web site. This page is accessible from the Transfer Monitoring List page or from a student’s Loan History or Grants History page by selecting the Add Student to Monitoring List button. The Student Monitoring Add page displays the following fields:
• Student Search Boxes—The boxes displayed are standard. You must type a student’s Social Security number (SSN), First Name, and date of birth (DOB) then click the Retrieve button to retrieve a student’s information from NSLDS.
• Student Identifiers—Once you have entered the student identifiers and selected the
Retrieve button, these identifiers display directly under the Student Search Boxes. They also display after selecting Retrieve from the student’s Loan History or Grants History pages.
• Left Arrow Icon (Return to Transfer Monitoring List)—Click this icon to return to
the Transfer Monitoring List page. • Title of Page—Student Monitoring Add.
Below the title, the following fields display:
• SSN—The student’s Social Security number. It automatically displays when the Student Monitoring Add page is accessed from the Loan History, Grants History, or Transfer Monitoring List pages, assuming a student has been selected.
• First Name—The student’s first name. It automatically displays when the Student
Monitoring Add page is accessed from the Loan History, Grants History, or Transfer Monitoring List pages, assuming a student has been selected.
• Last Name—The student’s last name. It automatically displays when the Student
Monitoring Add page is accessed from the Loan History, Grants History, or Transfer Monitoring List pages, assuming a student has been selected.
• Date of Birth—The student’s date of birth. It automatically displays when the Student
Monitoring Add page is accessed from the Loan History, Grants History, or Transfer Monitoring List pages, assuming a student has been selected.
April 2010 11 User Guide for Transfer Student Monitoring on the Web
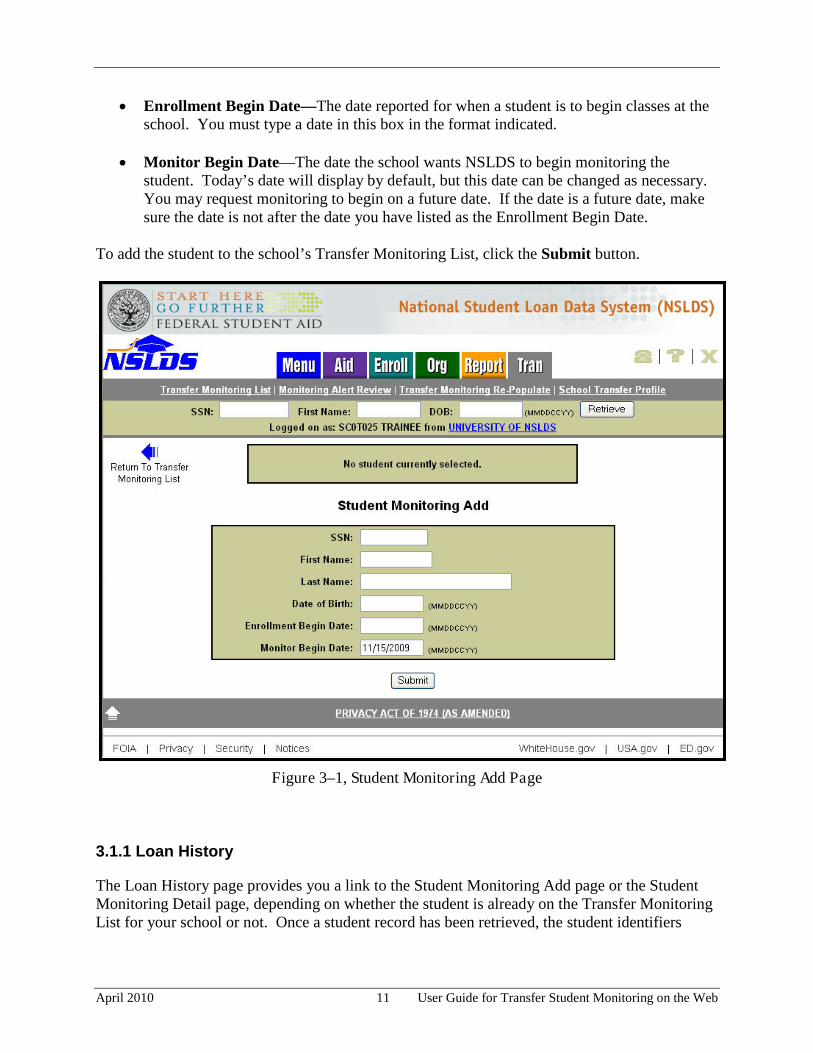
• Enrollment Begin Date—The date reported for when a student is to begin classes at the school. You must type a date in this box in the format indicated.
• Monitor Begin Date—The date the school wants NSLDS to begin monitoring the
student. Today’s date will display by default, but this date can be changed as necessary. You may request monitoring to begin on a future date. If the date is a future date, make sure the date is not after the date you have listed as the Enrollment Begin Date.
To add the student to the school’s Transfer Monitoring List, click the Submit button.
Figure 3–1, Student Monitoring Add Page
3.1.1 Loan History
The Loan History page provides you a link to the Student Monitoring Add page or the Student Monitoring Detail page, depending on whether the student is already on the Transfer Monitoring List for your school or not. Once a student record has been retrieved, the student identifiers
April 2010 12 User Guide for Transfer Student Monitoring on the Web
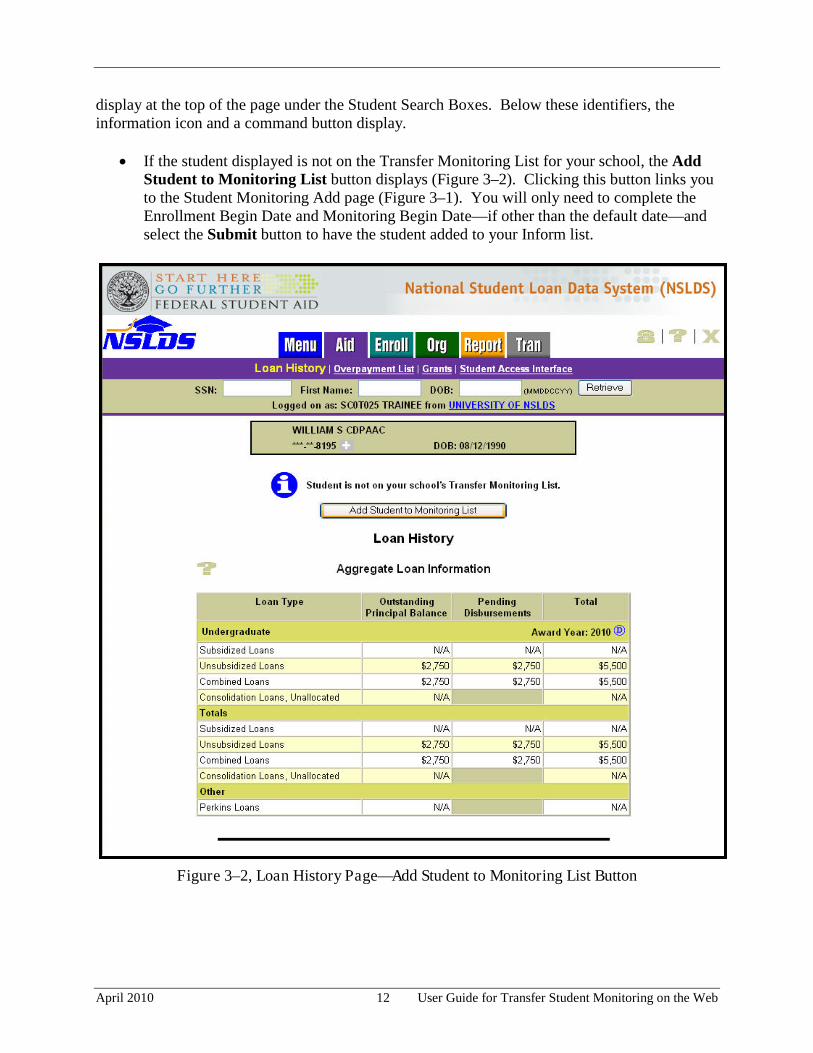
display at the top of the page under the Student Search Boxes. Below these identifiers, the information icon and a command button display.
• If the student displayed is not on the Transfer Monitoring List for your school, the Add Student to Monitoring List button displays (Figure 3–2). Clicking this button links you to the Student Monitoring Add page (Figure 3–1). You will only need to complete the Enrollment Begin Date and Monitoring Begin Date—if other than the default date—and select the Submit button to have the student added to your Inform list.
Figure 3–2, Loan History Page—Add Student to Monitoring List Button

April 2010 13 User Guide for Transfer Student Monitoring on the Web
• If the student displayed is already on the Transfer Monitoring List for your school, the Student Monitoring Detail button display on the Loan History page (Figure 3–3). Clicking this button links you to the Student Monitoring Detail page (Figure 3–7).
Figure 3–3, Loan History Page—Student Monitoring Detail Button
3.1.2 Grants
The Grants History page provides you a link to the Student Monitoring Add page or the Student Monitoring Detail page, depending on whether the student is already on the Transfer Monitoring List for your school or not. Once a student record has been retrieved, the student identifiers display at the top of the page under the Student Search Boxes. Below these identifiers, the information icon and a command button display.
April 2010 14 User Guide for Transfer Student Monitoring on the Web
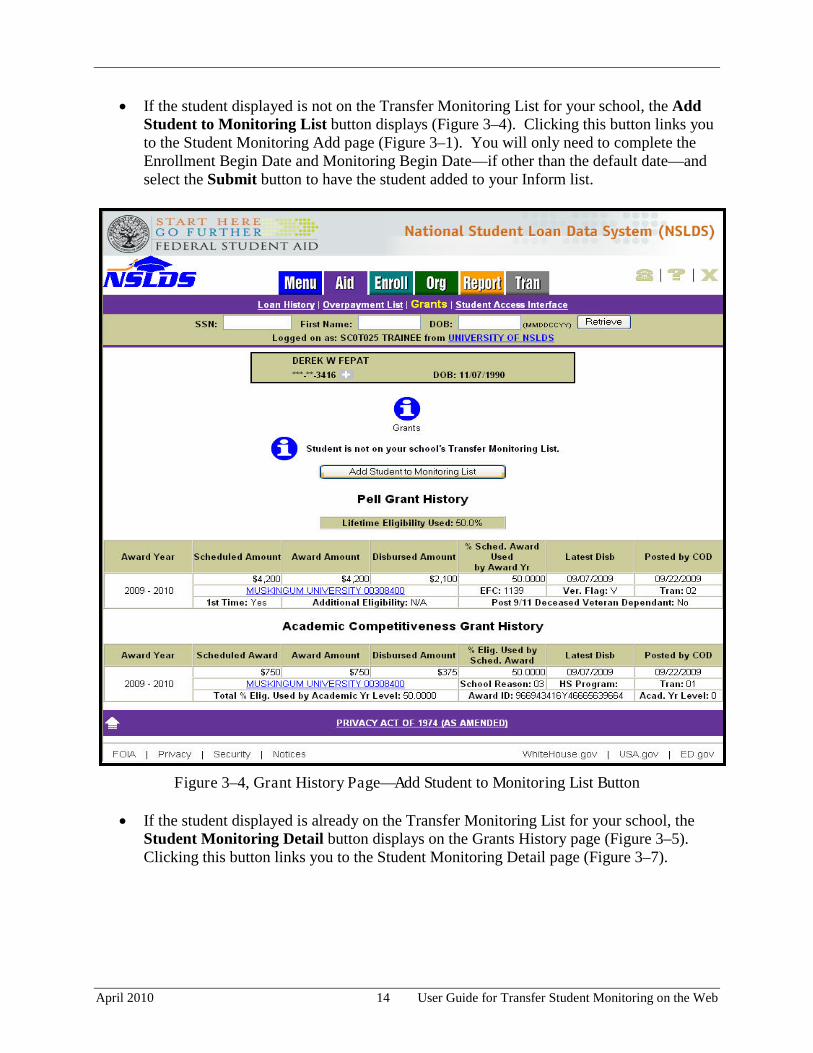
• If the student displayed is not on the Transfer Monitoring List for your school, the Add Student to Monitoring List button displays (Figure 3–4). Clicking this button links you to the Student Monitoring Add page (Figure 3–1). You will only need to complete the Enrollment Begin Date and Monitoring Begin Date—if other than the default date—and select the Submit button to have the student added to your Inform list.
Figure 3–4, Grant History Page—Add Student to Monitoring List Button
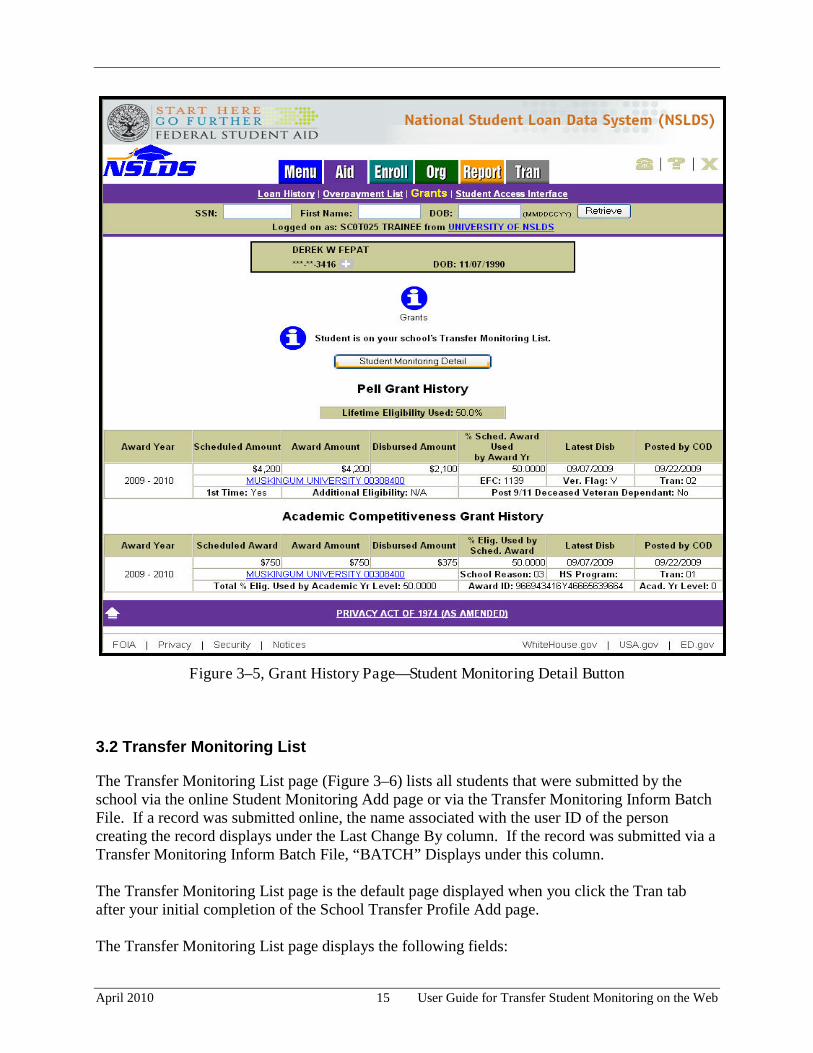
• If the student displayed is already on the Transfer Monitoring List for your school, the
Student Monitoring Detail button displays on the Grants History page (Figure 3–5). Clicking this button links you to the Student Monitoring Detail page (Figure 3–7).
April 2010 15 User Guide for Transfer Student Monitoring on the Web
Figure 3–5, Grant History Page—Student Monitoring Detail Button
3.2 Transfer Monitoring List
The Transfer Monitoring List page (Figure 3–6) lists all students that were submitted by the school via the online Student Monitoring Add page or via the Transfer Monitoring Inform Batch File. If a record was submitted online, the name associated with the user ID of the person creating the record displays under the Last Change By column. If the record was submitted via a Transfer Monitoring Inform Batch File, “BATCH” Displays under this column. The Transfer Monitoring List page is the default page displayed when you click the Tran tab after your initial completion of the School Transfer Profile Add page. The Transfer Monitoring List page displays the following fields:
April 2010 16 User Guide for Transfer Student Monitoring on the Web
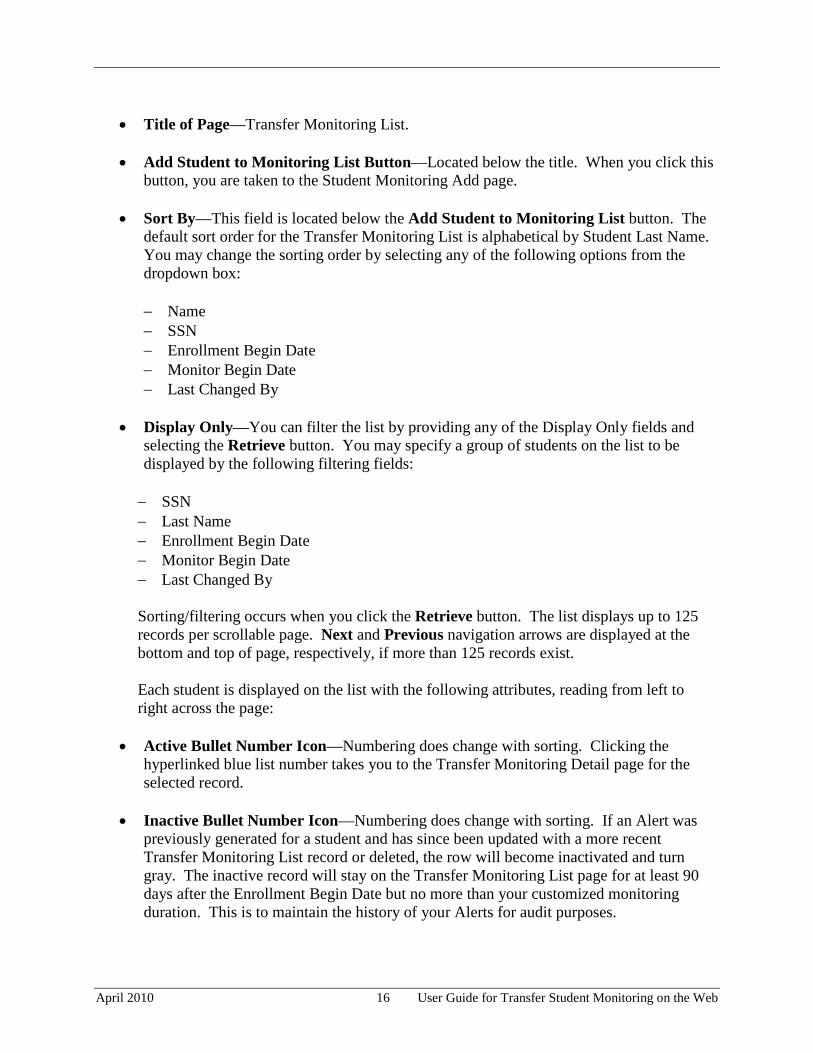
• Title of Page—Transfer Monitoring List.
• Add Student to Monitoring List Button—Located below the title. When you click this
button, you are taken to the Student Monitoring Add page.
• Sort By—This field is located below the Add Student to Monitoring List button. The default sort order for the Transfer Monitoring List is alphabetical by Student Last Name. You may change the sorting order by selecting any of the following options from the dropdown box: − Name − SSN − Enrollment Begin Date − Monitor Begin Date − Last Changed By
• Display Only—You can filter the list by providing any of the Display Only fields and
selecting the Retrieve button. You may specify a group of students on the list to be displayed by the following filtering fields: − SSN − Last Name − Enrollment Begin Date − Monitor Begin Date − Last Changed By
Sorting/filtering occurs when you click the Retrieve button. The list displays up to 125 records per scrollable page. Next and Previous navigation arrows are displayed at the bottom and top of page, respectively, if more than 125 records exist. Each student is displayed on the list with the following attributes, reading from left to right across the page:
• Active Bullet Number Icon—Numbering does change with sorting. Clicking the
hyperlinked blue list number takes you to the Transfer Monitoring Detail page for the selected record.
• Inactive Bullet Number Icon—Numbering does change with sorting. If an Alert was previously generated for a student and has since been updated with a more recent Transfer Monitoring List record or deleted, the row will become inactivated and turn gray. The inactive record will stay on the Transfer Monitoring List page for at least 90 days after the Enrollment Begin Date but no more than your customized monitoring duration. This is to maintain the history of your Alerts for audit purposes.
April 2010 17 User Guide for Transfer Student Monitoring on the Web
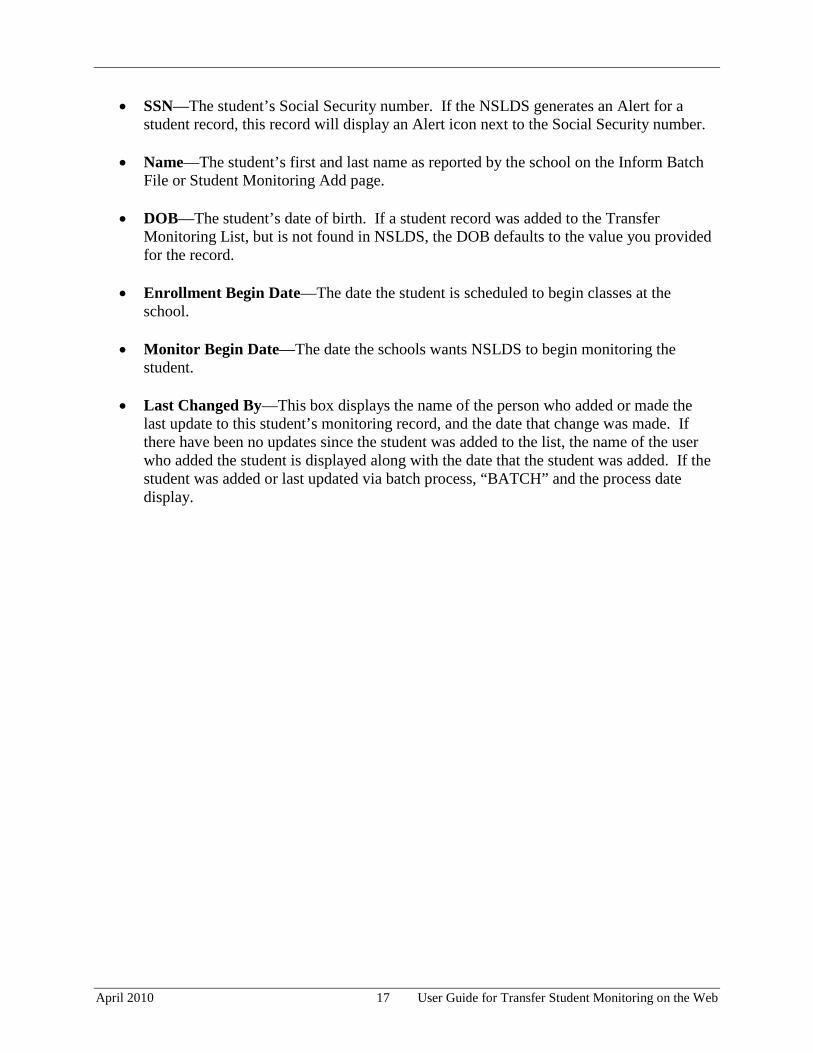
• SSN—The student’s Social Security number. If the NSLDS generates an Alert for a student record, this record will display an Alert icon next to the Social Security number.
• Name—The student’s first and last name as reported by the school on the Inform Batch File or Student Monitoring Add page.
• DOB—The student’s date of birth. If a student record was added to the Transfer Monitoring List, but is not found in NSLDS, the DOB defaults to the value you provided for the record.
• Enrollment Begin Date—The date the student is scheduled to begin classes at the school.
• Monitor Begin Date—The date the schools wants NSLDS to begin monitoring the student.
• Last Changed By—This box displays the name of the person who added or made the last update to this student’s monitoring record, and the date that change was made. If there have been no updates since the student was added to the list, the name of the user who added the student is displayed along with the date that the student was added. If the student was added or last updated via batch process, “BATCH” and the process date display.
April 2010 18 User Guide for Transfer Student Monitoring on the Web
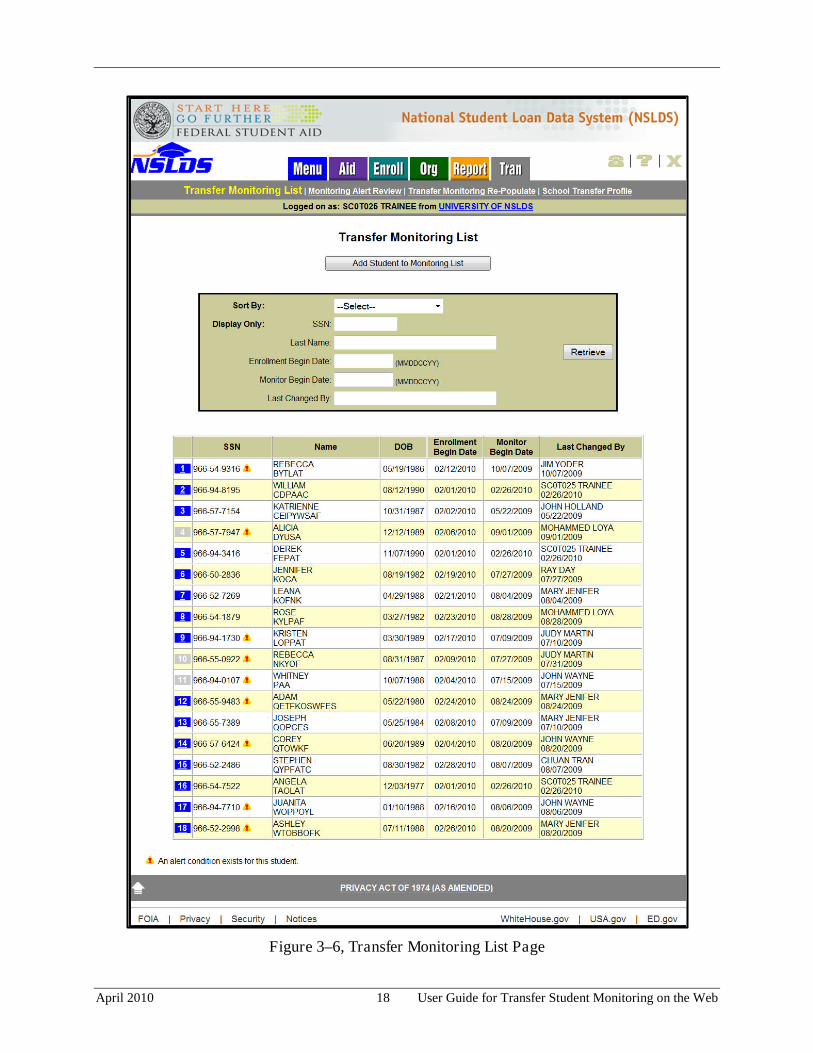
Figure 3–6, Transfer Monitoring List Page

April 2010 19 User Guide for Transfer Student Monitoring on the Web
3.3 Student Monitoring Detail
The Student Monitoring Detail page (Figure 3–7) provides detailed transfer monitoring student information that can be updated or deleted. It is accessible from the Loan History page, Grants History page, or Transfer Monitoring List page. To access this page from the Transfer Monitoring List, click the hyperlinked blue list number next to the student’s information. The Student Monitoring Detail page displays the following fields:
• Title of Page—Student Monitoring Detail.
• Left Arrow Icon (Return to Transfer Monitoring List)—Click this icon to return to the Transfer Monitoring List page.
• Update Button—Located below the title. To update the student’s record, click the
Update button. This button links you to the Student Monitoring Update page (Figure 3–8).
• Delete Button—Located beside the Update button. To delete the student’s record from
the Transfer Monitoring List or Inform Batch File, if applicable, click the Delete button. This links you to the Student Monitoring Delete page (Figure 3–9).
Below the Update and Delete buttons, the student information box displays. This information is from the school’s Inform Batch File or Student Monitoring Add process:
• SSN—The student’s Social Security number.
• First Name—The student’s first name.
• Last Name—The student’s last name.
• Date of Birth—The student’s date of birth.
• Enrollment Begin Date—The date the student is scheduled to begin classes at the school.
• Monitor Begin Date—The date the school wants NSLDS to begin monitoring the
student.
• Last Changed By—This box displays the name of the person who added or made the last update to this student’s monitoring record, and the date that change was made. If there have been no updates since the student was added to the list, the name of the user who added the student is displayed along with the date that the student was added. If the student was added or last updated via batch process, “BATCH” and the process date display.
April 2010 20 User Guide for Transfer Student Monitoring on the Web
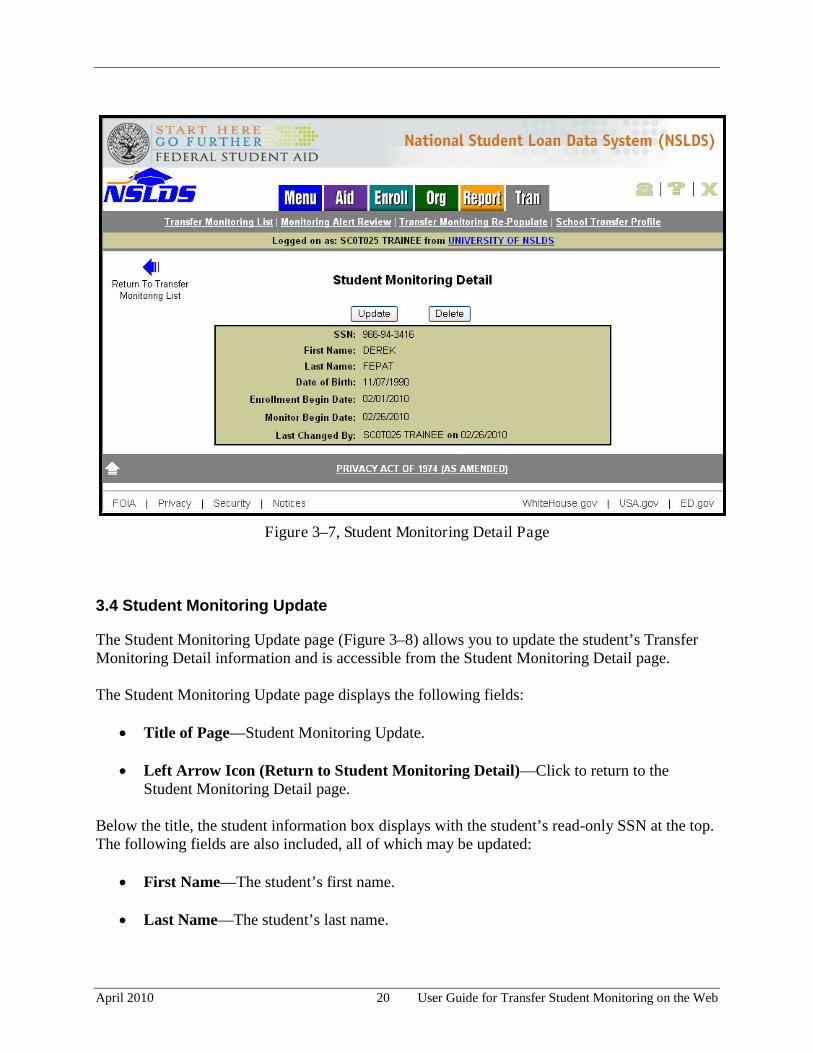
Figure 3–7, Student Monitoring Detail Page
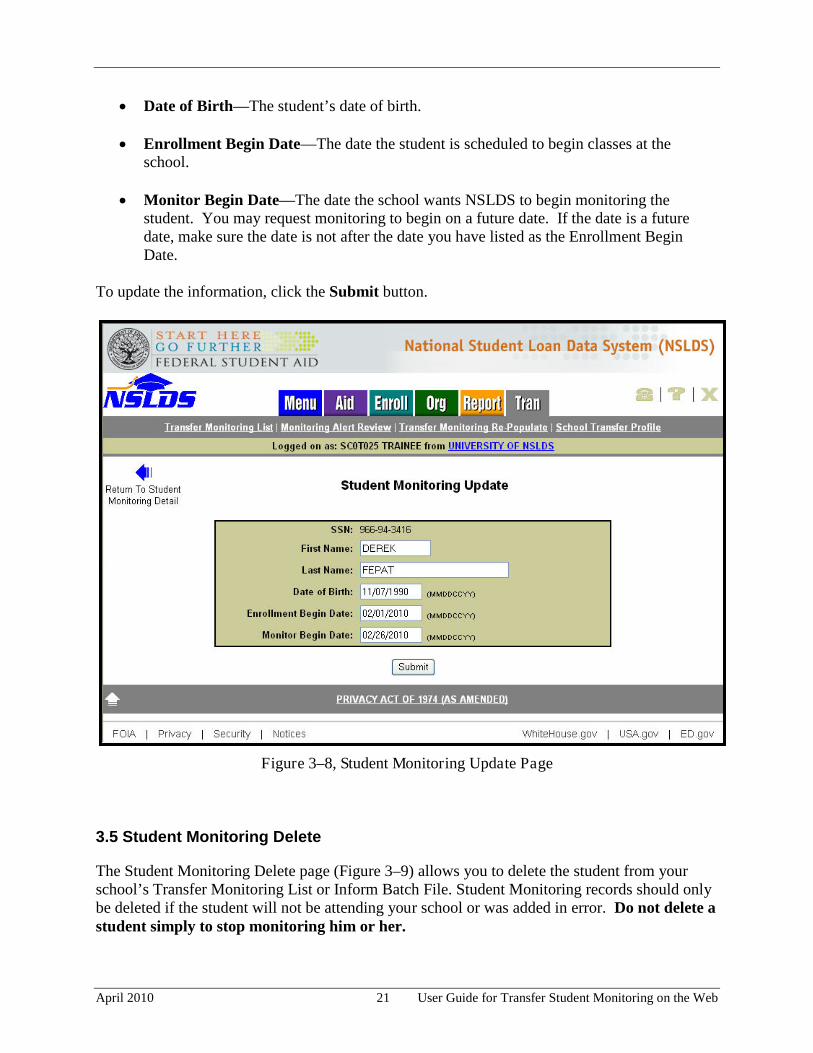
3.4 Student Monitoring Update
The Student Monitoring Update page (Figure 3–8) allows you to update the student’s Transfer Monitoring Detail information and is accessible from the Student Monitoring Detail page. The Student Monitoring Update page displays the following fields:
• Title of Page—Student Monitoring Update.
• Left Arrow Icon (Return to Student Monitoring Detail)—Click to return to the Student Monitoring Detail page.
Below the title, the student information box displays with the student’s read-only SSN at the top. The following fields are also included, all of which may be updated:
• First Name—The student’s first name.
• Last Name—The student’s last name.
April 2010 21 User Guide for Transfer Student Monitoring on the Web
• Date of Birth—The student’s date of birth.
• Enrollment Begin Date—The date the student is scheduled to begin classes at the school.
• Monitor Begin Date—The date the school wants NSLDS to begin monitoring the
student. You may request monitoring to begin on a future date. If the date is a future date, make sure the date is not after the date you have listed as the Enrollment Begin Date.
To update the information, click the Submit button.
Figure 3–8, Student Monitoring Update Page
3.5 Student Monitoring Delete
The Student Monitoring Delete page (Figure 3–9) allows you to delete the student from your school’s Transfer Monitoring List or Inform Batch File. Student Monitoring records should only be deleted if the student will not be attending your school or was added in error. Do not delete a student simply to stop monitoring him or her.
April 2010 22 User Guide for Transfer Student Monitoring on the Web
Note: Schools’ new capability to update the Monitoring Duration time period (selecting from a 30-120 day range instead of a fixed period of 90 days at all times), as part of the School Transfer Profile, provides schools greater flexibility in controlling the monitoring time periods for records. This added flexibility eliminates the need to stop a record from being monitored, as monitoring will automatically stop for all students once the Monitoring Duration time period (30-120 days after the Enrollment Begin Date) has been reached for the record. The Student Monitoring Delete page displays after you click the Delete button on the Student Monitoring Detail page. This page confirms the student’s deletion from the Transfer Student Monitoring process. Once the delete has been confirmed, the student’s information is removed from the Transfer Monitoring List or Inform Batch File, if applicable. The Student Monitoring Delete page displays the following fields:
• Title of Page—Student Monitoring Delete.
• Left Arrow Icon (Return to Student Monitoring Detail)—Click to return to the Student Monitoring Detail page.
• Delete Confirmation Statement—This statement displays beneath the title and confirms
that you wish to delete student monitoring information. Below the Delete Confirmation Statement, the following student information is displayed inside the student information box:
• SSN—The student’s Social Security number. • First Name—The student’s first name.
• Last Name—The student’s last name.
• Date of Birth—The student’s date of birth.
• Enrollment Begin Date—The date the student is scheduled to begin classes at the
school.
• Monitor Begin Date—The date the school wants NSLDS to begin monitoring the student.
• Last Changed By—This field displays the name of the person who added or made the
last update to this student’s monitoring record, and the date that change was made. If the student was added or last updated via batch process, “BATCH” and the process date display.
To delete a record, click the Confirm button at the bottom of the page. Once the deletion has been confirmed, the student’s information will be removed from the Transfer Monitoring List or

April 2010 23 User Guide for Transfer Student Monitoring on the Web
Inform Batch File, if applicable. Deletion ends the Monitoring process and removes the student from the Transfer Monitoring List. A record of the deletion is maintained by NSLDS for auditing purposes.
Figure 3–9, Student Monitoring Delete Page

April 2010 24 User Guide for Transfer Student Monitoring on the Web
4.0 Transfer Monitor Re-Populate
4.1 Transfer Monitor Re-Populate
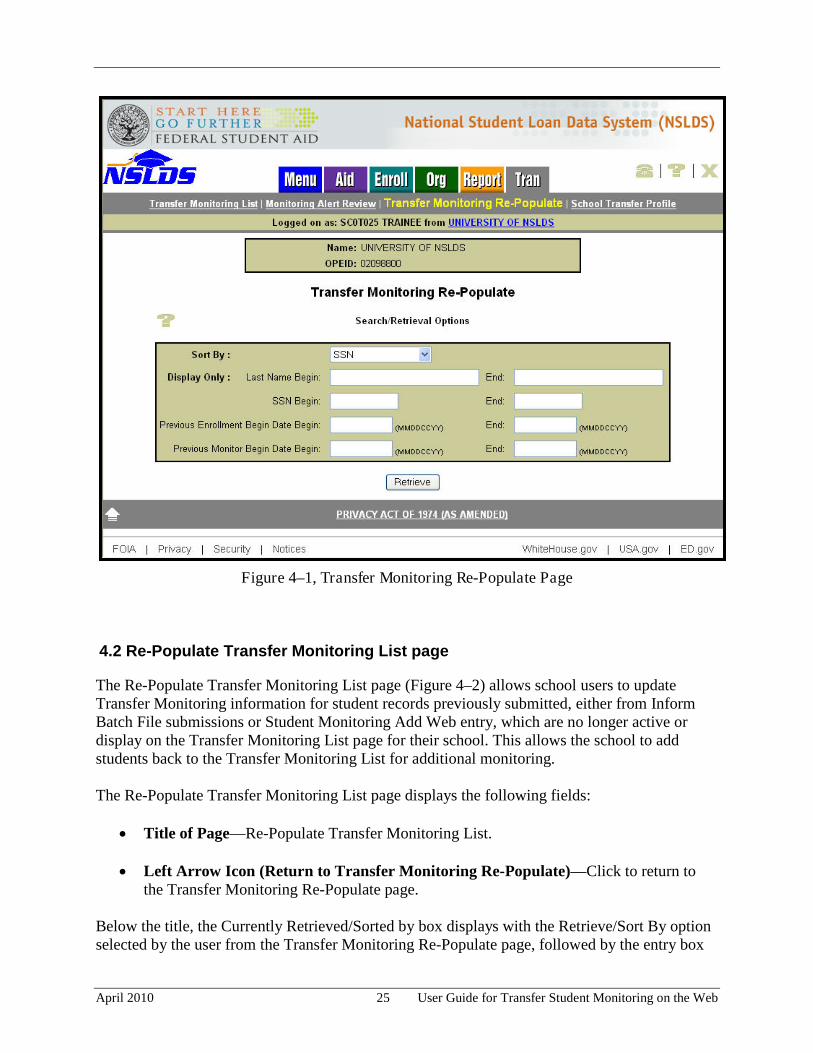
The Transfer Monitoring Re-Populate page (Figure 4–1) allows school users to retrieve student records previously submitted, either from Inform Batch File submissions or Student Monitoring Add Web entry, which are no longer active (have exceeded the number of days set as the user-specified Monitoring Duration period from their Enrollment Begin Date) or no longer display on the Transfer Monitoring List page for their school. This allows the school to add students back to the Transfer Monitoring List for additional monitoring from one Monitoring Duration period to another (see NSLDS Newsletter 23 at http://ifap.ed.gov/nsldsmaterials/Newsletter23.html for additional details). The Transfer Monitoring Re-Populate page displays the following fields:
• Title of Page—Transfer Monitoring Re-Populate • Sort By—This field is located below the Search/Retrieval Options heading. The default
sort order for this list is by SSN. You may change the sorting order by selecting any of the following options from the dropdown box: − SSN − Last Name − Enrollment Begin Date − Monitor Begin Date
• Display Only—You can filter the list by providing any of the Display Only fields and selecting the Retrieve button. You may specify a group of students on the list to be displayed by the following filtering fields:
− Last Name Begin / End − SSN Begin / End − Previous Enrollment Begin Date Begin/ End − Previous Monitor Begin Date Begin/ End
Note: If a school selects the Retrieve button without entering any filtering criteria, Transfer Monitoring Re-Populate will retrieve all transfer monitoring records for the school. The Transfer Monitoring Re-Populate List page displays 20 student records at a time. If more than 20 records exist, the Next and Previous navigation arrows will display at the top and bottom of the page, respectively, to move from page to page. To change filtering options, a school must return to Transfer Monitoring Re-Populate page.
April 2010 25 User Guide for Transfer Student Monitoring on the Web
Figure 4–1, Transfer Monitoring Re-Populate Page
4.2 Re-Populate Transfer Monitoring List page
The Re-Populate Transfer Monitoring List page (Figure 4–2) allows school users to update Transfer Monitoring information for student records previously submitted, either from Inform Batch File submissions or Student Monitoring Add Web entry, which are no longer active or display on the Transfer Monitoring List page for their school. This allows the school to add students back to the Transfer Monitoring List for additional monitoring. The Re-Populate Transfer Monitoring List page displays the following fields:
• Title of Page—Re-Populate Transfer Monitoring List.
• Left Arrow Icon (Return to Transfer Monitoring Re-Populate)—Click to return to the Transfer Monitoring Re-Populate page.
Below the title, the Currently Retrieved/Sorted by box displays with the Retrieve/Sort By option selected by the user from the Transfer Monitoring Re-Populate page, followed by the entry box
April 2010 26 User Guide for Transfer Student Monitoring on the Web
containing the Global Data Entry row (the row displaying your Monitoring Duration days) at the top and the Student Data Entry rows (the rows displaying the Enroll Begin Date and Monitor Begin Date entry fields). The following fields are included in this box, some of which may be updated: Global Data Entry Row
• Check All Button—Selects all records on the page for updates.
• Enrollment Begin Date—The date the student is scheduled to begin classes at the school. This field pre-populates the Enroll. Begin Date for each individual checked record.
• Monitor Begin Date—The date the school wants NSLDS to begin monitoring the
student. This field pre-populates the Monitor Begin Date for each individual checked record. You may request monitoring to begin on a future date. If the date is a future date, make sure the date is not after the date you have listed as the Enrollment Begin Date.
• Monitoring Duration—This field tracks the monitoring time period (in number of days) designated by a school for monitoring their student transfer records. It is a read-only field that can only be updated from the School Transfer Profile Update page (Figure 2–3).
Student Data Entry Rows:
• Check Box—Selects an individual monitoring record for updates.
• SSN—The student’s Social Security number (read-only field).
• Name—The student’s first and last name (read-only field).
• DOB—The student’s date of birth (read-only field).
• Enroll. Begin Date—The date the student is scheduled to begin classes at the school.
• Monitor Begin Date—The date the school wants NSLDS to begin monitoring the student. You may request monitoring to begin on a future date. If the date is a future date, make sure the date is not after the date you have listed as the Enroll. Begin Date.
• Last Changed By—This field displays the name of the person who added or made the
last update to this student’s monitoring record, and the date that change was made. If the student was added or last updated via the Inform batch process, “BATCH” and the process date display.
• Submit Checked Rows Button—Submits all record updates.
April 2010 27 User Guide for Transfer Student Monitoring on the Web
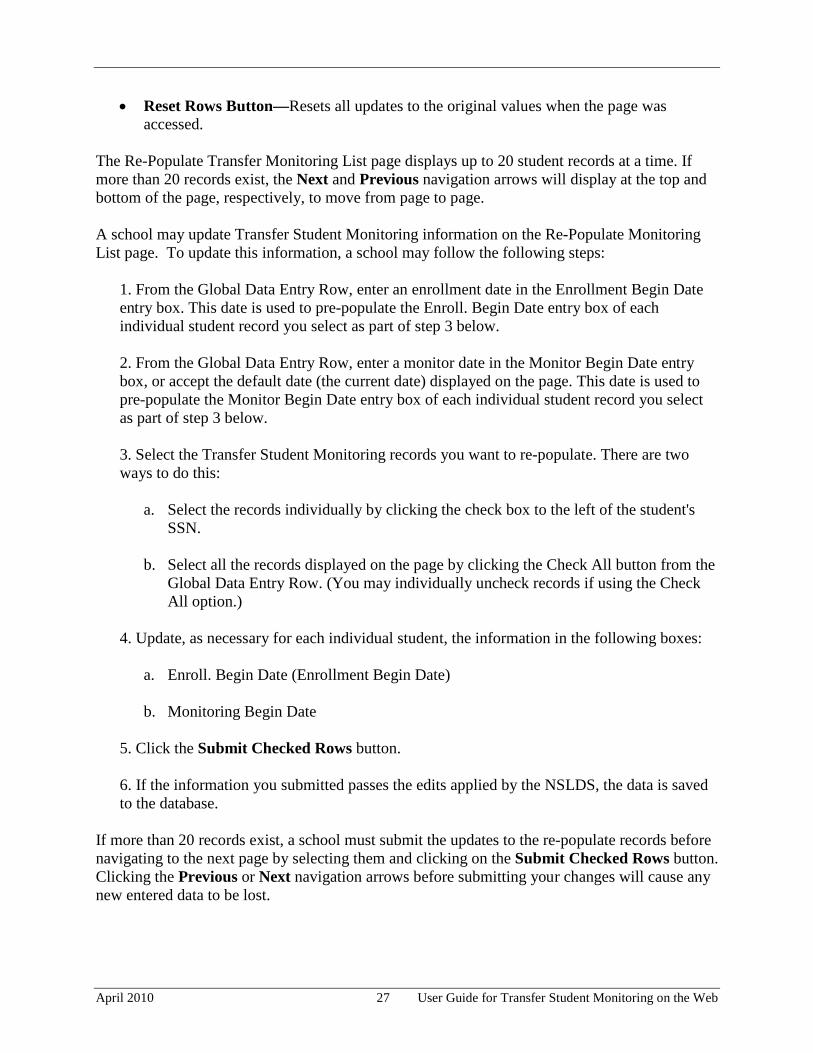
• Reset Rows Button—Resets all updates to the original values when the page was accessed.
The Re-Populate Transfer Monitoring List page displays up to 20 student records at a time. If more than 20 records exist, the Next and Previous navigation arrows will display at the top and bottom of the page, respectively, to move from page to page. A school may update Transfer Student Monitoring information on the Re-Populate Monitoring List page. To update this information, a school may follow the following steps:
1. From the Global Data Entry Row, enter an enrollment date in the Enrollment Begin Date entry box. This date is used to pre-populate the Enroll. Begin Date entry box of each individual student record you select as part of step 3 below.
2. From the Global Data Entry Row, enter a monitor date in the Monitor Begin Date entry box, or accept the default date (the current date) displayed on the page. This date is used to pre-populate the Monitor Begin Date entry box of each individual student record you select as part of step 3 below.
3. Select the Transfer Student Monitoring records you want to re-populate. There are two ways to do this:
a. Select the records individually by clicking the check box to the left of the student's
SSN. b. Select all the records displayed on the page by clicking the Check All button from the
Global Data Entry Row. (You may individually uncheck records if using the Check All option.)
4. Update, as necessary for each individual student, the information in the following boxes:
a. Enroll. Begin Date (Enrollment Begin Date) b. Monitoring Begin Date
5. Click the Submit Checked Rows button.
6. If the information you submitted passes the edits applied by the NSLDS, the data is saved to the database.
If more than 20 records exist, a school must submit the updates to the re-populate records before navigating to the next page by selecting them and clicking on the Submit Checked Rows button. Clicking the Previous or Next navigation arrows before submitting your changes will cause any new entered data to be lost.
April 2010 28 User Guide for Transfer Student Monitoring on the Web
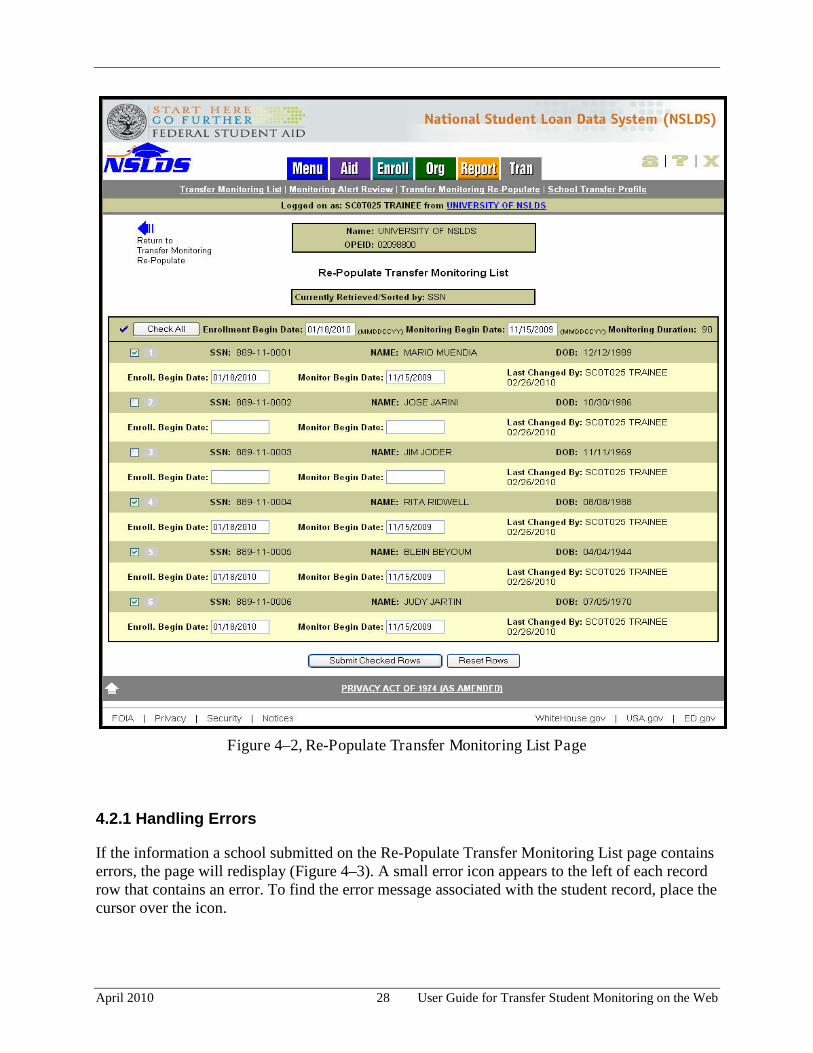
Figure 4–2, Re-Populate Transfer Monitoring List Page
4.2.1 Handling Errors
If the information a school submitted on the Re-Populate Transfer Monitoring List page contains errors, the page will redisplay (Figure 4–3). A small error icon appears to the left of each record row that contains an error. To find the error message associated with the student record, place the cursor over the icon.
April 2010 29 User Guide for Transfer Student Monitoring on the Web
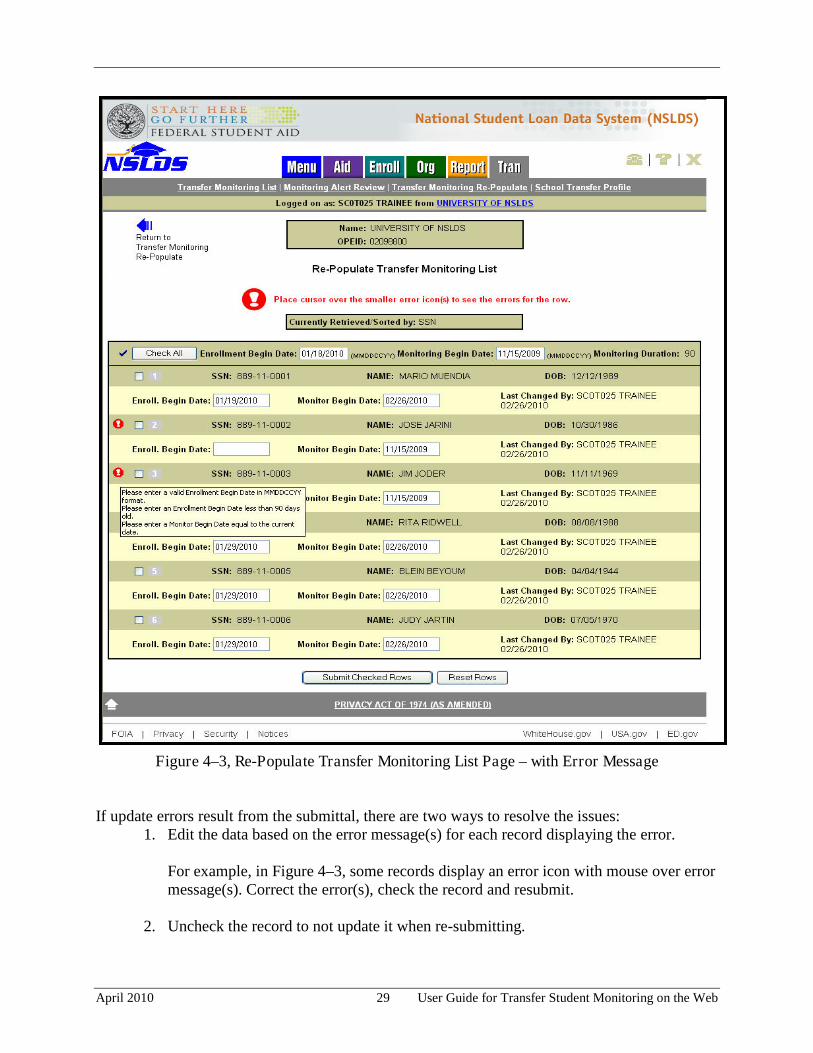
Figure 4–3, Re-Populate Transfer Monitoring List Page – with Error Message
If update errors result from the submittal, there are two ways to resolve the issues:
1. Edit the data based on the error message(s) for each record displaying the error.
For example, in Figure 4–3, some records display an error icon with mouse over error message(s). Correct the error(s), check the record and resubmit.
2. Uncheck the record to not update it when re-submitting.
April 2010 30 User Guide for Transfer Student Monitoring on the Web
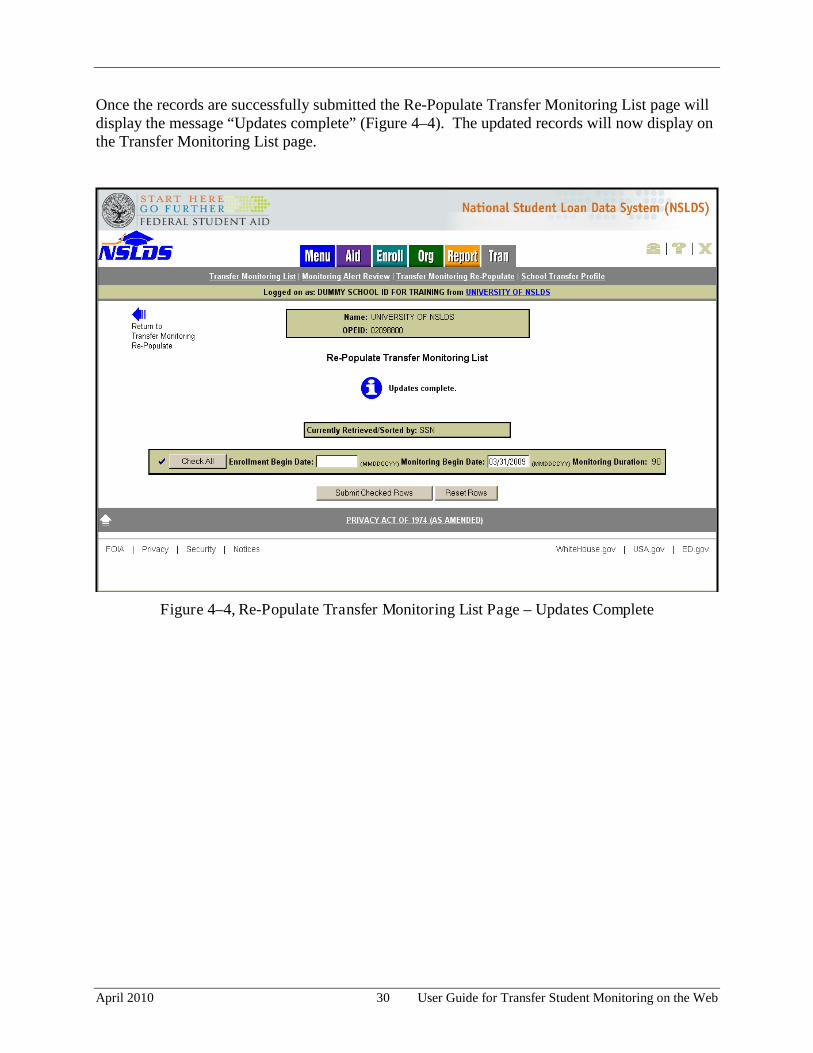
Once the records are successfully submitted the Re-Populate Transfer Monitoring List page will display the message “Updates complete” (Figure 4–4). The updated records will now display on the Transfer Monitoring List page.
Figure 4–4, Re-Populate Transfer Monitoring List Page – Updates Complete
April 2010 31 User Guide for Transfer Student Monitoring on the Web
5.0 Monitoring Alert
5.1 Monitoring Alert Review
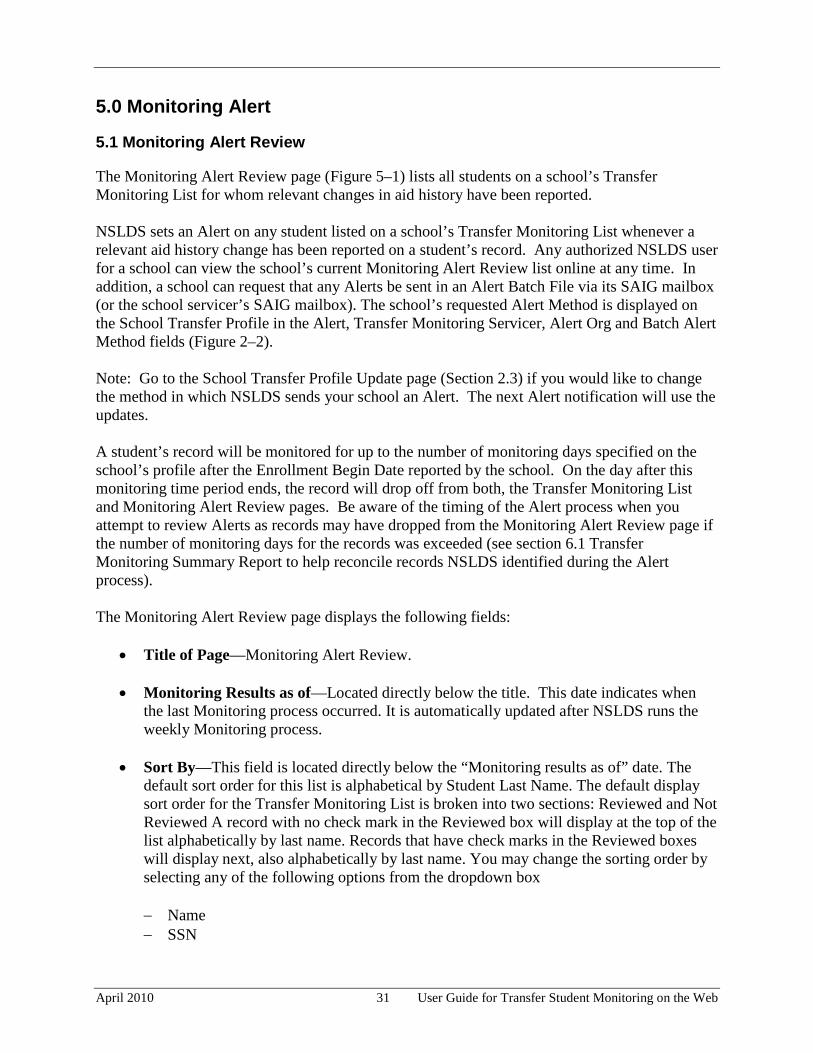
The Monitoring Alert Review page (Figure 5–1) lists all students on a school’s Transfer Monitoring List for whom relevant changes in aid history have been reported. NSLDS sets an Alert on any student listed on a school’s Transfer Monitoring List whenever a relevant aid history change has been reported on a student’s record. Any authorized NSLDS user for a school can view the school’s current Monitoring Alert Review list online at any time. In addition, a school can request that any Alerts be sent in an Alert Batch File via its SAIG mailbox (or the school servicer’s SAIG mailbox). The school’s requested Alert Method is displayed on the School Transfer Profile in the Alert, Transfer Monitoring Servicer, Alert Org and Batch Alert Method fields (Figure 2–2). Note: Go to the School Transfer Profile Update page (Section 2.3) if you would like to change the method in which NSLDS sends your school an Alert. The next Alert notification will use the updates. A student’s record will be monitored for up to the number of monitoring days specified on the school’s profile after the Enrollment Begin Date reported by the school. On the day after this monitoring time period ends, the record will drop off from both, the Transfer Monitoring List and Monitoring Alert Review pages. Be aware of the timing of the Alert process when you attempt to review Alerts as records may have dropped from the Monitoring Alert Review page if the number of monitoring days for the records was exceeded (see section 6.1 Transfer Monitoring Summary Report to help reconcile records NSLDS identified during the Alert process). The Monitoring Alert Review page displays the following fields:
• Title of Page—Monitoring Alert Review.
• Monitoring Results as of—Located directly below the title. This date indicates when the last Monitoring process occurred. It is automatically updated after NSLDS runs the weekly Monitoring process.
• Sort By—This field is located directly below the “Monitoring results as of” date. The
default sort order for this list is alphabetical by Student Last Name. The default display sort order for the Transfer Monitoring List is broken into two sections: Reviewed and Not Reviewed A record with no check mark in the Reviewed box will display at the top of the list alphabetically by last name. Records that have check marks in the Reviewed boxes will display next, also alphabetically by last name. You may change the sorting order by selecting any of the following options from the dropdown box
− Name − SSN
April 2010 32 User Guide for Transfer Student Monitoring on the Web
− Alert Date − Enrollment Begin Date − Monitor Begin Date − Loan First − Grant First
• Display Only—You can filter the list by providing any of the Display Only fields and
selecting the Retrieve button. You may specify a group of students on the list to be displayed by the following filtering fields:
− SSN − Last Name − Date Alerted − Enrollment Begin Date − Loans Only − Grants Only
Sorting/filtering will take place when you click the Retrieve button. The list displays up to 75 records per scrollable page. Next and Previous navigation arrows are displayed at the bottom and top of page, respectively, if more than 75 records exist Below the Sort By/Display Only box, the Student Record Information box displays. The following fields are included in this box:
• SSN—The student’s Social Security number.
• Name—The student’s first and last name.
• DOB—The student’s date of birth.
• Change/Reviewed—This column lists links to the changes that prompted the Alert. A column of check boxes is also displayed. Once an Alert is reviewed, check the box to mark it as reviewed. Clicking the link to the Alert information does not check the Reviewed box automatically. If the school requested that its Alerts be sent via Alert Batch File, any change reported via batch is automatically checked online as Reviewed.
• Date Alerted—The date when NSLDS added the student’s record to the Monitoring
Alert Review list and/or sent an Alert Batch File on the student to the school, if applicable.
• Enrollment Begin Date—The date the student is scheduled to begin classes at the
school.
• Monitor Begin Date—The date the school wants NSLDS begin monitoring the student.
April 2010 33 User Guide for Transfer Student Monitoring on the Web
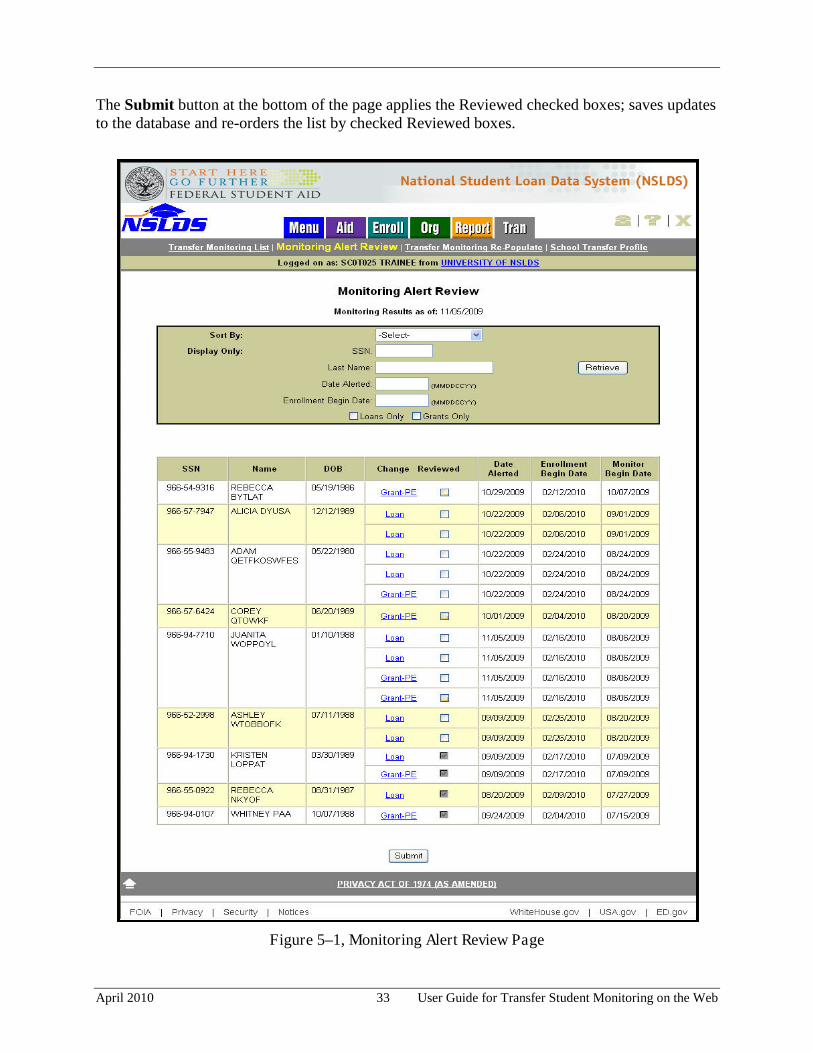
The Submit button at the bottom of the page applies the Reviewed checked boxes; saves updates to the database and re-orders the list by checked Reviewed boxes.
Figure 5–1, Monitoring Alert Review Page
April 2010 34 User Guide for Transfer Student Monitoring on the Web
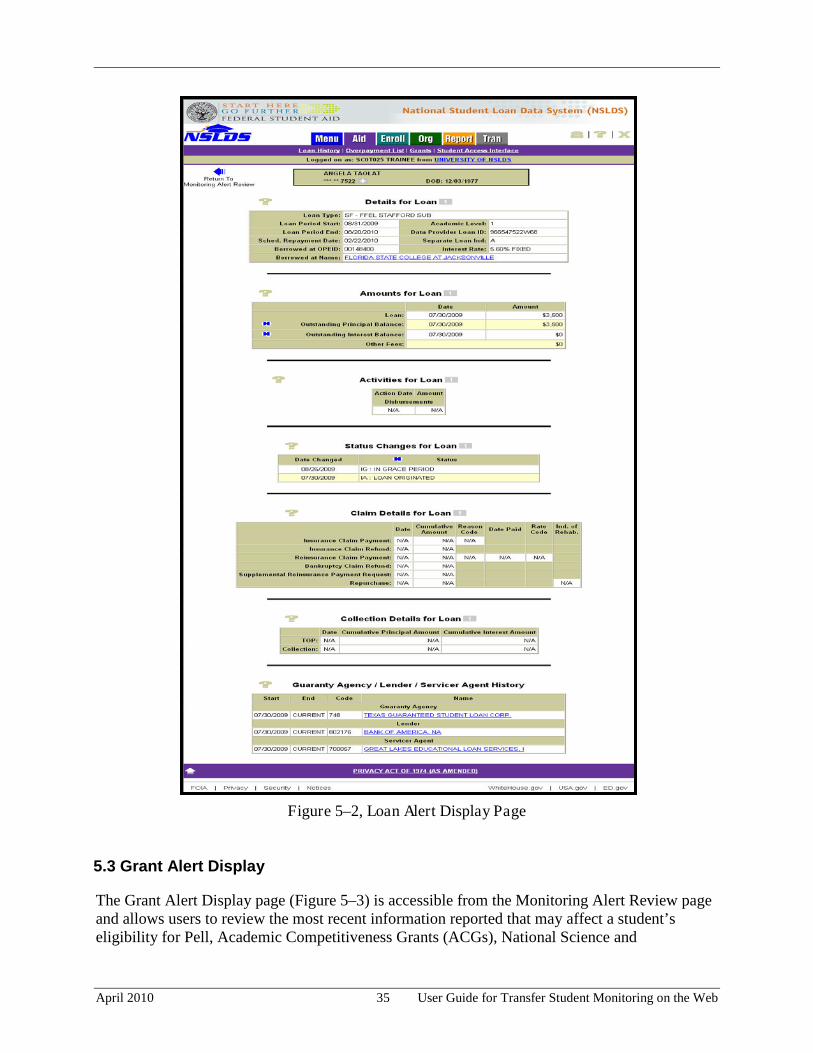
5.2 Loan Alert Display
The Loan Alert Display page (Figure 5–2) is accessible from the Monitoring Alert Review page and allows users to review the most recent information reported that may affect a student’s eligibility for Title IV loans at his or her school. Changes that prompt an Alert for loans are:
• New loan reported [Federal Family Education Loan (FFEL), Direct Loan, or Perkins].
• New disbursement or reduction in disbursed amount on an existing loan (FFEL, Direct Loan, or Perkins).
• A change in the amount of Outstanding Principal Balance (OPB) on an existing loan
(FFEL, Direct Loan, or Perkins).
Note: The OPB History page displays the changes made to the amounts. Select the history icon “H” from the Amounts for Loan table to get to the Outstanding Amount Balance History page.
• New, increased, or decreased cancellation amount reported on a loan.
• Change in amount of loan (FFEL, Direct Loan, or Perkins). If the student had a relevant change reported on a loan, the Loan link displays on the Monitoring Alert Review page. Clicking the Loan link takes you to the student’s Loan Alert Display (Details for Loan) page (Figure 5–2) for that specific loan to view the change reported.
If the student has changes to more than one loan, multiple Loan links display, each taking you to the Loan Detail page for the specific loan you have selected.
April 2010 35 User Guide for Transfer Student Monitoring on the Web
Figure 5–2, Loan Alert Display Page
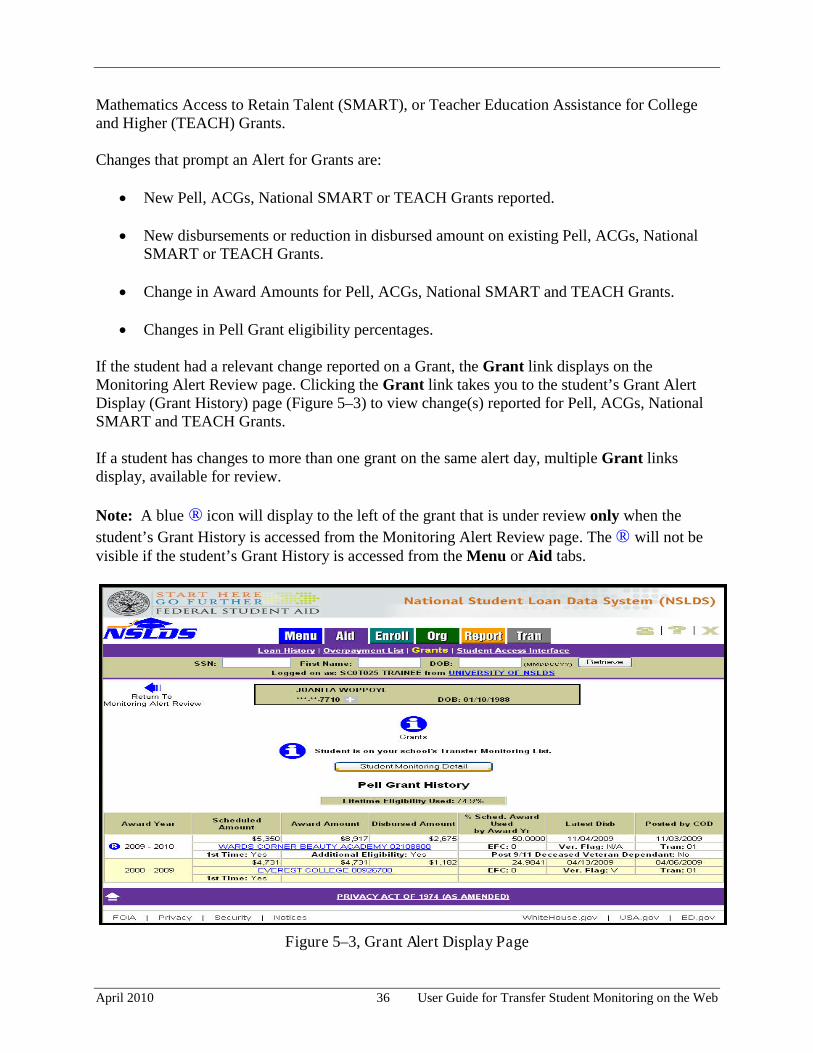
5.3 Grant Alert Display
The Grant Alert Display page (Figure 5–3) is accessible from the Monitoring Alert Review page and allows users to review the most recent information reported that may affect a student’s eligibility for Pell, Academic Competitiveness Grants (ACGs), National Science and
April 2010 36 User Guide for Transfer Student Monitoring on the Web
Mathematics Access to Retain Talent (SMART), or Teacher Education Assistance for College and Higher (TEACH) Grants. Changes that prompt an Alert for Grants are:
• New Pell, ACGs, National SMART or TEACH Grants reported.
• New disbursements or reduction in disbursed amount on existing Pell, ACGs, National SMART or TEACH Grants.
• Change in Award Amounts for Pell, ACGs, National SMART and TEACH Grants.
• Changes in Pell Grant eligibility percentages.
If the student had a relevant change reported on a Grant, the Grant link displays on the Monitoring Alert Review page. Clicking the Grant link takes you to the student’s Grant Alert Display (Grant History) page (Figure 5–3) to view change(s) reported for Pell, ACGs, National SMART and TEACH Grants. If a student has changes to more than one grant on the same alert day, multiple Grant links display, available for review. Note: A blue ® icon will display to the left of the grant that is under review only when the student’s Grant History is accessed from the Monitoring Alert Review page. The ® will not be visible if the student’s Grant History is accessed from the Menu or Aid tabs.
Figure 5–3, Grant Alert Display Page
April 2010 37 User Guide for Transfer Student Monitoring on the Web
6.0 Additional Information
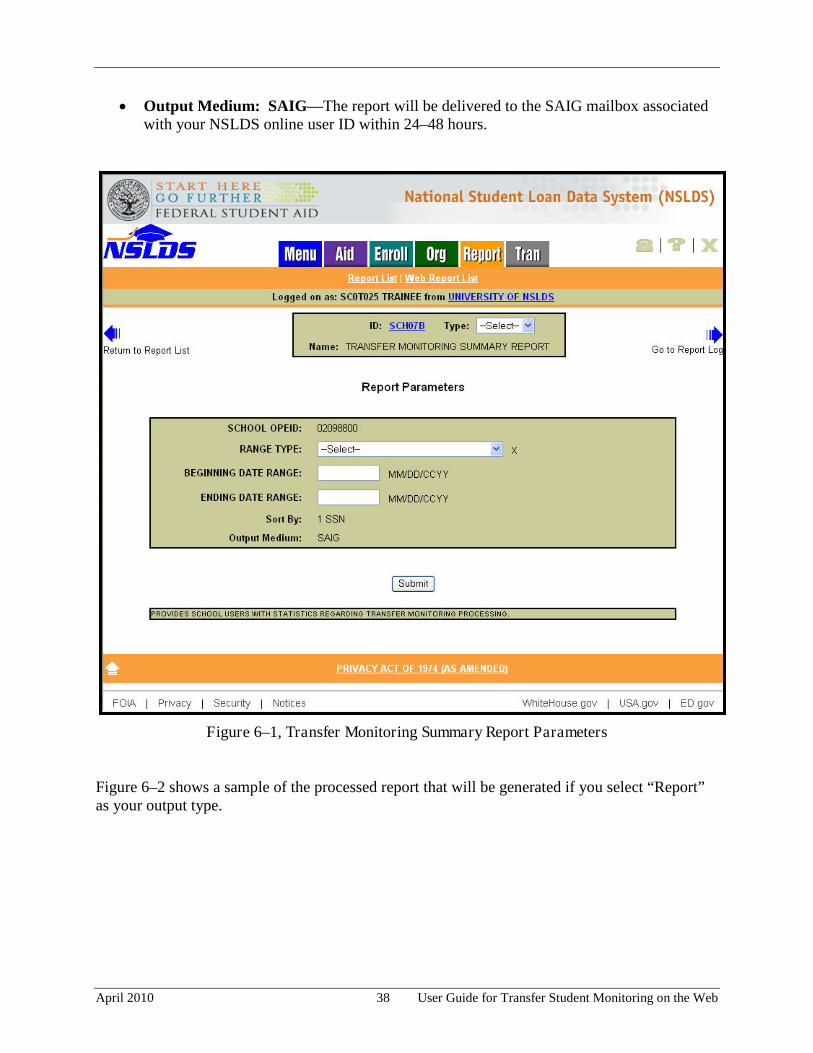
6.1 Transfer Monitoring Summary Report
The Transfer Monitoring Summary Report can be requested on the NSLDS Professional Access Web site from the Report tab by selecting Report ID SCH07B. This report provides school users with a list of students (by SSN) who are/were part of the school’s Transfer Student Monitoring process within a given time range. The processed report is available in either Extract (file layout) or Report format. The Transfer Monitoring Summary Report has various functions. These include to:
• Assist Financial Aid Administrators (FAAs) with the Transfer Student Monitoring process.
• Verify if schools are actively using the Transfer Student Monitoring process.
• Verify whether Alerts are being generated for oversight and auditing purposes.
• Aid in reconciliation when a student’s Transfer Student Monitoring record has been
dropped from the Transfer Monitoring List and Monitoring Alert Review pages. This occurs on the 1st day after the completion of the monitoring time period from the Enrollment Begin Date.
You can generate the Transfer Monitoring Summary Report for your school by filling in the following report parameters (Figure 6–1):
• Type—Select whether you want to receive the report in either Extract (file layout) or Report format.
• Range Type—You can query the report by:
1. Enrollment Period Begin Date—The date the student is scheduled to begin classes at
the school. 2. Monitor Begin Date—The date the school wants NSLDS to begin monitoring the
student.
• Beginning Date Range—The earliest start date of the range you want to use to query the school’s Transfer Student Monitoring lists.
• Ending Date Range—The end date of the range you want to use to query the school’s
Transfer Student Monitoring lists.
• Sort By—The report will be sorted by SSN.
April 2010 38 User Guide for Transfer Student Monitoring on the Web
• Output Medium: SAIG—The report will be delivered to the SAIG mailbox associated with your NSLDS online user ID within 24–48 hours.
Figure 6–1, Transfer Monitoring Summary Report Parameters
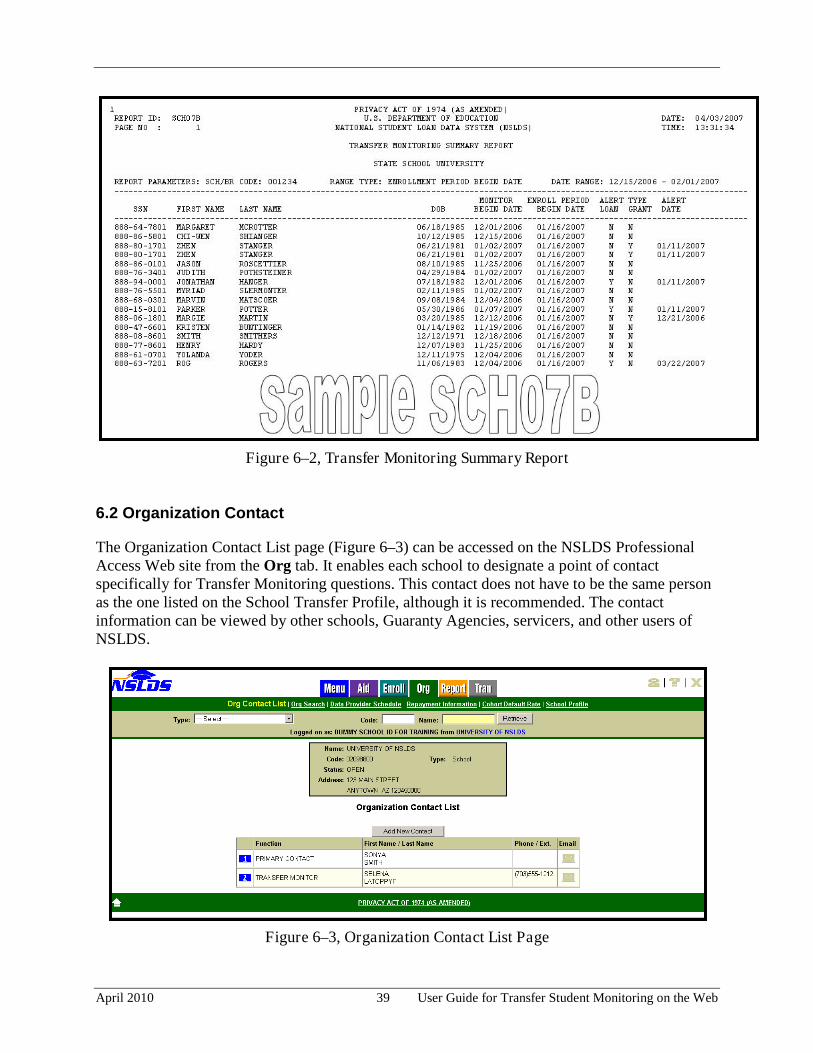
Figure 6–2 shows a sample of the processed report that will be generated if you select “Report” as your output type.
April 2010 39 User Guide for Transfer Student Monitoring on the Web
Figure 6–2, Transfer Monitoring Summary Report
6.2 Organization Contact
The Organization Contact List page (Figure 6–3) can be accessed on the NSLDS Professional Access Web site from the Org tab. It enables each school to designate a point of contact specifically for Transfer Monitoring questions. This contact does not have to be the same person as the one listed on the School Transfer Profile, although it is recommended. The contact information can be viewed by other schools, Guaranty Agencies, servicers, and other users of NSLDS.
Figure 6–3, Organization Contact List Page