Embed Size (px)
DESCRIPTION
Customizing a toy art in photoshop
Citation preview
3D Model
ToyArt
For this tutorial we are using PSD Extended CS5
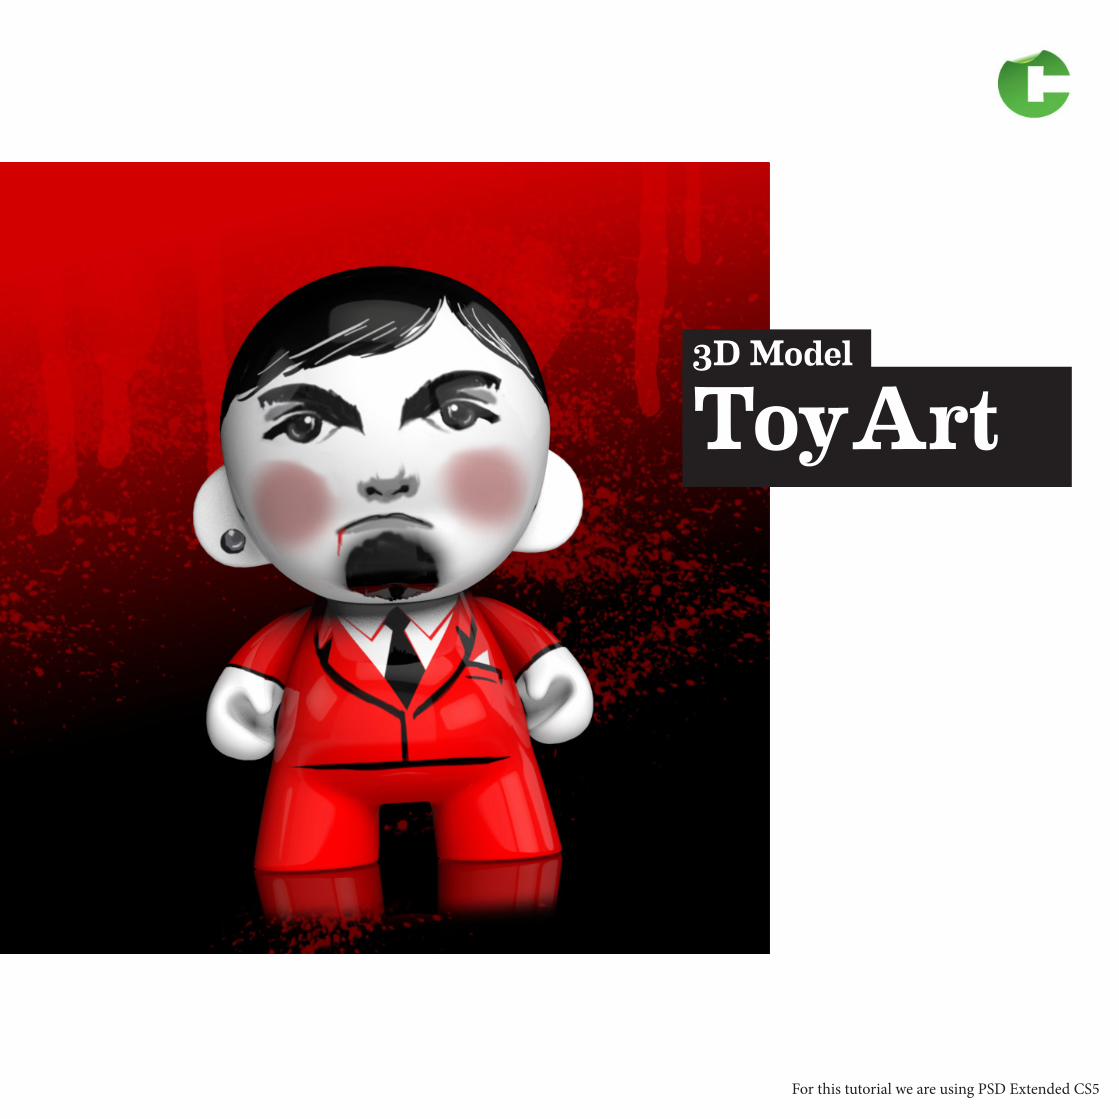
01 Files in this set
01WORKING PLANStart planing in a 2D work sheet
STARTING FILES
02PAINTING IN A 3D MODELYou can start painting directly in this 3d model
03UV MAPSYou can place yourart here and thenload to the model
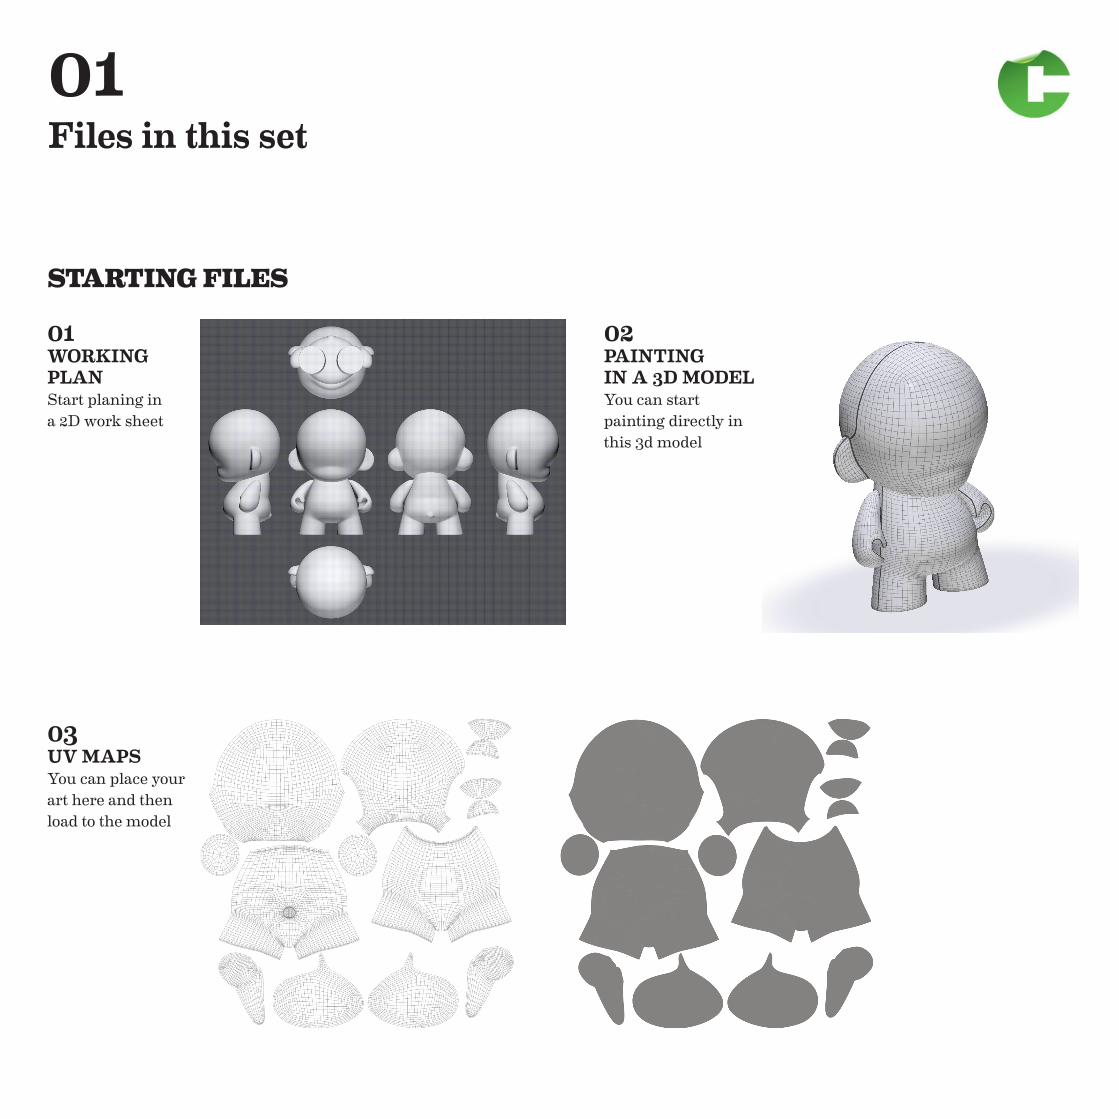
02 Files in this set
7 TOY SAMPLES SCENESYou can place your work in a blank toy or in a finish model.
FINISH FILES
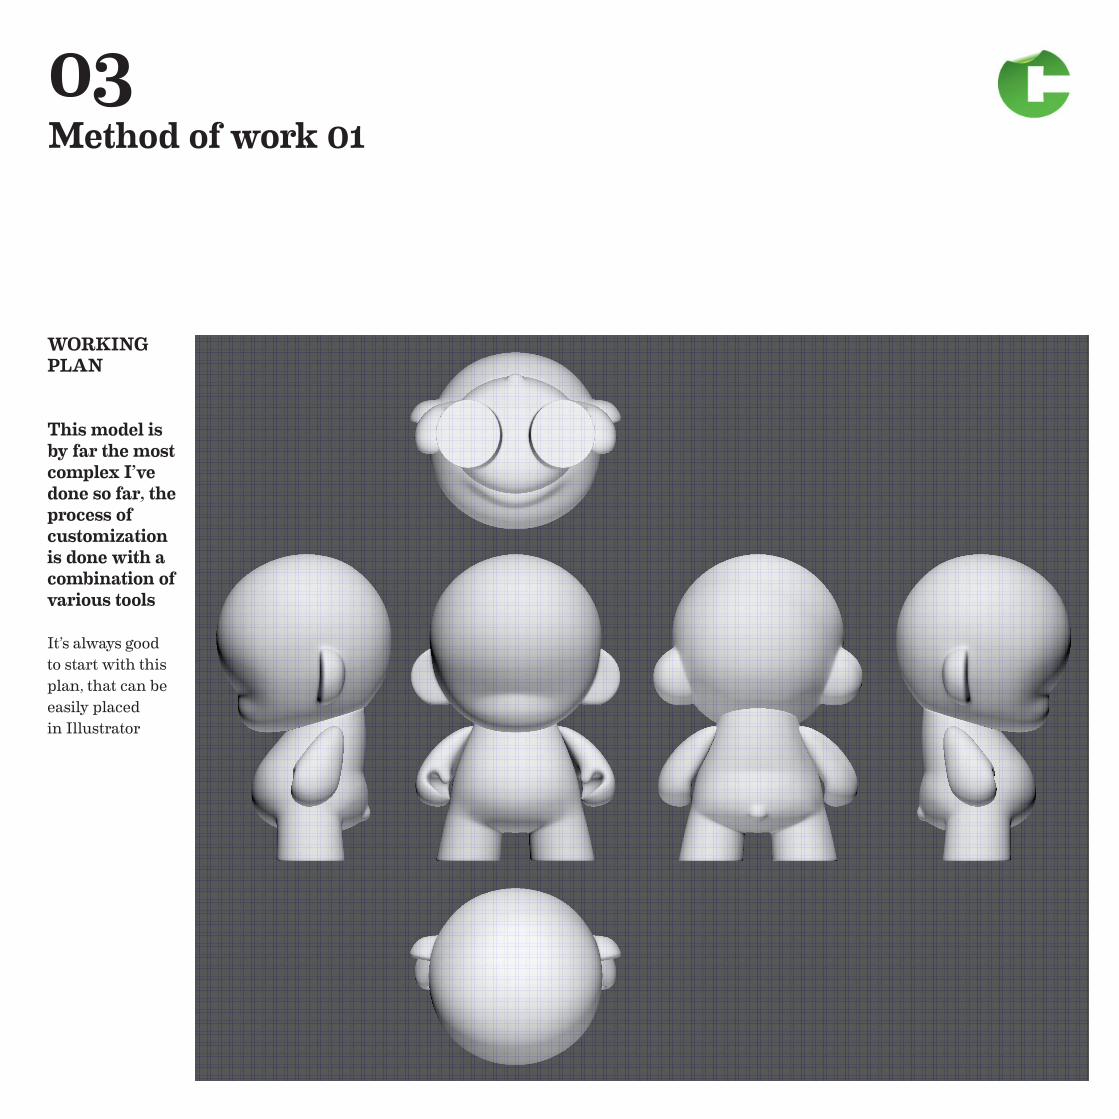
03 Method of work 01
WORKING PLAN
This model is by far the most complex I’ve done so far, the process ofcustomization is done with a combination of various tools
It’s always good to start with this plan, that can be easily placedin Illustrator
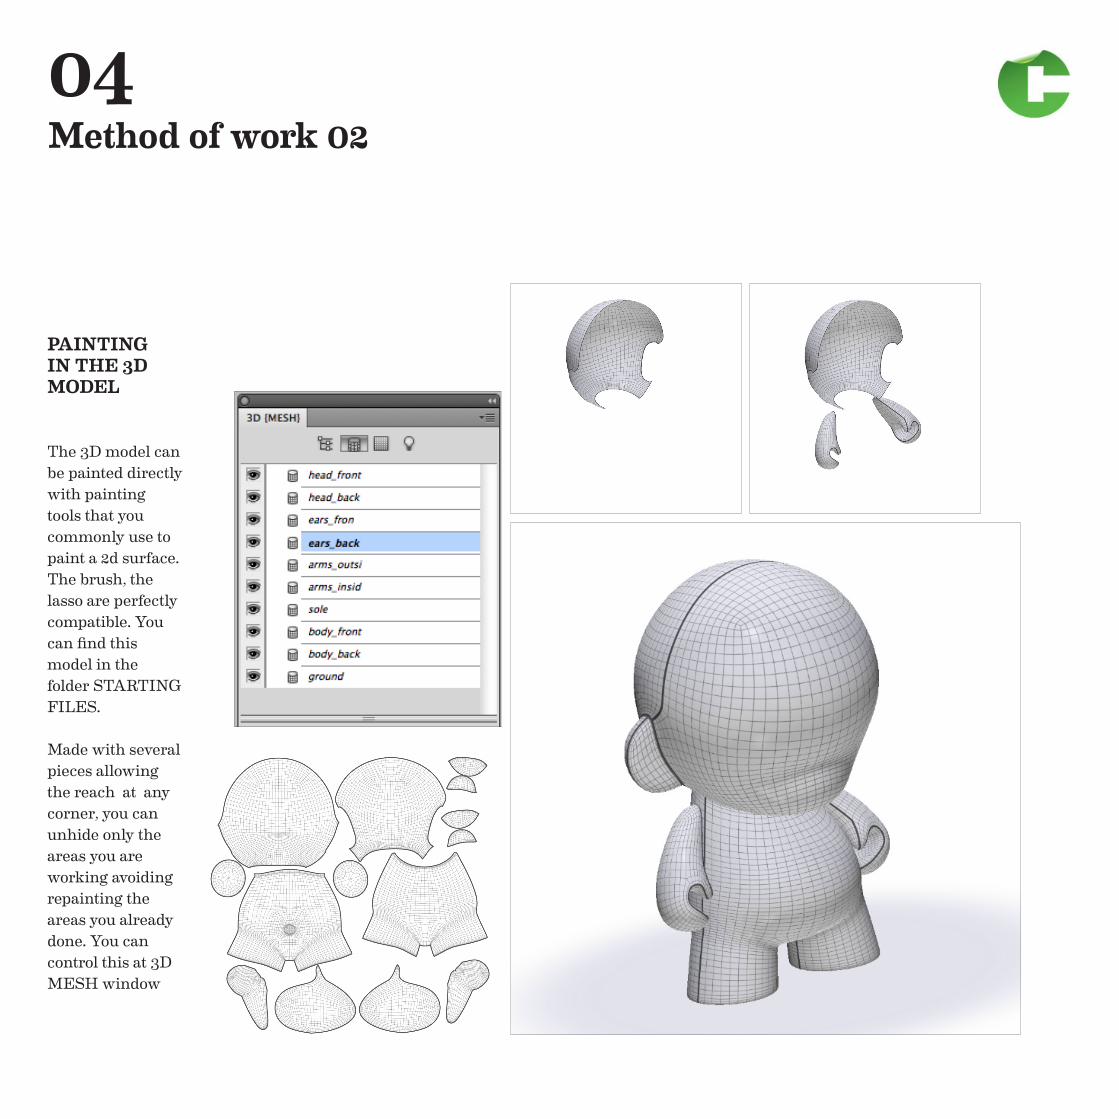
04 Method of work 02
PAINTING IN THE 3D MODEL
The 3D model can be painted directly with painting tools that you commonly use to paint a 2d surface. The brush, the lasso are perfectly compatible. You can find this model in the folder STARTING FILES.
Made with several pieces allowing the reach at any corner, you can unhide only the areas you are working avoiding repainting the areas you already done. You can control this at 3D MESH window
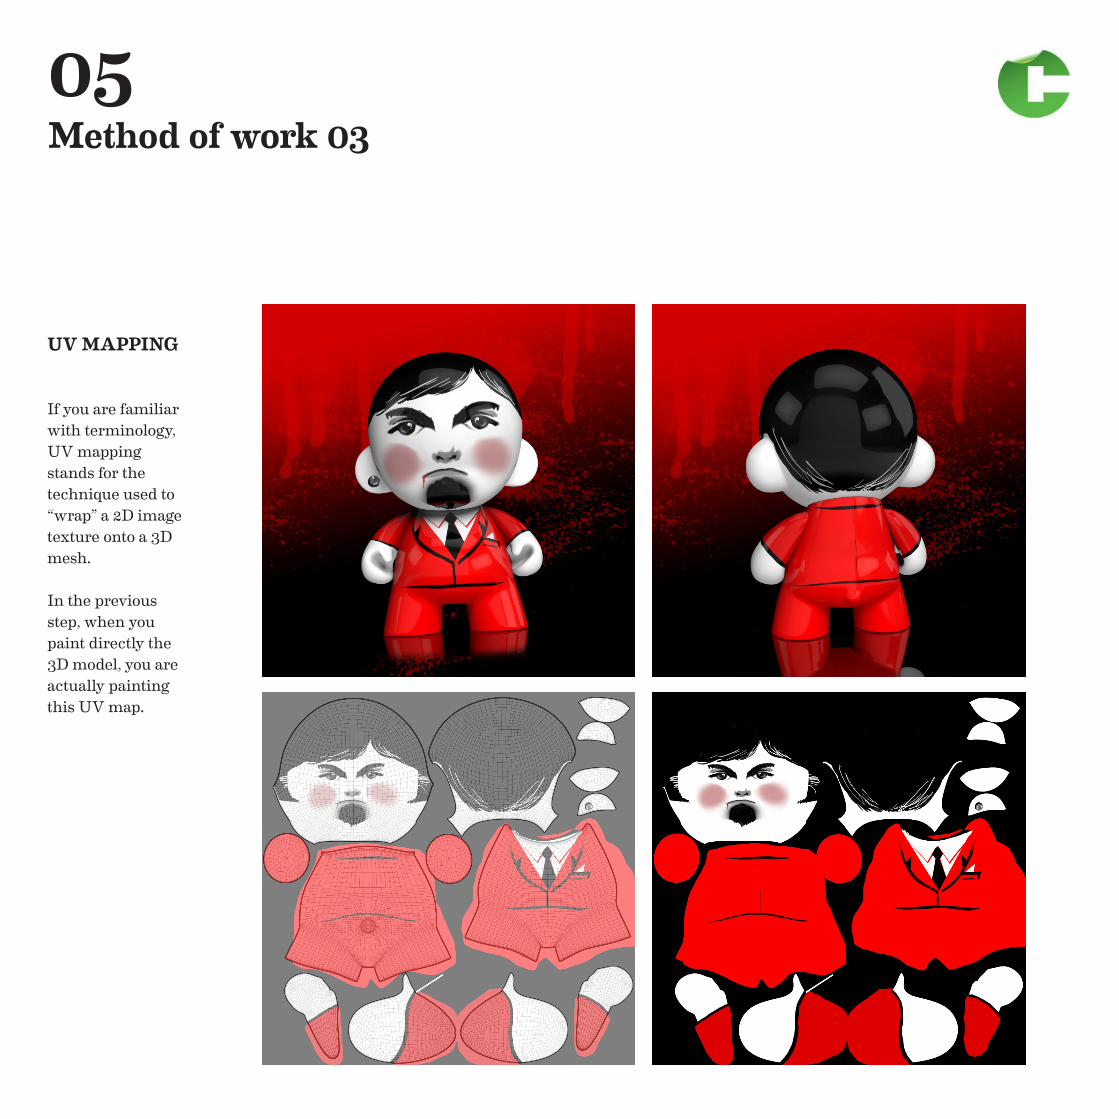
05 Method of work 03
UV MAPPING
If you are familiar with terminology,UV mapping stands for the technique used to “wrap” a 2D image texture onto a 3D mesh.
In the previous step, when you paint directly the 3D model, you are actually painting this UV map.
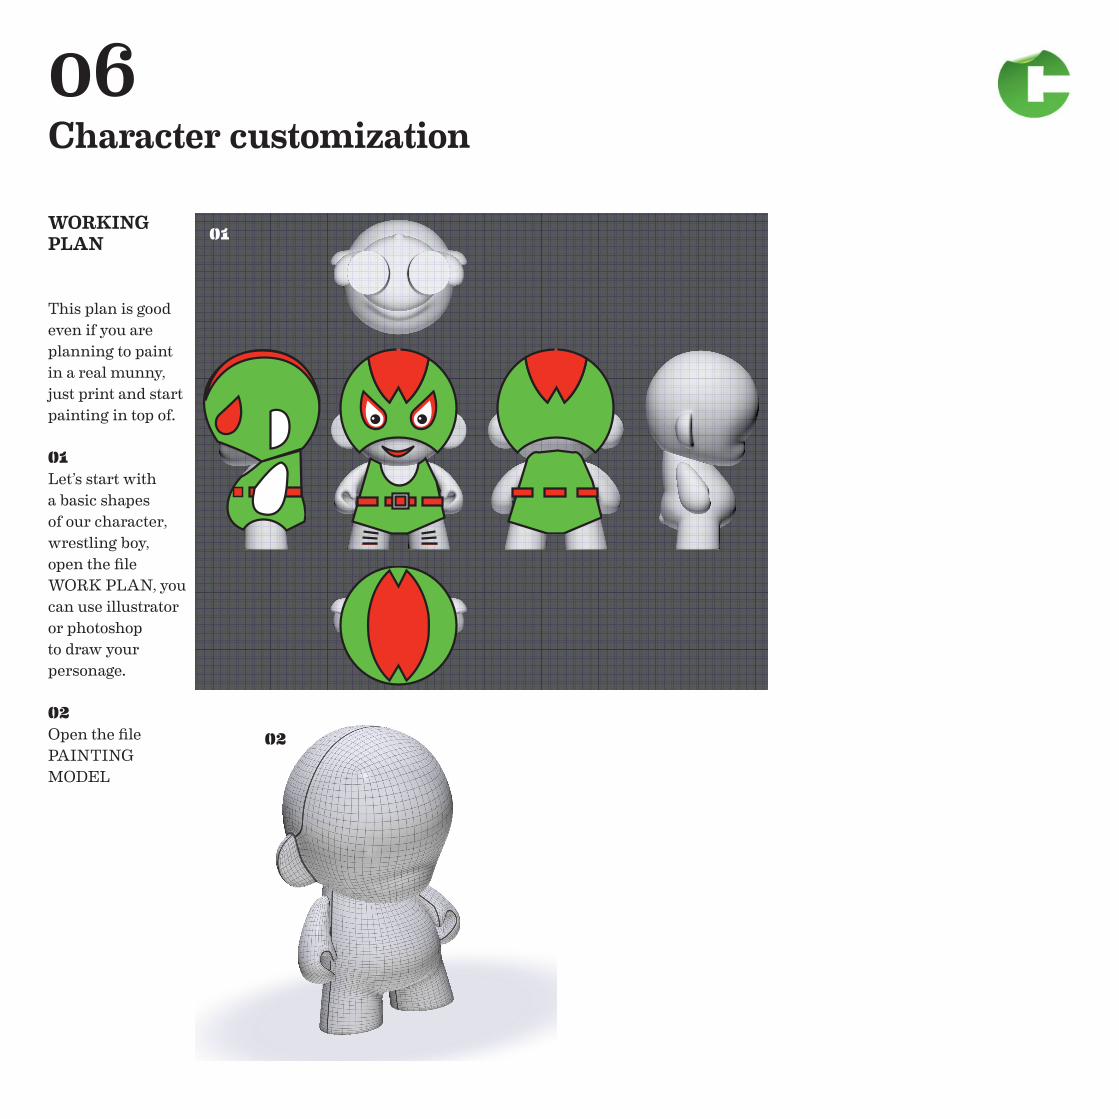
06 Character customization
WORKING PLAN
This plan is good even if you are planning to paint in a real munny, just print and start painting in top of.
01Let’s start with a basic shapes of our character, wrestling boy, open the file WORK PLAN, you can use illustrator or photoshop to draw your personage.
02Open the filePAINTING MODEL
02
01
07 Character customization
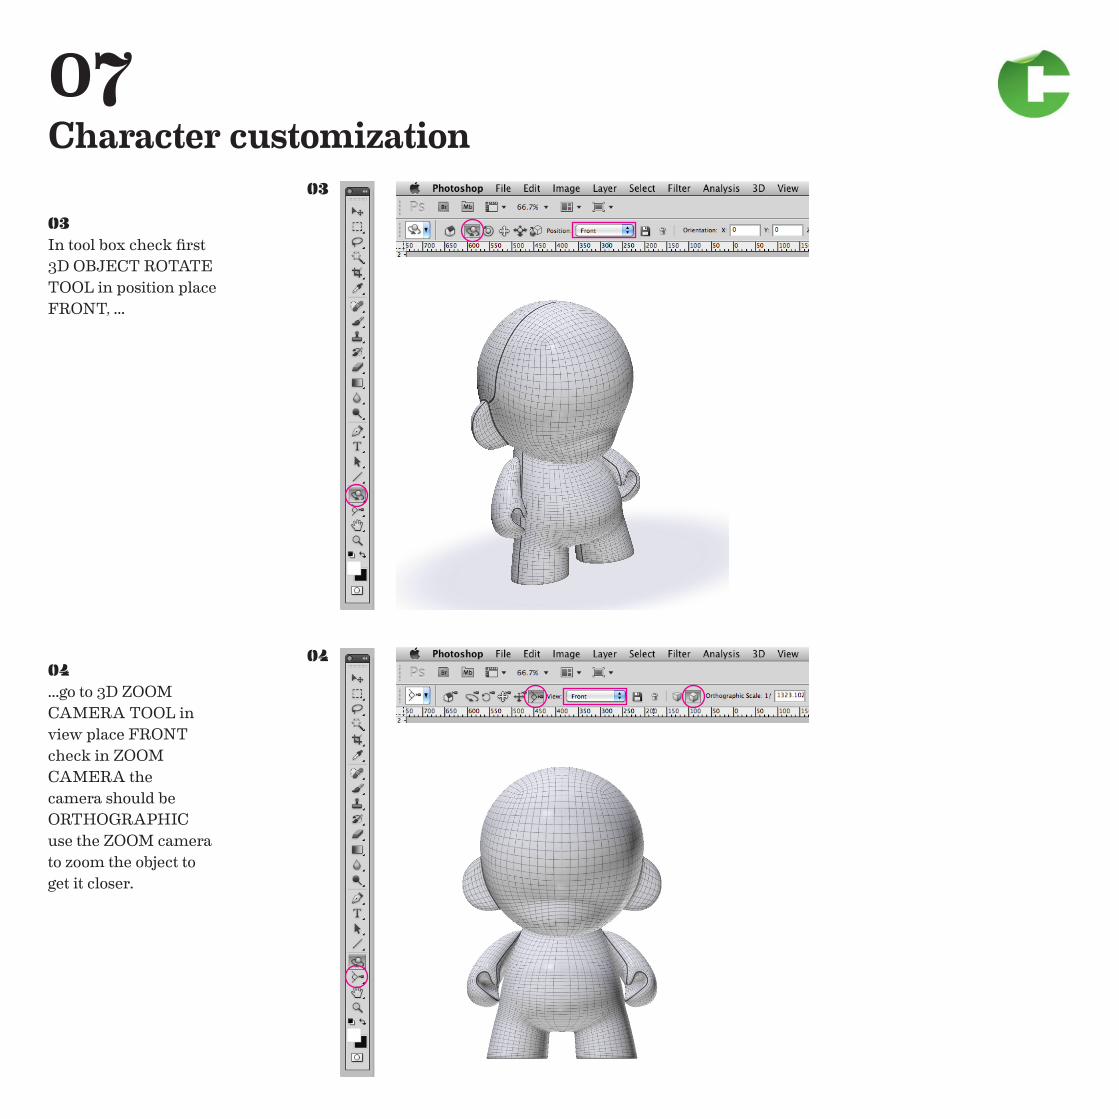
03In tool box check first 3D OBJECT ROTATE TOOL in position place FRONT, ...
04...go to 3D ZOOM CAMERA TOOL in view place FRONT check in ZOOM CAMERA the camera should be ORTHOGRAPHICuse the ZOOM camerato zoom the object to get it closer.
03
04
08 Character customization
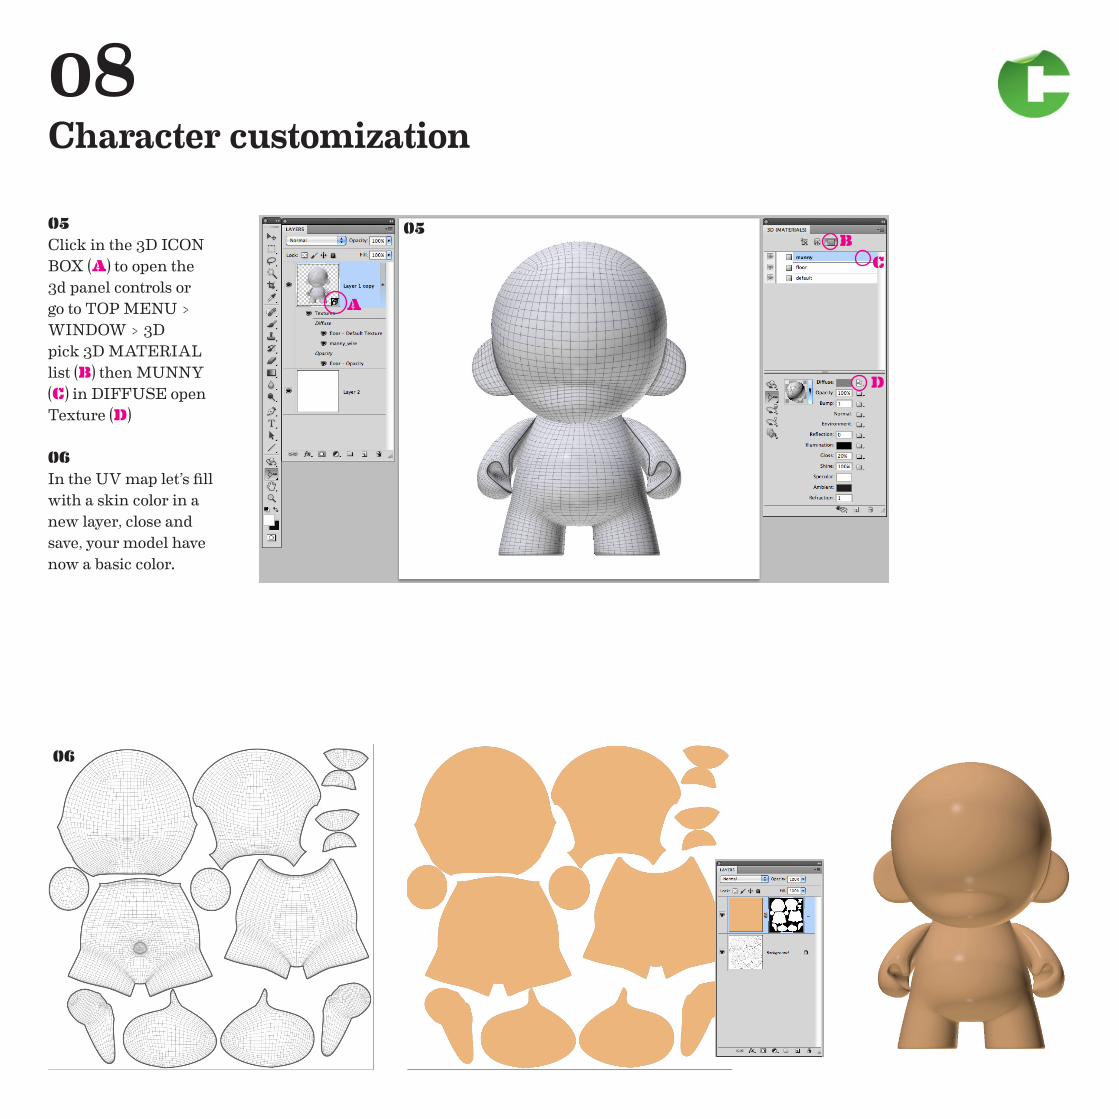
05Click in the 3D ICON BOX (A) to open the 3d panel controls or go to TOP MENU > WINDOW > 3Dpick 3D MATERIAL list (B) then MUNNY (C) in DIFFUSE open Texture (D)
06In the UV map let’s fill with a skin color in a new layer, close and save, your model have now a basic color.
05
A
BC
D
06
09 Character customization
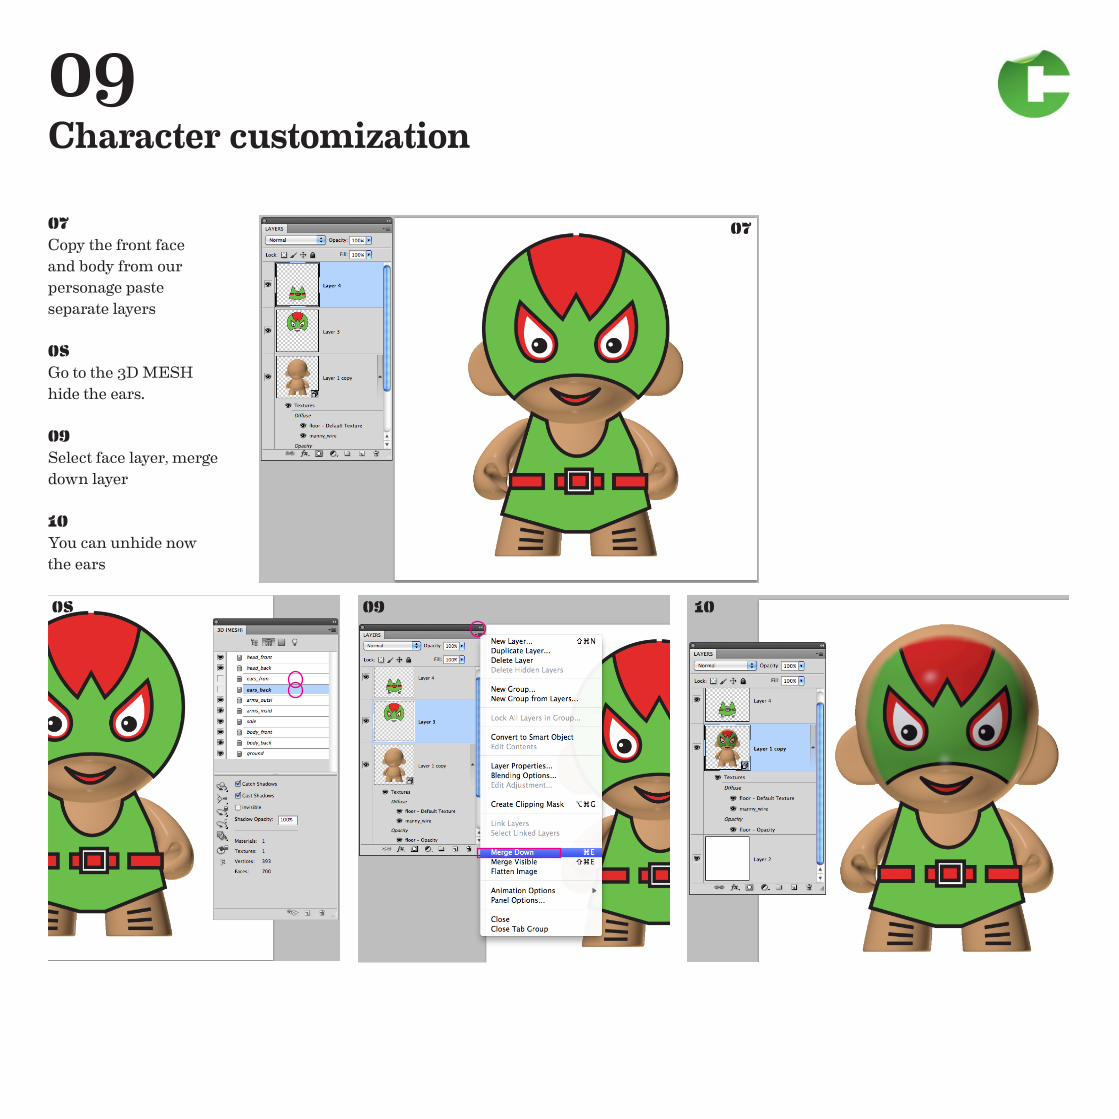
07Copy the front face and body from our personage paste separate layers
08 Go to the 3D MESH hide the ears.
09 Select face layer, merge down layer
10 You can unhide nowthe ears
07
08 09 10
10 Character customization
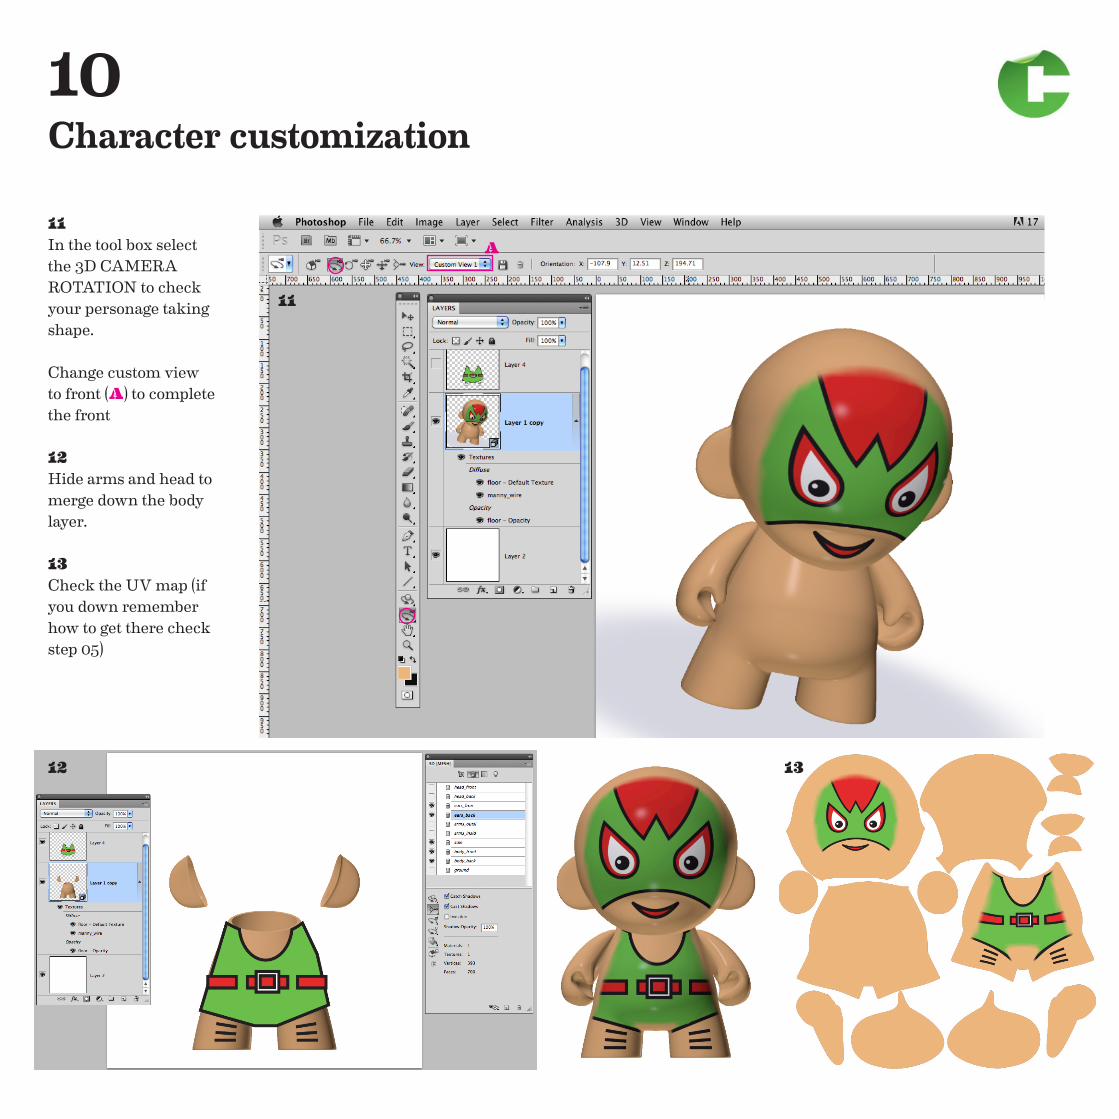
11In the tool box select the 3D CAMERA ROTATION to checkyour personage taking shape.
Change custom view to front (A) to complete the front
12 Hide arms and head to merge down the body layer.
13 Check the UV map (if you down remember how to get there check step 05)
11
A
12 13
11 Character customization
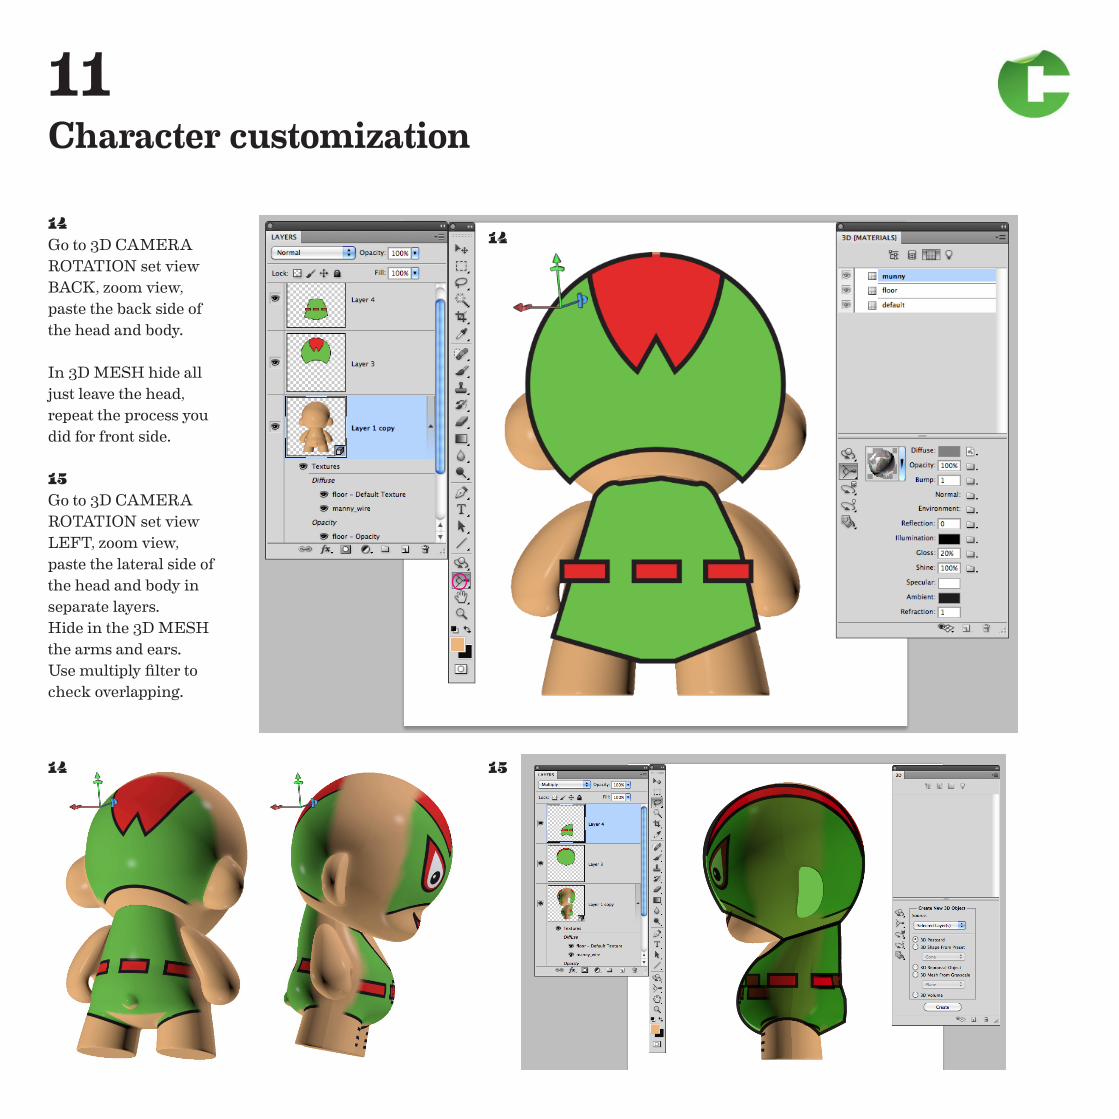
14Go to 3D CAMERA ROTATION set view BACK, zoom view, paste the back side of the head and body.
In 3D MESH hide all just leave the head, repeat the process you did for front side.
15Go to 3D CAMERA ROTATION set view LEFT, zoom view, paste the lateral side of the head and body in separate layers.Hide in the 3D MESH the arms and ears.Use multiply filter to check overlapping.
14
14 15
12 Character customization
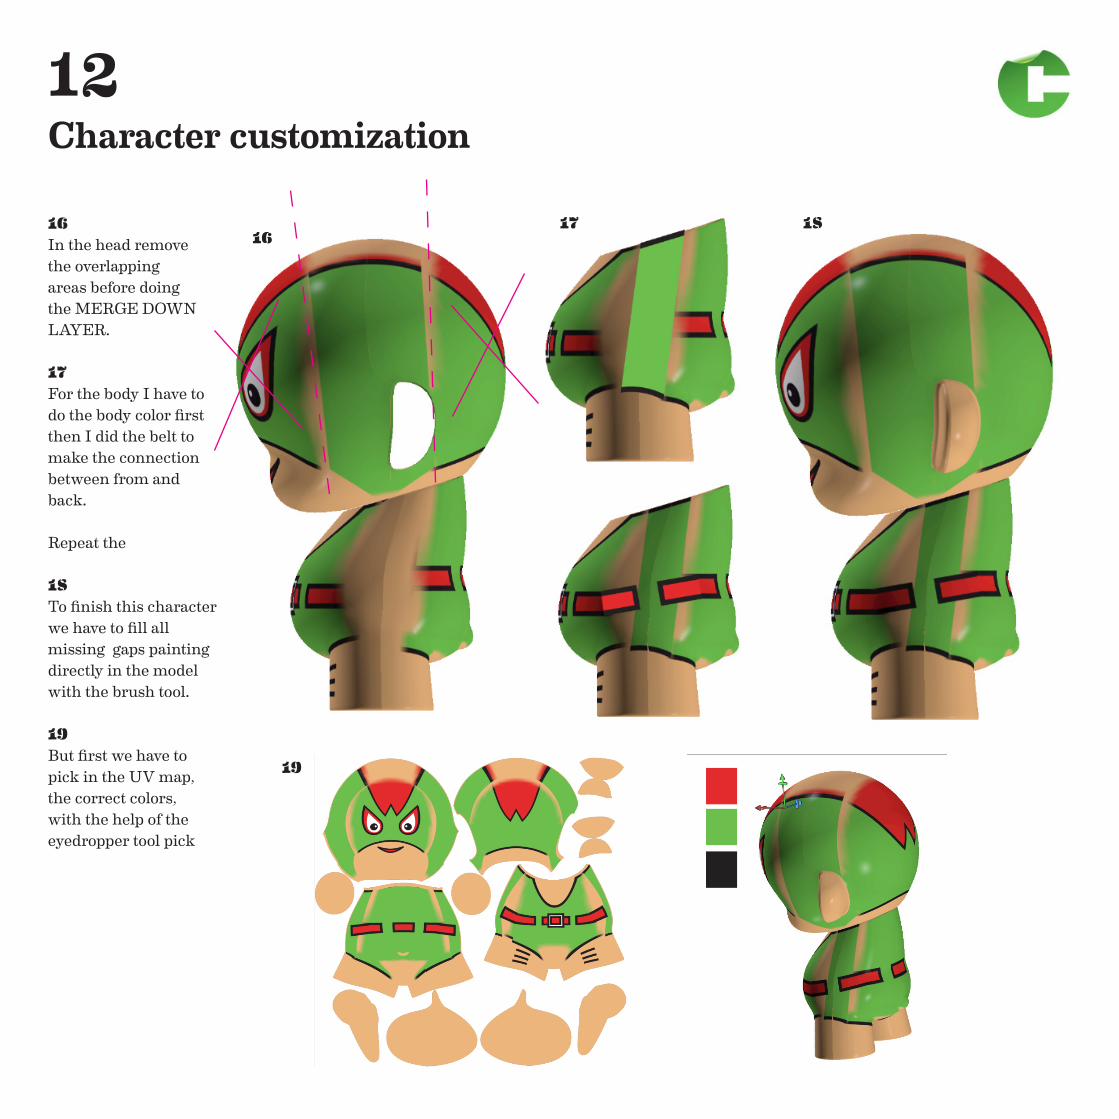
16In the head remove the overlapping areas before doing the MERGE DOWN LAYER.
17For the body I have to do the body color firstthen I did the belt to make the connection between from and back.
Repeat the
18To finish this characterwe have to fill all missing gaps painting directly in the model with the brush tool.
19But first we have to pick in the UV map, the correct colors, with the help of the eyedropper tool pick
1617 18
19
13 Character customization
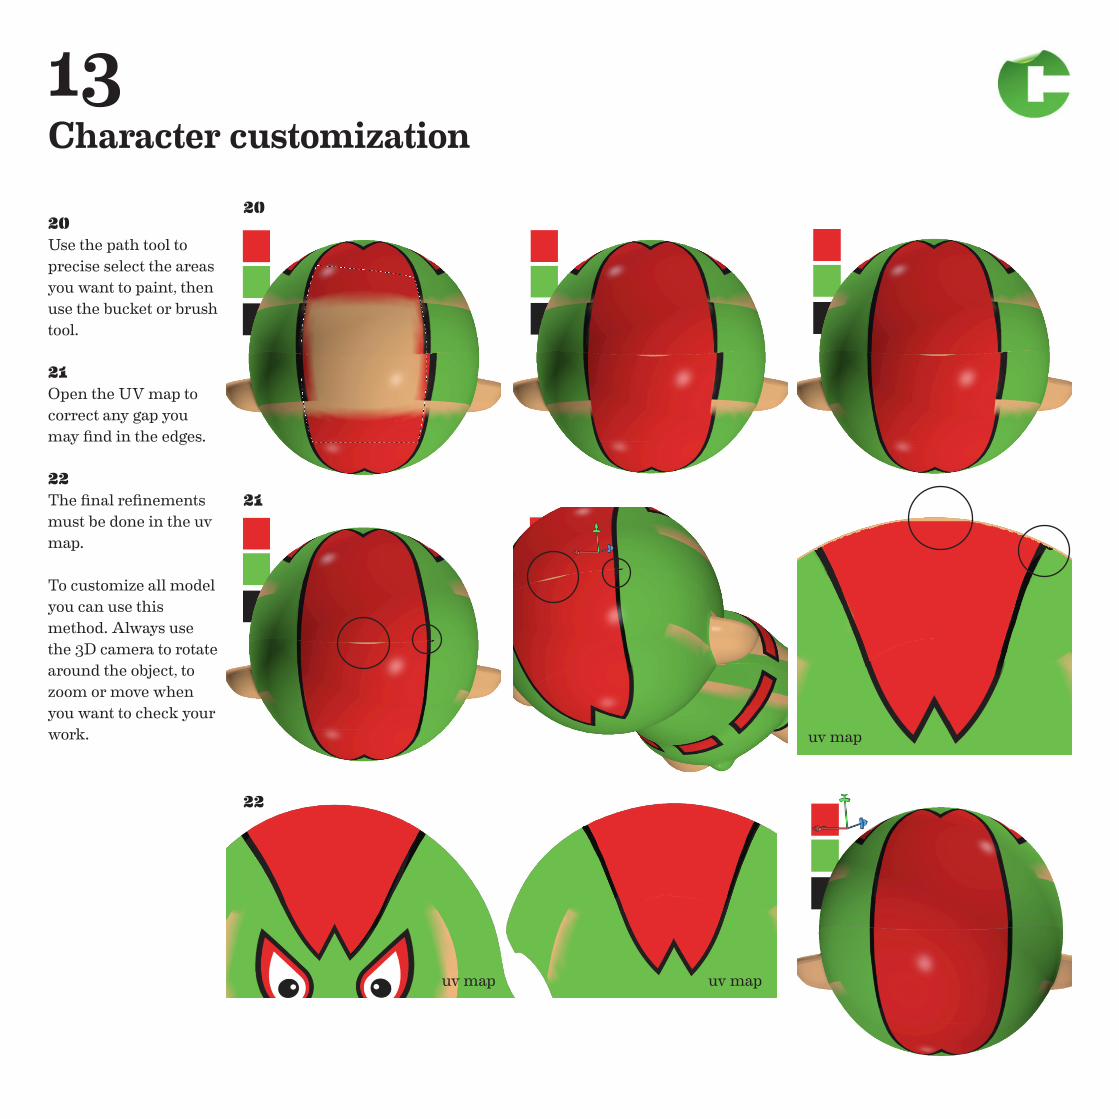
20Use the path tool to precise select the areasyou want to paint, then use the bucket or brush tool.
21Open the UV map tocorrect any gap you may find in the edges.
22The final refinements must be done in the uv map.
To customize all modelyou can use this method. Always use the 3D camera to rotate around the object, to zoom or move when you want to check your work.
20
21
uv map
uv map uv map
22
14 Character customization
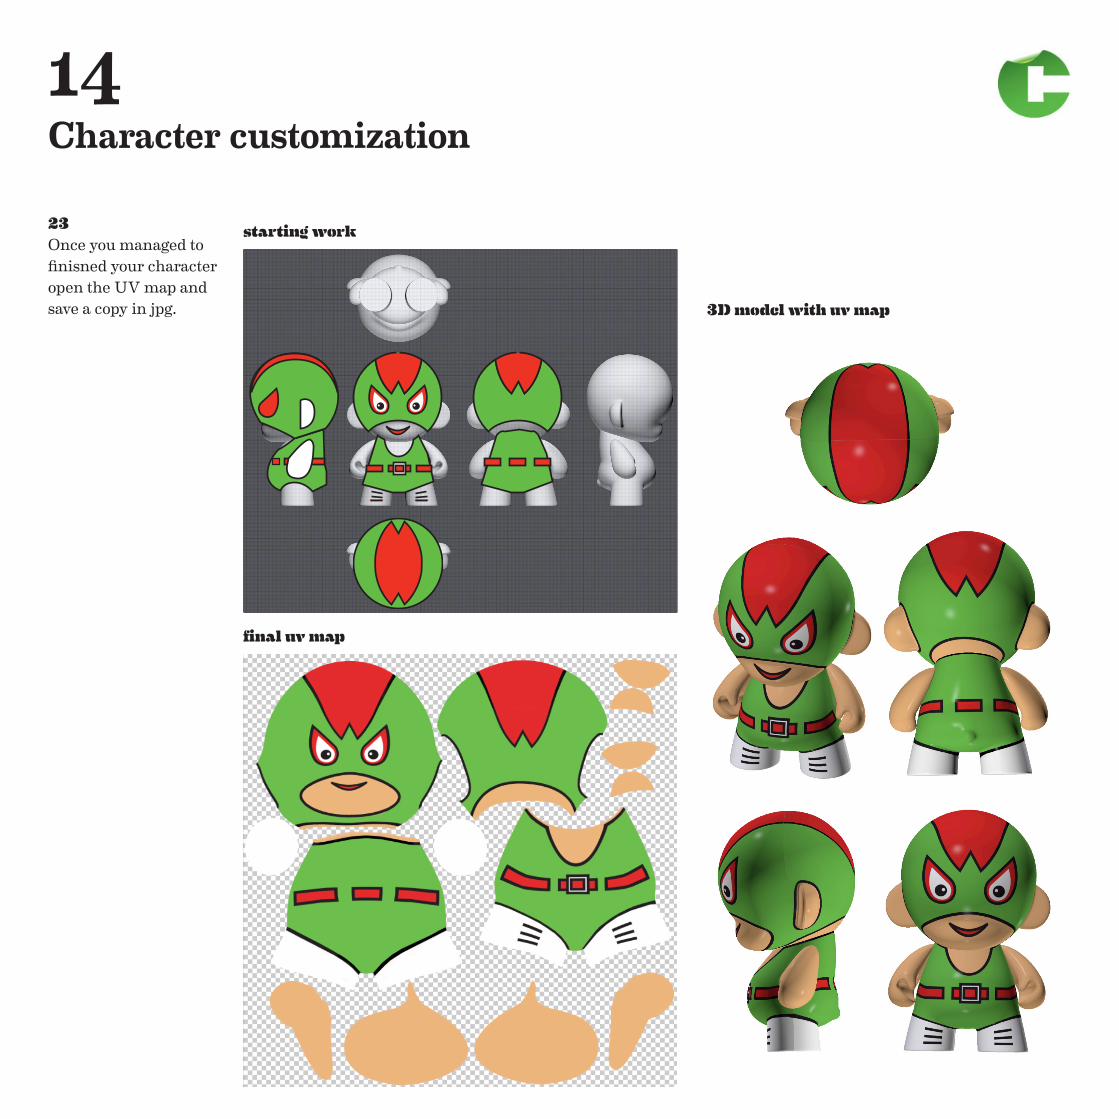
23Once you managed to finisned your characteropen the UV map and save a copy in jpg.
starting work
final uv map
3D model with uv map
15 Character customization
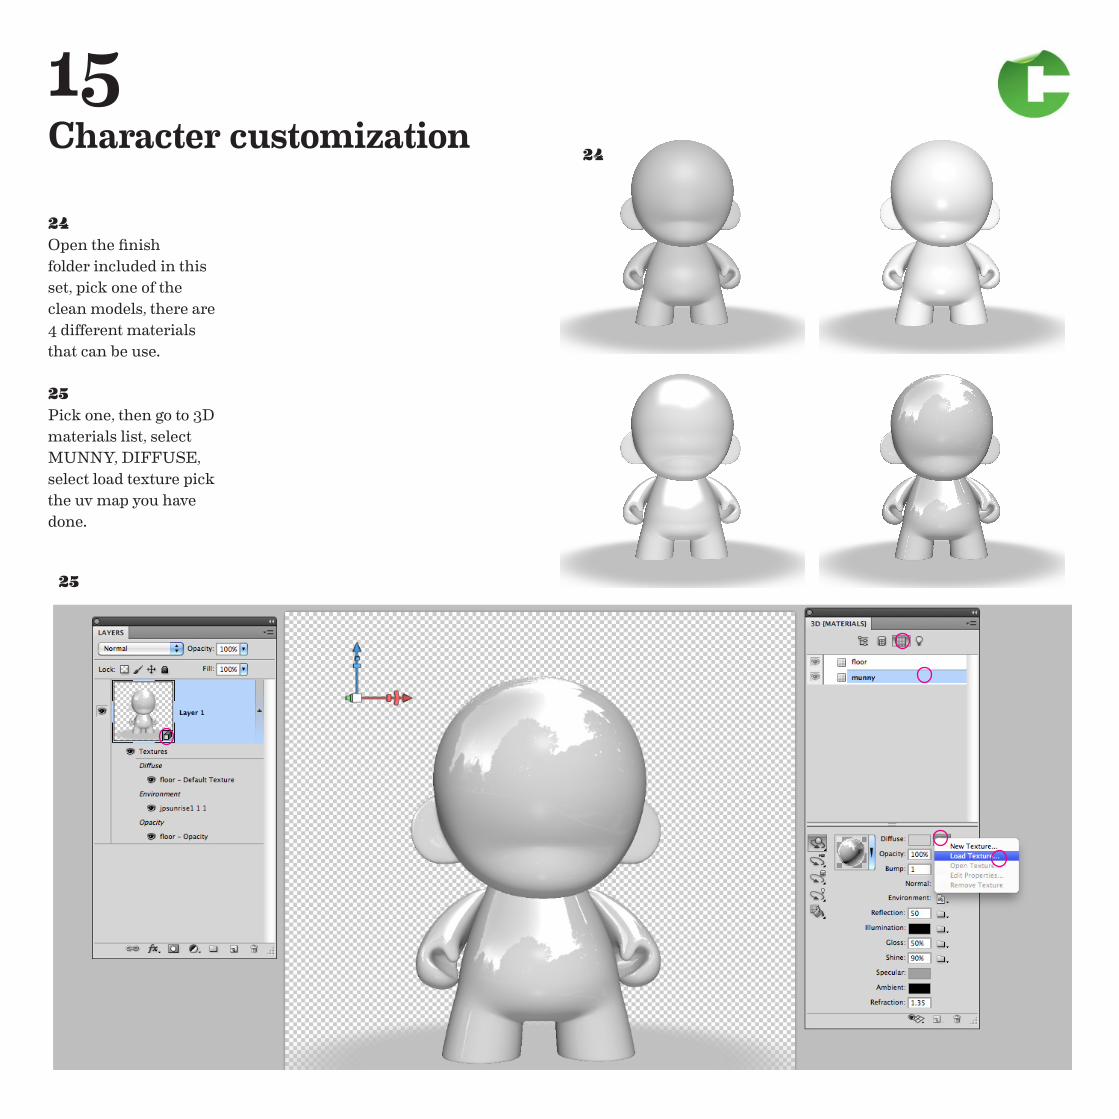
24Open the finishfolder included in this set, pick one of the clean models, there are 4 different materials that can be use.
25Pick one, then go to 3D materials list, select MUNNY, DIFFUSE, select load texture pick the uv map you have done.
24
25
16 Character customization
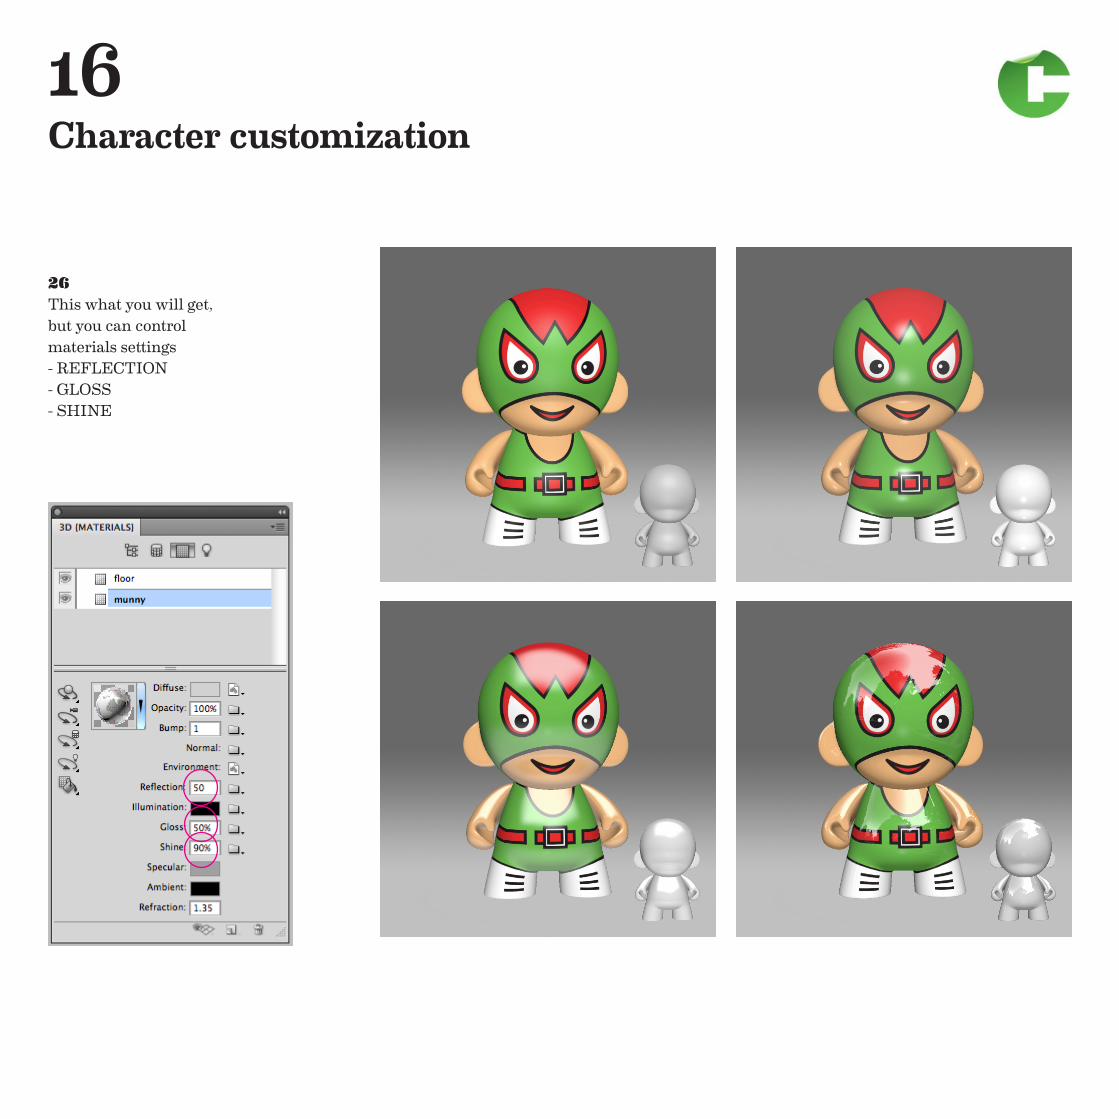
26This what you will get,but you can control materials settings- REFLECTION- GLOSS- SHINE
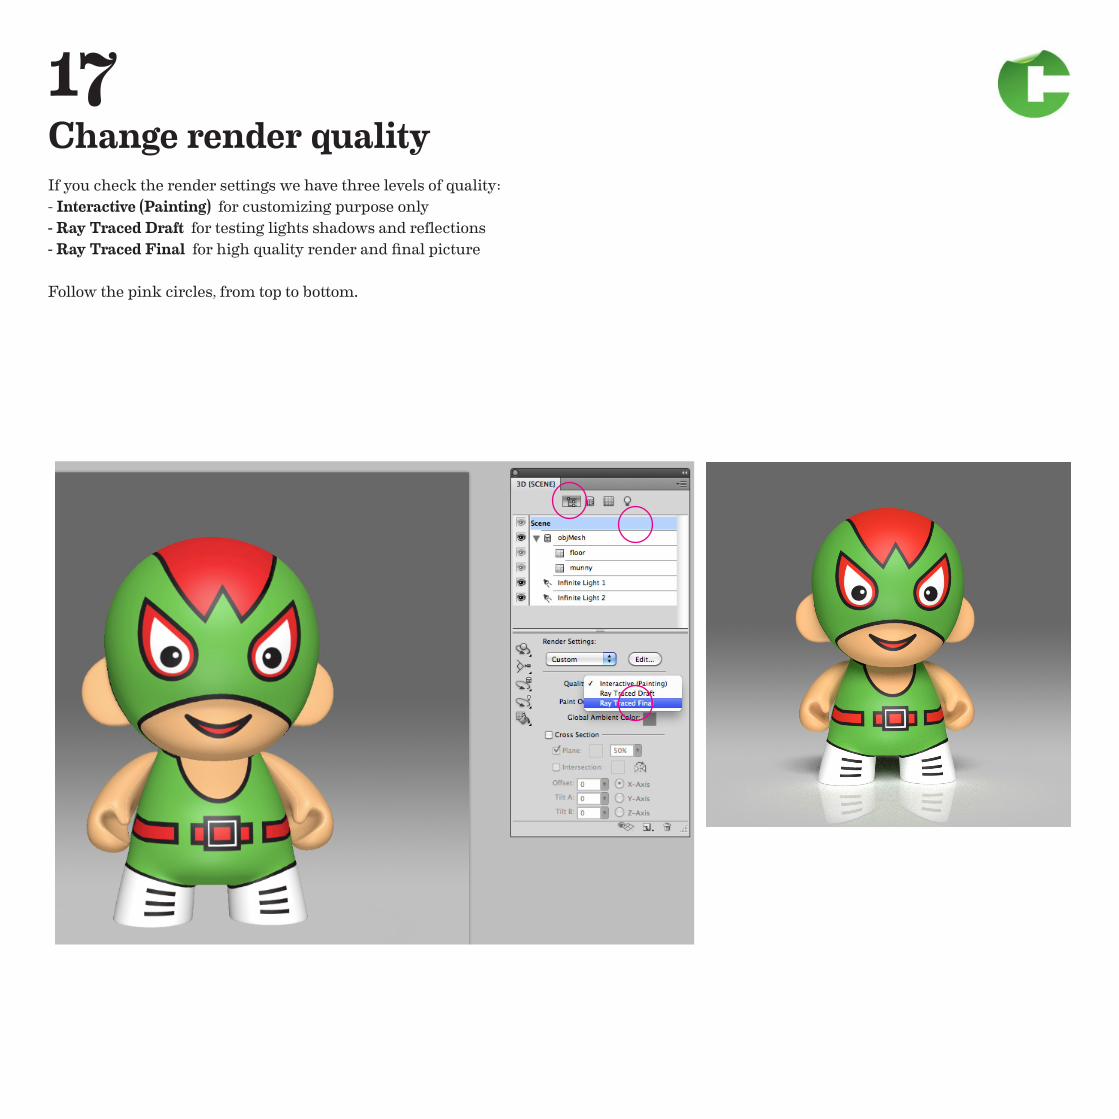
17 Change render qualityIf you check the render settings we have three levels of quality:- Interactive (Painting) for customizing purpose only- Ray Traced Draft for testing lights shadows and reflections- Ray Traced Final for high quality render and final picture
Follow the pink circles, from top to bottom.
18 Customizing your scene - 3D tools (Please check the QUICK TOUR tutorial)
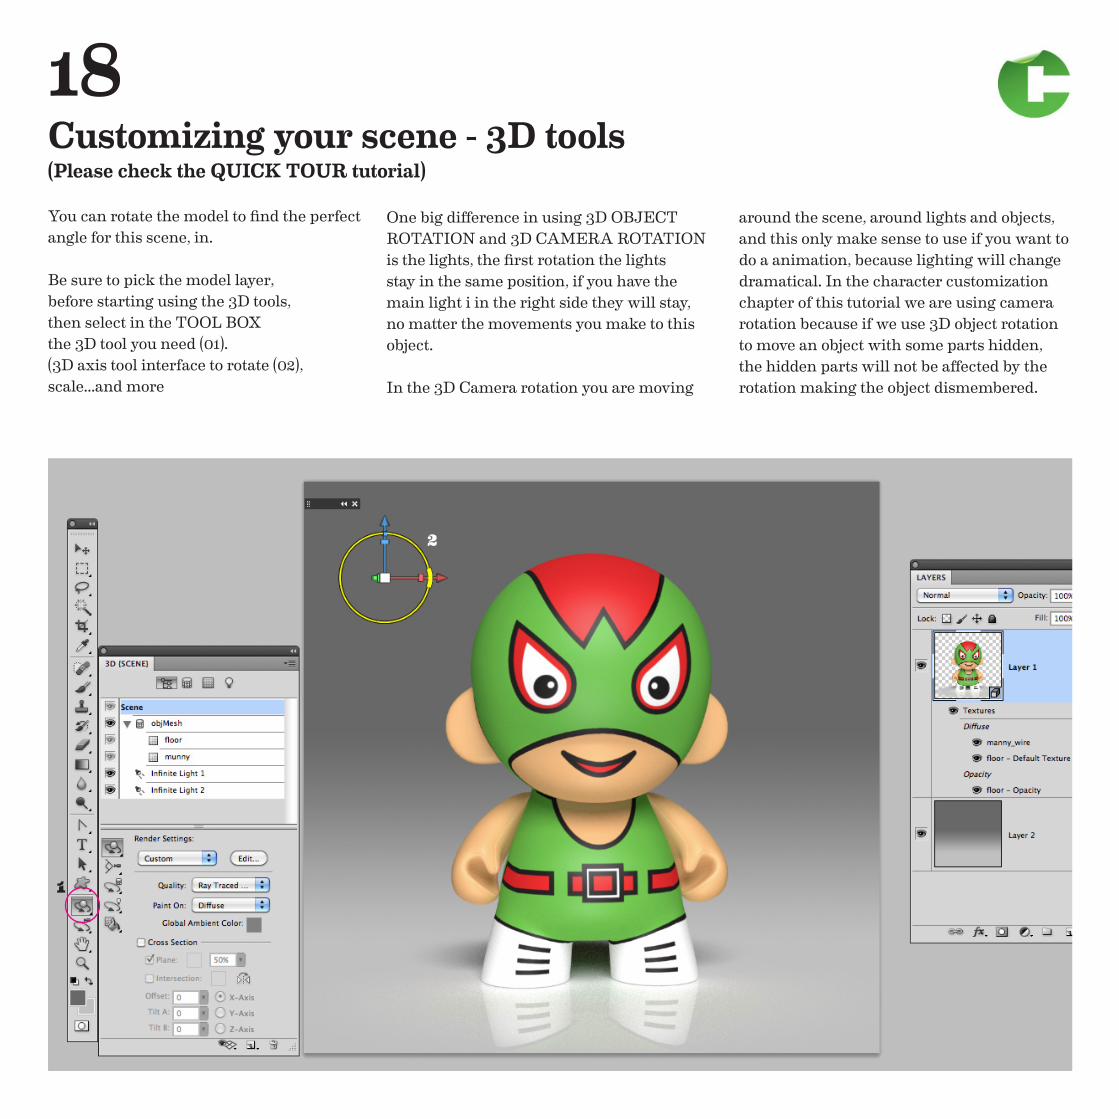
You can rotate the model to find the perfect angle for this scene, in.
Be sure to pick the model layer, before starting using the 3D tools, then select in the TOOL BOXthe 3D tool you need (01). (3D axis tool interface to rotate (02), scale...and more
One big difference in using 3D OBJECT ROTATION and 3D CAMERA ROTATION is the lights, the first rotation the lights stay in the same position, if you have the main light i in the right side they will stay, no matter the movements you make to this object.
In the 3D Camera rotation you are moving
around the scene, around lights and objects, and this only make sense to use if you want to do a animation, because lighting will change dramatical. In the character customization chapter of this tutorial we are using camera rotation because if we use 3D object rotation to move an object with some parts hidden, the hidden parts will not be affected by the rotation making the object dismembered.
1
2

19 Customizing your scene - 3D lights (Please check the QUICK TOUR tutorial)
If you need to lighten any dark part of the model,change light intensity or change the light color
02
0304
05A
05B
05C
05C
(01) Lights window(02) Pick the light you need to customize(03) Light intensity(04) Light color(05) Light control
(05A) show 3D light in the scene(05B) Light rotation(05C) Light rotation tool
1
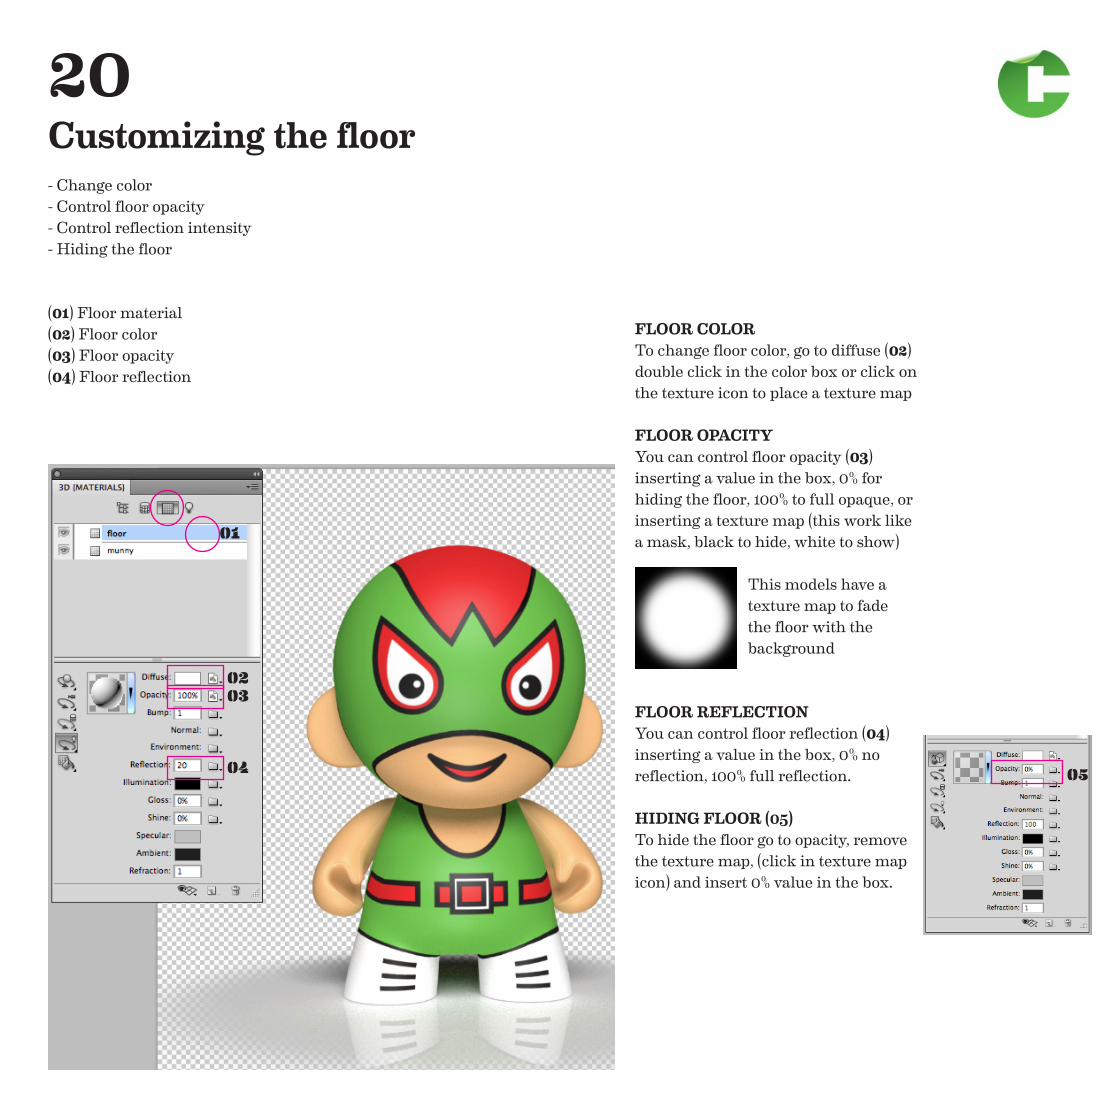
20 Customizing the floor - Change color- Control floor opacity- Control reflection intensity- Hiding the floor
(01) Floor material(02) Floor color(03) Floor opacity(04) Floor reflection
FLOOR COLORTo change floor color, go to diffuse (02) double click in the color box or click on the texture icon to place a texture map
FLOOR OPACITYYou can control floor opacity (03) inserting a value in the box, 0% for hiding the floor, 100% to full opaque, or inserting a texture map (this work like a mask, black to hide, white to show)
This models have a texture map to fade the floor with the background
FLOOR REFLECTIONYou can control floor reflection (04) inserting a value in the box, 0% no reflection, 100% full reflection.
HIDING FLOOR (05)To hide the floor go to opacity, remove the texture map, (click in texture map icon) and insert 0% value in the box.
02
01
03
04 05
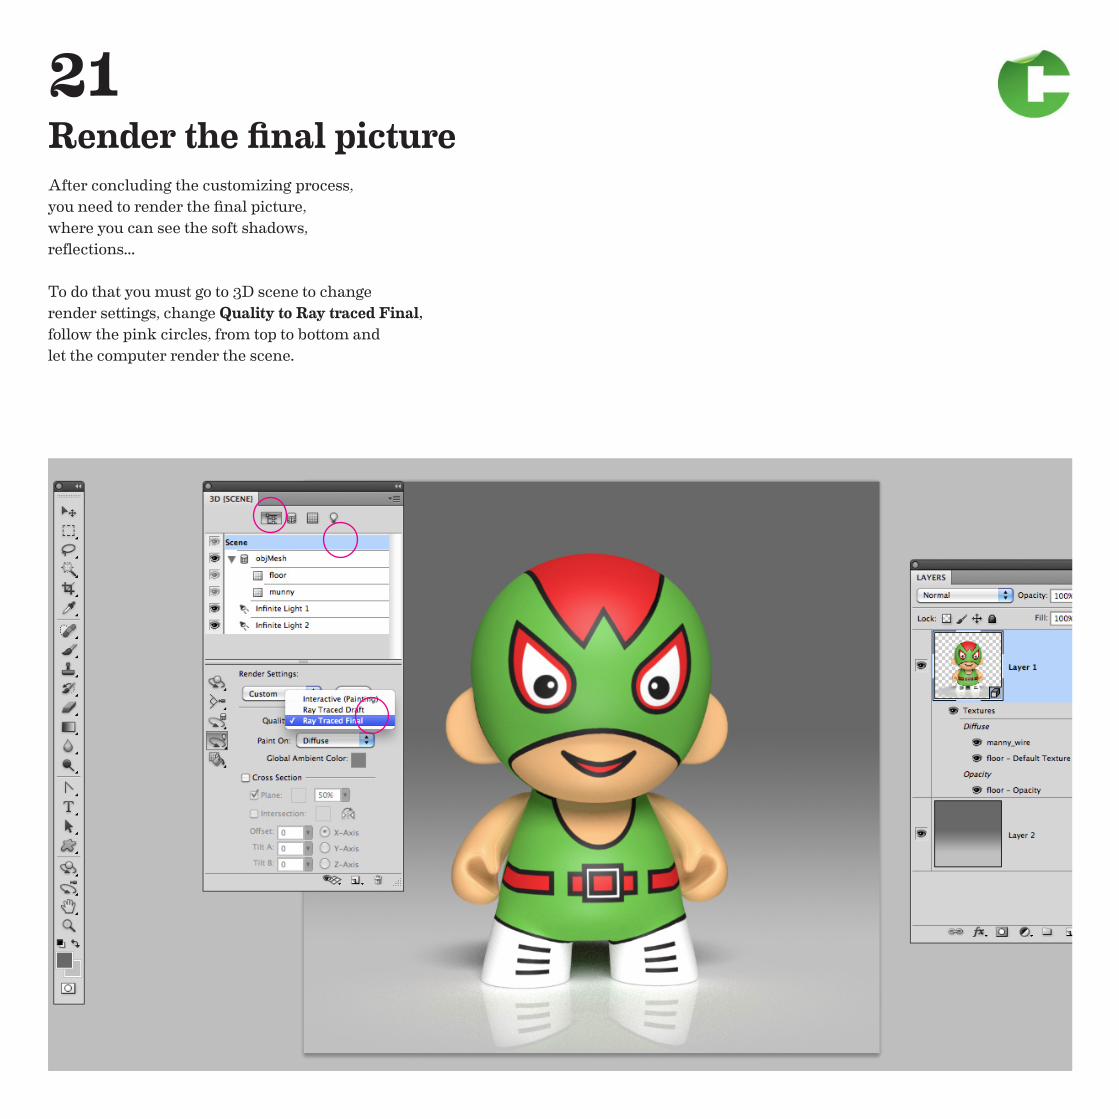
21 Render the final pictureAfter concluding the customizing process, you need to render the final picture, where you can see the soft shadows, reflections...
To do that you must go to 3D scene to change render settings, change Quality to Ray traced Final,follow the pink circles, from top to bottom andlet the computer render the scene.

For any questions you can use the photoshop help or contact me through my email - [email protected]