Embed Size (px)
DESCRIPTION
Manual
Citation preview

Hoval Switzerland Hoval Herzog AG CH-8706 Feldmeilen General-Wille-Strasse 201 Telephone 044 / 925 61 11 Fax 044 / 923 11 39
Hoval Austria Hoval Gesellschaft mbH A-4614 Marchtrenk Hovalstrasse 11 Telephone 07243 / 550-400 Fax 07243 / 550-17
Hoval Germany Hoval (Germany) GmbH Karl Hammerschmidt Strasse 45 D-85609 Aschheim-Dornach Telephone 089 / 92 20 97-0 Fax 089 / 92 20 97-77
ENG
Heating controller TopTronic®T
Operating instructions
Subject to change without notice 4 204 766 / 00 04/05

Overview of contents
Heating system control .......................................................................................................3-35 Operating and display elements What is the function of the heating controller TopTronic® T? .............................................................................4 Function of the operating elements ...................................................................................................................5 Basic procedure for changing settings ..............................................................................................................5 What to do if... ...................................................................................................................................................6 Control elements of the boiler control panel .................................................................................................. 7-9 Main settings Changing the room temperature ................................................................................................10-11 Holiday, absent, constant reduced heating ......................................................................................................12 Setting the operating mode ....................................................................................................................... 13-15 Changing the time programs ..................................................................................................................... 16-18 Copying of switching times ........................................................................................................................ 19-20 Heating curve (heating characteristic) ....................................................................................................... 21-22
Domestic hot water settings Setting the domestic hot water temperature ....................................................................................22 Manual domestic hot water reloading ..............................................................................................23 Domestic hot water economy temperature .....................................................................................................24
Further settings Setting the time ...............................................................................................................................................26 Setting the date ...............................................................................................................................................27 Changing between summer and winter time ...................................................................................................27 Setting the language .......................................................................................................................................28 Reloading the standard time program - Deleting the own time program ................................................... 29-30 Manual operating mode (in case of faults) ......................................................................................................31 Alarm messages .............................................................................................................................................32
System information Information key for system temperatures and heating circuit information .......................................................33 Special symbols ..............................................................................................................................................34 Optional accessories .......................................................................................................................................35
2
4 204 766 / 00

Important addresses / System data
Important addresses and telephone numbers
Technical data(To be completed by the heating installer)
Information for the owner of the system:
Room station available
Number of heating circuits: 1 2 3
Heating circuits Heating curve value set
Heating circuit HC = _____________ __________
Heating circuit MC1 = ____________ __________
Heating circuit MC2 = ____________ __________
Enable time program P2, P3: yes no
Heating installer
Plumbing installer
Electrical installer
Lowest outdoor temperature setting °C
Thermal output required for central heating kW Max. flow temperature °C
Max. return temperature °C
Calculation basis for heating system(To be completed by the heating installer)
3
4 204 766 / 00

What is the function of the heating controller TopTronic® T? The boiler controller is, in conjunction with the temperature sensor
connected to it, so to speak, the brain of the heating system. Its main functions are:
- maintaining the desired room temperature independently of the outdoor temperature
- heating the living space when required - produce warm water (e.g. for showering) only when required - displaying information
Further functions: - Input of desired temperatures and operating modes - Turn the burner ON/OFF - Temperature monitor
The correct settings for the heating system have already been applied by Hoval, or the installer, during commissioning. Any changes to those settings should only be carried out if you go away on a trip or if your home is to cold or too warm. An overview of the most frequent questions/answers can be found on pages 6 and 12 of these instructions.
How you can save energy For your benefit and for the environment Using energy more efficiently by avoiding unnecessary losses:
With little effort you can optimise the operation of your system and make it worth while.
- You can save money. Enough money to pay your oil or gas bill every sixth year
- Every year, you can save the energy equivalent of a bathtub full or heating oil
In autumn, it is worth while turning the heating off again on warm days
This prevents the heating system from producing unnecessa-ry heat in the morning, due to low outdoor temperatures, and overheating the house. Turning the heating on or off depending on the weather conditions is one of the most effective energy saving measures. If you want to save yourself going down the basement, you may want to consider acquiring a “remote cont-rol” from Hoval, which will allow you to operate and control the heating comfortably from your living room.
Basic display The basic display shows the day of the week, date and time of the day, as well as the current boiler temperature and room temperature (room station)
Heating system control
Heating system control
4
4 204 766 / 00

Heating system control
Function of the operating elements The central rotary pushbutton and the labelled keys are desi-gned for easy and straightforward operation.
Rotary pushbutton:Change and store values
Basic procedure for changing settings
An example
Select the desired function
Turn the rotary pushbutton to select or change the desired parameter (flashing word or number)
Press the Info key at any time to go back to the basic display without storing the values set
Press the rotary pushbutton to store the value setIt is also possible to store the value using the selected function key
Function keysFunction keys
5
4 204 766 / 00

Heating system control
What to do if ...The following information can be used as a first level support in frequently occurring situations.
6
4 204 766 / 00
Observation
It is too cold
It is too warm
From now on, equal day and night temperatures should be maintained continuously
This evening, the heating should remain on for longer
A larger amount of hot water is required
From now on, hot water but no hea-ting is required
Suddenly, there is no heating or hot water; it is cold.
The room temperature setpoint re-quires frequent adjustments becau-se it is too cold or too hot
Today, I will be absent for several hours during the day
I am travelling for a short period of time (e.g. 3 days)
I will be travelling for an indefinite period of time
In summer, it is too cold or too warm.
Remedy
Set a higher value for the room temperature with and the rotary pushbutton (see page 16).
Set a lower value for the room temperature with and the rotary pushbutton (see page 16 and 20).
Set the operating mode to “HEATING” with (page 20).
Set the operating mode to “PARTY” with and set the desired time (page 19).
Press for 3 seconds and set the additional loading time (page 29).
Set operating mode to “SUMMER” with (heating off, hot water only) (page 20).
Check the boiler controller for alarms and consult a heating en-gineer, if necessary.
Change the set heating curve (page 27). Changing the heating curve is not sensible if your system is fitted with a room sensor (or room station) and an outdoor sensor. The correct settings for the heating curve are then provided automatically
Set the operating mode to “ABSENT TIL” with and set the return time (see page 19).
Set the operating mode to “HOLIDAY TIL” with and set the return time (see page 19).
Set the operating mode to “RED. HEATING” with .When returning, set the operating mode to “AUTOMATIC” (see page 20).
indicates that the summer disconnection is active.If it is too cold, set the operating mode to with (see page 20).

Control elements of the boiler control panel
1. Daytime room temperature
2. Reduced room temperature
3. DHW temperature
4. Rotary pushbutton
Legend Function
Use this function key to change the desired daytime room temperature
For further information see page 10
Use this function key to change the desired room temperature in the reduced heating mode
For further information see page 11
Use this function key to set the desired daytime domestic hot water temperature
For further information see page 22
Use the rotary pushbutton to select or change the desired parameters (fl ashing word or number).- Clockwise turn (+): increase value- Counter-clockwise turn (-): decrease value- Short tap: accept and store the value selected and displayed- Pressing for approx. 3 seconds: go to programming level (level selec-
tion)
Heating system control
1
234
9
56
87
7
4 204 766 / 00

Legend Function
Heating system control
5. System information key
6. Heating curve set-up key
7. Operating mode selection key
- Show the temperatures and hours of operation on the display - Return to the basic display without saving the values, is also
possible any time with this function key.
For further information see page 33
The heating curve shows the flow temperature of a heating system as a function of the outdoor temperature. Use this function key to modify the heating curve.
For further information see page 21
Turn off the heating system during the holidays (frost protection)
Temporarily switch off heating
Extended heating
Automatic heating according to the preset heating times
Only DHWHeating off
Continuous heating mode
Constant reduced heating mode
System switched offFrost protection activated
For further information see pages 13-15
8
4 204 766 / 00

Heating system control
Legend Function
8. Manual mode and emis-sion measurement key
9. Display
This is used for emission measurement and may only be used by a chimney sweep or a qualified heating technician!
For further information see page 31
The basic display shows the day of the week, date and time of the day, as well as the current boiler temperature and room temperature (room station).
Possible readouts:1 Active heating time 24h 2 Weekday display 3 Display of the active operating mode and the clock programme 4 Time of the day 5 Selected operating mode 6 Date / Day / Month / Year 7 Room temperature (when activated)
2
1
3
4
6
7
5
9
4 204 766 / 00
Heating system control
Main settings
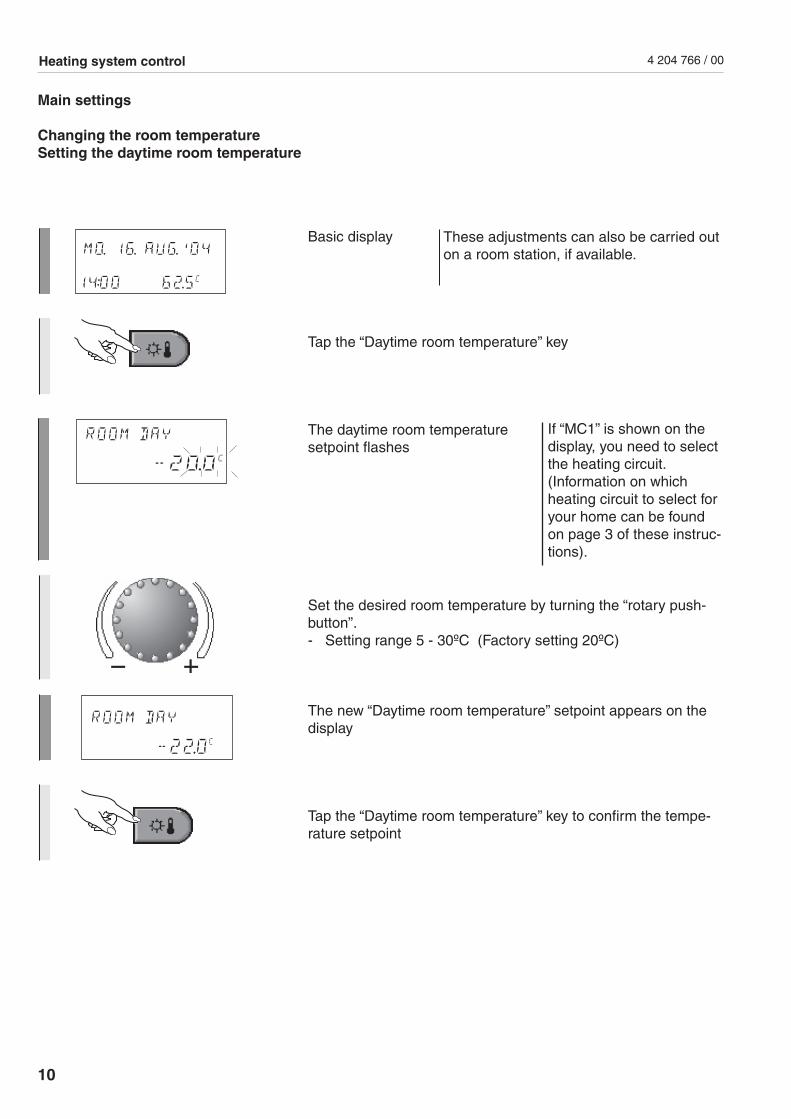
Changing the room temperatureSetting the daytime room temperature
Basic display
Tap the “Daytime room temperature” key
The daytime room temperature setpoint flashes
Set the desired room temperature by turning the “rotary push-button”.- Setting range 5 - 30ºC (Factory setting 20ºC)
The new “Daytime room temperature” setpoint appears on the display
Tap the “Daytime room temperature” key to confirm the tempe-rature setpoint
These adjustments can also be carried out on a room station, if available.
If “MC1” is shown on the display, you need to select the heating circuit. (Information on which heating circuit to select for your home can be found on page 3 of these instruc-tions).
10
4 204 766 / 00

Heating system control
Setting the reduced (night time) temperature
Basic display
Tap the “Reduced room temperature” key
The night time room temperature setpoint flashes.
Set the desired room temperature by turning the “rotary push-button”.- Setting range 5 - 30ºC (Factory setting 16ºC)
The new “Reduced room temperature” setpoint appears on the display.
Tap the “Reduced room temperature” key to confirm the tempe-rature setpoint.
These adjustments can also be carried out on a room station, if available.
If “MC1” is shown on the display, you need to select the heating circuit. (Information on which heating circuit to select for your home can be found on page 3 of these instruc-tions).
11
4 204 766 / 00

Holiday, absent, constant reduced heatingDepending on the duration of your absence and what your requirements are in regard to comfort, there are different operating modes available for interrupting or reducing the heating. In any case you will be able to save a lot of energy and money if the rooms are not heated or less heated during your absence.The following table is intended as a guide for finding the best operating mode for each particular case:
Application
You go on holiday for e.g. 1 week and you know the return date
You leave home in the mor-ning and come back late in the evening
You are travelling for an inde-finite period of time and want the living area to be at the set reduced temperature on return.
You are away for an indefinite period of time during spring or autumn and you don’t mind if your home is cool on return
Operating mode
System is off during holidays
"HOLIDAY TIL"
Heating interrupted temporarily
"ABSENT TIL"
Continuous reduced heating mode
"RED. HEATING"
System switched off - Frost pro-tection activated"STANDBY"
Function
- Heating system OFF / Calorifier frost protected (5ºC)
- Room temperature set to mini-mum (10ºC)
Setting range:current date + 250 days End of holiday = Return date 0:00 o’clockEarly return“Press and hold” for 3 sec, then return to “AUTOMATIC” mode
Heating temporarily interrupted until set timeSetting range: 0.5.....24h
Continuous reduced heating and DHW mode around the clock
The entire heating system is switched off and frost protected. No DHW mode!
Heating system control
See following pages for a detailed description on how to set the operating modes.
You can return to the “AUTOMATIC” function (normal heating mode) at any time by “pressing and hol-ding” for 3 sec
12
4 204 766 / 00

Heating system control
Tap the “Operating mode” key
The note “OP. MODE” is displayed for a short time
The currently active operating mode is then shown flashing on the display. An indicator bar at the lower part of the display points to the corresponding symbol.
Set the desired operating mode by turning the “rotary pushbutton”:"HOLIDAY TIL” or “ABSENT TIL” or “PARTY TIL"
The selected operating mode is shown flashing on the display
Tap the “rotary pushbutton” to confirm the selected operating mode
Today’s date (“HOLIDAY TIL”) or the current time (“ABSENT TIL”, “PARTY TIL”) is shown flashing on the display.
Turn the “rotary pushbutton” and select- for “HOLIDAY TIL”, the date of return from holiday- for “ABSENT TIL”, the expected return time (within max. 24h). - for “PARTY TIL”, the time the party is expected to end.
Tap the “rotary pushbutton” to confirm the setting.
Setting the operating modeProcedure for activating the operating modes “HOLIDAY TIL”, “ABSENT TIL” or “PARTY TIL”.
13
4 204 766 / 00

Heating system control
Procedure for activating the operating modes “AUTOMATIC”, “SUMMER1” , “HEATING”, “RED. HEATING” and “STANDBY”
Tap the key “Operating mode”
The note “OP. MODE” is displayed for a short time
The currently active operating mode is then shown flashing on the display
Set the desired operating mode by turning the “rotary pushbutton”
for example “RED. HEATING”
Tap the “rotary pushbutton” to confirm the setting.
1 The operating mode “Summer” can not be selected when each heating circuit is set up separately.
14
4 204 766 / 00

Operating mode Function
AUTOMATIC
SUMMER
HEATING
RED. HEATING
STANDBY
Automatic control mode according to the heating times set in the 1. time program Factory setting: Heating: 06:00 - 22:00 Reduced heating: 22:00 - 06:00 Domestic hot water: 05:00 - 22:00
DHW mode onlyDHW is produced at the times set in the time program (for showering, etc.)
Factory setting for domestic hot water: 05:00 - 22:00 Frost protection is active
Continuous heating modeThe room temperature is not reduced during the night. DHW is produced at the times set in the time program
Continuous reduced heating modeThe rooms are continuously heated at the “ROOM NIGHT” temperature set-ting.
No heating modeHeating system is switched off There is no heating and no DHW is produced. Frost protection is active.
Heating system control
Info:Operating mode “Summer” can not be selected when each heating circuit is set up separately.
15
4 204 766 / 00

Heating system control
Changing the time programs (heating times)
This function allows creating individual time programs for the heating and DHW modes. After selecting the respective heating circuit, the factory-set standard program (P1) is loaded and can then be edited individu-ally.The standard heating times preset by the manufacturer are, e.g.:
Circuit Day Heating from
All heating circuits (HC,MC-1,MC-2)
Mo-Su 06.00 - 22.00
Domestic hot wa-ter circuit (DHW)
Mo-Su 05.00 - 22.00
Further standard programs can be - or could have been - set-up or enabled for programming by the installer (P1-P3) see page 18.
A maximum of 3 heating times per day are
Table for recording individual switching times
Time program for living area (MC1)Day Cycle 1 Cycle 2 Cycle 3
from to from to from to
Mo
Tu
We
Th
Fr
Sa
Su
Time program for living area (MC2)Day Cycle 1 Cycle 2 Cycle 3
from to from to from to
Mo
Tu
We
Th
Fr
Sa
Su
Time program for living area (HC)Day Cycle 1 Cycle 2 Cycle 3
from to from to from to
Mo
Tu
We
Th
Fr
Sa
Su
Times program for calorifier (DHW)Day Cycle 1 Cycle 2 Cycle 3
from to from to from to
Mo
Tu
We
Th
Fr
Sa
Su
per day1 heating cycle
per day2 heating cycles
per dayheating cycles
16
4 204 766 / 00

Heating system control
�
Basic display
Press the “rotary pushbutton” for at least 3 sec.
The note “TIMEPROGRAMS” appears on the display.
Tap the “rotary pushbutton” to confirm
The letters “HC” also appear on the display
Select the heating circuit by turning the “rotary pushbutton”.(Information on which heating circuit to select for your home can be found on page 3 of these instructions)
Select Time program P1, P2 or P3, if required - see page 18
Tap the “rotary pushbutton” to confirm the selected heating circuit
Use the “rotary pushbutton” to select the day for which the heating time has to be modified. Note: The 3rd heating cycle is omitted if the 2nd heating cycle does
not contain any switching times.
Change - Exit:Every flashing setting can be corrected using the rotary button, if required, and accepted by tapping. Use the key to go back one step. Use the key or wait for approx. 60 sec. to go back to the basic display.
e.g.
17
4 204 766 / 00

Heating system control
If P1 is displayed, it means that further standard heating times programs are already enabled. If not, P2 and P3 can be enabled by the heating technician..
Circuit Day Heating from
All heating circuits (HC,MC-1,MC-2)
Mo-Th
Fr
Sa-Su
06.00-08.00 16.00-22.00
06.00-08.00 13.00-22.00
07.00-23.00
Hot water circuit (DHW)
Mo-Th
Fr
Sa-Su
05.00-08.00 15.30-22.00
05.00-08.00 12.30-22.00
06.00-23.00
Circuit Day Heating from
All heating circuits (HC,MC-1,MC-2)
Mo-Fr
Sa-Su
07.00-18.00
reduced
Hot water circuit (DHW)
Mo-Fr
Sa-Su
06.00-18.00
reduced
Factory setting:Switching times program P2
Factory setting: Switching times program P3
�
�
�
�
.....
..Tap the “rotary pushbutton” to confirm the day.
The currently set heating start time is shown flashing on the display
Set the desired heating start time by turning the “rotary pushbutton”.
Tap the “rotary pushbutton” to confirm the set start time. Turn the “rotary pushbutton” to set the time setpoint for the end of the heating mode on the week day shown
The week day is shown flashing on the display. You can now set a second heating time (Mo -2) for this day by turning the “rotary push-button” or by going directly to Tuesday to set the desired heating time.
Instead of introducing each day separately, you can also use the “copy” function - see page 25This function allows you to copy the switching times from any week day to other days (Mo-Su) or to an entire week (1-7) or to day groups like working days (1-5) or weekends (6-7).
Once you have completed all the changes, tap the operating mode key to confirm the settings and open the basic display
18
4 204 766 / 00

Heating system control
Copying switching times
Basic display
Press the “rotary pushbutton” for at least 3 seconds
The word “TIMEPROGRAMS” is shown on the display.
Tap the “rotary pushbutton” to confirm the selected operating mode.
The note “HC” is also shown on the display.
Select the heating circuit by turning the “rotary pushbutton”.(Information on which heating circuit to select for your home can be found on page 5 of these instructions)
Select Time program P1, P2 or P3, if required - see page 24
Tap the “rotary pushbutton” to confirm the selected heating circuit.
The heating time setpoint is shown flashing on the display
Keep turning the “rotary pushbutton”
until “COPY”, “DAY” appears flashing on the display
�
19
4 204 766 / 00

Heating system control
Tap the “rotary pushbutton” to confirm the settings
Change - Exit:Every flashing setting can be corrected using the rotary button and accepted by tapping. Use the key to go back one step. Use the key or wait for approx. 60 sec. to go back to the basic display.
Select the day from which the heating time setting is to be copied by turning the “rotary pushbutton”.Note: The 3rd heating cycle is omitted if the 2nd heating cycle
does not contain any switching times
Tap the “rotary pushbutton” to confirm the desired day.
Select the target day(s): Weekdays (MO...SU), whole week (1-7)Working days only (1-5), weekend only (6-7)
Tap the “rotary pushbutton” to confirm the setting
Confirmation for correct copying of day(s).
Target range for the next copy process is shown flashing on the dis-play.
Select the next copy range by turning the “rotary pushbutton”.
Target range for the copy process is shown again flashing on the display.Use the same scheme to create any additional copies.
After completing all the changes, tap the operating mode key to con-firm the settings and open the basic display.
20
4 204 766 / 00

Heating system control
Heating curve (heating characteristic)
The slope of the heating characteristic curve generally describes the ratio between variations in the flow temperature and variations in the outdoor temperature.
�
�
Basic display
Press the “Heating curve” key
“Heating curve” display appears “HC” flashes. In case of several heating circuits you must first select the relevant circuit by turning the “rotary pushbutton”- see page 3, Technical data.
Confirm
The slope of the heating characteristic curve is shown flashing on the display
Select the desired value for the slope of the heating characteristic curve by turning the “rotary pushbutton”.
The selected slope of the heating characteristic curve is shown on the display
Recommended settingsFloor heating: 0,3...1,0Radiator heating: 1,2...2,0Convector heating: 1,5...2,0
The heating is normally preset by the installer during the commissioning of the heating system. The hea-ting curve should only be changed in small steps and over longer periods of time.
Hea
ting
flow
tem
pera
ture
Outdoor temperature
Hea
ting
curv
e sl
ope
21
4 204 766 / 00

Heating system control
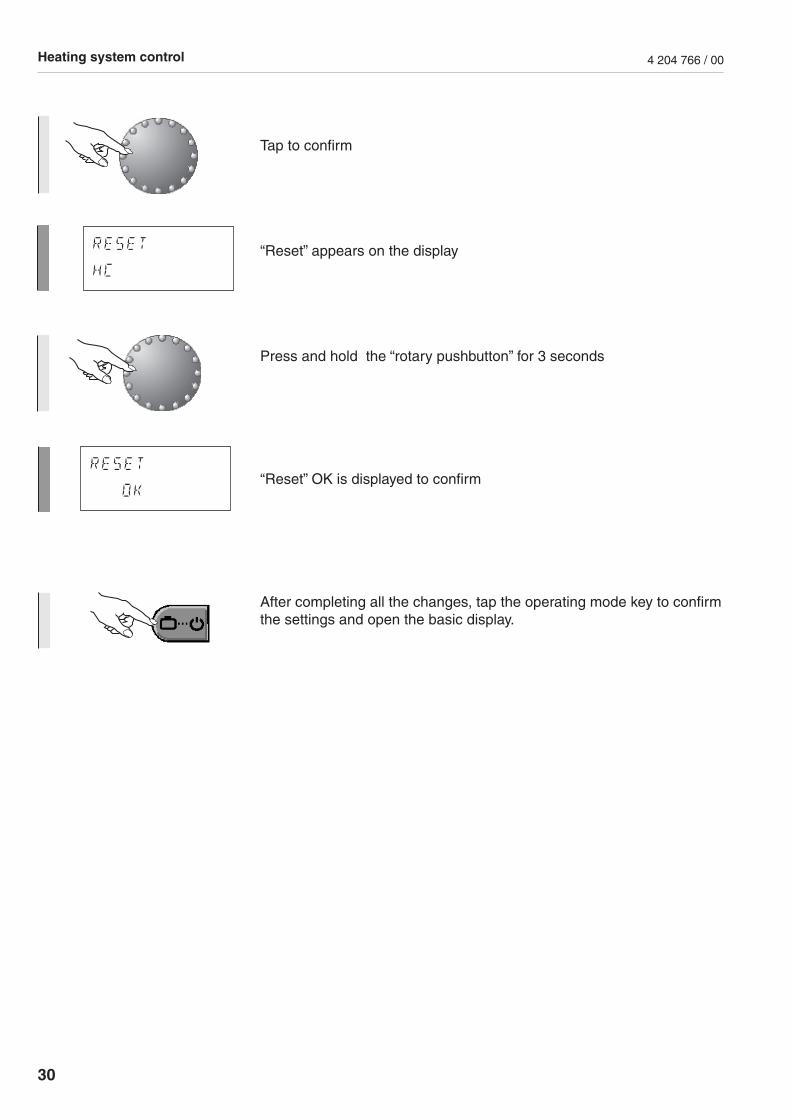
Tap to confirm
Turn the rotary pushbutton to set up further heating circuits, if required
After completing all the changes, tap the operating mode key to confirm the settings and open the basic display.
Setting the domestic hot water temperature
Basic displaySettings can be conducted at a room station, if this is available.
Tap the “Domestic hot water temperature” key.
The current DHW temperature setpoint is shown flashing on the display.
22
4 204 766 / 00

Basic display
Press and hold the “DHW temperature” key for 3 seconds
The DHW reloading time is displayed; the minute-display flashes
Set the desired additional reloading time by turning the “rotary push-button”. Setting range 0 - 240 min
Tap to confirm
The active reloading process is displayed until the reloading process has been completed
Manual domestic hot water reloading
Heating system control
Set the desired hot water temperature by turning the “rotary pushbut-ton”.- Setting range 10 - 65ºC (Factory setting 60ºC)
The selected hot water temperature is shown on the display
Tap the “Domestic hot water temperature” key to confirm the tempe-rature setpoint.
Outside the time periods during which the DHW mode is available, the calorifier can be manually reloaded within the selected setting range.The calorifier is reloaded once according to the set daytime DHW temperature. Reloading is limited by the set temperature for all other settings.
23
4 204 766 / 00

Heating system control
Basic display
Press and hold the “rotary pushbutton” for 3 seconds
“Time programs” is shown on the display.
Turn the “rotary pushbutton”
until “DHW” is shown flashing on the display
Tap to confirm
“DHW” flashes on the display.The temperature shown defines the the desired DHW temperature outside the time periods during which the DHW mode is available
Tap to confirm
The night-time DHW temperature flashes
Domestic hot water economy temperature (reduced temperature)
24
4 204 766 / 00

Heating system control
Set the desired temperature value by turning the “rotary pushbutton” and tap to confirm the setting.
After completing all the changes, tap the operating mode key to con-firm the settings and open the basic display.
25
4 204 766 / 00

Basic display
Press and hold the “rotary pushbutton” for 3 seconds
“Time programs” is shown on the display
Turn the “rotary pushbutton”
until “Time-date” is shown on the display
Tap to confirm
“Time” flashes
Tap to confirm
The “time” flashes
Further settings Setting the time
Heating system control
26
4 204 766 / 00

Turn the “rotary pushbutton” to set the desired time and tap to con-firmTurn the “rotary pushbutton” for further adjustments
“Year” appears - confirmTurn to change the year setting - confirm
“Day...Month” is shown flashing on the display - confirmTurn to change the Day...Month setting - confirm
“Change” is shown flashing on the display - confirmTurn to change SU-WI ON or OFF - confirm
After completing all the changes, tap the operating mode key to con-firm the settings and open the basic display.
Setting the date
Heating system control
Changing between summer and winter time
27
4 204 766 / 00

Heating system control
You will be prompted for the desired language when switching on the control system for the first time. Changing the language is also possible during normal operation.
Basic display
Press and hold the “rotary pushbutton” for 3 seconds
“Time programs” is shown on the display.
Turn the “rotary pushbutton”
until “System” is shown on the display
Tap to confirm
“Language” appears on the display. Abbreviations for the language are shown flashingD = German / GB = English I = Italian / F = French
Turn to select the desired language and tap to confirm.
After completing all the changes, tap the operating mode key to con-firm the settings and open the basic display.
Setting the language
28
4 204 766 / 00

Reloading the standard time program - Deleting the own time program
This function allows you to reload all the factory settings.
Basic display
Press and hold the “rotary pushbutton” for 3 seconds
“Time programs” is shown flashing on the display.
Tap to confirm
The letters “HC” appear on the display.
Keep turning until “Default-time” appears
“Default-time” is shown flashing on the display.
Tap to confirm
The letters “HC” appear on the displaySelect the desired heating circuit by turning the “rotary pushbutton”
Heating system control
29
4 204 766 / 00
Tap to confirm
“Reset” appears on the display
Press and hold the “rotary pushbutton” for 3 seconds
“Reset” OK is displayed to confirm
After completing all the changes, tap the operating mode key to confirm the settings and open the basic display.
Heating system control
30
4 204 766 / 00
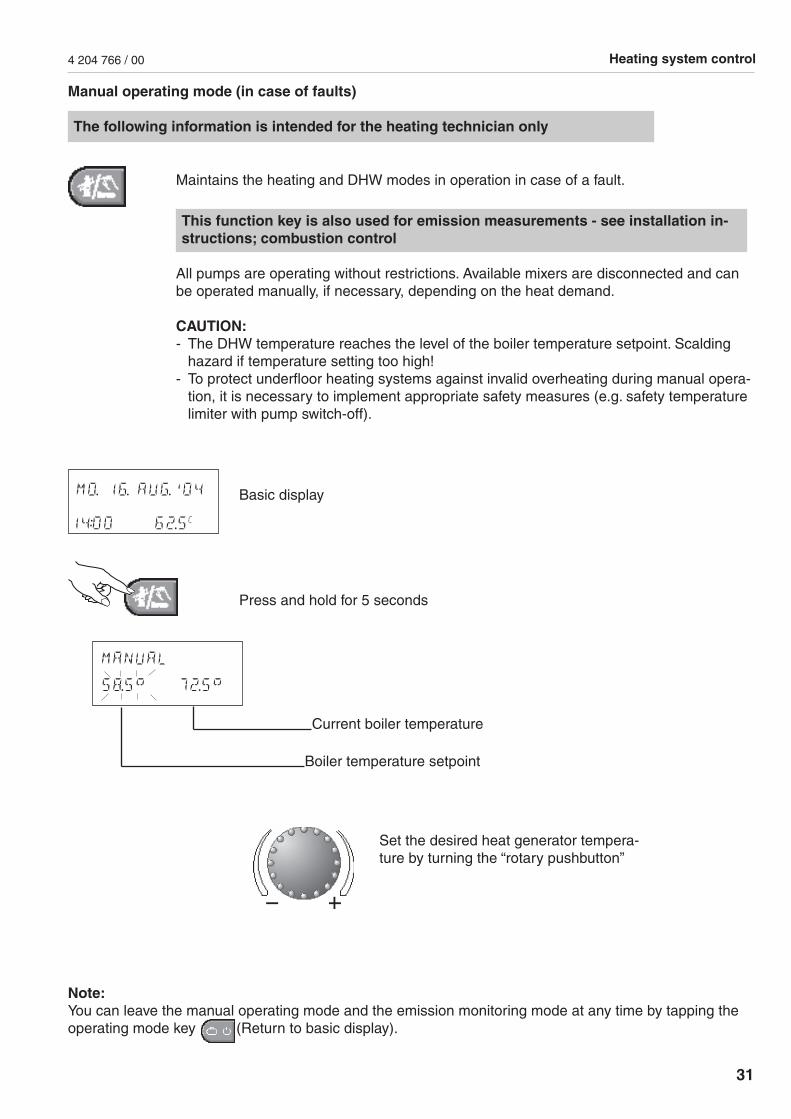
Manual operating mode (in case of faults)
The following information is intended for the heating technician only
Basic display
Press and hold for 5 seconds
Current boiler temperature
Boiler temperature setpoint
Set the desired heat generator tempera-ture by turning the “rotary pushbutton”
Maintains the heating and DHW modes in operation in case of a fault.
This function key is also used for emission measurements - see installation in-structions; combustion control
All pumps are operating without restrictions. Available mixers are disconnected and can be operated manually, if necessary, depending on the heat demand.
CAUTION:- The DHW temperature reaches the level of the boiler temperature setpoint. Scalding
hazard if temperature setting too high!- To protect underfloor heating systems against invalid overheating during manual opera-
tion, it is necessary to implement appropriate safety measures (e.g. safety temperature limiter with pump switch-off).
Heating system control
Note:You can leave the manual operating mode and the emission monitoring mode at any time by tapping the operating mode key (Return to basic display).
31
4 204 766 / 00

Alarm messages
Example for sensor alarm messages (short circuit or interruption) Error code 10-20 and index 0 or 1
Example for heat generator alarm messages (switching status) Error code 30-40 and index 2-5
Example for logical alarm messages (control functions) Error code 50-60 and index 2-4
Example for data bus alarm messages (address errors on data bus) Error code 70 and index 0 or 1
The controller comprises a comprehensive alarm logic which displays the fault type by means of the corresponding error code.
Heating system control
32
4 204 766 / 00

System informationInformation key for system temperatures and heating circuit information
Heat generator hours of operation (stage 1)
Heat generator starts (stage 1)
Flow temperature
DHW temperature
Heat generator temperature
Outdoor temperature
Actual values
All temperature values shown represent the current values. Press and hold the “rotary pushbutton” to display the individual setpoints..
only for 2-stage operation:- Heat generation hours of operation (stage 2)
- Heat generation starts (stage 2)
only in conjunction with room sensor:- Room temperature direct HC
- Room temperature MC1
- Room temperature MC2
In certain cases addi-tional information may be displayed.
Back to the basic dis-play: Briefly press
Heating system control
turn to left turn to right
33
4 204 766 / 00

Special symbols
Ice crystal symbol: Frost protection activated
Umbrella symbol: Summer disconnection active (hea-ting switched off, DHW according to program).
Heating system control
34
4 204 766 / 00
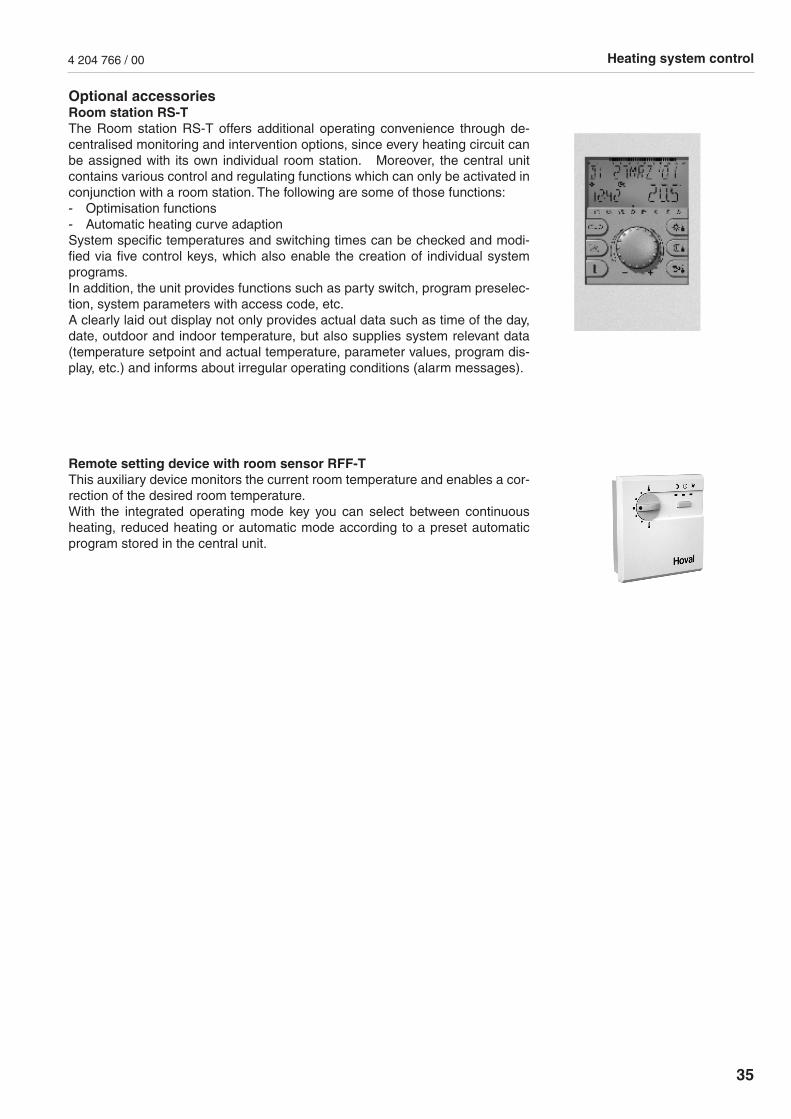
Optional accessoriesRoom station RS-TThe Room station RS-T offers additional operating convenience through de-centralised monitoring and intervention options, since every heating circuit can be assigned with its own individual room station. Moreover, the central unit contains various control and regulating functions which can only be activated in conjunction with a room station. The following are some of those functions:- Optimisation functions- Automatic heating curve adaptionSystem specific temperatures and switching times can be checked and modi-fied via five control keys, which also enable the creation of individual system programs.In addition, the unit provides functions such as party switch, program preselec-tion, system parameters with access code, etc.A clearly laid out display not only provides actual data such as time of the day, date, outdoor and indoor temperature, but also supplies system relevant data (temperature setpoint and actual temperature, parameter values, program dis-play, etc.) and informs about irregular operating conditions (alarm messages).
Remote setting device with room sensor RFF-TThis auxiliary device monitors the current room temperature and enables a cor-rection of the desired room temperature.With the integrated operating mode key you can select between continuous heating, reduced heating or automatic mode according to a preset automatic program stored in the central unit.
Heating system control
35
4 204 766 / 00
A-4614 Marchtrenk,Hovalstrasse 11, Tel. 07243/ 550-0Fax 07243/ 550 1 5Tel. Sales 072 43/ 550-300, Fax 07243/ 550-16 Customer service 072 43/550-400 Fax 07243/550-17www.hoval.at [email protected]
Hoval Herzog AGGeneral-Wille-Strasse 201, CH-8706 Feldmeilen Tel. 044 / 925 61 11 Fax 044 / 923 11 39 24 h Service:Tel. 0848 848 464 www.hoval.ch
Germany
Austria
Switzerland
Hoval (Germany) GmbHKarl Hammerschmidt Strasse 45, D-85609 Aschheim-Dornach Tel. 089 / 92 20 97-0Fax 089 / 92 20 97-77 [email protected]
Basel: Schneckelerstr. 9, 4414 Füllinsdorf Tel. 0848 640 640, Fax 0848 640 641 kc.basel @ hoval.ch
Bern: Aemmenmattstr. 43, 3123 Belp Tel. 031 818 66 30, Fax 031 818 66 31 [email protected]
Zürich: PO Box, 8706 Feldmeilen Tel. 0848 81 19 30, Fax 0848 81 19 31 [email protected]
Central Switzerland: PO Box, 8706 Feldmeilen Tel. 0848 81 19 40, Fax 0848 81 19 41 [email protected]
Vaduz: Austrasse 70, FL-9490 Vaduz Tel. +423 399 28 00, Fax +423 399 28 01 [email protected]
Ticino: Via Cantonale 34A, 6928 Manno Tel. 091 610 43 60, Fax 091 610 43 61 [email protected]
Eastern Switzerland: PO Box, 8706 Feldmeilen Tel. 0848 81 19 20, Fax 0848 81 19 21 [email protected]
Suisse romande : Ch. de Closalet 12,1023 CrissierTel. 0848 848 363, Fax 0848 848 767 [email protected]
Lüftungs- und Systemtechnik [Air conditioning and system technology], PO Box, 8706 Feldmeilen Tel. 0848 81 19 50, Fax 0848 81 19 51 [email protected]
A-6845 Hohenems, Franz-Michael-Felder-Strasse 6 Tel. 05576/ 77 499, Fax 05576/ 77 499 96 [email protected]
A-6020 Innsbruck, Etrichgasse 34Tel. 0512/ 36 40 50, Fax 0512/ 36 40 50 25 [email protected]
A-8041 Graz, Messendorfer Strasse 6Tel. 0316/ 47 25 36, Fax 0316/ 47 20 50 [email protected]
A-1220 Vienna, Percostrasse 26Tel. 01/ 278 06 74, Fax 01/ 278 06 74 29 [email protected]
Conservation of energy - Protection of the environment
36
4 204 766 / 00