Embed Size (px)
Citation preview

Copyright 2017 Ford Motor Company
Michael A. Berardi Ford Motor Company Director P. O. Box 1904 Service Engineering Operations Dearborn, Michigan 48121 Ford Customer Service Division
September 21, 2017 TO: All U.S. Ford and Lincoln Dealers
SUBJECT: NEW VEHICLE DEMONSTRATION / DELIVERY HOLD – Customer Satisfaction Program 17B25 – Supplement #1 Certain 2013-2017 Model Year Police Interceptor Utility Vehicles Exhaust Odor and Carbon Monoxide Complaints
REF :
Advance Notice – Customer Satisfaction Program 17B25 – Supplement #2 Dated: August 25, 2017
New! REASON FOR THIS SUPPLEMENT • Updated Service Action and Technical Information Attachment III, to include sealing certain
floor pan body plugs with foil-backed mastic patches • Updated Labor Allowances and Parts Requirements • Updated Dealer Q & A
PROGRAM TERMS This program will be in effect through September 30, 2018. There is no mileage limit for this program.
URGENCY / EXPIRATION DATE This Customer Satisfaction Program has an expiration date of September 30, 2018, to encourage dealers and customers to have this service performed as soon as possible. We recommend dealers utilize their FSA VIN Lists name and address (available by October 6, 2017) to contact customers with affected vehicles.
AFFECTED VEHICLES Vehicle Model Year Assembly Plant Build Dates
Police Interceptor Utility 2013-2017 Chicago August 25, 2011 through Job Last 2017MY
Affected vehicles built up to September 12, 2017 are identified in OASIS and FSA VIN Lists. Additional vehicles will be periodically added to this program until production ends for the 2017 model year. Non-Police Ford Explorer vehicles (with body codes other than K7A or K8A as denoted by VIN positions 5, 6, and 7) equipped with police/aftermarket up-fitter modifications and currently in law enforcement duty only may have this program performed by customer request. Contact the Special Service Support Center (SSSC) via the Web Contact Site, using a VIN specific Non-Involved Vehicle Request to request adding a VIN to this program prior to performing this service action.
REASON FOR THIS PROGRAM When an up-fitter installs customized emergency lighting, radios and other equipment, they may damage vehicle sealing systems and/or drill holes into the rear of the vehicle. This creates an opening where exhaust could enter the cabin if the sealing system is not properly repaired and holes are not properly sealed.
SEE VIDEO & NEWS RELEASE: Unsealed Holes Contribute to Exhaust Concerns in Police Interceptor Utility

Copyright 2017 Ford Motor Company
New! SERVICE ACTION Click Here to view a video demonstration of key inspection and repair procedures. For Police Interceptor Utility vehicles equipped, or formerly equipped with police/aftermarket up-fitter modifications, dealers are to inspect the rear of the vehicle and repair damage to body seals, grommets and liftgate spoiler sealing systems, seal the liftgate interior trim panel, install new muffler tips, seal certain body plugs in the floor pan, reprogram the Climate Control (HVAC) module, and check the Powertrain Control Module (PCM) for diagnostic trouble code (DTC) P0420 and/or P0430 following the technical instructions. For Police Interceptor Utility vehicles not equipped with police/aftermarket up-fitter modifications, dealers are to install new muffler tips, seal certain body plugs in the floor pan, reprogram the HVAC module, and check the PCM for DTC P0420 and/or P0430 following the technical instructions. NOTE: Aftermarket lighting and/or equipment mounted to the liftgate spoiler can compromise vehicle sealing and create a leak path for exhaust to enter the vehicle. Ford recommends removal of any aftermarket lighting and/or equipment mounted to the spoiler to prevent a potential path for exhaust to enter the vehicle. Any removed equipment must be returned to the customer. If the customer declines to allow removal of aftermarket lighting and/or equipment from the liftgate spoiler, have the customer sign a copy of the Customer Release Form – Liftgate Spoiler Aftermarket Lighting and/or Equipment (See Attachment V). Retain the signed document in your service records. This service must be performed on all affected vehicles at no charge to the vehicle owner.
OWNER NOTIFICATION MAILING SCHEDULE Owner letters are expected to be mailed the week of September 25, 2017. Dealers should repair any affected vehicles that arrive at their dealerships, whether or not the customer has received a letter.
ATTACHMENTS Attachment I: Administrative Information Attachment II: Labor Allowances and Parts Ordering Information Attachment III: Technical Information Attachment IV: Dealer Q & A Attachment V: Customer Release Form – Liftgate Spoiler Aftermarket Lighting and/or Equipment Attachment VI: 6 Important Facts About Carbon Monoxide and Police Vehicles Owner Notification Letter
QUESTIONS & ASSISTANCE For questions and assistance, contact the Special Service Support Center (SSSC) via the SSSC Web Contact Site. The SSSC Web Contact Site can be accessed through the Professional Technician Society (PTS) website using the SSSC link listed at the bottom of the OASIS VIN report screen or listed under the SSSC tab.
Sincerely,
Michael A. Berardi

Copyright 2017 Ford Motor Company
ATTACHMENT I Page 1 of 2
NEW VEHICLE DEMONSTRATION / DELIVERY HOLD – Customer Satisfaction Program 17B25 – Supplement #1
Certain 2013-2017 Model Year Police Interceptor Utility Vehicles Exhaust Odor and Carbon Monoxide Complaints
OASIS ACTIVATION OASIS was activated on July 28, 2017, for vehicles built up to July 19, 2017, and has been updated to include affected vehicles up to September 12, 2017. Additional 2017MY vehicles will be periodically added to this program until production ends for the model year.
FSA VIN LISTS ACTIVATION FSA VIN Lists will be available through https://web.fsavinlists.dealerconnection.com on September 13, 2017. Owner names and addresses will be available by October 6, 2017. NOTE: Your FSA VIN Lists may contain owner names and addresses obtained from motor vehicle registration records. The use of such motor vehicle registration data for any purpose other than in connection with this program is a violation of law in several states, provinces, and countries. Accordingly, you must limit the use of this listing to the follow-up necessary to complete this service action.
SOLD VEHICLES • Owners of affected vehicles will be directed to dealers for repairs. • Immediately contact any of your affected customers whose vehicles are not on your VIN list
but are identified in OASIS. Give the customer a copy of the Owner Notification Letter (when available) and schedule a service date.
• Correct other affected vehicles identified in OASIS which are brought to your dealership. • Dealers are to prioritize repairs of customer vehicles over repairs of new and used vehicle
inventory.
STOCK VEHICLES • Correct all affected units in your new vehicle inventory before delivery. • Use OASIS to identify any affected vehicles in your used vehicle inventory.
TITLE BRANDED / SALVAGED VEHICLES Affected title branded and salvaged vehicles are eligible for this service action.
ADDITIONAL REPAIR (LABOR TIME AND/OR PARTS) Additional repairs identified as necessary to complete the FSA should be managed as follows:
• For vehicles within new vehicle bumper-to-bumper warranty coverage, follow existing warranty and policy guidelines for related damage claims. No SSSC approval is required for these vehicles:
o Ford vehicles – 3 years or 36,000 miles • For vehicles outside new vehicle bumper-to-bumper warranty coverage, submit an Approval
Request to the SSSC Web Contact Site prior to completing the repair.
ATTACHMENT I Page 2 of 2
NEW VEHICLE DEMONSTRATION / DELIVERY HOLD –

Copyright 2017 Ford Motor Company
Customer Satisfaction Program 17B25 – Supplement #1 Certain 2013-2017 Model Year Police Interceptor Utility Vehicles
Exhaust Odor and Carbon Monoxide Complaints
OWNER REFUNDS • Ford Motor Company is offering a refund for owner-paid repairs covered by this program if the
repair was performed before the date of the Owner Notification Letter. This refund offer expires March 31, 2018.
• Refunds will only be provided for the cost associated with the inspection and repair of vehicles with exhaust odor and carbon monoxide complaints using TSB 16-0166 or 17-0044, and exhaust catalyst replacement for DTC P0420 and/or P0430.
RENTAL VEHICLES Rental vehicles are not approved for this program.
CLAIMS PREPARATION AND SUBMISSION • Enter claims using Direct Warranty Entry (DWE) or One Warranty Solution (OWS).
o DWE: refer to ACESII manual for claims preparation and submission information. o OWS: when entering claims in DMS software, select claim type 31: Field Service Action.
The FSA number 17B25 is the sub code. • Additional labor and/or parts must be claimed as related damage on a separate repair line
from the FSA. • Submit refunds on a separate repair line. - Program Code: 17B25 - Misc. Expense: ADMIN - Misc. Expense: REFUND - Misc. Expense: 0.2 Hrs. • Multiple refunds should be submitted on one repair line and the invoice details for each repair
should be detailed in the comments section of the claim. • Sublet repairs must be claimed using labor operations listed in this bulletin. Do not claim as
Outside Labor (OSL). Refer to Warranty & Policy Manual for additional information. • Provision for Locally Obtained Supplies: Includes automotive body seam sealer, anti-corrosion
coating, Loctite 414 or 495, and High Temperature Paint. o Program Code: 17B25 o Misc Expense: OTHER o Amount: Actual cost up to $25.00
• PROGRAM TERMS: This program will be in effect through September 30, 2018. There is no mileage limit for this program.

Copyright 2017 Ford Motor Company
ATTACHMENT II Page 1 of 3
NEW VEHICLE DEMONSTRATION / DELIVERY HOLD – Customer Satisfaction Program 17B25 – Supplement #1
Certain 2013-2017 Model Year Police Interceptor Utility Vehicles Exhaust Odor and Carbon Monoxide Complaints
New! LABOR ALLOWANCES – All Vehicles (Use One) Description Labor Operation Labor Time Stock/unsold vehicle (no modifications) • Install Liftgate Trim Panel Sealing Kit • Glue Liftgate Drains • Install Muffler Tips • Seal Certain Body Plugs in Floor Pan • Reprogram the HVAC module
17B25B repairs before
September 21, 2017 1.0 Hour
17B25BB repairs on/after
September 21, 2017 1.1 Hours
Customer/sold vehicle • Inspect for modifications • Install Liftgate Trim Panel Sealing Kit • Glue Liftgate Drain Valves • Install Muffler Tips • Seal Certain Body Plugs in Floor Pan • Reprogram the HVAC module • Check for DTCs
17B25C repairs before
September 21, 2017 1.1 Hours
17B25CC repairs on/after
September 21, 2017 1.2 Hours
LABOR ALLOWANCES – As Required Description Labor Operation Labor Time Seal grommets, body plugs and holes with body seam sealer and mastic patch as required
Use in combination with 17B25C or 17B25CC only
MT17B25 Up to 1.0 Hour
Remove liftgate spoiler and replace seals and fasteners 17B25D 0.4 Hours
Replace Air Extractor (one or both) 17B25E 1.0 Hours
Replace Exhaust Catalyst – 3.7L Right Hand 17B25F 1.5 Hours
Replace Exhaust Catalyst – 3.7L Left Hand 17B25G 1.0 Hours
Replace Exhaust Catalysts – 3.7L Both 17B25H 2.1 Hours
Replace Exhaust Catalyst – 3.5L Right 17B25J 0.7 Hours
Replace Exhaust Catalyst – 3.5L Left Hand 17B25K 0.7 Hours
Replace Exhaust Catalysts – 3.5L Both 17B25L 1.2 Hours
ATTACHMENT II Page 2 of 3
Copyright 2017 Ford Motor Company
NEW VEHICLE DEMONSTRATION / DELIVERY HOLD – Customer Satisfaction Program 17B25 – Supplement #1
Certain 2013-2017 Model Year Police Interceptor Utility Vehicles Exhaust Odor and Carbon Monoxide Complaints
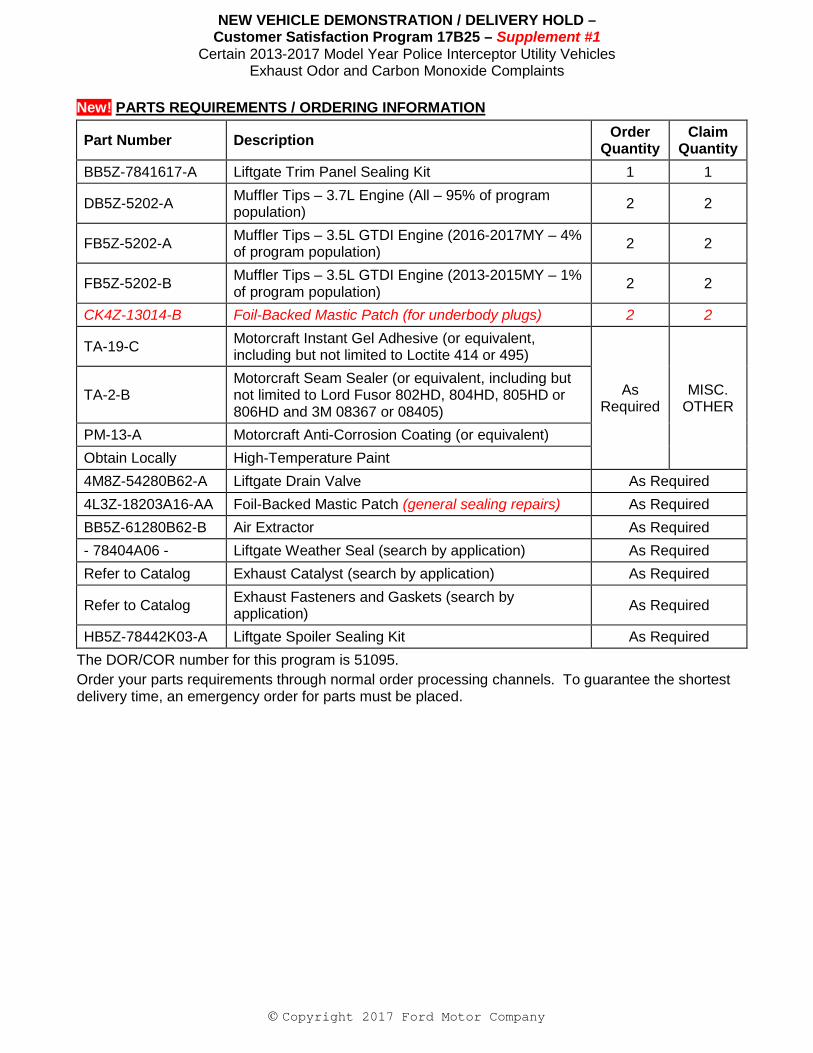
New! PARTS REQUIREMENTS / ORDERING INFORMATION
Part Number Description Order Quantity
Claim Quantity
BB5Z-7841617-A Liftgate Trim Panel Sealing Kit 1 1
DB5Z-5202-A Muffler Tips – 3.7L Engine (All – 95% of program population) 2 2
FB5Z-5202-A Muffler Tips – 3.5L GTDI Engine (2016-2017MY – 4% of program population) 2 2
FB5Z-5202-B Muffler Tips – 3.5L GTDI Engine (2013-2015MY – 1% of program population) 2 2
CK4Z-13014-B Foil-Backed Mastic Patch (for underbody plugs) 2 2
TA-19-C Motorcraft Instant Gel Adhesive (or equivalent, including but not limited to Loctite 414 or 495)
As Required
MISC. OTHER
TA-2-B Motorcraft Seam Sealer (or equivalent, including but not limited to Lord Fusor 802HD, 804HD, 805HD or 806HD and 3M 08367 or 08405)
PM-13-A Motorcraft Anti-Corrosion Coating (or equivalent) Obtain Locally High-Temperature Paint 4M8Z-54280B62-A Liftgate Drain Valve As Required 4L3Z-18203A16-AA Foil-Backed Mastic Patch (general sealing repairs) As Required BB5Z-61280B62-B Air Extractor As Required - 78404A06 - Liftgate Weather Seal (search by application) As Required Refer to Catalog Exhaust Catalyst (search by application) As Required
Refer to Catalog Exhaust Fasteners and Gaskets (search by application) As Required
HB5Z-78442K03-A Liftgate Spoiler Sealing Kit As Required The DOR/COR number for this program is 51095. Order your parts requirements through normal order processing channels. To guarantee the shortest delivery time, an emergency order for parts must be placed.

Copyright 2017 Ford Motor Company
ATTACHMENT II Page 3 of 3
NEW VEHICLE DEMONSTRATION / DELIVERY HOLD – Customer Satisfaction Program 17B25 – Supplement #1
Certain 2013-2017 Model Year Police Interceptor Utility Vehicles Exhaust Odor and Carbon Monoxide Complaints
DEALER PRICE For latest prices, refer to DOES II. PARTS RETENTION AND RETURN Follow the provisions of the Warranty and Policy Manual, Section 1 - WARRANTY PARTS RETENTION AND RETURN POLICIES. EXCESS STOCK RETURN Excess stock returned for credit must have been purchased from Ford Customer Service Division in accordance with Policy Procedure Bulletin 4000.

ATTACHMENT III PAGE 1 OF 24
CUSTOMER SATISFACTION PROGRAM 17B25-S1
CPR © 2017 FORD MOTOR COMPANYDEARBORN, MICHIGAN 481219/2017
CERTAIN 2013-2017 MODEL YEAR POLICE INTERCEPTOR UTILITY VEHICLES — EXHAUST ODOR AND CARBON MONOXIDE COMPLAINTS
OVERVIEW
When an up-fitter installs customized emergency lighting, radios and other equipment, they may damage vehicle sealing systems and/or drill holes into the rear of the vehicle. This creates an opening where exhaust could enter the cabin if the sealing system is not properly repaired and holes are not properly sealed. This procedure provides information to identify and repair vehicle-sealing concerns that have been caused by these installations. Be aware that this technical information does not capture all possible sealing concerns caused by non-Ford equipment installations due to the variability that exists with after market equipment and installation practices. Dealer technicians should thoroughly inspect vehicles and correct all potential leak paths caused by after market up-fitter equipment using robust sealing methods.
SERVICE PROCEDURE
NOTE: To view a video demonstration of key inspection and repair procedures, click the video icon.
1. Inspect the rear half of the vehicle for police or aftermarket up-fitter equipment such as: interior or exterior lighting, radio/audio/video equipment, or up-fitter wiring that crosses from the interior to the exterior of the vehicle (inspect liftgate opening).
NOTE: Roof-mounted antennas, lights and other equipment that has been properly sealed for water intrusion will not allow exhaust odor to enter the vehicle. If the vehicle has roof-mounted equipment present, and there is no evidence of water leaks in the vehicle, no further inspection or repairs are necessary for that equipment.
NOTE: It is not necessary to inspect police or aftermarket up-fitter equipment installed in the front half of the vehicle.
2. Has the vehicle been modified with aftermarket equipment as described?
No - Begin procedure at Liftgate Trim Panel Sealing on Page 12. Yes - Proceed to the Modified Vehicle Inspection and Sealing.

ATTACHMENT III PAGE 2 OF 24
CUSTOMER SATISFACTION PROGRAM 17B25-S1
CPR © 2017 FORD MOTOR COMPANYDEARBORN, MICHIGAN 481219/2017
Modified Vehicle Inspection and Sealing
Air Extractor Replacement Recommended Tool List:
1/4" Drive Ratchet (Power Tool & Hand Tool)
1/4" Drive Torque Wrench
1/4" Drive Extension (6 in 152 mm)
1/4" Drive 5.5mm Shallow Socket
1/4" Drive 8mm Shallow Socket
Trim Tool
Pocket Screwdriver
Phillips Screwdriver
1. With the vehicle in NEUTRAL, position it on a hoist. Please follow the Workshop Manual (WSM) procedures in Section 100-02.
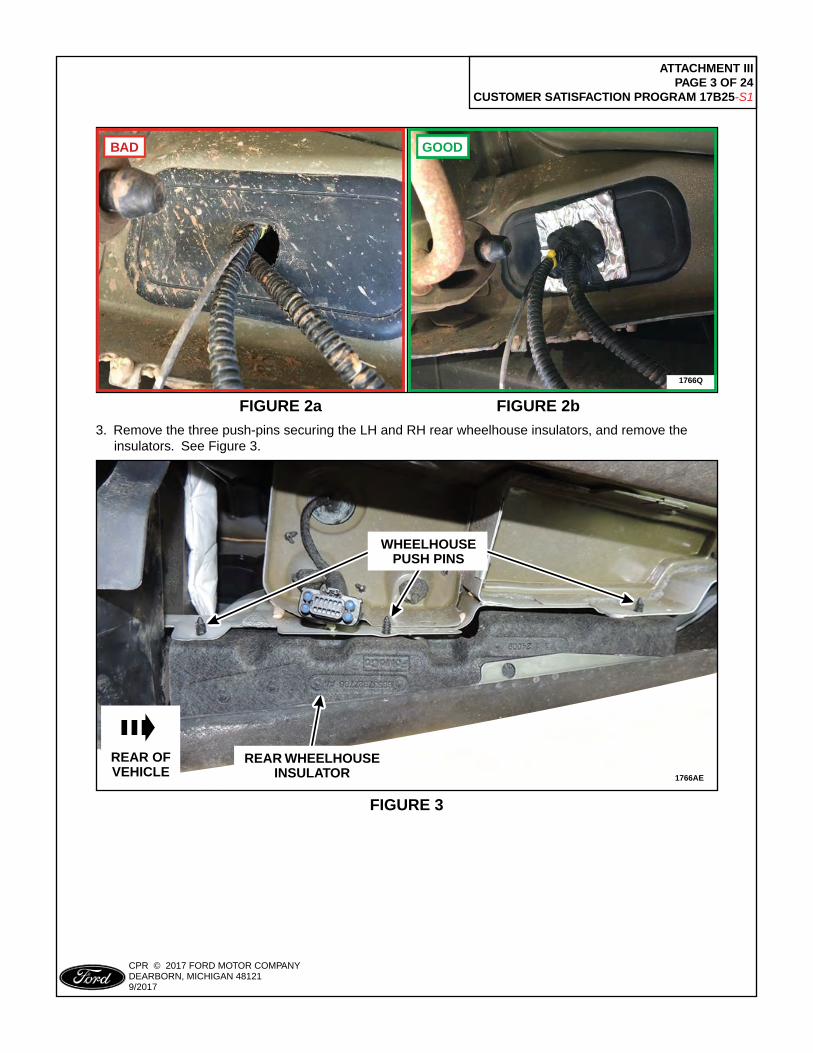
2. Inspect the rear underbody for damaged or missing body plugs, punctured/damaged floor pan sheet metal and baffle plates, damaged wiring harness grommets, aftermarket fasteners, and pass throughs (holes) created for aftermarket wiring/equipment. See Figures 1, 2a and 2b.
- Seal all aftermarket wiring and equipment pass throughs using Motorcraft® TA-2 seam sealer or equivalent, and Foil-Backed Mastic Patch as needed.
NOTE: Do not use silicones, RTVs or caulks during this repair.
PLACE COPY HERE
PLACE COPY HERE
PLACE COPY HERE
STUD FORMISSING NUT
STUD FORMISSING NUT
STUD FORMISSING NUT
REAR OFVEHICLE
1766AG
TWO BODY PLUGS ON VERTICAL PANEL BEHIND BUMPER
BAFFLEPLATE
REAR A/C COVERPLATE (VEHICLES
NOT EQUIPPEDWITH REAR A/C)
FIGURE 1
ATTACHMENT III PAGE 3 OF 24
CUSTOMER SATISFACTION PROGRAM 17B25-S1
CPR © 2017 FORD MOTOR COMPANYDEARBORN, MICHIGAN 481219/2017
GOOD
1766Q
PLACE COPY HERE
PLACE COPY HERE
PLACE COPY HERE
STUD FORMISSING NUT
STUD FORMISSING NUT
STUD FORMISSING NUT
START/ENDFOAM E HERE
BAD
FIGURE 2a FIGURE 2b3. Remove the three push-pins securing the LH and RH rear wheelhouse insulators, and remove the insulators. See Figure 3.
PLACE COPY HERE
PLACE COPY HERE
PLACE COPY HERE
STUD FORMISSING NUT
STUD FORMISSING NUT
STUD FORMISSING NUT
1766AE
REAR WHEELHOUSEINSULATOR
REAR OFVEHICLE
WHEELHOUSEPUSH PINS
FIGURE 3

ATTACHMENT III PAGE 4 OF 24
CUSTOMER SATISFACTION PROGRAM 17B25-S1
CPR © 2017 FORD MOTOR COMPANYDEARBORN, MICHIGAN 481219/2017
4. Using a telescoping mirror and flashlight, inspect the 4 body plugs and air extractor through the wheelhouse openings on each side of the vehicle to determine if aftermarket wiring has been routed through these components. Reroute aftermarket wiring as needed. See Figures 4a and 4b. - Replace body plugs or air extractors if any damage is present. Rear bumper cover removal is required to replace the air extractor. Please follow the WSM procedures in Section 501-19.
NOTE: Bumper removed for clarity.
BAD
PLACE COPY HERE
PLACE COPY HERE
PLACE COPY HERE
STUD FORMISSING NUT
STUD FORMISSING NUT
STUD FORMISSING NUT
START/ENDFOAM E HERE
GOOD
1766R
FIGURE 4a FIGURE 4b
5. Reinstall the wheelhouse insulators. The wheelhouse push pins can be reinstalled by removing the lower inner fender well fasteners to gain access to the fasteners. See Figure 5.
PLACE COPY HERE
PLACE COPY HERE
PLACE COPY HERE
STUD FORMISSING NUT
STUD FORMISSING NUT
STUD FORMISSING NUT
1766AF
REAR WHEELHOUSEINSULATOR
REAR OFVEHICLE
WHEELHOUSEPUSH PINS
FIGURE 5

ATTACHMENT III PAGE 5 OF 24
CUSTOMER SATISFACTION PROGRAM 17B25-S1
CPR © 2017 FORD MOTOR COMPANYDEARBORN, MICHIGAN 481219/2017
PLACE COPY HERE
PLACE COPY HERE
PLACE COPY HERE
STUD FORMISSING NUT
STUD FORMISSING NUT
STUD FORMISSING NUT
BAD
MOTORCRAFT® TA-2SEAM SEALER OR
EQUIVALENT
GOOD
1766T
FIGURE 6a FIGURE 6b
6. Remove the LH and RH rear tail lamp assemblies. Please follow the WSM procedures in Section 417-01.
7. Inspect the sheet metal, wiring harness grommets and factory equipped pass throughs for damage or holes created when installing aftermarket wiring and equipment. See Figure 6a. Seal all holes in the sheet metal and wiring harness grommets with Motorcraft® TA-2 seam sealer or equivalent. See Figure 6b.
PLACE COPY HERE
PLACE COPY HERE
PLACE COPY HERE
STUD FORMISSING NUT
STUD FORMISSING NUT
STUD FORMISSING NUT
AFTERMARKETD-PILLAR LIGHTS
1766AH
MOTORCRAFT® TA-2SEAM SEALER OR
EQUIVALENT
FIGURE 7a FIGURE 7b
8. For vehicles equipped with aftermarket lights on the D-pillars, seal all holes in the sheet metal and wiring harness grommets used as wiring pass throughs with Motorcraft® TA-2 seam sealer or equivalent. See Figures 7a and 7b.
ATTACHMENT III PAGE 6 OF 24
CUSTOMER SATISFACTION PROGRAM 17B25-S1
CPR © 2017 FORD MOTOR COMPANYDEARBORN, MICHIGAN 481219/2017
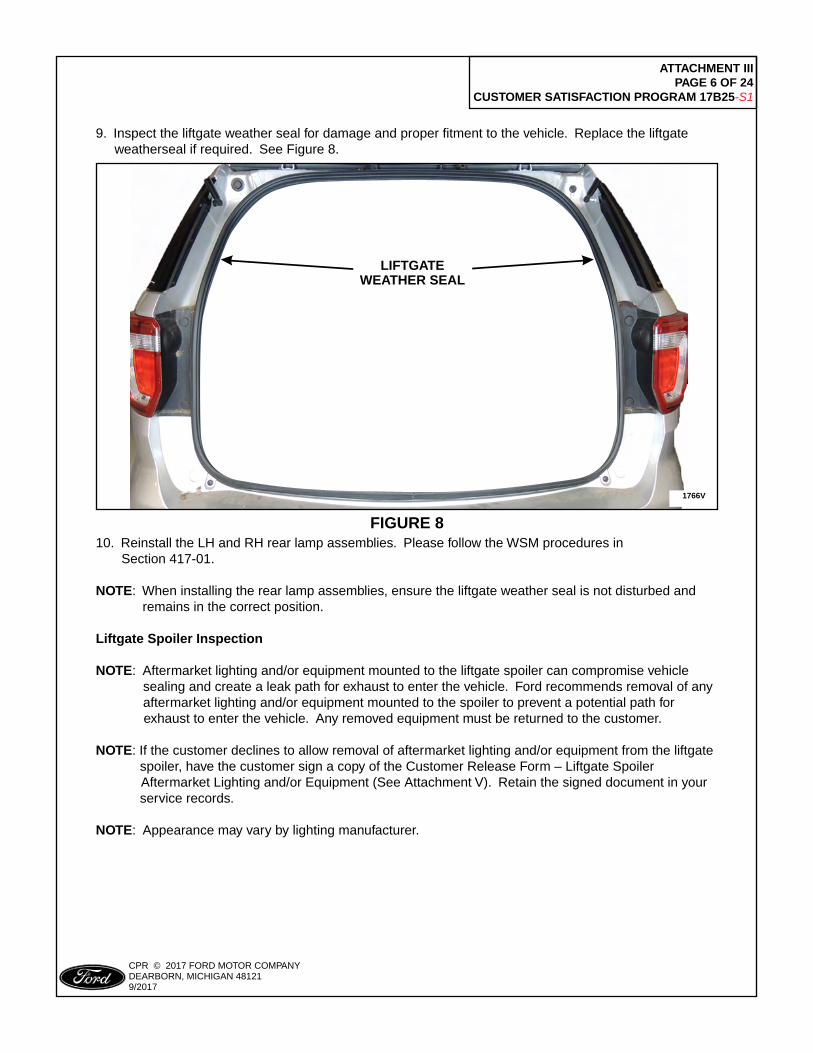
9. Inspect the liftgate weather seal for damage and proper fitment to the vehicle. Replace the liftgate weatherseal if required. See Figure 8.
PLACE COPY HERE
PLACE COPY HERE
PLACE COPY HERE
STUD FORMISSING NUT
STUD FORMISSING NUT
STUD FORMISSING NUT
1766V
LIFTGATEWEATHER SEAL
FIGURE 810. Reinstall the LH and RH rear lamp assemblies. Please follow the WSM procedures in Section 417-01.
NOTE: When installing the rear lamp assemblies, ensure the liftgate weather seal is not disturbed and remains in the correct position.
Liftgate Spoiler Inspection
NOTE: Aftermarket lighting and/or equipment mounted to the liftgate spoiler can compromise vehicle sealing and create a leak path for exhaust to enter the vehicle. Ford recommends removal of any aftermarket lighting and/or equipment mounted to the spoiler to prevent a potential path for exhaust to enter the vehicle. Any removed equipment must be returned to the customer.
NOTE: If the customer declines to allow removal of aftermarket lighting and/or equipment from the liftgate spoiler, have the customer sign a copy of the Customer Release Form – Liftgate Spoiler Aftermarket Lighting and/or Equipment (See Attachment V). Retain the signed document in your service records.
NOTE: Appearance may vary by lighting manufacturer.

ATTACHMENT III PAGE 7 OF 24
CUSTOMER SATISFACTION PROGRAM 17B25-S1
CPR © 2017 FORD MOTOR COMPANYDEARBORN, MICHIGAN 481219/2017
1. Inspect the rear spoiler for any of the following:
a. Is there aftermarket lighting or other equipment mounted to the spoiler? See Figure 9. b. Has the spoiler or vehicle been painted? NOTE: All Police Interceptor Utility Spoilers are painted black from the factory. c. Is the spoiler damaged or have any holes drilled through it? d. Is any aftermarket wiring routed to the spoiler?
Yes – Proceed to the Liftgate Spoiler Sealing Procedure. No – Proceed to the Liftgate Trim Panel Sealing Procedure.
PLACE COPY HERE
PLACE COPY HERE
PLACE COPY HERE
STUD FORMISSING NUT
STUD FORMISSING NUT
STUD FORMISSING NUT
1766P
FACTORY STROBE LIGHTING2017-MY ONLY
AFTERMARKET STROBE LIGHTINGEXAMPLE 1
AFTERMARKET STROBE LIGHTINGEXAMPLE 2
FIGURE 9

ATTACHMENT III PAGE 8 OF 24
CUSTOMER SATISFACTION PROGRAM 17B25-S1
CPR © 2017 FORD MOTOR COMPANYDEARBORN, MICHIGAN 481219/2017
Liftgate Spoiler Sealing
Recommended Tool List:
1766X
PLACE COPY HERE
PLACE COPY HERE
PLACE COPY HERE
STUD FORMISSING NUT
STUD FORMISSING NUT
STUD FORMISSING NUT
SPOILER SEALINGKIT COMPONENTS
SUPPLEMENTALLIFTGATE TOWER
FOAM SEAL
3X LOCATINGPIN SEALS
4X RETENTIONCLIPS
LIFTGATE SPOILERTOWER FOAM SEAL
FIGURE 10
1/4" Drive Ratchet (Power Tool & Hand Tool)
1/4" Drive 6 in (152 mm) Extension
1/4" Drive 7mm Shallow Socket
1/4" Drive Torque Wrench
3/8" Drive Ratchet (Power Tool & Hand Tool)
3/8" Drive 6 in (152 mm) Extension
3/8" Drive 13mm Twelve Point Socket
3/8" Drive Torque Wrench
Flat Faced Sheet Metal Hammer
Applicator Brush (Anti Corrosion Application)

ATTACHMENT III PAGE 9 OF 24
CUSTOMER SATISFACTION PROGRAM 17B25-S1
CPR © 2017 FORD MOTOR COMPANYDEARBORN, MICHIGAN 481219/2017
1766Z
PLACE COPY HERE
PLACE COPY HERE
PLACE COPY HERE
STUD FORMISSING NUT
STUD FORMISSING NUT
STUD FORMISSING NUT
LIFTGATE SPOILERTOWER FOAM SEAL
FIGURE 12
1766Y
PLACE COPY HERE
PLACE COPY HERE
PLACE COPY HERE
STUD FORMISSING NUT
STUD FORMISSING NUT
STUD FORMISSING NUT
START/ENDFOAM C HERE
BAD BAD
FIGURE 11a FIGURE 11b
3. Seal any leak paths created by the aftermarket wiring pass throughs/holes in the spoiler area with Motorcraft® TA-2 seam sealer or equivalent.
4. Remove the liftgate spoiler tower foam seal. See Figure 12.
1. Remove the liftgate spoiler. Please follow the WSM procedures in Section 501-08.
NOTE: Remove and do not reinstall any aftermarket lighting or other accessories mounted to the liftgate spoiler.
2. Inspect for any aftermarket wiring pass throughs/holes that could affect the sealing ability of the spoiler. See Figures 11a and 11b.

ATTACHMENT III PAGE 10 OF 24
CUSTOMER SATISFACTION PROGRAM 17B25-S1
CPR © 2017 FORD MOTOR COMPANYDEARBORN, MICHIGAN 481219/2017
PLACE COPY HERE
PLACE COPY HERE
PLACE COPY HERE
STUD FORMISSING NUT
STUD FORMISSING NUT
STUD FORMISSING NUT
1766AB
ALIGN EDGEOF SEAL WITH
RAISED CHANNEL
FIGURE 14a FIGURE 14b
6. Install a new liftgate spoiler tower seal. The flat edge of the seal must be aligned with the raised channel on the spoiler. See Figures 14a and 14b.
NOTE: Make sure the wiring and washer line are properly routed under the seal.
NOTE: Make sure the tower seal is installed as flat as possible, using even pressure around the perimeter to ensure a smooth wrinkle free seal.
1766AA
PLACE COPY HERE
PLACE COPY HERE
PLACE COPY HERE
STUD FORMISSING NUT
STUD FORMISSING NUT
STUD FORMISSING NUT
NEW SUPPLEMENTALLIFTGATE SPOILER
TOWER SEAL
ALIGN SLOT IN SEALWITH RAISED CHANNEL
FIGURE 13
5. Install a new supplemental liftgate spoiler tower seal underneath the wiring and washer line. Make sure the slot in the seal is aligned with the raised channel on the spoiler. See Figure 13.
ATTACHMENT III PAGE 11 OF 24
CUSTOMER SATISFACTION PROGRAM 17B25-S1
CPR © 2017 FORD MOTOR COMPANYDEARBORN, MICHIGAN 481219/2017
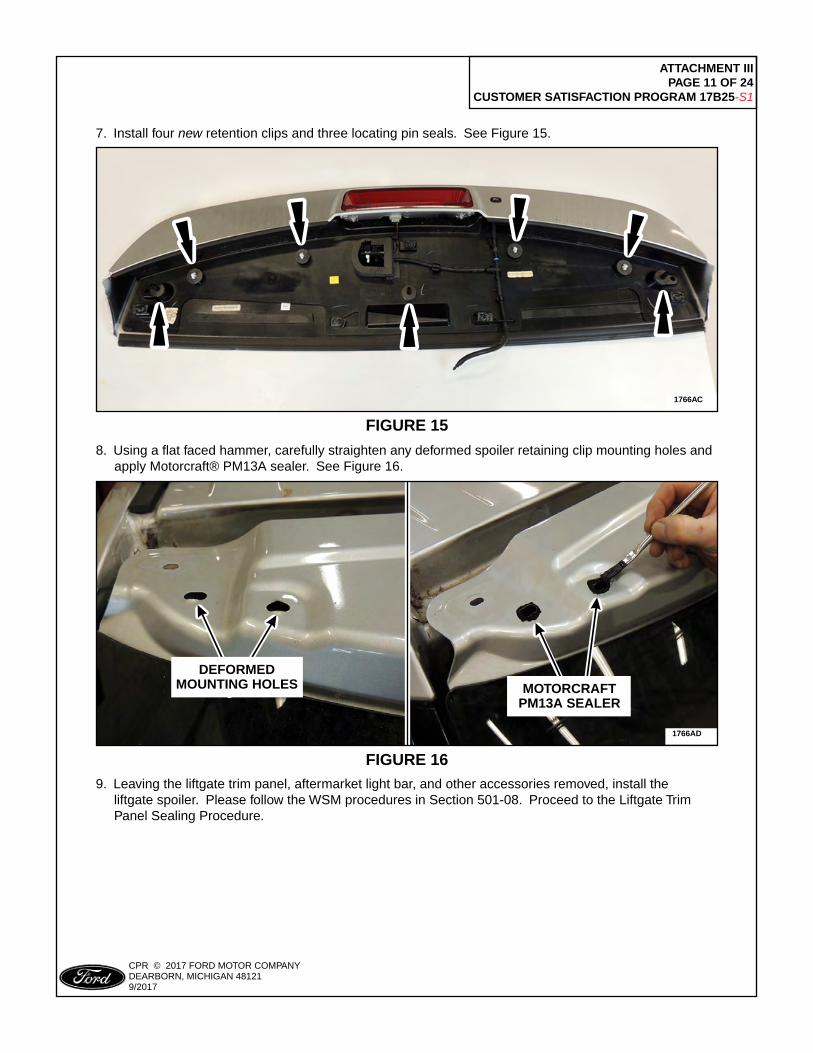
9. Leaving the liftgate trim panel, aftermarket light bar, and other accessories removed, install the liftgate spoiler. Please follow the WSM procedures in Section 501-08. Proceed to the Liftgate Trim Panel Sealing Procedure.
PLACE COPY HERE
PLACE COPY HERE
PLACE COPY HERE
STUD FORMISSING NUT
STUD FORMISSING NUT
STUD FORMISSING NUT
1766AD
DEFORMEDMOUNTING HOLES MOTORCRAFT
PM13A SEALER
FIGURE 16
8. Using a flat faced hammer, carefully straighten any deformed spoiler retaining clip mounting holes and apply Motorcraft® PM13A sealer. See Figure 16.
PLACE COPY HERE
PLACE COPY HERE
PLACE COPY HERE
STUD FORMISSING NUT
STUD FORMISSING NUT
STUD FORMISSING NUT
1766AC
FIGURE 15
7. Install four new retention clips and three locating pin seals. See Figure 15.

ATTACHMENT III PAGE 12 OF 24
CUSTOMER SATISFACTION PROGRAM 17B25-S1
CPR © 2017 FORD MOTOR COMPANYDEARBORN, MICHIGAN 481219/2017
1766A
PLACE COPY HERE
PLACE COPY HERE
PLACE COPY HERE
STUD FORMISSING NUT
STUD FORMISSING NUT
STUD FORMISSING NUT
FOAM KITGUIDE
TAPE
CB
D
A
FIGURE 171. Using isopropyl alcohol and a clean cloth, clean the liftgate glass along the edge of the liftgate interior trim panel.
2. Use a pencil on the rear glass to trace along the edge of the liftgate trim panel. This pencil line will be used in Step 10.
3. Remove the liftgate trim panel. Please follow the WSM procedures in Section 501-05.
Liftgate Trim Panel Sealing
Recommended Tool List:
1/4" Drive Ratchet (Power Tool & Hand Tool)
1/4" Drive 6 in (152 mm) Extension
1/4" Drive 8mm Shallow Socket
Trim Tool
Pencil

ATTACHMENT III PAGE 13 OF 24
CUSTOMER SATISFACTION PROGRAM 17B25-S1
CPR © 2017 FORD MOTOR COMPANYDEARBORN, MICHIGAN 481219/2017
1766D
PLACE COPY HERE
PLACE COPY HERE
PLACE COPY HERE
STUD FORMISSING NUT
STUD FORMISSING NUT
STUD FORMISSING NUT
TAPE
LATCH
DO NOT PLACETAPE OVER LATCHENTRY OPENING
FIGURE 19
7. Using isopropyl alcohol and a clean cloth, clean the area around the liftgate latch. Install the tape pieces around three (3) sides of the liftgate latch. See Figure 19.
4. Inspect the liftgate trim panel clips for any damage to the clips or clip mounting towers. Replace any clips that are found to be damaged or deformed. If a clip mounting tower is found to be damaged, replace the trim panel.
5. Using isopropyl alcohol and a clean cloth, clean the liftgate trim panel where foam A and B will be installed. See Figure 18.
6. Install foam A and B on the liftgate trim panel. See Figure 18.
1766B
PLACE COPY HERE
PLACE COPY HERE
PLACE COPY HERE
STUD FORMISSING NUT
STUD FORMISSING NUT
STUD FORMISSING NUT
FOAM B
FOAM A
FIGURE 18
ATTACHMENT III PAGE 14 OF 24
CUSTOMER SATISFACTION PROGRAM 17B25-S1
CPR © 2017 FORD MOTOR COMPANYDEARBORN, MICHIGAN 481219/2017
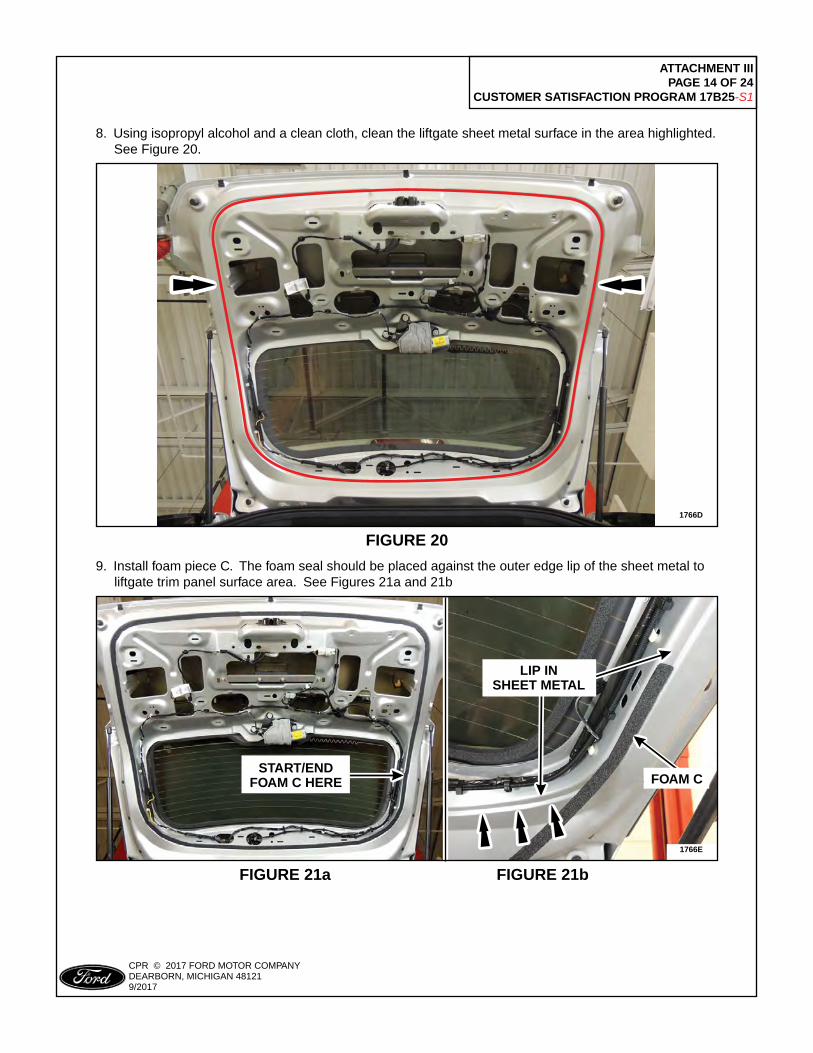
9. Install foam piece C. The foam seal should be placed against the outer edge lip of the sheet metal to liftgate trim panel surface area. See Figures 21a and 21b
1766E
PLACE COPY HERE
PLACE COPY HERE
PLACE COPY HERE
STUD FORMISSING NUT
STUD FORMISSING NUT
STUD FORMISSING NUT
LIP INSHEET METAL
START/ENDFOAM C HERE FOAM C
FIGURE 21a FIGURE 21b
8. Using isopropyl alcohol and a clean cloth, clean the liftgate sheet metal surface in the area highlighted. See Figure 20.
1766D
PLACE COPY HERE
PLACE COPY HERE
PLACE COPY HERE
STUD FORMISSING NUT
STUD FORMISSING NUT
STUD FORMISSING NUT
FIGURE 20
ATTACHMENT III PAGE 15 OF 24
CUSTOMER SATISFACTION PROGRAM 17B25-S1
CPR © 2017 FORD MOTOR COMPANYDEARBORN, MICHIGAN 481219/2017
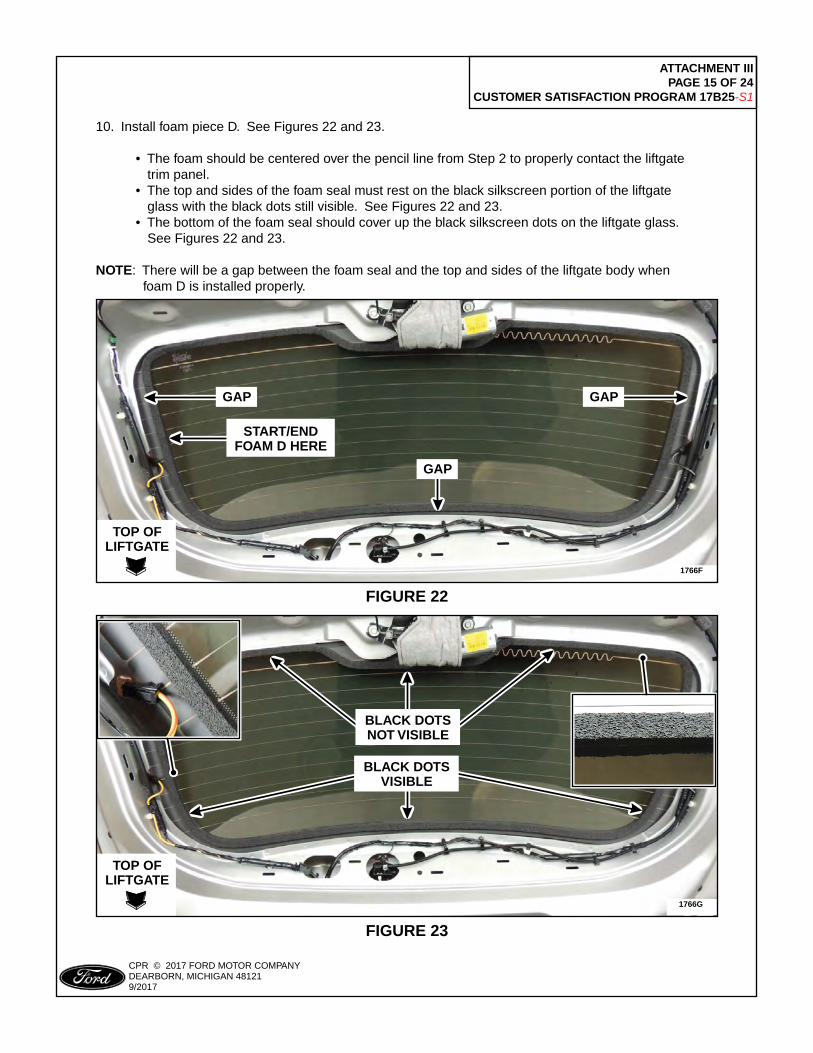
10. Install foam piece D. See Figures 22 and 23.
• The foam should be centered over the pencil line from Step 2 to properly contact the liftgate trim panel. • The top and sides of the foam seal must rest on the black silkscreen portion of the liftgate glass with the black dots still visible. See Figures 22 and 23. • The bottom of the foam seal should cover up the black silkscreen dots on the liftgate glass. See Figures 22 and 23.
NOTE: There will be a gap between the foam seal and the top and sides of the liftgate body when foam D is installed properly.
1766F
PLACE COPY HERE
PLACE COPY HERE
PLACE COPY HERE
STUD FORMISSING NUT
STUD FORMISSING NUT
STUD FORMISSING NUT
START/ENDFOAM D HERE
TOP OFLIFTGATE
GAP GAP
GAP
FIGURE 22
1766G
PLACE COPY HERE
PLACE COPY HERE
PLACE COPY HERE
STUD FORMISSING NUT
STUD FORMISSING NUT
STUD FORMISSING NUT
BLACK DOTSNOT VISIBLE
BLACK DOTSVISIBLE
TOP OFLIFTGATE
FIGURE 23

ATTACHMENT III PAGE 16 OF 24
CUSTOMER SATISFACTION PROGRAM 17B25-S1
CPR © 2017 FORD MOTOR COMPANYDEARBORN, MICHIGAN 481219/2017
11. Inspect the liftgate trim panel for lights, pass throughs/holes and/or aftermarket equipment that could compromise the seal of the liftgate trim panel. Seal any breaches of the liftgate trim panel using mastic patch, left over foam tape, Dow Corning® 7091 Adhesive/Sealant, or other robust sealing methods.
12. Ensure the interior luggage compartment release access panel is properly installed in the lower liftgate trim panel. See Figure 24.
1766H
PLACE COPY HERE
PLACE COPY HERE
PLACE COPY HERE
STUD FORMISSING NUT
STUD FORMISSING NUT
STUD FORMISSING NUT
INTERIOR LUGGAGECOMPARTMENT RELEASE
ACCESS PANEL
FIGURE 2413. Install the liftgate trim panel. Please follow the WSM procedures in Section 501-05. See Figures 25a and 25b.
NOTE: The clips where the upper and lower liftgate trim panels are joined are easily damaged on installation. Use care when installing the upper liftgate trim panel.
PLACE COPY HERE
PLACE COPY HERE
PLACE COPY HERE
STUD FORMISSING NUT
STUD FORMISSING NUT
STUD FORMISSING NUT
INTERIOR LUGGAGECOMPARTMENT RELEASE
ACCESS PANEL
1766I
FOAM SEAL ISVISIBLE
FIGURE 25a FIGURE 25b

ATTACHMENT III PAGE 17 OF 24
CUSTOMER SATISFACTION PROGRAM 17B25-S1
CPR © 2017 FORD MOTOR COMPANYDEARBORN, MICHIGAN 481219/2017
Liftgate Drain Valve Inspection
1. With the liftgate open, remove all liftgate drain valves. 2013-2015 model year vehicles are equipped with two valves, 2016-2017 model year vehicles are equipped with three valves. See Figure 26.
PLACE COPY HERE
PLACE COPY HERE
PLACE COPY HERE
STUD FORMISSING NUT
STUD FORMISSING NUT
STUD FORMISSING NUT
1766U
LIFTGATEDRAIN VALVES
FIGURE 262. Clean the liftgate drain valves and the liftgate where the drains are fitted using isopropyl alcohol. Replace all drain valves that are damaged or missing.
3. Apply a drop of Motorcraft® Instant Gel Adhesive TA-19-C or equivalent on each side of the liftgate drain valve attaching clip. Install the liftgate drain valves and hold the part in place for the period of time listed in the instructions on the package to allow the adhesive time to set. See Figure 27.
PLACE COPY HERE
PLACE COPY HERE
PLACE COPY HERE
STUD FORMISSING NUT
STUD FORMISSING NUT
STUD FORMISSING NUT
1766W
LIFTGATEDRAIN VALVE
APPLY ADHESIVEHERE
FIGURE 27

ATTACHMENT III PAGE 18 OF 24
CUSTOMER SATISFACTION PROGRAM 17B25-S1
CPR © 2017 FORD MOTOR COMPANYDEARBORN, MICHIGAN 481219/2017
PLACE COPY HERE
PLACE COPY HERE
PLACE COPY HERE
STUD FORMISSING NUT
STUD FORMISSING NUT
STUD FORMISSING NUT
1766J
FOAM SEAL ISVISIBLE
FIGURE 28
Exhaust Tip Replacement
NOTE: The following procedure modifies the appearance of the vehicle by replacing the straight facing exhaust tips with downward facing exhaust tips. See Figure 28.
Recommended Tool List:
Die Grinder
Abrasive Disc
Tape Measure
Level
Rubber Gloves
Welder
ATTACHMENT III PAGE 19 OF 24
CUSTOMER SATISFACTION PROGRAM 17B25-S1
CPR © 2017 FORD MOTOR COMPANYDEARBORN, MICHIGAN 481219/2017
2. Remove the remaining weld material on the mufflers with an abrasive disc until there is a smooth surface. See Figure 30.
PLACE COPY HERE
PLACE COPY HERE
PLACE COPY HERE
STUD FORMISSING NUT
STUD FORMISSING NUT
STUD FORMISSING NUT
1766L
FOAM SEAL ISVISIBLE
FIGURE 30
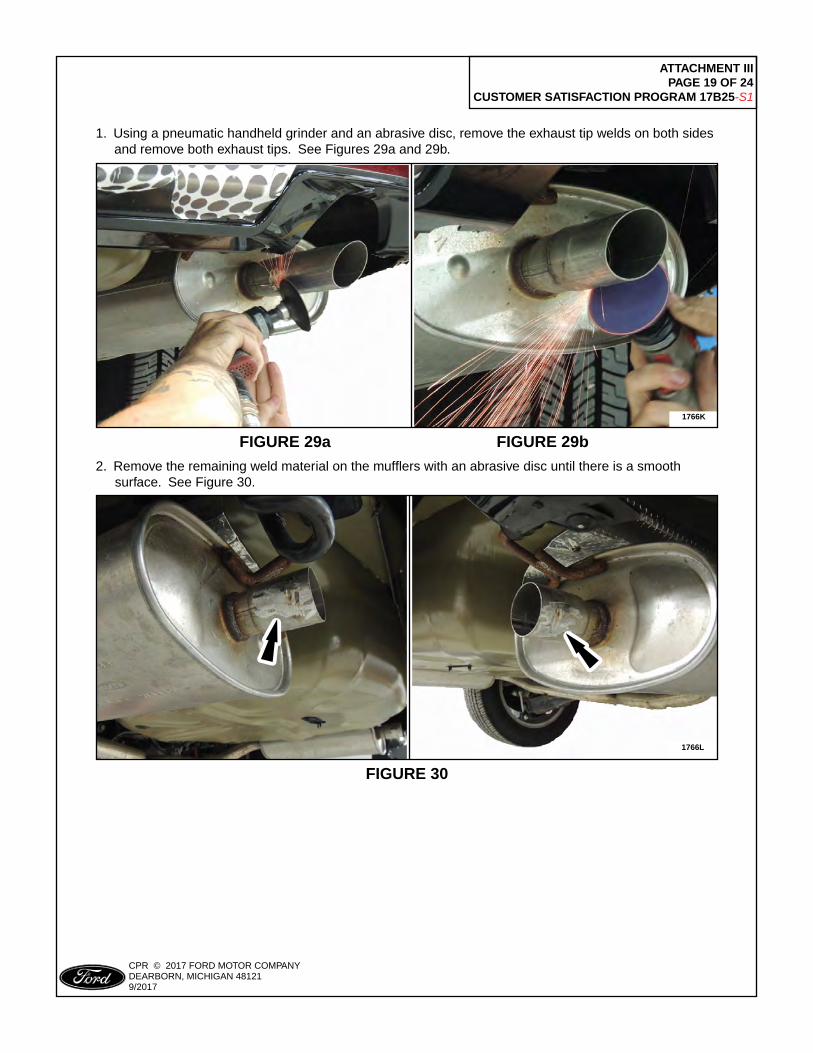
1. Using a pneumatic handheld grinder and an abrasive disc, remove the exhaust tip welds on both sides and remove both exhaust tips. See Figures 29a and 29b.
PLACE COPY HERE
PLACE COPY HERE
PLACE COPY HERE
STUD FORMISSING NUT
STUD FORMISSING NUT
STUD FORMISSING NUT
1766K
FOAM SEAL ISVISIBLE
FIGURE 29a FIGURE 29b

ATTACHMENT III PAGE 20 OF 24
CUSTOMER SATISFACTION PROGRAM 17B25-S1
CPR © 2017 FORD MOTOR COMPANYDEARBORN, MICHIGAN 481219/2017
4. Level the exhaust tips and clamp in position as required. See Figure 32.
PLACE COPY HERE
PLACE COPY HERE
PLACE COPY HERE
STUD FORMISSING NUT
STUD FORMISSING NUT
STUD FORMISSING NUT
1766M
FOAM SEAL ISVISIBLE
FIGURE 32
3. Install the new exhaust tips. Use a tape measure or ruler to position the exhaust tip prior to welding. See Figure 31.
• 2013-2015 vehicles with 3.5L GTDI engine 7 5/8 in (193 mm). • 2016-2017 vehicles with 3.5L GTDI engine 8 1/16 in (206 mm). • All vehicles with 3.7L engine 6 7/8 in (174 mm).
PLACE COPY HERE
PLACE COPY HERE
PLACE COPY HERE
STUD FORMISSING NUT
STUD FORMISSING NUT
STUD FORMISSING NUT
1766N
FOAM SEAL ISVISIBLE
MEASURE DISTANCEPRIOR TO WELDING
MUFFLERFACEEND OF
EXHAUST TIP
FIGURE 31

ATTACHMENT III PAGE 21 OF 24
CUSTOMER SATISFACTION PROGRAM 17B25-S1
CPR © 2017 FORD MOTOR COMPANYDEARBORN, MICHIGAN 481219/2017
5. Apply 1 in (25 mm) long weld beads along both sides of each exhaust tip using 308L or 409SS MIG welding wire. See Figure 33.
NOTE: If tips are welded using wire other than 308L or 409SS MIG welding wire, the welds must be protected from corrosion with two coats of high-temperature exterior paint rated at 500°F (260°C) or higher.
PLACE COPY HERE
PLACE COPY HERE
PLACE COPY HERE
STUD FORMISSING NUT
STUD FORMISSING NUT
STUD FORMISSING NUT
1766O
FOAM SEAL ISVISIBLE
HIGH TEMPERATUREPAINT
FIGURE 336. Clean the body plugs and surrounding sheet metal, then apply the mastic patches to the underbody plugs as shown in Figure 34.
NOTE: Make sure each patch completely covers the body plug.
NOTE: Apply firm pressure when applying the mastic patch to the underbody plugs and surrounding sheet metal to ensure proper adhesion.
PLACE COPY HERE
PLACE COPY HERE
PLACE COPY HERE
STUD FORMISSING NUT
STUD FORMISSING NUT
STUD FORMISSING NUT
1766AI
FOAM SEAL ISVISIBLE
FIGURE 34

ATTACHMENT III PAGE 22 OF 24
CUSTOMER SATISFACTION PROGRAM 17B25-S1
CPR © 2017 FORD MOTOR COMPANYDEARBORN, MICHIGAN 481219/2017
Check For Catalyst Efficiency DTCs
Recommended Tool List (3.5L GTDI Engines):
3/8" Drive Impact Gun
3/8" Drive Ratchet
3/8" Drive 10mm Impact Socket
3/8" Drive 15mm Deep Impact Socket
3/8" Drive Impact Universal Swivel Joint
3/8" Drive 3 in (76 mm) & 11 in (279 mm) Impact Extensions
3/8" Drive Torque Wrench
1/2" Drive Impact Gun (RH Converter Only)
1/2" Drive 19mm Impact Socket (RH Converter Only)
Stud Remover / Installer
Trim Tool
Exhaust Gas Oxygen Sensor Socket 303-476 (LH Converter Only)
1/4" Drive Ratchet (Power Tool)
1/4" Drive Flex Head Ratchet
1/4" Drive Shallow 10mm Socket
1/4" Drive 12 in (305 mm) Extension
1/4" Drive Torque Wrench
3/8" Drive Impact Gun
3/8" Drive Ratchet
3/8" Drive 13mm Deep Swivel Impact Socket
3/8" Drive 15mm Deep Swivel Impact Socket
3/8" Drive 7 in (178 mm) & 12 in (305 mm) Impact Extensions
3/8" Drive Torque Wrench
Long 10mm Ratchet Wrench
Stud Remover / Installer
Long Screwdriver (RH Converter Only)
Paint Stick (RH Converter Only)
Exhaust Gas Oxygen Sensor Socket 303-476 (RH Converter Only)
Recommended Tool List (3.7L TiVCT Engines):

ATTACHMENT III PAGE 23 OF 24
CUSTOMER SATISFACTION PROGRAM 17B25-S1
CPR © 2017 FORD MOTOR COMPANYDEARBORN, MICHIGAN 481219/2017
NOTE: For stock/unsold vehicles, proceed to HVAC Module Reprogramming. It is not necessary to check for catalyst efficiency DTCs on stock/unsold vehicles.
1. Perform a KOEO self-test on the PCM. Is DTC P0420 and/or P0430 present (including pending DTCs).
Yes – Replace the catalyst as required. Please follow the WSM procedures in Section 309-00. Proceed to the HVAC module reprogramming procedure. No – Proceed to the HVAC module reprogramming procedure.
HVAC Module Reprogramming
1. Reprogram the HVAC module using Integrated Diagnostic Software (IDS) release 106.07 or higher.
Important Information for Module Programming NOTE: When programming or reprogramming a module, use the following basic checks to ensure programming completes without errors.
• Make sure the 12V battery is fully charged before carrying out the programming steps and connect IDS/scan tool to a power source.• Inspect Vehicle Communication Module (VCM) and cables for any damage. Make sure scan tool connections are not interrupted during programming.• A hardwired connection is strongly recommended.• Turn off all unnecessary accessories (radio, heated/cooled seats, headlamps, interior lamps, HVAC system, etc.) and close doors.• Disconnect/depower any aftermarket accessories (remote start, alarm, power inverter, CB radio, etc.).• Follow all scan tool on-screen instructions carefully.• Disable IDS/scan tool sleep mode, screensaver, hibernation modes. • Create all sessions key on engine off (KOEO). Starting the vehicle before creating a session will cause errors within the programming inhale process.
Recovering a module when programming has resulted in a blank module: NEVER DELETE THE ORIGINAL SESSION!
a. Obtain the original IDS that was used when the programming error occurred during module reprogramming (MR) or programmable module installation (PMI).
b. Disconnect the VCM from the data link connector (DLC) and the IDS.
c. Reconnect the VCM to IDS and then connect to the DLC. Once reconnected, the VCM icon should appear in the corner of the IDS screen. If it does not, troubleshoot the IDS to VCM connection.
d. Locate the original vehicle session when programming failed. This should be the last session used in most cases. If not, use the session created on the date that the programming failed.
NOTE: If the original session is not listed in the previous session list, click the Recycle Bin icon at the lower right of the previous session screen. This loads any deleted sessions and allows you to look through them. Double-click the session to restore it.

ATTACHMENT III PAGE 24 OF 24
CUSTOMER SATISFACTION PROGRAM 17B25-S1
CPR © 2017 FORD MOTOR COMPANYDEARBORN, MICHIGAN 481219/2017
e. Once the session is loaded, the failed process should resume automatically.
f. If programming does not resume automatically, proceed to the Module Programming menu and select the previously attempted process, PMI or MR.
g. Follow all on-screen prompts/instructions.
h. The last screen on the IDS may list additional steps required to complete the programming process. Make sure all applicable steps listed on the screen are followed in order.

Copyright 2017 Ford Motor Company
ATTACHMENT IV Page 1 of 2
NEW VEHICLE DEMONSTRATION / DELIVERY HOLD – Customer Satisfaction Program 17B25 – Supplement #1
Certain 2013-2017 Model Year Police Interceptor Utility Vehicles Exhaust Odor and Carbon Monoxide Complaints
KEY MESSAGES FOR DEALERS / Q&A
Safety is our top priority. We continue to investigate. To address police customers who drive modified vehicles in unique ways, we are covering the costs of specific repairs in every Police Interceptor Utility that may have exhaust odor and carbon monoxide concerns, regardless of modifications made after leaving Ford’s factory. New! Key Messages • Ford Motor Company engineering teams continue working with law enforcement agencies in their
communities to investigate and address carbon monoxide concerns in some Ford Police Interceptor Utilities.
• Ford dealers will check and seal off the rear of the vehicle where exhaust can enter, update the air conditioning to bring in more fresh air during heavy acceleration typical of police driving, check for engine codes that could indicate a damaged exhaust manifold and add downward facing exhaust tips that further direct exhaust away from the vehicle.
• We continue to investigate. We have not found levels of carbon monoxide in non-Police Ford Explorers that present a risk to safety by exceeding the thresholds of normal exposure in everyday life.
• We have tested Police Interceptor Utilities with exhaust odor concerns, finding variable levels of carbon monoxide, depending on how well the rear of the vehicle was sealed after installation of police equipment.
• Unsealed holes can allow exhaust gases to enter the vehicle during aggressive acceleration and high speed driving unique to police use.
• If a customer believes their vehicle may be experiencing an issue, they should bring it to a Ford dealer for inspection. Customers also can call a dedicated hotline at 888-260-5575.
Q. How do you know there are no carbon monoxide issues with regular Explorers? A. We continue to investigate. We have not found levels of carbon monoxide in non-Police Ford
Explorers that present a risk to safety by exceeding the thresholds of normal exposure in everyday life.
Q. How many vehicles has Ford fixed so far? A. Ford has worked side-by-side with more than a dozen police agencies nationwide to inspect
and repair more than 50 vehicles in cities and towns, such as Auburn, Massachusetts and Galveston, Texas
Q. Are you considering a recall? A. Our decisions are driven by the data available. When the data indicates a safety recall is
needed, we move quickly on behalf of our customers.
ATTACHMENT IV Page 2 of 2

Copyright 2017 Ford Motor Company
NEW VEHICLE DEMONSTRATION / DELIVERY HOLD – Customer Satisfaction Program 17B25 – Supplement #1
Certain 2013-2017 Model Year Police Interceptor Utility Vehicles Exhaust Odor and Carbon Monoxide Complaints
Q. What repairs will dealers make? A. Ford dealers will check and seal-off the rear of the vehicle where exhaust can enter, update
the air conditioning to bring in more fresh air during heavy acceleration typical of police driving and check for PCM codes that could indicate an exhaust catalyst efficiency concern.
Q. What is your response to complaints from police on cracked exhaust manifolds that
may be causing carbon monoxide concerns? A. All of our testing to date has not shown cracked exhaust manifolds contributing to the carbon
monoxide levels in Police Interceptor Utilities. We are continuing to investigate. Q. Will you replace cracked exhaust manifolds? A. If PCM codes indicate an exhaust catalyst efficiency concern is present in the vehicle, we will
replace that exhaust catalyst/manifold assembly under our program. Q. Does Ford recommend police departments put in carbon monoxide detectors in their
vehicles? Will Ford pay for them? A. We encourage our police customers to bring their vehicle to their local Ford dealer. Q. How long does this program run? A. For vehicles covered by this program, coverage will remain in effect until September 30, 2018. Q. Will Ford reimburse for repairs/TSB work already done? A. Yes. If a police customer or consumer already had repairs for the specific repairs under this
concern, Ford will reimburse the customer for those costs. Refer to Attachment I in the dealer bulletin for details.
Q. Why is Ford asking for a signature on the Customer Release Form when dealers are
instructed by the customer not to remove aftermarket lighting and/or equipment mounted to the liftgate spoiler?
A. Ford’s investigation has found that aftermarket lighting and/or equipment mounted to the liftgate spoiler may be a significant leak path for exhaust gas to enter the vehicle. We included this form to ensure that the fleet’s management is making an informed decision when deciding to not have the recommended service performed.
.

Copyright 2017 Ford Motor Company
ATTACHMENT V Page 1 of 1
NEW VEHICLE DEMONSTRATION / DELIVERY HOLD – Customer Satisfaction Program 17B25 – Supplement #1
Certain 2013-2017 Model Year Police Interceptor Utility Vehicles Exhaust Odor and Carbon Monoxide Complaints
Liftgate Spoiler – Aftermarket Lighting and/or Equipment
I understand that my vehicle is equipped with aftermarket lighting and/or equipment mounted to the
liftgate spoiler system which may be allowing carbon monoxide and exhaust gasses to enter the
passenger compartment of the vehicle, and I have instructed the dealer not to remove this
equipment.
I release Ford Motor Company, ________________________________________________ and all Dealership Name
other Ford and Lincoln dealers of all future claims related to carbon monoxide and exhaust odor in my vehicle.
______________________________________________ Date
______________________________________________ Owner's Signature
______________________________________________ Owner's Name Printed
______________________________________________ Address
______________________________________________ City, State, ZIP
____________________________________________________ Dealership Name
____________________________________________________ Dealership Representative Signature
____________________________________________________ City, State, ZIP

ATTACHMENT VI Page 1 of 1
NEW VEHICLE DEMONSTRATION / DELIVERY HOLD – Customer Satisfaction Program 17B25 – Supplement #1
Certain 2013-2017 Model Year Police Interceptor Utility Vehicles Exhaust Odor and Carbon Monoxide Complaints
6 Important Facts About Carbon Monoxide and Police Vehicles
In response to police departments raising concerns about the possible presence of carbon monoxide (CO) in some Ford Police Interceptor Utilities, Ford Motor Company has prepared the following fact sheet to provide our customers with important information about CO, workplace safety and how to appropriately check for CO. 1. CO is measured in two ways: In the air, it is measured in parts per million (ppm) or in the blood, it is measured as the
percentage of hemoglobin bound to CO (or carboxyhemoglobin [COHb]).
2. The U.S. Department of Labor Occupational Safety and Health Administration (OSHA) sets a standard for the Workplace of 50 ppm average over 8 hours.
3. Instantaneous peak readings showing CO levels in parts per million at a single point in time do not provide an accurate depiction of an individual's dose.
4. In general, noticeable symptoms of CO exposure (shortness of breath with moderate exertion or possible headache)
among healthy adults occur after several hours breathing average CO levels of 100 ppm; more severe symptoms among health adults are generally associated with prolonged exposure to >100 ppm.
5. CO readings should only be performed with a scientifically calibrated detector, such as the RAE Systems ToxiRae PRO
CO Monitor, Otis Tocsin OI-315 or Industrial Scientific Tango TX1.
6. CO monitor readings can be affected by interference from police radios, radar guns or exposure to in-car chemicals, such as vapors from cleaners, solvents, air fresheners and other chemicals that could cause false readings. Additionally, monitors should not be left in a parked vehicle in warm or cold weather.
# # #