Embed Size (px)
Citation preview
a ‘tips and tricks’ publication from enabling
PROPRIETARY INFORMATION AND CONFIDENTIALITY
The information contained in this document represents the current view of Enabling on the topics discussed as of the
date of publication.
This document is for information purposes only. Without limiting the rights under copyright, no part of this document
may be reproduced, stored in or introduced into a retrieval system, or transmitted in any form, by any means
(electronic, mechanical, photocopying, recording, or otherwise), or for any purpose, without the express written
permission of Enabling Pty Ltd. Enabling may have patents, patent applications, trademarks, copyrights, or other
intellectual property rights covering subject matter in this document. Any product names herein are acknowledged
as the copyright of their copyright owners. The example companies, organisations, products, people, and events
depicted herein are fictitious. No association with any real company, organisation, product, person, or event is
intended or should be inferred.
© Enabling Pty Ltd. All rights reserved.
TIPS AND TRICKS
JANUARY 2011
microsoft dynamics nav 2009
Enabling is proud to sponsor this booklet and we hope readers gain key insights into our suggestions and views for your Microsoft solution.
For more information on how Enabling are able to streamline your Microsoft solution, additional copies of this booklet or for more information regarding your Microsoft Dynamics solution and Microsoft Dynamic suite, contact your local Enabling office.
Australia – 1800 ENABLING (1800 362 254)New Zealand – 0800 ENABLING (0800 362 254)
Or visit our website at www.enabling.net and discover how we enable better business for you.
a ‘tips and tricks’ publication from enabling PAGE 2
CONTENTS
Customise your Action Pane 3
Keyboard Shortcuts 5
Link Documents and URLs to Task Pages 6
Printer Selection Customising 7
Save Filtered Lists 8
Starting with a Different Profile 9
Microsoft Dynamics NAV– Costing Methods 11
TIPS AND TRICKS
JANUARY 2011
microsoft dynamicsnav 2009
references
Microsoft Australia http://www.microsoft.com/dynamics/en/au/products/nav-overview.aspx
Enabling www.enabling.net
tips & tricks authors & contributors:
Enabling Team Members:
Enabliser Bennie
Enabliser Kelly
Enabliser Yu
about microsoft
Founded in 1975, Microsoft (Nasdaq “MSFT”) is the worldwide leader in software,
services and solutions that help people and businesses realise their full potential.
Microsoft Dynamics helps you automate and streamline financial, customer
relationship and supply chain processes. Comprising several unique software products,
Microsoft Dynamics works with (and like) Microsoft software you may already be
familiar with – easing adoption and reducing the risks inherent with implementing a
new solution.
a ‘tips and tricks’ publication from enabling PAGE 3a ‘tips and tricks’ publication from enabling PAGE 3
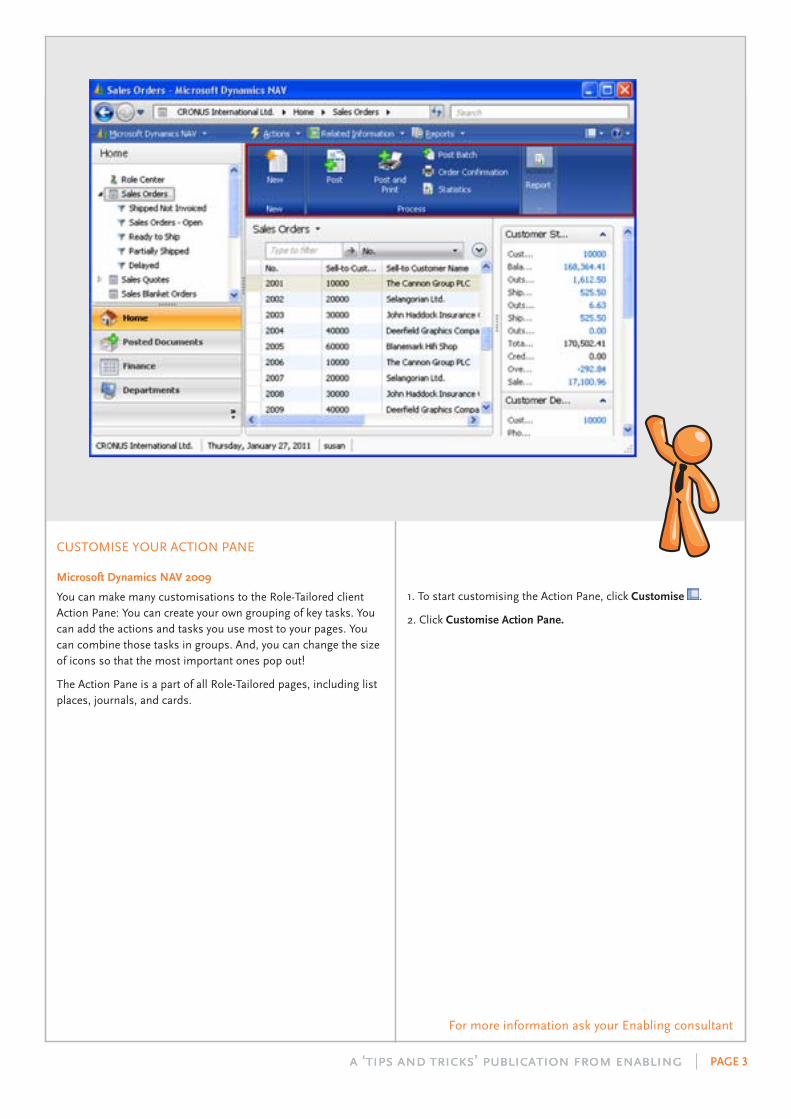
CUSTOMISE YOUR ACTION PANE
Microsoft Dynamics NAV 2009
You can make many customisations to the Role-Tailored client Action Pane: You can create your own grouping of key tasks. You can add the actions and tasks you use most to your pages. You can combine those tasks in groups. And, you can change the size of icons so that the most important ones pop out!
The Action Pane is a part of all Role-Tailored pages, including list places, journals, and cards.
For more information ask your Enabling consultant
1. To start customising the Action Pane, click Customise .
2. Click Customise Action Pane.
a ‘tips and tricks’ publication from enabling PAGE 4
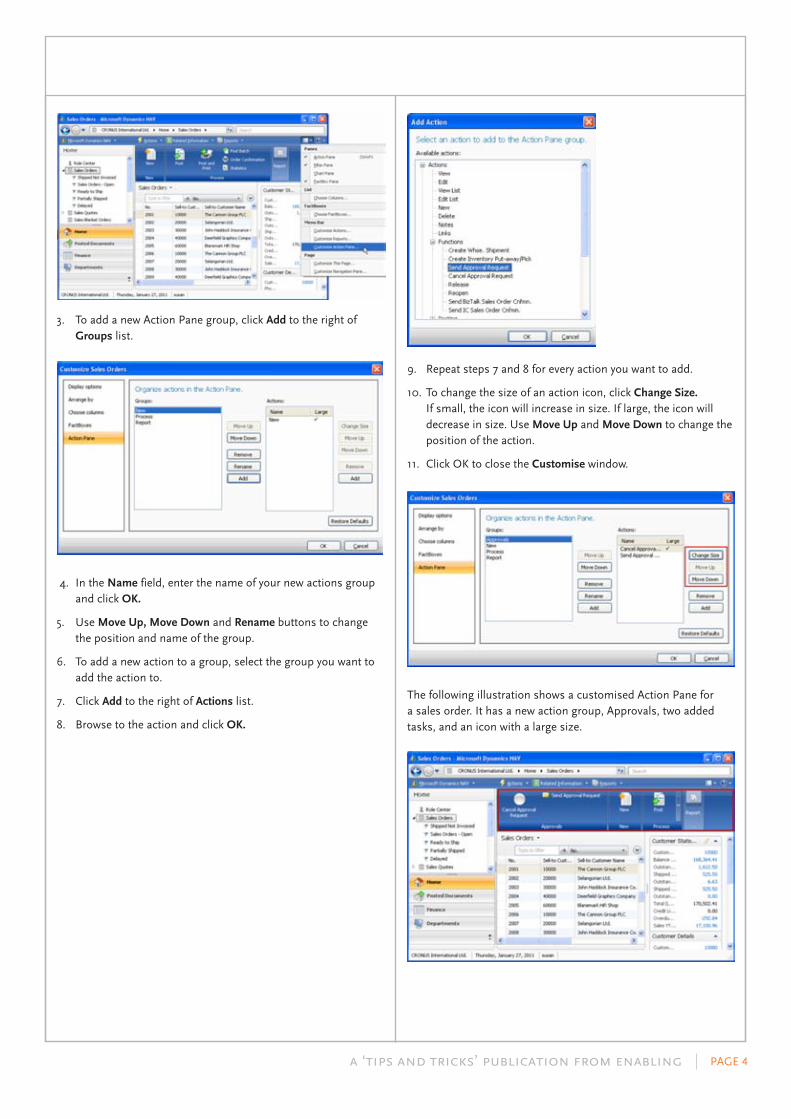
3. To add a new Action Pane group, click Add to the right of Groups list.
4. In the Name field, enter the name of your new actions group and click OK.
5. Use Move Up, Move Down and Rename buttons to change the position and name of the group.
6. To add a new action to a group, select the group you want to add the action to.
7. Click Add to the right of Actions list.
8. Browse to the action and click OK.
9. Repeat steps 7 and 8 for every action you want to add.
10. To change the size of an action icon, click Change Size. If small, the icon will increase in size. If large, the icon will decrease in size. Use Move Up and Move Down to change the position of the action.
11. Click OK to close the Customise window.
The following illustration shows a customised Action Pane for a sales order. It has a new action group, Approvals, two added tasks, and an icon with a large size.
a ‘tips and tricks’ publication from enabling PAGE 5
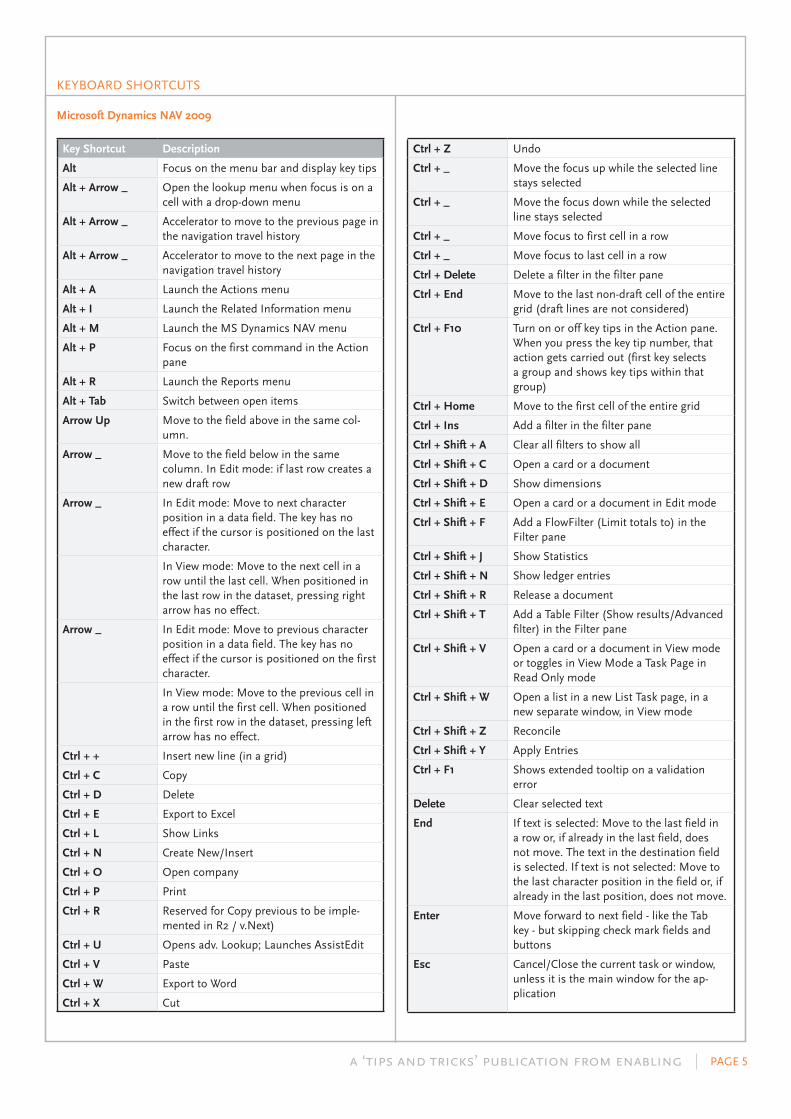
KEYBOARD SHORTCUTS
Microsoft Dynamics NAV 2009
Key Shortcut Description
Alt Focus on the menu bar and display key tips
Alt + Arrow _ Open the lookup menu when focus is on a cell with a drop-down menu
Alt + Arrow _ Accelerator to move to the previous page in the navigation travel history
Alt + Arrow _ Accelerator to move to the next page in the navigation travel history
Alt + A Launch the Actions menu
Alt + I Launch the Related Information menu
Alt + M Launch the MS Dynamics NAV menu
Alt + P Focus on the first command in the Action pane
Alt + R Launch the Reports menu
Alt + Tab Switch between open items
Arrow Up Move to the field above in the same col-umn.
Arrow _ Move to the field below in the same column. In Edit mode: if last row creates a new draft row
Arrow _ In Edit mode: Move to next character position in a data field. The key has no effect if the cursor is positioned on the last character.
In View mode: Move to the next cell in a row until the last cell. When positioned in the last row in the dataset, pressing right arrow has no effect.
Arrow _ In Edit mode: Move to previous character position in a data field. The key has no effect if the cursor is positioned on the first character.
In View mode: Move to the previous cell in a row until the first cell. When positioned in the first row in the dataset, pressing left arrow has no effect.
Ctrl + + Insert new line (in a grid)
Ctrl + C Copy
Ctrl + D Delete
Ctrl + E Export to Excel
Ctrl + L Show Links
Ctrl + N Create New/Insert
Ctrl + O Open company
Ctrl + P Print
Ctrl + R Reserved for Copy previous to be imple-mented in R2 / v.Next)
Ctrl + U Opens adv. Lookup; Launches AssistEdit
Ctrl + V Paste
Ctrl + W Export to Word
Ctrl + X Cut
Ctrl + Z Undo
Ctrl + _ Move the focus up while the selected line stays selected
Ctrl + _ Move the focus down while the selected line stays selected
Ctrl + _ Move focus to first cell in a row
Ctrl + _ Move focus to last cell in a row
Ctrl + Delete Delete a filter in the filter pane
Ctrl + End Move to the last non-draft cell of the entire grid (draft lines are not considered)
Ctrl + F10 Turn on or off key tips in the Action pane. When you press the key tip number, that action gets carried out (first key selects a group and shows key tips within that group)
Ctrl + Home Move to the first cell of the entire grid
Ctrl + Ins Add a filter in the filter pane
Ctrl + Shift + A Clear all filters to show all
Ctrl + Shift + C Open a card or a document
Ctrl + Shift + D Show dimensions
Ctrl + Shift + E Open a card or a document in Edit mode
Ctrl + Shift + F Add a FlowFilter (Limit totals to) in the Filter pane
Ctrl + Shift + J Show Statistics
Ctrl + Shift + N Show ledger entries
Ctrl + Shift + R Release a document
Ctrl + Shift + T Add a Table Filter (Show results/Advanced filter) in the Filter pane
Ctrl + Shift + V Open a card or a document in View mode or toggles in View Mode a Task Page in Read Only mode
Ctrl + Shift + W Open a list in a new List Task page, in a new separate window, in View mode
Ctrl + Shift + Z Reconcile
Ctrl + Shift + Y Apply Entries
Ctrl + F1 Shows extended tooltip on a validation error
Delete Clear selected text
End If text is selected: Move to the last field in a row or, if already in the last field, does not move. The text in the destination field is selected. If text is not selected: Move to the last character position in the field or, if already in the last position, does not move.
Enter Move forward to next field - like the Tab key - but skipping check mark fields and buttons
Esc Cancel/Close the current task or window, unless it is the main window for the ap-plication
a ‘tips and tricks’ publication from enabling PAGE 6
LINK DOCUMENTS AND URLS TO TASK PAGES
Microsoft Dynamics NAV 2009
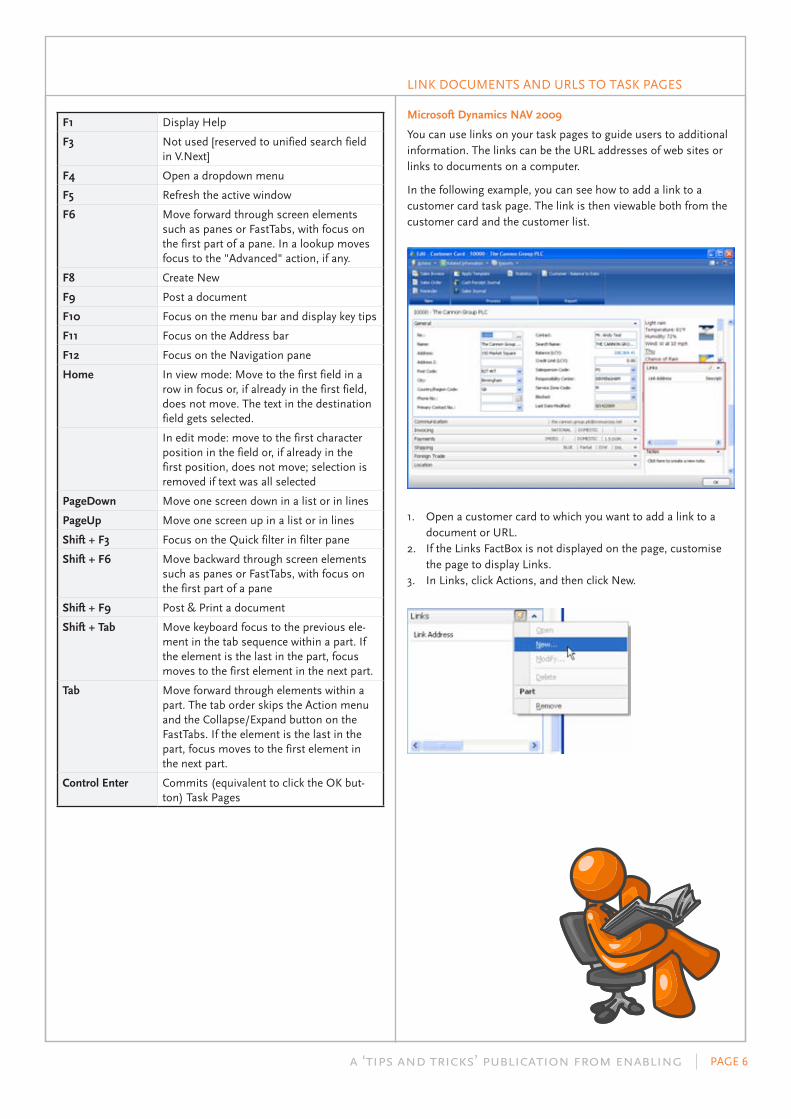
You can use links on your task pages to guide users to additional information. The links can be the URL addresses of web sites or links to documents on a computer.
In the following example, you can see how to add a link to a customer card task page. The link is then viewable both from the customer card and the customer list.
1. Open a customer card to which you want to add a link to a document or URL.2. If the Links FactBox is not displayed on the page, customise the page to display Links.3. In Links, click Actions, and then click New.
F1 Display Help
F3 Not used [reserved to unified search field in V.Next]
F4 Open a dropdown menu
F5 Refresh the active window
F6 Move forward through screen elements such as panes or FastTabs, with focus on the first part of a pane. In a lookup moves focus to the "Advanced" action, if any.
F8 Create New
F9 Post a document
F10 Focus on the menu bar and display key tips
F11 Focus on the Address bar
F12 Focus on the Navigation pane
Home In view mode: Move to the first field in a row in focus or, if already in the first field, does not move. The text in the destination field gets selected.
In edit mode: move to the first character position in the field or, if already in the first position, does not move; selection is removed if text was all selected
PageDown Move one screen down in a list or in lines
PageUp Move one screen up in a list or in lines
Shift + F3 Focus on the Quick filter in filter pane
Shift + F6 Move backward through screen elements such as panes or FastTabs, with focus on the first part of a pane
Shift + F9 Post & Print a document
Shift + Tab Move keyboard focus to the previous ele-ment in the tab sequence within a part. If the element is the last in the part, focus moves to the first element in the next part.
Tab Move forward through elements within a part. The tab order skips the Action menu and the Collapse/Expand button on the FastTabs. If the element is the last in the part, focus moves to the first element in the next part.
Control Enter Commits (equivalent to click the OK but-ton) Task Pages
a ‘tips and tricks’ publication from enabling PAGE 7
4. In the Link Address field, enter an address for the file or website, such as C:\My Documents\invoice1.doc, or www.microsoft.com.
5. Fill in the Description field with information about the link.
6. Click Save.
7. In Links, click on the link in the Link Address field. The appropriate program, such as Microsoft Word or Microsoft Internet Explorer, opens and displays the link target.
PRINTER SELECTION CUSTOMISING
Microsoft Dynamics NAV 2009
When you print invoices, credit/adjustment notes, and so on, it is important to choose the correct printer. Here is a way to make this automatic so you don’t have to select a printer each time.
You use the Printer Selection table to control this. In this table you can assign certain printers to certain users and/or reports so that the Invoice report, for example, is always printed on printer X. You can also specify that only User Y will always print credit/adjustment notes on printer X, for example.
Once you have set up the connections among users, reports and printers, the program will automatically use the information to direct future printouts.
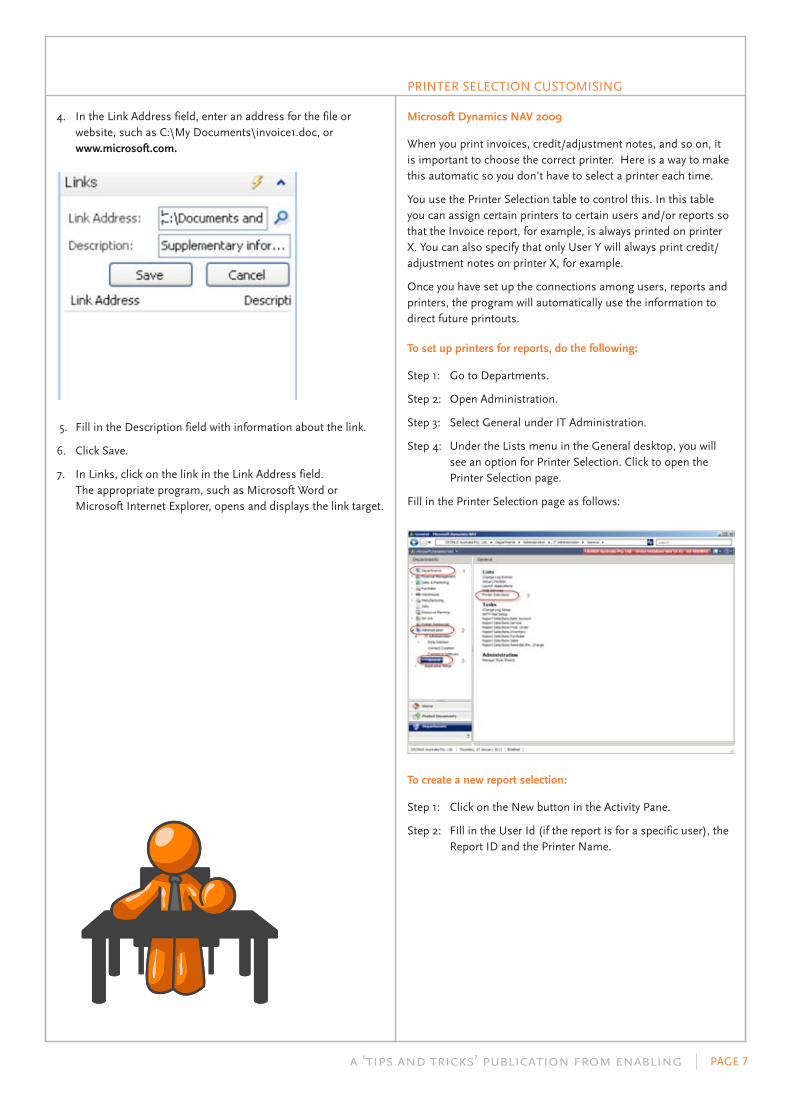
To set up printers for reports, do the following:
Step 1: Go to Departments.
Step 2: Open Administration.
Step 3: Select General under IT Administration.
Step 4: Under the Lists menu in the General desktop, you will see an option for Printer Selection. Click to open the Printer Selection page.
Fill in the Printer Selection page as follows:
To create a new report selection:
Step 1: Click on the New button in the Activity Pane.
Step 2: Fill in the User Id (if the report is for a specific user), the Report ID and the Printer Name.
a ‘tips and tricks’ publication from enabling PAGE 8
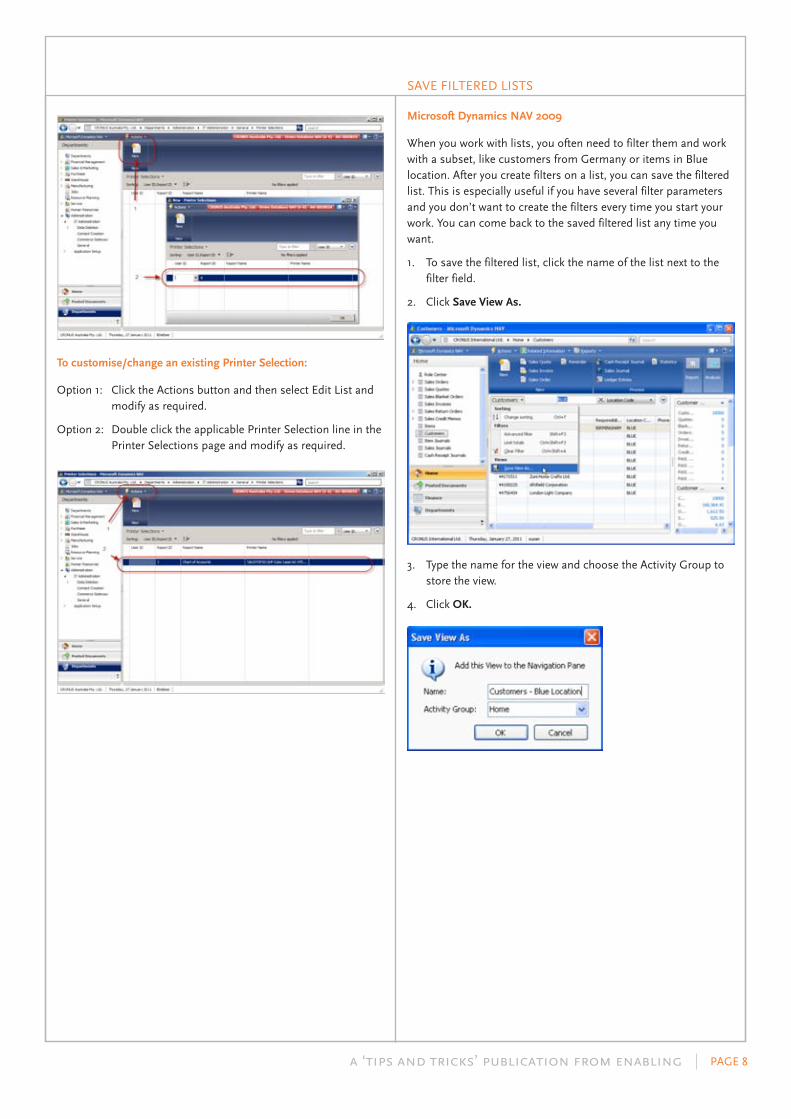
To customise/change an existing Printer Selection:
Option 1: Click the Actions button and then select Edit List and modify as required.
Option 2: Double click the applicable Printer Selection line in the Printer Selections page and modify as required.
SAVE FILTERED LISTS
Microsoft Dynamics NAV 2009
When you work with lists, you often need to filter them and work with a subset, like customers from Germany or items in Blue location. After you create filters on a list, you can save the filtered list. This is especially useful if you have several filter parameters and you don’t want to create the filters every time you start your work. You can come back to the saved filtered list any time you want.
1. To save the filtered list, click the name of the list next to the filter field.
2. Click Save View As.
3. Type the name for the view and choose the Activity Group to store the view.
4. Click OK.
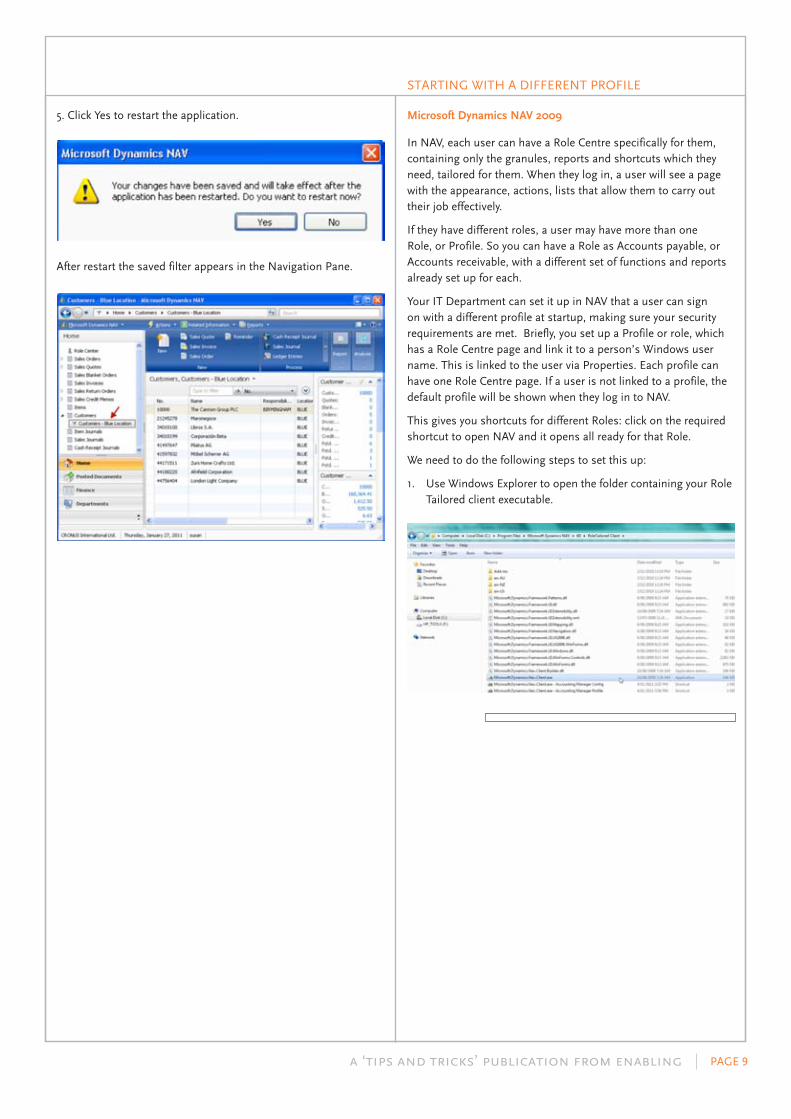
a ‘tips and tricks’ publication from enabling PAGE 9
5. Click Yes to restart the application.
After restart the saved filter appears in the Navigation Pane.
STARTING WITH A DIFFERENT PROFILE
Microsoft Dynamics NAV 2009
In NAV, each user can have a Role Centre specifically for them, containing only the granules, reports and shortcuts which they need, tailored for them. When they log in, a user will see a page with the appearance, actions, lists that allow them to carry out their job effectively.
If they have different roles, a user may have more than one Role, or Profile. So you can have a Role as Accounts payable, or Accounts receivable, with a different set of functions and reports already set up for each.
Your IT Department can set it up in NAV that a user can sign on with a different profile at startup, making sure your security requirements are met. Briefly, you set up a Profile or role, which has a Role Centre page and link it to a person’s Windows user name. This is linked to the user via Properties. Each profile can have one Role Centre page. If a user is not linked to a profile, the default profile will be shown when they log in to NAV.
This gives you shortcuts for different Roles: click on the required shortcut to open NAV and it opens all ready for that Role.
We need to do the following steps to set this up:
1. Use Windows Explorer to open the folder containing your Role Tailored client executable.
a ‘tips and tricks’ publication from enabling PAGE 10
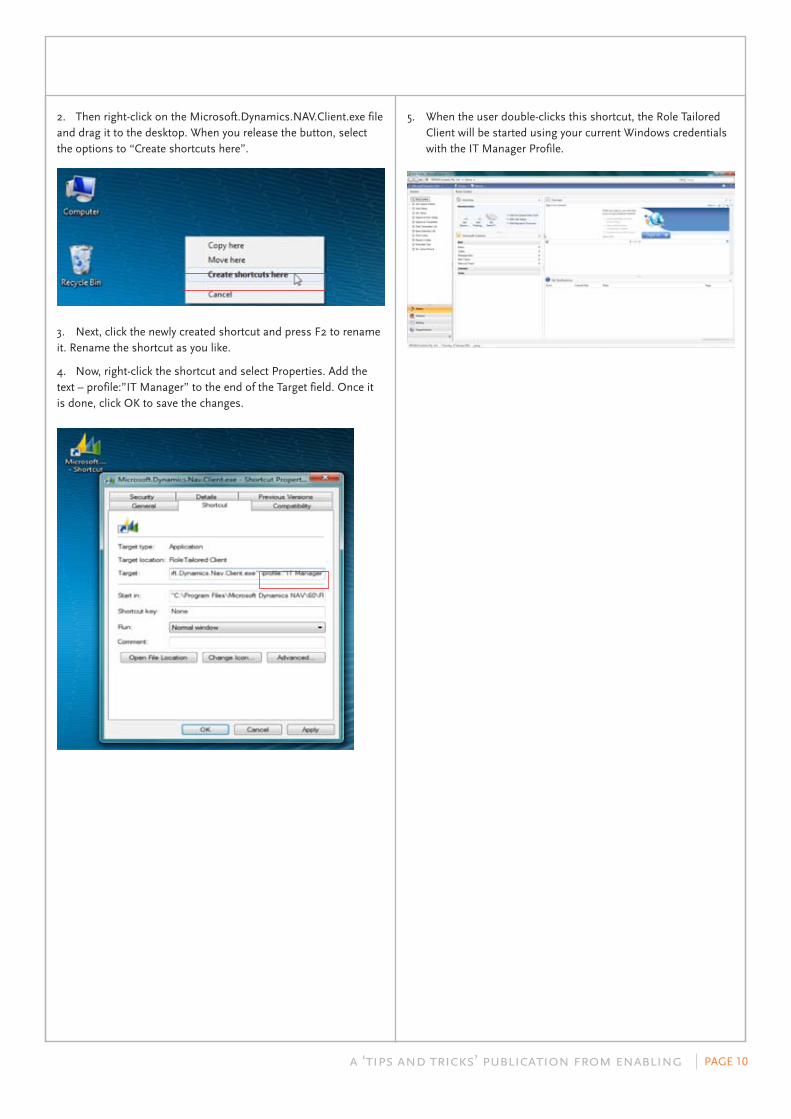
2. Then right-click on the Microsoft.Dynamics.NAV.Client.exe file and drag it to the desktop. When you release the button, select the options to “Create shortcuts here”.
3. Next, click the newly created shortcut and press F2 to rename it. Rename the shortcut as you like.
4. Now, right-click the shortcut and select Properties. Add the text – profile:”IT Manager” to the end of the Target field. Once it is done, click OK to save the changes.
5. When the user double-clicks this shortcut, the Role Tailored Client will be started using your current Windows credentials with the IT Manager Profile.

a ‘tips and tricks’ publication from enabling PAGE 11
Enabling is proud to sponsor this paper and we hope readers gain key insights into our suggestions and views for your Microsoft Dynamics Solution.
For more information on how Enabling are able you to streamline your Microsoft Dynamics Solution to optimise your business, please visit our website at www.enabling.net and discover how we enable better business for you.
Or contact us:
Australia – 1800 ENABLING (1800 362 254)New Zealand – 0800 ENABLING (0800 362 254)
COSTING METHODS
During an implementation, one of the hardest conversations for a consultant to have with a customer surrounds the choice of Costing Methods. It is important for customers to understand the different costing methods from a system point of view.
The costing method chosen will not only determine how the value of your inventory on hand (based on inventory increases) is calculated, but also what value posts to your Cost of Sales accounts in the event of a Sale (or inventory decrease). In Microsoft Dynamics NAV the following costing methods are available:
FIFO – This costing method stands for First-In-First-Out and means exactly that. Inventory increases are valued at their acquisition cost. Inventory decreases are valued by taking the value of the first inventory increases, followed by the cost values of the second increase and so on. This could result in different costs being associated to the same item on an inventory decrease transaction.
LIFO – This costing method stands for Last-In-First-Out and means exactly that. Inventory increases are valued at their acquisition cost. Inventory decreases are valued by taking the value of the last inventory increases, followed by the cost values of the second last increase and so on. This could result in different costs being associated to the same item on an inventory decrease transaction.
Average – Inventory increases are valued at their acquisition cost, however, the Average costing method values the inventory decrease by calculating a weighted average of the remaining inventory on the last day of the average cost period in which the inventory decrease was posted.
Standard – The Standard costing method works almost the same as FIFO, the difference being that the inventory increases are valued at standard cost, which affects the value of the inventory decreases. When purchasing inventory in a standard costing environment, adjustments will be made for any variance in cost between the acquisition cost and the defined standard cost.
Specific – The Specific costing method tracks individual inventory increase transactions that need to be applied to inventory decrease transactions in order for the cost to calculate based on the actual cost of the goods purchased.
a ‘tips and tricks’ publication from enabling PAGE 12
Enabling a better business solution can often mean a desire to achieve higher sales performance, make better decisions with accurate data, streamline or automate financial and business processes in a way that creates business success.
To achieve this you need the right business software – and a partner who will support you for the long term. With a team of over 100 experienced professionals throughout Australia and New Zealand, Enabling can review your business requirements, and help you to select the right solution – from the very best software vendors in the market.
We enable better business through our following Business / Industry solutions:
• EnterpriseResourcePlanning(ERP)
• FinancialManagementInformationSolutions(FMIS)
• CustomerRelationshipManagement(CRM)
• SupplyChainManagement(SCM)
• Construction,PropertyManagementandEngineeringSolutions(CPE)
• ProfessionalServicesAutomation(PSA)
• BusinessIntelligence(BI)
• SoftwareDevelopmentandIntegration(SDI)
five key reasons to choose enablingThese form part of our corporate vision and are the benchmarks from which we are able to determine the success and quality of the services we offer.
Passion
Is a key part of our culture. We care about your business and we want you to succeed. To this end we ensure that absolute value is what we deliver to your project, and we make sure our attitude and behaviors support this goal.
Choice
Having more than one offering allows us to focus on matching the right business solution to your distinctive business requirements. Enabling is unique in that we have partnered with several leading software vendors within our industry.
Experience
We understand business and technology; and with more than 100 team members, have the skills and resources to deliver results consistently.
Methodologies
With our best practice methodologies we are able to help lead your team from solution selection, through to delivery and long term support – taking the guess work out of technology.
“Raving Fans”
A Raving Fan is when you would, without hesitation recommend Enabling to a friend or colleague. For Enabling the true measure of our success is a Raving Fan.
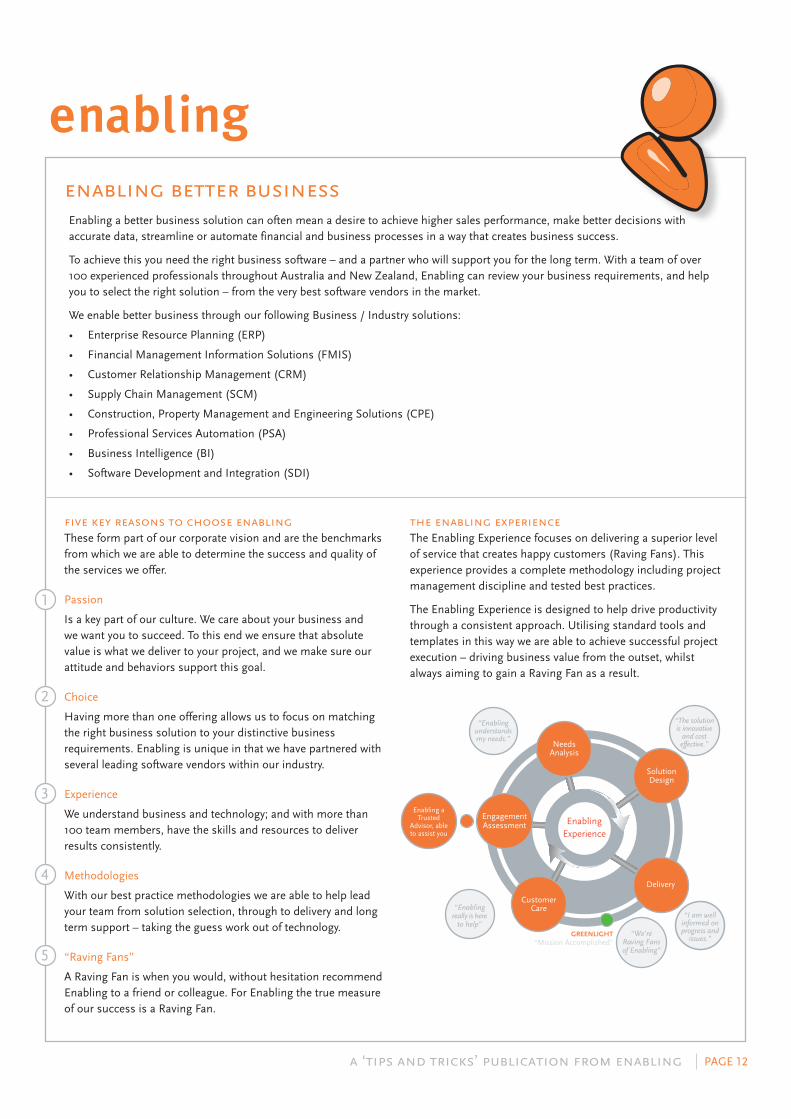
the enabling experienceThe Enabling Experience focuses on delivering a superior level of service that creates happy customers (Raving Fans). This experience provides a complete methodology including project management discipline and tested best practices.
The Enabling Experience is designed to help drive productivity through a consistent approach. Utilising standard tools and templates in this way we are able to achieve successful project execution – driving business value from the outset, whilst always aiming to gain a Raving Fan as a result.
1
2
3
4
5
enabling better business