Embed Size (px)
Citation preview

p1
© 2000-2016, Pacific Timesheet
Timesheet Help
www.pacifictimesheet.com
p2
© 2000-2016, Pacific Timesheet
Table of Contents
Introduction 5 System Requirements 6Setup Quick Start 8Home 11 Change Password 12 My Account 13 Preferences 14 Announcements 16My Timesheet 17My Assets 19Crew Timesheet 20Managing Timesheets 22 Time Entry Corrections 24Approvals 25 Approving Timesheets 26 Approving Project Time 28 Approving Crew Time 31Leave Requests 32 Leave Request Options 34Managing Tasks 35 Customers 36 Project Groups 37 Projects 38 Project Options 40 Project Dashboard 41 Task Groups 42 Tasks 43Asset Tracking 45 Asset Entries 46 Asset Entry Fields 49 Assets 51 Asset Classes 53 Asset Types 54 Units of Measure 55Managing Employees 56 Employee Balances 65 Employee Groups 66 Employee Types 68Reports 69 Report Properties 72 Employee Attendance Report 75 Hours Summary Report (Columnar) 76 FTE Summary Report 78 Profit Report 81Advanced Topics 83 Administrative Overview 84 System Settings 85 Work Breakdown Structure 88 Time Periods 90
p3
© 2000-2016, Pacific Timesheet
Holidays 91 Work Shifts 92 Approval Levels 93 Rate Options 94 Terminology 96 Branding 97 Data Integration 98 Timesheet Export Options 99 QuickBooks Export Options 104 Export Options 108 Auto-Import Directory 110 System Options 114 License 115 System Lists 116 Pay Codes 117 Templates 119 Asset Tracking 121 Advanced Settings 122 Submit Message 125 Policies 126 Time Entry Rules 127 Schedule Rules 133 Flex Time Rules 134 Balance and Accrual Rules 136 Over Time Rules 140 9/80 Over Time Rules 142 Work Shift Rules 144 Wage Rules 145 Absence Points Rules 148 Security 153 Permission Levels 155 Permission Lists 157 LDAP/Active Directory Authentication 158 SAML 2.0 Authentication 160 Okta Authentication 162 OneLogin Authentication 164 Ping Identity Authentication 166 Notices 168 Devices 171 ACTAtek Devices 174 Schema 177 Custom Fields 179 Importing/Exporting 184 Asset CSV Format 186 Asset Class CSV Format 188 Asset Entry CSV Format 189 Bill Rates CSV Format 191 Customer CSV Format 192 Employee CSV Format 193 Employee Balances CSV Format 196 Group CSV Format 197 Pay Rates CSV Format 198
p4
© 2000-2016, Pacific Timesheet
Project CSV Format 199 Project Group CSV Format 201 Task CSV Format 202 Task Group CSV Format 204 Timesheet CSV Format 205 Data Archival 208FAQ 209Appendix 210 Locale Codes 211 Time Zone Codes 214
p5
© 2000-2016, Pacific Timesheet
IntroductionIntroduction
Welcome to Pacific Timesheet , the premier web timesheet. Pacific Timesheet allows youremployees to track their time and attendance from a web browser, time clock or cell phone. Pacific Timesheet is available as an online service, or can be hosted on your own server.Click here for a list of supported browsers and platforms.
Note: This help document is context-sensitive. When you select a page in PacificTimesheet and click the Help link at the top of that page, the appropriate help topic willload.
Click here for a PDF version of this documentation.
Related Topics
Setup Quick Start System Requirements
-o-
p6
© 2000-2016, Pacific Timesheet
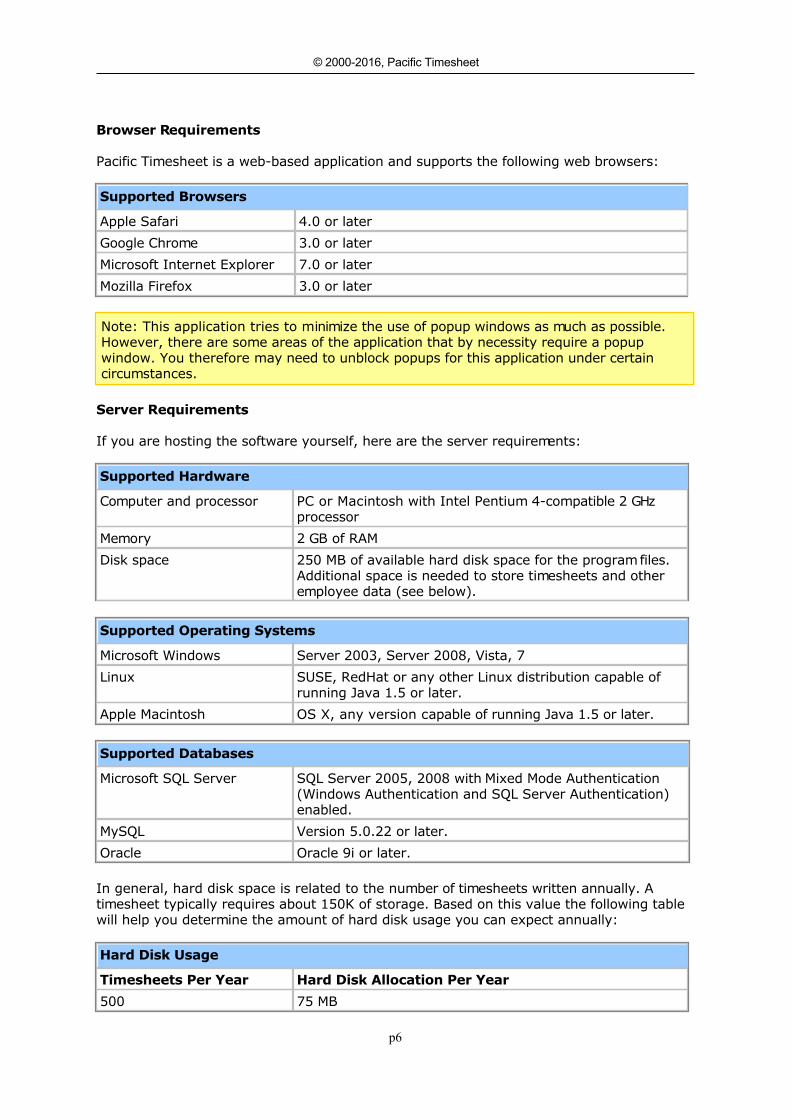
System RequirementsBrowser Requirements
Pacific Timesheet is a web-based application and supports the following web browsers:
Supported Browsers
Apple Safari 4.0 or later
Google Chrome 3.0 or later
Microsoft Internet Explorer 7.0 or later
Mozilla Firefox 3.0 or later
Note: This application tries to minimize the use of popup windows as much as possible.However, there are some areas of the application that by necessity require a popupwindow. You therefore may need to unblock popups for this application under certaincircumstances.
Server Requirements
If you are hosting the software yourself, here are the server requirements:
Supported Hardware
Computer and processor PC or Macintosh with Intel Pentium 4-compatible 2 GHzprocessor
Memory 2 GB of RAM
Disk space 250 MB of available hard disk space for the program files.Additional space is needed to store timesheets and otheremployee data (see below).
Supported Operating Systems
Microsoft Windows Server 2003, Server 2008, Vista, 7
Linux SUSE, RedHat or any other Linux distribution capable ofrunning Java 1.5 or later.
Apple Macintosh OS X, any version capable of running Java 1.5 or later.
Supported Databases
Microsoft SQL Server SQL Server 2005, 2008 with Mixed Mode Authentication(Windows Authentication and SQL Server Authentication)enabled.
MySQL Version 5.0.22 or later.
Oracle Oracle 9i or later.
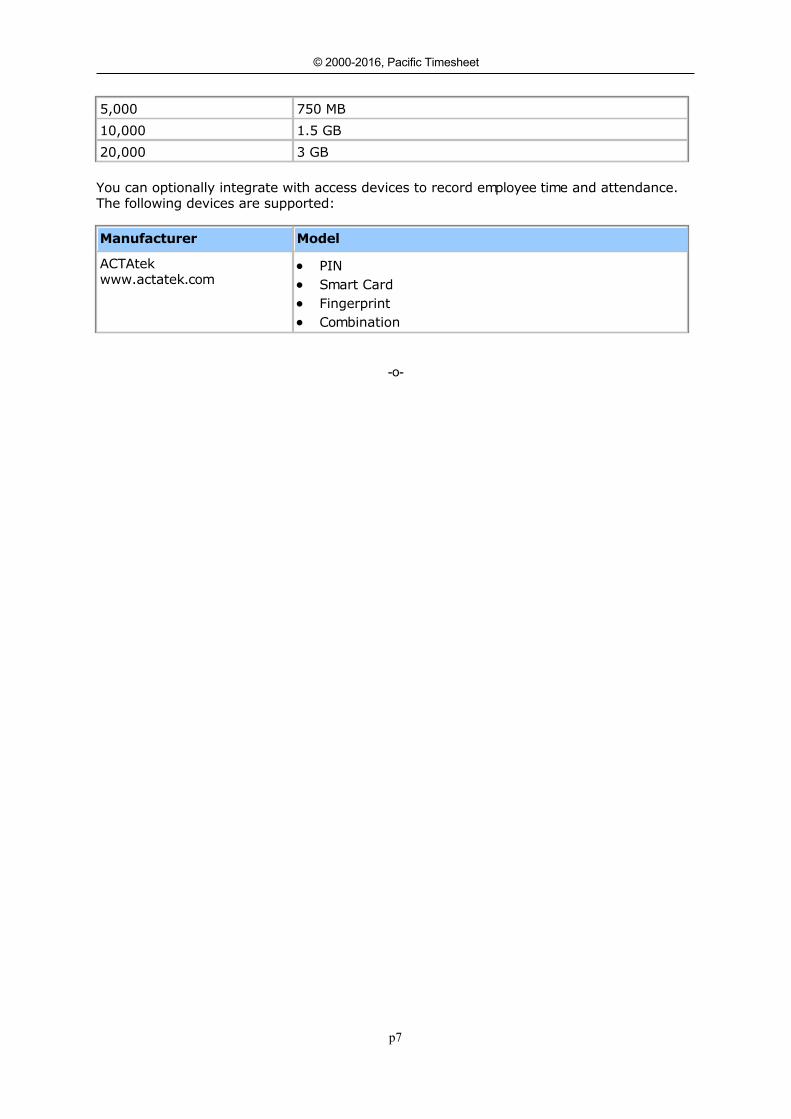
In general, hard disk space is related to the number of timesheets written annually. Atimesheet typically requires about 150K of storage. Based on this value the following tablewill help you determine the amount of hard disk usage you can expect annually:
Hard Disk Usage
Timesheets Per Year Hard Disk Allocation Per Year
500 75 MB
p7
© 2000-2016, Pacific Timesheet
5,000 750 MB
10,000 1.5 GB
20,000 3 GB
You can optionally integrate with access devices to record employee time and attendance.The following devices are supported:
Manufacturer Model
ACTAtekwww.actatek.com
PIN Smart Card Fingerprint Combination
-o-
p8
© 2000-2016, Pacific Timesheet
Setup Quick StartSetup Quick Start
If you are an administrator setting up Pacific Timesheet for the first time you will want toread this page to familiarize yourself with some basic concepts, and learn how to getup-and-running quickly. Please note that you can always get detailed information for eachpage of the application by clicking the context-sensitive Help link in the upper-right corner.
Step 1. Configure System Settings
The first steps you should take to set up your system are to configure the following global orsystem-wide settings:
Set the default time zone for your employees on the System > General page. Specify your work break down structure (WBS) on the System > Work Breakdown
Structure page. For example, one business might track time against customers, projectsand tasks. Another business might track time against clients and jobs.
Configure timesheet periods appropriate for your payroll or other reporting cycles fromthe System > Time Periods page.
Note that you can change the above settings at any time, but doing so after employees startentering time might be disruptive.
You may optionally want to do the following before rolling the system out to youremployees:
Set your list of company holidays from the System > Holidays page. Change the wording or terminology used for some labels from the System > Terminology
page. Upload your company logo and make other branding changes from the System >
Branding page. Configure bill and pay rates from the System > Bill Rates and System > Pay Rates
pages.
Step 2. Configure Timesheet Templates
The System > Templates page is where you configure the data fields that are displayed ontimesheets. You can create any number of different timesheet templates for different needs.Two sample timesheet templates are provided:
1. The "Attendance Timesheet" template is for attendance-oriented time entry, andcaptures daily in/out times and pay codes (e.g. Regular Time, Over Time, etc.).
2. The "Project Timesheet" template is for project or job-oriented time entry, and captureshours against customers, projects and tasks.
You can use and modify these templates, or create any number of new ones to suit yourneeds. When adding employees (described below), you will specify the timesheet templateas part of their profile.
Step 3. Configure Employee Policies
Employee policies allow you to control a variety of timesheet options, such as roundingrules, leave accruals and over time calculations. You should review the "Standard Policy"settings on the System > Policies page, then make changes or create new policies asdesired. You can have any number of different employee policies, such as separate policiesfor exempt and hourly employees. When adding employees (described below), you will
p9
© 2000-2016, Pacific Timesheet
specify the policy as part of their profile.
Step 4. Configure Pay Codes
The System > Pay Codes page lists the available pay codes. Pay codes are customizablevalues that you can use to track different types of work and leave hours. Work pay codescan include regular time, over time, etc. Leave pay codes can include sick, vacation, etc.
Work pay codes are often used for tracking overtime. With Pacific Timesheet you have twochoices about how overtime is handled:
1. You can have your employees select whether their hours are regular time, overtime, etc.on their timesheet via a pull down menu. To do this you add the Pay Code field to yourtimesheet template(s).
2. You can have overtime be computed automatically by enabling overtime rules for theemployee policy. If you do this you will generally want to remove the Pay Code fieldfrom the timesheet template, as you don't want the employee to enter their overtimevalues. You will still be able to report on overtime hours even if there is no Pay Codefield on the timesheet.
Leave pay codes, such as sick and vacation, can have an associated balance. Any hours anemployee enters on their timesheet for these pay codes will automatically have anequivalent amount deducted from their balance. Rules for whether balances are allowed togo negative, as well as automatic accruals, are configured by editing the balance rules onthe appropriate employee policies.
Step 5. Add Projects/Tasks
Depending upon your work breakdown structure, you may need to visit the Tasks page andcreate lists of customers, projects, tasks, jobs, etc.
Note that you can also import tasks, etc. in bulk from an external system via import files.The Importing/Exporting help topic has more details.
Step 6. Add Employees
The Employees page is where you add and edit your list of employees. Make sure theappropriate policy and timesheet template is selected for each employee.
You will also want to select the appropriate permission level for each employee, for example"Employee" or "Manager". Permission levels control what access to the timesheet systemthe employee will have, as well as giving fine-grained control over some aspects of timeentry. You can modify the permissions from the System > Security page, as well as createentirely new permission levels.
Note that you can also import employees in bulk from an external system via import files.The Importing/Exporting help topic has more details.
Employee groups can be created from the Employees > Group page. Employee groups canrepresent a variety of different logical entities, such as cost centers, permission groups andconstruction crews.
Step 7. Miscellaneous
Here are a few other topics worth being aware of:
A variety of reports are available, and can be customized for your requirements. PacificTimesheet allows you to publish your custom reports and make them available to any
p10
© 2000-2016, Pacific Timesheet
suitable permission level. For instance, you can make a customized billing reportavailable only to managers, or an hours summary report available to employees.
You may want to modify the audit level if you have stringent auditing requirements,such as DCAA. You can do this from the System > General page.
Most objects can be customized to add additional data fields. For instance, you mightwant to add an employee photograph to the employee object, or a location pick list tothe timesheet template. Choose the "Manage Custom Fields" menu option in the pop-upoptions menu in the upper-right corner of most lists of objects.
Please let us know if we can help you by contacting your sales representative or visiting oursupport site at http://www.pacifictimesheet.com/. Thank you for using Pacific Timesheet!
-o-
p11
© 2000-2016, Pacific Timesheet
HomeHome
The Home page is where you manage your employee account and preferences. It alsoprovides a "dashboard" where you can quickly view your balances, leave requests, companyannouncements and other information.
The Calendar shows recent and upcoming holidays and leave requests.
Related Topics
Change Password My Account Preferences Leave Requests Holidays Announcements
-o-
p12
© 2000-2016, Pacific Timesheet
Change PasswordChange Password
You can change your password at any time from this page. For security reasons you willneed to provide your old password.
Note: Passwords are case-sensitive, and can never be the same as your login name. Theremay be other constraints, such as being a minimum number of characters in length,depending upon how your application administrator has configured the password securitysettings.
-o-
p13
© 2000-2016, Pacific Timesheet
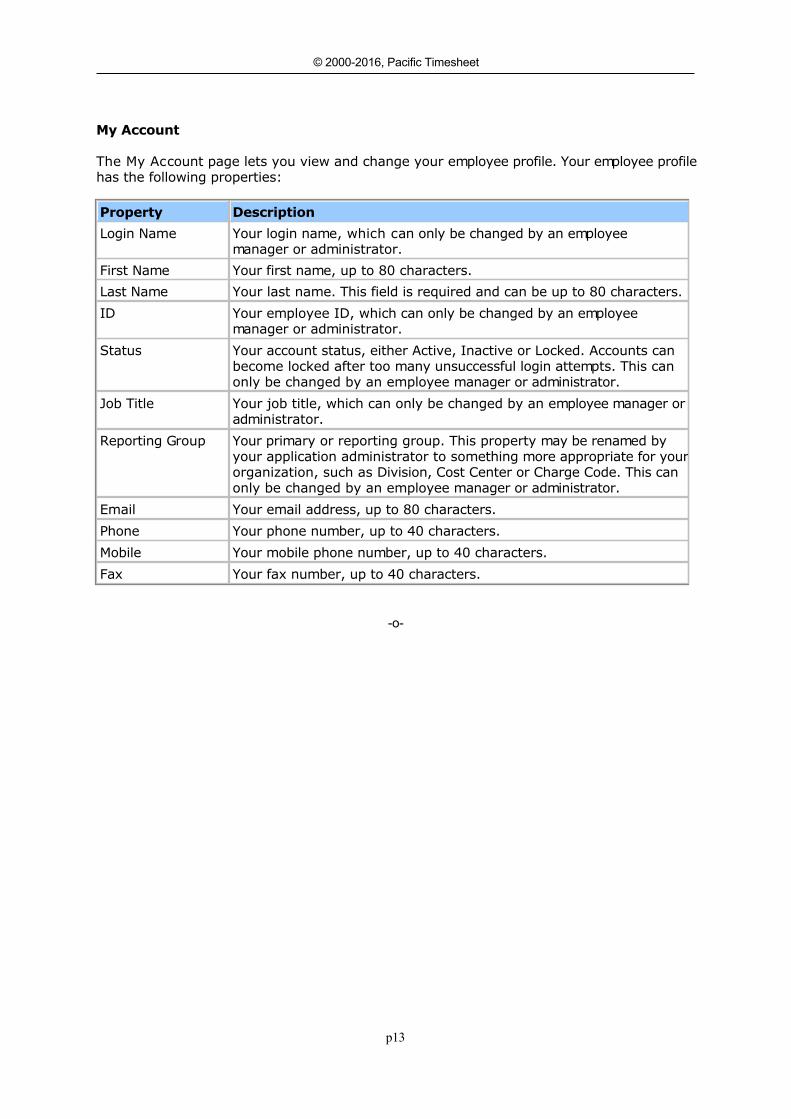
My AccountMy Account
The My Account page lets you view and change your employee profile. Your employee profilehas the following properties:
Property Description
Login Name Your login name, which can only be changed by an employeemanager or administrator.
First Name Your first name, up to 80 characters.
Last Name Your last name. This field is required and can be up to 80 characters.
ID Your employee ID, which can only be changed by an employeemanager or administrator.
Status Your account status, either Active, Inactive or Locked. Accounts canbecome locked after too many unsuccessful login attempts. This canonly be changed by an employee manager or administrator.
Job Title Your job title, which can only be changed by an employee manager oradministrator.
Reporting Group Your primary or reporting group. This property may be renamed byyour application administrator to something more appropriate for yourorganization, such as Division, Cost Center or Charge Code. This canonly be changed by an employee manager or administrator.
Email Your email address, up to 80 characters.
Phone Your phone number, up to 40 characters.
Mobile Your mobile phone number, up to 40 characters.
Fax Your fax number, up to 40 characters.
-o-
p14
© 2000-2016, Pacific Timesheet
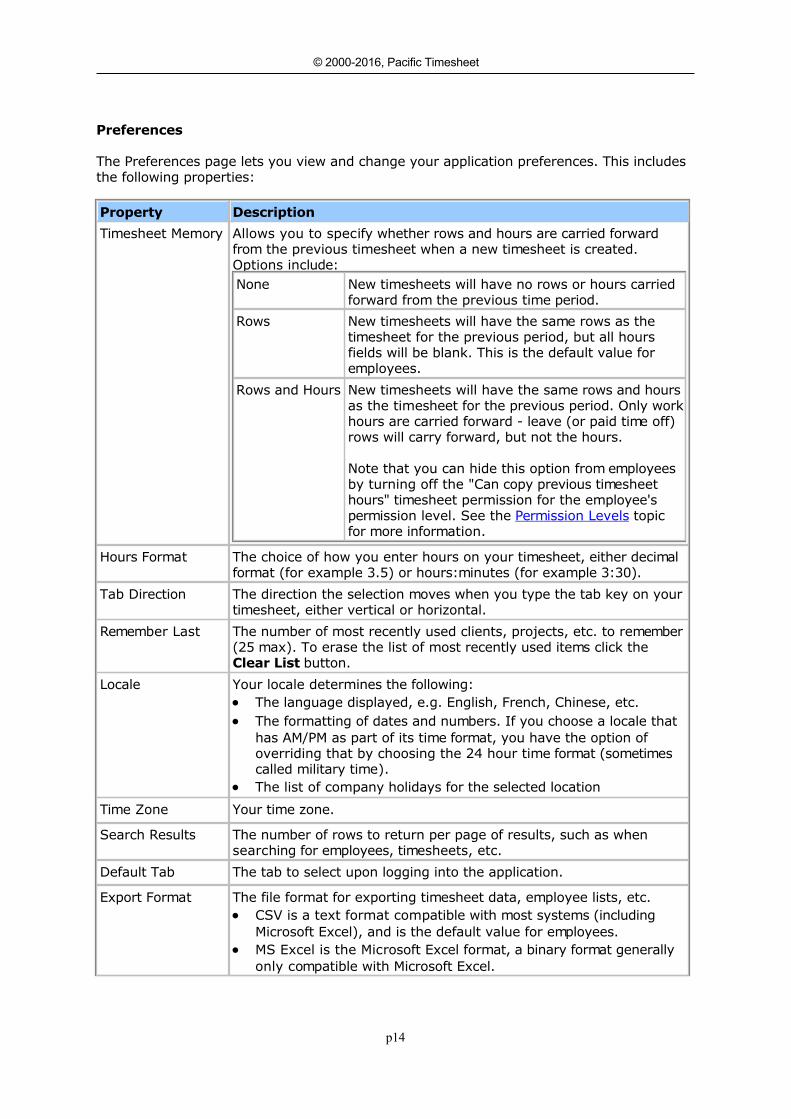
PreferencesPreferences
The Preferences page lets you view and change your application preferences. This includesthe following properties:
Property Description
Timesheet Memory Allows you to specify whether rows and hours are carried forwardfrom the previous timesheet when a new timesheet is created.Options include:None New timesheets will have no rows or hours carried
forward from the previous time period.
Rows New timesheets will have the same rows as thetimesheet for the previous period, but all hoursfields will be blank. This is the default value foremployees.
Rows and Hours New timesheets will have the same rows and hoursas the timesheet for the previous period. Only workhours are carried forward - leave (or paid time off)rows will carry forward, but not the hours.
Note that you can hide this option from employeesby turning off the "Can copy previous timesheethours" timesheet permission for the employee'spermission level. See the Permission Levels topicfor more information.
Hours Format The choice of how you enter hours on your timesheet, either decimalformat (for example 3.5) or hours:minutes (for example 3:30).
Tab Direction The direction the selection moves when you type the tab key on yourtimesheet, either vertical or horizontal.
Remember Last The number of most recently used clients, projects, etc. to remember(25 max). To erase the list of most recently used items click the Clear List button.
Locale Your locale determines the following: The language displayed, e.g. English, French, Chinese, etc. The formatting of dates and numbers. If you choose a locale that
has AM/PM as part of its time format, you have the option ofoverriding that by choosing the 24 hour time format (sometimescalled military time).
The list of company holidays for the selected location
Time Zone Your time zone.
Search Results The number of rows to return per page of results, such as whensearching for employees, timesheets, etc.
Default Tab The tab to select upon logging into the application.
Export Format The file format for exporting timesheet data, employee lists, etc. CSV is a text format compatible with most systems (including
Microsoft Excel), and is the default value for employees. MS Excel is the Microsoft Excel format, a binary format generally
only compatible with Microsoft Excel.

p15
© 2000-2016, Pacific Timesheet
-o-
p16
© 2000-2016, Pacific Timesheet
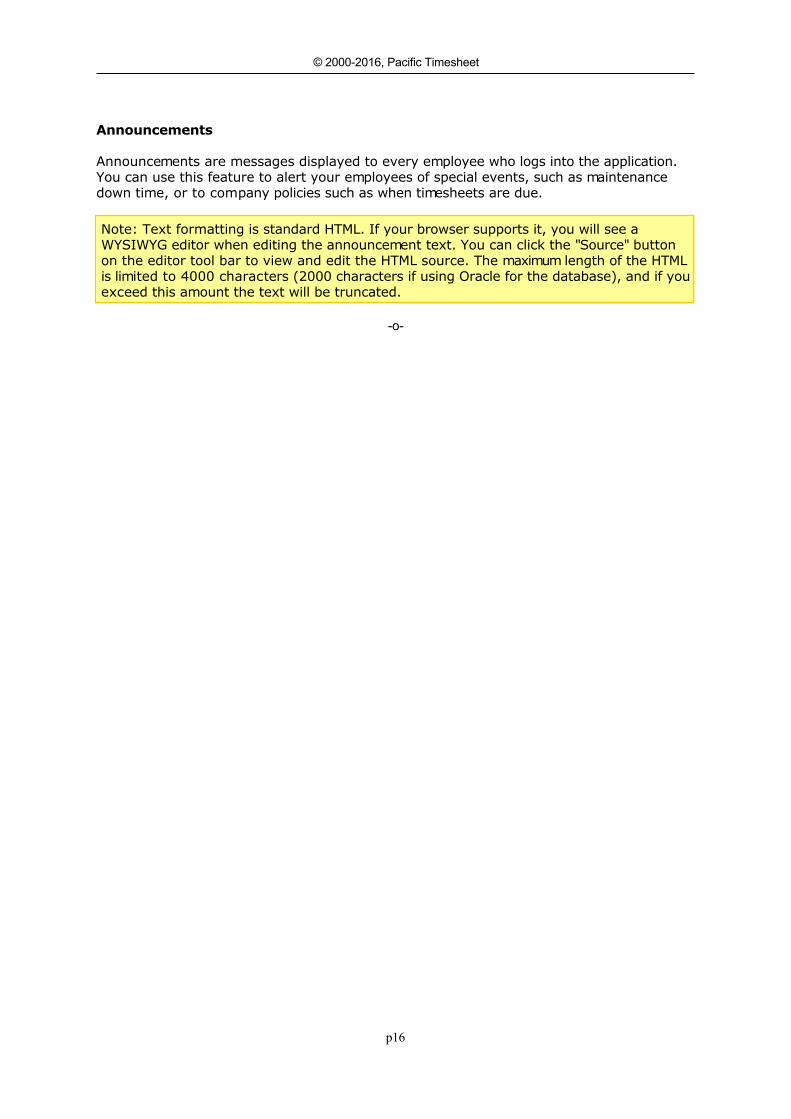
AnnouncementsAnnouncements
Announcements are messages displayed to every employee who logs into the application.You can use this feature to alert your employees of special events, such as maintenancedown time, or to company policies such as when timesheets are due.
Note: Text formatting is standard HTML. If your browser supports it, you will see aWYSIWYG editor when editing the announcement text. You can click the "Source" buttonon the editor tool bar to view and edit the HTML source. The maximum length of the HTMLis limited to 4000 characters (2000 characters if using Oracle for the database), and if youexceed this amount the text will be truncated.
-o-
p17
© 2000-2016, Pacific Timesheet
My TimesheetMy Timesheet
The My Timesheet page is where you enter hours into your timesheet. By default you will betaken to the timesheet for the current time period. You can change the time period byclicking the Time Period link or clicking the next/previous buttons beside the Time Periodlink. Time periods are determined by your application administrator, and usually correspondto payroll or other company time periods.
A timesheet has a status, which can be Open, Submitted, Approved or Rejected. TheOpen status means you can enter hours and make other edits to your timesheet. When youhave finished filling out your timesheet you should click the Submit button, which changesyour timesheet status to Submitted. Submitted timesheets cannot be edited.
Submitted timesheets can be reviewed and approved by an employee manager. If themanager finds a problem with the timesheet they might reject it, which will revert thetimesheet back to its Open status, allowing you to correct any problem.
If your timesheet status is Open you can delete it and start over with a new one by clickingthe Delete button.
Timesheet Views
You can view your time entries using a Day View, Week View, Summary View orPrintable View. You can switch between views at any time, and changing your view willsave any changes you have made to your timesheet automatically. The Day View allows youto view and enter time on a day-by-day basis. The Week View allows you to view and entertime on a weekly basis (this view is not available if you are entering start times with yourtime entries). The Summary View is a read-only view that lists all of the time entries for theentire time period. The Printable View will generate a PDF version of the Summary View,which is suitable for printing and signing by your manager.
Timesheet Rows
There are two types of time entries you can add to your timesheet: Work and Leave (notethat the terminology for these two types might have been changed by your applicationadministrator). Work time entries are added by clicking the Add Work button. Work timeentries generally require entering a Task or other description of the work done.
Leave time entries are added by clicking the Add Leave button. Leave time entriesgenerally require you select the type of leave, for example Vacation.
You can delete one or more rows at a time by checking the desired rows on your timesheetand then clicking the Delete Row button.
If you are entering start times then rows will be ordered from earliest to latest. If you arenot entering start times then you can order the rows as you like by checking the desiredrows and then clicking the Move Up or Move Down buttons.
Choosing Tasks
Your timesheet may be configured for you to choose a Task, Project or other additionalproperties for each time entry. The exact set of properties you need to choose will dependon how your application administrator has set up the work breakdown structure (WBS) foryour organization. Choosing a Task, Project, etc. will pop up the Task browser, which allowsyou to choose any level of the WBS.
You may narrow down the list of tasks shown in the browser by entering a query and
p18
© 2000-2016, Pacific Timesheet
clicking the Search button. You can refine your query using the '*' character. For instance,to return all tasks starting with the letter 't' enter the query 't*'. To find all tasks endingwith the letter 't' enter '*t'. Searching for '*t*' is the same as just searching for 't' - it willreturn any task with the letter 't' in it.
Timesheet Notes
The Notes field at the bottom of the timesheet allows you to enter notes or commentsabout the timesheet. This is commonly used to inform your manager or approver aboutanything special regarding your timesheet. The maximum size of a note is 4000 characters.
Other Timesheet Commands
There is a popup menu of additional Timesheet commands in the upper-right corner of thetimesheet. These commands include:
Copy Previous Timesheet will copy the rows and hours entered on the previoustimesheet. This command will only be available if the current timesheet has not beensubmitted and has no hours, to avoid inadvertently overwriting your timesheet.
Copy Previous Rows will copy the rows (but not the hours) from the previous timesheet.This command will only be available if the current timesheet has not been submitted andhas no hours, to avoid inadvertently overwriting your timesheet.
Copy Previous Day will copy the time entries for the previous day to the current day. Thiscommand will only be available when in the Day View and if the current timesheet has notbeen submitted and the day has no hours. If you choose this command for a Monday it willmove back to Friday to look for previous time entries if none are found on the weekend.
Delete Timesheet will delete the current timesheet. This command is only available if thecurrent timesheet has not been submitted.
-o-
p19
© 2000-2016, Pacific Timesheet
My AssetsMy Assets
The "My Assets" page allows you to record non-labor types of data such as materials,equipment and other types of assets you use as part of your project or job work. As PacificTimesheet allows asset tracking to be configured in many different ways (for example youmay be recording materials, equipment and expenses) the specifics of the "My Assets" pagewill depend upon your organization's configuration of Pacific Timesheet.
Note that the types of assets that can be entered on the "My Assets" page is controlled inpart by the timesheet template that is assigned to you by your application administrator.For instance, your system may be configured for both Materials and Equipment, but if yourtimesheet template only has Materials enabled then the "My Assets" page would instead be"My Materials", and you would only be able to enter the materials you used.
-o-
p20
© 2000-2016, Pacific Timesheet
Crew TimesheetCrew Timesheet
Crew timesheets allow the daily entry of time for groups (crews) of employees. Crewtimesheets are a convenient and efficient way to enter time for crews of employees that donot record their own time, such as field workers on construction sites.
Note: You can change the terminology for 'Crew' to suit your organization's needs. The Terminology topic has more information.
Crew timesheets are accessed from the "Crew Timesheet" tab. To access this tab crewtimesheets they must first be enabled from the System > General > System Options page.In addition, you must be a timesheet manager or approver for at least one group, and havethe 'Can View Crew Timesheet' option enabled in your employee permission level.
Configuring Crew Timesheets
The fields that appear on the crew timesheet (e.g. Hours, Project, Task, etc.) come from thetimesheet template of the employee that appears first in the crew. To add employees to thecrew simply click the "Add Employee" link at the bottom of the list of employees, thenchoose the appropriate employee(s) to add. You can also add employees to the crew bygoing to the Employees > Groups page and configuring the list of employees for each crew(group).
If you are an administrator (that is, you can edit timesheet templates on the System >Templates page), then you will be able to alter they layout of the crew timesheet. To dothis, click the "More" menu button (the triangle icon in the upper-right corner of the crewtimesheet) on the Crew Timesheet page, then click the "Timesheet Options" link. You willhave access to the following layout settings:
Property Description
Day Fields Choose which fields from the timesheet template should appear at thetop of the crew timesheet. Day fields values apply to every row andcolumn of the crew timesheet for the selected date.
Column Fields Choose which fields from the timesheet template should appear aboveeach column where the hours are entered. Column field values applyto every row in the column.
Row Fields Any remaining fields that are not selected as day or column fields areconsidered row fields, and will show up on each row for eachemployee.
Show Employee ID Check this option if you want to display the Employee ID column nextto the Employee column in the layout. Note that even if not checked,the user can always view an employee's ID and other properties byclicking the employee's name in the crew timesheet.
Employee Grouping Use this option to group certain types of employees at the top of thelist of employees on the crew timesheet. For instance, you might wantemployees with the Permission Level of 'Manager' to always be at thetop of the list. Another example is to group employees with the Policy'Full Time' at the top of the list, so that 'Part Time' employees sortbelow them (note that these policy names are not built into theproduct and are just examples).
Tab Direction You can choose whether the tab key will take you to the next column(horizontal) or to the next row (vertical).

p21
© 2000-2016, Pacific Timesheet
Remember Last This option will determine how many previously selected projects,tasks, etc. will be remembered for easy access.
Crew Parent Field If you have a lot of crews you may want to organize them intodifferent categories or types. For instance, you might create a groupcustom field named "Region" and specify a geographic region for eachcrew. Specify the "Region" field in this example for the crew parentfield in order to make browsing for crews more convenient.
Crew Approval Kiosk
You can access a special "kiosk" version of the Pacific Timesheet web interface that providesa streamlined or simplified crew timesheet approval page. From the Crew Timesheet clickthe "more" menu (the triangle in the upper-right corner of the page) and select the "CrewApproval Kiosk" option. The Crew Approval Kiosk gives you a "read-only" report of the crewtimesheet data in either weekly or daily format, and allows you to submit, approve or rejectthe data, depending upon your permissions.
You can provide your clients with the link to this page (e.g.http://someco.pacifictimesheet.com/timesheet/kiosk/crew-approval.do) to allow them toreview and approve timesheet data. You will need to provide them with a Pacific Timesheetemployee account so that they can log in. This account should have very limitedpermissions, e.g. only the ability to approve timesheets, and no timesheet template. Yourapplication specialist can assist you with setting up such client access accounts.
-o-
p22
© 2000-2016, Pacific Timesheet
Managing TimesheetsManaging Timesheets
Employees can be given permission to manage other employee's timesheets. A timesheetmanager can view, edit and even delete timesheets, depending upon their permission level.Any employee whose Permission Level allows timesheet management (for exampleAdministrator or Manager) can manage timesheets and will see the Timesheets tab. If youdo not see the Timesheets tab then you have not been given a Permission Level withtimesheet management permissions. You can check an employee's Permission Level fromthe Employees tab.
If the employee's permission level allows only limited timesheet management then theemployee will need to be added to the permission list for one or more employee groups.This can be done by clicking the Groups link under the Employees tab, then clicking one ofthe groups in the list. In the Permissions section for the group click the Edit button andadd the employee to the permission list with the appropriate permission level. The Groupstopic has more information.
Note: You can use timesheet management permissions to create "time keepers" -employees with the ability to enter time for other employees. This avoids the need to login as another user in order to fill out their timesheet. If implementing time keepers it isrecommended that you create a new Permission Level with only the minimum requiredtimesheet permissions such as manage, edit and create. The Permission Levels topic hasmore information.
Timesheet Lookup
To list employee timesheets click the Timesheets tab, enter an appropriate Start date,then click the Search button. You can optionally enter a Finish date and Status in order tonarrow down the list of returned timesheets.
If you do not find any timesheets then you may have only limited timesheet managementpermissions. As mentioned above, you may need to be added to the permission list for oneor more employee groups.
Clicking a Time Period link in the list will load that employee's timesheet. Depending uponyour permission level, you may be able to edit or even delete this timesheet.
Exporting Timesheets
If your permission level allows it you can export the list of timesheets by clicking the popupmenu in the upper right of the list and then clicking the Export List link. This will exportthe timesheet status information as displayed in the list to your local computer, incomma-separated value (CSV) format. This file can then be opened in Microsoft Excel orother applications that support the CSV format. You can optionally change this to MicrosoftExcel's native format (XLS) by clicking the Preferences link on the Home tab.
Clicking the Export Timesheet Data link will download the time entries for each timesheetin the list as a file that you can save on your local computer. This is useful for exportingtime entries to external systems such as Payroll processing applications. You can optionallymark time entries as being exported, so that you can avoid re-exporting the same data.Once a timesheet has been marked as exported it cannot be unsubmitted (unlocked) forre-editing. You will need to make corrections to the timesheet by clicking the "AddCorrection" button. This is a safeguard to avoid modifying previously exported time entries.Note that administrators (those with the "Can Manage All" timesheet permission) canbypass this restriction and still unsubmit a previously exported timesheet, if the needarises.
p23
© 2000-2016, Pacific Timesheet
Another option for getting access to timesheet data is to run a Timesheet Details report.This report can be customized to only output the fields you require, and can be downloadedin a number of formats, including Microsoft Excel. The Reports topic has more information.
Importing Timesheets
If your permission level allows it you can import timesheet data by clicking the popup menuin the upper right of the list and then clicking the Import Timesheet Data link. TheImporting/Exporting topic has more information.
Printing Timesheets
The 'Print Timesheet' option in the popup menu in the upper right corner of the timesheetlist allows you to download a PDF hard copy of all of the timesheets in the list. This is usefulif you need to print out multiple timesheets for signing, for instance. Note that, rather thanprinting the entire list, you can print selected timesheets by clicking the checkbox on eachrow before selecting the 'Print Timesheets' option.
You can also print individual timesheets by clicking the time period link in the timesheet list,then clicking the 'Print' view button in the upper-right corner of the timesheet. This willdownload a PDF version of the timesheet suitable for printing.
-o-
p24
© 2000-2016, Pacific Timesheet
Time Entry CorrectionsTime Entry Corrections
Administrators and managers with the ability to edit timesheets may add corrective oradjustment time entries to a timesheet that has been previously submitted or approved.Once a timesheet has been submitted (locked) an "Add Correction" button will appear onthe timesheet. This allows you to make a change to the timesheet without unsubmitting itfirst. This is necessary in instances where you only want to resend correction time entries(either with negative or positive hours) to your payroll or billing systems.
To make a correction, locate the submitted or approved timesheet, switch to either the Day,Week or Summary view, then click the "Add Correction" button. You will be presented with adialog in which you can enter properties for the corrective time entry, such as the pay code,project, task and hours. If you want to make a change to an existing time entry, select thetime entry row before clicking the "Add Correction" button, and all of the fields will bepre-filled.
You can enter negative hours in a correction time entry in order to subtract hours from aprevious entry. For instance, in order to subtract 2 hours from a previous time entry, youwould select the previous time entry, click the "Add Correction" button, then enter -2 in thehours field. When you click OK you will see the new negative time entry on the timesheet.
After adding correction time entries to a timesheet, any export flags for the timesheet willbe cleared. In this way you will be able to re-export the timesheet and send the correctiontime entries to your payroll system. Adding a time entry correction to a timesheet will notaffect other time entries on that timesheet, making it easy to export only the corrections toyour payroll or billing systems.
-o-
p25
© 2000-2016, Pacific Timesheet
ApprovalsApprovals
Pacific Timesheet has several flexible options for approving your employee's time. Inaddition to allowing multiple approval levels, you can approve employee time in severaldifferent formats.
Note: Leave requests are approved from the Leave Requests tab. See the Leave Requeststopic for more information.
Timesheet Approval
Timesheet approval is the most commonly used type of approval, and is especially useful forpayroll and human resources applications. With timesheet approval you can review andapprove employee time for entire time periods. You can also review and approve (or reject)individual line items or entries within a period. Refer to the Approving Timesheets topic formore information.
Project Time Approval
Project time approval allows project managers to review and approve (or reject) employeetime recorded for specific projects. Refer to the Approving Project Time topic for moreinformation.
Crew Time Approval
Crew time approval allows job supervisors and managers to review and approve (or reject)time entered for crews of workers. Refer to the Approving Crew Time topic for moreinformation.
-o-
p26
© 2000-2016, Pacific Timesheet
Approving TimesheetsApproving Timesheets
Submitted timesheets can be electronically signed by an employee's approver. An employeecan have a Primary Approver and a Backup Approver. Approvers are assigned to anemployee from the Employee Details page. Note that to be an approver the employee musthave a Permission Level such as Administrator or Manager with the "approve" timesheetpermission checked. If you do not see the Approval tab then your permission level does nothave the "approve" timesheet permission checked.
A backup approver has the same permissions as a primary approver, but will not be sentany approval-related email notices. The Notices topic has more information.
Timesheet Lookup
To list employee timesheets click the Approval tab, enter an appropriate Start date, thenclick the Search button. You can optionally enter a Finish date and Status in order tonarrow down the list of returned timesheets. If you do not find any timesheets no matterwhat search criteria you use then you may not be assigned to any employees as anapprover.
Timesheet Approval/Rejection
Timesheets in the list that are submitted (pending approval) can be approved by checkingthe checkbox in the Approved column. Then click the Save button to save the approvalchange.
You can approve individual time entries (line items) by clicking the Time Period link in thetimesheet list. This allows you to view the timesheet details and approve each rowindividually. When all time entries are approved then the entire timesheet is consideredapproved.
When viewing the individual time entries you have the option of rejecting any of them, andthereby rejecting the timesheet. To reject a time entry check the Rejected checkbox forthe appropriate time entry, enter a Reject Reason at the bottom of the page, then clickthe OK button to save the changes. A rejected timesheet is un-submitted and sent back tothe employee for correction.
Approval Options
You can customize which time entry fields are displayed in the timesheet details page byclicking the popup menu in the upper-right corner and choosing Options. The TimesheetApproval Options page lets you customize which timesheet fields are displayed in thetimesheet approval page. For a detailed description of the various timesheet fields refer tothe Templates topic.
Approval Levels
Your system can be configured to have mulitple approval levels (including zero levels, fororganizations that don't need timesheet approval). This is covered more fully in the Approval Levels topic.
Crew Time Approval
An alternative to approving timesheets is to use the Crew Time Approval page. This is moreappropriate for construction and field service applications where you are doing daily timeapproval.
p27
© 2000-2016, Pacific Timesheet
Exporting Timesheets
If your permission level allows it you can export the list of timesheets by clicking the popupmenu in the upper right of the list and then clicking the Export List link. This will exportthe timesheet status information as displayed in the list to your local computer, incomma-separated value (CSV) format. This file can then be opened in Microsoft Excel orother applications that support the CSV format. You can optionally change this to MicrosoftExcel's native format (XLS) by clicking the Preferences link on the Home tab.
Clicking the Export Timesheet Data link will download the time entries for each timesheetin the list as a file that you can save on your local computer. This is useful for exportingtime entries to external systems such as Payroll processing applications. You can optionallymark time entries as being exported, so that you can avoid re-exporting the same data.Once a timesheet has been marked as exported it cannot be unsubmitted (unlocked) forre-editing. You will need to make corrections to the timesheet by clicking the "AddCorrection" button. This is a safeguard to avoid modifying previously exported time entries.Note that administrators (those with the "Can Manage All" timesheet permission) canbypass this restriction and still unsubmit a previously exported timesheet, if the needarises.
Another option for getting access to timesheet data is to run a Timesheet Details report.This report can be customized to only output the fields you require, and can be downloadedin a number of formats, including Microsoft Excel. The Reports topic has more information.
Importing Timesheets
If your permission level allows it you can import timesheet data by clicking the popup menuin the upper right of the list and then clicking the Import Timesheet Data link. TheImporting/Exporting topic has more information.
Printing Timesheets
The 'Print Timesheet' option in the popup menu in the upper right corner of the timesheetlist allows you to download a PDF hard copy of all of the timesheets in the list. This is usefulif you need to print out multiple timesheets for signing, for instance. Note that, rather thanprinting the entire list, you can print selected timesheets by clicking the checkbox on eachrow before selecting the 'Print Timesheets' option.
You can also print individual timesheets by clicking the time period link in the timesheet list,then clicking the 'Print' view button in the upper-right corner of the timesheet. This willdownload a PDF version of the timesheet suitable for printing.
-o-
p28
© 2000-2016, Pacific Timesheet
Approving Project TimeApproving Project Time
Project time approval allows project managers to review and approve employee time. Ratherthan approving entire employee timesheets, employee time is approved on a per-projectbasis. You can set up permissions such that project approvers only see projects they areallowed to approve.
Enabling Project Time Approval
You enable project time approval from the Projects > Project Options page. You can setthe following project time approval properties:
Property Description
Project TimeApproval
If checked then project time approval is enabled. When you click theApprovals tab you will now have access to the Project TimeApprovals page (depending upon your permissions).
Approval Level If you have defined more than one approval level you need to selectwhich one is considered project approval.
Enabling project time approval will not automatically grant employees permission to approveprojects. You still need to go to the System > Security page and modify or add permissionlevels to enable the "Can approve" project permission. You can specify either "Can approveall" or "Can approve limited" project permission. Any project approver with the "Can approvelimited" project permission will need to be assigned permission to each appropriate project.This is done by going to the Tasks > Projects > Permissions page and adding theemployee to each appropriate project.
Project Time Approval Process
Click the Approvals tab. If you have "Can approve" permission on both Timesheets andProjects you will see two links in the area below the Approvals tab: "Timesheet Approvals"and "Project Time Approvals". Click the "Project Time Approvals" link. If you only have "Canapprove" permission for Projects (that is, you don't have the "Can approve" permission fortimesheets) then you will be taken directly to the Project Time Approvals page when clickingthe Approvals tab.
The Project Time Approvals page will list summary project time data, organized byproject and employee. This gives you a dashboard overview of project time. You can narrowor filter the project time shown by adjusting the following project lookup options:
Property Description
Time Period The time period for reviewing and approving project time data.Generally you will choose a prior timesheet period, e.g. "PreviousWeek" if using weekly timesheet periods. For convenience, the lastvalue selected will be recalled the next time this page is accessed.
Time Entry Status The approval status filter for the data being reviewed. Possiblevalues are: Any: No filtering applied. Open: Only show unsubmitted project time. Pending Approval: Only show submitted project time that is not
approved. Approved: Only show project time that is approved. Rejected: Only show project time that is rejected.
p29
© 2000-2016, Pacific Timesheet
Project If a project is selected then the data will be limited to the specifiedproject.
Employee Enter an employee name, ID or login to limit the project time to aspecific employee. The search will do a partial match, e.g. "ob" willmatch both "Robert" and "Bob". You can use the wildcard "*" for amore specific match. For example, to find an employees whosename ends with "bert" you would enter "*bert". To find an employeewhose name starts with "an" you would enter "an*".
Employee Type You can select one or more employee types to limit the data to justthose employees of the selected type.
Time Entry Notes You can limit or search for data that contains a specific comment inthe time entry notes field.
Reporting Group You can limit the data to a specific reporting group. Note that"reporting group" is a terminology item, and could have beenrenamed (e.g. "Cost Center" or "Department").
To review and approve (or reject) the displayed project time click the Details button on theright side of each row. This will bring you to the Project Approval Details page. On thedetails page you will see the individual time entries for the specified project and employee.To approve the entries you select one or more rows and click the Approve button (or theReject button if rejecting the entries). When you have finished your review you can clickthe Next/Previous buttons in the upper-right corner of the list to navigate to the next detailspage. This makes it easy to quickly step through each set of project time entries (you don'tneed to go back to the summary screen for each employee).
You can undo an approval or rejection by clicking the "More" popup menu to the right ofthe Approve and Reject buttons. Simply select the appropriate entries from the list, thenselect "Undo Approve" or "Undo Reject".
When reviewing the project time you may want to see different entry fields (e.g. PayAmount, or Overtime). Administrators can define which time entry fields are displayed onthe Project Approval Details page. See the Project Time Approval Options below for moreinformation.
Since project approvals can be done for any arbitrary time period (daily, weekly, etc.), it isimportant to understand when a timesheet is considered entirely project approved. When allof an employee's project time in a timesheet period is project approved, then the entiretimesheet will be considered project approved, even if that timesheet has non-project time(e.g. vacation or sick leave). Automatically marking the timesheet as project approved isuseful when you have multiple approval levels: a payroll or HR approver can quickly seethat a timesheet has been project approved when they are looking at timesheets on theTimesheet Approvals page.
Project Time Approval Options
If you are logged in as an administrator (that is, your permissions allow you to managesystem settings and you can see the System tab), you will see an Options item in the"More" popup menu to the right of the Approve and Reject buttons on the ProjectApproval Details page. Selecting the Options item will load the Project Time ApprovalsOptions page. You can change the following options:
Property Description
Time Entry Details The list of time entry fields that are displayed on the project timeapproval details page. You can add additional fields (for example, BillAmount), or remove fields that are not relevant.

p30
© 2000-2016, Pacific Timesheet
-o-
p31
© 2000-2016, Pacific Timesheet
Approving Crew TimeCrew Approval
The Crew Approval page allows you or your clients to review and approve entries on aweekly or daily basis. The Crew Approval page is accessed as a stand-alone (or kiosk) webpage:
http://hostname/timesheet/kiosk/home.do
Where the "http://hostname" portion should be replaced with the appropriate value foryour Pacific Timesheet installation, for example "https://myco.pacifictimesheet.com".
Once you log into this page you will be able to view and approve/reject entries on a weeklyor daily basis for employee groups or crews. To be able to do this you must have thefollowing configuration:
Your employee profile's permission level must allow you to approve. You can check yourpermission level from the Employees page, and the permission level can be checkedfrom the System > Security page. You can be set to "Approve All" or "Approve Limited".
If your approval permission is "Approve Limited" you must next be assigned to one ormore employee groups. For every group you are assigned to that you want to be able toapprove make sure the permission level is appropriate. For example, if your permissionlevel is "Manager" you must be assigned to one or more groups with the permission levelof "Manager".
Note: The system administrator may want to log into the kiosk and configure some of theCrew Approval options first. The online help link in the kiosk provides further information.
-o-
p32
© 2000-2016, Pacific Timesheet
Leave RequestsLeave Requests
Leave requests facilitate the scheduling of employee time off. New leave requests aresubmitted from the Home page by clicking the New Request link. Depending upon yourpolicy settings, your leave requests will automatically show up on your timesheet for therequested days when the request is approved. Note that the term "Leave" may have beenrenamed by an administrator to "Time Off" or some other terminology. The Terminologytopic has more information.
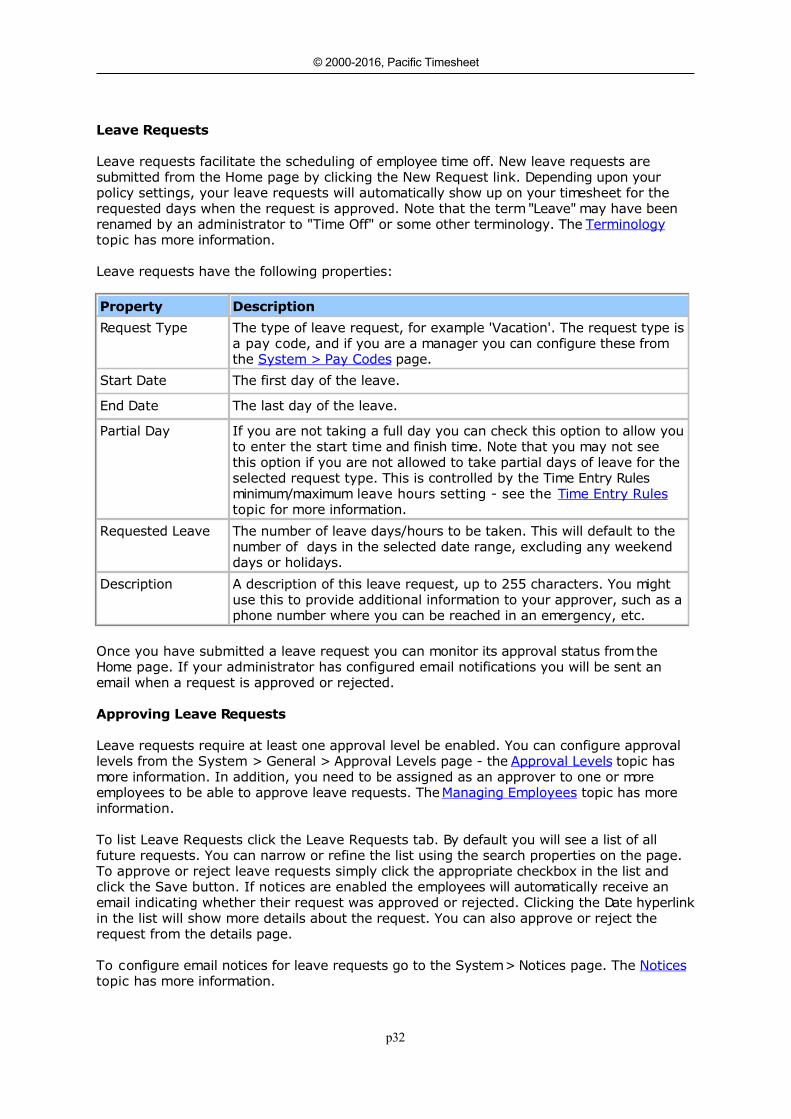
Leave requests have the following properties:
Property Description
Request Type The type of leave request, for example 'Vacation'. The request type isa pay code, and if you are a manager you can configure these fromthe System > Pay Codes page.
Start Date The first day of the leave.
End Date The last day of the leave.
Partial Day If you are not taking a full day you can check this option to allow youto enter the start time and finish time. Note that you may not seethis option if you are not allowed to take partial days of leave for theselected request type. This is controlled by the Time Entry Rulesminimum/maximum leave hours setting - see the Time Entry Rulestopic for more information.
Requested Leave The number of leave days/hours to be taken. This will default to thenumber of days in the selected date range, excluding any weekenddays or holidays.
Description A description of this leave request, up to 255 characters. You mightuse this to provide additional information to your approver, such as aphone number where you can be reached in an emergency, etc.
Once you have submitted a leave request you can monitor its approval status from theHome page. If your administrator has configured email notifications you will be sent anemail when a request is approved or rejected.
Approving Leave Requests
Leave requests require at least one approval level be enabled. You can configure approvallevels from the System > General > Approval Levels page - the Approval Levels topic hasmore information. In addition, you need to be assigned as an approver to one or moreemployees to be able to approve leave requests. The Managing Employees topic has moreinformation.
To list Leave Requests click the Leave Requests tab. By default you will see a list of allfuture requests. You can narrow or refine the list using the search properties on the page.To approve or reject leave requests simply click the appropriate checkbox in the list andclick the Save button. If notices are enabled the employees will automatically receive anemail indicating whether their request was approved or rejected. Clicking the Date hyperlinkin the list will show more details about the request. You can also approve or reject therequest from the details page.
To configure email notices for leave requests go to the System > Notices page. The Noticestopic has more information.
p33
© 2000-2016, Pacific Timesheet
Note: You can change the terminology for Leave to suit your organization's needs. The Terminology topic has more information.
Leave Request Policy Rules
Administrators can configure policy rules for leave requests from the System > Policies >Schedule Rules page. The Schedule Rules topic has more information.
-o-
p34
© 2000-2016, Pacific Timesheet
Leave Request OptionsLeave Request Options
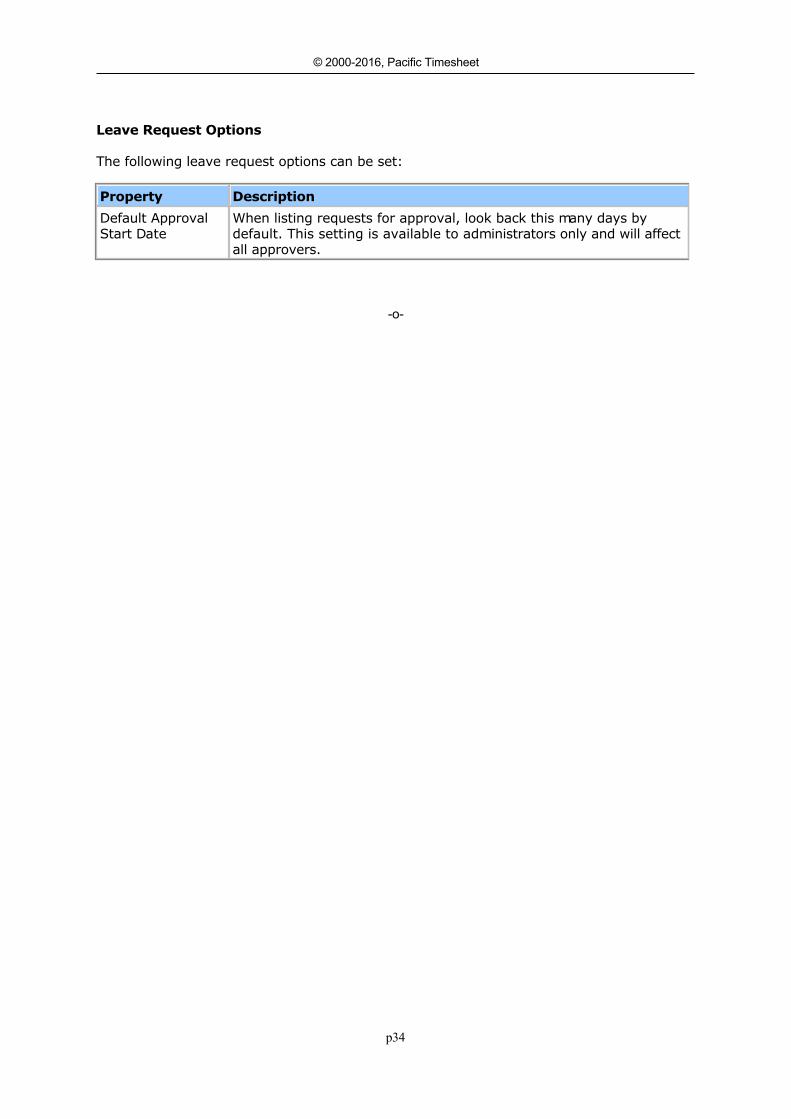
The following leave request options can be set:
Property Description
Default ApprovalStart Date
When listing requests for approval, look back this many days bydefault. This setting is available to administrators only and will affectall approvers.
-o-
p35
© 2000-2016, Pacific Timesheet
Managing TasksManaging Tasks
Normally time is recorded against a Work Breakdown Structure (WBS). A set of pre-definedlevels are provided: Project Groups, Projects, Task Groups and Tasks. Each level can berenamed as appropriate for your organization, for example Project Groups may be moreappropriately called Clients, or Task Groups called Phases or Cost Centers. Also, not alllevels need to be used and can be disabled. The Work Breakdown Structure topic has moreinformation.
Levels may or may not have a hierarchical relationship, for example a Project may belong toa Client, whereas a Cost Center could be used across all Projects.
Related Topics
Customers Project Groups Projects Task Groups Tasks
-o-
p36
© 2000-2016, Pacific Timesheet
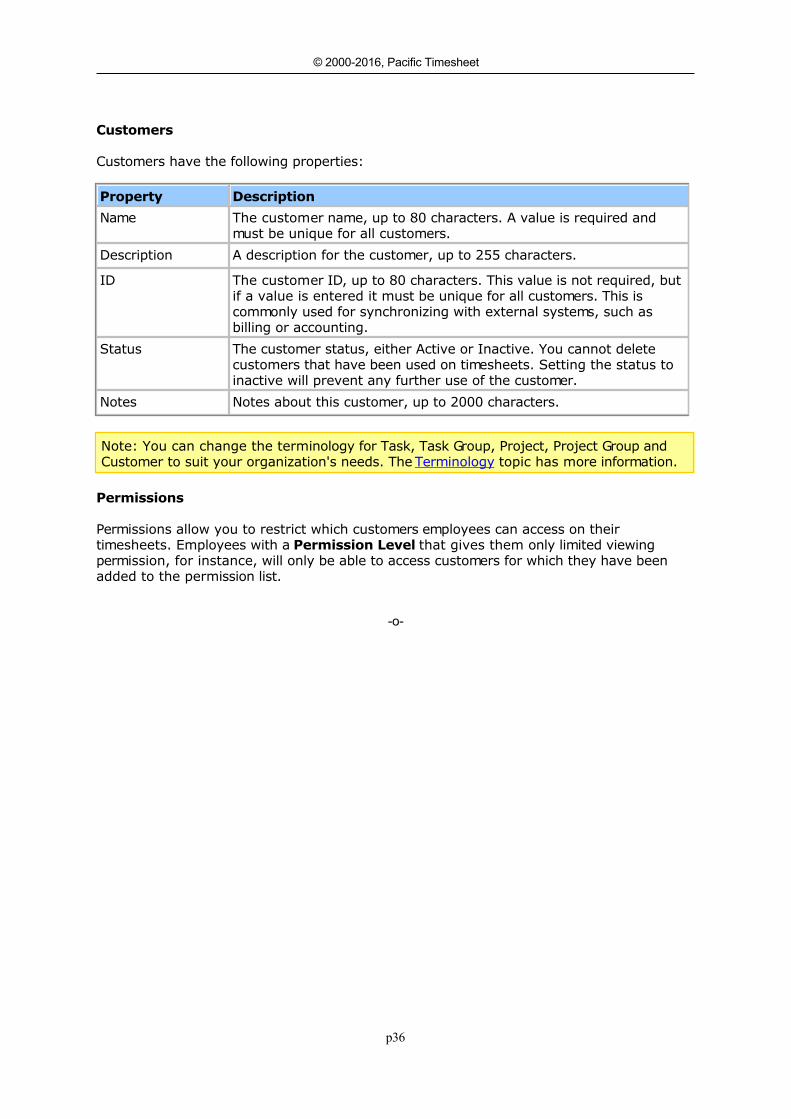
CustomersCustomers
Customers have the following properties:
Property Description
Name The customer name, up to 80 characters. A value is required andmust be unique for all customers.
Description A description for the customer, up to 255 characters.
ID The customer ID, up to 80 characters. This value is not required, butif a value is entered it must be unique for all customers. This iscommonly used for synchronizing with external systems, such asbilling or accounting.
Status The customer status, either Active or Inactive. You cannot deletecustomers that have been used on timesheets. Setting the status toinactive will prevent any further use of the customer.
Notes Notes about this customer, up to 2000 characters.
Note: You can change the terminology for Task, Task Group, Project, Project Group andCustomer to suit your organization's needs. The Terminology topic has more information.
Permissions
Permissions allow you to restrict which customers employees can access on theirtimesheets. Employees with a Permission Level that gives them only limited viewingpermission, for instance, will only be able to access customers for which they have beenadded to the permission list.
-o-
p37
© 2000-2016, Pacific Timesheet
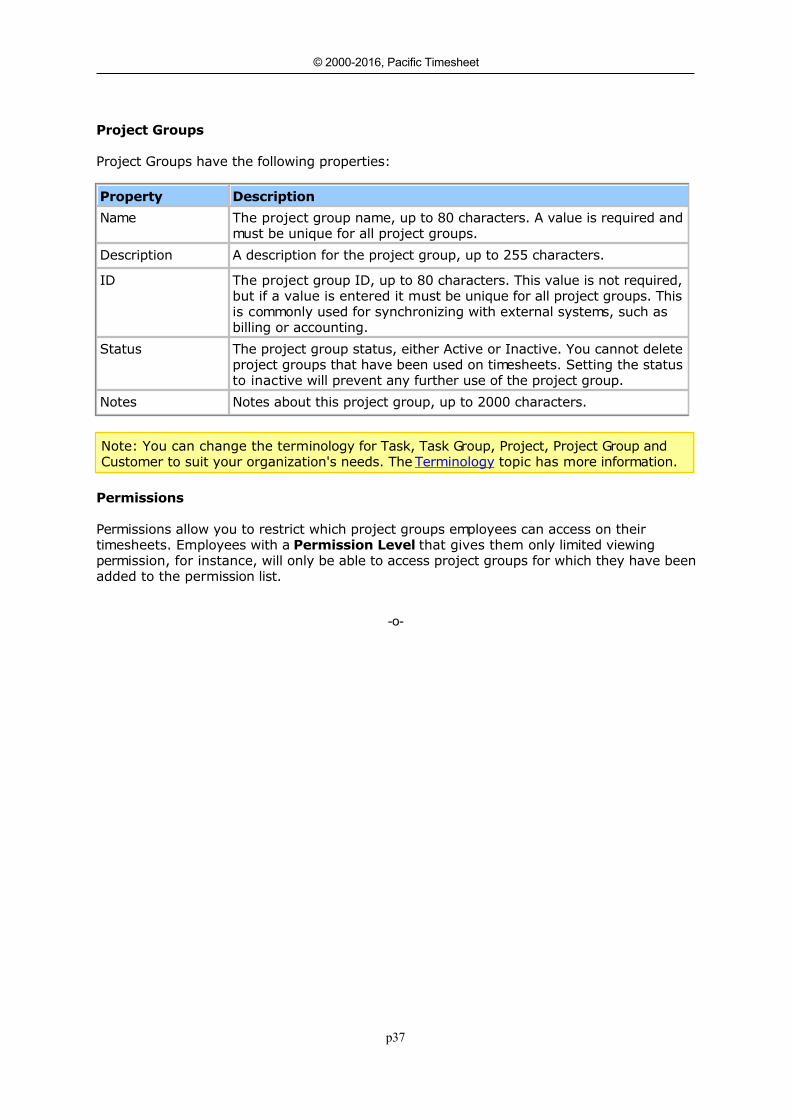
Project GroupsProject Groups
Project Groups have the following properties:
Property Description
Name The project group name, up to 80 characters. A value is required andmust be unique for all project groups.
Description A description for the project group, up to 255 characters.
ID The project group ID, up to 80 characters. This value is not required,but if a value is entered it must be unique for all project groups. Thisis commonly used for synchronizing with external systems, such asbilling or accounting.
Status The project group status, either Active or Inactive. You cannot deleteproject groups that have been used on timesheets. Setting the statusto inactive will prevent any further use of the project group.
Notes Notes about this project group, up to 2000 characters.
Note: You can change the terminology for Task, Task Group, Project, Project Group andCustomer to suit your organization's needs. The Terminology topic has more information.
Permissions
Permissions allow you to restrict which project groups employees can access on theirtimesheets. Employees with a Permission Level that gives them only limited viewingpermission, for instance, will only be able to access project groups for which they have beenadded to the permission list.
-o-
p38
© 2000-2016, Pacific Timesheet
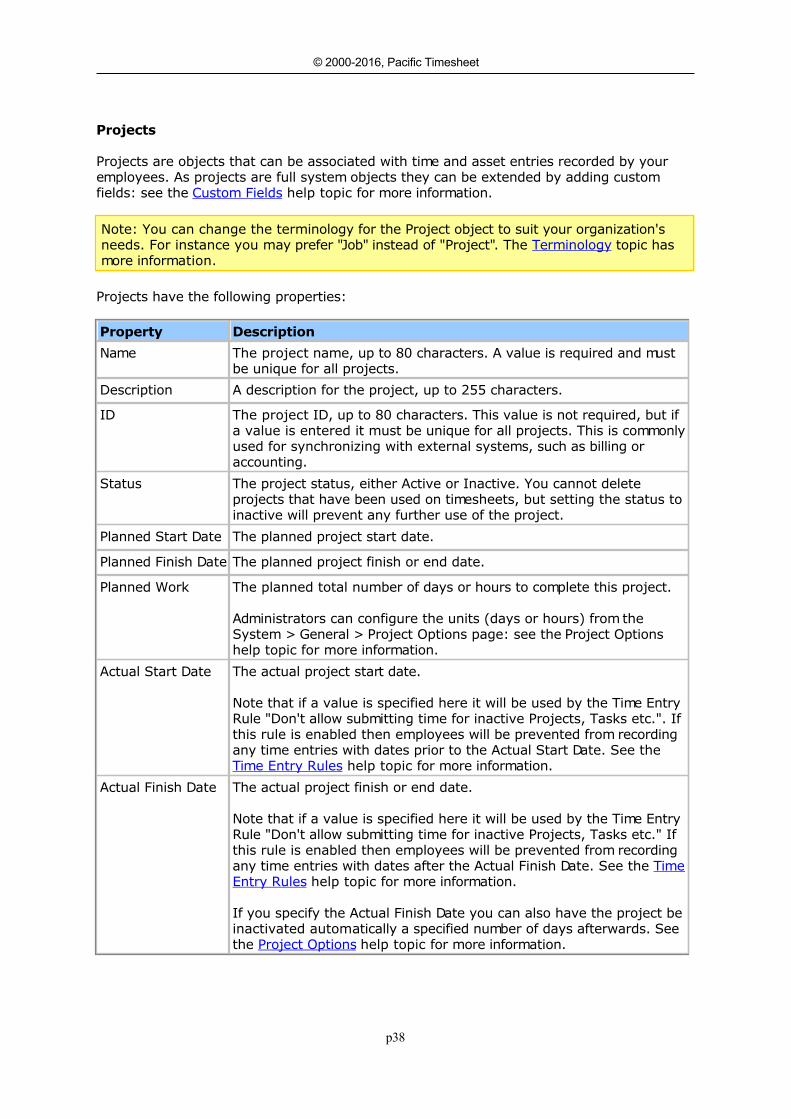
ProjectsProjects
Projects are objects that can be associated with time and asset entries recorded by youremployees. As projects are full system objects they can be extended by adding customfields: see the Custom Fields help topic for more information.
Note: You can change the terminology for the Project object to suit your organization'sneeds. For instance you may prefer "Job" instead of "Project". The Terminology topic hasmore information.
Projects have the following properties:
Property Description
Name The project name, up to 80 characters. A value is required and mustbe unique for all projects.
Description A description for the project, up to 255 characters.
ID The project ID, up to 80 characters. This value is not required, but ifa value is entered it must be unique for all projects. This is commonlyused for synchronizing with external systems, such as billing oraccounting.
Status The project status, either Active or Inactive. You cannot deleteprojects that have been used on timesheets, but setting the status toinactive will prevent any further use of the project.
Planned Start Date The planned project start date.
Planned Finish Date The planned project finish or end date.
Planned Work The planned total number of days or hours to complete this project.
Administrators can configure the units (days or hours) from theSystem > General > Project Options page: see the Project Optionshelp topic for more information.
Actual Start Date The actual project start date.
Note that if a value is specified here it will be used by the Time EntryRule "Don't allow submitting time for inactive Projects, Tasks etc.". Ifthis rule is enabled then employees will be prevented from recordingany time entries with dates prior to the Actual Start Date. See the Time Entry Rules help topic for more information.
Actual Finish Date The actual project finish or end date.
Note that if a value is specified here it will be used by the Time EntryRule "Don't allow submitting time for inactive Projects, Tasks etc." Ifthis rule is enabled then employees will be prevented from recordingany time entries with dates after the Actual Finish Date. See the TimeEntry Rules help topic for more information.
If you specify the Actual Finish Date you can also have the project beinactivated automatically a specified number of days afterwards. Seethe Project Options help topic for more information.
p39
© 2000-2016, Pacific Timesheet
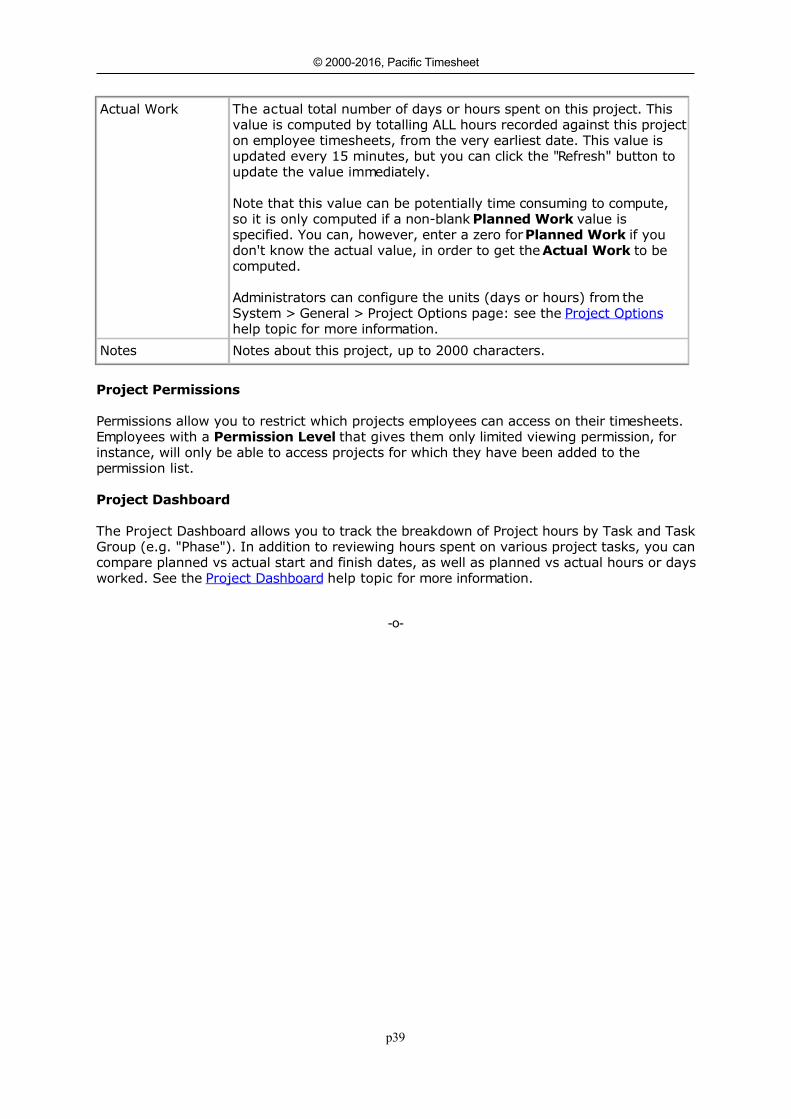
Actual Work The actual total number of days or hours spent on this project. Thisvalue is computed by totalling ALL hours recorded against this projecton employee timesheets, from the very earliest date. This value isupdated every 15 minutes, but you can click the "Refresh" button toupdate the value immediately.
Note that this value can be potentially time consuming to compute,so it is only computed if a non-blank Planned Work value isspecified. You can, however, enter a zero for Planned Work if youdon't know the actual value, in order to get the Actual Work to becomputed.
Administrators can configure the units (days or hours) from theSystem > General > Project Options page: see the Project Optionshelp topic for more information.
Notes Notes about this project, up to 2000 characters.
Project Permissions
Permissions allow you to restrict which projects employees can access on their timesheets.Employees with a Permission Level that gives them only limited viewing permission, forinstance, will only be able to access projects for which they have been added to thepermission list.
Project Dashboard
The Project Dashboard allows you to track the breakdown of Project hours by Task and TaskGroup (e.g. "Phase"). In addition to reviewing hours spent on various project tasks, you cancompare planned vs actual start and finish dates, as well as planned vs actual hours or daysworked. See the Project Dashboard help topic for more information.
-o-
p40
© 2000-2016, Pacific Timesheet
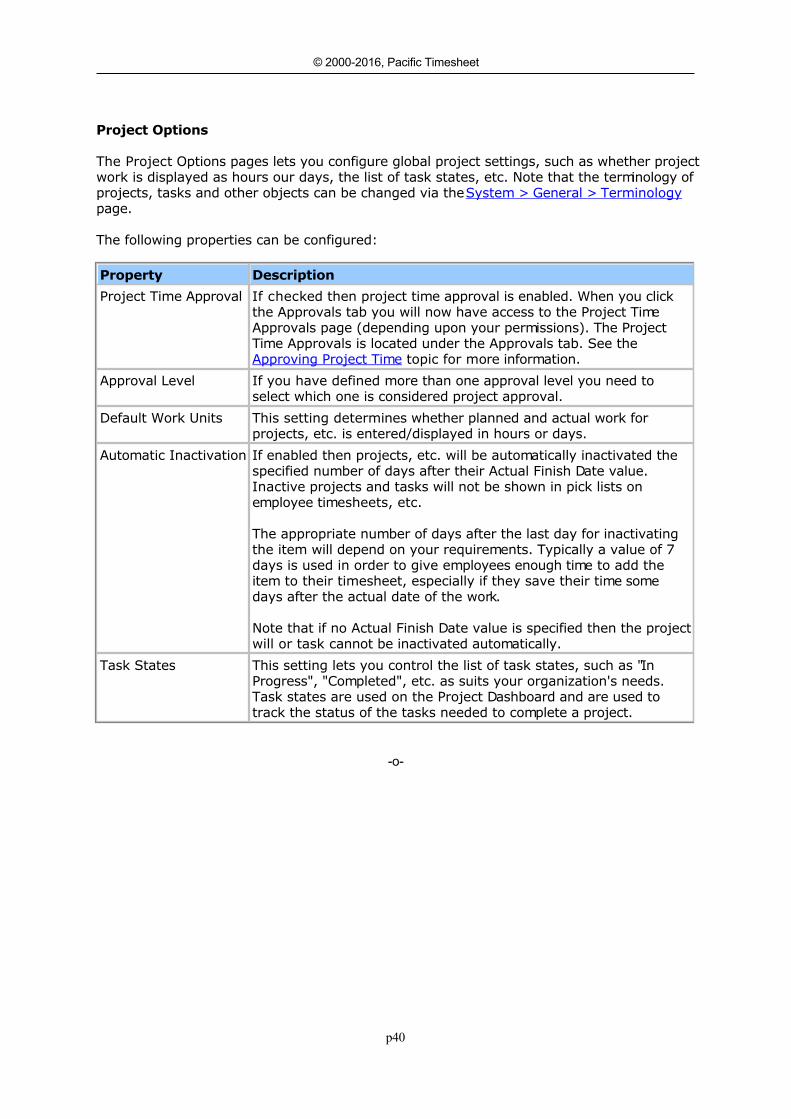
Project OptionsProject Options
The Project Options pages lets you configure global project settings, such as whether projectwork is displayed as hours our days, the list of task states, etc. Note that the terminology ofprojects, tasks and other objects can be changed via the System > General > Terminologypage.
The following properties can be configured:
Property Description
Project Time Approval If checked then project time approval is enabled. When you clickthe Approvals tab you will now have access to the Project TimeApprovals page (depending upon your permissions). The ProjectTime Approvals is located under the Approvals tab. See the Approving Project Time topic for more information.
Approval Level If you have defined more than one approval level you need toselect which one is considered project approval.
Default Work Units This setting determines whether planned and actual work forprojects, etc. is entered/displayed in hours or days.
Automatic Inactivation If enabled then projects, etc. will be automatically inactivated thespecified number of days after their Actual Finish Date value.Inactive projects and tasks will not be shown in pick lists onemployee timesheets, etc.
The appropriate number of days after the last day for inactivatingthe item will depend on your requirements. Typically a value of 7days is used in order to give employees enough time to add theitem to their timesheet, especially if they save their time somedays after the actual date of the work.
Note that if no Actual Finish Date value is specified then the projectwill or task cannot be inactivated automatically.
Task States This setting lets you control the list of task states, such as "InProgress", "Completed", etc. as suits your organization's needs.Task states are used on the Project Dashboard and are used totrack the status of the tasks needed to complete a project.
-o-
p41
© 2000-2016, Pacific Timesheet
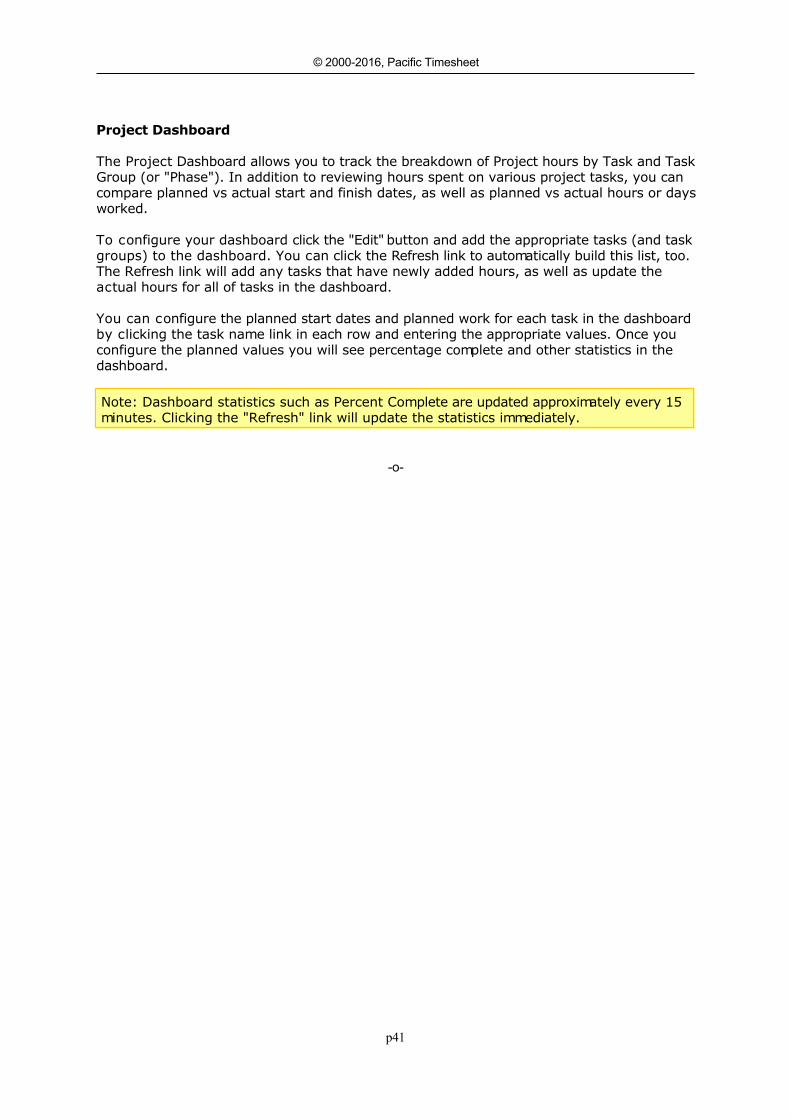
Project DashboardProject Dashboard
The Project Dashboard allows you to track the breakdown of Project hours by Task and TaskGroup (or "Phase"). In addition to reviewing hours spent on various project tasks, you cancompare planned vs actual start and finish dates, as well as planned vs actual hours or daysworked.
To configure your dashboard click the "Edit" button and add the appropriate tasks (and taskgroups) to the dashboard. You can click the Refresh link to automatically build this list, too.The Refresh link will add any tasks that have newly added hours, as well as update theactual hours for all of tasks in the dashboard.
You can configure the planned start dates and planned work for each task in the dashboardby clicking the task name link in each row and entering the appropriate values. Once youconfigure the planned values you will see percentage complete and other statistics in thedashboard.
Note: Dashboard statistics such as Percent Complete are updated approximately every 15minutes. Clicking the "Refresh" link will update the statistics immediately.
-o-

p42
© 2000-2016, Pacific Timesheet
Task GroupsTask Groups
Task Groups have the following properties:
Property Description
Name The task group name, up to 80 characters. A value is required andmust be unique for all task groups.
Description A description for the task group, up to 255 characters.
ID The task group ID, up to 80 characters. This value is not required,but if a value is entered it must be unique for all task groups. This iscommonly used for synchronizing with external systems, such asbilling or accounting.
Status The task group status, either Active or Inactive. You cannot deletetask groups that have been used on timesheets. Setting the status toinactive will prevent any further use of the task group.
Notes Notes about this task group, up to 2000 characters.
Note: You can change the terminology for Task, Task Group, Project, Project Group andCustomer to suit your organization's needs. The Terminology topic has more information.
Permissions
Permissions allow you to restrict which task groups employees can access on theirtimesheets. Employees with a Permission Level that gives them only limited viewingpermission, for instance, will only be able to access task groups for which they have beenadded to the permission list.
-o-
p43
© 2000-2016, Pacific Timesheet
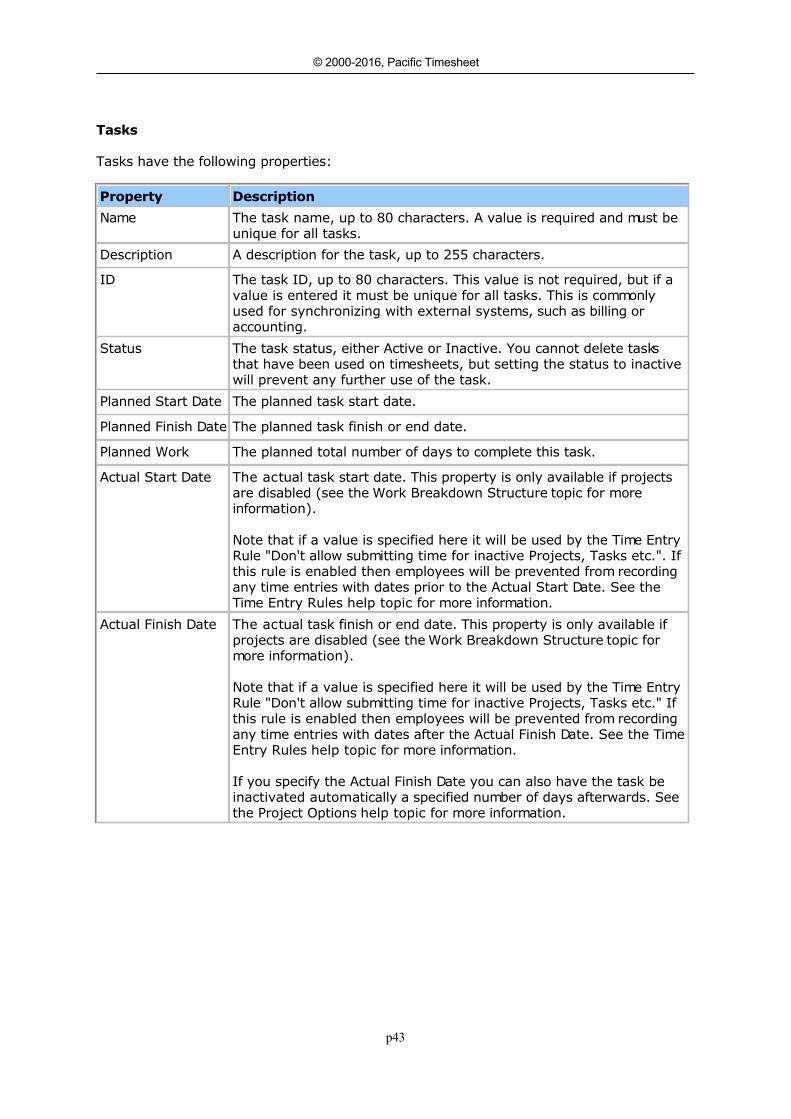
TasksTasks
Tasks have the following properties:
Property Description
Name The task name, up to 80 characters. A value is required and must beunique for all tasks.
Description A description for the task, up to 255 characters.
ID The task ID, up to 80 characters. This value is not required, but if avalue is entered it must be unique for all tasks. This is commonlyused for synchronizing with external systems, such as billing oraccounting.
Status The task status, either Active or Inactive. You cannot delete tasksthat have been used on timesheets, but setting the status to inactivewill prevent any further use of the task.
Planned Start Date The planned task start date.
Planned Finish Date The planned task finish or end date.
Planned Work The planned total number of days to complete this task.
Actual Start Date The actual task start date. This property is only available if projectsare disabled (see the Work Breakdown Structure topic for moreinformation).
Note that if a value is specified here it will be used by the Time EntryRule "Don't allow submitting time for inactive Projects, Tasks etc.". Ifthis rule is enabled then employees will be prevented from recordingany time entries with dates prior to the Actual Start Date. See the Time Entry Rules help topic for more information.
Actual Finish Date The actual task finish or end date. This property is only available ifprojects are disabled (see the Work Breakdown Structure topic formore information).
Note that if a value is specified here it will be used by the Time EntryRule "Don't allow submitting time for inactive Projects, Tasks etc." Ifthis rule is enabled then employees will be prevented from recordingany time entries with dates after the Actual Finish Date. See the TimeEntry Rules help topic for more information.
If you specify the Actual Finish Date you can also have the task beinactivated automatically a specified number of days afterwards. Seethe Project Options help topic for more information.
p44
© 2000-2016, Pacific Timesheet
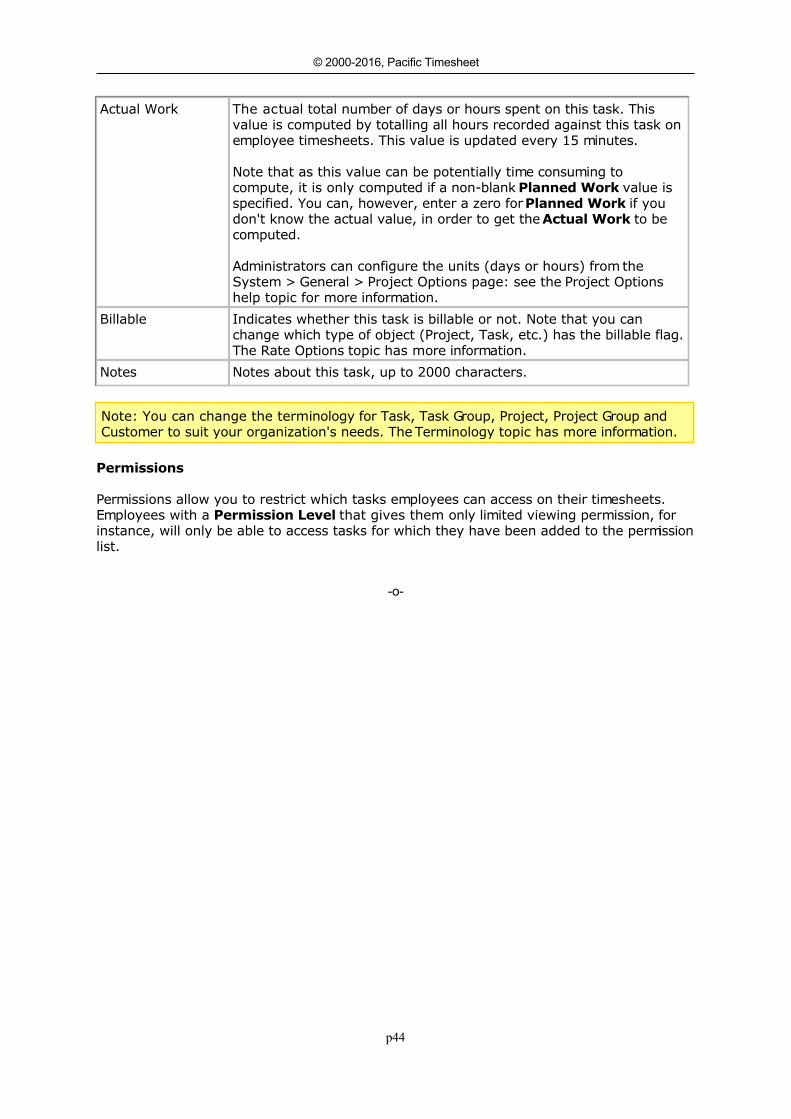
Actual Work The actual total number of days or hours spent on this task. Thisvalue is computed by totalling all hours recorded against this task onemployee timesheets. This value is updated every 15 minutes.
Note that as this value can be potentially time consuming tocompute, it is only computed if a non-blank Planned Work value isspecified. You can, however, enter a zero for Planned Work if youdon't know the actual value, in order to get the Actual Work to becomputed.
Administrators can configure the units (days or hours) from theSystem > General > Project Options page: see the Project Optionshelp topic for more information.
Billable Indicates whether this task is billable or not. Note that you canchange which type of object (Project, Task, etc.) has the billable flag.The Rate Options topic has more information.
Notes Notes about this task, up to 2000 characters.
Note: You can change the terminology for Task, Task Group, Project, Project Group andCustomer to suit your organization's needs. The Terminology topic has more information.
Permissions
Permissions allow you to restrict which tasks employees can access on their timesheets.Employees with a Permission Level that gives them only limited viewing permission, forinstance, will only be able to access tasks for which they have been added to the permissionlist.
-o-
p45
© 2000-2016, Pacific Timesheet
Asset TrackingAsset Tracking
Pacific Timesheet allows you to track assets and their usage. Assets are generally non-laboritems you want to track on a regular basis, such as materials, equipment and otherresources you use as part of your projects or jobs.
Note: You can change the terminology 'Asset' to suit your organization's needs. The Terminology topic has more information.
Related Topics:
Assets Asset Classes Asset Types Units of Measure Asset Entries Asset Entry Fields
-o-

p46
© 2000-2016, Pacific Timesheet
Asset EntriesAsset Entries
Asset entries track the actual usage of assets. Asset entries are records keeping track ofwhat quantities of assets were used over time. For example, you might have a materialasset entry of 10 gallons (the quantity) of diesel (the asset) used on Monday 3/28 (thedate). You can control the specific fields that are entered for each asset type from the AssetEntry Fields page.
Note: You can change the terminology 'Asset' to suit your organization's needs. The Terminology topic has more information.
Assets entries can have the following entry fields (depending upon how the entry fields areconfigured: see the Asset Entry Fields topic for more information):
Property Description
Date The date of the entry. This is the date the asset was used, forinstance. This field is required.
Entry ID A unique ID for identifying this entry. If the field is not enteredby the employee than a value is automatically generated. Youcan control the formatting of this by editing the ID format onthe Asset Entry Fields page. See the Asset Entry Field topic formore information.
Asset The asset associated with this entry. The selected asset willdetermine:
The unit of measure for the quantity field, e.g. Gallons orKilometers.
The number of digits to the right of the decimal point thatcan be entered for the quantity field.
The unit cost, which can be overridden if the Unit Cost orTotal Cost fields are allowed entry.
The unit price, which can be overridden if the Unit Price orTotal Price fields are allowed entry.
To learn more about setting up assets refer to the Assets topic.
Quantity The amount of the asset used for this entry, in whatever unitsthe asset's unit of measure indicates. Note that negative valuesare allowed as a way to make corrections to entries that arelocked and therefore not editable.
Description A description for this entry, up to 255 characters. For larger textinput you can also use the Notes field.
Unit Cost The unit cost for the asset used by this entry. Cost is what youpay for this asset, as opposed to price, which is what you chargefor this asset. The value will default to the unit price of theselected asset.
Note that you can optionally allow this value to overridden if youmake this field editable (see the Asset Entry Fields topic formore information).
p47
© 2000-2016, Pacific Timesheet
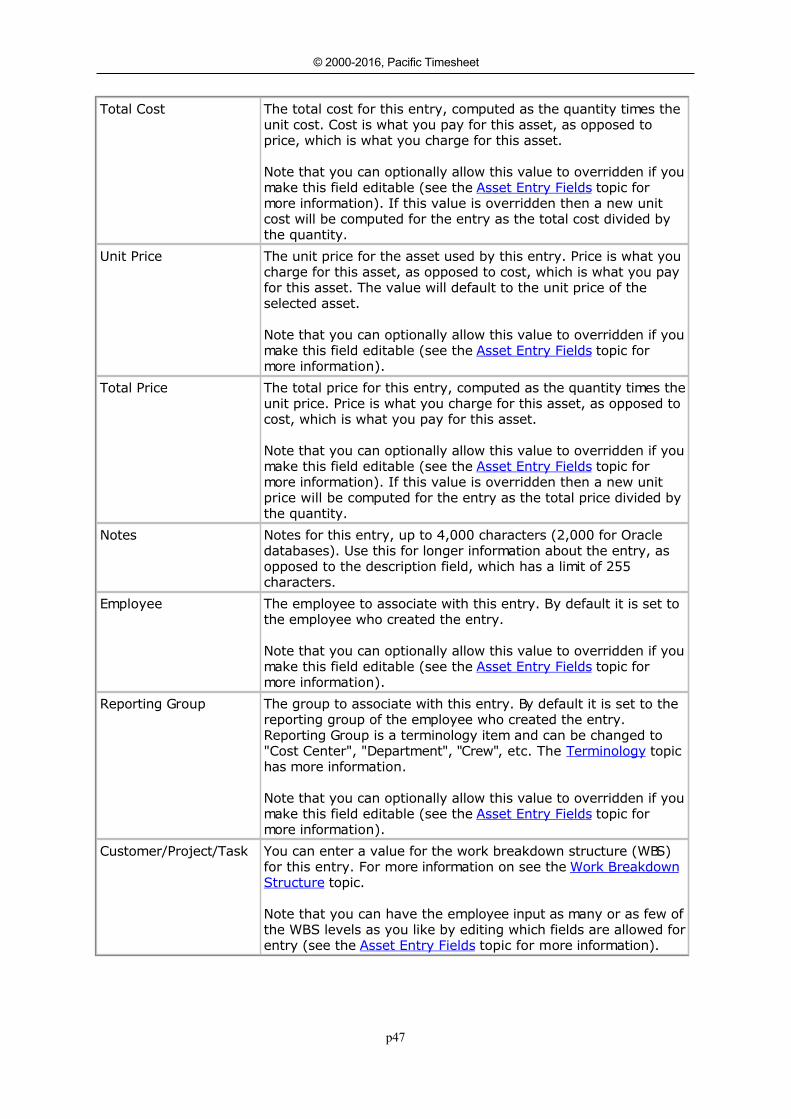
Total Cost The total cost for this entry, computed as the quantity times theunit cost. Cost is what you pay for this asset, as opposed toprice, which is what you charge for this asset.
Note that you can optionally allow this value to overridden if youmake this field editable (see the Asset Entry Fields topic formore information). If this value is overridden then a new unitcost will be computed for the entry as the total cost divided bythe quantity.
Unit Price The unit price for the asset used by this entry. Price is what youcharge for this asset, as opposed to cost, which is what you payfor this asset. The value will default to the unit price of theselected asset.
Note that you can optionally allow this value to overridden if youmake this field editable (see the Asset Entry Fields topic formore information).
Total Price The total price for this entry, computed as the quantity times theunit price. Price is what you charge for this asset, as opposed tocost, which is what you pay for this asset.
Note that you can optionally allow this value to overridden if youmake this field editable (see the Asset Entry Fields topic formore information). If this value is overridden then a new unitprice will be computed for the entry as the total price divided bythe quantity.
Notes Notes for this entry, up to 4,000 characters (2,000 for Oracledatabases). Use this for longer information about the entry, asopposed to the description field, which has a limit of 255characters.
Employee The employee to associate with this entry. By default it is set tothe employee who created the entry.
Note that you can optionally allow this value to overridden if youmake this field editable (see the Asset Entry Fields topic formore information).
Reporting Group The group to associate with this entry. By default it is set to thereporting group of the employee who created the entry.Reporting Group is a terminology item and can be changed to"Cost Center", "Department", "Crew", etc. The Terminology topichas more information.
Note that you can optionally allow this value to overridden if youmake this field editable (see the Asset Entry Fields topic formore information).
Customer/Project/Task You can enter a value for the work breakdown structure (WBS)for this entry. For more information on see the Work BreakdownStructure topic.
Note that you can have the employee input as many or as few ofthe WBS levels as you like by editing which fields are allowed forentry (see the Asset Entry Fields topic for more information).
p48
© 2000-2016, Pacific Timesheet
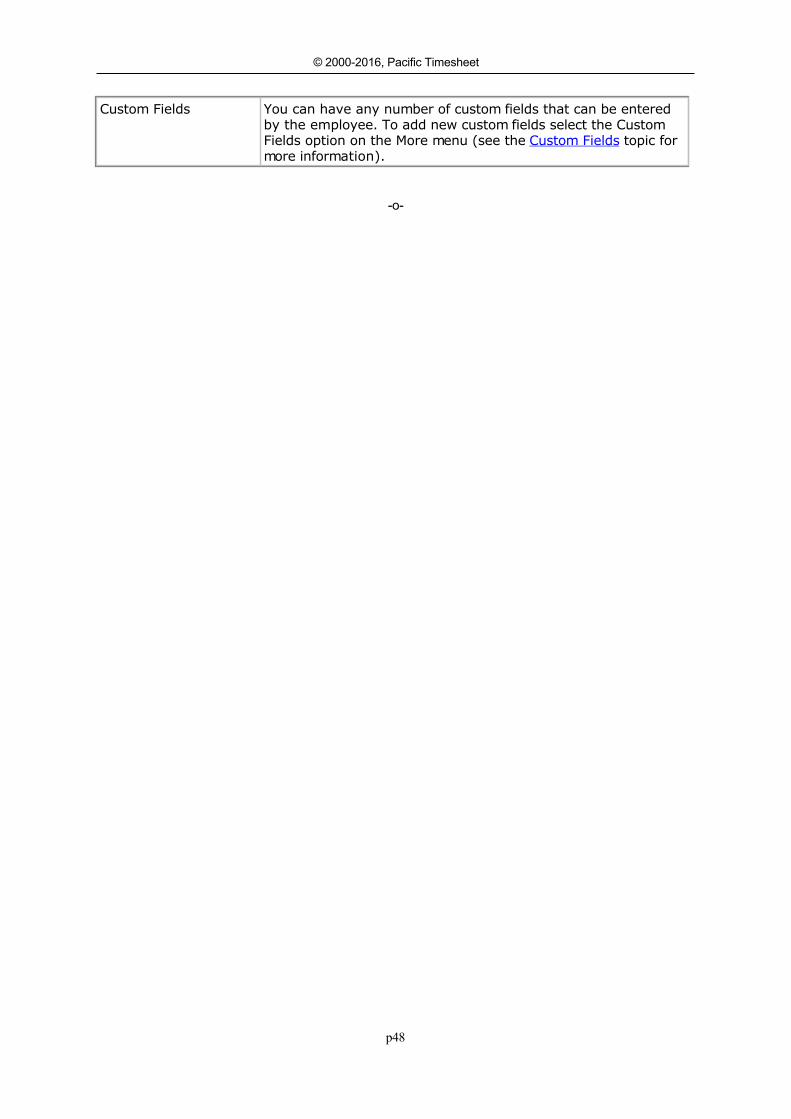
Custom Fields You can have any number of custom fields that can be enteredby the employee. To add new custom fields select the CustomFields option on the More menu (see the Custom Fields topic formore information).
-o-
p49
© 2000-2016, Pacific Timesheet
Asset Entry FieldsAsset Entry Fields
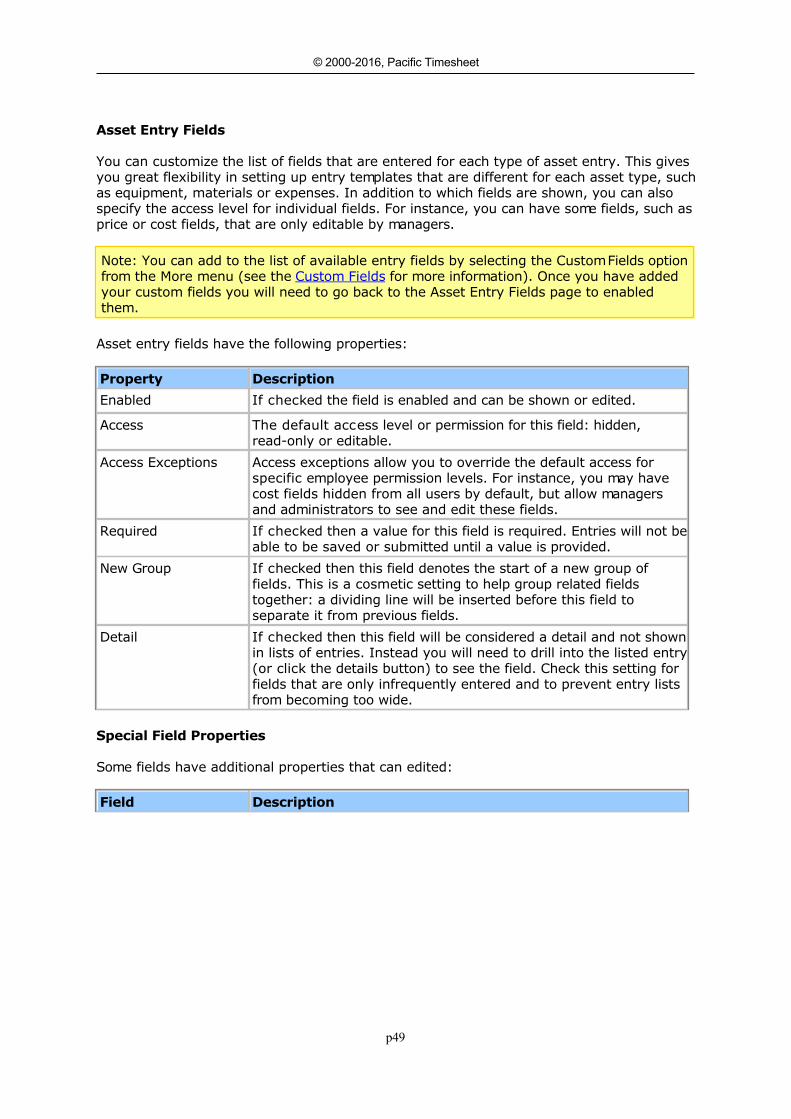
You can customize the list of fields that are entered for each type of asset entry. This givesyou great flexibility in setting up entry templates that are different for each asset type, suchas equipment, materials or expenses. In addition to which fields are shown, you can alsospecify the access level for individual fields. For instance, you can have some fields, such asprice or cost fields, that are only editable by managers.
Note: You can add to the list of available entry fields by selecting the Custom Fields optionfrom the More menu (see the Custom Fields for more information). Once you have addedyour custom fields you will need to go back to the Asset Entry Fields page to enabledthem.
Asset entry fields have the following properties:
Property Description
Enabled If checked the field is enabled and can be shown or edited.
Access The default access level or permission for this field: hidden,read-only or editable.
Access Exceptions Access exceptions allow you to override the default access forspecific employee permission levels. For instance, you may havecost fields hidden from all users by default, but allow managersand administrators to see and edit these fields.
Required If checked then a value for this field is required. Entries will not beable to be saved or submitted until a value is provided.
New Group If checked then this field denotes the start of a new group offields. This is a cosmetic setting to help group related fieldstogether: a dividing line will be inserted before this field toseparate it from previous fields.
Detail If checked then this field will be considered a detail and not shownin lists of entries. Instead you will need to drill into the listed entry(or click the details button) to see the field. Check this setting forfields that are only infrequently entered and to prevent entry listsfrom becoming too wide.
Special Field Properties
Some fields have additional properties that can edited:
Field Description
p50
© 2000-2016, Pacific Timesheet
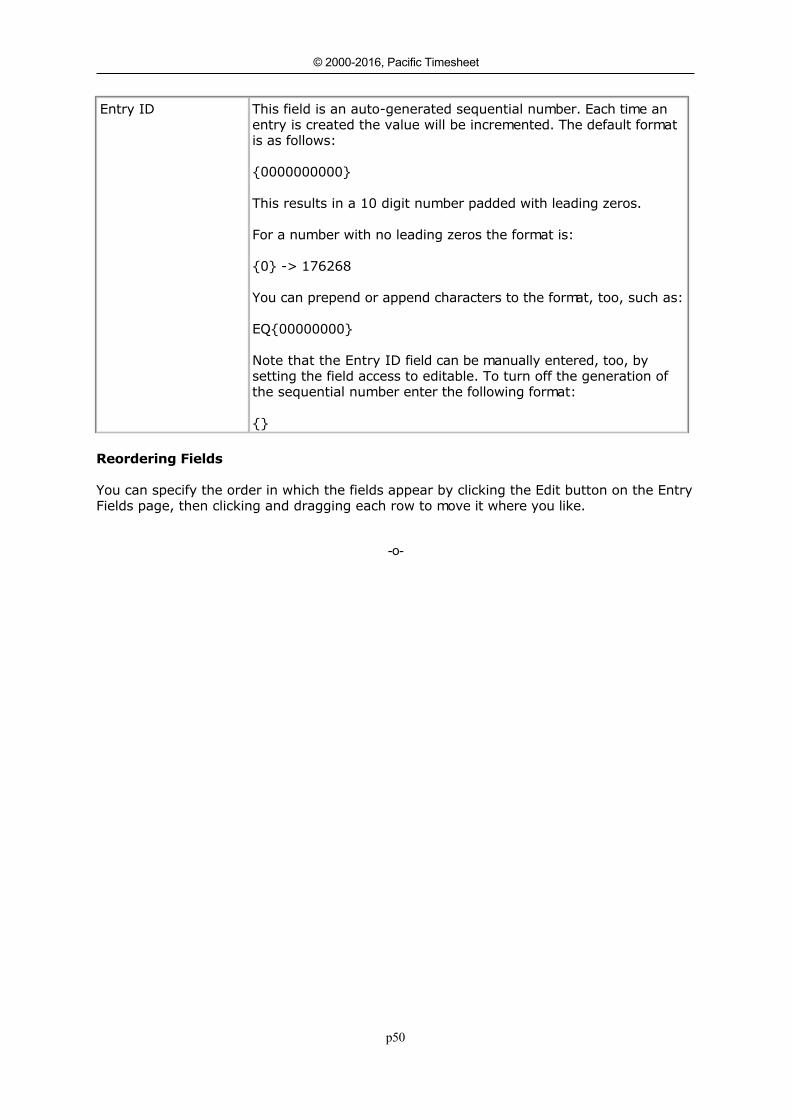
Entry ID This field is an auto-generated sequential number. Each time anentry is created the value will be incremented. The default formatis as follows:
{0000000000}
This results in a 10 digit number padded with leading zeros.
For a number with no leading zeros the format is:
{0} -> 176268
You can prepend or append characters to the format, too, such as:
EQ{00000000}
Note that the Entry ID field can be manually entered, too, bysetting the field access to editable. To turn off the generation ofthe sequential number enter the following format:
{}
Reordering Fields
You can specify the order in which the fields appear by clicking the Edit button on the EntryFields page, then clicking and dragging each row to move it where you like.
-o-

p51
© 2000-2016, Pacific Timesheet
AssetsAssets
Assets are the definitions or profiles of the materials, equipment, etc. you are tracking.Assets can be broadly divided into user-defined types, such as equipment, materials orexpenses (see the Asset Types topic for more information). Assets can be further dividedinto user-defined classes, for example equipment assets may be classified by Truck, Auto,etc. (see the Asset Classes topic for more information).
Assets define what you keep track of, whereas Asset Entries are used to track the actualusage of these assets. For example, you may have a material asset named 'Gravel', and anasset entry that indicates how much gravel a crew used on a particular date. See the AssetEntries topic for more information.
Note: You can change the terminology 'Asset' to suit your organization's needs. The Terminology topic has more information.
Assets have the following properties:
Property Description
Name The asset name, up to 80 characters. A value is required and mustbe unique for all assets (regardless of the asset type).
Description A description for the asset, up to 255 characters.
ID The asset ID, up to 80 characters. This value is not required, but ifa value is entered it must be unique for all assets (regardless of theasset type). This is commonly used for synchronizing with externalsystems, such as billing or accounting.
Status The asset status, either Active or Inactive. Setting the status toinactive will prevent the recording of any further asset entries forthis asset. Note that you cannot delete assets that have assetentries associated with them, and in those cases you will insteadmake the asset inactive to prevent its further use.
Class The asset class (optional). Asset classes are configured on theAssets > Asset Class page (see the Asset Classes topic form moreinformation).
Unit of Measure The unit of measure for this asset (optional). Units of measure areconfigured on the Assets > Units of Measure page (see the Units ofMeasure topic form more information).
Units Decimal Digits The number of decimal digits of precision for entries for this asset.It will default to the "Default Decimal Digits" property for theselected unit of measure, but you can override this.
Unit Cost The unit cost of this asset, per unit of measure. Cost is what youpay for this asset, as opposed to price, which is what you charge forthis asset. Unit cost is used to compute the total cost of entriesusing this asset.
Note that you can optionally allow entries to override this unit costif you allow the entry's Unit Price or Total Price fields to be editable(see the Asset Entry Fields topic for more information).
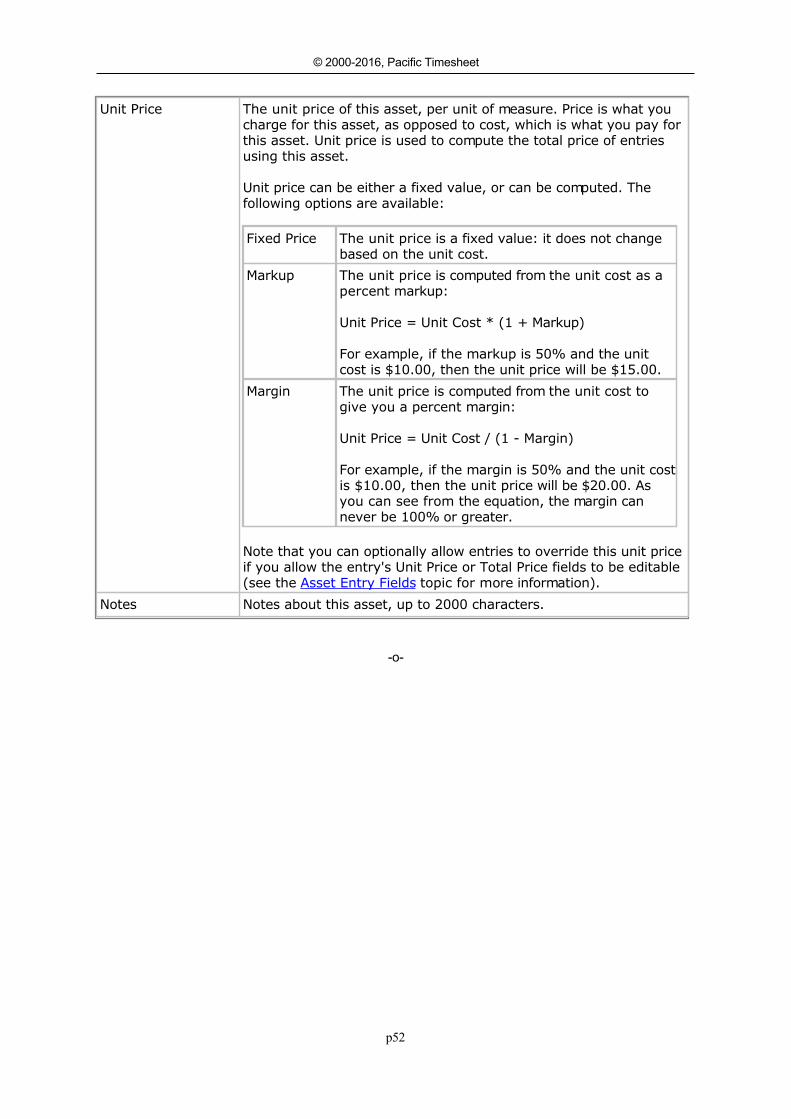
p52
© 2000-2016, Pacific Timesheet
Unit Price The unit price of this asset, per unit of measure. Price is what youcharge for this asset, as opposed to cost, which is what you pay forthis asset. Unit price is used to compute the total price of entriesusing this asset.
Unit price can be either a fixed value, or can be computed. Thefollowing options are available:
Fixed Price The unit price is a fixed value: it does not changebased on the unit cost.
Markup The unit price is computed from the unit cost as apercent markup:
Unit Price = Unit Cost * (1 + Markup)
For example, if the markup is 50% and the unitcost is $10.00, then the unit price will be $15.00.
Margin The unit price is computed from the unit cost togive you a percent margin:
Unit Price = Unit Cost / (1 - Margin)
For example, if the margin is 50% and the unit costis $10.00, then the unit price will be $20.00. Asyou can see from the equation, the margin cannever be 100% or greater.
Note that you can optionally allow entries to override this unit priceif you allow the entry's Unit Price or Total Price fields to be editable(see the Asset Entry Fields topic for more information).
Notes Notes about this asset, up to 2000 characters.
-o-

p53
© 2000-2016, Pacific Timesheet
Asset ClassesAsset Classes
Asset classes allow you to organize your assets into logical groupings. For example, given anasset type of Equipment you might created classes such as "Truck", "Auto", etc. Once youhave defined your asset classes you can select them when editing asset properties (see the Assets topic for more information).
Asset classes have the following properties:
Property Description
Name The asset class name, up to 80 characters. A value is required andmust be unique for all classes (regardless of the asset type).
Description A description for the asset class, up to 255 characters.
ID The asset class ID, up to 80 characters. This value is not required,but if a value is entered it must be unique for all asset classes(regardless of the asset type). This is commonly used forsynchronizing with external systems, such as billing or accounting.
Status The asset class status, either Active or Inactive. Setting the statusto inactive will prevent its use when editing assets. Note that youcannot delete an asset class if there are assets that use it, and inthose cases you will instead make the asset class inactive toprevent its further use.
-o-
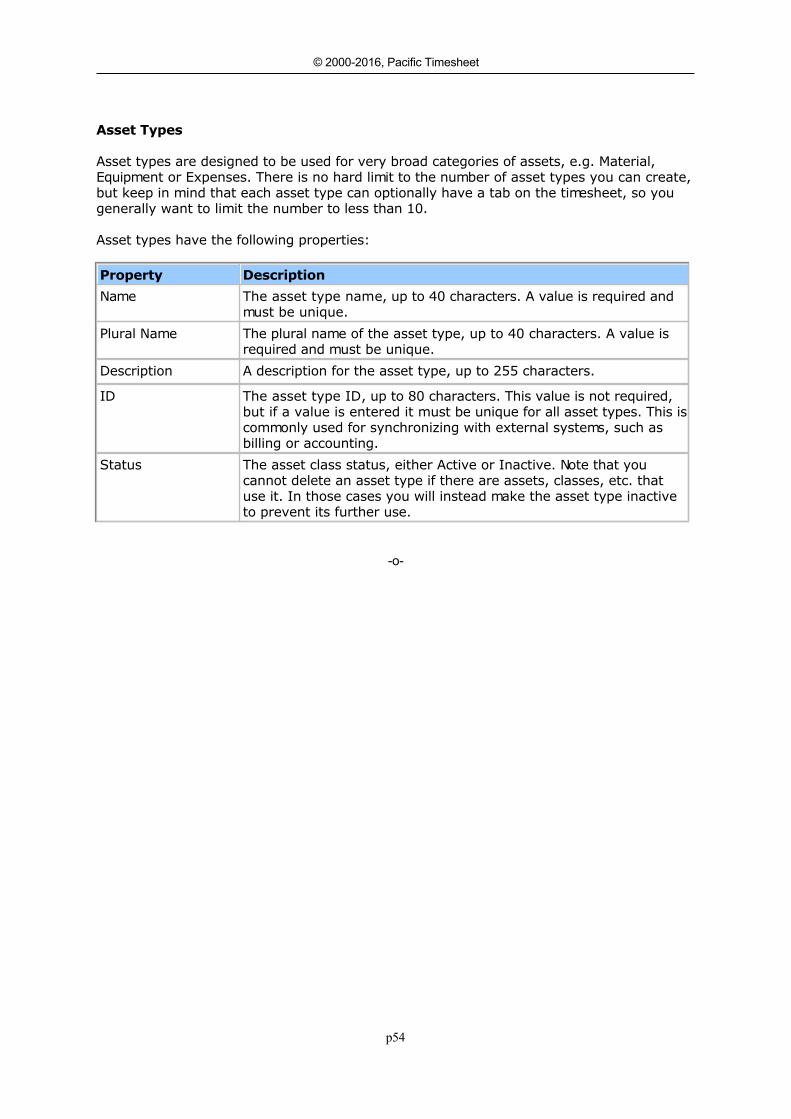
p54
© 2000-2016, Pacific Timesheet
Asset TypesAsset Types
Asset types are designed to be used for very broad categories of assets, e.g. Material,Equipment or Expenses. There is no hard limit to the number of asset types you can create,but keep in mind that each asset type can optionally have a tab on the timesheet, so yougenerally want to limit the number to less than 10.
Asset types have the following properties:
Property Description
Name The asset type name, up to 40 characters. A value is required andmust be unique.
Plural Name The plural name of the asset type, up to 40 characters. A value isrequired and must be unique.
Description A description for the asset type, up to 255 characters.
ID The asset type ID, up to 80 characters. This value is not required,but if a value is entered it must be unique for all asset types. This iscommonly used for synchronizing with external systems, such asbilling or accounting.
Status The asset class status, either Active or Inactive. Note that youcannot delete an asset type if there are assets, classes, etc. thatuse it. In those cases you will instead make the asset type inactiveto prevent its further use.
-o-
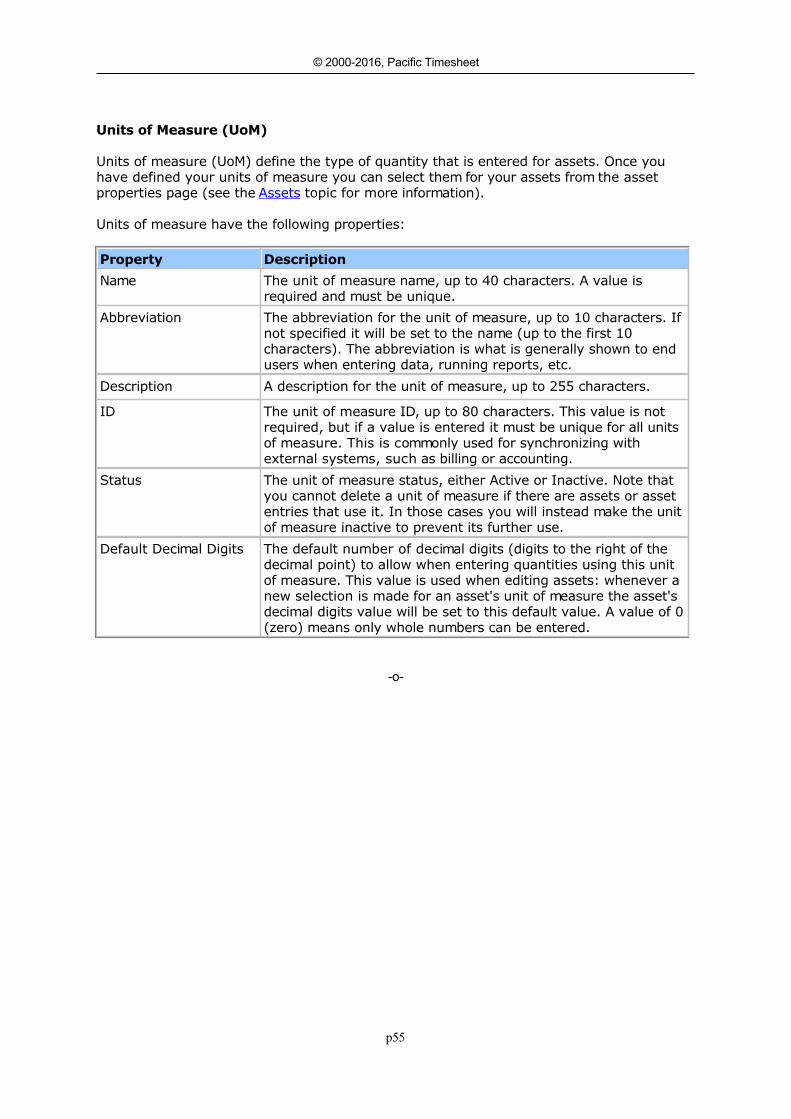
p55
© 2000-2016, Pacific Timesheet
Units of MeasureUnits of Measure (UoM)
Units of measure (UoM) define the type of quantity that is entered for assets. Once youhave defined your units of measure you can select them for your assets from the assetproperties page (see the Assets topic for more information).
Units of measure have the following properties:
Property Description
Name The unit of measure name, up to 40 characters. A value isrequired and must be unique.
Abbreviation The abbreviation for the unit of measure, up to 10 characters. Ifnot specified it will be set to the name (up to the first 10characters). The abbreviation is what is generally shown to endusers when entering data, running reports, etc.
Description A description for the unit of measure, up to 255 characters.
ID The unit of measure ID, up to 80 characters. This value is notrequired, but if a value is entered it must be unique for all unitsof measure. This is commonly used for synchronizing withexternal systems, such as billing or accounting.
Status The unit of measure status, either Active or Inactive. Note thatyou cannot delete a unit of measure if there are assets or assetentries that use it. In those cases you will instead make the unitof measure inactive to prevent its further use.
Default Decimal Digits The default number of decimal digits (digits to the right of thedecimal point) to allow when entering quantities using this unitof measure. This value is used when editing assets: whenever anew selection is made for an asset's unit of measure the asset'sdecimal digits value will be set to this default value. A value of 0(zero) means only whole numbers can be entered.
-o-
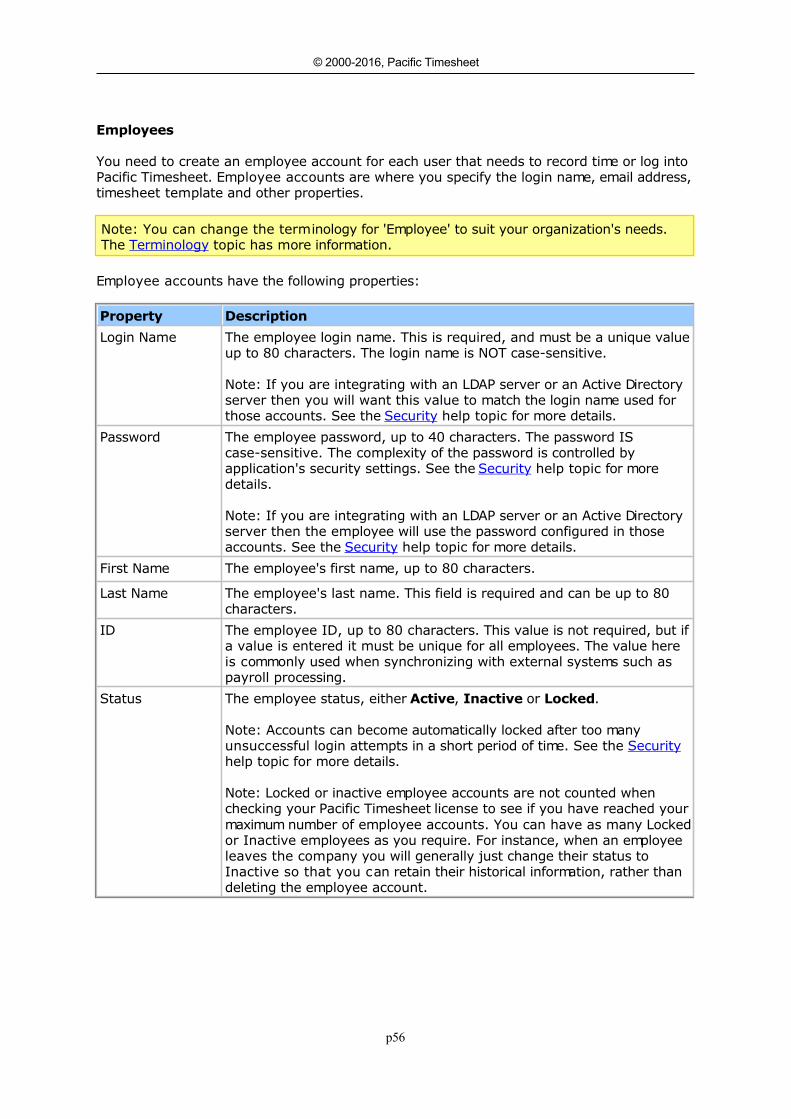
p56
© 2000-2016, Pacific Timesheet
Managing EmployeesEmployees
You need to create an employee account for each user that needs to record time or log into Pacific Timesheet. Employee accounts are where you specify the login name, email address,timesheet template and other properties.
Note: You can change the terminology for 'Employee' to suit your organization's needs.The Terminology topic has more information.
Employee accounts have the following properties:
Property Description
Login Name The employee login name. This is required, and must be a unique valueup to 80 characters. The login name is NOT case-sensitive.
Note: If you are integrating with an LDAP server or an Active Directoryserver then you will want this value to match the login name used forthose accounts. See the Security help topic for more details.
Password The employee password, up to 40 characters. The password IScase-sensitive. The complexity of the password is controlled byapplication's security settings. See the Security help topic for moredetails.
Note: If you are integrating with an LDAP server or an Active Directoryserver then the employee will use the password configured in thoseaccounts. See the Security help topic for more details.
First Name The employee's first name, up to 80 characters.
Last Name The employee's last name. This field is required and can be up to 80characters.
ID The employee ID, up to 80 characters. This value is not required, but ifa value is entered it must be unique for all employees. The value hereis commonly used when synchronizing with external systems such aspayroll processing.
Status The employee status, either Active, Inactive or Locked.
Note: Accounts can become automatically locked after too manyunsuccessful login attempts in a short period of time. See the Securityhelp topic for more details.
Note: Locked or inactive employee accounts are not counted whenchecking your Pacific Timesheet license to see if you have reached yourmaximum number of employee accounts. You can have as many Lockedor Inactive employees as you require. For instance, when an employeeleaves the company you will generally just change their status toInactive so that you can retain their historical information, rather thandeleting the employee account.
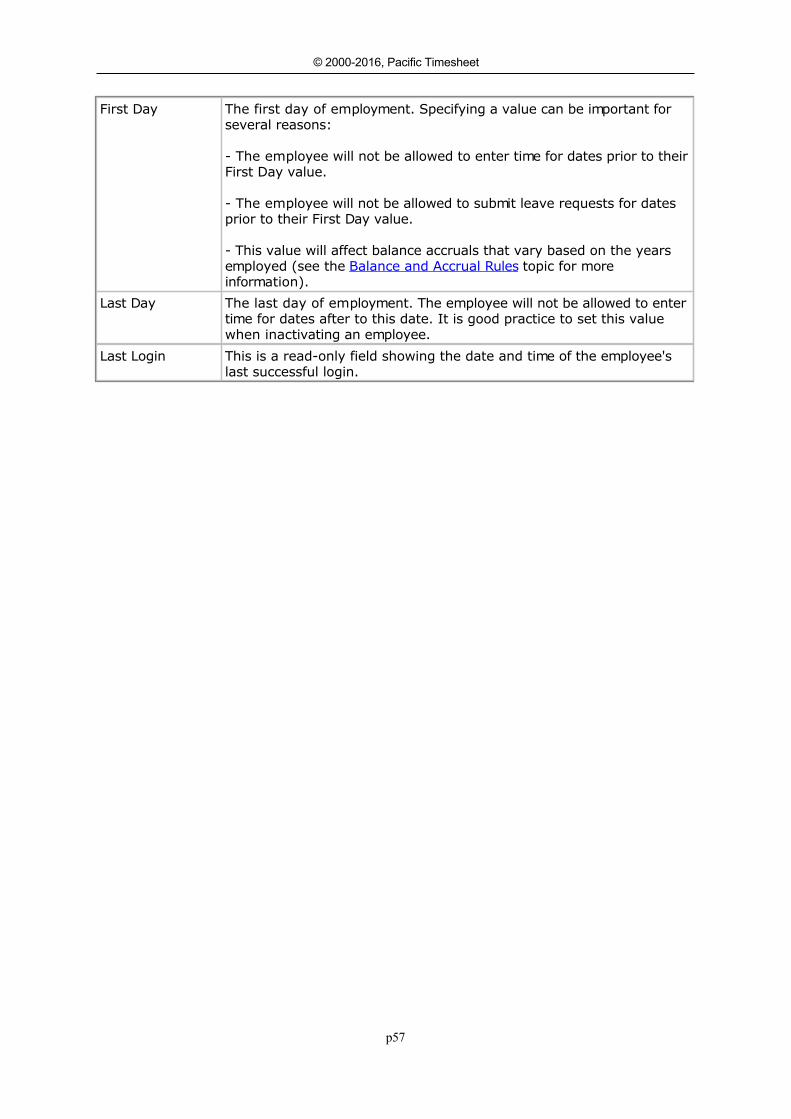
p57
© 2000-2016, Pacific Timesheet
First Day The first day of employment. Specifying a value can be important forseveral reasons:
- The employee will not be allowed to enter time for dates prior to theirFirst Day value.
- The employee will not be allowed to submit leave requests for datesprior to their First Day value.
- This value will affect balance accruals that vary based on the yearsemployed (see the Balance and Accrual Rules topic for moreinformation).
Last Day The last day of employment. The employee will not be allowed to entertime for dates after to this date. It is good practice to set this valuewhen inactivating an employee.
Last Login This is a read-only field showing the date and time of the employee'slast successful login.
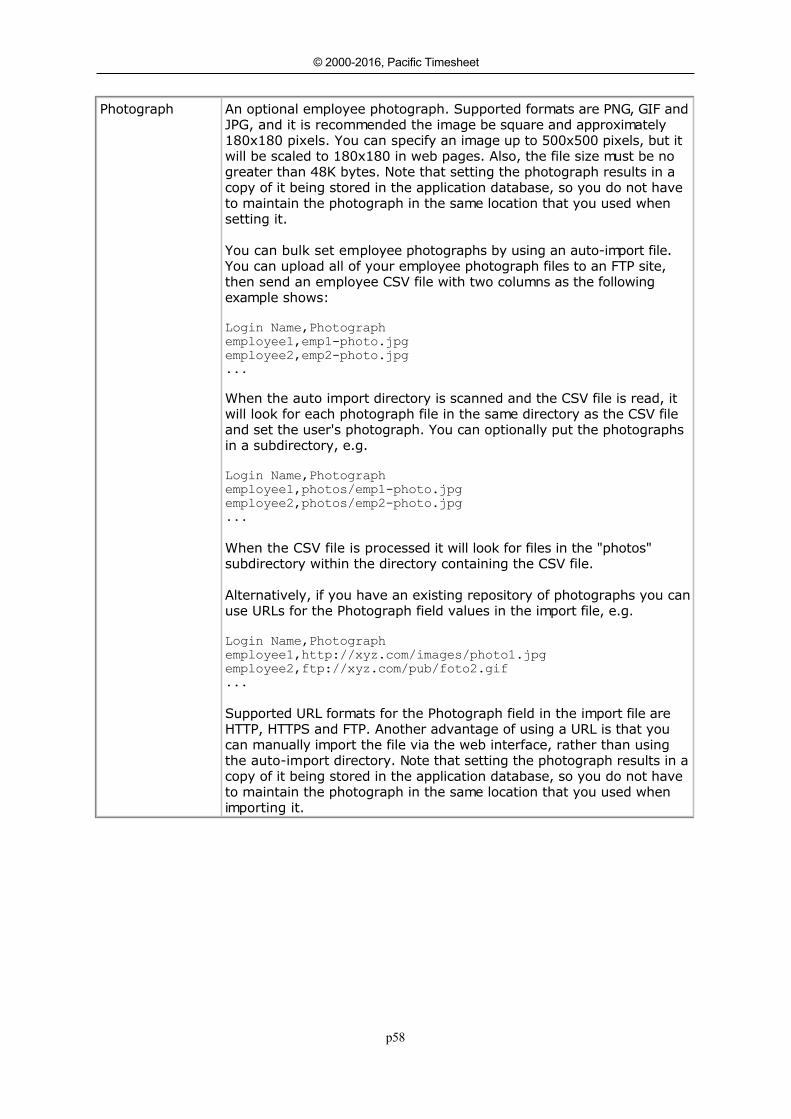
p58
© 2000-2016, Pacific Timesheet
Photograph An optional employee photograph. Supported formats are PNG, GIF andJPG, and it is recommended the image be square and approximately180x180 pixels. You can specify an image up to 500x500 pixels, but itwill be scaled to 180x180 in web pages. Also, the file size must be nogreater than 48K bytes. Note that setting the photograph results in acopy of it being stored in the application database, so you do not haveto maintain the photograph in the same location that you used whensetting it.
You can bulk set employee photographs by using an auto-import file.You can upload all of your employee photograph files to an FTP site,then send an employee CSV file with two columns as the followingexample shows:
Login Name,Photograph
employee1,emp1-photo.jpg
employee2,emp2-photo.jpg
...
When the auto import directory is scanned and the CSV file is read, itwill look for each photograph file in the same directory as the CSV fileand set the user's photograph. You can optionally put the photographsin a subdirectory, e.g.
Login Name,Photograph
employee1,photos/emp1-photo.jpg
employee2,photos/emp2-photo.jpg
...
When the CSV file is processed it will look for files in the "photos"subdirectory within the directory containing the CSV file.
Alternatively, if you have an existing repository of photographs you canuse URLs for the Photograph field values in the import file, e.g.
Login Name,Photograph
employee1,http://xyz.com/images/photo1.jpg
employee2,ftp://xyz.com/pub/foto2.gif
...
Supported URL formats for the Photograph field in the import file areHTTP, HTTPS and FTP. Another advantage of using a URL is that youcan manually import the file via the web interface, rather than usingthe auto-import directory. Note that setting the photograph results in acopy of it being stored in the application database, so you do not haveto maintain the photograph in the same location that you used whenimporting it.
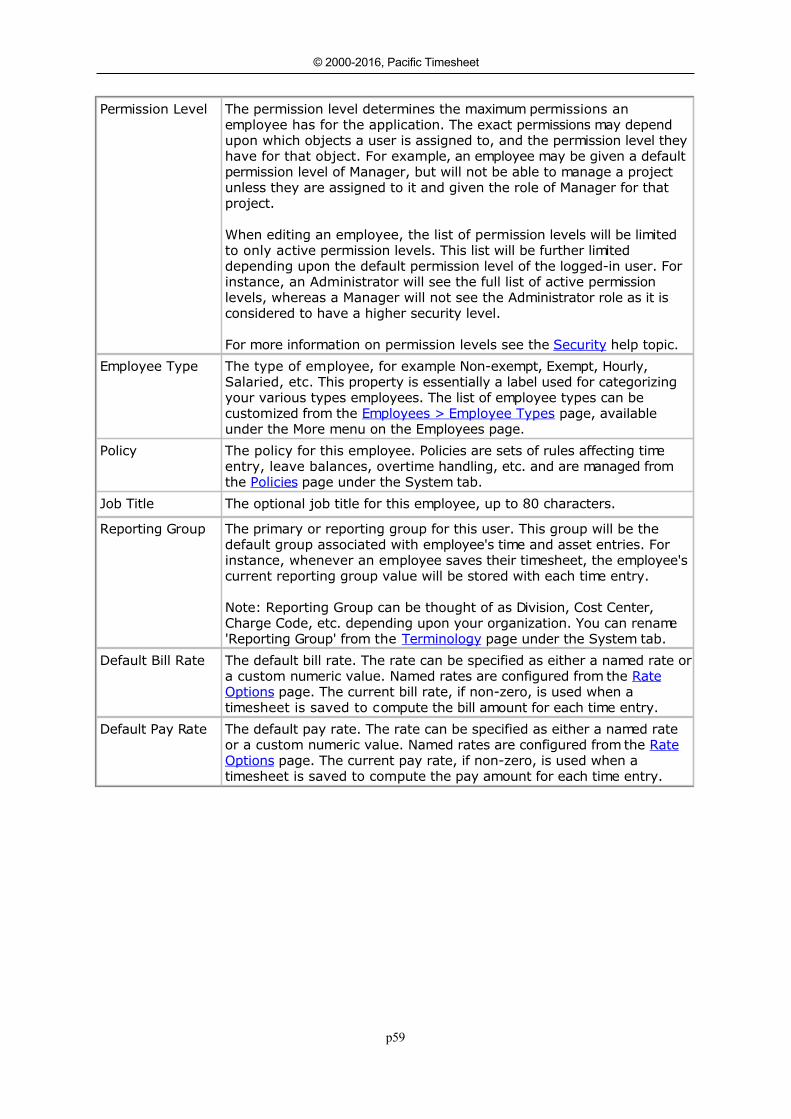
p59
© 2000-2016, Pacific Timesheet
Permission Level The permission level determines the maximum permissions anemployee has for the application. The exact permissions may dependupon which objects a user is assigned to, and the permission level theyhave for that object. For example, an employee may be given a defaultpermission level of Manager, but will not be able to manage a projectunless they are assigned to it and given the role of Manager for thatproject.
When editing an employee, the list of permission levels will be limitedto only active permission levels. This list will be further limiteddepending upon the default permission level of the logged-in user. Forinstance, an Administrator will see the full list of active permissionlevels, whereas a Manager will not see the Administrator role as it isconsidered to have a higher security level.
For more information on permission levels see the Security help topic.
Employee Type The type of employee, for example Non-exempt, Exempt, Hourly,Salaried, etc. This property is essentially a label used for categorizingyour various types employees. The list of employee types can becustomized from the Employees > Employee Types page, availableunder the More menu on the Employees page.
Policy The policy for this employee. Policies are sets of rules affecting timeentry, leave balances, overtime handling, etc. and are managed fromthe Policies page under the System tab.
Job Title The optional job title for this employee, up to 80 characters.
Reporting Group The primary or reporting group for this user. This group will be thedefault group associated with employee's time and asset entries. Forinstance, whenever an employee saves their timesheet, the employee'scurrent reporting group value will be stored with each time entry.
Note: Reporting Group can be thought of as Division, Cost Center,Charge Code, etc. depending upon your organization. You can rename'Reporting Group' from the Terminology page under the System tab.
Default Bill Rate The default bill rate. The rate can be specified as either a named rate ora custom numeric value. Named rates are configured from the RateOptions page. The current bill rate, if non-zero, is used when atimesheet is saved to compute the bill amount for each time entry.
Default Pay Rate The default pay rate. The rate can be specified as either a named rateor a custom numeric value. Named rates are configured from the RateOptions page. The current pay rate, if non-zero, is used when atimesheet is saved to compute the pay amount for each time entry.
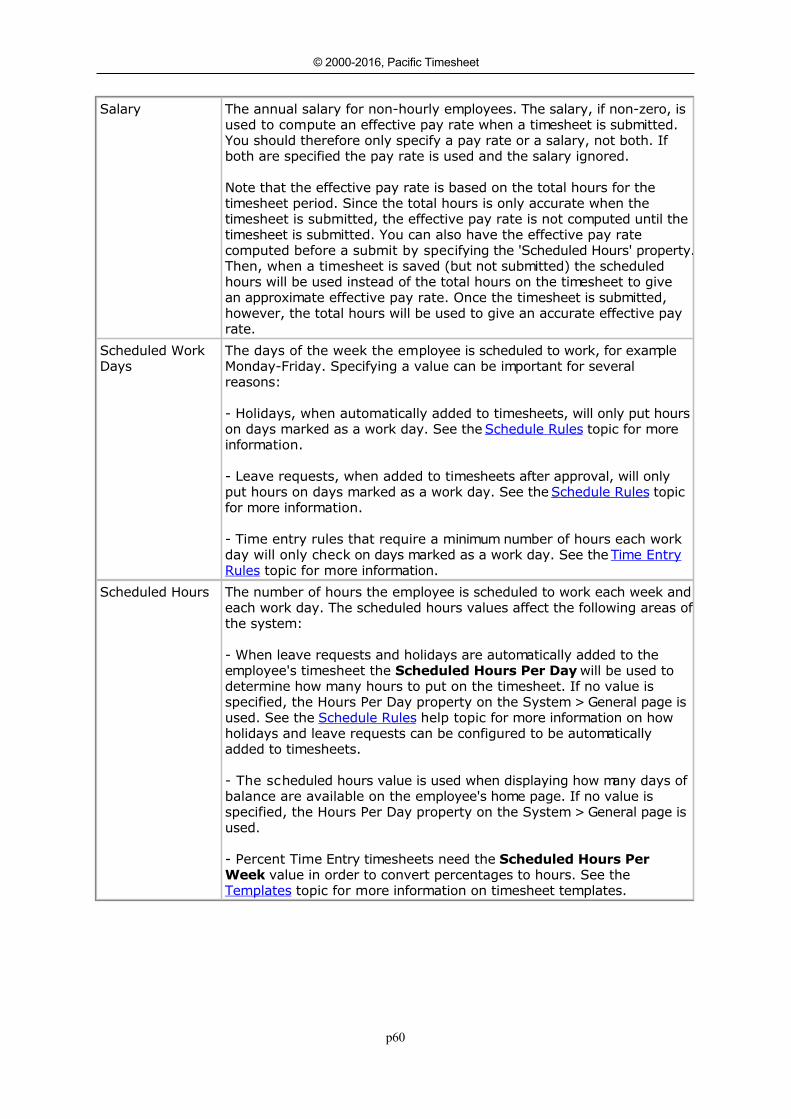
p60
© 2000-2016, Pacific Timesheet
Salary The annual salary for non-hourly employees. The salary, if non-zero, isused to compute an effective pay rate when a timesheet is submitted.You should therefore only specify a pay rate or a salary, not both. Ifboth are specified the pay rate is used and the salary ignored.
Note that the effective pay rate is based on the total hours for thetimesheet period. Since the total hours is only accurate when thetimesheet is submitted, the effective pay rate is not computed until thetimesheet is submitted. You can also have the effective pay ratecomputed before a submit by specifying the 'Scheduled Hours' property.Then, when a timesheet is saved (but not submitted) the scheduledhours will be used instead of the total hours on the timesheet to givean approximate effective pay rate. Once the timesheet is submitted,however, the total hours will be used to give an accurate effective payrate.
Scheduled WorkDays
The days of the week the employee is scheduled to work, for exampleMonday-Friday. Specifying a value can be important for severalreasons:
- Holidays, when automatically added to timesheets, will only put hourson days marked as a work day. See the Schedule Rules topic for moreinformation.
- Leave requests, when added to timesheets after approval, will onlyput hours on days marked as a work day. See the Schedule Rules topicfor more information.
- Time entry rules that require a minimum number of hours each workday will only check on days marked as a work day. See the Time EntryRules topic for more information.
Scheduled Hours The number of hours the employee is scheduled to work each week andeach work day. The scheduled hours values affect the following areas ofthe system:
- When leave requests and holidays are automatically added to theemployee's timesheet the Scheduled Hours Per Day will be used todetermine how many hours to put on the timesheet. If no value isspecified, the Hours Per Day property on the System > General page isused. See the Schedule Rules help topic for more information on howholidays and leave requests can be configured to be automaticallyadded to timesheets.
- The scheduled hours value is used when displaying how many days ofbalance are available on the employee's home page. If no value isspecified, the Hours Per Day property on the System > General page isused.
- Percent Time Entry timesheets need the Scheduled Hours PerWeek value in order to convert percentages to hours. See theTemplates topic for more information on timesheet templates.

p61
© 2000-2016, Pacific Timesheet
Scheduled Start The time of day the employee is scheduled to start work or "punch in".The scheduled start time affects the following areas of the system:
- Employee lateness is determined based on the scheduled start value,and can trigger the sending of an email notice. See the Notices topic forinformation about sending late email notices.
- When adding a new row to an attendance timesheet (one that hasstart and finish times) the start time will default to the employee'sscheduled start time.
- If you configure rounding rules to round punches to the scheduledstart time then you will need to specify the employee's scheduled starttime. See the section on rounding in the Time Entry Rules help topic formore information.
- If you are keeping track of absence points you will need to specify thescheduled start time. See the Absence Points Rules help topic for moreinformation.
Scheduled Finish The time of day the employee is scheduled to finish work or "punchout". The scheduled finish time affects the following areas of thesystem:
- If you configure rounding rules to round punches to the scheduledfinish time then you will need to specify the employee's scheduledfinish time. See the section on rounding in the Time Entry Rules helptopic for more information.
- If you are keeping track of absence points you will need to specify thescheduled finish time. See the Absence Points Rules help topic for moreinformation.
Email The email address, up to 80 characters.
Phone The phone number, up to 40 characters.
Mobile The mobile phone number, up to 40 characters.
Fax The fax number, up to 40 characters.
TimesheetTemplate
The timesheet template for this employee. Different employees canhave different timesheet templates, for example hourly workers mayuse a template that has fields for tracking their in and out times onspecific tasks, whereas salaried workers might use a template that onlyrequires tracking the total hours spent on each task. Timesheettemplates are managed from the Templates page under the Systemtab.
A blank value is allowed for the timesheet template, but the employeewill not get a "My Timesheet" tab when they log in to the application.This may be desired in some cases, such as for an administrativeaccount, or an employee who needs to log into the application to reviewand run reports on other employee's timesheets, but does not needrecord their own time.
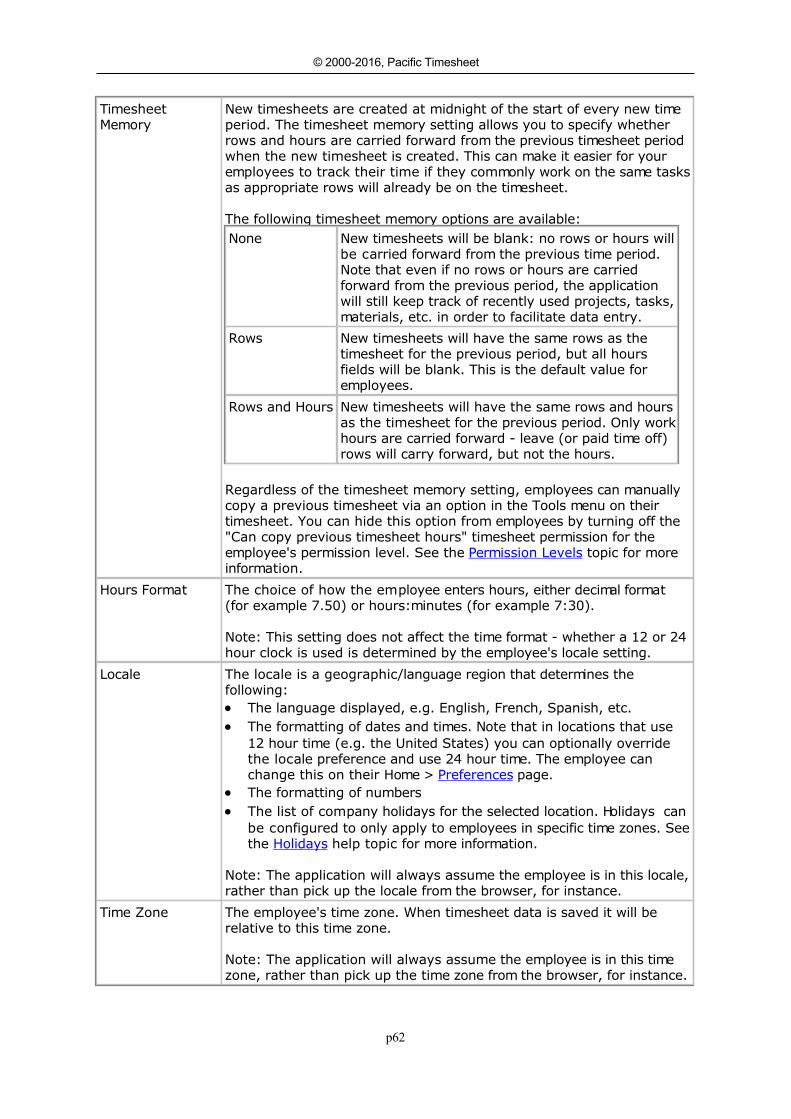
p62
© 2000-2016, Pacific Timesheet
TimesheetMemory
New timesheets are created at midnight of the start of every new timeperiod. The timesheet memory setting allows you to specify whetherrows and hours are carried forward from the previous timesheet periodwhen the new timesheet is created. This can make it easier for youremployees to track their time if they commonly work on the same tasksas appropriate rows will already be on the timesheet.
The following timesheet memory options are available:None New timesheets will be blank: no rows or hours will
be carried forward from the previous time period.Note that even if no rows or hours are carriedforward from the previous period, the applicationwill still keep track of recently used projects, tasks,materials, etc. in order to facilitate data entry.
Rows New timesheets will have the same rows as thetimesheet for the previous period, but all hoursfields will be blank. This is the default value foremployees.
Rows and Hours New timesheets will have the same rows and hoursas the timesheet for the previous period. Only workhours are carried forward - leave (or paid time off)rows will carry forward, but not the hours.
Regardless of the timesheet memory setting, employees can manuallycopy a previous timesheet via an option in the Tools menu on theirtimesheet. You can hide this option from employees by turning off the"Can copy previous timesheet hours" timesheet permission for theemployee's permission level. See the Permission Levels topic for moreinformation.
Hours Format The choice of how the employee enters hours, either decimal format(for example 7.50) or hours:minutes (for example 7:30).
Note: This setting does not affect the time format - whether a 12 or 24hour clock is used is determined by the employee's locale setting.
Locale The locale is a geographic/language region that determines thefollowing: The language displayed, e.g. English, French, Spanish, etc. The formatting of dates and times. Note that in locations that use
12 hour time (e.g. the United States) you can optionally overridethe locale preference and use 24 hour time. The employee canchange this on their Home > Preferences page.
The formatting of numbers The list of company holidays for the selected location. Holidays can
be configured to only apply to employees in specific time zones. Seethe Holidays help topic for more information.
Note: The application will always assume the employee is in this locale,rather than pick up the locale from the browser, for instance.
Time Zone The employee's time zone. When timesheet data is saved it will berelative to this time zone.
Note: The application will always assume the employee is in this timezone, rather than pick up the time zone from the browser, for instance.

p63
© 2000-2016, Pacific Timesheet
Approver This is the primary approver for the employee. A primary approver canreview and approve or reject this employee's time entries and leaverequests (depending upon the approver's permission level).
Primary approvers can also receive email reminders and notices whenthere are timesheets or requests that need approving, or whenemployees are late submitting their time. See the Notices help topic formore information.
Note: Only employees with permission to approve will appear in the listof possible approvers. If you do not see an employee in the list thenyou may need to change that employee's permission level, or enablethe appropriate approval permission for their permission level. See the Security help topic for more information.
Approver Backup This is the backup approver for this employee. The backup approver hasthe same capabilities as the primary approver, but will not receive theapproval email notices that are sent to the primary approver. It is agood idea to assign a backup approver for times when the primaryapprover is away or otherwise unavailable.
Notes
Clicking the Notes disclosure triangle allows you to review and enter notes about theemployee (up to 2000 characters).
Current Balances
Clicking the Current Balances disclosure triangle shows the list of current balances for theemployee. You can edit employee balances by clicking the current balance link. The Employee Balances topic has more information. Note that employee balances cannot beedited unless your Permission Level has the "Can edit advanced properties" Employeepermission checked.
Group Membership
Clicking the Group Membership disclosure triangle shows the list of groups the employee isa member of. The Employee Groups topic has more information about managing groups.
Calendar
Clicking the Calendar disclosure triangle shows the employee's calendar of holidays, leaverequests and other events.
Importing/Exporting Employees
You can import and export employee data using CSV (Comma Separated Values) formatfiles from the Employees tab. When importing data a good way to start is to do an exportfirst - this will generate a file you can use as a template. Once you modify this file(including removing unnecessary columns) to have your new data you can then import itback into the application. See the Employee CSV Format help topic for more information onthe import file format.
Note: The default format is CSV but you can change this from the Home > Preferencespage.
Importing/Exporting Employee Balances
You can import and export employee balance data using CSV (Comma Separated Values)
p64
© 2000-2016, Pacific Timesheet
format files from the Employees tab. When importing data a good way to start is to do anexport first - this will generate a file you can use as a template. Once you modify this file(including removing unnecessary columns) to have your new data you can then import itback into the application. See the Employee Balances CSV Format help topic for moreinformation on the import file format.
Note: The default format is CSV but you can change this from the Home > Preferencespage.
Custom Fields
Like all major objects in the application, you can customize them by creating new fields.Choosing the 'Manage Custom Fields' option on the Employees tab will let you create avariety of new fields or properties specific to your needs.
Related Topics
Employee Balances Employee Groups Rate Options
-o-
p65
© 2000-2016, Pacific Timesheet
Employee BalancesEmployee Balances
Employee balances are banks of hours that employees can accrue and use on theirtimesheets, such as Vacation, Sick or Flex-time. Balances are associated with leave paycodes: for instance if you have a Vacation pay code you can optionally have a Vacationbalance (see the Pay Codes topic has more information). Each balance can have its own setof rules for how hours are accrued and how situations such as when the employee's balancegoes negative are handled. See the Balance and Accrual Rules help topic for moreinformation.
You can update an employee's balance from the Employee Details page by clicking theCurrent Balances disclosure triangle, which shows the employee's balances as of thecurrent date. Clicking on the current balance link will load the Balance History page. TheBalance History page lists all changes made to the balance: the actual balance for any givendate is simply the total of all the balance changes up to that date. If you have appropriatepermissions you can modify the balance by adding, deducting or setting the balance for agiven date.
Note: In order to change an employee's balance you must have the 'Can edit advancedproperties' Employee permission. In addition, for security purposes, you can only deletebalance changes that you made. Only administrators (those with the 'Can manage all'Employee permission) can delete balance changes made by others.
Making Bulk Changes To Employee Balances
If you need to update balances for a number of employees you can import the list ofchanges using an import file. When importing data a good way to start is to export thecurrent employee balances via the Export Employee Balances option on the Employees tab -this will generate a file you can use as a template. Once you modify this file (includingremoving unnecessary columns) to have your new data you can then import it back into theapplication. The Managing Employees topic has more information.
-o-

p66
© 2000-2016, Pacific Timesheet
Employee GroupsEmployee Groups
Employee Groups are lists of employees, and can be used for several purposes. You cancreate employee groups that represent cost centers or divisions, for instance. These canthen be assigned to the appropriate employees as their Reporting Group (see theManaging Employees help topic for more information). In addition, groups are used byPacific Timesheet for managing application permissions. For instance, rather than assigningmanagers to specific employees you give the manager permission for a specific employeegroup (the Security help topic has more information about configuring permissions).
Employee groups have the following properties:
Property Description
Name The group name, up to 80 characters. A value is required and must beunique for all groups.
Description A description for the group, up to 255 characters.
ID The group ID, up to 80 characters. This value is not required, but if avalue is entered it must be unique for all groups. The value here iscommonly used when synchronizing with external systems such aspayroll processing.
Status The group status, either Active or Inactive. You can delete a group, butoften it is preferable to change its status to Inactive. This will keep itfrom being used for new data entry, but allow it to be reported on forhistorical purposes.
Notes
Clicking the Notes disclosure triangle allows you to review and enter notes about the group(up to 2000 characters).
Employees
Clicking the Employees disclosure triangle allows you to review and edit the list ofemployees belonging to this group. An employee can be in more than one group at thesame time. If you want to check if an employee belongs to more than one group you canview their group membership on the specific employee's properties page.
Permissions
Clicking the Permissions disclosure triangle allows you to review and edit which employeesor employee groups have been given special permissions for this group. Typically you woulduse this to assign an employee manager (someone with 'Can manage limited' Employeepermission) to this group in order to review and edit time or asset entries for employeeswho are members of this group. See the Security help topic for more information.
Importing/Exporting Groups
You can import and export group data using CSV (Comma Separated Values) format filesfrom the Employees > Groups page. When importing data a good way to start is to do anexport first - this will generate a file you can use as a template. Once you modify this file(including removing unnecessary columns) to have your new data you can then import itback into the application. See the Group CSV Format help topic for more information on theimport file format.
Note: The default format is CSV but you can change this from the Home > Preferences

p67
© 2000-2016, Pacific Timesheet
page.
Custom Fields
Like all major objects in the application, you can customize them by creating new fields.Choosing the 'Manage Custom Fields' option on the Employees > Groups page will let youcreate a variety of new fields or properties specific to your needs.
-o-
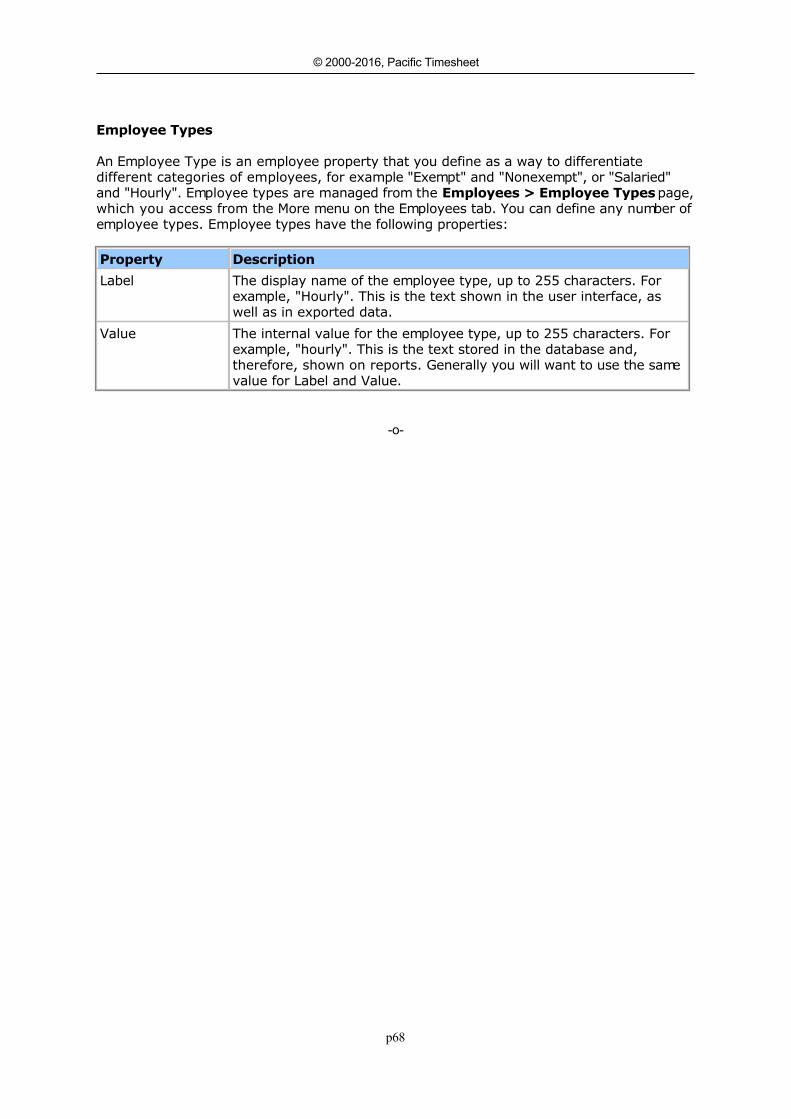
p68
© 2000-2016, Pacific Timesheet
Employee TypesEmployee Types
An Employee Type is an employee property that you define as a way to differentiatedifferent categories of employees, for example "Exempt" and "Nonexempt", or "Salaried"and "Hourly". Employee types are managed from the Employees > Employee Types page,which you access from the More menu on the Employees tab. You can define any number ofemployee types. Employee types have the following properties:
Property Description
Label The display name of the employee type, up to 255 characters. Forexample, "Hourly". This is the text shown in the user interface, aswell as in exported data.
Value The internal value for the employee type, up to 255 characters. Forexample, "hourly". This is the text stored in the database and,therefore, shown on reports. Generally you will want to use the samevalue for Label and Value.
-o-
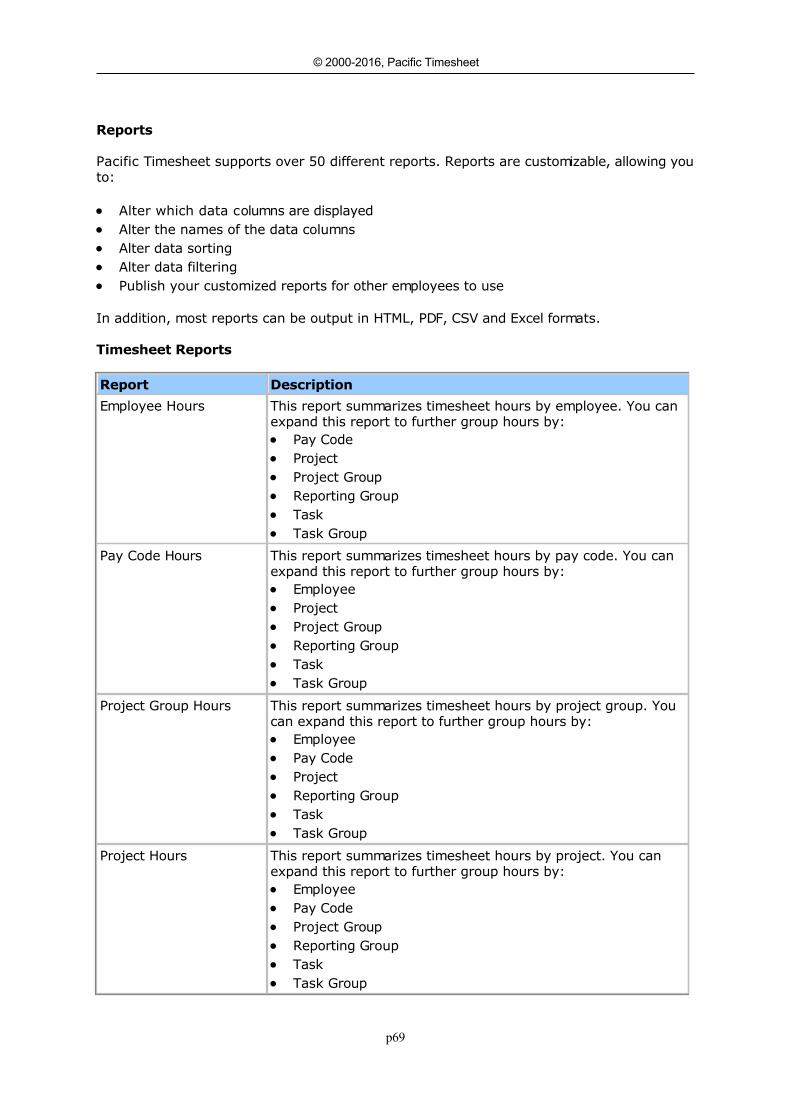
p69
© 2000-2016, Pacific Timesheet
ReportsReports
Pacific Timesheet supports over 50 different reports. Reports are customizable, allowing youto:
Alter which data columns are displayed Alter the names of the data columns Alter data sorting Alter data filtering Publish your customized reports for other employees to use
In addition, most reports can be output in HTML, PDF, CSV and Excel formats.
Timesheet Reports
Report Description
Employee Hours This report summarizes timesheet hours by employee. You canexpand this report to further group hours by: Pay Code Project Project Group Reporting Group Task Task Group
Pay Code Hours This report summarizes timesheet hours by pay code. You canexpand this report to further group hours by: Employee Project Project Group Reporting Group Task Task Group
Project Group Hours This report summarizes timesheet hours by project group. Youcan expand this report to further group hours by: Employee Pay Code Project Reporting Group Task Task Group
Project Hours This report summarizes timesheet hours by project. You canexpand this report to further group hours by: Employee Pay Code Project Group Reporting Group Task Task Group
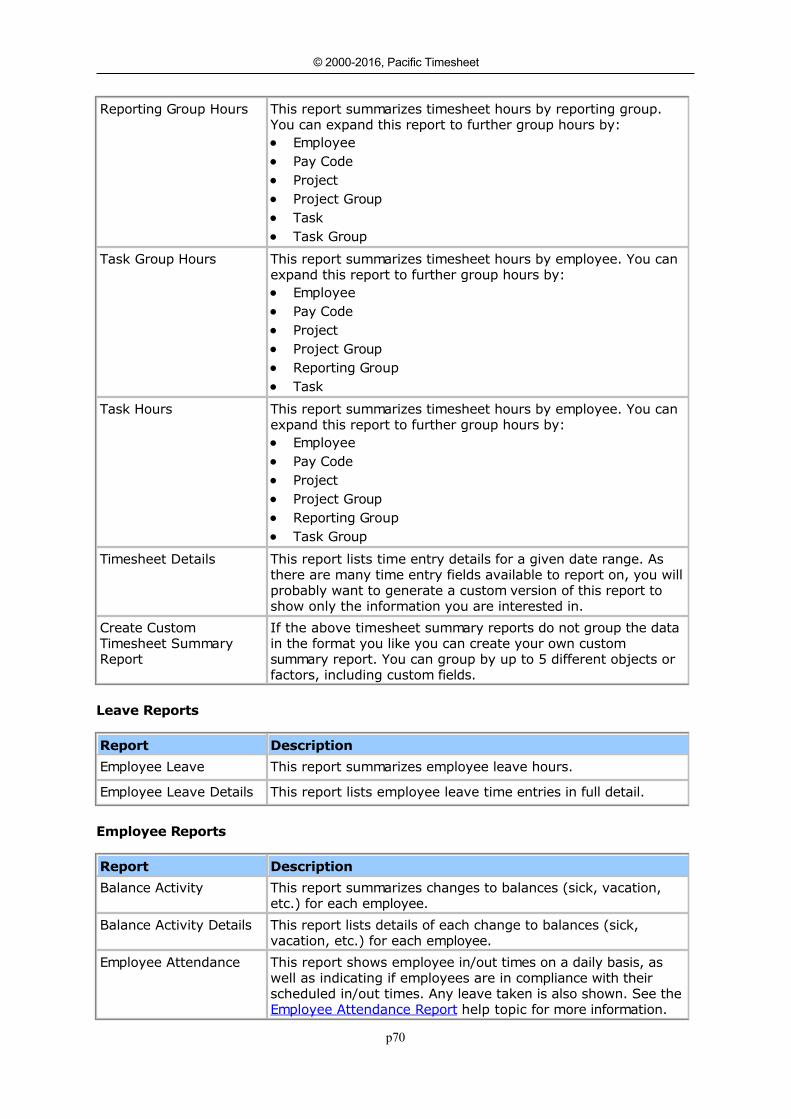
p70
© 2000-2016, Pacific Timesheet
Reporting Group Hours This report summarizes timesheet hours by reporting group.You can expand this report to further group hours by: Employee Pay Code Project Project Group Task Task Group
Task Group Hours This report summarizes timesheet hours by employee. You canexpand this report to further group hours by: Employee Pay Code Project Project Group Reporting Group Task
Task Hours This report summarizes timesheet hours by employee. You canexpand this report to further group hours by: Employee Pay Code Project Project Group Reporting Group Task Group
Timesheet Details This report lists time entry details for a given date range. Asthere are many time entry fields available to report on, you willprobably want to generate a custom version of this report toshow only the information you are interested in.
Create CustomTimesheet SummaryReport
If the above timesheet summary reports do not group the datain the format you like you can create your own customsummary report. You can group by up to 5 different objects orfactors, including custom fields.
Leave Reports
Report Description
Employee Leave This report summarizes employee leave hours.
Employee Leave Details This report lists employee leave time entries in full detail.
Employee Reports
Report Description
Balance Activity This report summarizes changes to balances (sick, vacation,etc.) for each employee.
Balance Activity Details This report lists details of each change to balances (sick,vacation, etc.) for each employee.
Employee Attendance This report shows employee in/out times on a daily basis, aswell as indicating if employees are in compliance with theirscheduled in/out times. Any leave taken is also shown. See the Employee Attendance Report help topic for more information.
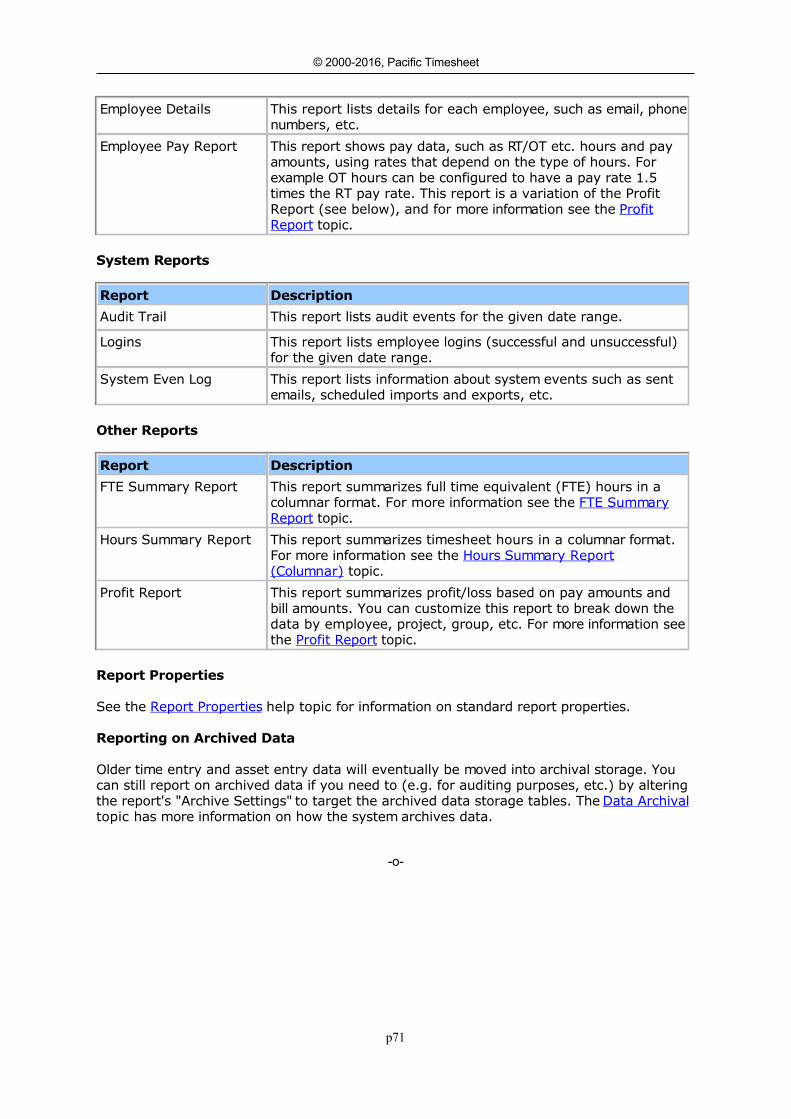
p71
© 2000-2016, Pacific Timesheet
Employee Details This report lists details for each employee, such as email, phonenumbers, etc.
Employee Pay Report This report shows pay data, such as RT/OT etc. hours and payamounts, using rates that depend on the type of hours. Forexample OT hours can be configured to have a pay rate 1.5times the RT pay rate. This report is a variation of the ProfitReport (see below), and for more information see the ProfitReport topic.
System Reports
Report Description
Audit Trail This report lists audit events for the given date range.
Logins This report lists employee logins (successful and unsuccessful)for the given date range.
System Even Log This report lists information about system events such as sentemails, scheduled imports and exports, etc.
Other Reports
Report Description
FTE Summary Report This report summarizes full time equivalent (FTE) hours in acolumnar format. For more information see the FTE SummaryReport topic.
Hours Summary Report This report summarizes timesheet hours in a columnar format.For more information see the Hours Summary Report(Columnar) topic.
Profit Report This report summarizes profit/loss based on pay amounts andbill amounts. You can customize this report to break down thedata by employee, project, group, etc. For more information seethe Profit Report topic.
Report Properties
See the Report Properties help topic for information on standard report properties.
Reporting on Archived Data
Older time entry and asset entry data will eventually be moved into archival storage. Youcan still report on archived data if you need to (e.g. for auditing purposes, etc.) by alteringthe report's "Archive Settings" to target the archived data storage tables. The Data Archivaltopic has more information on how the system archives data.
-o-
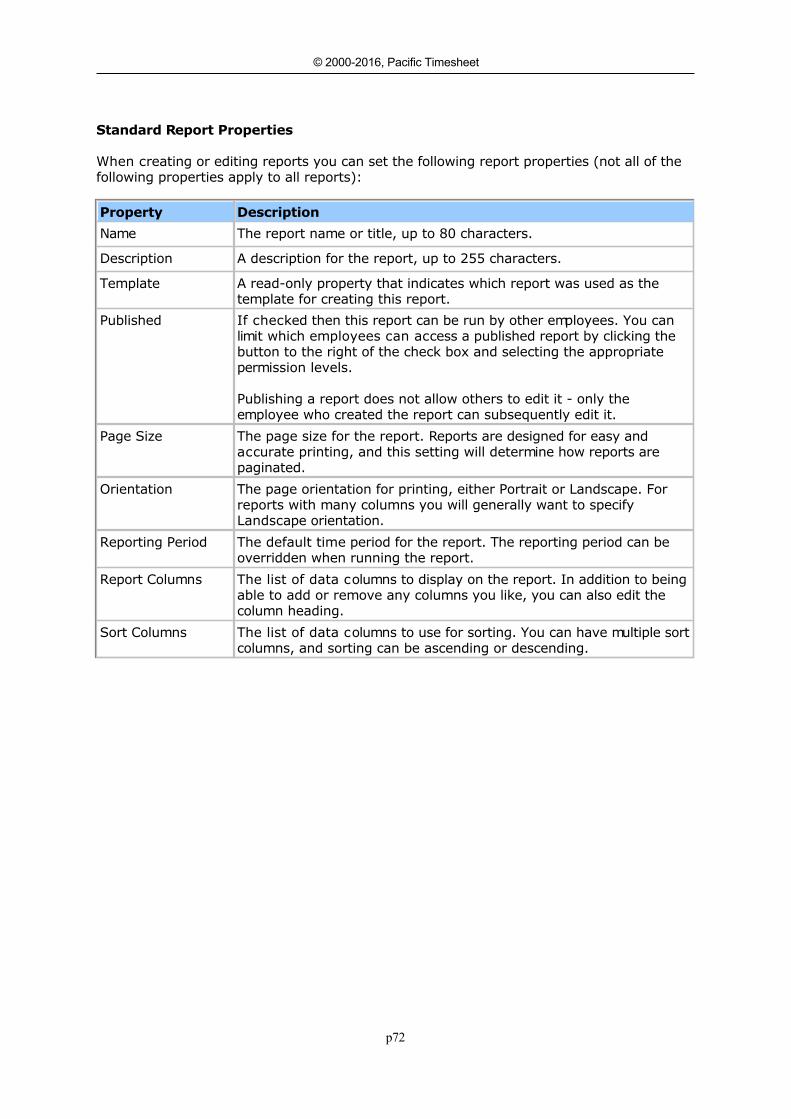
p72
© 2000-2016, Pacific Timesheet
Report PropertiesStandard Report Properties
When creating or editing reports you can set the following report properties (not all of thefollowing properties apply to all reports):
Property Description
Name The report name or title, up to 80 characters.
Description A description for the report, up to 255 characters.
Template A read-only property that indicates which report was used as thetemplate for creating this report.
Published If checked then this report can be run by other employees. You canlimit which employees can access a published report by clicking thebutton to the right of the check box and selecting the appropriatepermission levels.
Publishing a report does not allow others to edit it - only theemployee who created the report can subsequently edit it.
Page Size The page size for the report. Reports are designed for easy andaccurate printing, and this setting will determine how reports arepaginated.
Orientation The page orientation for printing, either Portrait or Landscape. Forreports with many columns you will generally want to specifyLandscape orientation.
Reporting Period The default time period for the report. The reporting period can beoverridden when running the report.
Report Columns The list of data columns to display on the report. In addition to beingable to add or remove any columns you like, you can also edit thecolumn heading.
Sort Columns The list of data columns to use for sorting. You can have multiple sortcolumns, and sorting can be ascending or descending.
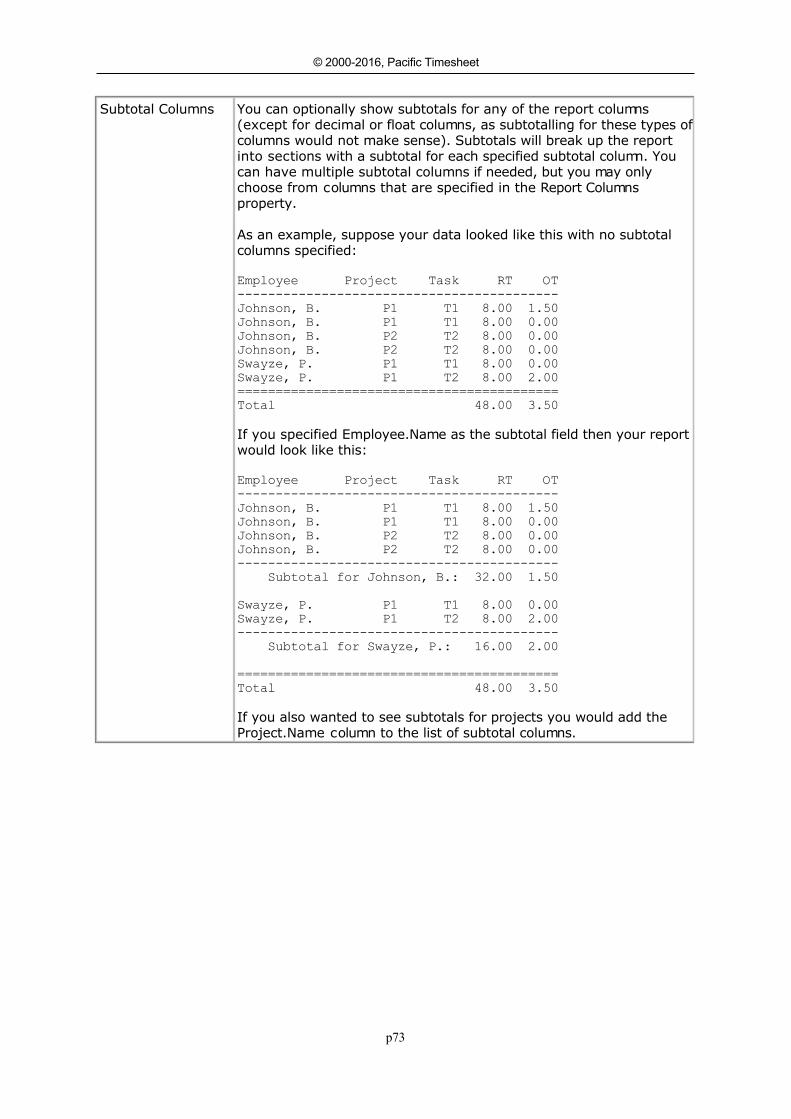
p73
© 2000-2016, Pacific Timesheet
Subtotal Columns You can optionally show subtotals for any of the report columns(except for decimal or float columns, as subtotalling for these types ofcolumns would not make sense). Subtotals will break up the reportinto sections with a subtotal for each specified subtotal column. Youcan have multiple subtotal columns if needed, but you may onlychoose from columns that are specified in the Report Columnsproperty.
As an example, suppose your data looked like this with no subtotalcolumns specified:
Employee Project Task RT OT
------------------------------------------
Johnson, B. P1 T1 8.00 1.50
Johnson, B. P1 T1 8.00 0.00
Johnson, B. P2 T2 8.00 0.00
Johnson, B. P2 T2 8.00 0.00
Swayze, P. P1 T1 8.00 0.00
Swayze, P. P1 T2 8.00 2.00
==========================================
Total 48.00 3.50
If you specified Employee.Name as the subtotal field then your reportwould look like this:
Employee Project Task RT OT
------------------------------------------
Johnson, B. P1 T1 8.00 1.50
Johnson, B. P1 T1 8.00 0.00
Johnson, B. P2 T2 8.00 0.00
Johnson, B. P2 T2 8.00 0.00
------------------------------------------
Subtotal for Johnson, B.: 32.00 1.50
Swayze, P. P1 T1 8.00 0.00
Swayze, P. P1 T2 8.00 2.00
------------------------------------------
Subtotal for Swayze, P.: 16.00 2.00
==========================================
Total 48.00 3.50
If you also wanted to see subtotals for projects you would add theProject.Name column to the list of subtotal columns.
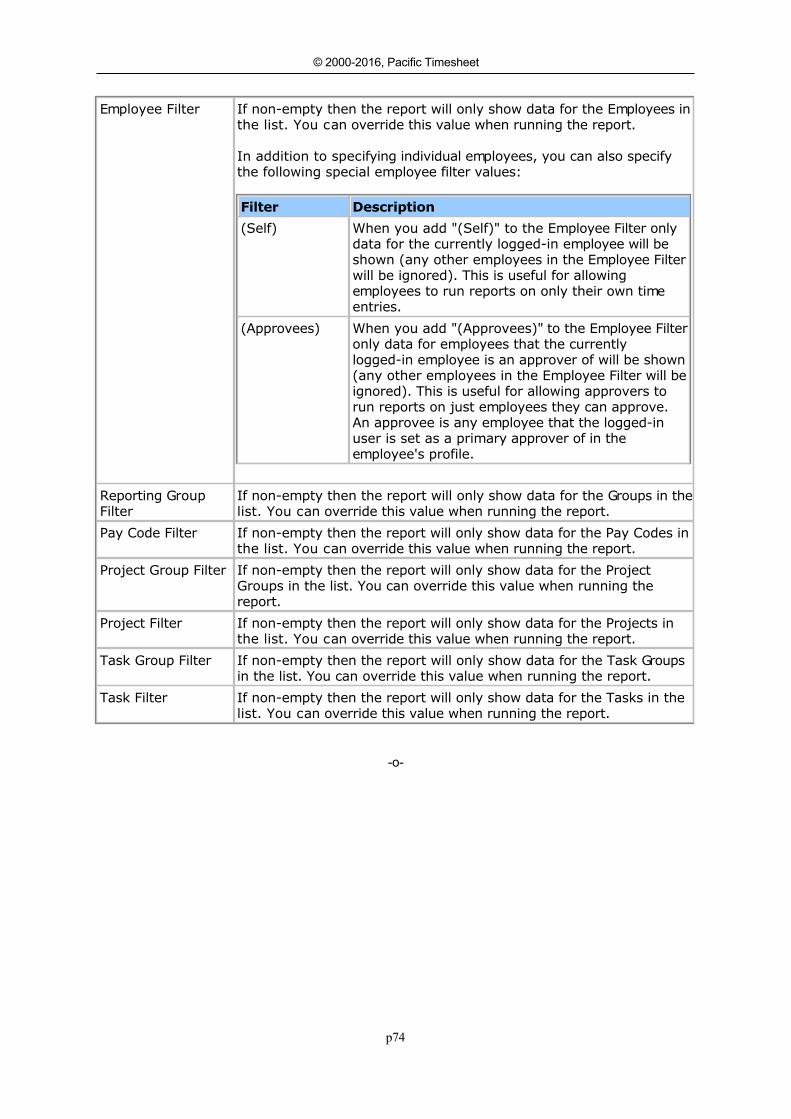
p74
© 2000-2016, Pacific Timesheet
Employee Filter If non-empty then the report will only show data for the Employees inthe list. You can override this value when running the report.
In addition to specifying individual employees, you can also specifythe following special employee filter values:
Filter Description
(Self) When you add "(Self)" to the Employee Filter onlydata for the currently logged-in employee will beshown (any other employees in the Employee Filterwill be ignored). This is useful for allowingemployees to run reports on only their own timeentries.
(Approvees) When you add "(Approvees)" to the Employee Filteronly data for employees that the currentlylogged-in employee is an approver of will be shown(any other employees in the Employee Filter will beignored). This is useful for allowing approvers torun reports on just employees they can approve.An approvee is any employee that the logged-inuser is set as a primary approver of in theemployee's profile.
Reporting GroupFilter
If non-empty then the report will only show data for the Groups in thelist. You can override this value when running the report.
Pay Code Filter If non-empty then the report will only show data for the Pay Codes inthe list. You can override this value when running the report.
Project Group Filter If non-empty then the report will only show data for the ProjectGroups in the list. You can override this value when running thereport.
Project Filter If non-empty then the report will only show data for the Projects inthe list. You can override this value when running the report.
Task Group Filter If non-empty then the report will only show data for the Task Groupsin the list. You can override this value when running the report.
Task Filter If non-empty then the report will only show data for the Tasks in thelist. You can override this value when running the report.
-o-
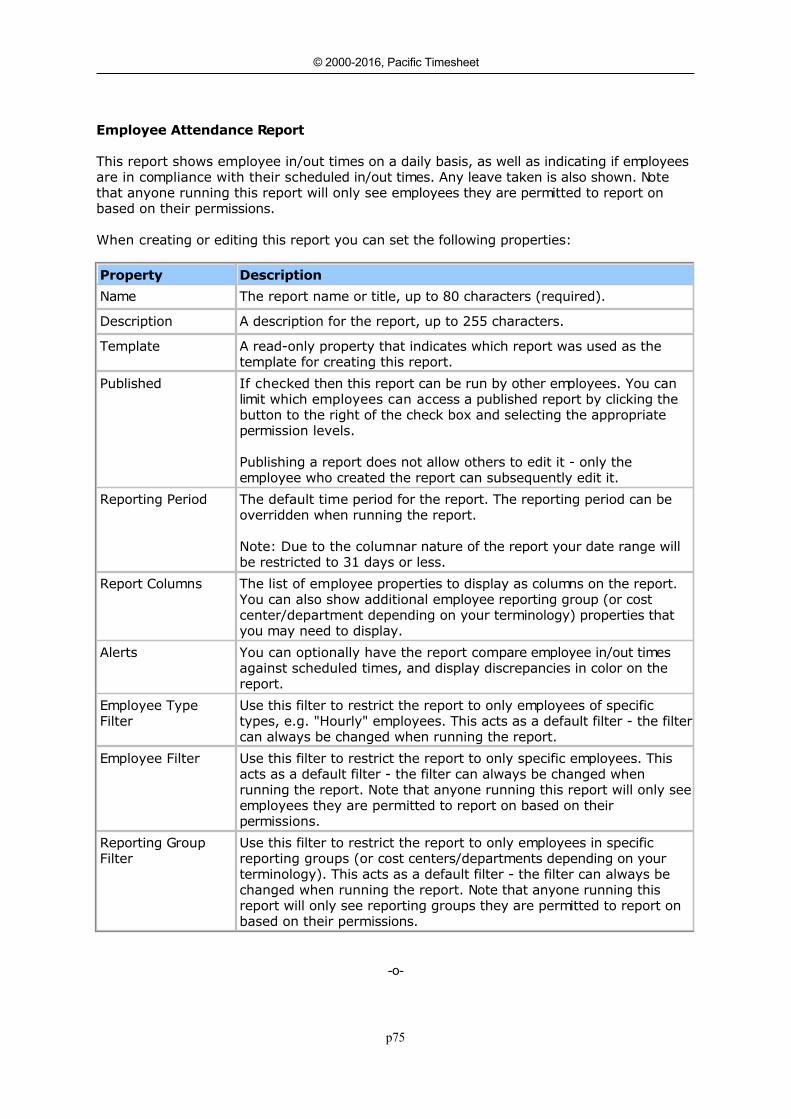
p75
© 2000-2016, Pacific Timesheet
Employee Attendance ReportEmployee Attendance Report
This report shows employee in/out times on a daily basis, as well as indicating if employeesare in compliance with their scheduled in/out times. Any leave taken is also shown. Notethat anyone running this report will only see employees they are permitted to report onbased on their permissions.
When creating or editing this report you can set the following properties:
Property Description
Name The report name or title, up to 80 characters (required).
Description A description for the report, up to 255 characters.
Template A read-only property that indicates which report was used as thetemplate for creating this report.
Published If checked then this report can be run by other employees. You canlimit which employees can access a published report by clicking thebutton to the right of the check box and selecting the appropriatepermission levels.
Publishing a report does not allow others to edit it - only theemployee who created the report can subsequently edit it.
Reporting Period The default time period for the report. The reporting period can beoverridden when running the report.
Note: Due to the columnar nature of the report your date range willbe restricted to 31 days or less.
Report Columns The list of employee properties to display as columns on the report.You can also show additional employee reporting group (or costcenter/department depending on your terminology) properties thatyou may need to display.
Alerts You can optionally have the report compare employee in/out timesagainst scheduled times, and display discrepancies in color on thereport.
Employee TypeFilter
Use this filter to restrict the report to only employees of specifictypes, e.g. "Hourly" employees. This acts as a default filter - the filtercan always be changed when running the report.
Employee Filter Use this filter to restrict the report to only specific employees. Thisacts as a default filter - the filter can always be changed whenrunning the report. Note that anyone running this report will only seeemployees they are permitted to report on based on theirpermissions.
Reporting GroupFilter
Use this filter to restrict the report to only employees in specificreporting groups (or cost centers/departments depending on yourterminology). This acts as a default filter - the filter can always bechanged when running the report. Note that anyone running thisreport will only see reporting groups they are permitted to report onbased on their permissions.
-o-
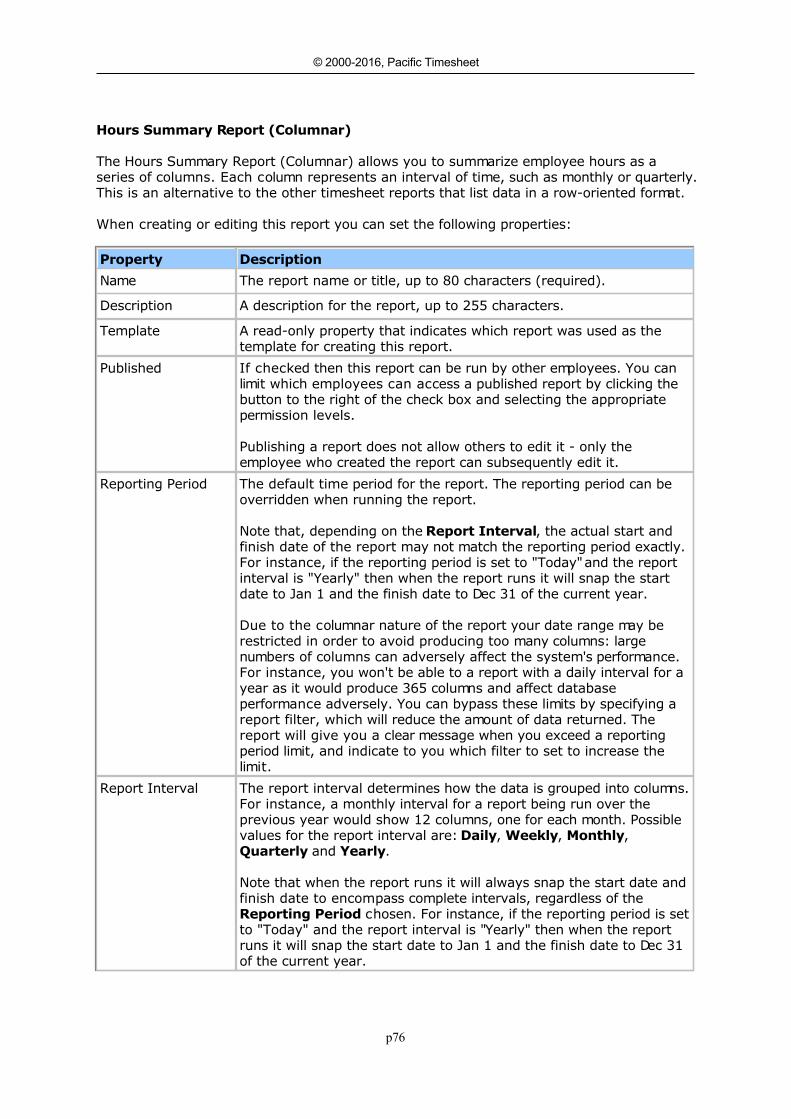
p76
© 2000-2016, Pacific Timesheet
Hours Summary Report (Columnar)Hours Summary Report (Columnar)
The Hours Summary Report (Columnar) allows you to summarize employee hours as aseries of columns. Each column represents an interval of time, such as monthly or quarterly.This is an alternative to the other timesheet reports that list data in a row-oriented format.
When creating or editing this report you can set the following properties:
Property Description
Name The report name or title, up to 80 characters (required).
Description A description for the report, up to 255 characters.
Template A read-only property that indicates which report was used as thetemplate for creating this report.
Published If checked then this report can be run by other employees. You canlimit which employees can access a published report by clicking thebutton to the right of the check box and selecting the appropriatepermission levels.
Publishing a report does not allow others to edit it - only theemployee who created the report can subsequently edit it.
Reporting Period The default time period for the report. The reporting period can beoverridden when running the report.
Note that, depending on the Report Interval, the actual start andfinish date of the report may not match the reporting period exactly.For instance, if the reporting period is set to "Today" and the reportinterval is "Yearly" then when the report runs it will snap the startdate to Jan 1 and the finish date to Dec 31 of the current year.
Due to the columnar nature of the report your date range may berestricted in order to avoid producing too many columns: largenumbers of columns can adversely affect the system's performance.For instance, you won't be able to a report with a daily interval for ayear as it would produce 365 columns and affect databaseperformance adversely. You can bypass these limits by specifying areport filter, which will reduce the amount of data returned. Thereport will give you a clear message when you exceed a reportingperiod limit, and indicate to you which filter to set to increase thelimit.
Report Interval The report interval determines how the data is grouped into columns.For instance, a monthly interval for a report being run over theprevious year would show 12 columns, one for each month. Possiblevalues for the report interval are: Daily, Weekly, Monthly,Quarterly and Yearly.
Note that when the report runs it will always snap the start date andfinish date to encompass complete intervals, regardless of the Reporting Period chosen. For instance, if the reporting period is setto "Today" and the report interval is "Yearly" then when the reportruns it will snap the start date to Jan 1 and the finish date to Dec 31of the current year.

p77
© 2000-2016, Pacific Timesheet
Report Columns The list of data columns by which to group or summarize the reportdata into rows (required). You can add or remove columns, and clickand drag to change the column order. The list of columns is limited todata that can be recorded with time entries, such as employee andproject values, timesheet custom fields, etc. You must have at leastone but no more than 10 report columns.
Note that the report will automatically insert subtotal rows in thereport if you select more than one type of column. For instance, ifyou have 2 columns, Project.Name and Employee.Name, then thereport will insert a subtotal row after each group of projects. If youhave 3 columns, Customer.Name, Project.Name and Employee.Name,then the report will insert a subtotal row after each group of projectsand after each group of customers.
Summarize Choose which timesheet hours data you want to total or summarizein the report. This can be All Hours, Work Hours or Leave Hours.If you choose Work Hours or Leave Hours you can optionally limit thehours to specific pay codes. For instance, if you choose only OverTime and Double then the hours totalled on the report for eachinterval column will be computed as SUM(Over Time + Double Time).
Submitted Filter Use this filter to restrict the report to only hours for timesheets thatare Submitted (locked), or only hours for timesheets that are Open(unsubmitted). By default all timesheet data is reported on,regardless of its submission status.
-o-
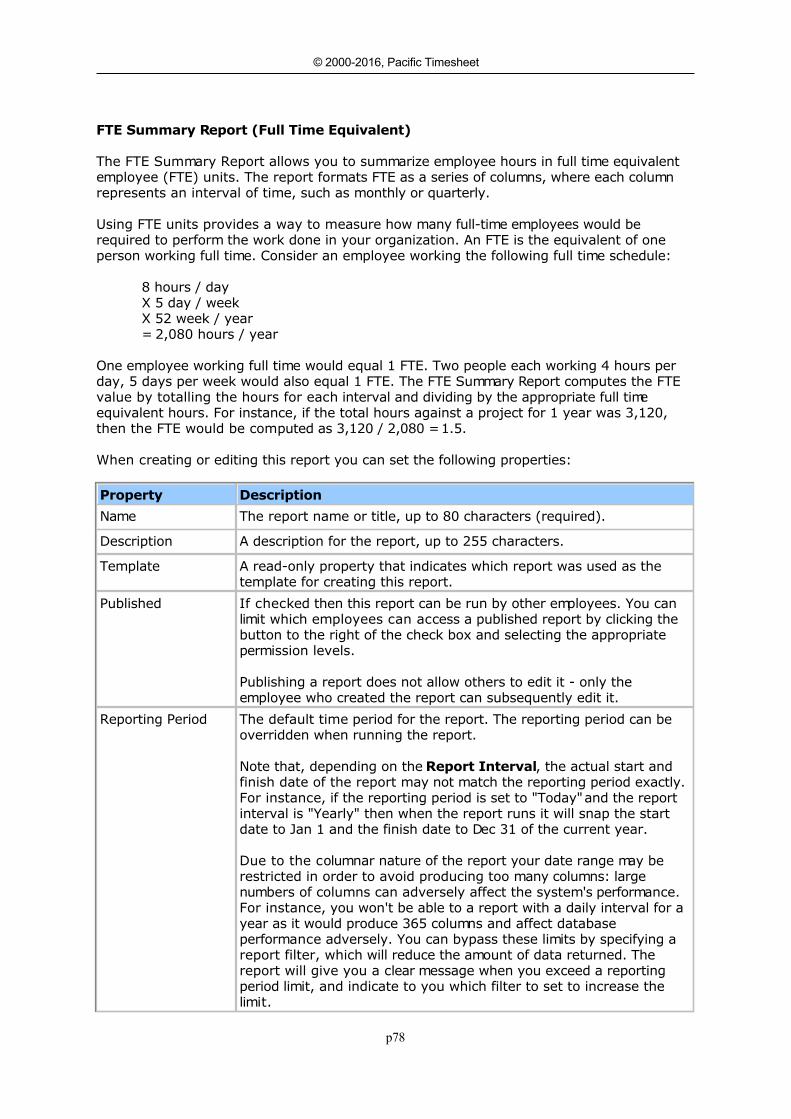
p78
© 2000-2016, Pacific Timesheet
FTE Summary ReportFTE Summary Report (Full Time Equivalent)
The FTE Summary Report allows you to summarize employee hours in full time equivalentemployee (FTE) units. The report formats FTE as a series of columns, where each columnrepresents an interval of time, such as monthly or quarterly.
Using FTE units provides a way to measure how many full-time employees would berequired to perform the work done in your organization. An FTE is the equivalent of oneperson working full time. Consider an employee working the following full time schedule:
8 hours / dayX 5 day / weekX 52 week / year= 2,080 hours / year
One employee working full time would equal 1 FTE. Two people each working 4 hours perday, 5 days per week would also equal 1 FTE. The FTE Summary Report computes the FTEvalue by totalling the hours for each interval and dividing by the appropriate full timeequivalent hours. For instance, if the total hours against a project for 1 year was 3,120,then the FTE would be computed as 3,120 / 2,080 = 1.5.
When creating or editing this report you can set the following properties:
Property Description
Name The report name or title, up to 80 characters (required).
Description A description for the report, up to 255 characters.
Template A read-only property that indicates which report was used as thetemplate for creating this report.
Published If checked then this report can be run by other employees. You canlimit which employees can access a published report by clicking thebutton to the right of the check box and selecting the appropriatepermission levels.
Publishing a report does not allow others to edit it - only theemployee who created the report can subsequently edit it.
Reporting Period The default time period for the report. The reporting period can beoverridden when running the report.
Note that, depending on the Report Interval, the actual start andfinish date of the report may not match the reporting period exactly.For instance, if the reporting period is set to "Today" and the reportinterval is "Yearly" then when the report runs it will snap the startdate to Jan 1 and the finish date to Dec 31 of the current year.
Due to the columnar nature of the report your date range may berestricted in order to avoid producing too many columns: largenumbers of columns can adversely affect the system's performance.For instance, you won't be able to a report with a daily interval for ayear as it would produce 365 columns and affect databaseperformance adversely. You can bypass these limits by specifying areport filter, which will reduce the amount of data returned. Thereport will give you a clear message when you exceed a reportingperiod limit, and indicate to you which filter to set to increase thelimit.
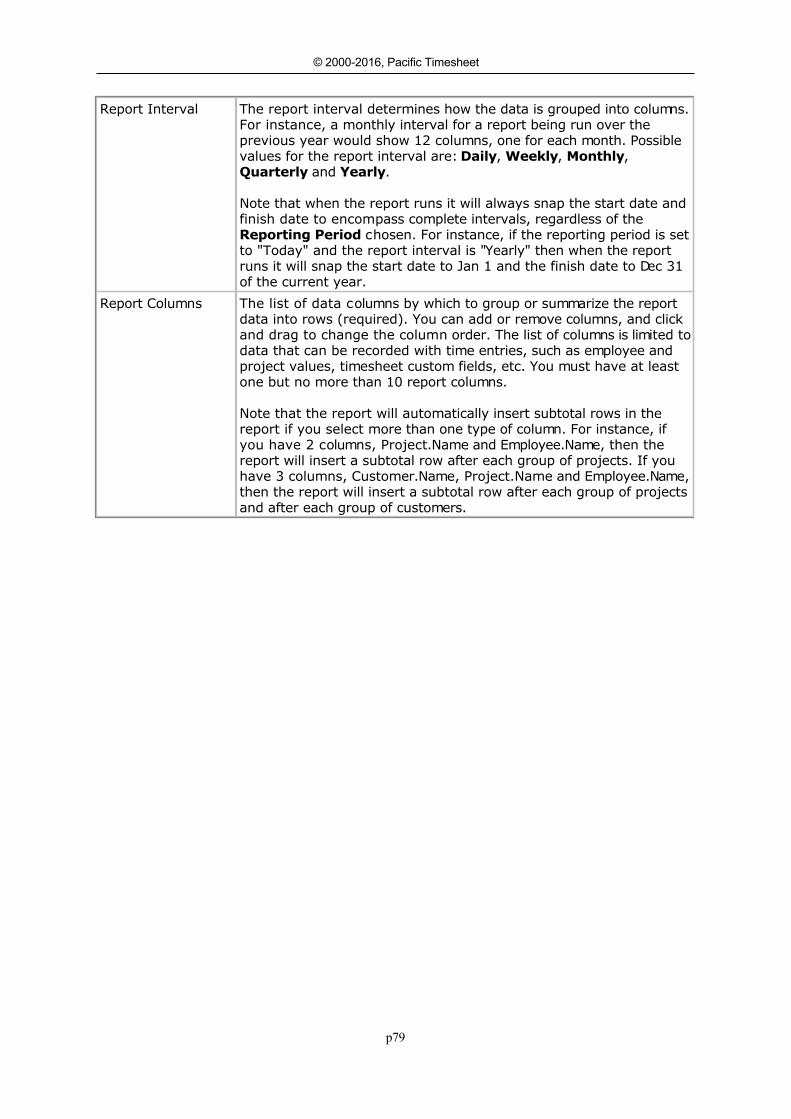
p79
© 2000-2016, Pacific Timesheet
Report Interval The report interval determines how the data is grouped into columns.For instance, a monthly interval for a report being run over theprevious year would show 12 columns, one for each month. Possiblevalues for the report interval are: Daily, Weekly, Monthly,Quarterly and Yearly.
Note that when the report runs it will always snap the start date andfinish date to encompass complete intervals, regardless of the Reporting Period chosen. For instance, if the reporting period is setto "Today" and the report interval is "Yearly" then when the reportruns it will snap the start date to Jan 1 and the finish date to Dec 31of the current year.
Report Columns The list of data columns by which to group or summarize the reportdata into rows (required). You can add or remove columns, and clickand drag to change the column order. The list of columns is limited todata that can be recorded with time entries, such as employee andproject values, timesheet custom fields, etc. You must have at leastone but no more than 10 report columns.
Note that the report will automatically insert subtotal rows in thereport if you select more than one type of column. For instance, ifyou have 2 columns, Project.Name and Employee.Name, then thereport will insert a subtotal row after each group of projects. If youhave 3 columns, Customer.Name, Project.Name and Employee.Name,then the report will insert a subtotal row after each group of projectsand after each group of customers.
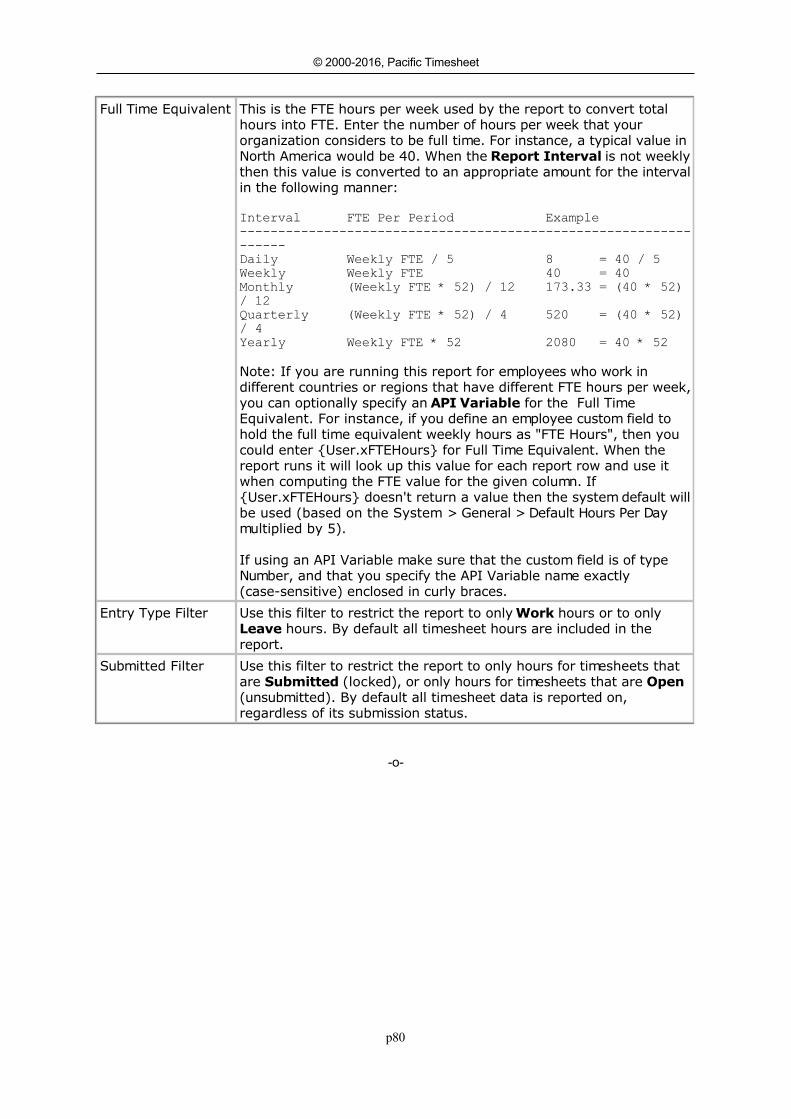
p80
© 2000-2016, Pacific Timesheet
Full Time Equivalent This is the FTE hours per week used by the report to convert totalhours into FTE. Enter the number of hours per week that yourorganization considers to be full time. For instance, a typical value inNorth America would be 40. When the Report Interval is not weeklythen this value is converted to an appropriate amount for the intervalin the following manner:
Interval FTE Per Period Example
-----------------------------------------------------------
------
Daily Weekly FTE / 5 8 = 40 / 5
Weekly Weekly FTE 40 = 40
Monthly (Weekly FTE * 52) / 12 173.33 = (40 * 52)
/ 12
Quarterly (Weekly FTE * 52) / 4 520 = (40 * 52)
/ 4
Yearly Weekly FTE * 52 2080 = 40 * 52
Note: If you are running this report for employees who work indifferent countries or regions that have different FTE hours per week,you can optionally specify an API Variable for the Full TimeEquivalent. For instance, if you define an employee custom field tohold the full time equivalent weekly hours as "FTE Hours", then youcould enter {User.xFTEHours} for Full Time Equivalent. When thereport runs it will look up this value for each report row and use itwhen computing the FTE value for the given column. If{User.xFTEHours} doesn't return a value then the system default willbe used (based on the System > General > Default Hours Per Daymultiplied by 5).
If using an API Variable make sure that the custom field is of typeNumber, and that you specify the API Variable name exactly(case-sensitive) enclosed in curly braces.
Entry Type Filter Use this filter to restrict the report to only Work hours or to onlyLeave hours. By default all timesheet hours are included in thereport.
Submitted Filter Use this filter to restrict the report to only hours for timesheets thatare Submitted (locked), or only hours for timesheets that are Open(unsubmitted). By default all timesheet data is reported on,regardless of its submission status.
-o-

p81
© 2000-2016, Pacific Timesheet
Profit ReportProfit Report
This report summarizes profit/loss data based on pay amounts and bill amounts. You cancustomize this report to break down the data by employee, project, group, etc.
Note that all employee data will be shown in the employee's time zone, regardless of thetime zone of the person running the report. For instance, if the report is run by a reporterin the Pacific Time for Jan 1-Jan 7, it will correctly summarize data for an employee inBrisbane using Jan 1 - Jan 7 Brisbane Time. This is different than other timesheet summaryreports that do not shift the data.
When creating or editing this report you can set the following properties:
Property Description
Name The report name or title, up to 80 characters (required).
Description A description for the report, up to 255 characters.
Template A read-only property that indicates which report was used as thetemplate for creating this report.
Published If checked then this report can be run by other employees. You canlimit which employees can access a published report by clicking thebutton to the right of the check box and selecting the appropriatepermission levels.
Publishing a report does not allow others to edit it - only theemployee who created the report can subsequently edit it.
Reporting Period The default time period for the report. The reporting period can beoverridden when running the report.
Grouping Columns The list of columns by which to group or summarize the report datainto rows (required). You can add or remove columns, and click anddrag to change the column order. The list of columns is limited todata that can be recorded with time entries, such as employee andproject values, timesheet custom fields, etc. You must have at leastone but no more than 10 grouping columns.
Note that the report will automatically insert subtotal rows in thereport if you select more than one type of column. For instance, ifyou have 2 columns, Project.Name and Employee.Name, then thereport will insert a subtotal row after each group of projects. If youhave 3 columns, Customer.Name, Project.Name and Employee.Name,then the report will insert a subtotal row after each group of projectsand after each group of customers.
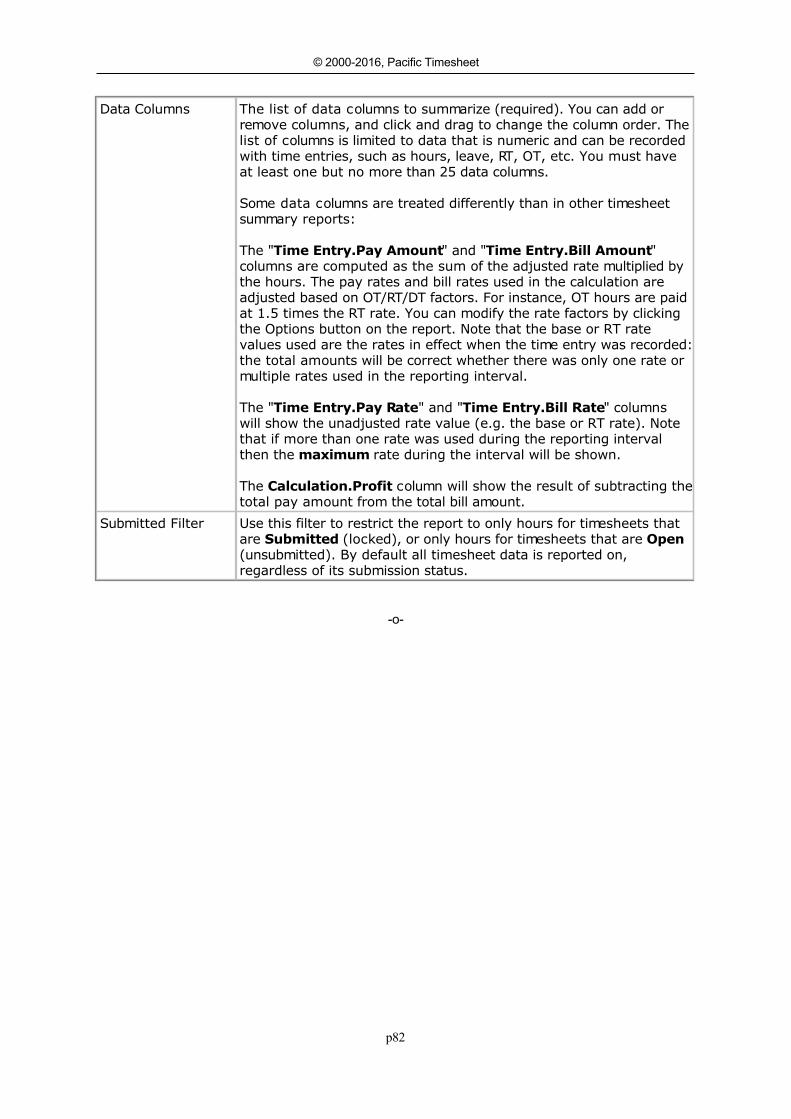
p82
© 2000-2016, Pacific Timesheet
Data Columns The list of data columns to summarize (required). You can add orremove columns, and click and drag to change the column order. Thelist of columns is limited to data that is numeric and can be recordedwith time entries, such as hours, leave, RT, OT, etc. You must haveat least one but no more than 25 data columns.
Some data columns are treated differently than in other timesheetsummary reports:
The "Time Entry.Pay Amount" and "Time Entry.Bill Amount"columns are computed as the sum of the adjusted rate multiplied bythe hours. The pay rates and bill rates used in the calculation areadjusted based on OT/RT/DT factors. For instance, OT hours are paidat 1.5 times the RT rate. You can modify the rate factors by clickingthe Options button on the report. Note that the base or RT ratevalues used are the rates in effect when the time entry was recorded:the total amounts will be correct whether there was only one rate ormultiple rates used in the reporting interval.
The "Time Entry.Pay Rate" and "Time Entry.Bill Rate" columnswill show the unadjusted rate value (e.g. the base or RT rate). Notethat if more than one rate was used during the reporting intervalthen the maximum rate during the interval will be shown.
The Calculation.Profit column will show the result of subtracting thetotal pay amount from the total bill amount.
Submitted Filter Use this filter to restrict the report to only hours for timesheets thatare Submitted (locked), or only hours for timesheets that are Open(unsubmitted). By default all timesheet data is reported on,regardless of its submission status.
-o-
p83
© 2000-2016, Pacific Timesheet
Advanced TopicsAdvanced Topics
Administration covers more advanced configuration settings, such as security settings andcustomization.
Related Topics
System Settings Pay Codes Templates Policies Security Notices Devices Schema Custom Fields Importing/Exporting Data Archival
-o-
p84
© 2000-2016, Pacific Timesheet
Administrative OverviewAdministrative Overview
If you are setting up your timesheet system for the first time, the following settings shouldbe configured first:
Week Start Default Time Zone Email Reply Address
These can be set on the System Settings page. These can be changed at any time, but it isa best-practice to define these before you start creating new employees.
-o-
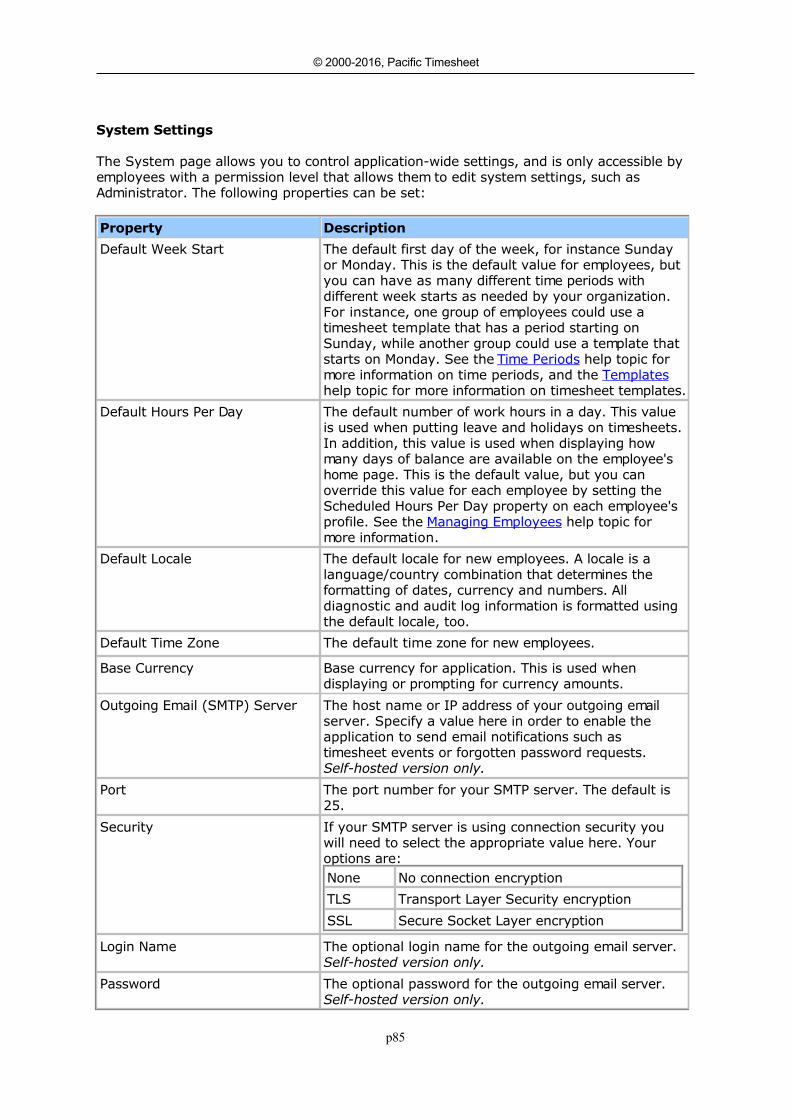
p85
© 2000-2016, Pacific Timesheet
System SettingsSystem Settings
The System page allows you to control application-wide settings, and is only accessible byemployees with a permission level that allows them to edit system settings, such asAdministrator. The following properties can be set:
Property Description
Default Week Start The default first day of the week, for instance Sundayor Monday. This is the default value for employees, butyou can have as many different time periods withdifferent week starts as needed by your organization.For instance, one group of employees could use atimesheet template that has a period starting onSunday, while another group could use a template thatstarts on Monday. See the Time Periods help topic formore information on time periods, and the Templateshelp topic for more information on timesheet templates.
Default Hours Per Day The default number of work hours in a day. This valueis used when putting leave and holidays on timesheets.In addition, this value is used when displaying howmany days of balance are available on the employee'shome page. This is the default value, but you canoverride this value for each employee by setting theScheduled Hours Per Day property on each employee'sprofile. See the Managing Employees help topic formore information.
Default Locale The default locale for new employees. A locale is alanguage/country combination that determines theformatting of dates, currency and numbers. Alldiagnostic and audit log information is formatted usingthe default locale, too.
Default Time Zone The default time zone for new employees.
Base Currency Base currency for application. This is used whendisplaying or prompting for currency amounts.
Outgoing Email (SMTP) Server The host name or IP address of your outgoing emailserver. Specify a value here in order to enable theapplication to send email notifications such astimesheet events or forgotten password requests. Self-hosted version only.
Port The port number for your SMTP server. The default is25.
Security If your SMTP server is using connection security youwill need to select the appropriate value here. Youroptions are:None No connection encryption
TLS Transport Layer Security encryption
SSL Secure Socket Layer encryption
Login Name The optional login name for the outgoing email server. Self-hosted version only.
Password The optional password for the outgoing email server. Self-hosted version only.
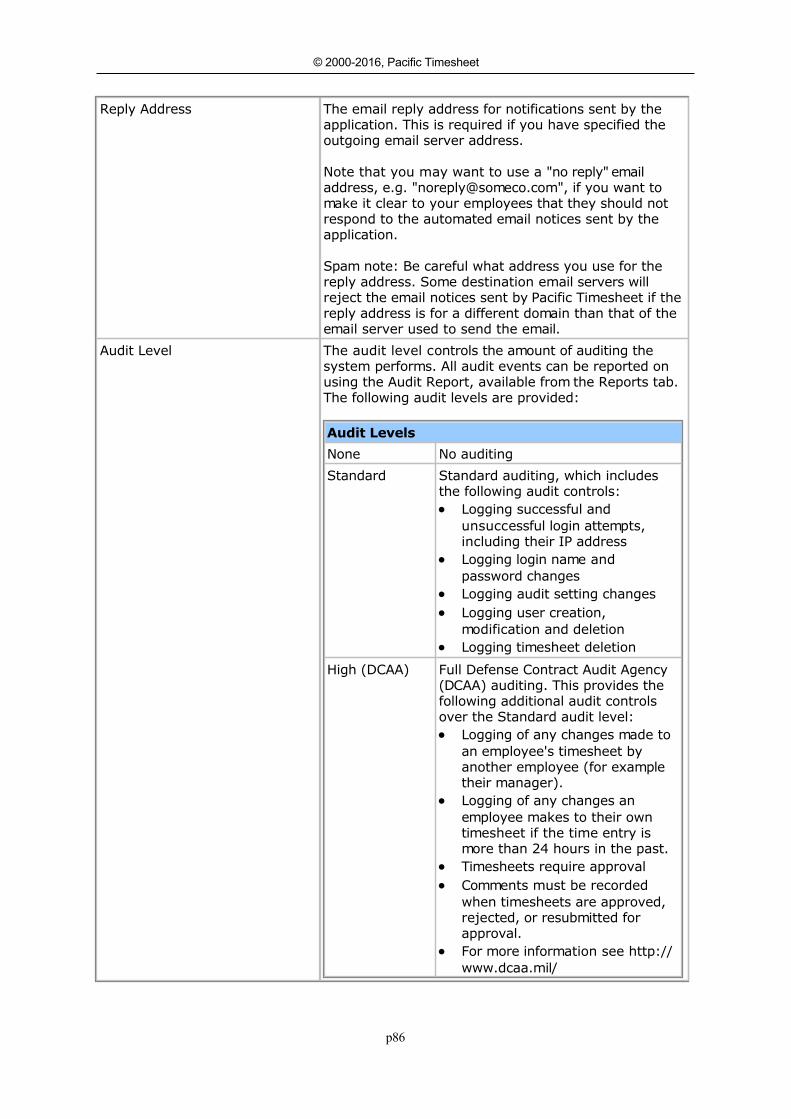
p86
© 2000-2016, Pacific Timesheet
Reply Address The email reply address for notifications sent by theapplication. This is required if you have specified theoutgoing email server address.
Note that you may want to use a "no reply" emailaddress, e.g. "[email protected]", if you want tomake it clear to your employees that they should notrespond to the automated email notices sent by theapplication.
Spam note: Be careful what address you use for thereply address. Some destination email servers willreject the email notices sent by Pacific Timesheet if thereply address is for a different domain than that of theemail server used to send the email.
Audit Level The audit level controls the amount of auditing thesystem performs. All audit events can be reported onusing the Audit Report, available from the Reports tab.The following audit levels are provided:
Audit Levels
None No auditing
Standard Standard auditing, which includesthe following audit controls: Logging successful and
unsuccessful login attempts,including their IP address
Logging login name andpassword changes
Logging audit setting changes Logging user creation,
modification and deletion Logging timesheet deletion
High (DCAA) Full Defense Contract Audit Agency(DCAA) auditing. This provides thefollowing additional audit controlsover the Standard audit level: Logging of any changes made to
an employee's timesheet byanother employee (for exampletheir manager).
Logging of any changes anemployee makes to their owntimesheet if the time entry ismore than 24 hours in the past.
Timesheets require approval Comments must be recorded
when timesheets are approved,rejected, or resubmitted forapproval.
For more information see http://www.dcaa.mil/
p87
© 2000-2016, Pacific Timesheet
Audit Days The number of days to keep audit data (maximum365). Note that audit data, especially if using the high(DCAA) level, can consume a considerable amount ofstorage.
Application URL The base address for this application, for examplehttp://hostname/timesheet. This is used whenformatting links in email notices and other messages.For instance, the notice variable ${System.url} will bereplaced with this value (see the Notices topic for moredetails). Self-hosted version only.
Send Test Email
After configuring your email server settings it is a good idea to send a test email. The emailwill be sent to the same address as the reply address.
Related Topics
Work Breakdown Structure Time Periods Holidays Work Shifts Approval Levels Rate Options Terminology Branding Data Integration System Options License System Lists
-o-
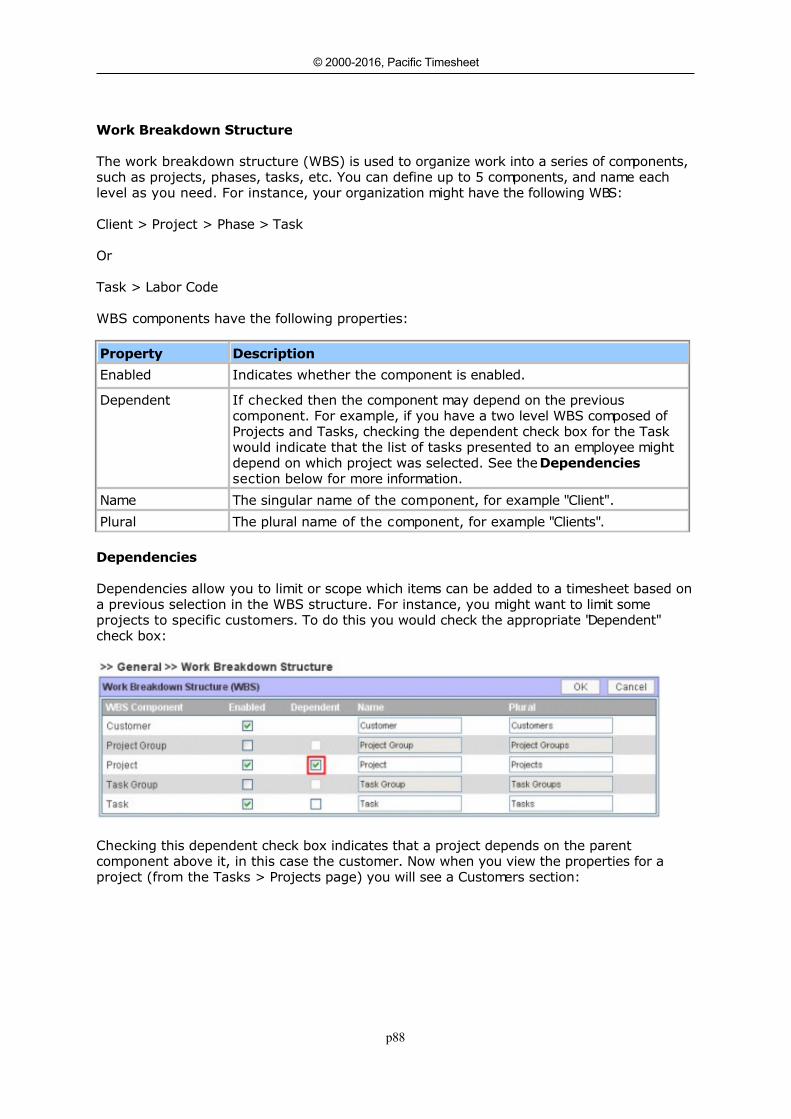
p88
© 2000-2016, Pacific Timesheet
Work Breakdown StructureWork Breakdown Structure
The work breakdown structure (WBS) is used to organize work into a series of components,such as projects, phases, tasks, etc. You can define up to 5 components, and name eachlevel as you need. For instance, your organization might have the following WBS:
Client > Project > Phase > Task
Or
Task > Labor Code
WBS components have the following properties:
Property Description
Enabled Indicates whether the component is enabled.
Dependent If checked then the component may depend on the previouscomponent. For example, if you have a two level WBS composed ofProjects and Tasks, checking the dependent check box for the Taskwould indicate that the list of tasks presented to an employee mightdepend on which project was selected. See the Dependenciessection below for more information.
Name The singular name of the component, for example "Client".
Plural The plural name of the component, for example "Clients".
Dependencies
Dependencies allow you to limit or scope which items can be added to a timesheet based ona previous selection in the WBS structure. For instance, you might want to limit someprojects to specific customers. To do this you would check the appropriate "Dependent"check box:
Checking this dependent check box indicates that a project depends on the parentcomponent above it, in this case the customer. Now when you view the properties for aproject (from the Tasks > Projects page) you will see a Customers section:
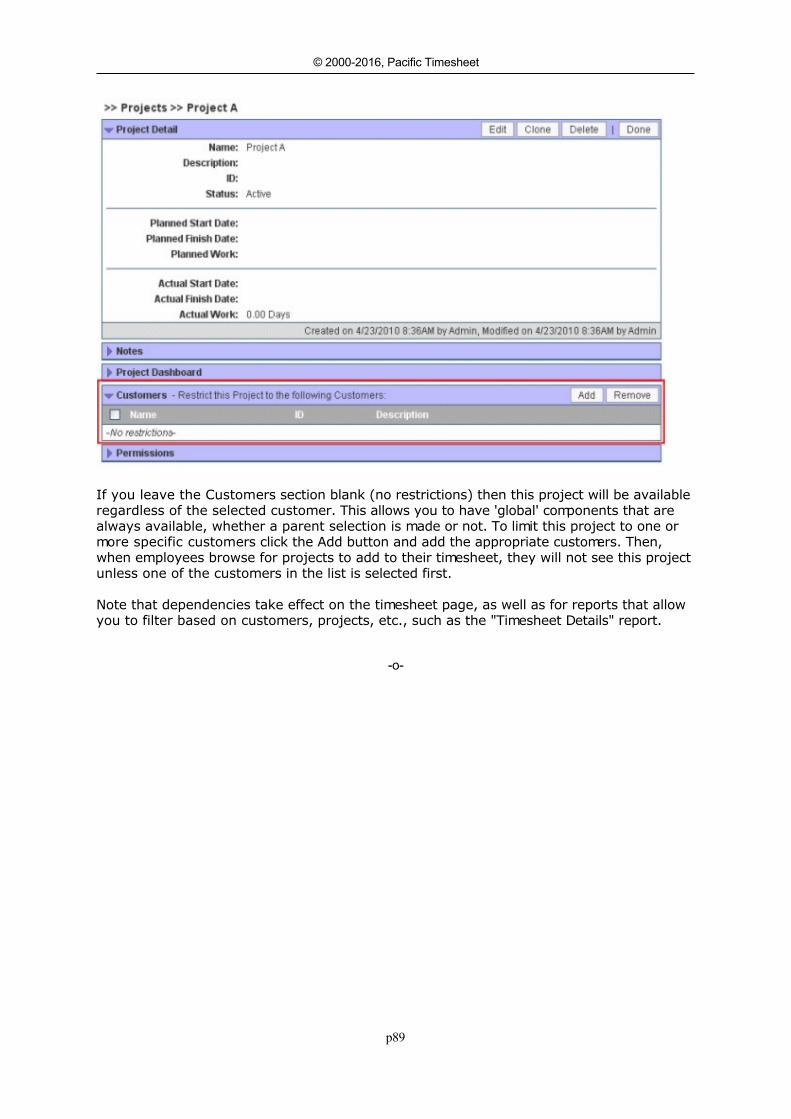
p89
© 2000-2016, Pacific Timesheet
If you leave the Customers section blank (no restrictions) then this project will be availableregardless of the selected customer. This allows you to have 'global' components that arealways available, whether a parent selection is made or not. To limit this project to one ormore specific customers click the Add button and add the appropriate customers. Then,when employees browse for projects to add to their timesheet, they will not see this projectunless one of the customers in the list is selected first.
Note that dependencies take effect on the timesheet page, as well as for reports that allowyou to filter based on customers, projects, etc., such as the "Timesheet Details" report.
-o-
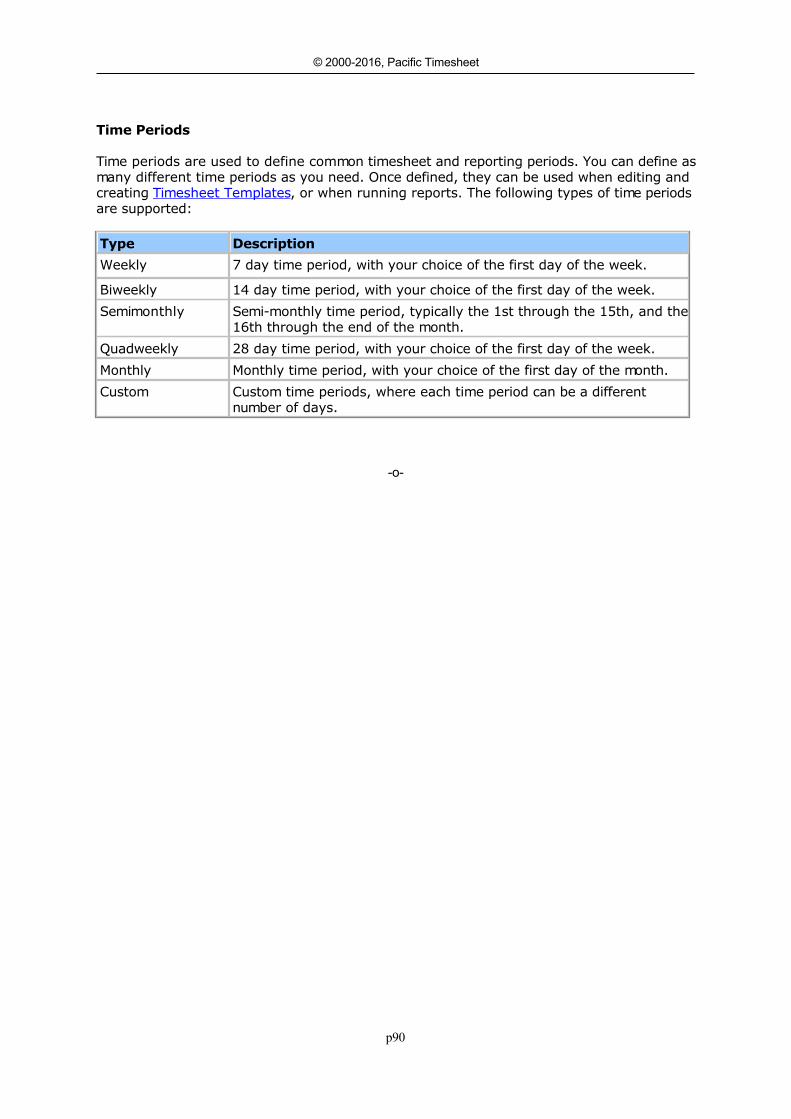
p90
© 2000-2016, Pacific Timesheet
Time PeriodsTime Periods
Time periods are used to define common timesheet and reporting periods. You can define asmany different time periods as you need. Once defined, they can be used when editing andcreating Timesheet Templates, or when running reports. The following types of time periodsare supported:
Type Description
Weekly 7 day time period, with your choice of the first day of the week.
Biweekly 14 day time period, with your choice of the first day of the week.
Semimonthly Semi-monthly time period, typically the 1st through the 15th, and the16th through the end of the month.
Quadweekly 28 day time period, with your choice of the first day of the week.
Monthly Monthly time period, with your choice of the first day of the month.
Custom Custom time periods, where each time period can be a differentnumber of days.
-o-
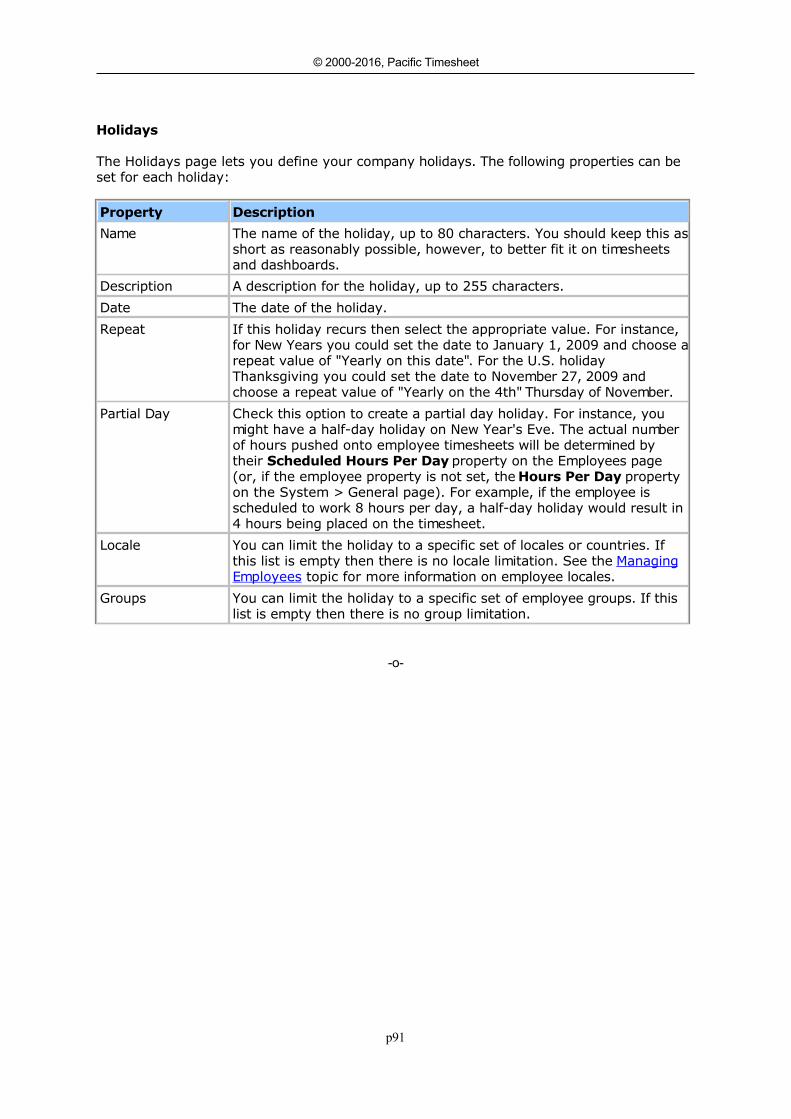
p91
© 2000-2016, Pacific Timesheet
HolidaysHolidays
The Holidays page lets you define your company holidays. The following properties can beset for each holiday:
Property Description
Name The name of the holiday, up to 80 characters. You should keep this asshort as reasonably possible, however, to better fit it on timesheetsand dashboards.
Description A description for the holiday, up to 255 characters.
Date The date of the holiday.
Repeat If this holiday recurs then select the appropriate value. For instance,for New Years you could set the date to January 1, 2009 and choose arepeat value of "Yearly on this date". For the U.S. holidayThanksgiving you could set the date to November 27, 2009 andchoose a repeat value of "Yearly on the 4th" Thursday of November.
Partial Day Check this option to create a partial day holiday. For instance, youmight have a half-day holiday on New Year's Eve. The actual numberof hours pushed onto employee timesheets will be determined bytheir Scheduled Hours Per Day property on the Employees page(or, if the employee property is not set, the Hours Per Day propertyon the System > General page). For example, if the employee isscheduled to work 8 hours per day, a half-day holiday would result in4 hours being placed on the timesheet.
Locale You can limit the holiday to a specific set of locales or countries. Ifthis list is empty then there is no locale limitation. See the ManagingEmployees topic for more information on employee locales.
Groups You can limit the holiday to a specific set of employee groups. If thislist is empty then there is no group limitation.
-o-
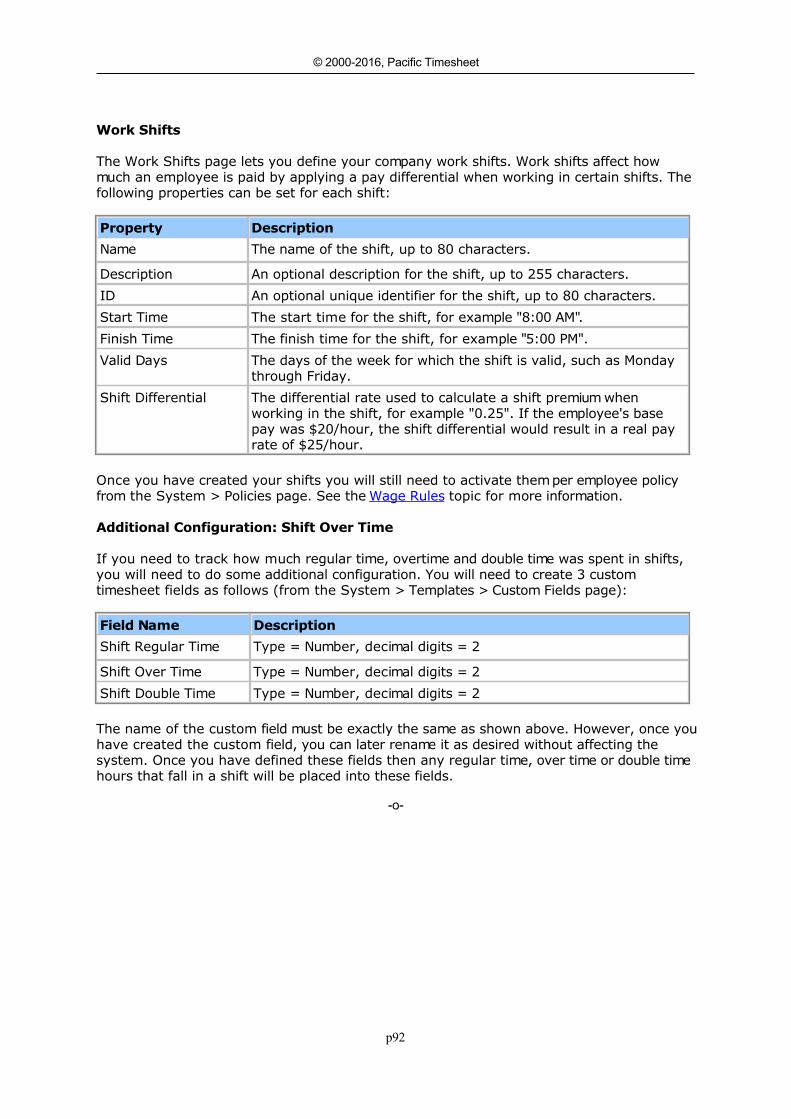
p92
© 2000-2016, Pacific Timesheet
Work ShiftsWork Shifts
The Work Shifts page lets you define your company work shifts. Work shifts affect howmuch an employee is paid by applying a pay differential when working in certain shifts. Thefollowing properties can be set for each shift:
Property Description
Name The name of the shift, up to 80 characters.
Description An optional description for the shift, up to 255 characters.
ID An optional unique identifier for the shift, up to 80 characters.
Start Time The start time for the shift, for example "8:00 AM".
Finish Time The finish time for the shift, for example "5:00 PM".
Valid Days The days of the week for which the shift is valid, such as Mondaythrough Friday.
Shift Differential The differential rate used to calculate a shift premium whenworking in the shift, for example "0.25". If the employee's basepay was $20/hour, the shift differential would result in a real payrate of $25/hour.
Once you have created your shifts you will still need to activate them per employee policyfrom the System > Policies page. See the Wage Rules topic for more information.
Additional Configuration: Shift Over Time
If you need to track how much regular time, overtime and double time was spent in shifts,you will need to do some additional configuration. You will need to create 3 customtimesheet fields as follows (from the System > Templates > Custom Fields page):
Field Name Description
Shift Regular Time Type = Number, decimal digits = 2
Shift Over Time Type = Number, decimal digits = 2
Shift Double Time Type = Number, decimal digits = 2
The name of the custom field must be exactly the same as shown above. However, once youhave created the custom field, you can later rename it as desired without affecting thesystem. Once you have defined these fields then any regular time, over time or double timehours that fall in a shift will be placed into these fields.
-o-
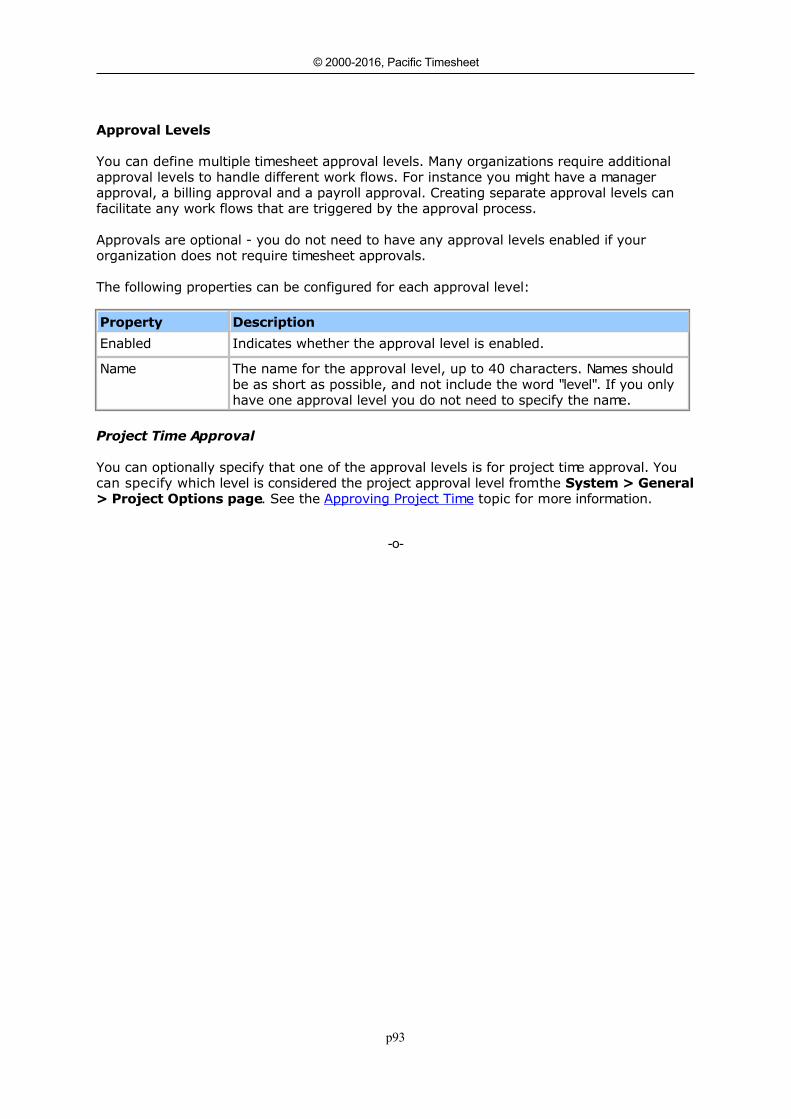
p93
© 2000-2016, Pacific Timesheet
Approval LevelsApproval Levels
You can define multiple timesheet approval levels. Many organizations require additionalapproval levels to handle different work flows. For instance you might have a managerapproval, a billing approval and a payroll approval. Creating separate approval levels canfacilitate any work flows that are triggered by the approval process.
Approvals are optional - you do not need to have any approval levels enabled if yourorganization does not require timesheet approvals.
The following properties can be configured for each approval level:
Property Description
Enabled Indicates whether the approval level is enabled.
Name The name for the approval level, up to 40 characters. Names shouldbe as short as possible, and not include the word "level". If you onlyhave one approval level you do not need to specify the name.
Project Time Approval
You can optionally specify that one of the approval levels is for project time approval. Youcan specify which level is considered the project approval level from the System > General> Project Options page. See the Approving Project Time topic for more information.
-o-
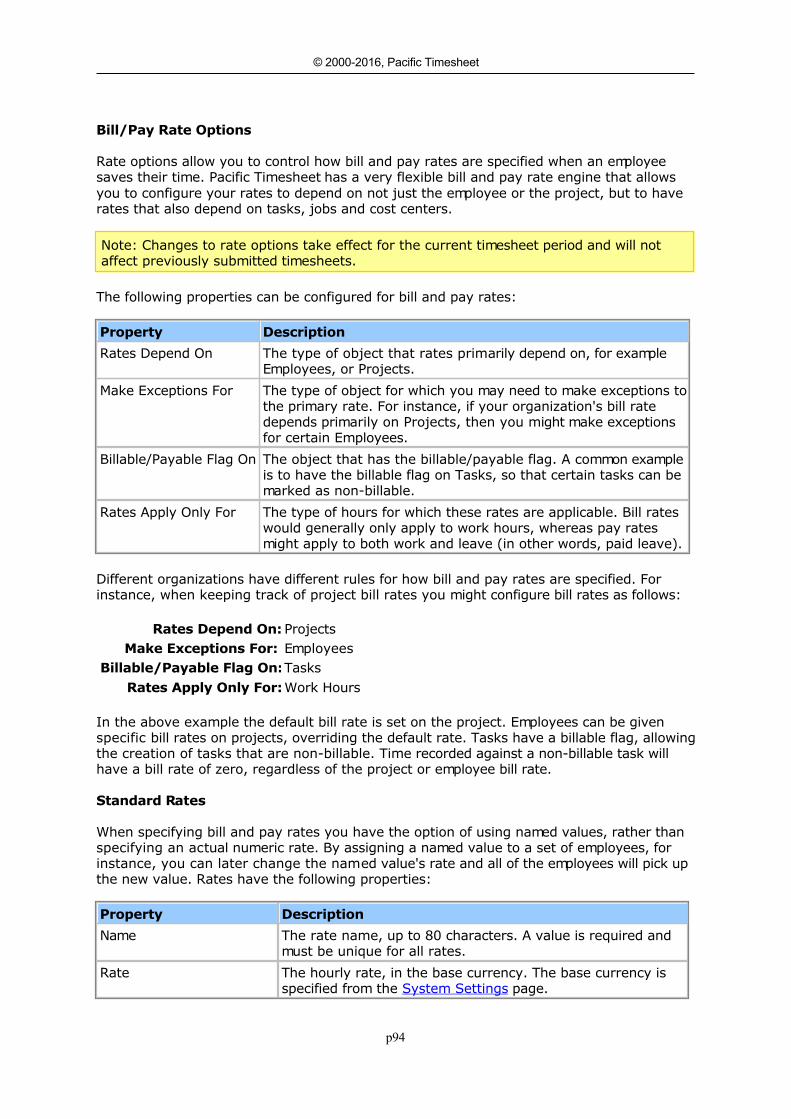
p94
© 2000-2016, Pacific Timesheet
Rate OptionsBill/Pay Rate Options
Rate options allow you to control how bill and pay rates are specified when an employeesaves their time. Pacific Timesheet has a very flexible bill and pay rate engine that allowsyou to configure your rates to depend on not just the employee or the project, but to haverates that also depend on tasks, jobs and cost centers.
Note: Changes to rate options take effect for the current timesheet period and will notaffect previously submitted timesheets.
The following properties can be configured for bill and pay rates:
Property Description
Rates Depend On The type of object that rates primarily depend on, for exampleEmployees, or Projects.
Make Exceptions For The type of object for which you may need to make exceptions tothe primary rate. For instance, if your organization's bill ratedepends primarily on Projects, then you might make exceptionsfor certain Employees.
Billable/Payable Flag On The object that has the billable/payable flag. A common exampleis to have the billable flag on Tasks, so that certain tasks can bemarked as non-billable.
Rates Apply Only For The type of hours for which these rates are applicable. Bill rateswould generally only apply to work hours, whereas pay ratesmight apply to both work and leave (in other words, paid leave).
Different organizations have different rules for how bill and pay rates are specified. Forinstance, when keeping track of project bill rates you might configure bill rates as follows:
Rates Depend On: ProjectsMake Exceptions For: Employees
Billable/Payable Flag On:TasksRates Apply Only For:Work Hours
In the above example the default bill rate is set on the project. Employees can be givenspecific bill rates on projects, overriding the default rate. Tasks have a billable flag, allowingthe creation of tasks that are non-billable. Time recorded against a non-billable task willhave a bill rate of zero, regardless of the project or employee bill rate.
Standard Rates
When specifying bill and pay rates you have the option of using named values, rather thanspecifying an actual numeric rate. By assigning a named value to a set of employees, forinstance, you can later change the named value's rate and all of the employees will pick upthe new value. Rates have the following properties:
Property Description
Name The rate name, up to 80 characters. A value is required andmust be unique for all rates.
Rate The hourly rate, in the base currency. The base currency isspecified from the System Settings page.
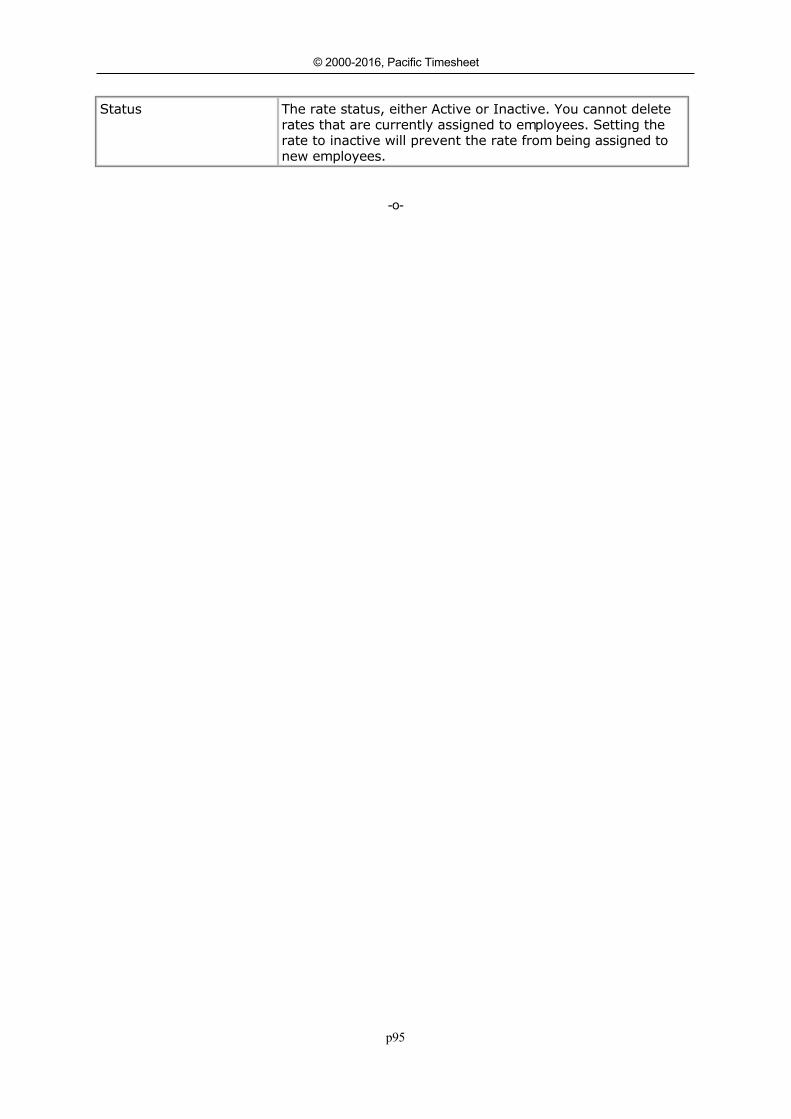
p95
© 2000-2016, Pacific Timesheet
Status The rate status, either Active or Inactive. You cannot deleterates that are currently assigned to employees. Setting therate to inactive will prevent the rate from being assigned tonew employees.
-o-

p96
© 2000-2016, Pacific Timesheet
TerminologyTerminology
You can override the default terminology for a number objects and phrases in theapplication. Make sure when changing the terminology that you specify both singular andplural versions to avoid confusion.
-o-
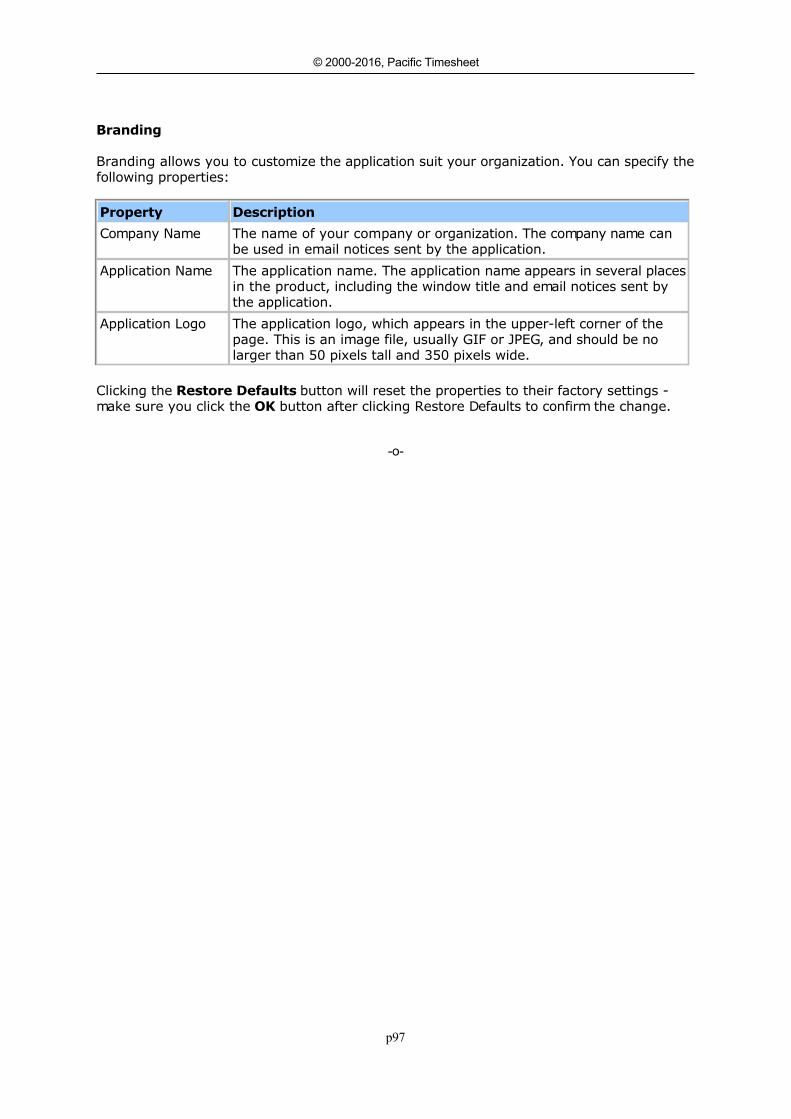
p97
© 2000-2016, Pacific Timesheet
BrandingBranding
Branding allows you to customize the application suit your organization. You can specify thefollowing properties:
Property Description
Company Name The name of your company or organization. The company name canbe used in email notices sent by the application.
Application Name The application name. The application name appears in several placesin the product, including the window title and email notices sent bythe application.
Application Logo The application logo, which appears in the upper-left corner of thepage. This is an image file, usually GIF or JPEG, and should be nolarger than 50 pixels tall and 350 pixels wide.
Clicking the Restore Defaults button will reset the properties to their factory settings -make sure you click the OK button after clicking Restore Defaults to confirm the change.
-o-
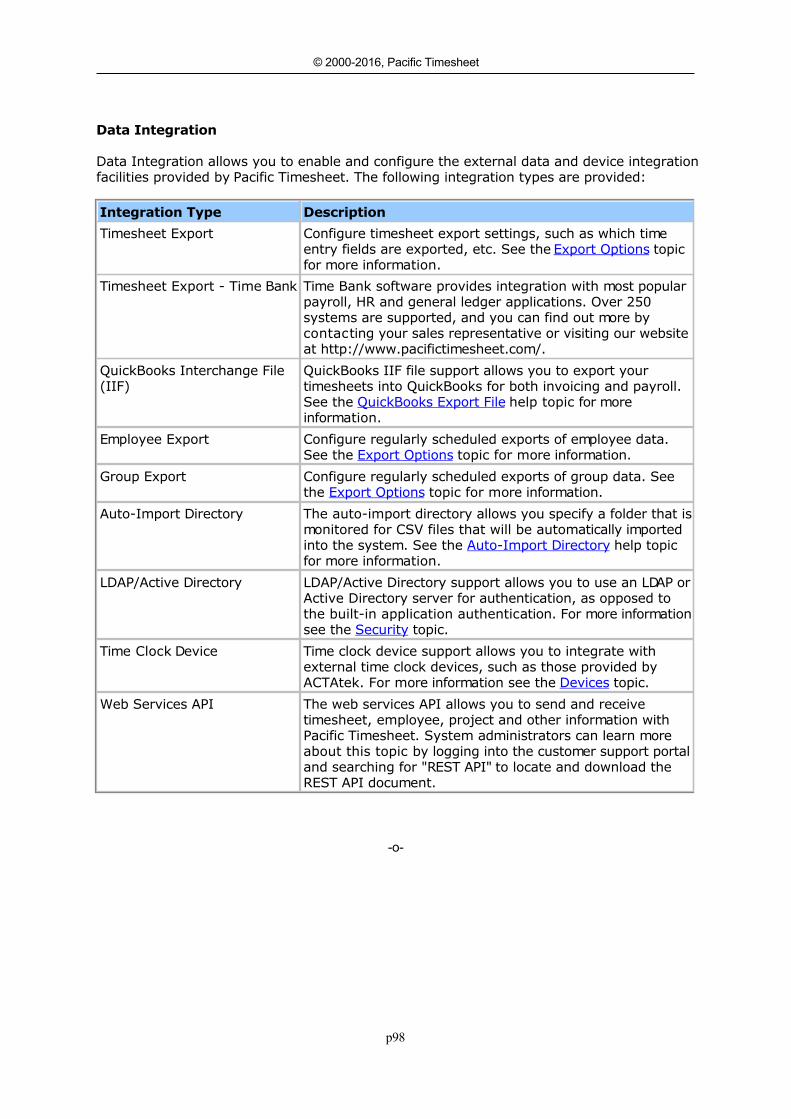
p98
© 2000-2016, Pacific Timesheet
Data IntegrationData Integration
Data Integration allows you to enable and configure the external data and device integrationfacilities provided by Pacific Timesheet. The following integration types are provided:
Integration Type Description
Timesheet Export Configure timesheet export settings, such as which timeentry fields are exported, etc. See the Export Options topicfor more information.
Timesheet Export - Time Bank Time Bank software provides integration with most popularpayroll, HR and general ledger applications. Over 250systems are supported, and you can find out more bycontacting your sales representative or visiting our websiteat http://www.pacifictimesheet.com/.
QuickBooks Interchange File(IIF)
QuickBooks IIF file support allows you to export yourtimesheets into QuickBooks for both invoicing and payroll.See the QuickBooks Export File help topic for moreinformation.
Employee Export Configure regularly scheduled exports of employee data.See the Export Options topic for more information.
Group Export Configure regularly scheduled exports of group data. Seethe Export Options topic for more information.
Auto-Import Directory The auto-import directory allows you specify a folder that ismonitored for CSV files that will be automatically importedinto the system. See the Auto-Import Directory help topicfor more information.
LDAP/Active Directory LDAP/Active Directory support allows you to use an LDAP orActive Directory server for authentication, as opposed tothe built-in application authentication. For more informationsee the Security topic.
Time Clock Device Time clock device support allows you to integrate withexternal time clock devices, such as those provided byACTAtek. For more information see the Devices topic.
Web Services API The web services API allows you to send and receivetimesheet, employee, project and other information with Pacific Timesheet. System administrators can learn moreabout this topic by logging into the customer support portaland searching for "REST API" to locate and download theREST API document.
-o-
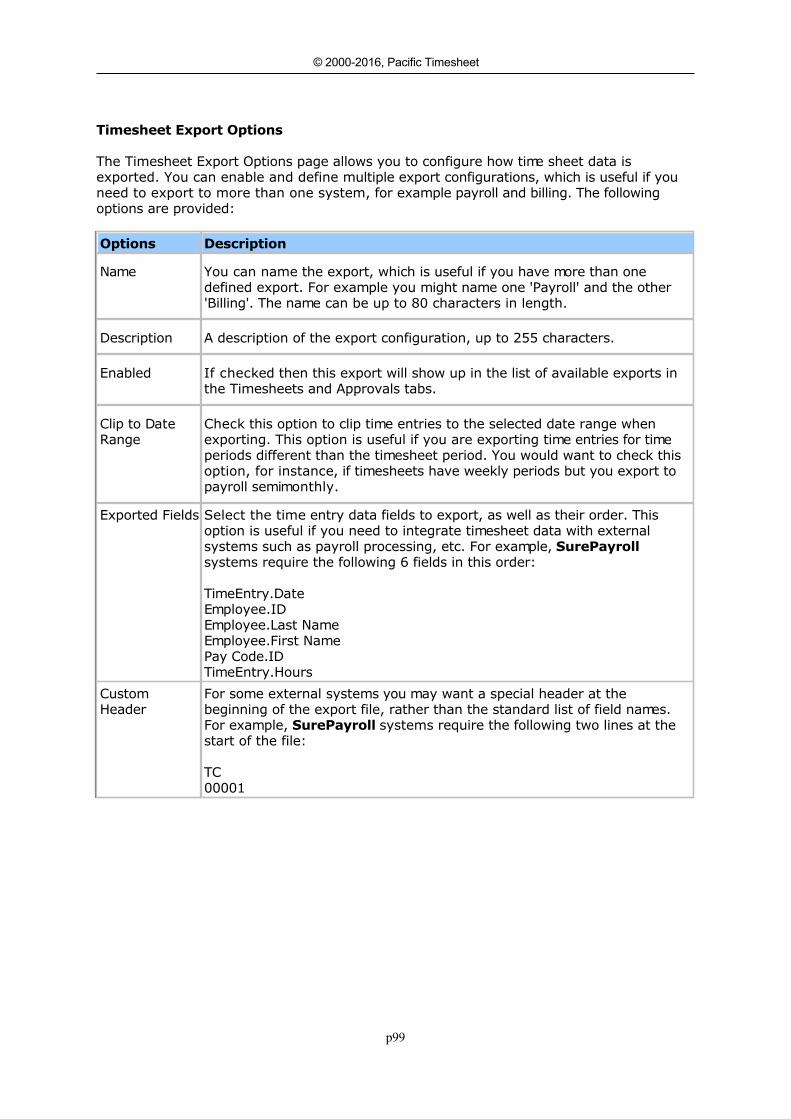
p99
© 2000-2016, Pacific Timesheet
Timesheet Export OptionsTimesheet Export Options
The Timesheet Export Options page allows you to configure how time sheet data isexported. You can enable and define multiple export configurations, which is useful if youneed to export to more than one system, for example payroll and billing. The followingoptions are provided:
Options Description
Name You can name the export, which is useful if you have more than onedefined export. For example you might name one 'Payroll' and the other'Billing'. The name can be up to 80 characters in length.
Description A description of the export configuration, up to 255 characters.
Enabled If checked then this export will show up in the list of available exports inthe Timesheets and Approvals tabs.
Clip to DateRange
Check this option to clip time entries to the selected date range whenexporting. This option is useful if you are exporting time entries for timeperiods different than the timesheet period. You would want to check thisoption, for instance, if timesheets have weekly periods but you export topayroll semimonthly.
Exported Fields Select the time entry data fields to export, as well as their order. Thisoption is useful if you need to integrate timesheet data with externalsystems such as payroll processing, etc. For example, SurePayrollsystems require the following 6 fields in this order:
TimeEntry.DateEmployee.IDEmployee.Last NameEmployee.First NamePay Code.IDTimeEntry.Hours
CustomHeader
For some external systems you may want a special header at thebeginning of the export file, rather than the standard list of field names.For example, SurePayroll systems require the following two lines at thestart of the file:
TC00001
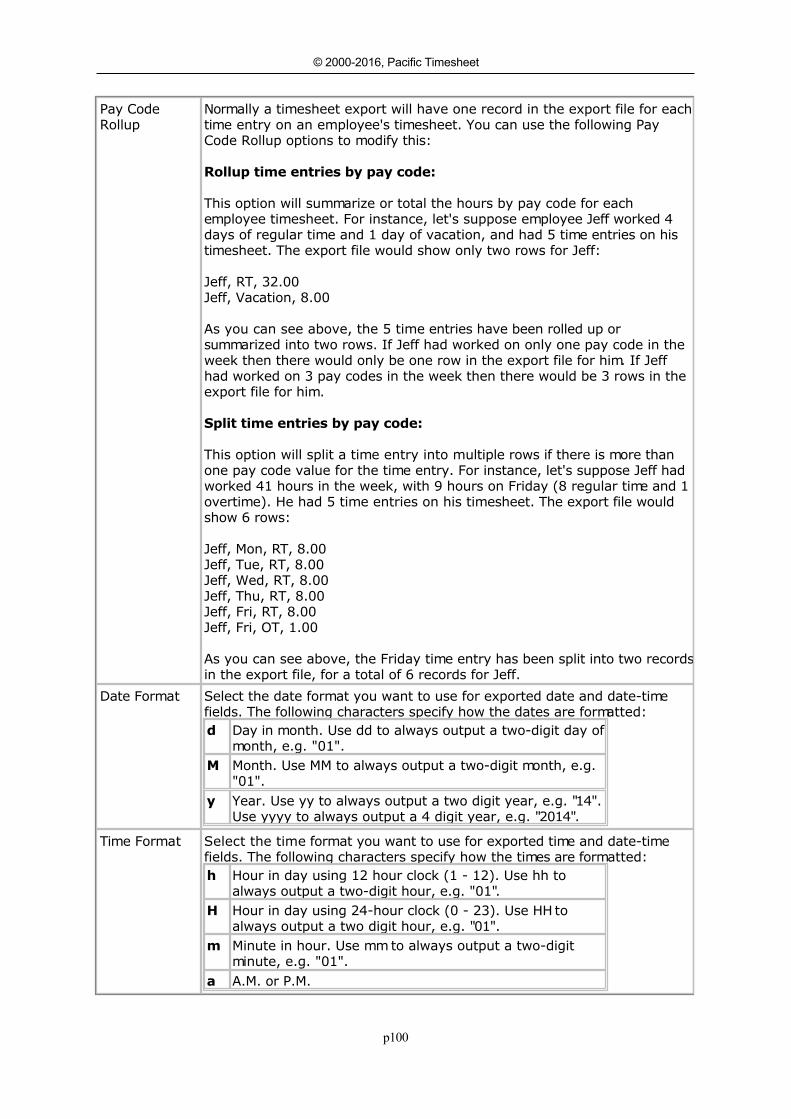
p100
© 2000-2016, Pacific Timesheet
Pay CodeRollup
Normally a timesheet export will have one record in the export file for eachtime entry on an employee's timesheet. You can use the following PayCode Rollup options to modify this:
Rollup time entries by pay code:
This option will summarize or total the hours by pay code for eachemployee timesheet. For instance, let's suppose employee Jeff worked 4days of regular time and 1 day of vacation, and had 5 time entries on histimesheet. The export file would show only two rows for Jeff:
Jeff, RT, 32.00Jeff, Vacation, 8.00
As you can see above, the 5 time entries have been rolled up orsummarized into two rows. If Jeff had worked on only one pay code in theweek then there would only be one row in the export file for him. If Jeffhad worked on 3 pay codes in the week then there would be 3 rows in theexport file for him.
Split time entries by pay code:
This option will split a time entry into multiple rows if there is more thanone pay code value for the time entry. For instance, let's suppose Jeff hadworked 41 hours in the week, with 9 hours on Friday (8 regular time and 1overtime). He had 5 time entries on his timesheet. The export file wouldshow 6 rows:
Jeff, Mon, RT, 8.00Jeff, Tue, RT, 8.00Jeff, Wed, RT, 8.00Jeff, Thu, RT, 8.00Jeff, Fri, RT, 8.00Jeff, Fri, OT, 1.00
As you can see above, the Friday time entry has been split into two recordsin the export file, for a total of 6 records for Jeff.
Date Format Select the date format you want to use for exported date and date-timefields. The following characters specify how the dates are formatted:d Day in month. Use dd to always output a two-digit day of
month, e.g. "01".M Month. Use MM to always output a two-digit month, e.g.
"01".y Year. Use yy to always output a two digit year, e.g. "14".
Use yyyy to always output a 4 digit year, e.g. "2014".
Time Format Select the time format you want to use for exported time and date-timefields. The following characters specify how the times are formatted:h Hour in day using 12 hour clock (1 - 12). Use hh to
always output a two-digit hour, e.g. "01".H Hour in day using 24-hour clock (0 - 23). Use HH to
always output a two digit hour, e.g. "01".m Minute in hour. Use mm to always output a two-digit
minute, e.g. "01".a A.M. or P.M.
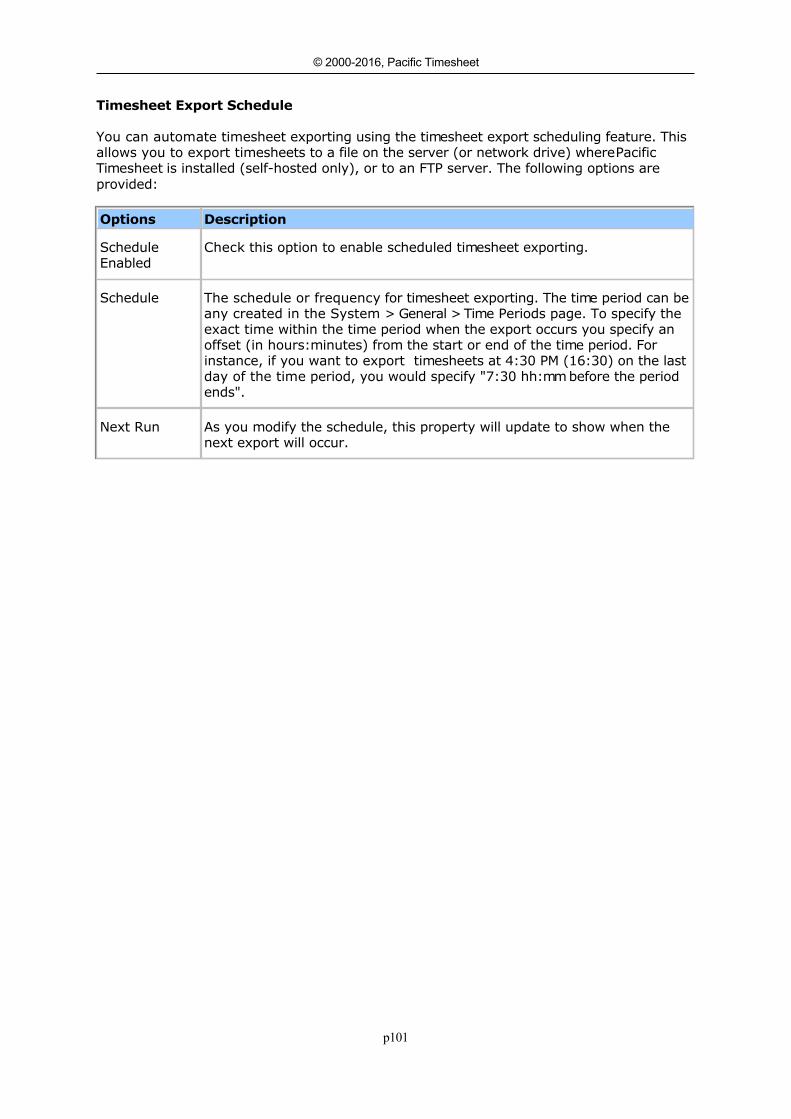
p101
© 2000-2016, Pacific Timesheet
Timesheet Export Schedule
You can automate timesheet exporting using the timesheet export scheduling feature. Thisallows you to export timesheets to a file on the server (or network drive) where PacificTimesheet is installed (self-hosted only), or to an FTP server. The following options areprovided:
Options Description
ScheduleEnabled
Check this option to enable scheduled timesheet exporting.
Schedule The schedule or frequency for timesheet exporting. The time period can beany created in the System > General > Time Periods page. To specify theexact time within the time period when the export occurs you specify anoffset (in hours:minutes) from the start or end of the time period. Forinstance, if you want to export timesheets at 4:30 PM (16:30) on the lastday of the time period, you would specify "7:30 hh:mm before the periodends".
Next Run As you modify the schedule, this property will update to show when thenext export will occur.
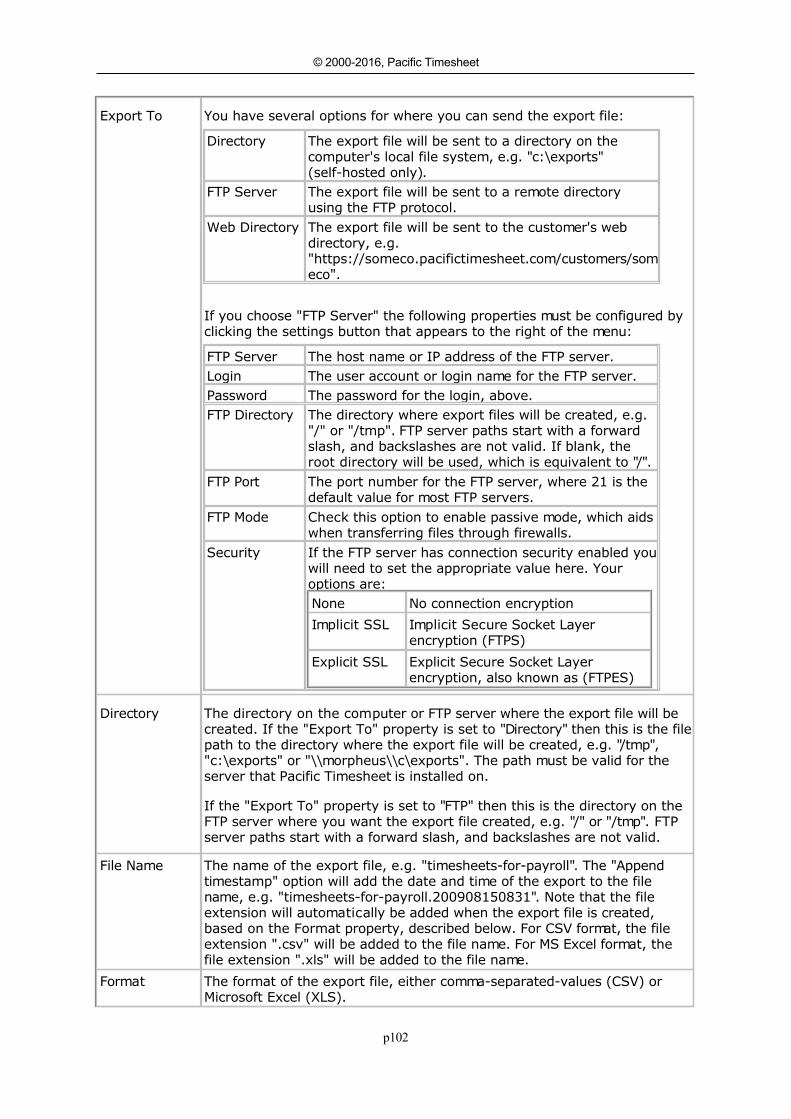
p102
© 2000-2016, Pacific Timesheet
Export To You have several options for where you can send the export file:
Directory The export file will be sent to a directory on thecomputer's local file system, e.g. "c:\exports"(self-hosted only).
FTP Server The export file will be sent to a remote directoryusing the FTP protocol.
Web Directory The export file will be sent to the customer's webdirectory, e.g."https://someco.pacifictimesheet.com/customers/someco".
If you choose "FTP Server" the following properties must be configured byclicking the settings button that appears to the right of the menu:
FTP Server The host name or IP address of the FTP server.Login The user account or login name for the FTP server.Password The password for the login, above.FTP Directory The directory where export files will be created, e.g.
"/" or "/tmp". FTP server paths start with a forwardslash, and backslashes are not valid. If blank, theroot directory will be used, which is equivalent to "/".
FTP Port The port number for the FTP server, where 21 is thedefault value for most FTP servers.
FTP Mode Check this option to enable passive mode, which aidswhen transferring files through firewalls.
Security If the FTP server has connection security enabled youwill need to set the appropriate value here. Youroptions are:None No connection encryption
Implicit SSL Implicit Secure Socket Layerencryption (FTPS)
Explicit SSL Explicit Secure Socket Layerencryption, also known as (FTPES)
Directory The directory on the computer or FTP server where the export file will becreated. If the "Export To" property is set to "Directory" then this is the filepath to the directory where the export file will be created, e.g. "/tmp","c:\exports" or "\\morpheus\\c\exports". The path must be valid for theserver that Pacific Timesheet is installed on.
If the "Export To" property is set to "FTP" then this is the directory on theFTP server where you want the export file created, e.g. "/" or "/tmp". FTPserver paths start with a forward slash, and backslashes are not valid.
File Name The name of the export file, e.g. "timesheets-for-payroll". The "Appendtimestamp" option will add the date and time of the export to the filename, e.g. "timesheets-for-payroll.200908150831". Note that the fileextension will automatically be added when the export file is created,based on the Format property, described below. For CSV format, the fileextension ".csv" will be added to the file name. For MS Excel format, thefile extension ".xls" will be added to the file name.
Format The format of the export file, either comma-separated-values (CSV) orMicrosoft Excel (XLS).
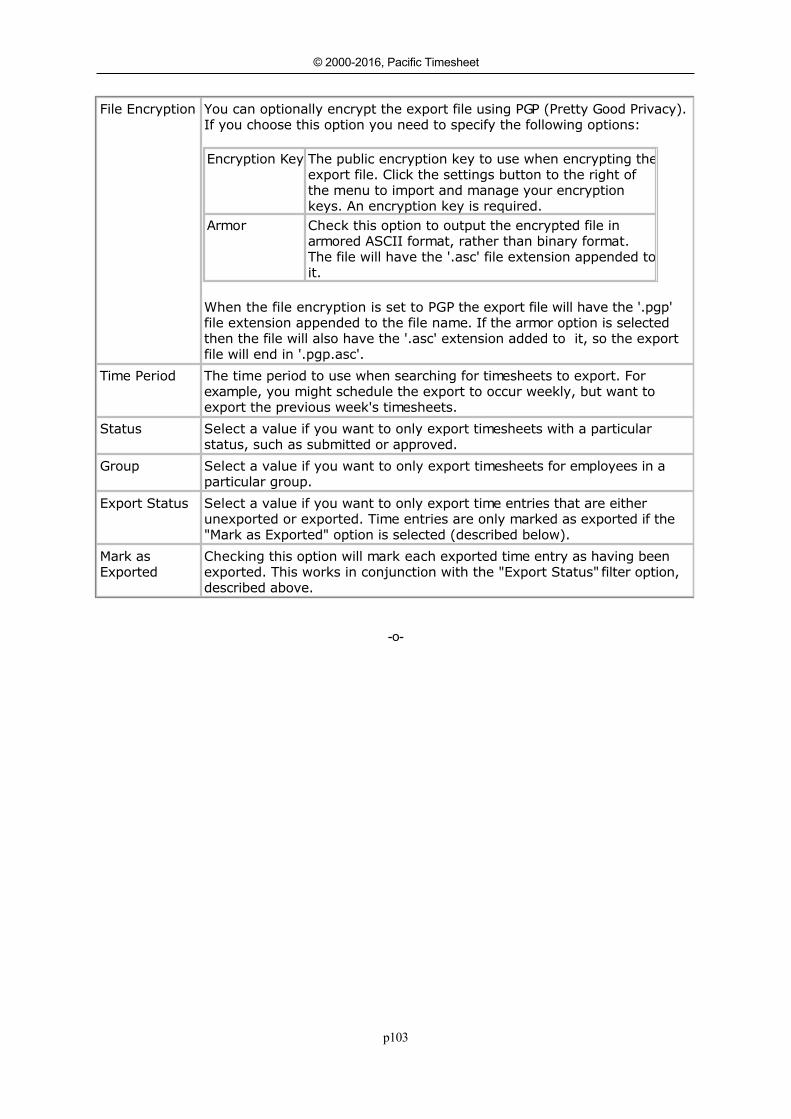
p103
© 2000-2016, Pacific Timesheet
File Encryption You can optionally encrypt the export file using PGP (Pretty Good Privacy).If you choose this option you need to specify the following options:
Encryption Key The public encryption key to use when encrypting theexport file. Click the settings button to the right ofthe menu to import and manage your encryptionkeys. An encryption key is required.
Armor Check this option to output the encrypted file inarmored ASCII format, rather than binary format.The file will have the '.asc' file extension appended toit.
When the file encryption is set to PGP the export file will have the '.pgp'file extension appended to the file name. If the armor option is selectedthen the file will also have the '.asc' extension added to it, so the exportfile will end in '.pgp.asc'.
Time Period The time period to use when searching for timesheets to export. Forexample, you might schedule the export to occur weekly, but want toexport the previous week's timesheets.
Status Select a value if you want to only export timesheets with a particularstatus, such as submitted or approved.
Group Select a value if you want to only export timesheets for employees in aparticular group.
Export Status Select a value if you want to only export time entries that are eitherunexported or exported. Time entries are only marked as exported if the"Mark as Exported" option is selected (described below).
Mark asExported
Checking this option will mark each exported time entry as having beenexported. This works in conjunction with the "Export Status" filter option,described above.
-o-
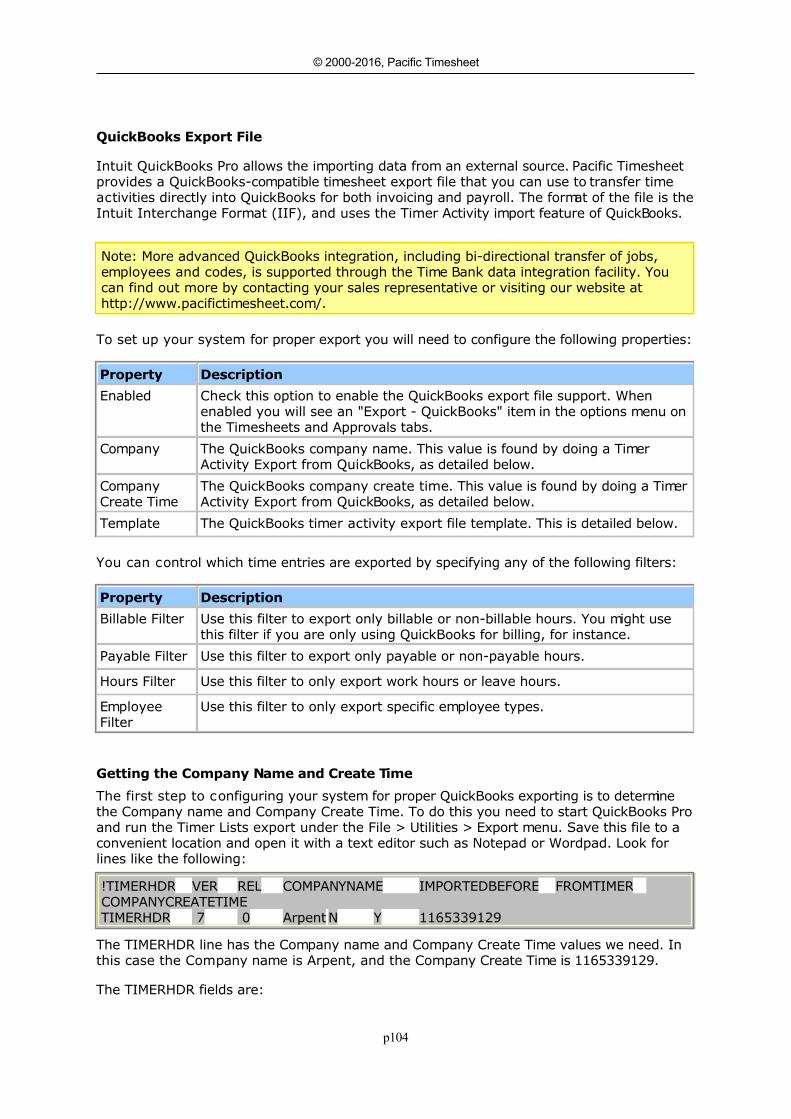
p104
© 2000-2016, Pacific Timesheet
QuickBooks Export OptionsQuickBooks Export File
Intuit QuickBooks Pro allows the importing data from an external source. Pacific Timesheetprovides a QuickBooks-compatible timesheet export file that you can use to transfer timeactivities directly into QuickBooks for both invoicing and payroll. The format of the file is theIntuit Interchange Format (IIF), and uses the Timer Activity import feature of QuickBooks.
Note: More advanced QuickBooks integration, including bi-directional transfer of jobs,employees and codes, is supported through the Time Bank data integration facility. Youcan find out more by contacting your sales representative or visiting our website at http://www.pacifictimesheet.com/.
To set up your system for proper export you will need to configure the following properties:
Property Description
Enabled Check this option to enable the QuickBooks export file support. Whenenabled you will see an "Export - QuickBooks" item in the options menu onthe Timesheets and Approvals tabs.
Company The QuickBooks company name. This value is found by doing a TimerActivity Export from QuickBooks, as detailed below.
CompanyCreate Time
The QuickBooks company create time. This value is found by doing a TimerActivity Export from QuickBooks, as detailed below.
Template The QuickBooks timer activity export file template. This is detailed below.
You can control which time entries are exported by specifying any of the following filters:
Property Description
Billable Filter Use this filter to export only billable or non-billable hours. You might usethis filter if you are only using QuickBooks for billing, for instance.
Payable Filter Use this filter to export only payable or non-payable hours.
Hours Filter Use this filter to only export work hours or leave hours.
EmployeeFilter
Use this filter to only export specific employee types.
Getting the Company Name and Create Time
The first step to configuring your system for proper QuickBooks exporting is to determinethe Company name and Company Create Time. To do this you need to start QuickBooks Proand run the Timer Lists export under the File > Utilities > Export menu. Save this file to aconvenient location and open it with a text editor such as Notepad or Wordpad. Look forlines like the following:
!TIMERHDR VER REL COMPANYNAME IMPORTEDBEFORE FROMTIMERCOMPANYCREATETIMETIMERHDR 7 0 ArpentN Y 1165339129
The TIMERHDR line has the Company name and Company Create Time values we need. Inthis case the Company name is Arpent, and the Company Create Time is 1165339129.
The TIMERHDR fields are:
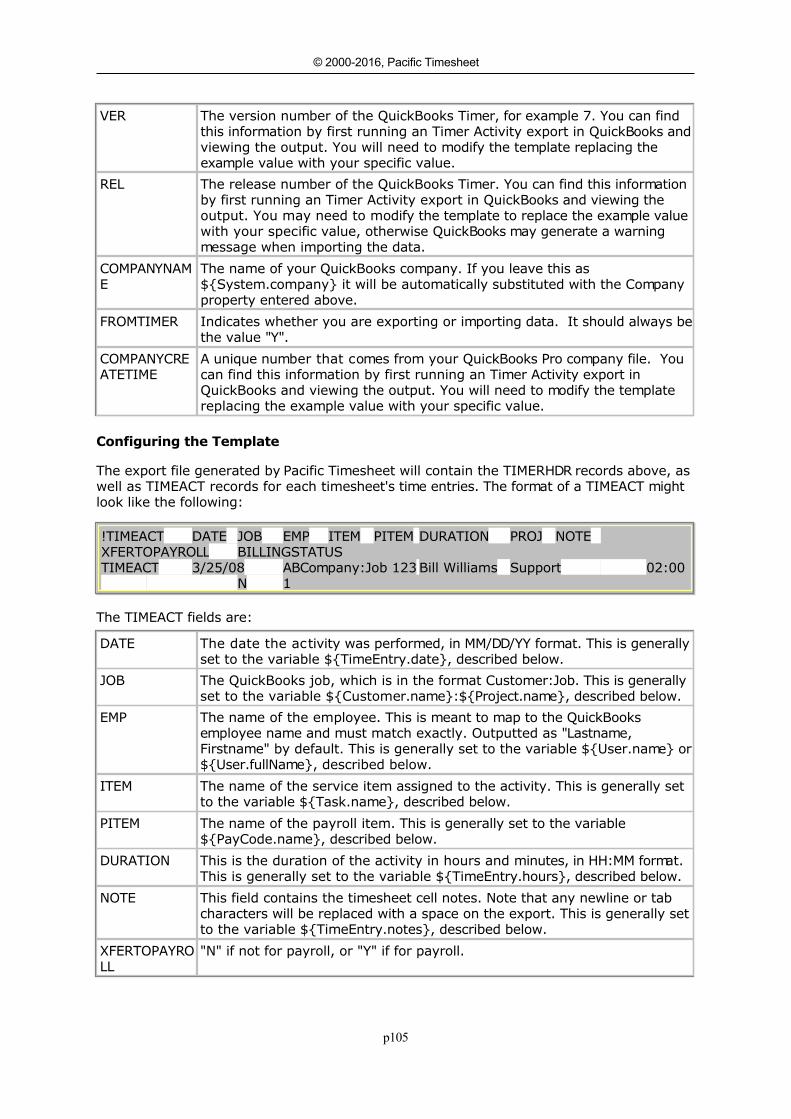
p105
© 2000-2016, Pacific Timesheet
VER The version number of the QuickBooks Timer, for example 7. You can findthis information by first running an Timer Activity export in QuickBooks andviewing the output. You will need to modify the template replacing theexample value with your specific value.
REL The release number of the QuickBooks Timer. You can find this informationby first running an Timer Activity export in QuickBooks and viewing theoutput. You may need to modify the template to replace the example valuewith your specific value, otherwise QuickBooks may generate a warningmessage when importing the data.
COMPANYNAME
The name of your QuickBooks company. If you leave this as${System.company} it will be automatically substituted with the Companyproperty entered above.
FROMTIMER Indicates whether you are exporting or importing data. It should always bethe value "Y".
COMPANYCREATETIME
A unique number that comes from your QuickBooks Pro company file. Youcan find this information by first running an Timer Activity export inQuickBooks and viewing the output. You will need to modify the templatereplacing the example value with your specific value.
Configuring the Template
The export file generated by Pacific Timesheet will contain the TIMERHDR records above, aswell as TIMEACT records for each timesheet's time entries. The format of a TIMEACT mightlook like the following:
!TIMEACT DATE JOB EMP ITEM PITEM DURATION PROJ NOTEXFERTOPAYROLL BILLINGSTATUSTIMEACT 3/25/08 ABCompany:Job 123 Bill Williams Support 02:00
N 1
The TIMEACT fields are:
DATE The date the activity was performed, in MM/DD/YY format. This is generallyset to the variable ${TimeEntry.date}, described below.
JOB The QuickBooks job, which is in the format Customer:Job. This is generallyset to the variable ${Customer.name}:${Project.name}, described below.
EMP The name of the employee. This is meant to map to the QuickBooksemployee name and must match exactly. Outputted as "Lastname,Firstname" by default. This is generally set to the variable ${User.name} or${User.fullName}, described below.
ITEM The name of the service item assigned to the activity. This is generally setto the variable ${Task.name}, described below.
PITEM The name of the payroll item. This is generally set to the variable${PayCode.name}, described below.
DURATION This is the duration of the activity in hours and minutes, in HH:MM format.This is generally set to the variable ${TimeEntry.hours}, described below.
NOTE This field contains the timesheet cell notes. Note that any newline or tabcharacters will be replaced with a space on the export. This is generally setto the variable ${TimeEntry.notes}, described below.
XFERTOPAYROLL
"N" if not for payroll, or "Y" if for payroll.
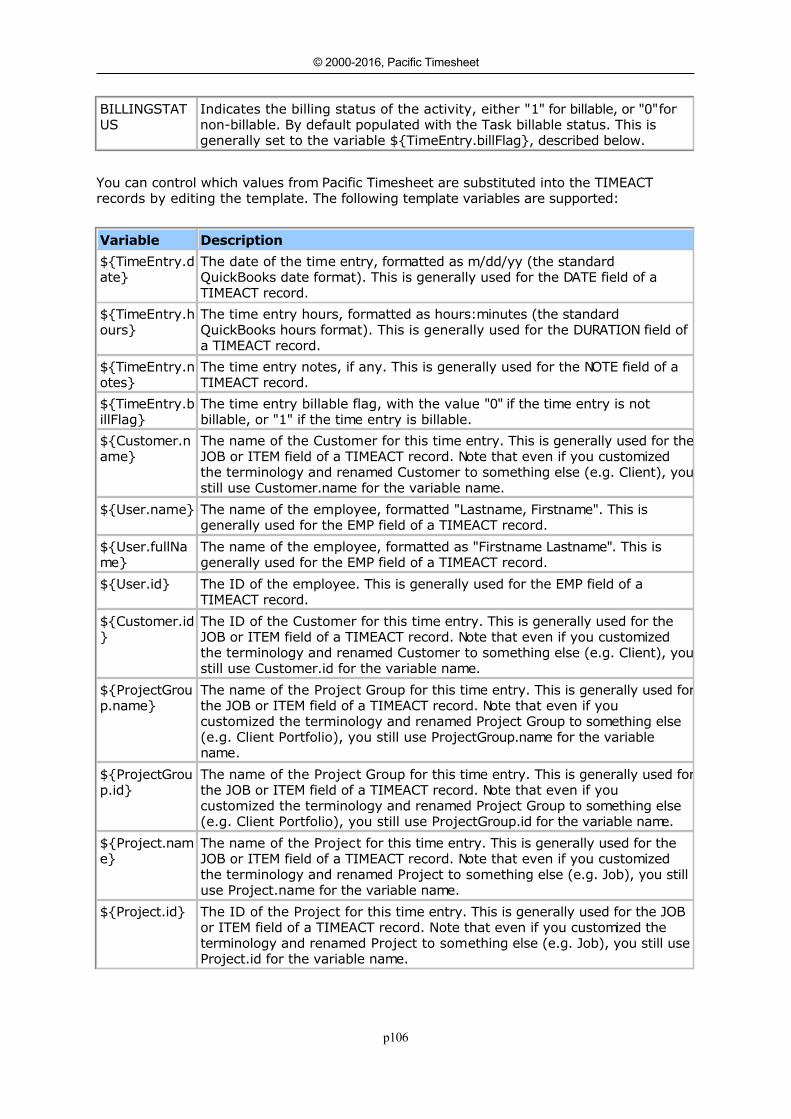
p106
© 2000-2016, Pacific Timesheet
BILLINGSTATUS
Indicates the billing status of the activity, either "1" for billable, or "0" fornon-billable. By default populated with the Task billable status. This isgenerally set to the variable ${TimeEntry.billFlag}, described below.
You can control which values from Pacific Timesheet are substituted into the TIMEACTrecords by editing the template. The following template variables are supported:
Variable Description
${TimeEntry.date}
The date of the time entry, formatted as m/dd/yy (the standardQuickBooks date format). This is generally used for the DATE field of aTIMEACT record.
${TimeEntry.hours}
The time entry hours, formatted as hours:minutes (the standardQuickBooks hours format). This is generally used for the DURATION field ofa TIMEACT record.
${TimeEntry.notes}
The time entry notes, if any. This is generally used for the NOTE field of aTIMEACT record.
${TimeEntry.billFlag}
The time entry billable flag, with the value "0" if the time entry is notbillable, or "1" if the time entry is billable.
${Customer.name}
The name of the Customer for this time entry. This is generally used for theJOB or ITEM field of a TIMEACT record. Note that even if you customizedthe terminology and renamed Customer to something else (e.g. Client), youstill use Customer.name for the variable name.
${User.name} The name of the employee, formatted "Lastname, Firstname". This isgenerally used for the EMP field of a TIMEACT record.
${User.fullName}
The name of the employee, formatted as "Firstname Lastname". This isgenerally used for the EMP field of a TIMEACT record.
${User.id} The ID of the employee. This is generally used for the EMP field of aTIMEACT record.
${Customer.id}
The ID of the Customer for this time entry. This is generally used for theJOB or ITEM field of a TIMEACT record. Note that even if you customizedthe terminology and renamed Customer to something else (e.g. Client), youstill use Customer.id for the variable name.
${ProjectGroup.name}
The name of the Project Group for this time entry. This is generally used forthe JOB or ITEM field of a TIMEACT record. Note that even if youcustomized the terminology and renamed Project Group to something else(e.g. Client Portfolio), you still use ProjectGroup.name for the variablename.
${ProjectGroup.id}
The name of the Project Group for this time entry. This is generally used forthe JOB or ITEM field of a TIMEACT record. Note that even if youcustomized the terminology and renamed Project Group to something else(e.g. Client Portfolio), you still use ProjectGroup.id for the variable name.
${Project.name}
The name of the Project for this time entry. This is generally used for theJOB or ITEM field of a TIMEACT record. Note that even if you customizedthe terminology and renamed Project to something else (e.g. Job), you stilluse Project.name for the variable name.
${Project.id} The ID of the Project for this time entry. This is generally used for the JOBor ITEM field of a TIMEACT record. Note that even if you customized theterminology and renamed Project to something else (e.g. Job), you still useProject.id for the variable name.
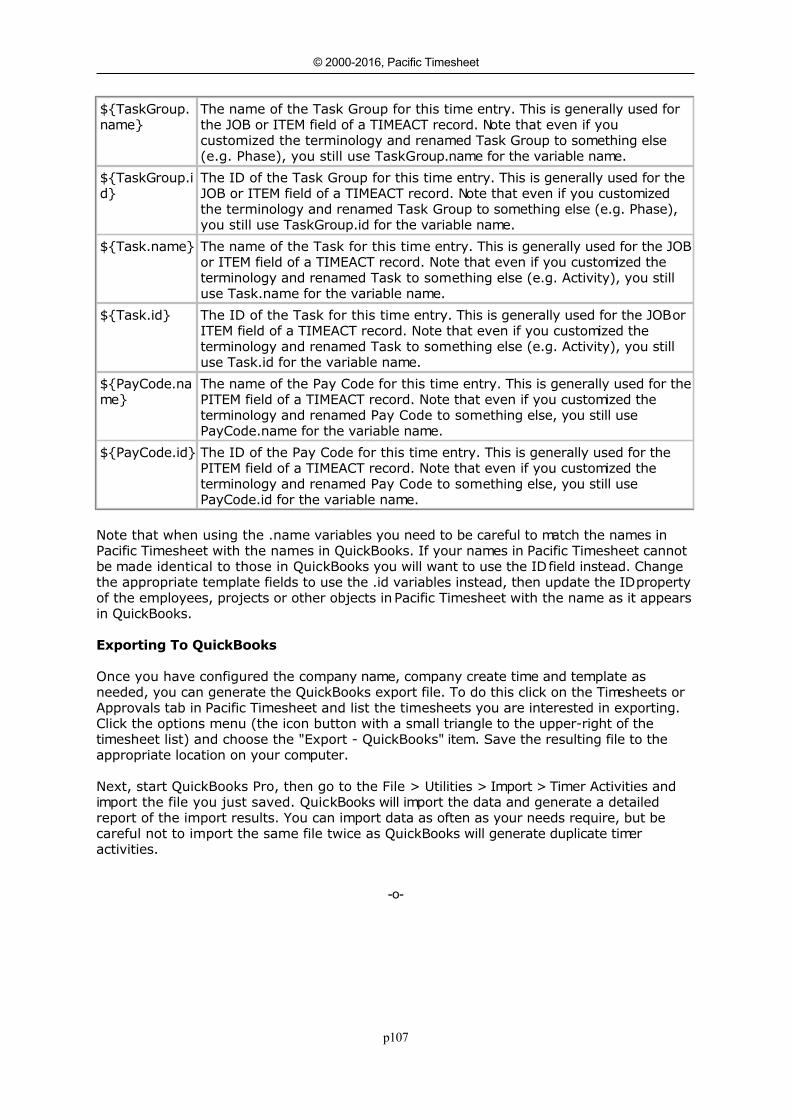
p107
© 2000-2016, Pacific Timesheet
${TaskGroup.name}
The name of the Task Group for this time entry. This is generally used forthe JOB or ITEM field of a TIMEACT record. Note that even if youcustomized the terminology and renamed Task Group to something else(e.g. Phase), you still use TaskGroup.name for the variable name.
${TaskGroup.id}
The ID of the Task Group for this time entry. This is generally used for theJOB or ITEM field of a TIMEACT record. Note that even if you customizedthe terminology and renamed Task Group to something else (e.g. Phase),you still use TaskGroup.id for the variable name.
${Task.name} The name of the Task for this time entry. This is generally used for the JOBor ITEM field of a TIMEACT record. Note that even if you customized theterminology and renamed Task to something else (e.g. Activity), you stilluse Task.name for the variable name.
${Task.id} The ID of the Task for this time entry. This is generally used for the JOB orITEM field of a TIMEACT record. Note that even if you customized theterminology and renamed Task to something else (e.g. Activity), you stilluse Task.id for the variable name.
${PayCode.name}
The name of the Pay Code for this time entry. This is generally used for thePITEM field of a TIMEACT record. Note that even if you customized theterminology and renamed Pay Code to something else, you still usePayCode.name for the variable name.
${PayCode.id} The ID of the Pay Code for this time entry. This is generally used for thePITEM field of a TIMEACT record. Note that even if you customized theterminology and renamed Pay Code to something else, you still usePayCode.id for the variable name.
Note that when using the .name variables you need to be careful to match the names in Pacific Timesheet with the names in QuickBooks. If your names in Pacific Timesheet cannotbe made identical to those in QuickBooks you will want to use the ID field instead. Changethe appropriate template fields to use the .id variables instead, then update the ID propertyof the employees, projects or other objects in Pacific Timesheet with the name as it appearsin QuickBooks.
Exporting To QuickBooks
Once you have configured the company name, company create time and template asneeded, you can generate the QuickBooks export file. To do this click on the Timesheets orApprovals tab in Pacific Timesheet and list the timesheets you are interested in exporting.Click the options menu (the icon button with a small triangle to the upper-right of thetimesheet list) and choose the "Export - QuickBooks" item. Save the resulting file to theappropriate location on your computer.
Next, start QuickBooks Pro, then go to the File > Utilities > Import > Timer Activities andimport the file you just saved. QuickBooks will import the data and generate a detailedreport of the import results. You can import data as often as your needs require, but becareful not to import the same file twice as QuickBooks will generate duplicate timeractivities.
-o-

p108
© 2000-2016, Pacific Timesheet
Export OptionsExport Options
The Export Options page allows you to configure and schedule automatic exporting ofemployees, groups, projects, tasks and other system object. The data can be exported ineither CSV or XLS format, and sent to either a directory (for the self-hosted version only) orto an FTP server.
Note: Cloud systems support auto-exporting to FTP sites only (via FTP/FTPS protocol).Self-hosted systems can additionally auto-export to file system directories.
The following options are provided:
Options Description
ScheduleEnabled
If checked then the export will automatically run on a recurring schedule.
Schedule The automatic export schedule, which can be daily at a specified time ofday.
Export To You have the option of exporting to a directory on the computer runningthe Pacific Timesheet service (self-hosted only), or exporting to an FTP(File Transfer Protocol) server.
If you choose "FTP Server" the following properties must be configured byclicking the settings button that appears to the right of the menu:
FTP Server The host name or IP address of the FTP server.Login The user account or login name for the FTP server.Password The password for the login, above.FTP Directory The directory where export files will be created, e.g. "/"
or "/tmp". FTP server paths start with a forward slash,and backslashes are not valid. If blank, the root directorywill be used, which is equivalent to "/".
FTP Port The port number for the FTP server, where 21 is thedefault value for most FTP servers.
FTP Mode Check this option to enable passive mode, which aidswhen transferring files through firewalls.
Security If the FTP server has connection security enabled you willneed to set the appropriate value here. Your options are:None No connection encryption
Implicit SSL Implicit Secure Socket Layerencryption (FTPS)
Explicit SSL Explicit Secure Socket Layerencryption, also known as (FTPES)
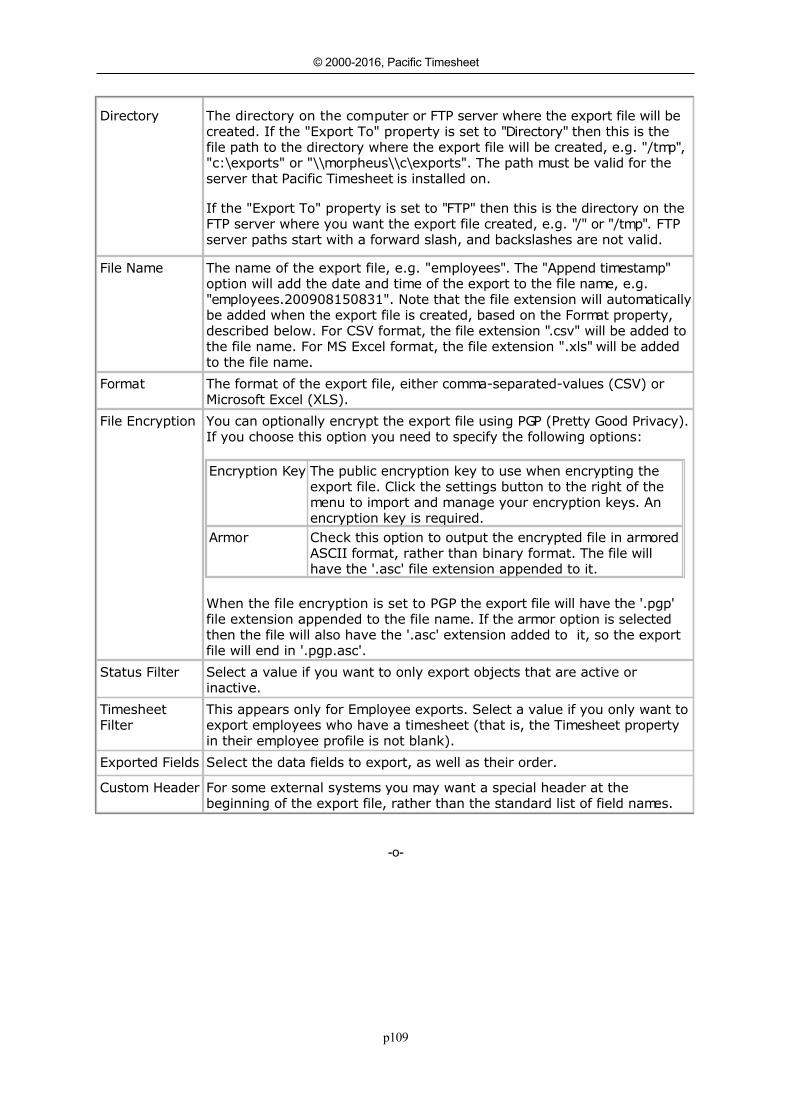
p109
© 2000-2016, Pacific Timesheet
Directory The directory on the computer or FTP server where the export file will becreated. If the "Export To" property is set to "Directory" then this is thefile path to the directory where the export file will be created, e.g. "/tmp","c:\exports" or "\\morpheus\\c\exports". The path must be valid for theserver that Pacific Timesheet is installed on.
If the "Export To" property is set to "FTP" then this is the directory on theFTP server where you want the export file created, e.g. "/" or "/tmp". FTPserver paths start with a forward slash, and backslashes are not valid.
File Name The name of the export file, e.g. "employees". The "Append timestamp"option will add the date and time of the export to the file name, e.g."employees.200908150831". Note that the file extension will automaticallybe added when the export file is created, based on the Format property,described below. For CSV format, the file extension ".csv" will be added tothe file name. For MS Excel format, the file extension ".xls" will be addedto the file name.
Format The format of the export file, either comma-separated-values (CSV) orMicrosoft Excel (XLS).
File Encryption You can optionally encrypt the export file using PGP (Pretty Good Privacy).If you choose this option you need to specify the following options:
Encryption Key The public encryption key to use when encrypting theexport file. Click the settings button to the right of themenu to import and manage your encryption keys. Anencryption key is required.
Armor Check this option to output the encrypted file in armoredASCII format, rather than binary format. The file willhave the '.asc' file extension appended to it.
When the file encryption is set to PGP the export file will have the '.pgp'file extension appended to the file name. If the armor option is selectedthen the file will also have the '.asc' extension added to it, so the exportfile will end in '.pgp.asc'.
Status Filter Select a value if you want to only export objects that are active orinactive.
TimesheetFilter
This appears only for Employee exports. Select a value if you only want toexport employees who have a timesheet (that is, the Timesheet propertyin their employee profile is not blank).
Exported Fields Select the data fields to export, as well as their order.
Custom Header For some external systems you may want a special header at thebeginning of the export file, rather than the standard list of field names.
-o-
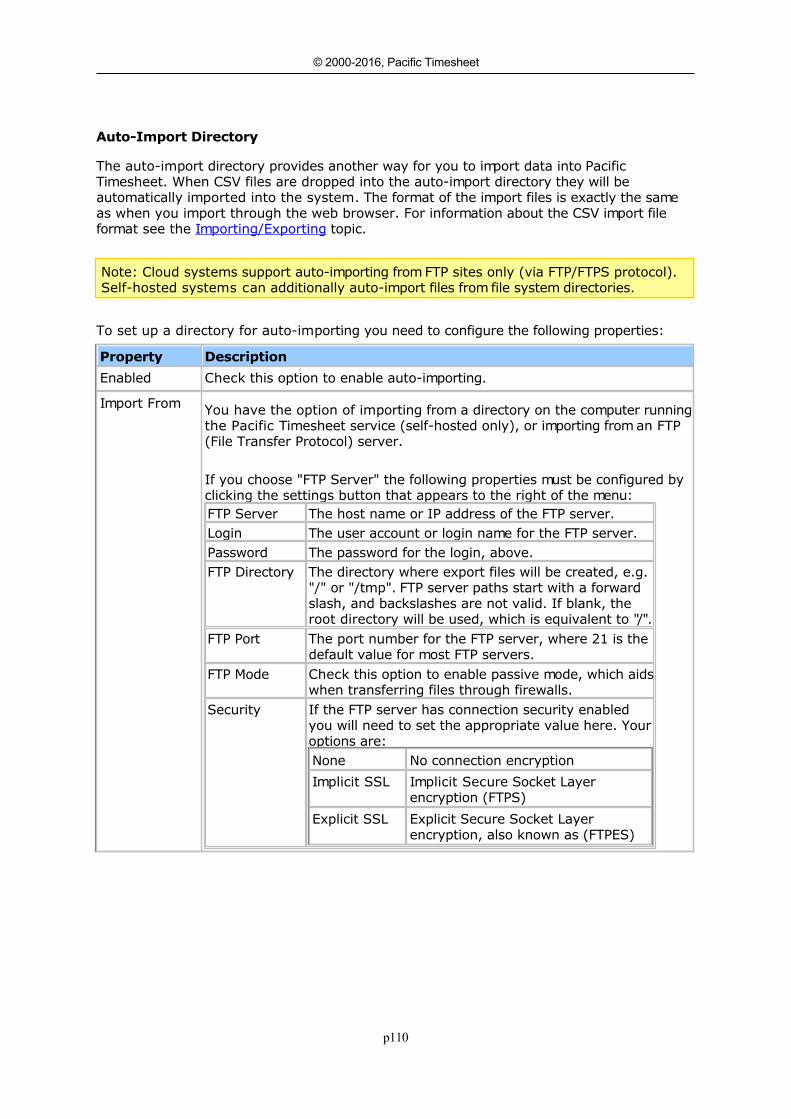
p110
© 2000-2016, Pacific Timesheet
Auto-Import DirectoryAuto-Import Directory
The auto-import directory provides another way for you to import data into PacificTimesheet. When CSV files are dropped into the auto-import directory they will beautomatically imported into the system. The format of the import files is exactly the sameas when you import through the web browser. For information about the CSV import fileformat see the Importing/Exporting topic.
Note: Cloud systems support auto-importing from FTP sites only (via FTP/FTPS protocol).Self-hosted systems can additionally auto-import files from file system directories.
To set up a directory for auto-importing you need to configure the following properties:
Property Description
Enabled Check this option to enable auto-importing.
Import From You have the option of importing from a directory on the computer runningthe Pacific Timesheet service (self-hosted only), or importing from an FTP(File Transfer Protocol) server.
If you choose "FTP Server" the following properties must be configured byclicking the settings button that appears to the right of the menu:FTP Server The host name or IP address of the FTP server.Login The user account or login name for the FTP server.Password The password for the login, above.FTP Directory The directory where export files will be created, e.g.
"/" or "/tmp". FTP server paths start with a forwardslash, and backslashes are not valid. If blank, theroot directory will be used, which is equivalent to "/".
FTP Port The port number for the FTP server, where 21 is thedefault value for most FTP servers.
FTP Mode Check this option to enable passive mode, which aidswhen transferring files through firewalls.
Security If the FTP server has connection security enabledyou will need to set the appropriate value here. Youroptions are:None No connection encryption
Implicit SSL Implicit Secure Socket Layerencryption (FTPS)
Explicit SSL Explicit Secure Socket Layerencryption, also known as (FTPES)
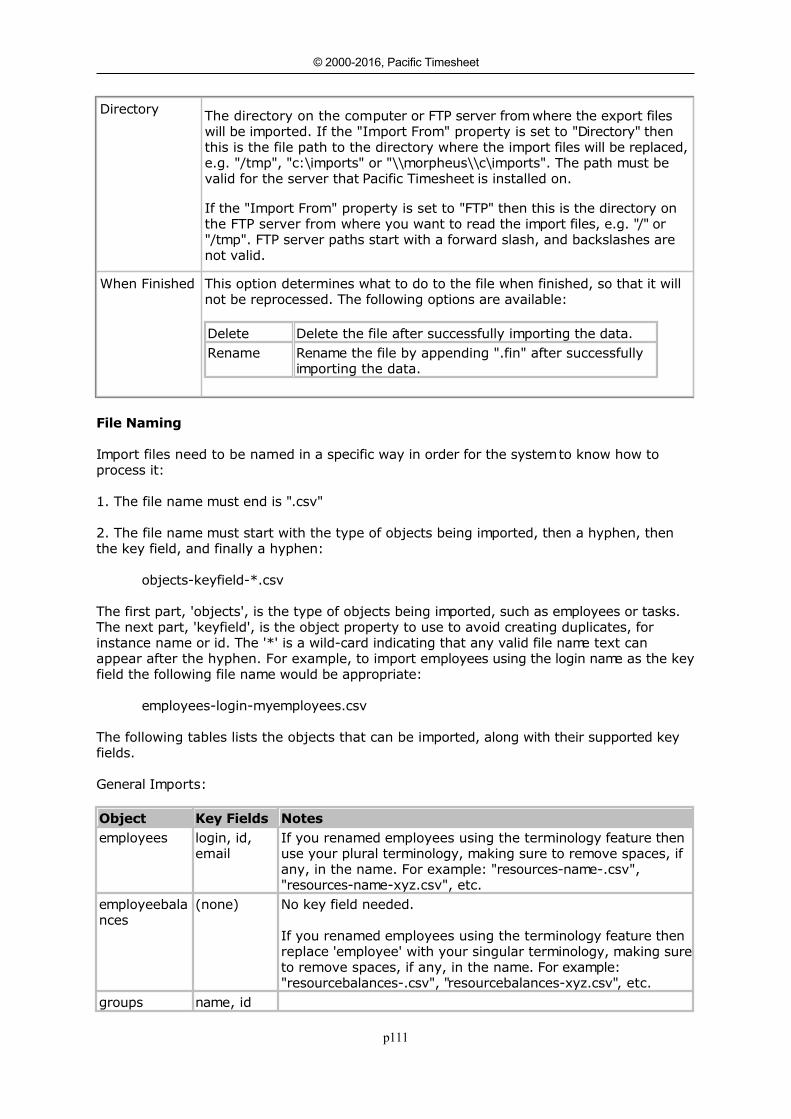
p111
© 2000-2016, Pacific Timesheet
Directory The directory on the computer or FTP server from where the export fileswill be imported. If the "Import From" property is set to "Directory" thenthis is the file path to the directory where the import files will be replaced,e.g. "/tmp", "c:\imports" or "\\morpheus\\c\imports". The path must bevalid for the server that Pacific Timesheet is installed on.
If the "Import From" property is set to "FTP" then this is the directory onthe FTP server from where you want to read the import files, e.g. "/" or"/tmp". FTP server paths start with a forward slash, and backslashes arenot valid.
When Finished This option determines what to do to the file when finished, so that it willnot be reprocessed. The following options are available:
Delete Delete the file after successfully importing the data.Rename Rename the file by appending ".fin" after successfully
importing the data.
File Naming
Import files need to be named in a specific way in order for the system to know how toprocess it:
1. The file name must end is ".csv"
2. The file name must start with the type of objects being imported, then a hyphen, thenthe key field, and finally a hyphen:
objects-keyfield-*.csv
The first part, 'objects', is the type of objects being imported, such as employees or tasks.The next part, 'keyfield', is the object property to use to avoid creating duplicates, forinstance name or id. The '*' is a wild-card indicating that any valid file name text canappear after the hyphen. For example, to import employees using the login name as the keyfield the following file name would be appropriate:
employees-login-myemployees.csv
The following tables lists the objects that can be imported, along with their supported keyfields.
General Imports:
Object Key Fields Notesemployees login, id,
emailIf you renamed employees using the terminology feature thenuse your plural terminology, making sure to remove spaces, ifany, in the name. For example: "resources-name-.csv","resources-name-xyz.csv", etc.
employeebalances
(none) No key field needed.
If you renamed employees using the terminology feature thenreplace 'employee' with your singular terminology, making sureto remove spaces, if any, in the name. For example:"resourcebalances-.csv", "resourcebalances-xyz.csv", etc.
groups name, id
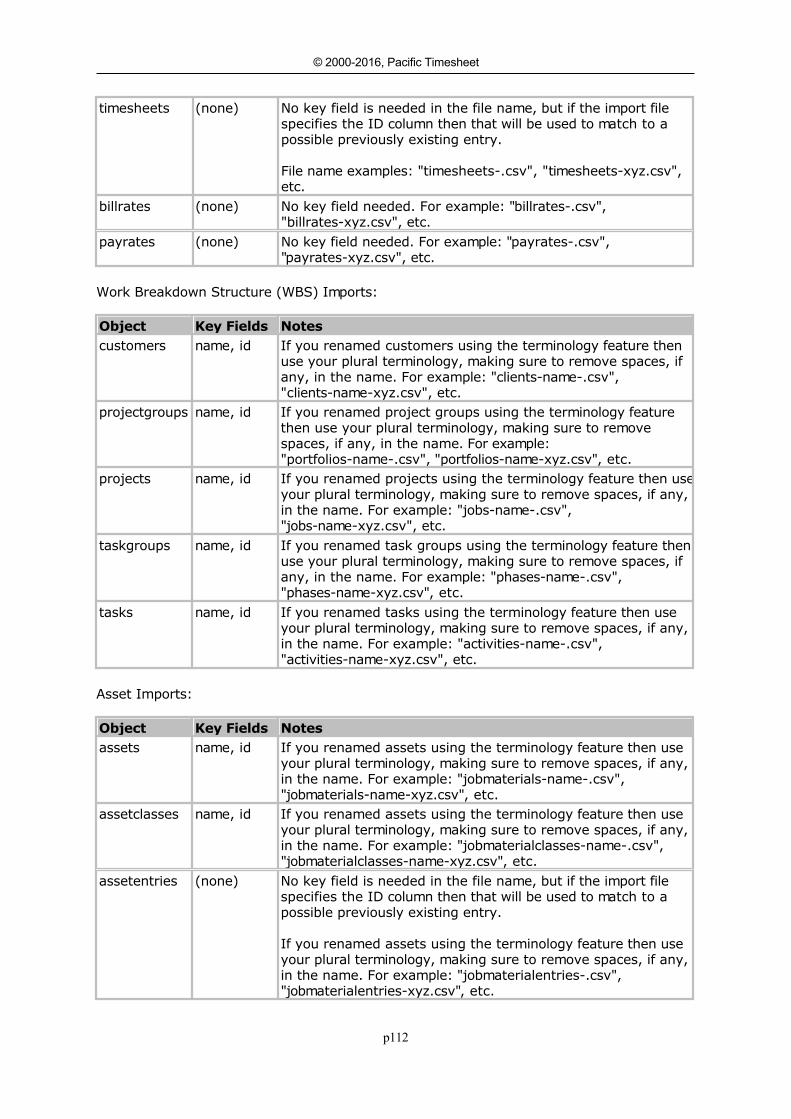
p112
© 2000-2016, Pacific Timesheet
timesheets (none) No key field is needed in the file name, but if the import filespecifies the ID column then that will be used to match to apossible previously existing entry.
File name examples: "timesheets-.csv", "timesheets-xyz.csv",etc.
billrates (none) No key field needed. For example: "billrates-.csv","billrates-xyz.csv", etc.
payrates (none) No key field needed. For example: "payrates-.csv","payrates-xyz.csv", etc.
Work Breakdown Structure (WBS) Imports:
Object Key Fields Notescustomers name, id If you renamed customers using the terminology feature then
use your plural terminology, making sure to remove spaces, ifany, in the name. For example: "clients-name-.csv","clients-name-xyz.csv", etc.
projectgroups name, id If you renamed project groups using the terminology featurethen use your plural terminology, making sure to removespaces, if any, in the name. For example:"portfolios-name-.csv", "portfolios-name-xyz.csv", etc.
projects name, id If you renamed projects using the terminology feature then useyour plural terminology, making sure to remove spaces, if any,in the name. For example: "jobs-name-.csv","jobs-name-xyz.csv", etc.
taskgroups name, id If you renamed task groups using the terminology feature thenuse your plural terminology, making sure to remove spaces, ifany, in the name. For example: "phases-name-.csv","phases-name-xyz.csv", etc.
tasks name, id If you renamed tasks using the terminology feature then useyour plural terminology, making sure to remove spaces, if any,in the name. For example: "activities-name-.csv","activities-name-xyz.csv", etc.
Asset Imports:
Object Key Fields Notesassets name, id If you renamed assets using the terminology feature then use
your plural terminology, making sure to remove spaces, if any,in the name. For example: "jobmaterials-name-.csv","jobmaterials-name-xyz.csv", etc.
assetclasses name, id If you renamed assets using the terminology feature then useyour plural terminology, making sure to remove spaces, if any,in the name. For example: "jobmaterialclasses-name-.csv","jobmaterialclasses-name-xyz.csv", etc.
assetentries (none) No key field is needed in the file name, but if the import filespecifies the ID column then that will be used to match to apossible previously existing entry.
If you renamed assets using the terminology feature then useyour plural terminology, making sure to remove spaces, if any,in the name. For example: "jobmaterialentries-.csv","jobmaterialentries-xyz.csv", etc.

p113
© 2000-2016, Pacific Timesheet
Note that these file naming conventions are case-insensitive!
Logging and Error Handling
An import log file will be generated in the auto-import directory, with details about what wasimported, and any errors that might have occurred. Up to 7 days of log files will begenerated - older ones will be deleted automatically.
If any errors occur during the import, the import file will be renamed by appending ".err" tothe file.
-o-
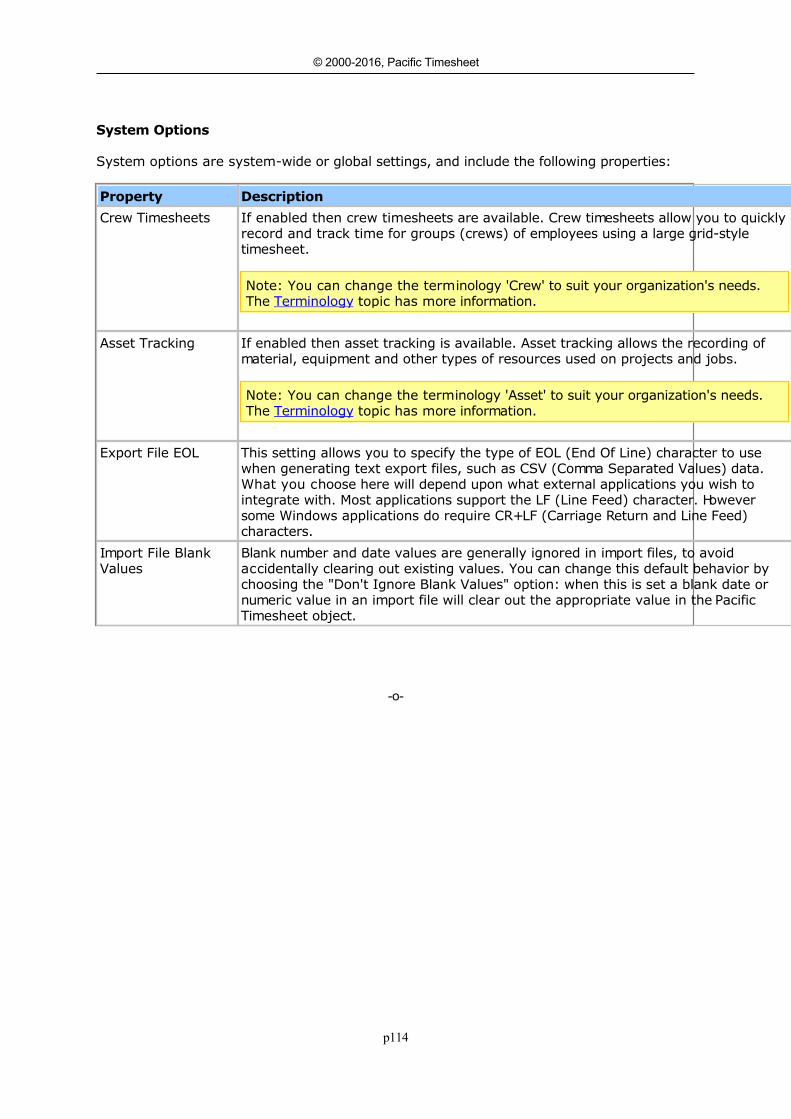
p114
© 2000-2016, Pacific Timesheet
System OptionsSystem Options
System options are system-wide or global settings, and include the following properties:
Property Description
Crew Timesheets If enabled then crew timesheets are available. Crew timesheets allow you to quicklyrecord and track time for groups (crews) of employees using a large grid-styletimesheet.
Note: You can change the terminology 'Crew' to suit your organization's needs.The Terminology topic has more information.
Asset Tracking If enabled then asset tracking is available. Asset tracking allows the recording ofmaterial, equipment and other types of resources used on projects and jobs.
Note: You can change the terminology 'Asset' to suit your organization's needs.The Terminology topic has more information.
Export File EOL This setting allows you to specify the type of EOL (End Of Line) character to usewhen generating text export files, such as CSV (Comma Separated Values) data.What you choose here will depend upon what external applications you wish tointegrate with. Most applications support the LF (Line Feed) character. Howeversome Windows applications do require CR+LF (Carriage Return and Line Feed)characters.
Import File BlankValues
Blank number and date values are generally ignored in import files, to avoidaccidentally clearing out existing values. You can change this default behavior bychoosing the "Don't Ignore Blank Values" option: when this is set a blank date ornumeric value in an import file will clear out the appropriate value in the PacificTimesheet object.
-o-
p115
© 2000-2016, Pacific Timesheet
LicenseLicense
Enter your license key on this page. After clicking OK your new license will take effectimmediately.
The license limits how many active employees your system may have. There is no limit onhow many inactive users you may have, so in general you need never delete terminatedemployees, just inactivate their accounts.
If you are hosting the software yourself, a free, non-expiring 10-employee license isgenerated when installed. This free license does not come with any technical support. Youcan purchase a support contract or a license for more employees by contacting your PacificTimesheet reseller or [email protected], or visiting www.pacifictimesheet.com.When ordering a new license you will be asked to provide the host computer name, whichcan be found on System > General > License page.
-o-
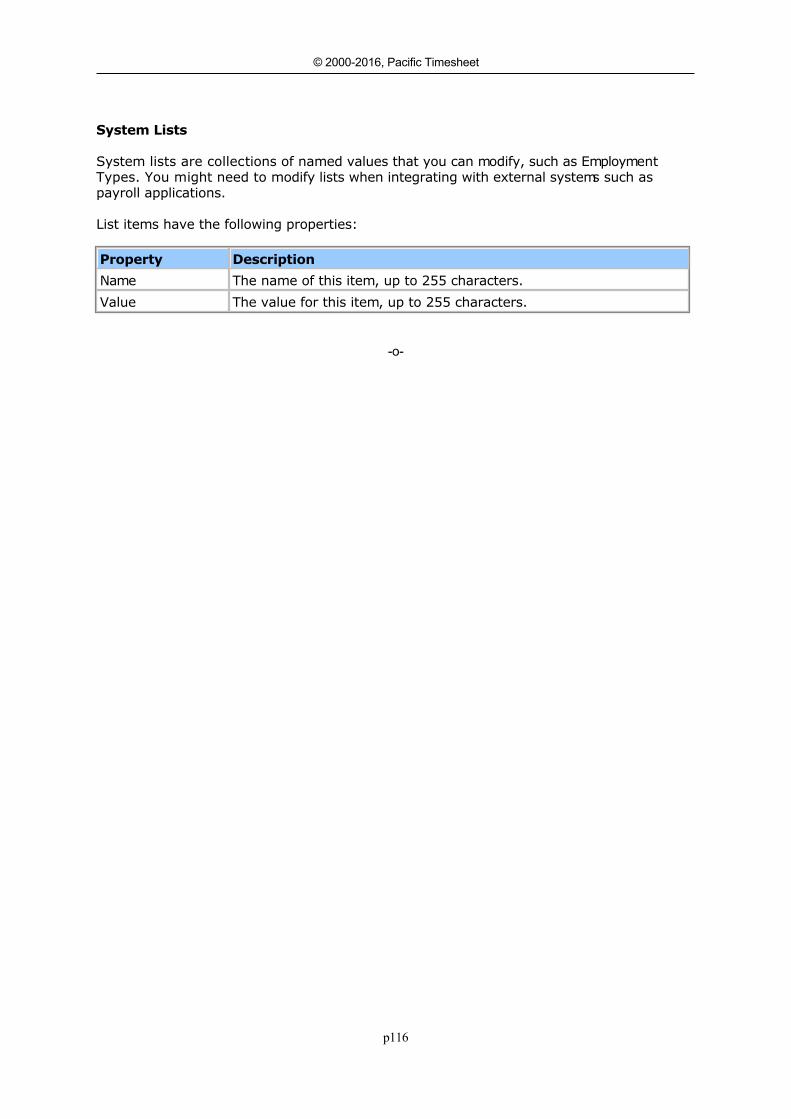
p116
© 2000-2016, Pacific Timesheet
System ListsSystem Lists
System lists are collections of named values that you can modify, such as EmploymentTypes. You might need to modify lists when integrating with external systems such aspayroll applications.
List items have the following properties:
Property Description
Name The name of this item, up to 255 characters.
Value The value for this item, up to 255 characters.
-o-
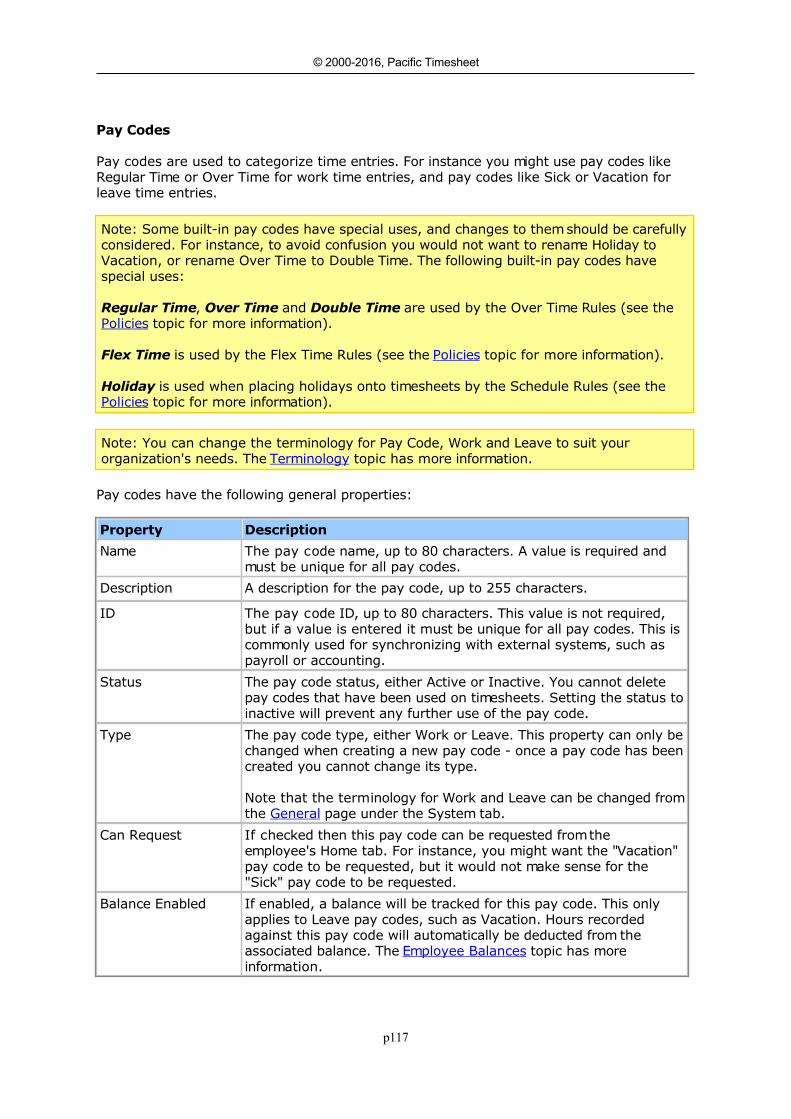
p117
© 2000-2016, Pacific Timesheet
Pay CodesPay Codes
Pay codes are used to categorize time entries. For instance you might use pay codes likeRegular Time or Over Time for work time entries, and pay codes like Sick or Vacation forleave time entries.
Note: Some built-in pay codes have special uses, and changes to them should be carefullyconsidered. For instance, to avoid confusion you would not want to rename Holiday toVacation, or rename Over Time to Double Time. The following built-in pay codes havespecial uses:
Regular Time, Over Time and Double Time are used by the Over Time Rules (see thePolicies topic for more information).
Flex Time is used by the Flex Time Rules (see the Policies topic for more information).
Holiday is used when placing holidays onto timesheets by the Schedule Rules (see thePolicies topic for more information).
Note: You can change the terminology for Pay Code, Work and Leave to suit yourorganization's needs. The Terminology topic has more information.
Pay codes have the following general properties:
Property Description
Name The pay code name, up to 80 characters. A value is required andmust be unique for all pay codes.
Description A description for the pay code, up to 255 characters.
ID The pay code ID, up to 80 characters. This value is not required,but if a value is entered it must be unique for all pay codes. This iscommonly used for synchronizing with external systems, such aspayroll or accounting.
Status The pay code status, either Active or Inactive. You cannot deletepay codes that have been used on timesheets. Setting the status toinactive will prevent any further use of the pay code.
Type The pay code type, either Work or Leave. This property can only bechanged when creating a new pay code - once a pay code has beencreated you cannot change its type.
Note that the terminology for Work and Leave can be changed fromthe General page under the System tab.
Can Request If checked then this pay code can be requested from theemployee's Home tab. For instance, you might want the "Vacation"pay code to be requested, but it would not make sense for the"Sick" pay code to be requested.
Balance Enabled If enabled, a balance will be tracked for this pay code. This onlyapplies to Leave pay codes, such as Vacation. Hours recordedagainst this pay code will automatically be deducted from theassociated balance. The Employee Balances topic has moreinformation.
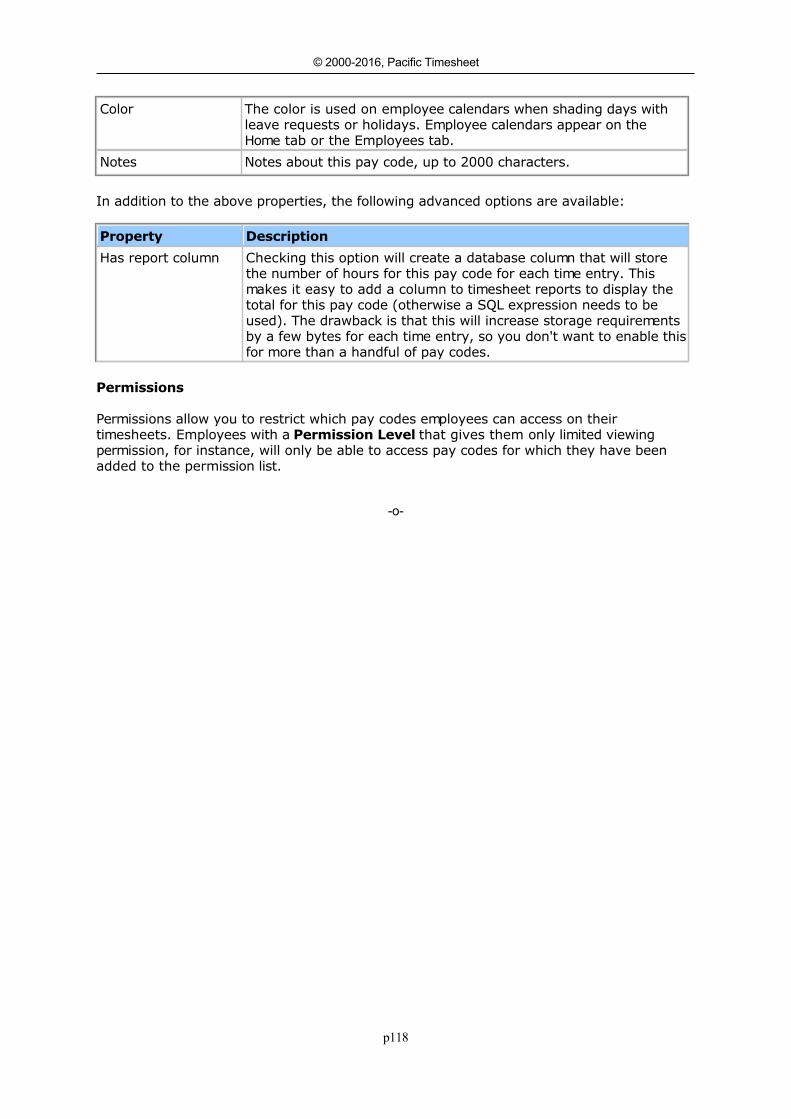
p118
© 2000-2016, Pacific Timesheet
Color The color is used on employee calendars when shading days withleave requests or holidays. Employee calendars appear on theHome tab or the Employees tab.
Notes Notes about this pay code, up to 2000 characters.
In addition to the above properties, the following advanced options are available:
Property Description
Has report column Checking this option will create a database column that will storethe number of hours for this pay code for each time entry. Thismakes it easy to add a column to timesheet reports to display thetotal for this pay code (otherwise a SQL expression needs to beused). The drawback is that this will increase storage requirementsby a few bytes for each time entry, so you don't want to enable thisfor more than a handful of pay codes.
Permissions
Permissions allow you to restrict which pay codes employees can access on theirtimesheets. Employees with a Permission Level that gives them only limited viewingpermission, for instance, will only be able to access pay codes for which they have beenadded to the permission list.
-o-
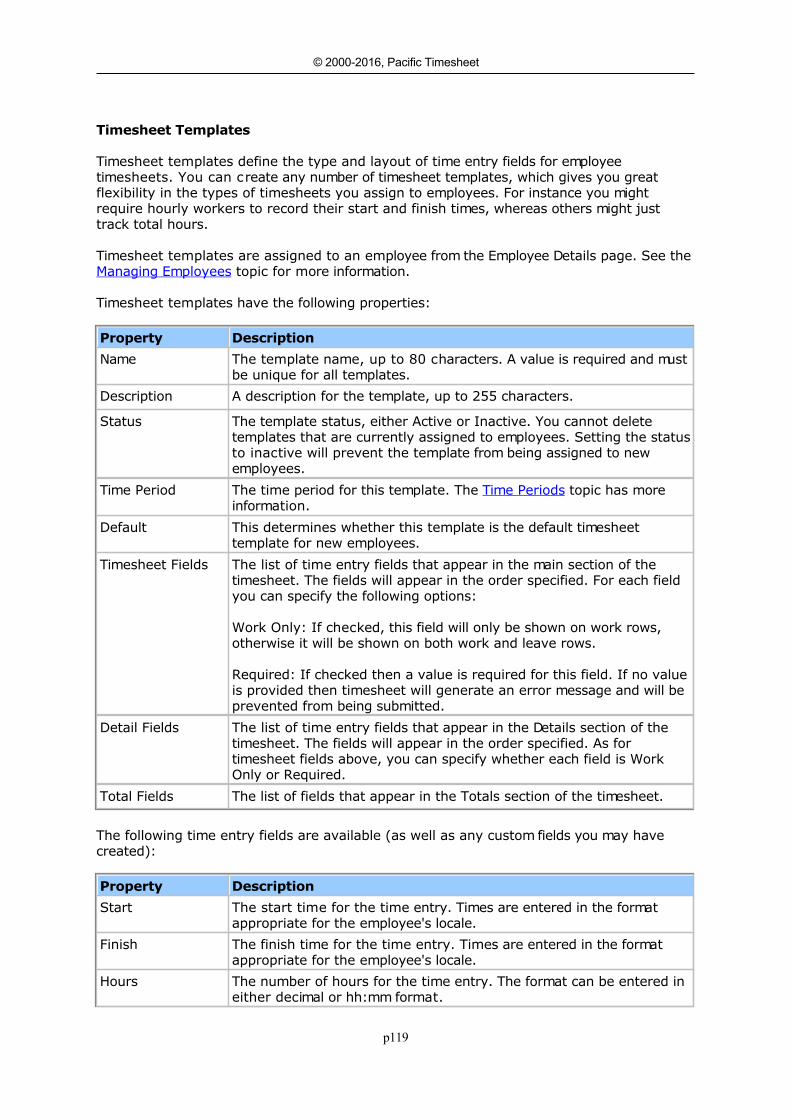
p119
© 2000-2016, Pacific Timesheet
TemplatesTimesheet Templates
Timesheet templates define the type and layout of time entry fields for employeetimesheets. You can create any number of timesheet templates, which gives you greatflexibility in the types of timesheets you assign to employees. For instance you mightrequire hourly workers to record their start and finish times, whereas others might justtrack total hours.
Timesheet templates are assigned to an employee from the Employee Details page. See the Managing Employees topic for more information.
Timesheet templates have the following properties:
Property Description
Name The template name, up to 80 characters. A value is required and mustbe unique for all templates.
Description A description for the template, up to 255 characters.
Status The template status, either Active or Inactive. You cannot deletetemplates that are currently assigned to employees. Setting the statusto inactive will prevent the template from being assigned to newemployees.
Time Period The time period for this template. The Time Periods topic has moreinformation.
Default This determines whether this template is the default timesheettemplate for new employees.
Timesheet Fields The list of time entry fields that appear in the main section of thetimesheet. The fields will appear in the order specified. For each fieldyou can specify the following options:
Work Only: If checked, this field will only be shown on work rows,otherwise it will be shown on both work and leave rows.
Required: If checked then a value is required for this field. If no valueis provided then timesheet will generate an error message and will beprevented from being submitted.
Detail Fields The list of time entry fields that appear in the Details section of thetimesheet. The fields will appear in the order specified. As fortimesheet fields above, you can specify whether each field is WorkOnly or Required.
Total Fields The list of fields that appear in the Totals section of the timesheet.
The following time entry fields are available (as well as any custom fields you may havecreated):
Property Description
Start The start time for the time entry. Times are entered in the formatappropriate for the employee's locale.
Finish The finish time for the time entry. Times are entered in the formatappropriate for the employee's locale.
Hours The number of hours for the time entry. The format can be entered ineither decimal or hh:mm format.
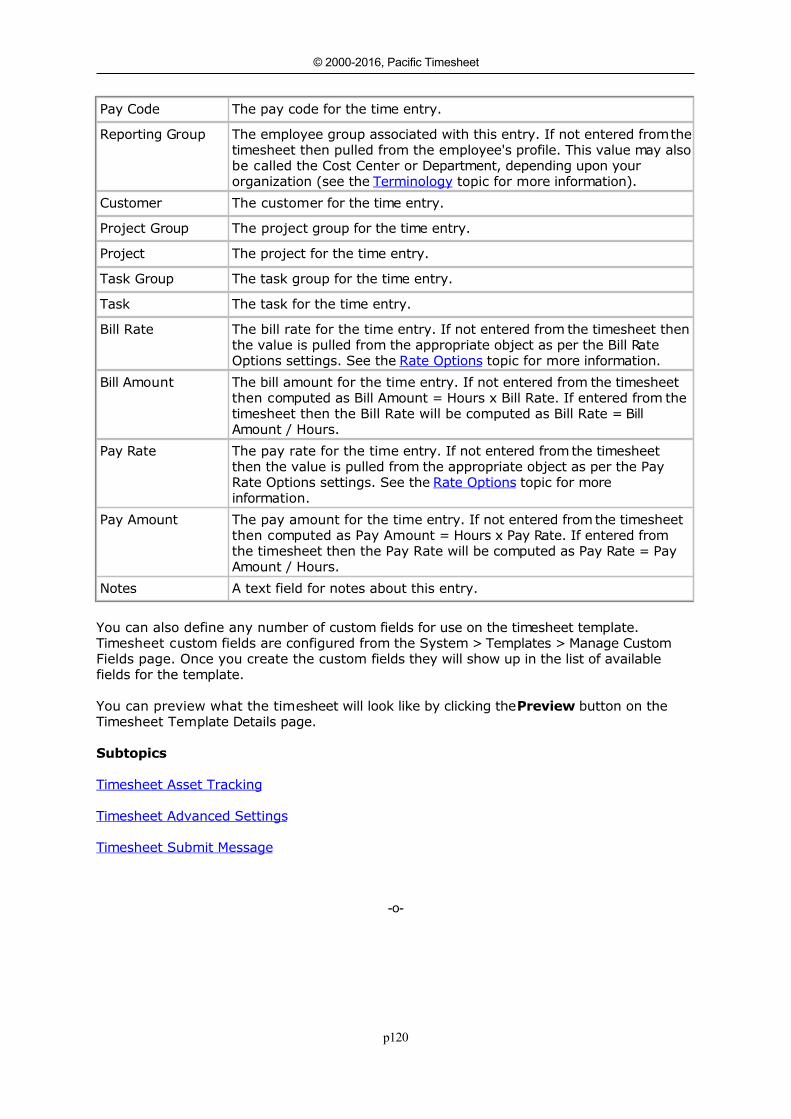
p120
© 2000-2016, Pacific Timesheet
Pay Code The pay code for the time entry.
Reporting Group The employee group associated with this entry. If not entered from thetimesheet then pulled from the employee's profile. This value may alsobe called the Cost Center or Department, depending upon yourorganization (see the Terminology topic for more information).
Customer The customer for the time entry.
Project Group The project group for the time entry.
Project The project for the time entry.
Task Group The task group for the time entry.
Task The task for the time entry.
Bill Rate The bill rate for the time entry. If not entered from the timesheet thenthe value is pulled from the appropriate object as per the Bill RateOptions settings. See the Rate Options topic for more information.
Bill Amount The bill amount for the time entry. If not entered from the timesheetthen computed as Bill Amount = Hours x Bill Rate. If entered from thetimesheet then the Bill Rate will be computed as Bill Rate = BillAmount / Hours.
Pay Rate The pay rate for the time entry. If not entered from the timesheetthen the value is pulled from the appropriate object as per the PayRate Options settings. See the Rate Options topic for moreinformation.
Pay Amount The pay amount for the time entry. If not entered from the timesheetthen computed as Pay Amount = Hours x Pay Rate. If entered fromthe timesheet then the Pay Rate will be computed as Pay Rate = PayAmount / Hours.
Notes A text field for notes about this entry.
You can also define any number of custom fields for use on the timesheet template.Timesheet custom fields are configured from the System > Templates > Manage CustomFields page. Once you create the custom fields they will show up in the list of availablefields for the template.
You can preview what the timesheet will look like by clicking the Preview button on theTimesheet Template Details page.
Subtopics
Timesheet Asset Tracking
Timesheet Advanced Settings
Timesheet Submit Message
-o-

p121
© 2000-2016, Pacific Timesheet
Asset TrackingAsset Tracking
If Asset Tracking is enabled (see the Asset Tracking Options topic) then you can configurewhich types of assets can be entered from this template. Being able to configure whichassets can be entered from the timesheet template gives you great flexibility in who caninput asset entries in your organization. For instance, you may only want to have field crewskeep track of equipment usage, which you could do by giving the field crew their owntimesheet template with equipment entry enabled.
-o-
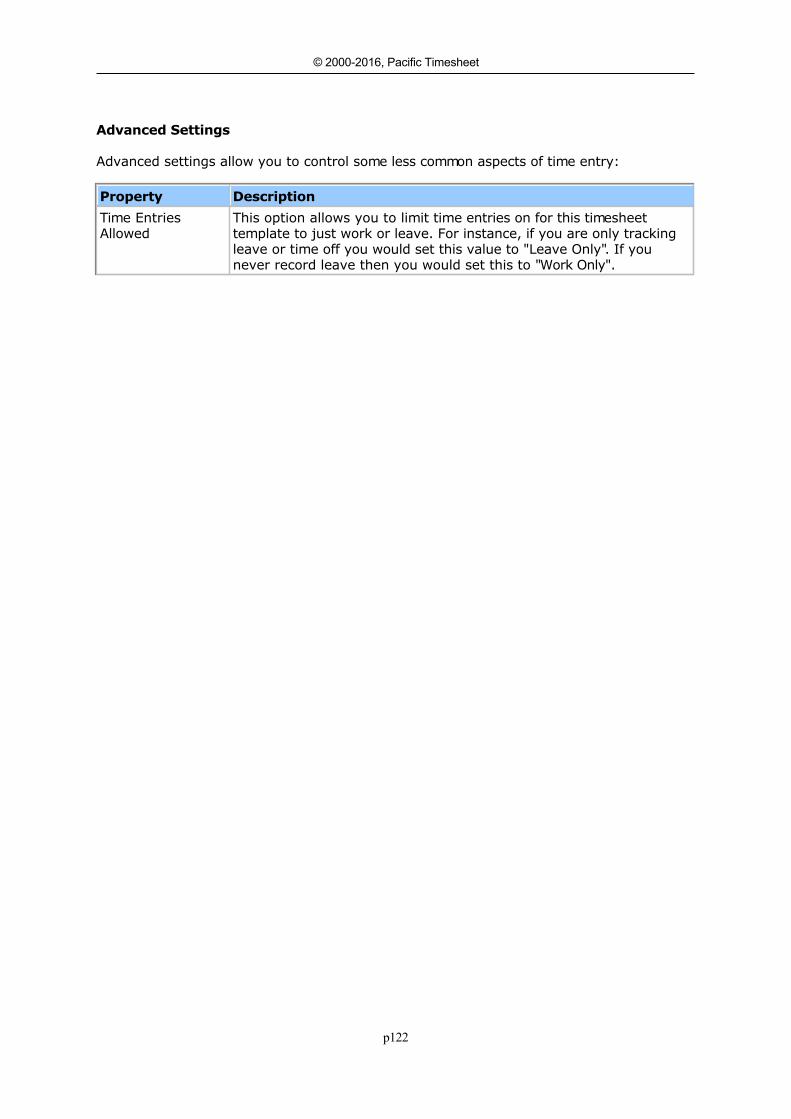
p122
© 2000-2016, Pacific Timesheet
Advanced SettingsAdvanced Settings
Advanced settings allow you to control some less common aspects of time entry:
Property Description
Time EntriesAllowed
This option allows you to limit time entries on for this timesheettemplate to just work or leave. For instance, if you are only trackingleave or time off you would set this value to "Leave Only". If younever record leave then you would set this to "Work Only".
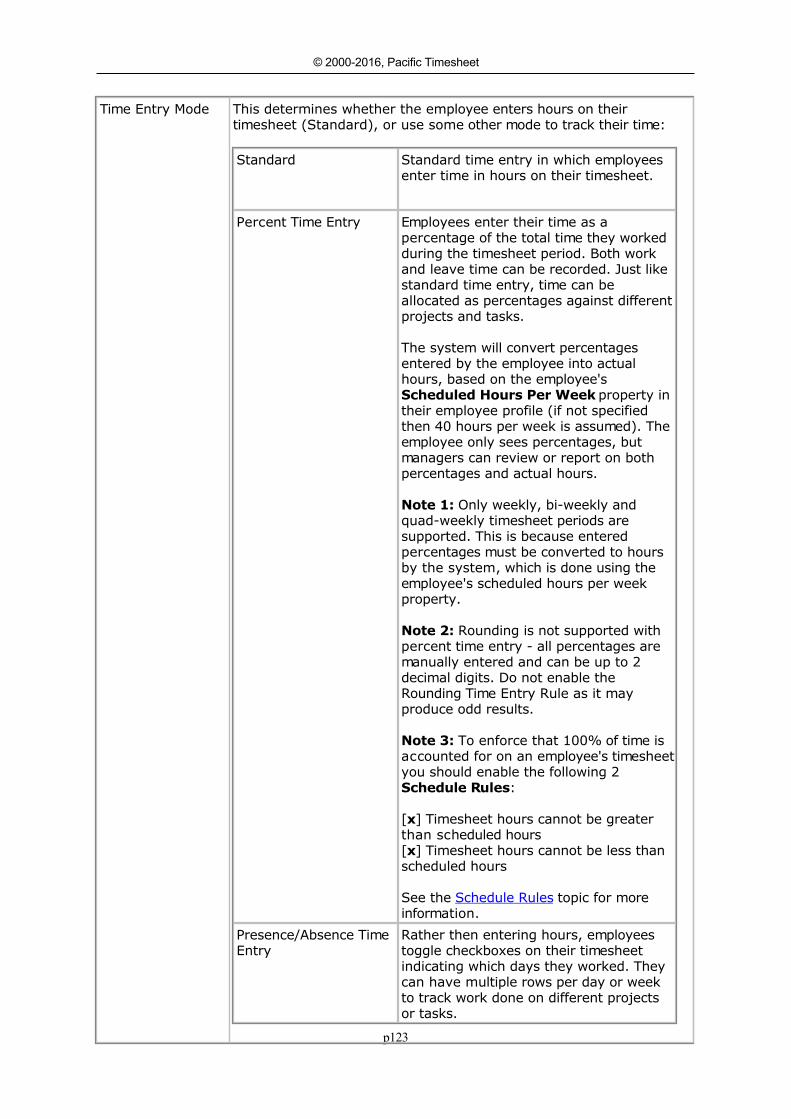
p123
© 2000-2016, Pacific Timesheet
Time Entry Mode This determines whether the employee enters hours on theirtimesheet (Standard), or use some other mode to track their time:
Standard Standard time entry in which employeesenter time in hours on their timesheet.
Percent Time Entry Employees enter their time as apercentage of the total time they workedduring the timesheet period. Both workand leave time can be recorded. Just likestandard time entry, time can beallocated as percentages against differentprojects and tasks.
The system will convert percentagesentered by the employee into actualhours, based on the employee's Scheduled Hours Per Week property intheir employee profile (if not specifiedthen 40 hours per week is assumed). Theemployee only sees percentages, butmanagers can review or report on bothpercentages and actual hours.
Note 1: Only weekly, bi-weekly andquad-weekly timesheet periods aresupported. This is because enteredpercentages must be converted to hoursby the system, which is done using theemployee's scheduled hours per weekproperty.
Note 2: Rounding is not supported withpercent time entry - all percentages aremanually entered and can be up to 2decimal digits. Do not enable theRounding Time Entry Rule as it mayproduce odd results.
Note 3: To enforce that 100% of time isaccounted for on an employee's timesheetyou should enable the following 2 Schedule Rules:
[x] Timesheet hours cannot be greaterthan scheduled hours[x] Timesheet hours cannot be less thanscheduled hours
See the Schedule Rules topic for moreinformation.
Presence/Absence TimeEntry
Rather then entering hours, employeestoggle checkboxes on their timesheetindicating which days they worked. Theycan have multiple rows per day or weekto track work done on different projectsor tasks.
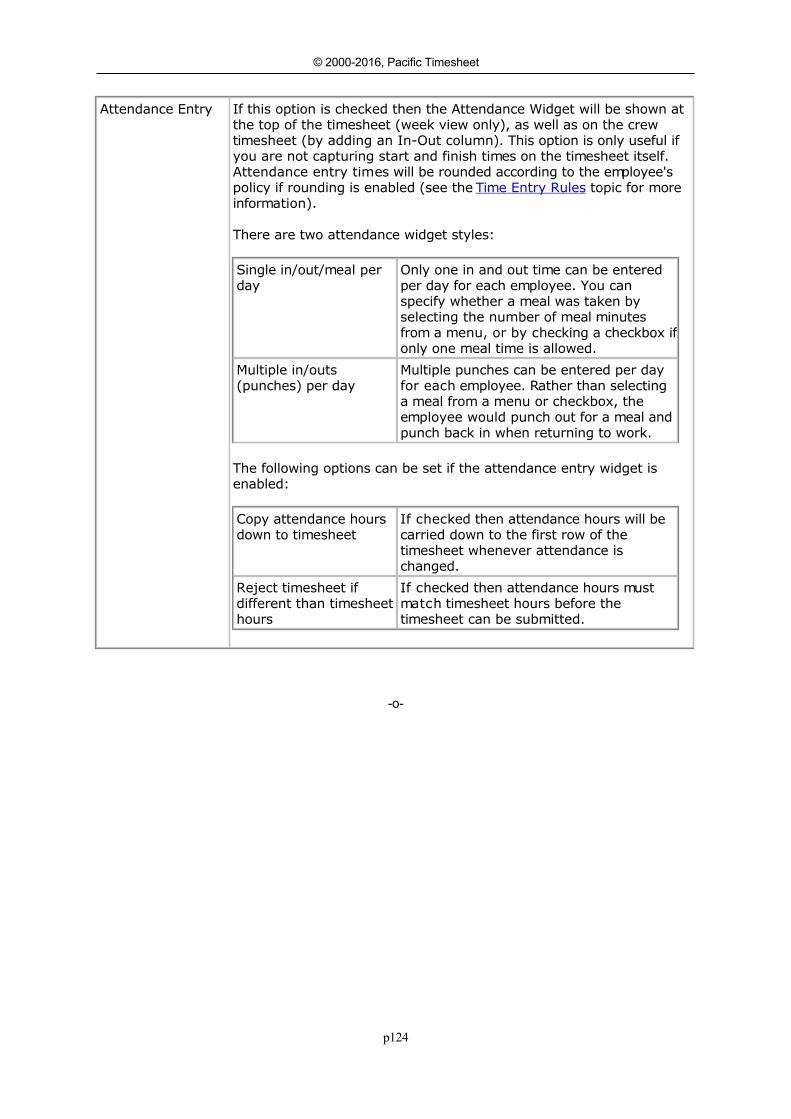
p124
© 2000-2016, Pacific Timesheet
Attendance Entry If this option is checked then the Attendance Widget will be shown atthe top of the timesheet (week view only), as well as on the crewtimesheet (by adding an In-Out column). This option is only useful ifyou are not capturing start and finish times on the timesheet itself.Attendance entry times will be rounded according to the employee'spolicy if rounding is enabled (see the Time Entry Rules topic for moreinformation).
There are two attendance widget styles:
Single in/out/meal perday
Only one in and out time can be enteredper day for each employee. You canspecify whether a meal was taken byselecting the number of meal minutesfrom a menu, or by checking a checkbox ifonly one meal time is allowed.
Multiple in/outs(punches) per day
Multiple punches can be entered per dayfor each employee. Rather than selectinga meal from a menu or checkbox, theemployee would punch out for a meal andpunch back in when returning to work.
The following options can be set if the attendance entry widget isenabled:
Copy attendance hoursdown to timesheet
If checked then attendance hours will becarried down to the first row of thetimesheet whenever attendance ischanged.
Reject timesheet ifdifferent than timesheethours
If checked then attendance hours mustmatch timesheet hours before thetimesheet can be submitted.
-o-
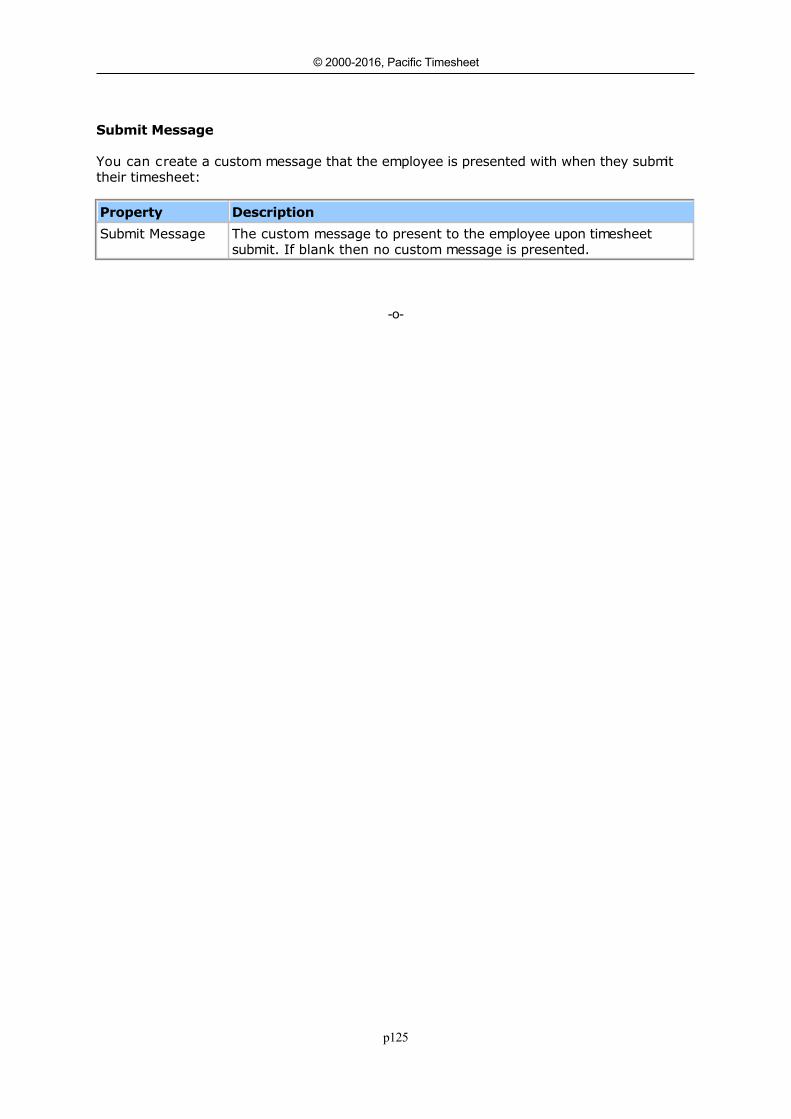
p125
© 2000-2016, Pacific Timesheet
Submit MessageSubmit Message
You can create a custom message that the employee is presented with when they submittheir timesheet:
Property Description
Submit Message The custom message to present to the employee upon timesheetsubmit. If blank then no custom message is presented.
-o-
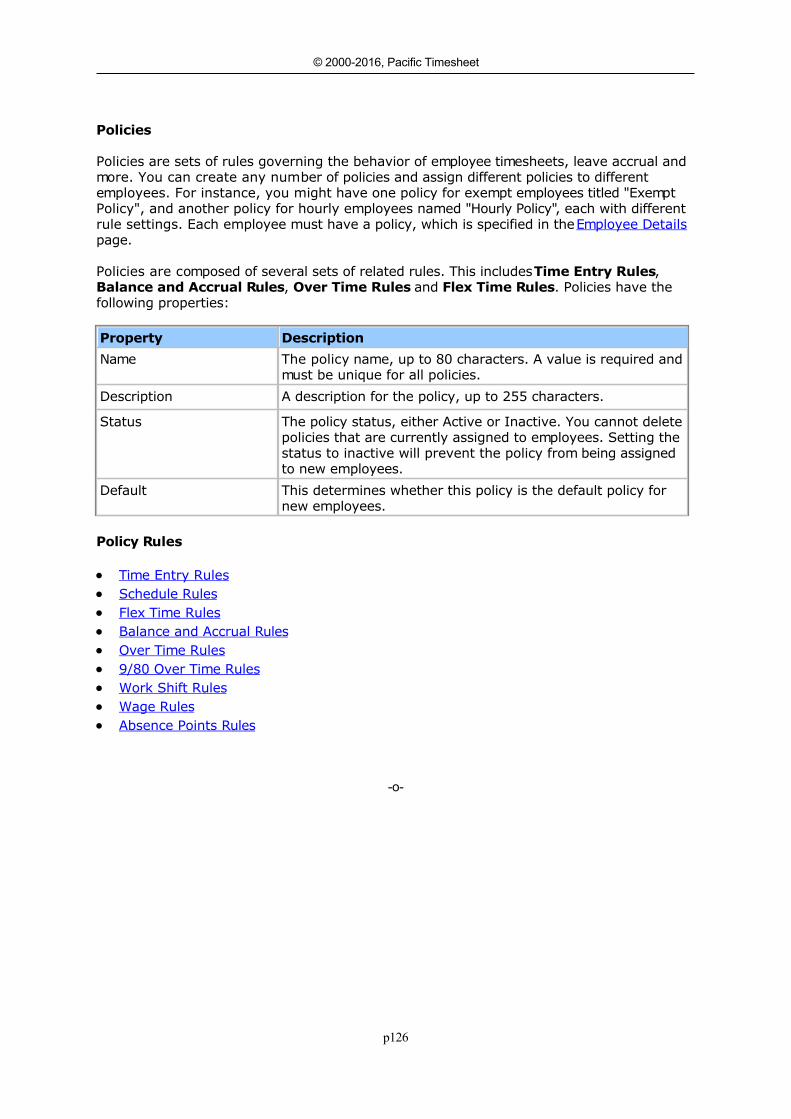
p126
© 2000-2016, Pacific Timesheet
PoliciesPolicies
Policies are sets of rules governing the behavior of employee timesheets, leave accrual andmore. You can create any number of policies and assign different policies to differentemployees. For instance, you might have one policy for exempt employees titled "ExemptPolicy", and another policy for hourly employees named "Hourly Policy", each with differentrule settings. Each employee must have a policy, which is specified in the Employee Detailspage.
Policies are composed of several sets of related rules. This includes Time Entry Rules,Balance and Accrual Rules, Over Time Rules and Flex Time Rules. Policies have thefollowing properties:
Property Description
Name The policy name, up to 80 characters. A value is required andmust be unique for all policies.
Description A description for the policy, up to 255 characters.
Status The policy status, either Active or Inactive. You cannot deletepolicies that are currently assigned to employees. Setting thestatus to inactive will prevent the policy from being assignedto new employees.
Default This determines whether this policy is the default policy fornew employees.
Policy Rules
Time Entry Rules Schedule Rules Flex Time Rules Balance and Accrual Rules Over Time Rules 9/80 Over Time Rules Work Shift Rules Wage Rules Absence Points Rules
-o-
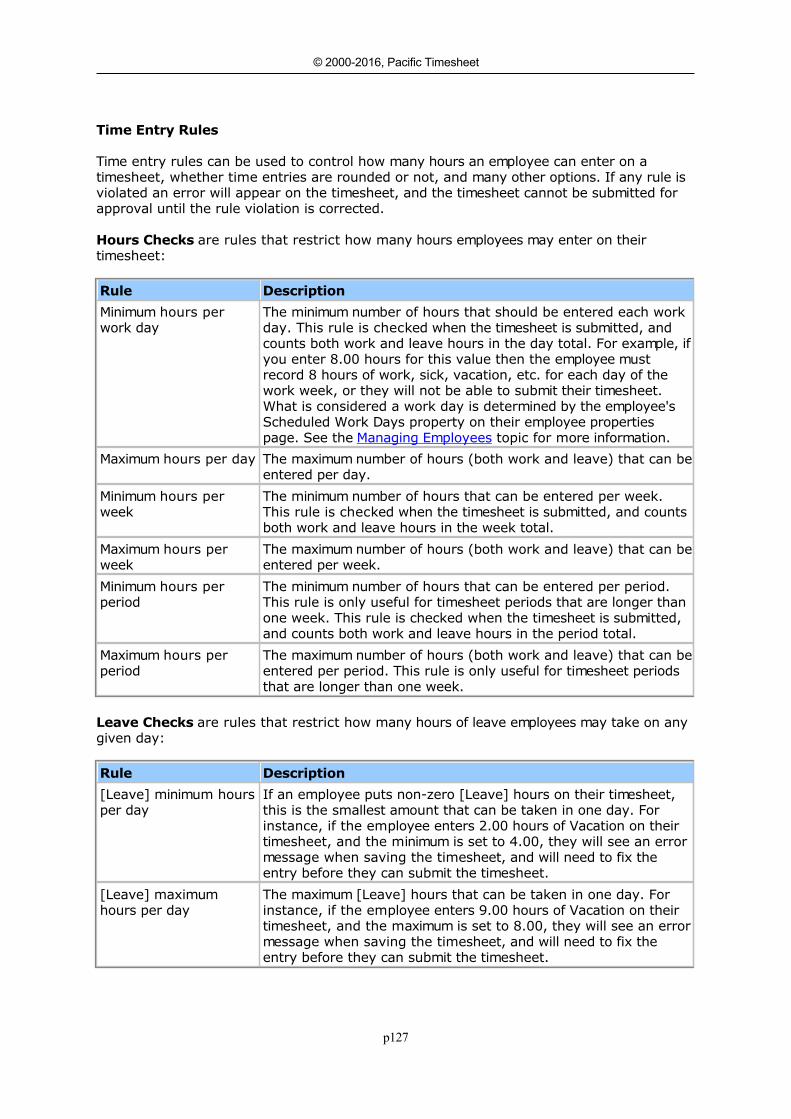
p127
© 2000-2016, Pacific Timesheet
Time Entry RulesTime Entry Rules
Time entry rules can be used to control how many hours an employee can enter on atimesheet, whether time entries are rounded or not, and many other options. If any rule isviolated an error will appear on the timesheet, and the timesheet cannot be submitted forapproval until the rule violation is corrected.
Hours Checks are rules that restrict how many hours employees may enter on theirtimesheet:
Rule Description
Minimum hours perwork day
The minimum number of hours that should be entered each workday. This rule is checked when the timesheet is submitted, andcounts both work and leave hours in the day total. For example, ifyou enter 8.00 hours for this value then the employee mustrecord 8 hours of work, sick, vacation, etc. for each day of thework week, or they will not be able to submit their timesheet.What is considered a work day is determined by the employee'sScheduled Work Days property on their employee propertiespage. See the Managing Employees topic for more information.
Maximum hours per day The maximum number of hours (both work and leave) that can beentered per day.
Minimum hours perweek
The minimum number of hours that can be entered per week.This rule is checked when the timesheet is submitted, and countsboth work and leave hours in the week total.
Maximum hours perweek
The maximum number of hours (both work and leave) that can beentered per week.
Minimum hours perperiod
The minimum number of hours that can be entered per period.This rule is only useful for timesheet periods that are longer thanone week. This rule is checked when the timesheet is submitted,and counts both work and leave hours in the period total.
Maximum hours perperiod
The maximum number of hours (both work and leave) that can beentered per period. This rule is only useful for timesheet periodsthat are longer than one week.
Leave Checks are rules that restrict how many hours of leave employees may take on anygiven day:
Rule Description
[Leave] minimum hoursper day
If an employee puts non-zero [Leave] hours on their timesheet,this is the smallest amount that can be taken in one day. Forinstance, if the employee enters 2.00 hours of Vacation on theirtimesheet, and the minimum is set to 4.00, they will see an errormessage when saving the timesheet, and will need to fix theentry before they can submit the timesheet.
[Leave] maximumhours per day
The maximum [Leave] hours that can be taken in one day. Forinstance, if the employee enters 9.00 hours of Vacation on theirtimesheet, and the maximum is set to 8.00, they will see an errormessage when saving the timesheet, and will need to fix theentry before they can submit the timesheet.
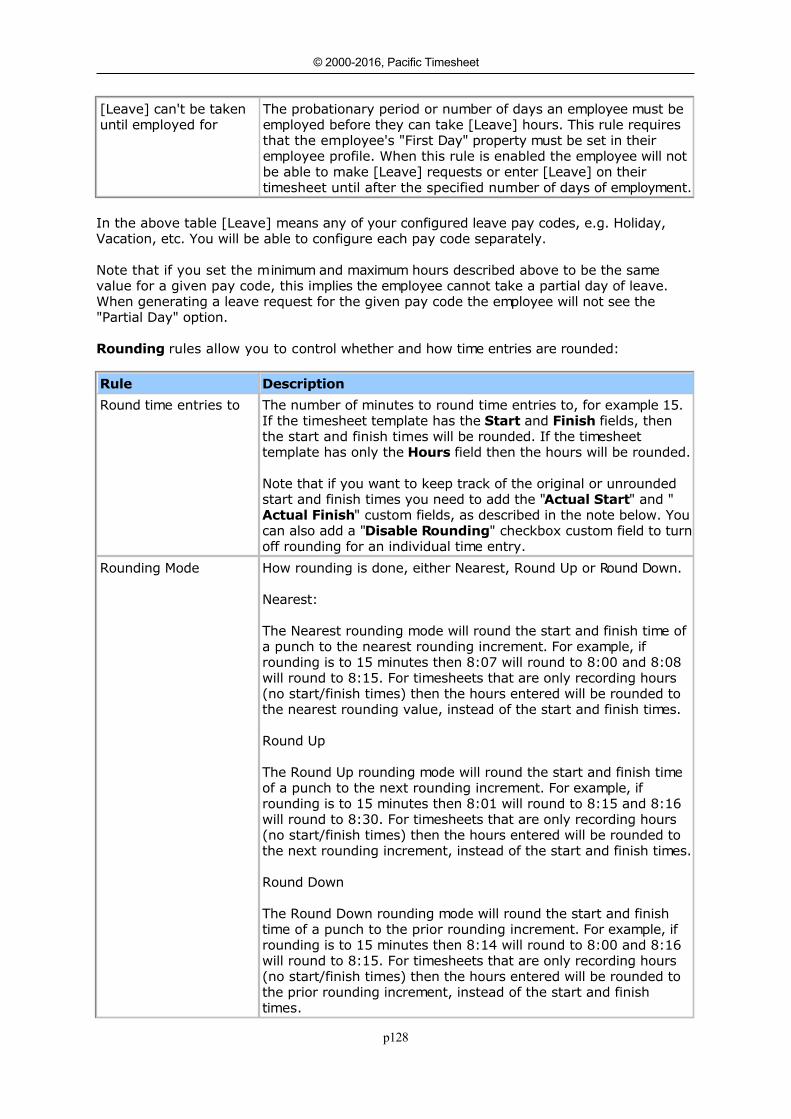
p128
© 2000-2016, Pacific Timesheet
[Leave] can't be takenuntil employed for
The probationary period or number of days an employee must beemployed before they can take [Leave] hours. This rule requiresthat the employee's "First Day" property must be set in theiremployee profile. When this rule is enabled the employee will notbe able to make [Leave] requests or enter [Leave] on theirtimesheet until after the specified number of days of employment.
In the above table [Leave] means any of your configured leave pay codes, e.g. Holiday,Vacation, etc. You will be able to configure each pay code separately.
Note that if you set the minimum and maximum hours described above to be the samevalue for a given pay code, this implies the employee cannot take a partial day of leave.When generating a leave request for the given pay code the employee will not see the"Partial Day" option.
Rounding rules allow you to control whether and how time entries are rounded:
Rule Description
Round time entries to The number of minutes to round time entries to, for example 15.If the timesheet template has the Start and Finish fields, thenthe start and finish times will be rounded. If the timesheettemplate has only the Hours field then the hours will be rounded.
Note that if you want to keep track of the original or unroundedstart and finish times you need to add the "Actual Start" and "Actual Finish" custom fields, as described in the note below. Youcan also add a "Disable Rounding" checkbox custom field to turnoff rounding for an individual time entry.
Rounding Mode How rounding is done, either Nearest, Round Up or Round Down.
Nearest:
The Nearest rounding mode will round the start and finish time ofa punch to the nearest rounding increment. For example, ifrounding is to 15 minutes then 8:07 will round to 8:00 and 8:08will round to 8:15. For timesheets that are only recording hours(no start/finish times) then the hours entered will be rounded tothe nearest rounding value, instead of the start and finish times.
Round Up
The Round Up rounding mode will round the start and finish timeof a punch to the next rounding increment. For example, ifrounding is to 15 minutes then 8:01 will round to 8:15 and 8:16will round to 8:30. For timesheets that are only recording hours(no start/finish times) then the hours entered will be rounded tothe next rounding increment, instead of the start and finish times.
Round Down
The Round Down rounding mode will round the start and finishtime of a punch to the prior rounding increment. For example, ifrounding is to 15 minutes then 8:14 will round to 8:00 and 8:16will round to 8:15. For timesheets that are only recording hours(no start/finish times) then the hours entered will be rounded tothe prior rounding increment, instead of the start and finishtimes.
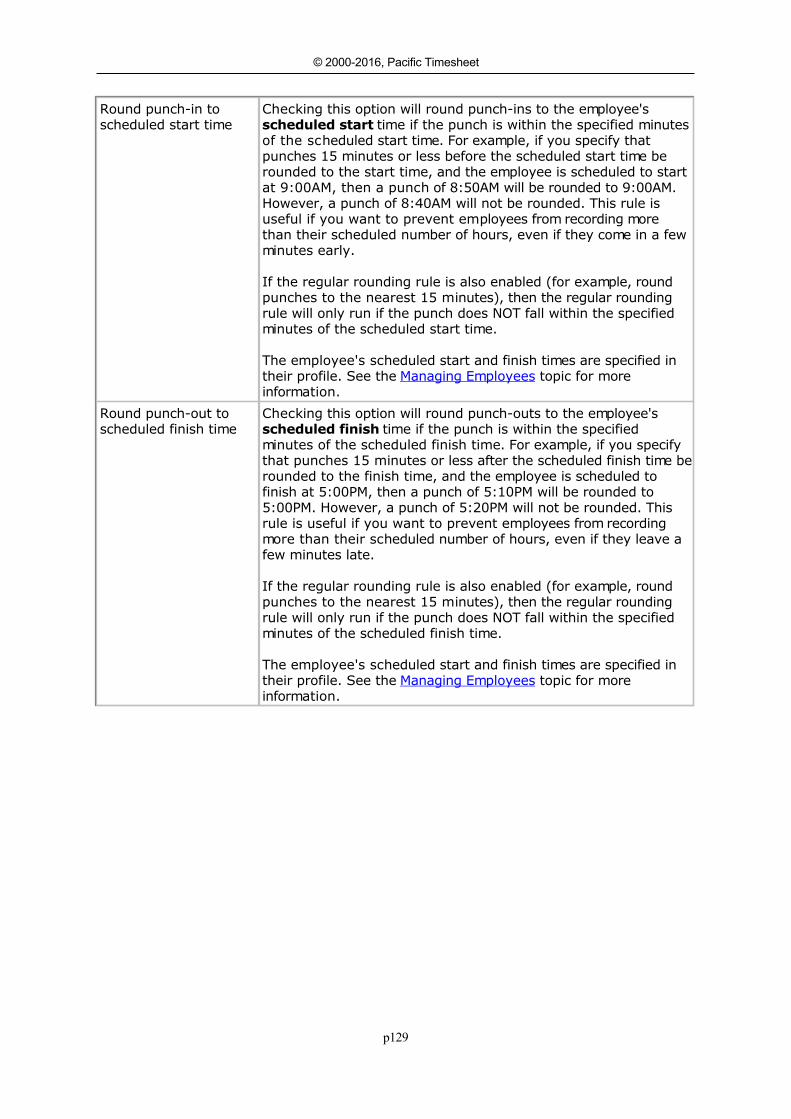
p129
© 2000-2016, Pacific Timesheet
Round punch-in toscheduled start time
Checking this option will round punch-ins to the employee's scheduled start time if the punch is within the specified minutesof the scheduled start time. For example, if you specify thatpunches 15 minutes or less before the scheduled start time berounded to the start time, and the employee is scheduled to startat 9:00AM, then a punch of 8:50AM will be rounded to 9:00AM.However, a punch of 8:40AM will not be rounded. This rule isuseful if you want to prevent employees from recording morethan their scheduled number of hours, even if they come in a fewminutes early.
If the regular rounding rule is also enabled (for example, roundpunches to the nearest 15 minutes), then the regular roundingrule will only run if the punch does NOT fall within the specifiedminutes of the scheduled start time.
The employee's scheduled start and finish times are specified intheir profile. See the Managing Employees topic for moreinformation.
Round punch-out toscheduled finish time
Checking this option will round punch-outs to the employee's scheduled finish time if the punch is within the specifiedminutes of the scheduled finish time. For example, if you specifythat punches 15 minutes or less after the scheduled finish time berounded to the finish time, and the employee is scheduled tofinish at 5:00PM, then a punch of 5:10PM will be rounded to5:00PM. However, a punch of 5:20PM will not be rounded. Thisrule is useful if you want to prevent employees from recordingmore than their scheduled number of hours, even if they leave afew minutes late.
If the regular rounding rule is also enabled (for example, roundpunches to the nearest 15 minutes), then the regular roundingrule will only run if the punch does NOT fall within the specifiedminutes of the scheduled finish time.
The employee's scheduled start and finish times are specified intheir profile. See the Managing Employees topic for moreinformation.
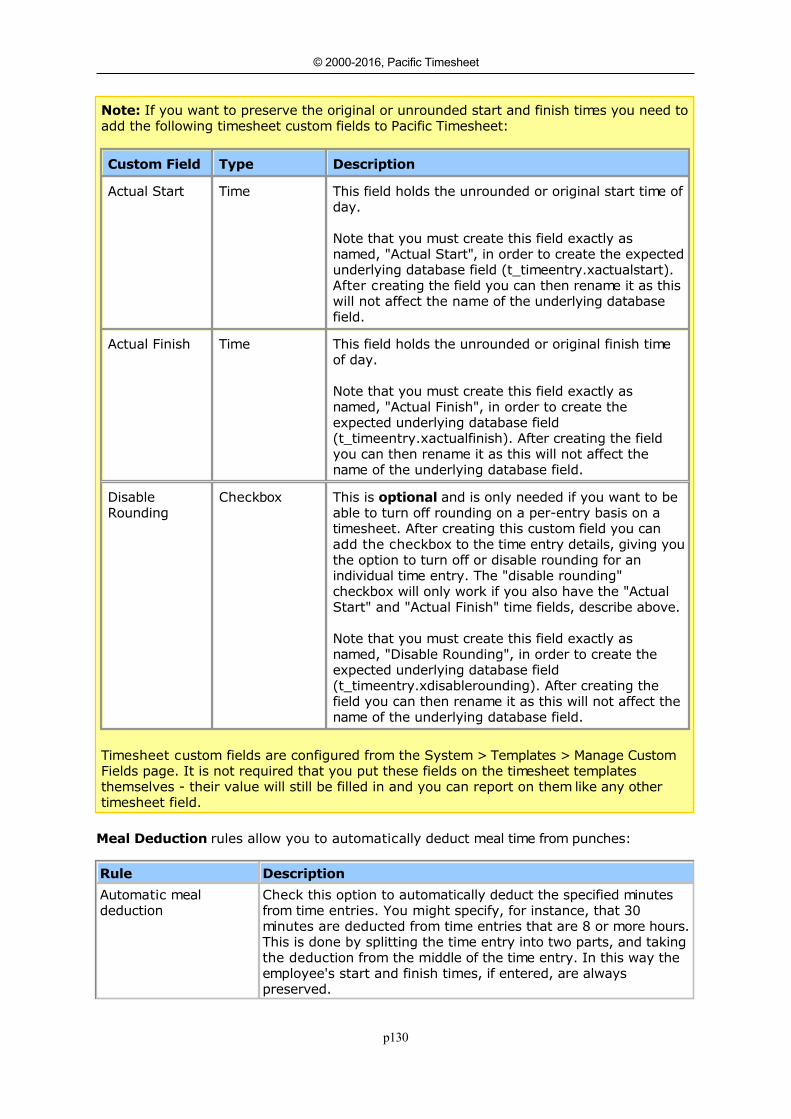
p130
© 2000-2016, Pacific Timesheet
Note: If you want to preserve the original or unrounded start and finish times you need toadd the following timesheet custom fields to Pacific Timesheet:
Custom Field Type Description
Actual Start Time This field holds the unrounded or original start time ofday.
Note that you must create this field exactly asnamed, "Actual Start", in order to create the expectedunderlying database field (t_timeentry.xactualstart).After creating the field you can then rename it as thiswill not affect the name of the underlying databasefield.
Actual Finish Time This field holds the unrounded or original finish timeof day.
Note that you must create this field exactly asnamed, "Actual Finish", in order to create theexpected underlying database field(t_timeentry.xactualfinish). After creating the fieldyou can then rename it as this will not affect thename of the underlying database field.
DisableRounding
Checkbox This is optional and is only needed if you want to beable to turn off rounding on a per-entry basis on atimesheet. After creating this custom field you canadd the checkbox to the time entry details, giving youthe option to turn off or disable rounding for anindividual time entry. The "disable rounding"checkbox will only work if you also have the "ActualStart" and "Actual Finish" time fields, describe above.
Note that you must create this field exactly asnamed, "Disable Rounding", in order to create theexpected underlying database field(t_timeentry.xdisablerounding). After creating thefield you can then rename it as this will not affect thename of the underlying database field.
Timesheet custom fields are configured from the System > Templates > Manage CustomFields page. It is not required that you put these fields on the timesheet templatesthemselves - their value will still be filled in and you can report on them like any othertimesheet field.
Meal Deduction rules allow you to automatically deduct meal time from punches:
Rule Description
Automatic mealdeduction
Check this option to automatically deduct the specified minutesfrom time entries. You might specify, for instance, that 30minutes are deducted from time entries that are 8 or more hours.This is done by splitting the time entry into two parts, and takingthe deduction from the middle of the time entry. In this way theemployee's start and finish times, if entered, are alwayspreserved.
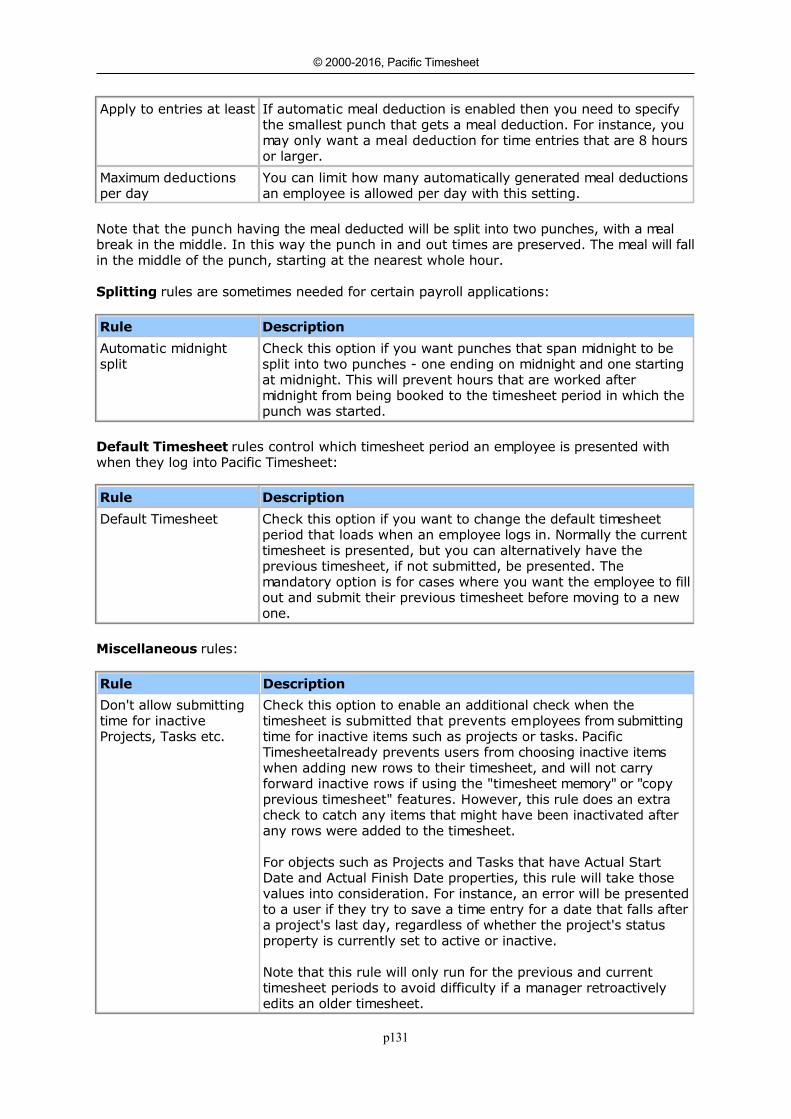
p131
© 2000-2016, Pacific Timesheet
Apply to entries at least If automatic meal deduction is enabled then you need to specifythe smallest punch that gets a meal deduction. For instance, youmay only want a meal deduction for time entries that are 8 hoursor larger.
Maximum deductionsper day
You can limit how many automatically generated meal deductionsan employee is allowed per day with this setting.
Note that the punch having the meal deducted will be split into two punches, with a mealbreak in the middle. In this way the punch in and out times are preserved. The meal will fallin the middle of the punch, starting at the nearest whole hour.
Splitting rules are sometimes needed for certain payroll applications:
Rule Description
Automatic midnightsplit
Check this option if you want punches that span midnight to besplit into two punches - one ending on midnight and one startingat midnight. This will prevent hours that are worked aftermidnight from being booked to the timesheet period in which thepunch was started.
Default Timesheet rules control which timesheet period an employee is presented withwhen they log into Pacific Timesheet:
Rule Description
Default Timesheet Check this option if you want to change the default timesheetperiod that loads when an employee logs in. Normally the currenttimesheet is presented, but you can alternatively have theprevious timesheet, if not submitted, be presented. Themandatory option is for cases where you want the employee to fillout and submit their previous timesheet before moving to a newone.
Miscellaneous rules:
Rule Description
Don't allow submittingtime for inactiveProjects, Tasks etc.
Check this option to enable an additional check when thetimesheet is submitted that prevents employees from submittingtime for inactive items such as projects or tasks. PacificTimesheetalready prevents users from choosing inactive itemswhen adding new rows to their timesheet, and will not carryforward inactive rows if using the "timesheet memory" or "copyprevious timesheet" features. However, this rule does an extracheck to catch any items that might have been inactivated afterany rows were added to the timesheet.
For objects such as Projects and Tasks that have Actual StartDate and Actual Finish Date properties, this rule will take thosevalues into consideration. For instance, an error will be presentedto a user if they try to save a time entry for a date that falls aftera project's last day, regardless of whether the project's statusproperty is currently set to active or inactive.
Note that this rule will only run for the previous and currenttimesheet periods to avoid difficulty if a manager retroactivelyedits an older timesheet.

p132
© 2000-2016, Pacific Timesheet
Autofill Autofill will automatically add work hours to a timesheet when itis submitted to make it match the employee's scheduled hours.For this to work the employee's scheduled hours per weekproperty must be set in their profile. The adjustment work entrywill be added to the last day of the timesheet period.
This setting is useful for salaried employees who may be onlytracking leave, but the back-end payroll system requires theirtotal hours total to, say, 40 each week.
-o-
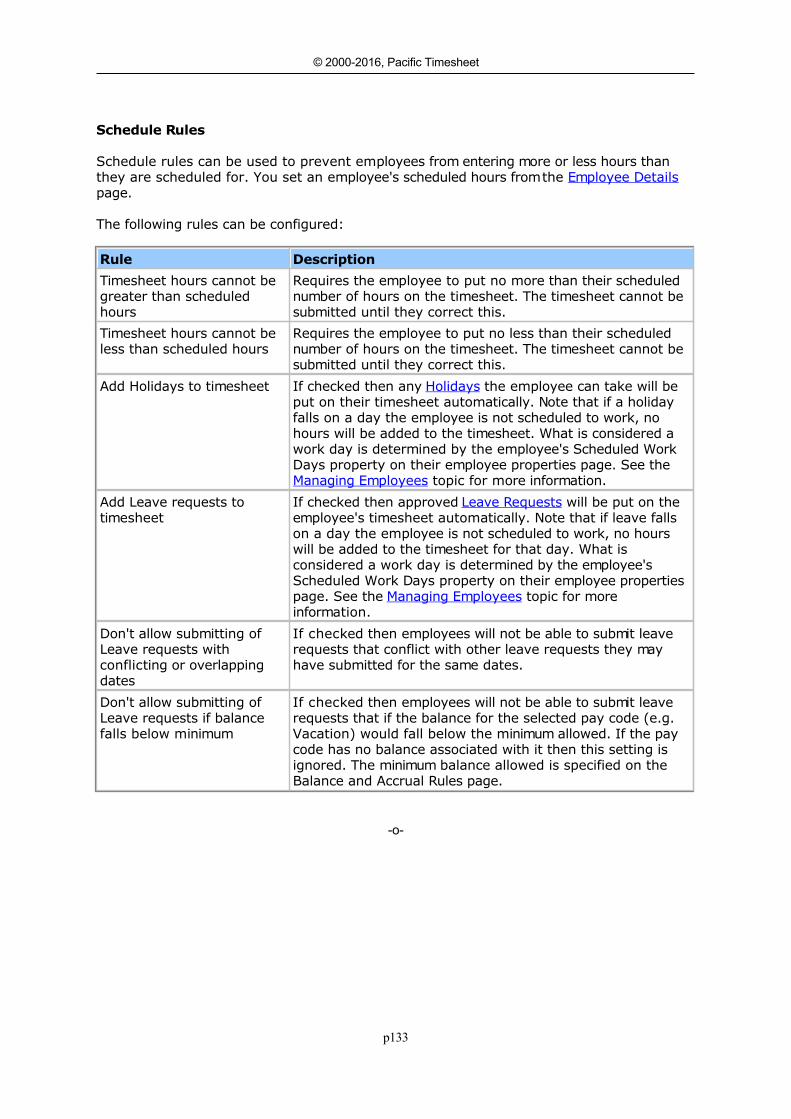
p133
© 2000-2016, Pacific Timesheet
Schedule RulesSchedule Rules
Schedule rules can be used to prevent employees from entering more or less hours thanthey are scheduled for. You set an employee's scheduled hours from the Employee Detailspage.
The following rules can be configured:
Rule Description
Timesheet hours cannot begreater than scheduledhours
Requires the employee to put no more than their schedulednumber of hours on the timesheet. The timesheet cannot besubmitted until they correct this.
Timesheet hours cannot beless than scheduled hours
Requires the employee to put no less than their schedulednumber of hours on the timesheet. The timesheet cannot besubmitted until they correct this.
Add Holidays to timesheet If checked then any Holidays the employee can take will beput on their timesheet automatically. Note that if a holidayfalls on a day the employee is not scheduled to work, nohours will be added to the timesheet. What is considered awork day is determined by the employee's Scheduled WorkDays property on their employee properties page. See the Managing Employees topic for more information.
Add Leave requests totimesheet
If checked then approved Leave Requests will be put on theemployee's timesheet automatically. Note that if leave fallson a day the employee is not scheduled to work, no hourswill be added to the timesheet for that day. What isconsidered a work day is determined by the employee'sScheduled Work Days property on their employee propertiespage. See the Managing Employees topic for moreinformation.
Don't allow submitting ofLeave requests withconflicting or overlappingdates
If checked then employees will not be able to submit leaverequests that conflict with other leave requests they mayhave submitted for the same dates.
Don't allow submitting ofLeave requests if balancefalls below minimum
If checked then employees will not be able to submit leaverequests that if the balance for the selected pay code (e.g.Vacation) would fall below the minimum allowed. If the paycode has no balance associated with it then this setting isignored. The minimum balance allowed is specified on theBalance and Accrual Rules page.
-o-
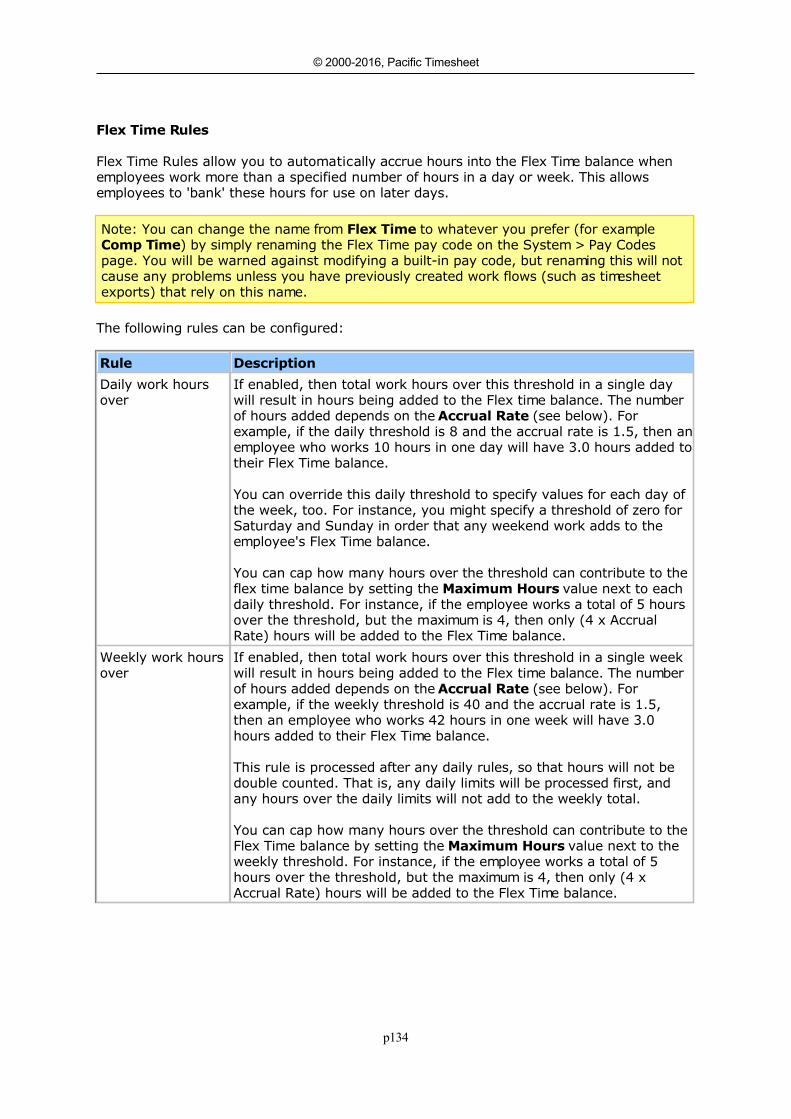
p134
© 2000-2016, Pacific Timesheet
Flex Time RulesFlex Time Rules
Flex Time Rules allow you to automatically accrue hours into the Flex Time balance whenemployees work more than a specified number of hours in a day or week. This allowsemployees to 'bank' these hours for use on later days.
Note: You can change the name from Flex Time to whatever you prefer (for exampleComp Time) by simply renaming the Flex Time pay code on the System > Pay Codespage. You will be warned against modifying a built-in pay code, but renaming this will notcause any problems unless you have previously created work flows (such as timesheetexports) that rely on this name.
The following rules can be configured:
Rule Description
Daily work hoursover
If enabled, then total work hours over this threshold in a single daywill result in hours being added to the Flex time balance. The numberof hours added depends on the Accrual Rate (see below). Forexample, if the daily threshold is 8 and the accrual rate is 1.5, then anemployee who works 10 hours in one day will have 3.0 hours added totheir Flex Time balance.
You can override this daily threshold to specify values for each day ofthe week, too. For instance, you might specify a threshold of zero forSaturday and Sunday in order that any weekend work adds to theemployee's Flex Time balance.
You can cap how many hours over the threshold can contribute to theflex time balance by setting the Maximum Hours value next to eachdaily threshold. For instance, if the employee works a total of 5 hoursover the threshold, but the maximum is 4, then only (4 x AccrualRate) hours will be added to the Flex Time balance.
Weekly work hoursover
If enabled, then total work hours over this threshold in a single weekwill result in hours being added to the Flex time balance. The numberof hours added depends on the Accrual Rate (see below). Forexample, if the weekly threshold is 40 and the accrual rate is 1.5,then an employee who works 42 hours in one week will have 3.0hours added to their Flex Time balance.
This rule is processed after any daily rules, so that hours will not bedouble counted. That is, any daily limits will be processed first, andany hours over the daily limits will not add to the weekly total.
You can cap how many hours over the threshold can contribute to theFlex Time balance by setting the Maximum Hours value next to theweekly threshold. For instance, if the employee works a total of 5hours over the threshold, but the maximum is 4, then only (4 xAccrual Rate) hours will be added to the Flex Time balance.
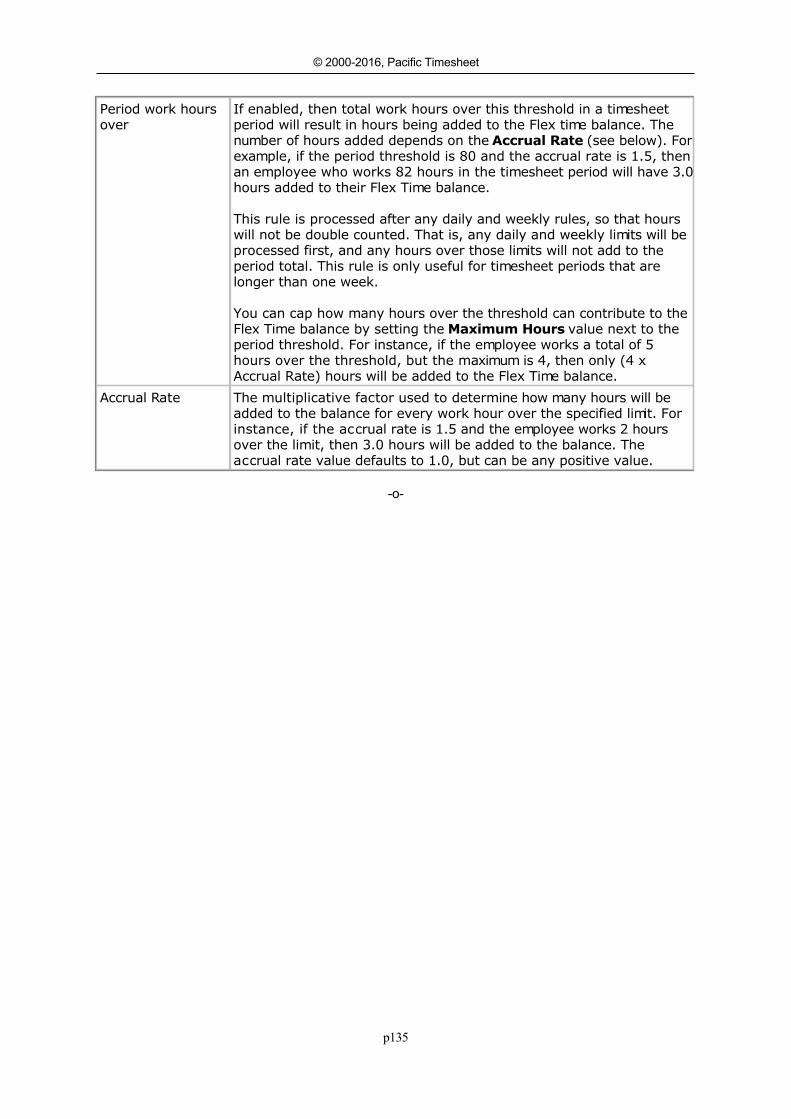
p135
© 2000-2016, Pacific Timesheet
Period work hoursover
If enabled, then total work hours over this threshold in a timesheetperiod will result in hours being added to the Flex time balance. Thenumber of hours added depends on the Accrual Rate (see below). Forexample, if the period threshold is 80 and the accrual rate is 1.5, thenan employee who works 82 hours in the timesheet period will have 3.0hours added to their Flex Time balance.
This rule is processed after any daily and weekly rules, so that hourswill not be double counted. That is, any daily and weekly limits will beprocessed first, and any hours over those limits will not add to theperiod total. This rule is only useful for timesheet periods that arelonger than one week.
You can cap how many hours over the threshold can contribute to theFlex Time balance by setting the Maximum Hours value next to theperiod threshold. For instance, if the employee works a total of 5hours over the threshold, but the maximum is 4, then only (4 xAccrual Rate) hours will be added to the Flex Time balance.
Accrual Rate The multiplicative factor used to determine how many hours will beadded to the balance for every work hour over the specified limit. Forinstance, if the accrual rate is 1.5 and the employee works 2 hoursover the limit, then 3.0 hours will be added to the balance. Theaccrual rate value defaults to 1.0, but can be any positive value.
-o-

p136
© 2000-2016, Pacific Timesheet
Balance and Accrual RulesBalance and Accrual Rules
Balance and accrual rules control how balance limits and accruals are handled. Balances areassociated with Pay Codes, and can be enabled from the Pay Code properties page.
Note: If automatic accruals are enabled and you are not seeing the accruals you expect,please refer to the troubleshooting section below.
The following rules can be configured for each enabled balance:
Rule Description
Minimum Balance The minimum value for this balance, in hours. Employees willbe alerted when their timesheet puts a balance below thisvalue, and they will not be able to submit the timesheet.
Maximum Balance The maximum value for this balance, in hours. The balancewill be capped at this value. Note that if accrual is enabled(see below) this option will instead be entered in the accrualtable.
Enable Accrual Enables automatic accrual on this balance. Automatic accrualmeans the system will automatically accrue hours andperform rollovers to the employee's balance on a regularinterval.
Accrual Period If accrual is enabled you should choose the appropriateaccrual period. The accrual will happen before midnight on thelast day of the period, making it available for the first day ofnext period. You can choose from any period you have definedin the System > General > Time Periods page, as well as thefollowing special time periods:
Hourly - For Every Hour Worked
Hours are accrued before midnight on the last day of thetimesheet period, based on the number of work hoursrecorded on the timesheet. The accrual calculation isperformed when the timesheet is submitted.
Yearly - Employee anniversary
Hours are accrued at end of the anniversary year, in whichthe anniversary year starts on the month and day of theemployee's first day of employment. For instance, if theemployee started working on March 28, 2012, thenanniversary years would look like:
March 28, 2012 to March 27, 2013 March 28, 2013 to March 27, 2014 etc.
The accrual would occur before midnight on March 27 of eachperiod for this employee.
When you enable accrual an accrual rate table will appear. You can specify accrual rates,etc. that vary by the number of years employed (if you don't have values that vary for thenumber of years employed then you will only need one row in the accrual table). You can

p137
© 2000-2016, Pacific Timesheet
click the Add button to add as many rows as you need. Each row in the accrual table canhave the following properties:
Property Description
Years Employed The number of years of employment that this rate starts totake effect. If you only have one row in your accrual tablethis property will be hidden and default to zero, meaning therate will apply to all employees using this policy, regardless oftheir years of employment.
The number of years of employment is determined by theemployee's First Day property (see the Employees topic formore details). If the employee's first day is not set then it isassumed to be zero years.
Accrual Rate The accrual rate for this balance, in hours. Accruals will beautomatically granted before midnight on the last day of thespecified accrual period.
Max. Work This column only appears if the accrual period is set to"Hourly - For Every Hour Worked". This is the maximumnumber of work hours to consider when calculating theaccrual, for example 40 for a weekly timesheet period, or 80for a biweekly timesheet period. Leave this value blank ifthere is no maximum.
Maximum The cap or maximum hours the balance can reach. Leave thisvalue blank if there is no maximum.
Rollover The maximum hours that can be carried forward each rolloverperiod for this balance. The balance will be capped at thisvalue just before midnight on the last day of the rolloverperiod (generally December 31, but you can choose anyrollover period you need to, as described below). Leave thisvalue blank if there is no rollover.
You can specify several accrual/rollover options:
Rule Description
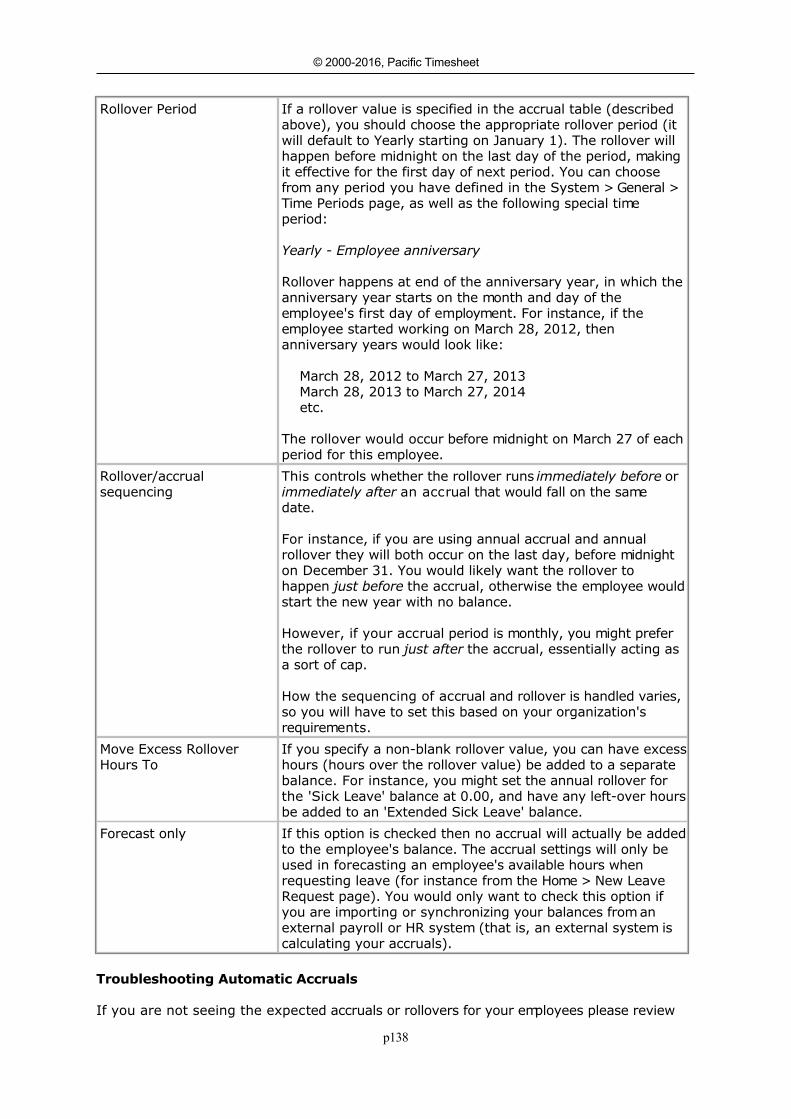
p138
© 2000-2016, Pacific Timesheet
Rollover Period If a rollover value is specified in the accrual table (describedabove), you should choose the appropriate rollover period (itwill default to Yearly starting on January 1). The rollover willhappen before midnight on the last day of the period, makingit effective for the first day of next period. You can choosefrom any period you have defined in the System > General >Time Periods page, as well as the following special timeperiod:
Yearly - Employee anniversary
Rollover happens at end of the anniversary year, in which theanniversary year starts on the month and day of theemployee's first day of employment. For instance, if theemployee started working on March 28, 2012, thenanniversary years would look like:
March 28, 2012 to March 27, 2013 March 28, 2013 to March 27, 2014 etc.
The rollover would occur before midnight on March 27 of eachperiod for this employee.
Rollover/accrualsequencing
This controls whether the rollover runs immediately before orimmediately after an accrual that would fall on the samedate.
For instance, if you are using annual accrual and annualrollover they will both occur on the last day, before midnighton December 31. You would likely want the rollover tohappen just before the accrual, otherwise the employee wouldstart the new year with no balance.
However, if your accrual period is monthly, you might preferthe rollover to run just after the accrual, essentially acting asa sort of cap.
How the sequencing of accrual and rollover is handled varies,so you will have to set this based on your organization'srequirements.
Move Excess RolloverHours To
If you specify a non-blank rollover value, you can have excesshours (hours over the rollover value) be added to a separatebalance. For instance, you might set the annual rollover forthe 'Sick Leave' balance at 0.00, and have any left-over hoursbe added to an 'Extended Sick Leave' balance.
Forecast only If this option is checked then no accrual will actually be addedto the employee's balance. The accrual settings will only beused in forecasting an employee's available hours whenrequesting leave (for instance from the Home > New LeaveRequest page). You would only want to check this option ifyou are importing or synchronizing your balances from anexternal payroll or HR system (that is, an external system iscalculating your accruals).
Troubleshooting Automatic Accruals
If you are not seeing the expected accruals or rollovers for your employees please review
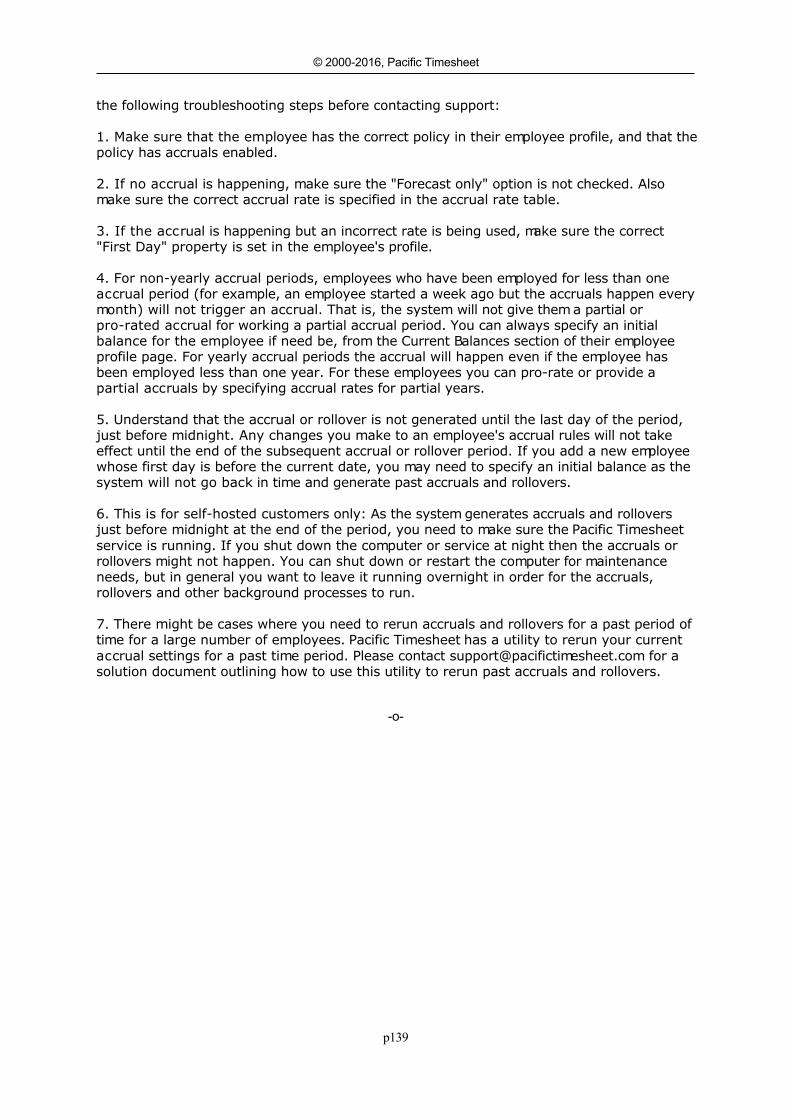
p139
© 2000-2016, Pacific Timesheet
the following troubleshooting steps before contacting support:
1. Make sure that the employee has the correct policy in their employee profile, and that thepolicy has accruals enabled.
2. If no accrual is happening, make sure the "Forecast only" option is not checked. Alsomake sure the correct accrual rate is specified in the accrual rate table.
3. If the accrual is happening but an incorrect rate is being used, make sure the correct"First Day" property is set in the employee's profile.
4. For non-yearly accrual periods, employees who have been employed for less than oneaccrual period (for example, an employee started a week ago but the accruals happen everymonth) will not trigger an accrual. That is, the system will not give them a partial orpro-rated accrual for working a partial accrual period. You can always specify an initialbalance for the employee if need be, from the Current Balances section of their employeeprofile page. For yearly accrual periods the accrual will happen even if the employee hasbeen employed less than one year. For these employees you can pro-rate or provide apartial accruals by specifying accrual rates for partial years.
5. Understand that the accrual or rollover is not generated until the last day of the period,just before midnight. Any changes you make to an employee's accrual rules will not takeeffect until the end of the subsequent accrual or rollover period. If you add a new employeewhose first day is before the current date, you may need to specify an initial balance as thesystem will not go back in time and generate past accruals and rollovers.
6. This is for self-hosted customers only: As the system generates accruals and rolloversjust before midnight at the end of the period, you need to make sure the Pacific Timesheetservice is running. If you shut down the computer or service at night then the accruals orrollovers might not happen. You can shut down or restart the computer for maintenanceneeds, but in general you want to leave it running overnight in order for the accruals,rollovers and other background processes to run.
7. There might be cases where you need to rerun accruals and rollovers for a past period oftime for a large number of employees. Pacific Timesheet has a utility to rerun your currentaccrual settings for a past time period. Please contact [email protected] for asolution document outlining how to use this utility to rerun past accruals and rollovers.
-o-
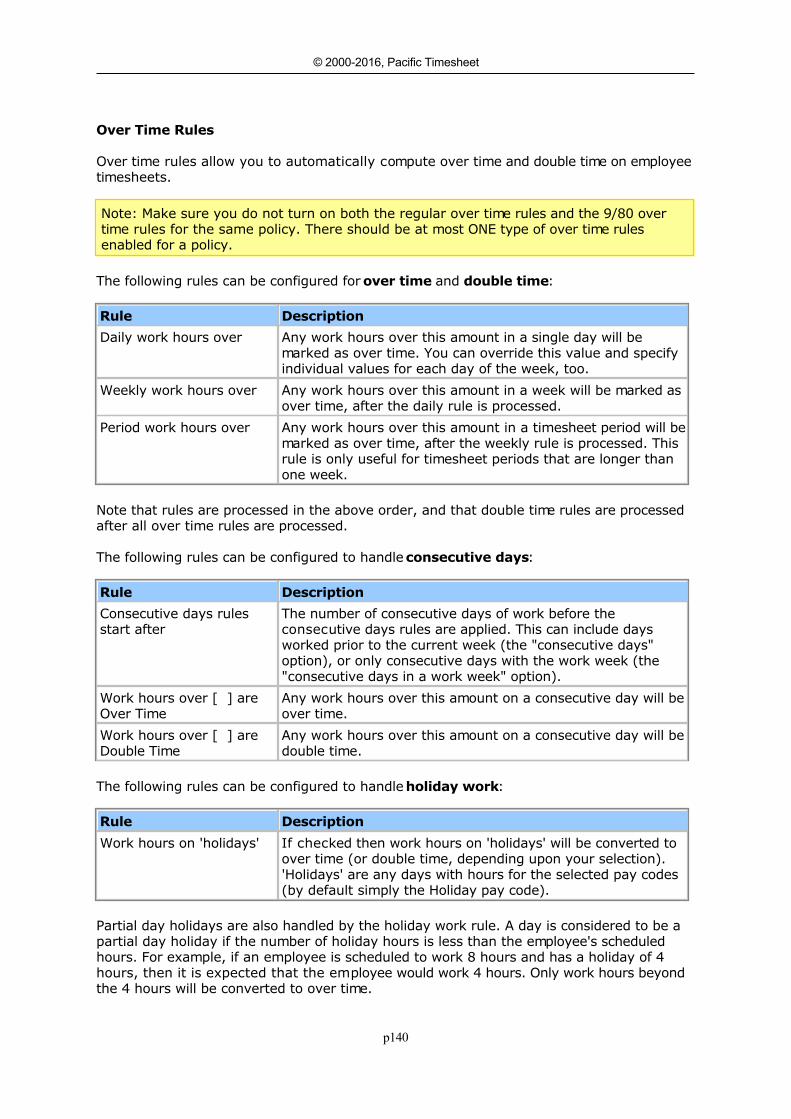
p140
© 2000-2016, Pacific Timesheet
Over Time RulesOver Time Rules
Over time rules allow you to automatically compute over time and double time on employeetimesheets.
Note: Make sure you do not turn on both the regular over time rules and the 9/80 overtime rules for the same policy. There should be at most ONE type of over time rulesenabled for a policy.
The following rules can be configured for over time and double time:
Rule Description
Daily work hours over Any work hours over this amount in a single day will bemarked as over time. You can override this value and specifyindividual values for each day of the week, too.
Weekly work hours over Any work hours over this amount in a week will be marked asover time, after the daily rule is processed.
Period work hours over Any work hours over this amount in a timesheet period will bemarked as over time, after the weekly rule is processed. Thisrule is only useful for timesheet periods that are longer thanone week.
Note that rules are processed in the above order, and that double time rules are processedafter all over time rules are processed.
The following rules can be configured to handle consecutive days:
Rule Description
Consecutive days rulesstart after
The number of consecutive days of work before theconsecutive days rules are applied. This can include daysworked prior to the current week (the "consecutive days"option), or only consecutive days with the work week (the"consecutive days in a work week" option).
Work hours over [ ] areOver Time
Any work hours over this amount on a consecutive day will beover time.
Work hours over [ ] areDouble Time
Any work hours over this amount on a consecutive day will bedouble time.
The following rules can be configured to handle holiday work:
Rule Description
Work hours on 'holidays' If checked then work hours on 'holidays' will be converted toover time (or double time, depending upon your selection).'Holidays' are any days with hours for the selected pay codes(by default simply the Holiday pay code).
Partial day holidays are also handled by the holiday work rule. A day is considered to be apartial day holiday if the number of holiday hours is less than the employee's scheduledhours. For example, if an employee is scheduled to work 8 hours and has a holiday of 4hours, then it is expected that the employee would work 4 hours. Only work hours beyondthe 4 hours will be converted to over time.
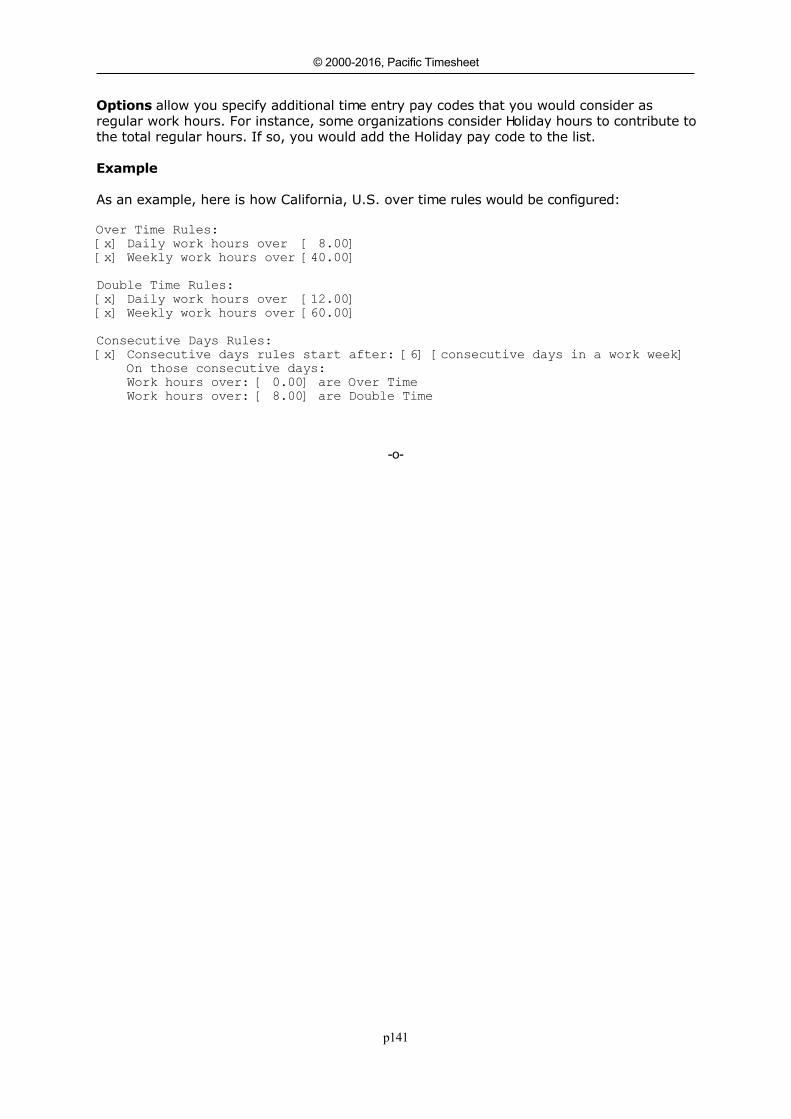
p141
© 2000-2016, Pacific Timesheet
Options allow you specify additional time entry pay codes that you would consider asregular work hours. For instance, some organizations consider Holiday hours to contribute tothe total regular hours. If so, you would add the Holiday pay code to the list.
Example
As an example, here is how California, U.S. over time rules would be configured:
Over Time Rules:
[x] Daily work hours over [ 8.00]
[x] Weekly work hours over [40.00]
Double Time Rules:
[x] Daily work hours over [12.00]
[x] Weekly work hours over [60.00]
Consecutive Days Rules:
[x] Consecutive days rules start after: [6] [consecutive days in a work week]
On those consecutive days:
Work hours over: [ 0.00] are Over Time
Work hours over: [ 8.00] are Double Time
-o-
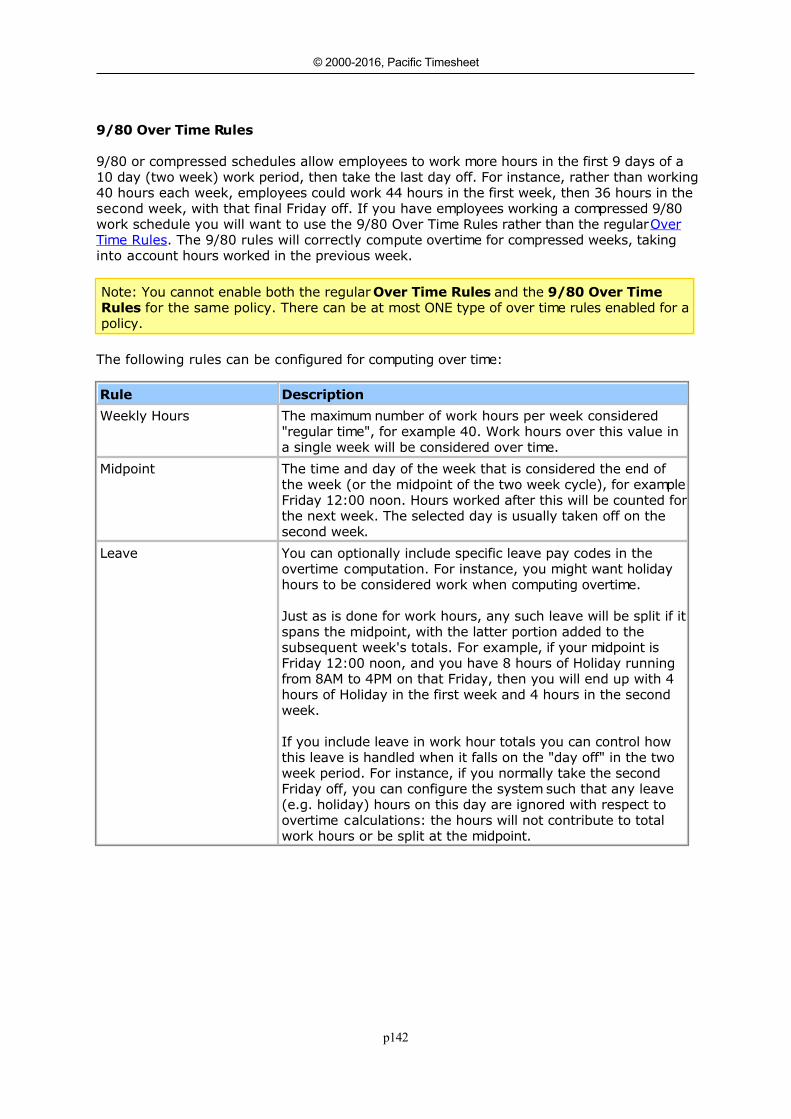
p142
© 2000-2016, Pacific Timesheet
9/80 Over Time Rules9/80 Over Time Rules
9/80 or compressed schedules allow employees to work more hours in the first 9 days of a10 day (two week) work period, then take the last day off. For instance, rather than working40 hours each week, employees could work 44 hours in the first week, then 36 hours in thesecond week, with that final Friday off. If you have employees working a compressed 9/80work schedule you will want to use the 9/80 Over Time Rules rather than the regular OverTime Rules. The 9/80 rules will correctly compute overtime for compressed weeks, takinginto account hours worked in the previous week.
Note: You cannot enable both the regular Over Time Rules and the 9/80 Over TimeRules for the same policy. There can be at most ONE type of over time rules enabled for apolicy.
The following rules can be configured for computing over time:
Rule Description
Weekly Hours The maximum number of work hours per week considered"regular time", for example 40. Work hours over this value ina single week will be considered over time.
Midpoint The time and day of the week that is considered the end ofthe week (or the midpoint of the two week cycle), for exampleFriday 12:00 noon. Hours worked after this will be counted forthe next week. The selected day is usually taken off on thesecond week.
Leave You can optionally include specific leave pay codes in theovertime computation. For instance, you might want holidayhours to be considered work when computing overtime.
Just as is done for work hours, any such leave will be split if itspans the midpoint, with the latter portion added to thesubsequent week's totals. For example, if your midpoint isFriday 12:00 noon, and you have 8 hours of Holiday runningfrom 8AM to 4PM on that Friday, then you will end up with 4hours of Holiday in the first week and 4 hours in the secondweek.
If you include leave in work hour totals you can control howthis leave is handled when it falls on the "day off" in the twoweek period. For instance, if you normally take the secondFriday off, you can configure the system such that any leave(e.g. holiday) hours on this day are ignored with respect toovertime calculations: the hours will not contribute to totalwork hours or be split at the midpoint.

p143
© 2000-2016, Pacific Timesheet
Important configuration notes:
1. If employees are not recording in/out times (just hours) then you need to specify theemployee's "Scheduled Start" property in their profile for the compressed overtime ruleto work properly. This is also true if you are including leave in overtime calculations. Thescheduled start value is specified on the Employees properties page for each employee (orcan be set in bulk via an import file).
2. If including leave in your overtime calculations you need to enable the database columnfor each leave pay code included. This is required in order for any split leave (leave thatfalls on the midpoint) to be stored properly. You enable the database column by editingeach appropriate pay code on the Systems > Pay Codes page, clicking the Options link inthe lower right corner, and checking the "Has report column" property.
-o-
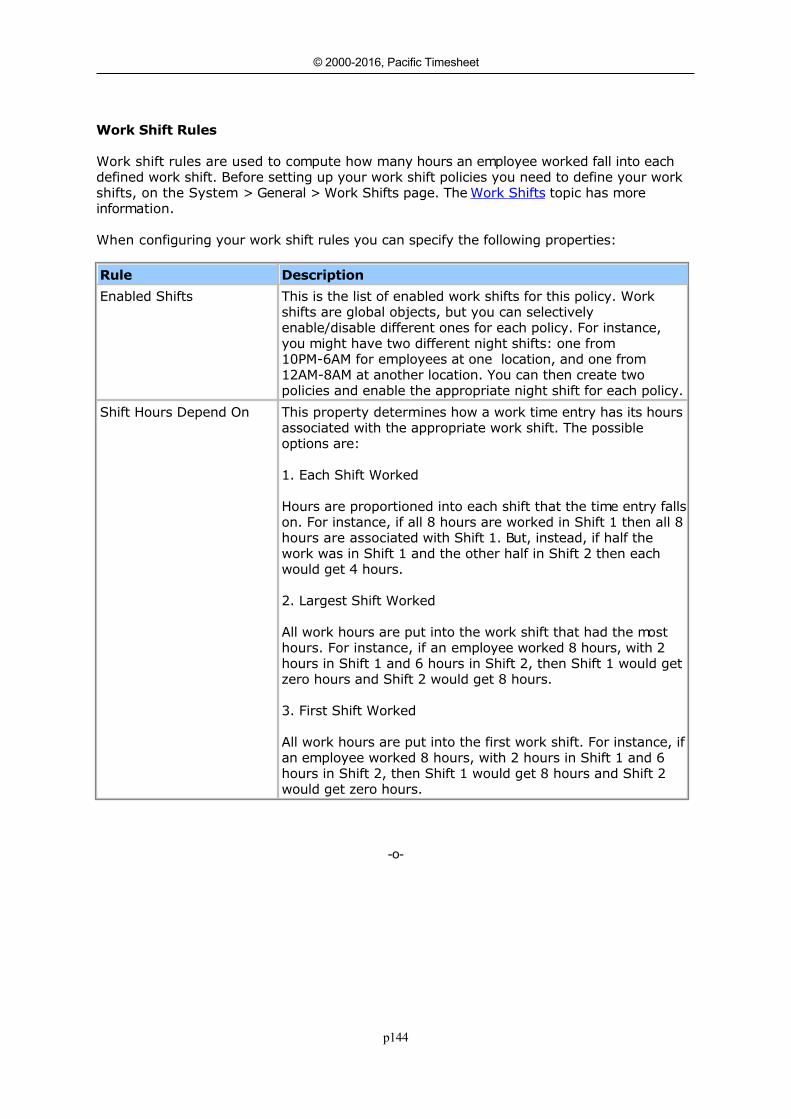
p144
© 2000-2016, Pacific Timesheet
Work Shift RulesWork Shift Rules
Work shift rules are used to compute how many hours an employee worked fall into eachdefined work shift. Before setting up your work shift policies you need to define your workshifts, on the System > General > Work Shifts page. The Work Shifts topic has moreinformation.
When configuring your work shift rules you can specify the following properties:
Rule Description
Enabled Shifts This is the list of enabled work shifts for this policy. Workshifts are global objects, but you can selectivelyenable/disable different ones for each policy. For instance,you might have two different night shifts: one from10PM-6AM for employees at one location, and one from12AM-8AM at another location. You can then create twopolicies and enable the appropriate night shift for each policy.
Shift Hours Depend On This property determines how a work time entry has its hoursassociated with the appropriate work shift. The possibleoptions are:
1. Each Shift Worked
Hours are proportioned into each shift that the time entry fallson. For instance, if all 8 hours are worked in Shift 1 then all 8hours are associated with Shift 1. But, instead, if half thework was in Shift 1 and the other half in Shift 2 then eachwould get 4 hours.
2. Largest Shift Worked
All work hours are put into the work shift that had the mosthours. For instance, if an employee worked 8 hours, with 2hours in Shift 1 and 6 hours in Shift 2, then Shift 1 would getzero hours and Shift 2 would get 8 hours.
3. First Shift Worked
All work hours are put into the first work shift. For instance, ifan employee worked 8 hours, with 2 hours in Shift 1 and 6hours in Shift 2, then Shift 1 would get 8 hours and Shift 2would get zero hours.
-o-
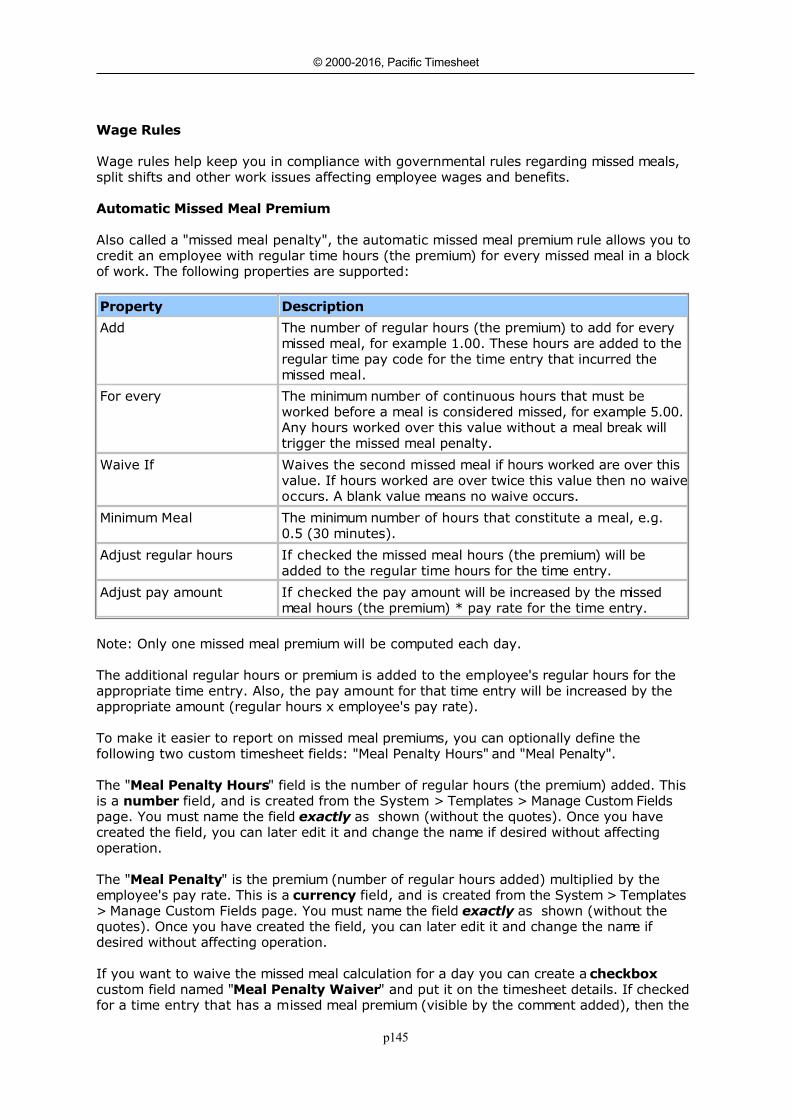
p145
© 2000-2016, Pacific Timesheet
Wage RulesWage Rules
Wage rules help keep you in compliance with governmental rules regarding missed meals,split shifts and other work issues affecting employee wages and benefits.
Automatic Missed Meal Premium
Also called a "missed meal penalty", the automatic missed meal premium rule allows you tocredit an employee with regular time hours (the premium) for every missed meal in a blockof work. The following properties are supported:
Property Description
Add The number of regular hours (the premium) to add for everymissed meal, for example 1.00. These hours are added to theregular time pay code for the time entry that incurred themissed meal.
For every The minimum number of continuous hours that must beworked before a meal is considered missed, for example 5.00.Any hours worked over this value without a meal break willtrigger the missed meal penalty.
Waive If Waives the second missed meal if hours worked are over thisvalue. If hours worked are over twice this value then no waiveoccurs. A blank value means no waive occurs.
Minimum Meal The minimum number of hours that constitute a meal, e.g.0.5 (30 minutes).
Adjust regular hours If checked the missed meal hours (the premium) will beadded to the regular time hours for the time entry.
Adjust pay amount If checked the pay amount will be increased by the missedmeal hours (the premium) * pay rate for the time entry.
Note: Only one missed meal premium will be computed each day.
The additional regular hours or premium is added to the employee's regular hours for theappropriate time entry. Also, the pay amount for that time entry will be increased by theappropriate amount (regular hours x employee's pay rate).
To make it easier to report on missed meal premiums, you can optionally define thefollowing two custom timesheet fields: "Meal Penalty Hours" and "Meal Penalty".
The "Meal Penalty Hours" field is the number of regular hours (the premium) added. Thisis a number field, and is created from the System > Templates > Manage Custom Fieldspage. You must name the field exactly as shown (without the quotes). Once you havecreated the field, you can later edit it and change the name if desired without affectingoperation.
The "Meal Penalty" is the premium (number of regular hours added) multiplied by theemployee's pay rate. This is a currency field, and is created from the System > Templates> Manage Custom Fields page. You must name the field exactly as shown (without thequotes). Once you have created the field, you can later edit it and change the name ifdesired without affecting operation.
If you want to waive the missed meal calculation for a day you can create a checkboxcustom field named "Meal Penalty Waiver" and put it on the timesheet details. If checkedfor a time entry that has a missed meal premium (visible by the comment added), then the

p146
© 2000-2016, Pacific Timesheet
premium will be removed. You must name the field exactly as shown (without the quotes).Once you have created the field, you can later edit it and change the name if desiredwithout affecting operation.
Calculation Notes
Meal penalties are computed using a California lab law approach in which total work hoursare divided into blocks of, in the case of California, 5 hours. This can result in somewhatsurprising behavior. For instance, let's suppose an employee works the following hours in aday:
In Out Hours
9:00AM 12:00PM 3.00
12:45PM 6:45PM 6.00
You might expect that the employee would be granted a missed meal premium for thesecond punch as it exceeds 5 hours. This would not be the case, however. The first 5 hourwork block starts at 9:00AM and goes to 2:45PM (accounting for the meal break from12:00PM to 12:45PM). As there was a meal break in that 5 hour block no penalty is granted.The next 5 hour block starts at 2:45PM (not 12:45PM!). As the employee clocked out at6:45PM there are only 4 hours in this block, so no penalty is granted.
Missed Meal Premium Example
A typical example would be that of California:
Add: 1.00For Every: 5.00Waive If:Minimum Meal: 0.50
To waive the second meal in California the configuration would be:
Add: 1.00For Every: 5.00Waive If: 6.00Minimum Meal: 0.50
Automatic Split Shift Premium
The automatic split shift premium rule allows you to credit an employee with extra pay (thepremium) for every split shift worked. A split shift is one in which a day's work is dividedinto two or more parts separated typically by at least one hour. The following properties aresupported:
Property Description
Shift separation The number of hours between two work shifts that, if greaterthan this value, would indicate a split shift. In other words, iftwo work shifts in a single day have a time separation greaterthan this value then they are considered a split shift.
Minimum wage The minimum wage used in computing the premium. Thepremium is computed according to the following formula:
Premium = M - ((E - M) x H)
Where M = Minimum pay, E = Employee's hourly rate and H =the number of hours worked.
p147
© 2000-2016, Pacific Timesheet
The additional pay or premium is added to the employee's pay amount for the appropriatetime entry.
To make it easier to report on split shift premiums, the additional pay or premium is alsoadded to a timesheet custom field named "Split Shift Premium". You can create this fieldfrom the System > Templates > Manage Custom Fields page. You must create a currencyfield named exactly as shown (without the quotes). Once you have created the field, youcan later edit it and change the name if desired without affecting operation.
If you want to waive the split shift calculation for a day you can create a checkbox customfield named "Split Shift Waiver" and put it on the timesheet details. If checked for a timeentry that has a split shift premium (visible by the comment added), then the premium willbe removed. You must name the field exactly as shown (without the quotes). Once youhave created the field, you can later edit it and change the name if desired without affectingoperation.
Split Shift Example:
A typical example would be a shift separation of 1 hour. Let's presume an employee workstwo shifts with more than 1 hour between them, for example:
8:00AM - 12:00PM - 4 Hours2:00 PM - 6:00PM - 4 Hours
If the employee has a pay rate of $10.00/hour, and the minimum wage is set to$12.00/hour, then the premium or additional wage would be:
Premium = 12 - ((10 - 12) * 8) = 28
The employee would gain an additional $28.00 pay.
-o-

p148
© 2000-2016, Pacific Timesheet
Absence Points RulesAbsence Points Rules
Absence points rules will automatically compute demerit points based on employeetardiness and absence. You can tailor the rules so that different points can be added basedon coming in late, leaving early, or for different types of absences (e.g. excused sick leavemight be given different points than unexcused sick leave).
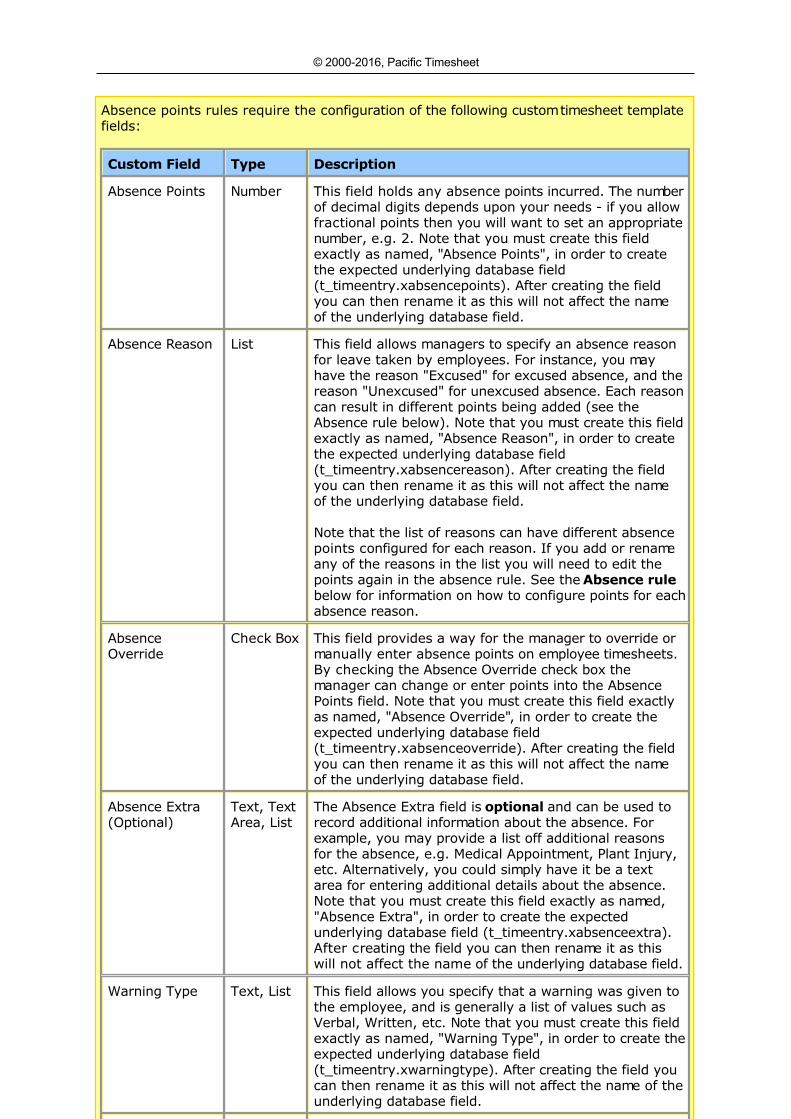
p149
© 2000-2016, Pacific Timesheet
Absence points rules require the configuration of the following custom timesheet templatefields:
Custom Field Type Description
Absence Points Number This field holds any absence points incurred. The numberof decimal digits depends upon your needs - if you allowfractional points then you will want to set an appropriatenumber, e.g. 2. Note that you must create this fieldexactly as named, "Absence Points", in order to createthe expected underlying database field(t_timeentry.xabsencepoints). After creating the fieldyou can then rename it as this will not affect the nameof the underlying database field.
Absence Reason List This field allows managers to specify an absence reasonfor leave taken by employees. For instance, you mayhave the reason "Excused" for excused absence, and thereason "Unexcused" for unexcused absence. Each reasoncan result in different points being added (see theAbsence rule below). Note that you must create this fieldexactly as named, "Absence Reason", in order to createthe expected underlying database field(t_timeentry.xabsencereason). After creating the fieldyou can then rename it as this will not affect the nameof the underlying database field.
Note that the list of reasons can have different absencepoints configured for each reason. If you add or renameany of the reasons in the list you will need to edit thepoints again in the absence rule. See the Absence rulebelow for information on how to configure points for eachabsence reason.
AbsenceOverride
Check Box This field provides a way for the manager to override ormanually enter absence points on employee timesheets.By checking the Absence Override check box themanager can change or enter points into the AbsencePoints field. Note that you must create this field exactlyas named, "Absence Override", in order to create theexpected underlying database field(t_timeentry.xabsenceoverride). After creating the fieldyou can then rename it as this will not affect the nameof the underlying database field.
Absence Extra(Optional)
Text, TextArea, List
The Absence Extra field is optional and can be used torecord additional information about the absence. Forexample, you may provide a list off additional reasonsfor the absence, e.g. Medical Appointment, Plant Injury,etc. Alternatively, you could simply have it be a textarea for entering additional details about the absence.Note that you must create this field exactly as named,"Absence Extra", in order to create the expectedunderlying database field (t_timeentry.xabsenceextra).After creating the field you can then rename it as thiswill not affect the name of the underlying database field.
Warning Type Text, List This field allows you specify that a warning was given tothe employee, and is generally a list of values such asVerbal, Written, etc. Note that you must create this fieldexactly as named, "Warning Type", in order to create theexpected underlying database field(t_timeentry.xwarningtype). After creating the field youcan then rename it as this will not affect the name of theunderlying database field.
Warning Points Number This field holds the absence points for the date of thewarning. The number of decimal digits should matchwhat you used for Absence Points. Note that you mustcreate this field exactly as named, "Warning Points", inorder to create the expected underlying database field(t_timeentry.xwarningpoints). After creating the fieldyou can then rename it as this will not affect the nameof the underlying database field.
WarningDescription
Text, TextArea, List
This field allows you to enter a description of thewarning given to the employee. Note that you mustcreate this field exactly as named, "WarningDescription", in order to create the expected underlyingdatabase field (t_timeentry.xwarningdescription). Aftercreating the field you can then rename it as this will notaffect the name of the underlying database field.
Note that if creating a text area you should limit the sizeto no more than 255 characters, as it is quite easy tobump into the limits of a database's record size (e.g. 8Kfor Microsoft SQL Server) if you create a few 2000character text area fields. You will still be able to recordadditional notes about the warning as these will go intothe time entry's notes field.
Timesheet custom fields are configured from the System > Templates > Manage CustomFields page. It is not required that you put these fields on the timesheet templatesthemselves. However, if you want a manager to be able to review and edit the points whilereviewing and approving timesheets you will want to add these fields to the appropriatetimesheet templates. When adding these fields to a timesheet template you need tospecify the following Field Options for each of the above fields (by clicking the [...]button next to the field name):
[ ] Required [ ] Work only [x] Manager Only
This will ensure the fields appear for both work and leave time entries, and that onlymanagers (or administrators) can modify the values - the employee will not be able tochange them.
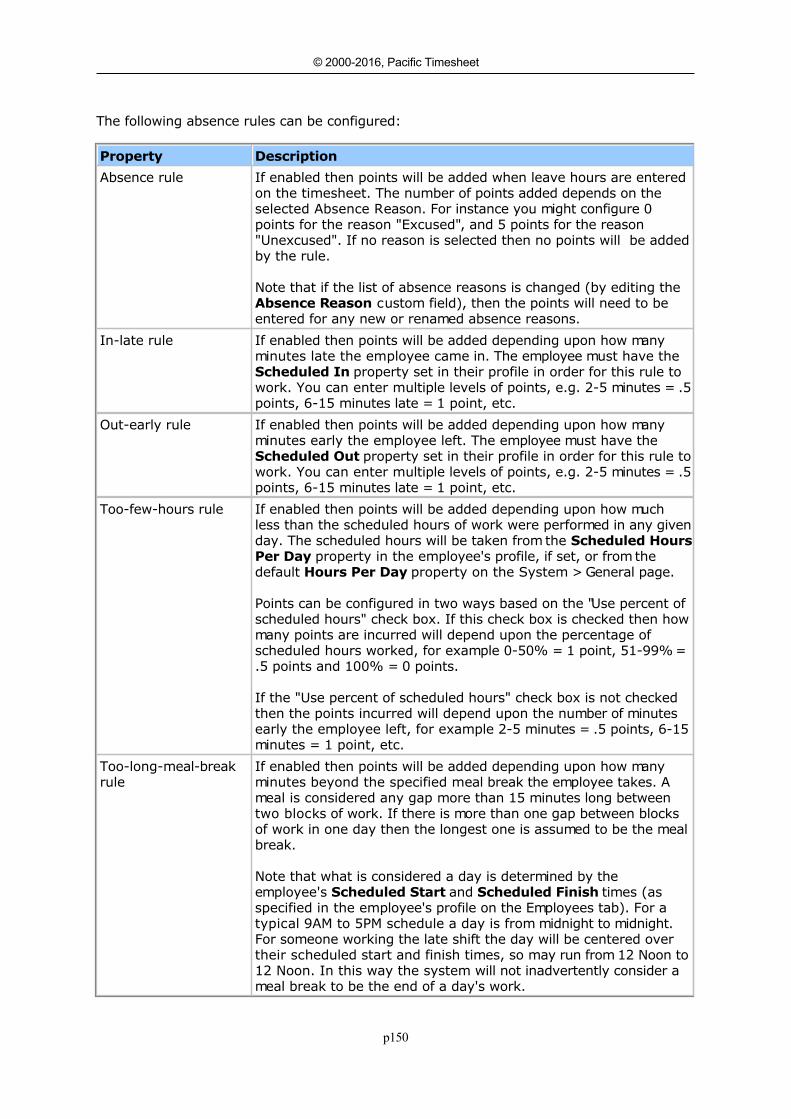
p150
© 2000-2016, Pacific Timesheet
The following absence rules can be configured:
Property Description
Absence rule If enabled then points will be added when leave hours are enteredon the timesheet. The number of points added depends on theselected Absence Reason. For instance you might configure 0points for the reason "Excused", and 5 points for the reason"Unexcused". If no reason is selected then no points will be addedby the rule.
Note that if the list of absence reasons is changed (by editing the Absence Reason custom field), then the points will need to beentered for any new or renamed absence reasons.
In-late rule If enabled then points will be added depending upon how manyminutes late the employee came in. The employee must have the Scheduled In property set in their profile in order for this rule towork. You can enter multiple levels of points, e.g. 2-5 minutes = .5points, 6-15 minutes late = 1 point, etc.
Out-early rule If enabled then points will be added depending upon how manyminutes early the employee left. The employee must have the Scheduled Out property set in their profile in order for this rule towork. You can enter multiple levels of points, e.g. 2-5 minutes = .5points, 6-15 minutes late = 1 point, etc.
Too-few-hours rule If enabled then points will be added depending upon how muchless than the scheduled hours of work were performed in any givenday. The scheduled hours will be taken from the Scheduled HoursPer Day property in the employee's profile, if set, or from thedefault Hours Per Day property on the System > General page.
Points can be configured in two ways based on the "Use percent ofscheduled hours" check box. If this check box is checked then howmany points are incurred will depend upon the percentage ofscheduled hours worked, for example 0-50% = 1 point, 51-99% =.5 points and 100% = 0 points.
If the "Use percent of scheduled hours" check box is not checkedthen the points incurred will depend upon the number of minutesearly the employee left, for example 2-5 minutes = .5 points, 6-15minutes = 1 point, etc.
Too-long-meal-breakrule
If enabled then points will be added depending upon how manyminutes beyond the specified meal break the employee takes. Ameal is considered any gap more than 15 minutes long betweentwo blocks of work. If there is more than one gap between blocksof work in one day then the longest one is assumed to be the mealbreak.
Note that what is considered a day is determined by theemployee's Scheduled Start and Scheduled Finish times (asspecified in the employee's profile on the Employees tab). For atypical 9AM to 5PM schedule a day is from midnight to midnight.For someone working the late shift the day will be centered overtheir scheduled start and finish times, so may run from 12 Noon to12 Noon. In this way the system will not inadvertently consider ameal break to be the end of a day's work.
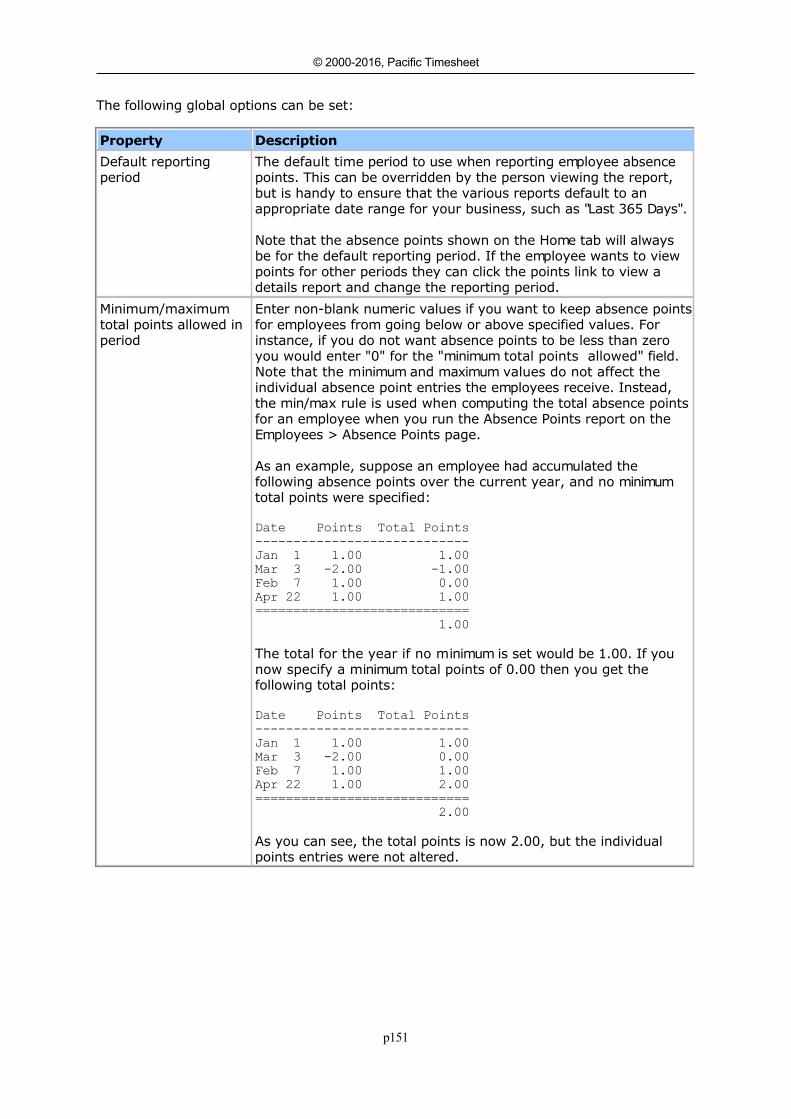
p151
© 2000-2016, Pacific Timesheet
The following global options can be set:
Property Description
Default reportingperiod
The default time period to use when reporting employee absencepoints. This can be overridden by the person viewing the report,but is handy to ensure that the various reports default to anappropriate date range for your business, such as "Last 365 Days".
Note that the absence points shown on the Home tab will alwaysbe for the default reporting period. If the employee wants to viewpoints for other periods they can click the points link to view adetails report and change the reporting period.
Minimum/maximumtotal points allowed inperiod
Enter non-blank numeric values if you want to keep absence pointsfor employees from going below or above specified values. Forinstance, if you do not want absence points to be less than zeroyou would enter "0" for the "minimum total points allowed" field.Note that the minimum and maximum values do not affect theindividual absence point entries the employees receive. Instead,the min/max rule is used when computing the total absence pointsfor an employee when you run the Absence Points report on theEmployees > Absence Points page.
As an example, suppose an employee had accumulated thefollowing absence points over the current year, and no minimumtotal points were specified:
Date Points Total Points
----------------------------
Jan 1 1.00 1.00
Mar 3 -2.00 -1.00
Feb 7 1.00 0.00
Apr 22 1.00 1.00
============================
1.00
The total for the year if no minimum is set would be 1.00. If younow specify a minimum total points of 0.00 then you get thefollowing total points:
Date Points Total Points
----------------------------
Jan 1 1.00 1.00
Mar 3 -2.00 0.00
Feb 7 1.00 1.00
Apr 22 1.00 2.00
============================
2.00
As you can see, the total points is now 2.00, but the individualpoints entries were not altered.
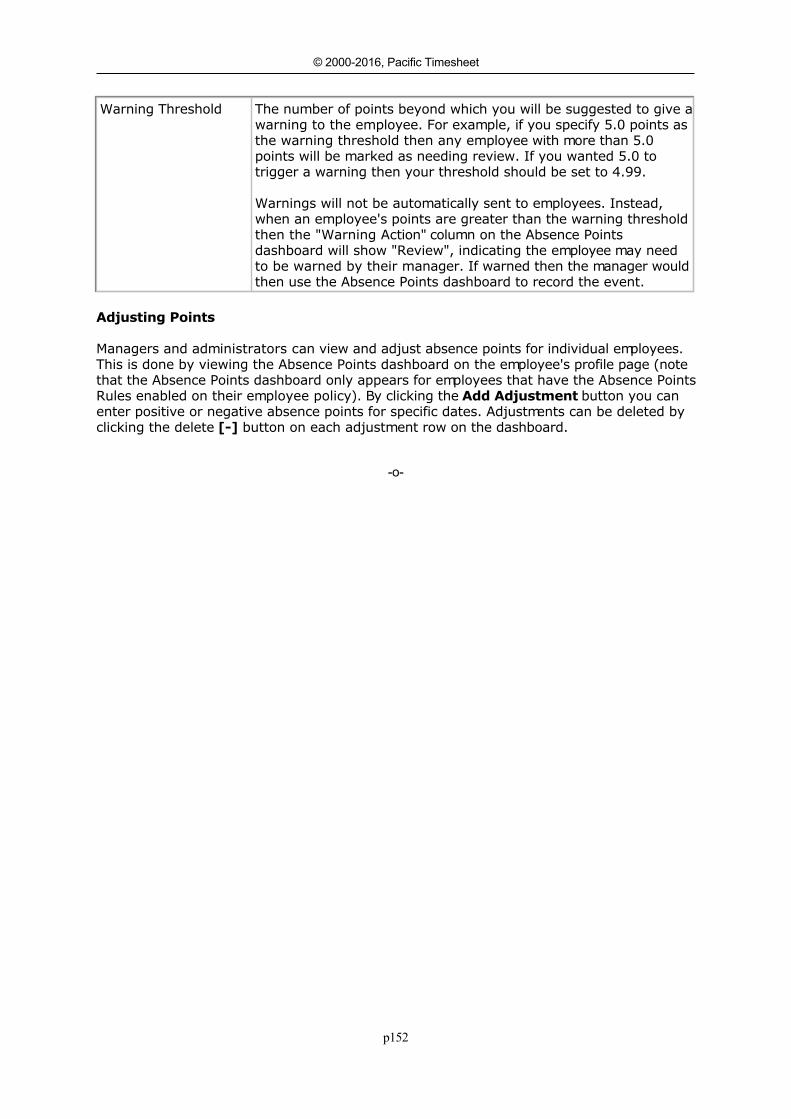
p152
© 2000-2016, Pacific Timesheet
Warning Threshold The number of points beyond which you will be suggested to give awarning to the employee. For example, if you specify 5.0 points asthe warning threshold then any employee with more than 5.0points will be marked as needing review. If you wanted 5.0 totrigger a warning then your threshold should be set to 4.99.
Warnings will not be automatically sent to employees. Instead,when an employee's points are greater than the warning thresholdthen the "Warning Action" column on the Absence Pointsdashboard will show "Review", indicating the employee may needto be warned by their manager. If warned then the manager wouldthen use the Absence Points dashboard to record the event.
Adjusting Points
Managers and administrators can view and adjust absence points for individual employees.This is done by viewing the Absence Points dashboard on the employee's profile page (notethat the Absence Points dashboard only appears for employees that have the Absence PointsRules enabled on their employee policy). By clicking the Add Adjustment button you canenter positive or negative absence points for specific dates. Adjustments can be deleted byclicking the delete [-] button on each adjustment row on the dashboard.
-o-
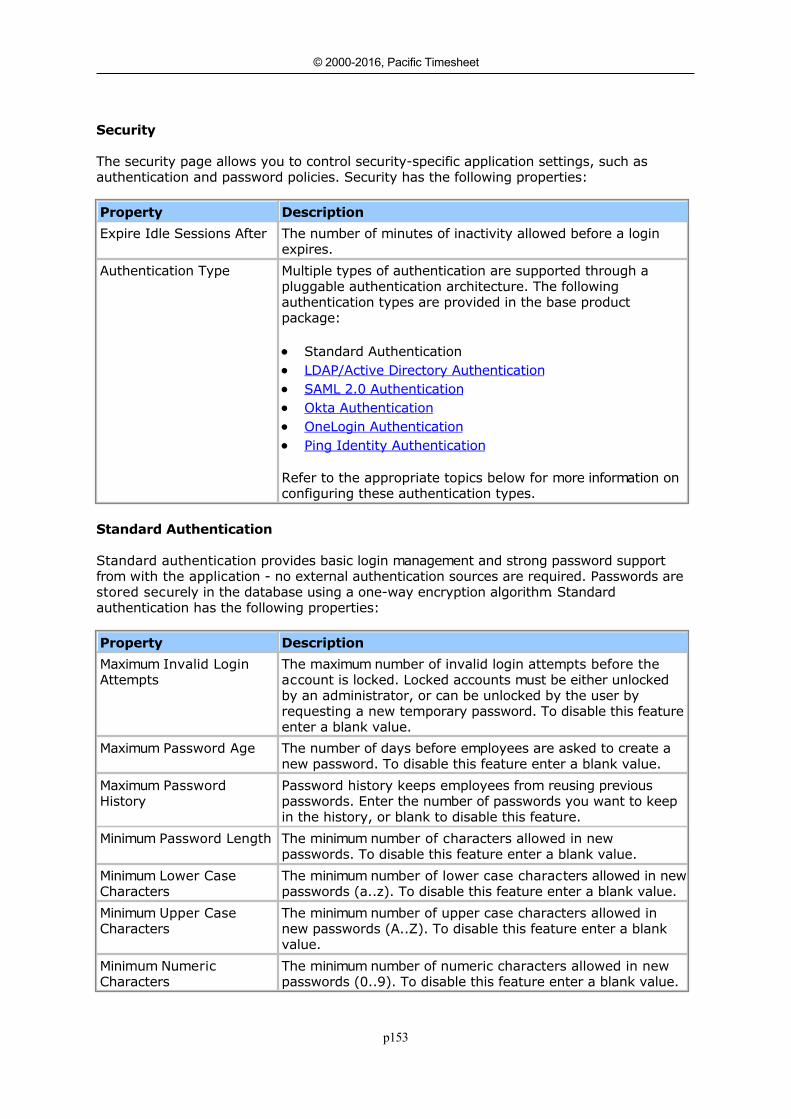
p153
© 2000-2016, Pacific Timesheet
SecuritySecurity
The security page allows you to control security-specific application settings, such asauthentication and password policies. Security has the following properties:
Property Description
Expire Idle Sessions After The number of minutes of inactivity allowed before a loginexpires.
Authentication Type Multiple types of authentication are supported through apluggable authentication architecture. The followingauthentication types are provided in the base productpackage:
Standard Authentication LDAP/Active Directory Authentication SAML 2.0 Authentication Okta Authentication OneLogin Authentication Ping Identity Authentication
Refer to the appropriate topics below for more information onconfiguring these authentication types.
Standard Authentication
Standard authentication provides basic login management and strong password supportfrom with the application - no external authentication sources are required. Passwords arestored securely in the database using a one-way encryption algorithm. Standardauthentication has the following properties:
Property Description
Maximum Invalid LoginAttempts
The maximum number of invalid login attempts before theaccount is locked. Locked accounts must be either unlockedby an administrator, or can be unlocked by the user byrequesting a new temporary password. To disable this featureenter a blank value.
Maximum Password Age The number of days before employees are asked to create anew password. To disable this feature enter a blank value.
Maximum PasswordHistory
Password history keeps employees from reusing previouspasswords. Enter the number of passwords you want to keepin the history, or blank to disable this feature.
Minimum Password Length The minimum number of characters allowed in newpasswords. To disable this feature enter a blank value.
Minimum Lower CaseCharacters
The minimum number of lower case characters allowed in newpasswords (a..z). To disable this feature enter a blank value.
Minimum Upper CaseCharacters
The minimum number of upper case characters allowed innew passwords (A..Z). To disable this feature enter a blankvalue.
Minimum NumericCharacters
The minimum number of numeric characters allowed in newpasswords (0..9). To disable this feature enter a blank value.
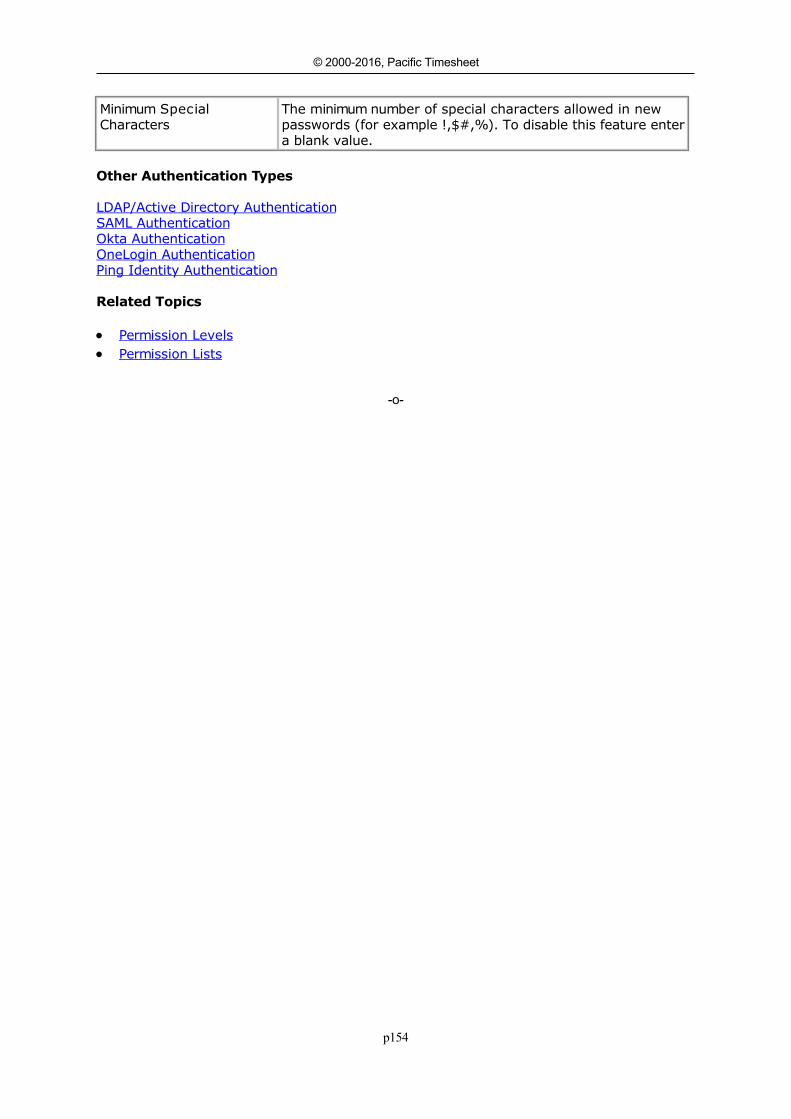
p154
© 2000-2016, Pacific Timesheet
Minimum SpecialCharacters
The minimum number of special characters allowed in newpasswords (for example !,$#,%). To disable this feature entera blank value.
Other Authentication Types
LDAP/Active Directory AuthenticationSAML AuthenticationOkta AuthenticationOneLogin AuthenticationPing Identity Authentication
Related Topics
Permission Levels Permission Lists
-o-
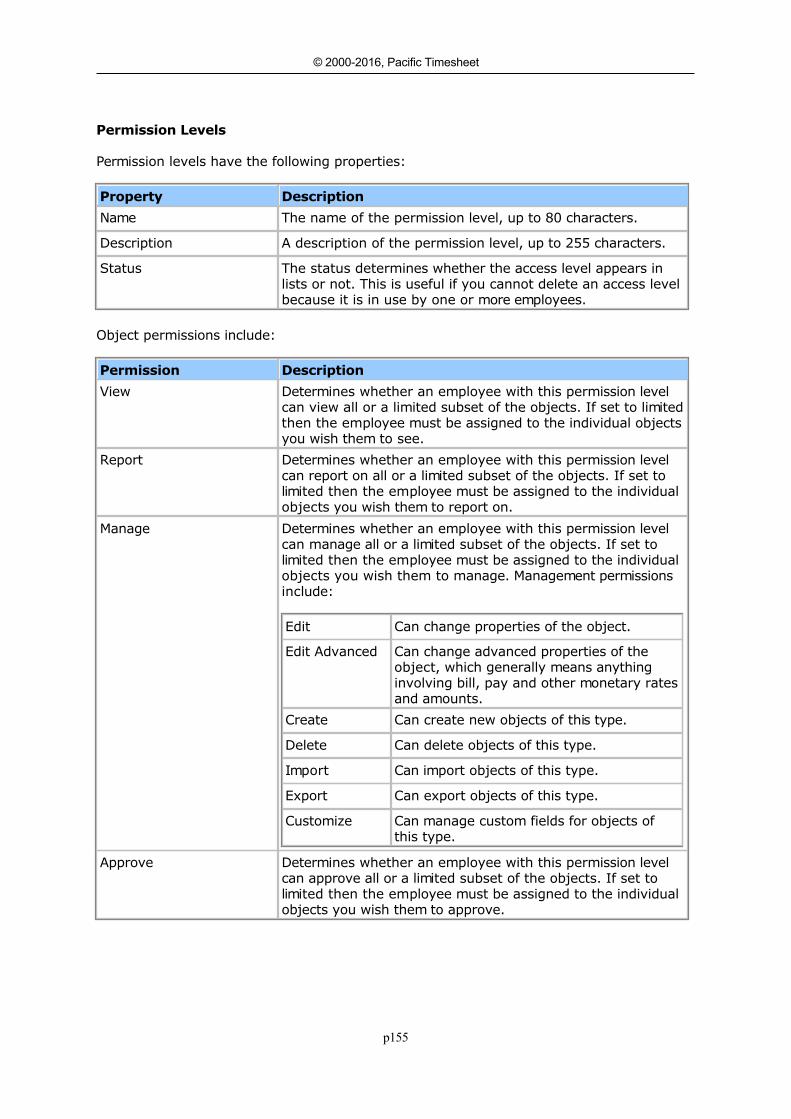
p155
© 2000-2016, Pacific Timesheet
Permission LevelsPermission Levels
Permission levels have the following properties:
Property Description
Name The name of the permission level, up to 80 characters.
Description A description of the permission level, up to 255 characters.
Status The status determines whether the access level appears inlists or not. This is useful if you cannot delete an access levelbecause it is in use by one or more employees.
Object permissions include:
Permission Description
View Determines whether an employee with this permission levelcan view all or a limited subset of the objects. If set to limitedthen the employee must be assigned to the individual objectsyou wish them to see.
Report Determines whether an employee with this permission levelcan report on all or a limited subset of the objects. If set tolimited then the employee must be assigned to the individualobjects you wish them to report on.
Manage Determines whether an employee with this permission levelcan manage all or a limited subset of the objects. If set tolimited then the employee must be assigned to the individualobjects you wish them to manage. Management permissionsinclude:
Edit Can change properties of the object.
Edit Advanced Can change advanced properties of theobject, which generally means anythinginvolving bill, pay and other monetary ratesand amounts.
Create Can create new objects of this type.
Delete Can delete objects of this type.
Import Can import objects of this type.
Export Can export objects of this type.
Customize Can manage custom fields for objects ofthis type.
Approve Determines whether an employee with this permission levelcan approve all or a limited subset of the objects. If set tolimited then the employee must be assigned to the individualobjects you wish them to approve.

p156
© 2000-2016, Pacific Timesheet
Can view my timesheet If not checked, the "My Timesheet" tab will not be shown,even if the employee has a timesheet template in theiremployee profile. This permission is useful for simplifying theuser interface for employees who meet all of the followingcriteria:
1. They are not recording work hours2. They are not required to submit their timesheet3. They are only using the Leave Request feature on the
Home tab to record leave4. Their employee policy's Schedule Rules is configured to
add leave requests to their timesheet
Can undo submit of mytimesheet
This applies to timesheet objects only, and determineswhether an employee can unsubmit (unlock) their timesheet.Note that once a timesheet has been approved the employeewill not be able to unsubmit it, regardless of this permission.
Can edit my punches This applies to timesheets only, and determines whether anemployee can edit work time entries on their timesheet. Ifthis permission is not enabled then:
Employees will not be able to edit the start, finish or hoursfields of their work rows manually.
Employees will not be able to delete work rows from theirtimesheets.
Employees will not be able to delete their timesheet.
Employees will still be able to change the project or pay code,enter notes, etc. of work rows. Also, this permission does notaffect leave rows - employees will be able to add leave rowsto their timesheet.
Can copy my previoustimesheet hours
This permission determines whether employees can havetimesheet memory carry forward hours from the previoustimesheet (this is set from the Home > Preferences page).This permission also determines whether the employee sees a"Copy Previous Timesheet" option on their timesheet. If thispermission is off then the employee can only carry forward orcopy rows from the previous timesheet.
Note that if you turn this permission off, but an employee hasalready set their timesheet memory to carry forward rows andhours, you will need to also change their timesheet memorysetting from Employees page.
Can punch from time clockdevice only
Turning this permission on will allow an employee to onlypunch in/out from a time clock device, ensuring their physicalpresence. The employee will not be able to punch in/out froma web browser. The employee will still be able to add leave totheir timesheet using a web browser, however.
-o-

p157
© 2000-2016, Pacific Timesheet
Permission ListsPermission Lists
A permission lists is a set of users and groups given special permissions to access an object.This is useful in larger organizations where you want to distribute some of the applicationmanagement tasks to mulitple employees. Another use is to limit which objects, such asprojects, tasks or paycodes, that an employee can view and add to their timesheets.
-o-
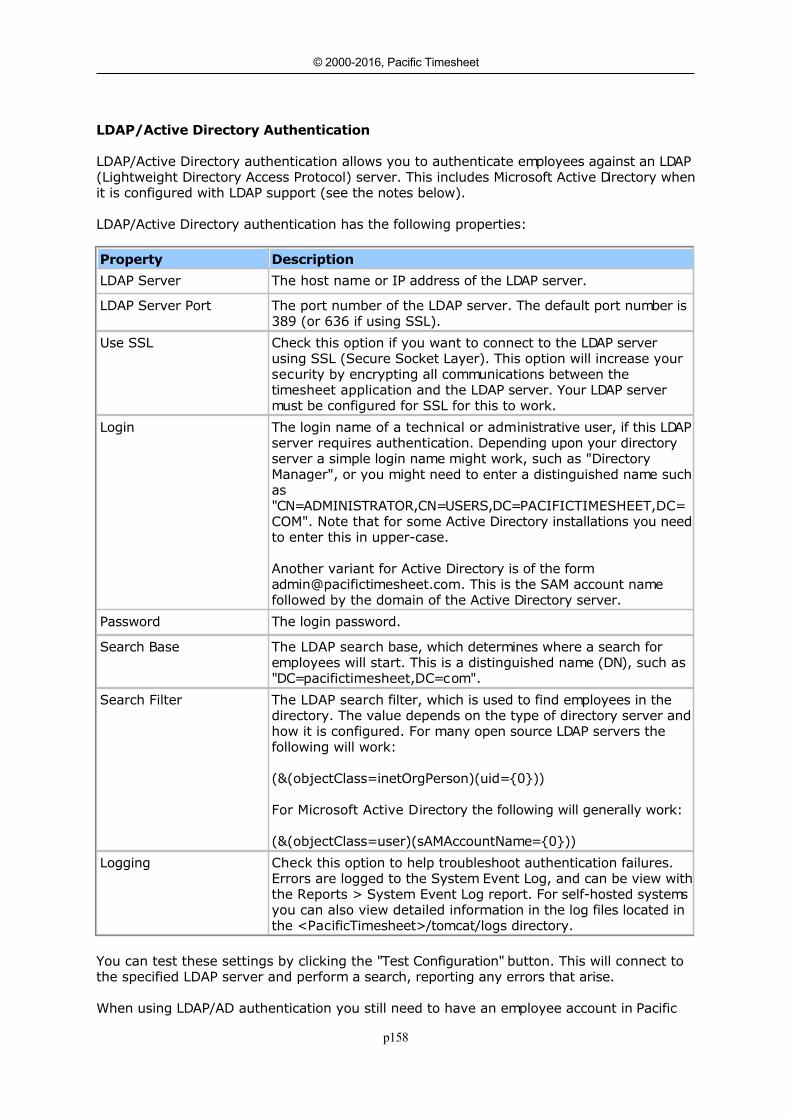
p158
© 2000-2016, Pacific Timesheet
LDAP/Active Directory AuthenticationLDAP/Active Directory Authentication
LDAP/Active Directory authentication allows you to authenticate employees against an LDAP(Lightweight Directory Access Protocol) server. This includes Microsoft Active Directory whenit is configured with LDAP support (see the notes below).
LDAP/Active Directory authentication has the following properties:
Property Description
LDAP Server The host name or IP address of the LDAP server.
LDAP Server Port The port number of the LDAP server. The default port number is389 (or 636 if using SSL).
Use SSL Check this option if you want to connect to the LDAP serverusing SSL (Secure Socket Layer). This option will increase yoursecurity by encrypting all communications between thetimesheet application and the LDAP server. Your LDAP servermust be configured for SSL for this to work.
Login The login name of a technical or administrative user, if this LDAPserver requires authentication. Depending upon your directoryserver a simple login name might work, such as "DirectoryManager", or you might need to enter a distinguished name suchas "CN=ADMINISTRATOR,CN=USERS,DC=PACIFICTIMESHEET,DC=COM". Note that for some Active Directory installations you needto enter this in upper-case.
Another variant for Active Directory is of the [email protected]. This is the SAM account namefollowed by the domain of the Active Directory server.
Password The login password.
Search Base The LDAP search base, which determines where a search foremployees will start. This is a distinguished name (DN), such as"DC=pacifictimesheet,DC=com".
Search Filter The LDAP search filter, which is used to find employees in thedirectory. The value depends on the type of directory server andhow it is configured. For many open source LDAP servers thefollowing will work:
(&(objectClass=inetOrgPerson)(uid={0}))
For Microsoft Active Directory the following will generally work:
(&(objectClass=user)(sAMAccountName={0}))
Logging Check this option to help troubleshoot authentication failures.Errors are logged to the System Event Log, and can be view withthe Reports > System Event Log report. For self-hosted systemsyou can also view detailed information in the log files located inthe <PacificTimesheet>/tomcat/logs directory.
You can test these settings by clicking the "Test Configuration" button. This will connect tothe specified LDAP server and perform a search, reporting any errors that arise.
When using LDAP/AD authentication you still need to have an employee account in Pacific
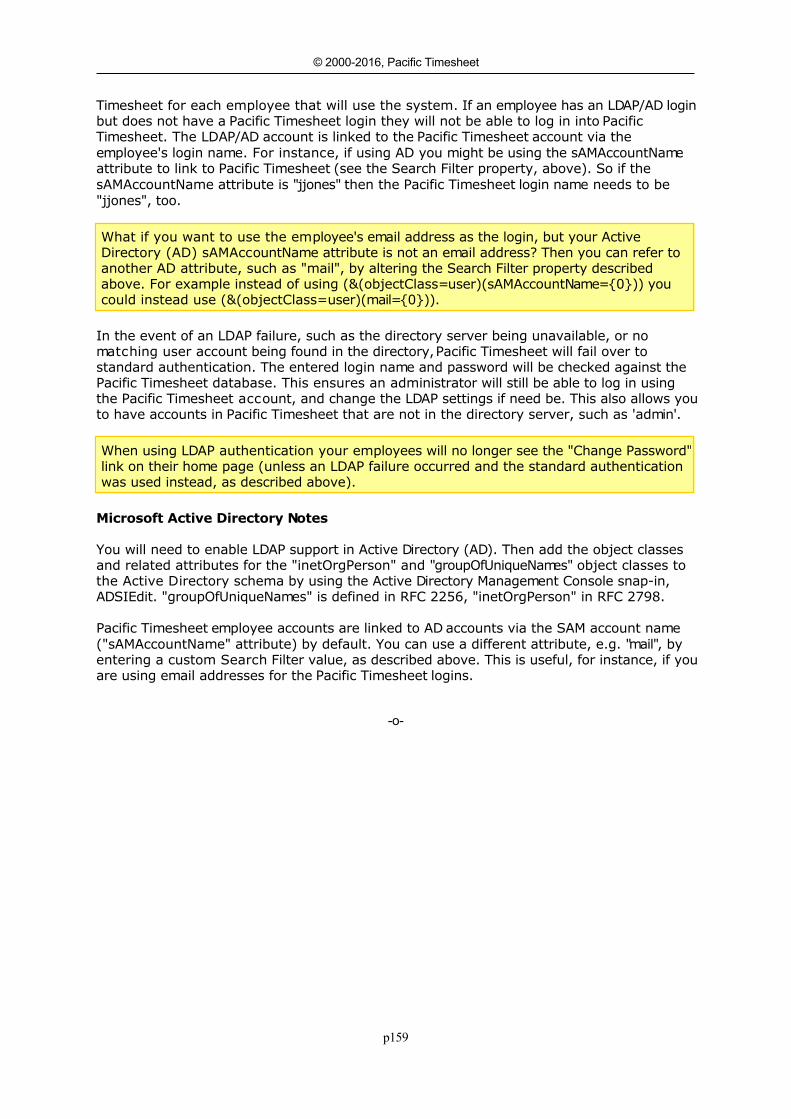
p159
© 2000-2016, Pacific Timesheet
Timesheet for each employee that will use the system. If an employee has an LDAP/AD loginbut does not have a Pacific Timesheet login they will not be able to log in into PacificTimesheet. The LDAP/AD account is linked to the Pacific Timesheet account via theemployee's login name. For instance, if using AD you might be using the sAMAccountNameattribute to link to Pacific Timesheet (see the Search Filter property, above). So if thesAMAccountName attribute is "jjones" then the Pacific Timesheet login name needs to be"jjones", too.
What if you want to use the employee's email address as the login, but your ActiveDirectory (AD) sAMAccountName attribute is not an email address? Then you can refer toanother AD attribute, such as "mail", by altering the Search Filter property describedabove. For example instead of using (&(objectClass=user)(sAMAccountName={0})) youcould instead use (&(objectClass=user)(mail={0})).
In the event of an LDAP failure, such as the directory server being unavailable, or nomatching user account being found in the directory, Pacific Timesheet will fail over tostandard authentication. The entered login name and password will be checked against the Pacific Timesheet database. This ensures an administrator will still be able to log in usingthe Pacific Timesheet account, and change the LDAP settings if need be. This also allows youto have accounts in Pacific Timesheet that are not in the directory server, such as 'admin'.
When using LDAP authentication your employees will no longer see the "Change Password"link on their home page (unless an LDAP failure occurred and the standard authenticationwas used instead, as described above).
Microsoft Active Directory Notes
You will need to enable LDAP support in Active Directory (AD). Then add the object classesand related attributes for the "inetOrgPerson" and "groupOfUniqueNames" object classes tothe Active Directory schema by using the Active Directory Management Console snap-in,ADSIEdit. "groupOfUniqueNames" is defined in RFC 2256, "inetOrgPerson" in RFC 2798.
Pacific Timesheet employee accounts are linked to AD accounts via the SAM account name("sAMAccountName" attribute) by default. You can use a different attribute, e.g. "mail", byentering a custom Search Filter value, as described above. This is useful, for instance, if youare using email addresses for the Pacific Timesheet logins.
-o-
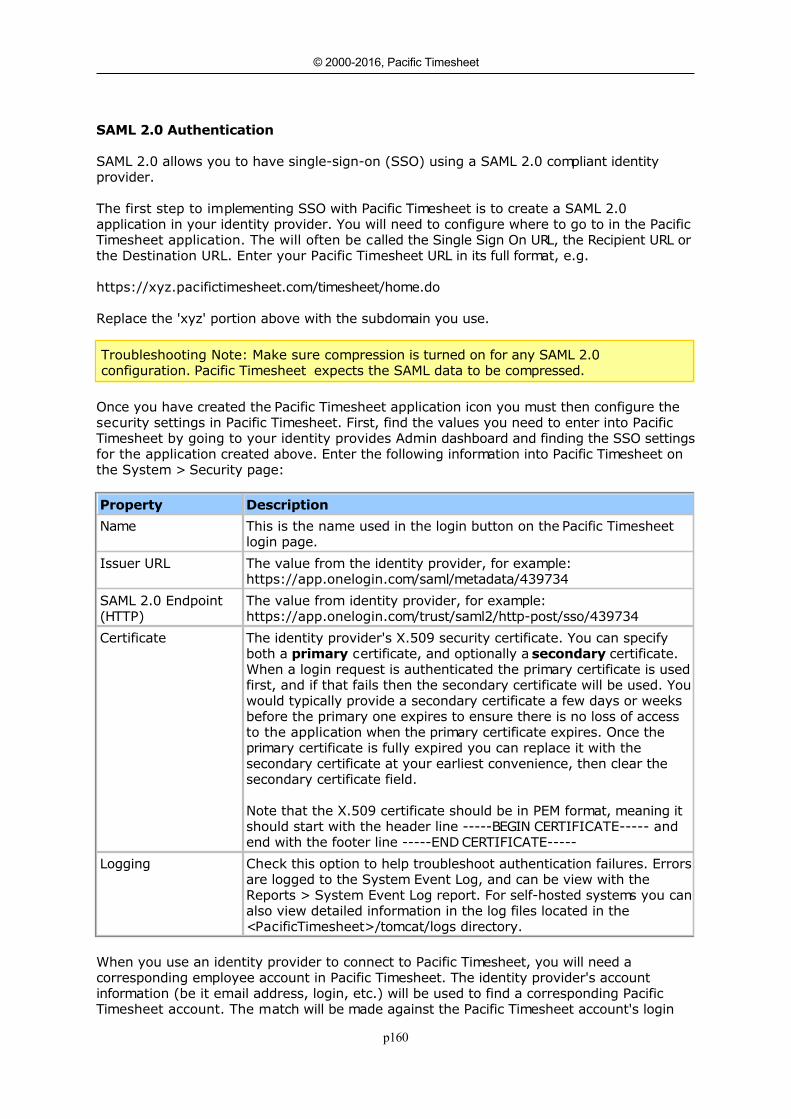
p160
© 2000-2016, Pacific Timesheet
SAML 2.0 AuthenticationSAML 2.0 Authentication
SAML 2.0 allows you to have single-sign-on (SSO) using a SAML 2.0 compliant identityprovider.
The first step to implementing SSO with Pacific Timesheet is to create a SAML 2.0application in your identity provider. You will need to configure where to go to in the PacificTimesheet application. The will often be called the Single Sign On URL, the Recipient URL orthe Destination URL. Enter your Pacific Timesheet URL in its full format, e.g.
https://xyz.pacifictimesheet.com/timesheet/home.do
Replace the 'xyz' portion above with the subdomain you use.
Troubleshooting Note: Make sure compression is turned on for any SAML 2.0configuration. Pacific Timesheet expects the SAML data to be compressed.
Once you have created the Pacific Timesheet application icon you must then configure thesecurity settings in Pacific Timesheet. First, find the values you need to enter into PacificTimesheet by going to your identity provides Admin dashboard and finding the SSO settingsfor the application created above. Enter the following information into Pacific Timesheet onthe System > Security page:
Property Description
Name This is the name used in the login button on the Pacific Timesheetlogin page.
Issuer URL The value from the identity provider, for example:https://app.onelogin.com/saml/metadata/439734
SAML 2.0 Endpoint(HTTP)
The value from identity provider, for example:https://app.onelogin.com/trust/saml2/http-post/sso/439734
Certificate The identity provider's X.509 security certificate. You can specifyboth a primary certificate, and optionally a secondary certificate.When a login request is authenticated the primary certificate is usedfirst, and if that fails then the secondary certificate will be used. Youwould typically provide a secondary certificate a few days or weeksbefore the primary one expires to ensure there is no loss of accessto the application when the primary certificate expires. Once theprimary certificate is fully expired you can replace it with thesecondary certificate at your earliest convenience, then clear thesecondary certificate field.
Note that the X.509 certificate should be in PEM format, meaning itshould start with the header line -----BEGIN CERTIFICATE----- andend with the footer line -----END CERTIFICATE-----
Logging Check this option to help troubleshoot authentication failures. Errorsare logged to the System Event Log, and can be view with theReports > System Event Log report. For self-hosted systems you canalso view detailed information in the log files located in the<PacificTimesheet>/tomcat/logs directory.
When you use an identity provider to connect to Pacific Timesheet, you will need acorresponding employee account in Pacific Timesheet. The identity provider's accountinformation (be it email address, login, etc.) will be used to find a corresponding PacificTimesheet account. The match will be made against the Pacific Timesheet account's login
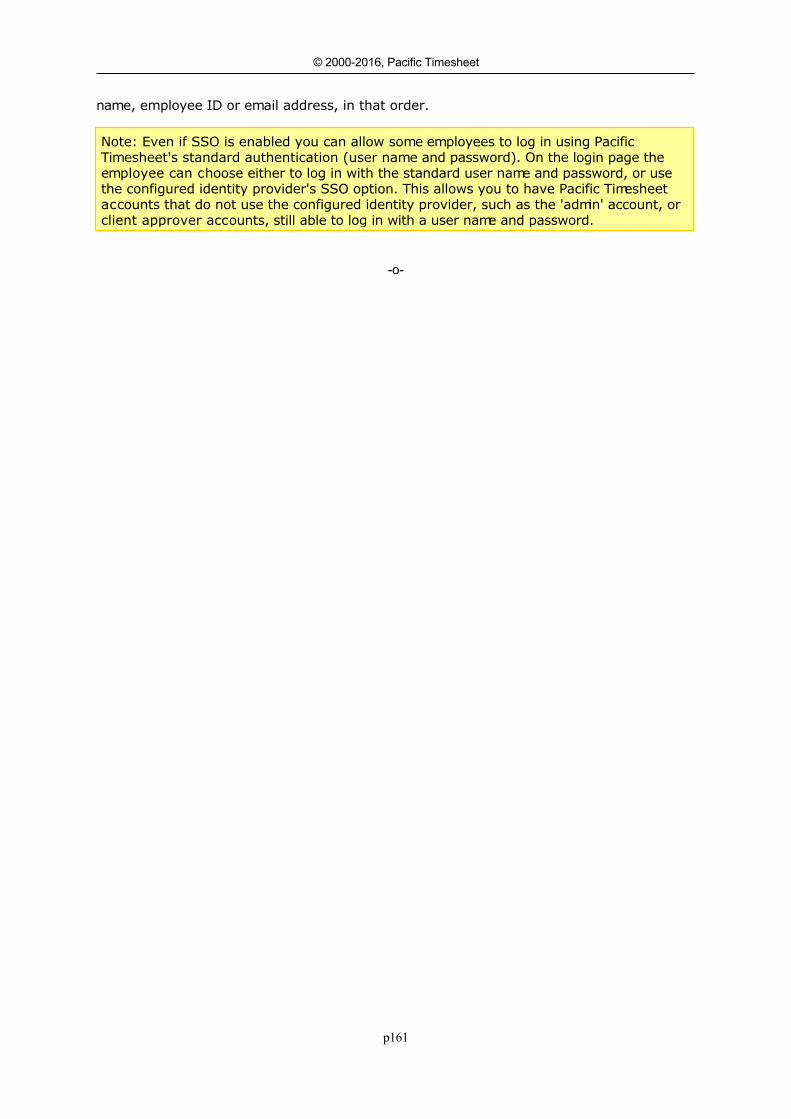
p161
© 2000-2016, Pacific Timesheet
name, employee ID or email address, in that order.
Note: Even if SSO is enabled you can allow some employees to log in using PacificTimesheet's standard authentication (user name and password). On the login page theemployee can choose either to log in with the standard user name and password, or usethe configured identity provider's SSO option. This allows you to have Pacific Timesheetaccounts that do not use the configured identity provider, such as the 'admin' account, orclient approver accounts, still able to log in with a user name and password.
-o-
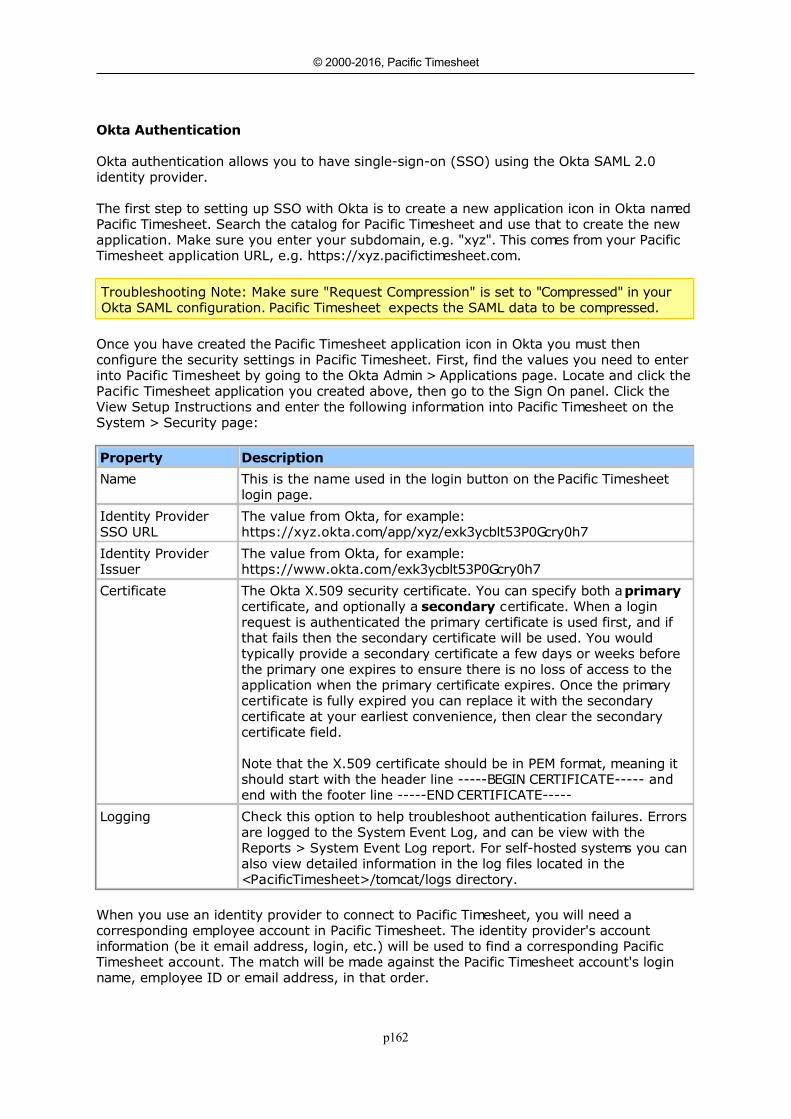
p162
© 2000-2016, Pacific Timesheet
Okta AuthenticationOkta Authentication
Okta authentication allows you to have single-sign-on (SSO) using the Okta SAML 2.0identity provider.
The first step to setting up SSO with Okta is to create a new application icon in Okta namedPacific Timesheet. Search the catalog for Pacific Timesheet and use that to create the newapplication. Make sure you enter your subdomain, e.g. "xyz". This comes from your PacificTimesheet application URL, e.g. https://xyz.pacifictimesheet.com.
Troubleshooting Note: Make sure "Request Compression" is set to "Compressed" in yourOkta SAML configuration. Pacific Timesheet expects the SAML data to be compressed.
Once you have created the Pacific Timesheet application icon in Okta you must thenconfigure the security settings in Pacific Timesheet. First, find the values you need to enterinto Pacific Timesheet by going to the Okta Admin > Applications page. Locate and click thePacific Timesheet application you created above, then go to the Sign On panel. Click theView Setup Instructions and enter the following information into Pacific Timesheet on theSystem > Security page:
Property Description
Name This is the name used in the login button on the Pacific Timesheetlogin page.
Identity ProviderSSO URL
The value from Okta, for example:https://xyz.okta.com/app/xyz/exk3ycblt53P0Gcry0h7
Identity ProviderIssuer
The value from Okta, for example:https://www.okta.com/exk3ycblt53P0Gcry0h7
Certificate The Okta X.509 security certificate. You can specify both a primarycertificate, and optionally a secondary certificate. When a loginrequest is authenticated the primary certificate is used first, and ifthat fails then the secondary certificate will be used. You wouldtypically provide a secondary certificate a few days or weeks beforethe primary one expires to ensure there is no loss of access to theapplication when the primary certificate expires. Once the primarycertificate is fully expired you can replace it with the secondarycertificate at your earliest convenience, then clear the secondarycertificate field.
Note that the X.509 certificate should be in PEM format, meaning itshould start with the header line -----BEGIN CERTIFICATE----- andend with the footer line -----END CERTIFICATE-----
Logging Check this option to help troubleshoot authentication failures. Errorsare logged to the System Event Log, and can be view with theReports > System Event Log report. For self-hosted systems you canalso view detailed information in the log files located in the<PacificTimesheet>/tomcat/logs directory.
When you use an identity provider to connect to Pacific Timesheet, you will need acorresponding employee account in Pacific Timesheet. The identity provider's accountinformation (be it email address, login, etc.) will be used to find a corresponding PacificTimesheet account. The match will be made against the Pacific Timesheet account's loginname, employee ID or email address, in that order.

p163
© 2000-2016, Pacific Timesheet
Note: Even if SSO is enabled you can allow some employees to log in using PacificTimesheet's standard authentication (user name and password). On the login page theemployee can choose either to log in with the standard user name and password, or usethe configured identity provider's SSO option. This allows you to have Pacific Timesheetaccounts that do not use the configured identity provider, such as the 'admin' account, orclient approver accounts, still able to log in with a user name and password.
-o-
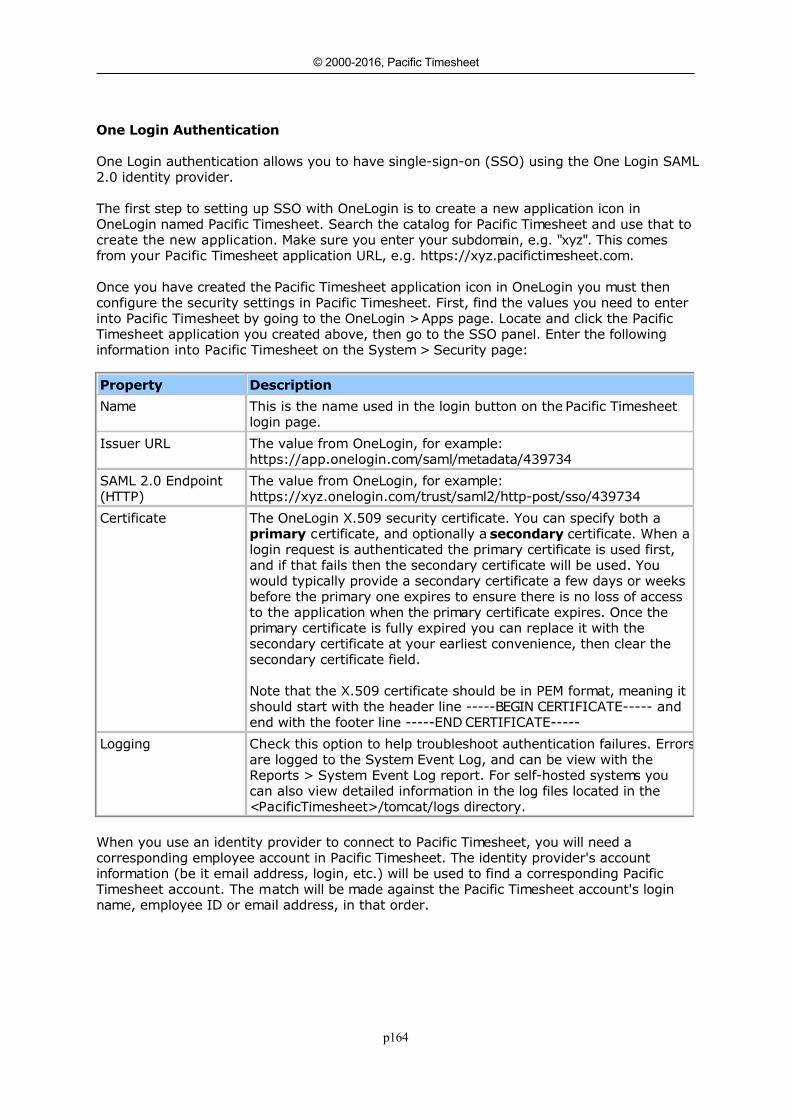
p164
© 2000-2016, Pacific Timesheet
OneLogin AuthenticationOne Login Authentication
One Login authentication allows you to have single-sign-on (SSO) using the One Login SAML2.0 identity provider.
The first step to setting up SSO with OneLogin is to create a new application icon inOneLogin named Pacific Timesheet. Search the catalog for Pacific Timesheet and use that tocreate the new application. Make sure you enter your subdomain, e.g. "xyz". This comesfrom your Pacific Timesheet application URL, e.g. https://xyz.pacifictimesheet.com.
Once you have created the Pacific Timesheet application icon in OneLogin you must thenconfigure the security settings in Pacific Timesheet. First, find the values you need to enterinto Pacific Timesheet by going to the OneLogin > Apps page. Locate and click the PacificTimesheet application you created above, then go to the SSO panel. Enter the followinginformation into Pacific Timesheet on the System > Security page:
Property Description
Name This is the name used in the login button on the Pacific Timesheetlogin page.
Issuer URL The value from OneLogin, for example:https://app.onelogin.com/saml/metadata/439734
SAML 2.0 Endpoint(HTTP)
The value from OneLogin, for example:https://xyz.onelogin.com/trust/saml2/http-post/sso/439734
Certificate The OneLogin X.509 security certificate. You can specify both a primary certificate, and optionally a secondary certificate. When alogin request is authenticated the primary certificate is used first,and if that fails then the secondary certificate will be used. Youwould typically provide a secondary certificate a few days or weeksbefore the primary one expires to ensure there is no loss of accessto the application when the primary certificate expires. Once theprimary certificate is fully expired you can replace it with thesecondary certificate at your earliest convenience, then clear thesecondary certificate field.
Note that the X.509 certificate should be in PEM format, meaning itshould start with the header line -----BEGIN CERTIFICATE----- andend with the footer line -----END CERTIFICATE-----
Logging Check this option to help troubleshoot authentication failures. Errorsare logged to the System Event Log, and can be view with theReports > System Event Log report. For self-hosted systems youcan also view detailed information in the log files located in the<PacificTimesheet>/tomcat/logs directory.
When you use an identity provider to connect to Pacific Timesheet, you will need acorresponding employee account in Pacific Timesheet. The identity provider's accountinformation (be it email address, login, etc.) will be used to find a corresponding PacificTimesheet account. The match will be made against the Pacific Timesheet account's loginname, employee ID or email address, in that order.

p165
© 2000-2016, Pacific Timesheet
Note: Even if SSO is enabled you can allow some employees to log in using PacificTimesheet's standard authentication (user name and password). On the login page theemployee can choose either to log in with the standard user name and password, or usethe configured identity provider's SSO option. This allows you to have Pacific Timesheetaccounts that do not use the configured identity provider, such as the 'admin' account, orclient approver accounts, still able to log in with a user name and password.
-o-
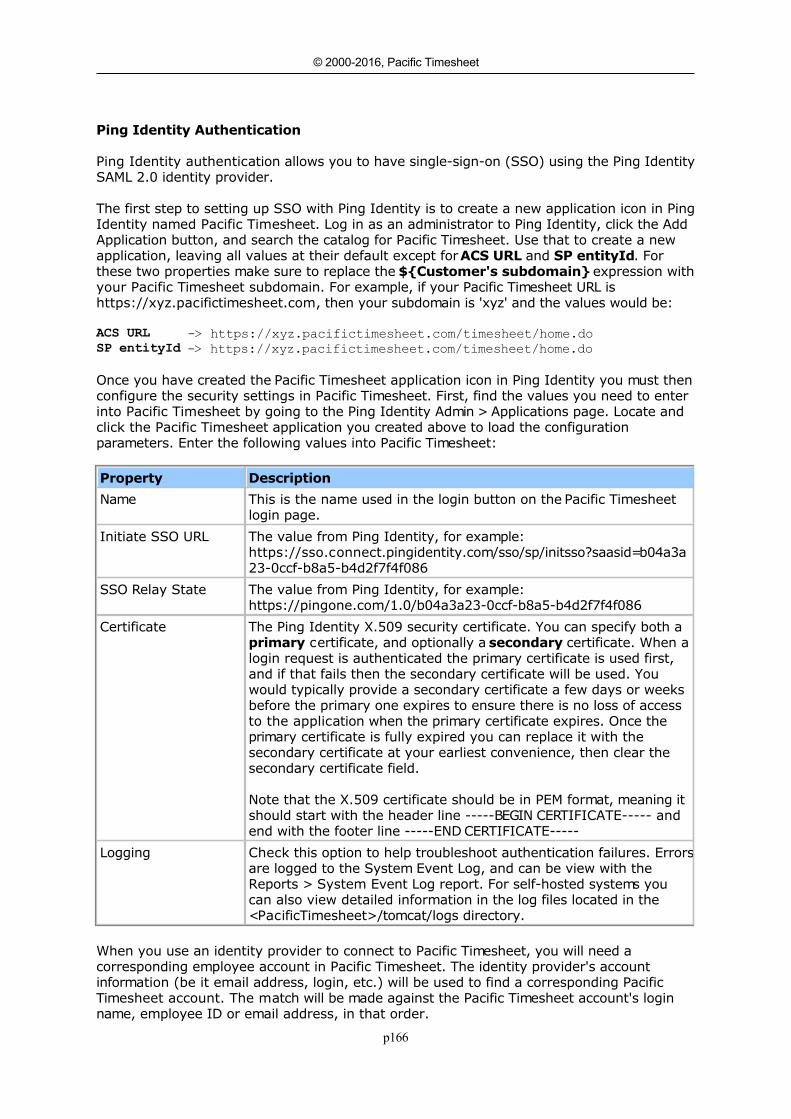
p166
© 2000-2016, Pacific Timesheet
Ping Identity AuthenticationPing Identity Authentication
Ping Identity authentication allows you to have single-sign-on (SSO) using the Ping IdentitySAML 2.0 identity provider.
The first step to setting up SSO with Ping Identity is to create a new application icon in PingIdentity named Pacific Timesheet. Log in as an administrator to Ping Identity, click the AddApplication button, and search the catalog for Pacific Timesheet. Use that to create a newapplication, leaving all values at their default except for ACS URL and SP entityId. Forthese two properties make sure to replace the ${Customer's subdomain} expression withyour Pacific Timesheet subdomain. For example, if your Pacific Timesheet URL ishttps://xyz.pacifictimesheet.com, then your subdomain is 'xyz' and the values would be:
ACS URL -> https://xyz.pacifictimesheet.com/timesheet/home.do
SP entityId -> https://xyz.pacifictimesheet.com/timesheet/home.do
Once you have created the Pacific Timesheet application icon in Ping Identity you must thenconfigure the security settings in Pacific Timesheet. First, find the values you need to enterinto Pacific Timesheet by going to the Ping Identity Admin > Applications page. Locate andclick the Pacific Timesheet application you created above to load the configurationparameters. Enter the following values into Pacific Timesheet:
Property Description
Name This is the name used in the login button on the Pacific Timesheetlogin page.
Initiate SSO URL The value from Ping Identity, for example:https://sso.connect.pingidentity.com/sso/sp/initsso?saasid=b04a3a23-0ccf-b8a5-b4d2f7f4f086
SSO Relay State The value from Ping Identity, for example:https://pingone.com/1.0/b04a3a23-0ccf-b8a5-b4d2f7f4f086
Certificate The Ping Identity X.509 security certificate. You can specify both a primary certificate, and optionally a secondary certificate. When alogin request is authenticated the primary certificate is used first,and if that fails then the secondary certificate will be used. Youwould typically provide a secondary certificate a few days or weeksbefore the primary one expires to ensure there is no loss of accessto the application when the primary certificate expires. Once theprimary certificate is fully expired you can replace it with thesecondary certificate at your earliest convenience, then clear thesecondary certificate field.
Note that the X.509 certificate should be in PEM format, meaning itshould start with the header line -----BEGIN CERTIFICATE----- andend with the footer line -----END CERTIFICATE-----
Logging Check this option to help troubleshoot authentication failures. Errorsare logged to the System Event Log, and can be view with theReports > System Event Log report. For self-hosted systems youcan also view detailed information in the log files located in the<PacificTimesheet>/tomcat/logs directory.
When you use an identity provider to connect to Pacific Timesheet, you will need acorresponding employee account in Pacific Timesheet. The identity provider's accountinformation (be it email address, login, etc.) will be used to find a corresponding PacificTimesheet account. The match will be made against the Pacific Timesheet account's loginname, employee ID or email address, in that order.

p167
© 2000-2016, Pacific Timesheet
Note: Even if SSO is enabled you can allow some employees to log in using PacificTimesheet's standard authentication (user name and password). On the login page theemployee can choose either to log in with the standard user name and password, or usethe configured identity provider's SSO option. This allows you to have Pacific Timesheetaccounts that do not use the configured identity provider, such as the 'admin' account, orclient approver accounts, still able to log in with a user name and password.
-o-
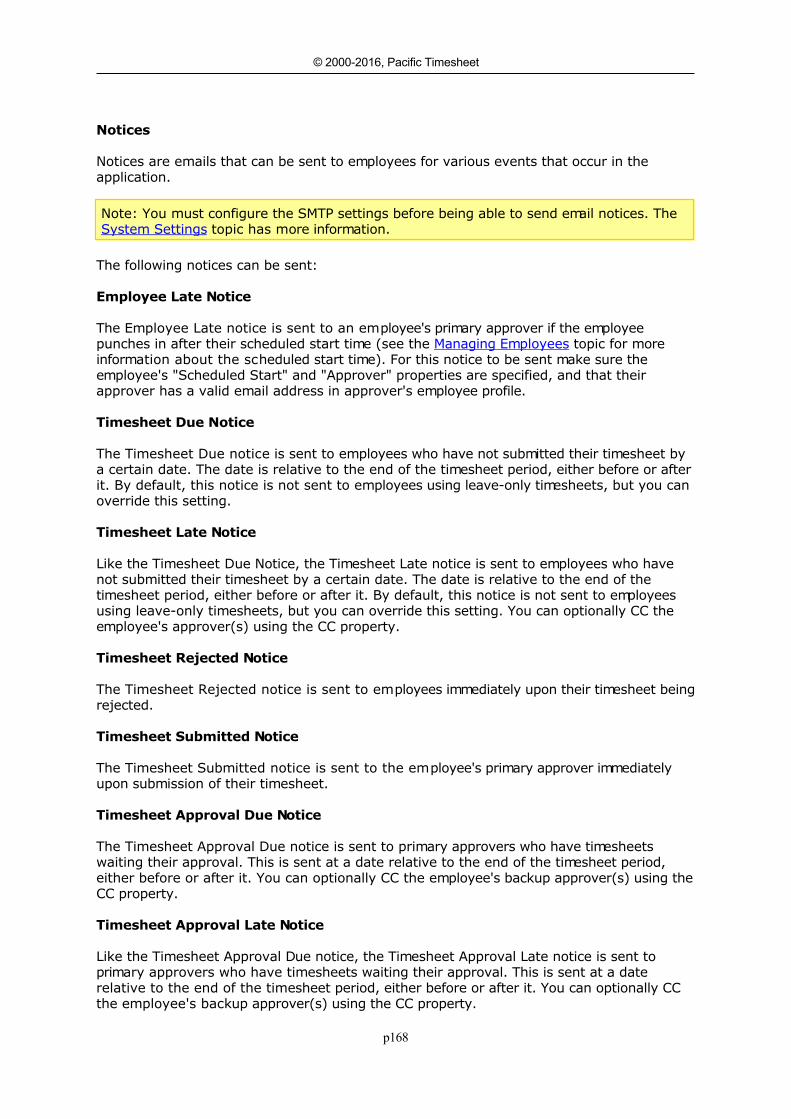
p168
© 2000-2016, Pacific Timesheet
NoticesNotices
Notices are emails that can be sent to employees for various events that occur in theapplication.
Note: You must configure the SMTP settings before being able to send email notices. The System Settings topic has more information.
The following notices can be sent:
Employee Late Notice
The Employee Late notice is sent to an employee's primary approver if the employeepunches in after their scheduled start time (see the Managing Employees topic for moreinformation about the scheduled start time). For this notice to be sent make sure theemployee's "Scheduled Start" and "Approver" properties are specified, and that theirapprover has a valid email address in approver's employee profile.
Timesheet Due Notice
The Timesheet Due notice is sent to employees who have not submitted their timesheet bya certain date. The date is relative to the end of the timesheet period, either before or afterit. By default, this notice is not sent to employees using leave-only timesheets, but you canoverride this setting.
Timesheet Late Notice
Like the Timesheet Due Notice, the Timesheet Late notice is sent to employees who havenot submitted their timesheet by a certain date. The date is relative to the end of thetimesheet period, either before or after it. By default, this notice is not sent to employeesusing leave-only timesheets, but you can override this setting. You can optionally CC theemployee's approver(s) using the CC property.
Timesheet Rejected Notice
The Timesheet Rejected notice is sent to employees immediately upon their timesheet beingrejected.
Timesheet Submitted Notice
The Timesheet Submitted notice is sent to the employee's primary approver immediatelyupon submission of their timesheet.
Timesheet Approval Due Notice
The Timesheet Approval Due notice is sent to primary approvers who have timesheetswaiting their approval. This is sent at a date relative to the end of the timesheet period,either before or after it. You can optionally CC the employee's backup approver(s) using theCC property.
Timesheet Approval Late Notice
Like the Timesheet Approval Due notice, the Timesheet Approval Late notice is sent toprimary approvers who have timesheets waiting their approval. This is sent at a daterelative to the end of the timesheet period, either before or after it. You can optionally CCthe employee's backup approver(s) using the CC property.
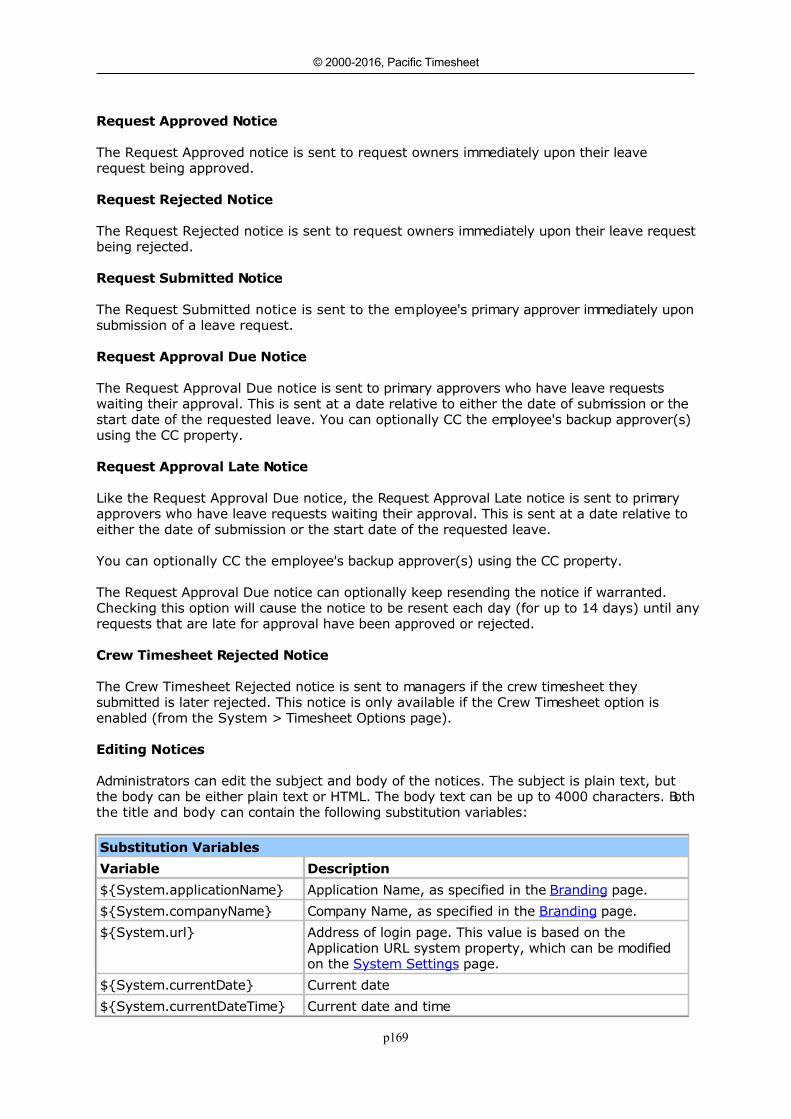
p169
© 2000-2016, Pacific Timesheet
Request Approved Notice
The Request Approved notice is sent to request owners immediately upon their leaverequest being approved.
Request Rejected Notice
The Request Rejected notice is sent to request owners immediately upon their leave requestbeing rejected.
Request Submitted Notice
The Request Submitted notice is sent to the employee's primary approver immediately uponsubmission of a leave request.
Request Approval Due Notice
The Request Approval Due notice is sent to primary approvers who have leave requestswaiting their approval. This is sent at a date relative to either the date of submission or thestart date of the requested leave. You can optionally CC the employee's backup approver(s)using the CC property.
Request Approval Late Notice
Like the Request Approval Due notice, the Request Approval Late notice is sent to primaryapprovers who have leave requests waiting their approval. This is sent at a date relative toeither the date of submission or the start date of the requested leave.
You can optionally CC the employee's backup approver(s) using the CC property.
The Request Approval Due notice can optionally keep resending the notice if warranted.Checking this option will cause the notice to be resent each day (for up to 14 days) until anyrequests that are late for approval have been approved or rejected.
Crew Timesheet Rejected Notice
The Crew Timesheet Rejected notice is sent to managers if the crew timesheet theysubmitted is later rejected. This notice is only available if the Crew Timesheet option isenabled (from the System > Timesheet Options page).
Editing Notices
Administrators can edit the subject and body of the notices. The subject is plain text, butthe body can be either plain text or HTML. The body text can be up to 4000 characters. Boththe title and body can contain the following substitution variables:
Substitution Variables
Variable Description
${System.applicationName} Application Name, as specified in the Branding page.
${System.companyName} Company Name, as specified in the Branding page.
${System.url} Address of login page. This value is based on theApplication URL system property, which can be modifiedon the System Settings page.
${System.currentDate} Current date
${System.currentDateTime} Current date and time
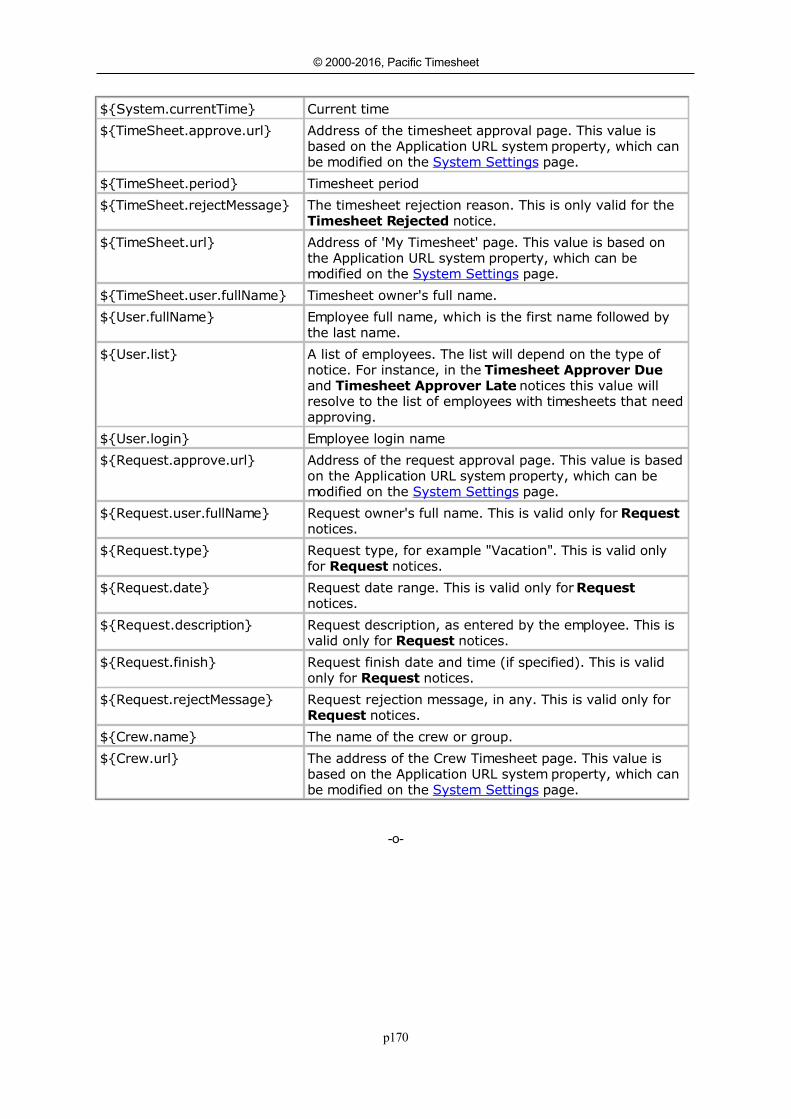
p170
© 2000-2016, Pacific Timesheet
${System.currentTime} Current time
${TimeSheet.approve.url} Address of the timesheet approval page. This value isbased on the Application URL system property, which canbe modified on the System Settings page.
${TimeSheet.period} Timesheet period
${TimeSheet.rejectMessage} The timesheet rejection reason. This is only valid for the Timesheet Rejected notice.
${TimeSheet.url} Address of 'My Timesheet' page. This value is based onthe Application URL system property, which can bemodified on the System Settings page.
${TimeSheet.user.fullName} Timesheet owner's full name.
${User.fullName} Employee full name, which is the first name followed bythe last name.
${User.list} A list of employees. The list will depend on the type ofnotice. For instance, in the Timesheet Approver Dueand Timesheet Approver Late notices this value willresolve to the list of employees with timesheets that needapproving.
${User.login} Employee login name
${Request.approve.url} Address of the request approval page. This value is basedon the Application URL system property, which can bemodified on the System Settings page.
${Request.user.fullName} Request owner's full name. This is valid only for Requestnotices.
${Request.type} Request type, for example "Vacation". This is valid onlyfor Request notices.
${Request.date} Request date range. This is valid only for Requestnotices.
${Request.description} Request description, as entered by the employee. This isvalid only for Request notices.
${Request.finish} Request finish date and time (if specified). This is validonly for Request notices.
${Request.rejectMessage} Request rejection message, in any. This is valid only for Request notices.
${Crew.name} The name of the crew or group.
${Crew.url} The address of the Crew Timesheet page. This value isbased on the Application URL system property, which canbe modified on the System Settings page.
-o-
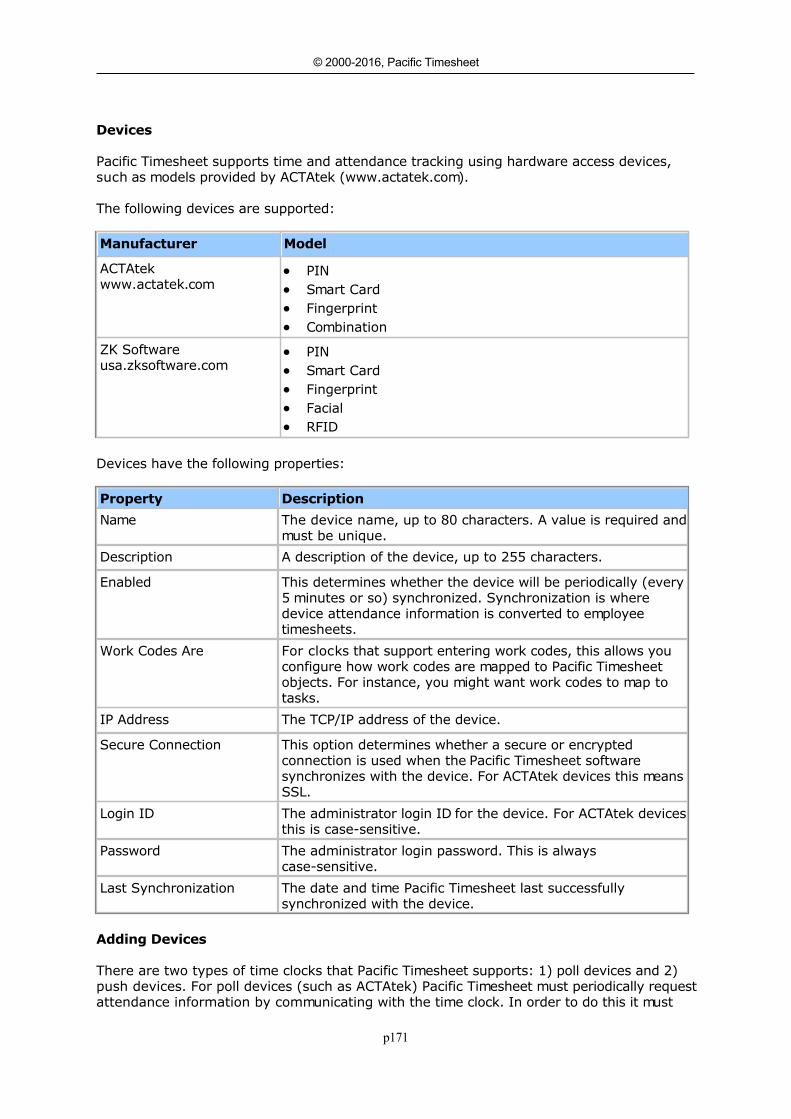
p171
© 2000-2016, Pacific Timesheet
DevicesDevices
Pacific Timesheet supports time and attendance tracking using hardware access devices,such as models provided by ACTAtek (www.actatek.com).
The following devices are supported:
Manufacturer Model
ACTAtekwww.actatek.com
PIN Smart Card Fingerprint Combination
ZK Softwareusa.zksoftware.com
PIN Smart Card Fingerprint Facial RFID
Devices have the following properties:
Property Description
Name The device name, up to 80 characters. A value is required andmust be unique.
Description A description of the device, up to 255 characters.
Enabled This determines whether the device will be periodically (every5 minutes or so) synchronized. Synchronization is wheredevice attendance information is converted to employeetimesheets.
Work Codes Are For clocks that support entering work codes, this allows youconfigure how work codes are mapped to Pacific Timesheetobjects. For instance, you might want work codes to map totasks.
IP Address The TCP/IP address of the device.
Secure Connection This option determines whether a secure or encryptedconnection is used when the Pacific Timesheet softwaresynchronizes with the device. For ACTAtek devices this meansSSL.
Login ID The administrator login ID for the device. For ACTAtek devicesthis is case-sensitive.
Password The administrator login password. This is alwayscase-sensitive.
Last Synchronization The date and time Pacific Timesheet last successfullysynchronized with the device.
Adding Devices
There are two types of time clocks that Pacific Timesheet supports: 1) poll devices and 2)push devices. For poll devices (such as ACTAtek) Pacific Timesheet must periodically requestattendance information by communicating with the time clock. In order to do this it must
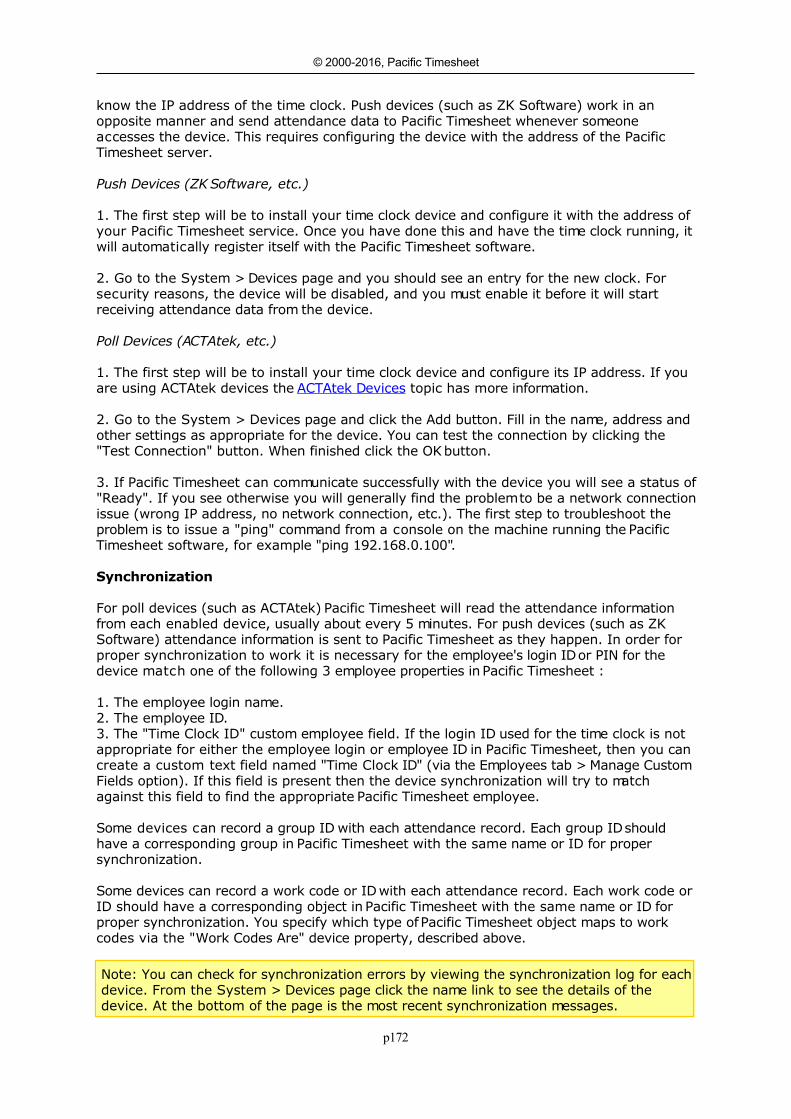
p172
© 2000-2016, Pacific Timesheet
know the IP address of the time clock. Push devices (such as ZK Software) work in anopposite manner and send attendance data to Pacific Timesheet whenever someoneaccesses the device. This requires configuring the device with the address of the PacificTimesheet server.
Push Devices (ZK Software, etc.)
1. The first step will be to install your time clock device and configure it with the address ofyour Pacific Timesheet service. Once you have done this and have the time clock running, itwill automatically register itself with the Pacific Timesheet software.
2. Go to the System > Devices page and you should see an entry for the new clock. Forsecurity reasons, the device will be disabled, and you must enable it before it will startreceiving attendance data from the device.
Poll Devices (ACTAtek, etc.)
1. The first step will be to install your time clock device and configure its IP address. If youare using ACTAtek devices the ACTAtek Devices topic has more information.
2. Go to the System > Devices page and click the Add button. Fill in the name, address andother settings as appropriate for the device. You can test the connection by clicking the"Test Connection" button. When finished click the OK button.
3. If Pacific Timesheet can communicate successfully with the device you will see a status of"Ready". If you see otherwise you will generally find the problem to be a network connectionissue (wrong IP address, no network connection, etc.). The first step to troubleshoot theproblem is to issue a "ping" command from a console on the machine running the PacificTimesheet software, for example "ping 192.168.0.100".
Synchronization
For poll devices (such as ACTAtek) Pacific Timesheet will read the attendance informationfrom each enabled device, usually about every 5 minutes. For push devices (such as ZKSoftware) attendance information is sent to Pacific Timesheet as they happen. In order forproper synchronization to work it is necessary for the employee's login ID or PIN for thedevice match one of the following 3 employee properties in Pacific Timesheet :
1. The employee login name.2. The employee ID.3. The "Time Clock ID" custom employee field. If the login ID used for the time clock is notappropriate for either the employee login or employee ID in Pacific Timesheet, then you cancreate a custom text field named "Time Clock ID" (via the Employees tab > Manage CustomFields option). If this field is present then the device synchronization will try to matchagainst this field to find the appropriate Pacific Timesheet employee.
Some devices can record a group ID with each attendance record. Each group ID shouldhave a corresponding group in Pacific Timesheet with the same name or ID for propersynchronization.
Some devices can record a work code or ID with each attendance record. Each work code orID should have a corresponding object in Pacific Timesheet with the same name or ID forproper synchronization. You specify which type of Pacific Timesheet object maps to workcodes via the "Work Codes Are" device property, described above.
Note: You can check for synchronization errors by viewing the synchronization log for eachdevice. From the System > Devices page click the name link to see the details of thedevice. At the bottom of the page is the most recent synchronization messages.

p173
© 2000-2016, Pacific Timesheet
-o-
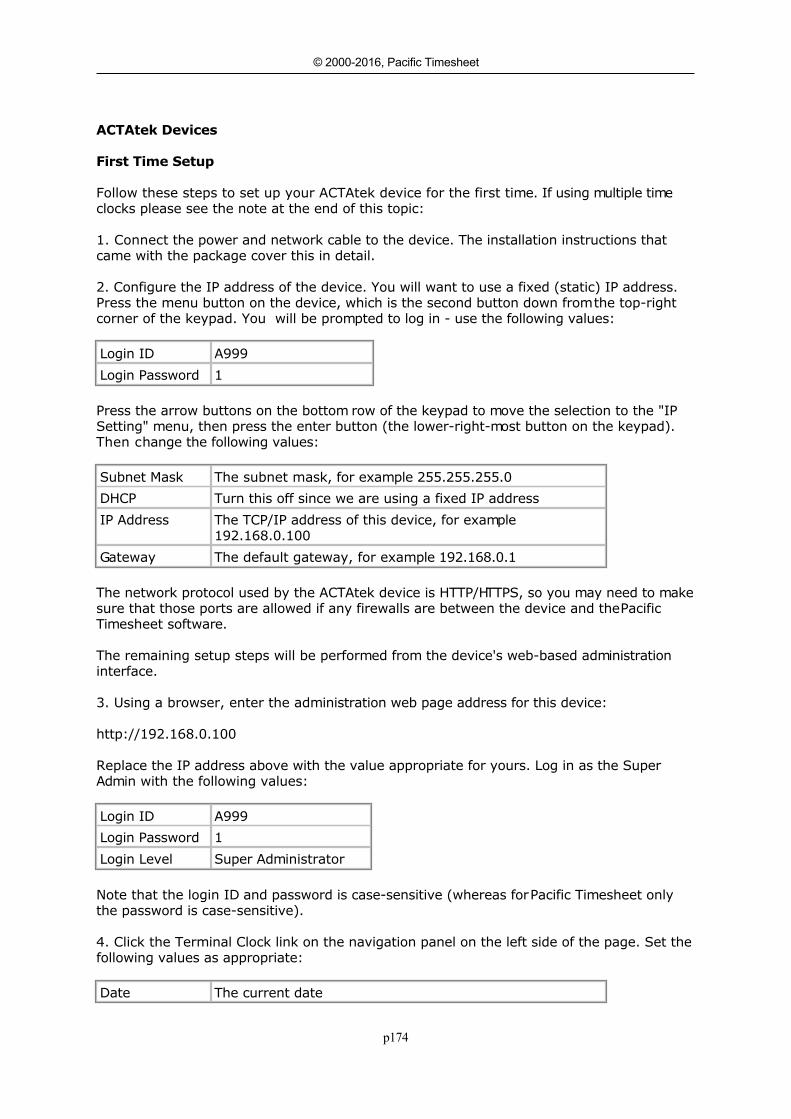
p174
© 2000-2016, Pacific Timesheet
ACTAtek DevicesACTAtek Devices
First Time Setup
Follow these steps to set up your ACTAtek device for the first time. If using multiple timeclocks please see the note at the end of this topic:
1. Connect the power and network cable to the device. The installation instructions thatcame with the package cover this in detail.
2. Configure the IP address of the device. You will want to use a fixed (static) IP address.Press the menu button on the device, which is the second button down from the top-rightcorner of the keypad. You will be prompted to log in - use the following values:
Login ID A999
Login Password 1
Press the arrow buttons on the bottom row of the keypad to move the selection to the "IPSetting" menu, then press the enter button (the lower-right-most button on the keypad).Then change the following values:
Subnet Mask The subnet mask, for example 255.255.255.0
DHCP Turn this off since we are using a fixed IP address
IP Address The TCP/IP address of this device, for example192.168.0.100
Gateway The default gateway, for example 192.168.0.1
The network protocol used by the ACTAtek device is HTTP/HTTPS, so you may need to makesure that those ports are allowed if any firewalls are between the device and the PacificTimesheet software.
The remaining setup steps will be performed from the device's web-based administrationinterface.
3. Using a browser, enter the administration web page address for this device:
http://192.168.0.100
Replace the IP address above with the value appropriate for yours. Log in as the SuperAdmin with the following values:
Login ID A999
Login Password 1
Login Level Super Administrator
Note that the login ID and password is case-sensitive (whereas for Pacific Timesheet onlythe password is case-sensitive).
4. Click the Terminal Clock link on the navigation panel on the left side of the page. Set thefollowing values as appropriate:
Date The current date
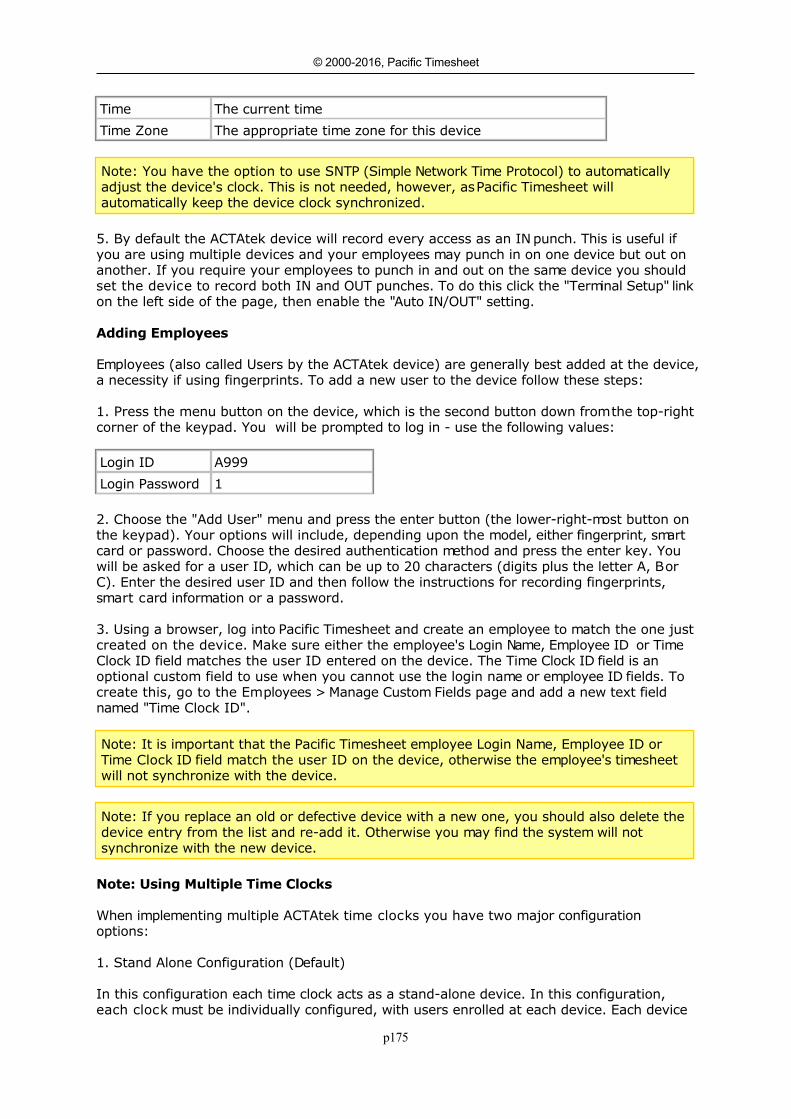
p175
© 2000-2016, Pacific Timesheet
Time The current time
Time Zone The appropriate time zone for this device
Note: You have the option to use SNTP (Simple Network Time Protocol) to automaticallyadjust the device's clock. This is not needed, however, as Pacific Timesheet willautomatically keep the device clock synchronized.
5. By default the ACTAtek device will record every access as an IN punch. This is useful ifyou are using multiple devices and your employees may punch in on one device but out onanother. If you require your employees to punch in and out on the same device you shouldset the device to record both IN and OUT punches. To do this click the "Terminal Setup" linkon the left side of the page, then enable the "Auto IN/OUT" setting.
Adding Employees
Employees (also called Users by the ACTAtek device) are generally best added at the device,a necessity if using fingerprints. To add a new user to the device follow these steps:
1. Press the menu button on the device, which is the second button down from the top-rightcorner of the keypad. You will be prompted to log in - use the following values:
Login ID A999
Login Password 1
2. Choose the "Add User" menu and press the enter button (the lower-right-most button onthe keypad). Your options will include, depending upon the model, either fingerprint, smartcard or password. Choose the desired authentication method and press the enter key. Youwill be asked for a user ID, which can be up to 20 characters (digits plus the letter A, B orC). Enter the desired user ID and then follow the instructions for recording fingerprints,smart card information or a password.
3. Using a browser, log into Pacific Timesheet and create an employee to match the one justcreated on the device. Make sure either the employee's Login Name, Employee ID or TimeClock ID field matches the user ID entered on the device. The Time Clock ID field is anoptional custom field to use when you cannot use the login name or employee ID fields. Tocreate this, go to the Employees > Manage Custom Fields page and add a new text fieldnamed "Time Clock ID".
Note: It is important that the Pacific Timesheet employee Login Name, Employee ID orTime Clock ID field match the user ID on the device, otherwise the employee's timesheetwill not synchronize with the device.
Note: If you replace an old or defective device with a new one, you should also delete thedevice entry from the list and re-add it. Otherwise you may find the system will notsynchronize with the new device.
Note: Using Multiple Time Clocks
When implementing multiple ACTAtek time clocks you have two major configurationoptions:
1. Stand Alone Configuration (Default)
In this configuration each time clock acts as a stand-alone device. In this configuration,each clock must be individually configured, with users enrolled at each device. Each device

p176
© 2000-2016, Pacific Timesheet
must be added to Pacific Timesheet for synchronization.
2. Primary/Secondary Configuration
In this configuration you define one of your time clocks as the primary device. Then everyother device is defined as a secondary and configured to synchronize with the primarydevice. In this configuration you only need to configure and enroll users at the primarydevice. Only the primary device must be added to Pacific Timesheet for synchronization.
Note: Do not add secondary devices to Pacific Timesheet for synchronization or you will getduplicate timesheet data.
See the Primary/Secondary option under 'Terminal Settings' in the ACTAtek webadministrative interface for more details.
Note: Resetting the Super Admin (A999) Password
For security reasons, there is no way to manually reset the device back to its factorysettings or otherwise reset the Super Admin (A999) password. If you have forgotten yourSuper Admin password please do the following:
1. Email the serial number and IP address of the unit to [email protected], letting themknow you want to reset the Super Admin password. To get the serial number and IP addresspress the Enter button on the ACTAtek unit six times and it will display the information.
2. You will be emailed a link to a password recovery patch, which will, for security, expireafter 48 hours. Download this patch to your local computer.
3. Open a browser on your local computer and go to the recovery page of the ACTAtek unit,as described in the email response from ACTAtek. For instance:
http://192.168.1.88/cgi-bin/recovery.cgi
4. Upload the recovery patch as per the instructions on this page. Once the upload iscompleted you will be able to log in as the Super Admin: A999 with password 1.
-o-
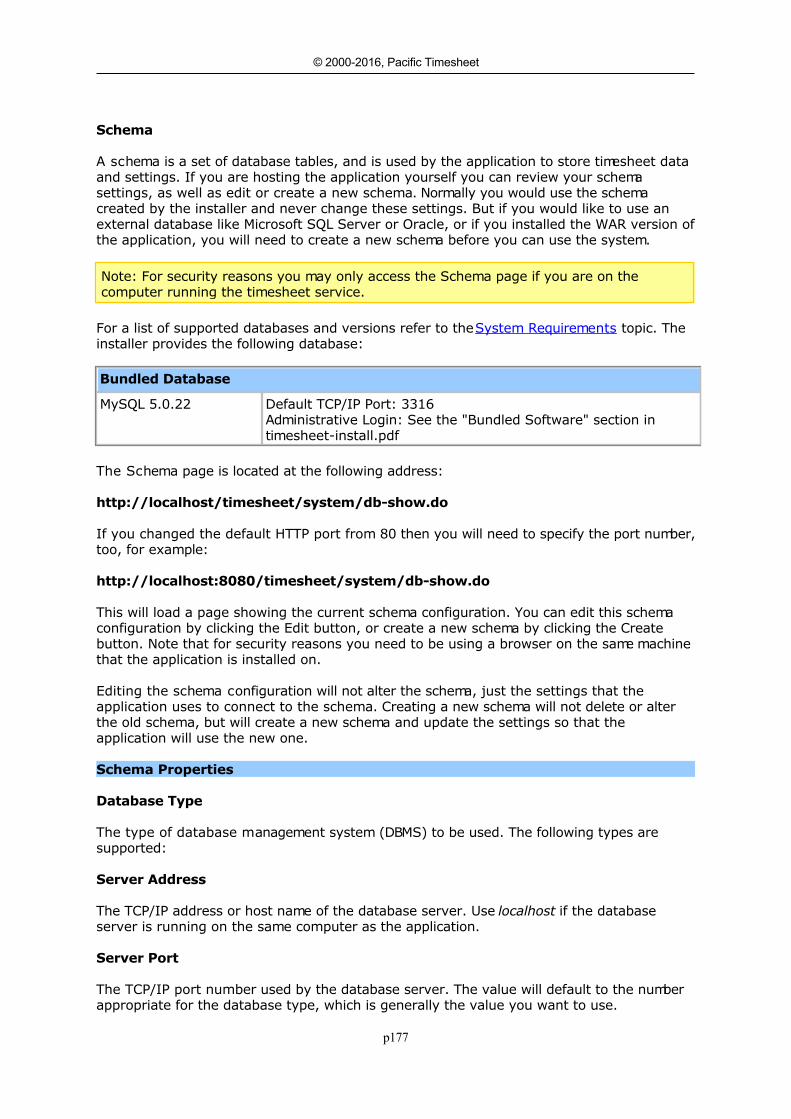
p177
© 2000-2016, Pacific Timesheet
Schema (Self-Hosted Version Only)Schema
A schema is a set of database tables, and is used by the application to store timesheet dataand settings. If you are hosting the application yourself you can review your schemasettings, as well as edit or create a new schema. Normally you would use the schemacreated by the installer and never change these settings. But if you would like to use anexternal database like Microsoft SQL Server or Oracle, or if you installed the WAR version ofthe application, you will need to create a new schema before you can use the system.
Note: For security reasons you may only access the Schema page if you are on thecomputer running the timesheet service.
For a list of supported databases and versions refer to the System Requirements topic. Theinstaller provides the following database:
Bundled Database
MySQL 5.0.22 Default TCP/IP Port: 3316Administrative Login: See the "Bundled Software" section intimesheet-install.pdf
The Schema page is located at the following address:
http://localhost/timesheet/system/db-show.do
If you changed the default HTTP port from 80 then you will need to specify the port number,too, for example:
http://localhost:8080/timesheet/system/db-show.do
This will load a page showing the current schema configuration. You can edit this schemaconfiguration by clicking the Edit button, or create a new schema by clicking the Createbutton. Note that for security reasons you need to be using a browser on the same machinethat the application is installed on.
Editing the schema configuration will not alter the schema, just the settings that theapplication uses to connect to the schema. Creating a new schema will not delete or alterthe old schema, but will create a new schema and update the settings so that theapplication will use the new one.
Schema Properties
Database Type
The type of database management system (DBMS) to be used. The following types aresupported:
Server Address
The TCP/IP address or host name of the database server. Use localhost if the databaseserver is running on the same computer as the application.
Server Port
The TCP/IP port number used by the database server. The value will default to the numberappropriate for the database type, which is generally the value you want to use.
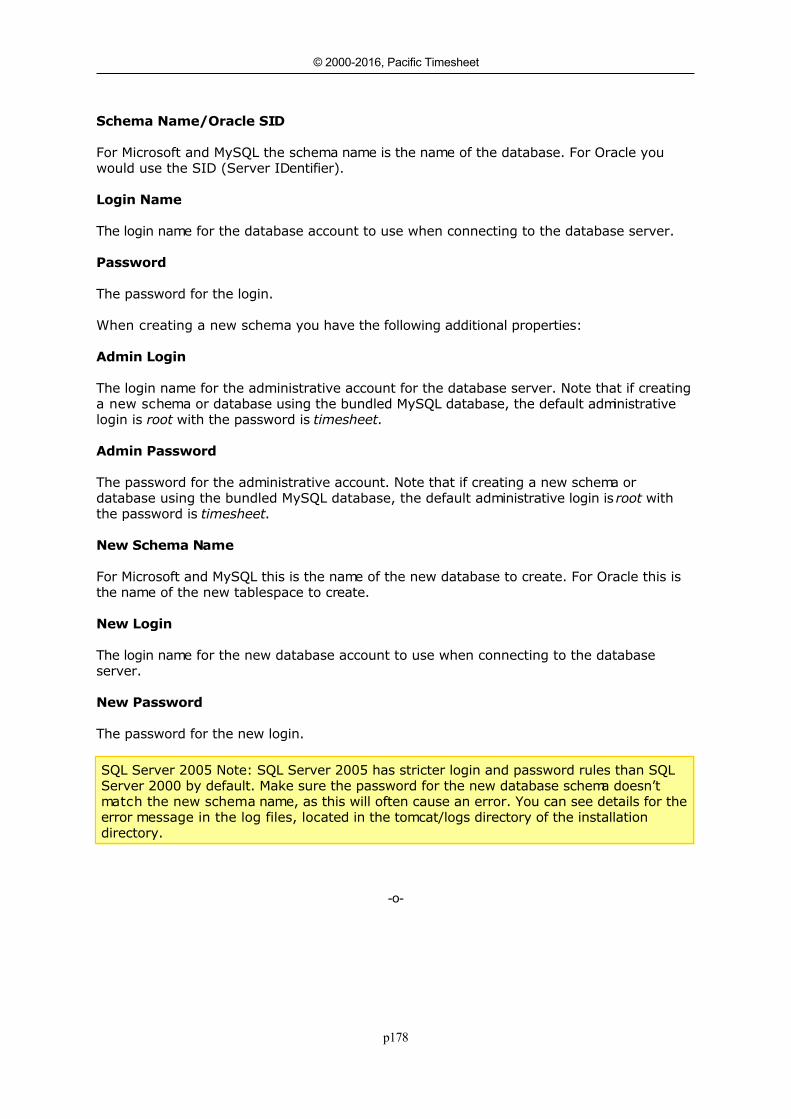
p178
© 2000-2016, Pacific Timesheet
Schema Name/Oracle SID
For Microsoft and MySQL the schema name is the name of the database. For Oracle youwould use the SID (Server IDentifier).
Login Name
The login name for the database account to use when connecting to the database server.
Password
The password for the login.
When creating a new schema you have the following additional properties:
Admin Login
The login name for the administrative account for the database server. Note that if creatinga new schema or database using the bundled MySQL database, the default administrativelogin is root with the password is timesheet.
Admin Password
The password for the administrative account. Note that if creating a new schema ordatabase using the bundled MySQL database, the default administrative login is root withthe password is timesheet.
New Schema Name
For Microsoft and MySQL this is the name of the new database to create. For Oracle this isthe name of the new tablespace to create.
New Login
The login name for the new database account to use when connecting to the databaseserver.
New Password
The password for the new login.
SQL Server 2005 Note: SQL Server 2005 has stricter login and password rules than SQLServer 2000 by default. Make sure the password for the new database schema doesn’tmatch the new schema name, as this will often cause an error. You can see details for theerror message in the log files, located in the tomcat/logs directory of the installationdirectory.
-o-
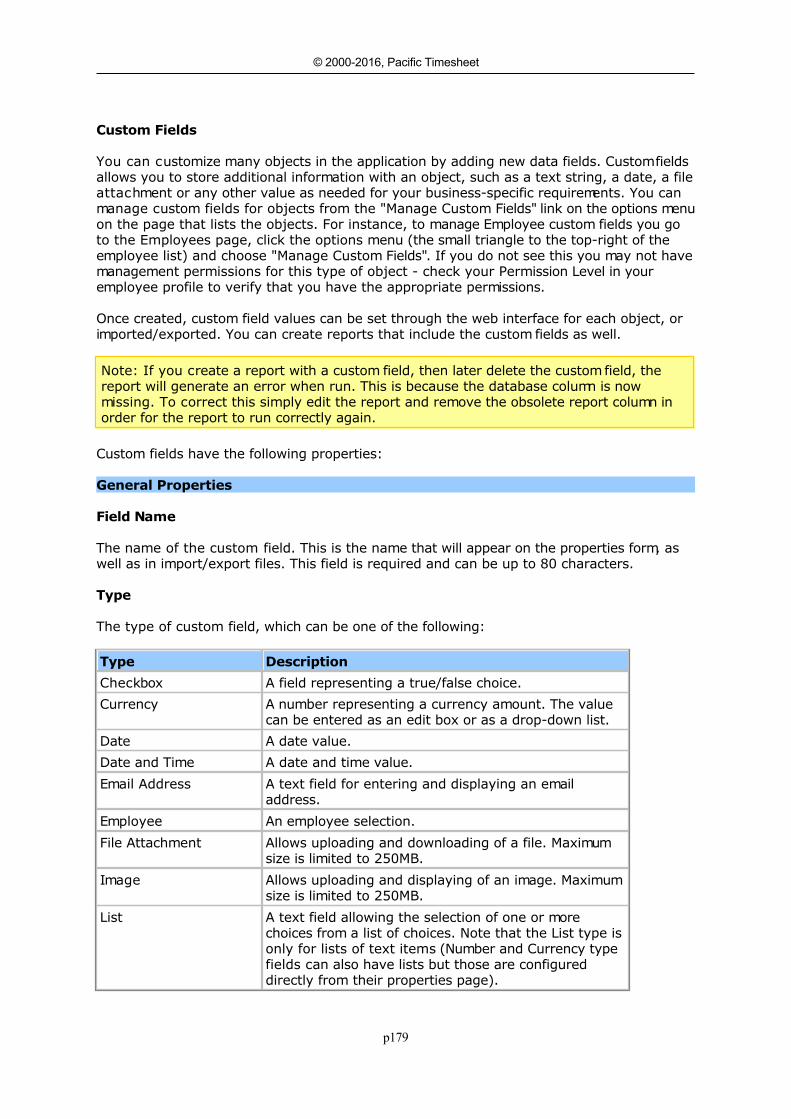
p179
© 2000-2016, Pacific Timesheet
Custom FieldsCustom Fields
You can customize many objects in the application by adding new data fields. Custom fieldsallows you to store additional information with an object, such as a text string, a date, a fileattachment or any other value as needed for your business-specific requirements. You canmanage custom fields for objects from the "Manage Custom Fields" link on the options menuon the page that lists the objects. For instance, to manage Employee custom fields you goto the Employees page, click the options menu (the small triangle to the top-right of theemployee list) and choose "Manage Custom Fields". If you do not see this you may not havemanagement permissions for this type of object - check your Permission Level in youremployee profile to verify that you have the appropriate permissions.
Once created, custom field values can be set through the web interface for each object, orimported/exported. You can create reports that include the custom fields as well.
Note: If you create a report with a custom field, then later delete the custom field, thereport will generate an error when run. This is because the database column is nowmissing. To correct this simply edit the report and remove the obsolete report column inorder for the report to run correctly again.
Custom fields have the following properties:
General Properties
Field Name
The name of the custom field. This is the name that will appear on the properties form, aswell as in import/export files. This field is required and can be up to 80 characters.
Type
The type of custom field, which can be one of the following:
Type Description
Checkbox A field representing a true/false choice.
Currency A number representing a currency amount. The valuecan be entered as an edit box or as a drop-down list.
Date A date value.
Date and Time A date and time value.
Email Address A text field for entering and displaying an emailaddress.
Employee An employee selection.
File Attachment Allows uploading and downloading of a file. Maximumsize is limited to 250MB.
Image Allows uploading and displaying of an image. Maximumsize is limited to 250MB.
List A text field allowing the selection of one or morechoices from a list of choices. Note that the List type isonly for lists of text items (Number and Currency typefields can also have lists but those are configureddirectly from their properties page).
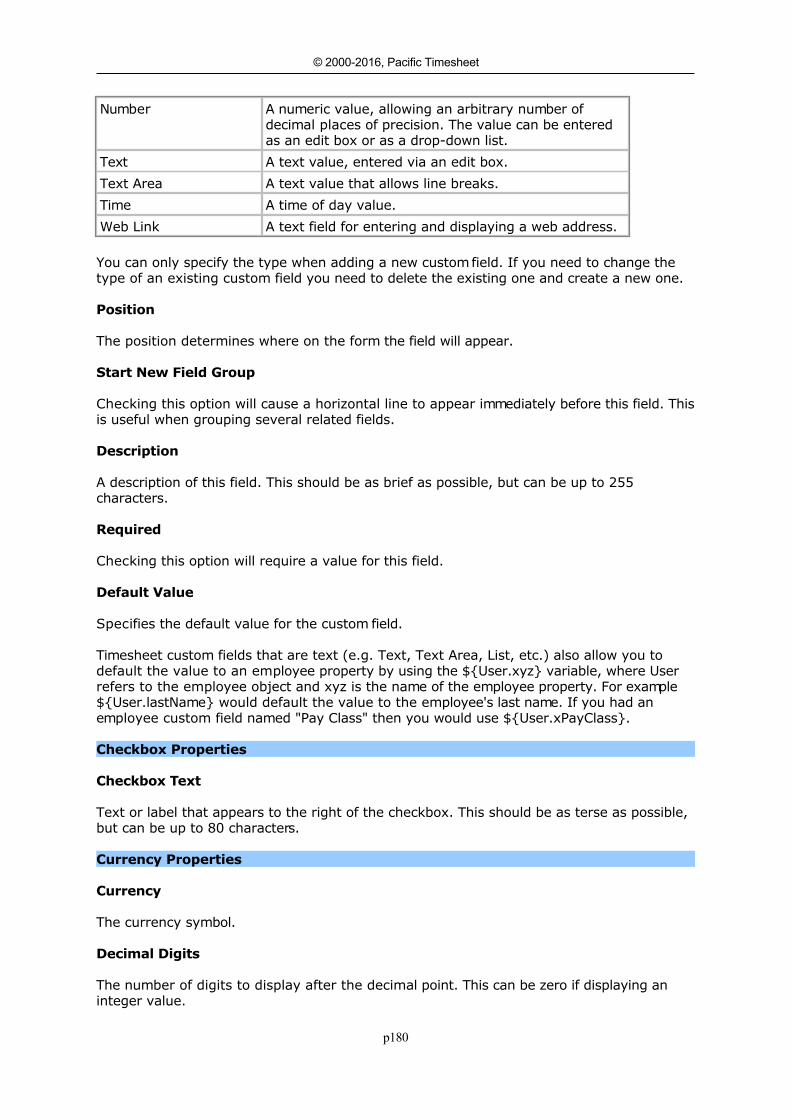
p180
© 2000-2016, Pacific Timesheet
Number A numeric value, allowing an arbitrary number ofdecimal places of precision. The value can be enteredas an edit box or as a drop-down list.
Text A text value, entered via an edit box.
Text Area A text value that allows line breaks.
Time A time of day value.
Web Link A text field for entering and displaying a web address.
You can only specify the type when adding a new custom field. If you need to change thetype of an existing custom field you need to delete the existing one and create a new one.
Position
The position determines where on the form the field will appear.
Start New Field Group
Checking this option will cause a horizontal line to appear immediately before this field. Thisis useful when grouping several related fields.
Description
A description of this field. This should be as brief as possible, but can be up to 255characters.
Required
Checking this option will require a value for this field.
Default Value
Specifies the default value for the custom field.
Timesheet custom fields that are text (e.g. Text, Text Area, List, etc.) also allow you todefault the value to an employee property by using the ${User.xyz} variable, where Userrefers to the employee object and xyz is the name of the employee property. For example${User.lastName} would default the value to the employee's last name. If you had anemployee custom field named "Pay Class" then you would use ${User.xPayClass}.
Checkbox Properties
Checkbox Text
Text or label that appears to the right of the checkbox. This should be as terse as possible,but can be up to 80 characters.
Currency Properties
Currency
The currency symbol.
Decimal Digits
The number of digits to display after the decimal point. This can be zero if displaying aninteger value.
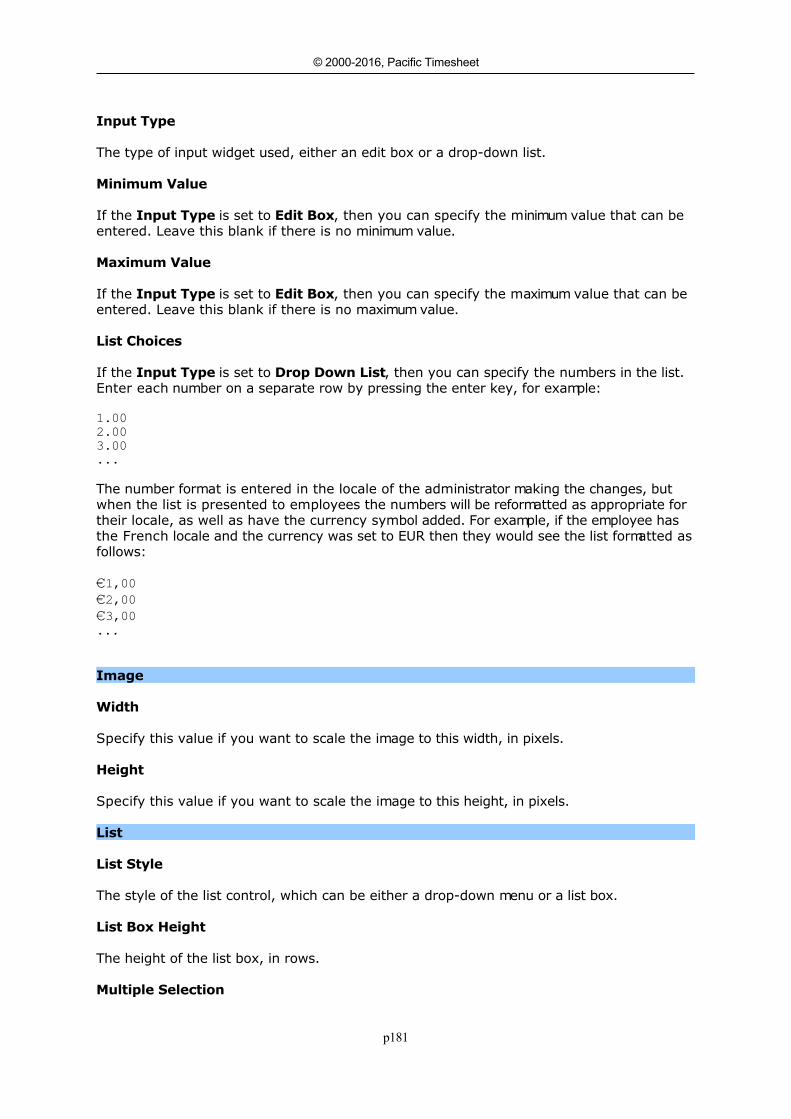
p181
© 2000-2016, Pacific Timesheet
Input Type
The type of input widget used, either an edit box or a drop-down list.
Minimum Value
If the Input Type is set to Edit Box, then you can specify the minimum value that can beentered. Leave this blank if there is no minimum value.
Maximum Value
If the Input Type is set to Edit Box, then you can specify the maximum value that can beentered. Leave this blank if there is no maximum value.
List Choices
If the Input Type is set to Drop Down List, then you can specify the numbers in the list.Enter each number on a separate row by pressing the enter key, for example:
1.00
2.00
3.00
...
The number format is entered in the locale of the administrator making the changes, butwhen the list is presented to employees the numbers will be reformatted as appropriate fortheir locale, as well as have the currency symbol added. For example, if the employee hasthe French locale and the currency was set to EUR then they would see the list formatted asfollows:
€1,00
€2,00
€3,00...
Image
Width
Specify this value if you want to scale the image to this width, in pixels.
Height
Specify this value if you want to scale the image to this height, in pixels.
List
List Style
The style of the list control, which can be either a drop-down menu or a list box.
List Box Height
The height of the list box, in rows.
Multiple Selection

p182
© 2000-2016, Pacific Timesheet
Checking this option allows multiple selections. Note that multiple selections are stored insame field just like single selections, but with each selection being separated by a line breakcharacter.
List Choices
Enter your list choices here, with each choice starting on a new line.
Number
Decimal Digits
The number of digits to display after the decimal point. This can be zero if displaying aninteger value.
Input Type
The type of input widget used, either an edit box or a drop-down list.
Minimum Value
If the Input Type is set to Edit Box, then you can specify the minimum value that can beentered. Leave this blank if there is no minimum value.
Maximum Value
If the Input Type is set to Edit Box, then you can specify the maximum value that can beentered. Leave this blank if there is no maximum value.
List Choices
If the Input Type is set to Drop Down List, then you can specify the numbers in the list.Enter each number on a separate row by pressing the enter key, for example:
1.00
2.00
3.00
...
The number format is entered in the locale of the administrator making the changes, butwhen the list is presented to employees the numbers will be reformatted as appropriate fortheir locale. For example, if the employee has the French locale they would see the listformatted as follows:
1,00
2,00
3,00
...
Text
Maximum Characters
The maximum number of characters that can be entered in this field. This can be up to 255characters.
Text Area
Maximum Characters

p183
© 2000-2016, Pacific Timesheet
The maximum number of characters that can be entered in this field. This can be up to4000 characters.
Rows
The height of the text area, in rows.
-o-
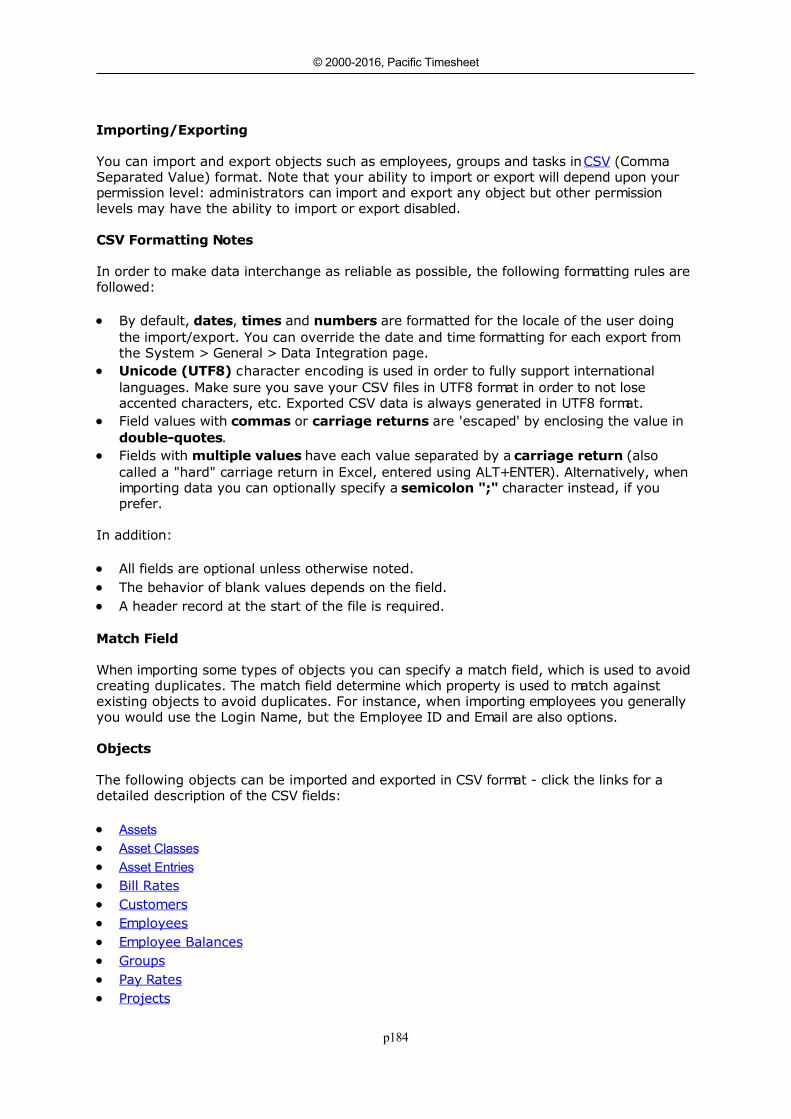
p184
© 2000-2016, Pacific Timesheet
Importing/ExportingImporting/Exporting
You can import and export objects such as employees, groups and tasks in CSV (CommaSeparated Value) format. Note that your ability to import or export will depend upon yourpermission level: administrators can import and export any object but other permissionlevels may have the ability to import or export disabled.
CSV Formatting Notes
In order to make data interchange as reliable as possible, the following formatting rules arefollowed:
By default, dates, times and numbers are formatted for the locale of the user doingthe import/export. You can override the date and time formatting for each export fromthe System > General > Data Integration page.
Unicode (UTF8) character encoding is used in order to fully support internationallanguages. Make sure you save your CSV files in UTF8 format in order to not loseaccented characters, etc. Exported CSV data is always generated in UTF8 format.
Field values with commas or carriage returns are 'escaped' by enclosing the value indouble-quotes.
Fields with multiple values have each value separated by a carriage return (alsocalled a "hard" carriage return in Excel, entered using ALT+ENTER). Alternatively, whenimporting data you can optionally specify a semicolon ";" character instead, if youprefer.
In addition:
All fields are optional unless otherwise noted. The behavior of blank values depends on the field. A header record at the start of the file is required.
Match Field
When importing some types of objects you can specify a match field, which is used to avoidcreating duplicates. The match field determine which property is used to match againstexisting objects to avoid duplicates. For instance, when importing employees you generallyyou would use the Login Name, but the Employee ID and Email are also options.
Objects
The following objects can be imported and exported in CSV format - click the links for adetailed description of the CSV fields:
Assets Asset Classes Asset Entries Bill Rates Customers Employees Employee Balances Groups Pay Rates Projects

p185
© 2000-2016, Pacific Timesheet
Project Groups Tasks Task Groups Timesheets
-o-
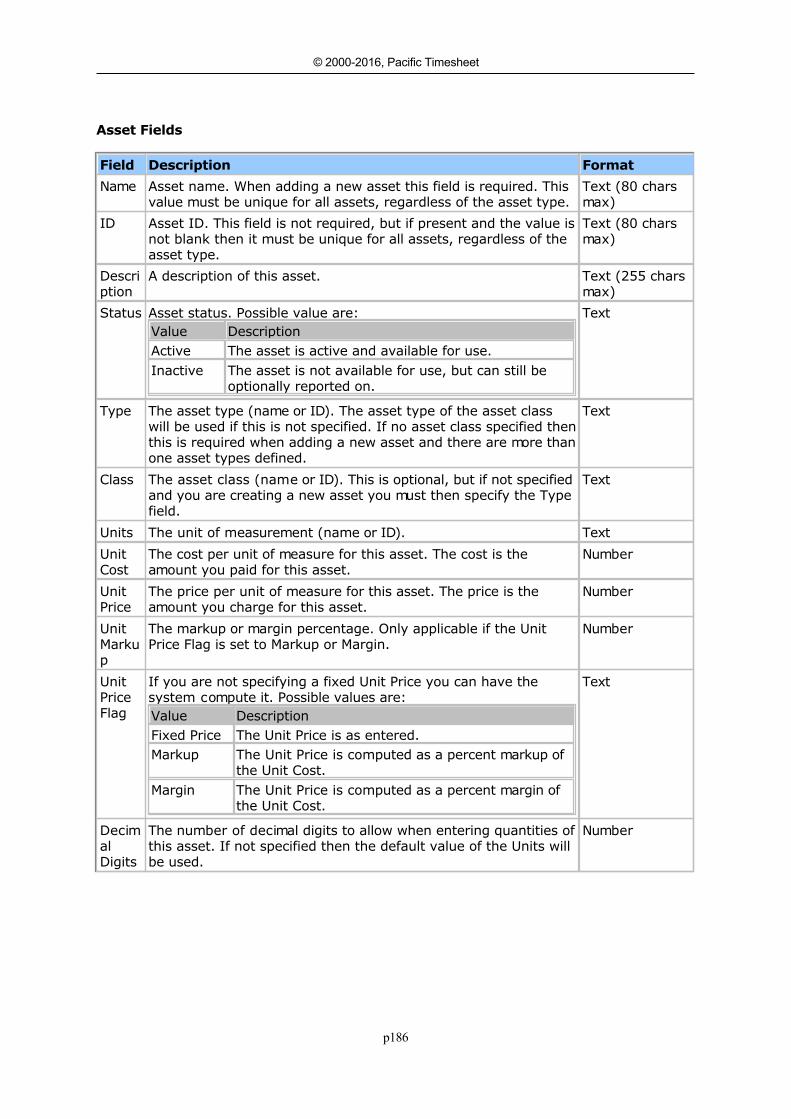
p186
© 2000-2016, Pacific Timesheet
Asset CSV FormatAsset Fields
Field Description Format
Name Asset name. When adding a new asset this field is required. Thisvalue must be unique for all assets, regardless of the asset type.
Text (80 charsmax)
ID Asset ID. This field is not required, but if present and the value isnot blank then it must be unique for all assets, regardless of theasset type.
Text (80 charsmax)
Description
A description of this asset. Text (255 charsmax)
Status Asset status. Possible value are:Value DescriptionActive The asset is active and available for use.Inactive The asset is not available for use, but can still be
optionally reported on.
Text
Type The asset type (name or ID). The asset type of the asset classwill be used if this is not specified. If no asset class specified thenthis is required when adding a new asset and there are more thanone asset types defined.
Text
Class The asset class (name or ID). This is optional, but if not specifiedand you are creating a new asset you must then specify the Typefield.
Text
Units The unit of measurement (name or ID). Text
UnitCost
The cost per unit of measure for this asset. The cost is theamount you paid for this asset.
Number
UnitPrice
The price per unit of measure for this asset. The price is theamount you charge for this asset.
Number
UnitMarkup
The markup or margin percentage. Only applicable if the UnitPrice Flag is set to Markup or Margin.
Number
UnitPriceFlag
If you are not specifying a fixed Unit Price you can have thesystem compute it. Possible values are:Value DescriptionFixed Price The Unit Price is as entered.Markup The Unit Price is computed as a percent markup of
the Unit Cost.Margin The Unit Price is computed as a percent margin of
the Unit Cost.
Text
DecimalDigits
The number of decimal digits to allow when entering quantities ofthis asset. If not specified then the default value of the Units willbe used.
Number

p187
© 2000-2016, Pacific Timesheet
Permissions
The list of employees and groups given special permission on thisobject. Multiple permissions have each value separated by acarriage return (also called a "hard" carriage return in Excel,entered using ALT+ENTER). Each value is of the form:
Object Name=Permission Level (Object Type)
Where Object Name is the name of the group or the login of theemployee, Permission Level is the permission level to give theemployee or group on this object, and Object Type is the whetherthis is an Employee or Group that is being given permission. Hereis an example of a group and an employee assigned to an object:
GroupA=Timekeeper (Group)jmeyers=Manager (Employee)
Note that the permission level and object type are optional. If thepermission level is not specified then it will be set to theemployee's default permission level. If the object type is notspecified the system will first check for a group with a matchingname, then look for an employee with a matching login name.Only if you have group names and employee logins that might bethe same do you need to specify the object type.
Text
Notes Notes about this asset. Text (2000chars max)
-o-
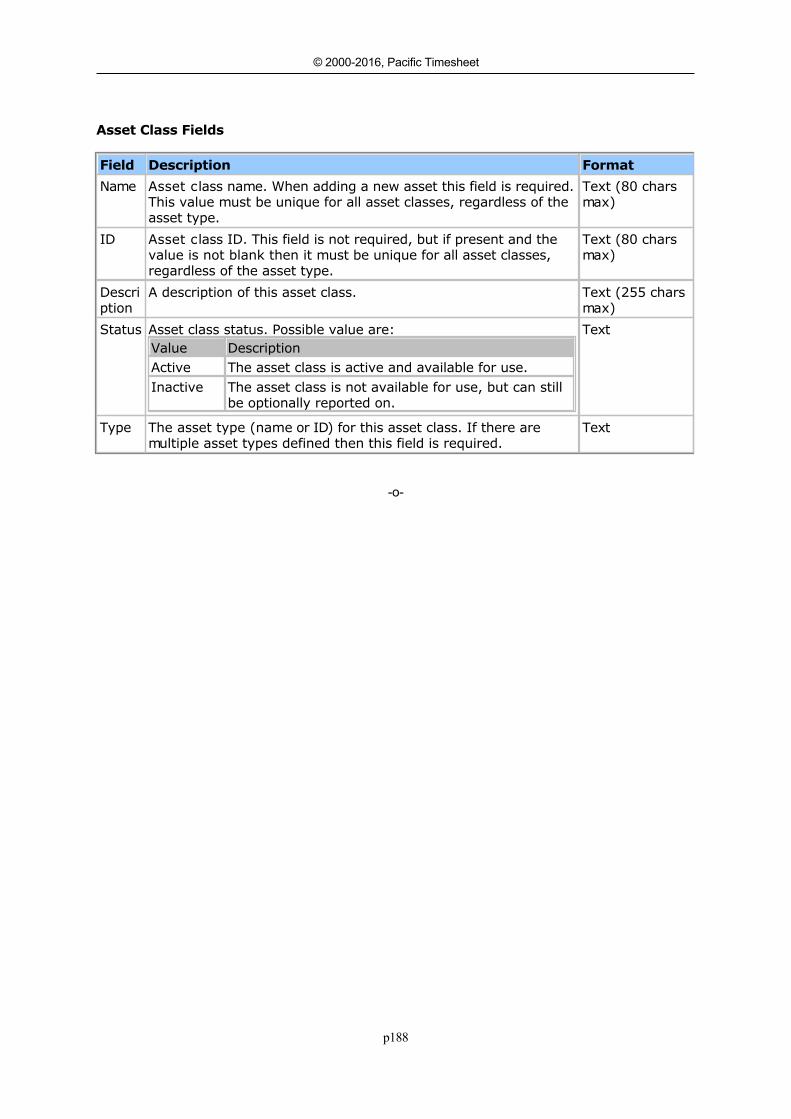
p188
© 2000-2016, Pacific Timesheet
Asset Class CSV FormatAsset Class Fields
Field Description Format
Name Asset class name. When adding a new asset this field is required.This value must be unique for all asset classes, regardless of theasset type.
Text (80 charsmax)
ID Asset class ID. This field is not required, but if present and thevalue is not blank then it must be unique for all asset classes,regardless of the asset type.
Text (80 charsmax)
Description
A description of this asset class. Text (255 charsmax)
Status Asset class status. Possible value are:Value DescriptionActive The asset class is active and available for use.Inactive The asset class is not available for use, but can still
be optionally reported on.
Text
Type The asset type (name or ID) for this asset class. If there aremultiple asset types defined then this field is required.
Text
-o-
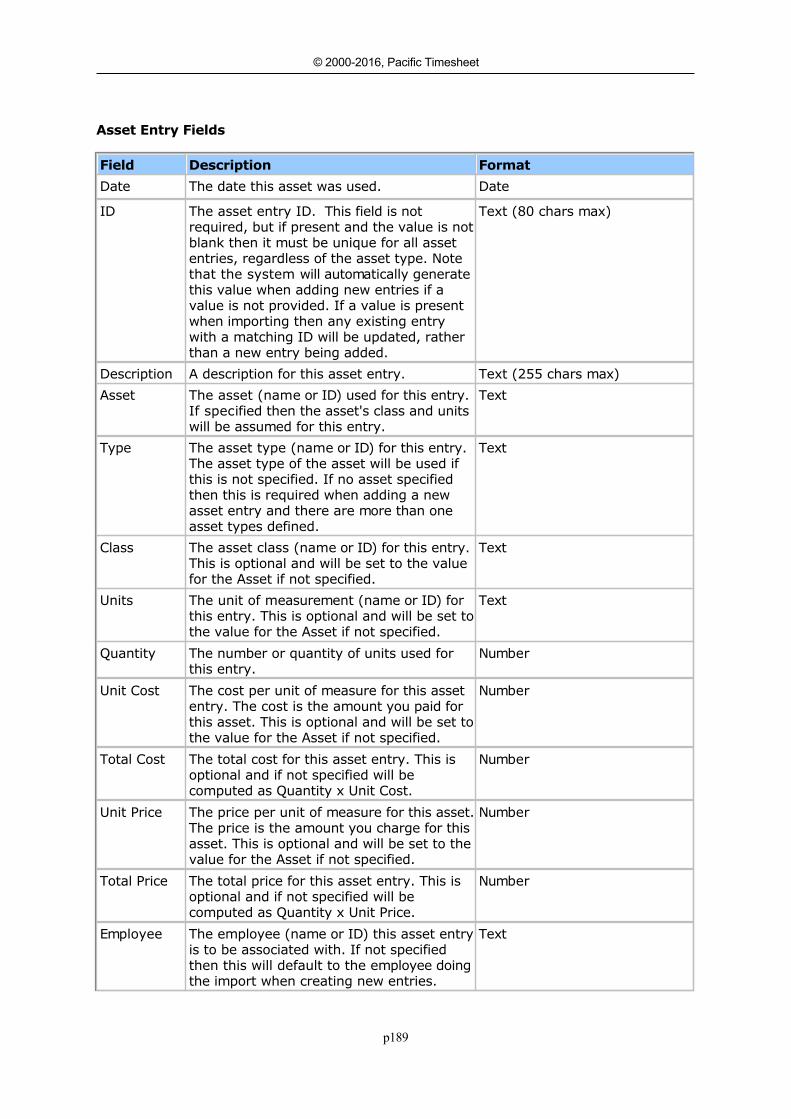
p189
© 2000-2016, Pacific Timesheet
Asset Entry CSV FormatAsset Entry Fields
Field Description Format
Date The date this asset was used. Date
ID The asset entry ID. This field is notrequired, but if present and the value is notblank then it must be unique for all assetentries, regardless of the asset type. Notethat the system will automatically generatethis value when adding new entries if avalue is not provided. If a value is presentwhen importing then any existing entrywith a matching ID will be updated, ratherthan a new entry being added.
Text (80 chars max)
Description A description for this asset entry. Text (255 chars max)
Asset The asset (name or ID) used for this entry.If specified then the asset's class and unitswill be assumed for this entry.
Text
Type The asset type (name or ID) for this entry.The asset type of the asset will be used ifthis is not specified. If no asset specifiedthen this is required when adding a newasset entry and there are more than oneasset types defined.
Text
Class The asset class (name or ID) for this entry.This is optional and will be set to the valuefor the Asset if not specified.
Text
Units The unit of measurement (name or ID) forthis entry. This is optional and will be set tothe value for the Asset if not specified.
Text
Quantity The number or quantity of units used forthis entry.
Number
Unit Cost The cost per unit of measure for this assetentry. The cost is the amount you paid forthis asset. This is optional and will be set tothe value for the Asset if not specified.
Number
Total Cost The total cost for this asset entry. This isoptional and if not specified will becomputed as Quantity x Unit Cost.
Number
Unit Price The price per unit of measure for this asset.The price is the amount you charge for thisasset. This is optional and will be set to thevalue for the Asset if not specified.
Number
Total Price The total price for this asset entry. This isoptional and if not specified will becomputed as Quantity x Unit Price.
Number
Employee The employee (name or ID) this asset entryis to be associated with. If not specifiedthen this will default to the employee doingthe import when creating new entries.
Text
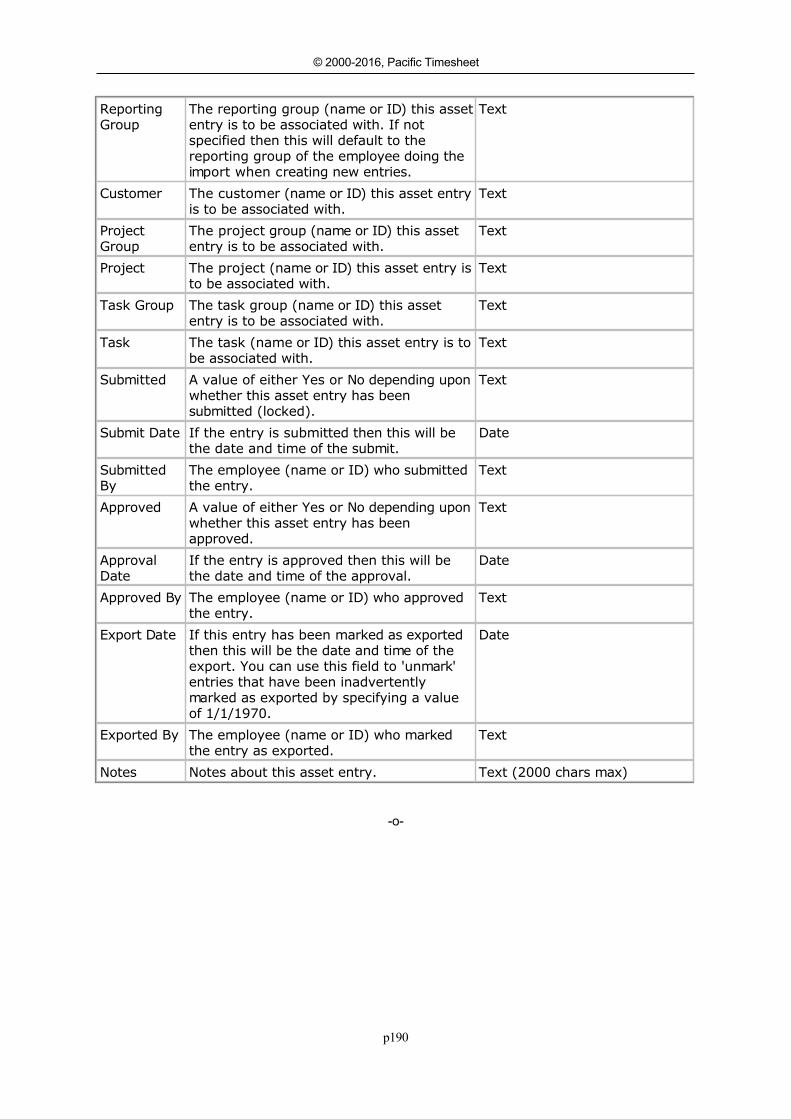
p190
© 2000-2016, Pacific Timesheet
ReportingGroup
The reporting group (name or ID) this assetentry is to be associated with. If notspecified then this will default to thereporting group of the employee doing theimport when creating new entries.
Text
Customer The customer (name or ID) this asset entryis to be associated with.
Text
ProjectGroup
The project group (name or ID) this assetentry is to be associated with.
Text
Project The project (name or ID) this asset entry isto be associated with.
Text
Task Group The task group (name or ID) this assetentry is to be associated with.
Text
Task The task (name or ID) this asset entry is tobe associated with.
Text
Submitted A value of either Yes or No depending uponwhether this asset entry has beensubmitted (locked).
Text
Submit Date If the entry is submitted then this will bethe date and time of the submit.
Date
SubmittedBy
The employee (name or ID) who submittedthe entry.
Text
Approved A value of either Yes or No depending uponwhether this asset entry has beenapproved.
Text
ApprovalDate
If the entry is approved then this will bethe date and time of the approval.
Date
Approved By The employee (name or ID) who approvedthe entry.
Text
Export Date If this entry has been marked as exportedthen this will be the date and time of theexport. You can use this field to 'unmark'entries that have been inadvertentlymarked as exported by specifying a valueof 1/1/1970.
Date
Exported By The employee (name or ID) who markedthe entry as exported.
Text
Notes Notes about this asset entry. Text (2000 chars max)
-o-

p191
© 2000-2016, Pacific Timesheet
Bill Rates CSV FormatBill Rates Fields
Field Description Format
Object The name of primary object that ratesdepend on, for example "Employee". This isoptional if the Object ID field is supplied.
Text (80 chars max)
Object ID The ID of the primary object the ratesdepend on, for example "222-99-5555".This is optional if the Object field issupplied.
Text (80 chars max)
Subobject The name of exceptioin object that ratesdepend on, for example "Group". This isoptional if the Subobject ID field issupplied. The subobject or subobject ID isoptional if you are setting the default ratefor the object.
Text (80 chars max)
Subobject ID The ID of the exception object the ratesdepend on, for example "AccountingGroup". This is optional if the Subobjectfield is supplied. The subobject or subobjectID is optional if you are setting the defaultrate for the object.
Text (80 chars max)
Bill Rate The rate for this object/subobject. The ratecan be either a numeric value, or the nameof a rate as defined in the System > BillRate Options page.
Number/Text
-o-

p192
© 2000-2016, Pacific Timesheet
Customer CSV FormatCustomer Fields
Field Description Format
Name Customer name. If this field is present in the CSV data then avalue is required, and is always required when adding newcustomers.
Text (80 charsmax)
ID Customer ID. This field is not required, but if present and thevalue is not blank then it must be unique for all customers.
Text (80 charsmax)
Description
A description of this customer. Text (255 charsmax)
Status Customer status. Possible value are:Value DescriptionActive Employee can log into system.Inactive Employee cannot log into system, and does not show
up on reports, etc. by default.
Text
Permissions
The list of employees and groups given special permission on thisobject. Multiple permissions have each value separated by acarriage return (also called a "hard" carriage return in Excel,entered using ALT+ENTER). Each value is of the form:
Object Name=Permission Level (Object Type)
Where Object Name is the name of the group or the login of theemployee, Permission Level is the permission level to give theemployee or group on this object, and Object Type is the whetherthis is an Employee or Group that is being given permission. Hereis an example of a group and an employee assigned to an object:
GroupA=Timekeeper (Group)jmeyers=Manager (Employee)
Note that the permission level and object type are optional. If thepermission level is not specified then it will be set to theemployee's default permission level. If the object type is notspecified the system will first check for a group with a matchingname, then look for an employee with a matching login name.Only if you have group names and employee logins that might bethe same do you need to specify the object type.
Text
Notes Notes about this customer. Text (2000chars max)
-o-
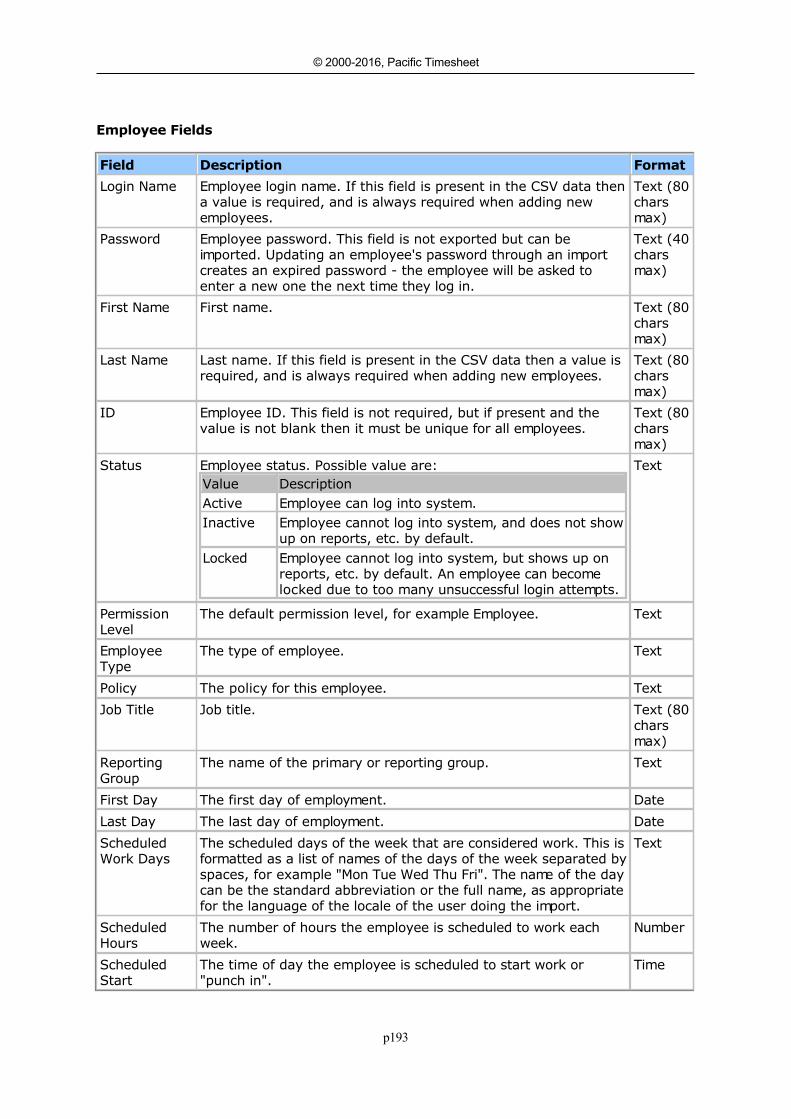
p193
© 2000-2016, Pacific Timesheet
Employee CSV FormatEmployee Fields
Field Description Format
Login Name Employee login name. If this field is present in the CSV data thena value is required, and is always required when adding newemployees.
Text (80charsmax)
Password Employee password. This field is not exported but can beimported. Updating an employee's password through an importcreates an expired password - the employee will be asked toenter a new one the next time they log in.
Text (40charsmax)
First Name First name. Text (80charsmax)
Last Name Last name. If this field is present in the CSV data then a value isrequired, and is always required when adding new employees.
Text (80charsmax)
ID Employee ID. This field is not required, but if present and thevalue is not blank then it must be unique for all employees.
Text (80charsmax)
Status Employee status. Possible value are:Value DescriptionActive Employee can log into system.Inactive Employee cannot log into system, and does not show
up on reports, etc. by default.Locked Employee cannot log into system, but shows up on
reports, etc. by default. An employee can becomelocked due to too many unsuccessful login attempts.
Text
PermissionLevel
The default permission level, for example Employee. Text
EmployeeType
The type of employee. Text
Policy The policy for this employee. Text
Job Title Job title. Text (80charsmax)
ReportingGroup
The name of the primary or reporting group. Text
First Day The first day of employment. Date
Last Day The last day of employment. Date
ScheduledWork Days
The scheduled days of the week that are considered work. This isformatted as a list of names of the days of the week separated byspaces, for example "Mon Tue Wed Thu Fri". The name of the daycan be the standard abbreviation or the full name, as appropriatefor the language of the locale of the user doing the import.
Text
ScheduledHours
The number of hours the employee is scheduled to work eachweek.
Number
ScheduledStart
The time of day the employee is scheduled to start work or"punch in".
Time
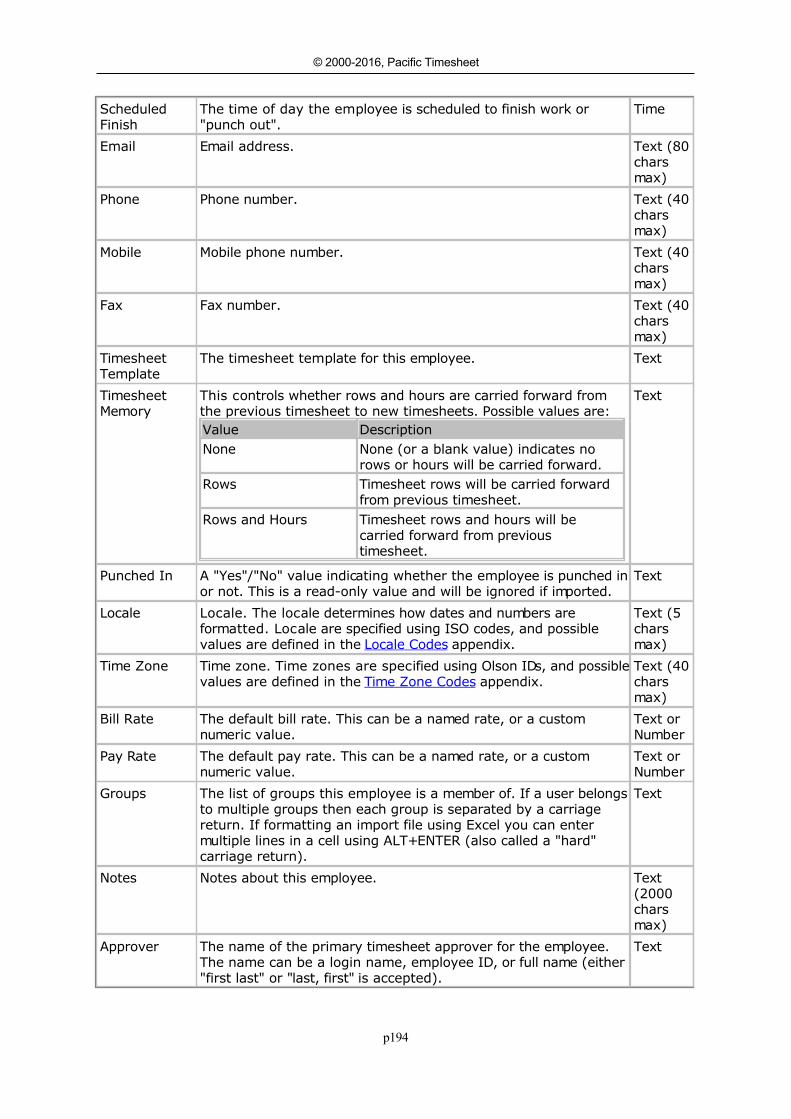
p194
© 2000-2016, Pacific Timesheet
ScheduledFinish
The time of day the employee is scheduled to finish work or"punch out".
Time
Email Email address. Text (80charsmax)
Phone Phone number. Text (40charsmax)
Mobile Mobile phone number. Text (40charsmax)
Fax Fax number. Text (40charsmax)
TimesheetTemplate
The timesheet template for this employee. Text
TimesheetMemory
This controls whether rows and hours are carried forward fromthe previous timesheet to new timesheets. Possible values are:Value DescriptionNone None (or a blank value) indicates no
rows or hours will be carried forward.Rows Timesheet rows will be carried forward
from previous timesheet.Rows and Hours Timesheet rows and hours will be
carried forward from previoustimesheet.
Text
Punched In A "Yes"/"No" value indicating whether the employee is punched inor not. This is a read-only value and will be ignored if imported.
Text
Locale Locale. The locale determines how dates and numbers areformatted. Locale are specified using ISO codes, and possiblevalues are defined in the Locale Codes appendix.
Text (5charsmax)
Time Zone Time zone. Time zones are specified using Olson IDs, and possiblevalues are defined in the Time Zone Codes appendix.
Text (40charsmax)
Bill Rate The default bill rate. This can be a named rate, or a customnumeric value.
Text orNumber
Pay Rate The default pay rate. This can be a named rate, or a customnumeric value.
Text orNumber
Groups The list of groups this employee is a member of. If a user belongsto multiple groups then each group is separated by a carriagereturn. If formatting an import file using Excel you can entermultiple lines in a cell using ALT+ENTER (also called a "hard"carriage return).
Text
Notes Notes about this employee. Text(2000charsmax)
Approver The name of the primary timesheet approver for the employee.The name can be a login name, employee ID, or full name (either"first last" or "last, first" is accepted).
Text

p195
© 2000-2016, Pacific Timesheet
ApproverBackup
The name of the backup timesheet approver for the employee.The name can be in the form of a login name, employee ID, orfull name (either "first last" or "last, first" is accepted).
Text
-o-
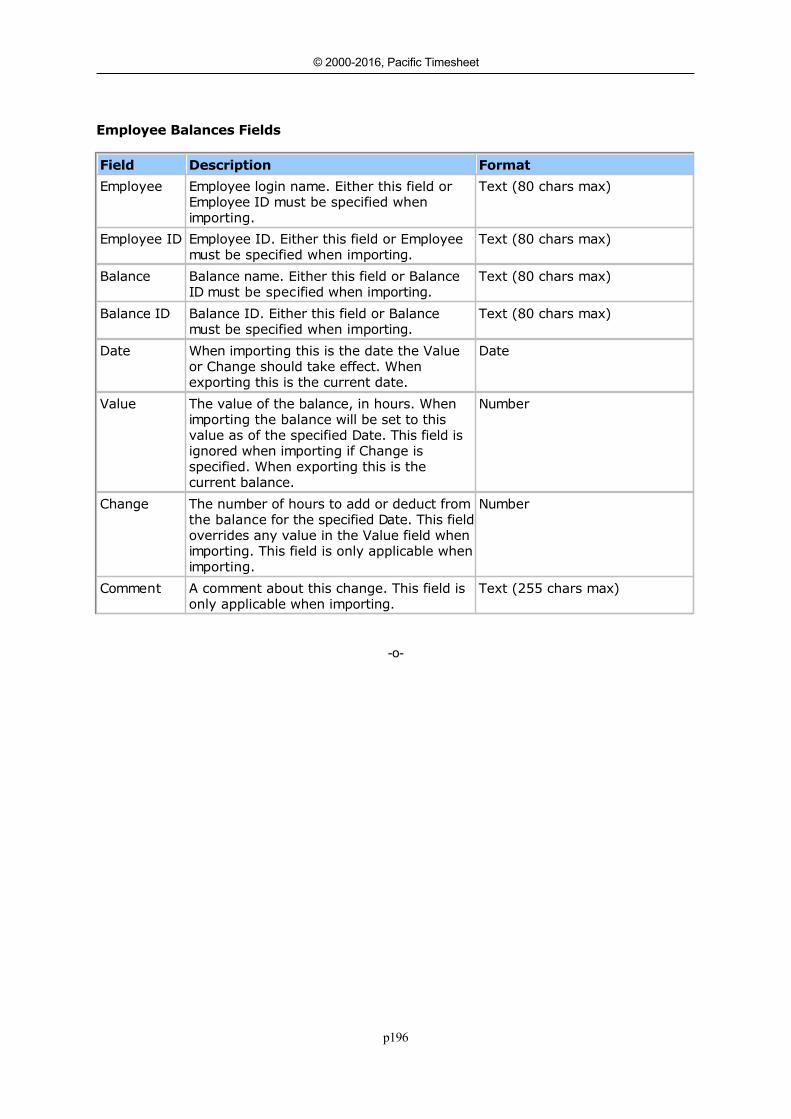
p196
© 2000-2016, Pacific Timesheet
Employee Balances CSV FormatEmployee Balances Fields
Field Description Format
Employee Employee login name. Either this field orEmployee ID must be specified whenimporting.
Text (80 chars max)
Employee ID Employee ID. Either this field or Employeemust be specified when importing.
Text (80 chars max)
Balance Balance name. Either this field or BalanceID must be specified when importing.
Text (80 chars max)
Balance ID Balance ID. Either this field or Balancemust be specified when importing.
Text (80 chars max)
Date When importing this is the date the Valueor Change should take effect. Whenexporting this is the current date.
Date
Value The value of the balance, in hours. Whenimporting the balance will be set to thisvalue as of the specified Date. This field isignored when importing if Change isspecified. When exporting this is thecurrent balance.
Number
Change The number of hours to add or deduct fromthe balance for the specified Date. This fieldoverrides any value in the Value field whenimporting. This field is only applicable whenimporting.
Number
Comment A comment about this change. This field isonly applicable when importing.
Text (255 chars max)
-o-
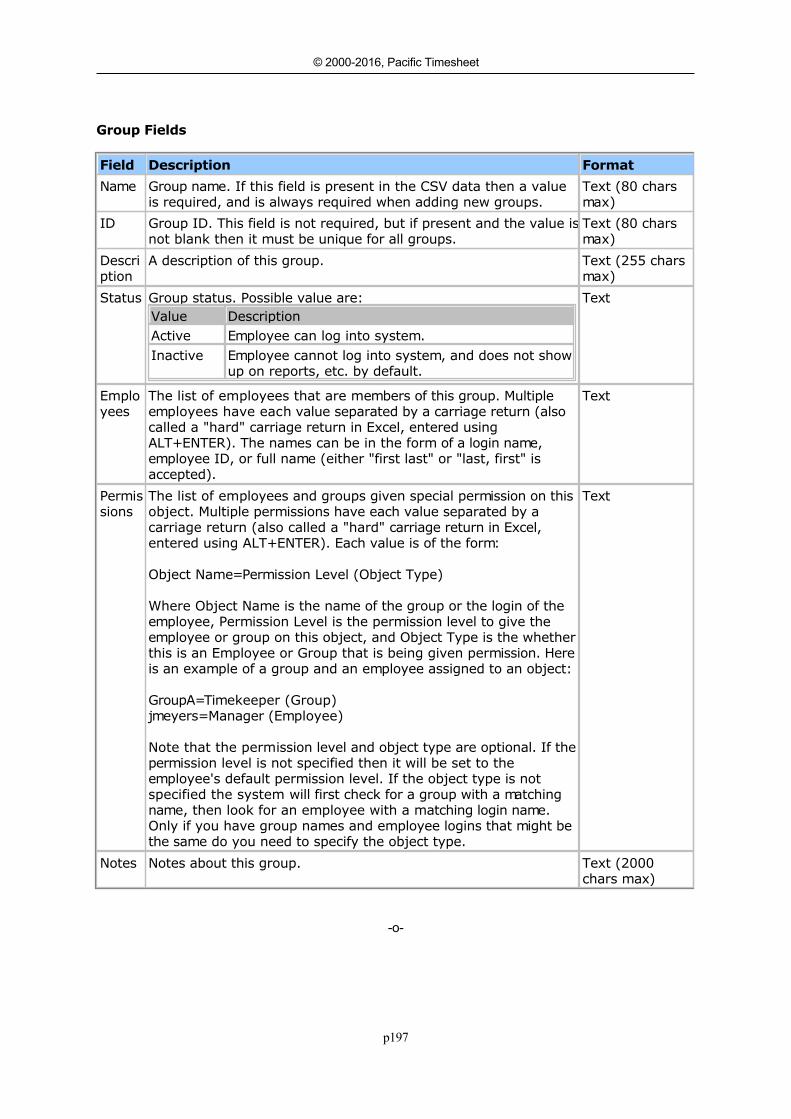
p197
© 2000-2016, Pacific Timesheet
Group CSV FormatGroup Fields
Field Description Format
Name Group name. If this field is present in the CSV data then a valueis required, and is always required when adding new groups.
Text (80 charsmax)
ID Group ID. This field is not required, but if present and the value isnot blank then it must be unique for all groups.
Text (80 charsmax)
Description
A description of this group. Text (255 charsmax)
Status Group status. Possible value are:Value DescriptionActive Employee can log into system.Inactive Employee cannot log into system, and does not show
up on reports, etc. by default.
Text
Employees
The list of employees that are members of this group. Multipleemployees have each value separated by a carriage return (alsocalled a "hard" carriage return in Excel, entered usingALT+ENTER). The names can be in the form of a login name,employee ID, or full name (either "first last" or "last, first" isaccepted).
Text
Permissions
The list of employees and groups given special permission on thisobject. Multiple permissions have each value separated by acarriage return (also called a "hard" carriage return in Excel,entered using ALT+ENTER). Each value is of the form:
Object Name=Permission Level (Object Type)
Where Object Name is the name of the group or the login of theemployee, Permission Level is the permission level to give theemployee or group on this object, and Object Type is the whetherthis is an Employee or Group that is being given permission. Hereis an example of a group and an employee assigned to an object:
GroupA=Timekeeper (Group)jmeyers=Manager (Employee)
Note that the permission level and object type are optional. If thepermission level is not specified then it will be set to theemployee's default permission level. If the object type is notspecified the system will first check for a group with a matchingname, then look for an employee with a matching login name.Only if you have group names and employee logins that might bethe same do you need to specify the object type.
Text
Notes Notes about this group. Text (2000chars max)
-o-
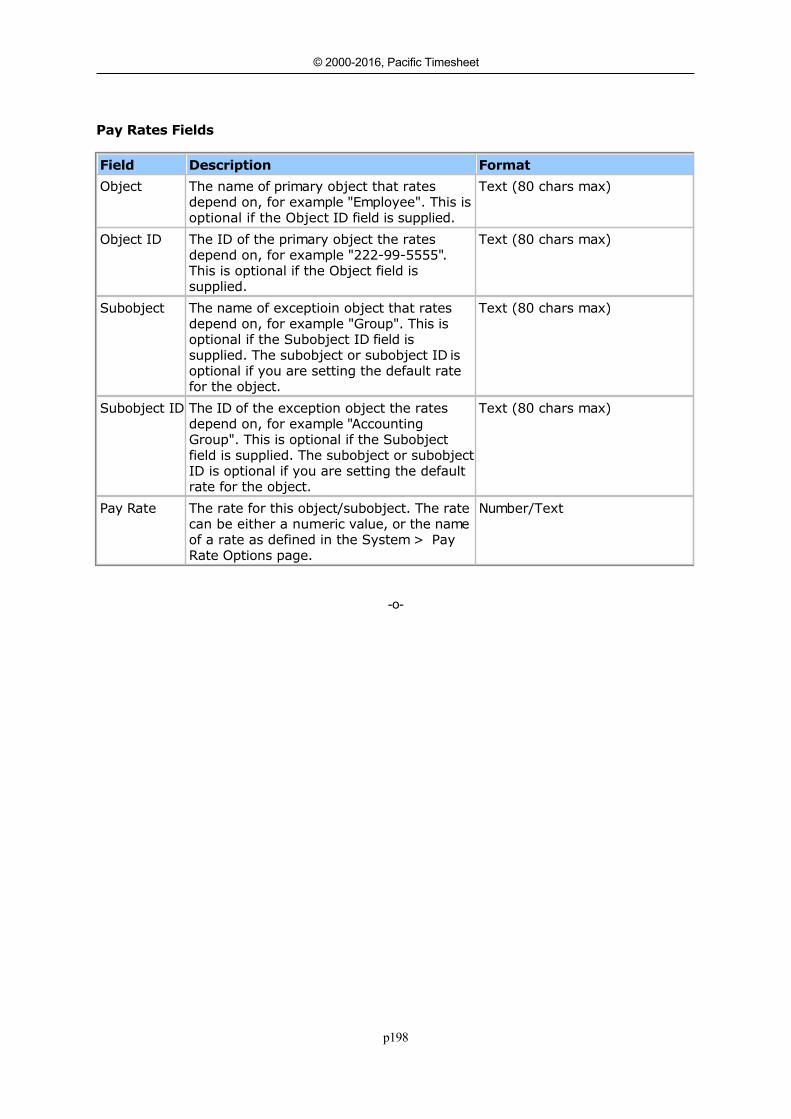
p198
© 2000-2016, Pacific Timesheet
Pay Rates CSV FormatPay Rates Fields
Field Description Format
Object The name of primary object that ratesdepend on, for example "Employee". This isoptional if the Object ID field is supplied.
Text (80 chars max)
Object ID The ID of the primary object the ratesdepend on, for example "222-99-5555".This is optional if the Object field issupplied.
Text (80 chars max)
Subobject The name of exceptioin object that ratesdepend on, for example "Group". This isoptional if the Subobject ID field issupplied. The subobject or subobject ID isoptional if you are setting the default ratefor the object.
Text (80 chars max)
Subobject ID The ID of the exception object the ratesdepend on, for example "AccountingGroup". This is optional if the Subobjectfield is supplied. The subobject or subobjectID is optional if you are setting the defaultrate for the object.
Text (80 chars max)
Pay Rate The rate for this object/subobject. The ratecan be either a numeric value, or the nameof a rate as defined in the System > PayRate Options page.
Number/Text
-o-
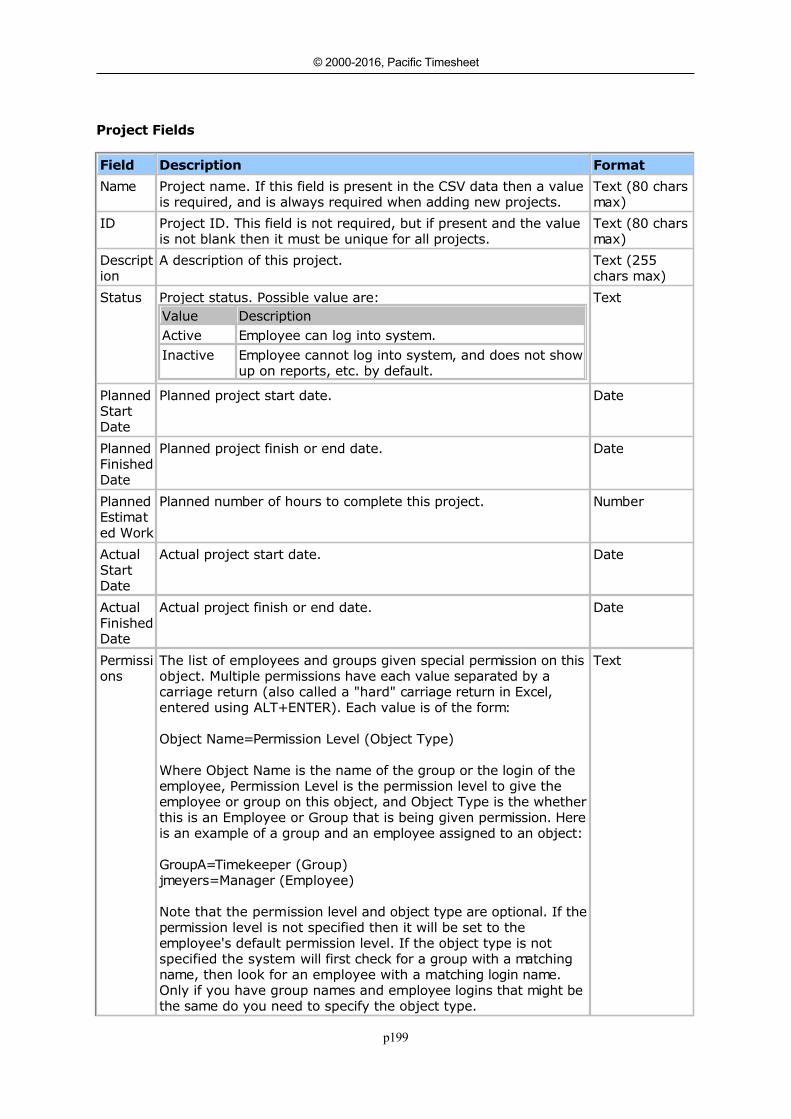
p199
© 2000-2016, Pacific Timesheet
Project CSV FormatProject Fields
Field Description Format
Name Project name. If this field is present in the CSV data then a valueis required, and is always required when adding new projects.
Text (80 charsmax)
ID Project ID. This field is not required, but if present and the valueis not blank then it must be unique for all projects.
Text (80 charsmax)
Description
A description of this project. Text (255chars max)
Status Project status. Possible value are:Value DescriptionActive Employee can log into system.Inactive Employee cannot log into system, and does not show
up on reports, etc. by default.
Text
PlannedStartDate
Planned project start date. Date
PlannedFinishedDate
Planned project finish or end date. Date
PlannedEstimated Work
Planned number of hours to complete this project. Number
ActualStartDate
Actual project start date. Date
ActualFinishedDate
Actual project finish or end date. Date
Permissions
The list of employees and groups given special permission on thisobject. Multiple permissions have each value separated by acarriage return (also called a "hard" carriage return in Excel,entered using ALT+ENTER). Each value is of the form:
Object Name=Permission Level (Object Type)
Where Object Name is the name of the group or the login of theemployee, Permission Level is the permission level to give theemployee or group on this object, and Object Type is the whetherthis is an Employee or Group that is being given permission. Hereis an example of a group and an employee assigned to an object:
GroupA=Timekeeper (Group)jmeyers=Manager (Employee)
Note that the permission level and object type are optional. If thepermission level is not specified then it will be set to theemployee's default permission level. If the object type is notspecified the system will first check for a group with a matchingname, then look for an employee with a matching login name.Only if you have group names and employee logins that might bethe same do you need to specify the object type.
Text

p200
© 2000-2016, Pacific Timesheet
Notes Notes about this project. Text (2000chars max)
-o-

p201
© 2000-2016, Pacific Timesheet
Project Group CSV FormatProject Group Fields
Field Description Format
Name Project Group name. If this field is present in the CSV data then avalue is required, and is always required when adding new projectgroups.
Text (80 charsmax)
ID Project Group ID. This field is not required, but if present and thevalue is not blank then it must be unique for all project groups.
Text (80 charsmax)
Description
A description of this project group. Text (255 charsmax)
Status Project Group status. Possible value are:Value DescriptionActive Employee can log into system.Inactive Employee cannot log into system, and does not show
up on reports, etc. by default.
Text
Permissions
The list of employees and groups given special permission on thisobject. Multiple permissions have each value separated by acarriage return (also called a "hard" carriage return in Excel,entered using ALT+ENTER). Each value is of the form:
Object Name=Permission Level (Object Type)
Where Object Name is the name of the group or the login of theemployee, Permission Level is the permission level to give theemployee or group on this object, and Object Type is the whetherthis is an Employee or Group that is being given permission. Hereis an example of a group and an employee assigned to an object:
GroupA=Timekeeper (Group)jmeyers=Manager (Employee)
Note that the permission level and object type are optional. If thepermission level is not specified then it will be set to theemployee's default permission level. If the object type is notspecified the system will first check for a group with a matchingname, then look for an employee with a matching login name.Only if you have group names and employee logins that might bethe same do you need to specify the object type.
Text
Notes Notes about this project group. Text (2000chars max)
-o-
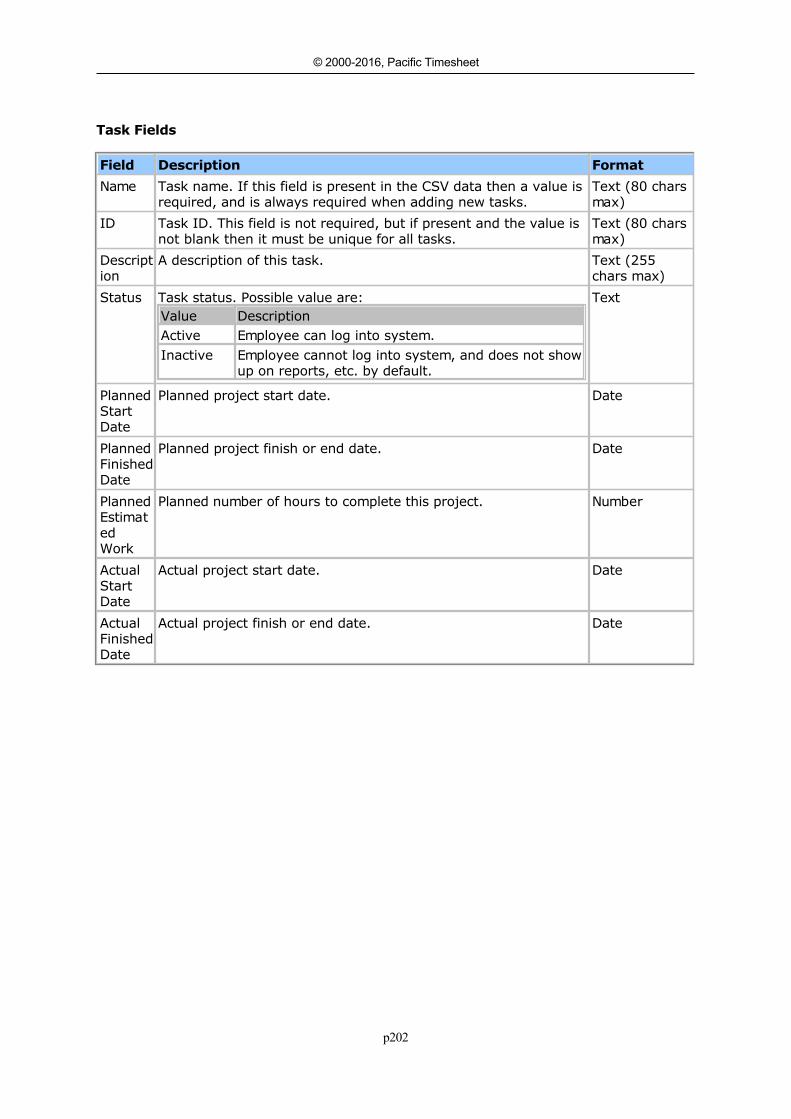
p202
© 2000-2016, Pacific Timesheet
Task CSV FormatTask Fields
Field Description Format
Name Task name. If this field is present in the CSV data then a value isrequired, and is always required when adding new tasks.
Text (80 charsmax)
ID Task ID. This field is not required, but if present and the value isnot blank then it must be unique for all tasks.
Text (80 charsmax)
Description
A description of this task. Text (255chars max)
Status Task status. Possible value are:Value DescriptionActive Employee can log into system.Inactive Employee cannot log into system, and does not show
up on reports, etc. by default.
Text
PlannedStartDate
Planned project start date. Date
PlannedFinishedDate
Planned project finish or end date. Date
PlannedEstimatedWork
Planned number of hours to complete this project. Number
ActualStartDate
Actual project start date. Date
ActualFinishedDate
Actual project finish or end date. Date
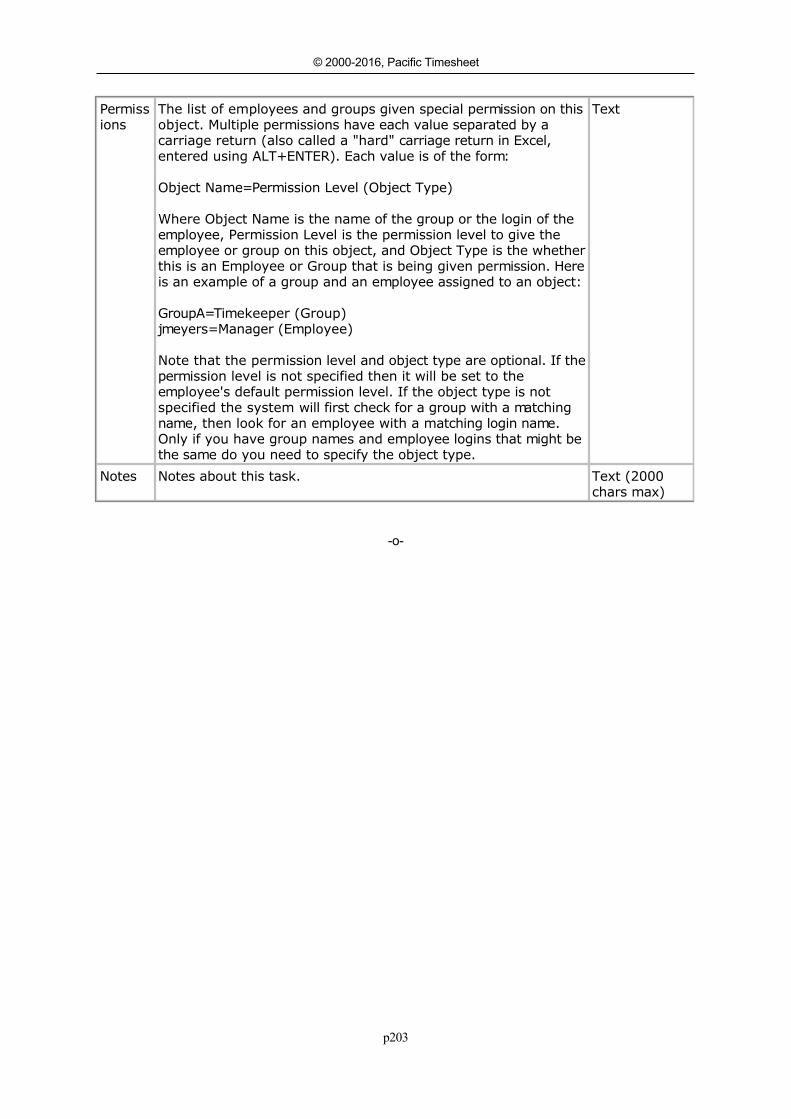
p203
© 2000-2016, Pacific Timesheet
Permissions
The list of employees and groups given special permission on thisobject. Multiple permissions have each value separated by acarriage return (also called a "hard" carriage return in Excel,entered using ALT+ENTER). Each value is of the form:
Object Name=Permission Level (Object Type)
Where Object Name is the name of the group or the login of theemployee, Permission Level is the permission level to give theemployee or group on this object, and Object Type is the whetherthis is an Employee or Group that is being given permission. Hereis an example of a group and an employee assigned to an object:
GroupA=Timekeeper (Group)jmeyers=Manager (Employee)
Note that the permission level and object type are optional. If thepermission level is not specified then it will be set to theemployee's default permission level. If the object type is notspecified the system will first check for a group with a matchingname, then look for an employee with a matching login name.Only if you have group names and employee logins that might bethe same do you need to specify the object type.
Text
Notes Notes about this task. Text (2000chars max)
-o-

p204
© 2000-2016, Pacific Timesheet
Task Group CSV FormatTask Group Fields
Field Description Format
Name Task Group name. If this field is present in the CSV data then avalue is required, and is always required when adding new taskgroups.
Text (80 charsmax)
ID Task Group ID. This field is not required, but if present and thevalue is not blank then it must be unique for all task groups.
Text (80 charsmax)
Description
A description of this task group. Text (255 charsmax)
Status Task Group status. Possible value are:Value DescriptionActive Employee can log into system.Inactive Employee cannot log into system, and does not show
up on reports, etc. by default.
Text
Permissions
The list of employees and groups given special permission on thisobject. Multiple permissions have each value separated by acarriage return (also called a "hard" carriage return in Excel,entered using ALT+ENTER). Each value is of the form:
Object Name=Permission Level (Object Type)
Where Object Name is the name of the group or the login of theemployee, Permission Level is the permission level to give theemployee or group on this object, and Object Type is the whetherthis is an Employee or Group that is being given permission. Hereis an example of a group and an employee assigned to an object:
GroupA=Timekeeper (Group)jmeyers=Manager (Employee)
Note that the permission level and object type are optional. If thepermission level is not specified then it will be set to theemployee's default permission level. If the object type is notspecified the system will first check for a group with a matchingname, then look for an employee with a matching login name.Only if you have group names and employee logins that might bethe same do you need to specify the object type.
Text
Notes Notes about this task group. Text (2000chars max)
-o-
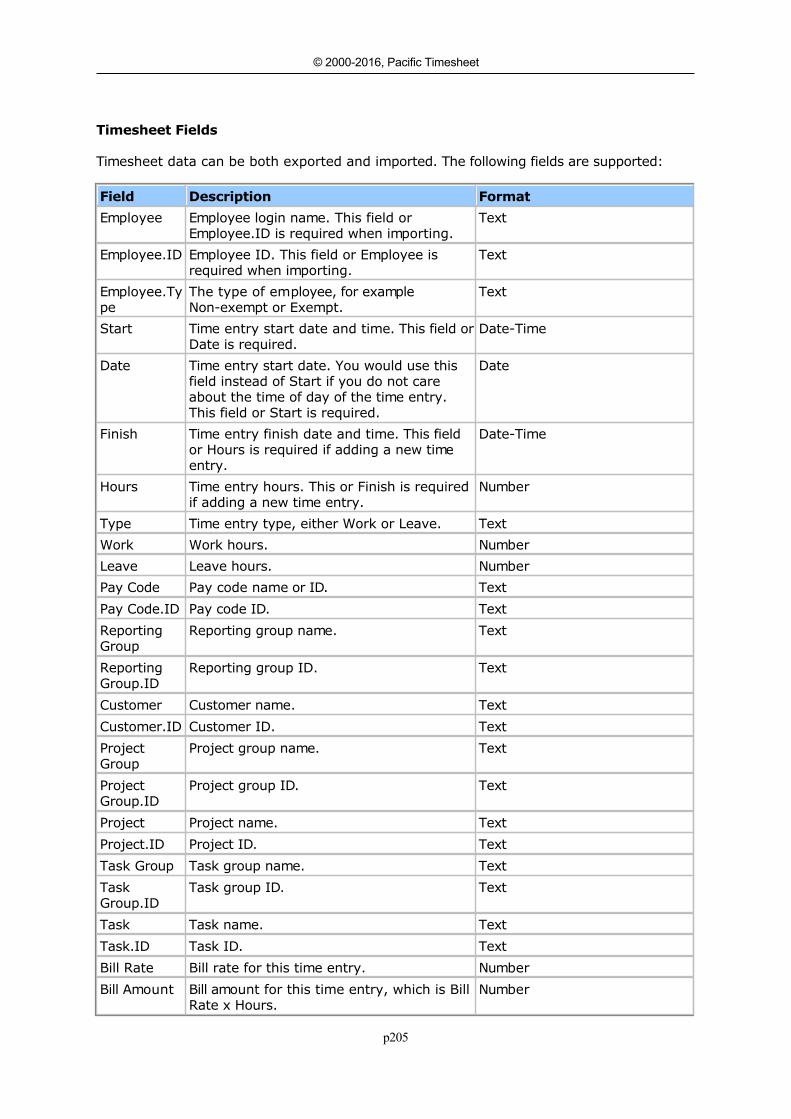
p205
© 2000-2016, Pacific Timesheet
Timesheet CSV FormatTimesheet Fields
Timesheet data can be both exported and imported. The following fields are supported:
Field Description Format
Employee Employee login name. This field orEmployee.ID is required when importing.
Text
Employee.ID Employee ID. This field or Employee isrequired when importing.
Text
Employee.Type
The type of employee, for exampleNon-exempt or Exempt.
Text
Start Time entry start date and time. This field orDate is required.
Date-Time
Date Time entry start date. You would use thisfield instead of Start if you do not careabout the time of day of the time entry.This field or Start is required.
Date
Finish Time entry finish date and time. This fieldor Hours is required if adding a new timeentry.
Date-Time
Hours Time entry hours. This or Finish is requiredif adding a new time entry.
Number
Type Time entry type, either Work or Leave. Text
Work Work hours. Number
Leave Leave hours. Number
Pay Code Pay code name or ID. Text
Pay Code.ID Pay code ID. Text
ReportingGroup
Reporting group name. Text
ReportingGroup.ID
Reporting group ID. Text
Customer Customer name. Text
Customer.ID Customer ID. Text
ProjectGroup
Project group name. Text
ProjectGroup.ID
Project group ID. Text
Project Project name. Text
Project.ID Project ID. Text
Task Group Task group name. Text
TaskGroup.ID
Task group ID. Text
Task Task name. Text
Task.ID Task ID. Text
Bill Rate Bill rate for this time entry. Number
Bill Amount Bill amount for this time entry, which is BillRate x Hours.
Number
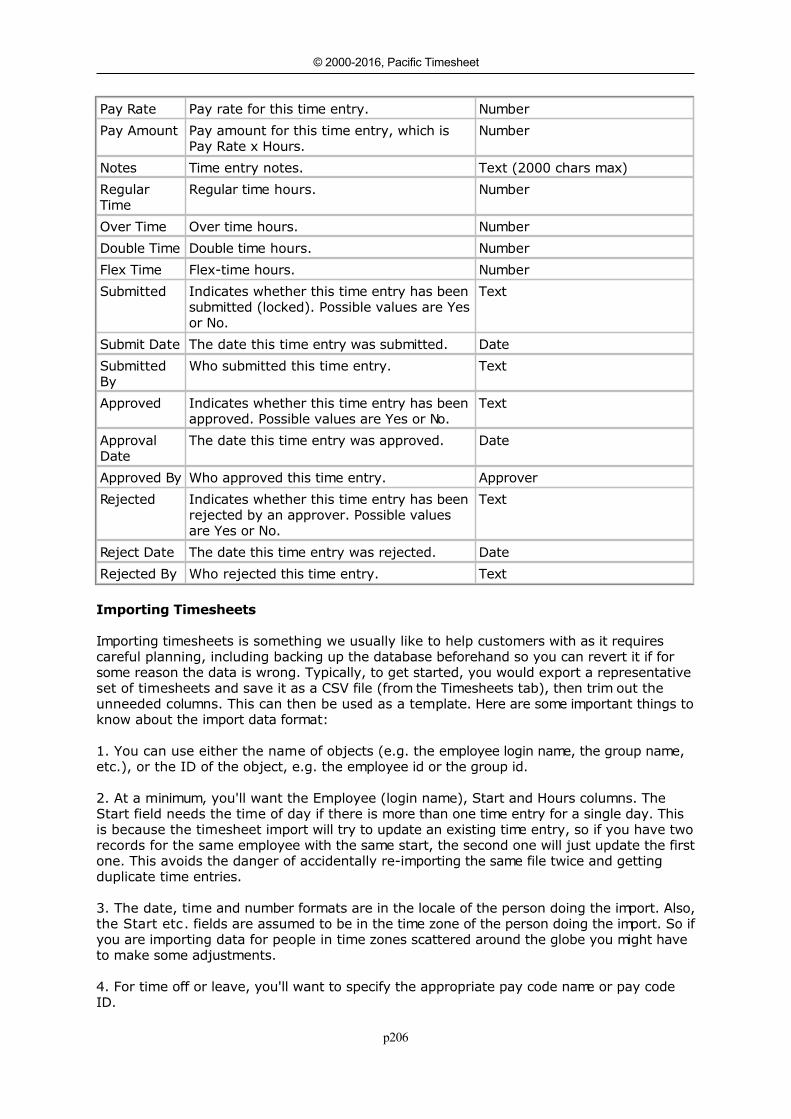
p206
© 2000-2016, Pacific Timesheet
Pay Rate Pay rate for this time entry. Number
Pay Amount Pay amount for this time entry, which isPay Rate x Hours.
Number
Notes Time entry notes. Text (2000 chars max)
RegularTime
Regular time hours. Number
Over Time Over time hours. Number
Double Time Double time hours. Number
Flex Time Flex-time hours. Number
Submitted Indicates whether this time entry has beensubmitted (locked). Possible values are Yesor No.
Text
Submit Date The date this time entry was submitted. Date
SubmittedBy
Who submitted this time entry. Text
Approved Indicates whether this time entry has beenapproved. Possible values are Yes or No.
Text
ApprovalDate
The date this time entry was approved. Date
Approved By Who approved this time entry. Approver
Rejected Indicates whether this time entry has beenrejected by an approver. Possible valuesare Yes or No.
Text
Reject Date The date this time entry was rejected. Date
Rejected By Who rejected this time entry. Text
Importing Timesheets
Importing timesheets is something we usually like to help customers with as it requirescareful planning, including backing up the database beforehand so you can revert it if forsome reason the data is wrong. Typically, to get started, you would export a representativeset of timesheets and save it as a CSV file (from the Timesheets tab), then trim out theunneeded columns. This can then be used as a template. Here are some important things toknow about the import data format:
1. You can use either the name of objects (e.g. the employee login name, the group name,etc.), or the ID of the object, e.g. the employee id or the group id.
2. At a minimum, you'll want the Employee (login name), Start and Hours columns. TheStart field needs the time of day if there is more than one time entry for a single day. Thisis because the timesheet import will try to update an existing time entry, so if you have tworecords for the same employee with the same start, the second one will just update the firstone. This avoids the danger of accidentally re-importing the same file twice and gettingduplicate time entries.
3. The date, time and number formats are in the locale of the person doing the import. Also,the Start etc. fields are assumed to be in the time zone of the person doing the import. So ifyou are importing data for people in time zones scattered around the globe you might haveto make some adjustments.
4. For time off or leave, you'll want to specify the appropriate pay code name or pay codeID.

p207
© 2000-2016, Pacific Timesheet
5. To mark the timesheet as locked or submitted, add the Submitted field or column, andspecify Yes for each timesheet entry.
-o-
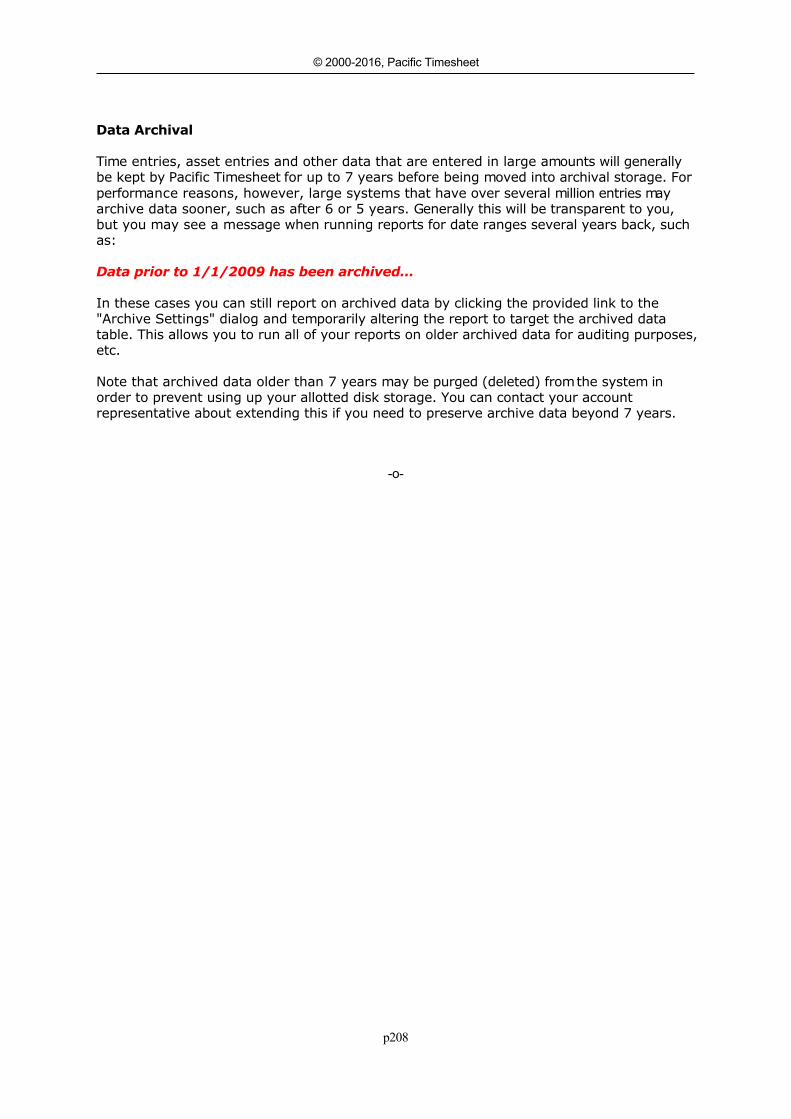
p208
© 2000-2016, Pacific Timesheet
Data ArchivalData Archival
Time entries, asset entries and other data that are entered in large amounts will generallybe kept by Pacific Timesheet for up to 7 years before being moved into archival storage. Forperformance reasons, however, large systems that have over several million entries mayarchive data sooner, such as after 6 or 5 years. Generally this will be transparent to you,but you may see a message when running reports for date ranges several years back, suchas:
Data prior to 1/1/2009 has been archived...
In these cases you can still report on archived data by clicking the provided link to the"Archive Settings" dialog and temporarily altering the report to target the archived datatable. This allows you to run all of your reports on older archived data for auditing purposes,etc.
Note that archived data older than 7 years may be purged (deleted) from the system inorder to prevent using up your allotted disk storage. You can contact your accountrepresentative about extending this if you need to preserve archive data beyond 7 years.
-o-
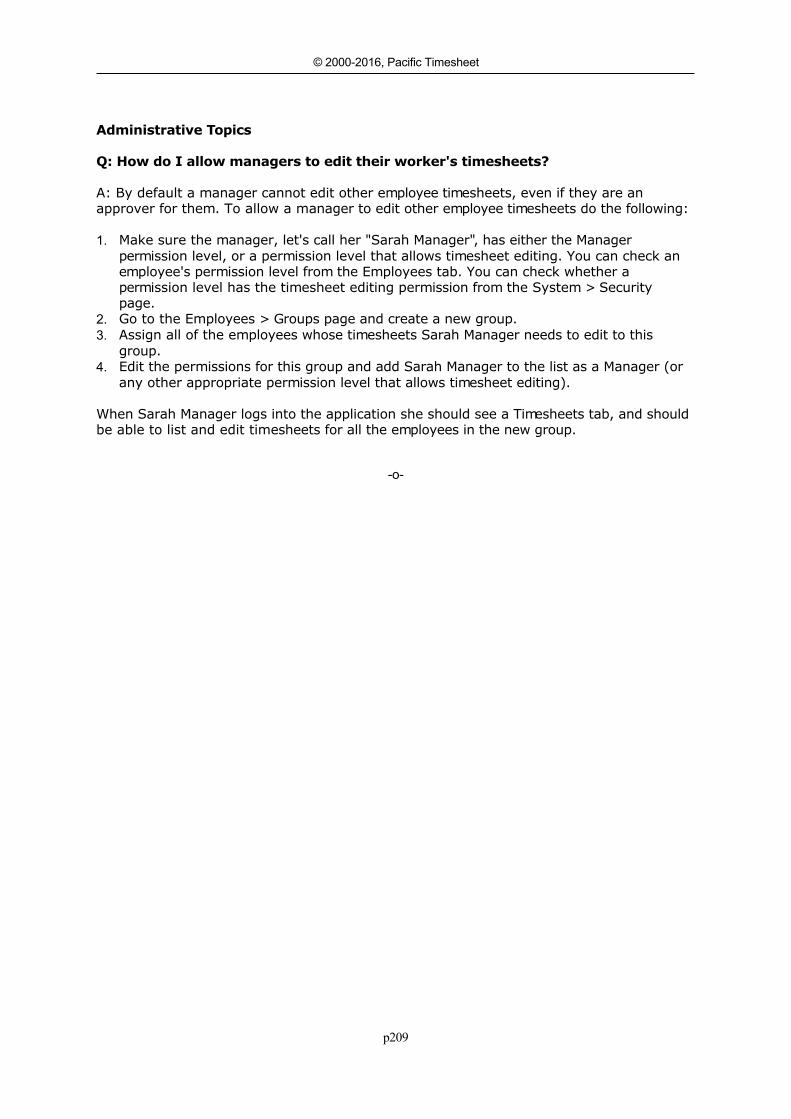
p209
© 2000-2016, Pacific Timesheet
FAQ - Frequently Asked QuestionsAdministrative Topics
Q: How do I allow managers to edit their worker's timesheets?
A: By default a manager cannot edit other employee timesheets, even if they are anapprover for them. To allow a manager to edit other employee timesheets do the following:
1. Make sure the manager, let's call her "Sarah Manager", has either the Managerpermission level, or a permission level that allows timesheet editing. You can check anemployee's permission level from the Employees tab. You can check whether apermission level has the timesheet editing permission from the System > Securitypage.
2. Go to the Employees > Groups page and create a new group. 3. Assign all of the employees whose timesheets Sarah Manager needs to edit to this
group. 4. Edit the permissions for this group and add Sarah Manager to the list as a Manager (or
any other appropriate permission level that allows timesheet editing).
When Sarah Manager logs into the application she should see a Timesheets tab, and shouldbe able to list and edit timesheets for all the employees in the new group.
-o-

p210
© 2000-2016, Pacific Timesheet
Appendix Locale Codes Time Zone Codes
-o-
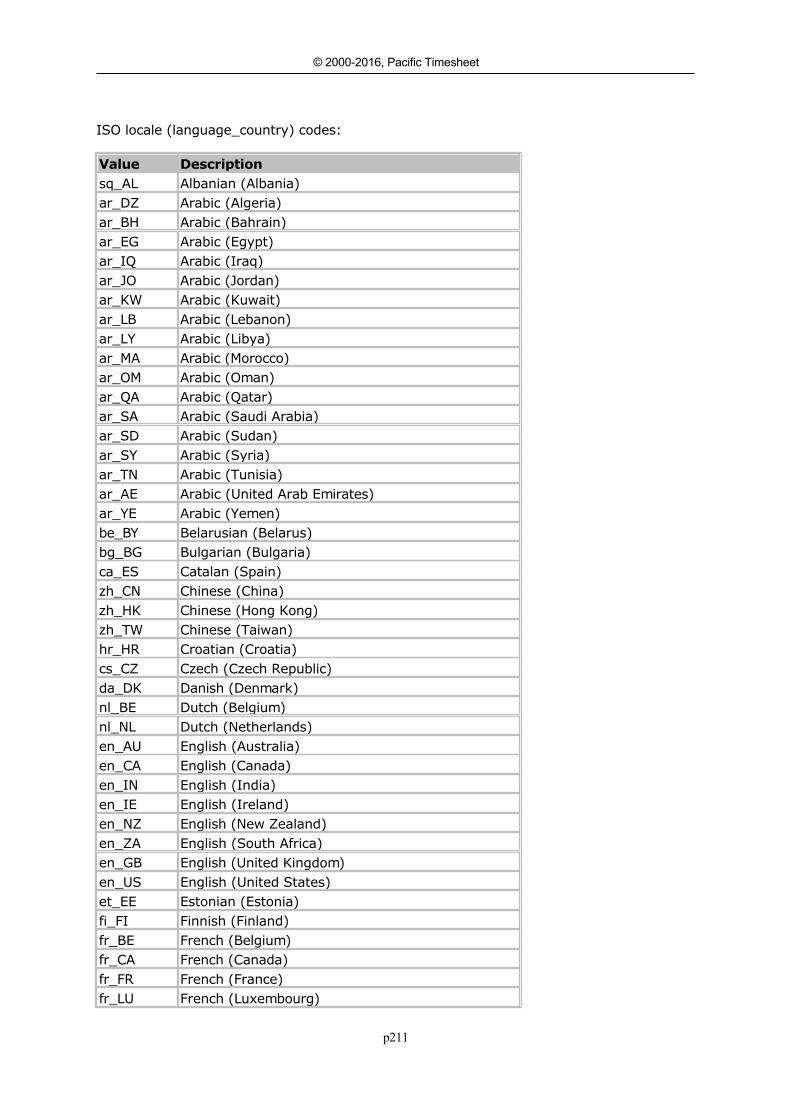
p211
© 2000-2016, Pacific Timesheet
Locale CodesISO locale (language_country) codes:
Value Descriptionsq_AL Albanian (Albania)ar_DZ Arabic (Algeria)ar_BH Arabic (Bahrain)ar_EG Arabic (Egypt)ar_IQ Arabic (Iraq)ar_JO Arabic (Jordan)ar_KW Arabic (Kuwait)ar_LB Arabic (Lebanon)ar_LY Arabic (Libya)ar_MA Arabic (Morocco)ar_OM Arabic (Oman)ar_QA Arabic (Qatar)ar_SA Arabic (Saudi Arabia)ar_SD Arabic (Sudan)ar_SY Arabic (Syria)ar_TN Arabic (Tunisia)ar_AE Arabic (United Arab Emirates)ar_YE Arabic (Yemen)be_BY Belarusian (Belarus)bg_BG Bulgarian (Bulgaria)ca_ES Catalan (Spain)zh_CN Chinese (China)zh_HK Chinese (Hong Kong)zh_TW Chinese (Taiwan)hr_HR Croatian (Croatia)cs_CZ Czech (Czech Republic)da_DK Danish (Denmark)nl_BE Dutch (Belgium)nl_NL Dutch (Netherlands)en_AU English (Australia)en_CA English (Canada)en_IN English (India)en_IE English (Ireland)en_NZ English (New Zealand)en_ZA English (South Africa)en_GB English (United Kingdom)en_US English (United States)et_EE Estonian (Estonia)fi_FI Finnish (Finland)fr_BE French (Belgium)fr_CA French (Canada)fr_FR French (France)fr_LU French (Luxembourg)

p212
© 2000-2016, Pacific Timesheet
fr_CH French (Switzerland)de_AT German (Austria)de_DE German (Germany)de_LU German (Luxembourg)de_CH German (Switzerland)el_GR Greek (Greece)iw_IL Hebrew (Israel)hi_IN Hindi (India)hu_HU Hungarian (Hungary)is_IS Icelandic (Iceland)it_IT Italian (Italy)it_CH Italian (Switzerland)ja_JP Japanese (Japan)ko_KR Korean (South Korea)lv_LV Latvian (Latvia)lt_LT Lithuanian (Lithuania)mk_MK Macedonian (Macedonia)no_NO Norwegian (Norway)pl_PL Polish (Poland)pt_BR Portuguese (Brazil)pt_PT Portuguese (Portugal)ro_RO Romanian (Romania)ru_RU Russian (Russia)sk_SK Slovak (Slovakia)sl_SI Slovenian (Slovenia)es_AR Spanish (Argentina)es_BO Spanish (Bolivia)es_CL Spanish (Chile)es_CO Spanish (Colombia)es_CR Spanish (Costa Rica)es_DO Spanish (Dominican Republic)es_EC Spanish (Ecuador)es_SV Spanish (El Salvador)es_GT Spanish (Guatemala)es_HN Spanish (Honduras)es_MX Spanish (Mexico)es_NI Spanish (Nicaragua)es_PA Spanish (Panama)es_PY Spanish (Paraguay)es_PE Spanish (Peru)es_PR Spanish (Puerto Rico)es_ES Spanish (Spain)es_UY Spanish (Uruguay)es_VE Spanish (Venezuela)sv_SE Swedish (Sweden)th_TH Thai (Thailand)
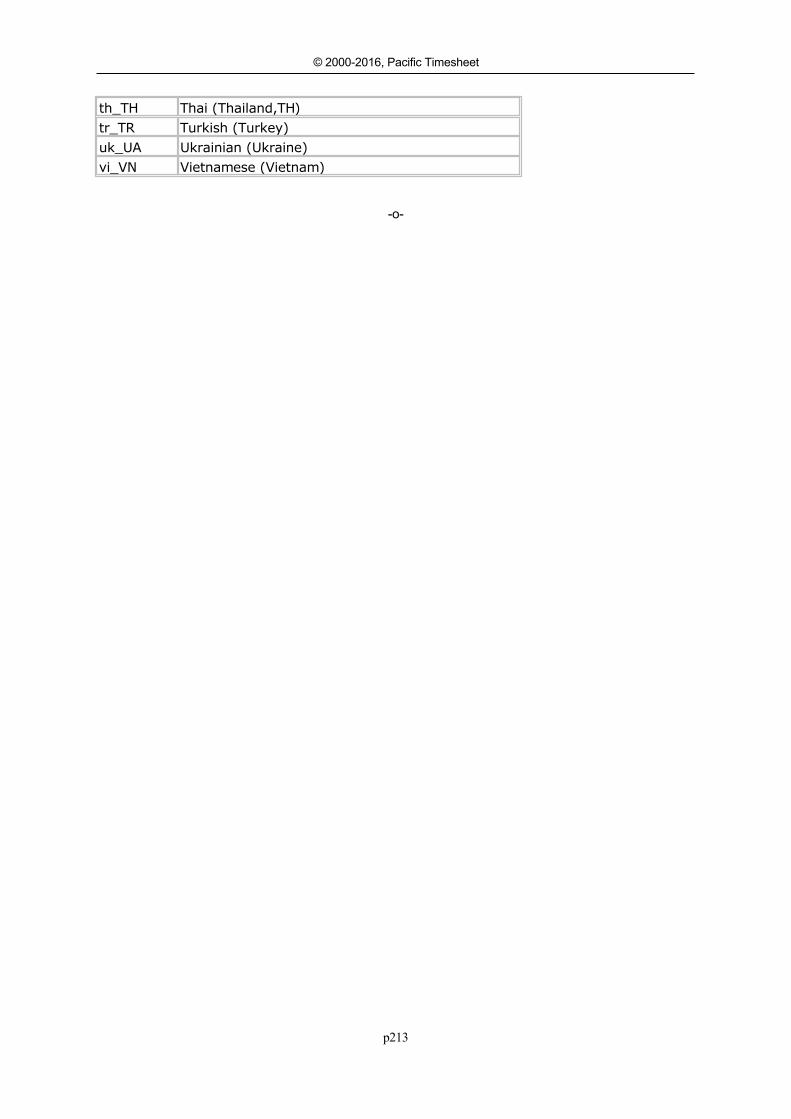
p213
© 2000-2016, Pacific Timesheet
th_TH Thai (Thailand,TH)tr_TR Turkish (Turkey)uk_UA Ukrainian (Ukraine)vi_VN Vietnamese (Vietnam)
-o-
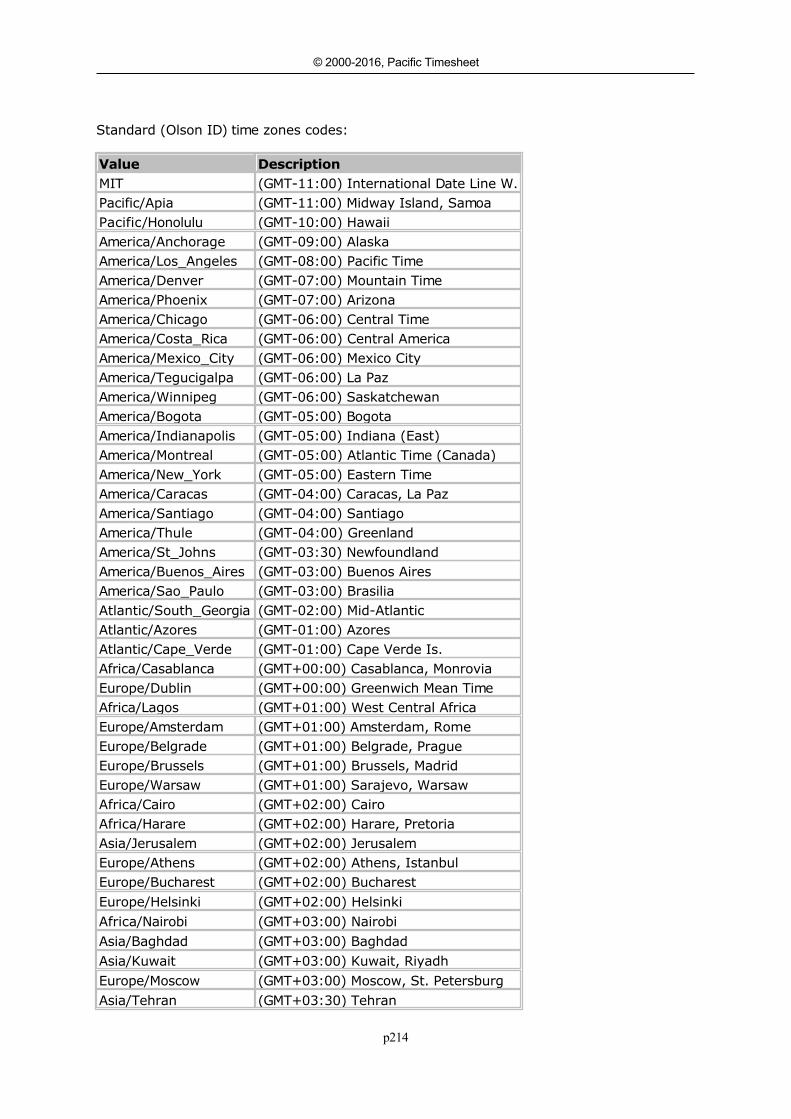
p214
© 2000-2016, Pacific Timesheet
Time Zone CodesStandard (Olson ID) time zones codes:
Value DescriptionMIT (GMT-11:00) International Date Line W.Pacific/Apia (GMT-11:00) Midway Island, SamoaPacific/Honolulu (GMT-10:00) HawaiiAmerica/Anchorage (GMT-09:00) AlaskaAmerica/Los_Angeles (GMT-08:00) Pacific TimeAmerica/Denver (GMT-07:00) Mountain TimeAmerica/Phoenix (GMT-07:00) ArizonaAmerica/Chicago (GMT-06:00) Central TimeAmerica/Costa_Rica (GMT-06:00) Central AmericaAmerica/Mexico_City (GMT-06:00) Mexico CityAmerica/Tegucigalpa (GMT-06:00) La PazAmerica/Winnipeg (GMT-06:00) SaskatchewanAmerica/Bogota (GMT-05:00) BogotaAmerica/Indianapolis (GMT-05:00) Indiana (East)America/Montreal (GMT-05:00) Atlantic Time (Canada)America/New_York (GMT-05:00) Eastern TimeAmerica/Caracas (GMT-04:00) Caracas, La PazAmerica/Santiago (GMT-04:00) SantiagoAmerica/Thule (GMT-04:00) GreenlandAmerica/St_Johns (GMT-03:30) NewfoundlandAmerica/Buenos_Aires (GMT-03:00) Buenos AiresAmerica/Sao_Paulo (GMT-03:00) BrasiliaAtlantic/South_Georgia (GMT-02:00) Mid-AtlanticAtlantic/Azores (GMT-01:00) AzoresAtlantic/Cape_Verde (GMT-01:00) Cape Verde Is.Africa/Casablanca (GMT+00:00) Casablanca, MonroviaEurope/Dublin (GMT+00:00) Greenwich Mean TimeAfrica/Lagos (GMT+01:00) West Central AfricaEurope/Amsterdam (GMT+01:00) Amsterdam, RomeEurope/Belgrade (GMT+01:00) Belgrade, PragueEurope/Brussels (GMT+01:00) Brussels, MadridEurope/Warsaw (GMT+01:00) Sarajevo, WarsawAfrica/Cairo (GMT+02:00) CairoAfrica/Harare (GMT+02:00) Harare, PretoriaAsia/Jerusalem (GMT+02:00) JerusalemEurope/Athens (GMT+02:00) Athens, IstanbulEurope/Bucharest (GMT+02:00) BucharestEurope/Helsinki (GMT+02:00) HelsinkiAfrica/Nairobi (GMT+03:00) NairobiAsia/Baghdad (GMT+03:00) BaghdadAsia/Kuwait (GMT+03:00) Kuwait, RiyadhEurope/Moscow (GMT+03:00) Moscow, St. PetersburgAsia/Tehran (GMT+03:30) Tehran
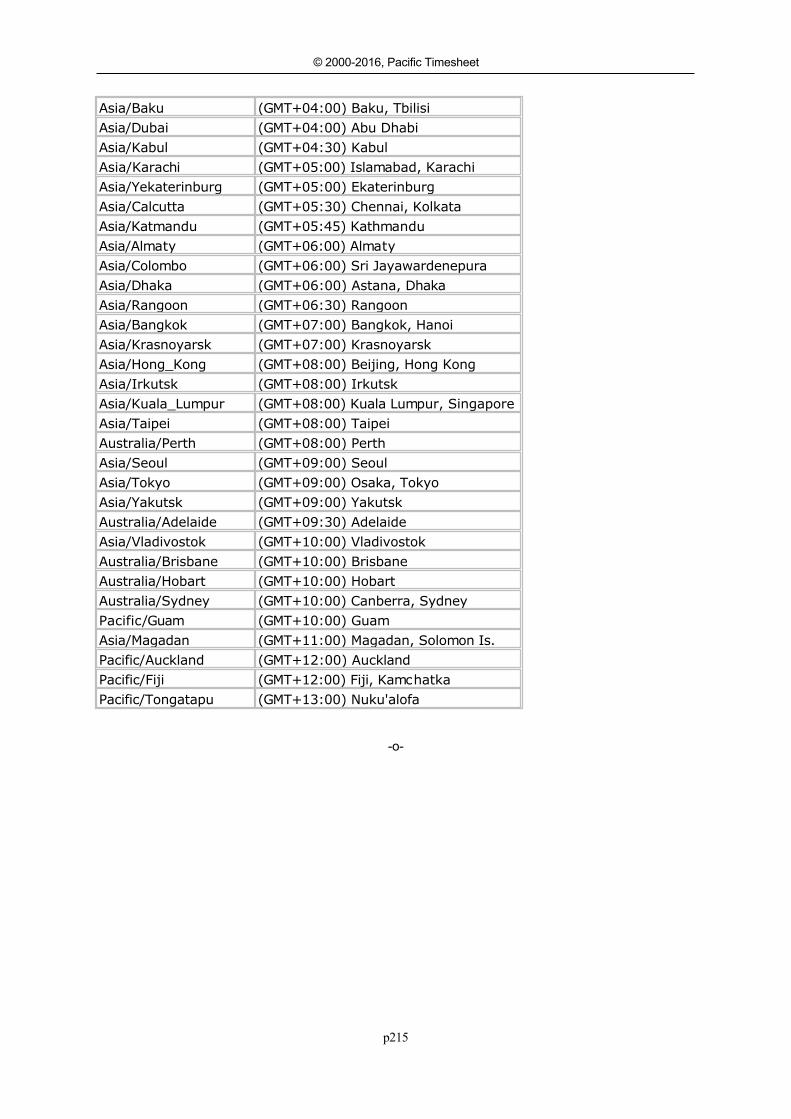
p215
© 2000-2016, Pacific Timesheet
Asia/Baku (GMT+04:00) Baku, TbilisiAsia/Dubai (GMT+04:00) Abu DhabiAsia/Kabul (GMT+04:30) KabulAsia/Karachi (GMT+05:00) Islamabad, KarachiAsia/Yekaterinburg (GMT+05:00) EkaterinburgAsia/Calcutta (GMT+05:30) Chennai, KolkataAsia/Katmandu (GMT+05:45) KathmanduAsia/Almaty (GMT+06:00) AlmatyAsia/Colombo (GMT+06:00) Sri JayawardenepuraAsia/Dhaka (GMT+06:00) Astana, DhakaAsia/Rangoon (GMT+06:30) RangoonAsia/Bangkok (GMT+07:00) Bangkok, HanoiAsia/Krasnoyarsk (GMT+07:00) KrasnoyarskAsia/Hong_Kong (GMT+08:00) Beijing, Hong KongAsia/Irkutsk (GMT+08:00) IrkutskAsia/Kuala_Lumpur (GMT+08:00) Kuala Lumpur, SingaporeAsia/Taipei (GMT+08:00) TaipeiAustralia/Perth (GMT+08:00) PerthAsia/Seoul (GMT+09:00) SeoulAsia/Tokyo (GMT+09:00) Osaka, TokyoAsia/Yakutsk (GMT+09:00) YakutskAustralia/Adelaide (GMT+09:30) AdelaideAsia/Vladivostok (GMT+10:00) VladivostokAustralia/Brisbane (GMT+10:00) BrisbaneAustralia/Hobart (GMT+10:00) HobartAustralia/Sydney (GMT+10:00) Canberra, SydneyPacific/Guam (GMT+10:00) GuamAsia/Magadan (GMT+11:00) Magadan, Solomon Is.Pacific/Auckland (GMT+12:00) AucklandPacific/Fiji (GMT+12:00) Fiji, KamchatkaPacific/Tongatapu (GMT+13:00) Nuku'alofa
-o-
p216
© 2000-2016, Pacific Timesheet
Index
- P -Policies 126
- A -Advanced Topics 83
- T -Terminology 96
- P -Pay Codes 117
- T -Templates 119
- M -Managing Timesheets 22My Timesheet 17
- N -Notices 168
- A -Approving Timesheets 26
- I -Introduction 5
- S -System Requirements 6
p217
© 2000-2016, Pacific Timesheet
- E -Employee Balances 65
- P -Preferences 14
- E -Employee Balances CSV Format 196
- W -Work Breakdown Structure 88
- A -Approval Levels 93
- S -System Lists 116
- R -Rate Options 94
- A -Administrative Overview 84
- L -Leave Requests 32
- D -Devices 171
- A -ACTAtek Devices 174
p218
© 2000-2016, Pacific Timesheet
- C -Customers 36
- F -FAQ 209
- C -Customer CSV Format 192
- A -Appendix 210
- L -Locale Codes 211
- T -Timesheet CSV Format 205
- P -Permission Levels 155
- L -License 115
- S -Security 153
- A -Announcements 16
- R -Reports 69

p219
© 2000-2016, Pacific Timesheet
- M -Managing Employees 56
- B -Branding 97
- S -Schema 177
- H -Home 11
- M -My Account 13
- C -Change Password 12
- E -Employee CSV Format 193
- T -Time Periods 90
- E -Employee Groups 66
- T -Time Entry Rules 127
- P -Permission Lists 157
p220
© 2000-2016, Pacific Timesheet
- I -Importing/Exporting 184
- M -Managing Tasks 35
- T -Tasks 43
- P -Projects 38Project Groups 37
- T -Task Groups 42
- G -Group CSV Format 197
- T -Task CSV Format 202
- P -Project CSV Format 199
- T -Task Group CSV Format 204
- P -Project Group CSV Format 201
- C -Custom Fields 179
p221
© 2000-2016, Pacific Timesheet
- O -OneLogin Authentication 164
- S -System Options 114
- A -Asset CSV Format 186Asset Class CSV Format 188Asset Entry CSV Format 189Absence Points Rules 148
- M -My Assets 19
- A -Approvals 25Approving Project Time 28
- P -Project Dashboard 41
- D -Data Archival 208
- L -LDAP/Active Directory Authentication 158
- T -Time Zone Codes 214
- O -Okta Authentication 162
- A -
p222
© 2000-2016, Pacific Timesheet
Assets 51
- P -Ping Identity Authentication 166
- H -Hours Summary Report (Columnar) 76
- F -FTE Summary Report 78
- A -Advanced Settings 122Asset Tracking 45, 121
- S -Submit Message 125
- E -Employee Types 68
- P -Percent Time Entry 122Presence Absence Time Entry 122
- A -Attendance Widget 122
- R -Report Properties 72
- P -Profit Report 81
- S -
p223
© 2000-2016, Pacific Timesheet
SAML 2.0 Authentication 160
- P -Project Options 40
- E -Employee Attendance Report 75
- S -Schedule Rules 133
- O -Over Time Rules 140
- F -Flex Time Rules 134
- H -Holidays 91
- D -Data Integration 98
- Q -QuickBooks Export Options 104
- A -Auto-Import Directory 110
- 9 -9/80 Over Time Rules 142
- T -Timesheet Export Options 99
p224
© 2000-2016, Pacific Timesheet
- A -Approving Crew Time 31
- S -Setup Quick Start 8
- A -Asset Classes 53
- W -Work Shifts 92
- A -Asset Entries 46
- T -Time Entry Corrections 24
- W -Wage Rules 145
- P -Pay Rates CSV Format 198
- B -Bill Rates CSV Format 191
- E -Export Options 108
- L -Leave Request Options 34
p225
© 2000-2016, Pacific Timesheet
- C -Crew Timesheet 20
- A -Asset Tracking 45, 121
- U -Units of Measure 55
- A -Asset Types 54Asset Entry Fields 49
- B -Balance and Accrual Rules 136
- W -Work Shift Rules 144
p226
© 2000-2016, Pacific Timesheet
www.pacifictimesheet.com