Embed Size (px)
Citation preview

Sydney 38 Cookbook
The

Quantum Sydney 2001 1 ©
TABLE OF CONTENTS
1
2
3
4
5
6
7
BASIC BOAT PREP FOR RACE DAY
RIG TUNE AND BASIC SET UP
UPWIND TRIM - THE JIB
UPWIND TRIM - THE MAIN
DOWNWIND TRIM - THE SPINNAKER
CREW WORK AND OTHER TIPS
SAIL CARE AND MAINTENANCE
Quantum Sydney 2001 2 ©
The Sydney 38 represents a major development in terms of both concept anddesign. High powered but simple, the boat combines the sophistication of the
latest IMS/IRC hull forms and appendages, with the simplicity of a swept-backspreader fractional rig, no running backstays and no overlapping jibs.
The strength of the Sydney 38 lies in its strict national one design class. The
generous sailplan and powerful hull/keel lend to very competitive IRC resultsdespite the class sail limitations. Experimentation with IRC maximum sails hasproduced some impressive results, but there is no substitute for the tight mark
roundings and overlapped finishes of class racing. Quantum Sail Design Grouphas been a part of the success of the Sydney 38 since its debut. From Annapolisto Sydney, Quantum staff have sailed countless hours developing and refining the
sail shapes that provide the horsepower the Sydney 38 loves. Whether you arelooking to finish first or merely beat that rain cloud back to your dock, theQuantum tuning guide is designed to help you get the most from your boat.
We took a cue from the boat and have kept it simple, yet efficient, thoroughyet easily handled! We have included tips from our best from Annapolis toSydney. As with all tuning guides, this information should not be taken as
absolute. It is impossible to sail strictly by the numbers, as trim and tune aredynamic, requiring constant changes to get the most from your boat. It is moreimportant to understand the concepts behind tuning, and the effects of the
different controls. We encourage you to experiment in changing conditions todetermine the right combination for your sailing style. There is no one way tomake your boat go fast. We ask that you keep in touch and let us know what is
working for you on your boat, and please do not hesitate to call if there are anyquestions. You own a great boat that will provide countless hours of sailingpleasure. We are confident our tuning guide can help you get the best
performance from the Sydney 38 and your Quantum Sails. Enjoy, and above all,go fast!
Sydney 38 ODTUNING GUIDE
Quantum Sydney 2001 3 ©
1. Race Day - Basic Boat PrepGeneral Items:
1. Keep manageable weight to a minimum! Check to assure all storage areas and
water tanks are empty. Try to carry only enough fuel to get to and from the race coursewith a margin of safety. Try to encourage crew to bring only what they intend to wear,limit sea bag weight, and stow crew bags in the middle of the salon on floor.
2. Be sure your bottom is clean. Even newly painted bottoms develop a “scum” withina day or two. Try to have your bottom scrubbed as close to race day as is possible -bribe your diver if necessary. It is a felony to use Quantum Sails with a dirty bottom!
3. Try to sail with as close to maximum crew weight as possible.
On Deck:
1. Install all class legal sail handling aids!Install U-bolts for outboard jib lead, etc.
Shock cord brace returnsVelcro tab on shroud to hold spinnaker halyard
2. Determine the point on the lazy brace that indicates when the brace is at full
extension for the bow person to jibe the spinnaker pole, and put a very visible markthere.3. Mark the spinnaker pole topping lift with a very visible line at the position for
average setting.4. Mark the spinnaker halyard with a very visible line at the full hoist position.5. Mark the deck on the inside of the jib track to easily locate optimal car settings for
Code 1, Code 2 and Code 3 jib6. Mark main halyard with optimal hoist settings for light medium and heavy airconditions.
7. Mark mainsail outhaul control line at maximum upwind and downwind positions.8. Splice the bitter end of the mainsheet together to keep it from kinking and knotting.

Quantum Sydney 2001 4 ©
9. Tie traveler line ends to stanchion base on each side of boat for easy location and to
keep from kinking and knotting,10. Check the battens in the mainsail to ensure they are inserted and tensioned properlybefore raising the main.
11. Check and lubricate all shackles and fittings on the way to the race course.12. Check running rigging for chafe while rigging the boat.
2. Rig Tune and Basic Set Up
Basic Set Up:There are a few basic goals to achieve when setting up the Sydney 38 mast. (1)
You want to be sure the mast head is centered in the boat and that the mast is straight side
to side. (2) You have the correct headstay tension required for the conditions. We musttemper that statement with our belief that the Sydney 38 should be sailed with minimumheadstay length. In the more windy areas, basic set up will necessarily require a tighter
overall basic set up. (3) Have the right amount of pre-bend for the conditions. NOTEthat pre-bend and headstay tension will need to change with wind volocity. As with allfractional rigs with slightly swept back spreaders, headstay tension is directly related to
shroud tension. The second principle to remember is that more pre-bend in light air andless as the breeze increases. Our basic setup for moderate to windy areas then, is for afairly tight rig, minimum rake, with moderate prebend. In lighter wind areas a little more
pre-bend is required. However, if the mast is set up with pre-bend you risk inverting themain prematurely when you tension the backstay as the breeze increases. On Pittwater,we set the boats up for breeze-on conditions from September to March, and unwind the
rig tension for our Winter Season. All that aside, the following will give you a pretty soundstarting point.
1.Mast Butt: Set the mast step as far foward as the class rules allow. Check withthe class rules and double check with the measurer it has to be as far foward as possable.
Quantum Sydney 2001 5 ©
2. Mast Rake: This is a function of forestay length. The base / medium length is1610 mm. To measure this, take the headsail halyard and hold it on the gooseneck, add1000 mm and then swing it out to the forestay, from this mark to the stem should measure
1610 mm. This is your medium rake set up.3. Centering the Mast: There are several ways to check that the mast is centered
in the boat. The most accurate method is when the boat is out of the water, shoot the
masthead with a transit along an imaginary centerline down to the tip of the keel. Thisinvolves levelling the boat in the stands and can involve some yard charges whileadjustments are made, but can be very accurate. The most common method involves
pulling a steel tape measure up on a centerline genoa halyard. Pull the tape measure toan equidistant mark you have put on both chainplates. Adjust the upper shrouds untilboth measurements are identical. The mast head will be centered at this point.
4. J Dimension at the Partners: This is set at the factory and cannot be adjusted.5. Shroud Tension: Shroud tension is almost as philosophical as it is technical.
The Sydney 38 mast must be carefully tuned to optimize power and acceleration out of
tacks with the class jibs. The shroud tensioning objective is two pronged; first to be ableto induce about 5 or 6 inches of headstay sag when sailing in light air with no backstayon. You must also be able to carry the headstay almost straight in 16 knots true and with
the backstay on most of the way. This is accomplished with upper shroud tension andforestay length. The second aspect of the tension equation involves lower shroud tensionand mainsail shape. The tension balance of the lowers must include enough tightness to
keep the lower part of the mast in column in moderate air so the main remains full downlow. But, as the breeze comes on, you want the mast to bend slightly to flatten the maindown low. If the lowers are carried too loose, the main will invert prematurely as the
backstay is wound on. So, how do you get to the proper set up?
a. Upper Shrouds (V-1’s): After the mast is centered and set up, wind the upper
turnbuckles until you get them as tight as you can by hand. Now wind theuppers on another 10 to 13 turns equally, this should leave between 60 mm to 45 mminbetween the ends of the threaded rods, depending on anticipated wind range.
b. Intermediate Shrouds (D-2’s): Hand tight, plus 4 or 5 turns.c. Lower Shrouds (D-1’s): Hand tight plus 2 turns. A little tension will reduce any
prebend, and shape the bottom of the main.

Quantum Sydney 2001 6 ©
Dockside tune must now be checked by going for a sail in at least 10 knots true.
Adjust shroud tension to get the mast straight. Each shroud (V-1, D-1, D-2) controls themast section where it is attached! Ease tension if the section pulls to weather, tighten if itfalls off to leeward. Remember our tuning philosophy wants enough headstay sag to power
up in under ten knots of true, and a straight lower mast section to shape the lower half ofthe main without inverting prematurely. Overall, mainsail shape will dictate final rigtension. If the main inverts too quickly as the backstay is tensioned (characterized by
overbend wrinkles running diagonally from clew to the middle of the mast), tighten thelowers. This will reduce bend and make the main fuller. In a breeze you should be able toapply maximum backstay without totally inverting the main. Conversely, if the mainsail is
too full with maximum backstay, ease the lowers off! A good gauge for overall tightness isthat leeward shrouds should just begin to go slack when the boat is powered up in theupper wind range. If they go slack before that, your basic set up is too loose for the "over
13 knots" basic set up.
The goals for tuning the Sydney 38 rig are:
* Get the mast centered in the boat;* Obtain correct headstay length and tension;* Slight pre bend in windy areas, more in light-air areas.
Remember, the governing principle in tuning the Sydney 38 mast (or any fractional rig withswept back spreaders) is that shroud tension controls headstay tension. The tighter the
V1’s, the tighter the headstay!
Quantum Sydney 2001 7 ©
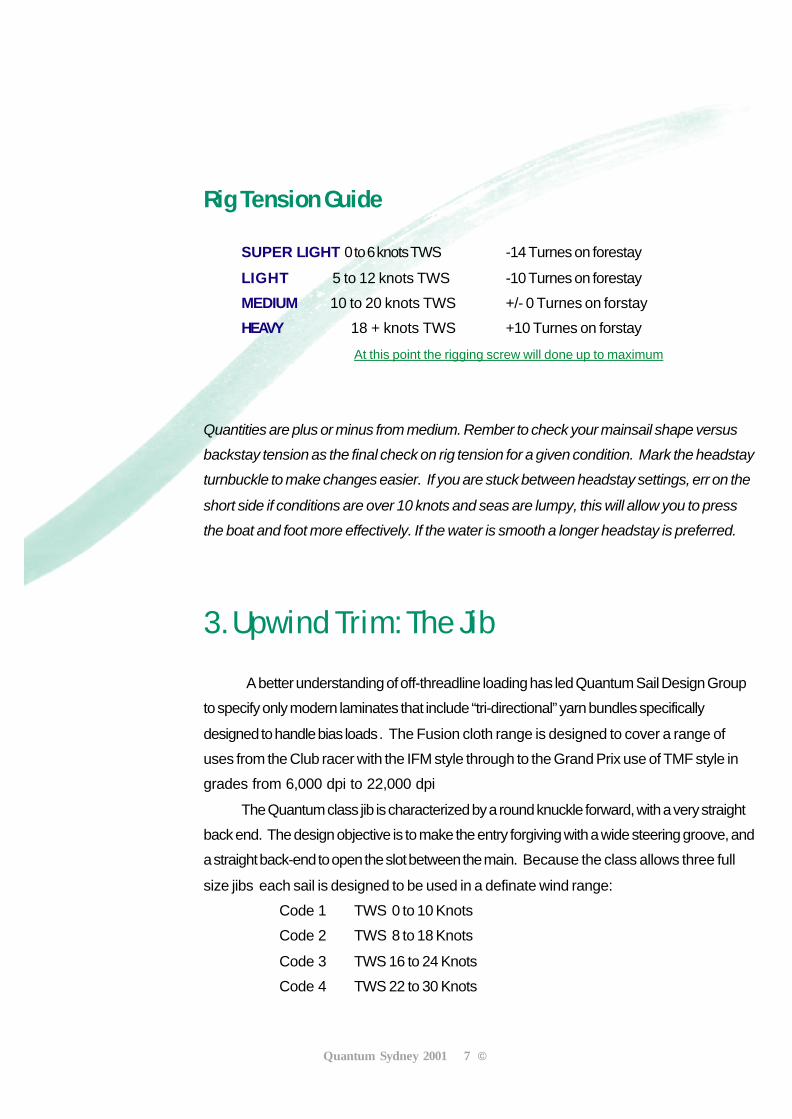
Rig Tension Guide
SUPER LIGHT 0 to 6 knots TWS -14 Turnes on forestay
LIGHT 5 to 12 knots TWS -10 Turnes on forestayMEDIUM 10 to 20 knots TWS +/- 0 Turnes on forstayHEAVY 18 + knots TWS +10 Turnes on forstay
At this point the rigging screw will done up to maximum
Quantities are plus or minus from medium. Rember to check your mainsail shape versusbackstay tension as the final check on rig tension for a given condition. Mark the headstayturnbuckle to make changes easier. If you are stuck between headstay settings, err on the
short side if conditions are over 10 knots and seas are lumpy, this will allow you to pressthe boat and foot more effectively. If the water is smooth a longer headstay is preferred.
3. Upwind Trim: The Jib
A better understanding of off-threadline loading has led Quantum Sail Design Groupto specify only modern laminates that include “tri-directional” yarn bundles specifically
designed to handle bias loads. The Fusion cloth range is designed to cover a range ofuses from the Club racer with the IFM style through to the Grand Prix use of TMF style ingrades from 6,000 dpi to 22,000 dpi
The Quantum class jib is characterized by a round knuckle forward, with a very straightback end. The design objective is to make the entry forgiving with a wide steering groove, anda straight back-end to open the slot between the main. Because the class allows three full
size jibs each sail is designed to be used in a definate wind range:Code 1 TWS 0 to 10 KnotsCode 2 TWS 8 to 18 Knots
Code 3 TWS 16 to 24 KnotsCode 4 TWS 22 to 30 Knots

Quantum Sydney 2001 8 ©
We will approach the trim problem from the four different areas that are readilyadjusted: jib-lead car placement, jib sheet tension, jib halyard tension, and headstay tension.
Jib Car Lead
The median car lead should apply equal tension to the leech and foot of the jib.
Moving the lead forward in lighter air, closes the head of the sail and makes the foot moreround. When the lead is aft of the median position the foot of the jib will be straight andflat, and the head of the sail will open and twist.
From the medium lead position, about 320mm from the back of the track, the leadshould be moved aft as the sail is sheeted harder and operates closer to the top of itsrange. At the bottom end of a jibs range, or as the sheet is eased the lead will need to
move forward slightly. maximum lead foward will be approximately 50mm and maximumaft will be as much as 150mm from the medium at the top of the sails range.
**If the boat is too overpowered continue to move the lead aft or begin easing the jibsheet a few inches to open the leech to balance the boat.
Jib Sheet Tension
The jib sheet is the most important headsail control and must be played constantly,easing to accelerate, trimming to point. Sheet tension will change with every change in
breeze velocity, but the basic premise is to trim as hard as possible without slowing theboat down. Speed first, then point! As the breeze builds over 10 knots, the headsailtrimmer should move to weather, bringing the jib sheet with them. Adjustments are not as
frequent in steadier breeze, but the trimmer can ease for lump or when a duck innecessary, then use the weather winch to trim in. The best indicator of sheet tension is thelocation of the leech of the sail with relation to the spreader tip. We recommend you put
a set of three marks measured from the tip of the spreader: one 300mm inboard, one at400mm from the tip and the inner most mark at 500mm in from the tip where the tapperfinishes on the spreader.
Quantum Sydney 2001 9 ©
We have found the following combinations to be fast with the correct jib on.* 0 to 6 knots 300 mm off spreader tip* 7-10 knots 500 mm inside spreader tip
* 11-15 knots 500 mm inside spreader tip* 16-20 knots 400 mm inside spreader tip*** 20+ knots 400 mm inside spreader tip**
** Seaway conditions affect trim positions. Sails can be sheeted tighter in smooth water,but must be eased for lump and heavy-air waves. Remember it is critical to get the boatmoving through the water before trying to point! Think of the jib sheet in terms of how it
relates to speed. If you are fast, sheet harder, if you are slow, ease slightly.
The Jib Inhaul:
Exactly how much inhaul to use in a given condition is still an area which is nottotally clear. In early competition and testing, differant people have been using varyingamounts of inhaul (with slightly differant sheet tensions and fore and aft lead position) and
getting comparable results. There are as yet no "definitive" numbers, in large part becauseof the drastic and veried effects inhauling has on the sail. In general, it can be said thatwe find ourselves using less and less inhaul. When in doudt let the lead go outboard.
Mark the inhaul control line for referance every 100mm. Every 100mm on thecontrol line will move the clew 25mm inboard. From maximum inboard position tomaximum out board it is possible to move the clew of the sail through a range of 150mm.
In practice it will rarely be pulled more than 75 to 100mm inboard. Pulling the clew ofthe sail in adds power and depth, and sheeting closer to the centerline allows for betterpointing. Inhauling also tends to slows the boat, and will tend to overpower and leave the
boat feeling "bound up" if the clew is pulled too far inboard. Get speed first, then shiftinto pointing mode by inhauling the jib. In general terms, at the bottom end of any jib'srange you will use the most inhaul. As the breeze builds, the clew should be eased
outboard. As a guideline these are maximum values;Code 1 Inhaul clew between 80mm and 120mmCode 2 Inhaul clew a maximum of 75mm
Code 3 Inhual clew a maximum of 50mmCode 4 Inhaul clew a maximum of 25mm
Be Carefull. Better to have the clew too far out board tan too far inboard
Quantum Sydney 2001 10 ©
Be cBarBeefuBel. Better to have the clew too far outboard than too far inboard
Jib Halyard Tension:
In normal conditions use just enough halyard tension to smooth the horizontalwrinkles out of the luff of the sail. More breeze will require more halyard tension. It is
better to have too little luff tension in light to moderate conditions than too much. We liketo leave the jib halyard on the winch for ease of adjustment. In smooth water and light tomoderate breeze leave a few wrinkles in the luff. That will make the entry finer and help
your pointing ability. In choppy water luff tension will round out the entry making thesteering groove wider. It will also flatten the exit of the sail as it pulls the shape forward,effectively depowering the sail. Use a little extra luff tension in the upper range of any
headsail.
Headstay Tension:
Pulling the backstay on, not only flattens the mainsail, but tightens the headstay aswell. In light conditions you will need as much headstay sag as possible to make the jib
fuller. In heavy conditions you tightening the headstay will depower the jib and help yourpointing ability. The key to this set up is to have enough travel in your backstayadjustment to be able to induce up to 150mm of headstay sag in light air, yet be able to
tighten the headstay to 25 mm of sag. When the backstay is maxed out the headstayshould have 25 to 50 mm of sag in 15 knots of wind.
4. Upwind Trim: The Mainsail
The Sydney 38 has twice as many mainsail controls than jib controls to adjust shape
with. We will address adjustments to halyard, sheet, backstay, outhaul, traveler,cunningham, and vang in this section. Conceptually we would like you to think in termsof having the boat in the groove, sailing high and fast. The mainsail trimmers job
becomes fairly simple at this point: keep a constant angle of heel with mainsail trimwithout the helmsman having to use more than 5 degrees of rudder in the boat. The
Quantum Sydney 2001 11 ©
question of what to ease on the puffs still has no perfect answer. We would suggest that
for subtle changes in wind velocity, the traveler is the control of choice. By easing thetraveler you are able to preserve leech tension, therefore pointing ability. In larger puffsthe mainsheet provides a more immediate and noticeable response. The key is to have
the helmsman correct as little as possible on the puff to keep the boat at a constant angleof heel. You need to experiment with the helmsman and main trimmer and see whatworks out best for them as a team. Here are some basic guidelines we have found fast for
mainsail controls.
Mainsheet
As with the jib sheet, there is no one magic position for the mainsheet. It too shouldbe adjusted with each change in wind velocity or wave pattern. Tightening the mainsheet
reduces twist and tightens the leech of the sail which forces the boat into point mode.Easing the sheet induces twist, opening the leech, which accelerates air flow across thesail. This trim setting encourages the boat to bear away, and therefore accelerate. Some
basic concepts for main sheet trim are: Tighten the sheet until the top batten is parallel tothe boom. This should be the position which will have the top telltale flying at least halfthe time, stalling just less than half the time. Once the boat is up to speed, trim the sheet
harder, until the effect of sheeting begins to slow the boat. Remember, your goal is to getthe boat up to speed first, then work on point. The mainsail trimmer is charged withfinding that delicate balance between speed and point. In light air he will have to ease
and twist from the median position to get the boat moving. In moderate air the sail will besheeted firmly with the top batten at least parallel. In the breeze the sail should besheeted as hard as the angle of heel will allow, and still keep the boat on its feet. All
these positions are tempered with sea conditions. More punch is required in choppyconditions to keep up speed in the waves.
Conceptually, the key point that should always prevail: The first thing to do if theboat is slow, or seems “bound up” is to ease the mainsheet! Allow the driver to bear offand drive on the telltales to get back up to speed. The boat must go fast before it can
point. Once up to speed keep sheeting the main until speed starts to drop, then work thatdelicate balance between speed and point.
Quantum Sydney 2001 12 ©
Traveler
The traveler serves two functions. It controls the boom’s angle of attack to the wind,
and in reality, it steers the boat by controlling helm and angle of heel in the puffs andlulls. Set the twist with the mainsheet, then use the traveler to position the boom relativeto centerline. When the mainsheet is well eased in light air to promote acceleration, the
traveler car will need to be well to weather to keep the boom on centerline (be sure thevang is off). A common misconception is that the traveler car should not be abovecenterline, when in reality it is the position of the boom (leech) that should be on
centerline. Assuming the proper amount of twist, i.e. proper leech profile, some nominalpositions for the traveler car would be:* Light air- 300mm to 400mm above centre
* Medium air- centered with sail sheeted on* Over 15 knots- 200mm to 400mm below centre line* Over 18 knots- centerline to leeward end with mainsheet eased for twist
The traveler must be played aggressively in the puffs to assure proper amount ofhelm and angle of heel. At about 16 knots true, the sheet must enter the equation at the
primary mainsail control, as twist will be required to depower in the puffs. In moderateconditions, playing the traveler will control the front of the main even inducing abackwinding bubble as eased in the puffs. It is important to dump the traveler quickly as
a puff hits the boat, but equally important to pull the traveler back up as the power of thepuff dissipates. Pulling the traveler up quickly after the puff hits turns the puff into forwardmotion instead of heel. If the trimmer waits too long and the boat totally depowers in the
puff, you have missed the opportunity to point once you acclerate.
Conceptual traveler trim: the traveler is the "tip meter" once you have set the sheet
for the proper leech profile. The trimmer must work with all the changes in velocity orwave pattern by adjusting the traveler up or down. The less rudder the helmsperson hasto induce to keep the boat tracking and on its feet, the faster the boat goes. Remember,
there is a critical point when the traveler is no longer effective at depowering in the puffs,and you must begin to ease the sheet.
Quantum Sydney 2001 13 ©
Backstay
Backstay tension does two things. First, as the mast bends, the upper two-thirds ofthe mainsail flattens out and the leech opens up, depowering the main. Second, theheadstay gets tighter which flattens the jib. Both of these depowering effects will keep the
boat on its feet when there is too much helm. Our goal is to sail the Sydney 38 with aslittle helm, as the helmsperson can live with, and still keep the boat in a groove. Thebackstay must have a graduate scale of markings (a numbered scale on a piece of batten
taped onto the cylinder). Basic positions would be no backstay in the bottom ranges ofeach jib / rig setting through to 80% at the top of each jib with a little left over then a sailor rig setting is carried over range.
Conceptual backstay use: remember adjusting the backstay has a large and immediateeffect on mainsail leech tension. Bending the mast opens the leech, so you will need to
add mainsheet as you add backstay, and ease mainsheet as you ease backstay. You willalso need to add cunningham as you add backstay and ease cunningham as you easethe backstay.
Main Halyard:
The initial halyard tension should be more loose than tight. Smooth out the wrinkles
in the front of the sail, except in light air when a few wrinkles in the lower section of themain will allow the lower draft to slide aft and round out the leech for maximum power.As the breeze increases more luff tension is required to control draft location, and
straigten out the back of the sail. A general rule would be as the backstay comes on, thehalyard should be tightened as well. Basic paremeters remain: light air let the sail wrinkle,moderate air just a wrinkle ot two down low, over 10 knots bring the halyard up to the
band and the luff should be smooth.
Cunningham:
Apply just enough tension to smooth any horizontal wrinkles. The two exceptionsare: light air when you want wrinkles down low to allow the draft to slide aft for power,and in breezy conditions when you want to pull the draft far forward.
Quantum Sydney 2001 14 ©
Outhaul:
The outhaul controls the depth in the lower third of the mainsail. Easing the outhauladds depth and power, pulling it on flattens and depowers. The rule of thumb here againrelates directly to the weather helm required to keep the helmsman in the groove. More
power in the bottom of the main will increase weather helm. Upwind, however, thebottom of the main should always be flatter than the top. The outhaul is only easedcompletely when sailing off the wind. In light air, the clew of the main should be 75mm to
100mm from the black band. Pull the clew to the band by 12 knots of wind. When thecrew is in full hike mode the outhaul should be maxed out.
Boom Vang:
The vang is generally considered an off the wind mainsail control. However,upwind in heavy air the vang should be used to help out the mainsheet with the job of
pulling down on the boom and maintaining leech tension. If you pull the vang on hardyou can ease the mainsheet rapidly in big puffs without giving away the whole leech. Thistechnique is called “vang sheeting”, and can be very effective. In light air, use only
enough vang tension to stop the boom from bouncing.
Conceptually, upwind the vang is an additional leech control for the mainsail. In heavy
air the vang will have to be eased at the weather mark to allow the boat to bear away, aseasing the mainsheet may not be enough.
5. Downwind Trim- Sail Selection
The Sydney 38 class rules allow three spinnakers:CODE 1 Symmetrical VMG/Light All Purpose 0-12 knots true. Designed as a
light all purpose to be used when tacking downwind in light air, can be poled back at the
top of range in bumpy water. Made from class mimimum weight cloth .5oz. Can beused up to 19knots apparent wind strength.
Quantum Sydney 2001 15 ©
CODE 2 Symmetrical Runner 8-22 knots true. Designed as a true running sail.This is the primary course racing sail when there is wind. Upper end range is a function ofthe crew's ability to keep the boat under coutrol. It is usually the sail of choice at the
bottom end if the sea's are flat. Made from class minimum weight cloth .6oz
CODE 3 Symmetrical Heavy Runner /Reacher 15-35 knots true. Designed as a
reaching sail and heavy air runner. Can be used as low as 14knots on a tight reach butcan be carried square to 35 knots due to its narrow mid-girth. Made from 1.5oz cloth.
Setting:
Except in light conditions make sure that you turn down first before you hoist or youmay trap the spinnaker behind the spreaders. You will need all the crew weight hiking inorder to bear off; don't let the crew move into the boat as you approach the mark. The
vang will need to be eased to bear off in heavy air. Set from the forward hatch. Take theport handle off the hatch so the spinnaker does not get hung up. Do not ease the jib toofar or you will trap the spinnaker. In heavy air, ease the jib to bear off, then retrim once
the boat has made the turn and flattened out.
Basic Trim:
The inboard and outboard ends of the spinnaker pole should always remain level.The outboard pole end should be secure. If the brace, topping lift or kicker is loose thesail will bounce and air flow will be detached. Usually position the pole perpendicular to
the apparent wind. If the pole is to high on a run it will loose effective area and stability.If the pole is to low little lift and poor down flow will occur when running. Oversquaringcauses a flatter and unstable bottom, when running the spinnaker will appear to be
cocked to leeward of the pole. Undersquaring causes less attached flow when reaching,the sail will not roll to windward and project less area. On a reach if the pole is to lowthe draft will be too far forward and the sailwill break early on the leading edge.

Quantum Sydney 2001 16 ©
Takedowns:
Start early! You will approaching the leeward mark faster than you think and youwant to be cleaned up and hiking as you round. Weather takedowns are the norm exept
when the pole is on the forestay. Take the pole off completely well before the mark. Themast person grabs the brace and holds it out to stabilize the chute. They become theprimary gatherer. The pit person lowers the topping lift to the bow person who stows the
pole. The brace trimmer trims aft slightly as the pole is tripped away. At the take downthe pit person lowers the halyard. The mast and bow person gather and stuff down thefoward hatch, leaving all gear attached. Don't clean up, hike
Jibes:
The mainsail is the key, grab the sheet parts close to the boom and throw it across
the cockpit just as it unloads (as the boat passes dead down wind ). In a breeze, if youare not aggresive about getting the mainsail across it will stear the boat and you willprobably crash. The driver should steer slowly, but smoothly and delibertely from broard
reach to broad reach. do not try and hold the boat dead downwind. In heavy air initiatethe jibe when surfing down a wave . Use one person on the sheets, and one on thebraces. We use the lazy braces even in light air.
Running Tips:
Until the breeze is on it is critical to keep the main powered up. Use the vang to
keep the leech tensioned and the top telltales flying. Be sure you have released all thebackstay, as well as the outhaul and cunningham to put as much shape into the main asis possible. Letting the rig go forward is also helpful. The crew should be forward in the
boat in lighter air, moving back as the wind builds. Rolling the boat to weather will helpyou to sail lower.Attack the downwind running legs by sailing lower than the boats around you. Practice
will enable you to determine the fine line between sailing too deep and the best VMG.Constant communication from the helmsman and trimmer will keep everyone focused onthe task of getting the boat to the bottom mark efficient.
Quantum Sydney 2001 17 ©
6. Crew Work & Other Tips
The Sydney 38 is a very straightforward, honest boat. This translates into sailing theboat as relatively flat as is possible. Crew weight greatly controls heel, and heel is greatly
responsible for the amount of helm the boat experiences. The helmsman needs helm forfeel, and to help him keep the boat in the groove. This interaction makes crew weightplacement almost as critical as sail trim! In light air, both upwind and down the weight
should be forward and to leeward to induce heel and helm. As the breeze builds, crewshould be up and aft, and in fresh breeze they should stack up tightly from the helmsmanforward (no one aft of the helmsman). In light lump it is especially effective to send all but
the primary trimmer below to stack up over the keel. This may seem cruel and unusualpunishment, but in most cases it is more comfortable than crouching on the leeward railstaring into the headsail!
Another critical part of sailing the Sydney 38 upwind efficiently is trying to maintainno more than 20 degrees of heel, and maintaining a constant angle of heel! If the
mainsail trimmer and helmsman work together (with puff input from the rail), the boatshould be sailed through most puffs without the helmsman having to steer too dramati-cally. If the helmsman has to dial in excess rudder (more than say 5 degrees on tiller) he
is slowing the boat with drag.
One final crew-weight comment. The crew should be aggressive both upwind and
down in moving to suit conditions. The boat should be heeled 5 degrees to weather withcrew weight when running in moderate conditions. Weight should be shifted to stabilizethe boat and promote surfing in heavy air. Upwind, induce heel in light air, hike hard in
breeze. If the boat is pounding upwind, shift a body forward to get the bow down into thewater. A finely tuned crew will react automatically to changes, and move accordingly.
Steering the boat requires discipline as the boat is so well balanced. Steering withvery little feel is hard for all of us, but is a fact of life with the Sydney 38. It is better topress on the jib a little, footing more than feathering, as speed through the water is
required to generate lift from the underwater foils. Velocity prediction programs are, atbest, unreliable for the Sydney 38. Use them as a guide to get started, but work reli-
Quantum Sydney 2001 18 ©
giously with your team to develop your own target boatspeeds. Once you have built your
own targets on your instruments, sail to them. You will be able to verify your targets veryquickly when you line up with the very competitive one design fleets!
On race day, prep the boat to be as light as possible. With respect to class andsafety requirements, bring only what you need for the day. Lighter is faster! Work withyour crew and get them used to traveling light. You should be able to wear most of what
you will need onto the boat. Most sea bags are rarely opened once the boat leaves thedock,. a change of clothes is often just as functional at the dock as it is on the boat. Ifyou are prone to wearing sea boots, wear them to the boat, eliminating an extra pair of
shoes on board.
If your boat bottom has not been faired to template, at least spend the time on your
next haulout to assure you have the best bottom you can afford to put on the boat. Youmay want the crew to pitch in with some sweat equity rather than pay the yard forprepping before they spray paint. Bottom preparation is one thing you can control in a
game full of variables! Smooth, fair bottoms are fast.
A final hint that will pay very large dividends: Arrange to go out with another
Sydney 38 for some straight line sailing in a controlled atmosphere. We will be happy totell you how to equalize the set up and how to get the most from the session. You will beamazed how much you will learn sailing alongside another boat for 20 minutes at a time.
It will also be a nice break to the normal practice session we all grow to dislike, butpractice is critical to success.
Above all, enjoy your boat!

Quantum Sydney 2001 19 ©
7. Sail Care and Maintenance
Dampness is a problem that you need to deal with in most climates. Fresh water,like rain, is especially prone to mildew. Whenever possible, dry sails thoroughly beforeputting them away for any length of time. If you leave your spinnaker spread out below,
rather than stuffed in the bag, it will encourage drying, and keep colours from bleedinginto each other.
Be sure you have taped over anything sharp on the rig and stanchions, etc. Werecommend you tape the spreader tips with plastic tape rather than leather or the rubberrig wrap. Leather becomes very hard (possibly sharp) after it has been wet and dry several
times, and the rubber rig wrap is actually sticky to the mylar film on your headsail. Theplastic tape, though the least durable, is the best surface for the mylar film to slide across.Rollers at the front stanchion help the sail over the stanchion when trimming in.
Release the tension on the corners of your sails when leaving the boat. We alsorecommend that you slack leech lines slightly if you have just sailed on a particularly brisk
day where you have added tension to leech lines. Chances are the next time you sail, theleech line will be on too tight when you first fly the sail unless you have released sometension.
When storing sails for an extended period, be sure they are dry, and placed in a wellventilated area that is not prone to becoming too hot. Excessive heat can lead to
premature shrinkage. Rolling is not necessary, but is probably easier on the sail over longperiods. Remove battens when storing mainsails for long periods.
Sails should be cleaned of salt and dirt at least annually. You can bring them to usfor this service, or do it yourself at season’s end. Scrubbing with a soft brush and a milddetergent will do the trick. Avoid harsh chemicals or detergents, as they will break down
the finish and the glues used in the sails. Spots will fade with cleaning, and with time andsun. If mildew occurs, this first step is to kill the mildew. If detergent doesn’t do the job,mildew removers like Lysol work well. Avoid mildew products that include bleach as their
Quantum Sydney 2001 20 ©
cleaning agent, as bleach is very hard on most sail materials. Dry sails thoroughly aftercleaning, before storing.
Dacron insignia cloth works very well for small tears and holes in most sails. It iscritical to keep the tear from enlarging so tape the hole as soon as is possible afternoticing it. In spinnakers you may need to make a judgment call on the tear location to
decide if you should douse and repair immediately or continue on the leg. Duct tape willwork on most surfaces if you have no other option. Try to work on a dry flat surface toaffect your patch, and it should easily last through the day.
Your inventory should be taken into the loft annually for a thorough check over.Little problems are much easier to spot on the loft floor than on the boat. We also
recommend that we schedule an annual appointment on the water so we can photographyour sails, and catalogue the changes. Periodic adjustments to the leech and to adjustdraft depth and location can add months of life to your inventory.
If you are going to store your sails for an extended period, fold or roll them carefully.We recommend you even fold your spinnaker for storage, as stuffing any sail is hard on
the finish. Store them in an area that is dry and not subject to extreme heat or cold.
Please do not hesitate to call us and let us know how your program is going. Thereis no such thing as a silly question, and we are interested in how we can help you enjoyyour boat and your Quantum sails to the fullest!
Geoff Couell
QUANTUM SAIL DESIGN GROUPphone:(02) 9997 3779
fax:(02) 9997 6376email: [email protected]

by Quantum
������������� ���������www.quantumsails.com
������������
������������� �� ������������� ��������������������
� �!��"�###$��$$#�% �!��"�###$�&�$&��
' �()�� ��*+�����,�����-)�,�