Embed Size (px)
Citation preview
The King Hunt (Part 2)
Mato Jelic
For all the talk of strategy, checkmate ends the game. And hunting the enemy king is the first
and final love for many chess players, the ultimate essence of the game.
The high stake sacrifice, tenacious defense and the brilliant finishing move are a major part of
many of the most beloved games in history.
Now Mato Jelic, the hugely popular chess coach and iChess presenter (From Novice To
Advanced in 7 Days; The King Hunt), has produced an extraordinary second part of his
training course into the art of the King Hunt.
Almost 300 new games are examined as Mato deconstructs some of the greatest attacks ever
played, teaching you how to win games in the most satisfying way imaginable!
By the end of this course, you will have absorbed hundreds of tactical ideas and patterns for
winning with attacks on the castled king and sacrifices on each of the classic target squares
h7/h2, f6/f3, g6/g3 and h6/h3.
Want to win more games with exciting onslaughts and create works of art you’re proud to
show to others? Learn the art of The King Hunt (Part 2) with Mato Jelic!
The course is divided into 5 chapters:
Introduction:
Chapter 1: The Sacrifice on h7/h2 – The Greek Gift Sacrifice
Chapter 2: The Sacrifice on f6/f3
Chapter 3: The Sacrifice on g6/g3
Chapter 4: The Sacrifice on h6/h3
Chapter 5: Brilliant Queen Sacrifices
Introduction
1. The ability to successfully attack your opponent’s king is an essential skill for any
ambitious chess player.
2. To develop a good sense of when to start an attack, how to build up an attack, when
it is best not to start an attack, and to improve your attacking abilities, you need to
absorb and study plenty of attacking patterns.
3. Throughout this course, Mato Jelic provides you with hundreds of tactical patterns to
study and later recognize in your own games. Tactical pattern recognition helps you
to improve your calculation as patterns you’ve noticed in the past come to your mind
in your games.
4. Mato Jelic’s examples in this course are well-structured and based on five elementary
attacking patterns like the sacrifice or h7/h2 or the sacrifice on g6/g3. This structure
follows simple tactical concepts which leads you to find more targets in own games.
By absorbing as many of these patterns as possible, you’ll be able to identify pieces or
squares which are perhaps exploitable. This can also help you to spot the not-so-
obvious moves.
5. You’ll also learn key insights about the coordination of your pieces. It’s essential to
remember that tactics occur when pieces are in the right places, on active squares.
When you have the right structure, with pieces working well together, you will find the
tactical shots that decide games.
Attack On The Castled King And The Squares h7 (h2), h6
(h3), g6 (g3) and f6 (f3) and h7 - General Concepts:
1. The most natural place for the king is in a castled position. It is usually his safest
shelter. It is advisable for each chess player to castle early and on the right side. In
fact, in most chess games, both players manage to castle in the opening.
However, there are still plenty of possibilities for attacking a castled king. If you want
to go for such an attack, you first of all need to identify the weakest point in your
opponent’s position.
2. Choose a clear target for your attack. Instead of randomly placing your pieces on the
kingside, you need to focus on a certain square and specifically build up your attack
against it. Look for weaknesses first and only then maneuver your pieces in a way to
directly exploit them.
3. On top of that, it is essential to include all your pieces in the attack. Many attacks fail
because there are not enough pieces involved. Try to use as many pieces as possible
for your attack. Try to overpower your opponent on the wing you’re attacking on. The
more pieces you have lined up against your opponent's king, the more likely your
attack is to succeed.
Aim for material superiority on the area of the board you’re attacking. This does not
mean that you need to be a piece up before you should think about attacking your
opponent. Before you start an attack, make sure you have more attacking pieces than
your opponent has defenders.
4. While the attacking side should generally try to avoid exchanges in order to keep
more attacking forces on the board, sometimes the most effective attacking idea is to
first trade off your opponent's main defensive piece. If there is one piece which
defends all the critical squares, try to trade it off. By exchanging off the key defender
in the opponent’s position you will make the attack much stronger.
5. Don’t be afraid to sacrifice material in order to destroy your opponent’s pawn shelter
in front of the king. If there are no obvious weaknesses in your opponent’s king
position, most of the time you will need to sacrifice a piece to fuel the attack.
Chapter 1: The Sacrifice on h7/h2 – The Greek Gift Sacrifice
1. Right after the castling, the squares h2 or h7 become a target. The rook doesn’t
protect the square anymore and it is solely protected by the king. This weakness often
stays a motif for combinations until the late middlegame. Frequently, the attacking
player sacrifices pieces on h7 or h2 to eliminate an important defending pawn and to
expose the king.
2. Try to get your pieces working together. If you want to attack the h7 square, for
instance, the combination of a light-squared bishop on c2 and a queen on d3 can be
extremely strong. Both pieces eye the vulnerable h7-square.
Example:
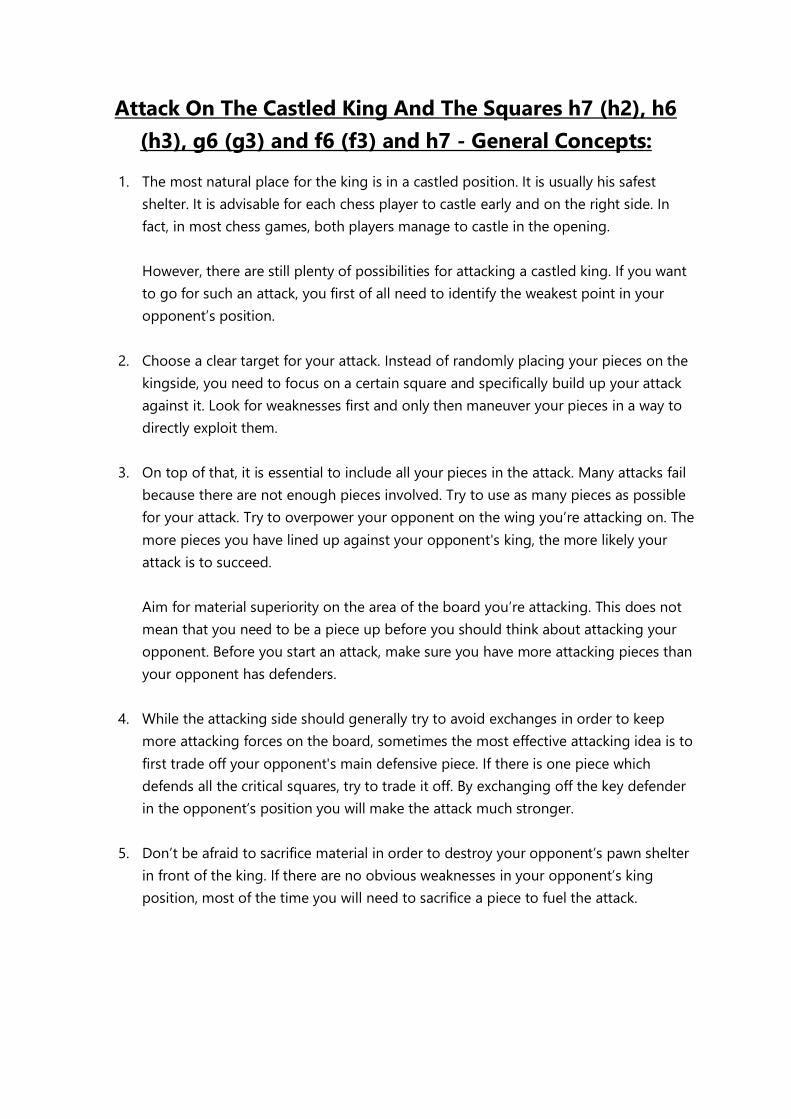
A sacrifice on h7 is possible on some special occasions. Usually, this sacrifice involves a
White bishop on the b1-h7 diagonal, a White knight on f3 which can come to g5 with
check and a White queen which then joins the action on the kingside.
In the position at hand, White can play 1.Bxh7+! Kxh7 2.Ng5+ Kg8 3.Qh5
(threatening mate on h7) 3…Re8 4.Qxf7+ Kh8 5.Nxe6! (see the diagram below),
attacking the Black queen and threatening mate on g7. Black is totally lost.
Example:
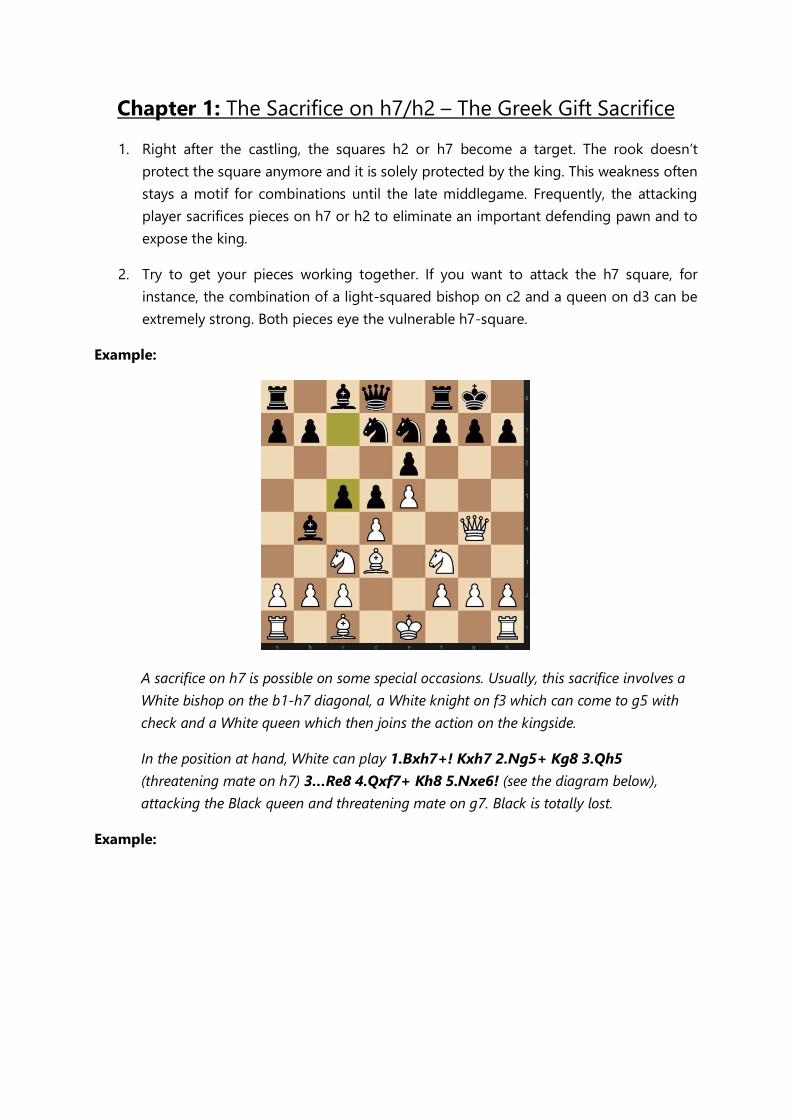
3. Moreover, a rook lift to the kingside is an effective attacking technique to keep in
mind. A rook is usually transferred to the g-file or h-file along the 3rd rank.
Example:
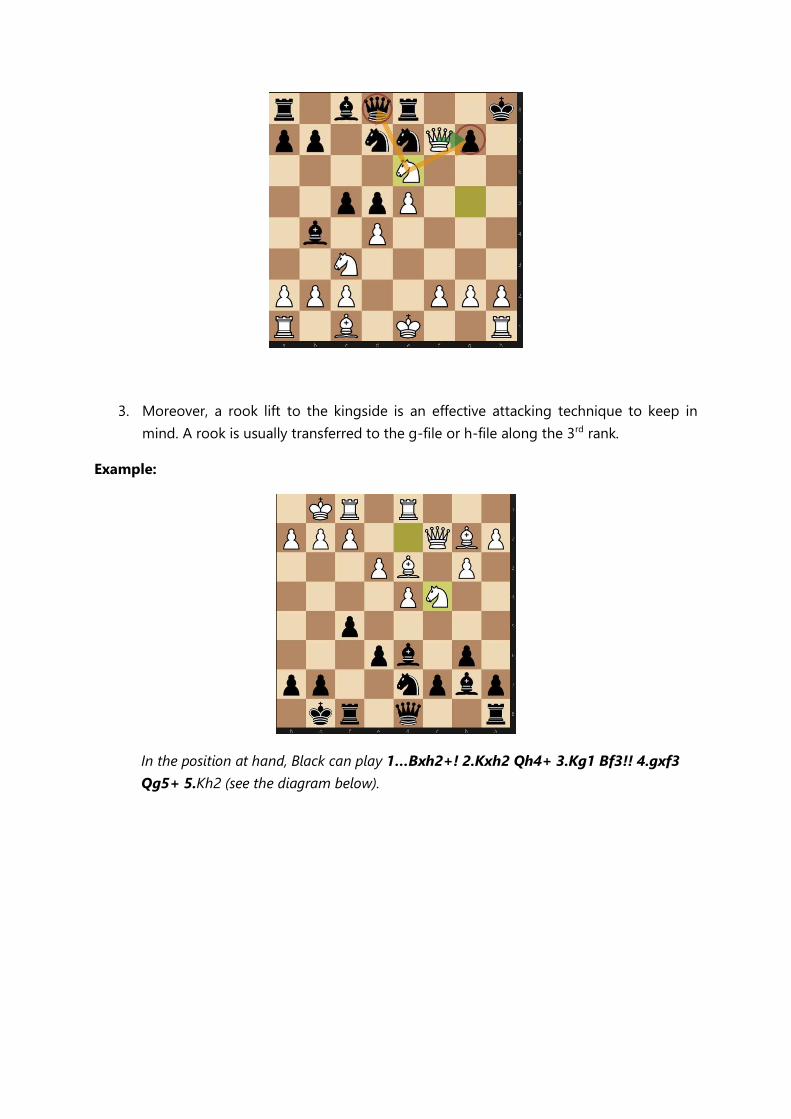
In the position at hand, Black can play 1…Bxh2+! 2.Kxh2 Qh4+ 3.Kg1 Bf3!! 4.gxf3
Qg5+ 5.Kh2 (see the diagram below).
Black wins by shifting the rook over to the h-file.
Chapter 2: The Sacrifice on f6/f3
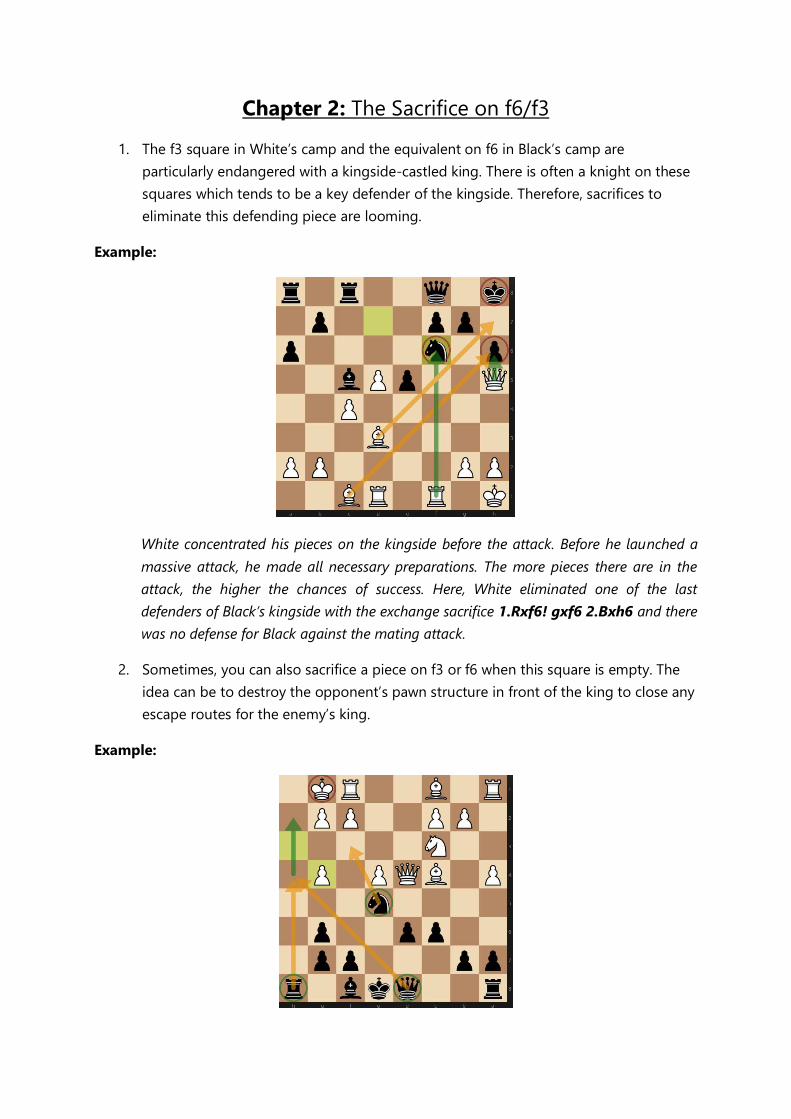
1. The f3 square in White’s camp and the equivalent on f6 in Black’s camp are
particularly endangered with a kingside-castled king. There is often a knight on these
squares which tends to be a key defender of the kingside. Therefore, sacrifices to
eliminate this defending piece are looming.
Example:
White concentrated his pieces on the kingside before the attack. Before he launched a
massive attack, he made all necessary preparations. The more pieces there are in the
attack, the higher the chances of success. Here, White eliminated one of the last
defenders of Black’s kingside with the exchange sacrifice 1.Rxf6! gxf6 2.Bxh6 and there
was no defense for Black against the mating attack.
2. Sometimes, you can also sacrifice a piece on f3 or f6 when this square is empty. The
idea can be to destroy the opponent’s pawn structure in front of the king to close any
escape routes for the enemy’s king.
Example:
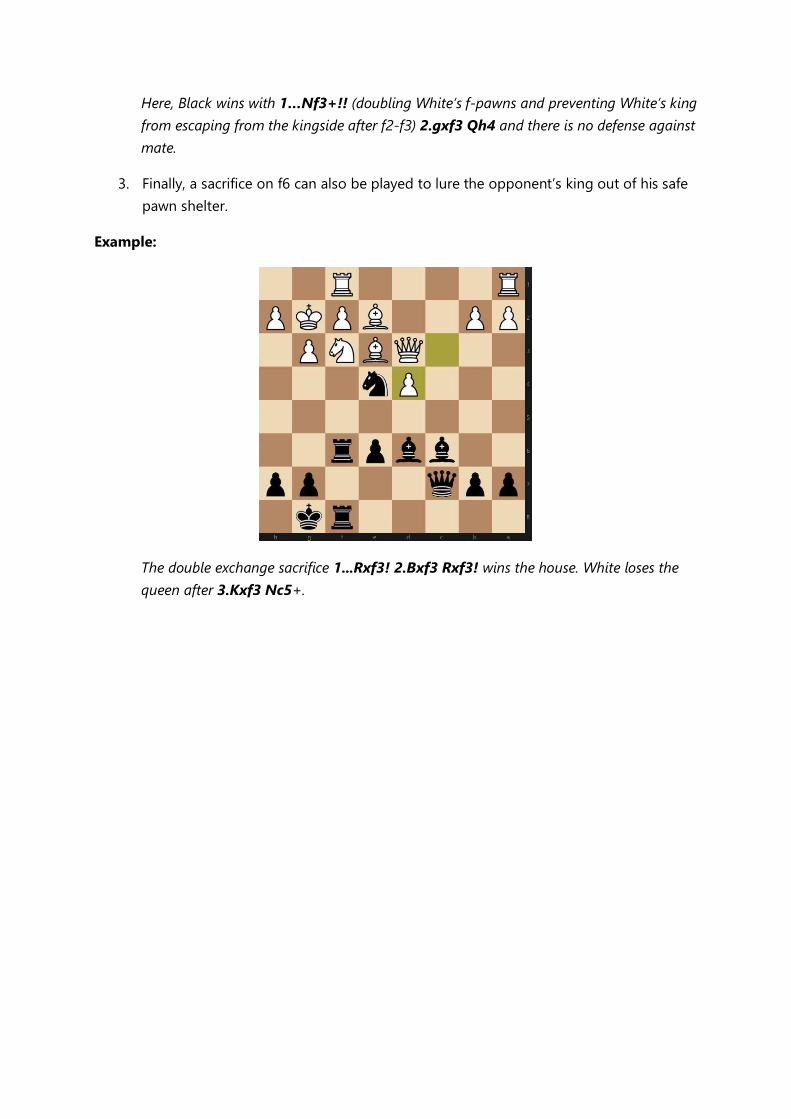
Here, Black wins with 1…Nf3+!! (doubling White’s f-pawns and preventing White’s king
from escaping from the kingside after f2-f3) 2.gxf3 Qh4 and there is no defense against
mate.
3. Finally, a sacrifice on f6 can also be played to lure the opponent’s king out of his safe
pawn shelter.
Example:
The double exchange sacrifice 1...Rxf3! 2.Bxf3 Rxf3! wins the house. White loses the
queen after 3.Kxf3 Nc5+.

Chapter 3: The Sacrifice on g6/g3
1. The sacrifice on g6 or g3 is a typical attacking idea when the opponent has
fianchettoed his kingside bishop and placed a pawn on these squares.
Example:
White fianchettoed his bishop on the kingside, but his king looks a bit vulnerable. Black
makes use of this with the killer move 1…Nxg3+! 2.hxg3 Qh6+ and Black mates
White.
2. When attacking on the kingside, it is still key to realize the whole board: Don’t
miss ideas because you are too focused on one side of the board. Sometimes, the
action takes place on the queenside, even if the focus lies on the kingside.
Example:
In the position at hand, kingside play and queenside play need to be combined to find
the right combination. White can sacrifice his knight on g6 as the bishop on b7 is
unprotected. 1.Nxg6 fxg6. White managed to open the d5-g8 diagonal. 2.Bxd5+!
Bxd5 3.Qxd5+ and the rook on a8 gets lost.
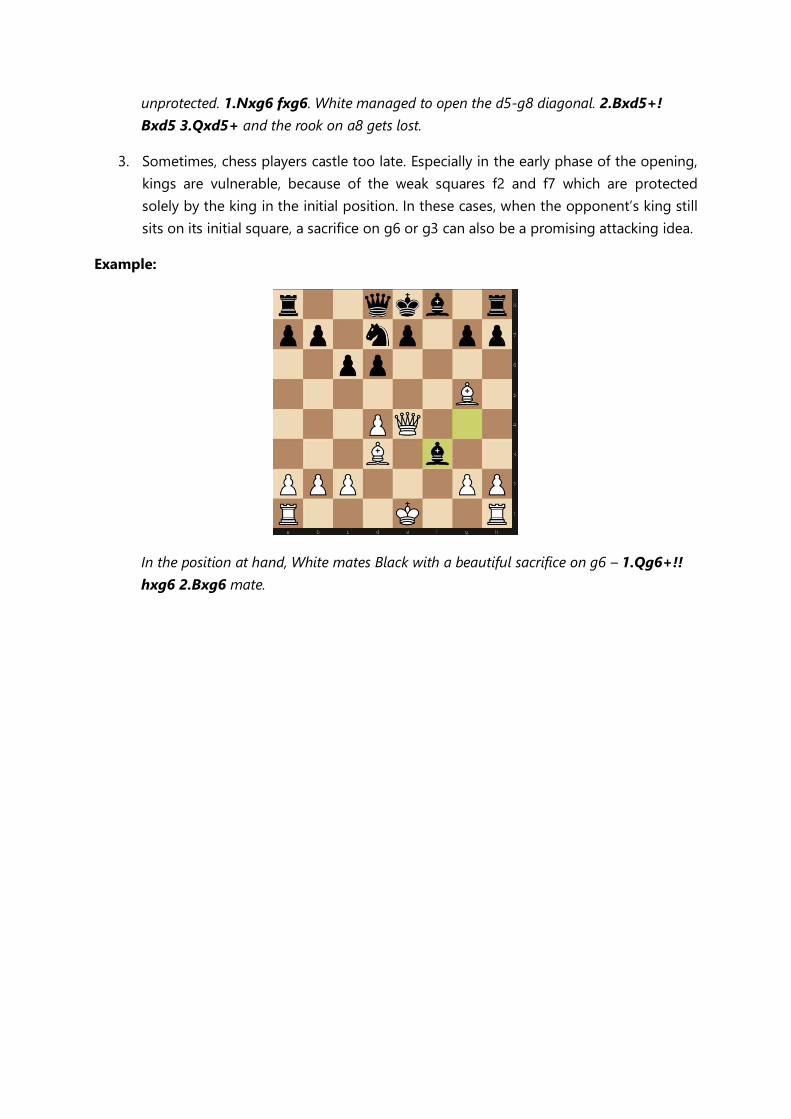
3. Sometimes, chess players castle too late. Especially in the early phase of the opening,
kings are vulnerable, because of the weak squares f2 and f7 which are protected
solely by the king in the initial position. In these cases, when the opponent’s king still
sits on its initial square, a sacrifice on g6 or g3 can also be a promising attacking idea.
Example:
In the position at hand, White mates Black with a beautiful sacrifice on g6 – 1.Qg6+!!
hxg6 2.Bxg6 mate.
Chapter 4: The Sacrifice on h6/h3
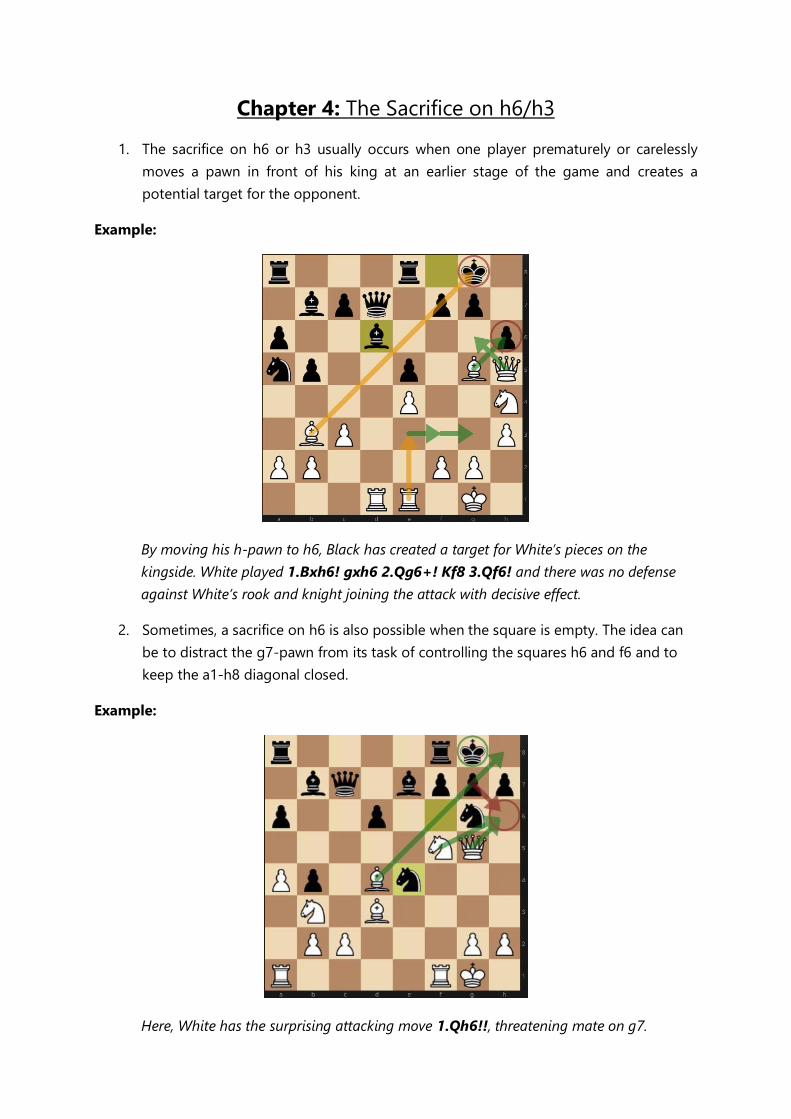
1. The sacrifice on h6 or h3 usually occurs when one player prematurely or carelessly
moves a pawn in front of his king at an earlier stage of the game and creates a
potential target for the opponent.
Example:
By moving his h-pawn to h6, Black has created a target for White’s pieces on the
kingside. White played 1.Bxh6! gxh6 2.Qg6+! Kf8 3.Qf6! and there was no defense
against White’s rook and knight joining the attack with decisive effect.
2. Sometimes, a sacrifice on h6 is also possible when the square is empty. The idea can
be to distract the g7-pawn from its task of controlling the squares h6 and f6 and to
keep the a1-h8 diagonal closed.
Example:
Here, White has the surprising attacking move 1.Qh6!!, threatening mate on g7.
However, capturing the queen doesn’t solve Black’s problems. 1…gxh6 runs into
2.Nxh6 mate.
3. The sacrifices on h6 or h3 do not only work in the opening and the middlegame, but
also in the endgame. It is key to stay attentive and watch out for attacking ideas even
in the endgame with reduced material.
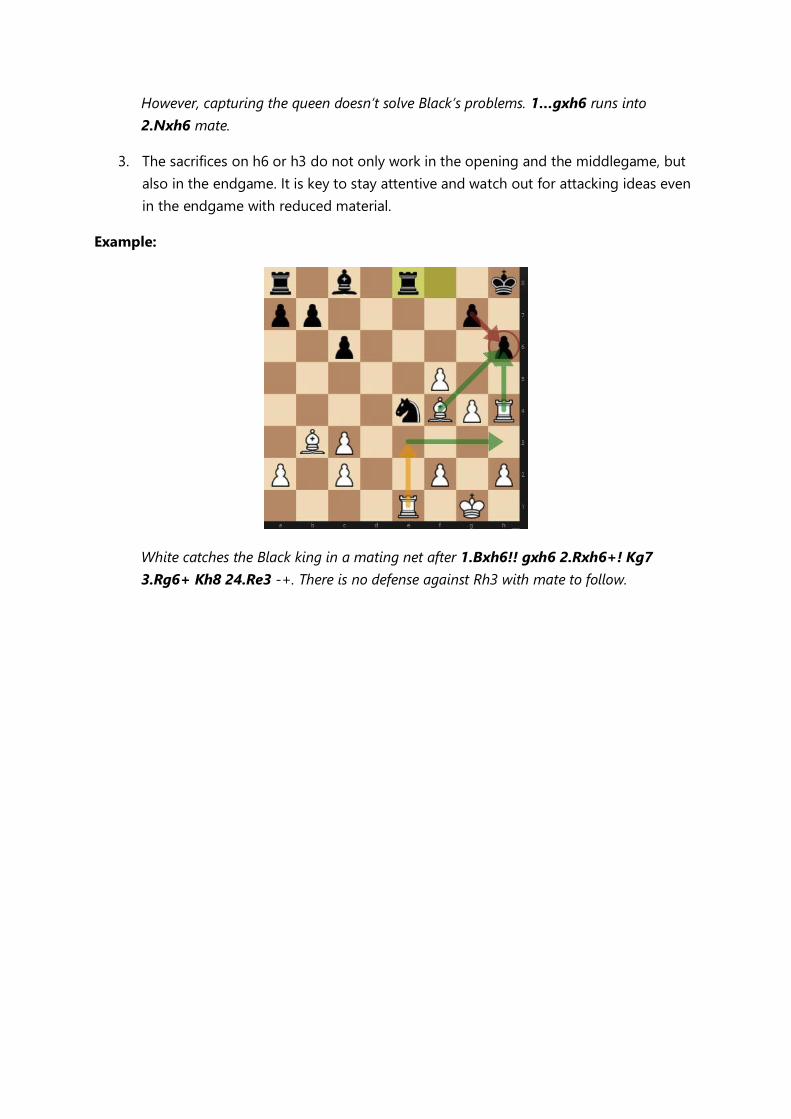
Example:
White catches the Black king in a mating net after 1.Bxh6!! gxh6 2.Rxh6+! Kg7
3.Rg6+ Kh8 24.Re3 -+. There is no defense against Rh3 with mate to follow.
Chapter 5: Brilliant Queen Sacrifices
1. There is a famous quote by Anatoly Karpov, “Chess is everything: art, science and
sport.” Although this statement is undoubtedly true, it is important to know that these
three characteristics of the game are not equally important in different situations.
When you’re at home, searching for an opening novelty with a strong chess engine,
your database and the latest chess books and chess DVDs, you are more like a
scientist than a sportsman. When you are sitting at the board for 5 hours or longer,
playing a tense fighting game, you are – above all – a sportsman.
Finally, when you solve a beautiful chess puzzle or spot a brilliant combination, you
might feel like an artist.
Nowadays, in a time where strong computers can show us the best continuation in
any given position, we should not forget that chess is a game played between
humans. There are many breathtaking combinations which have been played over the
board, underlining that chess is art. Although modern engines rain on the parade and
show that there may have been better ways to defend or attack, we should not
underestimate the value of fascinating games from the past and present with
aesthetically pleasing moves and combinations.
Sometimes, you just need to enjoy the games that display the beauty of chess.
Analyzing such games and motifs helps you to become more creative in your own
games. You learn some unusual and unique ideas and discover the rich possibilities
and hidden resources for both sides in complex positions. In this chapter, Mato Jelic
presents plenty of beautiful queen sacrifices.
2. Until the middle of the 20th century, there were tendencies towards romantic chess
play, when players relied on tactics and extremely dynamic play. This period is known
as “the romantic era of chess”. Many fantastic queen sacrifices occurred during this
period.
Example:
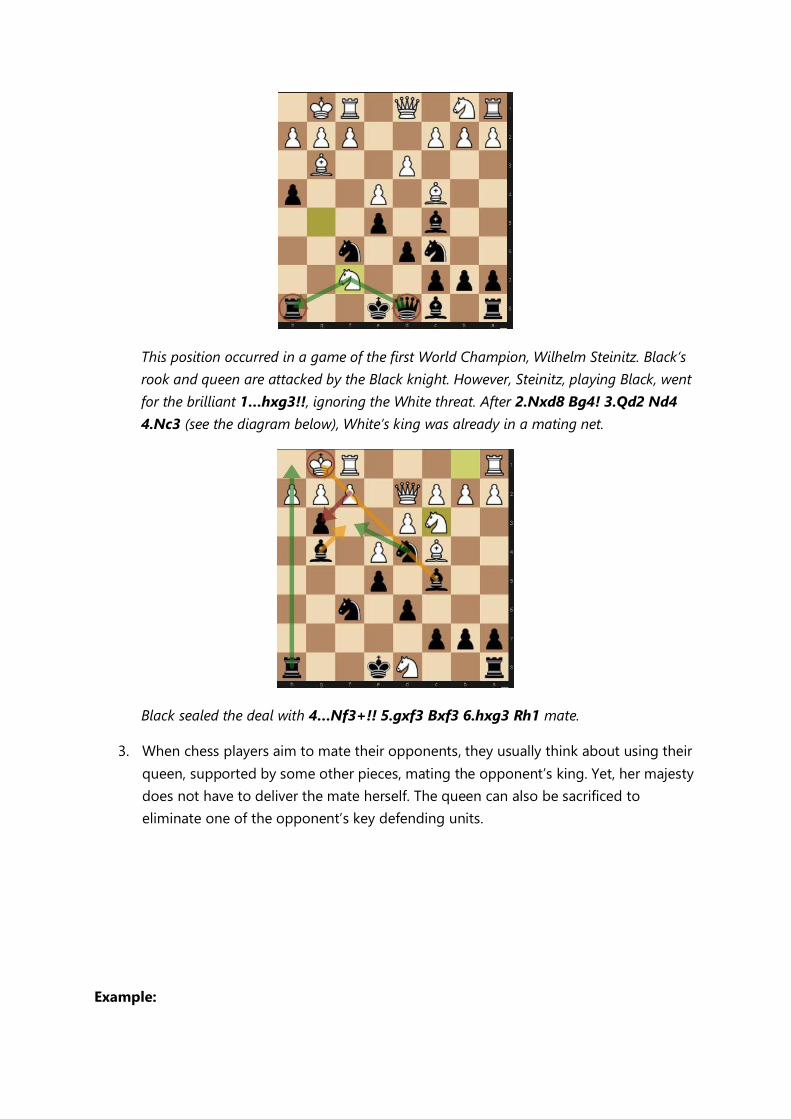
This position occurred in a game of the first World Champion, Wilhelm Steinitz. Black’s
rook and queen are attacked by the Black knight. However, Steinitz, playing Black, went
for the brilliant 1…hxg3!!, ignoring the White threat. After 2.Nxd8 Bg4! 3.Qd2 Nd4
4.Nc3 (see the diagram below), White’s king was already in a mating net.
Black sealed the deal with 4…Nf3+!! 5.gxf3 Bxf3 6.hxg3 Rh1 mate.
3. When chess players aim to mate their opponents, they usually think about using their
queen, supported by some other pieces, mating the opponent’s king. Yet, her majesty
does not have to deliver the mate herself. The queen can also be sacrificed to
eliminate one of the opponent’s key defending units.
Example:
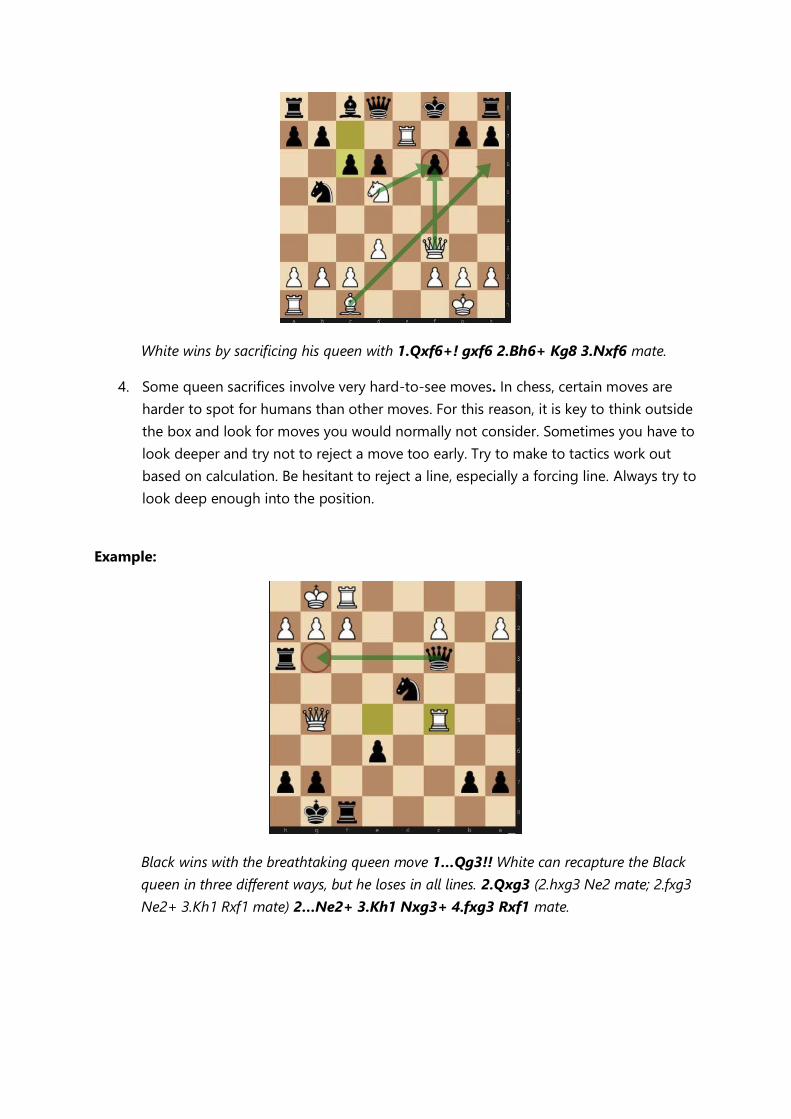
White wins by sacrificing his queen with 1.Qxf6+! gxf6 2.Bh6+ Kg8 3.Nxf6 mate.
4. Some queen sacrifices involve very hard-to-see moves. In chess, certain moves are
harder to spot for humans than other moves. For this reason, it is key to think outside
the box and look for moves you would normally not consider. Sometimes you have to
look deeper and try not to reject a move too early. Try to make to tactics work out
based on calculation. Be hesitant to reject a line, especially a forcing line. Always try to
look deep enough into the position.
Example:
Black wins with the breathtaking queen move 1…Qg3!! White can recapture the Black
queen in three different ways, but he loses in all lines. 2.Qxg3 (2.hxg3 Ne2 mate; 2.fxg3
Ne2+ 3.Kh1 Rxf1 mate) 2…Ne2+ 3.Kh1 Nxg3+ 4.fxg3 Rxf1 mate.


![Deriving Concepts and Strategies from Chess Tablebases · PDF fileand knight versus the lone king endgame. 1 Introduction Chess tablebases ... study specialist John Roycroft [3] and](https://img.pdfslide.us/doc/110x75/5a86caf47f8b9a001c8d502f/deriving-concepts-and-strategies-from-chess-tablebases-knight-versus-the-lone-king.jpg)