Embed Size (px)
Citation preview

1
The Installation Guide.

Table of ContentsEquipment........................................... . . . ... . . . ..................3
TVInstallation.................................................................. . . . . .4
How to activate your service............................ . . . . . . ............... . .5
Helpful hints...................................................... . . . . ...........7
Internet/PhoneInstallation................................................................ . . .....8
How to activate all three services or internet and phone services only.. ...10
Helpful Hints............................................................ . . ......11
General Terms & Conditions of Service........... . . . . . . . . . .12

2 3
This Optimum Installation Guide provides all the information you need to install your Optimum services. Fast and easy.
Moving?
Follow the instructions below to safely pack and move your equipment. If you’re not moving, go to page 3.
Cable Boxes/Modems:
1 a. If you have a Scientific Atlanta digital cable box. Locate the serial number found on the back of the digital cable box starting with the letters SAB and write it on an envelope. Remove the SmartCard currently inserted in the front of your digital cable box, place it in the envelope and tape it to the corresponding Scientific Atlanta digital cable box. b. If you have a Samsung digital cable box, go to Step 2.
2 Disconnect all cables, bundle up each set of cables and pack with the corresponding digital cable box(es) or modem.
If equipment is lost or damaged, unreturned equipment charges will apply.
All the answers you need, all in one place.
Visit optimum.net/getstarted for information on how your services work, troubleshooting tips, creating your Optimum ID and more.
We’re here to help 24/7:
optimum.net: Your first stop for all things Optimum. Find answers, TV listings, hotspots, FAQs and more.
optimum.net/chat: Instantly chat online with Optimum experts who can answer your account questions or help resolve your service issues via our instant messenger.
optimum.net/emailus: Send us your questions from anywhere for personalized help from an Optimum expert.
facebook.com/Optimum: Like our page to join an existing conversation or start your own.
@OptimumHelp: Tweet your questions in 140 characters or less. We’re #HereToHelp.
youtube.com/OptimumBrandVideos: Check out our playlist of tutorials.
When you are ready to install your equipment:
Have your digital cable box(es) and modem ready by making sure you’ve got all the parts:
TV
Internet/Phone
Remote Control
(Samsung) Digital Cable Box
Coaxial Cable for SD Installation only
SmartCard SA model only
(SA) Digital Cable Box
OrPower Cord
Power CordModem Ethernet Cable (RJ-45) Telephone Cord(s)
(RJ-11)
HDMI cable
(for HD Installation)(You may use component cables
(red, blue and green) and audio cables (red and white) instead).
4 5
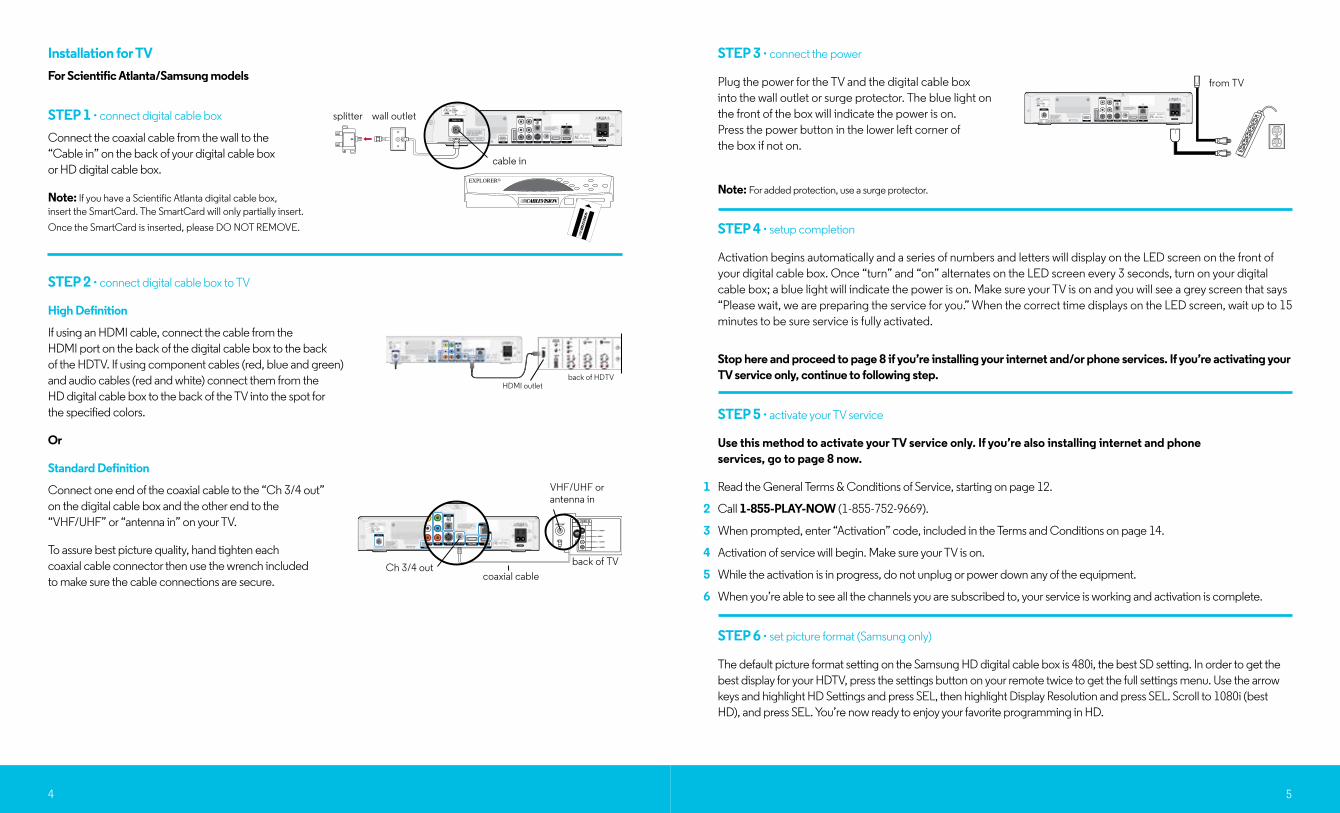
Installation for TVFor Scientific Atlanta/Samsung models
STEP 1 • connect digital cable box
Connect the coaxial cable from the wall to the “Cable in” on the back of your digital cable box or HD digital cable box.
Note: If you have a Scientific Atlanta digital cable box, insert the SmartCard. The SmartCard will only partially insert. Once the SmartCard is inserted, please DO NOT REMOVE.
STEP 2 • connect digital cable box to TV
High Definition
If using an HDMI cable, connect the cable from the HDMI port on the back of the digital cable box to the back of the HDTV. If using component cables (red, blue and green) and audio cables (red and white) connect them from the HD digital cable box to the back of the TV into the spot for the specified colors.
Or
Standard Definition
Connect one end of the coaxial cable to the “Ch 3/4 out” on the digital cable box and the other end to the “VHF/UHF” or “antenna in” on your TV.
To assure best picture quality, hand tighten each coaxial cable connector then use the wrench included to make sure the cable connections are secure.
STEP 3 • connect the power
Plug the power for the TV and the digital cable box into the wall outlet or surge protector. The blue light on the front of the box will indicate the power is on. Press the power button in the lower left corner of the box if not on.
Note: For added protection, use a surge protector.
STEP 4 • setup completion
Activation begins automatically and a series of numbers and letters will display on the LED screen on the front of your digital cable box. Once “turn” and “on” alternates on the LED screen every 3 seconds, turn on your digital cable box; a blue light will indicate the power is on. Make sure your TV is on and you will see a grey screen that says “Please wait, we are preparing the service for you.” When the correct time displays on the LED screen, wait up to 15 minutes to be sure service is fully activated.
Stop here and proceed to page 8 if you’re installing your internet and/or phone services. If you’re activating your TV service only, continue to following step.
STEP 5 • activate your TV service
Use this method to activate your TV service only. If you’re also installing internet and phone services, go to page 8 now.
1 Read the General Terms & Conditions of Service, starting on page 12.
2 Call 1-855-PLAY-NOW (1-855-752-9669).
3 When prompted, enter “Activation” code, included in the Terms and Conditions on page 14.
4 Activation of service will begin. Make sure your TV is on.
5 While the activation is in progress, do not unplug or power down any of the equipment.
6 When you’re able to see all the channels you are subscribed to, your service is working and activation is complete.
STEP 6 • set picture format (Samsung only)
The default picture format setting on the Samsung HD digital cable box is 480i, the best SD setting. In order to get the best display for your HDTV, press the settings button on your remote twice to get the full settings menu. Use the arrow keys and highlight HD Settings and press SEL, then highlight Display Resolution and press SEL. Scroll to 1080i (best HD), and press SEL. You’re now ready to enjoy your favorite programming in HD.
IN
back of HDTVHDMI outlet
VHF/UHF
S VIDEO
VIDEO
L AUDIO
R AUDIO
VIDEO IN1 3VHF/UHF
S VIDEO
VIDEO
L AUDIO
R AUDIO
VIDEO IN1 3
VHF/UHF
S VIDEO
VIDEO
L AUDIO
R AUDIO
VIDEO IN1 3
back of TV
VHF/UHF or antenna in
coaxial cableCh 3/4 out
LISTED 14H1CABLE EQUIP.
from TV
splitter wall outlet
cable in
6 7
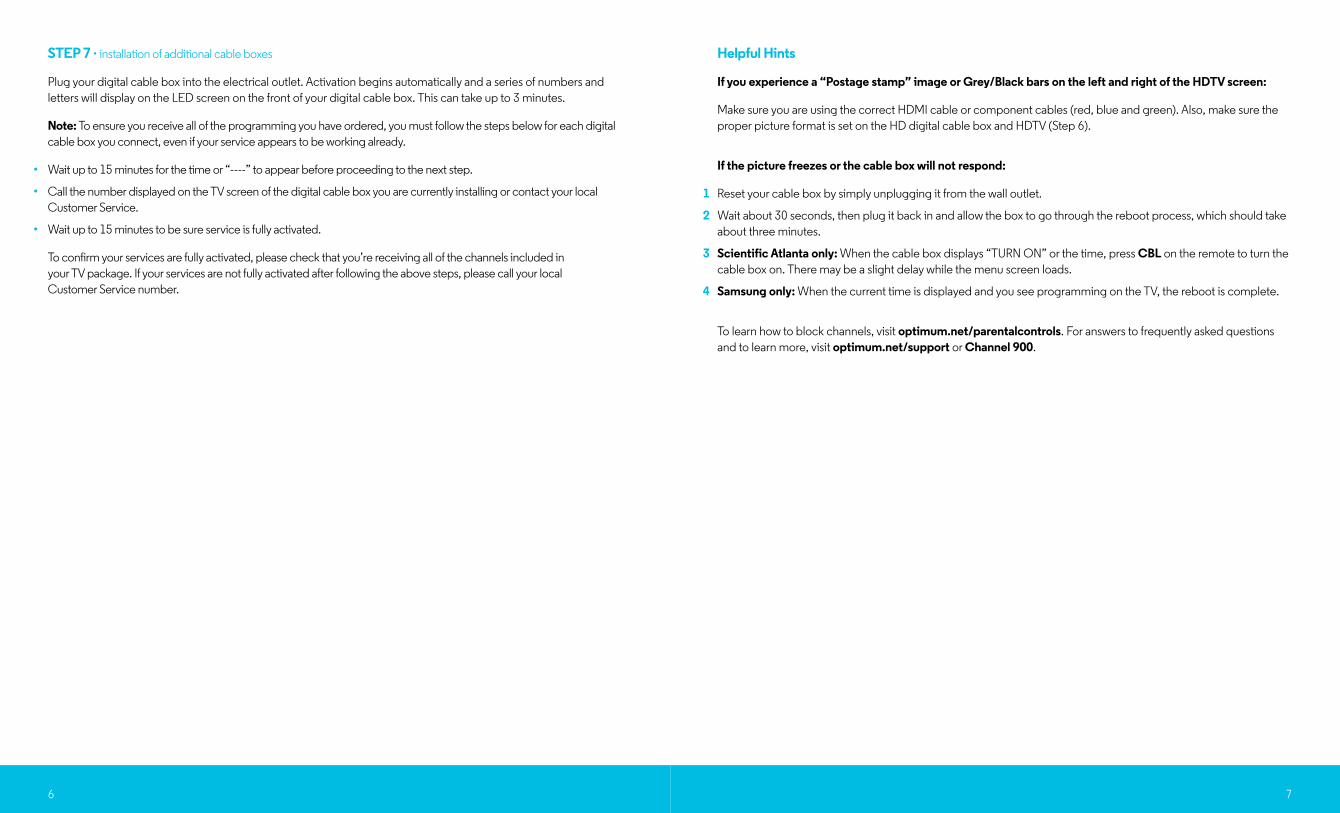
STEP 7 • installation of additional cable boxes
Plug your digital cable box into the electrical outlet. Activation begins automatically and a series of numbers and letters will display on the LED screen on the front of your digital cable box. This can take up to 3 minutes.
Note: To ensure you receive all of the programming you have ordered, you must follow the steps below for each digital cable box you connect, even if your service appears to be working already.
• Wait up to 15 minutes for the time or “----” to appear before proceeding to the next step.
• Call the number displayed on the TV screen of the digital cable box you are currently installing or contact your local Customer Service.
• Wait up to 15 minutes to be sure service is fully activated.
To confirm your services are fully activated, please check that you’re receiving all of the channels included in your TV package. If your services are not fully activated after following the above steps, please call your local Customer Service number.
Helpful Hints
If you experience a “Postage stamp” image or Grey/Black bars on the left and right of the HDTV screen:
Make sure you are using the correct HDMI cable or component cables (red, blue and green). Also, make sure the proper picture format is set on the HD digital cable box and HDTV (Step 6).
If the picture freezes or the cable box will not respond:
1 Reset your cable box by simply unplugging it from the wall outlet.
2 Wait about 30 seconds, then plug it back in and allow the box to go through the reboot process, which should take about three minutes.
3 Scientific Atlanta only: When the cable box displays “TURN ON” or the time, press CBL on the remote to turn the cable box on. There may be a slight delay while the menu screen loads.
4 Samsung only: When the current time is displayed and you see programming on the TV, the reboot is complete.
To learn how to block channels, visit optimum.net/parentalcontrols. For answers to frequently asked questions and to learn more, visit optimum.net/support or Channel 900.
8 9
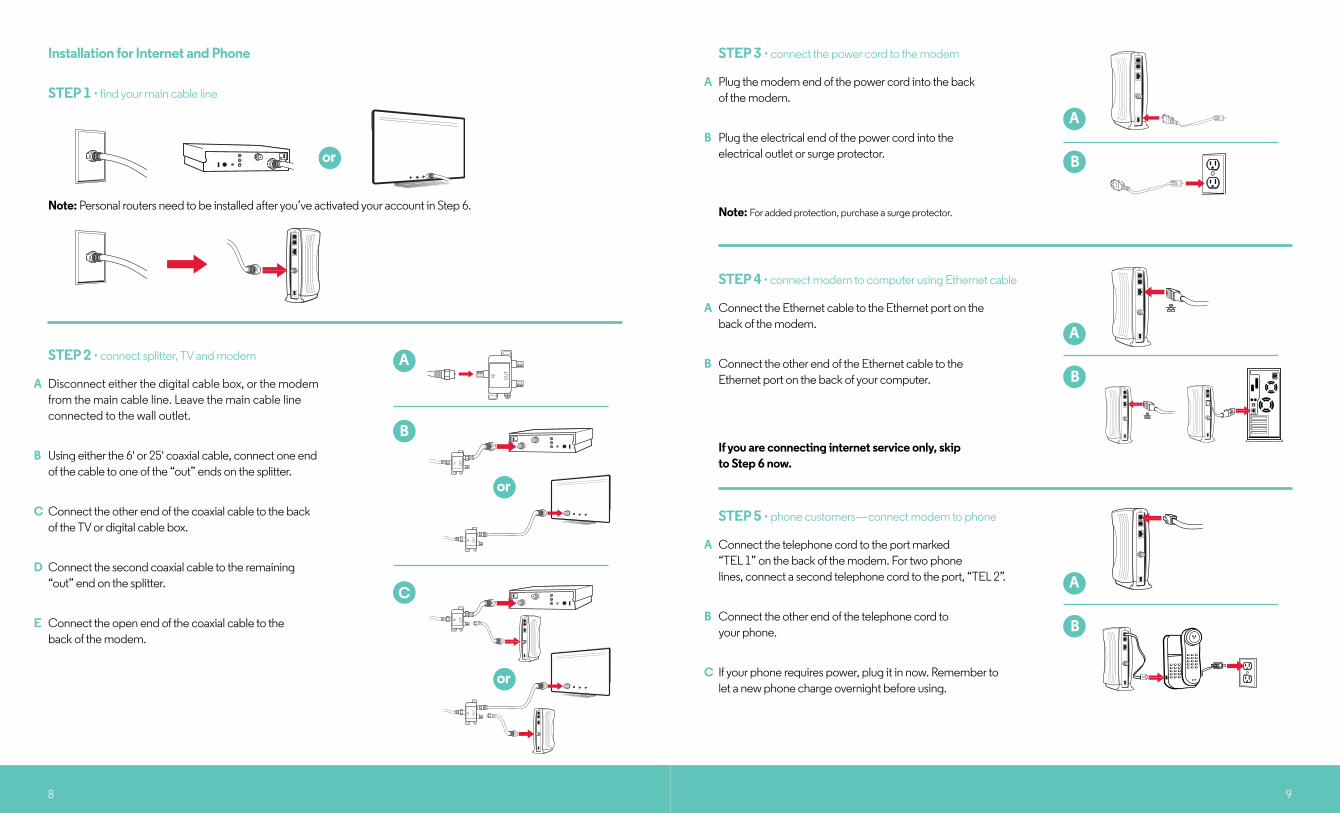
Installation for Internet and Phone
STEP 1 • find your main cable line
Note: Personal routers need to be installed after you’ve activated your account in Step 6.
STEP 2 • connect splitter, TV and modem
A Disconnect either the digital cable box, or the modem from the main cable line. Leave the main cable line connected to the wall outlet.
B Using either the 6' or 25' coaxial cable, connect one end of the cable to one of the “out” ends on the splitter.
C Connect the other end of the coaxial cable to the back of the TV or digital cable box.
D Connect the second coaxial cable to the remaining “out” end on the splitter.
E Connect the open end of the coaxial cable to the back of the modem.
STEP 3 • connect the power cord to the modem
A Plug the modem end of the power cord into the back of the modem.
B Plug the electrical end of the power cord into the electrical outlet or surge protector.
Note: For added protection, purchase a surge protector.
STEP 4 • connect modem to computer using Ethernet cable
A Connect the Ethernet cable to the Ethernet port on the back of the modem.
B Connect the other end of the Ethernet cable to the Ethernet port on the back of your computer.
If you are connecting internet service only, skip to Step 6 now.
STEP 5 • phone customers—connect modem to phone
A Connect the telephone cord to the port marked “TEL 1” on the back of the modem. For two phone lines, connect a second telephone cord to the port, “TEL 2”.
B Connect the other end of the telephone cord to your phone.
C If your phone requires power, plug it in now. Remember to let a new phone charge overnight before using.
OR
OR
OR
OR
OR
OR OR
IN
OR
OR
OUT
IN
OUT
IN
OUT
IN
OUT
IN
OUT
IN
OR
OR
OUT
IN
OUT
IN
OUT
IN
OUT
IN
OUT
IN
OR
OR
OUT
IN
OUT
IN
OUT
IN
OUT
IN
OUT
IN
OR
OR
OUT
IN
OUT
IN
OUT
IN
OUT
IN
OUT
IN
OR
OR
OUT
IN
OUT
IN
OUT
IN
OUT
IN
OUT
IN
OR
OR
OUT
IN
OUT
IN
OUT
IN
OUT
IN
OUT
or
or
or
A
A
A
A
B
B
B
B
C
IN
OR
OR
OUT
IN
OUT
IN
OUT
IN
OUT
IN
OUT
OR
IN
OR
OR
OUT
IN
OUT
IN
OUT
IN
OUT
IN
OUT

10 11
STEP 6 • activation
How to activate all three services or internet and phone services only.
1 Start your computer and click on a web browser (e.g., Internet Explorer). Follow the on-screen instructions to complete the installation process. You will need your 13-digit account number located on your work order, bill or Optimum Store receipt.
Note: If you open your web browser and do not see the on-screen instructions, type in “play.optimum.net” to launch the installation steps.
a If installing internet service for the first time, you will need to create an Optimum ID, a unique username that will allow you to access great features and benefits. Create yours at optimum.net/ID.
Note: If you have moved and wish to keep your existing Optimum Online email address(es), visit optimum.net/chat to live chat with an Optimum expert who can help transfer your ID.
b If installing phone service for the first time, you will need to register, set up and manage your calling features at voice.optimum.net.
Helpful Hints
No internet connection
1 Check your connections. Check and tighten the cable connection from the wall and the back of the cable modem. Also, check any Ethernet or USB cables connected to your computer, router (if you have one) and cable modem.
2 Reset your modem/home network.
a Unplug the power cord from your modem (and router if using one).
b Plug the modem back in and wait until it has fully restarted. This can take up to a few minutes.
c Plug the router back in and wait 30 seconds.
d Check your internet connection by opening a new web browser window.
e If you still have no internet connection, reboot your computer and then repeat Step 4.
No dial tone
1 Check that the telephone line is properly connected to TEL1/TEL2 of the modem.
2 Check that your telephone device is working properly. Connect another telephone that you have confirmed is working to the modem.
Static/hum on line
Move the telephone, or the base station if you are using a cordless telephone, along with the telephone cord as far away from your computer and monitor as possible.
More questions? We’re here to help 24/7:
optimum.net/support: Your go-to customer service directory. Find answers to FAQs, helpful tutorials and all the ways to contact us for help.
optimum.net/chat: Instantly chat online with Optimum experts who can answer your account questions or help resolve your service issues via our instant messenger.
optimum.net/emailus: Send us your questions from anywhere for personalized help from an Optimum expert.
facebook.com/Optimum: Like our page to join an existing conversation or start your own.
@OptimumHelp: Tweet your questions in 140 characters or less. We’re #HereToHelp.
youtube.com/OptimumBrandVideos: Check out our playlist of tutorials.

12 13
General Terms and Conditions of Service: In addition to these General Terms and Conditions of Service, Subscriber agrees to be bound by the Terms of Service for the applicable Optimum service as set forth at www.optimum.net, such as Optimum TV, Optimum Online and Optimum Voice, as such may be updated from time to time (collectively, the “Terms of Service”), which are incorporated herein by this reference. In the event of any conflict between these Terms and Conditions below and the Terms of Service, the Terms of Service shall control.
1 Payment of charges: Subscriber will be billed monthly in advance for Services to be received, plus pro rata charges, if any, for periods not previously billed. Subscriber will be billed monthly for Pay Per View, On Demand or other Services ordered where charges are based on actual usage or on orders placed during the previous month. Subscriber agrees to pay all undisputed monthly charges and all applicable fees and taxes as itemized on the Cablevision monthly bill and notify Cablevision of disputed items within thirty (30) days of receipt, or longer as provided by applicable law. Failure to pay charges billed (including checks returned for insufficient funds) may result in discontinuance of Service, the removal of all Cablevision Equipment (as defined below) and/or imposition of a late payment or service charge. If the Subscriber has more than one account (Business and/or Residential) served by Cablevision, all Cablevision provided Services at all locations may be subject to discontinuance of Service in the event any one account remains unpaid. In the event collection activities are required, an additional collection charge may be imposed.
2 Cablevision property: All equipment, including, but not limited to, any cables, wires, amplifiers, cable boxes, access cards, remotes, cable cards, battery backup units, modems, and routers distributed to and/or installed for use in the Subscriber’s service location(s) by or on behalf of Cablevision (“Equipment”) remains the property of Cablevision. None of the Equipment shall become a fixture. Cablevision property is intended to service and reside at the specific service location and is not to be used off premises without Cablevision authorization. Subscriber must return all Equipment upon substitution of use or termination of Service. Failure to do so will result in a charge to be determined in accordance with Cablevision’s then current schedule of charges for non-returned Equipment, which amount shall be due immediately. Subscriber agrees to pay such charge whether the Equipment is lost (through theft or otherwise), damaged or destroyed.
3 Disruption of service: In no event shall Cablevision be liable for any failure or interruption of Service, including, without limitation, those failures and interruptions resulting in part or entirely from circumstances beyond Cablevision’s reasonable control. Subject to applicable law, credit with respect to Subscriber’s recurring monthly subscription fee shall be given for qualifying outages of Cablevision Services.
4 Repair of cablevision equipment: Cablevision will repair and/or replace defective Equipment, if any, as long as such damage was not caused by misuse or other improper operations or handling by Subscriber. Cablevision is not responsible for the maintenance or repair of Subscriber-provided equipment, including, but not limited to, television sets, or other video equipment, computers, modems, or any other related Subscriber-provided equipment. Cablevision makes no warranties, with respect to Equipment or Service provided by Cablevision or with respect to the Equipment’s compatibility with any Subscriber provided equipment.
5 Subscriber property: Cablevision assumes no responsibility and shall have no responsibility for the condition or repair of any Subscriber-provided equipment and/or software. Subscriber is responsible for the repair and maintenance of Subscriber-provided equipment and/or software. Cablevision is not responsible or liable for any loss or impairment of Cablevision’s Service due in whole or in part to a malfunction, defect or otherwise caused by Subscriber-provided equipment and/or software.
6 Taxes: Subscriber agrees to pay any local, state or federal taxes imposed or levied on or with respect to the Services, the Equipment or installation or service charges incurred with respect to the same.
7 Care of Cablevision property: Subscriber agrees that neither Subscriber nor any other person (except Cablevision’s authorized personnel) will open, tamper with, service, make any alterations to, or remove any Equipment from the service address of initial installation. Any alteration, tampering, removal, etc., or the use of equipment which permits the receipt of Services without authorization, or the receipt of Services to an unauthorized number of outlets, or to unauthorized locations, constitutes theft of service and is prohibited.
8 Access to subscriber premises: Subscriber authorizes Cablevision and its employees, agents, contractors and representatives to access and otherwise enter the Subscriber’s premises to install, inspect, maintain and/or repair the Equipment and, upon the termination of Service, to remove the same from the premises. Cablevision’s failure to remove its Equipment shall not be deemed an abandonment thereof.
9 Assignment or transfer: This Agreement and the Services and/or Equipment supplied by Cablevision are not assignable or otherwise transferable by Subscriber, without specific written authorization from Cablevision.
10 Termination of service: Unless otherwise terminated in accordance with the terms hereof or the Terms of Service, this agreement shall automatically renew on a month-to-month basis. Subscriber acknowledges that upon such renewal, all pricing is subject to change.
11 Breach of agreement: In the event of any breach of this agreement (including the Terms of Service) by Subscriber, the failure of Subscriber to abide by the rates, rules and regulations of Cablevision, the failure of Subscriber to provide and maintain accurate registration information, or any illegal activity by the Subscriber using the Service, this agreement may be, at Cablevision’s option, terminated and Cablevision’s Equipment removed. Subscriber shall pay reasonable collection and/or attorney’s fees to Cablevision in the event that Cablevision shall find it necessary to enforce collection or to preserve and protect its rights under this agreement.
12 Security deposit: Any security deposit given by Subscriber for the Equipment or Cablevision’s Service will be due and payable upon the first monthly billing cycle. Such security deposits will be returned to Subscriber within sixty (60) days of termination of Cablevision’s Service so long as payment has been made for all amounts due on Subscriber’s account and Subscriber has returned the Cablevision Equipment undamaged.
13 Content and services: All content, program services, program packages, number of channels, channel allocations, broadcast channels, interactive services, e-mail, data offerings and other services are subject to change in accordance with applicable law.
14 Rates: All rates are subject to change in accordance with applicable law.
15 Late fee: If your account is 30 days past due, a reminder message will be included on your monthly bill. If your past due balance remains unpaid, you may be charged an applicable late fee in addition to your past due balance at Cablevision’s then current rate. If your account remains unpaid, your Services may be disconnected. You can avoid incurring late fees by paying your monthly bill promptly.
16 Disclaimer: Cablevision assumes no liability for any program, services, content or information distributed on or through the Services, and Cablevision expressly disclaims any responsibility or liability for your use thereof. Further, Cablevision shall not be responsible for any products, merchandise or prizes promoted or purchased through the use of the Services.
17 Entire agreement: These Terms and Conditions (including the Terms of Service) constitute the entire agreement between the Subscriber and Cablevision. No undertaking, representation or warranty made by an agent or representative of Cablevision in connection with the sale, installation, maintenance or removal of Cablevision’s Services or Equipment shall be binding on Cablevision except as expressly included herein.
14
Security and medical alert system limitations:
Although we will provide a wire connection so that phone services are available for use with your existing security system, it is your responsibility to follow-up with your alarm company to confirm that they have your correct and current phone number, and to perform any periodic operational tests that your central station-monitoring provider might recommend. You further understand that in the event of an outage, your phone service will not be available to contact your central station-monitoring provider.
Cablevision does not support the use of any phone service as a connection for (i) emergency medical alert systems, (ii) all high security monitoring systems (UL 681 or similar) or (iii) fire alarm systems (UL 864 or similar). If you have any such systems, you must maintain an alternative connection.
Optimum Voice customers
E-911 notification: In the event of a power outage, and provided you do not have a battery backup on your modem, you will not have E-911 service. If your service is disconnected or interrupted, you will not have E-911 service. If you relocate the modem to a different address, you must notify Cablevision in advance to update E-911 service. During the initial 72 hours of service at your new address, you may be required to provide the E-911 operator with your new service address.
Security and medical alert system limitations: You acknowledge that Cablevision does not support the use of any phone service as a connection for (i) emergency medical alert systems, (ii) all high security monitoring systems (UL 681 or similar) or (iii) fire alarm systems (UL 864 or similar). You acknowledge that it is your sole responsibility to contact your central station-monitoring provider to test and verify that your security system is in good working order and that you are responsible for any additional work required to ensure the proper operation of your security system.
Customer acceptance
You will be required to accept all General Terms and Conditions, including E911 notification and security and medical alert system limitations, stated above prior to activation of your services.
IVR activation code: 1114