Embed Size (px)
Citation preview
Table of Contents
What is a marking menu? ..................................................................................................................................... 5!
What is the marking menu puck ...................................................................................................................................................... 5!
What is a gesture? ................................................................................................................................................... 6!
What are menu gestures? ..................................................................................................................................................................... 7!
Specs ............................................................................................................................................................................. 7!
Using the Color Editor .......................................................................................................................................... 8!
Create a swatch ............................................................................................................................................................................................. 9!
Capture a color ............................................................................................................................................................................................... 9!
Random Color Controls .......................................................................................................................................................................... 9!
Copic Color Library ................................................................................................................................................................................... 10!
Using the Brush Editor ......................................................................................................................................... 11!
What is simulated pressure sensitivity? ....................................................................................................... 12!
How does Fill work? .............................................................................................................................................. 12!
Toolbar ......................................................................................................................................................................... 13!
1! Gallery .......................................................................................................................................................................................................... 13!
iCloud Gallery thumbnail icons .............................................................................................................................................. 14!
Opening a sketch ................................................................................................................................................................................ 14!
2! New ............................................................................................................................................................................................................... 15!
3! Line and Shape tools ....................................................................................................................................................................... 15!
4! Symmetry ................................................................................................................................................................................................. 15!
5! Text ................................................................................................................................................................................................................ 16!
6! Layer Transform ................................................................................................................................................................................. 16!
7! Preferences ............................................................................................................................................................................................. 17!
Offsetting the cursor ............................................................................................................................................................................... 17!
Disabling gestures ...................................................................................................................................................................................... 18!
Rotating an imported image ............................................................................................................................................................. 18!
Resetting defaults ....................................................................................................................................................................................... 18!
Changing your save location ............................................................................................................................................................ 18!
SketchBook® Mobile communities ............................................................................................................. 18!
Using layers .............................................................................................................................................................. 19!

Working with layers .................................................................................................................................................................................. 19!
Working with layers .................................................................................................................................................................................. 19!
Cut, copy, paste with layers .............................................................................................................................................................. 20!
Saving ........................................................................................................................................................................... 21!
Saving variations .................................................................................................................................................................................. 21!
Saving to iCloud and iPhone ..................................................................................................................................................... 21!
Duo Sketch ................................................................................................................................................................ 21!
What you can do ......................................................................................................................................................................................... 21!
Best Practices .......................................................................................................................................................... 22!

What’s New
We've added the following features and made the following improvements to Autodesk SketchBook® Mobile 2.7.5:
o Duo Sketch – connect to someone, draw together on one canvas, and exchange messages
o Copic markers – obtain the appearance of a natural marker. The more lines you make, the stronger the color becomes.
o Improved performance
User Guide
Welcome to the SketchBook® Mobile! Enjoy the same SketchBook® desktop experience on your iPhone with a professional-grade stroke engine, and produce stunning quality results.
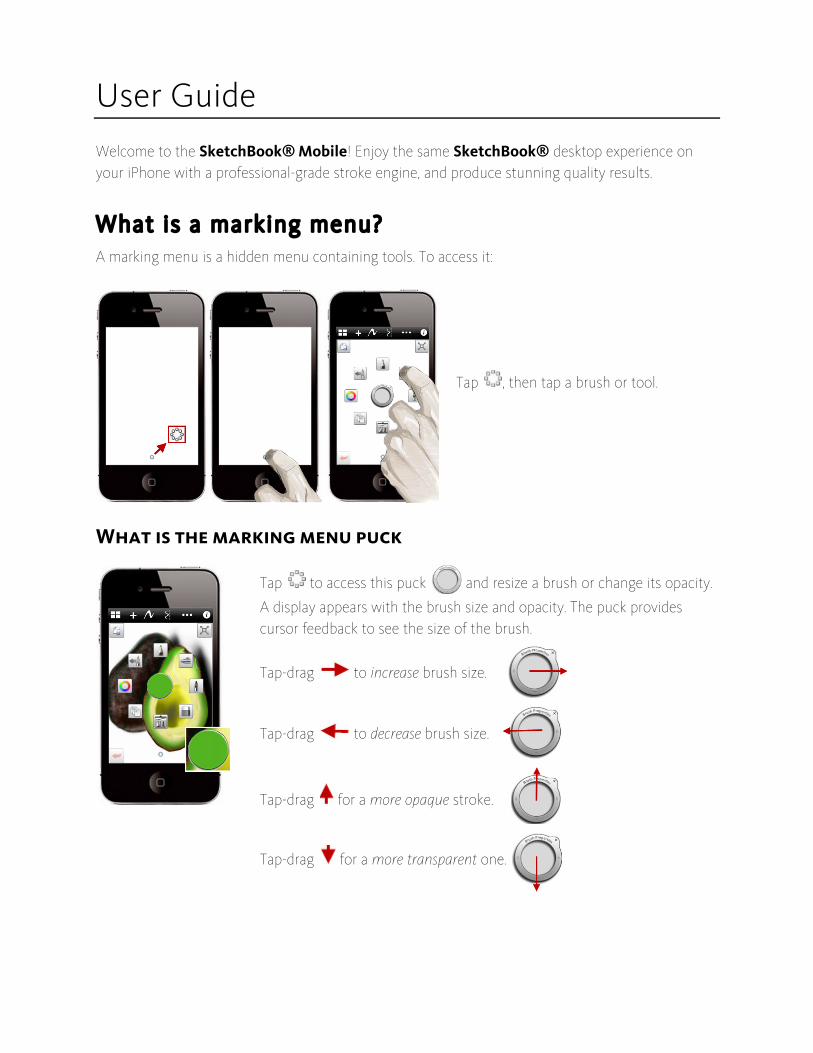
What is a marking menu?
A marking menu is a hidden menu containing tools. To access it:
Tap , then tap a brush or tool.
What is the marking menu puck
Tap to access this puck and resize a brush or change its opacity.
A display appears with the brush size and opacity. The puck provides cursor feedback to see the size of the brush.
Tap-drag to increase brush size.
Tap-drag to decrease brush size.
Tap-drag for a more opaque stroke.
Tap-drag for a more transparent one.
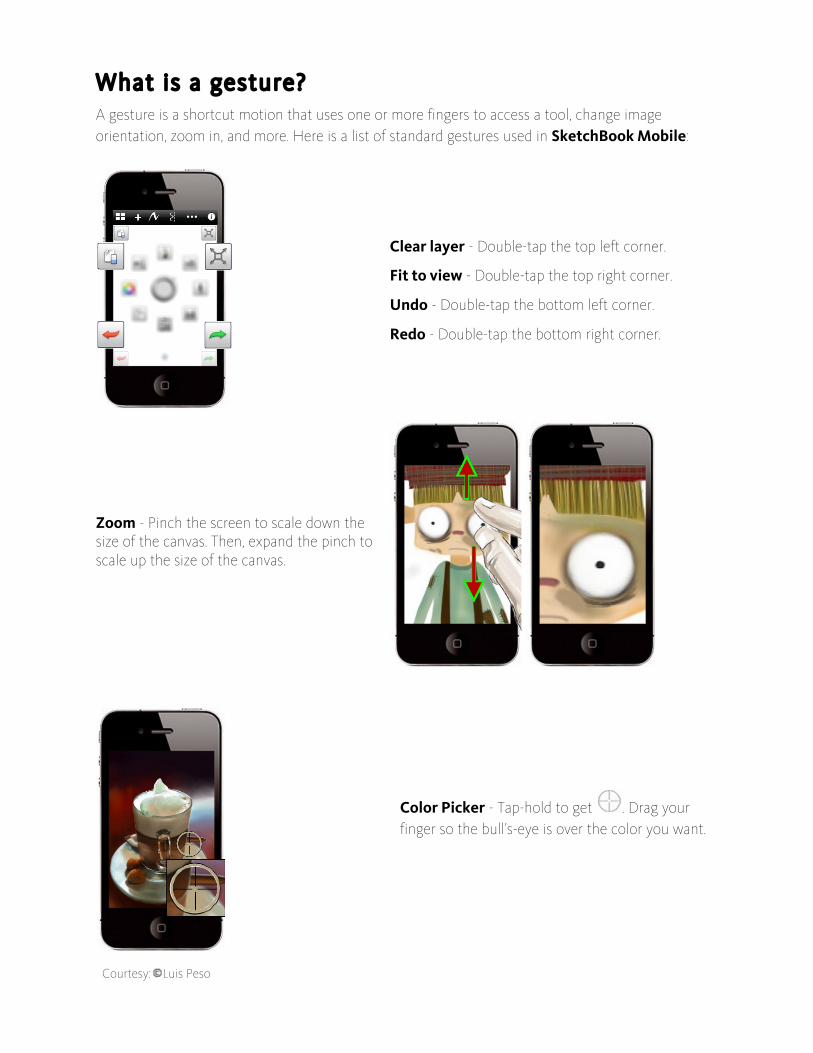
What is a gesture?
A gesture is a shortcut motion that uses one or more fingers to access a tool, change image orientation, zoom in, and more. Here is a list of standard gestures used in SketchBook Mobile:
Clear layer - Double-tap the top left corner.
Fit to view - Double-tap the top right corner.
Undo - Double-tap the bottom left corner.
Redo - Double-tap the bottom right corner.
Zoom - Pinch the screen to scale down the size of the canvas. Then, expand the pinch to scale up the size of the canvas.
Courtesy: Luis Peso
Color Picker - Tap-hold to get . Drag your finger so the bull’s-eye is over the color you want.
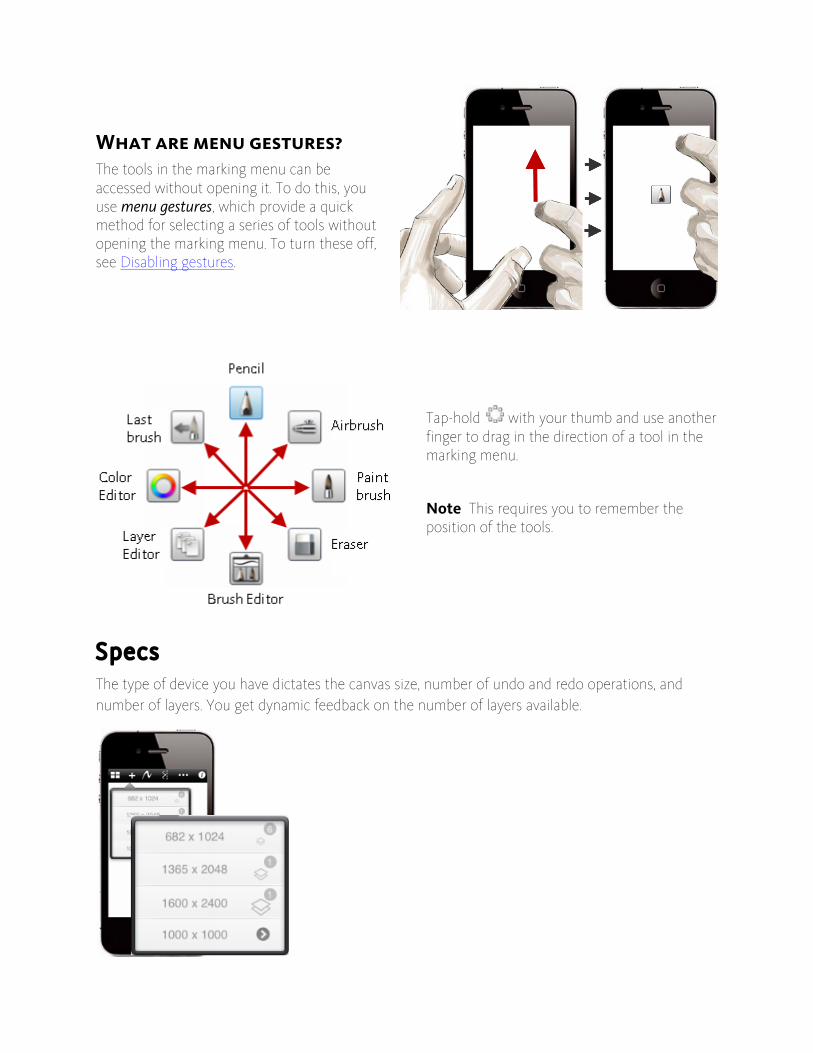
What are menu gestures? The tools in the marking menu can be accessed without opening it. To do this, you use menu gestures, which provide a quick method for selecting a series of tools without opening the marking menu. To turn these off, see Disabling gestures.
Tap-hold with your thumb and use another finger to drag in the direction of a tool in the marking menu.
Note This requires you to remember the position of the tools.
Specs
The type of device you have dictates the canvas size, number of undo and redo operations, and number of layers. You get dynamic feedback on the number of layers available.
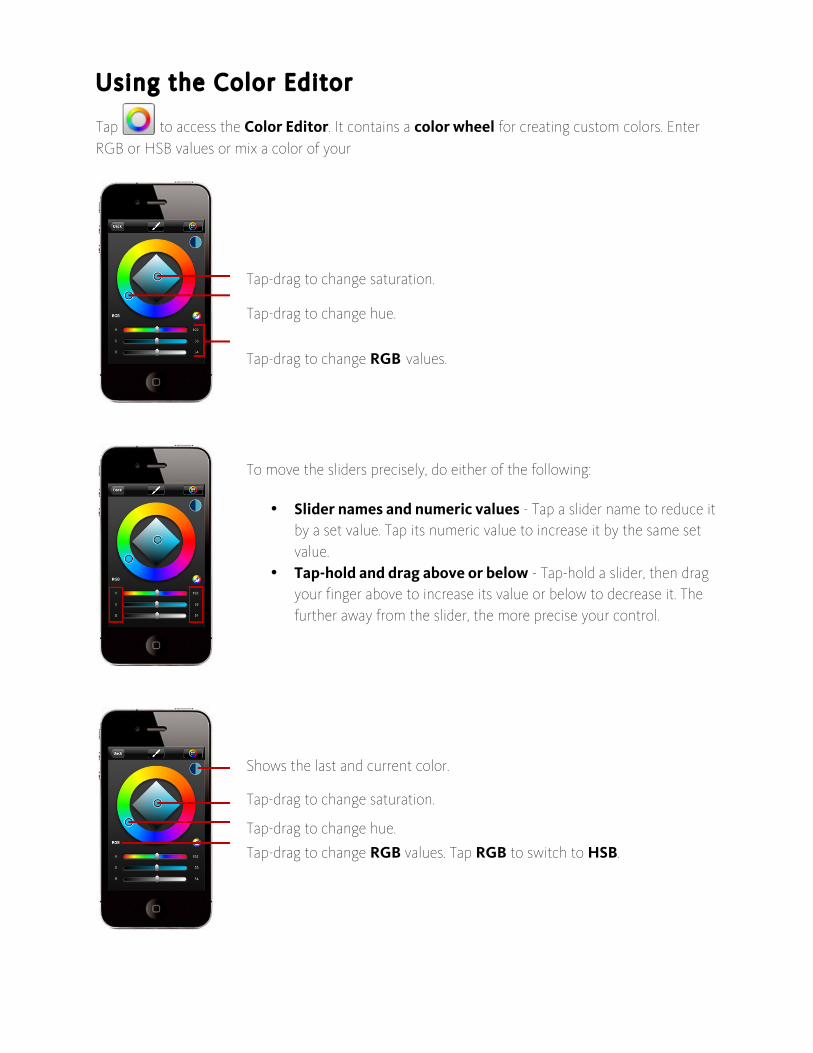
Using the Color Editor
Tap to access the Color Editor. It contains a color wheel for creating custom colors. Enter RGB or HSB values or mix a color of your
Tap-drag to change saturation.
Tap-drag to change hue.
Tap-drag to change RGB values.
To move the sliders precisely, do either of the following:
• Slider names and numeric values - Tap a slider name to reduce it by a set value. Tap its numeric value to increase it by the same set value.
• Tap-hold and drag above or below - Tap-hold a slider, then drag your finger above to increase its value or below to decrease it. The further away from the slider, the more precise your control.
Shows the last and current color.
Tap-drag to change saturation.
Tap-drag to change hue.
Tap-drag to change RGB values. Tap RGB to switch to HSB.
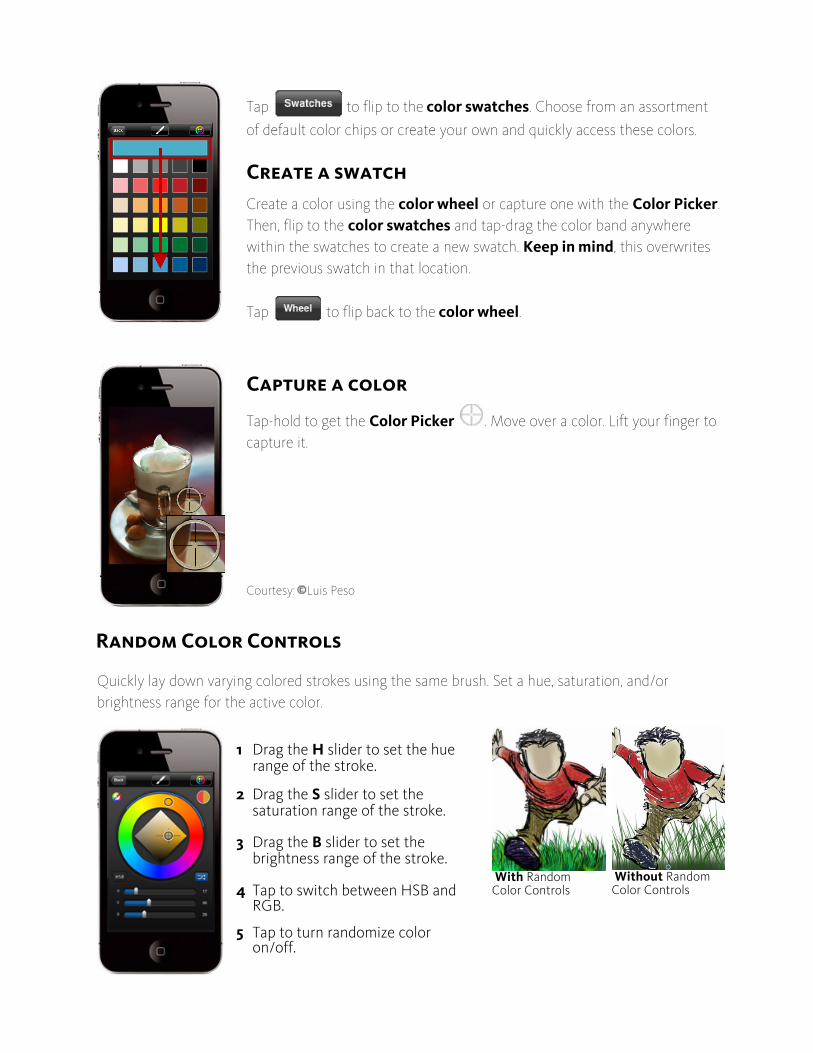
Tap to flip to the color swatches. Choose from an assortment
of default color chips or create your own and quickly access these colors.
Create a swatch Create a color using the color wheel or capture one with the Color Picker. Then, flip to the color swatches and tap-drag the color band anywhere within the swatches to create a new swatch. Keep in mind, this overwrites the previous swatch in that location.
Tap to flip back to the color wheel.
Capture a color
Tap-hold to get the Color Picker . Move over a color. Lift your finger to capture it.
Courtesy: Luis Peso
Random Color Controls
Quickly lay down varying colored strokes using the same brush. Set a hue, saturation, and/or brightness range for the active color.
1 Drag the H slider to set the hue
range of the stroke.
2 Drag the S slider to set the
saturation range of the stroke.
3 Drag the B slider to set the
brightness range of the stroke.
4 Tap to switch between HSB and
RGB.
5 Tap to turn randomize color
on/off.
With Random
Color Controls
Without Random
Color Controls
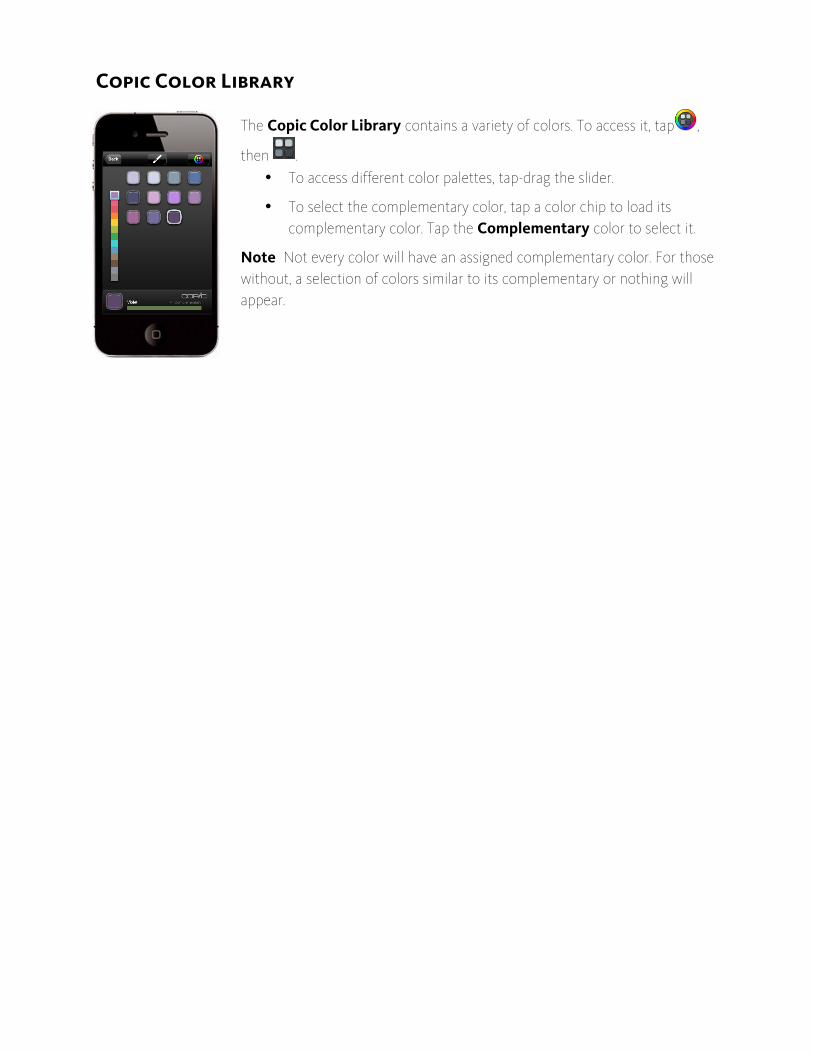
Copic Color Library
The Copic Color Library contains a variety of colors. To access it, tap ,
then . • To access different color palettes, tap-drag the slider.
• To select the complementary color, tap a color chip to load its complementary color. Tap the Complementary color to select it.
Note Not every color will have an assigned complementary color. For those without, a selection of colors similar to its complementary or nothing will appear.
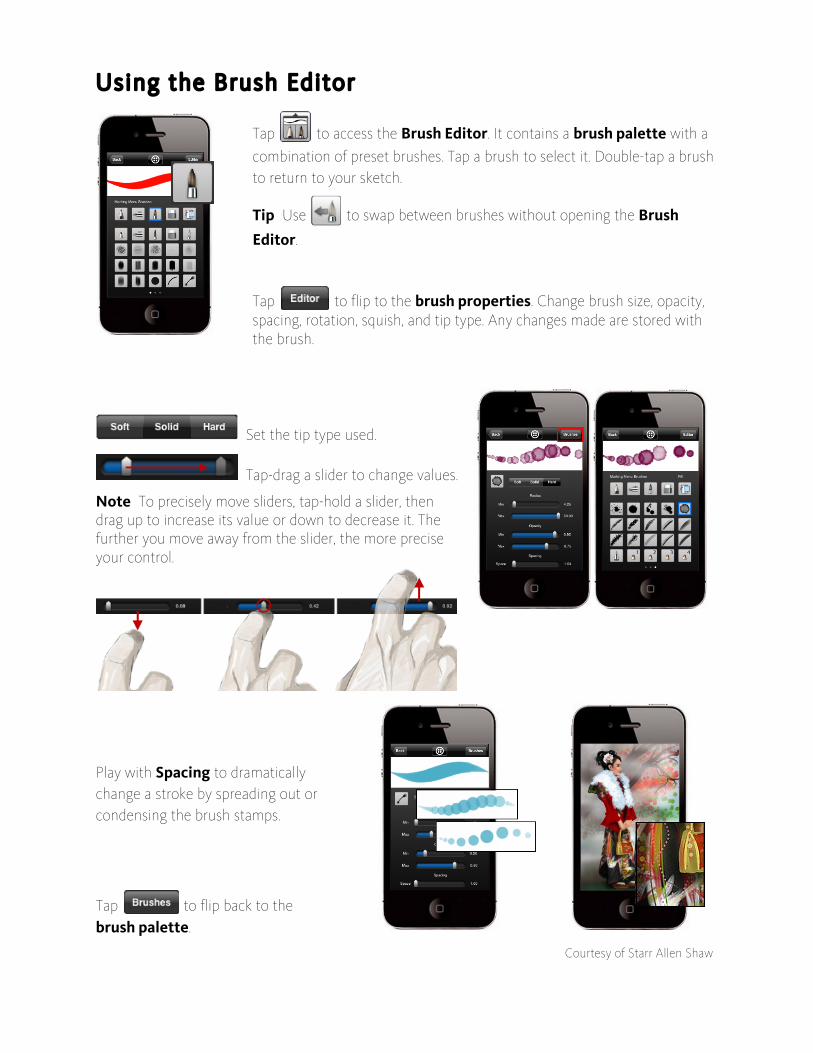
Using the Brush Editor
Tap to access the Brush Editor. It contains a brush palette with a
combination of preset brushes. Tap a brush to select it. Double-tap a brush to return to your sketch.
Tip Use to swap between brushes without opening the Brush Editor.
Tap to flip to the brush properties. Change brush size, opacity, spacing, rotation, squish, and tip type. Any changes made are stored with the brush.
Set the tip type used.
Tap-drag a slider to change values.
Note To precisely move sliders, tap-hold a slider, then drag up to increase its value or down to decrease it. The further you move away from the slider, the more precise your control.
Play with Spacing to dramatically change a stroke by spreading out or condensing the brush stamps.
Tap to flip back to the brush palette.
Courtesy of Starr Allen Shaw
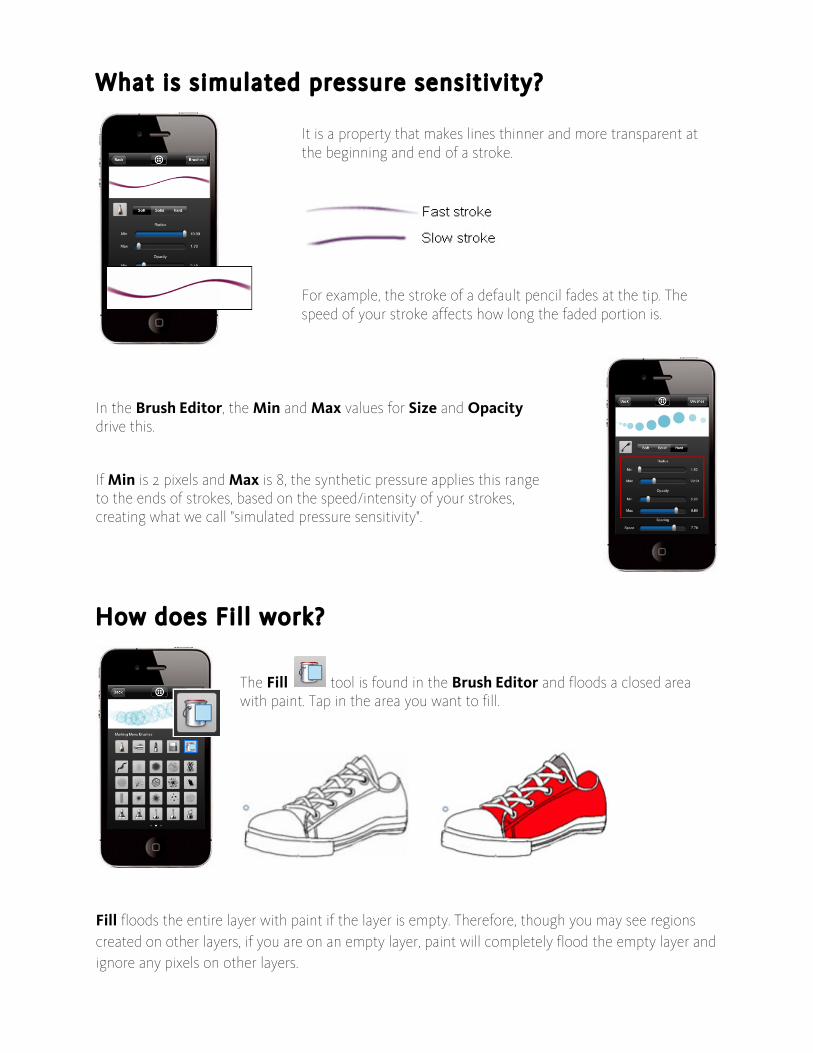
What is simulated pressure sensitivity?
It is a property that makes lines thinner and more transparent at the beginning and end of a stroke.
For example, the stroke of a default pencil fades at the tip. The speed of your stroke affects how long the faded portion is.
In the Brush Editor, the Min and Max values for Size and Opacity drive this.
If Min is 2 pixels and Max is 8, the synthetic pressure applies this range to the ends of strokes, based on the speed/intensity of your strokes, creating what we call "simulated pressure sensitivity".
How does Fi l l work?
The Fill tool is found in the Brush Editor and floods a closed area with paint. Tap in the area you want to fill.
Fill floods the entire layer with paint if the layer is empty. Therefore, though you may see regions created on other layers, if you are on an empty layer, paint will completely flood the empty layer and ignore any pixels on other layers.
Toolbar
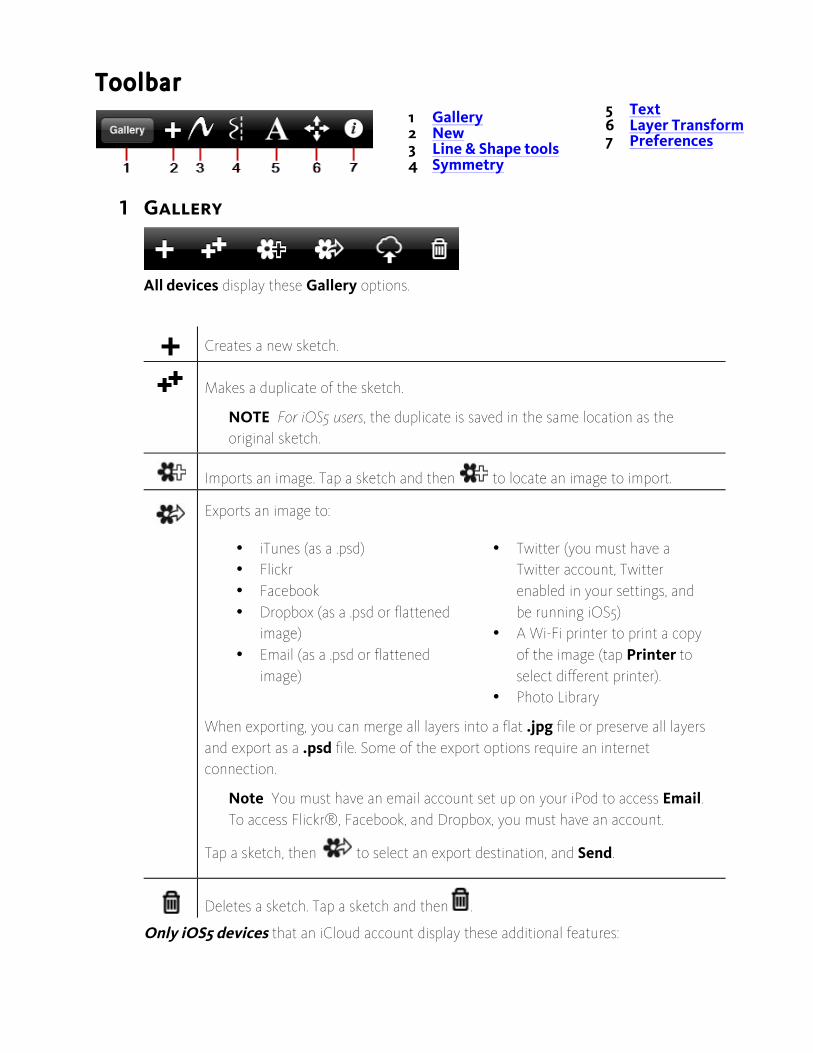
1 Gallery 2 New 3 Line & Shape tools 4 Symmetry
5 Text 6 Layer Transform 7 Preferences
1 Gallery
All devices display these Gallery options.
Creates a new sketch.
Makes a duplicate of the sketch.
NOTE For iOS5 users, the duplicate is saved in the same location as the original sketch.
Imports an image. Tap a sketch and then to locate an image to import.
Exports an image to:
• iTunes (as a .psd) • Flickr • Facebook • Dropbox (as a .psd or flattened
image) • Email (as a .psd or flattened
image)
• Twitter (you must have a Twitter account, Twitter enabled in your settings, and be running iOS5)
• A Wi-Fi printer to print a copy of the image (tap Printer to select different printer).
• Photo Library
When exporting, you can merge all layers into a flat .jpg file or preserve all layers and export as a .psd file. Some of the export options require an internet connection.
Note You must have an email account set up on your iPod to access Email. To access Flickr®, Facebook, and Dropbox, you must have an account.
Tap a sketch, then to select an export destination, and Send.
Deletes a sketch. Tap a sketch and then .
Only iOS5 devices that an iCloud account display these additional features:
Saves a sketch to iCloud.
Uploads a sketch to your device so it can be edited.
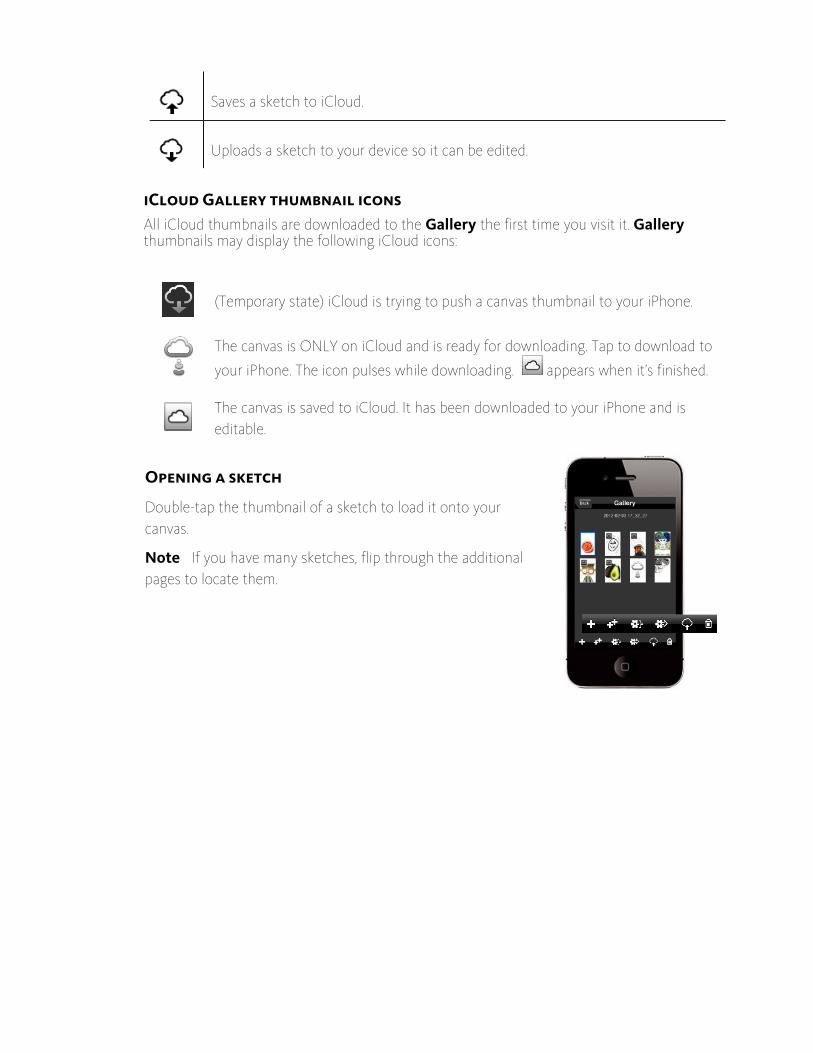
iCloud Gallery thumbnail icons All iCloud thumbnails are downloaded to the Gallery the first time you visit it. Gallery thumbnails may display the following iCloud icons:
(Temporary state) iCloud is trying to push a canvas thumbnail to your iPhone.
The canvas is ONLY on iCloud and is ready for downloading. Tap to download to
your iPhone. The icon pulses while downloading. appears when it’s finished.
The canvas is saved to iCloud. It has been downloaded to your iPhone and is editable.
Opening a sketch
Double-tap the thumbnail of a sketch to load it onto your canvas.
Note If you have many sketches, flip through the additional pages to locate them.
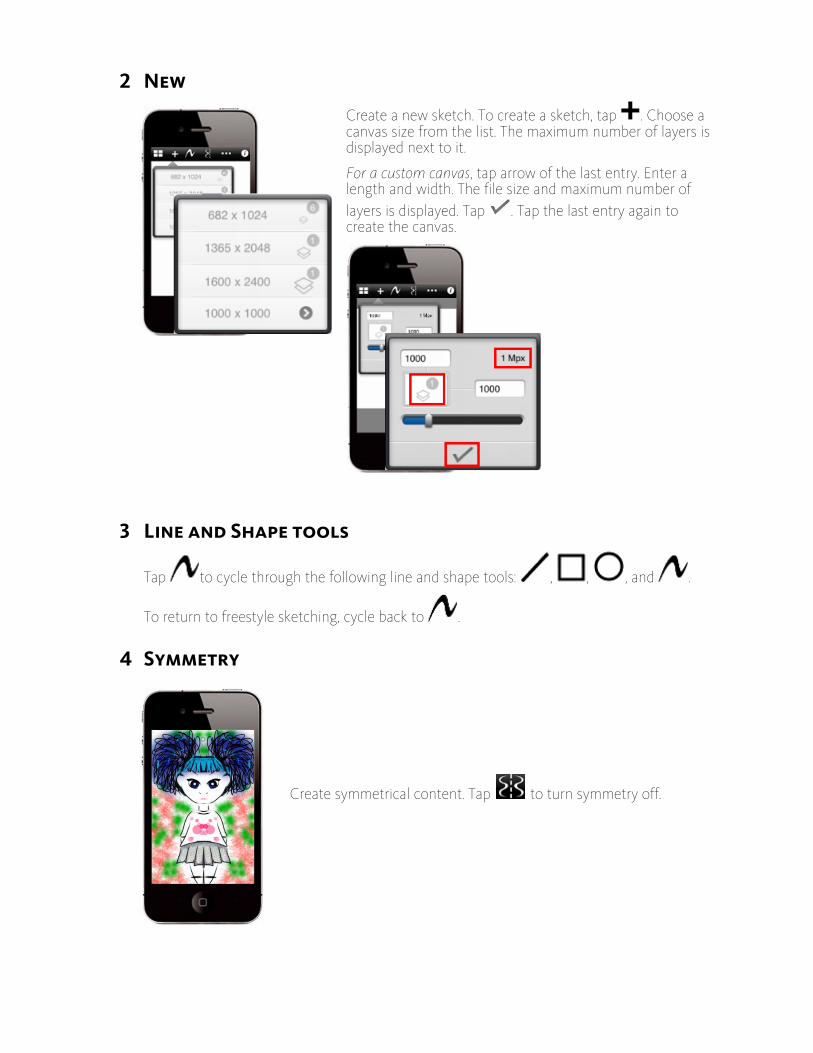
2 New Create a new sketch. To create a sketch, tap . Choose a canvas size from the list. The maximum number of layers is displayed next to it.
For a custom canvas, tap arrow of the last entry. Enter a length and width. The file size and maximum number of layers is displayed. Tap . Tap the last entry again to create the canvas.
3 Line and Shape tools
Tap to cycle through the following line and shape tools: , , , and .
To return to freestyle sketching, cycle back to .
4 Symmetry
Create symmetrical content. Tap to turn symmetry off.
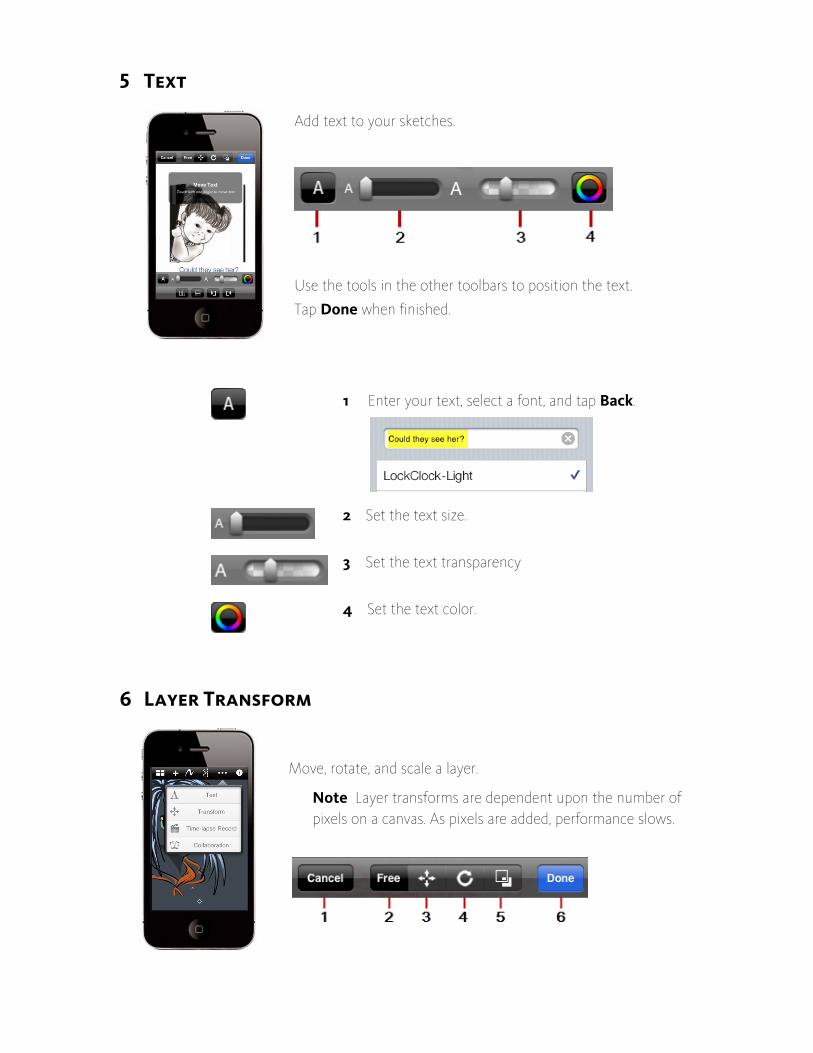
5 Text
Add text to your sketches.
Use the tools in the other toolbars to position the text.
Tap Done when finished.
1 Enter your text, select a font, and tap Back.
2 Set the text size.
3 Set the text transparency
4 Set the text color.
6 Layer Transform
Move, rotate, and scale a layer.
Note Layer transforms are dependent upon the number of pixels on a canvas. As pixels are added, performance slows.
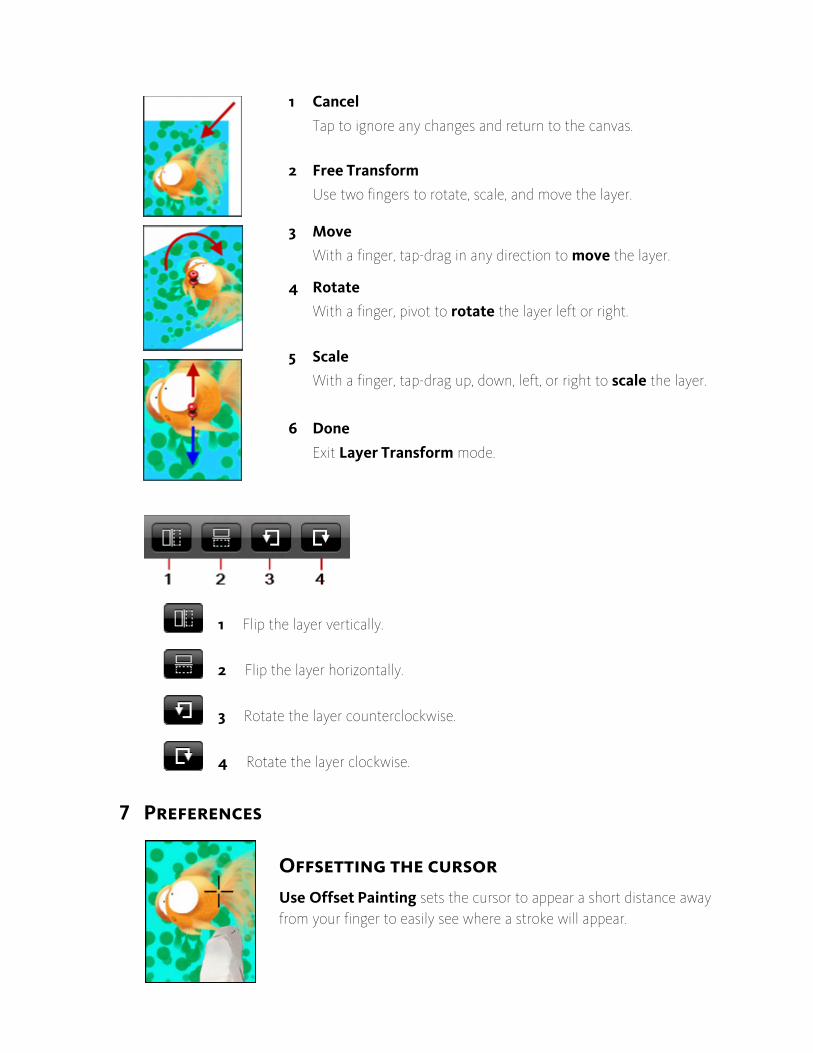
1 Cancel Tap to ignore any changes and return to the canvas.
2 Free Transform Use two fingers to rotate, scale, and move the layer.
3 Move With a finger, tap-drag in any direction to move the layer.
4 Rotate With a finger, pivot to rotate the layer left or right.
5 Scale With a finger, tap-drag up, down, left, or right to scale the layer.
6 Done Exit Layer Transform mode.
1 Flip the layer vertically.
2 Flip the layer horizontally.
3 Rotate the layer counterclockwise.
4 Rotate the layer clockwise.
7 Preferences
Offsetting the cursor Use Offset Painting sets the cursor to appear a short distance away from your finger to easily see where a stroke will appear.
Disabling gestures Use Menu Gestures to turn off menu gesturing and select tools only through accessing the marking menu.
Rotating an imported image Left-handed artist, use Import Landscape (Left) to rotate a landscaped image 180 degrees, making it easier to access clutch keys.
Resetting defaults Use Reset Color Swatches to restore swatches to their factory default settings.
Use Reset Brush Settings to restore brushes back to their factory default settings.
Changing your save location Use Save New Canvas to iCloud to set the default save location to iCloud. To save to your device, toggle it off.
SketchBook® Mobile communities
Tap , then to visit http://www.sketchbooknews.com/ and
provide feedback and access Help docs, event information, reviews, tips &
tricks, new technology and featured artist information, and the latest
updates for the SketchBook family of products.
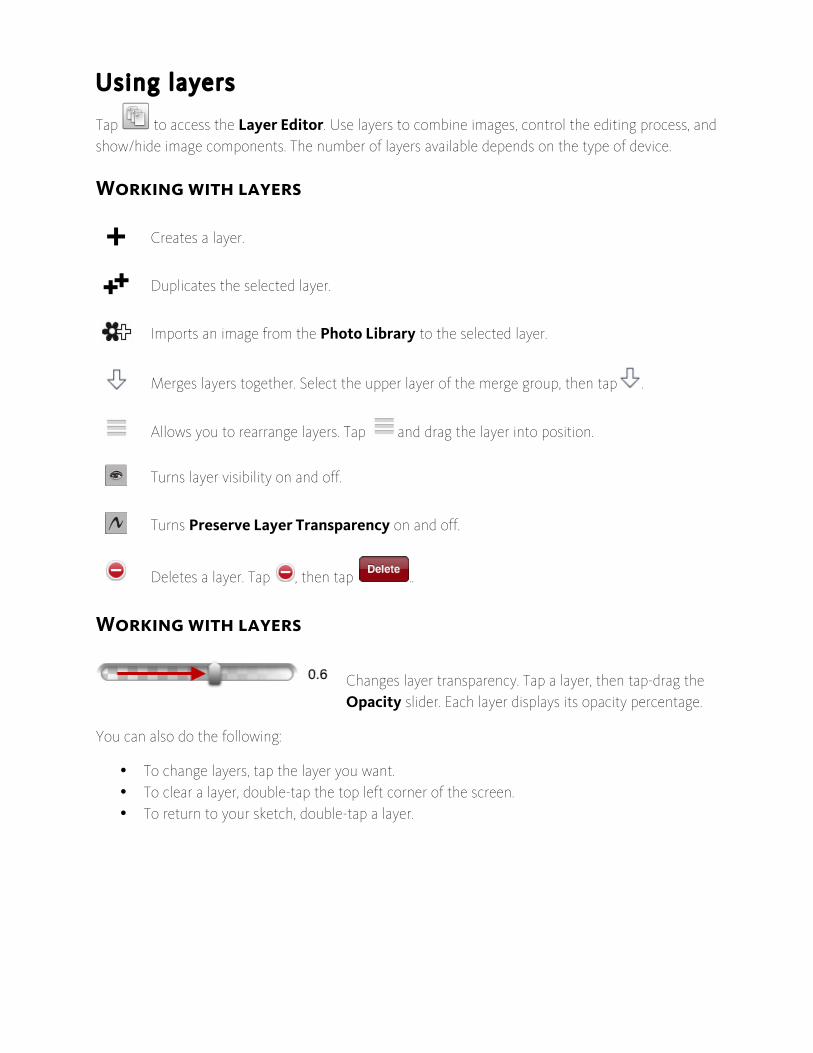
Using layers
Tap to access the Layer Editor. Use layers to combine images, control the editing process, and show/hide image components. The number of layers available depends on the type of device.
Working with layers
Creates a layer.
Duplicates the selected layer.
Imports an image from the Photo Library to the selected layer.
Merges layers together. Select the upper layer of the merge group, then tap .
Allows you to rearrange layers. Tap and drag the layer into position.
Turns layer visibility on and off.
Turns Preserve Layer Transparency on and off.
Deletes a layer. Tap , then tap ..
Working with layers
Changes layer transparency. Tap a layer, then tap-drag the Opacity slider. Each layer displays its opacity percentage.
You can also do the following:
• To change layers, tap the layer you want. • To clear a layer, double-tap the top left corner of the screen. • To return to your sketch, double-tap a layer.
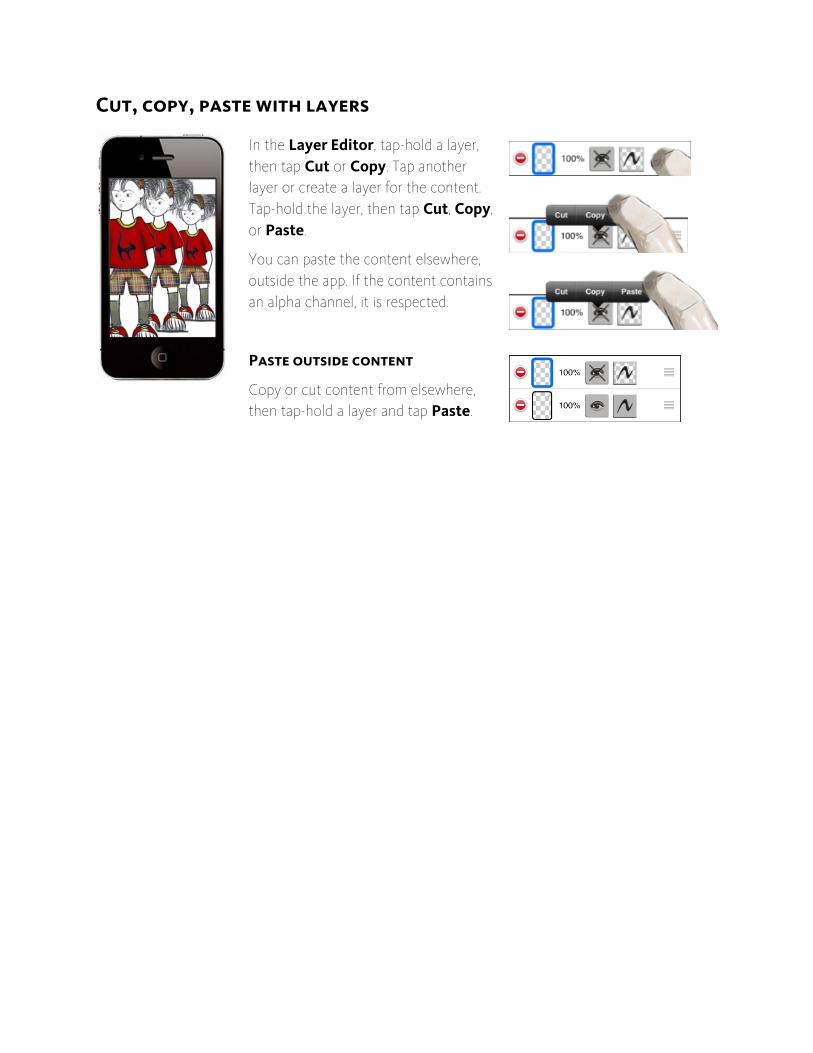
Cut, copy, paste with layers
In the Layer Editor, tap-hold a layer, then tap Cut or Copy. Tap another layer or create a layer for the content. Tap-hold the layer, then tap Cut, Copy, or Paste.
You can paste the content elsewhere, outside the app. If the content contains an alpha channel, it is respected.
Paste outside content
Copy or cut content from elsewhere, then tap-hold a layer and tap Paste.
Saving
Tap Gallery and Save to store a sketch in the Gallery and preserves its layers.
Saving variations
Save iterations of a sketch. Use Save A Copy to create variations and branch off.
NOTE For iOS5 users, this variation is saved in the same location as the original sketch. For example, if the original sketch is from iCloud, the copy (variation) will be saved to iCloud.
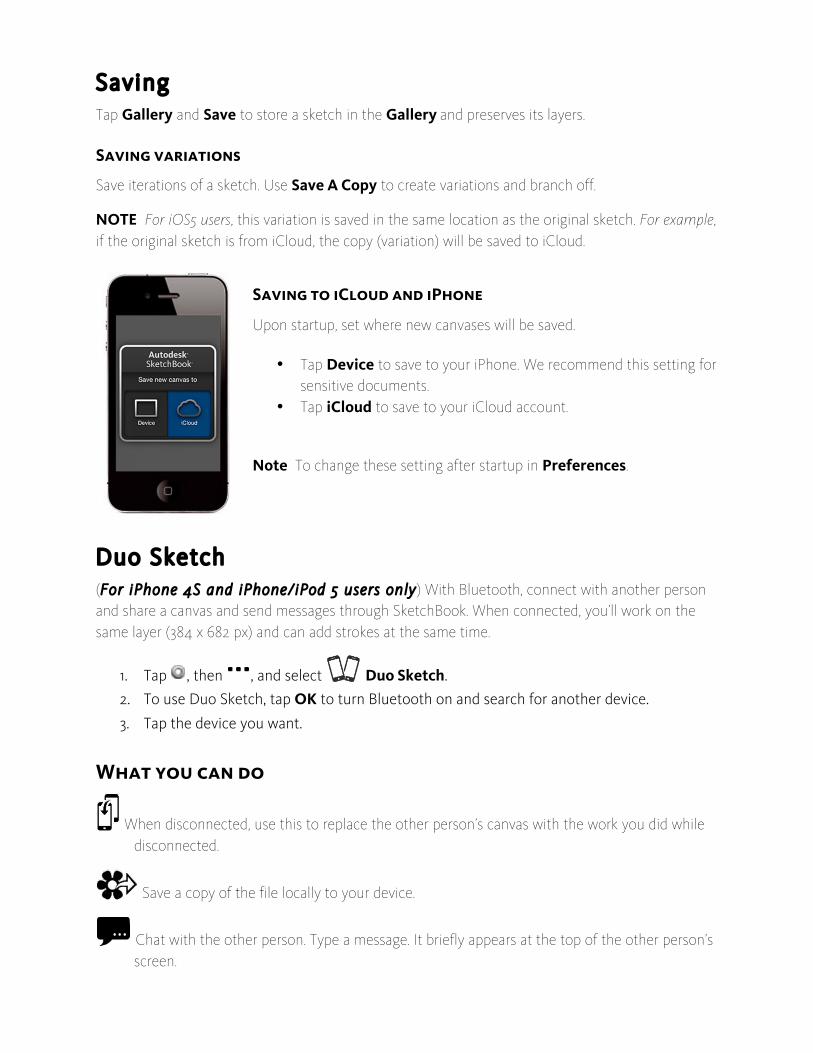
Saving to iCloud and iPhone
Upon startup, set where new canvases will be saved.
• Tap Device to save to your iPhone. We recommend this setting for sensitive documents.
• Tap iCloud to save to your iCloud account.
Note To change these setting after startup in Preferences.
Duo Sketch
(For iPhone 4S and iPhone/iPod 5 users only) With Bluetooth, connect with another person and share a canvas and send messages through SketchBook. When connected, you’ll work on the same layer (384 x 682 px) and can add strokes at the same time.
1. Tap , then , and select Duo Sketch.
2. To use Duo Sketch, tap OK to turn Bluetooth on and search for another device.
3. Tap the device you want.
What you can do
When disconnected, use this to replace the other person’s canvas with the work you did while disconnected.
Save a copy of the file locally to your device.
Chat with the other person. Type a message. It briefly appears at the top of the other person’s screen.

Connected.
Disconnected. You can reconnect and continue working together. If someone continued
sketching during this period, they should use to update both screens.
Exit. Stops the sharing and closes the session.
Best Practices
For optimal performance and/or to free up memory, follow these tips.
• For faster layer transforms, reduce the number of pixels on the canvas. • For older devices, exit SketchBook® Mobile about every 30 min. • For 3GS and 3rd Gen iPod Touch, exit SketchBook® Mobile about every hour. • Limit the number of apps running in the background. • Set Push to OFF.
(Settings > Mail, Contacts, Calendars > Fetch New Data > Push) • For iPhone users, change your settings to Wi-Fi to avoid the potential of losing your sketch. • For longer battery life, go to Settings > General and set Location Services OFF. This
turns off the location of your phone, which your camera and other apps use.
Important Turn this back on when finished to locate your phone if lost or stolen.
• Use Save A Copy to have iterative copies of a sketch.