Embed Size (px)
Citation preview
Table of Contents Title PageCopyright PageForewordPrefaceIntroductionKey to Diagrams Part I - Offensive Play for Forwards and Defensemen
Chapter 1 - Breakouts
Reading Pressure and OptionsReacting to Support the BreakoutBreakout PlaysControl Breakouts
Chapter 2 - Neutral Zone Counters and Regroups
CountersRegroups
Chapter 3 - Offensive Zone Entries
Dump-In EntriesMid-Ice EntriesWide-Lane DrivesThe FunnelTwo-on-One AttacksTwo-on-Two Attacks
Three-on-Two AttacksOffsidesActivating Defense Into Offensive Zone Entries
Chapter 4 - Attack Zone
CyclingPlaying Behind the NetStretching the Zone: Low-High PlaysActivating Defense in the Offensive ZoneAttack Zone Plays
Chapter 5 - Power Plays
Power-Play BreakoutsGaining and Maintaining Possession off the EntryZone SetupFive-on-Three Power PlayFour-on-Three Power Play
Part II - Defensive Play for Forwards and Defensemen
Chapter 6 - Forechecking
Forechecking Systems Chapter 7 - Neutral Zone Forechecking and Backchecking
Neutral Zone ForecheckingNeutral Zone Forechecking SystemsNeutral Zone BackcheckingNeutral Zone Backchecking Systems
Chapter 8 - Defensive Zone Entries
Handling Defensive Zone Entries Chapter 9 - Defensive Zone Coverage
Defensive Zone SystemsSituational Guidelines for Defensive Zone Coverag
Chapter 10 - Penalty Kills
Face-Offs and Penalty KillsForechecking and Penalty KillsPressuring the EntryDefensive Zone PlayThree-on-Five Penalty KillThree-on-Four Penalty Kill
Part III - Special Game Situations
Chapter 11 - Face-Offs
Offensive Zone Face-OffsNeutral Zone Face-OffsDefensive Zone Face-OffsPower-Play Face-OffsPenalty-Kill Face-OffsSpecial Face-Off Situations
Chapter 12 - Bench Management and Line Changes

Managing StaffDealing With OfficialsAdjusting Your Playing StrategyManaging LinesLine ChangesHandling the Moment
IndexAbout the Authors

Library of Congress Cataloging-in-Publication Data
Walter, Ryan, 1958-Hockey plays and strategies / Ryan Walter and Mike Johnston.
p. cm.Includes index.
ISBN-13: 978-0-7360-7634-0 (soft cover)ISBN-10: 978-0-736-07831-3 (soft cover)
1. Hockey--Offense. 2. Hockey--Coaching. I. Johnston, W. Michael II. Title.GV848.7.W35 2010
796.962’2--dc222009026623
ISBN-10: 978-0-736-07831-3 (print)ISBN-13: 978-0-7360-7634-0 (print)
Copyright © 2010 by Ryan Walter and Mike Johnston All rights reserved. Except for use in a review, the reproduction or utilization of this work
in any form or by any electronic, mechanical, or other means, now known or hereafterinvented, including xerography, photocopying, and recording, and in any information
storage and retrieval system, is forbidden without the written permission of the publisher.
Acquisitions Editor: Justin Klug; Developmental Editor: Kevin Matz; AssistantEditor: Scott Hawkins; Copyeditor: Patricia MacDonald; Indexer: Dan Connolly;
Graphic Designer: Kim McFarland; Graphic Artist: Kim McFarland; CoverDesigner: Keith Blomberg; Photographer (cover): Jim McIsaac/Getty Images Sport;Art Manager: Kelly Hendren; Associate Art Manager: Alan L. Wilborn; Illustrator:
Lineworks, Inc. and Alan L. Wilborn; Printer: Versa Press
Human Kinetics books are available at special discounts for bulk purchase. Specialeditions or book excerpts can also be created to specification. For details, contact the
Special Sales Manager at Human Kinetics.
Printed in the United States of America 10 9 8 7 6 5 4 3 2 1
The paper in this book is certified under a sustainable forestry program.
Human KineticsWeb site: www.HumanKinetics.com

United States: Human KineticsP.O. Box 5076
Champaign, IL 61825-5076800-747-4457
e-mail: [email protected]
Canada: Human Kinetics475 Devonshire Road Unit 100
Windsor, ON N8Y 2L5800-465-7301 (in Canada only)
e-mail: [email protected]
Europe: Human Kinetics107 Bradford Road
StanningleyLeeds LS28 6AT, United Kingdom
+44 (0) 113 255 5665e-mail: [email protected]
Australia: Human Kinetics
57A Price AvenueLower Mitcham, South Australia 5062
08 8372 0999e-mail: [email protected]
New Zealand: Human Kinetics
P.O. Box 80Torrens Park, South Australia 5062
0800 222 062e-mail: [email protected]
E4627

Foreword
Ryan Walter and Mike Johnston are great coaches who have beenaround long enough to really understand the game of hockey. Theirbook, Hockey Plays and Strategies, is a great reference for anycoach, player, or fan.
Hockey requires a strong blend of physical and mental skills.Players need a solid base of fundamentals—skating, shooting, andpassing—before beginning to understand how to play the game.But it’s the tactical team skills that are necessary for competingand winning at a high level. And this book will help develop thosetactical skills.
In Detroit, we talk about a three-step process for success. Thefirst two steps are work ethic and structure. Work ethic is self-explanatory. Structure, a focus of Hockey Plays and Strategies,protects each player. Everyone has a complete understanding ofhis responsibilities on the ice, which in turn makes everyonequicker. Players can be quick when they know that each teammatewill do his part. This leads to an up-tempo game and thereforesuccess.
The third step in the process is skill. Without the work ethic anda solid structure, players such as Lidstrom, Datsyuk, andZetterberg would still be extremely skilled, but they wouldn’t havethe continual success they’ve enjoyed in their careers. In 2008, theDetroit Red Wings won the Stanley Cup. One of the biggest playsin game 4 was a five-on-three penalty kill when Henrik Zetterbergblocked out Sidney Crosby’s stick to prevent a goal. That playwas a huge reason we went up 3-1 in the series instead of beingtied 2-2, and it probably assured Zetterberg the Conn Smythetrophy as playoff MVP and assured us the Stanley Cup. That is anexample of a great skill play, but it was also based on goodstructure.
This book offers advice for both coaches and players. Coacheswill learn the strategies necessary for success, and players willfind advice to help them understand the demands of the game andtheir roles within the specific systems and strategies that coachesask them to perform on the ice. Hockey Plays and Strategies isdivided into three parts dealing with offensive play, defensiveplay, and special situations such as power plays, penalty kills, andface-offs. Mike and Ryan’s structure of the chapters is easy tofollow—they work from the net out and from the opposition’s netback, just as a play progresses on the ice. Coaches and playersalike will find guidance on the movements and tactics in the mosteffective offensive and defensive systems in the game. This bookalso compares the systems and strategies—based on execution,personnel requirements, and their unique advantages anddisadvantages—so that coaches can make the best use of a team’stalents and prepare for specific opponents, situations, or playercombinations.
Most coaches agree that their main responsibility is to helpplayers become the best they can be. Understanding hockey’scomplicated plays and strategies is a key factor in creatingsuccessful players. A coach should always look for ways toprovide the information necessary to help a group of athletes cometogether and succeed as a team. This book goes a long way inproviding that information. Mike Babcock
Preface
In previous work as authors, Ryan and I focused on the leadershipangle and the so-called intangibles in the sport of hockey. Whenapproached about writing a book that involved breaking the gamedown into all its technical components and strategies, we wereboth very excited about the opportunity. The game of hockey ispresently played in almost every country, with millions ofparticipants worldwide. Although several countries claimownership of the game, there has been significant sharing of ideas,philosophies, and strategies over the years. All countries haveadapted their approach to include what they believe are the keyingredients to put them in a position to claim world titles. Thisbook includes several strategies and tactics prevalent in the gamesof successful European countries while focusing on ones we haveused with teams or observed being used with teams we havecoached against. Understanding the tactics and strategy involved inthe game is critical for on-ice success.
Hockey Plays and Strategies is broken down into three primarysections dealing with offensive play, defensive play, and specialsituations. Does great defensive play win championships, as thesaying goes? Not necessarily—if you look at the results of themajor professional leagues in baseball, football, basketball, andhockey, there have been an equal number of dynasties whoseteams are remembered for their offensive prowess. It is our beliefthat a good balance is best, and then as a coach your naturaltendency will be to lean slightly toward the offensive or defensiveside depending on your style and comfort level. The final sectionin the book discusses the strategies and tactics involved in face-offs and also discusses in detail how coaches can separatethemselves from the pack with their bench-management skills. Oneof the greatest coaches in the game, Scotty Bowman, was always
known as a master when it came to bench-management skills.The sequence for the offensive and defensive chapters works
from the net out and from the opposition’s net back. Offensivechapters cover the breakout, neutral zone attack and regroups,offensive zone entry (including odd-man rushes), the attack zone,and power plays. Defensive chapters cover the forecheck, neutralzone forecheck and backcheck, defensive zone entry (includingodd-man defensive play), defensive zone coverage, and penaltykill.
We have attempted to explain in detail where applicable the keyteaching points involved in executing the systems discussed. Asmentioned in the book, it is not the system you choose that willmake you successful; it is how effectively the players execute thesystem and whether you as a coach can get the players to executeconsistently every game. When there are breakdowns, you need toknow where to look to make corrections. Understanding the keyteaching points will help in this area as well as allow the playersto grasp the concepts easier. Our goal in writing this book is togive both coaches and players the information they need in orderto succeed. Enjoy!
Introduction: Preamble on Coaching
Coaching is a very complex job. We have found throughexperience and also in our previous book Simply the Best -Insights and Strategies from Great Coaches that there is an “artand science” side to coaching. The “art” refers to instincts andfeel while the “science” refers to technical and physiological.This book primarily deals with the technical side of the game,with only Chapter 12 (Bench Management and Line Changes)focusing on the art of coaching. Therefore we would be remiss ifwe didn’t highlight a few more key details on the art of coachingwhich are directly linked to the systems and strategies in the book.Developing your team identity, understanding teaching andlearning and conducting good practices all fit into being a wellrounded coach.
All great organizations and great teams have a clear identity.Teams are recognized as being hard working, dynamicoffensively, gritty and tough, fast, young, or sound defensively.You know what the identity of a team is simply by observing howthey operate. The saying that a team is a reflection of their coach isso true. It is the coach and management that impart an identity onthe team by the players they select, the system they play, how theypractice, and generally how they behave on and off the ice.Unfortunately many coaches miss this step in preparing for theseason and as a result they are not really anything. They lookdifferent from game to game, there is no base of “who they are” tofall back on in tough times and the coach will constantly bereacting to situations with quick fix solutions but never reallygetting anywhere. Remember, if your team doesn’t know youridentity, you are in trouble. A team is much like a corporation orbusiness - those with a clear identity and purpose which everyonebuys into, flourish, and those without one, sink. Therefore this is
one of the most important things you can do in preparing for asuccessful season. Is it difficult? No. Basically there are threesteps in identifying what type of team you want to be.
1. Picture yourself watching your team in late January; seethem on the ice for practice, in game action, training off theice, at a restaurant for a team meal, and possibly even inthe classroom.
2. Now write down everything you want to be observing fivemonths from now. What personal and physical qualities doyou want to see? How does the team act/behave? How dothey train? How do they treat each other? How do theyhandle pressure? How does your team play? We all want abig, fast, skilled, and sound defensive team, but we allknow it is not realistic to have everything. What is mostimportant to you? Discuss this with your staff. What valuesdo you want to impart to your team?
3. Once you have thoroughly developed your identity withyour staff, it is important to now inform the team of youridentity as well as other parties who are close to your team(e.g., parents, manager, support staff, and media).Constantly reinforce the identity throughout the season byrepeating it over and over again. This is how we practice,this is how we play, this is how we act. Your players willget it over time and eventually take on this identity andmore importantly take ownership for it. Challenge yourstaff and team to come up with a slogan, logo, or song thatexemplifies your identity.
Teaching and Learning
As a coach, you may find yourself asking, Why aren’t theylearning? or Why does he always do that? Doesn’t he get it? Thefirst place to look for answers is your coaching strategy, becauseif there is no learning, there is no coaching taking place. This bookis all about teaching. Sometimes you will get frustrated with yourplayers’ progress, but you need to recognize that coaching hasmany challenges. Don’t get caught in the cycle of looking atreasons why you can’t win. Instead, challenge yourself and yourstaff to find a way.
No matter what level you are coaching, it is important to neverassume. If you believe that players should know certain thingsbecause of their age, you may be eager to start at a higher level.However, you should always start with the basics. When using thisbook, chose a system or strategy and then review the key teachingpoints. Teach it to your team by using basic drills and thenprogressing to more complicated or involved drills. Be careful toresist the urge to change when it is not going well. Progress at apace appropriate for the team and age level. I suggest you use achecklist so that you can monitor the progression of the team andof specific positions. A check list involves all aspects of yourteam play written down one side of the page and then as youpractice each you make note of the date beside it. This will keepyour coaching staff focused on what has to be done, what needs tobe done and eliminate moving too fast. You can even note whatdate you would like to have taught that particular system orstrategy to the team. For instance with the power play, early in theyear the priority will be on breaking out and zone set up for a five-on-four. As the year moves along and team competency progressesyou will start to focus more on the five-on-three and four-on-threepower play options. Accept that with only so much practice time
you can’t do everything at once—so develop priorities.It is often the basic skills or teaching points within a system that
separate the top players and teams. Most players are motivatedand willing to learn or develop in any area that will help elevatetheir play or create longevity in their careers. Show them a plan tobe successful, work on developing it, and stay strong when yourplan is challenged. It is not the particular system that winschampionships; it is all about quality of execution.
Practices
Although many players would much rather play the games, it isimportant to remember that you develop through practice.Statistically, the average player in a game takes one or two shotson goal, makes 15 to 20 passes, and is on the ice for 20 out of the60 minutes. According to one of the more revealing statistics fromthe 2002 Olympic Games in Salt Lake City, elite players had thepuck on their sticks for less than 90 seconds for the whole game.Most players were under a minute. During a well-run practice, aplayer should be able to take 30-plus shots, make 50 passes,receive the puck 50 times, and have the puck on his stick at least25 percent of the time. Therefore it takes approximately 15 gamesto simulate the amount of skill repetition that takes place in aneffectively run 60-minute practice.
Listed below are eight keys to maximize your practice time. Icesessions are expensive and difficult to obtain, so it is important toget the most out of each.
1. Prepare yourself and your coaching staff.
◯ Use a set practice form which has room to explainthe execution of the drill, teaching points and lengthof time. Keep your practice forms in a book, or filethem away.
◯ All coaches on the ice should know the drillsequence and teaching points. The head coachshould outline who is responsible for teaching thedrill to the team and where the coaches will bepositioned once the drill begins.
◯ Come to the rink with energy and energize yourstaff. Players will feed off you, and these sessions

are what they look forward to all week. 2. Provide practice rules.
◯ To properly manage the ice, especially when theacoustics in most rinks are not good, it is critical tohave set practice rules. Inform the team that foreveryone to benefit, the rules need to be adheredto. One rule that can often speed up practice is“every time the whistle blows all players come inquickly to the coach and then after the next drill isdescribed go to your specific area and get ready togo” Depending on how much help the head coachhas try to get the players to collect the pucks andset them up in the appropriate area.
3. Create a positive learning environment.
Use positive talk and positive gestures.◯ Talk to every player every practice. Even if it is
about the movie they saw last night, your staffshould never leave the arena without havingtouched base with every player.◯ Provide feedback throughout practice. Try to do it
constructively, and do not stop the drill. Get to theplayers while they are waiting in line. Bring thegroup together only for key points or messages.
4. Balance individual skill with small-group and team-play
work.
◯ Vary the drill formations and alignments to workon team play and individual skills.◯ Use stations for small-group skill work. This is
effective for concentrated effort and highrepetition.
5. Repeat, repeat, and repeat again.
Players develop through the “agony of repetition”—those are the facts.
◯ Keep the players moving throughout practice;activity is key. This ◯ will develop endurance andensure that they’re making the best use of practicetime by always working on skills.
◯ Have a set bank of practice drills to teach yoursystem’s plays.
◯ Repeat drills often, but change the focus orteaching points.
◯ Constantly push the team for better execution. 6. Incorporate challenges and fun games.
Open and close practice with a bang.◯ Challenge yourself to come up with drills that are
fun but that also ◯ work on key skills.◯ Incorporate competitive challenges. Keep score
during drills. 7. Have teaching aids available.
◯ Use ropes, tires, balls, spray paint, chairs, andpylons to add to the practice environment.
◯ Make sure a rink board is also available so thatplayers can visualize what you’re explaining.Practice drawing the drills clearly.
8. Conduct your warm-up and conditioning off the ice.
◯ Ice time is valuable, so as much as possible,stretch and warm up off the ice as a group.◯ Try to get a conditioning effect by the way you
keep the practice moving and by the demands youmake on effort throughout practice. Stoppingpractice and forcing the players to do aconditioning skate is necessary at times, but it ismuch better to work on conditioning and skill at thesame time.
The key to developing players is to catch them doing somethingright, and the practice environment provides many opportunitiesfor this. Strive to achieve practice perfection and good habits.Coach the players to “think the game”; they will enjoy the gamemore and get much more out of it.
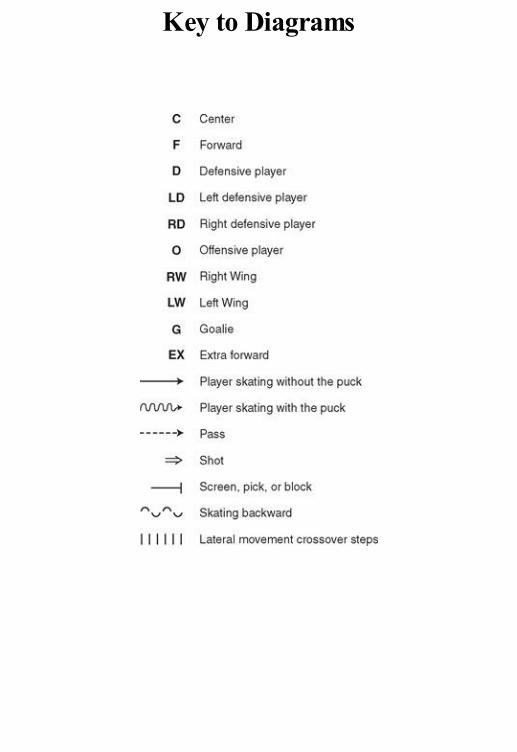
Key to Diagrams

Part I
Offensive Play for Forwards and Defensemen
Chapter 1
Breakouts
A breakout is initiated when the puck is in a team’s defensive
zone. All five skaters and even the goaltender need to be involvedto exit the zone successfully. Players react to the position of thepuck to initiate or support the breakout. Breakouts can take placein four situations: (1) after a dump-in by the other team; (2) canare bound off a shot; (3) after an intercepted pass; or (4) when aplayer takes the puck away from the opposition. The most difficultpart in executing a successful breakout is handling pressure fromthe opposition and completing a good first pass. The first step is torealize where the pressure is coming from so you can execute theappropriate option to escape your defensive zone.
Reading Pressure and Options
When a defenseman picks up the puck to initiate a breakout, hecould be faced with three different situations. In the first, there isno forechecking pressure; in the second, the forechecker is 6 feet(1.8 m) or more away; and in the third, the forechecker is right onthe defenseman’s back.
In most situations the defenseman has mere seconds to make aplay, so it is often important to “buy time.” To do this effectivelyyou have to fake one way by looking at that option with your eyeswhile putting the puck in a passing position. The forechecker willoften bite on this fake pass, or look-away, and turn his feet in thatdirection, which will give the defenseman more time to make aplay. The art of deception is a skill that must be practiced; oncemastered, it provides defensemen with both extra time in a criticalarea and less chance of being hit.
The following three examples for defensemen all deal withvarying forechecking pressure that happens after a dump-in by theother team; after a rebound off a shot; after an intercepted pass; orwhen a player takes the puck away from the opposition.
1 . No forechecking pressure. In this situation thedefenseman is concerned about getting back quickly,collecting the puck and turning up ice. Check your shoulderas you go back for the puck to read your options.Goaltenders should communicate options to thedefenseman retrieving the puck. Simply using a verbal cuesuch as “time” is enough to let the player know he has anopportunity to look up and turn the puck up ice withouthaving to protect it from pressure. Specific communicationcalls are critical to successful breakouts because the
player retrieving the puck is focused on getting the puckand has limited opportunity to read the other team. Histeammates, while moving to support the breakout, have achance to read the opponent’s forechecking pressure.When turning the puck up ice, get your feet moving rightaway while at the same time keeping the puck at your sidein a position to pass. If there are no options, then put thepuck out in front of you and jump up ice.
2. Close forechecking pressure. When the forechecker is 6feet (1.8 m) or more away, the defenseman should go backfor the puck under control while checking both shouldersto read the forecheck and also the passing optionsavailable. This is an important routine to do regardless ofthe checking pressure. As you get close to the puck, squareyour feet, glide, and then fake one way and go the other.This will shake the forechecker and give you time toescape or make a quick play. The fake doesn’t have to becomplicated, just a slight movement one way with yourstick or shoulder while tight turning to the other side. Takethree quick strides in order to separate from theforechecker, and then make a pass or continue skating.
3 . Quick, hard forechecking pressure. In this situation theforechecker is right on the defenseman, and it looks as ifthe defenseman will get hit. When going back for the puck,check both shoulders and then slow down as you approachthe puck. Your first priority is to protect the puck while atthe same time leaning back against the forechecker to gaincontrol over that player. Absorb his momentum, and eitherspin away with the puck or rebound off the boards in aposition to make a play. Never expose the puck; stay on thedefensive side and protect it until you can make a play.
Reacting to Support the Breakout
All three forwards have key positional responsibilities on thebreakout. Breakouts are initiated by the defense, and most of thetime the primary role of the forwards is to provide supportoptions. The option of having forwards leave the zone early maybe a team philosophy or a coaching philosophy, but it is worthconsidering allowing your wingers to leave the zone early oncertain breakout plays—especially since the red line was removedfrom the game at all levels. The key read for wingers is puckpossession and checking pressure; once you see your defensemanor center get the puck under control with minimal forecheckingpressure, then move out into the neutral zone and look for thestretch pass (figure 1.1). The pass does not have to be a directpass; it could be an indirect pass off the boards where the wingercan skate into it. This type of strategy is intimidating for theopposition because they will generally move at least one of theirDs back and often they get caught with a soft or loose gap in theneutral zone. They will definitely be worried about giving up abreakaway and as a result may not hold the blue line as tightly.The space between the attacking players and defensive players isgenerally referred to as the gap. On offense, a loose gap gives youa chance to make plays in front of the defensive team and havemore time. The defensive team wants to have a tight gap toeliminate time and space. Figure 1.1 Leaving the zone early on the breakout.
Center
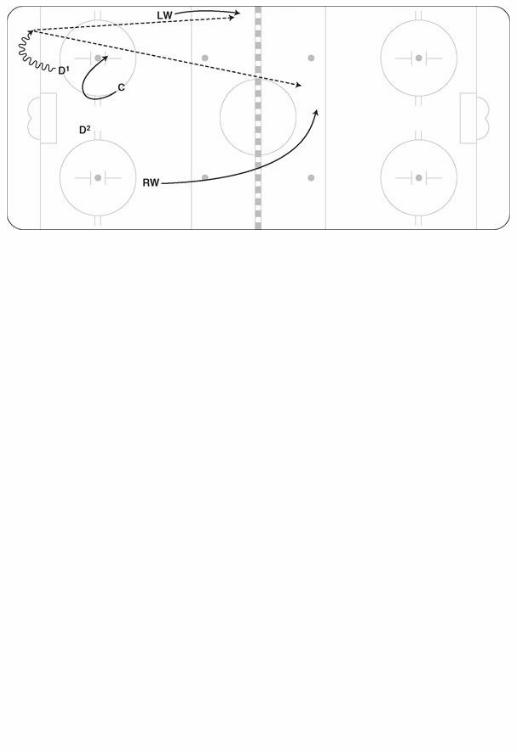
The center usually plays low in the defensive zone, but as notedunder the section on defensive zone coverage, any forward couldbe the low player. The player who plays low defensively isusually very good in coverage and breakout situations. Often thelow forward is involved in getting the puck back from theopposition, so other than a dumped-in puck, his position on thebreakout will seldom vary. The low forward provides the defensewith a mid-ice option on all breakouts. If the puck is passed up theboards, then he is in a support position for the winger, who maybring the puck inside, make a direct pass, or chip it off the boards.The center or low forward must be available for a pass but also ina position to react defensively if there is a turnover.
When passes are made up the boards, centers need to comefrom underneath the pass and skate into a support position. It isimportant to be cautious in this position because anything couldhappen, and if a turnover occurs during the breakout, the center orlow forward must be ready to defend.
Strong-Side Winger
The strong-side winger on the breakout must be available on theboards for a direct or rimmed puck. We like the winger to be in ahigher position above the circles so that the pass from thedefenseman or center advances the puck as far up ice as possible.If the other team pinches or closes down on the winger as the passis being made, then it is important for the winger to fight the battleup higher on the boards. He can try to box out the pinchingdefenseman by backing into him as the puck is being passed up.. Ifthe winger starts the breakout lower on the boards and not uphigher as suggested, then it will take more time and potentiallymore passes to get over the blue line, which often results inturnovers. The winger must be strong in all board battles becausea turnover here may be costly and lead to extended time in thedefensive zone and often an opportunity for the opposition tocreate scoring chances.
Back-Side Winger
The back-side winger on the breakout may skate one of threeroutes:
1. As the puck advances up the far side, the winger may moveacross for support and a pass or move to a puck that ischipped off the boards into the neutral zone. The wingercoming across creates more options than the wingerstaying wide, and the success of this strategy relies onshort passes or chip plays. Short passes or chip plays aredefinitely easier to execute than long cross-ice passes,which are often intercepted.
2. As the puck advances up the far side, the winger may staywide so that they avoid checking pressure from the otherteam. This wide pass is more difficult to make but oncemade usually provides more skating room for the wingerbecause he will be on the outside shoulder of theopponent’s defense and can drive in the wide lane.
3. Because of the elimination of the red line a few years ago,some coaches like to give the green light for the widewinger to leave the zone early and be available by movingin the neutral zone. This is effective because the oppositionwill have to back one of their defensemen out of the zone,and as a result the back-side winger can move into openice much easier as the pass is made. The only problemwith doing this is that playing four on four in yourdefensive zone is more difficult than five on five.
Goaltender
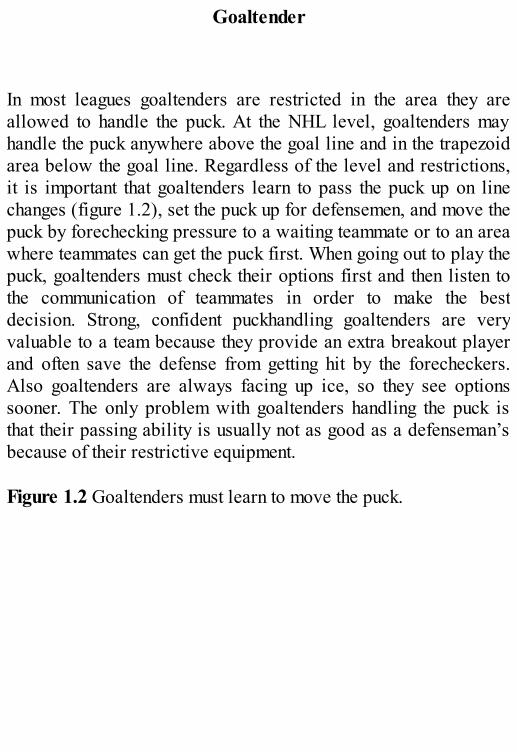
In most leagues goaltenders are restricted in the area they areallowed to handle the puck. At the NHL level, goaltenders mayhandle the puck anywhere above the goal line and in the trapezoidarea below the goal line. Regardless of the level and restrictions,it is important that goaltenders learn to pass the puck up on linechanges (figure 1.2), set the puck up for defensemen, and move thepuck by forechecking pressure to a waiting teammate or to an areawhere teammates can get the puck first. When going out to play thepuck, goaltenders must check their options first and then listen tothe communication of teammates in order to make the bestdecision. Strong, confident puckhandling goaltenders are veryvaluable to a team because they provide an extra breakout playerand often save the defense from getting hit by the forecheckers.Also goaltenders are always facing up ice, so they see optionssooner. The only problem with goaltenders handling the puck isthat their passing ability is usually not as good as a defenseman’sbecause of their restrictive equipment. Figure 1.2 Goaltenders must learn to move the puck.
Defense
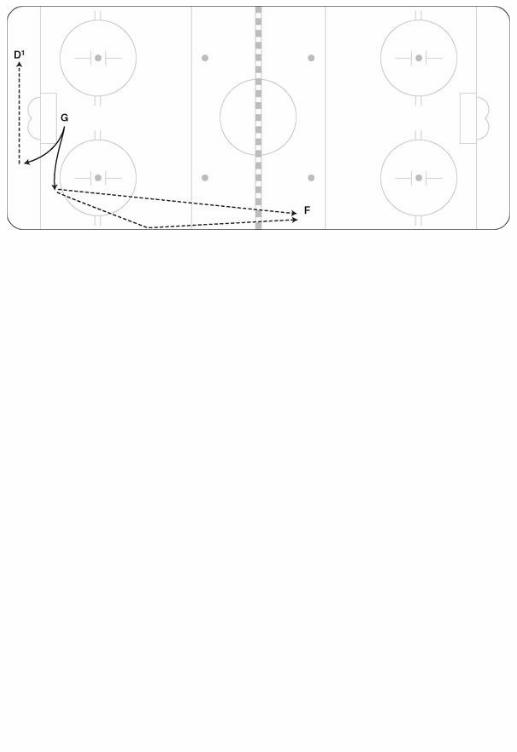
Coaches may have a different philosophy on this, but we believethe defense should be prepared to move into the breakout once asuccessful pass is made. Some coaches believe the defensemenshould “stay at home,” or always keep the play in front of them.This is a sound philosophy but significantly eliminates attackoptions. The key is a successful pass. The defenseman who jumpsinto the breakout should be the back-side D, while the puck-moving D holds a more defensive position after making the pass(figure 1.3a). The back-side D is in a better position to read theplay because he is not involved in retrieving the puck and isgenerally waiting at the net for the play to develop. Sometimes indefensive zone coverage and in other breakout situations the centeris caught low, so it is imperative that the net defenseman be readyand available for a breakout pass (figure 1.3b). Figure 1.3 (a) The defense joining the breakout and (b) the centercaught low.
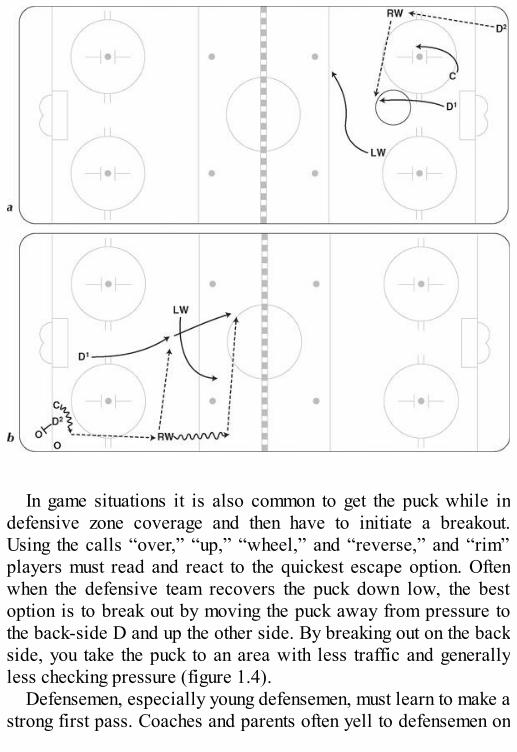
In game situations it is also common to get the puck while indefensive zone coverage and then have to initiate a breakout.Using the calls “over,” “up,” “wheel,” and “reverse,” and “rim”players must read and react to the quickest escape option. Oftenwhen the defensive team recovers the puck down low, the bestoption is to break out by moving the puck away from pressure tothe back-side D and up the other side. By breaking out on the backside, you take the puck to an area with less traffic and generallyless checking pressure (figure 1.4).
Defensemen, especially young defensemen, must learn to make astrong first pass. Coaches and parents often yell to defensemen on
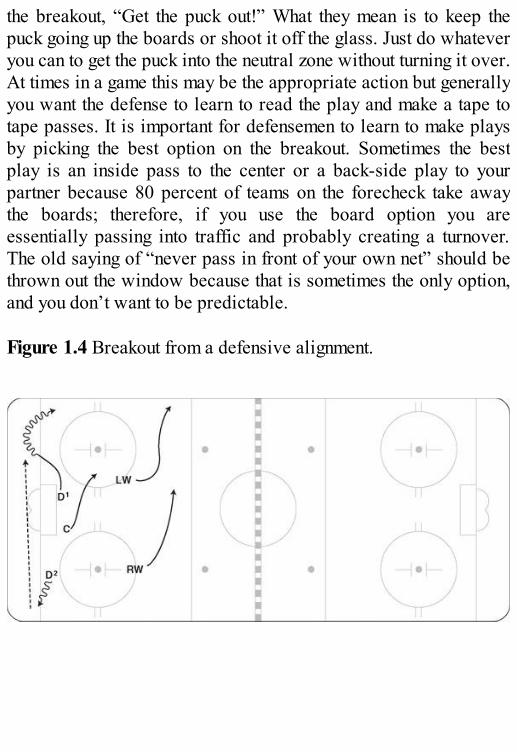
the breakout, “Get the puck out!” What they mean is to keep thepuck going up the boards or shoot it off the glass. Just do whateveryou can to get the puck into the neutral zone without turning it over.At times in a game this may be the appropriate action but generallyyou want the defense to learn to read the play and make a tape totape passes. It is important for defensemen to learn to make playsby picking the best option on the breakout. Sometimes the bestplay is an inside pass to the center or a back-side play to yourpartner because 80 percent of teams on the forecheck take awaythe boards; therefore, if you use the board option you areessentially passing into traffic and probably creating a turnover.The old saying of “never pass in front of your own net” should bethrown out the window because that is sometimes the only option,and you don’t want to be predictable. Figure 1.4 Breakout from a defensive alignment.
Breakout Plays
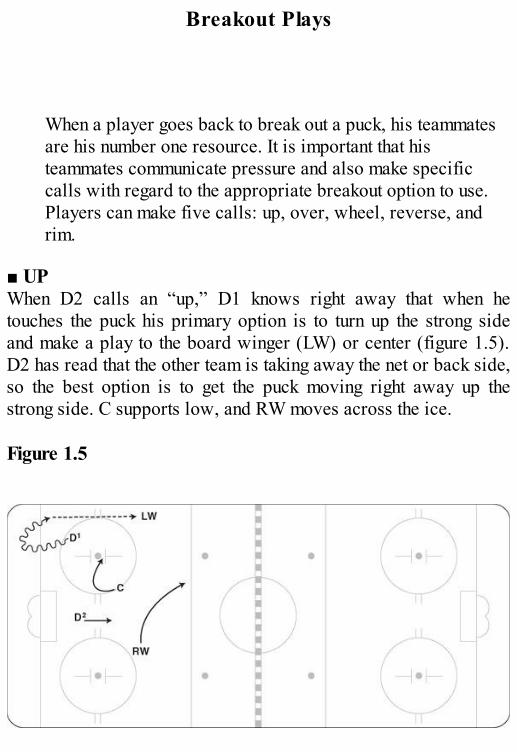
When a player goes back to break out a puck, his teammatesare his number one resource. It is important that histeammates communicate pressure and also make specificcalls with regard to the appropriate breakout option to use.Players can make five calls: up, over, wheel, reverse, andrim.
■ UPWhen D2 calls an “up,” D1 knows right away that when hetouches the puck his primary option is to turn up the strong sideand make a play to the board winger (LW) or center (figure 1.5).D2 has read that the other team is taking away the net or back side,so the best option is to get the puck moving right away up thestrong side. C supports low, and RW moves across the ice. Figure 1.5
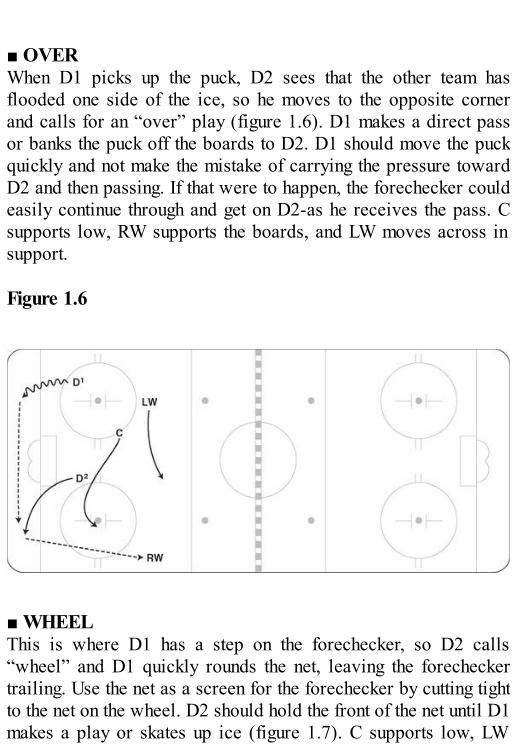
■ OVERWhen D1 picks up the puck, D2 sees that the other team hasflooded one side of the ice, so he moves to the opposite cornerand calls for an “over” play (figure 1.6). D1 makes a direct passor banks the puck off the boards to D2. D1 should move the puckquickly and not make the mistake of carrying the pressure towardD2 and then passing. If that were to happen, the forechecker couldeasily continue through and get on D2-as he receives the pass. Csupports low, RW supports the boards, and LW moves across insupport. Figure 1.6
■ WHEELThis is where D1 has a step on the forechecker, so D2 calls“wheel” and D1 quickly rounds the net, leaving the forecheckertrailing. Use the net as a screen for the forechecker by cutting tightto the net on the wheel. D2 should hold the front of the net until D1makes a play or skates up ice (figure 1.7). C supports low, LW
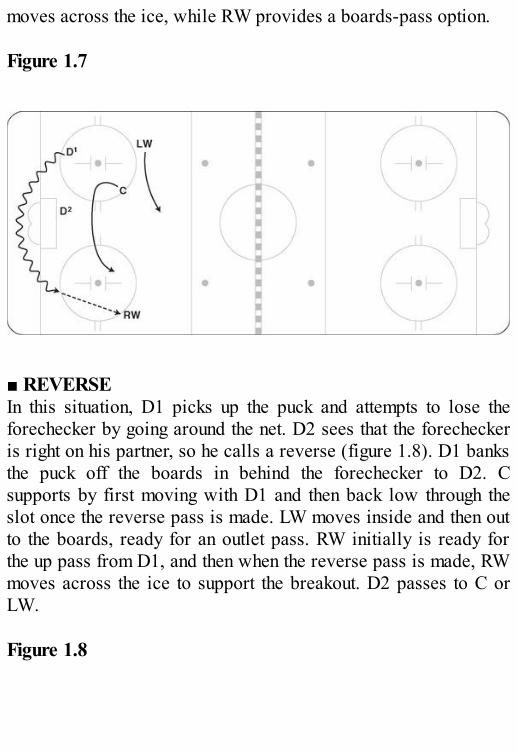
moves across the ice, while RW provides a boards-pass option. Figure 1.7
■ REVERSEIn this situation, D1 picks up the puck and attempts to lose theforechecker by going around the net. D2 sees that the forecheckeris right on his partner, so he calls a reverse (figure 1.8). D1 banksthe puck off the boards in behind the forechecker to D2. Csupports by first moving with D1 and then back low through theslot once the reverse pass is made. LW moves inside and then outto the boards, ready for an outlet pass. RW initially is ready forthe up pass from D1, and then when the reverse pass is made, RWmoves across the ice to support the breakout. D2 passes to C orLW. Figure 1.8
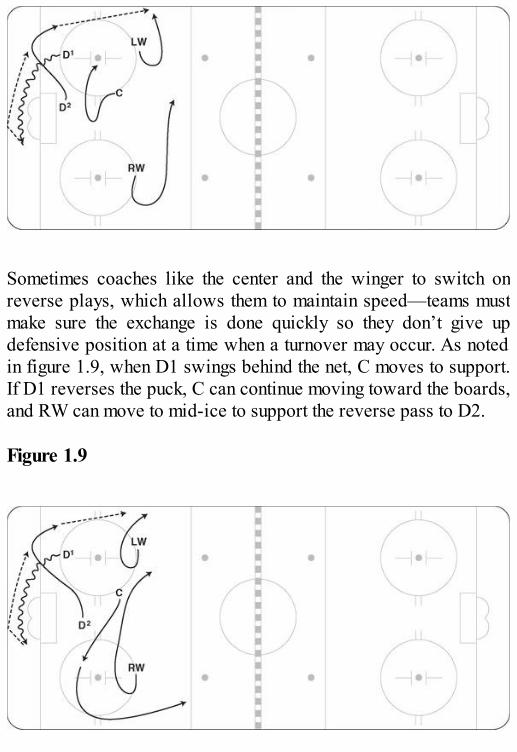
Sometimes coaches like the center and the winger to switch onreverse plays, which allows them to maintain speed—teams mustmake sure the exchange is done quickly so they don’t give updefensive position at a time when a turnover may occur. As notedin figure 1.9, when D1 swings behind the net, C moves to support.If D1 reverses the puck, C can continue moving toward the boards,and RW can move to mid-ice to support the reverse pass to D2. Figure 1.9
The final option for reverse plays is for D1 to reverse thepuck to C in the strong-side corner. This allows the breakoutteam to spread out and makes it difficult for the forecheckersto take away all options. D2 supports the wide side, lookingfor an over pass, and D1 reverses the puck to C, who shouldcall this option.
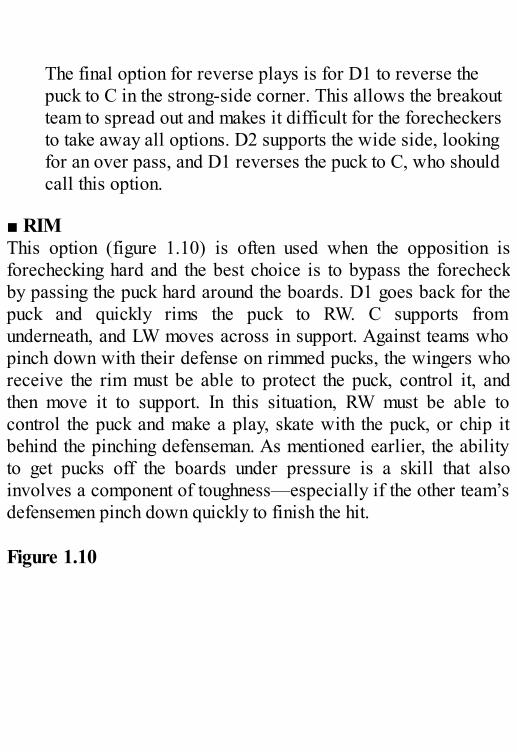
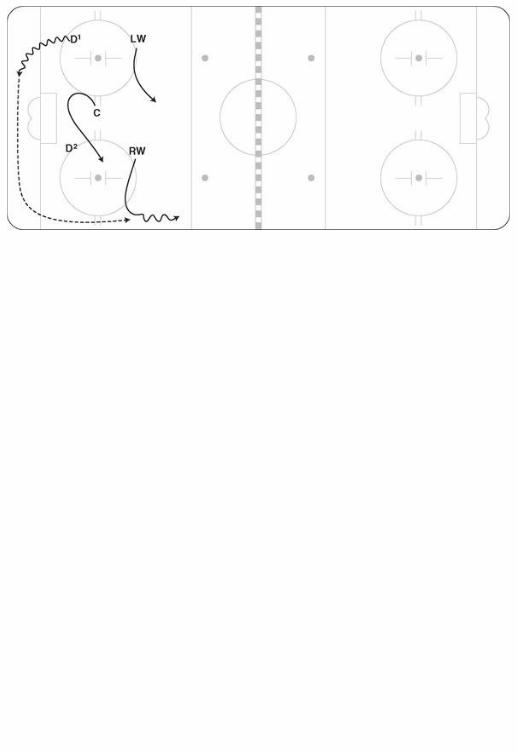
■ RIMThis option (figure 1.10) is often used when the opposition isforechecking hard and the best choice is to bypass the forecheckby passing the puck hard around the boards. D1 goes back for thepuck and quickly rims the puck to RW. C supports fromunderneath, and LW moves across in support. Against teams whopinch down with their defense on rimmed pucks, the wingers whoreceive the rim must be able to protect the puck, control it, andthen move it to support. In this situation, RW must be able tocontrol the puck and make a play, skate with the puck, or chip itbehind the pinching defenseman. As mentioned earlier, the abilityto get pucks off the boards under pressure is a skill that alsoinvolves a component of toughness—especially if the other team’sdefensemen pinch down quickly to finish the hit. Figure 1.10
Control Breakouts
There are times when your team gets the puck and theopposing players have already pulled back into a trapforecheck. They are back toward the neutral zone waiting forthe breakout to take place and looking to turn the puck over.Instead of freelancing your way through the trap and manytimes being unsuccessful, it is better to move out together in acoordinated fashion. This is called a control breakout.
Unless you come out of your zone in a controlled mannerwith set patterns for the five players, it is too easy for theopponent to create a turnover. There are two key factors in acontrolled breakout: (1) the four players without the puckmove with speed, and (2) the puck carrier knows the optionsand picks the best one. In a control setup, the puck carrier islike a quarterback who knows the routes of the receivers andpicks which option is open. This section includes diagramsof three control breakouts where the effect of moving in acoordinated fashion will provide you with enough options tobreak the trap. They are all equally successful, but it isdifficult to learn and execute all three, so coaches shouldpick one and practice it over and over until it becomesautomatic. Often when these breakouts are run effectively,they not only result in breaking the trap but also generate ascoring chance.
In all control breakout situations, the idea is to give thedefenseman with the puck more options than the oppositioncan take away. It is up to the defenseman to make the rightchoice, but the coaching staff must also prepare the team forspecific options that may work against certain opponents.
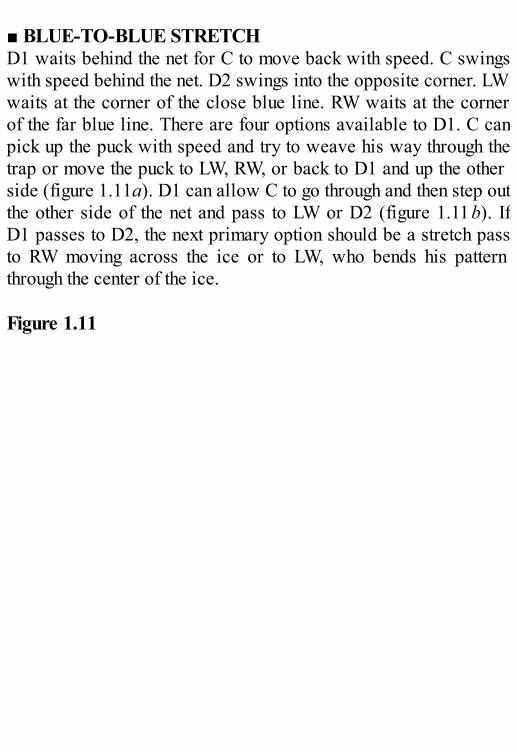
■ BLUE-TO-BLUE STRETCHD1 waits behind the net for C to move back with speed. C swingswith speed behind the net. D2 swings into the opposite corner. LWwaits at the corner of the close blue line. RW waits at the cornerof the far blue line. There are four options available to D1. C canpick up the puck with speed and try to weave his way through thetrap or move the puck to LW, RW, or back to D1 and up the otherside (figure 1.11a). D1 can allow C to go through and then step outthe other side of the net and pass to LW or D2 (figure 1.11b). IfD1 passes to D2, the next primary option should be a stretch passto RW moving across the ice or to LW, who bends his patternthrough the center of the ice. Figure 1.11
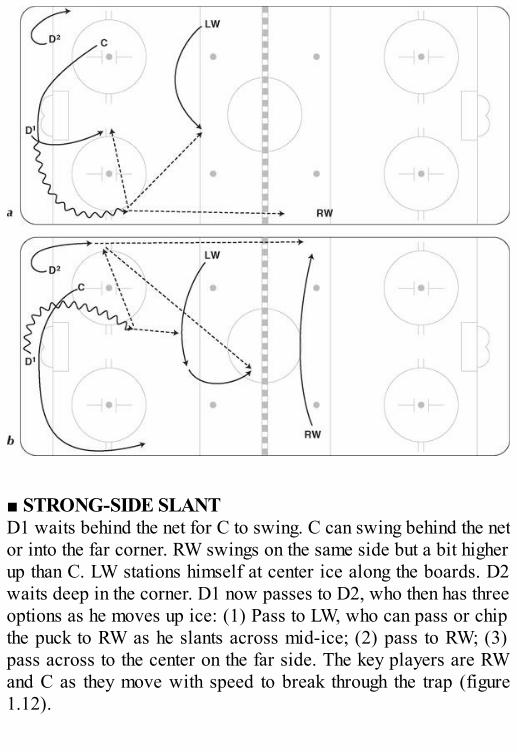
■ STRONG-SIDE SLANTD1 waits behind the net for C to swing. C can swing behind the netor into the far corner. RW swings on the same side but a bit higherup than C. LW stations himself at center ice along the boards. D2waits deep in the corner. D1 now passes to D2, who then has threeoptions as he moves up ice: (1) Pass to LW, who can pass or chipthe puck to RW as he slants across mid-ice; (2) pass to RW; (3)pass across to the center on the far side. The key players are RWand C as they move with speed to break through the trap (figure1.12).
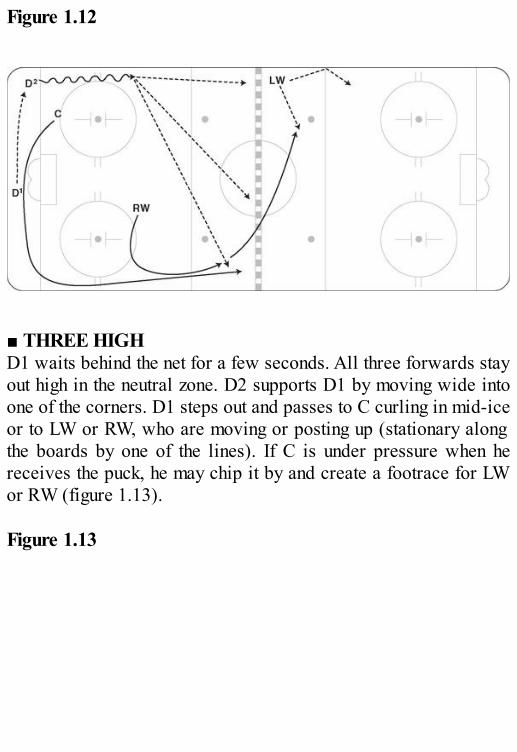
Figure 1.12
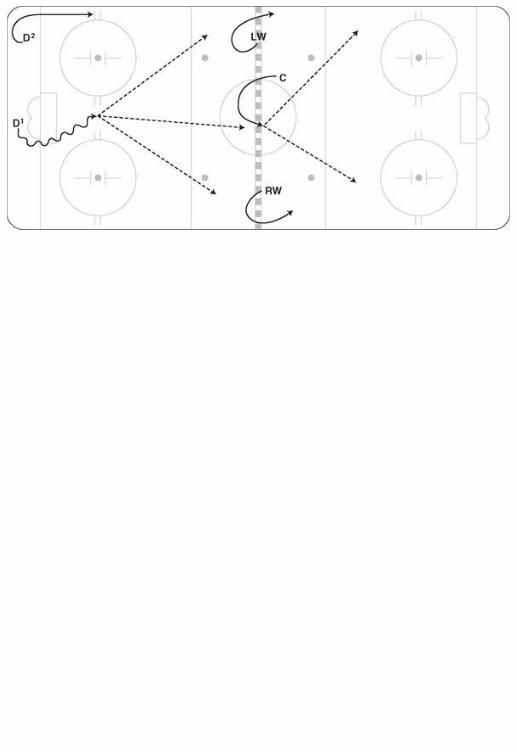
■ THREE HIGHD1 waits behind the net for a few seconds. All three forwards stayout high in the neutral zone. D2 supports D1 by moving wide intoone of the corners. D1 steps out and passes to C curling in mid-iceor to LW or RW, who are moving or posting up (stationary alongthe boards by one of the lines). If C is under pressure when hereceives the puck, he may chip it by and create a footrace for LWor RW (figure 1.13). Figure 1.13
Chapter 2
Neutral Zone Counters and Regroups
For the purpose of clarity, this section deals with plays thatoriginate in the neutral zone as opposed to plays that originate inthe defensive zone and move through the neutral zone. There arebasically two types of attacks that involve the neutral zone: (1) therush, which is a continuation of the breakout, or (2) regroups andcounters. All rush plays are covered in the next chapter onoffensive zone entries. This chapter focuses on transition playssuch as quick counters and regroups. Puck possession in theneutral zone usually results from a turnover or face-off. When the
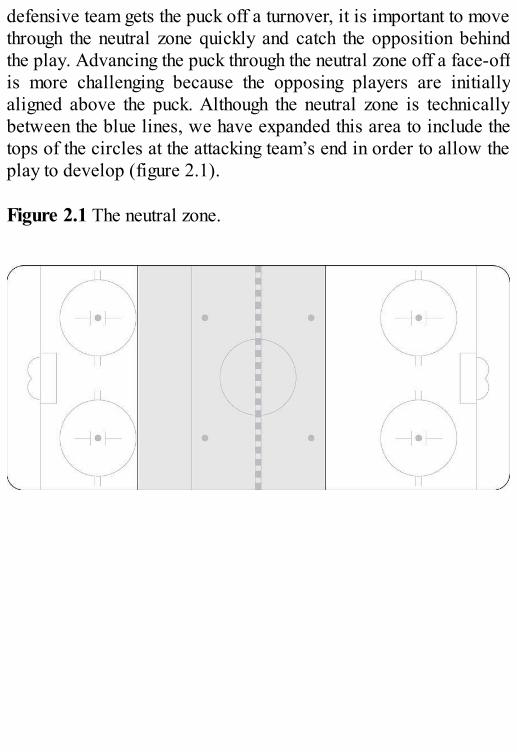
defensive team gets the puck off a turnover, it is important to movethrough the neutral zone quickly and catch the opposition behindthe play. Advancing the puck through the neutral zone off a face-offis more challenging because the opposing players are initiallyaligned above the puck. Although the neutral zone is technicallybetween the blue lines, we have expanded this area to include thetops of the circles at the attacking team’s end in order to allow theplay to develop (figure 2.1). Figure 2.1 The neutral zone.
Counters
The difference between counters and regroups is that countersrequire speed while regroups are more controlled. A team wantsto counter quickly when the opponent isn’t set up in a neutral zoneforecheck. Quick counters often result in odd-man rushes. Whenthe turnover happens, the opposition is moving aggressively on theattack and often cannot react quickly enough to get back. This iswhy it is important to practice counters with speed. When a teamcounters, the intent is to catch the opponent moving toward theoffensive zone and then quickly pass the puck up to the forwardsand hopefully get an odd-man rush. If this happens 50 percent ofthe time, then your team would be considered a very goodtransition team. The other 50 percent of the time the pass isconfronted by pressure, and the puck carrier must look for a playor dump the puck into the offensive zone.
Practice repetition will help teach defensemen to read theforecheck and then pick the appropriate option. There are timeswhen players counter quickly but then the puck carrier isconfronted or runs out of space to carry the puck, which leaves theplayer with only two options: either dump the puck in or chipbehind pressure.
Dump-Ins
Dumping the puck in is one counter option when players areconfronted. Some teams like to designate where to always dumpthe puck so that skaters off the puck will know which area to movetoward. There are four options for players when dumping thepuck.
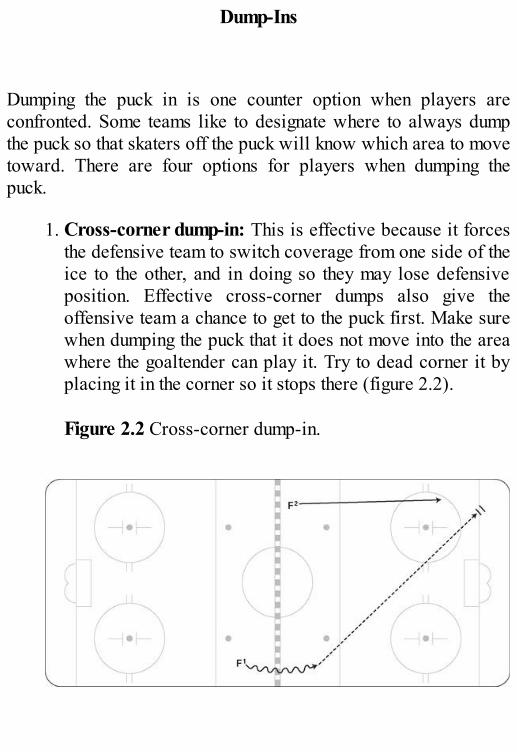
1. Cross-corner dump-in: This is effective because it forcesthe defensive team to switch coverage from one side of theice to the other, and in doing so they may lose defensiveposition. Effective cross-corner dumps also give theoffensive team a chance to get to the puck first. Make surewhen dumping the puck that it does not move into the areawhere the goaltender can play it. Try to dead corner it byplacing it in the corner so it stops there (figure 2.2).
Figure 2.2 Cross-corner dump-in.
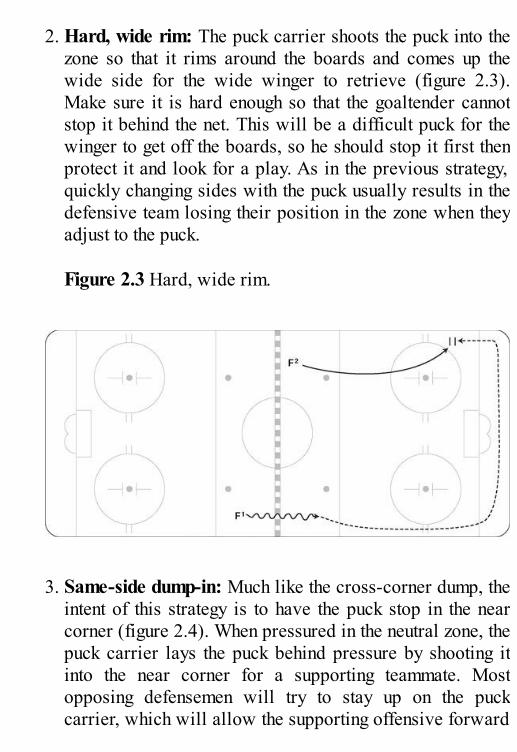
2. Hard, wide rim: The puck carrier shoots the puck into the
zone so that it rims around the boards and comes up thewide side for the wide winger to retrieve (figure 2.3).Make sure it is hard enough so that the goaltender cannotstop it behind the net. This will be a difficult puck for thewinger to get off the boards, so he should stop it first thenprotect it and look for a play. As in the previous strategy,quickly changing sides with the puck usually results in thedefensive team losing their position in the zone when theyadjust to the puck.
Figure 2.3 Hard, wide rim.
3. Same-side dump-in: Much like the cross-corner dump, theintent of this strategy is to have the puck stop in the nearcorner (figure 2.4). When pressured in the neutral zone, thepuck carrier lays the puck behind pressure by shooting itinto the near corner for a supporting teammate. Mostopposing defensemen will try to stay up on the puckcarrier, which will allow the supporting offensive forward
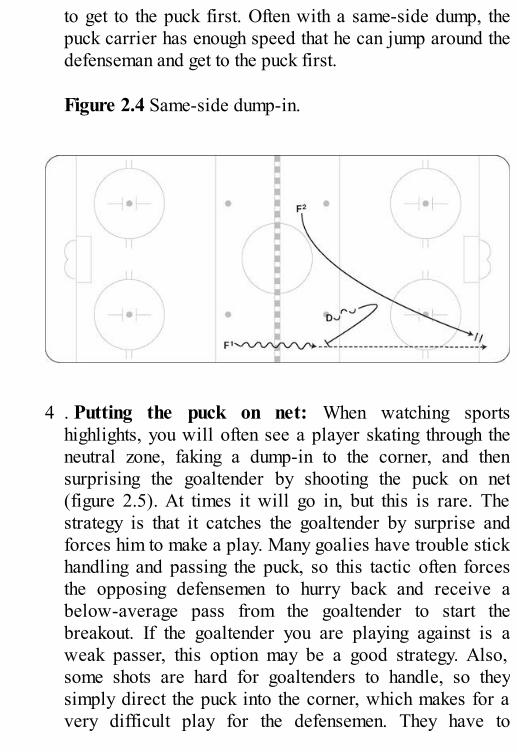
to get to the puck first. Often with a same-side dump, thepuck carrier has enough speed that he can jump around thedefenseman and get to the puck first.
Figure 2.4 Same-side dump-in.
4 . Putting the puck on net: When watching sportshighlights, you will often see a player skating through theneutral zone, faking a dump-in to the corner, and thensurprising the goaltender by shooting the puck on net(figure 2.5). At times it will go in, but this is rare. Thestrategy is that it catches the goaltender by surprise andforces him to make a play. Many goalies have trouble stickhandling and passing the puck, so this tactic often forcesthe opposing defensemen to hurry back and receive abelow-average pass from the goaltender to start thebreakout. If the goaltender you are playing against is aweak passer, this option may be a good strategy. Also,some shots are hard for goaltenders to handle, so theysimply direct the puck into the corner, which makes for avery difficult play for the defensemen. They have to
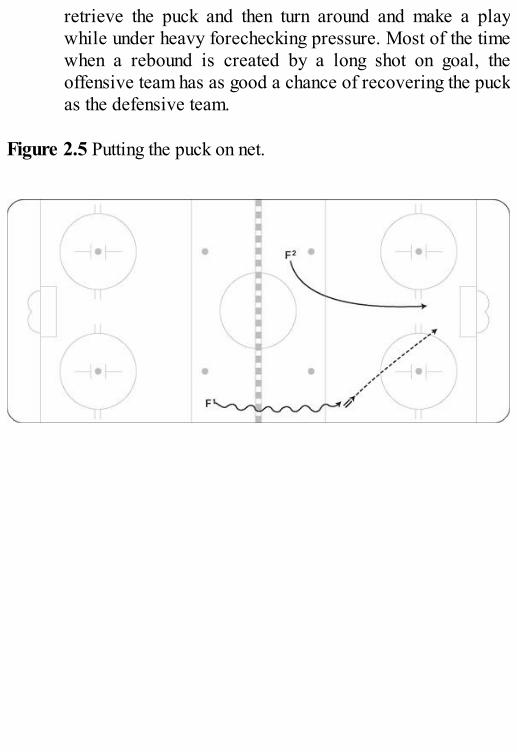
retrieve the puck and then turn around and make a playwhile under heavy forechecking pressure. Most of the timewhen a rebound is created by a long shot on goal, theoffensive team has as good a chance of recovering the puckas the defensive team.
Figure 2.5 Putting the puck on net.
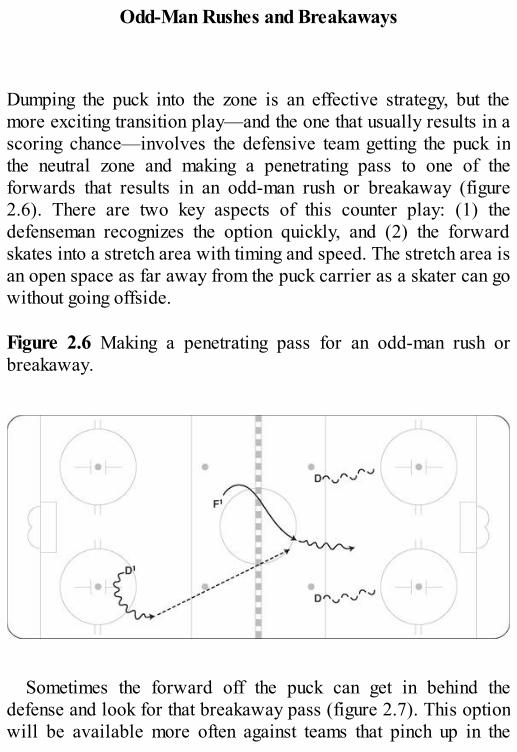
Odd-Man Rushes and Breakaways
Dumping the puck into the zone is an effective strategy, but themore exciting transition play—and the one that usually results in ascoring chance—involves the defensive team getting the puck inthe neutral zone and making a penetrating pass to one of theforwards that results in an odd-man rush or breakaway (figure2.6). There are two key aspects of this counter play: (1) thedefenseman recognizes the option quickly, and (2) the forwardskates into a stretch area with timing and speed. The stretch area isan open space as far away from the puck carrier as a skater can gowithout going offside. Figure 2.6 Making a penetrating pass for an odd-man rush orbreakaway.
Sometimes the forward off the puck can get in behind thedefense and look for that breakaway pass (figure 2.7). This optionwill be available more often against teams that pinch up in the
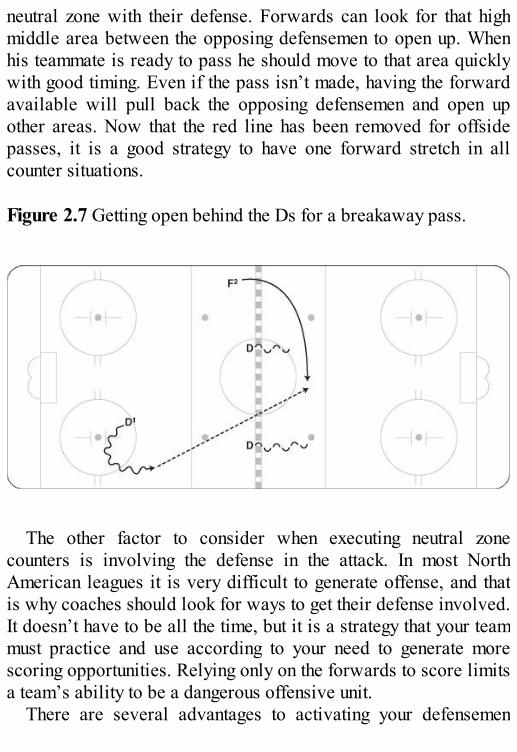
neutral zone with their defense. Forwards can look for that highmiddle area between the opposing defensemen to open up. Whenhis teammate is ready to pass he should move to that area quicklywith good timing. Even if the pass isn’t made, having the forwardavailable will pull back the opposing defensemen and open upother areas. Now that the red line has been removed for offsidepasses, it is a good strategy to have one forward stretch in allcounter situations. Figure 2.7 Getting open behind the Ds for a breakaway pass.
The other factor to consider when executing neutral zonecounters is involving the defense in the attack. In most NorthAmerican leagues it is very difficult to generate offense, and thatis why coaches should look for ways to get their defense involved.It doesn’t have to be all the time, but it is a strategy that your teammust practice and use according to your need to generate morescoring opportunities. Relying only on the forwards to score limitsa team’s ability to be a dangerous offensive unit.
There are several advantages to activating your defensemen
through the neutral zone:
It gives you one more passing option. It provides the defensive team with one more player tocover, often confusing their defensive system. It prepares the attack to have a late or mid-ice threat fromthe defense. If the defensemen wait too long to join theattack, they won’t be a factor in the offensive zone. Having a defenseman in the play often backs off theopposing defense, therefore giving the puck carrier moretime to skate or make a decision. It is important to note thatdefensemen cannot jump indiscriminately into an attack.The decision to activate must always be based on thequality of puck possession. If the puck carrier has goodpossession, then the defenseman can move to become anoption; if not, he should stay back.
Here are three ways that defensemen can activate on counters.
■ BACK-SIDE OPTIONIn this situation, the defenseman sees the pass being made on thestrong side and jumps up the back side to look for a pass or enterthe zone as a late option (figure 2.8). When seeing D2 activate, D1must move to a mid-ice position in case of a breakdown. Figure 2.8
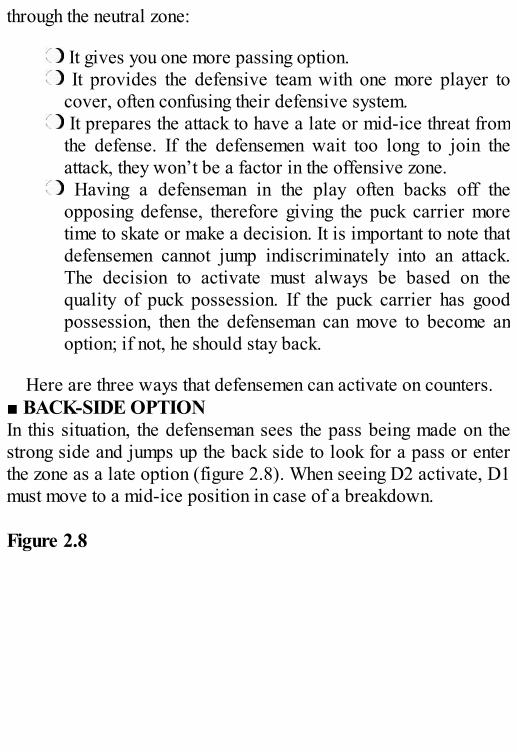
■ PASS AND GOHere the defenseman recognizes after he passes up the strong sidethat the forward will need an option right away, so he moves intothe opening for a potential inside play (figure 2.9). When seeingD1 activate, D2 must stay in mid-ice and behind the play. Figure 2.9
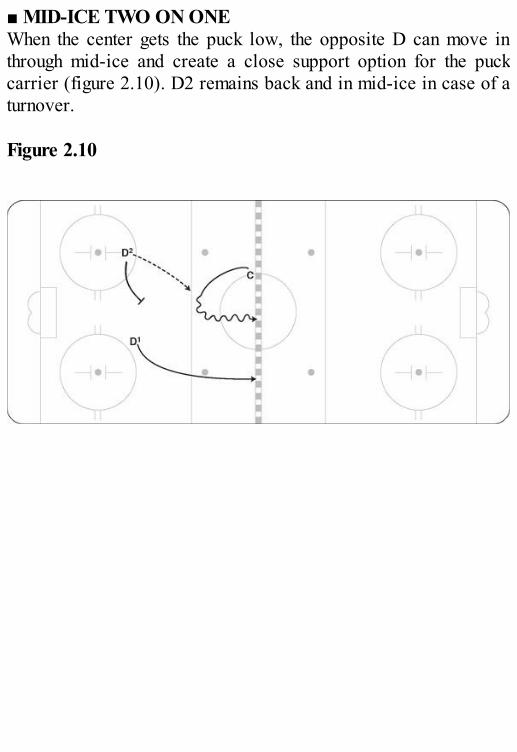
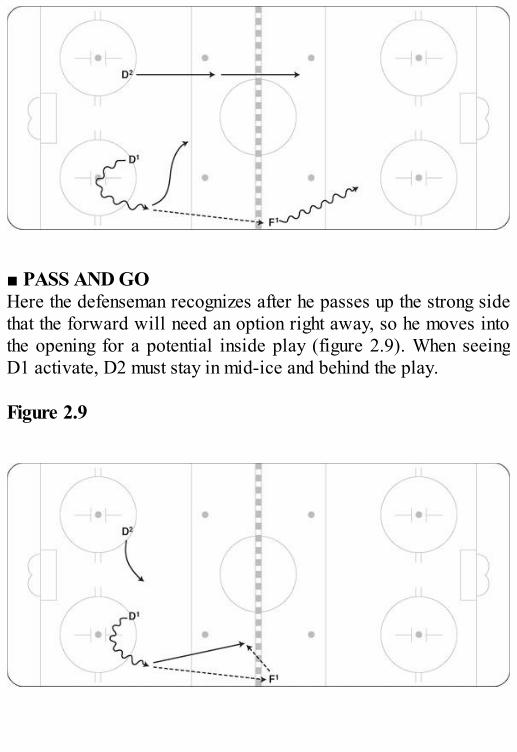
■ MID-ICE TWO ON ONEWhen the center gets the puck low, the opposite D can move inthrough mid-ice and create a close support option for the puckcarrier (figure 2.10). D2 remains back and in mid-ice in case of aturnover. Figure 2.10
Regroups
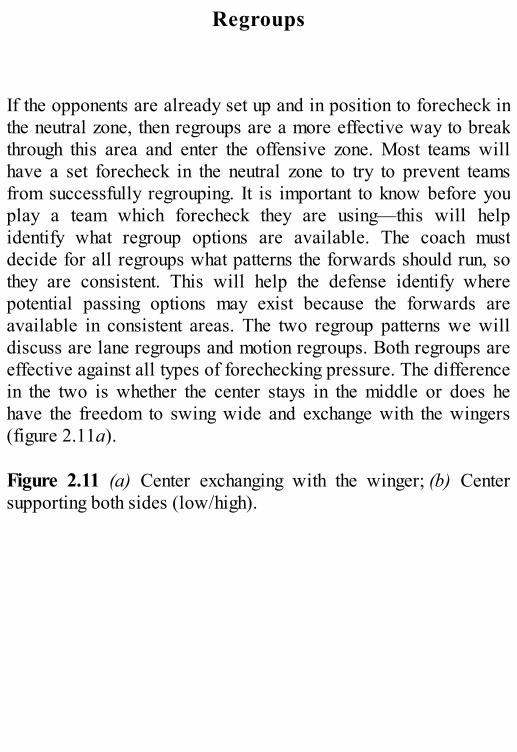
If the opponents are already set up and in position to forecheck inthe neutral zone, then regroups are a more effective way to breakthrough this area and enter the offensive zone. Most teams willhave a set forecheck in the neutral zone to try to prevent teamsfrom successfully regrouping. It is important to know before youplay a team which forecheck they are using—this will helpidentify what regroup options are available. The coach mustdecide for all regroups what patterns the forwards should run, sothey are consistent. This will help the defense identify wherepotential passing options may exist because the forwards areavailable in consistent areas. The two regroup patterns we willdiscuss are lane regroups and motion regroups. Both regroups areeffective against all types of forechecking pressure. The differencein the two is whether the center stays in the middle or does hehave the freedom to swing wide and exchange with the wingers(figure 2.11a). Figure 2.11 (a) Center exchanging with the winger; (b) Centersupporting both sides (low/high).
Lane Regroups
For the following regroups, the strong-side forward supportsthe boards while the back-side forward stretches. The centersupports both sides, either low or high (figure 2.11b). Thesequence of options for defensemen in the neutral zonedepends on how the opponents forecheck. Do they forecheckwith two forwards in a 2-1-2 system or with one forward in a1-2-2 or 1-3-1 setup? If they forecheck with one forward,does he take away the D-to-D pass, or does he take away theflat pass to the wide forward? Teams that take away the D-to-D pass eliminate the hinge play, while teams that takeaway the cross-ice pass give up the hinge play. These areimportant reads that help the defensemen choose which of thefollowing options to use.
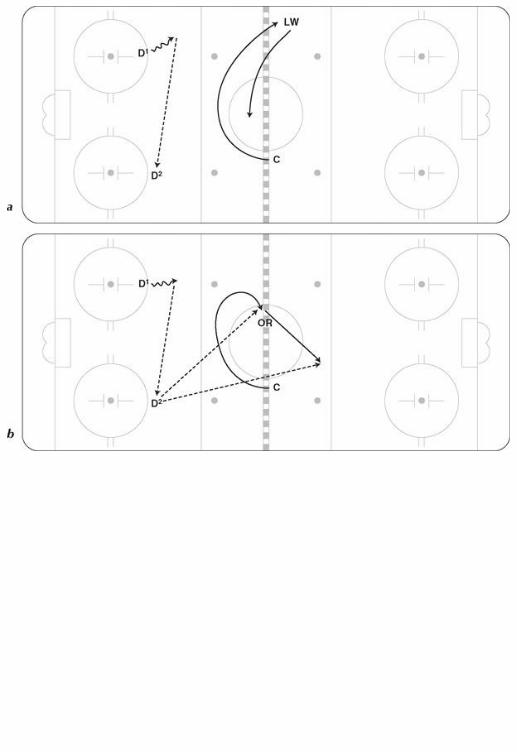
■ QUICK UPIn this situation, D1 gets the puck just inside the blue line and turnsit up quickly by passing to LW or C (figure 2.12). This should bethe first option for all teams because speed in transition usuallyresults in odd-man rushes, plus the quick-up play does not give theopposition time to set up a trap. RW stretches on the wide sideand then supports across the ice when the pass is made. Figure 2.12
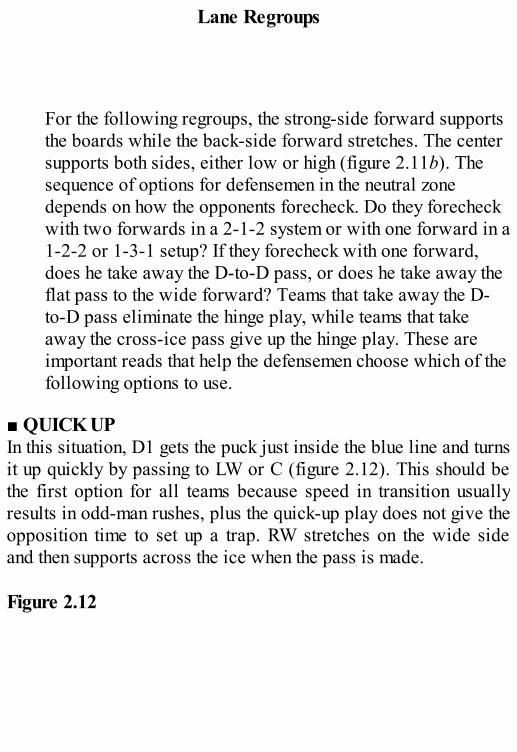
■ D-TO-D STRETCHWhen D1 gets the puck and the strong-side options are taken away,then he should immediately pass the puck to his partner (figure2.13). Once the pass is made, D1 should sink back to mid-ice toprotect his partner in case of a turnover and also to provide anoption for D2. D2 passes up to RW, who is in a stretch position bythe far blue line, or to C in mid-ice. Once the pass is made the LWmoves to support. Figure 2.13
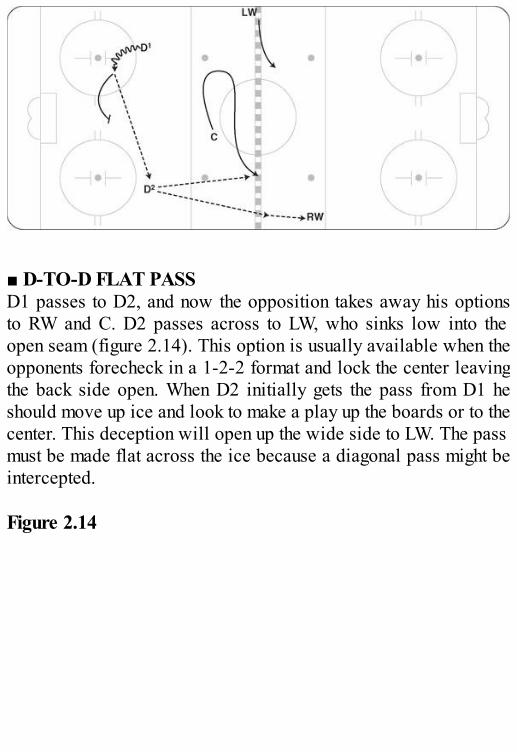
■ D-TO-D FLAT PASSD1 passes to D2, and now the opposition takes away his optionsto RW and C. D2 passes across to LW, who sinks low into theopen seam (figure 2.14). This option is usually available when theopponents forecheck in a 1-2-2 format and lock the center leavingthe back side open. When D2 initially gets the pass from D1 heshould move up ice and look to make a play up the boards or to thecenter. This deception will open up the wide side to LW. The passmust be made flat across the ice because a diagonal pass might beintercepted. Figure 2.14
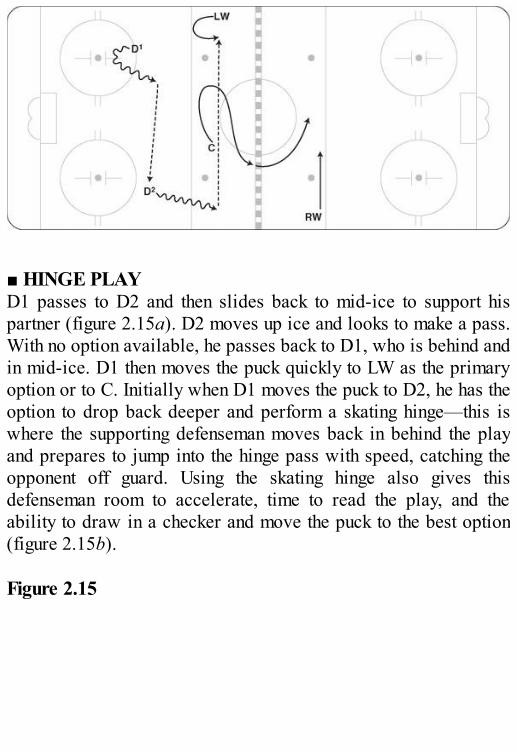
■ HINGE PLAYD1 passes to D2 and then slides back to mid-ice to support hispartner (figure 2.15a). D2 moves up ice and looks to make a pass.With no option available, he passes back to D1, who is behind andin mid-ice. D1 then moves the puck quickly to LW as the primaryoption or to C. Initially when D1 moves the puck to D2, he has theoption to drop back deeper and perform a skating hinge—this iswhere the supporting defenseman moves back in behind the playand prepares to jump into the hinge pass with speed, catching theopponent off guard. Using the skating hinge also gives thisdefenseman room to accelerate, time to read the play, and theability to draw in a checker and move the puck to the best option(figure 2.15b). Figure 2.15
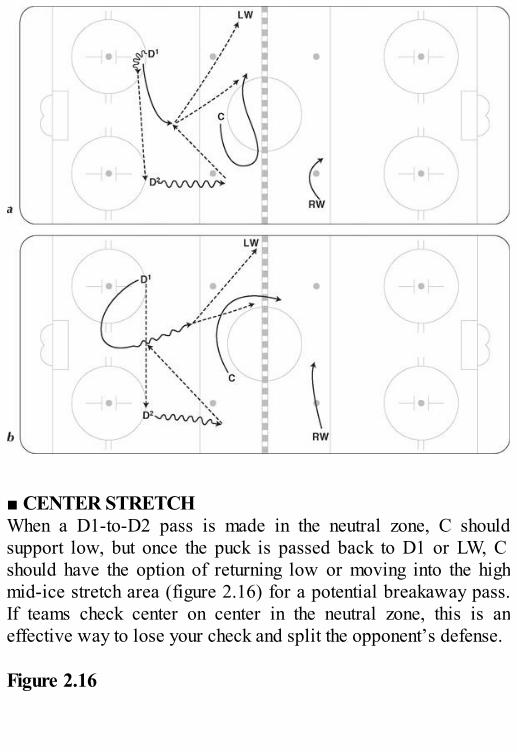
■ CENTER STRETCHWhen a D1-to-D2 pass is made in the neutral zone, C shouldsupport low, but once the puck is passed back to D1 or LW, Cshould have the option of returning low or moving into the highmid-ice stretch area (figure 2.16) for a potential breakaway pass.If teams check center on center in the neutral zone, this is aneffective way to lose your check and split the opponent’s defense. Figure 2.16
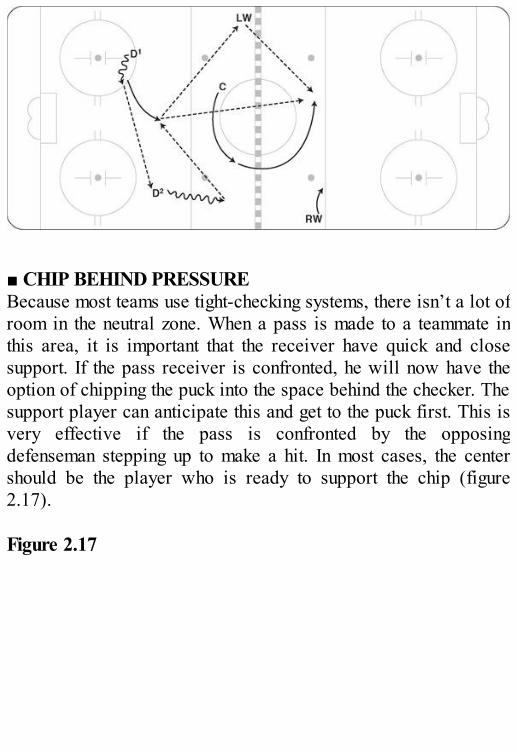
■ CHIP BEHIND PRESSUREBecause most teams use tight-checking systems, there isn’t a lot ofroom in the neutral zone. When a pass is made to a teammate inthis area, it is important that the receiver have quick and closesupport. If the pass receiver is confronted, he will now have theoption of chipping the puck into the space behind the checker. Thesupport player can anticipate this and get to the puck first. This isvery effective if the pass is confronted by the opposingdefenseman stepping up to make a hit. In most cases, the centershould be the player who is ready to support the chip (figure2.17). Figure 2.17
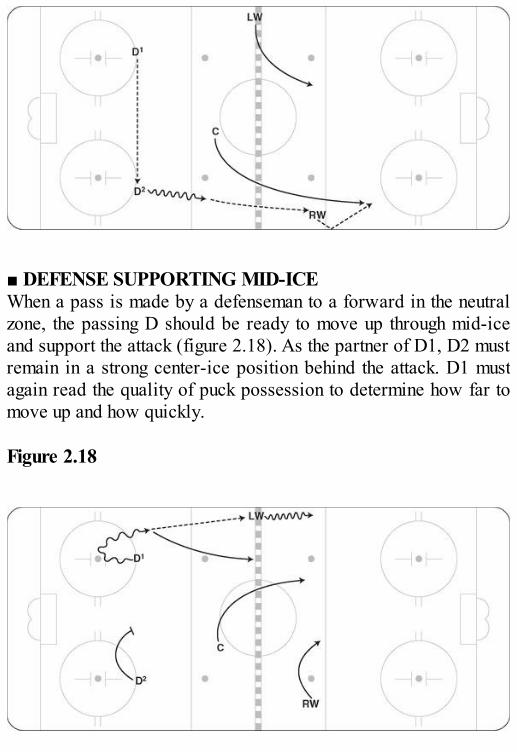
■ DEFENSE SUPPORTING MID-ICEWhen a pass is made by a defenseman to a forward in the neutralzone, the passing D should be ready to move up through mid-iceand support the attack (figure 2.18). As the partner of D1, D2 mustremain in a strong center-ice position behind the attack. D1 mustagain read the quality of puck possession to determine how far tomove up and how quickly. Figure 2.18

Motion Regroups
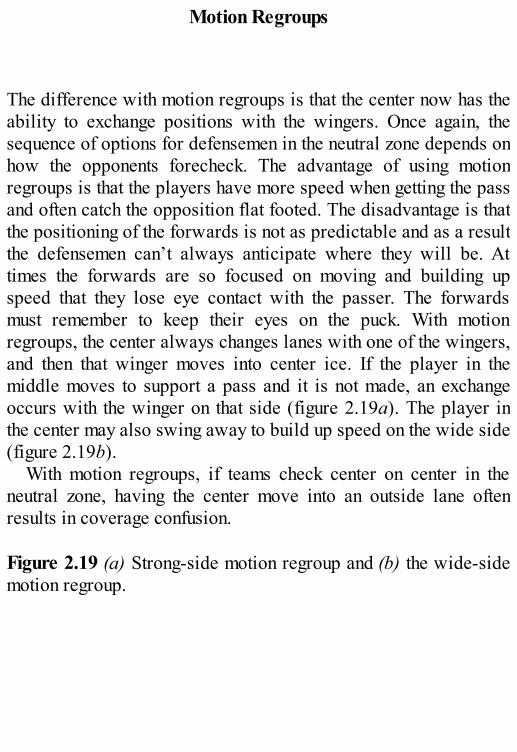
The difference with motion regroups is that the center now has theability to exchange positions with the wingers. Once again, thesequence of options for defensemen in the neutral zone depends onhow the opponents forecheck. The advantage of using motionregroups is that the players have more speed when getting the passand often catch the opposition flat footed. The disadvantage is thatthe positioning of the forwards is not as predictable and as a resultthe defensemen can’t always anticipate where they will be. Attimes the forwards are so focused on moving and building upspeed that they lose eye contact with the passer. The forwardsmust remember to keep their eyes on the puck. With motionregroups, the center always changes lanes with one of the wingers,and then that winger moves into center ice. If the player in themiddle moves to support a pass and it is not made, an exchangeoccurs with the winger on that side (figure 2.19a). The player inthe center may also swing away to build up speed on the wide side(figure 2.19b).
With motion regroups, if teams check center on center in theneutral zone, having the center move into an outside lane oftenresults in coverage confusion. Figure 2.19 (a) Strong-side motion regroup and (b) the wide-sidemotion regroup.
Using the same options presented for lane regroups, wenow look at how the passing options change with the centerleaving the mid-ice lane.
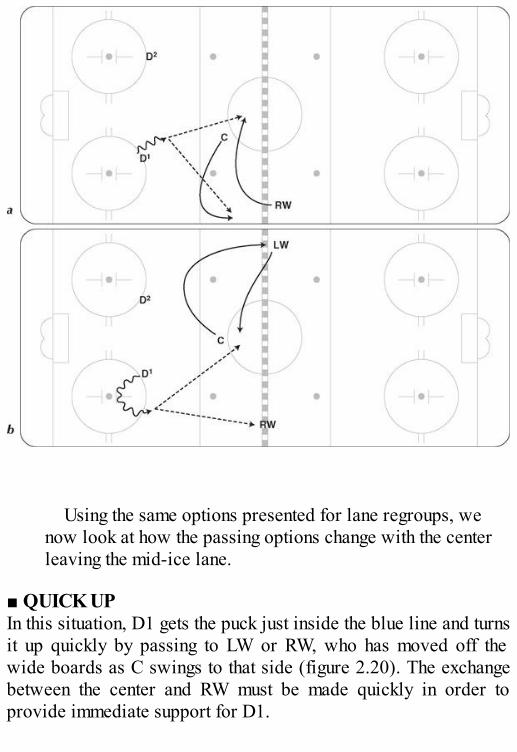
■ QUICK UPIn this situation, D1 gets the puck just inside the blue line and turnsit up quickly by passing to LW or RW, who has moved off thewide boards as C swings to that side (figure 2.20). The exchangebetween the center and RW must be made quickly in order toprovide immediate support for D1.
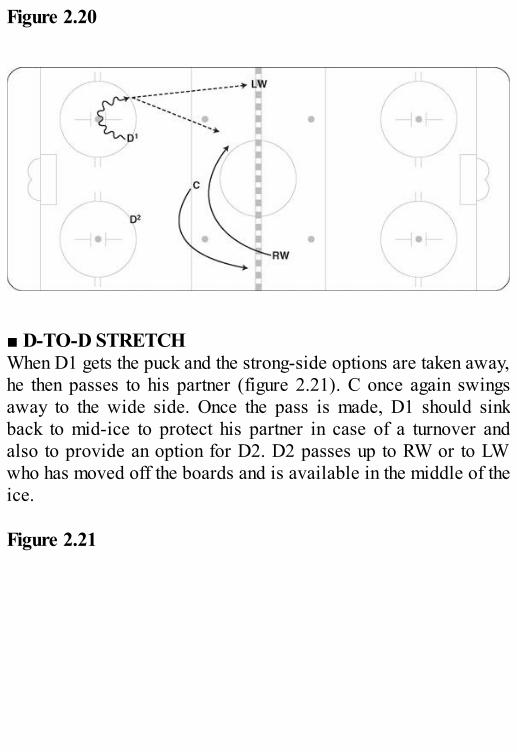
Figure 2.20
■ D-TO-D STRETCHWhen D1 gets the puck and the strong-side options are taken away,he then passes to his partner (figure 2.21). C once again swingsaway to the wide side. Once the pass is made, D1 should sinkback to mid-ice to protect his partner in case of a turnover andalso to provide an option for D2. D2 passes up to RW or to LWwho has moved off the boards and is available in the middle of theice. Figure 2.21
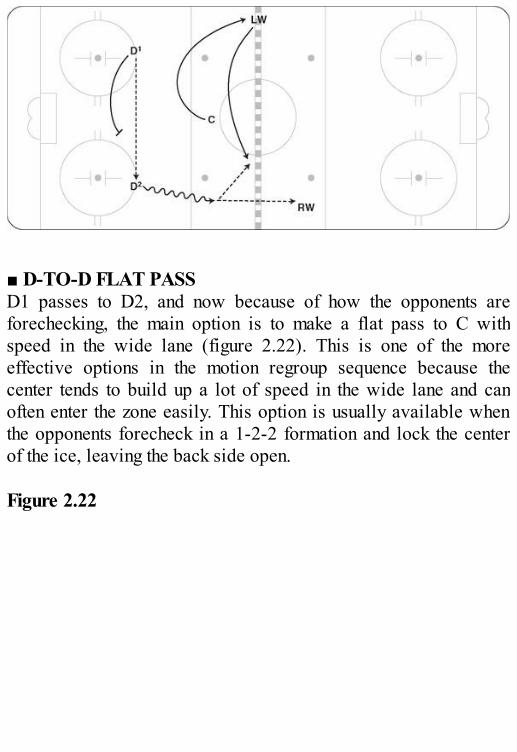
■ D-TO-D FLAT PASSD1 passes to D2, and now because of how the opponents areforechecking, the main option is to make a flat pass to C withspeed in the wide lane (figure 2.22). This is one of the moreeffective options in the motion regroup sequence because thecenter tends to build up a lot of speed in the wide lane and canoften enter the zone easily. This option is usually available whenthe opponents forecheck in a 1-2-2 formation and lock the centerof the ice, leaving the back side open. Figure 2.22
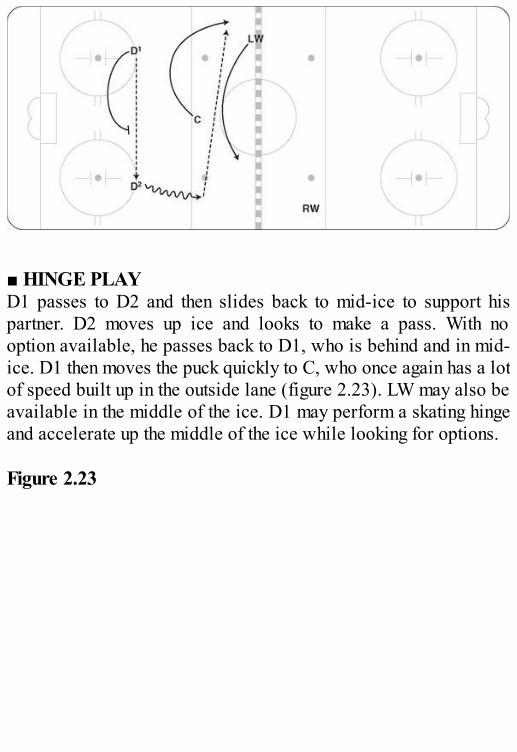
■ HINGE PLAYD1 passes to D2 and then slides back to mid-ice to support hispartner. D2 moves up ice and looks to make a pass. With nooption available, he passes back to D1, who is behind and in mid-ice. D1 then moves the puck quickly to C, who once again has a lotof speed built up in the outside lane (figure 2.23). LW may also beavailable in the middle of the ice. D1 may perform a skating hingeand accelerate up the middle of the ice while looking for options. Figure 2.23
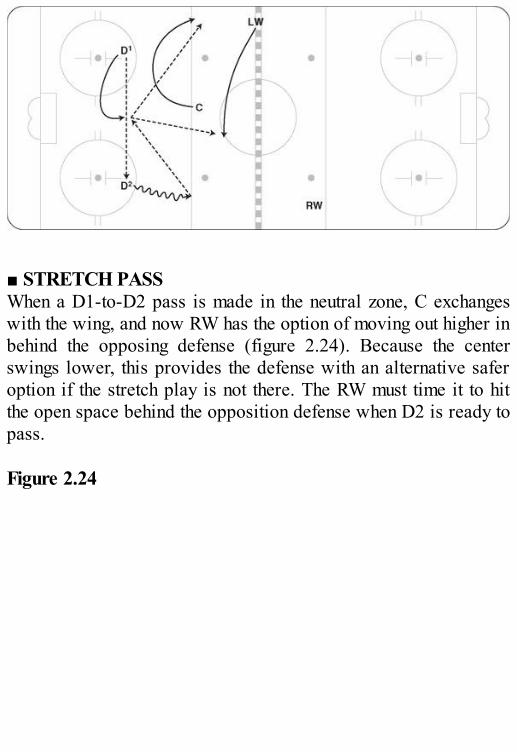
■ STRETCH PASSWhen a D1-to-D2 pass is made in the neutral zone, C exchangeswith the wing, and now RW has the option of moving out higher inbehind the opposing defense (figure 2.24). Because the centerswings lower, this provides the defense with an alternative saferoption if the stretch play is not there. The RW must time it to hitthe open space behind the opposition defense when D2 is ready topass. Figure 2.24

Chapter 3
Offensive Zone Entries
In this chapter, we deal with plays entering the offensive zone.Whether the rush starts from a successful breakout in the defensivezone or results from a counter or regroup in the neutral zone,offensive zone entry is a key strategy for generating successfulscoring chances.
Entering the offensive zone in control of the puck is everyplayer’s goal. Not turning the puck over when entering theoffensive zone is every coach’s goal. Let’s face it. We play this
game to battle for and enjoy possession of the puck. Puckpossession needs to be a key underlying philosophy, not only forplaying hockey at a high level but also for its enjoyment.
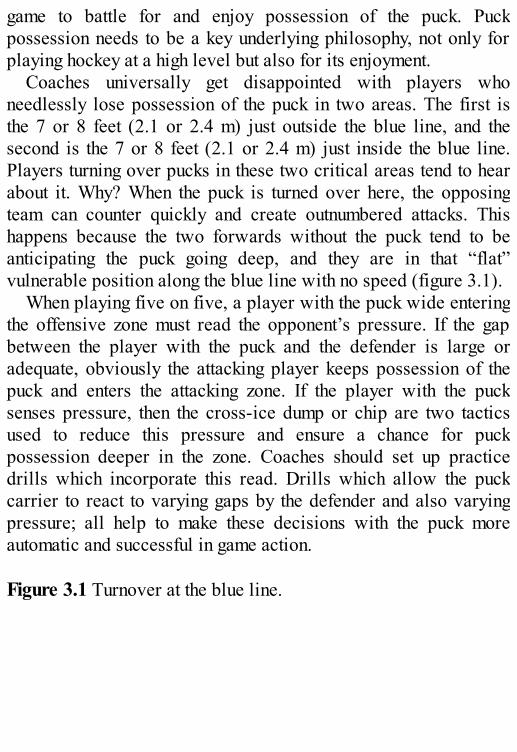
Coaches universally get disappointed with players whoneedlessly lose possession of the puck in two areas. The first isthe 7 or 8 feet (2.1 or 2.4 m) just outside the blue line, and thesecond is the 7 or 8 feet (2.1 or 2.4 m) just inside the blue line.Players turning over pucks in these two critical areas tend to hearabout it. Why? When the puck is turned over here, the opposingteam can counter quickly and create outnumbered attacks. Thishappens because the two forwards without the puck tend to beanticipating the puck going deep, and they are in that “flat”vulnerable position along the blue line with no speed (figure 3.1).
When playing five on five, a player with the puck wide enteringthe offensive zone must read the opponent’s pressure. If the gapbetween the player with the puck and the defender is large oradequate, obviously the attacking player keeps possession of thepuck and enters the attacking zone. If the player with the pucksenses pressure, then the cross-ice dump or chip are two tacticsused to reduce this pressure and ensure a chance for puckpossession deeper in the zone. Coaches should set up practicedrills which incorporate this read. Drills which allow the puckcarrier to react to varying gaps by the defender and also varyingpressure; all help to make these decisions with the puck moreautomatic and successful in game action. Figure 3.1 Turnover at the blue line.
Dump-In Entries
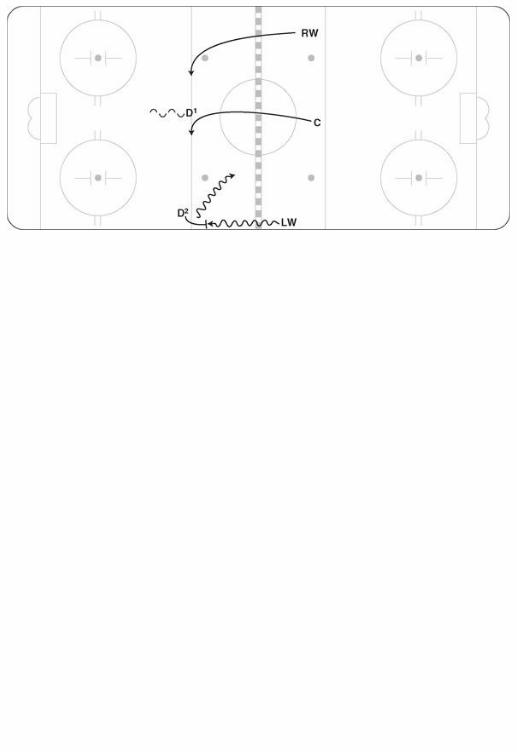
The cross-ice dump (figure 3.2) works best under two conditions:
1. Defensive pressure is read, and the offensive team ischanging.
2. Defensive pressure is read, and an offensive supportplayer is skating in the wide lane.
The perfect cross-ice dump hits the boards halfway between the
net and the side boards and angles away from the goalie towardthe half boards. Figure 3.2 The cross-ice dump-in.
Rims
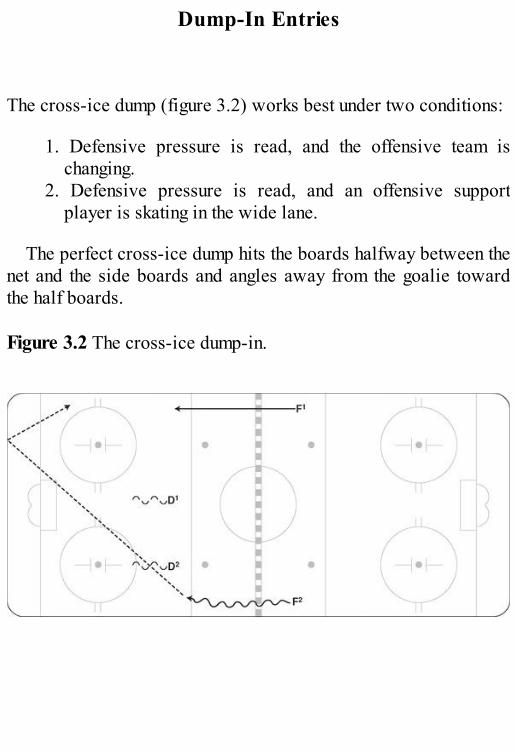
A second tactic when the offensive player with possession of thepuck reads pressure is the rim. The player entering the zone sensesthat his teammate skating wide can retrieve the puck, and thereforethe player with the puck rims it hard around the boards (figure3.3). At the very top levels of the game of hockey, this tactic haslimited success. Goalies in today’s game are so mobile and sogood at trapping the rimmed puck that very few pucks get aroundto the desired teammate. Most are stopped behind the net andturned over to the opposing defense. Before using this tactic knowthe opposition goaltender and if he is not mobile or is poor attrapping the puck off a rim, then use it more often. Conversely if hegets out of his net quick and is able to handle the puck thendumping it in will only result in a turnover. Figure 3.3 The basic rim.
Chips
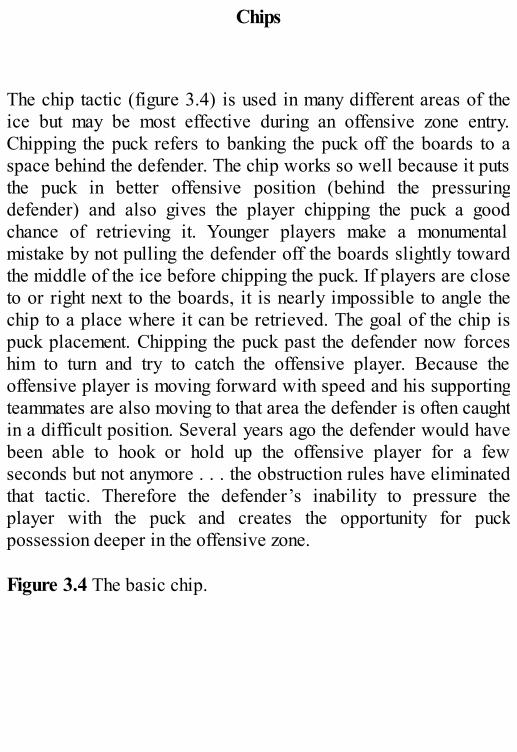
The chip tactic (figure 3.4) is used in many different areas of theice but may be most effective during an offensive zone entry.Chipping the puck refers to banking the puck off the boards to aspace behind the defender. The chip works so well because it putsthe puck in better offensive position (behind the pressuringdefender) and also gives the player chipping the puck a goodchance of retrieving it. Younger players make a monumentalmistake by not pulling the defender off the boards slightly towardthe middle of the ice before chipping the puck. If players are closeto or right next to the boards, it is nearly impossible to angle thechip to a place where it can be retrieved. The goal of the chip ispuck placement. Chipping the puck past the defender now forceshim to turn and try to catch the offensive player. Because theoffensive player is moving forward with speed and his supportingteammates are also moving to that area the defender is often caughtin a difficult position. Several years ago the defender would havebeen able to hook or hold up the offensive player for a fewseconds but not anymore . . . the obstruction rules have eliminatedthat tactic. Therefore the defender’s inability to pressure theplayer with the puck and creates the opportunity for puckpossession deeper in the offensive zone. Figure 3.4 The basic chip.
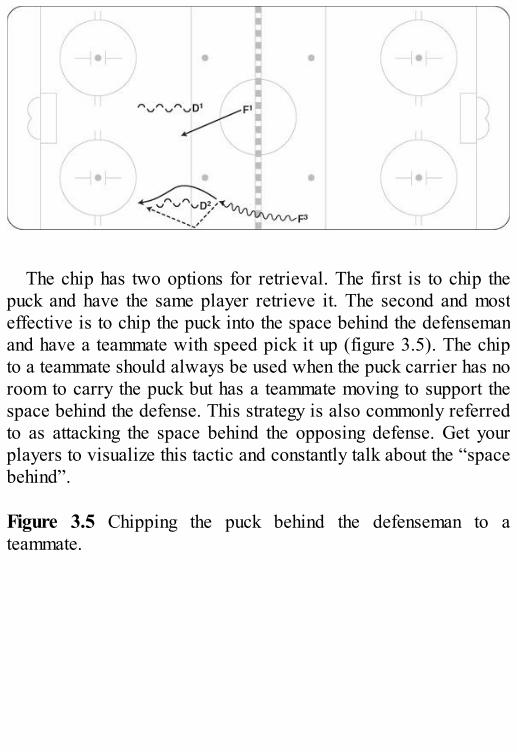
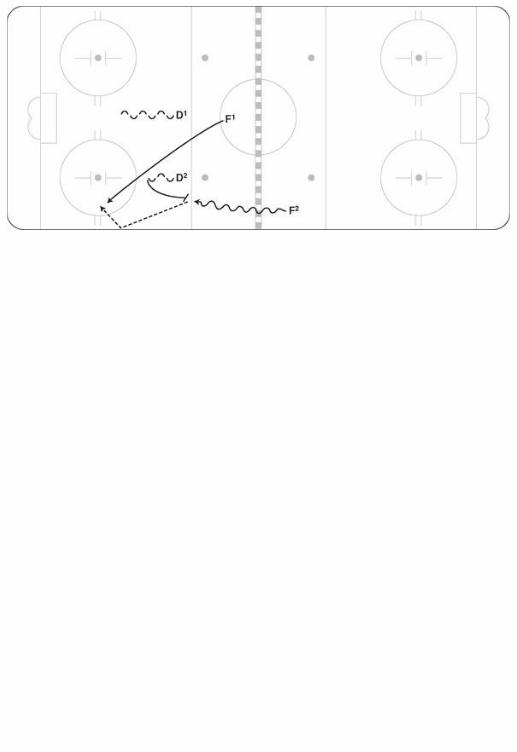
The chip has two options for retrieval. The first is to chip thepuck and have the same player retrieve it. The second and mosteffective is to chip the puck into the space behind the defensemanand have a teammate with speed pick it up (figure 3.5). The chipto a teammate should always be used when the puck carrier has noroom to carry the puck but has a teammate moving to support thespace behind the defense. This strategy is also commonly referredto as attacking the space behind the opposing defense. Get yourplayers to visualize this tactic and constantly talk about the “spacebehind”. Figure 3.5 Chipping the puck behind the defenseman to ateammate.
Mid-Ice Entries
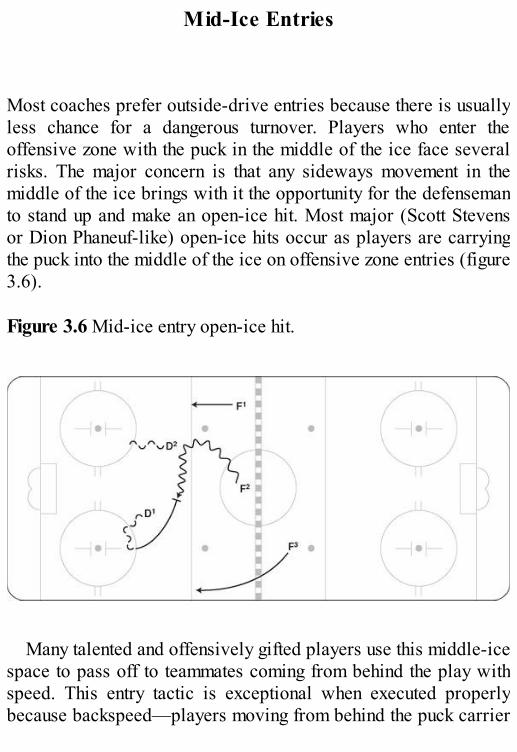
Most coaches prefer outside-drive entries because there is usuallyless chance for a dangerous turnover. Players who enter theoffensive zone with the puck in the middle of the ice face severalrisks. The major concern is that any sideways movement in themiddle of the ice brings with it the opportunity for the defensemanto stand up and make an open-ice hit. Most major (Scott Stevensor Dion Phaneuf-like) open-ice hits occur as players are carryingthe puck into the middle of the ice on offensive zone entries (figure3.6). Figure 3.6 Mid-ice entry open-ice hit.
Many talented and offensively gifted players use this middle-icespace to pass off to teammates coming from behind the play withspeed. This entry tactic is exceptional when executed properlybecause backspeed—players moving from behind the puck carrier
with more speed than the puck carrier—can completely catchdefenders off guard.
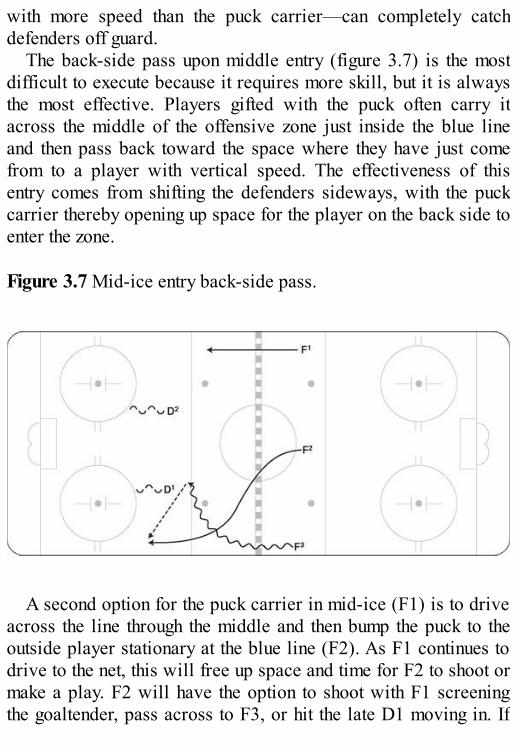
The back-side pass upon middle entry (figure 3.7) is the mostdifficult to execute because it requires more skill, but it is alwaysthe most effective. Players gifted with the puck often carry itacross the middle of the offensive zone just inside the blue lineand then pass back toward the space where they have just comefrom to a player with vertical speed. The effectiveness of thisentry comes from shifting the defenders sideways, with the puckcarrier thereby opening up space for the player on the back side toenter the zone. Figure 3.7 Mid-ice entry back-side pass.
A second option for the puck carrier in mid-ice (F1) is to driveacross the line through the middle and then bump the puck to theoutside player stationary at the blue line (F2). As F1 continues todrive to the net, this will free up space and time for F2 to shoot ormake a play. F2 will have the option to shoot with F1 screeningthe goaltender, pass across to F3, or hit the late D1 moving in. If
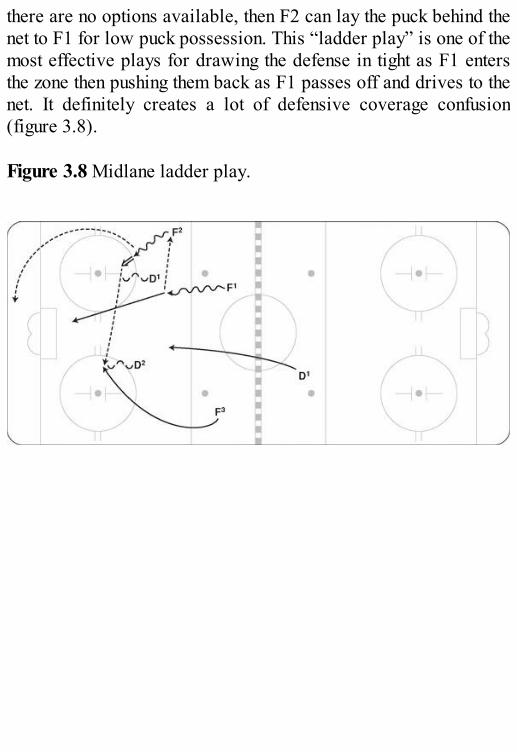
there are no options available, then F2 can lay the puck behind thenet to F1 for low puck possession. This “ladder play” is one of themost effective plays for drawing the defense in tight as F1 entersthe zone then pushing them back as F1 passes off and drives to thenet. It definitely creates a lot of defensive coverage confusion(figure 3.8). Figure 3.8 Midlane ladder play.
Wide-Lane Drives
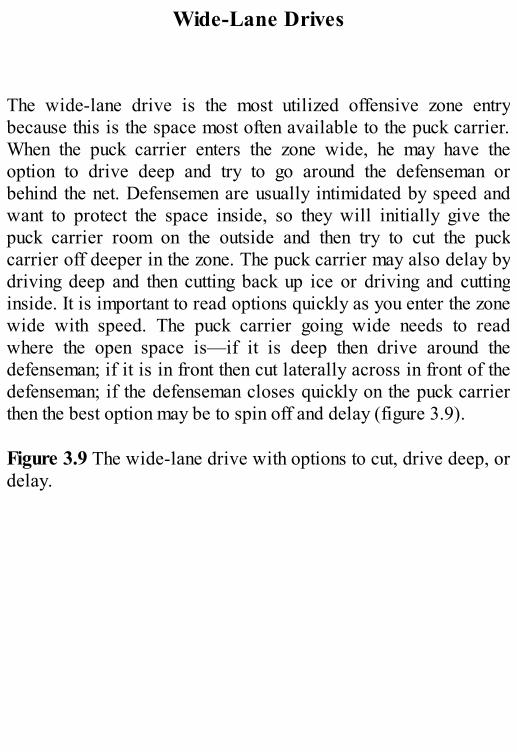
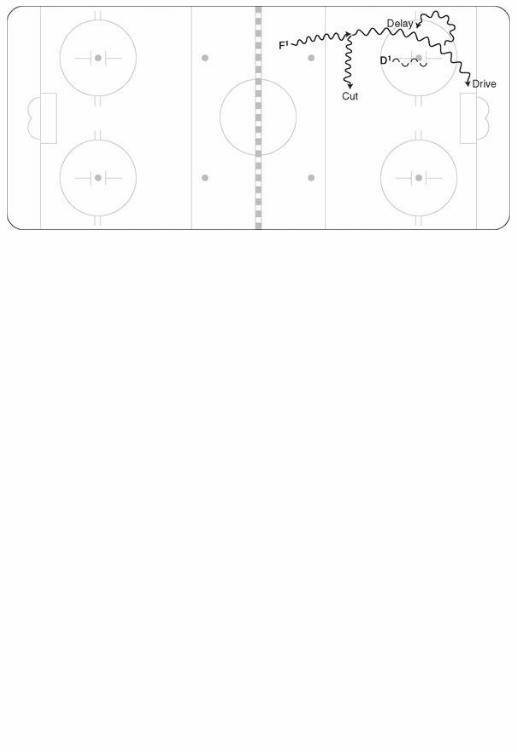
The wide-lane drive is the most utilized offensive zone entrybecause this is the space most often available to the puck carrier.When the puck carrier enters the zone wide, he may have theoption to drive deep and try to go around the defenseman orbehind the net. Defensemen are usually intimidated by speed andwant to protect the space inside, so they will initially give thepuck carrier room on the outside and then try to cut the puckcarrier off deeper in the zone. The puck carrier may also delay bydriving deep and then cutting back up ice or driving and cuttinginside. It is important to read options quickly as you enter the zonewide with speed. The puck carrier going wide needs to readwhere the open space is—if it is deep then drive around thedefenseman; if it is in front then cut laterally across in front of thedefenseman; if the defenseman closes quickly on the puck carrierthen the best option may be to spin off and delay (figure 3.9). Figure 3.9 The wide-lane drive with options to cut, drive deep, ordelay.
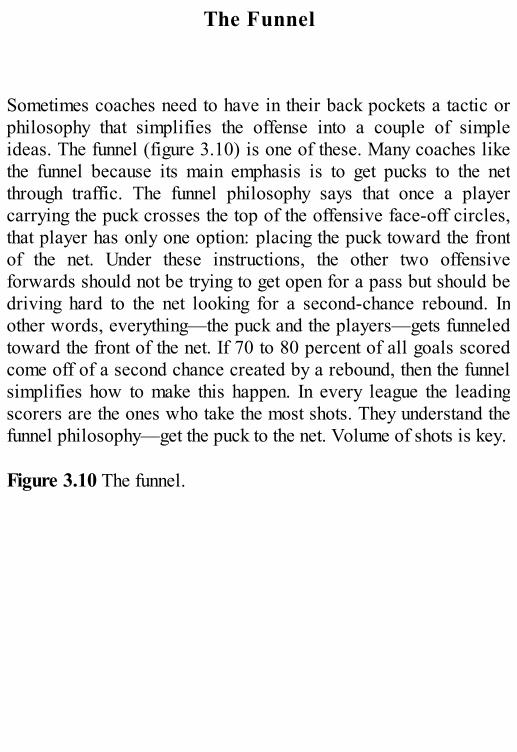
The Funnel
Sometimes coaches need to have in their back pockets a tactic orphilosophy that simplifies the offense into a couple of simpleideas. The funnel (figure 3.10) is one of these. Many coaches likethe funnel because its main emphasis is to get pucks to the netthrough traffic. The funnel philosophy says that once a playercarrying the puck crosses the top of the offensive face-off circles,that player has only one option: placing the puck toward the frontof the net. Under these instructions, the other two offensiveforwards should not be trying to get open for a pass but should bedriving hard to the net looking for a second-chance rebound. Inother words, everything—the puck and the players—gets funneledtoward the front of the net. If 70 to 80 percent of all goals scoredcome off of a second chance created by a rebound, then the funnelsimplifies how to make this happen. In every league the leadingscorers are the ones who take the most shots. They understand thefunnel philosophy—get the puck to the net. Volume of shots is key. Figure 3.10 The funnel.
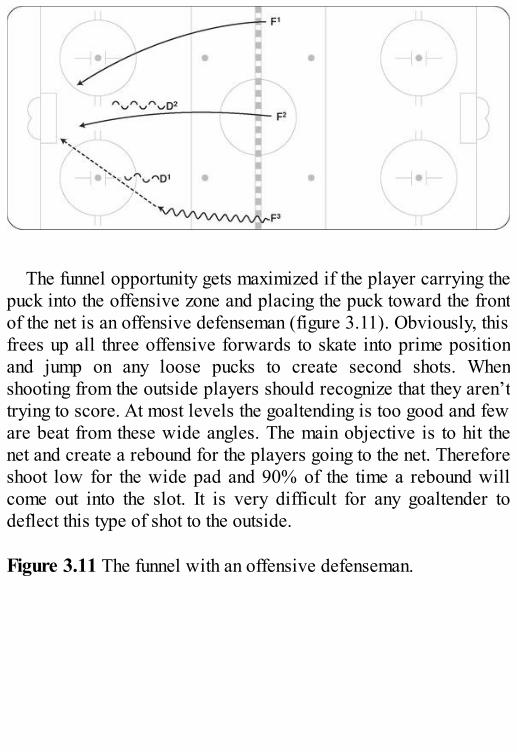
The funnel opportunity gets maximized if the player carrying thepuck into the offensive zone and placing the puck toward the frontof the net is an offensive defenseman (figure 3.11). Obviously, thisfrees up all three offensive forwards to skate into prime positionand jump on any loose pucks to create second shots. Whenshooting from the outside players should recognize that they aren’ttrying to score. At most levels the goaltending is too good and feware beat from these wide angles. The main objective is to hit thenet and create a rebound for the players going to the net. Thereforeshoot low for the wide pad and 90% of the time a rebound willcome out into the slot. It is very difficult for any goaltender todeflect this type of shot to the outside. Figure 3.11 The funnel with an offensive defenseman.

The funnel play is also a simple way to activate the mid-icedefenseman. If the defenseman on the rush has speed to attack thenet off the rush, then many coaches give the attacking defensemanpermission to attack the front of the net, with one rule—once theplay turns from a rush to a forecheck, the attacking defensemanmust return quickly and directly to the blue line. Another simplerule for the offensive defenseman joining the rush or joining theattack is the function of time. Many coaches prefer that theirdefensemen not join the rush or the attack with minutes to go in theperiod or the game, especially if the team is winning by a certainmargin.
Two-on-One Attacks
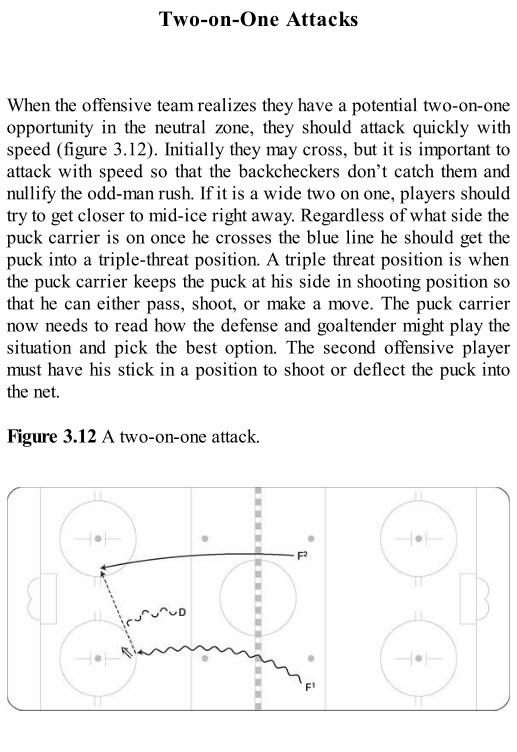
When the offensive team realizes they have a potential two-on-oneopportunity in the neutral zone, they should attack quickly withspeed (figure 3.12). Initially they may cross, but it is important toattack with speed so that the backcheckers don’t catch them andnullify the odd-man rush. If it is a wide two on one, players shouldtry to get closer to mid-ice right away. Regardless of what side thepuck carrier is on once he crosses the blue line he should get thepuck into a triple-threat position. A triple threat position is whenthe puck carrier keeps the puck at his side in shooting position sothat he can either pass, shoot, or make a move. The puck carriernow needs to read how the defense and goaltender might play thesituation and pick the best option. The second offensive playermust have his stick in a position to shoot or deflect the puck intothe net. Figure 3.12 A two-on-one attack.

Two-on-Two Attacks
There are basically three strategies for a two-on-two rush.There are no set rules when to use each but they give theoffensive players options. Sometimes the choice will bemade by the coaches’ philosophy of play but regardless itwill be important to practice each option. The key principlefor all two-on-two rushes is for the offensive players toisolate the attack on one of the defenders.
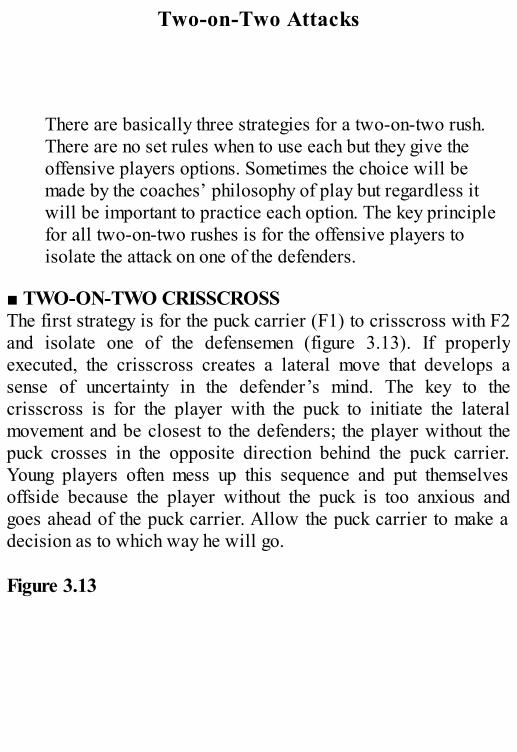
■ TWO-ON-TWO CRISSCROSSThe first strategy is for the puck carrier (F1) to crisscross with F2and isolate one of the defensemen (figure 3.13). If properlyexecuted, the crisscross creates a lateral move that develops asense of uncertainty in the defender’s mind. The key to thecrisscross is for the player with the puck to initiate the lateralmovement and be closest to the defenders; the player without thepuck crosses in the opposite direction behind the puck carrier.Young players often mess up this sequence and put themselvesoffside because the player without the puck is too anxious andgoes ahead of the puck carrier. Allow the puck carrier to make adecision as to which way he will go. Figure 3.13
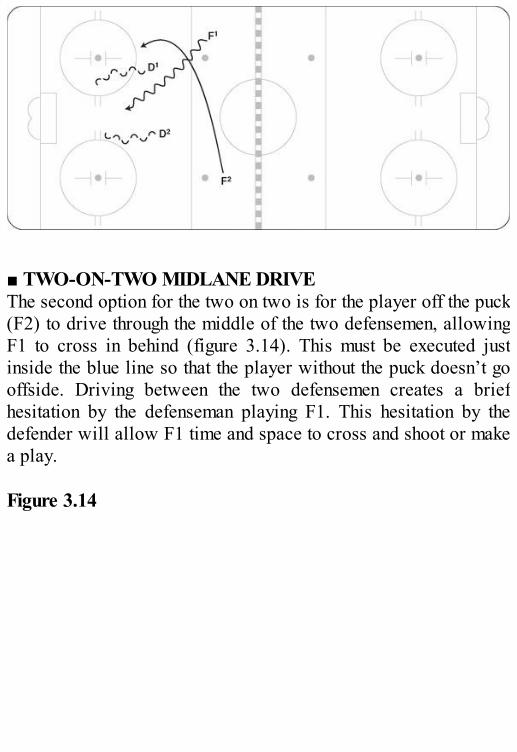
■ TWO-ON-TWO MIDLANE DRIVEThe second option for the two on two is for the player off the puck(F2) to drive through the middle of the two defensemen, allowingF1 to cross in behind (figure 3.14). This must be executed justinside the blue line so that the player without the puck doesn’t gooffside. Driving between the two defensemen creates a briefhesitation by the defenseman playing F1. This hesitation by thedefender will allow F1 time and space to cross and shoot or makea play. Figure 3.14
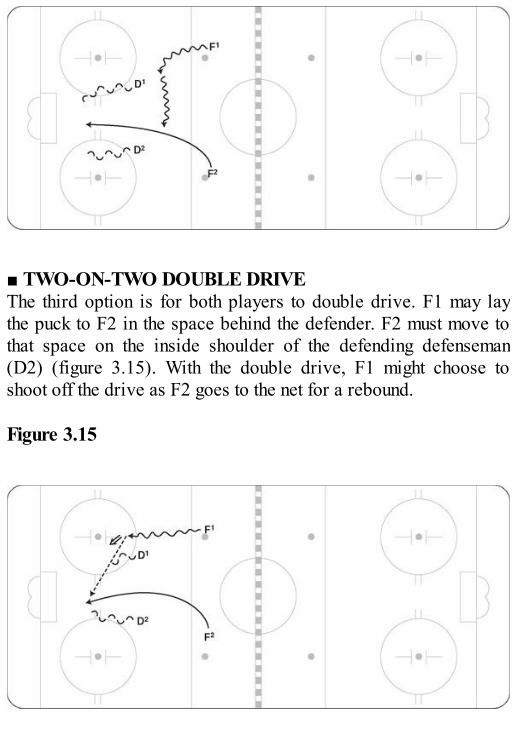
■ TWO-ON-TWO DOUBLE DRIVEThe third option is for both players to double drive. F1 may laythe puck to F2 in the space behind the defender. F2 must move tothat space on the inside shoulder of the defending defenseman(D2) (figure 3.15). With the double drive, F1 might choose toshoot off the drive as F2 goes to the net for a rebound. Figure 3.15


Three-on-Two Attacks
When you catch the opposition in a three on two, you shouldbe able to generate a scoring chance. Although obviously notas good as a two on one, it is still a great offensiveopportunity. Because three players are involved in the attack,several options are available to create that great chance.Teams should practice and utilize all four attack options: thehigh triangle, the midlane drive, the triple drive, and thedrive and delay.
■ THREE-ON-TWO HIGH TRIANGLELet’s start with the traditional option. Most often in three-on-twosituations, the attacking team wants to force the defenders to playman on man with one player and isolate the other defender two onone. F1 drives wide with the puck, and F3 drives wide without thepuck. F2 now trails, looking for a pass from F1 (figure 3.16). Theoptions available for F1 are to pass to F3, to shoot and create arebound for F3, or to pass back to F2 for a shot from the high slot.The key read for F1 is whether the opposing defenseman goes withF3 on the wide drive. This will give an indication of what is open. Figure 3.16
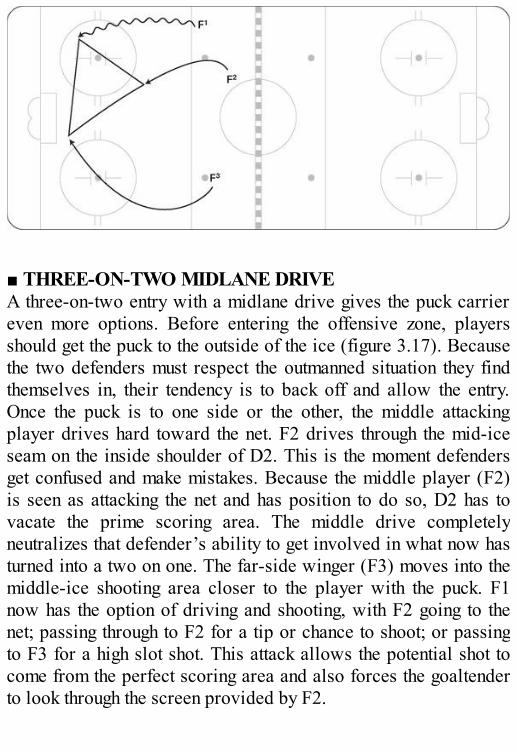
■ THREE-ON-TWO MIDLANE DRIVEA three-on-two entry with a midlane drive gives the puck carriereven more options. Before entering the offensive zone, playersshould get the puck to the outside of the ice (figure 3.17). Becausethe two defenders must respect the outmanned situation they findthemselves in, their tendency is to back off and allow the entry.Once the puck is to one side or the other, the middle attackingplayer drives hard toward the net. F2 drives through the mid-iceseam on the inside shoulder of D2. This is the moment defendersget confused and make mistakes. Because the middle player (F2)is seen as attacking the net and has position to do so, D2 has tovacate the prime scoring area. The middle drive completelyneutralizes that defender’s ability to get involved in what now hasturned into a two on one. The far-side winger (F3) moves into themiddle-ice shooting area closer to the player with the puck. F1now has the option of driving and shooting, with F2 going to thenet; passing through to F2 for a tip or chance to shoot; or passingto F3 for a high slot shot. This attack allows the potential shot tocome from the perfect scoring area and also forces the goaltenderto look through the screen provided by F2.
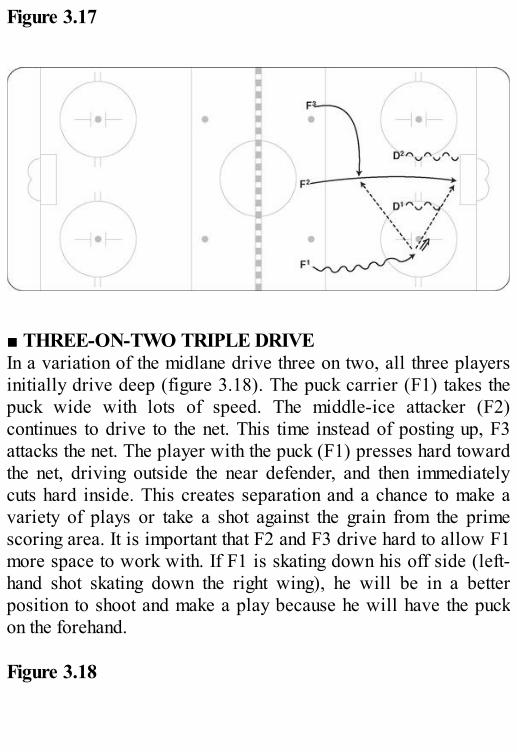
Figure 3.17
■ THREE-ON-TWO TRIPLE DRIVEIn a variation of the midlane drive three on two, all three playersinitially drive deep (figure 3.18). The puck carrier (F1) takes thepuck wide with lots of speed. The middle-ice attacker (F2)continues to drive to the net. This time instead of posting up, F3attacks the net. The player with the puck (F1) presses hard towardthe net, driving outside the near defender, and then immediatelycuts hard inside. This creates separation and a chance to make avariety of plays or take a shot against the grain from the primescoring area. It is important that F2 and F3 drive hard to allow F1more space to work with. If F1 is skating down his off side (left-hand shot skating down the right wing), he will be in a betterposition to shoot and make a play because he will have the puckon the forehand. Figure 3.18

■ THREE-ON-TWO DRIVE AND DELAYIn the world of hockey, as in most sports, speed kills. Outsideoffensive zone speed has a tendency to back off defenders, and thisis where our next offensive zone entry tactic works wonders. Theplayer driving outside with the puck looks as if he will drive thepuck hard toward the net, but then just at the right moment, thisplayer pivots or tight turns (always to the outside or away from thedefender) and skates back toward the blue line (figure 3.19). Thisdelay creates what every hockey player wants: time and space tomake the next move. Initially, the defender will have to give spacebecause he is afraid of the deep drive, and as a result it will take asecond or two to react to the delay.
A couple of teaching keys allow this excellent offensive tacticto work. The outside-drive player (F1) must “sell” the drive to thenet. The perfect time to turn up is when the offensive player islevel with or forcing the defender to pivot toward the offensiveplayer. Today’s highspeed, high-pace game gives players with thepuck very little time to make good plays. This is where creatingoffensive gaps between the player with the puck and the defendersis critical. Wayne Gretzky, an amazing player, scored a very highpercentage of his goals off this tactic of driving, pivoting, gaining
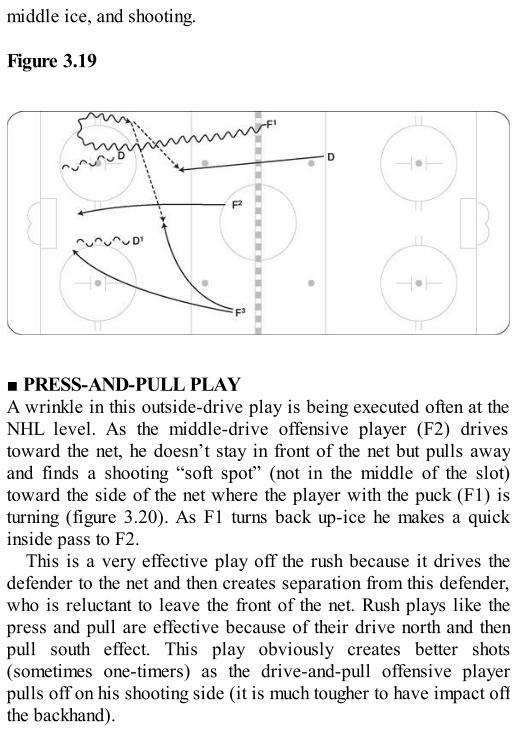
middle ice, and shooting. Figure 3.19
■ PRESS-AND-PULL PLAYA wrinkle in this outside-drive play is being executed often at theNHL level. As the middle-drive offensive player (F2) drivestoward the net, he doesn’t stay in front of the net but pulls awayand finds a shooting “soft spot” (not in the middle of the slot)toward the side of the net where the player with the puck (F1) isturning (figure 3.20). As F1 turns back up-ice he makes a quickinside pass to F2.
This is a very effective play off the rush because it drives thedefender to the net and then creates separation from this defender,who is reluctant to leave the front of the net. Rush plays like thepress and pull are effective because of their drive north and thenpull south effect. This play obviously creates better shots(sometimes one-timers) as the drive-and-pull offensive playerpulls off on his shooting side (it is much tougher to have impact offthe backhand).
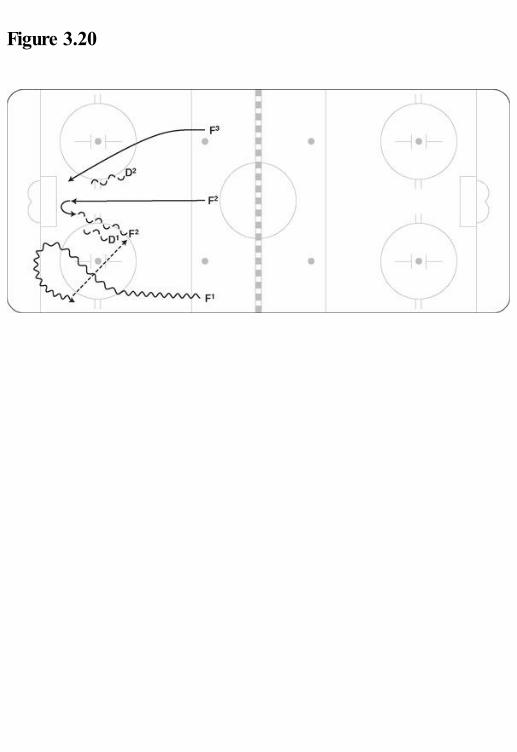
Figure 3.20
Offsides
Entry into the offensive zone can create one of a coach’s many petpeeves, the offside. High-level coaches speak often aboutcontrolling the controllables. John Wooden, the great basketballcoach, said, “I don’t worry too much about winning and losing. Iworry a lot about practicing the details that deliver the win.” Oneof the details that deliver the win is to never, never, never putyourself or your team offside. Offsides come from selfishpossession of the puck or lazy actions where the puck carrier ineach case waits too long to make a play and his teammates gooffside while trying to anticipate a pass. Yes, opponents can havea positional influence on the offside, but more often than not theoffside is created by the team with the puck instead of the teamwithout the puck. Coaches keep count of offsides by play and byline. Puck possession is so hard to get and so hard to keep, whywould a team easily give up a puck that they fought so hard toretrieve?
Activating Defense Into Offensive Zone Entries
After a successful breakout or regroup, with the puck inpossession of the forwards, one defenseman should follow up as alate-wave option or as one of the three attacking players. Asmentioned in the breakout chapter sometimes the center gets caughtlow in coverage, so it is important to have one defenseman in therush. When a defenseman moves up to join the rush, he should readthe quality of puck possession. Does your teammate have the puckunder control while advancing up the ice? If so, then onedefenseman must be activated into the rush. Is it risky to have anactive defense? Well, the answer is no. The responsibility is in thehands of the puck carrier; he must make good decisions and pickthe right options. A defenseman should join and stay in the rushfrom the breakout, through the neutral zone, and then read thequality of puck possession at the offensive blue line.
By joining the rush and staying in as the third or fourth attacker,the defenseman creates confusion as opponents try to figure outtheir coverage on the backcheck. Plus an active defensemanusually results in more odd-man rushes because he can get up theice quicker than the other team backchecks. If the quality of puckpossession is good, defensemen should have the green light to goto the net, but make sure they know that they cannot stop and “hangout” in front for the puck—they have to get back to the blue line.Allowing your defense to join the rush is a good strategy, but youdon’t want it to cost you the other way and give the opposition achance to get an odd-man rush.
Chapter 4
Attack Zone
Cycling. Setting up behind the net. Activating the defense in theoffensive zone. Exploiting the high seam area. Protecting the pucklow to buy time and find players who are open. Getting open offthe puck. Screening the goaltenders. Making tight plays to sticks atthe net. These are all tactics and strategies in the attacking zone.
Once an attacking team has possession in the offensive zone, thebrilliant coaches in the great game of hockey really turn on thecreative juices. The goal of every attacking team is to createoffensive chances. What constitutes a “chance” differs from coachto coach, but in essence, a chance is a shot taken from inside the
scoring area. There are three general philosophies to create theseoffensive chances:
1. Shooting through traffic2. Creating separation3. Creating deception
Taking shots through traffic (players in front of the goaltender)
will obviously distract the goaltender or deny him the opportunityto see the puck. Goalies are so good these days that a shot withouttraffic between the shooter and the goalie in many instances is agiveaway. All of the top offensive teams make sure that one playeris always in the net area and moving across the sight lines of thegoaltender or planted in front of the goaltender. Often this tacticresults in the opposition trying to clear the net by moving thisplayer which results in a double screen or possibly a penalty. Bothfavor the offensive team.
In the separation tactic, the puck carrier creates the time andspace needed to make successful plays and create shots. Playersaway from the puck have to work to get open and separate fromtheir check. They should move to areas where they can receive apass and be ready to one time the puck or shoot quickly.Sometimes players off the puck can move into an area and thenpush off their check or push back into an open space. It sounds likea simple principle to separate from your check but I find that a lotof offensive players off the puck skate into their check andessentially “check themselves”. When you watch smart playersthey always seem to be able to get open and as a result theyalways have the puck.
The puck carrier also needs to be deceptive so that thedefending team doesn’t know whether he is going to shoot or pass.Deception tactics include faking a shot or pass or simply lookingthe defender off. Looking the defender off the puck means looking
at an option, making a motion to pass in that direction and thenskating or moving in another direction. Usually the defender willturn his feet toward the first look and as a result give the offensiveplayer room to move by. Coaches often talk about the triple threatposition and we mention it several times in this book. When anoffensive player has the puck he should always keep it by the hipon his forehand side which gives him the option of passing,shooting, or making a move on the defender. This triple threatposition creates deception simply by where the puck is and theoptions available. All of these tactics play themselves out throughmany practiced and set plays that we will now explore.
Cycling
Many offensive strategies include cycling the puck. Younger,inexperienced players often get the cycling process wrong, so let’sstart with this basic tactic. The cycle works best when the playerwith the puck deep in the offensive zone begins to bring the puckup the boards toward the blue line (figure 4.1). Generally adefender will press this puck carrier toward the boards and workto remove the puck. The key to the cycle setup is the secondoffensive forward. This forward mirrors the positioning of thepuck carrier but stays 10 or 15 feet (3.0 to 4.6 m) away from thepuck carrier on the boards, toward the goal line. This player callsfor the puck. Here is where inexperienced players mess up. Thetendency is for players to pass into open ice, but the cycle doesn’twork best this way. It works best when the puck is angled off theboards, away from the defender’s stick, so it bounces off theboards and onto the stick of the second offensive forward. Cyclingis an effective tactic when executed correctly.
The purpose of the cycle is to keep possession of the puck andtake it to the net to create a scoring chance. If the initial playerwith the puck can gain a lane to the net, he shouldn’t cycle—heshould take the puck to the net. A pet peeve of many coaches iswhen players cycle for the sake of cycling and don’t read when toexploit the defenders. If the puck carrier feels pressure and knowsthe lane is shut down, he should lay the puck back to the cornerwhere he came from. His support player (F2) needs to read thisand move to support the cycle pass. Once this play is made, F2may continue the cycle with a pass back to F3. Figure 4.1 Cycling.
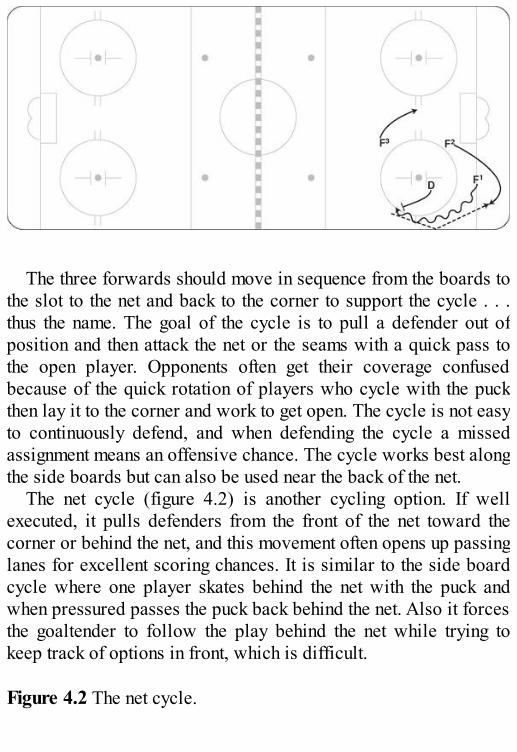
The three forwards should move in sequence from the boards tothe slot to the net and back to the corner to support the cycle . . .thus the name. The goal of the cycle is to pull a defender out ofposition and then attack the net or the seams with a quick pass tothe open player. Opponents often get their coverage confusedbecause of the quick rotation of players who cycle with the puckthen lay it to the corner and work to get open. The cycle is not easyto continuously defend, and when defending the cycle a missedassignment means an offensive chance. The cycle works best alongthe side boards but can also be used near the back of the net.
The net cycle (figure 4.2) is another cycling option. If wellexecuted, it pulls defenders from the front of the net toward thecorner or behind the net, and this movement often opens up passinglanes for excellent scoring chances. It is similar to the side boardcycle where one player skates behind the net with the puck andwhen pressured passes the puck back behind the net. Also it forcesthe goaltender to follow the play behind the net while trying tokeep track of options in front, which is difficult. Figure 4.2 The net cycle.
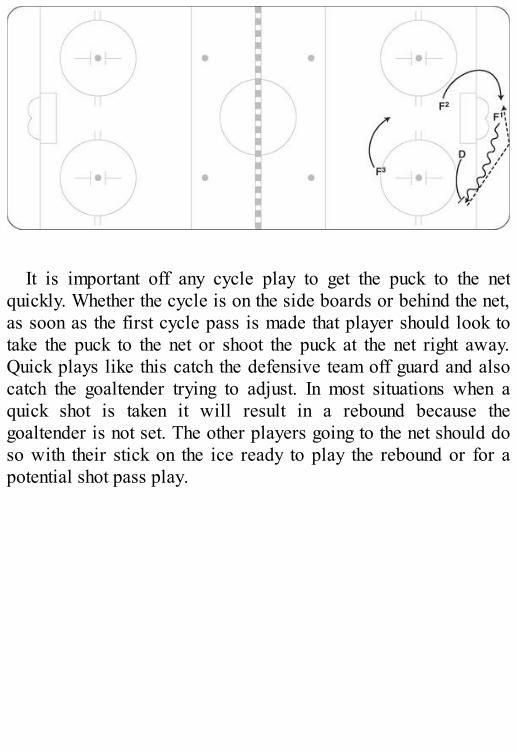
It is important off any cycle play to get the puck to the netquickly. Whether the cycle is on the side boards or behind the net,as soon as the first cycle pass is made that player should look totake the puck to the net or shoot the puck at the net right away.Quick plays like this catch the defensive team off guard and alsocatch the goaltender trying to adjust. In most situations when aquick shot is taken it will result in a rebound because thegoaltender is not set. The other players going to the net should doso with their stick on the ice ready to play the rebound or for apotential shot pass play.
Playing Behind the Net
Wayne Gretzky played behind the net so well, that this areabecame known as his “office.” Gaining offensive positioningbehind the net opens up many opportunities for direct-shot (high-percentage) chances. To effectively use the back of the net teamsshould automatically move the puck to this space when they don’thave another option. The offensive player at the net now reads histeammate is in trouble and moves to the back of the net area. Whena pass is made to the back of the net the offensive team willalways get there first because the defensive team never overplaysthis area. Using the back of the net forces the opposing defense andgoaltender to focus on that area while losing track of whereplayers are in front. Sometimes two defenders can be drawn intothis area; if the defensemen are unsure of who should be coveringthe player behind the net, both may jump in at the same time. Nowat least one offensive player will be open in the dangerous scoringarea in front of the net. Figure 4.3 Pressing the net.
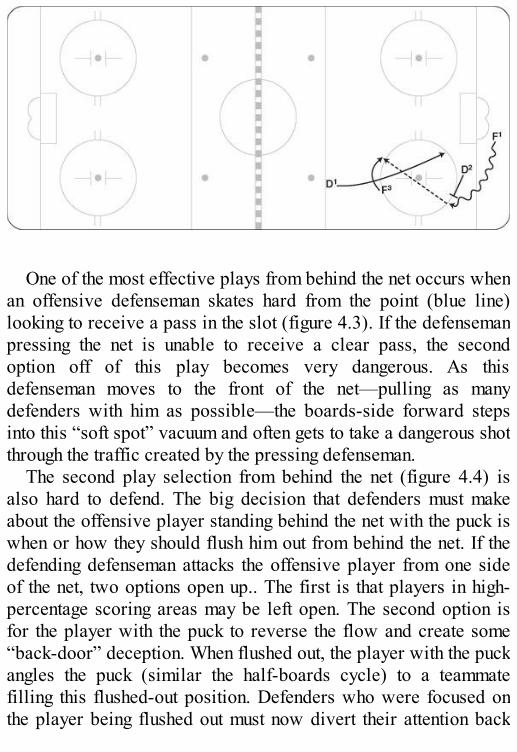
One of the most effective plays from behind the net occurs whenan offensive defenseman skates hard from the point (blue line)looking to receive a pass in the slot (figure 4.3). If the defensemanpressing the net is unable to receive a clear pass, the secondoption off of this play becomes very dangerous. As thisdefenseman moves to the front of the net—pulling as manydefenders with him as possible—the boards-side forward stepsinto this “soft spot” vacuum and often gets to take a dangerous shotthrough the traffic created by the pressing defenseman.
The second play selection from behind the net (figure 4.4) isalso hard to defend. The big decision that defenders must makeabout the offensive player standing behind the net with the puck iswhen or how they should flush him out from behind the net. If thedefending defenseman attacks the offensive player from one sideof the net, two options open up.. The first is that players in high-percentage scoring areas may be left open. The second option isfor the player with the puck to reverse the flow and create some“back-door” deception. When flushed out, the player with the puckangles the puck (similar the half-boards cycle) to a teammatefilling this flushed-out position. Defenders who were focused onthe player being flushed out must now divert their attention back
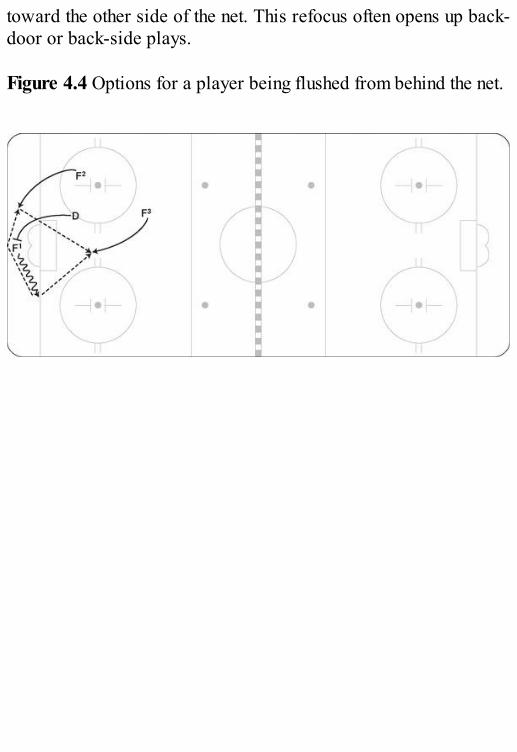
toward the other side of the net. This refocus often opens up back-door or back-side plays. Figure 4.4 Options for a player being flushed from behind the net.
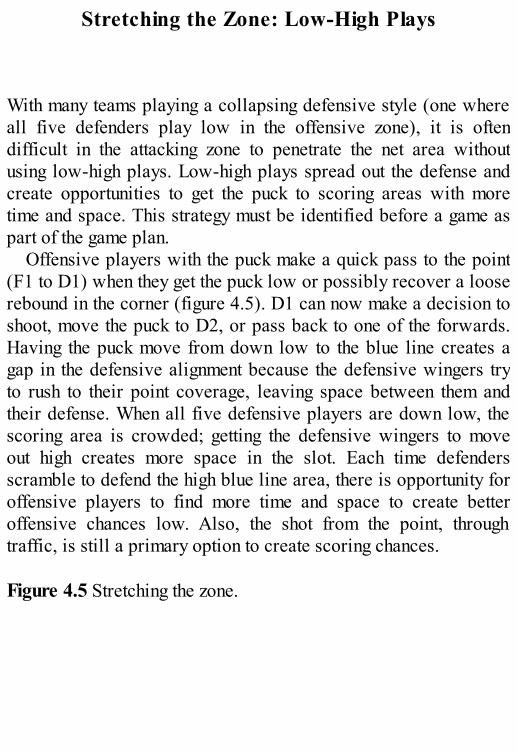
Stretching the Zone: Low-High Plays
With many teams playing a collapsing defensive style (one whereall five defenders play low in the offensive zone), it is oftendifficult in the attacking zone to penetrate the net area withoutusing low-high plays. Low-high plays spread out the defense andcreate opportunities to get the puck to scoring areas with moretime and space. This strategy must be identified before a game aspart of the game plan.
Offensive players with the puck make a quick pass to the point(F1 to D1) when they get the puck low or possibly recover a looserebound in the corner (figure 4.5). D1 can now make a decision toshoot, move the puck to D2, or pass back to one of the forwards.Having the puck move from down low to the blue line creates agap in the defensive alignment because the defensive wingers tryto rush to their point coverage, leaving space between them andtheir defense. When all five defensive players are down low, thescoring area is crowded; getting the defensive wingers to moveout high creates more space in the slot. Each time defendersscramble to defend the high blue line area, there is opportunity foroffensive players to find more time and space to create betteroffensive chances low. Also, the shot from the point, throughtraffic, is still a primary option to create scoring chances. Figure 4.5 Stretching the zone.
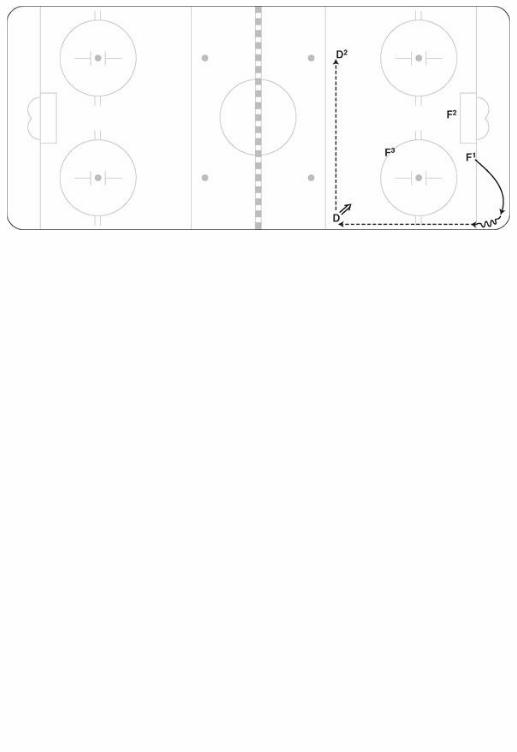
Activating Defense in the Offensive Zone
Much like other aspects of offensive play, coaches have todecide how comfortable they are with getting their Dsinvolved in the offense. Basically, how much risk do theywant to take? If the offensive team has quality puckpossession, there is little risk in allowing the defense tomove in offensively. You have to teach your players to makegood decisions with the puck and trust that they will make asafe play rather than a dangerous play. The key rules fordefensemen that will help minimize risk are as follows:
1. Only one D at a time goes deep into the offensivezone.
2. Read the time of the game and the score—Ds shouldbe more cautious when moving in offensively late inperiods or when your team has the lead.
3. The forwards must have quality puck possession inorder for the defense to activate.
4. When the defense move in, if a pass is not made donot “hang out”—get back to the blue line quickly.
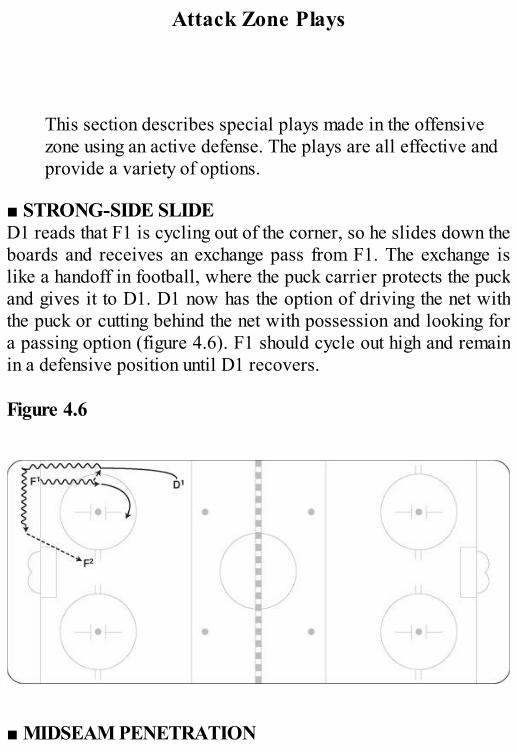
Attack Zone Plays
This section describes special plays made in the offensivezone using an active defense. The plays are all effective andprovide a variety of options.
■ STRONG-SIDE SLIDED1 reads that F1 is cycling out of the corner, so he slides down theboards and receives an exchange pass from F1. The exchange islike a handoff in football, where the puck carrier protects the puckand gives it to D1. D1 now has the option of driving the net withthe puck or cutting behind the net with possession and looking fora passing option (figure 4.6). F1 should cycle out high and remainin a defensive position until D1 recovers. Figure 4.6
■ MIDSEAM PENETRATION
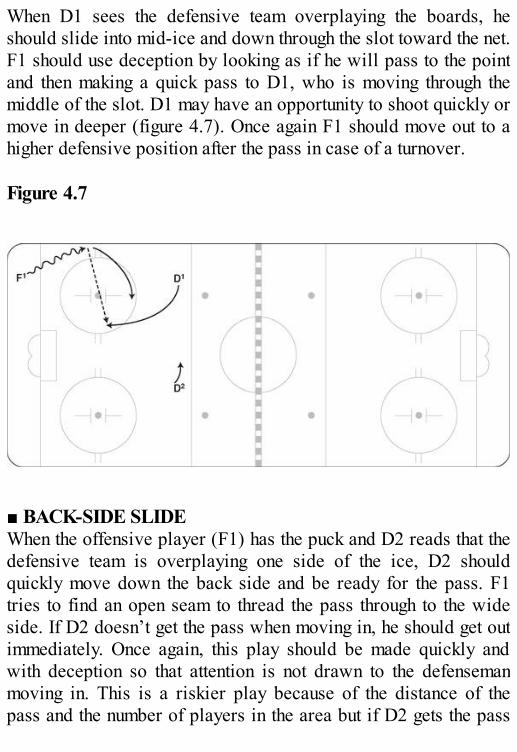
When D1 sees the defensive team overplaying the boards, heshould slide into mid-ice and down through the slot toward the net.F1 should use deception by looking as if he will pass to the pointand then making a quick pass to D1, who is moving through themiddle of the slot. D1 may have an opportunity to shoot quickly ormove in deeper (figure 4.7). Once again F1 should move out to ahigher defensive position after the pass in case of a turnover. Figure 4.7
■ BACK-SIDE SLIDEWhen the offensive player (F1) has the puck and D2 reads that thedefensive team is overplaying one side of the ice, D2 shouldquickly move down the back side and be ready for the pass. F1tries to find an open seam to thread the pass through to the wideside. If D2 doesn’t get the pass when moving in, he should get outimmediately. Once again, this play should be made quickly andwith deception so that attention is not drawn to the defensemanmoving in. This is a riskier play because of the distance of thepass and the number of players in the area but if D2 gets the pass
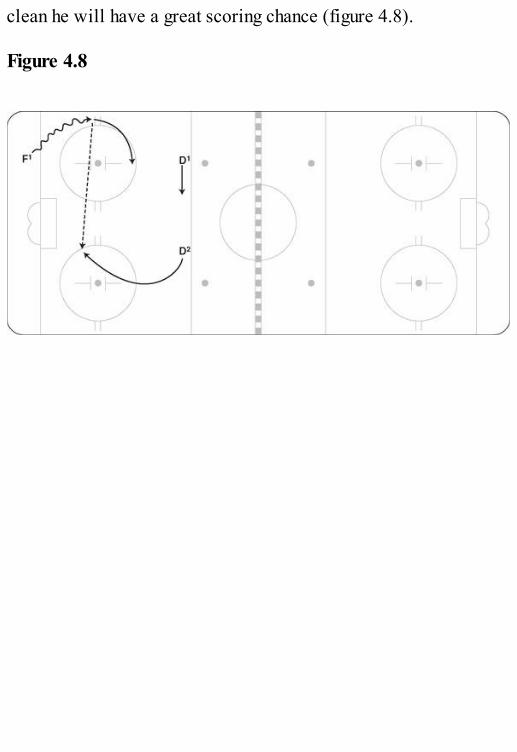
clean he will have a great scoring chance (figure 4.8). Figure 4.8
Chapter 5
Power Plays
When developing the power play, the coach must go throughseveral *steps including selecting a formation, describing theskills necessary for each position, slotting players into positions,developing drills to practice the skills, and finally allowingplayers to offer input as they mature and possibly the opportunityto select their own options within the framework. Most coaches gothrough these steps before the season starts once they know themakeup of the team. It is important as a coach to follow thesesteps, and then review them from time to time as your lineupchanges or when you are looking for improvements.
1. Select a formation. We will discuss three formations inthis chapter. Identify which formation is suited for theabilities of the players available to you. Certain playersare more suited to execute one better than another. Thedifferentiating factor is usually the skill level and howgood they are at passing, seeing the ice, and shooting offthe pass.
2. Describe skills necessary for each position. Make a listof all the skills needed to play each position in theformation selected. Keep this as a checklist when workingon the power play in practice. Also use it to decide whichplayers in your lineup are best suited to play each position.For example, the following six skills are critical fordefensemen on the power play: deception, walking theblue line on the forehand and backhand, shooting, one-timing the puck, seeing the opening and making a passthrough the box, and skating into the open seam at the righttime. Under the section on zone set up you will find theskills listed for each player. This should help you build achecklist and decide which players are best suited for aparticular position.
3. Slot players into the positions. Decide based on the skillsrequired where each player should play in the system. Onthe power play there will be some interchange, butgenerally each player will become proficient in one of thefive positions. One of the harder positions to play is thefront of the net. You would like someone with size whoalso has very good hands to corral a rebound or quicklyrelease a shot off the pass. This player cannot be afraid ofbeing hit with the puck and needs to have a touch fordeflecting and redirecting pucks.
4 . Develop or select drills to practice skills. Develop abank of drills to work on the skills of the chosen power-
play alignment and also the breakout options. Sometimesthe power-play breakout drills can be included withregular breakout practice. When developing in-zone skills,it is definitely better to start with no resistance and thenprogress to working against penalty killers. Players of allages need to focus for the first month or so on constantrepetitions with no resistance and get their puck movementand timing down before progressing to resistance. Ifpenalty killers are introduced too early in practicesituations, it will only lead to frustration.
5 . Allow players freedom to choose the right options.Much like a quarterback in football, one or two players onthe power play should take the lead and pick the bestavailable play or shot. As you will see in the specificalignments, there are five or six set plays to choose from. Itis better to have set options than to allow the power playto freelance. Once the players become familiar with thealignments and have practiced them enough, the optionswill become instinctive. Let the power play group watchvideo on a regular basis so they become familiar with theoptions that arise with different penalty-kill alignments andpressure.
6 . Repeat for specific situations. All of the previous stepsmust now be repeated for five-on-three and four-on-threesituations.
When developing and monitoring the power play, coaches
should remember that small details create the power. These arethe little things that make a successful power play.
Outwork the penalty-killing unit. Recognizing that theyhave the advantage, most power plays let up a bit withregard to effort, but this shouldn’t happen.
Give your team momentum by getting scoring chancesand shots. At all levels the best power plays units onlyscore on 2 out of every 10 power plays, but you shouldcreate momentum for your team on every power play.Look confident—never show dejection or defeat. Bodylanguage is so important in sports. Don’t give youropponent any signs that you don’t think you can score.Leave the ice with the attitude that you didn’t score thistime, but it will definitely happen next time.Have two units with two looks. Confuse the other team’spenalty-killing units by having a different setup for each ofyour units.Win the draw! Face-offs are so key on special teams. Ittakes 15 to 20 seconds to get set up again in the zone if theother team clears the puck.Try to give other players on your team an opportunityto go on the power play—this will do wonders for theirconfidence. Make sure in practice that all players work onpower-play skills.
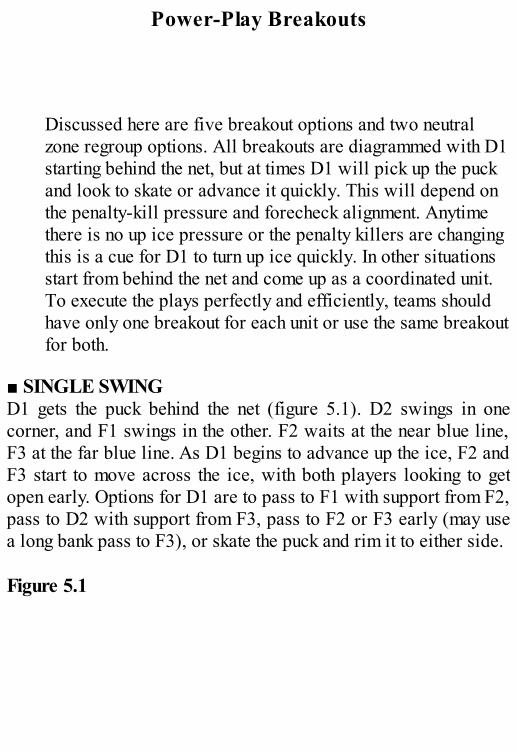
Power-Play Breakouts
Discussed here are five breakout options and two neutralzone regroup options. All breakouts are diagrammed with D1starting behind the net, but at times D1 will pick up the puckand look to skate or advance it quickly. This will depend onthe penalty-kill pressure and forecheck alignment. Anytimethere is no up ice pressure or the penalty killers are changingthis is a cue for D1 to turn up ice quickly. In other situationsstart from behind the net and come up as a coordinated unit.To execute the plays perfectly and efficiently, teams shouldhave only one breakout for each unit or use the same breakoutfor both.
■ SINGLE SWINGD1 gets the puck behind the net (figure 5.1). D2 swings in onecorner, and F1 swings in the other. F2 waits at the near blue line,F3 at the far blue line. As D1 begins to advance up the ice, F2 andF3 start to move across the ice, with both players looking to getopen early. Options for D1 are to pass to F1 with support from F2,pass to D2 with support from F3, pass to F2 or F3 early (may usea long bank pass to F3), or skate the puck and rim it to either side. Figure 5.1
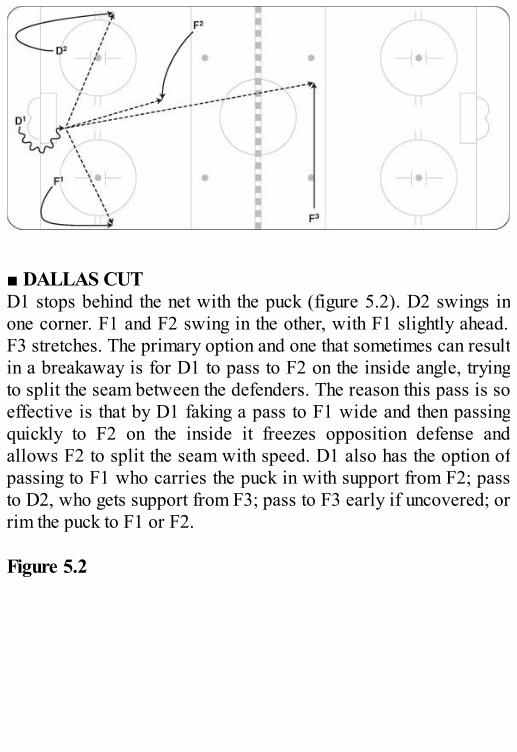
■ DALLAS CUTD1 stops behind the net with the puck (figure 5.2). D2 swings inone corner. F1 and F2 swing in the other, with F1 slightly ahead.F3 stretches. The primary option and one that sometimes can resultin a breakaway is for D1 to pass to F2 on the inside angle, tryingto split the seam between the defenders. The reason this pass is soeffective is that by D1 faking a pass to F1 wide and then passingquickly to F2 on the inside it freezes opposition defense andallows F2 to split the seam with speed. D1 also has the option ofpassing to F1 who carries the puck in with support from F2; passto D2, who gets support from F3; pass to F3 early if uncovered; orrim the puck to F1 or F2. Figure 5.2
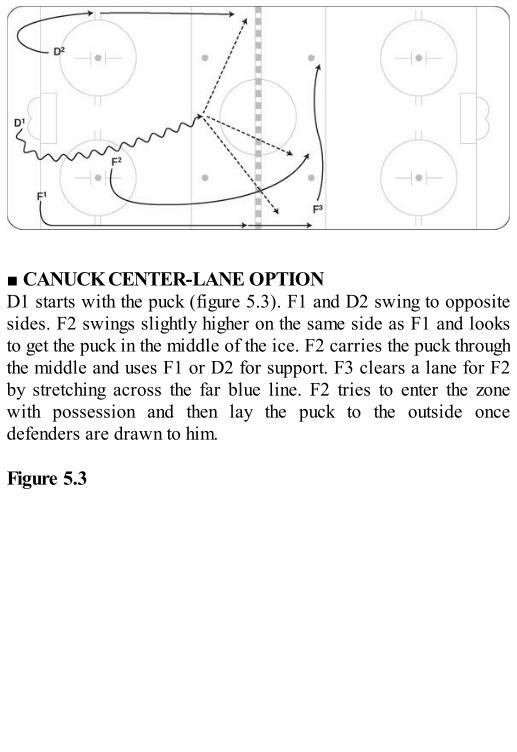
■ CANUCK CENTER-LANE OPTIOND1 starts with the puck (figure 5.3). F1 and D2 swing to oppositesides. F2 swings slightly higher on the same side as F1 and looksto get the puck in the middle of the ice. F2 carries the puck throughthe middle and uses F1 or D2 for support. F3 clears a lane for F2by stretching across the far blue line. F2 tries to enter the zonewith possession and then lay the puck to the outside oncedefenders are drawn to him. Figure 5.3
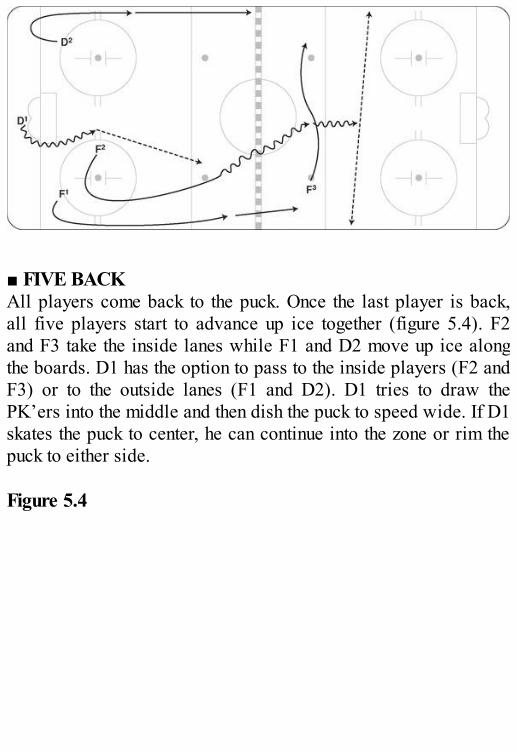
■ FIVE BACKAll players come back to the puck. Once the last player is back,all five players start to advance up ice together (figure 5.4). F2and F3 take the inside lanes while F1 and D2 move up ice alongthe boards. D1 has the option to pass to the inside players (F2 andF3) or to the outside lanes (F1 and D2). D1 tries to draw thePK’ers into the middle and then dish the puck to speed wide. If D1skates the puck to center, he can continue into the zone or rim thepuck to either side. Figure 5.4

■ DROP PASSThe key here is for the late forward to delay long enough to be anoption once the defense carries the puck up over the blueline. D1starts by skating up the middle with F2 and D2 moving up theoutside (figure 5.5). F3 stretches and F1 comes late from deep inthe zone behind the play. When D1 crosses the blue line he shouldtry to drag the first penalty killer to one side and then lay the puckover to the area where F1 is skating into. The penalty killers whohave been backing up with the initial rush now have to slow downand adjust to F1. F1 has too much speed and should be able toweave his way into the zone. F2, F3, and D2 have to be careful notto go offside. Figure 5.5
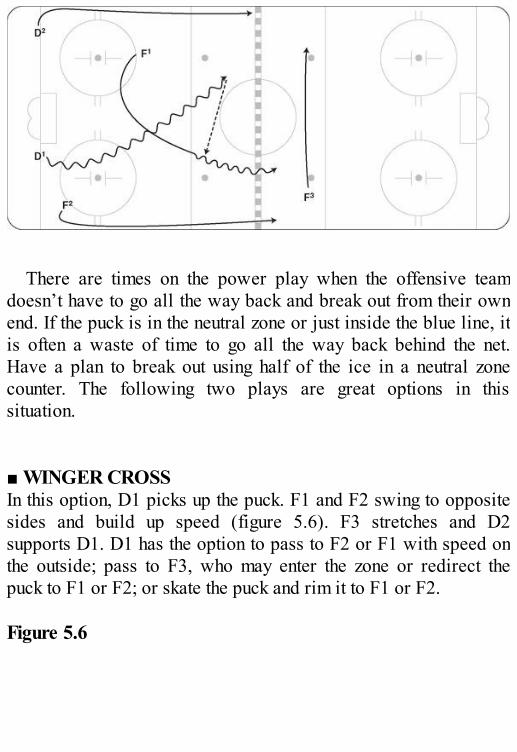
There are times on the power play when the offensive teamdoesn’t have to go all the way back and break out from their ownend. If the puck is in the neutral zone or just inside the blue line, itis often a waste of time to go all the way back behind the net.Have a plan to break out using half of the ice in a neutral zonecounter. The following two plays are great options in thissituation. ■ WINGER CROSSIn this option, D1 picks up the puck. F1 and F2 swing to oppositesides and build up speed (figure 5.6). F3 stretches and D2supports D1. D1 has the option to pass to F2 or F1 with speed onthe outside; pass to F3, who may enter the zone or redirect thepuck to F1 or F2; or skate the puck and rim it to F1 or F2. Figure 5.6
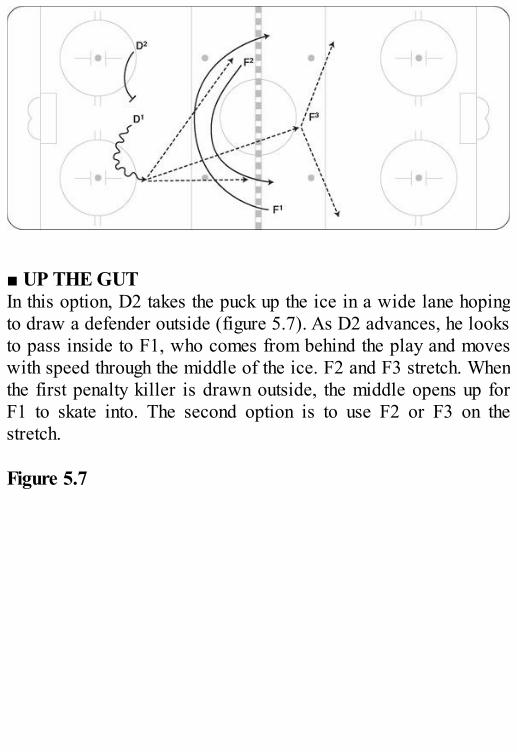
■ UP THE GUTIn this option, D2 takes the puck up the ice in a wide lane hopingto draw a defender outside (figure 5.7). As D2 advances, he looksto pass inside to F1, who comes from behind the play and moveswith speed through the middle of the ice. F2 and F3 stretch. Whenthe first penalty killer is drawn outside, the middle opens up forF1 to skate into. The second option is to use F2 or F3 on thestretch. Figure 5.7
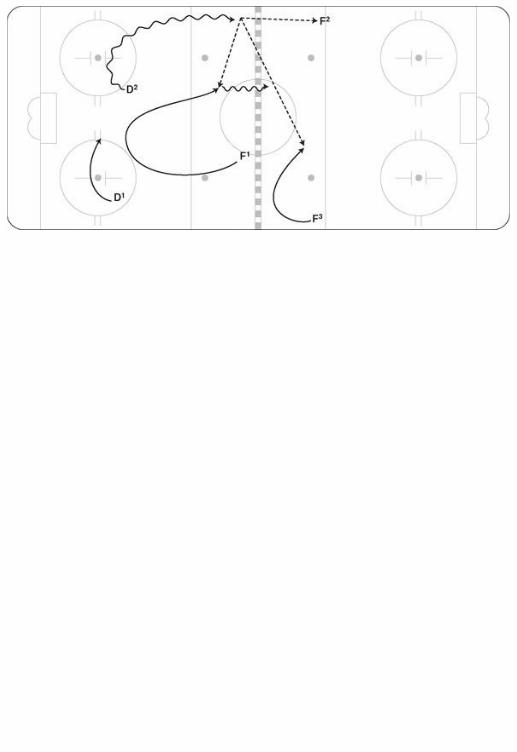
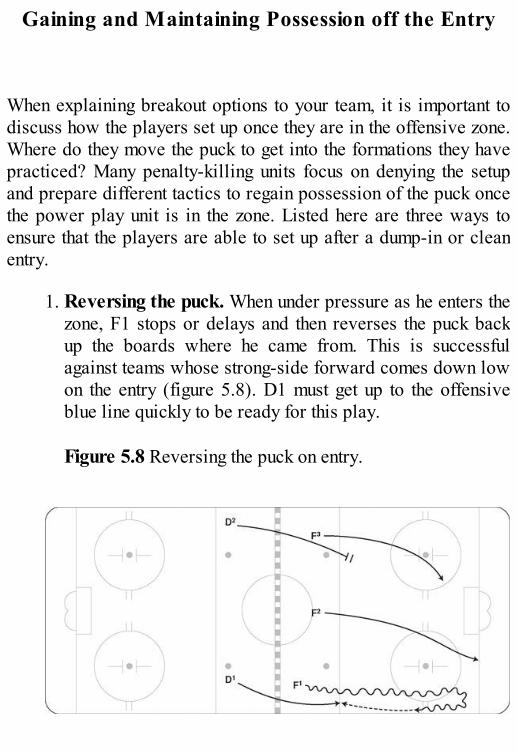
Gaining and Maintaining Possession off the Entry
When explaining breakout options to your team, it is important todiscuss how the players set up once they are in the offensive zone.Where do they move the puck to get into the formations they havepracticed? Many penalty-killing units focus on denying the setupand prepare different tactics to regain possession of the puck oncethe power play unit is in the zone. Listed here are three ways toensure that the players are able to set up after a dump-in or cleanentry.
1. Reversing the puck. When under pressure as he enters thezone, F1 stops or delays and then reverses the puck backup the boards where he came from. This is successfulagainst teams whose strong-side forward comes down lowon the entry (figure 5.8). D1 must get up to the offensiveblue line quickly to be ready for this play.
Figure 5.8 Reversing the puck on entry.
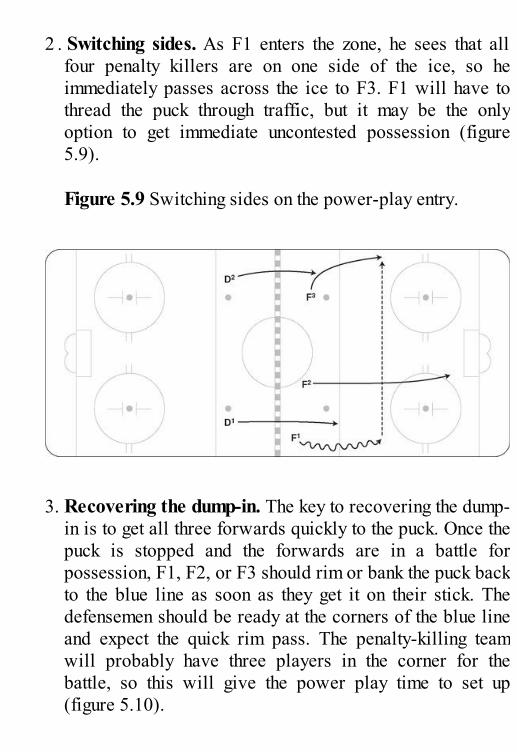
2 . Switching sides. As F1 enters the zone, he sees that all
four penalty killers are on one side of the ice, so heimmediately passes across the ice to F3. F1 will have tothread the puck through traffic, but it may be the onlyoption to get immediate uncontested possession (figure5.9).
Figure 5.9 Switching sides on the power-play entry.
3. Recovering the dump-in. The key to recovering the dump-in is to get all three forwards quickly to the puck. Once thepuck is stopped and the forwards are in a battle forpossession, F1, F2, or F3 should rim or bank the puck backto the blue line as soon as they get it on their stick. Thedefensemen should be ready at the corners of the blue lineand expect the quick rim pass. The penalty-killing teamwill probably have three players in the corner for thebattle, so this will give the power play time to set up(figure 5.10).
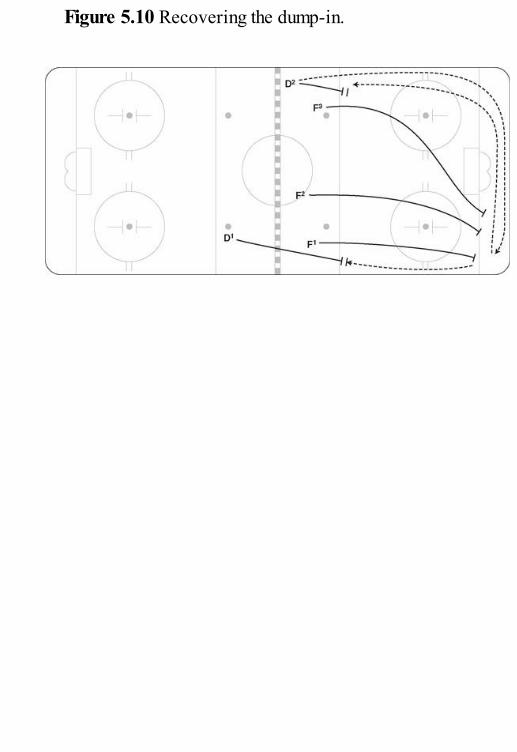
Figure 5.10 Recovering the dump-in.
Zone Setup
Once the players gain possession, they can set up in the zone anduse one of the following formations. This section discusses theoptions for three different power-play formations: the overload, 1-3-1, and split power play. Within each are the descriptions of thevarious plays and responsibilities of each player. As mentionedearlier, coaches can pick which option suits their players andteam. During the season you may change to another setup, but itdoes take a while to learn all the options and execute properly.Give the players time to get it right.
Overload Power Play
When using the overload power play, either side can be the strongside, with left-hand shots quarterbacking from the half boards onthe right side and right shots on the left side. This gives the playera shooting and passing advantage from that area. As the nameimplies, the setup is overloaded to the strong side, with fourplayers on that half of the ice. In this setup, much like most power-play setups, net presence is critical for success. It is important thatthe net player be in a screen position most of the time but alsoavailable to pop out into a scoring area. When setting up theoverload and moving the puck, the team should try to twist the boxaround by having the strong-side D move quickly across the blueline and even go beyond the halfway point before passing back tothe half boards or over to D2.
Half-Boards Player
The half-boards player is the key quarterback of this setup, withD1 playing a secondary role. The half-boards player must slide upand down the boards, distribute the puck, and shoot from theoutside, all while under pressure. He has to be calm and poisedwith the puck and quick to recognize where to move the puck.Penalty killers will either force the half-boards player with theirD from down low or their forward from the top, so this playermust be able to move with the pressure, protect the puck, and makea play.
Strong-Side Point Man
The strong-side defenseman is the other key player in thisoverload setup. He along with the half-boards player will have thepuck the most and be the ones to settle the play down and set up.Keep your feet on the blue line to create space between yourselfand the penalty killers. This extra room will give you time to makedecisions or step into a shot, while drawing out the penalty killersand creating seams in behind. This player needs to have a shootingmentality and always be a threat to shoot. The number one way toscore and create chances on the power play is still to take a pointshot with net traffic. Sometimes the shot can be a wrist shot, andother times the D should shoot hard. The penalty killers shouldn’tknow whether the D is going to shoot or pass—have gooddeception. When pressured, move the puck to the half-boardsplayer or the back-side D, or make a quick, low play.
Low Walk Player
The low walk player should have his feet on the goal line and stayclose to the net in order to attack quickly and also move in toscreen the goaltender or get a rebound. If this player drifts too farto the outside, he cannot do either. The low walk player must beversatile and quick. At times he will switch with the half-boardsplayer, usually when there is no option available as the half-boards player drives the net. This tactic forces the penalty killersto adjust quickly and often creates passing options. Before thegame, find out how the other team forces—will they pressurequickly with the low defenseman, or will they hold the front of thenet? This information will help determine what option might be
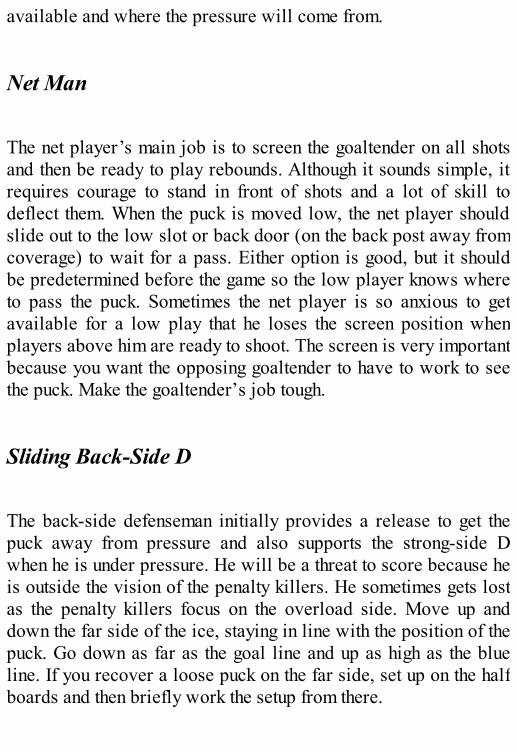
available and where the pressure will come from.
Net Man
The net player’s main job is to screen the goaltender on all shotsand then be ready to play rebounds. Although it sounds simple, itrequires courage to stand in front of shots and a lot of skill todeflect them. When the puck is moved low, the net player shouldslide out to the low slot or back door (on the back post away fromcoverage) to wait for a pass. Either option is good, but it shouldbe predetermined before the game so the low player knows whereto pass the puck. Sometimes the net player is so anxious to getavailable for a low play that he loses the screen position whenplayers above him are ready to shoot. The screen is very importantbecause you want the opposing goaltender to have to work to seethe puck. Make the goaltender’s job tough.
Sliding Back-Side D
The back-side defenseman initially provides a release to get thepuck away from pressure and also supports the strong-side Dwhen he is under pressure. He will be a threat to score because heis outside the vision of the penalty killers. He sometimes gets lostas the penalty killers focus on the overload side. Move up anddown the far side of the ice, staying in line with the position of thepuck. Go down as far as the goal line and up as high as the blueline. If you recover a loose puck on the far side, set up on the halfboards and then briefly work the setup from there.
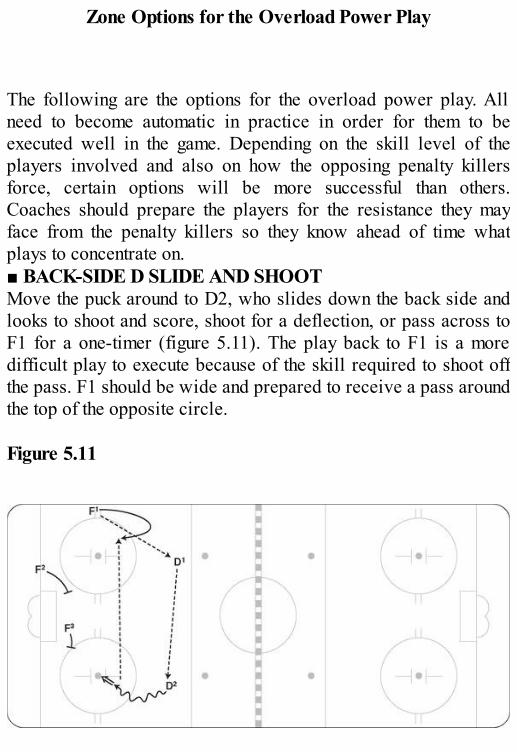
Zone Options for the Overload Power Play
The following are the options for the overload power play. Allneed to become automatic in practice in order for them to beexecuted well in the game. Depending on the skill level of theplayers involved and also on how the opposing penalty killersforce, certain options will be more successful than others.Coaches should prepare the players for the resistance they mayface from the penalty killers so they know ahead of time whatplays to concentrate on.■ BACK-SIDE D SLIDE AND SHOOTMove the puck around to D2, who slides down the back side andlooks to shoot and score, shoot for a deflection, or pass across toF1 for a one-timer (figure 5.11). The play back to F1 is a moredifficult play to execute because of the skill required to shoot offthe pass. F1 should be wide and prepared to receive a pass aroundthe top of the opposite circle. Figure 5.11
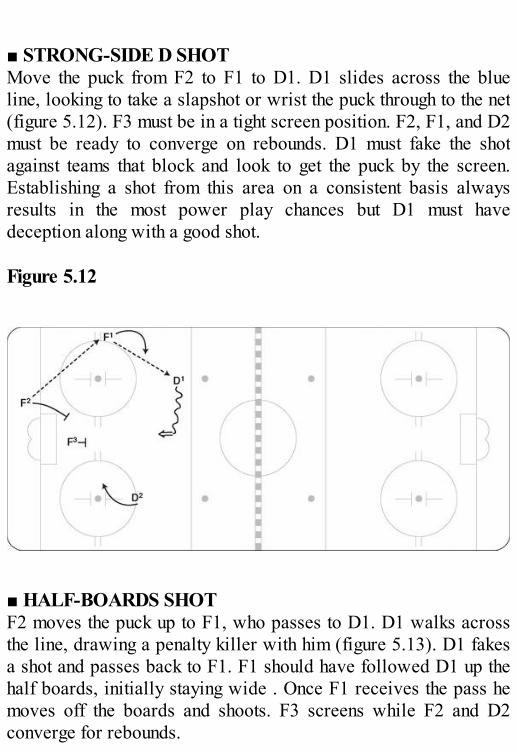
■ STRONG-SIDE D SHOTMove the puck from F2 to F1 to D1. D1 slides across the blueline, looking to take a slapshot or wrist the puck through to the net(figure 5.12). F3 must be in a tight screen position. F2, F1, and D2must be ready to converge on rebounds. D1 must fake the shotagainst teams that block and look to get the puck by the screen.Establishing a shot from this area on a consistent basis alwaysresults in the most power play chances but D1 must havedeception along with a good shot. Figure 5.12
■ HALF-BOARDS SHOTF2 moves the puck up to F1, who passes to D1. D1 walks acrossthe line, drawing a penalty killer with him (figure 5.13). D1 fakesa shot and passes back to F1. F1 should have followed D1 up thehalf boards, initially staying wide . Once F1 receives the pass hemoves off the boards and shoots. F3 screens while F2 and D2converge for rebounds.
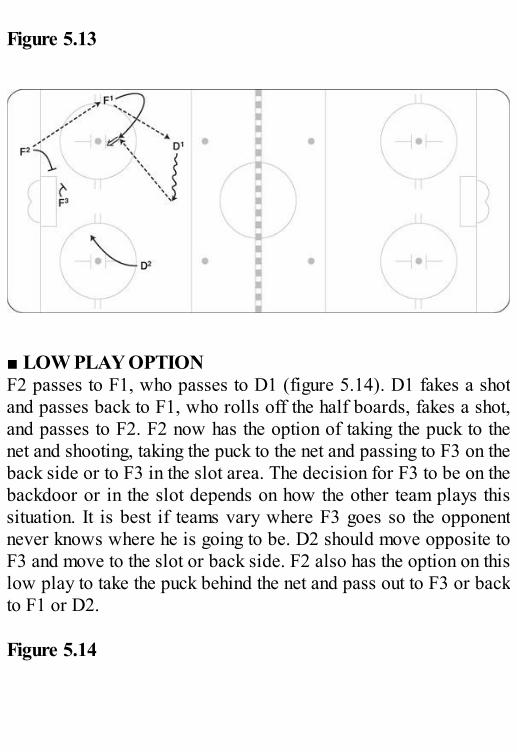
Figure 5.13
■ LOW PLAY OPTIONF2 passes to F1, who passes to D1 (figure 5.14). D1 fakes a shotand passes back to F1, who rolls off the half boards, fakes a shot,and passes to F2. F2 now has the option of taking the puck to thenet and shooting, taking the puck to the net and passing to F3 on theback side or to F3 in the slot area. The decision for F3 to be on thebackdoor or in the slot depends on how the other team plays thissituation. It is best if teams vary where F3 goes so the opponentnever knows where he is going to be. D2 should move opposite toF3 and move to the slot or back side. F2 also has the option on thislow play to take the puck behind the net and pass out to F3 or backto F1 or D2. Figure 5.14
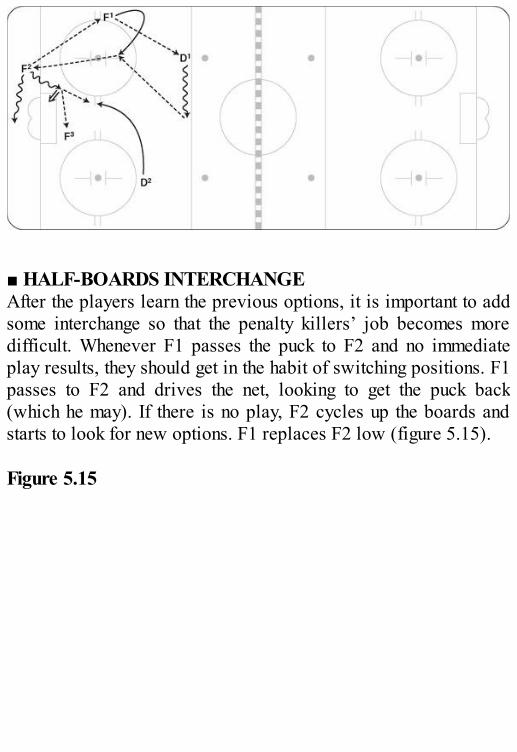
■ HALF-BOARDS INTERCHANGEAfter the players learn the previous options, it is important to addsome interchange so that the penalty killers’ job becomes moredifficult. Whenever F1 passes the puck to F2 and no immediateplay results, they should get in the habit of switching positions. F1passes to F2 and drives the net, looking to get the puck back(which he may). If there is no play, F2 cycles up the boards andstarts to look for new options. F1 replaces F2 low (figure 5.15). Figure 5.15
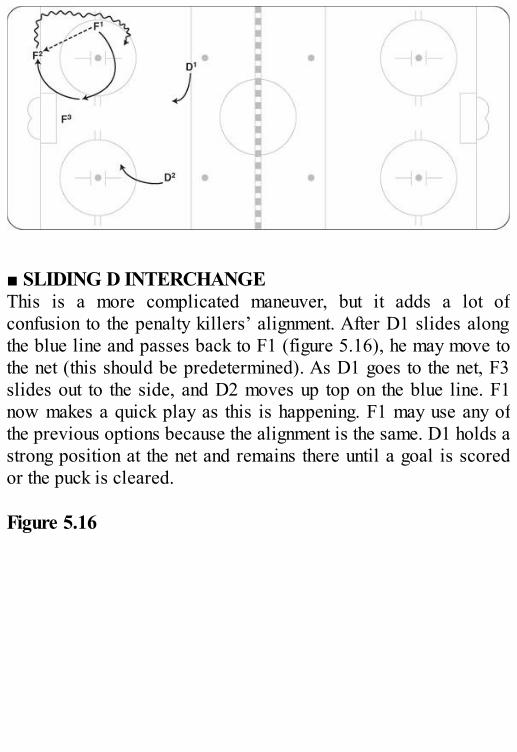
■ SLIDING D INTERCHANGEThis is a more complicated maneuver, but it adds a lot ofconfusion to the penalty killers’ alignment. After D1 slides alongthe blue line and passes back to F1 (figure 5.16), he may move tothe net (this should be predetermined). As D1 goes to the net, F3slides out to the side, and D2 moves up top on the blue line. F1now makes a quick play as this is happening. F1 may use any ofthe previous options because the alignment is the same. D1 holds astrong position at the net and remains there until a goal is scoredor the puck is cleared. Figure 5.16

1-3-1 Power Play
The 1-3-1 power play is one of the newer power-play formationsused by several teams today. Essentially there are two strongsides, with the puck being able to be controlled on either halfboards. It is easy to switch sides either up top or behind the net tosettle the puck out when under pressure or to create chances. Onceagain, net presence is critical. The key to success with thisformation is for the top three players to focus on shooting or one-timing the puck. This power play is difficult for pressure penalty-killing units to defend because of the side-to-side options.
Right and Left Side Half-Boards Players
Set up with the right shot on the left boards and the left shot on theright. These two players are definitely the quarterbacks. Both mustbe a threat to shoot or fake the shot and pass while also being calmunder pressure. They should work the puck up to the high D asnumber one option, and don’t force plays through the box—oftenthe play through the box will open up after recovering a rebound.
Mid-Ice Point Man
An important strategy for this defenseman is to keep his feet on theblue line to allow more room to make a play or step into a shot.Slide along the line with deception while looking to find an openlane to the net. Quickly work the puck from left to right if the shot
isn’t there, and then look to shoot again. Wrist shots to the net arealso good, but if there is a chance for a slapshot, use it. In the 1-3-1 setup, the puck should revolve around this player.
Slot Player
This can be a defenseman who slides in or a forward who playsdefense and then moves into the slot area. Move into this positiononce the puck is under control. Depending on whether this playeris a right or left shot, from one side he must be ready for a quickrelease shot and from the other side a shot pass. The shot pass is aplay where the outside players shoot to the stick of the slot playerfor a redirect on the net. The slot player should move around in thespace to distract the penalty killers. It is key that this player isready to support both half-boards players when they are in trouble.
Net Man
The net man, as the name indicates, plays the net area unlesssupport is needed to settle the puck out. He may release to thestrong side for a low pass and the potential to make a quick insideplay. This is a good strategy, but the player has to read whether thehigh players are shooting or whether they need a low option. Stayactive, and get into shooting lanes at the right time.
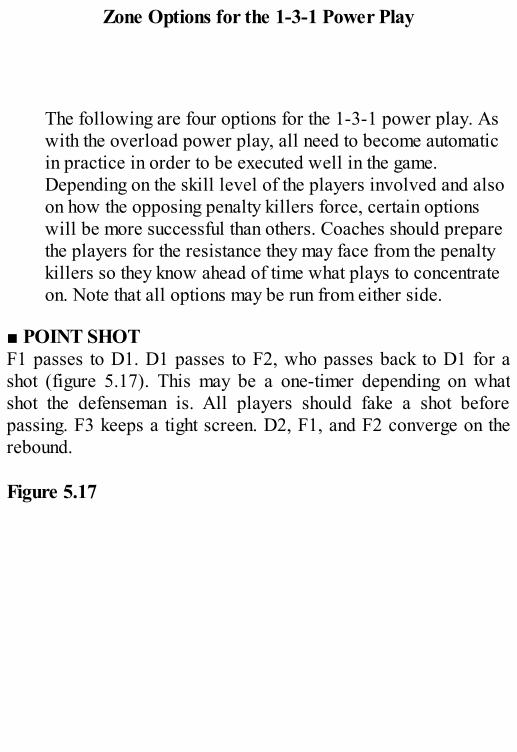
Zone Options for the 1-3-1 Power Play
The following are four options for the 1-3-1 power play. Aswith the overload power play, all need to become automaticin practice in order to be executed well in the game.Depending on the skill level of the players involved and alsoon how the opposing penalty killers force, certain optionswill be more successful than others. Coaches should preparethe players for the resistance they may face from the penaltykillers so they know ahead of time what plays to concentrateon. Note that all options may be run from either side.
■ POINT SHOTF1 passes to D1. D1 passes to F2, who passes back to D1 for ashot (figure 5.17). This may be a one-timer depending on whatshot the defenseman is. All players should fake a shot beforepassing. F3 keeps a tight screen. D2, F1, and F2 converge on therebound. Figure 5.17
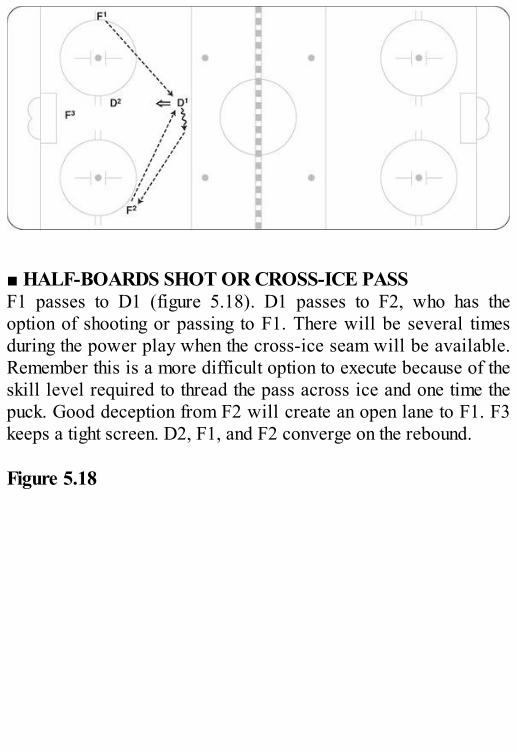
■ HALF-BOARDS SHOT OR CROSS-ICE PASSF1 passes to D1 (figure 5.18). D1 passes to F2, who has theoption of shooting or passing to F1. There will be several timesduring the power play when the cross-ice seam will be available.Remember this is a more difficult option to execute because of theskill level required to thread the pass across ice and one time thepuck. Good deception from F2 will create an open lane to F1. F3keeps a tight screen. D2, F1, and F2 converge on the rebound. Figure 5.18

■ INSIDE PLAYF1 passes to D1, who passes to F2 (figure 5.19). F2 fakes the shotand passes inside to D2 for a one-timer or redirect play. Thisinside play can be made from either side. D2 must be ready for apass at all times. F3 keeps a tight screen. F1 and F2 converge onthe rebound. Depending on which shot D2 is, this may be onopportunity for a quick release shot or shot pass deflection. Figure 5.19
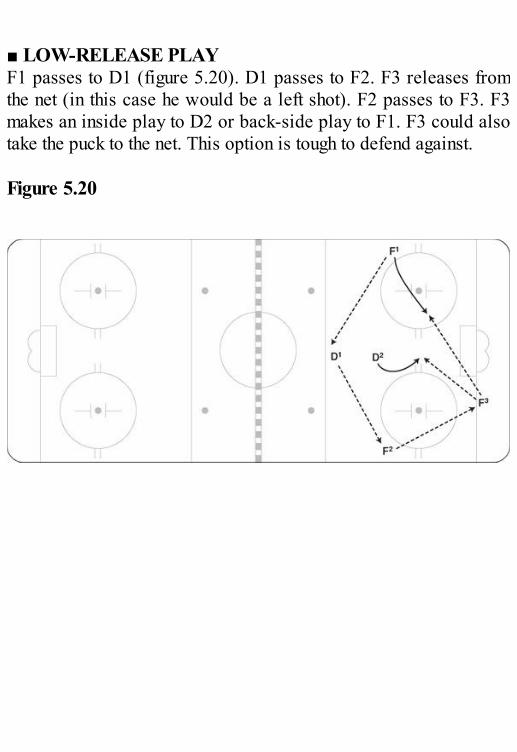
■ LOW-RELEASE PLAYF1 passes to D1 (figure 5.20). D1 passes to F2. F3 releases fromthe net (in this case he would be a left shot). F2 passes to F3. F3makes an inside play to D2 or back-side play to F1. F3 could alsotake the puck to the net. This option is tough to defend against. Figure 5.20
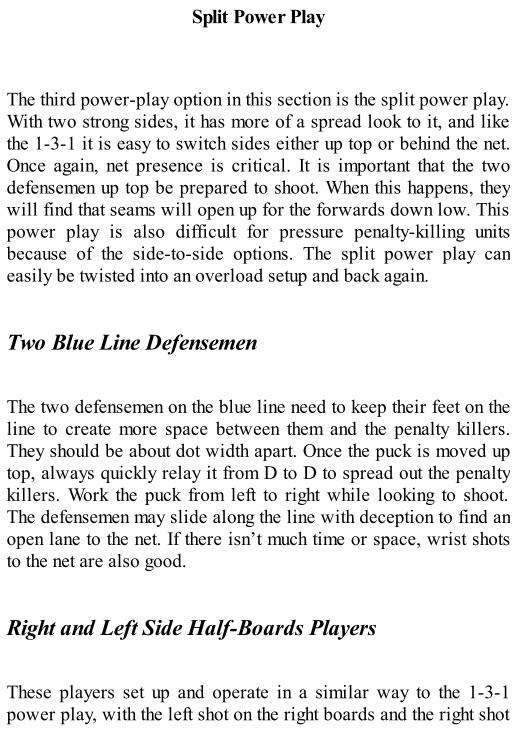
Split Power Play
The third power-play option in this section is the split power play.With two strong sides, it has more of a spread look to it, and likethe 1-3-1 it is easy to switch sides either up top or behind the net.Once again, net presence is critical. It is important that the twodefensemen up top be prepared to shoot. When this happens, theywill find that seams will open up for the forwards down low. Thispower play is also difficult for pressure penalty-killing unitsbecause of the side-to-side options. The split power play caneasily be twisted into an overload setup and back again.
Two Blue Line Defensemen
The two defensemen on the blue line need to keep their feet on theline to create more space between them and the penalty killers.They should be about dot width apart. Once the puck is moved uptop, always quickly relay it from D to D to spread out the penaltykillers. Work the puck from left to right while looking to shoot.The defensemen may slide along the line with deception to find anopen lane to the net. If there isn’t much time or space, wrist shotsto the net are also good.
Right and Left Side Half-Boards Players
These players set up and operate in a similar way to the 1-3-1power play, with the left shot on the right boards and the right shot

on the left boards. Both players should be a threat to shoot or fakethe shot and pass. Stay calm under pressure. The number oneoption should be to work the puck up to the high Ds especiallywhen being pressured low. Don’t force plays through the box—often the play through the box will open up after recovering arebound.
Net Man
With most of these power-play setups the net man’s jobdescription doesn’t change much. This player should stay at the netunless support is needed to settle the puck out but may release toeither side for a low pass. Stay active, and get into shooting lanesat the right time. Support the half-boards players when they are introuble and under pressure by sliding out to the side of the net. Tosettle the puck out when pressured down low, simply relay thepuck behind the net to the opposite half-boards player.
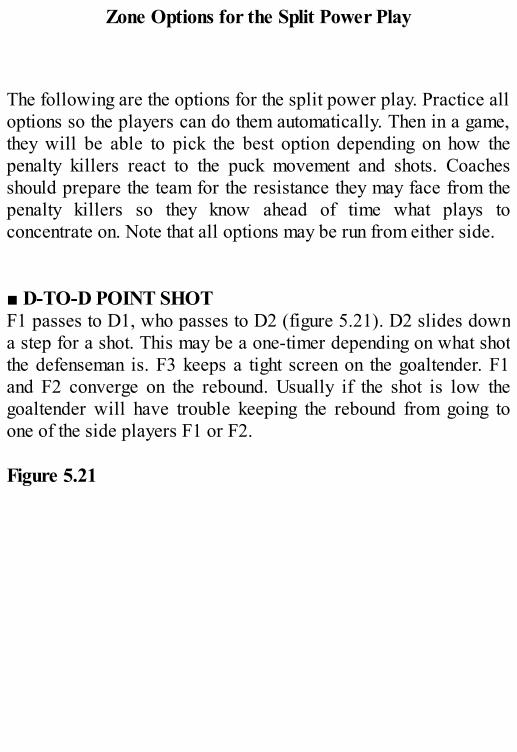
Zone Options for the Split Power Play
The following are the options for the split power play. Practice alloptions so the players can do them automatically. Then in a game,they will be able to pick the best option depending on how thepenalty killers react to the puck movement and shots. Coachesshould prepare the team for the resistance they may face from thepenalty killers so they know ahead of time what plays toconcentrate on. Note that all options may be run from either side. ■ D-TO-D POINT SHOTF1 passes to D1, who passes to D2 (figure 5.21). D2 slides downa step for a shot. This may be a one-timer depending on what shotthe defenseman is. F3 keeps a tight screen on the goaltender. F1and F2 converge on the rebound. Usually if the shot is low thegoaltender will have trouble keeping the rebound from going toone of the side players F1 or F2. Figure 5.21
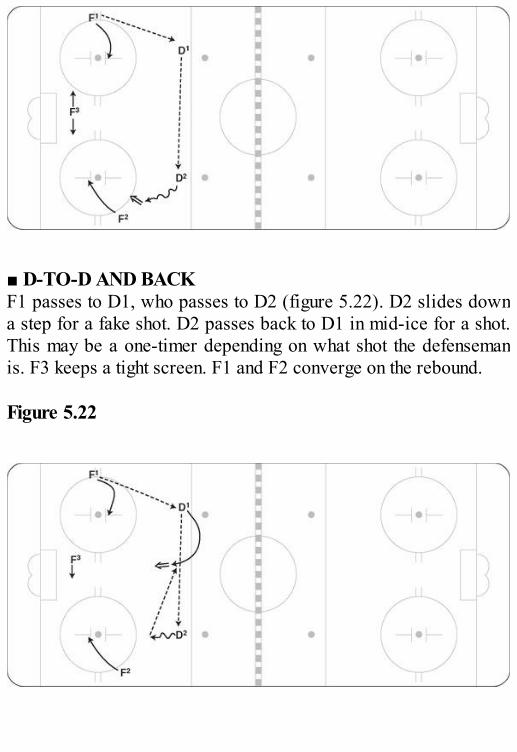
■ D-TO-D AND BACKF1 passes to D1, who passes to D2 (figure 5.22). D2 slides downa step for a fake shot. D2 passes back to D1 in mid-ice for a shot.This may be a one-timer depending on what shot the defensemanis. F3 keeps a tight screen. F1 and F2 converge on the rebound. Figure 5.22
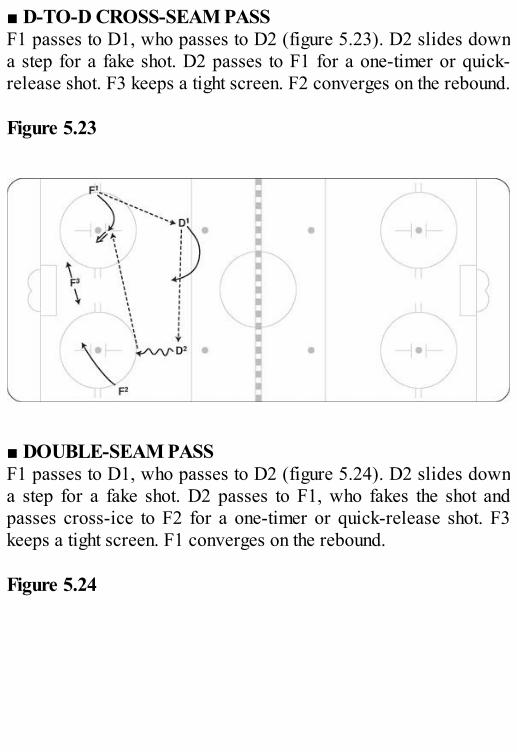
■ D-TO-D CROSS-SEAM PASSF1 passes to D1, who passes to D2 (figure 5.23). D2 slides downa step for a fake shot. D2 passes to F1 for a one-timer or quick-release shot. F3 keeps a tight screen. F2 converges on the rebound. Figure 5.23
■ DOUBLE-SEAM PASSF1 passes to D1, who passes to D2 (figure 5.24). D2 slides downa step for a fake shot. D2 passes to F1, who fakes the shot andpasses cross-ice to F2 for a one-timer or quick-release shot. F3keeps a tight screen. F1 converges on the rebound. Figure 5.24
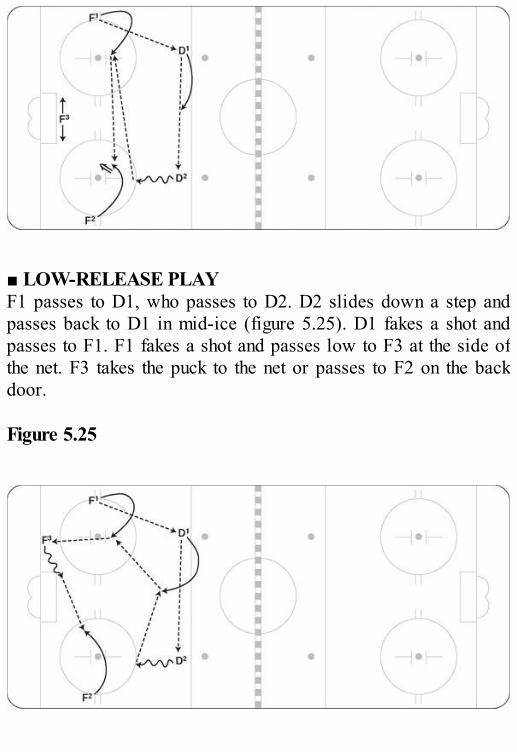
■ LOW-RELEASE PLAYF1 passes to D1, who passes to D2. D2 slides down a step andpasses back to D1 in mid-ice (figure 5.25). D1 fakes a shot andpasses to F1. F1 fakes a shot and passes low to F3 at the side ofthe net. F3 takes the puck to the net or passes to F2 on the backdoor. Figure 5.25

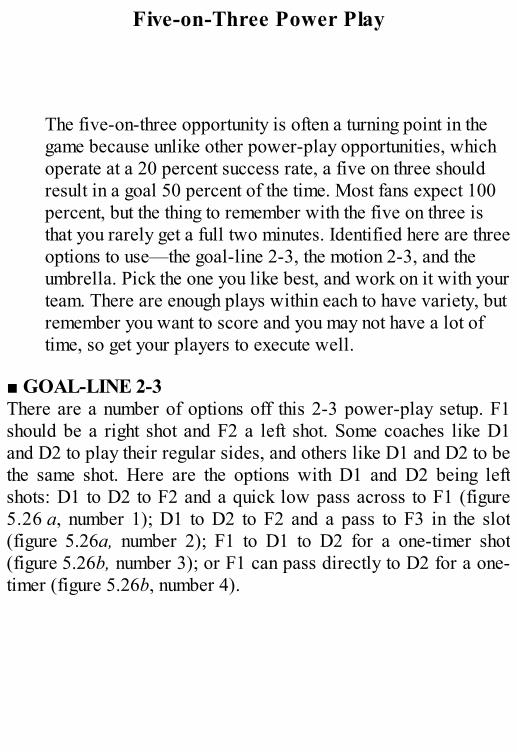
Five-on-Three Power Play
The five-on-three opportunity is often a turning point in thegame because unlike other power-play opportunities, whichoperate at a 20 percent success rate, a five on three shouldresult in a goal 50 percent of the time. Most fans expect 100percent, but the thing to remember with the five on three isthat you rarely get a full two minutes. Identified here are threeoptions to use—the goal-line 2-3, the motion 2-3, and theumbrella. Pick the one you like best, and work on it with yourteam. There are enough plays within each to have variety, butremember you want to score and you may not have a lot oftime, so get your players to execute well.
■ GOAL-LINE 2-3There are a number of options off this 2-3 power-play setup. F1should be a right shot and F2 a left shot. Some coaches like D1and D2 to play their regular sides, and others like D1 and D2 to bethe same shot. Here are the options with D1 and D2 being leftshots: D1 to D2 to F2 and a quick low pass across to F1 (figure5.26 a, number 1); D1 to D2 to F2 and a pass to F3 in the slot(figure 5.26a, number 2); F1 to D1 to D2 for a one-timer shot(figure 5.26b, number 3); or F1 can pass directly to D2 for a one-timer (figure 5.26b, number 4).
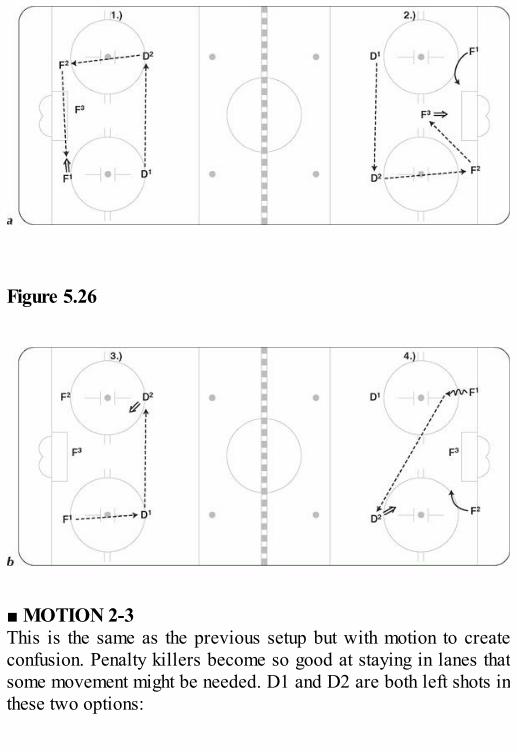
Figure 5.26
■ MOTION 2-3This is the same as the previous setup but with motion to createconfusion. Penalty killers become so good at staying in lanes thatsome movement might be needed. D1 and D2 are both left shots inthese two options:
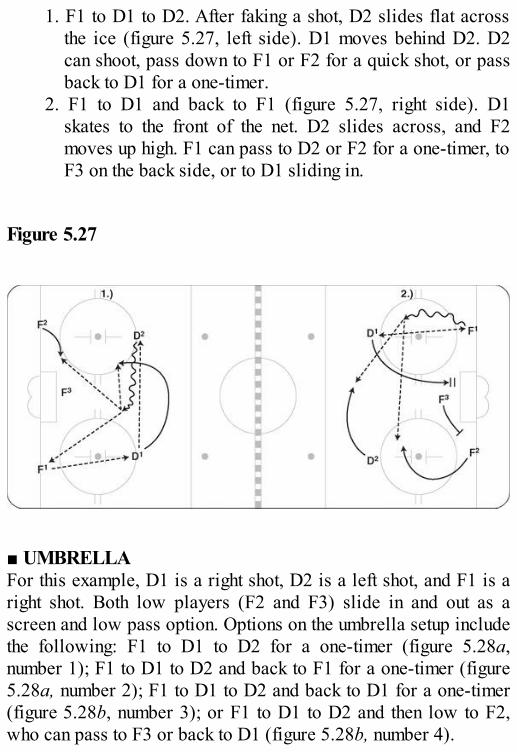
1. F1 to D1 to D2. After faking a shot, D2 slides flat acrossthe ice (figure 5.27, left side). D1 moves behind D2. D2can shoot, pass down to F1 or F2 for a quick shot, or passback to D1 for a one-timer.
2. F1 to D1 and back to F1 (figure 5.27, right side). D1skates to the front of the net. D2 slides across, and F2moves up high. F1 can pass to D2 or F2 for a one-timer, toF3 on the back side, or to D1 sliding in.
Figure 5.27
■ UMBRELLAFor this example, D1 is a right shot, D2 is a left shot, and F1 is aright shot. Both low players (F2 and F3) slide in and out as ascreen and low pass option. Options on the umbrella setup includethe following: F1 to D1 to D2 for a one-timer (figure 5.28a,number 1); F1 to D1 to D2 and back to F1 for a one-timer (figure5.28a, number 2); F1 to D1 to D2 and back to D1 for a one-timer(figure 5.28b, number 3); or F1 to D1 to D2 and then low to F2,who can pass to F3 or back to D1 (figure 5.28b, number 4).
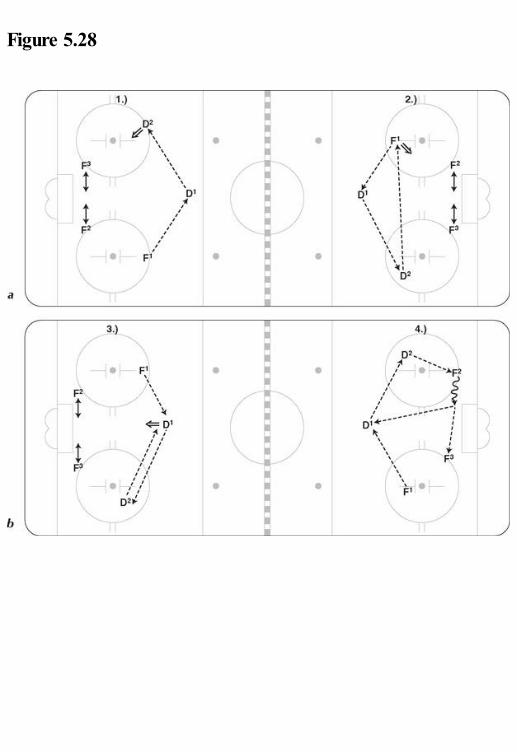
Figure 5.28
Four-on-Three Power Play
The four-on-three power play is the least common of theman-advantage opportunities that occur in a game. There aretwo basic setups: the box and the umbrella. The umbrella ismore suited for teams that have a big one-timer shooter uptop; the box is better for teams that can make quick, low playsonce the shot from the point is taken away.
■ BOXWhen using this setup, you need to make sure one of the lowplayers is in a screen position when D1 or D2 shoots. Bothforwards and both Ds should be opposite shots. D1 passes to D2,who passes to F1. F1 passes across to F2 for a quick shot (figure5.29, number 1). D1 and D2 can also pass the puck back and forth,looking for a one-timer (figure 5.29, number 2). Often the penaltykillers will overplay the one-timer shots up top and leave a quicktwo on one low for the forwards. Figure 5.29
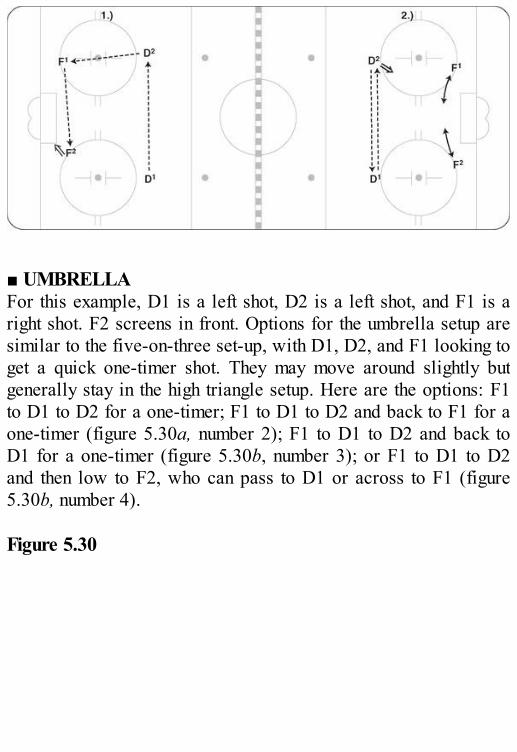
■ UMBRELLAFor this example, D1 is a left shot, D2 is a left shot, and F1 is aright shot. F2 screens in front. Options for the umbrella setup aresimilar to the five-on-three set-up, with D1, D2, and F1 looking toget a quick one-timer shot. They may move around slightly butgenerally stay in the high triangle setup. Here are the options: F1to D1 to D2 for a one-timer; F1 to D1 to D2 and back to F1 for aone-timer (figure 5.30a, number 2); F1 to D1 to D2 and back toD1 for a one-timer (figure 5.30b, number 3); or F1 to D1 to D2and then low to F2, who can pass to D1 or across to F1 (figure5.30b, number 4). Figure 5.30
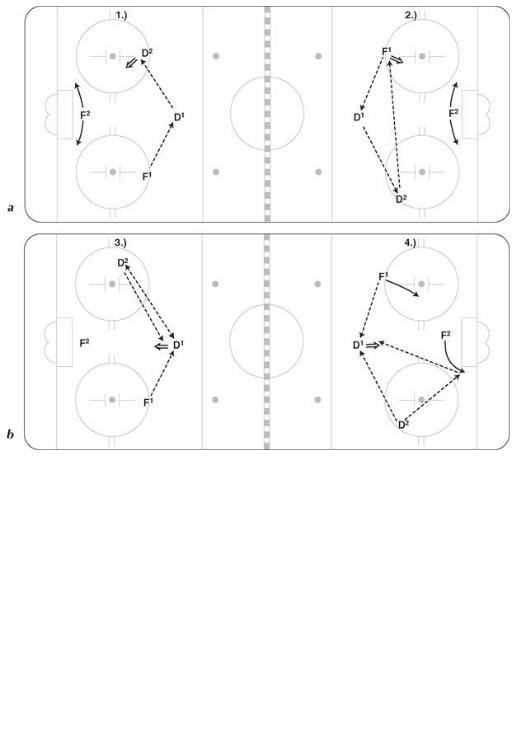
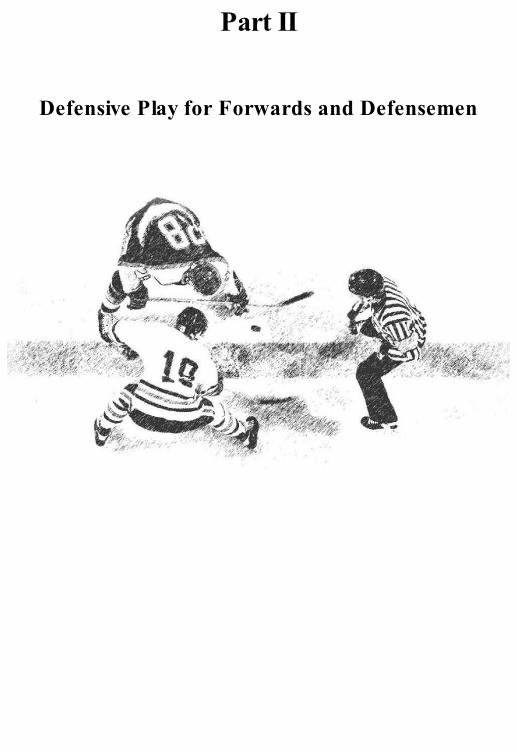
Part II
Defensive Play for Forwards and Defensemen
Chapter 6
Forechecking
There are basically three situations when a team would applyforechecking pressure. The most common is when a team dumps orchips the puck in from the neutral zone and then tries to retrieve itwhile the opponent tries to break out. The second is when theoffensive team takes a shot that creates a rebound and then theyforecheck to get the puck back. The final forechecking situationoccurs off a turnover. When the offensive team turns the puck overthey now need to apply forechecking pressure to get the puck back.Essentially, there are six keys to successful forechecking pressure:
1. F1 (the first forechecker in) must get in quickly andestablish an angle when pursuing the puck carrier. Thiswill limit the options for the breakout team. Taking awaytime and space from the breakout team forces hurried playsand mistakes. The quicker F1 responds to the puck the lesstime the offensive team will have to make a play.
2. Once the puck is moved, F1 must recover to a highposition above the puck while F2 or F3 responds topressure the pass. If F1 follows through on the hit he mustget off the check right away and move above the circleswhile observing where the puck is and what is happening.
3. Continue to pressure and recover, pressure and recoveruntil the puck is turned over. The response of the secondand third player is key to keep heat on the opposition andforce a turnover.
4. If the defensemen are going to pinch (pressure down theboards), they have to get to the puck before it is undercontrol. Pinching defense must read the play and anticipatewhen the pass is being moved up to the wingers on theboards. One forward must always be in a position to backup the D. Having the high forward in a position to back upthe pinching defense will prevent odd-man rushes the otherway.
5. Good forecheckers use their sticks to take away passinglanes. Keep it on the ice and in the right lane. The “rightlane” is the one that leads to the best breakout option forthe other team. Take this option away, or make it difficultto make the pass by having an active stick.
6. Finish hits when appropriate. Physical play on theforecheck often forces the defense to move the puckquicker next time. There are times when a hit is not thebest choice. When the forechecker is within strikingdistance of the pass then continue to pressure the puck
instead of hitting the first opponent.
Forechecking Systems
This section describes five forechecking systems that a team canuse to get the puck back. Which one you use may depend on thelevel you are coaching. For example, pressure forechecks workwell against younger teams who have difficulty making quickdecisions or sequential passes. It will also depend on the risk youwant to take as a coach. More conservative coaches like toemploy a system where one player is in on the forecheck but allother players are above the puck. More aggressive coaches willhave their defense pinching on a regular basis. Once again, the keyis proper execution. Therefore, any of the five systems could beused from novice to pro.
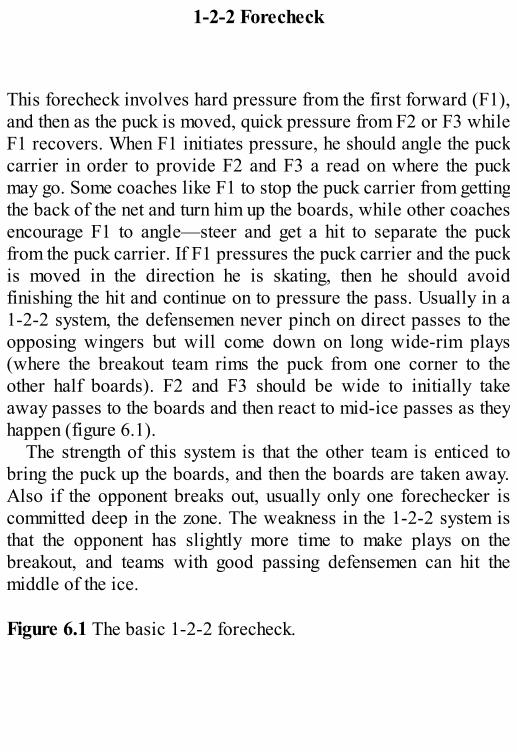
1-2-2 Forecheck
This forecheck involves hard pressure from the first forward (F1),and then as the puck is moved, quick pressure from F2 or F3 whileF1 recovers. When F1 initiates pressure, he should angle the puckcarrier in order to provide F2 and F3 a read on where the puckmay go. Some coaches like F1 to stop the puck carrier from gettingthe back of the net and turn him up the boards, while other coachesencourage F1 to angle—steer and get a hit to separate the puckfrom the puck carrier. If F1 pressures the puck carrier and the puckis moved in the direction he is skating, then he should avoidfinishing the hit and continue on to pressure the pass. Usually in a1-2-2 system, the defensemen never pinch on direct passes to theopposing wingers but will come down on long wide-rim plays(where the breakout team rims the puck from one corner to theother half boards). F2 and F3 should be wide to initially takeaway passes to the boards and then react to mid-ice passes as theyhappen (figure 6.1).
The strength of this system is that the other team is enticed tobring the puck up the boards, and then the boards are taken away.Also if the opponent breaks out, usually only one forechecker iscommitted deep in the zone. The weakness in the 1-2-2 system isthat the opponent has slightly more time to make plays on thebreakout, and teams with good passing defensemen can hit themiddle of the ice. Figure 6.1 The basic 1-2-2 forecheck.
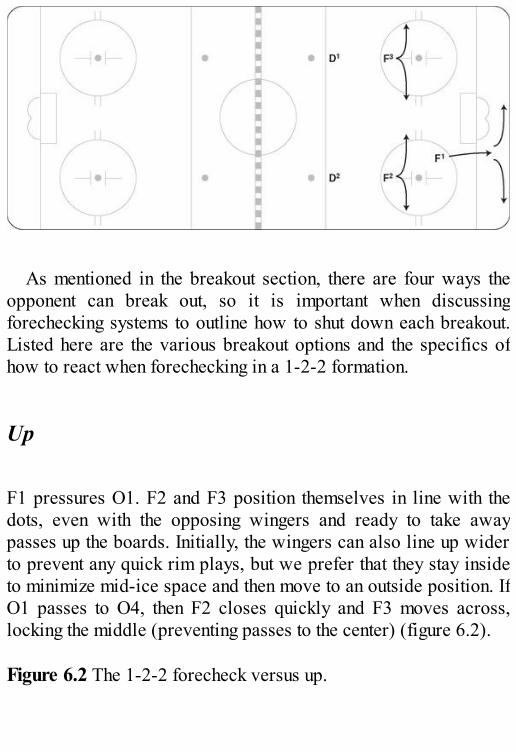
As mentioned in the breakout section, there are four ways theopponent can break out, so it is important when discussingforechecking systems to outline how to shut down each breakout.Listed here are the various breakout options and the specifics ofhow to react when forechecking in a 1-2-2 formation.
Up
F1 pressures O1. F2 and F3 position themselves in line with thedots, even with the opposing wingers and ready to take awaypasses up the boards. Initially, the wingers can also line up widerto prevent any quick rim plays, but we prefer that they stay insideto minimize mid-ice space and then move to an outside position. IfO1 passes to O4, then F2 closes quickly and F3 moves across,locking the middle (preventing passes to the center) (figure 6.2). Figure 6.2 The 1-2-2 forecheck versus up.
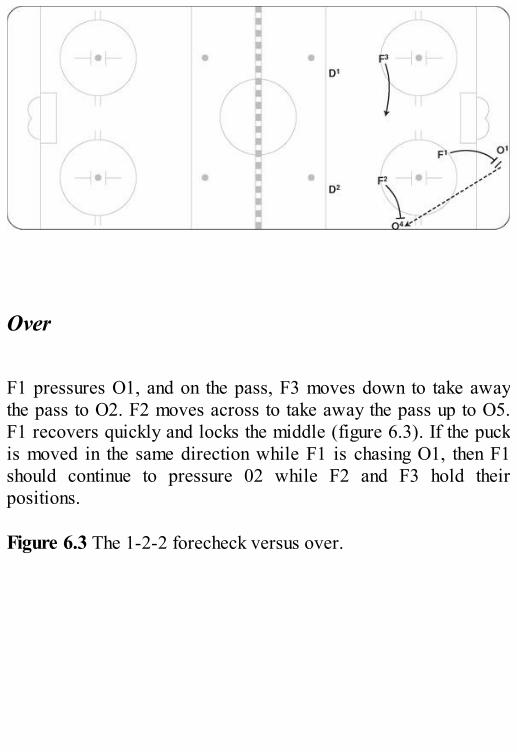
Over
F1 pressures O1, and on the pass, F3 moves down to take awaythe pass to O2. F2 moves across to take away the pass up to O5.F1 recovers quickly and locks the middle (figure 6.3). If the puckis moved in the same direction while F1 is chasing O1, then F1should continue to pressure 02 while F2 and F3 hold theirpositions. Figure 6.3 The 1-2-2 forecheck versus over.
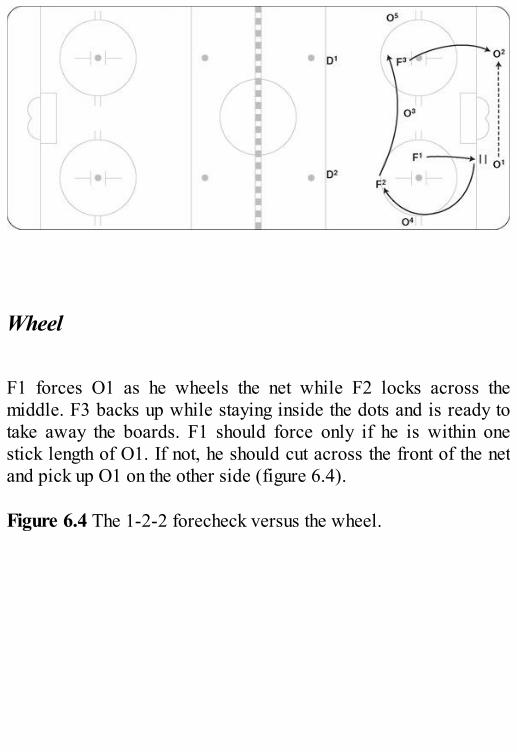
Wheel
F1 forces O1 as he wheels the net while F2 locks across themiddle. F3 backs up while staying inside the dots and is ready totake away the boards. F1 should force only if he is within onestick length of O1. If not, he should cut across the front of the netand pick up O1 on the other side (figure 6.4). Figure 6.4 The 1-2-2 forecheck versus the wheel.
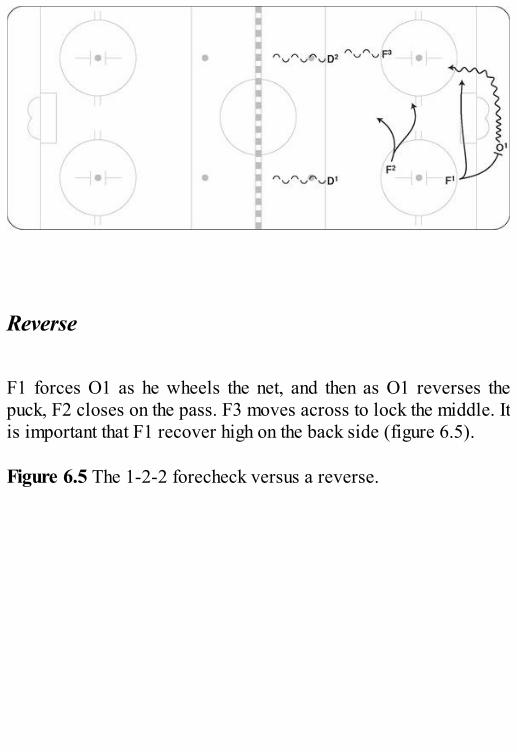
Reverse
F1 forces O1 as he wheels the net, and then as O1 reverses thepuck, F2 closes on the pass. F3 moves across to lock the middle. Itis important that F1 recover high on the back side (figure 6.5). Figure 6.5 The 1-2-2 forecheck versus a reverse.
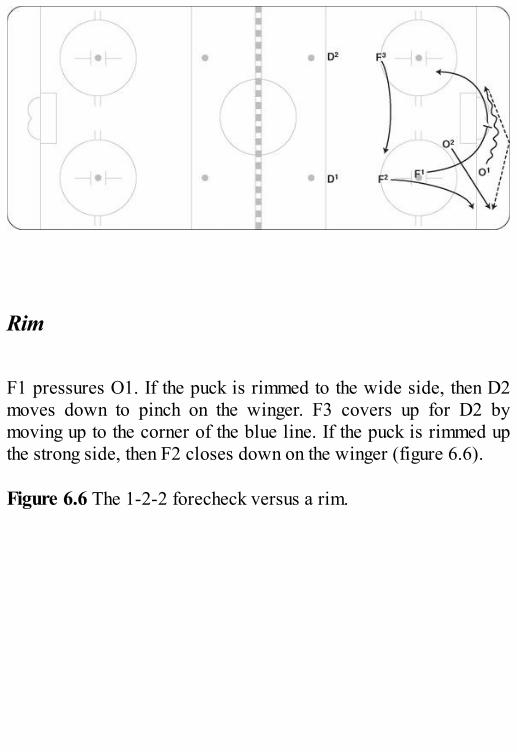
Rim
F1 pressures O1. If the puck is rimmed to the wide side, then D2moves down to pinch on the winger. F3 covers up for D2 bymoving up to the corner of the blue line. If the puck is rimmed upthe strong side, then F2 closes down on the winger (figure 6.6). Figure 6.6 The 1-2-2 forecheck versus a rim.
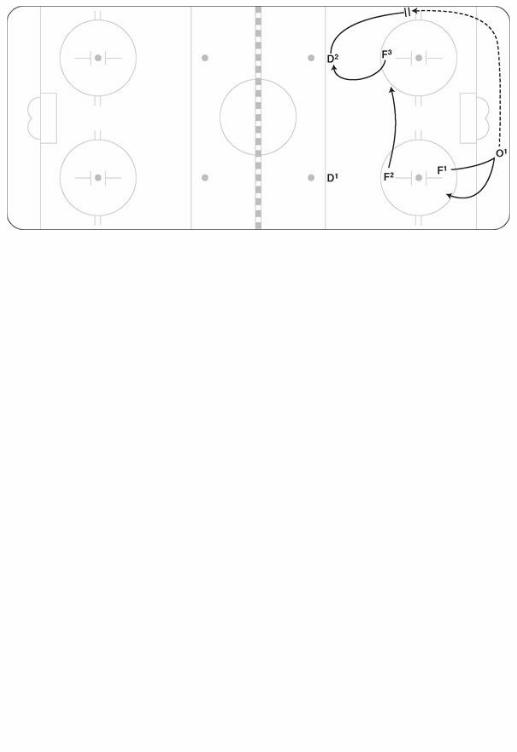
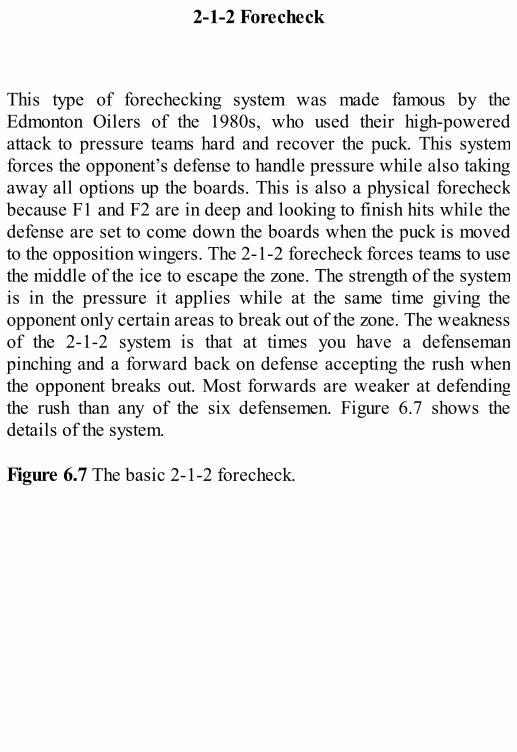
2-1-2 Forecheck
This type of forechecking system was made famous by theEdmonton Oilers of the 1980s, who used their high-poweredattack to pressure teams hard and recover the puck. This systemforces the opponent’s defense to handle pressure while also takingaway all options up the boards. This is also a physical forecheckbecause F1 and F2 are in deep and looking to finish hits while thedefense are set to come down the boards when the puck is movedto the opposition wingers. The 2-1-2 forecheck forces teams to usethe middle of the ice to escape the zone. The strength of the systemis in the pressure it applies while at the same time giving theopponent only certain areas to break out of the zone. The weaknessof the 2-1-2 system is that at times you have a defensemanpinching and a forward back on defense accepting the rush whenthe opponent breaks out. Most forwards are weaker at defendingthe rush than any of the six defensemen. Figure 6.7 shows thedetails of the system. Figure 6.7 The basic 2-1-2 forecheck.
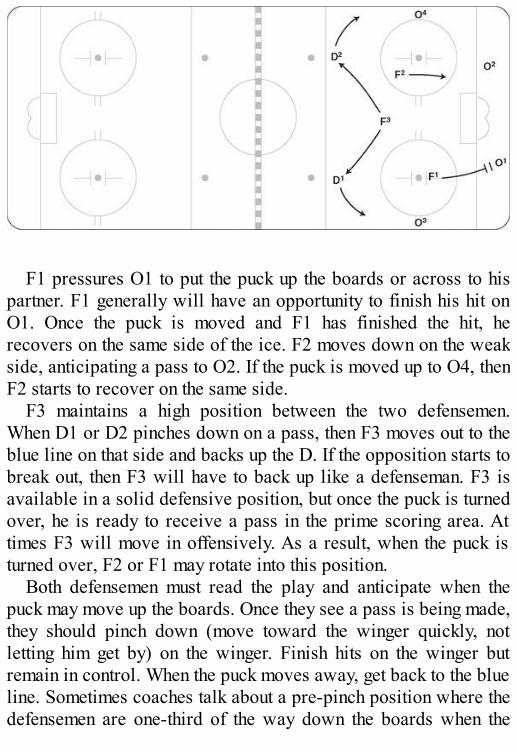
F1 pressures O1 to put the puck up the boards or across to hispartner. F1 generally will have an opportunity to finish his hit onO1. Once the puck is moved and F1 has finished the hit, herecovers on the same side of the ice. F2 moves down on the weakside, anticipating a pass to O2. If the puck is moved up to O4, thenF2 starts to recover on the same side.
F3 maintains a high position between the two defensemen.When D1 or D2 pinches down on a pass, then F3 moves out to theblue line on that side and backs up the D. If the opposition starts tobreak out, then F3 will have to back up like a defenseman. F3 isavailable in a solid defensive position, but once the puck is turnedover, he is ready to receive a pass in the prime scoring area. Attimes F3 will move in offensively. As a result, when the puck isturned over, F2 or F1 may rotate into this position.
Both defensemen must read the play and anticipate when thepuck may move up the boards. Once they see a pass is being made,they should pinch down (move toward the winger quickly, notletting him get by) on the winger. Finish hits on the winger butremain in control. When the puck moves away, get back to the blueline. Sometimes coaches talk about a pre-pinch position where thedefensemen are one-third of the way down the boards when the
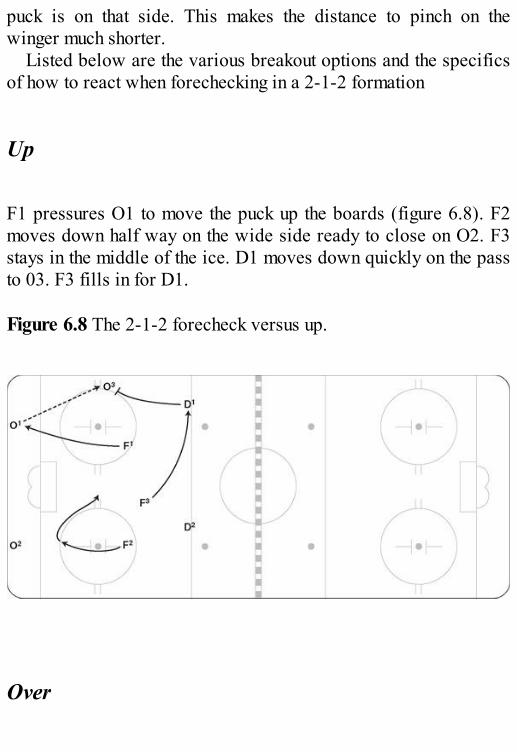
puck is on that side. This makes the distance to pinch on thewinger much shorter.
Listed below are the various breakout options and the specificsof how to react when forechecking in a 2-1-2 formation
Up
F1 pressures O1 to move the puck up the boards (figure 6.8). F2moves down half way on the wide side ready to close on O2. F3stays in the middle of the ice. D1 moves down quickly on the passto 03. F3 fills in for D1. Figure 6.8 The 2-1-2 forecheck versus up.
Over
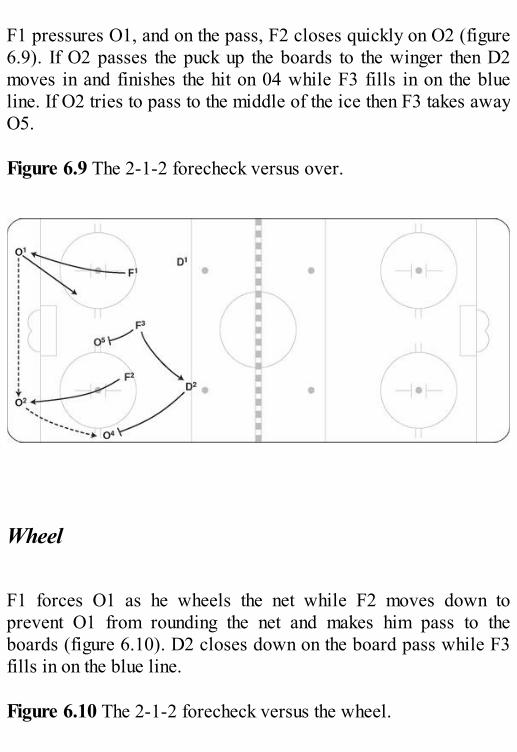
F1 pressures O1, and on the pass, F2 closes quickly on O2 (figure6.9). If O2 passes the puck up the boards to the winger then D2moves in and finishes the hit on 04 while F3 fills in on the blueline. If O2 tries to pass to the middle of the ice then F3 takes awayO5. Figure 6.9 The 2-1-2 forecheck versus over.
Wheel
F1 forces O1 as he wheels the net while F2 moves down toprevent O1 from rounding the net and makes him pass to theboards (figure 6.10). D2 closes down on the board pass while F3fills in on the blue line. Figure 6.10 The 2-1-2 forecheck versus the wheel.
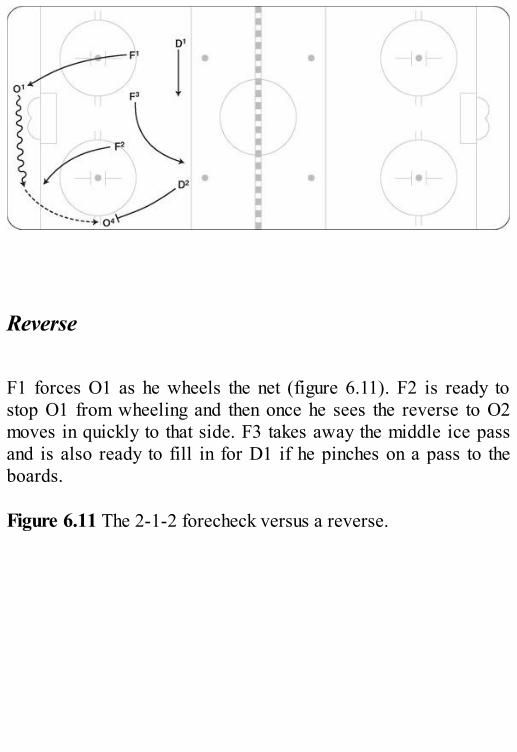
Reverse
F1 forces O1 as he wheels the net (figure 6.11). F2 is ready tostop O1 from wheeling and then once he sees the reverse to O2moves in quickly to that side. F3 takes away the middle ice passand is also ready to fill in for D1 if he pinches on a pass to theboards. Figure 6.11 The 2-1-2 forecheck versus a reverse.
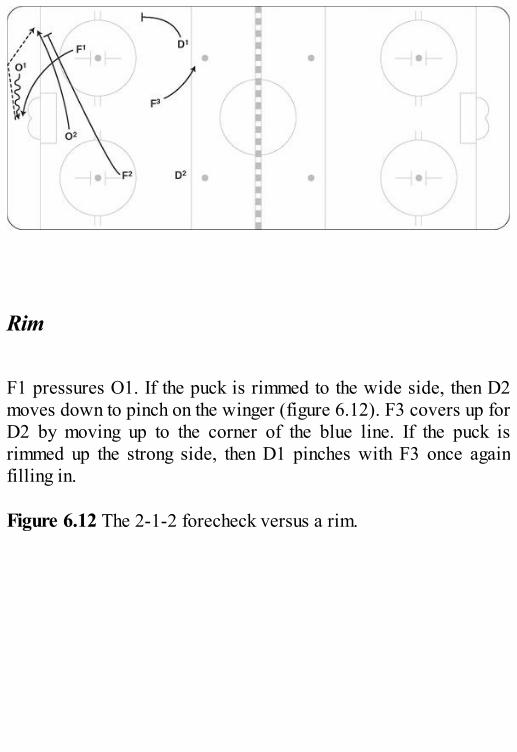
Rim
F1 pressures O1. If the puck is rimmed to the wide side, then D2moves down to pinch on the winger (figure 6.12). F3 covers up forD2 by moving up to the corner of the blue line. If the puck isrimmed up the strong side, then D1 pinches with F3 once againfilling in. Figure 6.12 The 2-1-2 forecheck versus a rim.
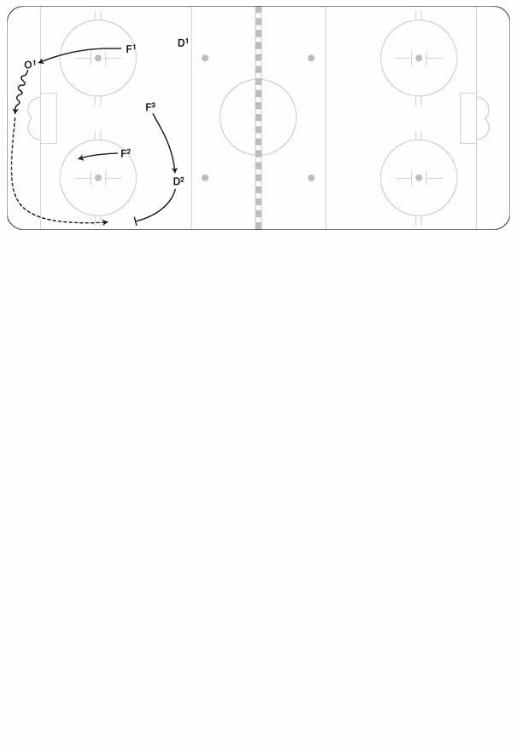
2-3 System or Left-Lane Lock
In the 2-3 system, the key component is the pressure exerted by F1and F2. They pressure the defensemen and each pass by skatingconstantly, finishing hits, and recovering quickly. The harder theywork, the more hits they finish, and the quicker they recover, themore effective the system is. The 2-3 system is often referred to asthe left-lane lock because one forward (F3) stays back on the leftside of the ice—eliminating breakouts up those boards. The reasonthe left side was originally picked is because left wingers aretraditionally better defensively than right wingers, while rightwingers are traditionally the scorers. The defensemen shift to theright side, with the left D playing in mid-ice and the right Dplaying the right boards (figure 6.13).
Once the puck is turned over, the left winger can move inoffensively, but then he has to move back when the puck is indoubt or turned over. The “lock” player doesn’t always have to bethe left winger; teams may decide to always use their topdefensive player there or use a reading system where the left sideis filled at any time by the closest player. Often it is better todesignate one player to have this responsibility. If you don’tdesignate exactly who should be in this position, most times youwill have confusion with the read and end up with no one there,two players there, or players moving to the area late. Listed beloware the various breakout options and the specifics of how to reactwhen forechecking in a 2-3 or Left Lane Lock System. Figure 6.13 The 2-3 system or left-lane lock.
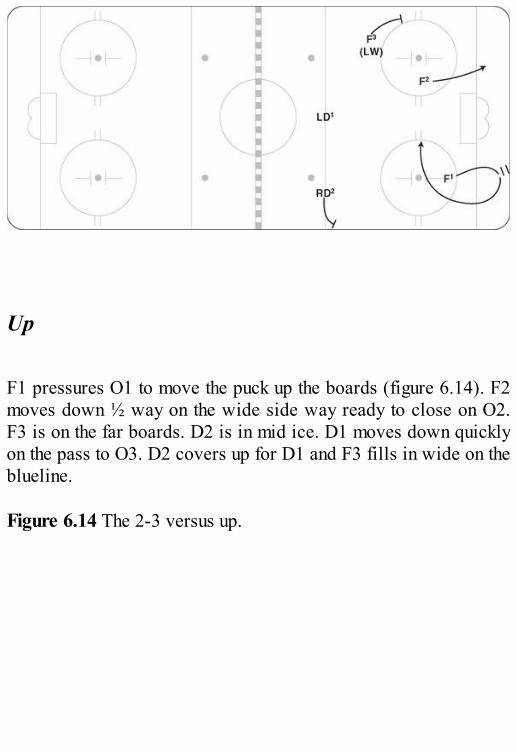
Up
F1 pressures O1 to move the puck up the boards (figure 6.14). F2moves down ½ way on the wide side way ready to close on O2.F3 is on the far boards. D2 is in mid ice. D1 moves down quicklyon the pass to O3. D2 covers up for D1 and F3 fills in wide on theblueline. Figure 6.14 The 2-3 versus up.
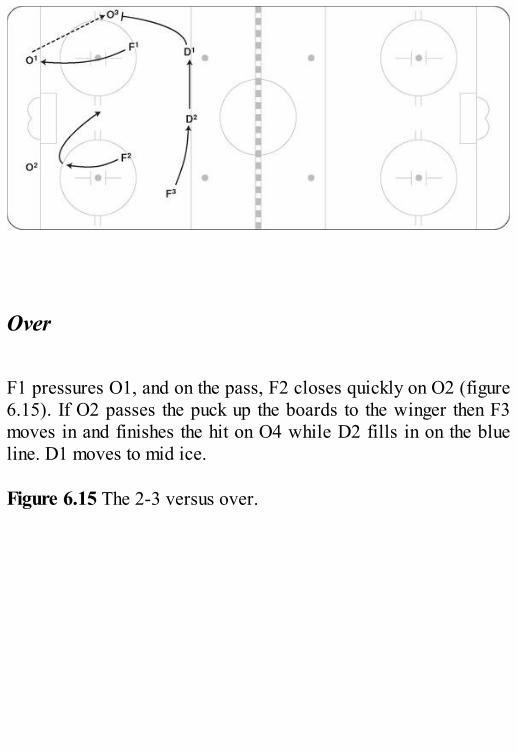
Over
F1 pressures O1, and on the pass, F2 closes quickly on O2 (figure6.15). If O2 passes the puck up the boards to the winger then F3moves in and finishes the hit on O4 while D2 fills in on the blueline. D1 moves to mid ice. Figure 6.15 The 2-3 versus over.
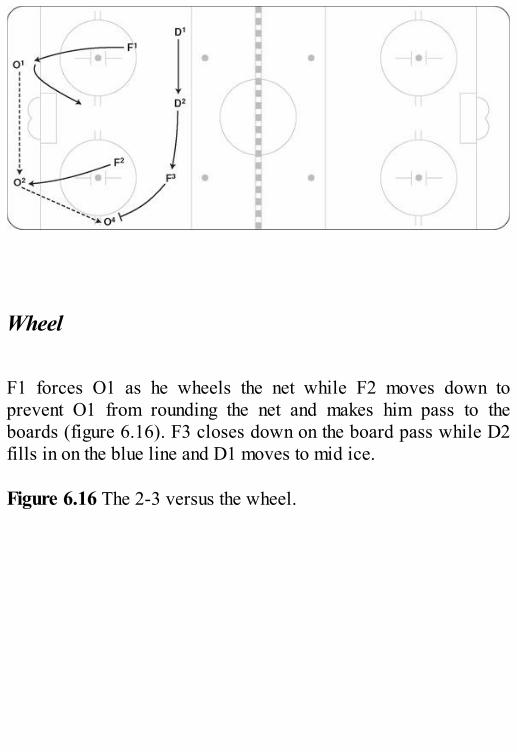
Wheel
F1 forces O1 as he wheels the net while F2 moves down toprevent O1 from rounding the net and makes him pass to theboards (figure 6.16). F3 closes down on the board pass while D2fills in on the blue line and D1 moves to mid ice. Figure 6.16 The 2-3 versus the wheel.
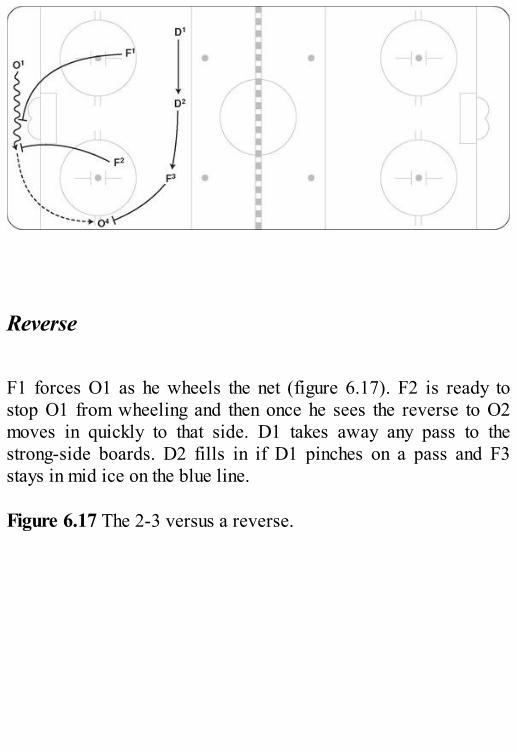
Reverse
F1 forces O1 as he wheels the net (figure 6.17). F2 is ready tostop O1 from wheeling and then once he sees the reverse to O2moves in quickly to that side. D1 takes away any pass to thestrong-side boards. D2 fills in if D1 pinches on a pass and F3stays in mid ice on the blue line. Figure 6.17 The 2-3 versus a reverse.
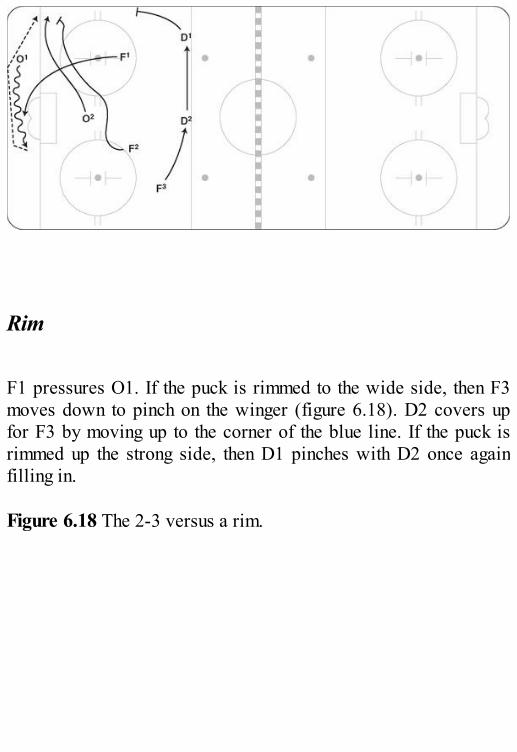
Rim
F1 pressures O1. If the puck is rimmed to the wide side, then F3moves down to pinch on the winger (figure 6.18). D2 covers upfor F3 by moving up to the corner of the blue line. If the puck isrimmed up the strong side, then D1 pinches with D2 once againfilling in. Figure 6.18 The 2-3 versus a rim.
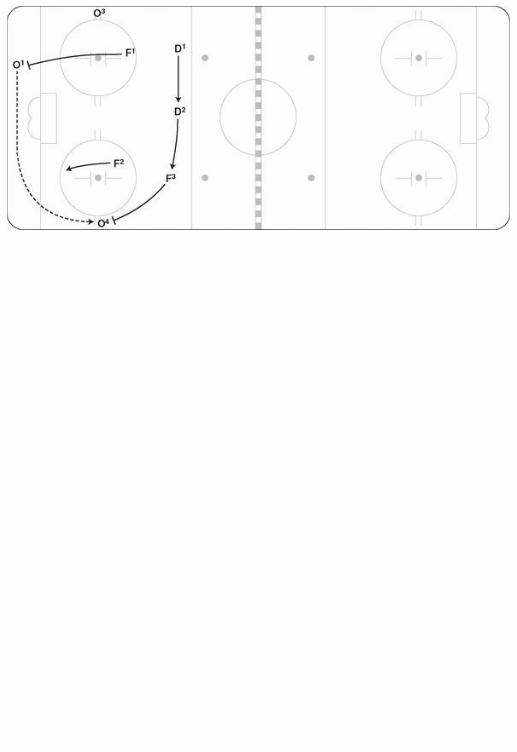
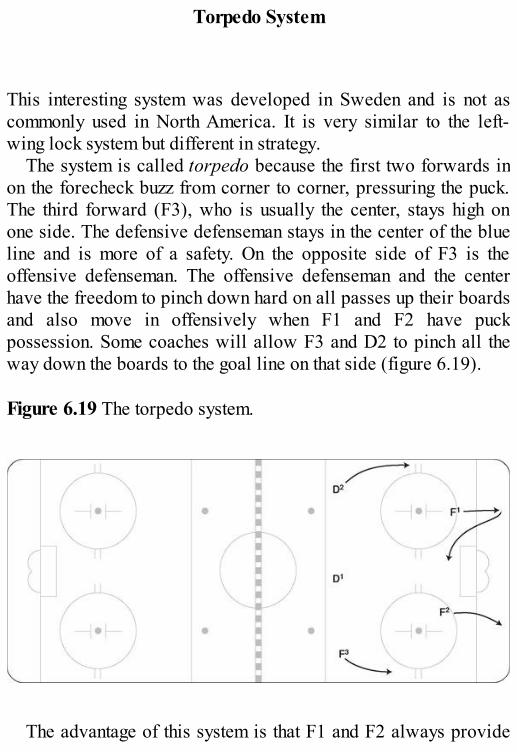
Torpedo System
This interesting system was developed in Sweden and is not ascommonly used in North America. It is very similar to the left-wing lock system but different in strategy.
The system is called torpedo because the first two forwards inon the forecheck buzz from corner to corner, pressuring the puck.The third forward (F3), who is usually the center, stays high onone side. The defensive defenseman stays in the center of the blueline and is more of a safety. On the opposite side of F3 is theoffensive defenseman. The offensive defenseman and the centerhave the freedom to pinch down hard on all passes up their boardsand also move in offensively when F1 and F2 have puckpossession. Some coaches will allow F3 and D2 to pinch all theway down the boards to the goal line on that side (figure 6.19). Figure 6.19 The torpedo system.
The advantage of this system is that F1 and F2 always provide

pressure on the opposing defense, while passes up the boards areshut down by F3 and D2. Also when the puck is turned over, thereare two potential passing options for F1 and F2. Offensively, F3and D2 are always ready to jump in to receive a pass or take ashot. For this system to work effectively, the center (F3) must begood at playing back defensively because if D2 gets caught in thezone, F3 will have to play defense with D1. Few teams are ascomfortable with their centers playing back as they are with theirdefense. Also the wingers who get in on the forecheck must begood, quick skaters who can “buzz” from side to side. As withother systems, the weakness in the torpedo system is that themiddle of the ice is available for breakout plays. Although thetorpedo is nontraditional and sometimes disregarded because ofthat, if you have the personnel to fit the descriptions of thepositions, it is definitely worth trying.
Diagrams and descriptions for the breakout options have notbeen included here because the rotations are the same as 2-3System. The one variation is that the center is back on the far sideand the outside players F3 and D1 pinch very aggressively on anypasses up the boards. They even try to anticipate the pass beingmade and pinch early, not giving the wingers any opportunity toget the puck.
Control Forecheck
A control forecheck is used when the opposing players are set upbehind their net with full control of the puck. This may happen offa line change or when the opponent gains the net and stops beforeyou can apply pressure. Usually it doesn’t make sense to forcethem out from behind the net because you will lose oneforechecker and they will have an easy escape. The only exceptionto this would be if the first forchecker can get in to flush thedefenseman quickly and surprise him before the other team hastime to get organized. Once the opponent stops behind the net,there are a couple of ways to forecheck off the control setup.
Deep Trap
Much like the neutral zone forecheck, all five players back up andmeet the attack at the blue line. F1 takes a shallow angle and steersthe puck carrier to one side. The forward on that side (F2) standsup and denies the team from gaining the red line. F3 can lockacross or stay wide. This is a more conservative strategy thatforces opponents to move through the neutral zone against a lot oftraffic with five defenders in this area. The opposition will havetime and space to build up speed, but once they hit the blue line itwill be taken away, and turnovers often result (figure 6.20). Figure 6.20 The deep trap.
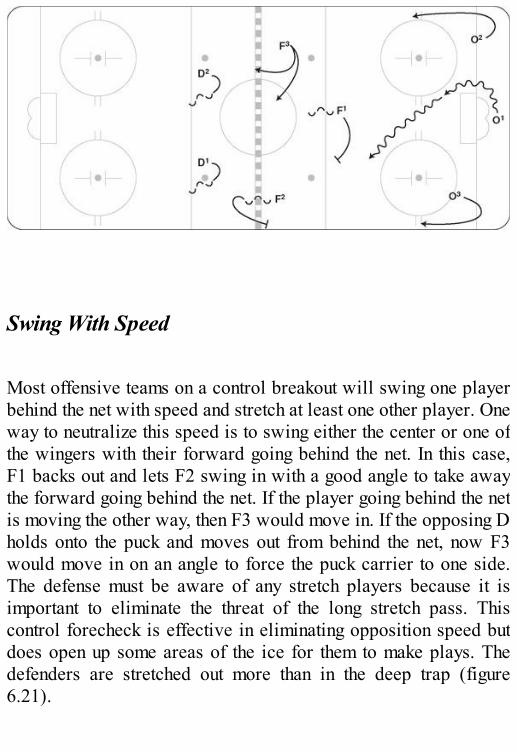
Swing With Speed
Most offensive teams on a control breakout will swing one playerbehind the net with speed and stretch at least one other player. Oneway to neutralize this speed is to swing either the center or one ofthe wingers with their forward going behind the net. In this case,F1 backs out and lets F2 swing in with a good angle to take awaythe forward going behind the net. If the player going behind the netis moving the other way, then F3 would move in. If the opposing Dholds onto the puck and moves out from behind the net, now F3would move in on an angle to force the puck carrier to one side.The defense must be aware of any stretch players because it isimportant to eliminate the threat of the long stretch pass. Thiscontrol forecheck is effective in eliminating opposition speed butdoes open up some areas of the ice for them to make plays. Thedefenders are stretched out more than in the deep trap (figure6.21).
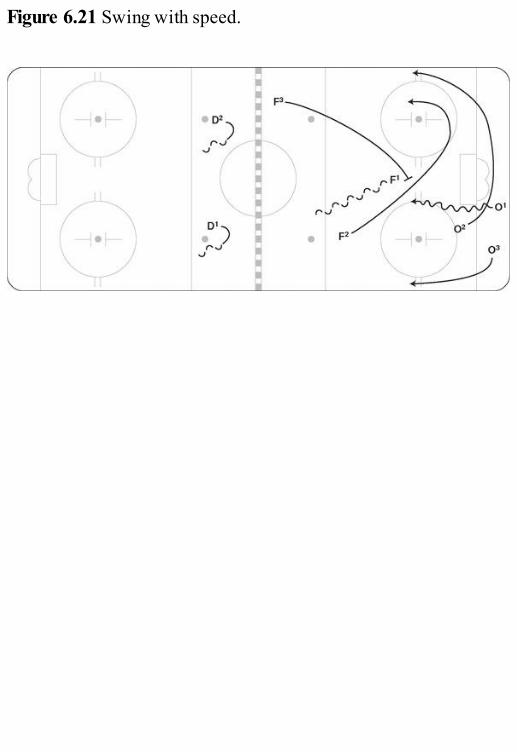
Figure 6.21 Swing with speed.
Chapter 7
Neutral Zone Forechecking and Backchecking
The neutral zone has changed dimensions over the last severalyears, which has dramatically altered the way teams defend thisarea. At almost all levels and in most leagues, the two-line pass isnow allowed which opens up new options in this zone. Breakoutteams are able to move the puck to the far blue line from behindtheir own net and while skating up ice can move the puck at anytime to the far blue line (figure 7.1). Teams and coaching staffs areconstantly talking about how much pressure they want to apply

versus how passive they want to be. There is a lot of space tocover, so it is a double-edged sword. If you pressure, opponentshave less time and may make mistakes, or they may take advantageof the extra space to work with. Conversely if you sit back,opponents have more time to read and make a play, but they haveless space to work with. What do you do? Coaches have severaloptions when designing the neutral zone forecheck. Figure 7.1 Breakout teams can now move the puck at any time tothe far blue line.
Neutral Zone Forechecking
All neutral zone forechecking systems must have the ability to shiftquickly as the puck moves from one side to the other. The keyplayer is F1 with regard to his angle and stick placement. With hisstick on the ice and proper skating angles, F1 can take awaypassing lanes from the opposition and steer them into a spacewhere they don’t want to go. F1 can also move the stick intodifferent lanes to actively take away options. When the puck ismoving up ice and then back or passed from side to side, bothdefensemen must be very good at regaining their gap. Teams thattighten their neutral zone gap (the distance between the defendingdefensemen and the attacking forwards) create havoc for attackingforwards trying to enter the offensive zone. Another key skill ofstrong neutral zone forechecking teams is that all three forwardsare able to skate backward and face the play to make their readseasier. It is important to practice this with all five defensiveplayers moving in unison.
Neutral Zone Forechecking Systems
There are five forechecking systems that teams may employ: 1-2-2wide; 1-3-1; 2-1-2; 1-2-2 mid-ice lock; and retreating 1-2-2. Eachsystem is described and discussed in this section.
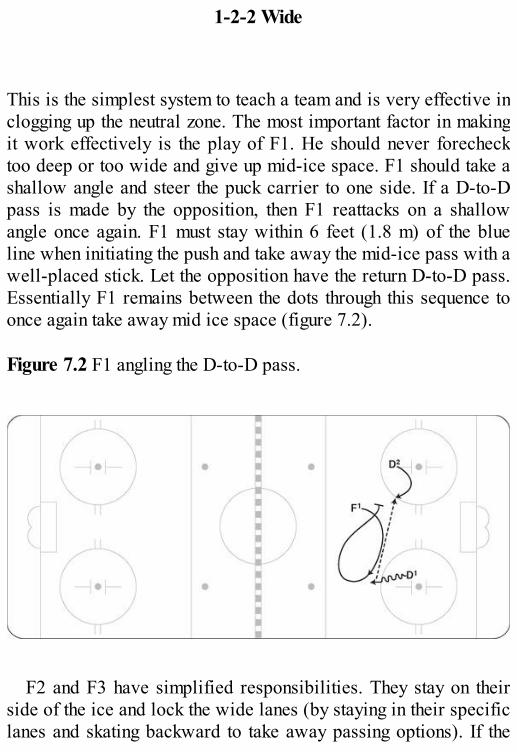
1-2-2 Wide
This is the simplest system to teach a team and is very effective inclogging up the neutral zone. The most important factor in makingit work effectively is the play of F1. He should never forechecktoo deep or too wide and give up mid-ice space. F1 should take ashallow angle and steer the puck carrier to one side. If a D-to-Dpass is made by the opposition, then F1 reattacks on a shallowangle once again. F1 must stay within 6 feet (1.8 m) of the blueline when initiating the push and take away the mid-ice pass with awell-placed stick. Let the opposition have the return D-to-D pass.Essentially F1 remains between the dots through this sequence toonce again take away mid ice space (figure 7.2). Figure 7.2 F1 angling the D-to-D pass.
F2 and F3 have simplified responsibilities. They stay on theirside of the ice and lock the wide lanes (by staying in their specificlanes and skating backward to take away passing options). If the

puck carrier comes up F2’s side, then he stands up (doesn’t backin) and keeps the opposition from gaining the red line (e.g., forceshim to ice the puck). F3 takes the wide lane and makes sure nopass can get to a player in that lane. D1 and D2 keep a tight gap inthe middle of the ice, ready to adjust to the puck (figure 7.3a). Ifthe puck is moved to mid-ice or up the boards, then all fiveplayers react. D1 would overplay the boards when the puck comesup F2’s side. D2 stays in mid ice and F3 takes the wide lane(figure 7.3b). Figure 7.3 (a) D1 and D2 keep a tight gap in the middle of the iceready to adjust to the puck. (b) If the puck is moved mid-ice or upthe boards, all five players react.
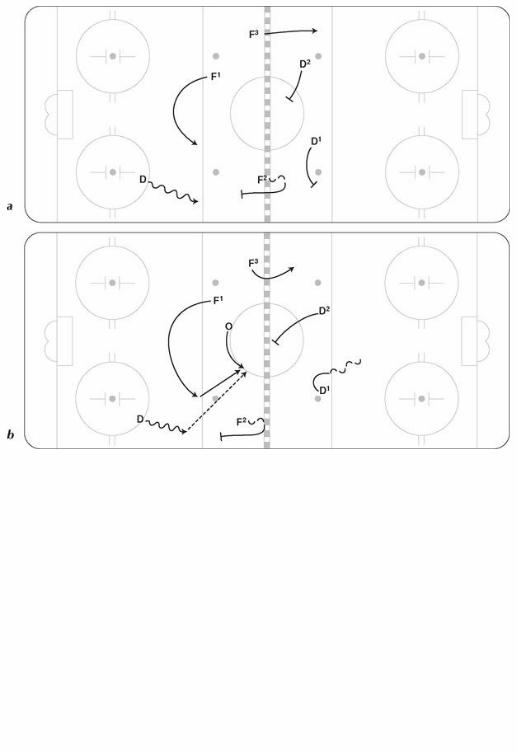
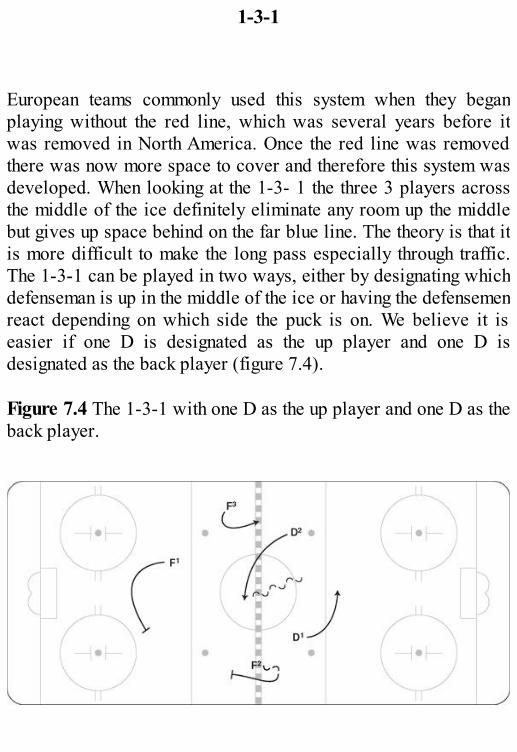
1-3-1
European teams commonly used this system when they beganplaying without the red line, which was several years before itwas removed in North America. Once the red line was removedthere was now more space to cover and therefore this system wasdeveloped. When looking at the 1-3- 1 the three 3 players acrossthe middle of the ice definitely eliminate any room up the middlebut gives up space behind on the far blue line. The theory is that itis more difficult to make the long pass especially through traffic.The 1-3-1 can be played in two ways, either by designating whichdefenseman is up in the middle of the ice or having the defensemenreact depending on which side the puck is on. We believe it iseasier if one D is designated as the up player and one D isdesignated as the back player (figure 7.4). Figure 7.4 The 1-3-1 with one D as the up player and one D as theback player.
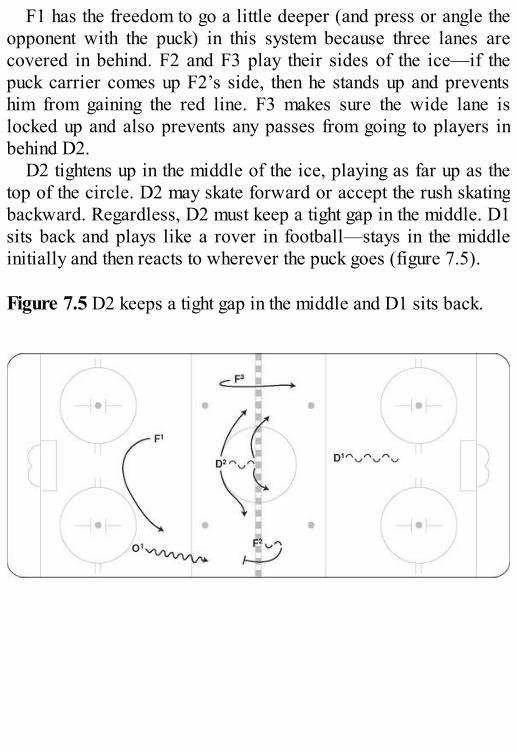
F1 has the freedom to go a little deeper (and press or angle theopponent with the puck) in this system because three lanes arecovered in behind. F2 and F3 play their sides of the ice—if thepuck carrier comes up F2’s side, then he stands up and preventshim from gaining the red line. F3 makes sure the wide lane islocked up and also prevents any passes from going to players inbehind D2.
D2 tightens up in the middle of the ice, playing as far up as thetop of the circle. D2 may skate forward or accept the rush skatingbackward. Regardless, D2 must keep a tight gap in the middle. D1sits back and plays like a rover in football—stays in the middleinitially and then reacts to wherever the puck goes (figure 7.5). Figure 7.5 D2 keeps a tight gap in the middle and D1 sits back.
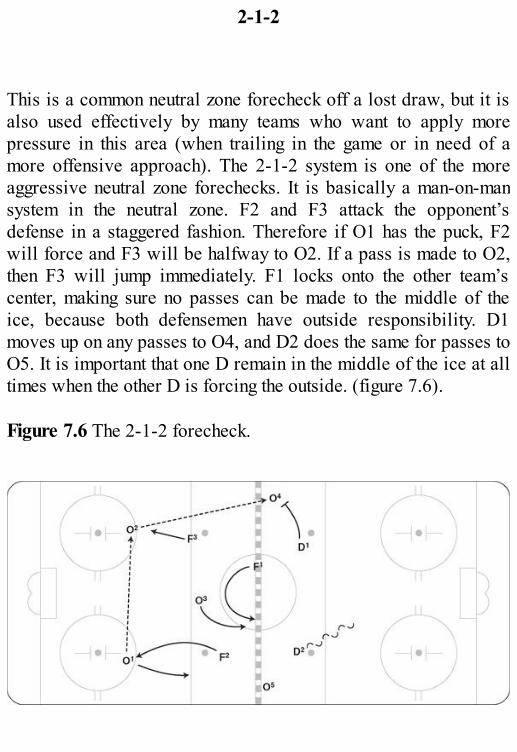
2-1-2
This is a common neutral zone forecheck off a lost draw, but it isalso used effectively by many teams who want to apply morepressure in this area (when trailing in the game or in need of amore offensive approach). The 2-1-2 system is one of the moreaggressive neutral zone forechecks. It is basically a man-on-mansystem in the neutral zone. F2 and F3 attack the opponent’sdefense in a staggered fashion. Therefore if O1 has the puck, F2will force and F3 will be halfway to O2. If a pass is made to O2,then F3 will jump immediately. F1 locks onto the other team’scenter, making sure no passes can be made to the middle of theice, because both defensemen have outside responsibility. D1moves up on any passes to O4, and D2 does the same for passes toO5. It is important that one D remain in the middle of the ice at alltimes when the other D is forcing the outside. (figure 7.6). Figure 7.6 The 2-1-2 forecheck.
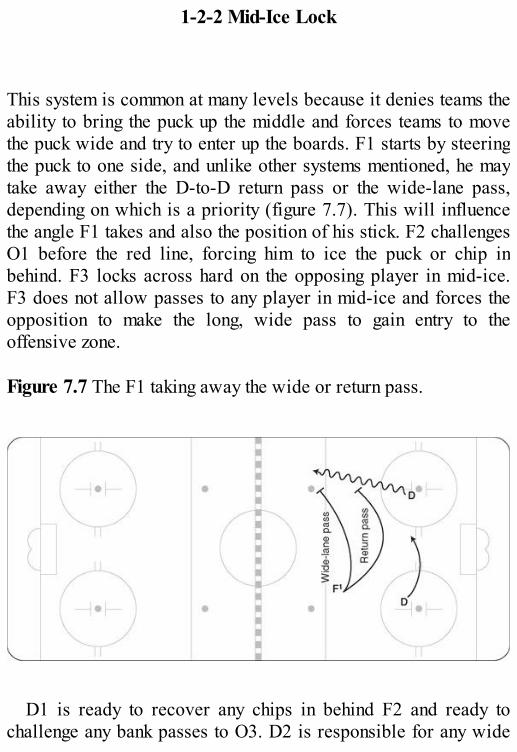
1-2-2 Mid-Ice Lock
This system is common at many levels because it denies teams theability to bring the puck up the middle and forces teams to movethe puck wide and try to enter up the boards. F1 starts by steeringthe puck to one side, and unlike other systems mentioned, he maytake away either the D-to-D return pass or the wide-lane pass,depending on which is a priority (figure 7.7). This will influencethe angle F1 takes and also the position of his stick. F2 challengesO1 before the red line, forcing him to ice the puck or chip inbehind. F3 locks across hard on the opposing player in mid-ice.F3 does not allow passes to any player in mid-ice and forces theopposition to make the long, wide pass to gain entry to theoffensive zone. Figure 7.7 The F1 taking away the wide or return pass.
D1 is ready to recover any chips in behind F2 and ready tochallenge any bank passes to O3. D2 is responsible for any wide
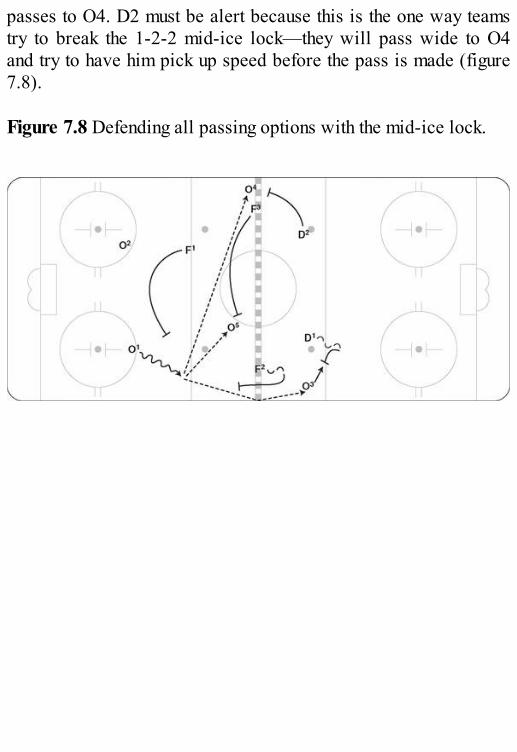
passes to O4. D2 must be alert because this is the one way teamstry to break the 1-2-2 mid-ice lock—they will pass wide to O4and try to have him pick up speed before the pass is made (figure7.8). Figure 7.8 Defending all passing options with the mid-ice lock.

Retreating 1-2-2
This is a very defensive setup and is similar to the 1-2-2 mid-icelock. The primary difference is that all five players tighten up,with F1 moving down to the top of the offensive zone circles andthe two defensemen back no farther than the center red line. As theoffensive team advances up ice, all five players skate backwardand retreat in a tight pack (figure 7.9a). This creates the visual oflimited space for the offensive team. F2 and F3 initially remainwide but align themselves with the dots giving up space along theboards and taking away space inside. D1 and D2 must be aware ofthe long stretch pass. A pass to the outside is not dangerous, butthey have to protect against being too wide and allowing the longmid-ice pass. Figure 7.9 In the retreating 1-2-2 (a) all five players skatebackward in a tight group. (b) F1 angles the puck carrier as soonas the puck advances above the offensive circles.
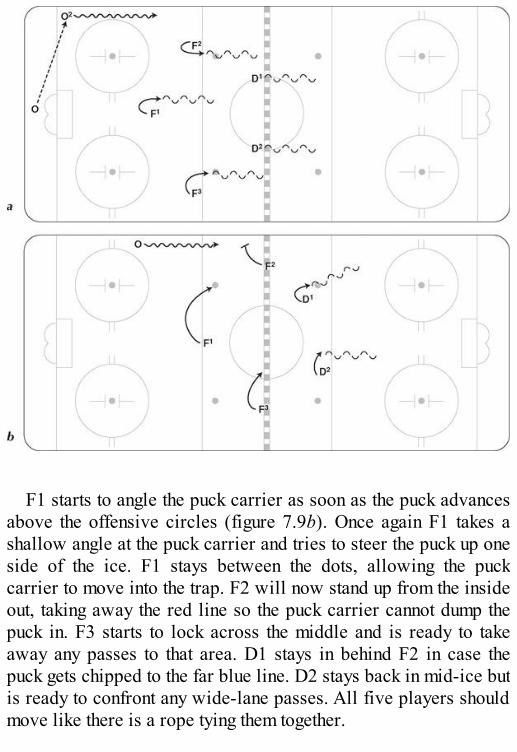
F1 starts to angle the puck carrier as soon as the puck advancesabove the offensive circles (figure 7.9b). Once again F1 takes ashallow angle at the puck carrier and tries to steer the puck up oneside of the ice. F1 stays between the dots, allowing the puckcarrier to move into the trap. F2 will now stand up from the insideout, taking away the red line so the puck carrier cannot dump thepuck in. F3 starts to lock across the middle and is ready to takeaway any passes to that area. D1 stays in behind F2 in case thepuck gets chipped to the far blue line. D2 stays back in mid-ice butis ready to confront any wide-lane passes. All five players shouldmove like there is a rope tying them together.

Neutral Zone Backchecking
Every team wants to be known as a hardworking team. Well, thereis nothing more reflective of a team’s work ethic than the players’willingness and commitment to backcheck. The backcheck startsonce the puck is turned over in the offensive zone and doesn’t enduntil either puck possession has been regained or you shift intodefensive zone coverage. All three forwards need to be involvedin the backcheck. Some teams rely mainly on one backchecker,with the other two forwards coasting back and watching that theother team’s Ds don’t jump by them. This strategy allows for quickcounterattacks using long stretch passes once the puck is turnedover, but it does not result in as many turnovers as when all threeforwards come back hard. Also it provides the offensive teamwith more space to work with as they advance up the ice.
The backcheck is set up in the offensive zone off the forecheckwhen players away from the puck recover above the puck toreattack (figure 7.10a), back up a pinching defenseman (figure7.10b), or initiate the backcheck by being in a high offensiveposition (figure 7.10c, above). It is important that players in theoffensive zone recognize the potential for loss of possession andquickly get themselves into an appropriate backchecking position. Figure 7.10 The back check set up by (a) recovering or (b)backing up a pinching defense
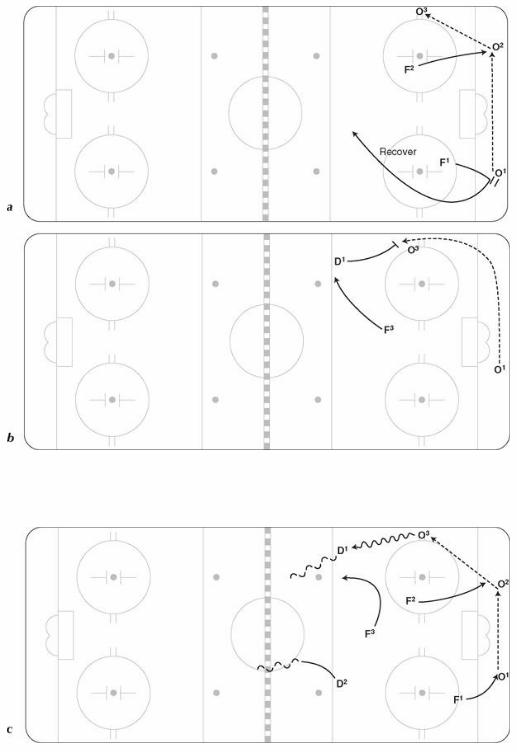
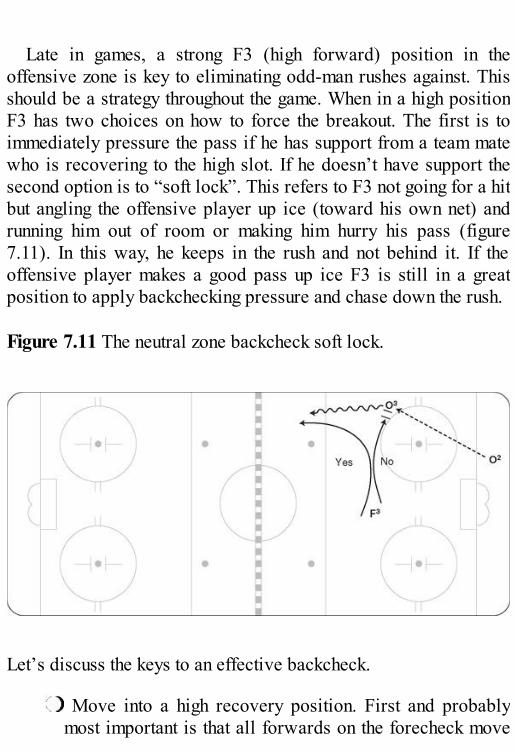
Late in games, a strong F3 (high forward) position in theoffensive zone is key to eliminating odd-man rushes against. Thisshould be a strategy throughout the game. When in a high positionF3 has two choices on how to force the breakout. The first is toimmediately pressure the pass if he has support from a team matewho is recovering to the high slot. If he doesn’t have support thesecond option is to “soft lock”. This refers to F3 not going for a hitbut angling the offensive player up ice (toward his own net) andrunning him out of room or making him hurry his pass (figure7.11). In this way, he keeps in the rush and not behind it. If theoffensive player makes a good pass up ice F3 is still in a greatposition to apply backchecking pressure and chase down the rush. Figure 7.11 The neutral zone backcheck soft lock.
Let’s discuss the keys to an effective backcheck.
Move into a high recovery position. First and probablymost important is that all forwards on the forecheck move

immediately into a high recovery position when the puck ismoved away from them in the offensive zone or after theymake a hit (figure 7.12). The high recovery area is the topof the circles in the offensive zone; that is where coachesalways want the forwards to move to. By always havingone forward in this area teams rarely give up odd manrushes. This now sets the stage for an effective backcheck.If the forwards don’t get in the habit of recovering, then itwon’t matter what your backchecking strategy is becausethey will not be in a position to help out.
Figure 7.12 The high recovery area off a forecheck.
Pressure the attack from behind. All forwards come backhard through mid-ice. Backcheck hard, and prepare tomove in transition with speed once the puck is turned over.Coaches must reinforce with their players that it isimportant for all three forwards to come back hard; not justthe responsibility of the high forward or the closestforward (figure 7.13a).
Outnumber them at the line. Keep pressuring the attackfrom behind, and at the defensive blue line, you shouldoutnumber the attacking team. Squeeze the attack from bothsides, with the forwards pressing from behind and the Dskeeping a tight gap on the other side (figure 7.13b). If youwere to look at an overhead picture of the oppositionattack at your blue line, you should see more of thedefending team than the offensive team. Show the team afreeze frame at the defensive blue line and if you have 5players in the picture and the opponent has, three, then theplayers are doing a great job of squeezing the attack. Oftenthe puck will be turned over in this area or the oppositionwill be forced to dump the puck in.
Figure 7.13 (a) Pressuring the attack from behind or (b)outnumbering them at the line.
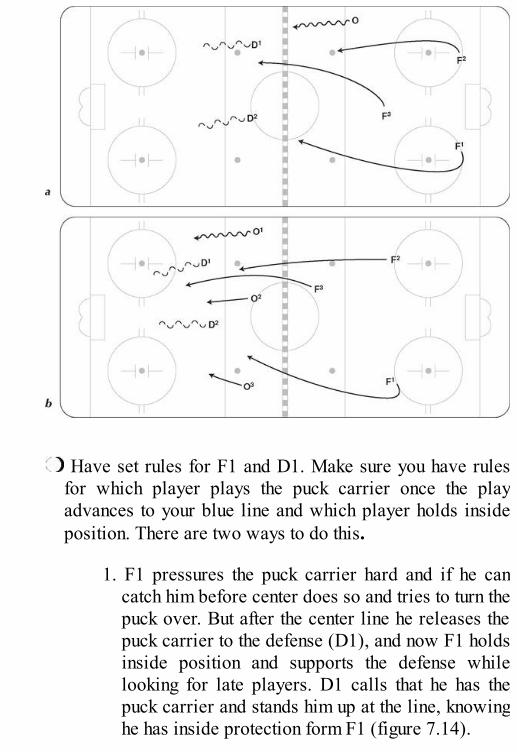
Have set rules for F1 and D1. Make sure you have rulesfor which player plays the puck carrier once the playadvances to your blue line and which player holds insideposition. There are two ways to do this.
1. F1 pressures the puck carrier hard and if he cancatch him before center does so and tries to turn thepuck over. But after the center line he releases thepuck carrier to the defense (D1), and now F1 holdsinside position and supports the defense whilelooking for late players. D1 calls that he has thepuck carrier and stands him up at the line, knowinghe has inside protection form F1 (figure 7.14).
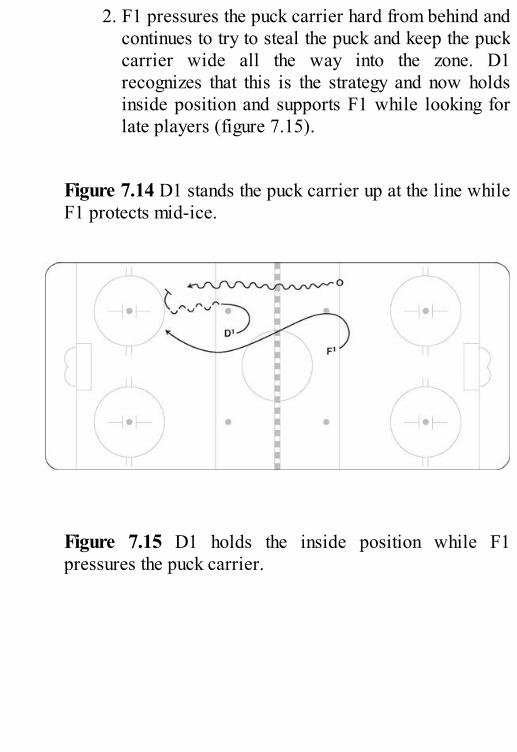
2. F1 pressures the puck carrier hard from behind andcontinues to try to steal the puck and keep the puckcarrier wide all the way into the zone. D1recognizes that this is the strategy and now holdsinside position and supports F1 while looking forlate players (figure 7.15).
Figure 7.14 D1 stands the puck carrier up at the line whileF1 protects mid-ice.
Figure 7.15 D1 holds the inside position while F1pressures the puck carrier.
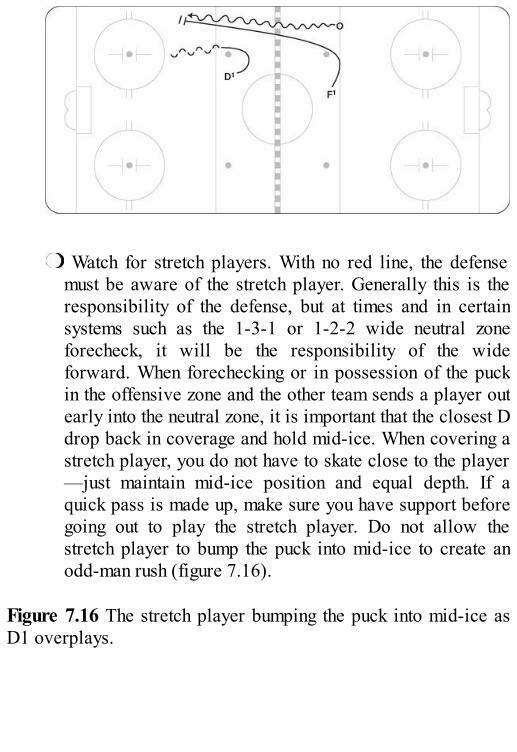
Watch for stretch players. With no red line, the defensemust be aware of the stretch player. Generally this is theresponsibility of the defense, but at times and in certainsystems such as the 1-3-1 or 1-2-2 wide neutral zoneforecheck, it will be the responsibility of the wideforward. When forechecking or in possession of the puckin the offensive zone and the other team sends a player outearly into the neutral zone, it is important that the closest Ddrop back in coverage and hold mid-ice. When covering astretch player, you do not have to skate close to the player—just maintain mid-ice position and equal depth. If aquick pass is made up, make sure you have support beforegoing out to play the stretch player. Do not allow thestretch player to bump the puck into mid-ice to create anodd-man rush (figure 7.16).
Figure 7.16 The stretch player bumping the puck into mid-ice asD1 overplays.
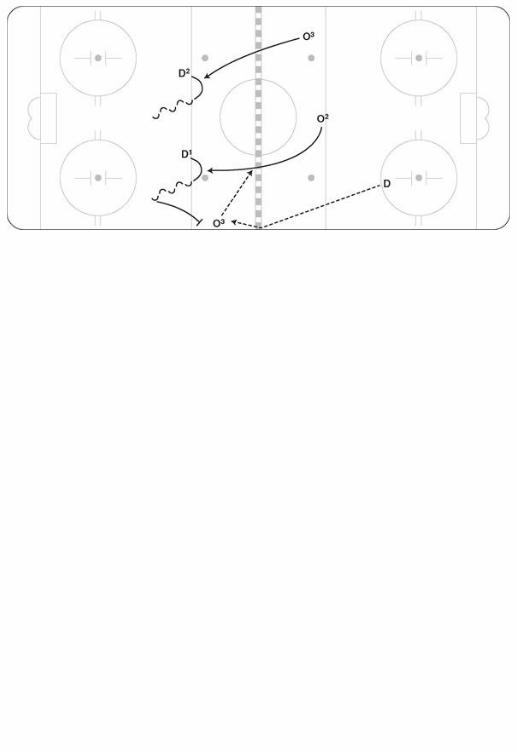
Neutral Zone Backchecking Systems
There are three backchecking systems that teams may employ:wide-lane lock, midlane backcheck, and hound the puck. Eachsystem is described and discussed in this section, and each has adifferent emphasis on where the offensive players are confrontedand how they are confronted.
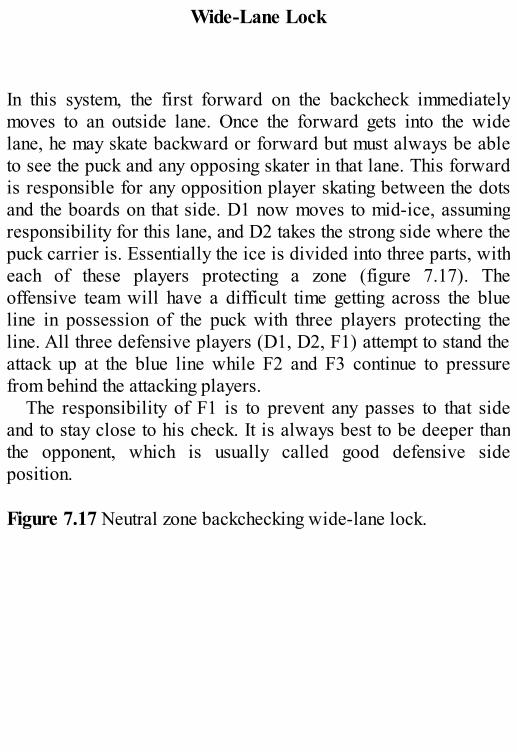
Wide-Lane Lock
In this system, the first forward on the backcheck immediatelymoves to an outside lane. Once the forward gets into the widelane, he may skate backward or forward but must always be ableto see the puck and any opposing skater in that lane. This forwardis responsible for any opposition player skating between the dotsand the boards on that side. D1 now moves to mid-ice, assumingresponsibility for this lane, and D2 takes the strong side where thepuck carrier is. Essentially the ice is divided into three parts, witheach of these players protecting a zone (figure 7.17). Theoffensive team will have a difficult time getting across the blueline in possession of the puck with three players protecting theline. All three defensive players (D1, D2, F1) attempt to stand theattack up at the blue line while F2 and F3 continue to pressurefrom behind the attacking players.
The responsibility of F1 is to prevent any passes to that sideand to stay close to his check. It is always best to be deeper thanthe opponent, which is usually called good defensive sideposition. Figure 7.17 Neutral zone backchecking wide-lane lock.
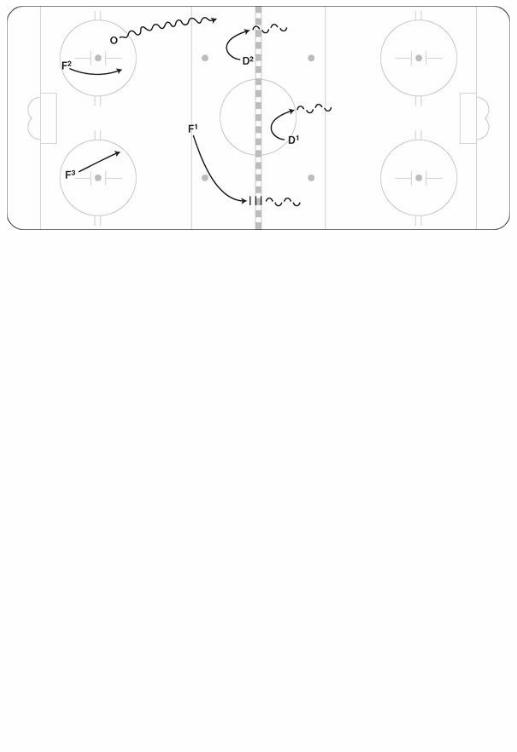
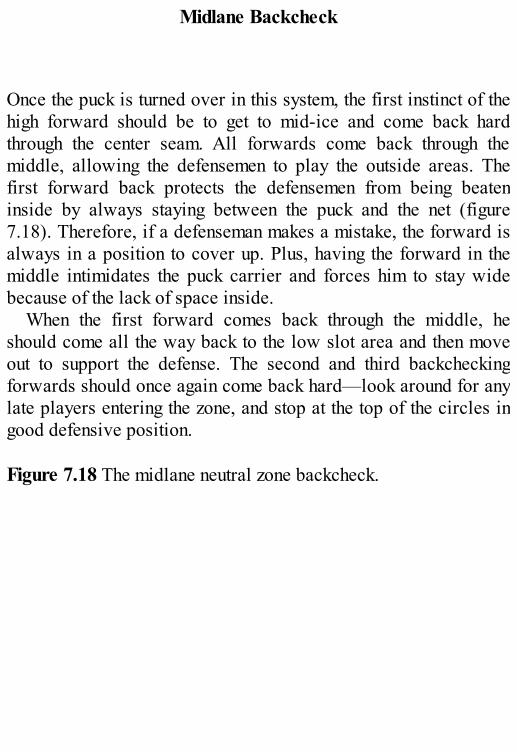
Midlane Backcheck
Once the puck is turned over in this system, the first instinct of thehigh forward should be to get to mid-ice and come back hardthrough the center seam. All forwards come back through themiddle, allowing the defensemen to play the outside areas. Thefirst forward back protects the defensemen from being beateninside by always staying between the puck and the net (figure7.18). Therefore, if a defenseman makes a mistake, the forward isalways in a position to cover up. Plus, having the forward in themiddle intimidates the puck carrier and forces him to stay widebecause of the lack of space inside.
When the first forward comes back through the middle, heshould come all the way back to the low slot area and then moveout to support the defense. The second and third backcheckingforwards should once again come back hard—look around for anylate players entering the zone, and stop at the top of the circles ingood defensive position. Figure 7.18 The midlane neutral zone backcheck.
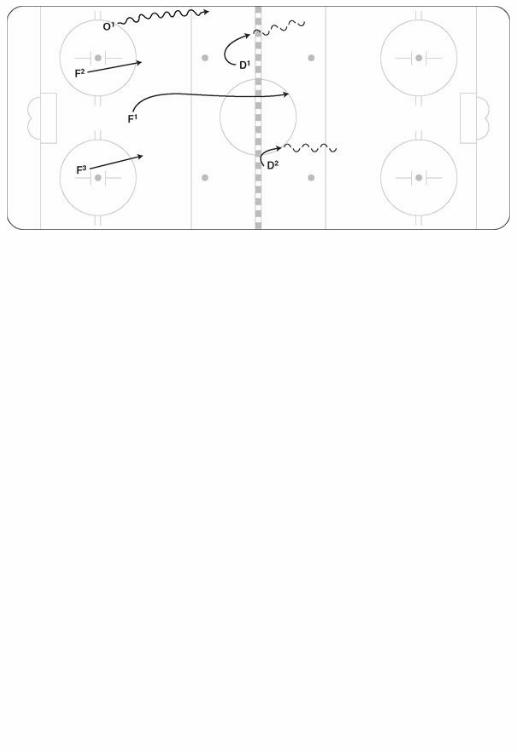
Hound the Puck
This system is the opposite of the midlane backcheck. The firstforward “hounds” the puck (backchecks toward the player with thepuck) as hard as he can, and if a pass is made, then the forwardcontinues to pressure the puck (figure 7.19). The forwards limitthe time and space for the opposing players as they move throughthe neutral zone and the defense hold inside position—protectingthe space between the dots. Coaches who like this system aregenerally ones who want to have a pressure philosophy and in allareas of the ice want to deny time and space.
The advantage of this system is that the opponent has little timewith the puck through the neutral zone if the backcheckingforwards are quick and work hard, plus the positioning of thedefense is always inside. The disadvantage is that at times there isconfusion between the backchecking forwards and the defense asto what to do if the forwards cannot catch the opposition by theblue line or confront the pass quickly enough. A team mustdevelop rules for these two scenarios so there is no confusionwhen they occur. One rule involves hounding the puck until the redline, where the backchecking forward must then pick a lane toskate into or pick up a man to cover. Figure 7.19 “Hounding” the puck in the neutral zone backcheck.
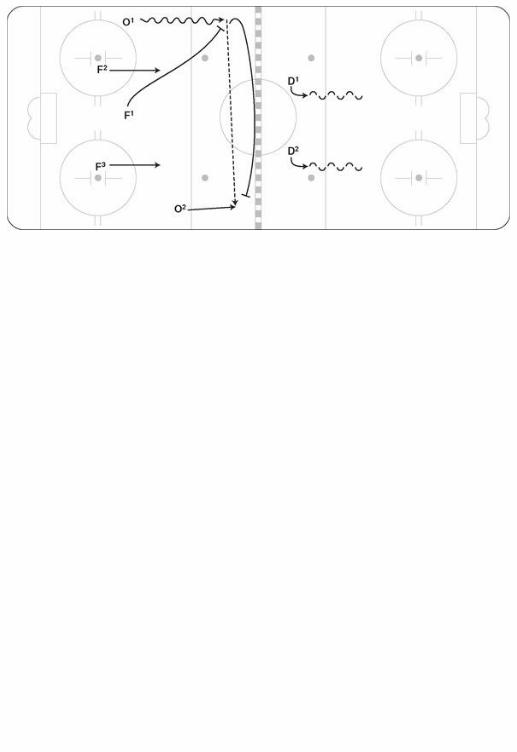
Chapter 8
Defensive Zone Entries
The most critical aspect of defensive zone entries is that thedefensive players accepting the attack must correctly read theplay. For the purposes of this book, defensive zone entries aredefined as the moment the attacking team hits the offensive blueline with the puck. Once this happens, the defensive players,which are usually the defensemen and possibly one forward, mustscan the rush quickly and identify how many attackers and howmany defenders. Because of the dynamic nature of hockey, thisread must be done in seconds, and rarely is any situation exactlylike another. Once the defenders see the rush clearly, they should
exactly like another. Once the defenders see the rush clearly, theyshould call out whether it is a two on one, two on two, or three ontwo and also communicate to any forwards coming back whichplayer to pick up. The forwards coming back must read the rushquickly from the back side and pick up the right players.
If reads are so important, how do coaches improve the players’ability to identify the rush? Well, there are a couple of ways. First,do read-the-rush drills in practice, where players are faced withdifferent situations; once they play it out, they get feedback from acoach who is off to the side. A simple read-the-rush drill mayinclude a neutral zone regroup where the defenseman must step up,read the rush, close the gap, and make it difficult for the offensiveteam to gain entry with possession. Another drill starts as a two ontwo with a backchecker and turns into a three on three, with thecoach sending the backchecking and offensive forwards atdifferent intervals.
The second way to help players identify the rush is to reviewthe video and ask what they see and how they would play eachsituation. Many times while watching video, players will commentthat during the game they read that they have less time and spacewhen in fact on the video they see it differently. It is helpful tohear their perspective. Also, during games have one coach on thebench who provides feedback and discusses reads with theplayers while the game is going on. The best approach is to ask theplayers, “What did you see on that rush?” and then tell them whatyou saw. Finally, to clear up any confusion about reads, set a rulefor what players should do if they are unsure. The rule should be:hold mid-ice position, take a few more seconds to sort it out, andthen when you are sure, move to outside areas to challenge thepuck carrier.
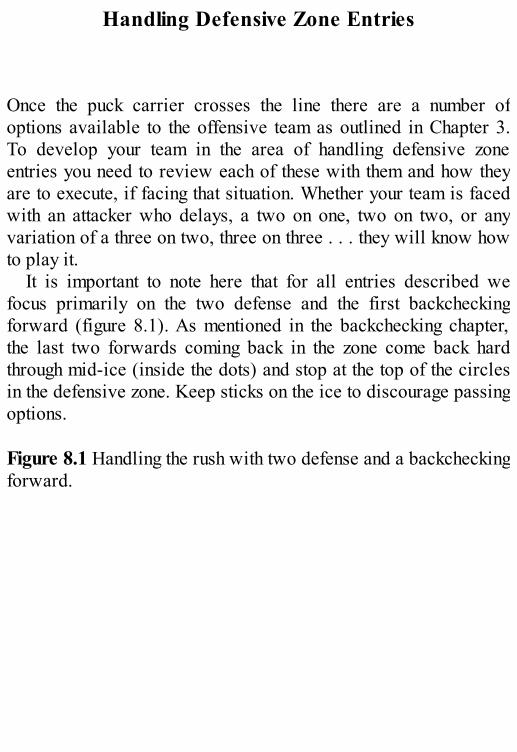
Handling Defensive Zone Entries
Once the puck carrier crosses the line there are a number ofoptions available to the offensive team as outlined in Chapter 3.To develop your team in the area of handling defensive zoneentries you need to review each of these with them and how theyare to execute, if facing that situation. Whether your team is facedwith an attacker who delays, a two on one, two on two, or anyvariation of a three on two, three on three . . . they will know howto play it.
It is important to note here that for all entries described wefocus primarily on the two defense and the first backcheckingforward (figure 8.1). As mentioned in the backchecking chapter,the last two forwards coming back in the zone come back hardthrough mid-ice (inside the dots) and stop at the top of the circlesin the defensive zone. Keep sticks on the ice to discourage passingoptions. Figure 8.1 Handling the rush with two defense and a backcheckingforward.
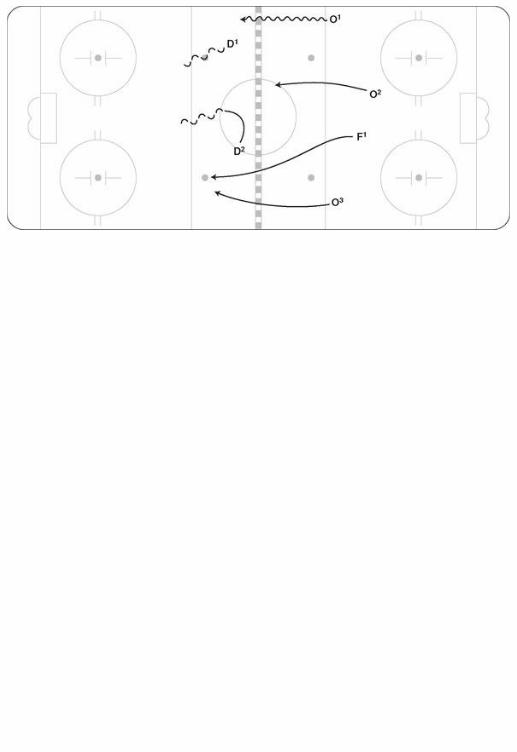
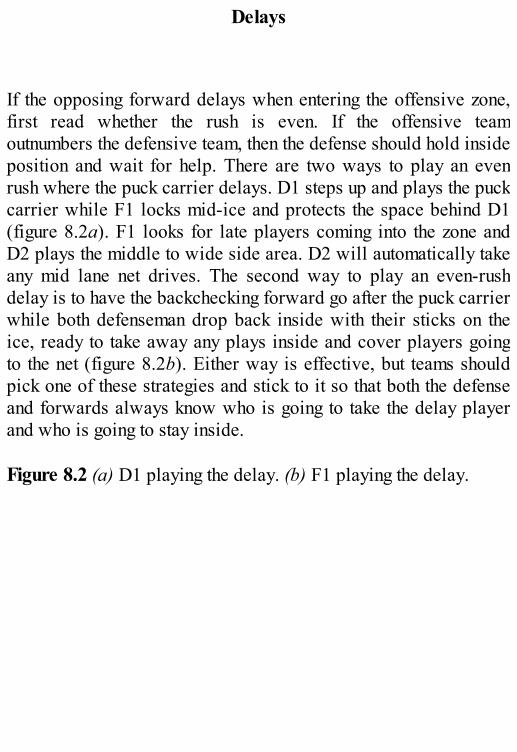
Delays
If the opposing forward delays when entering the offensive zone,first read whether the rush is even. If the offensive teamoutnumbers the defensive team, then the defense should hold insideposition and wait for help. There are two ways to play an evenrush where the puck carrier delays. D1 steps up and plays the puckcarrier while F1 locks mid-ice and protects the space behind D1(figure 8.2a). F1 looks for late players coming into the zone andD2 plays the middle to wide side area. D2 will automatically takeany mid lane net drives. The second way to play an even-rushdelay is to have the backchecking forward go after the puck carrierwhile both defenseman drop back inside with their sticks on theice, ready to take away any plays inside and cover players goingto the net (figure 8.2b). Either way is effective, but teams shouldpick one of these strategies and stick to it so that both the defenseand forwards always know who is going to take the delay playerand who is going to stay inside. Figure 8.2 (a) D1 playing the delay. (b) F1 playing the delay.
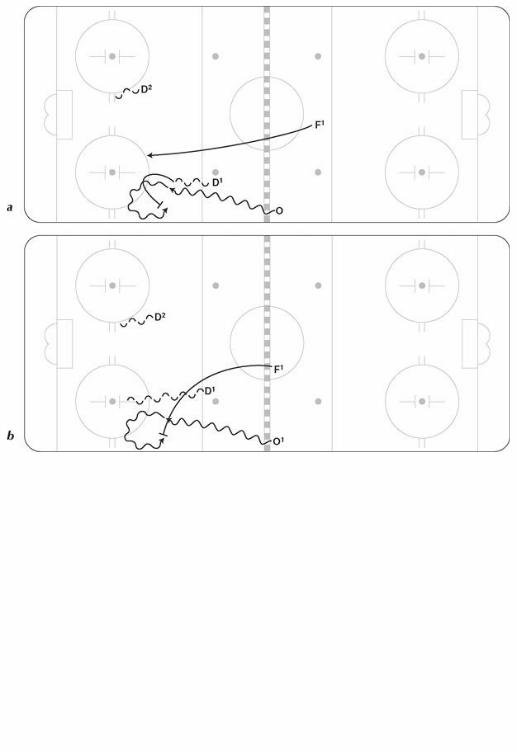
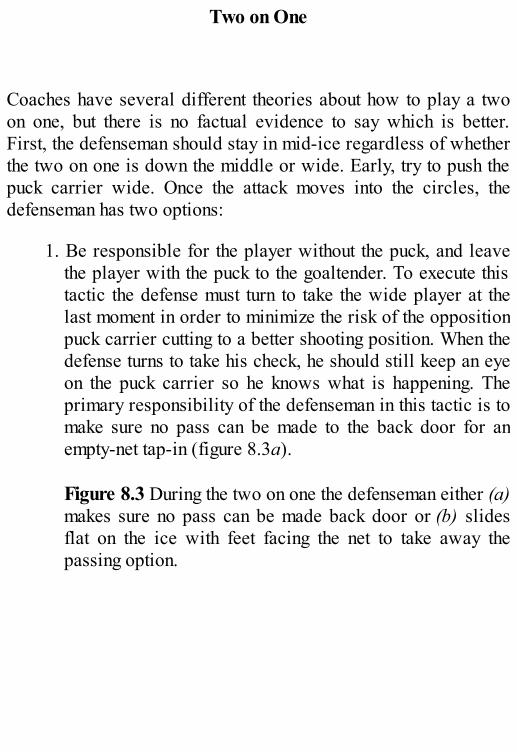
Two on One
Coaches have several different theories about how to play a twoon one, but there is no factual evidence to say which is better.First, the defenseman should stay in mid-ice regardless of whetherthe two on one is down the middle or wide. Early, try to push thepuck carrier wide. Once the attack moves into the circles, thedefenseman has two options:
1. Be responsible for the player without the puck, and leavethe player with the puck to the goaltender. To execute thistactic the defense must turn to take the wide player at thelast moment in order to minimize the risk of the oppositionpuck carrier cutting to a better shooting position. When thedefense turns to take his check, he should still keep an eyeon the puck carrier so he knows what is happening. Theprimary responsibility of the defenseman in this tactic is tomake sure no pass can be made to the back door for anempty-net tap-in (figure 8.3a).
Figure 8.3 During the two on one the defenseman either (a)makes sure no pass can be made back door or (b) slidesflat on the ice with feet facing the net to take away thepassing option.
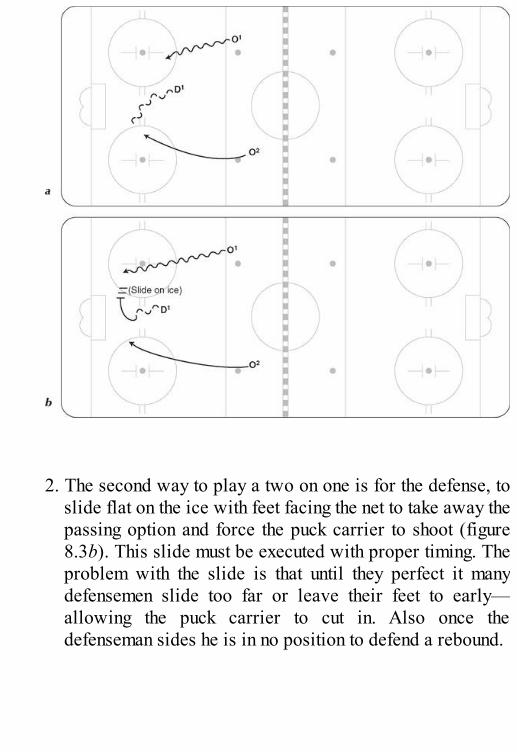
2. The second way to play a two on one is for the defense, to
slide flat on the ice with feet facing the net to take away thepassing option and force the puck carrier to shoot (figure8.3b). This slide must be executed with proper timing. Theproblem with the slide is that until they perfect it manydefensemen slide too far or leave their feet to early—allowing the puck carrier to cut in. Also once thedefenseman sides he is in no position to defend a rebound.
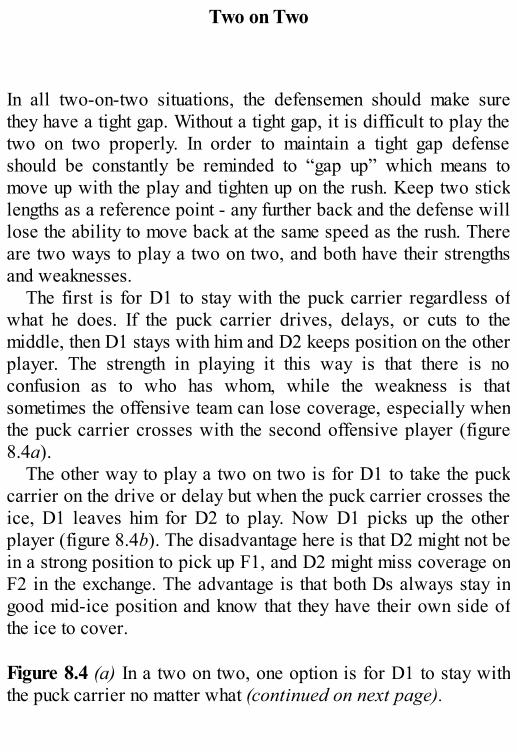
Two on Two
In all two-on-two situations, the defensemen should make surethey have a tight gap. Without a tight gap, it is difficult to play thetwo on two properly. In order to maintain a tight gap defenseshould be constantly be reminded to “gap up” which means tomove up with the play and tighten up on the rush. Keep two sticklengths as a reference point - any further back and the defense willlose the ability to move back at the same speed as the rush. Thereare two ways to play a two on two, and both have their strengthsand weaknesses.
The first is for D1 to stay with the puck carrier regardless ofwhat he does. If the puck carrier drives, delays, or cuts to themiddle, then D1 stays with him and D2 keeps position on the otherplayer. The strength in playing it this way is that there is noconfusion as to who has whom, while the weakness is thatsometimes the offensive team can lose coverage, especially whenthe puck carrier crosses with the second offensive player (figure8.4a).
The other way to play a two on two is for D1 to take the puckcarrier on the drive or delay but when the puck carrier crosses theice, D1 leaves him for D2 to play. Now D1 picks up the otherplayer (figure 8.4b). The disadvantage here is that D2 might not bein a strong position to pick up F1, and D2 might miss coverage onF2 in the exchange. The advantage is that both Ds always stay ingood mid-ice position and know that they have their own side ofthe ice to cover. Figure 8.4 (a) In a two on two, one option is for D1 to stay withthe puck carrier no matter what (continued on next page).
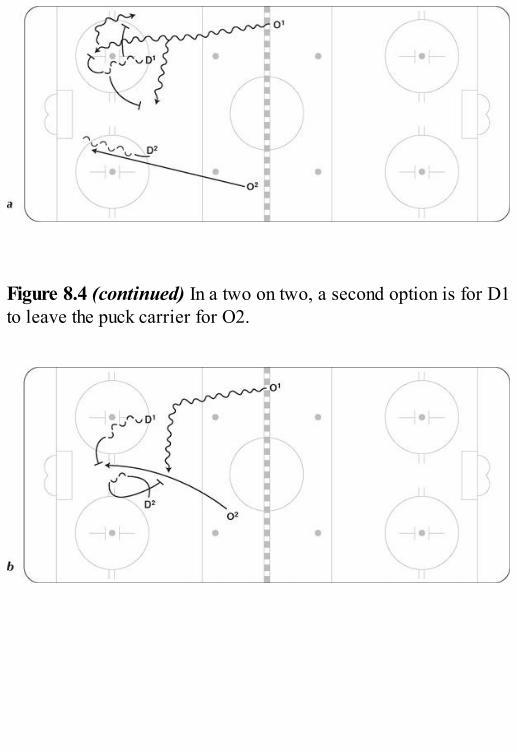
Figure 8.4 (continued) In a two on two, a second option is for D1to leave the puck carrier for O2.
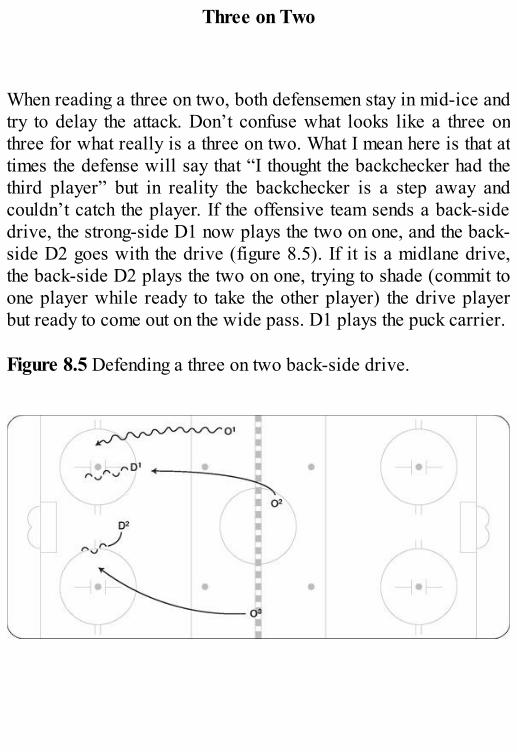
Three on Two
When reading a three on two, both defensemen stay in mid-ice andtry to delay the attack. Don’t confuse what looks like a three onthree for what really is a three on two. What I mean here is that attimes the defense will say that “I thought the backchecker had thethird player” but in reality the backchecker is a step away andcouldn’t catch the player. If the offensive team sends a back-sidedrive, the strong-side D1 now plays the two on one, and the back-side D2 goes with the drive (figure 8.5). If it is a midlane drive,the back-side D2 plays the two on one, trying to shade (commit toone player while ready to take the other player) the drive playerbut ready to come out on the wide pass. D1 plays the puck carrier. Figure 8.5 Defending a three on two back-side drive.
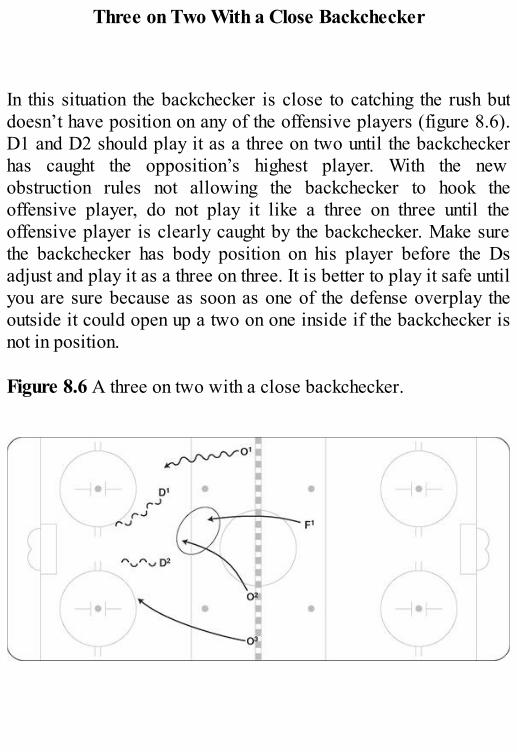
Three on Two With a Close Backchecker
In this situation the backchecker is close to catching the rush butdoesn’t have position on any of the offensive players (figure 8.6).D1 and D2 should play it as a three on two until the backcheckerhas caught the opposition’s highest player. With the newobstruction rules not allowing the backchecker to hook theoffensive player, do not play it like a three on three until theoffensive player is clearly caught by the backchecker. Make surethe backchecker has body position on his player before the Dsadjust and play it as a three on three. It is better to play it safe untilyou are sure because as soon as one of the defense overplay theoutside it could open up a two on one inside if the backchecker isnot in position. Figure 8.6 A three on two with a close backchecker.
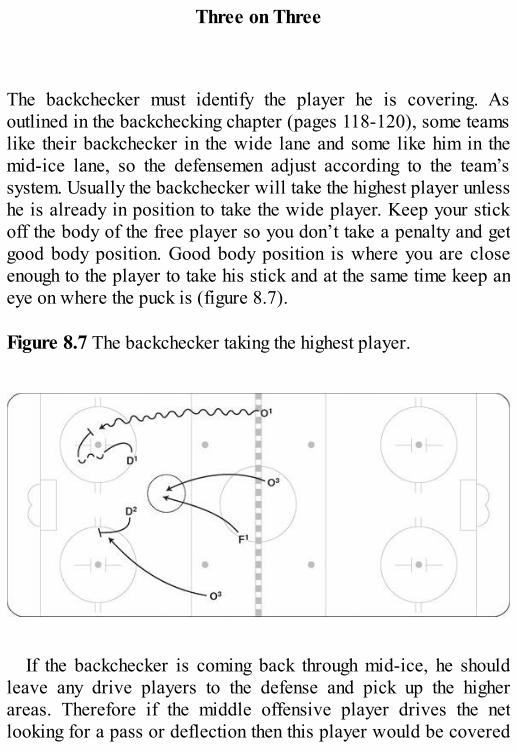
Three on Three
The backchecker must identify the player he is covering. Asoutlined in the backchecking chapter (pages 118-120), some teamslike their backchecker in the wide lane and some like him in themid-ice lane, so the defensemen adjust according to the team’ssystem. Usually the backchecker will take the highest player unlesshe is already in position to take the wide player. Keep your stickoff the body of the free player so you don’t take a penalty and getgood body position. Good body position is where you are closeenough to the player to take his stick and at the same time keep aneye on where the puck is (figure 8.7). Figure 8.7 The backchecker taking the highest player.
If the backchecker is coming back through mid-ice, he shouldleave any drive players to the defense and pick up the higherareas. Therefore if the middle offensive player drives the netlooking for a pass or deflection then this player would be covered
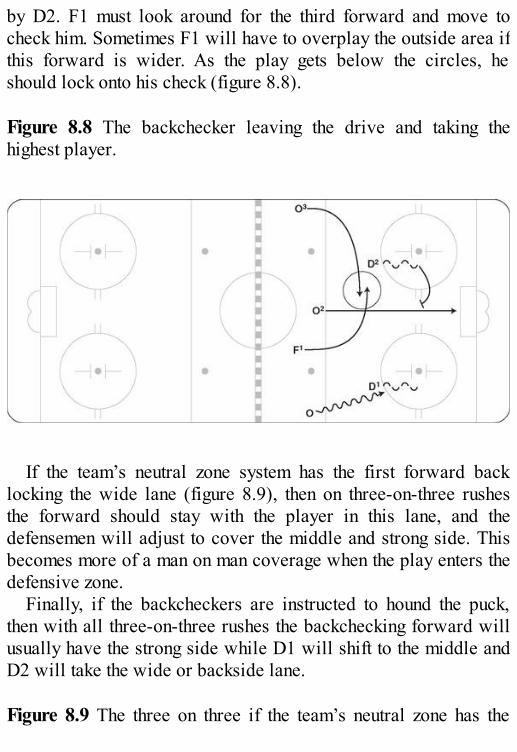
by D2. F1 must look around for the third forward and move tocheck him. Sometimes F1 will have to overplay the outside area ifthis forward is wider. As the play gets below the circles, heshould lock onto his check (figure 8.8). Figure 8.8 The backchecker leaving the drive and taking thehighest player.
If the team’s neutral zone system has the first forward backlocking the wide lane (figure 8.9), then on three-on-three rushesthe forward should stay with the player in this lane, and thedefensemen will adjust to cover the middle and strong side. Thisbecomes more of a man on man coverage when the play enters thedefensive zone.
Finally, if the backcheckers are instructed to hound the puck,then with all three-on-three rushes the backchecking forward willusually have the strong side while D1 will shift to the middle andD2 will take the wide or backside lane. Figure 8.9 The three on three if the team’s neutral zone has the
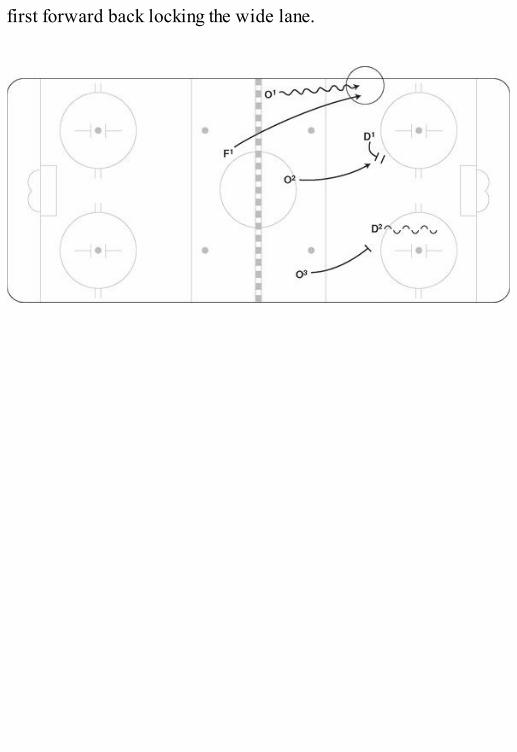
first forward back locking the wide lane.
Chapter 9
Defensive Zone Coverage
Defensive zone coverage refers to coverage once the offensiveteam has set up in the zone and all five defensive players are alsoin the zone . . . this may happen off a face-off in the defensivezone, after the opposition enters the zone and takes a shot on net,or when the opposition enters the zone and maintains puckpossession for several seconds. Following are some keyprinciples to remember in defensive zone coverage:
Maintain mid-ice positioning. Players are often in such a
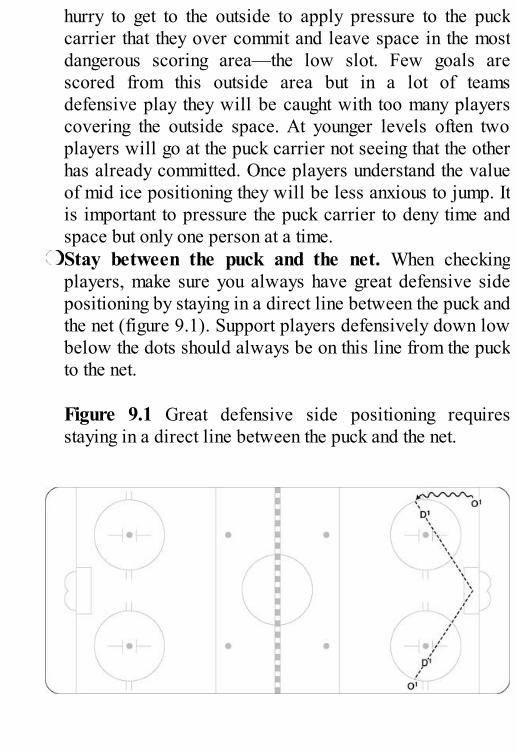
hurry to get to the outside to apply pressure to the puckcarrier that they over commit and leave space in the mostdangerous scoring area—the low slot. Few goals arescored from this outside area but in a lot of teamsdefensive play they will be caught with too many playerscovering the outside space. At younger levels often twoplayers will go at the puck carrier not seeing that the otherhas already committed. Once players understand the valueof mid ice positioning they will be less anxious to jump. Itis important to pressure the puck carrier to deny time andspace but only one person at a time.Stay between the puck and the net. When checkingplayers, make sure you always have great defensive sidepositioning by staying in a direct line between the puck andthe net (figure 9.1). Support players defensively down lowbelow the dots should always be on this line from the puckto the net.
Figure 9.1 Great defensive side positioning requiresstaying in a direct line between the puck and the net.
Be ready to block shots. In today’s game, it is much morecommon for defenders to get into shooting lanes and blockshots (primarily with the legs) or discourage opposingplayers from taking a shot. Although blocking a shot hurts,it takes away good scoring chances. Players who sacrificetheir body to block a shot are respected by teammates andcoaches. There are times when a player sprawls to block ashot which requires timing but most of the shots that areblocked are by players who make themselves big inshooting lanes. Many teams include blocking shots as partof regular practice routines.Keep your stick on the ice. In offensive situations,coaches often remind players, “Keep your stick on the ice,and be ready for the pass.” We believe this is even moreimportant in the defensive zone. By having your stick onthe ice, you take away passing lanes and often interceptpucks. When you look at a video clip of all five defensiveplayers with their sticks on the ice, it is amazing how muchmore space is covered. Although you often see playersholding their sticks up in a comfortable position, theirhands at their hips, this is a bad habit.See the puck, see your man. It is important in all sportsfor defenders to be able to see where the offensive playeris and where their coverage responsibility is. Keep yourhead on a swivel and look back and forth between the two,because the position of the puck is changing while at thesame time your check is moving.Find the stick on rebounds. When the puck is shot on goaland there is a rebound, defensive players often try to findthe puck, and the free offensive player finds it first andscores. First cover the opponent’s stick, and then look torespond to the loose puck. The goaltender should tell the
defensive players where the puck is (in the corner… inyour feet). This will help defenders respond once theyhave covered the stick and taken away any immediaterebound chances. Some defense also make the mistake oftrying to knock the player down in front. When the puck isin the net area the first rule is to take a stick. Next it isimportant to get body position on the player and finally youmay attempt to move the player or knock him down. Theseprinciples will all be reviewed in the following systems.
Defensive Zone Systems
There are several systems a team could use in their defensivezone. Teams may choose between the 2-3 system, low zonecollapse, half ice overload, or man on man coverage. The 2-3system should be used against teams that have a balanced attack inthe offensive zone while the low zone collapse works well againstteams who have trouble generating chances from their defense butgenerate a lot of chances from below the circles. The half iceoverload smothers the offensive team on one side of the ice butwith teams who are good at changing the point of attack it is not aseffective. The man-on-man system is based on pressure andsticking to your check. If one player loses their check thenexcellent scoring opportunities result. It is not ourrecommendation that coaches should change from system to systemdepending on the opponent. We believe it is important to pick onethat is suitable for your level of play and teach it well.
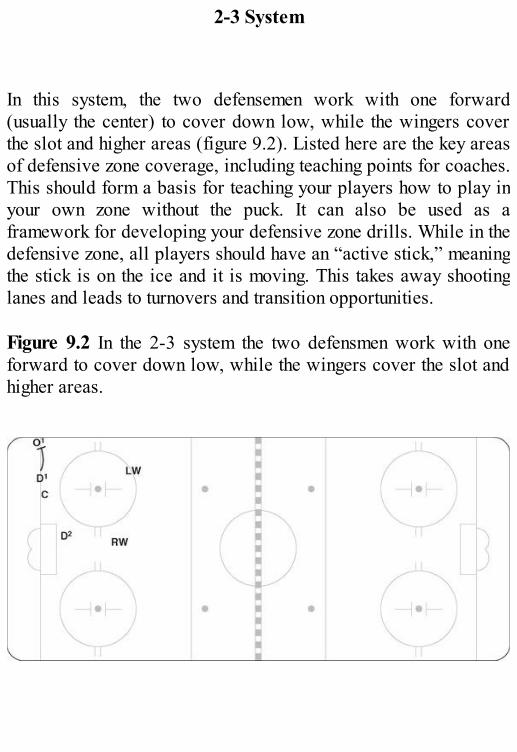
2-3 System
In this system, the two defensemen work with one forward(usually the center) to cover down low, while the wingers coverthe slot and higher areas (figure 9.2). Listed here are the key areasof defensive zone coverage, including teaching points for coaches.This should form a basis for teaching your players how to play inyour own zone without the puck. It can also be used as aframework for developing your defensive zone drills. While in thedefensive zone, all players should have an “active stick,” meaningthe stick is on the ice and it is moving. This takes away shootinglanes and leads to turnovers and transition opportunities. Figure 9.2 In the 2-3 system the two defensmen work with oneforward to cover down low, while the wingers cover the slot andhigher areas.
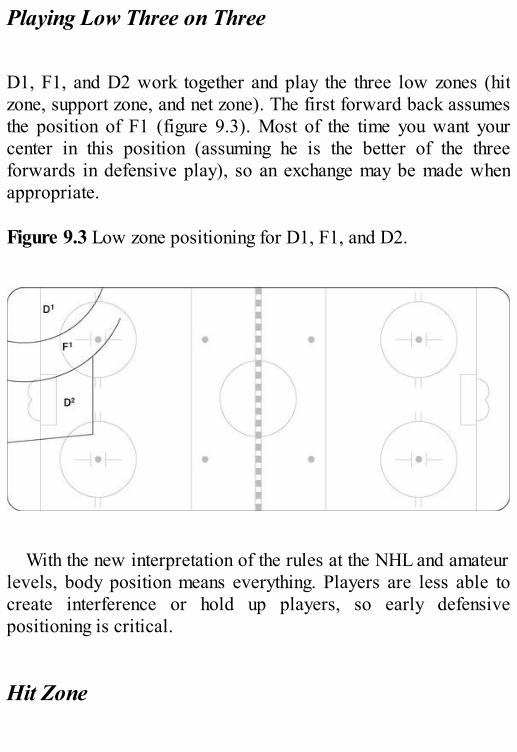
Playing Low Three on Three
D1, F1, and D2 work together and play the three low zones (hitzone, support zone, and net zone). The first forward back assumesthe position of F1 (figure 9.3). Most of the time you want yourcenter in this position (assuming he is the better of the threeforwards in defensive play), so an exchange may be made whenappropriate. Figure 9.3 Low zone positioning for D1, F1, and D2.
With the new interpretation of the rules at the NHL and amateurlevels, body position means everything. Players are less able tocreate interference or hold up players, so early defensivepositioning is critical.
Hit Zone
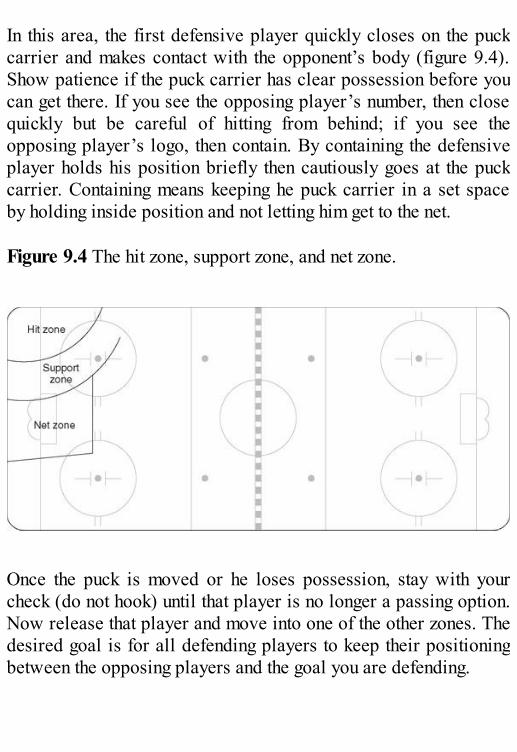
In this area, the first defensive player quickly closes on the puckcarrier and makes contact with the opponent’s body (figure 9.4).Show patience if the puck carrier has clear possession before youcan get there. If you see the opposing player’s number, then closequickly but be careful of hitting from behind; if you see theopposing player’s logo, then contain. By containing the defensiveplayer holds his position briefly then cautiously goes at the puckcarrier. Containing means keeping he puck carrier in a set spaceby holding inside position and not letting him get to the net. Figure 9.4 The hit zone, support zone, and net zone.
Once the puck is moved or he loses possession, stay with yourcheck (do not hook) until that player is no longer a passing option.Now release that player and move into one of the other zones. Thedesired goal is for all defending players to keep their positioningbetween the opposing players and the goal you are defending.
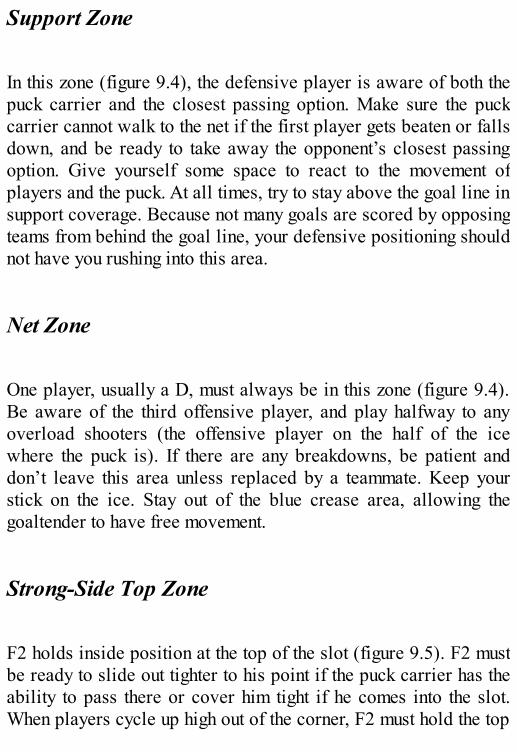
Support Zone
In this zone (figure 9.4), the defensive player is aware of both thepuck carrier and the closest passing option. Make sure the puckcarrier cannot walk to the net if the first player gets beaten or fallsdown, and be ready to take away the opponent’s closest passingoption. Give yourself some space to react to the movement ofplayers and the puck. At all times, try to stay above the goal line insupport coverage. Because not many goals are scored by opposingteams from behind the goal line, your defensive positioning shouldnot have you rushing into this area.
Net Zone
One player, usually a D, must always be in this zone (figure 9.4).Be aware of the third offensive player, and play halfway to anyoverload shooters (the offensive player on the half of the icewhere the puck is). If there are any breakdowns, be patient anddon’t leave this area unless replaced by a teammate. Keep yourstick on the ice. Stay out of the blue crease area, allowing thegoaltender to have free movement.
Strong-Side Top Zone
F2 holds inside position at the top of the slot (figure 9.5). F2 mustbe ready to slide out tighter to his point if the puck carrier has theability to pass there or cover him tight if he comes into the slot.When players cycle up high out of the corner, F2 must hold the top
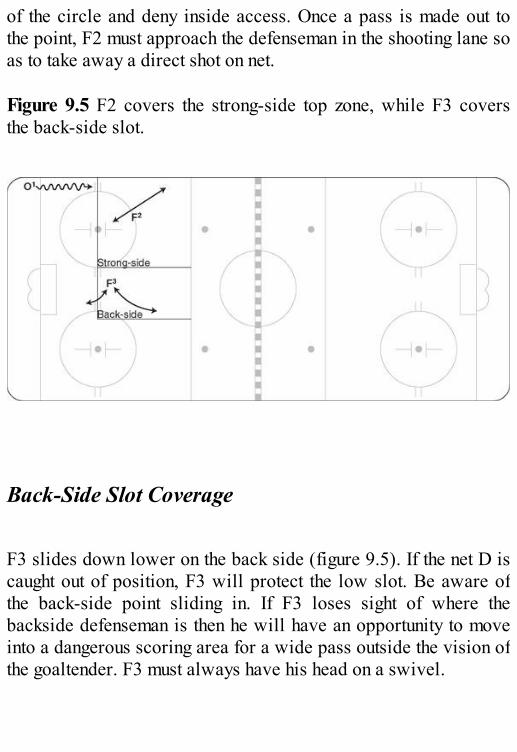
of the circle and deny inside access. Once a pass is made out tothe point, F2 must approach the defenseman in the shooting lane soas to take away a direct shot on net. Figure 9.5 F2 covers the strong-side top zone, while F3 coversthe back-side slot.
Back-Side Slot Coverage
F3 slides down lower on the back side (figure 9.5). If the net D iscaught out of position, F3 will protect the low slot. Be aware ofthe back-side point sliding in. If F3 loses sight of where thebackside defenseman is then he will have an opportunity to moveinto a dangerous scoring area for a wide pass outside the vision ofthe goaltender. F3 must always have his head on a swivel.
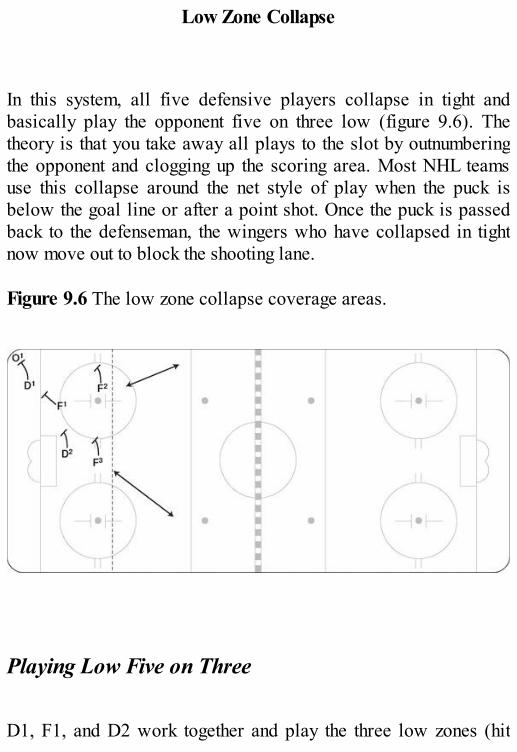
Low Zone Collapse
In this system, all five defensive players collapse in tight andbasically play the opponent five on three low (figure 9.6). Thetheory is that you take away all plays to the slot by outnumberingthe opponent and clogging up the scoring area. Most NHL teamsuse this collapse around the net style of play when the puck isbelow the goal line or after a point shot. Once the puck is passedback to the defenseman, the wingers who have collapsed in tightnow move out to block the shooting lane. Figure 9.6 The low zone collapse coverage areas.
Playing Low Five on Three
D1, F1, and D2 work together and play the three low zones (hit

zone, support zone, and net zone; figure 9.7). The first forwardback assumes the position of F1. Most of the time you want yourcenter in this position, so an exchange may be made whenappropriate. The other two forwards sink in tight as well. Theadjustment from the 2-3 system is that D2 can now move to thestrong-side post F3 plays close to the net, covering the low slotwhile F2 (who is also collapsed below the dots) tries to denypasses back to the point. Figure 9.7 Low five on three coverage.
High Zone Coverage
When the offensive team moves the puck back to the point, F2expands out in the shooting lane (figure 9.8). F2 should movequickly but be under control when the defenseman is ready toshoot. Get into the shooting lane when you anticipate a shot. At
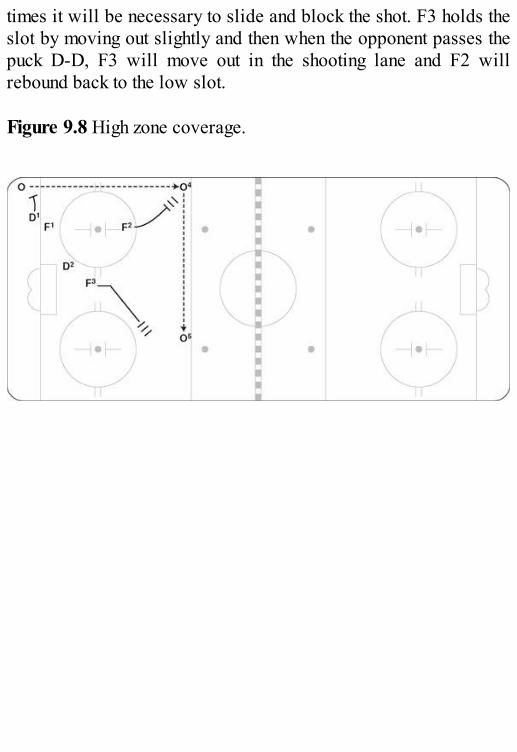
times it will be necessary to slide and block the shot. F3 holds theslot by moving out slightly and then when the opponent passes thepuck D-D, F3 will move out in the shooting lane and F2 willrebound back to the low slot. Figure 9.8 High zone coverage.
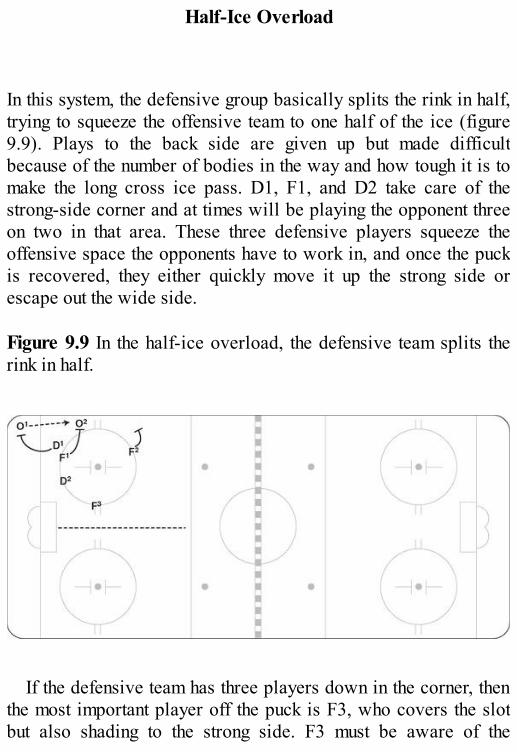
Half-Ice Overload
In this system, the defensive group basically splits the rink in half,trying to squeeze the offensive team to one half of the ice (figure9.9). Plays to the back side are given up but made difficultbecause of the number of bodies in the way and how tough it is tomake the long cross ice pass. D1, F1, and D2 take care of thestrong-side corner and at times will be playing the opponent threeon two in that area. These three defensive players squeeze theoffensive space the opponents have to work in, and once the puckis recovered, they either quickly move it up the strong side orescape out the wide side. Figure 9.9 In the half-ice overload, the defensive team splits therink in half.
If the defensive team has three players down in the corner, thenthe most important player off the puck is F3, who covers the slotbut also shading to the strong side. F3 must be aware of the
opponent’s third forward and cover anyone who comes to the frontof the net while at the same time be looking to see if the opposingback-side defenseman is moving into the scoring area. Theopposition will try to sneak a defenseman down the back side, soF3 has to be aware and alert. F2 takes away the strong-sidedefenseman by playing much closer to the boards, thereforedenying a pass out to the strong-side point. F2 needs to start insidethe circle and then move out to cut off players cycling up theboards and having an active stick to cut off passes to the point.
The advantage of this system is that it is very difficult for theoffensive team to find room to move and make plays on the strongside. A lot of teams like to cycle and then attack the net, but withthis system, space to cycle is all but eliminated. When offensiveplayers play against teams that use the half-ice overload, theyoften complain that they have no time! The one disadvantage is thatquick plays to the net may result in a two on one on F3 if theopposing defensemen drives to the front of the net, but this is adifficult pass to make.
Man-on-Man Coverage
This system relies on constant puck pressure and denying time andspace to the opponent. D1 starts by pressuring the puck carrier andthen, after a pass is made, sticks with that player as he tries to getopen. The only place D1 won’t follow the player when he doesn’thave the puck is out to the blue line; D1 has tight coverage on anyplayers in the slot. F1 now pressures the pass and once again if thepuck is moved sticks to his man (figure 9.10). This continues withD2 in the low zone area while F2 and F3 have responsibility forthe opposing defensemen. F2 and F3 cover the defensemenwhether they move in through the slot or slide down the boards.There is no confusion with the man-on-man system with regard towho a player is covering, but if the opposition is fairly creativeand incorporates lots of motion, then it becomes harder to staywith your check. The new rules preventing clutching and grabbinghave made it harder to play a true man-on-man system, but it canbe very effective if the defenders are good skaters because theoffensive team has minimal time with the puck before beingpressured, and players away from the puck have trouble findingspace to get open for a return pass. Figure 9.10 Man-on-man coverage.
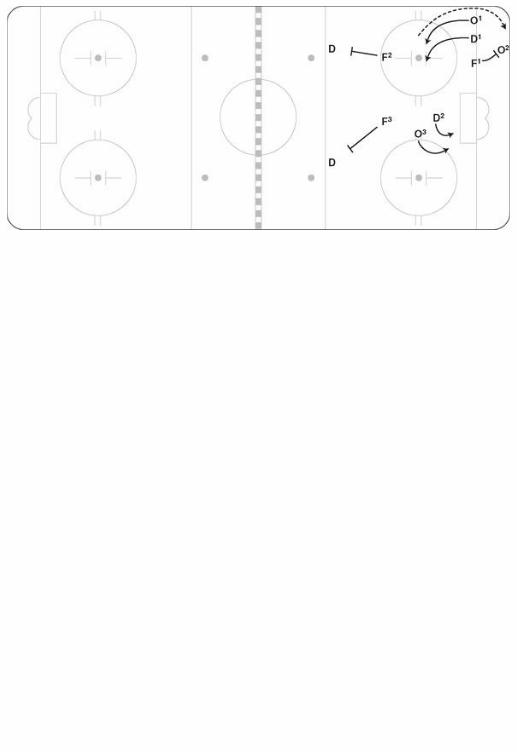
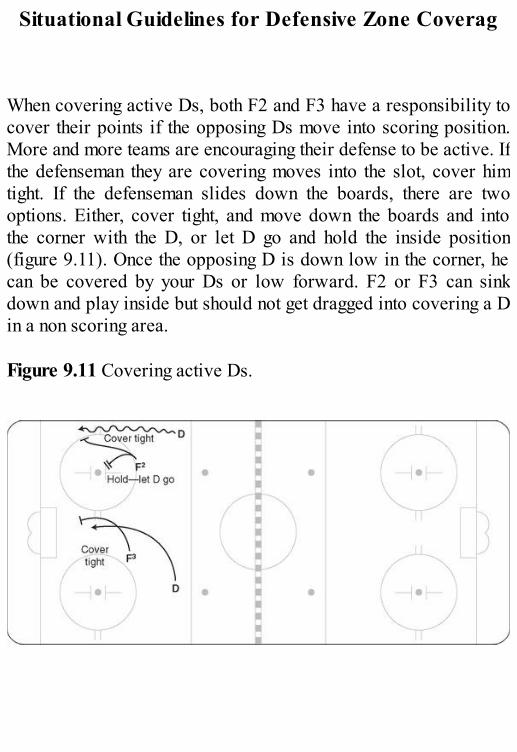
Situational Guidelines for Defensive Zone Coverag
When covering active Ds, both F2 and F3 have a responsibility tocover their points if the opposing Ds move into scoring position.More and more teams are encouraging their defense to be active. Ifthe defenseman they are covering moves into the slot, cover himtight. If the defenseman slides down the boards, there are twooptions. Either, cover tight, and move down the boards and intothe corner with the D, or let D go and hold the inside position(figure 9.11). Once the opposing D is down low in the corner, hecan be covered by your Ds or low forward. F2 or F3 can sinkdown and play inside but should not get dragged into covering a Din a non scoring area. Figure 9.11 Covering active Ds.
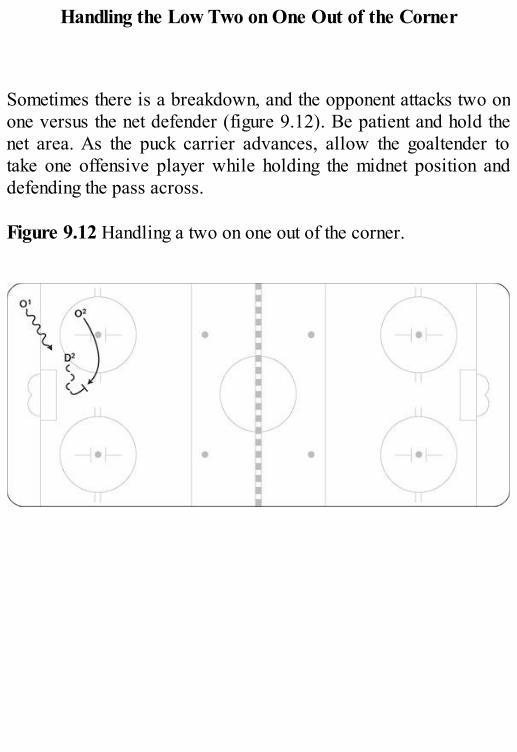
Handling the Low Two on One Out of the Corner
Sometimes there is a breakdown, and the opponent attacks two onone versus the net defender (figure 9.12). Be patient and hold thenet area. As the puck carrier advances, allow the goaltender totake one offensive player while holding the midnet position anddefending the pass across. Figure 9.12 Handling a two on one out of the corner.
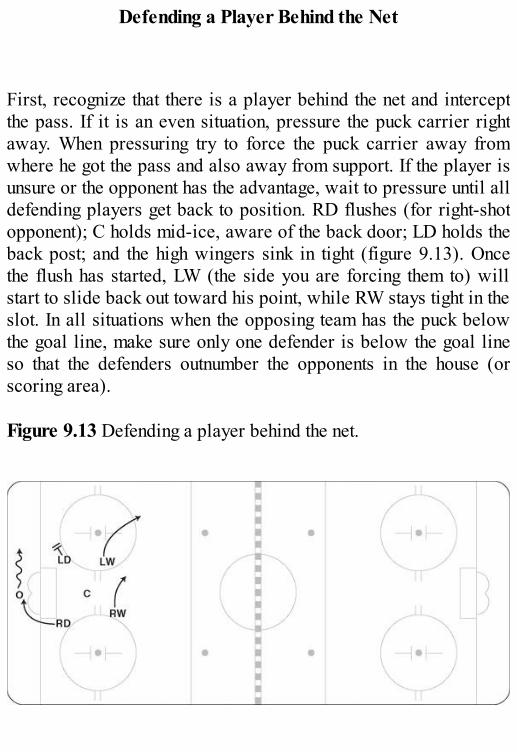
Defending a Player Behind the Net
First, recognize that there is a player behind the net and interceptthe pass. If it is an even situation, pressure the puck carrier rightaway. When pressuring try to force the puck carrier away fromwhere he got the pass and also away from support. If the player isunsure or the opponent has the advantage, wait to pressure until alldefending players get back to position. RD flushes (for right-shotopponent); C holds mid-ice, aware of the back door; LD holds theback post; and the high wingers sink in tight (figure 9.13). Oncethe flush has started, LW (the side you are forcing them to) willstart to slide back out toward his point, while RW stays tight in theslot. In all situations when the opposing team has the puck belowthe goal line, make sure only one defender is below the goal lineso that the defenders outnumber the opponents in the house (orscoring area). Figure 9.13 Defending a player behind the net.
Chapter 10
Penalty Kills
Today’s game of hockey can be characterized by two focuses andtwo words: special teams. Over the past few seasons, all levels ofhockey have endured much change. Most of this change stems froman increased attention by officials on the obstruction that had snuckinto our game. Players and coaches had become very adept atrunning interference and slowing down not only the game but alsoits most skilled players. A by-product of this change is a giganticincrease in the volume of penalties and an obvious impact thatpower plays and penalty kills have on the outcome of each game.
The penalty kill has in many ways turned into an art. Players
who in years past may have played a lesser role because of theirlack of offensive gifts are now playing a major role making surethat the opposing power play does not affect their team’s chancesof winning. Here are the keys to successful penalty killing:
Outwork the power play. Most PP units will relax to adegree because of the extra man, so be prepared tosignificantly outwork them.Win face-offs. Possession of the puck and a quick clearwill not only force the PP unit to go back 200 feet (61 m)for the puck but will also frustrate the PP unit, which iswhat you want.Talk. Communication improves positioning andawareness.No big hits. Never hit on the PK, as tempting as it is; youshould only “bump and run.” It is a priority to keep yourfeet moving and pressure the opponent. Making a big hittakes players out of the play which you can’t afford whenalready down one player.Have an active stick. Keep it on the ice at all times and inthe right passing lane.Get body position in shooting lanes, and know when togo down to block shots. Blocking shots can be a big boostto the penalty kill.When in the zone, pressure the puck in straight lines—rebound back into position quickly after you pressure, andlead with your stick as you return.Compete hard for loose pucks.When clearing the puck, make sure it goes 200 feet (61m). Try to score only when you have a lane to take thepuck into the offensive zone.Never get tied up with the player at the net. Mostleagues prevent you from moving that player legally, so
once he is there, do not create a double screen in front ofyour goaltender; play around him and have an active stick.Players coming out of the penalty box must knowwhere to go. Coaches should set rules for all playerscoming out of the box when the puck is in your end.
Face-Offs and Penalty Kills
Every penalty kill has one thing in common: It starts with a face-off. Many pundits of our game see the neutral zone face-off as athrowaway item, especially while killing penalties. We very muchdisagree. Every face-off is an opportunity to gain puck possession,and every detail of winning these face-offs must be attended to.For example, lazy positioning can seep into our game. Sometimesin the neutral zone both defensemen pull off the line and hang backtoward their own end at face-offs.
In this simple example of attention to details, any time the left orright side of the face-off is left abandoned, it increases theopponent’s ability to gain puck possession. Always place playerson the penalty kill, including defensemen, tight to the face-off(figure 10.1), giving them an ability to contest for the loose puckand therefore increasing your ability to gain possession.Possession of the puck on the penalty kill may mean only seconds,but every second decreases your opponent’s ability to score withthe player advantage.
For obvious reasons, the defensive zone face-off becomes avery important component of a successful penalty kill. Properpossession of the puck in the defensive zone often allows yourteam to relieve pressure and advance the puck 180 feet (55 m)away from your goal.
A key component of aligning or positioning your players(especially who takes the face-off) has much to do with thecenter’s strong side. During my nine seasons with the MontrealCanadiens, I played a number of those seasons with GuyCarbonneau. Carbo was a right shot, I was a left shot, and both ofus were good at winning face-offs on our strong side. What anadvantage! On face-offs to the left of our goalie, I could easily
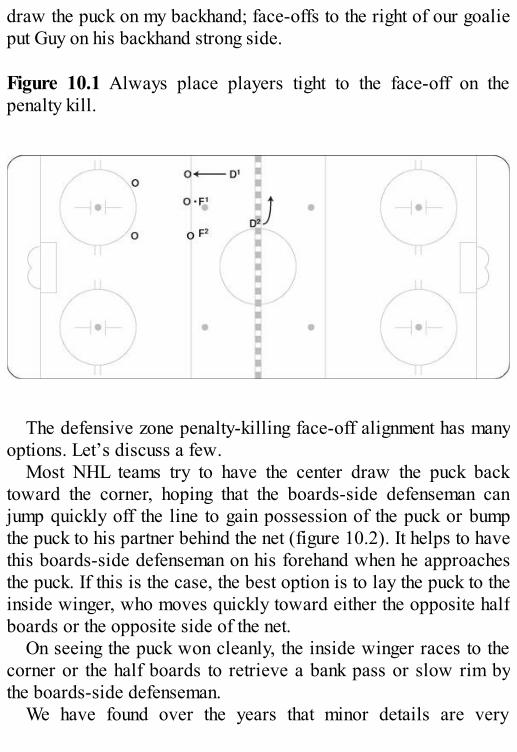
draw the puck on my backhand; face-offs to the right of our goalieput Guy on his backhand strong side. Figure 10.1 Always place players tight to the face-off on thepenalty kill.
The defensive zone penalty-killing face-off alignment has manyoptions. Let’s discuss a few.
Most NHL teams try to have the center draw the puck backtoward the corner, hoping that the boards-side defenseman canjump quickly off the line to gain possession of the puck or bumpthe puck to his partner behind the net (figure 10.2). It helps to havethis boards-side defenseman on his forehand when he approachesthe puck. If this is the case, the best option is to lay the puck to theinside winger, who moves quickly toward either the opposite halfboards or the opposite side of the net.
On seeing the puck won cleanly, the inside winger races to thecorner or the half boards to retrieve a bank pass or slow rim bythe boards-side defenseman.
We have found over the years that minor details are very
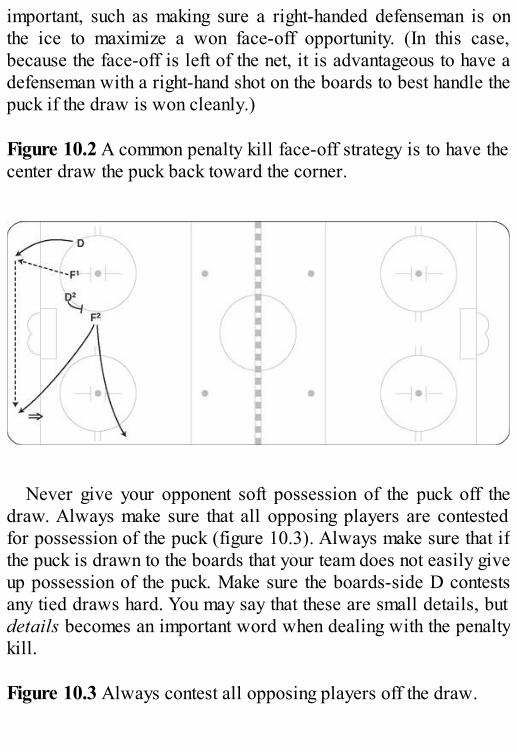
important, such as making sure a right-handed defenseman is onthe ice to maximize a won face-off opportunity. (In this case,because the face-off is left of the net, it is advantageous to have adefenseman with a right-hand shot on the boards to best handle thepuck if the draw is won cleanly.) Figure 10.2 A common penalty kill face-off strategy is to have thecenter draw the puck back toward the corner.
Never give your opponent soft possession of the puck off thedraw. Always make sure that all opposing players are contestedfor possession of the puck (figure 10.3). Always make sure that ifthe puck is drawn to the boards that your team does not easily giveup possession of the puck. Make sure the boards-side D contestsany tied draws hard. You may say that these are small details, butdetails becomes an important word when dealing with the penaltykill. Figure 10.3 Always contest all opposing players off the draw.
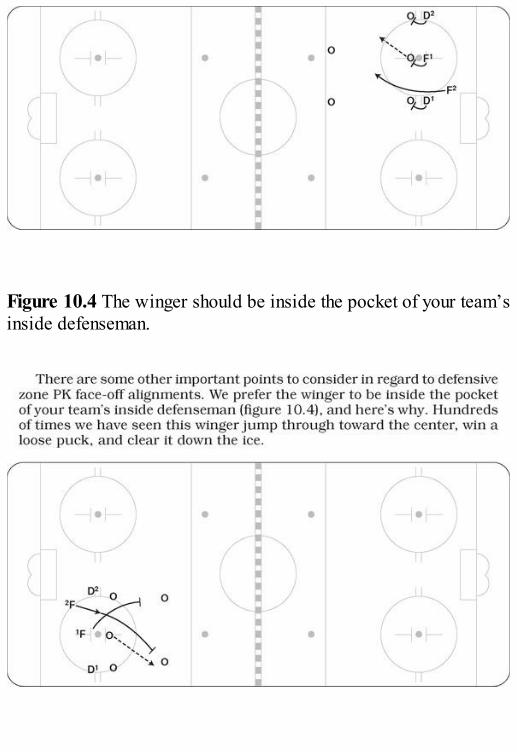
Figure 10.4 The winger should be inside the pocket of your team’sinside defenseman.
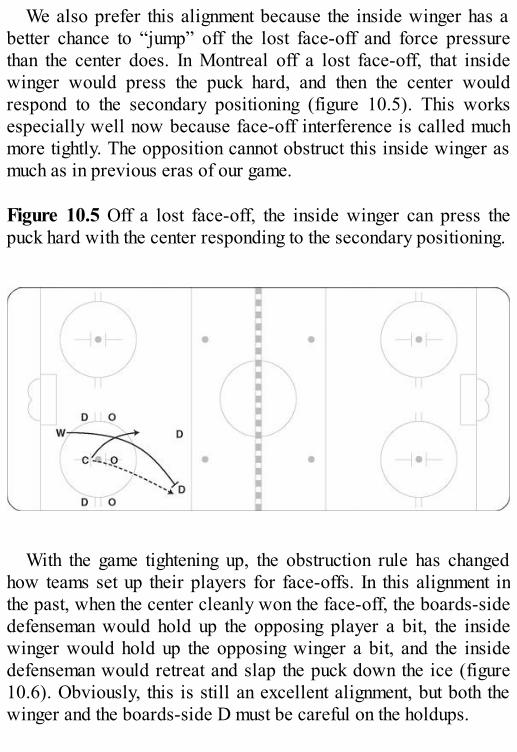
We also prefer this alignment because the inside winger has abetter chance to “jump” off the lost face-off and force pressurethan the center does. In Montreal off a lost face-off, that insidewinger would press the puck hard, and then the center wouldrespond to the secondary positioning (figure 10.5). This worksespecially well now because face-off interference is called muchmore tightly. The opposition cannot obstruct this inside winger asmuch as in previous eras of our game. Figure 10.5 Off a lost face-off, the inside winger can press thepuck hard with the center responding to the secondary positioning.
With the game tightening up, the obstruction rule has changedhow teams set up their players for face-offs. In this alignment inthe past, when the center cleanly won the face-off, the boards-sidedefenseman would hold up the opposing player a bit, the insidewinger would hold up the opposing winger a bit, and the insidedefenseman would retreat and slap the puck down the ice (figure10.6). Obviously, this is still an excellent alignment, but both thewinger and the boards-side D must be careful on the holdups.
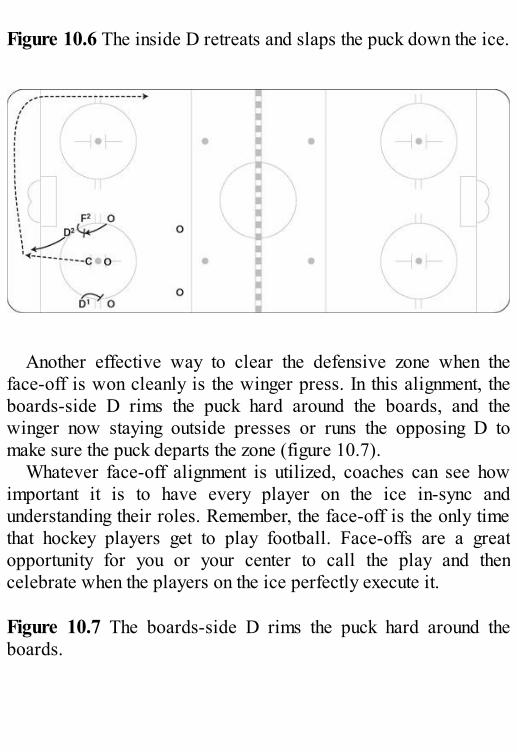
Figure 10.6 The inside D retreats and slaps the puck down the ice.
Another effective way to clear the defensive zone when theface-off is won cleanly is the winger press. In this alignment, theboards-side D rims the puck hard around the boards, and thewinger now staying outside presses or runs the opposing D tomake sure the puck departs the zone (figure 10.7).
Whatever face-off alignment is utilized, coaches can see howimportant it is to have every player on the ice in-sync andunderstanding their roles. Remember, the face-off is the only timethat hockey players get to play football. Face-offs are a greatopportunity for you or your center to call the play and thencelebrate when the players on the ice perfectly execute it. Figure 10.7 The boards-side D rims the puck hard around theboards.
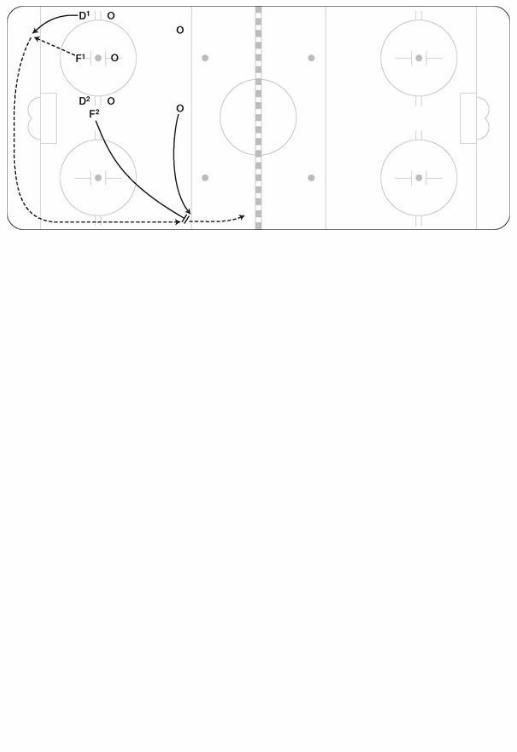
Forechecking and Penalty Kills
Now that you have cleared the puck 200 feet (55 m) from your net(initiating the forecheck) with the help of your expert face-offalignment, let’s look at ways to respond to your opponent’sbreakout. Many coaches prefer different styles of up-icepositioning, and it all depends on the objective of your attack. Forexample, do you want to angle your opponent toward the red line?Do you want to take away speed and a primary passing option? Doyou want to pressure deep up ice or meet the attack at the far blueline? Do you want to prevent a long pass and possible breakaway?Your team’s objective determines how your players, especiallythe two forwards, align themselves on the forecheck.
After clearing the puck or carrying it out of the defensive zone,penalty killers have three options:
1. Change to get fresh players on the ice. A change is thepriority at any time close to 30 seconds into the shift.
2. Pressure the puck when it is dumped down, and try todisrupt the breakout.
3. Challenge the PP and try to score. Many PP units have aforward on defense and are made up of the team’s bestoffensive players. On most teams these players lackdefensive skills, so the PP unit’s ability to defend is belowaverage. If attempting to score, don’t get fancy—take thepuck straight to the net. If you try to make too many plays,there is a better chance of a turnover and most likely youwill be caught and too tired to react appropriately. If yousimplify the attack and go hard to the net, more than likelyyou will draw a penalty or get a decent scoring chance.
This section describes five forechecking options. In reality, thePK unit rarely disrupts the PP breakout deep in the opposition’sown end; therefore, it is important on the forecheck to positionyourself through the neutral zone so that you are able to pressurethe entry.
Tandem Pressure is a more aggressive style of forecheckpressure allowing the forwards freedom to angle and press thepuck carrier. This style puts more pressure on the opponent in theneutral zone but can spread out the 4 penalty killers over twozones.
The Forwards Wide approach offers token pressure up ice andcreates 4 player alignment across the defending blue line. Thisforces the opposition to chip or dump the puck into the zone andaccomplishes its goal of “taking the puck out of the power playshands” where the PK now has an equal chance of retrieving thepuck. The Forwards Wide approach works well against powerplays who prefer to carry the puck into the zone on entries becausepressure can be applied on that puck carrier to turn over the puck.
The Retreating Box (or the Backing-up Box) keeps all puckpossession to the outside and allows angled pressure and no crossice passing. The Retreating Box works well against power playswho prefer to dump the puck into the zone because it keeps the PKD further back into the zone and therefore gives them a betterchance at puck retrieval. The Retreating Box does allow thepower play more possession entries but never through the middle.In other words opponents can skate with speed on the outside ofthe box and maintain possession of the puck until challengeddeeper in the zone.
The Same-Side Press forecheck forces the opponents entrytowards one side of the ice where all the defending pressure canbe applied. This system allows both forwards to angle thedirection of the play and allows that strong side defenseman tostep up and make the blue line hard to enter. Teams who move the

puck well laterally in the neutral zone may have a chance to breakthis forecheck but the Same-Side Press makes it difficult to enteron the strong-side.
The Passive 1-3 backs up in unison and tries to hold a close gapin the neutral zone. This formation is more passive but has thesame goal of getting the power play to dump the puck into the zone(taking the puck out of their hands) and giving the 4 penalty killersan opportunity to retrieve and ice the puck. This alignment isprimarily set up to confront the PP unit at the blueline and force aturnover or dump in.■ TANDEM PRESSUREF1 angles and pressures the opposition, trying to get there as soonas the opposing player picks up the puck (figure 10.8). F1recovers after forcing a pass or stays in the battle if he creates ascramble. F2 angles in on the first pass, making sure he is inposition to get back while trying to force the player to unload thepuck. D1 and D2 maintain a tight gap, making sure they are awareof any stretch players. F1 fills in the mid-ice lane, while F2 staysup in the middle, skating backward or angling forward and tryingto force the entry to one side. Figure 10.8
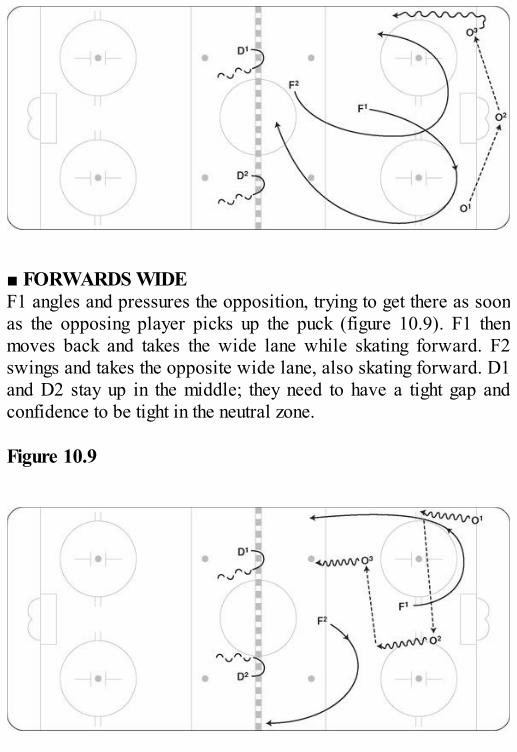
■ FORWARDS WIDEF1 angles and pressures the opposition, trying to get there as soonas the opposing player picks up the puck (figure 10.9). F1 thenmoves back and takes the wide lane while skating forward. F2swings and takes the opposite wide lane, also skating forward. D1and D2 stay up in the middle; they need to have a tight gap andconfidence to be tight in the neutral zone. Figure 10.9

■ RETREATING BOXF1 forces the opposition if he can and then skates backward upone side of the ice in line with the dots (figure 10.10). F2 skatesbackward up the other side. D1 and D2 tighten up in mid-ice. Allfour players skate backward together. Once the opposing puckcarrier crosses the blue line, F1 or F2 forces that player to hisbackhand. Therefore, if the player is a left shot, then F2 forces himtoward F1. F1 tries to deny the pass back to where he came from. Figure 10.10
■ SAME-SIDE PRESSF1 and F2 wait in the neutral zone for the opposition to break out(figure 10.11). F1 angles the puck carrier to one side with a goodstick, preventing passes back. F2 angles across to the same sideand goes after the pass or the puck carrier. D1 and D2 tighten up inmid-ice. D2 is ready to challenge passes to the far side, and D1 isready to retrieve pucks dumped in.

Figure 10.11
■ PASSIVE 1-3F1 applies pressure only when he is sure he can get the puck andclear it or can force the other player as he picks up the puck(figure 10.12). F1 now retreats with a tight gap, initially skatingbackward and then forces the puck carrier to one side. F2 stays inmid-ice behind F1, also skating backward with a tight gap. D1 andD2 stay up; they need to have a tight gap and confidence to be tightin the neutral zone. They also must be aware of any stretch playersgetting behind them. D1 or D2 must attempt to confront the entry atthe blueline by standing up the puck carrier and forcing a dump in. Figure 10.12
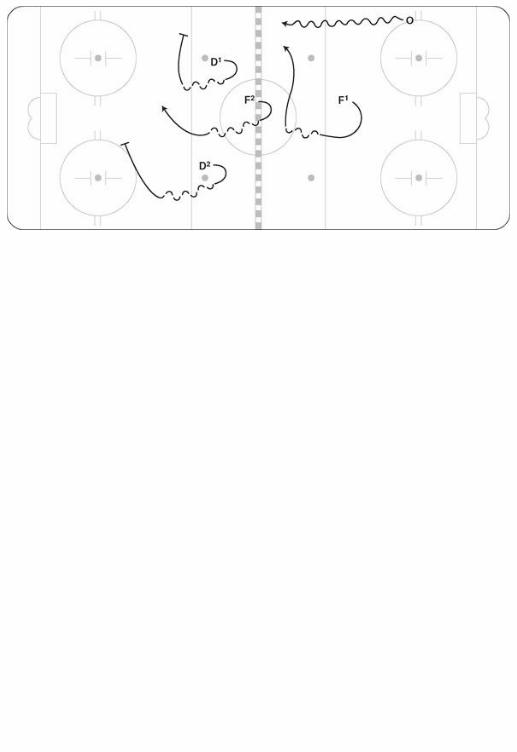
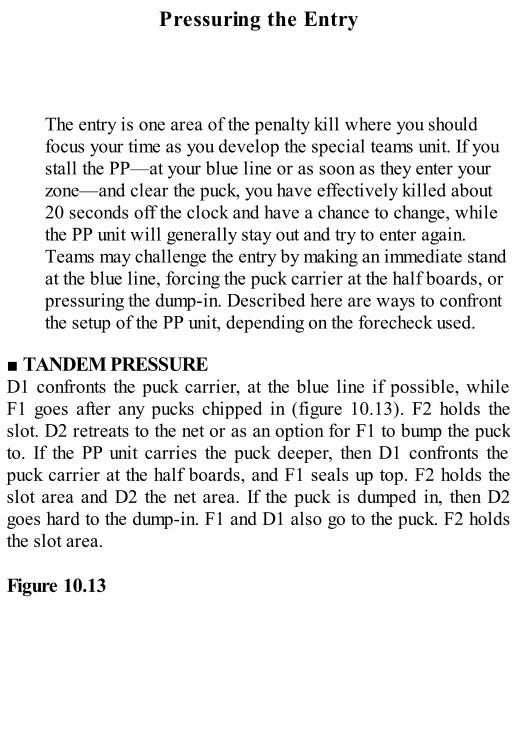
Pressuring the Entry
The entry is one area of the penalty kill where you shouldfocus your time as you develop the special teams unit. If youstall the PP—at your blue line or as soon as they enter yourzone—and clear the puck, you have effectively killed about20 seconds off the clock and have a chance to change, whilethe PP unit will generally stay out and try to enter again.Teams may challenge the entry by making an immediate standat the blue line, forcing the puck carrier at the half boards, orpressuring the dump-in. Described here are ways to confrontthe setup of the PP unit, depending on the forecheck used.
■ TANDEM PRESSURED1 confronts the puck carrier, at the blue line if possible, whileF1 goes after any pucks chipped in (figure 10.13). F2 holds theslot. D2 retreats to the net or as an option for F1 to bump the puckto. If the PP unit carries the puck deeper, then D1 confronts thepuck carrier at the half boards, and F1 seals up top. F2 holds theslot area and D2 the net area. If the puck is dumped in, then D2goes hard to the dump-in. F1 and D1 also go to the puck. F2 holdsthe slot area. Figure 10.13
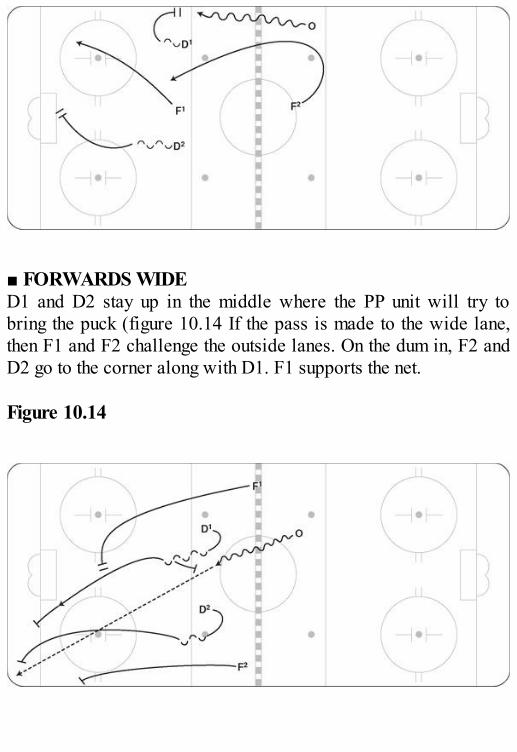
■ FORWARDS WIDED1 and D2 stay up in the middle where the PP unit will try tobring the puck (figure 10.14 If the pass is made to the wide lane,then F1 and F2 challenge the outside lanes. On the dum in, F2 andD2 go to the corner along with D1. F1 supports the net. Figure 10.14
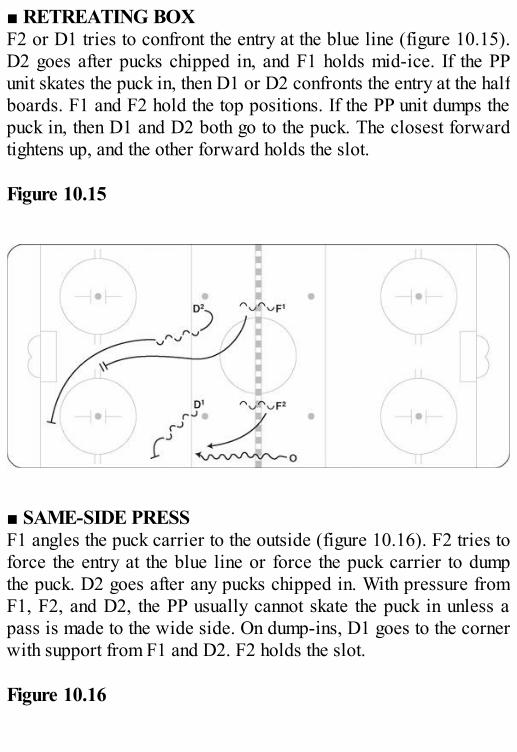
■ RETREATING BOXF2 or D1 tries to confront the entry at the blue line (figure 10.15).D2 goes after pucks chipped in, and F1 holds mid-ice. If the PPunit skates the puck in, then D1 or D2 confronts the entry at the halfboards. F1 and F2 hold the top positions. If the PP unit dumps thepuck in, then D1 and D2 both go to the puck. The closest forwardtightens up, and the other forward holds the slot. Figure 10.15
■ SAME-SIDE PRESSF1 angles the puck carrier to the outside (figure 10.16). F2 tries toforce the entry at the blue line or force the puck carrier to dumpthe puck. D2 goes after any pucks chipped in. With pressure fromF1, F2, and D2, the PP usually cannot skate the puck in unless apass is made to the wide side. On dump-ins, D1 goes to the cornerwith support from F1 and D2. F2 holds the slot. Figure 10.16
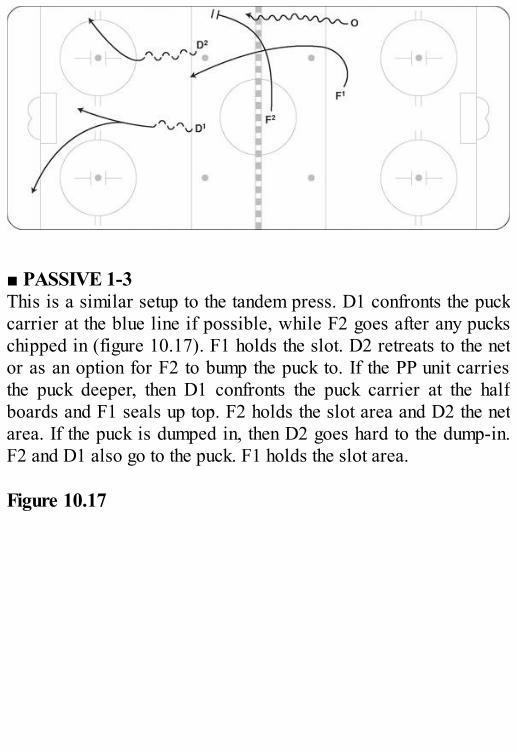
■ PASSIVE 1-3This is a similar setup to the tandem press. D1 confronts the puckcarrier at the blue line if possible, while F2 goes after any puckschipped in (figure 10.17). F1 holds the slot. D2 retreats to the netor as an option for F2 to bump the puck to. If the PP unit carriesthe puck deeper, then D1 confronts the puck carrier at the halfboards and F1 seals up top. F2 holds the slot area and D2 the netarea. If the puck is dumped in, then D2 goes hard to the dump-in.F2 and D1 also go to the puck. F1 holds the slot area. Figure 10.17
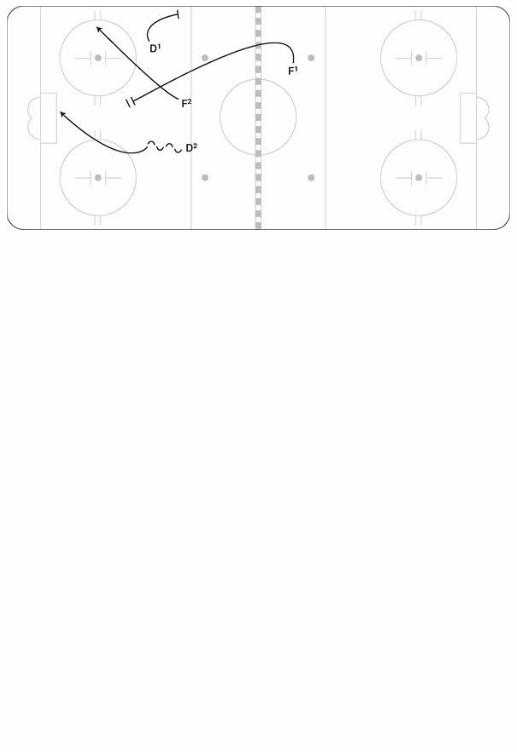
Defensive Zone Play
While in the defensive zone, the penalty-killing unit moves from“active contain” to “contain pressure” to “all-out pressure.” Thisis based on the reads of when to pressure. Every coach will havea varying degree of pressure he is comfortable with. Somecoaches make a simple rule for their players to read when to pressand when not to press. The rule is called “eyes” and “backsides.”If your player sees that the opposing player with the puck islooking directly at them they move into a more passive“containing” mode. If the player see an opponent’s “backside ornumber” then they apply maximum pressure. Obviously when aplayer is turned to get the puck and not facing mid-ice (backsideand numbers) he is not ready to make a play and therefore can bepressured harder. Remember, once one player moves to pressure,each subsequent pass must be pressured. The penalty killersshould assert more pressure when they know the puck carrier willhave a difficult time controlling the puck and making a good play.Here are some examples:
the PP has poor control or a player juggles a pass, the player with the puck has no immediate support, the player with the puck has his back turned to the net, the puck is being rimmed from one player to another alongthe boards, there is a loose puck from a rebound or missed shot, or the ice conditions are poor late in the period.
Following are some situations PK units may face and how to playthem. We describe different power play options and how thepenalty killers should react.
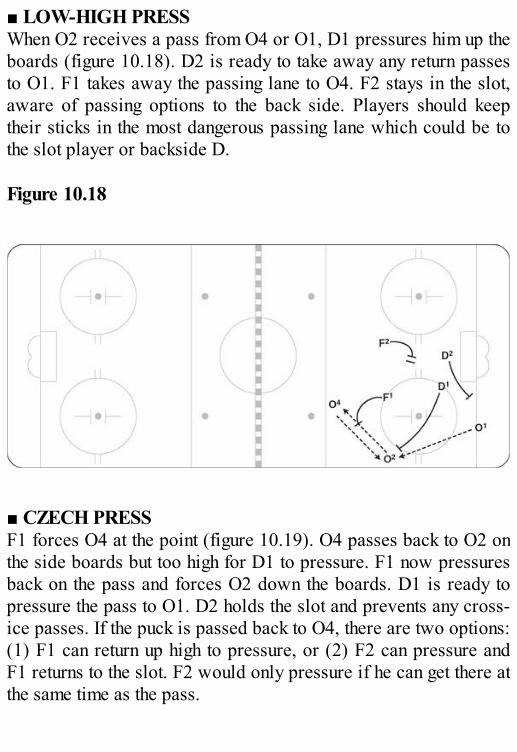
■ LOW-HIGH PRESSWhen O2 receives a pass from O4 or O1, D1 pressures him up theboards (figure 10.18). D2 is ready to take away any return passesto O1. F1 takes away the passing lane to O4. F2 stays in the slot,aware of passing options to the back side. Players should keeptheir sticks in the most dangerous passing lane which could be tothe slot player or backside D. Figure 10.18
■ CZECH PRESSF1 forces O4 at the point (figure 10.19). O4 passes back to O2 onthe side boards but too high for D1 to pressure. F1 now pressuresback on the pass and forces O2 down the boards. D1 is ready topressure the pass to O1. D2 holds the slot and prevents any cross-ice passes. If the puck is passed back to O4, there are two options:(1) F1 can return up high to pressure, or (2) F2 can pressure andF1 returns to the slot. F2 would only pressure if he can get there atthe same time as the pass.

Figure 10.19
■ DIAMOND FORCEF1 pressures or stays in O4’s shooting lane as he slides with thepuck across the blue line (figure 10.20). D1 moves up slightly,ready to go after O2 if the pass goes there. F2 sinks back into thediamond and is ready to get in the shooting lane of passes to O5.D2 plays the net. Stay in this formation as long as O4 continues tostay in the middle of the blue line. Figure 10.20
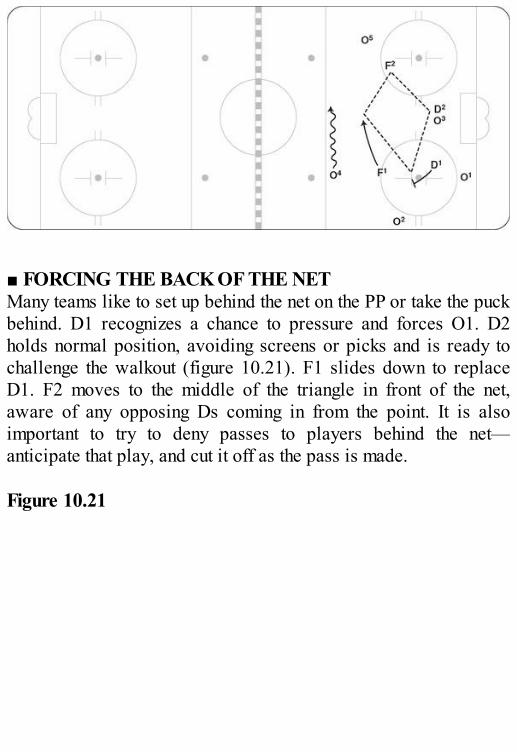
■ FORCING THE BACK OF THE NETMany teams like to set up behind the net on the PP or take the puckbehind. D1 recognizes a chance to pressure and forces O1. D2holds normal position, avoiding screens or picks and is ready tochallenge the walkout (figure 10.21). F1 slides down to replaceD1. F2 moves to the middle of the triangle in front of the net,aware of any opposing Ds coming in from the point. It is alsoimportant to try to deny passes to players behind the net—anticipate that play, and cut it off as the pass is made. Figure 10.21
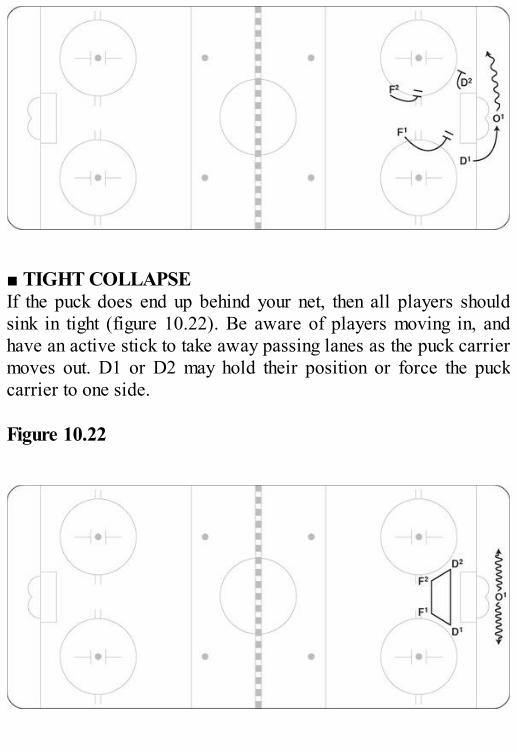
■ TIGHT COLLAPSEIf the puck does end up behind your net, then all players shouldsink in tight (figure 10.22). Be aware of players moving in, andhave an active stick to take away passing lanes as the puck carriermoves out. D1 or D2 may hold their position or force the puckcarrier to one side. Figure 10.22

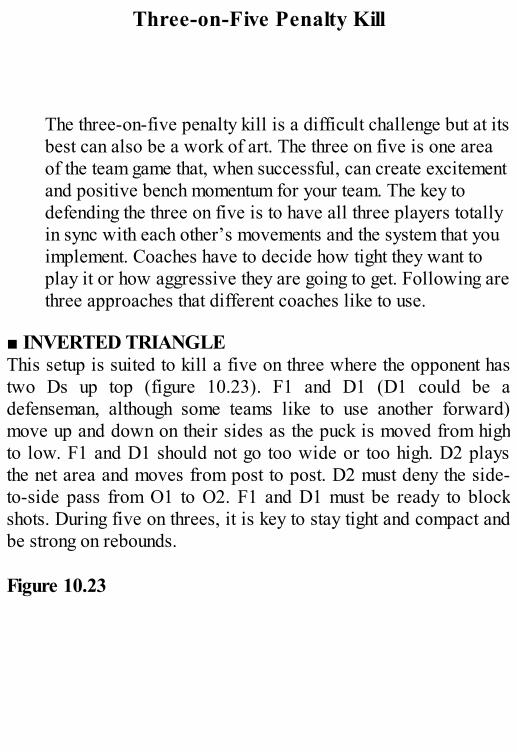
Three-on-Five Penalty Kill
The three-on-five penalty kill is a difficult challenge but at itsbest can also be a work of art. The three on five is one areaof the team game that, when successful, can create excitementand positive bench momentum for your team. The key todefending the three on five is to have all three players totallyin sync with each other’s movements and the system that youimplement. Coaches have to decide how tight they want toplay it or how aggressive they are going to get. Following arethree approaches that different coaches like to use.
■ INVERTED TRIANGLEThis setup is suited to kill a five on three where the opponent hastwo Ds up top (figure 10.23). F1 and D1 (D1 could be adefenseman, although some teams like to use another forward)move up and down on their sides as the puck is moved from highto low. F1 and D1 should not go too wide or too high. D2 playsthe net area and moves from post to post. D2 must deny the side-to-side pass from O1 to O2. F1 and D1 must be ready to blockshots. During five on threes, it is key to stay tight and compact andbe strong on rebounds. Figure 10.23
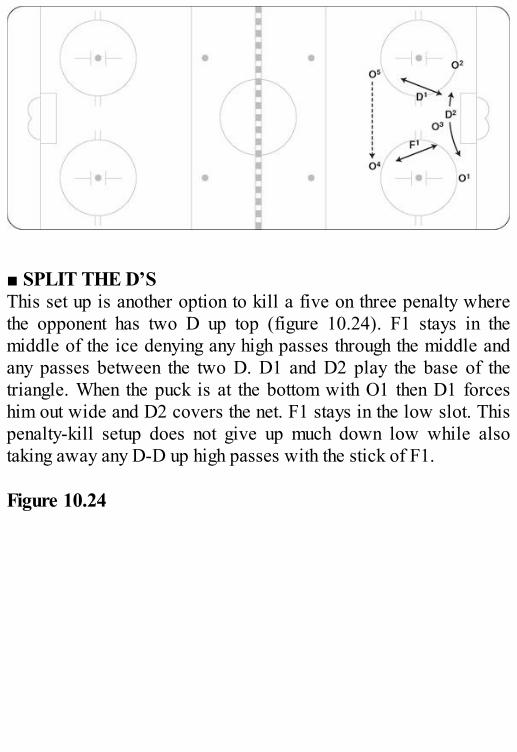
■ SPLIT THE D’SThis set up is another option to kill a five on three penalty wherethe opponent has two D up top (figure 10.24). F1 stays in themiddle of the ice denying any high passes through the middle andany passes between the two D. D1 and D2 play the base of thetriangle. When the puck is at the bottom with O1 then D1 forceshim out wide and D2 covers the net. F1 stays in the low slot. Thispenalty-kill setup does not give up much down low while alsotaking away any D-D up high passes with the stick of F1. Figure 10.24
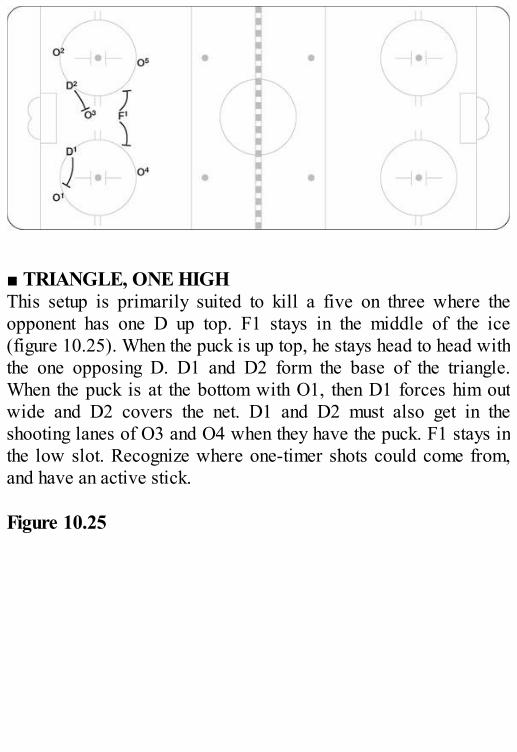
■ TRIANGLE, ONE HIGHThis setup is primarily suited to kill a five on three where theopponent has one D up top. F1 stays in the middle of the ice(figure 10.25). When the puck is up top, he stays head to head withthe one opposing D. D1 and D2 form the base of the triangle.When the puck is at the bottom with O1, then D1 forces him outwide and D2 covers the net. D1 and D2 must also get in theshooting lanes of O3 and O4 when they have the puck. F1 stays inthe low slot. Recognize where one-timer shots could come from,and have an active stick. Figure 10.25
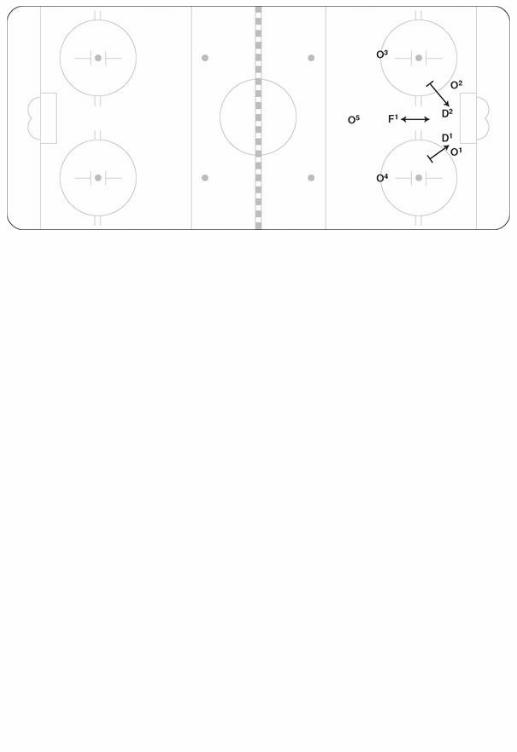
Three-on-Four Penalty Kill
The three-on-four penalty kill adds its own complexity and issimilar to yet different from killing the three on five. Thedifference is that the defending three must decide if they aregoing to take away the top two shooters or stay near the frontof the net. Usually the 4on3 is much easier to kill than the fiveon three. The PK unit focuses on playing around the man atthe net leaving them three on three against the shooters.
■ TRIANGLE, ONE HIGHMost teams on a four-on-three power play will set up in adiamond with one player at the net, so the triangle penalty kill withone high is the most effective system to use. F1 stays in the middleof the ice (figure 10.26). When the puck is up top, he stays head tohead with the one opposing D. When the puck is passed, F1 staysin the middle and uses his stick to deny the pass from O2 to O3.D1 and D2 are ready to move out and take the shooting lane awayfrom O2 and O3. D1 and D2 do not tie up with O1 at the net butare ready to defend his stick and get body position if the puck isshot through. Figure 10.26
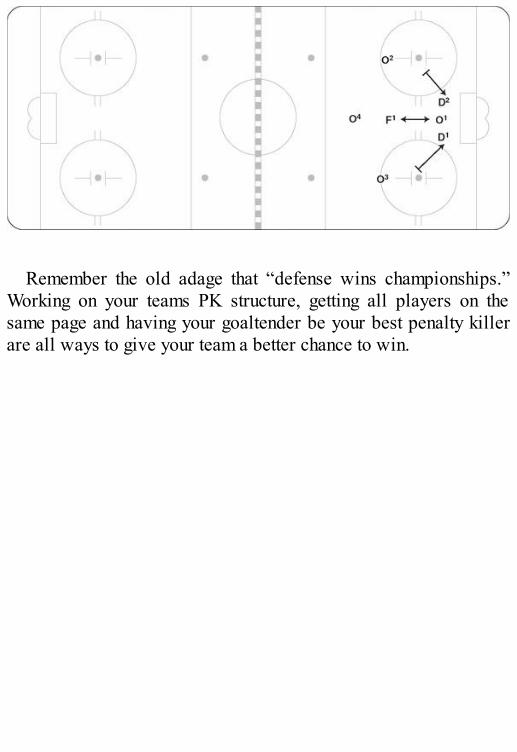
Remember the old adage that “defense wins championships.”Working on your teams PK structure, getting all players on thesame page and having your goaltender be your best penalty killerare all ways to give your team a better chance to win.
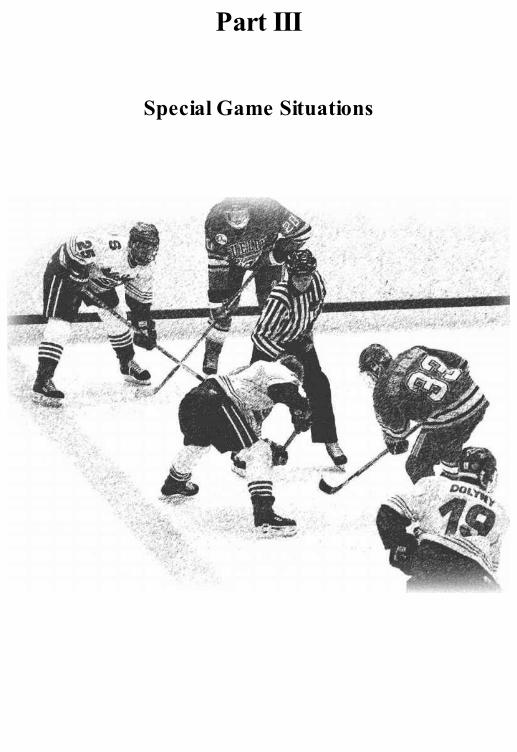
Part III
Special Game Situations
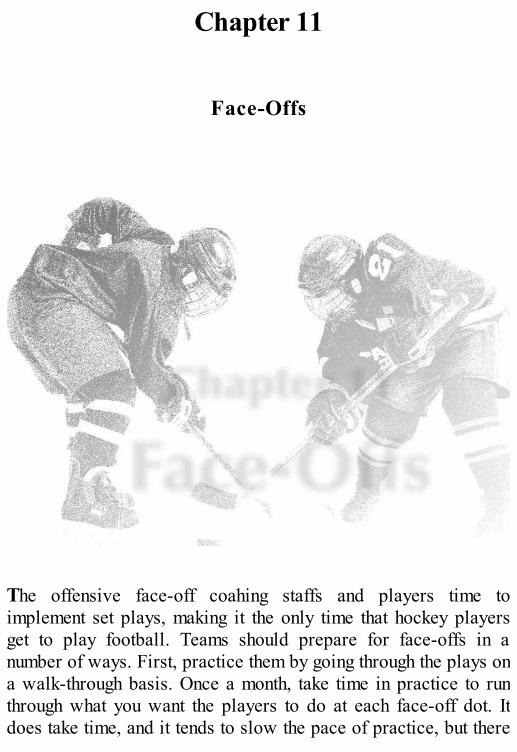
Chapter 11
Face-Offs
The offensive face-off coahing staffs and players time toimplement set plays, making it the only time that hockey playersget to play football. Teams should prepare for face-offs in anumber of ways. First, practice them by going through the plays ona walk-through basis. Once a month, take time in practice to runthrough what you want the players to do at each face-off dot. Itdoes take time, and it tends to slow the pace of practice, but there
are roughly 60 face-offs in a game, which means 60 times to winor lose possession of the puck—so it is worth the time. In additionto all players going through the face-offs, the centers must work onthe skill of taking the draw. It doesn’t take long for a coach toquickly do 50 reps with a center before or after practice, focusingon his technique. Centers should work on winning draws on theforehand, on the backhand, by tying up, and at times by touchingthe puck through to catch the opposition by surprise.
Consider having a face-off play book that includesresponsibilities as well as diagrams illustrating the executionpatterns. Some teams have developed a DVD to give to thecenters, who much like a quarterback in football need to know theformation and how to set up. This DVD should have dialogue anda clear illustration of the plays. Because of the clarity and cameraangle, it may be best to collect plays from NHL, college, andjunior games and then edit the material down for the players.
Finally, depending on the age of your group, you may want tohave the centers pick the option for their line for that night or cometo you with a play they think will work. This type of playerownership can be effective; the players will definitely focus if it istheir play because they want it to work.
Have face-off plays for all face-off dots and for specific gamesituations. The way a team lines up five on five is much differentfrom four-on-four and three-on-three situations. Don’t forgetpower-play five on four, four on three, and five on three; penalty-kill four on five, three on four, and three on five; and late-gamepulled goaltender plays defensively and offensively. Over thecourse of my NHL career across three different teams and sevendifferent head coaches, we implemented many face-off set plays,but they tended to be drawn from the following categories.
Offensive Zone Face-Offs
Offensive zone face-offs are an opportunity to create a scoringchance off a set play. Even if teams lose the draw there are waysto still recover possession and get a shot or chance. Many verysophisticated offensive face-off alignments have been developedover the years, but these alignments cover the basics of offensivezone strategy and provide enough options for teams at every level.You may want to challenge your staff to come up with a set play oftheir own, but don’t overwhelm your team with too many choices.
Offensive Zone: Won Draws
In the offensive zone, it is critical to win the draw and maintainpossession. This section describes various set plays off wondraws. A team cannot run all of them every night. It is important tohave some variance but like all other systems of play, execution isthe key to success. Give the team one play to run for every gameand that way they will become used to all the set ups so that laterin the year they can adjust on the spur of the moment. Also havingvariety in plays from game to game keeps the opposition offbalance and forces them to have to react in coverage. Make theopposition coches work to figure out what you are running andhow to cover that set up.■ DEEP POSSESSIONFor a number of reasons, an offensive center might call a face-offplay where he actually helps his opponent win the face-off backtoward the corner of the offensive zone (figure 11.1). The tacticbehind this deceived loss is to have both wingers positioned andready to press the defender when he wins the draw back to thecorner. This quick and unexpected pressure often turns over thepuck and therefore creates its desired effect, which is puckpossession and a possible scoring chance or play on the net. Offthe turnover, the player with the puck may decide to make a quickplay to the net or take the puck behind the net and come out theother side. This strategy should be used only once or twice a gameor if the center is struggling to win draws against a particularopponent (this gives that player a strategy to gain possession whilelosing the draw). Figure 11.1

■ INSIDE WINGER DRAWThis face-off starts with the direct intent to win the face-off backto the offensive defenseman. As defending players scramble tofront or block the shooting lane of the offensive defenseman, theinside winger RW skates above the circle and out to the sideboards (figure 11.2). The center and LW must go hard to the net.The offensive defenseman’s goal is to pull the puck toward themiddle of the ice and fake a slapshot. As defenders react to thisdeception, the defenseman passes the puck laterally to the insidewinger, who ends up with a clear shot toward the net throughtraffic. One variation is for C to drive the net and then push backto get open in the higher slot area. RW can now pass to C. Figure 11.2
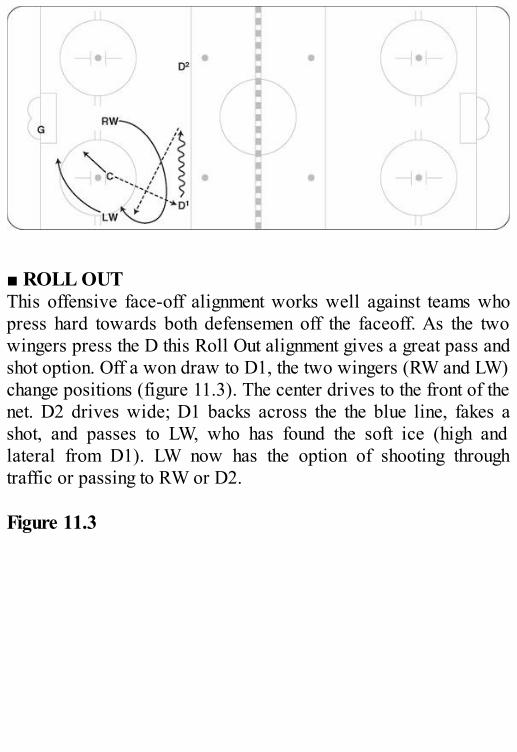
■ ROLL OUTThis offensive face-off alignment works well against teams whopress hard towards both defensemen off the faceoff. As the twowingers press the D this Roll Out alignment gives a great pass andshot option. Off a won draw to D1, the two wingers (RW and LW)change positions (figure 11.3). The center drives to the front of thenet. D2 drives wide; D1 backs across the the blue line, fakes ashot, and passes to LW, who has found the soft ice (high andlateral from D1). LW now has the option of shooting throughtraffic or passing to RW or D2. Figure 11.3
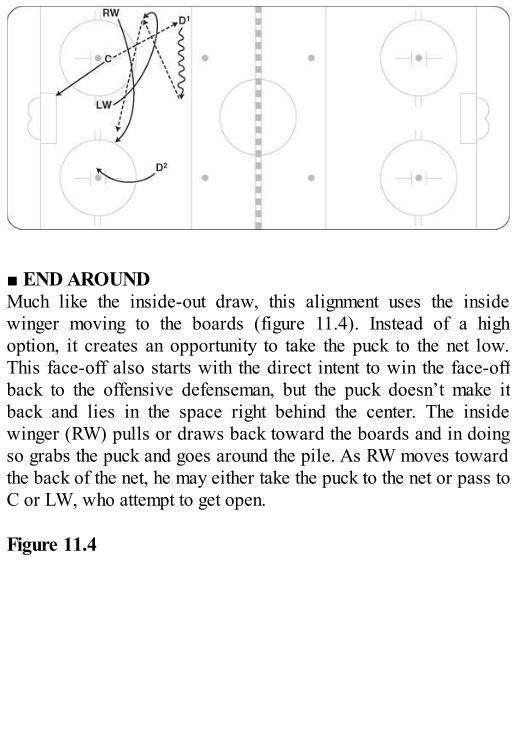
■ END AROUNDMuch like the inside-out draw, this alignment uses the insidewinger moving to the boards (figure 11.4). Instead of a highoption, it creates an opportunity to take the puck to the net low.This face-off also starts with the direct intent to win the face-offback to the offensive defenseman, but the puck doesn’t make itback and lies in the space right behind the center. The insidewinger (RW) pulls or draws back toward the boards and in doingso grabs the puck and goes around the pile. As RW moves towardthe back of the net, he may either take the puck to the net or pass toC or LW, who attempt to get open. Figure 11.4
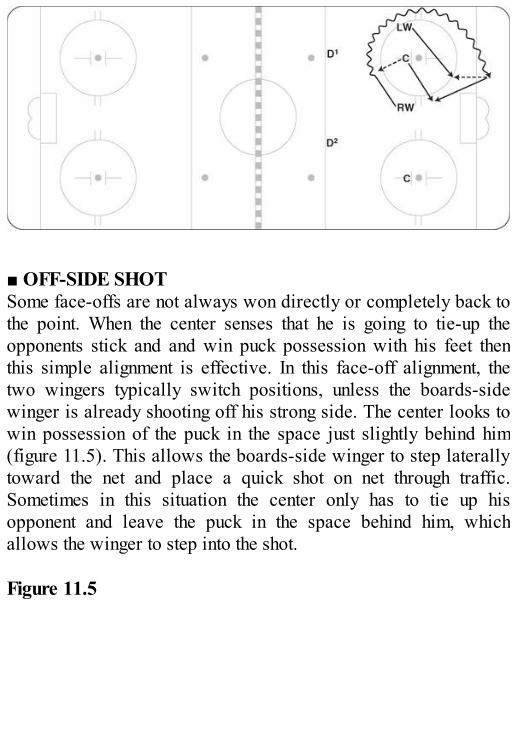
■ OFF-SIDE SHOTSome face-offs are not always won directly or completely back tothe point. When the center senses that he is going to tie-up theopponents stick and and win puck possession with his feet thenthis simple alignment is effective. In this face-off alignment, thetwo wingers typically switch positions, unless the boards-sidewinger is already shooting off his strong side. The center looks towin possession of the puck in the space just slightly behind him(figure 11.5). This allows the boards-side winger to step laterallytoward the net and place a quick shot on net through traffic.Sometimes in this situation the center only has to tie up hisopponent and leave the puck in the space behind him, whichallows the winger to step into the shot. Figure 11.5
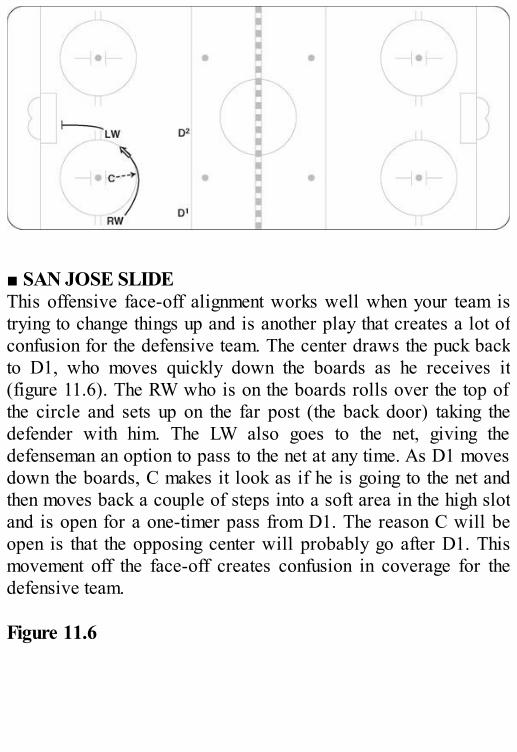
■ SAN JOSE SLIDEThis offensive face-off alignment works well when your team istrying to change things up and is another play that creates a lot ofconfusion for the defensive team. The center draws the puck backto D1, who moves quickly down the boards as he receives it(figure 11.6). The RW who is on the boards rolls over the top ofthe circle and sets up on the far post (the back door) taking thedefender with him. The LW also goes to the net, giving thedefenseman an option to pass to the net at any time. As D1 movesdown the boards, C makes it look as if he is going to the net andthen moves back a couple of steps into a soft area in the high slotand is open for a one-timer pass from D1. The reason C will beopen is that the opposing center will probably go after D1. Thismovement off the face-off creates confusion in coverage for thedefensive team. Figure 11.6
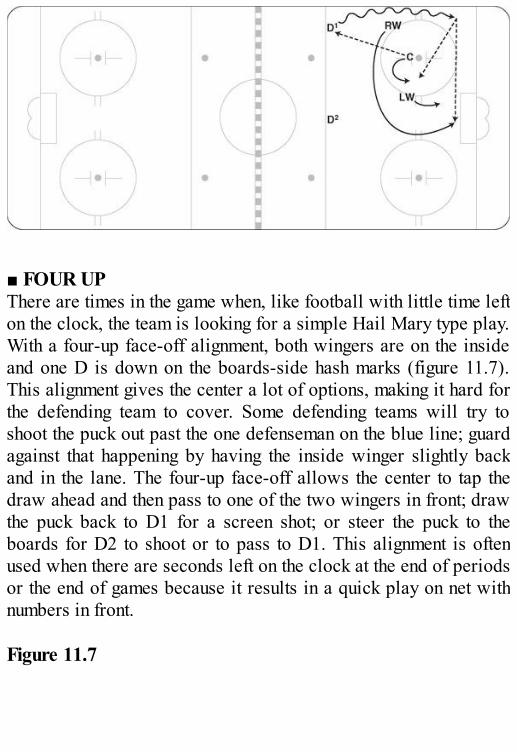
■ FOUR UPThere are times in the game when, like football with little time lefton the clock, the team is looking for a simple Hail Mary type play.With a four-up face-off alignment, both wingers are on the insideand one D is down on the boards-side hash marks (figure 11.7).This alignment gives the center a lot of options, making it hard forthe defending team to cover. Some defending teams will try toshoot the puck out past the one defenseman on the blue line; guardagainst that happening by having the inside winger slightly backand in the lane. The four-up face-off allows the center to tap thedraw ahead and then pass to one of the two wingers in front; drawthe puck back to D1 for a screen shot; or steer the puck to theboards for D2 to shoot or to pass to D1. This alignment is oftenused when there are seconds left on the clock at the end of periodsor the end of games because it results in a quick play on net withnumbers in front. Figure 11.7
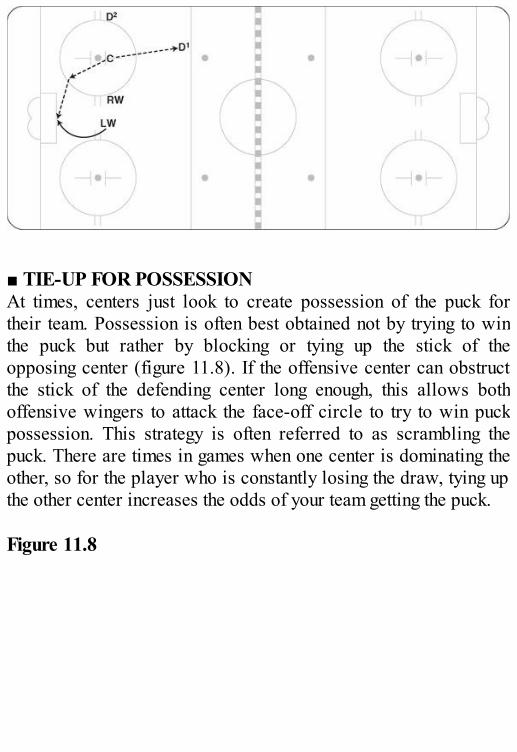
■ TIE-UP FOR POSSESSIONAt times, centers just look to create possession of the puck fortheir team. Possession is often best obtained not by trying to winthe puck but rather by blocking or tying up the stick of theopposing center (figure 11.8). If the offensive center can obstructthe stick of the defending center long enough, this allows bothoffensive wingers to attack the face-off circle to try to win puckpossession. This strategy is often referred to as scrambling thepuck. There are times in games when one center is dominating theother, so for the player who is constantly losing the draw, tying upthe other center increases the odds of your team getting the puck. Figure 11.8
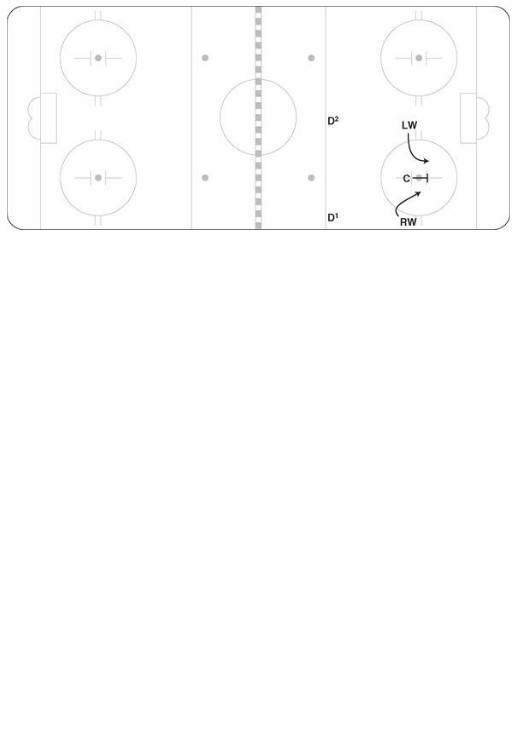
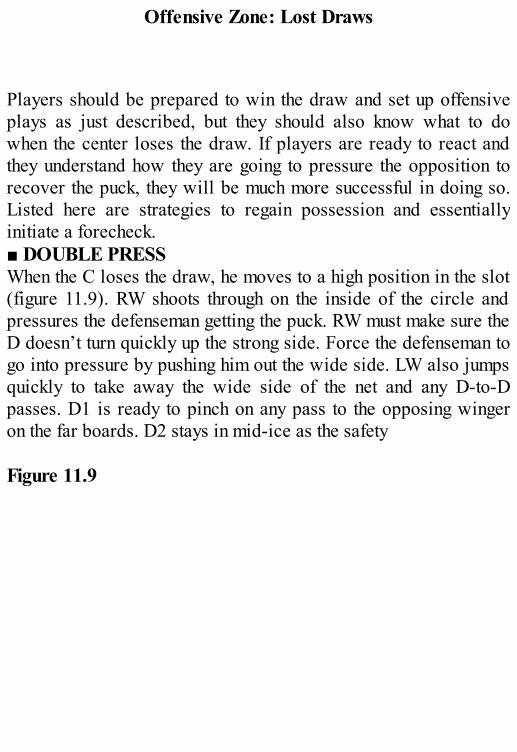
Offensive Zone: Lost Draws
Players should be prepared to win the draw and set up offensiveplays as just described, but they should also know what to dowhen the center loses the draw. If players are ready to react andthey understand how they are going to pressure the opposition torecover the puck, they will be much more successful in doing so.Listed here are strategies to regain possession and essentiallyinitiate a forecheck.■ DOUBLE PRESSWhen the C loses the draw, he moves to a high position in the slot(figure 11.9). RW shoots through on the inside of the circle andpressures the defenseman getting the puck. RW must make sure theD doesn’t turn quickly up the strong side. Force the defenseman togo into pressure by pushing him out the wide side. LW also jumpsquickly to take away the wide side of the net and any D-to-Dpasses. D1 is ready to pinch on any pass to the opposing wingeron the far boards. D2 stays in mid-ice as the safety Figure 11.9

■ 1-2-2 FORCEOn the lost draw, RW pressures hard into the corner, forcing thedefenseman around the net or to pass to his partner (figure 11.10).On any D-to-D passes, RW moves across either behind or in frontof the net and forces. C is ready to take away plays up the rightboards and takes away the mid-ice seam as the puck moves to thewide side. LW takes away the far boards. D1 and D2 stay in mid-ice and react to any passes up the middle. Figure 11.10

Neutral Zone Face-Offs
At one time, many coaches gave little thought to draws in theneutral zone, especially European coaches. Their feeling wasthat they were not important and didn’t lead to anything. Mosttimes their players would line up and halfheartedly take thedraw. Now almost all coaches realize the importance ofwinning the face-off and gaining puck possession. As a resultof the change in emphasis on neutral zone draws, many newstrategies have evolved to create a quick attack off this face-off or to apply forechecking pressure when the draw is lost.
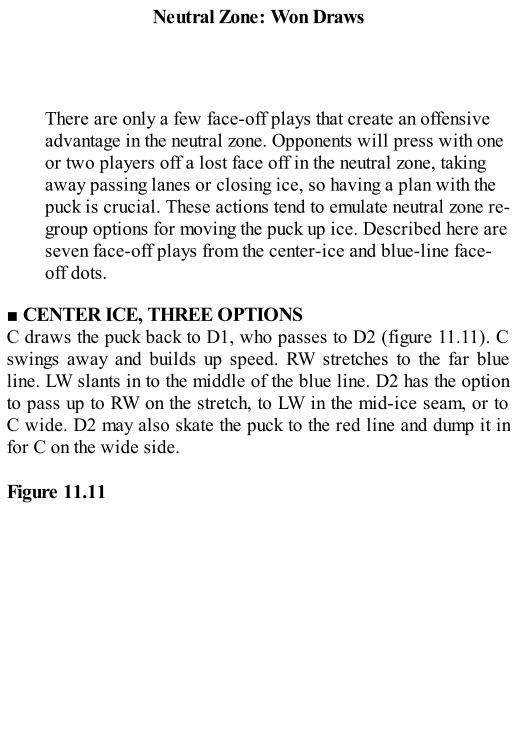
Neutral Zone: Won Draws
There are only a few face-off plays that create an offensiveadvantage in the neutral zone. Opponents will press with oneor two players off a lost face off in the neutral zone, takingaway passing lanes or closing ice, so having a plan with thepuck is crucial. These actions tend to emulate neutral zone re-group options for moving the puck up ice. Described here areseven face-off plays from the center-ice and blue-line face-off dots.
■ CENTER ICE, THREE OPTIONSC draws the puck back to D1, who passes to D2 (figure 11.11). Cswings away and builds up speed. RW stretches to the far blueline. LW slants in to the middle of the blue line. D2 has the optionto pass up to RW on the stretch, to LW in the mid-ice seam, or toC wide. D2 may also skate the puck to the red line and dump it infor C on the wide side. Figure 11.11
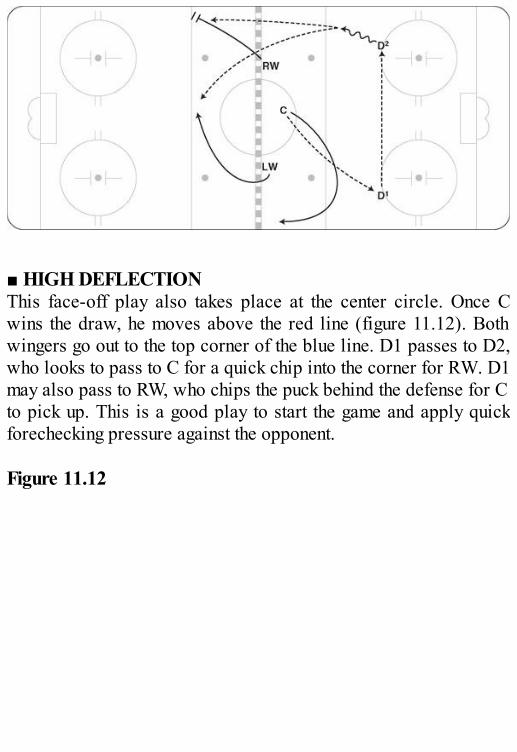
■ HIGH DEFLECTIONThis face-off play also takes place at the center circle. Once Cwins the draw, he moves above the red line (figure 11.12). Bothwingers go out to the top corner of the blue line. D1 passes to D2,who looks to pass to C for a quick chip into the corner for RW. D1may also pass to RW, who chips the puck behind the defense for Cto pick up. This is a good play to start the game and apply quickforechecking pressure against the opponent. Figure 11.12
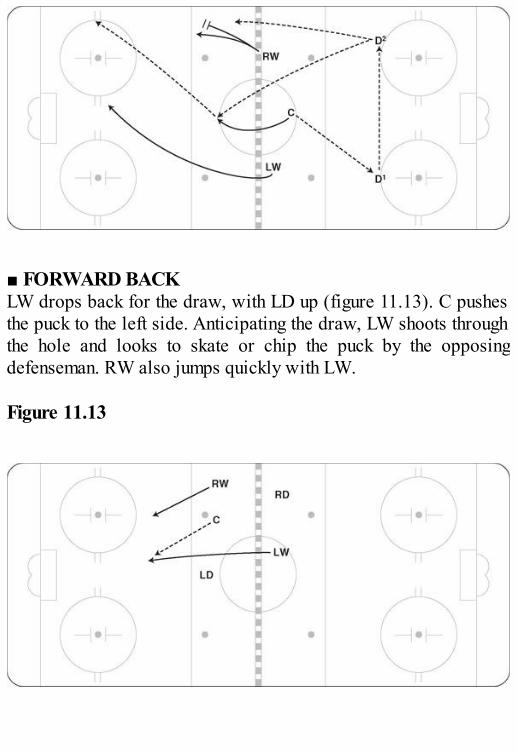
■ FORWARD BACKLW drops back for the draw, with LD up (figure 11.13). C pushesthe puck to the left side. Anticipating the draw, LW shoots throughthe hole and looks to skate or chip the puck by the opposingdefenseman. RW also jumps quickly with LW. Figure 11.13
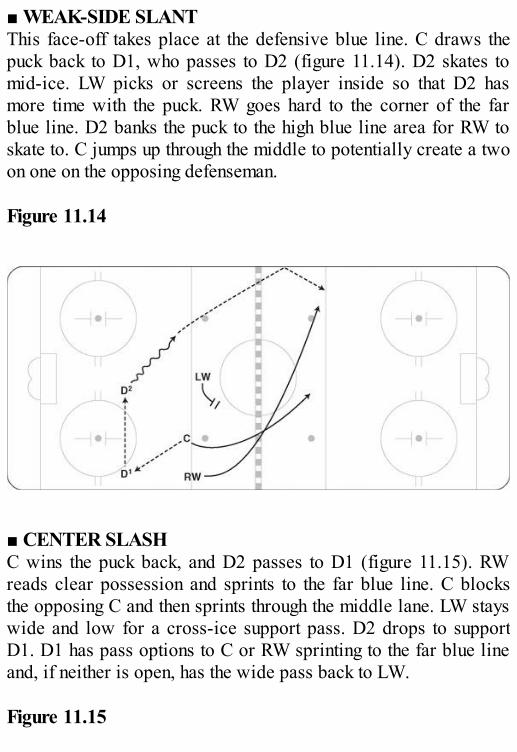
■ WEAK-SIDE SLANTThis face-off takes place at the defensive blue line. C draws thepuck back to D1, who passes to D2 (figure 11.14). D2 skates tomid-ice. LW picks or screens the player inside so that D2 hasmore time with the puck. RW goes hard to the corner of the farblue line. D2 banks the puck to the high blue line area for RW toskate to. C jumps up through the middle to potentially create a twoon one on the opposing defenseman. Figure 11.14
■ CENTER SLASHC wins the puck back, and D2 passes to D1 (figure 11.15). RWreads clear possession and sprints to the far blue line. C blocksthe opposing C and then sprints through the middle lane. LW stayswide and low for a cross-ice support pass. D2 drops to supportD1. D1 has pass options to C or RW sprinting to the far blue lineand, if neither is open, has the wide pass back to LW. Figure 11.15
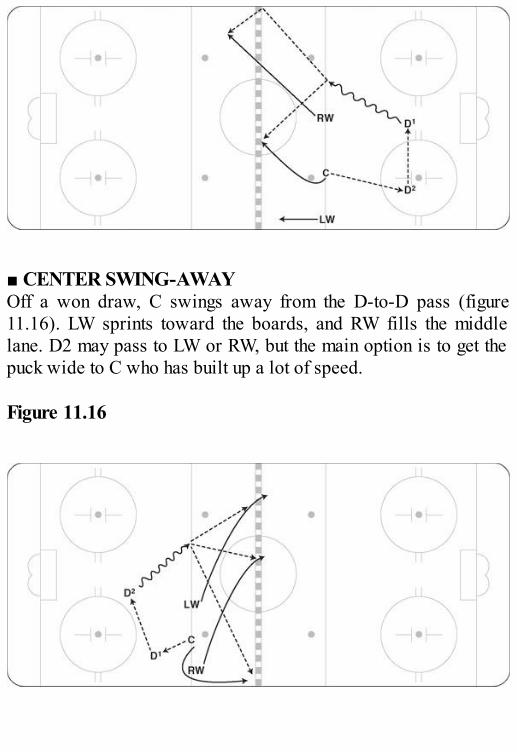
■ CENTER SWING-AWAYOff a won draw, C swings away from the D-to-D pass (figure11.16). LW sprints toward the boards, and RW fills the middlelane. D2 may pass to LW or RW, but the main option is to get thepuck wide to C who has built up a lot of speed. Figure 11.16
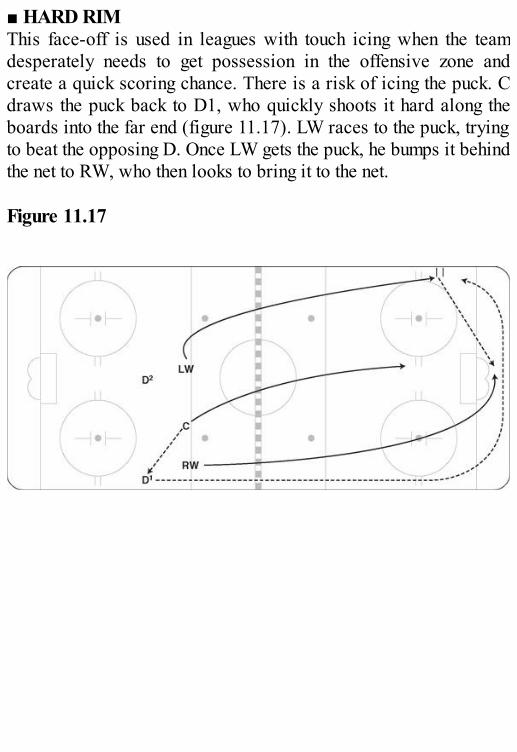
■ HARD RIMThis face-off is used in leagues with touch icing when the teamdesperately needs to get possession in the offensive zone andcreate a quick scoring chance. There is a risk of icing the puck. Cdraws the puck back to D1, who quickly shoots it hard along theboards into the far end (figure 11.17). LW races to the puck, tryingto beat the opposing D. Once LW gets the puck, he bumps it behindthe net to RW, who then looks to bring it to the net. Figure 11.17
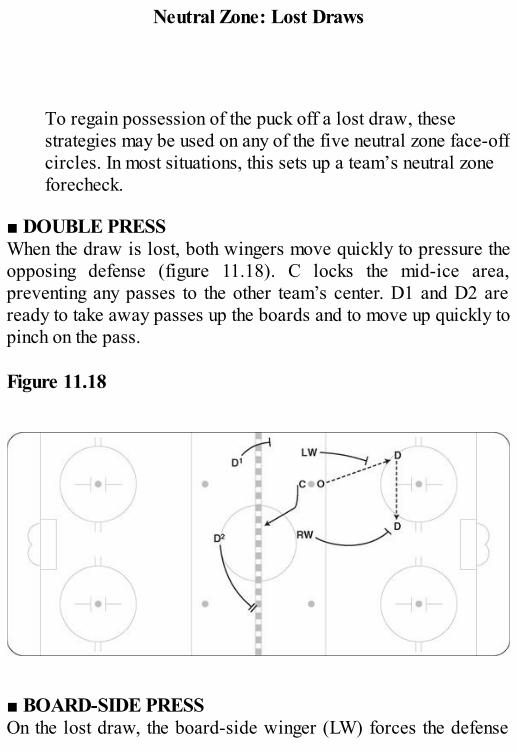
Neutral Zone: Lost Draws
To regain possession of the puck off a lost draw, thesestrategies may be used on any of the five neutral zone face-offcircles. In most situations, this sets up a team’s neutral zoneforecheck.
■ DOUBLE PRESSWhen the draw is lost, both wingers move quickly to pressure theopposing defense (figure 11.18). C locks the mid-ice area,preventing any passes to the other team’s center. D1 and D2 areready to take away passes up the boards and to move up quickly topinch on the pass. Figure 11.18
■ BOARD-SIDE PRESSOn the lost draw, the board-side winger (LW) forces the defense
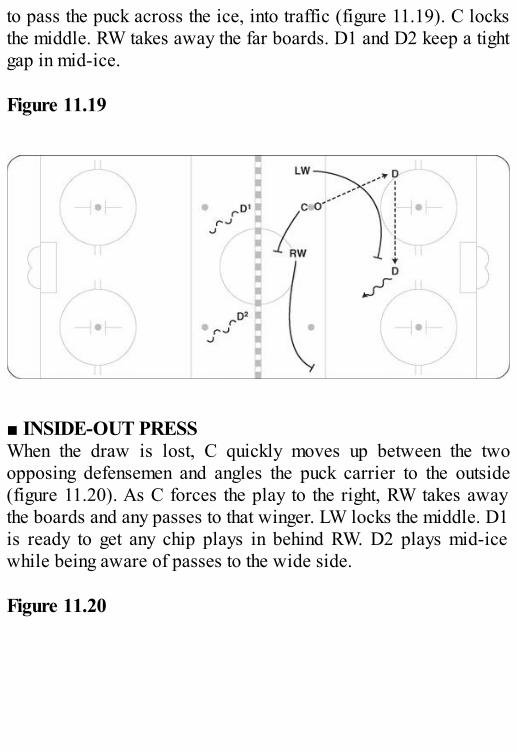
to pass the puck across the ice, into traffic (figure 11.19). C locksthe middle. RW takes away the far boards. D1 and D2 keep a tightgap in mid-ice. Figure 11.19
■ INSIDE-OUT PRESSWhen the draw is lost, C quickly moves up between the twoopposing defensemen and angles the puck carrier to the outside(figure 11.20). As C forces the play to the right, RW takes awaythe boards and any passes to that winger. LW locks the middle. D1is ready to get any chip plays in behind RW. D2 plays mid-icewhile being aware of passes to the wide side. Figure 11.20
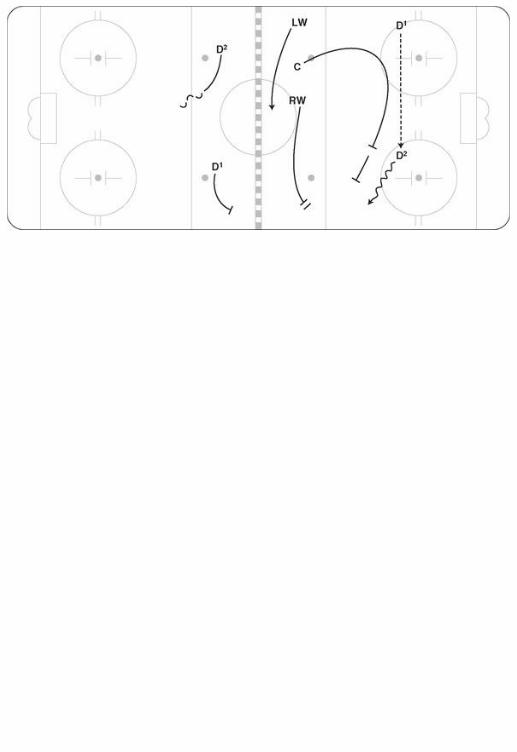

Defensive Zone Face-Offs
Winning a face-off in the defensive zone results in anopportunity to break the puck out and go on the attack. Losingthe face-off in the defensive zone forces a team to defend andessentially go into defensive zone coverage until a turnoverhappens. We discuss both situations and provide strategiesfor each.
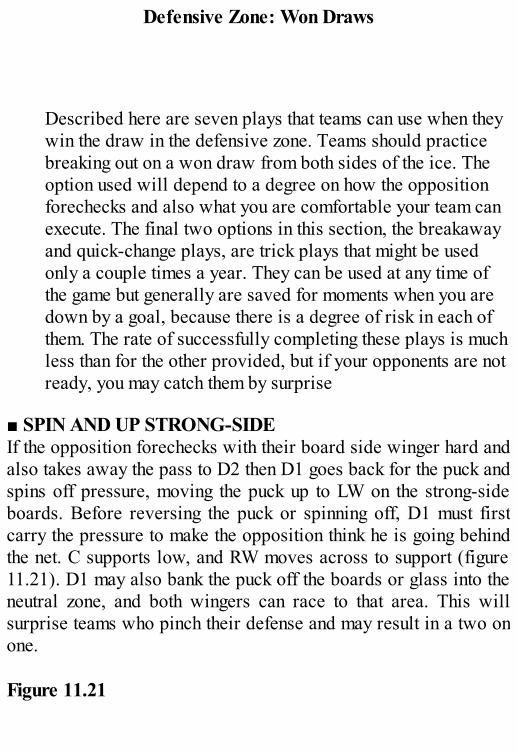
Defensive Zone: Won Draws
Described here are seven plays that teams can use when theywin the draw in the defensive zone. Teams should practicebreaking out on a won draw from both sides of the ice. Theoption used will depend to a degree on how the oppositionforechecks and also what you are comfortable your team canexecute. The final two options in this section, the breakawayand quick-change plays, are trick plays that might be usedonly a couple times a year. They can be used at any time ofthe game but generally are saved for moments when you aredown by a goal, because there is a degree of risk in each ofthem. The rate of successfully completing these plays is muchless than for the other provided, but if your opponents are notready, you may catch them by surprise
■ SPIN AND UP STRONG-SIDEIf the opposition forechecks with their board side winger hard andalso takes away the pass to D2 then D1 goes back for the puck andspins off pressure, moving the puck up to LW on the strong-sideboards. Before reversing the puck or spinning off, D1 must firstcarry the pressure to make the opposition think he is going behindthe net. C supports low, and RW moves across to support (figure11.21). D1 may also bank the puck off the boards or glass into theneutral zone, and both wingers can race to that area. This willsurprise teams who pinch their defense and may result in a two onone. Figure 11.21
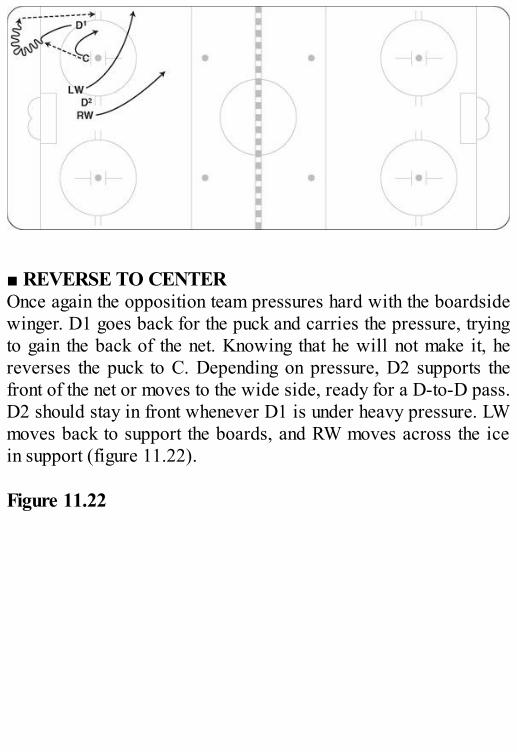
■ REVERSE TO CENTEROnce again the opposition team pressures hard with the boardsidewinger. D1 goes back for the puck and carries the pressure, tryingto gain the back of the net. Knowing that he will not make it, hereverses the puck to C. Depending on pressure, D2 supports thefront of the net or moves to the wide side, ready for a D-to-D pass.D2 should stay in front whenever D1 is under heavy pressure. LWmoves back to support the boards, and RW moves across the icein support (figure 11.22). Figure 11.22
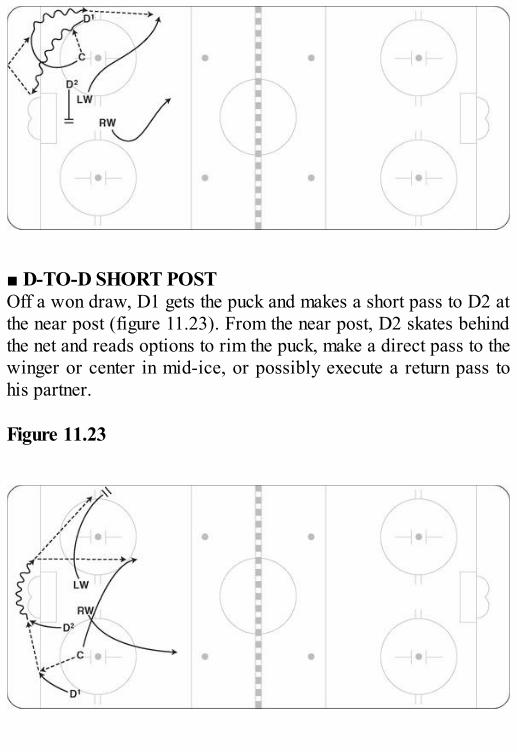
■ D-TO-D SHORT POSTOff a won draw, D1 gets the puck and makes a short pass to D2 atthe near post (figure 11.23). From the near post, D2 skates behindthe net and reads options to rim the puck, make a direct pass to thewinger or center in mid-ice, or possibly execute a return pass tohis partner. Figure 11.23
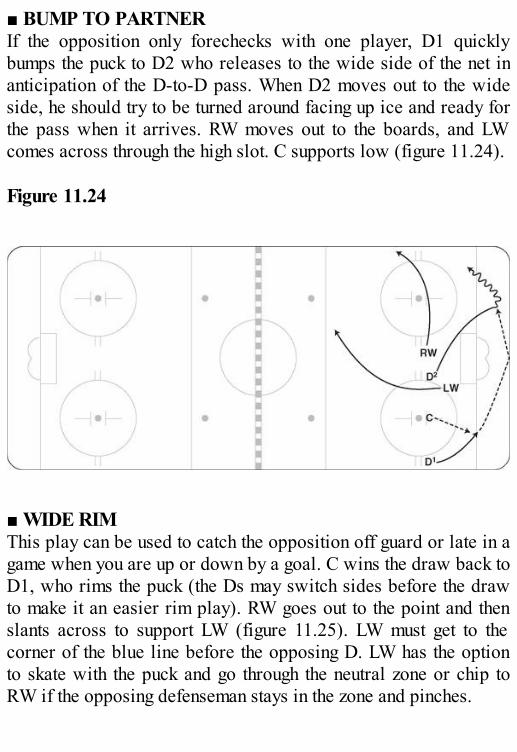
■ BUMP TO PARTNERIf the opposition only forechecks with one player, D1 quicklybumps the puck to D2 who releases to the wide side of the net inanticipation of the D-to-D pass. When D2 moves out to the wideside, he should try to be turned around facing up ice and ready forthe pass when it arrives. RW moves out to the boards, and LWcomes across through the high slot. C supports low (figure 11.24). Figure 11.24
■ WIDE RIMThis play can be used to catch the opposition off guard or late in agame when you are up or down by a goal. C wins the draw back toD1, who rims the puck (the Ds may switch sides before the drawto make it an easier rim play). RW goes out to the point and thenslants across to support LW (figure 11.25). LW must get to thecorner of the blue line before the opposing D. LW has the optionto skate with the puck and go through the neutral zone or chip toRW if the opposing defenseman stays in the zone and pinches.
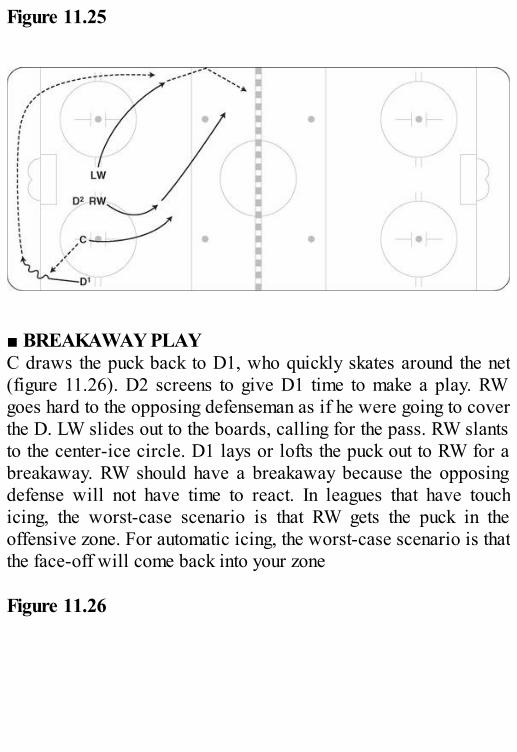
Figure 11.25
■ BREAKAWAY PLAYC draws the puck back to D1, who quickly skates around the net(figure 11.26). D2 screens to give D1 time to make a play. RWgoes hard to the opposing defenseman as if he were going to coverthe D. LW slides out to the boards, calling for the pass. RW slantsto the center-ice circle. D1 lays or lofts the puck out to RW for abreakaway. RW should have a breakaway because the opposingdefense will not have time to react. In leagues that have touchicing, the worst-case scenario is that RW gets the puck in theoffensive zone. For automatic icing, the worst-case scenario is thatthe face-off will come back into your zone Figure 11.26
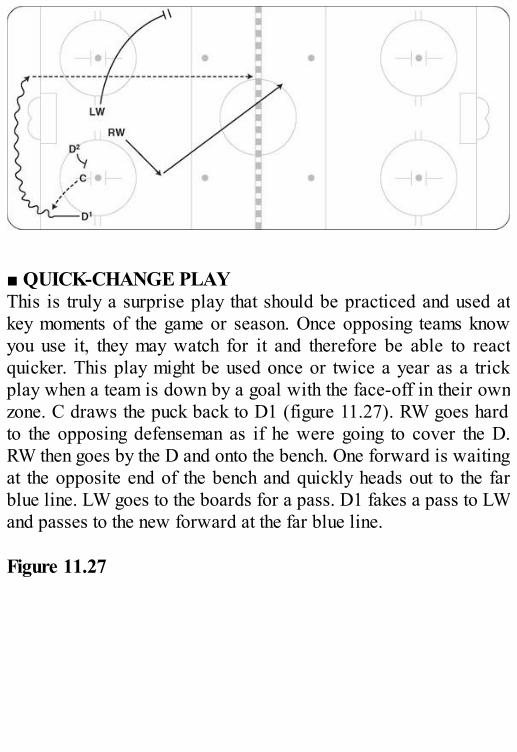
■ QUICK-CHANGE PLAYThis is truly a surprise play that should be practiced and used atkey moments of the game or season. Once opposing teams knowyou use it, they may watch for it and therefore be able to reactquicker. This play might be used once or twice a year as a trickplay when a team is down by a goal with the face-off in their ownzone. C draws the puck back to D1 (figure 11.27). RW goes hardto the opposing defenseman as if he were going to cover the D.RW then goes by the D and onto the bench. One forward is waitingat the opposite end of the bench and quickly heads out to the farblue line. LW goes to the boards for a pass. D1 fakes a pass to LWand passes to the new forward at the far blue line. Figure 11.27
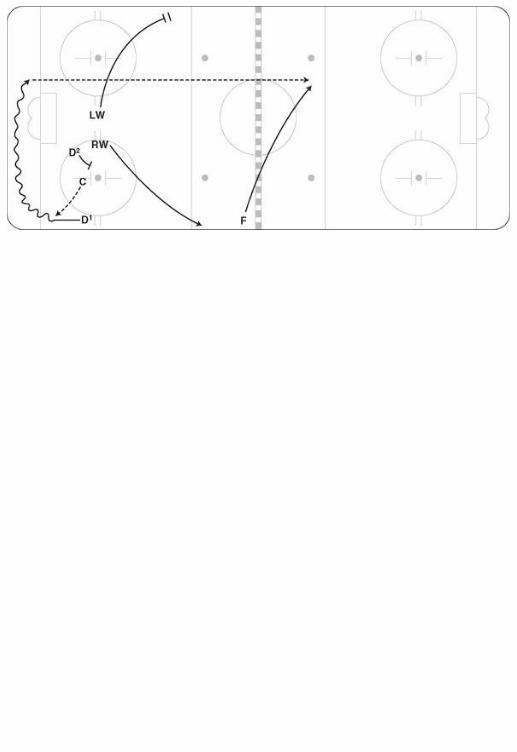
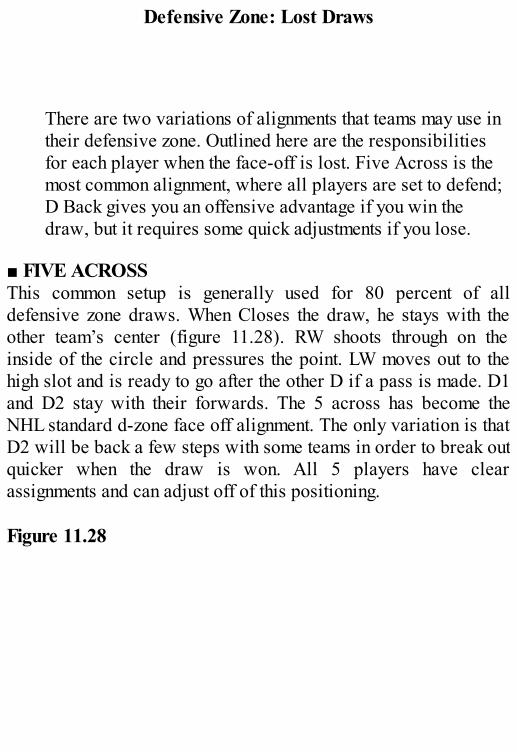
Defensive Zone: Lost Draws
There are two variations of alignments that teams may use intheir defensive zone. Outlined here are the responsibilitiesfor each player when the face-off is lost. Five Across is themost common alignment, where all players are set to defend;D Back gives you an offensive advantage if you win thedraw, but it requires some quick adjustments if you lose.
■ FIVE ACROSSThis common setup is generally used for 80 percent of alldefensive zone draws. When Closes the draw, he stays with theother team’s center (figure 11.28). RW shoots through on theinside of the circle and pressures the point. LW moves out to thehigh slot and is ready to go after the other D if a pass is made. D1and D2 stay with their forwards. The 5 across has become theNHL standard d-zone face off alignment. The only variation is thatD2 will be back a few steps with some teams in order to break outquicker when the draw is won. All 5 players have clearassignments and can adjust off of this positioning. Figure 11.28
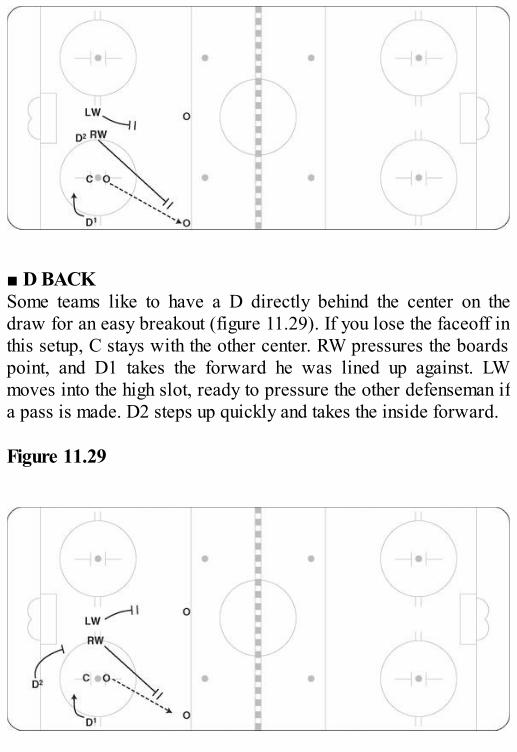
■ D BACKSome teams like to have a D directly behind the center on thedraw for an easy breakout (figure 11.29). If you lose the faceoff inthis setup, C stays with the other center. RW pressures the boardspoint, and D1 takes the forward he was lined up against. LWmoves into the high slot, ready to pressure the other defenseman ifa pass is made. D2 steps up quickly and takes the inside forward. Figure 11.29

Power-Play Face-Offs
It is very important to win or tie up and get possession onpower-play draws. If the other team clears the puck, itgenerally takes the players 20 seconds to get set up again.This is both frustrating and tiring for the power-play unit.Described here are three ways to get possession and set up.Players and coaches should also try to recognize what thepenalty-killing unit is trying to do if they win the draw—bydoing so you may be able to regain possession even thoughthe draw was lost.
■ TRADITIONAL ALIGNMENTWhen C wins or ties up on the draw, both wingers move in to pushthe puck back to the Ds. On lost draws, RW shoots through to thecorner and puts pressure on the opposing D. LW takes away the D-to-D penalty-kill clear or assists RW in the corner. C reacts toapply pressure and support RW and LW (figure 11.30). Althoughyou would like to win all draws because it is so critical to getpossession on the power play, you may want to tell the center totie up his opponent and allow the wingers to help out. The odds ofgetting possession are better. Figure 11.30
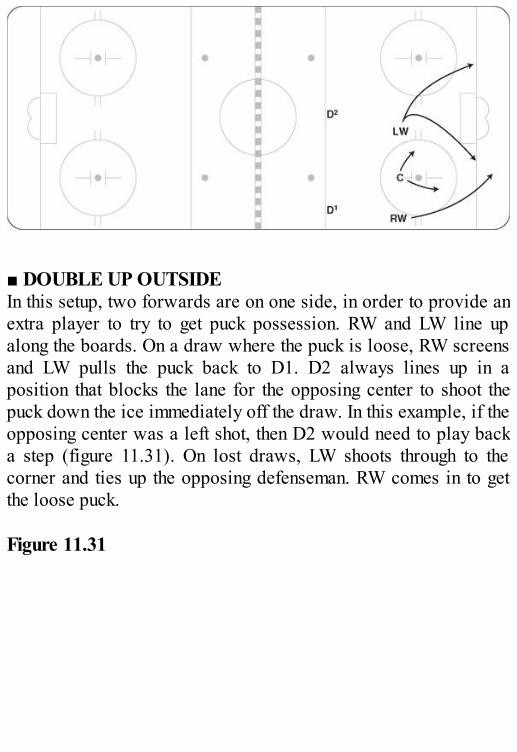
■ DOUBLE UP OUTSIDEIn this setup, two forwards are on one side, in order to provide anextra player to try to get puck possession. RW and LW line upalong the boards. On a draw where the puck is loose, RW screensand LW pulls the puck back to D1. D2 always lines up in aposition that blocks the lane for the opposing center to shoot thepuck down the ice immediately off the draw. In this example, if theopposing center was a left shot, then D2 would need to play backa step (figure 11.31). On lost draws, LW shoots through to thecorner and ties up the opposing defenseman. RW comes in to getthe loose puck. Figure 11.31
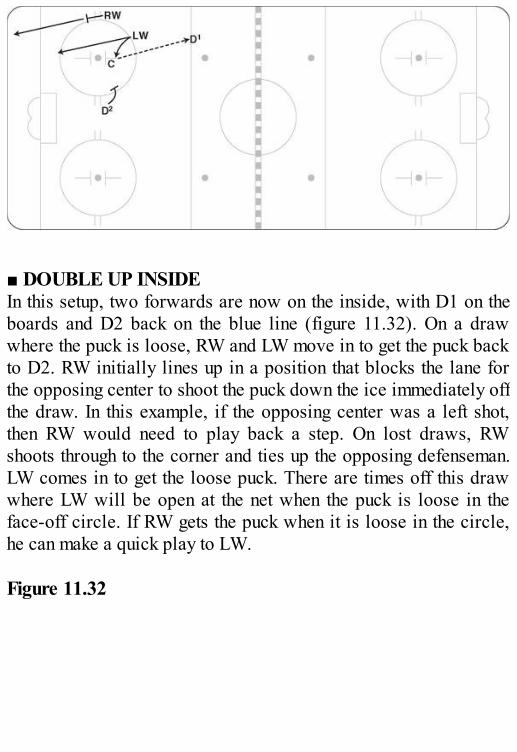
■ DOUBLE UP INSIDEIn this setup, two forwards are now on the inside, with D1 on theboards and D2 back on the blue line (figure 11.32). On a drawwhere the puck is loose, RW and LW move in to get the puck backto D2. RW initially lines up in a position that blocks the lane forthe opposing center to shoot the puck down the ice immediately offthe draw. In this example, if the opposing center was a left shot,then RW would need to play back a step. On lost draws, RWshoots through to the corner and ties up the opposing defenseman.LW comes in to get the loose puck. There are times off this drawwhere LW will be open at the net when the puck is loose in theface-off circle. If RW gets the puck when it is loose in the circle,he can make a quick play to LW. Figure 11.32
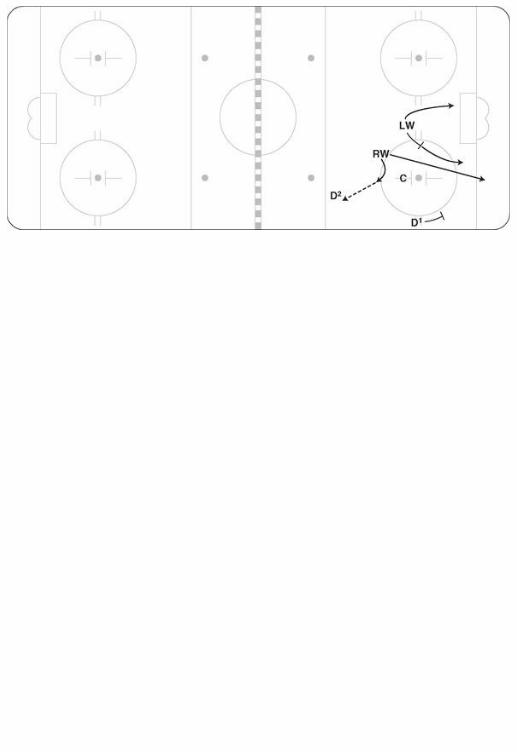
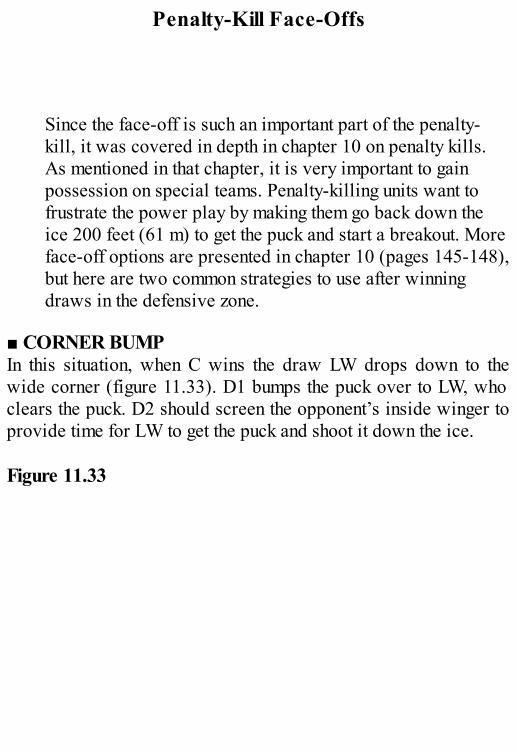
Penalty-Kill Face-Offs
Since the face-off is such an important part of the penalty-kill, it was covered in depth in chapter 10 on penalty kills.As mentioned in that chapter, it is very important to gainpossession on special teams. Penalty-killing units want tofrustrate the power play by making them go back down theice 200 feet (61 m) to get the puck and start a breakout. Moreface-off options are presented in chapter 10 (pages 145-148),but here are two common strategies to use after winningdraws in the defensive zone.
■ CORNER BUMPIn this situation, when C wins the draw LW drops down to thewide corner (figure 11.33). D1 bumps the puck over to LW, whoclears the puck. D2 should screen the opponent’s inside winger toprovide time for LW to get the puck and shoot it down the ice. Figure 11.33
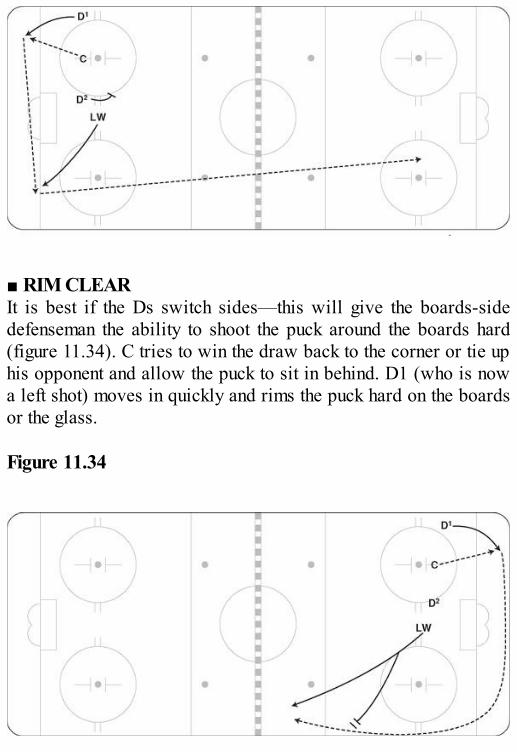
■ RIM CLEARIt is best if the Ds switch sides—this will give the boards-sidedefenseman the ability to shoot the puck around the boards hard(figure 11.34). C tries to win the draw back to the corner or tie uphis opponent and allow the puck to sit in behind. D1 (who is nowa left shot) moves in quickly and rims the puck hard on the boardsor the glass. Figure 11.34

Special Face-Off Situations
In this section, we cover face-off strategies for four-on-fourplay and late-game pulled goaltender situations. Althoughthere aren’t as many four-on-four face-offs in a game, it isimportant that the team be prepared—especially withovertime at most levels using four-on-four play to decide thegame. Pulled goaltender situations also don’t happen often,but they are very critical for getting that tying goal.
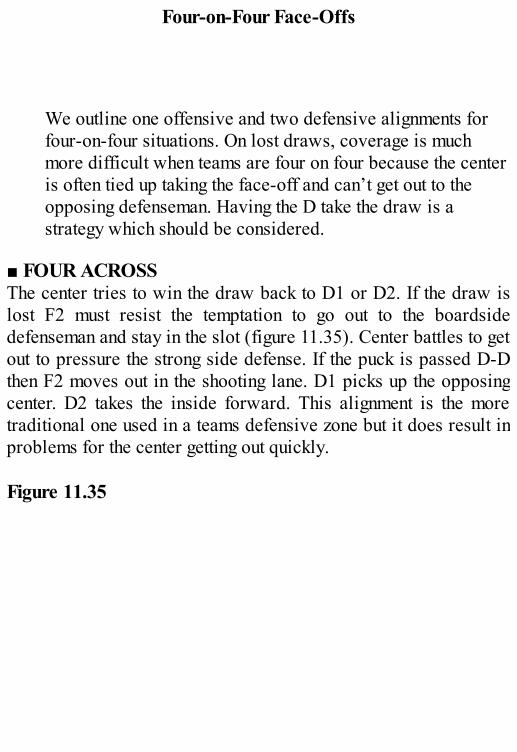
Four-on-Four Face-Offs
We outline one offensive and two defensive alignments forfour-on-four situations. On lost draws, coverage is muchmore difficult when teams are four on four because the centeris often tied up taking the face-off and can’t get out to theopposing defenseman. Having the D take the draw is astrategy which should be considered.
■ FOUR ACROSSThe center tries to win the draw back to D1 or D2. If the draw islost F2 must resist the temptation to go out to the boardsidedefenseman and stay in the slot (figure 11.35). Center battles to getout to pressure the strong side defense. If the puck is passed D-Dthen F2 moves out in the shooting lane. D1 picks up the opposingcenter. D2 takes the inside forward. This alignment is the moretraditional one used in a teams defensive zone but it does result inproblems for the center getting out quickly. Figure 11.35
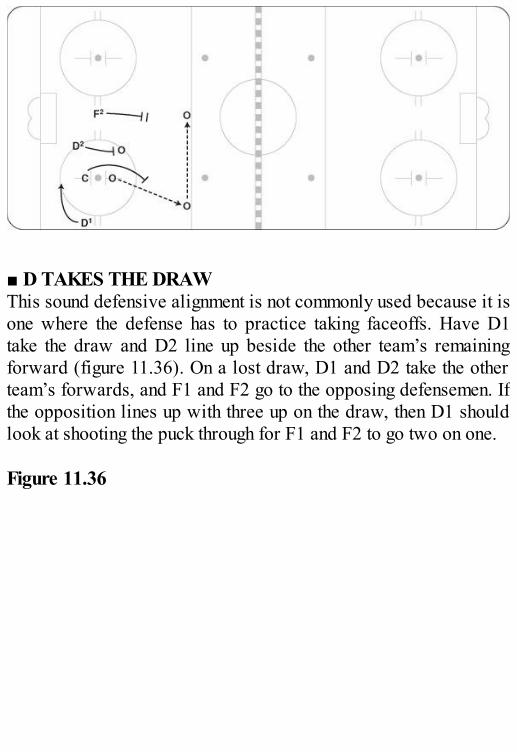
■ D TAKES THE DRAWThis sound defensive alignment is not commonly used because it isone where the defense has to practice taking faceoffs. Have D1take the draw and D2 line up beside the other team’s remainingforward (figure 11.36). On a lost draw, D1 and D2 take the otherteam’s forwards, and F1 and F2 go to the opposing defensemen. Ifthe opposition lines up with three up on the draw, then D1 shouldlook at shooting the puck through for F1 and F2 to go two on one. Figure 11.36
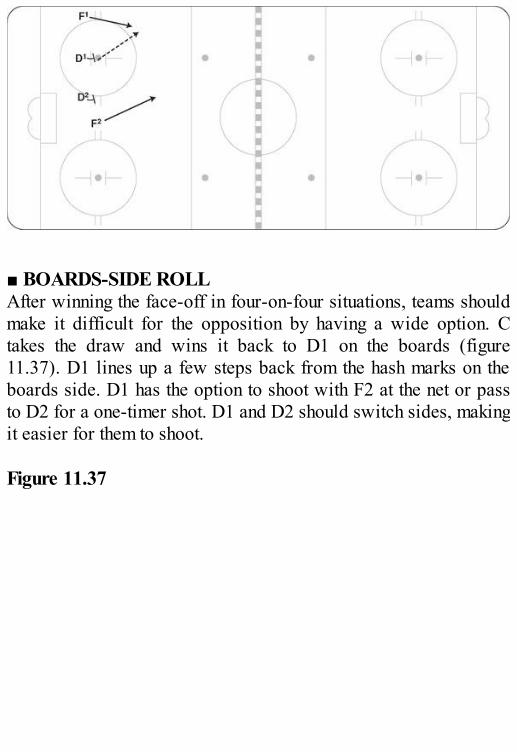
■ BOARDS-SIDE ROLLAfter winning the face-off in four-on-four situations, teams shouldmake it difficult for the opposition by having a wide option. Ctakes the draw and wins it back to D1 on the boards (figure11.37). D1 lines up a few steps back from the hash marks on theboards side. D1 has the option to shoot with F2 at the net or passto D2 for a one-timer shot. D1 and D2 should switch sides, makingit easier for them to shoot. Figure 11.37
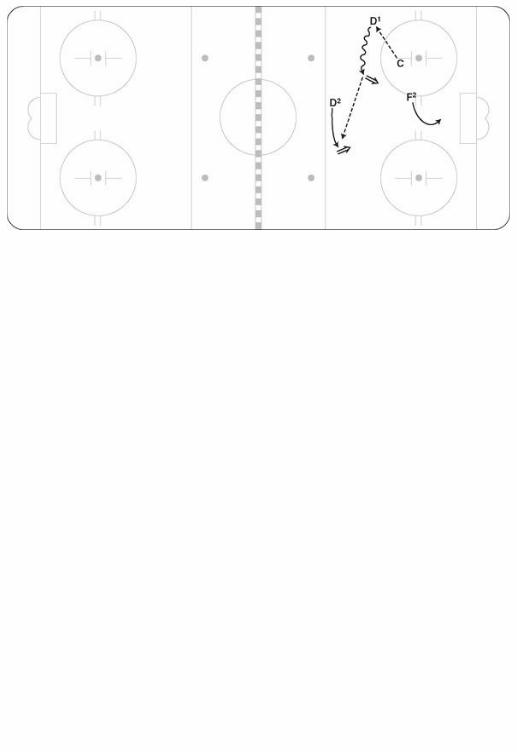
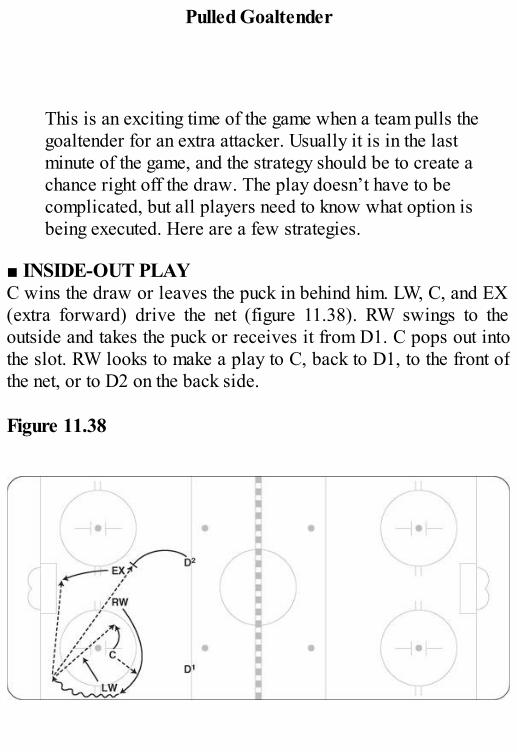
Pulled Goaltender
This is an exciting time of the game when a team pulls thegoaltender for an extra attacker. Usually it is in the lastminute of the game, and the strategy should be to create achance right off the draw. The play doesn’t have to becomplicated, but all players need to know what option isbeing executed. Here are a few strategies.
■ INSIDE-OUT PLAYC wins the draw or leaves the puck in behind him. LW, C, and EX(extra forward) drive the net (figure 11.38). RW swings to theoutside and takes the puck or receives it from D1. C pops out intothe slot. RW looks to make a play to C, back to D1, to the front ofthe net, or to D2 on the back side. Figure 11.38
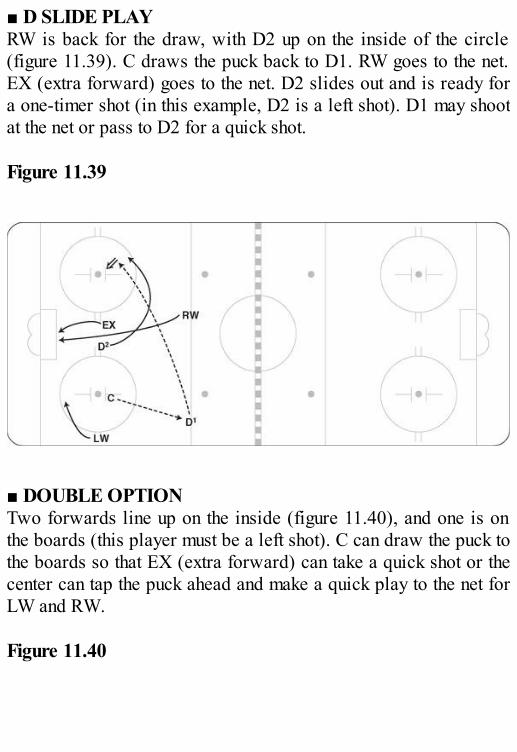
■ D SLIDE PLAYRW is back for the draw, with D2 up on the inside of the circle(figure 11.39). C draws the puck back to D1. RW goes to the net.EX (extra forward) goes to the net. D2 slides out and is ready fora one-timer shot (in this example, D2 is a left shot). D1 may shootat the net or pass to D2 for a quick shot. Figure 11.39
■ DOUBLE OPTIONTwo forwards line up on the inside (figure 11.40), and one is onthe boards (this player must be a left shot). C can draw the puck tothe boards so that EX (extra forward) can take a quick shot or thecenter can tap the puck ahead and make a quick play to the net forLW and RW. Figure 11.40
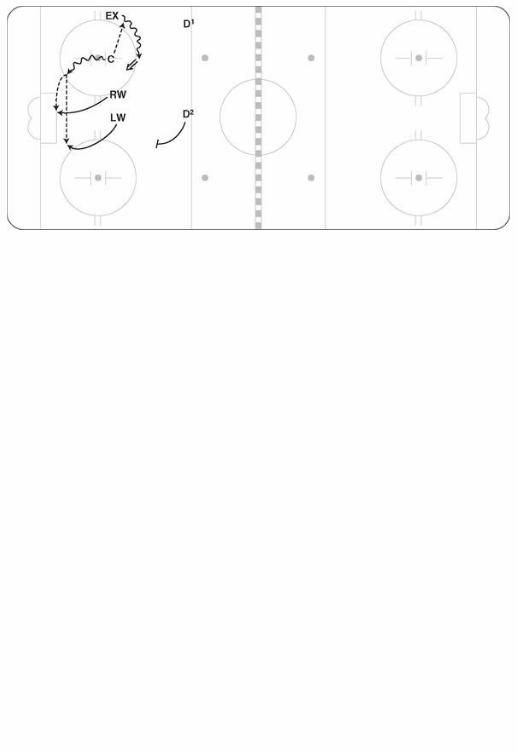
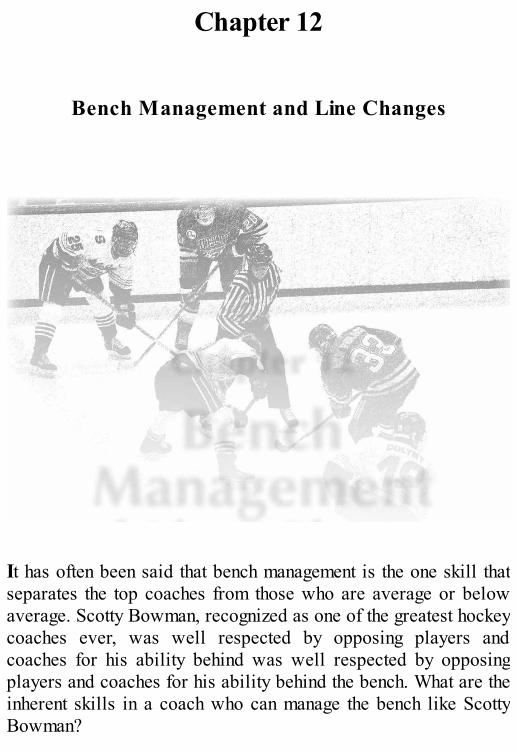
Chapter 12
Bench Management and Line Changes
It has often been said that bench management is the one skill thatseparates the top coaches from those who are average or belowaverage. Scotty Bowman, recognized as one of the greatest hockeycoaches ever, was well respected by opposing players andcoaches for his ability behind was well respected by opposingplayers and coaches for his ability behind the bench. What are theinherent skills in a coach who can manage the bench like ScottyBowman?
The great coaches and players all have in common the ability to“see the ice.” They have the unique ability to slow the game down—they see things at a controlled pace and rarely miss anything thathappens on the ice. After the game is over (and for some coaches,even years after the game was played), they can recall certainmoments clearly. To see the ice with the best, a coach must focuson the game at all times. Don’t get distracted by what is happeningon the bench or irrelevant things happening on the ice. Stay inemotional control. Stay in the moment. You should always belooking for the one adjustment that will give your team theadvantage.
A major aspect of being a great coach is being prepared beforethe game starts. Know everything you can about the opponent. Whoare their top players, who are their weaker players, and what arethe tendencies of both? Statistically, is there anything revealing asfar as team or individual tendencies? What is their coach like?Does he match lines or shorten his bench? What is his trademarkstyle of play? For example, if you know the opposing coach likesto match lines, then you try to make it hard for him to get the rightmatch. Change on the fly, switch the rotation of your lines (insteadof 1-2-3, go 1-2-1-3), or move your top players from line to line.These are all ways to get away from a strong match.
It is important to study the opponent thoroughly; watch them onvideo if possible, or seek out people who have watched themplay. Have a friend or staff member pre-scout them. Ultimately,you want to provide your team with five or six key points based onwhat you know about the other team. Players will realize that theiropportunity for success lies in their ability to execute these points.
Managing Staff
Make sure your staff on the bench know their roles andresponsibilities during the game. If you have two assistants on thebench, you should have one coach changing the defense and theother coach providing feedback to the players and to you. Mosthead coaches run the forward group but there are still a few wholike to run the whole bench. Whatever your preference as a coachmake sure you instruct your assistants on what you want them towatch for or do. Do you want them to watch for key opposingplayers, watch for tactical adjustments to make, evaluate yourplayers, or take statistical information? Make sure there is a rinkboard handy to draw any special plays or for teaching purposes.
Because most games are very hectic and fast paced, it isimportant to give the players feedback, but it must be concise andspecific. The type of feedback players need from assistant coachesshould be centered on playing your system or how to react to whatthe other team is doing. The head coach can provide feedback oneffort, work, discipline and game plan details. Assistant coachescan give descriptive feedback to the players during the play, whilethe head coach should make sure their dialogue is to the point sotheir focus never strays from the ice surface. It is important tobalance constructive with positive feedback, and at all timeseveryone on the bench should control their emotions. Sometimescoaches would rather wait until after the game to providefeedback, but if the dialogue is short and to the point, you can takeadvantage of great teaching opportunities on the bench.
Designate which coach will oversee special teams and face-offplays. With most teams special team responsibilities are dividedup between both assistants or one assistant and the head coach. Itwill be important to have one coach in charge of faceoffs and
prepared for any special faceoff situations. The most importantbeing pulled goaltender situations. Whether you on the offensiveor defensive side in the last minute or two when the goaltender ispulled the team needs to know what to do and who is providingthe direction.
In addition, make sure the trainer and equipment manager (if youare fortunate to have both) know their responsibilities. Trainersare mainly there to take care of injuries and make sure the playersare hydrated, but they may also keep track of shifts, time the lengthof shifts, watch for which players are coming out on the otherteam, and record shots. The equipment person must be available toget sticks when they are broken, sharpen skates, and take care ofany equipment problems.
Dealing With Officials
Find out before the game who the officials are and if possiblewhat they are like with regard to calling penalties and receivingfeedback. Most refs have a style of calling the game—find outwhether they are strict or are inclined to let more go. Once youknow this you can prepare the team for what may be called in thegame. If you ever challenge a referee, make sure you do it withrespect, and above all, know the rules. Over time, coaches whocontrol their emotions, talk to the referees when it is necessary,and cut them some slack on missed calls generally get more of thebreaks in the end. Remember, it is a fast-paced game and there is alot going on between the 10 skaters, so there will be times whenthe officials miss something or make the wrong call. Far too oftennow, with the use of video, coaches and managers will look at thegame and wonder how the ref made the call that he did—but this isafter watching the play several times and maybe in slow motion.Once again, treat officials with respect and you will get respect inreturn.
Adjusting Your Playing Strategy
First make sure your team is confident in how they have to play tobe successful. Your team trademarks should never be altered, butoften during the game certain system changes must be made. Again,when to do this and what adjustments to make fall under thecategory of the art of coaching. The ability to make these decisionscomes with experience. If the other team has prepared well and isbeating your forecheck with a certain breakout play, then you aregoing to have to make an adjustment. Often it will be a subtleadjustment; rarely will it be a total switch to another forecheckingsystem. The one area where most adjustments are made is onspecial teams. Again, because of how prepared opposing teamsare, especially in this area, you may be constantly tweaking yourpower play or penalty kill or making players aware of what theirreads should be.
Managing Lines
Before the game, all coaches have to decide whether they aregoing to match lines and defensive pairs or play whomever theywant and let the other team worry about deciding to match.Coaches have different philosophies on matching, with some notwanting to match at all while others want a hard match. Theadvantages of matching are that you get to put your forwards ordefense against players on the other team whom you know theywill have success against. For example, it will be difficult for theother team’s top offensive players to generate any type of attack ifyou always have your top defensive players on the ice. Or youmay choose to play your top offensive unit head to head against theother team’s top unit, thinking that this will challenge your groupto play two-way hockey as well as keep them away from thechecking unit. Many matching variations can take place in a game,with the most common being matching up your defensemen againstthe line they will have the most success against. It is much easierto change one or two defensemen during the play to get your matchthan it is to change a forward line.
The disadvantage of matching is that it disrupts the flow fromyour bench. Players are constantly changing quickly to maintain thematchups, and there is no rhythm from the bench as when the linesgo out 1-2-3. Sometimes it results in a penalty for too many menon the ice because of the constant changing on the fly. With strictmatching teams, the checking line will often play a bigger role andbe on the ice more than the offensive units. This is another reasonwhy some coaches don’t like a hard match.
Make timely decisions about adjusting your lineup. This is theart of coaching, where you trust your instincts and switch linecombinations, adjust defensive pairs, or pull the goaltender when
you see these players struggling or the team not playing well.Sometimes the best decision is not making a change and letting theplayers work their way through it. For most coaches, the ability tomake the right change comes with experience and also being ableto get a read on your players early in the game. You also have toknow the personalities of your players. Challenge your athletes,and allow them time to respond before making a change.
Line Changes
Unlike other sports, in the game of hockey, players change on thefly roughly every 40 seconds. It is the coach’s job to decide whatline is up and the players’ job to be ready, but there is a lot moreto this coordinated effort.
Hockey games have an ebb and flow woven within their oftenback and forth movement. One of the undercurrents of any game isdeveloped by the way a team changes its players and shares its icetime. Momentum is the cornerstone of most success, and thereforemomentum must be developed and sustained. Much of hockey’smomentum comes through effective line changes. Some coacheslike to turnover all 4 lines as much as possible and keep tempofrom the bench and try to get a contribution from everyone. Otherslike to flavor their games with much more ice-time for theiroffensively gifted players and as a result play them a lot more thanthe other players.
How coaches like to change players and match certain lines isoften more of an art than a science. Certain coaches like to match adefensive line against the opponent’s offensive line, but the by-product of this course of action is often less ice time for their ownoffensive players. Some coaches like to turn over all four lines asmuch as possible, and others like to flavor their games with muchmore ice time for their offensively gifted players.
Whatever their personal preference, most coaches agree on anumber of principles that set at least the ground rules forsuccessful line changes and the momentum they can generate. Let’slook at the fundamentals of line changes in the game of hockey.
Make changes while attacking the opponent ratherthan on the retreat or on the backcheck. Making sure
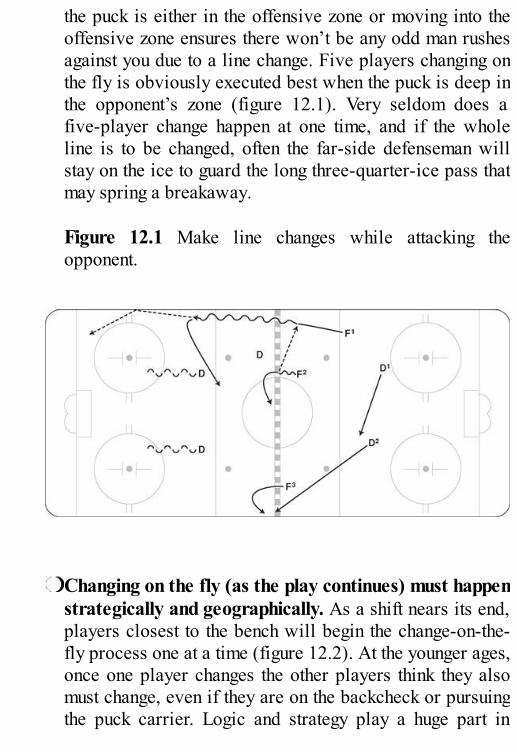
the puck is either in the offensive zone or moving into theoffensive zone ensures there won’t be any odd man rushesagainst you due to a line change. Five players changing onthe fly is obviously executed best when the puck is deep inthe opponent’s zone (figure 12.1). Very seldom does afive-player change happen at one time, and if the wholeline is to be changed, often the far-side defenseman willstay on the ice to guard the long three-quarter-ice pass thatmay spring a breakaway.
Figure 12.1 Make line changes while attacking theopponent.
Changing on the fly (as the play continues) must happenstrategically and geographically. As a shift nears its end,players closest to the bench will begin the change-on-the-fly process one at a time (figure 12.2). At the younger ages,once one player changes the other players think they alsomust change, even if they are on the backcheck or pursuingthe puck carrier. Logic and strategy play a huge part in
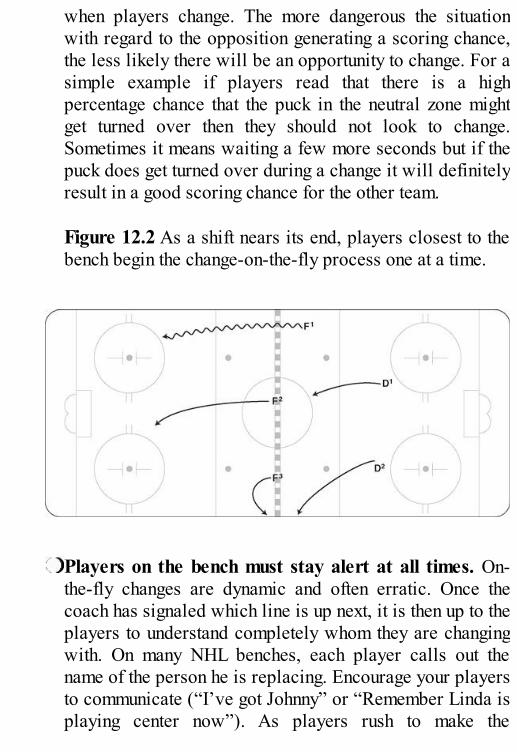
when players change. The more dangerous the situationwith regard to the opposition generating a scoring chance,the less likely there will be an opportunity to change. For asimple example if players read that there is a highpercentage chance that the puck in the neutral zone mightget turned over then they should not look to change.Sometimes it means waiting a few more seconds but if thepuck does get turned over during a change it will definitelyresult in a good scoring chance for the other team.
Figure 12.2 As a shift nears its end, players closest to thebench begin the change-on-the-fly process one at a time.
Players on the bench must stay alert at all times. On-the-fly changes are dynamic and often erratic. Once thecoach has signaled which line is up next, it is then up to theplayers to understand completely whom they are changingwith. On many NHL benches, each player calls out thename of the person he is replacing. Encourage your playersto communicate (“I’ve got Johnny” or “Remember Linda isplaying center now”). As players rush to make the
exchange, have one group go out the gate and another overthe boards if possible.Players on the bench must be aware of on-icehappenings as they are prepping to change. Oftenplayers get so fixated on the person they are going toreplace that they do not have a full sense of what ishappening on the ice. It is not uncommon for a player tojump on the ice and step right into a puck near the benchbefore the other player is completely off the ice.Obviously, this results in too many men on the ice andbecomes another penalty to kill if caught by an alertofficial. By being aware of what is happening on the ice,players will be able to react quickly offensively ordefensively. Awareness for the player coming on the icealso deals with knowing what your responsibilities are assoon as you get off the bench - are you going on the offenseor reacting defensively?Momentum can be increased by the fluidity of theplayer changes. Teams get into a player-changing rhythm,and when all cylinders are firing, this rhythm will createreal momentum and be an advantage. Players are allowed10 feet to make their change at the bench so fluidity refersto executing the change smoothly in this space, at the righttime (when players are not too fatigued), and in the rightsituation. Correct and successful changes save time andenergy and when executed perfectly can catch the opponentwith tired players on the ice. Can you practice this? Sureyou can. Simply set up a drill where players break out andtake a shot on goal. Then the line regroups with a secondpuck, dumps it into the corner, and changes. The new linecoming on the ice goes through the same sequence.Timing of changes is critical. Timing is everything insport. The timing of how long players stay on the ice and at
what point of the shift players change or don’t change tellsexperts a ton about that team’s character and identity. Oftenstar players struggling to score goals will cheat in thisarea. They stay longer than normal and because of thisupset the emotional egg carton at times. If the left wingerstays on the ice after the center and right winger havechanged, this can throw off the synergy of certain linecombinations and also anger the next left winger.
For a coach, distributing ice time is much like being theconductor of an orchestra. The goal is to weave each player’stalents and strengths into one large sound or force that becomesbeautiful and unbeatable.
Bench management has certain constraints and advantagesdepending on if the game is at home or away. The home-ice coachhas last change, and this obviously allows the home coach tobetter play the chess match that is the game of ice allocation.Away-game coaches look to change their players more often onthe fly to get certain desired matchups. NHL coach Mike Keenansuggested the following in our previous book, Simply the Best:“That’s another thing that I love: the dynamics of the game. Peoplecan be asked how many minutes are in a hockey game and thenormal answer is 60. Actually there are 720. There are 360minutes in regulation time distributed between two teams that have20 players each, so if you give 60 minutes to your goalie (mostteams will laugh when I tell them this and say you never do that,because I am always pulling my goaltender) then you’ve got 300minutes to distribute on your side with no penalties. The othercoach has the same. How you manage this time and who you giveit to at what time is an art and you must be able to read the gameand your players as it is unfolding.”
At every level of play, the entry to the bench and the exit fromthe bench often tell how cohesive and energetic a team is. You canwatch closely at how players change to see what their team spirit
is like at certain times of the season. Many people say that theleadership model identifying hockey, even more than in othersports, is that of collaboration. If this is true, then it is most true inthe area of bench management and line changes.
Handling the Moment
Finally, if you really want to manage the bench like ScottyBowman, then you must be able to “handle the moment.”Generally, the last 5 minutes in every game are more pressurepacked than the first 55, but you have to realize that the key turningpoint in the game could happen at any time. When the pressure ison—whether the game is tied, you are up or down by one, oneteam is making a charge and gaining momentum, or the refereeshave put you down two players—as a coach you need to stayfocused on what you are going to control. Never let outsidethoughts cloud the picture. Think about what is happening andwhat needs to be done. Ask for feedback from your assistants. Aswe mentioned earlier, stay in the moment, and remind your playersto do the same. Before the game you should prepare yourself foranything that might happen, so that when it does, it is as if youhave been there before . . . and nothing alleviates pressure likebeing confident in knowing what to do.
Index
Note: The italicized t and f following page numbers refer to tablesand figures, respectively.
A
attack zone about behind net play cycling defense activation low-high plays power play setups attack zone plays back-side slide midseam penetration strong-side slide
B
backchecking, neutral zone about hound the puck system midlane backcheck system wide-lane lock system back-sideslide and shoot play back-side option rush back-side pass, mid-ice entry back-side slide play backspeed bench management blocking shots boards-side press face-off boards-side roll face-off Bowman, Scotty box play breakaway face-off breakaways breakout plays. See also forechecking blue-to-blue stretch over power plays reverse rim strong-side slant three high up

wheel breakouts control breakouts reacting to support reading pressure bump to partner face-off
C
Canuck center-lane power play breakout center, breakout support center ice, three options face-off center slash face-off center stretch lane regroup center swing-away face-off chip behind pressure lane regroup chip dump-in coaching practices teaching and learning team identity coaching staff roles control forecheck corner bump face-off counters breakaways dump-ins odd-man rushes crisscross, two-on-two cross-corner dump-in cross-ice dump-in cycling Czech press penalty kill
D
Dallas cut power play breakout D back face-off deep possession face-off defensemen attack zone activation breakout pressure reading breakout support defensive side positioning in neutral zone counters in offensive zone entries defense supporting mid-ice lane regroup defensive zone coverage about half-ice overload system low zone collapse system man-on-man system penalty kills situational guidelines 2-3 system defensive zone entry about delays penalty kills three on three three on two three on two with close backchecker two on one
two on two defensive zone face-offs delays, defensive zone entry diamond force penalty kill double drive, two-on-two double option face-off double press face-off double-seam pass play double up inside face-off double up outside face-off drive and delay, three-on-two drop pass power play breakout D slide play face-off D takes the draw face-off D-to-D and back play D-to-D flat pass regroups D-to-D point shot play D-to-D short post face-off D-to-D stretch regroups dump-ins
E
end around face-off energy equipment managers
F
face-offs about defensive zone lost draws defensive zone won draws four-on-four neutral zone lost draws neutral zone won draws offensive zone lost draws offensive zone won draws penalty kills power play pulled goaltender five across face-off five-back power play breakout five-on-three power play forcing back of net penalty kill forechecking. See also breakout plays about control forecheck system left-lane lock system 1-2-2 forecheck system penalty kills reading, in breakouts torpedo system 2-1-2 forecheck system 2-3 system forechecking, neutral zone
about 1-2-2 mid-ice lock 1-3-1 system 1-2-2 wide system retreating-2 system 2-1-2 system forward back face-off forwards breakout support forwards wide forechecking four across face-off four-on-four face-offs four-on-three power play four up face-off funnel, the
G
gap, in neutral zone goal-lineplay goaltender, pulled goaltenders
H
half-boards interchange play half-boards shot or cross-ice pass play half-boards shot play half-ice overload defensive zone system hard, wide rim dump-in hard rim face-off high deflection face-off high recovery area high triangle, three-on-two hinge play regroups hound the puck backchecking system
I
inside-out play face-off inside-out press face-off inside play inside winger draw face-off inverted triangle penalty kill
L
lane regroups left-lane lock forecheck line changes line strategy low-high press penalty kill low play option play low-release play low zone collapse defensive zone system
M
man-on-man defensive zone system matching lines mid-ice offensive zone entry mid-ice two on one rush midlane backcheck system midlane drive, three-on-two midlane drive, two-on-two midlane ladder play, mid-ice entry midseam penetration play momentum motionplay motion regroups
N
net, behind play neutral zone. See also backchecking, neutral zone; forechecking,neutral zone counters gap regroups neutral zone face-offs
O
odd-man rushes offensive zone entry about dump-ins funnel mid-ice power plays three-on-two attacks two-on-one attacks two-on-two attacks wide-lane drives offensive zone face-offs officials, dealing with offsides off-side shot face-off 1-2-2 force face-off 1-2-2 forecheck 1-3-1power play open-ice hit, mid-ice entry over breakout play overload power play
P
pass and go rush passing, in breakout passiveforechecking pass stretch regroups penalty kills about defensive zone play face-offs forechecking pressuring entry three-on-five three-on-four point shot play power plays about breakout plays face-offs five-on-three power play four-on-three power play overload power play possession after entry 1-3-1 power play split power play zone setup practices press-and-pull play, three-on-two puck on net dump-in

Q
quick-change play face-off quick up regroups

R
rebounds regroups lane motion power play retreating box forechecking reverse breakout play reverse to center face-off rim breakout play rim clear face-off rim dump-in roll out face-off rushes, odd-man

S
same-side dump-in same-side press forechecking San Jose slide face-off screens single-swing power play breakout skills, basic slidinginterchange play soft lock spin and up strong-side face-off split power play split the’s penalty kill stick, on ice strategy, adjusting playing stretch players strong-sideshot play strong-side slide play
T
tandem pressure forechecking team identity three-on-five penalty kills three-on-four penalty kills three on three, defensive zone entry three on two, defensive zone entry three-on-two attacks tie-up for possession face-off tight collapse penalty kill torpedo system forecheck traditional alignment face-off trainers triangle, one high penalty kill triple drive, three-on-two 2-3 defensive zone system 2-1-2 forecheck two on one, defensive zone entry two-on-one attacks two on two, defensive zone entry two-on-two attacks 2-3 system forecheck
U
umbrella play up breakout play up the gut power play regroup
W
weak-side slant face-off wheel breakout play wide-lane drives wide-lane lock backcheck system wide rim face-off winger cross power play regroup winger support, breakouts
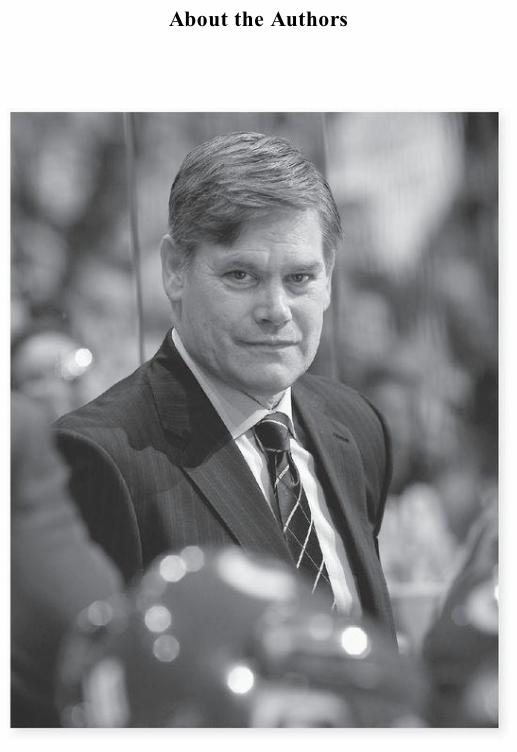
About the Authors
Ryan Walter is an assistant coach with the Vancouver Canucks ofthe National Hockey League. He played more than 1,000 gamesover 15 seasons with the Washington Capitals, MontrealCanadiens, and Vancouver Canucks. He served as vice presidentof the National Hockey League Players Association, was honoredas the NHL Man of the Year in 1992, and played in the NHL all-star game in 1993. Walter has also served as captain of teamCanada in the World Junior tournament and played for teamCanada in four World Championships. He has worked as aconsultant for several NHL teams and a television analyst for NHLbroadcasts. Walter lives in British Columbia, Canada.
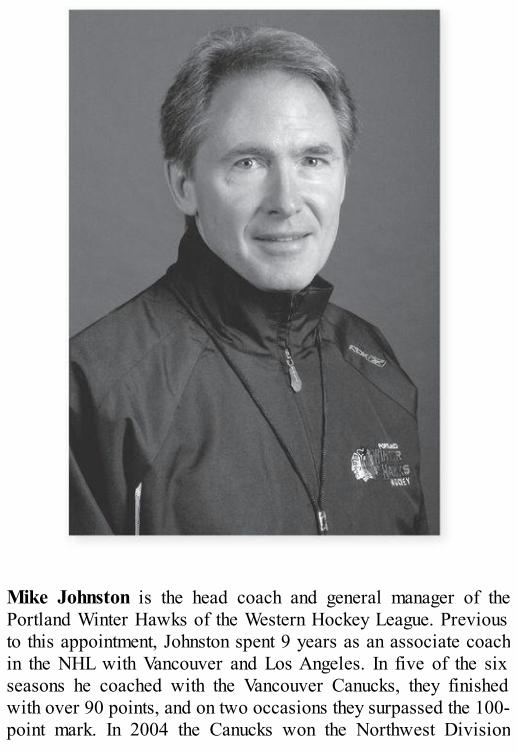
Mike Johnston is the head coach and general manager of thePortland Winter Hawks of the Western Hockey League. Previousto this appointment, Johnston spent 9 years as an associate coachin the NHL with Vancouver and Los Angeles. In five of the sixseasons he coached with the Vancouver Canucks, they finishedwith over 90 points, and on two occasions they surpassed the 100-point mark. In 2004 the Canucks won the Northwest Division
Championship. Internationally, Johnston has won seven medalswhile coaching Canada in World Championship events. He wonback to back gold medals as an assistant coach with the WorldJunior Team in 1994 and 1995. At the men’s WorldChampionships he has won a gold medal in 1997 and 2007 whilecapturing a bronze medal in 1995 and a silver medal in 1996 and2008. Johnston was also on the coaching staff for the Canadianteam at the 1998 Olympics in Nagano, Japan. This was the firsttime in history that NHL players participated in the Olympicgames. Johnston holds a master’s degree in Coaching Science andpresently lives in Portland, Oregon.