Embed Size (px)
Citation preview
TABLE OF CONTENTS
Contents Page No.
Basic Textiles terms
1
Cad (computer aided designs) 1
Sequence of Operations In Garment production
2
Various types of fabric 2
Some of the common market terms of the fabric used in
Garment Industry
5
Introduction to different parts and style of garments
7
Understanding of autocad Interface and Basic Tools for
Pattern Drafting and Grading
14
Main functions performed by CAD software 16
Page No 1 RSA DOCUMENT
Version No.01
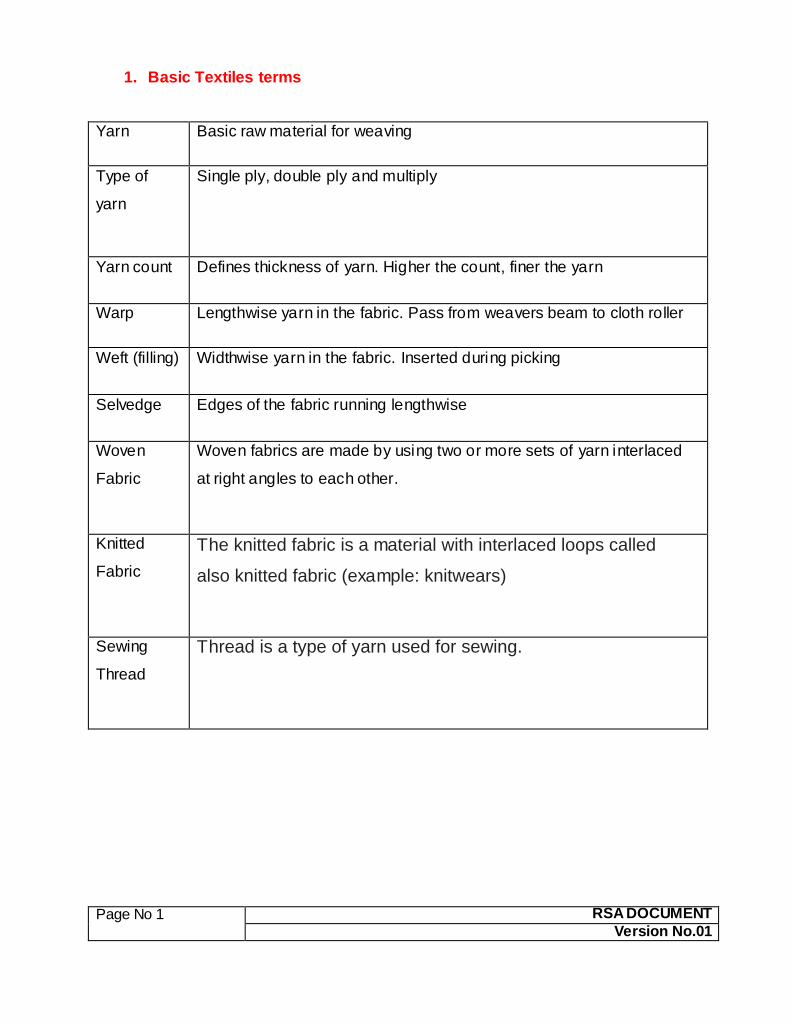
1. Basic Textiles terms
Yarn Basic raw material for weaving
Type of
yarn
Single ply, double ply and multiply
Yarn count Defines thickness of yarn. Higher the count, finer the yarn
Warp Lengthwise yarn in the fabric. Pass from weavers beam to cloth roller
Weft (filling) Widthwise yarn in the fabric. Inserted during picking
Selvedge Edges of the fabric running lengthwise
Woven
Fabric
Woven fabrics are made by using two or more sets of yarn interlaced
at right angles to each other.
Knitted
Fabric
The knitted fabric is a material with interlaced loops called
also knitted fabric (example: knitwears)
Sewing
Thread
1. Thread is a type of yarn used for sewing.
Page No 2 RSA DOCUMENT
Version No.01
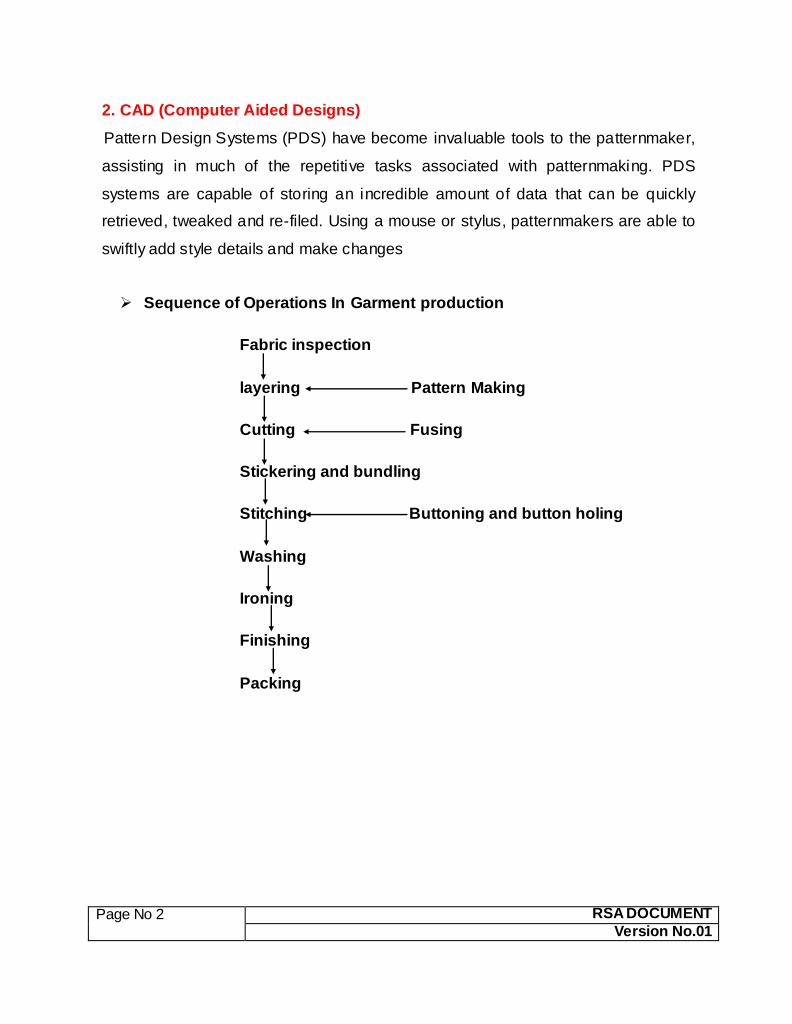
2. CAD (Computer Aided Designs)
Pattern Design Systems (PDS) have become invaluable tools to the patternmaker,
assisting in much of the repetitive tasks associated with patternmaking. PDS
systems are capable of storing an incredible amount of data that can be quickly
retrieved, tweaked and re-filed. Using a mouse or stylus, patternmakers are able to
swiftly add style details and make changes
Sequence of Operations In Garment production
Fabric inspection
layering Pattern Making
Cutting Fusing
Stickering and bundling
Stitching Buttoning and button holing
Washing
Ironing
Finishing
Packing
Page No 3 RSA DOCUMENT
Version No.01
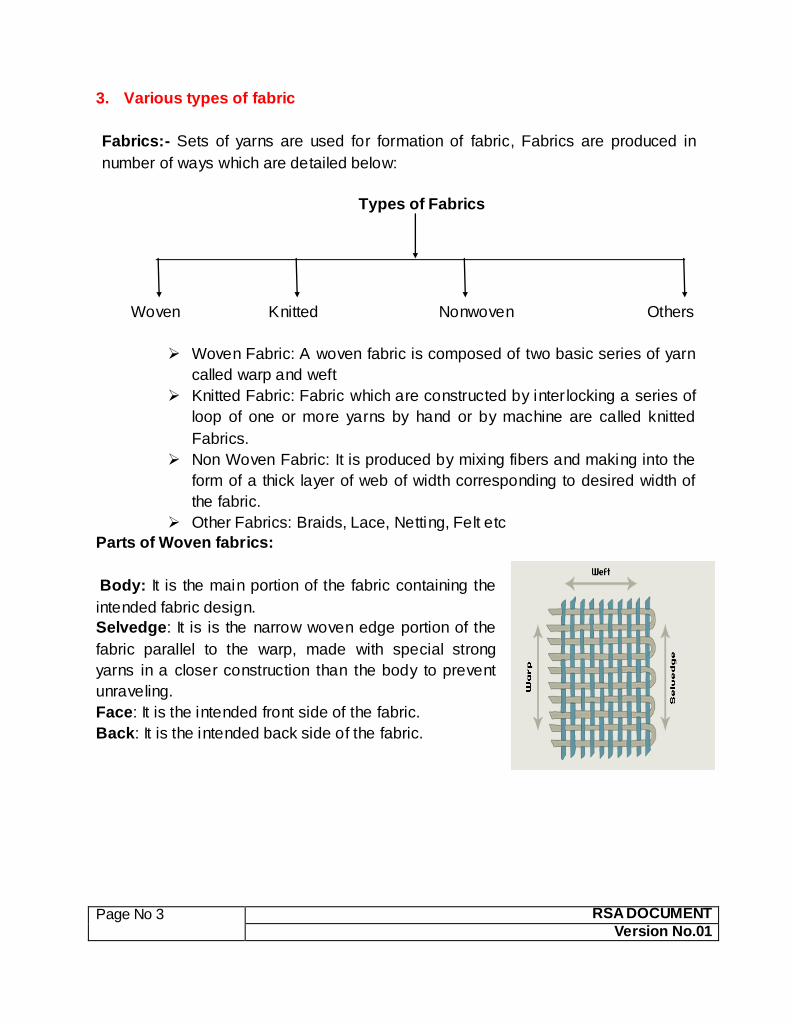
3. Various types of fabric
Fabrics:- Sets of yarns are used for formation of fabric, Fabrics are produced in
number of ways which are detailed below:
Types of Fabrics
Woven Knitted Nonwoven Others
Woven Fabric: A woven fabric is composed of two basic series of yarn
called warp and weft
Knitted Fabric: Fabric which are constructed by inter locking a series of
loop of one or more yarns by hand or by machine are called knitted
Fabrics.
Non Woven Fabric: It is produced by mixing fibers and making into the
form of a thick layer of web of width corresponding to desired width of
the fabric.
Other Fabrics: Braids, Lace, Netting, Felt etc
Parts of Woven fabrics:
Body: It is the main portion of the fabric containing the
intended fabric design.
Selvedge: It is is the narrow woven edge portion of the
fabric parallel to the warp, made with special strong
yarns in a closer construction than the body to prevent
unraveling.
Face: It is the intended front side of the fabric.
Back: It is the intended back side of the fabric.
Page No 4 RSA DOCUMENT
Version No.01
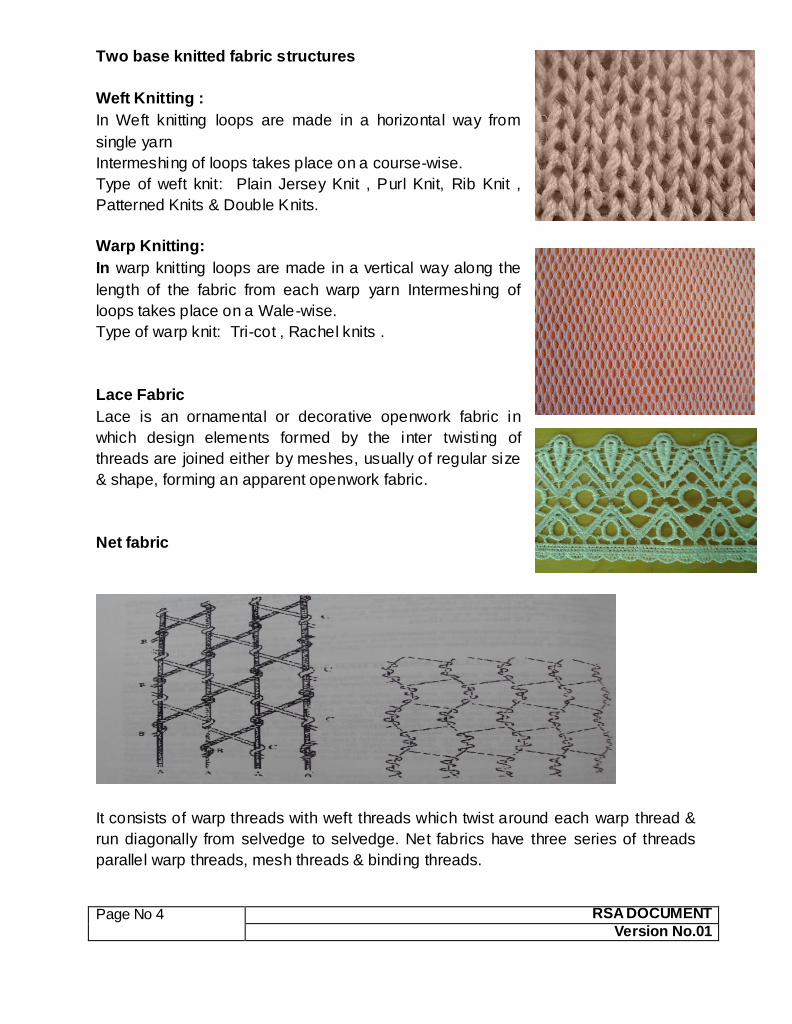
Two base knitted fabric structures
Weft Knitting :
In Weft knitting loops are made in a horizontal way from
single yarn
Intermeshing of loops takes place on a course-wise.
Type of weft knit: Plain Jersey Knit , Purl Knit, Rib Knit ,
Patterned Knits & Double Knits.
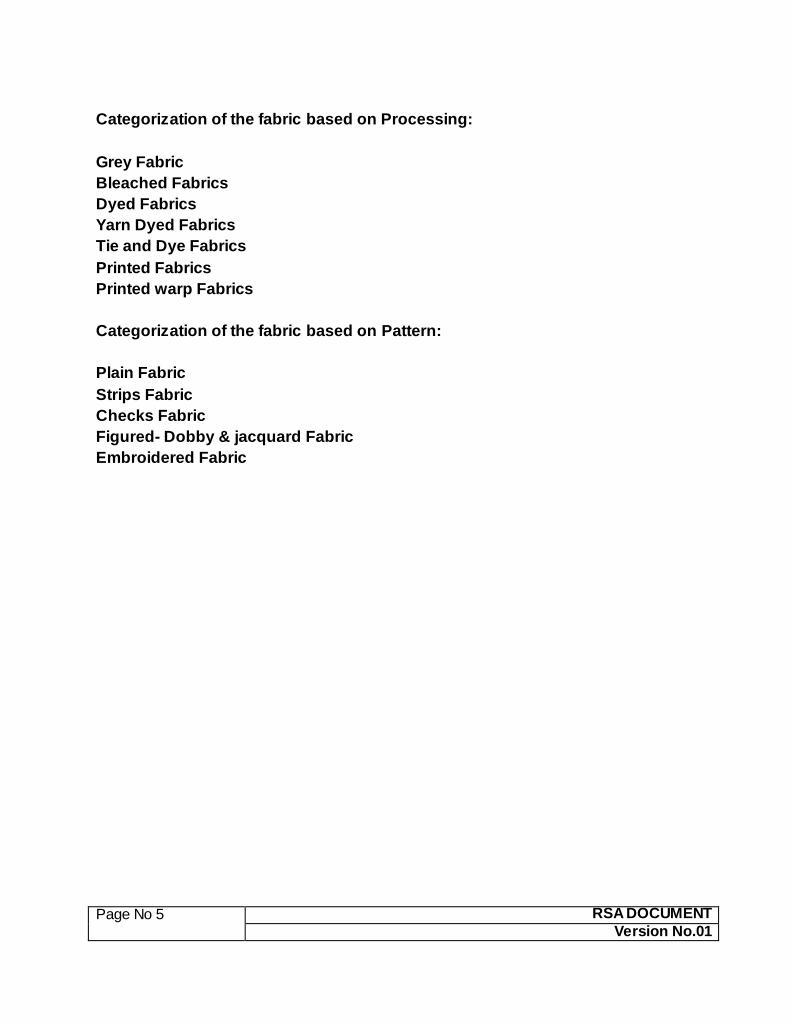
Warp Knitting:
In warp knitting loops are made in a vertical way along the
length of the fabric from each warp yarn Intermeshing of
loops takes place on a Wale-wise.
Type of warp knit: Tri-cot , Rachel knits .
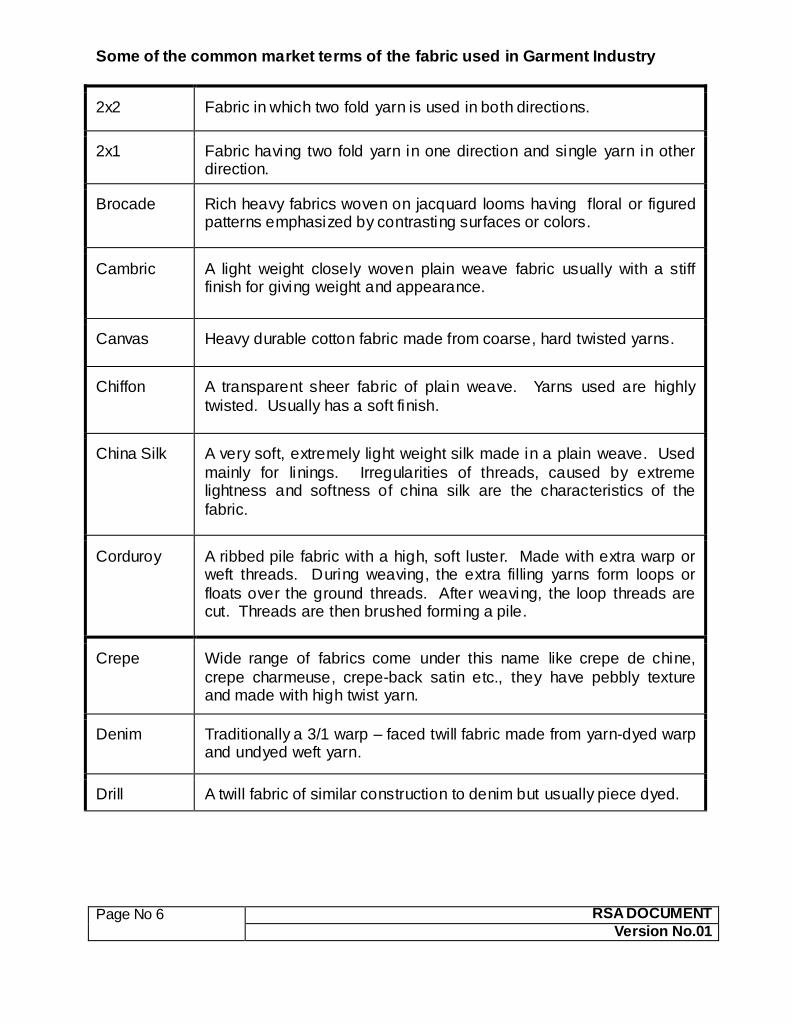
Lace Fabric
Lace is an ornamental or decorative openwork fabric in
which design elements formed by the inter twisting of
threads are joined either by meshes, usually of regular size
& shape, forming an apparent openwork fabric.
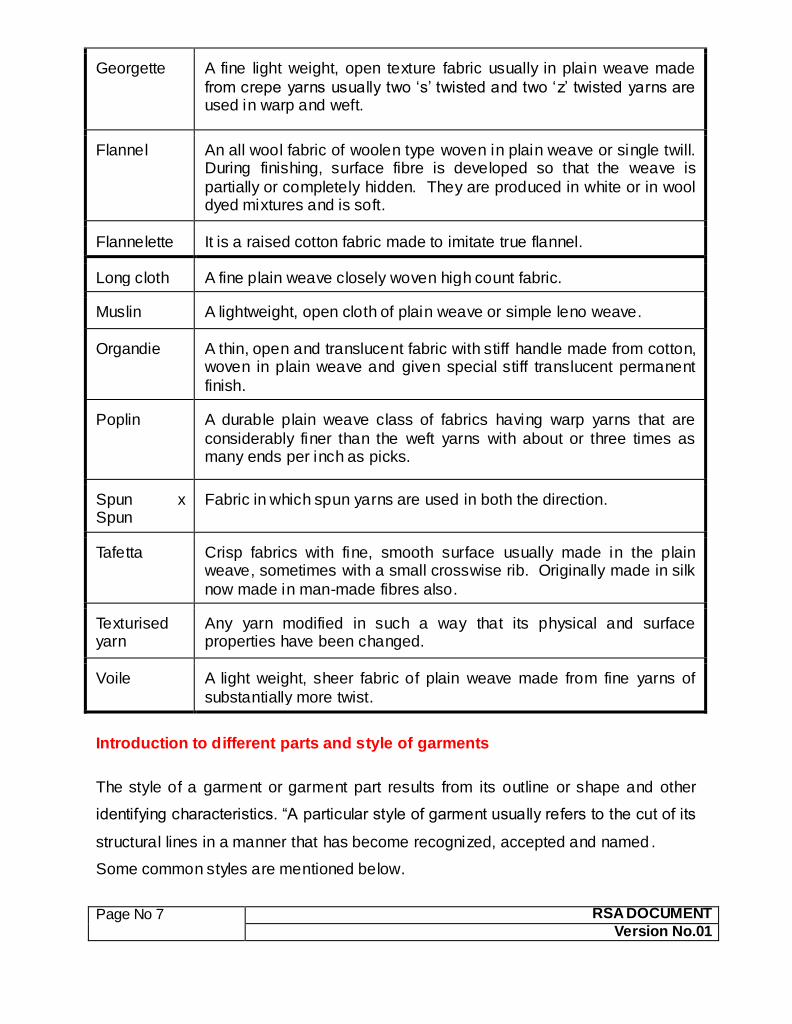
Net fabric
It consists of warp threads with weft threads which twist around each warp thread &
run diagonally from selvedge to selvedge. Net fabrics have three series of threads
parallel warp threads, mesh threads & binding threads.
Page No 5 RSA DOCUMENT
Version No.01
Categorization of the fabric based on Processing:
Grey Fabric
Bleached Fabrics
Dyed Fabrics
Yarn Dyed Fabrics
Tie and Dye Fabrics
Printed Fabrics
Printed warp Fabrics
Categorization of the fabric based on Pattern:
Plain Fabric
Strips Fabric
Checks Fabric
Figured- Dobby & jacquard Fabric
Embroidered Fabric
Page No 6 RSA DOCUMENT
Version No.01
Some of the common market terms of the fabric used in Garment Industry
2x2 Fabric in which two fold yarn is used in both directions.
2x1 Fabric having two fold yarn in one direction and single yarn in other direction.
Brocade Rich heavy fabrics woven on jacquard looms having floral or figured patterns emphasized by contrasting surfaces or colors.
Cambric A light weight closely woven plain weave fabric usually with a stiff finish for giving weight and appearance.
Canvas Heavy durable cotton fabric made from coarse, hard twisted yarns.
Chiffon A transparent sheer fabric of plain weave. Yarns used are highly
twisted. Usually has a soft finish.
China Silk A very soft, extremely light weight silk made in a plain weave. Used
mainly for linings. Irregularities of threads, caused by extreme lightness and softness of china silk are the characteristics of the
fabric.
Corduroy A ribbed pile fabric with a high, soft luster. Made with extra warp or weft threads. During weaving, the extra filling yarns form loops or
floats over the ground threads. After weaving, the loop threads are cut. Threads are then brushed forming a pile.
Crepe Wide range of fabrics come under this name like crepe de chine,
crepe charmeuse, crepe-back satin etc., they have pebbly texture and made with high twist yarn.
Denim Traditionally a 3/1 warp – faced twill fabric made from yarn-dyed warp and undyed weft yarn.
Drill A twill fabric of similar construction to denim but usually piece dyed.
Page No 7 RSA DOCUMENT
Version No.01
Georgette A fine light weight, open texture fabric usually in plain weave made
from crepe yarns usually two ‘s’ twisted and two ‘z’ twisted yarns are used in warp and weft.
Flannel An all wool fabric of woolen type woven in plain weave or single twill. During finishing, surface fibre is developed so that the weave is
partially or completely hidden. They are produced in white or in wool dyed mixtures and is soft.
Flannelette It is a raised cotton fabric made to imitate true flannel.
Long cloth A fine plain weave closely woven high count fabric.
Muslin A lightweight, open cloth of plain weave or simple leno weave.
Organdie A thin, open and translucent fabric with stiff handle made from cotton, woven in plain weave and given special stiff translucent permanent
finish.
Poplin A durable plain weave class of fabrics having warp yarns that are
considerably finer than the weft yarns with about or three times as many ends per inch as picks.
Spun x Spun
Fabric in which spun yarns are used in both the direction.
Tafetta Crisp fabrics with fine, smooth surface usually made in the plain weave, sometimes with a small crosswise rib. Originally made in silk
now made in man-made fibres also.
Texturised yarn
Any yarn modified in such a way that its physical and surface properties have been changed.
Voile A light weight, sheer fabric of plain weave made from fine yarns of
substantially more twist.
Introduction to different parts and style of garments
The style of a garment or garment part results from its outline or shape and other
identifying characteristics. “A particular style of garment usually refers to the cut of its
structural lines in a manner that has become recognized, accepted and named .
Some common styles are mentioned below.
Page No 8 RSA DOCUMENT
Version No.01
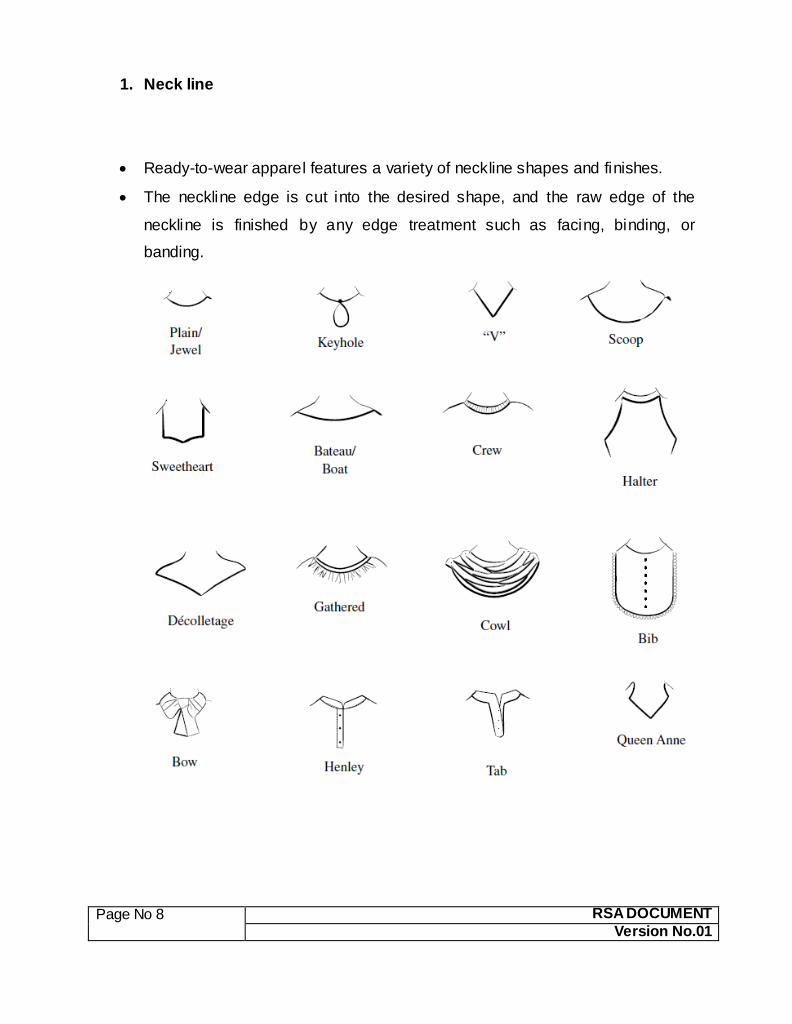
1. Neck line
Ready-to-wear apparel features a variety of neckline shapes and finishes.
The neckline edge is cut into the desired shape, and the raw edge of the
neckline is finished by any edge treatment such as facing, binding, or
banding.
Page No 9 RSA DOCUMENT
Version No.01
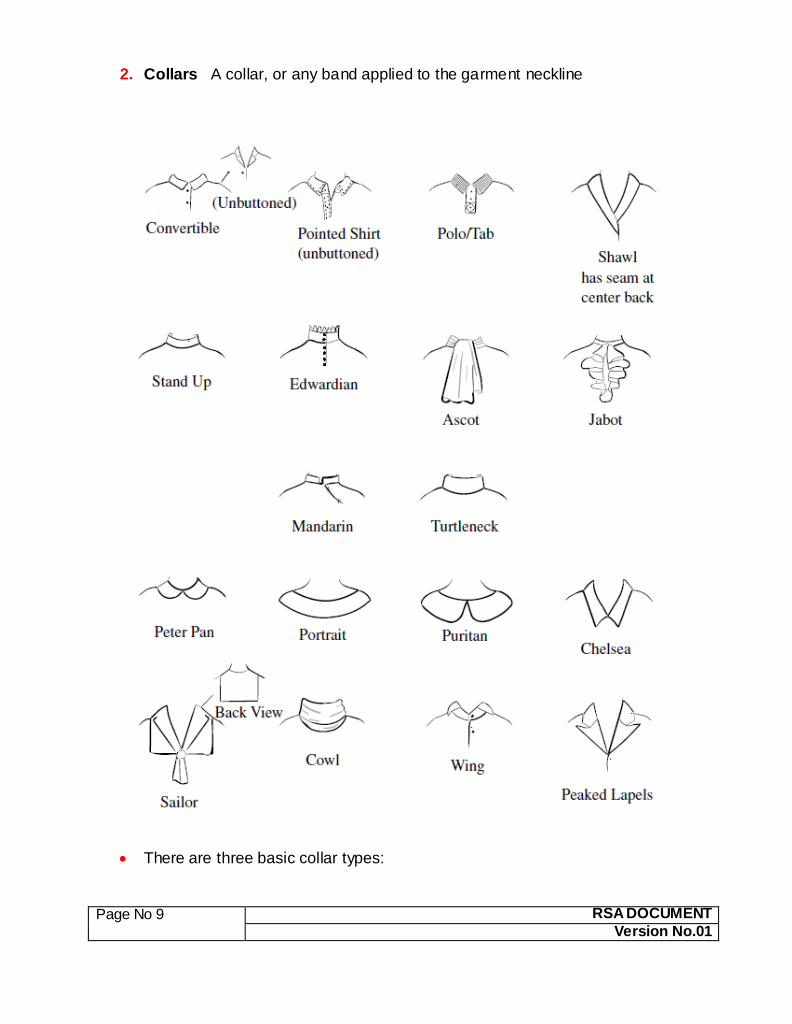
2. Collars A collar, or any band applied to the garment neckline
There are three basic collar types:
Page No 10 RSA DOCUMENT
Version No.01
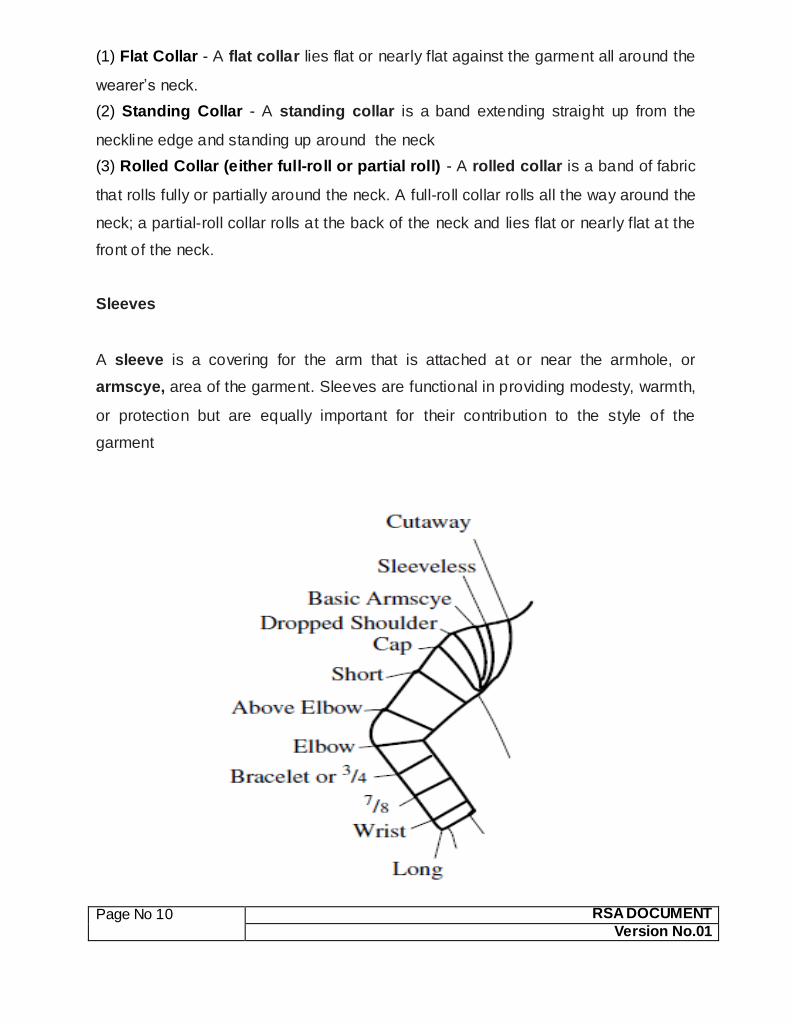
(1) Flat Collar - A flat collar lies flat or nearly flat against the garment all around the
wearer’s neck.
(2) Standing Collar - A standing collar is a band extending straight up from the
neckline edge and standing up around the neck
(3) Rolled Collar (either full-roll or partial roll) - A rolled collar is a band of fabric
that rolls fully or partially around the neck. A full-roll collar rolls all the way around the
neck; a partial-roll collar rolls at the back of the neck and lies flat or nearly flat at the
front of the neck.
Sleeves
A sleeve is a covering for the arm that is attached at or near the armhole, or
armscye, area of the garment. Sleeves are functional in providing modesty, warmth,
or protection but are equally important for their contribution to the style of the
garment
Page No 11 RSA DOCUMENT
Version No.01
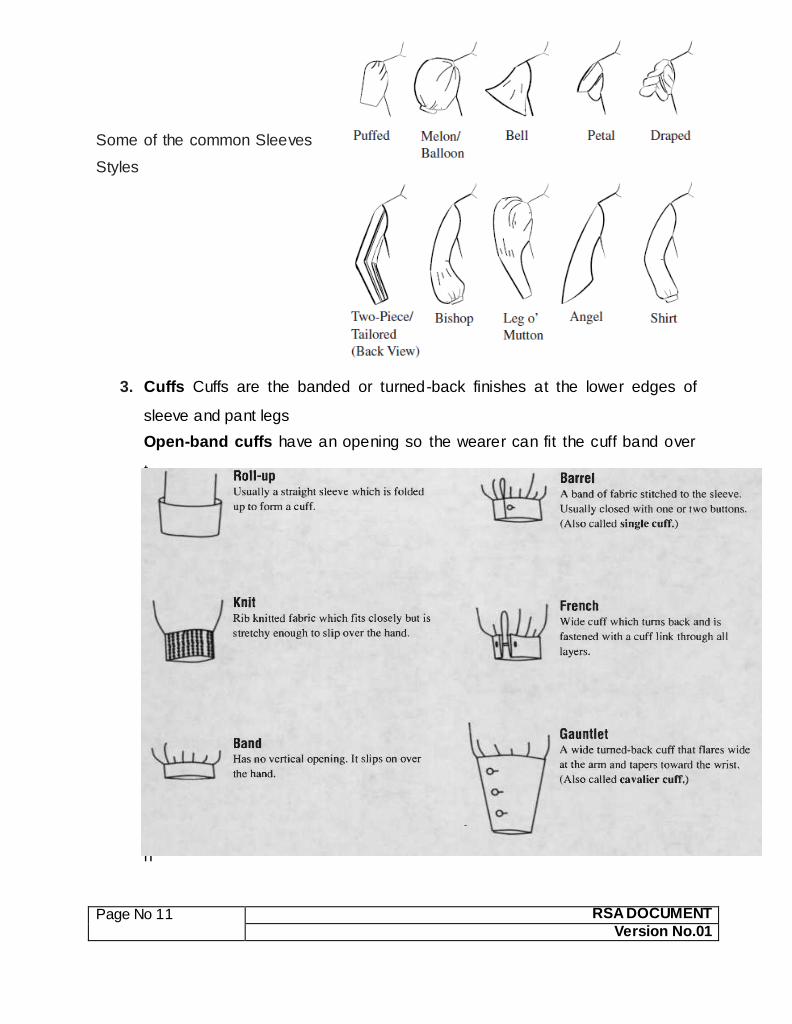
Some of the common Sleeves
Styles
3. Cuffs Cuffs are the banded or turned-back finishes at the lower edges of
sleeve and pant legs
Open-band cuffs have an opening so the wearer can fit the cuff band over
t
h
e
h
a
n
d
a
n
d
t
h
Page No 12 RSA DOCUMENT
Version No.01
en fasten it to fit snugly. Open-band cuffs include the following types:
1. Barrel cuff or shirt cuff, the most common type; it is a straight, open-band
cuff style. Long-sleeved shirts and blouses usually feature barrel cuffs. The
barrel cuff laps and buttons at the wrist.
2. Convertible cuff, an open band that fastens with layers superimposed to
resemble a French cuff.
3. French cuff or double-cuff, The French cuff is constructed like the barrel
cuff but twice as wide. Then the cuff is folded back on itself so the cuff is
doubled.
A closed-band cuff is an unbroken ring of fabric large enough to fit over the
arm. Turned-back cuffs on sleeves and cuffed pants are formed by turning
back or rolling up the lower portion of the sleeve or pant leg.
4. Pockets A pocket is a small pouch or bag sewn onto or into a garment and
used to carry small items. The four basic types of pockets are
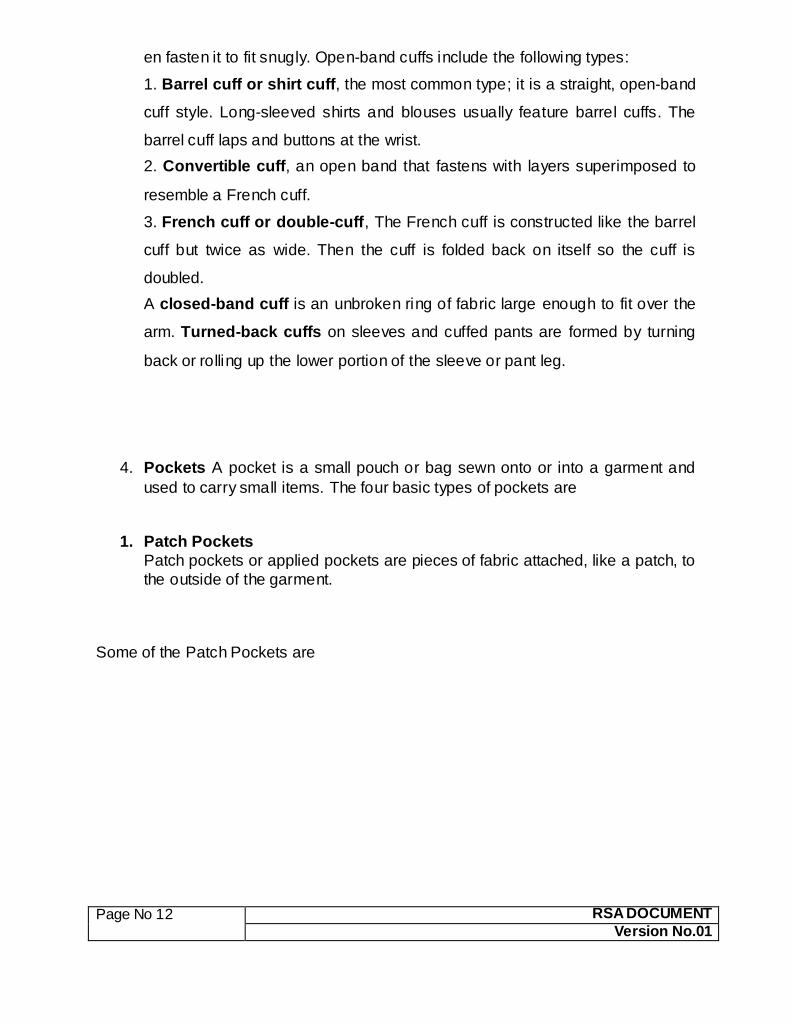
1. Patch Pockets
Patch pockets or applied pockets are pieces of fabric attached, like a patch, to
the outside of the garment.
Some of the Patch Pockets are
Page No 13 RSA DOCUMENT
Version No.01
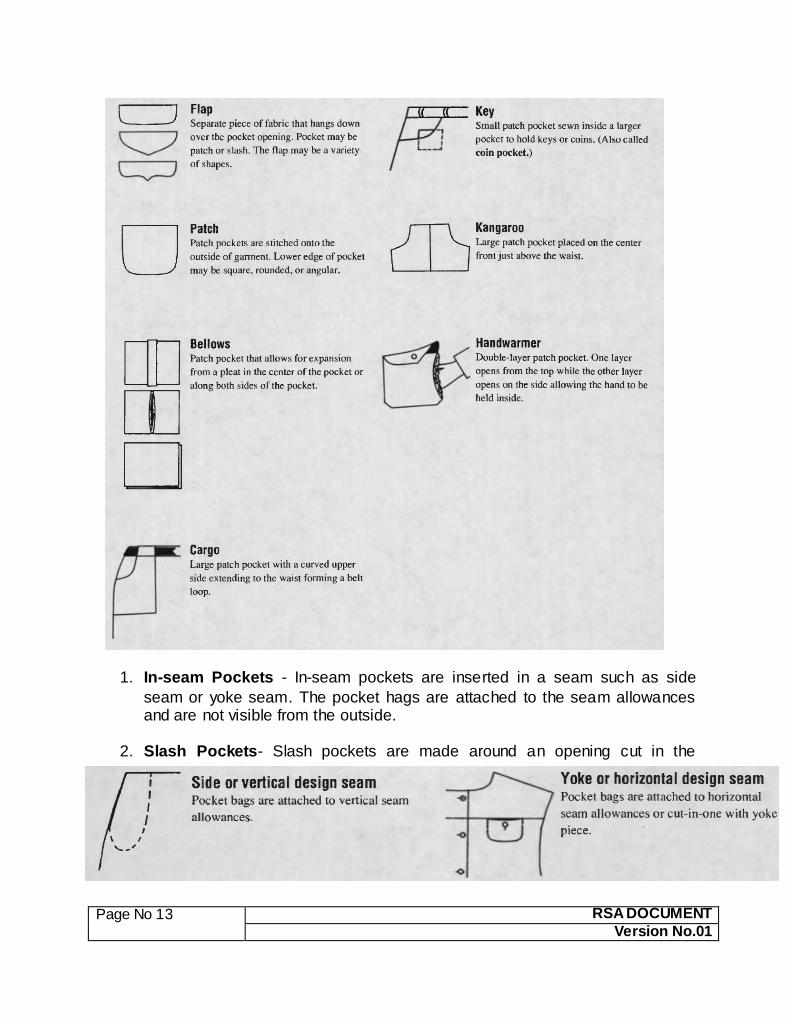
1. In-seam Pockets - In-seam pockets are inserted in a seam such as side
seam or yoke seam. The pocket hags are attached to the seam allowances and are not visible from the outside.
2. Slash Pockets- Slash pockets are made around an opening cut in the
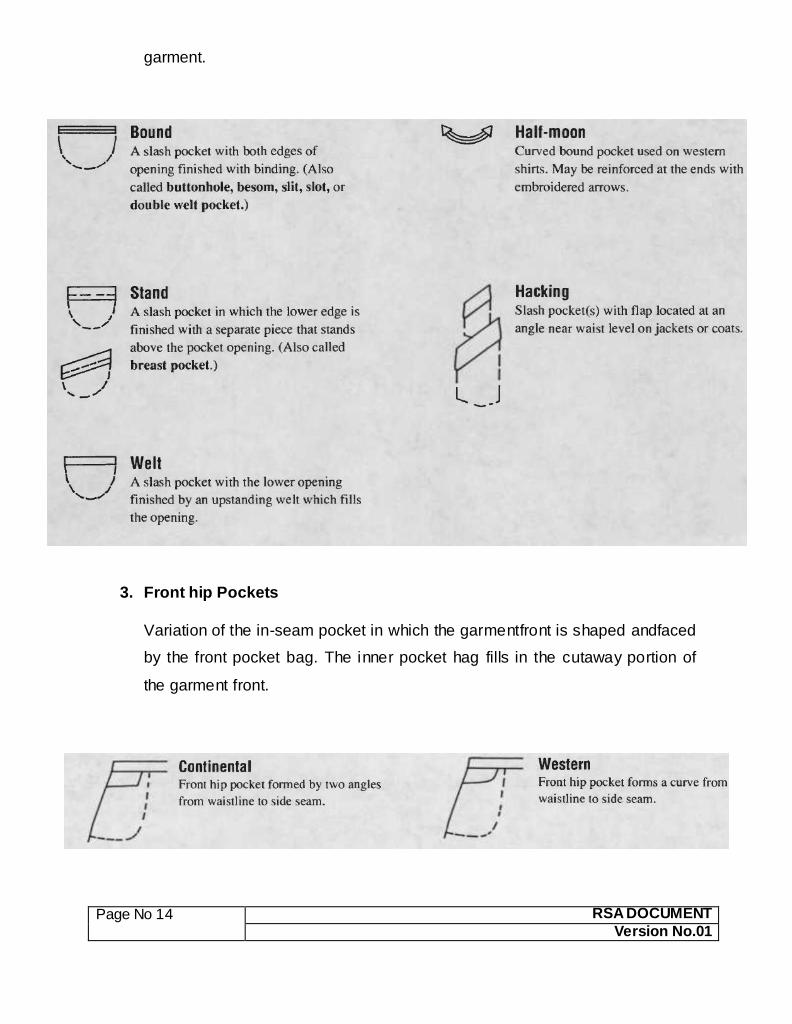
Page No 14 RSA DOCUMENT
Version No.01
garment.
3. Front hip Pockets
Variation of the in-seam pocket in which the garmentfront is shaped andfaced
by the front pocket bag. The inner pocket hag fills in the cutaway portion of
the garment front.
Page No 15 RSA DOCUMENT
Version No.01
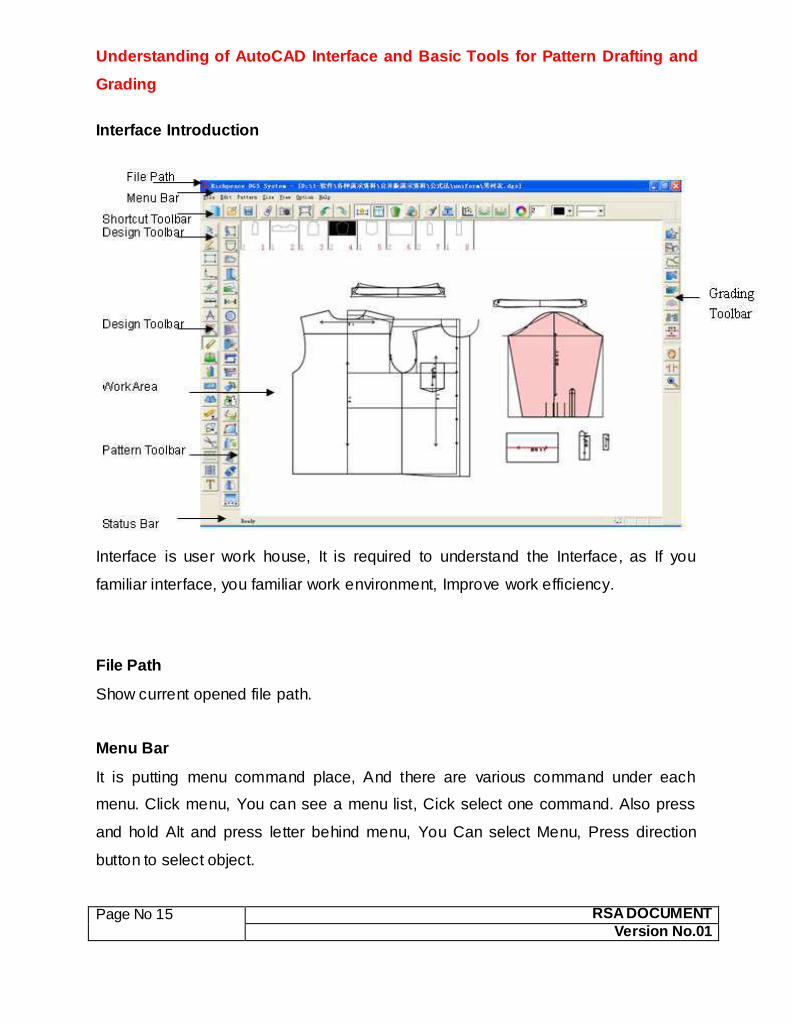
Understanding of AutoCAD Interface and Basic Tools for Pattern Drafting and
Grading
Interface Introduction
Interface is user work house, It is required to understand the Interface, as If you
familiar interface, you familiar work environment, Improve work efficiency.
File Path
Show current opened file path.
Menu Bar
It is putting menu command place, And there are various command under each
menu. Click menu, You can see a menu list, Cick select one command. Also press
and hold Alt and press letter behind menu, You Can select Menu, Press direction
button to select object.
Page No 16 RSA DOCUMENT
Version No.01
Shortcut Toolbar
Some commands in common use are put here in manner of icon.
Pattern list Box
It is a pictorial list of pieces within a design fi le. The Pattern Listbox shows a small
picture of each piece in a design file .You can display the Pattern Listbox location
from 【Option】--【System Setup】--【UI Setup】--【Piece Listbox Arrange】.By
dragging a pattern and move , you can adjust its arrangement order of pattern in the
Pattern List box. Also you can select pattern with menu, copy or paste pattern.
Ruler Bar
Show used unit.
Design Toolar
Line drawing or modify design line tool is put here.
Pattern Toolar
After using the tool of scissor to create a pattern, the tools in this toolbar can be used
to adjust the created patterns. Such as adding darts, notches, drills, etc.
Grading Toolbar
Some tools for grading are put here.
Work Area
It is seems a paper, You can draw design line, Also you can grading、Plot or show
paper border.
Page No 17 RSA DOCUMENT
Version No.01
Status Bar
The Status Bar is on the bottom of the interface. The status bar displays information
of the current tool and the prompts for its operation.
Main functions performed by CAD software
1. Digitizing system
2. Pattern making Process
3. Grading systems
4. Marker making systems
5. Shrinkage Setting System
6. Plotting of Patterns
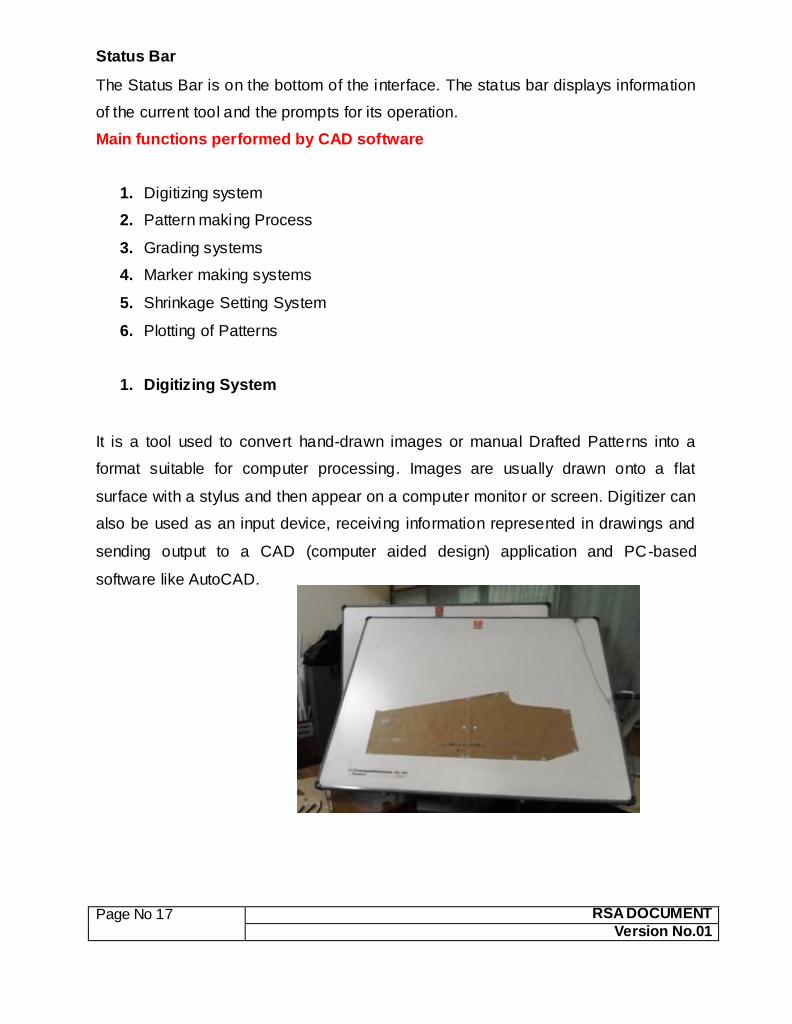
1. Digitizing System
It is a tool used to convert hand-drawn images or manual Drafted Patterns into a
format suitable for computer processing. Images are usually drawn onto a flat
surface with a stylus and then appear on a computer monitor or screen. Digitizer can
also be used as an input device, receiving information represented in drawings and
sending output to a CAD (computer aided design) application and PC-based
software like AutoCAD.
Page No 18 RSA DOCUMENT
Version No.01
Pattern Making Process
METHODS OF PATTERN MAKING BY USING CAD SOFTWARE
There are three way on CAD systems for Pattern designing as mentioned below Auto design
There are many pattern lib in software, It is easy for modifying part size and order
size, Grading automatically, Offer accurate data for calculating material, Also can
establish Pattern lib by yourself.
Free design
By drafting the pattern using the software tools, the role of various design tools are
mentioned below
Pattern made by hand import
We can input pattern to computer by camera or digitizer, Can input one size, Also
can Input more size.
Design Pattern Making Steps by CAD
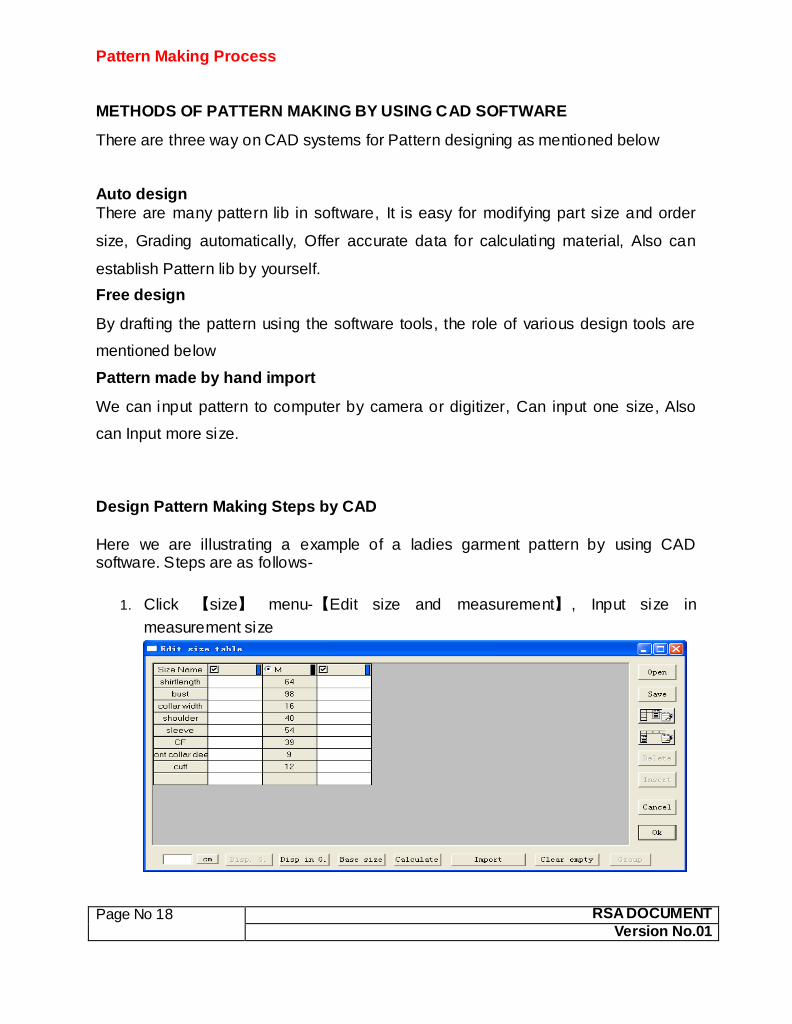
Here we are illustrating a example of a ladies garment pattern by using CAD software. Steps are as follows-
1. Click 【size】 menu-【Edit size and measurement】, Input size in
measurement size
Page No 19 RSA DOCUMENT
Version No.01
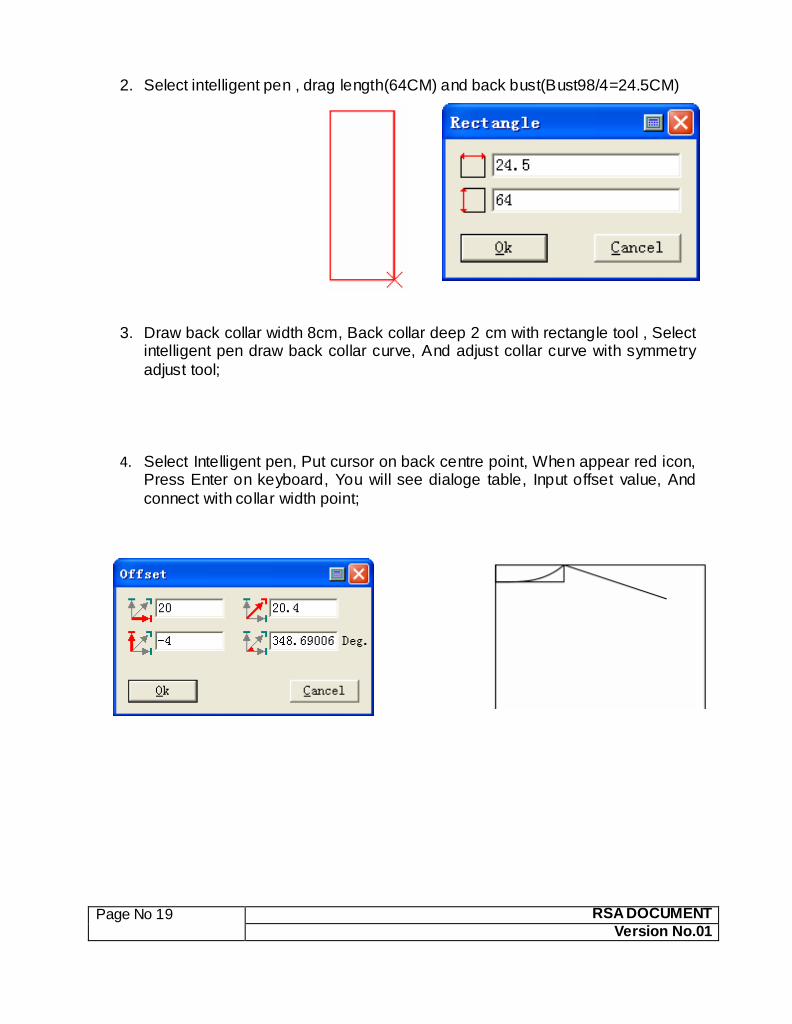
2. Select intelligent pen , drag length(64CM) and back bust(Bust98/4=24.5CM)
3. Draw back collar width 8cm, Back collar deep 2 cm with rectangle tool , Select intelligent pen draw back collar curve, And adjust collar curve with symmetry
adjust tool;
4. Select Intelligent pen, Put cursor on back centre point, When appear red icon, Press Enter on keyboard, You will see dialoge table, Input offset value, And
connect with collar width point;
Page No 20 RSA DOCUMENT
Version No.01
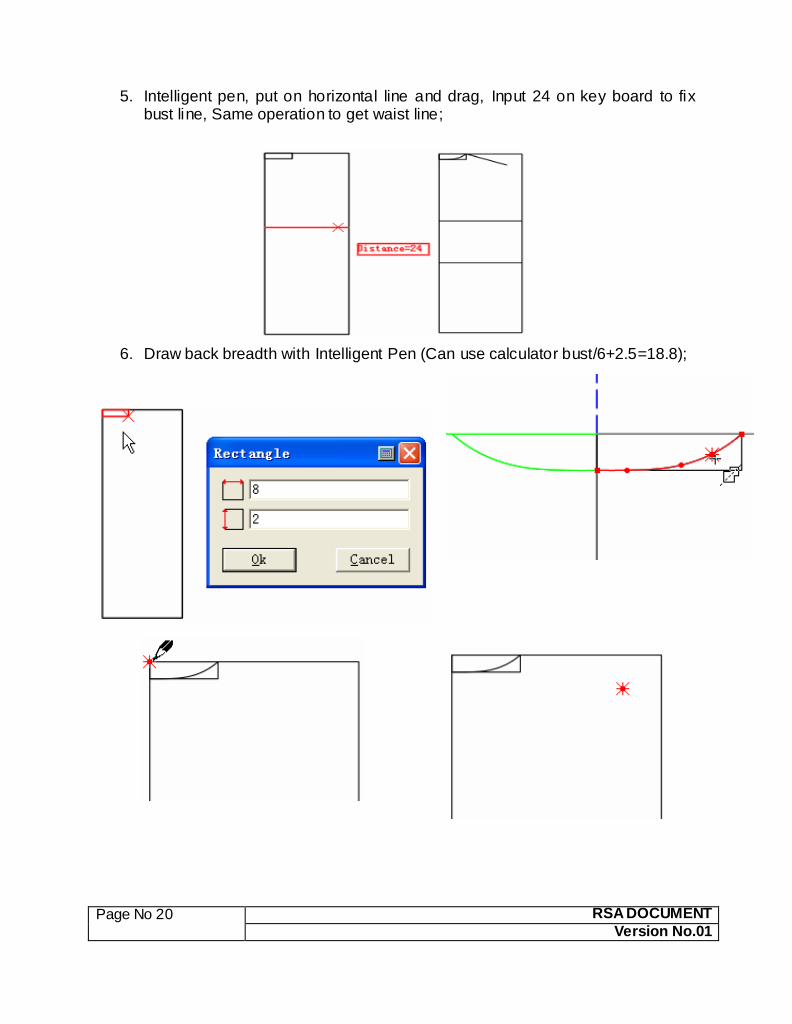
5. Intelligent pen, put on horizontal line and drag, Input 24 on key board to fix bust line, Same operation to get waist line;
6. Draw back breadth with Intelligent Pen (Can use calculator bust/6+2.5=18.8);
Page No 21 RSA DOCUMENT
Version No.01
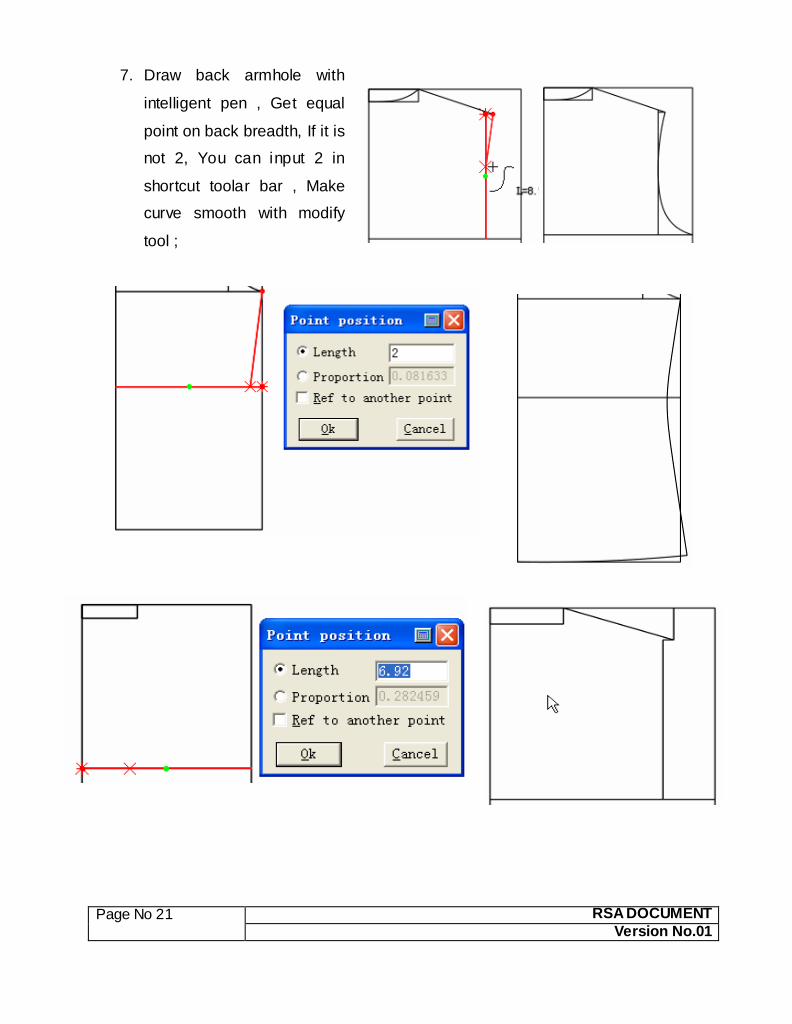
7. Draw back armhole with
intelligent pen , Get equal
point on back breadth, If it is
not 2, You can input 2 in
shortcut toolar bar , Make
curve smooth with modify
tool ;
Page No 22 RSA DOCUMENT
Version No.01
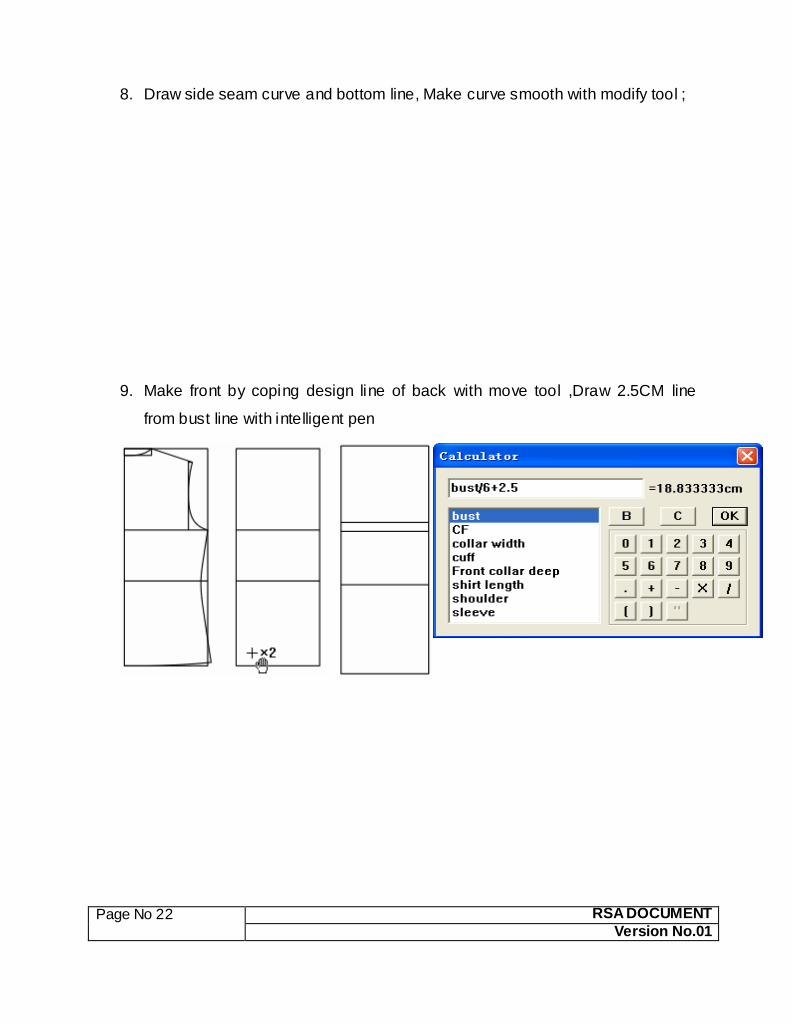
8. Draw side seam curve and bottom line, Make curve smooth with modify tool ;
9. Make front by coping design line of back with move tool ,Draw 2.5CM line
from bust line with intelligent pen
Page No 23 RSA DOCUMENT
Version No.01
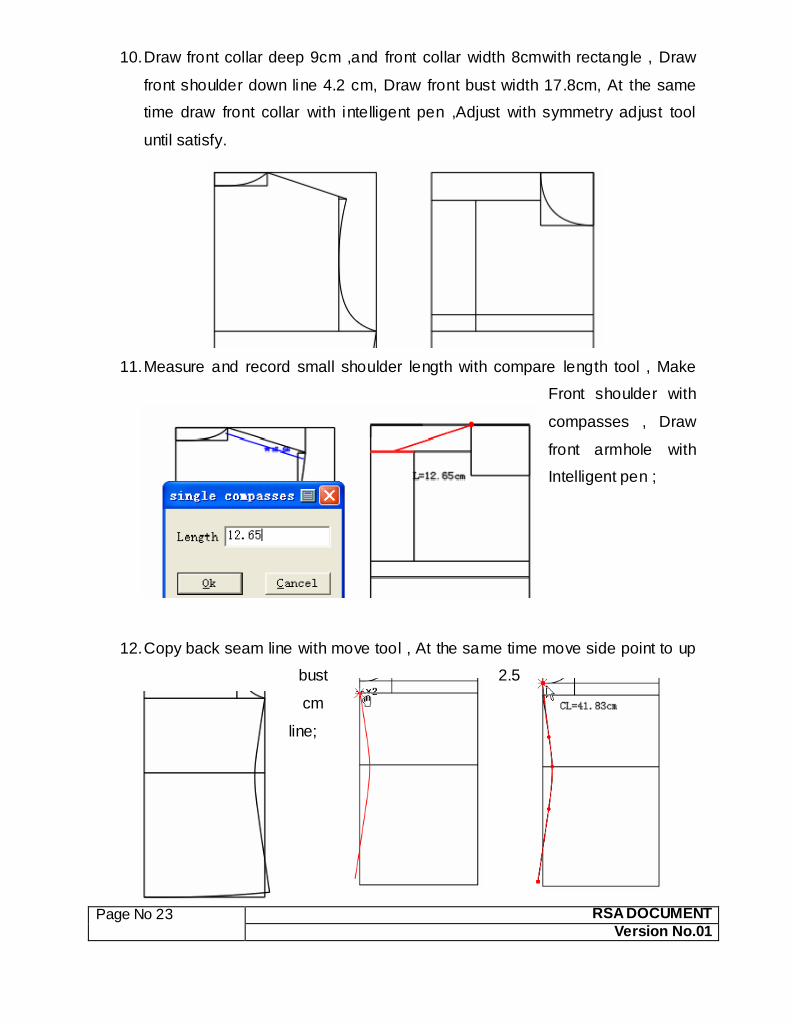
10. Draw front collar deep 9cm ,and front collar width 8cmwith rectangle , Draw
front shoulder down line 4.2 cm, Draw front bust width 17.8cm, At the same
time draw front collar with intelligent pen ,Adjust with symmetry adjust tool
until satisfy.
11. Measure and record small shoulder length with compare length tool , Make
Front shoulder with
compasses , Draw
front armhole with
Intelligent pen ;
12. Copy back seam line with move tool , At the same time move side point to up
bust 2.5
cm
line;
Page No 24 RSA DOCUMENT
Version No.01
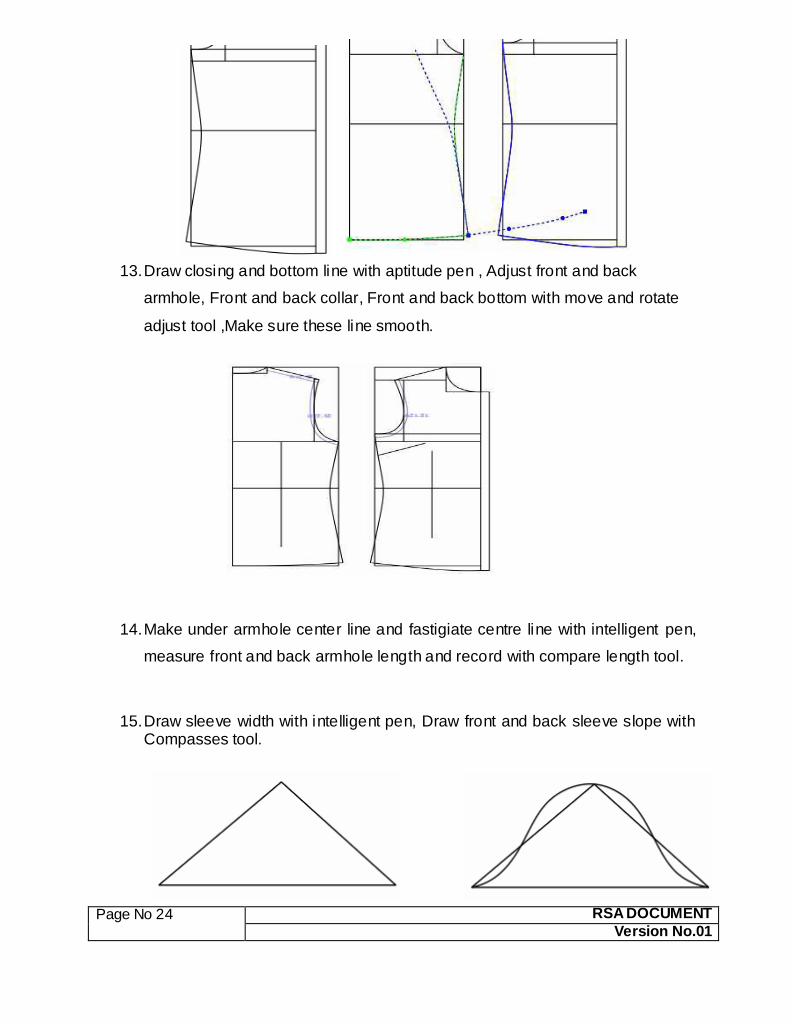
13. Draw closing and bottom line with aptitude pen , Adjust front and back
armhole, Front and back collar, Front and back bottom with move and rotate
adjust tool ,Make sure these line smooth.
14. Make under armhole center line and fastigiate centre line with intelligent pen,
measure front and back armhole length and record with compare length tool.
15. Draw sleeve width with intelligent pen, Draw front and back sleeve slope with Compasses tool.
Page No 25 RSA DOCUMENT
Version No.01
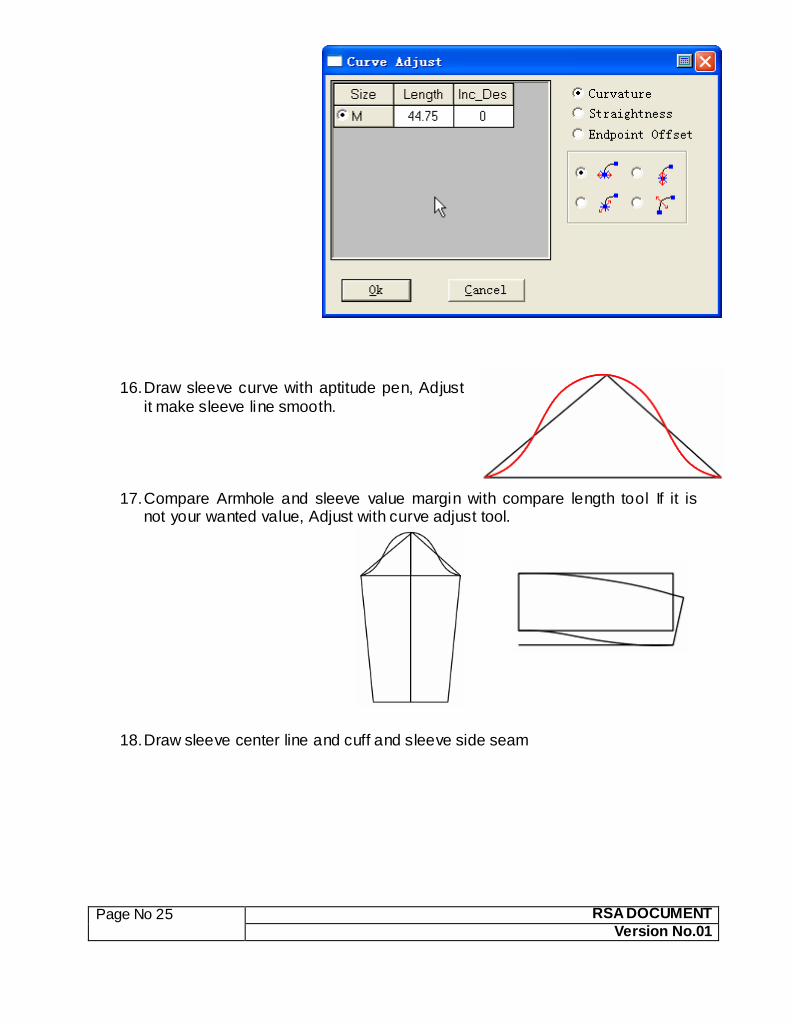
16. Draw sleeve curve with aptitude pen, Adjust
it make sleeve line smooth.
17. Compare Armhole and sleeve value margin with compare length tool If it is not your wanted value, Adjust with curve adjust tool.
18. Draw sleeve center line and cuff and sleeve side seam
Page No 26 RSA DOCUMENT
Version No.01
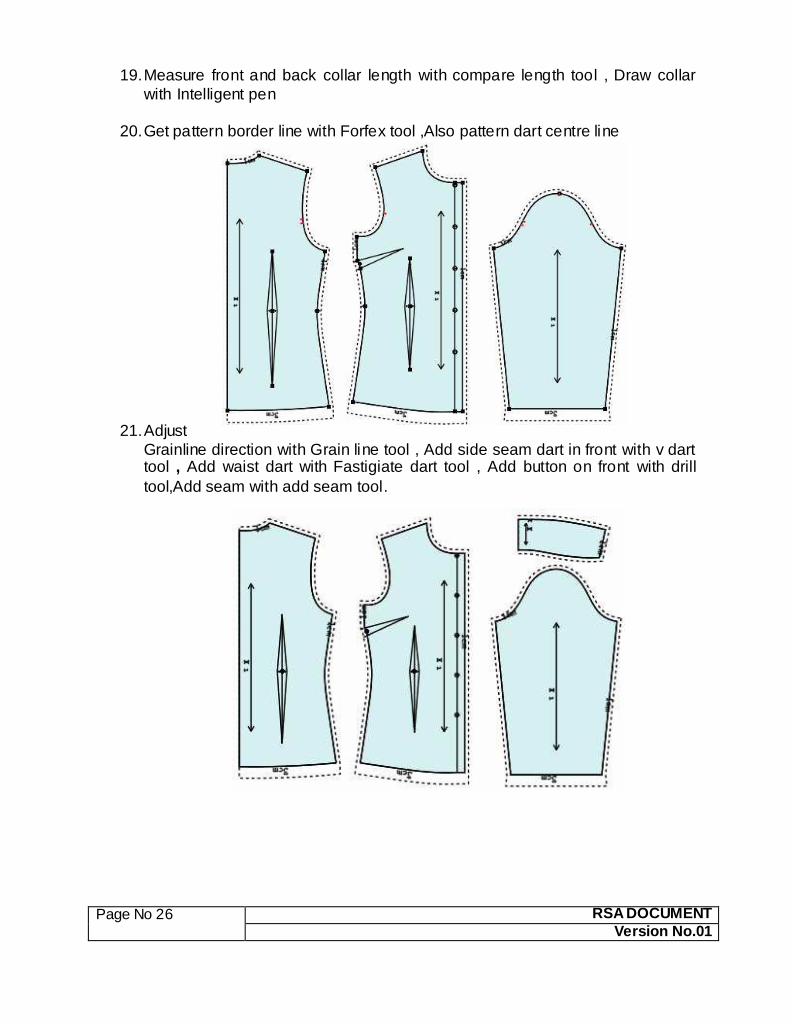
19. Measure front and back collar length with compare length tool , Draw collar
with Intelligent pen
20. Get pattern border line with Forfex tool ,Also pattern dart centre line
21. Adjust
Grainline direction with Grain line tool , Add side seam dart in front with v dart tool , Add waist dart with Fastigiate dart tool , Add button on front with drill
tool,Add seam with add seam tool.

Page No 27 RSA DOCUMENT
Version No.01
22. Make notch with Notch tool on waist, Make notch on armhole, sleeve curve
with “sleeve Crown and armhole notch tool.
23. Symmetry back and collar with pattern symmetry tool
Page No 28 RSA DOCUMENT
Version No.01
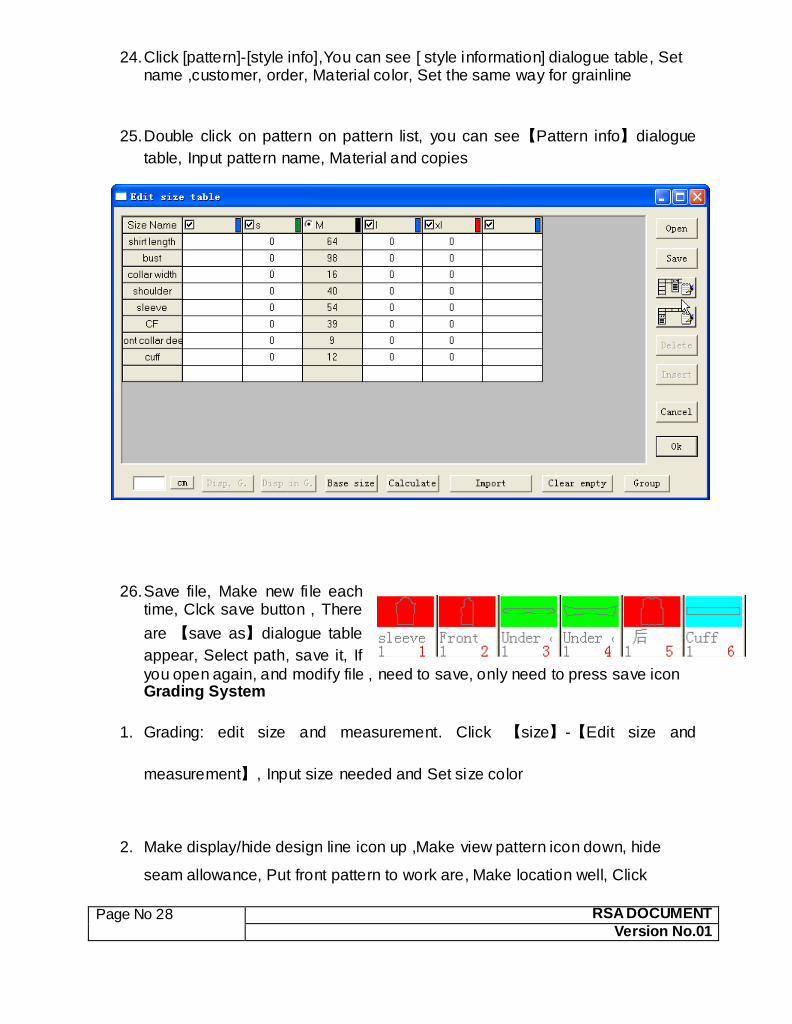
24. Click [pattern]-[style info],You can see [ style information] dialogue table, Set name ,customer, order, Material color, Set the same way for grainline
25. Double click on pattern on pattern list, you can see【Pattern info】dialogue
table, Input pattern name, Material and copies
26. Save file, Make new fi le each time, Clck save button , There
are 【save as】dialogue table
appear, Select path, save it, If
you open again, and modify file , need to save, only need to press save icon Grading System
1. Grading: edit size and measurement. Click 【size】-【Edit size and
measurement】, Input size needed and Set size color
2. Make display/hide design line icon up ,Make view pattern icon down, hide
seam allowance, Put front pattern to work are, Make location well, Click
Page No 29 RSA DOCUMENT
Version No.01
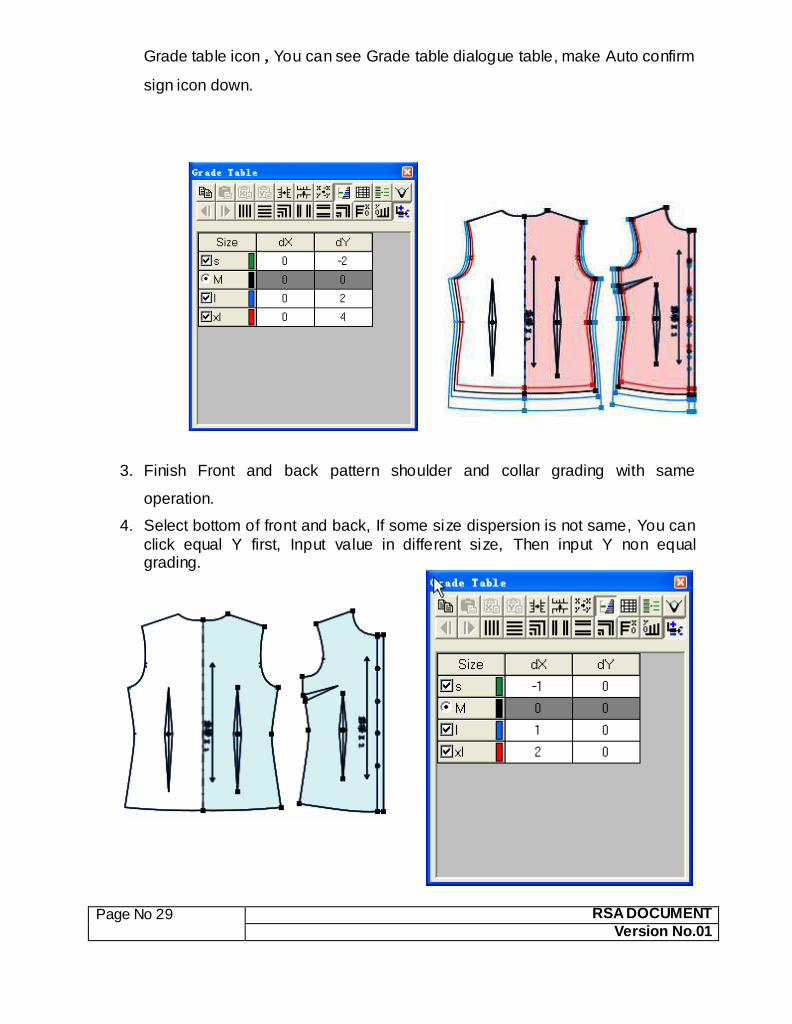
Grade table icon , You can see Grade table dialogue table, make Auto confirm
sign icon down.
3. Finish Front and back pattern shoulder and collar grading with same
operation.
4. Select bottom of front and back, If some size dispersion is not same, You can
click equal Y first, Input value in different size, Then input Y non equal grading.
Page No 30 RSA DOCUMENT
Version No.01
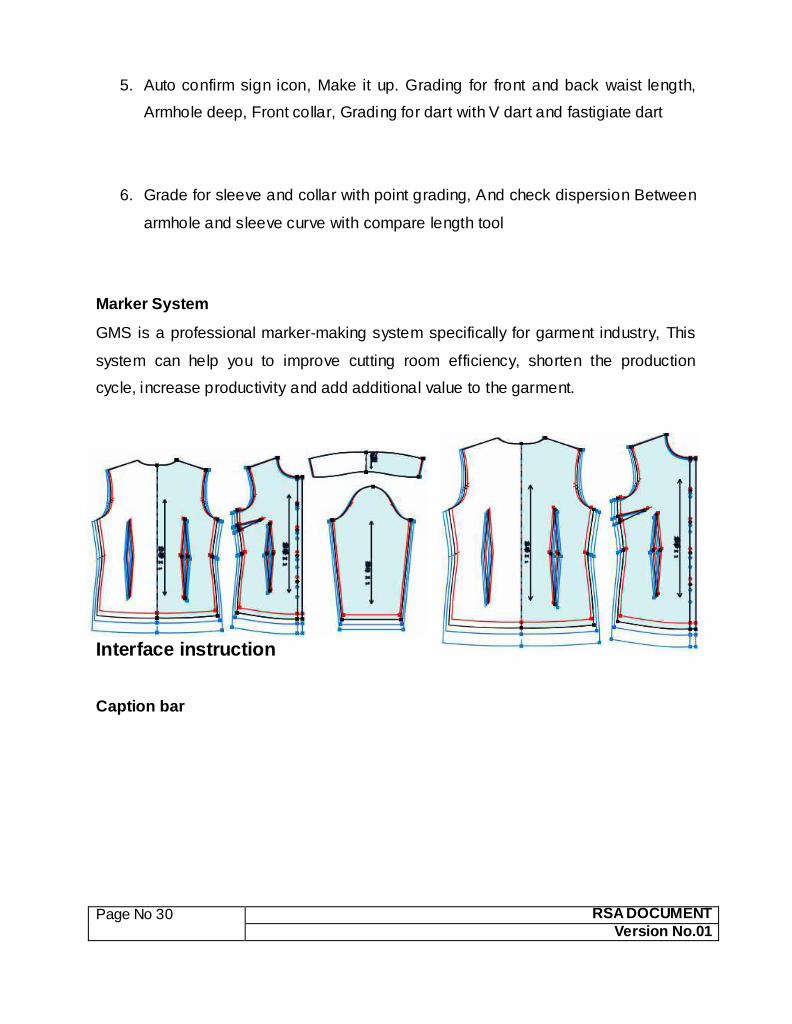
5. Auto confirm sign icon, Make it up. Grading for front and back waist length,
Armhole deep, Front collar, Grading for dart with V dart and fastigiate dart
6. Grade for sleeve and collar with point grading, And check dispersion Between
armhole and sleeve curve with compare length tool
Marker System
GMS is a professional marker-making system specifically for garment industry, This
system can help you to improve cutting room efficiency, shorten the production
cycle, increase productivity and add additional value to the garment.
Interface instruction
Caption bar

Page No 31 RSA DOCUMENT
Version No.01
It is positioned in the top of window showing the file name, type and file saved path
Menu bar
GMS Menu is designed as per the standard windows based software. It contains
nine menus which can be selected by clicking on respective menu or by pressing the
short key ALT + the underlinged letter in each menu
File tool bar
This tool bar has all the usual commands necessary for defining the marker
parameters, defining the constraint's to be applied, change the work units, file open
and file save, etc.
Page No 32 RSA DOCUMENT
Version No.01
Hide toolbar
Piece window:
In Piece window, it shows all the pieces for a marker file. Each piece is put into the
individual box. The size of piece box can be adjusted by dragging its right or left
border. By clicking the right button one can rearrange the pieces by their area,
height, width, material and or original order in the dialog box.
Size list :
Each small piece box has its size list where all sizes and the piece numbers of each size are shown. Ruler
It is used for showing the unit of current marker
Marker toolbar 1
Main marker work area
In the main marker work area, you can set the pieces in a manner so as to achieve a
highly efficient marker
Scroll bar
It includes horizontal or vertical scroll bar, Drag can browser main and aided marker
whole work area,Pattern in piece list, pattern different size.
Aided marker work area:
You can put Pieces in the aided marker according to the size, and then drag pieces
into the work area to operate as per request.
Page No 33 RSA DOCUMENT
Version No.01
Status bar:
The Status bar is at the bottom of the interface. It shows important information. it
contains 8 parts from left to right.
Marker toolbar 2
Marking Operation Steps
1. Click and the dialog box in the dialog box and the marker border. The marker
width in the dialog box can be defined as per the real width of cloth; Length is
suggested longer slightly.
2. Click 【Ok】to get the dialog box.
Page No 34 RSA DOCUMENT
Version No.01
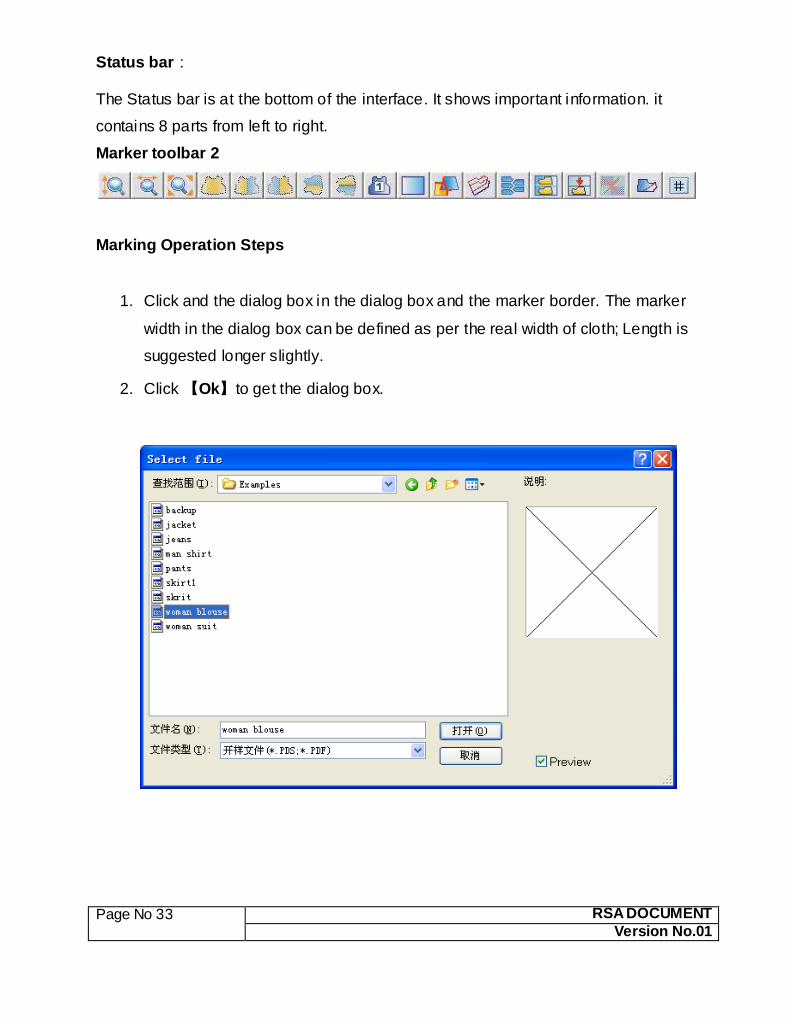
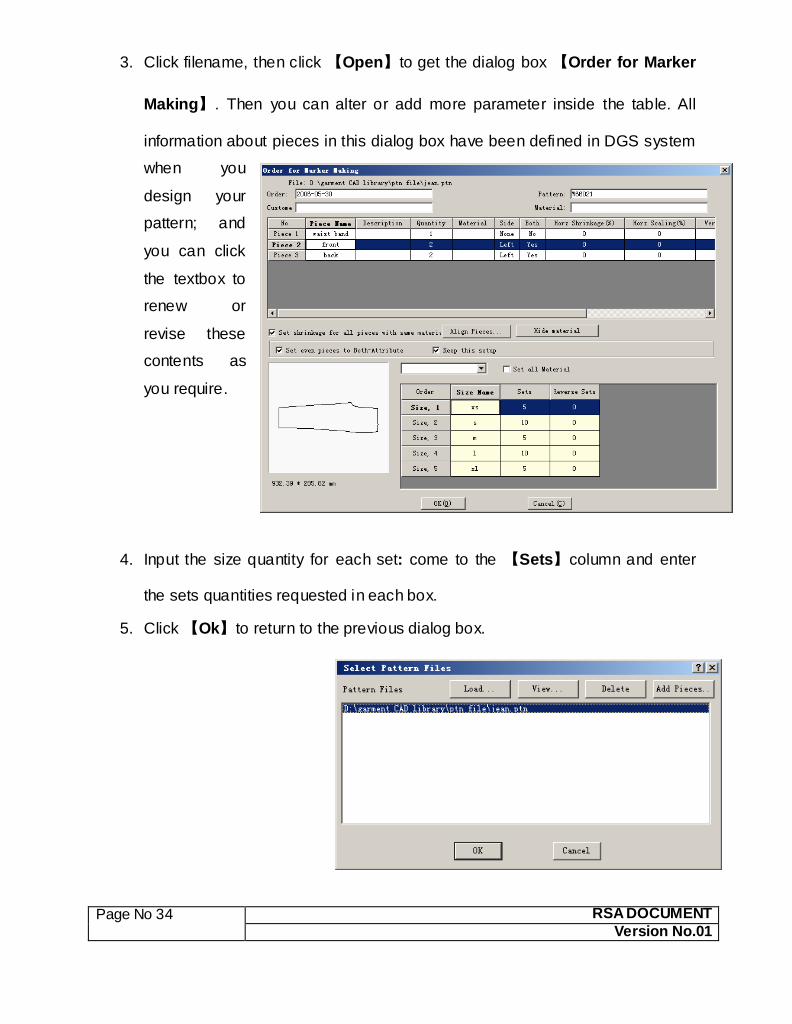
3. Click filename, then click 【Open】to get the dialog box 【Order for Marker
Making】. Then you can alter or add more parameter inside the table. All
information about pieces in this dialog box have been defined in DGS system
when you
design your
pattern; and
you can click
the textbox to
renew or
revise these
contents as
you require.
4. Input the size quantity for each set: come to the 【Sets】column and enter
the sets quantities requested in each box.
5. Click 【Ok】to return to the previous dialog box.
Page No 35 RSA DOCUMENT
Version No.01
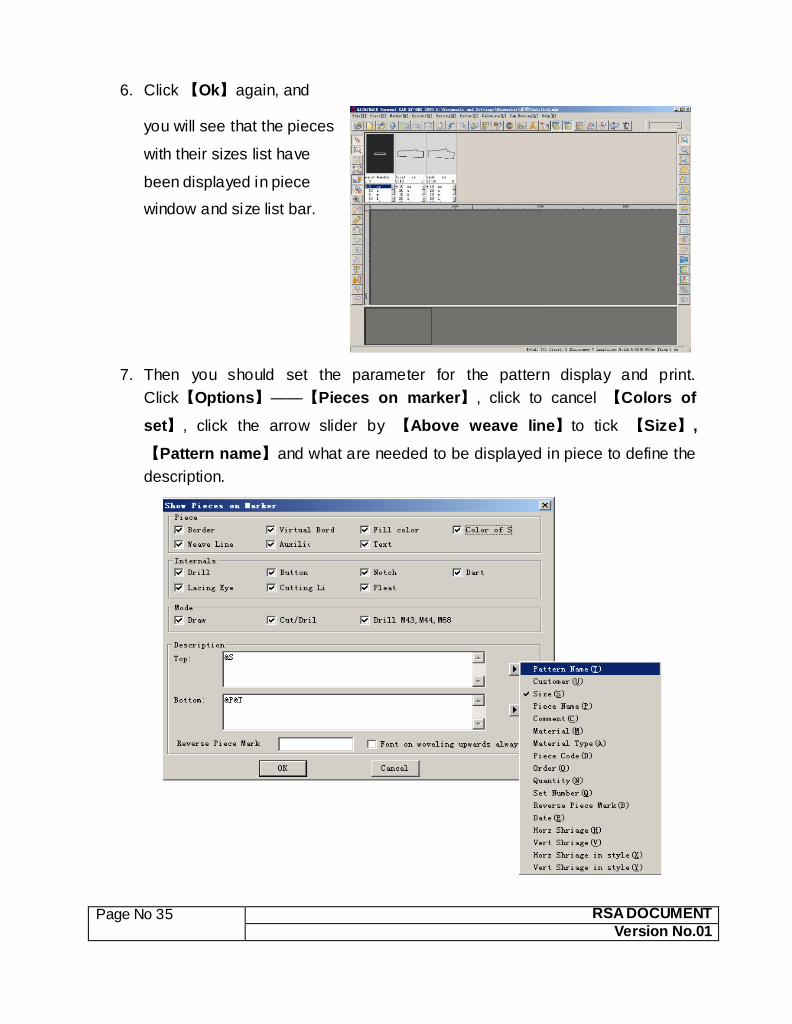
6. Click 【Ok】again, and
you will see that the pieces
with their sizes list have
been displayed in piece
window and size list bar.
7. Then you should set the parameter for the pattern display and print.
Click【Options】——【Pieces on marker】, click to cancel 【Colors of
set】, click the arrow slider by 【Above weave line】to tick 【Size】,
【Pattern name】and what are needed to be displayed in piece to define the
description.
Page No 36 RSA DOCUMENT
Version No.01
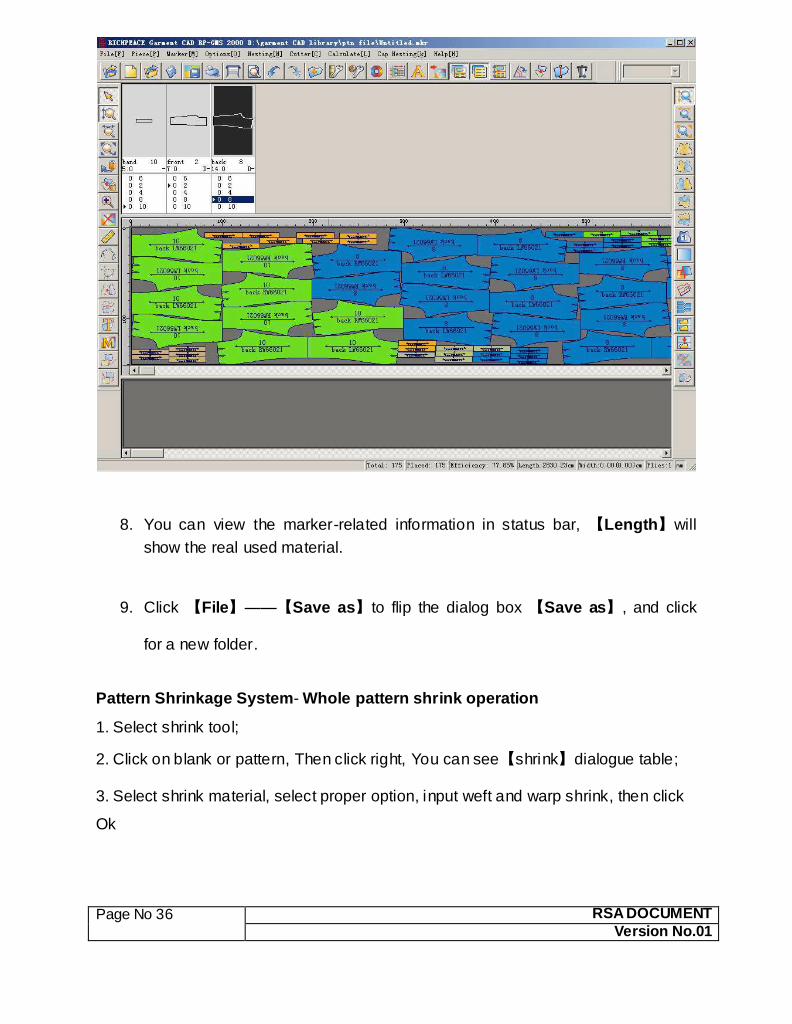
8. You can view the marker-related information in status bar, 【Length】will
show the real used material.
9. Click 【File】——【Save as】to flip the dialog box 【Save as】, and click
for a new folder.
Pattern Shrinkage System- Whole pattern shrink operation
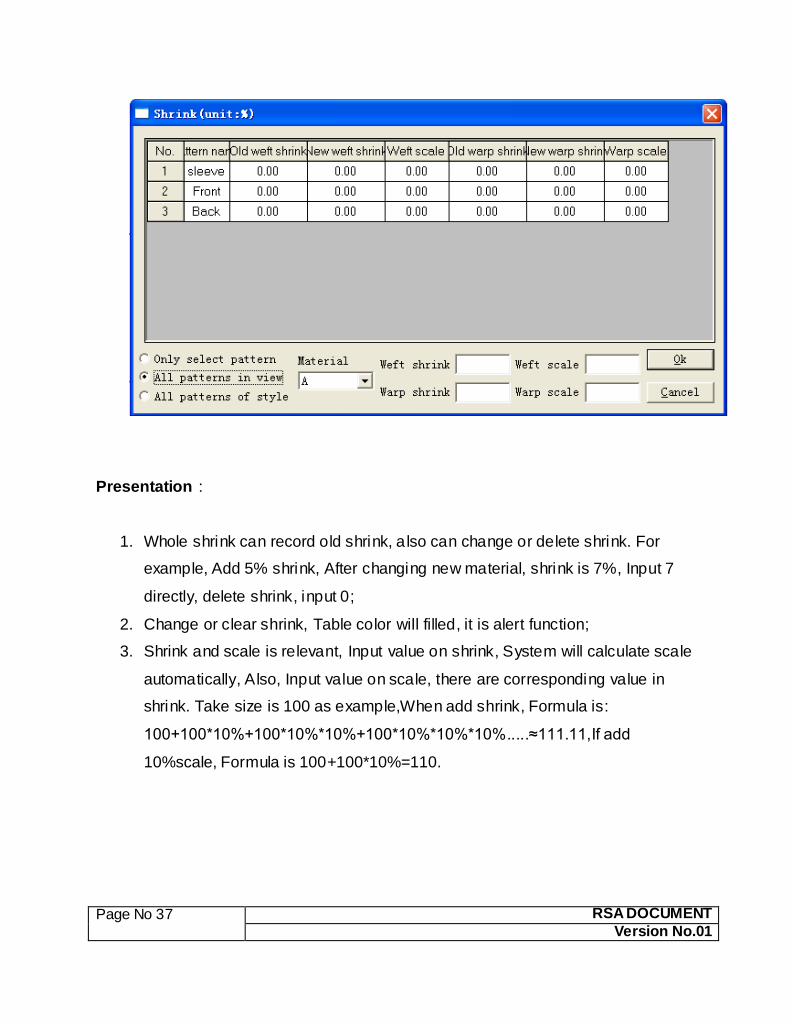
1. Select shrink tool;
2. Click on blank or pattern, Then click right, You can see【shrink】dialogue table;
3. Select shrink material, select proper option, input weft and warp shrink, then click
Ok
Page No 37 RSA DOCUMENT
Version No.01
Presentation:
1. Whole shrink can record old shrink, also can change or delete shrink. For
example, Add 5% shrink, After changing new material, shrink is 7%, Input 7
directly, delete shrink, input 0;
2. Change or clear shrink, Table color will filled, it is alert function;
3. Shrink and scale is relevant, Input value on shrink, System will calculate scale
automatically, Also, Input value on scale, there are corresponding value in
shrink. Take size is 100 as example,When add shrink, Formula is:
100+100*10%+100*10%*10%+100*10%*10%*10%.....≈111.11,If add
10%scale, Formula is 100+100*10%=110.
Page No 38 RSA DOCUMENT
Version No.01
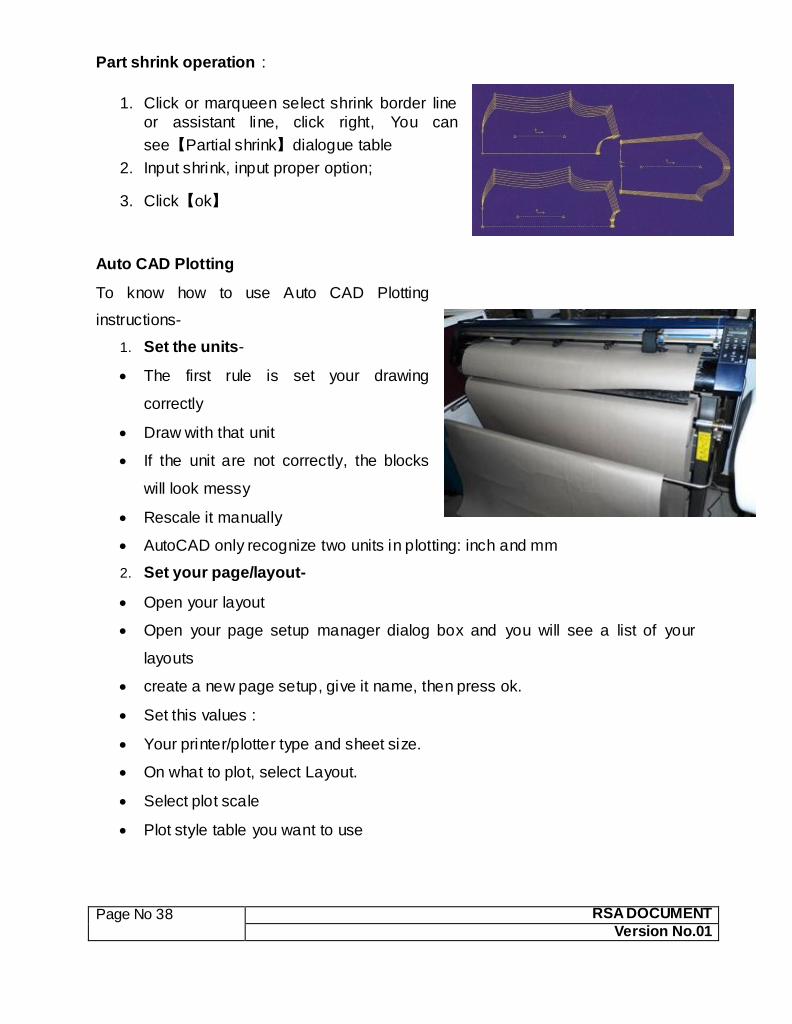
Part shrink operation:
1. Click or marqueen select shrink border line
or assistant line, click right, You can
see【Partial shrink】dialogue table
2. Input shrink, input proper option;
3. Click【ok】
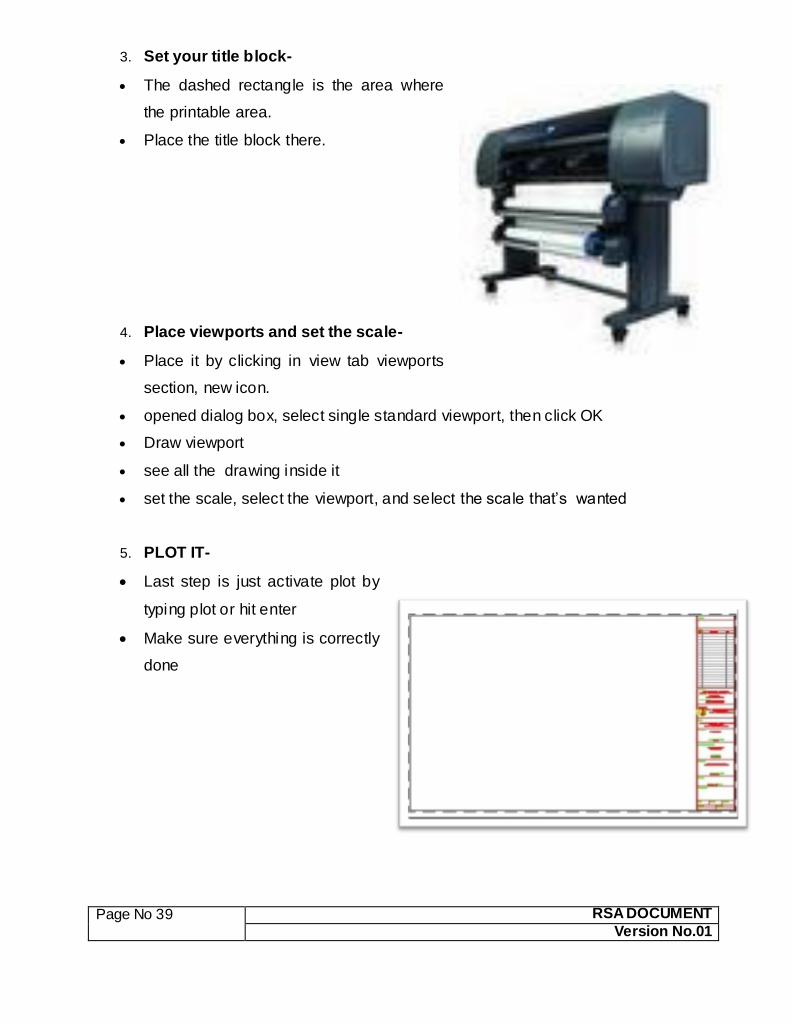
Auto CAD Plotting
To know how to use Auto CAD Plotting
instructions-
1. Set the units-
The first rule is set your drawing
correctly
Draw with that unit
If the unit are not correctly, the blocks
will look messy
Rescale it manually
AutoCAD only recognize two units in plotting: inch and mm
2. Set your page/layout-
Open your layout
Open your page setup manager dialog box and you will see a list of your
layouts
create a new page setup, give it name, then press ok.
Set this values :
Your printer/plotter type and sheet size.
On what to plot, select Layout.
Select plot scale
Plot style table you want to use
Page No 39 RSA DOCUMENT
Version No.01
3. Set your title block-
The dashed rectangle is the area where
the printable area.
Place the title block there.
4. Place viewports and set the scale-
Place it by clicking in view tab viewports
section, new icon.
opened dialog box, select single standard viewport, then click OK
Draw viewport
see all the drawing inside it
set the scale, select the viewport, and select the scale that’s wanted
5. PLOT IT-
Last step is just activate plot by
typing plot or hit enter
Make sure everything is correctly
done