Embed Size (px)
Citation preview

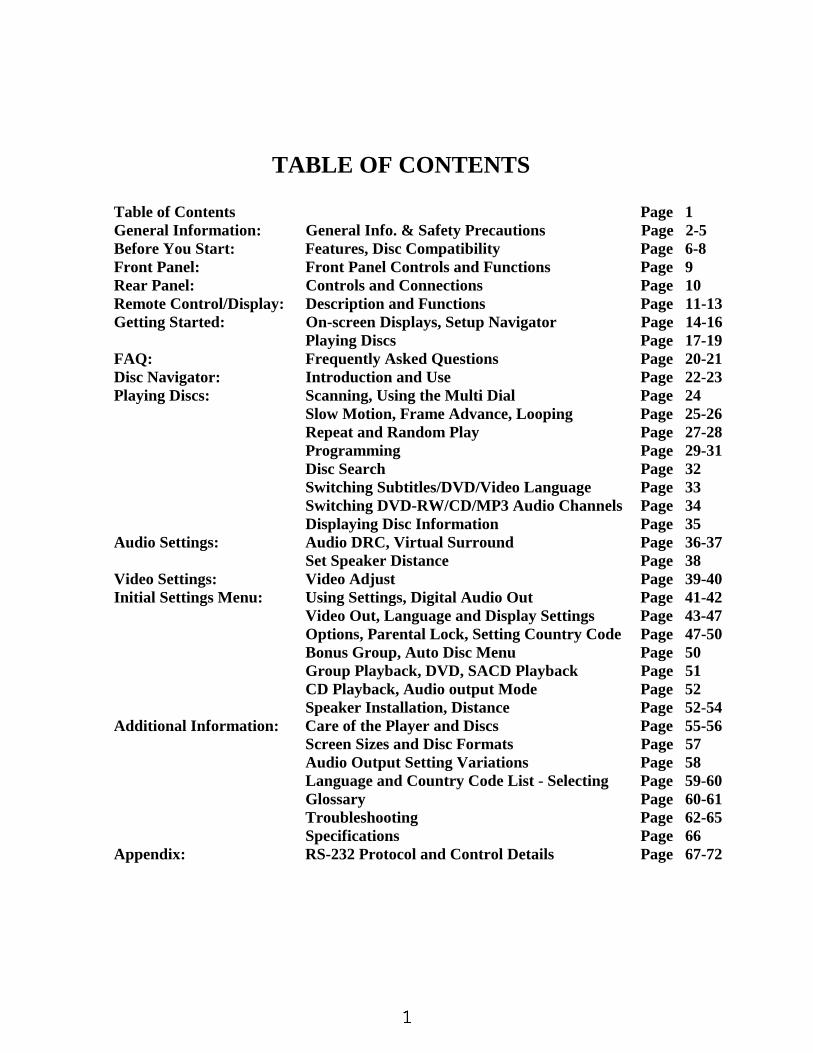
TABLE OF CONTENTS
Table of Contents Page 1 General Information: General Info. & Safety Precautions Page 2-5 Before You Start: Features, Disc Compatibility Page 6-8 Front Panel: Front Panel Controls and Functions Page 9 Rear Panel: Controls and Connections Page 10 Remote Control/Display: Description and Functions Page 11-13 Getting Started: On-screen Displays, Setup Navigator Page 14-16 Playing Discs Page 17-19 FAQ: Frequently Asked Questions Page 20-21 Disc Navigator: Introduction and Use Page 22-23 Playing Discs: Scanning, Using the Multi Dial Page 24 Slow Motion, Frame Advance, Looping Page 25-26 Repeat and Random Play Page 27-28 Programming Page 29-31 Disc Search Page 32 Switching Subtitles/DVD/Video Language Page 33 Switching DVD-RW/CD/MP3 Audio Channels Page 34 Displaying Disc Information Page 35 Audio Settings: Audio DRC, Virtual Surround Page 36-37 Set Speaker Distance Page 38 Video Settings: Video Adjust Page 39-40 Initial Settings Menu: Using Settings, Digital Audio Out Page 41-42 Video Out, Language and Display Settings Page 43-47 Options, Parental Lock, Setting Country Code Page 47-50 Bonus Group, Auto Disc Menu Page 50 Group Playback, DVD, SACD Playback Page 51 CD Playback, Audio output Mode Page 52 Speaker Installation, Distance Page 52-54 Additional Information: Care of the Player and Discs Page 55-56 Screen Sizes and Disc Formats Page 57 Audio Output Setting Variations Page 58 Language and Country Code List - Selecting Page 59-60 Glossary Page 60-61 Troubleshooting Page 62-65
Specifications Page 66 Appendix: RS-232 Protocol and Control Details Page 67-72

CONGRATULATIONSYou have just acquired the finest player available for the playback of digitally encoded source material for both audio and video formats. IMPORTANT Save all packaging in a dry place away from fire hazards. Your Bel Canto player is a precision electronic instrument and should be properly packaged any time shipment is made. In the unlikely event that you have to return your unit to the factory for service, or if you send it to us for updating, the original packaging will best protect the unit from shipping damage or delay. In order to achieve the fullest flexibility and enjoyment from your player, we at Bel Canto recommend that you read this manual in full before connecting the unit to your audio/video system. WARRANTY REGISTRATIONComplete and return by fax or mail your warranty document enclosed in product box for extended warranty coverage. Please return this document to Bel Canto within 30 days of original purchase.
Bel Canto Design offers a 90-day factory warranty from the date of purchase that can be extended to 2 year LIMITED WARRANTY. The original owner can obtain the LIMITED WARRANTY, by returning a completed warranty form along with a copy of the original sales receipt from your authorized Bel Canto Dealer. The extended LIMITED WARRANTY coverage extends the warranty to a period of 1 year on the Laser and Loader (mechanical portion of the unit and 2 years on the electronics, from the date of purchase by the original owner and includes all parts and workmanship. The warranty automatically commences on the date of purchase or I year from the date of shipment to an authorized Bel Canto dealer, which ever comes first, and terminates 3 years from date of shipment to an authorized Bel Canto dealer. Units purchased from a source other than an authorized dealer are not covered by this warranty. Warranty is void if damage is due to abuse, neglect or unauthorized modification. Cost associated with the return of this product is the sole responsibility of the owner. All repair work must be done by an authorized Bel Canto repair center. Workdone by unauthorized persons will void all warranty coverage. Bel Canto Design products are uniquely identified with a serial number on the back panel of each unit. This number is required to validate your warranty. Please reference your serial number if service is required. If you have any questions, comments or if we can be of service, please contact us Monday through Friday 9:00a.m. - 5:00p.m., Central Time in the United States.
Bel Canto Design, Ltd. 212 3rd Avenue North, Minneapolis, MN 55401 USA Tel: 612-317-4550 2003 FLC - Bel Canto/LFM

READ INSTRUCTIONS — All the safety andoperating instructions should be read beforethe product is operated.
RETAIN INSTRUCTIONS — The safety andoperating instructions should be retained forfuture reference.
HEED WARNINGS — All warnings on theproduct and in the operating instructions shouldbe adhered to.
FOLLOW INSTRUCTIONS — All operating anduse instructions should be followed.
CLEANING — Unplug this product from the walloutlet before cleaning. The product should becleaned only with a polishing cloth or a soft drycloth. Never clean with furniture wax, benzine,insecticides or other volatile liquids since theymay corrode the cabinet.
ATTACHMENTS — Do not use attachments notrecommended by the product manufacturer asthey may cause hazards.
WATER AND MOISTURE — Do not use thisproduct near water — for example, near abathtub, wash bowl, kitchen sink, or laundrytub; in a wet basement; or near a swimmingpool; and the like.
ACCESSORIES — Do not place this product onan unstable cart, stand, tripod, bracket, or table.The product may fall, causing serious injury to achild or adult, and serious damage to theproduct. Use only with a cart, stand, tripod,bracket, or table recommended by themanufacturer, or sold with the product. Anymounting of the product should follow themanufacturer’s instructions, and should use amounting accessory recommended by themanufacturer.
CART — A product and cartcombination should be moved withcare. Quick stops, excessive force,and uneven surfaces may cause theproduct and cart combination tooverturn.
VENTILATION — Slots and openings in thecabinet are provided for ventilation and toensure reliable operation of the product and toprotect it from overheating, and these openingsmust not be blocked or covered. The openingsshould never be blocked by placing the producton a bed, sofa, rug, or other similar surface.This product should not be placed in a built-ininstallation such as a bookcase or rack unlessproper ventilation is provided or themanufacturer’s instructions have been adheredto.
POWER SOURCES — This product should beoperated only from the type of power sourceindicated on the marking label. If you are notsure of the type of power supply to your home,consult your product dealer or local powercompany.
LOCATION – The appliance should be installedin a stable location.
NONUSE PERIODS – The power cord of theappliance should be unplugged from the outletwhen left unused for a long period of time.
GROUNDING OR POLARIZATION• If this product is equipped with a polarized
alternating current line plug (a plug having oneblade wider than the other), it will fit into theoutlet only one way. This is a safety feature. Ifyou are unable to insert the plug fully into theoutlet, try reversing the plug. If the plug shouldstill fail to fit, contact your electrician to replaceyour obsolete outlet. Do not defeat the safetypurpose of the polarized plug.
• If this product is equipped with a three-wiregrounding type plug, a plug having a third(grounding) pin, it will only fit into a groundingtype power outlet. This is a safety feature. Ifyou are unable to insert the plug into the outlet,contact your electrician to replace yourobsolete outlet. Do not defeat the safetypurpose of the grounding type plug.
IMPORTANT SAFETY INSTRUCTIONS
The lightning flash with arrowheadsymbol, within an equilateraltriangle, is intended to alert theuser to the presence of uninsulated“dangerous voltage” within theproduct's enclosure that may be ofsufficient magnitude to constitutea risk of electric shock to persons.
IMPORTANT
CAUTION:
TO PREVENT THE RISK OF ELECTRICSHOCK, DO NOT REMOVE COVER(OR BACK). NO USER-SERVICEABLEPARTS INSIDE. REFER SERVICINGTO QUALIFIED SERVICEPERSONNEL.
The exclamation point within anequilateral triangle is intended toalert the user to the presence ofimportant operating andmaintenance (servicing)instructions in the literatureaccompanying the appliance.
H002_En
RISK OF ELECTRIC SHOCKDO NOT OPEN
CAUTION

POWER-CORD PROTECTION — Power-supplycords should be routed so that they are notlikely to be walked on or pinched by itemsplaced upon or against them, paying particularattention to cords at plugs, conveniencereceptacles, and the point where they exit fromthe product.
OUTDOOR ANTENNA GROUNDING — If anoutside antenna or cable system is connectedto the product, be sure the antenna or cablesystem is grounded so as to provide someprotection against voltage surges and built-upstatic charges. Article 810 of the NationalElectrical Code, ANSI/NFPA 70, providesinformation with regard to proper grounding ofthe mast and supporting structure, groundingof the lead-in wire to an antenna discharge unit,size of grounding conductors, location ofantenna-discharge unit, connection togrounding electrodes, and requirements for thegrounding electrode. See Figure A.
LIGHTNING — For added protection for thisproduct during a lightning storm, or when it isleft unattended and unused for long periods oftime, unplug it from the wall outlet anddisconnect the antenna or cable system. Thiswill prevent damage to the product due tolightning and power-line surges.
POWER LINES — An outside antenna systemshould not be located in the vicinity ofoverhead power lines or other electric light orpower circuits, or where it can fall into suchpower lines or circuits. When installing anoutside antenna system, extreme care shouldbe taken to keep from touching such powerlines or circuits as contact with them might befatal.
OVERLOADING — Do not overload wall outlets,extension cords, or integral conveniencereceptacles as this can result in a risk of fire orelectric shock.
OBJECT AND LIQUID ENTRY — Never pushobjects of any kind into this product throughopenings as they may touch dangerous voltagepoints or short-out parts that could result in afire or electric shock. Never spill liquid of anykind on the product.
SERVICING — Do not attempt to service thisproduct yourself as opening or removing coversmay expose you to dangerous voltage or otherhazards. Refer all servicing to qualified servicepersonnel.
[For U.S. model]
IMPORTANT NOTICE
The serial number for this equipment is locatedon the rear panel. Please write this serialnumber on your enclosed warranty card andkeep it in a secure area. This is for yoursecurity. H006A_En
DAMAGE REQUIRING SERVICE — Unplug thisproduct from the wall outlet and refer servicingto qualified service personnel under thefollowing conditions:
• When the power-supply cord or plug isdamaged.
• If liquid has been spilled, or objects have falleninto the product.
• If the product has been exposed to rain orwater.
• If the product does not operate normally byfollowing the operating instructions. Adjust onlythose controls that are covered by theoperating instructions as an improperadjustment of other controls may result indamage and will often require extensive workby a qualified technician to restore the productto its normal operation.
• If the product has been dropped or damaged inany way.
• When the product exhibits a distinct change inperformance — this indicates a need forservice.
REPLACEMENT PARTS — When replacementparts are required, be sure the servicetechnician has used replacement partsspecified by the manufacturer or have thesame characteristics as the original part.Unauthorized substitutions may result in fire,electric shock, or other hazards.
SAFETY CHECK — Upon completion of anyservice or repairs to this product, ask theservice technician to perform safety checks todetermine that the product is in properoperating condition.
WALL OR CEILING MOUNTING — The productshould not be mounted to a wall or ceiling.
HEAT — The product should be situated awayfrom heat sources such as radiators, heatregisters, stoves, or other products (includingamplifiers) that produce heat.
POWER SERVICE GROUNDINGELECTRODE SYSTEM(NEC ART 250, PART H)
GROUND CLAMPS
GROUNDING CONDUCTORS(NEC SECTION 810-21)
ANTENNADISCHARGE UNIT(NEC SECTION 810-20)
GROUNDCLAMP
Fig. A
NEC — NATIONAL ELECTRICAL CODE
ANTENNALEAD IN WIRE
ELECTRICSERVICEEQUIPMENT
WARNING: TO PREVENT FIRE OR SHOCKHAZARD, DO NOT EXPOSE THIS APPLIANCETO RAIN OR MOISTURE. H001_En
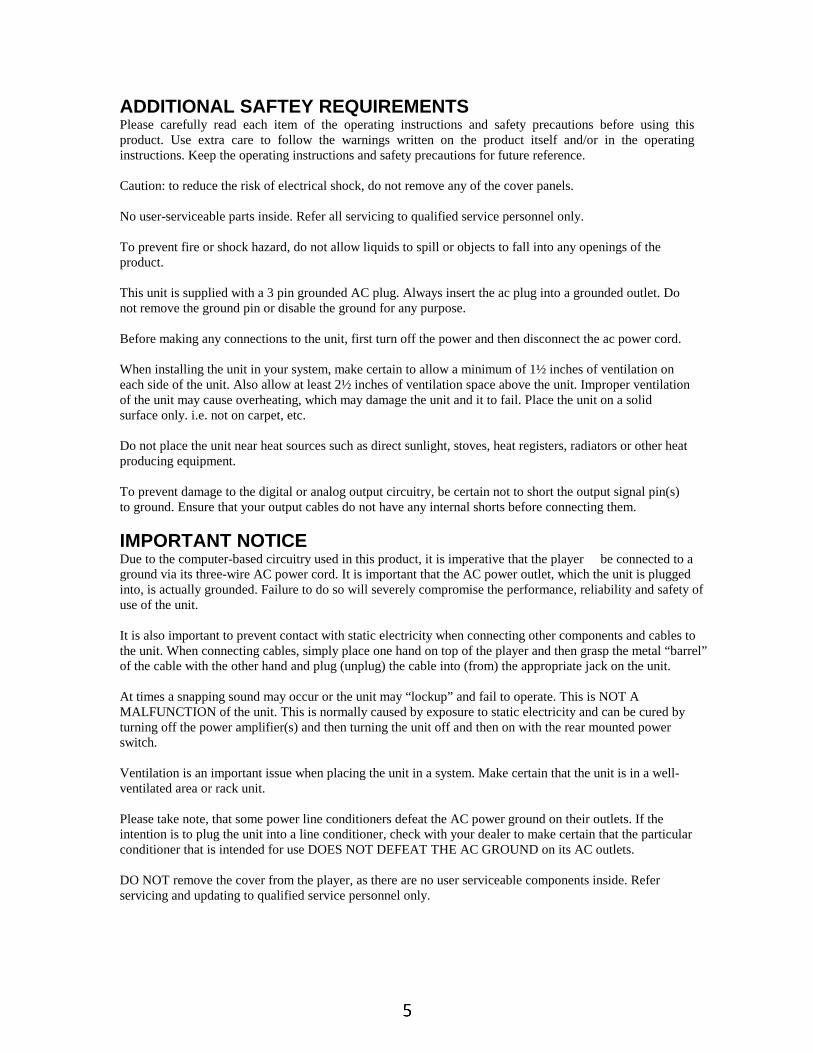
ADDITIONAL SAFTEY REQUIREMENTS Please carefully read each item of the operating instructions and safety precautions before using this product. Use extra care to follow the warnings written on the product itself and/or in the operating instructions. Keep the operating instructions and safety precautions for future reference. Caution: to reduce the risk of electrical shock, do not remove any of the cover panels. No user-serviceable parts inside. Refer all servicing to qualified service personnel only. To prevent fire or shock hazard, do not allow liquids to spill or objects to fall into any openings of the product. This unit is supplied with a 3 pin grounded AC plug. Always insert the ac plug into a grounded outlet. Do not remove the ground pin or disable the ground for any purpose. Before making any connections to the unit, first turn off the power and then disconnect the ac power cord. When installing the unit in your system, make certain to allow a minimum of 1½ inches of ventilation on each side of the unit. Also allow at least 2½ inches of ventilation space above the unit. Improper ventilation of the unit may cause overheating, which may damage the unit and it to fail. Place the unit on a solid surface only. i.e. not on carpet, etc. Do not place the unit near heat sources such as direct sunlight, stoves, heat registers, radiators or other heat producing equipment. To prevent damage to the digital or analog output circuitry, be certain not to short the output signal pin(s) to ground. Ensure that your output cables do not have any internal shorts before connecting them. IMPORTANT NOTICE Due to the computer-based circuitry used in this product, it is imperative that the player be connected to a ground via its three-wire AC power cord. It is important that the AC power outlet, which the unit is plugged into, is actually grounded. Failure to do so will severely compromise the performance, reliability and safety of use of the unit. It is also important to prevent contact with static electricity when connecting other components and cables to the unit. When connecting cables, simply place one hand on top of the player and then grasp the metal “barrel” of the cable with the other hand and plug (unplug) the cable into (from) the appropriate jack on the unit. At times a snapping sound may occur or the unit may “lockup” and fail to operate. This is NOT A MALFUNCTION of the unit. This is normally caused by exposure to static electricity and can be cured by turning off the power amplifier(s) and then turning the unit off and then on with the rear mounted power switch. Ventilation is an important issue when placing the unit in a system. Make certain that the unit is in a well-ventilated area or rack unit. Please take note, that some power line conditioners defeat the AC power ground on their outlets. If the intention is to plug the unit into a line conditioner, check with your dealer to make certain that the particular conditioner that is intended for use DOES NOT DEFEAT THE AC GROUND on its AC outlets. DO NOT remove the cover from the player, as there are no user serviceable components inside. Refer servicing and updating to qualified service personnel only.

Before You Start01
8En
Features
DVD-Audio and SACD compatibleExperience the super high-quality audioperformance of DVD-Audio and Super AudioCD (SACD).
The on-board 24-bit/192kHz DAC means thatthis player is fully compatible with highsampling-rate discs, capable of deliveringexceptional sound quality in terms ofdynamic range, low-level resolution andhigh-frequency detail.
Built-in Dolby*1 Digital and DTS*2
decoding with multichannel out-puts
Logos: 1R
This player features multichannel analogoutputs for connection to an AV amplifier togive you stunning surround sound fromDolby Digital, DTS and multichannel DVD-Audio discs.
TruSurround*3 and Virtual DolbyDigital
Logo:
TruSurround/Virtual Dolby Digital creates arealistic surround-sound effect from anyDolby Digital source using just two speakers.
PureCinema progressive scanWhen connected to a progressive scan-compatible TV or monitor using the compo-nent video outputs, you can enjoy extremelystable, flicker free images, with the sameframe refresh rate as the original movie (seepage 50).
Super Fine Focus digital filterThis improves the quality of the video outputby reducing video noise and increasing thehorizonatal resolution to 540 lines.
MP3 compatibilityThis player is compatible with CD-R, CD-RWand CD-ROM discs that contain MP3 audiotracks.
Graphical on-screen displaysSetting up and using your DVD player ismade very easy using the graphical on-screen displays.
*1 Manufactured under license from Dolby Laborato-ries. “Dolby” and the double-D symbol are trademarks ofDolby Laboratories.
*2 “DTS” and “DTS Digital Surround” are registeredtrademarks of Digital Theater Systems, Inc.
*3 TruSurround and the ® symbol are trademarksof SRS Labs, Inc. TruSurround technology is incorporatedunder license from SRS Labs, Inc.

Before You Start01
10En
Disc / Content Format Play-back CompatibilityGeneral Disc Compatibility
• This player was designed and engi-neered to be compatible with softwarecontaining one or more of the followinglogos.
DVD-Video DVD-R DVD-RWDVD-Audio
Video CD
Super Audio CD
Audio CD CD-R CD-RW
• Other formats, including but not limitedto the following, are not playable in thisplayer:Photo CD / DVD-RAM / DVD-ROM /CD-ROM(except those that contain MP3 filesformatted as specified in the “Com-pressed Audio Compatibility” section)
• DVD-R/RW and CD-R/RW discs (AudioCDs and Video CDs) recorded using aDVD Recorder, CD Recorder or PersonalComputer may not be playable on thismachine. This may be caused by anumber of possibilities, including butnot limited to: the type of disc used; thetype of recording; or damage, dirt orcondensation on either the disc or theplayer’s pick-up lens.
Special note about particular formats orsoftware follows below:
CD-R/RW Compatibility• This unit will play CD-R and CD-RW
discs recorded in CD Audio, Video CD,or MP3 audio formatting. However, anyother content may cause the disc not toplay, or create noise/distortion in theoutput.
• This unit cannot record CD-R or CD-RWdiscs.
• Un-finalized CD-R/RW discs recorded inCD Audio can be played, but not allTable of Contents (playing time, etc..)will be displayed.
DVD-R/RW Compatibility• This unit will play DVD-R/RW discs that
were recorded using the DVD Videoformat.
• This unit will play DVD-RW discs thatwere recorded using the Video Record-ing format.
• This unit cannot record DVD-R/RWdiscs.
• Un-finalized DVD-R/RW discs cannot beplayed in this player.
Compressed Audio Compatibility• This unit will play compressed audio
files formatted in the MPEG-1 AudioLayer 3 format (MP3) with a 44.1 or48kHz fixed bit rate. Incompatible fileswill not play and “UNPLAYABLE” will bedisplayed on the unit.
• Variable Bit-Rate (VBR) files areplayable, but playing time may not beshown correctly.
• The CD-ROM used to compile your MP3files must be ISO 9660 Level 2 compli-ant.
• CD physical format: Mode1, Mode2 XAForm1.
• This player only plays tracks that arenamed with the file extension “.mp3” or“.MP3”.

Before You Start 01
11En
• This player is compatible with multi-session discs, but only plays sessionsthat are closed.
• Use CD-R or CD-RW media for record-ing your MP3 files.
• This player can recognize a maximum of250 folders or 250 tracks. Discs contain-ing more than 250 folders or 250 trackswill play, but only the first 250 folders /tracks.
• Folder and track names (excluding the“.mp3” extension) are displayed.
• There are many different recording bit-rates available to encode your MP3 files.This unit was designed to be compatiblewith all of them. Audio encoded at128Kbps should sound close to regularCD Audio quality. This player will playlower bit-rate MP3 tracks, but pleasenote that the sound quality becomesnoticeably worse at lower bit-rates.
PC Created Disc Compatibility• If you record a disc using a Personal
Computer, even if it is recorded in a“compatible format” as listed above,there will be cases in which the discmay not be playable in this machine dueto the setting of the application softwareused to create the disc. In theseparticular incidences, check with thesoftware publisher for more detailedinformation.
• DVD-R/RW and CD-R/RW software discboxes also have additional compatibilityinformation.
Titles, chapters, Groups and tracksDVD-Video discs are generally divided intoone or more titles. Titles may be furthersubdivided into chapters.
Title 1 Title 2 Title 3
Chapter 1 Chapter 2 Chapter 3 Chapter 1 Chapter 1 Chapter 2
DVD-Audio discs are divided into one ormore groups that can each contain anumber of tracks.
Group 1 Group 2 Group 3
Track 1 Track 2 Track 3 Track 1 Track 1 Track 2
CDs, SACDs and Video CD are divided intotracks.
Track 1 Track 2 Track 3 Track 4 Track 5 Track 6
CD-ROMs containing MP3 files are dividedinto folders and tracks. Folders may alsocontain further subfolders.
Folder A Folder B Folder C
Track 1 Track 2 Track 3 Track 1 Track 1 Track 2
mp3
mp3
mp3
mp3
mp3
mp3
DVD-Video regionsAll DVD-Video discs carry a region mark onthe case somewhere that indicates whichregion(s) of the world the disc is compatiblewith. Your DVD player also has a regionmark, which you can find on the rear panel.Discs from incompatible regions will not playin this player. Discs marked ALL will play inany player.
The diagram below shows the various DVDregions of the world.
1
2
2
5
5
6
3
21
4
4


Controls and Displays03
20En
1 5.1CHLights when analog 5.1 channel output isselected.
2 V-PARTLights when playing a video part of a DVDdisc
3 PRGSVEThis indicator is not used on this player.See Section for front panel controls.
4Lights during multi-angle scenes on a DVDdisc.
5 GUI (Graphical User Interface)Lights when a menu is displayed on-screen
6 GRPIndicates that the character display isshowing a DVD-Audio group number
7 TITLEIndicates that the character display isshowing a DVD-Video title number
8Lights when 2V/TruSurround is active.
9 TRKIndicates that the character display isshowing a track number
10 CHPIndicates that the character display isshowing a DVD chapter number
11 REMAINLights when the character display is showingthe time or number of tracks/titles/chaptersremaining
12 Character display
13 8Lights when a disc is paused
14 3Lights when a disc is playing
15 2DLights when a Dolby Digital soundtrack isplaying
16 DTSLights when a DTS soundtrack is playing
1
1516 1214 13
3 5 76 8 9 10 112 4
Display

Controls and Displays 03
21En
1 (STANDBY/ON)Press to switch the player on or into standby
2 DISPLAYPress to display information about the discplaying (page 46)
3 AUDIOPress to select the audio channel orlanguage.
4 SETUPPress to display (or exit) the on-screendisplay
Remote control
• Buttons 6 thru 9 and 20 thu 22 glowslightly in the dark for ease of use.
E/E/
SETUP
DISPLAY AUDIO SUBTITLE ANGLE
TOP MENU
OPEN /CLOSE
MENU
– MULTI SPEED +
ENTER
VIDEOADJUST DIMMER JOG MODERETURN
V.ADJ FL JOG
PLAY MODE SURROUND
87 3
4 ¢ 1 ¡
0987
E654
C321
CLEAR
ENTER
VOLUME CHANNEL
TV CONTROL
+ FUNC
–
+
–TV
1 1415
1617
18
2021
22
25
2728
23
2
4
5
67
8
10
12
13
3
9
19
26
11 24
5 ENTER & JoystickUse to navigate on-screen displays andmenus. Press ENTER to select an option orexecute a command
6 (RETURN)Press to return to a previous menu screen
7 V.ADJ (VIDEO ADJUST )Press to display the Video Adjust menu.
8 7Press to stop the disc (you can resumeplayback by pressing 3 (play))
9 3Press to start or resume playback
10 4 ¢Press to jump to the start of the previous /next chapter / track
11 PLAY MODEPress to display the Play Mode menu. (You can also get to the Play Mode menu by pressing SETUP and selecting Play Mode)
12 Number buttons
13 MENUPress to display a DVD disc menu, or theDisc Navigator if a DVD-RW, CD, Video CD orMP3 disc is loaded
14 0 OPEN/CLOSEPress to open or close the disc tray
15 ANGLEPress to change the camera angle duringDVD multi-angle scene playback.
16 SUBTITLEPress to select a subtitle display.
17 TOP MENUPress to display the top menu of a DVD disc

Controls and Displays03
2152En
18 MULTI DIALUse for scanning and slow motion control.
19 Jog indcatorLights when multi dial is in jog mode .
20 JOG (JOG MODE)Press to put switch jog mode on/off. Whenon, use the MULTI DIAL to advance orreverse frames.
21 FL (DIMMER)Press to change the display brightness
22 8Press to pause playback; press again torestart
23 1 and /e / ¡ and E/Use for reverse / forward slow motionplayback, frame reverse / advance andreverse / forward scanning.
24 SURROUNDPress to activate/switch off 2V/TruSurround.
25 CLEARPress to clear a numeric entry
26 ENTERPress to select an option or execute acommand
27 TV CONTROL buttonsVOLUMEUse to adjust the volume
CHANNELUse to select TV channel
FUNCPress FUNC to select the TV for remotecontrol operation
28 TV Press TV to turn the TV’s power on or putin to standby
Setting up the Remote Control toTVThis most be set to use buttons 27 and 28.
1. Input the Manufacturer code.While holiding down the CLEAR button,input the two digit code from the table nextpage that corresponds to the make of yourTV.
For example, If you have a Pioneer TV, pressand hold CLEAR, then press 0, 0 on theremote control.
2. Confirm that the TV is responding tothe programmed code.On the remote, press the TV button. If theTV swithches on (or into standby if it was onpreviously), then you have the correct code.
If nothing happens when you press the TVbutton, start again from step 1 using adifferent code.
• Some manufacturers have severalcodes. Try each one until you find theone that works.
Preset code list00, PIONEER101, RCA102, SHARP303, ZENITH104, SONY05, TOSHIBA106, HITACHI107, PHILIPS08, PANASONIC109, MITSUBISHI10, GOLDSTAR111, GE112, MAGNAVOX113, JVC114, SANYO215, RCA216, RCA317, RCA4
18, RCA519, SHARP120, ZENITH1221, SANYO122, PANASONIC223, GOLDSTAR224, HITACHI225, HITACHI326, TOSHIBA227, SHARP228, GE229, MAGNAVOX230, TOSHIBA331, HITACHI432, JVC233, FUJITSU34, PIONEER235, GRANDIENTE

Getting Started 04
25En
• Information at the bottom of every OSDscreen explains the currently selectedmenu item and shows which buttonscan be used for that screen.
Setting up with the SetupNavigatorUsing the Setup Navigator you can make anumber of other initial settings for thisplayer. We recommend using the SetupNavigator, especially if you connected thisplayer to an AV receiver for playing surroundsound. To answer some of the questionsabout digital audio formats you may need tolook at the instructions that came with yourAV receiver.
1 If a disc is playing, press 7 (stop).Also turn on your TV and make sure that it isset to the correct video input.
2 Press SETUP.The on-screen display (OSD) appears.
Video AdjustAudio Settings
Play Mode
Setup Navigator
Disc Navigator
Initial Settings
3 Select ‘Setup Navigator’.
Audio Settings
Play Mode
Setup Navigator
Disc Navigator
Initial Settings
Video Adjust
Using the on-screen displaysFor ease of use, this player makes extensiveuse of graphical on-screen displays (OSDs).You should get used to the way these work asyou’ll need to use them when setting up theplayer, using some of the playback features,such as program play, and when makingmore advanced settings for audio and video.
All the screens are navigated in basically thesame way, using the cursor buttons tochange the highlighted item and pressingENTER to select it.
• Throughout this manual, ‘Select’ meansuse the Joystick to highlight an item on-screen, then press ENTER.
E/E/
SETUP
DISPLAY AUDIO SUBTITLE ANGLE
TOP MENUMENU
– MULTI SPEED +
ENTER
VIDEOADJUST DIMMER JOG MODERETURN
V.ADJ FL JOG
PLAY MODE SURROUND
87 3
4 ¢ 1 ¡
Button What it does
SETUP Display/exit the on-screendisplay
Changes the highlightedmenu item
ENTER Selects the highlighted menuitem (both ENTER buttonswork in exactly the same way)
(RETURN) Returns to the previous menuwithout saving changes
(Joystick)

Getting Started04
26En
7 Did you connect a digital output toyour AV receiver?Select Connected or Not Connected.
ConnectedNot Connected
AV Receiver
5.1ch Audio Out
Digital Audio Out
Language Settings
Audio Out Settings
Speaker Settings
AV Receiver Func.
Setup Navigator
• If you selected Not Connected in bothsteps 6 and 7, that completes the setup.Press ENTER to leave the SetupNavigator.
If you selected Connected in step 6, thenanswer the following questions about thespeakers in your system, otherwise jump tostep 11.
8 Do you have a center speaker con-nected to your AV receiver?Select Connected or Not Connected.
ConnectedNot Connected
Center SpeakerLanguage Settings
Audio Out Settings
Speaker Settings
AV Receiver Func.
Setup Navigator
9 Do you have surround speakersconnected to your AV receiver?Select Connected or Not Connected.
ConnectedNot Connected
Center Speaker
Surround Speakers
Language Settings
Audio Out Settings
Speaker Settings
AV Receiver Func.
Setup Navigator
4 Select a DVD language.Some DVD discs feature on-screen menus,soundtracks and subtitles in several lan-guages. Set your preferred language here.
EnglishFrenchGermanItalianSpanishDutchOther Language
DVD LanguageLanguage Settings
Audio Out Settings
Speaker Settings
AV Receiver Func.
Setup Navigator
• Note that the language you choose heremay not be available on all discs.
• If you want to select a language otherthan those listed, select Other Lan-guage. See Selecting languages usingthe language code list for details.
5 Did you connect this player to an AVreceiver?
ConnectedNot Connected
AV ReceiverLanguage Settings
Audio Out Settings
Speaker Settings
AV Receiver Func.
Setup Navigator
• If you selected Not Connected here,that completes the setup. Press ENTERto leave the Setup Navigator.
6 Did you connect the 5.1 channelanalog audio outputs to your AV re-ceiver?Select Connected or Not Connected.
ConnectedNot Connected
AV Receiver
5.1ch Audio Out
Language Settings
Audio Out Settings
Speaker Settings
AV Receiver Func.
Setup Navigator
Getting Started 04
27En
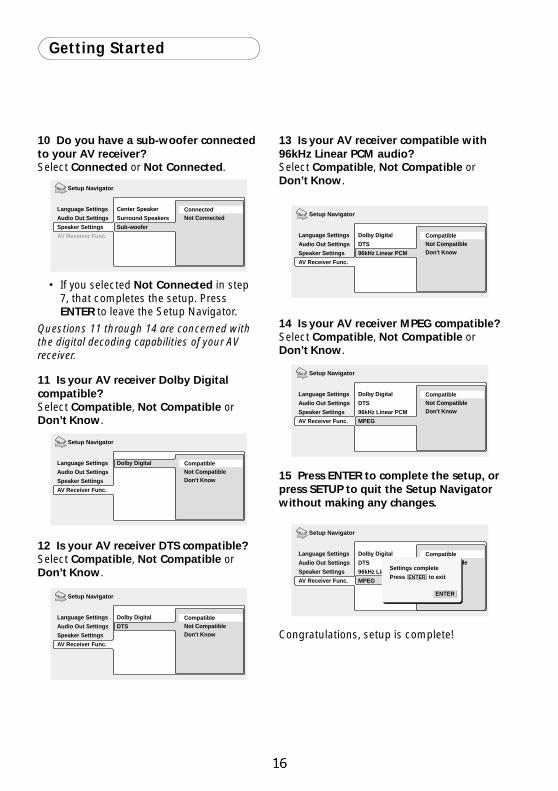
13 Is your AV receiver compatible with96kHz Linear PCM audio?Select Compatible, Not Compatible orDon’t Know.
CompatibleNot CompatibleDon't Know
Dolby Digital
DTS
96kHz Linear PCM
Language Settings
Audio Out Settings
Speaker Settings
AV Receiver Func.
Setup Navigator
14 Is your AV receiver MPEG compatible?Select Compatible, Not Compatible orDon’t Know.
CompatibleNot CompatibleDon't Know
Dolby Digital
DTS
96kHz Linear PCM
MPEG
Language Settings
Audio Out Settings
Speaker Settings
AV Receiver Func.
Setup Navigator
15 Press ENTER to complete the setup, orpress SETUP to quit the Setup Navigatorwithout making any changes.
CompatibleNot CompatibleUnknown
Dolby Digital
DTS
96kHz Linear PCM
MPEG
Language Settings
Audio Out Settings
Speaker Settings
AV Receiver Func.
Setup Navigator
Settings complete
Press ENTER to exit
ENTER
Congratulations, setup is complete!
10 Do you have a sub-woofer connectedto your AV receiver?Select Connected or Not Connected.
ConnectedNot Connected
Center Speaker
Surround Speakers
Sub-woofer
Language Settings
Audio Out Settings
Speaker Settings
AV Receiver Func.
Setup Navigator
• If you selected Not Connected in step7, that completes the setup. PressENTER to leave the Setup Navigator.
Questions 11 through 14 are concerned withthe digital decoding capabilities of your AVreceiver.
11 Is your AV receiver Dolby Digitalcompatible?Select Compatible, Not Compatible orDon’t Know.
CompatibleNot CompatibleDon't Know
Dolby DigitalLanguage Settings
Audio Out Settings
Speaker Settings
AV Receiver Func.
Setup Navigator
12 Is your AV receiver DTS compatible?Select Compatible, Not Compatible orDon’t Know.
CompatibleNot CompatibleDon't Know
Dolby Digital
DTS
Language Settings
Audio Out Settings
Speaker Settings
AV Receiver Func.
Setup Navigator
Getting Started04
28En
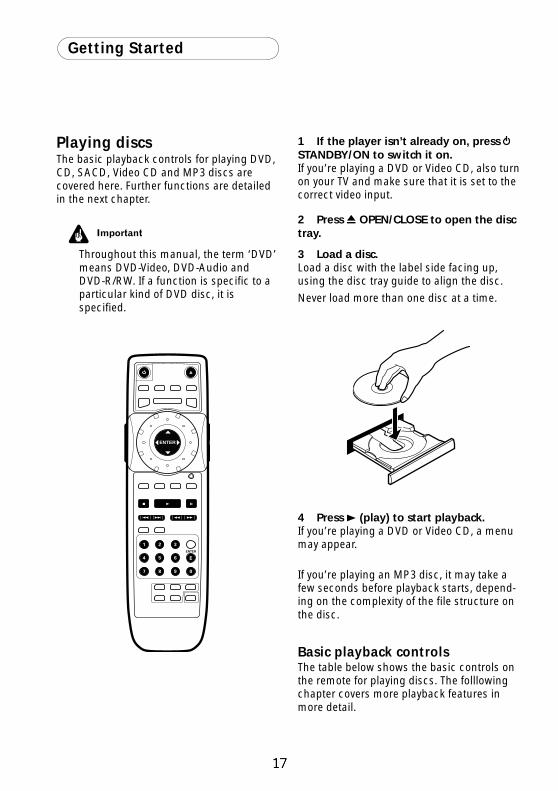
1 If the player isn’t already on, press STANDBY/ON to switch it on.If you’re playing a DVD or Video CD, also turnon your TV and make sure that it is set to thecorrect video input.
2 Press 0 OPEN/CLOSE to open the disctray.
3 Load a disc.Load a disc with the label side facing up,using the disc tray guide to align the disc.
Never load more than one disc at a time.
4 Press 3 (play) to start playback.If you’re playing a DVD or Video CD, a menumay appear.
If you’re playing an MP3 disc, it may take afew seconds before playback starts, depend-ing on the complexity of the file structure onthe disc.
Basic playback controlsThe table below shows the basic controls onthe remote for playing discs. The folllowingchapter covers more playback features inmore detail.
Playing discsThe basic playback controls for playing DVD,CD, SACD, Video CD and MP3 discs arecovered here. Further functions are detailedin the next chapter.
Throughout this manual, the term ‘DVD’means DVD-Video, DVD-Audio andDVD-R/RW. If a function is specific to aparticular kind of DVD disc, it isspecified.
E/E/
SETUP
DISPLAY AUDIO SUBTITLE ANGLE
TOP MENU
OPEN /CLOSE
MENU
– MULTI SPEED +
ENTER
VIDEOADJUST DIMMER JOG MODE
V.ADJ FL JOG
PLAY MODE SURROUND
87 3
4 ¢ 1 ¡
0987
E654
C321
CLEAR
ENTER
VOLUME CHANNEL
TV CONTROL
+ FUNC
–
+
–TV

Getting Started 04
29En
Front panel controlsThe 3 (play), 7 (stop), and 8 (pause) buttonson the front panel work in exactly the sameway as their remote control equivalents. Thecombined scan/skip buttons on the frontpanel (4 1 and ¡ ¢) work slightlydifferently from the remote buttons.
3 PLAY
OPEN/CLOSE0
741 ¡¢ 8
3
Î
4 1 ¡ ¢
Press and hold for fast scan; press for track/chapter skip.
• You may find with some DVD discs thatsome playback controls don’t work incertain parts of the disc. This is not amalfunction.
DVD disc menusMany DVD-Video and DVD-Audio discscontain menus from which you can selectwhat you want to watch or listen to. Theymay give access to additional features, suchas subtitle and audio language selection, orspecial features such as slideshows. See thedisc packaging for details.
Sometimes menus are displayed automati-cally when you start playback; others onlyappear when you press MENU or TOPMENU.
Button What it does
3 Starts playback.DVD and Video CD: if thedisplay shows RESUME,playback starts from theresume point.
8 Pauses a disc that’s playing,or restarts a paused disc.
7 Stops playback.DVD and Video CD: Displayshows RESUME. Press 7(stop) again to cancel theresume function (The resumefunction is also cancelledwhen you eject the disc tray.).
1 Press to start fast reversescanning. Press 3 (play) toresume normal playback.
¡ Press to start fast forwardscanning. Press 3 (play) toresume normal playback.
4 Skips to the start of thecurrent track or chapter, thento previous tracks/chapters.
¢ Skips to the next track orchapter.
Numbers Use to enter a title/group/tracknumber. Press ENTER to select(or wait a few seconds).• If the disc is stopped, play-back starts from the selectedtitle/group (for DVD) or tracknumber (for CD/SACD/VideoCD/MP3).• If the disc is playing,playback jumps to the start ofthe selected chapter or track(within the current group forDVD-Audio).

Getting Started04
30En
Video CD PBC menusSome Video CDs have menus from whichyou can choose what you want to watch.These are called PBC (Playback control)menus.
You can play a PBC Video CD/Super VCDwithout having to navigate the PBC menu bystarting playback using a number button ortrack skip button (¢) to select a track,rather than the 3 (play) button.
E
ENTER
E/E/
SETUP TOP MENUMENU
– MULTI SPEED +
ENTER
VIDEOADJUST DIMMER JOG MODERETURN
V.ADJ FL JOG
PLAY MODE SURROUND
87 3
4 ¢ 1 ¡
0987
654
C321
CLEAR
TV CONTROL
Button What it does
(RETURN) Displays the PBC menu.
Numbers Use to enter a numberedmenu option. Press ENTER toselect (or wait a few seconds).
4 Displays the previous menupage (if there is one).
¢ Displays the next menu page(if there is one).
• Some DVD-Audio discs feature a ‘bonusgroup’. To access this group you have toinput a password, which you can find onthe disc’s packaging.
E/E/
SETUP TOP MENUMENU
– MULTI SPEED +
ENTER
VIDEOADJUST DIMMER JOG MODERETURN
V.ADJ FL JOG
PLAY MODE SURROUND
87 3
4 ¢ 1 ¡
0987
E654
C321
CLEAR
ENTER
TV CONTROL
Button What it does
TOP MENU Displays the ‘top menu’ of adisc—this varies with the disc.
MENU Displays a disc menu—thisvaries with the disc and maybe the same as the ‘top menu’.
Moves the cursor around thescreen.
ENTER Selects the current menuoption.
(RETURN) Returns to the previouslydisplayed menu screen. Onsome DVD-Audio discsfeaturing browsable pictures,press to display the browserscreen.
Numbers Highlights a numbered menuoption (some discs only).Press ENTER to select (or waita few seconds).
(Joystick)

Getting Started 04
31En
• After I load a DVD disc, it ejects automati-cally after a few seconds!
Most likely, the disc is the wrong regionfor your player. The region numbershould be printed on the disc; check itagainst the region number of the player(which you can find on the rear panel).
If the region number is OK, it may bethat the disc is damaged or dirty. Cleanthe disc and look for signs of damage.Check also that the disc is aligned properly in the disc tray and that it’s loaded label-side up.
• Why won’t the disc I loaded play?
First check that you loaded the disc theright way up (label side up), and that it’sclean and not damaged.
If a disc loaded correctly won’t play, it’sprobably an incompatible format or disctype, such as DVD-ROM.
• There’s no picture!
Check the front panel and make surethat the VIDEO OFF indicator isn’t lit. Ifit is, press the VIDEO OFF button toswitch the video output back on.
Also make sure that if your TV isn’tcompatible with progressive scan video,that the PROGRESSIVE indicator isn’t lit.If it is, press the PROGRESSIVE buttonto switch the video output back tointerlace. See also page 18.
• I have a widescreen TV so why are thereblack bars at the top and bottom of thescreen when I play some discs?
Some movie formats are such that evenwhen played on a widescreen TV, blackbars are necessary at the top andbottom of the screen. This is not amalfunction.
• I have a standard (4:3) TV and set theplayer to show widescreen DVDs in pan &scan format, so why do I still get blackbars top and bottom with some discs?
Some discs override the displaypreferences of the player, so even if youhave 4:3 (Pan & Scan) selected, thosediscs will still be shown in letterboxformat. This is not a malfunction.
• My AV receiver is definitely compatiblewith 96/88.2kHz Linear PCM audio, but itdoesn’t seem to work with this player.What’s wrong?
For digital copy-protection purposes,some 96/88.2kHz DVD discs onlyoutput digital audio downsampled to48/44.1kHz. This is not a malfunction.To fully take advantage of the highsampling rate audio, connect the analogaudio outputs to your amplifier/receiver.
• Why can’t I hear SACD audio through thedigital outputs?
SACD audio is only available throughthe analog outputs. This is not amalfunction. Some DVD-Audio discs tooonly output audio through the analogoutputs.

Getting Started04
32En
• Is it better to listen to DVD-Audio discsthrough the analog outputs?
Some DVD-Audio discs do not outputanything through the digital outputs,and multichannel discs are downmixedto stereo for the digital output. Inaddition, high sampling rate DVD-Audiodiscs (higher than 96kHz) automaticallydownsample audio output from thedigital outputs.
Using the multichannel analog audiooutputs for DVD-Audio have none ofthese limitations.
• My DVD-Audio disc starts playing, butthen suddenly stops!
The disc may have been illegally copied.
• My CD with MP3 tracks won’t play!
Also make sure that the tracks areencoded in MPEG1 audio layer 3 format.
• Some MP3 tracks don’t show up. Whereare they?
Filenames that don’t end with theextension “.mp3” won’t be recognized bythis player. Also, if there are more than250 folders or tracks on the disc, onlythe first 250 are recognized.

Playing Discs 05
33En
1 Press SETUP and select ‘Disc Naviga-tor’ from the on-screen display.Alternatively, if a DVD-RW, CD, Video CD orMP3 disc is loaded, you can press MENU,which takes you straight to the Disc Naviga-tor screen.
Audio Settings
Play Mode
Setup Navigator
Disc Navigator
Initial Settings
Video Adjust
2 Select what you want to play.Depending on the type of disc you haveloaded, the Disc Navigator looks slightlydifferent.
For DVD-Video discs select a title, or achapter within a title.
Title(1-03)
DVD
Disc Navigator
Chapter(1-036)
Title 01Title 02Title 03
Chapter 001Chapter 002Chapter 003Chapter 004Chapter 005Chapter 006Chapter 007Chapter 008
For DVD-Audio discs select a group, or atrack within a group.
Group(1-03)
DVD-Audio
Disc Navigator
Track(1-14)Group 01Group 02Group 03
Track 01Track 02Track 03Track 04Track 05Track 06Track 07Track 08
IntroductionMost of the features described in thischapter make use of on-screen displays. Foan explanation of how to navigate these
r
see - Using the on-screen displays.
Many of the functions covered in this chapterapply to DVD and SACD discs, Video CDs,CDs and MP3 discs, although the exactoperation of some varies slightly with thekind of disc loaded.
Some DVD discs restrict the use of somefunctions (random or repeat, for example).This is not a malfunction.
When playing Video CDs, some of thefunctions are not available during PBCplayback. If you want to use them, start thedisc playing using a number button to selecta track.
Using the Disc Navigator tobrowse the contents of a discUse the Disc Navigator to browse throughthe contents of a disc to find the part youwant to play. You can use the Disc Navigatorwhen a disc is playing or stopped.
• It’s not possible to use the Disc Naviga-tor when playing a Video CD/Super VCDin PBC mode, or when a DVD disc menuis displayed.

Playing Discs05
34En
For MP3 discs select a folder, or a trackwithin a folder. (Note that if a folder or trackname contains accented or non-romancharacters, they may show up with genericnames – F_033, T_035, etc.).
Folder(1-017)MP3
Disc Navigator
Track(1-010)001. ACP002. Nth Degree003. Pfeuti004. Live005. Glitch music006. CodHead007. Thermo008. Missing Man
001. Gravity deluxe002. Tesla's patent003. Border dispute004. Delayed by rain005. Accident incident006. Pigeon post007. Outernational008. Vacuum tube
Playback starts after you press ENTER.
• The Disc Navigator is not availableunless there is a disc loaded.
• Another way to find a particular place ona disc is to use one of the searchmodes. See Searching a disc.
For SACD discs select a track within thecurrent playback area.
Track(1-009)Track 001Track 002Track 003Track 004Track 005Track 006Track 007Track 008
2ch Area
Disc Navigator
Total Time 40.31
For a VR mode DVD-RW disc select beweenthe Playlist and Original areas of the disc, ora title. Move the joystick right to preview thetitle.
• It’s not possible to switch betweenOriginal and Playlist during playback.
• Not all DVD-RW discs have a Playlist.
Title(1-03)01. 3/31 FIRST LEAGUE02. 4/28 SECOND LEAGUE03. 4/29 FINAL ROUND
Original
Play List
Disc Navigator
DVD-RW
For CDs and Video CDs select a track.
Track(1-13)Track 01Track 02Track 03Track 04Track 05Track 06Track 07Track 08
CD
Disc Navigator
Total Time 58.27

Playing Discs 05
35En
Scanning discsYou can fast-scan discs forward or backwardat various different speeds using the remote.
1 During playback, press 1 or ¡ tostart scanning.
2 Press repeatedly to increase thescanning speed.
• MP3s can only be scanned at one speed.• The scanning speed is shown on-screen.
3 To resume normal playback, press 3(play).
• Sound can be heard while scanningSACDs, audio CDs, and MP3 discs.
• There is no sound while scanning DVD-Videos and Video CDs, and no subtitleswhile scanning DVD-Video.
• Depending on the disc, normal playbackmay automatically resume when a newchapter is reached on a DVD-Video disc.
Using the Multi DialYou can use the Multi Dial to control fast andslow motion scanning and frame advance ofDVD-Video, DVD-R/RW and Video CDs.
When scanning, no audio is output, evenwhen the scanning speed is 1/1 (normalplayback speed).
To start scanning playback at 1/16 speed,turn the MULTI DIAL (clockwise forforward; anticlockwise for reverse)during playback.
• Turn the MULTI DIAL in the samedirection to increase the scan speed—the speed is indicated at the top left ofthe screen.
• Turn in the opposite direction to slow thescan speed/reverse direction.
To start high-speed scanning, turn theMULTI DIAL quickly (clockwise forforward; anticlockwise for reverse)during playback.
• Change the speed/direction in the sameway as above.
• To resume normal playback, press 3.
To start manual scanning, press JOG (JOGMODE), then use the MULTI DIAL toadvance frames in either direction.
To switch off jog mode, press JOG (JOGMODE) again. The picture remainspaused until you restart playback.
• To resume normal playback, press 3.
• You can scan Video CDs in the sameway as DVD-Video discs (see above).However, reverse slow-motion scanningis not possible, and there are just twofast scanning speeds.

Playing Discs05
36En
Playing in slow motionYou can play DVD-Videos, DVD-R/RW andVideo CDs at four different forward slowmotion speeds, and DVD-Videos, DVD-R/RWalso at two reverse speeds.
1 During playback, press 8 (pause).
2 Press and hold /e or E/ untilslow motion playback starts.
• The slow motion speed is shown on-screen.
• There is no sound during slow motionplayback.
3 Press repeatedly to change the slowmotion speed.
• The slow motion speed is displayed on-screen.
4 To resume normal playback, press 3(play).
• You can’t use slow motion playback withsome titles on some DVDs.
• Video CD only supports forward slowmotion playback.
• The picture quality during slow motionplayback is not as good as duringnormal playback.
• Depending on the disc, normal playbackmay automatically resume when a newchapter is reached.
• For DVD-Audio discs featuringbrowsable pictures, press
/e/E/ to view the previous/nextpicture.
Frame advance/frame reverseYou can advance or back up DVD-Video orDVD-RW discs frame-by-frame. With VideoCDs, you can only use frame advance.
1 During playback, press 8 (pause).
2 Press /e or E/ to reverse oradvance a frame at a time.
3 To resume normal playback, press 3(play).
• The picture quality when using framereverse is not as good as frame ad-vance.
• Depending on the disc, normal playbackmay automatically resume when a newchapter is reached.
• When changing direction of a DVD-Video disc, the picture may ‘move’ in anunexpected way. This is not a malfunc-tion.
• For DVD-Audio discs featuringbrowsable pictures, press
/e/E/ to view the previous/nextpicture.

Playing Discs 05
37En
Looping a section of a discThe A-B Repeat function allows you tospecify two points (A and B) within a track(DVD-Audio, CD and Video CD) or title (DVD-Video and DVD-RW) that form a loop whichis played over and over.
• A-B Repeat is not available with SACDs,MP3s, Super VCDs, Video CD in PBCmode, or while a DVD disc menu isbeing displayed.
1 During playback, press PLAY MODEand select ‘A-B Repeat’ from the list offunctions on the left.
A(Start Point)
B(End Point)
Off
A-B Repeat
Repeat
Random
Program
Search Mode
Play Mode
2 Press ENTER on ‘A(Start Point)’ to setthe loop start point.
A(Start Point)
B(End Point)
Off
A-B Repeat
Repeat
Random
Program
Search Mode
Play Mode
3 Press ENTER on ‘B(End Point)’ to setthe loop end point.
A(Start Point)
B(End Point)
Off
A-B Repeat
Repeat
Random
Program
Search Mode
Play Mode
After pressing ENTER, playback jumps backto the start point and plays the loop.
4 To resume normal playback, pressCLEAR or select ‘Off’ from the menu.

Playing Discs05
38En
Using repeat playThere are various repeat play options,depending on the kind of disc loaded. It’salso possible to use repeat play together withprogram play to repeat the tracks/chapters inthe program list (see Creating a program list.
• Repeat play is not available with VideoCDs/Super VCD in PBC mode, or whilea DVD disc menu is being displayed.
1 During playback, press PLAY MODEand select ‘Repeat’ from the list offunctions on the left.
Title Repeat
Chapter Repeat
Repeat Off
A-B Repeat
Repeat
Random
Program
Search Mode
Play Mode
2 Select a repeat play option.The repeat play options available depend onthe type of disc loaded. The screen belowappears when a DVD-Video disc is loaded.
Title Repeat
Chapter Repeat
Repeat Off
A-B Repeat
Repeat
Random
Program
Search Mode
Play Mode
DVD-Video and DVD-RW discs• Title Repeat• Chapter Repeat• Repeat Off
DVD-Audio discs• Group Repeat• Track Repeat• Repeat Off
SACD, CD and Video CD discs• Disc Repeat• Track Repeat• Repeat Off
MP3 discs• Disc Repeat• Folder Repeat• Track Repeat• Repeat Off
• If you’ve made a program list, theProgram Repeat option also appears asa repeat option.
• To stop the disc and cancel repeat play,press 7 (stop).
• You can also cancel repeat play withoutstopping playback by pressing CLEAR.The disc will play to the end, then stop.
• You can’t use repeat and random play atthe same time.
• If you switch camera angle duringrepeat play, repeat play is canceled.

Playing Discs 05
39En
Using random playUse the random play function to play titles orchapters (DVD-Video ), groups or tracks(DVD-Audio), or tracks (CD, Video CD andMP3 discs) in a random order.
You can set the random play option when adisc is playing or stopped.
• You can’t use random play with SACDs,DVD-RWs, Video CDs/Super VCDsplaying in PBC mode, or while a DVDdisc menu is being displayed.
1 Press PLAY MODE and select ‘Random’from the list of functions on the left.
Random Title
Random Chapter
Random Off
A-B Repeat
Repeat
Random
Program
Search Mode
Play Mode
2 Select a random play option.The random play options available depend onthe type of disc loaded. The screen belowappears when a DVD-Video disc is loaded.
Random Title
Random Chapter
Random Off
A-B Repeat
Repeat
Random
Program
Search Mode
Play Mode
DVD-Video discs• Random Title• Random Chapter• Random Off
DVD-Audio discs• Random Group• Random Track• Random Off
MP3, CD and Video CD discs• On• Off
• To stop the disc and cancel randomplayback, press 7 (stop).
• You can also cancel random playbackwithout stopping the disc by presssingCLEAR. The disc will play to the end,then stop.
• During random play, the 4 and ¢buttons function a little differently tonormal: 4 returns to the beginning ofthe current track/chapter. You can't goback further than this. ¢ selectsanother track/chapter at random fromthose remaining.
• You can't use random play together withprogram or repeat play.

Playing Discs05
40En
Creating a program listThis feature lets you program the play orderof titles/group/chapters/folders/tracks on adisc.
• Program play is not available with DVD-RWs, Video CDs/Super VCDs playing inPBC mode, or while a DVD disc menu isbeing displayed.
1 Press PLAY MODE and select ‘Pro-gram’ from the list of functions on theleft.
Create/Edit
Playback Start
Playback Stop
Program Delete
Program Memory ‰ Off
A-B Repeat
Repeat
Random
Program
Search Mode
Play Mode
2 Select ‘Create/Edit’ from the list ofprogram options.
Create/Edit
Playback Start
Playback Stop
Program Delete
Program Memory ‰ Off
A-B Repeat
Repeat
Random
Program
Search Mode
Play Mode
The Program edit screen that appearsdepends on the kind of disc loaded.
On the left side is the program list, then tothe right is a list of titles (if a DVD-Video discis loaded), groups (for DVD-Audio), tracks(for SACDs, CDs and Video CDs/Super VCD),or folder names (for MP3 discs). On the farright is a list of chapters (for DVD-Video) ortracks (for DVD-Audio and MP3).
3 Select a title, chapter, group, folder ortrack for the current step in the programlist.For a DVD-Video disc, you can add a wholetitle, or a chapter within a title to theprogram list.
• To add a title, select the title.
01. 0102.03.04.05.06.07.08.
Title(1-03) Title 01Title 02Title 03
Chapter(1-036) Chapter 001Chapter 002Chapter 003Chapter 004Chapter 005Chapter 006 Chapter 007 Chapter 008
Program
Program Step
• To add a chapter, first highlight the title,then move the cursor right and select achapter from the list.
01. 01-00302.03.04.05.06.07.08.
Title(1-03) Chapter(1-036)
Program
Title 01Title 02Title 03
Chapter 001Chapter 002Chapter 003Chapter 004Chapter 005Chapter 006Chapter 007Chapter 008
Program Step
For a DVD-Audio disc, you can add a wholegroup, or a track within a group to theprogram list.
• To add a group, select the group.
01. 0102.03.04.05.06.07.08.
Group(1-03) Group 01Group 02Group 03
Track(1-14) Track 01Track 02Track 03Track 04Track 05Track 06 Track 07 Track 08
Program
Program Step

Playing Discs 05
41En
• To add a track, first highlight the group,then move the cursor right and select atrack from the list.
01. 01-0302.03.04.05.06.07.08.
Group(1-03) Track(1-14)
Program
Group 01Group 02Group 03
Track 01Track 02Track 03Track 04Track 05Track 06Track 07Track 08
Program Step
For SACD, CD or Video CD/Super VCD, selecta track to add to the program list.
(The screen below shows a CD loaded.)
01. 0402.03.04.05.06.07.08.
Track(1-12) Track 01 Track 02 Track 03 Track 04 Track 05 Track 06 Track 07 Track 08
Program
Total Time 0.00Program Step
For an MP3 disc, you can add a whole folder,or a track within a folder to the program list.
• To add a folder, select the folder.
01. 00102.03.04.05.06.07.08.
001. ACP002. Nth Degree003. Pfeuti004. Live005. Glitch music006. CodHead
001. Gravity deluxe002. Tesla's patent003. Border dispute004. Delayed by rain005. Accident incident006. Pigeon post007. Outernational008. Vacuum tube
Program
Folder(1-006) Track(1-010)Program Step
• To add a track, first find the folder, thenmove the cursor right and select a trackname from the list.
01. 001-00302.03.04.05.06.07.08.
Program
001. ACP002. Nth Degree003. Pfeuti004. Live006. CodHead
001. Gravity deluxe002. Tesla's patent003. Border dispute004. Delayed by rain005. Accident incident006. Pigeon post007. Outernational008. Vacuum tube
Folder(1-006) Track(1-010)Program Step
After pressing ENTER to select the title/group/chapter/folder/track, the step numberautomatically moves down one.
4 Repeat step 3 to build up a programlist.A program list can contain up to 24 titles/chapters/groups/folders/tracks.
5 To play the program list, press 3(play).Program play remains active until you turnoff program play (see below), erase theprogram list (see below), eject the disc orswitch off the player.
• To exit the program edit screen withoutstarting playback, press PLAY MODE orSETUP. (Don’t press RETURN—yourprogram list will be lost.)
• During program play, press ¢ to skipto the next program step.
• Press CLEAR during playback (thoughnot if the program list OSD is displayed)to switch off program play. Press whilestopped to erase the program list.

Playing Discs05
42En
Editing a program listAfter creating a program list, you can add,delete and change steps.
1 Press PLAY MODE and select ‘Pro-gram’ from the list of functions on theleft.
2 Select ‘Create/Edit’ from the list ofprogram options.
3 To clear a step, highlight the stepnumber and press CLEAR.
4 To insert a step in the middle of theprogram list, highlight the step whereyou want the new step to appear, thenselect a title/group/chapter/folder/trackto add.After pressing ENTER, the new step isinserted into the list.
5 To add a step to the end of theprogram list, highlight the next free stepthen select a title/group/chapter/folder/track to add.
• To exit the program edit screen withoutstarting playback, press PLAY MODE orSETUP.
• If you want to exit the program editscreen without saving the changes youmade, press RETURN.
Other functions available fromthe program menuAs well as creating and editing a programlist, you can start and stop program play,erase the program list, and memorize a DVDprogram list from the Program menu.
1 Press PLAY MODE and select ‘Pro-gram’ from the list of functions on theleft.
Create/Edit
Playback Start
Playback Stop
Program Delete
Program Memory ‰ Off
A-B Repeat
Repeat
Random
Program
Search Mode
Play Mode
2 Select a program play function.• Create/Edit – See Creating a program
list.
• Playback Start – Starts playback of theprogram list
• Playback Stop – Turns off program play,but does not erase the program list
• Program Delete – Erases the programlist and turns off program play
• Program Memory (DVD-Video only) –Select On to save the program list forthe disc loaded. (Select Off to cancelthe program memory for the discloaded)
• After saving a program list using theProgram Memory feature, wheneveryou load that disc, the program list isautomatically recalled and program playswitched on.
• You can save program lists for up to 24discs. After that, the oldest one isreplaced with the new one saved.

Playing Discs 05
43En
Searching a discUsing the search mode function from thePlay Mode menu you can quickly jump to aparticular part of the disc that you’rewatching or listening to.
1 Press PLAY MODE and select ‘SearchMode’ from the list of functions on theleft.The search options that appear depend onthe kind of disc loaded. The screen belowshows the DVD-Video search options.
Title Search
Chapter Search
Time Search
A-B Repeat
Repeat
Random
Program
Search Mode
Play Mode
2 Select a search mode.
3 Use the number buttons to enter atitle, group, chapter, page, folder or tracknumber, or a time.
Title Search
Chapter Search
Time Search
Input ChapterA-B Repeat
Repeat
Random
Program
Search Mode
Play Mode
• For a time search, enter the number ofminutes and seconds into the currentlyplaying title (DVD-Video/DVD-RW) ortrack (Video CD) you want playback toresume from. For example, press 4, 5, 0,0 to have playback start from 45 minutesinto the disc. For 1 hour, 20 minutes and30 seconds, press 8, 0, 3, 0.
• Some DVD-Audio discs feature pages ofbrowsable pictures. Enter the pagenumber you want.
4 Press ENTER to start playback.
• You can only use time search with DVD-Video and Video CD discs.
• The disc must be playing in order to usetime search.
• Search functions are not available withVideo CDs/Super VCD in PBC mode(start non-PBC playback by stoppingplayback, then pressing ¢, then 3(play)).
• You can often select what you want towatch from a DVD disc menu.

Playing Discs05
44En
Switching subtitlesSome DVD-Video discs have subtitles in oneor more languages; the disc box will usuallytell you which subtitle languages areavailable. You can switch subtitle languageduring playback.
1 Press SUBTITLE repeatedly to select asubtitle option.
Subtitle 1 English
• While the above display is showing, youcan also use the joystick (up/down) andENTER to select a subtitle languagefrom a drop-down menu.
Subtitle 1 English
Off
1. English
2. French
3. German
4. Italian
1/ 1
• Some discs only allow you to changesubtitle language from the disc menu.Press TOP MENU to access.
• To set subtitle preferences, see SubtitleLanguage.
Switching DVD-Video audiolanguageWhen playing a DVD-Video disc recordedwith dialog in two or more languages, youcan switch audio language during playback.
1 Press AUDIO repeatedly to select anaudio language option.
Audio Dolby Digital 3/2.1CH2 French
• With some discs, while the abovedisplay is showing, you can also use thejoystick (up/down) and ENTER to selectan audio language from a drop-downmenu.
Audio Dolby Digital 3/2.1CH
Dolby Digital 3/2.1CHDolby Digital 3/2.1CHDolby Digital 2CHDolby Digital 2CH
2 French
1. English 2. French 3. German 4. Italian
1/ 1
• Some discs only allow you to changeaudio language from the disc menu.Press TOP MENU to access.
• To set audio language preferences, seeAudio Language.

Playing Discs 05
45En
Switching DVD-RW audiochannelWhen playing a DVD-RW disc recorded withdual-mono audio, you can switch betweenthe main, sub, and mixed channels duringplayback.
1 Press AUDIO repeatedly to select anaudio channel option.
Audio Dolby Digital 1+1CH1L
Switching DVD-Audio audiochannelDepending on the disc, you may be able toswitch channels when playing DVD-Audiodiscs—see the disc box for details.
1 Press AUDIO repeatly to select anaudio channel option.
Audio Linear PCM 192kHz24bit12CH
Digital Out Converted
When you change the audio channel,playback restarts from the beginning of thecurrent track.
• Some discs only allow you to changeaudio channel from the disc menu.Press TOP MENU to access.
• To set audio language preferences, seeAudio Language.
Switching CD/MP3/Video CDaudio channelYou can switch between stereo, just the leftchannel or just the right channel of a CD/MP3/Video CD/Super VCD. (To change theaudio channel of a CD it must be playing.)
Some Super VCDs have two soundtracks.With these discs you can switch between thetwo soundtracks as well as individualchannels in each.
1 Press AUDIO repeatly to select anaudio channel option.
Audio Stereo
Switching camera anglesSome DVD-Video discs feature scenes shotfrom two or more angles—check the discbox for details.
When a multi-angle scene is playing, a icon appears on screen to let you know thatother angles are available (this can beswitched off if you prefer).
¶ During playback press ANGLE toswitch angle.

Playing Discs05
46En
Displaying disc informationVarious track, chapter and title information,as well as the video transmission rate forDVD discs, can be displayed on-screen.
1 During playback, press DISPLAY toshow/switch the information displayed.Keep pressing DISPLAY to change thedisplayed information.
• DVD-Video displays
Audio Dolby Digital 3/2.1CH AngleSubtitle1 English 1
Title
Play DVD3
2.231/3Current / Total Elapsed
138.36Remain
138.59Total
1 English
# Tr. Rate : 6.0MbpsChapter
Play DVD3
0.062/36Current / Total Elapsed
1.40Remain
1.46Total
The # mark displayed with someDVD-Video discs means that thevideo is playing at 24 frames/second,progressive.
Tr. Rate : 6.0MbpsChapter
Pause DVD8
0.06 152/36Current / Total Elapsed
1.40Remain
1.46Total
When the disc is paused, the displayalso shows the frame number.
• DVD-Audio displays
Audio1 Linear PCM
AngleSubtitle- - 1
Track
Play DVD-Audio3
3.201/14Current / Total Elapsed
2.41Remain
6.01Total
192kHz 24bit 2/0CH
Tr. Rate : 9.5MbpsGroup
Play DVD3
3.211/3Current / Total Elapsed
53.20Remain
56.41Total
-Audio
• DVD-RW displays
Audio Dolby Digital 2/0CH1
Subtitle- -
Title
Play DVD-RW Original3
0.081/32Current / Total Elapsed
30.22Remain
30.30Total
Tr. Rate 4.3MbpsChapter
Play DVD-RW Original3
1/1Current / Total
• SACD displays
Track
Play SACD3
0.221/9Current / Total Elapsed
3.38Remain
4.00Total
(During multichannel playback only)
Audio3/2.1CH
Track
Play SACD3
0.221/9Current / Total Elapsed
3.38Remain
4.00Total
Disc
Play SACD3
0.24Elapsed
40.07Remain
40.31Total
• CD and Video CD displays
Disc
Play VCD3
0.23Elapsed
58.51Remain
57.14Total
Track
Play VCD3
0.232/16Current / Total Elapsed
4.20Remain
4.43Total
(During PBC playback only)Play VCD3
• MP3 disc displays
Play MP33
Track
Track Name Outernational
0.181/17Current / Total Elapsed
12.42Remain
13.00Total
Play MP33
Folder
Folder Name ACP
2 / 7Current / Total
• You can see disc information (number oftitles/chapters, groups, tracks, foldersand so on) from the Disc Navigatorscreen. See Using the Disc Navigator tobrowse the contents of a disc.

The Audio Settings Menu 06
47En
• Audio DRC is only effective with DolbyDigital audio sources.
• Audio DRC is only effective through thedigital output when Digital Out is set toOn, and Dolby Digital Out is set toDolby Digital > PCM.
• The effect of Audio DRC depends onyour speakers and AV receiver settings.
Audio DRC• Default setting: Off
When watching Dolby Digital DVDs at lowvolume, it’s easy to lose the quieter soundscompletely—including some of the dialog.Switching Audio DRC (Dynamic RangeControl) to On can help by bringing up thequieter sounds, while controlling loud peaks.
How much of a difference you hear dependson the material you’re listening to. If thematerial doesn’t have wide variations involume, you may not notice much change.
1 Press SETUP and select ‘Audio Set-tings’ from the on-screen display.
Video AdjustAudio Settings
Play Mode
Setup Navigator
Disc Navigator
Initial Settings
2 Highlight Audio DRC, then use theJoystick (left/right) to change to ‘On’ or‘Off’, as required.
Audio Settings 1/ 2
Audio DRC
Virtual Surround
Channel Level
Off
Off
Fix
3 Press ENTER to make the setting andexit the Audio Settings screen.

The Audio Settings Menu06
48En
Virtual Surround• Default setting: Off
Switch on Virtual surround to enjoy surroundsound effects from just two speakers.
When you play a Dolby Digital soundtrack,Virtual Dolby Digital, which usesTruSurround technology from SRS, producesa deep, realistic 3D soundspace from a pairof stereo speakers.
1 Press SETUP and select ‘Audio Set-tings’ from the on-screen display.
Video AdjustAudio Settings
Play Mode
Setup Navigator
Disc Navigator
Initial Settings
2 Highlight TruSurround, then use theJoystick (left/right) to change to ‘2V/TruSurround’ or ‘Off’, as required.
Audio Settings 1/ 2
Audio DRC
Virtual Surround
Channel Level
Off
Off
Fix
3 Press ENTER to make the setting andexit the Audio Settings screen.
• You can also use the SURROUNDbutton on the remote control to switchVirtual Surround on (2V/TruSurround)/Off.
• Virtual Surround does not work with CD,MP3, DVD-Audio or SACD discs, or96kHz Linear PCM soundtracks.
• The Virtual Surround effect is outputonly through the analog AUDIO OUT jacks.
• Make sure that Audio Output Mode isset to 2 Channel.
• How good the surround effect is varieswith the disc.

The Audio Settings Menu06
50En
Set the distance for each speaker.
Audio Settings 3/3
Speaker Distance L
Speaker Distance C
Speaker Distance R
Speaker Distance LS
Speaker Distance RS
Speaker Distance SW
10.0 ft.
10.0 ft.
10.0 ft.
10.0 ft.
10.0 ft.
10.0 ft.
• Use the joystick (up/down) to select aspeaker.
• Use the joystick (left/right) to adjust thedistance from your listening position tothat speaker.
Front left/right (L/R) speakers can be setfrom 1.0 ft. to 30 ft. in 0.5 ft. increments.
Center speaker (C) and subwoofer (SW) canbe set from – 6.5 ft. to +6.5 ft. relative to thefront left/right speakers
Surround left/right (LS/RS) speakers can beset from –20 ft. to +6.5 ft. relative to the frontleft/right speakers.
When you adjust the front left (L) or frontright (R) speaker, all the other speakerdistances are adjusted relative to thatspeaker.
6 Press ENTER to make the settings andexit the audio settings screen.
• The speaker distance settings have noeffect on SACD playback.
• You can’t adjust the channel level forany speakers that are set to Off in theSpeaker Installation menu screen(page 64).
• The Fix setting is equivalent to settingall the channel levels to +6 dB. There-fore, the Variable setting will usuallysound quieter than the Fix setting.

The Video Settings Menu 07
51En
1 Select one of the Memory presets (seeabove).
2 Move the joystick down to select‘Detailed Settings’ then press ENTER.
I.Memory1
Detailed Settings
Video Adjust
3 Adjust the picture quality settings.
Recall Settings
Fine Focus
Contrast
Sharpness
Chroma Level
Hue
I.Memory1
On
Interlace Memory 1 (I. Memory 1)
min max
soft fine
min max
green red
• Use the joystick (up/down) to select asetting.
• Use the joystick (left/right) to adjust thecurrent setting.
• Press DISPLAY to switch between fulland single view.
• You can change the preset number fromthe Recall Settings menu item.
You can adjust any or all of the following picture quality settings:
• Fine Focus – Switch On to revealgreater detail (high resolution) in thepicture.
• Contrast – Adjusts the contrastbetween light and dark elements in thepicture.
• Sharpness – Adjusts the sharpness ofthe mid-frequency (less detailed)elements in the picture. (This setting isonly effective when Fine Focus is On.)
• Chroma Level – Adjusts how saturatedcolours appear.
• Hue – Adjusts the overall colourbalance between red and green. (This is
Video Adjust - Interlace Only• Default setting: Standard
From the Video Adjust screen you can selectthe standard video presentation or definepresets of your own.
1 Press SETUP and select ‘Video Adjust’from the on-screen display.You can also access these settings bypressing V.ADJ (VIDEO ADJUST).
Audio Settings
Play Mode
Setup Navigator
Disc Navigator
Initial Settings
Video Adjust
2 Use the joystick (left/right) to select apreset.
Standard
Video Adjust
• Standard – Normal
• I. Memory1–2 Use for making your own interlaced presets (see below)
3 Press ENTER to make the setting andexit the Video Adjust screen.
• Depending on the disc and the TV/monitor, you may not see the effectclearly.
Creating your own interlaceoutput presets

The Video Settings Menu07
52En
You can adjust any or all of the followingpicture quality settings:
• PureCinema – When watching DVDmovies, PureCinema optimizes thepicture quality. The default setting isAuto, but if the picture appearsunnatural, then set to On or Off, asappropriate.
• Sharpness – Adjusts the sharpness ofthe mid-frequency (less detailed)elements in the picture.
• Contrast – Adjusts the contrastbetween light and dark elements in thepicture.
• Brightness – Adjusts the overallbrightness of the picture.
• Chroma Level – Adjusts how saturatedcolours appear.
• Hue – Adjusts the overall colourbalance between red and green.
3 Press ENTER to save the preset andexit the Video Adjust screen.
• Video on a DVD discs may be eithervideo material (originally shot on video)or film material (originally shot on film).Video material has a frame rate of 30frames/sec.(NTSC), compared with 24frames/sec. for film. This player convertsfilm material to 60 frames/sec. (inprogressive scan mode). PureCinemaadjusts the picture so that it matchesmore closely the picture quality of acinema screen.
You can see whether video on a DVDdisc is film or video material by display-ing the video transmission rate (seeIf a hash mark (#) appears next to thetransmission rate display, it is film material.
4 Press ENTER to save the preset andexit the Video Adjust screen.
Creating your own progressiveoutput presetsThese presets are available when the videooutput is set to progressive. (Use the frontpanel PROGRESSIVE button to switchbetween interlace and progressive videooutput. See also page 18)
1 Select one of the Memory presets (seeabove).
2 Move the joystick down to select‘Detailed Settings’ then press ENTER.
P. Memory1
Detailed Settings
Video Adjust
3 Ajust the picture quality settings.
Recall Settings
PureCinema
Sharpness
Contrast
Brughtness
Chroma Level
Hue
soft fine
soft fine
off max
min max
green red
Progressive Memory 1 (P. Memory 1)
Auto
P.Memory1
• Use the joystick (up/down) to select asetting.
• Use the joystick (left/right) to adjust thecurrent setting.
• Press DISPLAY to switch between fulland single view.
• You can change the preset number fromthe Recall Settings menu item.

The Initial Settings Menu 08
53En
Digital Audio Out
Video Output
Language
Display
Options
Speakers
Digital Out
Dolby Digital Out
DTS Out
Linear PCM Out
MPEG Out
On
Off
Initial Settings
If at any time you need to switch off thedigital audio output, set this to Off, other-wise leave it On.
• You can’t switch on/off the optical andcoaxial outputs individually.
• There is no digital output when playingSACDs and some DVD-Audio discsregardless of this setting.
Dolby Digital Out• Default setting: Dolby Digital
You only need to make this setting if youconnected this system to an AV receiver (orother component) using one of the digitaloutputs.
Digital Audio Out
Video Output
Language
Display
Options
Speakers
Digital Out
Dolby Digital Out
DTS Out
Linear PCM Out
MPEG Out
Dolby Digital
Dolby Digital > PCM
Initial Settings
If your AV receiver (or other connectedcomponent) is Dolby Digital compatible, setto Dolby Digital, otherwise set to DolbyDigital > PCM.
Using the Initial SettingsmenuThe Initial Settings menu is where you canset preferences for language, audio andvideo output, and so on.
If a menu option is grayed out it means thatit cannot be changed at the current time.This is usually because a disc is playing.Stop the disc, then change the setting.
1 Press SETUP and select ‘Initial Set-tings’ from the on-screen display.
Audio Settings
Play Mode
Setup Navigator
Disc Navigator
Video Adjust
Initial Settings
2 Select the setup category from the liston the left, then select an item from themenu list to the right.
3 Make the setting you want.
Digital Audio Out settings
Digital Out• Default setting: On
You only need to make this setting if youconnected this system to an AV receiver (orother component) using one of the digitaloutputs.


The Initial Settings Menu 08
55En
S-Video Out• Default setting: S2
You only need to make this setting if youconnected this player to your TV using anS-Video cord.
Digital Audio Out
Video Output
Language
Display
Options
Speakers
TV Screen
Auto Progressive
S-Video Out
Still Picture
S1
S2
Initial Settings
If you find that the picture is stretched ordistorted on the default S2 setting, trychanging it to S1. (See also S1 and S2 in theGlossary .)
experience this problem you can leave thissetting as Off.
S-Video Out• Default setting: S2
You only need to make this setting if youconnected this player to your TV using anS-Video cord.
Digital Audio Out
Video Output
Language
Display
Options
Speakers
TV Screen
Auto Progressive
S-Video Out
Still Picture
S1
S2
Initial Settings
If you find that the picture is stretched ordistorted on the default S2 setting, trychanging it to S1. (See also S1 and S2 in theGlossary .)
If your AV receiver (or other connectedcomponent) is compatible with MPEG audio,set this to MPEG, otherwise set it to MPEG >PCM (MPEG audio is converted to morecompatible PCM audio). Check the manualthat came with the other component if you’reunsure whether it is MPEG audio compat-ible.
Video Output settings
TV Screen• Default setting: 16:9 (Wide)
Digital Audio Out
Video Output
Language
Display
Options
Speakers
TV Screen
Auto Progressive
S-Video Out
Still Picture
4:3 (Letter Box)
4:3 (Pan&Scan)
16:9 (Wide)
Initial Settings
If you have a widescreen TV, select the 16:9(Wide) setting—widescreen DVD software isthen shown using the full screen area. Whenplaying software recorded in conventional(4:3) format, the settings on your TV willdetermine how the material is presented—see the manual that came with your TV fordetails on what options are available.
If you have a conventional TV, select either4:3 (Letter Box) or 4:3 (Pan & Scan). InLetter Box mode, widescreen software isshown with black bars at the top and bottomof the screen. Pan & Scan chops the sides offwidescreen material to make it fit the 4:3screen (so even though the image lookslarger on the screen, you’re actually seeingless of the picture).

The Initial Settings Menu08
56En
Language settings
Audio Language• Default setting: English
Digital Audio OutVideo OutputLanguageDisplayOptionsSpeakers
Audio LanguageSubtitle LanguageAuto LanguageDVD Menu Lang.Subtitle Display
EnglishFrenchGermanItalianSpanishDutchOther Language
Initial Settings
This setting is your preferred audio languagefor DVD-Video discs. If the language youspecify here is recorded on a disc, thesystem automatically plays the disc in thatlanguage.
The DVD-Video format recognizes 136different languages. Select Other Languageif you want to specify a language other thanthose listed. See also Selecting languagesusing the language code list.
• You can switch between the languagesrecorded on a DVD disc during playbackusing the AUDIO button. (This does notaffect this setting.)
• Some DVD discs set the audio languageautomatically when loaded, overridingthe audio language you set in the InitialSettings menu.
• Discs with two or more audio languagesusually allow you to select the audiolanguage from the disc menu. PressTOP MENU to access the disc menu.
Still Picture• Default setting: Auto
Digital Audio Out
Video Output
Language
Display
Options
Speakers
TV Screen
Auto Progressive
S-Video Out
Still Picture
Field
Frame
Auto
Initial Settings
This player uses one of two processes whendisplaying a still frame from a DVD disc. Thedefault Auto setting automatically choosesthe best setting each time.
• Field – produces a stable, generallyshake-free image
• Frame – produces a sharper image, butmore prone to shake than field stills
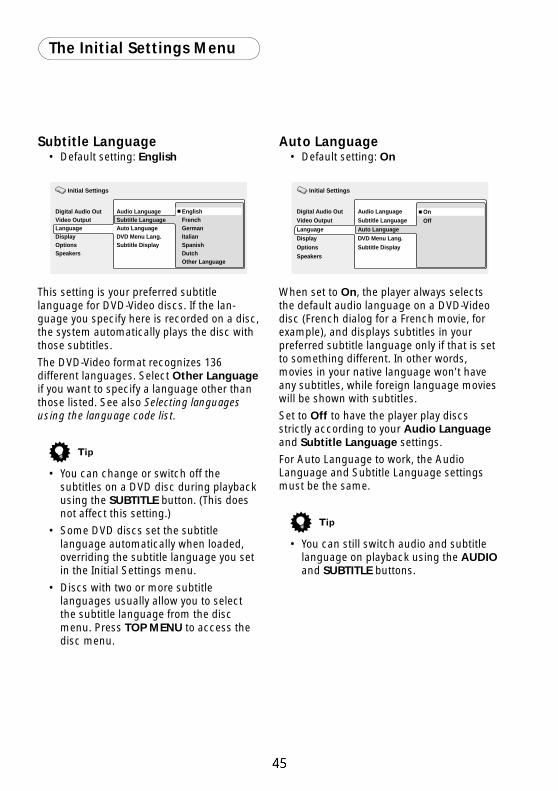
The Initial Settings Menu 08
57En
Auto Language• Default setting: On
Digital Audio Out
Video Output
Language
Display
Options
Speakers
Audio Language
Subtitle Language
Auto Language
DVD Menu Lang.
Subtitle Display
On
Off
Initial Settings
When set to On, the player always selectsthe default audio language on a DVD-Videodisc (French dialog for a French movie, forexample), and displays subtitles in yourpreferred subtitle language only if that is setto something different. In other words,movies in your native language won’t haveany subtitles, while foreign language movieswill be shown with subtitles.
Set to Off to have the player play discsstrictly according to your Audio Languageand Subtitle Language settings.
For Auto Language to work, the AudioLanguage and Subtitle Language settingsmust be the same.
• You can still switch audio and subtitlelanguage on playback using the AUDIOand SUBTITLE buttons.
Subtitle Language• Default setting: English
Digital Audio OutVideo OutputLanguageDisplayOptionsSpeakers
Audio LanguageSubtitle LanguageAuto LanguageDVD Menu Lang.Subtitle Display
EnglishFrenchGermanItalianSpanishDutchOther Language
Initial Settings
This setting is your preferred subtitlelanguage for DVD-Video discs. If the lan-guage you specify here is recorded on a disc,the system automatically plays the disc withthose subtitles.
The DVD-Video format recognizes 136different languages. Select Other Languageif you want to specify a language other thanthose listed. See also Selecting languagesusing the language code list.
• You can change or switch off thesubtitles on a DVD disc during playbackusing the SUBTITLE button. (This doesnot affect this setting.)
• Some DVD discs set the subtitlelanguage automatically when loaded,overriding the subtitle language you setin the Initial Settings menu.
• Discs with two or more subtitlelanguages usually allow you to selectthe subtitle language from the discmenu. Press TOP MENU to access thedisc menu.

The Initial Settings Menu08
58En
DVD Menu Language• Default setting: w/Subtitle Lang.
Digital Audio Out
Video Output
Language
Display
Options
Speakers
Audio Language
Subtitle Language
Auto Language
DVD Menu Lang.
Subtitle Display
w/Subtitle Lang.
Other Language
Initial Settings
Some multilingual discs have disc menus inseveral languages. This setting specifies inwhich language the disc menus shouldappear. Leave on the default setting formenus to appear in the same language asyour Subtitle Language.
The DVD-Video format recognizes 136different languages. Select Other Languageif you want to specify a language other thanthose listed. See also Selecting languagesusing the language code list.
Subtitle Display• Default setting: On
Digital Audio Out
Video Output
Language
Display
Options
Speakers
Audio Language
Subtitle Language
Auto Language
DVD Menu Lang.
Subtitle Display
On
Off
Assist Subtitle
Initial Settings
When set to On, the player displays subtitlesaccording to the Subtitle Language and AutoLanguage settings. Set to Assist Subtitle tohave the player display the extra assistivesubtitles recorded on to some DVD discs. Setto Off to switch subtitles off altogether.
Display settings
OSD Language• Default setting: English
Digital Audio Out
Video Output
Language
Display
Options
Speakers
OSD Language
On Screen Display
Angle Indicator
Background
Screen Saver
English
français
Deutsch
Italiano
Español
Nederlands
Initial Settings
This sets the language of this player’s on-screen displays.
On Screen Display• Default setting: On
Digital Audio Out
Video Output
Language
Display
Options
Speakers
OSD Language
On Screen Display
Angle Indicator
Background
Screen Saver
On
Off
Initial Settings
This sets whether operation displays areshown on-screen (Play, Resume, Scan andso on.)

The Initial Settings Menu 08
59En
Angle Indicator• Default setting: On
Digital Audio Out
Video Output
Language
Display
Options
Speakers
OSD Language
On Screen Display
Angle Indicator
Background
Screen Saver
On
Off
Initial Settings
If you prefer not to see the camera icon on-screen during multi-angle scenes on DVDdiscs, change this setting to Off.
Background• Default setting: Logo
Digital Audio Out
Video Output
Language
Display
Options
Speakers
OSD Language
On Screen Display
Angle Indicator
Background
Screen Saver
Logo
Black
Initial Settings
This specifies what is displayed on-screenwhen the player is stopped.
Screen Saver• Default setting: On
Digital Audio Out
Video Output
Language
Display
Options
Speakers
OSD Language
On Screen Display
Angle Indicator
Background
Screen Saver
On
Off
Initial Settings
If a constant image is displayed on aconventional CRT-type TV, it can ‘burn in’leaving a ghost image on the screen. Switchto On to make sure that a constant image isnot displayed for a dangerously long time.
Options
Parental Lock• Default level: Off
• Default password: none
• Default country code: us (2119)
Some DVD Video discs feature a ParentalLock level. If your player is set to a lower levelthan the disc, the disc won’t play. This givesyou some control about what your childrenwatch on your DVD player.
Some discs also support the Country Codefeature. The player does not play certainscenes on these discs, depending on thecountry code you set.
Before you can set the Parental Lock level orthe Country Code you must register apassword. As the password owner, you canchange the Parental Lock level or CountryCode whenever you like. You can also changethe password.
• Not all discs that you may considerinappropriate for your children use theParental Lock feature. These discs willalways play without requiring thepassword first.
• If you forget your password, you’ll needto reset the player to it’s factory settingsthen register a new password.

The Initial Settings Menu08
60En
Registering a new passwordYou must register a password before you canchange the Parental Lock level or enter aCountry Code.
1 Select ‘Password’.
Digital Audio OutVideo OutputLanguageDisplayOptionsSpeakers
Parental LockBonus GroupAuto Disc MenuGroup PlaybackDVD Playback ModeSACD PlaybackCD Playback
PasswordLevel ChangeCountry Code
Initial Settings
2 Use the number buttons to enter a 4-digit password.
Digital Audio Out
Video Output
Language
Display
Options
Speakers
Parental Lock: Register Code Number
Initial Settings
1 2 3 4
The numbers you enter show up as asterisks(*) on-screen.
3 Press ENTER to register the passwordand return to the Options menu screen.If you forget your password, you can resetthe system then register a new one.
Changing your passwordTo change your password, confirm yourexisting password then enter a new one.
1 Select ‘Password Change’.
Digital Audio OutVideo OutputLanguageDisplayOptionsSpeakers
Parental LockBonus GroupAuto Disc MenuGroup PlaybackDVD Playback ModeSACD PlaybackCD Playback
Password ChangeLevel ChangeCountry Code
Initial Settings
2 Use the number buttons to enter yourexisting password, then press ENTER.
• The numbers appear as asterisks as youenter them.
Digital Audio Out
Video Output
Language
Display
Options
Speakers
Parental Lock : Password Change
Initial Settings
1 * * *Password
New Password
3 Enter a new password.
Digital Audio Out
Video Output
Language
Display
Options
Speakers
Parental Lock : Password Change
Initial Settings
2 3 4 5
* * * *Password
New Password
4 Press ENTER to register the newpassword and return to the Optionsmenu screen.

The Initial Settings Menu 08
61En
Setting/changing the Parental Locklevel
1 Select ‘Level Change’.
Digital Audio OutVideo OutputLanguageDisplayOptionsSpeakers
Parental LockBonus GroupAuto Disc MenuGroup PlaybackDVD Playback ModeSACD PlaybackCD Playback
Password ChangeLevel ChangeCountry Code
Initial Settings
2 Use number buttons to enter yourpassword, then press ENTER.
Digital Audio Out
Video Output
Language
Display
Options
Speakers
Initial Settings
Parental Lock : Level Change
1 * * *Password
1 2 3 4 5 6 7 8 off
3 Select a new level.
Digital Audio Out
Video Output
Language
Display
Options
Speakers
Parental Lock : Level Change
Initial Settings
* * * *Password
1 2 3 4 5 6 7 8 off
Move the joystick left to lock more levels(more discs will require the password); moveright to unlock levels. You can’t lock level 1.
4 Press ENTER to set the new level andreturn to the Options menu screen.
Setting/changing the Country CodeYou may also want to refer to the Countrycode list.
1 Select ‘Country Code’.
Digital Audio OutVideo OutputLanguageDisplayOptionsSpeakers
Parental LockBonus GroupAuto Disc MenuGroup PlaybackDVD Playback ModeSACD PlaybackCD Playback
Password ChangeLevel ChangeCountry Code
Initial Settings
2 Use number buttons to enter yourpassword, then press ENTER.
Digital Audio Out
Video Output
Language
Display
Options
Speakers
Initial Settings
Country Code List Code
us 2 1 1 9
Parental Lock : Change Country Code
1 * * *Password
3 Select a country code.There are two ways you can do this.
• Select by code letter: Use the joystick(up/down) to change the country code.
Digital Audio Out
Video Output
Language
Display
Options
Speakers
Initial Settings
Country Code List Code
us 2 1 1 9
Parental Lock : Change Country Code
* * * *Password
• Select by code number: Move thejoystick right then use the numberbuttons to enter the 4-digit country codeSee Country code list).
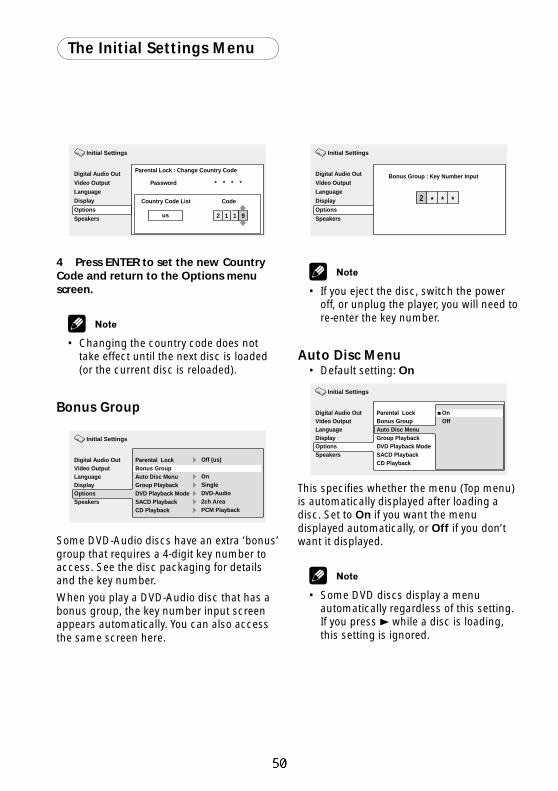
The Initial Settings Menu08
62En
Digital Audio Out
Video Output
Language
Display
Options
Speakers
Initial Settings
Country Code List Code
us 2 1 1 9
Parental Lock : Change Country Code
* * * *Password
4 Press ENTER to set the new CountryCode and return to the Options menuscreen.
• Changing the country code does nottake effect until the next disc is loaded(or the current disc is reloaded).
Bonus Group
Digital Audio OutVideo OutputLanguageDisplayOptionsSpeakers
Parental LockBonus GroupAuto Disc MenuGroup PlaybackDVD Playback ModeSACD PlaybackCD Playback
‰ Off (us)
‰ On‰ Single‰ DVD-Audio‰ 2ch Area‰ PCM Playback
Initial Settings
Some DVD-Audio discs have an extra ‘bonus’group that requires a 4-digit key number toaccess. See the disc packaging for detailsand the key number.
When you play a DVD-Audio disc that has abonus group, the key number input screenappears automatically. You can also accessthe same screen here.
Digital Audio Out
Video Output
Language
Display
Options
Speakers
Bonus Group : Key Number Input
Initial Settings
2 * * *
• If you eject the disc, switch the poweroff, or unplug the player, you will need tore-enter the key number.
Auto Disc Menu• Default setting: On
Digital Audio OutVideo OutputLanguageDisplayOptionsSpeakers
Parental LockBonus GroupAuto Disc MenuGroup PlaybackDVD Playback ModeSACD PlaybackCD Playback
OnOff
Initial Settings
This specifies whether the menu (Top menu)is automatically displayed after loading adisc. Set to On if you want the menudisplayed automatically, or Off if you don’twant it displayed.
• Some DVD discs display a menuautomatically regardless of this setting.If you press 3 while a disc is loading,this setting is ignored.

The Initial Settings Menu 08
63En
Group Playback• Default setting: Single
Digital Audio OutVideo OutputLanguageDisplayOptionsSpeakers
Parental LockBonus GroupAuto Disc MenuGroup PlaybackDVD Playback ModeSACD PlaybackCD Playback
AllSingle
Initial Settings
DVD-Audio discs can have up to 9 groups oftracks. When set to Single, the selectedgroup plays and then the disc stops, orreturns to the menu screen. Use GroupSearch to select the group to play.(You cannot use the track skip 4 / ¢ orscan buttons 1 / ¡ in this mode.)
Set to All if you want to play all the groupson a disc consecutively.
• Even if the players is set to All but youselect a group to play from the discmenu, only that group will play. If youstop playback, all groups will play againwhen you restart playback.
DVD Playback Mode• Default setting: DVD-Audio
Digital Audio OutVideo OutputLanguageDisplayOptionsSpeakers
Parental LockBonus GroupAuto Disc MenuGroup PlaybackDVD Playback ModeSACD PlaybackCD Playback
DVD-AudioDVD-Video
Initial Settings
Some DVD-Audio discs contain DVD-Videocontent in addition to the DVD-Audio. Set toDVD-Video to play a DVD-Audio disc as if itwere a DVD-Video disc. Note that in this caseonly the DVD-Video part of the disc will play.
SACD Playback• Default setting: 2ch Area
Digital Audio OutVideo OutputLanguageDisplayOptionsSpeakers
Parental LockBonus GroupAuto Disc MenuGroup PlaybackDVD Playback ModeSACD PlaybackCD Playback
2ch AreaMulti-ch AreaCD Area
Initial Settings
SACD discs can be divided up into severaldifferent areas — stereo audio (2ch Area),multi-channel audio (Multi-ch Area) and, forhybrid SACDs, standard CD audio (CDArea). Select which you want to listen to.
• If you select an area that isn’t on thedisc loaded, a different area of the discwill play. For example, if you choosestandard CD audio but the disc loadedis not a hybrid SACD, the stereo SACDaudio will play.

The Initial Settings Menu08
64En
CD Playback• Default setting: PCM Playback
Digital Audio OutVideo OutputLanguageDisplayOptionsSpeakers
Parental LockBonus GroupAuto Disc MenuGroup PlaybackDVD Playback ModeSACD PlaybackCD Playback
PCM PlaybackDTS CD Playback
Initial Settings
When set to PCM Playback, playback isoptimized for standard audio CDs. You canalso play DTS CDs, however you may noticesome noise when a DTS CD starts playing.Also, speakers which were set to Small inthe Speaker Installation screen areautomatically set to Large. This is not amalfunction.
When set to DTS CD Playback, playback isoptimized for DTS CDs. In this mode youcannot play standard audio CDs through theanalog outputs. Change the setting back toPCM Playback to play standard CDs.
Speakers
Audio Output Mode• Set in Setup Navigator (Default: 2
Channel)
Digital Audio Out
Video Output
Language
Display
Options
Speakers
Audio Output Mode
Speaker Installation
Speaker Distance
2 Channel
5.1 Channel
Initial Settings
If you connected this player to your amplifierusing the 5.1 channel analog outputs (front,surround, center and subwoofer outs), setthis to 5.1 Channel; if you connected onlythe stereo outs, set to 2 Channel.
• Even if you set Audio Output Mode to5.1 Channel, you’ll only get sound fromall speakers when playing a multi-channel DVD-Audio disc, SACD, orDolby Digital or DTS encoded DVD disc.
• When set to 5.1 Channel, only the frontleft/right channels are output from theAUDIO OUT (L/R) jacks. Change to2 Channel if you want to listen todownmixed stereo audio (for example,because you are listening through theTV’s built-in speakers).
• When set to 5.1 Channel there is nodigital output when playing DVD-Audio.
• If you set to 2 Channel, Dolby Digital,DTS and MPEG audio is mixed down totwo channels so you still hear all theaudio recorded on the disc.
• Some DVD-Audio discs don’t allowdown-mixing of audio. These discsalways output multi-channel audioregardless of the setting made here.
Speaker Installation• Set in Setup Navigator (default: L/R:
Large | C: Large | LS/RS: Large| SW:On )
You only need to make this setting if youconnected this player to your amplifier usingthe 5.1 channel analog outputs.
This setting does not affect digital audiooutput.
Digital Audio Out
Video Output
Language
Display
Options
Speakers
Audio Output Mode
Speaker Installation
Speaker Distance
Initial Settings
‰ 2 Channel

The Initial Settings Menu 08
65En
Use the Speaker Installation screen to tellthe player what kinds of speakers you haveconnected.
1 Use the joystick to move the cursorup/down to select a speaker.
• The L and R, and RS and LS speakersare paired; you can’t set them differ-ently.
Digital Audio Out
Video Output
Language
Display
Options
Speakers
LCRRSLSSW
LargeLargeLargeLargeLarge
On
Initial Settings
2 Move the cursor right to modify theselected speaker.
3 Use the joystick (up/down) to changethe current setting.
• You can see the effect of your changesin the room graphic on the right of thescreen.
• Except for the subwoofer, you can setspeaker size to Large or Small. If themain speaker cone in the speaker is12cm or more, set to Large, otherwiseset to Small (or Off if you don’t havethat speaker).
• If you set the front L and R speakers toSmall, the center and surround speak-ers are automatically set to Small andthe subwoofer to On.
• The subwoofer can only be set to On orOff.
4 Move the joystick left to go back tothe speaker list if you want to modifyanother speaker, or press ENTER to exitthe Speaker Installation screen.
Speaker Distance• Default setting: all speakers 10 ft.
You only need to make this setting if youconnected this player to your amplifier usingthe 5.1 channel analog outputs.
To get the best surround sound from yoursystem, you should set up the speakerdistances from your listening position.
‰ 2 ChannelDigital Audio Out
Video Output
Language
Display
Options
Speakers
Audio Output Mode
Speaker Installation
Speaker Distance
Initial Settings
1 Use the joystick to move the cursorup/down to select a speaker.
• The L and R speakers are paired; youcan’t set them differently.
Digital Audio Out
Video Output
Language
Display
Options
Speakers
LCRRSLSSW
10.0 ft.10.0 ft.10.0 ft.10.0 ft.10.0 ft.10.0 ft.
Initial Settings
2 Move the cursor right to change thespeaker distance for the highlightedspeaker.

The Initial Settings Menu08
66En
3 Use the joystick (up/down) to changethe distance.
• When you change the distance settingsof the front left (L) or front right (R)speakers, all the other speaker dis-tances change relative to it.
• Front left/right (L/R) speakers can be setfrom 1 ft. to 30 ft. in 0.5 ft. increments.
• Center speaker (C) and subwoofer (SW)can be set from – 6.5 ft. to +6.5 ft.relative to the front left/right speakers
• Surround left/right (LS/RS) speakers canbe set from –20 ft. to +6.5 ft. relative tothe front left/right speakers.
4 Move the cursor left to go back to thespeaker list if you want to modifyanother speaker, or press ENTER to exitthe Speaker Distance screen.
• Speaker Distance settings do not affectSACD playback.
Channel Level• Default setting: Fix
You only need to make this setting if youonnected this player to your amplifier using
the 5.1 channel analog outputs.
This setting does not affect digital audiooutput.
Digital Audio Out
Video Output
Language
Display
Options
Speakers
Audio Output Mode
Speaker Installation
Speaker Distance
Channel Level
Fix
Variable
Initial Settings
When set to Fix, the level of each of the 5.1channel analog outputs is fixed. ChooseVariable if you want to adjust the relativelevels to balance the surround sound betterfor your listening room.
Digital Audio Out
Video Output
Language
Display
Options
Speakers
LCRRSLSSW
Auto
0.0dB0.0dB0.0dB0.0dB0.0dB0.0dB
Initial Settings
You can set the individual channel levelsbetween –6dB and +6dB using the test toneoutput as a guide to set the correct levels.Adjust the levels until the output level fromall channels sounds the same from yourusual listening position.
Automatic: Select Auto to start the test toneoutput.
Digital Audio Out
Video Output
Language
Display
Options
Speakers
LCRRSLSSW
Auto
0.0dB0.0dB0.0dB0.0dB0.0dB0.0dB
Initial Settings
As the test tone plays through each speakerin turn, it is highlighted on-screen. Use the
joystick (up/down) to adjust the channeloutput level of the current speaker. Note thatthe test tone is not output from thesubwoofer. Move the joystick left to exit thetest tone sequence, or ENTER to save thesettings and exit the channel level settingscreen.
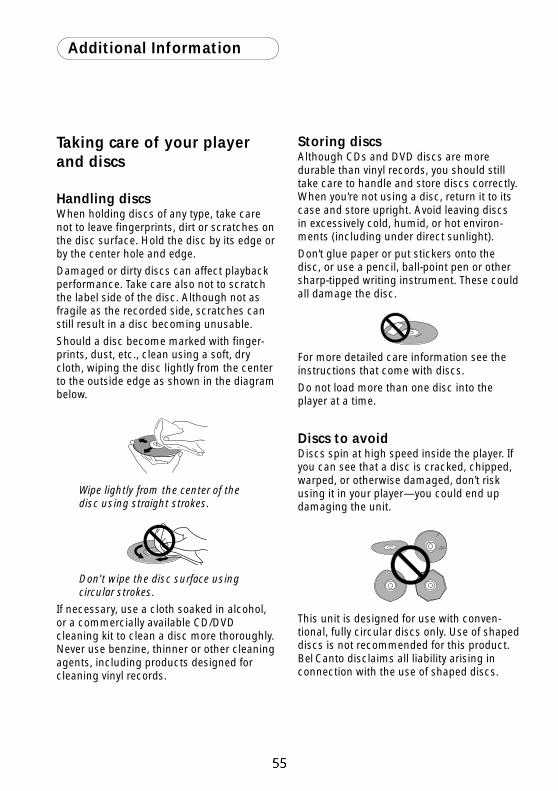
Additional Information09
68En
Storing discsAlthough CDs and DVD discs are moredurable than vinyl records, you should stilltake care to handle and store discs correctly.When you're not using a disc, return it to itscase and store upright. Avoid leaving discsin excessively cold, humid, or hot environ-ments (including under direct sunlight).
Don't glue paper or put stickers onto thedisc, or use a pencil, ball-point pen or othersharp-tipped writing instrument. These couldall damage the disc.
For more detailed care information see theinstructions that come with discs.
Do not load more than one disc into theplayer at a time.
Discs to avoidDiscs spin at high speed inside the player. Ifyou can see that a disc is cracked, chipped,warped, or otherwise damaged, don't riskusing it in your player—you could end updamaging the unit.
This unit is designed for use with conven-tional, fully circular discs only. Use of shapeddiscs is not recommended for this product.Bel Canto disclaims all liability arising inconnection with the use of shaped discs.
Taking care of your playerand discs
Handling discsWhen holding discs of any type, take carenot to leave fingerprints, dirt or scratches onthe disc surface. Hold the disc by its edge orby the center hole and edge.
Damaged or dirty discs can affect playbackperformance. Take care also not to scratchthe label side of the disc. Although not asfragile as the recorded side, scratches canstill result in a disc becoming unusable.
Should a disc become marked with finger-prints, dust, etc., clean using a soft, drycloth, wiping the disc lightly from the centerto the outside edge as shown in the diagrambelow.
Wipe lightly from the center of thedisc using straight strokes.
Don’t wipe the disc surface usingcircular strokes.
If necessary, use a cloth soaked in alcohol,or a commercially available CD/DVDcleaning kit to clean a disc more thoroughly.Never use benzine, thinner or other cleaningagents, including products designed forcleaning vinyl records.

Additional Information 09
69En
Place directly on top of an amplifier, orother component in your stereo systemthat becomes hot in use.
Use near a television or monitor as youmay experience interference—especiallyif the television uses an indoor antenna.
Use in a kitchen or other room wherethe player may be exposed to smoke orsteam.
Use on a thick rug or carpet, or coverwith cloth—this may prevent propercooling of the unit.
Place on an unstable surface, or onethat is not large enough to support allfour of the unit’s feet.
Moving the playerIf you need to move the player, first press
STANDBY/ON on the front panel to turnthe player off. Wait for --OFF-- to disappearfrom the display, then turn of the rear switch or unplug the powcord. Never lift or move the unit during playback—discs rotate at a high speed and may be damaged.
Power cord cautionHandle the power cord by the plug part. Donot pull out the plug by tugging the cord,and never touch the power cord when yourhands are wet, as this could cause a shortcircuit or electric shock. Do not place theunit, a piece of furniture, or other object onthe power cord or pinch the cord in any otherway. Never make a knot in the cord or tie itwith other cords. The power cords should berouted so that they are not likely to bestepped on. A damaged power cord cancause a fire or give you an electric shock.Check the power cord once in a while. If youfind it damaged, ask your nearest Bel Cantoauthorized service center or your dealer for areplacement.
Cleaning the pickup lensThe DVD player’s lens should not becomedirty in normal use, but if for some reason itshould malfunction due to dust or dirt,consult your nearest authorizedservice center. Although lens cleaners for CDplayers are commercially available, we donot recommend using them since some maydamage the lens.
Problems with condensationCondensation may form inside the player if itis brought into a warm room from outside, orif the temperature of the room rises quickly.Although the condensation won’t damagethe player, it may temporarily impair itsperformance. For this reason you shouldleave it to adjust to the warmer temperaturefor about an hour before switching on andusing.
Hints on installationWe want you to enjoy using this unit foryears to come, so please bear in mind thefollowing points when choosing a suitablelocation for it:
Do... Use in a well-ventilated room.
Place on a solid, flat, level surface, suchas a table, shelf or stereo rack.
Don’t... Use in a place exposed to high tempera-
tures or humidity, including nearradiators and other heat-generatingappliances.
Place on a window sill or other placewhere the player will be exposed todirect sunlight.
Use in an excessively dusty or dampenvironment.

Additional Information09
70En
Screen sizes and disc formatsDVD-Video discs come in several differentscreen aspect ratios, ranging from TVprograms, which are generally 4:3, toCinemaScope widescreen movies, with anaspect ratio of up to about 7:3.
Televisions, too, come in different aspectratios; ‘standard’ 4:3 and widescreen 16:9.
Widescreen TV usersIf you have a widescreen TV, the TV Screensetting of this player should be set to16:9(Wide).
When you watch discs recorded in 4:3format, you can use the TV controls to selecthow the picture is presented. Your TV mayoffer various zoom and stretch options; seethe instructions that came with your TV fordetails.
Please note that some movie aspect ratiosare wider than 16:9, so even though you havea widescreen TV, these discs will still play ina ‘letterbox’ style with black bars at the topand bottom of the screen.
Standard TV usersIf you have a standard TV, the TV Screensetting of this player should be set to4:3 (Letter Box) or 4:3 (Pan&Scan),depending on which you prefer.
Set to 4:3 (Letter Box), widescreen discs areshown with black bars top and bottom.
Set to 4:3(Pan&Scan), widescreen discs areshown with the left and right sides cropped.Although the picture looks larger, you don’tactually see the whole picture.
Please note that many widescreen discsoverride the player’s settings so that the discis shown in letterbox format regardless of thesetting.
• Using the 16:9 (Wide) setting with astandard 4:3 TV, or either of the 4:3settings with a widescreen TV, will resultin a distorted picture.
Resetting the playerUse this procedure to reset all the player’ssettings to the factory default.
1 Switch the player into standby.
2 Using the front panel buttons, holddown the 7 (stop) button and press
STANDBY/ON to switch the player backon.All the player’s settings are now reset, andyou should see the ‘Let’s Get Started’ screen.
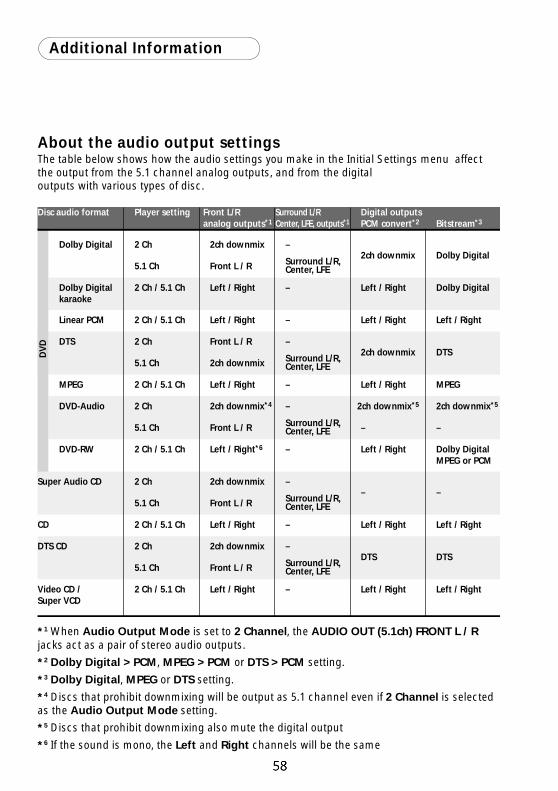
Additional Information 09
71En
Disc audio format Player setting
2 Ch
Front L / R
–
–
–
–
– –
– –
–
–
–
–
–
–
Surround L/R,Center, LFE
Surround L/R,Center, LFE
Surround L/R,Center, LFE
Surround L/R,Center, LFE
Surround L/R,Center, LFE
–
Front L / R
Front L / R
Front L / R
Left / Right Left / Right
Left / Right Left / Right
Left / Right*6
Left / Right
Left / Right
Left / Right
Left / Right
2ch downmix
2ch downmix*4
2ch downmix
2ch downmix
Front L / R
2ch downmix
5.1 Ch
Front L/Ranalog outputs*1
Surround L/RCenter, LFE, outputs*1
Digital outputsPCM convert*2 Bitstream*3
Dolby Digital
Dolby Digitalkaraoke
2 Ch / 5.1 Ch
2 Ch / 5.1 Ch
2 Ch / 5.1 Ch
2 Ch / 5.1 Ch
2 Ch / 5.1 Ch
2 Ch / 5.1 Ch
Linear PCM
2 Ch
5.1 Ch
DTS
MPEG
2 Ch
5.1 Ch
DVD-Audio
2 Ch
5.1 Ch
Super Audio CD
2 Ch
5.1 Ch
DTS CD
CD
Video CD /Super VCD
DVD-RW
DV
D
2ch downmix Dolby Digital
2ch downmix
2ch downmix*5 2ch downmix*5
DTS
DTSDTS
Dolby Digital
Left / Right
Left / Right
Left / Right Left / Right
Left / Right Left / Right
Dolby DigitalMPEG or PCM
MPEG
About the audio output settingsThe table below shows how the audio settings you make in the Initial Settings menu affect the output from the 5.1 channel analog outputs, and from the digital outputs with various types of disc.
*1 When Audio Output Mode is set to 2 Channel, the AUDIO OUT (5.1ch) FRONT L / Rjacks act as a pair of stereo audio outputs.
*2 Dolby Digital > PCM, MPEG > PCM or DTS > PCM setting.
*3 Dolby Digital, MPEG or DTS setting.
*4 Discs that prohibit downmixing will be output as 5.1 channel even if 2 Channel is selectedas the Audio Output Mode setting.
*5 Discs that prohibit downmixing also mute the digital output
*6 If the sound is mono, the Left and Right channels will be the same
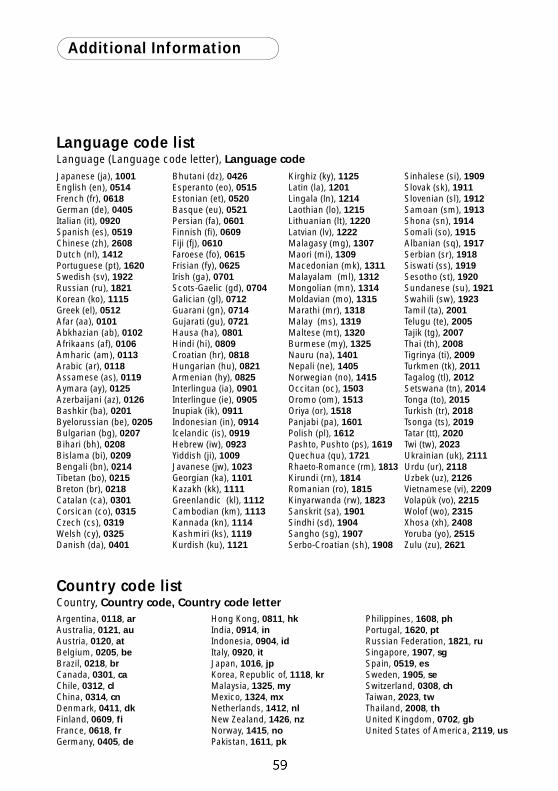
Additional Information09
72En
Argentina, 0118, arAustralia, 0121, auAustria, 0120, atBelgium, 0205, beBrazil, 0218, brCanada, 0301, caChile, 0312, clChina, 0314, cnDenmark, 0411, dkFinland, 0609, fiFrance, 0618, frGermany, 0405, de
Japanese (ja), 1001English (en), 0514French (fr), 0618German (de), 0405Italian (it), 0920Spanish (es), 0519Chinese (zh), 2608Dutch (nl), 1412Portuguese (pt), 1620Swedish (sv), 1922Russian (ru), 1821Korean (ko), 1115Greek (el), 0512Afar (aa), 0101Abkhazian (ab), 0102Afrikaans (af), 0106Amharic (am), 0113Arabic (ar), 0118Assamese (as), 0119Aymara (ay), 0125Azerbaijani (az), 0126Bashkir (ba), 0201Byelorussian (be), 0205Bulgarian (bg), 0207Bihari (bh), 0208Bislama (bi), 0209Bengali (bn), 0214Tibetan (bo), 0215Breton (br), 0218Catalan (ca), 0301Corsican (co), 0315Czech (cs), 0319Welsh (cy), 0325Danish (da), 0401
Language code listLanguage (Language code letter), Language code
Bhutani (dz), 0426Esperanto (eo), 0515Estonian (et), 0520Basque (eu), 0521Persian (fa), 0601Finnish (fi), 0609Fiji (fj), 0610Faroese (fo), 0615Frisian (fy), 0625Irish (ga), 0701Scots-Gaelic (gd), 0704Galician (gl), 0712Guarani (gn), 0714Gujarati (gu), 0721Hausa (ha), 0801Hindi (hi), 0809Croatian (hr), 0818Hungarian (hu), 0821Armenian (hy), 0825Interlingua (ia), 0901Interlingue (ie), 0905Inupiak (ik), 0911Indonesian (in), 0914Icelandic (is), 0919Hebrew (iw), 0923Yiddish (ji), 1009Javanese (jw), 1023Georgian (ka), 1101Kazakh (kk), 1111Greenlandic (kl), 1112Cambodian (km), 1113Kannada (kn), 1114Kashmiri (ks), 1119Kurdish (ku), 1121
Kirghiz (ky), 1125Latin (la), 1201Lingala (ln), 1214Laothian (lo), 1215Lithuanian (lt), 1220Latvian (lv), 1222Malagasy (mg), 1307Maori (mi), 1309Macedonian (mk), 1311Malayalam (ml), 1312Mongolian (mn), 1314Moldavian (mo), 1315Marathi (mr), 1318Malay (ms), 1319Maltese (mt), 1320Burmese (my), 1325Nauru (na), 1401Nepali (ne), 1405Norwegian (no), 1415Occitan (oc), 1503Oromo (om), 1513Oriya (or), 1518Panjabi (pa), 1601Polish (pl), 1612Pashto, Pushto (ps), 1619Quechua (qu), 1721Rhaeto-Romance (rm), 1813Kirundi (rn), 1814Romanian (ro), 1815Kinyarwanda (rw), 1823Sanskrit (sa), 1901Sindhi (sd), 1904Sangho (sg), 1907Serbo-Croatian (sh), 1908
Sinhalese (si), 1909Slovak (sk), 1911Slovenian (sl), 1912Samoan (sm), 1913Shona (sn), 1914Somali (so), 1915Albanian (sq), 1917Serbian (sr), 1918Siswati (ss), 1919Sesotho (st), 1920Sundanese (su), 1921Swahili (sw), 1923Tamil (ta), 2001Telugu (te), 2005Tajik (tg), 2007Thai (th), 2008Tigrinya (ti), 2009Turkmen (tk), 2011Tagalog (tl), 2012Setswana (tn), 2014Tonga (to), 2015Turkish (tr), 2018Tsonga (ts), 2019Tatar (tt), 2020Twi (tw), 2023Ukrainian (uk), 2111Urdu (ur), 2118Uzbek (uz), 2126Vietnamese (vi), 2209Volapük (vo), 2215Wolof (wo), 2315Xhosa (xh), 2408Yoruba (yo), 2515Zulu (zu), 2621
Hong Kong, 0811, hkIndia, 0914, inIndonesia, 0904, idItaly, 0920, itJapan, 1016, jpKorea, Republic of, 1118, krMalaysia, 1325, myMexico, 1324, mxNetherlands, 1412, nlNew Zealand, 1426, nzNorway, 1415, noPakistan, 1611, pk
Philippines, 1608, phPortugal, 1620, ptRussian Federation, 1821, ruSingapore, 1907, sgSpain, 0519, esSweden, 1905, seSwitzerland, 0308, chTaiwan, 2023, twThailand, 2008, thUnited Kingdom, 0702, gbUnited States of America, 2119, us
Country code listCountry, Country code, Country code letter

Additional Information
73En
Dolby Digital 1Using a maximum of 5.1 channels of audio,this high quality surround system is used inmany of the finer movie theaters around theworld.
The on-screen display shows which channelsare active, for example showing 3/2.1. The 3being the two front channels and the centerchannel; the 2 being the surround channels,and the .1 being the LFE channel.
DTS R
DTS stands for Digital Theater System. DTSis a surround system different from DolbyDigital that has become a popular surroundsound format for movies.
Dynamic rangeThe difference between the quietest andloudest sounds possible in an audio signal(without distorting or getting lost in noise).Dolby Digital and DTS soundtracks arecapable of a very wide dynamic range,delivering dramatic cinema-like effects.
File extensionA tag added to the end of a filename toindicate the type of file. For example, “.mp3”indicates an MP3 file.
Interlaced videoA method of displaying a picture in whichodd-numbered lines are updated in onepass, then even-numbered lines updated inthe next. See also Progressive scan video.
MP3MP3 (MPEG1 audio layer 3) is a compressedaudio file format. Files are recognized bytheir file extension “.mp3” or “.MP3”.
Selecting languages usingthe language code listSome of the language options (such as ‘DVDLanguage’ in the Setup Navigator) allow youto set your prefered language from any of the136 languages listed in the language codelist on the previous page.
1 Select ‘Other Language’.
2 Use the joystick (left/right) to high-light either the language name or codenumber.
3 Use the joystick (up/down) to changethe language or code number.
• You can also use the number buttons ifyou’re entering a language code.
See the language code list on the previouspage for a complete list of langauges andcodes.
GlossaryAnalog audioAn electrical signal that directly representssound. Compare this to digital audio whichcan be an electrical signal, but is an indirectrepresentation of sound. See also Digitalaudio.
Aspect ratioThe width of a TV screen relative to its height.Conventional TVs are 4:3 (in other words, thescreen is almost square); widescreen modelsare 16:9 (the screen is almost twice as wideas it is high).
Bonus Group (DVD-Audio only)An ‘extra’ group on some DVD-Audio discsthat requires a key number to access. Alsosee Group.
Browsable pictures (DVD-Audio only)A feature of some DVD-Audio discs in whichthe user can browse still pictures recordedon the disc as the audio is played. See alsoSlideshow.

Additional Information09
74En
Regions (DVD-Video only)These associate discs and players withparticular areas of the world. This unit willonly play discs that have compatible regioncodes. You can find the region code of yourunit by looking on the rear panel. Some discsare compatible with more than one region(or all regions).
S1 S-video outputThis S-video signal format includes aspectratio information (4:3 or 16:9) within thevideo signal. TVs which are compatible withS1 S-video automatically switch aspect ratioaccording to the signal.
S2 S-video outputS2 is an enhanced version of S-video which,in addition to aspect ratio information,contains letterbox / pan & scan information.Widescreen TVs which are compatible withS2 S-video automatically switch aspect ratioaccording to the signal.
Sampling frequencyThe rate at which sound is measured to beturned into digital audio data. The higher therate, the better the sound quality, but themore digital information is generated.Standard CD audio has a sampling fre-quency of 44.1kHz, which means 44,100samples (measurements) per second. Seealso Digital audio.
Slidshow (DVD, Video CD/Super VCD)A feature of some DVD discs in which stillpictures recorded on the disc cycle automati-cally as the audio is played. See alsoBrowsable Picture.
Super Audio CD (SACD)Super Audio CD is a high quality audio discformat that can accomodate high samplingrate stereo and multi-channel audio, as wellas conventional CD audio all on the samedisc.
MPEG audio An audio format used on Video CDs andsome DVD discs. This unit can convertMPEG audio to PCM format for widercompatibility with digital recorders and AVamplifiers. See also PCM.
MPEG videoThe video format used for Video CDs andDVDs. Video CD uses the older MPEG-1standard, while DVD uses the newer andmuch better quality MPEG-2 standard.
Packed PCM (DVD-Audio only)A lossless compression system that enablesmore PCM audio to be stored on a DVD-Audio disc than would otherwise be possi-ble.
PCM (Pulse Code Modulation)The most common system of encodingdigital audio, found on CDs and DAT.Excellent quality, but requires a lot of datacompared to formats such as Dolby Digitaland MPEG audio. For compatibility withdigital audio recorders (CD, MD and DAT)and AV amplifiers with digital inputs, thisunit can convert Dolby Digital, DTS andMPEG audio to PCM. See also Digital audio.
PBC (PlayBack Control) (Video CD only)A system of navigating a Video CD throughon-screen menus recorded onto the disc.Especially good for discs that you wouldnormally not watch from beginning to end allat once—karaoke discs, for example.
Progressive scan videoAlso called non-interlaced video, this methodof displaying a picture updates all the linesin one pass, resulting in a more stable,flicker-free image than interlaced video (for agiven scanning rate). See also Interlacedvideo.
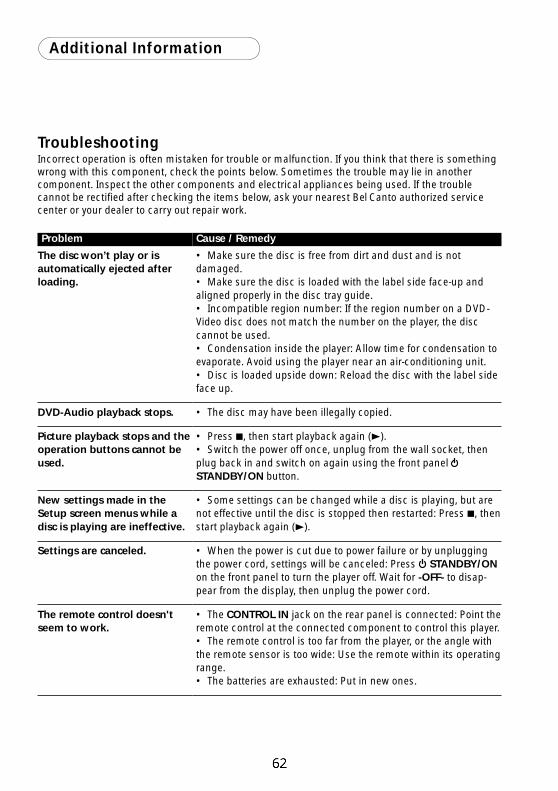
Additional Information 09
75En
TroubleshootingIncorrect operation is often mistaken for trouble or malfunction. If you think that there is somethingwrong with this component, check the points below. Sometimes the trouble may lie in anothercomponent. Inspect the other components and electrical appliances being used. If the troublecannot be rectified after checking the items below, ask your nearest Bel Canto authorized servicecenter or your dealer to carry out repair work.
Problem
The disc won’t play or isautomatically ejected afterloading.
DVD-Audio playback stops.
Picture playback stops and theoperation buttons cannot beused.
New settings made in theSetup screen menus while adisc is playing are ineffective.
Settings are canceled.
The remote control doesn'tseem to work.
Cause / Remedy
• Make sure the disc is free from dirt and dust and is notdamaged.• Make sure the disc is loaded with the label side face-up andaligned properly in the disc tray guide.• Incompatible region number: If the region number on a DVD-Video disc does not match the number on the player, the disccannot be used.• Condensation inside the player: Allow time for condensation toevaporate. Avoid using the player near an air-conditioning unit.• Disc is loaded upside down: Reload the disc with the label sideface up.
• The disc may have been illegally copied.
• Press 7, then start playback again (3).• Switch the power off once, unplug from the wall socket, thenplug back in and switch on again using the front panel STANDBY/ON button.
• Some settings can be changed while a disc is playing, but arenot effective until the disc is stopped then restarted: Press 7, thenstart playback again (3).
• When the power is cut due to power failure or by unpluggingthe power cord, settings will be canceled: Press STANDBY/ONon the front panel to turn the player off. Wait for -OFF- to disap-pear from the display, then unplug the power cord.
• The CONTROL IN jack on the rear panel is connected: Point theremote control at the connected component to control this player.• The remote control is too far from the player, or the angle withthe remote sensor is too wide: Use the remote within its operatingrange.• The batteries are exhausted: Put in new ones.

Additional Information09
76En
Problem
No picture/No color.
Screen is stretched or aspectdoes not change.
Picture disturbance duringplayback or the picture is dark.
No audio, or audio is dis-torted.
Cause / Remedy
• Check that the VIDEO OFF indicator is not lit. If it is, press theVIDEO OFF button.• Incorrect video connections: Check that connections arecorrect and that plugs are inserted fully. Also check the videocable for damage.• TV/monitor or AV amplifier settings are incorrect: Check theinstruction manual of the connected equipment.• The video ouput is progressive but your TV/monitor is notcompatible with progressive scan.
• The TV Screen setting in the Initial Settings menu is incorrect.
• If your TV/monitor is connected using an S-video cable, trychanging the S-Video Out setting.
• This player is compatible with Macro-Vision System copy guard.Some discs include a copy prevention signal, and when this typeof disc is played back, stripes etc., may appear on some sectionsof the picture depending on the TV. This is not a malfunction.• Due to the player’s copy protection circuits, connection of thisdevice through a VCR or an AV selector may prevent recording orcause picture problems. This is not a malfunction.
• No audio is output during slow motion playback or whenscanning discs other than audio CDs• Some DVD discs do not output digital audio: Switch youramplifier to the player's analog outputs.• Check that the disc is free from dust and dirt, and that it is notdamaged.• Check that all interconnects are firmly inserted.• Check that the plugs and terminals are free of dirt, oxide, etc.and clean if necessary. Also check the cable for damage.• Make sure the player's output is not connected to the amplifi-er's phono (turntable) inputs.• Check your amplifier/receiver’s settings (volume, inputfunction, speaker settings, etc.).

Additional Information 09
77En
Problem
The analog audio is OK, butthere appears to be no digitalaudio signal.
Noticeable difference in DVDand CD volume.
Cannot play multi-channelaudio.
Cannot listen to high-samplingrate audio through the digitaloutput.
Cannot output 192kHz or176.4kHz digital audio.
Cannot output 96kHz or88.2kHz digital audio.
No DTS audio output.
Cause / Remedy
• Make sure that the Digital Out setting is set to On.• Check that the Dolby Digital, DTS and MPEG out settings are suitable for your amplifier/receiver—check the instruction manual that came with your amplifier/receiver.• SACDs and some DVD-Audio discs do not output digital audio.Listen through the player’s analog audio outputs.
• This is due to differences in the audio format and is not amalfunction.
•Make sure that Audio Output Mode is set to 5.1 Channel.
•Check that the Dolby Digital, DTS and MPEG Out settingsare suitable for your amplifier/receiver—check the instruction manual that came with your amplifier/receiver.• DVD-Audio and SACDs do not output multichannel digitalaudio. Listen through the player’s analog outputs.• Check that the settings in the Speaker Installation screen arecorrect.• Check the audio options available from the disc menu.
• Make sure that Linear PCM Out is set to Down Sample Off.
• As a copy-protection measure, some DVDs do not output 96kHzaudio. In this case, even if set to Down Sample Off, the playerautomatically outputs the audio at 48 kHz. This is not a malfunc-tion.
• The player does not output digital audio at these samplingrates. The digital output is automatically downsampled.
• Check that Linear PCM Out is set to Down Sample Off.
• Some discs are digital copy protected and do not output highsampling rate digital audio. In this case the output is automati-cally downsampled.
• If this unit is connected to a non-DTS compatible amplifier ordecoder using a digital audio cable, set DTS Out to DTS 3 PCM.If you do not do this, noise will be output when you play a DTSdisc.• If this unit is connected to a DTS-compatible amplifier ordecoder using a digital audio cable, check the amplifier settings,and that the cable is properly connected.

Additional Information09
78En
Problem
Audio mix does not soundright or sounds incomplete(for example, inaudible ).
Disc containing the MP3 trackswon’t play.
Can’t hear effect ofTruSurround.
Cause / Remedy
• Make sure that Audio Output Mode is set to 2 Channel ifyou've connected to the stereo inputs on your amplifier or TV.
• This player is compatible with multi-session discs, but onlyplays sessions that are closed.• If the message UNPLAYABLE MP3 FORMAT is displayed whenyou try to play a disc/track, check the audio file formats. For moreinformation.
• TruSurround does not work with CD, MP3, DVD-Audio, SACD or96kHz linear PCM DVD.• The TruSurround effect is only output through the AUDIO OUT(LF/RF) analog audio outputs.• Make sure that Audio Output Mode is set to 2 Channel.
• The effectiveness of TruSurround varies with the disc.
• Static electricity or other externalinfluences may cause malfunctioning ofthis unit. In this case, unplug the powercord and then plug back in. This willusually reset the unit for properoperation. If this does not correct theproblem, please consult your dealer.

Additional Information 09
GeneralSystem .............................................. DVD PlayerPower requirements ....... AC 80-260V, 50/60 HzPower consumption .................................... 43 WPower consumption (standby) ......................... 10 WWeight ....................................................... (23 lb )Dimensions ..... 17 1/2(W) x 5 1/4 (H) x 15 (D) in
Operating temperature .............. +5°C to +35°C(+36°F to +96°F)
Operating humidity ............................ 5% to 85%(no condensation)
Component Video output (Y, PB, PR)Output level ............................. Y: 1.0 Vp-p (75 Ω)
PB, PR: 0.7 Vp-p (75 Ω)Jacks ................................................... RCA jacks
S-Video outputY (luminance) - Output level .......... 1 Vp-p (75 Ω)C (color) - Output level ........... 286 mVp-p (75 Ω)Jack .................................................. S-Video jack
Video outputOutput level .................................... 1 Vp-p (75 Ω)Jack ....................................................... RCA jack
Audio output (1 stereo pair)Output level ....................... During audio output
200 mVrms (1 kHz, –20 dB)Number of channels .......................................... 2Jacks ..................................................... RCA jack
Audio output (multi-channel / L, R, C,SW, LS, RS)Output level ....................... During audio output
200 mVrms (1 kHz, –20 dB)Number of channels .......................................... 6Jacks ..................................................... RCA jack
Digital audio characteristicsFrequency response........................... 4 Hz to 44 kHz(DVD fs: 96 kHz)............. 4 Hz to 88 kHz (DVD-Audio fs: 192 kHz)S/N ratio .................................................... 118 dBDynamic range ......................................... 108 dBTotal harmonic distortion ....................... 0.001 %Wow and flutter .............. Limit of measurement
(0.001% W. PEAK) or lower
Digital outputOptical digital output ........... Optical digital jackCoaxial digital output ..................BNC, RCA jack
AccessoriesPower cord ......................................................... 1Remote control ................................................... 1 Operating Instructions........................................1 Warranty card ....................................................1AA dry cell batteries .......................................... 2
• The specifications and design of thisproduct are subject to change withoutnotice, due to improvement.
Specifications

bel canto – PLayer-1(A) RS-232 Protocol and Control Details - Rev. 2
Configuration - The following settings should be used for RS-232 transmission: Baud Rate – RS-232 baud rate is configured using jumpers on the internal RS-232 interface located on the upper 480p board or on the separate RS232 board. Available settings are 2400, 4800, 9600 and *19200. *Factory default is 19200.
Baud Rate Jumper 1 Jumper 2 2400 Jumped Jumped 4800 Open Jumped 9600 Jumped Open 19200 Open Open
Data Bits – Eight (8) data bits. Stop Bits – One (1) stop bit. Parity – No parity checking. Flow Control – None. RS-232 Interface – Commands are to be sent to the unit via RS-232 using the following format: Arguments 1 through 3 are in decimal format. <Command> = <Header><Command ID><Argument 1><Argument 2><Argument 3> <Header> = <CAh><FEh> = HEX or <202><254> = DECIMAL <Command ID> = <Byte> <Argument 1> = <Byte> <Argument 2> = <Byte> <Argument 3> = <Byte> <Byte> = 0 – 255 EXAMPLE OF DECIMAL COMMAND: To send the command “Play”, send <202><254><3><1><0><0> Note: Command 1 and 2 are for IR Equivalents only. Direct Commands are # 3 and higher. Any invalid command received via RS232 is ignored and will not affect normal operation. Status Byte – Upon receiving the command “Poll Status” command [CAh FEh 09h 00h 00h 00h], a single status byte will be transmitted. The format for the status byte is: <Status Byte> = <R><R><R><R><Device><Power Status> <R> = 0b : Reserved <Device> = 000b : Reserved = 001b : Reserved = 010b : Reserved = 011b : Reserved = 100-111 : Reserved <Power Status> = 0b : Unit is in standby. = 1b : Unit is not in standby.

Command Details and Explanation – This section will outline basic functionality and usage of each command set within the RS232 interface protocol. Note: Command IDs one(1) and two(2) are implemented to provide provision for future expandability. Command IDs three (3) through nine(9) offer more flexible control solutions and should be used for most applications. Command ID #1: Send Single-Byte IR Code Equivalent Command Format: <CAh><FEh><1><Data Byte><00h><00h> Functional Description: This command will write the given data (<Data Byte>) to the unit’s IR data bus. Usage: This command can be used to effectively implement any other command, which has a one-byte equivalent IR code. Equivalent IR codes for commands can be found on RS-232 command listing. Note that not all commands have equivalent IR codes. Example: To send the single byte command “Play”, send <CAh><FEh><1><79h><00h><00h> <202><254><1><121><0><0> DECIMAL Equiv. Command ID #2: Send Three-Byte IR Code Equivalent Command Format: <CAh><FEh><2><Data Byte 1><Data Byte 2><Data Byte 3> Functional Description: This command will write the given data (<Data Byte 1><Data Byte 2><Data Byte 3>) to the unit’s IR data bus. Usage: This command can be used to effectively implement any other command, which has a three-byte equivalent IR code. Equivalent IR codes for commands can be found on RS-232 command listing. Note that not all commands have equivalent IR codes. Example: To send the three byte command “Repeat”, send <CAh><FEh><2><99h><F5h><27h> <202><254><2><153><245><39> DECIMAL Equiv. Command ID #3: Direct Disk Commands Function: These commands have a function when the unit is loaded with any Theta CD, CDV or DVD. However, the effect of a given command may vary depending on currently loaded media and state of unit. Command ID #4: CDV/DVD Commands Function: These commands have a function when the unit is loaded with video media. However, the effect of a given command may vary depending on currently loaded media and state of unit. Command ID #5: DVD Commands Function: These commands have an effect only when the unit is loaded with a DVD. Their function may vary depending on the current state of the unit. Command ID #6: LD Commands Not Used Function: These commands have an effect only when the unit is loaded with a LD. Their function may vary depending of the current state of the unit.

Command ID #7: Miscellaneous Commands Function: These commands have the same function regardless of media type. However, their effect is dependent on current state of the unit. Command ID #8: Menu Navigation Commands Usage: These commands can be used to navigate the unit’s menus. Note that available menus are highly dependent on media type and state of the unit. Command ID #9: Poll Status Command Function: This command will request the return of the status byte from the unit. See RS-232 specifications for format and meaning of the status byte. Usage: This command can be used to retrieve basic information about the current status of the unit. RS232-Interface Usage Details – The RS-232 interface has a first-in-first-out (FIFO) buffer which will allow 15 full-length commands to be received in direct succession. Commands are executed in the order in which they are received with approximately a ½ second delay between each command. After a command is executed, it is removed from the buffer, making room to receive another command. If the buffer is full, any command received is ignored. For consistent results, no more than 15 commands should be sent in direct succession. If a longer string of commands is necessary, a minimum of ½ second delay should be added before sending additional commands. Example for sending a long string of commands: [Command 1] [Command 2] [Command 3] . . [Command 15 ] [Delay ½ sec] [Command 16 ] [Delay ½ sec] [Command 17 ] [Delay ½ sec] At most, it will take approximately 10 seconds for the RS-232 interface to execute all of the commands stored in a full command buffer. Overloaded buffers can cause the unit to freeze with respect to RS-232 commands. If this occurs the unit must be rebooted. Data errors can occur in asynchronous data transmission. Parity checking is not supported in the interface and unexpected operation can occur due to data errors. However, invalid commands are ignored. For this reason, using the IR equivalent command should be avoided if possible because the RS-232 interface will perform no error checking on the data to be sent via the IR data bus.

Command Command Description Argument 1 Argument 1 Description Argument 2 Argument 3 IR Code equivalent COMMAND AND ALL ARGUMENTS (ie.1, 2 AND 3 ARE TO BE INPUT AS DECIMAL NUMBERS Byte 1 Byte 2 Byte 3 1 Send single byte IR code equivalent. 0 - 255 First Byte to be sent (1) 0 0 -- -- -- Ex: Play <CAh><FEh><1><79h><00h><00h> 2 **Send three byte IR code equivalent. 0 - 255 First byte to be sent (2) 0 - 255 0 - 255 -- -- -- **Note: Arguments 2 and 3 are IR Code equivalents Byte 2 and Byte 3 to be sent. Ex: Repeat <CAh><FEh><2><99h><F5h><27h> 3 Direct disk commands 1 Play 0 0 79h -- -- Ex: Play <202><254><3><1><0><0> (Decimal) 2 Previous 0 0 B9h -- -- 3 Pause 0 0 F9h -- -- 4 Stop 0 0 19h -- -- 5 Next 0 0 39h -- -- 6 Step forward 0 0 99h F5h EDh 7 Step reverse 0 0 99h F5h 1Dh 9 Numeric keypad 0 0 0 99h F5h 05h 10 Numeric keypad 1 0 0 99h F5h 85h 11 Numeric keypad 2 0 0 99h F5h 45h 12 Numeric keypad 3 0 0 99h F5h C5h 13 Numeric keypad 4 0 0 99h F5h 25h 14 Numeric keypad 5 0 0 99h F5h A5h 15 Numeric keypad 6 0 0 99h F5h 65h 16 Numeric keypad 7 0 0 99h F5h E5h 17 Numeric keypad 8 0 0 99h F5h 15h 18 Numeric keypad 9 0 0 99h F5h 95h 19 Program 0 0 99h F5h 37h 21 Repeat 0 0 99h F5h 27h 22 Repeat A-B 0 0 99h F5h 17h 23 Random 0 0 99h F5h 7Fh 24 Clear 0 0 99h F5h A7h 25 Display 0 0 99h F5h C7h 26 Reverse 0 0 99h F5h 57h 27 Forward 0 0 99h F5h 97h

Command Command Description Argument 1 Argument 1 Description Argument 2 Argument 3 IR Code equivalent COMMAND AND ALL ARGUMENTS (ie.1, 2 AND 3) ARE TO BE INPUT AS DECIMAL NUMBERS Byte 1 Byte 2 Byte 3 4 Commands pertaining to CDV/DVD only 0 Jog reverse 0 0 99h F5h 24h From remote control only 1 Jog reverse medium (IR ONLY) 0 0 99h F5h A4h From remote control only 2 Jog reverse fast (IR ONLY) 0 0 99h F5h 64h 3 Jog forward 0 0 99h F5h 04h From remote control only 4 Jog forward medium (IR ONLY) 0 0 99h F5h 84h From remote control only 5 Jog forward fast (IR ONLY) 0 0 99h F5h 44h 6 Shuttle reverse 0 0 99h F5h 3Eh 7 Shuttle forward 0 0 99h F5h 5Eh 8 Play Mode 0 0 99h F5h FEh 5 Commands pertaining to DVD only 1 Audio 0 0 99h F5h 7Dh 2 Subtitle 0 0 99h F5h 6Ch 3 Angle 0 0 99h F5h ADh 4 Top menu (title) 0 0 99h F5h 2Dh 5 Video adjust 0 0 99h F5h 0Ch 6 Surround 0 0 99h F5h 86h 7 DVD menu 0 0 99h F5h 62h 7 Miscellaneous commands 0 Dimmer 0 0 99h F5h 9Fh 1 Open/Close 0 0 99h F5h 6Dh 2 Toggle standby 0 0 99h F5h 3Dh 3 Put unit in standby 0 0 -- -- -- 4 Take unit out of standby 0 0 -- -- -- 8 Menu navigation commands 0 Up 0 0 99h 99h 4Fh 1 Down 0 0 99h F5h CFh 2 Right 0 0 99h F5h 26h 3 Left 0 0 99h F5h C6h 4 Return 0 0 99h F5h 2Fh 5 Enter 0 0 99h F5h F7h 6 Setup menu 0 0 99h F5h 0Dh 9 Poll status 0 Return status byte 0 0 -- -- --

RS232 Hardware Connections