Embed Size (px)
Citation preview

LOG SPLITTERSENGINE DRIVEN, TRAILER MOUNTED
Assembly, Parts
& Operator's Manual
For Model
T34B
March 2007
Form: T34BLogsplit.pm7

TABLE OF CONTENTS
SECTION DESCRIPTION PAGE
1 Introduction .............................................................. 11.1 Specifications .......................................................... 1
2 Safety .......................................................................... 22.1 Training & Preparation .......................................... 32.2 Safety Wear ............................................................. 32.3 Operating Safety ..................................................... 42.4 Operating Procedure ............................................... 52.5 Repair & Maintenance Safety ................................ 52.6 Towing Safety ......................................................... 62.7 Fire Prevention ....................................................... 62.8 Hydraulic Safety ..................................................... 72.9 Safety Decals ........................................................ 7-8
3 Assembly Instructions ............................................. 93.1 Assembly Guide ...................................................... 9
4 Operation ................................................................. 104.1 Engine Oil Recommendations .............................. 104.2 Filling Hydraulic System ..................................... 104.3 Starting Instructions ............................................ 104.4 Towing ................................................................... 114.5 Operation .............................................................. 11
5 Maintenance ............................................................ 11
6 Parts Breakdown.................................................... 126.1 Parts List .......................................................... 13-14
7 Limited Warranty ................................................... 15
DATE OF PURCHASE:___________________________
MODEL NUMBER: ______________________________
SERIAL NUMBER: ______________________________
1 INTRODUCTION
Congratulations on your choice of Log Splitters. This equipment has been designed and manufactured tomeet the needs of a discriminating buyer for the splitting of logs.
Safe, efficient and trouble free operation of your Log Splitter requires that you and anyone else who will beoperating or maintaining the machine, read and understand the Safety, Operation, and Maintenanceinformation contained within the Operator's Manual.
Keep this manual handy for frequent reference and to pass on to new operators or owners. Call your dealer,or Gearmore if you need assistance, information or additional copies of the manuals.
1
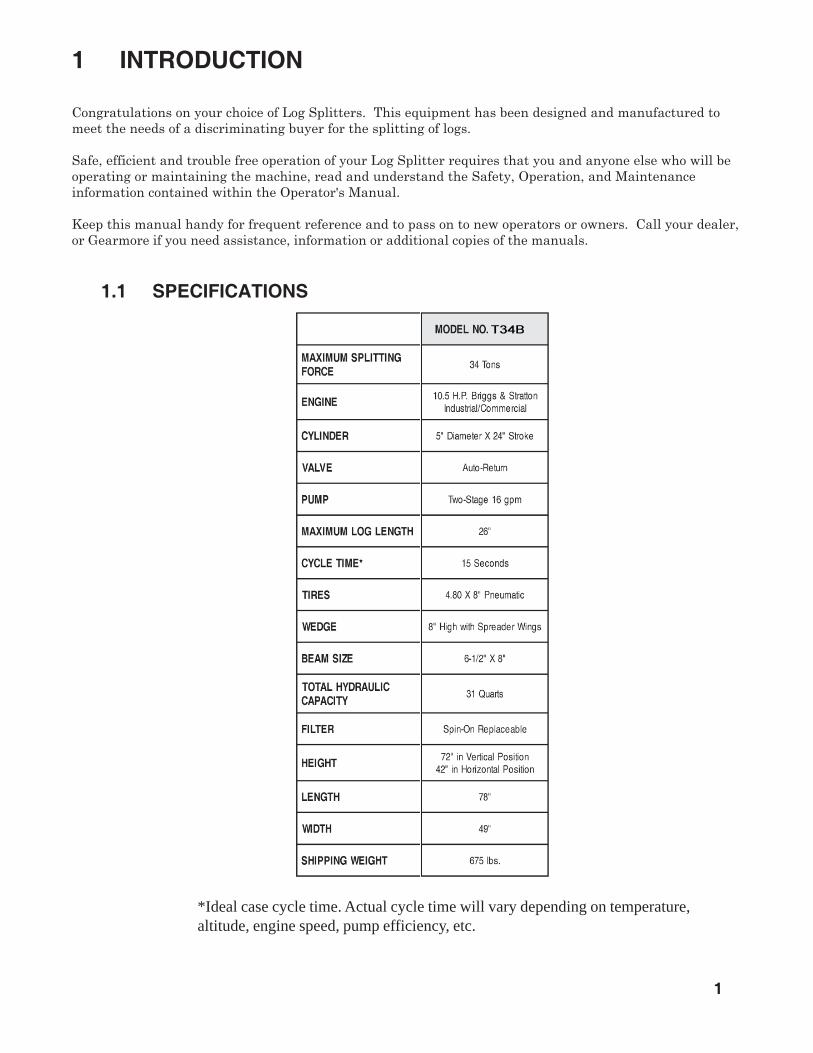
*Ideal case cycle time. Actual cycle time will vary depending on temperature,altitude, engine speed, pump efficiency, etc.
1.1 SPECIFICATIONS

2 SAFETYSAFETY ALERT SYMBOL
Why is SAFETY important to you?
The Safety Alert symbol identifiesimportant safety messages on theLog Splitter and in the manual.When you see this symbol, be alertto the possibility of personal injuryor death. Follow the instructionsin the safety message.
This Safety Alert symbol meansATTENTION! BECOMEALERT! YOUR SAFETY ISINVOLVED!
Accidents Disable and KillAccidents CostAccidents Can Be Avoided
3 Big Reasons
DANGER - Indicates an imminently hazardoussituation that, if not avoided, will resultin death or serious injury. This signalword is to be limited to the mostextreme situations typically formachine components which, forfunctional purposes, cannot be guarded.
WARNING - Indicates a potentially hazardoussituation that, if not avoided, couldresult in death or serious injury, andincludes hazards that are exposedwhen guards are removed. It mayalso be used to alert against unsafepractices.
CAUTION - Indicates a potentially hazardoussituation that, if not avoided, mayresult in minor or moderate injury.It may also be used to alert againstunsafe practices.
SIGNAL WORDS:
Note the use of the signal words DANGER,WARNING and CAUTION with the safetymessages. The appropriate signal word foreach message has been selected using thefollowing guide-lines:
If you have any questions not answered in this manual or require additional copies or the manual isdamaged, please contact your dealer.
2

3
2.1 TRAINING & PREPARATION
WARNING: Read and thoroughly understand allinstructions and safety infor-mation before assembling oroperating this log splitter.Failure to do so may causeserious injury or death. Do notallow anyone to operate thislog splitter who has not readthis manual. As with all powerequipment, a log splitter can be dangerous ifassembled or used improperly. Do not operatethis log splitter if you have doubts or questionsconcerning safe operation.
PREPARE LOGS PROPERLY
BOTH ends of each log should be cut as squareas possible to help prevent the log from ridingout of the splitter during operation. Do not splitlogs greater than 26 inches in length.
INTENDED USE
NEVER use this log splitter for any otherpurposes than splitting wood. It is designed forthis use only. Any other use can cause seriousinjury or death.
2.2 PERSONAL PROTECTIVEEQUIPMENT
BEFORE operating this log splitter, make surethat you adhere to the safety standards set forthin this manual.
NEVER wear loose clothing or jewelry that canbe caught by moving parts of your Log Splitterand pull you into it. Keep clothing away from allmoving parts of your Log Splitter. Wear properhead gear to keep hair away from moving parts.
ALWAYS wear safetyshoes. A dropped log canseriously injure your foot.
ALWAYS wear safetyglasses or goggles. Apiece of splitting logcould fly off and hit youreyes.
If you wear gloves, be sure they are tight fittingwithout loose cuffs or draw strings.
Have a first aid kit availableshould the need arise andlearn how to use it.
ALWAYS wear protectivehearing devices as needed.
PROLONGED EXPOSURE TO LOUDNOISE MAY CAUSE PERMANENTHEARING LOSS!Tractors with or without equipmentattached can often be noisy enough tocause permanent, partial hearing loss.We recommend that you wear hearingprotection on a full-time basis if the noisein the Operator's position exceeds 80db.Noise over 85db on a long-term basis cancause severe hearing loss. Noise over90db adjacent to the Operator over along-term basis may cause permanent,total hearing loss. NOTE: Hearing lossfrom loud noise (from tractors, chainsaws, radios, and other such sources closeto the ear) is cumulative over a lifetimewithout hope of natural recovery.

2.3 GENERAL SAFETY
4
Failure to follow these instructions mayresult in serious injury or death.
NEVER allow children or adults lacking properinstructions and understanding to operate thislog splitter.
KEEP all people and pets a minimum of 10 feetaway from your work area when operating thislog splitter. Only the operator is to be near thelog splitter during use.
If a helper is assisting in loading logs, NEVERactuate the control until the helper is clear of thework area.
NEVER operate the log splitter while under theinfluence of alcohol, drugs, or medication.
NEVER allow a person who is tired or otherwisenot alert to use your log splitter.
• Log Splitter owners must give operatinginstructions to operators or employees beforeallowing them to operate the machine, and atleast annually thereafter per OSHA (Occupa-tional Safety and Health Administration)regulation 1928.57.
• The most important safety feature on thisequipment is a SAFE operator. It is theoperator’s responsibility to read and under-stand ALL Safety and Operating instructionsin the manual and to follow these. Mostaccidents can be avoided.
• A person who has not read and understoodall operating and safety instructions is notqualified to operate the machine. Anuntrained operator exposes himself andbystanders to possible serious injury ordeath.
• Do not modify the equipment in any way.Unauthorized modification may impair thefunction and/or safety and could affect thelife of the equipment.
• Think SAFETY! Work SAFELY!
OPERATE IN SAFE ENVIRONMENT AND ONSAFE GROUND
1. NEVER operate yourLog Splitter on slippery,wet, muddy or icy surfaces.Safe footing is essential inpreventing accidents.
2. ONLY operate your Log Splitter on levelground. Operating on a slope could cause thelog splitter to roll over or logs to fall off.
3. NEVER operate your log splitter in anenclosed area. Exhaust fumes contain carbonmonoxide, which can be deadly when inhaled.
4. NEVER attempt to move your log splitterover hilly or uneven terrain without atow vehicle or adequate help.
5. ALWAYS block the wheels to preventmovement of the log splitter while inoperation.
6. ONLY operate your log splitter in daylight orunder good artificial light.
7. ALWAYS keep the work area clean. Removesplit wood around your log splitterimmediately so that you don't stumble over it.
2.4 WORK AREA SAFETY

2.4 OPERATING PROCEDURE
♦♦♦♦♦ ONLY operate the Log Splitter from theoperator zone.
♦♦♦♦♦ Know how to stop the log splitter and disengagethe controls before operating it.
♦♦♦♦♦ NEVER place hands or feet between log andsplitting wedge during forward or reversestroke. Serious injury or death could result.
♦♦♦♦♦ NEVER straddle or step over the log splitterduring operation.
♦♦♦♦♦ NEVER try to split two logs on top of eachother.
♦♦♦♦♦ NEVER try to cross split a second log.
♦♦♦♦♦ NEVER allow one person to operate the valvewhile another is positioning the log.
♦♦♦♦♦ NEVER attempt to load your Log Splitterwhen the ram or wedge is in motion.
♦♦♦♦♦ ALWAYS use your hand to operate the controllever. NEVER use your foot, a rope or anyother extension device.
♦♦♦♦♦ NEVER move the Log Splitter while theengine is running. Shut off the engine even ifyou are leaving the log splitter for a shortperiod of time.
♦♦♦♦♦ ALWAYS avoid contact with the muffler andother hot areas of the engine during operationto prevent burns.
2.5 REPAIR & MAINTENANCE SAFETY
Good maintenance is your responsibility. Poormaintenance is an invitation to trouble.
Follow good shop practices.
• Keep service area cleanand dry.
• Be sure electrical outletsand tools are properlygrounded.
• Use adequate light forthe job at hand.
NEVER operate your Log Splitter in poor mechanicalcondition or when in need of repair.
PERIODICALLY check that all nuts, bolts screws,hydraulic fittings, and hose clamps are tightened.
NEVER alter your log splitter in any manner, such asattaching a rope or extension to the control lever oradding to the width or height of the wedge. Suchalterations may cause your log splitter to be unsafe andwill void the warranty.
PERFORM all recommended maintenance proceduresbefore you use your log splitter.
REPLACE all damaged or worn parts immediately.
NEVER tamper with the engine to run it at excessivespeeds. The maximum engine speed is preset by themanufacturer and is within safety limits.
ALWAYS remove the spark plug wire before performingany service or repair on your log splitter.
ALWAYS check the level of hydraulic oil and engine oilbefore operation.
All replacement parts must meet manufacturer’sspecifications.
5

2.6 TOWING SAFETY
6
ALWAYS check all local and state regulationsregarding towing, licensing, and lights beforetowing your log splitter.
BEFORE towing, be certain that the log splitteris correctly and securely attached to the towingvehicle and that the safety chains are secured tothe hitch or bumper of the vehicle with enoughslack to allow turning. Always use a Class I, 2"ball with this log splitter.
NEVER carry any cargo or wood on your logsplitter.
NEVER allow anyone to sit or ride on your LogSplitter.
ALWAYS disconnect your log splitter from thetowing vehicle before operating it.
ALWAYS be careful when backing up with yourlog splitter in tow. It could jackknife.
ALWAYS allow for added length of your logsplitter when turning, parking, crossingintersections and in all driving situations.
NEVER exceed 45 mph when towing your logsplitter. Towing the log splitter at speeds higherthan 45 mph could result in loss of control,damage to the equipment, serious injury ordeath. Adjust towing speed for terrain andconditions. Be extra cautious when towing overrough terrain, especially railroad crossings.
NEVER operate your log splitter near a flame orspark. Hydraulic oil and gasoline are flammableand can explode.
DO NOT fill the gas tank while the engine is hotor running. Allow the engine to cool beforerefueling.
NEVER smoke while operating or refueling yourLog Splitter. Gas fumes can easily explode.
Only refuel your log splitter outdoors in a cleararea void of gas fumes or spilled gas. Always usean approved fuel container. Always replace the gascap securely.
If gasoline is spilled, move machine away from thearea of the spill and avoid creating any source ofignition until the spilled gas has evaporated.
Take a Class B fire extinguisherwith you when operating yourlog splitter in dry areas as aprecautionary measure againstpossible flying sparks.
Completely drain the fuel tank prior to storage toavoid the potential fire hazard.
ALWAYS store gasoline in an approved, tightlysealed container. Store the container in a cool, dryplace. DO NOT store in the house or near aheating appliance.
IMPORTANT NOTE:This unit is equipped with an internal combustionengine and should not be used on or near anyunimproved forest covered, brush covered or grasscovered land unless the engine’s exhaust system isequipped with a spark arrester meeting applicablelocal or state laws (if any). If a spark arrester isused, it should be maintained in effective workingorder by the operator.
In the state of California, the above is required bylaw (Section 442 of the California Public ResourcesCode). Other states may have similar laws.Federal laws apply on federal lands. A sparkarrester muffler (optional by manufacturer) isavailable as an accessory at your nearest enginedealer. Check legal requirements in your area.
2.7 FIRE PREVENTION

2.8 HYDRAULIC SAFETY
The hydraulic system of your log splitter requires careful inspection along with themechanical parts. Be sure to replace frayed, kinked, cracked or otherwise damagedhydraulic hose and components.
NEVER Check for leaks of hydraulic fluid with your hand. Fluid escaping from a small hole can almost beinvisible. Escaping fluid under pressure can have sufficient force to penetrate skin causing serious personalinjury or even death. Leaks can be detected by passing a piece of cardboard over the suspected leak andlooking for discoloration.
ALWAYS seek professional medical attention immediately if injured by escaping hydraulicfluid. Serious infection or reaction can develop if proper medical treatment is not administeredimmediately.
Should it become necessary to loosen or remove any hydraulic fitting or line, be sure to relieve all pressureby shutting off the engine and moving the control handle back and forth several times.
NEVER remove the cap from the hydraulic tank or reservoir while your log splitter is running. Hot oilunder pressure could result in serious injury.
NEVER adjust the hydraulic valve. The pressure relief valve on your Log Splitter is preset at the factory.Only a qualified service technician should perform this adjustment.
7
2.9 SAFETY DECALS
Make sure that all safety warning decals are in good condition and readable. Alwaysreplace missing or defaced decals. Contact your local dealer or Gearmore for freereplacements.
Part No. DL52-2-9Location: Top, front end of tongue
Part No. DL52-2-10Location: Briggs & Strattonengines - 8 H.P. and up
Part No. DL52-2-8Location: Top, front end of tongue

8
2.9 SAFETY DECALS (Continued)
1. READ AND UNDERSTAND OPERATOR’SMANUAL THOROUGHLY BEFOREOPERATION. FAILURE TO DO SO MAYRESULT IN SERIOUS INJURY.
2. KEEP ALL SHIELDS IN PLACE.3. KEEP HANDS, FEET AND CLOTHING
AWAY FROM POWER DRIVEN PARTS.4. ALWAYS WEAR SAFETY GLASSES AND
SAFETY SHOES DURING OPERATION.5. ALWAYS OPERATE OUT-OF-DOORS WITH
GOOD VENTILATION.6. ALWAYS STOP ENGINE AND REMOVE
SPARK PLUG WIRE BEFORE PERFORMINGMAINTENANCE OPERATIONS.
7. ALWAYS SHUT OFF ENGINE WHENLEAVING LOG SPLITTER UNATTENDED,EVEN FOR A SHORT PERIOD OF TIME.
8. ONLY ONE PERSON SHOULD LOAD ANDOPERATE THE LOG SPLITTER. KEEP ALLOTHERS CLEAR DURING OPERATION.NEVER ALLOW ONE PERSON TOOPERATE VALVE WHILE ANOTHER ISPOSITIONING THE LOG.
9. ALWAYS POSITION LOG WITH HANDS ONTHE SIDES OF LOG. KEEP HANDS CLEAROF ENDS.
10.KEEP ALL CHILDREN AWAY FROM THELOG SPLITTER.
11.DO NOT STEP OVER THE LOG SPLITTER.12.ONLY USE HANDS TO OPERATE THE
CONTROL VALVE.13.DO NOT OPERATE THE LOG SPLITTER
WHILE UNDER THE INFLUENCE OFALCOHOL, DRUGS OR MEDICATION.
14.ALWAYS OPERATE THE LOG SPLITTERON LEVEL, DRY, NON-SLIPPERYSURFACES. KEEP OFF SLOPES.
15.KEEP WORK AREA CLEAR OF SPLITWOOD, DEBRIS OR OTHER OBSTACLES.
16.ALWAYS STAY IN THE OPERATOR ZONEWHEN USING THE LOG SPLITTER.
17.ALWAYS SPLIT WOOD IN THE DIRECTIONOF THE GRAIN ONLY.
18.DO NOT ADD GASOLINE WHILE THEENGINE IS HOT OR RUNNING. ALLOWALL SPILLED GAS TO EVAPORATEBEFORE USING LOG SPLITTER.
WARNING
Part No. DL51-1-32Location: Top of hydraulic cylinder
Part No. DL51-1-57Location: Top, forward section of hydrauliccylinder
ALWAYS REPLACEMISSING ORDAMAGED DECALS
USE EXTREME CARE WHEN TILTING THE BEAM.DUE TO THE HEAVY WEIGHT OF THE BEAM,SOME ASSISTANCE MAY BE NEEDED TO INSURESAFETY AND PREVENT INJURY.
Part No. DL51-1-86Location: Clevis end of beamnear tilt locking pin
Part No. DL52-2-14Location: Top, front end of tongue

STEP 1: Remove all the components from thecrate. Inspect each piece for shipping damage. Ifany part is damaged, contact your dealer ordelivering carrier.
STEP 2: Attach the tongue (3)* to the tank/axle(2)* as shown in the diagram using the two 1/2" NCx 4-1/2" hex cap screws (48)*, 1/2" lockwashers (47)*and 1/2" NC hex nuts (46)* from the hardware kit.Tighten. Make sure the ground stand (24)* is inthe vertical position.
Note: Flatwashers are included in the hardwarekit should it be necessary to use them as spacers.This will eliminate play between the tongue andthe tank/tongue mounting plate.
STEP 3: Remove the rubber covering from thetwo spindles on the tank/axle (2)*. The wheelbearing cups, bearing cones, grease seals and hubcaps are already assembled. Bearing cones havebeen greased at the factory. Remove the blue,plastic protective covering from the wheel hubs.Mount the wheels (54)* to the spindles on thetank/axle (2)* using the 3/4" light flatwasher (59)*and 3/4" slotted nut (60)* from the hardware kit.There are two types of light flatwashers (59)*. Usethe ones that best allow the wheel to rotate freelyafter the 3/4" slotted nut (60)* is tightened downand bearing play is removed. Install the cotter pin(61)* and the hub cap (62)* from the hardware kit.Repeat step 4 for the other wheel.
3 ASSEMBLY INSTRUCTIONS
NOTE:
This log splitter was partially assembled at the factory. Refer to the drawing and parts list should itbecome necessary to disassemble the unit for repair or replacement parts.
STEP 4: Stand the beam (1)* up on end. NOTE:At least two people are required to raise the beamfor the 34 ton model to insure safety and preventinjury. Make sure that the beam is stable. Removethe pivot pin (52)* and the clip pin (53)* from thetank/axle (2)*. Roll the axle/tongue assembly intoposition between the two tabs on the beam (1)*.Slide the pivot pin (52)* through the holes and lockin place with the clip pin (53)*.
STEP 5: Connect the end of the 1/2" I.D. x 44"hydraulic hose (21)* coming from the fitting (20)*on the pump (9)* to the fitting (75)* on the valve(5)*.
STEP 6: Slide one hose clamp (50)* on the end ofthe 3/4" I.D. x 37" hydraulic hose (49)* that comesfrom the fitting on the tank/axle (2)*. Then connectthe hose to the fitting (69)* on the valve (5)*.Tighten the hose clamp.
STEP 7: Attach the fenders (44)* to the tank/axle (2)* using the 1/4" NC x 3/4" hex cap screws(43)*, 1/4" flatwashers (42)*, 1/4" lockwashers (41)*,and 1/4" hex nuts (40)*. Tighten.
9
* See Parts Breakdown (Pages 12 - 14)in this manual.

STEP 1: Starting
WARNING: Read and thoroughlyunderstand all instructions and safetyinformation before operating this logsplitter. Failure to do so may cause serious
injury or death. Do not allow anyone to operate thislog splitter who has not read this manual. As will allpower equipment, a log splitter can be dangerous ifit is assembled or used improperly. Do not operatethis log splitter if you have doubts or questionsconcerning safe operation.
IMPORTANT: The engine and hydraulic tank areshipped without oil. See the engine operating andmaintenance instructions manual packed with yourLog Splitter for the type of crankcase oil, fuel, etc. Theengine manufacturer recommends lead-freegasoline only.
CAUTION: DO NOT START OR RUNTHE ENGINE WITHOUT OIL iN THEHYDRAULIC RESERVOIR ANDENGINE.
STEP 2: The hydraulic reservoir should be filledwith an SAE20 hydraulic oil. If hydraulic oil isdifficult to obtain, automatic transmission fluid canbe substituted and should be used instead ofhydraulic oil when temperatures are below 32ºF. Use only clean oil and take care to prevent dirtfrom entering the hydraulic reservoir.
CAUTION:WHEN TIGHTENING THEBREATHER CAP ON THE TANK, POINTTHE HOLE AWAY FROM THE ENGINEAND THE OPERATOR ZONE.
4 OPERATING INSTRUCTIONS
4.1 ENGINE OIL RECOMMENDATIONS
For temperatures above 40º F use an SAE30W oil.Using multigrade oil may increase oil consumption.Using SAE 30W oil below 40º F will result in hardstarting and possible engine bore damage. Fortemperatures below 40º F use an SAE10W-30 orSAE5W-30 oil. Oil capacity is about 5/8 quart (20ounces; 0.6 liter).
10
Fill the hydraulic reservoir with at least five gallons ofhydraulic fluid. After the hydraulic reservoir and theengine crankcase are filled with oil, start the engine.The hydraulic pump should prime itself. With theengine running, move the hydraulic valve levertoward the wedge. This will cause the cylinder toextend and expel air. When the cylinder is fullyextended, retract it. Repeat this procedure severaltimes. An erratic movement of the cylinder indicatesthat there is still air in the system. More oil shouldthen be added to bring the fluid level up to the "OK"range on the dipstick. Total hydraulic capacity is 31quarts. NOTE: If the tank is overfilled, it will tend toexpel oil from the breather cap when the cylinder isretracted. After adding more oil to the tank, cycle thecylinder again until it has a constant speed indicatingthat all oil has been expelled. Check the oil level in thereservoir again with the dipstick to make sure it is inthe "OK" range. Do not fill beyond the "OK" range onthe dipstick.
4.2 FILLING HYDRAULIC SYSTEM
4.3 STARTING INSTRUCTIONS
Refer also to the Engine Operating andMaintenance Instructions manual for yourparticular log splitter.
1. 34 Ton Model with 10.5 h.p. Engine
a. Move the throttle to "FAST". Always operatethe engine with throttle lever in the "FAST"position.
b. Move choke control lever to "CHOKE"position.
c. Grasp rope handle and pull slowly untilresistance is felt. Then pull rapidly to startengine and avoid engine kickback.
d. Allow the engine to warm up. If operatingin warm weather, move the choke controllever toward "RUN" a short distance at atime over several seconds. For coldweather operation do this procedure overseveral minutes. Operate with choke leverin the "RUN" position.
e. To stop engine, move the throttle lever tothe "STOP" position.
The engine maximum governed speed is preset at thefactory at 3600 RPM no load speed. When splittingwood, the throttle should be set at the maximumsetting to develop the horsepower required for thepump.

11
4.3 TOWINGThe Log Splitter is equipped with pneumatic tires, aClass I coupler (2" diameter ball required) and safetychains. Before towing the safety chains must besecured to the hitch or bumper of the vehicle. Localregulations should be checked regarding licensing,lights, towing, etc. See also Towing Safety on page 6of this manual
4.5 OPERATION
1. Set up the Log Splitter in a clear, levelarea and block the wheels. Make surethat the suction port on the tanks isalways on the lower side of the logsplitter.
2. Place a log on the beam against the footplate. Make sure that the log is securelyon the foot plate and up against thebeam.
Both ends of each log should be cut assquare as possible to help prevent the logfrom riding out of the splitter duringoperation.
3. Depress the valve handle so that thecylinder will drive the wedge into the log.Extend the cylinder until the log splits orto the end of its stroke. If the log has notcompletely split after the cylinder hasreached the end of its extension, retractthe cylinder.
IMPORTANT: Leaving the valve in the"actuate" position at the end of the stroke maydamage the pump. Always use extra care whensplitting logs with unsquare ends.
NOTE: For operation in wooded areas, obtain a sparkarrester for the exhaust system. See the engineoperating and maintenance manual and check withyour authorized Briggs & Stratton center. See also FirePrevention in the Safety Information Section (Page 6)of this manual.
IMPORTANT:
TO EXTEND THE LIFE OF THE HYDRAULICCYLINDER, AVOID "BOTTOMING OUT" WEDGEPLATE TO THE FOOT PIECE. TO CONFORM WITHINDUSTRY SAFETY RECOMMENDATIONS, THEWEDGE STOPS 2 INCHES FROM THE END OF THESTROKE.
WARNING: See safety information relatedto operation of the log splitter on page 3and 4 of this manual. Make sure that youhave the recommended personal protectiveequipment described on page 3.
By following a good maintenance program, your
equipment will last for many years.
1. Consult the operating and maintenanceinstructions of the engine manufacturer forengine care and maintenance.
2. Always check the oil level of the hydraulicreservoir before operation. Operating the logsplitter without an adequate oil supply willcause severe damage to the pump.
3. Change the oil filter after the first 25 hours ofoperation. Thereafter, change the oil filterevery 100 hours or seasonally, whichevercomes first.
4. If the wedge becomes dull or nicked, it can beremoved and sharpened. Remove the 1/2"diameter bolt that connects the wedge to thecylinder. The hose from the valve may need tobe removed. While the log splitter is in thehorizontal position, loosen the hose clamp anddisconnect the hose from the valve. Carefullylift the cylinder to allow the wedge to slideforward. The wedge can now be lifted off andsharpened.
5. Clean the breather cap after 25 hours ofoperation. Clean it more often when operatedin dusty conditions. To clean, remove thebreather from the tank and flush withkerosene or liquid detergent to remove thedirt.
6. See also Repair and Maintenance Safety inthe Safety Information section (page 5) of thismanual.
7. All replacement parts must meetmanufacturer's specifications.
* See Parts Breakdown (Pages 12 - 14)in this manual.
5 MAINTENANCE

12
6 PARTS BREAKDOWN

13
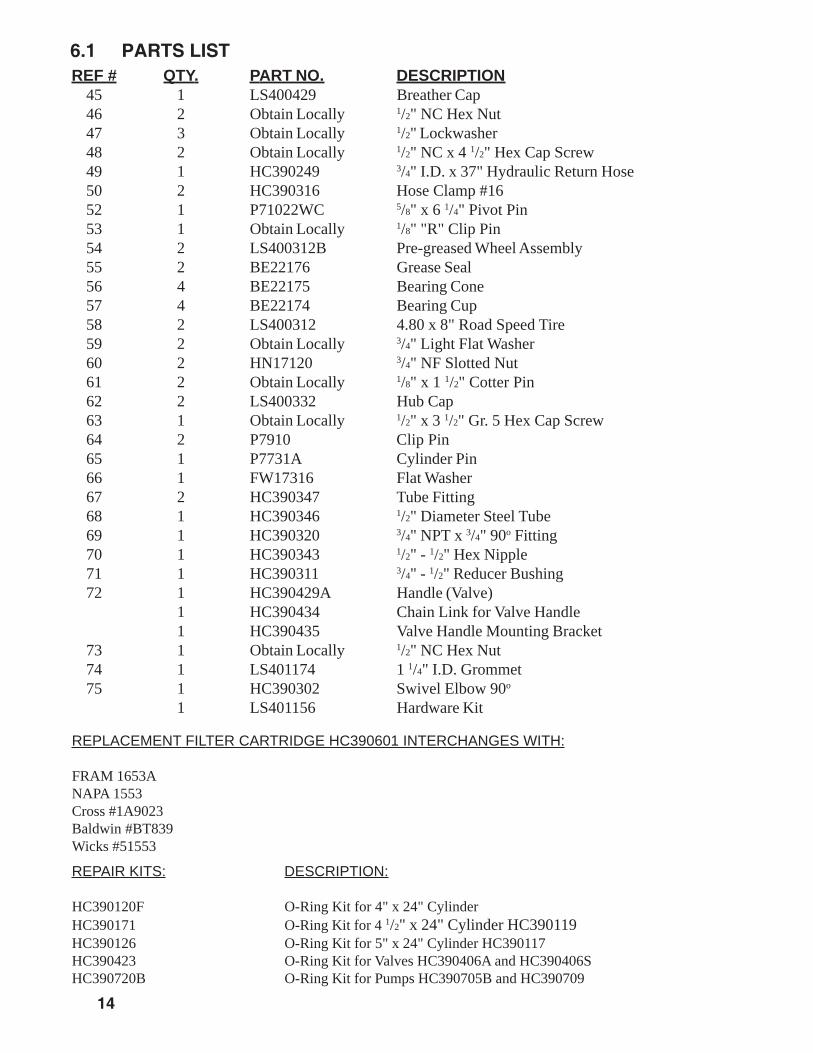
6.1 PARTS LIST
REF # QTY. PART NO. DESCRIPTION
1 1 LS401148 Beam2 1 LS401190 Tank/Axle3 1 LS401261 Tongue4 1 HC390129 5" x 24" Hydraulic Cylinder5 1 HC390406S Auto-Return Valve6 1 LS401183 Wedge7 1 HC390524 10.5 H.P. Industrial/Commercial Engine8 1 HC390601 Filter
1 HC390601A Filter Element (see list of equivalent filter elements)1 HC390601B Filter Base
9 1 HC390709 16 GPM Pump10 1 LS400824L Pump Engine Coupler (3 pieces)11 1 LS400825L 1" I.D. Coupler Half (engine side)
1 LS400826L 1/2" I.D. Coupler Half (pump side)1 LS400827L Coupler Spider
12 4 Obtain Locally 5/16" x 1" Hex Cap Screw14 4 Obtain Locally 5/16" NC Locknut16 1 LS400343 1/4" Square Engine Key17 4 Obtain Locally 5/16" NC x 1 1/2" Hex Cap Screw18 2 HC390316 Hose Clamp #1619 1 HC390248 1" x 9" Suction Hose20 1 HC390341 1/2" x 90o Street Elbow21 1 HC390257 1/2" I.D. x 47" Hydraulic Pressure Hose22 1 HC390320 3/4" NPT x 3/4" 90o Hose Fitting23 1 HC390349 3/4" x 2 1/2" Nipple24 1 LS401260 Ground Stand25 1 P7958 5/16" Locking Pin for Ground Stand26 1 HW172718 M10 x 1.5 x 85mm Bolt27 2 Obtain Locally 5/8" Lockwasher28 2 Obtain Locally 5/8" NF Hex Nut29 3 HW172803 M10 x 1.5 Nut31 1 P789 7/8" Diameter Pin with 5/8" NF Thread32 1 P794 1/4" Lynch Pin33 1 LS400346 Hitch Coupler for 2" Ball34 6 HW172908 10mm Washer35 1 HW172717 M10x1.5x115mm Bolt 3/8" NC x 1" Gr. 5 Hex Cap Screw36 1 HW172716 M10 x 1.5 x 100mm Bolt37 1 LS400323 Safety Chain with "S" Hook
1 LS400345 3/8" "S" Hook39 4 Obtain Locally 5/16" NC Locknut40 4 Obtain Locally 1/4" NC Hex Nut for Fender (Optional)41 4 Obtain Locally 1/4" Lockwasher for Fender (Optional)42 4 Obtain Locally 1/4" Flatwasher for Fender (Optional)43 4 Obtain Locally 1/4" NC x 3/4" Hex Cap Screw for Fender (Optional)44 2 LS401151 Fender
14
REF # QTY. PART NO. DESCRIPTION45 1 LS400429 Breather Cap46 2 Obtain Locally 1/2" NC Hex Nut47 3 Obtain Locally 1/2" Lockwasher48 2 Obtain Locally 1/2" NC x 4 1/2" Hex Cap Screw49 1 HC390249 3/4" I.D. x 37" Hydraulic Return Hose50 2 HC390316 Hose Clamp #1652 1 P71022WC 5/8" x 6 1/4" Pivot Pin53 1 Obtain Locally 1/8" "R" Clip Pin54 2 LS400312B Pre-greased Wheel Assembly55 2 BE22176 Grease Seal56 4 BE22175 Bearing Cone57 4 BE22174 Bearing Cup58 2 LS400312 4.80 x 8" Road Speed Tire59 2 Obtain Locally 3/4" Light Flat Washer60 2 HN17120 3/4" NF Slotted Nut61 2 Obtain Locally 1/8" x 1 1/2" Cotter Pin62 2 LS400332 Hub Cap63 1 Obtain Locally 1/2" x 3 1/2" Gr. 5 Hex Cap Screw64 2 P7910 Clip Pin65 1 P7731A Cylinder Pin66 1 FW17316 Flat Washer67 2 HC390347 Tube Fitting68 1 HC390346 1/2" Diameter Steel Tube69 1 HC390320 3/4" NPT x 3/4" 90o Fitting70 1 HC390343 1/2" - 1/2" Hex Nipple71 1 HC390311 3/4" - 1/2" Reducer Bushing72 1 HC390429A Handle (Valve)
1 HC390434 Chain Link for Valve Handle1 HC390435 Valve Handle Mounting Bracket
73 1 Obtain Locally 1/2" NC Hex Nut74 1 LS401174 1 1/4" I.D. Grommet75 1 HC390302 Swivel Elbow 90o
1 LS401156 Hardware Kit
6.1 PARTS LIST
REPLACEMENT FILTER CARTRIDGE HC390601 INTERCHANGES WITH:
FRAM 1653ANAPA 1553Cross #1A9023Baldwin #BT839Wicks #51553
REPAIR KITS: DESCRIPTION:
HC390120F O-Ring Kit for 4" x 24" CylinderHC390171 O-Ring Kit for 4 1/2" x 24" Cylinder HC390119HC390126 O-Ring Kit for 5" x 24" Cylinder HC390117HC390423 O-Ring Kit for Valves HC390406A and HC390406SHC390720B O-Ring Kit for Pumps HC390705B and HC390709

15
7 LIMITED WARRANTY
GEARMORE, INC., warrants each new Gearmore product to be free from defects in material andworkmanship for a period of twelve (12) months from date of purchase to the original purchaser.This warranty shall not apply to implements or parts that have been subject to misuse, negli-gence, accident, or that have been altered in any way.
Our obligation shall be limited to repairing or replacement of any part, provided that such part isreturned within thirty (30) days from date of failure to Gearmore through the dealer from whomthe purchase was made, transportation charges prepaid.
This warranty shall not be interpreted to render us liable for injury or damages of any kind ornature, direct, consequential or contingent, to person or property. This warranty does not extendto loss of crops, loss because of delay in harvesting or any other expenses, for any other rea-sons.
Gearmore in no way warranties engines, tires, or other trade accessories, since these items arewarranted separately by these respective manufacturers.
Gearmore reserves the right to make improvements in design or changes in specification at anytime, without incurring any obligations to owners or units previously sold.
GEARMORE, INC.13477 Benson Ave.
Chino, CA 91710Always refer to and heed machine operating warning decals on machine.
The serial number of this product is stored in our computer database, thussubmitting a warranty registration card is not required.