Embed Size (px)
Citation preview

ARENA-VATOR JR.
Assembly/Operator's/
& Parts Manual
For Models
AV-JR & AV-JRT
June 2007
Form: Arena-vatorJr.pm7

TABLE OF CONTENTSSECTION DESCRIPTION
PAGE1 Introduction .............................................................. 1
1.1 Serial Number Location ......................................... 1
2 Safety .......................................................................... 22.1 General Safety ........................................................ 32.2 Equipment Safety Guidelines ................................ 42.3 Safety Training ....................................................... 52.4 Safety Signs ............................................................ 52.5 Preparation ............................................................. 62.6 Operating Safety ..................................................... 72.7 Transport Safety ..................................................... 82.8 Storage Safety ......................................................... 82.9 Maintenance Safety ................................................ 8
3 Safety Sign Locations .............................................. 9
4 Operation ................................................................. 10 4.1 To the New Operator or Owner ............................ 10 4.2 Machine Components ........................................... 11 4.3 Machine Break-In ................................................. 11 4.4 Pre-Operation Checklist ....................................... 11 4.5 Field Operation ..................................................... 12 4.6 Transporting ......................................................... 13 4.7 Storage .................................................................. 13
5 Service & Maintenance ......................................... 14 5.1 Service ................................................................... 14
5.1.1 Fluids and Lubricants ...................................... 145.1.2 Greasing ............................................................ 145.1.3 Servicing Intervals............................................ 155.1.4 Service Record ................................................... 15
6 Trouble Shooting .................................................... 16
7 Assembly ................................................................... 17 7.1 Tine Spacing.......................................................... 18
8 Specifications .......................................................... 19 8.1 Mechanical ............................................................ 19 8.2 Bolt Torque............................................................ 19
9 Parts Reference ...................................................... 20 9.1 Drawing ................................................................. 20 9.2 Parts List ............................................................... 21
10 Limited Warranty ................................................... 22

1 INTRODUCTION
Congratulations on your choice of an Arena-Vator Jr. to complement your conditioning and levelingoperation. This equipment has been designed and manufactured to meet the needs of a discriminating buyerfor the efficient conditioning and leveling of land.
Safe, efficient and trouble free operation of your Arena-Vator Jr. requires that you and anyone else who willbe operating or maintaining the machine, read and understand the Safety, Operation, Maintenance andTroubleshooting information contained within the Operator's Manual.
This manual covers the Arena-Vator Jr. Models AV-JR & AV-JRT. Differences are explained whereappropriate. Use the Table of Contents as a guide to locate required information.
Keep this manual handy for frequent reference and to pass on to new operators or owners. Call yourGearmore dealer or distributor if you need assistance, information or additional copies of the manuals.
OPERATOR ORIENTATION - The directions left, right, front and rear, as mentioned throughout thismanual, are as seen from the driver's seat and facing in the direction of travel.
1
1.1 SERIAL NUMBER LOCATION
Always give your dealer the serial number of your implement when ordering parts or requesting service orother information.
The serial number plate is located where indicated. Please mark the number in the space provided for easy
reference.
DATE OF PURCHASE:___________________________
MODEL NUMBER:______________________________
SERIAL NUMBER: ______________________________
Serial NumberPlate
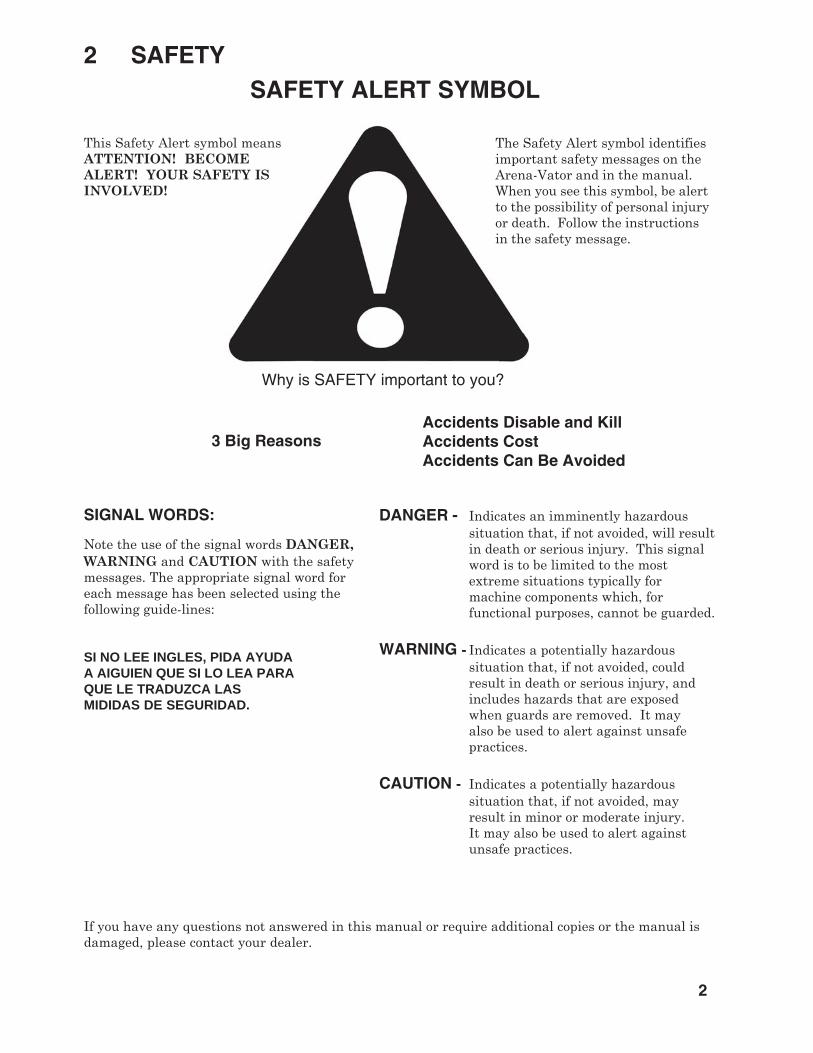
2 SAFETYSAFETY ALERT SYMBOL
Why is SAFETY important to you?
The Safety Alert symbol identifiesimportant safety messages on theArena-Vator and in the manual.When you see this symbol, be alertto the possibility of personal injuryor death. Follow the instructionsin the safety message.
This Safety Alert symbol meansATTENTION! BECOMEALERT! YOUR SAFETY ISINVOLVED!
Accidents Disable and KillAccidents CostAccidents Can Be Avoided
3 Big Reasons
DANGER - Indicates an imminently hazardoussituation that, if not avoided, will resultin death or serious injury. This signalword is to be limited to the mostextreme situations typically formachine components which, forfunctional purposes, cannot be guarded.
WARNING - Indicates a potentially hazardoussituation that, if not avoided, couldresult in death or serious injury, andincludes hazards that are exposedwhen guards are removed. It mayalso be used to alert against unsafepractices.
CAUTION - Indicates a potentially hazardoussituation that, if not avoided, mayresult in minor or moderate injury.It may also be used to alert againstunsafe practices.
SIGNAL WORDS:
Note the use of the signal words DANGER,WARNING and CAUTION with the safetymessages. The appropriate signal word foreach message has been selected using thefollowing guide-lines:
SI NO LEE INGLES, PIDA AYUDAA AIGUIEN QUE SI LO LEA PARAQUE LE TRADUZCA LASMIDIDAS DE SEGURIDAD.
If you have any questions not answered in this manual or require additional copies or the manual isdamaged, please contact your dealer.
2

3
2.1 GENERAL SAFETY
YOU are responsible for the SAFE operation andmaintenance of your Arena-Vator Jr. YOU must en-sure that you and anyone else who is going to oper-ate, maintain or work around the Arena-Vator Jr. befamiliar with the operating and maintenance proce-dures and related SAFETY information contained inthis manual. This manual will take you step-by-stepthrough your working day and alerts you to all goodsafety practices that should be adhered to while op-erating the Arena-Vator Jr.
Remember, YOU are the key to safety. Good safetypractices not only protect you, but also the peoplearound you. Make these practices a working part ofyour safety program. Be certain that EVERYONEoperating this equipment is familiar with the recom-mended operating and maintenance procedures andfollows all the safety precautions. Most accidents canbe prevented. Do not risk injury or death by ignoringgood safety practices.
• Arena-Vator Jr. owners must give operatinginstructions to operators or employeesbefore allowing them to operate themachine, and at least annually thereafter per OSHA (Occupational Safety andHealth Administration) regulation1928.57.
• The most important safety feature onthis equipment is a SAFE operator. It isthe operator's responsibility to read andunderstand ALL Safety and Operatinginstructions in the manual and to followthese. Most accidents can be avoided.
• A person who has not read and under-stood all operating and safety instructionsis not qualified to operate the machine.An untrained operator exposes himselfand bystanders to possible serious injuryor death.
• DO NOT modify the equipment in anyway. Unauthorized modification may im-pair the function and/or safety and couldaffect the life of the equipment.
• Think SAFETY! Work SAFELY!
1. Read and understand theOperator's Manual and allsafety signs before operating,maintaining adjusting or unplugging the Arena-Vator Jr.
2. Have a first-aid kit availablefor use should the need ariseand know how to use it.
3. Have a fire extinguisheravailable for use shouldthe need arise and knowhow to use it.
4. Wear appropriate protectivegear. This list includes but isnot limited to:
- A hard hat- Protective shoes
with slip resistantsoles
- Protective goggles,glasses or faceshield
- Heavy gloves- Protective clothing
5. Install and secure all guardsbefore starting.
6. DO NOT allow riders.
7. Wear suitable ear protectionfor prolonged exposure to ex-cessive noise.
8. Place all controls in neutral, stop tractorengine, set park brake, remove ignitionkey and wait for all moving parts to stopbefore servicing, adjusting, repairing, orunplugging.
9. Clear the area of people, especially smallchildren, before starting.
10. Review safety related items annuallywith all personnel who will be operatingor maintaining the Arena-Vator.

2.2 EQUIPMENT SAFETY GUIDELINES
4
Safety of the operator and bystanders is one of themain concerns in designing and developing amachine. However, every year many accidentsoccur which could have been avoided by a fewseconds of thought and a more careful approach tohandling equipment. You, the operator, can avoidmany accidents by observing the followingprecautions in this section. To avoid personal injuryor death, study the following precautions and insistthose working with you, or for you, follow them.
• In order to provide a better view, certainphotographs or illustrations in this manualmay show an assembly with a safety shieldremoved. However, equipment should neverbe operated in this condition. Keep all shieldsin place. If shield removal becomes necessaryfor repairs, replace the shield prior to use.
• Replace any safety sign or instruction signthat is not readable or is missing. Location ofsuch safety signs is indicated in this manual.
• NEVER use alcoholic beverages or drugswhich can hinder alertness or coordinationwhile operating this equipment. Consult yourdoctor about operating this machine whiletaking prescription medications.
• Under no circumstances should youngchildren be allowed to work with thisequipment. Do not allow persons tooperate or assemble this unit until theyhave read this manual and havedeveloped a thorough understanding ofthe safety precautions and of how itworks. Review the safety instructions withall users annually.
• This equipment is dangerous to children andpersons unfamiliar with its operation. Theoperator should be a responsible, properlytrained and physically able person familiarwith farm machinery and trained in thisequipment's operations. If the elderly areassisting with farm work, their physicallimitations need to be recognized andaccommodated.
• Use a tractor equipped with a Roll OverProtective Structure (ROPS) and a seat belt.
• NEVER exceed the limits of a piece ofmachinery. If its ability to do a job, or to do sosafely, is in question - DON'T TRY IT.
• Do not modify the equipment in any way.Unauthorized modification may impair thefunction and/or safety and could affect the lifeof the equipment.
In addition to the design and configuration of thisimplement, including Safety Signs and SafetyEquipment, hazard control and accident preventionare dependent upon the awareness, concern,prudence and proper training of personnel involved inthe operation, transport, maintenance and storage ofthe machine. Refer also to Safety Messages andoperation instruction in each of the appropriatesections of the tractor and machine manuals. Payclose attention to the Safety Signs affixed to thetractor and the machine.
Think SAFETY! Work SAFELY!

2.3 SAFETY TRAINING
Safety is a primary concern in the design andmanufacture of our products. Unfortunately, ourefforts to provide safe equipment can be wiped out bya single careless act of an operator or bystander.
In addition to the design and configuration ofequipment, hazard control and accident preventionare dependent upon the awareness, concern,prudence and proper training of personnel involvedin the operation, transport, maintenance andstorage of this equipment.
It has been said, "The best safety feature is aninformed, careful operator." We ask you to bethat kind of an operator. It isthe operator's responsibility toread and understand ALLSafety and Operating instructionsin the manual and to follow these. Accidents can beavoided.
Working with unfamiliar equipment can lead tocareless injuries. Read this manual, and the manualfor your tractor, before assembly or operating, toacquaint yourself with the machines. If this machineis used by any person other than yourself, or isloaned or rented, it is the machine owner'sresponsibility to make certain that the operator,prior to operating:
a. Reads and understands the operator'smanuals.
b. Is instructed in safe and proper use.
Know your controls and how to stop tractor, engineand machine quickly in an emergency. Read thismanual and the one provided with your tractor.
Train all new personnel and review instructionsfrequently with existing workers. Be certain only aproperly trained and physically able person willoperate the machinery. A person who has not readand understood all operating and safety instructionsis not qualified to operate the machine. Anuntrained operator exposes himself and bystandersto possible serious injury or death. If the elderly areassisting with farm work, their physical limitationsneed to be recognized and accommodated.
2.4 SAFETY SIGNS
1. Keep safety signs clean and legible at all times.
2. Replace safety signs that are missing or havebecome illegible.
3. Replaced parts that displayed a safety signshould also display the current sign.
4. Safety signs are available from your authorizeddealer or from Gearmore.
How To Install Safety Signs:
• Be sure that the installation area is cleanand dry.
• Be sure temperature is above 50º F (10º C).
• Determine exact position before you removethe backing paper. (See Section 3)
• Remove the smallest portion of the splitbacking paper.
• Align the sign over the specified area andcarefully press the small portion with theexposed sticky backing in place.
• Slowly peel back the remaining paper andcarefully smooth the remaining portion of thesign in place.
• Small air pockets can be pierced with a pinand smoothed out using the piece of signbacking paper.
5

2.5 PREPARATION
6
1. Never operate the tractor and machine untilyou have read and completely understandthis manual, the Tractor Operator's Manualand each of the Safety Messages found onthe safety signs on the tractor and machine.
2. Personalprotectionequipment,including hardhat, safetyglasses, safetyshoes and glovesare recommendedduring assembly,installation, operation, adjustment,maintaining, repairing, removal or movingthe implement. DO NOT allow long hair,loose fitting clothing or jewelry to be aroundequipment.
3. PROLONGED EXPOSURETO LOUD NOISE MAYCAUSE PERMANENTHEARING LOSS!Tractors with or withoutequipment attached canoften be noisy enough to cause permanent,partial hearing loss. We recommend thatyou wear hearing protection on a full-timebasis if the noise in the Operator's positionexceeds 80db. Noise over 85db on a long-term basis can cause severe hearing loss.Noise over 90db adjacent to the Operatorover a long-term basis may cause perma-nent, total hearing loss.
NOTE: Hearing loss from loud noise (fromtractors, chain saws, radios, and other suchsources close to the ear) is cumulativeover a lifetime without hope of naturalrecovery.
4. Operate the machine onlywith a tractor equippedwith an approved Roll-OverProtective Structure (ROPS).Always wear your seat belt.Serious injury or even deathcould result from falling offthe tractor --- particularly during a turn-over when the operator could be pinnedunder the ROPS or the tractor.
5. Clear working area of stones, branchesor hidden obstacles that might be hookedor snagged, causing injury or damage.
6. Operate only in daylight or good artificiallight.
7. Be sure machine is properly mounted,adjusted and in good operating condition.
8. Ensure that all safety shielding andsafety signs are properly installed and ingood condition.

2.6 OPERATING SAFETY
7
Please remember it is important that you read andheed the safety signs on the Arena-Vator Jr. Clean orreplace all safety signs if they cannot be clearly readand understood. They are there for your safety, aswell as the safety of others. The safe use of thismachine is strictly up to you, the operator.
All things with moving parts are potentiallyhazardous. There is no substitute for a cautious,safe-minded operator who recognizes potentialhazards and follows reasonable safety practices. Themanufacturer has designed this Arena-Vator Jr. tobe used with all its safety equipment properlyattached to minimize the chance of accidents. Studythis manual to make sure you have all safetyequipment attached.
If a safety shield or guard is removed for any reason,it must be replaced before the machine is againoperated.
When the use of hand tools is required to perform anypart of assembly, installation, adjustment,maintaining, repairing, removal, or moving, be surethe tools used are designed and recommended by thetool manufacturer for that specific task.
Personal protection equipment including hard hat,safety glasses, safety shoes, and gloves arerecommended during assembly, installation,operation, adjustment, maintaining, repairing,removal, or moving. Do not allow long hair, loosefitting clothing, or jewelry to be around movingparts.
Always use two people to handle heavy, unwieldycomponents during assembly, installation, removal,or moving.
Never place any part of your body where it would bein danger if movement should occur duringassembly, installation, operation, maintaining,repairing, removal, or moving.
Never place yourself between the tractor andmachine while implement is in operation.
Do not walk or work under a raised machine orattachment unless it is securely blocked or held inposition. Do not depend on the tractor hydraulicsystem to hold the machine or attachment in place.
A heavy load can cause instability of the tractor. Useextreme care during travel. Slow down on turns andwatch out for bumps. The tractor may need frontcounterweights to counterbalance the weight of themachine.
Never use alcoholic beverages or drugs, which canhinder alertness or coordination, while operatingthis equipment. Consult your doctor about operatingthis machine while taking prescription medications.
Do not allow riders on the machine or tractor at anytime. There is no safe place for any riders.
Before you operate the machine, check over all pins,bolts and connections to be sure all are securely inplace. Replace any damaged or worn partsimmediately.
Do not allow anyone who is not familiar with thesafety rules and operation instructions to use thismachine.
Never allow children to operate or be around thismachine.
Use stabilizer bars, adjustable sway chains, or swayblocks on the tractor lift arms to keep the machinefrom swinging side to side. Adjust as tightly aspractical for best performance.
Clear the work area of objects which might be pickedup and snagged or entangled in the machine.
Keep hands, feet, hair, jewelry, and clothing awayfrom all moving and/or rotating parts.

8
2.7 TRANSPORT SAFETY1. Comply with state and local laws governing
highway safety and movement of farmmachinery on public roads.
2. The use of flashing amber lights isacceptable in most localities. However,some localities prohibit their use. Locallaws should be checked for all highwaylighting and marking requirements.
3. At all times, when driving the tractor andequipment on the road or highway under20 mph (32 kph) use flashing amberwarning lights and a slow moving vehicle(SMV) identification emblem. Do not exceed20 mph (32 kph). Reduce speed on roughroads and surfaces.
4. Plan your route to avoid heavy traffic.
5. Always install transport locks, pins, orbrackets before transporting.
6. Do not drink and drive.
7. Be a safe and courteous driver. Always yieldto oncoming traffic in all situations,including narrow bridges, intersections, etc.Watch for traffic when operating near orcrossing roadways.
8. Turn into curves or go up or down hills onlyat a low speed and at a gradual steeringangle. Make certain that at least 20% of thetractor's weight is on the front wheels tomaintain safe steerage. Slow down on roughor uneven surfaces.
9. Never allow riders on either tractor ormachine.
1. Store the unit in an area away from humanactivity.
2. Do not permit children to play on or aroundthe stored machine.
3. Store the unit is a dry, level area. Supportthe frame with planks if required.
2.9 MAINTENANCE SAFETY1. Good maintenance is your responsibility.
Poor maintenance is an invitation totrouble.
2. Follow good shop practices.- Keep service
area cleanand dry.
- Be sure electricaloutlets and toolsare properlygrounded.
- Use adequate lightfor the job at hand.
3. Make sure there is plenty of ventilation.Never operate the engine in a closedbuilding. The exhaust fumes may causeasphyxiation.
4. Before working on this machine, shutoff the engine, set the brakes, and removethe ignition key.
5. Never work under equipment unless it isblocked securely.
6. Use personal protection devices such as eye,hand and hearing protectors, whenperforming any service or maintenancework.
7. Where replacement parts are necessary forperiodic maintenance and servicing,genuine factory replacement parts must beused to restore your equipment to originalspecifications. The manufacturer will not beresponsible for injuries or damages causedby use of unapproved parts and/oraccessories.
8. A fire extinguisherand first aid kitshould be keptreadily accessiblewhile performingmaintenance onthis equipment
9. Periodically tighten all bolts, nuts andscrews and check that all cotter pins areproperly installed to ensure unit is in a safecondition.
10. When completing a maintenance or servicefunction, make sure all safety shields anddevices are installed before placing unit inservice.
2.8 STORAGE SAFETY

3 SAFETY SIGN LOCATIONGood safety requires that you familiarize yourself with the various safety signs, the type of warning and thearea, or particular function related to that area, that requires your SAFETY AWARENESS.
REMEMBER - If safety signs have been damaged, removed, become illegible or parts replaced withoutsigns, new signs must be applied. New signs are available from your authorized dealer.
A
CAUTION
• Read and understand Operator'sManual before starting.
• Place all controls in neutral, stopengine, set park brake, removeignition key, and wait for allmoving parts to stop beforeservicing, adjusting, repairing orunplugging.
• Place jack stands under framebefore working under machine.
• Review safety instructionsannually.
9
CAUT001

10
4 OPERATION4.1 TO THE NEW OPERATOR
OR OWNER
The Arena-Vator Jr is designed as a light dutytillage tool for working up, leveling, packing, andconditioning the soil and surface. Be familiar withthe machine before starting.
It is the responsibility of the owner oroperator to read this manual and to train allother operators before they start workingwith the machine. Follow all safetyinstructions exactly. Safety is everyone'sbusiness. By following recommendedprocedures, a safe working environment isprovided for the operator, bystanders andthe area around the worksite. Untrainedoperators are not qualified to operate themachine.
Many features incorporated into this machine arethe result of suggestions made by customers likeyou. Read this manual carefully to learn how tooperate the machine safely and how to set it toprovide maximum field efficiency. By followingthe operating instructions in conjunction with agood maintenance program, your Arena-Vator Jrwill provide many years of trouble free service.
OPERATING SAFETY1. Read and understand the Operator's
Manual and all safety signs beforeoperating, servicing, adjusting, repairing, orunplugging.
2. Do not allow riders.
3. Install and secure all guards and shieldsbefore starting or operating.
4. Keep hands, feet, hair, and clothing awayfrom moving parts.
5. Place all controls in neutral, stop tractorengine, set park brake, remove ignition keyand wait for all moving parts to stop beforeservicing, adjusting, repairing, orunplugging.
6. Place all tractor and machine controls inneutral before starting.
7. Never start or operate machine unlesssitting on tractor seat.
8. Clear the area of bystanders, especiallysmall children, before starting.
9. Clean reflectors, SMV and lights beforetransporting.
10. Use hazard flashers on tractor whentransporting.
11. Do not put hands or feet under machinewhile tractor engine is running.
12. Review safety instructions with all operatorsannually.

4.2 MACHINE COMPONENTS
4.4 PRE-OPERATION CHECKLIST
Although there are no operational restrictions onthe Arena-Vator Jr. when used for the first time,it is recommended that the following mechanicalitems be checked:
A. After Operating For 1 and 5 Hours:
1. Check all nuts, bolts and other fasteners.Tighten to their specified torque level.
2. Check that the tines are in goodcondition.
3. Then go to the regular service schedule asdefined in Section 5.
Efficient and safe operation of the Arena-VatorJr. requires that each operator reads andunderstands the operating procedures and allrelated safety precautions outlined in thissection. A pre-operation checklist is provided forthe operator. It is important for both the personalsafety and maintaining the good mechanicalcondition of the Arena-Vator Jr. that thischecklist is followed.
Before operating the machine and each timethereafter, the following areas should bechecked off:
√ Use only ATV's or small Agriculturaltractors of the recommended horsepoweron the machine.
√ Check that the machine is properlyattached to the tractor. Be sure retainersare used on the mounting pins.
√ Check the tines/shovels/blade. Be sure theyare not damaged or broken and are notbadly worn. Repair or replace as required.
√ Check for entangled material. Remove thismaterial.
11
4.3 MACHINE BREAK-IN
Fig. 1 Machine Components
The Arena-Vator Jr. consists of acultivator assembly up front and arear leveling box. It will work thesoil, level it, pack and condition thesurface in one pass.
A. Cultivator Frame
B. Reversible Points
C. Tines
D. Rear Leveling Box
E. Electric Actuator
F. Control Box
G. Manual Link - Not Shown

12
4.5 FIELD OPERATION
OPERATING SAFETY
The Arena-Vator Jr. is designed as a light duty tillage tool used to work up horse arenas and tracks, levelthem, and pack/condition the surface. However the operator has the responsibility of being familiar with alloperating and safety procedures and following them. Each operator should review this section of the manualat the start of the season and as often as required to be familiar with the machine. When using, follow thisprocedure:
OPERATING SAFETY1. Read and understand the Operator's Manual
and all safety signs before operating,servicing, adjusting, repairing, or unplugging.
2. Do not allow riders.
3. Install and secure all guards and shieldsbefore starting or operating.
4. Keep hands, feet, hair, and clothing awayfrom moving parts.
5. Place all controls in neutral, stop tractorengine, set park brake, remove ignition keyand wait for all moving parts to stop beforeservicing, adjusting, repairing, or unplugging.
6. Place all tractor and machine controls inneutral before starting.
7. Never start or operate machine unless sittingon tractor seat.
8. Clear the area of bystanders, especiallysmall chilren, before starting.
9. Clean reflectors, SMV and lights beforetransporting.
10. Use hazard flashers on tractor whentransporting.
11. Do not put hands or feet under machine whiletractor engine is running.
1. Review and follow the Pre-Operation Checklist.
2. The Arena-Vator Jr. is a comletely selfcontained towable implement that can beoperated by almost any vehicle. The tillingdepth is controlled by an electro cylinderoperated from the vehicle seat. The unit is alsoavailable with a manually operated turnbuckle.
3. Before going to the working area reviewSection 4.6 Transporting.
4. Drive to the working area and stop in a levelarea.
5. Although the Arena-Vator Jr. can be operatedat any speed, it is recommended that slowspeeds be used. High speeds can lead toskipping by the tines and an uneven job. Two tofour mph will give the best results. the operatorwill have to experiment a little to determinethe best speed. Use the type of job being doneas a guide.
6. The machine was designed for arenamaintenance, however the unit can be used forother light cultivating and leveling projects.
7. Set the machine:
a. Leveling Box Position:The leveling box is located directly behind thecultivator section and is used to spread andlevel the soil loosened by the cultivator.A goodstarting position would be in the top hole onthe strap. Lower if the box is not distributingor moving the soil along the width of the cut.Set both ends of the blade in the same hole.
b. Leveling Box Angle:The leveling box mounting frame is designedwith a slotted mounting hole to provide a wayto adjust the blade angle. To set the angle,loosen mounting bolt and tap box into thedesired position. Tighten mounting bolt to itsspecified torque. Set both ends of the blade atthe same angle.
c. Clevis Hitch:The tongue of the frame is designed with anadjustable clevis hitch to allow thte operator tolevel the Arena-Vator Jr. during operation.The best results are obtained when the clevishitch is set so that the frame is level duringoperation. All tines should penetrate theground to the same depth. The soil should beloosened and smoothed as the machine movesacross the working area.

13
OPERATING SAFETY
4.6 TRANSPORTING
TRANSPORT SAFETY
4.7 STORAGE
1. Make sure you are in compliance with alllocal regulations regarding transportingequipment on public roads and highways.
2. Make sure the SMV (Slow Moving Vehicle)emblem and all the lights and reflectors thatare required by the local highway andtransport authorities are in place, are cleanand can be seen clearly by all overtakingand oncoming traffic.
3. Do not allow anyone to ride on the Arena-Vator or tractor during transport.
4. Do not exceed 20 mph (32 kph). Reducespeed on rough roads and surfaces.
5. Use retainers on the mounting pins whenattaching.
6. Always use hazard flashers on the tractorwhen transporting unless prohibited by law.
1. Store the unit in an area away from humanactivity.
2. Do not permit children to play on or aroundthe stored machine.
3. Store the unit in a dry, level area. Supportthe frame with planks if required.
STORAGE SAFETY
When transporting the machine, review and followthese instructions:
1. Be sure all bystanders are clear of the machine.
2. Be sure that the machine is securely attached tothe vehicle and all retainer pins are installed.
3. Clean the SMV emblem, lights and reflectorsand be sure they are working.
4. Be sure you are in compliance with all applicablelighting and marking regulations whentransporting. Check with your local authorities.
5. Be sure your machine can clearly be seen byovertaking and oncoming traffic.
6. Keep to the right and yield the right-of-way toallow faster traffic to pass. Drive on the roadshoulder if permitted by law.
7. Do not allow riders.
8. Always use hazard flashers on the tractor whentransporting unless prohibited by law.
After the season's use, the machine should bethoroughly inspected and prepared for storage.Repair or replace any worn or damaged compo-nents to prevent any unnecessary down time atthe start of next season. To insure a long,trouble free life, this procedure should befollowed when preparing the unit for storage:
1. Clear the area of bystanders, especiallysmall children.
2. Thoroughly wash the machine using apressure washer to remove all dirt, mud,debris and residue.
3. Inspect the tines and pivot for damage orentangled material. Repair or replacedamaged parts. Remove all entangledmaterial.
4. Touch up all paint nicks and scratches toprevent rusting.
5. Move to storage area.
6. Select an area that is dry, level and free ofdebris.
7. Unhook from towing vehicle.
8. If the machine cannot be placed inside,cover with a waterproof tarpaulin and tiesecurely in place.
9. Store the machine in an area away fromhuman activity.
10. Do not allow children to play on or aroundthe stored machine.
14
5 SERVICE AND MAINTENANCE
MAINTENANCE SAFETY
1. Follow ALL the operating, maintenance, andsafety information in the manual.
2. Support the machine with blocks or safetystands when working beneath it.
3. Follow good shop practices:
- Keep service area clean and dry.- Be sure electrical outlets and tools are
properly grounded.- Use adequate light for the job at hand.
4. Make sure there is plenty of ventilation.Never operate the engine of the towingvehicle in a closed building. The exhaustfumes may cause asphyxiation.
5. Use only tools, jacks and hoists of sufficientcapacity for the job.
6. Make sure all guards are in place andproperly secured when maintenance workis completed.
7. Keep hands, feet, hair, and clothing awayfrom moving or rotating parts.
8. Clear the area of bystanders, especiallysmall children, when carrying out anymaintenance and repairs or making anyadjustments.
5.1 SERVICE
5.1.1 FLUIDS AND LUBRICANTS
1. Grease:Use an SAE multi-purpose high temperaturegrease with extreme pressure (EP)performance. Also acceptable is an SAE multi-purpose lithium base grease.
2. Storing Lubricants:Your machine can operate at top efficiency onlyif clean lubricants are used. Use cleancontainers to handle all lubricants. Store themin an area protected from dust, moisture andother contaminants.
5.1.2 GREASING
Use a Maintenance Checklist to keep a record of allscheduled maintenance.
1. Use a hand-held grease gun for all greasing.
2. Wipe grease fitting with a clean cloth beforegreasing to avoid injecting dirt and grit.
3. Replace and repair broken fittingsimmediately.
4. If fittings will not take grease, remove andclean thoroughly. Also clean lubricant passage.Replace fitting if necessary.

15
5.1.3 SERVICING INTERVALS
The period recommended is based on normal operating conditions. Severe or unusual conditionsmay require more frequent servicing.
Daily or 10 Hours
1. Grease axle pivot bearings(2 locations)
Weekly
1. Check bolts for tightness
2. Check tire pressure
Annually
1. Clean machine.
5.1.4 SERVICE RECORD
See Lubrication and Maintenance sections for details of service. Copy this page to continue record.
HOURS
SERVICED
BY
MAINTENANCE
WEEKLY
ANNUALLY
Check Bolts
Check Tire Pressure
Clean Machine
Fig. 2 Roller Bearings

16
6 TROUBLE SHOOTING
The Arena-Vator Jr. is a simple and reliable system that requires minimal maintenance.
In the following section, we have listed many of the problems, causes and solutions to the problems that youmay encounter.
If you encounter a problem that is difficult to solve, even after having read through this trouble shootingsection, please call your local dealer or distributor. Before you call, please have this Operator's Manual andthe serial number from your Arena-Vator Jr. ready.
PROBLEM CAUSE SOLUTION
Soil isn't being worked up. Compacted soil. Raise leveling boxto place more weighton cultivator.
Make 2 passes.
Tines skip over ground. Driving too fast.Slow down.
Reversible Points worn out. Replace points.
Machine skips over theground. Compacted soil. Slow Down.
Add weight to frame.
Slow down and maketwo passes.
Ruts aren't being filled. Leveling box too high. Lower box.
17
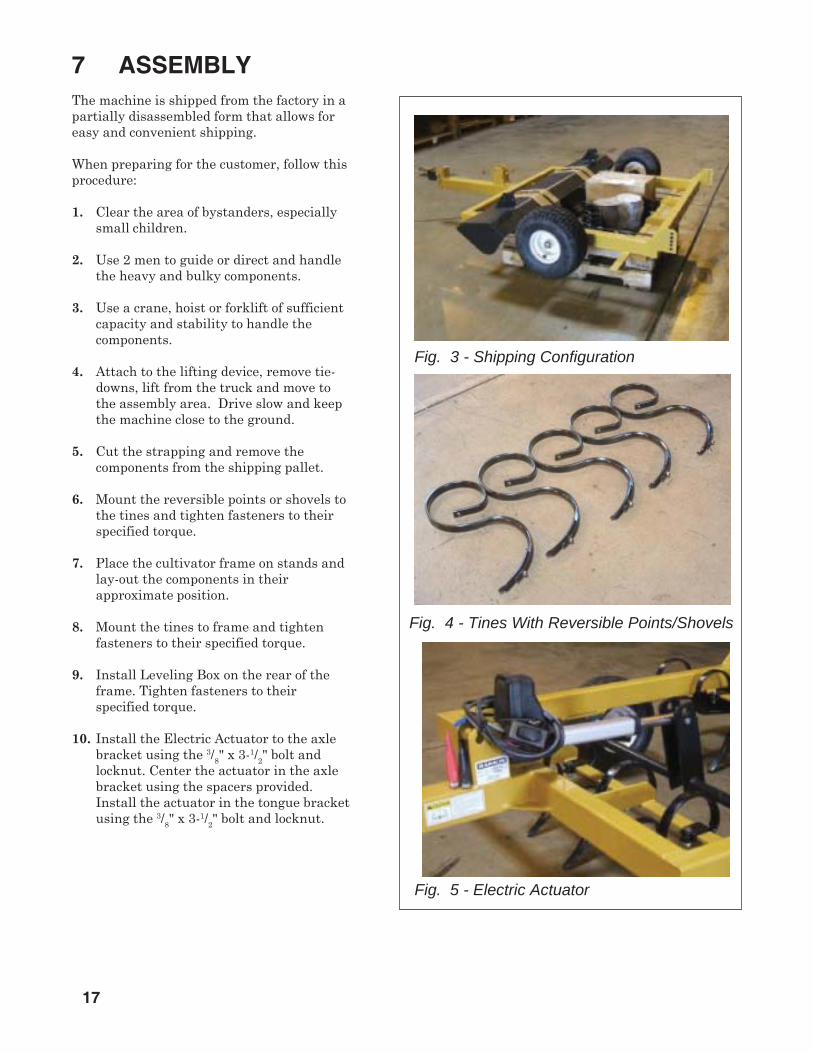
7 ASSEMBLYThe machine is shipped from the factory in apartially disassembled form that allows foreasy and convenient shipping.
When preparing for the customer, follow thisprocedure:
1. Clear the area of bystanders, especiallysmall children.
2. Use 2 men to guide or direct and handlethe heavy and bulky components.
3. Use a crane, hoist or forklift of sufficientcapacity and stability to handle thecomponents.
4. Attach to the lifting device, remove tie-downs, lift from the truck and move tothe assembly area. Drive slow and keepthe machine close to the ground.
5. Cut the strapping and remove thecomponents from the shipping pallet.
6. Mount the reversible points or shovels tothe tines and tighten fasteners to theirspecified torque.
7. Place the cultivator frame on stands andlay-out the components in theirapproximate position.
8. Mount the tines to frame and tightenfasteners to their specified torque.
9. Install Leveling Box on the rear of theframe. Tighten fasteners to theirspecified torque.
10. Install the Electric Actuator to the axlebracket using the 3/8" x 3-1/2" bolt andlocknut. Center the actuator in the axlebracket using the spacers provided.Install the actuator in the tongue bracketusing the 3/8" x 3-1/2" bolt and locknut.
Fig. 4 - Tines With Reversible Points/Shovels
Fig. 3 - Shipping Configuration
Fig. 5 - Electric Actuator

18
7.1 S-TINE SPACING
19
BoltDiameter"A"
1/4"5/16"3/8"
7/16"1/2"
9/16"5/8"3/4"7/8"1"
(6)(10)(20)(30)(45)(70)(95)(165)(170)(225)
SAE 2N.m (lb-ft)
SAE 5N.m (lb-ft)
SAE 8N.m (lb-ft)
81327416195128225230345
12254572110155215390570850
(9)(19)(33)(53)(80)(115)(160)(290)(420)(630)
1736631001552203055408801320
(12)(27)(45)(75)(115)(165)(220)(400)(650)(970)
Bolt Torque *
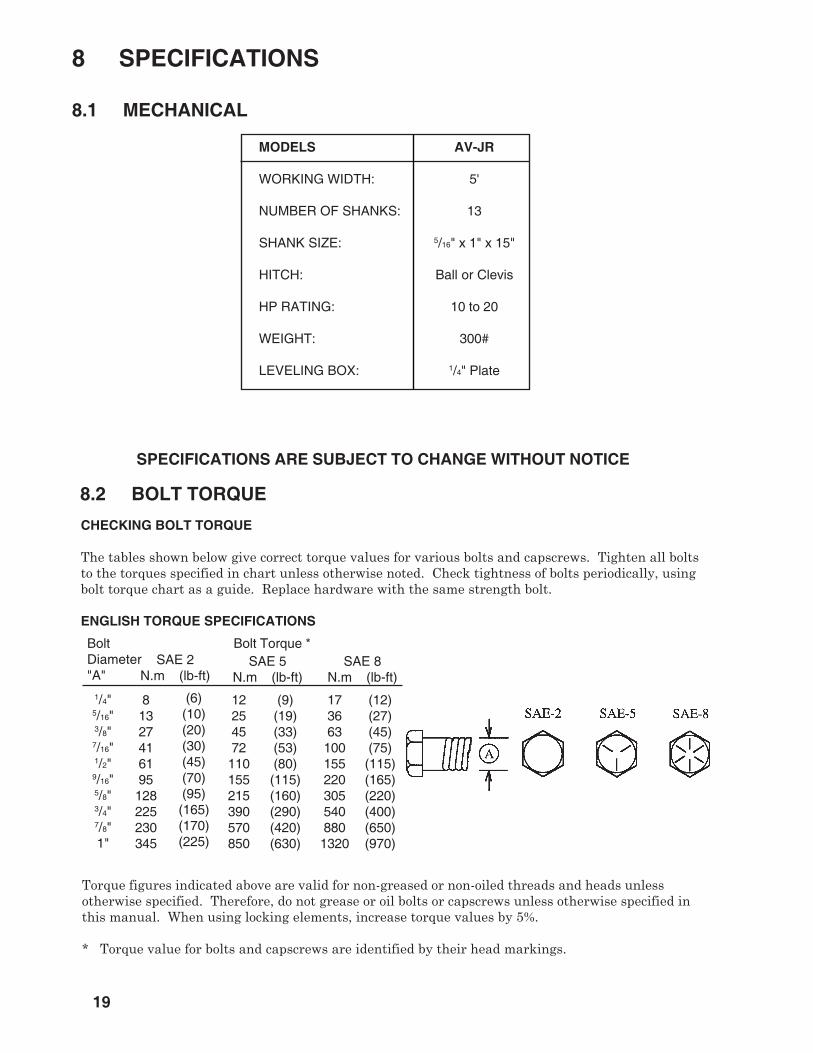
CHECKING BOLT TORQUE
The tables shown below give correct torque values for various bolts and capscrews. Tighten all boltsto the torques specified in chart unless otherwise noted. Check tightness of bolts periodically, usingbolt torque chart as a guide. Replace hardware with the same strength bolt.
ENGLISH TORQUE SPECIFICATIONS
8.2 BOLT TORQUE
Torque figures indicated above are valid for non-greased or non-oiled threads and heads unlessotherwise specified. Therefore, do not grease or oil bolts or capscrews unless otherwise specified inthis manual. When using locking elements, increase torque values by 5%.
* Torque value for bolts and capscrews are identified by their head markings.
8 SPECIFICATIONS
8.1 MECHANICAL
MODELS AV-JR
WORKING WIDTH: 5'
NUMBER OF SHANKS: 13
SHANK SIZE: 5/16" x 1" x 15"
HITCH: Ball or Clevis
HP RATING: 10 to 20
WEIGHT: 300#
LEVELING BOX: 1/4" Plate
SPECIFICATIONS ARE SUBJECT TO CHANGE WITHOUT NOTICE

20
9 PARTS REFERENCE
9.1 DRAWING

21
REF. QTY. PART NO. DESCRIPTION
1 1 AVJR-1005 Frame Assembly2 1 AVJR-1505 Leveler Assembly3 2 AVJR-0400 Leveler Bracket4 2 AVJR-0151 1/2" x 1-1/4" NC Gr. 5 Capscrew w/Flat Wshr & Nut5 4 AVJR-0152 1/2" x 1-1/4" NC Gr. 5 Capscrew w/Nylock Nut6 1 AVJR-0600 Clevis Hitch
1 AVJR-0700 Coupler Hitch 7/8" Ball (not shown) Optional7 2 AVJR-0155 1/2" x 3-1/2" NC Gr. 5 Capscrew w/Nylock Nut8 1 AVJR-300-755 Electric Linear Actuator
1 AVJR-300-754 Switch Box Control (not shown)9 2 AVJR-0156 3/8" x 3-1/2" NC Gr. 5 Capscrew w/Nylock Nut
1 AVJR-0157 Top Link (not shown) To Replace Electric Actuator on AV5JR-M2 AVJR-0158 Top Link Pin (not shown) AV5JR-M2 AVJR-0159 7/16" Linch Pin (not shown) AV5JR-M
10 13 AVJR-0180 S-Tine11 13 AVJR-0161 S-Tine Clamp12 13 AVJR-0162 Reversible Point13 13 AVJR-0163 3/8" x 1" Eliptical Head Plow Bolt w/Nut14 13 AVJR-0164 3/8" x 1-1/2" NC Gr. 5 Capscrew w/Nylock Nut15 1 AVJR-1205 Axle Shaft16 2 aVJR-0165 1-1/4" Pillow Block Bearing17 4 AVJR-0166 1/2" x 1-1/2" NC Gr. 5 Capscrew w/Lockwasher & Flat Washer18 2 AVJR-0167 3/8" Square Key19 2 AVJR-0300 Axle Bar (bolt-on)20 2 AVJR-0169 1/2" x 1-3/4" NC Gr. 5 Capscrew w/Lockwasher & Flat Washer21 2 AVJR-0170 15 x 8.00 Integral Wheel and Tire22 2 AVJR-0171 3/4" x 6-1/2" NC Gr. 5 Capscrew23 4 AVJR-0172 3/4" Bearing24 2 AVJR-0173 3/4" NC Jam Nut
9.2 PARTS LIST

22
GEARMORE, INC., warrants each new Gearmore product to be free from defects in material andworkmanship for a period of twelve (12) months from date of purchase to the original purchaser.This warranty shall not apply to implements or parts that have been subject to misuse, negli-gence, accident, or that have been altered in any way.
Our obligation shall be limited to repairing or replacement of any part, provided that such part isreturned within thirty (30) days from date of failure to Gearmore through the dealer from whomthe purchase was made, transportation charges prepaid.
This warranty shall not be interpreted to render us liable for injury or damages of any kind ornature, direct, consequential or contingent, to person or property. This warranty does not extendto loss of crops, loss because of delay in harvesting or any other expenses, for any other rea-sons.
Gearmore in no way warranties engines, tires, or other trade accessories, since these items arewarranted separately by these respective manufacturers.
Gearmore reserves the right to make improvements in design or changes in specification at anytime, without incurring any obligations to owners or units previously sold.
GEARMORE, INC.13477 Benson Ave.
Chino, CA 91710Always refer to and heed machine operating warning decals on machine.
10 LIMITED WARRANTY
The serial number of this product is stored in our computer database, thussubmitting a warranty registration card is not required.