Embed Size (px)
Citation preview
www.swiftbiosci.com
Protocol
Swift Hybridization Capture Kits
For NGS Target Enrichment
Uses:
• Swift Exome Hyb Panel, Cat. No. 83216
• Swift Pan-Cancer Hyb Panel, Cat. No. 83316
• Swift Inherited Diseases Hyb Panel, Cat. No. 83416
• Swift Hyb and Wash kit, Cat. No. 88016
• Swift Hyb, Wash, and Universal Blocker Kit, Cat. No. 89016
• Swift Library Amplification Primer Mix, Cat. No. 88196
For use with Swift libraries, including:
• Swift 2S Turbo DNA Library Kits (Cat. No. 44024, 44096, 45024, 45096)
• Swift Accel-NGS 2S Hyb DNA Library Kit (Cat. No. 23024, 23096)
• Swift Accel-NGS 1S Plus DNA Library Kit (Cat. No. 10024, 10096)
Visit swiftbiosci.com/protocols for updates.
www.swiftbiosci.com 1
Table of Contents
Revision History .................................................................................................................................. 4
About This Guide ................................................................................................................................ 4
Library Preparation Upstream of Hybridization Capture .................................................................................................... 4
Input for Hybridization Capture .......................................................................................................................................... 4
Concentrating DNA for Hybridization Capture .................................................................................................................... 4
Swift Hyb, Wash, and Universal Blocker Kit ........................................................................................................................ 5
Consumables from Swift ..................................................................................................................................................... 5
Target Region ...................................................................................................................................... 6
Genes Covered .................................................................................................................................... 6
Number of Probes ............................................................................................................................... 6
Required Consumables from Other Suppliers ..................................................................................................................... 6
Equipment ........................................................................................................................................................................... 6
Plate Protocol ...................................................................................................................................................................... 6
Tube Protocol ...................................................................................................................................................................... 6
Workflow ............................................................................................................................................................................. 7
Plate and Tube Protocols..................................................................................................................................................... 7
Begin your Plate Protocol .................................................................................................................. 8
Guidelines ............................................................................................................................................................................ 8
Before You Start .................................................................................................................................................................. 8
Perform Hybridization Reaction .......................................................................................................................................... 8
Prepare Buffers.................................................................................................................................................................. 10
Wash Streptavidin Beads ................................................................................................................................................... 11
Perform Bead Capture ....................................................................................................................................................... 11
Perform Washes ................................................................................................................................................................ 12
Heated Washes.................................................................................................................................................................. 12
Room Temperature Washes .............................................................................................................................................. 13
Perform Post-capture PCR ................................................................................................................................................. 14
Purify post-capture Amplified Library Pools ..................................................................................................................... 15
Validate and Quantify Library............................................................................................................................................ 15
Perform Sequencing .......................................................................................................................................................... 15
www.swiftbiosci.com 2
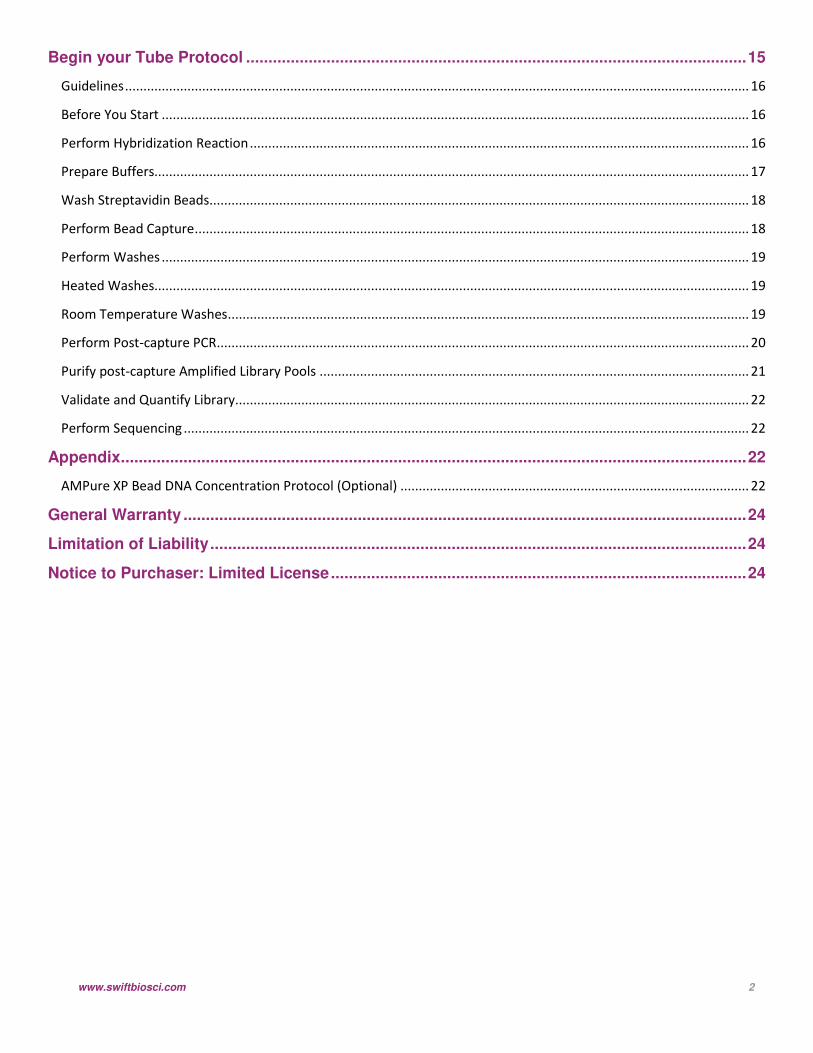
Begin your Tube Protocol ................................................................................................................ 15
Guidelines .......................................................................................................................................................................... 16
Before You Start ................................................................................................................................................................ 16
Perform Hybridization Reaction ........................................................................................................................................ 16
Prepare Buffers.................................................................................................................................................................. 17
Wash Streptavidin Beads ................................................................................................................................................... 18
Perform Bead Capture ....................................................................................................................................................... 18
Perform Washes ................................................................................................................................................................ 19
Heated Washes.................................................................................................................................................................. 19
Room Temperature Washes .............................................................................................................................................. 19
Perform Post-capture PCR ................................................................................................................................................. 20
Purify post-capture Amplified Library Pools ..................................................................................................................... 21
Validate and Quantify Library............................................................................................................................................ 22
Perform Sequencing .......................................................................................................................................................... 22
Appendix............................................................................................................................................ 22
AMPure XP Bead DNA Concentration Protocol (Optional) ............................................................................................... 22
General Warranty .............................................................................................................................. 24
Limitation of Liability ........................................................................................................................ 24
Notice to Purchaser: Limited License ............................................................................................. 24

www.swiftbiosci.com 3

www.swiftbiosci.com 4
Revision History
Part # Revision Date Description of Change
MKT-002 Version 1.0 3/26/2019 • Initial release.
About This Guide
This protocol describes the steps necessary for target enrichment by hybridization capture of next generation libraries prepared from genomic DNA, using Swift target enrichment panels. Visit www.swiftbiosci.com to verify that you are using the most updated version of this protocol.
Swift panels are pre-designed enrichment probes for targeted next generation sequencing (NGS). The panels consist of individually synthesized and quality-controlled probes that have been validated to provide the highest level of performance. Panels are available for the human genome, including the whole exome, genes implicated in several cancers, and genes associated with inherited diseases.
Swift universal blockers will bind to Illumina adapter sequences on a designated strand to help prevent non-specific binding, improve the number of reads on-target, and increase the depth of enrichment. These blockers are compatible with ligation-based library prep techniques, such as Swift 2S Turbo, Accel-NGS 2S Hyb, and Accel-NGS 1S Plus DNA Library Kits. These blockers are designed for both single and dual indexing strategies when the index sequences are 6 to 8 bases in length or when using the Swift 9 base molecular identifiers (MIDs, Cat. No. 27024, 27096).
Contact [email protected], for compatibility with alternate adapter sequences or indexing strategies.
Library Preparation Upstream of Hybridization Capture This protocol is compatible with libraries prepared using:
• Swift 2S Turbo DNA Library Kits
• Accel-NGS® 2S Hyb DNA Library Kits
• Accel-NGS 1S Plus DNA Library Kits
• Ligation-based library preparation kits from other vendors (not compatible with transposon-based kits)
For optimal results:
• It is recommended to use fragmented DNA between 150-350 bp. Note that Swift evaluated performance using 200 bp DNA fragments.
• Use 100 ng or more with PCR amplification to capture the highest library complexity; however, Swift library preparation kits are compatible with human DNA inputs down to 1 ng.
• Please contact [email protected] for compatibility with PCR-free libraries.
Input for Hybridization Capture We recommend using Qubit, Bioanalyzer, or equivalent methods to quantify amplified libraries. 500 ng of each amplified library for hybridization capture is highly recommended. Using less input per library for hybridization can result in higher duplicate rates, lower mean coverage and poor coverage uniformity. For hybridization, multiplexing has been tested on up
to 12 samples (6 g total DNA) with limited impact on data quality.
Concentrating DNA for Hybridization Capture For optimal results, use a SpeedVacTM system (Savant) for concentrating DNA. Although a bead-based concentration system can be used, test results have shown reproducible, though minor, adverse impact on GC bias during bead-based concentration.
Note: If you do not have access to a SpeedVac or require a quicker turnaround when multiplexing many samples, you may concentrate the DNA samples following the instructions in Appendix: AMPure XP Bead DNA Concentration Protocol.
www.swiftbiosci.com 5
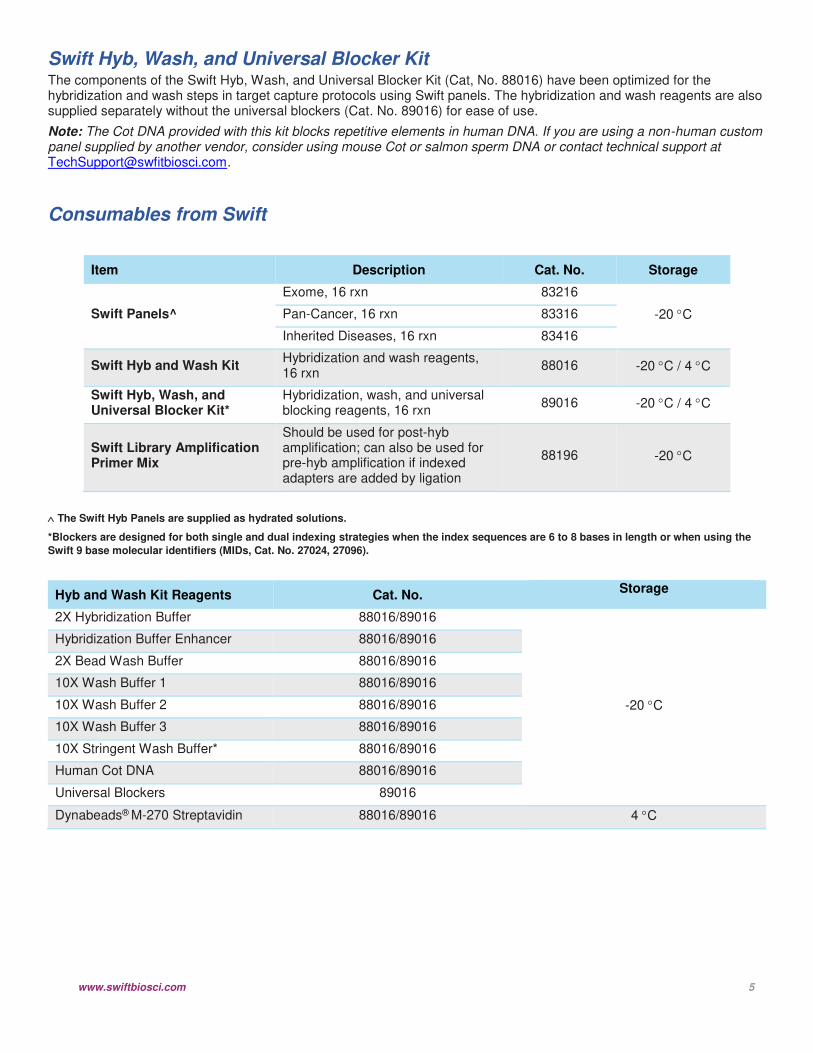
Swift Hyb, Wash, and Universal Blocker Kit
The components of the Swift Hyb, Wash, and Universal Blocker Kit (Cat, No. 88016) have been optimized for the hybridization and wash steps in target capture protocols using Swift panels. The hybridization and wash reagents are also supplied separately without the universal blockers (Cat. No. 89016) for ease of use.
Note: The Cot DNA provided with this kit blocks repetitive elements in human DNA. If you are using a non-human custom panel supplied by another vendor, consider using mouse Cot or salmon sperm DNA or contact technical support at [email protected].
Consumables from Swift
Item Description Cat. No. Storage
Swift Panels^
Exome, 16 rxn 83216
-20 C Pan-Cancer, 16 rxn 83316
Inherited Diseases, 16 rxn 83416
Swift Hyb and Wash Kit Hybridization and wash reagents, 16 rxn
88016 -20 C / 4 C
Swift Hyb, Wash, and Universal Blocker Kit*
Hybridization, wash, and universal blocking reagents, 16 rxn
89016 -20 C / 4 C
Swift Library Amplification Primer Mix
Should be used for post-hyb amplification; can also be used for pre-hyb amplification if indexed adapters are added by ligation
88196 -20 C
The Swift Hyb Panels are supplied as hydrated solutions.
*Blockers are designed for both single and dual indexing strategies when the index sequences are 6 to 8 bases in length or when using the
Swift 9 base molecular identifiers (MIDs, Cat. No. 27024, 27096).
Hyb and Wash Kit Reagents Cat. No. Storage
2X Hybridization Buffer 88016/89016
-20 C
Hybridization Buffer Enhancer 88016/89016
2X Bead Wash Buffer 88016/89016
10X Wash Buffer 1 88016/89016
10X Wash Buffer 2 88016/89016
10X Wash Buffer 3 88016/89016
10X Stringent Wash Buffer* 88016/89016
Human Cot DNA 88016/89016
Universal Blockers 89016
Dynabeads® M-270 Streptavidin 88016/89016 4 C

www.swiftbiosci.com 6
Required Consumables from Other Suppliers • Magnetic beads for clean-up steps: Agencourt AMPure XP-PCR Purification beads, Beckman Coulter, Cat. No.
A63880 or, e.g., SPRIselect™ beads (Beckman Coulter, Cat. No. B23317/B23318/B23319) • KAPA HiFi HotStart ReadyMix, Kapa Biosystems, Cat. No. KK2601
• Human Cot DNA, IDT, Cat. No. 1080768/1080769 (if using AMPure XP Bead Concentration Method, See Appendix)
• Library Quantification Kit – qPCR or fluorometric based, see Equipment below
• Digital electrophoresis consumables, see Equipment below
• Nuclease-Free Water, molecular biology grade, general laboratory supplier
• Low EDTA TE buffer, 10mM Tris-Cl, 0.1 mM EDTA pH 8.o0, Swift Biosciences, Cat. No. 90296
• 200-proof/absolute ethanol (molecular biology-grade)
• Twin.tecTM 96 Well LoBind PCR Plates, Semi-skirted (if working with multiple samples), Eppendorf, Cat. No. 0030129504
• MAXYMum Recovery Microtubes, 1.7 mL, VWR, Cat. No. 22234-046
• MAXYMum Recovery PCR tubes, VWR, Cat. No. 22234-056, 0.2 mL flat cap (if following the tube protocol)
• Plate protocol: Microseal B PCR Plate Sealing, Bio-Rad, Cat. No. MSB1001
Equipment
Plate Protocol o Two Themocyclers, Bio-Rad C/S 1000 or T100 o Magnet (two options):
▪ MagnumTM EX Universal Magnet Plate, Alpaqua (Cat# A000380) ▪ Magentic Stand-96, Thermo Fisher Scientific (Cat# AM10027)
o Plate centrifuge, general laboratory supplier
Tube Protocol o Themocycler, Bio-Rad C/S 1000 or T100 o Water bath or heating block, general laboratory supplier o Magnet (two options):
▪ DynaMagTM -2 Magnet ▪ DynaMag-PCR Magnet
Swift Exome Swift Pan-Cancer Swift Inherited Diseases
Target Region
39 Mb 0.8 Mb 11.1 Mb
Genes Covered
Coding region of 19,396 coding genes*
127 oncology-related genes* implicated in 12 tumor types
4,503 genes* based on the Human
Gene Mutation Database (HGMD)
Number of Probes
429,826 7,816 116,355
www.swiftbiosci.com 7
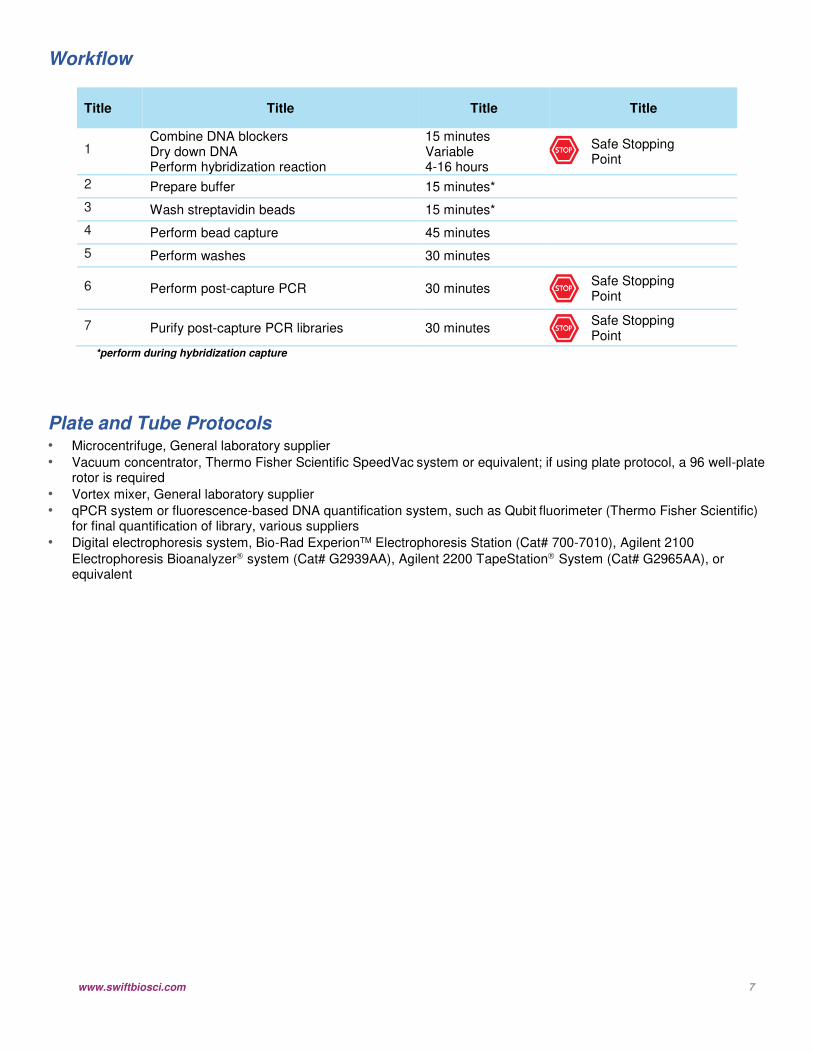
Workflow
Title Title Title Title
1 Combine DNA blockers Dry down DNA Perform hybridization reaction
15 minutes Variable 4-16 hours
Safe Stopping Point
2 Prepare buffer 15 minutes*
3 Wash streptavidin beads 15 minutes*
4 Perform bead capture 45 minutes
5 Perform washes 30 minutes
6 Perform post-capture PCR 30 minutes Safe Stopping Point
7 Purify post-capture PCR libraries 30 minutes Safe Stopping Point
*perform during hybridization capture
Plate and Tube Protocols • Microcentrifuge, General laboratory supplier
• Vacuum concentrator, Thermo Fisher Scientific SpeedVac system or equivalent; if using plate protocol, a 96 well-plate rotor is required
• Vortex mixer, General laboratory supplier
• qPCR system or fluorescence-based DNA quantification system, such as Qubit fluorimeter (Thermo Fisher Scientific) for final quantification of library, various suppliers
• Digital electrophoresis system, Bio-Rad ExperionTM Electrophoresis Station (Cat# 700-7010), Agilent 2100
Electrophoresis Bioanalyzer system (Cat# G2939AA), Agilent 2200 TapeStation System (Cat# G2965AA), or equivalent
www.swiftbiosci.com 8
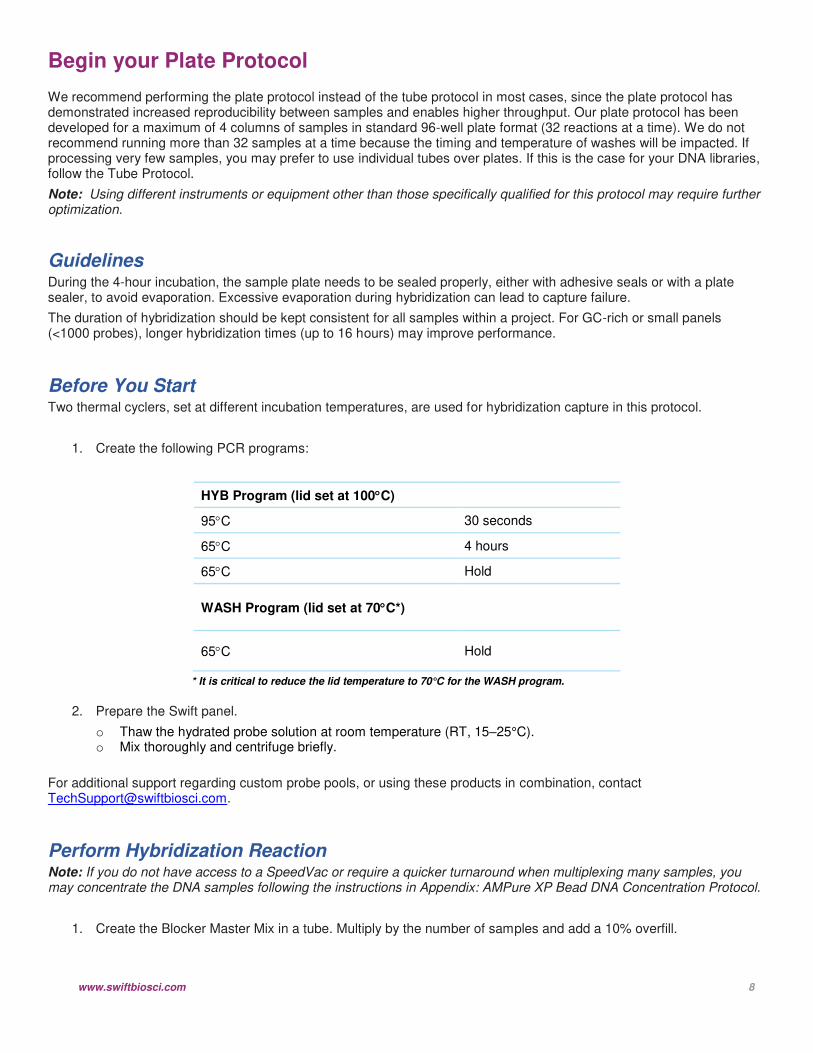
Begin your Plate Protocol
We recommend performing the plate protocol instead of the tube protocol in most cases, since the plate protocol has demonstrated increased reproducibility between samples and enables higher throughput. Our plate protocol has been developed for a maximum of 4 columns of samples in standard 96-well plate format (32 reactions at a time). We do not recommend running more than 32 samples at a time because the timing and temperature of washes will be impacted. If processing very few samples, you may prefer to use individual tubes over plates. If this is the case for your DNA libraries, follow the Tube Protocol.
Note: Using different instruments or equipment other than those specifically qualified for this protocol may require further optimization.
Guidelines During the 4-hour incubation, the sample plate needs to be sealed properly, either with adhesive seals or with a plate sealer, to avoid evaporation. Excessive evaporation during hybridization can lead to capture failure.
The duration of hybridization should be kept consistent for all samples within a project. For GC-rich or small panels (<1000 probes), longer hybridization times (up to 16 hours) may improve performance.
Before You Start Two thermal cyclers, set at different incubation temperatures, are used for hybridization capture in this protocol.
1. Create the following PCR programs:
HYB Program (lid set at 100C)
95C 30 seconds
65C 4 hours
65C Hold
WASH Program (lid set at 70C*)
65C Hold
* It is critical to reduce the lid temperature to 70°C for the WASH program.
2. Prepare the Swift panel.
o Thaw the hydrated probe solution at room temperature (RT, 15–25°C). o Mix thoroughly and centrifuge briefly.
For additional support regarding custom probe pools, or using these products in combination, contact [email protected].
Perform Hybridization Reaction Note: If you do not have access to a SpeedVac or require a quicker turnaround when multiplexing many samples, you may concentrate the DNA samples following the instructions in Appendix: AMPure XP Bead DNA Concentration Protocol.
1. Create the Blocker Master Mix in a tube. Multiply by the number of samples and add a 10% overfill.
www.swiftbiosci.com 9
Blocker Master Mix Component Volume per reaction (μL)
Human Cot DNA 5
Swift Universal Blockers or custom blockers (supplied by another vendor) based on your library adapters/indexes
2
2. Vortex to mix well.
3. Add 7 µL of the Blocker Master Mix to each well of a LoBind plate.
4. Add 500 ng of library to each well containing Blocker Master Mix. If multiplexing samples, use 500 ng of each library.
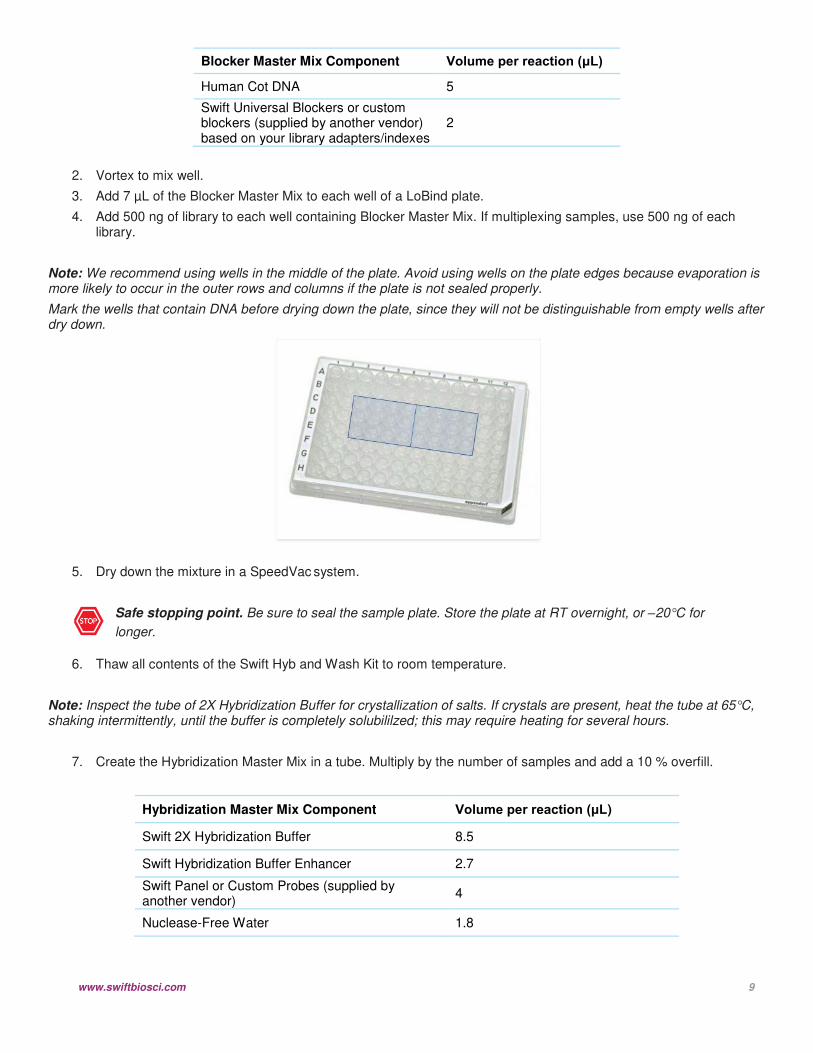
Note: We recommend using wells in the middle of the plate. Avoid using wells on the plate edges because evaporation is more likely to occur in the outer rows and columns if the plate is not sealed properly.
Mark the wells that contain DNA before drying down the plate, since they will not be distinguishable from empty wells after dry down.
5. Dry down the mixture in a SpeedVac system.
Safe stopping point. Be sure to seal the sample plate. Store the plate at RT overnight, or –20°C for
longer.
6. Thaw all contents of the Swift Hyb and Wash Kit to room temperature.
Note: Inspect the tube of 2X Hybridization Buffer for crystallization of salts. If crystals are present, heat the tube at 65°C, shaking intermittently, until the buffer is completely solubililzed; this may require heating for several hours.
7. Create the Hybridization Master Mix in a tube. Multiply by the number of samples and add a 10 % overfill.
Hybridization Master Mix Component Volume per reaction (μL)
Swift 2X Hybridization Buffer 8.5
Swift Hybridization Buffer Enhancer 2.7
Swift Panel or Custom Probes (supplied by another vendor)
4
Nuclease-Free Water 1.8
www.swiftbiosci.com 10
8. Vortex or pipet the mix to homogenize well.
9. Add 17 µL of the Hybridization Master Mix to each well of the plate containing dried DNA.
10. Securely seal the plate with a Microseal B seal.
11. Incubate at least 5 minutes at room temperature.
12. Vortex the samples, making sure that they are completely mixed.
13. Briefly centrifuge the samples.
14. Place the plate on the thermal cycler and start the HYB program.
Prepare Buffers Note: Before preparing the buffers, remove the Dynabeads® M-270 Streptavidin beads from storage at 4°C. The beads need to equilibrate at room temperature for a minimum of 30 minutes before performing the washes.
1. Dilute the following buffers to create 1X working solutions as follows, multiplying by the required number of samples and adding 10% overfill:
Component Nuclease Free Water (μL) Buffer (μL) Total (μL)
Swift 2X Bead Wash Buffer 150 150 300
Swift 10X Wash Buffer 1 225 25 250
Swift 10X Wash Buffer 2 135 15 150
Swift 10X Wash Buffer 3 135 15 150
Swift 10X Stringent Wash Buffer
270 30 300
Note: If Wash Buffer 1 is cloudy, heat the bottle in a 65°C water bath to allow resuspension. The 1X working solutions are stable at room temperature (15–25°C) for up to 4 weeks.
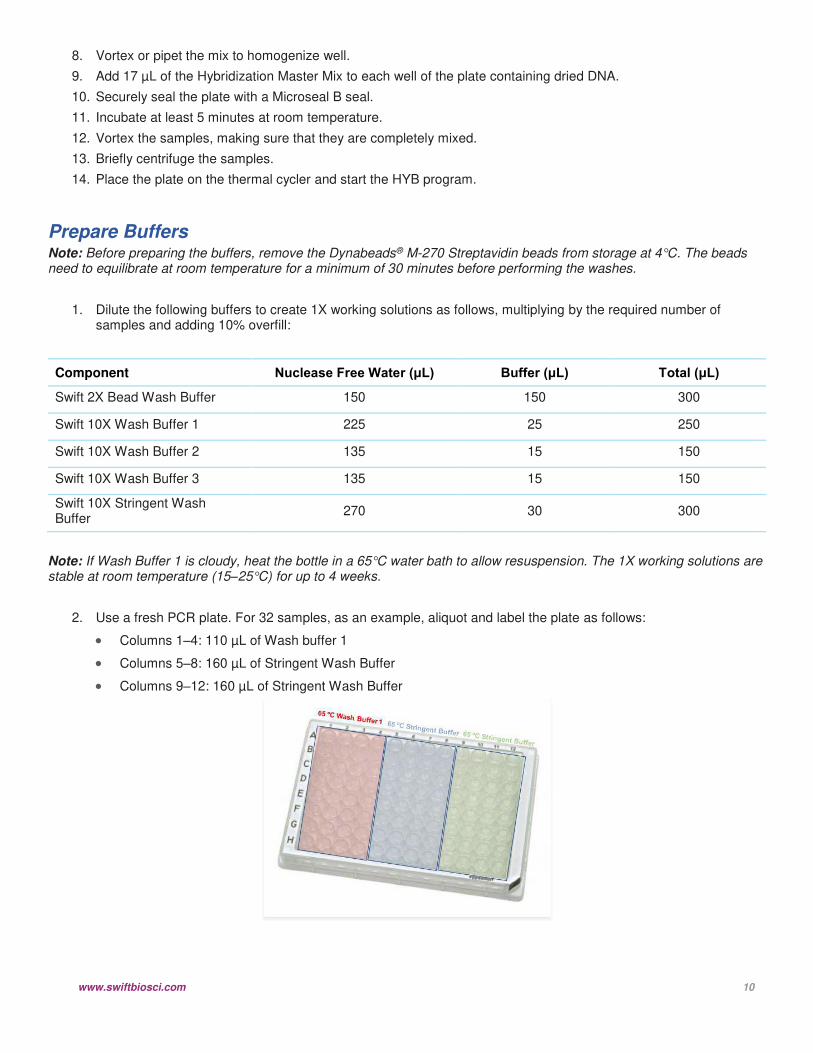
2. Use a fresh PCR plate. For 32 samples, as an example, aliquot and label the plate as follows:
• Columns 1–4: 110 µL of Wash buffer 1
• Columns 5–8: 160 µL of Stringent Wash Buffer
• Columns 9–12: 160 µL of Stringent Wash Buffer
www.swiftbiosci.com 11
Note: Do not discard the remaining Wash Buffer 1. The remaining buffer is needed to perform the room temperature washes later in the protocol.
3. Seal the buffer plate and set aside.
4. In a LoBind tube, make the Bead Resuspension Mix. Multiply by the number of samples and add a 10% overfill.
Bead Resuspension Mix component Volume per reaction (μL)
Swift 2X Hybridization Buffer 8.5
Swift Hybridization Buffer Enhancer 2.7
Nuclease-Free Water 5.8
Wash Streptavidin Beads
Important! Only perform bead washes with beads that have equilibrated to room temperature.
1. Mix the beads thoroughly by vortexing for 15 sec.
2. Add 50 µL of streptavidin beads to a new PCR plate, filling a well for every sample being captured.
3. Add 100 µL of Bead Wash Buffer from Prepare buffers, step 1 to each well, then gently pipet the mix 10 times.
4. Place the plate containing beads on a magnet and allow the beads to fully separate from the supernatant (approximately 1 minute).
5. Remove and discard the clear supernatant, ensuring that the beads remain in the well.
6. Remove the plate containing beads from the magnet.
7. Perform the following wash:
• Add 100 µL of Bead Wash Buffer to each well containing beads, then gently pipet the mix 10 times.
• Place the plate on the magnet for approximately 1 minute, allowing beads to fully separate from the supernatant.
• Carefully remove and discard the clear supernatant.
8. Perform an additional wash by repeating step 7 (above) for a total of 2 washes.
9. Resuspend the beads in 17 µL of Bead Resuspension Mix from Prepare buffers, step 4.
10. Mix thoroughly to ensure the beads are not left to dry in the well. If needed, briefly centrifuge the plate containing beads at 25 x g (400 rpm).
Perform Bead Capture
Important! If any of the sample accidentally splashes onto the plate seal while vortexing in Perform
Bead Capture, briefly and gently centrifuge the plate (10 sec at 25 x g).
1. Start the WASH program in the second thermal cycler to start warming the buffer plate prepared in Prepare buffers, step 2. Make sure the lid temperature is set to 70°C for the WASH program.
Note: The buffer plate needs to warm up for at least 15 minutes. We recommend starting incubation at the same time as the bead capture.
www.swiftbiosci.com 12
2. After the 4-hour incubation is complete, remove the sample plate from the thermal cycler.
3. Once the sample plate has been removed from the instrument, stop the HYB program.
4. Immediately after the HYB program is complete, start the WASH program.
Note: At this point, both thermal cyclers should be running the WASH program.
5. Using a multichannel pipette and fresh LoBind tips, transfer the fully homogenized beads to the samples.
6. Securely seal the sample plate.
7. Gently vortex the sample plate until it is fully mixed, being careful not to splash onto the plate seal.
8. Place the sample plate in the thermal cycler for 45 minutes. During incubation, remove the plate every 10–12 minutes to quickly and gently vortex.
Note: It is safe to place the sample plate in the thermal cycler before the lid temperature has fully cooled to 70°C when starting the incubation.
Perform Washes
Important! Always keep the buffer plate on the thermal cycler during washes. Make sure to reseal the
buffer plate in between washes.
When performing the heated washes, keep the buffer plate on the thermal cycler to maintain its set temperature.
Heated Washes 1. After 45 minutes, remove the sample plate from the thermal cycler.
2. With the buffer plate remaining in the thermal cycler, transfer 100 µL of heated Wash Buffer 1 to each sample and pipet the mix 10 times, being careful to minimize bubble formation.
3. Reseal the buffer plate, then close the lid.
4. Place the sample plate on the magnet for 1 minutes. Remove the supernatant.
Note: Due to the supernatant having a high concentration of hybridization buffer and enhancer, use appropriate disposal methods.
5. Remove the sample plate from the magnet, then add 150 µL of heated Stringent Wash Buffer to each well containing a sample.
6. Reseal the buffer plate, then close the lid.
7. Pipet the mix 10 times, being careful to minimize bubble formation. Always use fresh pipette tips for each well.
8. Securely seal the sample plate, then incubate for 5 minutes in the thermal cycler.
9. Place the sample plate on the magnet for 1 minute, then remove the supernatant.
10. Remove the sample plate from the magnet, then add 150 µL of heated Stringent Wash Buffer from the buffer plate to the sample plate.
11. Pipet the mix 10 times, being careful to minimize bubble formation. Securely seal the sample plate, then incubate for 5 minutes on the thermal cycler.
12. Place the sample plate on the magnet for 1 minutes.
www.swiftbiosci.com 13
Room Temperature Washes
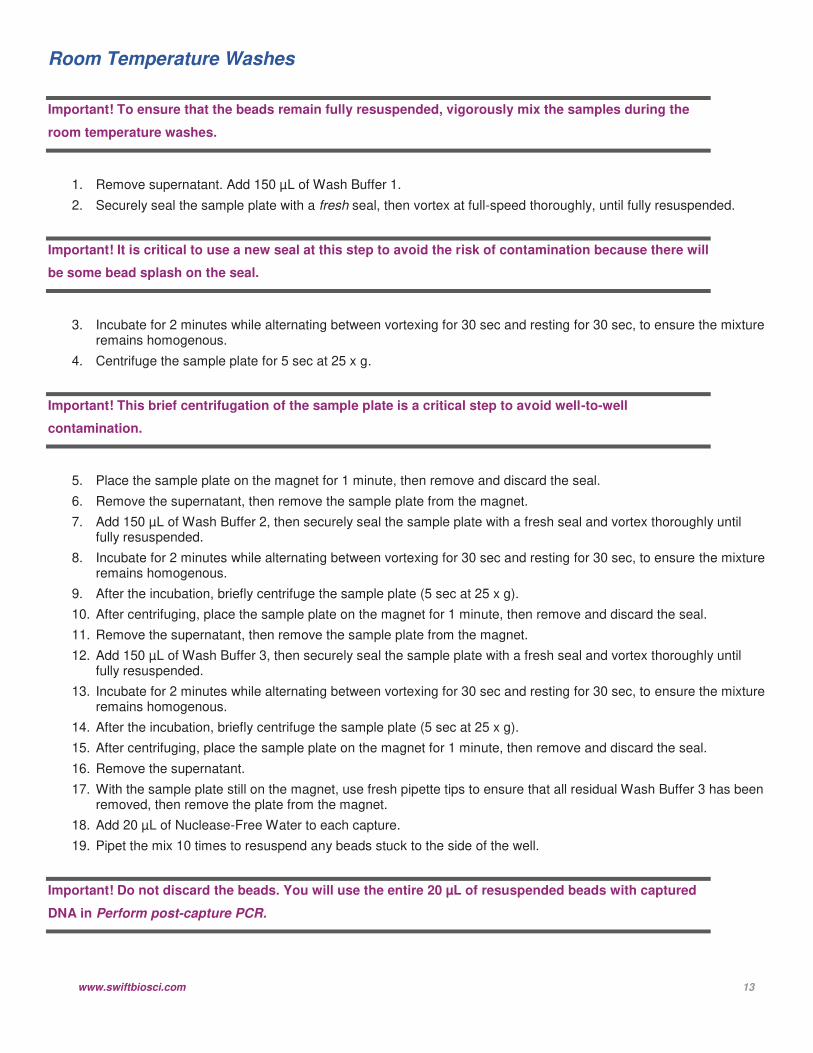
Important! To ensure that the beads remain fully resuspended, vigorously mix the samples during the
room temperature washes.
1. Remove supernatant. Add 150 µL of Wash Buffer 1.
2. Securely seal the sample plate with a fresh seal, then vortex at full-speed thoroughly, until fully resuspended.
Important! It is critical to use a new seal at this step to avoid the risk of contamination because there will
be some bead splash on the seal.
3. Incubate for 2 minutes while alternating between vortexing for 30 sec and resting for 30 sec, to ensure the mixture remains homogenous.
4. Centrifuge the sample plate for 5 sec at 25 x g.
Important! This brief centrifugation of the sample plate is a critical step to avoid well-to-well
contamination.
5. Place the sample plate on the magnet for 1 minute, then remove and discard the seal.
6. Remove the supernatant, then remove the sample plate from the magnet.
7. Add 150 µL of Wash Buffer 2, then securely seal the sample plate with a fresh seal and vortex thoroughly until fully resuspended.
8. Incubate for 2 minutes while alternating between vortexing for 30 sec and resting for 30 sec, to ensure the mixture remains homogenous.
9. After the incubation, briefly centrifuge the sample plate (5 sec at 25 x g).
10. After centrifuging, place the sample plate on the magnet for 1 minute, then remove and discard the seal.
11. Remove the supernatant, then remove the sample plate from the magnet.
12. Add 150 µL of Wash Buffer 3, then securely seal the sample plate with a fresh seal and vortex thoroughly until fully resuspended.
13. Incubate for 2 minutes while alternating between vortexing for 30 sec and resting for 30 sec, to ensure the mixture remains homogenous.
14. After the incubation, briefly centrifuge the sample plate (5 sec at 25 x g).
15. After centrifuging, place the sample plate on the magnet for 1 minute, then remove and discard the seal.
16. Remove the supernatant.
17. With the sample plate still on the magnet, use fresh pipette tips to ensure that all residual Wash Buffer 3 has been removed, then remove the plate from the magnet.
18. Add 20 µL of Nuclease-Free Water to each capture.
19. Pipet the mix 10 times to resuspend any beads stuck to the side of the well.
Important! Do not discard the beads. You will use the entire 20 µL of resuspended beads with captured
DNA in Perform post-capture PCR.
www.swiftbiosci.com 14
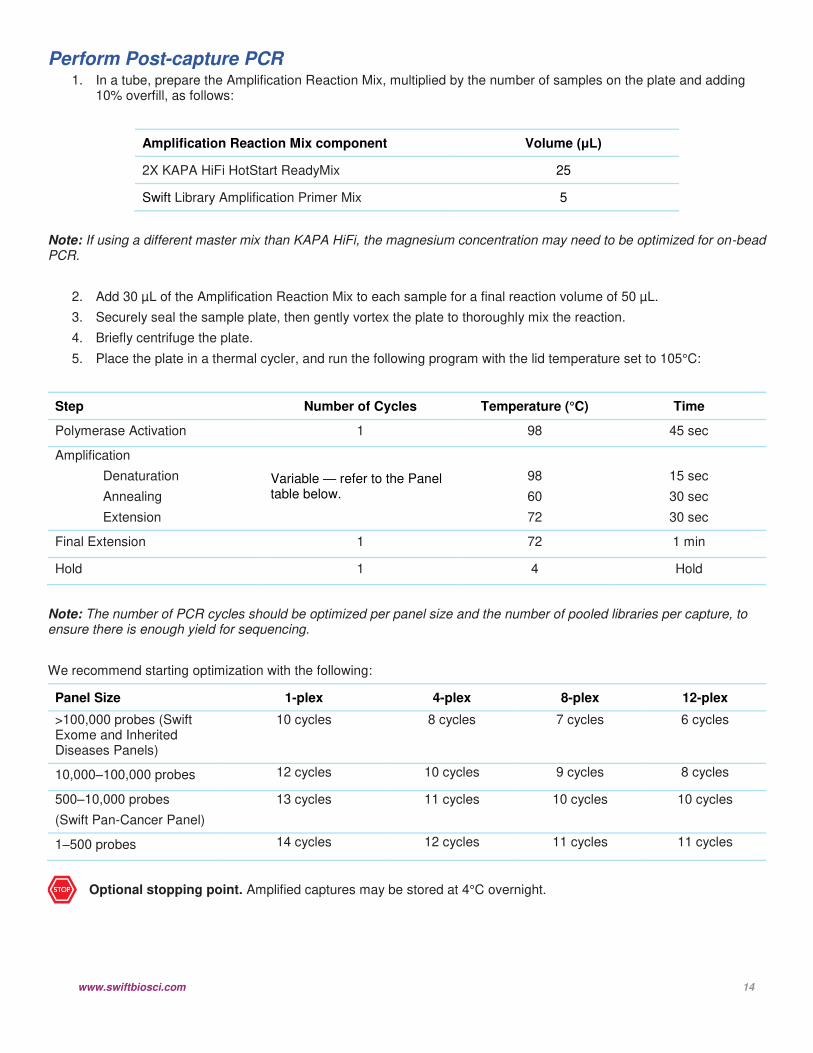
Perform Post-capture PCR 1. In a tube, prepare the Amplification Reaction Mix, multiplied by the number of samples on the plate and adding
10% overfill, as follows:
Amplification Reaction Mix component Volume (μL)
2X KAPA HiFi HotStart ReadyMix 25
Swift Library Amplification Primer Mix 5
Note: If using a different master mix than KAPA HiFi, the magnesium concentration may need to be optimized for on-bead PCR.
2. Add 30 µL of the Amplification Reaction Mix to each sample for a final reaction volume of 50 µL.
3. Securely seal the sample plate, then gently vortex the plate to thoroughly mix the reaction.
4. Briefly centrifuge the plate.
5. Place the plate in a thermal cycler, and run the following program with the lid temperature set to 105°C:
Step Number of Cycles Temperature (°C) Time
Polymerase Activation 1 98 45 sec
Amplification
Denaturation
Annealing
Extension
Variable — refer to the Panel table below.
98
60
72
15 sec
30 sec
30 sec
Final Extension 1 72 1 min
Hold 1 4 Hold
Note: The number of PCR cycles should be optimized per panel size and the number of pooled libraries per capture, to ensure there is enough yield for sequencing.
We recommend starting optimization with the following:
Panel Size 1-plex 4-plex 8-plex 12-plex
>100,000 probes (Swift Exome and Inherited Diseases Panels)
10 cycles 8 cycles 7 cycles 6 cycles
10,000–100,000 probes 12 cycles 10 cycles 9 cycles 8 cycles
500–10,000 probes
(Swift Pan-Cancer Panel)
13 cycles 11 cycles 10 cycles 10 cycles
1–500 probes 14 cycles 12 cycles 11 cycles 11 cycles
Optional stopping point. Amplified captures may be stored at 4°C overnight.
www.swiftbiosci.com 15
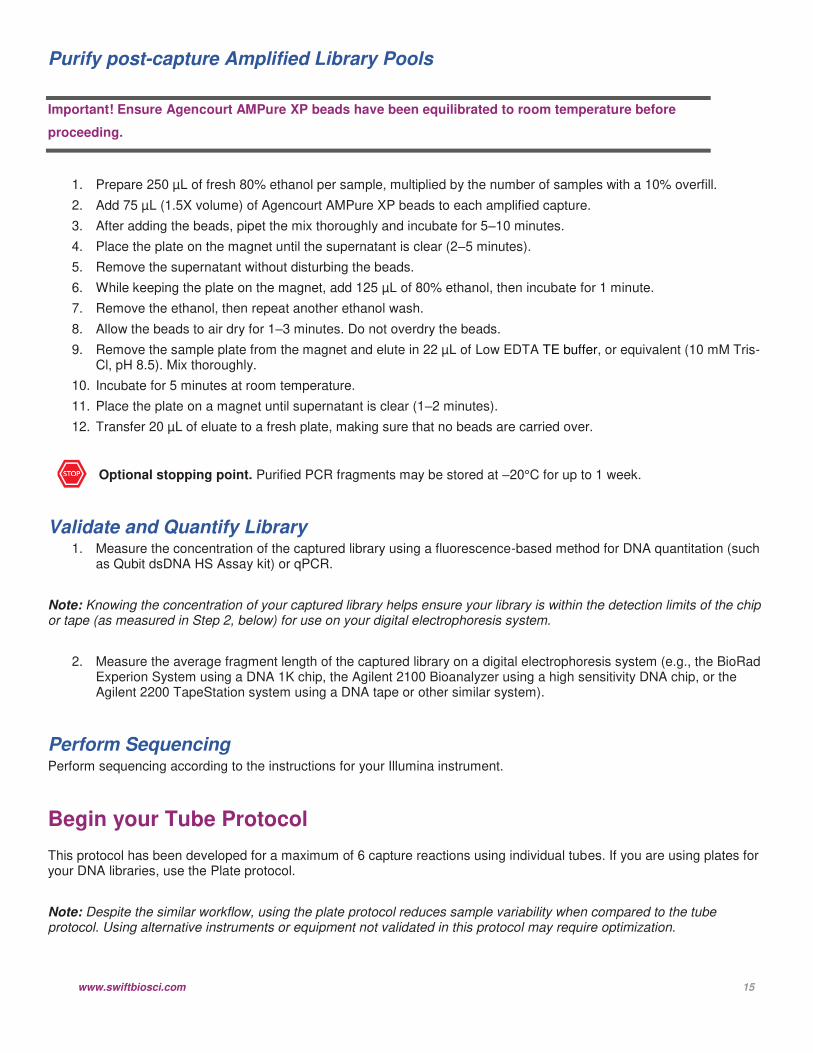
Purify post-capture Amplified Library Pools
Important! Ensure Agencourt AMPure XP beads have been equilibrated to room temperature before
proceeding.
1. Prepare 250 µL of fresh 80% ethanol per sample, multiplied by the number of samples with a 10% overfill.
2. Add 75 µL (1.5X volume) of Agencourt AMPure XP beads to each amplified capture.
3. After adding the beads, pipet the mix thoroughly and incubate for 5–10 minutes.
4. Place the plate on the magnet until the supernatant is clear (2–5 minutes).
5. Remove the supernatant without disturbing the beads.
6. While keeping the plate on the magnet, add 125 µL of 80% ethanol, then incubate for 1 minute.
7. Remove the ethanol, then repeat another ethanol wash.
8. Allow the beads to air dry for 1–3 minutes. Do not overdry the beads.
9. Remove the sample plate from the magnet and elute in 22 µL of Low EDTA TE buffer, or equivalent (10 mM Tris-Cl, pH 8.5). Mix thoroughly.
10. Incubate for 5 minutes at room temperature.
11. Place the plate on a magnet until supernatant is clear (1–2 minutes).
12. Transfer 20 µL of eluate to a fresh plate, making sure that no beads are carried over.
Optional stopping point. Purified PCR fragments may be stored at –20°C for up to 1 week.
Validate and Quantify Library 1. Measure the concentration of the captured library using a fluorescence-based method for DNA quantitation (such
as Qubit dsDNA HS Assay kit) or qPCR.
Note: Knowing the concentration of your captured library helps ensure your library is within the detection limits of the chip or tape (as measured in Step 2, below) for use on your digital electrophoresis system.
2. Measure the average fragment length of the captured library on a digital electrophoresis system (e.g., the BioRad Experion System using a DNA 1K chip, the Agilent 2100 Bioanalyzer using a high sensitivity DNA chip, or the Agilent 2200 TapeStation system using a DNA tape or other similar system).
Perform Sequencing Perform sequencing according to the instructions for your Illumina instrument.
Begin your Tube Protocol
This protocol has been developed for a maximum of 6 capture reactions using individual tubes. If you are using plates for your DNA libraries, use the Plate protocol.
Note: Despite the similar workflow, using the plate protocol reduces sample variability when compared to the tube protocol. Using alternative instruments or equipment not validated in this protocol may require optimization.
www.swiftbiosci.com 16
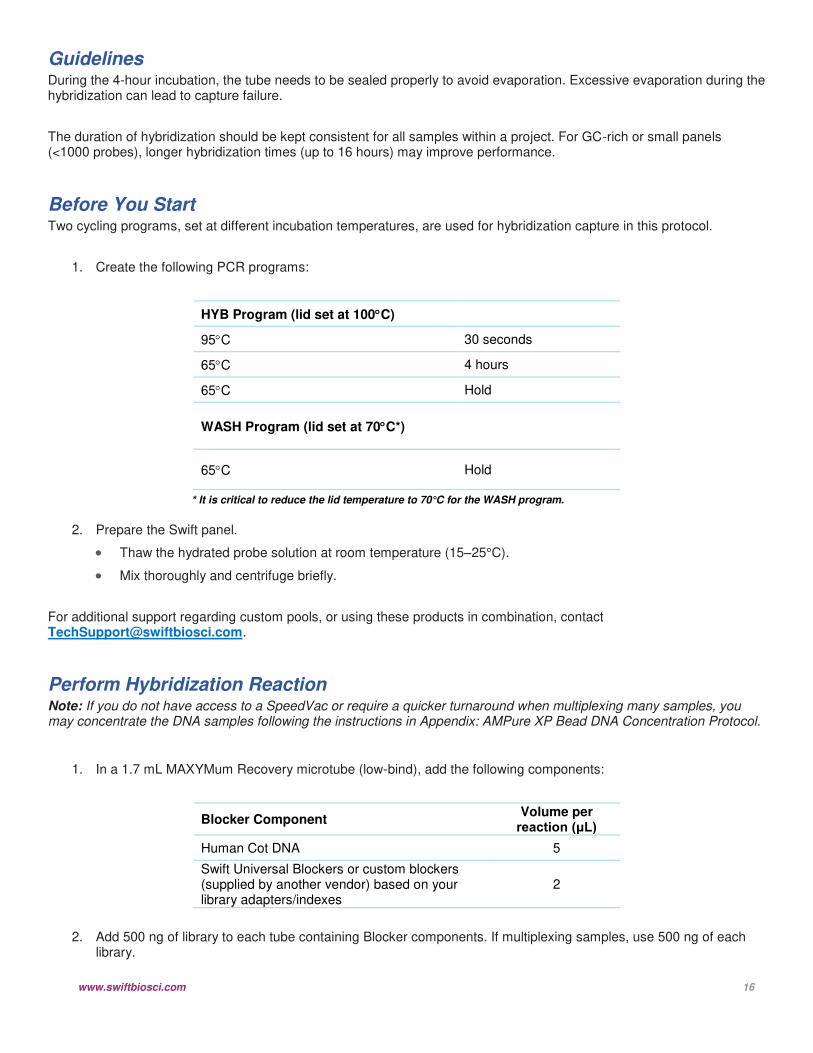
Guidelines During the 4-hour incubation, the tube needs to be sealed properly to avoid evaporation. Excessive evaporation during the hybridization can lead to capture failure.
The duration of hybridization should be kept consistent for all samples within a project. For GC-rich or small panels (<1000 probes), longer hybridization times (up to 16 hours) may improve performance.
Before You Start Two cycling programs, set at different incubation temperatures, are used for hybridization capture in this protocol.
1. Create the following PCR programs:
HYB Program (lid set at 100C)
95C 30 seconds
65C 4 hours
65C Hold
WASH Program (lid set at 70C*)
65C Hold
* It is critical to reduce the lid temperature to 70°C for the WASH program.
2. Prepare the Swift panel.
• Thaw the hydrated probe solution at room temperature (15–25°C).
• Mix thoroughly and centrifuge briefly.
For additional support regarding custom pools, or using these products in combination, contact [email protected].
Perform Hybridization Reaction Note: If you do not have access to a SpeedVac or require a quicker turnaround when multiplexing many samples, you may concentrate the DNA samples following the instructions in Appendix: AMPure XP Bead DNA Concentration Protocol.
1. In a 1.7 mL MAXYMum Recovery microtube (low-bind), add the following components:
Blocker Component Volume per
reaction (μL) Human Cot DNA 5
Swift Universal Blockers or custom blockers (supplied by another vendor) based on your library adapters/indexes
2
2. Add 500 ng of library to each tube containing Blocker components. If multiplexing samples, use 500 ng of each library.
www.swiftbiosci.com 17
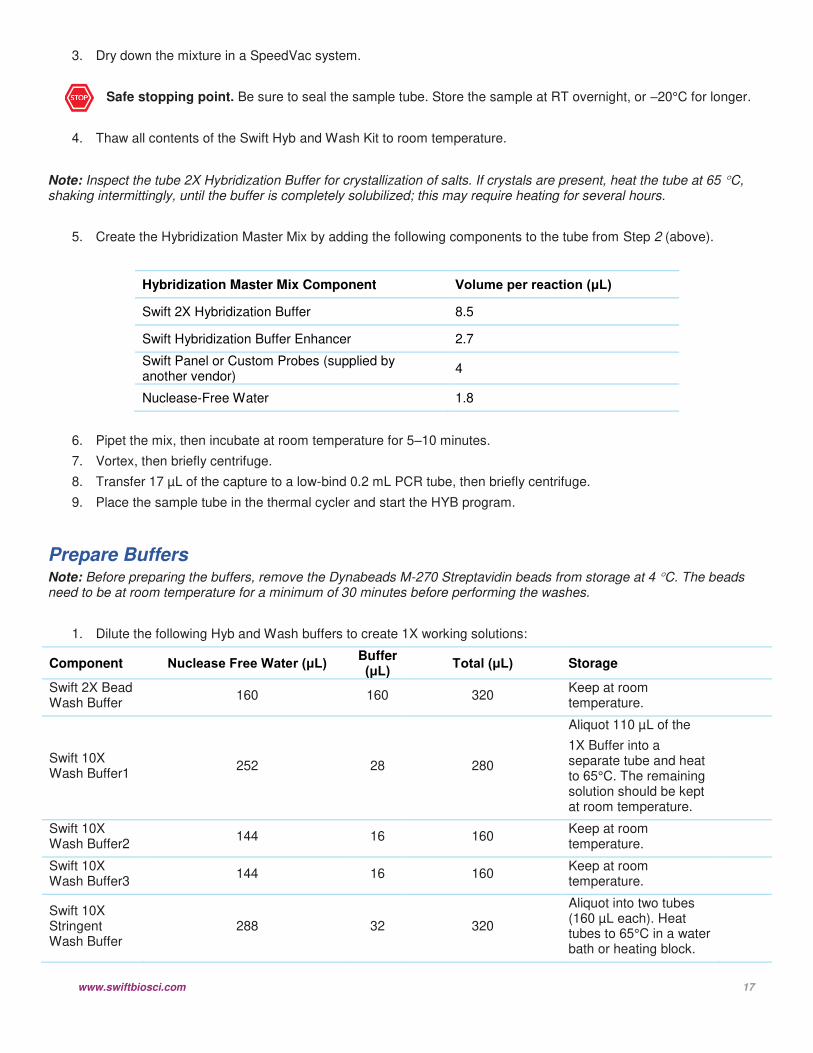
3. Dry down the mixture in a SpeedVac system.
Safe stopping point. Be sure to seal the sample tube. Store the sample at RT overnight, or –20°C for longer.
4. Thaw all contents of the Swift Hyb and Wash Kit to room temperature.
Note: Inspect the tube 2X Hybridization Buffer for crystallization of salts. If crystals are present, heat the tube at 65 C, shaking intermittingly, until the buffer is completely solubilized; this may require heating for several hours.
5. Create the Hybridization Master Mix by adding the following components to the tube from Step 2 (above).
Hybridization Master Mix Component Volume per reaction (μL)
Swift 2X Hybridization Buffer 8.5
Swift Hybridization Buffer Enhancer 2.7
Swift Panel or Custom Probes (supplied by another vendor)
4
Nuclease-Free Water 1.8
6. Pipet the mix, then incubate at room temperature for 5–10 minutes.
7. Vortex, then briefly centrifuge.
8. Transfer 17 µL of the capture to a low-bind 0.2 mL PCR tube, then briefly centrifuge.
9. Place the sample tube in the thermal cycler and start the HYB program.
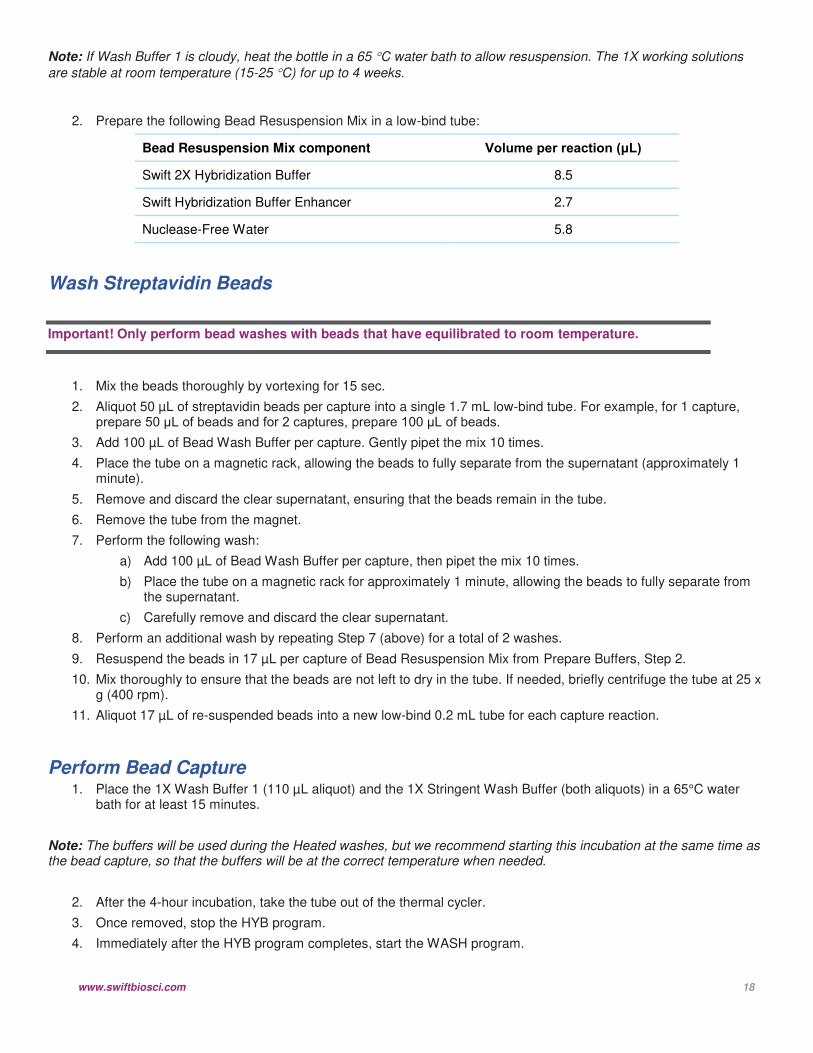
Prepare Buffers Note: Before preparing the buffers, remove the Dynabeads M-270 Streptavidin beads from storage at 4 C. The beads need to be at room temperature for a minimum of 30 minutes before performing the washes.
1. Dilute the following Hyb and Wash buffers to create 1X working solutions:
Component Nuclease Free Water (μL) Buffer (μL) Total (μL) Storage
Swift 2X Bead Wash Buffer
160 160 320 Keep at room temperature.
Swift 10X Wash Buffer1
252 28 280
Aliquot 110 µL of the
1X Buffer into a separate tube and heat to 65°C. The remaining solution should be kept at room temperature.
Swift 10X Wash Buffer2
144 16 160 Keep at room temperature.
Swift 10X Wash Buffer3
144 16 160 Keep at room temperature.
Swift 10X Stringent Wash Buffer
288 32 320
Aliquot into two tubes (160 µL each). Heat tubes to 65°C in a water bath or heating block.
www.swiftbiosci.com 18
Note: If Wash Buffer 1 is cloudy, heat the bottle in a 65 C water bath to allow resuspension. The 1X working solutions
are stable at room temperature (15-25 C) for up to 4 weeks.
2. Prepare the following Bead Resuspension Mix in a low-bind tube:
Bead Resuspension Mix component Volume per reaction (μL)
Swift 2X Hybridization Buffer 8.5
Swift Hybridization Buffer Enhancer 2.7
Nuclease-Free Water 5.8
Wash Streptavidin Beads
Important! Only perform bead washes with beads that have equilibrated to room temperature.
1. Mix the beads thoroughly by vortexing for 15 sec.
2. Aliquot 50 µL of streptavidin beads per capture into a single 1.7 mL low-bind tube. For example, for 1 capture, prepare 50 μL of beads and for 2 captures, prepare 100 μL of beads.
3. Add 100 µL of Bead Wash Buffer per capture. Gently pipet the mix 10 times.
4. Place the tube on a magnetic rack, allowing the beads to fully separate from the supernatant (approximately 1 minute).
5. Remove and discard the clear supernatant, ensuring that the beads remain in the tube.
6. Remove the tube from the magnet.
7. Perform the following wash:
a) Add 100 µL of Bead Wash Buffer per capture, then pipet the mix 10 times.
b) Place the tube on a magnetic rack for approximately 1 minute, allowing the beads to fully separate from the supernatant.
c) Carefully remove and discard the clear supernatant.
8. Perform an additional wash by repeating Step 7 (above) for a total of 2 washes.
9. Resuspend the beads in 17 µL per capture of Bead Resuspension Mix from Prepare Buffers, Step 2.
10. Mix thoroughly to ensure that the beads are not left to dry in the tube. If needed, briefly centrifuge the tube at 25 x g (400 rpm).
11. Aliquot 17 µL of re-suspended beads into a new low-bind 0.2 mL tube for each capture reaction.
Perform Bead Capture 1. Place the 1X Wash Buffer 1 (110 µL aliquot) and the 1X Stringent Wash Buffer (both aliquots) in a 65°C water
bath for at least 15 minutes.
Note: The buffers will be used during the Heated washes, but we recommend starting this incubation at the same time as the bead capture, so that the buffers will be at the correct temperature when needed.
2. After the 4-hour incubation, take the tube out of the thermal cycler.
3. Once removed, stop the HYB program.
4. Immediately after the HYB program completes, start the WASH program.
www.swiftbiosci.com 19
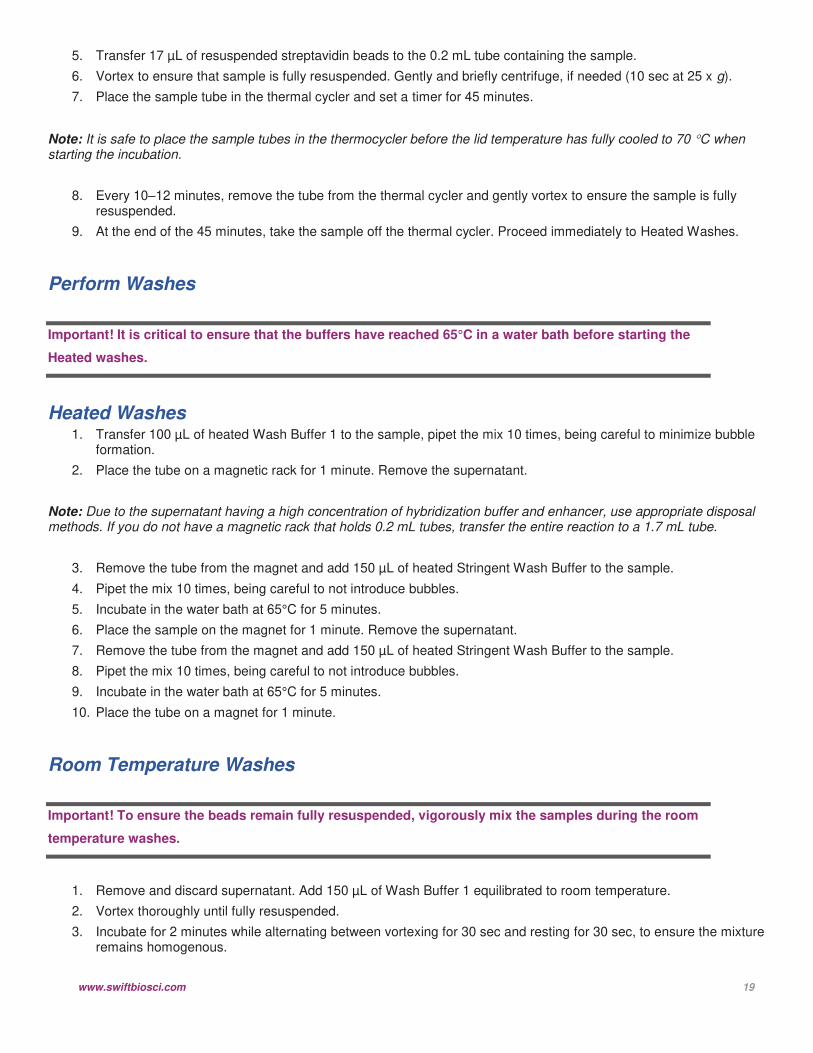
5. Transfer 17 µL of resuspended streptavidin beads to the 0.2 mL tube containing the sample.
6. Vortex to ensure that sample is fully resuspended. Gently and briefly centrifuge, if needed (10 sec at 25 x g).
7. Place the sample tube in the thermal cycler and set a timer for 45 minutes.
Note: It is safe to place the sample tubes in the thermocycler before the lid temperature has fully cooled to 70 C when starting the incubation.
8. Every 10–12 minutes, remove the tube from the thermal cycler and gently vortex to ensure the sample is fully resuspended.
9. At the end of the 45 minutes, take the sample off the thermal cycler. Proceed immediately to Heated Washes.
Perform Washes
Important! It is critical to ensure that the buffers have reached 65°C in a water bath before starting the
Heated washes.
Heated Washes 1. Transfer 100 µL of heated Wash Buffer 1 to the sample, pipet the mix 10 times, being careful to minimize bubble
formation.
2. Place the tube on a magnetic rack for 1 minute. Remove the supernatant.
Note: Due to the supernatant having a high concentration of hybridization buffer and enhancer, use appropriate disposal methods. If you do not have a magnetic rack that holds 0.2 mL tubes, transfer the entire reaction to a 1.7 mL tube.
3. Remove the tube from the magnet and add 150 µL of heated Stringent Wash Buffer to the sample.
4. Pipet the mix 10 times, being careful to not introduce bubbles.
5. Incubate in the water bath at 65°C for 5 minutes.
6. Place the sample on the magnet for 1 minute. Remove the supernatant.
7. Remove the tube from the magnet and add 150 µL of heated Stringent Wash Buffer to the sample.
8. Pipet the mix 10 times, being careful to not introduce bubbles.
9. Incubate in the water bath at 65°C for 5 minutes.
10. Place the tube on a magnet for 1 minute.
Room Temperature Washes
Important! To ensure the beads remain fully resuspended, vigorously mix the samples during the room
temperature washes.
1. Remove and discard supernatant. Add 150 µL of Wash Buffer 1 equilibrated to room temperature.
2. Vortex thoroughly until fully resuspended.
3. Incubate for 2 minutes while alternating between vortexing for 30 sec and resting for 30 sec, to ensure the mixture remains homogenous.
www.swiftbiosci.com 20
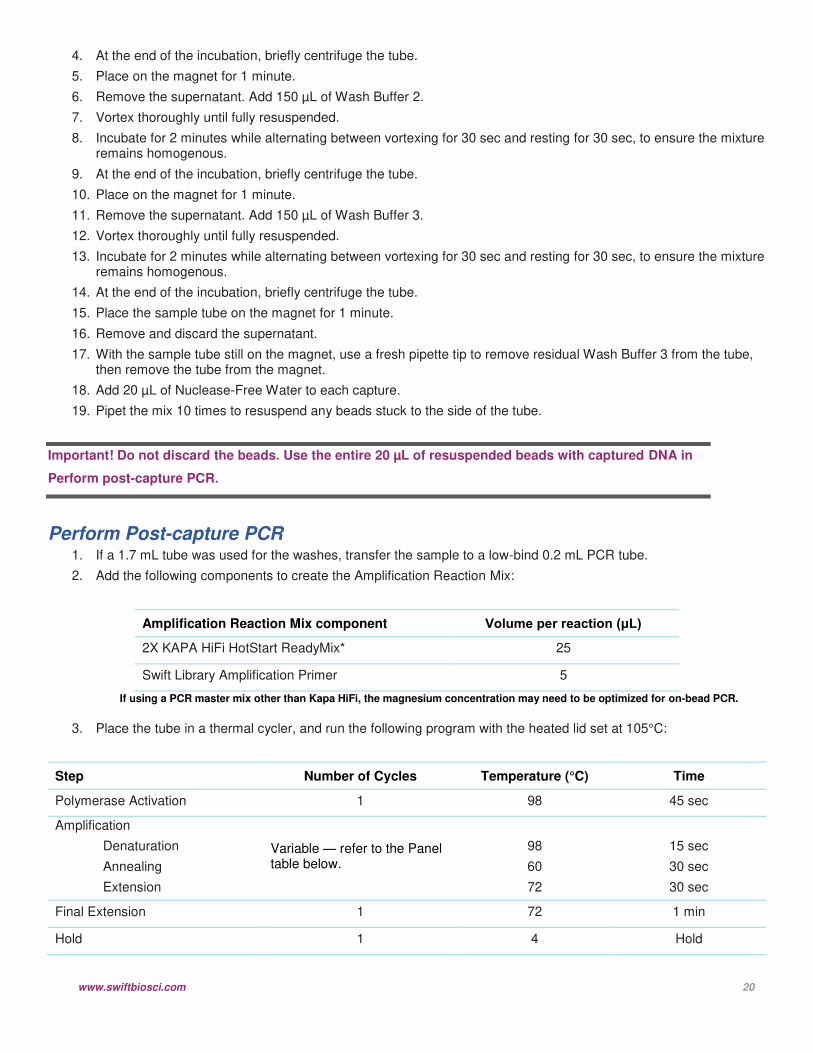
4. At the end of the incubation, briefly centrifuge the tube.
5. Place on the magnet for 1 minute.
6. Remove the supernatant. Add 150 µL of Wash Buffer 2.
7. Vortex thoroughly until fully resuspended.
8. Incubate for 2 minutes while alternating between vortexing for 30 sec and resting for 30 sec, to ensure the mixture remains homogenous.
9. At the end of the incubation, briefly centrifuge the tube.
10. Place on the magnet for 1 minute.
11. Remove the supernatant. Add 150 µL of Wash Buffer 3.
12. Vortex thoroughly until fully resuspended.
13. Incubate for 2 minutes while alternating between vortexing for 30 sec and resting for 30 sec, to ensure the mixture remains homogenous.
14. At the end of the incubation, briefly centrifuge the tube.
15. Place the sample tube on the magnet for 1 minute.
16. Remove and discard the supernatant.
17. With the sample tube still on the magnet, use a fresh pipette tip to remove residual Wash Buffer 3 from the tube, then remove the tube from the magnet.
18. Add 20 µL of Nuclease-Free Water to each capture.
19. Pipet the mix 10 times to resuspend any beads stuck to the side of the tube.
Important! Do not discard the beads. Use the entire 20 µL of resuspended beads with captured DNA in
Perform post-capture PCR.
Perform Post-capture PCR 1. If a 1.7 mL tube was used for the washes, transfer the sample to a low-bind 0.2 mL PCR tube.
2. Add the following components to create the Amplification Reaction Mix:
Amplification Reaction Mix component Volume per reaction (μL)
2X KAPA HiFi HotStart ReadyMix* 25
Swift Library Amplification Primer 5
If using a PCR master mix other than Kapa HiFi, the magnesium concentration may need to be optimized for on-bead PCR.
3. Place the tube in a thermal cycler, and run the following program with the heated lid set at 105°C:
Step Number of Cycles Temperature (°C) Time
Polymerase Activation 1 98 45 sec
Amplification
Denaturation
Annealing
Extension
Variable — refer to the Panel table below.
98
60
72
15 sec
30 sec
30 sec
Final Extension 1 72 1 min
Hold 1 4 Hold
www.swiftbiosci.com 21
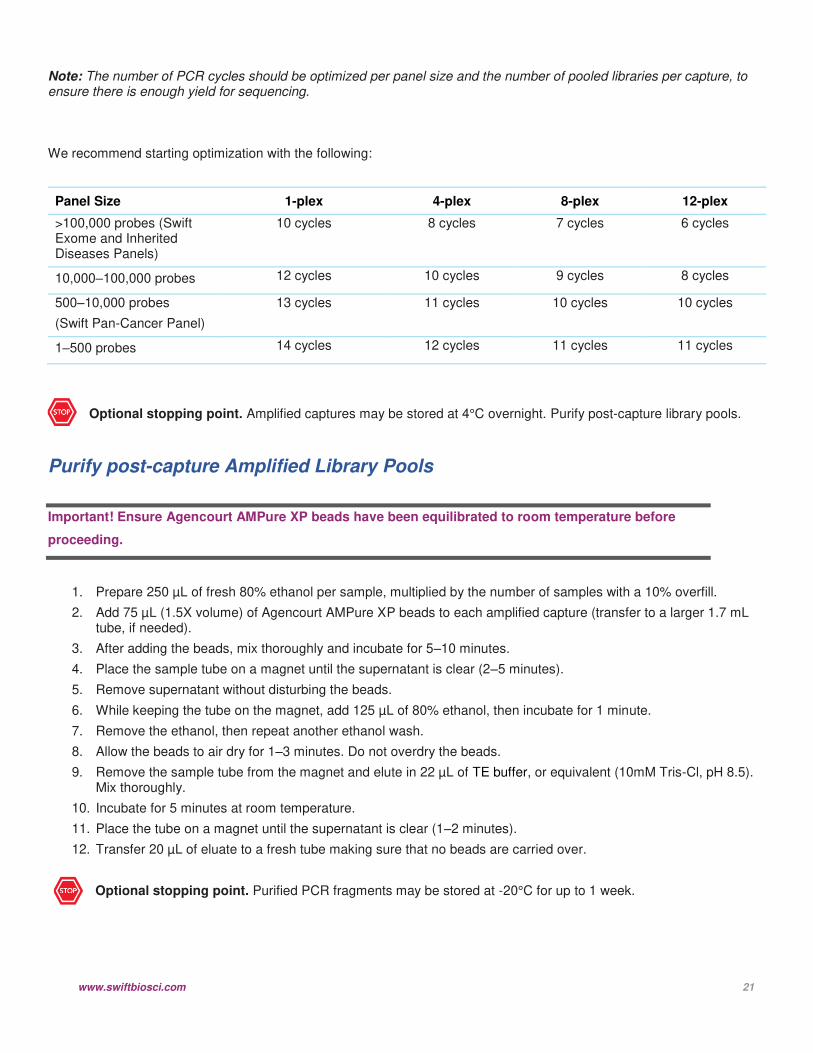
Note: The number of PCR cycles should be optimized per panel size and the number of pooled libraries per capture, to ensure there is enough yield for sequencing.
We recommend starting optimization with the following:
Panel Size 1-plex 4-plex 8-plex 12-plex
>100,000 probes (Swift Exome and Inherited Diseases Panels)
10 cycles 8 cycles 7 cycles 6 cycles
10,000–100,000 probes 12 cycles 10 cycles 9 cycles 8 cycles
500–10,000 probes
(Swift Pan-Cancer Panel)
13 cycles 11 cycles 10 cycles 10 cycles
1–500 probes 14 cycles 12 cycles 11 cycles 11 cycles
Optional stopping point. Amplified captures may be stored at 4°C overnight. Purify post-capture library pools.
Purify post-capture Amplified Library Pools
Important! Ensure Agencourt AMPure XP beads have been equilibrated to room temperature before
proceeding.
1. Prepare 250 µL of fresh 80% ethanol per sample, multiplied by the number of samples with a 10% overfill.
2. Add 75 µL (1.5X volume) of Agencourt AMPure XP beads to each amplified capture (transfer to a larger 1.7 mL tube, if needed).
3. After adding the beads, mix thoroughly and incubate for 5–10 minutes.
4. Place the sample tube on a magnet until the supernatant is clear (2–5 minutes).
5. Remove supernatant without disturbing the beads.
6. While keeping the tube on the magnet, add 125 µL of 80% ethanol, then incubate for 1 minute.
7. Remove the ethanol, then repeat another ethanol wash.
8. Allow the beads to air dry for 1–3 minutes. Do not overdry the beads.
9. Remove the sample tube from the magnet and elute in 22 µL of TE buffer, or equivalent (10mM Tris-Cl, pH 8.5). Mix thoroughly.
10. Incubate for 5 minutes at room temperature.
11. Place the tube on a magnet until the supernatant is clear (1–2 minutes).
12. Transfer 20 µL of eluate to a fresh tube making sure that no beads are carried over.
Optional stopping point. Purified PCR fragments may be stored at -20°C for up to 1 week.
www.swiftbiosci.com 22
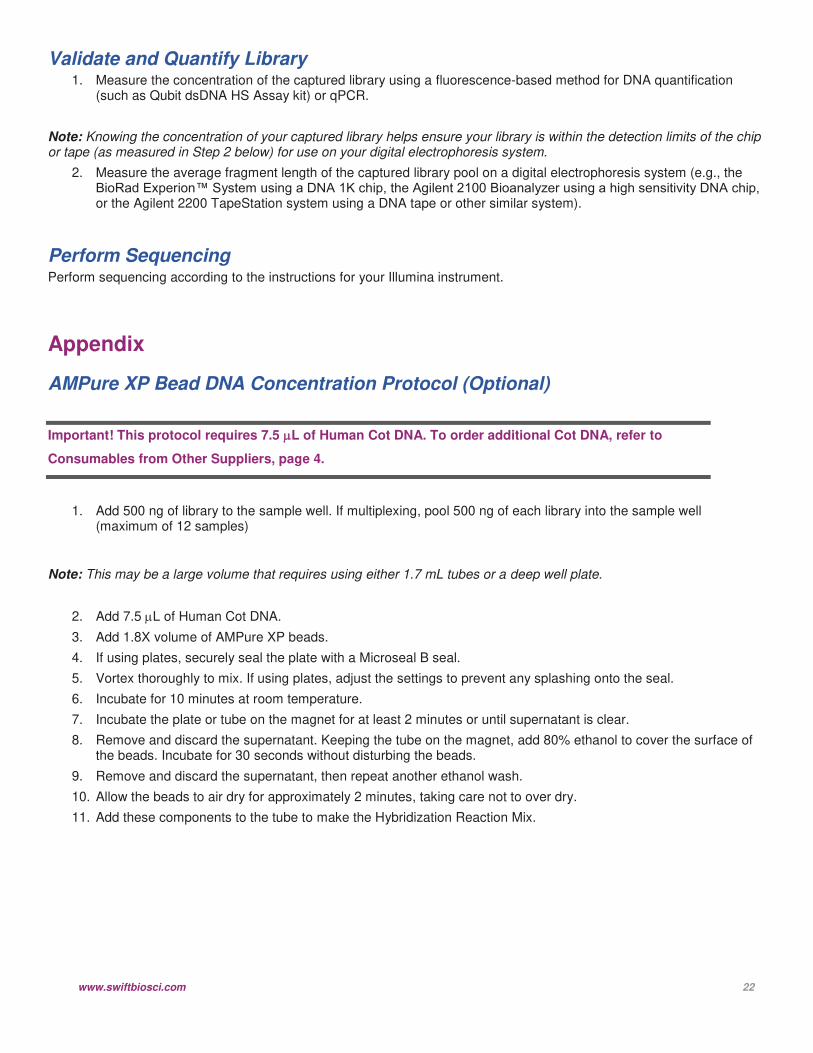
Validate and Quantify Library 1. Measure the concentration of the captured library using a fluorescence-based method for DNA quantification
(such as Qubit dsDNA HS Assay kit) or qPCR.
Note: Knowing the concentration of your captured library helps ensure your library is within the detection limits of the chip or tape (as measured in Step 2 below) for use on your digital electrophoresis system.
2. Measure the average fragment length of the captured library pool on a digital electrophoresis system (e.g., the BioRad Experion™ System using a DNA 1K chip, the Agilent 2100 Bioanalyzer using a high sensitivity DNA chip, or the Agilent 2200 TapeStation system using a DNA tape or other similar system).
Perform Sequencing Perform sequencing according to the instructions for your Illumina instrument.
Appendix
AMPure XP Bead DNA Concentration Protocol (Optional)
Important! This protocol requires 7.5 L of Human Cot DNA. To order additional Cot DNA, refer to
Consumables from Other Suppliers, page 4.
1. Add 500 ng of library to the sample well. If multiplexing, pool 500 ng of each library into the sample well (maximum of 12 samples)
Note: This may be a large volume that requires using either 1.7 mL tubes or a deep well plate.
2. Add 7.5 L of Human Cot DNA.
3. Add 1.8X volume of AMPure XP beads.
4. If using plates, securely seal the plate with a Microseal B seal.
5. Vortex thoroughly to mix. If using plates, adjust the settings to prevent any splashing onto the seal.
6. Incubate for 10 minutes at room temperature.
7. Incubate the plate or tube on the magnet for at least 2 minutes or until supernatant is clear.
8. Remove and discard the supernatant. Keeping the tube on the magnet, add 80% ethanol to cover the surface of the beads. Incubate for 30 seconds without disturbing the beads.
9. Remove and discard the supernatant, then repeat another ethanol wash.
10. Allow the beads to air dry for approximately 2 minutes, taking care not to over dry.
11. Add these components to the tube to make the Hybridization Reaction Mix.

www.swiftbiosci.com 23
Hybridization Master Mix components Volume per reaction (μL)
Swift 2X Hybridization Buffer 9.5
Swift Hybridization Buffer Enhancer 3
Swift Universal Blockers 2
Swift Panel Probes 4.5
Total 19
Note: The Hybridization Reaction Mix elutes the DNA from the AMPure XP beads.
12. Vortex to mix. Ensure that the beads are fully re-suspended.
13. Incubate for 5 minutes at room temperature.
14. After incubation place on a magnet for 5-10 minutes or until the supernatant is clear.
15. Transfer 17 L of the supernatant to the sample plate, or tube, where the hybridization will occur.
Important! Make sure to avoid bead carryover during the transfer process.
Proceed to Perform hybridization reaction step 13, for plate capture, or step 8, for tube captures immediately after the sample DNA is ready.
If you experience problems with your protocol, please contact us at [email protected], or by phone: 734.330.2568 (9:00 am – 5:00 pm ET, Monday through Friday).
General Warranty
Swift Biosciences, Inc. (“Swift”) warrants that its products meet Swift’s specifications at the time of delivery. Any sample or model used in connection with Swift’s product literature is for illustrative purposes only and does not constitute a warranty that the products will conform to the sample or model.
To the maximum extent permitted by applicable law, Swift hereby expressly disclaims, and the buyer hereby expressly waives, any warranty regarding results obtained through the use of the products including, without limitation, any claim of inaccurate, invalid, or incomplete results. All other warranties, representations, terms and conditions (statutory, express, implied or otherwise) as to quality, condition, description, merchantability, fitness for purpose, or non-infringement (except for the implied warranty of title) are hereby expressly excluded.
All warranty claims on products must be made in writing within ninety (90) days of receipt of the products. Swift’s sole li-ability and the buyer’s exclusive remedy for a breach of this warranty is limited to replacement or refund at the sole option of Swift.
The warranties identified in this paragraph are Swift’s sole and exclusive warranties with respect to the products and are in lieu of all other warranties, statutory, express or implied, all of which other warranties are expressly disclaimed,
including without limitation any implied warranty of merchantability, fitness for a particular purpose, non-infringement, or regarding results obtained through the use of any product (including, without limitation, any claim of inaccurate, invalid or incomplete results), whether arising from a statute or otherwise in law or from a course of performance, dealing or usage of trade.
Limitation of Liability
Swift Biosciences, Inc. (“Swift”) shall have no liability under the warranties cited above with respect to any defect in the products arising from: (i) specifications or materials supplied by the buyer; (ii) willful damage or negligence of the buyer or its employees or agents; (iii) abnormal working conditions at the buyer’s premises; (iv) failure to follow Swift’s use restrictions or instructions (whether oral or in writing); (v) misuse or alteration of the products without Swift’s approval; or (vi) if the buyer is in breach of its payment obligations in regards to purchasing the products.
To the fullest extent allowed by law, in no event shall Swift be liable, whether in contract, tort, strict liability, negligence, warranty, or under any statute or on any other basis for any special, incidental, indirect, exemplary, punitive, multiple or consequential damages sustained by the buyer or any other person or entity arising out of or caused by product, Swift’s performance or failure to perform its obligations relating to the purchase of product or performance of services, Swift’s breach of these terms, the possession or use of any product, or the performance by Swift of any services, whether or not foreseeable and whether or not Swift is advised of the possibility of such damages, including without limitation damages arising from or related to loss of use, loss of data, downtime, procurement of substitute products or services, or for loss of revenue, profits, goodwill, or business or other financial loss.
The total liability of Swift arising under or in connection with the purchase of the products, including for any breach of con-tractual obligations and/or any misrepresentation, misstatement or tortious act or omission (including without limitation, negligence and liability for infringement of any third party intellectual property rights) shall be limited to damages in an amount equal to the amount paid to Swift under the purchase agreement.
The exclusion of liability shall apply only to the extent not prohibited by applicable law.
Notice to Purchaser: Limited License
This product is for research use only and is licensed to the user under Swift Biosciences intellectual property only for the purchaser’s internal purposes. Not for use in diagnostic procedures.
Swift Biosciences, Inc. 674 S. Wagner Road, Suite 100 • Ann Arbor, MI 48103 • 734.330.2568 • www.swiftbiosci.com © 2019, Swift Biosciences, Inc. The Swift logo and Accel-Amplicon are trademarks of Swift Biosciences. This product is for Research Use Only. Not for use in diagnostic procedures. Manufactured by Integrated DNA Technologies, Inc. Qubit, SpeedVac, and DynaMag are registered trademarks of Thermo Fisher Scientific. AMPure XP is a registered trademark of Beckman Coulter. MAXYMum Recovery is a registered trademark of VWR. Microseal and Experion are registered trademarks of Bio Rad. Bioanalyzer and TapeStation are registered trademarks of Agilent. PRT-021 Rev 1