Embed Size (px)
Citation preview

SVN Tutorial for Windows Users
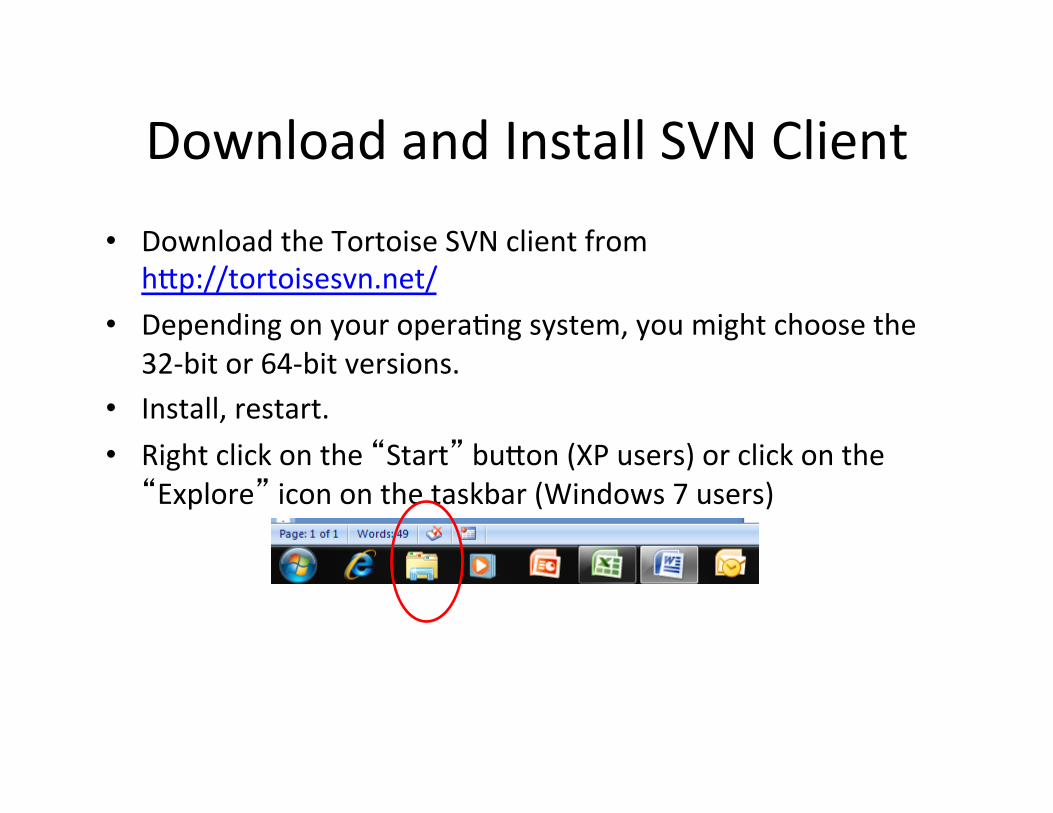
Download and Install SVN Client • Download the Tortoise SVN client from
h;p://tortoisesvn.net/ • Depending on your operaCng system, you might choose the
32-‐bit or 64-‐bit versions. • Install, restart. • Right click on the “Start” bu;on (XP users) or click on the “Explore” icon on the taskbar (Windows 7 users)
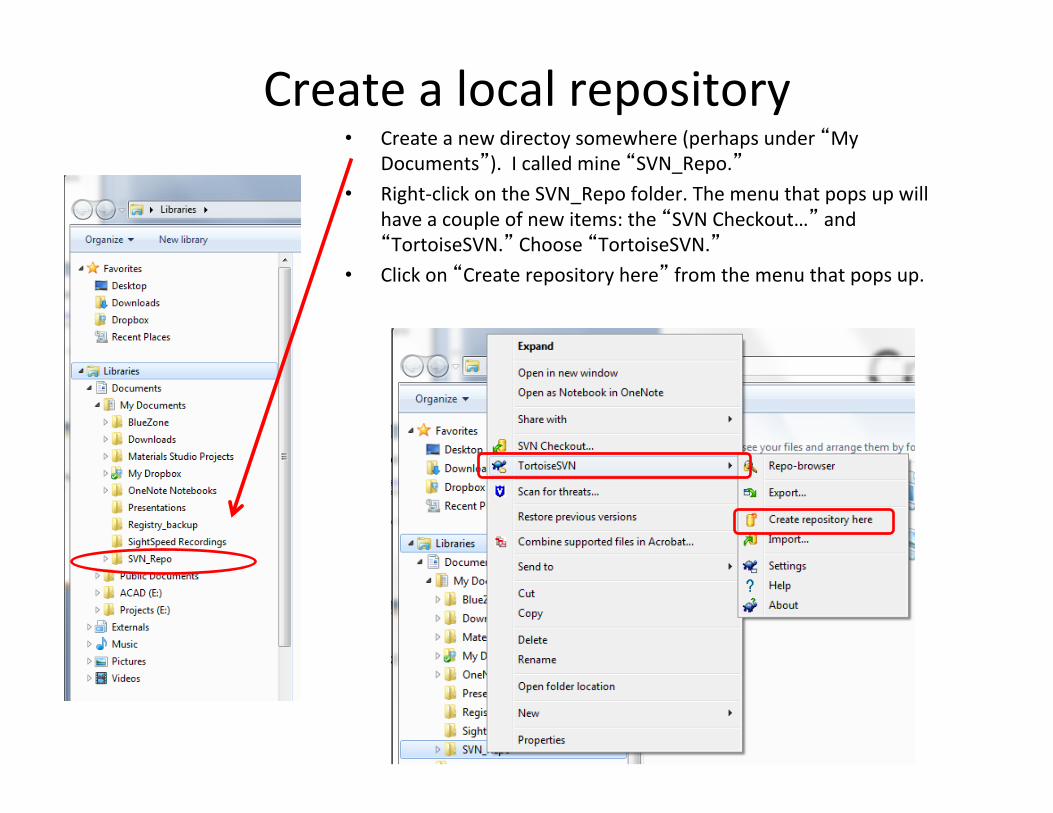
Create a local repository • Create a new directoy somewhere (perhaps under “My
Documents”). I called mine “SVN_Repo.” • Right-‐click on the SVN_Repo folder. The menu that pops up will
have a couple of new items: the “SVN Checkout…” and “TortoiseSVN.” Choose “TortoiseSVN.”
• Click on “Create repository here” from the menu that pops up.

Do the first “Check Out” • Once the repository is successfully
created, right-‐click on the “SVN_Repo” directory again, and choose “SVN Checkout…”
• The program will ask you for the repo address. For the LA-‐SiGMA project, it is h;ps://svn.cct.lsu.edu/repos/proposals/epscor09
• Enter the user-‐id and password provided by CCT.
• The checkout process now starts, and creates an exact replica of the SVN file system on your local drive. You should do this step while connected to a fast connecCon, because our repo has become quite large.
• You should allow a fair amout of Cme. [I did this at home, on a 54 Mbps wireless, and it took about 2.5 hours.]
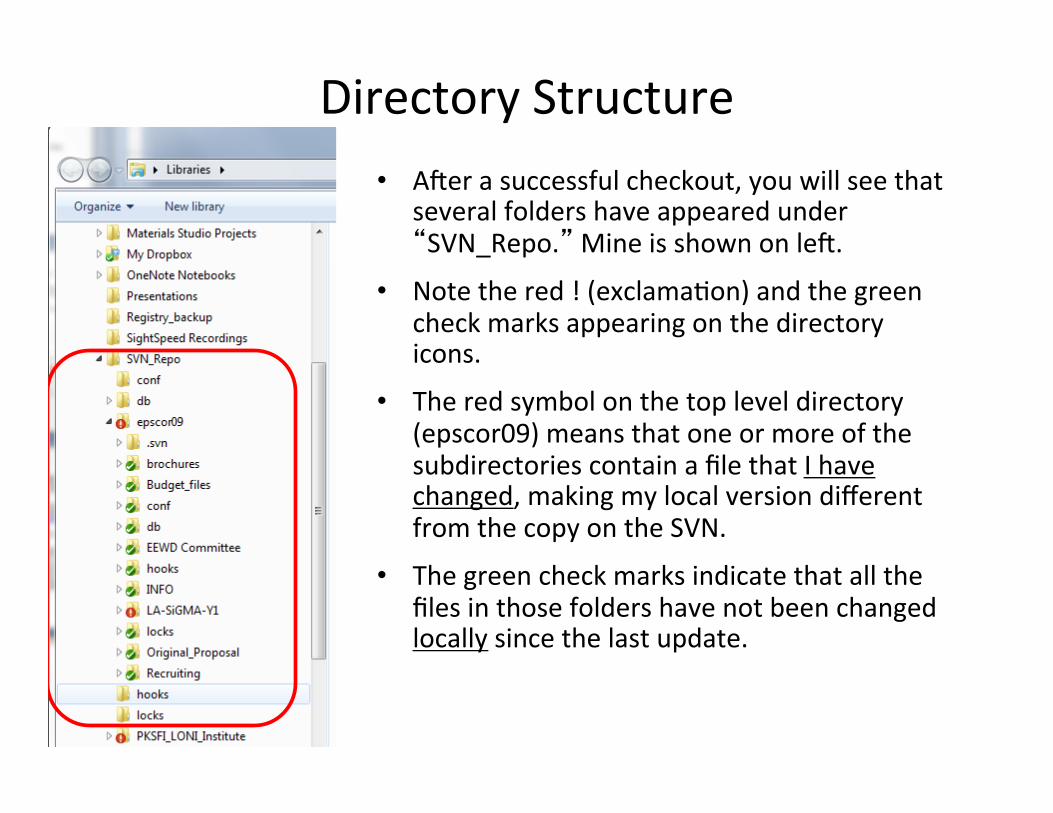
Directory Structure • Aeer a successful checkout, you will see that
several folders have appeared under “SVN_Repo.” Mine is shown on lee.
• Note the red ! (exclamaCon) and the green check marks appearing on the directory icons.
• The red symbol on the top level directory (epscor09) means that one or more of the subdirectories contain a file that I have changed, making my local version different from the copy on the SVN.
• The green check marks indicate that all the files in those folders have not been changed locally since the last update.
Working with the SVN: Update and Commit
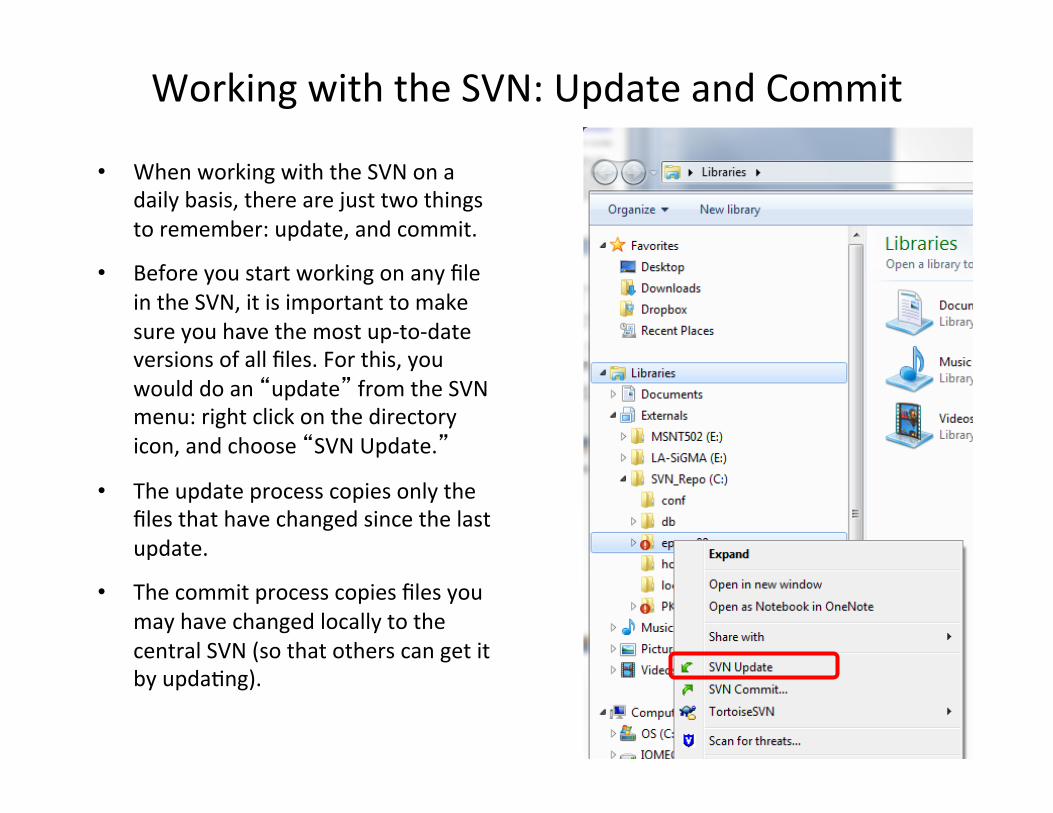
• When working with the SVN on a daily basis, there are just two things to remember: update, and commit.
• Before you start working on any file in the SVN, it is important to make sure you have the most up-‐to-‐date versions of all files. For this, you would do an “update” from the SVN menu: right click on the directory icon, and choose “SVN Update.”
• The update process copies only the files that have changed since the last update.
• The commit process copies files you may have changed locally to the central SVN (so that others can get it by updaCng).
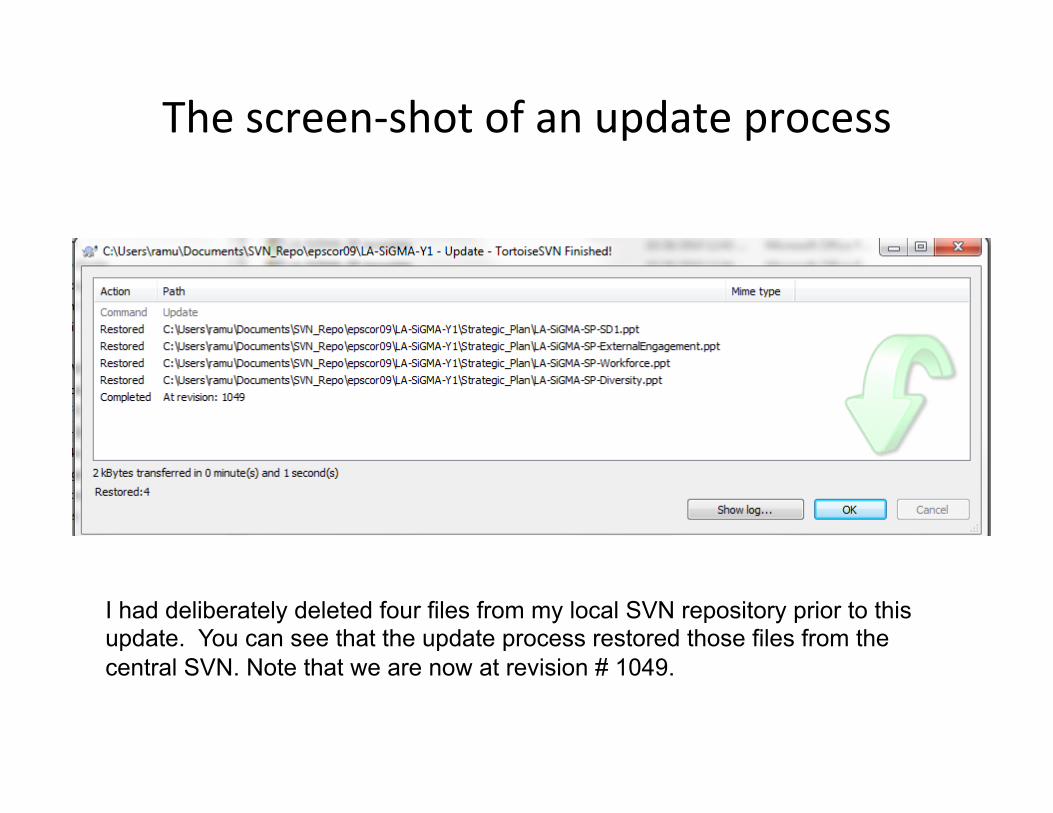
The screen-‐shot of an update process
I had deliberately deleted four files from my local SVN repository prior to this update. You can see that the update process restored those files from the central SVN. Note that we are now at revision # 1049.

Commiing changes -‐ 1 • If you make changes to a file, or if
you create a new file, it needs to be “commi;ed” (not in the psychiatric sense in most cases) so that others can see it.
• In the screen shot to the right, I have deliberately modified one of the files. Note that it is marked by a red exclamaCon mark all the way up the directory tree to the top level.
• Note that all the other files (and sub-‐folder) have green check marks, indicaCng that their contents are consistent with the central SVN.
• If you create a new file, it will not have any mark on it, which is a clue that the central SVN knows nothing about that file’s existence.
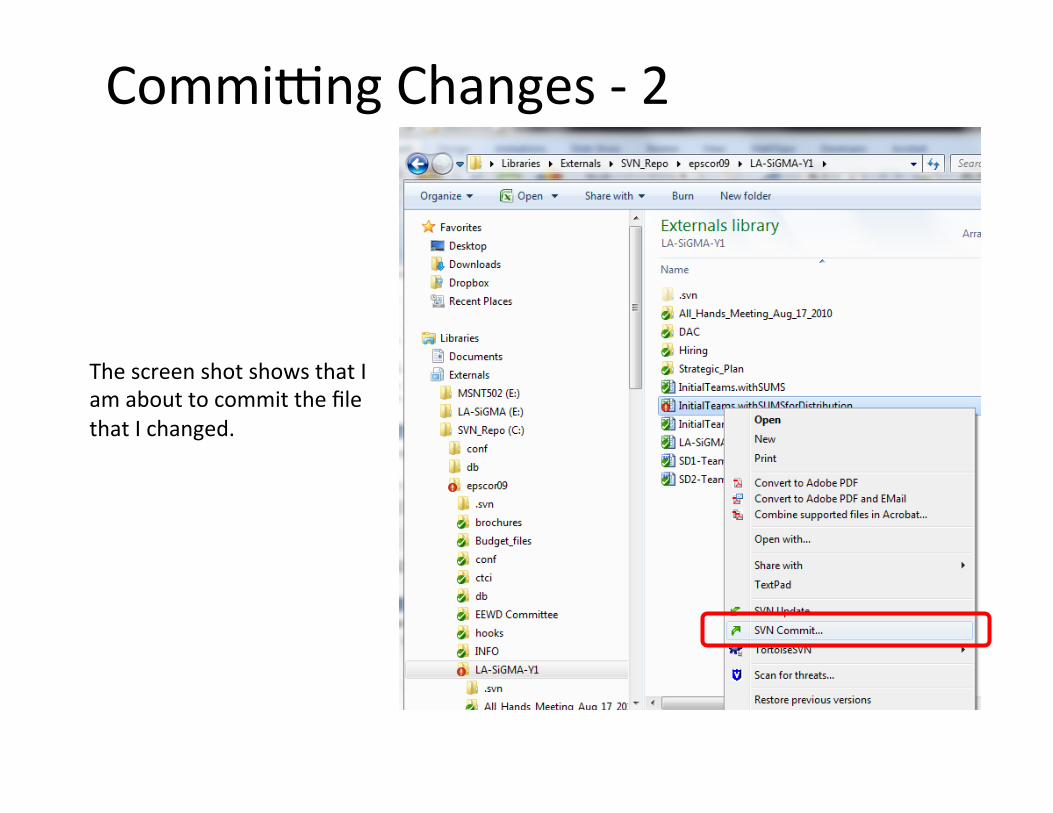
Commiing Changes -‐ 2
The screen shot shows that I am about to commit the file that I changed.

Commiing Changes -‐ 3
When you choose the “SVN Commit” menu, a window pops up in which you can type a note that explains what you have changed. This note will become part of the SVN change log and, if the SVN is e-‐mail enabled, an automaCc e-‐mail is generated to all authorized users alerCng them of your change.
Now we are at revision # 1050.

One more slide on “commit”
If all goes well with the “commit,” when I refresh my directory, the red exclamaCon mark will change to a green check mark, telling me that I have achieved a harmonious union with the great mother SVN. You may note that there is sCll a red exclamaCon mark on the high level directory “epscor09.” This never goes away on my desktop machine. I think it is an arCfact of my 64-‐bit client not interacCng with the central SVN. I run the 32-‐bit client applicaCon on my laptop and it does not have this problem.
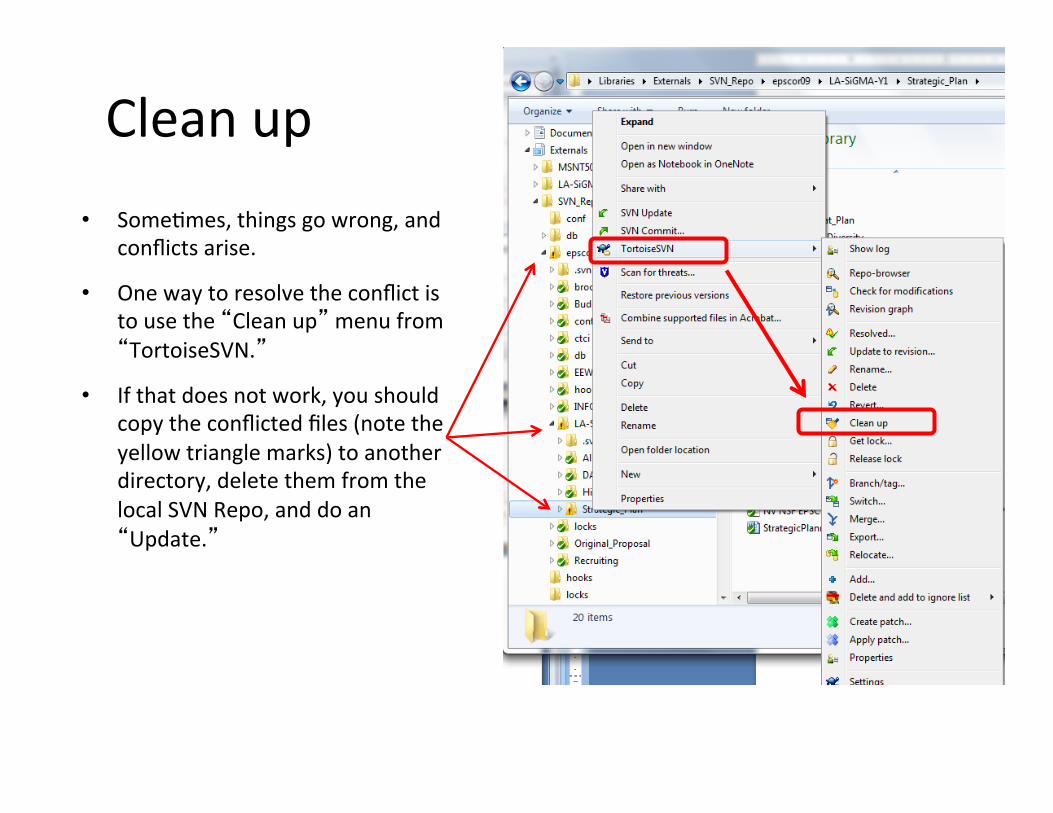
Clean up • SomeCmes, things go wrong, and
conflicts arise.
• One way to resolve the conflict is to use the “Clean up” menu from “TortoiseSVN.”
• If that does not work, you should copy the conflicted files (note the yellow triangle marks) to another directory, delete them from the local SVN Repo, and do an “Update.”

That’s it! Have fun.