Embed Size (px)
Citation preview

Strategies for Developing Course Content
© 2004 Desire2Learn, Inc.

Strategies for Developing Course Content
Created on 06/08/2004 © 2004 Desire2Learn Inc., all rights reserved. 2
Table of Contents
INTRODUCTION.......................................................................4
AVAILABLE CONTENT STRATEGIES...........................................4
CREATING HTML FILES.............................................................7
Using the D2L HTML Editor to Create Content ............................................7
Converting Documents to HTML ................................................................9
Content Formatting Tips ............................................................................................... 9
Tips for Converting Documents................................................................................... 10
Converting Microsoft Word/PowerPoint Documents ...................................................... 10
Converting WordPerfect Documents............................................................................ 11
Creating HTML Files Using HTML Editing Software ...................................12
Copying Content from another Course .....................................................12
Using Learning Objects...........................................................................12
UPLOADING CONTENT INTO D2L ............................................13
Tips for Naming and Managing Files ........................................................13
Uploading a Content Topic into D2L.........................................................13
Uploading Files with the Manage Files Tool..............................................15
Using WebDAV .......................................................................................17
What is WebDAV?....................................................................................................... 17
Setting up WebDAV on Windows 98/2000/ME/XP......................................................... 17
Alternate Method for Setting Up WebDAV in Windows 98/2000/ME/XP.......................... 19
Setting Up WebDAV for Macintosh Computers.............................................................. 22
Strategies for Developing Course Content
Created on 06/08/2004 © 2004 Desire2Learn Inc., all rights reserved. 3
General Notes on Using WebDAV ................................................................................ 25
WebDAV and Dreamweaver........................................................................................ 26
Troubleshooting WebDAV............................................................................................ 29
Importing Content from other Learning Platforms ...................................30
ADDITIONAL RESOURCES.......................................................32
APPENDIX A: USING MACROMEDIA DREAMWEAVER................32
Working with Text..................................................................................33
Adding and Formatting Text........................................................................................ 33
Checking Spelling....................................................................................................... 33
Changing Font Characteristics..................................................................................... 33
Creating Lists............................................................................................................. 34
Inserting Dates .......................................................................................................... 34
Linking and Navigation ...........................................................................35
Creating Links............................................................................................................ 35
Working with Images .............................................................................36
Inserting an Image..................................................................................................... 36
Image Properties........................................................................................................ 36
Aligning Elements....................................................................................................... 38

Strategies for Developing Course Content
Created on 06/08/2004 © 2004 Desire2Learn Inc., all rights reserved. 4
Introduction
This guide outlines some basic strategies for creating content for your D2L courses.
It is recommended that you read Unit 3: Creating Interactive Course Content in the Teaching with D2L Guide and become familiar with basic content terms and procedures before reading this guide.
Almost any document format can be used in conjunction with Desire2Learn. However, for students view documents online (as opposed to downloading and opening them in another program) you should use one of the following formats:
Format Works Best for…
HTML (.html or .htm)
Text or complex documents (including PowerPoint).
Plain Text (.txt) Short, simple text where no formatting beyond paragraphing is required.
GIF (.gif) Graphics that are not photographs or reproductions of fine art.
JPEG (.jpg or .jpeg)
Graphics that ARE photographs or fine art reproductions.
Available Content Strategies The table below outlines some common content creation/upload strategies, and describes the situations in which each strategy is most useful. Refer to the appropriate section(s) of this document for details on each content strategy.
NOTE: Regardless of how you create/upload your course content in D2L, you must always use D2L’s Manage Content tool to designate files as course topics.
Strategy Works Best for…
Content Creation Strategies
Using D2L’s HTML Editor Use this strategy if you have not already composed your content in a separate document and would like to enter it directly into the D2L system, OR, if you want to copy and paste pre-written plain-text content. The HTML Editor can then be used to format the content, insert images and tables, etc.

Strategies for Developing Course Content
Created on 06/08/2004 © 2004 Desire2Learn Inc., all rights reserved. 5
This is a good strategy to use if you are unfamiliar with HTML and have not already applied lot of formatting to your content. This strategy is also useful if you need to insert mathematical equations into your content, as you can use the Equation Editor that is built into the HTML Editor. Additionally, using the HTML Editor eliminates the need to create and upload separate content files on your computer – you can simply input your content directly into the D2L system.
Creating and Uploading HTML Documents
Creating your own HTML documents allows you to apply formatting to your content using an HTML editor (such as Macromedia Dreamweaver, Microsoft Frontpage, etc.) on your own computer. This strategy is recommended if you are comfortable using HTML edit ing software and want to add formatting and include images and other HTML elements in your content. This strategy is also recommended if you have a dial-up internet connection and/or do not want to spend long periods of time connected to the Internet while editing your content in the D2L HTML Editor.
Non-HTML Documents Any file format can be uploaded into D2L, including text, presentation, and animation files, but plain text files (.txt) and images (.jpeg/.jpg and .gif) are the only files besides HTML documents that can be viewed directly in D2L. For other file formats, users will have to download and open the files in the applicable programs (e.g. Microsoft PowerPoint) on their computers. You may wish to upload other file types if you need to provide content that cannot be easily rendered in HTML. For example, complex PowerPoint presentations, large AutoCad drawings, etc. Uploading plain text files is a useful strategy if your content is purely text and does not include formatting beyond line breaks. Plain text is also useful if you need to minimize page loading time to accommodate users with slow internet connections.
Copying Content from another Course
This strategy is useful if your course is a re-offering of a previous course, or if your course offers content that is similar to another course.
Using Learning Objects (LOs)
The Learning Object Repository, if available at your organization, provides a central library for D2L users to place LOs (content, images, etc.) that may be useful for

Strategies for Developing Course Content
Created on 06/08/2004 © 2004 Desire2Learn Inc., all rights reserved. 6
multiple courses. The LOR is useful if you only want to copy certain elements or sections of content that have been added to the LOR, rather than the all of the content from another course.
Content Uploading Strategies
Uploading Content Topics Use this uploading strategy if you have completed a content file on your own computer and wish to upload it into D2L and designate it as a content topic all in one step.
Using Manage Files Tool The D2L Manage Files tool allows you to upload files into D2L for your course content. This strategy is useful if you have a small to moderate number of course files which may or may not need to be designated as content topics.
WebDAV WebDAV is a useful uploading tool if you have a large number of course content files and need to access/edit them frequently. It allows you to upload/edit/delete your course files directly from your desktop, without logging into the D2L system.
Importing Content from other Learning Platforms
Course content can be imported into D2L from other Learning Platforms, such as Blackboard and WebCT. Contact your D2L site administrator if you need to import course content.

Strategies for Developing Course Content
Created on 06/08/2004 © 2004 Desire2Learn Inc., all rights reserved. 7
Creating HTML Files
Using the D2L HTML Editor to Create Content
Using the D2L’s built-in HTML Editor to create your content is useful when you have little or no knowledge of HTML. It allows you to format your content in a similar fashion to common word processing software. You can type or copy and paste your text directly into the HTML Editor and add formatting as well as insert images, tables, and other objects. The HTML Editor also includes an Equation Editor, which allows you to insert mathematical equations into your content.
Refer to the Teaching with D2L Guide for complete details on creating content using the HTML Editor in D2L. For information on using the Equation Editor (within the HTML Editor), refer to the Equation Editor Troubleshooting Guide.
NOTE: When using the D2L HTML Editor, avoid copying and pasting anything more than plain text from Microsoft Word into the HTML Editor. For example, do not copy and paste tables, graphics, lists, etc.
NOTE: Before you create course content, you must create content modules (these are categories in which to place your content). Refer to the Teaching with D2L Guide for instruction on creating content modules.
To create a course topic using D2L’s HTML Editor from your course homepage:
1. Click the Content link in the course navbar.
The Course Content page displays.
2. Click the link on the left-hand side of the page.
The New Topic page displays.
3. Click .
The New Topic – Create New File page displays containing the HTML Editor.

Strategies for Developing Course Content
Created on 06/08/2004 © 2004 Desire2Learn Inc., all rights reserved. 8
4. Choose the course module that your new topic will belong to from the Parent Module droplist.
5. Type a Title for your new topic.
6. Type a Short Title for your new topic (optional).
7. Enter your content in the white textbox within the HTML Editor. For complete details on using the HTML Editor, refer to the Teaching with D2L Guide.
8. Click SAVE when you have completed your content, or click SAVE & NEW to save your content and create another new topic.
A new page displays, allowing you to specify where your new content should be saved in D2L.

Strategies for Developing Course Content
Created on 06/08/2004 © 2004 Desire2Learn Inc., all rights reserved. 9
9. Use the Folder droplist to choose the course folder you want to save your content in.
10. Type a File Name and ensure that it ends in “.html”.
11. Click SAVE.
Your new topic appears in the Content Manager page. Click the title of the topic to preview how it will appear to students.
Converting Documents to HTML
This section includes some suggestions for converting some common document types into HTML files. Once you have converted your content into an HTML file, you will need the file into your course using one of the strategies described in the Uploading Content into D2L section of this guide.
Content Formatting Tips
When creating content in other programs (as opposed to typing it into the D2L HTML Editor):
• If you are creating content in a word processor, do not use tabs to create tables since HTML does not allow for the use of tabs.
• Do not use multiple spaces to indent a line. Your web browser will treat multiple spaces as a single space.

Strategies for Developing Course Content
Created on 06/08/2004 © 2004 Desire2Learn Inc., all rights reserved. 10
• Use the default font face and size (Times New Roman 12pt font) to achieve best results.
• If you are coding your content in HTML, do not put line breaks after each line of content. Only use line breaks where you need to force a line break.
Tips for Converting Documents
Quickly scan documents before you convert them to HTML and try to eliminate any formatting that won't display well on the Web. Problematic elements may include (some may not display at all in HTML format):
• headers and footers,
• page breaks,
• special paragraph formatting (double spacing, indentation, etc.),
• tabs,
• special characters,
• WordArt images created inside a Word document, and
• page numbers.
Converting Microsoft Word/PowerPoint Documents
If you are using Microsoft Word or PowerPoint to compose your content, save it as a filtered web page (.html). The filtered web page format removes Microsoft Office-specific code, which significantly reduces the size of the file. Note that if you save your content as filtered HTML and then reopen it in an Office program, the text and general appearance will be preserved, but some features may work differently.
To save a Word or PowerPoint document as a filtered web page:
1. Open the applicable document.
2. Select the File menu, and click Save As.
3. Type the applicable file name in the File name box.
4. Choose the Web Page, Filtered option from the Save as type droplist.
5. Click SAVE.
TIP: If/when you need to edit the file, first edit the content in the Word document, and then re-save a copy of the document with the new changes in filtered HTML format.

Strategies for Developing Course Content
Created on 06/08/2004 © 2004 Desire2Learn Inc., all rights reserved. 11
NOTE: You cannot compile and print course content from the Course Content page
( ) that contains a PowerPoint presentation that has been saved in any other file format than .html.
Why Not Use “Save as Web Page”?
When the “Save as Web Page” option is used, Word/PowerPoint automatically inserts style definitions, Microsoft-specific tags, and Office-specific formatting instructions that allow you to open the .html file as an Office document. In addition, using “Save as Web page” doubles the size of the file, which increases the page load time.
Other issues with “Save as Web Page”:
• MetaData is automatically inserted. This is information used to enhance the editing, viewing, filing, and retrieval of Office documents. Unless you remove it from the HTML document, visitors can look at your source code and find your name, the name of your computer, document revision, comments, and more.
• Fonts and font sizes may not display properly. Your word processing program often supports many more fonts than a standard Web browser. When visitors' browsers use their default font and font size instead, the change could break your page layout.
Converting WordPerfect Documents
If you are using WordPerfect to create your content, you can convert it to HTML with the “Publish To” command.
1. Open the applicable WordPerfect document.
2. Open the File menu and choose Publish To/HTML….
3. Type the applicable file name in the HTML File Name box. TIP: Use the small folder icon ( ) next to the HTML File Name box to check/update the folder that the file will be saved in. Make sure you know exactly where your file will be saved so you know where to find any images associated with the file (see step 4).
4. If there are any images in your document, choose how you would like WordPerfect to save them in the Default GIF Options and Default JPEG Options areas. The images will then be saved separately in their own folder, in the same directory as your HTML file.
5. Click PUBLISH.
TIP: If/when you need to edit the file, first edit the content in the Word document, and then re-save a copy of the document with the new changes in filtered HTML format.

Strategies for Developing Course Content
Created on 06/08/2004 © 2004 Desire2Learn Inc., all rights reserved. 12
Creating HTML Files Using HTML Editing Software
If you are comfortable using HTML editing software, you may wish to create your own HTML content files and then upload them into D2L. This strategy is recommended if you have a dial-up internet connection and/or do not want to spend long periods of time connected to the Internet while editing your content in the D2L HTML Editor.
Refer to the Help tool in your HTML editing software if you need assistance creating your content. Some common programs such as Macromedia Dreamweaver and Microsoft Frontpage also have a great deal of online support including step-by-step tutorials at their respective websites. This guide includes some basic instructions for using Dreamweaver in Appendix A.
Once you have created your HTML files, you must upload them into D2L. You must also upload any images and audio/video files that you use in your HTML and ensure that they are placed in the appropriate folder in D2L. Refer to the Uploading Content into D2L section of this guide for details on uploading content.
Copying Content from another Course
If your course borrows a lot of content from another course, or if you are re-offering a course, you may wish to copy the content from the relevant course. To do so, you must be enrolled in the course that you want to copy content from. For example, if you wish to copy content from “History 101” into “History 102”, you must be enrolled in both courses.
It is not possible to copy only certain parts of content from another course – you must copy all of the content at once.
Also keep in mind that if you have already uploaded files into your course content and then choose to copy content from another course, the files you created could be overwritten if the files you are copying have the same file names.
For instructions on copying content from another course, refer to the Copy Course Components section under Unit 3: Creating Interactive Course Content in the Teaching with D2L Guide.
Using Learning Objects
If your organization uses the Learning Object Repository (LOR), you can use Learning Objects (LOs) in your course content. The LOR is an online library of Learning Objects. LOs can be HTML files, audio/video files, images, etc., or a collection of various content items (for example, an entire content module could be made into a Learning Object). If you create content that you think might be useful in other courses or to other instructors, you can upload items to the LOR. You can then import any objects from the LOR into another course.

Strategies for Developing Course Content
Created on 06/08/2004 © 2004 Desire2Learn Inc., all rights reserved. 13
If the LOR is available at your organization, you will see the option when you create a new content module or topic, and in the HTML Editor. Clicking on this option will take you to the Learning Object Repository page, where you can search for applicable LOs and import them into your course.
Refer to the D2L Learning Object Repository (LOR) User and Reference Guide for details on using Learning Objects.
Uploading Content into D2L When you save your document as an HTML file on your computer, any images that appear in the document will be placed in an associated folder on your local hard drive (usually, your computer will create a new “Images” folder in the same directory that your HTML document is located in). Be sure that when you upload an HTML file into your course, you also upload any associated images and other files.
Also note that the location of your images must match the image path that is used in your HTML. For example, if an image tag reads <img src=”images/picture.gif”>, the file “picture.gif” must be placed in a folder called “images” within the same directory as the HTML file.
If you are unsure what folder your images should go into, use the Creating Content with the D2L HTML Editor strategy (described in this guide) to create your content and insert images. In this strategy, the D2L HTML Editor will help you locate images within your course and upload new images to your course files.
Tips for Naming and Managing Files
When saving your content on your computer and/or uploading it into the D2L system:
• Avoid using spaces and punctuation when naming files (underscores (‘_’) can be used instead of spaces).
• Keep files names concise.
• Organize groups of related files into folders.
• When saving on a Macintosh computer, remember to include file extensions.
Uploading a Content Topic into D2L
If you have created a file on your computer that you want to upload into your course as a topic:
2. Click the Content link in your course navbar.
3. Click .

Strategies for Developing Course Content
Created on 06/08/2004 © 2004 Desire2Learn Inc., all rights reserved. 14
The New Topic page displays.
4. Choose .
The New Topic – Upload New File page displays.
5. Choose the content module that your new topic will belong to from the Parent Module droplist.
6. Type a Title and Short Title for your new topic.
7. Click BROWSE and navigate to the file you want to upload as a topic. Then click OPEN.
8. Click SAVE.
The Save As page displays.

Strategies for Developing Course Content
Created on 06/08/2004 © 2004 Desire2Learn Inc., all rights reserved. 15
9. Use the Folder droplist to choose the course folder you want to save your content in.
10.Type a File Name.
11.Click SAVE.
Your new topic appears in the Content Manager page. Click the title of the topic to preview how it will appear to students.
Uploading Files with the Manage Files Tool
The Manage Files tool allows you to upload files into your course without designating them as content topics. You can always go back and designate files as topics after you have uploaded them. To upload files to your course using the Manage Files tool:
1. Click the Content link in your course navbar.
2. Click .
The Manage Files page displays.

Strategies for Developing Course Content
Created on 06/08/2004 © 2004 Desire2Learn Inc., all rights reserved. 16
3. Open the folder that you want to upload your file into.
4. Click .
The Upload File page displays.
5. Click BROWSE and select the applicable file. Then click UPLOAD.
Your file is uploaded into your course files.

Strategies for Developing Course Content
Created on 06/08/2004 © 2004 Desire2Learn Inc., all rights reserved. 17
Using WebDAV
In order to use WebDAV, you must have Internet Explorer version 5 or higher (which has WebDAV capabilities built in) for PCs. Macintosh users must have a PowerPC-based Macintosh running Mac OS version 8.1 or higher, and must have the Goliath WebDAV client installed. The Goliath WebDAV client for Macs is available at: http://www.WebDAV.org/goliath/#download.
Please refer to the Installation and Configuration Guide for details about installing the HTML Editor on local machines.
What is WebDAV?
WebDAV stands for “Web-based Distributed Authoring and Versioning.” It allows a user to manage files for his/her web site(s) as if the files were stored on a local hard drive. Course designers can quickly and easily copy, move, delete, rename and upload/download course files for their Desire2Learn (D2L) courses directly from their own computers, without having to log into the D2L website and upload files via the Manage Files interface.
WebDAV is an ideal option for course instructors that have a large number of course files to edit and upload on a regular basis.
For further information, please visit the WebDAV website at: http://www.WebDAV.org/.
Setting up WebDAV on Windows 98/2000/ME/XP
NOTE: WebDAV requires Microsoft Internet Explorer version 5 or higher.
To setup a web folder that connects to your D2L course from your Windows desktop:
1. If you are using Windows 98:
a. Double-click My Computer (or select it from inside ‘Windows Explorer’).
b. Double-click Web Folders.
c. Double-click Add Web Folder.
The Add Web Folder Wizard screen displays.
OR, if you are using Windows 2000/ME/XP:
a. Double-click My Network Places.
b. Select Add a Network Place.
The Add Network Place Wizard window displays.
c. Windows XP users only:
Strategies for Developing Course Content
Created on 06/08/2004 © 2004 Desire2Learn Inc., all rights reserved. 18
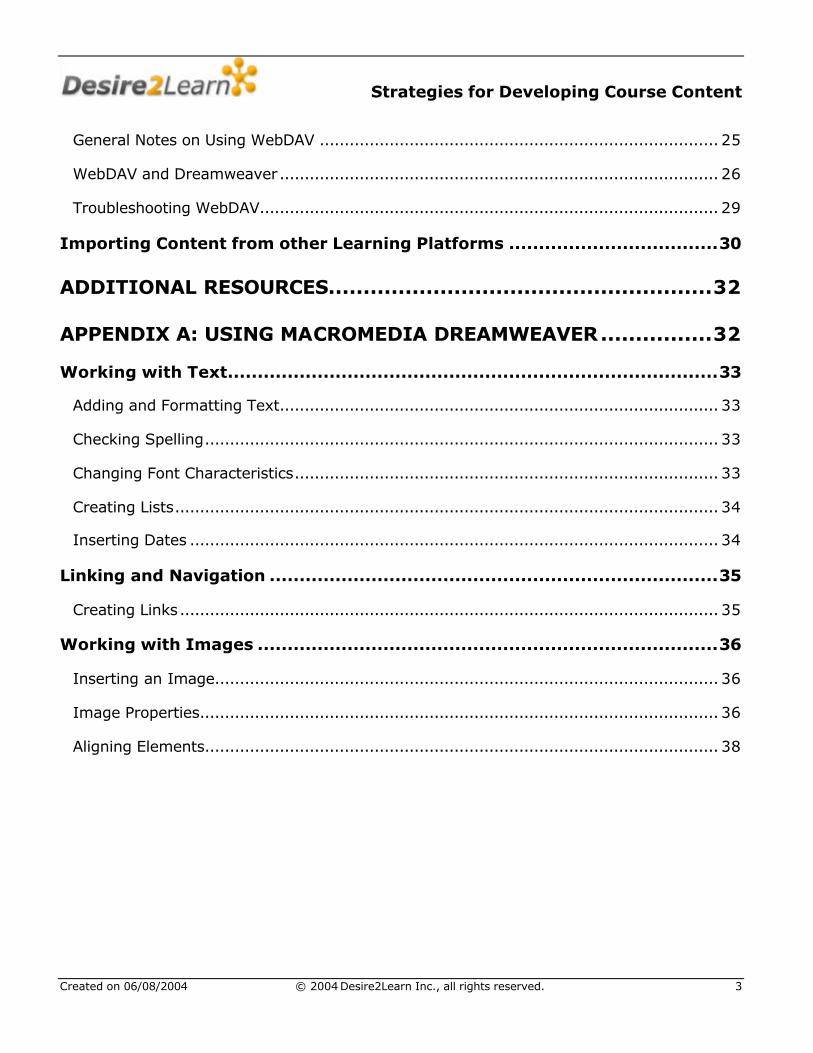
i. Click NEXT.
ii. Select Choose another network location and click NEXT.
2. Type in the URL for your D2L course in the location/address field. The URL should
follow the format: http://<domain>/content/<CoursePath>/. <domain> = The domain from which you access the D2L platform. For example, “organization.ucourses.com”. <CoursePath> = The location of the applicable course within the Course folder in D2L. If you are unsure of the course path, you can confirm it by going to the Manage Files area of D2L’s Course Management Console. Simply go to the Homepage of the applicable course and click Content in the navbar, and then Manage Files. Your course path will be displayed near the top of the page beside a yellow file folder icon.
NOTE: In the example above, the course location would be “http://<domain>/content/Astronomy”.
3. Click NEXT.
A login dialog box displays.

Strategies for Developing Course Content
Created on 06/08/2004 © 2004 Desire2Learn Inc., all rights reserved. 19
4. Type your D2L username and password, uncheck the Save this password in your password list or Remember my password box, if it appears, and click OK.
NOTE: The Remember my password box (if it appears) will be checked by default. For security reasons, we strongly recommend that you uncheck this box before proceeding.
Another login dialog box displays.
5. Type your D2L username and password again and click OK.
6. Label the new web folder with a name that will help you easily identify it in the future (e.g. ‘Hist 101 – History’) and click FINISH (Windows XP users will need to click NEXT and then FINISH).
A new network folder displays in My Network Places with the label you specified in Step 7.
You can now create, move, copy, and delete files and folders through your Windows interface using this new network folder. Keep in mind that you need to be connected to the Internet in order to access or modify any files within the network folder.
If you are unable to view or modify your course files after completing this setup process, contact your D2L site administrator.
NOTE: You will need to create one WebDAV folder for each D2L course that you are managing. Follow the steps above for each course that you need to access.
Alternate Method for Setting Up WebDAV in Windows 98/2000/ME/XP
If you experience any difficulties setting up WebDAV using the instructions above, you may wish to try this alternative method for Windows operating systems.
NOTE: WebDAV requires Microsoft Internet Explorer version 5 or higher.
Strategies for Developing Course Content
Created on 06/08/2004 © 2004 Desire2Learn Inc., all rights reserved. 20
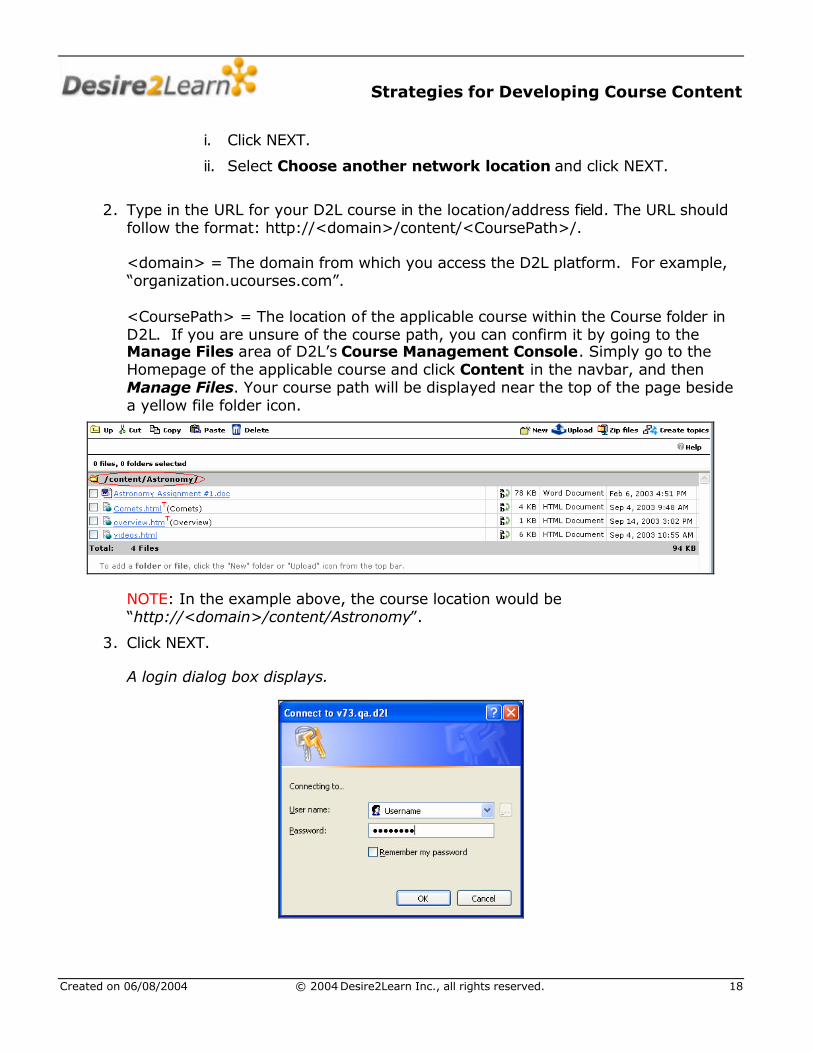
Instead of creating a Windows Network Place, an alternative is to connect your D2L content folders through Internet Explorer.
a. Open Internet Explorer.
b. Select File/Open.
The Open dialog box displays.
c. Check the Open as Web Folder option.
d. Type the URL for your D2L course in the Open: field. The URL should follow the format: http://<domain>/content/<CoursePath>/. <domain> = The domain from which you access the D2L platform. For example, “organization.ucourses.com”. <CoursePath> = The location of the applicable course within the Course folder in D2L. If you are unsure of the course path, you can confirm it by going to the Manage Files area of D2L’s Course Management Console. Simply go to the Homepage of the applicable course and click Content in the navbar, and then Manage Files. Your course path will be displayed near the top of the page beside a yellow file folder icon.
NOTE: In the example above, the course location would be “http://<domain>/content/Astronomy”.

Strategies for Developing Course Content
Created on 06/08/2004 © 2004 Desire2Learn Inc., all rights reserved. 21
e. Click OK.
A dialog box displays, prompting you for your user name and password.
f. Type your D2L username and password and click OK.
A new folder displays in Windows Explorer with the name you specified in Step 8.
You can now create, move, copy, and delete files and folders through your Windows interface using this new network folder. Keep in mind that you need to be connected to the Internet in order to access or modify any files within the network folder.
If you are unable to view or modify your course files after completing this setup process, contact your D2L site administrator.
NOTE: You will need to create one WebDAV folder for each D2L course that you are managing. Follow the steps above for each course that you need to access.
Moving and Copying Files in Windows Platforms
WebDAV enables you to easily manage files that are used in your course content. However, your course modules and topics must still be managed from within the D2L Manage Content area. If you edit a file using WebDAV that has already been associated with a topic, the file will remain associated with the topic.
The easiest way to move and copy files using WebDAV is the “drag and drop” method:
1. Open the folder containing your WebDAV files using Windows Explorer.
2. In another Windows Explorer window, browse to the directory on your computer that contains the files you wish to move/copy into your course files in D2L. Ensure that you can see at least part of both windows at the same time (one window can partly overlap the other).
3. Select the file(s) you wish to move/copy from your local directory.
4. Place your cursor over one of the selected files. Then click and hold the mouse button down and drag the file(s) into the window that contains your WebDAV files.

Strategies for Developing Course Content
Created on 06/08/2004 © 2004 Desire2Learn Inc., all rights reserved. 22
NOTE: As you drag the file(s), a small plus (+) sign may appear near your cursor. The plus sign indicates that the file(s) are being copied; the file(s) will therefore appear in both locations (your local directory and the WebDAV folder). If the plus sign does not appear, the file(s) are being moved. In this case, the file(s) will ONLY appear in the location you drag them to, and will be removed from their original location. The plus sign can be added or removed by holding or releasing the CTRL key as you drag your file(s).
5. Release the mouse button once you have dragged your file(s) over the WebDAV window.
The selected file(s) is/are moved/copied to the WebDAV folder.
Setting Up WebDAV for Macintosh Computers
Mac users must have a PowerPC-based Macintosh running Mac OS version 8.1 or higher, and must have the Goliath WebDAV client installed.
To install Goliath, visit http://www.webdav.org/goliath and download the appropriate software for your version of Mac OS. Details about the Goliath software are also available at this website.
Once you have installed Goliath, follow these steps to connect to your D2L course using WebDAV:
1. Go to http://www.WebDAV.org/goliath/#download and download the version of Goliath that is appropriate for your version of Mac OS (instructions are provided on this website).
2. Install the Goliath application following the instructions on the above website.
3. Open the Goliath WebDAV application (the icon looks like a globe partially hidden by a folder). If the icon does not appear on your desktop, you can find it by browsing to the folder that you installed the program in.
4. Open the New WebDAV Connection screen by clicking on the Goliath File menu, and selecting New Connection.
NOTE: When you start the program for the first time, the New WebDAV Connection screen will display automatically.
5. Type your D2L username and password and the URL for your D2L course. The URL should follow the format: http://<domain>/content/<CoursePath>/. <domain> = The domain from which you access the D2L platform. For example, “organization.ucourses.com”.

Strategies for Developing Course Content
Created on 06/08/2004 © 2004 Desire2Learn Inc., all rights reserved. 23
<CoursePath> = The location of the applicable course within the Course folder in D2L. If you are unsure of the course path, you can confirm it by going to the Manage Files area of D2L’s Course Management Console. Simply go to the Homepage of the applicable course and click Content in the navbar, and then Manage Files. Your course path will be displayed near the top of the page beside a yellow file folder icon.
NOTE: In the example above, the course location would be “http://<domain>/content/Astronomy”.
6. Click OK.
A new web folder is created.
If you wish to keep this web folder connection permanently on your computer, you must save the connection before you close the folder. To do so in Goliath 1.0:
7. Open the File menu and click Save Connection.
8. Type a name for the WebDAV folder that will help you to easily identify it in the future (e.g. ‘Hist 101 – History’) and click SAVE.
You can now create, move, copy, and delete files and folders through your Windows interface using this new network folder. Keep in mind that you need to be connected to the Internet in order to access or modify any files within the network folder.
If you are unable to view or modify your course files after completing this setup process, contact your D2L site administrator.
NOTE: You will need to create one WebDAV folder for each D2L course that you are managing. Follow the steps above for each course that you need to access.
Strategies for Developing Course Content
Created on 06/08/2004 © 2004 Desire2Learn Inc., all rights reserved. 24
Moving and Copying Files in Mac OS
WebDAV enables you to easily manage files that are used in your course content. However, your course modules and topics must still be managed from within the D2L Manage Content area. If you edit a file using WebDAV that has already been associated with a topic, the file will remain associated with the topic.
The easiest way to move and copy files using WebDAV is the “drag and drop” method:
1. Open the WebDAV folder that you wish to move/copy files into.
2. Open the directory on your computer where the file(s) that you wish to move/copy are.
3. Select the file(s) you wish to move/copy.
4. Click and hold the mouse button while dragging the selected file(s). Release the mouse button once the files are over the WebDAV folder.
We strongly recommend that you read Goliath’s Help section. To view it, open the Help menu and click on Help On Goliath.
For more assistance on setting up and using Goliath, please visit http://www.webdav.org/goliath/help0.9/index.html.

Strategies for Developing Course Content
Created on 06/08/2004 © 2004 Desire2Learn Inc., all rights reserved. 25
General Notes on Using WebDAV
File Locking
WebDAV supports file locking. This means that if a user is editing a file in a web folder, that file can be viewed, but not edited, by any other users. Once the file has been saved and closed, other users will be able to edit it again.
Web Folder Functionality
For applications such as Office 2000, the web folder icon will appear in the folder list for these applications. Users can then edit the file directly from one of these applications. For applications that do not use web folders, users can save their files on a local hard drive. Once any edits have been made, the files can be copied or moved back into the applicable web folder.
Naming Conventions
When using WebDAV, file names may contain letters, numerals, periods, and the underscore (_).
Do not use spaces, tabs, line feeds, carriage returns, or any of the following symbols when naming your files:
: ~ [ ] ! @ # $ % ^ & * ( ) + ` { } | \ < > , ? / ; ' "

Strategies for Developing Course Content
Created on 06/08/2004 © 2004 Desire2Learn Inc., all rights reserved. 26
WebDAV and Dreamweaver
Dreamweaver contains a built-in WebDAV client that can be used to manage course files. The instructions below are for Dreamweaver MX. The setup process may differ if you are using a different version of Dreamweaver. Refer to the Dreamweaver online help for assistance.
To use Dreamweaver's WebDAV client in Dreamweaver MX:
1. Start Dreamweaver, open the Site menu and choose New Site….
The Site Definition window displays.
2. Type a Site Name (e.g. the name of your course). NOTE: Select the Basic tab in the top left of the window if the Site Definition window looks different than the example below.
3. Click NEXT.
4. Specify if you want to work with a server technology (e.g ColdFusion, ASP, etc.), click NO or click NEXT.
5. Choose how you want to work with your files during development:
• Edit local copies on my machine, then upload to server when ready (recommended),
• Edit directly on server using local network, or

Strategies for Developing Course Content
Created on 06/08/2004 © 2004 Desire2Learn Inc., all rights reserved. 27
• Edit directly on server using FTP or RDS.
6. Choose where on your computer you want to store the course files (click the yellow folder icon to browse for an existing folder or specify a new folder that will contain D2L course files.) Click NEXT.
7. Choose WebDAV from the How do you connect to your remote server? drop list.
A “SETTINGS…” button displays next to the drop list.
8. Click the SETTINGS button.
The WebDAV Connection window displays.
8. In the WebDAV Connection window, type the URL for your D2L course in the URL: field. The URL should follow the format: http://<domain>/content/<CoursePath>/. <domain> = The domain from which you access the D2L platform. For example, “organization.ucourses.com”. <CoursePath> = The location of the applicable course within the Course folder in D2L. If you are unsure of the course path, you can confirm it by going to the Manage Files area of D2L’s Course Management Console. Simply go to the Homepage of the applicable course and click Content in the navbar, and then Manage Files. Your course path will be displayed near the top of the page beside a yellow file folder icon.
9. Type your D2L username and password. You do not need to enter an email address. Then click OK.
The WebDAV Connection window closes.

Strategies for Developing Course Content
Created on 06/08/2004 © 2004 Desire2Learn Inc., all rights reserved. 28
10. Click NEXT.
11. Check the “Dreamweaver should check it out” option and click NEXT.
12. Click DONE.
The Site Definition window closes, and the information for your new site displays in the Site panel, to the right side of the Dreamweaver screen.
13. In Site panel, click the button to connect to the D2L server.
Your course files are listed in the Site panel.
You can now use Dreamweaver to create, move, copy, delete, and upload html files for your D2L course. Keep in mind that you need to be connected to the Internet in order to access or modify any files within your course folder.
If you are unable to view or modify your course files after completing this setup process, contact your D2L site administrator.
NOTE: You will need to create one WebDAV folder for each D2L course that you are managing. Follow the steps above for each course that you need to access.

Strategies for Developing Course Content
Created on 06/08/2004 © 2004 Desire2Learn Inc., all rights reserved. 29
Troubleshooting WebDAV
Issue Solution
I’m using Windows XP and my username and password aren’t accepted when I try to set up WebDAV.
If the authentication window is titled “WebDAV Authentication” above the User Name field:
1. Ensure that Caps Lock and Num Lock are off, and re-type your username password.
2. If your password is still not accepted, contact your D2L system administrator and confirm that your WebDAV access has been enabled.
If the authentication window does NOT say “WebDAV Authentication” above the User Name field:
1. Click CANCEL.
A new authentication window should display.
2. Type your login information in the new window and click OK.
When I follow the instructions for Windows XP, two windows appear asking for my username and password.
Duplicate authentication windows sometimes appear in Windows XP. If you receive duplicate authentication windows:
1. Check the text that appears above the User Name field. If it does NOT say “WebDAV Authentication,” click CANCEL. Another authentication window displays. If you receive an error message instead, refer to Issue 3.
2. If the authentication window does say “WebDAV Authentication,” type your username and password and click OK.
Sample Correct Authentication Dialog
Strategies for Developing Course Content
Created on 06/08/2004 © 2004 Desire2Learn Inc., all rights reserved. 30
When creating a new WebDAV folder in Windows XP, I get an error that says “The folder you have entered does not appear to be valid. Please choose another.”
This error is caused by a bug in Windows XP, described in Microsoft Knowledge Base Article 269281. There are two options for dealing with this issue:
1. Create your WebDAV folder using the method described in the Alternate Method for WebDAV Setup in Windows 98/2000/ME/XP section of this document. OR
2. When typing the URL for your D2L course in step 5 of the Windows XP instructions, add a number sign (#) to the end of the URL. EXAMPLE: “http://<domain>/Content/<CoursePath>/” would become “http://<domain>/Content/<CoursePath>/#”.
3. If you still receive the error, add a period (.) to the end of the URL, instead of the number sign.
Importing Content from other Learning Platforms
Desire2Learn allows you to import content that was created in other learning software packages. In order to import content, you must have exported it from the software it was created in. The software you are exporting content from should include instructions for creating export files.
Supported file types for importing course content include:
• WebCT export files,
• Blackboard export files,
• SCORM SCO files, and
• Respondus QTI files.
To import course materials:
1. Select the Content link on your course navigation bar.
2. Select from the menu on the right side of the page.
The Import Course Material page displays.

Strategies for Developing Course Content
Created on 06/08/2004 © 2004 Desire2Learn Inc., all rights reserved. 31
3. Click Browse and Open your Blackboard or WebCT course import file.
4. The system will notify you when the upload is complete.
Contact your D2L Site Administrator if you need assistance importing a course from another learning platform.

Strategies for Developing Course Content
Created on 06/08/2004 © 2004 Desire2Learn Inc., all rights reserved. 32
Additional Resources
Visit these sites for tutorials and further information on HTML and the HTML authoring tools mentioned in this document:
• HTML Goodies (a good how-to site for HTML): http://www.htmlgoodies.com
• Creating Web Pages with Microsoft FrontPage: http://www.learningspace.org/tech/FrontPage/
• Using FrontPage 2000 to Create Accessible Content: http://www.webaim.org/techniques/frontpage/
• How to Make Accessible Web Content Using Dreamweaver 3.0 and 4.0: http://www.webaim.org/techniques/dreamweaver/
• Dreamweaver MX Tutorial: http://www.macromedia.com/support/dreamweaver/documentation/dwmx_tutorials.html
Appendix A: Using Macromedia Dreamweaver
Macromedia Dreamweaver includes a number of tutorials that will guide you through the basics of creating and editing web pages if you are unfamiliar with the program. To access these tutorials, click Help/Tutorials.
The Dreamweaver work area accommodates different styles of working and levels of expertise. It has many different palettes (toolbars) for you to use:
• The Insert bar contains buttons for inserting various types of “objects,” such as images, tables, and layers, into a document. Each object is a piece of HTML code that allows you to set various attributes as you insert it.
• The Document toolbar contains buttons and pop-up menus that provide different views of the Document window (such as Design view and Code view), various viewing options, and some common operations such as previewing in a browser.
• The Document window displays the current document as you create and edit it.
• The Property inspector lets you view and change a variety of properties for the selected object or text. Each kind of object has different properties.
• Panel groups are sets of related panels docked together under one heading. To expand a panel group, click the expander arrow at the left of the group’s name.

Strategies for Developing Course Content
Created on 06/08/2004 © 2004 Desire2Learn Inc., all rights reserved. 33
Working with Text
Adding and Formatting Text
Add text to your pages by typing or pasting text directly into the Document area. To add text to your document:
• type text directly into the Document window, or
• copy and paste text from another application.
Checking Spelling
To use the spell-check tool, open the Text menu and choose Check spelling.
Changing Font Characteristics
The Property inspector or the Text menu will allow you to make changes to your font.
To change font characteristics:
1. Select the text. If no text is selected, the change applies to any subsequent text that you type.
2. Choose from the following options:
• To change the font, choose a font or font combination from the Property inspector or from the Text/Font submenu.
• To change the color of text, choose a colour from the palette of browser-safe colours by clicking the colour box in the Property inspector.
• To change the font style, click Bold or Italic in the Property inspector, or choose a font style (Bold, Italic, Underline, and so on) from the Text/Style submenu.
• To change the font size, choose a size (1 through 7 or +,-) from the Property inspector or from the Text/Size submenu.
• To increase or decrease the size of selected text, choose a relative size (+ or -1 to + or -7) from the Property inspector or from either the Text/Size Increase or Text/Size Decrease menu.

Strategies for Developing Course Content
Created on 06/08/2004 © 2004 Desire2Learn Inc., all rights reserved. 34
Creating Lists
You can create numbered lists, bulleted lists, and definition lists from existing text or from new text as you type in the Document window.
To create a new list:
1. Place the insertion point on the line where you want to add a list of new items.
2. Click the Bulleted or Numbered List buttons in the Property inspector, or choose Text/List and select from Unordered (bulleted) List, Ordered (numbered) List, or Definition List.
3. Type your list, pressing Enter to begin another bulleted or numbered list item.
Inserting Dates
You can insert the current date and/or time into your Document area. To do so:
1. In the Document window, place the insertion point where you want the date to be inserted.
2. Choose Insert/Date.
3. In the resulting dialog box, select a format for the name of the day of the week, a format for the date, and a format for the time.
4. If you want the inserted date to be updated every time you save the document, check Update Automatically on Save. Otherwise, uncheck this option.
5. Click OK to insert the date.

Strategies for Developing Course Content
Created on 06/08/2004 © 2004 Desire2Learn Inc., all rights reserved. 35
Linking and Navigation
Creating Links
Links can be created from text, images, or other objects. They can be linked to other HTML documents, email addresses, Acrobat files, and the like. Use the Property inspector to link an image, an object, or text to another document, or to link to a particular section of a document. You can create a link by typing in the URL, selecting the file from the folder icon, or using the point-to-file icon.
To create links between documents:
1. Select the text or image you want to use as a link in the Document window.
2. Open the Property inspector and do one of the following:
• Click the folder icon to the right of the Link field to browse to and select a file. Then click SELECT.
• If the file you want to link to is located within the same website as the file you are editing (e.g. another file in the same course), type the path and file name of the applicable document in the Link field.
• If the file you wish to link to is located in a different website, type in the complete URL of the file in the Link field, starting with “http://”.
To link using frames or to make a link open in a new window:
3. In the Properties inspector, select one of the following from the Target menu:
• _blank loads the linked document in a new, unnamed browser window.
• _parent loads the linked document in the parent frameset or window of the frame that contains the link. If the frame containing the link is not nested, then the linked document will load into the full browser window.
• _self loads the linked document in the same frame or window as the link. This is the default setting, so you usually don't have to specify it.
• _top loads the linked document in the full browser window, thereby removing all frames.

Strategies for Developing Course Content
Created on 06/08/2004 © 2004 Desire2Learn Inc., all rights reserved. 36
Working with Images
Inserting an Image
Images can be inserted using the Object palette or the Insert/Image menu. Dreamweaver will ask you to save images within the site structure. Always select YES for this option to ensure Dreamweaver can easily locate your image. To insert an image:
1. To insert an image, you can choose from one of the following options:
• Place the insertion point where you want the image to appear in the Document window, and then choose Insert/Image from the top menu or click the Insert Image button on the Common panel of the Object palette.
• Drag the Insert Image button from the Object palette to the applicable location in the Document window.
• Drag an image from the desktop to the applicable location in the Document window; then skip to step 3.
2. In the dialog box that displays, click Browse (Windows) or Choose (Macintosh) to choose a file, or type the path for the image file. If you are working in an unsaved document, Dreamweaver inserts “file://” before the name of your image. When you save the document anywhere in the site, Dreamweaver automatically converts this text to a document-relative path to the image.
3. Set image properties in the Property inspector.
Image Properties
To view the following properties in the Property inspector, select an image in the Document window.
The Property inspector initially displays the most commonly used properties. Click the expander arrow in the lower right corner to see all properties.
• Name: Lets you name an image so you can refer to it with a scripting language such as JavaScript or VBScript.
• W and H: Setting the width and height of an image reserves space for it on a page as it loads in a browser. Dreamweaver automatically fills these fields with the image's original size. Default and unlabeled values are measured in pixels. You can also specify the following units: pc (picas), pt (points), in (inches), mm (millimeters), and cm (centimeters), and combinations thereof, such as 2in+5mm; Dreamweaver converts the values to pixels in the HTML source code.
NOTE: Altering image proportions in web authoring software distorts the quality of the image when viewed in a browser. To change the size of an image, edit the actual image file using image software such as Adobe Photoshop before inserting the image into an HTML page.

Strategies for Developing Course Content
Created on 06/08/2004 © 2004 Desire2Learn Inc., all rights reserved. 37
• Src: Specifies the source file for the image. Click the folder icon to browse to the source file, or type the path.
• Link: Specifies a hyperlink for the image. Drag the Point-to-File icon ( ) to a file in the Site window, click the folder icon to browse to a document on your site, or type the URL.
• Align: Aligns an image and text on the same line.
• Alt: Specifies alternative text that appears in place of the image for text-only browsers or for browsers that have been set to download images manually. For visually impaired users who use speech synthesizers with text-only browsers, the text is spoken out loud. In some browsers, this text also appears when the pointer is placed over the image.
• V Space and H Space: Add space, in pixels, above, below, and on both sides of the image.
• Target: Specifies the frame or window in which the linked page should load. (This option is not available when there is no link on the image.) The names of all the frames in the current document appear on the list. If the specified frame does not exist when the document is opened in a browser, the linked page loads into a new window that has the name you specified. Once this window exists, other files can be targeted to it. You can also choose from the following reserved target names:
i. _blank: Loads the linked file into a new, unnamed browser window.
ii. _parent: Loads the linked file into the parent frameset or window of the frame that contains the link. If the frame containing the link is not nested, the linked file loads into the full browser window.
iii. _self: Loads the linked file into the same frame or window as the link. This target is implied, so you generally don't need to specify it.
iv. _top: Loads the linked file into the full browser window, thereby removing all frames.
• Low Src: Specifies the image that should load before the main image. Many designers use a 2-bit (black and white) version of the main image because it loads quickly and gives visitors an idea of what they're waiting for, but you can use any image with the same dimensions as the main image.
• Border: Sets the width, in pixels, of the link border around the image. Enter 0 for no border.
• Map Name Field: Enables you to create client-side image maps.
• Refresh: Resets the W and H values to the original size of the image.
• Edit: Launches the image editor you specified in External Editors preferences and opens the selected image. When you save your image file and return to Dreamweaver. Dreamweaver updates the Document window with the edited image.

Strategies for Developing Course Content
Created on 06/08/2004 © 2004 Desire2Learn Inc., all rights reserved. 38
Aligning Elements
The following options appear in the Alignment drop-down menu in the Property inspector, and can be associated with certain elements, such as images and plug-ins. You can also use the alignment buttons (left, right, and center) to place selected elements.
• Browser default: Generally specifies a baseline alignment.
• Baseline and Bottom: Align the text baseline to the bottom of the selected object.
• Absolute bottom: Aligns the absolute bottom of the text, including descenders (such as the letter g) with the bottom of the selected object.
• Top: Aligns the top of the tallest character in the text line with the top of the selected object.
• Text top: Aligns the tallest character in the text line with the top of the selected object.
• Middle: Aligns the text baseline with the middle of the selected object.
• Absolute middle: Aligns the middle of the selected object with the middle of the text.
• Left: Places the selected object on the left margin, wrapping text around it to the right. If left-aligned text precedes the object on the line, it generally forces left-aligned objects to wrap to a new line.
• Right: Places the object on the right margin, wrapping text around the object to the left. If right-aligned text precedes the object on the line, it generally forces right-aligned objects to wrap to a new line.