Embed Size (px)
Citation preview
FOR FACULTY:
What is the GRADE TOOL?
The Grades tool lets you set up a gradebook and record students' scores in D2L.
This page contains information on:
Setup Wizard Categories Creating Grade Items Calculating Midterm Grades Editing Grade Items Deleting Grade Items Recovering Grade Items Extra Credit Entering Grades Previewing Student Grades Setting Final Grade Properties Recalculating the Final Grade
Set up Wizard
The Setup Wizard in the D2L gradebook allows you to choose grade display preferences for
yourself and your students, as well as choose options for calculating final grades. Use the
seven-step Setup Wizard to determine your options before creating grade items and categories.
You can also access these options through Settings in the upper right of most Grades pages:
Grade Settings
1. From the Course Home page, on the Navigation bar, click my tools, then click Grades.
D2L: An introduction to GRADES University of Wisconsin-Parkside
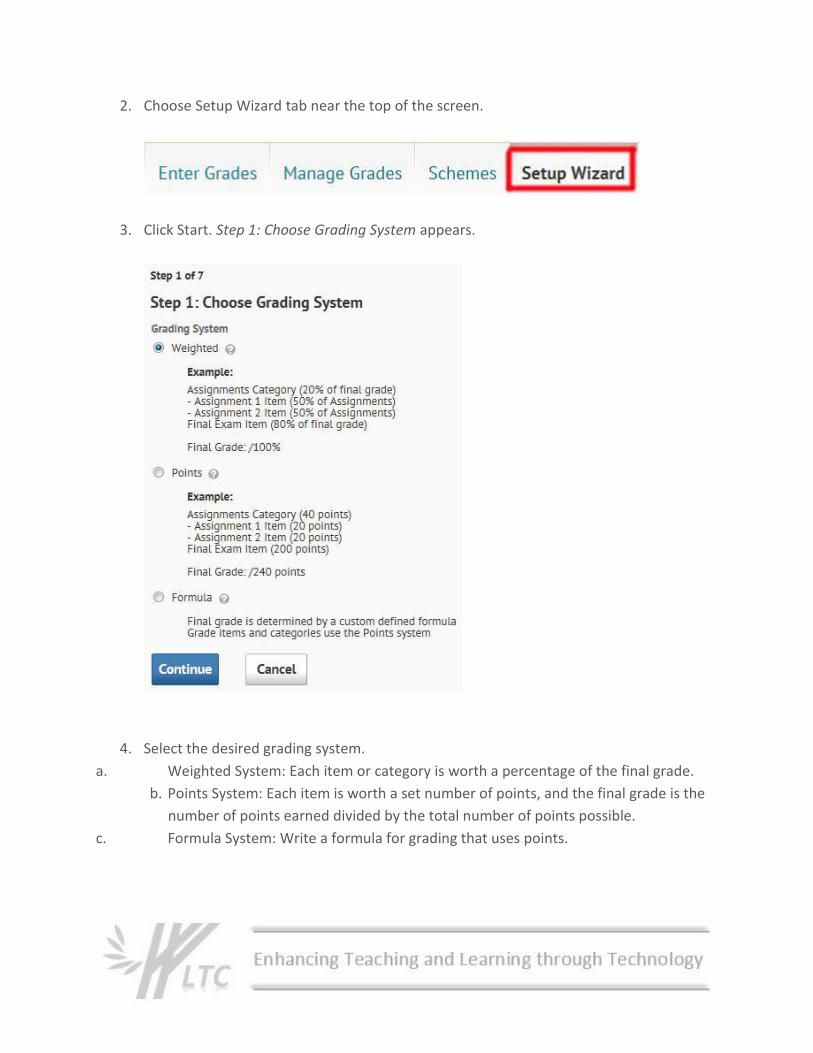
2. Choose Setup Wizard tab near the top of the screen.
3. Click Start. Step 1: Choose Grading System appears.
4. Select the desired grading system.
a. Weighted System: Each item or category is worth a percentage of the final grade.
b. Points System: Each item is worth a set number of points, and the final grade is the
number of points earned divided by the total number of points possible.
c. Formula System: Write a formula for grading that uses points.
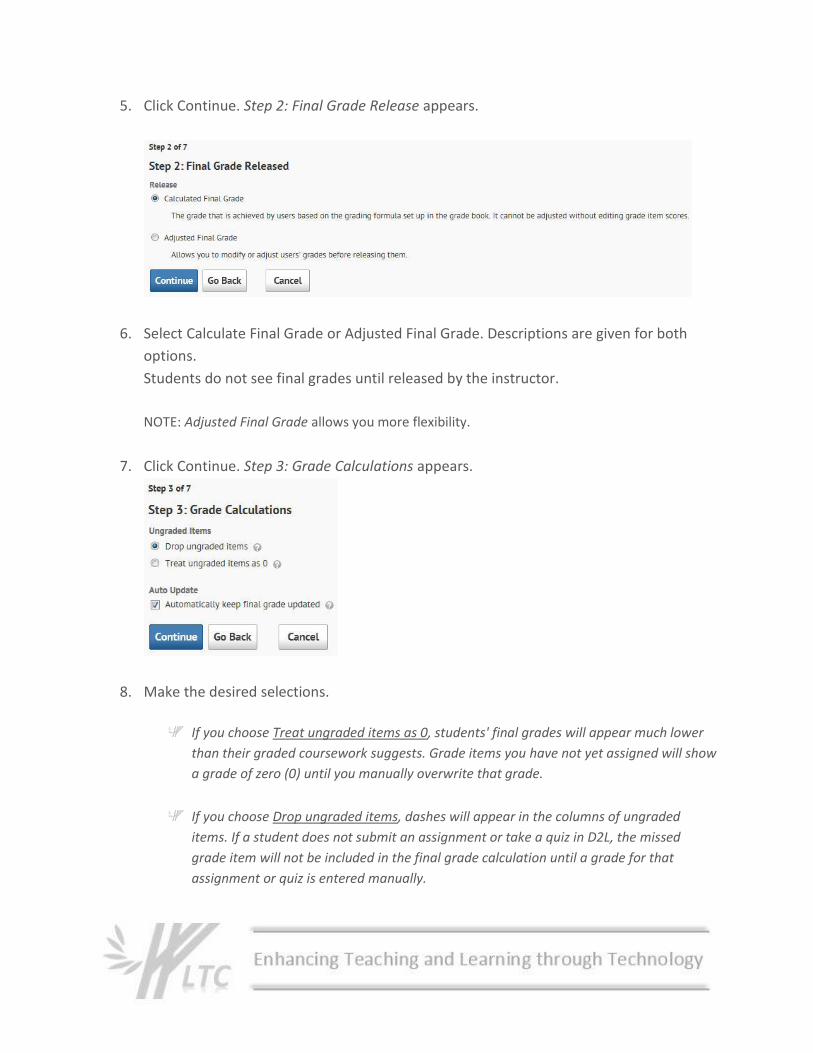
5. Click Continue. Step 2: Final Grade Release appears.
6. Select Calculate Final Grade or Adjusted Final Grade. Descriptions are given for both
options.
Students do not see final grades until released by the instructor.
NOTE: Adjusted Final Grade allows you more flexibility.
7. Click Continue. Step 3: Grade Calculations appears.
8. Make the desired selections.
If you choose Treat ungraded items as 0, students' final grades will appear much lower
than their graded coursework suggests. Grade items you have not yet assigned will show
a grade of zero (0) until you manually overwrite that grade.
If you choose Drop ungraded items, dashes will appear in the columns of ungraded
items. If a student does not submit an assignment or take a quiz in D2L, the missed
grade item will not be included in the final grade calculation until a grade for that
assignment or quiz is entered manually.
If you select automatically keep final grade updated, D2L will keep the final calculated
grade updated in the course gradebook. However, the gradebook may take longer to
load, especially if you have a large class and/or lots of grade items.
9. Click Continue. Step 4: Choose Default Grade Scheme appears.
10. Choose the desired scheme by clicking the radio button next to the desired scheme in
the Default Scheme column. To learn about a scheme, click the icon in the Preview
column.
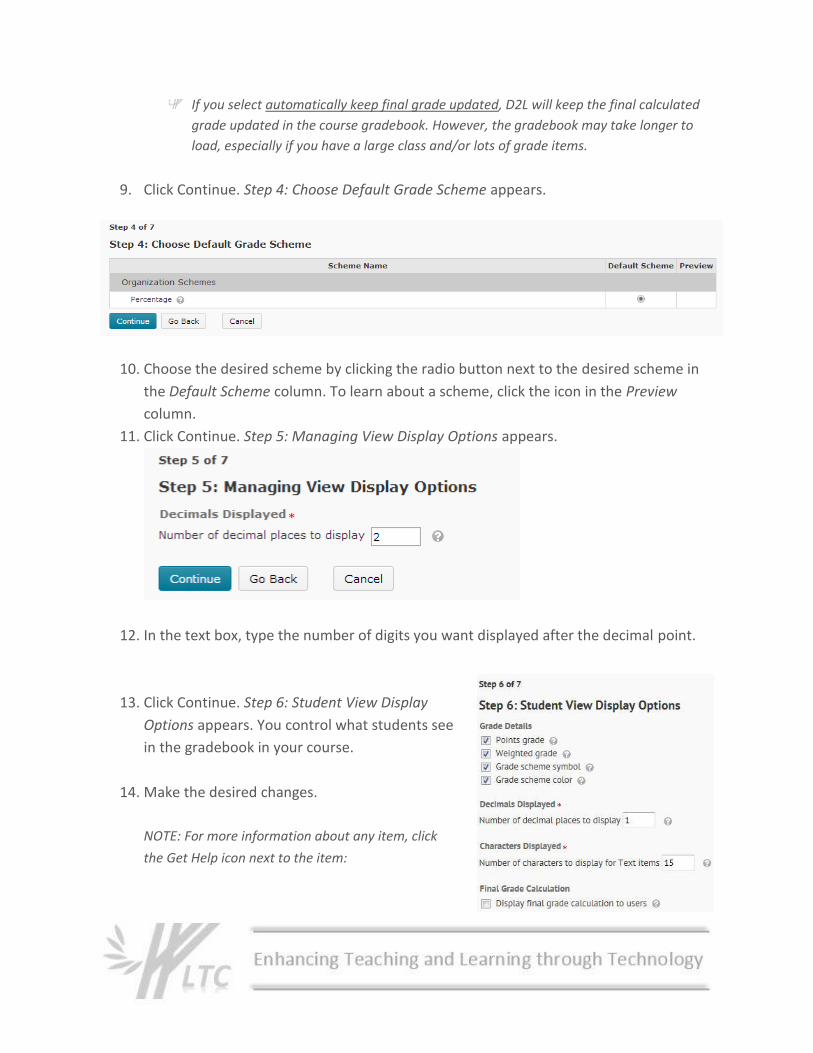
11. Click Continue. Step 5: Managing View Display Options appears.
12. In the text box, type the number of digits you want displayed after the decimal point.
13. Click Continue. Step 6: Student View Display
Options appears. You control what students see
in the gradebook in your course.
14. Make the desired changes.
NOTE: For more information about any item, click
the Get Help icon next to the item:
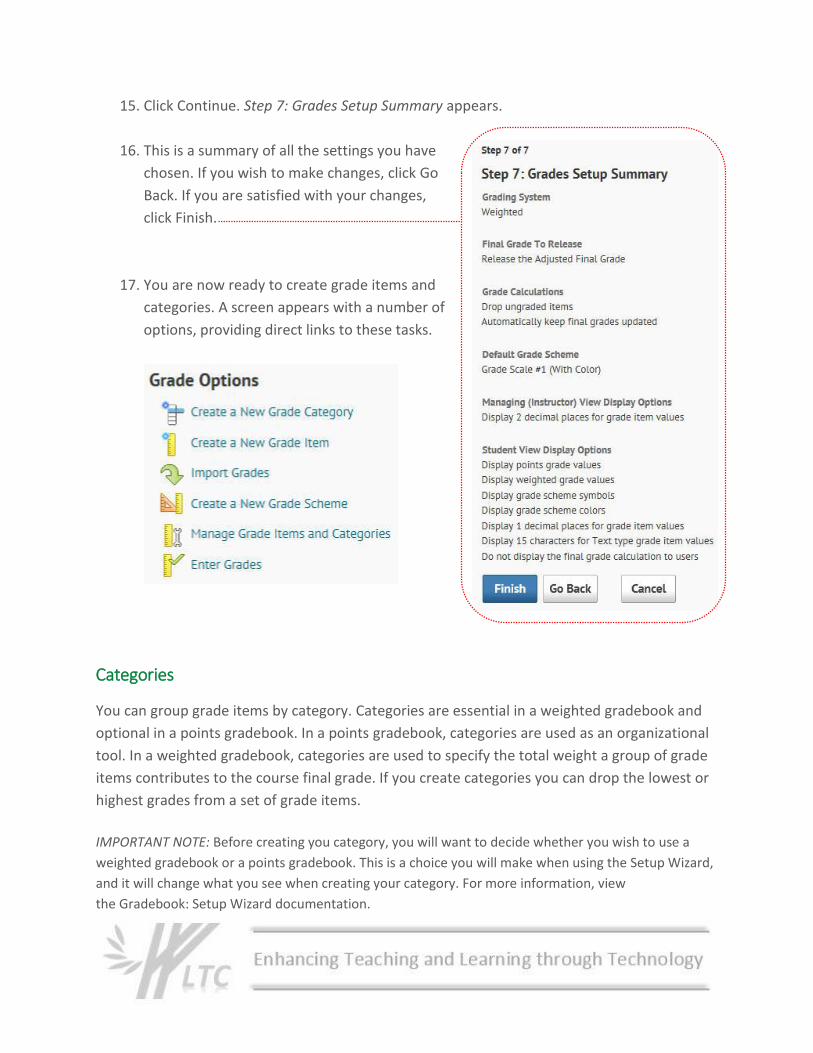
15. Click Continue. Step 7: Grades Setup Summary appears.
16. This is a summary of all the settings you have
chosen. If you wish to make changes, click Go
Back. If you are satisfied with your changes,
click Finish.
17. You are now ready to create grade items and
categories. A screen appears with a number of
options, providing direct links to these tasks.
Categories
You can group grade items by category. Categories are essential in a weighted gradebook and
optional in a points gradebook. In a points gradebook, categories are used as an organizational
tool. In a weighted gradebook, categories are used to specify the total weight a group of grade
items contributes to the course final grade. If you create categories you can drop the lowest or
highest grades from a set of grade items.
IMPORTANT NOTE: Before creating you category, you will want to decide whether you wish to use a
weighted gradebook or a points gradebook. This is a choice you will make when using the Setup Wizard,
and it will change what you see when creating your category. For more information, view
the Gradebook: Setup Wizard documentation.
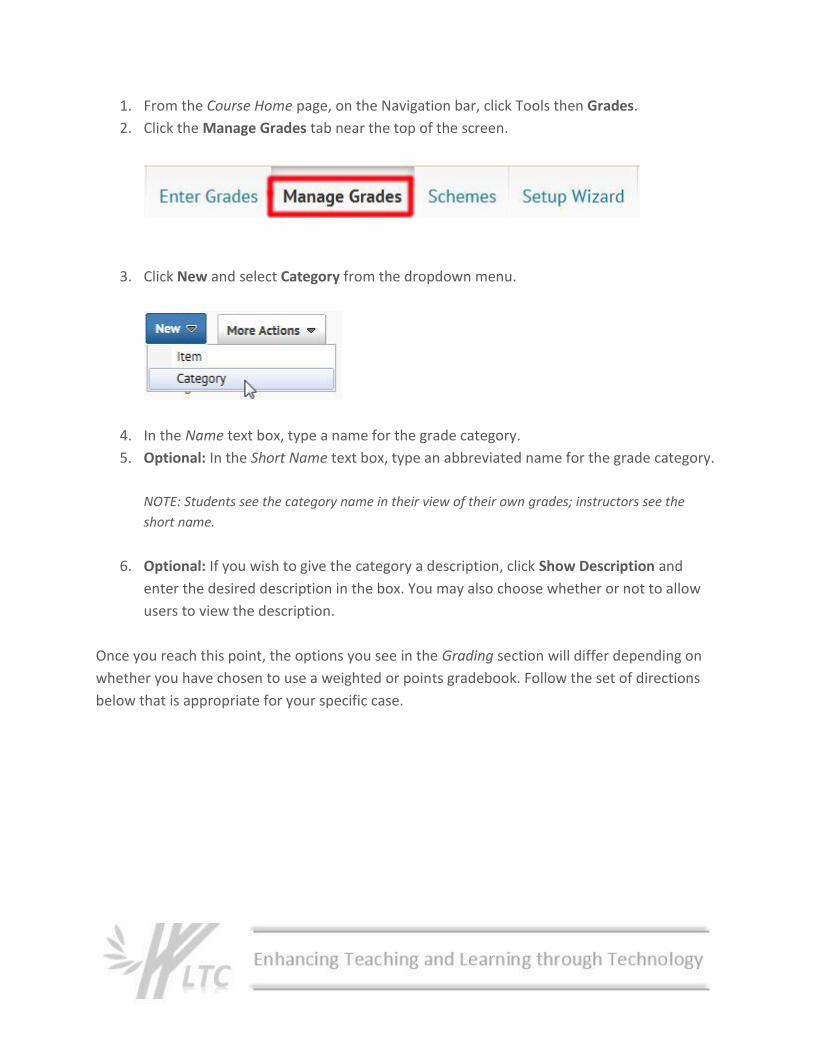
1. From the Course Home page, on the Navigation bar, click Tools then Grades.
2. Click the Manage Grades tab near the top of the screen.
3. Click New and select Category from the dropdown menu.
4. In the Name text box, type a name for the grade category.
5. Optional: In the Short Name text box, type an abbreviated name for the grade category.
NOTE: Students see the category name in their view of their own grades; instructors see the
short name.
6. Optional: If you wish to give the category a description, click Show Description and
enter the desired description in the box. You may also choose whether or not to allow
users to view the description.
Once you reach this point, the options you see in the Grading section will differ depending on
whether you have chosen to use a weighted or points gradebook. Follow the set of directions
below that is appropriate for your specific case.
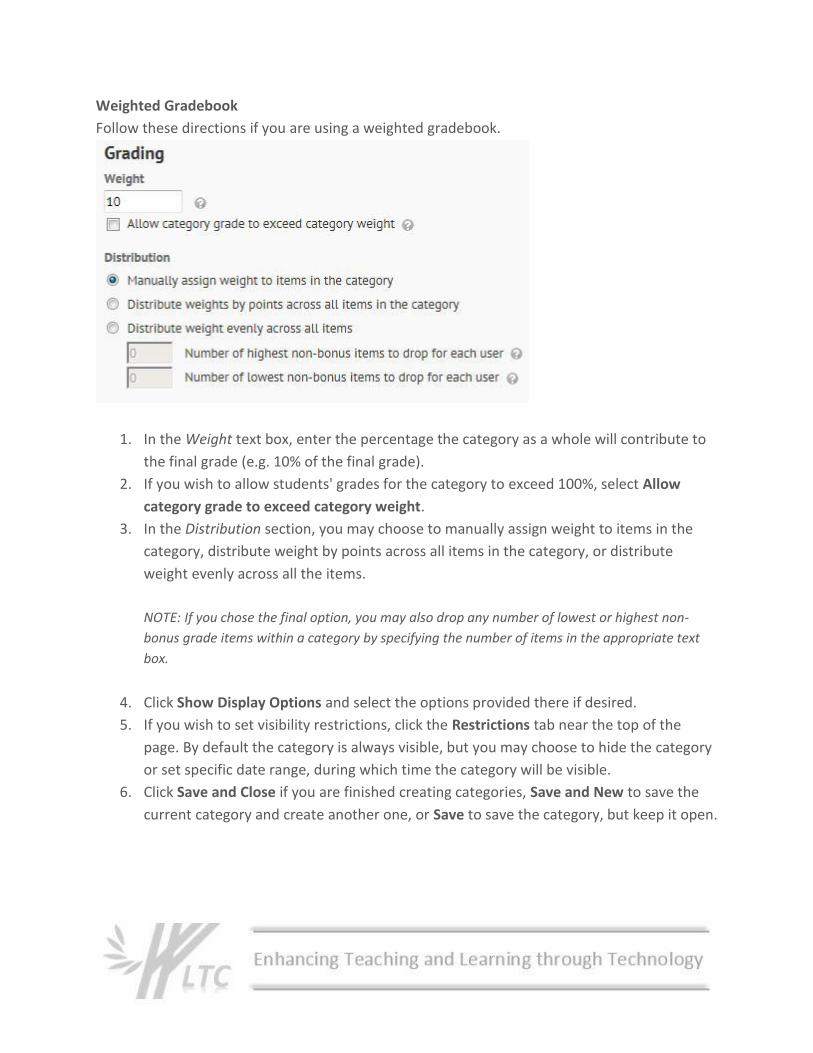
Weighted Gradebook
Follow these directions if you are using a weighted gradebook.
1. In the Weight text box, enter the percentage the category as a whole will contribute to
the final grade (e.g. 10% of the final grade).
2. If you wish to allow students' grades for the category to exceed 100%, select Allow
category grade to exceed category weight.
3. In the Distribution section, you may choose to manually assign weight to items in the
category, distribute weight by points across all items in the category, or distribute
weight evenly across all the items.
NOTE: If you chose the final option, you may also drop any number of lowest or highest non-
bonus grade items within a category by specifying the number of items in the appropriate text
box.
4. Click Show Display Options and select the options provided there if desired.
5. If you wish to set visibility restrictions, click the Restrictions tab near the top of the
page. By default the category is always visible, but you may choose to hide the category
or set specific date range, during which time the category will be visible.
6. Click Save and Close if you are finished creating categories, Save and New to save the
current category and create another one, or Save to save the category, but keep it open.
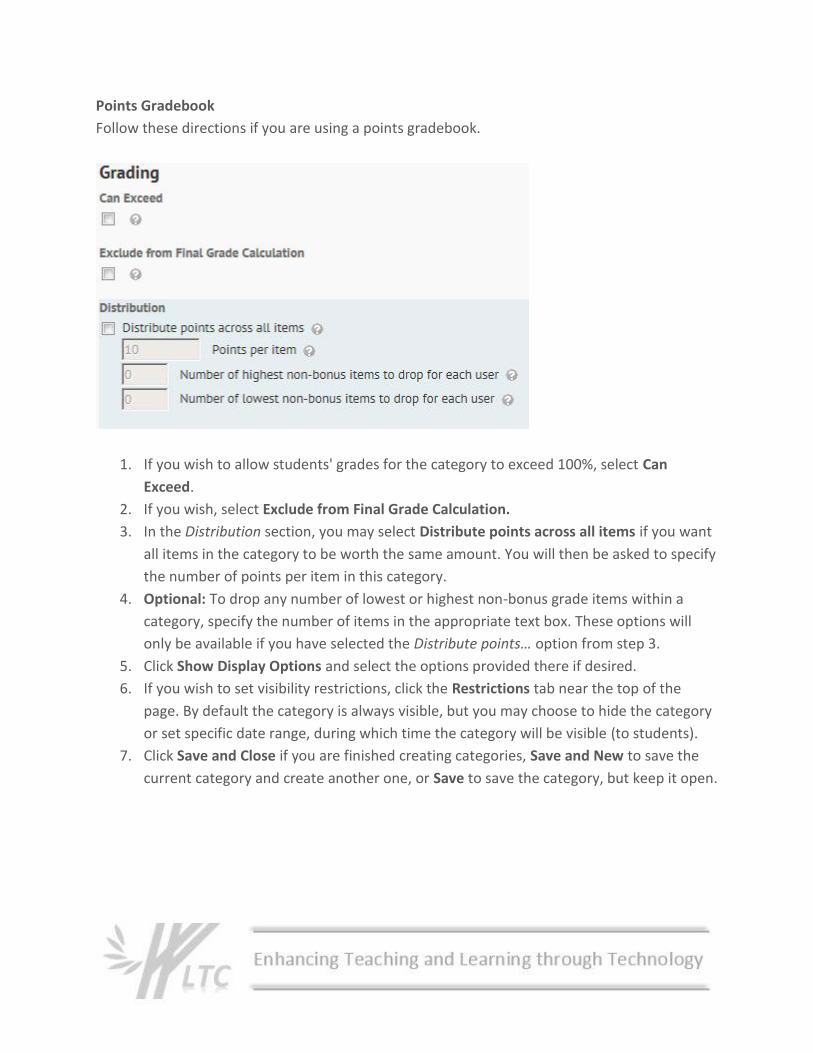
Points Gradebook
Follow these directions if you are using a points gradebook.
1. If you wish to allow students' grades for the category to exceed 100%, select Can
Exceed.
2. If you wish, select Exclude from Final Grade Calculation.
3. In the Distribution section, you may select Distribute points across all items if you want
all items in the category to be worth the same amount. You will then be asked to specify
the number of points per item in this category.
4. Optional: To drop any number of lowest or highest non-bonus grade items within a
category, specify the number of items in the appropriate text box. These options will
only be available if you have selected the Distribute points… option from step 3.
5. Click Show Display Options and select the options provided there if desired.
6. If you wish to set visibility restrictions, click the Restrictions tab near the top of the
page. By default the category is always visible, but you may choose to hide the category
or set specific date range, during which time the category will be visible (to students).
7. Click Save and Close if you are finished creating categories, Save and New to save the
current category and create another one, or Save to save the category, but keep it open.
Creating Grade Items
Grade items are what actually get scored. They might include papers, quizzes, projects, and
other assignments. You can create grade items in the Grades tool, or when creating a linked
quiz, dropbox, or other item.
1. On the Navigation bar, click Grades.
2. Click the Manage Grades tab.
3. Click the New dropdown arrow and select New Item.
4. Choose a grade item type (if unsure, choose Numeric).
5. Name the item; also give the item an abbreviated name in the Short Name field to keep
the columns narrow and reduce left-right scrolling.
Students will see the grade item name; instructors will see the Short Name.
6. Optional: Assign a category, either existing (from the dropdown menu) or create a new
category for this grade item.
7. For a Numeric grade item, enter the Max. Points.
8. Fill out any other applicable fields.
9. Click Save.
Calculating Midterm Grades
In the D2L gradebook, it is possible to create a Calculated grade item that will display to
students their midterm grades.
In Grades, choose Manage Grades:
1. Select New, then Item
2. Choose Calculated toward the bottom of the list of Grade Item Types
3. The New Item screen appears; name the grade item, e.g., Midterm Grade
OPTIONAL: Type in a short name which will display only to you, not to students, e.g., MT Grade,
to keep your gradebook column narrow and reduce left/right scrolling.
4. Scroll down the page and select (check the checkboxes) the grade items from the list to
include in the calculation.
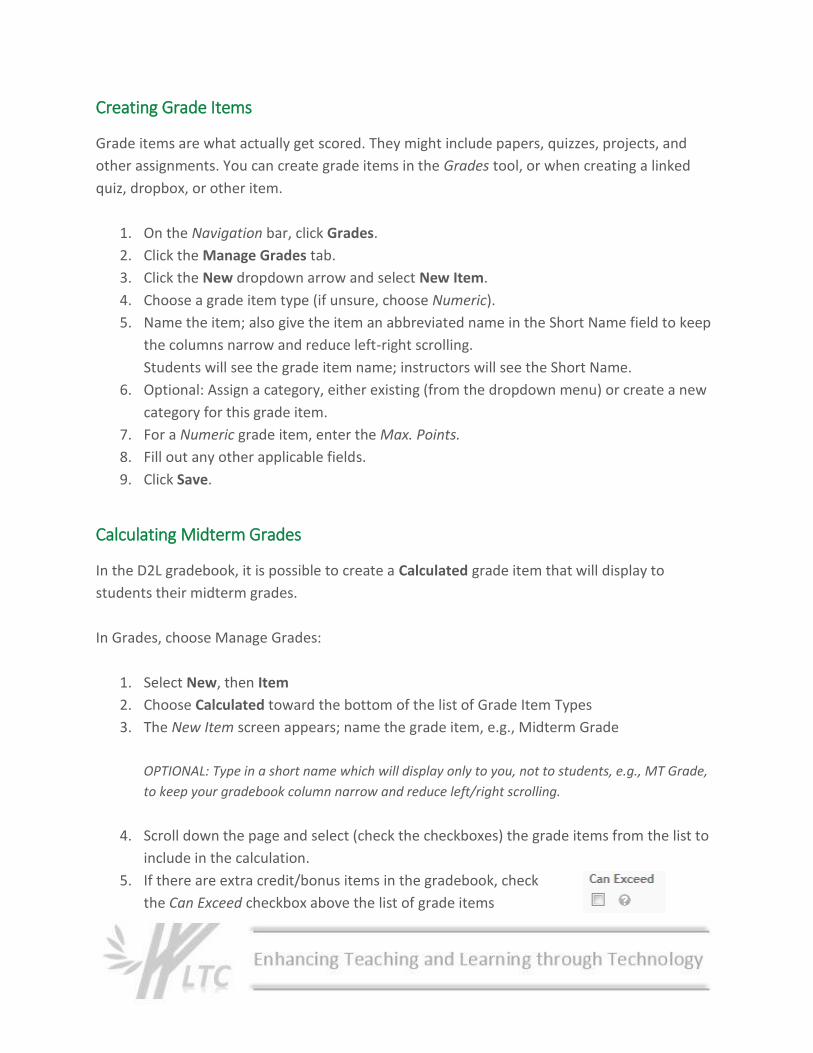
5. If there are extra credit/bonus items in the gradebook, check
the Can Exceed checkbox above the list of grade items

6. Press Save and Close; you are returned to Manage Grades.
7. Move the item to the desired location in the list by pressing More Actions, then
Reorder.
8. Change the order of the grade items by choosing the numbers in the dropdown
menus to the right of each grade item; press Save to retain your changes.
9. Go to the Enter Grades view and verify the results in that view.
Editing Grade Items
1. On the Navigation bar, click Grades.
2. Click the Manage Grades tab.
3. To edit a specific grade item, click the item's name in the list.
4. A page will open that allows you to edit the name, category, max points, etc.
5. When you are finished editing, click one of the Save options at the bottom of the page.
Deleting Grade Items
Deleting Grade Items
1. On the Navigation bar, click Grades.
2. Click the Manage Grades tab.
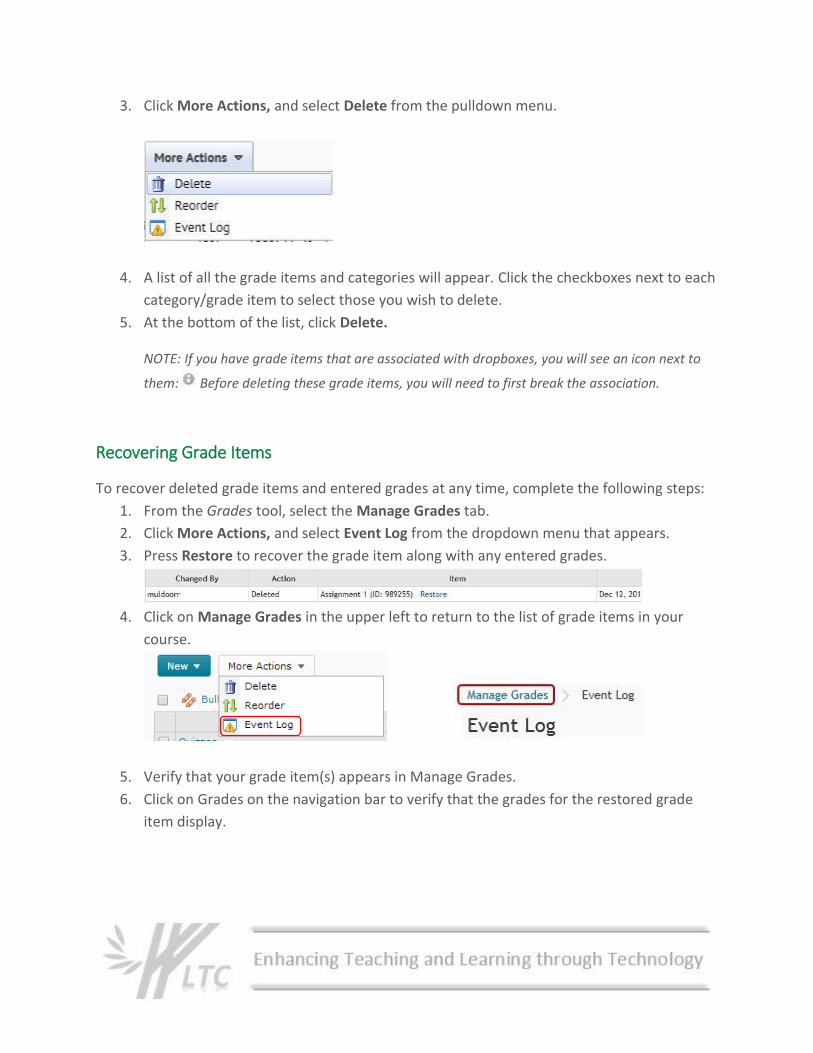
3. Click More Actions, and select Delete from the pulldown menu.
4. A list of all the grade items and categories will appear. Click the checkboxes next to each
category/grade item to select those you wish to delete.
5. At the bottom of the list, click Delete.
NOTE: If you have grade items that are associated with dropboxes, you will see an icon next to
them: Before deleting these grade items, you will need to first break the association.
Recovering Grade Items
To recover deleted grade items and entered grades at any time, complete the following steps:
1. From the Grades tool, select the Manage Grades tab.
2. Click More Actions, and select Event Log from the dropdown menu that appears.
3. Press Restore to recover the grade item along with any entered grades.
4. Click on Manage Grades in the upper left to return to the list of grade items in your
course.
5. Verify that your grade item(s) appears in Manage Grades.
6. Click on Grades on the navigation bar to verify that the grades for the restored grade
item display.
Extra Credit
There are two ways to allow extra credit in the gradebook. Bonus items are entirely extra
credit, and items that 'Can Exceed' might include extra credit questions along with required
ones.
Can Exceed: To create a grade item that includes extra credit, select Can Exceed when creating
the item. For a detailed explanation of how these items work in different gradebooks,
consult the Learning Technology Center.
Bonus: To create a grade item that is entirely extra credit, select Bonus when creating the item.
For a detailed explanation of how bonus items work in different gradebooks, consult the
Learning Technology Center.
Entering Grades
1. On the navigation bar, click Grades and make sure the Enter Grades tab is selected.
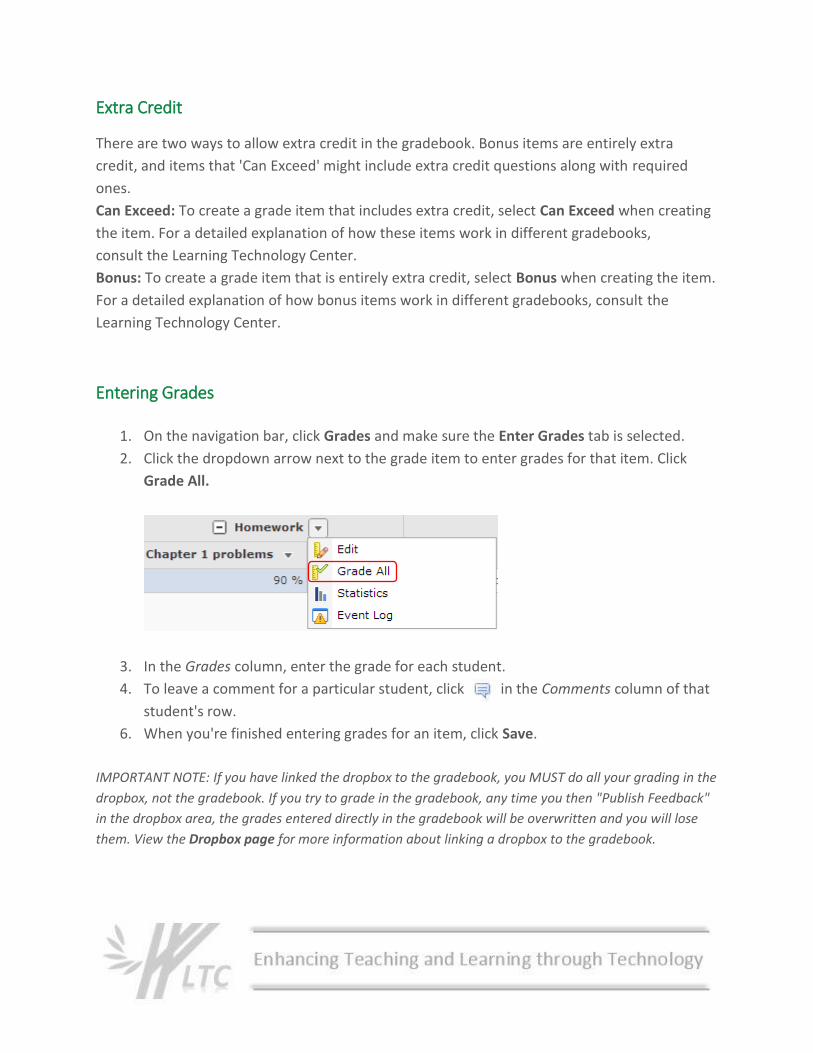
2. Click the dropdown arrow next to the grade item to enter grades for that item. Click
Grade All.
3. In the Grades column, enter the grade for each student.
4. To leave a comment for a particular student, click in the Comments column of that
student's row.
6. When you're finished entering grades for an item, click Save.
IMPORTANT NOTE: If you have linked the dropbox to the gradebook, you MUST do all your grading in the
dropbox, not the gradebook. If you try to grade in the gradebook, any time you then "Publish Feedback"
in the dropbox area, the grades entered directly in the gradebook will be overwritten and you will lose
them. View the Dropbox page for more information about linking a dropbox to the gradebook.
Previewing Student Grades
This feature allows instructors to see exactly what students see when they click on Grades in
the D2L course.
1. Click Tools, then Grades in the navigation bar.
2. Go to the Enter Grades tab.
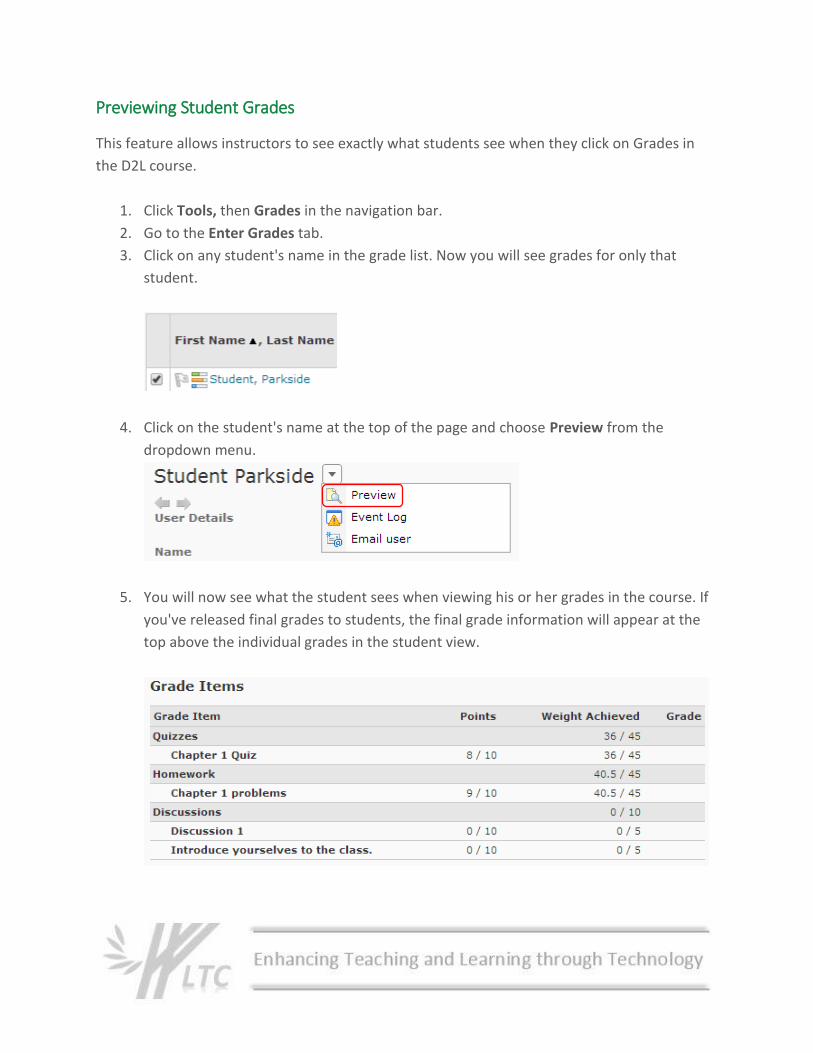
3. Click on any student's name in the grade list. Now you will see grades for only that
student.
4. Click on the student's name at the top of the page and choose Preview from the
dropdown menu.
5. You will now see what the student sees when viewing his or her grades in the course. If
you've released final grades to students, the final grade information will appear at the
top above the individual grades in the student view.
Final Grades
The final grade provides you and your students with the overall grade in a course at a given
point.
This section describes settings for the final grade in your Desire2Learn gradebook. In order for
these recommended settings to work, you should have your Grade Calculations set as described
in Gradebook: Setup Wizard.
Setting Final Grade Properties
Final grade properties determine how the Final Grade item is displayed in the Grades List. The
properties need to be set only once each semester.
1. From the Course Home page, click Tools, then Grades.
2. Click the Manage Grades tab.
The Grades List appears.
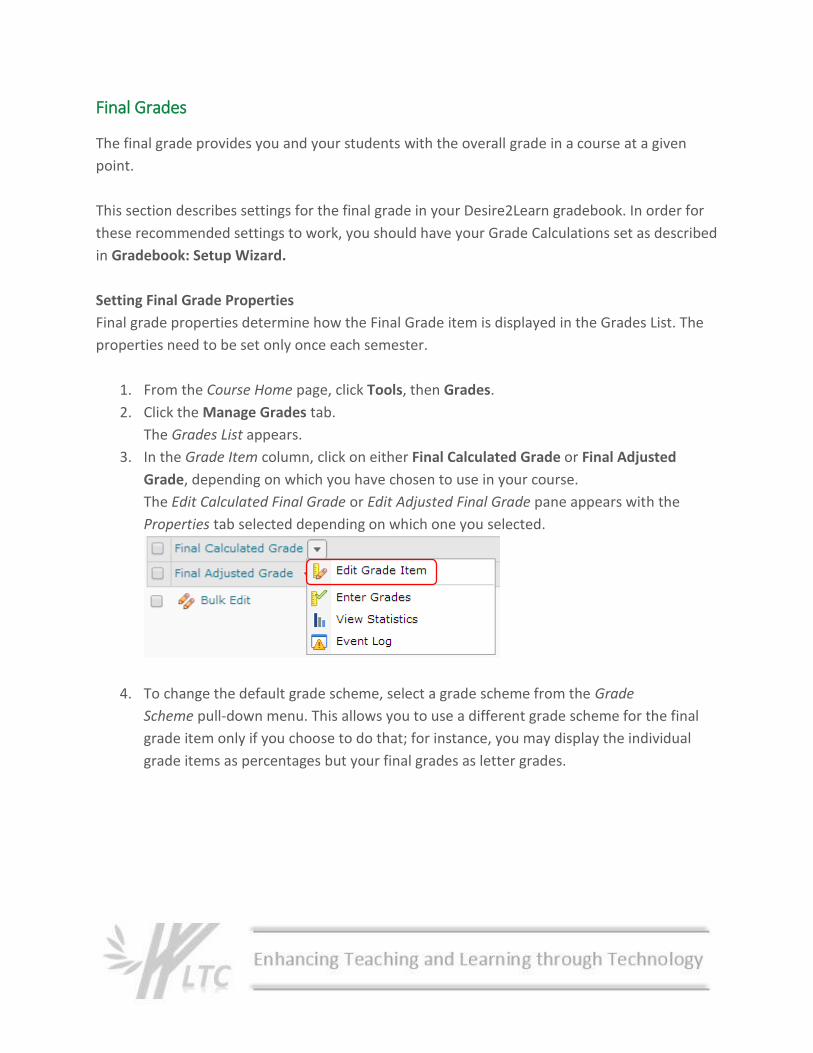
3. In the Grade Item column, click on either Final Calculated Grade or Final Adjusted
Grade, depending on which you have chosen to use in your course.
The Edit Calculated Final Grade or Edit Adjusted Final Grade pane appears with the
Properties tab selected depending on which one you selected.
4. To change the default grade scheme, select a grade scheme from the Grade
Scheme pull-down menu. This allows you to use a different grade scheme for the final
grade item only if you choose to do that; for instance, you may display the individual
grade items as percentages but your final grades as letter grades.
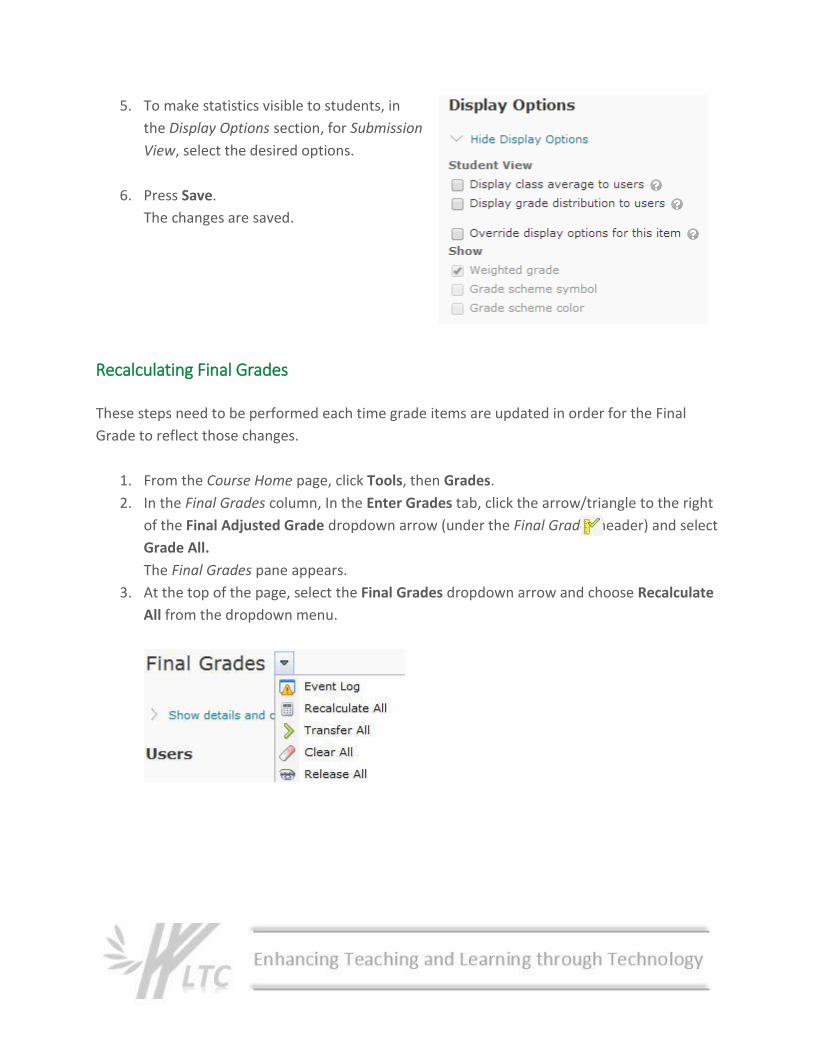
5. To make statistics visible to students, in
the Display Options section, for Submission
View, select the desired options.
6. Press Save.
The changes are saved.
Recalculating Final Grades
These steps need to be performed each time grade items are updated in order for the Final
Grade to reflect those changes.
1. From the Course Home page, click Tools, then Grades.
2. In the Final Grades column, In the Enter Grades tab, click the arrow/triangle to the right
of the Final Adjusted Grade dropdown arrow (under the Final Grades header) and select
Grade All.
The Final Grades pane appears.
3. At the top of the page, select the Final Grades dropdown arrow and choose Recalculate
All from the dropdown menu.
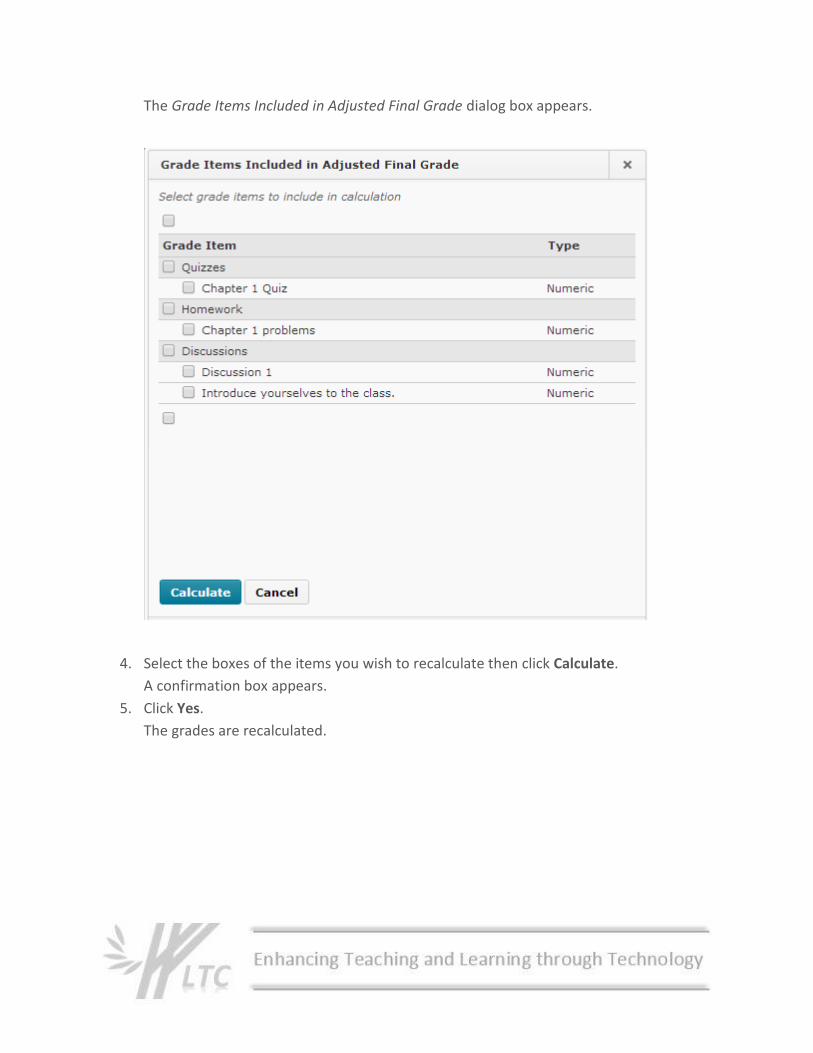
The Grade Items Included in Adjusted Final Grade dialog box appears.
4. Select the boxes of the items you wish to recalculate then click Calculate.
A confirmation box appears.
5. Click Yes.
The grades are recalculated.


![Instructors: Zoom D2L Access | D2L Help Pages · Instructors: Zoom D2L Access | D2L Help Pages 3/13/2020 8:08:16 AM] Policies D2L Login](https://img.pdfslide.us/doc/110x75/5fcef59c08bc6a035a7bbe1a/instructors-zoom-d2l-access-d2l-help-pages-instructors-zoom-d2l-access-d2l.jpg)