Embed Size (px)
Citation preview

STP 31-18E34-SM-TG
SOLDIER’S MANUAL AND TRAINER’S GUIDE
MOS 18E
SPECIAL FORCES COMMUNICATIONS SERGEANT
Skill Levels 3 and 4
APRIL 2003
DISTRIBUTION RESTRICTION: Approved for public release; distribution is unlimited.
HEADQUARTERS DEPARTMENT OF THE ARMY

*STP 31-18E34-SM-TG
i
*SOLDIER TRAINING HEADQUARTERS PUBLICATION DEPARTMENT OF THE ARMY No. 31-18E34-SM-TG Washington, DC, 28 April 2003
SOLDIER'S MANUAL and TRAINER'S GUIDE
MOS 18E
SPECIAL FORCES COMMUNICATIONS SERGEANT
Skill Levels 3 and 4
TABLE OF CONTENTS
PAGE
Table of Contents ...................................................................................................................... i
PREFACE .................................................................................................................................................... iv
Chapter 1. Introduction...........................................................................................................................1-1
Chapter 2. Trainer's Guide .....................................................................................................................2-1 2-1. General...........................................................................................................................2-1 2-2. Subject Area Codes .......................................................................................................2-2 2-3. Duty Position Training Requirements.............................................................................2-2 2-4. Critical Tasks List ...........................................................................................................2-2
Chapter 3. MOS/Skill Level Tasks .........................................................................................................3-1 Skill Level 3
Subject Area 1: Communication Procedures 331-201-5029 Authenticate Message Traffic............................................................................................ 3-1 331-201-5101 Apply Time Zone Indicators............................................................................................... 3-2
Subject Area 2: Communication Security 331-201-5019 Check Transfer and Accounting Documents for Transfer of COMSEC Material............ 3-3 113-573-6001 Recognize Electronic Attack (EA) and Implement Electronic Protection (EP) ................ 3-4
*DISTRIBUTION RESTRICTION: Approved for public release; distribution is unlimited. This publication superseded STP 31-18E34-SM-TG, 20 September 1994.

STP 31-18E34-SM-TG
ii
331-201-5018 Employ Field Cryptography Techniques........................................................................... 3-7 331-201-5021 Employ Speech/Encryption Device KY-99(A) ................................................................ 3-10 113-573-9012 Destroy Classified Material.............................................................................................. 3-15 113-573-0001 Check Signal Security (SIGSEC) Procedures................................................................ 3-18 113-573-9008 Maintain Classified Documents....................................................................................... 3-19
Subject Area 3: Equipment Maintenance 331-201-5037 Use a Multimeter to Perform a Continuity Check and Voltage Check........................... 3-20 331-201-5036 Perform Unit Level Preventive Maintenance Checks and Services on
Communications Equipment ........................................................................................ 3-21 113-580-3069 Perform Unit Level Maintenance (ULM) on a Desktop IBM or Compatible
Microcomputer .............................................................................................................. 3-22 113-580-0051 Troubleshoot a Desktop IBM or Compatible Microcomputer......................................... 3-24
Subject Area 4: Communication Antennas 113-596-1052 Construct Vertical Half-Rhombic Antenna...................................................................... 3-26 331-201-5053 Install Antenna Group OE-452/PRC.............................................................................. 3-29 113-596-1056 Construct a Long-Wire Antenna...................................................................................... 3-30 331-201-5052 Construct a Clandestine Antenna ................................................................................... 3-31 331-201-5017 Construct a 14 Percent Off-Center-Fed Antenna........................................................... 3-39 113-596-1070 Construct a Doublet Antenna.......................................................................................... 3-41 331-201-5054 Construct Sloping-Vee Antenna...................................................................................... 3-42 113-596-1068 Install Antenna Group OE-254/GRC (Team Method) .................................................... 3-44
Subject Area 5: Communication Systems 331-201-5051 Employ Power Supply Assembly OP-177/U .................................................................. 3-45 331-201-5039 Employ the Advanced Data Controller (ADC) ................................................................ 3-47 331-201-5026 Employ INMARSAT Terminal ......................................................................................... 3-49 331-201-5025 Employ STU-III................................................................................................................. 3-52 113-587-2070 Operate SINCGARS Single-Channel (SC)..................................................................... 3-57 113-580-1032 Configure a Desktop IBM or Compatible Microcomputer for Operation........................ 3-58 113-580-1031 Prepare a Microcomputer System for Operation (Pentium Architecture)...................... 3-60 113-484-5001 Operate a Computer System .......................................................................................... 3-63 331-201-5061 Employ Radio Set AN/PRC-137 ..................................................................................... 3-65 113-587-1064 Prepare SINCGARS (Manpack) for Operation............................................................... 3-68 331-201-5751 Employ Radio Set AN/PSC-5.......................................................................................... 3-69 331-201-5086 Employ Radio Set AN/PRC-104B................................................................................... 3-75 331-201-5083 Employ Radio Set AN/PRC-113 ..................................................................................... 3-76 331-201-5072 Employ the Multiband Inter/Intra Team Radio (MBITR)................................................. 3-79 331-201-5068 Operate On-Line Text Encryption Terminal, KL-43(C)................................................... 3-80 331-201-5067 Employ Multiband Multimission Radio Set AN/PSC-5D, (MBMMR) ............................. 3-84
Subject Area 6: Communication Operations 331-201-5078 Determine Basic Electricity Requirements...................................................................... 3-87 331-201-5058 Provide Communications Support Using High Frequency or Very High
Frequency Antenna Systems ....................................................................................... 3-89 331-201-5044 Sterilize A Transmission Site........................................................................................... 3-90 331-201-5043 Select A Transmission Site ............................................................................................. 3-91 113-611-6004 Plan a Single-Channel Tactical Satellite Communications Network ............................. 3-93 113-611-6002 Plan FM Voice and Data Communications Net.............................................................. 3-95 113-611-5014 Prepare the Signal Annex to the Operations Order (OPORD) ...................................... 3-97 113-611-5013 Identify Manpower and Materiel Requirements to Accomplish Mission........................ 3-99

*STP 31-18E34-SM-TG
iii
113-623-4001 Check Preventive Unit-Level Maintenance of Communications Equipment............... 3-100 113-611-4010 Plan HF Radio Net......................................................................................................... 3-101 113-573-8006 Use an Automated Signal Operation Instruction (SOI) ................................................ 3-103 113-573-5002 Check Implementation of Electronic Counter-Countermeasures Procedures ............ 3-110 113-572-7026 Check Processing of Service Messages ..................................................................... 3-112 113-571-7004 Check Voice Radio Net Procedures ............................................................................. 3-114
Skill Level 4 Subject Area 6: Communication Operations
331-201-5048 Supervise Signal Augmentation.................................................................................... 3-115 331-201-5046 Coordinate Signal Activities With Other Units .............................................................. 3-116 331-201-5045 Establish a Forward Operational Base Signal Center.................................................. 3-117 331-201-5042 Prepare a Joint Communications Plan ......................................................................... 3-119
APPENDIX................................................................................................................................................ A-1
Glossary...................................................................................................................................... Glossary-1
Supporting References.......................................................................................................... References-1
Questionnaire ....................................................................................................................Questionnaire -1

STP 31-18E34-SM-TG
iv
PREFACE
This soldier's training publication (STP) is for skill levels (SLs) 3 and 4 soldiers holding military occupational specialty (MOS) 18E in career management field (CMF) 18, their trainers, and first-line supervisors. It contains standardized training objectives (in the form of task summaries) that can be used to train and evaluate soldiers on critical tasks that support unit missions during wartime and peacetime operations. Noncommissioned officers (NCOs) holding MOS 18E, SLs 3 and 4, should have access to this STP. Trainers and first-line supervisors must ensure it is available in the soldiers' work area, unit learning center, and unit libraries. However, there is no requirement for each soldier to be provided an individual copy. Commanders will ensure this STP is readily available to all soldiers. All tasks in this STP are applicable to both the Active Army and Reserve Component (RC) soldiers. However, due to differences in tables of organization and equipment (TOEs) and missions, some tasks may not apply to all Special Forces (SF) units. The users of this STP are encouraged to recommend changes and submit comments for its improvement. They should key comments to specific page, paragraph, and line of the text in which the change is recommended. They should provide reasons for each comment to ensure understanding and complete evaluation. They should prepare comments on Department of the Army (DA) Form 2028 and forward them to Commander, United States Army John F. Kennedy Special Warfare Center and School (USAJFKSWCS), ATTN: AOJK DT-SFI, Fort Bragg, North Carolina 28310-5000. Unless this STP states otherwise, masculine nouns and pronouns do not refer exclusively to men.

STP 31-18E34-SM-TG
1 - 1
CHAPTER 1
Introduction 1-1. GENERAL. a. This soldier's manual (SM) identifies the individual MOS training requirement for soldiers in MOS 18E. Commanders, trainers, and soldiers should use it to plan, conduct, and evaluate individual training in units. This manual is the primary MOS reference to support the self-development and training of the soldier. b. Commanders, trainers, and soldiers use this manual with the soldier's manuals of common tasks (SMCTs) (STPs 21-1-SMCT and 21-24-SMCT), Army Training and Evaluation Programs (ARTEPs), and Field Manual (FM) 25-101, Battle Focused Training, to establish effective training plans and programs that integrate soldier, leader, and collective tasks. c. The Army's mission is to mobilize and deploy units trained to accomplish wartime missions. Successful mission accomplishment requires emphasis on individual training. Individual training must focus on performance under the conditions and to the standards expected in wartime. This STP, in conjunction with STP 31-18-SM-TG, identifies the individual MOS training requirements for soldiers in MOS 18E, SLs 3 and 4. It is designed to be used by commanders, trainers, and soldiers to plan, conduct, and evaluate individual training in units. d. Task summaries outline the wartime performance requirements of each critical task in the SM. They give the soldier and the trainer the information necessary to prepare, conduct, and evaluate critical task training. As a minimum, task summaries include information the soldier must know and the skills he must perform to standard for each task. These summaries are, in effect, standardized training objectives that ensure soldiers do not have to relearn a task upon assignment to a new unit. e. This manual contains repetitive feedback statements in all its task summaries that read as follows: Score the soldier GO if all steps are passed. Score the soldier NO-GO if any step is failed. If the soldier fails any step, show what was done wrong and how to do it correctly. f. Critical tasks are those that are essential for successful individual skill performance for survival in battle and that require training. The critical tasks for MOS 18E are in Chapter 3 of this manual. g. Additionally, some task summaries include safety statements and notes. Safety statements (danger, warning, and caution) alert users to the possibility of immediate death, personal injury, or damage to equipment. Notes are short, extra supportive explanations relevant to the performance measures. 1-2. SOLDIER'S RESPONSIBILITIES. Each soldier is responsible for performing individual tasks that the first-line supervisor identifies based on the unit's mission-essential task list (METL). The soldier must perform the task to the standards listed in the SM. If a soldier has a question about performing a task, or which task in this manual he must perform, he must ask the first-line supervisor for clarification. The first-line supervisor knows how to perform each task or can direct the soldier to the appropriate training materials. 1-3. NCO SELF-DEVELOPMENT AND THE SOLDIER'S MANUAL. a. Self-development is one of the key components of the leader development program. It is a planned progressive and sequential program followed by leaders to enhance and sustain their military competencies. It consists of individual study, research, professional reading, practice, and self-assessment. Under the self-development concept, the NCO, as an Army professional, is responsible for

STP 31-18E34-SM-TG
1 - 2
remaining current in all phases of the MOS. The SM is the NCO's primary source in maintaining MOS proficiency. b. Another important resource for NCO self-development is the Army Correspondence Course Program (ACCP). For information on enrolling in this program and for a list of courses, refer to DA Pamphlet (Pam) 350-59, Army Correspondence Course Program Catalog, or log on to the Army Correspondence Course Program at http://www.atsc.army.mil/accp/AIPD.htm. c. Unit learning centers are valuable resources for planning self-development programs. They can help access enlisted career maps, training support products, and extension training materials. 1-4. TRAINING SUPPORT. This manual includes the following appendix and additional training support information: a. Appendix. Sample DA Form 5164-R (Hands-On Evaluation) Instructions to the Trainer. The appendix contains a sample DA Form 5164-R that the trainer uses to keep a record of the performance measures. It also provides instructions to the trainer on how to complete the form. b. Glossary. The glossary is a single comprehensive list of acronyms, abbreviations, and definitions. c. References. The references section contains two parts--required and related. Required references are necessary for the soldier to do the task. These references are listed in the conditions statement and at the end of the task summary. Related references are materials that provide more detailed information and a more thorough explanation of task performance. All references are listed at the end of the task summary.

STP 31-18E34-SM-TG
2 - 1
CHAPTER 2
Trainer's Guide 2-1. General. The MOS Training Plan (MTP) identifies the essential components of a unit training plan for individual training. Units have different training needs and requirements based on differences in environment, location, equipment, dispersion, and similar factors. Therefore, the MTP should be used as a guide for conducting unit training and not a rigid standard. The MTP consists of two parts. Each part is designed to assist the commander in preparing a unit training plan which satisfies integration, cross training, training up, and sustainment training requirements for soldiers in this MOS. Part One of the MTP shows the relationship of an MOS skill level between duty position and critical tasks. These critical tasks are grouped by task commonality into subject areas. Section I lists subject area numbers and titles used throughout the MTP. These subject areas are used to define the training requirements for each duty position within an MOS. Section II identifies the total training requirement for each duty position within an MOS and provides a recommendation for cross training and train-up/merger training.
• Duty Position column. This column lists the duty positions of the MOS, by skill level, which have different training requirements.
• Subject Area column. This column lists, by numerical key (see Section I), the subject areas a soldier must be proficient in to perform in that duty position.
• Cross Train column. This column lists the recommended duty position for which soldiers should be cross trained.
• Train-up/Merger column. This column lists the corresponding duty position for the next higher skill level or MOSC the soldier will merge into on promotion.
Part Two lists, by general subject areas, the critical tasks to be trained in an MOS and the type of training required (resident, integration, or sustainment).
• Subject Area column. This column lists the subject area number and title in the same order as Section I, Part One of the MTP.
• Task Number column. This column lists the task numbers for all tasks included in the subject area.
• Title column. This column lists the task title for each task in the subject area.
• Training Location column. This column identifies the training location where the task is first trained to soldier training publications standards. If the task is first trained to standard in the unit, the word “Unit” will be in this column. If the task is first trained to standard in the training base, it will identify, by brevity code (ANCOC, BNCOC, etc.), the resident course where the task was taught. Figure 2-1 contains a list of training locations and their corresponding brevity codes.
ANCOC Advanced NCO Course AIT Advanced Individual Training UNIT Trained in the Unit OSUT One Station Unit Training PLDC Primary Leadership Development Course SFQC SPECIAL FORCES QUALIFICATION COURSE OBC Officer Basic Course
Figure 2-1. Training Locations

STP 31-18E34-SM-TG
2 - 2
• Sustainment Training Frequency column. This column indicates the recommended frequency at which the tasks should be trained to ensure soldiers maintain task proficiency. Figure 2-2 identifies the frequency codes used in this column.
BA - Biannually AN - Annually SA - Semiannually QT - Quarterly MO - Monthly BW - Bi-weekly WK - Weekly
Figure 2-2. Sustainment Training Frequency Codes • Sustainment Training Skill Level column. This column lists the skill levels of the MOS for which
soldiers must receive sustainment training to ensure they maintain proficiency to soldier’s manual standards.
2-2. Subject Area Codes.
Skill Level 3 1 Communication Procedures 2 Communication Security 3 Equipment Maintenance 4 Communication Antennas 5 Communication Systems 6 Communication Operations
Skill Level 4 6 Communication Operations
2-3. Duty Position Training Requirements. 2-4. Critical Tasks List.
MOS TRAINING PLAN 18E34
CRITICAL TASKS
Subject Area
Task Number Title Training Location
Sust Tng Freq
Sust Tng SL
Skill Level 3
1. Communication Procedures
331-201-5029 Authenticate Message Traffic SFQC QT 3
331-201-5101 Apply Time Zone Indicators SFQC SA 3

STP 31-18E34-SM-TG
2 - 3
CRITICAL TASKS
Subject Area
Task Number Title Training Location
Sust Tng Freq
Sust Tng SL
2. Communication Security
113-573-0001 Check Signal Security (SIGSEC) Procedures
113-573-6001 Recognize Electronic Attack (EA) and Implement Electronic Protection (EP)
113-573-9008 Maintain Classified Documents
113-573-9012 Destroy Classified Material
331-201-5018 Employ Field Cryptography Techniques SFQC QT 3
331-201-5019 Check Transfer and Accounting Documents for Transfer of COMSEC Material
SFQC SA 3
331-201-5021 Employ Speech/Encryption Device KY-99(A) SFQC SA 3
3. Equipment Maintenance
113-580-0051 Troubleshoot a Desktop IBM or Compatible Microcomputer
113-580-3069 Perform Unit Level Maintenance (ULM) on a Desktop IBM or Compatible Microcomputer
331-201-5036 Perform Unit Level Preventive Maintenance Checks and Services on Communications Equipment
SFQC SA 3
331-201-5037 Use a Multimeter to Perform a Continuity Check and Voltage Check
SFQC SA 3
4. Communication Antennas
113-596-1052 Construct Vertical Half-Rhombic Antenna
113-596-1056 Construct a Long-Wire Antenna
113-596-1068 Install Antenna Group OE-254/GRC (Team Method)
113-596-1070 Construct a Doublet Antenna
331-201-5017 Construct a 14 Percent Off-Center-Fed Antenna SFQC SA 3
331-201-5052 Construct a Clandestine Antenna SFQC SA 3
331-201-5053 Install Antenna Group OE-452/PRC SFQC SA 3
331-201-5054 Construct Sloping-Vee Antenna SFQC SA 3
5. Communication Systems
113-484-5001 Operate a Computer System
113-580-1031 Prepare a Microcomputer System for Operation (Pentium Architecture)

STP 31-18E34-SM-TG
2 - 4
CRITICAL TASKS
Subject Area
Task Number Title Training Location
Sust Tng Freq
Sust Tng SL
113-580-1032 Configure a Desktop IBM or Compatible Microcomputer for Operation
113-587-1064 Prepare SINCGARS (Manpack) for Operation
113-587-2070 Operate SINCGARS Single-Channel (SC)
331-201-5025 Employ STU-III UNIT QT 3
331-201-5026 Employ INMARSAT Terminal UNIT QT 3
331-201-5039 Employ the Advanced Data Controller (ADC) SFQC QT 3
331-201-5051 Employ Power Supply Assembly OP-177/U SFQC QT 3
331-201-5061 Employ Radio Set AN/PRC-137 SFQC SA 3
331-201-5067 Employ Multiband Multimission Radio Set AN/PSC-5D, (MBMMR)
UNIT QT 3
331-201-5068 Operate On-Line Text Encryption Terminal, KL-43(C)
SFQC QT 3
331-201-5072 Employ the Multiband Inter/Intra Team Radio (MBITR)
ANCOC QT 3
331-201-5083 Employ Radio Set AN/PRC-113 SFQC QT 3
331-201-5086 Employ Radio Set AN/PRC-104B SFQC QT 3
331-201-5751 Employ Radio Set AN/PSC-5 SFQC QT 3
6. Communication Operations
113-571-7004 Check Voice Radio Net Procedures
113-572-7026 Check Processing of Service Messages
113-573-5002 Check Implementation of Electronic Counter-Countermeasures Procedures
113-573-8006 Use an Automated Signal Operation Instruction (SOI)
113-611-4010 Plan HF Radio Net
113-611-5013 Identify Manpower and Materiel Requirements to Accomplish Mission
113-611-5014 Prepare the Signal Annex to the Operations Order (OPORD)
113-611-6002 Plan FM Voice and Data Communications Net
113-611-6004 Plan a Single-Channel Tactical Satellite SFQC SA 3

STP 31-18E34-SM-TG
2 - 5
CRITICAL TASKS
Subject Area
Task Number Title Training Location
Sust Tng Freq
Sust Tng SL
Communications Network
113-623-4001 Check Preventive Unit-Level Maintenance of Communications Equipment
331-201-5043 Select A Transmission Site SFQC SA 3
331-201-5044 Sterilize A Transmission Site SFQC SA 3
331-201-5058 Provide Communications Support Using High Frequency or Very High Frequency Antenna Systems
SFQC SA 3
331-201-5078 Determine Basic Electricity Requirements SFQC SA 3
Skill Level 4
331-201-5042 Prepare a Joint Communications Plan ANCOC SA 4
331-201-5045 Establish a Forward Operational Base Signal Center
ANCOC QT 4
331-201-5046 Coordinate Signal Activities With Other Units ANCOC SA 4
331-201-5048 Supervise Signal Augmentation ANCOC QT 4


STP 31-18E34-SM-TG
3 - 1
CHAPTER 3
MOS/Skill Level Tasks
Skill Level 3
Subject Area 1: Communication Procedures
Authenticate Message Traffic 331-201-5029
Conditions: Given a ciphertext message to decode, signal operating instructions, one-time cryptographic pad, and a pencil. Standards: Decode and authenticate message in accordance with communication techniques and procedures. Performance Measures GO NO GO
1. Decode a message using the proper authentication. —— —— Evaluation Guidance: Score the soldier GO if all steps are passed. Score the soldier NO-GO if any step is failed. If the soldier fails any step, show what was done wrong and how to do it correctly. References
Required Related FM 24-18 FM 24-33

STP 31-18E34-SM-TG
3 - 2
Apply Time Zone Indicators 331-201-5101
Conditions: Given FM 24-18, Tactical Single-Channel Radio Communications Techniques; paper; pencil; and six-digit date-time groups (DTGs) with time zone indicator suffix. Standards: Convert the time element of the DTG from one time zone to a different time zone within 2 minutes and without error. Performance Steps
1. Convert time using the Time Conversion Table found in FM 24-18. a. Find the Greenwich Mean Time (GMT) (Z time zone indicator) on the chart. b. Look up the Z column until you find the time element you are converting from. c. Find the time zone indicator for the time zone you are converting to. d. Look up this column until you find the time that is in the same horizontal position as the Z time
you are converting from. This will be the conversion time. EXAMPLE: If you are given a Z time of 212100ZAUG01 and you want to convert this time to G time, the conversion time would be changed to 220400GAUG01.
NOTE: Pay particular attention to the previous day and the next day shaded areas on the charts.
2. Convert time using the Time Zone Chart found in FM 24-18. a. Given the DTG using the local time zone indicator, go across the bottom of the job aid until you
locate the time zone you are changing to. There will be a plus (+) or minus (-) sign and number associated with the time zone indicator. This number will be either added or subtracted, according to its sign, from the GMT.
NOTE: If the hours total more than 24, add 1 day to the date digit. If subtracting, take the hour digits below zero, then subtract 1 from the day's digit. b. Convert from local time to GMT by determining from the time zone indicator the number of
hours to add or subtract, changing the arithmetic sign in the time zone column, and proceeding to add or subtract.
Performance Measures GO NO GO
1. Convert time using the time conversion table, found in FM 24-18, within 2 minutes.
—— ——
2. Convert time using the time zone chart, found in FM 24-18, within 2 minutes. —— —— Evaluation Guidance: Score the soldier GO if all steps are passed. Score the soldier NO-GO if any step is failed. If the soldier fails any step, show what was done wrong and how to do it correctly. References
Required Related FM 24-18 FM 24-1

STP 31-18E34-SM-TG
3 - 3
Subject Area 2: Communication Security
Check Transfer and Accounting Documents for Transfer of COMSEC Material 331-201-5019
Conditions: As a communications noncommissioned officer (NCO) in a field environment, given a list of communications security (COMSEC) items to be transferred and supporting documents (SF 153, DA Form 2011, DA Form 2011-1, DA Form 2653-R, and TB 380-41), ensure completeness and accuracy of the documents for transfer. Standards: Check COMSEC material accounting documents (SF 153, DA Form 2011, DA Form 2011-1, and DA Form 2653-R) for completeness and accuracy within 30 minutes. Evaluation Preparation: Setup: Provide completed SF 153, DA Form 2011, DA Form 2011-1, and DA Form 2653-R. Also provide a list of COMSEC items to be transferred. Brief Soldier: Tell the soldier to check the transfer and accounting documents for accuracy. Performance Measures GO NO GO
1. Verify that the SF 153 has been properly prepared. —— ——
2. Verify that the materials transferred are annotated on DA Form 2011. —— ——
3. Verify that the equipment transfer is annotated on DA Form 2011-1. —— ——
4. Check DA Form 2653-R for deletion of all items transferred. —— ——
5. Verify that the advance copy of SF 153 has been mailed to the Army COMSEC Central Office of Record.
—— ——
6. Verify that the suspense copy of SF 153 has been placed in the suspense file. —— —— Evaluation Guidance: Score the soldier GO if all steps are passed. Score the soldier NO-GO if any step is failed. If the soldier fails any step, show what was done wrong and how to do it correctly. References
Required Related DA FORM 2011 DA FORM 2011-1 DA FORM 2653-R SF 153 TB 380-41

STP 31-18E34-SM-TG
3 - 4
Recognize Electronic Attack (EA) and Implement Electronic Protection (EP) 113-573-6001
Conditions: Given a radio set, applicable operator's technical manual, FM 24-1, FM 24-33, and unit SOI extract. Standards: Standards are met when you have determined that electronic warfare is directed at your station and electronic counter-countermeasures (ECCM) are employed for continued operation. Performance Steps
1. Introduction. A close relationship exists between ECCM and COMSEC. Both defensive arts are based on the same principle. An enemy who does not have access to our essential elements of friendly information (EEFI) is a much less effective foe. The major goal of COMSEC is to ensure that friendly use of the electromagnetic spectrum for communications is by the enemy. The major goal of practicing sound ECCM techniques is to ensure the continued use of the electromagnetic spectrum. ECCM techniques are designed to ensure commanders some degree of confidence in the continued use of these techniques. Our objective must be to ensure that all communications equipment can be employed effectively by tactical commanders in spite of the enemy's concerted efforts to degrade such communications to the enemy's tactical advantage. The modification and the development of equipment to make our communications less susceptible to enemy exploitation are expensive processes. Equipment is being developed and fielded which will provide an answer to some of ECCM problems. Commanders, staff, planners, and operators remain responsible for security and continued operation of all communications equipment.
a. Operators of communications equipment must be taught what jamming and deception can do to communications. They must be made aware that incorrect operating procedures can jeopardize the unit's mission and ultimately increase unit casualties. Preventive and remedial ECCM techniques must be employed instinctively. Maintenance personnel must be made aware that unauthorized or improperly applied modifications may cause equipment to develop peculiar characteristics which can be readily identified by the enemy.
b. ECCM should be preventive in nature. ECCM should be planned and applied to force the enemy to commit more jamming, interception and deception resources to a target than it is worth, or is available. ECCM techniques must also be applied to force the enemy to doubt the effectiveness of the enemy's jamming and deception efforts.
c. Before we can begin to prevent electronic countermeasures (ECM), we must first be certain of what we are trying to prevent.
(1) Jamming is the deliberate radiation, reradiation, or reflection of electromagnetic energy with the object of impairing the use of electronic devices, equipment, or systems. The enemy conducts jamming operations against us to prevent us from effectively employing our radios, radars, navigational aids (NAVAIDS), satellites, and electro-optics. Obvious jamming is normally very simple to detect. The more commonly used jamming signals of this type are described below. Do not try to memorize them; just be aware that these and others exist. When experiencing a jamming incident, it is much more important to recognize it and take action to overcome it than to identify it formally.
( a) Random noise. It is random in amplitude and frequency. It is similar to normal background noise and can be used to degrade all types of signals.
( b) Stepped tones. These are tones transmitted in increasing and decreasing pitch. They resemble the sound of bagpipes.
( c) Spark. The spark is easily produced and is one of the most effective forms of jamming. Bursts are of short duration and high intensity. Sparks are repeated at a rapid rate and are effective in disrupting all types of communications.
( d) Gulls. The gull signal is generated by a quick rise and a slow fall of a variable radio frequency and is similar to the cry of a sea gull.

STP 31-18E34-SM-TG
3 - 5
Performance Steps ( e) Random pulse. In this type of interference, pulses of varying amplitude, duration, and
rate are generated and transmitted. Random pulses are used to disrupt teletypewriter, radar, and all types of data transmission systems.
( f) Wobbler. The wobbler is a single frequency which is modulated by a low and slowly varying tone. The result is a howling sound which causes a nuisance on voice radio communications.
( g) Recorded sounds. Any audible sound, especially of a variable nature, can be used to distract radio operators and disrupt communications. Examples of sounds include: music, screams, applause whistles, machinery noise, and laughter.
( h) Preamble jamming. This type of jamming occurs when the synchronization tone of speech security equipment is broadcast over the operating frequency of secure radio sets. Preamble jamming results in radios being locked in the receive mode. It is especially effective when employed against radio nets using speech security devices.
( i) Subtle jamming. This type of jamming is not obvious at all. With subtle jamming, no sound is heard from our receivers. They cannot receive incoming friendly signals, but everybody appears normal to the radio operator.
(2) Meaconing. This is a system of receiving radio beacon signals from NAVAIDS and rebroadcasting them on the same frequency to confuse navigation. The enemy conducts meaconing operations against us to prevent our ships and aircraft from arriving at their intended targets or destinations.
(3) Intrusion. Intentional insertion of electromagnetic energy into transmission paths with the objective of deceiving equipment operators or causing confusion. The enemy conducts intrusion operations against us by inserting false information into our receiver paths. This false information may consist of voice instructions, ghost targets, coordinates for fire missions, or even rebroadcasting of prerecorded data transmissions.
(4) Interference. Interference is any electrical disturbance which causes undesirable responses in electronic equipment. As a MIJI term, interference refers to the unintentional disruption of the use of radios, radars, NAVAIDS, satellites, and electro-optics. This interference may be of friendly, enemy, or atmospheric origin. For example, a civilian radio broadcast interrupting military communications is interference.
2. Communications Protective Measures. a. Considerations. Properly applied ECCM techniques will deny valuable intelligence sources to
the enemy and eliminate much of the threat that he poses to our combat operations. The following discussion describes practical ways to protect communications systems.
b. The siting of the transmitting antenna is critical in the ECCM process. Before making a decision about a proposed site for either a single-channel or multichannel antenna, there are two basic questions to answer:
(1) Are communications possible from the proposed site? (2) Are there enough natural obstacles between the site and the enemy to mask
transmission? c. The final decision on site selection will often be a tradeoff between the answers to these two
questions. The communications mission must have first priority in determining the actual antenna sites. There are additional actions that must be taken to limit the enemy's chances of interception and location successes. Transmitters and antennas should be located away from the headquarters. The two locations should be separated by more than 1 kilometer (0.62 mile). Erroneous radio frequency direction (RFD) data used in conjunction with observation data may favor the targeting of a decoy site instead of the actual transmitter site. This ploy depends upon good camouflage at the actual site. Transmitters grouped in one area indicate the relative value of the headquarters. Directional antennas reduce radiation exposure to enemy receivers and enhance the intended signal. (For instruction on directional antennas, refer to TC 24-21.)
d. Use the lowest possible transmitter power output. power means less radiated power reaches the enemy and thus increases his difficulty in applying ECM.

STP 31-18E34-SM-TG
3 - 6
Performance Steps e. Use only approved code systems. Never use unauthorized (homemade) codes. Use of non-
NSA generated codes can provide a false COMSEC sense of security that can be exploited by enemy radio intercept operators. Only when absolutely necessary should traffic be passed in the clear.
f. Rather than assuming equipment is defective, assume that it is operational. Operators must not contact other stations for equipment checks simply because no message has been transmitted in a set time frame.
Evaluation Preparation: Setup: A radio set operating in a radio net with interference applied to the system. Brief soldier. Tell the soldier to ensure that he is applying proper tactics to the jamming system. Performance Measures GO NO GO
1. Determine if ECM is being employed. —— —— a. Check for accidental or unintentional interference. (Refer to FM 24-33.) b. Check for intentional interference. (Refer to FM 24-33.)
2. Initiate operator's procedures. (Refer to FM 24-1 and FM 24-33.) —— —— a. Check the equipment ground to ensure that the interference is not caused by
a buildup of static electricity.
b. Disconnect the antenna. c. Identify the type of sound. d. Move the receiver or reorient the antenna, if possible, and listen or look for
variations in the strength of the disturbance.
e. Tune the receiver above or below the normal frequency. If such detuning causes the intensity of the interfering signal to drop sharply, it can be assumed that the interference is the result of spot jamming.
3. Identify jamming signals. (Refer to FM 24-33.) —— ——
4. Employ antijamming measures. (Refer to FM 24-1.) —— —— NOTE: Antijamming measures are designed to allow radio operators to work effectively through intentional interference. Regardless of the nature of the interfering signal, radio operators WILL NOT reveal in the clear the possibility or success of enemy jamming.
Evaluation Guidance: Score the soldier GO if all steps are passed. Score the soldier NO-GO if any step is failed. If the soldier fails any step, show what was done wrong and how to do it correctly. Have the soldier practice until he can correctly perform the task. References
Required Related FM 24-1 FM 24-33 TC 24-21

STP 31-18E34-SM-TG
3 - 7
Employ Field Cryptography Techniques 331-201-5018
Conditions: Given paper, pencil, and selected field cryptography technique, employ required technique. Standards: Employ field cryptography techniques, as required, within 10 minutes and without error. Performance Steps
1. Encrypt and decrypt a message using the single transposition cipher system. a. Encrypt a message. (1) Write a 10-letter memory word phrase across the paper. NOTE: Leave enough space between the letters of the memory word to avoid confusion when writing the plaintext message underneath. (2) Write the message underneath the 10-letter word; place the 11th letter of the message
underneath the first letter of the message and continue writing on a letter-by-letter basis until the message is complete. Put XX at the end of each sentence and at the end of the message. Ensure each letter of the memory word phrase has an equal number of letters underneath.
(3) Alphabetize the 10-letter memory word phrase. Put small numbers of letters underneath. EXAMPLE: A is 1, B is 2, C is 3, and Z is 10.
(4) Draw vertical lines separating the 10-letter memory word or phrase. Extend the lines down the paper until the bottom line of the message is reached.
(5) Go to column number one and write the first five letters in that column forming a five-letter group.
(6) If the letters in column one do not make a five-letter group, go to column two and finish the group.
NOTE: Always start at the top of the column and work down. (7) If the letters in column two do not complete the five-letter group, go to column three and
finish the group. (8) Continue this process until all letters are placed into five-letter groups. (9) Place the five-letter groups, in order, from left to right as if you are reading a page. b. Decrypt a single transposition message. (1) Write a 10-letter memory word or phrase across the paper as stated in 1a(1), 1a(3), and
1a(4) above. (2) Determine the number of letters in the message. Complete matrix so that each letter has
its own individual box. (3) Go to column one and write down the first five-letter group, letter-by-letter. Place the
second five-letter group directly under the first, until all columns are filled. NOTE: Work neatly. (4) Read the plaintext message from left to right.
2. Encrypt and decrypt a message using the double transposition cipher system. a. Encrypt a message. (1) Write a second memory word or phrase on the paper. (2) Place the first five-letter group of the single transposition cipher underneath the first
number column of the second memory word or phrase on a letter-by-letter basis. (3) Place the second five-letter group of single transposition cipher underneath the second
five-letter group of the single transposition on a letter-by-letter basis. (4) Place the third five-letter group of single transposition cipher under the first five-letter
group of single transposition on a letter-by-letter basis. (5) Continue on until all five-letter groups of single transposition are placed under the second
memory word or phrase on a letter-by-letter basis. (6) To complete the double transposition cipher process repeat 1a(1) through 1a(9). b. Decrypt a double transposition cipher message.
STP 31-18E34-SM-TG
3 - 8
Performance Steps (1) Write second 10-letter memory word or phrase across the paper as in 2a(1), 2a(3), and
2a(4) above. (2) Determine the number of letters in the message. Complete matrix so that each letter has
its own individual box. (3) Repeat 2a(2) above. (4) Write out, from left to right, the single transposition cipher in the five-letter group. (5) Repeat 2a(1) through 2a(4) above.
3. Employ the Julius Caesar cipher system. a. Encrypt a message. (1) Write the alphabet from left to right. (2) Determine the first letter in your plaintext message. (3) Start with that letter and count three characters to the right. The third character is your
ciphertext. (4) Continue this procedure, as stated in 3a(3) above, until all letters of the plaintext message
have a cipher character. (5) Write the encrypted characters into five-letter groups. b. Decrypt a message. (1) Write the alphabet from left to right. (2) Locate the first character of the ciphertext in the alphabet. (3) Start with that letter and count three characters to the left. This is the first letter of the
plaintext. (4) Continue this procedure, as stated in 3b(3) above, until all letters of the ciphertext
message are deciphered. NOTE: The number three can be substituted with any other number, as long as both parties encrypt and decrypt with the same number.
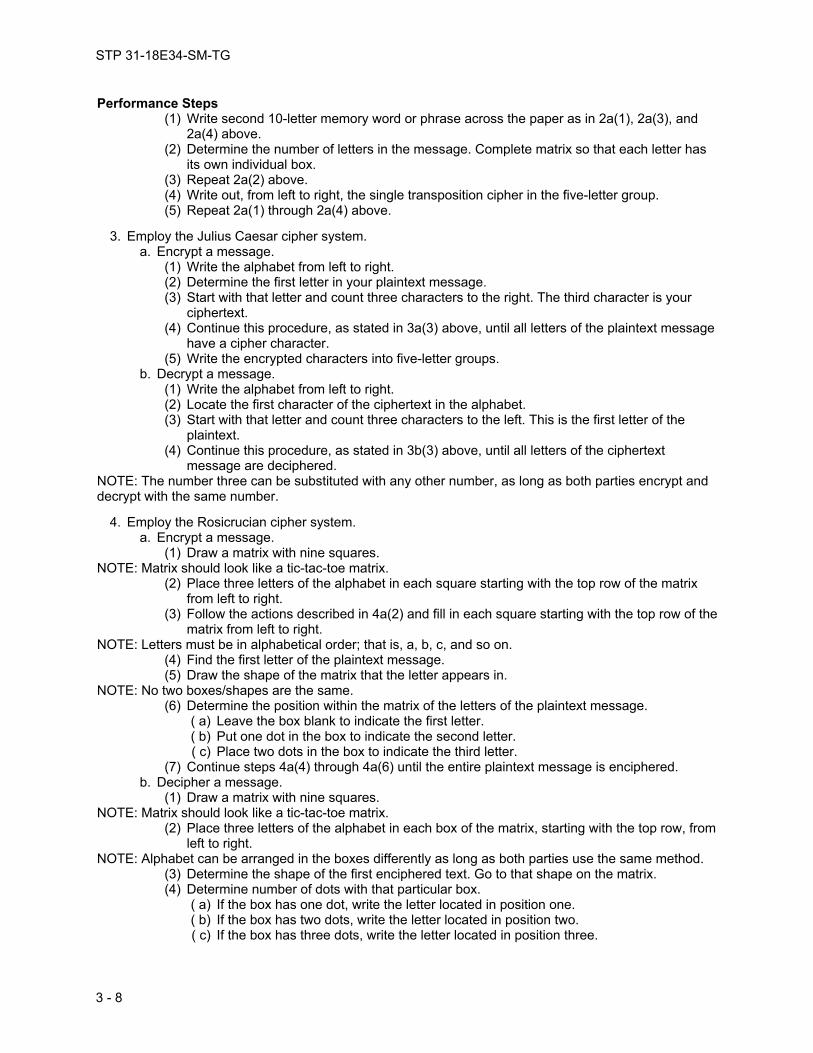
4. Employ the Rosicrucian cipher system. a. Encrypt a message. (1) Draw a matrix with nine squares. NOTE: Matrix should look like a tic-tac-toe matrix. (2) Place three letters of the alphabet in each square starting with the top row of the matrix
from left to right. (3) Follow the actions described in 4a(2) and fill in each square starting with the top row of the
matrix from left to right. NOTE: Letters must be in alphabetical order; that is, a, b, c, and so on. (4) Find the first letter of the plaintext message. (5) Draw the shape of the matrix that the letter appears in. NOTE: No two boxes/shapes are the same. (6) Determine the position within the matrix of the letters of the plaintext message. ( a) Leave the box blank to indicate the first letter. ( b) Put one dot in the box to indicate the second letter. ( c) Place two dots in the box to indicate the third letter. (7) Continue steps 4a(4) through 4a(6) until the entire plaintext message is enciphered. b. Decipher a message. (1) Draw a matrix with nine squares. NOTE: Matrix should look like a tic-tac-toe matrix. (2) Place three letters of the alphabet in each box of the matrix, starting with the top row, from
left to right. NOTE: Alphabet can be arranged in the boxes differently as long as both parties use the same method. (3) Determine the shape of the first enciphered text. Go to that shape on the matrix. (4) Determine number of dots with that particular box. ( a) If the box has one dot, write the letter located in position one. ( b) If the box has two dots, write the letter located in position two. ( c) If the box has three dots, write the letter located in position three.

STP 31-18E34-SM-TG
3 - 9
Performance Steps (5) Continue 4b(3) through 4b(4) until the entire message has been deciphered. Performance Measures GO NO GO
1. Encrypt and decrypt message using the single transposition cipher system. —— ——
2. Encrypt and decrypt message using the double transposition cipher system. —— ——
3. Employ the Julius Caesar cipher system. —— ——
4. Employ the Rosicrucian cipher system. —— —— Evaluation Guidance: Score the soldier GO if all steps are passed. Score the soldier NO-GO if any step is failed. If the soldier fails any step, show what was done wrong and how to do it correctly. References
Required Related FM 24-18

STP 31-18E34-SM-TG
3 - 10
Employ Speech/Encryption Device KY-99(A) 331-201-5021
Conditions: Given a KY-99(A), local fills, fill device (KYK-13, KYX-15, KOI-18), installed radio set, a requirement to employ the KY-99(A) and transmit or receive a secure message, and TB 11-5810-375-10. Standards: Employ the KY-99(A) in accordance with (IAW) procedures outlined in TB 11-5810-375-10. Performance Steps
1. Install the KY-99(A). a. Install the battery. (1) Place the KY-99(A) face down on carrying handles. (2) With thumbs, push down and out on the battery box latches. (3) Unhook the latches and remove the battery box. (4) Install the battery on the device. (5) Replace the battery box and connect the latches. b. Connect the secure device to the radio set. NOTE: Use the proper cable to connect the KY-99(A) to the radio set being used. (1) Connect the appropriate cable to the radio connector on the KY-99(A). (2) Connect the appropriate end of the cable to the radio set. c. Connect the handset.
2. Prepare for operation. a. Turn on the KY-99(A). (1) Set the volume out of the OFF position. NOTE: Display shows "ON," then "PASS." (2) Press INIT when the display shows "PSH INIT." NOTE: Display shows "COLD START." (3) Press INIT again. NOTE: Display blanks and then shows "PSH INIT." DO NOT press INIT a third time until ready to load the key. NOTE: To continue, a key must be loaded in position 1. Connect the fill device KY-99(A) and set the KY-99(A) mode control to receive crypto (RK); press KY-99(A) INIT when prompted. Pass tone is heard and display shows "KEY 1 01" (key is automatically loaded into position 1). Refer to loading fill procedures for detailed information. b. Load the KY-99(A) using the KOI-18. NOTE: COLD START procedures must be performed before loading additional keys. A key must be loaded into position 1. (1) Using the fill cable, connect the fill devices to the KY-99(A) (only) fill connector. (2) Set the KY-99(A) mode switch to off-line. (3) If required, perform turn-on procedure. NOTE: Display shows "TEST." (4) Press the KY-99(A) arrow button. NOTE: KY-99(A) display shows "KEYS." (5) Press INIT. NOTE: Display shows "LOAD." (6) Press INIT. NOTE: Display shows "LOAD N" (flashing "N" represents fill storage position). (7) Repeatedly press the KY-99(A) arrow button until the desired fill position (1, 2, 3, 4, 5, 6,
or U) is displayed. (8) Insert the tape leader into the KOI-18 slot. (9) Press KY-99(A) INIT. NOTE: Display shows fill position. NOTE: Steps 10 and 11 must be performed within 10 seconds or fail message is received. (10) When the display flashes "LOAD N," press KY-99(A) INIT.

STP 31-18E34-SM-TG
3 - 11
Performance Steps NOTE: Display blanks during fill. (11) Pull the tape through at a steady rate. NOTE: Pass tone is heard and display shows "KEY N," then shows "LOAD N" ("N" flashes). (12) Record the fill information on the KY-99(A) writing surface. (13) Set the KY-99(A) mode control switch to RK, ciphertext (CT), or plaintext (PT). (14) Disconnect the fill cable. c. Load the KY-99(A) using the KYX-15. (1) Perform steps (1) through (7) of loading procedure. (2) Select the KYX-15 address; select switch of the key to be transferred, and then set to ON. (3) Set the KYX-15 mode switch to LD. (4) Press the KY-99(A) INIT. NOTE: Display shows the fill position by flashing "LOAD N." NOTE: DO NOT press the KYX-15 INIT button. (5) Press the KY-99(A) INIT. NOTE: Display blanks, a pass tone is heard, display shows "KEY N," then "LOAD N" ("N" flashes). (6) Record fill information on the KY-99(A) writing surface. (7) Return the KYX-15 address select switch to OFF. (8) Set the KYX-15 address mode switch to OFF/CHECK. (9) Set the KY-99(A) function switch to RK, CT, or PT and communicate with new traffic
encryption keys (TEKs). (10) Disconnect the fill cable. d. Load the KY-99(A) using the KYK-13. (1) Perform steps (1) through (6) of the KOI-18 loading procedures. (2) Set the KYK-13 mode switch to ON. (3) Repeatedly press the KY-99(A) arrow button until the desired fill position (1, 2, 3, 4, 5, 6,
or U) is displayed. (4) Set the KY-13 fill switch to the position containing the desired key. (5) Press INIT. NOTE: DO NOT press the KYK-13 INIT button. (6) Press KY-99(A) INIT. NOTE: Display blanks during fill, a pass tone is heard and display shows "KEY N," then "LOAD N" ("N" flash). (7) Record the fill information on the KY-99(A) writing surface. (8) Set the KYK-13 mode switch to OFF/CHECK. (9) Set the KY-99(A) mode switch to RK, CT, or PT position. (10) Disconnect the fill cable.
3. Operate the KY-99(A). a. PT operation. (1) Set the KY-99(A) mode switch to PT. (2) If required, perform KY-99(A) turn-on procedure. (3) Press handset push-to-talk (PTT), then transmit nonsecure voice to remote station. Beeps
are heard in the handset every 6 seconds if the communications channel is idle or if receiving in PT.
(4) Release handset PTT. (5) Listen, receive response from remote station. b. CT operation. (1) CT, high frequency (HF), network (NET) voice operation. ( a) If required, perform the KY-99(A) turn-on procedure. NOTE: Make sure that the correct cable is used for the KY-99(A) HF operation. If display blanks, it is possible to restart operation by pressing KY-99(A) INIT. If the KY-99(A) is locked, only the PT operation is possible. ( b) Set the KY-99(A) mode control switch to CT. ( c) Press INIT. NOTE: Display shows voice, data, and fill position.

STP 31-18E34-SM-TG
3 - 12
Performance Steps ( d) Repeatedly press the arrow button until the desired rate (24, 12, 6, or 3) is displayed. ( e) Press the arrow button to continue selection of fill position. Display shows "NET" 24,
12, 6, or 3 (fill field flashes). ( f) Repeatedly press the arrow button until the desired rate (1, 2, 6, or 3) is displayed. ( g) Press the arrow button to continue the selection of the fill position. Display shows
"NET" 24, 12, 6, or 3 (fill field flashes). ( h) Repeatedly press the arrow button until the desired TEK position is displayed (1, 2,
3, 4, 5, or 6). ( i) Press INIT. NOTE: Pass tone is heard and the display shows HF modem mode and the selected fill position "NET" (24, 12, 6, or 3) and (1, 2, 3, 4, 5, or 6). ( j) Press handset PTT. ( k) Listen to the full transmitted preamble and then transmit voice to remote station.
During transmit, display shows "TX CT VC." During receive, display shows "RX CT VC".
(2) CT, HF, point-to-point (PTP) voice operation. ( a) If required, perform the KY-99(A) turn-on procedure. Make sure the correct cable is
used for HF operation. If the display blanks, restart the operation by pressing INIT. If the KY-99(A) is locked, only the PT operation is possible
( b) Set the KY-99(A) mode control switch to CT. Establish HF voice communications and request second station to switch to PTP operations.
( c) Press INIT, then repeatedly press the up arrow button until the desired voice mode "PTP" is displayed. Display shows voice, data, and fill position ("VOICE" field flashes).
( d) Press the right arrow bottom to select the data rate field. Display shows "PTP," data fill (selected data mode rate flashes).
( e) Repeatedly press the up arrow button until the desired rate is displayed (24, 12, 6, or 3) is displayed.
( f) Press the right arrow button to continue the selection of the fill position. NOTE: Display shows PTP and 24, 12, 6, or 3 (fill position flashes). ( g) Repeatedly press the up arrow button until desired TEK position is displayed. ( h) Press INIT. Pass tone is heard and display shows HF modem mode and selected fill
position. ( i) Press handset PTT to send initial transmission. Long preamble is heard. ( j) Listen for the second station to reply with a responding transmission. Long preamble
is heard. NOTE: Subsequent transmissions are performed in PTP mode. Short preambles are heard. PTP can be resynchromized with long preambles by pressing the INIT button on the KY-99(A). Use CT HF NET voice procedures to fully exit PTP mode. (3) CT, line of sight (LOS) voice/data operations. ( a) If required, perform the KY-99(A) turn-on procedure. NOTE: Use the radio cable wired for the KY-99(A) (only) (LOS operation. KY-99(A) select the LOS mode using off-line interface (INFC) menu. (LOS operation supports only data rate of 2400 bauds per second [bps].) ( b) Set the KY-99(A) mode control switch to CT. ( c) Press INIT. Display shows "NET 24 N" ("N" flashes). ( d) Repeatedly press the up arrow button until the desired TEK position (1, 2, 3, 4, 5, or
6) is displayed. ( e) Press INIT. Lock in selection position. Pass tone is heard and display shows "NET
24" and selected TEK position. ( f) Press handset PTT; listen. LOS preamble and receive response heard. (4) CT, HF, NET data operations. ( a) If required, perform KY-99(A) turn-on procedures.

STP 31-18E34-SM-TG
3 - 13
Performance Steps NOTE: Ensure that the correct cable is used for the KY-99(A) HF operation. If display blanks, it is possible to restart the operation by pressing KY-99(A) INIT. If KY-99(A) is locked, only PT operations are possible. ( b) Set the KY-99(A) mode control switch to CT. ( c) Press INIT. NOTE: Display shows voice, data, and fill field ("VOICE" field flashes). ( d) Repeatedly press the up arrow button until the desired voice mode ("NET" or "PTP")
is displayed. ( e) Press the right arrow button to selected data mode rate field. NOTE: Display shows "NET" or "PTP" data, fill, current selected data rate flashes. ( f) Repeatedly press the up arrow button until the desired data rate (24, 12, or 6) is
displayed. ( g) Press the right arrow button to continue HF modem mode selection. NOTE: Display shows "NET" or "PTP;" 24, 12, 6, or 3 (fill position flashes). ( h) Repeatedly press the up arrow button until the desired TEK position is displayed. ( i) Press INIT. NOTE: Pass tone is heard and the displayed shows HF modem mode and fill position. ( j) Perform the data device transmit operation. NOTE: Display shows "TX DT N" ("N" is selected data rate). ( k) Configure the data device transmit operation. ( l) Confirm the data transmission reception by remote station. NOTE: Display shows "TX DT N" ("N" is received data rate). (5) CT, black digital (BLK DIG), net voice operation. ( a) If required, perform the KY-99(A) turn-on procedure. NOTE: Transmit clock source is selected by performing INFC BLK DIG procedure. Ensure that the correct cable is used for the KY-99(A) BLK DIG operation. PT is not possible when using BLK DIG mode or if the KY-99(A) is locked. ( b) Set the KY-99(A) mode control to CT. ( c) Press INIT. NOTE: Display shows "NET" data fill field (current selected data mode data rate flashes). ( d) Repeatedly press the up arrow until the desired rate (24,12, 6, or 3) is displayed. ( e) Press the right arrow button to select fill position field. NOTE: Display shows "NET" 24, 12, 6, or 3 (flashing "N" is fill position field). ( f) Repeatedly press the up arrow button until the desired TEK is displayed. ( g) Press INIT. NOTE: Locked in on-line mode. Pass tone is heard and display shows "NET," data and selected TEK position. ( h) Perform data devices transmit operation and transmit to remote station. Confirm the
communication. NOTE: Display shows "TX DT N" ("N" is selected data rate). ( i) Configure the data devices to receive the message. NOTE: Display shows "RX DT N" ("N" is selected data rate). ( j) Confirm the remote station's reception of the data transmission. NOTE: Operation of the secure device is accomplished automatically through operation of the radio system.
4. Perform the shutdown procedures. a. Zeroing the secured device. (1) Zeroing the signal keys. ( a) Set the KY-99(A) mode control switch to off-line. ( b) If required, perform the turn-on procedure. NOTE: Display shows "TEST." ( c) Press the up arrow button. NOTE: Display shows "KEYS." ( d) Press INIT, then the up arrow and the right arrow button until "ZERO" is displayed.

STP 31-18E34-SM-TG
3 - 14
Performance Steps ( e) Press INIT. NOTE: Display shows "ZERO N" ("N" is flashing). ( f) Repeatedly press the up arrow button until the fill you wish to ZERO (1, 2, 3, 4, 5, 6,
or U) is displayed. ( g) Press INIT. NOTE: Display shows flashing "ZERO N." ( h) Press INIT. NOTE: Display blanks, pass tone is heard and shows "ZEROED N". ( i) While in "N" fill position, set the function switch to CT and attempt to communicate. NOTE: Display shows "PT" only. (2) Zero all keys. NOTE: -Setting mode control switch to A ALL zeroes all keys that are stored in KY-99 fill position. -Locked KY-99(A) can be zeroed. -KY-99(A) power may be set to OFF or ON. -- Set KY-99(A) mode control switch to off-line. -- Pull KY-99(A) mode control switch and set to Z ALL. -If KY-99(A) is on, pass tone is heard, then display shows "ZEROED." -If KY-99(A) is on when function is brought out of Z ALL, display shows "PSH INIT." (3) Disconnect the handset. (4) Disconnect the secure devices from the radio set. ( a) Disconnect the cable from the radio set. ( b) Disconnect the cable from the KY-99(A). (5) Remove the battery from the KY-99(A). ( a) Place the KY-99(A) face down on carrying handles. ( b) With thumbs, push down on the battery box latches. ( c) Unhook the latches and remove the battery box. ( d) Remove the battery from device. (6) Place the secure devices in storage. Performance Measures GO NO GO
1. Inspect the equipment for damage and accountability. —— ——
2. Check to see if the battery is in the battery box; if not, install the battery. —— ——
3. Verify that the proper cryptographic key is loaded. —— ——
4. Install the KY-99(A) to selected communications equipment. —— ——
5. Conduct a secure radio transmission. —— —— Evaluation Guidance: Score the solider GO if all steps are passed. Score the soldier NO-GO if any step is failed. If the soldier fails any step, show what was done wrong and how to do it correctly. References
Required Related TB 11-5810-375-10

STP 31-18E34-SM-TG
3 - 15
Destroy Classified Material 113-573-9012
Conditions: Given AR 380-5, DA Form 3964 or a certificate of destruction (as appropriate), destruction facility or equipment, witness, appropriate moving storage bags/boxes, transportation (if required), and TB 380-41. Standards: The standards are met when the documentation is complete and the classified material is destroyed by burning or shredding. Performance Steps
1. When dealing with classified material, it is important that all guidelines, Army regulations, and installation/unit polices be followed.
NOTE: In some instances, classified material will include equipment such as hard drives, disk packs, and tape cartridges. Be sure the S4 office or unit supply is well aware that equipment is to be destroyed and ensure the properly completed supply documents accompany the equipment.
2. Several things must be accomplished when you are tasked to destroy classified documents. You must know the classification of the documents to be destroyed. The classification determines the paperwork needed, the security clearances required, method of destruction required, witness, and so on.
NOTE: If you are the witness, the person in charge of the required destruction will decide what items require your assistance. a. Safeguarding--When tasked to destroy information classified under AR 380-5, that information
shall be afforded the level of protection against unauthorized disclosure commensurate with the level of classification assigned under the varying conditions that may arise in connection with its use, dissemination, storage, movement or transmission, and destruction. Responsible officials will ensure classified information is adequately protected from compromise. Officials must be continually aware of possible threats from all-source intelligence efforts of potential adversaries (AR 380-5, paragraph 1-402).
b. Classified information access policy--No person may have access to classified information unless that person has been determined to be trustworthy and unless access is essential to the accomplishment of lawful and authorized government purposes, that is, the person has the appropriate security clearance and a need-to-know. No one has a right to have access to classified information solely by virtue of rank or position.
3. Destruction of classified documents and material--These procedures shall incorporate means of verifying the destruction of classified information and material (AR 380-5, paragraph 9-100).
a. Classified documents and material shall be destroyed by burning or, with the approval of the cognizant DOD component head or designee, by melting, chemical decomposition, pulping, pulverizing, cross-cut shredding, or mutilation sufficient to preclude recognition or reconstruction of the classified information, (TB 380-41). In all cases, burning is the preferred method of destroying classified information (AR 380-5, paragraph 9-101).
b. Procedures shall be instituted that ensure all classified information intended for destruction actually is destroyed. Destruction records and imposition of a two-person rule, that is, having two cleared persons involved in the entire destruction process, will satisfy this requirement for TOP SECRET information. Imposition of a two-person rule, without destruction records, will satisfy this requirement for SECRET information, as will use of destruction records without imposition of the two-person rule. Only one cleared person needs to be involved in the destruction process for CONFIDENTIAL information (AR 380-5, paragraph 9-102).

STP 31-18E34-SM-TG
3 - 16
Performance Steps c. Records of destruction (DA Form 3964) are required for TOP SECRET information. The record
shall be dated and signed at the time of destruction by two persons cleared for access to TOP SECRET information. Records of destruction of SECRET and CONFIDENTIAL information are not required except for NATO SECRET and some limited categories of specially controlled SECRET information. When records of destruction are used for SECRET information, only one cleared person has to sign such records. DA Form 3964 will normally be used as the record of destruction (AR 380-5, paragraph 9-103).
d. Waste materials such as handwritten notes, carbon paper, typewriter ribbons, and working papers that contain classified information must be protected to prevent unauthorized disclosure of the information. Classified waste shall be destroyed when no longer needed. Destruction records are not required (AR 380-5, paragraph 9-104).
4. Destruction of classified hardware equipment--Approval of destruction methods will be obtained from US Army Intelligence and Security Command (INSCOM) prior to destruction. Usually there will be an installation security office to advise you or do the destruction for you. Only under EMERGENCY CONDITIONS OCONUS is destruction or other disposition of equipment components by the individual user or user organization authorized.
NOTE: All waste material generated within a cryptofacility (worksheets, tape, carbon paper, typing ribbons, and so forth) both classified and unclassified, will be disposed of in the same manner as directed by AR 380-5 for the destruction of classified waste.
5. Penalties for violation of security regulations--DOD military and civilian personnel are subject to administrative sanctions if they knowingly, willfully, or negligently disclose to unauthorized persons information properly classified under Executive Order 12356, "National Security Information," April 2, 1982, prior orders, any implementing issuances or AR 380-5. Sanctions include but are not limited to a warning notice, reprimand, termination of classification authority, suspension without pay, forfeiture of pay, removal or discharge, and will be imposed upon any person, regardless of office or level of employment, who is responsible for a violation specified under this paragraph as determined appropriate under applicable law and DOD regulations. Nothing in AR 380-5 prohibits or limits action under the Uniform Code of Military Justice based upon violations of that code. Actions against military personnel may include those recognized by the Manual for Courts-Martial (US), 1969 (revised), paragraph 128c, or provided by regulation. Administrative action against civilian personnel may be pursued under US Army civilian personnel regulations (AR 380-5, paragraph 14-101).
Evaluation Preparation: Performance Measures GO NO GO
1. Apply need-to-know limitations for access to classified material. (Refer to AR 380-5, para 7-100 and TB 380-41.)
—— ——
a. Security clearance. b. Initial security briefing. c. Not solely by rank or position.
2. Determine the classification of material to be destroyed. —— ——
3. Verify/prepare the DA Form 3964 or certificate of destruction. —— ——
4. Verify that the witness has the appropriate clearance. —— ——
5. Identify individual responsibilities and violations subject to sanctions. (Refer to AR 380-5, para 14-101.)
—— ——
a. Violations. b. Sanctions.

STP 31-18E34-SM-TG
3 - 17
Performance Measures GO NO GO
6. Apply physical and administrative measures for storage and safekeeping of classified material. (Refer to AR 380-5, paras 5-102, 5-104, and 5-202, and TB 380-41).
—— ——
a. Storage equipment. b. Recording storage facility data. c. Security checks.
7. Transport the material to be destroyed to the appropriate facility. —— ——
8. Apply control measures to prevent unauthorized entry and protect and safeguard classified material. (Refer to AR 380-5, para 7-100 and (O)TB 380-41.)
—— ——
a. Need-to-know. b. Clearance status roster. c. Visitor register. d. Equipment screening. e. Visitor surveillance.
9. Assist in the routine destruction of classified material. (Refer to AR 380-5, paras 9-100 through 9-104.)
—— ——
a. Policy. b. Records. c. Methods.
10. Complete DA Form 3964 or certificate of destruction. —— ——
11. Forward DA Form 3964 or certificate of destruction to the security custodian, or file as required.
—— ——
NOTE: Specific extracts of the references are not included because of the quantity of material.
Evaluation Guidance: Score the soldier GO if all steps are passed (P). Score the soldier NO-GO if any step is failed (F). If the soldier fails any step, show what was done wrong and how to do it correctly. References
Required Related AR 380-5 DA FORM 3964 TB 380-41

STP 31-18E34-SM-TG
3 - 18
Check Signal Security (SIGSEC) Procedures 113-573-0001
Conditions: Given a requirement check SIGSEC procedures of an established signal node with organic cryptosystems, and AR 380-40, and the unit operation order/operation plan (OPORD/OPLAN). Standards: The standards are met when emission, physical, crypto, transmission, and electronics areas of security are checked and corrective action is taken for any discrepancy noted. Evaluation Preparation: Setup: Different types of signal operational requirements will be in effect for this task. Brief soldier: You are required to check SIGSEC at the signal area node and make the necessary corrections. Performance Measures GO NO GO
1. Review the mission OPORD/OPLAN and AR 380-40 to determine specific SIGSEC policies prior to inspecting the signal node.
—— ——
2. Check emission security. —— ——
3. Check physical security. —— —— a. Signal node area of operation. b. Area where a cryptosystem is employed. c. Emergency evacuation and destruction plans. d. Handling of classified material waste. e. Control of access and crypto safeguards. f. Identify physical insecurities. g. Identify personnel insecurities.
4. Check cryptographic security. —— —— a. Proper utilization of cryptosystems. b. Encryption of all classified information. c. Competent operation of cryptosystems. d. Identify crypto insecurities.
5. Check transmission security (TRANSEC). —— —— a. Radio communications. b. Conventional telephone communications.
6. Direct appropriate corrective action for any discrepancy noted. —— —— Evaluation Guidance: Score the soldier GO if all steps are passed (P). Score the soldier NO-GO if any step is failed (F). If the soldier fails any step, show what was done wrong and how to do it correctly. Have the soldier practice until he can correctly perform the task. References
Required Related AR 380-40 AR 380-5 AR 530-1 FM 19-30 FM 24-18 IT0464

STP 31-18E34-SM-TG
3 - 19
Maintain Classified Documents 113-573-9008
Conditions: This task can be performed in a tactical or fixed environment under all weather conditions. The following items are available: 1. Classified containers with documents. 2. AR 340-2. 3. AR 380-5. 4. DA Form 672. 5. DA Form 727. 6. Classified document covers. 7. OPEN/CLOSED placard. 8. Emergency Evacuation/Destruction Plan. 9. Access roster. Standards: Standards are met when security procedures contained in applicable regulations are enforced. Evaluation Preparation: Setup: Provide applicable regulations and forms, a security container with classified documents, OPEN/CLOSED placard, access roster, classified document covers, and Emergency Evacuation and Destruction Plan. Brief Soldier: Tell the soldier to maintain classified documents contained in a security container. Performance Measures GO NO GO
1. Ensures that appropriate document covers are used when classified documents are removed from security container.
—— ——
2. Ensures that security container is adequate. —— ——
3. Ensures that documents are marked with appropriate classification markings and downgrading instructions.
—— ——
4. Ensures that DA Form 672 (Safe or Cabinet Security Record) is attached and maintained.
—— ——
5. Ensures that classified access rosters are current. —— ——
6. Ensures that DA Form 727 (Classified Container Information) is prepared whenever a security container combination has been changed.
—— ——
7. Ensures proper accounting of classified documents. —— ——
8. Ensures that the Emergency Evacuation and Destruction Plan for classified material and files is posted along with Evacuation Priority Code.
—— ——
9. Ensures use of safe OPEN/CLOSED placard. —— ——
10. Ensures control measures are followed in the reproduction of classified documents.
—— ——
Evaluation Guidance: Score the soldier GO if all steps are passed (P). Score the soldier NO-GO if any step is failed (F). If the soldier fails any step, show what was done wrong and how to do it correctly. References
Required Related AR 380-5

STP 31-18E34-SM-TG
3 - 20
Subject Area 3: Equipment Maintenance
Use a Multimeter to Perform a Continuity Check and Voltage Check 331-201-5037
Conditions: Given a multimeter, antenna wire, and a battery. Standards: Set up a multimeter for operation, perform a continuity check on the antenna wire, and perform a voltage check on the battery within 10 minutes. Performance Steps
1. Set up a multimeter for operation. a. Turn the multimeter selector switch to the lowest ohm setting. b. Connect the red test lead to the positive jack. c. Connect the black test lead to the negative jack. d. Hold the end of black test lead and the end of red test lead together. e. Adjust the multimeter for a 0-ohm reading. (1) Observe the multimeter scale for 0 ohms. (2) Adjust the ohm knob until the scale reads 0 ohms.
2. Perform a continuity check on the antenna wire. a. Touch the red test lead to one end of the antenna wire and, at the same time, touch the black
test lead to the opposite end of the antenna wire. b. Observe that meter reading is 0 ohms.
3. Perform voltage check on the battery. a. Turn multimeter selector switch to alternating current/direct current range and set the correct
voltage setting (next highest setting above voltage to be tested). b. Apply the positive and negative leads to the battery's positive and negative terminals. c. Observe the meter for voltage reading. Performance Measures GO NO GO
1. Set up a multimeter for operation. —— ——
2. Perform continuity check on the antenna wire. —— ——
3. Perform voltage check on the battery. —— —— Evaluation Guidance: Score the soldier GO if all steps are passed. Score the soldier NO-GO if any step is failed. If the soldier fails any step, show what was done wrong and how to do it right. References
Required Related TM 11-6625-203-12

STP 31-18E34-SM-TG
3 - 21
Perform Unit Level Preventive Maintenance Checks and Services on Communications Equipment 331-201-5036
Conditions: Given communications equipment, Department of the Army Pamphlet (DA Pam) 738-750, Functional Users Manual for The Army Maintenance Management System (TAMMS); applicable technical manual (TM) for equipment; DA Form 2404, DA Form 2407, DA Form 2407-1; and a pencil or pen. Standards: Conduct the preventive maintenance checks and services (PMCS) in accordance with (IAW) PMCS outlined in TM. Note all deficiencies or services on appropriate forms IAW instructions in DA Pam 738-750. Performance Measures GO NO GO NOTE: Refer to DA Pam 738-750.
1. Perform the PMCS IAW the appropriate TM for the equipment. —— ——
2. Prepare DA Form 2404 (paragraph 3-4a through 3-4c). —— ——
3. Prepare DA Form 2407 (paragraph 3-6). —— —— a. Request support maintenance (paragraph 3-7b[2]). b. Report on accomplishment of a modification work order (paragraph 3-8a
through 3-8c).
c. Record work accomplished at support level (paragraph 3-6b[3][a]).
4. Prepare DA Form 2407-1 (paragraph 3-6). —— ——
5. Make proper disposition of DA Forms 2404, 2407, and 2407-1. —— —— a. DA Form 2404 disposition (paragraph 3-4d). b. DA Form 2407 disposition (paragraph 3-7d and 3-8d). c. DA Form 2407-1 disposition (paragraph 3-7d and 3-8d). Evaluation Guidance: Score the soldier GO if all steps are passed. Score the soldier NO-GO if any step is failed. If the soldier fails any step, show what was done wrong and how to do it correctly. References
Required Related DA FORM 2404 DA FORM 2407 DA FORM 2407-1 DA PAM 738-750

STP 31-18E34-SM-TG
3 - 22
Perform Unit Level Maintenance (ULM) on a Desktop IBM or Compatible Microcomputer 113-580-3069
Conditions: Given an operational desktop IBM or compatible microcomputer, peripheral devices, MS-DOS Version 3.0 or later, tool kit TK-101/G, difluoroethane (canned air), hand-held vacuum cleaner, ESD strap, 3.5 inch and/or 5.25 inch floppy disk. Standards: The standards are met when the hard disk is scanned for errors, the hard disk is defragmented, all changed files are backed up, and all shortcomings are properly documented. Performance Steps
1. Collect all required material.
2. Initiate maintenance forms.
3. Maintain peripheral devices. a. Inspect devices and connector cables for cracks, holes, and fraying. b. Vacuum paper residue from inside printer.
4. Maintain the CPU. a. Quit all applications including WINDOWS and return to DOS prompt. b. Turn off power and unplug power cord. WARNING: Circuit card assemblies are sensitive to ESD. Ensure that an ESD wriststrap is worn whenever the CPU cover is removed. c. Remove the CPU cover. d. Spray canned air to remove dust from all internal parts. e. Check all cards and connectors for proper seating. f. Replace the CPU cover. g. Test floppy disk drives for accepting and ejecting floppy disks. h. Restore power to the CPU. WARNING: Do not run CheckDisk on a network drive. Do not run ScanDisk while other programs are running.
5. Maintain the hard disk drive. (Use the appropriate operating system manual or hard disk management tools software manual.)
a. Check for hard disk errors. b. Defragment hard disk. c. Verify current anti-virus software is installed. d. Perform backup.
6. Complete appropriate documentation. Evaluation Preparation: Performance Measures GO NO GO
1. Collected all required material. —— ——
2. Initiated maintenance forms. —— ——
3. Maintained peripheral devices. —— ——
4. Maintained the CPU. —— ——
5. Maintained the hard disk drive. —— ——
6. Completed appropriate documentation. —— ——

STP 31-18E34-SM-TG
3 - 23
Evaluation Guidance: Score the soldier GO if all steps are passed. Score the soldier NO GO if any step is failed. If the soldier fails any step, show what was done wrong and how to do it correctly. Have the soldier practice until he can correctly perform the task. References
Required Related ASUM CUM DA PAM 738-750 MS-DOS MANUAL

STP 31-18E34-SM-TG
3 - 24
Troubleshoot a Desktop IBM or Compatible Microcomputer 113-580-0051
Conditions: Given an inoperable desktop IBM or compatible microcomputer in a network or stand-alone configuration, Computer User's Manual, Network Hardware User's Manual, Applications Software User's Manual, Network Software User's Manual, and tool kit TK-101/G. Standards: The standards are met when all shortcomings are corrected, or the computer is evacuated to a higher maintenance level. Performance Steps
1. Verify reported malfunctions.
2. Perform systematic troubleshooting procedures. (Refer to the CUM, NHUM, NSUM, or ASUM.)
3. Correct the LRU within unit level authorization. a. Test the LRU. b. Repair the LRU. c. Replace unserviceable parts. d. Perform an operational check. e. Requisition unserviceable parts not on hand.
4. Correct the LRU outside unit level authorization. a. Document actions taken. b. Return DA Form 5988-E and obtain DA Form 5990-E from the ULLS clerk. c. Evacuate defective LRU outside of maintenance allocations authorization to a higher
maintenance level. Evaluation Preparation: Performance Measures GO NO GO
1. Verified reported malfunctions. —— ——
2. Performed systematic troubleshooting procedures. (Refer to the CUM, NHUM, NSUM, or the ASUM.)
—— ——
3. Corrected the LRU within unit level authorization. —— —— a. Tested the LRU. b. Repaired the LRU. c. Replaced unserviceable parts. d. Performed an operational test. e. Requisitioned unserviceable parts not on hand.
4. Corrected the LRU outside unit level authorization. —— —— a. Documented actions taken. b. Returned DA Form 5988-E and obtained DA Form 5990-E from the ULLS
clerk.
c. Evacuated the defective LRU outside of the maintenance allocation authorization to a higher maintenance level.
Evaluation Guidance: Score the soldier GO if all steps are passed. Score the soldier NO GO if any step is failed. If the soldier fails any step, show what was done wrong and how to do it correctly. Have the soldier practice until he can correctly perform the task.

STP 31-18E34-SM-TG
3 - 25
References Required Related ASUM DA PAM 738-750 CUM FM 24-7

STP 31-18E34-SM-TG
3 - 26
Subject Area 4: Communication Antennas
Construct Vertical Half-Rhombic Antenna 113-596-1052
Conditions: Given 200 feet of W-1 antenna wire, electrical tape, 400 to 600 ohms terminating resistor, insulators or material to construct field expedient insulators, radio set, knife, suspension line, measuring device, compass, SOI with frequency and call signs, suitable training site, FM 24-18, and FM 11-487-1. Standards: The standards are met when a vertical half-rhombic antenna is constructed and operational. Evaluation Preparation: Performance Measures GO NO GO NOTE: This antenna is used for frequency modulation (FM) communications.
1. Construct antenna.
—— ——
NOTE: Counterpoise should be the length from leg closest to distant station to leg furthest from distant station.
a. Measure 100 feet of antenna wire total length. (Add 12 inches to connect insulators.)
b. Bend wire in half to find apex point for connection of insulator.
c. Connect insulator to apex point.
d. Connect halyard to insulator at apex point. (Refer to Figure 1.)

STP 31-18E34-SM-TG
3 - 27
Performance Measures GO NO GO
Figure 1. Connection of Apex Insulator (Floating)
e. Tape wire to insulator to prevent movement to apex point.
2. Erect antenna.
—— ——
a. Determine azimuth to distant station.
b. Install antenna so apex is at least 30 feet high.
c. Separate legs and equal distance on azimuth to distant station. (Refer to Figure 2.)

STP 31-18E34-SM-TG
3 - 28
Performance Measures GO NO GO
Figure 2. Half-Rhombic Antenna With Counterpoise
d. Install counterpoise.
e. Connect terminating resistor.
NOTE: One end of resistor is connected to end of antenna; the other end is connected to counterpoise and closest to distant station.
3. Connect feeder line.
—— ——
a. Connect one wire to antenna and positive side to radio.
b. Connect other wire from end of counterpoise to ground on radio.
4. Call distant station.
—— ——
Evaluation Guidance: Score the soldier GO if all steps are passed. Score the soldier NO-GO if any step is failed. If the soldier fails any step, show what was done wrong and how to do it correctly. Have the soldier practice until he can correctly perform the task. References
Required Related FM 11-487-1 FM 24-18

STP 31-18E34-SM-TG
3 - 29
Install Antenna Group OE-452/PRC 331-201-5053
Conditions: Given at least two personnel, antenna group OE-452/PRC, communication range (distance), an installation site, an installed very high frequency or high frequency radio set, a compass, and technical manual (TM) 11-5985-391-12. This task may be performed in a nuclear, biological, and chemical environment; therefore, some iterations should be done in mission-oriented protective posture (MOPP) 4. Standards: Install antenna group OE-452/PRC into one of its five configurations in accordance with TM 11-5895-391-12 within 30 minutes. Performance Measures GO NO GO
1. Select an antenna configuration. (Refer to TM 11-5985-391-12, Table 2-1.) —— ——
2. Erect a 22-foot mast. (Refer to TM 11-5985-391-12.) —— —— a. Ensure the mast is vertical if deploying the 175-foot bent long-wire antenna. b. Ensure the mast is bent slightly beyond the vertical opposite the direction of
pull of the first antenna wire deployed if deploying the 117-foot sloping dipole or 468-foot bent long-wire.
c. Preload the top of the mast for an offset of 1 to 1.5 feet from the vertical if deploying a sloping-vee antenna.
3. Erect the antenna in the selected configuration. —— —— a. Deploy the 175-foot bent long-wire antenna. (Refer to TM 11-5985-391-12.) (1) Deploy the antenna wire. (2) Terminate the deployed antenna wire. (3) Connect the antenna to the radio. b. Deploy the 117-sloping dipole and 117- or 234-foot sloping-vee antennas.
(Refer to TM 11-5985-391-12.)
(1) Rig the antenna assembly at the 22-foot mast. (2) Deploy the antenna wire along the proper heading. (3) Erect the 6-foot mast. (4) Terminate the deployed antenna wire. (5) Repeat subparagraphs 3b(1) through 3b(4) to deploy the second leg of
the antenna.
(6) Connect the antenna to the radio. c. Deploy the 468-foot bent long-wire antenna. (Refer to TM 11-5985-391-12.) (1) Rig antenna assembly at the 22-foot mast. (2) Deploy the antenna wire along the proper heading. (3) Erect the 6-foot mast. (4) Terminate the deployed antenna wire. (5) Repeat subparagraphs 3c(1) through 3c(4) to deploy the second leg of
the antenna.
(6) Attach the balun, ground stake, and coax. (7) Connect the coax to the radio. Evaluation Guidance: Score the soldier GO if all steps are passed. Score the soldier a NO-GO if any step is failed. If the soldier fails any steps, show what was done wrong and how to do it correctly. References
Required Related TM 11-5985-391-12

STP 31-18E34-SM-TG
3 - 30
Construct a Long-Wire Antenna 113-596-1056
Conditions: Given a suitable area, paper, pencil, antenna wire, three insulators, a 50-foot guy rope, anchor stakes, hammer, knife, pliers, measuring tape, compass, frequency, a suitable radio, azimuth to orient the antenna, FM 24-18, and FM 11-487-1. NOTE: The AN/PRC-74 radio set is not a suitable radio due to the impedance mismatch. Standards: The standards are met when the antenna is constructed and erected so it is within plus or minus 3 inches of the required length. Evaluation Preparation: Performance Measures GO NO GO
1. Compute antenna length by using the following formula: L = 492 (N - .05)/Frequency (MHz) L = length in feet N = number of half wavelengths (1 wavelength = 2 half wavelengths) Example: Build a 4-wavelength antenna for a frequency of 12 MHz. L = 492 (N - .05)/Frequency L = 492 (8 - .05)/12 L = 492/7.95/12 L = 326 feet
—— ——
2. Assemble antenna.
—— ——
a. Measure antenna wire using computations from performance measure 1.
b. Attach insulators.
3. Install antenna.
—— ——
a. Using the compass, orient antenna to the direction of maximum desired radiation. (Long wires can be directional antennas.)
b. Erect antenna.
Evaluation Guidance: Score the soldier GO if all steps are passed. Score the soldier NO-GO if any step is failed. If the soldier fails any step, show what was done wrong and how to do it correctly. Have the soldier practice until he can correctly perform the task. References
Required Related FM 11-487-1 FM 24-18

STP 31-18E34-SM-TG
3 - 31
Construct a Clandestine Antenna 331-201-5052
Conditions: Given a high frequency radio set, unit signal operation instructions, installation sites (indoor and outdoor, urban and rural), designated frequency, pencil and paper, lensatic compass, expedient insulator material, electrical tape, knife, and pliers. Standards: Construct and install an operational indoor and outdoor clandestine antenna (urban or rural) within 1 hour for each antenna in accordance with the performance measures. Performance Steps
1. Construct a clandestine indoor antenna (urban or rural). a. Select the most suitable indoor location at the site for the required transmission. (1) Select a building in a sector of the city towards the receiving station so transmitted signal
will not be distorted or attenuated by other structures. Avoid industrial areas and areas where buildings are made of reinforced steel (skyscrapers).
(2) Check the area around the building location for television and radio reception antennas to determine the possibility of interference with local reception of television and radio signals. Avoid areas with many rooftop antennas, high-tension power lines, and heavy motor vehicle traffic. To detect such sources of interference, use a small amplitude-modulated (AM) transistor radio (with an earphone) set to the highest frequency.
(3) Select as high a floor as possible within the chosen building so other close buildings do not interfere with transmitted signal. Install antenna on the side of the building in the direction of transmission if possible.
(4) Check local available power for adequacy of voltage, current, and frequency requirements. Power sources must be sufficient enough to preclude fluctuation in other areas of the neighborhood or building when transmitting.
(5) Check walls and ceiling of the room for reinforcing bars or beams, metal lathe plaster, or any substance that conducts electricity. Hold the compass close to the walls and ceiling to detect metallic objects. This procedure, however, will not detect nonmagnetic metal, so a thorough inspection must be made.
(6) Use the radio receiver to check for local reception interference from faulty wiring, fluorescent lights, and other sources.
(7) Determine if the noise created by the radio station will be detected by nearby rooms or passersby.
(8) Determine the bearing to the receiving station in relation to the layout of the room. (9) Check the room for means of concealment and support--moldings, baseboards, and
window frames--for antenna and transmission lines. b. Select a suitable antenna for the indoor site and required transmission. (1) Determine the length of antenna for the frequency given. ( a) Figures 1 and 2 reflect the formulas used to determine the length of the antenna in
feet according to the type of antenna constructed.

STP 31-18E34-SM-TG
3 - 32
Performance Steps
Figure 1. Full-Wave Square Loop Antenna

STP 31-18E34-SM-TG
3 - 33
Performance Steps
Figure 2. Half-Wave Square Loop Antenna
( b) Since the loop antenna must be square, divide the length by 4 to determine the
size of each leg of the square. (2) Use any of the antennas mentioned in Figures 3 through 8, if there is enough space
within the indoor location.

STP 31-18E34-SM-TG
3 - 34
Performance Steps
Figure 3. Quarter Wave-Length Antenna (Vertical)
Figure 4. Half-Wave Doublet Antenna
c. Assemble components. (1) Measure and cut antenna wire to a tolerance of 2 inches. (2) Attach loop to wall resulting in closest azimuth. d. Connect the antenna to radio set. e. Tune radio (radio should tune in 3 to 12 seconds).

STP 31-18E34-SM-TG
3 - 35
Performance Steps
Figure 5. Slant-Wire Antenna
Figure 6. Fourteen Percent Off-Center Fed Antenna
2. Construct an outdoor clandestine antenna (urban or rural). a. Determine if the radio station is to be permanent and operated from inside a structure or if the
station is to be operated from the antenna site. (1) If the radio station is to be operated inside a structure, select a location as close as
possible to the structure and one in which the transmission line will not be discovered during operation by passersby or damaged by vehicular or foot traffic.
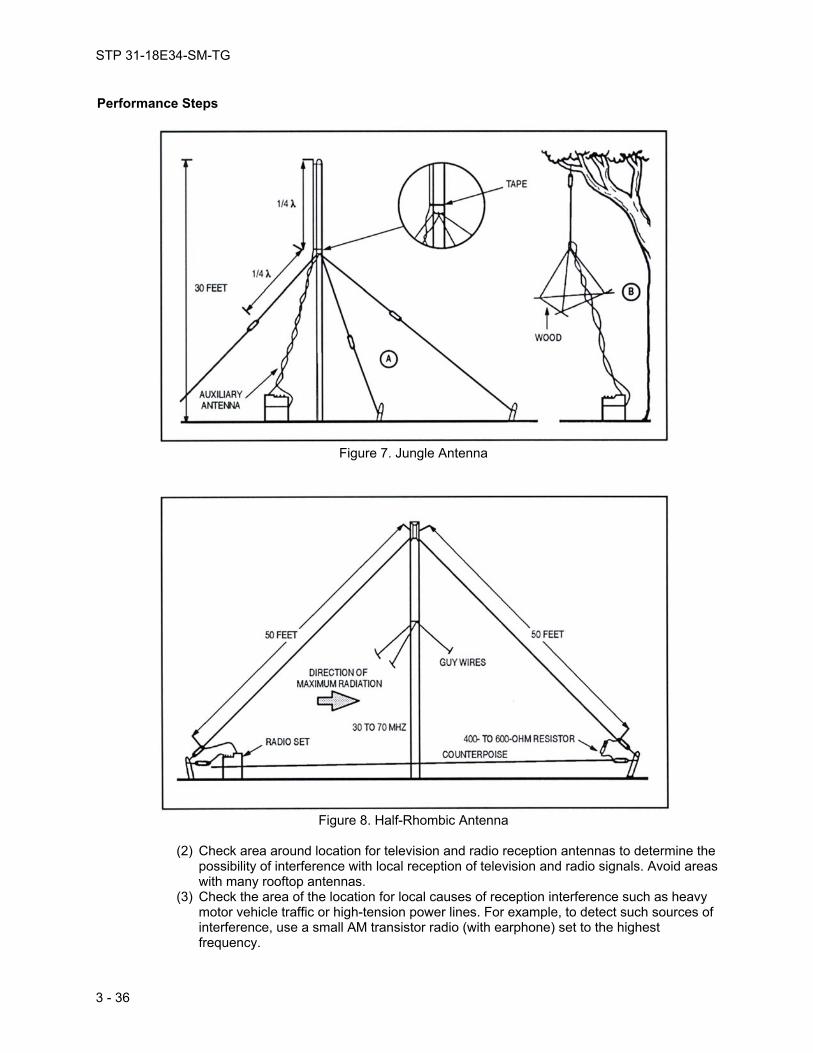
STP 31-18E34-SM-TG
3 - 36
Performance Steps
Figure 7. Jungle Antenna
Figure 8. Half-Rhombic Antenna
(2) Check area around location for television and radio reception antennas to determine the
possibility of interference with local reception of television and radio signals. Avoid areas with many rooftop antennas.
(3) Check the area of the location for local causes of reception interference such as heavy motor vehicle traffic or high-tension power lines. For example, to detect such sources of interference, use a small AM transistor radio (with earphone) set to the highest frequency.

STP 31-18E34-SM-TG
3 - 37
Performance Steps (4) Check local available power for adequacy of voltage, current, and frequency
requirements. Ensure power sources are sufficient to preclude fluctuations in other areas of the neighborhood when transmitting.
(5) Check the immediate area around the location for metal obstructions that may cause a distortion in the radiation pattern of the transmitted signal.
(6) Determine the bearing to the receiving station in relation to the layout of the location. (7) Check the location for adequate horizontal clearance in the direction of transmission in
relation to the required transmission angle. The horizon, whether it is from terrain or buildings, should be no more than one-half the transmission angle.
(8) Check the location for a means to conceal or disguise the antenna and transmission line from view and a means to support the antenna, such as exterior steps made of wood, guy wires for signs, rain gutters, or clotheslines.
b. Determine the types of antennas that can be erected in the location using the available space, supports, and concealment areas. (Figures 2 through 7 illustrate field expedient antenna configurations.)
c. Construct and install selected antenna. (1) Construct the antenna using adequate insulators, when necessary, to prevent shorting
of antenna. (Figure 9 shows expedient insulators.) (2) Conceal or disguise the antenna.
Figure 9. Expedient Insulators
(3) Conceal the transmission line from the location of the radio to the feedpoint on the
antenna. (4) Check the concealment of the antenna and transmission line from different angles in the
area. Ensure no evidence of the antenna, to include wire elements, transmission line, halyard, and insulators, is visible or unnatural to the location.
(5) Connect the radio to the antenna, tune the radio, and transmit a signal, ensuring the antenna works properly.

STP 31-18E34-SM-TG
3 - 38
Performance Measures GO NO GO
1. Construct and install an indoor antenna that is concealed or disguised and operational.
—— ——
a. Select the most suitable indoor location at the installation site for the required transmission.
b. Select a suitable antenna for the indoor location and required transmission. c. Determine the length of antenna for the frequency given. d. Assemble components. e. Connect the antenna to the radio, tune it, and transmit a signal.
2. Construct and install an outdoor antenna that is concealed or disguised and operational.
—— ——
a. Select the most suitable outdoor location at the installation site for the required transmission.
b. Select a suitable antenna for the outdoor location and required transmission. c. Construct antenna, ensuring that adequate insulators are used to prevent
shorting of the antenna.
d. Conceal the antenna and transmission line. e. Check the concealment of the antenna and transmission line. f. Connect the antenna to the radio, tune it, and transmit a signal. Evaluation Guidance: Score the soldier GO if all steps are passed. Score the soldier NO-GO if any step is failed. If the soldier fails any step, show what was done wrong and how to do it correctly. References
Required Related ST 31-157

STP 31-18E34-SM-TG
3 - 39
Construct a 14 Percent Off-Center-Fed Antenna 331-201-5017
Conditions: Given 150 feet of antenna wire, insulators or material to fabricate insulators, antenna support AB-155/U or site containing antenna support material, measuring tape, guy-rope material, knife, pliers, suitable radio set, lensatic compass, radio frequency, direction (azimuth) to orient antenna, paper, pencil, and stake. Standards: Compute antenna length, assemble antenna, and install antenna for operation within 30 minutes. Performance Steps
1. Compute antenna length by using the half-wavelength formula (468 divided by frequency [number in megahertz (MHz)]). Example: 1/2 = 468 divided by frequency. Frequency is 4 MHz. 468 divided by 4 = 117 feet.
2. Assemble the antenna. a. Use the antenna length determined in paragraph 1 above, cut length of wire needed. b. Locate the midpoint of the cut antenna wire.
Example: 1/2 of 117 feet = 58.5 feet. c. Calculate and locate a point 14 percent from the center of the antenna by multiplying .14 times
the figure determined in paragraph 1. Example: .14 x 117 feet = 16.38 feet
NOTE: Convert a tenth of a foot to inches by multiplying by 12. Example: .38 feet X 12 = 4 1/2 inches Therefore, the 14 percent is 16 feet 4 1/2 inches from the center of the antenna wire. d. Attach a single wire feeder to the 14 percent mark on the antenna wire as shown in Figure 1. e. Attach the guy ropes and insulators to the antenna as shown in Figure 1.
3. Install the antenna.

STP 31-18E34-SM-TG
3 - 40
Performance Steps
Figure 1. Fourteen Percent Off-Center Fed Antenna
a. Using the direction (azimuth) and compass, line up the antenna so it will be broadside to the
receiving station. b. Connect feeder line to antenna binding post of the radio.
c. Ground the radio as illustrated in Figure 1. Performance Measures GO NO GO
1. Compute antenna length by using the half-wavelength formula (468 divided by frequency [number in MHz]).
—— ——
2. Assemble the antenna. —— ——
3. Install the antenna. —— —— Evaluation Guidance: Score the soldier GO if all steps are passed. Score the soldier NO-GO if any step is failed. If the soldier fails any step, show what was done wrong and how to do it correctly. References
Required Related FM 11-487-1 ST 31-157

STP 31-18E34-SM-TG
3 - 41
Construct a Doublet Antenna 113-596-1070
Conditions: Given a requirement and a radio set, mast AB/155(*)/U (three each), antenna group AN/GRA-50 or sufficient W-1 antenna wire for the construction of the doublet antenna to the assigned frequency, compass M-2 or equivalent, TM 11-5815-334-10, TM 11-5820-256-10, TM 11-5820-467-15, and wire cutter kit TE-33 or equivalent. NOTE: Supervision and assistance are available. Standards: The standards are met when the doublet antenna is properly cut to frequency and erected broadside to the most distant station. Evaluation Preparation: Setup: For this evaluation, provide frequency for performance measure 1. Brief Soldier: Tell the soldier he must pass all performance measures. Performance Measures GO NO GO NOTE: Performance Measure 3 is a team task.
1. Construct antenna using W-1 antenna wire (refer to TM 11-5820-256-10, TM 11-5815-334-10, and TM 11-5820-467-15); or construct antenna using antenna group AN/GRA-50 (refer to TM 11-5820-467-15 and Figures 3-4, 3-5, and 3-6).
—— ——
a. Use formula 468/Frequency = length. b. Frequency ______ MHz. EXAMPLE: 468/26.00 MHz = length 26 x 18 feet = 468 18 feet halfwave or 9 feet quarterwave center fed
2. Prepare mast AB-155(*)/U for erection. (Refer to TM 11-5820-256-10 and TM 11-5815-334-10.)
—— ——
3. Erect antenna. (Refer to TM 11-5820-256-10 and TM 11-5815-334-10.) —— —— a. Antenna must be broadside to the most distant station. Determine azimuth
by using compass.
b. Connect antenna lead-in to radio set. (Refer to TM 11-5820-256-10.) Evaluation Guidance: Score the soldier GO if all steps are passed. Score the soldier NO-GO if any step is failed. If the soldier fails any step, show what was done wrong and how to do it correctly. Have the soldier practice until he can correctly perform the task. References
Required Related TM 11-5815-334-10 TM 11-5820-256-10 TM 11-5820-467-15

STP 31-18E34-SM-TG
3 - 42
Construct Sloping-Vee Antenna 331-201-5054
Conditions: Given 500 to 1000 feet of antenna wire, 10 feet of 600-ohm open-wire feed line, a balun and 100 feet of coaxial cable or 600-ohm open-wire feed line, two 300- to 400-ohm resistors, four insulators or material to construct insulators, one 50- to 75-feet and two 15- to 30-feet antenna support masts or site with existing supports (for example, trees, structures), a measuring tape, 200 feet of guide rope material, a knife, pliers, suitable radio set, compass, writing material, three stakes, and current signal operating instructions. Standards: Compute antenna length, assemble antenna, and connect antenna to radio set for operation within 30 minutes. Performance Measures GO NO GO
1. Assemble the antenna. —— —— NOTE: 1. Characteristics of a sloping-vee antenna: - Frequency range: 3 to 30 megahertz (MHz) - Polarization: Horizontal - Power Cap: Dependant on terminating resistors - Radiation Pattern: 20 degrees either side of direction of radiation 2. There are many variables to constructing any field-expedient antenna. The sloping-vee antenna should be at least one wavelength long and preferably several wavelengths long. A compromise tactical sloping-vee antenna can be constructed using two 500-foot legs. The length can be calculated by using the following formula: L = 492(N-.05)/frequency (MHz) L = length N = number of half wavelengths 3. This task will use the compromise tactical sloping-vee antenna for measurement purposes. a. Measure two lengths of antenna wire, each 502 feet long (add 12 inches to each end for insulators). b. Connect insulators to both ends of each antenna leg, ensuring the length between the insulators is 500 feet. c. Connect the insulator on one end of one leg to the insulator on the end of the other leg with the halyard material 4 to 6 inches apart. d. Connect the balun end assembly to antenna legs at the apex. e. Connect sufficient halyard material to the apex and terminating ends to raise the antenna to proper height.
2. Erect the antenna. —— —— a. Determine azimuth to the distant station. b. Align terminating ends toward the direction of the receiving antenna. c. Erect three antenna masts or choose three trees at the site to be used as
antenna masts.
d. Elevate the apex of the antenna to a height of no more than 75 feet and no less than 49 feet.
e. Adjust the distances between the legs (equal distance apart) to provide maximum radiation at the desired take-off angle.

STP 31-18E34-SM-TG
3 - 43
Performance Measures GO NO GO NOTE: The following angles between the legs (apex angle) will give good results for the distances indicated: 60 degrees 700 to 1000 miles 45 degrees 1000 to 1500 miles 30 degrees over 1500 miles
f. Elevate each of the terminating ends not more than 26 feet and not less than 15 feet.
g. Attach a resistor to each end of the terminating ends of the antenna legs. h. Drive stakes into the ground and attach the halyard to the stakes.
3. Attach the antenna to the radio set. Attach the ends of the feed line to the antenna posts or the coaxial cable connector to the coaxial post on the radio set.
—— ——
Evaluation Guidance: Score the solider GO if all steps are passed. Score the solider NO-GO if any step is failed. If the soldier fails any step, show what was done wrong and how to do it correctly. NOTE: Soldier needs to be trained in basic antenna theory, to include computing antenna lengths, and be able to determine direction with a compass. References
Required Related FM 11-65

STP 31-18E34-SM-TG
3 - 44
Install Antenna Group OE-254/GRC (Team Method) 113-596-1068
Conditions: Given antenna group OE-254/GRC, two persons for erecting the antenna, frequency modulation (FM) radio set (installed), DA Pam 738-750, and TM 11-5985-357-13. This task is performed in a tactical or nontactical situation. Standards: The standards are met when the OE-254/GRC is installed and connected to the FM radio set, and PMCS are performed IAW TM 11-5985-357-13 and DA Pam 738-750 within 25 minutes. Evaluation Preparation: Performance Measures GO NO GO (Refer to TM 11-5985-357-13 for all performance measures.)
1. Perform PMCS. —— ——
2. Plan antenna installation site. —— ——
3. Position baseplate and guy stakes. —— ——
4. Assemble antenna equipment. —— ——
5. Erect antenna using two persons. —— ——
6. Connect the CG-1889B/U connector to the radio. —— —— Evaluation Guidance: Score the soldier GO if all steps are passed. Score the soldier NO-GO if any step is failed. If the soldier fails any step, show what was done wrong and how to do it correctly. Have the soldier practice until he can correctly perform the task. References
Required Related DA PAM 738-750 FM 24-18 TM 11-5985-357-13 GTA 11-03-20 TB 43-0129

STP 31-18E34-SM-TG
3 - 45
Subject Area 5: Communication Systems
Employ Power Supply Assembly OP-177/U 331-201-5051
Conditions: Given power supply OP-177/U and one of the following batteries: BB-542/U, BB-490/U, or BB-590/U. Standards: Employ power assembly OP-177/U to charge a battery within 10 minutes in accordance with the training information outline. Performance Steps
1. Use single panel operations to charge BB-590/U or BB-490/U type batteries. Install and charge using the following procedures:
a. Open solar panel and position it directly in the sunlight. b. Connect banana plug end or 12-volt cable to the solar panel (observe polarity). c. Connect 12-volt cable to power supply assembly (PSA). d. Connect PSA to BB-590/U or BB-490/U. Batteries are charged when PSA reads 200
milliampere (ma).
2. Use dual panel parallel operation to charge BB-590/U or BB-490/U under overcast skies. The following operational steps assume single-panel operations are ongoing:
a. Connect a second solar panel to the first using a parallel cable (observe polarity). Use the piggyback plug on 12-volt cable.
b. Observed current on the PSA should double. PSA reading of 20 ma indicates a charged battery.
CAUTION: During this operation charge amperage (amp) should not exceed 1.2 amps or damage to batteries may occur. Shade, reposition, or close one side of the solar panels to stay below or at 1.2 amps.
3. Use series panel operation to charge BB-542/U batteries in sunny or partly sunny conditions using the following steps:
a. Position two solar panels in the sunlight. b. Connect the banana plugs of the 24-volt cable into each solar panel (observe polarity). CAUTION: Always connect battery to 23-volt cable last. The battery can discharge at high currents if banana plugs are short. NOTE: Charge can be confirmed using PSA, 12-volt cable by checking voltage on one panel, then "piggybacking" to series configuration. If a reading of 17 to 19 volts, direct current (VDC) is read both ways and reading is equal, charge is over.
4. Use quad panel series or parallel operation to charge BB-542 batteries in all light conditions and as quickly as possible using the following steps:
a. Place four solar panels in direct sunlight. b. Use two parallel cables, connect two pairs of solar panels (observe polarity). c. Connect 24-volt cable "piggy back" to opposite jacks from each parallel cable (observe
polarity). d. Connect BB-542/U to 24-volt cable. Charge should finish in 1 1/2 hours in bright sun. Using
PSA and 23-volt cable, charge can be confirmed as before by measuring "piggyback" at panels not connected to the 24-volt cable.
Performance Measures GO NO GO
1. Select the desired installation configuration. —— —— a. Single panel. b. Dual panel.

STP 31-18E34-SM-TG
3 - 46
Performance Measures GO NO GO c. Series panel. d. Quad panel series or parallel.
2. Install the power supply assembly. —— ——
3. Remove the charged battery. —— —— Evaluation Guidance: Score the soldier GO if all steps are passed. Score the soldier NO-GO if any step is failed. If the soldier fails any step, show what was done wrong and how to do it correctly. References
Required Related TM 11-6130-479-13&P
STP 31-18E34-SM-TG
3 - 47
Employ the Advanced Data Controller (ADC) 331-201-5039
Conditions: Given a radio set installed, computer with installed data terminal software (DTS) and the advanced data controller (ADC). Standards: Install and operate the ADC with DTS in accordance with (IAW) the training outline. Performance Steps
1. Install the ADC. NOTE: The power switches to the computer and encryption device must be in the OFF position before hooking the ADC to them. a. Connect the power to the port marked POWER on the ADC. b. Connect the cables from the computer and encryption device to the ADC. c. Connect the handset to the audio connector on the ADC. NOTE: When using the KY-99(A), the handset must be connected to the KY-99(A) not the ADC.
2. Operate the ADC. a. Perform an operational check. (1) Apply the power to the computer. (2) Place the ADC power switch to the LAMP position. (3) Light emitting diodes (LEDs) should light for about 4 seconds and liquid crystal display
(LCD) enunciators should light briefly. NOTE: If using the KY-57, make sure the power switch is in the time delay (TD) position (not the ON position). (4) The bottom of computer screen should indicate "TX; idle." NOTE: If the computer indicates "ADC not responding," there is a problem. If this happens, follow these steps: ( a) Ensure the LCD on the ADC indicates DTS. ( b) Press SET and check data rate. Computer and ADC data rate must match. ( c) Check cables, systematically swap equipment until the words "TX: idle" are seen. (5) Select user/destination. ( a) Press F3 function key and scroll down to the bottom of addresses to OA, OB, OC,
and OD. ( b) DO NOT use OA; the system uses it. ( c) OB/OC are used to preset groups. ( d) Selecting broadcast deselects groups. ( e) Always designate your station as the node. b. Send message using the ADC and the DTS software. (1) Open the file window by pressing F4 on the keyboard or by selecting the file item under
the DTS pull-down menu. (2) Select the file you wish to send by clicking once on the filename in the file display box. (3) Click on the send button. c. Receive a message using the ADC and the DTS software. NOTE: The DTS software will receive messages on its own after the ADC/DTS software has been set up properly. To view all messages received, open the inbox menu item located in the DTS menu bar or press F5 on the keyboard. NOTE: Data terminal software function keys are as follows: F1= Help F2= Notes F3= Destinations F4= Files F5= Inbox F6= Outbox F7= Next Screen

STP 31-18E34-SM-TG
3 - 48
Performance Steps F8= Configuration Performance Measures GO NO GO
1. Install the ADC. —— ——
2. Operate the ADC. —— —— a. Perform the operational check. b. Send a message. c. Receive a message. Evaluation Guidance: Score the soldier GO if all steps are passed. Score the soldier NO-GO if any step is failed. If the soldier fails any step, show what was wrong and how to do it correctly. References
Required Related VSD-613800-97-071 REV B

STP 31-18E34-SM-TG
3 - 49
Employ INMARSAT Terminal 331-201-5026
Conditions: Given a MX2400T SATURN, compact international maritime satellite (INMARSAT) terminal complete, secure telephone unit (STU)-III, a requirement to transmit and receive a message, and applicable reference manuals. Standards: Operate the INMARSAT terminal in accordance with (IAW) procedures outlined in the naval communications (NAVCOM) manual, and the SATURN compact terminal. Performance Steps
1. Install MX2400T INMARSAT terminal. NOTE: DMTF must be set on the STU-III telephone. Pick-up handset, press program (PGRM), then press *6; the display should read "DTMF HIGH"; if not, press 6 until it does. Hang up the handset. a. Install the terminal. (1) Open the zero suitcase. (2) Supply a 110- volt, alternating current (VAC) power source. (3) Remove the keyboard from the lid of the suitcase. (4) Lift the flat display. (5) Connect the keyboard to the DIN connector marked keyboard. (6) Turn the power on (takes 10 to 15 minutes). b. Install the antenna. (1) Lay the antenna transit case on its side and open. (2) Remove the tripod and deploy its adjustable legs. (3) Remove the "L" band electronics unit and insert the "L" band yoke into the top of the
tripod. (4) Rotate the "L" band electronics unit 90 degrees to the ground with heat sink down. (5) Hand-tighten the blue locking knobs. (6) Remove the two halves of the dish from the transit case. Place the half with the Magnavox
logo on the top of the "L" band electronics unit, slide it against the keyway with the logo on the same side as the "S" meter.
(7) Secure the dish to the "L" band with two quarter-turn CAM-LOC fasteners. (8) Place side two (other half of the dish) on the "L" band electronics unit and press against
side one so that the indexing pins line up and fasten with two CAM-LOC fasteners. (9) Fasten the 4 latches on the face of the disk. (10) Remove the horn assembly and press its connector side down in the center of the dish. (11) Secure in place with two threaded retainers on the support ribs on the back of the dish. (12) Aim the dish at the horizon with the meter on top. (13) Tighten the quarter-turn fasteners on the support ribs on the back of the dish. (14) Remove the antenna power supply and place it on the tripod cross-ribs. (15) Remove the 50-foot antenna control cable from the transit case and connect the 16-pin
and TNC connector to the back of the "L" band electronics unit. (16) Secure the connector by rotating the outer ring clockwise until tightened. (17) Connect the other end to the matching connectors NOTE: DO NOT wrap the cables under the cross-ribs or around the legs of the tripod. (18) Remove the 50-foot cable from the transit case and connect the 9-pin connector and TNC
connectors at the opposite end of the electronics console connectors marked ANTENNA (ANT).
(19) Turn on the switch marked ANT AC. (20) Place the compass on the back of the "L" band electronics unit. c. Initialize the MX2400T INMARSAT terminal. (1) Press F1 (screen appears).

STP 31-18E34-SM-TG
3 - 50
Performance Steps NOTE: 1. When screen 1 is displayed the cursor will be over the letters "N" or "S." 2. Use the right arrow key to move to the value you want to change. 3. To change, use the up arrow key for higher and the down arrow key to lower values. 4. Shift arrow key allows changes in increments of 10. PgUp goes to highest value possible and PgDn goes to the lowest value possible. 5. If the F6 (SAVE) key has not been pressed, the F10 key will cancel the change. (2) Choose one of the following: ( a) POSITION. Entries for latitude/longitude. NOTE: If you know the magnetic variation, go to screen 5 and enter it under the antenna orientation. ( b) REGION. Select satellite for the region of operation. ( c) COAST EARTH STATION (CES). Shows the CES that has been selected. ( d) DAY/TIME. Enter current date and time. NOTE: MESSAGE BOX in lower right hand screen displays messages from the central processing unit (CPU). Values that have been changed flash on and off. Press the F6 key to save. Press the F8 key to aim. d. Aim the antenna. (1) Press the F8 in screen 1. The MX2400T will compute the azimuth and elevation. They will
be displayed on screen 4. To get to screen 4, press SHIFT/F4. (2) Screen 4, marked "antenna column one," is the azimuth relative to north, and column two
is the elevation.
2. Operate the MX2400T INMARSAT terminal. a. Place a call. (1) Lift the handset, listen for a dial tone. (2) Dial subscriber's number (for example, 00 1 910 432 3633#).
-00 is for auto service. -1 is the country code. -910 is the area code. -432 3633 is the subscriber's number. -# is the ending sign.
(3) The connection is complete when the party answers go to secure on the STU-III telephone.
b. Receive a call. (1) Lift the receiver and go secure on the STU-III. (2) Local calls: 1 ring every 6 seconds. (3) Voice call from CES: 2 rings every 6 seconds.
3. Install the SATURN compact INMARSAT terminal. a. Install the antenna (1) Fasten the antenna rod to the terminal container. (2) Mount the antenna pivot on the top of the rod. (3) Mount the mid-dish section and feeder. (4) Connect the coax to the antenna and to the equipment. (5) Mount the dish side sections. (6) Mount the feeder reflector. b. Install the terminal. (1) Supply an AC power source (110 or 220 volts, direct current [VDC]). (2) Connect the cable from the main ID on the box to the phone. c. Initialize the terminal. (1) Turn on the main power. (NOTE: Terminal takes about 5 minutes to warm up.) (2) Terminal will run through the initializing sequence. (3) Press POINT and adjust the antenna orientation for maximum signal reading on the
display. (4) Once the terminal has achieved a maximum signal reading, press OPERATE.

STP 31-18E34-SM-TG
3 - 51
Performance Steps
4. Operate the SATURN compact INMARSAT terminal. a. Place a call. (1) Lift the handset; listen for the dial tone. (2) Dial the 4 digit code 0111. (3) Listen in the handset for a 1.5 second tone. (4) Dial subscriber's number (for example, 00 1 910 432 3633).
-00 is for auto service. -1 is the country code. -910 is the area code. -432 3633 is the subscriber's number. -# is the ending sign.
b. Receive a call. (1) Lift the receiver and go secure on the STU-III. (2) Local calls: 1 ring every 6 seconds. (3) Voice calls from CES: 2 rings every 6 seconds. Performance Measures GO NO GO
1. Install MX2400T INMARSAT terminal. —— ——
2. Install antenna. (NOTE: Ensure the blue knobs are ONLY hand-tightened.) —— ——
3. Initialize MX2400T INMARSAT terminal. —— ——
4. Operate the SATURN compact INMARSAT. —— ——
5. Dial subscriber's numbers and establish communication. —— ——
6. Receive an incoming call on the INMARSAT. —— —— Evaluation Guidance: Score the soldier GO if all steps are passed. Score the soldier NO-GO if any step is failed. If the soldier fails any step, show what was done wrong and how to do it correctly. References
Required Related LSS-94429 TT-98-107770A

STP 31-18E34-SM-TG
3 - 52
Employ STU-III 331-201-5025
Conditions: Given a secure telephone unit (STU)-III, operational telephone line, cryptographic ignition key (CIK), and the Motorola Secure Voice & Data Telephone User's Guide, August 1988. Standards: Place the STU-III into operation in accordance with (IAW) the training outline. Performance Steps
1. Install the STU-III telephone. NOTE: Prior to installation, ensure the zero button is pressed in (white not showing). a. Connect the power source. (1) Plug the 8-pin Deutshe Industries Norman (DIN) (German Standard Institute) power
converter into the DIN jack at the rear of the terminal. Match the notch in the DIN power converter to the notch on the DIN jack.
(2) Plug the female side of the power converter line cord into the power converter, then plug the other end into any standard three-pronged wall outlet.
NOTE: When the power is applied, the terminal will automatically run an internal diagnostics program to verify that it is functioning properly ("ringer Medium-Hi" will be displayed, if operational). b. Connect the handset. (1) Plug one end of the handset cord into the telephone receiver. (2) Plug the other end of the handset cord into the left side of the STU-III. c. Connect the telephone line cord between the STU-III and an outside line. (1) Plug one end of the telephone line cord into the jack at the rear of the STU-III. (2) Plug the other end of the telephone line into the telephone jack on the wall. d. Adjust the message display contrast using the adjustment knob on the rear of the terminal. e. Adjust the ringer volume. (1) Place the handset on-hook. (2) Make sure program annunciator is not showing. (3) Press VOL< or VOL> until desired setting appears on the message display.
2. Prepare the STU-III for operation. a. Program the STU-III installation options. (1) Make sure the handset is on-hook. (2) Press PRGM - program annunciator appears. (3) Press SCROLL. The display will show "Please wait." (4) Press * (to set options). (5) Press SCROLL to continue.
The message display will show "Clear mode ON." Press # to change. (6) Press SCROLL to continue.
The message display will show "Auto secure OFF." Press # to change. (7) Press SCROLL to continue.
The message display will show "Dial pause, set to 2 seconds." Use to set any display into a telephone dialing sequence. Press 1-9 on the keypad.
(8) Press SCROLL to continue. The message display will show "AV, preempt OFF." Use this option when STU-III is attached to an AUTOVON or Initial Voice Switched Network (IVSN) telephone network. Press # to change.
(9) Press SCROLL to continue. The message display will show "Setup tones OFF." Press # to change.
(10) Press SCROLL to continue. The message display will show "Data = synchronous." Press # to change.
(11) Press SCROLL, STU-III is now in the idle mode (program annunciator disappears).
3. Examine a memory dial location.

STP 31-18E34-SM-TG
3 - 53
Performance Steps a. Make sure handset is on-hook. b. Press PRGM - program annunciator appears. c. Press the memory dial key to be examined. If a number is stored in that location, number will
appear on the message display. d. Repeat step 3c to check additional locations. e. Press PGRM - program annunciator disappears. STU-III returns to the idle mode.
4. Store telephone numbers in the STU-III. a. Make sure handset is on-hook. b. Press PRGM - program annunciator appears. c. Press a memory dial key to store number; if already in the location, select another location or
erase the number. d. Make sure to enter all the digits you normally dial to reach the other party. Make sure to enter
all required pauses. Press PAUSE to enter a pause in the dialing sequence (when using AUTOVON/off-post prefixes, and so on).
e. Make sure the number shown on the display is correct; if not, press PRGM twice and repeat previous step.
f. Press the selected memory dial key. The terminal transfers the number to the memory dial key and the message display will blink.
g. Enter the identification of the memory dial key on the identification strip in the appropriate area. h. Repeat steps 4c through 4g for additional numbers. i. Press PRGM - program annunciator disappears.
5. Erase stored telephone number(s) from a memory dial location. a. Make sure handset is on-hook. b. Press PRGM - program annunciator appears. c. Press RESET. The memory dial key will be erased. d. Press PRGM - program annunciator appears.
6. Install a cryptograph fill in the STU-III for operation. a. Make sure handset is on-hook. b. Insert valid fill key and turn quarter-turn clockwise. c. Press PRGM. d. Press SCROLL. e. Press # (for communication security [COMSEC]). f. Press # (for fill). g. Press #. The display will read:
Serial Number OK? * = YES # = NO
NOTE: The serial number from the back of the phone must be entered; if not, enter it at this time. h. Press * if the number is okay. i. Press # if the number is not correct (or not present) and enter the new number using the
keypad. The display will read: Enter Number ? = Done 1234567890
j. Press #. The display will read: OK? * = YES # = No 1234567890 Press * 20 times
k. Press SCROLL. Check the key registration number and edition. l. Press SCROLL. Check type (I, II, and so on). m. Press SCROLL. Check expiration date and classification.

STP 31-18E34-SM-TG
3 - 54
Performance Steps n. Press SCROLL. Check department/agency/organization (DAO) code. o. Press SCROLL. Display will read "Department of Defense." p. Press SCROLL. Display will read:
Fill Correct? * = YES # = NO
q. Press *. r. Insert cryptographic ignition key (CIK) 1 (master key). s. Press #. Display will read:
Make Master CIK? * = YES # = NO
t. Press *. Display will read: Erasing Keying Secure Device (KSD). Please Wait. CIK 1 Loaded. Scroll to Exit. Insert CIK 2. Press # to Load. Completing Fill. Please Wait.
u. Press SCROLL. Display will read: Fill is Secure Editing (SEED) Key. Call the Key Management Center (KMC).
v. Make sure the master key is inserted in the STU-III prior to calling the KMC. w. Contact the KMC to convert the SEED key to operational fill. Display will read:
Key Update x. Hang up. y. Make the appropriate entries on SEED key card. z. Turn the card into the COMSEC custodian. aa. Make a spare key. (To make a spare key, you must have the master key and loan or spare
key.) (1) Make sure handset is on-hook. (2) Insert the master key and turn quarter-turn clockwise (make sure master key has the
same number as the STU-III). (3) Press PRGM - program annunciator appears. (4) Press # (COMSEC). (5) Press # (fill/add). (6) Press * (to add CIKs). (7) Remove master key. (8) Insert blank/spare CIK (CIK 2). (9) Press # (to load). (10) Repeat steps 6aa(8) through 6aa(9) for more keys (up to a maximum of seven spare
keys). (11) Press SCROLL. (12) Make appropriate entries on SEED key card. (13) Turn card into COMSEC custodian.
7. Operate the STU-III. a. Make sure that the STU-III options are set correctly. b. Operate the STU-III for nonsecure voice communications: (1) Nonsecure call (outgoing). ( a) Lift the handset and listen for the dial tone. ( b) Dial the phone number using the number keys, redial key, or a memory key (number
dialed will be displayed on the message display).
STP 31-18E34-SM-TG
3 - 55
Performance Steps ( c) When distant end answers, speak at normal level; if desired, adjust the earpiece
volume (VOL> or VOL< ). NOTE: If the mute annunciator is on, the distant party cannot hear you but you can hear them; press mute to disable. ( d) End the call by pressing reset or hanging up. (2) Nonsecure call (incoming). ( a) Lift the handset when the receiver rings. ( b) Speak at normal level; if desired, adjust the earpiece volume (VOL> or VOL< ). ( c) End call by hanging up. c. Operate the STU-III for secure voice communications. (1) Outgoing calls. ( a) Make sure your CIK is inserted and turn quarter-turn clockwise. ( b) Make sure that the HD annunciator is off; if not, press HALF DUPLEX. ( c) Place a call in the clear and establish voice contact with the distant station. ( d) Tell the distant station that you want to "GO SECURE." ( e) Press SECURE. ( f) The STU-III takes about 15 seconds to enter the secure mode. ( g) When the secure mode is established, the secure annunciator will appear. ( h) Speak at a normal level; adjust the volume as needed. NOTE: If voice quality becomes unintelligible, press SECURE to resynchronize. Either end may reinitiate the clear mode by pressing CLEAR. If the distant party presses CLEAR, communication will be disabled and nonsecure request will appear. To continue nonsecure, press CLEAR. ( i) Press CLEAR to reestablish plaintext communications. ( j) End the call by hanging up. (2) Incoming calls. ( a) Lift the handset when the receiver rings. ( b) Wait for the secure annunciator to appear. ( c) Speak at a normal level; adjust the volume as needed. ( d) End the call by hanging up. d. Operate the STU-III for data communications. (1) Make sure STU-III options are correct. (2) Connect the data cable from the data device to the STU-III. (3) Transmit and receive a data file. ( a) Establish a clear call to the distant station. ( b) Go SECURE with the distant station. ( c) Inform the distant station of your protocol settings - they must be the same. ( d) When both STU-IIIs are ready, press VOICE/DATA - data annunciator appears. NOTE: If a problem is encountered, the following message will be displayed: CLASSIFICATION LOCAL DISABLED CLASSIFICATION REMOTE DISABLED NOTE: If either message is displayed, the STU-III will return to the SECURE voice mode. ( e) Transfer data with the computer telecommunications software. NOTE: If the data you are transmitting suddenly becomes garbled, press SECURE to resynchronize. ( f) After the data transfer is complete, exit the data mode in any of the following ways:
1. Press VOICE/DATA, exit data mode and return to voice mode, still secure. 2. Press CLEAR, exit data mode and return to voice mode, nonsecure. 3. Press RESET or hang up the handset, exit the data and secure modes and end the call.
e. Zeroize the STU-III CIK. (1) Make sure the handset is on-hook. (2) Make sure the CIK to be erased is inserted. (3) Press PRGM. (4) Press SCROLL.

STP 31-18E34-SM-TG
3 - 56
Performance Steps (5) Press # (COMSEC). (6) Press * (status/zeroize). (7) Press * (for key). (8) Press *. (9) Press SCROLL. (10) Press SCROLL. (11) Press # (no). (12) Press # (no). (13) Press # (to zero CIK 1 ). (14) Press # (yes). (15) Press *. (16) Repeat steps 7e(14) through 7e(15). (17) Press PRGM. (18) Press SCROLL. f. Zeroize the STU-III terminal. (1) Verify the handset is on-hook. (2) Press PRGM. (3) Press SCROLL. (4) Press # (COMSEC). (5) Press * (status/zeroize). (6) Press * (for terminal). (7) Press *. (8) Press SCROLL. (9) Press SCROLL. (10) Press # (yes). (11) Press # (yes). (12) Press * the terminal has been zeroized. (13) Make the appropriate entries on the card. Performance Measures GO NO GO
1. Check the STU-III for damage and ensure the zero button is pressed in with no white showing.
—— ——
2. Install the STU-III. —— ——
3. Establish secure voice telephone communications. —— ——
4. Zeroize the STU-III, removing all crypto and key from the STU-III memory. —— —— Evaluation Guidance: Score the solider GO if all steps are passed. Score the soldier NO-GO if any step is failed. If the soldier fails any step, show what was done wrong and how to do it correctly. References
Required Related DA PAM 25-380-2 AR 380-5

STP 31-18E34-SM-TG
3 - 57
Operate SINCGARS Single-Channel (SC) 113-587-2070
Conditions: Given an operational SINCGARS, KYK-13/TSEC with keys, distant station, TM 11-5820-890-10-1, TM 11-5820-890-10-3, ACP 125 US Suppl-1, DA Pam 738-750, FM 24-19, FM 24-18, and unit SOI. Standards: The standards are met when a secure communications check is conducted in SC mode with a distant station. Evaluation Preparation: Performance Measures GO NO GO
1. Perform starting procedures. —— ——
2. Load traffic encryption key (TEK). —— ——
3. Enter net. —— —— a. Use correct procedures. b. Conduct secure communications check.
4. Exit net. —— ——
5. Perform stopping procedures. —— —— Evaluation Guidance: Score the soldier GO if all steps are passed. Score the soldier NO-GO if any step is failed. If the soldier fails any step, show what was done wrong and how to do it correctly. Have the soldier practice until he can correctly perform the task. References
Required Related ACP 125 US SUPPL-1 FM 24-19 DA PAM 738-750 FM 24-18 TM 11-5820-890-10-1 TM 11-5820-890-10-3 UNIT SOI

STP 31-18E34-SM-TG
3 - 58
Configure a Desktop IBM or Compatible Microcomputer for Operation 113-580-1032
Conditions: Given a central processing unit (CPU), monitor, keyboard, mouse, mouse pad, printer, surge suppressor, and Microsoft-Disk Operating System (MS-DOS), Version 3.0 or later. Standards: The standards are met when the TREE command is displayed and printed. Performance Steps
1. Prepare for configuration. a. Inventory components from enclosed packing lists. b. Select appropriate site. (1) Enough desktop space for computer and any peripheral devices. (2) Close proximity to electrical connection.
2. Configure the microcomputer. a. Place the CPU in the selected location. (1) Plug the female end of the power cable into the connector on the rear panel of the CPU. (2) Plug the male end into the surge suppressor. b. Place the keyboard in front of the CPU. (1) Plug the keyboard cable into the keyboard connector on the rear panel of the CPU. (2) Adjust the keyboard legs as desired. c. Connect the monitor. (1) Place the monitor on or near the CPU. (2) Connect the monitor power cable to the surge suppressor. (3) Connect the monitor signal cable to the monitor connector on the rear panel of the CPU. (4) Tighten the two screws on the monitor signal cable plug to anchor the cable to the
connector. d. Connect printer. (1) Connect printer interface cable to the printer connector on the rear panel of the printer. (2) Connect the opposite end of the printer interface cable to a printer connector on the back
panel of the CPU. (3) Tighten the two screws of the printer interface cable to anchor the cable to the connector. (4) Connect the printer power cable to the surge suppressor. (5) Set up printer paper. e. Connect mouse. (1) Connect the mouse to the appropriate serial port. (2) Tighten the two screws on the cable plug to anchor the cable to the connector. (3) Place the mouse pad next to the keyboard and set the mouse on it. f. Connect AC power. (1) Ensure the system power switch and surge suppressor switches are set to OFF. (2) Ensure that the CPU line voltage selection switch is set to the proper voltage. (3) Plug surge suppressor into the AC outlet.
3. Set up the system. a. Apply power to the system. b. If no operating system was factory installed, install the operating system. c. Install application software.
4. Test the system. a. Create text in Notepad or Wordpad. b. Save and print text. Evaluation Preparation:

STP 31-18E34-SM-TG
3 - 59
Performance Measures GO NO GO
1. Prepared for configuration. —— ——
2. Configured the microcomputer. —— ——
3. Set up the system. —— ——
4. Tested the system. —— —— Evaluation Guidance: Score the soldier GO if all steps are passed. Score the soldier NO GO if any step is failed. If the soldier fails any step, show what was done wrong and how to do it correctly. Have the soldier practice until he can correctly perform the task. References
Required Related CUM

STP 31-18E34-SM-TG
3 - 60
Prepare a Microcomputer System for Operation (Pentium Architecture) 113-580-1031
Conditions: You will need a disassembled IBM compatible Pentium Architecture microcomputer with all components, peripherals, and cables; operating system (OS) with documentation; computer repair tool kit; surge protector power strip; uninterrupted power supply (UPS), and voltmeter. Standards: The standards are met when the system and peripherals have power and commands entered are executed. Performance Steps
1. Select an appropriate location for setting up the microcomputer. This should be a flat, level, clear space approximately waist high or slightly lower. A table or desk top that can support the weight of the system is ideal. Occasionally, as in field environments, the system carrying cases may be used. Make special note to check with the office Informations Systems Security Officer (ISSO) to meet necessary security measures.
NOTE: For training information purposes, an IBM Compatible, Pentium Architecture, microcomputer is used. With minor modifications, any IBM compatible, Pentium Architecture, microcomputer system can be used for this task.
2. As the system is unpacked, visually inspected for burned, broken, frayed, loose, or missing components or cables.
3. If the equipment has been stored or transported in inclement weather (cold or wet), you must acclimatize the system to operating conditions for approximately 30 minutes before applying power.
4. Position and/or stack all the microcomputer system components into their working configuration. Normally this is with the monitor on top of the central processing unit (CPU) case and keyboard in front of this assembly. Cables should be labeled for ease of assembly. If not, pay close attention to ensure the peripherals are connected to the correct ports, check the cable lengths, distance to power outlets, proximity to large power supplies or boxes, water pipes, air conditioner units, heaters, and so forth. Allow adequate space for air circulation and cable connections.
5. As you connect data cables (between devices only), ensure you use the right cable for the right function. Check for bent pins and loose plugs. DO NOT connect power cables to the power source at this time.
6. Prepare all the peripherals for operation. Install printer paper and ribbons; clean scanners, screens, keyboards, and so forth.
7. Making the power connection.
a. Connect the system to an additional or separate power grounding connection, if available. b. Ensure all equipment power switches are in the OFF position; sometimes indicated as the "O"
position rather than the "1", particularly in CPU, and all peripheral equipment (printers, surge protectors, external compact disk read only memory (CD-ROM) units, and so forth) for 120 V or 240 V as required at your location. For the Pentium microcomputer, there is usually a switch placed on the front panel in the center or the upper right. If you are unable to locate the power switch consult the equipment Users Guide for that information.
c. Connect the power cables to the equipment. d. Plug the power cables into the surge protector/power strip.
STP 31-18E34-SM-TG
3 - 61
Performance Steps e. Connect the power strip to the UPS, if available, then connect the UPS to the power source. If
an UPS is not available, plug the power strip into the power source. When overseas using local power, the ground and polarity of the wall socket should be checked too prevent system burnout due to incorrect grounding. Use a voltmeter and check with the local utilities engineer, if necessary.
8. Now you're ready to apply power and boot the system.
Evaluation Preparation: Performance Measures GO NO GO NOTE: For the performance measures, the term computer will be restricted to that unit comprised of the chassis, chassis cover, CPU, random access memory (RAM), and all internally mounted electronic cards, chips, and devices.
1. Select the location for equipment setup, check with Information Systems Security Officer (ISSO).
—— ——
2. Unpack the equipment.
—— ——
3. Visually inspect the system for burned, broken, frayed, loose, or missing components or cables.
—— ——
4. Position and stack all microcomputer system components into the working configuration.
—— ——
a. Cathode ray tube (CRT) monitor. b. Computer.
c. Keyboard.
d. Printer.
e. Cables.
f. All peripherals.
5. Acclimatize the equipment for approximately 30 minutes, if required. —— ——
6. Connect all external data cables between the microcomputer, monitor, keyboard, and peripherals.
—— ——
7. Connect the microcomputer to an additional ground if required by the TM or manufacturer's reference manual.
—— ——
8. Connect each external component power cable to the surge protector/power strip.
—— ——
9. Connect the surge protector/power strip to an UPS, if available. —— ——
10. Complete the power connection to the power source.
—— ——
11. Power up all peripheral devices. —— ——

STP 31-18E34-SM-TG
3 - 62
Performance Measures GO NO GO
12. Boot the microcomputer system. —— —— Evaluation Guidance: Score the soldier GO if all steps are passed. Score the soldier NO-GO if any step is failed. If the soldier fails any step, show what was done wrong and how to do it correctly.

STP 31-18E34-SM-TG
3 - 63
Operate a Computer System 113-484-5001
Conditions: Given a computer system, software, network access, applicable reference manuals, and unit automation SOP. Standards: The system was functional and maintained IAW regulations and guidance, and the user was able to perform assigned tasks. Performance Steps
1. Assemble system components.
2. Power-up system and peripherals.
3. Install and configure operating system and applications software.
4. Create documents using word processing, spreadsheet, database, and graphics software.
5. Process E-mail. a. Start E-mail program. b. Prepare E-mail message. c. Send an E-mail message. d. Receive an E-mail message.
6. Transfer files between computers. a. Log onto the host computer. b. Upload files to the host computer. c. Download files from the host computer. d. Log off of the host computer.
7. Remove computer viruses. a. Perform virus checks on hard drive and disks. b. Remove all viruses IAW specific antivirus software and unit SOP. c. Report virus IAW SOP.
8. Perform disk maintenance. a. Scan disk for errors. b. Repair disk as required. c. Defragment disk.
9. Back up computer files. a. Duplicate system files. b. Duplicate data files. c. Duplicate entire file system for emergency restoration.
10. Restore computer files. a. Recover files. b. Read and utilize backup files.
11. Power down the system and peripherals. Performance Measures GO NO GO
1. Assembled system components. —— ——
2. Powered up system and peripherals. —— ——

STP 31-18E34-SM-TG
3 - 64
Performance Measures GO NO GO
3. Installed and configured operating system and applications software. —— ——
4. Created documents using word processing, spreadsheet, database, and graphics software.
—— ——
5. Processed E-mail. —— —— a. Started E-mail program. b. Prepared E-mail message. c. Sent an E-mail message. d. Received an E-mail message.
6. Transferred files between computers. —— —— a. Logged onto the host computer. b. Uploaded files to the host computer. c. Downloaded files from the host computer. d. Logged off of the host computer.
7. Removed computer viruses. —— —— a. Performed virus checks on hard drive and disks. b. Removed all viruses IAW specific antivirus software and unit SOP. c. Reported virus IAW SOP.
8. Performed disk maintenance. —— —— a. Scanned disk for errors. b. Repaired disk as required. c. Defragmented disk.
9. Backed up computer files. —— —— a. Duplicated system files. b. Duplicated data files. c. Duplicated entire file system for emergency restoration.
10. Restored computer files. —— —— a. Recovered files. b. Read and utilized backup files.
11. Powered down the system and peripherals. —— —— References
Required Related ISBN 0072122269 ISBN 0072337451 ISBN 0782122612 ISBN 0789710536 ISBN 1562057685 ISBN 1562763644
STP 31-18E34-SM-TG
3 - 65
Employ Radio Set AN/PRC-137 331-201-5061
Conditions: Given a complete radio set AN/PRC-137 and a communications requirement. Standards: Install and operate the AN/PRC-137 radio in accordance with (IAW) the procedures prescribed in the training information outline. Performance Steps
1. Check the radio for completeness and damage. WARNING: The following protective measures should be observed when operating the radio in extreme weather conditions. a. Cold climates: (1) Be careful when handling the cables and connecting them, so that kinks and unnecessary
loops will not result in permanent damage. (2) Make sure all connectors are free of frost, snow, and ice. Replace covers when they are
not in use. (3) Never drag or place an open connector in the frost, snow, or ice. b. Hot climates: (1) Replace the connector covers as soon as the cable is disconnected. (2) Never place an open connector on the ground. c. In warm and damp climates, use a soft cloth to wipe all moisture and fungi from the equipment.
2. Install the battery. a. Verify that the mode switch is set to OFF position. b. Position the receiver/transmitter (R/T) unit, with the handles down, on a solid surface. c. Unfasten the two drawhook latches on the battery box and remove the battery box. d. Inspect the battery box and the battery, if installed, for signs of damage. e. Carefully plug the new battery into the mating connector on the R/T. f. Replace the battery box and secure it with the two drawhook latches. WARNING: A lithium-sulfur dioxide (Li-SO2) battery is used with the R/T. It contains pressurized sulfur dioxide (SO2) gas, which is toxic. The battery MUST NOT be abused in any manner that would cause it to rupture. (1) DO NOT heat, short circuit, crush, puncture, mutilate, or disassemble the battery. (2) DO NOT use a battery that shows signs of damage, such as bulging, swelling,
disfigurement, a swollen plastic wrap, or a brown liquid in the plastic wrap. (3) DO NOT test a Li-SO2 battery for capacity. (4) DO NOT recharge a Li-SO2 battery. Lithium-based batteries may explode during
recharging, causing severe personal injury and equipment damage. (5) DO NOT use water to extinguish Li-SO2 battery fires if a shock hazard exists due to high
voltage electrical equipment in the vicinity (that is, greater than 30 volts alternating current [VAC] or direct current [VDC]).
(6) If the battery compartment becomes hot to the touch, if you hear a hissing sound (battery venting), or detect SO2 gas (a pungent, irritating odor), IMMEDIATELY turn off the equipment. Move the equipment to a well-ventilated area or leave the area.
(7) DO NOT use a halon-type fire extinguisher on a lithium battery fire. (8) In the event of a fire near a lithium battery, rapid cooling of the battery is important. Use a
carbon dioxide (CO2) extinguisher. Control of the equipment fire, and cooling, may prevent the battery from venting and potentially exposing lithium metal. If lithium becomes involved in the fire, the use of a graphite-based Class D fire extinguisher is recommended; for example, Lith-X, MET-L-X.
(9) DO NOT store lithium batteries with other hazardous materials. Keep them away from open flame or heat.
3. Install the antenna.

STP 31-18E34-SM-TG
3 - 66
Performance Steps a. Attach the ground or counterpoise wire to the black antenna binding post. b. Attach the antenna feed line to the red antenna binding post. c. Remaining accessories will be installed during the operation of the radio set. NOTE: The outstation (OS) radio is supplied with a BNC adapter for interfacing to standard antenna systems (AS-2259, special operations radio antenna kit [SORAK], dipoles, whips, and so on). The coupler eliminates the need for the antenna to present a 50-ohm impedance to the OS.
4. Operate the AN/PRC-137. a. Turn on the digital message devise (DMD). “Create a new MSG” should appear on the screen. b. Press ENTER and type in your message. c. After the complete message text is typed in, press the END key. d. Press the arrow key until “Save MSG” is highlighted, then press ENTER. e. Give the message a filename and press ENTER. f. Scroll down the menu and highlight “Existing MSG CMDS” and press ENTER. g. Highlight “Load a MSG” and press ENTER. h. Connect the DMD to the red audio connector on the radio and place in the NORM position. i. Select the MSG to be loaded and press ENTER. j. Enter the password and press ENTER. k. When asked, “Do you want to change password?” press N (no). l. Place R/T in the auto mode. The message is now loaded and will be transmitted during the
next contact time.
5. Program the AN/PRC-137. a. Zero the radio. (1) Verify the mode switch is in the OFF position. (2) Verify the BA 5590 battery pack is connected to the radio. (3) Place the mode switch to the Z position. (4) Push the Z button twice. (5) Connect a handset to the red dot connector. (6) Click the handset to the red dot connector. (7) Observe that the light emitting diode (LED) will momentarily stop flashing. (8) Disconnect the handset. NOTE: The radio is now zeroed. b. Load the key encryption key (KEK). (1) Connect the KOI-18 fill device to the red dot connector. NOTE: The LED should stop flashing. (2) Feed the key tape through the KOI-18 fill device. (3) Observe that the LED flashes once. NOTE: If any of the above conditions do not occur, repeat steps 5a through 5b (4) Disconnect the KOI-18 from the radio. (5) Observe that the LED flashes rapidly again. NOTE: The radio is now loaded with the KEK. c. Download operating parameters. (1) Connect the serial 2 cable from the basestation laptop to the radio red dot connector. (2) Select "Programs OS" from the command menu. (3) Follow the instructions on the screen to load the radio with the keys (transmission
encryption key [TEK], transmission security key [TSK], and emergency field broadcast [EFB]), operating parameters, and schedules.
(4) Observe that the download of operating parameters is complete. ( a) The radio will momentarily, rapidly click. ( b) The radio will pass a self-test. ( c) The basestation will display "OS successfully programmed." NOTE: Should any of these conditions not occur, repeat steps 5c(1) through 5c(4). d. Shut down the system. (1) Disconnect the radio from the basestation.

STP 31-18E34-SM-TG
3 - 67
Performance Steps (2) Turn the mode switch to OFF. (3) Pack the system for deployment. NOTE: The time of day and date should be checked against the ANTRQ-43 for accuracy prior to deployment. The OS date and time must be within 2 minutes of the basestation date and time to be operational. It is recommended that the OS be tested over the air with the basestation prior to deployment. Performance Measures GO NO GO
1. Place DMD into operation. —— ——
2. Enter the message. —— ——
3. Press the END key. —— ——
4. Save the message. —— ——
5. Name the message. —— ——
6. Load the message to the radio. —— ——
7. Enter the password. —— ——
8. Place in auto mode. —— —— Evaluation Guidance: Score the soldier GO if all steps are passed. Score the soldier NO-GO if any step is failed. If the soldier fails any step, show what was done wrong and how to do it correctly. References
Required Related AN/PRC-137 AN/PRC-137 SF RADIO

STP 31-18E34-SM-TG
3 - 68
Prepare SINCGARS (Manpack) for Operation 113-587-1064
Conditions: Given an operational SINCGARS manpack radio with battery box CY-8346, battery BA-5590, antenna AS-3683, handset H-250, pack frame with straps, TM 11-5820-890-10-1, and TM 11-5820-890-10-3. Standards: The standards are met when battery is correctly installed, function controls are correctly preset for operation, radio is mounted on backpack, and accessories are correctly connected. Evaluation Preparation: Performance Measures GO NO GO
1. Install batteries. —— ——
2. Install antenna. —— ——
3. Connect handset H-250. —— ——
4. Assemble radio and pack frame. —— ——
5. Preset function controls. —— —— Evaluation Guidance: Score the soldier GO if all steps are passed. Score the soldier NO-GO if any step is failed. If the soldier fails any step, show what was done wrong and how to do it correctly. Have the soldier practice until he can correctly perform the task. References
Required Related TM 11-5820-890-10-1 TM 11-5820-890-10-3

STP 31-18E34-SM-TG
3 - 69
Employ Radio Set AN/PSC-5 331-201-5751
Conditions: Given a requirement and a complete radio set AN/PSC-5 with two BA 5590 or two BA 590 batteries. Standards: Install and operate in accordance with (IAW) procedures outlined in TM 11-5820-1130-12&P. Performance Steps
1. Verify that the equipment is complete. WARNING: The following protective measures should be observed when operating the radio in extreme weather conditions. a. Cold climates: (1) Be careful when handling the cables and connecting them, so that kinks and unnecessary
loops will not result in permanent damage. (2) Make sure all connectors are free of frost, snow, and ice. Replace covers when they are
not in use. (3) Never drag or place an open connecter in the frost, snow, or ice. b. Hot climates: (1) Replace the connector covers as soon as the cable is disconnected. (2) Never place on open connector on the ground. c. In warm and damp climates, use a soft cloth to wipe all moisture and fungi from the equipment.
2. Install the batteries. a. Verify that the mode switch is set to OFF position. b. Position the receiver/transmitter (R/T) unit, with the handles down, on a solid surface. c. Unfasten the two drawhook latches on the battery box and remove the battery box. d. Inspect the battery box and the batteries, if installed, for signs of damage. e. Carefully plug the new batteries into the mating connector on the R/T. f. Replace the battery box and secure with the two drawhook latches. WARNING: Two lithium-sulfur dioxide (Li-SO2) batteries are used with the R/T. They contain pressurized sulfur dioxide (SO2) gas, which is toxic. The batteries MUST NOT be abused in any manner that would cause them to rupture. (1) DO NOT heat, short circuit, crush, puncture, mutilate, or disassemble the batteries. (2) DO NOT use batteries that show signs of damage, such as bulging, swelling,
disfigurement, a swollen plastic wrap, or a brown liquid in the plastic wrap. (3) DO NOT test Li-SO2 batteries for capacity. (4) DO NOT recharge Li-SO2 batteries. Lithium-based batteries may explode during
recharging, causing severe personal injury and equipment damage. (5) DO NOT use water to extinguish Li-SO2 battery fires if a shock hazard exists due to high
voltage electrical equipment in the vicinity (that is, greater than 30 volts alternating current [VAC] or direct current [VDC]).
(6) If the battery compartment becomes hot to the touch, if you hear a hissing sound (battery venting), or detect SO2 gas (a pungent, irritating odor), IMMEDIATELY turn off the equipment. Move the equipment to a well-ventilated area or leave the area.
(7) DO NOT use a halon-type fire extinguisher on a lithium battery fire. (8) In the event of a fire near a lithium battery, rapid cooling of the battery is important. Use a
carbon dioxide (CO2) extinguisher. Control of the equipment fire, and cooling, may prevent the battery from venting and potentially exposing lithium metal. If lithium becomes involved in the fire, the use of a graphite-based Class D fire extinguisher is recommended; for example, Lith-X, MET-L-X.
(9) DO NOT store lithium batteries with other hazardous materials. Keep them away from open flame or heat.

STP 31-18E34-SM-TG
3 - 70
Performance Steps NOTE: An internal hold-up device retains communications security (COMSEC) and order wire variables in memory storage for at least 2.5 minutes after battery removal. Ten minutes after the new battery installation, the internal hold-up device can again retain variables.
3. Install the accessories. a. Line of sight (LOS) antenna. (1) Remove the antenna connector protector cover. (2) Install the LOS antenna on the R/T antenna connector by turning the LOS antenna fully
clockwise (finger-tighten only). WARNING: Use of the AN/PRC-5 in the frequency modulation (FM) LOS modes cannot expose the user to non-ionizing radiation greater than the whole-body limits. Physical contact with any nearby metallic object may cause a radio frequency (RF) shock or burn and shall therefore be avoided. DO NOT use the antenna if the sheath covering is damaged or removed, because contact with the internal metallic parts of the antenna can cause an RF shock or burn. b. Install the satellite antenna. WARNING: Satellite communications antennas concentrate transmitter signals into beams of high-energy electromagnetic radiation. DO NOT stand in front of the satellite antenna or touch it at any time when transmitting. Since the AN/PRC-5 can transmit in a demand assign multiple access (DAMA) mode without the user being aware, a distance of at least 10 inches should be maintained from the front of the satellite antenna at all times to avoid partial body exposure, which could exceed the applicable permissible limits. Avoid physical contact with any bare-metal wire or antenna surface because it could result in RF shock or burn. (1) Open the antenna carrying case cover by releasing the hook/pile fastener. (2) Remove the antenna from the carrying case. (3) Release the strap holding the tripod legs around the antenna assembly. (4) Push/set tripod legs to receptacles and set up on the ground. WARNING: Satellite antenna dipole elements are spring-loaded. Release elements away from immediate personnel. (5) Press down on the locking ring and release the four dipole elements. (6) Open eight telescoping ground plane arms by pulling down and out on the conductive
chain attached to each arm. (7) Place the antenna assembly in the vertical position and loosen "T" screw
counterclockwise. (8) Adjust the antenna angle and hand-tighten "T" screw clockwise. (9) Use a compass to position the dipole elements to the desired azimuth according to the
operation requirements. NOTE: Additional ballast may be required to hold down the antenna when operating in high wind environments. (10) Unfold the radials. (11) Connect two radials together as an array. (12) Insert the long ends of array into the driven assembly. NOTE: Verify that the array elements align with the dipole elements. (13) Connect P2 of the antenna cable W6 to the satellite antenna (ANT) connector. (14) Connect P1 of W6 to ANT connector on R/T. c. Install the handset H-250O/U. (1) Align keyway of the handset connector with the keyway of the R/T audio connector and
press down. (2) Lock the handset connector by turning clockwise. d. Interface the KL-43. (1) Connect P1 of interface cable W2 to the auxiliary (AUX) connector on the radio set. (2) Connect P2 of interface cable W1 to the input/output connector on the KL-43. e. Interface the digital communications terminal (DCT) AN/PSC-2. (1) Connect P1 of interface cable W2 to the AUX connector on the radio set. (2) Connect P2 of interface cable W2 to the input/output connector on the DCT. f. Interface the digital message device group (DMDG) OA-8990.

STP 31-18E34-SM-TG
3 - 71
Performance Steps (1) Connect W3P1 to the AUX connector on the radio set. (2) Connect W3P2 to the satellite connector on the DMDG.
4. Perform power-up procedure. a. Verify batteries are installed. NOTE: If a low battery message appears or the radio suspends operation after new BA-5590 batteries have been installed, perform the BA 5590 battery preconditioning procedure before proceeding. Battery preconditioning procedures are as follows: (1) Cycle power (turn radio on then off) two or three times. Allow power up built-in-test (BIT) to run each cycle. (2) Select LOS mode from the current mode menu and set for an unused frequency. Adjust power for 30 dBm. (3) Disconnect antenna. (4) Attach handset. (5) Press escape (ESC) until the main menu is displayed. (6) Press 4 (BIT options). (7) Press 6 (battery level). (8) Press push-to-talk (PTT) switch. Battery voltage will drop and start to climb. (9) When the voltage reaches 24 volts, release PTT switch. (10) Press PTT switch again. If the voltage remains above 24 volts, the batteries are good. If not, hold PTT switch until the voltage rises to 24 volts and repeat steps 8 and 9 If the voltage will not reach 24 volts, replace the batteries. b. Set mode switch to plaintext (PT) position. The radio set displays "Initializing Radio" for
approximately 2 seconds. NOTE: The message "AN/PSC-5 Igniting Modules" will appear for 1 second or less. c. Observe that the radio set initiates power-up BIT. NOTE: During BIT, the display will alternately show a checkerboard test pattern and a status message with the version of the latest loaded software. d. Observe the display. After 30 seconds, the power-up BIT will be completed. The display will
show the last active current mode menu.
5. Perform the fill procedures. a. Connect the desired fill device to the fill connector on R/T. (1) If using KYK-13, set address select (fill) switch to desired key position and proceed to step
5b. (2) If using KOI-18, proceed to step 5b. (3) If using KYX-15, set desired address select switch to ON. Set all other address select
switches to OFF and proceed to step 5b. (4) If using AN/CYZ-10, proceed to step 5b. NOTE: If the display shows the message "COMSEC Alarm," press ENTER key and proceed. If the message persists, press PTT on handset. b. Rotate the mode switch on R/T to ciphertext (CT) position, then to F1. NOTE: If no keys are loaded, the display shows "COMSEC Randomize Proceed to F1" and press ENTER twice. (1) Press ENTER key. (2) Press ENTER key again. c. Enter COMSEC key number (1-6) using keypad number key. NOTE: The "Key Type" field will default to over-the-air rekey (OTAR) if key 6 was selected. Key 6 contains the key encryption key (KEK) that processes as incoming OTAR for storage keys 1-5. Key 6 by itself is not OTAR'ed, it is used to process the OTAR. d. Press the arrow keys to select the desired key tape. e. Load the COMSEC using KYK-13. (1) Set the mode switch on the KYK-13 to ON. (2) Press ENTER key on R/T. (3) Observe that the light emitting diode (LED) on the KYK-13 flashes.

STP 31-18E34-SM-TG
3 - 72
Performance Steps NOTE: The display shows the message "Filling." (4) Set the mode switch on the KYK-13 to OFF within 15 seconds. NOTE: The display shows the message "Key Filled" or "Key Fill Failure." (5) Repeat steps 5d through 5e(7) for additional keys to be filled. (6) Disconnect the KYK-13 from the R/T and deselect the F1 position on the mode switch if
the fill is complete. (7) Repeat steps 5d through 5e(7) if key failed. f. Load the COMSEC using KOI-18. (1) Install the tape in the KOI-18. (2) Press ENTER key on R/T. NOTE: The display shows the message "Filling." (3) Pull the paper tape through the KOI-18. (4) Disconnect the KOI-18 from the R/T within 15 seconds. NOTE: The display shows the message "Key Filled" or "Key Fill Failure." (5) If additional keys are to be filled, reconnect the KOI-18 and repeat steps 5f(1) through
5f(4). (6) If the fill is complete, deselect the F1 position on the mode switch. (7) If the key fill failed, reconnect the KOI-18 and repeat steps 5f(1) through 5f(4). g. Load the COMSEC using KYX-15. (1) Set the mode switch on KYX-15 to load (LD). (2) Press ENTER on the R/T. NOTE: The display shows the message "Filling." (3) Set the mode switch on the KYX-15 to OFF within 15 seconds. (4) Disconnect the KYX-15 from the R/T. NOTE: The display shows the message "Key Filled" or "Key Fill Failure." (5) If additional keys are to be filled, reconnect KYX-15 and repeat steps 5g(1) through 5g(4). (6) If the fill is complete, deselect the F1 position on the mode switch. (7) If the key fill failed, reconnect the KYX-15 and repeat steps 5g(1) through 5g(4). h. Load the COMSEC using the AN/CYZ-10. (1) Press the ON/OFF key on the AN/CYZ-10. NOTE: The AN/CYZ-10 display shows the message "System Loaded." (2) Proceed with the fill procedures on the AN/CYZ-10. (3) Select transmit (XMIT) and ENTER when the application menu appears on the AN/CYZ-
10. (4) Press SELECT on the AN/CYZ-10. (5) Press ENTER on the AN/CYZ-10. (6) Scroll to QUIT on the AN/CYZ-10. (7) Press ENTER on the AN/CYZ-10. (8) Press clear (CLR) on the AN/CYZ-10. (9) Press SEND on the AN/CYZ-10. NOTE: The AN/CYZ-10 display shows the message "Press Initiate on Receiving Station." (10) Press ENTER key on the R/T. NOTE: The display on the R/T shows the message "Key Filling" or "Key Fill Failure." (11) Disconnect the AN/CYZ-10 cable from the R/T. (12) If additional keys are to be filled: ( a) Reconnect the AN/CYZ-10. ( b) Repeat steps 5h(2) through 5h(9). ( c) Select RETRANSMIT on the AN/CYZ-10. ( d) Press ENTER. ( e) Repeat steps 5h(8) through 5h(12). (13) If fill is complete: ( a) Press the ON/OFF key on the AN/CYZ-10. NOTE: The display on the R/T shows the message "Shut Down in Progress." ( b) Deselect the F1 position on the R/T mode switch. (14) If the key fails, reconnect the AN/CYZ-10 and repeat steps 5h(1) through 5h(11).
STP 31-18E34-SM-TG
3 - 73
Performance Steps
6. Conduct premission LOS setup. NOTE: DO NOT use frequencies not assigned by the higher command. The radio set, AN/PSC-5, is capable of extended frequency operations from 30 to 399.995 megahertz (MHz). Inappropriate or uncoordinated use of unauthorized frequencies is a violation of laws and treaties and may be punishable by law. a. Load the LOS presets. (1) Press ESC key until the main menu is displayed. NOTE: The display shows "Main Menu:" ( a) Current Mode. ( b) Database Options. ( c) Set Presets. ( d) BIT Options. ( e) Maintenance. (2) Press 3 key. The display shows the last used set preset menu. NOTE: The data rate field will only be displayed when the mode switch is in the CT position. NOTE: Press NEXT/PREV key to move the cursor past the fields requiring no change. The "#" sign indicates field data to be entered when loading presets. (3) Press the arrow keys to select LOS. (4) Press ENTER key until the cursor moves to the next field. (5) Enter the desired preset number (1-6) using the keypad number keys. (6) Press ENTER key. NOTE: If the selection for the type of modulation is incompatible with the frequency selected, the R/T will automatically select a valid frequency. The cursor will jump to the frequency field when this occurs. Enter the correct frequency and go to the next step. (7) Press the arrow keys to select amplitude modulation (AM) or FM (select FM for frequency
shift keying [FSK]). (8) Press ENTER key. NOTE: The encryption type field (next step) must be entered even if operating in PT. This field will be displayed when in the PT position in the current mode. (9) Press the arrow keys to select VINSN to KG-84. (10) Press ENTER key. (11) Press the arrow keys to select voice (V) or data (D) mode. (12) Press ENTER key. (13) Press the arrow keys to select "Normal." (14) Press ENTER key. (15) Press the arrow keys to select the desired power level. (16) Press ENTER key. NOTE: Press the arrow keys to move the cursor from one character to another within a multiple-entry field. (17) Enter the desired receive operating frequency with the keypad number keys. (18) Press ENTER key. (19) Press ENTER key if transmit frequency is the same. (20) Enter the transmit frequency, if different than receive frequency, using the frequency
keypad number keys. (21) Press ENTER key. (22) Repeat steps 6a(3) through 6a(21) to load additional presets. (23) Set the mode switch to OFF. b. Load the SCAN parameters. (1) Set the mode switch to PT. (2) Press the ESC key until the main menu is displayed. (3) Press 3 key. (4) Press the arrow keys to select LOS. (5) Press ENTER key.

STP 31-18E34-SM-TG
3 - 74
Performance Steps NOTE: The frequencies previously entered in the preset that will be used for SCAN are still available but not displayed. (6) Enter the preset number using the keypad number keys for the preset you wish for the
SCAN mode operation. (7) Press ENTER key. (8) Press NEXT key. (9) Press arrow keys. (10) Press ENTER key. (11) Press arrow keys to select the desired power level. (12) Press ENTER key. (13) Select the first SCAN LOS preset (1-6) using the keypad number keys. (14) Press ENTER key. (15) Select the second SCAN LOS preset (1-6) using the keypad number keys. NOTE: Select 0 if the transmit frequency is the same as the receive frequency. (16) Press ENTER key. (17) Press ESC to return to main menu. c. Load BEACON preset. (1) Press ESC key until the main menu is displayed. (2) Press 3 key. (3) Press arrow keys to select BEACON. (4) Press ENTER key. (5) Enter the transmit frequency using the keypad number keys. NOTE: Type of modulation is selectable only when both AM and FM are valid for the selected frequency. (6) Press arrow keys to select AM or FM. (7) Press ENTER key. NOTE: The transmit power is not selectable in BEACON mode. (8) Press ESC to return to main menu. Performance Measures GO NO GO
1. Inventory the equipment. —— ——
2. Install the batteries. —— ——
3. Install the accessories. —— ——
4. Perform fill procedures. —— ——
5. Conduct premission LOS setup. —— —— Evaluation Guidance: Score the soldier GO if all steps are passed. Score the soldier NO-GO if any step is failed. If the soldier fails any step, show what was wrong and how to do it correctly. References
Required Related TM 11-5820-1130-12&P

STP 31-18E34-SM-TG
3 - 75
Employ Radio Set AN/PRC-104B 331-201-5086
Conditions: As a communications sergeant in a field environment, given an AN/PRC-104B, current unit operating instructions, a requirement for high frequency (HF) communications, TM 11-5820-1045-12, and a distant communications station. Standards: Inventory and install the radio set in accordance with (IAW) TM 11-5820-1045-12, and establish HF communications IAW the current signal operating instructions. Performance Measures GO NO GO
1. Check radio set for completeness and damage. —— ——
2. Install batteries and attach battery box to bottom of radio. —— ——
3. Assemble and mount whip antenna or HF antenna suitable for communications to the distant station.
—— ——
4. Connect H-250/189 handset to the receive/transmitter (R/T). —— ——
5. Set antenna selector on the amplifier coupler AM-6874 to the proper antenna position.
—— ——
6. Set selected frequency for transmission. —— ——
7. Turn on radio (turn volume OFF/MAX knob to halfway). —— ——
8. Transmit message to distant station and receive acknowledgement of contact. —— —— Evaluation Guidance: Score the soldier GO if all steps are passed. Score the soldier NO-GO if any step is failed. If the soldier fails any step, show what was done wrong and how to do it correctly.

STP 31-18E34-SM-TG
3 - 76
Employ Radio Set AN/PRC-113 331-201-5083
Conditions: Given an AN/PRC-113 complete, a call sign, and frequency. Standards: Install, operate, and maintain the AN/PRC-113; establishing voice communications with a distant element within 10 minutes. Performance Steps
1. Check the radio for completeness and damage.
2. Install the battery box. a. Position the receiver/transmitter (R/T) unit, with handles down, on a solid flat surface. b. Check the rear panel of the R/T unit to make sure the gasket is in place and in good condition. c. Install two batteries of the same type while carefully aligning the connector and fully seating
each battery. d. With the latches in the open position, install the battery box over the batteries. e. While pressing down on the bottom of the battery box, place each latch bar over the R/T until
the ears and lock latch.
3. Install the handset. a. Position the R/T unit, with handles up, on a solid flat surface. b. Remove the cap from the audio connector and push the handset connector onto the audio
connector; twist to connect.
4. Install the antenna. a. Position the R/T upright (function control is OFF). b. Remove the cap from the antenna connector, screw the antenna onto the radio antenna
connector clockwise and hand-tighten.
5. Conduct turn-on procedures. a. Turn the OFF/VOLUME control knob clockwise to the ON position. NOTE: The display shows 888.888 for approximately 4 seconds. After 4 seconds, the display shows the last frequency to preset channel set into the radio and special operating modes (guard receiver [GD], squelch [SQL], or low power [LPR]) that were previously set in. b. Adjust dimness (DIM) control knob for desired brightness on display. c. Observe display decimal point. NOTE: If display decimal point is blinking, replace the radio set batteries. d. Select the manual frequency. (1) Press the ENTER key on the keyboard. (2) Press either the 1, 2, or 3 for the first number key of the new frequency. The display
shows 1, 2, or 3. NOTE: All frequencies must start with either 1, 2, or 3. When the first number of a new frequency is selected and displayed, the remaining numbers of the display will go black, indicating need for additional entries. Selection of an invalid (out-of-band) frequency number will cause that number to blink on the display. (3) Press the second number key of the new frequency. (4) Press the third number key of the new frequency. (5) Press the fourth number key of the new frequency. (6) Press the fifth number key of the new frequency. NOTE: The sixth number of any frequency will always be 0 or 5. If the fifth number is 2 or 7, the sixth number will be 5. If the fifth number is 5 or 0, the sixth number will be 0. This is an automatic function of the radio set. NOTE: After the fifth number has been entered and the sixth number is entered automatically, the display will blink on and off for approximately 30 seconds.

STP 31-18E34-SM-TG
3 - 77
Performance Steps (7) Press the ENTER key to set the new operating frequency into the radio set; the blinking
will stop. The radio is ready for operation and will manually set the frequency. NOTE: If the ENTER key is not pressed within 30 seconds, while the display is blinking, the radio set will return to the last frequency setting. e. Load preset channels. (1) Perform steps 1 through 6 of loading a manual frequency. (2) Press the 0 preset (PRST) key after all frequency numbers have been entered and the
display is blinking. NOTE: The display shows "LP-." (3) Press the key number assigned to that preset channel (1 through 8). Example: When 2 is pressed, the display shows "LP-2." (4) Press the ENTER key to load the selected frequency into the radio's memory. NOTE: The display will show the frequency manually entered into the memory and tune the radio to this frequency. NOTE: The radio set can now be operated on the frequency loaded into the preset channel. (5) Repeat steps 1 through 4 to preset each of the eight preset channels. f. Select the preset channel. (1) Press the 0 key. (2) Press the key (1 through 8) that will operate the radio on the desired preset channel. EXAMPLE: When 3 is pressed, the display shows "P-3." NOTE: The radio set will now receive and transmit on the frequency loaded into channel 3. To recall any other preset channel, press the channel number. (3) Press the ENTER key to see the selected preset channel. g. Select operating mode. NOTE: Before any operating modes can be selected, a frequency must be shown on the display. (1) Low power/high power. Press the 4 (LRP) key. NOTE: The radio set will transmit in the 2-watt mode when the LPR on the display is lit. The radio set transmits in the 10-watt mode when LPR is not lit on the display. (2) Direction finding (DF). ( a) Press the 9 (DF) key to turn on. NOTE: The DF is lit on the display, the radio is transmitting a continuous tone and the tone is heard in the speaker of the handset. ( b) Press the 9 (DF) key again to turn off. NOTE: The DF mode must be turned off for the radio to receive. (3) Guard receiver. ( a) Press the 6 (GD) key. NOTE: When GD is lit on the display, the radio will automatically receive signals transmitted on the guard frequency, 234.000 megahertz (MHz), and main receiver frequency, 2.95.375 MHz. ( b) Manually enter the guard frequency (234.000). ( c) Press ENTER key, while display is blinking, to talk (transmit) on the guard frequency. (4) SQUELCH. Press 7 (SQL) unit desired setting. h. Operate the radio set. i. Conduct turn-off procedures. (1) Turn off the radio using the OFF/VOLUME knob. (2) Remove the batteries. (3) Perform steps in reverse order to installation (antenna, handset, and battery box) of the
AN/PRC 113. (4) Perform preventive maintenance checks and services. Performance Measures GO NO GO
1. Check radio set AN/PRC-113 for completeness and damage to the equipment. —— ——
2. Carefully install batteries, ensuring batteries are properly seated. —— ——
3. Employ the radio set (attach handset, antenna, or other equipment). —— ——

STP 31-18E34-SM-TG
3 - 78
Performance Measures GO NO GO
4. Establish communications with a distant element. —— —— Evaluation Guidance: Score the soldier GO if all steps are passed. Score the soldier NO-GO if any step is failed. If the soldier fails any step, show what was done wrong and how to do it correctly. References
Required Related TO31R2-2PRC113-1
STP 31-18E34-SM-TG
3 - 79
Employ the Multiband Inter/Intra Team Radio (MBITR) 331-201-5072
Conditions: Given a multiband inter/intra team radio (MBITR) with THALES Operation and Maintenance Instructions or the Quick Reference Guide. Standards: Install and place the MBITR into operation in accordance with (IAW) THALES Operation Manual, page 2-1. Conduct communications check with distant station IAW unit signal operating instructions (SOI) contact time or within 5 minutes. Performance Steps
1. Safety summary. The following are general safety precautions that are not related to any specific procedure. These safety summaries are recommended precautions that all personnel must understand and apply during any given phase of operation and maintenance. -- Hazards of electromagnetic radiation to ordnance (HERO). DO NOT operate the radio within 10 feet (3 meters) of any type of fused ordnance. Operating the radio in close proximity to ordnance MAY induce or otherwise couple currents or voltages of magnitudes large enough to initiate electro-explosive devices or other sensitive explosive components of weapon systems, ordnance, or explosive devices. -- Caution - lithium-ion batteries. Lithium-ion batteries have a very high energy density. Exercise precaution when handling and testing. DO NOT short circuit, overcharge, crush, mutilate, nail-penetrate, or apply reverse polarity to the battery. DO NOT expose it to high temperature or disassemble it. High case temperature resulting from abuse of the cell could cause physical injury.
Performance Measures GO NO GO
1. Inventory AN/PRC-148 and accessories. —— —— a. MBITR receiver transmitter unit. b. Rechargeable lithium-ion batteries (2). c. Battery holder for nonrechargeable batteries (2). d. Receiver/transmitter holster. e. Accessory carrying bag. f. Antenna complement 30 to 90 megahertz (MHz) through 30 to 512 MHz.
2. Place the AN/PRC-148 into operation. —— —— a. Install battery. b. Install correct antenna. c. Turn on radio. d. Select proper channel. e. Transmit message to distant station. Evaluation Guidance: Score the soldier GO if all steps are passed. Score the soldier NO-GO if any step is failed. If the soldier fails any step, show what was done wrong and how to do it correctly. References
Required Related AN/PRC-148 AN/PRC-148(V)(C)

STP 31-18E34-SM-TG
3 - 80
Operate On-Line Text Encryption Terminal, KL-43(C) 331-201-5068
Conditions: Given satellite radio set AN/PSC-3, unit signal operation instructions, KL-43(C) text encryption and decryption terminal, associated cryptographic (crypto) keying material, and a distant station to pass traffic. Standards: Transmit and receive a message without error within 30 minutes. Performance Steps
1. Convert plaintext to ciphertext using the KL-43(C). a. The KL-43(C) is an off-line text encryption terminal specifically designed to send and receive
classified messages over unprotected telephone lines and radio links under field conditions. The KL-43(C) ensures the secure communication of messages by converting them from plaintext to ciphertext using advanced crypto techniques that result in each message having its own set of encryption variables.
b. Once converted to ciphertext, a message may only be decrypted using the crypto key identical to the one with which it was encrypted. The KL-43(C)'s key update function allows creation of a new key while in the field without the risk of hard-copy distribution or compromise because of misplaced or lost keying material.
CAUTION: The KL-43(C) should not be used if signs of tampering or other security breaches are detected or if the device malfunctions causing the display to read: "MALFUNCTION! DO NOT USE."
2. Key the terminal. a. Turn on the terminal by pressing the search (SRCH)/ON key and pressing the (Y) key to
confirm power on. b. The main menu is the starting point for all KL-43(C) operations. Once a valid key has been
loaded or selected, the two top lines of the main menu are displayed. There are 14 functions from which to select. Use the (Y) or (B) keys to scroll through the functions in the main menu or type the first letter of the function desired. The following items are in the main menu-- W - Word Processor K - Key Change D - Decrypt Message C - Communications V - View Angle Adjust Q - Quiet Operation U - Key Update A - Authentication R - Review H - Help S - Set Time and Date E - Encrypt Message P - Print O - Turn Off Unit
NOTE: The key select menu shows the status of the terminal's 16 key positions numbered 01-16. Four positions are displayed at a time on the screen. Use the (Y) or (B) keys to scroll through the key select menu to observe the other positions. Once a key is selected, it becomes the active key for encryption, decryption, authentication, and communications purposes. A key will remain active until it is changed, a new key is selected, or the unit is powered down. c. Use the (Y) or (B) key to select the desired key position to be filled or press the 2-digit number
for that key position. Example, 01: Press (0) and then (1). The terminal will then display the selected key position and request a name for the key.
d. ENTER the key name (may be an alphanumeric character string up to 10 characters long). e. Type in the first key set. When the first set is typed in correctly press (ENTER). Repeat the
procedure for the remaining sets.

STP 31-18E34-SM-TG
3 - 81
Performance Steps
3. Encrypt a message. NOTE: Message must be entered in the plaintext language or the terminal will not process or reencrypt communications for transmission purposes. The unit will, however, allow for ciphered text to be entered for the purpose of storage or decryption of a ciphered message that has been received or printed. a. Select key to be used. b. Press (W) to ENTER the plaintext message. (1) The following prompt will be displayed:
A - Message A Select B - Message B Message to use
(2) Press (A) to select Message A, (B) to select Message B. (3) If the Message buffer selected for use already contains stored text, the following prompt
will appear: Do you wish to clear message from memory? (Y/N)
(4) Press (Y) to replace existing message and to start a new text. Press (N) to retain message existing in the buffer; that message will appear on the screen for editing purposes.
(5) If the selected buffer is empty, the terminal will briefly display: Message Space Is Empty Starting New Message It will then display a prompt requesting choice of mode: P - Plaintext Mode C - Ciphertext Mode Select Editor Mode
(6) Press (P) to ENTER a plaintext message. NOTE: If the plaintext mode is selected, the terminal will respond by requesting message classification. ENTER classification (up to 20 characters) and press (ENTER) or bypass classification and press (ENTER). The terminal will then display briefly: The editor is in the plaintext mode. c. Type a message to be transmitted to a distant station in plaintext. d. Press (E) at the main menu to begin encryption. e. Press (A) to begin encryption of message A, (B) to encrypt message B. f. Press (Y) to encrypt the message with the current key. g. Press (N) to leave the message in the plaintext form and to return to the main menu. h. Press (Y) to begin encryption.
4. Transmit the encrypted message. NOTE: Radio communications can be accomplished for the KL-43(C) over radio links using either the acoustic coupler or the six-pin audio connector located at one end of the unit. Transmissions requiring the use of the RS-232 or RS-423 (radio cable) cable interface are performed by selecting the digital data function and using the six-pin audio connector. a. Transmit using audio data-acoustic coupler. (1) Press (C) at the main menu. (2) Press (A) for audio data transmission. (3) Press (A) for acoustic coupler function. (4) Press (T) to transmit. Follow terminal prompts. (5) Press (XIT) to abort the transmission and return to the main menu. (6) Press (ENTER) to transmit. b. Transmit using audio data connector. (1) Press (C) at the main menu. (2) Press (C) for the connector audio function. (3) Press (T) to transmit. Follow terminal prompts. (4) Press (XIT) to abort the transmission and return to the main menu. (5) Press (ENTER) to transmit. c. Transmit digital data. (1) Press (C) at the main menu.

STP 31-18E34-SM-TG
3 - 82
Performance Steps (2) Press (D) to initiate digital data function. (3) Press (T) to transmit. Follow terminal prompts. (4) Press (XIT) to abort transmission and return to main menu. (5) Press (ENTER) to transmit.
5. Receive a message using the KL-43(C). a. Use the audio data-acoustic coupler to receive a message. (1) Press (C) at the main menu. (2) Press (A) for acoustic adapter function. (3) Press (R) to receive. Follow terminal prompts. (4) Press (XIT) to abort and return to main menu. (5) Press (ENTER) receive. b. Use the audio data connector to receive a message. (1) Press (C) at the main menu. (2) Press (C) for connector audio function. (3) Press (R) to receive. Follow terminal prompts. (4) Press (XIT) to abort and return to main menu. (5) Press (ENTER) to receive. c. Use the digital data function to receive a message. (1) Press (C) at the main menu. (2) Press (D) to initiate digital data function. (3) Press (R) to receive. Follow terminal prompts. (4) Press (XIT) to abort and return to main menu. (5) Press (ENTER) to receive.
6. Decrypt a message that has been received. NOTE: The decrypt function converts ciphertext stored in memory to plaintext. A message can only be decrypted using the same key with which it was encrypted. a. Press (D) at the main menu to begin decryption. b. Press (A) to decrypt message A, (B) to decrypt message B. c. Press (Y) to decrypt message with the current key. d. Press (N) to return to the main menu and leave the message in the ciphertext form. e. Press (Y) to begin decryption.
7. Review a message contained in the KL-43(C). NOTE: The review a message function allows plaintext or ciphertext message stored in the memory to be directly accessed from the main menu. a. Press (R) at the main menu to begin reviewing a message. b. Press (A) to review message A, (B) to review message B. c. Press (XIT) to return to main menu.
8. Authenticate a message using KL-43(C). NOTE: The authentication mode generates a challenge and reply authentication using the currently selected key. a. Prior to authentication, establish verbal contact with distant station operator. b. Select transmit/receive stations with the same key variable for transmission and reception of
communications traffic. c. Review internal clocks to ensure time difference is no greater than 20 minutes. If necessary,
press (S) for clock function to check time at each station. d. Press (A) at the main menu and follow terminal prompts.
9. Zero the KL-43(C). CAUTION: The zeroing feature allows all of the keys to be zeroed simultaneously or one at a time. Ensure that only those keys desired to be zeroed are erased and all usable variables are maintained. a. Press (ZERO) at any time to activate the key zeroing function. b. Follow terminal prompts.

STP 31-18E34-SM-TG
3 - 83
Performance Steps
10. Turn off the KL-43(C). a. Press (O) at the main menu to power down the unit. b. Press (Y) to confirm unit shutdown. c. Press (N) to abort if (O) key was unintentionally pressed. Performance Measures GO NO GO
1. Key the KL-43(C) for operation. —— ——
2. Encrypt a message. —— ——
3. Transmit an encrypted message. —— ——
4. Receive a message. —— ——
5. Decrypt a received message. —— ——
6. Review message traffic. —— ——
7. Zero the KL-43(C). —— ——
8. Perform shutdown procedures for KL-43(C). —— —— Evaluation Guidance: Score the soldier GO if all steps are passed. Score the soldier NO-GO if any step is failed. If the soldier fails any step, show what was done wrong and how to do it correctly. References
Required Related KL-43(C)

STP 31-18E34-SM-TG
3 - 84
Employ Multiband Multimission Radio Set AN/PSC-5D, (MBMMR) 331-201-5067
Conditions: Given an AN/PSC-5D multiband multimission radio (MBMMR), a communications requirement, operating frequency, distant station, and quick reference guide Technical Manuals (TMs) SOFIIS-00-G10-00290-00 and SOFIIS-00-G10-002970-00. Standards: Install, operate, and maintain radio set in accordance with (IAW) TM SOFS-00-G10-00297-00, establish communications with distant station at scheduled contact time or within 30 minutes. Performance Steps WARNNG: Two lithium-sulfur dioxide (Li-SO2) batteries are used with the AN/PSC-5D. They contain pressurized sulfur dioxide (SO2) gas, which is toxic. The batteries MUST NOT be abused in any manner that would cause them to rupture. (1) DO NOT heat, short circuit, crush, puncture, mutilate, or disassemble the batteries. (2) DO NOT use a battery that shows signs of damage, such as bulging, swelling, disfigurement, a swollen plastic wrap, or a brown liquid in the plastic wrap. (3) DO NOT test Li-SO2 batteries for capacity. (4) DO NOT recharge Li-SO2 batteries. Lithium-based batteries may explode during recharging, causing severe personal injury and equipment damage. (5) DO NOT use water to extinguish Li-SO2 battery fires if a shock hazard exists due to high voltage electrical equipment in the vicinity (that is, greater than 30 volts alternating current [VAC] or direct current [VDC]). (6) If the battery compartment becomes hot to the touch, if you hear a hissing sound (battery venting), or detect SO2 gas (a pungent, irritating odor), IMMEDIATELY turn off the equipment. Move the equipment to a well-ventilated area or leave the area. (7) DO NOT use a halon-type fire extinguisher on a lithium battery fire. (8) In the event of a fire near a lithium battery, rapid cooling of the battery is important. Use a carbon dioxide (CO2) extinguisher. Control of the equipment fire, and cooling, may prevent the battery from venting and potentially exposing lithium metal. If lithium becomes involved in the fire, the use of a graphite-based Class D fire extinguisher is recommended; for example, Lith-X, MET-L-X. (9) DO NOT store lithium batteries with other hazardous materials. Keep them away from open flame or heat.
1. Conduct an inventory of the multiband multimission radio AN/PSC-5D (manpack configuration) for completeness and serviceability.
a. Manpack radio equipment. (1) Receiver/transmitter, RT-1672D(C)/U. (2) Battery BB-390A/U. (3) Battery box assembly. (4) Cloning cable assembly. (5) Remote data adapter cable assembly. (6) Remote data user cable assembly. (7) Global positioning system (GPS) time of day (TOD) cable assembly. (8) Backpack accessory bag. (9) Portable remote control device (PRCD). (10) Handset H-250/U. (11) Flexible very-high frequency (VHF) antenna (30 to 88 megahertz [MHz]). (12) Flexible VHF/ultra-high frequency (UHF) antenna (30 to 512 MHz). b. AN/PSC-5D serviceability checks. (1) Check control knobs to ensure they are tight. (2) Check the displays for cracks and breakage. (3) Check connectors for bent or missing pins, distorted or broken shells. (4) Check the handset for broken or missing parts. Operate the push-to-talk (PTT) switch and
inspect the cable connector.

STP 31-18E34-SM-TG
3 - 85
Performance Steps (5) Manually check the battery box latches and the pressure relief valve for proper operation. (6) Manually check the receiver/transmitter (R/T) latch catch for proper operations. (7) Check the rubber gasket on rear of R/T; ensure it is pliable and not damaged. (8) Check the interface cables for signs of damage. (9) Check the interface cable connections for bent or missing pins and distorted or broken
shells. (10) Check the line of sight (LOS) antenna(s) connector, shell, and body for signs of damage. (11) Check the satellite antenna assembly, including radio frequency (RF) connector shell, and
body for signs of damage.
2. Battery installation. a. Verify the radio set mode switch is set to the OFF position. b. Unfasten the drawhook latches and remove the battery box. c. Inspect the battery box and the batteries, if installed, for signs of damage. d. Disconnect and replace the batteries one at a time. e. Replace the battery box.
3. Installation of accessories. a. Install the radio in the user-supplied carrying harness. b. Connect the LOS antenna to the antenna connector on the radio. If using the satellite antenna,
connect the antenna cable to antenna connector. c. If using a PRCD, connect the PRCD cable to the auxiliary (AUX) connector on the radio or to
the remote data adapter cable, if used. d. If using the smart remote control: (1) Connect the P1 of the remote data user cable (PN 432204-801) to the remote/data
adapter (PN 423155-1), if in use, or directly to the AUX connector on the radio. (2) Connect the P3 of the remote data user cable to the serial port on the personal computer
(PC). NOTE: The remote data user cable can also be connected to the radio through the remote data adapter.
4. Install the GPS receiver. Connect the GPS receiver directly to the AUX connector on the radio or to the remote data adapter cable, if used.
5. External devices. If using external input/output (I/O) message devices (for example, KL-43C/KL-43F, AN-PSC-2, OA-8890), connect the device to the remote data adapter cable or directly to the AUX connector on the radio.
6. Manpack power-up procedures. a. Ensure the batteries are installed. b. If operating from an R/T, set the mode switch to plaintext (PT). c. If operating from the PRCD, perform the following steps: (1) Set the mode switch on the R/T to remote (RMT) position. (2) Set the mode switch on the PRCD to the PT position. After the opening screen, the
power-up messages on the PRCD are the same as the R/T's. The R/T displays "THIS TERMINAL IS UNDER REMOTE CONTROL."
(3) To adjust the PRCD backlight intensity or contrast, rotate the volume control fully counterclockwise to the detent position. Then use the arrow keys to adjust the backlight intensity or the NEXT/PREV key to adjust the contrast (press and release keys continuously to adjust). Rotate the volume control clockwise out of the detent position when finished.
d. If operating from smart remote control (via PC), perform the following steps: (1) Set the mode switch on R/T to RMT position. (2) Boot up the PC and install the CD-ROM containing the smart remote control software. (3) Follow the prompts on the PC to operate the radio. Refer to Appendix O in TM SOFIIS-00-
G10-00297-00.
7. Set the backlight timer.

STP 31-18E34-SM-TG
3 - 86
Performance Steps a. Press the ESC key as necessary until the main menu is displayed. b. From the main menu, press the 4 key to enter the configuration menu. c. From the configuration menu, press the 1 key to enter the terminal data menu. d. Press the NEXT/PREV key to move the cursor to the backlight timer field. e. Press the keypad number keys to select the backlight shut-off time in delay seconds (00-60). f. Press the ENTER key. g. Press the ESC key, as required, to return to the main menu.
8. Manpack power-down procedure. a. Zero variables, if required, by setting mode switch to Z position (pull out knob to rotate). The
display will show "ZEROIZED" when Z is selected. b. If operating from the PRCD, set the mode switch on the PRCD to the OFF position. c. If operating from the smart remote control, power down the PC. d. Set the mode switch on the R/T to the OFF position. Performance Measures GO NO GO
1. Inventory the AN/PSC-5D (manpack), for completeness and serviceability. —— ——
2. Install the batteries. —— ——
3. Install the necessary equipment for transmission; that is, handset, flexible VHF or satellite antenna, PRCD, smart remote control, and GPS receiver.
—— ——
4. Conduct the power-up procedures. —— ——
5. Set the backlight time and radio settings for transmission. —— ——
6. Transmit a message to the distant station. —— ——
7. Conduct proper shutdown procedures. —— ——
8. Break down the radio set and equipment. —— —— Evaluation Guidance: Score the soldier GO if all steps are passed. Score the soldier NO-GO if any step is failed. If the soldier fails any step, show what was done wrong and how to do it correctly. References
Required Related TM SOFIIS-00-G10-00297-00 TM 11-5820-1130-12&P TM SOFIIS-00-G10-00299-00

STP 31-18E34-SM-TG
3 - 87
Subject Area 6: Communication Operations
Determine Basic Electricity Requirements 331-201-5078
Conditions: Given paper; pencil; calculator; FM 5-424, Theater of Operations Electrical Systems; and an itemized list of equipment requiring alternating current power to be used on a deployment. Standards: Compute the electrical power generation requirement for the equipment list within 3 hours. Performance Measures GO NO GO
1. Map out a sketch of the area. —— —— a. Map out the distribution system. b. Locate and identify each facility that requires power in relation to the source. c. List all power requirements for each facility.
2. Determine the connected load for each facility. —— —— a. Total wattage for all loads. b. Consider power factors of inductive loads.
3. Determine the demand load for each facility. —— —— a. Multiply the connected load by the demand factor. b. Use Table 8-3, Demand Factors, found in FM 5-424.
4. Determine the diversity factor between each facility. —— —— a. Estimate time periods for use of each facility. b. Compare to other facilities.
5. Determine the peak load for the system. —— —— a. Determine the maximum power required during any one time. b. Base calculations on 24-hour time period.
6. Determine generator size. —— —— a. Consider future growth of the system. (In general, allowance for future
growth should be 50 percent of initial load.)
b. Use Table 8-1, Generator Set Characteristics, and Table 8-2, Mobile Electric Generator Sets, found in FM 5-424.
7. Determine cable size from source to farthest load. —— —— a. Figure total current using formula P = I x E. b. Use Table 8-6, Allowable Current Capacities of Conductors, in Amperes, for
not More Than Three Conductors in a Raceway or Cable, found in FM 5-424.
8. Determine the voltage drop. —— —— a. Find resistance per 1,000 feet of cable in Table 8-8, Physical and Electrical
Properties of Conductors, found in FM 5-424.
b. Multiply distance from the source to the farthest load by 2. c. Multiply result by ohms per 1,000 feet and divide result by 1,000. d. Multiply result by total current. This figure equals total volts dropped. e. Divide total volts dropped by voltage and multiply by 100. This equals the
percent of drop.
9. If necessary, increase cable size to minimize voltage drop. —— ——

STP 31-18E34-SM-TG
3 - 88
Performance Measures GO NO GO NOTE: The percentage of line loss for power loads should not exceed 10 percent; for motor loads, the percentage of line loss should not exceed 1 percent; and for systems of 208 volts, alternating current (VAC) or higher, line loss should not exceed 4 percent.
10. Balance the load in the distribution system. —— —— a. Determine and evenly distribute single-phase loads of the same voltages. b. Determine and evenly distribute three-phase loads of the same voltages. c. Maintain 10-percent or better balance between phases. Evaluation Guidance: Score the soldier GO if all steps are passed. Score the soldier NO-GO if any step is failed. If the soldier fails any step, show what was done wrong and how to do it correctly. References
Required Related FM 5-424

STP 31-18E34-SM-TG
3 - 89
Provide Communications Support Using High Frequency or Very High Frequency Antenna Systems
331-201-5058 Conditions: Given an operation order (OPORD), standing operating procedure (SOP), tactical antennas and associated equipment, operators, and signal operating instructions (SOI). Standards: Direct the installation of a high frequency (HF) or very high frequency (VHF) antenna system that provides the means for subscribers to pass traffic. Follow safety procedures at all times. Performance Steps
1. Check to ensure the following actions are accomplished. a. Antenna is oriented by compass for accurate determination. b. Correct polarization (vertical of horizontal) is used to determine radiation pattern. c. Antenna is sited properly by shooting an azimuth in accordance with (IAW) the OPORD. d. Operational checks are completed on the equipment.
2. Verify the standing wave ratio and radio frequency (RF) levels are correct for the radio equipment being utilized.
3. Verify operator level preventive maintenance checks and services (PMCS) are performed in a timely manner.
Performance Measures GO NO GO
1. Check to ensure the following actions are accomplished. —— —— a. Antenna is oriented by using a compass for accurate determination. b. Correct polarization (vertical or horizontal) is used to determine the radiation
pattern.
c. Antenna is sited properly by shooting an azimuth IAW OPORD. d. Operational checks are completed.
2. Verify the standing wave ratio and power levels are correct for radio equipment being used.
—— ——
3. Perform operator PMCS in a timely manner. —— —— Evaluation Guidance: Score the soldier GO if all steps are passed. Score the soldier NO-GO if any step is failed. If the soldier fails any step, show what was done wrong and how to do it correctly. References
Required Related FM 20-3 FM 24-1 FM 24-18 TC 24-21

STP 31-18E34-SM-TG
3 - 90
Sterilize A Transmission Site 331-201-5044
Conditions: Given two to three personnel and a dismantled, unsterilized transmission site. Standards: Return the transmission site to its natural state and remove all signs of occupancy. Performance Steps
1. Recover all communications equipment, such as antenna wire, transmission line, guy ropes, counterpoise, ground wire, batteries, radio components, and accessory equipment used.
2. Remove all signs of occupancy, such as trash, food wrappers, cigarette butts, human waste, crushed undergrowth, paths, and footprints.
3. Inspect the sterilized site to ensure nothing has been left behind and it has been returned to a natural-looking state.
4. Conceal tracks as exiting the site.
5. Assign a two- or three-man surveillance team to watch the site for 48 hours after departure for evidence of enemy activity. Report any enemy activity to detachment commander, forward operational base, or Special Forces operational base.
Performance Measures GO NO GO
1. Recover all communications equipment. —— ——
2. Remove all signs of occupancy. —— ——
3. Inspect the sterilized site. —— ——
4. Conceal tracks as exiting the site. —— ——
5. Assign a surveillance team to watch the site for 48 hours. —— ——
6. Report any enemy activity. —— —— Evaluation Guidance: Score the soldier GO if all steps are passed. Score the soldier NO-GO if any step is failed. If the soldier fails any step, show what was done wrong and how to do it correctly. References
Required Related FM 24-18

STP 31-18E34-SM-TG
3 - 91
Select A Transmission Site 331-201-5043
Conditions: Given unit signal operating instructions, map of the area of operations, lensatic compass, and protractor. Standards: Select a Special Forces transmission site in accordance with (IAW) the training information outline. Performance Steps
1. Identify the purpose of the transmission site. a. Ground wave communications use line of sight (LOS) direct wave or surface wave
transmission. Site must provide an unobstructed line of communications (LOC) path with no large terrain features between the transmitter and the receiver.
b. Sky wave communications use atmospheric propagation/transmission. The transmitter and receiver and site should meet the following requirements:
(1) Vertical clearance of ridge lines in the direction of the transmission must be no more than one-half the required transmission angle.
(2) The dimensional areas for the construction of the antenna must be sufficient for the height and the horizontal areas needed with the supporting elements in the correct location.
2. Conduct map reconnaissance to select tentative sites, considering enemy positions, terrain, and any other operational considerations.
3. Evaluate tentative sites. a. Verify security considerations are met. (1) Cover and concealment. ( a) Equipment and personnel must be camouflaged to prevent detection from overhead,
horizontal, and ground observation. Equipment must be packed for immediate evacuation.
( b) Antenna must be erected in areas that provide cover from shrapnel and small arms fire, and concealment from observation. Antennas erected in fairly open terrain can be observed from long distances.
( c) Depending on the location of the site, cover should be provided for protection against mortar, rocket, artillery, small arms, and shrapnel damage.
(2) Avenues of approach. ( a) Vehicular avenues of approach should not be limited to only established roads but
should include any terrain that military vehicles could cross fast enough to prevent safe evacuation of the transmission site.
( b) High-speed avenues of approach by foot (such as trails) should be avoided, especially in areas with heavy local populations.
( c) Sites should not be located near clear areas that could be used for drop zones and landing zones, especially if the enemy has the capability of conducting these operations.
(3) Physical security. (4) Communication security. b. Verify terrain considerations are met. (1) Terrain that provides maximum masking of the signal in all but the desired direction of
transmission. (2) Terrain that provides a good conductivity factor, especially for ground wave sites. ( a) The water table in the area should be confirmed, if possible, with transmission sites
selected in areas of high water tables. ( b) If poor conductivity exists, enhance this factor by using an artificial ground system. ( c) Areas of high mineral deposits should be avoided because of the unpredictable
nature of the reflected wave.

STP 31-18E34-SM-TG
3 - 92
Performance Steps
4. Select primary and alternate transmission sites. Performance Measures GO NO GO
1. Identify the purpose of the transmission site. —— ——
2. Conduct map reconnaissance to select tentative sites. —— ——
3. Evaluate tentative sites. —— ——
4. Select primary and alternate transmission sites. —— —— Evaluation Guidance: Score the soldier GO if all steps are passed. Score the soldier NO-GO if any step is failed. If the soldier fails any step, show what was done wrong and how to do it correctly. References
Required Related FM 24-18

STP 31-18E34-SM-TG
3 - 93
Plan a Single-Channel Tactical Satellite Communications Network 113-611-6004
Conditions: Given an operation plan (OPLAN), map of operational area, protractor, FM 21-26, FM 24-16, and unit SOP. Standards: The standard is met when the signal estimate is approved and planning of the single channel tactical satellite is incorporated into the operational order. Performance Steps
1. Review the unit's SOP and SOI to determine specific TACSAT communications requirements. a. Determine the net requirements. b. Determine the locations of the communication sites as required.
2. Review the equipment list to determine the assets available to support the mission.
3. Determine the logistical support required to install and maintain the TACSAT communications network.
a. Type of unit. b. Number of units. c. Availability of COMSEC devices. d. Restricted frequencies. e. Antenna requirements. f. Power requirements.
4. Review equipment capabilities.
5. Submit the plan for approval. a. Brigade or battalion signal officer. b. S3 operations.
6. Incorporate the approved plan into the OPORD. Evaluation Preparation: Performance Measures GO NO GO
1. Reviewed the unit's SOP and SOI to determine specific TACSAT communications requirements.
—— ——
a. Determined the net requirements. b. Determined the locations of the communication sites as required.
2. Reviewed the equipment list to determine the assets available to support the mission.
—— ——
3. Determined the logistical support required to install and maintain the TACSAT communications network.
—— ——
a. Type of unit. b. Number of units. c. Availability of COMSEC devices. d. Restricted frequencies. e. Antenna requirements. f. Power requirements.
4. Reviewed equipment capabilities. —— ——
5. Submitted the plan for approval. —— —— a. Brigade or battalion signal officer.

STP 31-18E34-SM-TG
3 - 94
Performance Measures GO NO GO b. S3 operations.
6. Incorporated the approved plan into the OPORD. —— —— Evaluation Guidance: Score the soldier GO if all steps are passed. Score the soldier NO GO if any step is failed. If the soldier fails any step, show what was done wrong and how to do it correctly. Have the soldier practice until he can correctly perform the task. References
Required Related DA PAM 738-750 FM 21-26 FM 24-16 FM 24-22 TM 11-5895-1180-20 UNIT SOI

STP 31-18E34-SM-TG
3 - 95
Plan FM Voice and Data Communications Net 113-611-6002
Conditions: Given FM 21-26; FM 24-16; FM 24-22; TM 11-5820-890-20-1; TM 11-5820-890-20-2; TM 11-5825-283-23; list of equipment (SINCGARS radio set, AN/CYZ-10, EPLRS radio set AN/VSQ-2(V)2; and unit SOP. Standards: The standards are met when the voice and data communications net is approved and incorporated into the unit operations plan (OPLANs). Performance Steps
1. Identify mission requirements of the FM voice and data communications net. a. Review the OPLAN. b. Review the assets.
2. Formulate signal estimate. a. Develop the transmission plan diagram. b. Identify the sustainment requirements.
3. Planning considerations. a. Terrain. b. Weather. c. Type of unit. d. Number of units. e. Availability of COMSEC devices. f. Restricted frequencies. g. Antenna requirements. h. Power requirements. i. Electronic warfare (EW) threats.
4. Submit the plan for approval. a. Brigade or battalion signal officer. b. Training operations S-3.
5. Incorporate the approved plan into the OPORD. Evaluation Preparation: Performance Measures GO NO GO
1. Identified mission requirements of the FM voice and data communications net. —— —— a. Reviewed the OPLAN. b. Reviewed the assets.
2. Formulated signal estimate. —— —— a. Developed the transmission plan diagram. b. Identified the sustainment requirements.
3. Planned considerations. —— —— a. Terrain. b. Weather. c. Type of units. d. Number of units. e. Availability of COMSEC devices. f. Restricted frequencies. g. Antenna requirements. h. Power requirements.

STP 31-18E34-SM-TG
3 - 96
Performance Measures GO NO GO i. EW threats.
4. Submitted the plan for approval. —— —— a. Brigade or battalion signal officer. b. Training operations S-3.
5. Incorporated the approved plans into the OPORD. —— —— Evaluation Guidance: Score the soldier GO if all steps are passed. Score the soldier NO GO if any step is failed. If the soldier fails any step, show what was done wrong and how to do it correctly. Have the soldier practice until he can correctly perform the task. References
Required Related FM 21-26 FM 24-22 FM 24-16 UNIT SOI

STP 31-18E34-SM-TG
3 - 97
Prepare the Signal Annex to the Operations Order (OPORD) 113-611-5014
Conditions: You will be provided with an OPORD user requirements, DA Form 2406, and FM 24-16. Standards: The standards are met when the signal annex is prepared correctly and approved by S-3. Performance Steps
1. In order to prepare the signal annex to the OPORD, it is necessary to review the OPORD in detail so you have a complete understanding of the signal requirements in support of the mission. You must also understand the contents of the SOP, SOI, and material status reports (DA Form 2406).
2. Preparing the signal annex. a. Heading and classification. Mark the signal annex with the same classification as the basic
OPORD. As a minimum, the heading should contain the following: b. Paragraph 1: Situation. Briefly gives the general picture so subordinate commanders will
understand the current situation. Always include the following subparagraphs: (1) Enemy Forces. A reference may be made to the signal annex of the command OPORD if
the signal annex is available to all elements receiving the signal annex. If the signal annex is available, pertinent information must be extracted and included in the unit annex.
(2) Friendly Forces. Only information pertinent to the operation of the signal unit is extracted from the signal annex and amplified, where required, to clarify the mission.
(3) Attachments and Detachments. Lists the attached or detached signal units with the effective date and time of the attachment or detachment from the issuing headquarters. If these units are indicated in a task organization, an appropriate reference is entered.
(4) Commander's Evaluation. This is an optional subparagraph to be used when directed or required. It gives briefly the commander's evaluation of the situation.
c. Paragraph 2: Mission. Briefly states the missions that are assigned to the unit or assumed by the unit commander. When the missions are as stated in the command operations, service operations, service support orders, or their annexes, the missions may be extracted and amplified as necessary to ensure clarity. This paragraph is never subparagraphed.
d. Paragraph 3: Execution. The signal unit commander's concept of the operation and the tasks assigned to each major element of the signal unit are stated in this paragraph. Task assignments may be made by simply referring to the unit SOP if they have been adequately and appropriately covered; otherwise, the tasks assigned to appropriate elements of the units are stated in this paragraph. Overlays, maps, or diagrams may be used to indicate task assignments. The last subparagraph includes appropriate coordinating instructions when instructions are applicable to two or more elements of the command.
e. Paragraph 4: Service support. This paragraph contains essential information pertaining to the procedures for obtaining service support not covered by the unit SOP, other orders, or instructions. It lists the locations on the administrative, supply, and maintenance installations that provide support to the unit; or it makes reference to a service support order or annex that contains service support information.
f. Paragraph 5: Command and Signal. Contains the three following subparagraphs: (1) Subparagraph a. Contains the appropriate reference to the applicable portion of the SOI
to be in effect. It also contains special instructions relating to signal matters, such as instructions on the use of pyrotechnics or restrictions on the employment of any means of communications.
(2) Subparagraph b. Includes the location of the CP of the issuing unit (if not shown graphically) and the location of the CP. It may also include the CP locations of subordinate units; the CP location of the next higher headquarters; and the designation of the active and standby tactical CPs.
(3) Subparagraph c. If a signal annex is not published, this subparagraph will contain information on future locations of major headquarters.
g. Preparation and Distribution:

STP 31-18E34-SM-TG
3 - 98
Performance Steps (1) The preparation of the order is a logical and systematic procedure. It is the product of a
coordinated effort by the commander and his staff. The ideal situation is to make a formal estimate of the situation, develop a formal plan, and follow with the order. Because of the type of operation and time available, you have the luxury of developing a textbook order. In a tactical environment, surprise is a key factor so you will not sacrifice the element of surprise to mull over the estimate and plan before issuing the order.
(2) In developing and distributing the order, consider the time it takes subordinate units to prepare and plan for the operation or the order will lose its effectiveness. If there is not sufficient time to develop a formal OPORD, you may have to use a series of fragmentary orders (FRAGOs), a previously prepared plan, or a combination of directives, orders, and instructions.
Evaluation Preparation: Setup: You will be provided with an OPORD, DA Form 2406, a field SOP, and a FRAGO (if applicable). Brief the Soldier: You must prepare a Signal Annex for the OPORD. Performance Measures GO NO GO
1. Analyze the mission as it pertains to communications- electronics (CE) responsibility. (Refer to FM 24-16, Chapter 1.)
—— ——
2. Review measures to reduce planning time. (Refer to FM 24-16, Figure 1-5.) —— ——
3. Review techniques and format to be used in the preparation of plans and orders (signal annex). (Refer to FM 24-16, Appendix D.)
—— ——
4. Review equipment condition status report. (Refer to FM 24-16, Chapter 5.) —— ——
5. Determine CE systems planning requirements. (Refer to FM 24-16, Chapter 4.) —— ——
6. Prepare signal annex. (Refer to FM 24-16, Chapter 3 and Appendix D.) —— —— a. Heading and classification. (Refer to AR 380-5.) b. Paragraph 1 (situation). c. Paragraph 2 (mission). d. Paragraph 3 (execution). e. Paragraph 4 (service support). f. Paragraph 5 (command and signal). g. Authentication, Appendixes, and Distribution.
7. Prepare appendixes (as required, to the signal annex. (Refer to FM 24-16, Appendix G.)
—— ——
NOTE: The signal unit OPORD is identical in format to a signal annex of an OPORD. It normally expands the signal annex.
Evaluation Guidance: Score the soldier GO if all steps are passed (P). Score the soldier NO-GO if any step is failed (F). If the soldier fails any step, demonstrate the correct performance of the missed step. Have the soldier practice until he can correctly perform the task. References
Required Related AR 380-5 SS0068 DA FORM 2406 FM 101-5 FM 24-16

STP 31-18E34-SM-TG
3 - 99
Identify Manpower and Materiel Requirements to Accomplish Mission 113-611-5013
Conditions: As a telecommunications supervisor, your task is to identify manpower and materiel requirements to accomplish the mission. You will need the unit OPORD, FM 24-16, and FM 24-18. Standards: The standards are met when the manpower and materiel requirements are identified and paragraph 3 of the signal unit OPORD is completed IAW applicable references. Evaluation Preparation: Setup: Warning order, completed DA Form 2715-R, and a completed DA Form 2406 will be available. Brief soldier: You will identify manpower and materiel requirements and complete paragraph 3 of the signal unit OPORD. Performance Measures GO NO GO
1. Review the mission requirements. —— —— a. Determine net requirements. b. Determine location of communication sites as required.
2. Review equipment and troop lists to determine the assets available to support the mission.
—— ——
3. Review equipment capabilities. —— ——
4. Review time permitted for installation, type of terrain, and expected weather conditions under which the system will operate.
—— ——
Evaluation Guidance: Score the soldier GO if all steps are passed. Score the soldier NO-GO if any step is failed. If the soldier fails any step, show what was done wrong and how to do it correctly. References
Required Related DA FORM 2406 AR 220-1 DA FORM 2715 FM 24-16 FM 24-18
STP 31-18E34-SM-TG
3 - 100
Check Preventive Unit-Level Maintenance of Communications Equipment 113-623-4001
Conditions: You will be given a blank DA Form 2404 (Equipment Inspection and Maintenance Worksheet) and the following: 1. DA Form 2404 (completed by the operator and maintainer). 2. DA Form 2407 (Maintenance Request) (completed by the maintainer). 3. DA Form 2408-14 (Uncorrected Fault Record). 4. DD Form 314 (Preventive Maintenance Schedule and Record), completed. 5. DA Pam 738-750. Standards: This task has been performed correctly when the operator and unit-level maintenance on the various types of communications equipment have been checked for compliance with the indicated references and all noted discrepancies have been corrected on the spot or instructions have been given as to corrective actions to be taken. Evaluation Preparation: Setup: Provide various types of communications equipment for the soldier to check. Brief the Soldier: You will check the performance of operator and unit-level maintenance on the equipment. Performance Measures GO NO GO NOTE: All performance measures refer to DA Pam 738-750, Chapter 3.
1. Checks the entries on DA Form 2407. —— ——
2. Checks the entries on DD Form 314. —— ——
3. Checks the entries on DA Form 2404. —— ——
4. Checks the entries on DA Form 2408-14. —— ——
5. Checks the equipment and compares the maintenance status of the equipment with the entries on DA Form 2404.
—— ——
6. Records all noted deficiencies on a blank DA Form 2404. —— ——
7. Ensures all noted deficiencies are corrected on the spot or instructs the equipment team chief, operators, and/or unit-level communications maintainer as to the corrective actions to be taken.
—— ——
Evaluation Guidance: Score the soldier GO if all steps are passed (P). Score the soldier NO-GO if any step is failed (F). If the soldier fails any step, show what was done wrong and how to do it correctly. References
Required Related DA FORM 2404 DA FORM 2407 DA FORM 2408-14 DA PAM 738-750

STP 31-18E34-SM-TG
3 - 101
Plan HF Radio Net 113-611-4010
Conditions: As CE operations chief assigned to a coordinating staff section (CSPE/CSCE), you will be required to plan a HF radio net. This task is performed in a fixed or tactical environment under all weather conditions. To perform this task, you will have a unit SOP, OPORD/OPLAN, Materiel Condition Status Report (DA Form 2406), troop list, and applicable maps. Standards: Standards are met when the HF system planning is complete and the radio net diagram has been prepared. Task can normally be performed within 4 hours. Evaluation Preparation: Setup: Unit SOP, OPORD/OPLAN, Materiel Condition Status Report (DA Form 2406), troop list, and applicable maps will be available. Brief soldier: You will prepare a HF radio net diagram. Performance Measures GO NO GO
1. Reviews the mission/SOP and CEOI to determine specific HF requirements. (Refer to FM 24-16, chap 4, sec III.)
—— ——
a. Determines net requirements. b. Determines location of communication sites as required.
2. Reviews equipment list/Materiel Condition Status Report (DA Form 2406) and troop lists to determine the assets available to support the mission.
—— ——
NOTE: Operation Resource Record (DA Form 4618-R) may be used.
3. Determines logistical support required to install and maintain the HF communications system.
—— ——
4. Reviews equipment capabilities. —— ——
5. Reviews time permitted for installation, type of terrain, and expected weather conditions under which the system will operate. (Refer to FM 24-18, para 82.)
—— ——
6. Determines propagation mode(s). (Refer to FM 24-18, chap 8, para 35 and 39.) —— —— a. Ground wave. b. Sky wave.
7. Requests engineering support as required. (Refer to FM 11-65, app D.) —— —— a. Propagation prediction. b. Antenna siting and orientation. c. Frequency. NOTE: Planner may be required to do part of or all the systems engineering utilizing the appropriate ground wave propagation chart and/or the intermediate and short distance sky-wave propagation charts. Coordination should be made with the frequency management section on frequency selection.
8. Determines network layout, as required. (Refer to FM 24-16, chap 4, sec III.) —— ——
9. Assigns net control station (NCS) as required. (Refer to FM 24-16, chap 4, sec III.)
—— ——
10. Assigns frequencies and time periods for operations. (Refer to FM 24-16, chap 4, sec III.)
—— ——
NOTE: Frequencies are obtained from CEOI or requested from frequency management. Frequencies and time period relationships are derived from the prediction charts.

STP 31-18E34-SM-TG
3 - 102
Performance Measures GO NO GO
11. Assigns station and net call signs as required. (Refer to FM 24-16, chap 4, sec III, and CEOI.)
—— ——
12. Prepares radio net diagram(s). (Refer to FM 24-22, para 6-11, fig 6-9 and FM 24-16, app G.)
—— ——
Evaluation Guidance: Score the soldier GO if all steps are passed (P). Score the soldier NO-GO if any step is failed (F). If the soldier fails any step, show what was done wrong and how to do it correctly. References
Required Related DA FORM 2406 SS0026 DA FORM 4618-R TM 11-5985-357-13 FM 11-65 FM 24-16 FM 24-18 FM 24-22

STP 31-18E34-SM-TG
3 - 103
Use an Automated Signal Operation Instruction (SOI) 113-573-8006
Conditions: Given an SOI KTV 1600, a radio, an operational radio net, scratch paper and a pencil. Standards: This task has been performed correctly when the soldier does the following in 10 minutes. 1. Lists the item number of the SOI extract. 2. Lists a radio station call sign. 3. Lists a radio net frequency. 4. Lists an item number identifier. 5. Enters a radio net in which you do not normally operate. 6. Lists a challenge and reply authentication. Performance Steps
1. List an SOI Item number. a. Get the SOI/extract for your unit. b. Find the item number for the unit you want. See Figure 1. look down the left-hand column to
find the unit (2ND, BDE, 1-80 IN BN). Then look immediately to the right of the unit to find the Item Number (8C).
KTV 1600C (PROTECTIVE MARKING) 1 INDEX
ITEM ITEM NO 1-77 IN BN .................................................................................................................................. 7B 1-78 IN BN.................................................................................................................................. 7C 2ND BDE ...................................................................................................................................... 8 1-3 AR BN .................................................................................................................................. 8A 1-79 IN BN.................................................................................................................................. 8B 1-80 IN BN.................................................................................................................................. 8C 3RD BDE ...................................................................................................................................... 9 1-4 AR BN .................................................................................................................................. 9A 1-81 IN BN.................................................................................................................................. 9B 1-82 IN BN.................................................................................................................................. 9C DIVARTY ...................................................................................................................................... 10 1-40 FA BN................................................................................................................................. 10A 1-41 FA BN................................................................................................................................. 10B 1-42 FA BN................................................................................................................................. 10C 1-43 FA BN................................................................................................................................. 10D DISCOM ....................................................................................................................................... 11 52ND MED BN ........................................................................................................................... 11A 52ND S & T BN .......................................................................................................................... 11B 52ND MAINT BN ........................................................................................................................ 11C 1-23 CAV SQDN ............................................................................................................................ 12 1-23 D/CAV SQDN..................................................................................................................... 12A 1-441 ADA BN................................................................................................................................ 13 INDEX 2 of 5 1
Figure 1 c. Turn to the Item number page for the time period you are using. See Figure 2. The Item
number is located at the upper and lower right of the page. The Time period is located at the top right of the page. Example: Time Period 01, Item number 8C.

STP 31-18E34-SM-TG
3 - 104
Performance Steps
(PROTECTIVE MARKING)
TIME PERIOD 1-80 IN BN EXTRACT 1-80 IN BN Z6Z 57.85 CMD COMMANDER 37 49.65 A/L XO 26 HHC/1-80 IN R1L S1 59
A/1-80 IN Q3V 36.05 CMD S2 65 1/A/1-80 I8C 51.40 S3 89 2/A/1-80 W1J 50.20 S4/SUP SGT 45 3/A/1-80 C4K 51.20 MTR OFF/SGT 29 WPNS/A/1-80 S6Y 65.60 C-E O/COMM CH 25 B/1-80 IN I3B 56.65 CMD MED OFF/MEDIC 95 1/B/1-80 P6P 50.10 FO 4 18 2/B/1-80 LOB 51.00 FO 5 78 3/B/1-80 S3I 49.90 FO 6 06 WPNS/B/1-80 E4V 34.55 FSO/FIST CHIEF 10 C/1-80 IN U4P 44.25 CMD NCS/TOC/CP 08 1/C/1-80 M8O 50.60 FDC 16 2/C/1-80 Y6M 51.70 PLT/SEC/TM LDR 44 3/C/1-80 V3X 49.60 PLT/SEC/TM SGT 98 WPNS/C/1-80 Z4N 34.85 TM/SQD/SEC 1 63 CSC/1-80 IN Q6C 68.15 CMD TM/SQD/SEC 2 51 AD/CSC/1-80 N2L 45.95 TM/SQT/SEC 3 77 AT/CSC/1-80 B8G 37.25 TM/SQT/SEC 4 69 SCT.CSC/1-80 V1R 47.40 TACP 31 MORT/CSC/1-80 K9T 33.50 MAINT OFF 58 GSR/CSC/1-80 C9A 61.05 ENGR OFF 41 1-80 AJ/ALTN 1 74.20 CSM/SGM/1sg 40 1-80 AJ/ALTN 2 32.25 OFF ASST H 2 BDE X8A 40.05 CMD ENL ASST O 2 BDE RETRANS T7N 63.40 RTS RTO/DRIVER F MEDEVAC (P) W5X 32 75 MED SIGN HITS C/SIGN YEAR 1-80 IN BN EXTRACT
01 8C
8C
Figure 2
2. List a radio station call sign. See Figure 2. a. Look down the left-hand column to find the unit. Example: Weapons platoon of Company C,
1-80 Infantry Battalion (WPNS/C/1-80)). b. Then look immediately to the right of the unit to find the call sign (Z4N). c. Find the suffix that designated the person or subordinate element of the unit by reading down
the list of suffixes on the right side of the page and reading the two-digit suffix for that element. (The suffix for PLT LDR is 44). Add it to the previous call signs you found. You now the five-character call sign for the element/person (Z4N44).
3. List a radio net frequency. See Figure 2. Look to the immediate right of your call sign. You now have the opening frequency of the weapons platoon (34.85MHz).
4. List an item number identifier. a. With the item number for your unit (see paragraph 1) turn to the Item Number Identifiers
section of your SOI/extract. See Figure 3.

STP 31-18E34-SM-TG
3 - 105
Performance Steps
(PROTECTIVE MARKING) KTV 1600C 23
ITEM NUMBER IDENTIFIERS
01 02 03 04 05 06 07 08 09 10 CA 9C 14 11B 10 16G 10B 11A 21 16G 3D CB 16A 16J 13A 9C 7B 5A 22B 9C 12 4A CC 16E 22D 16C 8B 9B 6A 21 3F 22E 3 CD 3B 22B 16E 7A 8B 7B 13 16B 11C 9B CE 10 16 15 16D 18 13 3A 7C 21 12 CF 8C 16A 16F 22E 3 4A 16A 6B 12A 7B CG 9A 13 9B 16I 22B 3B 6D 6A 19 10A CH 22B 16G 5 16G 22 6C 10 16A 16C 11B CI 13 3F 3A 19 16B 8C 5A 16D 18 9 CJ 7B 22A 11C 4A 10C 22B 8 6 4 16G CK 3E 3A 16G 3A 6B 22E 6 8 6 4 CL 8 6 21 13A 16J 8 16C 3E 4A 16I CM 19 16D 22C 16A 9C 16E 16E 13A 22C 3F CN 21 11A 20 8A 20 3 16I 22 11A 22A
Figure 3 b. Find the column for the period you are in (Time period 01). The time periods 1-10 are the
column heading across the top of the sheet. c. Read down this time period column unit you find the Item Number for your unit. Example: The
Item Number for 1-80/In BN is 8C. d. Read the two-letter code in the left column opposite your unit Item Number (CF).
5. Enter a radio net in which you don not normally operate. a. Turn to the Quick Ref Maj Subor Elms & CBT BNS items of your SOI/extract. There are two
sets, one for call sign (Figure 4) and one for frequencies (Figure 5).

STP 31-18E34-SM-TG
3 - 106
Performance Steps
(PROTECTIVE MARKING) KTV 1600C CALL SIGNS QUICK REF MAJOR SUBOR ELMS & CBT BNS 3 01 02 03 04 05 52D DIV K6P D4J N3D Y2E L5D 1 BDE V4Y M8R Z4S H1S X2E 2 BDE X8A Z6N K2J K7H V9A 3 BDE V8K B1P V8Q K8W R4I DIVARTY C9L X0V E4H S2B A0H DISCOM T6I Q0Q U4F V6R R1V 1-2 AR BN R4S B8W A7G H4I D9L 1-3 AR BN X3W Z9S L6P H2M S4K 1-4 AR BN X4R R7X T1B I9F C1Y 1-40 FA BN D2U E1F W4W A8Q A5P 1-41 FA BN S0D Z6T W0M Z6X H1X 1-42 FA BN T0X S5D Q2Y P8A S2R 1-43 FA BN G2G L3G J7I Q0L Q9Q 1-77 IN BN A1H N8L V8R W4T X2S 1-78 IN BN Q0F M7I Z2C A3K G1M 1-79 IN BN K7O Z5K D5N G7C N8F 1-80 IN BN Z6Z H6H M4V K2U M9N 1-81 IN BN J5N X9E R5U L1Z Y2W 1-82 IN BN V5E C6U R2T D8N G7U 1-23 CAV SQDN N0C C8Y N0L E7O F5O 1-441 ADA BN Y7B M2B U7E J2G V1C 52D ENBN D6J S1Z D6X D4Y B9T 52D SIG BN P4V G4A K7Z B9P R8B 52D CAB J5T L6C R5O M3V D4Z 312 CEWI BN J3Q P8O M4A U2J G2G MEDEVAC W5X L5U X9S Z7X 52D MP CO S8M Y4M T8K U4D R8J
QUICK REF MAJOR SUBOR ELMS & CBT BNS 3
Figure 4

STP 31-18E34-SM-TG
3 - 107
Performance Steps
(PROTECTIVE MARKING)
KTV 1600C FREQUENCIES QUICK REF MAJOR SUBOR ELMS ELMS & CBT BNS 3 01 02 03 04 05 DIV CMD 38.05 63.75 68.10 65.45 59.15 1BDE CMD 51.65 68.30 46.80 62.70 64.65 2 BDE CMD 40.05 50.50 39.55 69.50 51.50 3 BDE CMD 55.05 67.50 44.35 63.20 69.85 DIVARTY CF 1 54.50 69.20 60.90 42.90 67.00 DISCOM CMD 49.95 34.05 64.45 58.10 56.00 1-2 AR CMD 34.65 37.30 66.95 44.90 64.45 1-3 AR CMD 46.25 31.70 66.70 52.90 55.65 1-4 AR CMD 66.85 40.30 60.15 40.90 69.55 1-40 FA CF 61.90 36.60 49.85 43.60 38.45 1-41 FA CF 56.05 46.50 61.70 39.35 58.35 1-42 FA CF 34.30 65.30 62.75 60.80 34.45 1-43 FA CF 58.20 49.15 64.00 48.90 51.60 1-77 IN CMD 44.20 46.00 41.65 32.35 50.05 1-78 IN CMD 32.65 31.95 54.50 62.45 62.75 1-79 IN CMD 47.75 53.10 52.35 39.45 53.15 1-80 IN CMD 57.85 55.35 30.55 64.60 66.35 1-81 IN CMD 48.55 35.15 39.90 67.30 35.85 1-82 IN CMD 38.40 48.40 62.95 33.35 47.85 1-23 CAV CMD 43.10 47.90 42.40 37.90 62.15 1-441 ADA CMD 67.65 38.65 58.25 46.35 37.45 52D EN CMD 51.60 47.55 47.40 31.60 63.45 52D SIG CMD 32.80 46.70 51.10 58.20 34.35 52D CAB CMD 54.70 54.95 35.75 53.35 34.05 312 CEWI BN CMD 30.65 55.20 38.90 63.40 69.95 MEDEVAC P 32.75 32.75 32.75 32.75 32.75 MEDEVAC A 53.55 55.40 55.55 40.40 46.85 QUICK REF MAJOR SUBOR ELMS ELMS & CBT BNS 3
Figure 5
b. Look down the left-hand column of the Call Signs set to find the unit (1-3 AR BN). Then look
immediately to the right of the unit to find the call sign under the correct Time Period column. Example: 1-3 AR BN under Time Period 01, the call sign is X3W. See Figure 4.
c. Turn to the Frequencies set and repeat the procedures to find the frequency of the battalion command net (1-3 AR BN, Time Period 01, 46.25MHz). See Figure 5.
d. Set your radio to the frequency for the Net Control Station (NCS). e. Call the NCS and request permission to enter the net. Example: Call: X-RAY THREE
WHISKEY ZERO EIGHT, THIS ZULU FOUR NOVEMBER FOUR, REFER TO CHARLIE FOXTROT. (CF is the Number Identifier for your unit). I HAVE TRAFFIC FOR X-RAY THREE WHISKEY EIGHT NINER. REQUEST PERMISSION TO ENTER YOUR NET. OVER.
f. Give the correct reply when the NCS challenges. Example: (Challenge by the NCS.) ZULU FOUR NOVEMBER FOUR, THIS IS X-RAY THREE WHISKEY ZERO EIGHT. AUTHENTICATE CHARLIE HOTEL. OVER. (Reply by you or the caller). XRAY THREE WHISKY ZERO EIGHT, THIS IS ZULU FOUR NOVEMBER FOUR. I AUTHENTICATE LIMA. OVER.

STP 31-18E34-SM-TG
3 - 108
Performance Steps NOTE: The station being called will make the first challenge. Both stations must find the correct reply so that the station being called can authenticate the reply by the calling station. If the called station does not respond to the challenge within a reasonable time, the station calling will require another authentication using different challenge. Either station can challenge the other if there is a reason to believe that the other station is not a friendly station. g. When the NCS grants permission to enter the net, find the call sign for the unit you want. h. Call the unit you want and send your message. i. After you finish sending your message, call the NCS and ask to leave the net. You should be
required to authenticate.
6. List a challenge and reply authentication. a. Get the KTC 1400 section of your SOI. b. Turn to the Set (page) for the time period you are using (01). See Figure 6.
(PROTECTIVE MARKING)SET 01 PERIOD 01
KTC 1400 D
ABC DEF GHJ KL MN PQR ST UV WX YZ0 1 2 3 4 5 6 7 8 9
A IMKY QOC PAU WH LX FSD RB VN EG JTB MYNJ RDH OBA WP CI ETG SQ UF KV XLC SWLN VJM HXB KO UA RYD TE FI PQ CGD BJYM GPP LIT KC SR DOV XE UA QH NWE WAHY CUR KMQ XO TS EIG JP FN BL DVF VKLY BQA FEX HR JN CUS DM GT PI WO
ABC DEF GHJ KL MN PQR ST UV WX YZ0 1 2 3 4 5 6 7 8 9
G MYRL NEP WSC HX IF BDJ KQ OG TA VUH UWXG CQR OMT YB HP VES FJ LN AD KII RILN HVB WGD PE MS ATQ CK XU YO JFJ LEGX SWY MNR DC KF VUH JO TB QI APK WTOD SRF VEQ LU GK HNA YJ PX BC MIL OHXL SJI QNK GC YF TUD WE RA BV PM
ABC DEF GHJ KL MN PQR ST UV WX YZ0 1 2 3 4 5 6 7 8 9
M CVGB YIM SHE TU JL ODQ KN PX RF AWN SEDL AFT WJG NR XB UHP MV YI KO QCO DGVK ASM RUY JQ HT BPN CL EX IF OWP EPQW GTR HJK YS IF UBC DX MN OL AVQ EUOM PXD SQG TA NF WHJ VR BI CK LYR LESV JWX HOR YF QC ATU BP MN DG KI
ABC DEF GHJ KL MN PQR ST UV WX YZ0 1 2 3 4 5 6 7 8 9
S BQMO NTI XSG CL WY AHV JU FR ED KPT UNYT GOV EAS PJ QL DHX FW CI MR KBU BSFP MKT QWL IJ UO HCR VD GX AE NYV EYHX OID VMN AC FU KPS TB WG RL JQW EBLA SQU POV IW GN CJX YD RF TM HKX PXVN KLS WCD YO FB REI UM TJ AH QGY MTXO JGD FPH VU QR LKS CY EA BW IN
LINE INDICATORCOLUMN
FIRST LETTERIN CHALLENGE
SECOND LETTERIN CHALLENGE
REPLY
Figure 6
c. The challenge is any two letters (except Z), selected at random. Example: "C H". d. Find the first letter of the challenge ("C") in the Line Indicator Column on the left of the page. e. Read to the right on that line to find the second letter ("H").
f. Road the letter directly under the second letter ("L"). This is the correct reply to the challenge. If the first letter is "Y", go to the top of the sheet in the same column to find the reply. Example: For challenge "YR", the reply is "X".

STP 31-18E34-SM-TG
3 - 109
Evaluation Preparation: Setup: Provide the soldier with an SOI KTV 1600D, KTC 1400 a radio, an operational radio net, scratch paper, and a pencil. Brief Soldier: Tell the soldier to perform each step correctly and to do it within a time limit of 10 minutes. Performance Measures GO NO GO
1. List the Item Number of the SOI extract. —— ——
2. List a radio net frequency. —— ——
3. List a radio station call sign. —— ——
4. List an item number identifier. —— ——
5. Enter a radio net in which you do not normally operate. —— ——
6. List a challenge and reply authentication. —— —— Evaluation Guidance: Score the soldier GO if all steps are passed. Score the soldier NO-GO if any step is failed. If the soldier fails any step, show what was done wrong and how to do it correctly. References
Required Related FM 24-35 FM 24-35-1 UNIT SOI

STP 31-18E34-SM-TG
3 - 110
Check Implementation of Electronic Counter-Countermeasures Procedures 113-573-5002
Conditions: Given the requirement to check the implementation of ECCM procedures, an active communications site/node, a meaconing, intrusion, jamming, interference (MIJI) source, and FM 24-33. Standards: Standards are met when you have checked the implementation of counter-countermeasures procedures, performance measures 1 through 5 have been completed, and all faults have been corrected and reported to your supervisor. Evaluation Preparation: Setup: A radio set operating in a radio net with interference applied to the system. Brief soldier: As the supervisor of an operator, you must ensure that the operator is applying proper tactics to a jammed system. Performance Measures GO NO GO NOTE: Refer to FM 24-33 for all performance measures.
1. Ensure radio operators are minimizing transmissions. —— —— a. Ensure all transmission is necessary. b. Preplan all messages before transmitting them. c. Transmit quickly and precisely. d. Use equipment capable of data burst transmission. e. Use an alternate means of communications when possible.
2. Ensure operators protect transmission from enemy interception. —— —— a. Use low power. b. Select proper antenna. c. Use the antenna with the shortest feasible range. d. Use directional antennas. e. Select a site that mask transmitted signals from enemy interception. f. Use mobile antennas. g. Use decoy antennas. h. Use steerable null antenna processors.
3. Ensure radio operators are practicing proper authentication procedures. —— —— a. Reduce operator-distinguishing characteristics. b. Operate on a random schedule when using nonsecure communications
means.
c. Encrypt all EEFI category data. c. when using non secure communications means. d. Use PROWORDs. NOTE: Ensure that operators submit a MIJI report.
4. Ensure radio operators can overcome jamming/interference. —— —— a. Determine whether the interference is internal or external to the radio. b. Determine whether the interference is jamming or unintentional. c. Report jamming/interference incidents.
5. Ensure radio operators can: —— —— a. Continue to operate. b. Improve the signal-to-jamming ratio. c. Adjust the receiver. d. Increase the transmitter power output. e. Adjust or change the antenna. f. Establish a retransmission station.

STP 31-18E34-SM-TG
3 - 111
Performance Measures GO NO GO g. Relocate the antenna. h. Use an alternate route of communications. i. Change frequencies. j. Acquire another satellite (if required). Evaluation Guidance: Score the soldier GO if all steps are passed (P). Score the soldier NO-GO if any step is failed (F). If the soldier fails any step, show what was done wrong and how to do it correctly. Have the soldier practice until he can correctly perform the task. References
Required Related FM 24-33 FM 34-60

STP 31-18E34-SM-TG
3 - 112
Check Processing of Service Messages 113-572-7026
Conditions: Given a requirement to check the processing of a service message. You will need ACP 127( ), JANAP 128( ), ACP 131( ), COMCEN files, service logs, and (C)DOI-103. Standards: The standards are met when the soldier has identified all deficiencies in the processing of a service message within 10 minutes. Performance Steps
1. Service messages are short concise messages used by communication personnel to exchange information and instructions concerning conduct of communication; such as to expedite traffic, corrections, retransmissions, verifications, acknowledgements, tracer actions, and other matters relative to network management and operations.
2. Service messages are normally assigned the same precedence as the message being serviced and is normally prepared in abbreviated PLAINDRESS format. Authorized operating signals are used to the greatest extent possible. However, do not sacrifice clarity for brevity. Service messages may be assigned sequential reference numbers. The service numbers are placed immediately after the abbreviation SVC in the message text. If used, sequential service reference numbers may continue throughout the remainder of the calendar year. When replying to a service message with a reference number, refer to that number in the text of the reply.
3. The abbreviation, cite our service in reply (COSIR), may be used as the last word after the service message text.
Evaluation Preparation: Setup: Provide the soldier with TCC files, incoming and outgoing service messages, and appropriate forms and manuals. Brief soldier: Tell the soldier to check the processing of a stop notice, go-ahead notice, misrouted message, missent message preparation, and a garbled message. Performance Measures GO NO GO
1. Check processing of a stop notice. (Refer to JANAP 128( ) Chap 4, Sec X, para 458a, and Figs 3-15 and 3-16.)
—— ——
NOTE: Precedence is always IMMEDIATE for STOP notice. QRT (stop sending) must be in text.
a. Check preparation of stop notice citing last good channel number received on teletypewriter.
b. Check outgoing log for stop notice. NOTE: Mode of transmission will vary depending on the communications being utilized.
2. Check processing of a go-ahead message. (Refer to JANAP 128( ), Chap 4, Sec X, para 458b, and Figs 3-17 and 3-18.)
—— ——
NOTE: QRV (I am ready) must be in text. a. Check preparation of a go-ahead message citing last good channel number
received on teletypewriter.
b. Check outgoing log for go-ahead service. NOTES: Mode of transmission will vary depending on the teletypewriter being utilized. If no traffic received within 30 minutes, send a channel check.
3. Check processing of a garbled message with response. (Refer to JANAP 128( ), Chap 4, Sec VI, para 435.)
—— ——
a. Check for incoming garbled message (Fig 3-19). b. Check preparation of service message (Fig 3-20).

STP 31-18E34-SM-TG
3 - 113
Performance Measures GO NO GO c. Check outgoing log for service message. d. Check suspense files for service message. e. Check for incoming garbled service message (Fig 3-20). f. Check corrected garbled message (Fig 3-21). g. Check log for filing of message.
4. Check processing of a misrouted message. (Refer to JANAP 128( ), Chap 4, Sec III, para 428.)
—— ——
a. Check for misrouted message (Fig 3-22). NOTE: RI on FL2 is incorrect for FL7 or FL8. b. Check preparation of misrouted header change (Fig 3-23). NOTE: CIC is changed to ZOVW. Use original SSN for FL2 with your RI. Use new TOF for FL2.
c. Check preparation of service message to originator (Fig 3-24). NOTE: Precedence of service will be the same as the original message. d. Check outgoing log for misrouted and service log.
5. Check processing of a missent message. (Refer to JANAP 128( ), Chap 4, Sec III, para 429; Chap 15, Sec V, para 15-13.)
—— ——
a. Check for missent message (Fig 3-25). NOTE: Message as received by RUCLDIA. Message is routed correctly, but received by wrong COMCEN.
b. Check preparation of missent header change (Fig 3-26). c. Check preparation of service message to the station who missent the
message (Fig 3-27).
NOTE: Previous station is normally an ASC or AN/TYC-39. Therefore, the last three letters of the RI are CSA. If not connected to an ASC or TYC-39, send the service message to last connected station.
d. Check outgoing log for missent and service message. NOTE: Specific extracts of references are not included because of the quantity of material.
Evaluation Guidance: Score the soldier GO if all steps are passed (P). Score the soldier NO-GO if any step is failed (F). If the soldier fails any step, show what was done wrong and how to do it correctly.

STP 31-18E34-SM-TG
3 - 114
Check Voice Radio Net Procedures 113-571-7004
Conditions: Given a radio net and radio operator, FM 24-1, FM 24-18, FM 24-33, ACP 125(E), ACP 125 US Suppl 1, Unit SOI. Standards: Standard is met when a check of a voice radio net operation has been made to ensure compliance with the indicated references and noted discrepancies have been corrected on the spot or instructions have been given as to corrective action to be taken. Performance Measures GO NO GO
1. Check the radio operator(s) to ensure the prescribed radiotelephone procedures are being used. (Refer to FM 24-1, Appendix J; FM 24-18, Chapter 5, Section III; ACP-125(E); and ACP-125 US SUPPL 1).
—— ——
2. Check the written messages before transmission. —— ——
3. Check that proper authentication procedures are being followed. (Refer to FM 24-33
—— ——
4. Correct all noted discrepancies on the spot or instruct the radio team chief and/or operator as to corrective action to be taken (refer to FM 24-19 and Unit SOI).
—— ——
Evaluation Guidance: Score the soldier GO if all steps are passed (P). Score the soldier NO-GO if any step is failed (F). If the soldier fails any step, show what was done wrong and how to do it correctly. References
Required Related ACP 125 US SUPPL-1 ACP 125(E) FM 24-1 FM 24-18 FM 24-33 UNIT SOI

STP 31-18E34-SM-TG
3 - 115
Skill Level 4
Subject Area 6: Communication Operations
Supervise Signal Augmentation 331-201-5048
Conditions: Given deployment instructions, operations order (OPORD), letter of instruction (LOI), or verbal orders of commanding officer (VOCO); list of personnel and equipment to become augmented; the communications plan; the signal operating instructions (SOI); and an operation site. Standards: Verify that the deploying element is effectively augmented with signal support in accordance with commander's guidance, SOI, and all pertinent directives. Performance Steps
1. Coordinate equipment and personnel requirements based upon OPORD, LOI, VOCO, or instructions.
2. Verify personnel security clearances with S-2.
3. Request radio frequencies.
4. Issue SOI or extracts of SOI to selected personnel.
5. Coordinate the establishment of the communications center (COMCEN) and related equipment (for example, antenna fields and power generation).
6. Select priority sites for telephone installation with the forward operational base. Performance Measures GO NO GO
1. Verify all security clearances with the S-2. —— ——
2. Request for radio frequencies. —— ——
3. Issue SOI or extracts of the SOI to selected personnel. —— ——
4. Coordinate with COMCEN. —— —— Evaluation Guidance: Score the soldier GO if all steps are passed. Score the soldier NO-GO if any step is failed. If the soldier fails any step, show what was done wrong and how to do it correctly. References
Required Related FM 24-18 TC 24-21

STP 31-18E34-SM-TG
3 - 116
Coordinate Signal Activities With Other Units 331-201-5046
Conditions: Given the commander's planning guidance; field manual (FM) 3-05.20, Special Forces Operations; FM 24-18, Tactical Single-Channel Radio Communications Techniques; communications-electronics (CE) annex to the operation order (OPORD); unit signal operating instructions (SOI) or extract; Signal/Audio/Visual Services Supplement 6 (SAV SER SUP 6); equipment lists; and pencil and paper. Standards: Provide brief, specific, and timely instructions and a copy of the unit's SOI extract to all affected units. Performance Measures GO NO GO
1. Determine the signal mission. —— ——
2. Determine how much and what type of communications equipment is needed and available.
—— ——
3. Verify compatibility and frequency operating range of equipment. —— ——
4. Determine any auxiliary signals (other than radio). —— ——
5. Forward any changes or additional information to be implemented into the CE annex of the OPORD to superiors for approval.
—— ——
6. Review SOI or extract for completeness and clarity. —— ——
7. Brief and distribute the SOI or extract to all affected units. —— —— Evaluation Guidance: Score the soldier GO if all steps are passed. Score the soldier NO-GO if any step is failed. If the soldier fails any step, show what was done wrong and how to do it correctly. References
Required Related FM 24-18 FM 3-05.20 SAV SER SUP 6

STP 31-18E34-SM-TG
3 - 117
Establish a Forward Operational Base Signal Center 331-201-5045
Conditions: Given organic signal element with personnel and equipment; a unit standing operating procedure (SOP); unit signal operating instructions (SOI); radio net diagrams; telephone traffic diagrams; patchwork sheet; wiring plan; an operation order; applicable equipment technical manuals (TMs); field manual (FM) 11-50, Combat Communications Within the Division (Heavy & Light); FM 20-3, Camouflage, Concealment, and Decoys; and FM 24-18, Tactical Single-Channel Radio Communications Techniques. Standards: Camouflage the signal center, establish the site defense, and ensure the communications systems are ready to pass traffic within 3 hours. Performance Measures GO NO GO
1. Review mission, SOP, communication diagrams, site defense plan, and SOI to determine the specific requirements for the installation, operation, and maintenance of the signal center.
—— ——
2. Implement site defense plan. —— —— a. Position security outposts around site to provide early warning of an enemy
approach.
b. Establish entrance and exit points and lanes for traffic flow within the site. c. Coordinate with supported unit for specific defense responsibility and
perimeter sector responsibility, as required.
d. Coordinate with engineer element for assistance in establishing field fortifications for communications assemblages, as required.
e. Direct location and construction of individual and crew-served fighting positions.
f. Direct installation of artificial obstacles, as required. g. Direct installation of chemical alarm system, as required. h. Identify and locate focal point for command and control of site defense. i. Plan for orderly withdrawal. j. Prepare defense overlay, if required.
3. Direct installation of secure radio teletype (RATT) station. (Refer to applicable TMs.)
—— ——
a. Review the mission, SOP, SOI, and radio net diagram to determine specific requirements for installation and operation of a RATT terminal.
b. Direct installation of RATT sets, to include organic power generator, if required.
c. Direct antenna installation. d. Direct preoperational checks and adjustments on equipment, as required. e. Direct establishment of physical security.
4. Direct installation of high-frequency outstation radio net. (Refer to applicable TMs.)
—— ——
a. Review the mission, SOP, SOI, and radio net diagram to determine specific requirements for installation and operation of the base-station radio system.
b. Direct installation of base-station radio system, to include organic power generator, as required.
c. Direct antenna installation. d. Direct preoperational checks and adjustments on equipment, as required. e. Direct establishment of physical security.
5. Direct installation of telephone central office. (Refer to equipment TM.) —— ——

STP 31-18E34-SM-TG
3 - 118
Performance Measures GO NO GO a. Review the mission, SOP, telephone traffic diagram, patchwork sheet, and
SOI to determine specific requirements for installation and operation of manual telephone central office.
b. Direct the installation of central manual telephone office. c. Direct the preparation of main distribution frame line and trunk cable records,
as required.
d. Direct the testing of line and trunk circuits. e. Review the mission, SOP, telephone traffic diagram, patchwork sheet,
program work sheet, and SOI to determine specific requirements for installation and operation of an automatic telephone central office.
f. Direct establishment of central automatic telephone office. g. Review program work sheet (wiring plan), as required. h. Direct preliminary adjustments of switchboard.
6. Direct installation of internal and external cable or field. —— ——
7. Direct installation of a telecommunications center. —— —— a. Review the mission, SOP, RATT traffic diagram, and initial messenger
schedules to determine specific requirements for installation and operation of a tactical telecommunications center.
b. Direct installation of telegraph terminal and organic power generator. c. Direct installation of message center equipment. d. Establish messenger service, if required. e. Direct the establishment of physical security.
8. Direct implementation of cover and concealment for personnel and equipment, as required. (Refer to FM 20-3.)
—— ——
9. Coordinate with support personnel for petroleum, oils, lubricants, mess facilities, administrative needs of assigned personnel, maintenance, and field sanitation, as required.
—— ——
10. Coordinate with the communications-electronics officer/noncommissioned officer for support of nonorganic communications requirements.
—— ——
Evaluation Guidance: Score the soldier GO if all steps are passed. Score the soldier NO-GO if any step is failed. If the soldier fails any steps, show what was done wrong and how to do it correctly. References
Required Related FM 11-50 FM 20-3 FM 24-18

STP 31-18E34-SM-TG
3 - 119
Prepare a Joint Communications Plan 331-201-5042
Conditions: Given essential documents--operation orders (OPORDs), mission statements, signal operating instructions (SOIs), joint signal operating instructions (JSOI), commander's guidance, unit standing operating procedure (SOP), communications and electronics (C&E) brief, equipment support to meet communications need, and a joint communications requirement. Standards: Develop and coordinate a communications plan that provides secure, reliable communications between unit, higher, adjacent, subordinate, joint, and coalition forces. Performance Steps
1. Determine communication requirements for joint/combined operations. (Refer to OPORD, mission statement, SOI/JSOI, commander's guidance, unit SOP, and C&E brief.)
a. Types of communication. b. Communications equipment. (1) Availability of equipment. (2) Compatibility of equipment.
2. Recognize and interface with national-level communication organizations and defense communication systems.
a. National-level communications within theater area of operations. (1) National communications system (NCS). ( a) Agencies responsible for operating the NCS and with whom coordination may be
necessary are: - Department of State - Diplomatic Telecommunications Service (DTS). - Department of Treasury - Treasury Enforcement Communications Service/Federal Reserve Communications System (FRCS). - Department of Defense - Defense Communications System (DCS). - Federal Aviation Administration (FAA) - National Airspace Data Interchange Network National Aeronautical and Space Administration (NASA) - Training and Data Relay System. - Federal Emergency Management Agency (Emergency Broadcast System).
b. Defense communications systems within theater area of operations. (1) Worldwide Military Command and Control System (WWMCCS). ( a) Global Command and Control System (GCCS). ( b) National Military Command Systems (NMCS). ( c) Defense Satellite Communications System (DSCS). (2) Defense Switching Network (DSN). (3) Defense Data Network (DDN). (4) DCS Commercial Satellite Communications System. (5) Automatic Digital Network (AUTODIN). (6) Ground Mobile Forces (GMF)/tactical satellite (TACSAT). (7) Leased Satellite System (LEASAT). (8) White House Communications Agency (WHCA). (9) Joint Integration and Engineering Organization (JIEO).
3. Prepare a plan. a. Select a communications systems to integrate into the joint theater of operations. b. Request the frequencies to support the selected communications systems selected. c. Review applicable joint publications, technical manuals, field manuals, army regulations, and
so on.

STP 31-18E34-SM-TG
3 - 120
Performance Steps
4. Coordinate with the special operations command (SOC) J-6. NOTE: If there is not a SOC J-6 or SOC, you may have to coordinate directly with the theater J-6 or request support from the area signal battalion, in order to plug into specific networks because some groups and battalions are not equipped to do so. a. Theater directory. b. SOI. c. Phone lines. d. Support from the signal battalion.
5. Review and revise the plan. Performance Measures GO NO GO
1. Evaluate mission, OPORD, and commander's guidance to determine the need for the mission.
—— ——
2. Coordinate with the SOC J-6, agencies, sister Services, theater commander, and prior missions.
—— ——
3. Verify all communication equipment is compatible with own units, adjacent units, and higher units.
—— ——
4. Supervise implementation of plan. —— —— Evaluation Guidance: Score the soldier GO if all steps are passed. Score the soldier NO-GO if any step is failed. If the soldier fails any step, show what was done wrong and how to do it correctly. References
Required Related CJCSM 6231.01A CJCSM 6231.03 CJCSM 6231.04 CJCSM 6231.05 CJCSM 6231.06 CJCSM 6231.07A FM 100-25 FM 100-5 FM 100-6 FM 100-8 JP 6-0 JP 6-02 JP 6-02.4 JP 6-06.2

STP 31-18E34-SM-TG
Appendix - 1
APPENDIX
Sample DA Form 5164-R
(Hands-On Evaluation) Instructions to the Trainer
The DA Form 5164-R allows the trainer to keep a record of the performance measures a soldier passes or fails on each task. The figure below shows a completed sample of a DA Form 5164-R. Instructions for using this form follow: 1. Obtain a blank reproducible DA Form 5164-R from AR 350-57 that you may reproduce locally on 8 ½
by 11 inch paper. 2. Enter the title and number of the task to be evaluated at the top of the form. 3. Enter the number of each performance step from the evaluation guide in column "a." 4. Enter each performance from the evaluation guide in column "b" that corresponds to the number in
column "a." (Information may be abbreviated, if necessary.) 5. If more than one soldier will be evaluated on the specific task or if the same soldier will be evaluated
more than once, reproduce the partially completed DA Form 5164-R. 6. Before evaluating a soldier, enter the date, the evaluator's name, and the soldier's name and unit. 7. Enter a check in column "c" (PASS) or column "d" (FAIL) as appropriate for each performance step
evaluated. 8. Check the status block GO/NO-GO, as appropriate by referring to the evaluation guide for the task
standard.

STP 31-18E34-SM-TG
Appendix - 2
Figure A-1. Sample DA Form 5164-R

STP 31-18E34-SM-TG
Glossary - 1
GLOSSARY
1SG
first sergeant AC
Active component; assistant commandant; alternating current; hydrogen cyanide; active current; activated charcoal
ACCP
Army Correspondence Course Program ACP
Allied Communication Publication AD
armored division; air defense ADA
air defense artillery ADC
advanced data controller AIT
Advanced Individual Training altn
alternate AM
amplitude modulation amp
amperage AN
annually; artery to nerve ANCOC
Advanced Noncommissioned Officer Course ANT
antenna app
appendix AR
Army regulation; Army reserve Army Training and Evaluation Program (ARTEP)
The cornerstone of unit training. It is the umbrella program to be used by the trainer and training manager in the training evaluation of units. The ARTEP is a complete program enabling commanders to evaluate and develop collective training based on unit weaknesses, ten train the

STP 31-18E34-SM-TG
Glossary - 2
unit to overcome those weaknesses and reevaluate. Success on the battlefield depends on the coordinated performance of collective and individual skills that are taught through the ARTEP MTP.
ARTEP
Army Training and Evaluation Program ASAT
Automated Systems Approach to Training ASC
AUTODIN switching center asst
assistance; assistant ASUM
applications software user's manual AT
annual training; antiterrorism; anti-tank AUTODIN
Automatic Digital Network AUX
auxiliary BAT
battery Bde
Brigade BIT
built-in-test BLK DIG
black digital BM
bimonthly Bn
Battalion BNC
Basic NCO Course (BNCOC); connector that was named after its inventor (Bayonet Neill Concelman)
BPS
basic psychological operations study; bauds per second BT
basic tasks; borderline tuberculosis leprosy BTB
STP 31-18E34-SM-TG
Glossary - 3
blind transmission broadcast BTTP
basic task training plan C&E
communications and electronics cav
cavalry CBT
combatting terrorism; computer-based training CD-ROM
compact disk-read-only memory CE
communications-electronics CEOI
communications-electronics operation instructions CES
coast earth station CF
Correlation Factor; complement fixation CH
chaplains chap
chapter CIC
content indicator code CIK
cryptographic ignition key CLR
clear CMD
command CMF
career management field CO
company; Commissioned Officer; carbon monoxide; cardiac output CO2
carbon dioxide

STP 31-18E34-SM-TG
Glossary - 4
collective training Training, either in institutions or units, that prepares cohesive teams and units to accomplish their missions on the battlefield and in operations other than war.
COMCEN
communications center COMM
communications common task
A critical task that is performed by every soldier in a specific SL regardless of MOS. COMSEC
communications security COSIR
cite our service in reply CP
command post; counterproliferation; checkpoint CPU
central processing unit Critical task
See "Task," "Critical collective task," and "Critical individual task." cross-training
The systematic training of a soldier on tasks related to another duty position within the same MOS or tasks related to a secondary MOS at the same SL.
CRT
cathode ray tube crypto
cryptographic CSA
communications service authorization CSC
command and staff college CSCE
communications system control element CSM
Command Sergeant Major CSPE
communication system planning element CT
counterterrorism; computed tomography; ciphertext

STP 31-18E34-SM-TG
Glossary - 5
CUM computer user's manual
d
image distance representing vertical side of the object; data; diameter DA
Department of the Army; direct action DA Form
Department of the Army Form DA Pam
Department of the Army Pamphlet DAMA
demand assign multiple access DAO
dependent assistance officer; department/agency/organization dBm
decibels above or below milliwatt (denotes power level) DC
dislocated civilian; Dental Corps; discharge; direct current DCS
division clearing station; Defense Communications System DCT
digital communications terminal DD
Defense Department DD Form
Department of the Defense Form DDN
Defense Data Network DF
direction finding DIA
Defense Intelligence Agency DIM
dimness DIN
Deutshe Industries Norman DIR
direction

STP 31-18E34-SM-TG
Glossary - 6
DISCOM
division support command Div
Division DIVARTY
division artillery DMD
digital message device DMDG
digital message device group doct
doctrine DOD
Department of Defense DOS
Department of State; disk operating system Drill
A disciplined, repetitious exercise to teach and perfect a skill or procedure. Drills are linked to Mission Training Plans in that they are a method for executing a collective task or task step. There are two types: Battle Drill--A collective action executed in a standard manner throughout the Army by a platoon or smaller element without the application of a deliberate decision making process. The action is vital to success in combat or critical to preserving life. The drill is initiated on a cue, such as an enemy action or simple leader's order, and is a trained response to the given stimulus. It requires minimal leader orders to accomplish and is standard throughout like units in the Army. Crew Drill--A collective action that a crew of a weapon or piece of equipment must perform to use the weapon or equipment successfully in combat or to preserve life. This action is a trained response to a given stimulus such as a simple leader order or the status of the weapon or equipment. It requires minimal leader orders to accomplish and is standard throughout the Army.
DSCS
Defense Satellite Communications System DSN
Defense Switchboard Network DT
data DTG
date-time group DTS
data terminal software; Diplomatic Telecommunications Service EA
Each; electronic protection

STP 31-18E34-SM-TG
Glossary - 7
ECCM electronic counter-countermeasures
ECM
electronic countermeasures; erythema chronicum migrans EEFI
essential elements of friendly information EFB
emergency field broadcast EL
elevation ENL
erythema nodosum leprosum EP
electronic protection EPLRS
enhanced position locating and reporting system ESC
escape ESD
electrostatic dissipative EW
electronic warfare FA
field artillery; functional area FAA
Federal Aviation Administration; Functional Area Assessment FDC
Fire Direction Center Fielding date
The date that equipment, training materials, or other support are required to be in the field to support training requirements
FIST
Fire Support Team FL
friction loss; fill FM
field manual; frequency modulation FRAGO
STP 31-18E34-SM-TG
Glossary - 8
fragmentary order freq
frequency FSK
frequency shift keying FSO
fire support officer GCCS
global command and control system GD
ground distance; soman; guard receiver GMF
ground mobile forces GMT
Greenwich Mean Time GPS
global positioning system GSR
ground surveillance radar GTA
Graphic Training Aid HD
headquarters detachment; distilled mustard gas; half duplex HERO
hazards of electromagnetic radiation to ordnance HF
high frequency HHC
headquarters and headquarters company IAW
in accordance with IBM
International Business Machines ID
identification; intradermal IN
interdiction; Infantry

STP 31-18E34-SM-TG
Glossary - 9
Individual training Training which prepares the soldier to perform specified duties or tasks related to assigned duty position or subsequent duty positions and skill level.
individual training plan
A document prepared for each enlisted MOS, warrant officer MOS, commissioned officer specialty code or separate functional training program that describes the overall plan to satisfy training requirements.
INFC
interface INIT
initiate INMARSAT
international maritime satellite INSCOM
U.S. Army Intelligence and Security Command IO
intelligence officer; international organizations; information operations; input/output ISSO
information system security officer IVSN
initial voice switch network J-6
Communications-Electronics Directorate JIEO
joint integration and engineering organization JSOI
joint signal operating instructions KEK
key encryption key kHz
kilohertz KTC
Dryad Numeral Cypher/Authentication System (Training) KTV
Cryptographic training, SOI LCD
liquid crystal display LD
line of departure; load

STP 31-18E34-SM-TG
Glossary - 10
ldr
leader LEASAT
leased satellite system LED
light emitting diode Li-SO2
lithium-sulfur dioxide LOC
line of communications; location; level of consciousness LOI
letter of instruction LOS
line of sight LRP
long-range planning; low power LRU
lowest replaceable unit ma
milliampere maint
maintenance MAJ
major MBITR
multiband inter/intra team radio MBMMR
multiband multimission radio MED
medical MEDEVAC
medical evacuation merger training
Training that prepares NCOs to supervise one or more different MOSs at lower SLs when they advance to a higher SL in their career management field.
METL
mission-essential task list

STP 31-18E34-SM-TG
Glossary - 11
MHz megahertz
MIJI
meaconing intrusion jamming interference mission-essential task list
A compilation of collective mission-essential tasks that must be successfully performed if an organization is to accomplish its wartime mission(s).
MOPP
mission-oriented protective posture MORT
mortar MOS
military occupational specialty MOSC
military occupational specialty code MP
military police MS-DOS
Microsoft-disk operating system MSG
master sergeant; message MTP
mission training plan; MOS training plan NASA
National Aeronautics and Space Administration NATO
North Atlantic Treaty Organization NAVAIDS
navigational aids NAVCOM
navigation communications; naval communications NCO
noncommissioned officer NCS
net control station; National Communications System NET
not earlier than; new equipment training; network NHUM

STP 31-18E34-SM-TG
Glossary - 12
network hardware user's manual NMCS
National Military Command Systems NO.
number NSA
National Security Agency NSN
national stock number; nonstandard number; nothing by mouth NSUM
network software user's manual OBC
Officer Basic Course OCONUS
outside continental U.S. OCR
optical character reader OPLAN
operation plan OPORD
operation order OPS
operations OPSEC
operations security OS
operating system; outstation OSUT
one-station unit training OTAR
over-the-air Pam
pamphlet; pralidoxime para
paragraph PC
personal computer

STP 31-18E34-SM-TG
Glossary - 13
Performance measures The actions that can be objectively observed and measured to determine if a task performer has performed the task to the prescribed standard. These measures are derived from the task performance steps during task analysis. See "Task performance specifications."
PgDn
page down PGRM
program PgUp
page up PLDC
Primary Leadership Development Course PLT
platoon PMCS
preventive maintenance checks and services PRCD
portable remote control device PREV
previous Procedure
A standard and detailed course of action that describes how to perform a task. PRST
preset PSA
primary support agency; port support activity; port shipping authority; power supply assembly PT
physical training; prothrombin times; preparatory marksmanship training; plaintext PTP
point-to-point PTT
push-to-talk pub
publication QRT
stop sending QRV
I am ready
STP 31-18E34-SM-TG
Glossary - 14
R/T receiver/transmitter
RAM
random access memory; rapid alternating movements RATT
radioteletype RC
Reserve Component REF
Reference RF
radio frequency; reserve forces; rheumatoid factor RFD
radio frequency direction RI
routing identifier RK
receive crypto RMT
remote RTO
radio telephone operator RX
receive S1
adjutant; first sacral vertebrae; first heart sound S2
intelligence officer; second heart sound S-2
intelligence officer S3
operations and training officer; third heart sound S-3
operations and training officer S4
supply officer; fourth heart sound SAV SER SUP
Signal Audiovisual Service Supplement; Standard Audiovisual Service Supplement

STP 31-18E34-SM-TG
Glossary - 15
SC
Signal Corps; single channel sec
second SEED
secure editing key SF
Special Forces; Standard Form SFQC
Special Forces Qualification Course SGM
sergeant major SGT
sergeant SIG
Signal SIGSEC
signal security SINCGARS
single-channel ground and airborne radio system SL
skill level; slight SM
soldier's manual SMCT
Soldier's Manual of Common Tasks SO2
sulfur dioxide SOC
special operations command SOI
signal operating instructions SOP
standing operating procedure SORAK
special operations radio antenna kit SQD

STP 31-18E34-SM-TG
Glossary - 16
squad sqdn
squadron SQL
squelch SRCH
search SSN
social security number ST
special text, student text STP
soldier training publication STU
secure telephone unit SVC
service TACP
tactical air control party TACSAT
tactical satellite TB
Technical Bulletin; tuberculosis TC
technical coordinator; training circular TCC
telecommunications center TD
Training Development ; time delay TEK
traffic encryption key TG
task group; trainer's guide TM
technical manual; tympanic membrane TOC
tactical operations center

STP 31-18E34-SM-TG
Glossary - 17
TOD time of day
TOE
table of organization and equipment TOF
time of forwarding train-up
The process of increasing the skills and knowledge of an individual to a higher SL in the appropriate MOS. It may involve certification.
TRANSEC
transportation security; transmission security TSK
transmission security key tx
treatment; transmit UHF
ultra high frequency ULLS
unit level logistics system ULM
unit level maintenance unit training
Training (individual, collective, and joint or combined) that takes place outside the Army's institutional base.
UPS
uninterrupted power supply US
United States USAJFKSWCS
United States Army John F. Kennedy Special Warfare Center and School V
nerve agent; volts; voice; volume VAC
volts, alternating current VC
Veterinary Corps; voice VDC
volts, direct current

STP 31-18E34-SM-TG
Glossary - 18
VHF very high frequency
VOCO
verbal orders of commanding officer Vol
Volume WHCA
White House Communications Agency WPNS
weapons WWMCCS
Worldwide Military Command and Control System XIT
exit XMIT
transmit XO
executive officer Z
zulu time (Greenwich Mean Time)

STP 31-18E34-SM-TG
References - 1
REFERENCES Department of Army Pamphlets DA PAM 738-750 Functional Users Manual for The Army Maintenance Management
System (TAMMS) 1 August 1994 Graphic Training Aids GTA 11-03-20 Installation of Antenna OE-254 (Card/1983) 1 January 1983 Other Product Types ACP 125 US SUPP-1 Communication Instructions-- Radiotelephone Procedures for United
States Ground Forces (1982/11/01) ST 31-157 Special Forces Radio Antenna. Soldier Training Publications STP 31-18-SM-TG Soldier's Manual, Skill Levels 3/4 and Trainer's Guide, CMF18, Special
Forces Basic Tasks 25 September 1997 Technical Manuals TM 11-5820-890-10-1 Operator's Manual for SINCGARS Ground Combat Net Radio, ICOM
Manpack Radio AN/PRC-119A (5820-01-267-9482) (EIC:L20) Short Range Vehicular Radio AN/VRC-87A (5820-01-267-9480) (EIC:L22) Short Range Vehicular Radio With Single Radio Mount AN/V 1 September 1992
TM 11-5820-890-10-3 Operator for Radio Set AN/PRC 119 VRC 87-92 1 September 1992 TM 11-5985-357-13 Operator's, Organizational, and Direct Support Maintenance Manual for
Antenna Group, OE-254/GRC (NSN 5985-01-063-1574). 1 February 1991
TM 11-5985-391-12 Operator's and Unit Maintenance Manual for Special Operations Radio Antenna Kit (SORAK) Antenna Group OE-452/PRC (NSN 5985-01-279-7942). 1 January 1991. 1 January 1991
Army Regulations AR 380-40 (C) Policy for Safeguarding and Controlling Communications Security
(COMSEC) Material (U) 30 June 2000 AR 380-5 Department of the Army Information Security Program 29 September
2000 Department of Army Forms DA FORM 2011 COMSEC Aids Items Register (Using Unit) 1 November 1977 DA FORM 2011-1 COMSEC Equipment Items Register (Using Unit) 1 November 1977 DA FORM 2404 Equipment Inspection and Maintenance Worksheet 1 April 1979 DA FORM 2406 Material Status Report 1 April 1993 DA FORM 2407 Maintenance Request 1 July 1994 DA FORM 2407-1 Maintenance Request Continuation Sheet 1 July 1994 DA FORM 2408-14 Uncorrected Fault Record 1 June 1994 DA FORM 2653-R COMSEC Account -- Daily Shift Inventory 1 November 1974 DA FORM 2715 Unit Status Report 1 September 2001 DA FORM 3964 Classified Document Accountability Record 1 July 1979 DA FORM 4618-R Operational Resource Record (LRA) 1 June 1977

STP 31-18E34-SM-TG
References - 2
Department of Army Pamphlets DA PAM 25-380-2 (O) Security Procedures for Controlled Cryptographic Items 10 January
1991 DA PAM 738-750 Functional Users Manual for The Army Maintenance Management
System (TAMMS) 1 August 1994 Field Manuals FM 101-5 Staff Organization and Operations 31 May 1997 FM 11-487-1 Installation Practices: HF Radio Communications Systems 18 April
1991 FM 11-50 Combat Communications Within the Division (Heavy and Light) 4 April
1991 FM 11-65 High Frequency Radio Communications 31 October 1978 FM 20-3 Camouflage, Concealment, and Decoys 30 August 1999 FM 21-26 Map Reading and Land Navigation (SUPERSEDED BY FM 3-25.26) 7
May 1993 FM 24-1 Signal Support in the Airland Battle 15 October 1990 FM 24-16 Communications-Electronics Operations, Orders, Records, and Reports
7 April 1978 FM 24-18 Tactical Single-Channel Radio Communications Techniques 30
September 1987 FM 24-22 Communication-Electronics Management System (CEMS) 30 June 1977 FM 24-33 Communications Techniques: Electronic Counter-Countermeasures 17
July 1990 FM 24-35 (O) Signal Operation Instructions "The SOI" 26 October 1990 FM 24-35-1 (O) Signal Supplemental Instructions 2 October 1990 FM 3-05.20 Special Forces Operations 26 June 2001 FM 5-424 Theater of Operations Electrical Systems 25 June 1997 Other Product Types ACP 125 US SUPPL-1 Communications Instructions Radiotelephone Procedures for Use by
United States Ground Forces. 1 October 1985 1 October 1985 ACP 125(E) Communication Instructions Radiotelephone Procedures. 1 August 1987. ASUM Applications software user's manuals CUM Computer user's manuals ISBN 0072122269 Networking: A Beginner's Guide by Bruce A. Hallberg. 22 December
1999 ISBN 0072337451 More Excellent HTML: With an Introduction to Javascript by Timothy T.
Gottleber/Timothy N. Trainor. ISBN 0782122612 MCSE: Exchange Server 5.5 Study Guide. 17 April 1998 ISBN 0789710536 Repairing and Upgrading PCs. 10 January 1995 ISBN 1562057685 MCSE Training Guide: Windows NT Server and Workstation 4 ISBN 1562763644 How Computers Work. 10 January 1995 SAV SER SUP 6 Signal/Audio/Visual Services Supplement 6 SF 153 COMSEC Material Report 1 September 1979 TM SOFIIS-00-G10-00297-00 Operator's and Unit Maintenance Manual (Including Repair Parts and
Special Tools List) for Radio Set AN/PSC-5D (NSN 5821-01-477-6237); Raytheon Company, Fort Wayne, Indiana. 20 September 2000
UNIT SOI Signal Operation Instructions

STP 31-18E34-SM-TG
References - 3
Technical Bulletins TB 380-41 (O) Procedures for Safeguarding, Accounting and Supply Control of
COMSEC Material. TB 11-5810-375-10 KY-99 and KY-99A Operator's Pocket Guide 1 September 1995 Technical Manuals TM 11-5815-334-10 Operator's Manual for Radio Teletypewriter Sets AN/GRC-122 (NSN
5815-00-401-9719), AN/GRC-122A (5815-00-167-7998), AN/GRC-122B (5815-00-937-5295), AN/GRC-122C (5815-01-095-1211), AN/GRC-122D (5815-01-096-0428), AN/GRC-122E (5815-01-095-1212 1 October 1994
TM 11-5820-1130-12&P Operator's and Unit Maintenance Manual (Including Repair Parts and Special Tools List) for Radio Set AN/PSC-5 1 June 2000
TM 11-5820-256-10 Operator's Manual: RADIO SET, AN/GRC-26D 29 December 1978 TM 11-5820-467-15 Operator's, Organizational Maintenance Manual: Antenna Group
AN/GRA-50 TM 11-5820-890-10-1 Operator's Manual for SINCGARS Ground Combat Net Radio, ICOM
Manpack Radio AN/PRC-119A (5820-01-267-9482) (EIC:L20) Short Range Vehicular Radio AN/VRC-87A (5820-01-267-9480) (EIC:L22) Short Range Vehicular Radio With Single Radio Mount AN/V 1 September 1992
TM 11-5820-890-10-3 Operator for Radio Set AN/PRC 119 VRC 87-92 1 September 1992 TM 11-5895-1180-20 Organizational Maintenance Manual for Radio Set AN/PSC-3 (NSN
5820-01-145-4943) (EIC:L25) [EE125-JD-MMO-110/PSC3;TO 31R2-2PCS3-2;TM5895-20/3]. 1 September 1994
TM 11-5985-357-13 Operator's, Organizational, and Direct Support Maintenance Manual for Antenna Group, OE-254/GRC (NSN 5985-01-063-1574). 1 February 1991
TM 11-5985-391-12 Operator's and Unit Maintenance Manual for Special Operations Radio Antenna Kit (SORAK) Antenna Group OE-452/PRC (NSN 5985-01-279-7942). 1 January 1991. 1 January 1991
Training Circulars TC 24-21 Tactical Multichannel Radio Communications Techniques 3 October
1988
Related Publications Related publications are sources of additional information. They are not required in order to understand this publication. Army Correspondence Course Program Subcourses IT0464 Operations Security SS0026 SIGNAL CENTER OPERATIONS. SS0068 DIVISION SIGNAL ORDERS AND REPORTS Army Regulations AR 220-1 Unit Status Reporting 30 November 2001

STP 31-18E34-SM-TG
References - 4
AR 380-5 Department of the Army Information Security Program 29 September 2000
AR 530-1 Operations Security (OPSEC) 3 March 1995 Department of Army Pamphlets DA PAM 738-750 Functional Users Manual for The Army Maintenance Management
System (TAMMS) 1 August 1994 Field Manuals FM 100-25 Doctrine for Army Special Operations Forces 1 August 1999 FM 100-5 Operations 14 June 1993 FM 100-6 Information Operations 27 August 1996 FM 100-8 The Army in Multinational Operations 24 November 1997 FM 11-487-1 Installation Practices: HF Radio Communications Systems 18 April
1991 FM 11-65 High Frequency Radio Communications 31 October 1978 FM 19-30 Physical Security 1 March 1979 FM 24-1 Signal Support in the Airland Battle 15 October 1990 FM 24-18 Tactical Single-Channel Radio Communications Techniques 30
September 1987 FM 24-19 Radio Operator's Handbook 24 May 1991 FM 24-22 Communication-Electronics Management System (CEMS) 30 June 1977 FM 24-33 Communications Techniques: Electronic Counter-Countermeasures 17
July 1990 FM 24-7 Tactical Local Area Network (LAN) Management 8 October 1999 FM 34-60 Counterintelligence 3 October 1995 Graphic Training Aids GTA 11-03-20 Installation of Antenna OE-254 (Card/1983) 1 January 1983 Joint Publications CJCSM 6231.01A Manual for Employing Joint Tactical Communications Joint System
Management 23 May 1997 CJCSM 6231.03 (FO)Manual for Employing Joint Tactical Communications Systems Joint
DATA Communications 15 August 1997 CJCSM 6231.04 Manual for Employing Joint Tactical Communications-Joint Transmission
Systems 29 December 1995 CJCSM 6231.05 Manual for Employing Joint Communications Systems Joint
Communications-Security 13 October 1995 CJCSM 6231.06 Manual for Employing Joint Tactical Communications Joint Technical
control Procedures and Systems 14 August 1995 CJCSM 6231.07A Manual for Employing Joint Tactical Communication (Joint Network
Management and Control 24 January 1997 JP 6-0 Doctrine for C4 Systems Support to Joint Operations 30 May 1995 JP 6-02 Joint Doctrine for Employment of Operational/Tactical C4 Systems 1
October 1996 JP 6-02.4 Joint Spectrum Management JP 6-06.2 JTTP for SINCGARS Other Product Types AN/PRC-137 AN/PRC-137 Quick Reference

STP 31-18E34-SM-TG
References - 5
AN/PRC-137 SF RADIO AN/PRC-137 Special Forces Manpack Radio AN/PRC-148 AN/PRC-148 MultiBand Inter/Intra Team Radio (MBITR) Quick
Reference Guide AN/PRC-148(V)(C) Operation and Maintenance Instructions with Illustrated Parts Breakdown
for AN/PRC-148(V)(C) Multiband Inter/Intra Team Radio (Includes SINCGARS, HAVEQUICK, RETRANSMISSION); Thales Communications, Inc., Clarksburg, MD. 25 October 2000
ASUM Applications software user's manuals CUM Computer user's manuals KL-43(C) Operator's Manual, KL-43(C), Part Number 410-308, REV D; TRW
Electronic Products, Inc. 8 December 1989 LSS-94429 LSS-94429 SOLSAT Phone Communication System Equipment
Handbook MS-DOS MANUAL Microsoft-Disk Operating System (MS-DOS) User's Manual ST 31-157 Special Forces Radio Antenna. TM SOFIIS-00-G10-00299-00 Preliminary Operator Quick Reference Guide, Radio Set AN/PSC-5D
(NSN 5821-01-477-6237); Raytheon Company 15 September 2000 TO31R2-2PRC113-1 Operator's Manual for Radio Set AN/PRC-113(V)1, P/N 706738-801;
Magnavox Government Industrial Electronics Company 15 March 1985 TT-98-107770A TT-3060A Capsat Mobile Telephone Users Manual; Thrane & Thrane
A/S, Denmark. 6 January 1998 VSD-613800-97-071 REV B Personal Data Controller Model VDC-400 User's Guide; ViaSat, Inc.,
Carlsbad, CA. 1 April 1997 Technical Bulletins TB 43-0129 Safety Requirements for Use of Antenna and Mast Equipment 15 June
1986 Technical Manuals TM 11-5820-1130-12&P Operator's and Unit Maintenance Manual (Including Repair Parts and
Special Tools List) for Radio Set AN/PSC-5 1 June 2000 TM 11-5985-357-13 Operator's, Organizational, and Direct Support Maintenance Manual for
Antenna Group, OE-254/GRC (NSN 5985-01-063-1574). 1 February 1991
TM 11-6130-479-13&P Operator's, Unit, and Direct Support Maintenance Manual (Including Repair Parts and Special Tools List) for Power Supply Assembly OP-177(V)1/U 1 June 1995
TM 11-6625-203-12 Operation and Organizational Maintenance Manual for Multimeter AN/URM-105 and AN/URM-105C (Including Multimeters, ME-77/U and ME-77C/U) (Reprinted w/Basic Incl C4-6). 11 June 1959. 11 June 1959
Training Circulars TC 24-21 Tactical Multichannel Radio Communications Techniques 3 October
1988 Army Regulations AR 350-57 Self-Development Test 17 June 1994 Department of Army Forms DA FORM 2028 Changes to Publications 1 May 1985 DA FORM 5164-R Hands-On Evaluation 1 September 1985

STP 31-18E34-SM-TG
References - 6
Department of Army Pamphlets DA PAM 350-59 Army Correspondence Course Program Catalog 1 October 2002 Field Manuals FM 25-101 Battle Focused Training 30 September 1990 Soldier Training Publications STP 21-1-SMCT Soldier's Manual of Common Task Skill Level 1 1 October 1994 STP 21-24-SMCT Soldier's Manual of Common Tasks, Skill Levels 2/3/4 1 October 1992

STP 31-18E34-SM-TG
References - 7
Questionnaire
Type Unit____________________________________________________________________________ Date________________________________________________________________________________ MOS/Skill Level_______________________________________________________________________ Current Duty Position__________________________________________________________________ Years in Service______________________________________________________________________ Years in Current Grade_________________________________________________________________ Special Note to Commanders and Trainers: Results of hands-on evaluations are no longer reported for Enlisted Personnel Management System (EPMS) purposes. To improve its products, the USAJFKSWCS must obtain training diagnostic feedback from the field. Upon completion of your periodic hands-on evaluations, please provide the USAJFKSWCS with the consolidated results of your analysis. Strict unit anonymity will be maintained. We are only interested in obtaining sufficient data to identify tasks and performance measures that indicate a need for improvement in our training products. Although data in any form will be accepted, the elements in the following example would be most meaningful to us: Task Number of Total Number
Number Soldiers Evaluated NO-GO Steps Failed
061-294-1104 20 5 step 3 (2) step 5 (1) step 6 (2) If you are aware of any external factors that affected the results of your evaluation, please identify them. Informal, handwritten feedback will be fine. Again, responding to this request is entirely voluntary and unit anonymity will be maintained. Thank you for your help. Please complete the questionnaire below by indicating the number of the response that reflects your feeling about each statement. Please explain overall responses of Disagree or Strongly Disagree in the Comments section. Strongly Strongly No Opinion/ Agree Agree Disagree Disagree Not Applicable
4 3 2 1 0 1. This manual is well-organized and easy to use. ________ 2. The tasks in this manual are assigned to the proper skill level. (Please identify tasks that you think should be assigned to a different skill level. Give your reasons in the Comments section.) ________ 3. The MTP is helpful in planning my training. ________

STP 31-18E34-SM-TG
References - 8
4. The location of qualification training (resident or unit) in the MOS training plan is appropriate. (Please identify any disagreements by task and explain in the Comments section.) ________ 5. The instructions given in the Evaluation Preparation section are clear and complete. (Please identify exceptions by task numbers in the Comments section.) ________ 6. The conditions for all tasks are correct. (Please list exceptions in the Comments section.) ________ 7. The standards for all tasks are correct and attainable. (Please list those that are not clear in the Comments section.) ________ 8. The steps listed in the Evaluation Guide for all tasks are accurate. ________ 9. The evaluation guidelines and hands-on evaluation (DA Form 5164-R) are clear and easy to use. ________ 10. The study references for each task are complete and accurate. (Please list those that are not in the Comments section.) ________ If you need to comment on any item above or if you have any recommendations to improve this manual in any way, please write your thoughts in the Comments section. Comments: ____________________________________________________________________________________ ____________________________________________________________________________________ ____________________________________________________________________________________ ____________________________________________________________________________________ ____________________________________________________________________________________ ____________________________________________________________________________________ ____________________________________________________________________________________ ____________________________________________________________________________________ ____________________________________________________________________________________ ____________________________________________________________________________________ ____________________________________________________________________________________ ____________________________________________________________________________________ ____________________________________________________________________________________ ____________________________________________________________________________________ ____________________________________________________________________________________

STP 31-18E34-SM-TG
References - 9
____________________________________________________________________________________ ____________________________________________________________________________________ ____________________________________________________________________________________ ____________________________________________________________________________________ ____________________________________________________________________________________ ____________________________________________________________________________________ ____________________________________________________________________________________ ____________________________________________________________________________________ ____________________________________________________________________________________ ____________________________________________________________________________________ ____________________________________________________________________________________ ____________________________________________________________________________________ ____________________________________________________________________________________ ____________________________________________________________________________________ ____________________________________________________________________________________ ____________________________________________________________________________________ ____________________________________________________________________________________ ____________________________________________________________________________________ ____________________________________________________________________________________ ____________________________________________________________________________________ ____________________________________________________________________________________ ____________________________________________________________________________________ ____________________________________________________________________________________ ____________________________________________________________________________________ ____________________________________________________________________________________ ____________________________________________________________________________________ ____________________________________________________________________________________ ____________________________________________________________________________________

STP 31-18E34-SM-TG
References - 10
____________________________________________________________________________________ ____________________________________________________________________________________ ____________________________________________________________________________________ ____________________________________________________________________________________ ____________________________________________________________________________________ ____________________________________________________________________________________ ____________________________________________________________________________________ ____________________________________________________________________________________ ____________________________________________________________________________________ ____________________________________________________________________________________ ____________________________________________________________________________________ ____________________________________________________________________________________ ____________________________________________________________________________________ If you desire a response, please provide your name and address: _______________________________________________________ _______________________________________________________ _______________________________________________________ _______________________________________________________ Send responses to: Commander USAJFKSWCS ATTN: AOJK-DT-SF Fort Bragg, NC 28310-5000

STP 31-18E34-SM-TG 28 APRIL 2003
By Order of the Secretary of the Army: ERIC K. SHINSEKI
General, United States Army Chief of Staff
Official:
0309907
JOEL B. HUDSON Administrative Assistant to the
Secretary of the Army
DISTRIBUTION: Active Army, Army National Guard, and US Army Reserve: Not to be distributed. Electronic media only.

PIN: 080794-000