Embed Size (px)
Citation preview

SolSunoWatches
Guarantee/Instruction

GUARANTEE
The SolSuno Timepiece has been produced using the latest technical method.
Each item is individually tested and has to go through strict quality controls.
Therefore we guarantee this item for a period of: 12 MONTHS from date of purchase.
This guarantee is offered in order to make our technical facilities available. It is in addition to the statutory rights of the purchaser and will not affect them. This guarantee is only valid if full particulars are filled in by the retailer at time of purchase.
This guarantee excludes batteries where applicable which are not included in the purchase prices, but are provided free of charge for demonstration purposes.
This guarantee does not include bracelets/straps.This guarantee does not cover damage caused by misuse or neglect.
This guarantee shall be void if the product has been taken apart or repaired by anyone but ourselves in our own service department.
SolSuno Limited will carry out repairs that are not covered by the guarantee at a charge.
2

INSTRUCTIONS FOR RETURN
Please note carefully: Should your timepiece require attention, pack it well and send with the guarantee form and £6.00 cheque paid to “SolSuno Limited” to cover packing, handling, insurance and return postage.Please send to:
SolSuno LimitedUnits R S T U Burnham Trading EstateLawson Road Dartford KentDA1 5BHUK
* If replacement batteries are required, please send an additional £3.00 to cover cost of supplying and fitting batteries.
BATTERY REPLACEMENT SHOULD ONLY BE UNDERTAKEN BY A WATCH SPECIALIST.
3
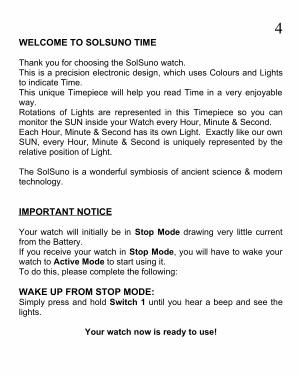
WELCOME TO SOLSUNO TIME
Thank you for choosing the SolSuno watch. This is a precision electronic design, which uses Colours and Lights to indicate Time. This unique Timepiece will help you read Time in a very enjoyable way.Rotations of Lights are represented in this Timepiece so you can monitor the SUN inside your Watch every Hour, Minute & Second. Each Hour, Minute & Second has its own Light. Exactly like our own SUN, every Hour, Minute & Second is uniquely represented by the relative position of Light.
The SolSuno is a wonderful symbiosis of ancient science & modern technology.
IMPORTANT NOTICE
Your watch will initially be in Stop Mode drawing very little current from the Battery.If you receive your watch in Stop Mode, you will have to wake your watch to Active Mode to start using it.To do this, please complete the following:
WAKE UP FROM STOP MODE:Simply press and hold Switch 1 until you hear a beep and see the lights.
Your watch now is ready to use!
4

TELLING TIME
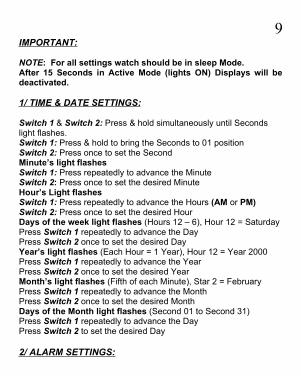
Note: When reading Time first look & read the Hour, Minute, & then the Second.
- Press Switch 1 once Time will appear from one Hour, one Minute, one Second (Image B).
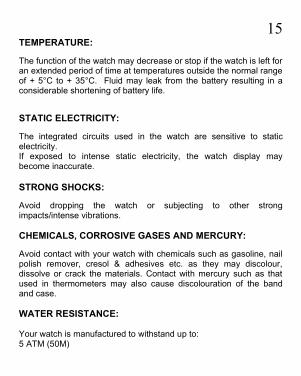
- Press Switch 1 twice Day of week will appear from one Hour (Image C).
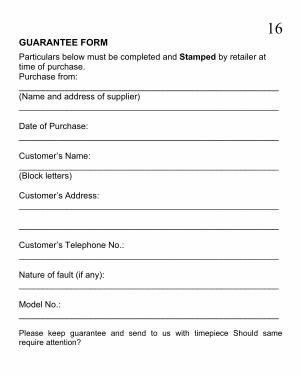
- Press Switch 1 three times Year, Month & Day of the Month will appear from one Hour, one Minute, one Second (Image D).
- The display will switch OFF automatically after 15 Seconds to save Battery power.
- You can switch the display OFF earlier by pressing Switch 2 to let your Battery LAST LONGER.
- If you press 25 times a day the Battery will last you approx 24 Months.
- If you press 25 times a day and you switch it OFF after 5 or 10 seconds each time, the Battery will last you much longer.
As you become familiar with the SolSuno way of telling TIME, this life span will undoubtedly increase.
Flickering Mode/Battery Life: 24 Hours a day ON: (Appox. 8 Months)12 Hours a day ON: (Appox. 14 Months) and so on.....
5
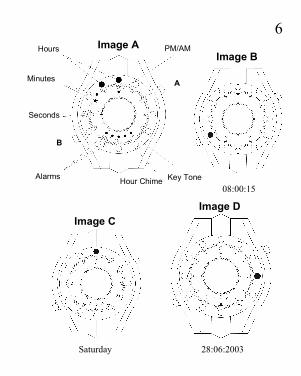
Hours
Seconds
Stunde
Key ToneHour ChimeAlarms
Minutes
Image B
A
B
Image CImage D
PM/AMImage A
08:00:15
Saturday 28:06:2003
6

FEATURES: 18- CR2032 Lithium Battery 210mAh- Very low power consumption- Sleep Mode- Stop Mode- Active Mode- Flickering Mode- Seconds, Minutes & Hours- Week Day, Day, Month & Year- 3 Alarms, Sound & Lights- Buzzer built in- Auto power OFF (after 15 Seconds)- Manual power OFF- 138 coloured LED lights- Key tone operation- Hourly Chime- AM/PM indicator- Alarm activated display- Green, Yellow & Red colours supported
MODES: 4Sleep Mode = Display OFFStop Mode = Display OFFActive Mode = Display ON Flickering Mode = Display always ON
Note: Not all SolSuno Models include the Flickering Mode.Briefly and Simultaneously Press Switch 2 and Switch 1.If your watch has this Feature, Flickering Mode is ON.Repeat the same procedure to turn the Flickering Mode OFF
7

SCREENS: 8Screen 1 = Switch 2-1, Flickering Mode (ON/OFF)Screen 1 = (1 Press) Hour, Minute & SecondScreen 2 = (2 Presses) Day of the weekScreen 2 = Alarms, Hour Chime & Key toneScreen 3 = (3 Presses) Year, Month & Day of MonthScreen 4 = (4 presses) Alarm 1Screen 5 = (5 presses) Alarm 2Screen 6 = (6 presses) Alarm 3 Screen 7 = (Switch 1) Press & Hold (Hour Chime)Screen 8 = (Switch 1) Press & Hold (Key Tone)
CODES: 11Hours = RedMinutes = RedSeconds = Yellow, Green & Red etc.Hours 1 – 12 = Years (Hour 1 = Year 2001)Hour 12 – 6 = Days of week (Hour 12 = Saturday)Minutes 5, 10, 15 etc = Months (Minute 5 = January)Seconds 1 – 31 = Days of Month (Second 1 = 1st.)Flashing light = OFFStable light = ONAM = light OFFPM = light ON
SWITCHES: 2Switch 1 (A): Press to access Screens 1 to 8Switch 2 (B): Press to shut OFF displaySwitch 1 & Switch 2: Press & Hold for Time Setting
8
IMPORTANT:
NOTE: For all settings watch should be in sleep Mode. After 15 Seconds in Active Mode (lights ON) Displays will be deactivated.
1/ TIME & DATE SETTINGS:
Switch 1 & Switch 2: Press & hold simultaneously until Seconds light flashes.Switch 1: Press & hold to bring the Seconds to 01 positionSwitch 2: Press once to set the Second Minute’s light flashesSwitch 1: Press repeatedly to advance the MinuteSwitch 2: Press once to set the desired Minute Hour’s Light flashesSwitch 1: Press repeatedly to advance the Hours (AM or PM)Switch 2: Press once to set the desired HourDays of the week light flashes (Hours 12 – 6), Hour 12 = SaturdayPress Switch 1 repeatedly to advance the Day Press Switch 2 once to set the desired DayYear’s light flashes (Each Hour = 1 Year), Hour 12 = Year 2000Press Switch 1 repeatedly to advance the YearPress Switch 2 once to set the desired YearMonth’s light flashes (Fifth of each Minute), Star 2 = FebruaryPress Switch 1 repeatedly to advance the MonthPress Switch 2 once to set the desired MonthDays of the Month light flashes (Second 01 to Second 31) Press Switch 1 repeatedly to advance the DayPress Switch 2 to set the desired Day
2/ ALARM SETTINGS:
9

Setting Alarm 1:Switch 1: Press & hold until Alarm 1 light flashes then release it Switch 2: Press once to activate the MinuteSwitch 1: Press repeatedly to set the desired MinuteSwitch 2: Press once to activate the HourSwitch 1: Press repeatedly to set the desired Hour (AM or PM)Switch 2: Press to set Alarm 1 (ON)
Setting Alarm 2:Switch 1: Press & hold until Alarm 1 light flashes then release it Switch 1: Press once to activate Alarm 2Switch 2: Press once to activate the MinuteSwitch 1: Press repeatedly to set the desired MinuteSwitch 2: Press to activate the HourSwitch 1: Press repeatedly to set the desired Hour (AM or PM)Switch 2: Press to set Alarm 2 (ON)
Setting Alarm 3:Switch 1: Press & hold until Alarm 1 light flashes then release it Switch 1: Press once to activate Alarm 2Switch 1: Press once again to activate Alarm 3Switch 2: Press to activate the MinuteSwitch 1: Press repeatedly to set the desired MinuteSwitch 2: Press to activate the HourSwitch 1: Press repeatedly to set the desired Hour (AM or PM)Switch 2: Press to set Alarm 3 (ON)
Checking Alarms ON/OFF:Alarms ON if in screen 2 (2 presses) Alarms lights are ONAlarms OFF if in screen 2 (2 presses) Alarms lights are OFFChecking Alarms Setting:
10

Switch 1: Press 4 times to see Alarm 1 setting (screen 4)Switch 1: Press once again to see Alarm 2 setting (screen 5)Switch 1: Press once again to see Alarm 3 setting (screen 6)Switch 1: Press once again to leave the screen.
Switching Alarms OFF:Switch 1: Press 4 times to go to Alarm 1 (screen 4)Switch 2: Press once to switch Alarm 1 OFFSwitch 1: Press once to go to Alarm 2 (screen 5)Switch 2: Press once to switch Alarm 2 OFFSwitch 1: Press once to go to Alarm 3 (screen 6)Switch 2: Press once to switch Alarm 3 OFFSwitch 1: Press once to leave the screen.Note: When Alarms are OFF Screen 4/5/6 are unavailable
3/ HOUR CHIME SETTING
Turn Hour Chime ON/OFFSwitch 1: Press & hold until Alarm 1 flashes then release itSwitch 1: Press once again to go to Alarm 2Switch 1: Press once again to go to Alarm 3Switch 1: Press once again to go to Hour Chime (Screen 7)Switch 2: Press repeatedly to set Hour Chime (ON or OFF)Switch 1: Press 2 times to leave the screen.
Checking Hour Chime:Switch 1: Press once to go to Time Reading ScreenSwitch 1: Press once again to see if Hour Chime light is (ON) Switch 2: Press once to leave the screen.4/ KEY TONE SETTING:
11

Turn Key Tone ON/OFFSwitch 1: Press & hold until Alarm 1 flashesSwitch 1: Press once again to go to Alarm 2Switch 1: Press once again to go to Alarm 3Switch 1: Press once again to go to Hour ChimeSwitch 1: Press once again to go to Key ToneSwitch 2: Press repeatedly to set Key Tone (ON or OFF)Switch 1: Press once to leave the screen.
Checking Key Tone:Switch 1: Press once to go to Time Reading ScreenSwitch 1: Press again to check Key Tone (ON or OFF)Switch 2: Press once again to leave the screen.
5/ ENTER STOP MODE WHEN IN SLEEP MODE:
Switch 1 & 2: Press & hold simultaneously until you see the lightsSwitch 2: Press & hold until you hear a long beep
Your Watch is now in stop mode
6/ WAKE UP FROM STOP MODE:
Switch 1: Press & hold until you hear a long beep & see the Lights
Your Watch is now ready to use!
BATTERY REPLACEMENT
12

Open/Close Slot
3 VOLT CR2032
IMAGE 1
13

SPECIFICATIONS: Accuracy: + 30 seconds per month on average (When worn at normal temperatures of + 5°C to + 35°C).
HANDLING OF BATTERIES:
Keep batteries out of reach from small children. In the event of a battery being mistakenly swallowed, consult a doctor immediately.
BATTERY REPLACEMENT:
Do not leave a dead battery in the watch for a long time. It may cause a malfunction due to leakage and be sure to replace it with a new correct one, Image 1.
INSTALLATION (VERY IMPORTANT):
Your battery should be properly installed. When replacing a new battery always make sure the Metal Clip, which holds the battery in position, is firmly fitted for contact activation. Image 1.To confirm this you will see all LED lights scanning around the display.If after installing a new battery you did not see the scanning display, this means that the battery has not been installed properly, please repeat the installation.We recommend for the first time use a jeweller to change the battery, For more info on installing the battery please visit our website:www.solsunotime.comwww.solsuno.com
14
TEMPERATURE:
The function of the watch may decrease or stop if the watch is left for an extended period of time at temperatures outside the normal range of + 5°C to + 35°C. Fluid may leak from the battery resulting in a considerable shortening of battery life.
STATIC ELECTRICITY:
The integrated circuits used in the watch are sensitive to static electricity. If exposed to intense static electricity, the watch display may become inaccurate.
STRONG SHOCKS:
Avoid dropping the watch or subjecting to other strong impacts/intense vibrations.
CHEMICALS, CORROSIVE GASES AND MERCURY:
Avoid contact with your watch with chemicals such as gasoline, nail polish remover, cresol & adhesives etc. as they may discolour, dissolve or crack the materials. Contact with mercury such as that used in thermometers may also cause discolouration of the band and case.
WATER RESISTANCE:
Your watch is manufactured to withstand up to: 5 ATM (50M)
15
GUARANTEE FORMParticulars below must be completed and Stamped by retailer at time of purchase. Purchase from: ______________________________________________________(Name and address of supplier)______________________________________________________
Date of Purchase: ______________________________________________________
Customer’s Name: ______________________________________________________(Block letters)
Customer’s Address: ______________________________________________________
______________________________________________________
Customer’s Telephone No.: ______________________________________________________
Nature of fault (if any): ______________________________________________________
Model No.: ______________________________________________________
Please keep guarantee and send to us with timepiece Should same require attention?
16

Guarantee
17


![Aeroboto [Instruction] [English]](https://img.pdfslide.us/doc/110x75/55cf8cb05503462b138ee293/aeroboto-instruction-english.jpg)