Embed Size (px)
Citation preview

1/4
U700 Abbreviated instruction
• This watch is solar-powered. Expose the dial to light and use it sufficiently charged.• To see details of charging time, specifications and operations, refer to the instruction manual: U700 instruction manual
English
Component identificationChronograph 1/10 second
handChronograph 1/100 second
hand
Chronograph second hand
Hour hand
Second hand
Button M
Rotating bezel
24-hour hand
Button B
Minute hand
Crown
Digital display
Button A
• Actual appearance may differ from the illustration.• Refer also to our web page for detail of usage of the scale and bezel on the watch.
(http://www.citizenwatch-global.com/support/pdf/enhanced/e.pdf)
Changing the modeThis watch features seven different modes: “Time and calendar”, “Chronograph”, “Race”, “Lap record”, “World time”, “Alarm”, and “Timer”.
Race
World time
Lap recordChronograph
Alarm
Time and calendar
Timer
1. Press and release the lower left button M repeatedly.
Setting the time and the calendar of the digital section• The analog section (hour/minute/second hands) moves synchronously with the
digital section and indicates the time set here.
1. Press and release the lower left button M repeatedly to change the mode to “Time and calendar”.
2. Pull out the crown.The second hand moves to the 0 second position and all hands stop.The area name starts blinking.
3. Press and release the lower right button A or upper right button B repeatedly to indicate an area name you want.
4. Press and release the lower left button M repeatedly to change the target to be set.• Each time you press the button, the target changes as follows:
Area name
Year Date Month 12/24-hour basis Hour
Summer time Second Minute
5. Press and release the lower right button A or the upper right button B to adjust the setting.• Pressing and holding any of the buttons changes indication continuously.
6. Push in the crown to finish the procedure.

2/4
U700 Abbreviated instruction
Using the alarm
1. Press and release the lower left button M repeatedly to change the mode to “Alarm”.
2. Pull out the crown.“ON”/“OF” of the alarm setting becomes adjustable.
3. Press and release the lower right button A to set the alarm “ON” or “OF”.• Each time you press the button, “ON”/“OF” changes alternately.
4. Press and release the lower left button M.The area becomes adjustable.
5. Press and release the lower right button A or upper right button B repeatedly to select an area.• Pressing and holding any of the buttons changes indication continuously.
6. Press and release the lower left button M to set the hour.The alarm hour starts blinking.
7. Press and release the lower right button A or upper right button B repeatedly to adjust the setting.
8. Press and release the lower left button M to set the minute.The alarm minute starts blinking.
9. Press and release the lower right button A or upper right button B repeatedly to adjust the setting.
10. Push in the crown to finish the procedure.To stop alarm
Press any of the buttons.• The alarm sounds for 15 seconds.
Using the chronographMeasuring up to 24 hours in 1/1000 second increments. The 1/1000 second units is indicated in the digital display.• The chronograph 1/10 second hand and chronograph 1/100 second hand stop at
the “0/.00” positions after 60 seconds pass from the start of the measurement.
1. Press and release the lower left button M repeatedly to change the mode to “Chronograph”.
2. Press and release the upper right button B.Measurement starts.Start/stop: press button B.Reset: press button A while the chronograph is stopped.• Pressing button A during measurement indicates the split time for 10
seconds and “SPL” is displayed.
Setting the world time
1. Press and release the lower left button M repeatedly to change the mode to “World time”.The area name currently set and its time are indicated.
2. Pull out the crown.3. Press and release the lower right button A or upper right
button B repeatedly to select an area.• Pressing and holding any of the buttons changes indication continuously.
4. Press and release the lower left button M.The summer time becomes adjustable.
5. Press and release the lower right button A to set the summer time “ON” or “OFF”.
6. Push in the crown to finish the procedure.Switching the home time and the world time
1. Press and release both the lower right button A and upper right button B at the same time.
Table of time zones and representative areas
Area name Representative area
Time zone
UTC Coordinated Universal Time ±0
LON LondonMAD Madrid
+1PAR ParisROM RomeBER BerlinCAI Cairo
+2ATH AthensJNB Johannesburg
MOW Moscow+3
RUH RiyadhTHR Tehran +3.5DXB Dubai +4KBL Kabul +4.5KHI Karachi +5DEL Delhi +5.5DAC Dhaka +6RGN Yangon +6.5BKK Bangkok +7SIN Singapore
+8HKG Hong KongBJS BeijingTPE Taipei
Area name Representative area
Time zone
SEL Seoul+9
TYO TokyoADL Adelaide +9.5SYD Sydney +10NOU Noumea +11AKL Auckland
+12SUV SuvaMDY Midway -11HNL Honolulu -10ANC Anchorage -9YVR Vancouver
-8LAX Los AngelesDEN Denver -7MEX Mexico City
-6CHI ChicagoNYC New York
-5YMQ MontrealSCL Santiago -4RIO Rio de Janeiro -3
FEN Fernando de Noronha -2
PDL Azores -1
• The time zone in the table is based on UTC (Coordinated Universal Time).• Countries or regions may change time zones for various reasons.

3/4
U700 Abbreviated instruction
Using the race modeYou can measure lap times and the average speed of each lap.The records of the latest 20 laps are stored in the Lap record mode.
Setting the distance of the courseTo calculate speed, set the distance of the course.The course distance can be set within the range from 0 to 99.999 km/mile (unit may differ depending on models).
1. Press and release the lower left button M repeatedly to change the mode to “Race”.
2. Pull out the crown.3. Press and release the lower right button A.
“YES” is displayed.
4. Press and hold the lower left button M for 2 seconds or more to delete the past lap records.The last distance setting is displayed.
5. Press and release the lower right button A or upper right button B repeatedly to set the integer digits.• Pressing and holding any of the buttons changes indication continuously.
6. Press and release the lower left button M to change the digit to be set.• Each time you press button M, the target changes as follows:
Integer (1s and 10s digits) → tenth digit → hundredth digit → thousandth digit → (back to the top)
7. Press and release the lower right button A or upper right button B repeatedly to set the distance.• Pressing and holding any of the buttons changes indication continuously.
8. Push in the crown to finish the procedure.Measuring lap times
The largest lap number is “99” and it returns to “01” as you take the 100th lap time.You cannot change the mode during the measurement.
1. Press and release the lower left button M repeatedly to change the mode to “Race”.
2. Press and release the upper right button B.Measurement starts.
3. Press the lower right button A to measure lap times.• Each time you press button A, the lap time and its number are displayed
for 7 seconds, then the speed for 3 seconds.• The speed can be displayed up to 999 km/hour. Beyond that, “---” is
displayed.
Lap number
4. Press and release the upper right button B to stop the measurement.The lap time and its number, then speed are displayed before the total of elapsed time.• To restart the measurement, press button B again.• To reset the measurement time, press button A.
Using the lap record modeAfter the lap measurement, you can check the records of the latest 20 laps.
1. Press and release the lower left button M repeatedly to change the mode to “Lap record”.“FAS” (best time) is displayed.• When no record is stored, “---” is displayed.
2. Press and release the lower right button A to change the record displayed.• Each time you press button A, the record changes as follows:
Best time (“FAS”) Average (“AVG”) Worst time (“LAT”)
All lap times (from old to new)
• If you press button B while a lap time is displayed, the speed is displayed for three seconds.
• “FAS” or “LAT” and the lap number are displayed alternately.
Deleting the records
1. Pull out the crown.2. Press and release the lower right button A.
“YES” is displayed.
3. Press and hold lower left button M for 2 seconds or more.The records are deleted and “---” is displayed.
4. Push in the crown to finish the procedure.
Using the timerYou can set the countdown timer up to 99 minutes by 1-minute increments.• Countdown continues even after changing the mode.
1. Press and release the lower left button M repeatedly to change the mode to “Timer”.
2. Pull out the crown.3. Press and release the lower right button A or upper right
button B repeatedly to set the time to countdown.• Pressing and holding any of the buttons changes indication continuously.
4. Push in the crown.5. Press and release the upper right button B.
Timer indication mark ( ) is displayed and the countdown starts.Start/stop: press button B.Reset: press button A while the timer is stopped.• Pressing button A during countdown starts countdown again from the
time set.
When the countdown is finishedThe time-up tone sounds for 5 seconds.Press any of the buttons to stop the sound.
4/4
U700 Abbreviated instruction
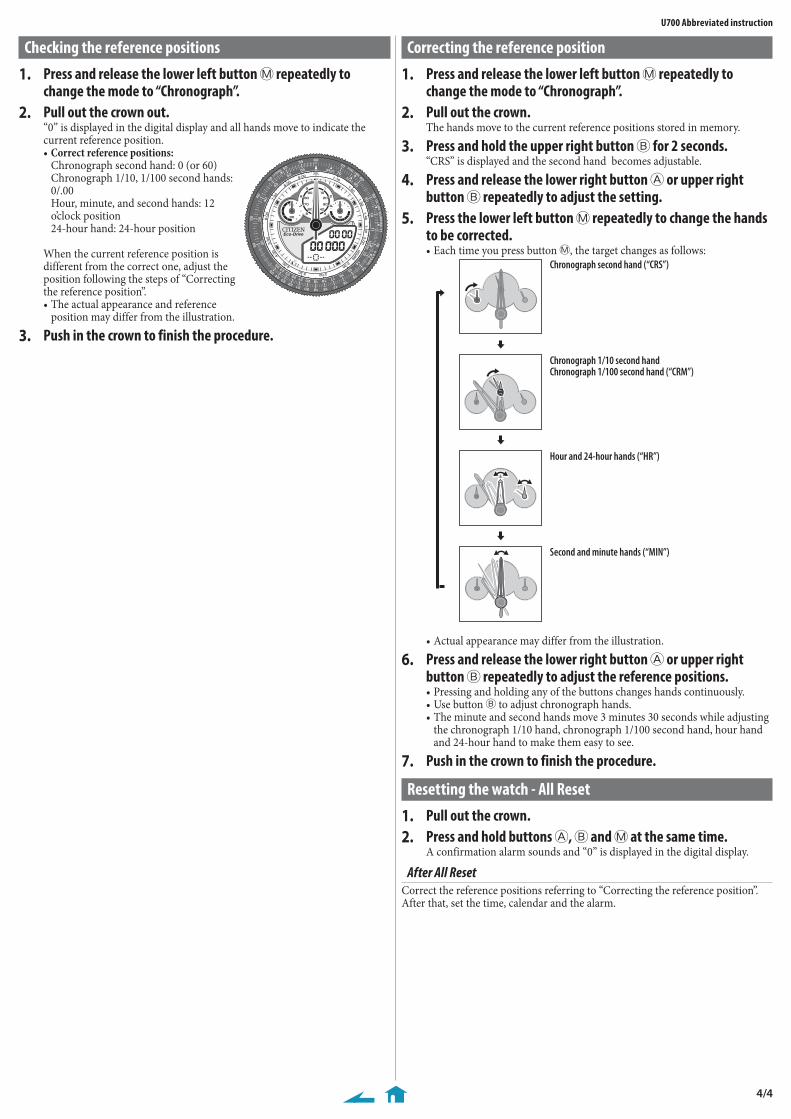
Correcting the reference position
1. Press and release the lower left button M repeatedly to change the mode to “Chronograph”.
2. Pull out the crown.The hands move to the current reference positions stored in memory.
3. Press and hold the upper right button B for 2 seconds.“CRS” is displayed and the second hand becomes adjustable.
4. Press and release the lower right button A or upper right button B repeatedly to adjust the setting.
5. Press the lower left button M repeatedly to change the hands to be corrected.• Each time you press button M, the target changes as follows:
Chronograph second hand (“CRS”)
Chronograph 1/10 second handChronograph 1/100 second hand (“CRM”)
Hour and 24-hour hands (“HR”)
Second and minute hands (“MIN”)
• Actual appearance may differ from the illustration.
6. Press and release the lower right button A or upper right button B repeatedly to adjust the reference positions.• Pressing and holding any of the buttons changes hands continuously.• Use button B to adjust chronograph hands.• The minute and second hands move 3 minutes 30 seconds while adjusting
the chronograph 1/10 hand, chronograph 1/100 second hand, hour hand and 24-hour hand to make them easy to see.
7. Push in the crown to finish the procedure.
Resetting the watch - All Reset
1. Pull out the crown.2. Press and hold buttons A, B and M at the same time.
A confirmation alarm sounds and “0” is displayed in the digital display.
After All ResetCorrect the reference positions referring to “Correcting the reference position”. After that, set the time, calendar and the alarm.
Checking the reference positions
1. Press and release the lower left button M repeatedly to change the mode to “Chronograph”.
2. Pull out the crown out.“0” is displayed in the digital display and all hands move to indicate the current reference position.• Correct reference positions:
Chronograph second hand: 0 (or 60) Chronograph 1/10, 1/100 second hands: 0/.00 Hour, minute, and second hands: 12 o’clock position 24-hour hand: 24-hour position
When the current reference position is different from the correct one, adjust the position following the steps of “Correcting the reference position”.• The actual appearance and reference
position may differ from the illustration.
3. Push in the crown to finish the procedure.