Embed Size (px)
Citation preview
Solmetric iPV iPhone Application
User Manual
Rev 2.4
copyright 2011 Solmetric Corporation
www.solmetric.com
Disclaimer
Solmetric iPV/Sun Tracker is designed as a pre-screening tool for determining the suitability of a site for a solar installation. Before making an investment decision you should have a professional analysis completed on your site. Do not make financial decisions based solely on the information from this tool.
Do not climb on a rooftop without proper safety equipment and training.
1

Table of ContentsAbout Solmetric iPV..................................................................................................................................3System Setup..............................................................................................................................................4
Skyline Scan Page................................................................................................................................. 4Set-up Page............................................................................................................................................4Performing a Skyline Scan.................................................................................................................... 7Analysis Page........................................................................................................................................ 8Report Page........................................................................................................................................... 9
Importing a Photo or Panorama............................................................................................................... 10About the iPhone Camera....................................................................................................................10Using AutoPan and AutoStitch............................................................................................................10
Setting Sweep Start and End on a iPhone 3G or iPod Touch...................................................................12Across Face Sighting Method.................................................................................................................. 13Button Functions...................................................................................................................................... 14
2
About Solmetric iPV
Solmetric iPV is an iPhone based preliminary site assessment tool. While it cannot match the speed and accuracy of the SunEye, its low cost makes site assessment available to anyone with an iPhone.
The Solmetric iPV is the evolution of the SunTracker App developed by Imeasure Systems and acquired by Solmetric in February 2010.
The app runs on the iPhone 4, 3GS, 3G or iPod Touch second generation or later (iPod second generation has the speaker function). The iPhone 4 and 3GS, with built in compass, is the preferred platform.
Solmetric iPV is self contained. All of the information you need for a site evaluation is stored on the iPhone.
By utilizing the compass (on 4 & 3GS) and inclinometer functions of the iPhone, you simply trace the edge of your skyline with the on screen cross-hairs. The position and elevation of the obstructions are recorded and overlaid on a sun plot that shows today's sun path, the current position of the sun and the summer and winter solstice.
Using a built in weather station database Solmetric iPV produces an estimate of the energy that will be received at a location, taking into account the losses due to local shading.
The iPhone's high resolution graphical display makes it easy to review results on site. You can show your customer why a particular location is best suited for the installation.
Solmetric iPV includes a large database of PV panel models and inverter models. You select your configuration and the tool will estimate production from that configuration. It supports fixed, single and dual axis tracking systems.
Solmetric iPV generates a personalized PDF site survey report. The report includes the sun path chart with shade profile, shade derating, estimated AC and DC output, and estimated revenue per month from the electricity generated. You can e-mail this report from the job site back to your office.
The tool is useful for education, pre-assessment or doing on site verification. However, due to the limits of the application, you should check the results of each survey carefully and you should not make financial decisions solely on the results from this software.
3
System Setup
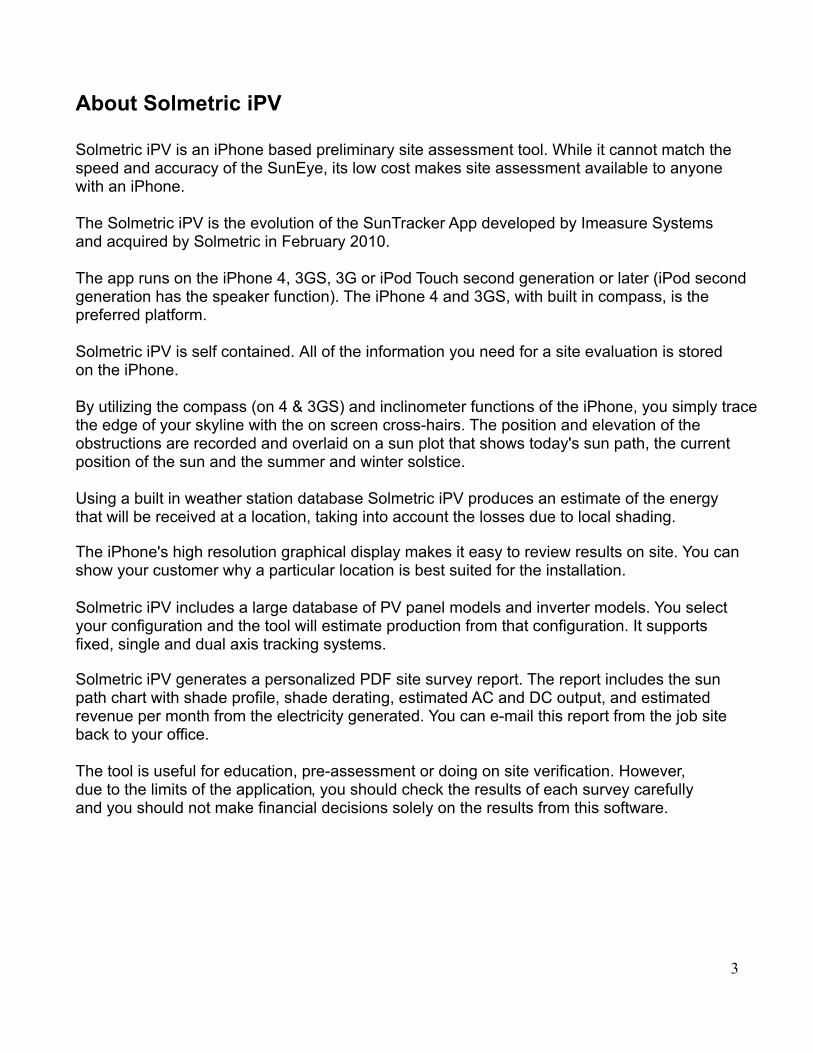
Skyline Scan PageWhen you open Solmetric iPV it will find your location using the built in GPS, provided GPS is installed and enabled. It will then present you with a sun path plot, showing today's trajectory together with an animated sun that will track the sun path in real time. It also shows the sun path for the summer and winter solstice. If yourdevice does not have GPS you must manually enter your location in the “Setup” page. Press the Setup button at the top left of the screen to navigate to the setup page.
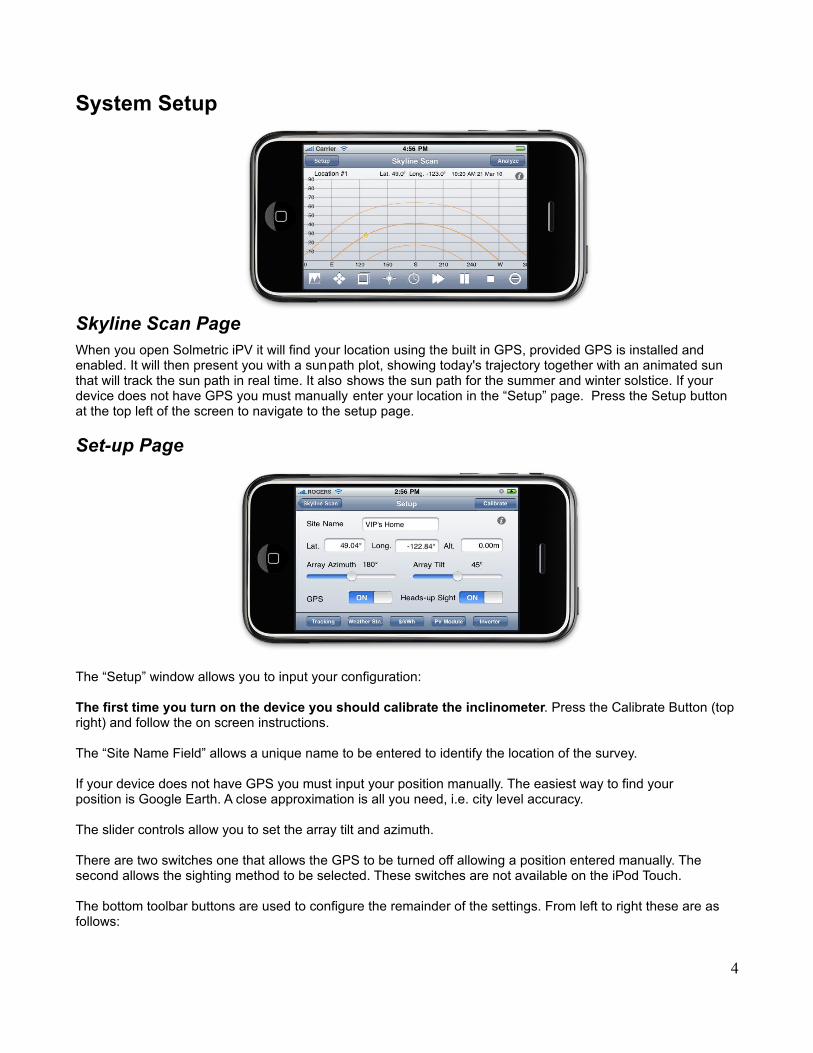
Set-up Page
The “Setup” window allows you to input your configuration:
The first time you turn on the device you should calibrate the inclinometer. Press the Calibrate Button (top right) and follow the on screen instructions.
The “Site Name Field” allows a unique name to be entered to identify the location of the survey.
If your device does not have GPS you must input your position manually. The easiest way to find your position is Google Earth. A close approximation is all you need, i.e. city level accuracy.
The slider controls allow you to set the array tilt and azimuth.
There are two switches one that allows the GPS to be turned off allowing a position entered manually. The second allows the sighting method to be selected. These switches are not available on the iPod Touch.
The bottom toolbar buttons are used to configure the remainder of the settings. From left to right these are as follows:
4
Tracking
Set the array to switch from Fixed, Single or Dual tracking mode. Note the on screen tilt and azimuth slider display is updated with the appropriate controls for each setting.
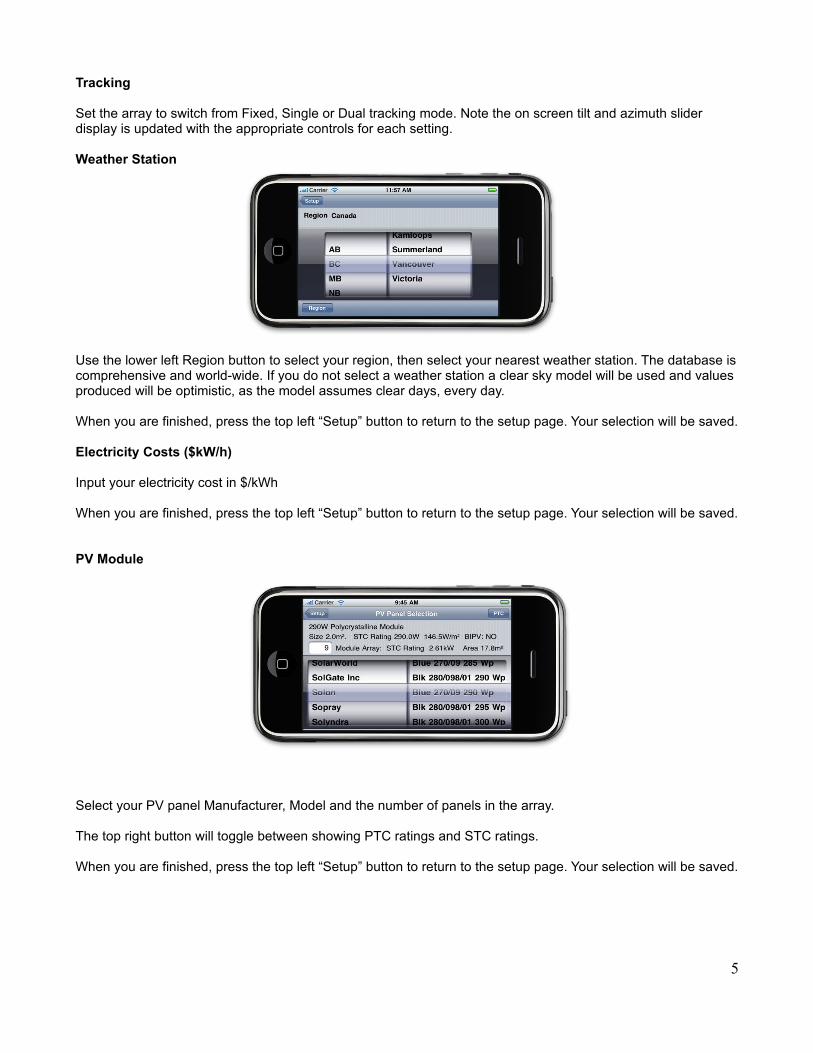
Weather Station
Use the lower left Region button to select your region, then select your nearest weather station. The database is comprehensive and world-wide. If you do not select a weather station a clear sky model will be used and values produced will be optimistic, as the model assumes clear days, every day.
When you are finished, press the top left “Setup” button to return to the setup page. Your selection will be saved.
Electricity Costs ($kW/h)
Input your electricity cost in $/kWh
When you are finished, press the top left “Setup” button to return to the setup page. Your selection will be saved.
PV Module
Select your PV panel Manufacturer, Model and the number of panels in the array.
The top right button will toggle between showing PTC ratings and STC ratings.
When you are finished, press the top left “Setup” button to return to the setup page. Your selection will be saved.
5
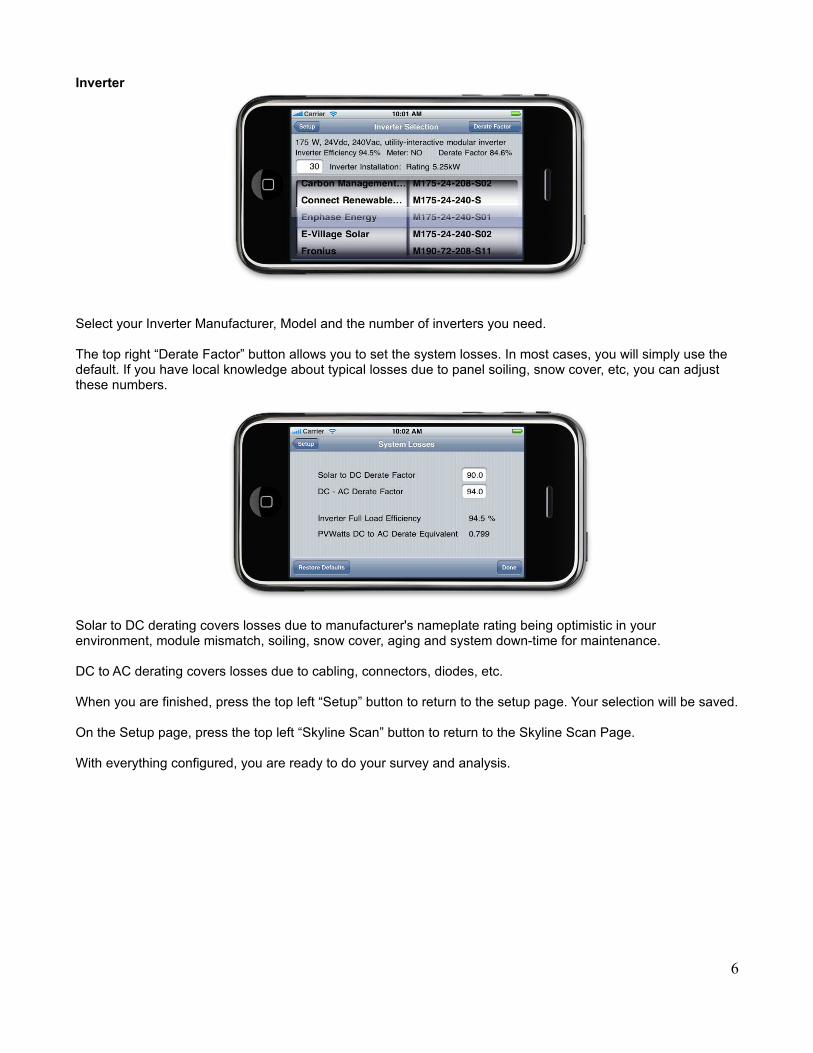
Inverter
Select your Inverter Manufacturer, Model and the number of inverters you need.
The top right “Derate Factor” button allows you to set the system losses. In most cases, you will simply use the default. If you have local knowledge about typical losses due to panel soiling, snow cover, etc, you can adjust these numbers.
Solar to DC derating covers losses due to manufacturer's nameplate rating being optimistic in your environment, module mismatch, soiling, snow cover, aging and system down-time for maintenance.
DC to AC derating covers losses due to cabling, connectors, diodes, etc.
When you are finished, press the top left “Setup” button to return to the setup page. Your selection will be saved.
On the Setup page, press the top left “Skyline Scan” button to return to the Skyline Scan Page.
With everything configured, you are ready to do your survey and analysis.
6
Performing a Skyline Scan
If you are running on a iPhone 4 or 3GS, no set-up is required. For other devices, you must set the start and endpoints for your scan using on screen markers. Refer to the “Setting Sweep Start and End on a iPhone 3G or iPod Touch” section at the end of the document.
When ready, press the “Scan” icon, signified by the outline of two trees (lower left). If you get a popup asking you to clear the old scan first, press the lower right clear icon signified by the circle with a line in it.
This will bring up the “sight” screen (3G and 3GS).
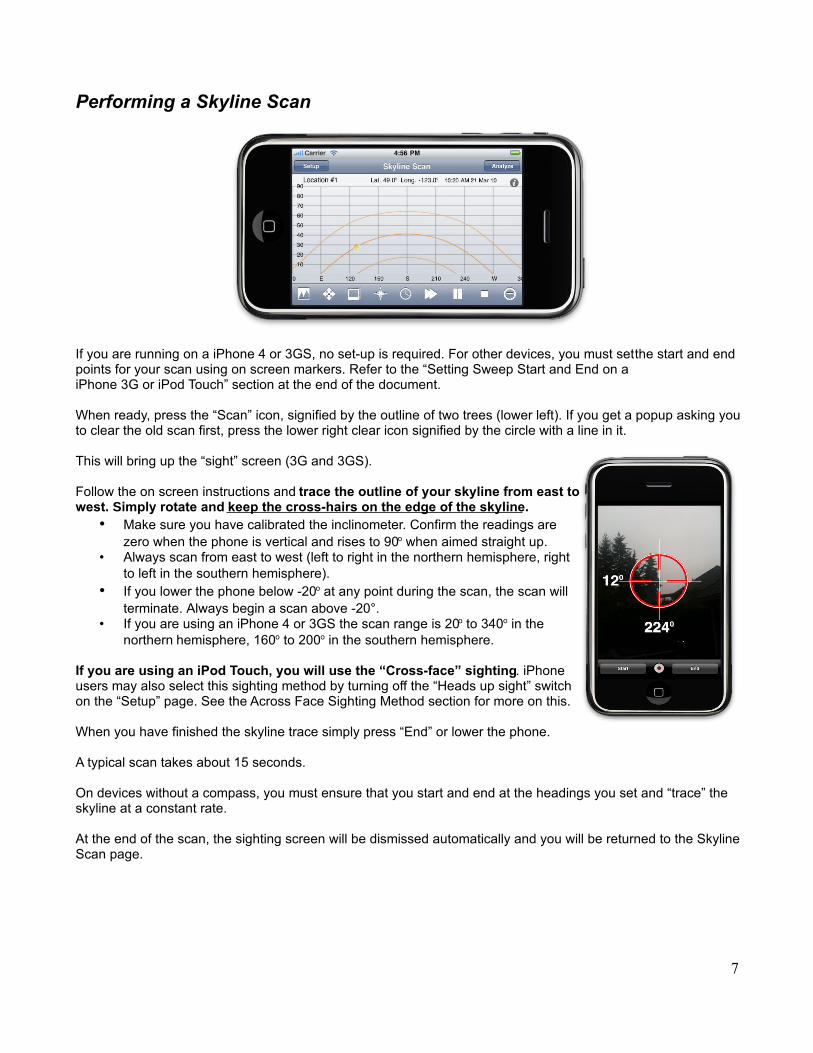
Follow the on screen instructions and trace the outline of your skyline from east to west. Simply rotate and keep the cross-hairs on the edge of the skyline.
• Make sure you have calibrated the inclinometer. Confirm the readings are zero when the phone is vertical and rises to 90o when aimed straight up.
• Always scan from east to west (left to right in the northern hemisphere, right to left in the southern hemisphere).
• If you lower the phone below -20o at any point during the scan, the scan will terminate. Always begin a scan above -20°.
• If you are using an iPhone 4 or 3GS the scan range is 20o to 340o in the northern hemisphere, 160o to 200o in the southern hemisphere.
If you are using an iPod Touch, you will use the “Cross-face” sighting. iPhone users may also select this sighting method by turning off the “Heads up sight” switch on the “Setup” page. See the Across Face Sighting Method section for more on this.
When you have finished the skyline trace simply press “End” or lower the phone.
A typical scan takes about 15 seconds.
On devices without a compass, you must ensure that you start and end at the headings you set and “trace” the skyline at a constant rate.
At the end of the scan, the sighting screen will be dismissed automatically and you will be returned to the Skyline Scan page.
7
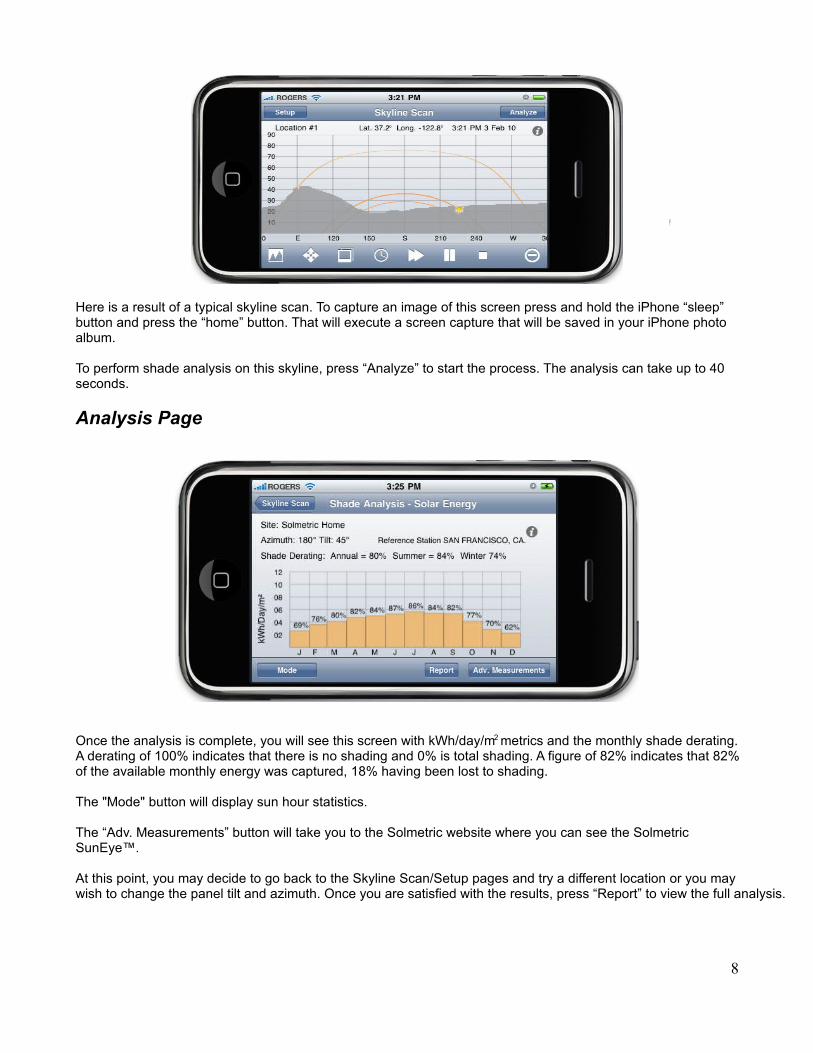
Here is a result of a typical skyline scan. To capture an image of this screen press and hold the iPhone “sleep” button and press the “home” button. That will execute a screen capture that will be saved in your iPhone photo album.
To perform shade analysis on this skyline, press “Analyze” to start the process. The analysis can take up to 40 seconds.
Analysis Page
Once the analysis is complete, you will see this screen with kWh/day/m2 metrics and the monthly shade derating. A derating of 100% indicates that there is no shading and 0% is total shading. A figure of 82% indicates that 82% of the available monthly energy was captured, 18% having been lost to shading.
The "Mode" button will display sun hour statistics.
The “Adv. Measurements” button will take you to the Solmetric website where you can see the Solmetric SunEye™.
At this point, you may decide to go back to the Skyline Scan/Setup pages and try a different location or you may wish to change the panel tilt and azimuth. Once you are satisfied with the results, press “Report” to view the full analysis.
8
Report Page
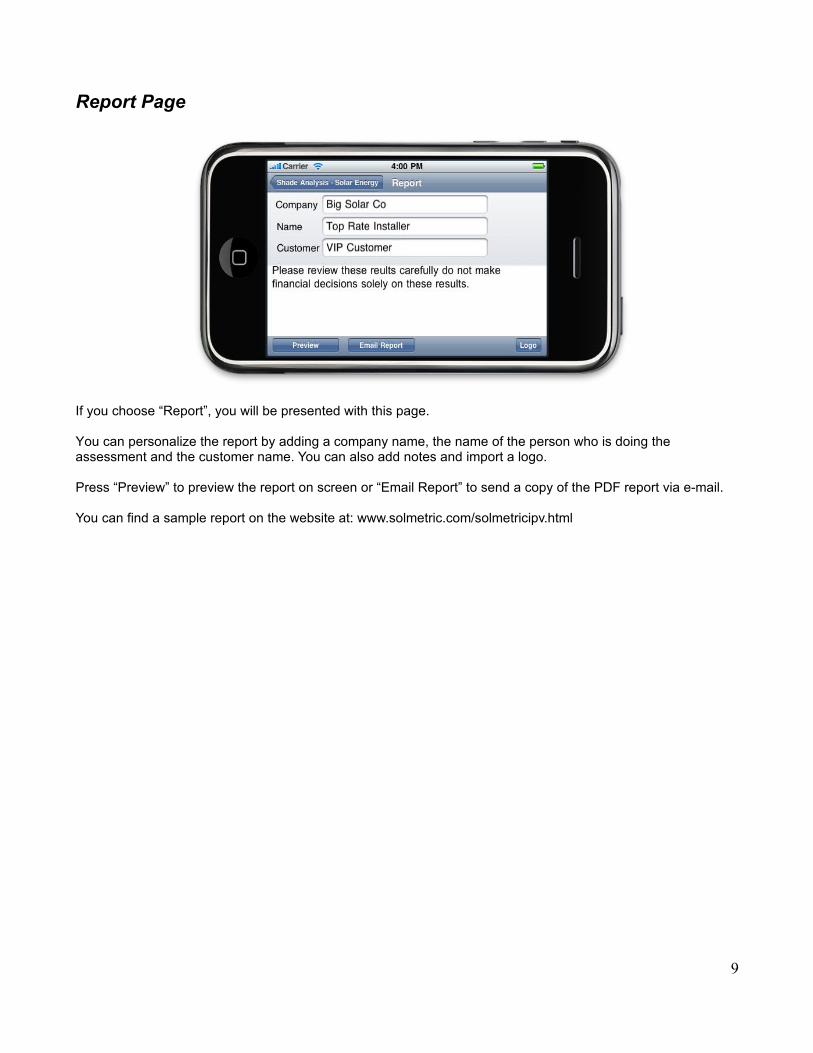
If you choose “Report”, you will be presented with this page.
You can personalize the report by adding a company name, the name of the person who is doing the assessment and the customer name. You can also add notes and import a logo.
Press “Preview” to preview the report on screen or “Email Report” to send a copy of the PDF report via e-mail.
You can find a sample report on the website at: www.solmetric.com/solmetricipv.html
9
Importing a Photo or Panorama
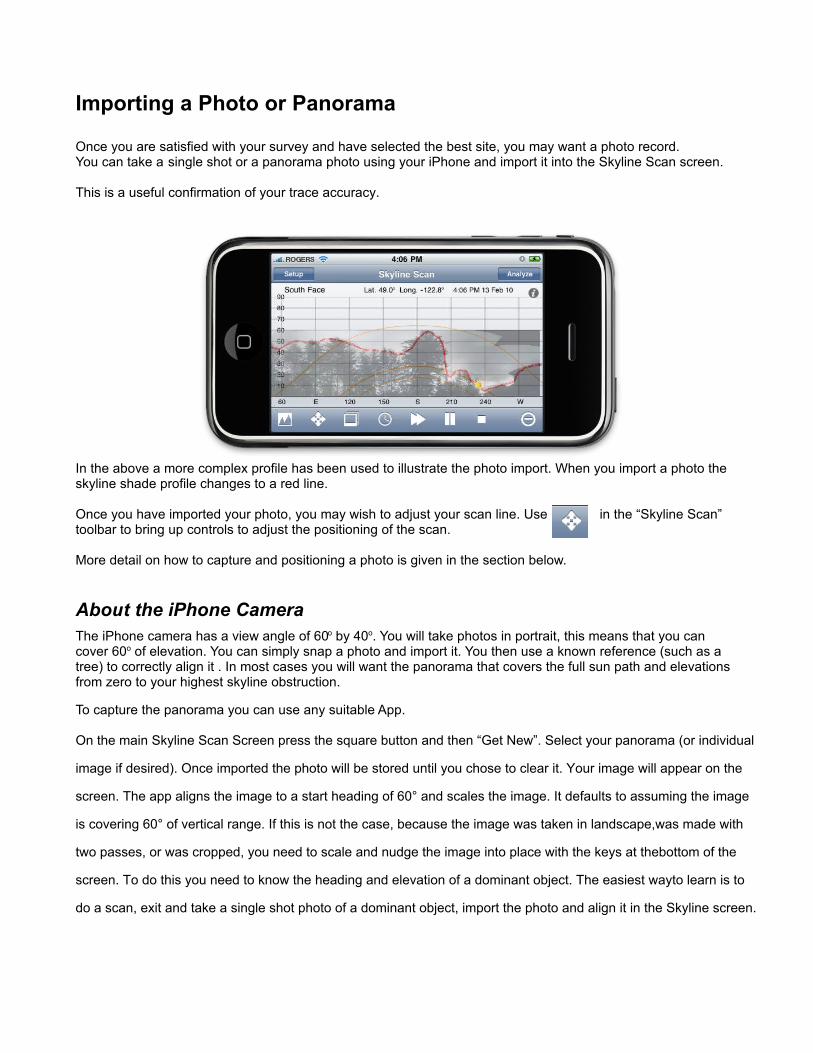
Once you are satisfied with your survey and have selected the best site, you may want a photo record. You can take a single shot or a panorama photo using your iPhone and import it into the Skyline Scan screen.
This is a useful confirmation of your trace accuracy.
In the above a more complex profile has been used to illustrate the photo import. When you import a photo the skyline shade profile changes to a red line.
Once you have imported your photo, you may wish to adjust your scan line. Use in the “Skyline Scan” toolbar to bring up controls to adjust the positioning of the scan.
More detail on how to capture and positioning a photo is given in the section below.
About the iPhone CameraThe iPhone camera has a view angle of 60o by 40o. You will take photos in portrait, this means that you can cover 60o of elevation. You can simply snap a photo and import it. You then use a known reference (such as a tree) to correctly align it . In most cases you will want the panorama that covers the full sun path and elevations from zero to your highest skyline obstruction.
To capture the panorama you can use any suitable App.
On the main Skyline Scan Screen press the square button and then “Get New”. Select your panorama (or individual
image if desired). Once imported the photo will be stored until you chose to clear it. Your image will appear on the
screen. The app aligns the image to a start heading of 60° and scales the image. It defaults to assuming the image
is covering 60° of vertical range. If this is not the case, because the image was taken in landscape,was made with
two passes, or was cropped, you need to scale and nudge the image into place with the keys at thebottom of the
screen. To do this you need to know the heading and elevation of a dominant object. The easiest wayto learn is to
do a scan, exit and take a single shot photo of a dominant object, import the photo and align it in the Skyline screen.

Setting Sweep Start and End on a iPhone 3G or iPod Touch
The iPhone 3G and the iPod Touch does not have built in compass. Hence the user must set the start and end headings for the sweep manually. You do this by using the red and green marks. Simply place your finger on the lines to drag them to the desired heading.
You should choose a reference points on your skyline that are easily identified and set your start and end at those headings.
On the iPod Touch or iPhone 3G, this button will display the sun compass.
You can use the sun compass to set your marks. Look along the line towards the current heading of the sun. Then move the marks to your desired start and end points, noting the position of objects that you can sight at those headings.
You can also use a hand compass, but you must convert the compass bearing to a true bearing and set your marks accordingly. Another convenient way to find orientation is to use Google Maps or Google Earth.
11
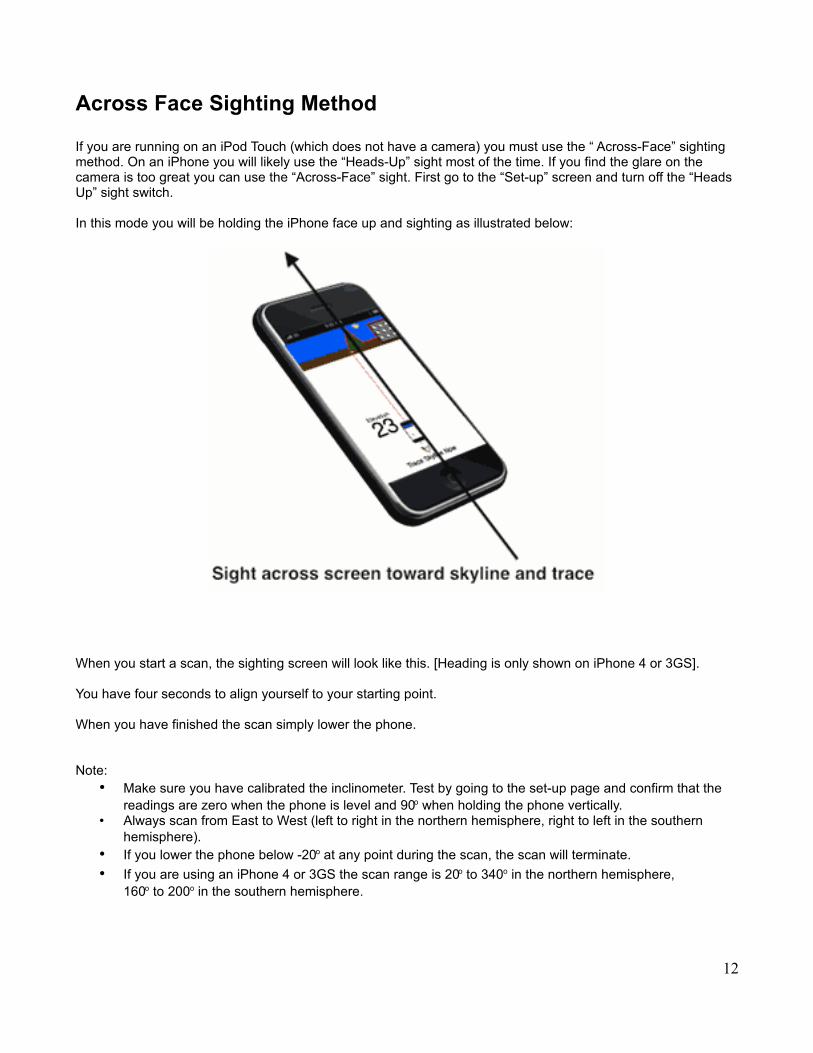
Across Face Sighting Method
If you are running on an iPod Touch (which does not have a camera) you must use the “ Across-Face” sighting method. On an iPhone you will likely use the “Heads-Up” sight most of the time. If you find the glare on the camera is too great you can use the “Across-Face” sight. First go to the “Set-up” screen and turn off the “Heads Up” sight switch.
In this mode you will be holding the iPhone face up and sighting as illustrated below:
When you start a scan, the sighting screen will look like this. [Heading is only shown on iPhone 4 or 3GS].
You have four seconds to align yourself to your starting point.
When you have finished the scan simply lower the phone.
Note:• Make sure you have calibrated the inclinometer. Test by going to the set-up page and confirm that the
readings are zero when the phone is level and 90o when holding the phone vertically.• Always scan from East to West (left to right in the northern hemisphere, right to left in the southern
hemisphere).• If you lower the phone below -20o at any point during the scan, the scan will terminate.
• If you are using an iPhone 4 or 3GS the scan range is 20o to 340o in the northern hemisphere, 160o to 200o in the southern hemisphere.
12
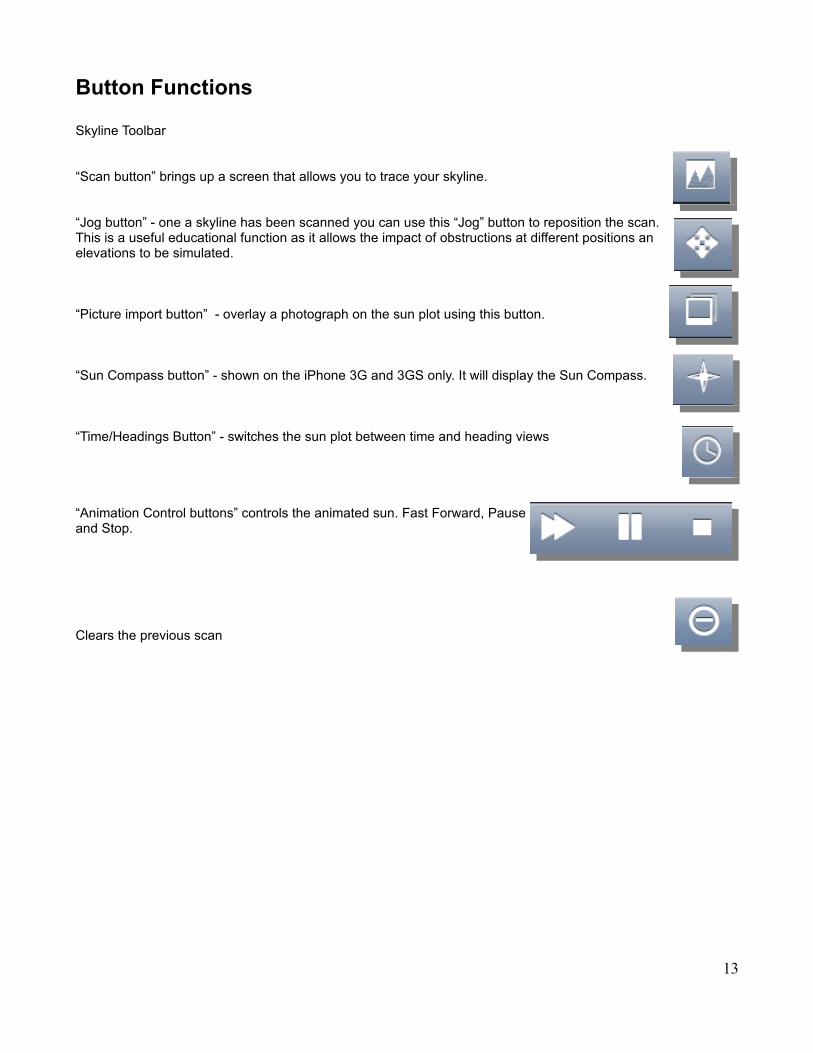
Button Functions
Skyline Toolbar
“Scan button” brings up a screen that allows you to trace your skyline.
“Jog button” - one a skyline has been scanned you can use this “Jog” button to reposition the scan. This is a useful educational function as it allows the impact of obstructions at different positions an elevations to be simulated.
“Picture import button” - overlay a photograph on the sun plot using this button.
“Sun Compass button” - shown on the iPhone 3G and 3GS only. It will display the Sun Compass.
“Time/Headings Button” - switches the sun plot between time and heading views
“Animation Control buttons” controls the animated sun. Fast Forward, Pause and Stop.
Clears the previous scan
13