Embed Size (px)
Citation preview

Software Installationand
Configuration Guide
High Definition Intraoral Video Camera SystemPart Number G1000
Fluorescence Caries Detection Aid SystemPart Number G4000
Intraoral Video Camera SystemPart Number G5000

Page 3Air Techniques, Inc.
FOREWORD
GeneralThe instructions provided are limited to the integration of intraoral video camera (Luna HD and Polaris) and caries detection (Spectra) devices. All devices work using TWAIN. In addition, various third party software provides direct integration for one or more of the devices.This document does not provide detailed installation or operation instructions for the third party imaging management software. Therefore, the user must refer to the individual software manufacturer user documentation for all information specific to installing the application and its subsequent detailed operation.
Pre-Installation CheckPerform the following checks to verify that the computer system and associated monitor resolution meet or exceed the requirements needed to operate Polaris, Luna HD and Spectra.
1. Refer to section 1 and make sure that the computer system being used has the requirements necessary to operate Polaris, Luna HD and Spectra.
2. Check or set the monitor resolution using the procedure provided by section 2 for the Windows operating system in use.
Device SetupPerform the following to setup and configure Polaris, Luna HD or Spectra to operate as a TWAIN device. Install the Standard Device Drivers by selecting Standard (default option) from the Setup program menu. If full device functionality is not present after the Standard Device Drivers are in-stalled, the Legacy Device Drivers may need to be installed.
1. Refer to section 3 and install the drivers provided on the Drivers and Utilities CD included with each device.
2. Refer to section 4 and perform the procedure for integration with the authorized third party imaging management applications listed.

Air Techniques, Inc.Page 4
CONTENTS
Section Description Page
1. Computer Requirements . . . . . . . . . . . . . . . . . . . . . . . . . . . . . . . . . . . . .5 Minimum Computer System Requirements - This section provides the
minimum computer system requirements necessary to operate Luna HD, Polaris and Spectra.
2. Monitor Resolution Requirements . . . . . . . . . . . . . . . . . . . . . . . . . . . . .6 This section provides guidelines to set the resolution of the monitor when
using various Windows operating systems with intraoral video cameras manufactured by Air Techniques.
3. Device Driver Installation . . . . . . . . . . . . . . . . . . . . . . . . . . . . . . . . . . . . . . . . 10 The Luna HD, Polaris and Spectra devices are USB video compliant and use
the streaming video drivers that come with the Windows operating system. However, drivers provided on the Drivers and Utilities CD included with each device must be installed to provide support for TWAIN still image capture and for camera button freeze/save operation.
4. Third Party Imaging Management Application Setup . . . . . . . . . . . . . .12 This section provides guidelines to setup popular imaging management
applications to work with intraoral video cameras manufactured by Air Techniques. The imaging management software covered includes the following.
Item Application Setup Page
4.1.Apteryx/XrayVision Version 3.12, Build 38 12
Apteryx/XV Lite Version 3.12, Build 14 12
4.2. Dexis 9.0.2 14
4.3. Dexis 10.0.8.55 16
4.4. EagleSoft 17.00.45 18
4.5. Kodak KDI Version 6.12.9.0 22
4.6. TigerView 7.7.3 24
4.7. VISIX 2.3.9 28
4-8. VixWin2000 Version1.8 29
5. Troubleshooting . . . . . . . . . . . . . . . . . . . . . . . . . . . . . . . . . . . . . . . . . . .30 This section provides guidelines to check the operation of Luna HD when
using Microsoft Windows XP.
Page 5Air Techniques, Inc.
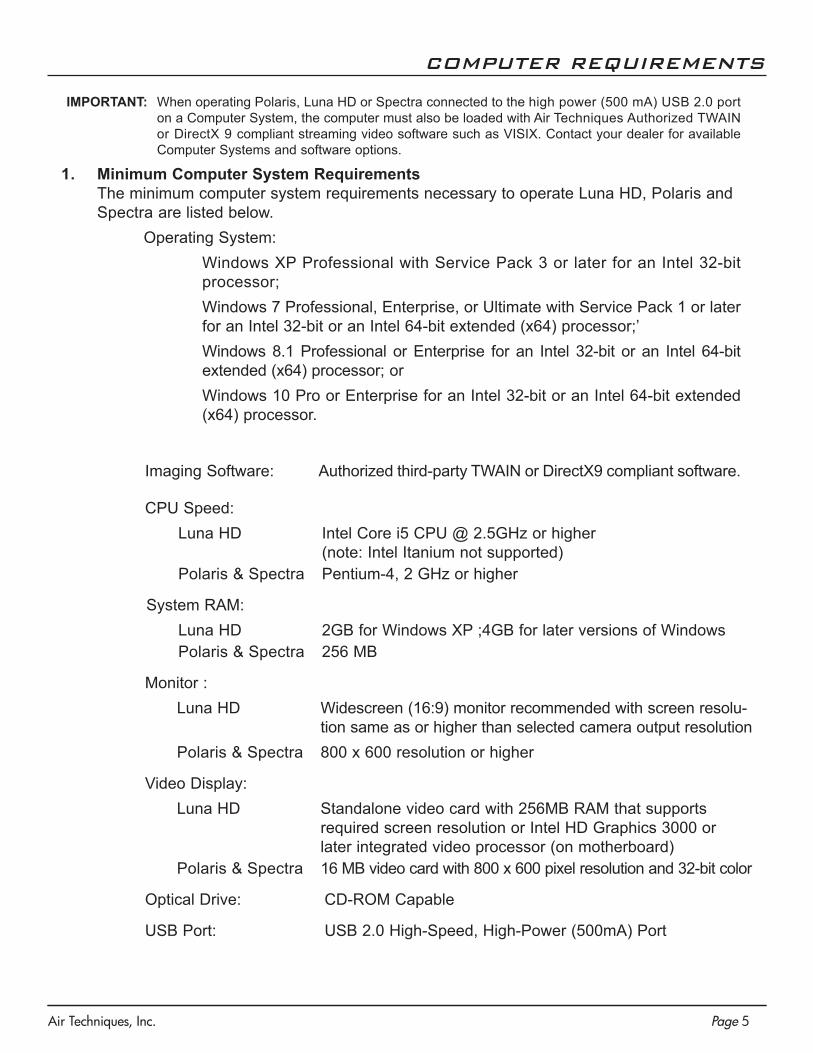
COMPUTER REQUIREMENTS
IMPORTANT: When operating Polaris, Luna HD or Spectra connected to the high power (500 mA) USB 2.0 port on a Computer System, the computer must also be loaded with Air Techniques Authorized TWAIN or DirectX 9 compliant streaming video software such as VISIX. Contact your dealer for available Computer Systems and software options.
1. Minimum Computer System Requirements The minimum computer system requirements necessary to operate Luna HD, Polaris and Spectra are listed below.
Operating System: Windows XP Professional with Service Pack 3 or later for an Intel 32-bit
processor; Windows 7 Professional, Enterprise, or Ultimate with Service Pack 1 or later
for an Intel 32-bit or an Intel 64-bit extended (x64) processor;’ Windows 8.1 Professional or Enterprise for an Intel 32-bit or an Intel 64-bit
extended (x64) processor; or Windows 10 Pro or Enterprise for an Intel 32-bit or an Intel 64-bit extended
(x64) processor.
Imaging Software: Authorized third-party TWAIN or DirectX9 compliant software.
CPU Speed:Luna HD Intel Core i5 CPU @ 2.5GHz or higher
(note: Intel Itanium not supported)Polaris & Spectra Pentium-4, 2 GHz or higher
System RAM:Luna HD 2GB for Windows XP ;4GB for later versions of WindowsPolaris & Spectra 256 MB
Monitor :Luna HD Widescreen (16:9) monitor recommended with screen resolu-
tion same as or higher than selected camera output resolutionPolaris & Spectra 800 x 600 resolution or higher
Video Display:Luna HD Standalone video card with 256MB RAM that supports
required screen resolution or Intel HD Graphics 3000 or later integrated video processor (on motherboard)
Polaris & Spectra 16 MB video card with 800 x 600 pixel resolution and 32-bit color
Optical Drive: CD-ROM Capable
USB Port: USB 2.0 High-Speed, High-Power (500mA) Port
Air Techniques, Inc.Page 6
MONITOR RESOLUTION REQUIREMENTS - WINDOWS XP
2. Monitor Resolution Settings:The following section provides guidelines to set the resolution of the monitor to work with Windows operating systems and intraoral video cameras manufactured by Air Techniques. This allows the monitor to display the highest quality image produced by the device. Make sure that the monitor is correctly set to display more than 640 x 480 for the Polaris camera, 1280 x 720 for the Luna HD camera, 720 x 576 for Spectra and the corresponding Windows operating system by performing the for the specific operating system used. Refer to the Microsoft Windows documentation as necessary.
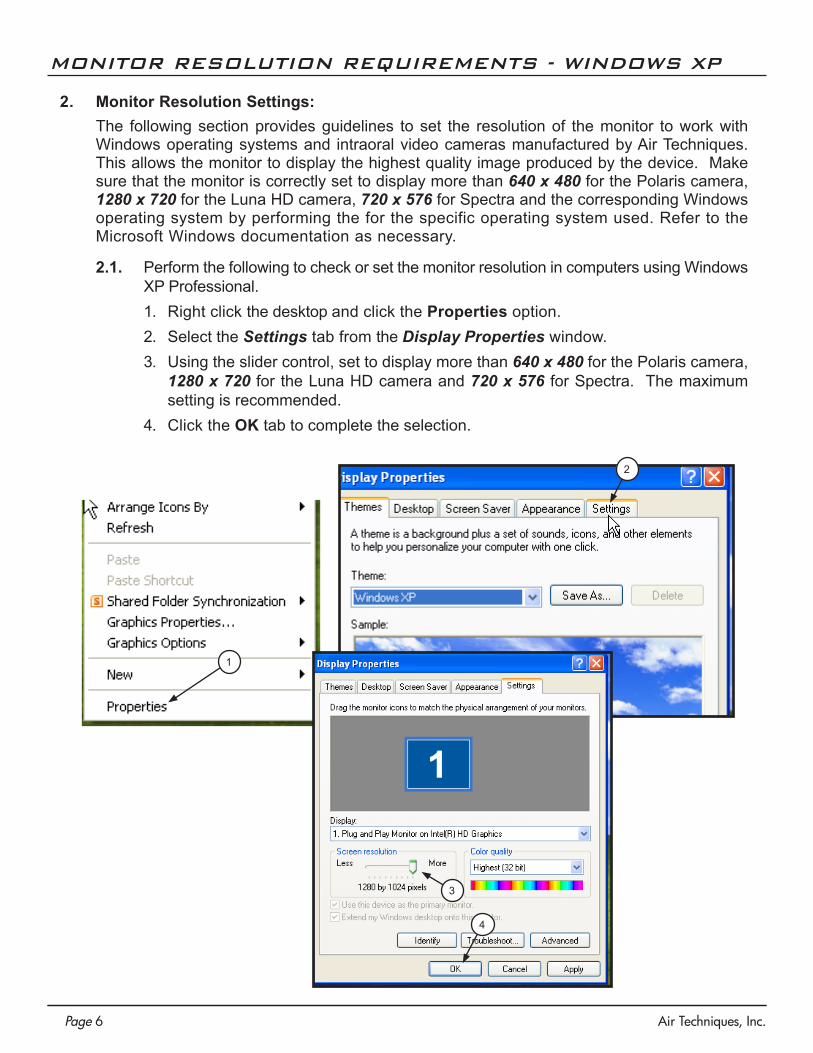
2.1. Perform the following to check or set the monitor resolution in computers using Windows XP Professional.1. Right click the desktop and click the Properties option.2. Select the Settings tab from the Display Properties window. 3. Using the slider control, set to display more than 640 x 480 for the Polaris camera,
1280 x 720 for the Luna HD camera and 720 x 576 for Spectra. The maximum setting is recommended.
4. Click the OK tab to complete the selection.
1
2
3
4
Page 7Air Techniques, Inc.
MONITOR RESOLUTION SETTING - WINDOWS 7
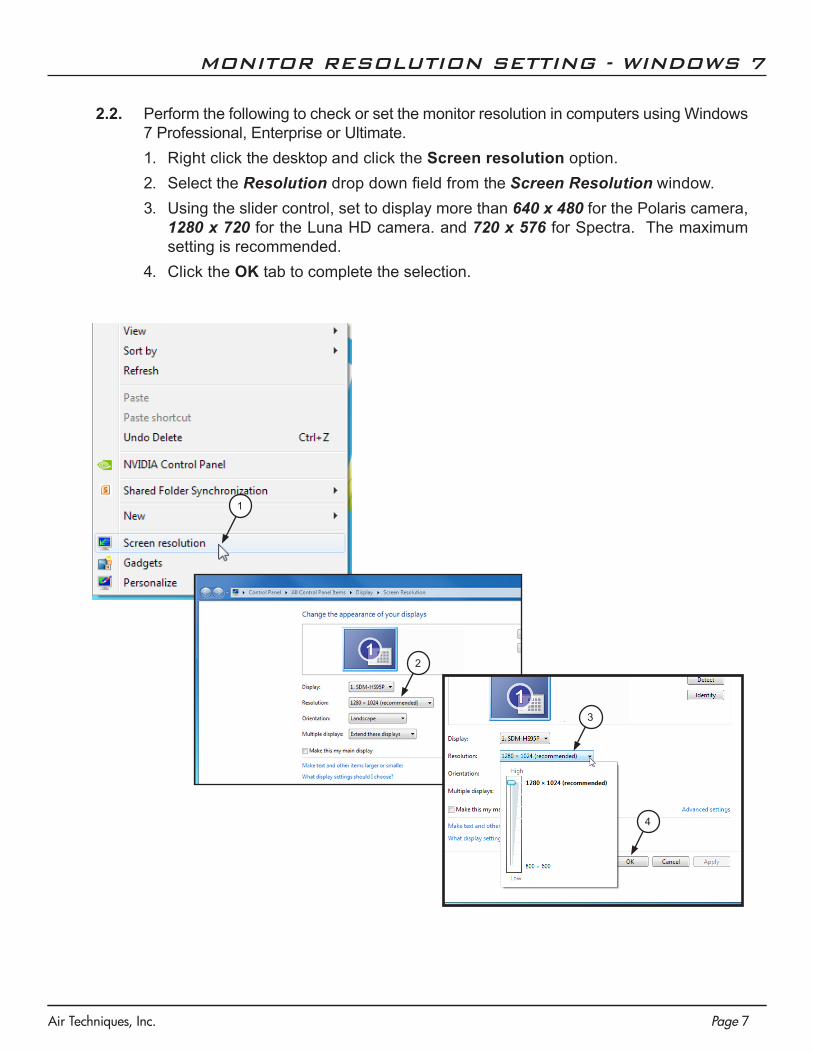
2.2. Perform the following to check or set the monitor resolution in computers using Windows 7 Professional, Enterprise or Ultimate.1. Right click the desktop and click the Screen resolution option.2. Select the Resolution drop down field from the Screen Resolution window. 3. Using the slider control, set to display more than 640 x 480 for the Polaris camera,
1280 x 720 for the Luna HD camera. and 720 x 576 for Spectra. The maximum setting is recommended.
4. Click the OK tab to complete the selection.
1
2
3
4
Air Techniques, Inc.Page 8
MONITOR RESOLUTION SETTING - WINDOWS 8.1
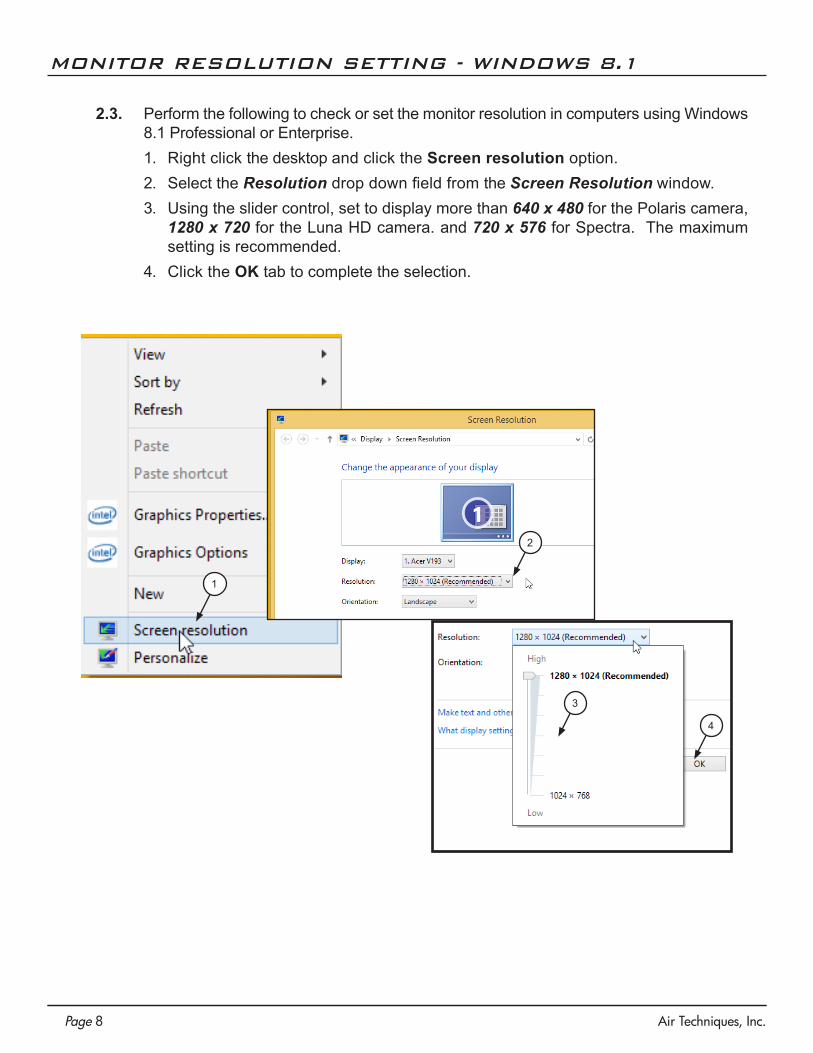
2.3. Perform the following to check or set the monitor resolution in computers using Windows 8.1 Professional or Enterprise.1. Right click the desktop and click the Screen resolution option.2. Select the Resolution drop down field from the Screen Resolution window. 3. Using the slider control, set to display more than 640 x 480 for the Polaris camera,
1280 x 720 for the Luna HD camera. and 720 x 576 for Spectra. The maximum setting is recommended.
4. Click the OK tab to complete the selection.
1
2
3
4
Page 9Air Techniques, Inc.
MONITOR RESOLUTION SETTING - WINDOWS 10
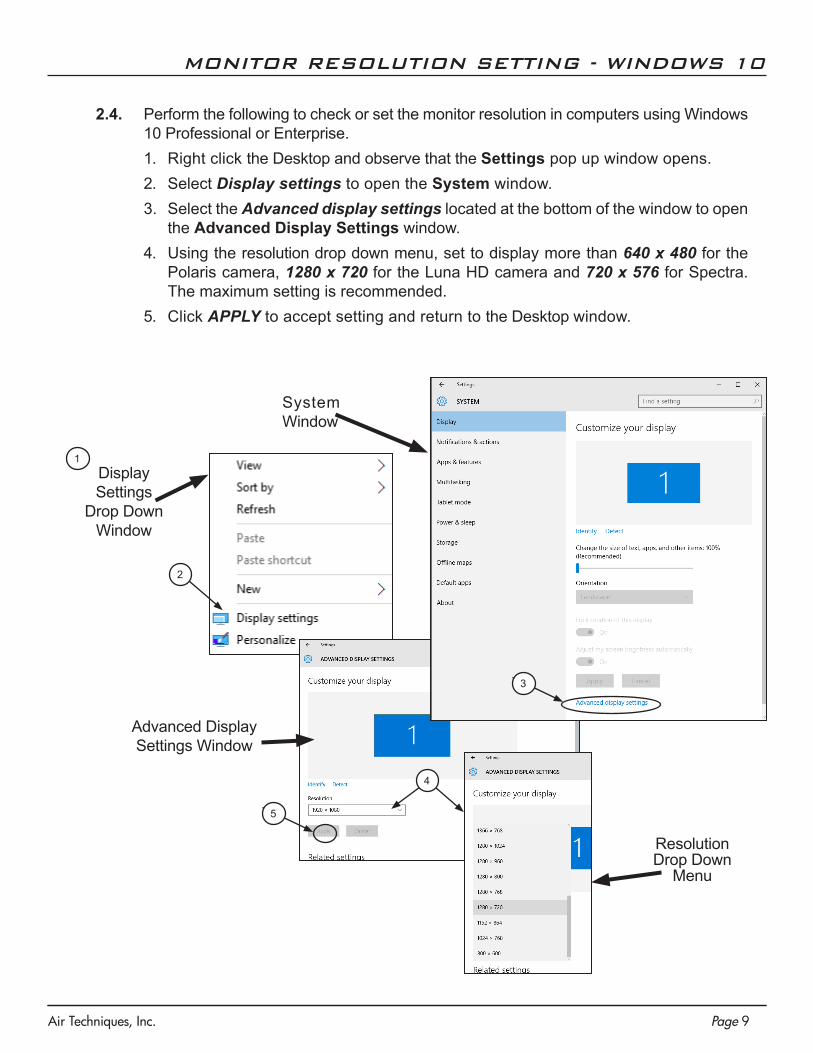
2.4. Perform the following to check or set the monitor resolution in computers using Windows 10 Professional or Enterprise.1. Right click the Desktop and observe that the Settings pop up window opens.2. Select Display settings to open the System window. 3. Select the Advanced display settings located at the bottom of the window to open
the Advanced Display Settings window. 4. Using the resolution drop down menu, set to display more than 640 x 480 for the
Polaris camera, 1280 x 720 for the Luna HD camera and 720 x 576 for Spectra. The maximum setting is recommended.
5. Click APPLY to accept setting and return to the Desktop window.
Resolution Drop Down
Menu
6
1
System Window
Display Settings
Drop Down Window
2
3
Advanced Display Settings Window
4
5

Air Techniques, Inc.Page 10
Important: Device drivers must be installed before the device will operate properly.
3. Software Installation. Before operating the camera, run the Setup program on the Software Disk included with the device. Normally, this program runs automatically when the CD is inserted into the drive for the first time. If not, run the Setup program located in the root directory of the CD (typically D:\AutoRun.exe) and select Install Software from the menu. a. Follow the on-screen instructions to complete the software installation, clicking Next
or Install to advance the installation.b. Check the Select the type of device drivers check box and, depending on the
application to be installed, select either the Standard Drivers or Legacy Drivers radio button. Refer to the device drivers setup option (pages 12 thru 29) corresponding with the third party software installed.
c. Make sure that all Air Techniques supported devices are unplugged from the computer then select OK. Additional windows will appear questioning whether to install software for the device. Always click Install.
d. From the Installation completed window, click Finish to complete the installation.
Do not twist or turn the Handpiece Cable connector. The connector is keyed and mates straight on with Handpiece connector.
e. Connect device handpiece by aligning the connector key of the quick disconnect collar end of the handpiece cable with the keyway of the handpiece connector. Insert straight into handpiece connector until it securely snaps into place.
DEVICE DRIVER INSTALLATION
3b3a
NOTE: Make sure that all Air Techniques supported devices are unplugged from the computer before installing device drivers.
NOTE: Depending on the operating system used, it may be required to restart the computer after installing the device drivers.

Page 11Air Techniques, Inc.
DEVICE DRIVER INSTALLATION
3c
3d

Air Techniques, Inc.Page 12
APTERYX VERSION 3.12 SETUP
4.1. Apteryx Setup for Intraoral Cameras. The following provides setup instructions for Apteryx imaging software XrayVision
Version 3.12 build 38 and XVLight Version 3.12 build 14. Except for the selection of the acquisition mode, the procedure is identical for both.
4.1a. Make sure that the Standard Drivers option has been installed. Refer to the Device Driver Installation procedure on page 10 as necessary.
4.1b. Perform one of the following:1. For XrayVision - from the XrayVision application, select the Capture Single Image
icon located on the top tool bar and observe that the Capture Image window opens.2. For XVision Lite - Click Acquire Image on the command side bar.
4.1c. Perform one of the following:1. TWAIN acquisition (Polaris, Luna or Spectra) - Select as follows:
A. Choose the General TWAIN tab.B. Select the Intraoral Camera TWAIN Interface from the drop down menu.C. Choose OK tab.D. Observe that the TWAIN Device Configuration window may open the first time
TWAIN is being setup. Choose OK tab.2. Direct acquisition (Polaris or Luna) - Select as follows:
A. Choose the Digital Image tab.B. Select the Direct Video Capture from the drop down menu.C. Choose the OK tab and observe that the Direct Video window opens.D. Choose the XTriggers tab and observe that drop down menu opens.E. Select the AT Video from the drop down menu.

Page 13Air Techniques, Inc.
APTERYX VERSION 3.12 SETUP
DisplaysDirect Video
4.1c2.D
2.B2.C
2.A
2.E
4.1bXrayVision See 4.1b.1
XVLight See 4.1b.2
2
1
4.1c
1.C
Window OpensOnly on First Time Setup
4.1c
1.B
1.A
1.D

Air Techniques, Inc.Page 14
DEXIS 9.0.2 SETUP
4.2. Dexis 9.0.2 Setup for Intraoral Cameras. This software allows Polaris and Luna to acquire images via both TWAIN and direct acquisition. Spectra only uses TWAIN.
4.2a. Make sure that the Legacy Drivers option has been installed. Refer to the Device Driver Installation procedure on page 10 as necessary.
4.2b. From the DEXIS Administration window, select the Tool Icon from the main tool bar.4.2c. Select the DEXimage tab from the newly opened Tools & Preferences window.4.2d. Perform one of the following:
1. TWAIN acquisition (Polaris, Luna or Spectra) - Select the Intraoral Camera TWAIN Interface from the drop down menu.
2. Direct acquisition (Polaris) - Select as follows:A. 6 - WDM 640x480 in the Video Hardware drop down menu.B. - automatic in the Capture Device drop down menu.C. 3 - Double Move Capture in the Pedal Type drop down menu.
4.2e. Choose the DONE button to return to the DEXIS Administration window.
4.2b
4.2f
4.2c
4.2d
4.2e
2.A
1
2.B
2.C
Page 15Air Techniques, Inc.
DEXIS 9.0.2 SETUP
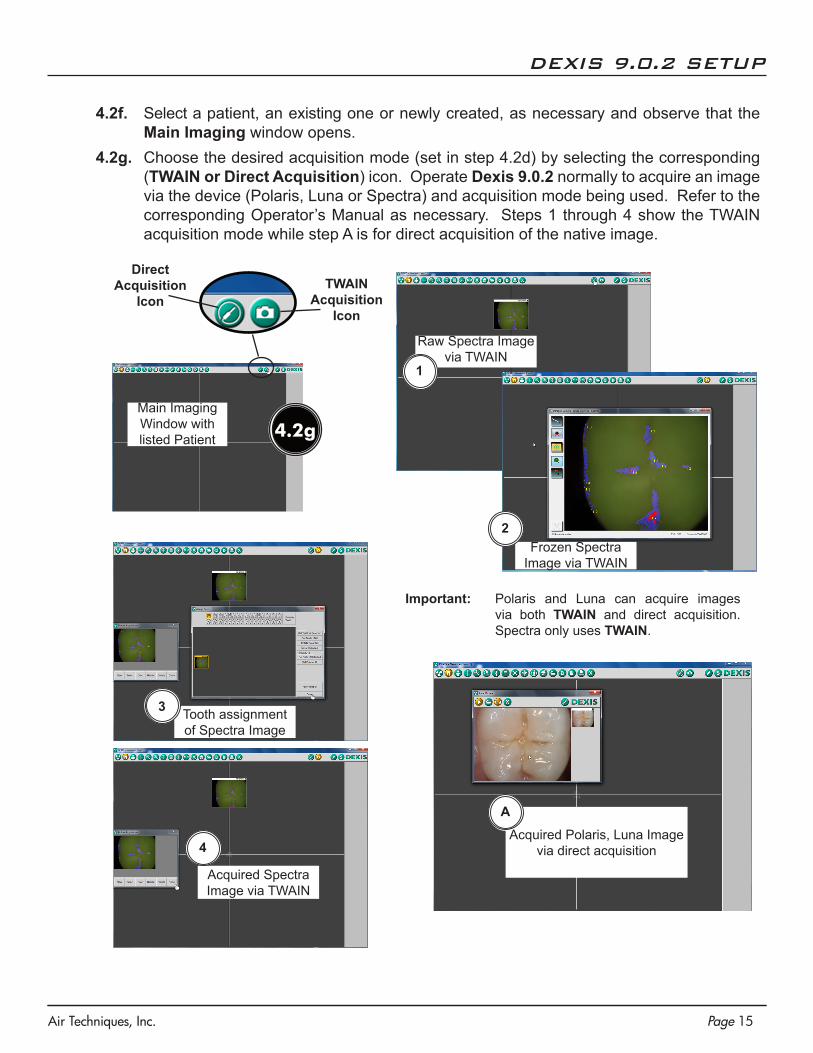
4.2f. Select a patient, an existing one or newly created, as necessary and observe that the Main Imaging window opens.
4.2g. Choose the desired acquisition mode (set in step 4.2d) by selecting the corresponding (TWAIN or Direct Acquisition) icon. Operate Dexis 9.0.2 normally to acquire an image via the device (Polaris, Luna or Spectra) and acquisition mode being used. Refer to the corresponding Operator’s Manual as necessary. Steps 1 through 4 show the TWAIN acquisition mode while step A is for direct acquisition of the native image.
Main Imaging Window with listed Patient
TWAINAcquisition
Icon
Direct Acquisition
Icon
Raw Spectra Image via TWAIN
Frozen Spectra Image via TWAIN
Acquired Spectra Image via TWAIN
Tooth assignment of Spectra Image
4.2g
Acquired Polaris, Luna Image via direct acquisition
Important: Polaris and Luna can acquire images via both TWAIN and direct acquisition. Spectra only uses TWAIN.
1
2
4
3
A
Air Techniques, Inc.Page 16
DEXIS 10.0.8.55 SETUP
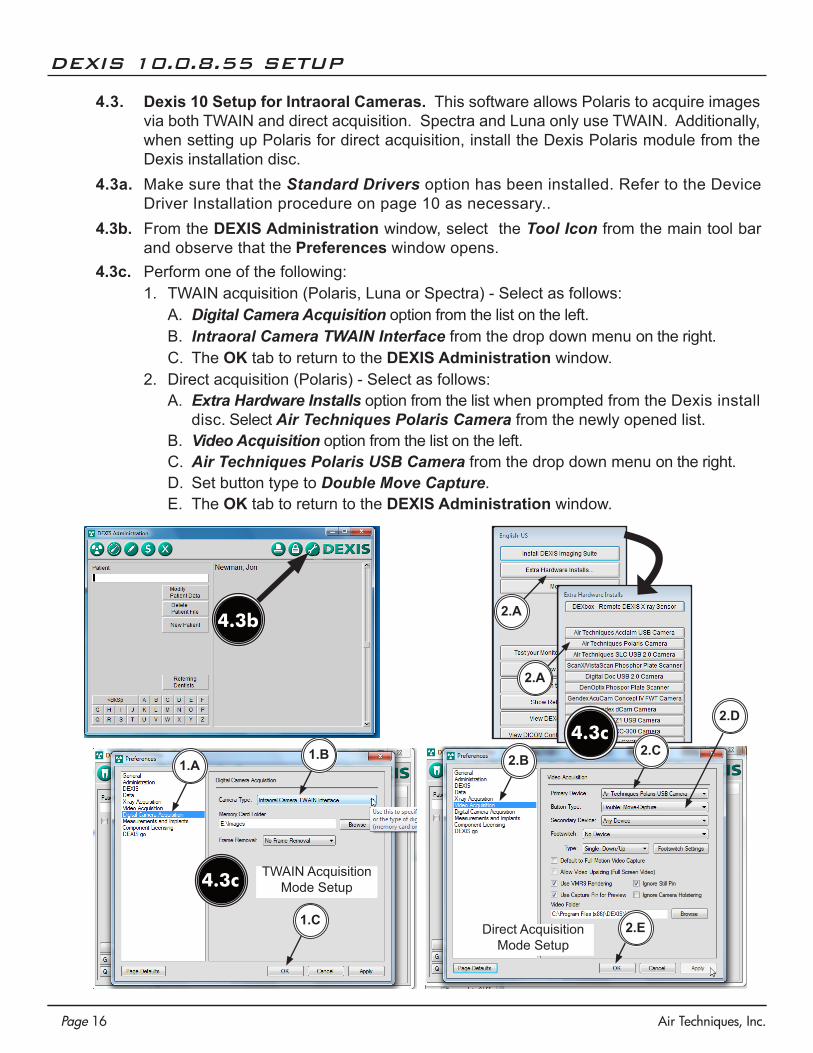
4.3. Dexis 10 Setup for Intraoral Cameras. This software allows Polaris to acquire images via both TWAIN and direct acquisition. Spectra and Luna only use TWAIN. Additionally, when setting up Polaris for direct acquisition, install the Dexis Polaris module from the Dexis installation disc.
4.3a. Make sure that the Standard Drivers option has been installed. Refer to the Device Driver Installation procedure on page 10 as necessary..
4.3b. From the DEXIS Administration window, select the Tool Icon from the main tool bar and observe that the Preferences window opens.
4.3c. Perform one of the following:1. TWAIN acquisition (Polaris, Luna or Spectra) - Select as follows:
A. Digital Camera Acquisition option from the list on the left.B. Intraoral Camera TWAIN Interface from the drop down menu on the right.C. The OK tab to return to the DEXIS Administration window.
2. Direct acquisition (Polaris) - Select as follows:A. Extra Hardware Installs option from the list when prompted from the Dexis install
disc. Select Air Techniques Polaris Camera from the newly opened list.B. Video Acquisition option from the list on the left.C. Air Techniques Polaris USB Camera from the drop down menu on the right.D. Set button type to Double Move Capture.E. The OK tab to return to the DEXIS Administration window.
4.3b
4.3c TWAIN Acquisition Mode Setup
1.B
1.C
1.A
Direct Acquisition Mode Setup
2.A
2.A
4.3c2.B
2.C
2.E
2.D

Page 17Air Techniques, Inc.
DEXIS 10.0.8.55 SETUP
4.3d
4.3d. Select a patient, an existing one or newly created, as necessary and observe that the Main Imaging window opens.
4.3e. Choose the desired acquisition mode (set in step 4.3c) by selecting the corresponding (TWAIN or Direct Acquisition) icon.
Operate Dexis 10 normally to acquire an image via the device (Polaris, Luna or Spectra) and acquisition mode being used. Refer to the corresponding Opera-tor’s Manual as necessary.
Main Imaging Window with listed Patient
TWAINAcquisition
Icon
Direct Acquisition
Icon
Raw Spectra Image via TWAIN
Frozen Spectra Image via TWAIN
4.3e
Acquired Polaris Image via direct acquisition
Acquired Spectra Image via TWAIN
Tooth assignment of Spectra Image
Important: Polaris can acquire images via both TWAIN and direct acquisition. Spectra and Luna only use TWAIN.
1
23
4
A
Steps 1 through 4 show the TWAIN acquisition mode while step A is for direct acquisition of the native image.

Air Techniques, Inc.Page 18
4.4. Eaglesoft17 Setup for Intraoral Cameras. This software allows Polaris to acquire im-ages via both TWAIN and direct acquisition. Luna and Spectra only use TWAIN.
Perform steps 4.4b, 4.4c and 4.4d to setup the camera to operate in the TWAIN acquisition mode. Steps 4.4e through 4.4g shows the typical TWAIN procedure to acquire an image via the device (Polaris, Luna or Spectra). Refer to the corresponding Operator’s Manual as necessary.
Perform steps 4.4h, 4.4i and 4.4j to setup Polaris devices to operate in the direct ac-quisition mode. Step 4.4k show the typical direct procedure to acquire an image via the device (Polaris). Refer to the corresponding Operator’s Manual as necessary.
4.4a. Make sure that the Standard Drivers option has been installed. Refer to the Device Driver Installation procedure on page 10 as necessary.
4.4b. From the main program menu, select File to open a drop down list of operational functions.4.4c. Select Preferences from the list, which opens a new window as shown. Select the following.
1. Select X-ray tab2. Check “use scanner default interface” check box.3. Press Scanner button
4.4d. Observe that the Select Source pop up window opens and perform the following.1. Highlight Intraoral Camera TWAIN Interface 1.4 (32-32) from the source list.2. Click the Select button to select the TWAIN option as the source module and return
to the Preferences window.3. Select OK in the upper right hand corner to return to the main program window.
The application is now set to acquire images via TWAIN using either the Polaris, Luna or Spectra devices.
EAGLESOFT 17.00.45 SETUP
4.4b
PreferencesFile
4.4c
4.4d
1
1
2
2
3
3

Page 19Air Techniques, Inc.
EAGLESOFT 17.00.45 SETUP
4.4e. From the Clinical window, open the Imaging window by selecting the X-ray picture shown on the Clinical window.
4.4f. Acquire an image via Polaris, Luna or Spectra in the TWAIN acquisition mode as follows.1. From the main program menu, select File (A), New (B) and Scanned Images (C).2. Observe the raw video image is shown in a pop up window screen3. Observe the captured Spectra image via TWAIN on screen.
Click to Open Imaging window
4.4e
Raw Spectra Image via TWAIN
Important: Polaris can acquire images via both TWAIN and direct acquisition. Luna and Spectra only use TWAIN.
Captured Spectra Image via TWAIN
2
3
4.4f
A
BC
1

Air Techniques, Inc.Page 20
4.4g. From the main program menu, select File to open a drop down list of operational functions.
4.4h. Select Preferences from the list, which opens a new window as shown. Select the X-ray tab and press the Video button and observe that the Video Capture Properties pop up window opens.
4.4i. Perform the following to setup the direct acquisition mode for Polaris devices.1. Select and save Standard Windows Driver Model Device in the Capture Card
drop down.2. Click the Save button to select the direct acquisition option as the source module
and return to the Preferences window. 3. Select OK in the upper right hand corner to return to the main program window.
The application is now set to acquire images using the direct acquisition mode with the Polaris device.
4.4j. From the Clinical window, open the Video Exam window for the selected patient by selecting the picture of the camera shown on the Clinical window.
4.4k. Acquire an image as shown in the Video Exam window using Polaris in the direct acquisition mode.
EAGLESOFT 17.00.45 SETUP
4.4g
PreferencesFile
4.5j
2
3
4.4h
1Default Device Field Remains
Blank
4.4i

Page 21Air Techniques, Inc.
4.4j
Click to Open Video Exam
window
4.4k
EAGLESOFT 17.00.45 SETUP

Air Techniques, Inc.Page 22
4.5. KODAK Dental Imaging (KDI ) Software Setup for Intraoral Cameras This software uses TWAIN for Polaris, Luna and Spectra operation. The following steps sets up KDI for multiple image acquisitions:
4.5a. Make sure that the Legacy Drivers option has been installed. Refer to the Device Driver Installation procedure on page 10 as necessary.
4.5b. Start the application and observe that the KDI window displays. 4.5c. Perform the steps of paragraph 4.5d when running KDI for the first time. Otherwise,
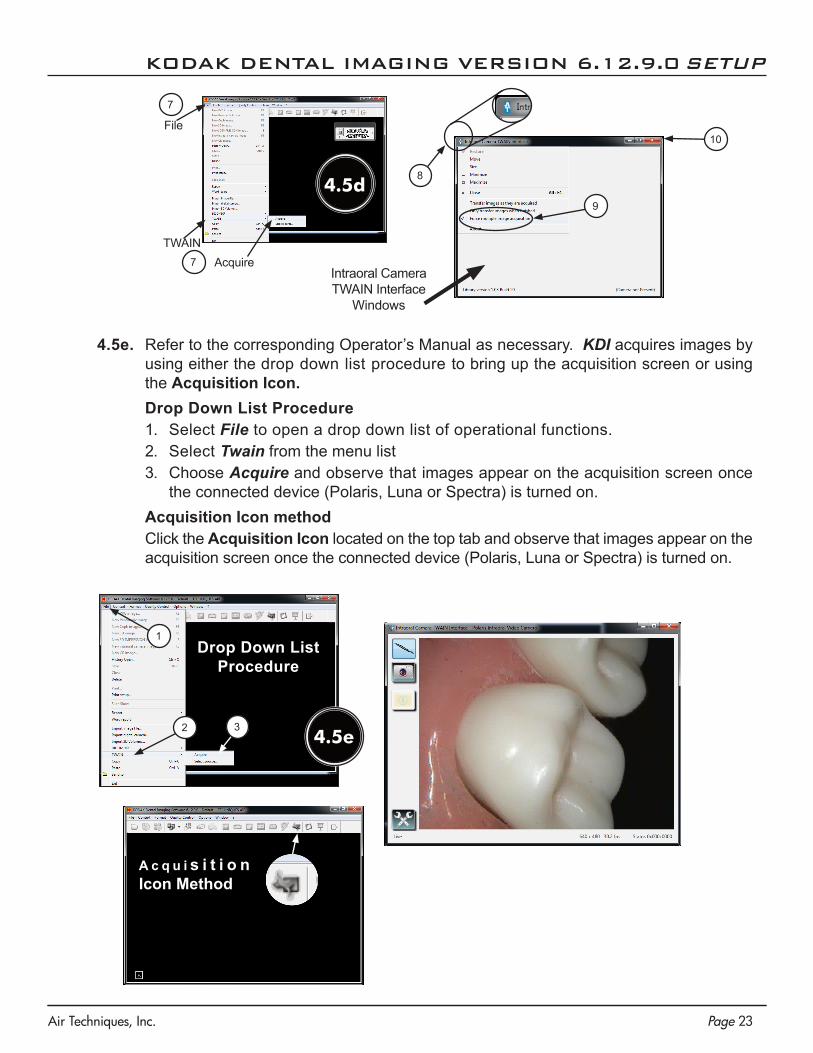
proceed to paragraph 4.5e to acquire images via the installed intraoral camera.4.5d. Setup cameras to work with KDI for the first time by performing the following.
1. Select File to open a drop down list of operational functions.2. Select Twain from the menu list3. Choose Select source... and observe that the Select Source window opens.4. Highlight Intraoral Camera TWAIN Interface 1.4 (32-32) from the source list. 5. Click the Select button to set it as the source for the capture device.6. Return to the KDI window. 7. Select File/Twain/Acquire to display the Intraoral Camera TWAIN Interface window. 8. Click the AT icon located in the upper left corner of the window and observe a drop
down menu appears. 9. Check “Force multiple image acquisition”. 10. Close the Intraoral Camera TWAIN Interface window to return to the KDI window.
KODAK DENTAL IMAGING VERSION 6.12.9.0 SETUP
4.5d
3
5
4
1
2
KDIWindow
Page 23Air Techniques, Inc.
KODAK DENTAL IMAGING VERSION 6.12.9.0 SETUP
4.5e. Refer to the corresponding Operator’s Manual as necessary. KDI acquires images by using either the drop down list procedure to bring up the acquisition screen or using the Acquisition Icon.
Drop Down List Procedure1. Select File to open a drop down list of operational functions.2. Select Twain from the menu list3. Choose Acquire and observe that images appear on the acquisition screen once
the connected device (Polaris, Luna or Spectra) is turned on. Acquisition Icon method Click the Acquisition Icon located on the top tab and observe that images appear on the
acquisition screen once the connected device (Polaris, Luna or Spectra) is turned on.
7
1
2 3
A c q u i s i t i o n Icon Method
Drop Down List Procedure
9
8
TWAIN
File
Acquire
7
Intraoral Camera TWAIN Interface
Windows
4.5d
4.5e
10
Air Techniques, Inc.Page 24
TIGERVIEW 7.7.3 SETUP
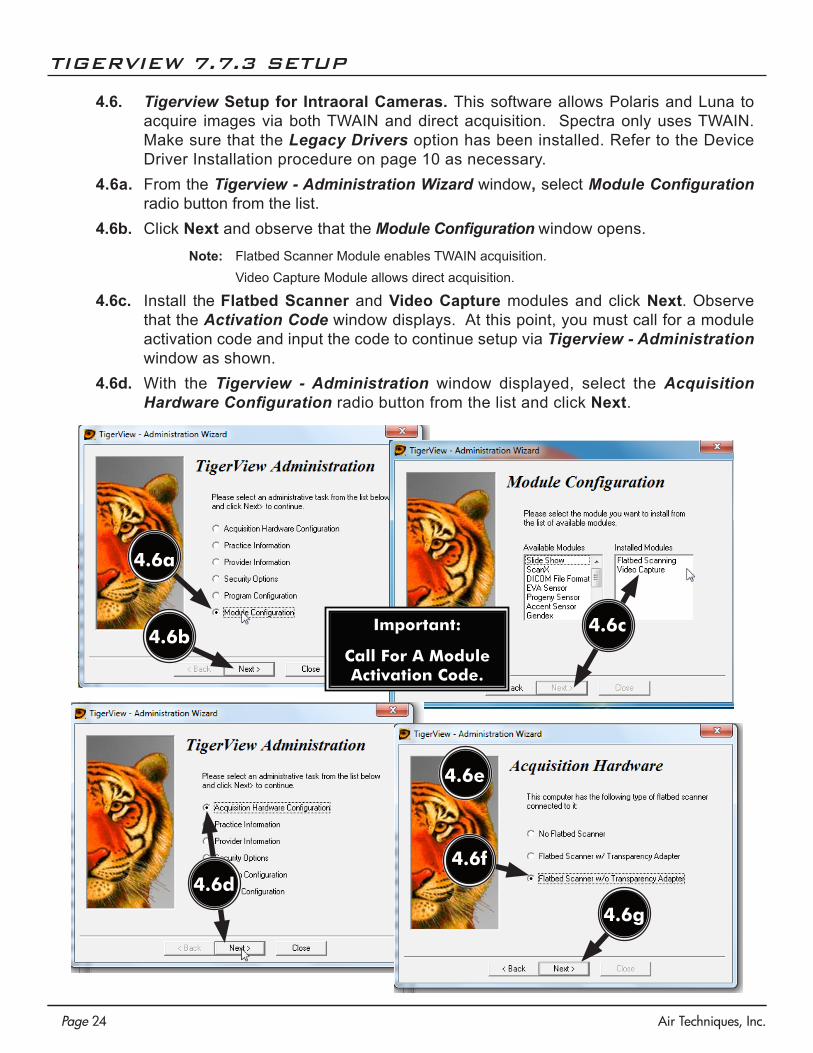
4.6. Tigerview Setup for Intraoral Cameras. This software allows Polaris and Luna to acquire images via both TWAIN and direct acquisition. Spectra only uses TWAIN. Make sure that the Legacy Drivers option has been installed. Refer to the Device Driver Installation procedure on page 10 as necessary.
4.6a. From the Tigerview - Administration Wizard window, select Module Configuration radio button from the list.
4.6b. Click Next and observe that the Module Configuration window opens.
Note: Flatbed Scanner Module enables TWAIN acquisition. Video Capture Module allows direct acquisition.
4.6c. Install the Flatbed Scanner and Video Capture modules and click Next. Observe that the Activation Code window displays. At this point, you must call for a module activation code and input the code to continue setup via Tigerview - Administration window as shown.
4.6d. With the Tigerview - Administration window displayed, select the Acquisition Hardware Configuration radio button from the list and click Next.
4.6a
4.6b4.6c
4.6d
4.6e
4.6g
4.6f
Important:
Call For A Module Activation Code.

Page 25Air Techniques, Inc.
TIGERVIEW 7.7.3 SETUP
4.6e. Observe that the Acquisition Hardware window opens.4.6f. Select the Flatbed Scanner w/o Transparency Adapter radio button from the list.4.5g. Click Next and observe that the Acquisition Hardware window changes to display video
camera hardware configuration options.4.6h. Select the Analog Video Camera or USB 2.0 Camera radio button from the list.4.6i. Click Next and observe that new window opens for image file format options.4.6j. Click Next to accept the default file format as JPEG. A new window opens for default
acquisition mode options.4.6lk Select the Video Capture radio button.4.6l. Clicking Finish to accept the selection opens a pop up query window.4.6m. Click Yes to accept saving the configuration.
4.6h
4.6i4.6j
4.6k
4.6l 4.6m
Air Techniques, Inc.Page 26
Important: Polaris and Luna can acquire images via both TWAIN and direct acquisition. Spectra only uses TWAIN.
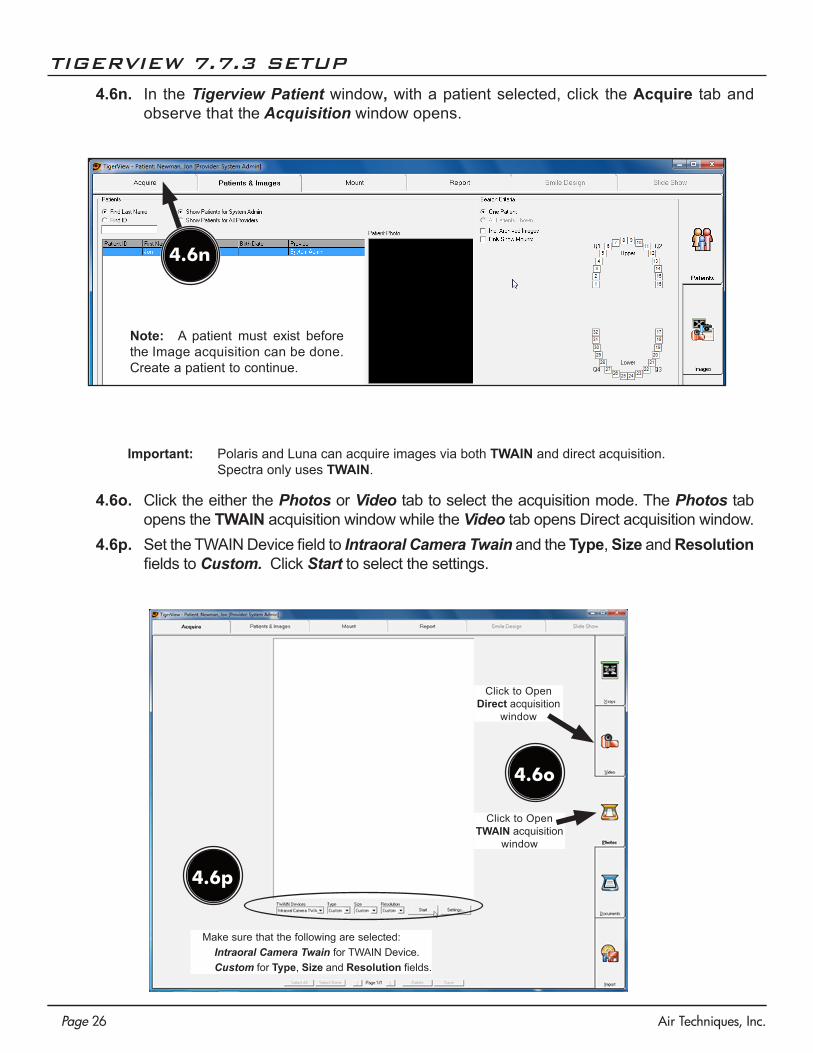
4.6n. In the Tigerview Patient window, with a patient selected, click the Acquire tab and observe that the Acquisition window opens.
Note: A patient must exist before the Image acquisition can be done. Create a patient to continue.
4.6n
4.6o. Click the either the Photos or Video tab to select the acquisition mode. The Photos tab opens the TWAIN acquisition window while the Video tab opens Direct acquisition window.
4.6p. Set the TWAIN Device field to Intraoral Camera Twain and the Type, Size and Resolution fields to Custom. Click Start to select the settings.
Make sure that the following are selected:Intraoral Camera Twain for TWAIN Device.Custom for Type, Size and Resolution fields.
4.6o
Click to Open Direct acquisition
window
4.6p
Click to Open TWAIN acquisition
window
TIGERVIEW 7.7.3 SETUP
Page 27Air Techniques, Inc.
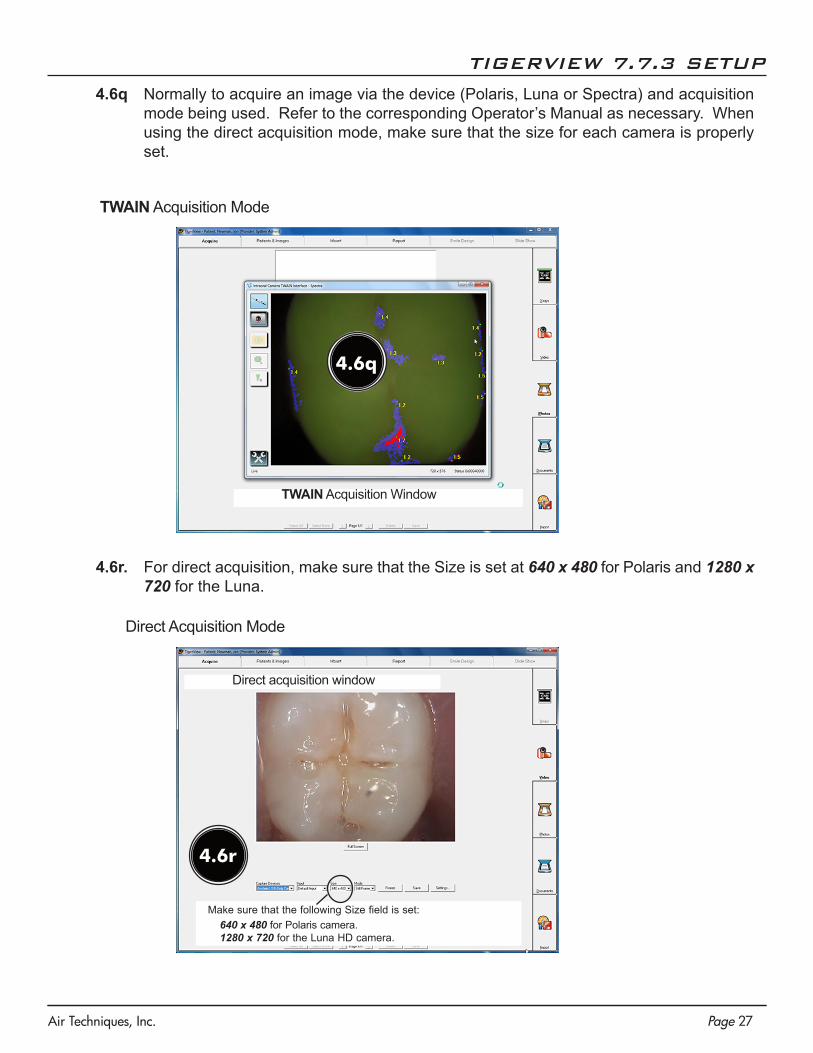
4.6q Normally to acquire an image via the device (Polaris, Luna or Spectra) and acquisition mode being used. Refer to the corresponding Operator’s Manual as necessary. When using the direct acquisition mode, make sure that the size for each camera is properly set.
Direct acquisition window
TWAIN Acquisition Window
Make sure that the following Size field is set:640 x 480 for Polaris camera.1280 x 720 for the Luna HD camera.
4.6r
TWAIN Acquisition Mode
Direct Acquisition Mode
TIGERVIEW 7.7.3 SETUP
4.6q
4.6r. For direct acquisition, make sure that the Size is set at 640 x 480 for Polaris and 1280 x 720 for the Luna.

Air Techniques, Inc.Page 28
VISIX 2.3.9 SETUP
Polaris and Luna Direct Acquisition Mode -
Spectra Direct Acquisition Mode -
4.7. VISIX 2.3.9 Setup for Intraoral Cameras. This software uses direct integration for Polaris, Luna and Spectra operation.
4.7a. Make sure that the Legacy Drivers option has been installed. Refer to the Device Driver Installation procedure on page 10 as necessary.
4.7b. Start the application and observe that the Visix Imaging window opens. When using a Polaris or Luna, perform step 4.7c. Go to step 4.7d when using a Spectra.
4.7c. Perform the following to acquire images using a Polaris or Luna.1. Click the I/O Camera icon and observe that the I/O Acquisition window opens.2. Make sure that Acclaim USB - Only Camera is selected for the Capture Device. 3. Make sure that the Size is set at 640 x 480 for Polaris and 1280 x 720 for the Luna.4. Acquire an image via the device (Polaris or Luna).
4.7d. Perform the following to acquire images using a Spectra.1. Click the Spectra icon and observe that the Spectra Acquisition window opens.2. Make sure that the Analysis view mode is selected. 3. Acquire an image via the Spectra.
Shows Selected Camera
4.7d
1
2
4.7c
1
Shows Selected Camera
23
Page 29Air Techniques, Inc.
VIXWIN2000 VERSION 1.8 SETUP
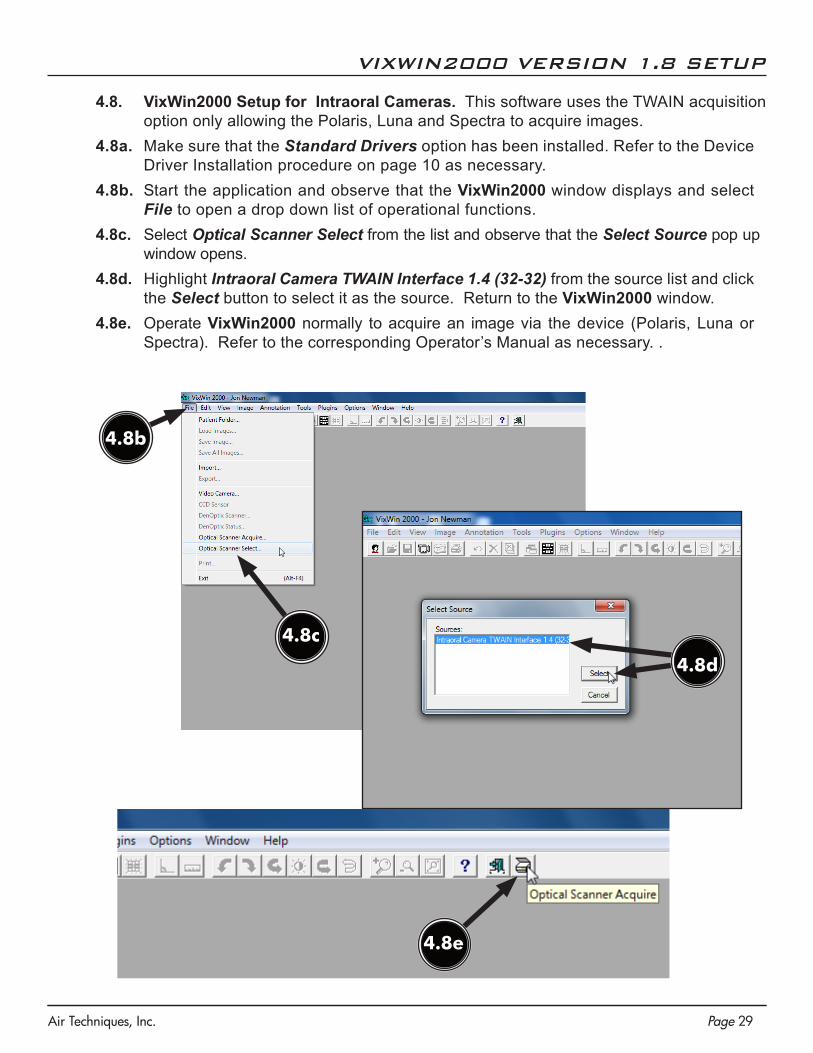
4.8. VixWin2000 Setup for Intraoral Cameras. This software uses the TWAIN acquisition option only allowing the Polaris, Luna and Spectra to acquire images.
4.8a. Make sure that the Standard Drivers option has been installed. Refer to the Device Driver Installation procedure on page 10 as necessary.
4.8b. Start the application and observe that the VixWin2000 window displays and select File to open a drop down list of operational functions.
4.8c. Select Optical Scanner Select from the list and observe that the Select Source pop up window opens.
4.8d. Highlight Intraoral Camera TWAIN Interface 1.4 (32-32) from the source list and click the Select button to select it as the source. Return to the VixWin2000 window.
4.8e. Operate VixWin2000 normally to acquire an image via the device (Polaris, Luna or Spectra). Refer to the corresponding Operator’s Manual as necessary. .
4.8b
4.8d
4.8c
4.8e

Air Techniques, Inc.Page 30
TROUBLESHOOTING
5. This section provides guidelines to check the operation of Luna HD when using Microsoft Windows XP or Vista. Perform the following steps to fix when receiving a start up error stating that the application is not recognizing Luna HD.
1Start Up Error Application
Not Recognizing LUNA
3
Open Device Manager & Select USB Video Device
from Imaging Devices
USB Video Device Selection Opens Drop Down Menu :
Select Update Driver
4
1. Observe an on-screen start up error stating application not rec-ognizing LUNA.
2. Make sure that exit the program and connect a camera.
3. Open Device Manager and select USB Video Device from imaging devices selection.
4. From the USB Video Device Selec-tion, open the drop down menu and select Update Driver. 2
Page 31Air Techniques, Inc.
TROUBLESHOOTING
From the Hardware Update Wizard Select:
No, not at this timeRadio Button
5
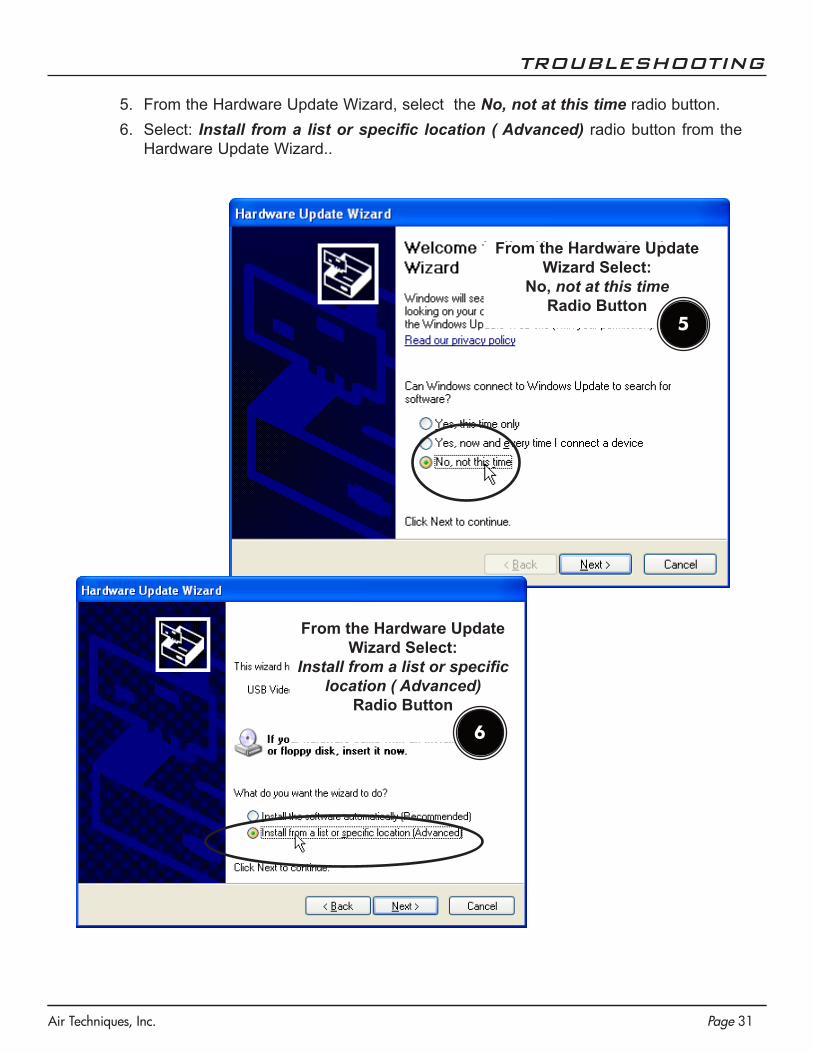
5. From the Hardware Update Wizard, select the No, not at this time radio button.6. Select: Install from a list or specific location ( Advanced) radio button from the
Hardware Update Wizard..
From the Hardware Update Wizard Select:
Install from a list or specific location ( Advanced)
Radio Button
6

Air Techniques, Inc.Page 32
TROUBLESHOOTING
From the Hardware Update Wiz-ard Select:
Luna HD Intraoral Video Camera
7
Select Finish to Close the Hardware Update Wizard
8
7. From the Hardware Update Wizard select Luna HD Intraoral Video Camera.8. Select Finish to close the Hardware Update Wizard..

Page 33Air Techniques, Inc.
NOTES

Air Techniques, Inc.Page 34
NOTES

Page 35Air Techniques, Inc.
NOTES
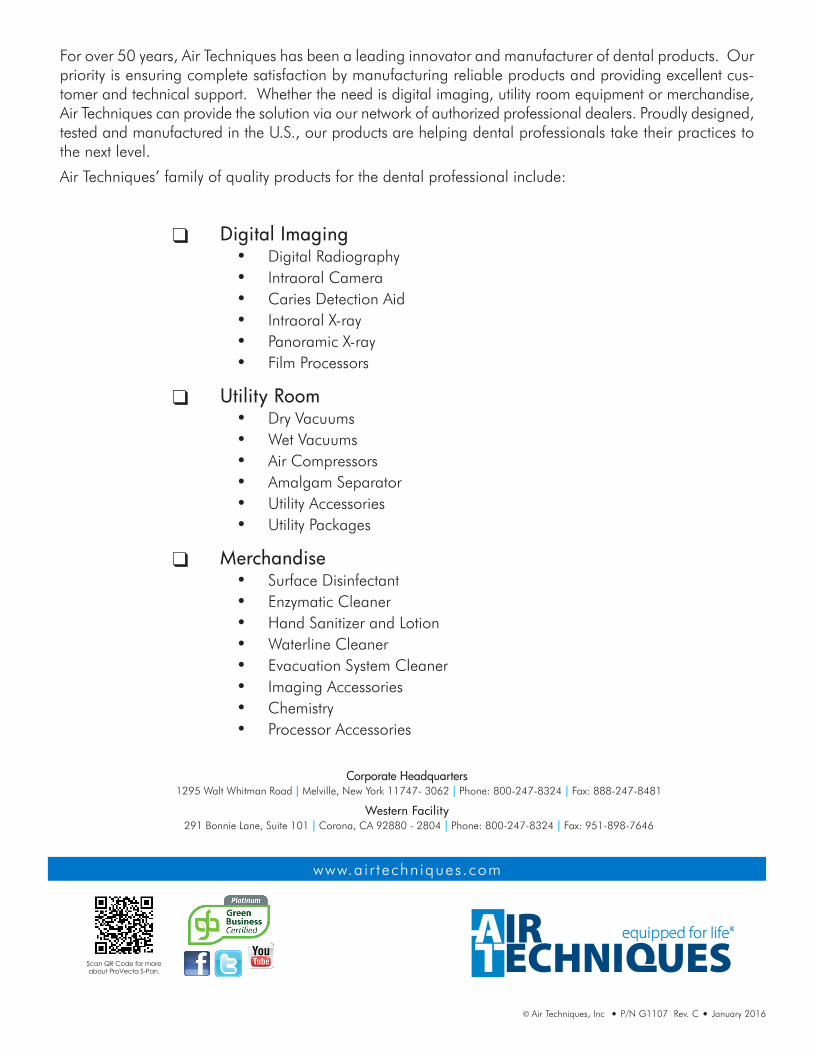
For over 50 years, Air Techniques has been a leading innovator and manufacturer of dental products. Our priority is ensuring complete satisfaction by manufacturing reliable products and providing excellent cus-tomer and technical support. Whether the need is digital imaging, utility room equipment or merchandise, Air Techniques can provide the solution via our network of authorized professional dealers. Proudly designed, tested and manufactured in the U.S., our products are helping dental professionals take their practices to the next level.
Air Techniques’ family of quality products for the dental professional include:
© Air Techniques, Inc • P/N G1107 Rev. C • January 2016
Corporate Headquarters1295 Walt Whitman Road | Melville, New York 11747- 3062 | Phone: 800-247-8324 | Fax: 888-247-8481
Western Facility291 Bonnie Lane, Suite 101 | Corona, CA 92880 - 2804 | Phone: 800-247-8324 | Fax: 951-898-7646
www.air techniques.com
Digital Imaging• Digital Radiography• Intraoral Camera• Caries Detection Aid• Intraoral X-ray• Panoramic X-ray• Film Processors
Utility Room• Dry Vacuums• Wet Vacuums• Air Compressors• Amalgam Separator• Utility Accessories• Utility Packages
Merchandise• Surface Disinfectant• Enzymatic Cleaner• Hand Sanitizer and Lotion• Waterline Cleaner• Evacuation System Cleaner• Imaging Accessories• Chemistry• Processor Accessories
Scan QR Code for more about ProVecta S-Pan.