Embed Size (px)
Citation preview

Version 10.1.2
Business Intelligence Installation
and Configuration Guide
Oracle ATG
One Main Street
Cambridge, MA 02142
USA

ATG Business Intelligence Installation and Configuration Guide
Product version: 10.1.2
Release date: 12-17-12
Document identifier: AciInstallationGuide1404301402
Copyright © 1997, 2012 Oracle and/or its affiliates. All rights reserved.
Oracle and Java are registered trademarks of Oracle and/or its affiliates. Other names may be trademarks of their respective owners.
Intel and Intel Xeon are trademarks or registered trademarks of Intel Corporation. All SPARC trademarks are used under license and are
trademarks or registered trademarks of SPARC International, Inc. AMD, Opteron, the AMD logo, and the AMD Opteron logo are trademarks or
registered trademarks of Advanced Micro Devices. UNIX is a registered trademark of The Open Group.
This software and related documentation are provided under a license agreement containing restrictions on use and disclosure and are
protected by intellectual property laws. Except as expressly permitted in your license agreement or allowed by law, you may not use, copy,
reproduce, translate, broadcast, modify, license, transmit, distribute, exhibit, perform, publish, or display any part, in any form, or by any
means. Reverse engineering, disassembly, or decompilation of this software, unless required by law for interoperability, is prohibited.
The information contained herein is subject to change without notice and is not warranted to be error-free. If you find any errors, please
report them to us in writing.
If this software or related documentation is delivered to the U.S. Government or anyone licensing it on behalf of the U.S. Government, the
following notice is applicable:
U.S. GOVERNMENT END USERS:
Oracle programs, including any operating system, integrated software, any programs installed on the hardware, and/or documentation,
delivered to U.S. Government end users are "commercial computer software" pursuant to the applicable Federal Acquisition Regulation and
agency-specific supplemental regulations. As such, use, duplication, disclosure, modification, and adaptation of the programs, including any
operating system, integrated software, any programs installed on the hardware, and/or documentation, shall be subject to license terms and
license restrictions applicable to the programs. No other rights are granted to the U.S. Government.
This software or hardware is developed for general use in a variety of information management applications. It is not developed or intended
for use in any inherently dangerous applications, including applications that may create a risk of personal injury. If you use this software or
hardware in dangerous applications, then you shall be responsible to take all appropriate fail-safe, backup, redundancy, and other measures
to ensure its safe use. Oracle Corporation and its affiliates disclaim any liability for any damages caused by use of this software or hardware in
dangerous applications.
This software or hardware and documentation may provide access to or information on content, products, and services from third parties.
Oracle Corporation and its affiliates are not responsible for and expressly disclaim all warranties of any kind with respect to third-party
content, products, and services. Oracle Corporation and its affiliates will not be responsible for any loss, costs, or damages incurred due to
your access to or use of third-party content, products, or services.
The software is based in part on the work of the Independent JPEG Group.

ATG Business Intelligence Installation and Configuration Guide iii
Table of Contents
1. Introduction . . . . . . . . . . . . . . . . . . . . . . . . . . . . . . . . . . . . . . . . . . . . . . . . . . . . . . . . . . . . . . . . . . . . . . . . . . . . . . . . . . . . . . . . . . . . . . . . . . . . . . . . . . . . . . . . . . . . . 1
Components of Oracle ATG Web Commerce Business Intelligence . . . . . . . . . . . . . . . . . . . . . . . . . . . . . . . . . . . . . . . . . . . . . . . 1
Information About Oracle Business Intelligence . . . . . . . . . . . . . . . . . . . . . . . . . . . . . . . . . . . . . . . . . . . . . . . . . . . . . . . . . . . . . . . . . . . . . 2
2. Installation Overview . . . . . . . . . . . . . . . . . . . . . . . . . . . . . . . . . . . . . . . . . . . . . . . . . . . . . . . . . . . . . . . . . . . . . . . . . . . . . . . . . . . . . . . . . . . . . . . . . . . . . . . . . . 3
Installing With CIM . . . . . . . . . . . . . . . . . . . . . . . . . . . . . . . . . . . . . . . . . . . . . . . . . . . . . . . . . . . . . . . . . . . . . . . . . . . . . . . . . . . . . . . . . . . . . . . . . . . . . . . . 4
3. Configuring Oracle ATG Web Commerce Business Intelligence . . . . . . . . . . . . . . . . . . . . . . . . . . . . . . . . . . . . . . . . . . . . . . . . . . . . . . . . 5
Creating the Data Warehouse Schema . . . . . . . . . . . . . . . . . . . . . . . . . . . . . . . . . . . . . . . . . . . . . . . . . . . . . . . . . . . . . . . . . . . . . . . . . . . . . . . . 5
Creating Platform Data Warehouse Tables . . . . . . . . . . . . . . . . . . . . . . . . . . . . . . . . . . . . . . . . . . . . . . . . . . . . . . . . . . . . . . . . . . . . 5
Creating Search Data Warehouse Tables . . . . . . . . . . . . . . . . . . . . . . . . . . . . . . . . . . . . . . . . . . . . . . . . . . . . . . . . . . . . . . . . . . . . . . 6
Creating Outreach Data Warehouse Tables . . . . . . . . . . . . . . . . . . . . . . . . . . . . . . . . . . . . . . . . . . . . . . . . . . . . . . . . . . . . . . . . . . . 6
Creating Service Data Warehouse Tables . . . . . . . . . . . . . . . . . . . . . . . . . . . . . . . . . . . . . . . . . . . . . . . . . . . . . . . . . . . . . . . . . . . . . . 6
Creating Commerce Service Center Data Warehouse Tables . . . . . . . . . . . . . . . . . . . . . . . . . . . . . . . . . . . . . . . . . . . . . . . 6
Enabling Oracle ATG Web Commerce Server Logging . . . . . . . . . . . . . . . . . . . . . . . . . . . . . . . . . . . . . . . . . . . . . . . . . . . . . . . . . . . . . . 7
Application EAR Files . . . . . . . . . . . . . . . . . . . . . . . . . . . . . . . . . . . . . . . . . . . . . . . . . . . . . . . . . . . . . . . . . . . . . . . . . . . . . . . . . . . . . . . . . . . . . . 7
Configuring an Asset Management Server . . . . . . . . . . . . . . . . . . . . . . . . . . . . . . . . . . . . . . . . . . . . . . . . . . . . . . . . . . . . . . . . . . . . 8
Configuring a Production Server . . . . . . . . . . . . . . . . . . . . . . . . . . . . . . . . . . . . . . . . . . . . . . . . . . . . . . . . . . . . . . . . . . . . . . . . . . . . . . . 9
Configuring an Agent Server . . . . . . . . . . . . . . . . . . . . . . . . . . . . . . . . . . . . . . . . . . . . . . . . . . . . . . . . . . . . . . . . . . . . . . . . . . . . . . . . . . 11
Log Files . . . . . . . . . . . . . . . . . . . . . . . . . . . . . . . . . . . . . . . . . . . . . . . . . . . . . . . . . . . . . . . . . . . . . . . . . . . . . . . . . . . . . . . . . . . . . . . . . . . . . . . . . . . . . . . . . . . 12
Configuring the Data Warehouse Loader Server . . . . . . . . . . . . . . . . . . . . . . . . . . . . . . . . . . . . . . . . . . . . . . . . . . . . . . . . . . . . . . . . . . . 12
Configuring the Main Loader Server . . . . . . . . . . . . . . . . . . . . . . . . . . . . . . . . . . . . . . . . . . . . . . . . . . . . . . . . . . . . . . . . . . . . . . . . . 12
Configuring the Outreach Loader Server . . . . . . . . . . . . . . . . . . . . . . . . . . . . . . . . . . . . . . . . . . . . . . . . . . . . . . . . . . . . . . . . . . . . 14
Creating the Data Loader Production Tables . . . . . . . . . . . . . . . . . . . . . . . . . . . . . . . . . . . . . . . . . . . . . . . . . . . . . . . . . . . . . . . . 15
Creating the Data Loader Local Tables . . . . . . . . . . . . . . . . . . . . . . . . . . . . . . . . . . . . . . . . . . . . . . . . . . . . . . . . . . . . . . . . . . . . . . . 15
4. Configuring Oracle Business Intelligence . . . . . . . . . . . . . . . . . . . . . . . . . . . . . . . . . . . . . . . . . . . . . . . . . . . . . . . . . . . . . . . . . . . . . . . . . . . . . . . . . 17
Oracle Business Intelligence Installation Summary . . . . . . . . . . . . . . . . . . . . . . . . . . . . . . . . . . . . . . . . . . . . . . . . . . . . . . . . . . . . . . . . 17
Repository . . . . . . . . . . . . . . . . . . . . . . . . . . . . . . . . . . . . . . . . . . . . . . . . . . . . . . . . . . . . . . . . . . . . . . . . . . . . . . . . . . . . . . . . . . . . . . . . . . . . . . . . . 17
Server Installation . . . . . . . . . . . . . . . . . . . . . . . . . . . . . . . . . . . . . . . . . . . . . . . . . . . . . . . . . . . . . . . . . . . . . . . . . . . . . . . . . . . . . . . . . . . . . . . . 18
Deploying the Data Model and Analysis Definitions . . . . . . . . . . . . . . . . . . . . . . . . . . . . . . . . . . . . . . . . . . . . . . . . . . . . . . . . . . . . . . 19
Preparing the Data Model . . . . . . . . . . . . . . . . . . . . . . . . . . . . . . . . . . . . . . . . . . . . . . . . . . . . . . . . . . . . . . . . . . . . . . . . . . . . . . . . . . . . . . 19
Deploying to the Oracle Business Intelligence Server . . . . . . . . . . . . . . . . . . . . . . . . . . . . . . . . . . . . . . . . . . . . . . . . . . . . . 20
5. Accessing Business Intelligence Analyses . . . . . . . . . . . . . . . . . . . . . . . . . . . . . . . . . . . . . . . . . . . . . . . . . . . . . . . . . . . . . . . . . . . . . . . . . . . . . . . . . 21
Viewing Analyses and Dashboards . . . . . . . . . . . . . . . . . . . . . . . . . . . . . . . . . . . . . . . . . . . . . . . . . . . . . . . . . . . . . . . . . . . . . . . . . . . . . . . . . . . 21
Access Control . . . . . . . . . . . . . . . . . . . . . . . . . . . . . . . . . . . . . . . . . . . . . . . . . . . . . . . . . . . . . . . . . . . . . . . . . . . . . . . . . . . . . . . . . . . . . . . . . . . . . . . . . . . . 21
6. Configuring Data Collection . . . . . . . . . . . . . . . . . . . . . . . . . . . . . . . . . . . . . . . . . . . . . . . . . . . . . . . . . . . . . . . . . . . . . . . . . . . . . . . . . . . . . . . . . . . . . . . . 23
Data Collection Process . . . . . . . . . . . . . . . . . . . . . . . . . . . . . . . . . . . . . . . . . . . . . . . . . . . . . . . . . . . . . . . . . . . . . . . . . . . . . . . . . . . . . . . . . . . . . . . . . 23
Event Listener Component . . . . . . . . . . . . . . . . . . . . . . . . . . . . . . . . . . . . . . . . . . . . . . . . . . . . . . . . . . . . . . . . . . . . . . . . . . . . . . . . . . . . . 23
Event Queue Component . . . . . . . . . . . . . . . . . . . . . . . . . . . . . . . . . . . . . . . . . . . . . . . . . . . . . . . . . . . . . . . . . . . . . . . . . . . . . . . . . . . . . . . 24
Data File Writing Component . . . . . . . . . . . . . . . . . . . . . . . . . . . . . . . . . . . . . . . . . . . . . . . . . . . . . . . . . . . . . . . . . . . . . . . . . . . . . . . . . . 24
Data Log Record Format . . . . . . . . . . . . . . . . . . . . . . . . . . . . . . . . . . . . . . . . . . . . . . . . . . . . . . . . . . . . . . . . . . . . . . . . . . . . . . . . . . . . . . . . 27
Log File Rotation . . . . . . . . . . . . . . . . . . . . . . . . . . . . . . . . . . . . . . . . . . . . . . . . . . . . . . . . . . . . . . . . . . . . . . . . . . . . . . . . . . . . . . . . . . . . . . . . . 27
Site Visit Data Collection . . . . . . . . . . . . . . . . . . . . . . . . . . . . . . . . . . . . . . . . . . . . . . . . . . . . . . . . . . . . . . . . . . . . . . . . . . . . . . . . . . . . . . . . . . . . . . . . 28
Filtering Specific Site Visits . . . . . . . . . . . . . . . . . . . . . . . . . . . . . . . . . . . . . . . . . . . . . . . . . . . . . . . . . . . . . . . . . . . . . . . . . . . . . . . . . . . . . 29
Tracking Users During Multiple Site Visits . . . . . . . . . . . . . . . . . . . . . . . . . . . . . . . . . . . . . . . . . . . . . . . . . . . . . . . . . . . . . . . . . . . 30
User Data Collection . . . . . . . . . . . . . . . . . . . . . . . . . . . . . . . . . . . . . . . . . . . . . . . . . . . . . . . . . . . . . . . . . . . . . . . . . . . . . . . . . . . . . . . . . . . . . . . . . . . . . 31
Segment Data Collection . . . . . . . . . . . . . . . . . . . . . . . . . . . . . . . . . . . . . . . . . . . . . . . . . . . . . . . . . . . . . . . . . . . . . . . . . . . . . . . . . . . . . . . . . . . . . . . 32
Commerce Data Collection Components . . . . . . . . . . . . . . . . . . . . . . . . . . . . . . . . . . . . . . . . . . . . . . . . . . . . . . . . . . . . . . . . . . . . . . . . . . . . 33
Commerce Service Center Data Collection Components . . . . . . . . . . . . . . . . . . . . . . . . . . . . . . . . . . . . . . . . . . . . . . . . . . . . . . . . . 33
Search Data Collection Components . . . . . . . . . . . . . . . . . . . . . . . . . . . . . . . . . . . . . . . . . . . . . . . . . . . . . . . . . . . . . . . . . . . . . . . . . . . . . . . . . 33
Extending Data Collection . . . . . . . . . . . . . . . . . . . . . . . . . . . . . . . . . . . . . . . . . . . . . . . . . . . . . . . . . . . . . . . . . . . . . . . . . . . . . . . . . . . . . . . . . . . . . . 33
Creating an Event Listener Component . . . . . . . . . . . . . . . . . . . . . . . . . . . . . . . . . . . . . . . . . . . . . . . . . . . . . . . . . . . . . . . . . . . . . . 34
Creating an Event Queue Component . . . . . . . . . . . . . . . . . . . . . . . . . . . . . . . . . . . . . . . . . . . . . . . . . . . . . . . . . . . . . . . . . . . . . . . 34

iv ATG Business Intelligence Installation and Configuration Guide
Creating a Data File Writing Component . . . . . . . . . . . . . . . . . . . . . . . . . . . . . . . . . . . . . . . . . . . . . . . . . . . . . . . . . . . . . . . . . . . . 34
Example Data Collection Components . . . . . . . . . . . . . . . . . . . . . . . . . . . . . . . . . . . . . . . . . . . . . . . . . . . . . . . . . . . . . . . . . . . . . . . 34
7. Configuring Fact Data Loading . . . . . . . . . . . . . . . . . . . . . . . . . . . . . . . . . . . . . . . . . . . . . . . . . . . . . . . . . . . . . . . . . . . . . . . . . . . . . . . . . . . . . . . . . . . . . 37
Data Loader Components . . . . . . . . . . . . . . . . . . . . . . . . . . . . . . . . . . . . . . . . . . . . . . . . . . . . . . . . . . . . . . . . . . . . . . . . . . . . . . . . . . . . . . . . . . . . . . 37
Data Warehouse Loader Repository . . . . . . . . . . . . . . . . . . . . . . . . . . . . . . . . . . . . . . . . . . . . . . . . . . . . . . . . . . . . . . . . . . . . . . . . . . . . . . . . . . 40
Handling Errors . . . . . . . . . . . . . . . . . . . . . . . . . . . . . . . . . . . . . . . . . . . . . . . . . . . . . . . . . . . . . . . . . . . . . . . . . . . . . . . . . . . . . . . . . . . . . . . . . . . . . . . . . . . 42
Pipeline Drivers and Processors . . . . . . . . . . . . . . . . . . . . . . . . . . . . . . . . . . . . . . . . . . . . . . . . . . . . . . . . . . . . . . . . . . . . . . . . . . . . . . . . . . . . . . . 42
8. Configuring Dimension Loading . . . . . . . . . . . . . . . . . . . . . . . . . . . . . . . . . . . . . . . . . . . . . . . . . . . . . . . . . . . . . . . . . . . . . . . . . . . . . . . . . . . . . . . . . . . 49
Adding an Attribute to a Dimension . . . . . . . . . . . . . . . . . . . . . . . . . . . . . . . . . . . . . . . . . . . . . . . . . . . . . . . . . . . . . . . . . . . . . . . . . . . . . . . . . 50
Adding a New Dimension . . . . . . . . . . . . . . . . . . . . . . . . . . . . . . . . . . . . . . . . . . . . . . . . . . . . . . . . . . . . . . . . . . . . . . . . . . . . . . . . . . . . . . . . . . . . . . 51
Dimension Converters . . . . . . . . . . . . . . . . . . . . . . . . . . . . . . . . . . . . . . . . . . . . . . . . . . . . . . . . . . . . . . . . . . . . . . . . . . . . . . . . . . . . . . . . . . . . . . . . . . . 52
Conversion Context . . . . . . . . . . . . . . . . . . . . . . . . . . . . . . . . . . . . . . . . . . . . . . . . . . . . . . . . . . . . . . . . . . . . . . . . . . . . . . . . . . . . . . . . . . . . . . 53
Setting Conversion Property Parameters . . . . . . . . . . . . . . . . . . . . . . . . . . . . . . . . . . . . . . . . . . . . . . . . . . . . . . . . . . . . . . . . . . . . 53
Example Dimension Converter . . . . . . . . . . . . . . . . . . . . . . . . . . . . . . . . . . . . . . . . . . . . . . . . . . . . . . . . . . . . . . . . . . . . . . . . . . . . . . . . 55
Index . . . . . . . . . . . . . . . . . . . . . . . . . . . . . . . . . . . . . . . . . . . . . . . . . . . . . . . . . . . . . . . . . . . . . . . . . . . . . . . . . . . . . . . . . . . . . . . . . . . . . . . . . . . . . . . . . . . . . . . . . . . . . . . . 57

1 Introduction 1
1 Introduction
The business intelligence component of Oracle ATG Web Commerce provides quantitative information about
the performance of your Web commerce sites. It gathers data about the operation of your sites and presents it
through reporting analyses that run on an Oracle Business Intelligence server. This guide provides information
about installing and configuring Oracle ATG Web Commerce Business Intelligence.
Find additional information about Oracle ATG Web Commerce Business Intelligence in the related documents
described below.
Document Contains Information About
ATG Reports Guide The information available in the Oracle Business Intelligence
analyses that are provided with Oracle ATG Web Commerce
ATG Data Warehouse Guide The database structure of the Oracle ATG Web Commerce data
warehouse and explanations of the information stored in it
In this guide, the directory in which you installed Oracle ATG Web Commerce is identified as <ATG10dir>.
Components of Oracle ATG Web Commerce Business
Intelligence
The components of Oracle ATG Web Commerce Business Intelligence include:
• A data warehouse database schema that is optimized for reporting
• Event logging functionality in Oracle ATG Web Commerce servers
• A data loader server that transfers information from the log files to the data warehouse
• An Oracle Business Intelligence data model that provides connections to the Oracle ATG Web Commerce data
warehouse and calculated values that may be included in analyses
• Oracle Business Intelligence content that provides quantitative and trending information about the
performance of your Oracle ATG Web Commerce sites

2 1 Introduction
The relationship between these components is shown in the following diagram.
Components of Oracle ATG Web Commerce Business Intelligence
Information About Oracle Business Intelligence
Oracle ATG Web Commerce Business Intelligence is tightly integrated with the reporting functionality of
Oracle Business Intelligence. However, Oracle Business Intelligence is a separate application. See complete
information about installing and using Oracle Business Intelligence in the documentation for that product
(http://www.oracle.com/technetwork/middleware/bi-enterprise-edition/documentation/bi-ee-087853.html).

2 Installation Overview 3
2 Installation Overview
This chapter provides a high-level overview of the steps required to install Oracle ATG Web Commerce Business
Intelligence.
To install Oracle ATG Web Commerce Business Intelligence:
1. Install the Oracle ATG Web Commerce applications that will be the subject of Oracle ATG Web Commerce
Business Intelligence reporting. See the ATG Installation and Configuration Guide.
2. Use the Configuration and Installation Manager (CIM) utility to configure those applications. Choose the
Reporting add on from the Choose Addons menu in CIM. See Installing With CIM (page 4).
CIM will perform the following configurations to support Oracle ATG Web Commerce Business Intelligence:
• Configure your Oracle ATG Web Commerce servers to log operational data in log files. See Log Files (page
12).
• Configure the data warehouse loader server.
• Configure the data warehouse schema.
See information about the individual configurations that CIM makes in Configuring Oracle ATG Web Commerce
Business Intelligence (page 5).
3. Install and configure Oracle Business Intelligence. See information about the required versions in the Oracle
ATG Commerce Supported Environments Matrix document in the My Oracle Support knowledge base
(https://support.oracle.com/).
See complete instructions for installing and configuring Oracle Business Intelligence in the documentation
for that product (http://www.oracle.com/technetwork/middleware/bi-enterprise-edition/documentation/bi-
ee-087853.html).
For your convenience, this guide includes a summary of the steps required to configure Oracle Business
Intelligence to support Oracle ATG Web Commerce Business Intelligence in Oracle Business Intelligence
Installation Summary (page 17).
4. Deploy the Oracle ATG Web Commerce data model and business intelligence content to the Oracle Business
Intelligence server. See Deploying the Data Model and Analysis Definitions (page 19).
5. Confirm that the Oracle ATG Web Commerce dashboards and analyses are available in Oracle Business
Intelligence. See Accessing Business Intelligence Analyses (page 21).

4 2 Installation Overview
Installing With CIM
The Configuration and Installation Manager (CIM) is a utility that simplifies Oracle ATG Web Commerce product
configuration. It ensures that all configuration steps are completed in the correct order. Use CIM to configure
Oracle ATG Web Commerce products after you have installed them. See more information about installing
Oracle ATG Web Commerce and the CIM utility in the ATG Installation and Configuration Guide.
Before configuring Oracle ATG Web Commerce Business Intelligence using CIM, do the following in addition to
the standard installation prerequisites:
• Create a database user account for the data warehouse schema. Make sure you have the connection
information for the database server.
• Create a database user account for the data warehouse loader server schema. Make sure you have the
connection information for the database server.
• Identify a directory for log files. Both your Oracle ATG Web Commerce operational servers and the data
warehouse loader server must have access to this directory. See Log Files (page 12).
To configure Oracle ATG Web Commerce Business Intelligence with CIM, choose the Reporting add-on during
the Product Selection step. This option is available from the Choose Addons menu.
-------CHOOSE ADDONS :----------------------------------------------------------enter [h]elp, [m]ain menu, [q]uit to exit
Choose AddOns :
[1] Reporting [2] Staging Server [3] Preview Server [4] Dedicated Lock Servers [5] Abandoned Order Services [D] Done
Select zero or more > 1
When you choose the Reporting add on, CIM performs several additional steps during the configuration process.
These include:
• Creating a data warehouse database schema during the Database Configuration step
• Creating a database schema for the data warehouse loader server during the Database Configuration step
• Installing a data warehouse loader server during the Server Instance Configuration step
• Choosing a log file directory during the Server Instance Configuration step. See Log Files (page 12).
Note: You will need the user account and connection information for the data warehouse schema again when
you configure Oracle Business Intelligence. See Configuring Oracle Business Intelligence (page 17).

3 Configuring Oracle ATG Web Commerce Business Intelligence 5
3 Configuring Oracle ATG Web
Commerce Business Intelligence
This section provides instructions for configuring the components of Oracle ATG Web Commerce that support
business intelligence functions. These instructions include creating the data warehouse database, configuring
your Web commerce servers to log event data, and configuring the data warehouse loader server to transfer
logged information to the data warehouse database.
All the installation and initial configuration steps described in this section are performed by the Configuration
and Installation Manager (CIM) utility. If you install Oracle ATG Web Commerce using CIM, you can choose to
include the reporting function. CIM will handle all of the Oracle ATG Web Commerce configurations that are
required to log event data and load it into the data warehouse database. See Installing With CIM (page 4).
Creating the Data Warehouse Schema
Data warehouse tables can be housed in any supported database in your system. For performance reasons your
database should be tuned for data warehousing; see your database vendor documentation for information. It is
strongly recommended that the data warehouse reside in a separate database instance from other Oracle ATG
Web Commerce data.
All Oracle ATG Web Commerce applications share a single data warehouse.
Creating Platform Data Warehouse Tables
For your data warehouse database, load the following SQL scripts into the data warehouse database in the order
shown:
1. <ATG10dir>/ARF/DW/base/sql/db_components/db_name
• arf_ddl.sql
• arf_init.sql
2. <ATG10dir>/DCS/DW/sql/db_components/db_name
• arf_dcs_ddl.sql
• arf_dcs_init.sql

6 3 Configuring Oracle ATG Web Commerce Business Intelligence
Creating Search Data Warehouse Tables
To create data warehouse tables for Oracle ATG Web Commerce Search, load the following SQL scripts into the
data warehouse database.
<ATG10dir>/ARF/DW/Search/sql/db_components/db_name:
• search_datawarehouse_ddl.sql
• search_datawarehouse_init.sql
If you are using Search with Commerce, after you create the Search tables, run the following script:
<ATG10dir>/DCS/DW/Search/sql/db_components/db_name/dcs_srch_ddl.sql
Note: There are foreign key dependencies among the tables created by dcs_srch_ddl.sql and the Search
and platform tables.
Creating Outreach Data Warehouse Tables
To create data warehouse tables for Oracle ATG Web Commerce Outreach load the following SQL script into the
data warehouse database:
<ATG10dir>/ACO10.1.2/ACO/sql/install/db_name/data_warehouse_ddl.sql
Creating Service Data Warehouse Tables
To create data warehouse tables for Oracle ATG Web Knowledge Manager and Oracle ATG Web Knowledge
Manager Self Service, load the following SQL script into the data warehouse database:
<ATG10dir>/Service10.1.2/Service/sql/install/db_name/service_datawarehouse.sql
Creating Commerce Service Center Data Warehouse Tables
To create data warehouse tables for ATG Commerce Service Center load the following SQL script into the data
warehouse database:
<ATG10dir>/Service10.1.2/Service/DW/sql/db_components/db_name/svc_dw_ddl.sql

3 Configuring Oracle ATG Web Commerce Business Intelligence 7
Enabling Oracle ATG Web Commerce Server Logging
This section explains how to configure Oracle ATG Web Commerce applications to log operational information
that will be loaded into the data warehouse.
You can control the way that Oracle ATG Web Commerce servers log operational information. See Configuring
Data Collection (page 23).
Application EAR Files
To use Oracle ATG Web Commerce Business Intelligence, compile an EAR file that includes the following modules
along with your applications:
• Asset Management Server (also called publishing, management, or administration): ARF.base, ARF.BIZUI,
ARF.WSCAP
• Production (also called customer-facing) server: ARF.base
• Agent server: ARF.base, ARF.BIZUI
• Data loader servers: Modules depend on the applications you are using; see the table that follows. Note that
ACO.Communication.DW cannot run in the same server as the other data loader modules.
Product Data Warehouse Module to Include
B2C Commerce B2CCommerce
DCS.DW
DCS.PublishingAgent
DCS.CustomCatalogs
B2B Commerce B2BCommerce
DCS.DW
DCS.PublishingAgent
B2C Commerce & Search B2CCommerce
DCS.DW.Search
DCS.PublishingAgent
SearchAdmin.datawarehouse
B2B Commerce & Search B2BCommerce
DCS.DW.Search
DCS.PublishingAgent
SearchAdmin.datawarehouse
B2C Commerce & Commerce
Service Center
B2CCommerce
DCS-CSR.DW
DCS.PublishingAgent
B2B Commerce & Commerce
Service Center
B2BCommerce
DCS-CSR.DW
DCS.PublishingAgent

8 3 Configuring Oracle ATG Web Commerce Business Intelligence
Product Data Warehouse Module to Include
Oracle ATG Web Commerce
Outreach
ACO.communication.DW
Oracle ATG Web Knowledge
Manager
Service.KnowledgeDataWarehouse
Oracle ATG Web Knowledge
Manager & Oracle ATG Web
Commerce Search
Service.KnowledgeDataWarehouse
SearchAdmin.datawarehouse
ARF.DW.Search.InternalUsers
Oracle ATG Web Knowledge
Manager Self Service
Service.SelfServiceDatawarehouse
Oracle ATG Web Knowledge
Manager Self Service & Oracle ATG
Web Commerce Search
Service.SelfServiceDatawarehouse
SearchAdmin.datawarehouse
For information on assembling applications, see the ATG Platform Programming Guide.
Once you have assembled your EAR file, deploy it to the appropriate location, and start your Web application
according to the instructions provided in your application server manuals.
Oracle ATG Web Commerce applications may be configured to write log files containing operational information
for reporting. Data warehouse loader servers load that operational data into the data warehouse. See
Components of Oracle ATG Web Commerce Business Intelligence (page 1).
This section explains how to configure Oracle ATG Web Commerce applications so that they will write log files
for reporting.
Note: The examples in this section are based on the server architecture described in the ATG Multiple Application
Integration Guide. This model includes an asset management server running Content Administration, Oracle
ATG Web Commerce Search, and other administrative applications (sometimes called an administration or
management server), an external-facing or production server on which your Oracle ATG Web Commerce stores
run, an internal-facing server for Oracle ATG Web Knowledge Manager, and two dedicated data loading servers
for reporting.
Configure changes in the <ATG10dir>/home/servers/server_name/localconfig directory.
Configuring an Asset Management Server
The asset management server logs information about the following items for Oracle ATG Web Commerce:
• Changes to the product catalog after deployment
• Changes to external user information
The asset management server logs information about the following items for Oracle ATG Web Commerce
Search:
• Changes to Search projects
• Changes to Search environments
• Changes to topics

3 Configuring Oracle ATG Web Commerce Business Intelligence 9
The asset management server logs information about the following items for Oracle ATG Web Commerce
Outreach:
• Data related to campaign deployments
First, enable logging on the server. To enable logging, create a <ATG10dir>/home/servers/
server_name/localconfig/atg/dynamo/service/DeploymentDWDataCollectionConfig.properties
file and set the following properties:
enabled=truedefaultRoot=log_file_directory
The log file directory can be any place in your system accessible to both the publishing and data loader servers.
See Log Files (page 12).
Next, configure the data source for the data warehouse loader repository. Create an <ATG10dir>/home/
servers/server_name/localconfig/atg/dynamo/service/jdbc/
DirectJTDataSource_production.properties with the following content:
$class=atg.nucleus.JNDIReferenceJNDIName=JNDI_name_for_production_datasource
Finally, import the default roles, groups, and permissions into your profile repository. These roles can then be
assigned to users.
Note: If you have already installed other applications, such as ATG Service, the data imported in this step may
already exist; re-importing the roles may cause errors. Check your system and your application documentation
before proceeding.
To import roles, from a command prompt, import arf-profile.xml to the profile repository:
<ATG10dir>/home/bin/startSQLRepository -m PubPortlet-repository /atg/userprofiling/InternalProfileRepository -import<ATG10dir>/ARF/BIZUI/data/arf-profile.xml
Configuring a Production Server
The production server logs information about the following items for Oracle ATG Web Commerce:
• Site visits
• Order submissions
• Segments
• User profiles
The production server logs the following items for Oracle ATG Web Commerce Search:
• Search queries
• Document views

10 3 Configuring Oracle ATG Web Commerce Business Intelligence
• Search environment use
The production server logs the following items for Oracle ATG Web Knowledge Manager and Oracle ATG Web
Knowledge Manager Self Service:
• Site visits
• Order submissions
• Segments
• User profiles
• Solution views
• Search queries
• Search environment use
The production server logs the following items for Oracle ATG Web Commerce Outreach:
• Landing pages
• E-mail data, including bounces
• Segment information
• Revenue-related information such as number of orders placed in a response to a campaign (requires Oracle
ATG Web Commerce)
Configuring your production server involves two steps. First, enable logging on the server. To enable
logging, create a <ATG10dir>/home/servers/server_name/localconfig/atg/dynamo/service/
DWDataCollectionConfig.properties file and set the following properties:
enabled=truedefaultRoot=log_file_directory
The log file directory can be any place in your system accessible to both the production and data loader servers.
See Log Files (page 12).
Oracle ATG Web Commerce Search has an additional logging control for the NLP reports, the atg/search/
routing/ReportDataControl. By default, the enabled property of this component is configured to point to
DWDataCollectionConfig.enabled, but it can be enabled and disabled separately if you are not interested
in reporting on that data. The NLP reports include all Search-related reports except for Search Activity Summary,
Search Activity Over Time, and Search Response Time Trends. See the ATG Search Administration Guide for
detailed information on Search reports.
Next, configure the data sources for the data warehouse loader repository. To do this, create two properties files
in your production server’s localconfig directory:
/atg/dynamo/service/jdbc/DirectJTDataSource.properties$class=atg.nucleus.JNDIReferenceJNDIName=JDNI name for production datasource
/atg/dynamo/service/jdbc/DirectJTDataSource_production.properties$class=atg.nucleus.JNDIReference

3 Configuring Oracle ATG Web Commerce Business Intelligence 11
JNDIName=JDNI name for production datasource
If you are using Oracle ATG Web Commerce Search with Oracle ATG Web Commerce, add the following
configuration properties to the file /atg/commerce/search/catalog/QueryRequest.properties.
firingSearchEvents=truesaveRequest=true
If you are using Oracle ATG Web Commerce Search with Oracle ATG Web Knowledge Manager, configure the
following properties files as shown:
/atg/search/routing/command/search/BrowseRequest.propertiesfiringSearchEvents=true
/atg/search/routing/command/search/CategorizeRequest.propertiesfiringSearchEvents=true
/atg/search/routing/command/search/QueryRequest.propertiesfiringSearchEvents=true
/atg/search/routing/command/search/SimilarDocsRequest.propertiesfiringSearchEvents=true
/atg/search/routing/command/search/StructuredQueryRequest.propertiesfiringSearchEvents=true
/atg/search/routing/command/search/ViewDocumentRequest.propertiesfiringSearchEvents=true
Configuring an Agent Server
The agent server logs changes to the following items for Oracle ATG Web Knowledge Manager, Oracle ATG Web
Knowledge Manager Self Service, and Oracle ATG Web Commerce Service Center:
• Orders
• Returns
• Calls
• Solution activity.
Configuring your agent server involves two steps. First, enable logging on the server. To enable logging,
create a <ATG10dir>/home/servers/server_name/localconfig/atg/dynamo/service/
DWDataCollectionConfig.properties file and set the following properties:

12 3 Configuring Oracle ATG Web Commerce Business Intelligence
enabled=truedefaultRoot=log_file_directory
The log file directory can be any place in your system accessible to both the production and data loader servers.
See Log Files (page 12).
Next, configure the data sources for the data warehouse loader repository. To do this, create a properties file in
your production server’s localconfig directory:
# /atg/dynamo/service/jdbc/DirectJTDataSource_production.properties$class=atg.nucleus.JNDIReferenceJNDIName=<_JDNI name for production datasource_>
Log Files
Oracle ATG Web Commerce applications write log files that contain operational information for reporting. Data
warehouse loaders load this information in the data warehouse. See Components of Oracle ATG Web Commerce
Business Intelligence (page 1).
Both Oracle ATG Web Commerce application servers and data warehouse loader servers must have access to the
log files. As you configure the servers, you will need to know the directory in which one will write the files and
the other will read them.
If the servers share a file system you can create a shared directory in which Oracle ATG Web Commerce
application servers write files and the data warehouse loader server reads them. If the servers are separated
from each other, you may need to implement a strategy for making the log files written by the Oracle ATG Web
Commerce application servers available to the data warehouse servers.
Configuring the Data Warehouse Loader Server
These servers are responsible for the components that load data into the Oracle ATG Web Commerce data
warehouse. Note that the data loaders must run on dedicated servers.
You must configure a separate data warehouse loader server for Oracle ATG Web Commerce Outreach if you use
that application. Do not configure one data warehouse loader server for Oracle ATG Web Commerce Outreach
and any other application.
Configuring the Main Loader Server
First, enable data collection on the main loader server. This step is only necessary if you intend to pre-load data
into the warehouse (see the “Preparing to Use Commerce Reporting” chapter of the ATG Commerce Programming
Guide for information). Create a <ATG10dir>/home/servers/server_name/

3 Configuring Oracle ATG Web Commerce Business Intelligence 13
localconfig/atg/dynamo/service/DWDataCollectionConfig.properties file and set the following
content:
enabled=truedefaultRoot=path to log file directory
Next, configure the data sources for the data warehouse repository, production schema, and local loader
machine. Create the following properties file in your loader server’s localconfig directory:
/atg/reporting/datawarehouse/DirectJTDataSource.properties$class=atg.nucleus.JNDIReferenceJNDIName=JDNI name for warehouse datasource
/atg/dynamo/service/jdbc/DirectJTDataSource_production.properties$class=atg.nucleus.JNDIReferenceJNDIName=JDNI name for production datasource
/atg/dynamo/service/jdbc/DirectJTDataSource.properties$class=atg.nucleus.JNDIReferenceJNDIName=JDNI name for local datasource
/atg/dynamo/service/jdbc/DirectJTDataSource_agent.properties$class=atg.nucleus.JNDIReferenceJNDIName=JDNI name for agent datasource
/atg/dynamo/service/jdbc/DirectJTDataSource_management.properties$class=atg.nucleus.JNDIReferenceJNDIName=JDNI name for management datasource
Note that the DirectJTDataSource_agent datasource is only required if you are using ATG Service
applications.
The data loaders use a lock manager to ensure that only a single loader processing a given file. To configure your
loader server as a lock management client, create the following files:
<ATG10dir>/home/servers/server_name/localconfig/atg/dynamo/service/ClientLockManager.properties
<ATG10dir>/home/servers/server_name/localconfig/atg/dynamo/service/ClientLockManager_production.properties
<ATG10dir>/home/servers/server_name/localconfig/atg/dynamo/service/ClientLockManager_agent.properties

14 3 Configuring Oracle ATG Web Commerce Business Intelligence
<ATG10dir>/home/servers/server_name/localconfig/atg/dynamo/service/ClientLockManager_management.properties
Each of these files should include the following configuration:
lockServerAddress=lock server hostnamelockServerPort=lock server portuseLockServer=true
Custom Catalogs
If you are using custom catalogs with Oracle ATG Web Commerce, you must start the DCS.CustomCatalog
module on the data warehouse loader server. See information about custom catalogs in the ATG Commerce
Programming Guide.
Configuring the Outreach Loader Server
First, enable data collection on the loader server. This step is only necessary if you intend to pre-load data into
the warehouse (see the “Preparing to Use Commerce Reporting” chapter of the ATG Commerce Programming
Guide for information). Create a <ATG10dir>/home/servers/server_name/
localconfig/atg/dynamo/service/DWDataCollectionConfig.properties file and set the following
content:
enabled=truedefaultRoot=path to log file directory
Next, configure the data sources for the data warehouse repository, production schema, and local loader
machine. Create the following properties file in your loader server’s localconfig directory:
/atg/reporting/datawarehouse/DirectJTDataSource.properties$class=atg.nucleus.JNDIReferenceJNDIName=JDNI name for warehouse datasource
/atg/dynamo/service/jdbc/DirectJTDataSource_production.properties$class=atg.nucleus.JNDIReferenceJNDIName=JDNI name for production datasource
/atg/dynamo/service/jdbc/DirectJTDataSource.properties$class=atg.nucleus.JNDIReferenceJNDIName=JDNI name for local datasource
/atg/dynamo/service/jdbc/DirectJTDataSource_management.properties$class=atg.nucleus.JNDIReferenceJNDIName=JDNI name for management datasource

3 Configuring Oracle ATG Web Commerce Business Intelligence 15
The data loaders use a lock manager to ensure that only a single loader processes a given file. To configure your
loader server as a lock management client, create the following files:
<ATG10dir>/home/servers/server_name/localconfig/atg/dynamo/service/ClientLockManager.properties
<ATG10dir>/home/servers/server_name/localconfig/atg/dynamo/service/ClientLockManager_production.properties
<ATG10dir>/home/servers/server_name/localconfig/atg/dynamo/service/ClientLockManager_agent.properties
<ATG10dir>/home/servers/server_name/localconfig/atg/dynamo/service/ClientLockManager_management.properties
Each of these files should include the following configuration:
lockServerAddress=lock server hostnamelockServerPort=lock server portuseLockServer=true
Creating the Data Loader Production Tables
The data loader tables are used to queue log files for processing and to track load execution. In the event of a
failure, load progress resumes where it left off.
Important: These tables should be part of your production server schema.
Run the following script:
<ATG10dir>/ARF/base/sql/install/db_name/arf_base_ddl.sql
Creating the Data Loader Local Tables
These tables are used by the data loader server, and represent the minimal set of tables required by the Oracle
ATG Web Commerce platform.
Important: These tables should be part of the local schema for the data warehouse loader server.
Run the following script:
<ATG10dir>/DAS/sql/install/db_name/das_ddl.sql

16 3 Configuring Oracle ATG Web Commerce Business Intelligence

4 Configuring Oracle Business Intelligence 17
4 Configuring Oracle Business
Intelligence
This section provides information about configuring Oracle Business Intelligence to run the analyses and
dashboards that are provided with Oracle ATG Web Commerce Business Intelligence.
Oracle ATG Web Commerce and Oracle Business Intelligence are independent products. See information about
the required version of Oracle Business Intelligence in the Oracle ATG Commerce Supported Environments
Matrix document in the My Oracle Support knowledge base (https://support.oracle.com/). See complete
information about installing and configuring Oracle Business Intelligence in the documentation for that product
(http://www.oracle.com/technetwork/middleware/bi-enterprise-edition/documentation/bi-ee-087853.html).
Oracle Business Intelligence Installation Summary
This section provides a summary of the installation procedure for Oracle Business Intelligence. The dashboards
and analyses provided with Oracle ATG Web Commerce run on an Oracle Business Intelligence server.
The information in this section is provided as a convenience for users of Oracle ATG Web Commerce Business
Intelligence. See comprehensive information about Oracle Business Intelligence in the documentation for
that product (http://www.oracle.com/technetwork/middleware/bi-enterprise-edition/documentation/bi-
ee-087853.html).
Repository
Oracle Business Intelligence requires a repository database. Use the Repository Creation Utility that is provided
with Oracle Business Intelligence to configure the databases schemas for the repository.
To configure the Oracle Business Intelligence repository:
1. Prepare a database installation for the repository. You must have a user account with system administrator
permission for the database installation. For example, if you are using Oracle Database, make sure you can
log into the SYS user account. The Repository Creation Utility will use this account to create additional user
accounts, table spaces, and schemas.
2. Download the Repository Creation Utility from the Oracle Business Intelligence download Web page (http://
www.oracle.com/technetwork/middleware/bi-enterprise-edition/downloads/biee-111150-393613.html).
Expand the utility zip file.

18 4 Configuring Oracle Business Intelligence
3. Invoke the rcu or rcu.bat program in the rcuHome\BIN directory.
4. Follow the prompts in the utility to configure a connection to the repository database and create the
database schemas that Oracle Business Intelligence requires. Keep a record of the database account names
and passwords that you create. You will need these when you configure the Oracle Business Intelligence
server.
Note: See comprehensive information about the Repository Creation Utility and Oracle Business Intelligence in
the documentation for that product (http://www.oracle.com/technetwork/middleware/bi-enterprise-edition/
documentation/bi-ee-087853.html).
Server Installation
To install and configure Oracle Business Intelligence using its installation program:
1. Prepare the server environment.
• Make sure the server you are installing Oracle Business Intelligence on can display the graphical installation
program.
• Make sure the server you are installing Oracle Business Intelligence on has enough free disk space. You will
need approximately 20 gigabytes. If you are using a UNIX or Linux operating system, make sure that the
root directories /u01 and /tmp have adequate space available.
• Set the JAVA_HOME environment variable to the home directory of a 64 bit Java Development Kit (JDK)
installation.
2. Download Oracle Business Intelligence from the download Web page for that product (http://
www.oracle.com/technetwork/middleware/bi-enterprise-edition/downloads/biee-111150-393613.html).
Create a temporary directory for the installation files and expand each of the zip files that you downloaded
into it.
3. Invoke the runInstaller (UNIX or Linux) or setup.exe (Windows) program. Find these programs in the
bishiphome/Disk1 directory of the expanded installation files. Follow the prompts of the installation
program.
• If the Prerequisite Checks step finds missing software, install that software and run the installation program
again.
• If the Prerequisite Checks step finds incorrect kernel parameters, correct the parameters and run the
installation program again. For example, you may need to add the following lines to the /etc/security/
limits.conf configuration file on Linux operating systems.
username soft nofile 10000
username hard nofile 10000
4. Verify that the server starts successfully.
Note: See comprehensive information about installing Oracle Business Intelligence in the documentation
for that product (http://www.oracle.com/technetwork/middleware/bi-enterprise-edition/documentation/bi-
ee-087853.html).

4 Configuring Oracle Business Intelligence 19
Deploying the Data Model and Analysis Definitions
This section provides instructions for configuring the data model and business intelligence content that are
provided with Oracle ATG Web Commerce Business Intelligence on an Oracle Business Intelligence server.
Preparing the Data Model
The Oracle Business Intelligence data model that is provided with Oracle ATG Web Commerce Business
Intelligence connects reporting analyses to the data warehouse database. It includes database connection
information and it presents the data in the data warehouse to the Oracle Business Intelligence server in a
manner that is more useful for creating reports.
To configure your data warehouse database connection information in the data model:
1. Make sure that you have installed and configured Oracle ATG Web Commerce including the reporting
components for Oracle ATG Web Commerce Business Intelligence. Make sure that you have the user account
and connection information for the data warehouse database. See Installation Overview (page 3).
2. Run the Oracle Business Intelligence Administration tool.
• If you have installed Oracle Business Intelligence on Microsoft Windows, choose the Administration tool
from the Start menu options for Oracle Business Intelligence.
• If you have installed Oracle Business Intelligence on another operating system, download and install
the Oracle Business Intelligence Developer Client Tools on a Microsoft Windows computer. Download
the Oracle Business Intelligence Developer Client Tools installer from the Oracle Business Intelligence
download Web page (http://www.oracle.com/technetwork/middleware/bi-enterprise-edition/downloads/
biee-111150-393613.html).
3. Move a copy of the Oracle ATG Web Commerce Business Intelligence data model repository file to a directory
in which you can open and edit it with the administration tool. The repository file is provided in the Oracle
ATG Web Commerce installation directory at the following location.
<ATG10dir>/ARF/DW/OracleBI/OracleBIServerComponent/repository/ATG.rpd
If you are deploying the data model for Oracle ATG Web Knowledge Manager analyses, configure the
repository file at the following location. Only use this repository file for Knowledge Manager reporting and
use it instead of the primary Oracle ATG Web Commerce repository file described above.
<ATG10dir>/Service10.1.2/Service/DW/OracleBI/OracleBIServerComponent/repository/
ATG.rpd
4. Open the repository file in the Oracle Business Intelligence Administration tool. Enter the default password
Admin123.
5. Open the properties dialog box for the physical layer of the model. Select View > Physical if it is not already
selected. Select the physical layer (labeled ATGDW) and choose Edit > Properties.
6. Open the Connection Pool tab and double-click the ATGDW Connection Pool connection to edit it. Enter the
connection information for your data warehouse database.
7. Click OK on all open dialog boxes. Save the model and check its consistency when prompted. Close the
repository file. You will need this file when you deploy business intelligence content. See Deploying to the
Oracle Business Intelligence Server (page 20).
Note: Improve the security of your installation by changing the data model repository file password.

20 4 Configuring Oracle Business Intelligence
Note: See comprehensive information about configuring repository files for Oracle Business Intelligence in
the documentation for that product (http://www.oracle.com/technetwork/middleware/bi-enterprise-edition/
documentation/bi-ee-087853.html).
Deploying to the Oracle Business Intelligence Server
Install the Oracle Business Intelligence data model repository file and analysis definitions on the Oracle Business
Intelligence server.
Before you perform this procedure, make sure that you have installed Oracle Business Intelligence, you have the
administrator user name and password, and that you have prepared the data model repository file. See Oracle
Business Intelligence Installation Summary (page 17) and Preparing the Data Model (page 19).
To deploy the data model and business intelligence content to the Oracle Business Intelligence server:
1. Get the file containing the Oracle ATG Web Commerce Business Intelligence analysis definitions file from the
Oracle ATG Web Commerce installation directory at the following location.
<ATG10dir>/ARF/DW/OracleBI/OracleBIPresentationServicesComponent/catalog/ATG.zip
If you are deploying analyses for Oracle ATG Web Knowledge Manager, get the file from the following
location. Only use this file for Knowledge Manager reporting and use it instead of the primary Oracle ATG
Web Commerce analysis definition file described above.
<ATG10dir>/Service10.1.2/Service/DW/OracleBI/OracleBIPresentationServicesComponent/
catalog/ATG.zip
2. Unzip the analysis definitions file at the following location on the Oracle Business Intelligence server.
<OBIserver>/instances/instance1/bifoundation/OracleBIPresentationServicesComponent/
coreapplication_obips1/catalog
3. Log into the Oracle Enterprise Manager Fusion Middleware Control. This application is available on the Oracle
Business Intelligence server at the following URL:
http://server-name:port/em
4. Choose Farm_bifoundation_domain > Business Intelligence > coreapplication in the navigation panel on the
left.
5. Click Lock and Edit Configuration.
6. Click Choose File in the Upload BI Server Repository section of the coreapplication configuration screen.
Browse to the data model repository file that you prepared with the connection information for your data
warehouse database. See Preparing the Data Model (page 19).
Enter the password for the data model repository file in the Repository Password and Confirm Password
fields.
7. Enter the path to the directory that holds the business intelligence content catalog files in the Catalog
Location field in the BI Presentation Catalog section. This is the directory that you unzipped in a previous step.
8. Click Apply, Activate Changes, and Restart to apply recent changes. Restart the system on the overview tab.
Note: See comprehensive information about configuring Oracle Business Intelligence in the documentation
for that product (http://www.oracle.com/technetwork/middleware/bi-enterprise-edition/documentation/bi-
ee-087853.html).

5 Accessing Business Intelligence Analyses 21
5 Accessing Business Intelligence
Analyses
This section provides information about viewing the Oracle ATG Web Commerce Business Intelligence analyses
and dashboards.
Viewing Analyses and Dashboards
View Oracle ATG Web Commerce analyses and dashboards in the Oracle Business Intelligence user interface.
1. Log in to Oracle Business Intelligence. The URL for the Oracle Business Intelligence user interface is typically:
http://server-name:7001/analytics
2. Open an Oracle ATG Web Commerce Business Intelligence dashboard from the Dashboards menu. Choose
Catalog > ATG to browse through individual Oracle ATG Web Commerce Business Intelligence analyses.
See information about the analyses and dashboards provided for Oracle ATG Web Commerce in the ATG Reports
Guide.
Access Control
Configure access control and user permissions for Oracle ATG Web Commerce Business Intelligence using the
security functions of Oracle Business Intelligence. Oracle Business Intelligence runs independently of your Oracle
ATG Web Commerce servers. See information about configuring security for Oracle Business Intelligence in
the documentation for that product (http://www.oracle.com/technetwork/middleware/bi-enterprise-edition/
documentation/bi-ee-087853.html).

22 5 Accessing Business Intelligence Analyses

6 Configuring Data Collection 23
6 Configuring Data Collection
This section explains how Oracle ATG Web Commerce Business Intelligence gathers operational data from your
web application and stores it in log files. It provides instructions for extending and modifying the data it collects.
See information about the way data collection fits in the overall Oracle ATG Web Commerce Business
Intelligence architecture in Components of Oracle ATG Web Commerce Business Intelligence (page 1).
Data Collection Process
Oracle ATG Web Commerce Business Intelligence uses components that listen for Java Messaging Service (JMS)
messages to collect operational data from your web application. The following steps explain the data collection
process.
1. The event listener component receives JMS events from the Oracle ATG Web Commerce messaging system.
See Event Listener Component (page 23). See information about the Oracle ATG Web Commerce
messaging system in the ATG Platform Programming Guide.
2. The event listener component passes event objects to an event queue component. This component holds the
event objects until a third component writes the event data to log files. See Event Queue Component (page
24).
Queuing the event objects and logging their data with a different component separates the log file writing
action from the Java Virtual Machine (JVM) threads used by Web application visitors while they generate the
operational data. This improves performance for Web application users.
3. The data file writing component examines the event objects that are held by the event queue component
and writes the data they contain to log files. See Data File Writing Component (page 24).
The data loading components of Oracle ATG Web Commerce read the log files and load the data into the data
warehouse database. The data loading components are not a part of the production Web application and are
completely separate from the data collection process. See Configuring Fact Data Loading (page 37).
Event Listener Component
Event listener components function as message sinks in the Oracle ATG Web Commerce messaging system,
which uses the Java Messaging System (JMS). Event listener components are based on classes that implement
the atg.dms.patchbay.MessageSink interface and they are configured as message sinks in the messaging
system patch bay. See information about the Oracle ATG Web Commerce messaging system in the ATG Platform
Programming Guide.

24 6 Configuring Data Collection
When the components receive events from the messaging system, they send event objects to event queue
component. See Event Queue Component (page 24). The data listener property of the event listener
component stores references to the event queue components.
Event listener components send the event objects they receive to event queue components. They store
the Nucleus paths of the event queue components in a configuration property that is typically named
dataListeners or dataListener. For example:
dataListener=/mycompany/reporting/datacollection/MyEventQueue
Event Queue Component
Event queue components hold the event objects that are received by event listener components until those
events can be handled by data file writing components. Event queue components are based on the class
atg.service.datacollection.DataCollectorQueue.
Event queue components are associated with the data file writing components that will process the event
objects that they store. Event queue components store references to the data file writing components in a
configuration property named dataListeners. For example:
dataListener=/mycompany/reporting/datacollection/MyFileLogger
Data File Writing Component
Data file writing components examine the event objects stored in an event queue component and write log files
that contain the data in those event objects.
Data File Writing Component Properties
This section explains the configuration properties of a data file writing component. See an example
configuration file in Example Data File Writing Component (page 35).
Property Explanation
defaultRoot The base directory for the data log files that the component writes. Provide
the absolute path to a directory or specify the default data collection log file
directory by linking this property value to the corresponding property of the /
atg/dynamo/service/DWDataCollectionConfig component. Use the ^=
operator. For example:
defaultRoot^=/atg/dynamo/service/
DWDataCollectionConfig.defaultRoot
See information about linking property values in the ATG Platform Programming
Guide.

6 Configuring Data Collection 25
Property Explanation
logFileName The base file name for the data log files that the component writes. This is
the first part of the file name. You can choose to append unique identifiers
or timestamps after this part of the file name. See the UIDLogFileName and
timestampLogFileName properties.
You can include a subdirectory in this value. For example:
logFileName=mysubdirectory/mylogfilename
If you specify a subdirectory, make sure that the subdirectory exists in the
default root directory. The data file writing component will not create it.
UIDLogFileName Controls whether the log file names include a unique identifier after the base
name.
Set this value to true to include a unique identifier. Set it to false to omit the
unique identifier.
idGenerator The nucleus path of the component that generates the unique identifiers used
in log file names. For example:
/atg/dynamo/service/IdGenerator
timestampLogFileName Controls whether the log file names include the date and time after the base
name.
Set this value to true to include the date and time. Set it to false to omit the
date and time.
timestampDateFormat The pattern used to express the date and time in log file names. Specify the
date and time as required by the java.text.SimpleDateFormat class. For
example:
MM-dd-yyyy_HH-mm-ss-SS
logFileExtension The log file name extension. For example, .data.
formatFields Controls which pieces of object data the file writing component will include in
the log file. Include a comma-separated list of the message object properties in
this value. Do not include spaces. For example:
id,requestId,contentId
If the message object contains an object (it implements the
javax.jms.ObjectMessage interface), include the message property that
holds the object and then the property of the inner object. For example:
object.orderId,object.profileId,object.type
You can control the format of the logged data fields. Specify the format after a
colon character. For example:
object.timestamp:MM/dd/yyyy

26 6 Configuring Data Collection
Property Explanation
jobName A name to identify the scheduled log file rotation job. See Log File
Rotation (page 27). See information about scheduler services in the ATG
Platform Programming Guide.
schedule Controls the frequency of log file rotation. For example:
every 1 hour without catch up
See Log File Rotation (page 27). See information about scheduler services in
the ATG Platform Programming Guide.
dataItemThreshold The maximum number of records for a data file. If the number of records
exceeds this number, the log file will be rotated. See Log File Rotation (page
27).
scheduler The Nucleus path of the scheduling component that handles log file rotation.
For example:
/atg/dynamo/service/Scheduler
messageSource The Nucleus path of the component that will send log rotation messages. See
Log File Rotation (page 27). For example:
/atg/dynamo/service/LogRotationMessageSource
logRotationMessageTypeThe type of data that the log file contains. This identifies which loader queue
should handle the logged data. The log rotation message source component
includes this information in log rotation messages. See Log File Rotation (page
27).
You can use any string to represent the type of data. By convention, the default
Oracle ATG Web Commerce data file writing components use the object class
of the Java Messaging System (JMS) events that are handled by the data file
writing component. For example:
atg.commerce.order.abandoned.OrderAbandoned
enabled Controls whether the component will write data files. Set this value to true to
write data files. Set this value to false to prevent the component from writing
files. See Enabling Data File Writing Components (page 26).
fieldDelimiter The string that separates individual data elements in each line of a data file.
This is set to the tab character (\t) by default.
lineTerminator The string that indicates the end of each line in a data field. This is set to the
newline character (\n) by default.
Enabling Data File Writing Components
You can enable data file writing components individually or as a group.
• To enable a component individually, set the value of its enabled property to either true or false.
6 Configuring Data Collection 27
• To enable components as a group, link the values of their enabled properties to the value of the /atg/
dynamo/service/DWDataCollectionConfig component. Use the linking operator, ^=. Set the enabled
property of the DWDataCollectionConfig component to either true or false. For example:
enabled^=/atg/dynamo/service/DWDataCollectionConfig.enabled
See information about linking property values in the ATG Platform Programming Guide.
Note: Link the enabled property of the Commerce product catalog data collection component to the enabled
property of the /atg/dynamo/service/DeploymentDWDataCollectionConfig component. See more
information about product catalog data collection in the ATG Commerce Programming Guide.
Data Log Record Format
Data file writing components write the operational data from each message object in separate lines of the data
log files. The formatFields configuration property of the data file writing component controls the order of
data elements in each line.
By default, the data elements in each line are separated by tab characters (\t) and each line ends with the
newline character (\n). Use the fieldDelimeter property control the string that separates data elements. Use
the lineTerminator property to control the line ending characters.
The following example shows a list of message object properties. A data file writing component will write the
values from each property on one line of a data log file. In this example, the message object contains an object
that contains event information. The property names include the property that holds the object (object) and
name of a property of the inner object.
formatFields=object.abandonmentState,object.orderId,object.profileId,object.type
The following example shows the tab-delimited values from a message object.
ABANDONEDo290005390005atg.commerce.order.abandoned.OrderAbandoned
You can control the format of the logged data fields. Specify the format after a colon character. For example:
object.timestamp:MM/dd/yyyy
Log File Rotation
Data file writing components rotate log files to indicate that they are no longer writing new information in a file
and that it is ready to be processed by the data warehouse loader server. When a data file writing component
rotates a log file, it does the following:
1. It opens a new log file that will hold any new data that the component collects. It stops writing any data in
the old log file.
2. It invokes a log rotation message source component to send a Java Messaging System (JMS) message.
The JMS message indicates that the data in the old log file is ready to be loaded into the data warehouse
database.

28 6 Configuring Data Collection
3. A log rotation sink component receives the JMS message and adds the closed log file and its type to the
queue in the DataWarehouseLoaderRepository. The data warehouse loader server components will load
the data in a separate server process.
Configure the data file writing component to send log rotation messages with the following properties.
• messageSource - the Nucleus path of the log rotation message source component
• logRotationMessageType - the Java class of the JMS messages handled by the data file writing component
Data file writing components rotate log files when one of two conditions occurs. These are:
• The schedule configured by the schedule and scheduler properties prompts the component to rotate the
log file.
• The number of records in the log file exceeds the maximum number allowed by the dataItemThreshold
property.
Log files are rotated by the FileLogger components, either at a scheduled time or when a configured limit on
the number of log entries is reached.
Note: If a log file does not contain any data, the data file writing component will not rotate it.
Site Visit Data Collection
This section provides information about data collection components that log operational data about Web site
user sessions.
The /atg/reporting/datacollection/userprofiling/SiteVisitManager component listens for
session start, session end and page view events. It accumulates information about a site visit in a session-
scoped component called /atg/reporting/datacollection/userprofiling/SiteVisitRequest. When
the session ends, the SiteVisitManager sends a JMS message. The siteVisit message has a JMS type of
atg.dps.SiteVisit, and is an instance of the atg.userprofiling.dms.SiteVisitMessage class.
This message is received by the SiteVisitMessageSink, which calls the /atg/reporting/
datacollection/userprofiling/SiteVisitQueue component. The SiteVisitQueue component calls
the /atg/reporting/datacollection/userprofiling/SiteVisitFileLogger component, which adds
an entry to the site-visit_timestamp_unique-ID.data file.
The log file includes the following details for each visit:
• Session ID
• Profile ID
• Session start timestamp
• Session end timestamp
• Visit duration in seconds
• Number of pages viewed

6 Configuring Data Collection 29
The following is an example of the site visit log:
0385E85E9E8BC68D34354D132AFAB29C17000311/07/2006 14:38:4611/07/2006 14:38:4601
65F444358B90D134E745E0E9859F397412000011/07/2006 14:35:2711/07/2006 15:01:55158825
Filtering Specific Site Visits
You can configure your production server to omit certain site visits when it logs site visit information. Use this to
ignore visits from web crawlers(bots), application monitoring software, or load balancers. You can omit site visits
based on:
• The Internet Protocol (IP) address of the site visitor
• The type of Web browser (agent) used by the site visitor
• The context path accessed by the site visitor
To filter specific site visitors from the site visit records loaded in your data warehouse:
1. Create or edit the following configuration file for the production server.
<ATG10dir>/home/servers/server_name/localconfig/
atg/reporting/datacollection/userprofiling/
SiteVisitRequest.properties
2. Set one or more of the following properties: ignoreIPAddresses (page 29), ignoreUserAgents (page 30),
and ignoreContextPaths (page 30).
3. Restart your Oracle ATG Web Commerce servers.
ignoreIPAddresses
Include a comma-separated list of Internet Protocol (IP) addresses in the ignoreIPAddresses property. The site
visit data logger will ignore site visits from those IP addresses.
You can use regular expressions in the values for ignoreIPAddresses. The regular expression syntax that you
use must conform to the patterns recognized by the class java.util.regex.Pattern. The first pattern in
the example shown below uses regular expressions to match any IP address that starts with the octet “10” and
contains any one, two, or three digits in the following octets. The periods in the pattern are escaped with two
backslash characters so that they are interpreted as literal period characters. The regular expression requires
only one backspace to escape the period. The second backslash protects the first from interpretation by the
Java byte code compiler. This and other important information about java.util.regex.Pattern regular
expressions are explained in the documentation for that class.
The following example configures the data logger to ignore site visits from any IP addresses in which the first
octet is 10 and an additional specific IP address.
ignoreIPAddresses=10\\.\\d{1,3}\\.\\d{1,3}\\.\\d{1,3},64.69.8.165

30 6 Configuring Data Collection
ignoreUserAgents
Include a comma-separated list of HTTP_USER_AGENT identifiers in the ignoreUserAgents property. If the
HTTP_USER_AGENT reported by a site visitor’s user agent (for example, a Web browser or Web crawler) matches
one of the values you configure, the site visit data logger will ignore the entire HTTP session.
You can use regular expressions in the values for ignoreUserAgents. The regular expression syntax that you
use must conform to the patterns recognized by the Java class java.util.regex.Pattern. The example
shown below uses regular expressions to match any string of characters before and after “searchEngineBot.” See
important information about the way java.util.regex.Pattern regular expressions are interpreted in the
documentation for that class. For example, you must use two backslash characters to escape special characters
in your regular expressions. The second backslash protects the first from interpretation by the Java byte code
compiler.
The following example configures the data logger to ignore site visits from any user agent that contains the
string “searchEngineBot” in its HTTP_USER_AGENT identifier.
ignoreUserAgents=.*searchEngineBot.*
ignoreContextPaths
Include a comma-separated list of context paths in the ignoreContextPaths property. If a site visitor accesses
one of the context paths configured in the ignoreContextPaths property, the data logger will ignore the
entire HTTP session.
Use the ignoreContextPaths property to ignore an entire Web application. You cannot ignore specific
content within a Web application. Application servers define and configure context paths differently. See the
documentation for your application server to find out how context paths are defined.
The following example shows the ignoreContextPaths property configured to ignore visits that include the
Oracle ATG Web Commerce Reference Store.
ignoreContextPaths=/crs
The /dyn context path that runs on Oracle ATG Web Commerce servers is a default value of the
ignoreContextPaths property. The data logger will never log visits to this Oracle ATG Web Commerce
administration Web application.
Note: You cannot use regular expressions in the ignoreContextPaths property. Include each context path you
want to ignore in the comma-separated list.
Tracking Users During Multiple Site Visits
Oracle ATG Web Commerce logs records of site visits based on the HTTP sessions in which the site visits take
place. If a user is registered with a site and that user logs in at any time during the HTTP session, the entire site
visit is associated with that user account. This includes the period during which the user was visiting the site
anonymously.
If you have more than one Oracle ATG Web Commerce site configured, a visitor may access multiple sites during
the same HTTP session. If the visitor logs in at any time during the HTTP session, Oracle ATG Web Commerce
will associate the visits at all sites with that user account. This behavior is configurable. You can choose to have

6 Configuring Data Collection 31
anonymous visits to a site logged with the default visitor ID (anonymous) even if the visitor logs into a different
site in the same HTTP session.
See information about the way site visits are recorded in the data warehouse in the ATG Data Warehouse Guide.
To configure the way users are tracked during multiple site visits:
1. Create or edit the following configuration file for the production server.
<ATG10dir>/home/servers/server_name/localconfig/atg/reporting/datacollection/
userprofiling/SiteVisitRequest.properties
2. Set the trackPersistentProfileAmongSites property. The value true is the default and it will associate
anonymous site visits with a registered user’s account if that user logs in at another site in the same HTTP
session. Set the value to false to log site visits anonymously even if a user logs in at another site in the same
HTTP session.
trackPersistentProfileAmongSites="false"
3. Restart your Oracle ATG Web Commerce servers.
User Data Collection
The /atg/reporting/datacollection/userprofiling/UserEventListener component is notified
whenever an insert, update, or delete is performed on either User or ContactInfo repository item descriptors
in the Profile Repository. The user_timestamp_unique ID.data log created by the /atg/reporting/
datacollection/userprofiling/UserFileLogger component includes the following data:
• Time stamp
• Dynamo path to the repository.
• Type of item that changed.
• Repository item ID for the changed item.
• Change type (insert, update, or delete)
The UserEventListener.properties file includes several configurable properties that allow you to filter out
information you do not want to log. The sourceRepositoryPathToItemDescriptorNames property specifies
which repository items have change information logged for them:
sourceRepositoryPathToItemDecriptorNames=\ /atg/userprofiling/ProfileAdapterRepository=user;contactInfo
The excludedEventTypes property allows you to filter out change types that you do not want logged.
There are four types of change event: UPDATE, DELETE, INSERT, and CACHE_INVALIDATE. By default,
CACHE_INVALIDATE is excluded from logging. The property is set as follows:
excludedEventTypes=CACHE_INVALIDATE

32 6 Configuring Data Collection
The itemDescriptorToPropertyNames property allows you to explicitly identify which properties you want
to log UPDATE changes for:
itemDescriptorToPropertyNames=\/atg/userprofiling/ProfileAdapterRepository:user=login
The following is an example of the user log:
10/19/2006 10:08:39 /atg/userprofiling/ProfileAdapterRepositoryuser 711 insert10/19/2006 10:10:39 /atg/userprofiling/ProfileAdapterRepositoryuser 735 insert10/19/2006 10:10:39 /atg/userprofiling/ProfileAdapterRepositoryuser 1710002 update
Segment Data Collection
Segments (also known as profile groups) represent different groups in your customer base. To log segment data
for reporting, the /atg/reporting/datacollection/userprofiling/SegmentChangeListenerService
listens for ConfigurationEvents. These events occur when updates, deletions, or insertions are made
to segments. The listener sends details of segment changes to the /atg/reporting/datacollection/
userprofiling/SegmentFileLogger via a data collection queue. The SegmentFileLogger creates the log
entry.
The segment_timestamp_unique id.data file contains the following logged information:
• Timestamp
• Name of the repository to which segments are bound within the repository group container, specified in /
atg/registry/RepositoryGroups
• Item type, which is always segment
• A repository:name combination, which uniquely identifies the segment. For example,
UserProfile:HighValueCustomers.
• Change type (INSERT, UPDATE, or DELETE)
• Segment name
• Segment description from the serviceInfo property of the associated Nucleus component
The following is an example of the segment log:
10/19/2006 20:46:01 UserProfiles segment UserProfiles:DiscountShopper INSERT DiscountShopper "Prefers sale items"10/19/2006 21:46:10 UserProfiles segment UserProfiles:DiscountShopper UPDATE DiscountShopper "Only sale items"10/19/2006 21:50:13 UserProfiles segment UserProfiles:DiscountShopper

6 Configuring Data Collection 33
DELETE DiscountShopper "Only sale items"
Commerce Data Collection Components
See information about the data collection components that are specific to the commerce functionality of Oracle
ATG Web Commerce in the ATG Commerce Programming Guide.
Commerce Service Center Data Collection Components
See information about the Oracle ATG Web Commerce Service Center reporting framework in the ATG Commerce
Service Center Installation and Programming Guide.
Search Data Collection Components
See information about the Oracle ATG Web Commerce Search logging components and messages in the ATG
Search Administration Guide.
Extending Data Collection
Extend the data collection components of Oracle ATG Web Commerce Business Intelligence if you need to
capture additional reporting data about events that occur during the operation of your Web application.
Determine which Java Messaging Service (JMS) messages sent by the Oracle ATG Web Commerce messaging
system contain the data that you need to capture. Then create the components described in Data Collection
Process (page 23) to receive, queue, and log the events in new log files. See instructions for creating
components in the following subsections.
• Creating an Event Listener Component (page 34)
• Creating an Event Queue Component (page 34)
• Creating a Data File Writing Component (page 34)
If the additional reporting information that you need is available after a logged event occurs, use the data
loading process to include it in the data warehouse database. Log only the minimum amount of information
required during the data collection process. The data loading process can load additional data that is available
in the transactional database for your Web application along with the data stored in the data collection log files.
Including additional data during the data loading process streamlines the data collection process which runs on
your production Web application server. See Configuring Fact Data Loading (page 37).

34 6 Configuring Data Collection
For example, if you choose to collect information about abandoned orders, you could write the order identifier
in the data log file. Then, during the data loading process, you could use the order identifier to find other
information about the order, such as the value of the order or the date and time of last activity, from the
transactional database.
Creating an Event Listener Component
To create an event listener component:
1. Create a component in your web application. Base it on a class that implements the
atg.dms.patchbay.MessageSink interface. For example, you can base the component on the
atg.service.datacollection.MessageSinkDataListenerService class.
2. Add the Nucleus path of the event queue component to the dataListener property. See Example Event
Listener Component (page 34).
3. Configure the Oracle ATG Web Commerce messaging system to send the events you are listening for to the
event listener component. See Example Event Listener Component (page 34).
Creating an Event Queue Component
To create an event queue component:
1. Create a component based on the atg.service.datacollection.DataCollectorQueue class in your
Web application.
2. Add the nucleus path of the data file writing component to the dataListeners property. See Example Event
Queue Component (page 35).
Creating a Data File Writing Component
To create a data file writing component:
1. Create a component based on the
atg.service.datacollection.RotationAwareFormattingFileLogger class in your Web application.
2. Configure the component properties that control the data file paths, the event data included in files, and the
file rotation schedule. See Example Data File Writing Component (page 35).
Example Data Collection Components
This section provides examples of the configuration files required to create data collection components. The
example components collect operational data about abandoned orders. Oracle ATG Web Commerce Business
Intelligence does not collect this data by default. See general information about data collection components in
Data Collection Process (page 23).
Example Event Listener Component
This section provides example configuration files for an event listener component. See general information
about these components in Event Listener Component (page 23).
Create an event listener component with the following component configuration file:

6 Configuring Data Collection 35
$class=atg.service.datacollection.MessageSinkDataListenerServicedataListener=/mycompany/reporting/datacollection/MyEventQueue
Register the event listener component with the Oracle ATG Web Commerce messaging system patch bay.
Configure it to receive the events that contain the operational information that you want to collect. For example,
the message-sink element in the following XML configuration file registers an event listener component to
receive abandoned order events. Add a file like this to the configuration path of your web application at /atg/
dynamo/messaging/dynamoMessagingSystem.xml.
<?xml version="1.0" encoding="ISO-8859-1" ?><dynamo-message-system> <patchbay> <message-sink> <nucleus-name>/mycompany/reporting/datacollection/MyEventListener</nucleus-name> <input-port> <port-name>OrderAbandonedPort</port-name> <input-destination> <provider-name> local </provider-name> <destination-name> localdms:/local/Order/OrderAbandoned </destination-name> <destination-type> Topic </destination-type> </input-destination> </input-port> </message-sink> </patchbay></dynamo-message-system>
Example Event Queue Component
This section provides example configuration properties for an event queue component. See general information
about these components in Event Queue Component (page 24).
Create an event queue component with the following component configuration file:
$class=atg.service.datacollection.DataCollectorQueuedataListeners=/mycompany/reporting/datacollection/MyFileLogger
Example Data File Writing Component
This section provides example configuration properties for a data file writing component. See general
information about these components in Data File Writing Component (page 24).
Create a data file writing component with the following component configuration file:
$class=atg.service.datacollection.RotationAwareFormattingFileLogger
# --------------------------------------# Log file path and name properties

36 6 Configuring Data Collection
# --------------------------------------
# The base directory for log filesdefaultRoot^=/atg/dynamo/service/DWDataCollectionConfig.defaultRoot# The file name for log files. This may include a subdirectory.logFileName=my-abandoned-orders_# Insert an optional unique identifier in each file nameUIDLogFileName=true# The component that will generate the unique identifiersidGenerator=/atg/dynamo/service/IdGenerator# The file name extension for log fileslogFileExtension=.data
# --------------------------------------# Logged data configuration# --------------------------------------
formatFields=object.abandonmentState,object.orderId,object.profileId,object.type
# --------------------------------------# Log file rotation scheduling properties# --------------------------------------
# An identifier for the scheduled taskjobName=MyLog# The log file rotation scheduleschedule=every 1 hour without catch up# The maximum number of records in a log file. If the number of records# reaches this threshold, the application will rotate the file.dataItemThreshold=10000# The centralized Dynamo scheduling componentscheduler=/atg/dynamo/service/Scheduler# The messageSource component that will send log rotation messagesmessageSource=/atg/dynamo/service/LogRotationMessageSource# The Java Messaging Service (JMS) typelogRotationMessageType=atg.commerce.order.abandoned.OrderAbandoned
# --------------------------------------# Enable or disable this component# --------------------------------------
enabled^=/atg/dynamo/service/DWDataCollectionConfig.enabled
7 Configuring Fact Data Loading 37
7 Configuring Fact Data Loading
Loading data into the Data Warehouse is performed in a separate Oracle ATG Web Commerce environment,
typically (but not necessarily) running on a different group of physical servers. These data loader environment
instances do not handle customer requests; their primary purpose is to process data from the log files and load it
into the Data Warehouse. Unlike logging, the loading process is not performed in real time. It is run on a regular
schedule, typically once a day.
For each type of log file, the data loader environment has a data loader component. When one of these loader
components is run, it claims a log file from a queue, then parses the entries in the file in batches, using the Data
Warehouse Loader Repository to track the progress of the load operation. The loader component hands off the
batches to a pipeline driver component, which parses the data and passes it to a processor pipeline. The pipeline
processes the data and stores it in the data warehouse.
Data Loader Components
For each type of log file, there is a corresponding data loader component. These components are all of
class atg.reporting.datawarehouse.loader.Loader, and are located in the /atg/reporting/
datawarehouse/loaders/ Nucleus folder. The loader components are:
• OrderSubmitLoader
• ProductCatalogLoader
• SegmentLoader
• SiteVisitLoader
• UserUpdateLoader
The following table summarizes the key properties of the loader components. Some of these properties are
described in more detail below the table:
Property Description
charset The character set used for the log files. The default value is null, which
means the loader expects the log files to be encoded with the character set
specified by the JVM file.encoding system property. Typically you should
not need to change the value of this property.

38 7 Configuring Fact Data Loading
Property Description
defaultRoot The directory path to the location of the log files. See Specifying the Location
of Log Files (page 39) for more information.
noLoadSleepMillis The number of milliseconds to wait if, during the loading process, the loader
determines that there are no log files currently ready to be loaded. After the
interval specified by this property, the loader will check whether any new
log files are ready to be loaded. This process is repeated until the loader
shuts down. The default is 600000 (ten minutes). See Specifying the Loading
Schedule (page 39) for more information.
loadStatusListeners The component to use for archiving log files when a successful load
completion event is detected.
LogFileDeleteListener—Deletes the log file.
LogFileMoveListener—Moves the log file to the destination directory you
specify (can be used to rename the file at the same time).
LogFileGZipListener—Leaves the file in its original location and creates
a .zip archive. This is the default component.
You can write your own component based on LogStatusListener if you
require other archiving behavior.
pipelineDriver The Nucleus pathname of the pipeline driver component that the loader
passes log file lines to for processing. The default value is different for each
loader component. See Pipeline Drivers and Processors (page 42) for
more information.
queueName A String that identifies the queue from which the loader reads log files.
Each loader component has a different default value for this property.
For example, the default value of the queueName property of the
OrderSubmitLoader component is atg.reporting.submitOrder; for
the SegmentLoader component, it is atg.reporting.segmentUpdate.
You should not need to change the value of this property.
runSchedule A CalendarSchedule that specifies the schedule for starting up the loader.
See Specifying the Loading Schedule (page 39) for more information.
skipRecordOnError If set to true, if the data loader encounters an error while loading a log file, it
skips the record that caused the error and moves on to the next record.
Caution: A record that causes a loading error can indicate a serious problem,
and should be investigated. Under normal circumstances, this flag should be
false.
stopSchedule A CalendarSchedule that specifies the schedule for shutting down
the loader. See Specifying the Loading Schedule (page 39) for more
information.
transactionBatchSize Specifies the number of lines in a log file to process as a single transaction.
Default is 100.

7 Configuring Fact Data Loading 39
Note: Data loading for Commerce Search information is done by the existing Search loading components; see
Search Loader Components in the ATG Search Administration Guide
Specifying the Loading Schedule
The Loader class implements the Schedulable interface, which enables it to be run automatically on a
specified schedule. By default, each loader component is configured to start up once a day and run for a period
of several hours. When a loader first starts up, it checks the corresponding queue to see if there are entries for
any log files. If so, the loader claims an entry and begins to process the file. When it finishes processing the file,
the loader checks the queue again, and if there are any more entries, claims another entry and processes that
file. This process continues until there are no more entries in the queue.
If there are no entries in the queue, the loader sleeps for a specified period of time, and then checks again. If at
this point the queue is still empty, the loader sleeps again. This process continues until a specified time, at which
point the loader stops checking and waits until the next scheduled start time.
The schedule for starting up the loader is specified by the component’s runSchedule property. This property
is a CalendarSchedule object that is set by default to run the loader once each day. The schedule for
shutting down the loader is specified by the component’s stopSchedule property. This property is also a
CalendarSchedule object, and is set by default to shut down the loader once each day, several hours after the
component starts up. You can change these settings to run the loader on a different schedule.
The period of time (in milliseconds) that the loader sleeps if there are no entries in the queue is set by the
component’s noLoadSleepMillis property. The default value of this property is 600000 (equivalent to 10
minutes).
For more information about scheduler components and properties, and the syntax used to set those properties,
see the Core Dynamo Services chapter of the ATG Platform Programming Guide.
Specifying the Location of Log Files
The data loaders may be running on a different machine (or group of machines) from the production site
that creates the log files. Therefore the machines will typically use some file-sharing mechanism such as
NFS, and thus may require different pathnames to access the same files. For example, the directory /u1/
logfiles/ on the production environment might be accessed as /nfs/livesite/u1/logfiles/ on the
loader environment.
To make it easier to share files, the loggers and loaders always specify files relative to a root location, rather than
using absolute paths. You configure each component to point to this root location by setting the component’s
defaultRoot property to the correct pathname for the machine the component is running on. In the example
above, you would set defaultRoot for the loggers to /u1/logfiles/, and set defaultRoot for the loaders to
/nfs/livesite/u1/logfiles/.
Loading Existing Order Data from a Repository
If you have existing order data in a repository and you want to load into the Data Warehouse for reporting, you
can use the OrderRepositoryLoader to do so. This component treats the data in your order repository as if it were
a log file and loads it accordingly.
This component uses the same SubmitOrder pipeline chain as the OrderSubmitLoader, but is managed by
the OrderRepositoryPipelineDriver component.
To use the OrderRepositoryLoader, first start the OrderRepositoryPipelineDriver component. You can
either start this component in the ACC, or enter the following browser path to start it in the Dynamo Admin UI:
http://host:port/dyn/admin/nucleus/atg/reporting/datawarehouse/

40 7 Configuring Fact Data Loading
loaders/OrderRepositoryPipelineDriver
In the Admin UI, go to /atg/reporting/datawarehouse/loaders/OrderRepositoryPipelineDriver. In
the text field, enter an RQL statement corresponding to a query against the order repository. Check the Preview
box if you want to see how many records will be retrieved before actually processing the orders.
The OrderRepositoryPipelineDriver includes the following configurable properties:
• skipRecordOnError—If set to true, the component skips any records for which processing results in an
error. The default is false.
• errorDataListener—Set this property to a component that implements the
atg.service.datacollection.DataListener interface. If skipRecordOnError is true, the
driver notifies this component when an error occurs. The record that produced the error is added to the
DataListener.
When you click Submit, the query is issued against the repository. For each result, the component creates a new
pipeline parameter object and sends that object down the pipeline, just as if it were a line item in a log file.
The Dynamo Admin UI keeps a count of how many records have been processed out of the total retrieved.
Note: The following data is not included for orders in the repository, and has the values indicated:
• Session ID—Null
• Site visit—Unspecified
• SegmentclusterID—Unspecified
These fields are not populated in the Data Warehouse when loading existing orders. This may affect the
conversion rate as it appears in reports, because that calculation relies on the session ID.
Configuring the Data Warehouse Time Zone
In addition to data loaders for orders, site visits, etc., there are other loaders whose purpose is to add
information that is static, rarely-changing, or not site-dependent to the Data Warehouse. One such loader is the
TimeRepositoryLoader, which populates the ARF_TIME_YEAR, ARF_TIME_MONTH, etc. tables (see the ATG
Data Warehouse Guide for information).
The TimeRepositoryLoader is run by the TimeRepositoryLoaderJob, a scheduled service that runs every
two weeks by default. When the job runs, the loader populates the next two weeks worth of days into the
appropriate tables. For example, if the loader runs on December 20, it loads the next fourteen days, two weeks,
one month, and one year into the ARF_TIME_DAY, ARF_TIME_WEEK, ARF_TIME_MONTH, and ARF_TIME_YEAR
Data Warehouse tables respectively.
The TimeRepositoryLoader includes a datetimezoneID property, which identifies the time zone to use
when loading this data. The default is UTC, meaning that, if an order is loaded into the warehouse, the date and
time of that order’s placement are converted from the values used in the order repository to the UTC equivalent,
and the UTC times are used in reports.
Data Warehouse Loader Repository
The data loaders manage the Data Warehouse Loader Repository, which keeps track of the progress of data
loading. This repository has three item types, described in the following table:
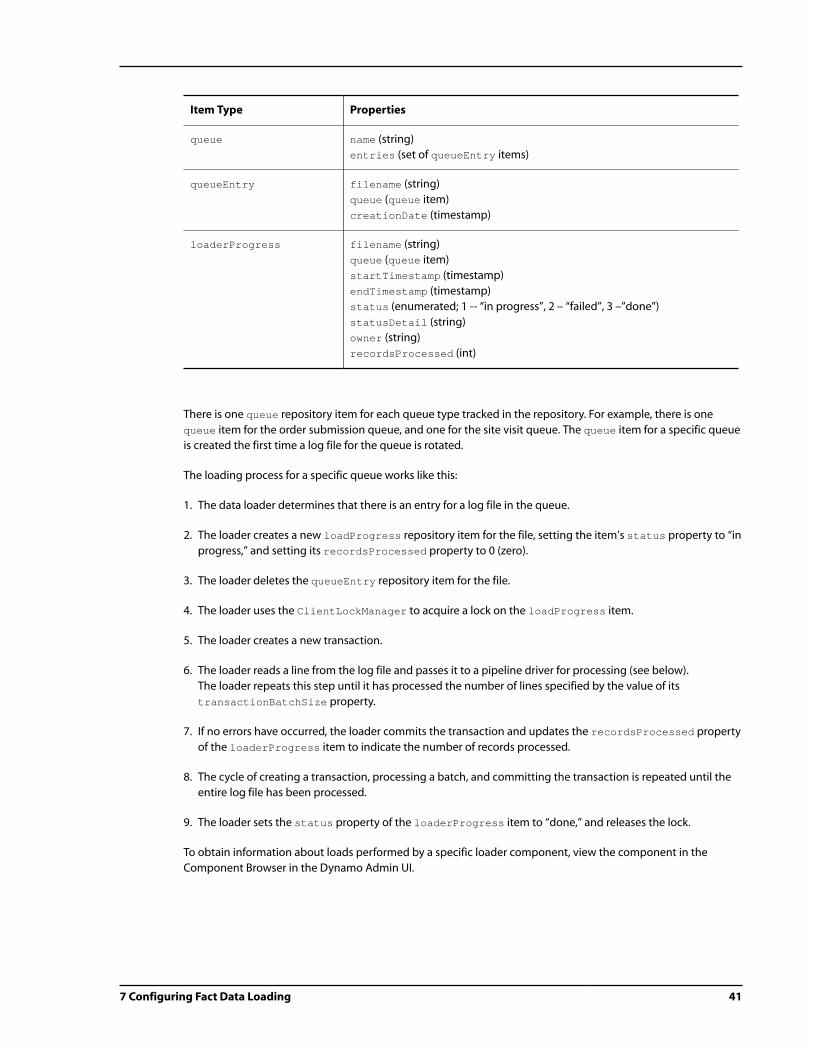
7 Configuring Fact Data Loading 41
Item Type Properties
queue name (string)
entries (set of queueEntry items)
queueEntry filename (string)
queue (queue item)
creationDate (timestamp)
loaderProgress filename (string)
queue (queue item)
startTimestamp (timestamp)
endTimestamp (timestamp)
status (enumerated; 1 -- “in progress”, 2 – “failed”, 3 –”done”)
statusDetail (string)
owner (string)
recordsProcessed (int)
There is one queue repository item for each queue type tracked in the repository. For example, there is one
queue item for the order submission queue, and one for the site visit queue. The queue item for a specific queue
is created the first time a log file for the queue is rotated.
The loading process for a specific queue works like this:
1. The data loader determines that there is an entry for a log file in the queue.
2. The loader creates a new loadProgress repository item for the file, setting the item’s status property to “in
progress,” and setting its recordsProcessed property to 0 (zero).
3. The loader deletes the queueEntry repository item for the file.
4. The loader uses the ClientLockManager to acquire a lock on the loadProgress item.
5. The loader creates a new transaction.
6. The loader reads a line from the log file and passes it to a pipeline driver for processing (see below).
The loader repeats this step until it has processed the number of lines specified by the value of its
transactionBatchSize property.
7. If no errors have occurred, the loader commits the transaction and updates the recordsProcessed property
of the loaderProgress item to indicate the number of records processed.
8. The cycle of creating a transaction, processing a batch, and committing the transaction is repeated until the
entire log file has been processed.
9. The loader sets the status property of the loaderProgress item to “done,” and releases the lock.
To obtain information about loads performed by a specific loader component, view the component in the
Component Browser in the Dynamo Admin UI.

42 7 Configuring Fact Data Loading
Handling Errors
If an error occurs while processing a batch of lines, the transaction is rolled back. The loader sets the status
property of the loaderProgress item to “failed,” and sets the statusDetail property to a string describing
the failure. Once you have resolved the problem, you can reinitiate the load process by clicking the Return to
Queue link in the entry for the failed load in the Component Browser. This changes the value of the status
property to “in progress,” so the loader will attempt to continue processing the file when the next schedule load
time arrives. Alternately, you can use the loadAllAvailable method to start loading immediately.
The Loader class implements logic that enables it to deal with failures such as a JVM crash. Before a loader
component looks in the queue for a file to load, it first looks for loaderProgress items whose status
properties are set to “in progress.” If the loader finds a loaderProgress item in this state, it uses the
ClientLockManager to try to obtain a lock on the item. If the lock is not granted, this means some other
process has the lock, and is currently loading the file (for instance, if there is separate instance of the same loader
running on another Oracle ATG Web Commerce instance).
If the lock is granted, this means that either a loader crashed earlier while loading the file (leaving the
loaderProgress item in this state), or that a load failed and the associated Return to Queue link was
subsequently clicked. In this situation, the loader will continue loading the file, starting from the first record that
has not yet been successfully processed.
Pipeline Drivers and Processors
As mentioned above, the loader component initiates the data loading process, but the actual processing of the
data is performed by a processor pipeline. The pipeline is invoked by a pipeline driver component to which the
loader passes batches of log entries. The pipeline driver calls a pipeline manager component, which controls the
pipeline. The processors in the pipeline perform such tasks as looking up dimensional data in the warehouse;
looking up profile, catalog, and order data in repositories on the production site; and writing data about each
item in an order to the warehouse.
The pipeline driver components, like the data loader components, are located in the /atg/reporting/
datawarehouse/loaders/ Nucleus folder. Each loader component has a pipelineDriver property that
points to the pipeline driver it invokes. For example, the OrderSubmitLoader.properties file includes:
pipelineDriver=OrderSubmitPipelineDriver
All of the pipeline drivers point to the same pipeline manager component, /atg/reporting/datawarehouse/
process/PipelineManager. This pipeline manager’s definition file, /atg/reporting/datawarehouse/
process/pipeline.xml, defines several data loading processor chains. The specific chain invoked
by an individual pipeline driver is specified by its pipelineChainId property. For example, the
OrderSubmitPipelineDriver.properties file includes:
pipelineManager=../process/pipelineManagerpipelineChainId=submitOrder
The following table summarizes the data loaders, their pipeline drivers, and the processor chains they invoke:

7 Configuring Fact Data Loading 43
Data Loader Pipeline Driver Processor Chain
OrderSubmitLoader OrderSubmitPipelineDriver submitOrder (which also runs
lineItem)
ProductCatalogLoader DimensionPipelineDriver dimensionUpdate
SegmentLoader SegmentPipelineDriver segmentUpdate
SiteVisitLoader SiteVisitPipelineDriver siteVisit
UserUpdateLoader DimensionPipelineDriver dimensionUpdate
Mapping Production Properties to Data Warehouse Properties
Individual product catalogs and user profile repositories can vary widely from one customer site to another.
However, the Data Warehouse is a fixed structure; therefore, a map is required. The mapping is done using an
XML file with the structure shown below, which allows you to map between any Oracle ATG Web Commerce
repository and the Data Warehouse for data loading purposes.
You must map each item and property in your product catalog that you want to report on to the Data
Warehouse.
<data-warehouse-dimension-loader-definition> <data-warehouse-repository repository="path_to_warehouse_repository"> <data-warehouse-repository-item item="item_name"> <production-repository repository="path_to_production_repository"> <production-repository-item item="item_name" natural-key="key"/> </production-repository> <property-mappings> <warehouse-property name="name" default-value="value"> <production-property name="name"/> </warehouse-property> </property-mappings> </data-warehouse-repository-item> </data-warehouse-repository></data-warehouse-dimension-loader-definition>
The data-warehouse-repository names the destination repository and contains the destination repository
items. The production-repository names the source repository and items.
<data-warehouse-dimension-loader-definition> <data-warehouse-repository repository="/atg/reporting/datawarehouse/WarehouseRepository"> <data-warehouse-repository-item item="category" natural-key="categoryId"> <production-repository repository="/atg/commerce/catalog/ProductCatalog" nickname="catalog"> <production-repository-item item="category"/> </production-repository>

44 7 Configuring Fact Data Loading
The property-mappings element contains the individual warehouse-properties to be mapped for a
specific warehouse item.
In cases where there is a simple one-to-one mapping between the repository item property and the Data
Warehouse item property, the production-property element identifies the repository item property which is
mapped to the corresponding warehouse-property element. This example uses the user’s first name from the
profile repository:
<property-mappings> <warehouse-property name="firstName"> <production-property name="ProfileRepository.user.firstName"/> </warehouse-property></property-mappings>
In some cases, there is not a one-to-one mapping, so a converter component is used. Converters perform tasks
such as:
• Combining multiple repository item properties into a single warehouse item property
• Converting the data of the property before placing it in the Data Warehouse
• Looking up parent objects for SKUs, products, and categories, where there may be multiple values to select
from
For example, the AddressToRegionItemConverter component combines the user’s state and country into
the region used by the Data Warehouse.
<warehouse-property name="homeRegion" conversion-component="/atg/reporting/datawarehouse/process/converter/ AddressToRegionItemConverter"> <production-property name="ProfileRepository.user.homeAddress.state" conversion-context-name="state"/> <production-proprerty name="ProfileRepository.user.homeAddress.country"conversion-context-name="country"/></warehouse-property>
SiteVisit Pipeline
The siteVisit chain is triggered by the SiteVisitLoader component. This pipeline has no branches. Each
processor, if successful, starts the one that follows.
Each processor uses a passed-in parameter retrieved from the log file to look up items in the Data Warehouse.
For example, the lookupVisitor processor uses the profileId from the log file to look up the visitor in the
ARF_USER table and return its ID, using an RQL query. If the visitor cannot be found, the processor attempts to
load the visitor into ARF_USER table first, and then return the ARF_USER.ID. If this fails, the processor returns
the “Unspecified” visitor. Similar patterns apply to the other lookup processors, although the algorithm varies.
The processors are:
• lookupSiteVisitDay—Uses the session start timestamp in the log file to determine the starting day of the
visit.
• lookupSiteVisitTime—Uses the session start timestamp in the log file to determine the starting time of
the visit.

7 Configuring Fact Data Loading 45
• lookupSiteVisitEndDay—Uses the session end timestamp in the log file to determine the ending day of
the visit.
• lookupSiteVisitEndTimelookupSiteVisitEndDay—Uses the session end timestamp in the log file to
determine the ending time of the visit.
• lookupVisitor—Uses the profile ID in the log file to look up the visitor in the ARF_USER table.
• lookupSiteVisitStimulusGroup—Reserved for future use. Currently returns the “Unspecified” stimulus
group.
• lookupDemographic—Examines the visitor’s date-of-birth, gender, marital status and home region as
defined in the Data Warehouse. It uses this information to look up the record in the ARF_DEMOGRAPHIC table
that classifies this user.
• logSiteVisit—Writes the row to the ARF_SITE_VISIT table in the Data Warehouse.
SubmitOrder Pipeline
The submitOrder chain is triggered by the OrderSubmitLoader component. This pipeline has no branches.
When it starts, the only information available to the pipeline is the order ID. Each processor in the pipeline, if
successful, adds information to the data being processed and starts the next processor.
The processors are:
• fetchOrder—Uses the order ID to look up the order in the order repository.
• lookupOrder—If line items exist in the data warehouse for the current order ID, this processor fetches those
line items and creates a parameter map entry for them.
• checkOrderExists—Acts as a switch in the pipeline. If the warehouseItemPropertyName value pair
exists in the parameter map, then the line items for the order already exist, and the current log record does
not need to be processed. If the map entry does not exist then the pipeline processes the log entry.
• createOrderId—Generates a surrogate key for the order.
• createLineItems—Breaks the order down into line items. If a single line item is shipped to multiple
addresses, each address is considered a separate line item.
• calculateLineItemsGrossRevenue—The quantity of that particular line item, times the unit price of the
item.
• allocateTax—Allocates the order’s tax amount to the individual line items, using a weighted calculation. If
rounding results in the sum of the line item allocations being more or less than the original total, the tax on
the final line item is used to make any adjustments. The calculation is:
(line item gross revenue/total order gross revenue) * total tax
• allocateShipping—Allocates the order’s shipping amount to the individual line items, using a weighted
calculation. If rounding results in the sum of the line item allocations being more or less than the original
total, the shipping on the final line item is used to make any adjustments. The calculation is:
(line item gross revenue/total order gross revenue) * total shipping
• allocateOrderDiscount—Allocates order-level discounts (such as free shipping) to individual line items
using a weighted calculation. If rounding results in the sum of the line item allocations being more or less
than the original total, the shipping on the final line item is used to make any adjustments. The calculation is:
(line item gross revenue/total order gross revenue) * total discount

46 7 Configuring Fact Data Loading
• calculateManualAdjustments—Calculates the manual adjustment credits and debits for the entire order.
This processor is used only for Oracle ATG Web Commerce Service Center.
• allocateManualAdjustmentsDebit—Allocates manual adjustment debits to line items. This processor is
used only for Oracle ATG Web Commerce Service Center.
• allocateManualAdjustmentsCredit—Allocates manual adjustment credits to line items. This processor is
used only for Oracle ATG Web Commerce Service Center.
• calculateLineItemsDiscountAmount—Totals any discounts applied to the line items in the order.
• calculateLineItemsMarkdownDiscountAmount—Calculates the markdown discount. That discount is
basically any discounts that apply before promotionally discounts are applied. For example, if someone buys a
package of hot dogs on sale (no promotions) for $4.50 when the list price for the package of hot dogs is $5.00
then the markdown discount is $.50.
• calculateLocalOrderDiscountAmountTotal—Calculates the total order discount amount (order
discount amount plus manual adjustment credits) in the local currency.
• calculateLineItemsPriceOverride—Captures price override amounts. This processor comes into use
only if you are using Oracle ATG Web Commerce Service Center.
• calculateLineItemNetRevenue—Calculates net revenue for individual line items using the following
formula:
Gross revenue + tax allocation + shipping allocation – line item discount
- order discount allocation
• calculateOrderNetRevenue—Sums the net revenue of all line items. This information is stored with the
line item in the Data Warehouse, but is the same for all items in an order.
• calcluateLocalOrderNetRevenueTotal—Sum of the order net revenue plus manual adjustment debits
in the local currency.
• convertCurrency—For all of the amounts in the pipeline to this point (gross net revenue,
line item shipping allocation, etc.), converts the local currency to the standard currency. The
standardCurrencyCode property of the processor points to the /atg/reporting/datawarehouse/
CommerceWarehouseConfiguration.standardCurrencyCode, which identifies the standard currency;
the default is USD.
The actual conversion is done by the CurrencyTools component. CurrencyTools uses the
ARF_CURRENCY_CONV table in the Data Warehouse to look up the conversation rate for the day on which the
order was placed, if one is available.
Note: Oracle ATG Web Commerce does not populate the ARF_CURRENCY_CONV table. Customers are
responsible for acquiring and maintaining currency conversion rate data.
• lookupBillingRegion—Uses the billing address in the order to determine the billing region.
• lookupSiteVisit—Looks up visit information in the ARF_SITE_VISIT table using the SESSION_ID,
START_DATE, and END_DATE columns.
• lookupInternalUser—Identifies the agent involved with the order. If not using Oracle ATG Web Commerce
Service Center, this value is set to Unspecified.
• lookupOriginOfOrder—Identifies the order’s place of creation. Orders can originate either from Web or
Contact Center. If the order is created from a scheduled order template and the template is created by the

7 Configuring Fact Data Loading 47
Commerce site, the origin is Web. If the template is for the Commerce Service Center, the origin is Contact
Center.
• lookupSalesChannel—Identifies the sales channel through which the order was submitted. The sales
channel for an order can be either Web or Contact Center. If the order is submitted from the Commerce site,
the sales channel is Web. If the order is submitted from Commerce Service Center, the origin is Contact Center.
• lookupDay—Uses the timestamp of the order to look up the day in the ARF_TIME_DAY table.
• lookupTime—Uses the timestamp of the order to look up the time in the ARF_TIME_TOD table.
• lookupLocalCurrency—Looks ups the currency used in the transaction in the ARF_CURRENCY, using the
ISO4217_ALPHA3 code for the currency.
• lookupCustomer—Uses the profile ID in the order to look up the customer in the ARF_USER table.
• lookupCustomerDemographic—Examines the visitor’s date-of-birth, gender, marital status and
home region as defined in the Data Warehouse. It uses this information to look up the record in the
ARF_DEMOGRAPHIC table that classifies this user.
• lookupPromotionGroup—Examines the order for any promotions that were used and uses this information
to look up a promotion group.
• lookupSegmentCluster— Examines the order for segment clusters and looks up any associated with the
order.
• runLineItems—Runs the runLineItem pipeline chain for each line item in the order.
Note: The allocateTax, allocateShipping, and allocateOrderDiscount processors can be replaced
with processors that use a uniform rather than a weighted allocation strategy. Oracle ATG Web Commerce
provides a sample component for this purpose (the Nucleus location is /atg/reporting/datawarehouse/
process/allocators/UniformLineItemAllocator), or you can write your own processor that implements
the atg.reporting.datawarehouse.commerce.LineItemAllocator interface. See information about
processor chains and the pipeline manager in the ATG Commerce Programming Guide.
The runLineItem pipeline includes the following processors:
• lookupProduct—Uses the product ID in the order to look up the product in the ARF_PRODUCT table via the
NPRODUCT_ID column.
• lookupSku—Uses the SKU ID associated with the order to look up the SKU in the ARF_SKU table, using the
NSKU_ID column.
• lookupCategory—Uses the PARENT_CAT_ID of the product to find the category.
• listOrderStimuli—Retrieves a list of stimuli from markers in the order.
• lookupStimulusGroup—Uses all stimuli in the pipeline to look the stimulus group in the ARF_STIMGRP
table. Computes a hash code for all stimuli and uses the HASH_VALUE column to look up the group.
• lookupShippingRegion—Uses the order’s shipping address to find the region to which the line item is
shipped.
• lookupQuestion—If the DCS.DW.Search module is running, runs an additional pipeline chain
that determines what search fact, if any, was associated with this line item, and links the two in the
ARF_LINE_ITEM_QUERY table. If DCS.DW.Search is not running, the question is “unspecified.”
• logLineItem—Writes the line item to the Data Warehouse ARF_LINE_ITEM table.

48 7 Configuring Fact Data Loading
• tailLineItemProcessor—If the DCS.DW.Search module is running, starts the LineItemQuery
pipeline and its logLineItemQuery processor,, which logs Commerce Search data for each line item in the
ARF_LINE_ITEM_QUERY table. If DCS.DW.Search is not running, does nothing.
SegmentUpdate Pipeline
The segmentUpdate chain is triggered by the SegmentLoader component. This pipeline chain consists of a
single processor, /atg/reporting/datawarehouse/process/SegmentLoadProcessor.
This processor handles insert, update and delete operations from the segment log files. Unlike the SiteVisit
and SubmitOrder pipelines, it does not perform any lookups on the production system.
Each time the SegmentLoadProcessor component is invoked, it performs the following steps:
1. Gets a reference to the most recent Data Warehouse entry for the segment referred to in the log entry.
2. Determines what sort of change is to be applied (insert, update, or delete).
3. If an insert action and the item is not already in the database, the processor creates a new item. If the item
already exists, the processor checks to see if a start date is specified. If not, which will typically be the case
if an update or delete action is processed before an insert action, the start date of the existing item is set. If
the start date has already been set, meaning there has been a prior insert action for the segment, then the
current item is marked as expired and a new item is created.
If an update action, if no matching item is found, creates a new item.
If a delete action, if no matching item is found, a new item is created and marked as deleted.
4. Applies changes in the item to the repository.

8 Configuring Dimension Loading 49
8 Configuring Dimension Loading
The Oracle ATG Web Commerce Business Intelligence framework supports a wide variety of potential
customizations. Customization projects can range in complexity from the very simple, such as adding a single
property to an item in a repository, to the elaborate, such as adding support for reporting on an entirely new
business process. Depending on the complexity of the data structures you are adding, these customizations may
require changes to the following layers of the reporting infrastructure:
• Data Collection
• Data Loading
• Warehouse Schema
• Metadata Model
• Reports
The examples in this chapter take you through two common and relatively simple examples:
Adding an Attribute to a Dimension (page 50)
This represents a small expansion of the existing data structures, where you want to report
on an attribute that is not represented by default. The example is based on the premise that
you have added weight information to your product catalog, and would like to include this in
your reports.
Adding a New Dimension (page 51)
This is a more complex example than the first, and describes how you would go about
adding a new data structure on which you can report. The example describes the steps
necessary to add shipping information to your reports.
More complicated customization projects involve integrating data from third-party sources, and are therefore
not addressed in this document. For example, you may be considering a project that incorporates cost-of-
goods data about from a non-Oracle ATG Web Commerce system. If you are considering a project of that level,
thoroughly review the available reporting documentation, including the chapter on logging and loading
components in this guide. Many existing components can be reused or adapted for these circumstances.
Note: This chapter assumes that you are familiar with database and dimensional modeling concepts, and
with Oracle ATG Web Commerce repositories. Many books and Web sites provide information on dimensional
modeling and data warehousing. Be sure to perform appropriate research before you begin your customization
project if you are new to the subject.

50 8 Configuring Dimension Loading
Adding an Attribute to a Dimension
A very common practice is to add properties to existing repository items, for instance by extending the product
catalog. The example in this section describes in detail the changes you would need to make if you had added
a new attribute, weight, to the SKUs in your catalog. The example assumes that you have already made this
change to your repository, and now want to include weight information in your reports.
To add an attribute to a dimension:
1. Alter the ARF_SKU table by adding a new column to represent weight. This column will contain a numeric
attribute in your standard measurement system (for instance, pounds or kilograms). The table then contains
the following columns:
ID
NSKU_ID
...
WEIGHT
2. Extend the /atg/reporting/datawarehouse/dataWarehouseRepository.xml file to expose the
weight property as in this simplified sample:
<item-descriptor name="sku"> <table name="ARF_SKU"> <property name="weight" column-name="WEIGHT" type="double"/> </table>
1. Map the weight property in the product catalog to the weight property in the data warehouse. This
mapping is crucial for loading the product catalog dimension. The /atg/reporting/datawarehouse/
process/Definition/DimensionProperties.xml file contains a data-warehouse-repository-item
element, which has a property-mappings child element. For this example, we’ll add a new warehouse-
property element under that, identifying how to map the data.
<data-warehouse-repository-item item="sku">
<property-mappings>
<warehouse-property name="weight">
<production-property name="catalog.sku.weight"/>
</warehouse-property>
</property-mappings>
</data-warehouse-repository-item>
This XML snippet maps the SKU’s weight property in the product catalog to the weight property in the data
warehouse.
2. Modify the Oracle Business Intelligence data model so that it includes the new dimension data. Modify
any reports that will use the new dimension data. See information about working with the Oracle Business
Intelligence data model and reports in the documentation for that product (http://www.oracle.com/
technetwork/middleware/bi-enterprise-edition/documentation/bi-ee-087853.html).

8 Configuring Dimension Loading 51
Adding a New Dimension
The example in this section shows how you would add a new dimension, specifically a shipping method
dimension. Having added this, you could then create reports that show sales by shipping method.
Note: Take care when designing new dimensions. One potential pitfall lies in the reduction of performance that
can result if your queries join your new dimension to existing, large dimensions such as the User dimension.
Always consider whether you could extend an existing dimension instead, or otherwise streamline your data
gathering process.
To add a new dimension:
1. Create a table that represents this dimension in the data warehouse. In this case, we’ll call it
ACME_SHIPPING_METHOD. For purposes of this example, the table is very simple, consisting only of an
identifier, the shipping method name, the estimated number of days for delivery, and the carrier.
ACME_SHIPPING_METHOD
ID
NAME—Name of shipping method, for instance, FedEx 3 day Ground
DELIVERY_COMMENT—For instance Same Day, 1-2 Business Days
CARRIER—Name of carrier, for instance, FedEx, UPS
1. Prepopulate the table with your data. This can be done many ways, including executing INSERT statements
for static data or pipeline processors for more dynamic information. Since this table is your custom creation,
you are responsible for its maintenance. For this example, since shipping methods are unlikely to change
often, prepopulating it via INSERT statement would probably be used.
2. Modify the ARF_LINE_ITEM table to add a SHIPPING_METHOD_ID column, which is a foreign key reference
to the ACME_SHIPPING_METHOD table’s ID column.
3. Extend the /atg/reporting/datawarehouse/dataWarehouseRepository.xml file to add a
ShippingMethod item:
<item-descriptor name="ShippingMethod">
<table name="ACME_SHIPPING_METHOD" id-column-names="id" type="primary">
<property name="carrier" column-name="CARRIER" type="string"/>
<property name="deliveryComment" column-name="DELIVERY_COMMENT"
type="string"/>
<property name="name" column-name="NAME" type="string"/>
</table>
</item-descriptor>
Modify the line item (you can use XML-combine to make this task easier; for information, see the ATG
Repository Guide).
<item-descriptor name="lineItem">
<table name="ARF_LINE_ITEM">
<property name="shippingMethodID" column-name="SHIPPING_METHOD_ID"
type="int"/>
</table>
For this example, the ID is of type int. If necessary, you can create a new item type instead.
4. Create a new pipeline processor in /atg/reporting/datawarehouse/process/ called
ShippingMethodLookupProcessor. The new processor must do the following:

52 8 Configuring Dimension Loading
• Look up the shipping method ID. In this case, the pipeline should look up the shipping method based on
some property in the order.
• At the end of the processor, set the output to the member value. In this case, set
lineItem.shippingMethodID to the member value as shown in the following code:
runProcess(Object pParam, PipelineResult pResult) {
// perform shipping method id lookup
Dynamic.Beans.setPropertyValue(pParam, "lineItem.shippingMethodId",
value)
}
You may want to review the information on existing pipeline processors in this guide. The exact features of
your pipeline will vary depending on what information you are retrieving and what, if any, transformations
you want to make to the data.
5. Modify the pipeline chain to include your new lookup processor. Add the following line to the file:
<pipelinelink name-"shippingMethodLookup" transaction="TX_MANDATORY">
<processor jndi="/atg/reporting/datawarehouse/process
/ShippingMethodLookupProcessor"/>
</pipelinelink>
6. Modify the /atg/reporting/datawarehouse/process/LineItemLoggerProcessor.properties file:
lookupProperties += \lineItem.shippingMethodId
dimensionProperties += \shippingMethodId
7. Modify the Oracle Business Intelligence data model so that it includes the new dimension data. Modify
any reports that will use the new dimension data. See information about working with the Oracle Business
Intelligence data model and reports in the documentation for that product (http://www.oracle.com/
technetwork/middleware/bi-enterprise-edition/documentation/bi-ee-087853.html).
Dimension Converters
A dimension data converter modifies information before it is loaded in your data warehouse dimension tables.
The data warehouse loader server invokes converter components if one is specified for a data warehouse
repository item in the DimensionProperties.xml file for a product.
Dimension converters implement the atg.reporting.datawarehouse.process.DimensionConverter
interface. This interface expects only a single method called convert to be implemented. Oracle ATG Web
Commerce includes several dimension converters. You can modify these converters or develop your own if
needed.
For example, the following warehouse-property element specifies that the data warehouse loader server should
invoke the ProductParentCategoryConverter dimension data converter when loading a product repository
item into a data warehouse repository item. The conversion-component attribute of the warehouse-
property element names the dimension converter.
<warehouse-property

8 Configuring Dimension Loading 53
name="parentCategory" conversion-component="/atg/reporting/datawarehouse/process/ converter/ProductParentCategoryConverter">
<production-property name="catalog.product" conversion-context-name="product"/>
</warehouse-property>
Conversion Context
When the data warehouse loader server invokes a dimension converter, it passes it a context object. The context
object is a map of parameters that the converter can use as it modifies the information that will be loaded in the
data warehouse.
All dimension loader components implement a convert method. This method takes the context object as its
only argument.
Each parameter in a context object has a conversion context name. These names are defined in the
DimensionProperties.xml file. You can use atg.beans.DynamicBeans.getPropertyValue to get the
value of a parameter in the context object. See Example Dimension Converter (page 55).
Setting Conversion Property Parameters
You can pass parameters to a dimension data converter that you create or modify. Use the
production-property and conversion-property elements to define these parameters in the
DimensionProperties.xml files for your Oracle ATG Web Commerce products. A dimension data converter
will use the parameters when it converts specific production repository items before they are loaded into your
data warehouse.
The production-property Element
Include the production-property element in a warehouse-property element to pass the name of a
production repository item to a dimension converter component. The production-property element is
shown in the example below.
<data-warehouse-repository-item item="product" natural-key="productId"> <production-repository repository="/atg/commerce/catalog/ProductCatalog" nickname="catalog"> <production-repository-item item="product"/> </production-repository> <property-mappings> <warehouse-property name="parentCategory" conversion-component="/atg/reporting/datawarehouse/process/ converter/ProductParentCategoryConverter">
<production-property name="catalog.product"<!-- This attribute indicates the production repository item. The name "catalog" refers to the nickname of the production repository

54 8 Configuring Dimension Loading
specified in the production-respository element above. --> conversion-context-name="product"/>
</warehouse-property> </property-mappings></data-warehouse-repository-item>
The following table explains the attributes of the production-property element.
Attribute Explanation
name The identifier of a production repository item. Include the nickname of
the production repository specified in the production-repository
element of a data-warehouse-repository-item element. For example,
catalog.product.
conversion-context-name An identifier for the parameter. Use this identifier in your dimension data
converter implementation.
The conversion-property Element
Include the conversion-property element in a warehouse-property element when you need to pass
additional parameters to a dimension converter component. The conversion-property element is shown in
the example below.
<warehouse-property name="parentCategory" conversion-component="/atg/reporting/datawarehouse/process/ converter/ProductParentCategoryConverter"> <production-property name="catalog.product" conversion-context-name="product"/>
<conversion-property property-value="1" property-type="java.lang.Integer" conversion-context-name="productIndex"/>
</warehouse-property>
The following table explains the attributes of the conversion-property element.
Attribute Explanation
property-value The value that is passed to the dimension data converter.
property-type The Java data type of the value that is passed to the dimension data
converter.

8 Configuring Dimension Loading 55
Attribute Explanation
conversion-context-name An identifier for the parameter. Use this identifier in your dimension data
converter implementation.
Example Dimension Converter
The following two examples show the definition for a simple conversion parameter and the implementation of a
dimension data converter that uses it.
The warehouse-property element specifies that the data loader server should invoke the dimension data
converter named EchoConverter when it loads the myProperty data warehouse repository item. Because this
example is extremely simple, it does not take source data from a production repository item.
<warehouse-property name="myProperty" conversion-component="/atg/reporting/datawarehouse/process/ converter/EchoConverter"> <conversion-property property-value="Hello, World!" property-type="java.lang.String" conversion-context-name="message"/></warehouse-property>
The implementation of EchoConverter shows one way to use parameters in a custom dimension converter.
The convert method uses atg.beans.DynamicBeans.getPropertyValue to get the value of the parameter
named “message.” This parameter and its value are defined in the warehouse-property element shown
above. See information about the classes used here in the ATG Platform API Reference.
This example is very simple. The data that it produces is nothing more than the value of the string parameter
that was passed in from the DimensionProperties.xml file.
package atg.reporting.datawarehouse.process.converter;import atg.beans.DynamicBeans;/*** Echos the message property*/publicclass EchoConverter implements DimensionConverter{ //------------------------------------- // Constructors //------------------------------------- /** * Constructs an instanceof EchoConverter */ public EchoConverter() { } /** * Returns the message property of context, otherwise * the emptry string * @param pContext converation contexnt * @return a message

56 8 Configuring Dimension Loading
*/ public Object convert(Object pContext) throws ProcessorException { String returnValue = null; String returnValue = DynamicBeans.getPropertyValue(pContext,"message"); if(returnValue == null) return ""; return returnValue; }} // end of class

Index 57
Index
Aagent servers
configuring logging, 11
analyses
deploying, 20
viewing, 21
asset management servers
configuring logging, 8
CCIM, 4
Configuration and Installation Manager (CIM), 4
custom catalogs, 14
Ddata loading
accessing log files, 39
handling errors, 42
loader components, 37
loading existing orders, 39
loading process, 41
processor pipelines, 42
scheduling, 39
data model
deploying, 20
preparing, 19
data warehouse, 1
creating tables, 5
loader server (see data warehouse loader server)
Oracle ATG Web Commerce Outreach tables, 6
Oracle ATG Web Commerce Search tables, 6
Oracle ATG Web Commerce Service Center tables, 6
Oracle ATG Web Knowledge Manager tables, 6
platform tables, 5
Data Warehouse
configuring time zone, 40
scheduling data loading, 39
Data Warehouse Loader Repository, 40
data warehouse loader server, 12
for Oracle ATG Web Commerce Outreach, 14
local database tables, 15
production database tables, 15
databases
data warehouse loader tables in local schema, 15
data warehouse loader tables in production schema, 15
data warehouse, creating tables, 5
EEAR files, 7
IignoreContextPaths, 30
ignoreIPAddresses, 29
ignoreUserAgents, 30
ignoring site visits, 29
Lloading the data warehouse, 12
log files, 12
configuring applications, 8
logging
ignoring site visits, 29
visits to multiple sites, 30
OOracle ATG Web Commerce
relationship to Oracle Business Intelligence, 2
Oracle ATG Web Commerce Business Intelligence
components of, 1
Oracle ATG Web Commerce Outreach
data warehouse tables, 6
Oracle ATG Web Commerce Search
data warehouse tables, 6
Oracle ATG Web Commerce Service Center
data warehouse tables, 6
Oracle ATG Web Knowledge Manager
data warehouse tables, 6
Oracle Business Intelligence
documentation for, 2
repository database for, 17
orders
loading into the Data Warehouse , 39
Ppipeline chains
data loading, 42
pipelines
data loading, 42
production servers
configuring logging, 9

58 Index
Rrepository
for Oracle Business Intelligence, 17
Ssecurity, 21
segment data logging, 32
site visit data logging, 28
site visits
ignoring, 29
logging for multiple sites, 30
Ttime zone
configuring for Data Warehouse, 40
Uuser data logging, 31