Embed Size (px)
Citation preview

www.intelepeer.com
SIP Trunking Configuration Guide
for
Toshiba IPedge
Version 1.6.2.359

Property of IntelePeer, Inc. Version 1.0 Page 2 of 21
Table of Contents 1 Audience ................................................................................................................................................. 3 2 Introduction ............................................................................................................................................. 3
2.1 tekVizion Labs ................................................................................................................................. 3 3 SIP Trunking Network Components ....................................................................................................... 4
3.1 Hardware Components ................................................................................................................... 4 3.2 Software Requirements ................................................................................................................... 4
4 Features .................................................................................................................................................. 5 4.1 Features Supported......................................................................................................................... 5 4.2 Features Not Supported by PBX ..................................................................................................... 5 4.3 Caveats and Limitations .................................................................................................................. 5
5 Configuration .......................................................................................................................................... 6 5.1 Configuration Checklist ................................................................................................................... 6 5.2 IP Address Worksheet..................................................................................................................... 6 5.3 Create Trunk Groups....................................................................................................................... 7 5.4 Setup SIP Trunk Services ............................................................................................................. 11 5.5 Create Trunk DIDs ........................................................................................................................ 15 5.6 Setup Caller ID for Outgoing Calls ................................................................................................ 16 5.7 Setup Station Assignments ........................................................................................................... 18
6 Summary of Tests and Results ............................................................................................................ 19
Property of IntelePeer, Inc. Version 1.0 Page 3 of 21
1 Audience This document is intended for the SIP trunk customer’s technical staff and Value Added Retailer (VAR) having installation and operational responsibilities.
2 Introduction
This Configuration Guide describes configuration steps for IntelePeer SIP Trunking to a Toshiba IPedge PBX.
2.1 tekVizion Labs tekVizion LabsTM is an independent testing and Verification facility offered by tekVizion PVS, Inc. (“tekVizion”). tekVizion Labs offers several types of testing services including:
Remote Testing – provides secure, remote access to certain products in tekVizion Labs for pre-Verification and ad hoc testing
Verification Testing – Verification of interoperability performed on-site at tekVizion Labs between two products or in a multi-vendor configuration
Product Assessment – independent assessment and verification of product functionality, interface usability, assessment of differentiating features as well as suggestions for added
functionality, stress and performance testing, etc.
tekVizion is a systems integrator specifically dedicated to the telecommunications industry. Our core services include consulting/solution design, interoperability/Verification testing, integration, custom software development and solution support services. Our services helps service providers achieve a smooth transition to packet-voice networks, speeding delivery of integrated services. While we have expertise covering a wide range of technologies, we have extensive experience surrounding our practice areas which include: SIP Trunking, Packet Voice, Service Delivery, and Integrated Services. The tekVizion team brings together experience from the leading service providers and vendors in telecom. Our unique expertise includes legacy switching services and platforms, and unparalleled product knowledge, interoperability and integration experience on a vast array of VoIP and other next-generation products. We rely on this combined experience to do what we do best: help our clients advance the rollout of services that excite customers and result in new revenues for the bottom line. TekVizion leverages this real-world, multi-vendor integration and test experience and proven processes to offer services to vendors, network operators, enhanced service providers, large enterprises and other professional services firms. TekVizion’s headquarters, along with a state-of-the-art test lab and Executive Briefing Center, is located in Plano, Texas.
For more information on tekVizion and its practice areas, please visit tekVizion Labs website at www.tekvizion.com

Property of IntelePeer, Inc. Version 1.0 Page 4 of 21
3 SIP Trunking Network Components
The network for the SIP trunk reference configuration is illustrated below and is representative of Toshiba IPedge PBX configuration.
Customer Premise
SIP
10.70.53.0/24
PSTNIntelepeerNetwork
Media
SIP
10.70.53.2
ToshibaIPedge
IP5022-SD
IP5022-SD
Figure 1: SIP Trunk Lab Reference Network
The lab network consists of the following components:
Toshiba IPedge PBX for voice features, SIP proxy and SIP trunk termination
Toshiba IP phones connected to the local LAN
3.1 Hardware Components
Toshiba IPedge I-EP-IA
Toshiba IP phones
3.2 Software Requirements
Toshiba IPedge Firmware 1.6.2.359

Property of IntelePeer, Inc. Version 1.0 Page 5 of 21
4 Features
4.1 Features Supported
Basic calls using G.711ulaw
Calling and Called Party Number Presentation
Call Transfer
Call Forwarding
Call Hold and Resume
Call Waiting
Conference call
Three-Way Calling
Fax calls using G711ulaw
DTMF RTP events via RFC 2833
Session Audit using Re-INVITE messages
4.2 Features Not Supported by PBX
Privacy (Calling Party Restriction)
Fax Calls
Inband DTMF
Early Media
4.3 Caveats and Limitations Intermittent no way speech path observed for an inbound calls. This issue is not
indicative of CUBE/CUCM and Taqua standard behavior but is a Layer 3 issue. The
intermittent audio issue is due to the nature of the lab used for testing by IntelePeer.
IntelePeer has CUBE/CUCM customers running this deployment load on Taqua in
production without audio issues
There are no fax ports on the Toshiba IPedge PBX. A gateway (e.g. Adtran or
AudioCodes) would be needed for fax calls.
The PBX could not be configured for early media per Toshiba support
Refer to Section 6 Summary of Tests and Results
Property of IntelePeer, Inc. Version 1.0 Page 6 of 21
5 Configuration
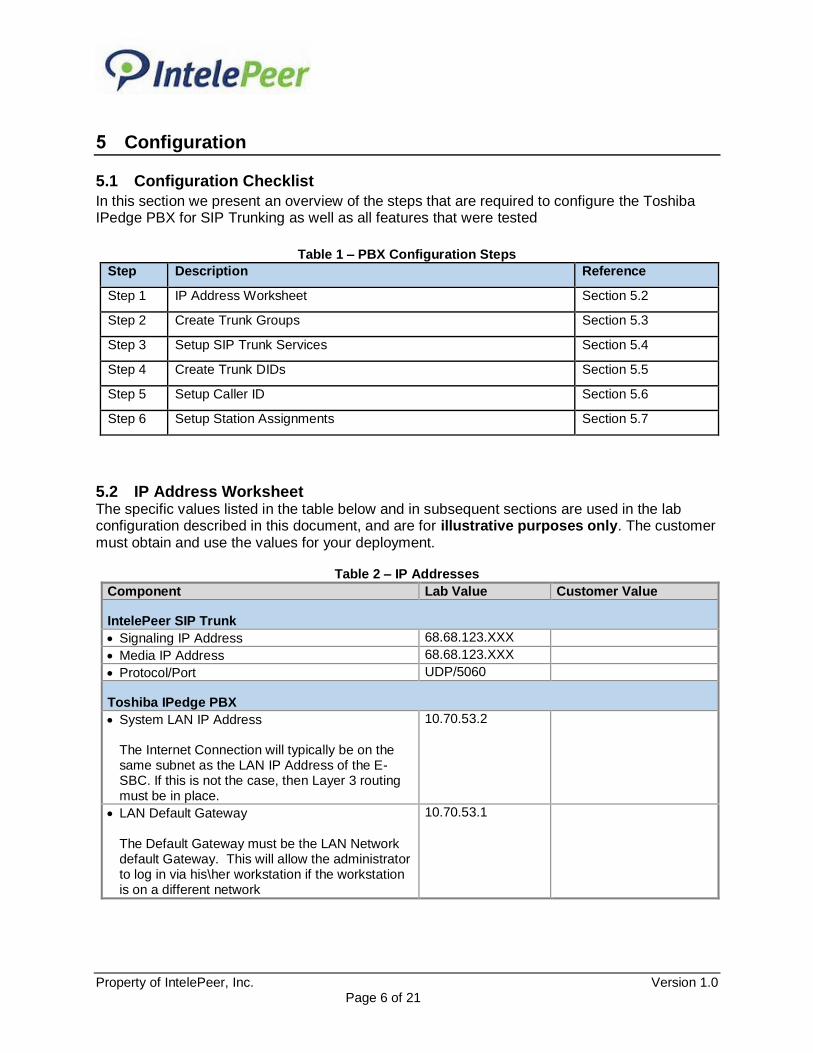
5.1 Configuration Checklist
In this section we present an overview of the steps that are required to configure the Toshiba IPedge PBX for SIP Trunking as well as all features that were tested
Table 1 – PBX Configuration Steps
Step Description Reference
Step 1 IP Address Worksheet Section 5.2
Step 2 Create Trunk Groups Section 5.3
Step 3 Setup SIP Trunk Services Section 5.4
Step 4 Create Trunk DIDs Section 5.5
Step 5 Setup Caller ID Section 5.6
Step 6 Setup Station Assignments Section 5.7
5.2 IP Address Worksheet The specific values listed in the table below and in subsequent sections are used in the lab configuration described in this document, and are for illustrative purposes only. The customer must obtain and use the values for your deployment.
Table 2 – IP Addresses
Component Lab Value Customer Value
IntelePeer SIP Trunk
Signaling IP Address 68.68.123.XXX
Media IP Address 68.68.123.XXX
Protocol/Port UDP/5060
Toshiba IPedge PBX
System LAN IP Address
The Internet Connection will typically be on the same subnet as the LAN IP Address of the E-SBC. If this is not the case, then Layer 3 routing must be in place.
10.70.53.2
LAN Default Gateway
The Default Gateway must be the LAN Network default Gateway. This will allow the administrator to log in via his\her workstation if the workstation is on a different network
10.70.53.1
Property of IntelePeer, Inc. Version 1.0 Page 7 of 21
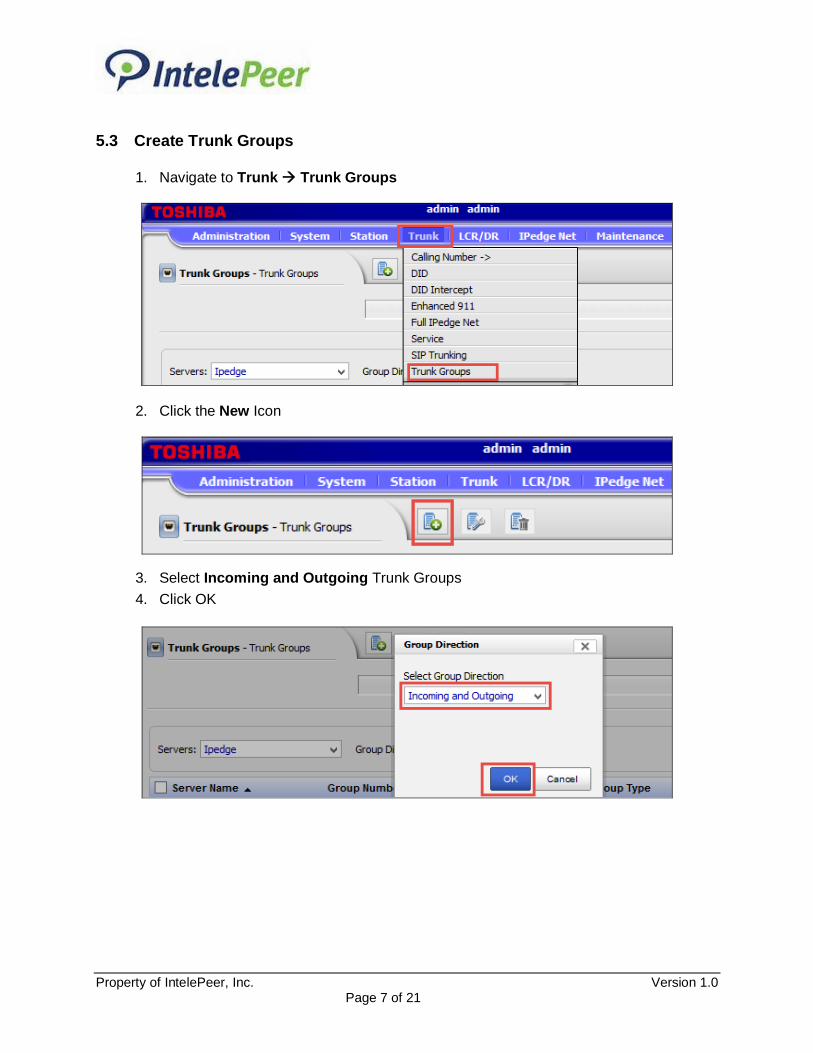
5.3 Create Trunk Groups
1. Navigate to Trunk Trunk Groups
2. Click the New Icon
3. Select Incoming and Outgoing Trunk Groups
4. Click OK

Property of IntelePeer, Inc. Version 1.0 Page 8 of 21
5. Select a Trunk Group Number
6. Select SIP in the Group Type field
7. Leave other fields as default
8. Click the Save icon
Property of IntelePeer, Inc. Version 1.0 Page 9 of 21
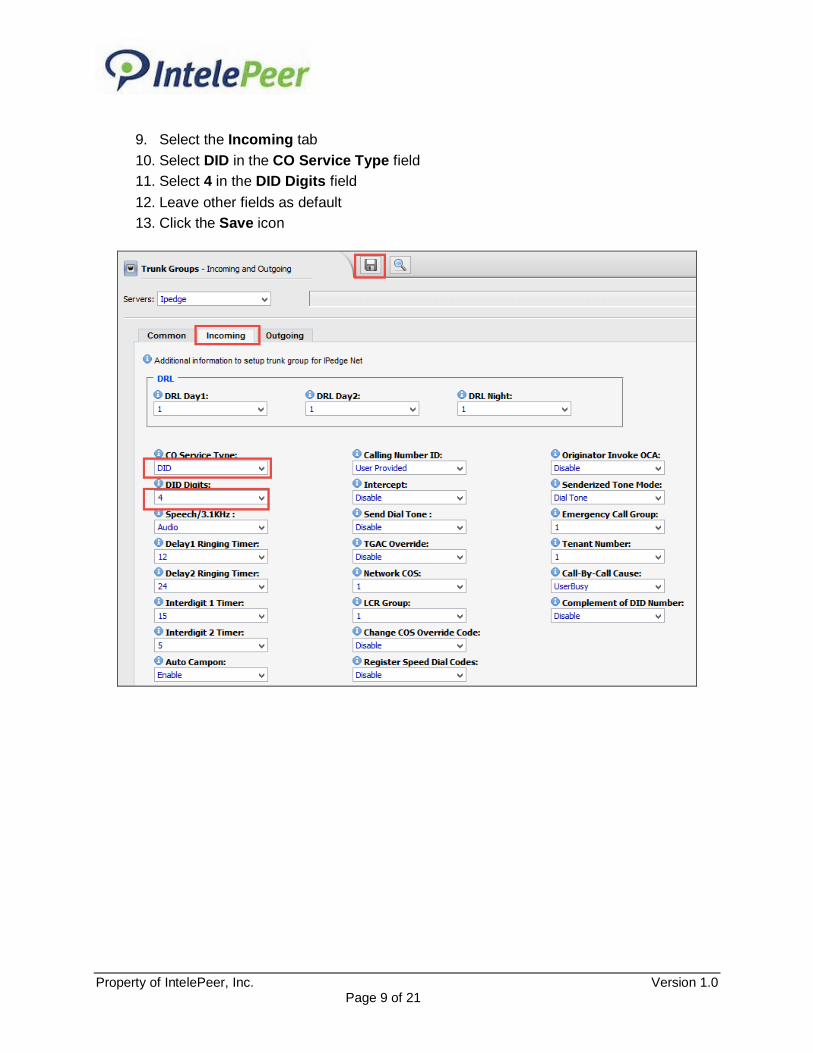
9. Select the Incoming tab
10. Select DID in the CO Service Type field
11. Select 4 in the DID Digits field
12. Leave other fields as default
13. Click the Save icon

Property of IntelePeer, Inc. Version 1.0 Page 10 of 21
14. Select the Outgoing tab
15. Leave other fields as default
16. Click the Save icon

Property of IntelePeer, Inc. Version 1.0 Page 11 of 21
5.4 Setup SIP Trunk Services
1. Navigate to Trunk SIP Trunking
2. Select the Channel Group tab to setup SIP trunk services
3. Select a SIP Trunk Channel Group number
4. Select number of SIP Trunk Channels
5. Click the Save icon
Property of IntelePeer, Inc. Version 1.0 Page 12 of 21
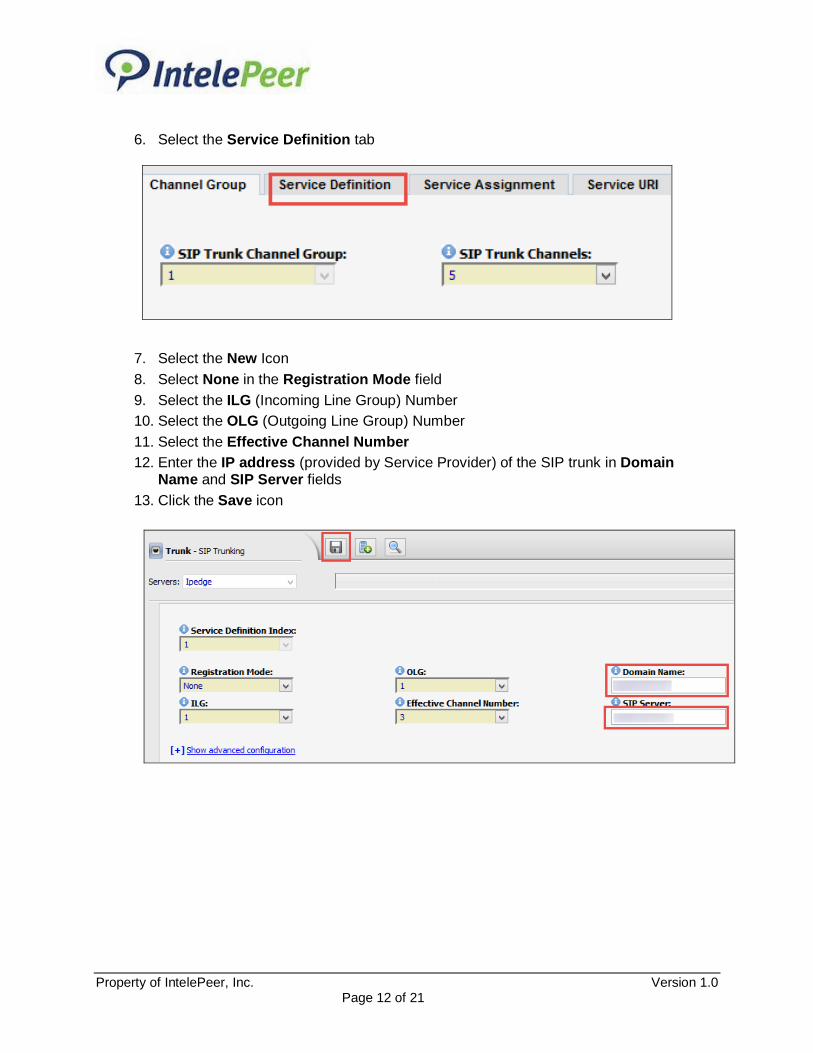
6. Select the Service Definition tab
7. Select the New Icon
8. Select None in the Registration Mode field
9. Select the ILG (Incoming Line Group) Number
10. Select the OLG (Outgoing Line Group) Number
11. Select the Effective Channel Number
12. Enter the IP address (provided by Service Provider) of the SIP trunk in Domain Name and SIP Server fields
13. Click the Save icon

Property of IntelePeer, Inc. Version 1.0 Page 13 of 21
14. Select the Service Assignment tab
15. Select the New Icon
16. Select the Service Definition Index for the Channel Group
17. Select the Service Number for the Channel Group
18. Click OK
19. Click the Save icon
Property of IntelePeer, Inc. Version 1.0 Page 14 of 21
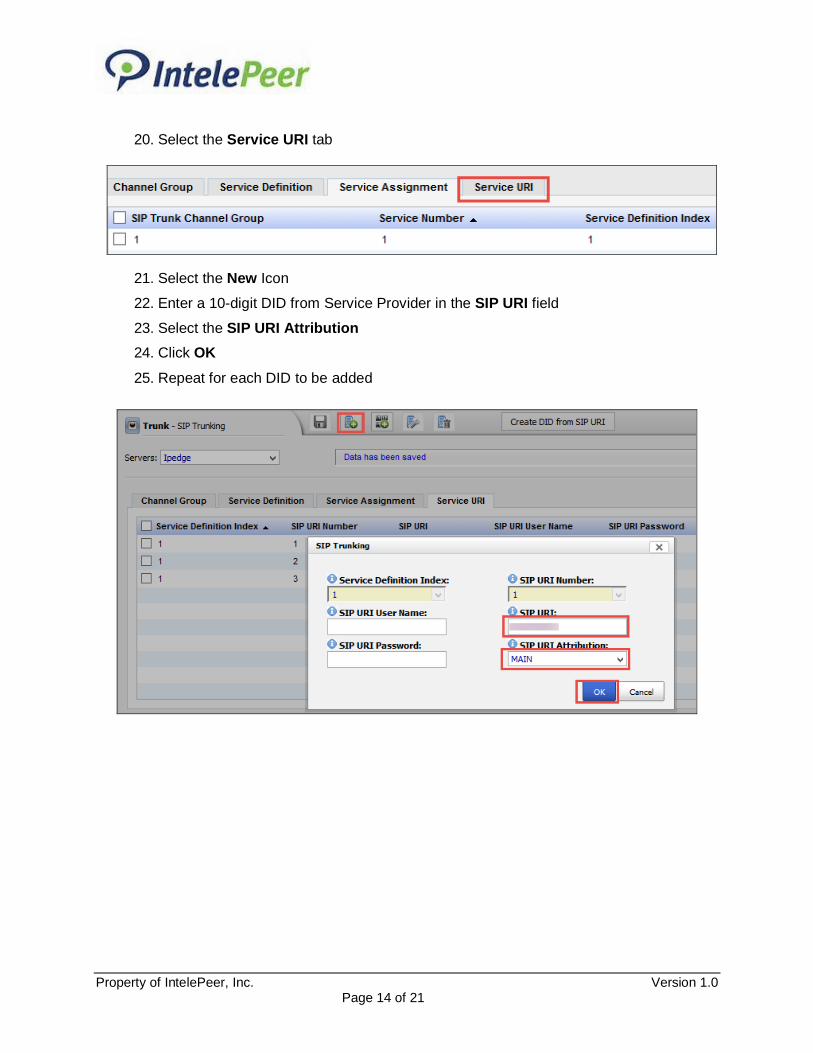
20. Select the Service URI tab
21. Select the New Icon
22. Enter a 10-digit DID from Service Provider in the SIP URI field
23. Select the SIP URI Attribution
24. Click OK
25. Repeat for each DID to be added

Property of IntelePeer, Inc. Version 1.0 Page 15 of 21
5.5 Create Trunk DIDs
1. Navigate to Trunk DID
2. Click the New Icon
3. Enter the last 4-digits of DID (provided by Service Provider) in the DID Number field
4. Enter a 4-digit extension or range in the Audio Day1, Day2, & Night Dst Digits fields
5. Leave the default values for the other fields
6. Click the Save icon
7. Repeat steps for additional DIDs

Property of IntelePeer, Inc. Version 1.0 Page 16 of 21
5.6 Setup Caller ID for Outgoing Calls
1. Navigate to Trunk Calling Number Calling Number Identification
2. Enter the DID 3-digit prefix in the Number Prefix field
3. Enter the DID 7-digit remainder in the Default Number field
4. Click the Save icon
Property of IntelePeer, Inc. Version 1.0 Page 17 of 21
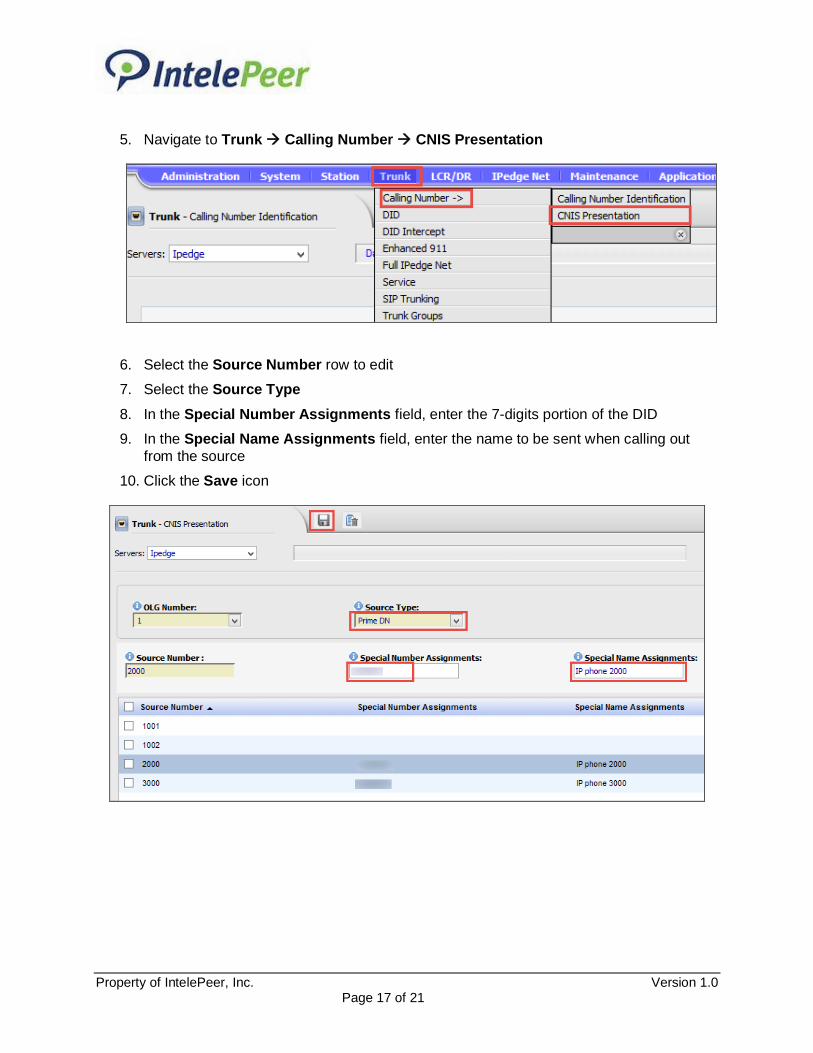
5. Navigate to Trunk Calling Number CNIS Presentation
6. Select the Source Number row to edit
7. Select the Source Type
8. In the Special Number Assignments field, enter the 7-digits portion of the DID
9. In the Special Name Assignments field, enter the name to be sent when calling out
from the source
10. Click the Save icon

Property of IntelePeer, Inc. Version 1.0 Page 18 of 21
5.7 Setup Station Assignments
1. Navigate to Station Station Assignment
2. Select New Icon to create station assignment
3. Enter Prime DN
4. Enter Name to Display
5. Enter Network Calling Number
6. Enter VM MW Center Port
7. Enter VMID Code
8. Leave the default values for the other fields
9. Click the Save icon
8. Repeat steps for additional stations

Property of IntelePeer, Inc. Version 1.0 Page 19 of 21
6 Summary of Tests and Results
N/S = Not Supported N/T= Not Tested N/A= Not Applicable
Test Case # Test Case Description Results Notes
1.4 Registration N/A
Inbound Calling Test Cases
2.1 Calling Party Disconnects Before Answer Pass
2.2 Calling Party Disconnects After Answer Pass
2.3 Called Party Disconnects After Answer Pass
2.4
Calling Party Receives RNA - Call Times Out Pass
2.5 Calling Party Receives Busy Pass
2.6 Calling Party Places Call on Hold Pass
2.7
Three Way Calling Pass
No BYE is seen once the conference controller hangs up. Since the conference is external to the PBX, the BYE will not be seen.
2.8 Calling Party Presentation Restricted Pass
Outbound Calling Test Cases
3.1 Calling Party Disconnect Before Answer Pass
3.2 Calling Party Disconnects after Answer Pass
3.3 Called Party Disconnects after Answer Pass
3.4 Calling Party Receives Busy Pass
3.5 Called Party Unprovisioned Subscriber Pass
3.6 Calling Party Presentation Restricted N/S Not supported by Toshiba IPedge
3.7 Calling Number Presentation Pass
4.1
Inbound Calling Party Sends Fax Inband N/S
A gateway (e.g. Adtran or AudioCodes) would need to be used for fax calls
4.2 Outbound Calling Party Sends Fax Inband N/S
A gateway (e.g. Adtran or AudioCodes) would need to be used for fax calls

Property of IntelePeer, Inc. Version 1.0 Page 20 of 21
4.3 Inbound Calling Party Sends Fax using
t.38 N/S
A gateway (e.g. Adtran or AudioCodes) would need to be used for fax calls
4.4
Outbound Calling Party Sends Fax via t38
N/S
A gateway (e.g. Adtran or AudioCodes) would need to be used for fax calls
5.1 International Outbound Dialing Pass
5.2 800/866/877/888 Outbound Dialing Pass
6.1 Outbound Call Forward Always Pass
6.2
Outbound Call Forward Always to an Out of Service Subscriber Pass
6.3 Outbound Call Forward Busy Pass
6.4 Outbound Call Forward Not Available (Ring No Answer) Pass
6.5 Outbound Blind Call Transfer Pass
6.6 Outbound Consultative Call Transfer Pass
6.7 Outbound Semi Attended Call Transfer Pass
6.8
Outbound Consultative Call Transfer to Local Extension Pass
6.9 Outbound Three Way Calling Pass
6.10 Outbound Call Hold Pass
6.11 Call Waiting Pass
After CWT was configured on the PBX, audio notification was only seen when the SDN was on first call and second call received on PDN. Otherwise visual indication was seen.
7.1
Terminate Early Media Outbound Call Before Answer Pass
7.2 Early Media Forward Call Pass
8.1 Outbound, Wait for Session Audit Pass
Session Audit method with Re-Invite was tested
8.2
Outbound, DUT Places Call on Hold ,Wait for Session Audit Pass
8.3
Inbound, PBX Holds, Wait for Session Audit Pass
8.4 Inbound, Wait for Session Audit Pass
9.1 Outbound DTMF (RTPevent) Pass
Property of IntelePeer, Inc. Version 1.0 Page 21 of 21
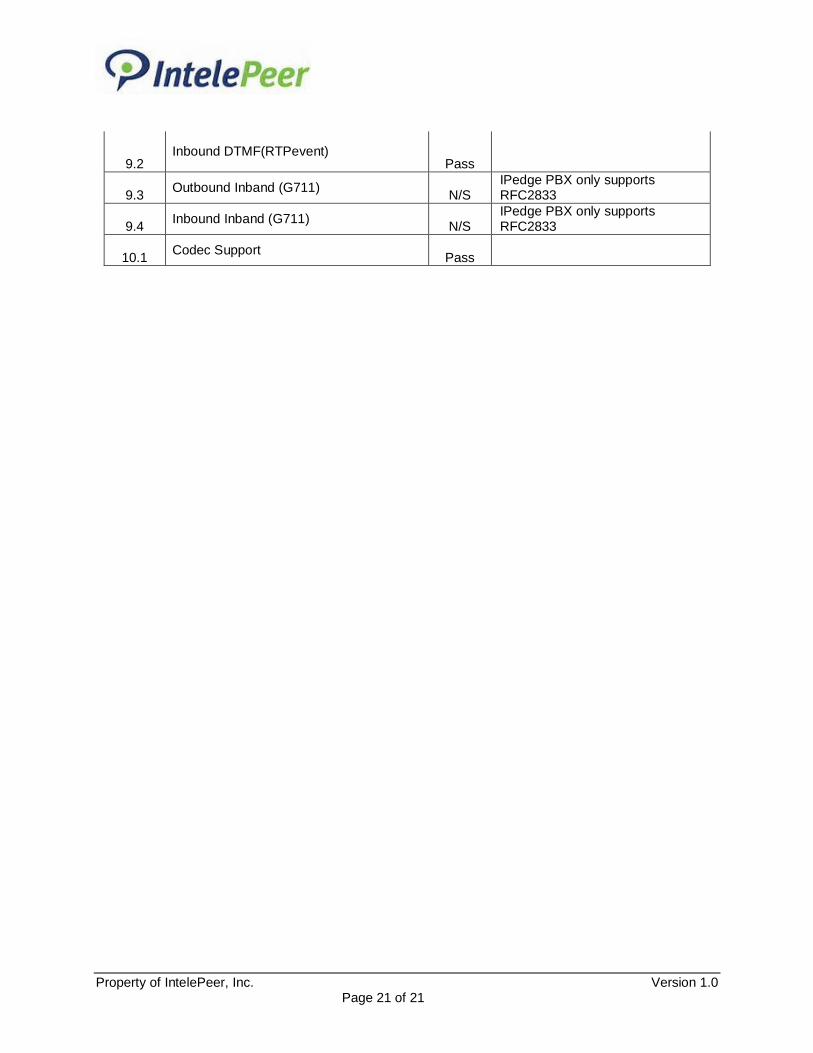
9.2
Inbound DTMF(RTPevent) Pass
9.3
Outbound Inband (G711) N/S
IPedge PBX only supports RFC2833
9.4
Inbound Inband (G711) N/S
IPedge PBX only supports RFC2833
10.1
Codec Support Pass