Embed Size (px)
DESCRIPTION
Created for the Open University to guide Youth Workers in creating video records of their professional practice - but also useful for any projects seeking to create a video about what they do.
Citation preview

Shared Practice Through VideoA practical guide
! 1 of 28

Shared Practice through video
Introduction
This guide steps you through the process of choosing what sort of video you will create. It will help you to choose equipment, and to plan your video. It includes guidance on filming your video and editing and addresses important issues of copyright and getting consent from anyone in your video. It also explores creative approaches to communicating with video in sensitive settings.
Overview:
There are 12 sections to this guide. We recommend you read through the guide first and then return to those sections that are directly relevant to you and to your choice of video approach:
1! Filming Essentials: Permission and Consent2! Filming Skills: Recording Sessions3! Choosing your Style and Approach4! Preparation Equipment5! Preparation Software6! Filming Skills: Sound and Light7! Filming Skills: Interviewing8! Planning: Shotlists and Storyboards 9! Editing: Simple Edits10! Editing: Advanced Editing11! Publishing: Sharing your video12 ! Find more support
About this guideThis guide was written by Tim Davies (@timdavies) of Practical Participation ([email protected]) for the Open University. This is an adapted version for general purpose use. It is licensed under a Creative Commons Attribution Share-Alike Non-Commercial license. That means you are free to share this document and create adaptations, providing you credit the original source and share your updates under a similar license.
Production of this guide was funded by the Practice-based Professional Learning Centre for Excellence in Teaching and Learning (www.open.ac.uk/pbpl) as part of the Personal and Professional Learning Environment
! 2 of 28

1) Filming essentials: Permission and consent
Whenever you film anyone you need to make sure you get their permission to use the video footage, and explicit permission to use it in a video that will be uploaded to the Internet.
When do you need permission?There are no cast-iron legal rules which state when you need consent, however, generally you will want to make sure you have consent:
• From anyone who appears in the foreground of video. If you are filming an outside scene, you do not need consent from everyone in the background, but you may wish to announce that you are filming a clip that may be shown online, and give people nearby the opportunity to move away if they donʼt wish to be in the background of the video.
• From the people being directly filmed, and, if relevant, parents and guardiansYou should check your local services policy on consent from parents/guardians - as there may be existing consent forms that you should use.
You should generally gain parental consent as well as the individuals consent for anyone under 16.
• For your specific filming and for posting video onlineAny consent should explicitly recognize your intention to share the final video on the Internet.
When you share a video online, whilst you can select settings that limit the ease with which it is shared, you cannot guarantee that it will not be taken and shared more widely by a viewer. Making sure the people giving consent understand this is important.
Forms of consentYou can gain consent in a number of ways:
• Written consent - on a signed form detailing the extent of consent given;
• Verbal consent - some policies will allow verbal consent, as long as you record this on paper at the earliest possible opportunity;
• Recorded consent - recording verbal consent on the start of a video clip. This can be useful to do in addition to written consent.
You should keep a secure record of consent you have gained, and when consent has been refused.
Example consent formOn the following page is an example of a consent form. You will need to adapt any consent form to your own circumstances. Remember to make it accessible for the people you will ask to read and sign it.
! 3 of 28

! 4 of 28
Your Project NameProject AddressContact Details
Video Consent & Model Release Form
About the projectWe are recording video footage at [ ] to create a film about the project. This will help other people to understand what the project involves. The video is designed for young people and adults interested in getting involved in the project, or in learning more about it. It might also be shown and seen in other settings.
Online videoThe film we record will be edited and uploaded to our website. Once video is on the Internet we do not have full control over how it will be used or re-used by others, but we will only use video of you in ways that you give us permission for.
PrivacyUnless we agree otherwise, only your first name will be used in connection with this video, and we will not share any personal information about you alongside the video.
Your permissionWe need your permission for this recording. Please tick the following boxes and sign below to confirm your permission. If you are under 18 then please ask a parent or guardian to also sign this form.
• [ ] I agree to [ ] recording and storing videos and photos of me• [ ] I give [ ] permission to edit and re-use this footage in creating
videos for teaching and learning, and for promoting the project. • [ ] I give [ ] permission to upload videos and photos of me, and
videos and photos created by editing footage and photos that include me, to the Internet.
Your name: ______________________________ Date of Birth ___ / ___ /___
Your signature: ____________________________Date: __________________
Parent/guardianʼs signature: _________________ Date: __________________
Your address: ____________________________________________________
Postcode: _________ E-mail address: ________________________________
If you have any questions about this project, you contact us by e-mailing: [email protected]; phone or text: 07777 123 456 or by post to: Example Project, Example Street, PO BOX 123, UK.
Exam
ple fo
rm

Triple opt-in Gaining consent is about giving individuals a choice about how footage of them is used. The triple opt-in approach attempts to do this without creating undue burdens on the filming process:
(1) Gain general consent in advance for the recording of video that may be used online. Including parental consent if necessary.
Getting general written consent in advance, providing you use a triple opt-in approach, avoids the difficulties in following up written consent after filming. Sending forms home with people to bring back will often result in many consents not being given, creating trouble when it comes to editing.
An example written consent form is shown on the previous page.
(2) Ask before filming - before you start filming explain concisely how you plan to use the footage. If the person/people being filmed are happy with the explanation, start the camera recording and re-confirm on film that they are happy for the film to be used online.
E.g. “Bill, Iʼve just started recording. Can you confirm youʼre happy for this video to be used as part of a video that will be shared on the Internet?”
(3) Check after filming - once you have finished recording ask the individual/group if they were happy with what has been recorded and are still happy for it to be used online.
If any of the group object, discuss whether they wish any parts of the recording to be deleted and not-used.
Give the person/people who have been filmed your contact details and explain that if they wish any of the footage to be removed in future they can contact you directly.
(You may wish to prepare some cards with these details on).
Creative approachesSometimes it is not possible to gain appropriate consent when you want to record short video clips. However, there are many creative ways to make sure that this doesnʼt lead to certain voices being excluded from your filming.
For example. if you are filming vox-pop clips with young people in the town centre and are unable to get parental permission, you could take a blackboard which people can draw or write a message on, and you can film that whilst people speak their vox-pop responses, or have someone else read them out.
That way, youʼve respected the privacy of individuals and not identified particular young people, whilst allowing young people to express their views.
Some projects have also used models, animations and drawings accompanied by a voice over to demonstrate practice situations. Computer text-to-speech tools can be used when young people do not wish to have their own voices used.
! 5 of 28

2) Filming skills: Recording sessions
Filming project work in action requires some careful thought. You need to balance your need to record footage with the aims of the project, and to avoid unnecessarily interfering in or disrupting the project. Section 3 introduces a wide range of ways you can create clips about your practice sessions: however, if youʼre planning to dive straight in then you can find essential tips below.
Getting permissionBefore filming any sessions taking place you need to make sure you have permission from both the session leader / worker, and the participants. If the group are discussing sensitive issues then you should make sure they feel confident to ask you to stop filming at any time. If some members of the group do not want to be filmed, think about how you can accommodate this, perhaps by only filming from on side of a circle of chairs, so certain individuals are never in shot.
Long-shot or close-upAre you trying to give a sense of the project, using a long shot of a group at work? Are you filming session for supervision with a fixed position camera that shows you and the group / individual you are working with? Or are you trying to capture a mid-shot/close-up of group discussions, including audio of the group discussion?
If you are filming for supervision then think about whether it is more important for the camera to be filming you or the participants.
Sometimes if you are trying to capture audio as well, using a separate audio recorder (try the record feature on your phone if you havenʼt got anything else) to get audio from the middle of a group, whilst you are moving the camera around, can be useful.
Other techniquesThere are many different techniques you can use to gain footage that gives a sense of a project:
• Participant cam - give a video camera to participants in the session and ask them to film elements of the evening from their own eye-view;
• Diary room - set up a laptop with a web-cam and software to record direct from the web-cam (e.g. Photobooth on Mac) and invite participants to record their own short piece to camera in a ʻdiary roomʼ
• Time-lapse - set up a fixed camera and record from that position for the whole session. Speed up the footage when editing afterwards to create a time-lapse. You can sometimes use a web-cam, plus free time-lapse software from the Internet to do this.
Managing session footageIf you have filmed sessions for the purpose of supervision, and your recordings contain any personal or sensitive information then you must take care about how the footage is managed. Tapes should be kept in secure storage. Hard disk / memory card based recorders used for filming private information should be kept solely for that task - as even deleted video files can be recovered. Any digital copies of footage should be password protected and securely deleted as soon as there is no further need for them.
! 6 of 28

3) Choosing your style and approach
When you create a video to share ideas on the Internet you have a choice about the style of video you create, and about how you will create it. It is important to choose a style and approach which will:
• Allow you to clearly communicate your message;
• Communicate with authenticity;
• Make the best use of the tools you have to hand;
• Be possible to produce within the time you have available;
Are you creating a mini-documentary? Or simply trying to create a quick video clip to share an idea or experience with other practitioners?
Styles
There are three main styles of shared learning video:
• Talking head/interview - one person sharing a story, idea or presentation;
• Show and tell - one or more people sharing a story with the camera, interspersed with video of the things they are talking about;
• Visuals and voiceover - showing one or more shots of practice, and using text and voiceover to explain what is happening and to share points of learning;
Approaches
And there are three main approaches to capturing and editing video:
• All in one take - creating a video clip that can be uploaded and shared directly from the video camera with no editing.
• Simple editing - capturing a small number of clips and then cutting them down and editing them together, perhaps with still images, titles and a voiceover;
• Professional and polished - taking a larger amount of footage and spending time editing it together with titles, overlays, transitions, stock footage, still images, voiceovers and music.
The table on the following page shows how you can combine the styles of video with the different approaches to capture and editing.
It indicates: Appropriate length for the final video !! Planning & preparation considerations Amount of footage to capture! ! ! Estimated editing time Things to consider
! 7 of 28

In later sections you will find more details on the approaches and styles mentioned here, and information on some of the things to consider noted in the table.
Talking Head or Interview
Show & Tell Visuals & Voiceover
All in one take
Golden rules:Rough and ready video quality is OK providing the
content is clear and interesting.
Simple editing
Golden rules:Donʼt get
carried away with flashy
transitions; keep it simple; cuts between video
can be as effective as
video flying in and out...
Professional & Polished
Golden rules:Always think about your
audience. You will have to
leave out some great content from the final edit, so select clips with their
impact on audience in
mind.
Use a fixed or handheld camera. Interviewer behind the camera.
Length: 2 - 5 mins Prep: interview questions (10 mins)
Capture: 2 - 5 mins Edit: 5 - 10 mins Consider: make sure you have good quality audio and that the interview is well lit. Test the audio beforehand.
Move the camera from an interviewee to show what they are talking about.
Length: 2 - 5 mins Prep: plan key messages (15 mins)
Capture: 2 - 5 mins Edit: 5 - 10 mins Consider: check the camera will auto-focus well on different parts of the scene and that the filming venue is well lit.
Provide a voiceover from behind the camera whilst showing a practice scene.
Length: 3 - 6 mins Prep: script/plan your voiceover (1 hr)
Capture: 3 - 6 mins Edit: 5 - 10 mins Consider: Can you use an external mic to record the voiceover? Make sure you have time to repeat the take in case you go off script.
Cut between interviewer and interviewee. Use titles and images.
Length: 3 - 6 mins Prep: interview questions; (15 mins)
Capture: 30 mins - 1 hr Edit: 1 - 5 hrs Consider: Think about how you will edit as you are recording.
Mix together separate footage of interviews and activities.
Length: 5 - 10 mins Prep: key messages, shot list (1 hr)
Capture: 1 - 2 hrs Edit: 2 - 5 hrs Consider: Will you film interviews, or activities first? How will you use on-screen titles to provide context.
Record your footage, and then add a voiceover whilst you are editing.
Length: 3 - 10 mins Prep: shot list & voiceover script (1 hr)
Capture: 3 mins - 1 hr Edit: 1 - 2 hrs Consider: Will you script your voiceover or be spontaneous? Have you got a quiet setting for editing.
Cut between interviewer and interviewee. Use titles and images.
Length: 5 - 10 mins Prepare: interview questions; (1 hr)
Capture: 30 mins - 2 hr Edit: 2 - 10 hrs Consider: Capture ʻreverse nodʼ footage. Make sure you have good sound and audio. Record with multiple cameras.
Mix together interviews, activity footage and stock footage.
Length: 5 - 15 mins Prepare: storyboard; (2 hrs)
Capture: 1 - 5 hrs Edit: 2 - 10 hrs Consider: Can stock footage help you communicate your point. Will you use music in your edit?
Create a full documentary style video - with talk to camera and voiceovers.
Length: 10 - 20 mins Prepare: storyboard (3 hrs)
Capture: 1 - 2 days Edit: 1 - 2 days Consider: You may need to get extra footage once you try your first edit.
! 8 of 28

4) Preparation: Equipment
You donʼt need expensive equipment to make a video - but you should choose the right equipment for the type of video you want to create. To create a professional and polished video, choose better equipment and make sure you can add an external microphone. For a rough-and-ready interview, you can use the video feature on a standard mobile phone or digital camera.
Digital Camera or Phone Digital Video Recorder MiniDV / Tape Camera
Depending on the storage memory in your camera/phone you will be able to record between a few minutes and an hours footage. Audio and video quality are often low, but good enough for quick interviews or online show-and-tell.
Some phones can have an external microphone attached through the hands-free to capture better audio - and services like Qik available on some smartphones let you record footage direct to the Internet.
Dedicated digital video cameras range from low quality cheap cameras such as the Busbi (approx £30) which give phone-quality footage, to high-end cameras costing hundreds of pounds that can record hours of footage to internal hard disk drives.
The mid-range Flip video cameras, around £100, are very popular - providing high quality video and good audio recording to their inbuilt memory which record for around an hour.
MiniDV Cameras record to tape - which can then be converted into digital formats. You can record very high quality footage and audio with a mid-range MiniDV camera. Tapes cost around £5 each and record over an hour - so can provide a good medium for archiving video.
It takes around 1 minute to transfer 1 minute of footage from the camera to computer for editing. Many professional video firms still use MiniDV, and good quality cameras bought a few years ago are likely to be MiniDV.
Things to check: does your existing phone have video capability?
How do you transfer footage from your phone to a computer?
Can you edit directly on the phone?
Things to check: What sorts of batteries does the camera use? Do you need to buy spares?
Will the camera fit on a tripod easily?
What format does the camera record in? Can you editing software use this format? (See section 5)
Things to check: What MiniDV formats (standard / High Quality) can the camera use?
Does the camera connect to a computer via FireWire, or USB cables? Which can your computer support?
Camera Image by Capt Kodak: http://www.flickr.com/photos/captkodak/271924428/sizes/s/ CC BY-NC
! 9 of 28

Preparation: Software
When it comes to editing your video you will need some software. You could have four choices:
• Use the software that comes free with your computer: Microsoft Windows usually includes the free ʻWindows Movie Makerʼ software. On an Apple Mac you will usually have iMovie.
• Use the software that comes free with your camera: Some cameras come with free video editing software when you buy them. Usually this will be fairly basic, but it may offer some features not available in the software that comes with your computer.
• Use online video editing services: Services such as Kaltura and JayCut (search to find them) offer video editing through your web browser. You upload all your footage (which can be quite slow) and then use a web-based interface to edit your video.
This can be a good option if the computers you have access to do not have editing software on, and youʼre not able to install new software. It can also allow different people to work on an edit from home.
• Buy professional quality video editing software: Some of the most popular packages are Adobe Premier; Final Cut Pro and Sony Vegas. Expect to pay £100 or more for good quality software.
You may also be able to find a local project who have a fully equipped video editing suite which you can gain access to.
Viewing videoOne helpful tool for any video-makers toolbox is VLC Media Player. Itʼs available as a free download for most operating system platforms and can play just about any video format.
If you find your have a video file which other players will not display, then VLC Player will usually manage to view it - and let you decide whether you need to locate a convertor into order to get it into your editing programme.
VLC can also act as a video convertor using itʼs ʻTranscodeʼ feature. However, other software is available that provides more user-friendly conversation between video formats.
! 10 of 28

Editing tipsIt is beyond the scope of this guide to cover how to use each editing package - and most video editing software will have tutorials and support available from the ʻHelpʼ menu. However, some common issues to watch out for include:
• Video format incompatibilityDigital video files can be stored by cameras and computers in many different formats. You need to check that your editing software can read the format of video your camera records in, or that you can convert between formats.
Many modern digital video cameras record in MP4 format (the video version of MP3) which many versions of Windows Movie Maker cannot read. However, you can get free software to convert ʻMP4 to AVIʼ format which Windows Movie Maker will process. Search the web for ʻMP4 to AVI convertorsʼ and be sure to only download from reputable software websites such as CNET or SourceForge.
• Saving and exportingWhen you ʻsaveʼ a video edit, you are usually only saving the instructions for how the edit is made. Those instructions will point to the original video files on your computer, but donʼt save a whole copy of the video file. It is only when you ʻexportʼ or ʻrenderʼ your video that a full copy of your edited together footage, and a new video file, is created.
That means that, if you want to edit the footage again in future, you must not delete or move the original video files.
If you have plenty of storage on your computer, you should save a copy of the videos on the hard disk. If you have limited storage, then you may find that saving all your video to an external hard disk or large (8Gb or more) memory stick, and editing it together from there will avoid future problems with lost original footage.
• Save early, save oftenVideo software does not always have an ʻauto saveʼ option, which means that if you carry out hours of editing without saving, and your computer crashes you can loose all your work.
Make sure you save your edit as soon as you start, and regularly save changes.
• Exporting for the webWhen you export or render your final video / movie file you will usually have a choice of qualities and formats. Some software will also provide you with a predicted file-size.
The larger the file the longer it will take to upload to online video-sharing services (although most services now convert your video to Flash Video so larger files do not take much longer to download/stream for the viewer) and some video sharing services have limits on the file size they will allow on their free services.
Targeting a file-size of around 100Mb is a good rule of thumb, and you can adjust the settings for this.
! 11 of 28

6) Filming skills: Sound and light
Even for a quick single-take talking head video clip, making sure you record footage with good sound and lighting is important.
SoundTest your camera with different background noise to see how well it can record audio.
• Does it pick up the voice of someone talking directly to camera?• Does it pick up discussion in a group?• Does it pick up noise in the distance with a long-shot?
Some cameraʼs can have external microphones plugged in. You can get different types of microphone, depending on your need.
Directional Microphone
Handheld Microphone
Clip-on Microphone
Boundary Microphone
Usually mounts on the top of the camera and improves the recording of people directly in front of the camera
If you have separate people interviewing and filming, a hand-held microphone can be handed between interviewer and interviewees
For a static interview, you can clip a lapel microphone onto your interviewee to pick up their voice only.
A boundary microphone picks up all the discussions and sounds in an area. Good for recording group discussions.
You can also get portable radio-microphone kits which mean you do not need a cable between the camera and microphone, although these can be expensive.
If you are recording from a mobile phone you may find that the hands-free kit for the phone works as a simple clip-on microphone. You can also buy external microphones now for many high-end mobile phones including for the iPhone.
VoiceoverIf you are recording a voice-over, then identify the best quality recording device you have available. You should always put the video you are narrating on headphones whilst you record your voice-over, to avoid accidentally re-recording a faint version of the original audio.
A good earphones and microphone headset can be useful for recording a narration direct to your computer.
! 12 of 28

Light
Getting the lighting right for filming can make a big difference to the quality of the finished video. You will rarely be working with professional lighting equipment, but you can think about a number of issues to get the most our of your video equipment.
Choose your spotIf you are interviewing someone, make sure you donʼt interview directly beneath a ceiling light, as otherwise shadows will fall on their face. Placing your interviewee a few steps back from a ceiling light will allow a more even light to fall on their face. If you need extra light in a space, you may be better pointing light at the ceiling so it is reflected onto the scene more evenly than light would be if directed straight at the scene.
Consistent lightingIdeally you want to make sure that the scene you are filming is evenly lit, without large shadows, and with good, consistent light. If the room your are in has multiple types of lights, check which offer the best light for filming with.
Keep it constantNatural light is good, as long as you can be sure it will be consistent for the time you are filming. Most cameras will auto-adjust to the light levels available - so variations in the light level can cause them to re-adjust and focus mid-filming, which can ruin a shot.
Whilst you can usually lighten or darken clips in your editing software, having consistence between the light levels in different clips is useful when you come to edit.
Think aheadIf you are planning to move the camera whilst filming, check that the light levels in all the places you will be moving to are even, and that you donʼt need to move through some dark area, or to point the camera directly at bright lights which may upset the auto-focus and automatic light level detection in the camera.
Donʼt trust the LCDMany cameras have an LCD screen you can view to see what is being recorded. When checking light levels, look directly through the viewfinder, as the angle you are viewing it at, and the background light levels can affect what you see on the LCD screen - making it a misleading way of checking that you have enough light to record with.
What sort of video?The amount of time you spend getting audio and lighting ʻjust rightʼ will depend on the sort of video you are creating. For a quick clip, stopping an interview in order to get perfect lighting is likely to do more harm than good, as it will interrupt the flow of conversation. However, if someone walks past talking loudly in your interview, you may need to stop and start recording again. By contrast, if youʼre filming for a professional edit, taking the time to get lighting and sound as good as you can get them will be really important, and it can create an atmosphere which gets the best out of the people you are filming.
! 13 of 28

7) Filming skills: Interviewing
Capturing interviews on camera is a key way of sharing learning. Interview range from carefully planned and staged conversations, to quickly captured clips.
For example: If you have a small digital video camera to hand (or even a video recording mobile phone), and you hear someone with a story to share, or an idea that deserves a wider audience (perhaps in a staff meeting, or at a conference), you could invite them to summarize their story or idea in a short video interview there and then. You can even video record a short conversation between two people at the meeting or conference, so that you donʼt have to ask interview questions. Alternatively, you could plan for a more formal interview at a later date - when you can prepare questions beforehand, set up a quiet environment for the recording; and perhaps edit in photos, titles and other video footage to illustrate the point in the interview.
Quick interviews: social reportingQuick single-take interviews are very easy to create as long as you work through some simple steps.
1) Know your cameraYou can capture single-take interviews on just about any recording device - but they work best with hand-held small cameras like a mobile phone or Flip Digital Video recorder - as these donʼt create too much of a barrier between the interviewer and interviewee. C
Check in advance that you know how to use your chosen camera, and practice recording short clips. Test how well the audio records, and how the video and audio work when there is background noise, or low/high light levels. Check how well the camera records your voice from behind the camera, and the voice of a person in front of the camera - as it will need to pick up both in your quick interview.
You might choose to use an external microphone - but be careful with this choice - as it may slow down and complicate the recording process if you need to then use a tripod for your camera, or to get someone else to hold the camera / microphone.
2) Keep your interview informalInvite your interviewee to take part and makes sure you explain how you plan to use the video clip (See section 1 for details on getting consent) - but keep the invitation to participate informal at this stage. The shorter the time between inviting someone to participate, and then interviewing them, the more natural their responses to your questions are likely to be.
3) Find a quiet space with good lightingIt doesnʼt need to be silent, but you should know from your test what conditions you need to get a good quality video clip. Line up your video shot so that the head and shoulders of the person you are interviewing are in frame, and so that you are close enough to get good audio recording.
4) Start recording & start the interview
! 14 of 28

On the start of your clip, from behind the camera, introduce yourself, the person you are interviewing, and the context of the interview, and then launch into your first question.
You will usually only be asking two or three questions - and you are aiming to get a natural reply of between 1 and 2 minutes to each question.
Your questions may take the form of an invitation for the person you are interviewing to explain a point they made in a conversation/presentation earlier. Your role as interviewer is to help the interviewee communicate an idea - not to interrogate them.
Hold the camera just in front of you, and make eye contact with the person you are interviewing, glancing occasionally at the camera to see how long you have been recording (most cameraʼs display a counter of how many seconds have passed since you hit record). Try to complete the whole interview in one take. Use your body language to communicate to the interviewee when you want them to carry on talking on a topic, or when time is running short and they should be quick in making their point.
5) Stop recordingEnd your interview by thanking the interviewee on camera, and then stop the recording.
Check with your interviewee that they are still happy for you to use the video clip. Explain again how you are planning to use and share the video clip.
6) ReviewLater on, watch through the clip again to check that it clearly communicates the ideas or information you wanted shared.
If you have time to edit, you may add some titles to the video - although hopefully you recored on the start of the clip details of who was in it, and what it was about - so even if you donʼt add titles the clip has some context.
! 15 of 28

Advanced interviewing
If you are planning to create a longer interview, or to film a long interview, but only use some elements of it, the following tips may prove useful.
1) Use a quiet setting with good lighting
If you have access to a tripod and an external microphone for your camera then you will probably want to make use of these. Make sure your interview venue is well lit and comfortable. Be sure that you wonʼt get disturbed during the interview.
If you are using natural light - make sure itʼs not going to get dark or change as you are filming - as you may edit together clips from the interview in a different order from the order you capture them in.
2) Position yourself in relation to the camera
Are you going to be in the recording next to the interviewee? Are you going to ask questions from behind the camera so your interviewee looks directly in the camera? Or are you going to sit next to the camera, so the interviewee looks at you, avoiding direct eye contact with the camera, but still looking towards it?
Think about whether you will need to be reading questions from paper (probably best not to be in the shot then), and whether you want to give the impression of a conversation (sit next to the camera) or a monologue (position yourself behind the camera so the interviewee makes eye contact with it).
3) Record a short test clip
A test clip allows you to check that the audio and video are recording well - but itʼs also a good way to ask informal questions that make your interviewee feel more comfortable and relaxed.
4) Ask your questions
If you are planning on including your voice asking the questions in the edit, then you can have a flowing conversation with your interviewee. If you plan to only have the responses of the interviewee on your edit, then you will need to ask them to restate the question in their reply. Itʼs not very easy to edit video with just the interviewee in the final edit where all their responses start with “Yes. And...”.
5) Listen carefully to the answers & ask follow up questions
Think about how you will edit them - and whether the answers have been concise enough, or whether a key point has been missed out. You could invite your interviewee to repeat a key point by asking “Can you summarize your point about X in just 10 or 15 seconds...” or your might ask a context-setting follow up question: “You mentioned Y. What is Y?”.
6) Film extra establishing shots; reverse noddys etc.
If you asked relatively long questions and want them to be on the final video, you will need to have footage of you asking them. When you have finished videoing the interview ! 16 of 28

responses, move the camera to point at you, over the shoulder of the interviewee. Now record yourself asking the questions so that you can edit these in between the answers youʼve got.
You might also want to film some ʻestablishing shotsʼ - such as you and the interviewee shaking hands and sitting down in your chairs; or you and the interviewee going into the building / room where the interview takes place.
Young people and service users as interviewersThink carefully about who should be asking the questions. Video interviewing can be a powerful participation tool if you enable project members and service users to be in control of recording interviews.
Vox-popsVox-pop clips can add to a video edit. In a vox-pop you ask many different people to give a short reply to a single question.
With small digital video cameras you can think creatively about capturing vox-pops. For example, inviting project members to interview each other, or even starting a ʻChain Reactionʼ vox-pop, where you interview on person, before handing the camera to them to interview someone else, and so-on.
! 17 of 28
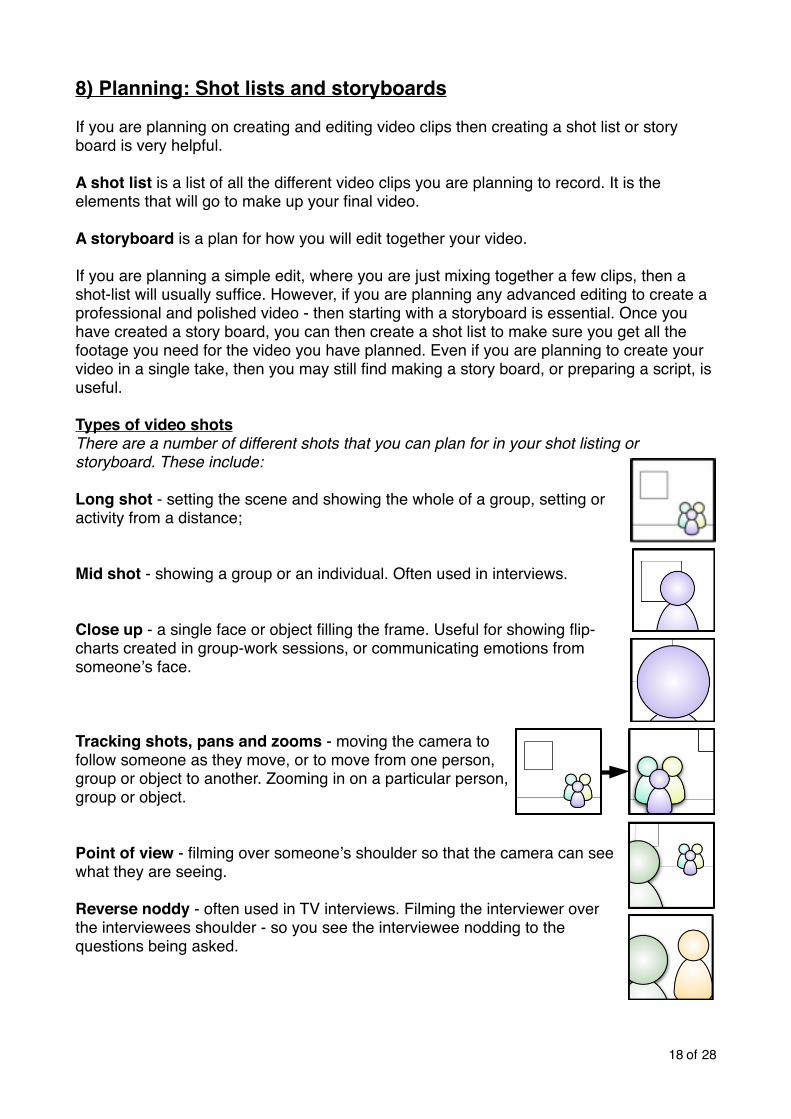
8) Planning: Shot lists and storyboards
If you are planning on creating and editing video clips then creating a shot list or story board is very helpful.
A shot list is a list of all the different video clips you are planning to record. It is the elements that will go to make up your final video.
A storyboard is a plan for how you will edit together your video.
If you are planning a simple edit, where you are just mixing together a few clips, then a shot-list will usually suffice. However, if you are planning any advanced editing to create a professional and polished video - then starting with a storyboard is essential. Once you have created a story board, you can then create a shot list to make sure you get all the footage you need for the video you have planned. Even if you are planning to create your video in a single take, then you may still find making a story board, or preparing a script, is useful.
Types of video shotsThere are a number of different shots that you can plan for in your shot listing or storyboard. These include:
Long shot - setting the scene and showing the whole of a group, setting or activity from a distance;
Mid shot - showing a group or an individual. Often used in interviews.
Close up - a single face or object filling the frame. Useful for showing flip-charts created in group-work sessions, or communicating emotions from someoneʼs face.
Tracking shots, pans and zooms - moving the camera to follow someone as they move, or to move from one person, group or object to another. Zooming in on a particular person, group or object.
Point of view - filming over someoneʼs shoulder so that the camera can see what they are seeing.
Reverse noddy - often used in TV interviews. Filming the interviewer over the interviewees shoulder - so you see the interviewee nodding to the questions being asked.
! 18 of 28

Shot listing A shot listing will include all the different video clips you plan to record. Use it as a check-list whilst recording.
If you are using a tape-based video camera, then taking note of the order in which you capture your shots will be useful when you come to editing and need to find different bits of footage on the video tape.
Example shot listThis is an example shot list for a simple edit ʻshow and tellʼ video demonstrating a youth work discussion session. Wherever individuals are identifiable in any of these shots, you will need to get their permission and consent (see section 1)
Shot Notes
• Long-shot of the youth centre with cars going past
Capture 30 seconds
• Long-shot of the group talking Capture 2 minutes
• Mid-shot of a group discussion Capture 15 - 20 minutes worth. Good audio needed.
• Mid-shot youth worker interview - Interviewing the worker after the session about the issues that were discussed.
Capture 5 - 10 minutes, but aim to get a clear 3 minute overview in one take.
• Mid-shot or reverse noddy young person interview
Interviewing a young person after the session. Possibly vox-pops with a few young people.
Use reverse noddy format if young person does not want their face on camera.
Capture 4 - 5 minutes.
• Photos of flip-charts from the group discussion
Your editing software might be able to make a slide show of these at the end of the video.
! 19 of 28

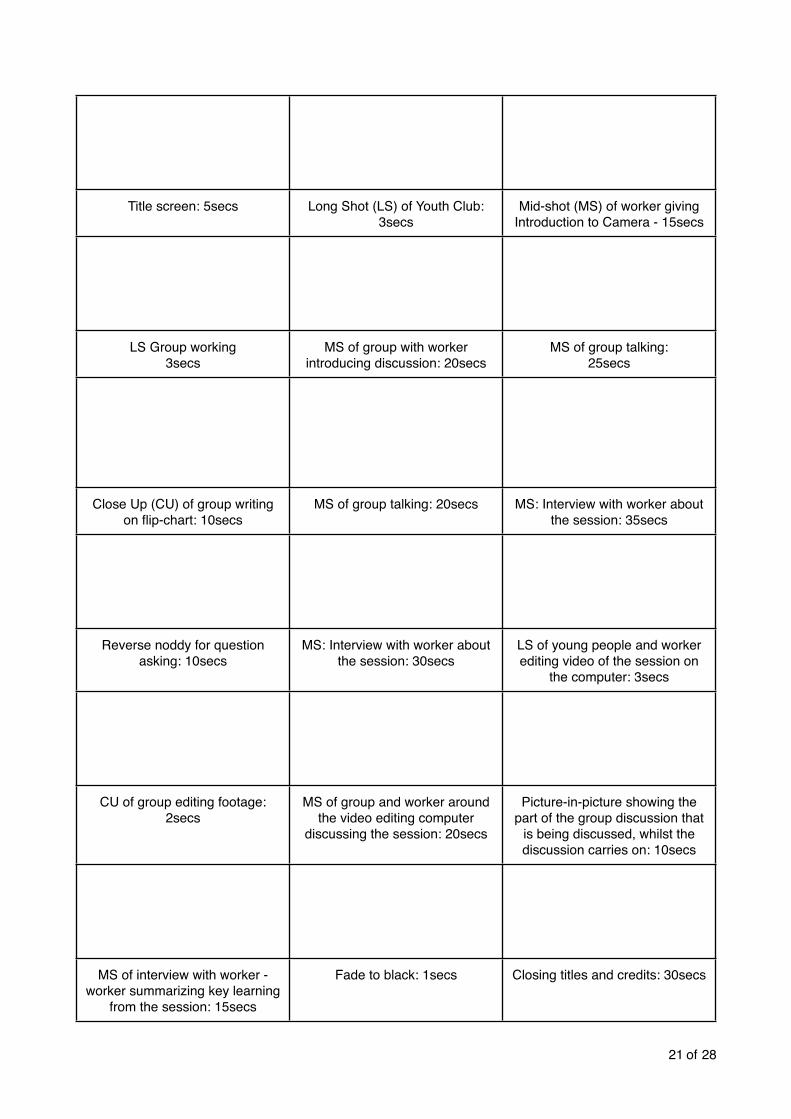
Story boardA story board shows how you will edit different shots together. In a professional video edit, you may be changing what is shown on the screen between every 5 and 20 seconds, and a voiceover or the audio from an interview may be heard on top of a number of different visual clips.
To get a sense of how to storyboard - watch some videos that you think communicate their ideas well - and see if you can reconstruct a storyboard from those videos. How often did they use a new shot? How did audio and video overlap? Use your storyboard to put together a shot-list of all the different footage you might need. See section 10 for ideas around using stock footage as well as your own content.
Note: the times in the story board are how long that clip will be on screen, not how much footage you will need to capture. You might need a lot of footage to make even a short video. Keeping track of all the footage you capture will be very helpful for when you come to editing.!
Example story boardThe example overleaf is a story board for a more complicated edit of a video showing a youth work session. It may not be possible to plan all edits in such detail before you capture your footage - and you may come back to adapt your story board after you have captured your video footage.
Storyboards by Chris Cambell: http://www.flickr.com/photos/cgc/4540616/ - CC BY-NC
! 20 of 28
Title screen: 5secs Long Shot (LS) of Youth Club: 3secs
Mid-shot (MS) of worker giving Introduction to Camera - 15secs
LS Group working3secs
MS of group with worker introducing discussion: 20secs
MS of group talking: 25secs
Close Up (CU) of group writing on flip-chart: 10secs
MS of group talking: 20secs MS: Interview with worker about the session: 35secs
Reverse noddy for question asking: 10secs
MS: Interview with worker about the session: 30secs
LS of young people and worker editing video of the session on
the computer: 3secs
CU of group editing footage: 2secs
MS of group and worker around the video editing computer
discussing the session: 20secs
Picture-in-picture showing the part of the group discussion that
is being discussed, whilst the discussion carries on: 10secs
MS of interview with worker - worker summarizing key learning
from the session: 15secs
Fade to black: 1secs Closing titles and credits: 30secs
! 21 of 28

9) Editing: Simple edits
If youʼve chosen to create your video all in one take then you may be able to upload it straight to the Internet. However, you will often want to try some editing.
Basic editing will allow you to:
• Add titles to your video - for example, a header slide and credits on the end;
• Split up long clips - and take extracts from clips
• Mix together separate clips
• Add still images and photos
The help files for your chosen video editing software will be able to step you through how it works.
Generally video editing involves these steps:
1. Transfer the video files to your computer
Make sure you have plenty of storage space available, and that you wonʼt need to move the files / delete them.
If you are using a digital video camera then usually it will act like an external hard-drive or memory stick when you plug it into your computer, allowing you to drag-and-drop the files to your computer. With MiniDV Tape cameras you will need to use the import from camera / tape feature within your editing software.
2. Import the video into your editing software
See the ʻPreparation: softwareʼ section for tips on what to do if your editing software will not import the video formats that your camera creates.
3. Split individual clips
Most editing software provides an option to view the clips you have imported and to split them up into smaller units in order to re-combine them later on.
4. Drag footage, titles and images onto the timeline
Arrange text titles, video clips and images on your timeline. Add transitions between them where appropriate, but use transitions sparingly. A simple cross-fade or cut between clips is usually preferable to transitions that make clips fly in and out.
5. Render/export your video
Some software will export directly to the Internet, but usually you will want to export to a file on your computer, ready to upload to the Internet later on.
! 22 of 28

10) Editing: Advanced editing
If youʼve planned your video out with a detailed storyboard then you may want to take advantage of some more advanced editing approaches.
Keep it tight:Most video editing software allows you to zoom in on your timeline when cutting between clips, adding transitions and dragging or dropping footage. This is essential when you are working with short clips and regular changes between clips - as you will need to get split-second timing.
You will often find you need to go back over parts of your video to edit them down and tighten up the footage once your first attempt at an edit is complete - as itʼs easy to create a long video, but far harder to edit down to a few minutes for an online video.
Voiceover:Your video editing software may allow you to record a voiceover directly, or you may need to record a separate audio file and add it to the audio track of your video.
If you need to record a separate audio file, then the free and open source Audacity editor available for download from http://audacity.sourceforge.net/ may prove useful.
You can record your voiceover in one go, but you may find it useful to plan in advance and to record in small parts.
Titles:You can add two types of titles to your video:
• Title screens - showing titles against a coloured background or image
• Overlays - where titles are displayed on top of the clip
Make sure you are consistent in the styles you use for titles, and that they are easily readable even on a small screen. When videos are compressed for the Internet then text can become harder to read - so clear and large text is important.
Subtitles:If the audio on a particular interview or piece of footage is hard to hear, or is in a different language, you may wish to add subtitles or a translation on screen.
You can use on screen overlays for this.
For full subtitles for the video you will find many online video sharing services, including YouTube, allow you to add optional subtitles which the viewer can switch on or off.
!! 23 of 28

Stock footage:Engaging online videos often cut between different clips at a rapid rate. It is not uncommon to be shown 10 or 15 different ʻscenesʼ in one minute of video.
Instead of going out to film all the different clips you might need (many of which you might only use 2 or 3 seconds of), you can use a public domain or stock footage resource.
Public domain footage, or footage under permissive copyright licences like ʻcreative commonsʼ can usually be used for free in clips that you create.
With royalty free stock footage you may pay once to get hold of the clips, but you do not have to pay royalties every time you use them.
To use stock footage:
1. Think creatively about the sort of clips you need. The exact image you have in mind may not be available, so you need to be flexible;
2. Go to one of the websites listed below and search on key words to help you find suitable clips;
3. View any possible clips. Pay attention to any copyright conditions or terms of use;4. Download the clips that you think you can use; 5. Make a note of the source of any clips you download – youʼll need to add this to your
credits on your clip. 6. Import the clips into your editing software and splice them into the mix;7. Make sure you add credits to the end of your film to acknowledge the creators of any
clips you have used.
Five stock footage resources
1) The Internet Archive: http://www.archive.org/details/movies The Internet Archive host 100s of public domain and out-of-copyright films and clips for you to search, download and use.
2) US National Archives: http://video.google.com/nara.html Clips from the US Government and NASA, including lots of old newsreel footage.
3) VJVault.com: http://www.vjvault.com VJ clip libraries are great places to find very short, often impressionistic, clips to use.
4) Blip.tv: http://spinxpress.com/getmedia Blip.tv is a video sharing site which allows creative commons video to be shared. SpinXPress offers a search interface making it easier to find video content from blip.tv.
5) Flickr.com Creative Commons: http://www.flickr.com In the advanced search options you can find creative commons videos and photos. Videos are in flash format, so you’ll need a tool like TubeTV (mac) or AnyVideoConverter (PC) to download them.
Echo Park Film Center by Markschoneveld - CC BY-NC - http://www.flickr.com/photos/51683598@N00/258477446
!
! 24 of 28

Music: Music can really add to a video clip - particularly at the start and end and in scene-setting shots. You need to make sure you have rights to any music that you choose to use.
There are many websites that provide ʻCreative Commonsʼ and ʻPublic Domainʼ music that you are free to re-use without copyright restrictions. The search engine at http://search.creativecommons.org/ is a good place to start, and searching for ʻCreative Commons Musicʼ or ʻPublic Domain Musicʼ can also help you track down tracks you can use.
Alternatively, local unsigned bands (search on MySpace Music for your local area to find some) might be willing to allow you to use a music track in the right contexts.
Short extracts of music playing the background during a session are acceptable ʻfair useʼ of copyright material but you should be careful if you have filmed a long clip which includes copyright music or video in the foreground or background.
! 25 of 28

11) Publishing: Putting in it online
There are two steps to sharing your video: exporting a video file, and uploading it to a video hosting service.
Exporting the video fileWhen you select ʻSaveʼ in your editing software you are only saving the instructions (the ʻrecipeʼ) for your edit. You will need to tell your software when you are ready to create a final video for sharing.
Your video editing software help files will have details of how to create a final edited video. Usually this is under an ʻExportʼ, ʻMake movieʼ or ʻRender videoʼ menu option.
If you are creating a video to be shared on the Internet then you normally want to choose a file format which will generate relatively small file sizes: between 10Mb and 100Mb. Your software may give you an estimate of the final video file size, or you may need to try different options and check the file-size when you have exported your video.
Your software may offer the option to upload directly to the Internet. You should usually ignore this and save the completed video file to your computerʼs hard disk or to a memory stick.
Uploading to another video hosting serviceThere are many free video hosting services. You upload your video to these services and they convert it into a standard ʻFlash Videoʼ which can be displayed on most types of computer.
Most people know YouTube, but there are many different video hosting services as well, including:
• YouTube.com - YouTube is the largest video sharing service and is a good platform for getting widespread attention for your video.
When uploading videos to YouTube you will need to decide if you want to allow comments on your videos or not. You cannot control the related videos that display next to your clip: although as these are affected by the name and keywords of your video you can sometimes make changes if unsuitable related videos are displayed.
You can add annotations to your YouTube videos (e.g. text boxes and links) and YouTube have an automatic sync tool for adding subtitles.
• Blip.tv - Blip keep the originals of your video available for download, and will automatically distribute your video to other services if you request.
Blip will allow you to create playlists and custom video players for
! 26 of 28
Video formatsYour software may export in different formats. Four possible formats (in order of preference) are show below:
MPEG Video!! .mp4Quicktime ! ! .movWindows Media! .wmvAVI! ! ! .avi
embedding in your own website, and you can turn off the display of related videos alongside your clips.
You can upload subtitles (Closed Captions) for your video on Blip.tv by selecting ʻAnother formatʼ when editing your video.
Make sure you turn off advertising and revenue sharing from your videos.
• Vimeo.com - Vimeo focus on high quality (HD) video.
You can password protect videos on Vimeo so that visitors need to enter the password before viewing your video.
You will need to register with your video sharing service of choice, before following their instructions on how to upload your video.
Your video may take a while to upload depending on your Internet connection speed, and it will usually take a short while to be converted to flash video before it is available to view.
Remember: Only upload videos to the Internet when you have consent to do so.
Embedding videos:Video hosting services allow you to embed your video in other websites. Look for the ʻEmbed Codeʼ option. Copy this code and paste it into any site that allowed embedded videos.
Captions:To make your video accessible to those with hearing impairments you should consider including subtitle captions. Most video sharing services will allow you to upload a subtitle / closed captions file. Check the help files or video options when uploading.
YouTube will estimate the timings of titles if you upload a word-for-word transcript of your video, however, most services require a Timed Titles file. The common formats for these files are .tt and .srt. You can find freeware caption editors for download for most operating systems.
Subtitle Horse (http://www.subtitle-horse.com/) is a browse-based subtitle editor which will work with Blip.tv. Paste in the address of your video on Blip.tv and then create and save the resulting .srt sub title file. Upload this as an additional ʻClosed Captionsʼ format for your video. You may need to re-upload the original video file for it to properly display.
! 27 of 28
12) Find more support
On the wider webYou will find many online tutorials and guides on video making.
Once you have decided upon the software and equipment you are using you may find it useful to search the web for any online communities linked to your chosen software or equipment.
The YouthWorkOnline network at http://www.youthworkonline.org.uk has active forums where you are welcome to post questions about topics in this guide.
! 28 of 28