Embed Size (px)
Citation preview

Resource: Module 3.1: Introduction to Shading
Supplies: paper, 2H, HB, 2B, 4B, and 6B pencils, pencil sharpener, sandpaper block, vinyl and kneaded erasers, ruler, blending tool
This activity has three sections: • Bring Contours to Paper• Shade Forms• Add Texture
Bring Contours to PaperThe goal of the preliminary outline is to lightly render the shape of the arrow proportionally correct.
1. Use an HB pencil and press lightly to outline the arrowhead (Figures 1 and 2).
ISBN: 978-1-927539-91-0Copyright © 2013 Drawspace Publishing and Brenda Hoddinott. All rights reserved. No part of this publication may be reproduced, stored in a retrieval system, transferred, or transmitted in any form or by any means, including
electronic, digital, mechanical, recording, photographing, photocopying, or otherwise, without the purchase of a licence from drawspace.com or the prior written consent of Brenda Hoddinott and Drawspace Publishing.
Shade a Medieval Arrowhead
Use diverse shading techniques to capture the three-dimensional forms and the dull, weathered, metal texture of an arrowhead
Flesch-Kincaid Grade Level: 7.2Flesch-Kincaid Reading Ease: 63.4Drawspace Curriculum 3.2.A9 - 6 Pages and 12 Illustrations
Figure 1
This drawing of a replica medieval arrowhead (not a real antique) is rendered from life. The light source (a lamp) shines directly on the upper-right part of the object from the front.
Tip!
The frontal view of this arrowhead is relatively symmetrical (except for its bumps and dents). Use a ruler to draw a straight line down the center of your page before you begin to draw. The lightly-rendered symmetry line isn’t visible in the illustrations.
Tip!

2 Drawspace Curriculum 3.2.A9
ISBN: 978-1-927539-91-0Copyright © 2013 Drawspace Publishing and Brenda Hoddinott. All rights reserved. No part of this publication may be reproduced, stored in a retrieval system, transferred, or transmitted in any form or by any means, including
electronic, digital, mechanical, recording, photographing, photocopying, or otherwise, without the purchase of a licence from drawspace.com or the prior written consent of Brenda Hoddinott and Drawspace Publishing.
Figure 3Figure 2
These preliminary lines will be lightened, erased, and/or covered with shading – so nobody will know if you use a ruler!
2. Outline the ridge down the center of the upper section (Figure 3).
Continually peek ahead to the fi nal drawing in Figure 11 to better understand what you are outlining.
3. Outline the shapes of some sections of shading as a simple value map.
Shade Forms 4. Use diagonal hatching lines to
bring out the basic forms of the arrowhead (Figures 4 and 5).
A 2H or HB pencil works well for light values (Figure 4).
The texture of the arrowhead is rendered with a combination of hatching, crosshatching, squirkling, stippling, a kneaded eraser, and a blending tool.
As an Aside
If you are using regular pencils, sharpen the pencil points with a sharpener and/or sandpaper block after each section of shading is added.
Tip!
Photo references are rarely as reliable as drawing from life. If, however, the object isn’t available to draw from life, make sure your reference photos capture the object from every possible angle. Also be sure to take numerous close-ups of the detailed sections so you’re not left guessing which parts connect to what and how!
Tip!

5. Cross over the hatching lines with HB and 2B pencils to darken some areas of shading (Figure 6).
ISBN: 978-1-927539-91-0Copyright © 2013 Drawspace Publishing and Brenda Hoddinott. All rights reserved. No part of this publication may be reproduced, stored in a retrieval system, transferred, or transmitted in any form or by any means, including
electronic, digital, mechanical, recording, photographing, photocopying, or otherwise, without the purchase of a licence from drawspace.com or the prior written consent of Brenda Hoddinott and Drawspace Publishing.
3Drawspace Curriculum 3.2.A9
Figure 6
Figure 5Figure 4 Medium values are added with freshly sharpened HB and 2B pencils (Figure 5).
As you work, focus on the broad range of values that exist in between the darks and the lights. Very light and very dark values are fairly easy to achieve; the real challenge is creating medium values.
Tip!
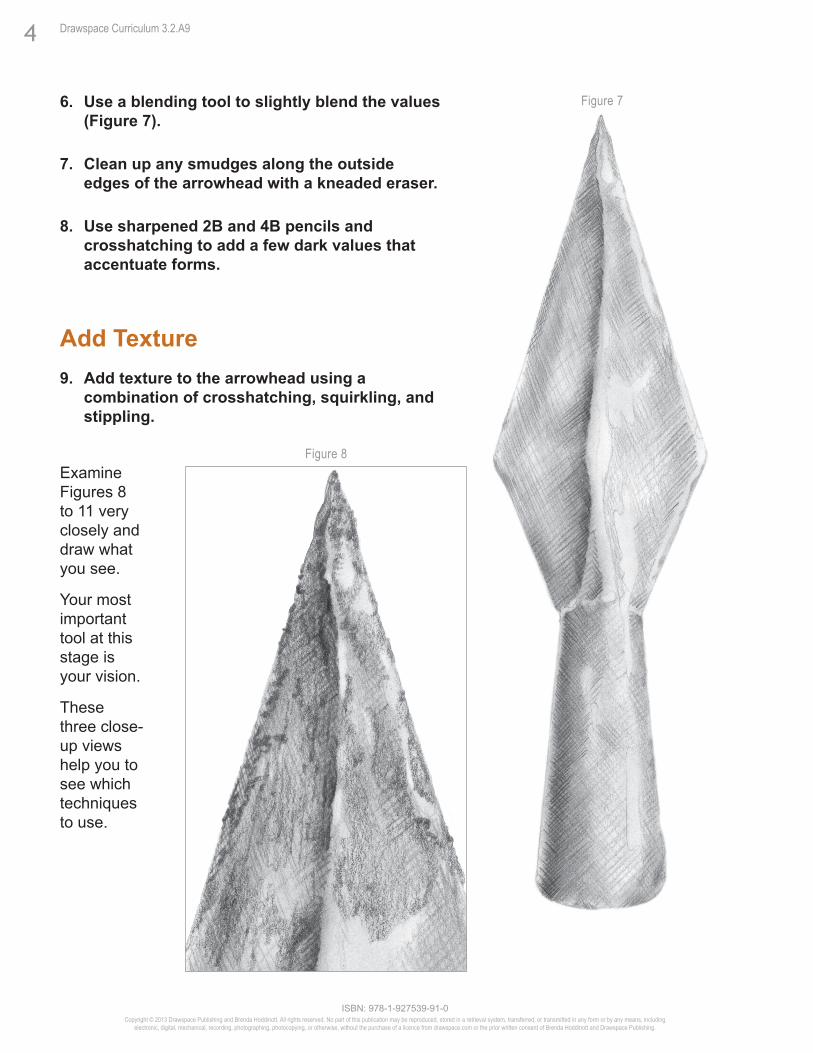
Examine Figures 8 to 11 very closely and draw what you see.
Your most important tool at this stage is your vision.
These three close-up views help you to see which techniques to use.
ISBN: 978-1-927539-91-0Copyright © 2013 Drawspace Publishing and Brenda Hoddinott. All rights reserved. No part of this publication may be reproduced, stored in a retrieval system, transferred, or transmitted in any form or by any means, including
electronic, digital, mechanical, recording, photographing, photocopying, or otherwise, without the purchase of a licence from drawspace.com or the prior written consent of Brenda Hoddinott and Drawspace Publishing.
6. Use a blending tool to slightly blend the values (Figure 7).
7. Clean up any smudges along the outside edges of the arrowhead with a kneaded eraser.
8. Use sharpened 2B and 4B pencils and crosshatching to add a few dark values that accentuate forms.
Add Texture 9. Add texture to the arrowhead using a
combination of crosshatching, squirkling, and stippling.
4 Drawspace Curriculum 3.2.A9
Figure 7
Figure 8
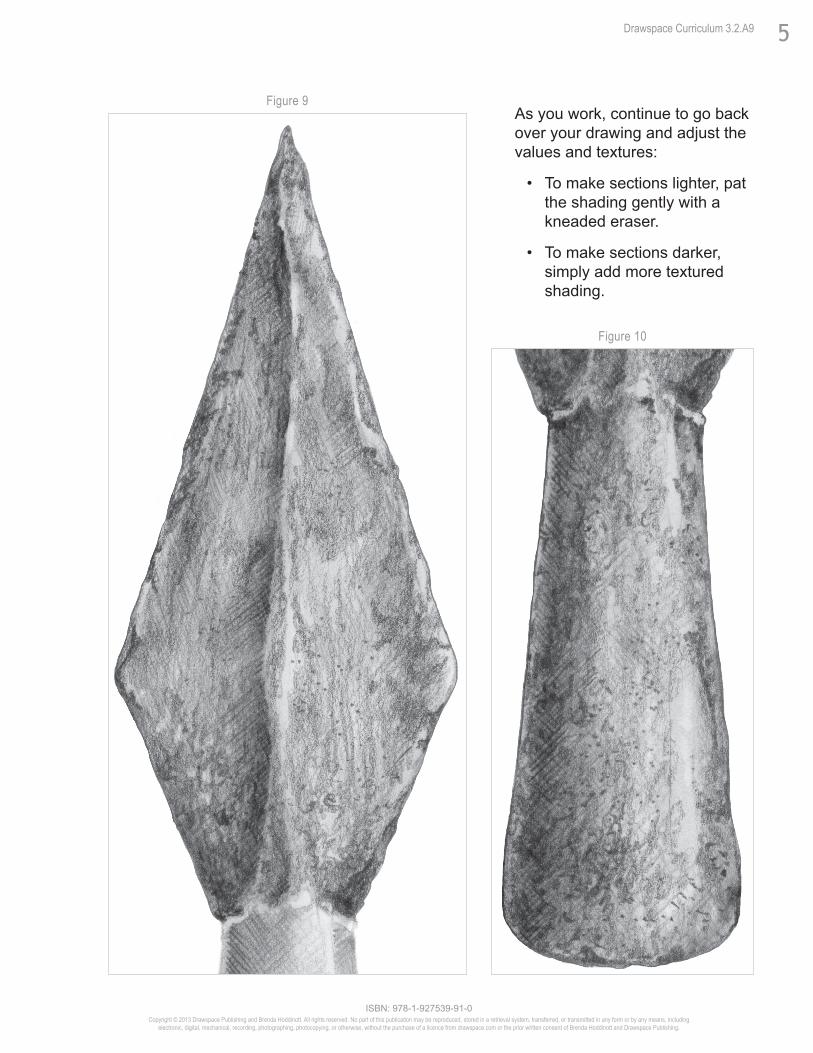
Figure 9
ISBN: 978-1-927539-91-0Copyright © 2013 Drawspace Publishing and Brenda Hoddinott. All rights reserved. No part of this publication may be reproduced, stored in a retrieval system, transferred, or transmitted in any form or by any means, including
electronic, digital, mechanical, recording, photographing, photocopying, or otherwise, without the purchase of a licence from drawspace.com or the prior written consent of Brenda Hoddinott and Drawspace Publishing.
Figure 10
5Drawspace Curriculum 3.2.A9
As you work, continue to go back over your drawing and adjust the values and textures:
• To make sections lighter, pat the shading gently with a kneaded eraser.
• To make sections darker, simply add more textured shading.

ISBN: 978-1-927539-91-0Copyright © 2013 Drawspace Publishing and Brenda Hoddinott. All rights reserved. No part of this publication may be reproduced, stored in a retrieval system, transferred, or transmitted in any form or by any means, including
electronic, digital, mechanical, recording, photographing, photocopying, or otherwise, without the purchase of a licence from drawspace.com or the prior written consent of Brenda Hoddinott and Drawspace Publishing.
6 Drawspace Curriculum 3.2.A9
Stay away from strong highlights when you want to capture dull, weathered-looking metal surfaces. The surface of this arrowhead is not only dull, but also uneven and dented as a result of being made with primitive metalworking tools (Figure 11). However, if you want to depict a slightly shiny version of a metal arrowhead, you can pull out a few highlights with erasers (Figure 12).
Tip!
Figure 11
Figure 12 10. Use horizontal hatching lines to render the cast shadow (Figure 11).
The dark values of the cast shadow graduate from very dark close to the arrowhead to lighter farther away.
Sign and date your drawing, and give yourself a big hug!