Embed Size (px)
Citation preview
Set up guide for Floor Clocks
Page 1
OWNERS MANUALCONTENTS
Tools you will need 2Unpacking the carton 2Choosing a location 2Unpacking the clock 3Unpacking the movement and chimes 3Puffing the clock into operation 4The pendulum 5Hanging the pendulum 5Attaching the weights 6Attaching the finial 6Starting the pendulum swing 7Setting the time 8Setting the moving moon 8The story of the moving moon dial 9Winding the clock 10Regulation (fast/slow) 12Suspension spring replacement 14Synchronisation, hour strike 14Minute hand adjustment 15Chime selection 15Identification of dial parts 16Answers to your questions about the chimes 17Chimes, history of 18Chimes, music 18Moving your clock 20Care tips for the cabinet 20Care tips for the movement 20A little poetry 21
Page 2
TOOLS YOU WILL , NEED FOR SETTING UP YOUR CLOCK
1. Cotton Gloves of soft cloth (to use when handling brass parts ofyour clock.
2. A Helper (for safety's sake.
UNPACKING THE CARTON1. The weights for your clock are packed at the base of the clock.
Be careful when removing and handling the weights, as they areextremely heavy.
2. The Pendulum is packed in a separate carton and located on theside of the clock
3. The Tubes (if you order your clock with the tubular bellmovement) they are packed in a separate carton and will belocated behind the clock.
4. The Final(hood ornament ), if your clock has one, is packed in abox located on top of the clock.
5. The Winding Crank (on cable driven clocks only) is in the box ontop of the clock.
6. The Door Key will be taped to the front of the clock.
CHECK THE PACKING CAREFULLY BEFORE DISCARDING SO YOU WON'T ACCIDENTLYTHROW AWAY ANY OF THE PARTS OF YOUR CLOCK. SET THESE PARTS ASIDE ANDUSE AS INSTRUCTED IN THE FOLLOWING SET UP PROCEDURE.
CHOOSING A LOCATION FOR YOUR CLOCK
When choosing a location for your clock there are several situations orconditions you should consider:
1. Avoid placing the cabinet in direct sunlight. The portion of thecabinet that receives the most exposure may lighten or otherwisedistort the finish.
2. Avoid placing the clock directly in front of or below a heatingor air conditioning vent. Since there is a certain amount of dustas well as hot or cold air blown through the vents, you will findthat your clock needs to be cleaned and lubricated morefrequently in order to operate correctly.
3. The volume of the chimes will be affected by the size andfurnishings in a room. A clock placed in an uncarpeted foyer forinstance would be much louder than the same clock placed in roomwith plush carpet and heavy drapes.
4. When possible, avoid heavy traffic areas, especially if smallchildren are in the home. This will prevent possible injury tothe child or damage to the clock.
Page 3
UNPACKING THE CLOCK
For safety's sake, (yours and your clock’s) 2 people are suggested tohandle set up.
1. After removing the clock from the carton, set it near it's permanentlocation.
2. Tilt the clock to make sure the four glide levellers located on eachcomer of the base move freely. You will adjust the glides when youmove the clock to its permanent position.
CAUTION. YOUR CLOCK IS EXTREMELY HEAVY AND CARE SHOULD BE TAKEN WHENTILTING.
UNPACKING THE MOVEMENT AND THE CHIMES
There are 3 different types of packing methods used. Select theinstruction that matches your clock.
1. Tubular Bell Movement:A) Unhook the rubber band holding the Pendulum leader.B) Remove wood hammer retainer bar.C) Unscrew red screw (left side of clock) This is only used to
secure the movement during shipping.2. Chime Rod Movement:A) Remove the masking tape from the Chime Hammers.B) Unhook the rubber band holding the Pendulum leader.C) The Cardboard packing for the chime rods should be slid down the
chime rode and removed.D) Remove rubber bands securing the 3 cable pulleys, or chain to the
door hinge.
SET CLOCK IN PERMANENT LOCATION
Move the clock to it's permanent location and level the clock (usingthe glide levellers on the base). You may use a spirit (bubble) levelto make this adjustment but it is not necessary. You should make surethe clock is resting firmly on all four levellers and is "sight" level,as viewed from the front and side. If your clock is placed on plushcarpet you may need to re-level the clock after it 'settles".
Page 4
PUTTING THE CLOCK INTO OPERATION
ADJUST THE CHIME HAMMERS ON THE TUBULAR BELL MQVEMENT.
ADJUSTING THE CHIME HAMMERS ON THE CHIME ROD MOVEMENT.
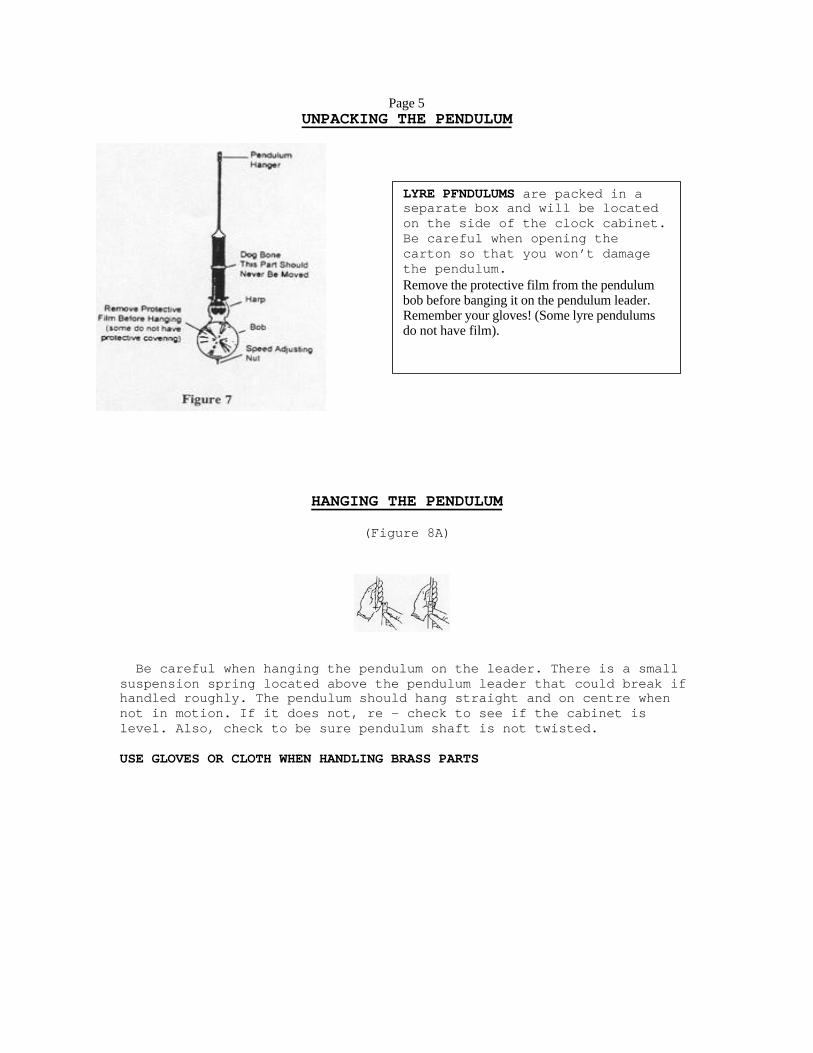
Each Hammer shouldrest approximately 1/8inch from the chimetube. This distance canbe changed by turningthe adjusting screw asshown in figure 5.
Each hammer should restapproximately 1/8 inchfrom chime rod. Checkto make sure eachhammer hits the chimerod squarely, if itdoes not, bend the stemof the hammer gentlyuntil it is in thecorrect position. (SeeFigure 6)
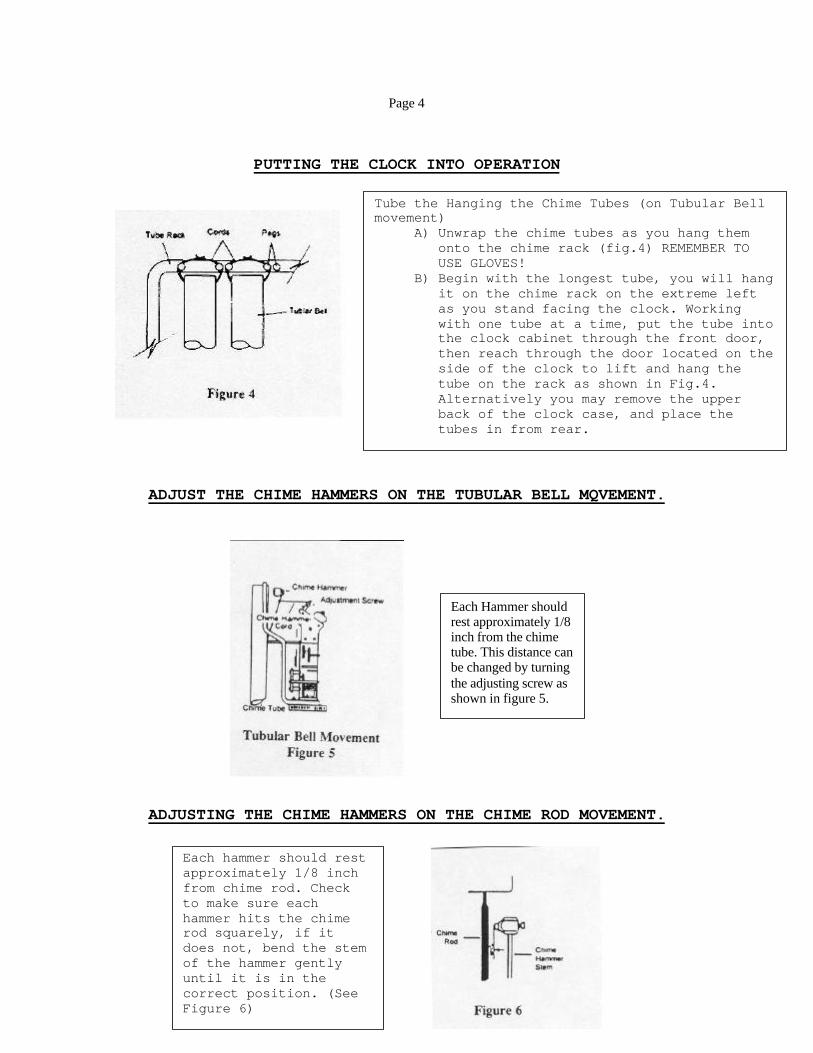
Tube the Hanging the Chime Tubes (on Tubular Bellmovement)
A) Unwrap the chime tubes as you hang themonto the chime rack (fig.4) REMEMBER TOUSE GLOVES!
B) Begin with the longest tube, you will hangit on the chime rack on the extreme leftas you stand facing the clock. Workingwith one tube at a time, put the tube intothe clock cabinet through the front door,then reach through the door located on theside of the clock to lift and hang thetube on the rack as shown in Fig.4.Alternatively you may remove the upperback of the clock case, and place thetubes in from rear.
Page 5UNPACKING THE PENDULUM
HANGING THE PENDULUM
(Figure 8A)
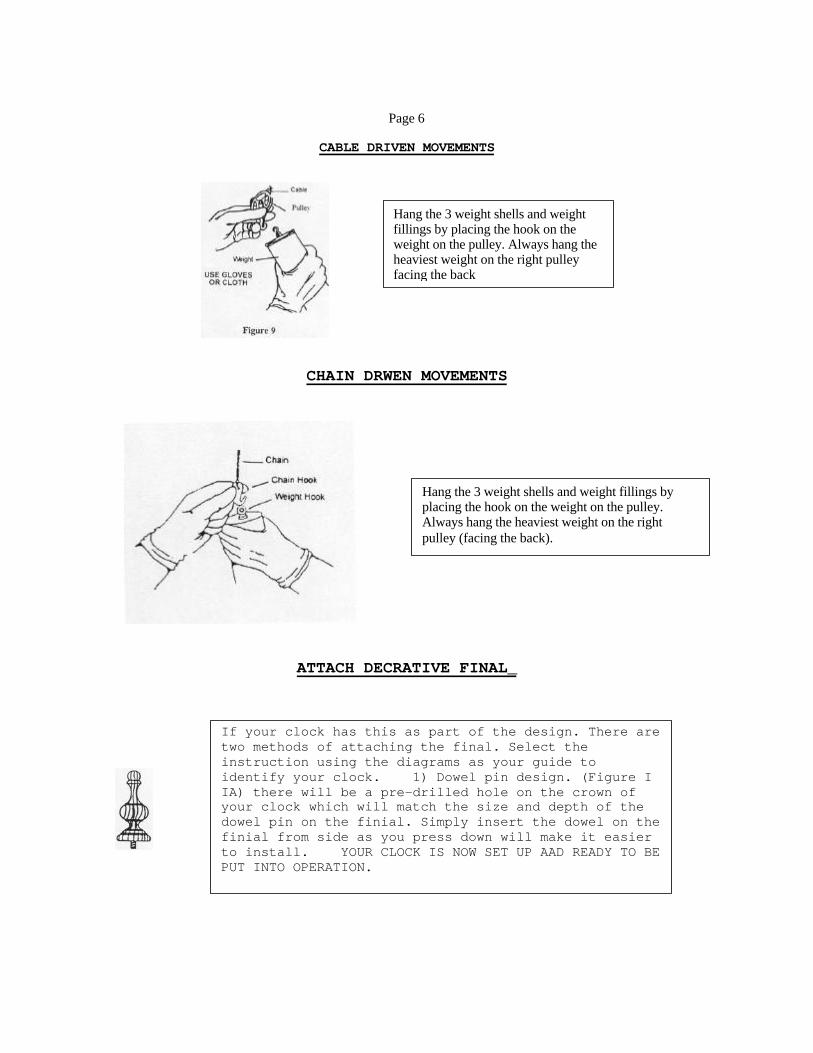
Be careful when hanging the pendulum on the leader. There is a smallsuspension spring located above the pendulum leader that could break ifhandled roughly. The pendulum should hang straight and on centre whennot in motion. If it does not, re - check to see if the cabinet islevel. Also, check to be sure pendulum shaft is not twisted.
USE GLOVES OR CLOTH WHEN HANDLING BRASS PARTS
LYRE PFNDULUMS are packed in aseparate box and will be locatedon the side of the clock cabinet.Be careful when opening thecarton so that you won’t damagethe pendulum.Remove the protective film from the pendulumbob before banging it on the pendulum leader.Remember your gloves! (Some lyre pendulumsdo not have film).
Page 6
CABLE DRIVEN MOVEMENTS
CHAIN DRWEN MOVEMENTS
ATTACH DECRATIVE FINAL_
Hang the 3 weight shells and weightfillings by placing the hook on theweight on the pulley. Always hang theheaviest weight on the right pulleyfacing the back
If your clock has this as part of the design. There aretwo methods of attaching the final. Select theinstruction using the diagrams as your guide toidentify your clock. 1) Dowel pin design. (Figure IIA) there will be a pre-drilled hole on the crown ofyour clock which will match the size and depth of thedowel pin on the finial. Simply insert the dowel on thefinial from side as you press down will make it easierto install. YOUR CLOCK IS NOW SET UP AAD READY TO BEPUT INTO OPERATION.
Hang the 3 weight shells and weight fillings byplacing the hook on the weight on the pulley.Always hang the heaviest weight on the rightpulley (facing the back).
Page 7
START PENDULUM SWING
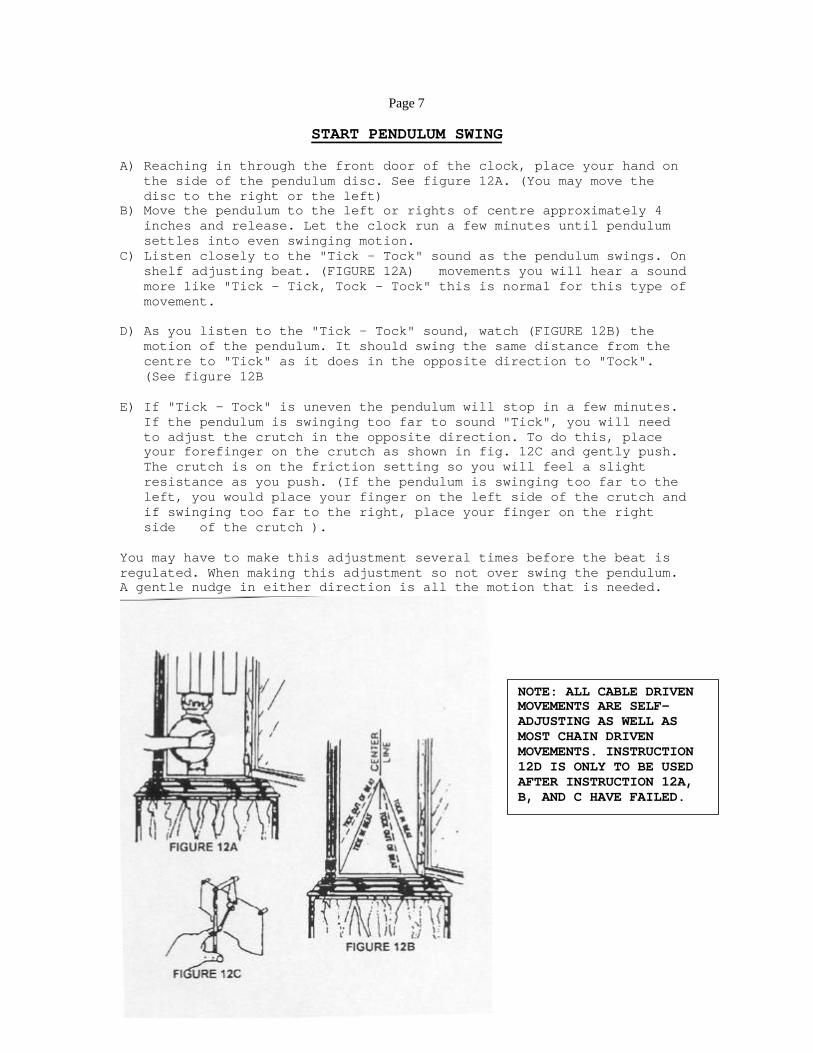
A) Reaching in through the front door of the clock, place your hand onthe side of the pendulum disc. See figure 12A. (You may move thedisc to the right or the left)
B) Move the pendulum to the left or rights of centre approximately 4inches and release. Let the clock run a few minutes until pendulumsettles into even swinging motion.
C) Listen closely to the "Tick - Tock" sound as the pendulum swings. Onshelf adjusting beat. (FIGURE 12A) movements you will hear a soundmore like "Tick - Tick, Tock - Tock" this is normal for this type ofmovement.
D) As you listen to the "Tick - Tock" sound, watch (FIGURE 12B) themotion of the pendulum. It should swing the same distance from thecentre to "Tick" as it does in the opposite direction to "Tock".(See figure 12B
E) If "Tick - Tock" is uneven the pendulum will stop in a few minutes.If the pendulum is swinging too far to sound "Tick", you will needto adjust the crutch in the opposite direction. To do this, placeyour forefinger on the crutch as shown in fig. 12C and gently push.The crutch is on the friction setting so you will feel a slightresistance as you push. (If the pendulum is swinging too far to theleft, you would place your finger on the left side of the crutch andif swinging too far to the right, place your finger on the rightside of the crutch ).
You may have to make this adjustment several times before the beat isregulated. When making this adjustment so not over swing the pendulum.A gentle nudge in either direction is all the motion that is needed.
NOTE: ALL CABLE DRIVENMOVEMENTS ARE SELF-ADJUSTING AS WELL ASMOST CHAIN DRIVENMOVEMENTS. INSTRUCTION12D IS ONLY TO BE USEDAFTER INSTRUCTION 12A,B, AND C HAVE FAILED.
Page 8
SETTING THE TIME
A) Put clock in silent position.B) Set the clock to the correct time by moving the minute (longest)
hand clockwise or counter - clockwise whichever is moreconvenient. Move the hand slowly and evenly. Avoid touching thehour shortest) hand and accidentally moving it as you set thetime.
C) Reset chimes to desired selection.
ALLOW THE CLOCK TO OPERATE, FOR AT LEAST 1 TO 2 HOURS BEFORE MAKING ANYADDITIONAL ADJUSTMENTS TO THE TIME. If, at the end of 2 hours, theclock strikes the incorrect number of times on the hour, see theadjustment for synchronisation.
SETTING THE MOVING MOON
The moon dial corresponds with the lunar month and not the calendarmonth. As long as the clock operates continuously, the moon dial willfollow the moon through its phases automatically. If the clock stopsyou will need to reset the moon dial.
CAUTION: IF YOU ATTEMPT TO SET THE MOON AND IT DOES NOT MOVE EASILY,WAIT! THE MOON IS IN THE PROCESS OF MAKING A CHANGE. IT USUALLY TAKESABOUT 6 - 8 HOURS FOR THE CHANGE To BE COMPLETED.YOU WILL NEED TO WAITA FEW HOURS AND ATTEMPT TO SET THE MOON AGAIN.
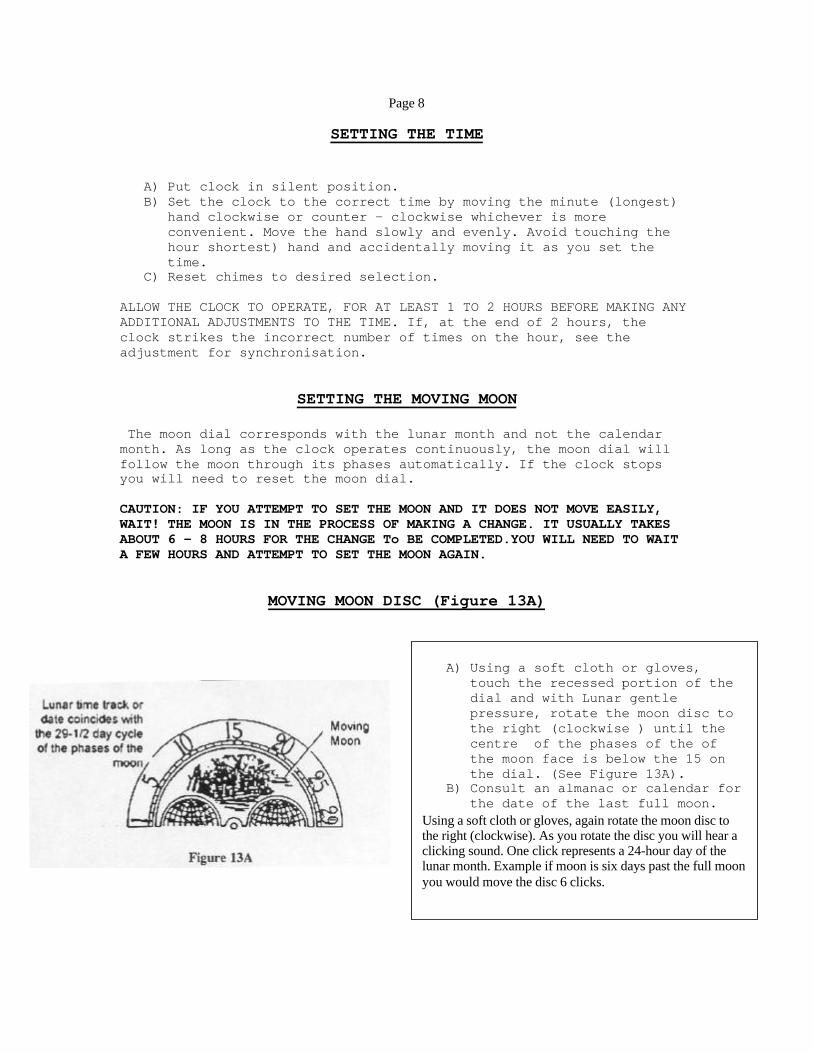
MOVING MOON DISC (Figure 13A)
A) Using a soft cloth or gloves,touch the recessed portion of thedial and with Lunar gentlepressure, rotate the moon disc tothe right (clockwise ) until thecentre of the phases of the ofthe moon face is below the 15 onthe dial. (See Figure 13A).
B) Consult an almanac or calendar forthe date of the last full moon.
Using a soft cloth or gloves, again rotate the moon disc tothe right (clockwise). As you rotate the disc you will hear aclicking sound. One click represents a 24-hour day of thelunar month. Example if moon is six days past the full moonyou would move the disc 6 clicks.
Page 9
THE STORY OF THE MOVINING MOON DIAL
One of the most frequently asked questions of new clock owners is 'Whatis the purpose of the moon dial and what do the picture or symbolsstand for"? The question itself tells us just how far our world hasadvanced.
Today it is difficult for us to realise just how important the ever-changing phases of the moon were in times gone by. In the late 17thcentury, the moon dial was added to most long case clocks so peoplecould plan ahead for when the moon was full and travel at night was notso hazardous. Clock masters endeavoured to simulate and approximate theappearance of the moon in the heavens, on the face of clocks.
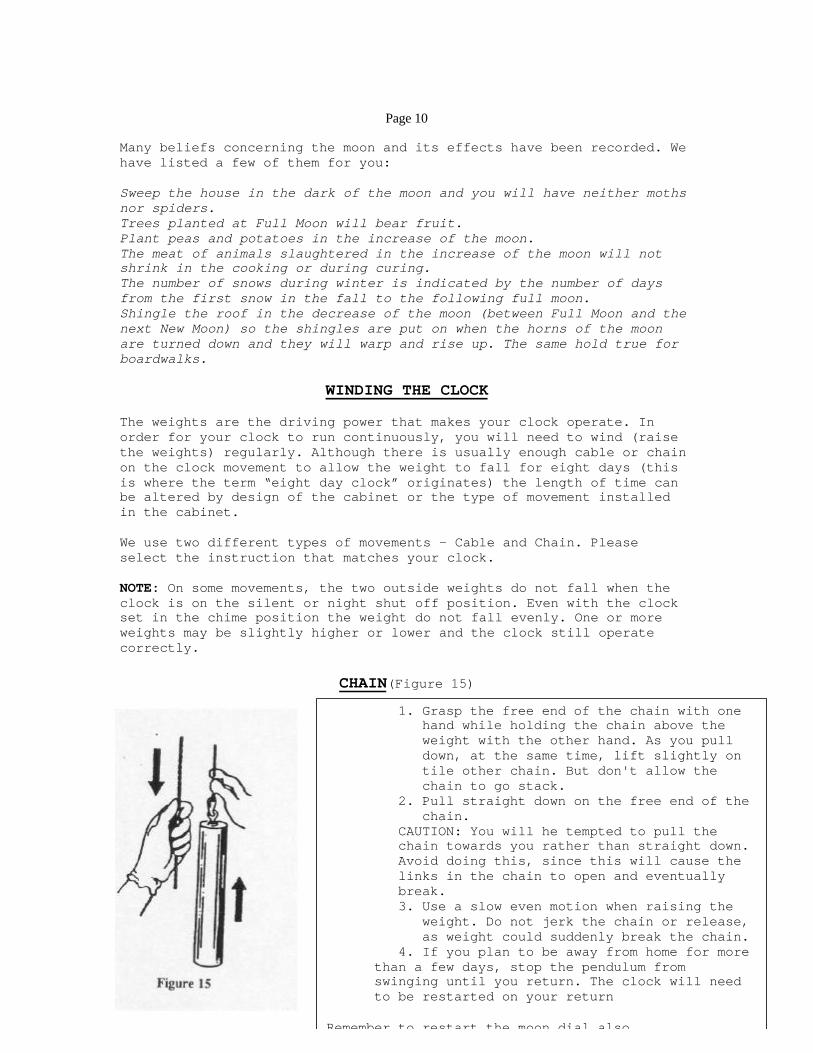
The arched dial was first used in clocks in the beginning of the 18thcentury and presented a real challenge to the makers of fine clocks. Inapproximately 1720, moving figures which moved back and forth with theswing of the pendulum. They used prancing deer, rocking ships, andFather Time with his scythe. At the time there was no practical valueof this feature on the clock; it was simply a pleasing way of showingmotion and life. After motion had been added in the arch above thedial, the next step was to reproduce the progress of the moon fromphase to phase. The proverbial Man in the Moon “Man in the Moon” wasused on most dials with a landscape and/or seascape on the other halfof the circle - symbols of sea - the rocking ship, and of land - thedeer.
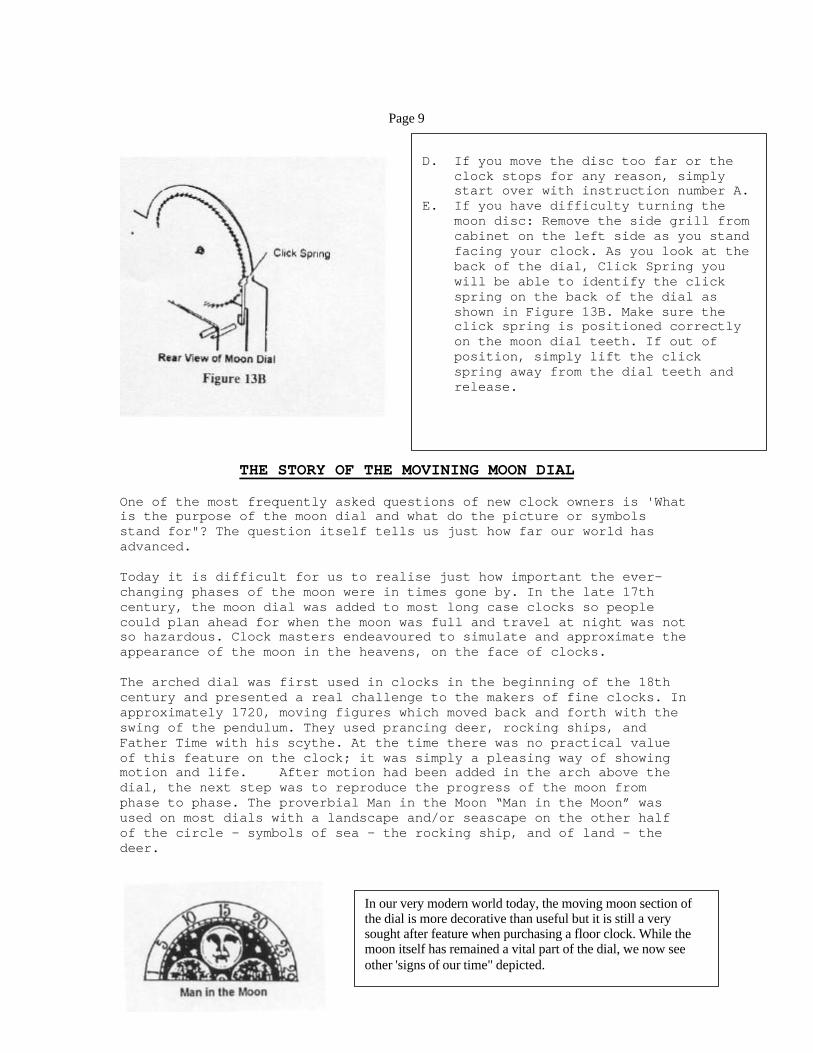
D. If you move the disc too far or theclock stops for any reason, simplystart over with instruction number A.
E. If you have difficulty turning themoon disc: Remove the side grill fromcabinet on the left side as you standfacing your clock. As you look at theback of the dial, Click Spring youwill be able to identify the clickspring on the back of the dial asshown in Figure 13B. Make sure theclick spring is positioned correctlyon the moon dial teeth. If out ofposition, simply lift the clickspring away from the dial teeth andrelease.
In our very modern world today, the moving moon section ofthe dial is more decorative than useful but it is still a verysought after feature when purchasing a floor clock. While themoon itself has remained a vital part of the dial, we now seeother 'signs of our time" depicted.
Page 10
Many beliefs concerning the moon and its effects have been recorded. Wehave listed a few of them for you:
Sweep the house in the dark of the moon and you will have neither mothsnor spiders.Trees planted at Full Moon will bear fruit.Plant peas and potatoes in the increase of the moon.The meat of animals slaughtered in the increase of the moon will notshrink in the cooking or during curing.The number of snows during winter is indicated by the number of daysfrom the first snow in the fall to the following full moon.Shingle the roof in the decrease of the moon (between Full Moon and thenext New Moon) so the shingles are put on when the horns of the moonare turned down and they will warp and rise up. The same hold true forboardwalks.
WINDING THE CLOCK
The weights are the driving power that makes your clock operate. Inorder for your clock to run continuously, you will need to wind (raisethe weights) regularly. Although there is usually enough cable or chainon the clock movement to allow the weight to fall for eight days (thisis where the term “eight day clock” originates) the length of time canbe altered by design of the cabinet or the type of movement installedin the cabinet.
We use two different types of movements - Cable and Chain. Pleaseselect the instruction that matches your clock.
NOTE: On some movements, the two outside weights do not fall when theclock is on the silent or night shut off position. Even with the clockset in the chime position the weight do not fall evenly. One or moreweights may be slightly higher or lower and the clock still operatecorrectly.
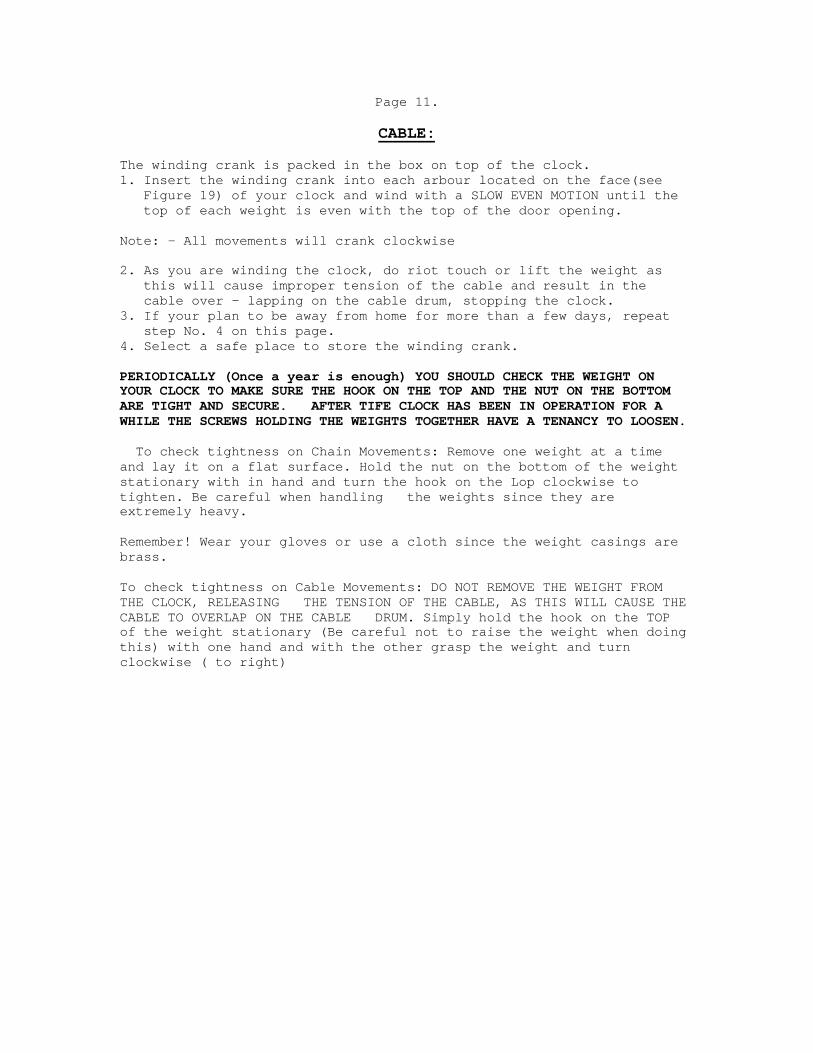
CHAIN(Figure 15)
1. Grasp the free end of the chain with onehand while holding the chain above theweight with the other hand. As you pulldown, at the same time, lift slightly ontile other chain. But don't allow thechain to go stack.
2. Pull straight down on the free end of thechain.
CAUTION: You will he tempted to pull thechain towards you rather than straight down.Avoid doing this, since this will cause thelinks in the chain to open and eventuallybreak.3. Use a slow even motion when raising the
weight. Do not jerk the chain or release,as weight could suddenly break the chain.
4. If you plan to be away from home for morethan a few days, stop the pendulum fromswinging until you return. The clock will needto be restarted on your return
Remember to restart the moon dial also
Page 11.
CABLE:
The winding crank is packed in the box on top of the clock.1. Insert the winding crank into each arbour located on the face(see
Figure 19) of your clock and wind with a SLOW EVEN MOTION until thetop of each weight is even with the top of the door opening.
Note: - All movements will crank clockwise
2. As you are winding the clock, do riot touch or lift the weight asthis will cause improper tension of the cable and result in thecable over - lapping on the cable drum, stopping the clock.
3. If your plan to be away from home for more than a few days, repeatstep No. 4 on this page.
4. Select a safe place to store the winding crank.
PERIODICALLY (Once a year is enough) YOU SHOULD CHECK THE WEIGHT ONYOUR CLOCK TO MAKE SURE THE HOOK ON THE TOP AND THE NUT ON THE BOTTOMARE TIGHT AND SECURE. AFTER TIFE CLOCK HAS BEEN IN OPERATION FOR AWHILE THE SCREWS HOLDING THE WEIGHTS TOGETHER HAVE A TENANCY TO LOOSEN.
To check tightness on Chain Movements: Remove one weight at a timeand lay it on a flat surface. Hold the nut on the bottom of the weightstationary with in hand and turn the hook on the Lop clockwise totighten. Be careful when handling the weights since they areextremely heavy.
Remember! Wear your gloves or use a cloth since the weight casings arebrass.
To check tightness on Cable Movements: DO NOT REMOVE THE WEIGHT FROMTHE CLOCK, RELEASING THE TENSION OF THE CABLE, AS THIS WILL CAUSE THECABLE TO OVERLAP ON THE CABLE DRUM. Simply hold the hook on the TOPof the weight stationary (Be careful not to raise the weight when doingthis) with one hand and with the other grasp the weight and turnclockwise ( to right)
Page 12
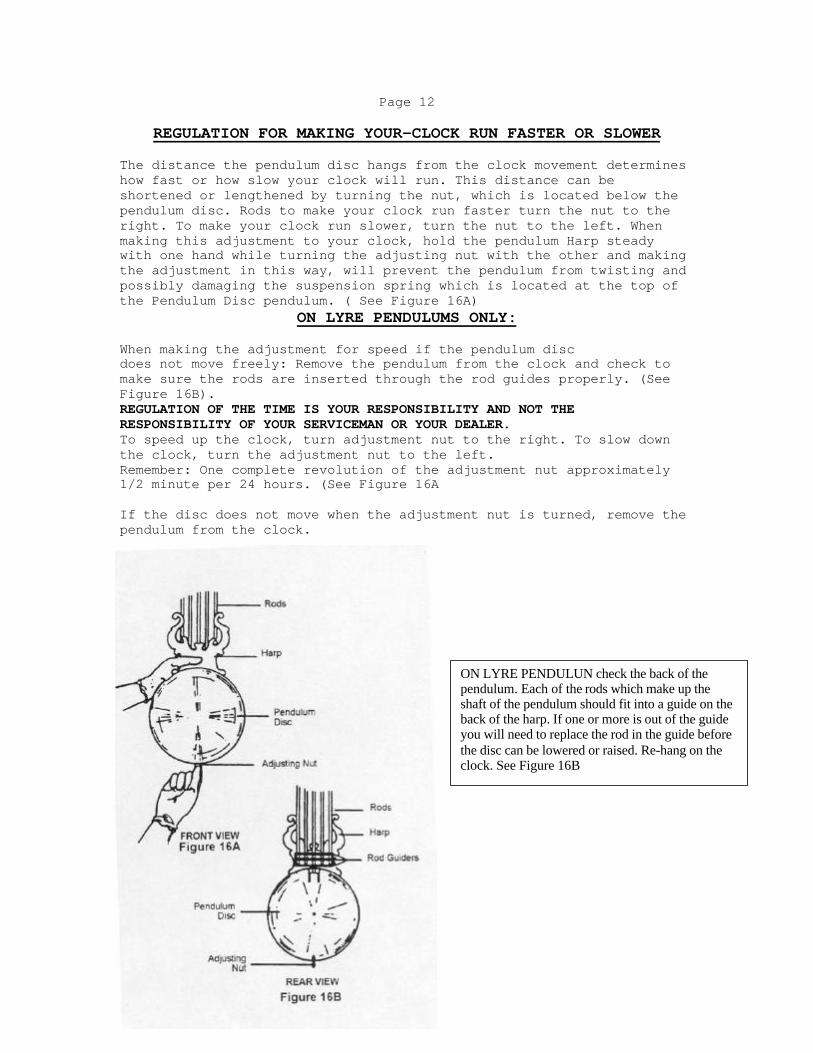
REGULATION FOR MAKING YOUR-CLOCK RUN FASTER OR SLOWER
The distance the pendulum disc hangs from the clock movement determineshow fast or how slow your clock will run. This distance can beshortened or lengthened by turning the nut, which is located below thependulum disc. Rods to make your clock run faster turn the nut to theright. To make your clock run slower, turn the nut to the left. Whenmaking this adjustment to your clock, hold the pendulum Harp steadywith one hand while turning the adjusting nut with the other and makingthe adjustment in this way, will prevent the pendulum from twisting andpossibly damaging the suspension spring which is located at the top ofthe Pendulum Disc pendulum. ( See Figure 16A)
ON LYRE PENDULUMS ONLY:
When making the adjustment for speed if the pendulum discdoes not move freely: Remove the pendulum from the clock and check tomake sure the rods are inserted through the rod guides properly. (SeeFigure 16B).REGULATION OF THE TIME IS YOUR RESPONSIBILITY AND NOT THERESPONSIBILITY OF YOUR SERVICEMAN OR YOUR DEALER.To speed up the clock, turn adjustment nut to the right. To slow downthe clock, turn the adjustment nut to the left.Remember: One complete revolution of the adjustment nut approximately1/2 minute per 24 hours. (See Figure 16A
If the disc does not move when the adjustment nut is turned, remove thependulum from the clock.
ON LYRE PENDULUN check the back of thependulum. Each of the rods which make up theshaft of the pendulum should fit into a guide on theback of the harp. If one or more is out of the guideyou will need to replace the rod in the guide beforethe disc can be lowered or raised. Re-hang on theclock. See Figure 16B
Page 13
REGULATING YOUR CLOCK
Phone Number for Time in your town: __________________
First Day
1. Select a time2. Call TIME3. Reset the minute hand to exact, correct time.
Second day at Same Time
1. Call TIME2. Compare time shown on the clock with correct time. Is the clock
fast or slow?3. Turn the adjustment nut on the bottom of the pendulum
Two complete revolutions for each minute fast or slow.4. Call TIME again.5. Reset the minute hand to the exact, correct time.
Third day at Same Time
1. Repeat second day instructions.2. Repeat for 2, 3 or 4 days until it is right.
If clock is still not correct, check to make sure the pendulum disc(brass round section is actually moving when you turn the adjustmentnut. To make this check, mark the pendulum stick right above the edgeto the disc. Turn the adjustment nut and watch to see if the discmoves.
Page 14
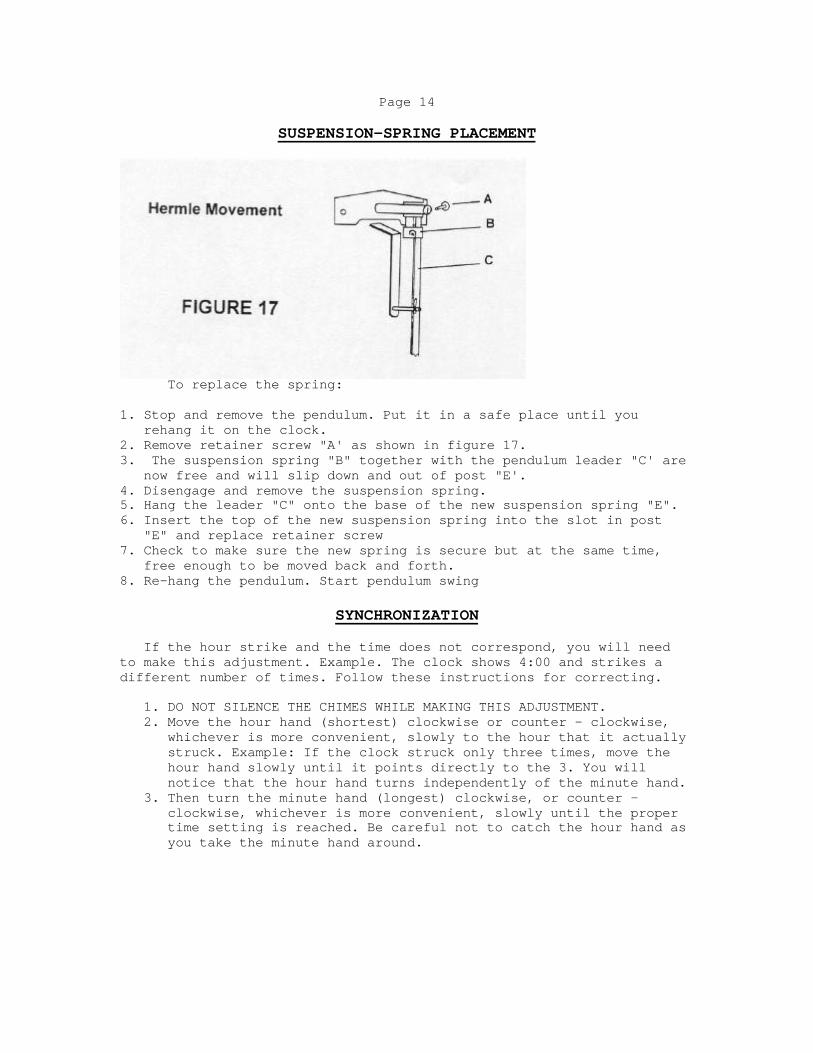
SUSPENSION-SPRING PLACEMENT
To replace the spring:
1. Stop and remove the pendulum. Put it in a safe place until yourehang it on the clock.
2. Remove retainer screw "A' as shown in figure 17.3. The suspension spring "B" together with the pendulum leader "C' are
now free and will slip down and out of post "E'.4. Disengage and remove the suspension spring.5. Hang the leader "C" onto the base of the new suspension spring "E".6. Insert the top of the new suspension spring into the slot in post
"E" and replace retainer screw7. Check to make sure the new spring is secure but at the same time,
free enough to be moved back and forth.8. Re-hang the pendulum. Start pendulum swing
SYNCHRONIZATION
If the hour strike and the time does not correspond, you will needto make this adjustment. Example. The clock shows 4:00 and strikes adifferent number of times. Follow these instructions for correcting.
1. DO NOT SILENCE THE CHIMES WHILE MAKING THIS ADJUSTMENT.2. Move the hour hand (shortest) clockwise or counter - clockwise,
whichever is more convenient, slowly to the hour that it actuallystruck. Example: If the clock struck only three times, move thehour hand slowly until it points directly to the 3. You willnotice that the hour hand turns independently of the minute hand.
3. Then turn the minute hand (longest) clockwise, or counter -clockwise, whichever is more convenient, slowly until the propertime setting is reached. Be careful not to catch the hour hand asyou take the minute hand around.
Page 15
4. The chime and strike will now adjust themselves to the propersequence. It takes approximately 1-2 hours for the movement to re- adjust itself.
Your clock was synchronized for the correct strike prior to beingpackaged for shipment. You will not need to make this adjustment unlessthe hour hand is accidentally moved while setting the time.
REMEMBER: This is not the adjustment for the time (fast/slow)regulation. This adjustment is needed only if your clock strikes theincorrect number of times on the hour, and is off even hour(s).
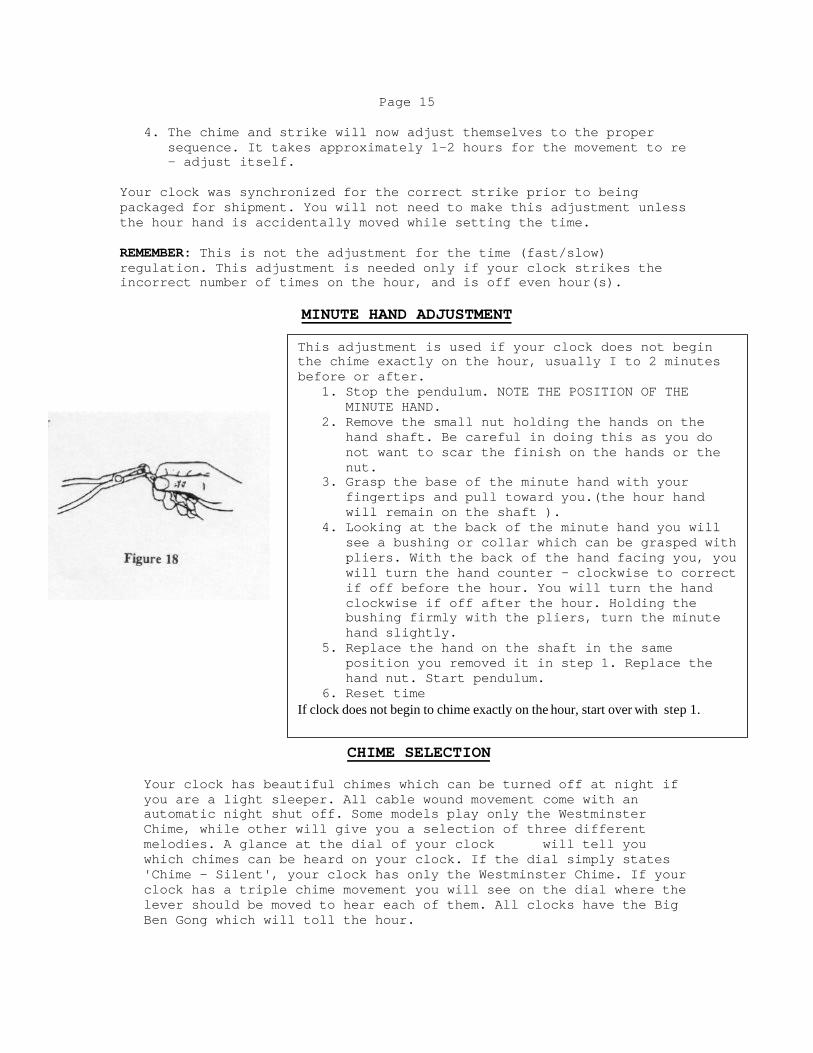
MINUTE HAND ADJUSTMENT
CHIME SELECTION
Your clock has beautiful chimes which can be turned off at night ifyou are a light sleeper. All cable wound movement come with anautomatic night shut off. Some models play only the WestminsterChime, while other will give you a selection of three differentmelodies. A glance at the dial of your clock will tell youwhich chimes can be heard on your clock. If the dial simply states'Chime - Silent', your clock has only the Westminster Chime. If yourclock has a triple chime movement you will see on the dial where thelever should be moved to hear each of them. All clocks have the BigBen Gong which will toll the hour.
This adjustment is used if your clock does not beginthe chime exactly on the hour, usually I to 2 minutesbefore or after.
1. Stop the pendulum. NOTE THE POSITION OF THEMINUTE HAND.
2. Remove the small nut holding the hands on thehand shaft. Be careful in doing this as you donot want to scar the finish on the hands or thenut.
3. Grasp the base of the minute hand with yourfingertips and pull toward you.(the hour handwill remain on the shaft ).
4. Looking at the back of the minute hand you willsee a bushing or collar which can be grasped withpliers. With the back of the hand facing you, youwill turn the hand counter - clockwise to correctif off before the hour. You will turn the handclockwise if off after the hour. Holding thebushing firmly with the pliers, turn the minutehand slightly.
5. Replace the hand on the shaft in the sameposition you removed it in step 1. Replace thehand nut. Start pendulum.
6. Reset timeIf clock does not begin to chime exactly on the hour, start over with step 1.
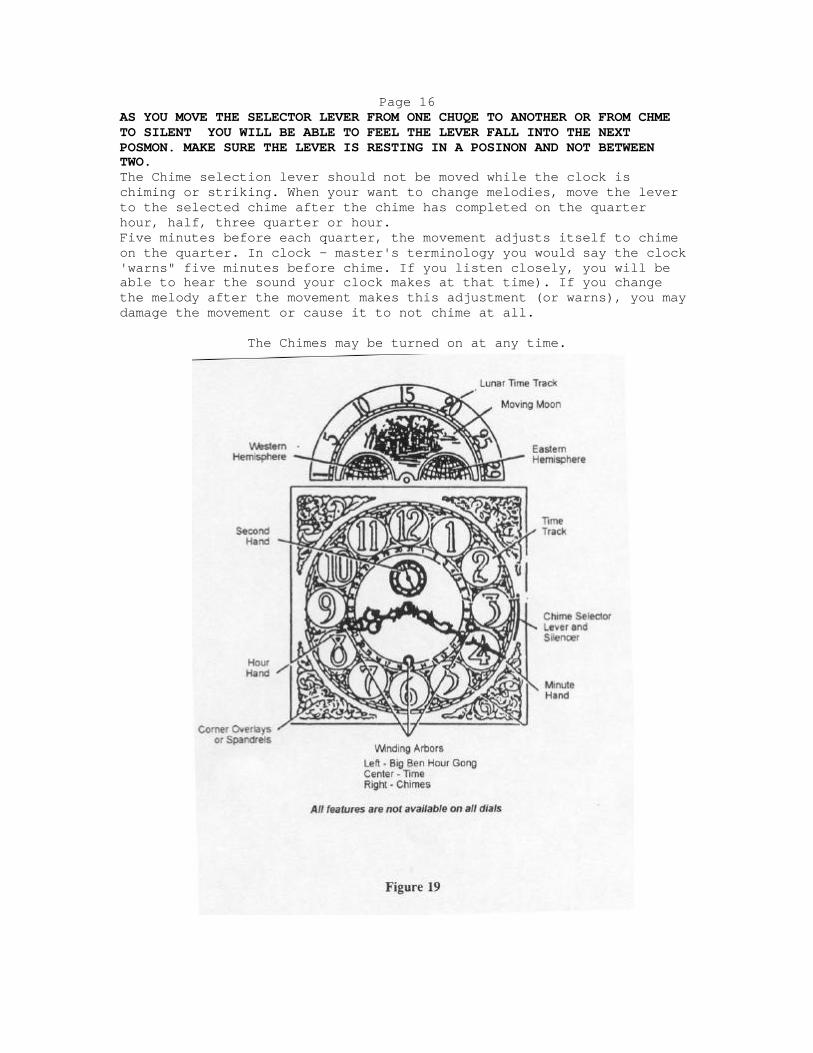
Page 16AS YOU MOVE THE SELECTOR LEVER FROM ONE CHUQE TO ANOTHER OR FROM CHMETO SILENT YOU WILL BE ABLE TO FEEL THE LEVER FALL INTO THE NEXTPOSMON. MAKE SURE THE LEVER IS RESTING IN A POSINON AND NOT BETWEENTWO.The Chime selection lever should not be moved while the clock ischiming or striking. When your want to change melodies, move the leverto the selected chime after the chime has completed on the quarterhour, half, three quarter or hour.Five minutes before each quarter, the movement adjusts itself to chimeon the quarter. In clock - master's terminology you would say the clock'warns" five minutes before chime. If you listen closely, you will beable to hear the sound your clock makes at that time). If you changethe melody after the movement makes this adjustment (or warns), you maydamage the movement or cause it to not chime at all.
The Chimes may be turned on at any time.
Page 17
ANSWERS TO YOUR QUESTIONS ABOUT THE CHIMES
Can the chimes be made softer? Yes, but we do not recommend it. Onceyou become accustomed to hearing the chimes, the only time you willnotice them is when your clock fails to chime.
Suggestions to soften the chimes:
1. Place the clock in carpeted area rather than on tile or hardwoodfloor.
2. Make sure there is a small space between the back of the clockand the wall. Placing the clock flat against the wall will causethe wall to act as a sounding board and make the chimes louder.
3. The proper adjustment for the chime hammer is 1/8" from thechime rods when not in motion. If you adjust them a littlefurther away from the rods this will soften the chimes slightly.
Can the chimes-be made louder? Yes, but not to any great degree.There isn't a volume control on the clock meant to turn the chimesup or down.
Suggestions to increase the volume:
1. Reverse suggestion 1 and 2 for softening the chimes.2. Make sure the chime hammers are adjustable to approximately 1/8"
from the chime rods when not in motion. The size of the roommakes a difference in the volume of the chimes. A clock placed ina hall or foyer will sound much louder than the same clock placedin a larger room with carpet and drapes.
A WORD ABOUT THE CHIMES
Your clock was primarily made to tell time. It was not intended orconstructed to be a musical instrument with the perfection one wouldexpect from such. Chime tone will vary from clock to clock accordingto the sounding board wood and how much moister the wood absorbs orloses from changes in the weather. Chime rods are mass-produced anddo not "go out of tune". Chimes are tuned in sets and have nodefinite pitch or key. The hour chord requires only that it bedifferent enough from the other chords to tell when the hour ifbeing struck. Chime speed is set and cannot be changed, however,speed will slow down as the movement becomes dirty. Cleaning willrestore the chime speed.
Page 18
HISTORY OF THE CHIMES
Westminster Chimes
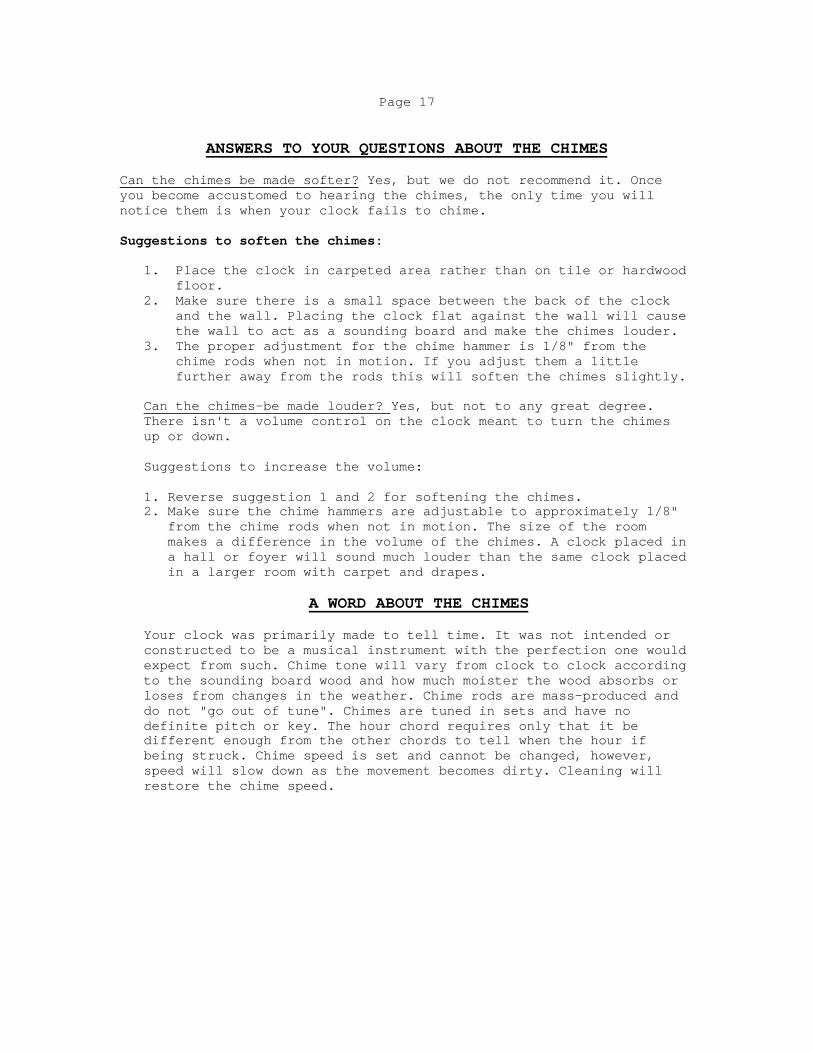
The world's most famous chimes are Westminster. Nearly everyoneassociates the Westminster chimes with the Victoria Clock Tower of thehouse of Parliament in London.Originally, however, they were fitted to the clock of the UniversityChurch, St. Mary's the Great, in Cambridge, England. The words to thisbeautiful chime come from Handel's symphony, "I know that My RedeemerLiveth" and could be our daily prayer:"Lord through thisBe Thou our guideSo, by Thy powerNo foot shall slide".
Whittington Chimes
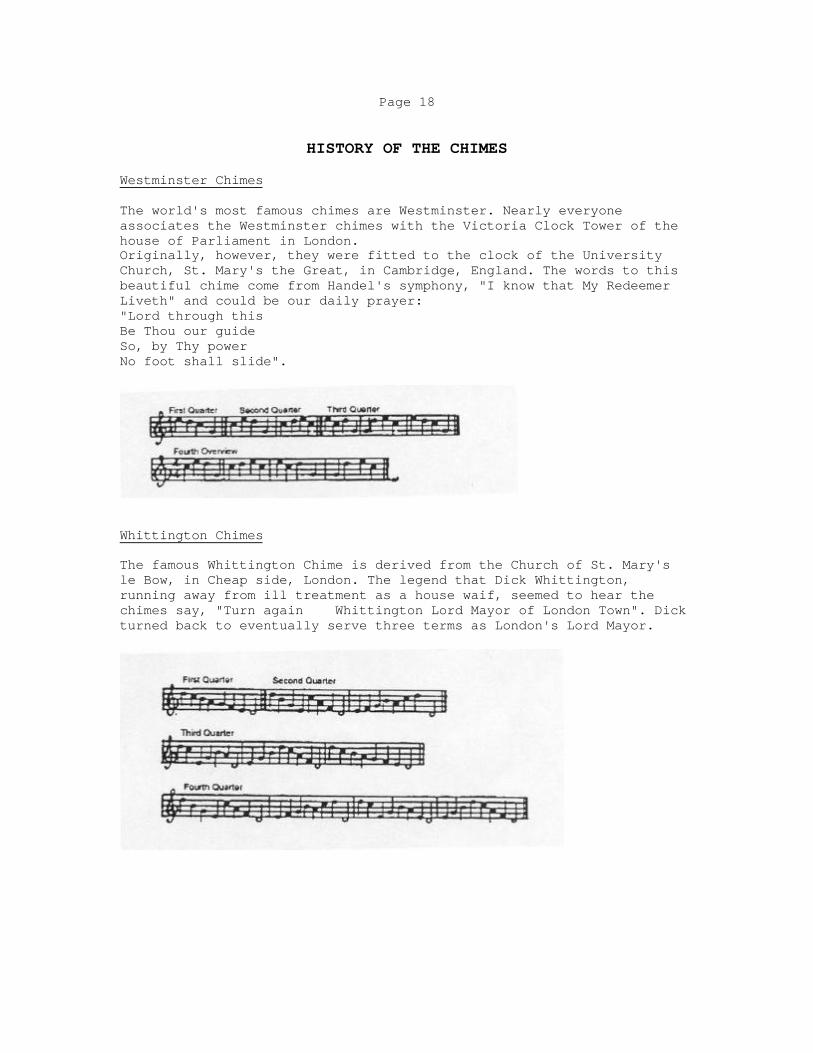
The famous Whittington Chime is derived from the Church of St. Mary'sle Bow, in Cheap side, London. The legend that Dick Whittington,running away from ill treatment as a house waif, seemed to hear thechimes say, "Turn again Whittington Lord Mayor of London Town". Dickturned back to eventually serve three terms as London's Lord Mayor.
Page 19
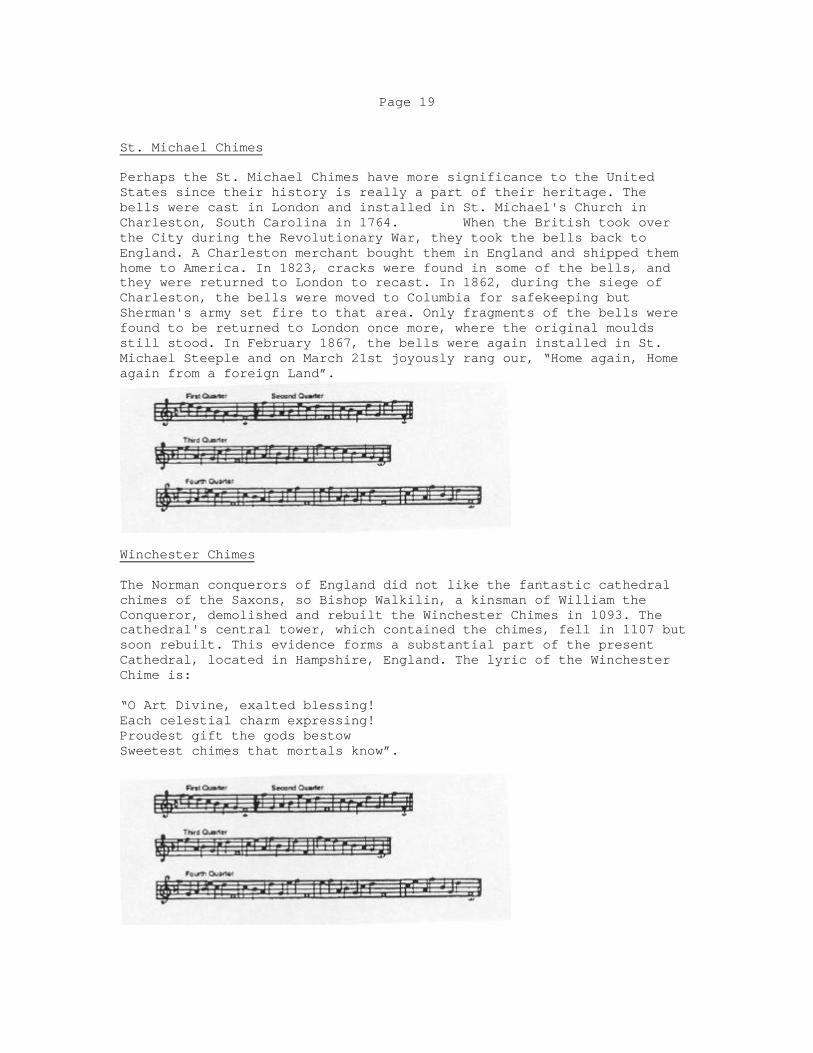
St. Michael Chimes
Perhaps the St. Michael Chimes have more significance to the UnitedStates since their history is really a part of their heritage. Thebells were cast in London and installed in St. Michael's Church inCharleston, South Carolina in 1764. When the British took overthe City during the Revolutionary War, they took the bells back toEngland. A Charleston merchant bought them in England and shipped themhome to America. In 1823, cracks were found in some of the bells, andthey were returned to London to recast. In 1862, during the siege ofCharleston, the bells were moved to Columbia for safekeeping butSherman's army set fire to that area. Only fragments of the bells werefound to be returned to London once more, where the original mouldsstill stood. In February 1867, the bells were again installed in St.Michael Steeple and on March 21st joyously rang our, “Home again, Homeagain from a foreign Land”.
Winchester Chimes
The Norman conquerors of England did not like the fantastic cathedralchimes of the Saxons, so Bishop Walkilin, a kinsman of William theConqueror, demolished and rebuilt the Winchester Chimes in 1093. Thecathedral's central tower, which contained the chimes, fell in 1107 butsoon rebuilt. This evidence forms a substantial part of the presentCathedral, located in Hampshire, England. The lyric of the WinchesterChime is:
“O Art Divine, exalted blessing!Each celestial charm expressing!Proudest gift the gods bestowSweetest chimes that mortals know”.
Page 20
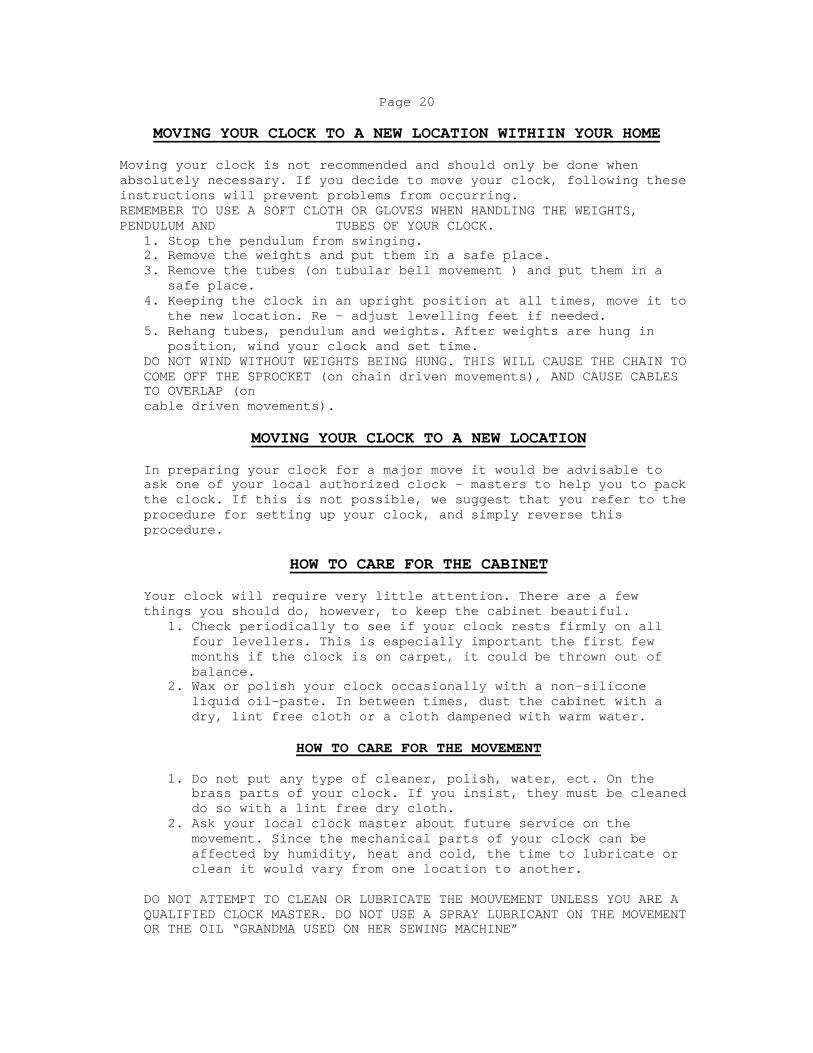
MOVING YOUR CLOCK TO A NEW LOCATION WITHIIN YOUR HOME
Moving your clock is not recommended and should only be done whenabsolutely necessary. If you decide to move your clock, following theseinstructions will prevent problems from occurring.REMEMBER TO USE A SOFT CLOTH OR GLOVES WHEN HANDLING THE WEIGHTS,PENDULUM AND TUBES OF YOUR CLOCK.
1. Stop the pendulum from swinging.2. Remove the weights and put them in a safe place.3. Remove the tubes (on tubular bell movement ) and put them in a
safe place.4. Keeping the clock in an upright position at all times, move it to
the new location. Re - adjust levelling feet if needed.5. Rehang tubes, pendulum and weights. After weights are hung in
position, wind your clock and set time.DO NOT WIND WITHOUT WEIGHTS BEING HUNG. THIS WILL CAUSE THE CHAIN TOCOME OFF THE SPROCKET (on chain driven movements), AND CAUSE CABLESTO OVERLAP (oncable driven movements).
MOVING YOUR CLOCK TO A NEW LOCATION
In preparing your clock for a major move it would be advisable toask one of your local authorized clock - masters to help you to packthe clock. If this is not possible, we suggest that you refer to theprocedure for setting up your clock, and simply reverse thisprocedure.
HOW TO CARE FOR THE CABINET
Your clock will require very little attention. There are a fewthings you should do, however, to keep the cabinet beautiful.
1. Check periodically to see if your clock rests firmly on allfour levellers. This is especially important the first fewmonths if the clock is on carpet, it could be thrown out ofbalance.
2. Wax or polish your clock occasionally with a non-siliconeliquid oil-paste. In between times, dust the cabinet with adry, lint free cloth or a cloth dampened with warm water.
HOW TO CARE FOR THE MOVEMENT
1. Do not put any type of cleaner, polish, water, ect. On thebrass parts of your clock. If you insist, they must be cleaneddo so with a lint free dry cloth.
2. Ask your local clock master about future service on themovement. Since the mechanical parts of your clock can beaffected by humidity, heat and cold, the time to lubricate orclean it would vary from one location to another.
DO NOT ATTEMPT TO CLEAN OR LUBRICATE THE MOUVEMENT UNLESS YOU ARE AQUALIFIED CLOCK MASTER. DO NOT USE A SPRAY LUBRICANT ON THE MOVEMENTOR THE OIL “GRANDMA USED ON HER SEWING MACHINE”


![L 22 – Vibrations and Waves [2] resonance clocks – pendulum springs harmonic motion mechanical waves sound waves musical instruments](https://img.pdfslide.us/doc/110x75/56649f2a5503460f94c44e28/l-22-vibrations-and-waves-2-resonance-clocks-pendulum.jpg)


![L 23 – Vibrations and Waves [3] resonance clocks – pendulum springs harmonic motion mechanical waves sound waves golden rule for](https://img.pdfslide.us/doc/110x75/56649f455503460f94c6636b/l-23-vibrations-and-waves-3-resonance-clocks-pendulum.jpg)


![L 22 – Vibrations and Waves [2] resonance clocks – pendulum springs harmonic motion mechanical waves sound waves musical instruments](https://img.pdfslide.us/doc/110x75/5697bf711a28abf838c7dc96/l-22-vibrations-and-waves-2-resonance-clocks-pendulum-.jpg)

![L 22 – Vibration and Waves [2] resonance clocks – pendulum springs harmonic motion mechanical waves sound waves musical instruments](https://img.pdfslide.us/doc/110x75/56649f185503460f94c2f629/l-22-vibration-and-waves-2-resonance-clocks-pendulum-.jpg)

![L 21 – Vibration and Sound [1] Resonance Tacoma Narrows Bridge Collapse clocks – pendulum springs harmonic motion mechanical waves sound waves musical](https://img.pdfslide.us/doc/110x75/5a4d1ace7f8b9ab0599709b7/l-21-vibration-and-sound-1-resonance-tacoma-narrows-bridge-collapse.jpg)