Embed Size (px)
Citation preview

SELF-HELP GUIDeUSER MANUALHBT CUSTOMER PORTAL
Meet the future. Today.
Part of Telkom | Business Connexion’s Next Generation Networks and Services is the new Hosted Business Telephony (HBT) service. HBT is a PBX that is hosted in our network, so there is no physical device on your site. You have access to the PBX through a portal provided to make changes to your PBX. This document provides a step-by-step guide on how to use the HBT Customer Portal and anything else you need to know.
SCOPEa. This document provides step-by-step work instructions for understanding how to use the HBT Customer Portal as a User.b. It will also serve as a training manual for the users of the platform that need to do the provisioning.
INTRODUCTIONHosted Business Telephony is a hosted voice solution being offered on the BroadSoft Application Server. This document describes the detailed work instructions required to activate and provision such voice services on the platform itself.
The work instructions contained within this document are aimed at empowering users to effectively configure and use the platform as their personal hosted PABX.
DEFINITIONS, ABBREVIATIONS AND ACRONYMS 3.1 Acronyms
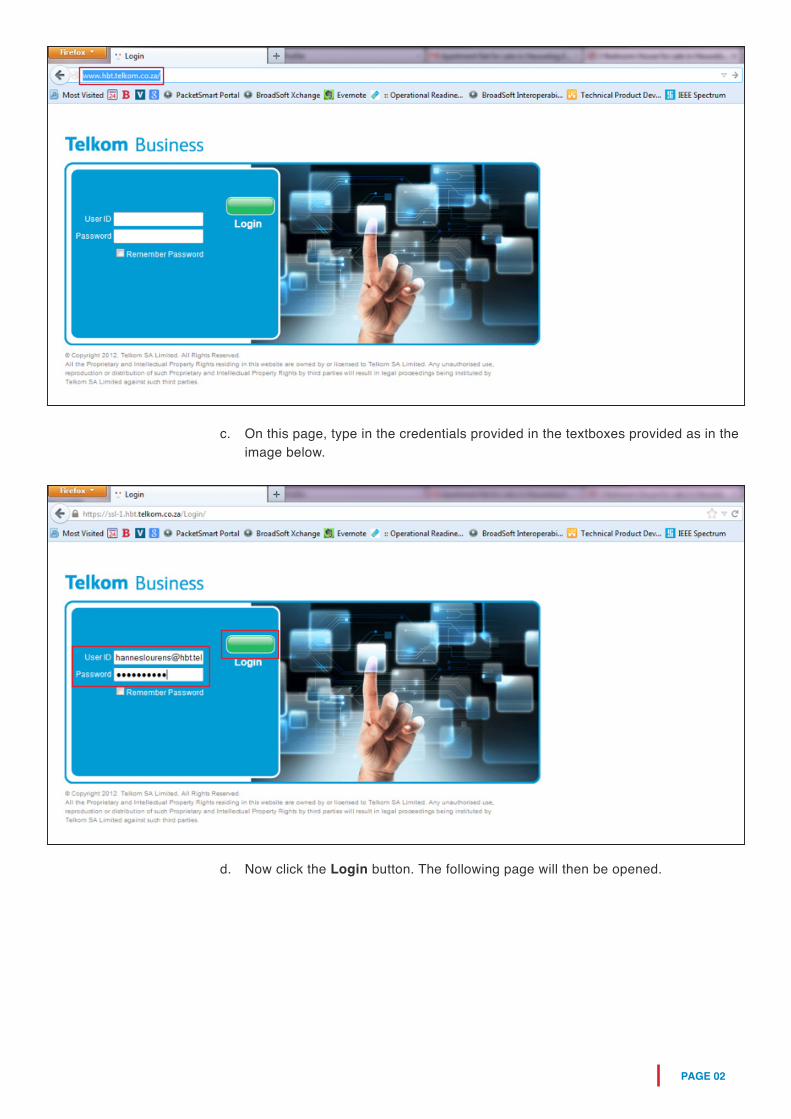
CUSTOMER PORTAL4.1 Portal Logina. Open your Internet Browser (i.e. Internet Explorer, Mozilla Firefox, Google Chrome, or Opera). Type the following in the browser’s address bar: www.hbt.telkom.co.zab. The following page will then be opened. Here you will use the User ID and Password provided.
Hbt Customer Portal01
02
03
04
Acronym Word in fullHBT Hosted Business Telephony
VoIP Voice over IP
ADSL Asymmetric Digital Subscriber Line
PAGE 01
PAGE 02
c. On this page, type in the credentials provided in the textboxes provided as in the image below.
d. Now click the Login button. The following page will then be opened.
PAGE 03
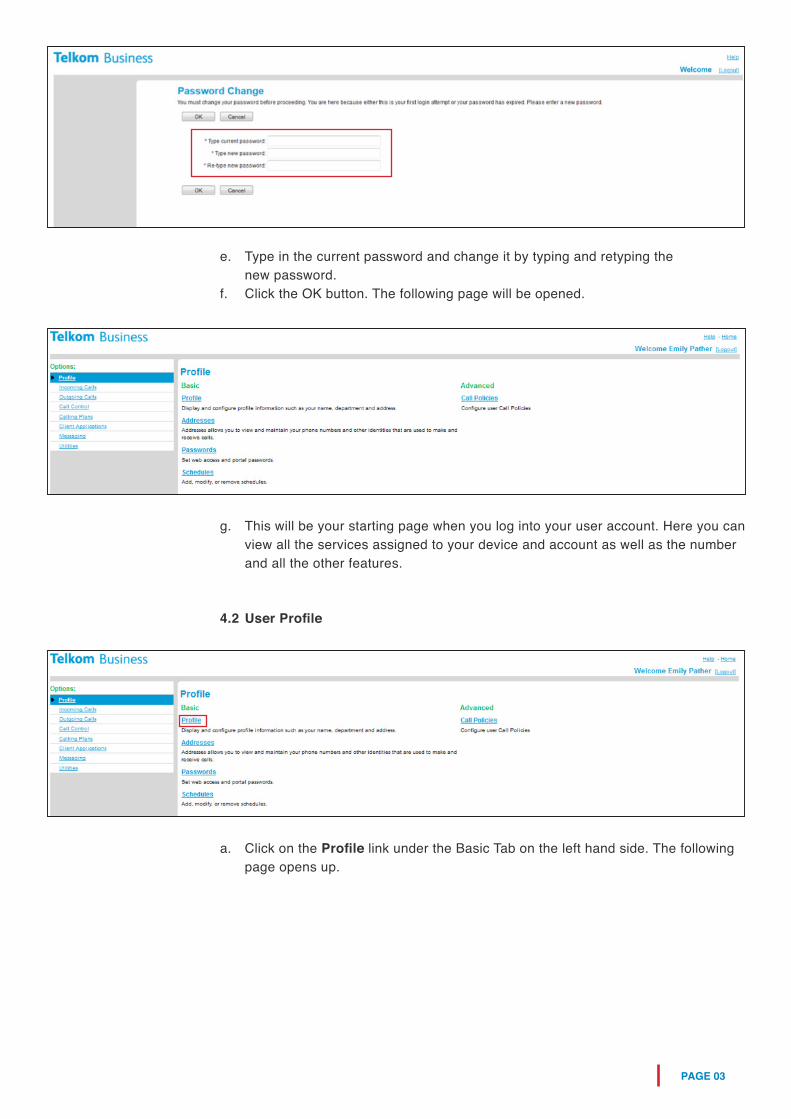
e. Type in the current password and change it by typing and retyping the new password. f. Click the OK button. The following page will be opened.
g. This will be your starting page when you log into your user account. Here you can view all the services assigned to your device and account as well as the number and all the other features.
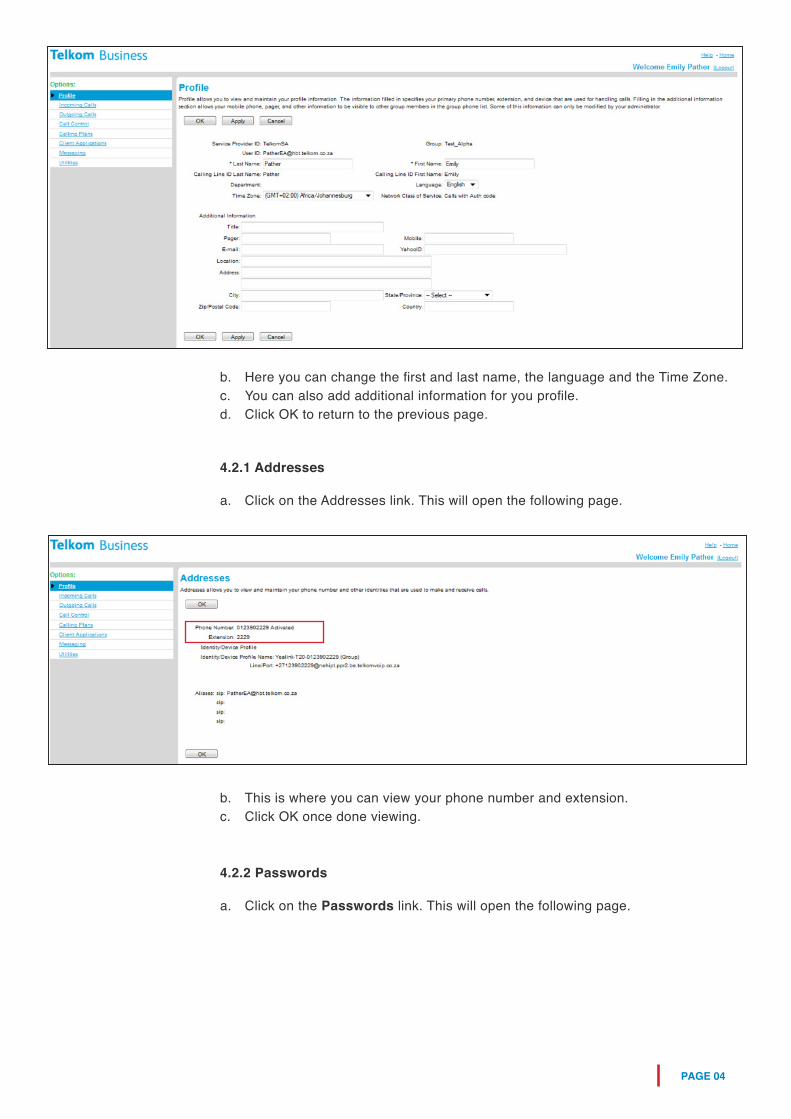
a. Click on the Profile link under the Basic Tab on the left hand side. The following page opens up.
4.2 User Profile
PAGE 04
b. Here you can change the first and last name, the language and the Time Zone. c. You can also add additional information for you profile.d. Click OK to return to the previous page.
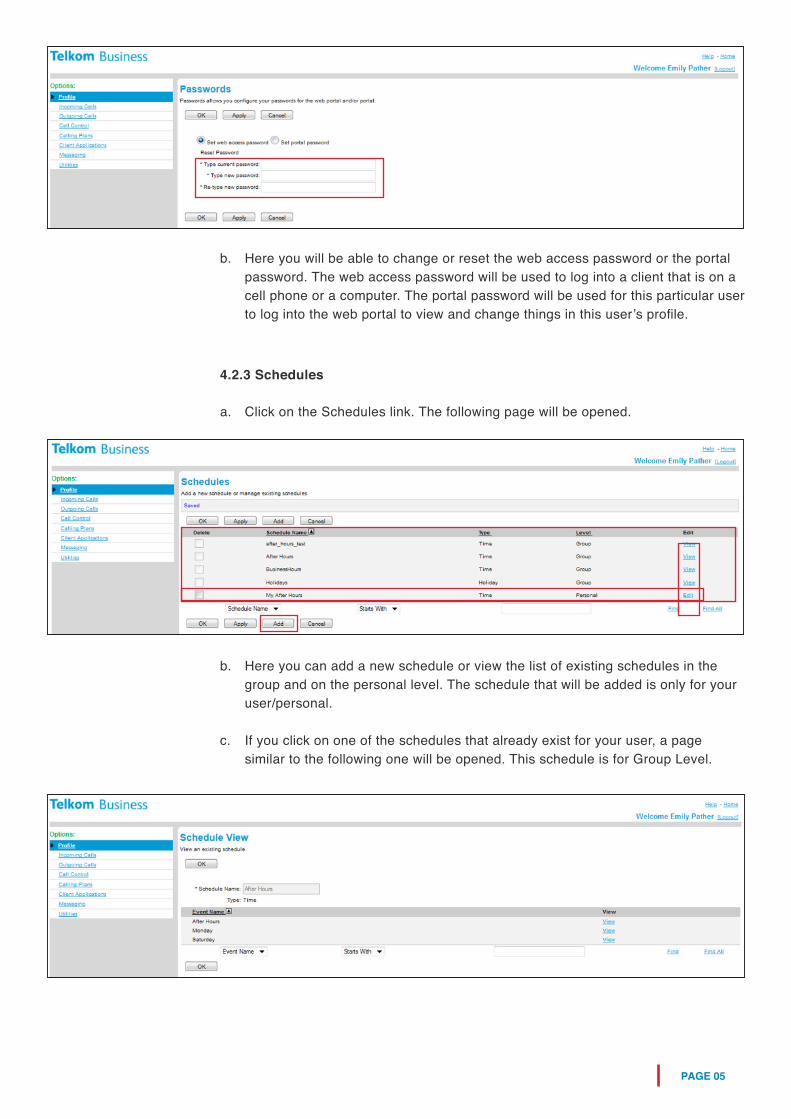
b. This is where you can view your phone number and extension.c. Click OK once done viewing.
a. Click on the Addresses link. This will open the following page.
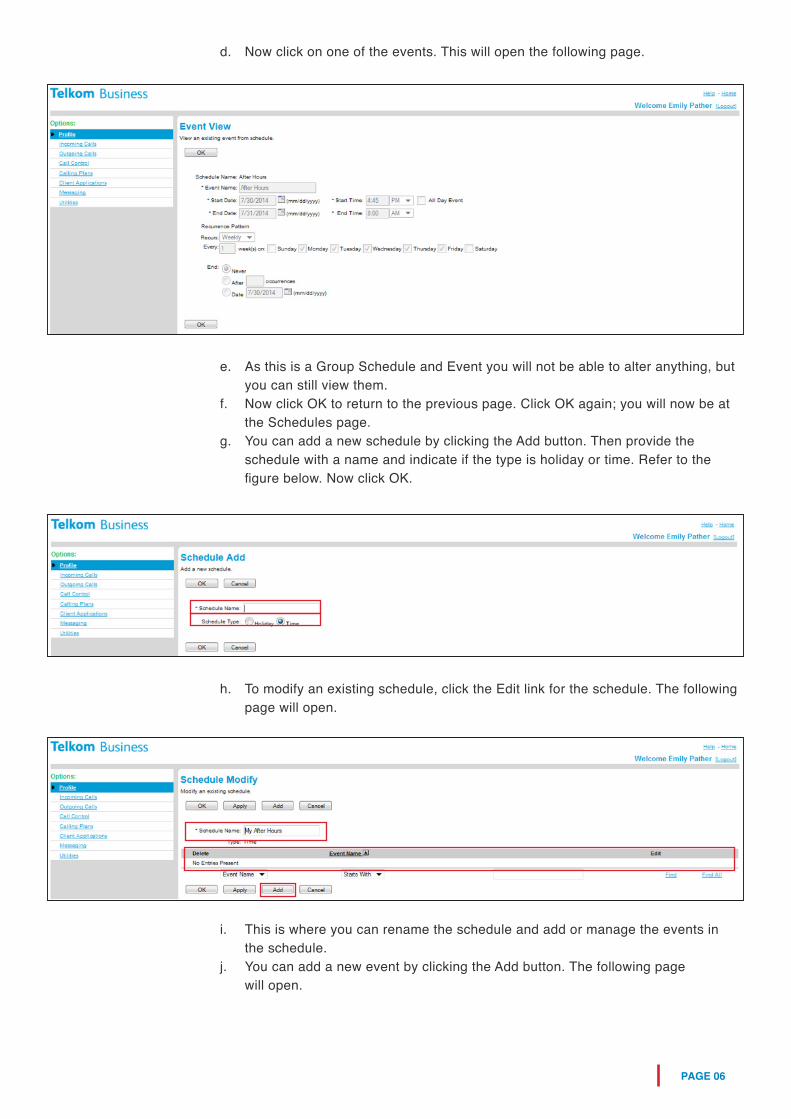
a. Click on the Passwords link. This will open the following page.
4.2.1 Addresses
4.2.2 Passwords
PAGE 05
b. Here you will be able to change or reset the web access password or the portal password. The web access password will be used to log into a client that is on a cell phone or a computer. The portal password will be used for this particular user to log into the web portal to view and change things in this user’s profile.
b. Here you can add a new schedule or view the list of existing schedules in the group and on the personal level. The schedule that will be added is only for your user/personal.
c. If you click on one of the schedules that already exist for your user, a page similar to the following one will be opened. This schedule is for Group Level.
a. Click on the Schedules link. The following page will be opened.
4.2.3 Schedules
PAGE 06
d. Now click on one of the events. This will open the following page.
e. As this is a Group Schedule and Event you will not be able to alter anything, but you can still view them.f. Now click OK to return to the previous page. Click OK again; you will now be at the Schedules page.g. You can add a new schedule by clicking the Add button. Then provide the schedule with a name and indicate if the type is holiday or time. Refer to the figure below. Now click OK.
h. To modify an existing schedule, click the Edit link for the schedule. The following page will open.
i. This is where you can rename the schedule and add or manage the events in the schedule.j. You can add a new event by clicking the Add button. The following page will open.
PAGE 07
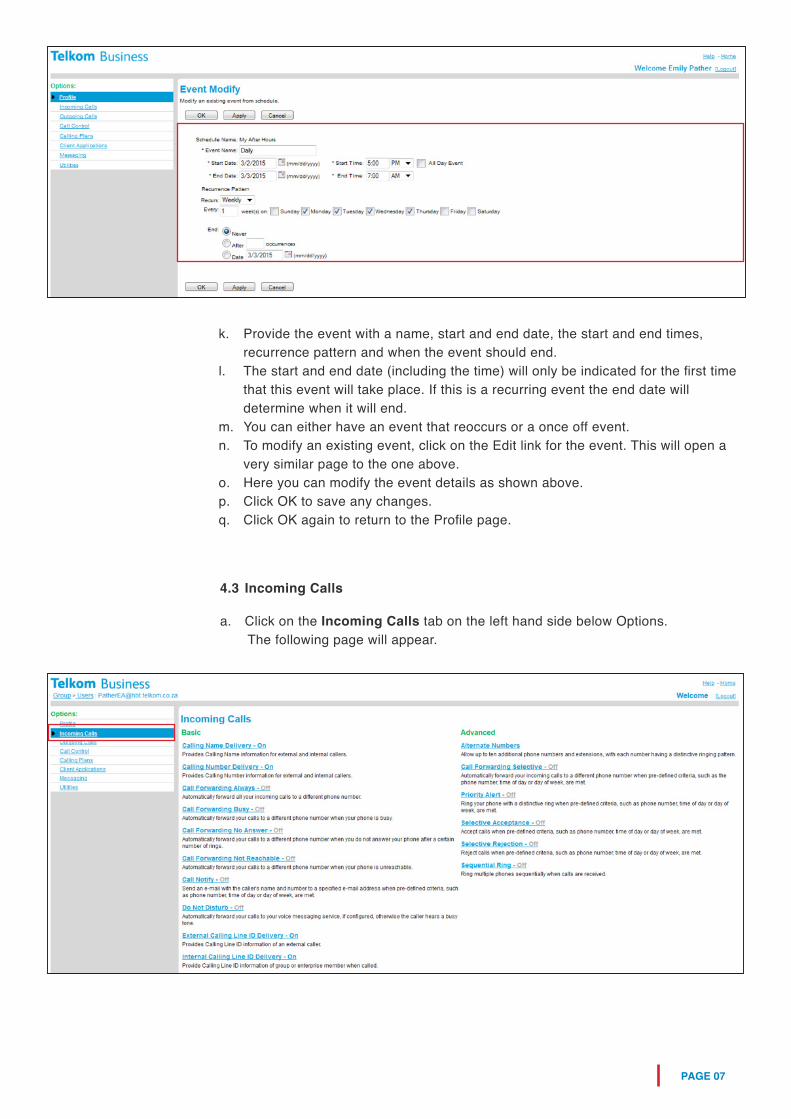
k. Provide the event with a name, start and end date, the start and end times, recurrence pattern and when the event should end.l. The start and end date (including the time) will only be indicated for the first time that this event will take place. If this is a recurring event the end date will determine when it will end.m. You can either have an event that reoccurs or a once off event. n. To modify an existing event, click on the Edit link for the event. This will open a very similar page to the one above.o. Here you can modify the event details as shown above. p. Click OK to save any changes.q. Click OK again to return to the Profile page.
a. Click on the Incoming Calls tab on the left hand side below Options. The following page will appear.
4.3 Incoming Calls
PAGE 08
b. Here you can set what the phone should do when it receives an incoming call. You can set if it should forward the call for certain scenarios or do not disturb, etc.c. Remember with all transfers and forwards you need to make sure that you are able to make those to the particular numbers that you want to select. Check by reviewing Section 4.6 Calling Plans.
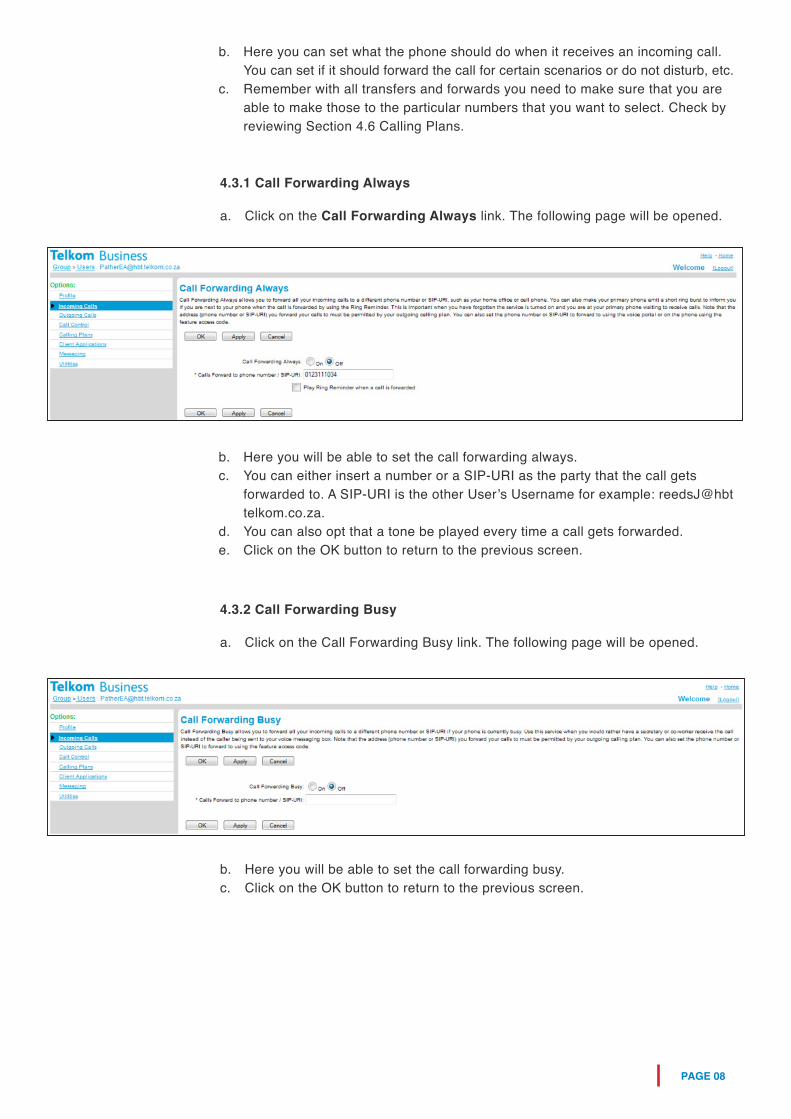
b. Here you will be able to set the call forwarding always.c. You can either insert a number or a SIP-URI as the party that the call gets forwarded to. A SIP-URI is the other User’s Username for example: reedsJ@hbt telkom.co.za.d. You can also opt that a tone be played every time a call gets forwarded.e. Click on the OK button to return to the previous screen.
a. Click on the Call Forwarding Always link. The following page will be opened.
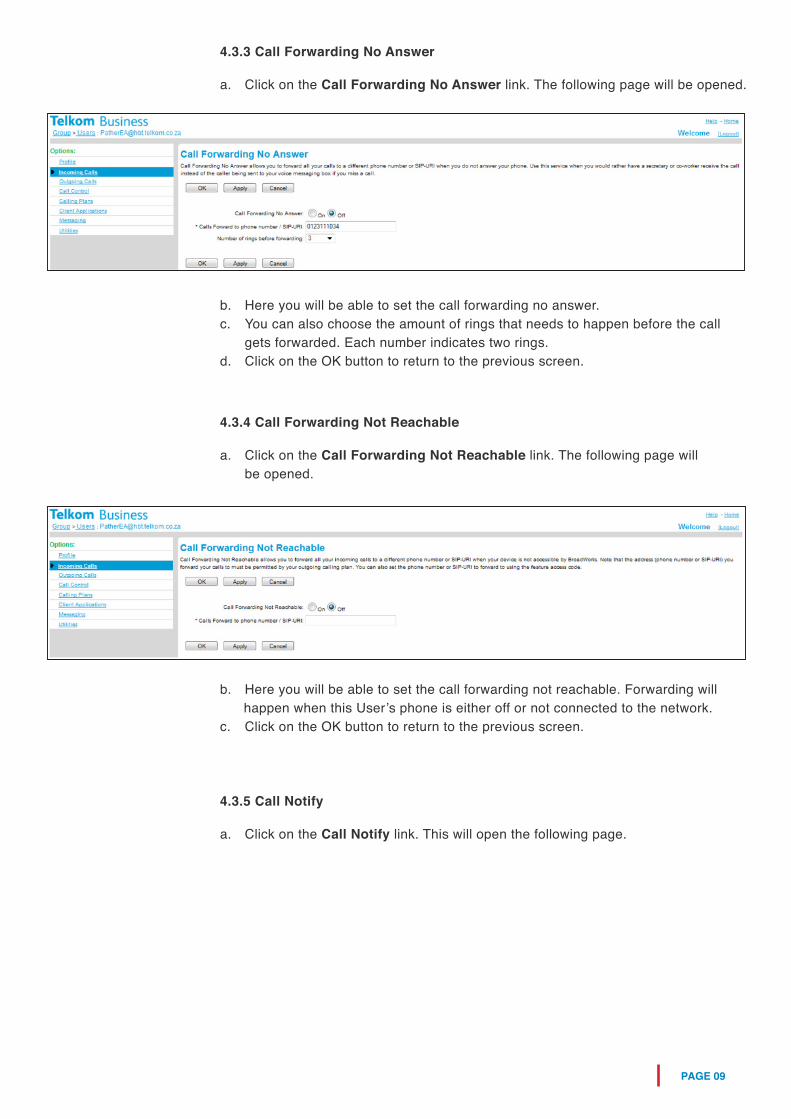
a. Click on the Call Forwarding Busy link. The following page will be opened.
b. Here you will be able to set the call forwarding busy.c. Click on the OK button to return to the previous screen.
4.3.1 Call Forwarding Always
4.3.2 Call Forwarding Busy
PAGE 09
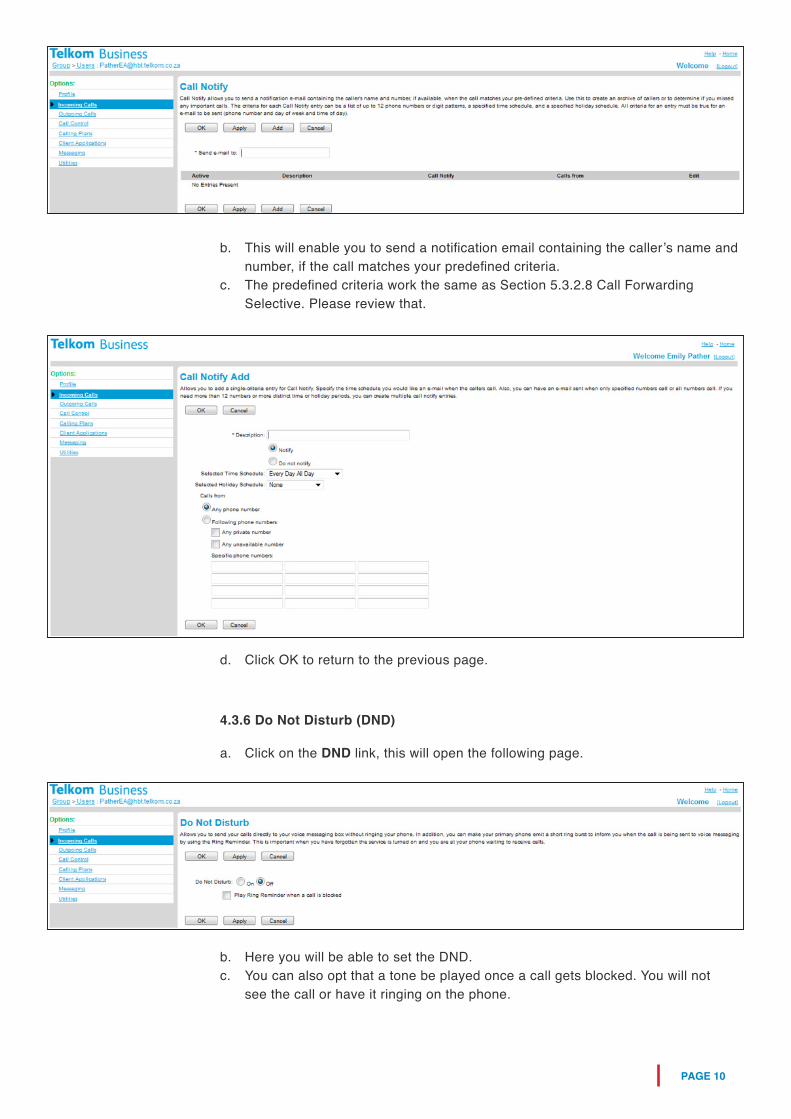
a. Click on the Call Forwarding No Answer link. The following page will be opened.
a. Click on the Call Forwarding Not Reachable link. The following page will be opened.
a. Click on the Call Notify link. This will open the following page.
b. Here you will be able to set the call forwarding not reachable. Forwarding will happen when this User’s phone is either off or not connected to the network.c. Click on the OK button to return to the previous screen.
b. Here you will be able to set the call forwarding no answer.c. You can also choose the amount of rings that needs to happen before the call gets forwarded. Each number indicates two rings.d. Click on the OK button to return to the previous screen.
4.3.3 Call Forwarding No Answer
4.3.4 Call Forwarding Not Reachable
4.3.5 Call Notify
PAGE 10
b. This will enable you to send a notification email containing the caller’s name and number, if the call matches your predefined criteria.c. The predefined criteria work the same as Section 5.3.2.8 Call Forwarding Selective. Please review that.
d. Click OK to return to the previous page.
a. Click on the DND link, this will open the following page.
b. Here you will be able to set the DND. c. You can also opt that a tone be played once a call gets blocked. You will not see the call or have it ringing on the phone.
4.3.6 Do Not Disturb (DND)
PAGE 11
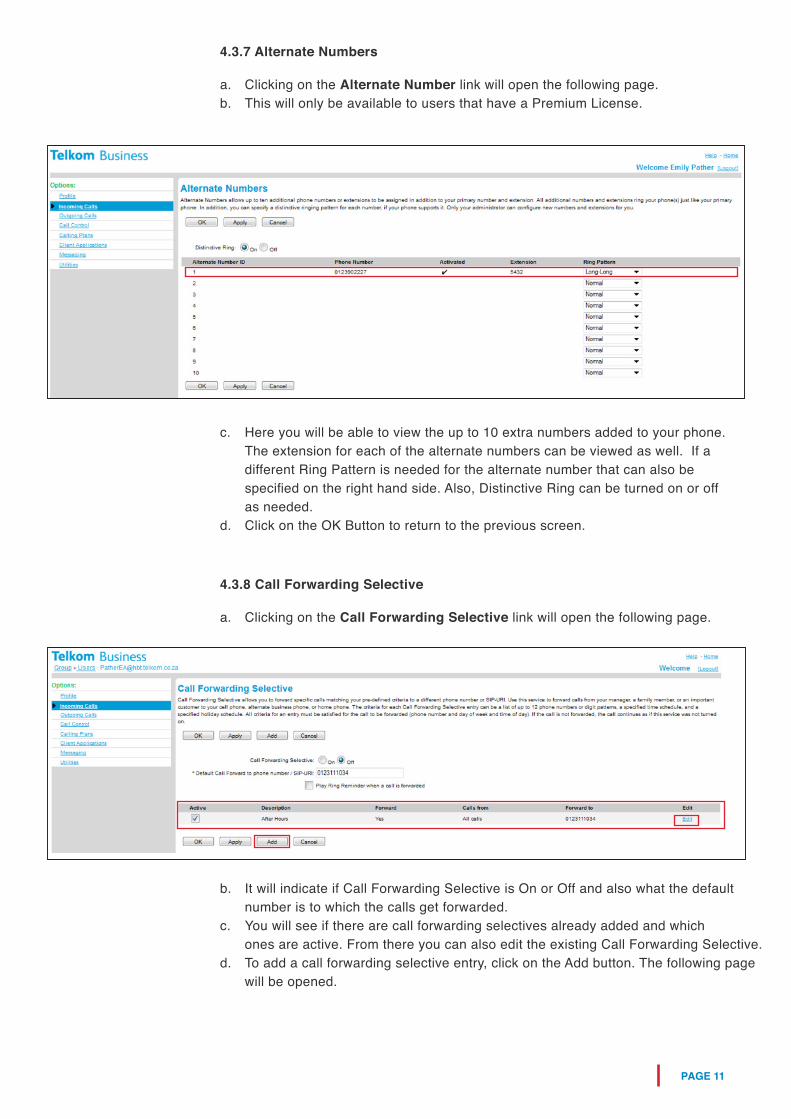
a. Clicking on the Alternate Number link will open the following page.b. This will only be available to users that have a Premium License.
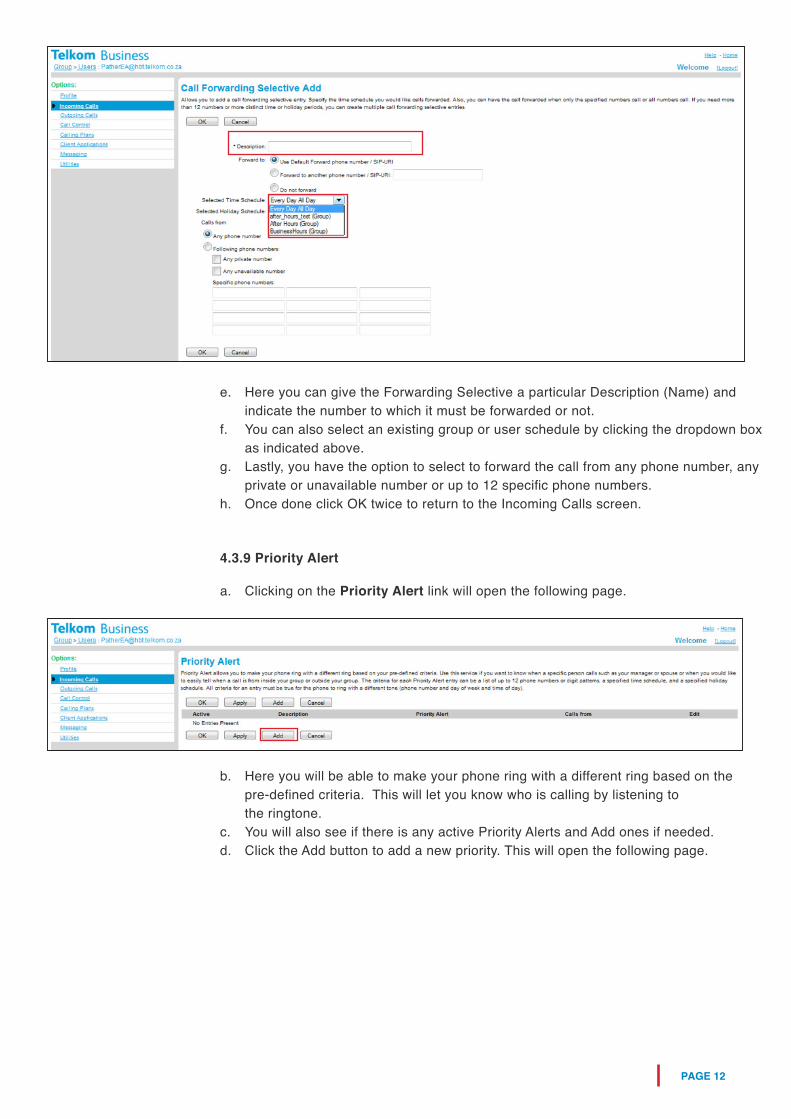
a. Clicking on the Call Forwarding Selective link will open the following page.
b. It will indicate if Call Forwarding Selective is On or Off and also what the default number is to which the calls get forwarded. c. You will see if there are call forwarding selectives already added and which ones are active. From there you can also edit the existing Call Forwarding Selective.d. To add a call forwarding selective entry, click on the Add button. The following page will be opened.
c. Here you will be able to view the up to 10 extra numbers added to your phone. The extension for each of the alternate numbers can be viewed as well. If a different Ring Pattern is needed for the alternate number that can also be specified on the right hand side. Also, Distinctive Ring can be turned on or off as needed.d. Click on the OK Button to return to the previous screen.
4.3.7 Alternate Numbers
4.3.8 Call Forwarding Selective
PAGE 12
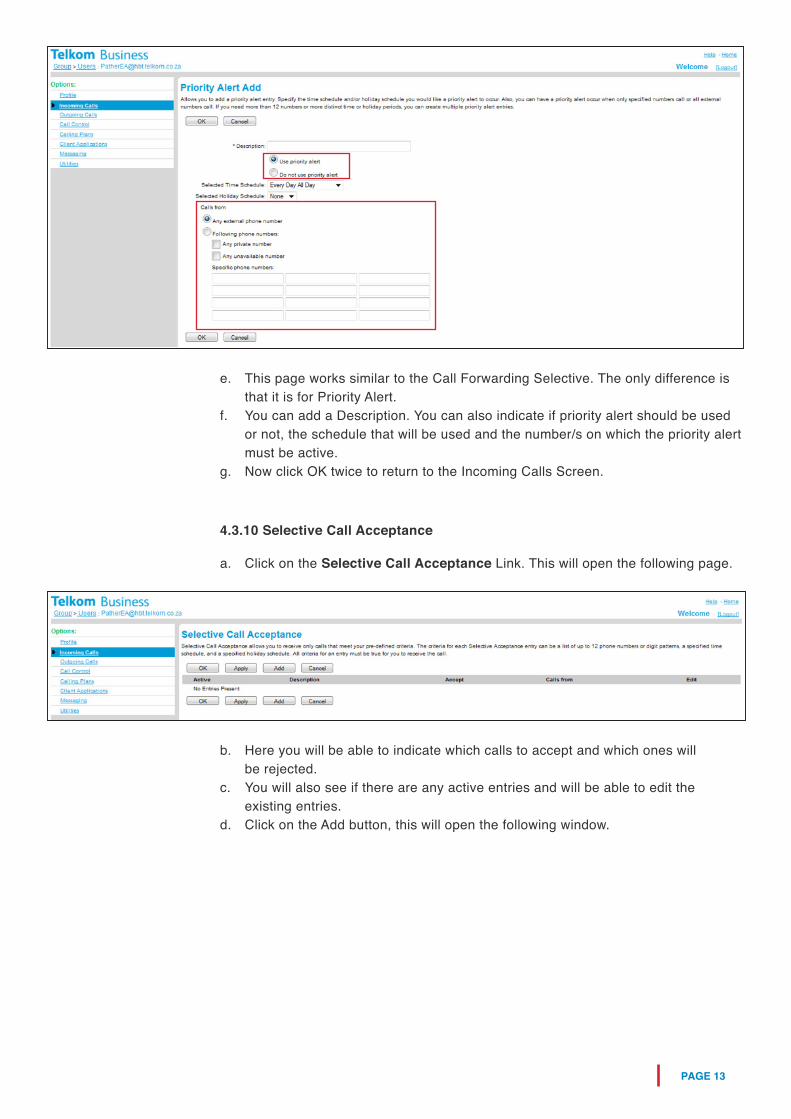
e. Here you can give the Forwarding Selective a particular Description (Name) and indicate the number to which it must be forwarded or not.f. You can also select an existing group or user schedule by clicking the dropdown box as indicated above.g. Lastly, you have the option to select to forward the call from any phone number, any private or unavailable number or up to 12 specific phone numbers.h. Once done click OK twice to return to the Incoming Calls screen.
a. Clicking on the Priority Alert link will open the following page.
b. Here you will be able to make your phone ring with a different ring based on the pre-defined criteria. This will let you know who is calling by listening to the ringtone.c. You will also see if there is any active Priority Alerts and Add ones if needed.d. Click the Add button to add a new priority. This will open the following page.
4.3.9 Priority Alert
PAGE 13
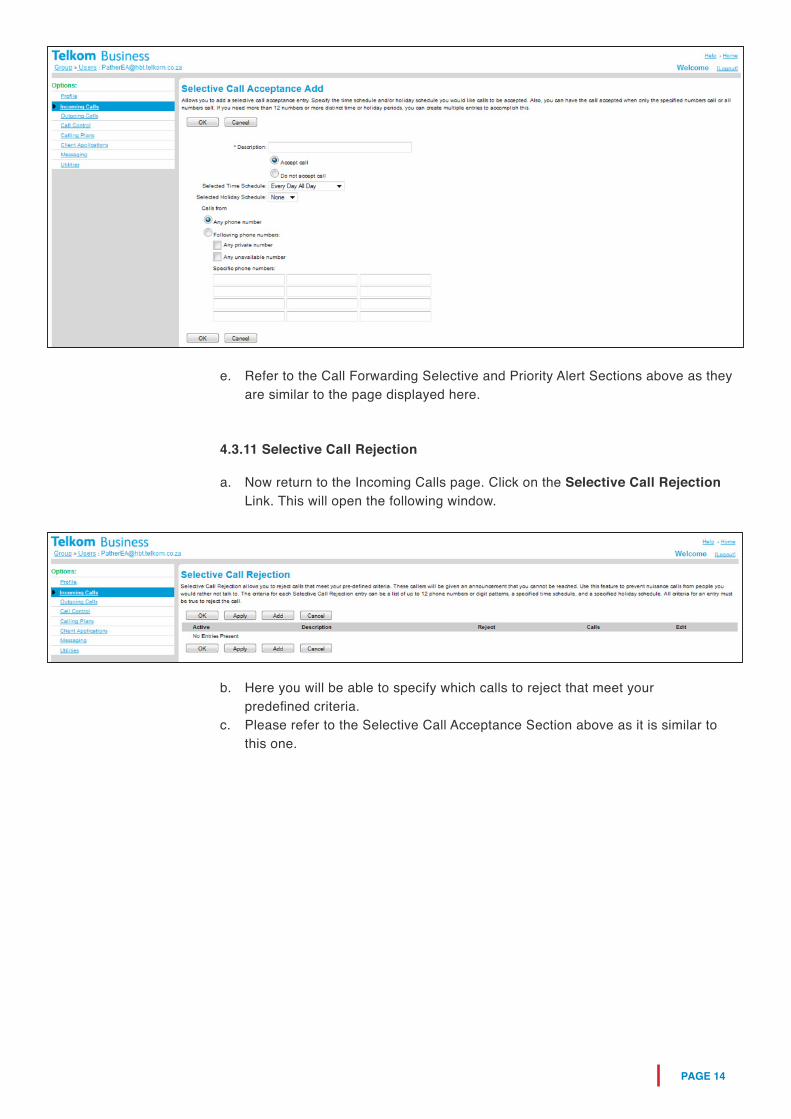
e. This page works similar to the Call Forwarding Selective. The only difference is that it is for Priority Alert.f. You can add a Description. You can also indicate if priority alert should be used or not, the schedule that will be used and the number/s on which the priority alert must be active.g. Now click OK twice to return to the Incoming Calls Screen.
a. Click on the Selective Call Acceptance Link. This will open the following page.
b. Here you will be able to indicate which calls to accept and which ones will be rejected.c. You will also see if there are any active entries and will be able to edit the existing entries.d. Click on the Add button, this will open the following window.
4.3.10 Selective Call Acceptance
PAGE 14
e. Refer to the Call Forwarding Selective and Priority Alert Sections above as they are similar to the page displayed here.
a. Now return to the Incoming Calls page. Click on the Selective Call Rejection Link. This will open the following window.
b. Here you will be able to specify which calls to reject that meet your predefined criteria.c. Please refer to the Selective Call Acceptance Section above as it is similar to this one.
4.3.11 Selective Call Rejection
PAGE 15
d. Click the OK button to return to the previous screen.
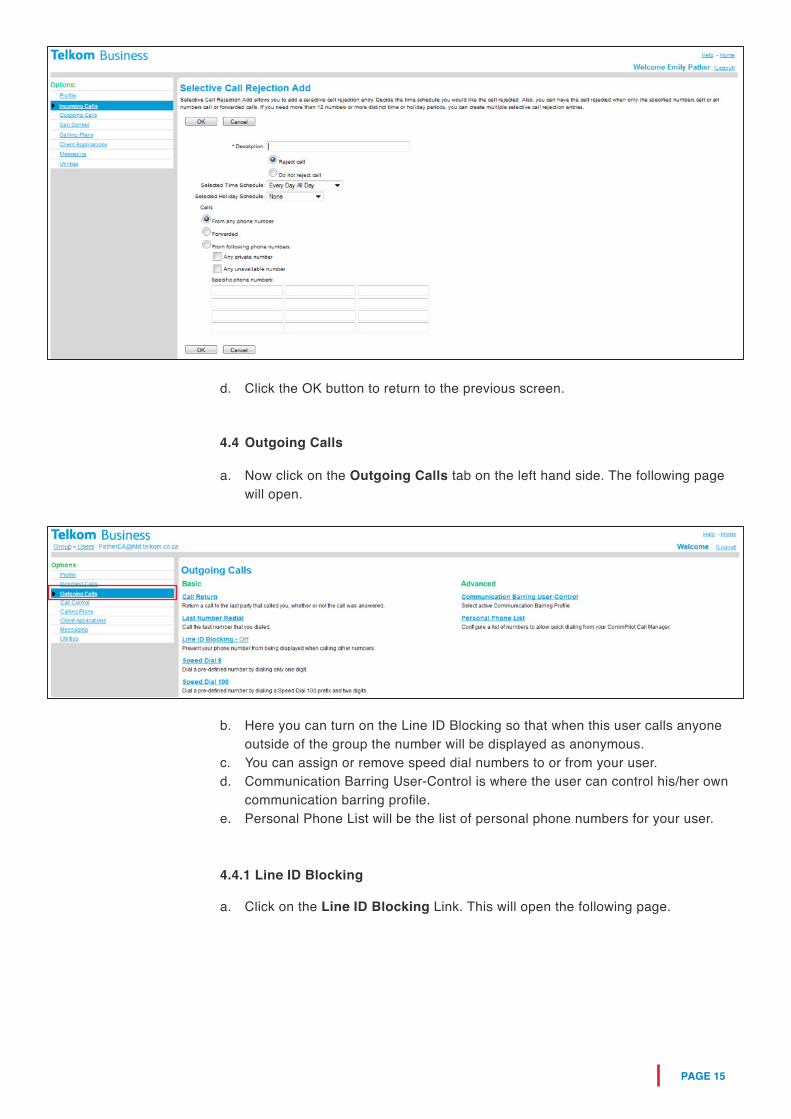
a. Now click on the Outgoing Calls tab on the left hand side. The following page will open.
a. Click on the Line ID Blocking Link. This will open the following page.
b. Here you can turn on the Line ID Blocking so that when this user calls anyone outside of the group the number will be displayed as anonymous.c. You can assign or remove speed dial numbers to or from your user.d. Communication Barring User-Control is where the user can control his/her own communication barring profile.e. Personal Phone List will be the list of personal phone numbers for your user.
4.4 Outgoing Calls
4.4.1 Line ID Blocking
PAGE 16
b. Here you will be able to block your number when calling out.c. Click OK to return to the Outgoing Calls window.
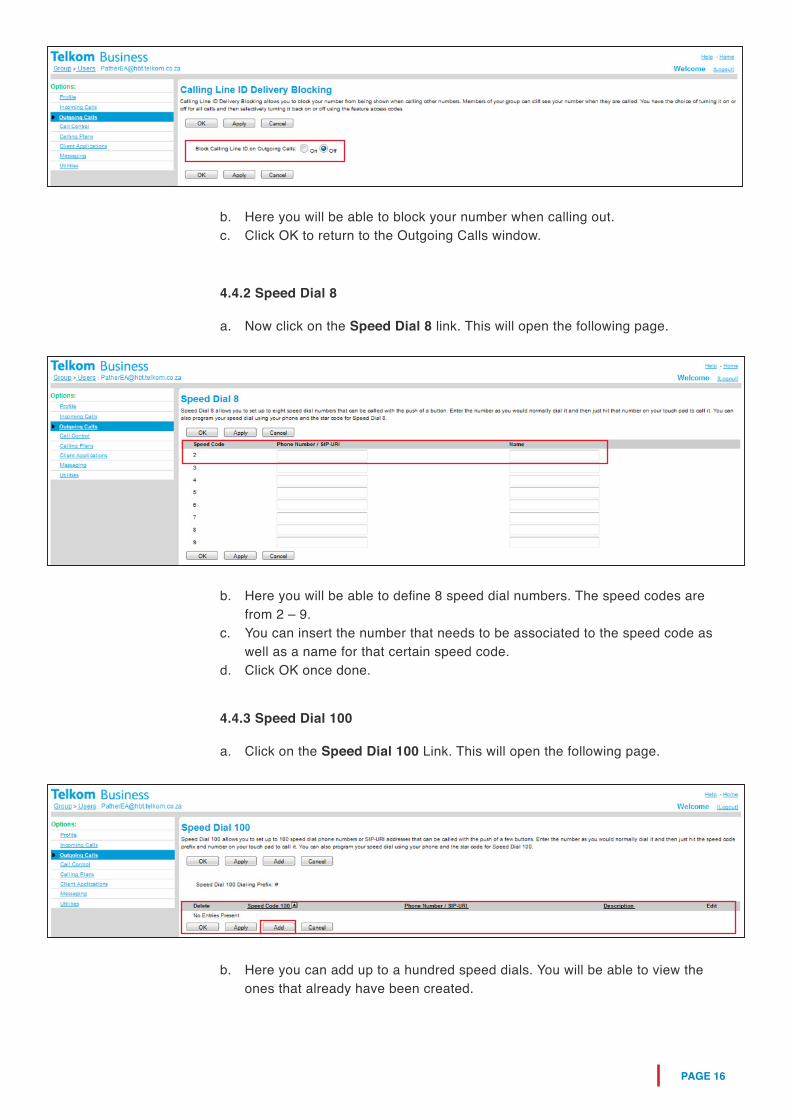
b. Here you will be able to define 8 speed dial numbers. The speed codes are from 2 – 9.c. You can insert the number that needs to be associated to the speed code as well as a name for that certain speed code.d. Click OK once done.
a. Now click on the Speed Dial 8 link. This will open the following page.
a. Click on the Speed Dial 100 Link. This will open the following page.
4.4.2 Speed Dial 8
4.4.3 Speed Dial 100
b. Here you can add up to a hundred speed dials. You will be able to view the ones that already have been created.
PAGE 17
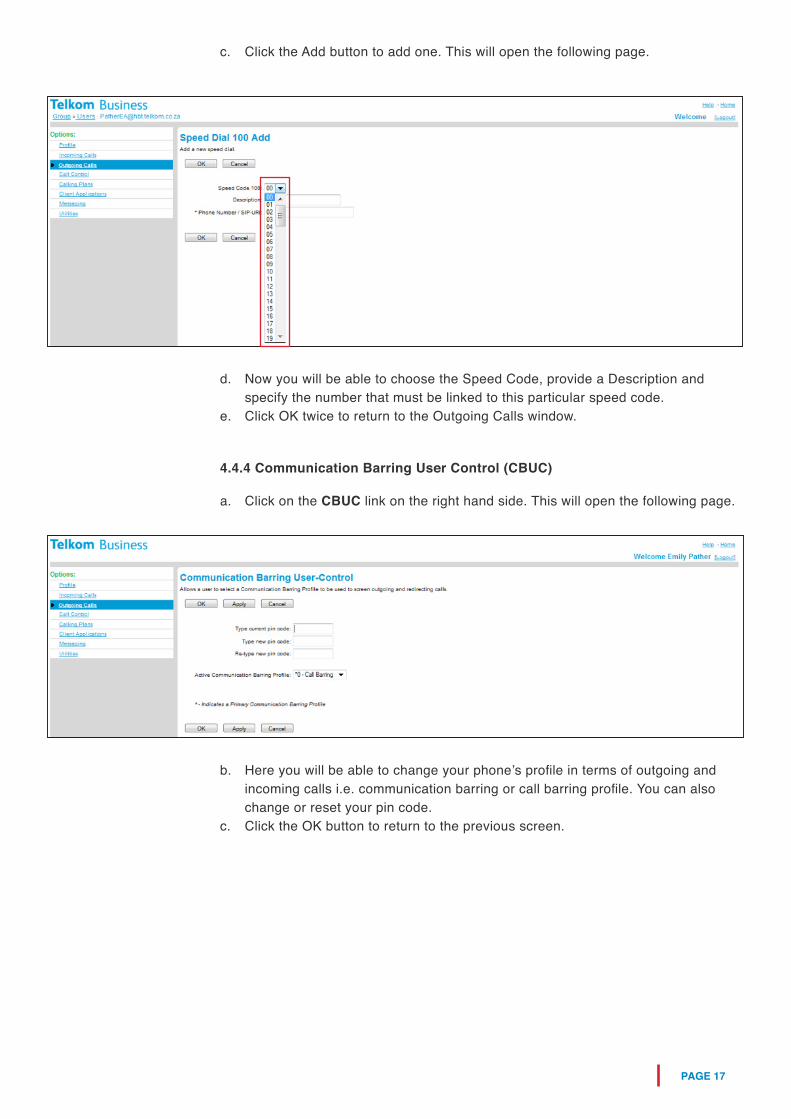
c. Click the Add button to add one. This will open the following page.
d. Now you will be able to choose the Speed Code, provide a Description and specify the number that must be linked to this particular speed code.e. Click OK twice to return to the Outgoing Calls window.
a. Click on the CBUC link on the right hand side. This will open the following page.
b. Here you will be able to change your phone’s profile in terms of outgoing and incoming calls i.e. communication barring or call barring profile. You can also change or reset your pin code.c. Click the OK button to return to the previous screen.
4.4.4 Communication Barring User Control (CBUC)
PAGE 18
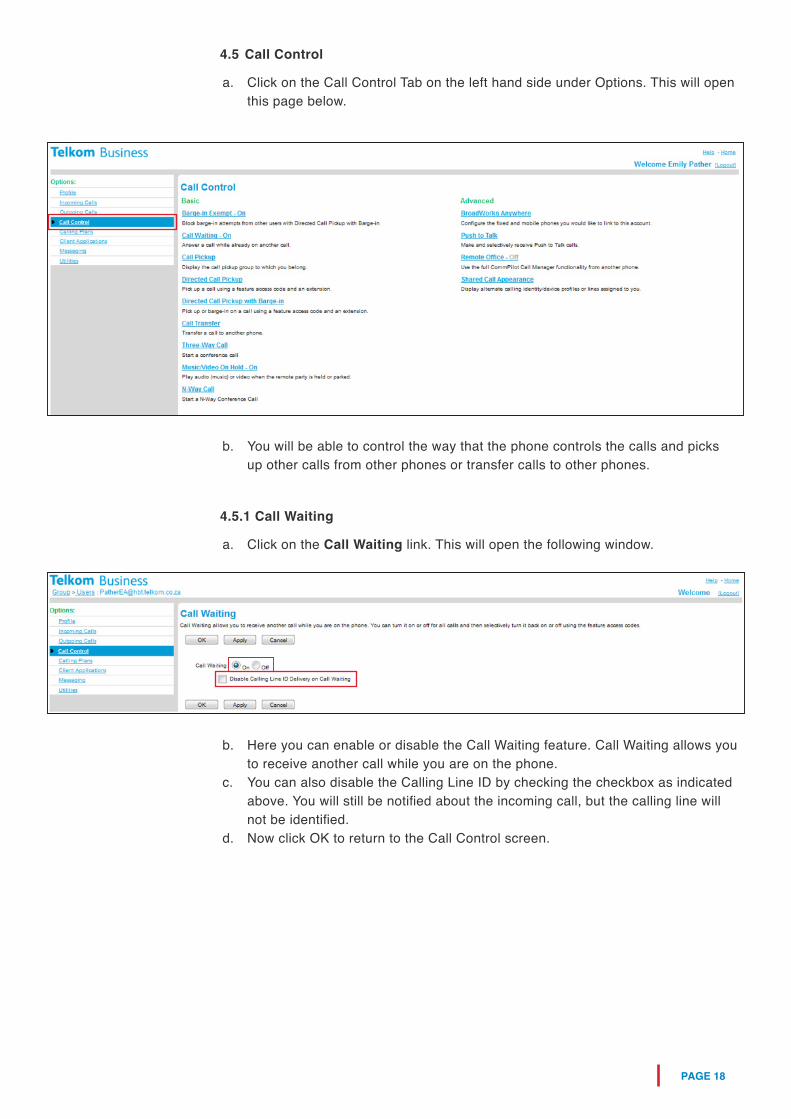
b. You will be able to control the way that the phone controls the calls and picks up other calls from other phones or transfer calls to other phones.
a. Click on the Call Waiting link. This will open the following window.
b. Here you can enable or disable the Call Waiting feature. Call Waiting allows you to receive another call while you are on the phone.c. You can also disable the Calling Line ID by checking the checkbox as indicated above. You will still be notified about the incoming call, but the calling line will not be identified.d. Now click OK to return to the Call Control screen.
4.5.1 Call Waiting
a. Click on the Call Control Tab on the left hand side under Options. This will open this page below.
4.5 Call Control
PAGE 19
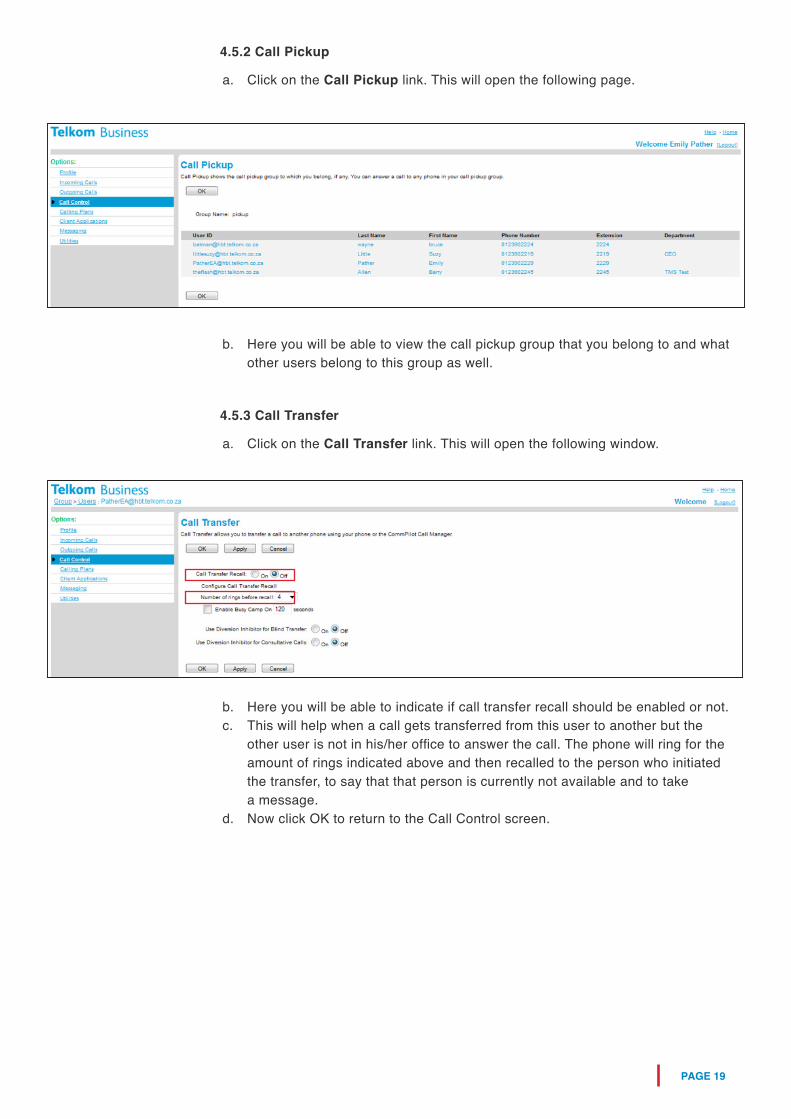
b. Here you will be able to view the call pickup group that you belong to and what other users belong to this group as well.
b. Here you will be able to indicate if call transfer recall should be enabled or not.c. This will help when a call gets transferred from this user to another but the other user is not in his/her office to answer the call. The phone will ring for the amount of rings indicated above and then recalled to the person who initiated the transfer, to say that that person is currently not available and to take a message.d. Now click OK to return to the Call Control screen.
a. Click on the Call Transfer link. This will open the following window.
4.5.3 Call Transfer
a. Click on the Call Pickup link. This will open the following page.
4.5.2 Call Pickup
PAGE 20
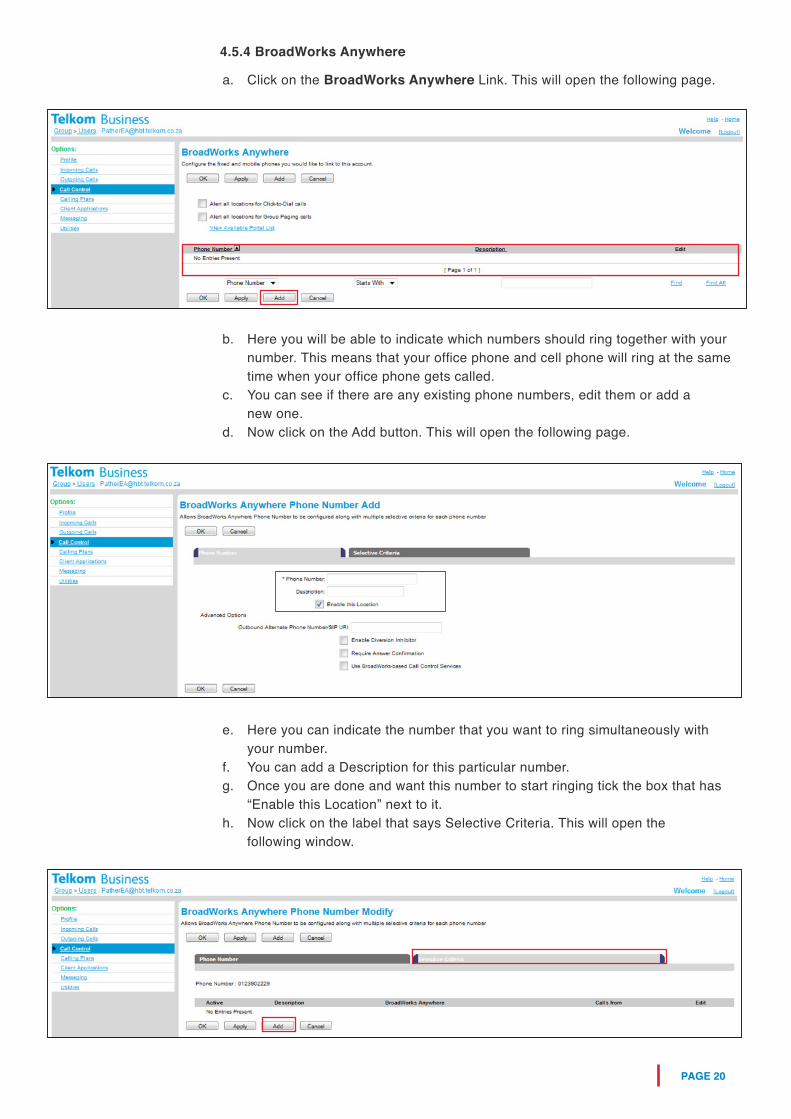
b. Here you will be able to indicate which numbers should ring together with your number. This means that your office phone and cell phone will ring at the same time when your office phone gets called.c. You can see if there are any existing phone numbers, edit them or add a new one.d. Now click on the Add button. This will open the following page.
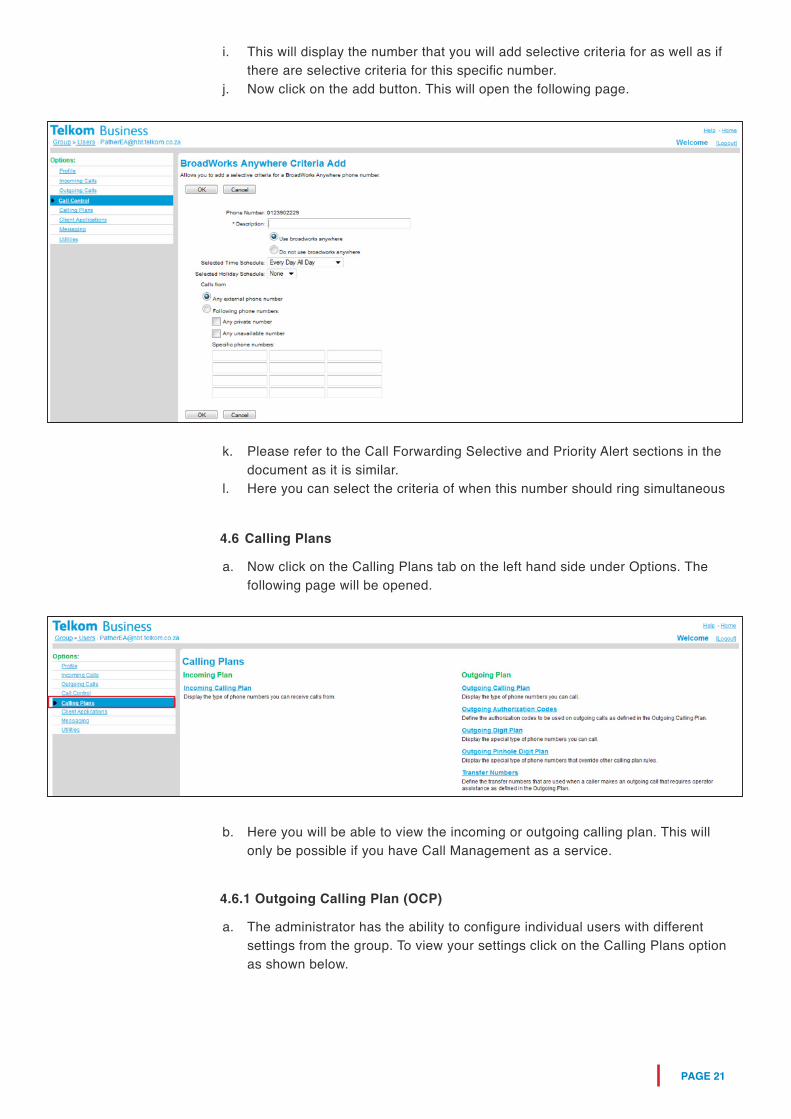
e. Here you can indicate the number that you want to ring simultaneously with your number.f. You can add a Description for this particular number.g. Once you are done and want this number to start ringing tick the box that has “Enable this Location” next to it.h. Now click on the label that says Selective Criteria. This will open the following window.
a. Click on the BroadWorks Anywhere Link. This will open the following page.
4.5.4 BroadWorks Anywhere
PAGE 21
i. This will display the number that you will add selective criteria for as well as if there are selective criteria for this specific number.j. Now click on the add button. This will open the following page.
k. Please refer to the Call Forwarding Selective and Priority Alert sections in the document as it is similar.l. Here you can select the criteria of when this number should ring simultaneous
b. Here you will be able to view the incoming or outgoing calling plan. This will only be possible if you have Call Management as a service.
a. Now click on the Calling Plans tab on the left hand side under Options. The following page will be opened.
a. The administrator has the ability to configure individual users with different settings from the group. To view your settings click on the Calling Plans option as shown below.
4.6 Calling Plans
4.6.1 Outgoing Calling Plan (OCP)

PAGE 22
b. Click the Outgoing Calling Plan option. The following screen will be displayed.
a. For each user the call type restrictions for originating calls, initiating forwards or transfers and receiving forwarded or transferred calls will be applied. Here you will be able to view which outgoing calls you can and cannot make.b. The next two user Outgoing Calling Plan tabs are shown in the images below.
c. The above figure shows you to which numbers you can initiate call forwards or transfers to.

PAGE 23
d. The above figure shows you which numbers can forward or transfer to you.e. Click OK to return to the previous page.
a. Click on the Client Applications tab on the left hand side under Options. This will open the following page.
b. Here you can view and/or change things in and around the Busy Lamp Field used for this particular user. c. Busy Lamp Field monitors other users in the group. It will show a red button when the users is available, flashing red when the users phone is ringing and red when the user is busy on a call.d. Click on the Busy Lamp Field link. This will open the following page.
e. Here you will be able to select which users will be monitored with the Busy Lamp Field.f. Click on the search button and then choose from the available users and add them to the monitored users.g. You can only add as many users as you have buttons available.h. The name for the BLF can be viewed as well.
4.7 Client Applications
PAGE 24
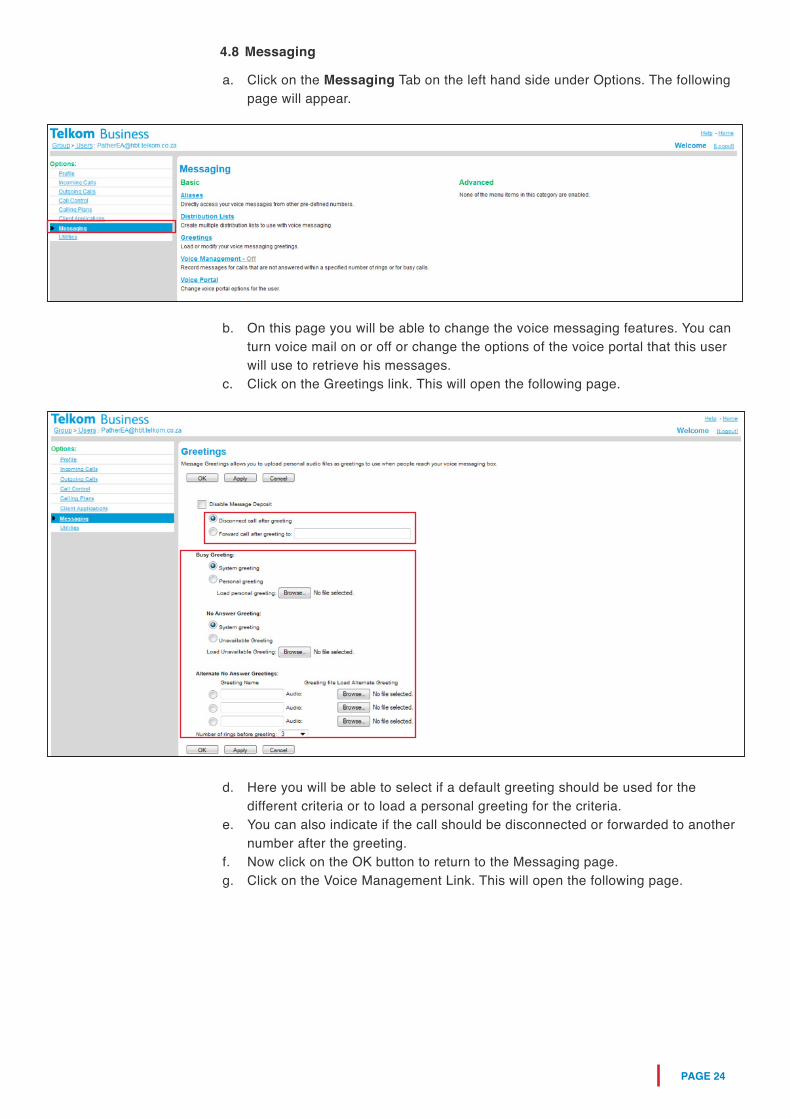
a. Click on the Messaging Tab on the left hand side under Options. The following page will appear.
b. On this page you will be able to change the voice messaging features. You can turn voice mail on or off or change the options of the voice portal that this user will use to retrieve his messages.c. Click on the Greetings link. This will open the following page.
d. Here you will be able to select if a default greeting should be used for the different criteria or to load a personal greeting for the criteria.e. You can also indicate if the call should be disconnected or forwarded to another number after the greeting.f. Now click on the OK button to return to the Messaging page.g. Click on the Voice Management Link. This will open the following page.
4.8 Messaging
PAGE 25
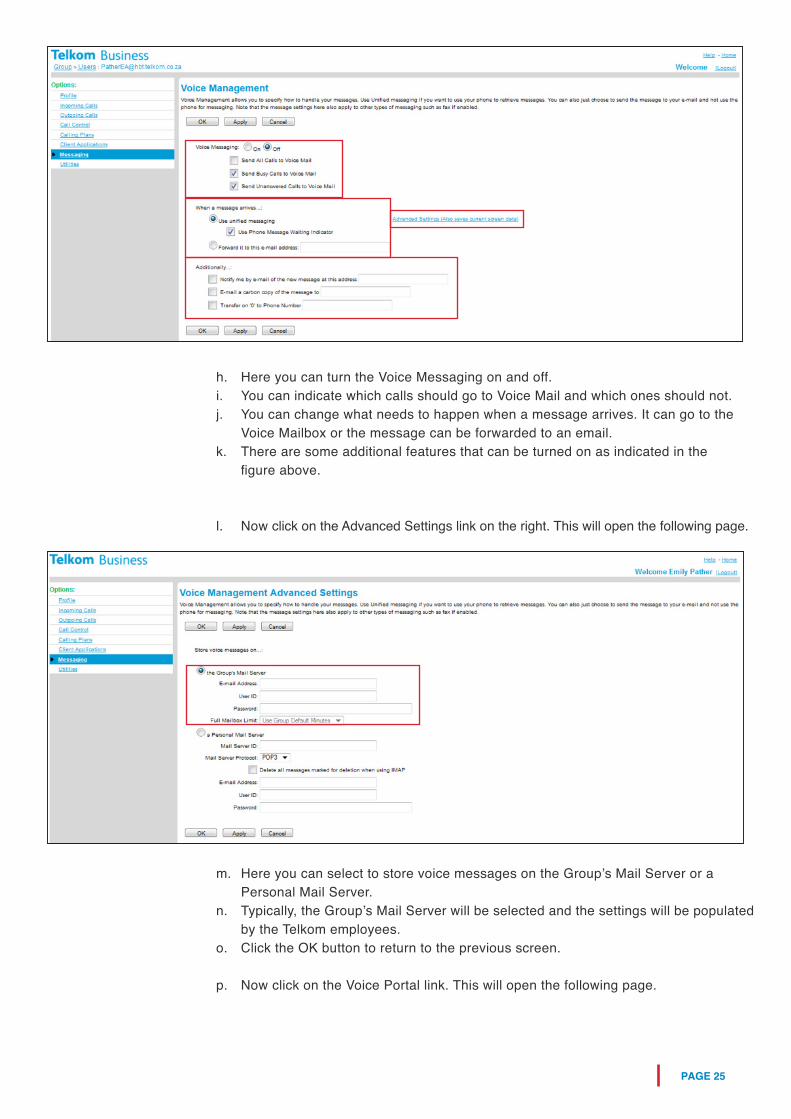
h. Here you can turn the Voice Messaging on and off. i. You can indicate which calls should go to Voice Mail and which ones should not.j. You can change what needs to happen when a message arrives. It can go to the Voice Mailbox or the message can be forwarded to an email.k. There are some additional features that can be turned on as indicated in the figure above.
l. Now click on the Advanced Settings link on the right. This will open the following page.
m. Here you can select to store voice messages on the Group’s Mail Server or a Personal Mail Server.n. Typically, the Group’s Mail Server will be selected and the settings will be populated by the Telkom employees.o. Click the OK button to return to the previous screen.
p. Now click on the Voice Portal link. This will open the following page.
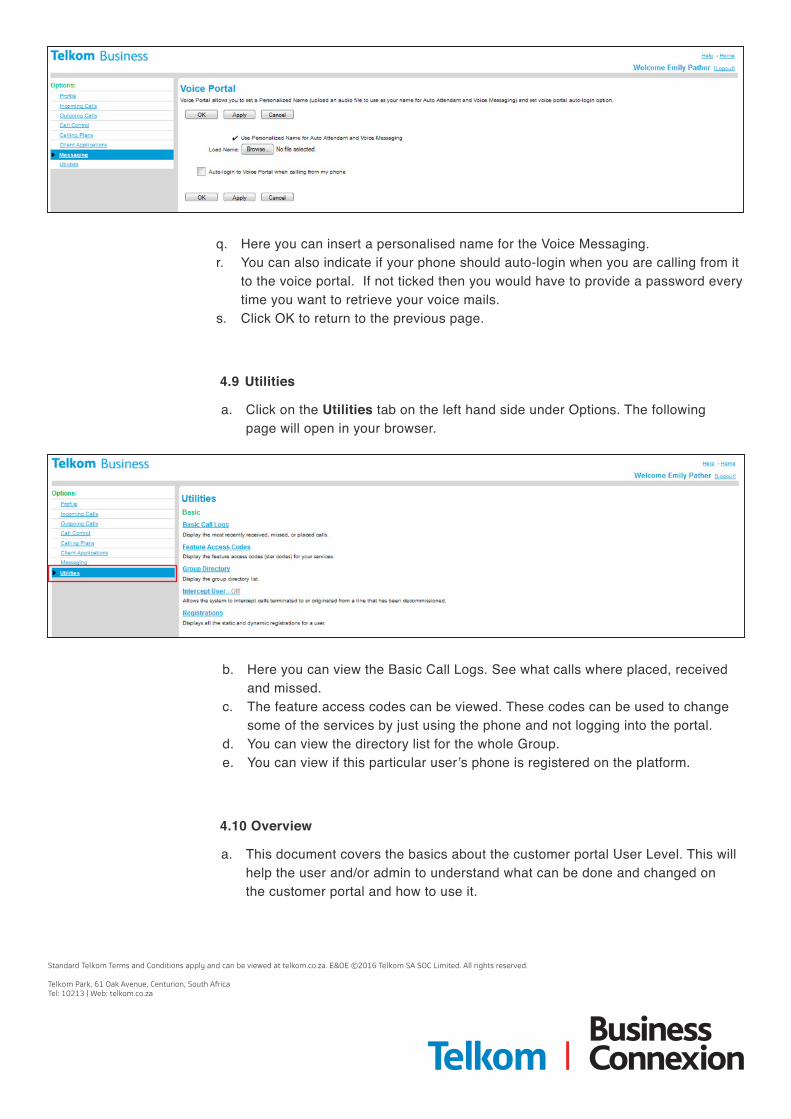
q. Here you can insert a personalised name for the Voice Messaging.r. You can also indicate if your phone should auto-login when you are calling from it to the voice portal. If not ticked then you would have to provide a password every time you want to retrieve your voice mails.s. Click OK to return to the previous page.
a. Click on the Utilities tab on the left hand side under Options. The following page will open in your browser.
a. This document covers the basics about the customer portal User Level. This will help the user and/or admin to understand what can be done and changed on the customer portal and how to use it.
b. Here you can view the Basic Call Logs. See what calls where placed, received and missed.c. The feature access codes can be viewed. These codes can be used to change some of the services by just using the phone and not logging into the portal.d. You can view the directory list for the whole Group.e. You can view if this particular user’s phone is registered on the platform.
4.9 Utilities
4.10 Overview
Standard Telkom Terms and Conditions apply and can be viewed at telkom.co.za. E&OE ©2016 Telkom SA SOC Limited. All rights reserved.
Telkom Park, 61 Oak Avenue, Centurion, South Africa Tel: 10213 | Web: telkom.co.za