Embed Size (px)
Citation preview
Sales Manager Inventory Edition User’s Guide
Sales Manager Inventory Edition
User’s Guide
Version 5
1

Sales Manager Inventory Edition User’s Guide
I. Introduction................................................................................................................. 5 A. What Does it Mean to be “Inventory-Centric”? ..................................................... 5 B. How are Inventory Items Different from Listings? ................................................ 5 C. Optimizing your Inventory Workflow.................................................................... 7
II. Setting up Your Global Preferences ........................................................................... 8 1. Setting Shipping Preferences .............................................................................. 8 2. Setting Shipping Insurance Preferences............................................................ 10 3. Setting Calculated Shipping Options ................................................................ 10 4. Setting Other Shipping Preferences .................................................................. 11 5. Setting Payment Preferences............................................................................. 12 6. Setting Promotional Options............................................................................. 13 7. Setting Item Listing Options............................................................................. 14 8. Setting Archiving Options ................................................................................ 15
III. Setting up Your eBay Site Specific Preferences................................................... 16 1. Default Template .................................................................................................. 16 2. Default Category................................................................................................... 16
IV. Building Your Inventory....................................................................................... 19 A. Importing an Initial Set of Inventory .................................................................... 19
1. Importing from a CSV File ............................................................................... 19 2. Importing from Current eBay Listings ............................................................. 22 3. Importing from an Existing Vendio Account ................................................... 23 4. Importing Inventory from Sales Manager Pro .................................................. 25
B. Creating and Managing Inventory Folders ........................................................... 26 1. About Folders.................................................................................................... 26 2. Creating Folders................................................................................................ 26 3. Renaming Folders ............................................................................................. 26 4. Deleting Folders................................................................................................ 27 5. Moving Items Between Folders ........................................................................ 27
C. Creating and Editing Inventory Items................................................................... 27 1. Pre-filling Item Details ..................................................................................... 28 2. Inventory Tab.................................................................................................... 29 3. Description & Template Tab ............................................................................ 31 4. Site Specifics Tab ............................................................................................. 32 5. Payment & Shipping Tab.................................................................................. 36 6. Auto-Launch Tab .............................................................................................. 36
D. Editing Inventory Items Using Find and Replace Feature.................................... 38 1. Common Uses for Find and Replace ................................................................ 38 2. Using Find and Replace to Edit Items .............................................................. 38
V. Managing Images...................................................................................................... 40 A. Uploading Standard or ZoomStream Images........................................................ 40
1. Access the Online Uploader.............................................................................. 40 2. Create a New Folder to Upload to (for Standard images) ................................ 40 3. Select Your Files and Upload ........................................................................... 40
B. Uploading Images in Bulk .................................................................................... 41 C. Attaching Images to Inventory Items.................................................................... 41 D. Automatic Renewal of Images associated with Inventory Items.......................... 42
2
Sales Manager Inventory Edition User’s Guide
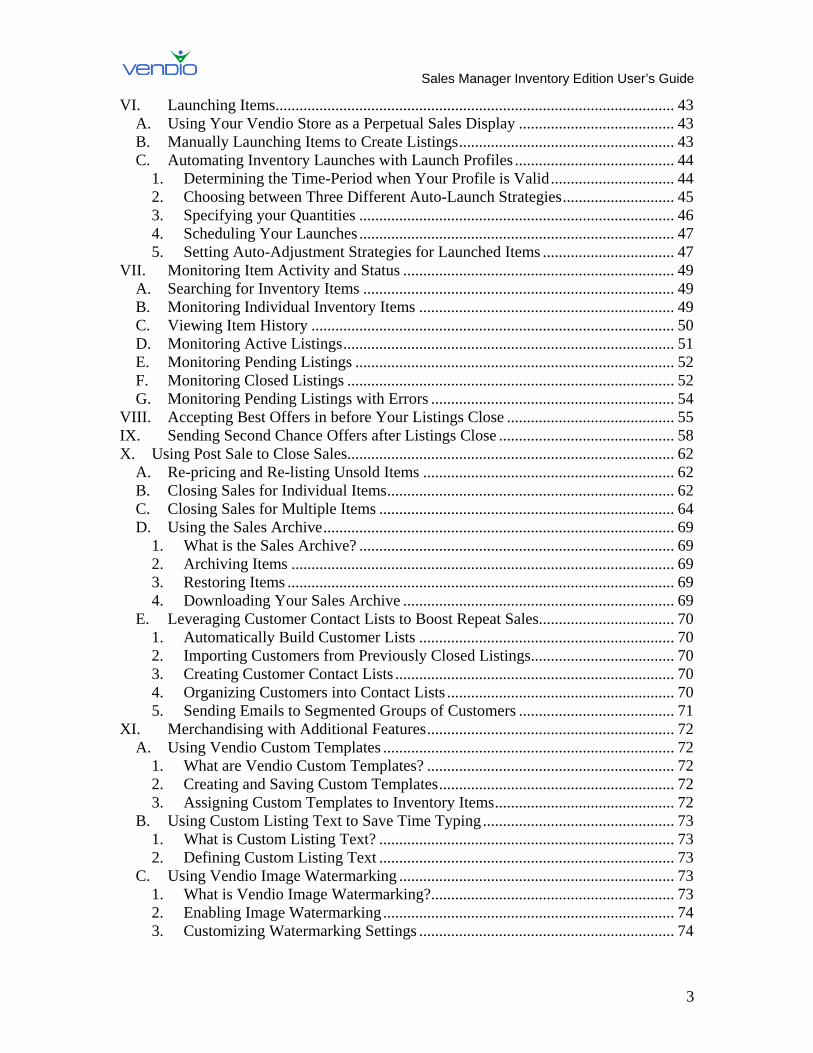
VI. Launching Items.................................................................................................... 43 A. Using Your Vendio Store as a Perpetual Sales Display ....................................... 43 B. Manually Launching Items to Create Listings...................................................... 43 C. Automating Inventory Launches with Launch Profiles ........................................ 44
1. Determining the Time-Period when Your Profile is Valid............................... 44 2. Choosing between Three Different Auto-Launch Strategies............................ 45 3. Specifying your Quantities ............................................................................... 46 4. Scheduling Your Launches ............................................................................... 47 5. Setting Auto-Adjustment Strategies for Launched Items ................................. 47
VII. Monitoring Item Activity and Status .................................................................... 49 A. Searching for Inventory Items .............................................................................. 49 B. Monitoring Individual Inventory Items ................................................................ 49 C. Viewing Item History ........................................................................................... 50 D. Monitoring Active Listings................................................................................... 51 E. Monitoring Pending Listings ................................................................................ 52 F. Monitoring Closed Listings .................................................................................. 52 G. Monitoring Pending Listings with Errors ............................................................. 54
VIII. Accepting Best Offers in before Your Listings Close .......................................... 55 IX. Sending Second Chance Offers after Listings Close ............................................ 58 X. Using Post Sale to Close Sales.................................................................................. 62
A. Re-pricing and Re-listing Unsold Items ............................................................... 62 B. Closing Sales for Individual Items........................................................................ 62 C. Closing Sales for Multiple Items .......................................................................... 64 D. Using the Sales Archive........................................................................................ 69
1. What is the Sales Archive? ............................................................................... 69 2. Archiving Items ................................................................................................ 69 3. Restoring Items ................................................................................................. 69 4. Downloading Your Sales Archive .................................................................... 69
E. Leveraging Customer Contact Lists to Boost Repeat Sales.................................. 70 1. Automatically Build Customer Lists ................................................................ 70 2. Importing Customers from Previously Closed Listings.................................... 70 3. Creating Customer Contact Lists ...................................................................... 70 4. Organizing Customers into Contact Lists ......................................................... 70 5. Sending Emails to Segmented Groups of Customers ....................................... 71
XI. Merchandising with Additional Features.............................................................. 72 A. Using Vendio Custom Templates ......................................................................... 72
1. What are Vendio Custom Templates? .............................................................. 72 2. Creating and Saving Custom Templates........................................................... 72 3. Assigning Custom Templates to Inventory Items............................................. 72
B. Using Custom Listing Text to Save Time Typing ................................................ 73 1. What is Custom Listing Text? .......................................................................... 73 2. Defining Custom Listing Text .......................................................................... 73
C. Using Vendio Image Watermarking ..................................................................... 73 1. What is Vendio Image Watermarking?............................................................. 73 2. Enabling Image Watermarking ......................................................................... 74 3. Customizing Watermarking Settings ................................................................ 74
3

Sales Manager Inventory Edition User’s Guide
D. Using ZoomStream Images................................................................................... 75 1. What are ZoomStream Images?........................................................................ 75 2. Taking Images Suitable for ZoomStream Applications.................................... 75
4
Sales Manager Inventory Edition User’s Guide
I. Introduction Sales Manager Inventory Edition provides high-volume sellers with a powerful system for streamlining, centralizing and automating inventory and online sales management. By being in control of your inventory, you are better prepared to sell on multiple venues, capitalize on changing market dynamics and grow your business. This user’s guide describes how to use Sales Manager Inventory Edition to maximize the potential of your inventory and your operation.
A. What Does it Mean to be “Inventory-Centric”? Sales Manager Inventory Edition’s advanced features are made possible through its unique inventory-centric model. This means that your goods are completely defined as inventory items first, enabling them to be effectively organized and managed. A well-organized and well-defined inventory lays the groundwork for quick and efficient listing and sales automation. Once you have a good understanding of your inventory, you can think strategically about your business and how to sell items. Some questions you might ask yourself include the following: • Are there certain times of known demand for my items, such as before certain
holidays, during a particular season or triggered by a weekly event? • Do I want to have a large number of items available for sale at a time, or do my items
sell better when they are perceived to be rare? • Are certain items complementary, such that they should always be listed for sale at
the same time to maximize cross- and up-sell potential (for example, a camera and its various accessories)?
• Which items sell better at auction rather than fixed-price, and vice-versa? • When an item sells or ends without a sale, do I want to adjust the price accordingly
for the next time I list that item for sale? With Sales Manager Inventory Edition, you can easily launch your inventory into successful listings that execute on each of these various selling strategies.
B. How are Inventory Items Different from Listings? • An inventory system stores information about the items you have available to sell. • A listing is created when an inventory item is launched on a specific marketplace. Think of your inventory as all the items you have available to sell, while a listing is equivalent to placing one of these items on display - arranged neatly, merchandised and priced appropriately. Just like placing an item on display, you can list an item to
5
Sales Manager Inventory Edition User’s Guide
marketplaces like eBay, eBay Motors and Vendio and eBay Stores to ensure that it’s accessible to millions of online buyers. Because listings are a re-packaging of your inventory items, data fields that you have defined for your inventory can be optimized for your internal bookkeeping use only, and are not necessarily reflected in your listings. For example, in the back storeroom, for your own tracking purposes, you might label an inventory item “Purple Widgets,” but when you launch this item as a listing on eBay, you might title it “Purple Widget – Brand New in Package. NR!” Please note that, by default, our system pre-fills listing titles with the inventory name. Therefore, if you tend to sell all your items on a single marketplace, an alternative and convenient naming method is to name your inventory items the same way you would title a listing for that item. Then, you can use the Notes field to add and share private inventory item information that doesn’t appear on any listings and remains hidden from buyers. Inventory items can be launched as listings using different merchandising and pricing strategies on each channel, to achieve various business goals. For example: • Displaying an item as a fixed-price listing in your Vendio Store makes it
automatically visible and available at all times to all buyers at its suggested retail price, at very little cost to you.
• Launching an item as a “$1 No Reserve” highlighted auction listing on eBay can turn it into a loss leader item that attracts visitors to this auction and, from here, your other eBay or Store listings.
• Launching an item as an auction with a buy-it-now price listing on eBay can motivate buyers to purchase the item quickly rather than risk losing it in a bidding war.
In addition, you can also have different strategies for launching and pricing your items on an ongoing basis. For example: • To reflect market dynamics, one general rule of thumb is to reduce your item’s price
if a listing ends without a sale, and to increase your price on the next listing if the current listing of the same item sells (note that time-dependent items, such as event tickets, may not necessarily follow these same dynamics).
• Another ongoing launch strategy is to keep a certain quantity of your inventory on market, which is the online equivalent to keeping display shelves fully-stocked.
• You can also launch items at specific, designated times, in order to coincide with peak viewing/browsing hours for your items or to align with your personal/business schedule.
Sales Manager Inventory Edition enables you to set up your inventory, merchandising, pricing and launching strategies, and then streamlines and enables automatic inventory tracking, so that you spend less time on day-to-day operations and more time on growing your overall business.
6
Sales Manager Inventory Edition User’s Guide
C. Optimizing your Inventory Workflow As with any retailing operation, your business will function smoothly when you have an organized, well-catalogued storeroom of inventory, an efficient method for displaying your items, and a convenient process for handling checkout, payment and shipping. With Sales Manager Inventory Edition, you can optimize your workflow as follows: 1. Build up and organize your inventory: get a head start by importing existing
inventory or listings, create new items or edit existing ones in bulk and organize them into folders.
2. Display your items according to your business’ strategic goals: display items in your Vendio Store as an economical permanent showcase, launch listings manually or define auto-launch profiles that reflect your merchandising and pricing strategies, monitor listing performance while they are live.
3. Manage items after sale or close: adjust prices according to sales success, accept payment, communicate with customers and ship orders.
7
Sales Manager Inventory Edition User’s Guide
II. Setting up Your Global Preferences Because many of your listing details remain the same from listing to listing, you can specify them once in your Global Preferences and not have to enter them again as you create new listings. We recommend that you set your Global Preferences after registering for Sales Manager to make creating your first listings easier. You can expect this section to take about 30 minutes to complete, but it will save you hours of time when you begin to create listings. To access your Global Preferences, follow these steps:
• Click on the My Account link at the top of the page. • Click on the Global Preferences link.
Please refer to each section below to learn how to set each of your Global Preferences.
1. Setting Shipping Preferences Make sure you are in the Shipping section of the Global Preferences page. Before you set your shipping preferences, you should first answer these questions:
1. Which shipping carrier(s) do you use to ship items to your customers? 2. Do you ship internationally?
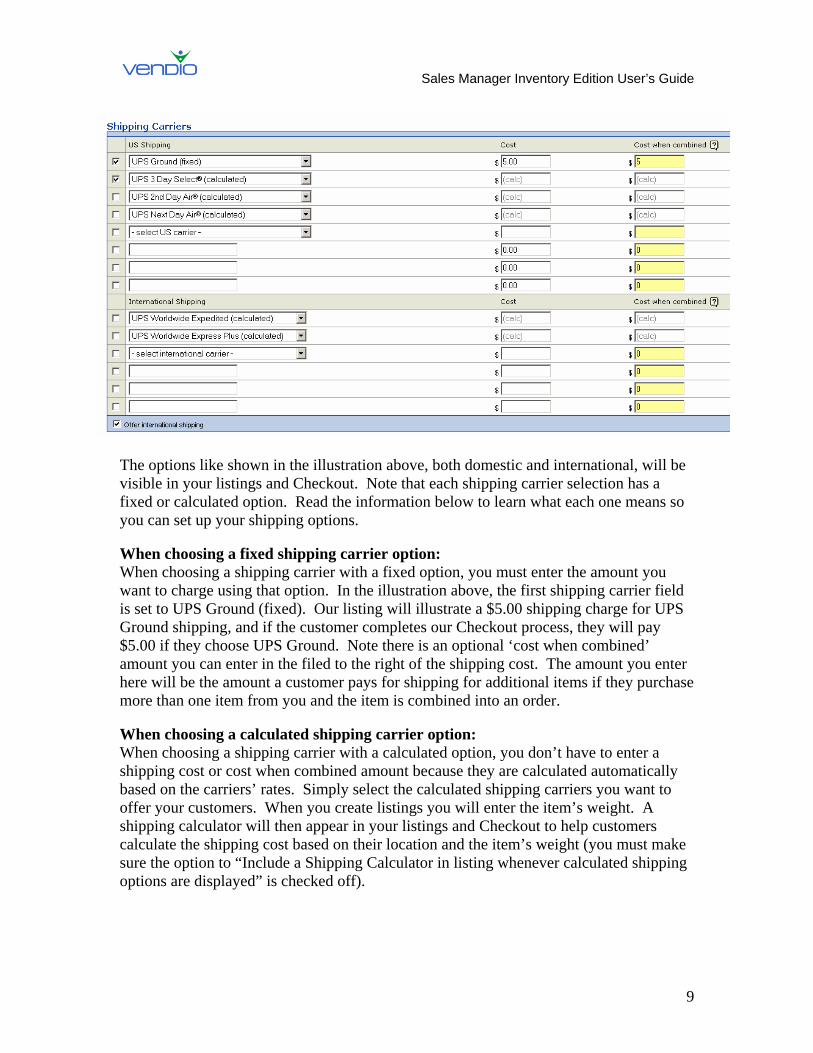
Once you have the answers to these questions, completing this section will be easier. Start by navigating to the Shipping Carriers section. Use the available fields to select the domestic shipping carriers you use to ship items to your customers. If you ship internationally, select the ‘Offer international shipping’ checkbox to display the international fields. Note that you cannot put international shipping options in the domestic shipping area or your international customers will not be able to check out properly.
8
Sales Manager Inventory Edition User’s Guide
The options like shown in the illustration above, both domestic and international, will be visible in your listings and Checkout. Note that each shipping carrier selection has a fixed or calculated option. Read the information below to learn what each one means so you can set up your shipping options. When choosing a fixed shipping carrier option: When choosing a shipping carrier with a fixed option, you must enter the amount you want to charge using that option. In the illustration above, the first shipping carrier field is set to UPS Ground (fixed). Our listing will illustrate a $5.00 shipping charge for UPS Ground shipping, and if the customer completes our Checkout process, they will pay $5.00 if they choose UPS Ground. Note there is an optional ‘cost when combined’ amount you can enter in the filed to the right of the shipping cost. The amount you enter here will be the amount a customer pays for shipping for additional items if they purchase more than one item from you and the item is combined into an order. When choosing a calculated shipping carrier option: When choosing a shipping carrier with a calculated option, you don’t have to enter a shipping cost or cost when combined amount because they are calculated automatically based on the carriers’ rates. Simply select the calculated shipping carriers you want to offer your customers. When you create listings you will enter the item’s weight. A shipping calculator will then appear in your listings and Checkout to help customers calculate the shipping cost based on their location and the item’s weight (you must make sure the option to “Include a Shipping Calculator in listing whenever calculated shipping options are displayed” is checked off).
9

Sales Manager Inventory Edition User’s Guide
2. Setting Shipping Insurance Preferences Make sure you are in the Insurance section of the Global Preferences page. Before you set you set your insurance options, you should answer these questions:
1. Do you want to charge shipping insurance? 2. Will shipping insurance be optional, recommended, or required?
Once you have the answers to these questions, completing this section will be easier. Start by navigating to the Insurance section. The first step is to specify if you offer shipping insurance. If not, select ‘Not Offered’ from the US and International Insurance dropdown menus. If you do offer shipping insurance, you will need to specify if it is optional, recommended, required, or included in shipping and handling for both the US and International Insurance dropdown menus.
The next step is to specify the shipping insurance rates for the domestic and international shipping carrier options you have selected. For each shipping carrier, you can choose the shipping carrier’s insurance rates or use your own. If you select your own insurance rates, you must enter them in the appropriate fields. In the example above, we decided to use our own rates for UPS. The way they are illustrated, a customer will pay $1.00 in insurance for an item costing up to $50.00, and $2.00 for an item costing $50.00 to $100.00. If the item costs over $100.00, a customer will pay an additional $1.00 for every $50.00 over $100.00 that the item costs. Note that this holds true only if the customer chooses shipping insurance. We could have made it required if we selected ‘Required’ from the dropdown menu.
3. Setting Calculated Shipping Options Make sure you are in the Calculated Shipping Options section of the Global Preferences page. Keep in mind that these settings only apply if you offer calculated shipping for any of your shipping carriers. If you do not offer calculated shipping, you can ignore this section.
10
Sales Manager Inventory Edition User’s Guide
The first step is to enter the Zip Code you ship from. Optionally, you can offer a fixed or percentage of shipping cost markup to account for handling. This amount is automatically added to the total shipping amount in your shipping calculator and is not visible to the buyer as a separate charge. The next step is to determine how you will calculate the shipping on combined orders. You can calculate shipping on the total weight of both items (assuming they are shipped in one package), or calculate shipping on the total weight of each individual item (assuming they are shipped in separate packages). Similarly, if you have entered a fixed or percentage of shipping cost markup to account for handling, you can calculate the combined markup as the highest markup of all the items in the order or as a sum of the markup of all items. There are some additional options in this section that you will need to specify. You can choose to remind yourself to enter the item weight for all items or for items using calculated shipping only, or you can register for UPS Online Tools, which is necessary if you plan to offer calculated shipping for UPS shipments.
4. Setting Other Shipping Preferences Make sure you are in the Other Shipping Settings section of the Global Preferences page: Setting #1, Cost when Combined Discount This setting allows you to specify a shipping discount when buyers add several items to the shopping cart, or want to combine shipments of different purchases made over time. You can set the discount to be a dollar amount off each individual shipment in the order, or as a percentage off each individual shipment in the order. Note: The shipping discount you specify here only applies for fixed shipping carriers. Also note that the combined shipping discounts apply to the least expensive shipping amounts only (i.e. the most expensive shipping cost in the order does not receive a discount). Setting #2, Custom Shipping & Handling Note This setting allows you to add custom text about your shipping and handling policy. This note appears where the shipping details are located in your listing. If there is a special message related to your shipping and handling, this is where you should specify it. Setting #3, Shopping Cart This setting turns on your shopping cart and allows buyers to purchase multiple items at a time from your Vendio Store. By turning on your shopping cart, you also enable buyers to automatically combine the shipments of multiple purchases. Select the ‘Enable shopping cart’ checkbox only if you have a Vendio Store and if you would like to be able to cross-promote Vendio Store items when buyers check out on eBay purchases.
11
Sales Manager Inventory Edition User’s Guide
Setting #4, Auto-Combine Eligibility This setting allows you to specify the maximum number of days after an auction ends before a buyer will no longer be eligible to automatically combine shipping on their next check out with you. For example, if you enter a ‘5’ in the field, this means that a buyer who purchases three items from you within a five day period are eligible to combine their shipment into one and take advantage of the “Cost when Combined” discount you specified in your Global Preferences.
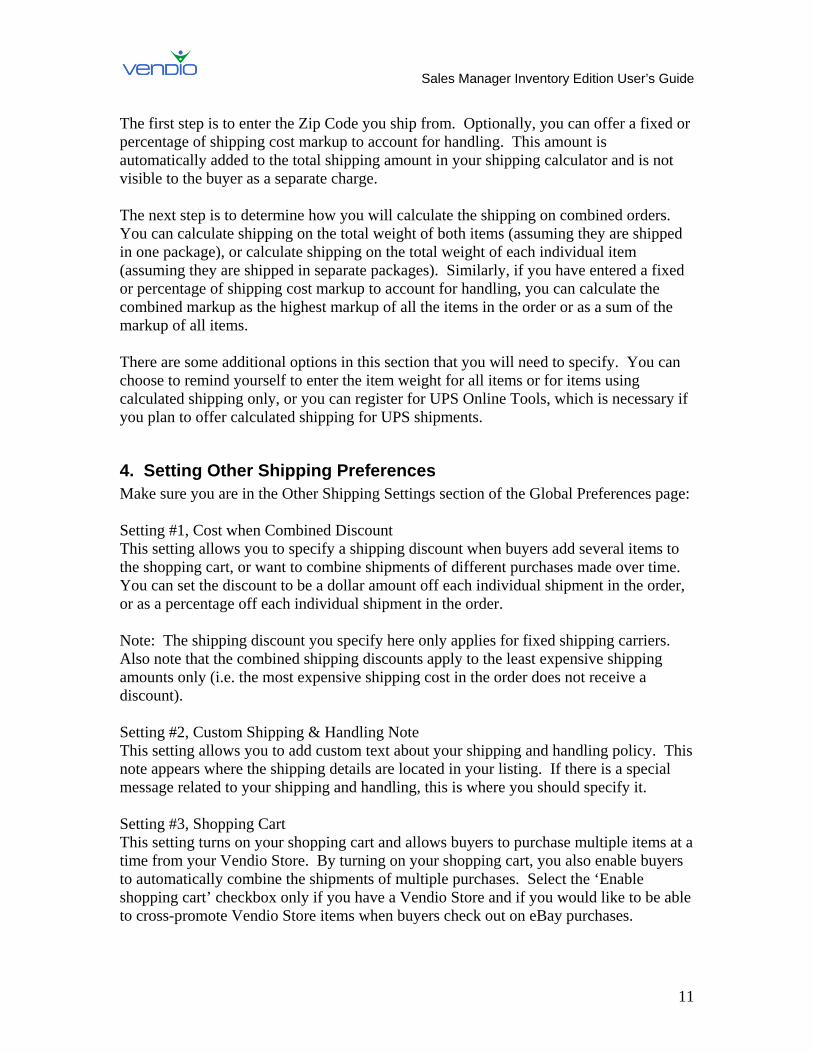
5. Setting Payment Preferences Make sure you are in the Payment Types Accepted section of the Global Preferences page. This section is used to specify the payment types you accept from buyers. All major payment methods are available, including PayPal. If you have your PayPal ID, enter it in the field provided (note that PayPal ID refers to the email address you use for PayPal – if you do not enter an email address, you will not be able to save changes made to the Global Preferences section). If you do not have a PayPal account set up, you can easily create one by clicking on the ‘Sign Up With PayPal’ link. Note that all of the payment options and special instructions you specify in your Global Preferences will be visible under the Payment section of your listings as illustrated in the example below:
Note that if you use PayPal as your primary payment method, we recommend that you activate eBay Checkout Redirect to drive buyers who click the eBay or PayPal ‘Pay Now’ button through your Vendio Checkout. To do this, follow these steps:
• Click on the My Account link at the top of the page. • Click on the Post Sale Management link. • Select the ‘Use eBay Checkout’ checkbox. • Click the ‘Save’ button.
12
Sales Manager Inventory Edition User’s Guide
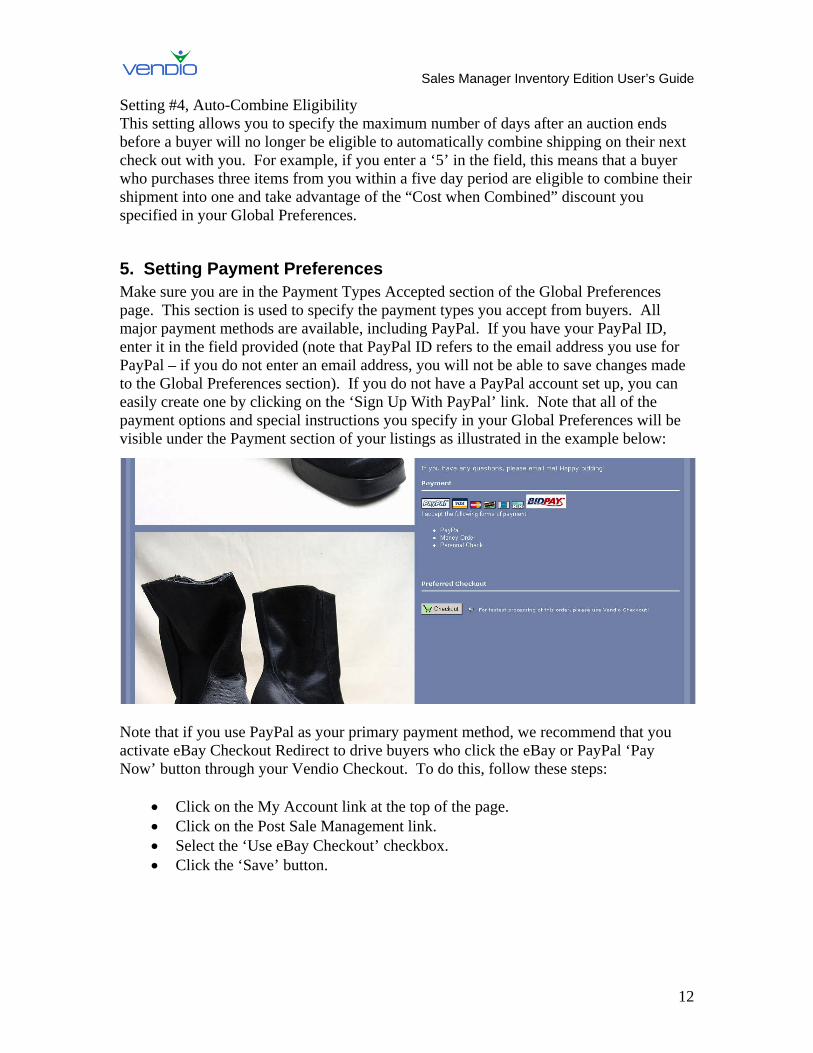
6. Setting Promotional Options Make sure you are in the Promotional Options section of the Global Preferences page. This preference helps you enhance your enlarged image pages on eBay so you can acquire more sales leads. Note that the enlarged image pages are the pages your buyers reach when they click to enlarge an image on one of your listings as illustrated below”
Setting #1, Automatically import winning bidders into Customer Management folder This setting helps you import your winning bidders into a designated folder to ensure you keep a record of every customer and transaction you ever make. Keep in mind that the folder you specify in your Global Preferences can easily be changed from listing to listing. For example, if you are listing an item in the Consumer Electronics category but your default folder is set to ‘Antiques’, you can choose to import your winning bidder into the ‘Consumer Electronics’ folder on the Create Listings page. Note that you must create a contact list(s) before they will appear in the dropdown menu on the Global Preferences page. To learn how to do this, please see the ‘Creating Contact Lists’ section of this guide. Setting #2, Include a ‘Join My Mailing List’ link on enlarged image page. This setting adds a mailing list sign up field to all of your enlarged image pages to capture buyers who are interested in the items you sell but may not be ready to buy. Once they enter and submit their email address, it is automatically stored in your default ‘Store Mailing List’ folder where you can easily contact them from the Customers page in Sales Manager. Setting #3, Include a Vendio Store promo on the enlarged image page.
13
Sales Manager Inventory Edition User’s Guide
This setting ads a Vendio Store banner to the top of your enlarged image pages to drive buyers to your Vendio Store. You can take advantage of this feature only if you have a Vendio Stores subscription. Setting #4, Insert a ‘Track this auction’ link on enlarged image page. This setting adds a ‘Track this auction’ link to the top of your image on your enlarged image pages. A buyer is then able to track the auction on the Vendio Web site.
7. Setting Item Listing Options Make sure you are in the Item Listing Options section of the Global Preferences page: Setting #1, Sort attach images in create auction. This setting determines the way you view your uploaded images in the ‘attach images’ window on the Create Listing page. This setting is designed to save you time by making it easier to find the images you want to attach to your listings by displaying your most recently uploaded images first. We recommend selecting this option if you upload images just before creating listings. If you select ‘Alphabetically’ from the dropdown menu, your images will be sorted alphabetically by image name (i.e. image names that start with the letter ‘a’ will appear first, and image names that start with the letter ‘z’ will appear last). We recommend selecting this option if you do not upload images just before creating listings. Setting #2, Display the Square Trade Seal on my listing. This setting displays the Square Trade Seal on your listings. This recognizable logo gives buyers more confidence in purchasing from you because it offers them added purchase protection. If you select this checkbox to add the Square Trade Seal on your listings, please note that you must have a Square Trade Seal account and enter your Seal ID in the Auction site Accounts page. To do this, follow these steps:
• Click on the My Account link at the top of the page. • Click on the Auction Site Accounts link. • Click the ‘Add Accounts’ button. • Select the ‘SquareTrade’ checkbox. • Enter your Square Trade Seal ID, registered email address and password. • Click the ‘Continue’ button and confirm your account information.
Setting #3, Automatically scale down large images for faster download. This setting makes sure that images with larger file sizes are scaled down to a consistent image size, which ensures a better presentation and a faster download once they are supersized. If you decide to use this option in your listings, the images will appear as small images, which are clickable to a new page where the image appears at their full size. Please keep in mind that in order for this feature to work, your actual image size must be larger than 250 pixels wide.
14
Sales Manager Inventory Edition User’s Guide
Setting #4, Allow automatic eBay Category Remapping. This setting ensures that your items remain listed in the appropriate category if eBay changes its category structure. Because eBay can sometimes remove certain categories, the Category Remapping setting ensures that your items are moved to the nearest appropriate category if this happens.
8. Setting Archiving Options Make sure you are in the Archiving Options section of the Global Preferences page. This preference helps you remove items from the Closed Listings section of your Control Panel that you have already closed (i.e. paid for, shipped, left feedback), and no longer need your attention. Note that the items removed from your Control Panel using the auto-archive option are not deleted. Instead, the items move to a Sales Archive you can access later on to find information about a specific transaction, customer, or item sold. You can always restore an item back to your Control Panel if the amount of time is reasonable (usually two-weeks after it has been archived). To set this option, select the number of weeks for Vendio to wait until it moves your items from the Closed Listings section of the Control Panel to your Sales Archive. As a good rule of thumb, the number of weeks you specify should adequately cover the amount of time it takes you to close a sale using Vendio Post Sale. To learn more about the Sales Archive, please see the ‘Archiving Items out of Your Control Panel’ in this guide.
15

Sales Manager Inventory Edition User’s Guide
III. Setting up Your eBay Site Specific Preferences Because many of your eBay listing details remain the same from listing to listing, you can specify them once in your eBay Site Specific Preferences to streamline the process of creating new listings. For example, you can set a global listing template, a global item category and subcategory, a global eBay Gallery image, and specify your commonly used eBay features, such as highlight and bold. When you create new listings, these global preferences will already be prefilled to save you time, but you can overwrite this information as needed and continue with your listing. We recommend that you set your eBay Site Specifics Preferences after registering for Sales Manager to make creating your first listings easier. You can expect this section to take about 30 minutes to complete, but it will save you hours of time when you begin to create listings. To access your eBay site Specific Preferences, follow these steps:
• Click on the My Account link at the top of the page. • Click on the eBay link under the Site Specifics heading.
Please refer to the sections below to learn how to set up your Site Specific Preferences. Default Template Select the template you would like to use for your eBay listings by clicking a saved template in the ‘Saved Templates’ box. To learn how to create and save templates, please see the ‘Creating and Saving Custom Templates’ section in this guide. Default Category Selecting the appropriate category will ensure the greatest visibility of your item in eBay searches. Once you select a top-level category, sub categories will pre-fill themselves in the empty box below it. Keep narrowing the focus of your category by clicking on the appropriate sub categories until a category number appears in the small box next to the right of the Top Category dropdown menu. This signifies that you have successfully chosen a category for your item. Note: You can give your item even greater visibility by listing it in a second category. To do this, copy and paste your first category number into the second category box, then follow the same process outlined above to select your other category. Note that listing your item in two categories doubles your eBay insertion and special features fees. eBay Features The Features section lists the extra features offered by eBay. The right hand column displays pricing for each feature for Auction and eBay Store formats – charged by eBay. Payment Instructions & Return Policy If you are using Vendio Checkout, you can keep the default text that appears in the box, or enter other instructions if you are using another method of receiving payment. If you do not want to display payment instructions on your listing, unselect the checkbox.
16
Sales Manager Inventory Edition User’s Guide PayPal Buyer Financing Options The PayPal Buyer Financing option gives buyers who use PayPal Buyer Credit the ability to make low monthly payments on their PayPal purchases. Note that when buyers purchase items using this option, you still get paid in full by PayPal. Auto Relist If your listing closes without a winning bidder, you can relist it automatically if this selection is made. Check the 'Enable Auto Relist' checkbox and specify the number of times you want to relist your item if it does not sell successfully. Best Offers To avoid the manual process of accepting and declining Best Offers, you can set up a global rule that automatically accepts or declines Best Offers based on your preferences. Note that the global rule you set up in your preferences only prefills new items you create but it will NOT cause existing items to accept or decline Best Offers. First, decide if you want to automatically accept Best Offers by an amount greater than or equal to the item’s cost or fixed price. This amount can be a dollar amount or percentage of the item’s cost of fixed price. When Best Offers are automatically accepted, Vendio treats the transaction the same way as a normal sale. The buyer is sent an automated message that directs them through your Checkout process (or your other preferred Checkout method) to complete the sale. To edit this message, please see the ‘Monitoring and accepting Best Offers in bulk’ section in this guide. You can automatically decline Best Offers by an amount less than or equal to the item’s cost of fixed price. This amount can be a dollar amount or percentage. When Best Offers are declined, the buyer is sent an automated message informing them of your decision. To edit this message, please see the ‘Monitoring and accepting Best Offers in bulk’ section in this guide. To maximize the value of your Best Offers, you can ignore offers that are made early on by specifying the time you would like to wait until a better offer is made. To do this, check off the selection box for this option. Next, select one of the three radio buttons, each of which follow a basic strategy that help you accept Best Offers based on what will drive you the most revenue.
• Wait until a Best Offer is made at a higher price. • Wait until a Best Offer is made where a larger quantity is requested. • Wait until a Best offer is made where total sales price (item price plus the
quantity) is the highest. Second Chance Offers To streamline the manual process of specifying Second Chance Offers for each unsold item, you can set up a global rule that automatically filters non-winning bidders based on
17
Sales Manager Inventory Edition User’s Guide
your own preferences. This makes it easier for you to send Second Chance Offers by having Vendio display only the bidders you think are most likely to purchase your items. First, select the checkbox to enable Second Chance Offers, and select the duration you would like the offer to be valid, which can be 1, 3, 5, or 7 days. Next, determine if you only want to show the top bidder, or the top bidders with bids above a certain amount. This amount can be a percent or dollar amount above the item’s cost, the reserve, or a percent or dollar amount minus the winning bid. Finally, you can only show bidders that have a feedback rating greater than a specific number. Ship-From Location Specify the location where your items are shipped from. This information is visible in your listings and Checkout. Ship-To Locations Specify the locations where you are willing to ship your item. This information is visible in your listings and Checkout. eBay Shipping & Payment Details If you have opted to use eBay Checkout, this section is important, because it specifies how you want eBay Checkout to display your shipping and payment details. If you want to specify your shipping and payment details in eBay Checkout, then select the radio button for this option. The next step is to choose if you want to display your fixed or calculated shipping rates. These rates are taken directly from your Global Preferences. To learn how to set up your fixed and calculated shipping rates, please see ‘Setting up Your Global Preferences’ in this guide. This section also allows you to apply the shipping discounts you specified in your Global Preferences for multiple purchases in eBay checkout. Just select the appropriate checkbox. Photo Preview Select your eBay Gallery image (the image that appears at the top right hand corner of your listing). You can choose your eBay Gallery image to be one of the following:
• Text that instructs buyers to read your item description before bidding. • Leave the section blank (do not use an eBay Gallery image). • Select your company logo (this is stored in your Custom Templates Preferences). • Use the first image you select for your listing as the eBay Gallery image.
18
Sales Manager Inventory Edition User’s Guide
IV. Building Your Inventory
A. Importing an Initial Set of Inventory To help create your initial set of inventory, you can import inventory from current eBay listings, or from current inventory records stored in a Sales Manager Merchandising Edition account. Note that it may take up to an hour to complete the import, depending on how many items you need to transfer into inventory items. To access the import options, click on Import in the left navigation bar.
1. Importing from a CSV File Selecting this option will import any items you have entered into our .CSV template before the upload. The process takes four simple steps: Step One: Download the Vendio Template The Vendio Template is a Comma Separated Value (CSV) file that contains the titles of the data columns Sales Manager accepts. The first step is to download this template by clicking the appropriate link on the ‘Import from .CSV file’ page. Step Two: Fill the Template with Data After downloading the template, you can begin entering data for each item by using any spreadsheet program that supports CSV format (i.e. Microsoft Excel). The annex, which appears after step #4, will help you understand which columns are required or optional, as well as what each column means.
• Do NOT change or erase the line that contains the titles of the columns, as this will cause the import to fail.
• Enter data for the required columns, which are marked with an asterisk. • Enter data for the optional columns. • Save the file in CSV format (.csv or .txt).
Step Three: Upload the CSV File at Vendio After saving your file, select it for uploading by clicking the Browse button on the ‘Import from .CSV file’ page. Before uploading, note that the maximum size of the file is 15 MB (approximately 2,500 items with average sized descriptions). If your file exceeds 15 MB, please split the file and spread your data across two or more files. Important Note: For split files, each file MUST contain the titles of the columns.
Step Four: Fine Tune and Import Make sure your data is entered under the appropriate columns using the annex below. When all changes have been made and you are ready to import your file, make sure your items are organized into the appropriate folder(s) by taking note of the following:
19
Sales Manager Inventory Edition User’s Guide
• By default, each item is imported into the folder you specified in the 'Folder' column in your file. You can overwrite this entry by selecting an existing folder from the dropdown menu, or by creating a new folder. This will import all your items in the selected folder. Note that SMIE accepts a maximum of 2,000 items per folder. If you have more than 2,000 items in your file, you should make sure items are assigned to other folders to ensure the maximum limit is not reached. Alternatively, you can split the file as described in step #3.
• Click 'Import' to import your items into SMIE. Depending on the file size, this process can take a few minutes or up to an hour. The page will display the status of the import.
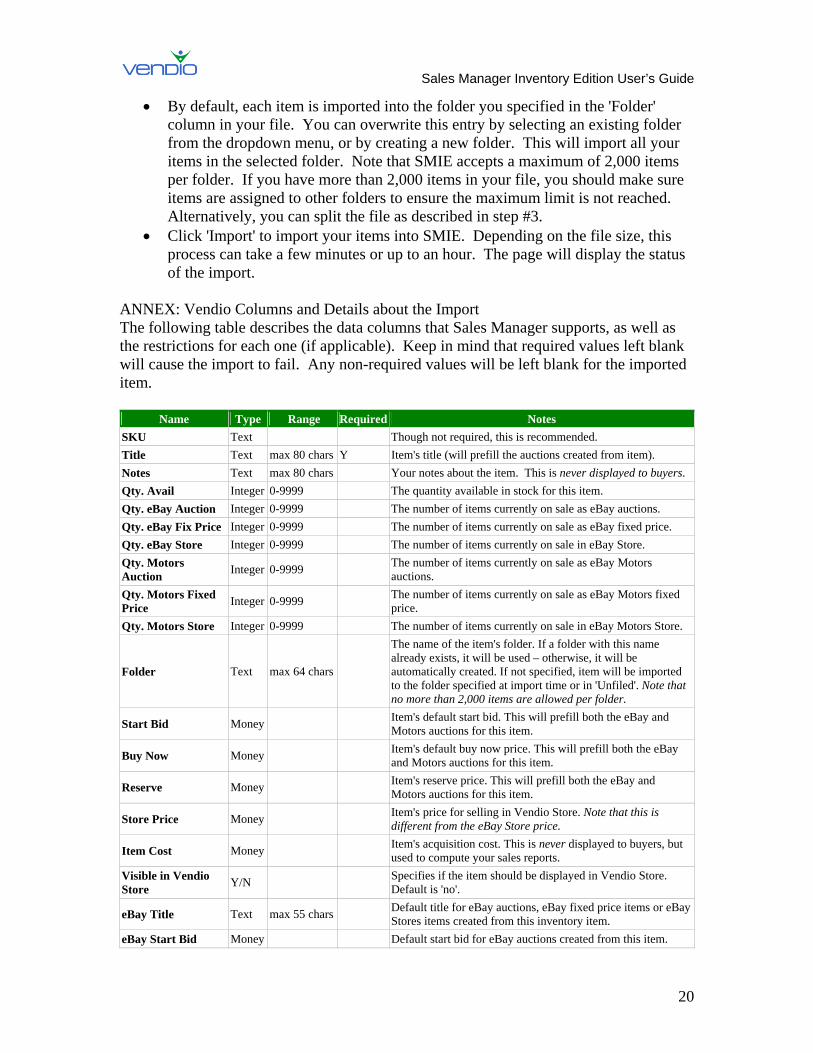
ANNEX: Vendio Columns and Details about the Import The following table describes the data columns that Sales Manager supports, as well as the restrictions for each one (if applicable). Keep in mind that required values left blank will cause the import to fail. Any non-required values will be left blank for the imported item.
Name Type Range Required Notes SKU Text Though not required, this is recommended. Title Text max 80 chars Y Item's title (will prefill the auctions created from item). Notes Text max 80 chars Your notes about the item. This is never displayed to buyers. Qty. Avail Integer 0-9999 The quantity available in stock for this item. Qty. eBay Auction Integer 0-9999 The number of items currently on sale as eBay auctions. Qty. eBay Fix Price Integer 0-9999 The number of items currently on sale as eBay fixed price. Qty. eBay Store Integer 0-9999 The number of items currently on sale in eBay Store. Qty. Motors Auction Integer 0-9999 The number of items currently on sale as eBay Motors
auctions. Qty. Motors Fixed Price Integer 0-9999 The number of items currently on sale as eBay Motors fixed
price. Qty. Motors Store Integer 0-9999 The number of items currently on sale in eBay Motors Store.
Folder Text max 64 chars
The name of the item's folder. If a folder with this name already exists, it will be used – otherwise, it will be automatically created. If not specified, item will be imported to the folder specified at import time or in 'Unfiled'. Note that no more than 2,000 items are allowed per folder.
Start Bid Money Item's default start bid. This will prefill both the eBay and Motors auctions for this item.
Buy Now Money Item's default buy now price. This will prefill both the eBay and Motors auctions for this item.
Reserve Money Item's reserve price. This will prefill both the eBay and Motors auctions for this item.
Store Price Money Item's price for selling in Vendio Store. Note that this is different from the eBay Store price.
Item Cost Money Item's acquisition cost. This is never displayed to buyers, but used to compute your sales reports.
Visible in Vendio Store Y/N Specifies if the item should be displayed in Vendio Store.
Default is 'no'.
eBay Title Text max 55 chars Default title for eBay auctions, eBay fixed price items or eBay Stores items created from this inventory item.
eBay Start Bid Money Default start bid for eBay auctions created from this item.
20
Sales Manager Inventory Edition User’s Guide
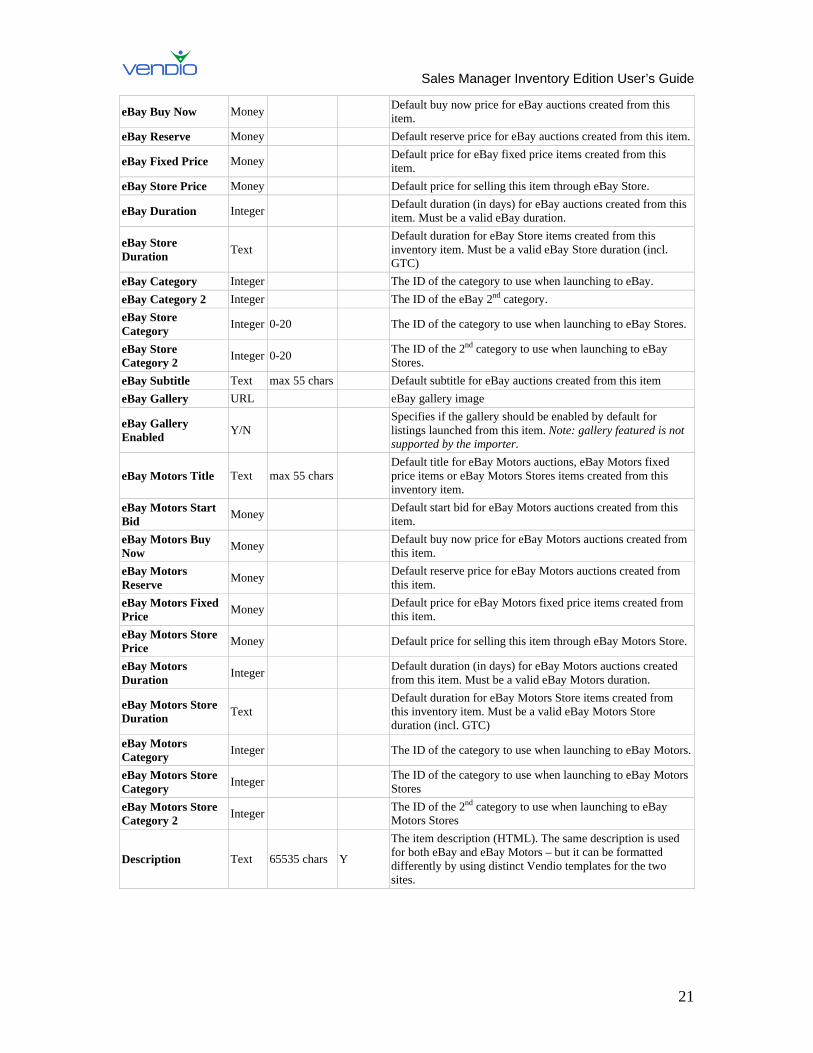
eBay Buy Now Money Default buy now price for eBay auctions created from this item.
eBay Reserve Money Default reserve price for eBay auctions created from this item.
eBay Fixed Price Money Default price for eBay fixed price items created from this item.
eBay Store Price Money Default price for selling this item through eBay Store.
eBay Duration Integer Default duration (in days) for eBay auctions created from this item. Must be a valid eBay duration.
eBay Store Duration Text
Default duration for eBay Store items created from this inventory item. Must be a valid eBay Store duration (incl. GTC)
eBay Category Integer The ID of the category to use when launching to eBay. eBay Category 2 Integer The ID of the eBay 2nd category. eBay Store Category Integer 0-20 The ID of the category to use when launching to eBay Stores.
eBay Store Category 2 Integer 0-20 The ID of the 2nd category to use when launching to eBay
Stores. eBay Subtitle Text max 55 chars Default subtitle for eBay auctions created from this item eBay Gallery URL eBay gallery image
eBay Gallery Enabled Y/N
Specifies if the gallery should be enabled by default for listings launched from this item. Note: gallery featured is not supported by the importer.
eBay Motors Title Text max 55 chars Default title for eBay Motors auctions, eBay Motors fixed price items or eBay Motors Stores items created from this inventory item.
eBay Motors Start Bid Money Default start bid for eBay Motors auctions created from this
item. eBay Motors Buy Now Money Default buy now price for eBay Motors auctions created from
this item. eBay Motors Reserve Money Default reserve price for eBay Motors auctions created from
this item. eBay Motors Fixed Price Money Default price for eBay Motors fixed price items created from
this item. eBay Motors Store Price Money Default price for selling this item through eBay Motors Store.
eBay Motors Duration Integer Default duration (in days) for eBay Motors auctions created
from this item. Must be a valid eBay Motors duration.
eBay Motors Store Duration Text
Default duration for eBay Motors Store items created from this inventory item. Must be a valid eBay Motors Store duration (incl. GTC)
eBay Motors Category Integer The ID of the category to use when launching to eBay Motors.
eBay Motors Store Category Integer The ID of the category to use when launching to eBay Motors
Stores eBay Motors Store Category 2 Integer The ID of the 2nd category to use when launching to eBay
Motors Stores
Description Text 65535 chars Y
The item description (HTML). The same description is used for both eBay and eBay Motors – but it can be formatted differently by using distinct Vendio templates for the two sites.
21
Sales Manager Inventory Edition User’s Guide
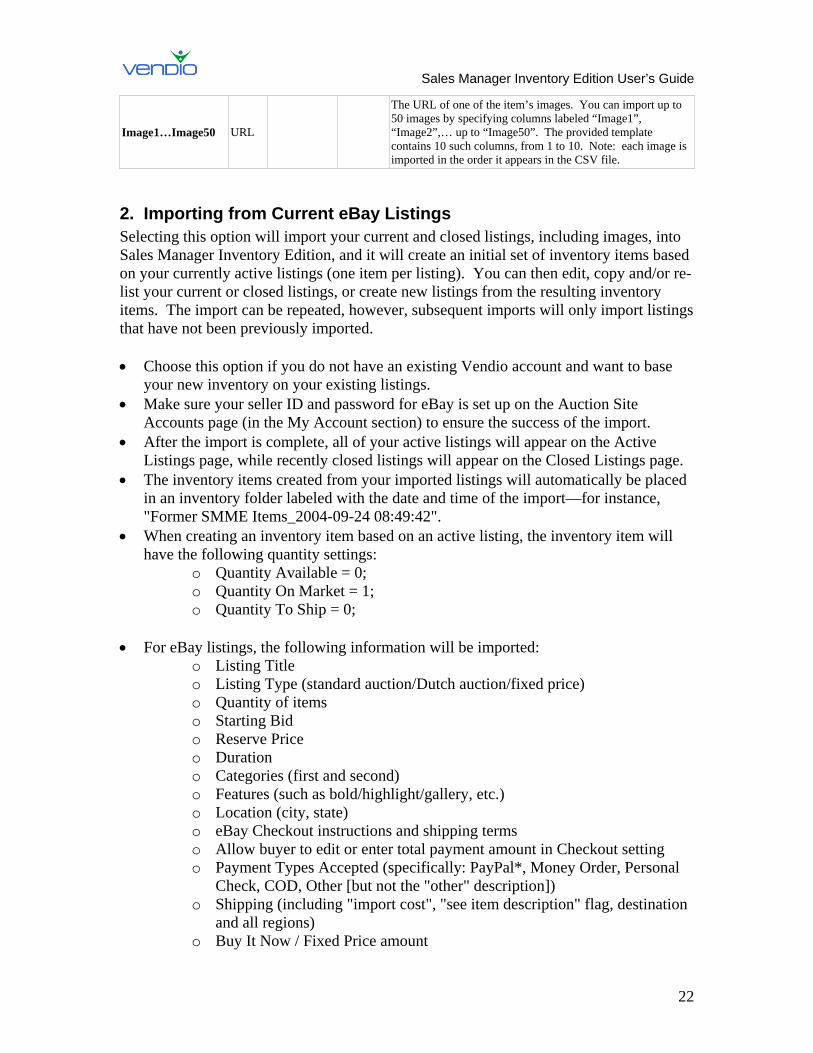
Image1…Image50 URL
The URL of one of the item’s images. You can import up to 50 images by specifying columns labeled “Image1”, “Image2”,… up to “Image50”. The provided template contains 10 such columns, from 1 to 10. Note: each image is imported in the order it appears in the CSV file.
2. Importing from Current eBay Listings Selecting this option will import your current and closed listings, including images, into Sales Manager Inventory Edition, and it will create an initial set of inventory items based on your currently active listings (one item per listing). You can then edit, copy and/or re-list your current or closed listings, or create new listings from the resulting inventory items. The import can be repeated, however, subsequent imports will only import listings that have not been previously imported. • Choose this option if you do not have an existing Vendio account and want to base
your new inventory on your existing listings. • Make sure your seller ID and password for eBay is set up on the Auction Site
Accounts page (in the My Account section) to ensure the success of the import. • After the import is complete, all of your active listings will appear on the Active
Listings page, while recently closed listings will appear on the Closed Listings page. • The inventory items created from your imported listings will automatically be placed
in an inventory folder labeled with the date and time of the import—for instance, "Former SMME Items_2004-09-24 08:49:42".
• When creating an inventory item based on an active listing, the inventory item will have the following quantity settings:
o Quantity Available = 0; o Quantity On Market = 1; o Quantity To Ship = 0;
• For eBay listings, the following information will be imported: o Listing Title o Listing Type (standard auction/Dutch auction/fixed price) o Quantity of items o Starting Bid o Reserve Price o Duration o Categories (first and second) o Features (such as bold/highlight/gallery, etc.) o Location (city, state) o eBay Checkout instructions and shipping terms o Allow buyer to edit or enter total payment amount in Checkout setting o Payment Types Accepted (specifically: PayPal*, Money Order, Personal
Check, COD, Other [but not the "other" description]) o Shipping (including "import cost", "see item description" flag, destination
and all regions) o Buy It Now / Fixed Price amount
22
Sales Manager Inventory Edition User’s Guide
o Description (see below for notes) o Images (see below for notes)
*You must enter your PayPal account information on the Global Preferences page (in the My Account section). This information will not be imported automatically.
Notes about Importing from eBay Listings • Vendio currently supports importing images from the following image hosts: Andale,
AuctionHelper, AuctionWorks, Auctiva, ChannelAdvisor, and eBay. If you are using a different provider, you may easily upload your images with our Image Uploader.
• Images will be imported to your Vendio image hosting; listings will automatically reference Vendio hosted images.
• Images will automatically resize if they are too large. • Promotional text/banners for other sites will typically be removed from imported
listings. • Counters will typically be removed from imported listings. • Vendio Winning Bidder Notifications will not be automatically sent for imported
listings, even if your default preference is to send them automatically. You'll have to do some light editing of the listing's details before being able to send a WBN.
3. Importing from an Existing Vendio Account If you have an existing Vendio Sales Manager Merchandising Edition Account, this option allows you to create an initial set of inventory based on your existing inventory and/or your existing listings. Note that all the active and closed listings from your existing Vendio account (including the state of all Post Sale tasks) will remain in your account when you convert to Inventory Edition. Importing is required in order to do the following:
1. To bring in your existing inventory or Vendio Store items from Merchandising Edition.
2. To correlate your active and pending listings from Merchandising Edition with corresponding inventory items.
Once your items are defined as inventory items, you can then take advantage of all the Sales Manager Inventory Edition features that facilitate inventory management (automatic launching, round-trip-inventory calculations, bulk editing, find & replace, etc.). a) Import ALL my Sales Manager Merchandising Edition Inventory Items Selecting this option will import all existing inventory items in your Sales Manager Merchandising Edition’s older inventory system (including Vendio Store items). All new inventory items will have the exact same characteristics as their old inventory counterpart. • Choose this option if you want to base your new inventory on all of your existing
inventory items.
23
Sales Manager Inventory Edition User’s Guide
• Your imported items will automatically be placed in a folder labeled with the date and time of the import - for instance, "Former Inventory Items_2004-09-24 08:49:42".
• The “Quantity Available” value for your imported inventory items will be calculated based on the “quantity available” and “quantity at store” values from your existing inventory items.
• The “Quantity On Market” value for your imported inventory items will be calculated based on the “quantity at auction” value from your existing inventory item.
• You can repeat this import at any time, which will place a complete set of imported items into a corresponding new folder based on the date and time of the import. Note, however, that the quantity calculations will exclude quantities that have been associated with a previously imported item, so that those items and their association with corresponding listings remains intact.
• Your previous folders will be re-created as sub-folders within this folder, and each imported item will be stored in the corresponding sub-folder, as it was in the old inventory. Your empty folders will be imported too.
• Importing your old inventory or using Sales Manager Inventory Edition will not affect your previous inventory items. If you choose to go back to Sales Manager Merchandising Edition, your old inventory items will still be there. In fact, you will find their quantities still in sync.
• Note that it may take up to one hour for items to be visible in your Vendio Store after the import.
b) Import ONLY my Vendio Store Items Selecting this option will import ONLY your existing Vendio Store items, creating an initial set of inventory based on them (one item per Store item). You can repeat the import at any time, which will place the imported items into a corresponding folder based on the date and time of the import. • Choose this option if you do not want to import all your inventory items, but you
want to be able to edit your existing Vendio Store items. • The “Quantity Available” value for your imported items will be calculated based on
the “quantity available” and “quantity at store” values from your existing Vendio Store items. (Note that Sales Manager Inventory Edition counts items in your Vendio Store as part of your “Quantity Available”).
• You can edit Vendio Store items by editing their corresponding inventory item. • As noted above, it may take up to one hour for items to be visible in your Vendio
Store after the import. c) Import Inventory Based on Existing Listings Selecting this option will import all active and pending listings from your existing Sales Manager Merchandising Edition account, and it will create an initial set of inventory items based on your currently active and pending listings (one item per listing). You can repeat the import, however, subsequent imports will only import listings that have not been previously imported.
24
Sales Manager Inventory Edition User’s Guide
• Choose this option if you want to create a set of inventory items based on existing listings, or if you are using Sales Manager Pro to create items.
• After the import is complete, all of your active listings will appear on the Active Listings page and scheduled pending listings will appear in the appropriate time window in the Pending Listings page. Note that your scheduled listings will still remain scheduled in Inventory Edition. If you want to unschedule any listings after the import, select Listings > Pending Listings in the left navigation bar to complete this action.
• The inventory items created from your imported listings will automatically be placed in an inventory folder labeled with the date and time of the import—for instance, "Former SMME Items_2004-09-24 08:49:42".
• When creating an inventory item based on an active listing, the inventory item will have the following quantities:
o Quantity Available = 0; o Quantity On Market = <calculated based on quantity listed and bids
received/purchases made>; o Quantity To Ship = 0;
• When creating an inventory item based on a pending listing, the inventory item will have the following quantities:
o Quantity Available = <calculated based on quantity to be listed>; o Quantity On Market = 0; o Quantity To Ship = 0;
4. Importing Inventory from Sales Manager Pro Because Sales Manager Pro has not yet been updated to fully support Sales Manager Inventory Edition, a two-step synchronizing and importing process is required:
1. Determine the items that you want to import from Sales Manager Pro and schedule them as pending listings (if they have not already been defined as a batch listing). Then synchronize Sales Manager Pro as usual.
2. Follow the steps outlined above in option ‘(C) Import Inventory Based on Existing Listings’ to complete the import.
When the import is finished, all of your pending items will appear on the Pending Listings page, where you can un-schedule them as needed or monitor their normally scheduled launch times. Switching between Sales Manager Merchandising Edition and Inventory Edition If you return to using Sales Manager Merchandising Edition in the future, your old listings and items will still be accessible, but you will no longer see any new inventory items created in Sales Manager Inventory Edition, as explained below: • All the listings created from Sales Manager Inventory Edition inventory items (all
launched items) will be visible in Sales Manager Merchandising Edition. • Inventory items previously created in Sales Manager Merchandising Edition will be
restored. • Inventory items created in Sales Manager Inventory Edition will NOT be available in
Sales Manager Merchandising Edition.
25
Sales Manager Inventory Edition User’s Guide
• Your Vendio Store will be restored to the state it was in before switching to Sales Manager Inventory Edition (i.e. items added from Sales Manager Inventory Edition will not be visible. Instead, the items that were in your Vendio Store when you switched to Inventory Edition will be restored).
• If you return to Sales Manager Inventory Edition again, all your previous work (new items, folders, profiles created) will still be retained.
B. Creating and Managing Inventory Folders
1. About Folders Folders allow you to efficiently organize inventory items according to item type, price range, product family or any criteria that is helpful to you. When you are ready to launch your items, folders will help you find items quickly and make any necessary edits before launch. To help categorize inventory items so you can find and manage them easily in the future, your folders can be up to three levels deep. If you sell popular music, for example, you can categorize your items by music type, as well as by artist:
Music Country Faith Hill Garth Brooks Shania Twain Classical Ludwig van Beethoven Johann Sebastian Bach Wolfgang Amadeus Mozart
2. Creating Folders • Click on ‘manage folders’, in the left navigation bar. • On the Manage Inventory Folders page, click ‘New’, and name your folder by
typing over the default text that appears in the Folder Name field. • If you want to create a subfolder to add to your newly created folder, click ‘New’,
name your subfolder, then click ‘Move to’. From the Move to dropdown menu, select the existing folder that you want to add your subfolder, and click ‘Move’.
• Click ‘Done’.
3. Renaming Folders • Click on ‘manage folders’ in the left navigation bar. • On the Manage Inventory Folders page, overwrite the text in the appropriate
Folder Name field. • Click ‘Done’.
26
Sales Manager Inventory Edition User’s Guide
4. Deleting Folders • Click on ‘manage folders’ in the left navigation bar. • On the Manager Inventory Folders page, select the checkbox(s) of the folder(s)
you want to delete (note that folders must first be empty before you can delete them).
• Click ‘Delete’. • Click ‘Done’.
5. Moving Items Between Folders • Open a folder to access the item(s) you want to move. • Select the checkbox(s) of the item(s) you want to move, and click ‘Move’. • From the appearing dropdown menu, select the folder where you want to move
your item(s), and click ‘Move’. • Alternatively, you can move your item(s) to a new folder by selecting the ‘New
Folder’ radio button, naming your folder in the appropriate field, and clicking ‘Move’.
C. Creating and Editing Inventory Items Once you have imported inventory items and created a folder structure to organize them efficiently, you can create new inventory items using the powerful controls of the Bulk Editor. If using images with your inventory items, we recommend uploading all your images (see the Managing Images Section of this User’s Guide) before creating inventory items. From the main inventory page, click on ‘Create Inventory Items’ in the left navigation bar or click ‘Create’ in the inventory table. If you want to edit existing items, select the checkbox(s) of the appropriate items, and click ‘Edit’. The Bulk Editor provides a powerful ability to create, copy, and edit up to 50 items at once while seeing all the changes that are being made. The legend at the bottom of the table describes the functions that make Bulk Editing quick and easy:
: Edit whole column or item. Use the pencil to open an entire row or column for editing either an item or column of information. You can quickly tab from input to input very rapidly down a column or across a row (or in combination across and then down)
: Return to read-only view. Use OK to close a column, row, or individual item to remember it’s completed. You do NOT have to hit OK on each item to confirm your entries. All changes will be saved when you click Save after completing entries.
: Cancel edits for this item only. If you’d like to remove an item you created on this page or ignore the changes you made to it while in Bulk Edit, click this X. The item will be visually grey and stricken from the list of items.
27
Sales Manager Inventory Edition User’s Guide
: Restore item for editing. Restores any item that you cancelled using the X.
: Copy value to all checked items. The most powerful visual inventory editing service available on the web. You can copy any value in a column to all other items (rows) you select (with checkboxes), whether those rows are above or below the line you are using as the source.
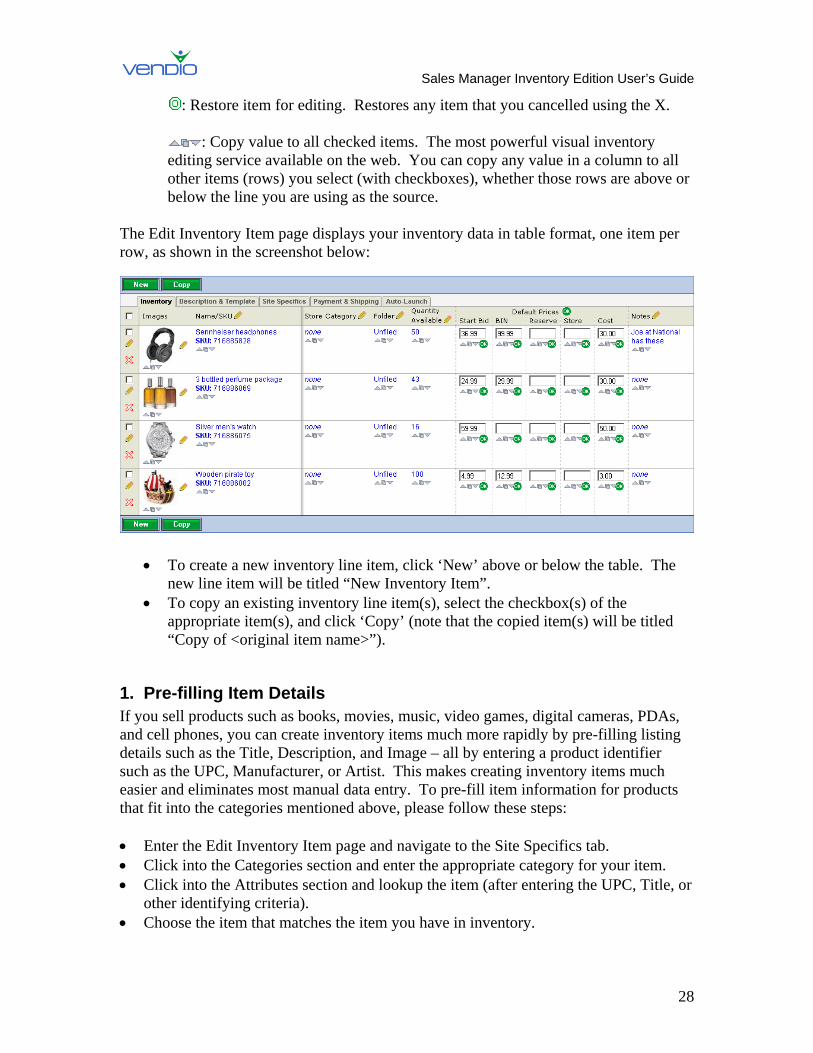
The Edit Inventory Item page displays your inventory data in table format, one item per row, as shown in the screenshot below:
• To create a new inventory line item, click ‘New’ above or below the table. The
new line item will be titled “New Inventory Item”. • To copy an existing inventory line item(s), select the checkbox(s) of the
appropriate item(s), and click ‘Copy’ (note that the copied item(s) will be titled “Copy of <original item name>”).
1. Pre-filling Item Details If you sell products such as books, movies, music, video games, digital cameras, PDAs, and cell phones, you can create inventory items much more rapidly by pre-filling listing details such as the Title, Description, and Image – all by entering a product identifier such as the UPC, Manufacturer, or Artist. This makes creating inventory items much easier and eliminates most manual data entry. To pre-fill item information for products that fit into the categories mentioned above, please follow these steps: • Enter the Edit Inventory Item page and navigate to the Site Specifics tab. • Click into the Categories section and enter the appropriate category for your item. • Click into the Attributes section and lookup the item (after entering the UPC, Title, or
other identifying criteria). • Choose the item that matches the item you have in inventory.
28
Sales Manager Inventory Edition User’s Guide
• Select the checkboxes of the information you would like to pre-fill. This includes the image, title, description, and other product specific details such as Condition and Region Code.
• Click ‘Ok’. To complete the remaining sections of your inventory item, there are a series of other tabs at the top of the table; each tab reveals additional data fields to help complete the definition of each inventory item:
2. Inventory Tab • Images Column:
o Displays a thumbnail of the first image (if any) associated with an inventory item.
o To manage the associated images or to attach more, click on the thumbnail image shown. Both Standard and ZoomStream images can be attached using the controls in this column. These images will be used in listings of this item on various venues.
o To learn more about uploading and managing your images, please see the Managing Images section of this guide.
• Name, SKU & UPC/ISBN Column: o Displays the Name, SKU, and UPC/ISBN for this inventory item. The
Name is used to pre-fill Vendio Store item listing titles, but it can be modified for different venues in the “Site Specifics” tab. Note that once you alter the Site Specifics Title, it will no longer change when updating the inventory item Name later. Unlike the Name, the SKU and UPC/ISBN are for your internal use only and are never visible to your customers. They are useful if you want to categorize your items in comparison shopping sites like Shopzilla and Dealio (if you choose to feed your inventory to them).
o To edit, click the name link and type in the item’s name and SKU. The Name has a max length of 80 characters.
o Tip: Provide a descriptive Name for your item, so that you can easily distinguish one inventory item from another.
• Store Category Column: o Displays the Vendio Store category under which this item will appear (if
you have a Vendio Store). See “Using Your Vendio Store as a Perpetual Sales Display” in Chapter IV for more information.
o To edit, click on the category name and select an alternate category. o Ensure the checkbox for “Visible” is selected if you want the item visible
in your Vendio store. When the Available Quantity of the item is less than 1 (e.g. all items are launched to eBay), the item will no longer appear in your Vendio store.
o New Vendio Store categories can be created using the Vendio Stores Wizard, available from the Vendio Stores Management page (http://wsacp.vendio.com/my/shop/handle_shop.html)– simply click on the “Edit Categories” link.
29

Sales Manager Inventory Edition User’s Guide
• Folder Column: o Displays the inventory folder into which this item will be filed. o To edit, click on the folder name and select an alternate folder. o New inventory folders can be created by clicking on “Add Folders” in the
left-hand navigation of the main inventory page. o Items can also easily be moved among folders and to a new folder in the
main inventory page, as described in the Building Inventory Section of this User’s Guide.
• Quantity Available Column: o Displays how much you have in stock for this inventory item. o To edit, click on the number and type in the appropriate values. o Please note that this quantity field determines the total number of items
that you can have available for sale at any one time. In your Inventory summary view, this quantity corresponds to the number of “available” items.
o The round-trip inventory system will automatically manage your quantities based on selling events: When you launch an inventory item, the quantity you launch is removed from the “available” state and shown as “On Market”. When items successfully sell (or close with a winning bidder), the quantity sold is removed from the “On Market” state and shown as “To Ship”. If items close without sale, the quantity not sold is removed from the “On Market” state and returned to “Available.”
• Default Prices Columns: o Display your default prices for this inventory item. These default price
values will be used when launching this item as a listing on different sites, unless you explicitly overwrite the values in the “Site Specifics” tab.
o To edit, click on the price fields and type in your desired values. o The “Start Bid” is this item’s opening price when it is launched as an
auction. o The “BIN” price is the Buy-It-Now or fixed price for this item when it is
launched as a fixed-price or eBay Store listing, or as an auction with a Buy-It-Now price. If you generally do not use these listing formats, you should leave this field blank. By default, BIN will pre-fill Site Specifics for BIN, Fixed Price, and Store Price, so you must remove it from BIN for any Site that you would like to list an item to without the BIN option as part of an auction. Note that the use of BIN on various marketplaces may require an additional marketplace fee.
o The “Reserve” price is the minimum auction price that the item must reach in order for it to be considered sold. If you generally do not use reserve prices, you should leave this field blank, since it will also be used to pre-fill Reserve in Site Specifics for each venue.
o The “Store” price is the price of this item when displayed in your Vendio Store.
o The “Cost” is your acquisition cost for this item. This field can be used for your internal bookkeeping and calculations.
• Notes Column:
30
Sales Manager Inventory Edition User’s Guide
o Displays your notes for this inventory item. Note that this field is for your internal use only – and is never visible to your customers.
o To edit, click the link and type in any relevant notes about this item. This field has a max length of 80 characters.
o Tip: Provide descriptive Notes for your item, so that you can easily distinguish one inventory item from another.
3. Description & Template Tab • Images, Name/SKU Columns
o Are for informational display only to help you keep track of each item row – they show a thumbnail of the first image associated with this inventory item, as well as the item’s (internal) name, SKU, and UPC/ISBN. Both of these columns can be edited on the “Inventory” tab.
• Default Subtitle Column o Displays the subtitle associated with this inventory item. This default
subtitle will be used when launching this item onto sites that support subtitles, unless you explicitly overwrite the subtitle field in the “Site Specifics” tab. If you do NOT want to use subtitle on your listings, you will need to ensure Subtitle is removed in the Site Specifics tab under ‘Features’, since by default it is pre-filled based upon the Default Subtitle.
o To edit, click on the text and type in your desired subtitle. Please note that there is a 55-character limit on this field.
• Description Column o Displays the description associated with this inventory item. This
description will serve as the main body of the item description when launching this item onto different sites (templates, default listing text, standard and custom sections will be added to this to create the full description).
o To edit, click on the description link and type in your desired description in the resulting window. Click OK when your description is complete. Please note there is a 500kB limit on this field.
o You can preview your item by clicking the Preview button • Condition Column
o Displays the condition, which can be New, New w/o Box, Mint in Box, Mint w/o Box, Used, Refurbished, Vintage, or Unknown. This automatically populates the eBay Item Condition attribute (if available) under the Site Specifics tab for SMIE created items.
• Manufacturer & Manufacturer Part Number Column o Displays the manufacturer and manufacturer part number. Note that these
fields are for your internal use only – and are never visible to your customers. The field is only used to categorize your items in comparison shopping sites like Shopzilla and Dealio (if you choose to feed your inventory to them).
• Default Counter Column
31
Sales Manager Inventory Edition User’s Guide
o Displays the type and style of counter (if any) to insert when launching this item onto different sites.
o To edit, click the text or counter image and select your desired type and style. Note that the “Smart” type of counter does not count refreshes of a browser window, while a “Simple” type does.
• Default Template Column o Displays the name of the listing template that will be used to format this
item’s description when it is launched onto sites that support templates (currently eBay, eBay Motors and eBay Stores only)
o To edit, click on the text and select your desired listing template, from your list of Saved Templates.
o Click on the link for “Template Workshop” to create and instantly add new templates to your “Saved Templates” list.
• Preview Column o Click the green ‘Preview’ button within this column to see a full preview
of how your description, counter and template will look, fully assembled, when launched as a live listing.
4. Site Specifics Tab • Each venue that you can launch to has a sub-tab within this tab. In this version, there
are two sub-tabs, one for eBay and one for eBay Motors. Here you can make additional changes for each specific venue/channel that you launch to. • Ebay – Images Column
o Displays a thumbnail of the first image associated with this inventory item.
o To add or remove images associated with this item, click on the “Inventory” tab.
• Ebay - Title/SKU Column o Displays the item’s title and SKU. Note that this is pre-filled with the
item’s internal name, but can be changed here to suit your merchandising strategy. Note that once you change the Title, it will no longer be changed when changing the Inventory Name, since the default linkage is broken
o To edit the default value, click on the text and modify the title as desired. Please note that titles on eBay are restricted to 55 characters.
o Tip: Modify your title here so that it is grabs attention and is compelling compared with similar items on eBay.
• Ebay – Prices Columns o Display the prices that will be used when this item is launched to eBay.
By default, these fields are pre-filled with the default prices that were set in the “Inventory” tab. Pre-filled values are marked with an asterisk (*).
o To adjust these pre-filled prices to reflect your eBay pricing strategies, click on the values and type in your desired prices. The “Fixed Price” field is the price used for Fixed-Price eBay listings.
o Note that if you want to launch auctions on eBay without a Buy-It-Now or Reserve price, make sure those two fields are left blank if the default values were also blank, or set to 0 to override your default values.
32
Sales Manager Inventory Edition User’s Guide
o Note that once you change a price, it will no longer be changed when changing the default pricing, since the default linkage is broken.
• Ebay – Duration Column o Displays the duration of your eBay and eBay Store listings. By default,
this field is pre-filled with the duration set in your eBay Site Specifics Preferences, under “My Account”.
o To edit, click the text and select your desired durations for each type of listing.
• Ebay – Counter Column o Displays the counter style and type that will be used in this item’s
descriptions. By default, this field is pre-filled with the default counter style and type that was set on the “Description & Template” tab.
o To edit, click the counter image and select your desired counter type and style.
• Ebay – Template Column o Displays the name of the listing template that will be used to format your
item’s description on eBay. By default, this field is pre-filled with the default template selected on the Description & Template tab.
o To edit, click the text and select your desired listing template, from your list of Saved Templates.
o Click the ‘Template Workshop’ button to create and instantly add new templates to your “Saved Templates” list.
• Ebay – Categories Column o Displays the eBay first, second (if any) and Store (if any) categories into
which this item will be launched. By default, this field is pre-filled with the category set in your eBay Site Specifics Preferences, under “My Account”.
o Note that eBay charges additional fees for use of a second category. o To edit, click the text and select your desired categories using the controls
provided. • Ebay – Attributes Column
o Displays the eBay Item Specifics (if any) values that will be used when this item is launched. Item Specifics are used for products such as books, movies, music, video games, digital cameras, PDAs, and cell phones which have general product descriptions from the manufacturer.
o To edit, click the text and enter the UPC, Title, or other identifying criteria. Click ‘Look up Item’ and click on the item that matches the item you have in inventory. Next, select the checkboxes of the information you would like to pre-fill. This includes the image, title, description, and other product specific details such as Condition and Region Code. Click ‘Ok’ once you are finished to commit the changes.
• Ebay – Features Column o Displays the eBay Listing Upgrades that will be applied to this item when
launched. Please note that eBay charges additional fees for all listing upgrades. By default, this field is pre-filled with the listing upgrades set in your eBay Site Specifics Preferences, under “My Account”.
33
Sales Manager Inventory Edition User’s Guide
o To edit, click the text and select the upgrade features desired. • Ebay – eBay shipping/location Column
o Displays the eBay Shipping & Location settings that will be associated with this item when launched. By default, this field is pre-filled with the shipping & location values set in your eBay Site Specifics Preferences, under “My Account”.
o To edit, click the text and select the appropriate settings using the controls provided.
• Ebay – eBay Checkout Column o Displays the eBay Checkout settings that will be associated with this item
when launched. By default, this field is pre-filled with the eBay Checkout settings in your eBay Site Specifics Preferences, under “My Account”.
o To edit, click the text and select the appropriate values using the controls provided.
• Ebay – Best Offers Column o Displays how you would like to accept Best Offers. You can
automatically accept Best Offers above a dollar amount, and automatically decline Best Offers below a dollar amount. When Best Offers are automatically accepted, Vendio treats the transaction the same way as a normal sale, and the buyer is directed through your Checkout.
• Ebay Motors – Images Column o Displays a thumbnail of the first image associated with this inventory
item. o To add or remove images associated with this item, click on the
“Inventory” tab. • Ebay Motors - Title/SKU Column
o Displays the item’s title and SKU. Note that this is pre-filled with the item’s internal name, but can be changed here to suit your merchandising strategy.
o To edit the default value, click on the text and modify the title as desired. Please note that titles on eBay are restricted to 55 characters.
o Tip: Modify your title here so that it is grabs attention and is compelling compared with similar items on eBay Motors.
• Ebay Motors – Prices Columns o Display the prices that will be used when this item is launched to eBay.
By default, these fields are pre-filled with the default prices that were set in the “Inventory” tab. Pre-filled values are marked with an asterisk (*).
o To adjust these pre-filled prices to reflect your eBay pricing strategies, click on the values and type in your desired prices. The “Fixed Price” field is the price used for Fixed-Price eBay listings, as well as launches to your eBay Store.
o Note that if you want to launch auctions on eBay without a Buy-It-Now or Reserve price, make sure those two fields are left blank if the default values were also blank, or set to 0 to override your default values.
• Ebay Motors – Duration Column o Displays the duration of your eBay Motors and eBay Store listings.
34
Sales Manager Inventory Edition User’s Guide
o To edit, click the text and select your desired duration for each type of listing.
• Ebay Motors – Counter Column o Displays the counter type and style that will be used in this item’s
descriptions. By default, this field is pre-filled with the default counter style and type that was set on the “Description & Template” tab.
o To edit, click the counter image and select your desired counter type and style.
• Ebay Motors – Template Column o Displays the name of the listing template that will be used to format your
item’s description on eBay. By default, this field is pre-filled with the default template selected on the Description & Template tab.
o To edit, click the text and select your desired listing template from your list of Saved Templates.
o Click the ‘Template Workshop’ button to create and instantly add new templates to your “Saved Templates” list.
• Ebay Motors – Categories Column o Displays the eBay Motors category into which this item will be launched. o To edit, click the text and select your desired category using the controls
provided. • Ebay Motors – Item Specifics Column
o Displays the eBay Motors Item Specifics (if any) values that will be used when this item is launched.
o To edit, click the text and provide the appropriate item specifics values for this item.
• Ebay Motors – Features Column o Displays the eBay Motors Listing Upgrades that will be applied to this
item when launched. Please note that eBay charges additional fees for all listing upgrades.
o To edit, click on the text and select the listing upgrades desired. • Ebay Motors – eBay shipping/location Column
o Displays the eBay Shipping & Location settings that will be associated with this item when launched.
o To edit, click the text and select the appropriate values using the controls provided in the pop-up.
• Ebay Motors – eBay Checkout Column o Displays the eBay Checkout settings that will be associated with this item
when launched. o To edit, click the text and select the appropriate values using the controls
provided in the pop-up. • Ebay Motors – Best Offers Column
o Displays how you would like to accept Best Offers. You can automatically accept Best Offers above a dollar amount, and automatically decline Best Offers below a dollar amount. When Best Offers are automatically accepted, Vendio treats the transaction the same way as a normal sale, and the buyer is directed through your Checkout.
35
Sales Manager Inventory Edition User’s Guide
5. Payment & Shipping Tab • Images, Name/SKU Columns
o Are for informational display only – they show a thumbnail of the first image associated with this inventory item, as well as the item’s (internal) name and SKU. Both of these columns can be edited by clicking on the “Inventory” tab just above the table.
• Dimensions Column o Displays the dimensions of this item, used for calculated shipping options. o To edit, click the text and change the values using the controls provided.
• Payment Column o Displays all the payment methods you will accept for this item, as well as
any PayPal financing options you will offer. By default, this field is pre-filled with the Payment Types Accepted set in your Global Preferences, under “My Account”.
o Please note that some payment methods, such as PayPal with Immediate Payment Required, may impose some restrictions to your pricing and shipping/location settings. Please refer to eBay’s rules for accepting PayPal with Immediate Payment Required.
o To edit, click the text and select the payment methods that you will accept, along with any PayPal financing options you will offer.
• Shipping Column o Displays all the shipping options and prices associated with this item. By
default, this field is pre-filled with the Shipping and Insurance settings in your Global Preferences, under “My Account”.
o These shipping options can appear in any or all of the following places: • As an inserted standard section within your listing description. • In the “Shipping & Payment Details” section of an eBay listing. • As selectable options in Vendio or eBay Checkout.
o To edit, click the text and provide details for the shipping methods and prices you offer for this product.
• Post Sale & Checkout Columns o Displays the Post-Sale automation and Vendio Checkout settings
associated with this item. By default, this field is pre-filled with values set in your Post-Sale Management and Global Preferences, under “My Account”.
o To edit, click on the text and select your desired settings using the controls in the pop-up provided.
6. Auto-Launch Tab This tab can be used to apply existing auto-launch profiles to an item or to create custom launch automation for an item according to the listing format (i.e. auction, Fixed-Price, etc.). You can control independently how many items of a specified format are on a marketplace at any moment. For instance, you can specify simultaneously for an item "keep 4 auctions and 3 fixed-price listings for this item on eBay.” To enable that sample
36

Sales Manager Inventory Edition User’s Guide
selling strategy, assign to that item an Auto-Launch profile with quantity on market set to 4 for eBay auction listings and another Auto-Launch profile with quantity on market set to 3 for eBay fixed-price listings. To edit the auto-launch data for each listing format, click the text and select an Auto-Launch Profile out of your list of available profiles or create a custom auto-launch schedule by selecting the “Custom” radio button and making appropriate edits. You can create multiple auto-launch profiles by clicking on “Manage Profiles>Auto-Launch Profiles” in the left navigation bar of most Sales Manager pages. Auto-launching and auto-launch profiles are thoroughly explained in the Launching Items Section of this User’s Guide and enable you to control listing times according to various selling strategies. You should read this section prior to adding auto-launching, since it is designed to be powerful enough to launch thousands of items for you. Note that Auto-Launch Profiles can also be attached using Find and Replace on the main inventory page. When you save items with auto-launch profiles attached, you can review the pending launches by selecting Listings > Pending Listings in the left navigation bar of most Sales Manager pages. • Images, Name/SKU Columns
o Are for informational display only – they show a thumbnail of the first image associated with this inventory item, as well as the item’s (internal) name and SKU. Both of these columns can be edited by clicking on the “Inventory” tab just above the table.
• eBay Auction Column o Displays the auto-launch profile that will be used when launching this
item to eBay as an Auction type listing. • eBay Fixed Price Column
o Displays the auto-launch profile that will be used when launching this item to eBay as a Fixed-Price type listing.
• eBay Stores Column o Displays the auto-launch profile that will be used when launching this
item to your eBay Store as an eBay Store listing. • eBay Motors Auction Column
o Displays the auto-launch profile that will be used when launching this item to eBay Motors as an Auction type listing.
• eBay Motors Fixed Price Column o Displays the auto-launch profile that will be used when launching this
item to eBay Motors as a Fixed-Price type listing. • eBay Motors Stores
o Displays the auto-launch profile that will be used when launching this item to your eBay Motors Store as an eBay Motors Store listing.
37
Sales Manager Inventory Edition User’s Guide
D. Editing Inventory Items Using Find and Replace Feature The Find and Replace feature allows you to replace or adjust Starting Prices, BIN Prices, Titles, and other commonly revised values across multiple items at once. This saves you from having to replace the value for each inventory item individually, which would take much more time.
1. Common Uses for Find and Replace • Reduce default prices on inventory items that are selling poorly (Example: Find
old inventory items, which have been stocked too long, by searching items with a quantity available greater than 100. Then reduce the price for all of these items to blow out your stale inventory).
• Increase default prices for inventory items that will sell strongly in the near future (Example: A popular television show features Beanie Babies, so you raise prices for all of your existing Beanie Baby inventory before launch to take advantage of the expected increase in demand).
• Increase quantities available for inventory items as shipments arrive (Example: As a new shipment arrives, find the appropriate inventory items and increase the quantity available values in bulk to account for your increase in inventory levels).
• Enhance default titles for multiple items at once (Example: Find inventory items that you want to add new text, such as “New Item!” or “Price Reduced!” to promote your items effectively before launch).
• Modify internal Notes fields to provide instruction for other members of your operation. (Example: To tell your partner, Nancy, which inventory items you want her to re-stock on her next sourcing trip, find all the items by their title and replace the Notes field with a note saying “Nancy – please re-stock”).
2. Using Find and Replace to Edit Items The Find and Replace feature can be very powerful, so make sure you double-check your work before committing your changes:
• To use the Find and Replace feature, open an inventory folder where the items you want to edit are located, or conduct a Search to obtain the set of items you want to work on.
• Click the ‘Find & Replace…’ button. • Use the Field dropdown menu to select the appropriate field to edit.
o For text fields (such as Title and Notes): Select the ‘Entire Contents’ radio button if you want to replace the
value entirely, or select the ‘Matching text’ radio button if you want to replace an element of the value, but not the entire value (note that if you have selected ‘Matching Text’, you will need to enter the existing text to be replaced with new text).
o For numeric fields (such as prices and quantity): Specify how you want the adjustment to be made – as a complete
replacement, or as an increase/decrease to the existing value. o For other fields, you can select the new value from a list of options shown
in the dropdown menus that appear.
38
Sales Manager Inventory Edition User’s Guide
• You can apply your changes to only selected items (specify the selected items by clicking the checkboxes of the appropriate items) or to “All items”, which applies to an entire folder or search result set (note that these sets can sometimes be larger than what is currently visible on the page).
• Note that the Find and Replace feature can currently be used on up to 50,000 items at once.
Please note that only default prices can be changed in bulk, and changes to the default prices will affect any venue-specific prices that are using those default values. If you have made explicit changes from the default values for your venue-specific prices, those prices will remain unchanged, and cannot be changed through bulk find and replace. Keep in mind that changes you make to existing inventory items will not update live listings originally launched from inventory items. However, listings are generally synthesized within minutes of an auto-launch (or instantaneously for manual launches), so subsequent launches of listings using those inventory items will be updated with the replaced values. When using the Search and Replace feature on auto-launch profiles, remember that:
• Setting an auto-launch profile could cause the items to start launching immediately (if the profile is set appropriately).
• Replacing the auto-launch profile to "none" can quickly disable the automatic launches for multiple items in bulk.
39
Sales Manager Inventory Edition User’s Guide
V. Managing Images Sales Manager Inventory Edition gives you access to Vendio’s full image-hosting capabilities. Images enhance your item descriptions and listings by giving your buyers their best chance to see your items before purchase.
A. Uploading Standard or ZoomStream Images Before uploading images, make sure all adjustments to color, cropping, and file size have been made using photo-editing software. Standard images must be less than 500KB, while ZoomStream images must be less than 15MB. For more information about ZoomStream images, visit the “About ZoomStream Images” section of this guide.
1. Access the Online Uploader • Click the Image Hosting tab. • Click 'Upload Images' to access the Online Uploader. • Or, select 'Upload Images' from the Jump to dropdown menu located in the upper
right of most pages. • If you are uploading Standard images, remain on the page. If you are uploading
ZoomStream images, select the ZoomStream Images radio button. This will take you to the ZoomStream Uploader.
2. Create a New Folder to Upload to (for Standard images) • On the Upload Standard Images page, enter a name for your folder in the "Create
New Folder" field, or simply leave the default name. • Click 'Create'.
3. Select Your Files and Upload • Increase the number of upload fields on the page if necessary by selecting the
number from the 'Show upload fields' dropdown menu at the top left of the page. You can upload up to 50 images at a time.
• Click the first Browse button. In the dialog box that appears, navigate to the folder containing your image, select your image, then click ‘Open’.
• Rename the image if you want by editing the corresponding name in the Image Name field (you do not need to type the file extension as part of the file name).
• For Standard images, select the folder you want to upload to. • Repeat these steps for each additional image. It is not necessary to fill all upload
fields. • When you have finished selecting all your images, click 'Upload'. You will see the
status of each image as it's being uploaded. • When the upload is complete, you will be shown a confirmation page. • If you have uploaded any images with the same names as ones already in your
account, you will be given several choices: keep the auto-created name, rename it to something else, or replace the existing image online. To keep the auto-created
40

Sales Manager Inventory Edition User’s Guide
name, take no additional action. To rename it, type in a new name. To replace the existing image, select the Replace option.
• To leave the confirmation page and save any rename or replace selections, click 'Upload More', or click 'Done'.
B. Uploading Images in Bulk Vendio offers two offline tools to help you upload images in bulk. XPress Image Publisher Vendio customers running Windows XP can save time uploading images by using Vendio XPress Image Publisher. This tool will help you:
• Upload images directly from your digital camera. • Upload an entire folder of images stored in any Windows directory. • Upload Standard or high quality ZoomStream images.
To learn more about XPress Publisher and download the software, click the Image Hosting tab in the left navigation bar, then click on XPress Publisher. Sales Manager Pro Vendio's offline listing tool, Sales Manager Pro, makes it easy to upload images in bulk along with the listings you create offline. This tool will help you:
• Upload an entire folder of images stored in Sales Manager Pro. • Upload Standard images only. • Import images that are already hosted online.
To learn more about Sales Manager Pro and download the software, logout, click the Sales Manager tab in the left navigation bar, then click on Sales Manager Pro. Note that Sales Manager Pro is optimized to work with Sales Manager Merchandising Edition and is not compatible with Sales Manager Inventory Edition for all elements. It’s use should generally be restricted to uploading images in this context. XP users are encouraged to use the XPress Image Publisher.
C. Attaching Images to Inventory Items Before attaching images to inventory items, make sure they have already been uploaded as outlined in the ‘Uploading Standard or ZoomStream Images’ section of this guide.
• To attach images to a new item(s), click on ‘Create Inventory Items’ in the left navigation bar.
• To attach images to an existing inventory item(s), locate your item(s) by opening the appropriate folder (click on the folder name in the left navigation bar).
• Select the checkbox(s) of the appropriate item(s) and click ‘Edit’.
41
Sales Manager Inventory Edition User’s Guide
• On the Edit Inventory Items page, click ‘NONE’ under the ‘Thumbnail’ heading if no images are attached, or click the image itself if at least one is already attached.
• Keep the Standard Images radio button selected (if you want to attach ZoomStream images, select the ZoomStream radio button).
• Use the ‘Folder’ dropdown menu to select the folder where your image(s) are located (for Standard images only). Use Quick Find to search within a page for an image, or click the Search tab to search all of your folders for an image.
• Click to highlight the appropriate image(s), and click ‘Attach’. • Your attached image(s) will now appear in the Attached Images pane. You can
detach an image by clicking the red ‘X’ icon, which appears below each image. • Use the green ‘Arrow’ icons to move your images left or right, depending on what
order you want them to appear on your listings. • Click ‘OK’.
D. Automatic Renewal of Images associated with Inventory Items Images hosted by Vendio are subject to automatic deletion or automatic renewal, based on the settings you select in the My Account > Image Hosting General Preferences page. However, if you have inventory items that are set for automatic launches (using Auto-Launch Profiles – see section IV.C), the images associated with those items may be automatically renewed, in order to prevent items launching without valid images. For more details, see section IV.C.1).
42
Sales Manager Inventory Edition User’s Guide
VI. Launching Items Once you have defined inventory items, launching them to various sites as live listings can be done manually or through the use of auto-launch profiles. Launching items manually or automatically will decrement the “Quantity Available” and increment the “Quantity on Market” appropriately for the items, to help keep track of round-trip inventory. You should also take advantage of your Vendio Store as an economical venue for keeping items on perpetual display.
A. Using Your Vendio Store as a Perpetual Sales Display If you have a Vendio Stores subscription, you can generate sales even BEFORE you launch your items to eBay. Without a Vendio Store, think of inventory items not launched to eBay as “sitting in your warehouse, and not visible to buyers”. With a Vendio Store, you can make all of your inventory items visible to buyers by selecting the appropriate Vendio Store category when you create your inventory item. This will make each inventory item available in your Vendio Store, 24 hours a day, 7 days a week. Vendio Stores have no listing fees and only a 1% final value fee and gives your items easy exposure on Froogle and other shopping sites. Note that there is an approximately 1 hour lag between when changes are made to your inventory item definitions and when they are reflected in the Vendio Store display. For example, if you create or edit an inventory item and assign it to your Vendio Store, it may take up to an hour to be visible in your Vendio Store.
B. Manually Launching Items to Create Listings You can manually launch items from the main inventory page at any time. Note that items launched manually will NOT be limited by any marketplace quantity limits that may exist in any Auto-Launch Profiles you may have attached to the item. For example, if you have an auto-launch profile that specifies a maximum quantity on market of 3, you can still manually launch a 4th listing. You may manually launch as many items as you wish. However, if the number of items of a specific listing format (eBay auction, eBay fixed-price, etc.), including those launched manually, exceeds any limits in the Auto-Launch Profile, the Auto-Launches for that format will not proceed until the number of listings of that format again falls below the desired quantity on market limit. Users should initially launch items either with Auto-Launch Profiles or Manually to ensure consistent application of marketplace limits when using Auto-Launch Profiles. More experienced users will quickly appreciate the ability to set limits generally, but manually override them in certain circumstances. Note also that Fixed-Price and Auctions are each considered an independent listing format, so the limits are independent as well. If you are launching listings of both formats for the same item, you should limit each to ½ the marketplace limit, if any such limit exists.
• Select the checkbox(s) of the item(s) you want to launch from the inventory view. • Click ‘Launch’.
43
Sales Manager Inventory Edition User’s Guide
• From the appearing dropdown menu, specify the items you want to launch (choose the items you have selected, or all the inventory items in your folder).
• Make sure you also specify the type of listing you want to create from each inventory item (eBay Auction, eBay Fixed Price, eBay Motors Auction, eBay Motors Fixed Price, or eBay Motors Stores).
• Click ‘Launch’. • On the Items to Launch page, set your Qty. Per Listing (1 for standard listings, >1
for multiple-quantity fixed-price or dutch auction listings). • Set the Number of Listings you want to launch (each of which will become a
separate listing). • Optionally, set the Launch Interval to spread out each separate listing across time. • Enter the Launch Date and Time for each item (or you can click "Set Interval" to
spread out all your listings on this page across time). • Optionally, preview to see how each item will look, and click ‘Launch’. • You can review the items you have scheduled to launch at any time by selecting
Listings > Pending Listings in the left navigation bar. Pending listings created manually are marked as “Manual.”
C. Automating Inventory Launches with Launch Profiles Using auto-launch profiles, you no longer have to schedule launches for each item manually – simply set your desired launch schedule and assign your profile to a set of items, and Vendio will automatically launch the appropriate quantity of items at the exact times you’ve specified. A single profile can be used on multiple items to save you time. Any edits to the profile will affect pending launches for all items that have this profile attached. For instance, if you want to re-enable launches for a profile that expired, all you have to do is to edit the profile and adjust its end date. Or, if you want to change the launch schedules of all the items that use the profile, just edit the profile and enter the new listing strategy and schedule. To create auto-launch profiles, click on Manage Profiles in the left navigation bar. On the Manage Profiles: Auto-Launch Profiles page, click ‘New’ to create a profile, or select the checkbox of an existing profile and click ‘Copy & Edit’. Once inside the Auto-Launch Profile page, you’ll be able to:
1. Determining the Time-Period when Your Profile is Valid Specify the exact date and time that your launch profile will begin, and the exact date and time it will end using the following date and time formats:
Date Time Apr 1, 2005 5:01 AM Apr 01, 2005 05:01 pm April 01, 2005 12:52 PM Apr 1, 05 12:01 PM 04/01/2005 1 am
44
Sales Manager Inventory Edition User’s Guide
04/01/05 0101 am 4/1/05 12 pm 1645
For example, you may specify that your launch profile should be valid from November 1st to December 18th, which would be an ideal profile to assign to holiday merchandise that you want to liquidate before the new year. When the profile becomes valid on November 1st, Vendio will launch the appropriate quantity of items at the times you’ve specified. When your profile expires on December 18th, no new launches of your items will occur. Note that if you do not explicitly set the time period for your profile, it will begin immediately and continue indefinitely. Note that active auto-launch profiles affect the automatic renewal of images. If some inventory items use an active auto-launch profile, this will cause the images attached to those items be automatically renewed even if the item cannot launch. This prevents items from being launched without working images. However, if you don't set an end time for the profile, this may cause the images to be automatically renewed indefinitely for the items that use the profile, even if the items are not actively launching (due to availability constraints or other conditions).
2. Choosing between Three Different Auto-Launch Strategies You can choose between three different launch strategies to control when your items begin and end, as well as the quantity you have available on the market at any given time. Fixed Schedule The Fixed Schedule strategy will always adhere to your launch schedule, regardless of how many items are on the market. (i.e. items are launched according to your launch schedule until you sell out of your available quantity. If an item closes before the next scheduled launch, a new item will not launch until the next scheduled time. When your available quantity is exhausted, no new items will launch). If you launch an item manually, it will have no effect on the launch schedule – items will still launch according to your schedule. This strategy is ideal if you have a large supply of items that you want to sell when you know demand is going to be strong (for example, Sopranos merchandise offered after weekly Sopranos television episodes).
Pros: • You can control exactly when your listings start and end (if they are auctions). Cons: • If your items sell before the next scheduled launch, new items will not launch
immediately (the auto-launcher will wait until the next scheduled launch). • If your items do not sell, new listings will launch at the next scheduled time
regardless (you may end up with more items on the market than you want).
45
Sales Manager Inventory Edition User’s Guide
Schedule-Quantity The Schedule-Quantity strategy will always adhere to your launch schedule until you reach your desired maximum quantity on market. (i.e. items are launched according to your launch schedule, but only up to a certain quantity. If an item closes before the next scheduled launch, a new item will not launch until the next schedule time. However, once the auto-launcher has reached the maximum number of items you want on the market, it will not launch another item at the next scheduled time until the quantity on market has dropped below your maximum. When your available quantity is exhausted, no new items will launch). If you launch an item manually, it will have an effect on launch schedule unless you have exceeded your maximum quantity on the market, in which no items will launch according to your schedule until the quantity on market drops below your maximum. This strategy is ideal if you have a limited supply of items and want to make them available when you know demand is going to be strong.
Pros • You can control exactly when your listings start and end (if they are auctions),
while making sure that you never have more items on the market than you want.
Cons • If your items sell before the next scheduled launch, new listings will not
launch immediately (the auto-launcher will wait until the next scheduled launch).
Fixed Quantity The Fixed Quantity strategy will always keep your specified quantity of items on the market at all times (i.e. items are launched according to your launch schedule until your fixed ‘on market’ quantity is reached. If an item closes early, another item will launch immediately to keep the fixed ‘on market’ quantity maintained. When your available quantity is exhausted, no new items will launch). If you launch an item manually, it will have an effect on the launch schedule – items will not launch again until the fixed ‘on market’ quantity is re-established. This strategy is ideal if you want to keep a set number of items on the market at all times (similar to how a supermarket keeps shelves fully stocked).
Pros • You can control exactly how many items you have on the market at any time. Cons • If an item sells, for example, via a buy-it-now, a new listing will launch
immediately. This gives you no control over when items launch, which can be an issue if you want last-minute bidding at peak times on your auctions.
3. Specifying your Quantities Depending on which strategy you select, you can specify the quantity of item you want to offer per listing and, for the schedule-quantity and fixed-quantity strategies, the total
46
Sales Manager Inventory Edition User’s Guide
number of listings you want on a market at any one time. Note that the total number of listings on a market is computed as a total between both manual- and automatic launches. Therefore, manual launches of an item will affect the automatic launcher. For example, if you manually launch 4 listings of an item, and its associated auto-launch profile is defined with “quantity on market” set to 3, the auto-launch profile will not trigger any new launches until two of the manually-launched listings close.
4. Scheduling Your Launches To optimize the times at which your items reach the market, you can schedule your listings up to the exact day and time using the following formats:
5:01 AM 05:01 pm 12:52 am 12:01 PM 1 am 0101 am 12 pm 1645 0900
For each day that you schedule a listing, you can also specify a by-minute schedule to launch subsequent listings. This will help you ensure that your listings don’t all end at the same time, giving buyers a second chance to purchase an item from you. Use the # of listings field to specify the number of subsequent listings you want launched after the initial launch. Then use the Interval (min) field to specify the stagger, or gap until your subsequent item is launched. Note that you can schedule automatic launches to go through the night. For example, you can schedule 10 launches every hour starting at 11:00 PM on Mondays, and these will continue through until Tuesdays at 8:00 AM. However, overnight launches that pass into the next day may not overlap with launches scheduled for the next day. So, in the example above, any launches scheduled for Tuesdays must start after 8:01 AM.
5. Setting Auto-Adjustment Strategies for Launched Items Auto-Adjustment strategies allow you to maximize sales by raising prices, reserves, and bins/store/fixed prices for launched items that have sold, and by lowering prices, reserves, and bins/store/fixed prices for re-listed items that have failed to sell. These automatic adjustments allow you to respond to changing market conditions automatically, without having to analyze your closed items and make these calculations and adjustments manually after each sale or close. To enable Auto-Adjustments, select the ‘Enable auto-Adjustments settings’ checkbox. This will reflect your chosen strategies across all future items that use this profile.
47
Sales Manager Inventory Edition User’s Guide
Your price adjustments can be defined by a dollar amount, or by a percentage over the previous amount. To keep within limits determined by you, you can set how high or how low you want these price-adjustments to go. A few notes about Auto-adjustments: • For multiple-quantity or “dutch” auctions, the adjustments are done as follows:
o If the quantity sold is equal to the quantity in the listing, increase prices. o If the quantity sold is 0, decrease prices. o If any quantity sells between 0 and the total quantity in the listing, then do
not adjust prices. • For multiple-quantity fixed-price listings, the adjustments are done exactly as stated
above: o If the quantity sold is equal to the quantity in the listing, increase prices. o If the quantity sold is 0, decrease prices. o If any quantity sells between 0 and the total quantity in the listing, then do
not adjust prices. o Any adjustments made are done only when the item closes, not for each
transaction, thereby preventing multiple price adjustments for the item. • All auto-adjustments are triggered by both manual and automatic events. For
example, when a listing closes with a sale, it will trigger price increases for the next automatic launch, even if the listing was manually launched.
Save any changes to your profile by clicking ‘Save’ at the bottom of the page. You can attach Auto-Launch Profiles when creating or editing items in the Bulk Editor or by using Find and Replace on the main inventory page. You can review the listings scheduled using Auto-Launch Profiles at any time by selecting Listings > Pending Listings in the left navigation bar. Pending listings created by Auto-Launch Profiles are marked as “Auto.”
48
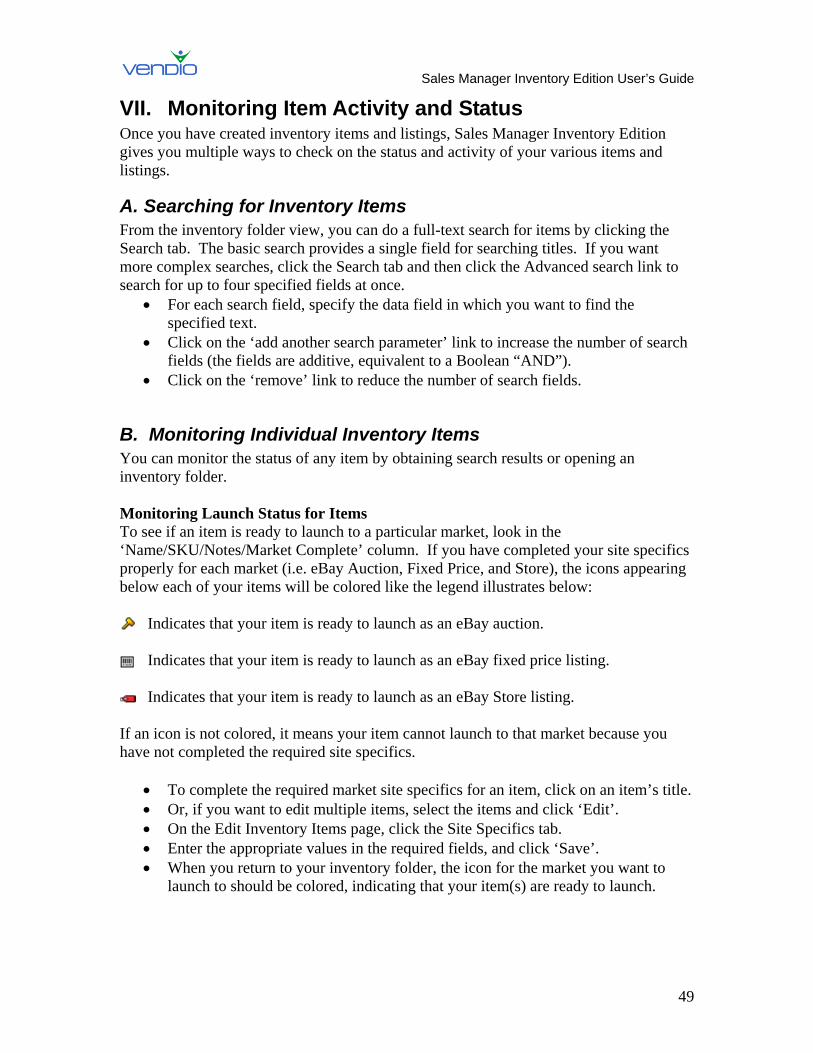
Sales Manager Inventory Edition User’s Guide
VII. Monitoring Item Activity and Status Once you have created inventory items and listings, Sales Manager Inventory Edition gives you multiple ways to check on the status and activity of your various items and listings.
A. Searching for Inventory Items From the inventory folder view, you can do a full-text search for items by clicking the Search tab. The basic search provides a single field for searching titles. If you want more complex searches, click the Search tab and then click the Advanced search link to search for up to four specified fields at once.
• For each search field, specify the data field in which you want to find the specified text.
• Click on the ‘add another search parameter’ link to increase the number of search fields (the fields are additive, equivalent to a Boolean “AND”).
• Click on the ‘remove’ link to reduce the number of search fields.
B. Monitoring Individual Inventory Items You can monitor the status of any item by obtaining search results or opening an inventory folder. Monitoring Launch Status for Items To see if an item is ready to launch to a particular market, look in the ‘Name/SKU/Notes/Market Complete’ column. If you have completed your site specifics properly for each market (i.e. eBay Auction, Fixed Price, and Store), the icons appearing below each of your items will be colored like the legend illustrates below:
Indicates that your item is ready to launch as an eBay auction.
Indicates that your item is ready to launch as an eBay fixed price listing. Indicates that your item is ready to launch as an eBay Store listing.
If an icon is not colored, it means your item cannot launch to that market because you have not completed the required site specifics.
• To complete the required market site specifics for an item, click on an item’s title. • Or, if you want to edit multiple items, select the items and click ‘Edit’. • On the Edit Inventory Items page, click the Site Specifics tab. • Enter the appropriate values in the required fields, and click ‘Save’. • When you return to your inventory folder, the icon for the market you want to
launch to should be colored, indicating that your item(s) are ready to launch.
49
Sales Manager Inventory Edition User’s Guide
Monitoring Item Activity The Quantities columns give you automatic updates to the following values as items launch, close, sell, or when you add items to inventory manually: Available Indicates the number of items you currently have available to sell; that are not already on a market. On Market Indicates the number of items you currently have listed on the market (these items also appear on the Active Listings page). To Ship Indicates the number of items you have sold (these items also appear on the Closed Items and Post Sales Summary pages).
C. Viewing Item History Click on any of the numbers in the Quantities columns to bring up an item history window, which shows, for the given inventory item, its history of quantity changes (due to both manual and automatic launches). Note that in some cases multiple events are being recorded simultaneously, so we generally describe which events are occurring and the changes made. When reviewing a line item, the following information is available: Date Displays when the change to your item’s quantity took place. Action Taken Displays the action taken to your item, which was caused by one of the following reasons:
• Updated the quantity (qty available, qty on the market, or qty held was automatically adjusted by the system after an event).
• Adjusted the price (the launch price was automatically adjusted for your item after a sale or after a close without sale).
• Reset the adjustable price (the launch price was reset to its default - triggered by you when saving a profile or the custom info for your item).
• Auto-scheduled listing (after your listing closed, another was scheduled to launch - for fixed quantity and quantity-schedule strategies only).
• Skipped launch (You didn’t have enough items available, or too many items were on the market).
Reason for Action Displays the reason why the action was taken, including:
• Item created (you manually created the item).
50
Sales Manager Inventory Edition User’s Guide
• Item updated (you manually edited the item). • Item deleted (you deleted the item). • Manual launch (a manually scheduled listing was launched). • Auto-launch (an automatically scheduled listing was launched). • Listing closed with sale. • Listing closed without sale. • Vendio Store sale. • Listing marked as shipped (this will decrement qty to ship). • Listing unmarked as shipped (this will re-increment qty to ship).
Details Displays the exact adjustment made to your item’s quantity (if any), and the exact adjustment made to your item’s price. Additionally, if a listing was auto-scheduled following one of these events, it will display the date and time of the launch. Example: Qty. eBay Auction: 2 +1 Note that 2 in the line above indicates the value of the item prior to the adjustment and not the resulting value after the change. Thus, this line indicates that the quantity of eBay auction listings for this item was increased by 1 from 2. We present the data in this fashion to avoid conditions when multiple events are occurring that may lead to erroneous sums. If this is the only line available in the history, the Quantity on Market would be 3 (2 +1). Note also that some events (Item closes, item launches, etc.) are not instantly captured and may be delayed by eBay’s confirmation in addition to Vendio’s processing time. Status Displays if your item’s status is ‘ok’ or ‘error’. If marked ‘ok’, your item has launched successfully. If marked ‘error’, your item was canceled because there were not enough items available or too many items on the market. You can use the Adjust Quantities section to adjust your item’s quantity, if for some reason, it’s out of sync with your physical inventory status. To avoid miscalculations, please wait for at least 1 hour after an event occurs before adjusting quantity on market (although most items will update very quickly, this time provides an additional safety margin).
D. Monitoring Active Listings The Active Listings page allows you to view the current price, hits received, bid activity, and ending time for all of your currently active listings. If you click on an item’s title, you can see your actual listing on the marketplace. The buttons located in the table above your items will help you with the following tasks:
51
Sales Manager Inventory Edition User’s Guide
If you have forgotten to set Auto-WBN in your preferences, or if you would like to manually edit a WBN message for a particular item(s), select the checkbox(s) of the item(s) you want to set a WBN for, and click the ‘Set WBN’ action
button. On the following page, you’ll be able to turn your Auto-WBN message on or off, as well as manually edit your WBN message(s) for your selected item(s).
Delete items from the Active Listings page. Select the checkbox(s) of the items you want to delete, and click the ‘Delete’ action button. Note that items deleted will not end your live listings.
Refresh the Active Listings page. This button is useful if the Active Listings page has been static and you want to update the page with your recently listed items.
E. Monitoring Pending Listings The Pending Listings page displays all of your items scheduled to launch this week. If you want to display items that will launch today or in the coming weeks, click the View Options tab and use the Period dropdown menu to select the appropriate time window. You can click on an item’s title to make any necessary edits. Just remember to click the ‘Save’ button, which will update the changes to your inventory item. The buttons located in the table above your items will help you with the following tasks: Launch Now Launch your selected item(s) immediately. This action will cancel their previously scheduled launch time. Edit Launch Time Edit launch schedules for items on the Pending Listings page. Select the checkbox(s) of the items you want to schedule new launch times for, and click the ‘Edit Launch Time’ button. On the Edit Launch Time page, you can edit the launch time for each item individually, or click the ‘Set Interval’ button to set the amount of time between all of your launches, as well as the appropriate spacing interval between each individual launch. Cancel Launch Cancel the launch of your selected item(s).
F. Monitoring Closed Listings The Closed Listings page displays all of your closed items, including sold and unsold items. Items that have sold are shown with a set of post-sale keys in the far right column. Click on the post-sale keys to access that item's specific post-sale checklist, or you can manage post sale tasks for multiple items at once by using the Post Sale links located in the left navigation bar. To learn more about Post Sale Management, please visit the Manage Post Sale Tasks section of the User’s Guide.
52
Sales Manager Inventory Edition User’s Guide
The buttons located in the table above your items will help you with the following tasks:
Quickly re-list your unsold items. Select the checkbox(s) of the unsold items you want to re-list, and click the ‘Relist’ action button. On the following page, you can manually edit individual listings, adjust prices (singly or in bulk) and set
the new launch times (singly or in bulk). Note that the Re-List function has changed from what you may have become familiar with using in Merchandising Edition. Now, when you select your unsold items and click ‘Re-list’, the following page will allow you to perform the same re-list function, although with more flexibility in options. These options include the ability to schedule your items in bulk, set launch intervals between listings, and adjust Starting Bids, Reserves, and Buy It Now values in bulk.
• To bulk schedule your selected items, choose the date and time in the table at the top of the page, set a time interval between each item’s launch (in minutes), and click ‘Apply’ (note that you can set the date and time for each item individually).
• To bulk edit your Starting Bids, Reserves, or Buy It Now values, fill in the appropriate field at the top of the Relist table, and click the copy value icon, which will populate all of your items with the correct value (note that you can set these values individually for each item).
• To make edits to your titles, descriptions, or any other element of your listing, click ‘Edit’ at the right of the page. When you are finished, click ‘Return’.
• Click ‘Relist’. Keep in mind that items re-listed manually will NOT be limited by quantity limits that may exist in an Auto-Launch Profile associated with your item. For example, if you have an auto-launch profile that specifies a maximum quantity on market of 3 listings, you can still re-list your item as a 4th listing manually. However, if the number of items on market exceed the quantity allowed by the auto-launch profile, the auto-launch will not proceed until the number of listings fall below your specified quantity on market limit.
Refresh the Closed Listings page. This button is useful if the Closed Listings page has been static and you want to update the page with your recently closed items.
Move items from the Closed Listings and Post Sale pages into your Sales Archive. This button is useful for separating unsold and processed items (items that are marked as paid for and shipped) from items that still need to be
processed.
53

Sales Manager Inventory Edition User’s Guide
G. Monitoring Pending Listings with Errors The Errors page displays Pending items that did not launch successfully. You can click on ‘Details’ in the far right column to identify why each item didn’t launch, and use the buttons located in the table above your items to help you with the following tasks:
Attempt to resubmit items that didn’t launch successfully. Select the checkbox(s) of the items you want to resubmit, and click the ‘Resubmit’ action button.
Refresh the Pending Listings with Errors page. This button is useful if the Pending Listings with Errors page has been static and you want to update the page with recently listed items.
Cancel items that didn’t launch successfully. Select the checkbox(s) of the items you want to cancel, and click the ‘Cancel’ action button. Vendio will take no further action to launch your items.
Delete items from the Pending Listings with Errors page. Select the checkbox(s) of the items you want to delete, and click the ‘Delete’ action button. This button is useful for deleting items that you have already canceled.
54
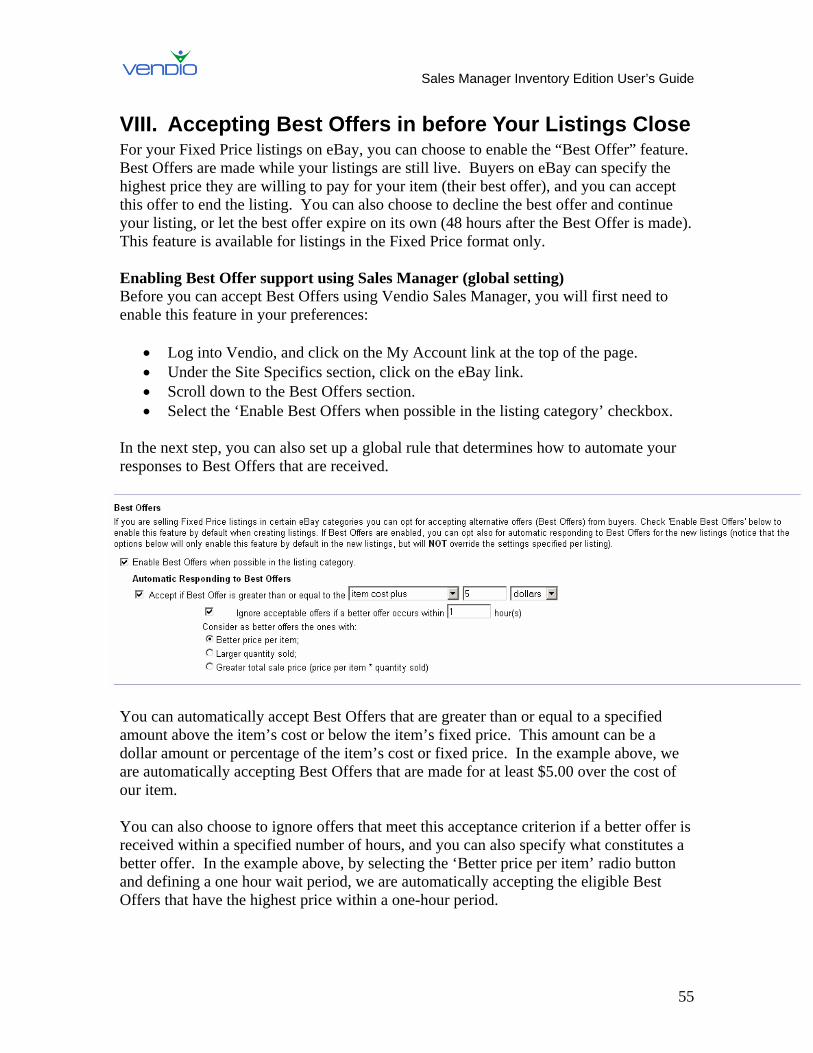
Sales Manager Inventory Edition User’s Guide
VIII. Accepting Best Offers in before Your Listings Close For your Fixed Price listings on eBay, you can choose to enable the “Best Offer” feature. Best Offers are made while your listings are still live. Buyers on eBay can specify the highest price they are willing to pay for your item (their best offer), and you can accept this offer to end the listing. You can also choose to decline the best offer and continue your listing, or let the best offer expire on its own (48 hours after the Best Offer is made). This feature is available for listings in the Fixed Price format only. Enabling Best Offer support using Sales Manager (global setting) Before you can accept Best Offers using Vendio Sales Manager, you will first need to enable this feature in your preferences:
• Log into Vendio, and click on the My Account link at the top of the page. • Under the Site Specifics section, click on the eBay link. • Scroll down to the Best Offers section. • Select the ‘Enable Best Offers when possible in the listing category’ checkbox.
In the next step, you can also set up a global rule that determines how to automate your responses to Best Offers that are received.
You can automatically accept Best Offers that are greater than or equal to a specified amount above the item’s cost or below the item’s fixed price. This amount can be a dollar amount or percentage of the item’s cost or fixed price. In the example above, we are automatically accepting Best Offers that are made for at least $5.00 over the cost of our item. You can also choose to ignore offers that meet this acceptance criterion if a better offer is received within a specified number of hours, and you can also specify what constitutes a better offer. In the example above, by selecting the ‘Better price per item’ radio button and defining a one hour wait period, we are automatically accepting the eligible Best Offers that have the highest price within a one-hour period.
55
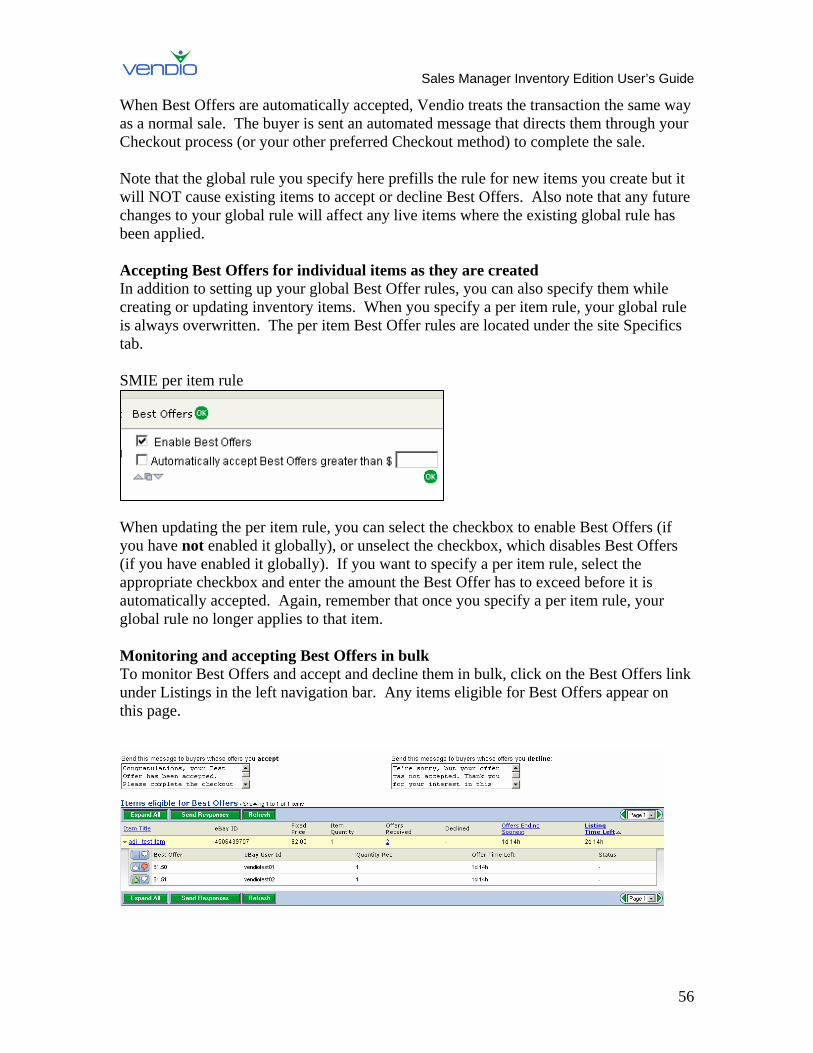
Sales Manager Inventory Edition User’s Guide
When Best Offers are automatically accepted, Vendio treats the transaction the same way as a normal sale. The buyer is sent an automated message that directs them through your Checkout process (or your other preferred Checkout method) to complete the sale. Note that the global rule you specify here prefills the rule for new items you create but it will NOT cause existing items to accept or decline Best Offers. Also note that any future changes to your global rule will affect any live items where the existing global rule has been applied. Accepting Best Offers for individual items as they are created In addition to setting up your global Best Offer rules, you can also specify them while creating or updating inventory items. When you specify a per item rule, your global rule is always overwritten. The per item Best Offer rules are located under the site Specifics tab. SMIE per item rule
When updating the per item rule, you can select the checkbox to enable Best Offers (if you have not enabled it globally), or unselect the checkbox, which disables Best Offers (if you have enabled it globally). If you want to specify a per item rule, select the appropriate checkbox and enter the amount the Best Offer has to exceed before it is automatically accepted. Again, remember that once you specify a per item rule, your global rule no longer applies to that item. Monitoring and accepting Best Offers in bulk To monitor Best Offers and accept and decline them in bulk, click on the Best Offers link under Listings in the left navigation bar. Any items eligible for Best Offers appear on this page.
56

Sales Manager Inventory Edition User’s Guide
To accept or decline Best Offers, click on the title of the item to expand the offers. Next, click on the appropriate icon to either accept or decline the Best Offer as illustrated below:
Accept Decline
After accepting and declining Best Offers for an item, click the ‘Send Response’ button. This will submit the action and send the appropriate message to each respective buyer.
57
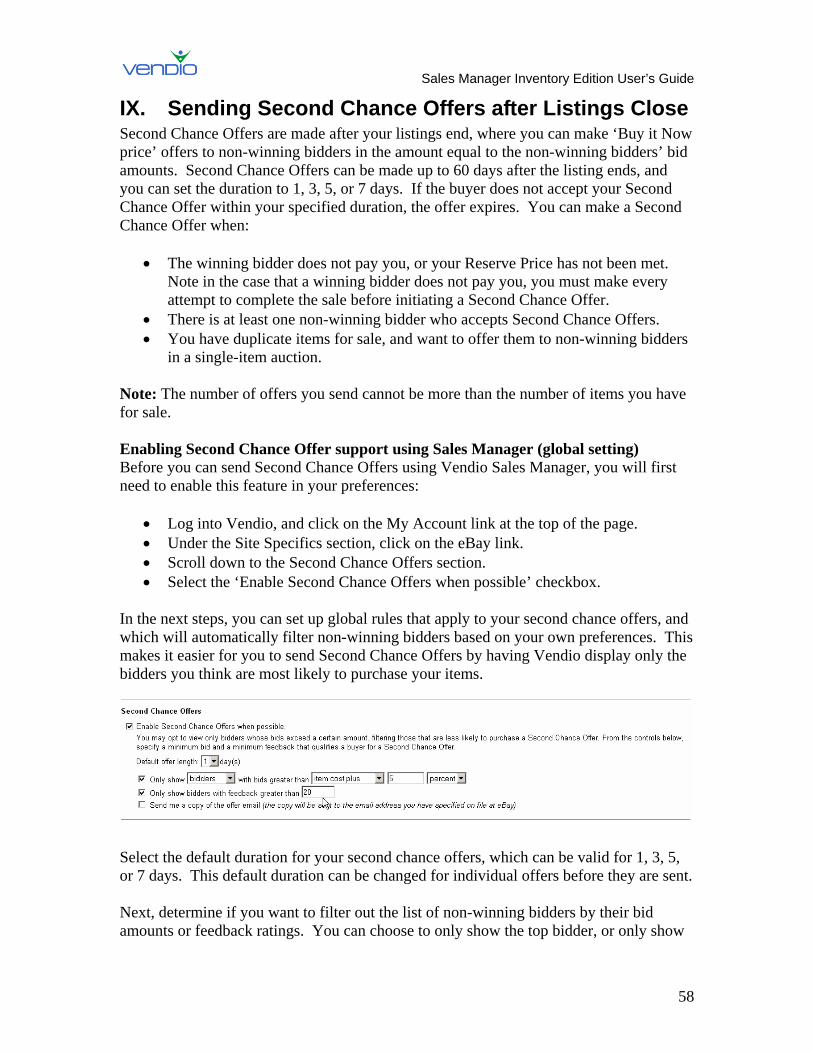
Sales Manager Inventory Edition User’s Guide
IX. Sending Second Chance Offers after Listings Close Second Chance Offers are made after your listings end, where you can make ‘Buy it Now price’ offers to non-winning bidders in the amount equal to the non-winning bidders’ bid amounts. Second Chance Offers can be made up to 60 days after the listing ends, and you can set the duration to 1, 3, 5, or 7 days. If the buyer does not accept your Second Chance Offer within your specified duration, the offer expires. You can make a Second Chance Offer when:
• The winning bidder does not pay you, or your Reserve Price has not been met. Note in the case that a winning bidder does not pay you, you must make every attempt to complete the sale before initiating a Second Chance Offer.
• There is at least one non-winning bidder who accepts Second Chance Offers. • You have duplicate items for sale, and want to offer them to non-winning bidders
in a single-item auction. Note: The number of offers you send cannot be more than the number of items you have for sale. Enabling Second Chance Offer support using Sales Manager (global setting) Before you can send Second Chance Offers using Vendio Sales Manager, you will first need to enable this feature in your preferences:
• Log into Vendio, and click on the My Account link at the top of the page. • Under the Site Specifics section, click on the eBay link. • Scroll down to the Second Chance Offers section. • Select the ‘Enable Second Chance Offers when possible’ checkbox.
In the next steps, you can set up global rules that apply to your second chance offers, and which will automatically filter non-winning bidders based on your own preferences. This makes it easier for you to send Second Chance Offers by having Vendio display only the bidders you think are most likely to purchase your items.
Select the default duration for your second chance offers, which can be valid for 1, 3, 5, or 7 days. This default duration can be changed for individual offers before they are sent. Next, determine if you want to filter out the list of non-winning bidders by their bid amounts or feedback ratings. You can choose to only show the top bidder, or only show
58
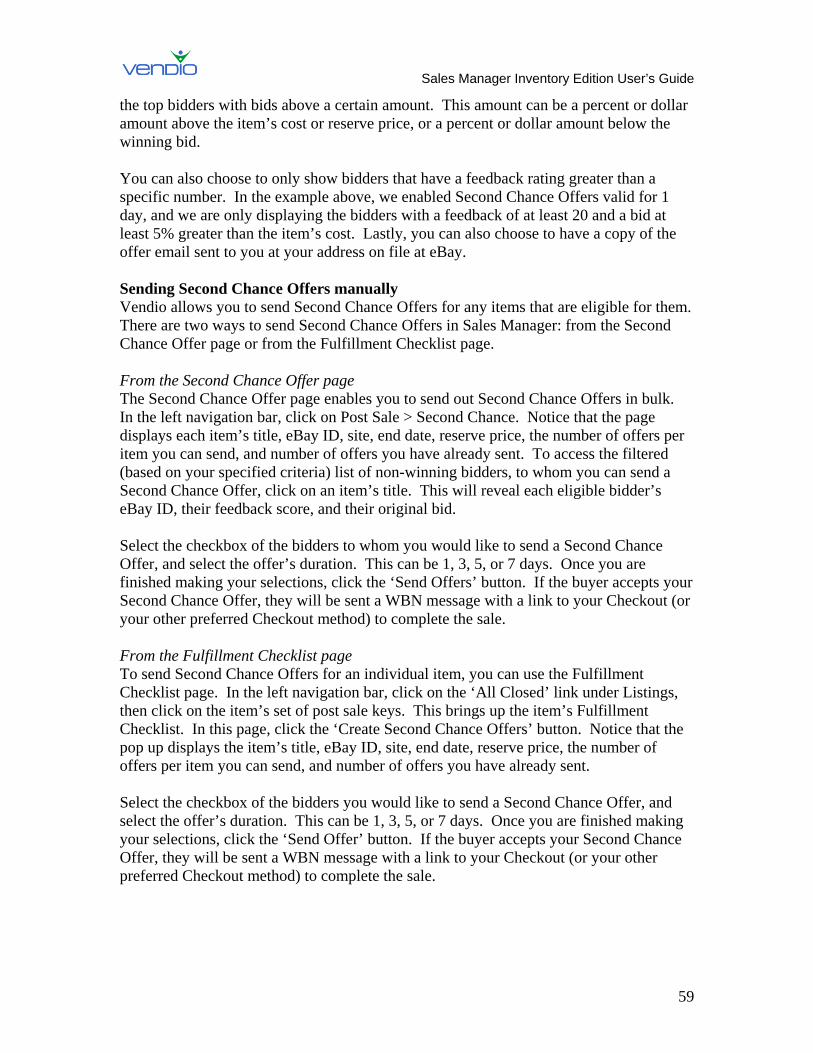
Sales Manager Inventory Edition User’s Guide
the top bidders with bids above a certain amount. This amount can be a percent or dollar amount above the item’s cost or reserve price, or a percent or dollar amount below the winning bid. You can also choose to only show bidders that have a feedback rating greater than a specific number. In the example above, we enabled Second Chance Offers valid for 1 day, and we are only displaying the bidders with a feedback of at least 20 and a bid at least 5% greater than the item’s cost. Lastly, you can also choose to have a copy of the offer email sent to you at your address on file at eBay. Sending Second Chance Offers manually Vendio allows you to send Second Chance Offers for any items that are eligible for them. There are two ways to send Second Chance Offers in Sales Manager: from the Second Chance Offer page or from the Fulfillment Checklist page. From the Second Chance Offer page The Second Chance Offer page enables you to send out Second Chance Offers in bulk. In the left navigation bar, click on Post Sale > Second Chance. Notice that the page displays each item’s title, eBay ID, site, end date, reserve price, the number of offers per item you can send, and number of offers you have already sent. To access the filtered (based on your specified criteria) list of non-winning bidders, to whom you can send a Second Chance Offer, click on an item’s title. This will reveal each eligible bidder’s eBay ID, their feedback score, and their original bid. Select the checkbox of the bidders to whom you would like to send a Second Chance Offer, and select the offer’s duration. This can be 1, 3, 5, or 7 days. Once you are finished making your selections, click the ‘Send Offers’ button. If the buyer accepts your Second Chance Offer, they will be sent a WBN message with a link to your Checkout (or your other preferred Checkout method) to complete the sale. From the Fulfillment Checklist page To send Second Chance Offers for an individual item, you can use the Fulfillment Checklist page. In the left navigation bar, click on the ‘All Closed’ link under Listings, then click on the item’s set of post sale keys. This brings up the item’s Fulfillment Checklist. In this page, click the ‘Create Second Chance Offers’ button. Notice that the pop up displays the item’s title, eBay ID, site, end date, reserve price, the number of offers per item you can send, and number of offers you have already sent. Select the checkbox of the bidders you would like to send a Second Chance Offer, and select the offer’s duration. This can be 1, 3, 5, or 7 days. Once you are finished making your selections, click the ‘Send Offer’ button. If the buyer accepts your Second Chance Offer, they will be sent a WBN message with a link to your Checkout (or your other preferred Checkout method) to complete the sale.
59
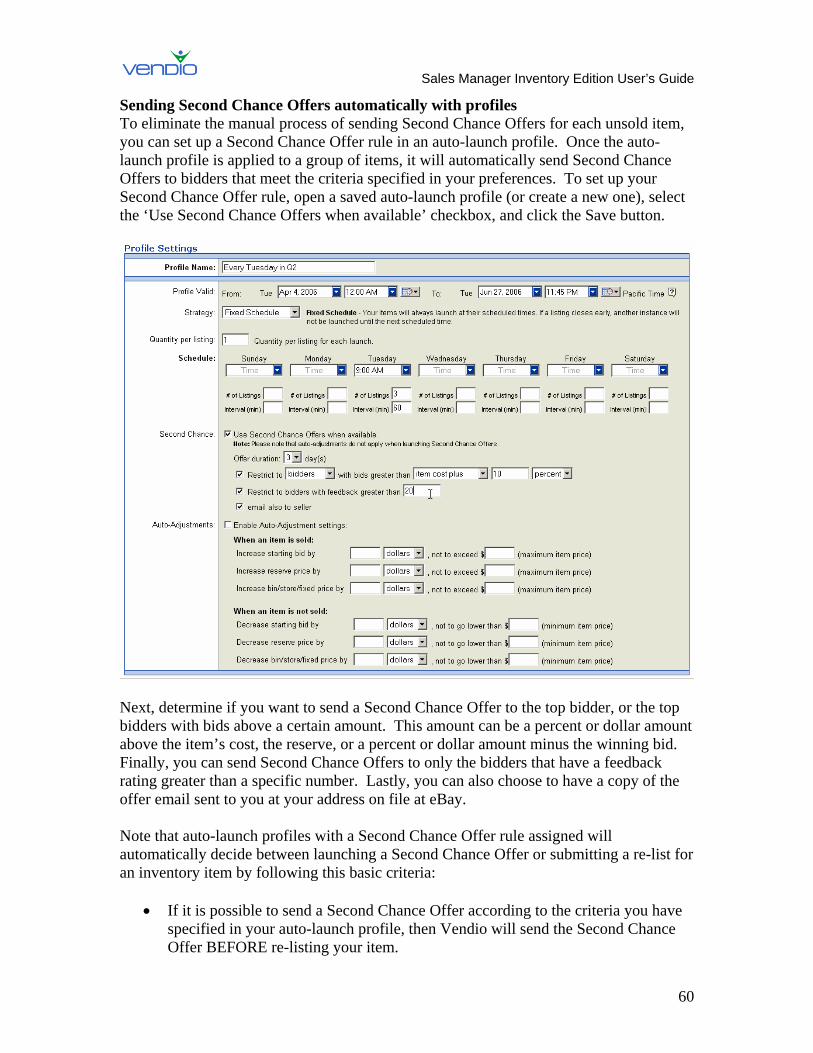
Sales Manager Inventory Edition User’s Guide
Sending Second Chance Offers automatically with profiles To eliminate the manual process of sending Second Chance Offers for each unsold item, you can set up a Second Chance Offer rule in an auto-launch profile. Once the auto-launch profile is applied to a group of items, it will automatically send Second Chance Offers to bidders that meet the criteria specified in your preferences. To set up your Second Chance Offer rule, open a saved auto-launch profile (or create a new one), select the ‘Use Second Chance Offers when available’ checkbox, and click the Save button.
Next, determine if you want to send a Second Chance Offer to the top bidder, or the top bidders with bids above a certain amount. This amount can be a percent or dollar amount above the item’s cost, the reserve, or a percent or dollar amount minus the winning bid. Finally, you can send Second Chance Offers to only the bidders that have a feedback rating greater than a specific number. Lastly, you can also choose to have a copy of the offer email sent to you at your address on file at eBay. Note that auto-launch profiles with a Second Chance Offer rule assigned will automatically decide between launching a Second Chance Offer or submitting a re-list for an inventory item by following this basic criteria:
• If it is possible to send a Second Chance Offer according to the criteria you have specified in your auto-launch profile, then Vendio will send the Second Chance Offer BEFORE re-listing your item.
60

Sales Manager Inventory Edition User’s Guide
• If the criteria in your auto-launch profile makes sending the Second Chance Offer not possible, Vendio will re-list the item (taking advantage of the free re-list if possible).
• If re-listing the item is not possible, Vendio will launch a new listing.
61

Sales Manager Inventory Edition User’s Guide
X. Using Post Sale to Close Sales When a listing ends, if it has ended with a sale, the “Quantity on Market” is decremented and the “Quantity To Ship” is incremented appropriately. If the listing has ended without a sale, the “Quantity on Market” is decremented and the “Quantity Available” is incremented appropriately. You can then perform the following tasks that pertain to your sold and unsold items:
A. Re-pricing and Re-listing Unsold Items To quickly find listings that did not sell and re-set prices for them before re-launching, go to the Closed Listings page:
• Select Listings > Closed Listings from the left navigation bar. • Listings that did not sell will not have a Fulfillment Checklist (the 1-9 image on
the far right column). Select the checkbox(s) of any of these listing(s), and click ‘Relist’.
• On the following page, you can manually edit individual listings, adjust prices (singly or in bulk) and set the new launch times (singly or in bulk).
• If you want to adjust prices and launch new listings automatically, use auto-launch profiles. For more information about auto-launch profiles, please refer to the Launching Items section of this guide.
Many marketplaces offer free re-lists (listing fee is waived) provided your listing meets certain criteria (which vary from marketplace to marketplace). Please note that both manual re-lists AND automatic launches will utilize free re-list capabilities from a marketplace whenever possible, and when a listing meets free re-list requirements. Therefore, if a listing ends without a sale, and if your re-list meets all criteria, the next automatically-scheduled launch of that item OR your manual re-list will take advantage of any free re-list policy available on that marketplace.
B. Closing Sales for Individual Items After an item has sold, it will appear under the Closed Listings section of your Control Panel. From here, you can complete each step of the post-sale process by accessing the item’s Fulfillment Checklist:
• In the left navigation bar, select Post Sale > Summary. • Find a sold item and click on the row of numbers (post-sale keys) to the right of it.
After you enter the Fulfillment Checklist, notice there are nine steps, each of which are not necessary to complete. You should decide, however, which steps are critical to you so you can focus on the ones that need your attention. Each of the steps are outlined thoroughly below:
62
Sales Manager Inventory Edition User’s Guide
1. Winning Bidder Notification (WBN) This step is checked automatically once an item is won and Vendio sends an email on your behalf to the winning bidder, provided you have elected to send the WBN automatically in your Global Preferences. If you did not choose this option, you can send the WBN manually by clicking the ‘Send WBN’ link. Note that the WBN includes a link to Vendio Checkout so your buyer knows to complete your check out process.
2. Checkout completed
This step is checked automatically once your buyer has completed the Vendio or eBay Checkout process. You can view the customer’s information if you click the ’view checkout’ link. If your customer has not completed the checkout process, you can check this step manually. Just click the ‘edit’ link, enter the customer’s shipping and payment information, and click ‘Save’.
3. Payment Received
This step is checked automatically once your buyer has paid you via PayPal. Note that this step is only automatic if you set your PayPal Instant Payment Notifications properly in your Post-Sale Acceleration Preferences. For all other payment methods, this step must be completed manually. Just click the checkbox to the right of this field to indicate your payment has been received, or click the ‘send payment rec’d notice’ link if you want to send a payment reminder.
4. Postage/Address Printed
This step is checked manually once you print a packaging slip/invoice. Just click the ‘print packaging slip’ link, review the information for correctness, and click the ‘Print Now’ button. If you want to print postage for your item using Stamps.com or Endicia, click the ‘print postage’ link. Verify the pre-filled postage options (such as the shipping carrier), and click the ‘Print Postage’ button. If you have not yet enabled printing postage from Vendio, follow these simple steps:
• Create your account either with Stamps.com or with Endicia. • Download and install the postage software offered by the provider. • Click on the My Account link at the top of the page. • Click on the Postage Options link, and select either of the two checkboxes
labeled ‘Use Stamps.com to print postage’ or ‘Use Endicia to print postage’.
• If you chose Stamps.com, you must also specify the name of the printer you are using to print postage.
• Click Save.
5. Item Shipped This step is checked manually once you have shipped the item. Note that you can also add a tracking number to track the status of your shipment. By entering the
63
Sales Manager Inventory Edition User’s Guide
tracking number, Vendio will automatically check Step #8 (Shipment Arrived) once the shipment has arrived.
6. Shipment Status sent to buyer
This step is checked manually once you have sent a Shipment Notification to your buyer. Just click the ‘send shipment notification’ link to perform this action.
7. Feedback Sent
This step is checked automatically once you leave feedback for your buyer through Vendio. Note that automatic feedback is only activated once you set it up in your Feedback Management Preferences. To do this, follow these steps:
• Click on the My Account link a the top of the page. • Click on the Feedback Management link.
If you want to leave feedback manually, just select one of the preset messages (or enter your own), and click the ‘Submit’ button.
8. Shipment Arrived
This step is checked automatically if you entered a tracking number for your shipment in Step #5. If you did not enter a tracking number, you will need to check this step manually when you know the shipment has arrived to your buyer. Just click the checkbox to the right of this field to perform this function.
9. Feedback Received
This step is checked automatically once your buyer leaves feedback for you. You can send a feedback reminder message to your buyer at this step to remind them if necessary. Just click the ‘send feedback reminder’ link to perform this function.
C. Closing Sales for Multiple Items If you have more than one closed item under the Closed Listings section of your Control Panel, you can use the post-sale links in the left navigation bar to complete each post-sale step in bulk. As you complete each of the post-sale steps, they are reflected in each items' Fulfillment Checklist just as if you were completing each step one by one. Notice that each step in the post sale process are not necessary to complete. You should decide, however, which steps are critical to you so you can focus on the ones that need your attention. Each of the steps are outlined thoroughly below. WBN to Send In the left navigation bar, click on WBN to Send. All of your closed items that still need Winning Bidder Notifications sent (i.e. step 1 is not checked) will appear on this page.
Click the 'Edit WBN' action button to customize your Winning Bidder Notification and to edit the tax, shipping, and payment options that will be
64
Sales Manager Inventory Edition User’s Guide
presented during Vendio Checkout.
Select the checkboxes of the items you want to send a WBN, and click the 'Send WBN' action button, which will send your winning bidder your customized message and a link to your Checkout.
Once the Winning Bidder Notifications have been sent, the number 1 in each items' Fulfillment Checklist will turn blue to mark the status of WBN sent as complete. Awaiting Checkout In the left navigation bar, click on Awaiting Checkout. All of your closed items awaiting Checkout (i.e. step 2 is not checked) will appear on this page, including the closed items that you have sent WBNs. After your winning bidders complete Checkout, the items will move out of this page to the Awaiting Payment page and the Items to Ship page.
If you would like to send your winning bidders a reminder WBN, select the checkboxes of the items you want to send a WBN reminder, and click the 'Send WBN Reminder' action button.
Once your winning bidders have completed Checkout, the number 2 in each items' Fulfillment Checklist will turn blue to mark the status of Checkout as complete. Awaiting Payment In the left navigation bar, click on Awaiting Payment. All of your closed items awaiting payment will appear on this page. If your item has been paid for using PayPal, your item will be moved to the 'Items to Ship' page automatically. If your item has been paid for by check, for example, you will have to record the payment manually.
If you would like to mark your items as paid, select the checkboxes of the items you want to mark as paid, and click the 'Mark as Paid' action button.
If you would like to remind your winning bidders to pay for the item they have won, select the checkboxes of the items you want to send a reminder, and click the 'Send Payment Reminder' action button.
Once your items have been marked as paid (either automatically via electronic payment or manually by you), the number 3 in each items' Fulfillment Checklist will turn blue to mark the status of payment received as complete. A note about unpaid items In the event that your buyer does not pay you after a reasonable amount of time, you can file an Unpaid Item Dispute with eBay in this section.
To do this, select the checkbox of the item(s), and click the ‘Unpaid Item Dispute’ action button. Enter the reason for your dispute on the following page and submit it to eBay. To monitor the status of the dispute, you will have to log
into your eBay account, as this is not tracked in Vendio at this time.
65
Sales Manager Inventory Edition User’s Guide Items to Ship In the left navigation bar, click on Items to Ship. All of your closed items that have been paid for (i.e. step 3 is checked, but step 4 and 5 are not) will appear on this page. You can conveniently print an invoice and packaging slip for each item based on the buyers' selections during Checkout.
If you would like to print out an invoice and packaging slip for each item, select the checkboxes of the items you want to print invoices and packaging slips for, and click the 'Print Invoice/Packaging Slip' action button. On the following page,
choose the correct print mode by selecting the items you want to print (Shipping Label / Invoice Combo, Shipping Label Only, or Invoice Only). When you are ready to print your shipping label and or invoice, click the 'Print Now' button. Make sure that accurate shipping cost information has been updated in each item's fulfillment checklist before invoices are printed. Once you have printed out an invoice and packaging slip for each item, the number 4 in each items' Fulfillment Checklist will turn blue to mark the status of postage/address labels printed as complete.
After you have shipped each item, select the checkboxes of the items you have shipped and click the 'Mark as Shipped' action button.
Once you click the ‘Marked as Shipped’ action button for your selected items, the number 5 in each items’ Fulfillment Checklist will turn blue to mark the status of item shipped as complete. Note that you can enter tracking numbers for each shipped item on the Mark as Shipped confirmation page, which appears after you click this button.
After you have shipped each item, select the checkboxes of the items you want to send a shipment notification email, and click the 'Send Shipment Notification' action button.
Once you click the 'Send Shipment Notification' action button, the number 6 in each items' Fulfillment Checklist will turn blue, and a check mark will appear automatically to mark the status of the shipment notifications as sent. Expediting the ‘Items to Ship’ step by exporting shipping details or printing postage You can streamline your post-sale shipping process by exporting shipping information to USPS Dazzle, UPS Worldship, or FedEx Ship Manager, or by printing postage for USPS shipments using Stamps.com or Endicia. To learn how to do this, follow these steps: Exporting shipping information Items with steps 1-3 checked off will appear in this section, indicating that these items are ready to ship. A column called Available Formats will display which format your items
66
Sales Manager Inventory Edition User’s Guide
are in (i.e. what shipping method the buyer has chosen) so you know what you can download. Signups for the software offered by USPS, UPS and FedEx are optional and are done on their websites. We do provide directions on how to import the files to each carrier (these links are visible near the top of the page). Before clicking the ‘Export’ button to export your shipping details to your preferred carrier, select the ‘Mark Step 5 (Item Shipped) Checked in Post Sale Management’ checkbox. This will ensure that number 5 in each item’s Fulfillment Checklist automatically turns blue to mark the status of the item shipped as complete. Printing postage Items with steps 1-3 checked off will appear in this section, indicating that these items are ready to ship.
Select the checkboxes of the items you want to print postage for, and click the ‘Print Postage’ action button. Verify the pre-filled postage options (such as the shipping carrier), and click the ‘Print Postage’ button. If you have not yet
enabled postage printing from Vendio, follow these steps:
• Create your account either with Stamps.com or with Endicia. • Download and install the postage printing software for your provider. • Click on the My Account link at the top of the page. • Click on the Postage Options link, and select either of the two checkboxes
labeled ‘Use Stamps.com to print postage’ or ‘Use Endicia to print postage’.
• If you chose Stamps.com, you must also specify the name of the printer you are using to print postage.
• Click Save. Once postage is printed for your selected items, the number 5 in each items’ Fulfillment Checklist will turn blue to mark the status of item shipped as complete. Feedback to Send In the left navigation bar, click on Feedback to Send. All of your items marked as paid and needing feedback will appear on this page.
After your items have been paid for, select the checkboxes of the items you want to send feedback for and click the 'Send Feedback' action button.
If you would like to fulfill step 7 of the Fulfillment Checklist for feedback sent, select the checkboxes of the items you sent feedback for and click the 'Mark as Feedback Sent' action button.
Once you click the ‘Mark as Feedback Sent’ action button, the number 7 in each items' Fulfillment Checklist will turn blue to mark the status of feedback sent as complete.
67
Sales Manager Inventory Edition User’s Guide
Note that you can perform this step automatically by enabling automatic feedback. Automatic feedback enables you to send feedback based on your own trigger preferences (i.e. after a winning bidder has paid for your item or left you feedback. Note that automatic feedback is only activated once you set it up in your Feedback Management Preferences. To do this, follow these steps:
• Click on the My Account link a the top of the page. • Click on the Feedback Management link.
Awaiting Feedback In the left navigation bar, click on Awaiting Feedback. All of your items marked as shipped will appear on this page.
After your items have been paid for and shipped, select the checkboxes of the items you have not yet received feedback for, and click the 'Send Feedback Reminder' action button.
If you would like to fulfill step 9 of the Fulfillment Checklist for feedback received, select the checkboxes of the items you have received feedback for, and click the 'Feedback Received' action button.
Once you click the ‘Feedback Received’ action button, the number 8 in each items' Fulfillment Checklist will turn blue to mark the status of feedback received as complete. Unsold Items All of your unsold items appear in this section, where you can either archive them to remove them from the page, or relist them back to the marketplace. Note that by archiving items, you don’t delete them. Instead, you store them in a database that you can download later on to view information on past transactions. To learn more about the Sales Archive, please see ‘Archiving Items Out of Your Control Panel’ in this guide to learn how.
Select the checkboxes of the items you want to archive, and click the ‘Archive’ action button.
Once you click the ‘Archive’ action button, the number 9 in each items' Fulfillment Checklist will turn blue, and check marks will appear automatically next to each item to mark the status of archived as complete.
Note that any item that appears on the Unsold Items page can also be relisted. Just select the checkboxes of the items you want to relist, and click the ‘Relist’ action button.
68

Sales Manager Inventory Edition User’s Guide
D. Using the Sales Archive
1. What is the Sales Archive? The Sales Archive allows you to keep your closed listings and Post Sale pages organized by separating unsold and processed items (items that are paid for and shipped) from items that still need to be processed. Your Sales Archive can be downloaded and opened into an Excel spreadsheet, where important sales information, such as item titles, closing prices, shipping details, and winning bidder information can be used for sales analysis and reporting purposes.
2. Archiving Items To move items into your Sales Archive, go to the Closed Listings, Unsold Items, or any of the Post Sale pages:
• Select the checkbox(s) of the item(s) that you want to move. • Click the ‘Archive’ action button. Keep in mind that items moved to your Sales
Archive can be restored to their originating location, but only for a limited time (up to 2 weeks).
If you want to move closed items to your Sales Archive automatically, use the auto-archive feature, which will allow you to move items to your Sales Archive after they have been closed for a period of time. You can specify this period to be as little as one or as many as twelve weeks after your items close. To enable auto-archiving, go to the Global Preferences page:
• Click on the My Account link at the top of the page. • Click on the Global Preferences link, and Scroll down to Archiving Options. • Select the Auto-archive checkbox, and use the dropdown menu to select the
number of weeks to wait after your items close until they are moved into your Sales Archive.
• Click ‘Save’.
3. Restoring Items To move items from your Sales Archive back to the Closed Listings and Post Sale pages, go to the Restore Items page:
• In the left navigation bar, select Sales Archive > Restore Items. • Select the checkbox(s) of the item(s) that you want to restore. • Click ‘Restore’.
4. Downloading Your Sales Archive To download sales data from archived items, go to the Download Archive page:
• In the left navigation bar, select Sales Archive > Download Archive. • Use the Start and End date dropdown menus to select the time period that you
want to download sales data from. • Use the Type dropdown menu to select between Sold, Unsold, or All, depending
on the types of items you want to download.
69
Sales Manager Inventory Edition User’s Guide
• Click ‘Download’. • Use the Format dropdown menu to select between Basic or Complete, depending
on how many fields you want to download (click on ‘Format Descriptions’ to see a list of fields that will be downloaded with each format).
• At the prompt, click ‘Open’, or click ‘Save’. •
E. Leveraging Customer Contact Lists to Boost Repeat Sales Selling to existing customers is far easier than acquiring new ones. By leveraging your customer contact lists, you can keep past buyers informed of special offers or hot new merchandise.
1. Automatically Build Customer Lists • In your inventory item definition, you can choose to have winning
bidders’/buyers’ e-mail addresses automatically imported into a Customer Management folder.
• This way, you have an instant customer list you can use to contact previous customers, as seen in the “PostSale & Checkout” column.
2. Importing Customers from Previously Closed Listings • In the left navigation bar, click on Customers. • Click ‘Import’. • Select the checkboxes of the listings from which you want to import customer
emails. • In the Action Panel section, use the dropdown menu to select a contact list to
import your customer emails. If you haven’t yet created a contact list, leave the default ‘Unfilled’ contact list selected.
• Click ‘Go’. • On the Confirm page, click the ‘Back to Customer Mgt’ button, which will bring
you back to the Customers page.
3. Creating Customer Contact Lists • In the left navigation bar, click on Customers. • Click on ‘Edit Contact Lists’ in the Display Options section. • Click ‘Add New’ to create a contact list. • Name your contact list and click ‘Add New’ again. • Follow this process until you have created as many contact lists as you need. • Click ‘Back’ when you are finished to return to the Customers page.
4. Organizing Customers into Contact Lists • In the left navigation bar, click on Customers. • Select the checkboxes of the customer emails that you would like to organize into
a contact list.
70
Sales Manager Inventory Edition User’s Guide
• Use the dropdown menus in the Action Panel section to copy or move your selected customer emails into the appropriate contact list.
• Click ‘Go’.
5. Sending Emails to Segmented Groups of Customers • In the left navigation bar, click on Customers. • In the Display Options section, highlight the contact list(s) that will receive your
message. • Click ‘Display Results’. • Click ‘Select All’ if you want to send your message to all of the email addresses
in your list(s), or select the checkboxes of specific email addresses to limit your message to a few individuals.
• In the Action Panel section, select ‘e-Mail’ from the dropdown menu. • Click ‘Go’, and compose your message using the email editor. • Click ‘Send E-Mail’. Your email will be sent, coming from your primary email
address, with a copy sent to your primary email address (as defined in your Vendio Account, in the Personal Information section).
Note: Before sending your message, you must agree to the terms of the Vendio Customer Management Tool.
71
Sales Manager Inventory Edition User’s Guide
XI. Merchandising with Additional Features With Vendio Sales Manager Inventory Edition, you also get access to all of these additional merchandising features, which are available for Sales Manager Merchandising Edition
A. Using Vendio Custom Templates
1. What are Vendio Custom Templates? Vendio helps you create attractive and professional listing templates - without having to know HTML. You can choose from hundreds of pre-designed templates, or create your own, until you come up with a style and theme that best matches your brand. These templates can then be assigned to your inventory items with just a few clicks.
2. Creating and Saving Custom Templates • Click on the My Account link at the top of the page. • On the My Account page, click on the Custom Templates link. • Upload your company logo or other graphic (if applicable) in the Logos section.
These logos can be placed in any of six locations of your template later on. • Scroll down the page to your list of Saved Templates, and highlight one of the
default template styles that appear in the Saved Templates box. This will bring up a preview of the template in the Template Preview window to the right of the Saved Templates list.
• Click the ‘Template Workshop’ button to begin selecting from hundreds of pre-designed template styles, or to create your own.
• Once inside the Template Workshop, you’ll notice that nearly every element of your template is customizable, including the colors of your template frame, main background, and description box. You can also add accent graphics, such as your company logo, format your listing title, and organize the orientation of your description, images, payment, and custom listing text sections.
• Spend some time creating a template that best matches your brand and style. • When you are finished, name your template at the bottom of the page and click
'Save’. Your new template will now appear in your list of Saved Templates.
3. Assigning Custom Templates to Inventory Items Once you have added a template(s) to your list of Saved Templates, you can begin to assign them to your inventory items with just a few clicks. To assign your saved template to a new or existing item:
• Click on ‘Create Inventory Items’ in the left navigation bar to assign your template to a new item, or click on a folder where the existing item is located.
• If you are assigning your template to an existing item, select the checkbox of the item you want to update and click ‘Edit’.
• Click the ‘Description & Template’ top-level tab. • Use the Template dropdown menu to select your saved template. • Click ‘Ok’.
72
Sales Manager Inventory Edition User’s Guide
To assign your saved template to multiple inventory items at once:
• Click on a folder where your existing items are located. • Select the checkboxes of the items you want to edit, and click ‘Edit’. • Click the ‘Description & Template’ top-level tab. • Use the Template dropdown menu to select your saved template. • Click ‘Ok’. • Select the checkboxes of the items you want to update with your saved template. • Next, click the 'Copy to Checked Rows' icon that matches the item with the
correct template. This will update all of your selected items.
B. Using Custom Listing Text to Save Time Typing
1. What is Custom Listing Text? If you have specific terms and conditions, "fine print”, policy statements, or personal messages that you include on all of your listings, create and organize them into custom sections of information to make your listings easier to navigate and understand. This also eliminates the need to type policy statements and other information repetitively for each item – you can type it once and assign the information to all of your listings automatically!
2. Defining Custom Listing Text • Click on the My Account link at the top of the page. • On the My Account page, click on the Custom Listing Text link. • Enter your Default Listing Text, which will appear after the last paragraph of your
Description and before the Standard or Custom Information sections. • If you want to add additional sections, scroll down the page to Custom Listing
Text and enter a title, which will be displayed at the top of your listing as a navigation link, allowing buyers to jump directly to this information.
• You can add up to five custom sections, each with an introductory heading, to explain additional policy statements that you want to include on all of your listings.
• When you have completed your Custom Listing Text sections, click the 'Save'.
C. Using Vendio Image Watermarking
1. What is Vendio Image Watermarking? Vendio's Watermarking service makes it easy to add a unique, fully customized watermark to all of your images in less than a minute. Unlike other watermarking services, you get more customization and better features with Vendio. Use a company logo, website URL, or any text you want, and customize your watermark by changing its size, colors, and exact placement on your images.
73

Sales Manager Inventory Edition User’s Guide
2. Enabling Image Watermarking • Click on the My Account link at the top of the page. • Click on the My Product Plans link at the right of the page. • Scroll down the page to Image Watermarking and click on the enable Image
Watermarking link (please note that Watermarking is an additional $2.95 per month).
• Read over the User Agreement, agree to the terms, and click ‘Continue’.
3. Customizing Watermarking Settings Use the five settings outlined below to customize your watermark. Occasionally, you’ll want to click ‘Preview’ at the bottom of the page to see how your watermark will appear on different images. When you are finished creating or editing your watermark, click ‘Save’ at the bottom of the page. Your watermark will be updated on all of your images, including those in active listings, within two hours. Watermark Type: Choose between an Image, Text, or None By default, ‘Text’ will be selected for you, and your username will appear in the corresponding text box. You can replace your username with other text, such as your company name or website URL. Note that you can also change the font, style, and color of your text. If you select ‘Image’ as your watermark type, try uploading a simple company logo to maximize brand awareness. You may also select ‘None’, which will stop displaying your watermark on all of your images. Note that selecting ‘None’ does not cancel your Image Watermarking plan. Watermark Position: Change the location of your watermark on images Your watermark can be positioned in nine different areas. Generally, a watermark applied in the middle of your image is ideal for protecting against image theft, while a watermark applied in a corner of your image is ideal for increasing brand awareness. Watermark Visibility: Adjust the transparency of your watermark You can adjust how hard or soft your watermark will appear on top of your images. Generally, start with 50% and make adjustments from there. The softer the transparency, under 50%, the more difficult your watermark will be to see. A soft transparency is ideal if you want to preserve the image view for buyers, but you still want to provide strong image protection. The harder the transparency, over 50%, will make your watermark highly visible, which is ideal for building brand awareness. Watermark Size: Increase or decrease the size of your watermark You can increase or decrease the size of your watermark relative to your images. A size of 50%-100% provides strong image protection because it covers more of the image. Alternatively, you can size your watermark to be 33% and below to offer a branding opportunity without interfering with image views. The smaller the watermark size, however, the easier it is to crop an image and eliminate your watermark.
74
Sales Manager Inventory Edition User’s Guide
Watermark Style: Choose between embossed or blended You can emboss your watermark so it appears stamped onto your images, or blend your watermark to overlay it in color. An embossed watermark is ideal for protecting yourself from image theft, while a blended watermark is ideal for building brand awareness.
D. Using ZoomStream Images
1. What are ZoomStream Images? ZoomStream images enable your buyers to see the greatest detail available from your digital images, without having to wait for the images to download. Buyers can zoom in to see extraordinary details, such as the stain finish on an antique chair, the paint quality of a fine automobile, or the condition of a rare baseball card. With ZoomStream images, buyers get an accurate representation of your items’ appearance and quality, and will bid on your items more confidently. When fine detail or quality is an important factor in a buyer’s purchasing decision, use ZoomStream images. Note: ZoomStream Images are $1.00 per upload. Each two-week renewal is $0.50.
2. Taking Images Suitable for ZoomStream Applications To get the best performance out of ZoomStream, take high-resolution images by using the highest setting on your digital camera.
• 2272 X 1704 or 2048 X 1536 pixels will provide enough detail for ZoomStream to work effectively.
• If you are using a scanner, remember to set your resolution high. 600 dpi is ideal, and try to keep your image file size between 1MB and 15 MB.
Note: ZoomStream images up to 15MB will load as quickly as a 100KB image for viewers on dialup.
75