Embed Size (px)
Citation preview
The repair information in this document is intended for use only by skilled technicians who have the proper tools, equipment and training to correctly and safely maintain your vehicle. These procedures are not intended to be attempted by “do-it-yourselfers,” and you should not assume this document applies to your vehicle, or that your vehicle has the condition described. To determine whether this information applies, contact an authorized Audi dealer. 2016 Audi of America, Inc. and Audi Canada. All Rights Reserved. November 2016 24BZ Page 1 of 33
Safety Recall Code: 24BZ
Subject Fuel Hose & Fuel Pump
Release Date 11/21/2016
Affected Vehicles U.S.A. & CANADA: Certain 2012-2013 MY Audi A6 & A7 Check Campaigns/Actions screen in Elsa on the day of repair to verify that a VIN qualifies for repair under this action. Elsa is the only valid campaign inquiry & verification source.
Campaign status must show “open.” If Elsa shows other open action(s), inform your customer so that the work can also be completed at
the same time the vehicle is in the workshop for this campaign.
Problem Description On certain vehicles, the under hood fuel hose may degrade, which could result in a fuel leak. Leaking fuel, in the presence of an ignition source, may result in a fire.
Corrective Action Replace the in-tank fuel pump and an under hood fuel hose.
Precautions If a fuel smell is detected in the vehicle, customers are advised to immediately contact the nearest authorized Audi dealer in order to have the vehicle inspected.
Parts Information Parts will be allocated prior to owner notification. If allocated parts have been used and your dealership is at the weekly Upper Order Limit, please submit the backordered sales document number to [email protected] to have additional parts released.
Code Visibility On or about 11/21/2016 parts will be available to begin repairing vehicles affected by this recall. On or about 11/02/2016, affected vehicles were listed on the Inventory Vehicle Open Campaign Action report under My Dealership Reports (found on www.accessaudi.com & OMD Web). A list was not posted for dealers who did not have any affected vehicles.
On or about 11/02/2016, affected vehicles were identified with this campaign code in the VIN Lookup tool at www.audiusa.com and on the NHTSA VIN lookup tool at www.safercar.gov.
Owner Notification Owner notification took place on November 2, 2016. Owner letter examples are included in this bulletin for your reference.
Additional Information Please alert everyone in your dealership about this action, including Sales, Service, Parts and Accounting personnel. Contact Warranty if you have any questions. IMPORTANT REMINDER ON VEHICLES AFFECTED BY SAFETY & COMPLIANCE RECALLS New Vehicles in Dealer Inventory: It is a violation of Federal law for a dealer to deliver a new motor vehicle or any new or used item of motor vehicle equipment (including a tire) covered by this notification under a sale or lease until the defect or noncompliance is remedied. By law, dealers must correct, prior to delivery for sale or lease, any vehicle that fails to comply with an applicable Federal Motor Vehicle Safety Standard or that contains a defect relating to motor vehicle safety. Pre-Owned Vehicles in Dealer Inventory: Dealers should not deliver any pre-owned vehicles in their inventory which are involved in a safety or compliance recall until the defect has been remedied. Dealers must ensure that every affected inventory vehicle has this campaign completed before delivery to consumers.
The repair information in this document is intended for use only by skilled technicians who have the proper tools, equipment and training to correctly and safely maintain your vehicle. These procedures are not intended to be attempted by “do-it-yourselfers,” and you should not assume this document applies to your vehicle, or that your vehicle has the condition described. To determine whether this information applies, contact an authorized Audi dealer. 2016 Audi of America, Inc. and Audi Canada. All Rights Reserved. November 2016 24BZ Page 2 of 33
Claim Entry Instructions
After campaign has been completed, enter claim as soon as possible to help prevent work from being duplicated elsewhere. Attach the Elsa screen print showing action open on the day of repair to the repair order. If customer refused campaign work:
U.S. dealers: Submit the request through Audi Warranty Online under the Campaigns/Update option.
Canada dealers: Fax repair order to Warranty at (905) 428-4811.
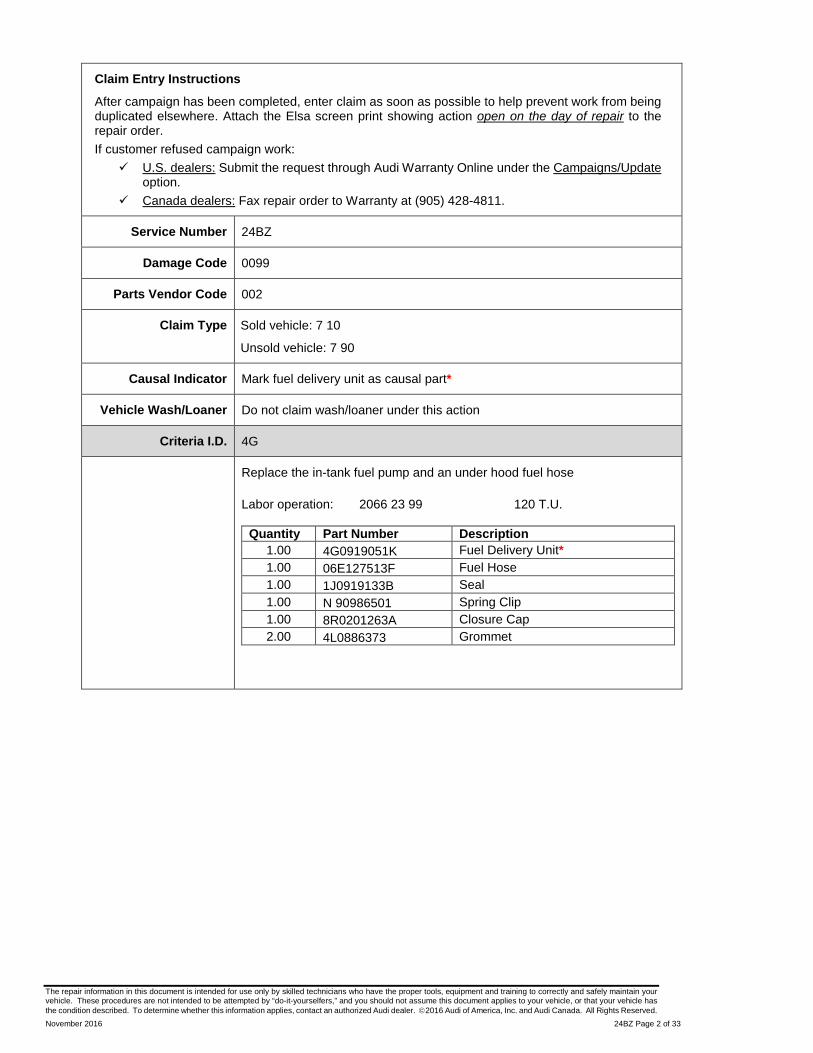
Service Number 24BZ
Damage Code 0099
Parts Vendor Code 002
Claim Type Sold vehicle: 7 10
Unsold vehicle: 7 90
Causal Indicator Mark fuel delivery unit as causal part*
Vehicle Wash/Loaner Do not claim wash/loaner under this action
Criteria I.D. 4G
Replace the in-tank fuel pump and an under hood fuel hose Labor operation: 2066 23 99 120 T.U.
Quantity Part Number Description 1.00 4G0919051K Fuel Delivery Unit* 1.00 06E127513F Fuel Hose 1.00 1J0919133B Seal 1.00 N 90986501 Spring Clip 1.00 8R0201263A Closure Cap 2.00 4L0886373 Grommet
The repair information in this document is intended for use only by skilled technicians who have the proper tools, equipment and training to correctly and safely maintain your vehicle. These procedures are not intended to be attempted by “do-it-yourselfers,” and you should not assume this document applies to your vehicle, or that your vehicle has the condition described. To determine whether this information applies, contact an authorized Audi dealer. 2016 Audi of America, Inc. and Audi Canada. All Rights Reserved. November 2016 24BZ Page 3 of 33
Customer Letter Example (USA)
<MONTH YEAR> <CUSTOMER NAME> <CUSTOMER ADDRESS> <CUSTOMER CITY STATE ZIPCODE>
This notice applies to your vehicle: <VIN>
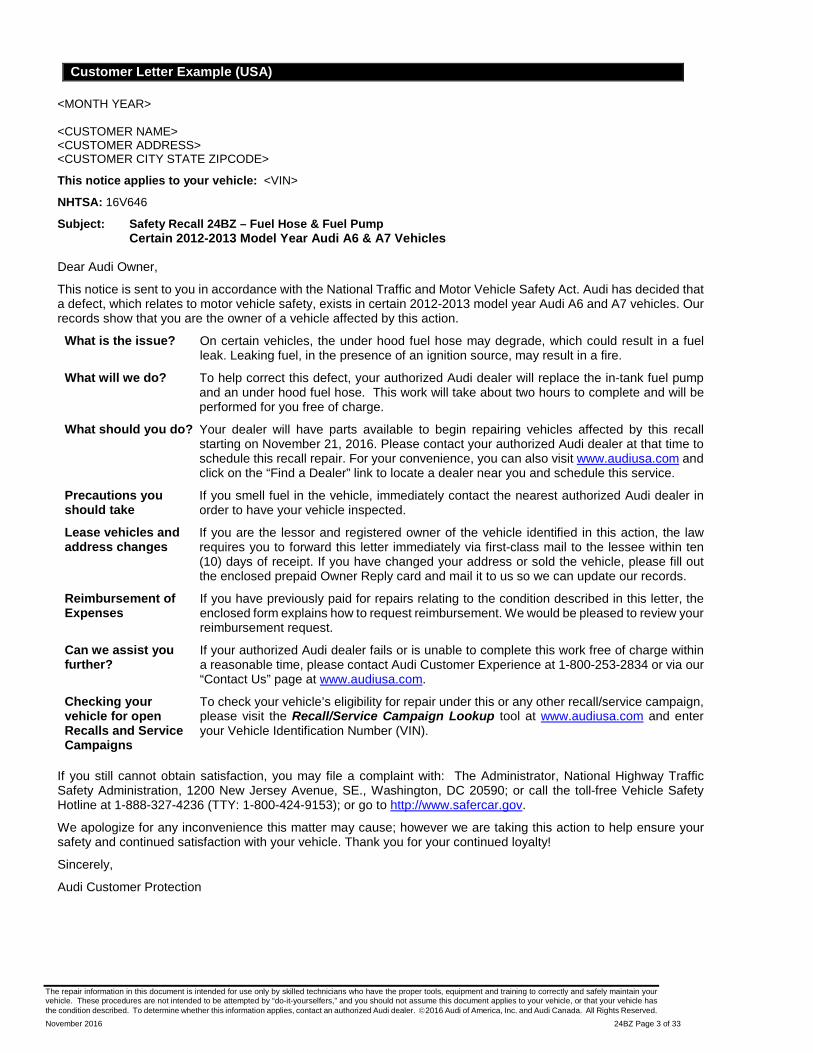
NHTSA: 16V646
Subject: Safety Recall 24BZ – Fuel Hose & Fuel Pump Certain 2012-2013 Model Year Audi A6 & A7 Vehicles Dear Audi Owner,
This notice is sent to you in accordance with the National Traffic and Motor Vehicle Safety Act. Audi has decided that a defect, which relates to motor vehicle safety, exists in certain 2012-2013 model year Audi A6 and A7 vehicles. Our records show that you are the owner of a vehicle affected by this action.
What is the issue? On certain vehicles, the under hood fuel hose may degrade, which could result in a fuel leak. Leaking fuel, in the presence of an ignition source, may result in a fire.
What will we do? To help correct this defect, your authorized Audi dealer will replace the in-tank fuel pump and an under hood fuel hose. This work will take about two hours to complete and will be performed for you free of charge.
What should you do? Your dealer will have parts available to begin repairing vehicles affected by this recall starting on November 21, 2016. Please contact your authorized Audi dealer at that time to schedule this recall repair. For your convenience, you can also visit www.audiusa.com and click on the “Find a Dealer” link to locate a dealer near you and schedule this service.
Precautions you should take
If you smell fuel in the vehicle, immediately contact the nearest authorized Audi dealer in order to have your vehicle inspected.
Lease vehicles and address changes
If you are the lessor and registered owner of the vehicle identified in this action, the law requires you to forward this letter immediately via first-class mail to the lessee within ten (10) days of receipt. If you have changed your address or sold the vehicle, please fill out the enclosed prepaid Owner Reply card and mail it to us so we can update our records.
Reimbursement of Expenses
If you have previously paid for repairs relating to the condition described in this letter, the enclosed form explains how to request reimbursement. We would be pleased to review your reimbursement request.
Can we assist you further?
If your authorized Audi dealer fails or is unable to complete this work free of charge within a reasonable time, please contact Audi Customer Experience at 1-800-253-2834 or via our “Contact Us” page at www.audiusa.com.
Checking your vehicle for open Recalls and Service Campaigns
To check your vehicle’s eligibility for repair under this or any other recall/service campaign, please visit the Recall/Service Campaign Lookup tool at www.audiusa.com and enter your Vehicle Identification Number (VIN).
If you still cannot obtain satisfaction, you may file a complaint with: The Administrator, National Highway Traffic Safety Administration, 1200 New Jersey Avenue, SE., Washington, DC 20590; or call the toll-free Vehicle Safety Hotline at 1-888-327-4236 (TTY: 1-800-424-9153); or go to http://www.safercar.gov.
We apologize for any inconvenience this matter may cause; however we are taking this action to help ensure your safety and continued satisfaction with your vehicle. Thank you for your continued loyalty!
Sincerely,
Audi Customer Protection
The repair information in this document is intended for use only by skilled technicians who have the proper tools, equipment and training to correctly and safely maintain your vehicle. These procedures are not intended to be attempted by “do-it-yourselfers,” and you should not assume this document applies to your vehicle, or that your vehicle has the condition described. To determine whether this information applies, contact an authorized Audi dealer. 2016 Audi of America, Inc. and Audi Canada. All Rights Reserved. November 2016 24BZ Page 4 of 33
Customer Letter Example (CANADA)
<MONTH YEAR> <CUSTOMER NAME> <CUSTOMER ADDRESS> <CUSTOMER CITY STATE ZIPCODE>
This notice applies to your vehicle: <VIN>
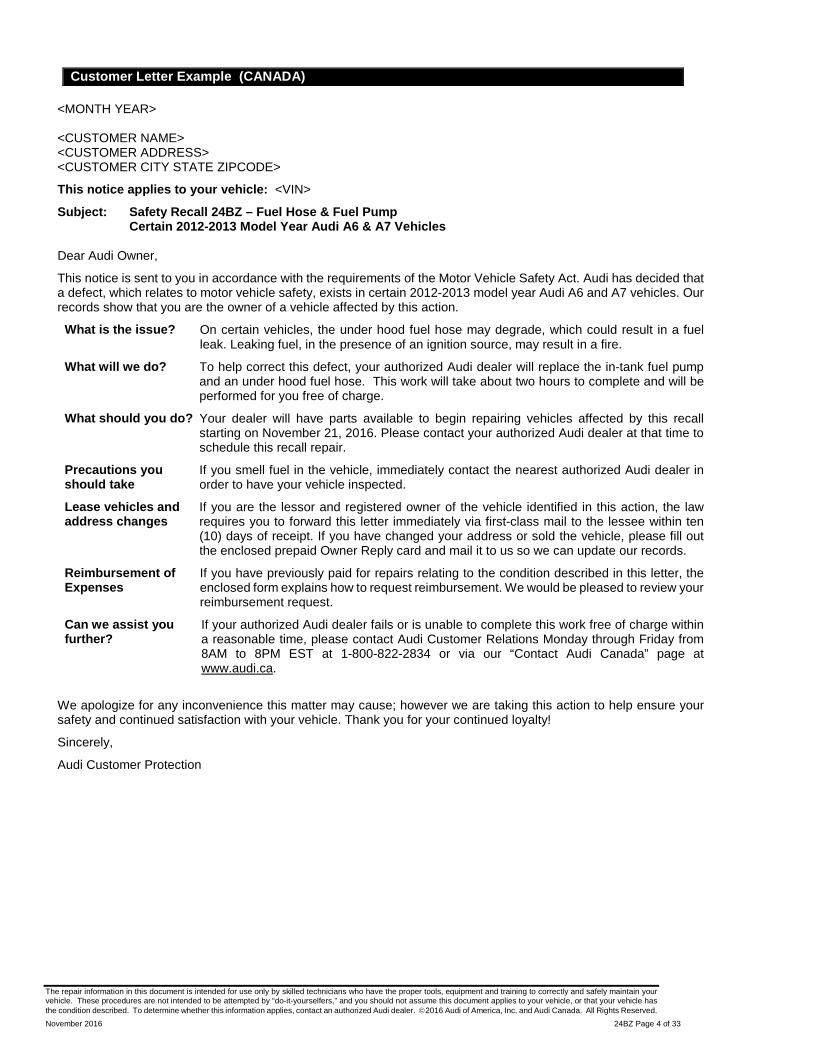
Subject: Safety Recall 24BZ – Fuel Hose & Fuel Pump Certain 2012-2013 Model Year Audi A6 & A7 Vehicles Dear Audi Owner,
This notice is sent to you in accordance with the requirements of the Motor Vehicle Safety Act. Audi has decided that a defect, which relates to motor vehicle safety, exists in certain 2012-2013 model year Audi A6 and A7 vehicles. Our records show that you are the owner of a vehicle affected by this action.
What is the issue? On certain vehicles, the under hood fuel hose may degrade, which could result in a fuel leak. Leaking fuel, in the presence of an ignition source, may result in a fire.
What will we do? To help correct this defect, your authorized Audi dealer will replace the in-tank fuel pump and an under hood fuel hose. This work will take about two hours to complete and will be performed for you free of charge.
What should you do? Your dealer will have parts available to begin repairing vehicles affected by this recall starting on November 21, 2016. Please contact your authorized Audi dealer at that time to schedule this recall repair.
Precautions you should take
If you smell fuel in the vehicle, immediately contact the nearest authorized Audi dealer in order to have your vehicle inspected.
Lease vehicles and address changes
If you are the lessor and registered owner of the vehicle identified in this action, the law requires you to forward this letter immediately via first-class mail to the lessee within ten (10) days of receipt. If you have changed your address or sold the vehicle, please fill out the enclosed prepaid Owner Reply card and mail it to us so we can update our records.
Reimbursement of Expenses
If you have previously paid for repairs relating to the condition described in this letter, the enclosed form explains how to request reimbursement. We would be pleased to review your reimbursement request.
Can we assist you further?
If your authorized Audi dealer fails or is unable to complete this work free of charge within a reasonable time, please contact Audi Customer Relations Monday through Friday from 8AM to 8PM EST at 1-800-822-2834 or via our “Contact Audi Canada” page at www.audi.ca.
We apologize for any inconvenience this matter may cause; however we are taking this action to help ensure your safety and continued satisfaction with your vehicle. Thank you for your continued loyalty!
Sincerely,
Audi Customer Protection
The repair information in this document is intended for use only by skilled technicians who have the proper tools, equipment and training to correctly and safely maintain your vehicle. These procedures are not intended to be attempted by “do-it-yourselfers,” and you should not assume this document applies to your vehicle, or that your vehicle has the condition described. To determine whether this information applies, contact an authorized Audi dealer. 2016 Audi of America, Inc. and Audi Canada. All Rights Reserved. November 2016 24BZ Page 5 of 33
Campaign Work Procedure 24BZ Safety Recall
NOTE
Damages resulting from improper repair or failure to follow these work instructions are the dealer’s responsibility and are not eligible for reimbursement under this action.
WARNING
Risk of injury. Refer to “Warning and Safety Precautions”, found in Appendix A at the end of this document.
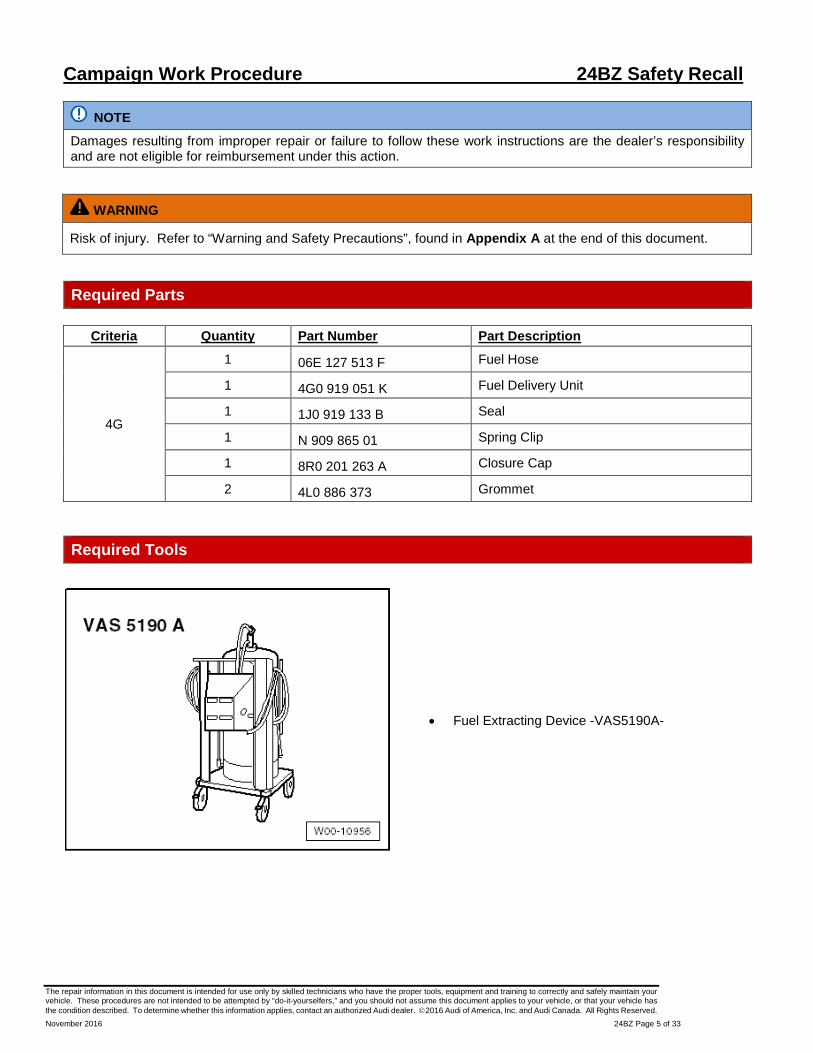
Required Parts
Criteria Quantity Part Number Part Description
4G
1 06E 127 513 F Fuel Hose
1 4G0 919 051 K Fuel Delivery Unit
1 1J0 919 133 B Seal
1 N 909 865 01 Spring Clip
1 8R0 201 263 A Closure Cap
2 4L0 886 373 Grommet
Required Tools
• Fuel Extracting Device -VAS5190A-
The repair information in this document is intended for use only by skilled technicians who have the proper tools, equipment and training to correctly and safely maintain your vehicle. These procedures are not intended to be attempted by “do-it-yourselfers,” and you should not assume this document applies to your vehicle, or that your vehicle has the condition described. To determine whether this information applies, contact an authorized Audi dealer. 2016 Audi of America, Inc. and Audi Canada. All Rights Reserved. November 2016 24BZ Page 6 of 33
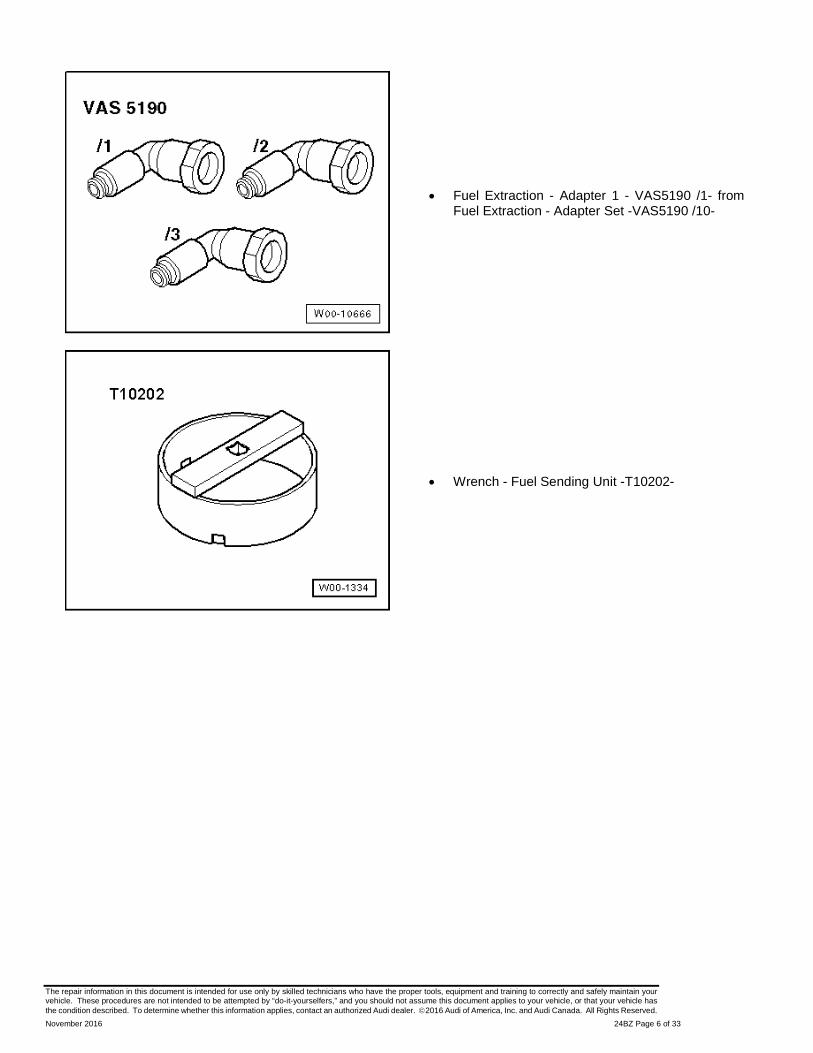
• Fuel Extraction - Adapter 1 - VAS5190 /1- from Fuel Extraction - Adapter Set -VAS5190 /10-
• Wrench - Fuel Sending Unit -T10202-
The repair information in this document is intended for use only by skilled technicians who have the proper tools, equipment and training to correctly and safely maintain your vehicle. These procedures are not intended to be attempted by “do-it-yourselfers,” and you should not assume this document applies to your vehicle, or that your vehicle has the condition described. To determine whether this information applies, contact an authorized Audi dealer. 2016 Audi of America, Inc. and Audi Canada. All Rights Reserved. November 2016 24BZ Page 7 of 33
Repair Instruction Section A - Check for Previous Repair
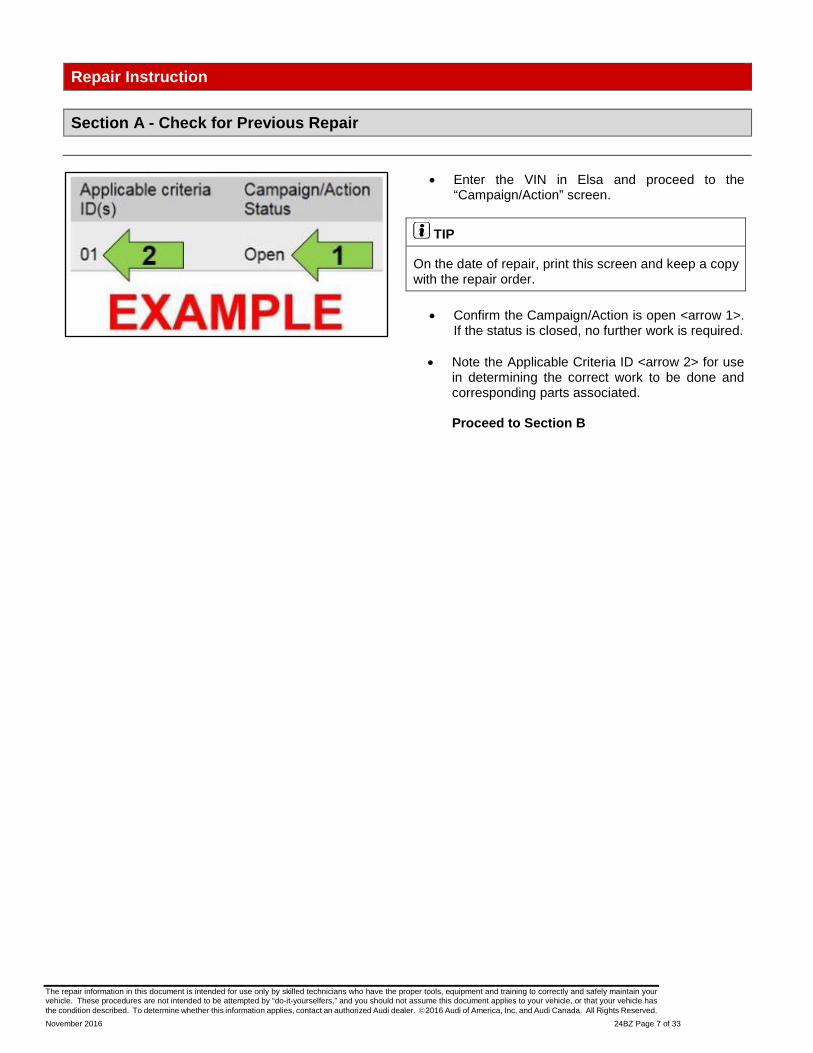
• Enter the VIN in Elsa and proceed to the
“Campaign/Action” screen.
TIP
On the date of repair, print this screen and keep a copy with the repair order.
• Confirm the Campaign/Action is open <arrow 1>.
If the status is closed, no further work is required.
• Note the Applicable Criteria ID <arrow 2> for use in determining the correct work to be done and corresponding parts associated. Proceed to Section B
The repair information in this document is intended for use only by skilled technicians who have the proper tools, equipment and training to correctly and safely maintain your vehicle. These procedures are not intended to be attempted by “do-it-yourselfers,” and you should not assume this document applies to your vehicle, or that your vehicle has the condition described. To determine whether this information applies, contact an authorized Audi dealer. 2016 Audi of America, Inc. and Audi Canada. All Rights Reserved. November 2016 24BZ Page 8 of 33
Section B – Repair Procedure
WARNING
Risk of injury. Refer to “Warning and Safety Precautions”, found in Appendix A at the end of this document.
NOTE
Due to variations in vehicle equipment and options, the steps/illustrations in this work procedure may not identically match all affected vehicles.
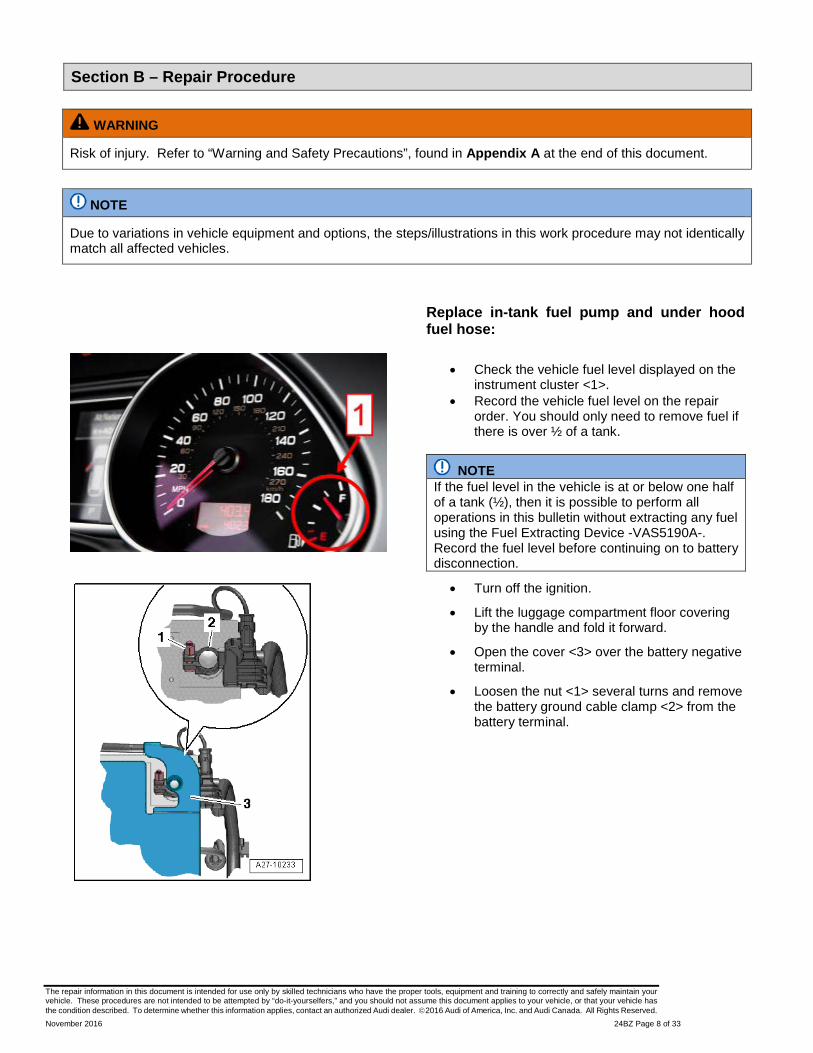
Replace in-tank fuel pump and under hood fuel hose:
• Check the vehicle fuel level displayed on the
instrument cluster <1>. • Record the vehicle fuel level on the repair
order. You should only need to remove fuel if there is over ½ of a tank.
NOTE If the fuel level in the vehicle is at or below one half of a tank (½), then it is possible to perform all operations in this bulletin without extracting any fuel using the Fuel Extracting Device -VAS5190A-. Record the fuel level before continuing on to battery disconnection.
• Turn off the ignition.
• Lift the luggage compartment floor covering by the handle and fold it forward.
• Open the cover <3> over the battery negative terminal.
• Loosen the nut <1> several turns and remove the battery ground cable clamp <2> from the battery terminal.
The repair information in this document is intended for use only by skilled technicians who have the proper tools, equipment and training to correctly and safely maintain your vehicle. These procedures are not intended to be attempted by “do-it-yourselfers,” and you should not assume this document applies to your vehicle, or that your vehicle has the condition described. To determine whether this information applies, contact an authorized Audi dealer. 2016 Audi of America, Inc. and Audi Canada. All Rights Reserved. November 2016 24BZ Page 9 of 33
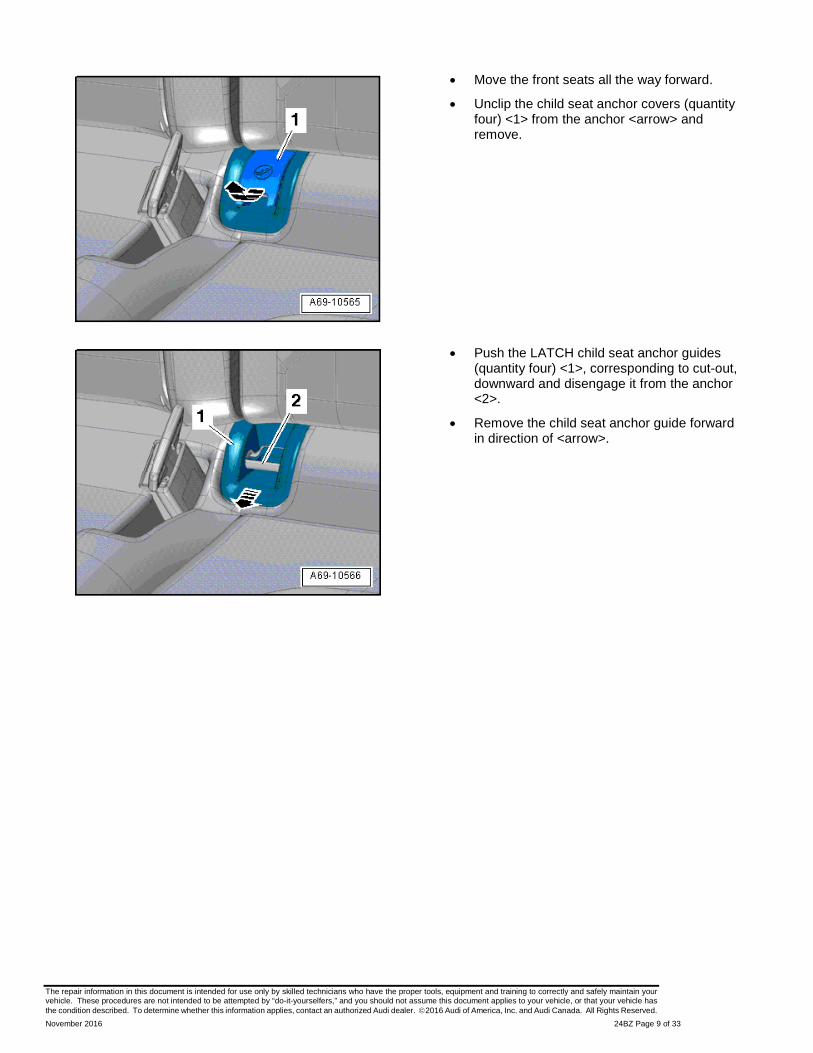
• Move the front seats all the way forward.
• Unclip the child seat anchor covers (quantity four) <1> from the anchor <arrow> and remove.
• Push the LATCH child seat anchor guides (quantity four) <1>, corresponding to cut-out, downward and disengage it from the anchor <2>.
• Remove the child seat anchor guide forward in direction of <arrow>.
The repair information in this document is intended for use only by skilled technicians who have the proper tools, equipment and training to correctly and safely maintain your vehicle. These procedures are not intended to be attempted by “do-it-yourselfers,” and you should not assume this document applies to your vehicle, or that your vehicle has the condition described. To determine whether this information applies, contact an authorized Audi dealer. 2016 Audi of America, Inc. and Audi Canada. All Rights Reserved. November 2016 24BZ Page 10 of 33
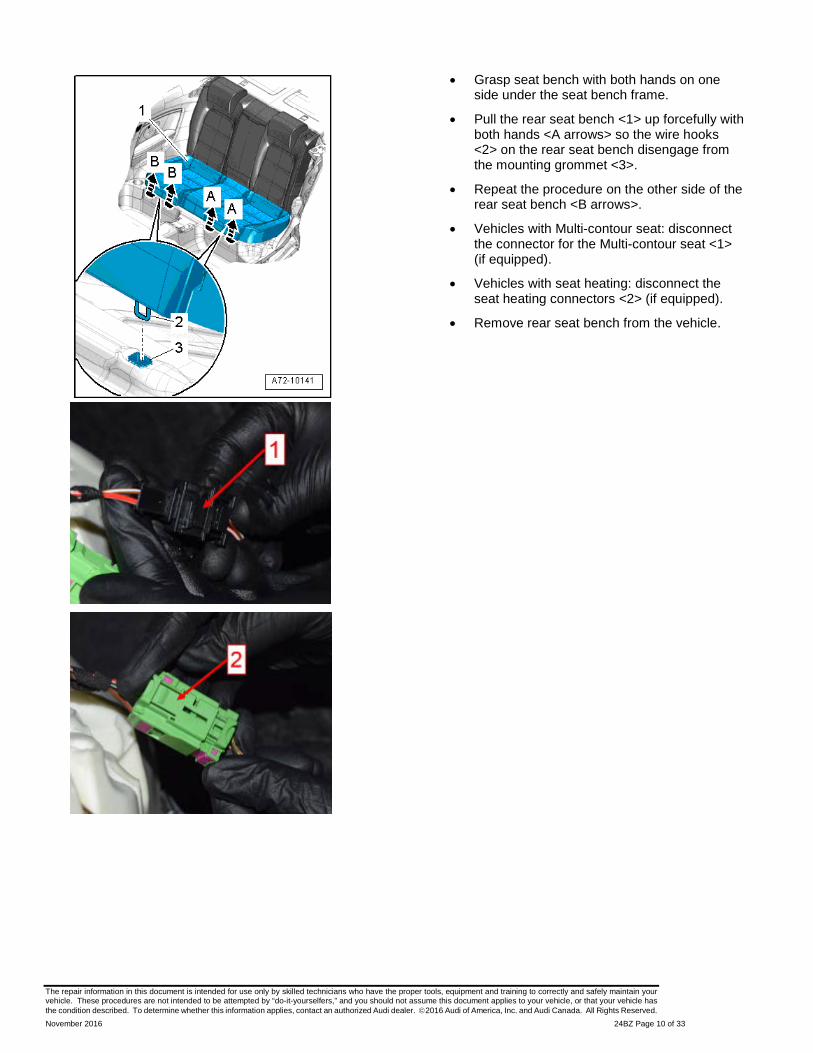
• Grasp seat bench with both hands on one side under the seat bench frame.
• Pull the rear seat bench <1> up forcefully with both hands <A arrows> so the wire hooks <2> on the rear seat bench disengage from the mounting grommet <3>.
• Repeat the procedure on the other side of the rear seat bench <B arrows>.
• Vehicles with Multi-contour seat: disconnect the connector for the Multi-contour seat <1> (if equipped).
• Vehicles with seat heating: disconnect the seat heating connectors <2> (if equipped).
• Remove rear seat bench from the vehicle.
The repair information in this document is intended for use only by skilled technicians who have the proper tools, equipment and training to correctly and safely maintain your vehicle. These procedures are not intended to be attempted by “do-it-yourselfers,” and you should not assume this document applies to your vehicle, or that your vehicle has the condition described. To determine whether this information applies, contact an authorized Audi dealer. 2016 Audi of America, Inc. and Audi Canada. All Rights Reserved. November 2016 24BZ Page 11 of 33
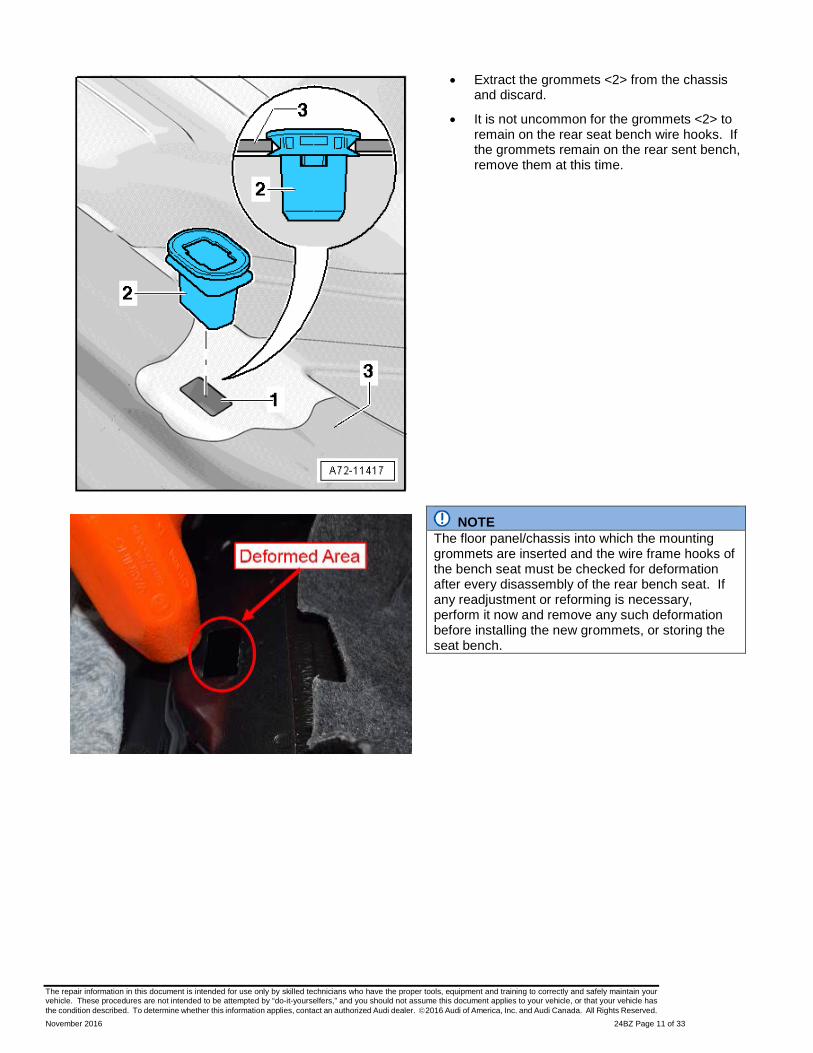
• Extract the grommets <2> from the chassis and discard.
• It is not uncommon for the grommets <2> to remain on the rear seat bench wire hooks. If the grommets remain on the rear sent bench, remove them at this time.
NOTE The floor panel/chassis into which the mounting grommets are inserted and the wire frame hooks of the bench seat must be checked for deformation after every disassembly of the rear bench seat. If any readjustment or reforming is necessary, perform it now and remove any such deformation before installing the new grommets, or storing the seat bench.
The repair information in this document is intended for use only by skilled technicians who have the proper tools, equipment and training to correctly and safely maintain your vehicle. These procedures are not intended to be attempted by “do-it-yourselfers,” and you should not assume this document applies to your vehicle, or that your vehicle has the condition described. To determine whether this information applies, contact an authorized Audi dealer. 2016 Audi of America, Inc. and Audi Canada. All Rights Reserved. November 2016 24BZ Page 12 of 33
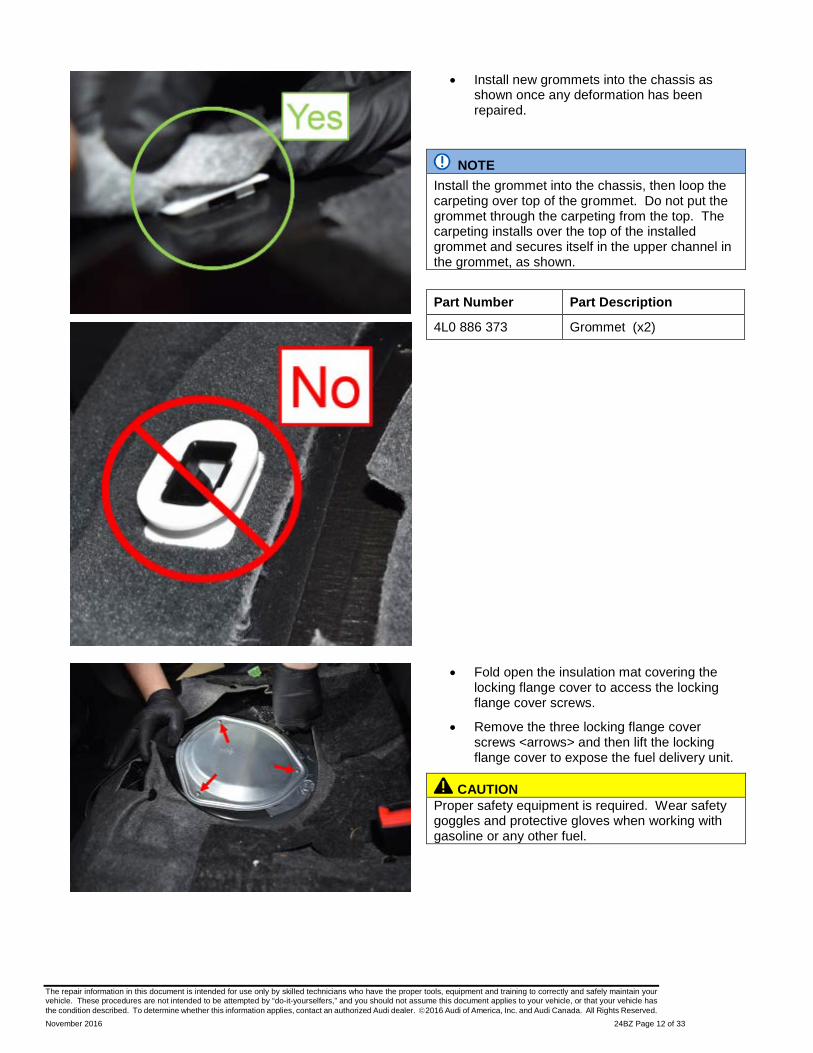
• Install new grommets into the chassis as shown once any deformation has been repaired.
NOTE Install the grommet into the chassis, then loop the carpeting over top of the grommet. Do not put the grommet through the carpeting from the top. The carpeting installs over the top of the installed grommet and secures itself in the upper channel in the grommet, as shown.
Part Number Part Description
4L0 886 373 Grommet (x2)
• Fold open the insulation mat covering the locking flange cover to access the locking flange cover screws.
• Remove the three locking flange cover screws <arrows> and then lift the locking flange cover to expose the fuel delivery unit.
CAUTION Proper safety equipment is required. Wear safety goggles and protective gloves when working with gasoline or any other fuel.
The repair information in this document is intended for use only by skilled technicians who have the proper tools, equipment and training to correctly and safely maintain your vehicle. These procedures are not intended to be attempted by “do-it-yourselfers,” and you should not assume this document applies to your vehicle, or that your vehicle has the condition described. To determine whether this information applies, contact an authorized Audi dealer. 2016 Audi of America, Inc. and Audi Canada. All Rights Reserved. November 2016 24BZ Page 13 of 33
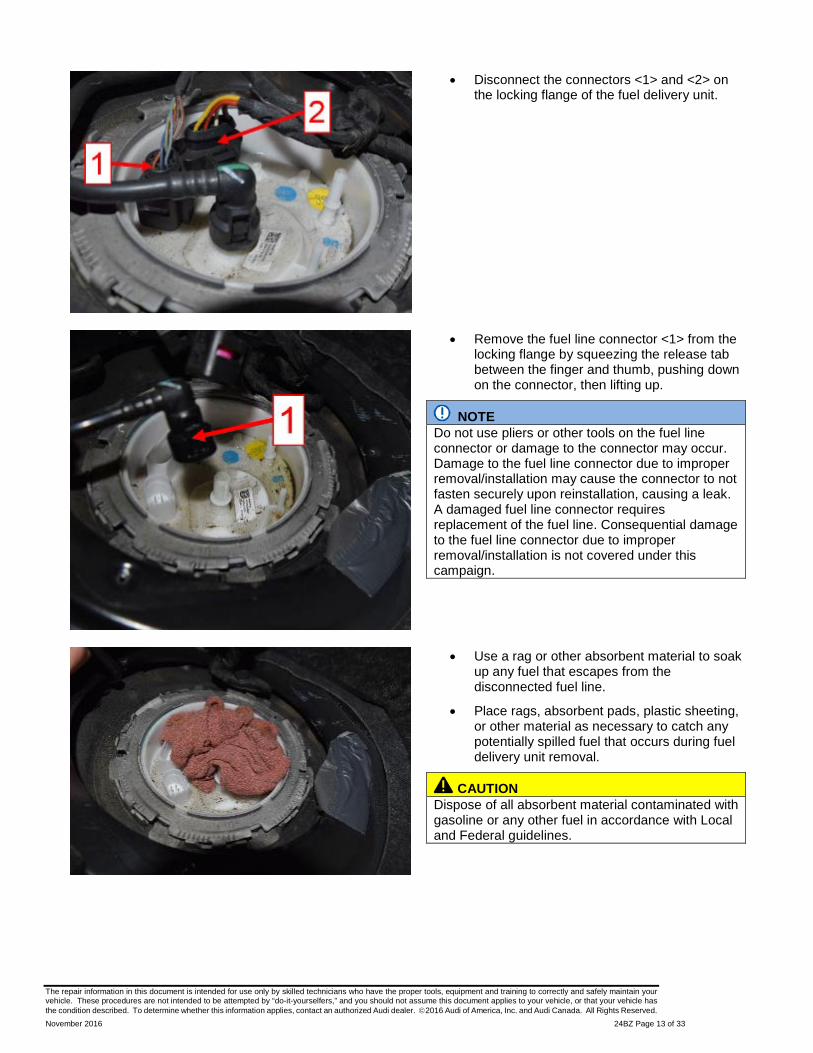
• Disconnect the connectors <1> and <2> on the locking flange of the fuel delivery unit.
• Remove the fuel line connector <1> from the locking flange by squeezing the release tab between the finger and thumb, pushing down on the connector, then lifting up.
NOTE Do not use pliers or other tools on the fuel line connector or damage to the connector may occur. Damage to the fuel line connector due to improper removal/installation may cause the connector to not fasten securely upon reinstallation, causing a leak. A damaged fuel line connector requires replacement of the fuel line. Consequential damage to the fuel line connector due to improper removal/installation is not covered under this campaign.
• Use a rag or other absorbent material to soak up any fuel that escapes from the disconnected fuel line.
• Place rags, absorbent pads, plastic sheeting, or other material as necessary to catch any potentially spilled fuel that occurs during fuel delivery unit removal.
CAUTION Dispose of all absorbent material contaminated with gasoline or any other fuel in accordance with Local and Federal guidelines.
The repair information in this document is intended for use only by skilled technicians who have the proper tools, equipment and training to correctly and safely maintain your vehicle. These procedures are not intended to be attempted by “do-it-yourselfers,” and you should not assume this document applies to your vehicle, or that your vehicle has the condition described. To determine whether this information applies, contact an authorized Audi dealer. 2016 Audi of America, Inc. and Audi Canada. All Rights Reserved. November 2016 24BZ Page 14 of 33
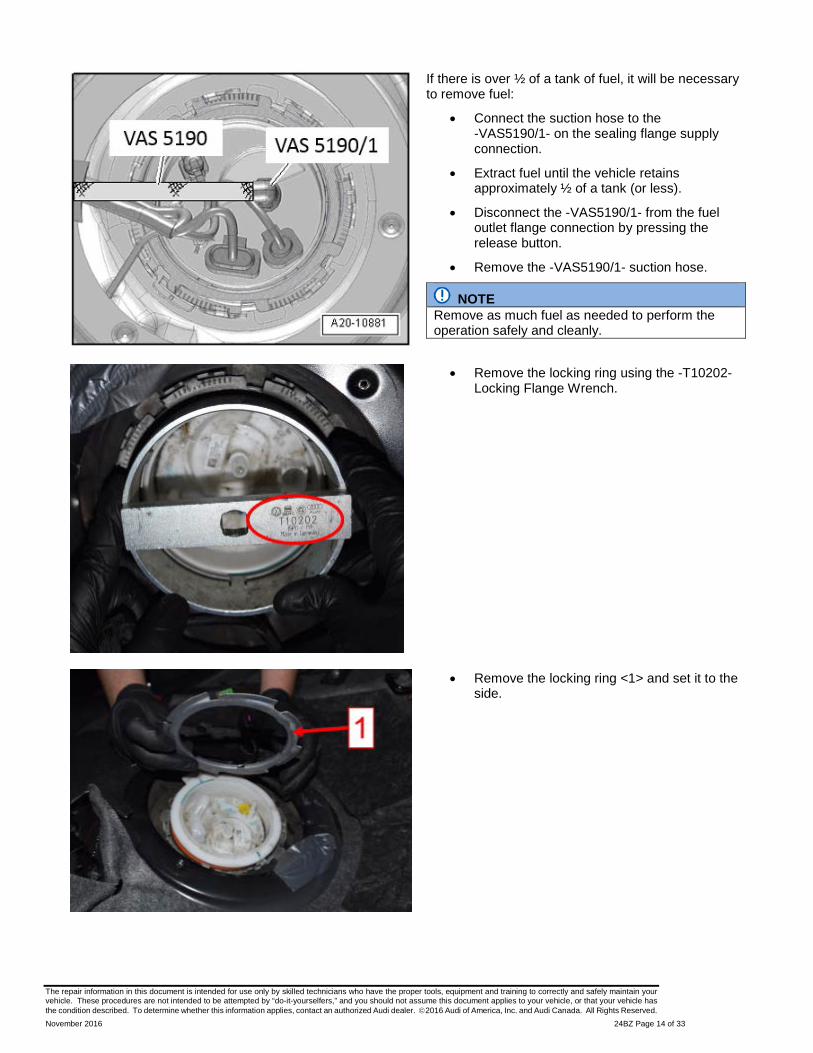
If there is over ½ of a tank of fuel, it will be necessary to remove fuel:
• Connect the suction hose to the -VAS5190/1- on the sealing flange supply connection.
• Extract fuel until the vehicle retains approximately ½ of a tank (or less).
• Disconnect the -VAS5190/1- from the fuel outlet flange connection by pressing the release button.
• Remove the -VAS5190/1- suction hose.
NOTE Remove as much fuel as needed to perform the operation safely and cleanly.
• Remove the locking ring using the -T10202- Locking Flange Wrench.
• Remove the locking ring <1> and set it to the side.
The repair information in this document is intended for use only by skilled technicians who have the proper tools, equipment and training to correctly and safely maintain your vehicle. These procedures are not intended to be attempted by “do-it-yourselfers,” and you should not assume this document applies to your vehicle, or that your vehicle has the condition described. To determine whether this information applies, contact an authorized Audi dealer. 2016 Audi of America, Inc. and Audi Canada. All Rights Reserved. November 2016 24BZ Page 15 of 33
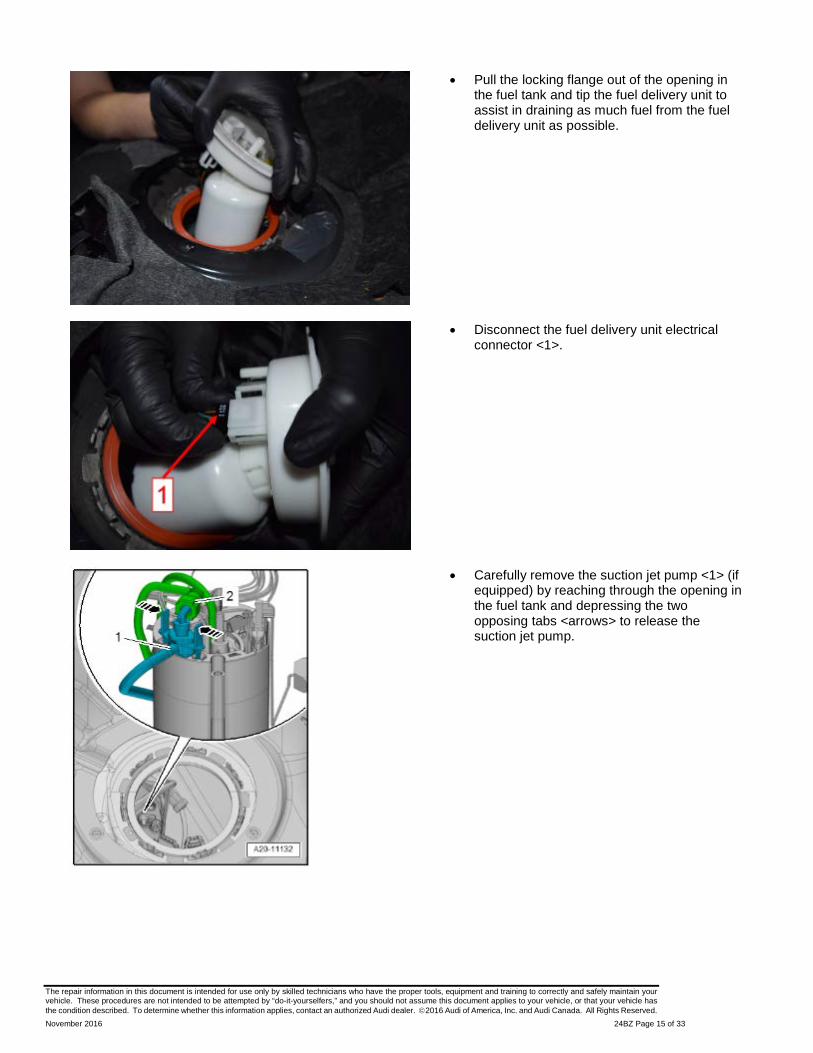
• Pull the locking flange out of the opening in the fuel tank and tip the fuel delivery unit to assist in draining as much fuel from the fuel delivery unit as possible.
• Disconnect the fuel delivery unit electrical connector <1>.
• Carefully remove the suction jet pump <1> (if equipped) by reaching through the opening in the fuel tank and depressing the two opposing tabs <arrows> to release the suction jet pump.
The repair information in this document is intended for use only by skilled technicians who have the proper tools, equipment and training to correctly and safely maintain your vehicle. These procedures are not intended to be attempted by “do-it-yourselfers,” and you should not assume this document applies to your vehicle, or that your vehicle has the condition described. To determine whether this information applies, contact an authorized Audi dealer. 2016 Audi of America, Inc. and Audi Canada. All Rights Reserved. November 2016 24BZ Page 16 of 33
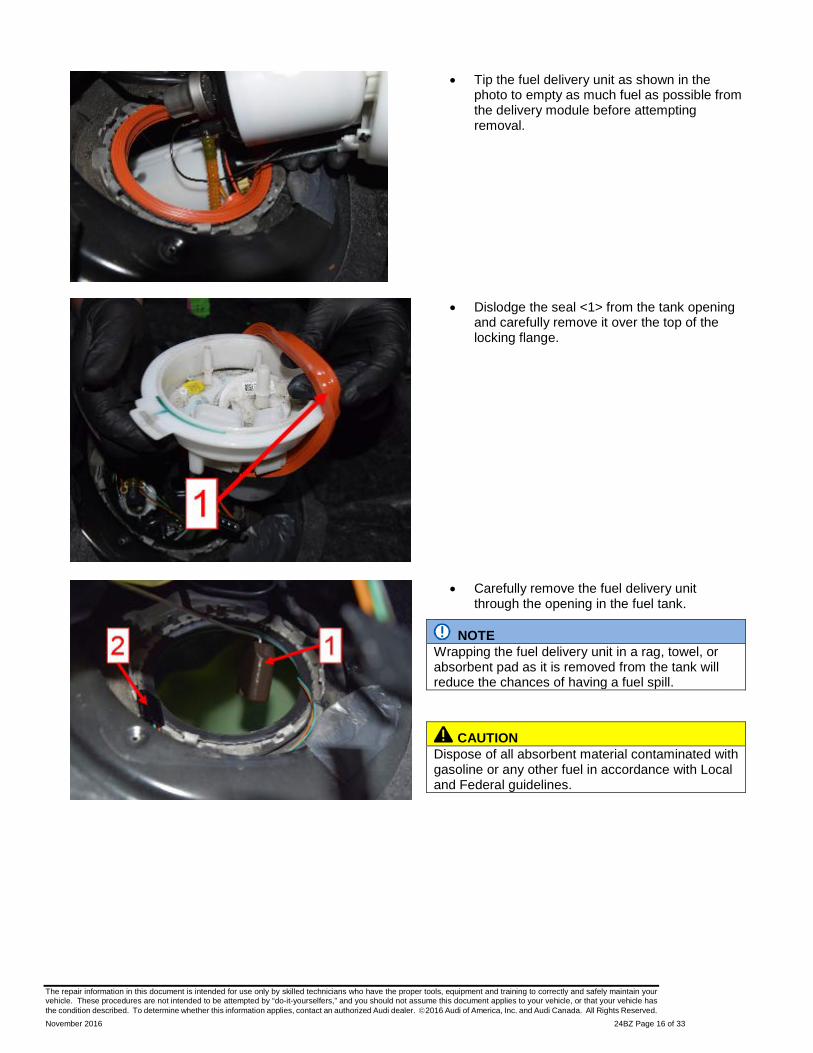
• Tip the fuel delivery unit as shown in the photo to empty as much fuel as possible from the delivery module before attempting removal.
• Dislodge the seal <1> from the tank opening and carefully remove it over the top of the locking flange.
• Carefully remove the fuel delivery unit through the opening in the fuel tank.
NOTE Wrapping the fuel delivery unit in a rag, towel, or absorbent pad as it is removed from the tank will reduce the chances of having a fuel spill.
CAUTION Dispose of all absorbent material contaminated with gasoline or any other fuel in accordance with Local and Federal guidelines.
The repair information in this document is intended for use only by skilled technicians who have the proper tools, equipment and training to correctly and safely maintain your vehicle. These procedures are not intended to be attempted by “do-it-yourselfers,” and you should not assume this document applies to your vehicle, or that your vehicle has the condition described. To determine whether this information applies, contact an authorized Audi dealer. 2016 Audi of America, Inc. and Audi Canada. All Rights Reserved. November 2016 24BZ Page 17 of 33
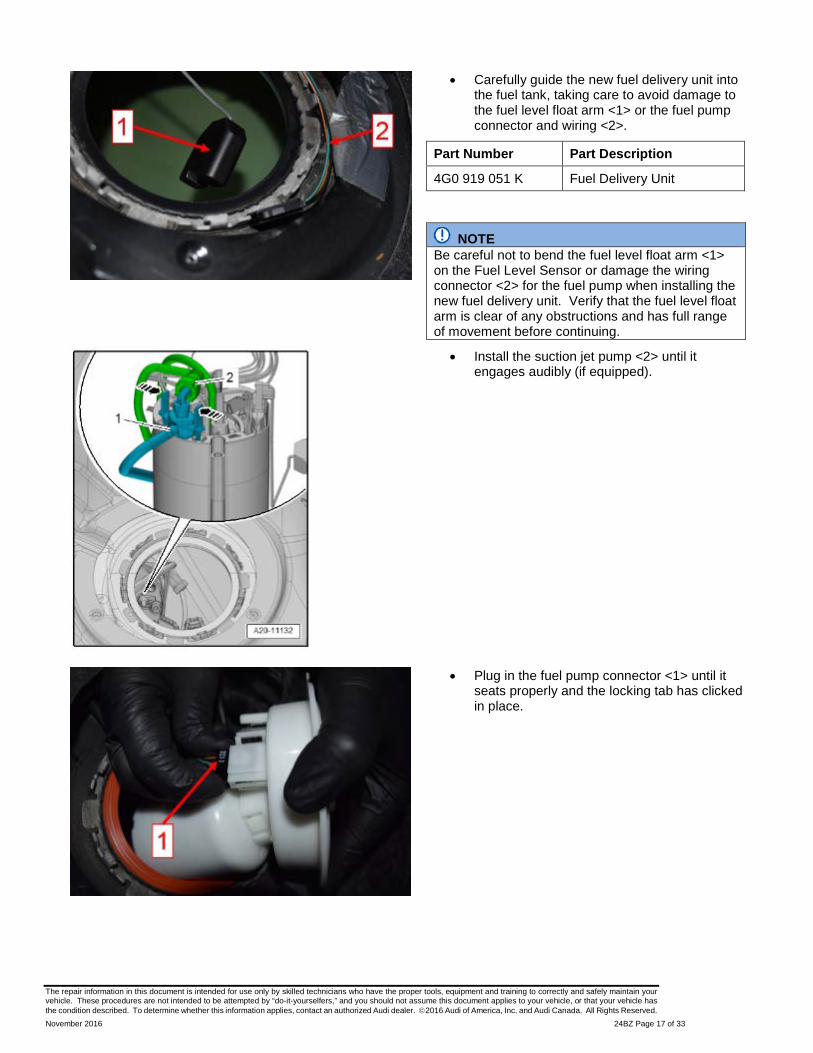
• Carefully guide the new fuel delivery unit into the fuel tank, taking care to avoid damage to the fuel level float arm <1> or the fuel pump connector and wiring <2>.
Part Number Part Description
4G0 919 051 K Fuel Delivery Unit
NOTE Be careful not to bend the fuel level float arm <1> on the Fuel Level Sensor or damage the wiring connector <2> for the fuel pump when installing the new fuel delivery unit. Verify that the fuel level float arm is clear of any obstructions and has full range of movement before continuing.
• Install the suction jet pump <2> until it engages audibly (if equipped).
• Plug in the fuel pump connector <1> until it seats properly and the locking tab has clicked in place.
The repair information in this document is intended for use only by skilled technicians who have the proper tools, equipment and training to correctly and safely maintain your vehicle. These procedures are not intended to be attempted by “do-it-yourselfers,” and you should not assume this document applies to your vehicle, or that your vehicle has the condition described. To determine whether this information applies, contact an authorized Audi dealer. 2016 Audi of America, Inc. and Audi Canada. All Rights Reserved. November 2016 24BZ Page 18 of 33
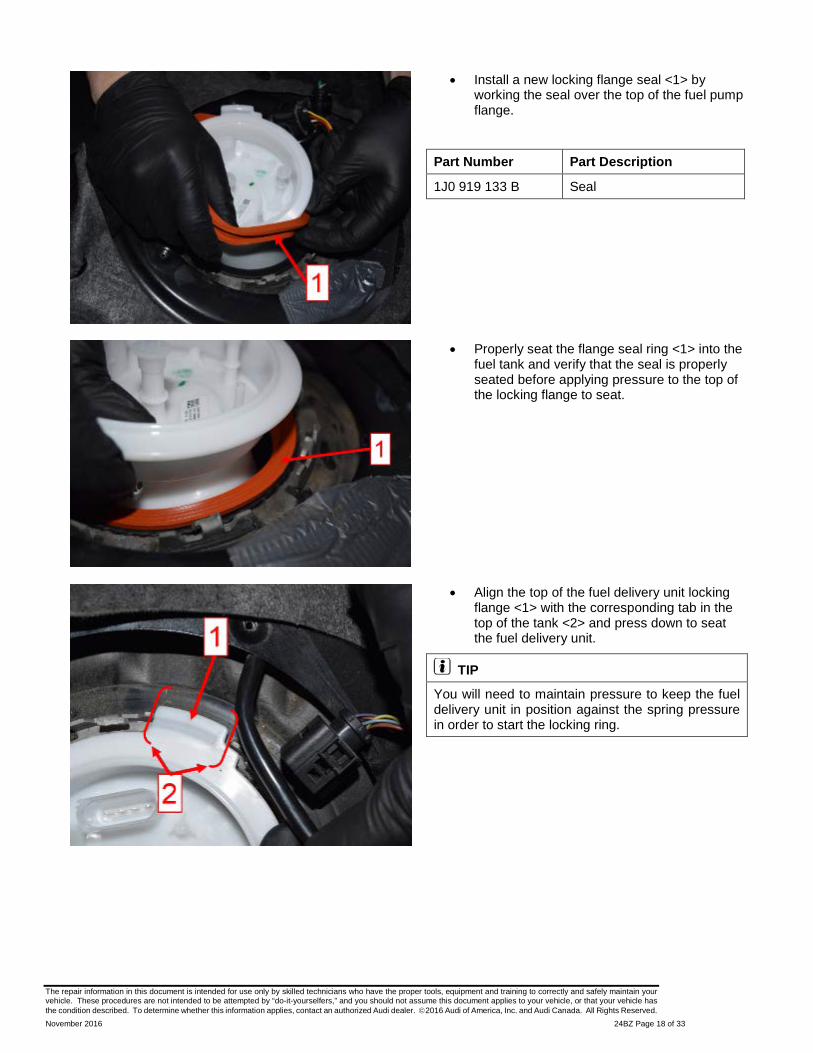
• Install a new locking flange seal <1> by working the seal over the top of the fuel pump flange.
Part Number Part Description
1J0 919 133 B Seal
• Properly seat the flange seal ring <1> into the fuel tank and verify that the seal is properly seated before applying pressure to the top of the locking flange to seat.
• Align the top of the fuel delivery unit locking flange <1> with the corresponding tab in the top of the tank <2> and press down to seat the fuel delivery unit.
TIP
You will need to maintain pressure to keep the fuel delivery unit in position against the spring pressure in order to start the locking ring.
The repair information in this document is intended for use only by skilled technicians who have the proper tools, equipment and training to correctly and safely maintain your vehicle. These procedures are not intended to be attempted by “do-it-yourselfers,” and you should not assume this document applies to your vehicle, or that your vehicle has the condition described. To determine whether this information applies, contact an authorized Audi dealer. 2016 Audi of America, Inc. and Audi Canada. All Rights Reserved. November 2016 24BZ Page 19 of 33
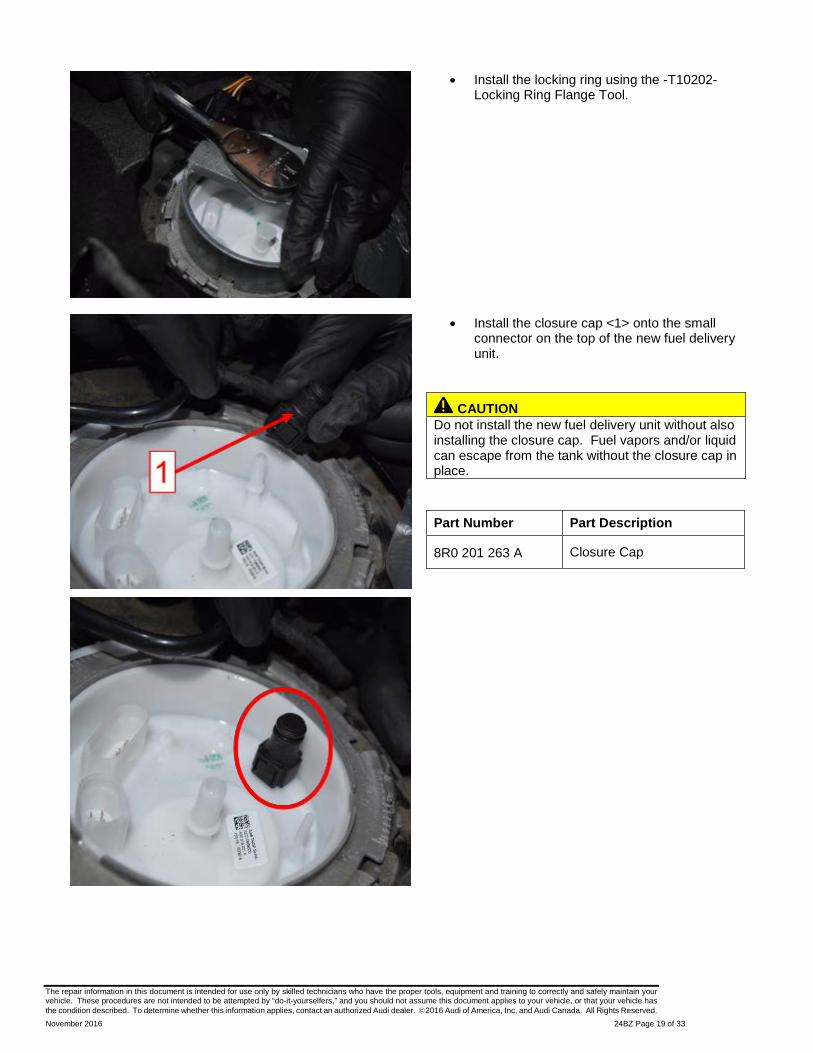
• Install the locking ring using the -T10202- Locking Ring Flange Tool.
• Install the closure cap <1> onto the small connector on the top of the new fuel delivery unit.
CAUTION Do not install the new fuel delivery unit without also installing the closure cap. Fuel vapors and/or liquid can escape from the tank without the closure cap in place.
Part Number Part Description
8R0 201 263 A Closure Cap
The repair information in this document is intended for use only by skilled technicians who have the proper tools, equipment and training to correctly and safely maintain your vehicle. These procedures are not intended to be attempted by “do-it-yourselfers,” and you should not assume this document applies to your vehicle, or that your vehicle has the condition described. To determine whether this information applies, contact an authorized Audi dealer. 2016 Audi of America, Inc. and Audi Canada. All Rights Reserved. November 2016 24BZ Page 20 of 33
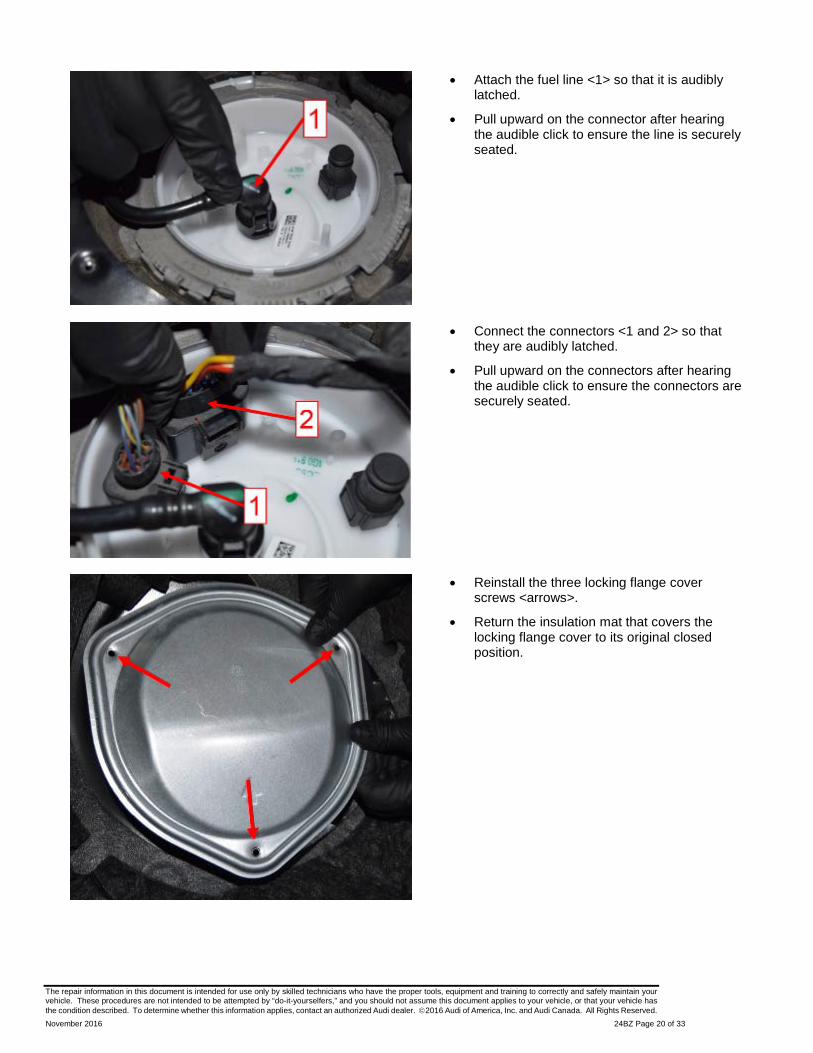
• Attach the fuel line <1> so that it is audibly latched.
• Pull upward on the connector after hearing the audible click to ensure the line is securely seated.
• Connect the connectors <1 and 2> so that they are audibly latched.
• Pull upward on the connectors after hearing the audible click to ensure the connectors are securely seated.
• Reinstall the three locking flange cover screws <arrows>.
• Return the insulation mat that covers the locking flange cover to its original closed position.
The repair information in this document is intended for use only by skilled technicians who have the proper tools, equipment and training to correctly and safely maintain your vehicle. These procedures are not intended to be attempted by “do-it-yourselfers,” and you should not assume this document applies to your vehicle, or that your vehicle has the condition described. To determine whether this information applies, contact an authorized Audi dealer. 2016 Audi of America, Inc. and Audi Canada. All Rights Reserved. November 2016 24BZ Page 21 of 33
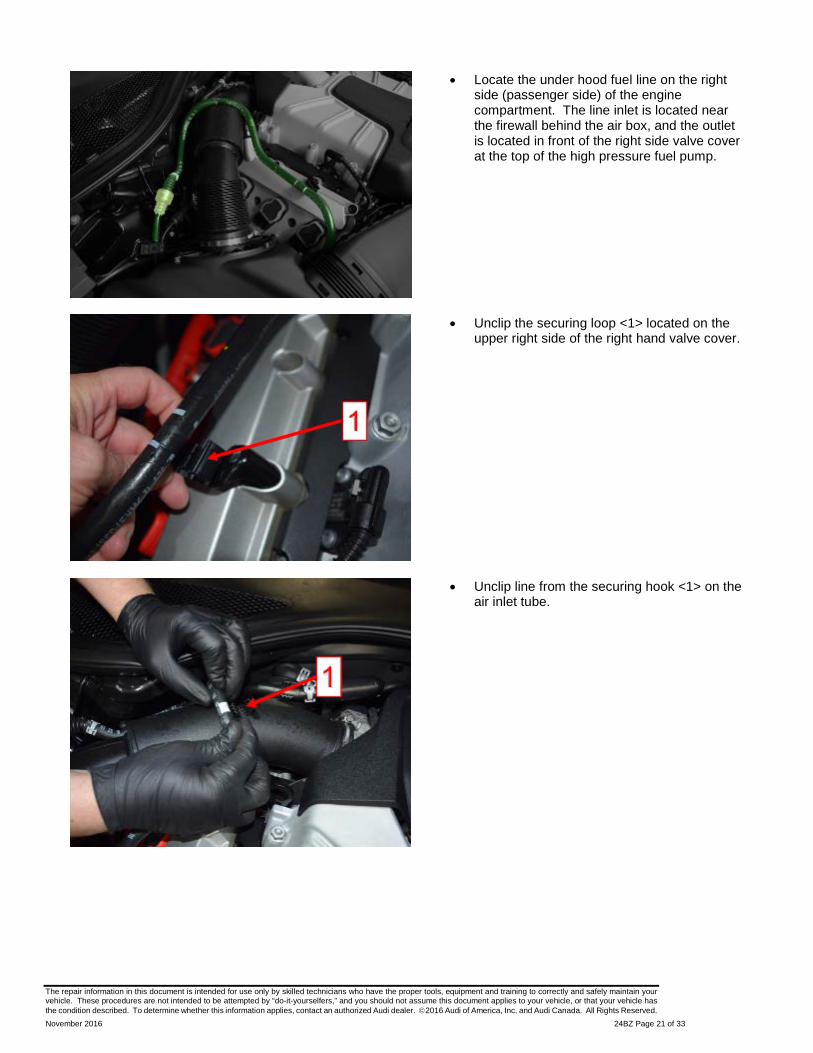
• Locate the under hood fuel line on the right side (passenger side) of the engine compartment. The line inlet is located near the firewall behind the air box, and the outlet is located in front of the right side valve cover at the top of the high pressure fuel pump.
• Unclip the securing loop <1> located on the upper right side of the right hand valve cover.
• Unclip line from the securing hook <1> on the air inlet tube.
The repair information in this document is intended for use only by skilled technicians who have the proper tools, equipment and training to correctly and safely maintain your vehicle. These procedures are not intended to be attempted by “do-it-yourselfers,” and you should not assume this document applies to your vehicle, or that your vehicle has the condition described. To determine whether this information applies, contact an authorized Audi dealer. 2016 Audi of America, Inc. and Audi Canada. All Rights Reserved. November 2016 24BZ Page 22 of 33
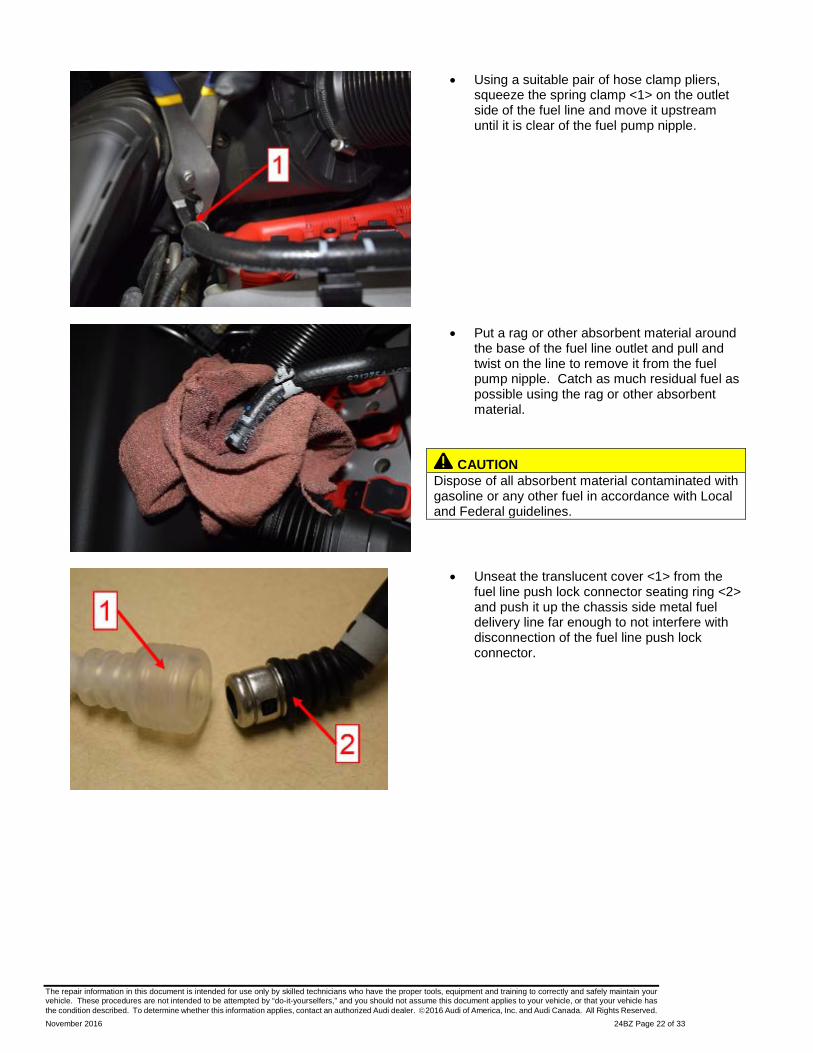
• Using a suitable pair of hose clamp pliers, squeeze the spring clamp <1> on the outlet side of the fuel line and move it upstream until it is clear of the fuel pump nipple.
• Put a rag or other absorbent material around the base of the fuel line outlet and pull and twist on the line to remove it from the fuel pump nipple. Catch as much residual fuel as possible using the rag or other absorbent material.
CAUTION Dispose of all absorbent material contaminated with gasoline or any other fuel in accordance with Local and Federal guidelines.
• Unseat the translucent cover <1> from the fuel line push lock connector seating ring <2> and push it up the chassis side metal fuel delivery line far enough to not interfere with disconnection of the fuel line push lock connector.
The repair information in this document is intended for use only by skilled technicians who have the proper tools, equipment and training to correctly and safely maintain your vehicle. These procedures are not intended to be attempted by “do-it-yourselfers,” and you should not assume this document applies to your vehicle, or that your vehicle has the condition described. To determine whether this information applies, contact an authorized Audi dealer. 2016 Audi of America, Inc. and Audi Canada. All Rights Reserved. November 2016 24BZ Page 23 of 33
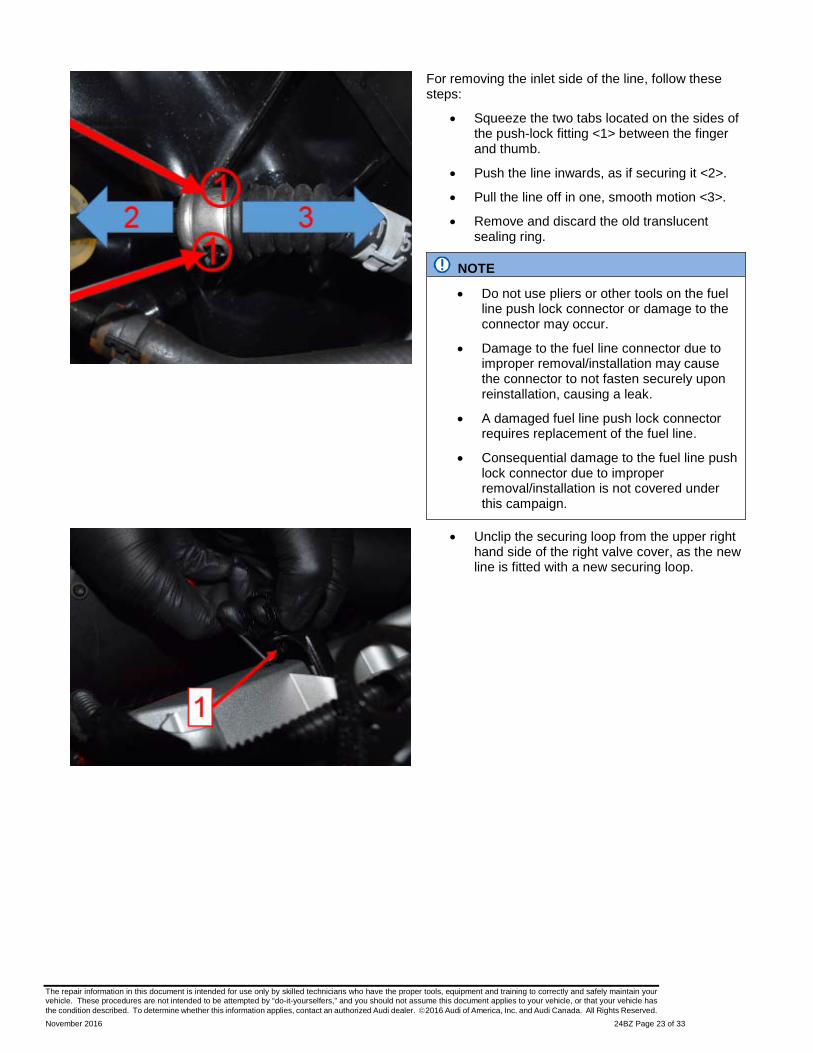
For removing the inlet side of the line, follow these steps:
• Squeeze the two tabs located on the sides of the push-lock fitting <1> between the finger and thumb.
• Push the line inwards, as if securing it <2>.
• Pull the line off in one, smooth motion <3>.
• Remove and discard the old translucent sealing ring.
NOTE
• Do not use pliers or other tools on the fuel line push lock connector or damage to the connector may occur.
• Damage to the fuel line connector due to improper removal/installation may cause the connector to not fasten securely upon reinstallation, causing a leak.
• A damaged fuel line push lock connector requires replacement of the fuel line.
• Consequential damage to the fuel line push lock connector due to improper removal/installation is not covered under this campaign.
• Unclip the securing loop from the upper right hand side of the right valve cover, as the new line is fitted with a new securing loop.

The repair information in this document is intended for use only by skilled technicians who have the proper tools, equipment and training to correctly and safely maintain your vehicle. These procedures are not intended to be attempted by “do-it-yourselfers,” and you should not assume this document applies to your vehicle, or that your vehicle has the condition described. To determine whether this information applies, contact an authorized Audi dealer. 2016 Audi of America, Inc. and Audi Canada. All Rights Reserved. November 2016 24BZ Page 24 of 33
• Install the new fuel line, starting with the securing loop <1> on the upper right hand side of the right valve cover.
Part Number Part Description
06E 127 513 F Fuel Hose
• Install the new spring clamp <1> onto the outlet side of the new fuel line, centering it in between the white lines which show proper clamp location <2>.
Part Number Part Description
N 909 865 01 Spring Clip
• Place the clamp in between the white lines <1> and then adjust the pliers to allow an unobstructed path for the fuel line and clamp to the fuel pump nipple.
The repair information in this document is intended for use only by skilled technicians who have the proper tools, equipment and training to correctly and safely maintain your vehicle. These procedures are not intended to be attempted by “do-it-yourselfers,” and you should not assume this document applies to your vehicle, or that your vehicle has the condition described. To determine whether this information applies, contact an authorized Audi dealer. 2016 Audi of America, Inc. and Audi Canada. All Rights Reserved. November 2016 24BZ Page 25 of 33
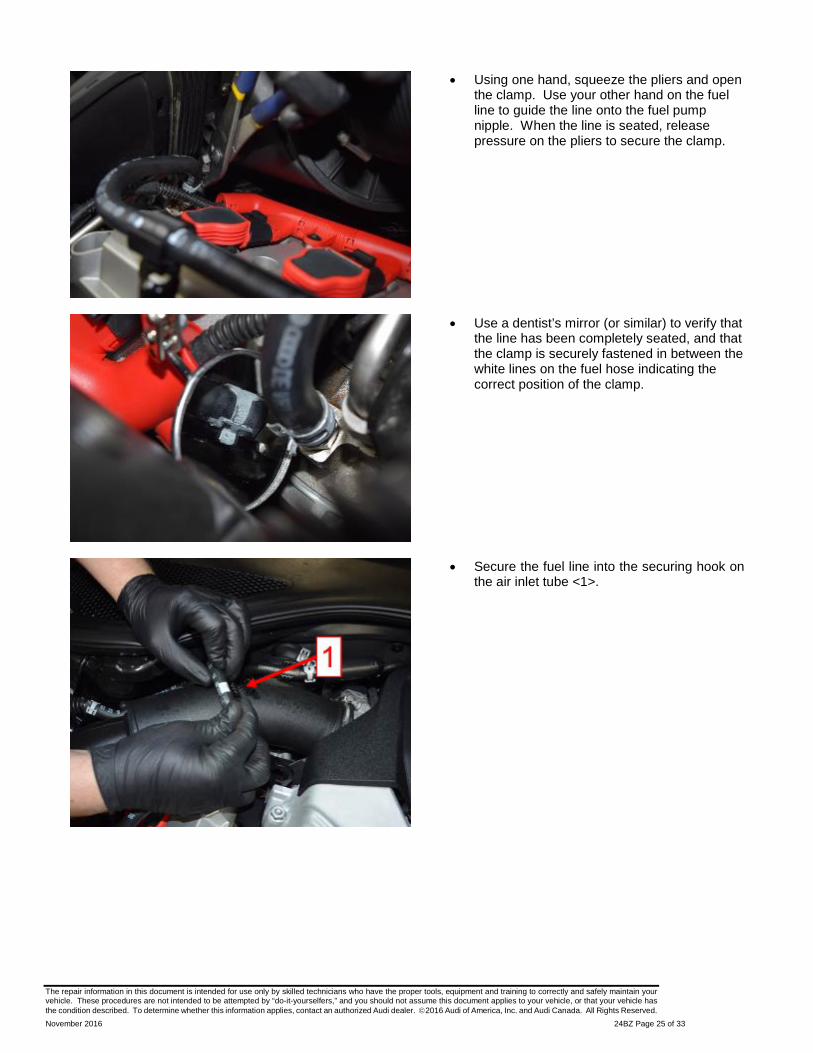
• Using one hand, squeeze the pliers and open the clamp. Use your other hand on the fuel line to guide the line onto the fuel pump nipple. When the line is seated, release pressure on the pliers to secure the clamp.
• Use a dentist’s mirror (or similar) to verify that the line has been completely seated, and that the clamp is securely fastened in between the white lines on the fuel hose indicating the correct position of the clamp.
• Secure the fuel line into the securing hook on the air inlet tube <1>.

The repair information in this document is intended for use only by skilled technicians who have the proper tools, equipment and training to correctly and safely maintain your vehicle. These procedures are not intended to be attempted by “do-it-yourselfers,” and you should not assume this document applies to your vehicle, or that your vehicle has the condition described. To determine whether this information applies, contact an authorized Audi dealer. 2016 Audi of America, Inc. and Audi Canada. All Rights Reserved. November 2016 24BZ Page 26 of 33
• Install the translucent cover <1> onto the chassis side metal fuel delivery line in the orientation shown and push it down the metal fuel delivery line far enough as to not interfere with the fuel line push-lock connector <2> installation.
• Push the fuel line push lock connector onto the fuel line until there is an audible click <arrows>.
• Move the translucent cover into position over the fuel line push lock connector and verify it is securely fastened as detailed in the following steps.
• The translucent cover <2> must be seated beyond the seating ring <1> of the fuel line push lock connector.
The repair information in this document is intended for use only by skilled technicians who have the proper tools, equipment and training to correctly and safely maintain your vehicle. These procedures are not intended to be attempted by “do-it-yourselfers,” and you should not assume this document applies to your vehicle, or that your vehicle has the condition described. To determine whether this information applies, contact an authorized Audi dealer. 2016 Audi of America, Inc. and Audi Canada. All Rights Reserved. November 2016 24BZ Page 27 of 33
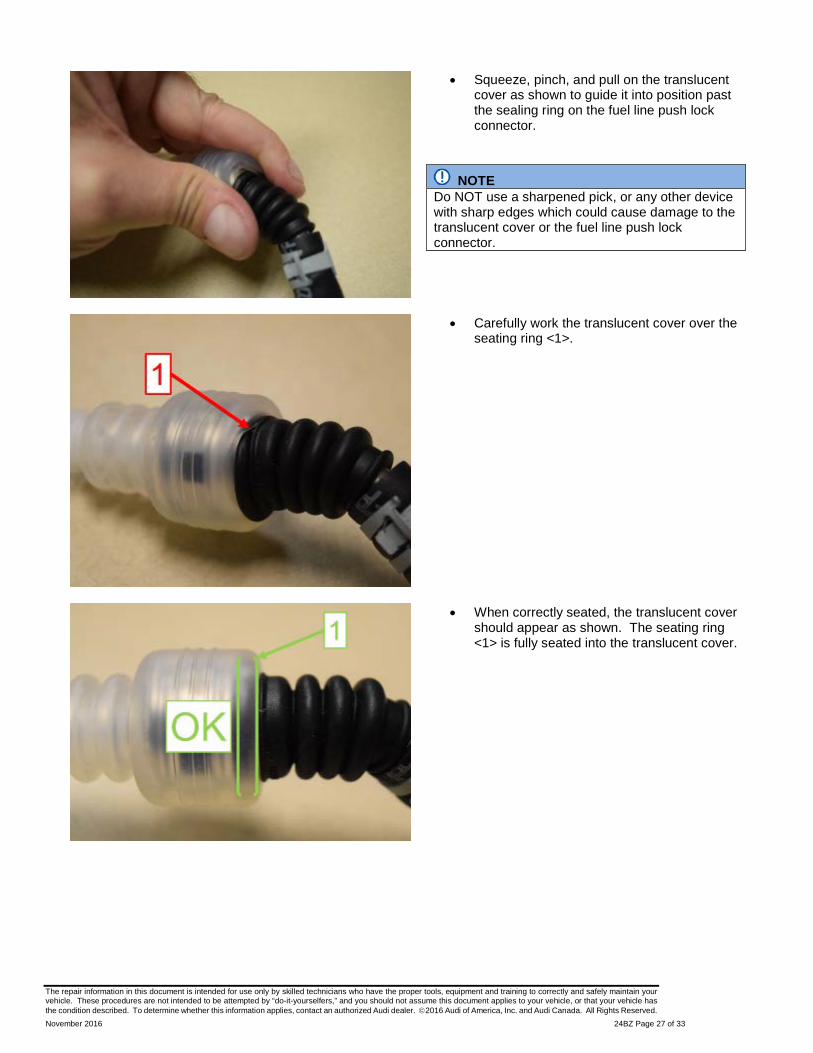
• Squeeze, pinch, and pull on the translucent cover as shown to guide it into position past the sealing ring on the fuel line push lock connector.
NOTE Do NOT use a sharpened pick, or any other device with sharp edges which could cause damage to the translucent cover or the fuel line push lock connector.
• Carefully work the translucent cover over the seating ring <1>.
• When correctly seated, the translucent cover should appear as shown. The seating ring <1> is fully seated into the translucent cover.
The repair information in this document is intended for use only by skilled technicians who have the proper tools, equipment and training to correctly and safely maintain your vehicle. These procedures are not intended to be attempted by “do-it-yourselfers,” and you should not assume this document applies to your vehicle, or that your vehicle has the condition described. To determine whether this information applies, contact an authorized Audi dealer. 2016 Audi of America, Inc. and Audi Canada. All Rights Reserved. November 2016 24BZ Page 28 of 33
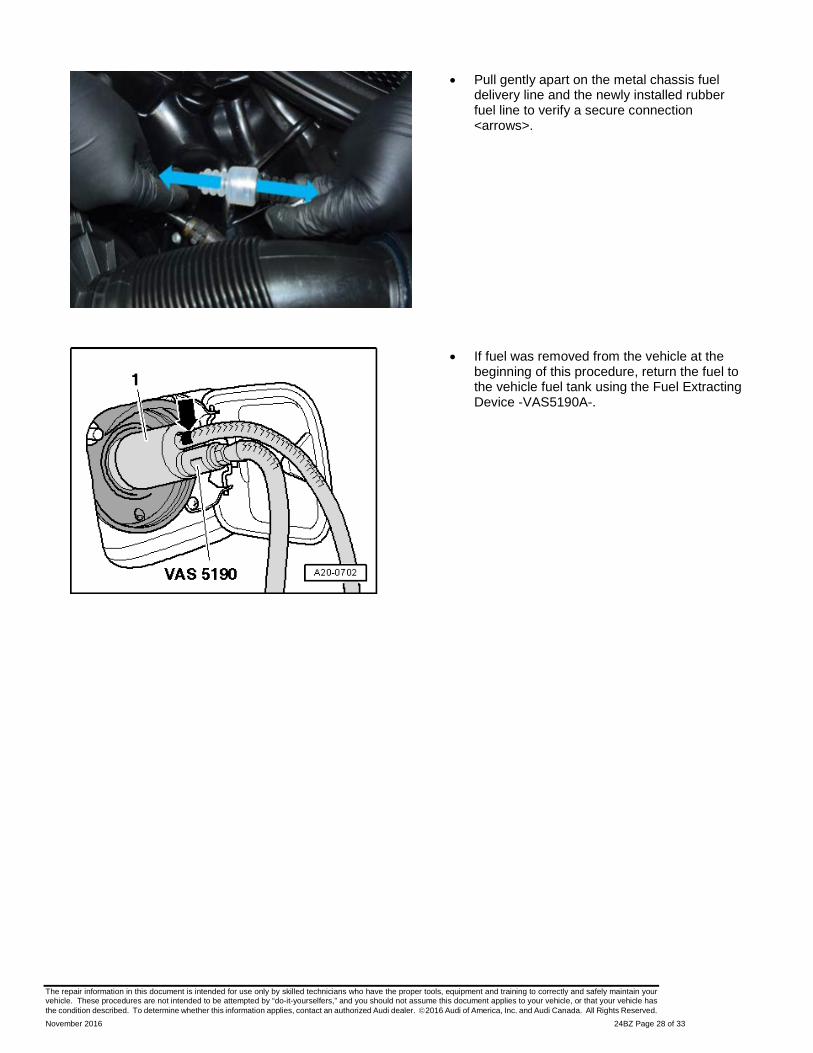
• Pull gently apart on the metal chassis fuel delivery line and the newly installed rubber fuel line to verify a secure connection <arrows>.
• If fuel was removed from the vehicle at the beginning of this procedure, return the fuel to the vehicle fuel tank using the Fuel Extracting Device -VAS5190A-.
The repair information in this document is intended for use only by skilled technicians who have the proper tools, equipment and training to correctly and safely maintain your vehicle. These procedures are not intended to be attempted by “do-it-yourselfers,” and you should not assume this document applies to your vehicle, or that your vehicle has the condition described. To determine whether this information applies, contact an authorized Audi dealer. 2016 Audi of America, Inc. and Audi Canada. All Rights Reserved. November 2016 24BZ Page 29 of 33
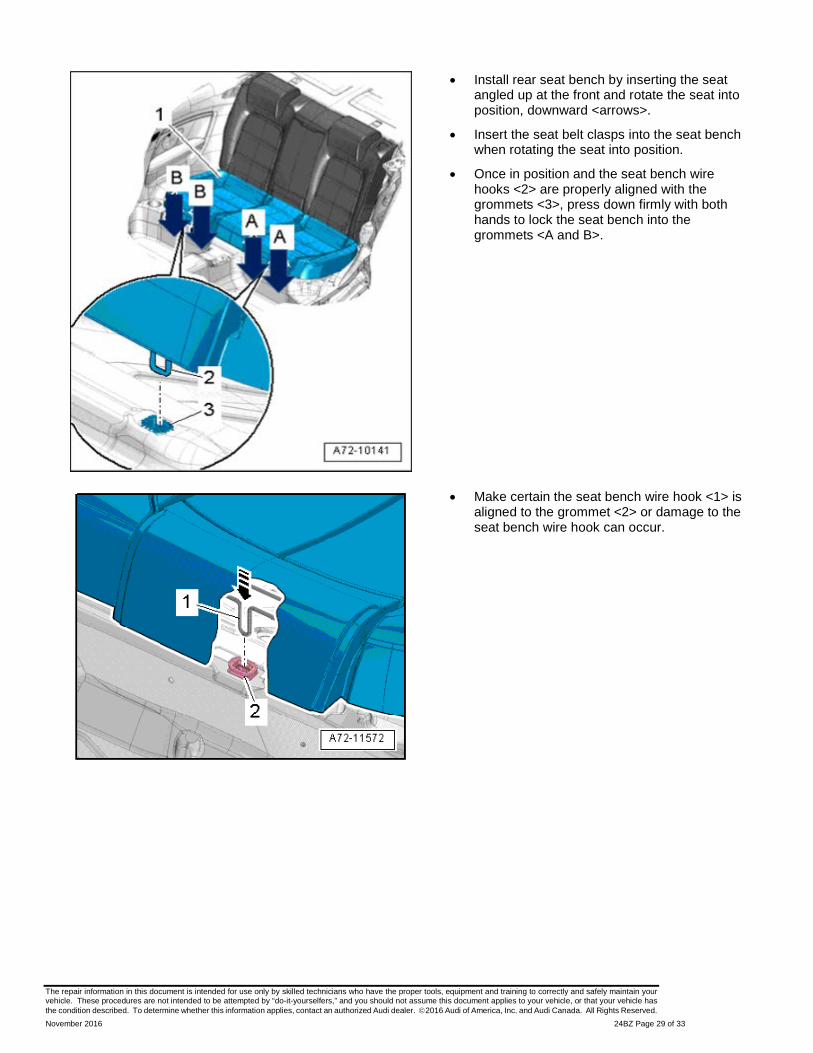
• Install rear seat bench by inserting the seat angled up at the front and rotate the seat into position, downward <arrows>.
• Insert the seat belt clasps into the seat bench when rotating the seat into position.
• Once in position and the seat bench wire hooks <2> are properly aligned with the grommets <3>, press down firmly with both hands to lock the seat bench into the grommets <A and B>.
• Make certain the seat bench wire hook <1> is aligned to the grommet <2> or damage to the seat bench wire hook can occur.
The repair information in this document is intended for use only by skilled technicians who have the proper tools, equipment and training to correctly and safely maintain your vehicle. These procedures are not intended to be attempted by “do-it-yourselfers,” and you should not assume this document applies to your vehicle, or that your vehicle has the condition described. To determine whether this information applies, contact an authorized Audi dealer. 2016 Audi of America, Inc. and Audi Canada. All Rights Reserved. November 2016 24BZ Page 30 of 33
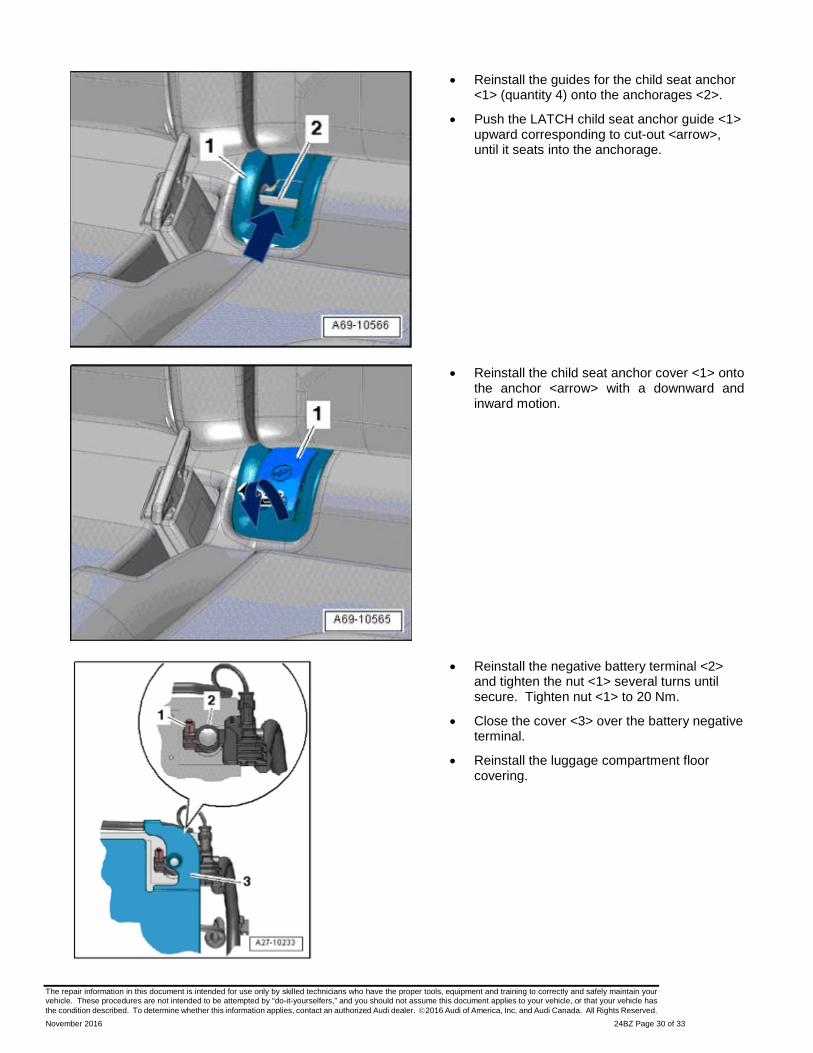
• Reinstall the guides for the child seat anchor <1> (quantity 4) onto the anchorages <2>.
• Push the LATCH child seat anchor guide <1> upward corresponding to cut-out <arrow>, until it seats into the anchorage.
• Reinstall the child seat anchor cover <1> onto the anchor <arrow> with a downward and inward motion.
• Reinstall the negative battery terminal <2> and tighten the nut <1> several turns until secure. Tighten nut <1> to 20 Nm.
• Close the cover <3> over the battery negative terminal.
• Reinstall the luggage compartment floor covering.
The repair information in this document is intended for use only by skilled technicians who have the proper tools, equipment and training to correctly and safely maintain your vehicle. These procedures are not intended to be attempted by “do-it-yourselfers,” and you should not assume this document applies to your vehicle, or that your vehicle has the condition described. To determine whether this information applies, contact an authorized Audi dealer. 2016 Audi of America, Inc. and Audi Canada. All Rights Reserved. November 2016 24BZ Page 31 of 33
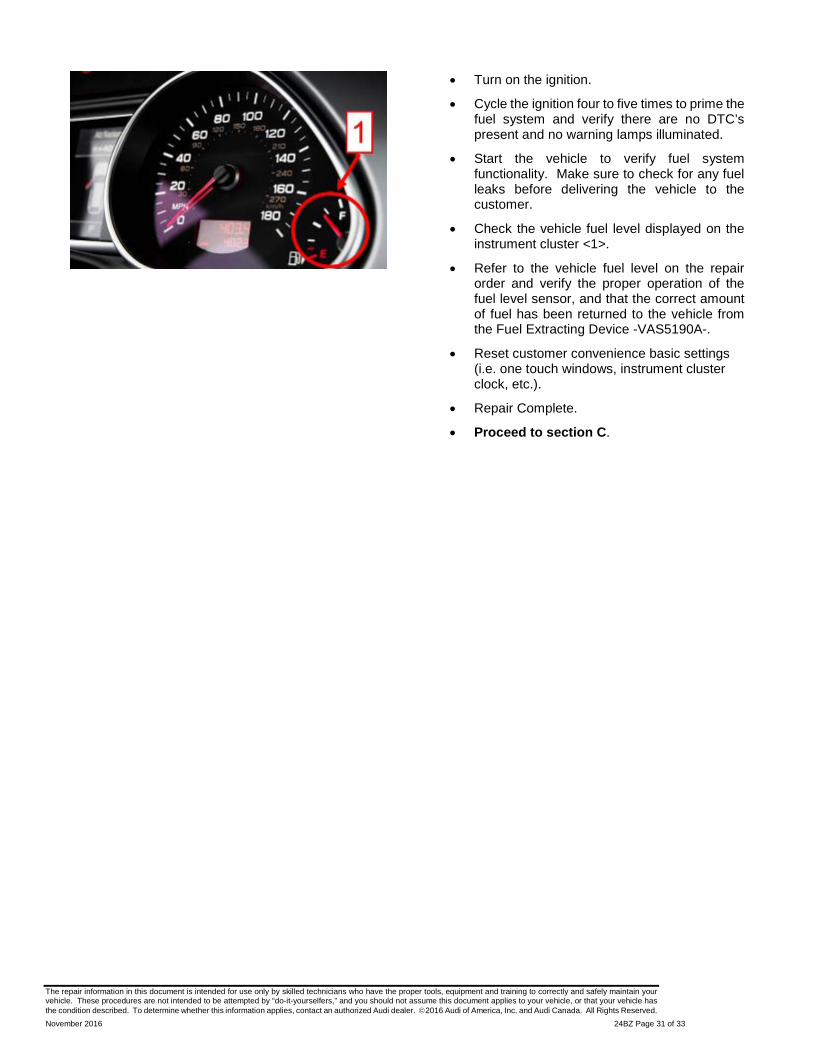
• Turn on the ignition.
• Cycle the ignition four to five times to prime the fuel system and verify there are no DTC’s present and no warning lamps illuminated.
• Start the vehicle to verify fuel system functionality. Make sure to check for any fuel leaks before delivering the vehicle to the customer.
• Check the vehicle fuel level displayed on the instrument cluster <1>.
• Refer to the vehicle fuel level on the repair order and verify the proper operation of the fuel level sensor, and that the correct amount of fuel has been returned to the vehicle from the Fuel Extracting Device -VAS5190A-.
• Reset customer convenience basic settings (i.e. one touch windows, instrument cluster clock, etc.).
• Repair Complete.
• Proceed to section C.
The repair information in this document is intended for use only by skilled technicians who have the proper tools, equipment and training to correctly and safely maintain your vehicle. These procedures are not intended to be attempted by “do-it-yourselfers,” and you should not assume this document applies to your vehicle, or that your vehicle has the condition described. To determine whether this information applies, contact an authorized Audi dealer. 2016 Audi of America, Inc. and Audi Canada. All Rights Reserved. November 2016 24BZ Page 32 of 33
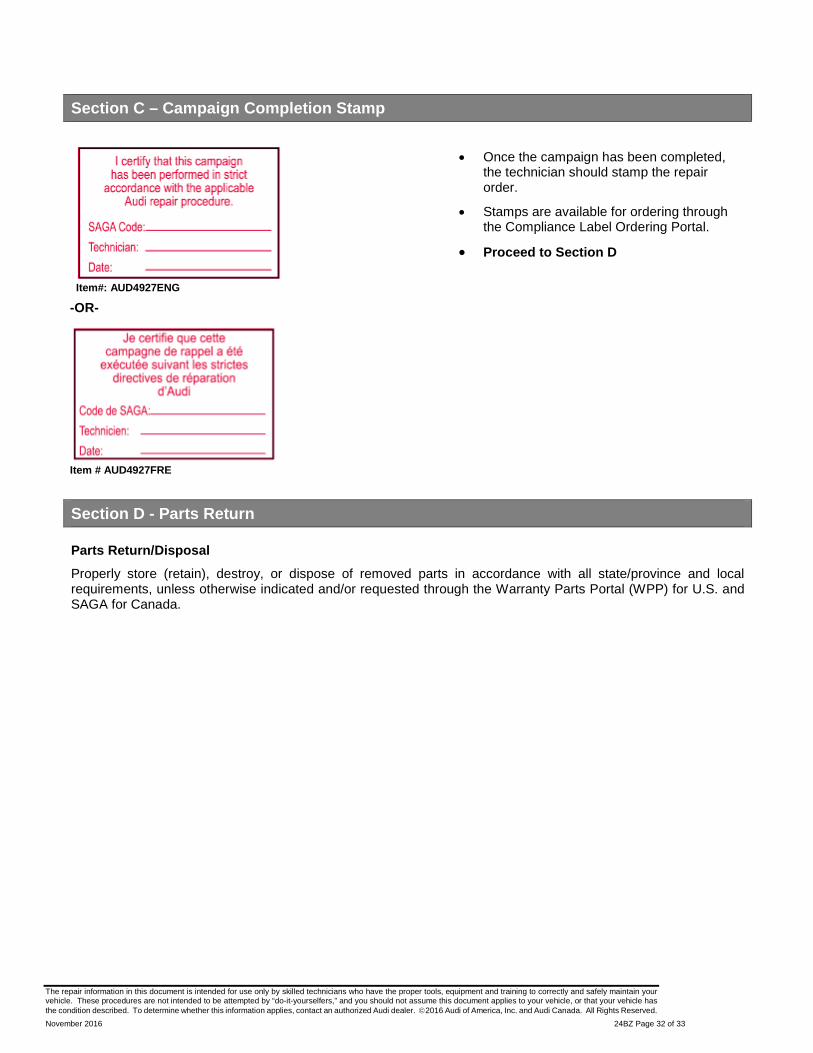
Section C – Campaign Completion Stamp
Item#: AUD4927ENG
-OR-
Item # AUD4927FRE
• Once the campaign has been completed, the technician should stamp the repair order.
• Stamps are available for ordering through the Compliance Label Ordering Portal.
• Proceed to Section D
Section D - Parts Return Parts Return/Disposal
Properly store (retain), destroy, or dispose of removed parts in accordance with all state/province and local requirements, unless otherwise indicated and/or requested through the Warranty Parts Portal (WPP) for U.S. and SAGA for Canada.
The repair information in this document is intended for use only by skilled technicians who have the proper tools, equipment and training to correctly and safely maintain your vehicle. These procedures are not intended to be attempted by “do-it-yourselfers,” and you should not assume this document applies to your vehicle, or that your vehicle has the condition described. To determine whether this information applies, contact an authorized Audi dealer. 2016 Audi of America, Inc. and Audi Canada. All Rights Reserved. November 2016 24BZ Page 33 of 33
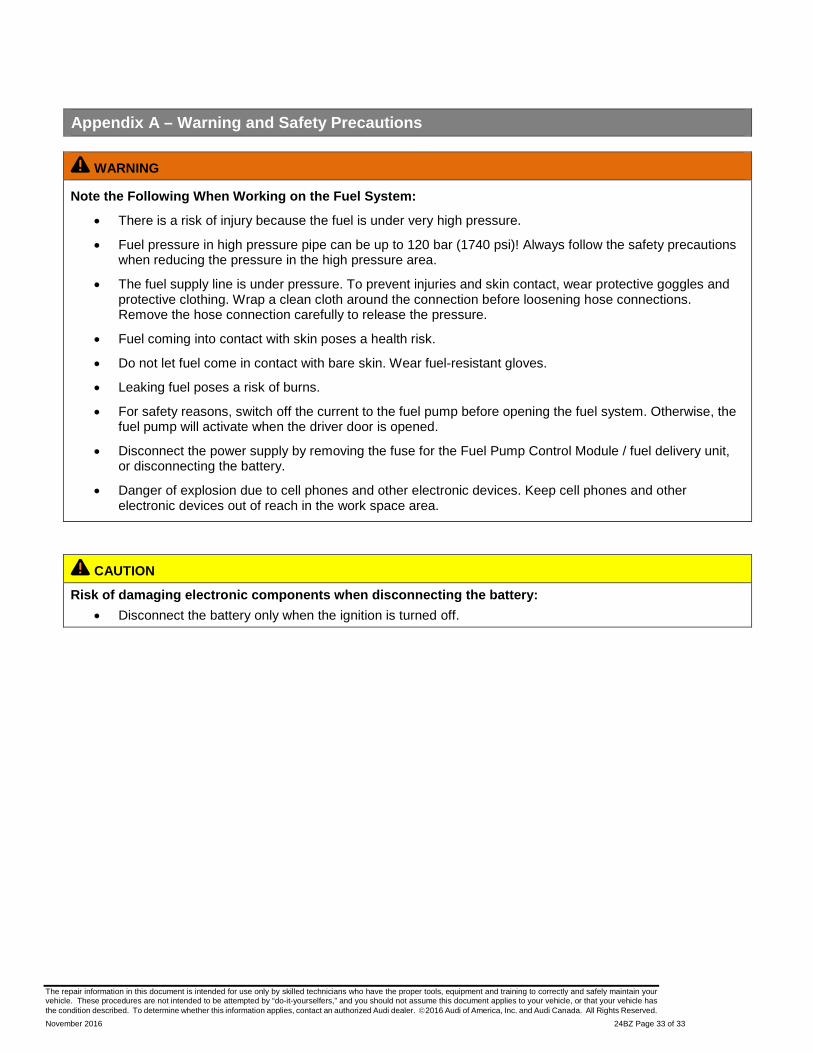
Appendix A – Warning and Safety Precautions
WARNING
Note the Following When Working on the Fuel System:
• There is a risk of injury because the fuel is under very high pressure.
• Fuel pressure in high pressure pipe can be up to 120 bar (1740 psi)! Always follow the safety precautions when reducing the pressure in the high pressure area.
• The fuel supply line is under pressure. To prevent injuries and skin contact, wear protective goggles and protective clothing. Wrap a clean cloth around the connection before loosening hose connections. Remove the hose connection carefully to release the pressure.
• Fuel coming into contact with skin poses a health risk.
• Do not let fuel come in contact with bare skin. Wear fuel-resistant gloves.
• Leaking fuel poses a risk of burns.
• For safety reasons, switch off the current to the fuel pump before opening the fuel system. Otherwise, the fuel pump will activate when the driver door is opened.
• Disconnect the power supply by removing the fuse for the Fuel Pump Control Module / fuel delivery unit, or disconnecting the battery.
• Danger of explosion due to cell phones and other electronic devices. Keep cell phones and other electronic devices out of reach in the work space area.
CAUTION
Risk of damaging electronic components when disconnecting the battery: • Disconnect the battery only when the ignition is turned off.