Embed Size (px)
Citation preview
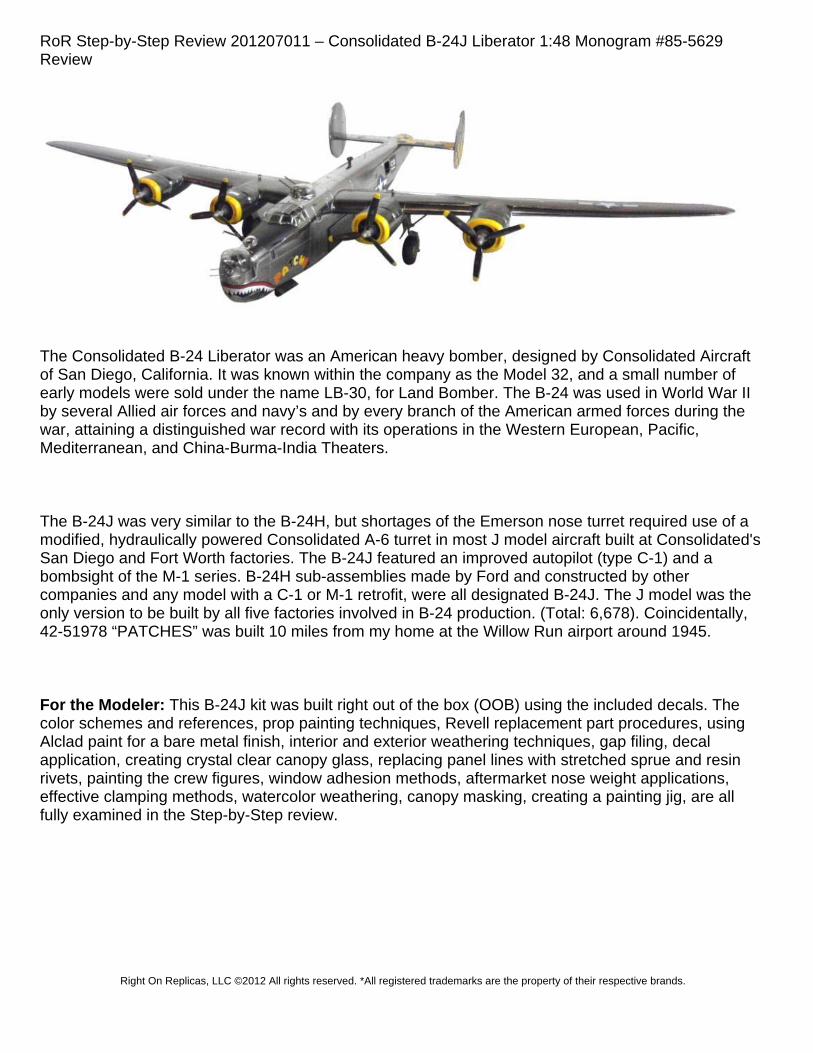
RoR Step-by-Step Review 201207011 – Consolidated B-24J Liberator 1:48 Monogram #85-5629 Review
The Consolidated B-24 Liberator was an American heavy bomber, designed by Consolidated Aircraft of San Diego, California. It was known within the company as the Model 32, and a small number of early models were sold under the name LB-30, for Land Bomber. The B-24 was used in World War II by several Allied air forces and navy’s and by every branch of the American armed forces during the war, attaining a distinguished war record with its operations in the Western European, Pacific, Mediterranean, and China-Burma-India Theaters. The B-24J was very similar to the B-24H, but shortages of the Emerson nose turret required use of a modified, hydraulically powered Consolidated A-6 turret in most J model aircraft built at Consolidated's San Diego and Fort Worth factories. The B-24J featured an improved autopilot (type C-1) and a bombsight of the M-1 series. B-24H sub-assemblies made by Ford and constructed by other companies and any model with a C-1 or M-1 retrofit, were all designated B-24J. The J model was the only version to be built by all five factories involved in B-24 production. (Total: 6,678). Coincidentally, 42-51978 “PATCHES” was built 10 miles from my home at the Willow Run airport around 1945. For the Modeler: This B-24J kit was built right out of the box (OOB) using the included decals. The color schemes and references, prop painting techniques, Revell replacement part procedures, using Alclad paint for a bare metal finish, interior and exterior weathering techniques, gap filing, decal application, creating crystal clear canopy glass, replacing panel lines with stretched sprue and resin rivets, painting the crew figures, window adhesion methods, aftermarket nose weight applications, effective clamping methods, watercolor weathering, canopy masking, creating a painting jig, are all fully examined in the Step-by-Step review.
Right On Replicas, LLC ©2012 All rights reserved. *All registered trademarks are the property of their respective brands.
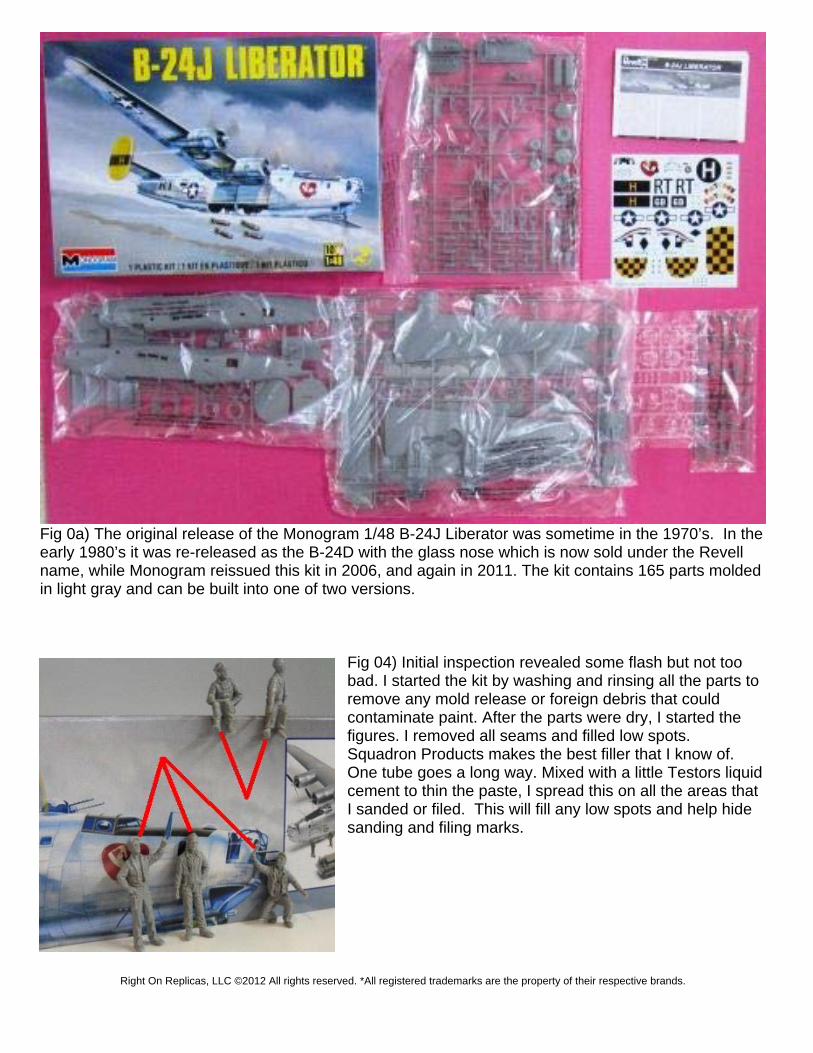
Fig 0a) The original release of the Monogram 1/48 B-24J Liberator was sometime in the 1970’s. In the early 1980’s it was re-released as the B-24D with the glass nose which is now sold under the Revell name, while Monogram reissued this kit in 2006, and again in 2011. The kit contains 165 parts molded in light gray and can be built into one of two versions.
Fig 04) Initial inspection revealed some flash but not too bad. I started the kit by washing and rinsing all the parts to remove any mold release or foreign debris that could contaminate paint. After the parts were dry, I started the figures. I removed all seams and filled low spots. Squadron Products makes the best filler that I know of. One tube goes a long way. Mixed with a little Testors liquid cement to thin the paste, I spread this on all the areas that I sanded or filed. This will fill any low spots and help hide sanding and filing marks.
Right On Replicas, LLC ©2012 All rights reserved. *All registered trademarks are the property of their respective brands.
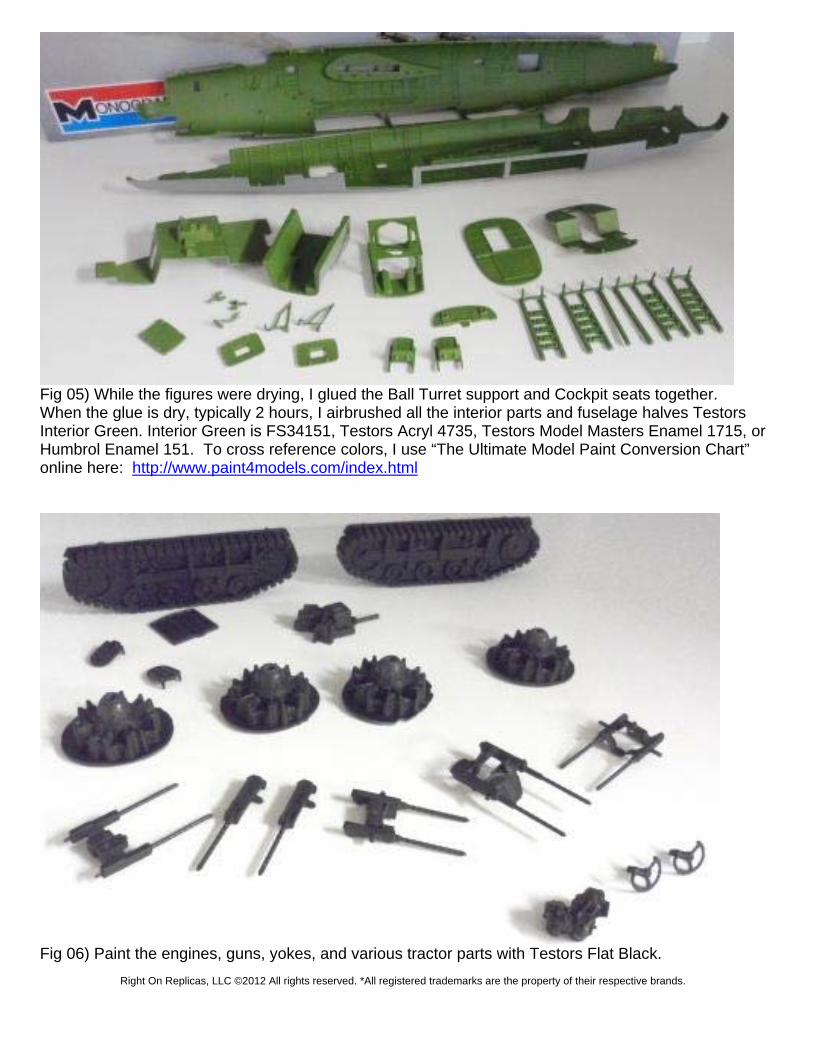
Fig 05) While the figures were drying, I glued the Ball Turret support and Cockpit seats together. When the glue is dry, typically 2 hours, I airbrushed all the interior parts and fuselage halves Testors Interior Green. Interior Green is FS34151, Testors Acryl 4735, Testors Model Masters Enamel 1715, or Humbrol Enamel 151. To cross reference colors, I use “The Ultimate Model Paint Conversion Chart” online here: http://www.paint4models.com/index.html
Fig 06) Paint the engines, guns, yokes, and various tractor parts with Testors Flat Black.
Right On Replicas, LLC ©2012 All rights reserved. *All registered trademarks are the property of their respective brands.
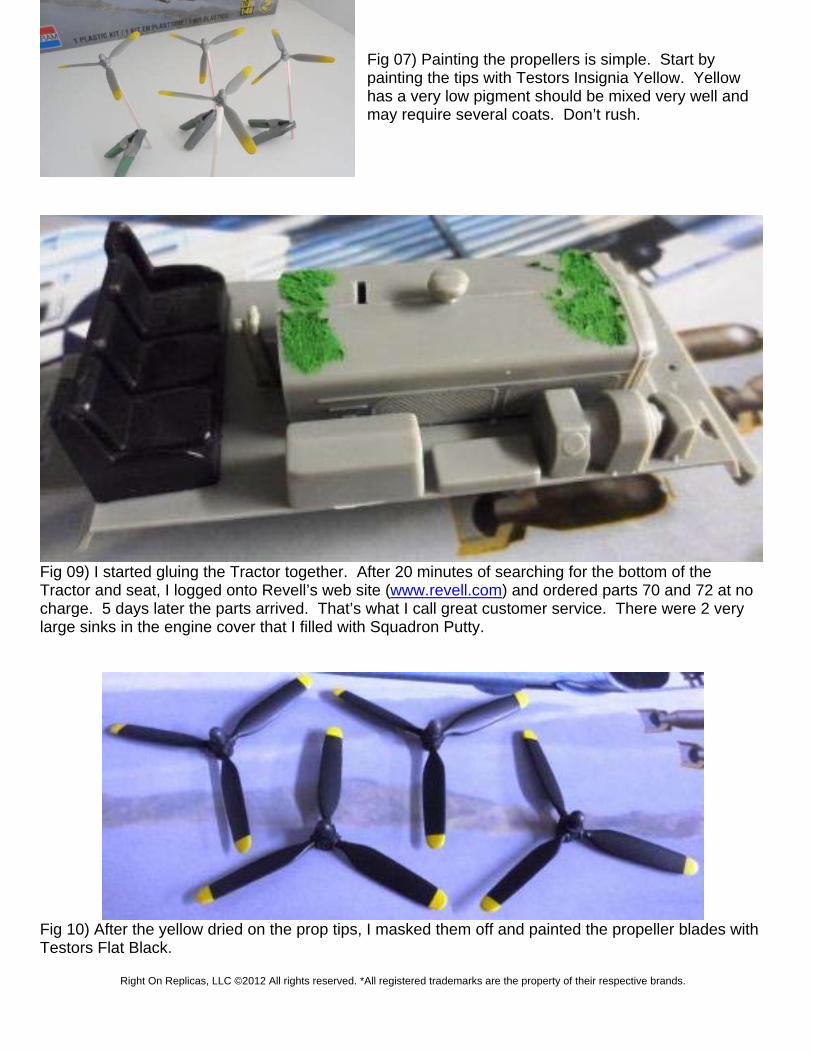
Fig 07) Painting the propellers is simple. Start by painting the tips with Testors Insignia Yellow. Yellow has a very low pigment should be mixed very well and may require several coats. Don’t rush.
Fig 09) I started gluing the Tractor together. After 20 minutes of searching for the bottom of the Tractor and seat, I logged onto Revell’s web site (www.revell.com) and ordered parts 70 and 72 at no charge. 5 days later the parts arrived. That’s what I call great customer service. There were 2 very large sinks in the engine cover that I filled with Squadron Putty.
Fig 10) After the yellow dried on the prop tips, I masked them off and painted the propeller blades with Testors Flat Black.
Right On Replicas, LLC ©2012 All rights reserved. *All registered trademarks are the property of their respective brands.
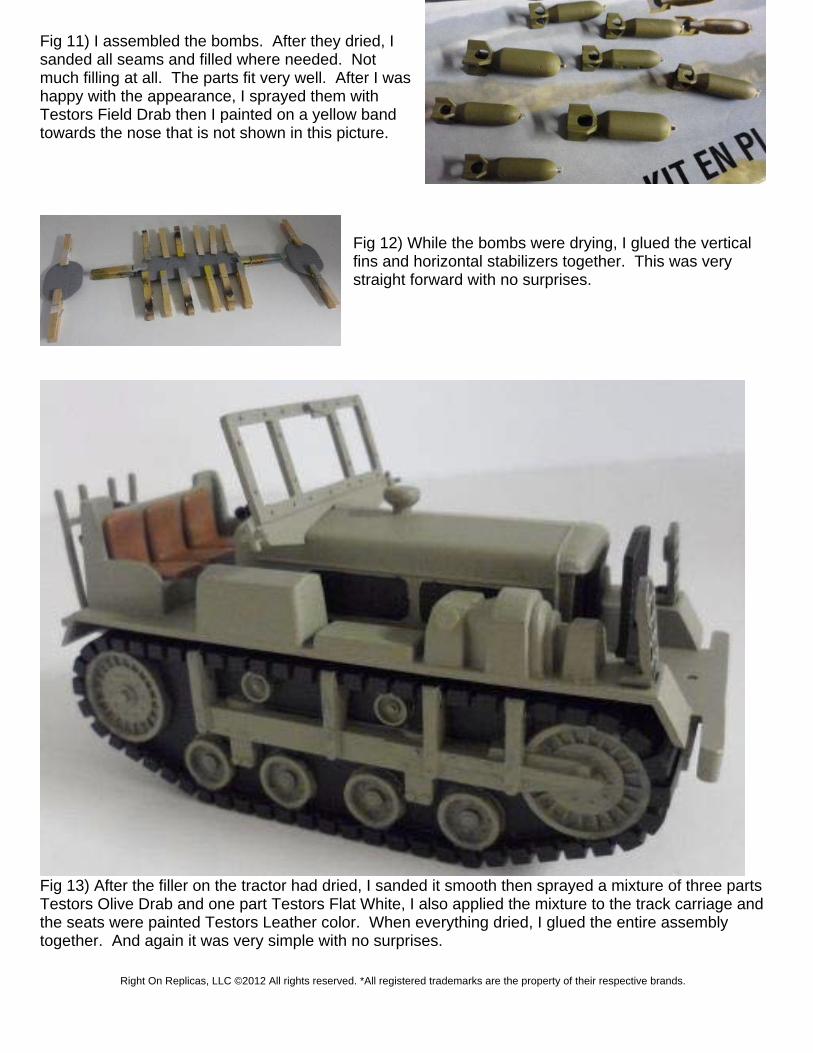
Fig 11) I assembled the bombs. After they dried, I sanded all seams and filled where needed. Not much filling at all. The parts fit very well. After I was happy with the appearance, I sprayed them with Testors Field Drab then I painted on a yellow band towards the nose that is not shown in this picture.
Fig 12) While the bombs were drying, I glued the vertical fins and horizontal stabilizers together. This was very straight forward with no surprises.
Fig 13) After the filler on the tractor had dried, I sanded it smooth then sprayed a mixture of three parts Testors Olive Drab and one part Testors Flat White, I also applied the mixture to the track carriage and the seats were painted Testors Leather color. When everything dried, I glued the entire assembly together. And again it was very simple with no surprises.
Right On Replicas, LLC ©2012 All rights reserved. *All registered trademarks are the property of their respective brands.
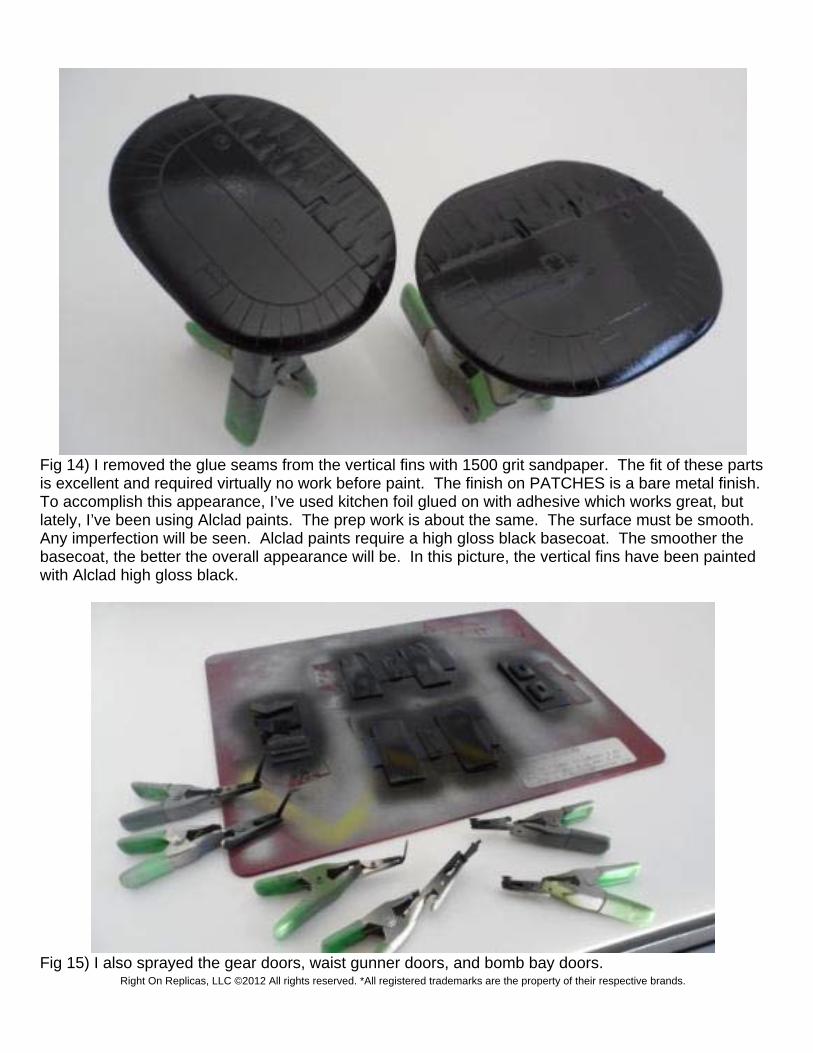
Fig 14) I removed the glue seams from the vertical fins with 1500 grit sandpaper. The fit of these parts is excellent and required virtually no work before paint. The finish on PATCHES is a bare metal finish. To accomplish this appearance, I’ve used kitchen foil glued on with adhesive which works great, but lately, I’ve been using Alclad paints. The prep work is about the same. The surface must be smooth. Any imperfection will be seen. Alclad paints require a high gloss black basecoat. The smoother the basecoat, the better the overall appearance will be. In this picture, the vertical fins have been painted with Alclad high gloss black.
Fig 15) I also sprayed the gear doors, waist gunner doors, and bomb bay doors.
Right On Replicas, LLC ©2012 All rights reserved. *All registered trademarks are the property of their respective brands.
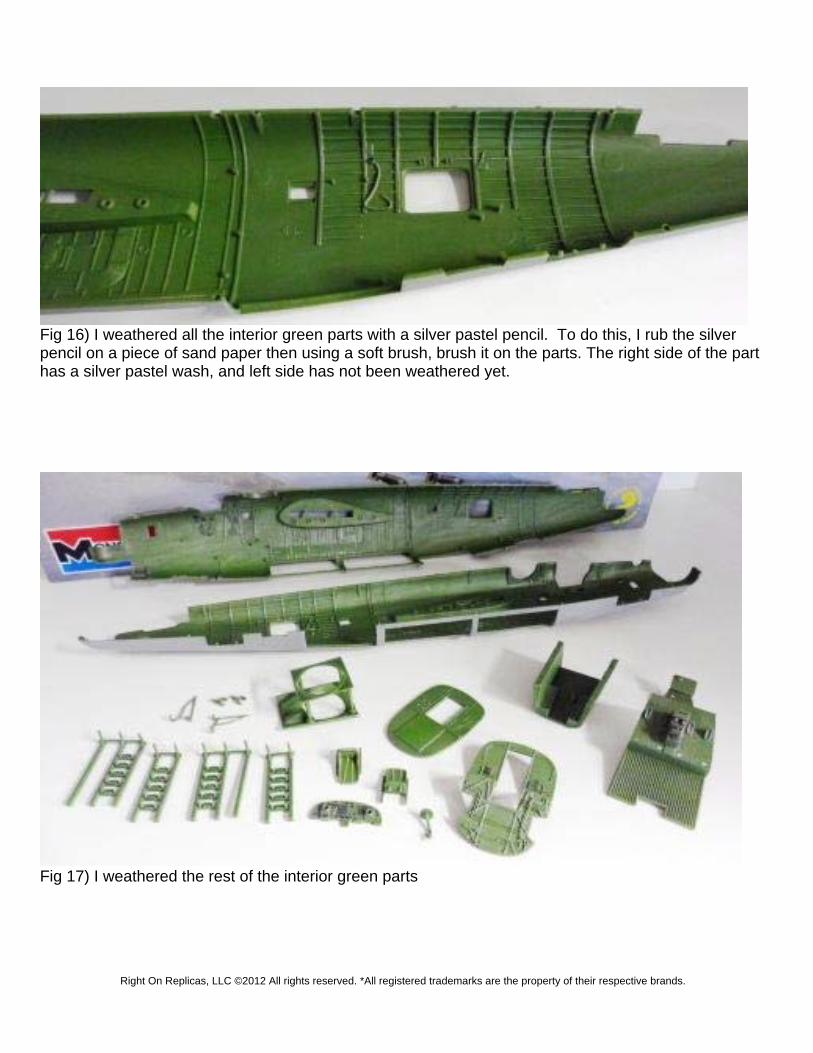
Fig 16) I weathered all the interior green parts with a silver pastel pencil. To do this, I rub the silver pencil on a piece of sand paper then using a soft brush, brush it on the parts. The right side of the part has a silver pastel wash, and left side has not been weathered yet.
Fig 17) I weathered the rest of the interior green parts
Right On Replicas, LLC ©2012 All rights reserved. *All registered trademarks are the property of their respective brands.
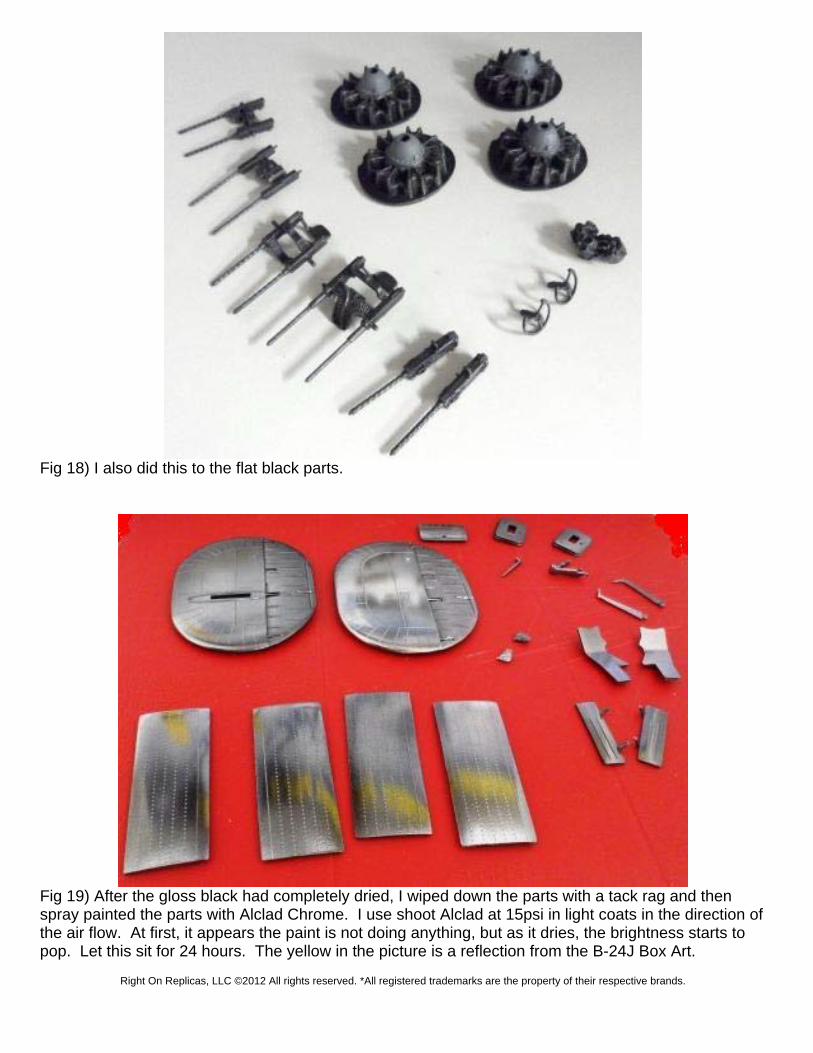
Fig 18) I also did this to the flat black parts.
Fig 19) After the gloss black had completely dried, I wiped down the parts with a tack rag and then spray painted the parts with Alclad Chrome. I use shoot Alclad at 15psi in light coats in the direction of the air flow. At first, it appears the paint is not doing anything, but as it dries, the brightness starts to pop. Let this sit for 24 hours. The yellow in the picture is a reflection from the B-24J Box Art.
Right On Replicas, LLC ©2012 All rights reserved. *All registered trademarks are the property of their respective brands.
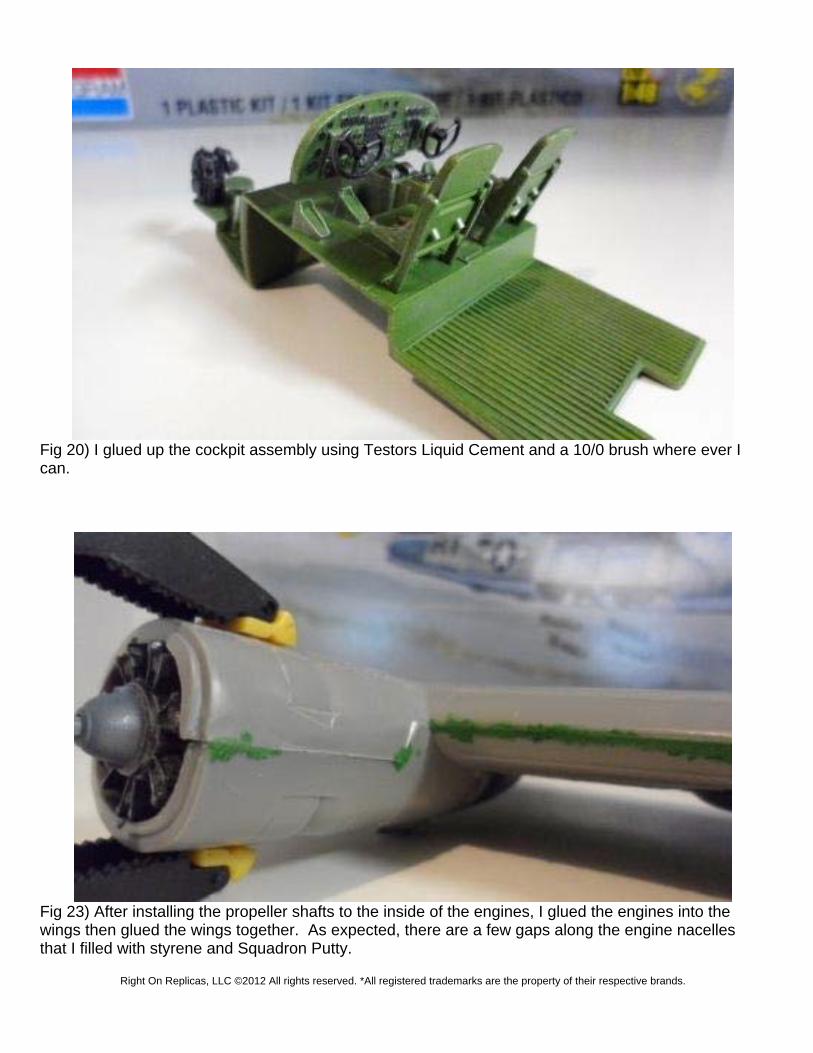
Fig 20) I glued up the cockpit assembly using Testors Liquid Cement and a 10/0 brush where ever I can.
Fig 23) After installing the propeller shafts to the inside of the engines, I glued the engines into the wings then glued the wings together. As expected, there are a few gaps along the engine nacelles that I filled with styrene and Squadron Putty.
Right On Replicas, LLC ©2012 All rights reserved. *All registered trademarks are the property of their respective brands.
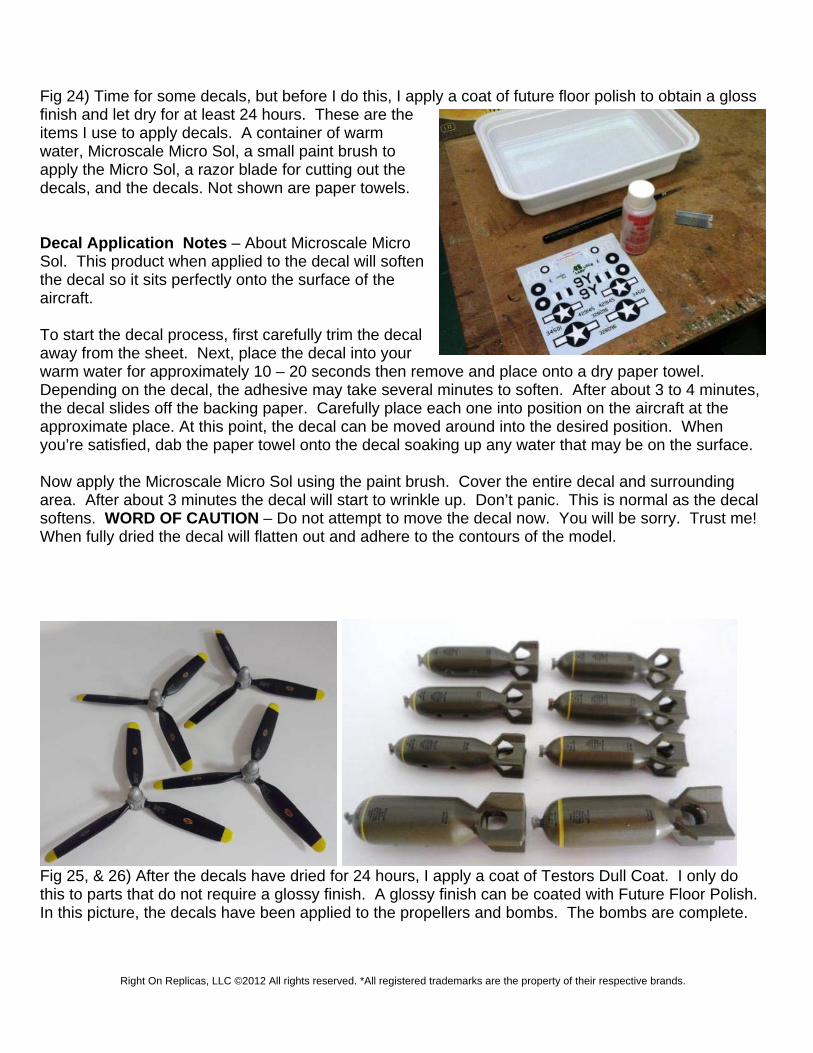
Fig 24) Time for some decals, but before I do this, I apply a coat of future floor polish to obtain a gloss finish and let dry for at least 24 hours. These are the items I use to apply decals. A container of warm water, Microscale Micro Sol, a small paint brush to apply the Micro Sol, a razor blade for cutting out the decals, and the decals. Not shown are paper towels. Decal Application Notes – About Microscale Micro Sol. This product when applied to the decal will soften the decal so it sits perfectly onto the surface of the aircraft. To start the decal process, first carefully trim the decal away from the sheet. Next, place the decal into your warm water for approximately 10 – 20 seconds then remove and place onto a dry paper towel. Depending on the decal, the adhesive may take several minutes to soften. After about 3 to 4 minutes, the decal slides off the backing paper. Carefully place each one into position on the aircraft at the approximate place. At this point, the decal can be moved around into the desired position. When you’re satisfied, dab the paper towel onto the decal soaking up any water that may be on the surface. Now apply the Microscale Micro Sol using the paint brush. Cover the entire decal and surrounding area. After about 3 minutes the decal will start to wrinkle up. Don’t panic. This is normal as the decal softens. WORD OF CAUTION – Do not attempt to move the decal now. You will be sorry. Trust me! When fully dried the decal will flatten out and adhere to the contours of the model.
Fig 25, & 26) After the decals have dried for 24 hours, I apply a coat of Testors Dull Coat. I only do this to parts that do not require a glossy finish. A glossy finish can be coated with Future Floor Polish. In this picture, the decals have been applied to the propellers and bombs. The bombs are complete.
Right On Replicas, LLC ©2012 All rights reserved. *All registered trademarks are the property of their respective brands.
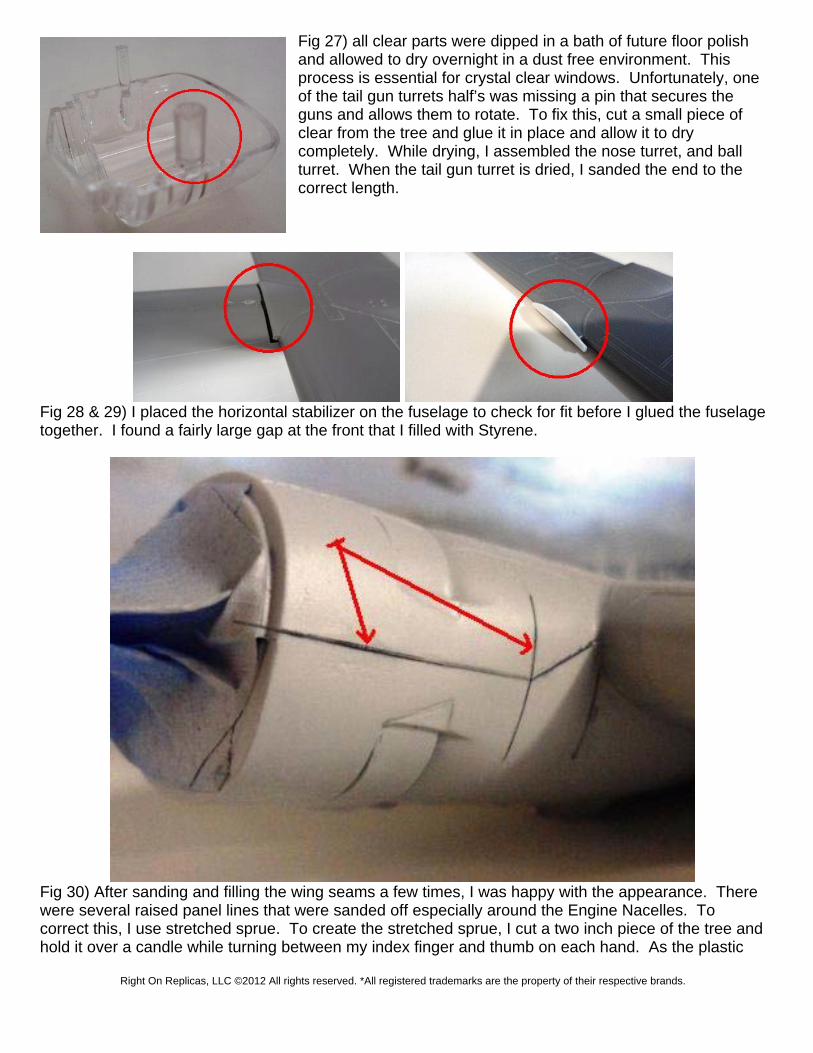
Fig 27) all clear parts were dipped in a bath of future floor polish and allowed to dry overnight in a dust free environment. This process is essential for crystal clear windows. Unfortunately, one of the tail gun turrets half’s was missing a pin that secures the guns and allows them to rotate. To fix this, cut a small piece of clear from the tree and glue it in place and allow it to dry completely. While drying, I assembled the nose turret, and ball turret. When the tail gun turret is dried, I sanded the end to the correct length.
Fig 28 & 29) I placed the horizontal stabilizer on the fuselage to check for fit before I glued the fuselage together. I found a fairly large gap at the front that I filled with Styrene.
Fig 30) After sanding and filling the wing seams a few times, I was happy with the appearance. There were several raised panel lines that were sanded off especially around the Engine Nacelles. To correct this, I use stretched sprue. To create the stretched sprue, I cut a two inch piece of the tree and hold it over a candle while turning between my index finger and thumb on each hand. As the plastic
Right On Replicas, LLC ©2012 All rights reserved. *All registered trademarks are the property of their respective brands.
softens, it will get shinny. When it gets to that point, it’s ready to be stretched. Remove it from the flame and pull your hands apart. I can typically get four feet with each pull and it is paper thin. Then cut a piece longer than required and glue it into position with the liquid cement. After a few minutes, trim it to length and the panel line has been replaced!
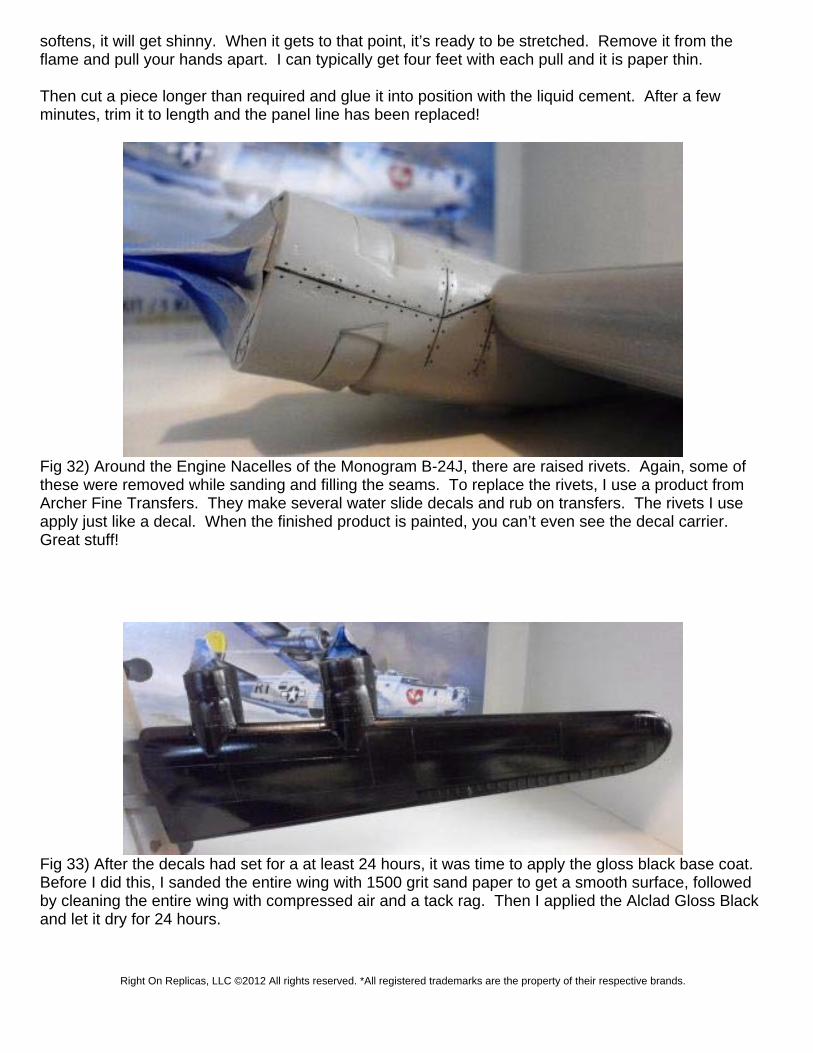
Fig 32) Around the Engine Nacelles of the Monogram B-24J, there are raised rivets. Again, some of these were removed while sanding and filling the seams. To replace the rivets, I use a product from Archer Fine Transfers. They make several water slide decals and rub on transfers. The rivets I use apply just like a decal. When the finished product is painted, you can’t even see the decal carrier. Great stuff!
Fig 33) After the decals had set for a at least 24 hours, it was time to apply the gloss black base coat. Before I did this, I sanded the entire wing with 1500 grit sand paper to get a smooth surface, followed by cleaning the entire wing with compressed air and a tack rag. Then I applied the Alclad Gloss Black and let it dry for 24 hours.
Right On Replicas, LLC ©2012 All rights reserved. *All registered trademarks are the property of their respective brands.
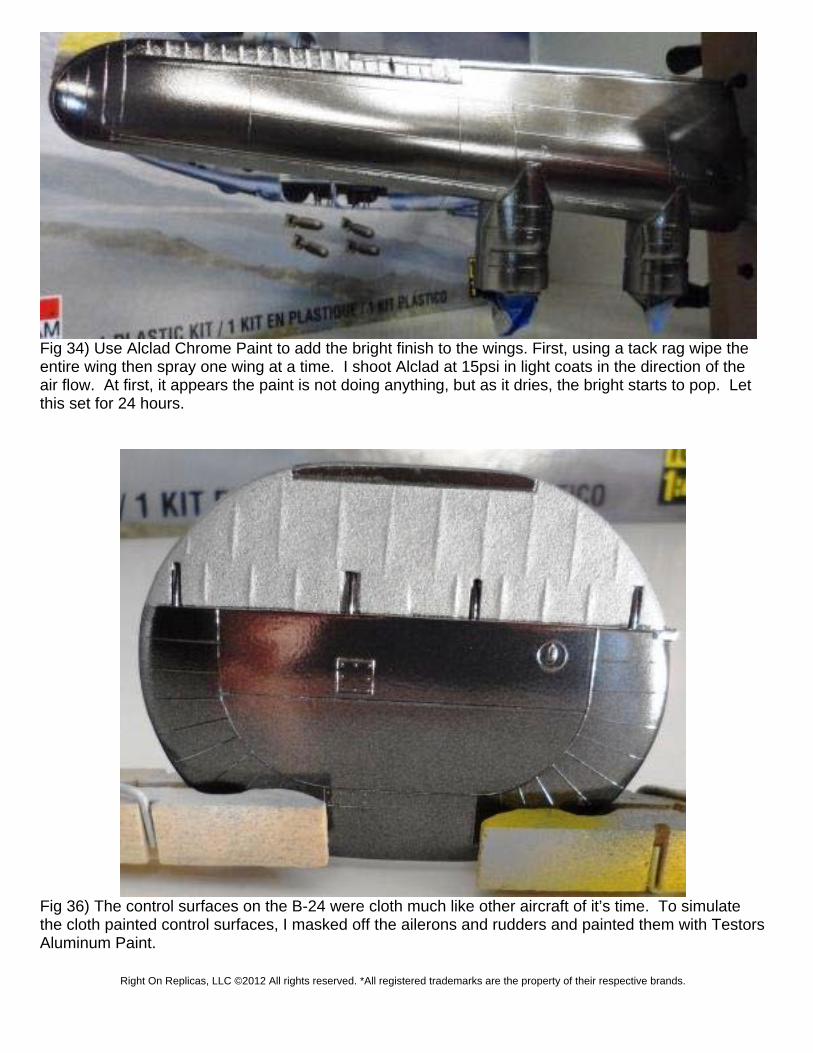
Fig 34) Use Alclad Chrome Paint to add the bright finish to the wings. First, using a tack rag wipe the entire wing then spray one wing at a time. I shoot Alclad at 15psi in light coats in the direction of the air flow. At first, it appears the paint is not doing anything, but as it dries, the bright starts to pop. Let this set for 24 hours.
Fig 36) The control surfaces on the B-24 were cloth much like other aircraft of it’s time. To simulate the cloth painted control surfaces, I masked off the ailerons and rudders and painted them with Testors Aluminum Paint.
Right On Replicas, LLC ©2012 All rights reserved. *All registered trademarks are the property of their respective brands.
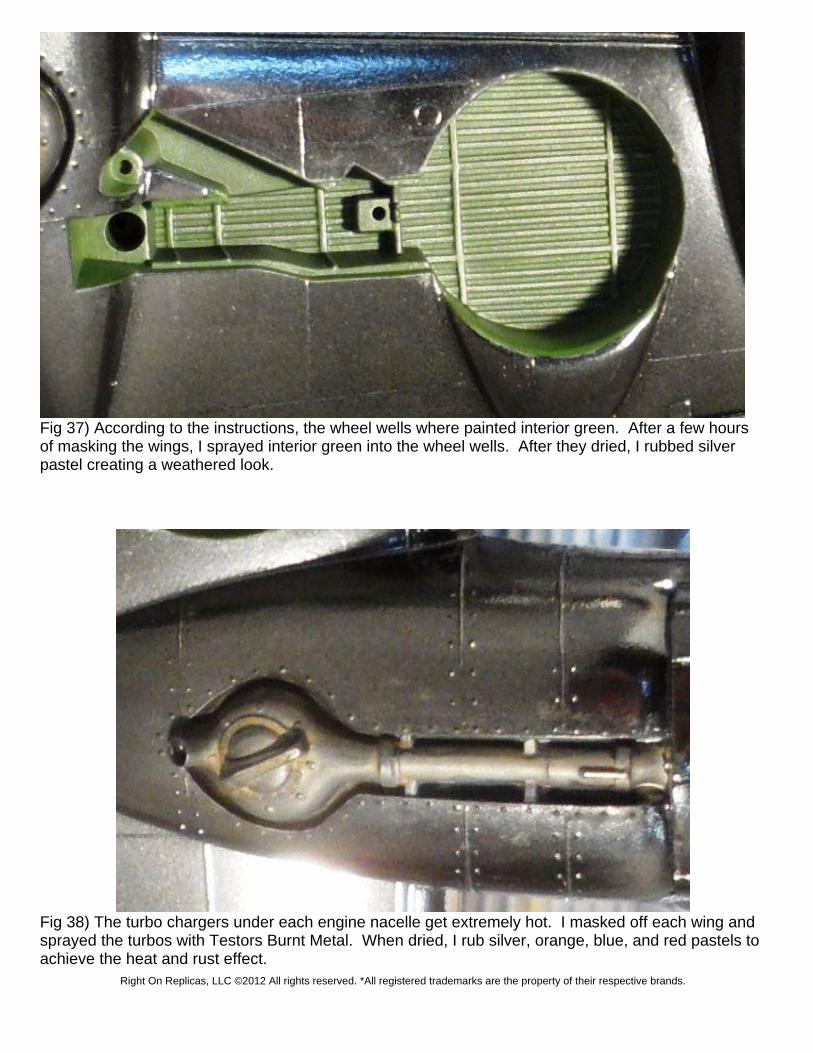
Fig 37) According to the instructions, the wheel wells where painted interior green. After a few hours of masking the wings, I sprayed interior green into the wheel wells. After they dried, I rubbed silver pastel creating a weathered look.
Fig 38) The turbo chargers under each engine nacelle get extremely hot. I masked off each wing and sprayed the turbos with Testors Burnt Metal. When dried, I rub silver, orange, blue, and red pastels to achieve the heat and rust effect.
Right On Replicas, LLC ©2012 All rights reserved. *All registered trademarks are the property of their respective brands.
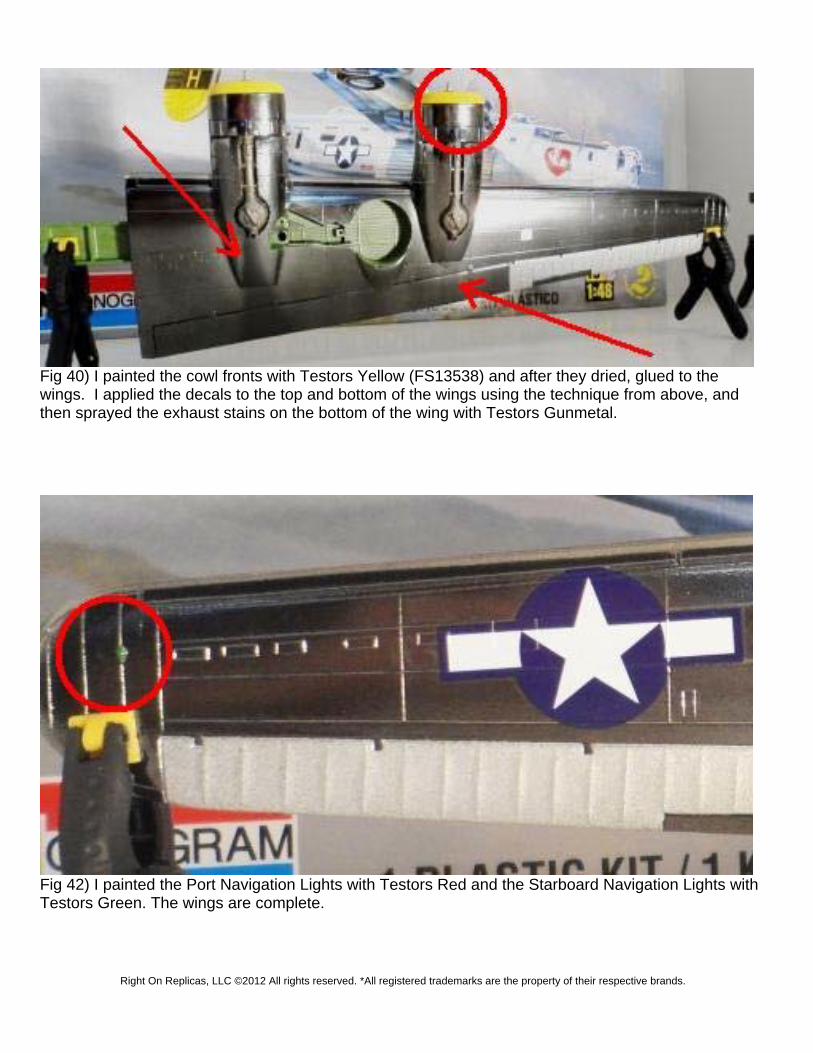
Fig 40) I painted the cowl fronts with Testors Yellow (FS13538) and after they dried, glued to the wings. I applied the decals to the top and bottom of the wings using the technique from above, and then sprayed the exhaust stains on the bottom of the wing with Testors Gunmetal.
Fig 42) I painted the Port Navigation Lights with Testors Red and the Starboard Navigation Lights with Testors Green. The wings are complete.
Right On Replicas, LLC ©2012 All rights reserved. *All registered trademarks are the property of their respective brands.

Fig 43) Time to apply the weathering to the tractor. To do this, I use water colors. Yup; water colors that a child would use. It’s cheap and cleans up easily. For the tractor, I used black and I brushed this on the entire tractor. After an hour or so, I use Q-Tips to clean off the majority of the water color by damping the end then wiping the area.
Fig 46) Next I applied the decals to the vertical fins using the above technique. The vertical fins are complete.
Right On Replicas, LLC ©2012 All rights reserved. *All registered trademarks are the property of their respective brands.
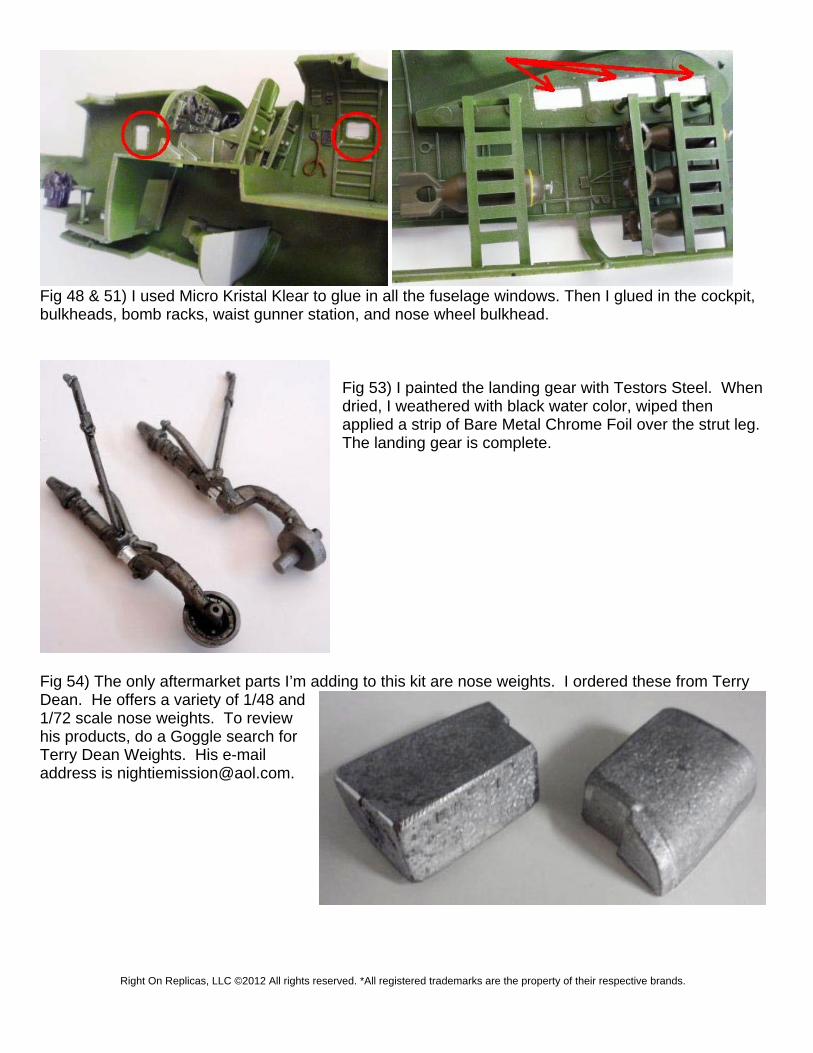
Fig 48 & 51) I used Micro Kristal Klear to glue in all the fuselage windows. Then I glued in the cockpit, bulkheads, bomb racks, waist gunner station, and nose wheel bulkhead.
Fig 53) I painted the landing gear with Testors Steel. When dried, I weathered with black water color, wiped then applied a strip of Bare Metal Chrome Foil over the strut leg. The landing gear is complete.
Fig 54) The only aftermarket parts I’m adding to this kit are nose weights. I ordered these from Terry Dean. He offers a variety of 1/48 and 1/72 scale nose weights. To review his products, do a Goggle search for Terry Dean Weights. His e-mail address is [email protected].
Right On Replicas, LLC ©2012 All rights reserved. *All registered trademarks are the property of their respective brands.
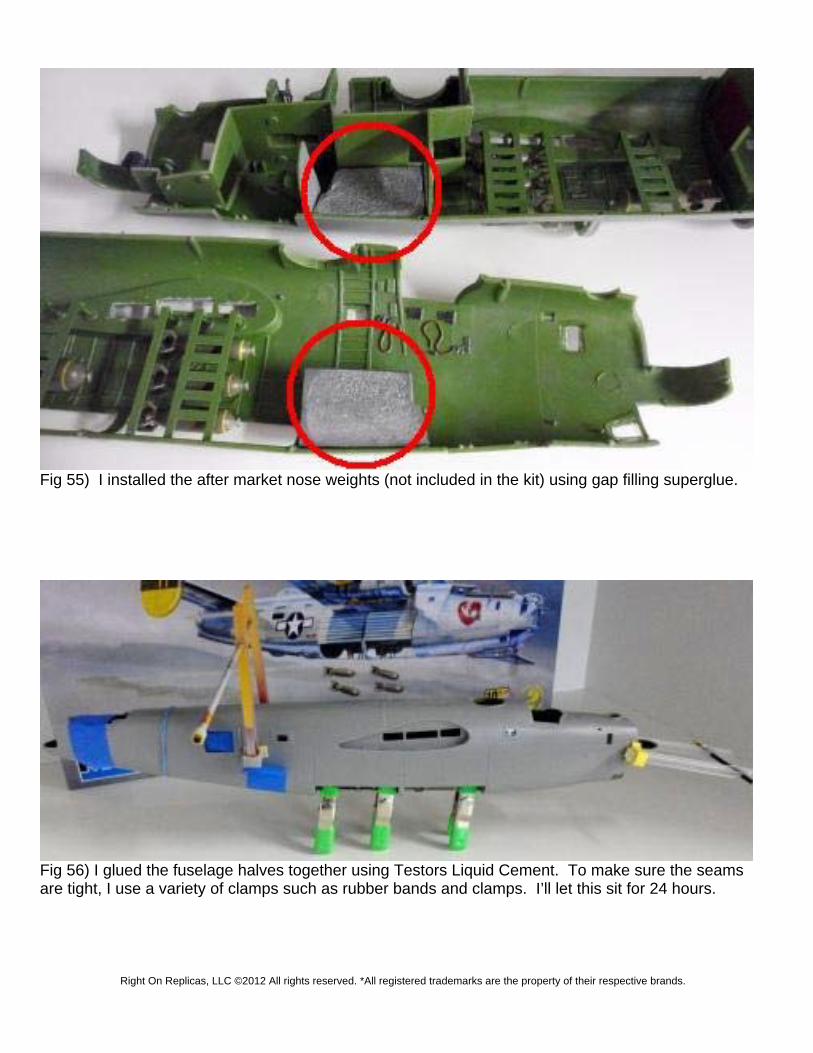
Fig 55) I installed the after market nose weights (not included in the kit) using gap filling superglue.
Fig 56) I glued the fuselage halves together using Testors Liquid Cement. To make sure the seams are tight, I use a variety of clamps such as rubber bands and clamps. I’ll let this sit for 24 hours.
Right On Replicas, LLC ©2012 All rights reserved. *All registered trademarks are the property of their respective brands.
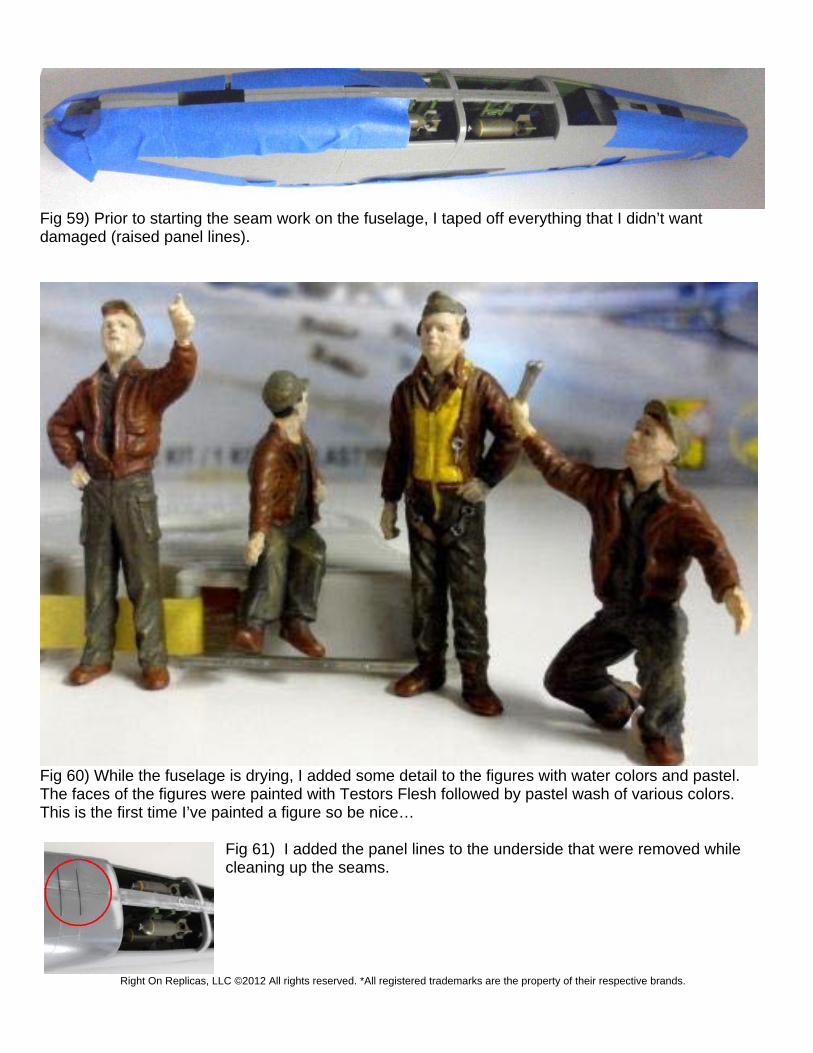
Fig 59) Prior to starting the seam work on the fuselage, I taped off everything that I didn’t want damaged (raised panel lines).
Fig 60) While the fuselage is drying, I added some detail to the figures with water colors and pastel. The faces of the figures were painted with Testors Flesh followed by pastel wash of various colors. This is the first time I’ve painted a figure so be nice…
Fig 61) I added the panel lines to the underside that were removed while cleaning up the seams.
Right On Replicas, LLC ©2012 All rights reserved. *All registered trademarks are the property of their respective brands.
Fig 62) I added the panel lines to the top side of the fuselage that were removed while cleaning up the seams.
Fig 63) Mask off the windshield using Tamiya Tape. Fig 64) Everything has been masked off and is ready for paint. The basecoat for Alclad is Gloss Black and I didn’t want that visible looking into the turrets and windscreen, so I painted the frames silver first.
Right On Replicas, LLC ©2012 All rights reserved. *All registered trademarks are the property of their respective brands.
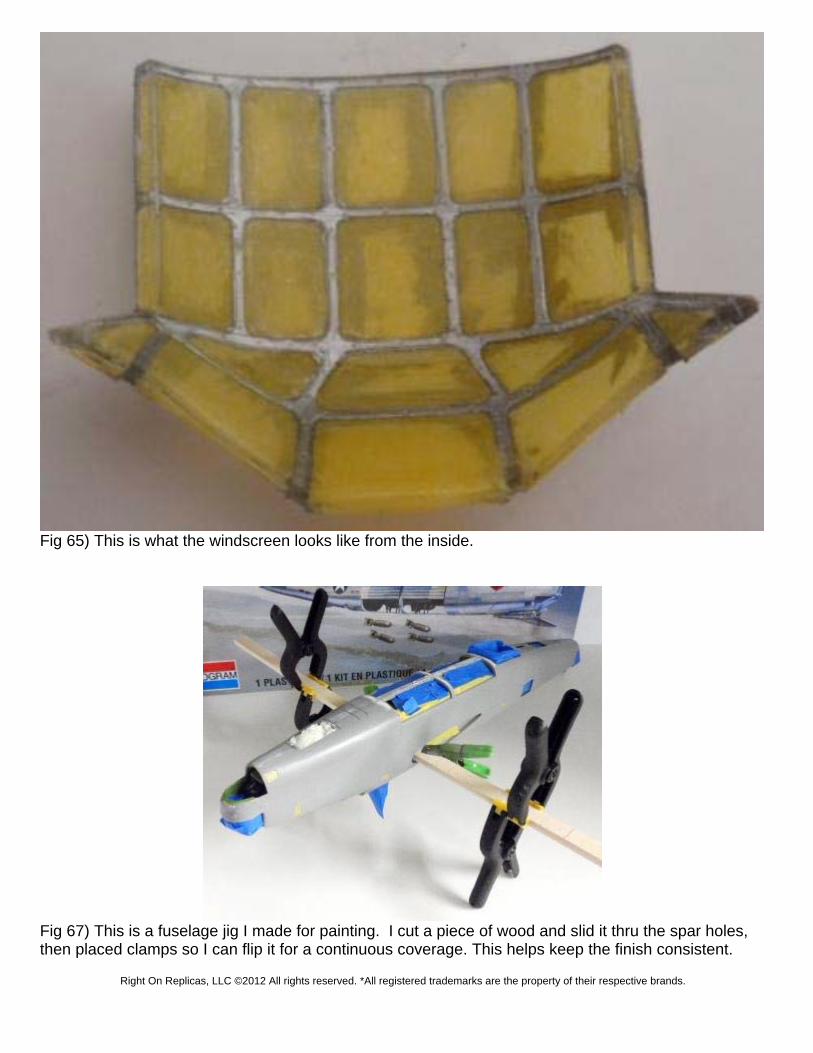
Fig 65) This is what the windscreen looks like from the inside.
Fig 67) This is a fuselage jig I made for painting. I cut a piece of wood and slid it thru the spar holes, then placed clamps so I can flip it for a continuous coverage. This helps keep the finish consistent.
Right On Replicas, LLC ©2012 All rights reserved. *All registered trademarks are the property of their respective brands.
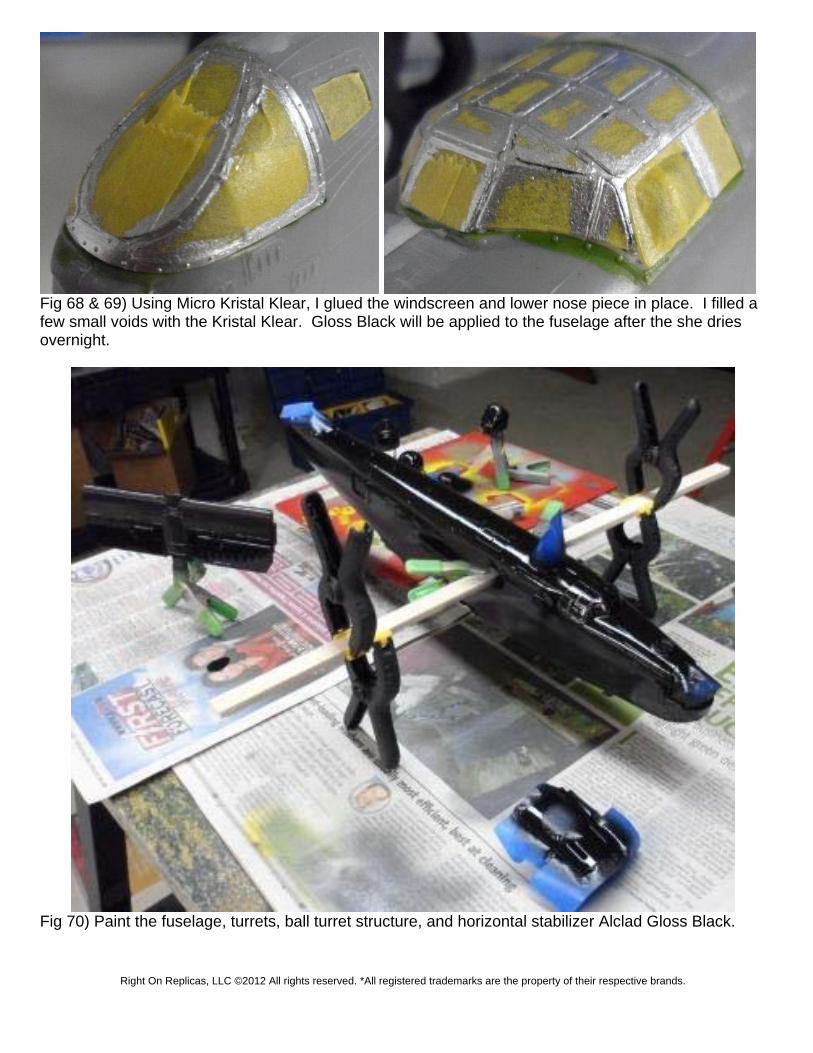
Fig 68 & 69) Using Micro Kristal Klear, I glued the windscreen and lower nose piece in place. I filled a few small voids with the Kristal Klear. Gloss Black will be applied to the fuselage after the she dries overnight.
Fig 70) Paint the fuselage, turrets, ball turret structure, and horizontal stabilizer Alclad Gloss Black.
Right On Replicas, LLC ©2012 All rights reserved. *All registered trademarks are the property of their respective brands.
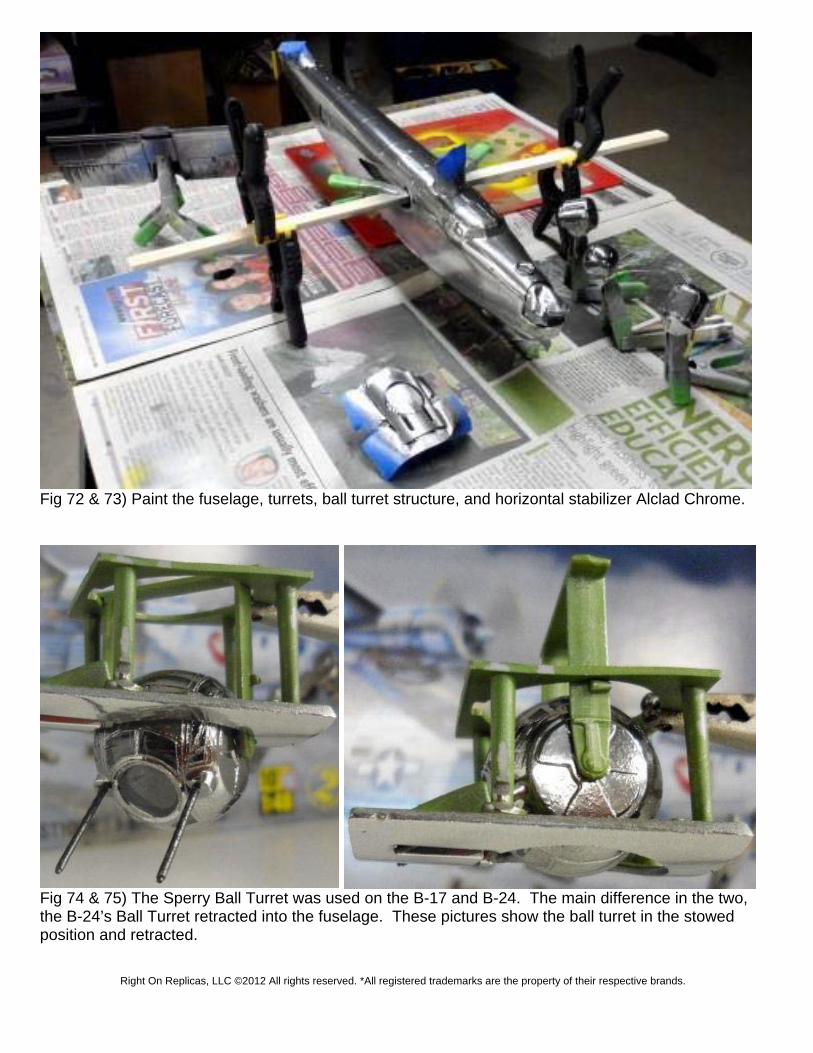
Fig 72 & 73) Paint the fuselage, turrets, ball turret structure, and horizontal stabilizer Alclad Chrome.
Fig 74 & 75) The Sperry Ball Turret was used on the B-17 and B-24. The main difference in the two, the B-24’s Ball Turret retracted into the fuselage. These pictures show the ball turret in the stowed position and retracted.
Right On Replicas, LLC ©2012 All rights reserved. *All registered trademarks are the property of their respective brands.
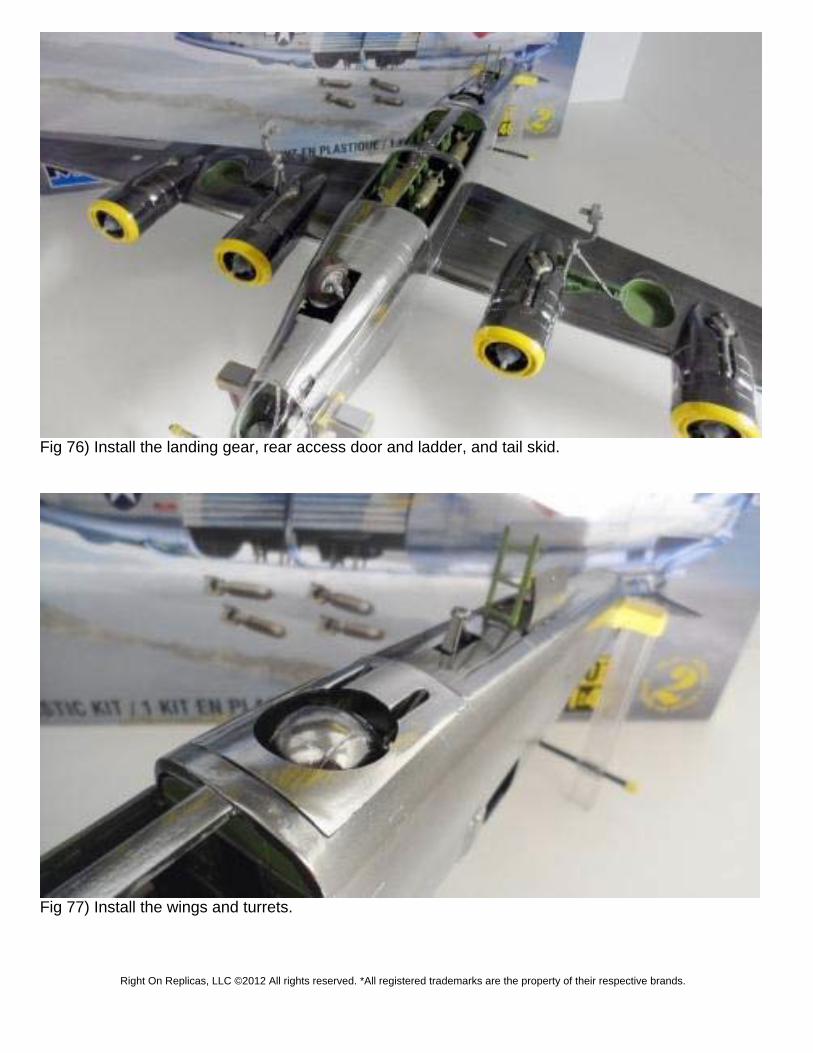
Fig 76) Install the landing gear, rear access door and ladder, and tail skid.
Fig 77) Install the wings and turrets.
Right On Replicas, LLC ©2012 All rights reserved. *All registered trademarks are the property of their respective brands.
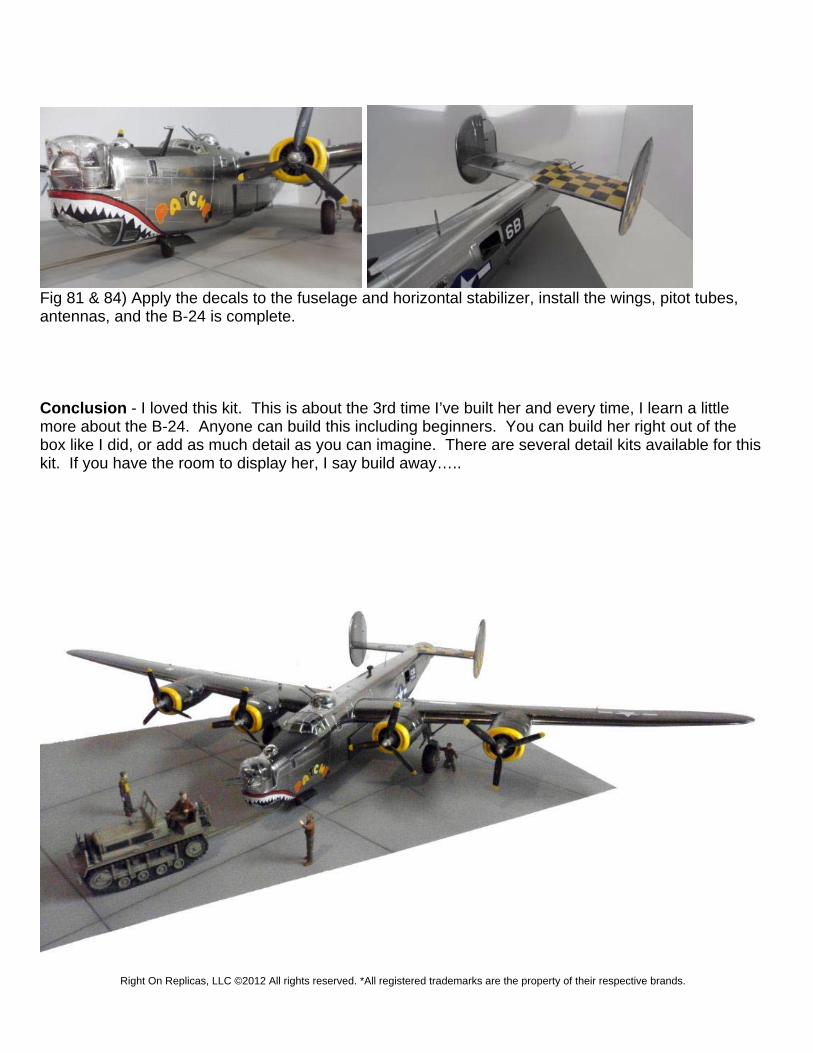
Fig 81 & 84) Apply the decals to the fuselage and horizontal stabilizer, install the wings, pitot tubes, antennas, and the B-24 is complete. Conclusion - I loved this kit. This is about the 3rd time I’ve built her and every time, I learn a little more about the B-24. Anyone can build this including beginners. You can build her right out of the box like I did, or add as much detail as you can imagine. There are several detail kits available for this kit. If you have the room to display her, I say build away…..
Right On Replicas, LLC ©2012 All rights reserved. *All registered trademarks are the property of their respective brands.