Embed Size (px)
Citation preview
Resolution SubwooferPowered Subwoofer
QUICK SETUP GUIDE
Getting Started
THE LEADER IN AUDIO ENGINEERING
Thank you for your purchase of the Resolution Subwoofer, a powered subwoofer inthe Resolution Series of loudspeakers.
The Resolution Subwoofer delivers large amounts of sustained low frequency infor-mation without reservation. Excellent cabinet construction, robust driver selectionand 650 watts of genuine Krell amplification combine to offer the huge output, speedand resolution necessary for the ultimate home theater or music system experience. The Resolution Subwoofer features a one-inch MDF enclosure with 2-inch thick frontand rear baffles. The sealed box design promotes clean, accurate bass. A separatecontrol cavity completely isolates electronics package from the driver.
The single 15-inch driver has a very stiff, reinforced polypropylene cone. Peak toPeak linear travel is 1-3/8-inch, and the voice coil is extra long. Motor geometry fea-tures a focused magnetic field that promotes control and lowers distortion.
The 650 watt Krell Current Mode power amplifier is a Class AB design featuring a1000 watt transformer and 55,000 microfarads of filter capacitance. Class AB amplifi-cation provides power quickly and sustains power indefinitely, thereby providingcomplete control of the driver under the most demanding conditions.
This document outlines the basic steps for unpacking, placing, connecting, and oper-ating the Resolution Subwoofer. The owner’s reference for this product, including adetailed description of features and the product warranty, is available on the web at:
www.krellonline.com
Please contact your authorized dealer, distributor, or Krell if you have any ques-tions not addressed in the owner’s reference.
Follow these steps to safely unpack your subwoofer:
1. Set the shipping box right side up using the arrows on the box as a guide.2 people needed
2. Use a box-cutting knife and slit the tape all along the top seams of the outercarton.
3. Open the flaps to reveal the inner carton.
4. Slit the tape along the top seams of the inner carton.
5. Open the flaps and remove the power cord and two cardboard boxes, marked“accessories” and “grille”, and set aside.
6. Carefully invert the box, so that the top foam piece is on the floor. Make certainthat the subwoofer stays inside the carton as you bring it to the vertical position.2 people needed
7. Kneel down and grasp the top foam piece.
8. Carefully lift the inner and outer cartons straight up, and off the box. The sub-woofer is still inverted.
9. Remove the bottom foam piece.
10. Set the inner and outer cartons and the bottom foam piece aside.
11. Gently slide the protective sleeve around the subwoofer down, toward the top ofthe subwoofer and toward the top foam piece on the floor.
WARNINGS
THERE ARE NO USER-SERVICE-ABLE PARTS INSIDE ANY KRELLPRODUCT.
Krell Resolution Subwoofer 1
Unpacking
Note
Save all packing materials. Ifyou need to ship a ResolutionSeries loudspeaker in the future,repack the unit in its originalpackaging to prevent shippingdamage.
This product complies with the EMC directive (89/336/EEC) and the low-voltage directive (73/23/EEC).
2 Krell Resolution Subwoofer
Notes
Be careful not to scratch theloudspeaker cabinet with thegrille locator pins.
Clean the grille periodically toremove accumulated dust.Gently wipe the grille from top tobottom using a soft, dry, lint-freecloth. Do not use rubber condi-tioner or solvent.
Attach the grille to the loudspeakerbefore you play music. The ResolutionSubwoofer has a snap-on grille, whichis comprised of grille cord strungbetween 2 metal grille blocks. Thegrille is shipped in the cardboard boxmarked “grille”.
Follow These Steps to Attach theSubwoofer Grille:
1. Grasp the grille blocks on each endof the grille and lift the grille out ofthe grille box.
Place the grille block with the Krelllogo on the bottom front of the sub-woofer; and place the other grilleblock on the top front.
2. Gently guide the grille locator pinsinto the 3 grille holes on the bottomfront of the subwoofer.
3. Grasp the remaining grille block,allowing it to rest between thethumb and forefinger of each hand.
4. Pull firmly to stretch the grille cords,until the grille locator pins align withthe 3 grille holes on the top front ofthe subwoofer.
5. Gently guide the pins into the grilleholes. You hear a click when thegrille is in place.
Detach the Grille Before YouRepack the Subwoofer:
1. Grasp the grille block attached tothe top front of the subwoofer.
2. Gently pull the grille block straightout until the grille locator pins slideout of the grille holes.
3. Remove the grille block with theKrell logo from the bottom front ofthe subwoofer.
4. To protect the grille, place it in thegrille box until you are ready to rein-stall it.
This product is manufactured in the United States of America. Krell® is a registered trademark of Krell Industries, Inc.,and is restricted for use by Krell Industries, Inc., its subsidiaries, and authorized agents. All rights reserved. All othertrademarks and trade names are registered to their respective companies.
© 2004 by Krell Industries, Inc., All rights reserved
12. Locate the spikes, rubber feet and locking washers, in the small cardboardbox marked “accessories”.
13. Choose the set of feet you want to use on your subwoofer.
14. Thread the washers onto the feet.
15. Screw each foot/washer assembly into the 4 screw holes located on the bot-tom of the subwoofer.
16. Carefully invert the subwoofer so that it is resting on the feet, right side up.
17. Spin the washers counterclockwise up the shaft of each foot to fix the heightof the foot.
18. Remove the top foam piece and protective sleeve. You are ready to positionthe subwoofer in the listening area. 2 people needed
Each Resolution Subwoofer requires at least 2 inches (5 cm) of clearance on eachside and in front, and at least 2 inches (5 cm) of clearance above and to the rearof the subwoofer for adequate ventilation. The subwoofer delivers excellent per-formance in nearly any location in the listening room. Two placement options fol-low:
Option 1: Stereo. Place the Resolution Subwoofer midway between the left andright loudspeakers.
Option 2: Home Theater. Place the subwoofer in a corner of the room, preferablyone foot from any wall.
AC Power Guidelines. The subwoofer has superb regulation and does notrequire a dedicated AC circuit. Operate the subwoofer only with the power cordsupplied.
Placement
To Install Feet On Your Loudspeaker
Position the loudspeaker in the listening area before attachingthe grille.
Each Resolution Subwoofer isprovided with 2 sets of feet: 4spikes and 4 rubber feet. Thesharp, pointed spikes are idealfor carpeted floors. The rubberfeet protect tile and wood floors.
Unpacking, continued
To Attach/Detach theSubwoofer Grille
(not illustrated)
Krell Resolution Subwoofer 3
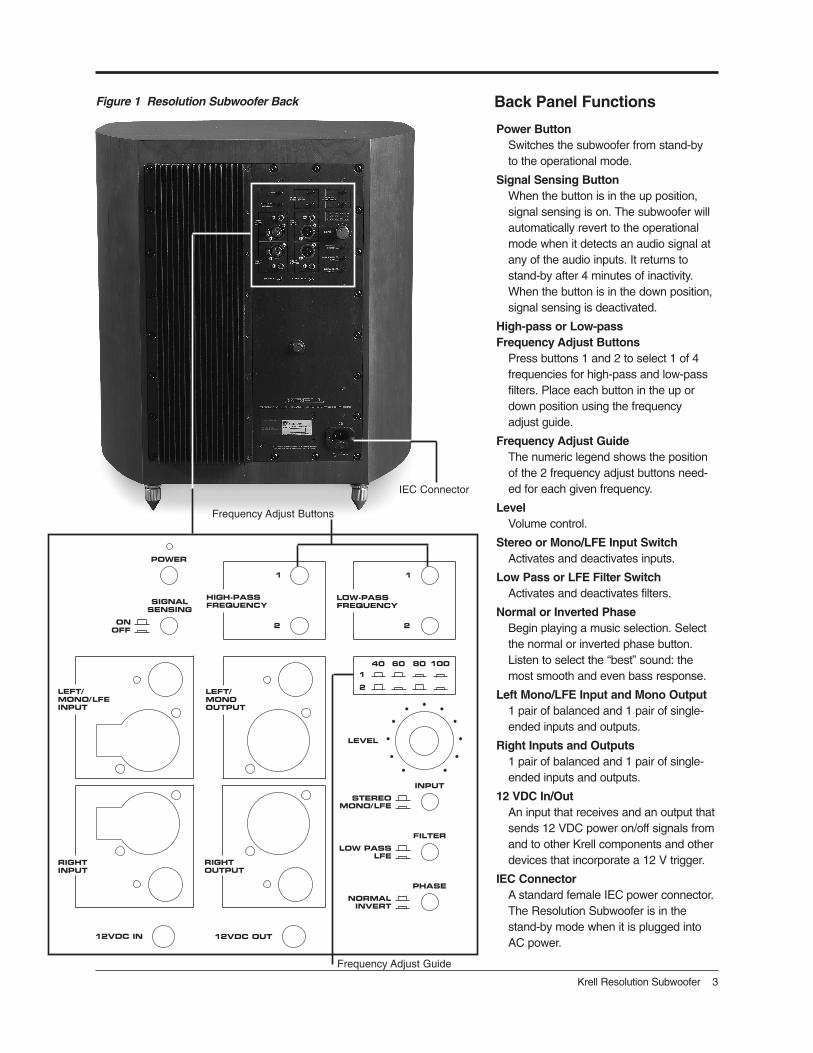
Power Button Switches the subwoofer from stand-byto the operational mode.
Signal Sensing ButtonWhen the button is in the up position,signal sensing is on. The subwoofer willautomatically revert to the operationalmode when it detects an audio signal atany of the audio inputs. It returns tostand-by after 4 minutes of inactivity.When the button is in the down position,signal sensing is deactivated.
High-pass or Low-pass Frequency Adjust Buttons
Press buttons 1 and 2 to select 1 of 4frequencies for high-pass and low-passfilters. Place each button in the up ordown position using the frequencyadjust guide.
Frequency Adjust GuideThe numeric legend shows the positionof the 2 frequency adjust buttons need-ed for each given frequency.
LevelVolume control.
Stereo or Mono/LFE Input SwitchActivates and deactivates inputs.
Low Pass or LFE Filter SwitchActivates and deactivates filters.
Normal or Inverted PhaseBegin playing a music selection. Selectthe normal or inverted phase button.Listen to select the “best” sound: themost smooth and even bass response.
Left Mono/LFE Input and Mono Output1 pair of balanced and 1 pair of single-ended inputs and outputs.
Right Inputs and Outputs1 pair of balanced and 1 pair of single-ended inputs and outputs.
12 VDC In/OutAn input that receives and an output thatsends 12 VDC power on/off signals fromand to other Krell components and otherdevices that incorporate a 12 V trigger.
IEC ConnectorA standard female IEC power connector.The Resolution Subwoofer is in thestand-by mode when it is plugged intoAC power.
Figure 1 Resolution Subwoofer Back Back Panel Functions
LEFT/MONO/LFEINPUT
RIGHTINPUT
12VDC IN 12VDC OUT
LEFT/MONOOUTPUT
RIGHTOUTPUT
ON
POWER
LEVEL
STEREO
LOW PASS
1
2
1
2
MONO/LFE
LFE
NORMALINVERT
OFF
1
2
HIGH-PASSFREQUENCY
LOW-PASSFREQUENCY
40 10060 80
SIGNALSENSING
INPUT
FILTER
PHASE
IEC Connector
Frequency Adjust Buttons
Frequency Adjust Guide
IMPORTANT
Do not disconnect signal cableswhen the amplifier is on and con-nected to the loudspeaker. Doingso will cause a loud pop that maydamage your components.Tighten loudspeaker binding postsby hand only.
Notes
When powering up any system,always turn amplifiers on last.When powering down, always turn amplifiers off first.
When single-ended inputs areused, shorting jumpers must beinserted into pins 1 and 3 on theXLR connectors. The jumper isnot necessary for the right XLRwhen in mono/LFE mode.
Jumpers are provided in theaccessory box.
Krell Industries, Inc., 45 Connair Road,Orange, CT 06477-3650 USATEL 203-799-9954, FAX 203-891-2028, E-MAIL [email protected] SITE http://www.krellonline.com
4 Krell Resolution Subwoofer
Your Resolution subwoofer product serial number is:
P/N 307978-Wv 04.0
Krell recommends using balanced interconnect cables which minimize sonic lossand are immune to induced noise, especially with installations using long cables.Balanced connections have 6 dB more gain than single-ended connections.
Before connecting the subwoofer to your system, make sure that all power sourcesand components are off. Neatly organize wiring between the subwoofer and all sys-tem components. Separate AC wires from audio cable to prevent hum or otherunwanted noise from being introduced into the system.
There are 2 connection modes for the subwoofer, 1) Mono/LFE (LFE is active) and2) Stereo (LFE is not active). In addition, there are 2 connection options under theStereo mode: A) Stereo with 1 subwoofer and B) Stereo with 2 subwoofers.
Choose the LFE mode to use the Resolution Subwoofer in your home theater sys-tem, driven by the LFE/sub processor output. Choose the stereo mode if you wantthe subwoofer(s) to interface with the main left and right loudspeakers full time, driv-en by the left and right channel outputs of your preamplifier or processor.
Connect the subwoofer to AC power, and turn signal sensing off. Follow these steps:
1. To connect the subwoofer in the LFE mode (LFE is active)
Put the input switch in the down position. Mono/LFE is selected. The mono/LFEinput is active, and the right stereo input and output are disabled.
Put the filter switch in the down position. LFE is selected. The left mono outputis now disabled. Low pass and high pass filters are deactivated. Do not selectfilter frequencies.
Connect the LFE output from the processor to the left mono/LFE input. Useeither a single-ended or balanced connection.
Set the level control to the three o’clock position.
Use the surround processor to balance the subwoofer level with the systemloudspeakers.
2A. To connect 1 subwoofer in the stereo mode (LFE is not active)
Put the input switch in the up position. Stereo is selected. All inputs are enabled.
Put the filter switch in the up position. Low pass is selected. The filters areactive.
Connect the left and right preamplifier outputs to the left mono/LFE and rightinputs. Connect the left/mono and right outputs to the left and right amplifierinputs. Use either single-ended or balanced connections.
Set the crossover points for high-pass frequency and low-pass frequency usingthe frequency adjust buttons.
Adjust the level control to balance the subwoofer with the system loudspeakers.
2B. To connect 2 subwoofers in the stereo mode (LFE not active)
Put the input switch in the down position. Mono/LFE is selected. The rightstereo input and output are disabled.
Put the filter switch in the up position. Low pass is selected. The filters areactive.
Connect the left or right preamplifier output to the left mono/LFE input.
Connect the left mono output to the left or right amplifier input. Use either single-ended or balanced connections.
Set the crossover points for high-pass frequency and low-pass frequency usingthe frequency adjust buttons.
Adjust the level control to balance the subwoofer with system loudspeakers.
Repeat for the second subwoofer.
Connecting theResolution Subwooferto Your System