Embed Size (px)
Citation preview
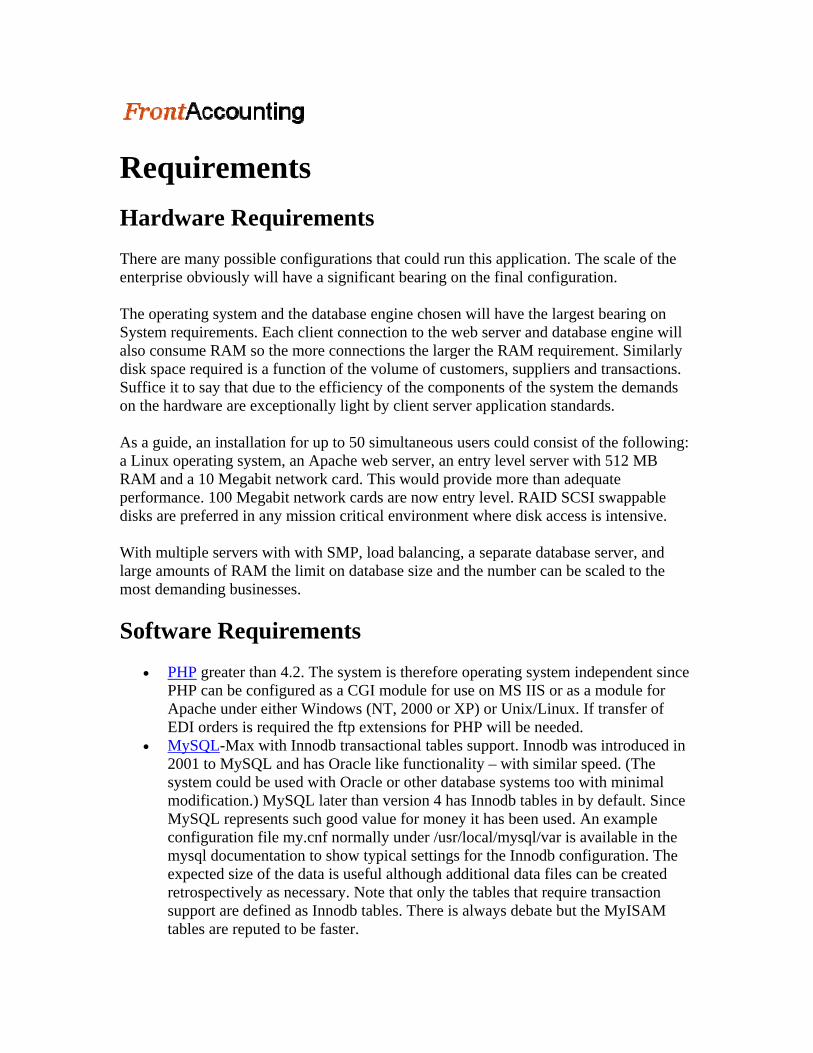
Requirements Hardware Requirements There are many possible configurations that could run this application. The scale of the enterprise obviously will have a significant bearing on the final configuration. The operating system and the database engine chosen will have the largest bearing on System requirements. Each client connection to the web server and database engine will also consume RAM so the more connections the larger the RAM requirement. Similarly disk space required is a function of the volume of customers, suppliers and transactions. Suffice it to say that due to the efficiency of the components of the system the demands on the hardware are exceptionally light by client server application standards. As a guide, an installation for up to 50 simultaneous users could consist of the following: a Linux operating system, an Apache web server, an entry level server with 512 MB RAM and a 10 Megabit network card. This would provide more than adequate performance. 100 Megabit network cards are now entry level. RAID SCSI swappable disks are preferred in any mission critical environment where disk access is intensive. With multiple servers with with SMP, load balancing, a separate database server, and large amounts of RAM the limit on database size and the number can be scaled to the most demanding businesses. Software Requirements
• PHP greater than 4.2. The system is therefore operating system independent since PHP can be configured as a CGI module for use on MS IIS or as a module for Apache under either Windows (NT, 2000 or XP) or Unix/Linux. If transfer of EDI orders is required the ftp extensions for PHP will be needed.
• MySQL-Max with Innodb transactional tables support. Innodb was introduced in 2001 to MySQL and has Oracle like functionality – with similar speed. (The system could be used with Oracle or other database systems too with minimal modification.) MySQL later than version 4 has Innodb tables in by default. Since MySQL represents such good value for money it has been used. An example configuration file my.cnf normally under /usr/local/mysql/var is available in the mysql documentation to show typical settings for the Innodb configuration. The expected size of the data is useful although additional data files can be created retrospectively as necessary. Note that only the tables that require transaction support are defined as Innodb tables. There is always debate but the MyISAM tables are reputed to be faster.

• A web server. Apache makes the most sense – but most web servers are supported by PHP in various forms.
• If the web server is accessible over the Internet and not just over a LAN then encrypted communications are required. The openssl and mod-ssl modules for apache can be easily used to ensure all data is transmitted in encrypted form.
There are many sources of information on the compilation and installation of MySQL and PHP. See the following links: http://logidac.com/apache/apache-install-rpm.phtml http://www.linux-sottises.net/en_apache_install.php The system could be used with many other database servers but it is tested and developed on MySQL. Independent benchmarks show that MySQL is one of the fastest for most common database tasks, particularly at establishing connections – since this is required for every page, MySQL is therefore ideally suited to the web environment. The ftp library for PHP is only required for sending order files to a Radio Beacon ftp server for remote warehouse services. Using Apache with mod_ssl and openssl secure sockets makes sense where there is any data transmitted over the Internet and not just over a LAN.
FrontAccounting Installation
Pre-requisites
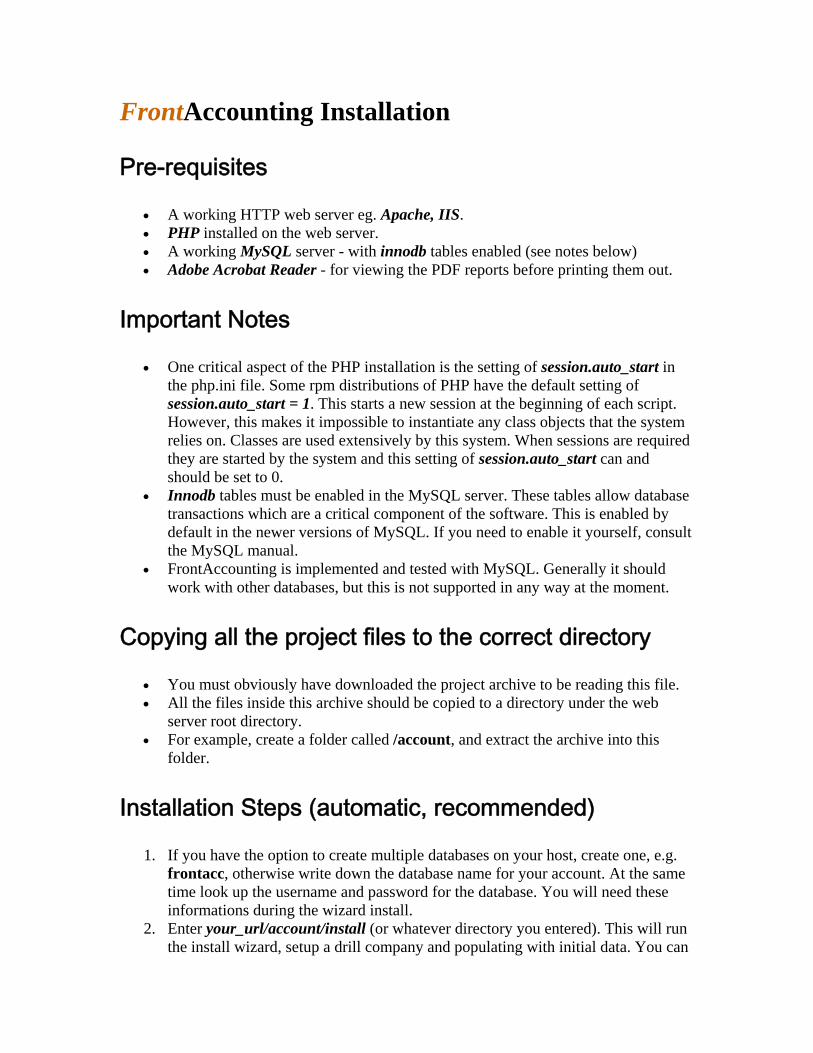
• A working HTTP web server eg. Apache, IIS. • PHP installed on the web server. • A working MySQL server - with innodb tables enabled (see notes below) • Adobe Acrobat Reader - for viewing the PDF reports before printing them out.
Important Notes
• One critical aspect of the PHP installation is the setting of session.auto_start in the php.ini file. Some rpm distributions of PHP have the default setting of session.auto_start = 1. This starts a new session at the beginning of each script. However, this makes it impossible to instantiate any class objects that the system relies on. Classes are used extensively by this system. When sessions are required they are started by the system and this setting of session.auto_start can and should be set to 0.
• Innodb tables must be enabled in the MySQL server. These tables allow database transactions which are a critical component of the software. This is enabled by default in the newer versions of MySQL. If you need to enable it yourself, consult the MySQL manual.
• FrontAccounting is implemented and tested with MySQL. Generally it should work with other databases, but this is not supported in any way at the moment.
Copying all the project files to the correct directory
• You must obviously have downloaded the project archive to be reading this file. • All the files inside this archive should be copied to a directory under the web
server root directory. • For example, create a folder called /account, and extract the archive into this
folder.
Installation Steps (automatic, recommended)
1. If you have the option to create multiple databases on your host, create one, e.g. frontacc, otherwise write down the database name for your account. At the same time look up the username and password for the database. You will need these informations during the wizard install.
2. Enter your_url/account/install (or whatever directory you entered). This will run the install wizard, setup a drill company and populating with initial data. You can
later on create your own real company. It is a good idea to get familiar with the system before starting your own company.
3. After successfully install, remove or rename your install directory for safety reasons. You don't need it any more.
Installation Steps (manual, for advanced users, not recommended)
1. Creating the Database 1. NOTE : As FrontAccounting is still heavily under development, the
database structure will ALWAYS change between releases, so if you have a database that you created for a previous release of FrontAccounting, it WILL NOT WORK after installing a new release. Please delete any old databases before proceeding.
2. We strongly suggest using a GUI to manage your database(s) and database users. If you don’t have any, download phpMyAdmin.
3. Create a database with a name of your choice. The default in config_db.php is ‘frontacc’, but of course you can select whatever name you desire.
4. Populate the database you have created. There are two scripts provided to populate the database (both inside the folder /sql) :
1. en_US-demo.sql. This has a minimal amount of demonstration data set up so that transactions can be tried to see how the system works.
2. en_US-new.sql. This script has only the basic data necessary to start a new company system off. If you wish to set up your company on FrontAccounting then this is the script to use.
5. Now that the database is created you will need to set up a database user to access this database. DO NOT USE THE USER ‘ROOT’. Set up a new user and give that user full privilege over the database ‘frontacc’.
6. After successfully install, remove or rename your install directory your_url/account/install (or whatever directory you entered) for safety reasons. You don't need it any more.
2. Editing config_db.php 1. config_db.php contains connection information for the database. These
must be set to your local settings or you will not be able to access FrontAccounting. This information is commented out. Uncomment it.
2. FrontAccounting allows multiple connections; you can enter as many connections as you have separate entities (most people will use only one).
3. $db_connections is an array of connections – for each connection :
4. “name” is the name of the connection, this is the name that will be displayed to the user
5. “host” is the computer IP address or name where the database is. The default is localhost assuming that the web server is also the sql server.
6. “dbuser” is the user name under which the database should be accessed. NB, again, do not use the user ROOT. A user with appropriate privileges must be set up.
7. “dbpassword” is the password for “dbuser”. You would have entered this when you created “dbuser”.
8. “dbname” is the name of the database. The provided scripts use the name frontacc.
9. “tbpref” is the table prefix for the tables. If you only have access to one database, you must use table prefix to separate the companies. Table prefix is set by a table prefix counter inside config_db.php, e.g. 0_ for the first company.
Logging In For the First Time
1. Open a browser and enter the URL for the web server directory where FrontAccounting is installed.
2. Enter the user name: 'admin' 3. Enter the password: 'password' 4. (NB : enter without quotation marks. If you went through the automatic install,
enter your password here). 5. You can set up additional user accounts from the System Setup tab. Be careful not
to delete the demonstration user until a new user has been set up. If there are no users defined the next time you try to login you won't be able to enter the system. The only way then to login is to manually edit the SQL table "users" by inserting a user.
Setting Up Company Specific Data
1. All the standing configuration data is defined from the Setup tab and each link should be reviewed to enter appropriate data for the business. Setup wizard that guide you through this process has been implemented and we strongly recommend you to use this approach, see Installation steps (automatic, recommended) .
Troubleshooting
1. If FrontAccounting is installed locally, you may have the session save path not set correctly. Normally this is set in your php.ini (for Windows). The entry is

called session.save_path. Make sure this is set to a directory that actually exists. The default is set to /tmp, which may not be valid.
2. If you are installing FrontAccounting onto a shared server, you may have to set the session save path within FrontAccounting. At the top of config.php you will find this line :
3. Uncomment this line and set the path to a directory that exists on your server. Make sure that you have read/write privileges on this directory.
FrontAccounting Update
Important Notes
• You can easily upload all the files to your installation folder on the server overwriting the existing files, if you take these important steps:
1. Backup (download) the following files to another folder: 1. config_db.php (contains information about the companies and
connection info). 2. config.php (contains various settings. You only need to backup
this file if you have done manually changes to it. 3. /lang/installed_languages.inc (contains information about the
installed languages) 4. /modules/installed_modules.php (contains information about
installed modules, only vers. 1.1) 5. if you have made changes to other files, like themes or so, backup
these files too. 2. Upload all the new files. 3. Restore the files mentioned in #1. Be careful with config.db. Look into
variances. There might be new variables in the new version. It might be easier to manually change your former values in the new file.
4. Rename or remove the /install folder (you have already performed the install process earlier).
FrontAccounting Login
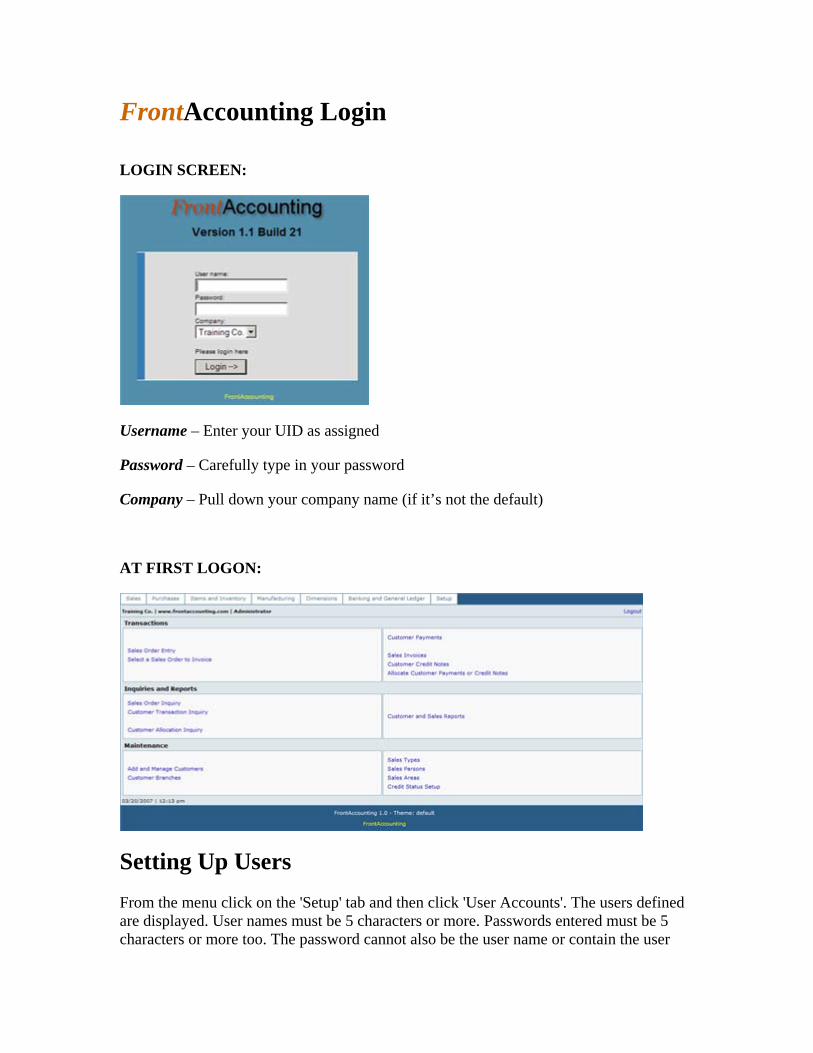
LOGIN SCREEN:
Username – Enter your UID as assigned
Password – Carefully type in your password
Company – Pull down your company name (if it’s not the default)
AT FIRST LOGON:
Setting Up Users From the menu click on the 'Setup' tab and then click 'User Accounts'. The users defined are displayed. User names must be 5 characters or more. Passwords entered must be 5 characters or more too. The password cannot also be the user name or contain the user

name. It is not necessary to enter the full name telephone and other details. The access level selected is important as this determines the pages that the user can access. In any business where the employees are not also the owners it is advisable to split the functions between staff so that no user can complete an entire transaction. There are occasions in smaller businesses where this is impractical. However, the system has great flexibility to allow the user access to be finely defined. As well as allowing the access to be restricted there is some flexibility about the links that are made available to a user. In the 'User Accounts' screen the system administrator can define which tabs of the main menu are activated and available to the user. There is also the facility to set up customers with their own logon. This restricts them to inquiries on their account including invoice re-prints and to entering new sales orders. Customer logins do not allow any modification to the pricing.
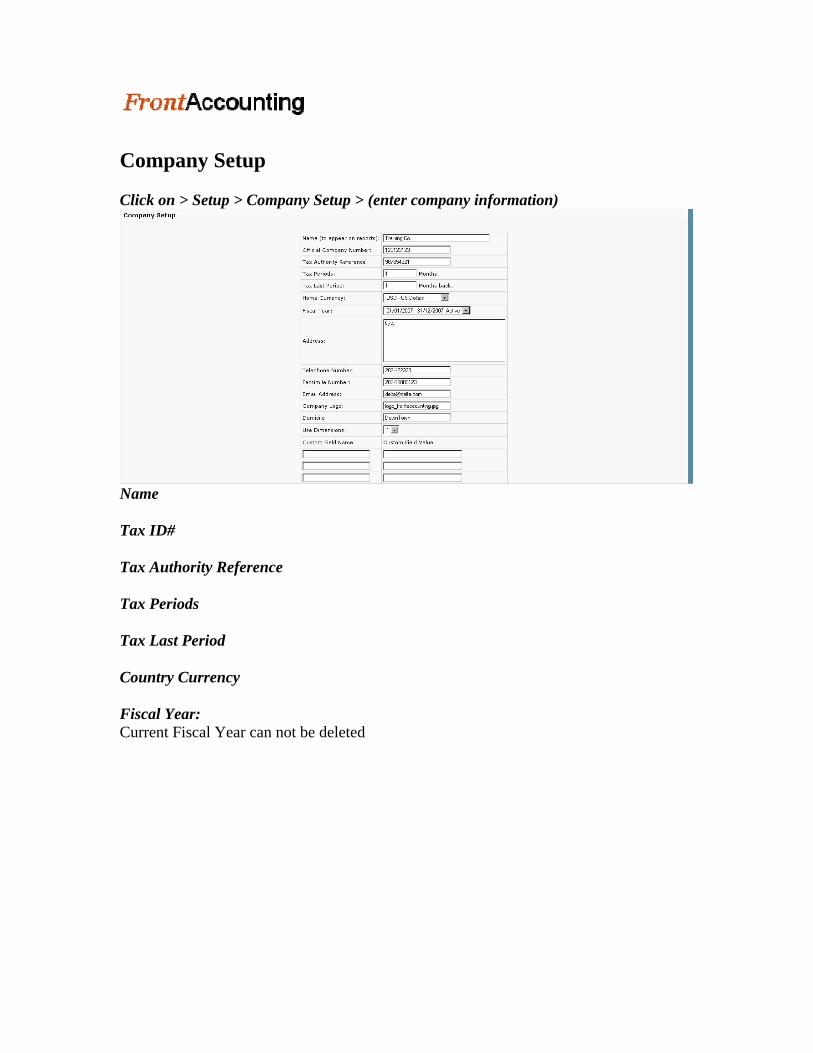
Company Setup Click on > Setup > Company Setup > (enter company information)
Name Tax ID# Tax Authority Reference Tax Periods Tax Last Period Country Currency Fiscal Year: Current Fiscal Year can not be deleted
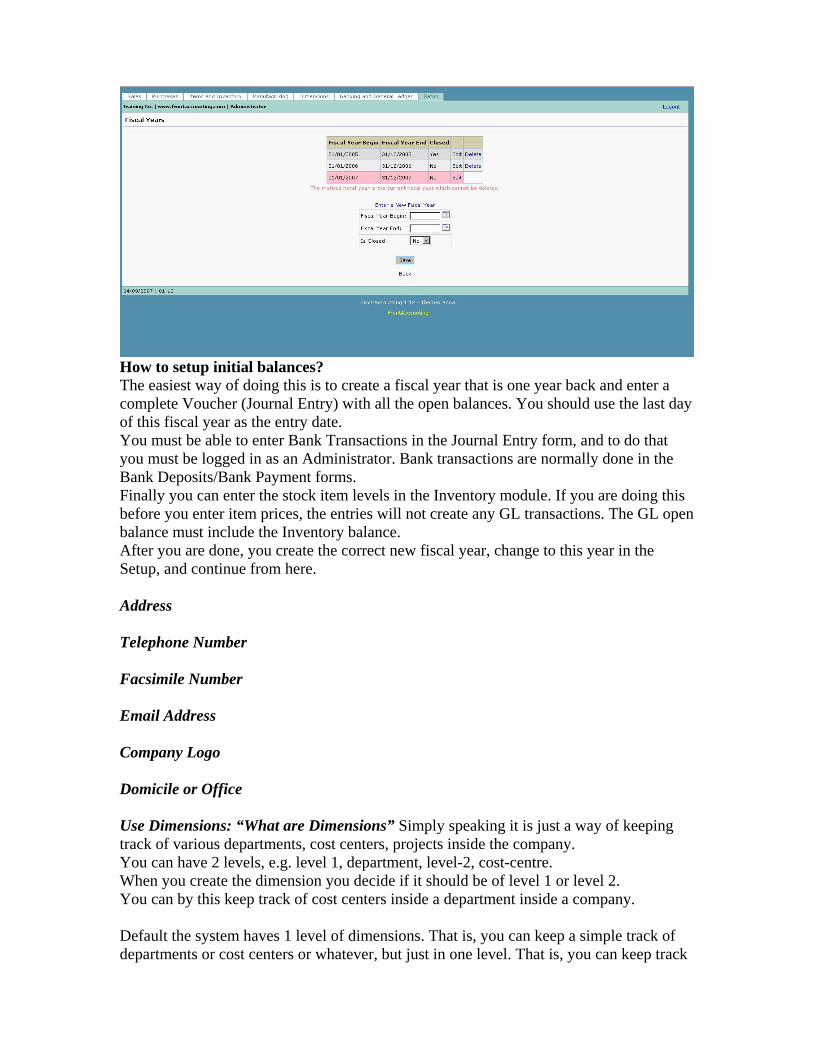
How to setup initial balances? The easiest way of doing this is to create a fiscal year that is one year back and enter a complete Voucher (Journal Entry) with all the open balances. You should use the last day of this fiscal year as the entry date. You must be able to enter Bank Transactions in the Journal Entry form, and to do that you must be logged in as an Administrator. Bank transactions are normally done in the Bank Deposits/Bank Payment forms. Finally you can enter the stock item levels in the Inventory module. If you are doing this before you enter item prices, the entries will not create any GL transactions. The GL open balance must include the Inventory balance. After you are done, you create the correct new fiscal year, change to this year in the Setup, and continue from here. Address Telephone Number Facsimile Number Email Address Company Logo Domicile or Office Use Dimensions: “What are Dimensions” Simply speaking it is just a way of keeping track of various departments, cost centers, projects inside the company. You can have 2 levels, e.g. level 1, department, level-2, cost-centre. When you create the dimension you decide if it should be of level 1 or level 2. You can by this keep track of cost centers inside a department inside a company. Default the system haves 1 level of dimensions. That is, you can keep a simple track of departments or cost centers or whatever, but just in one level. That is, you can keep track
of department’s only or cost centers only inside a company. If you don't need dimensions you can set it to 0 in the company setup. Here you can choose between level 0, 1 or 2. Custom Field Name Custom Field Valve
Click > update NOTE: Once Company information is set-up now you can setup users.
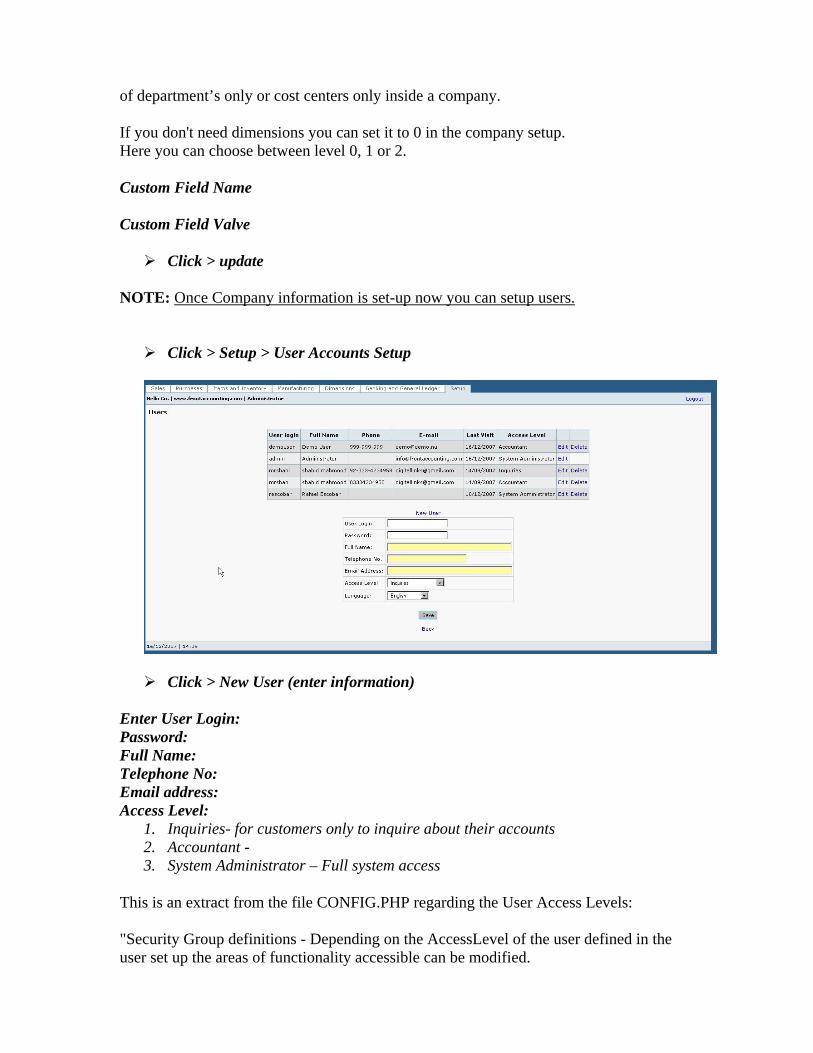
Click > Setup > User Accounts Setup
Click > New User (enter information) Enter User Login: Password: Full Name: Telephone No: Email address: Access Level:
1. Inquiries- for customers only to inquire about their accounts 2. Accountant - 3. System Administrator – Full system access
This is an extract from the file CONFIG.PHP regarding the User Access Levels: "Security Group definitions - Depending on the AccessLevel of the user defined in the user set up the areas of functionality accessible can be modified.
Each AccessLevel is associated with an array containing the security categories that the user is entitled to access Each script has a particular security category associated with it. If the security setting of the page is contained in the security group as determined by the access level then the user will be allowed access. Each page has a $page security = x; variable This value is compared to contents of the array applicable which is based on the access level of the user. Access authorization is checked in header.inc this is where _SESSION["AccessLevel"] is the index of the security groups array. If you wish to add more security groups with then you must add a new Security Heading to the security headings array and a new array of Security categories to the Security Groups array This mechanism allows more fine grained control of access security groups is an array of arrays The index is the order in which the array of allowed pages is defined new ones can be defined at will or by changing the numbers in each array the security access can be tailored. These numbers need to read in conjunction with the Page Security index"
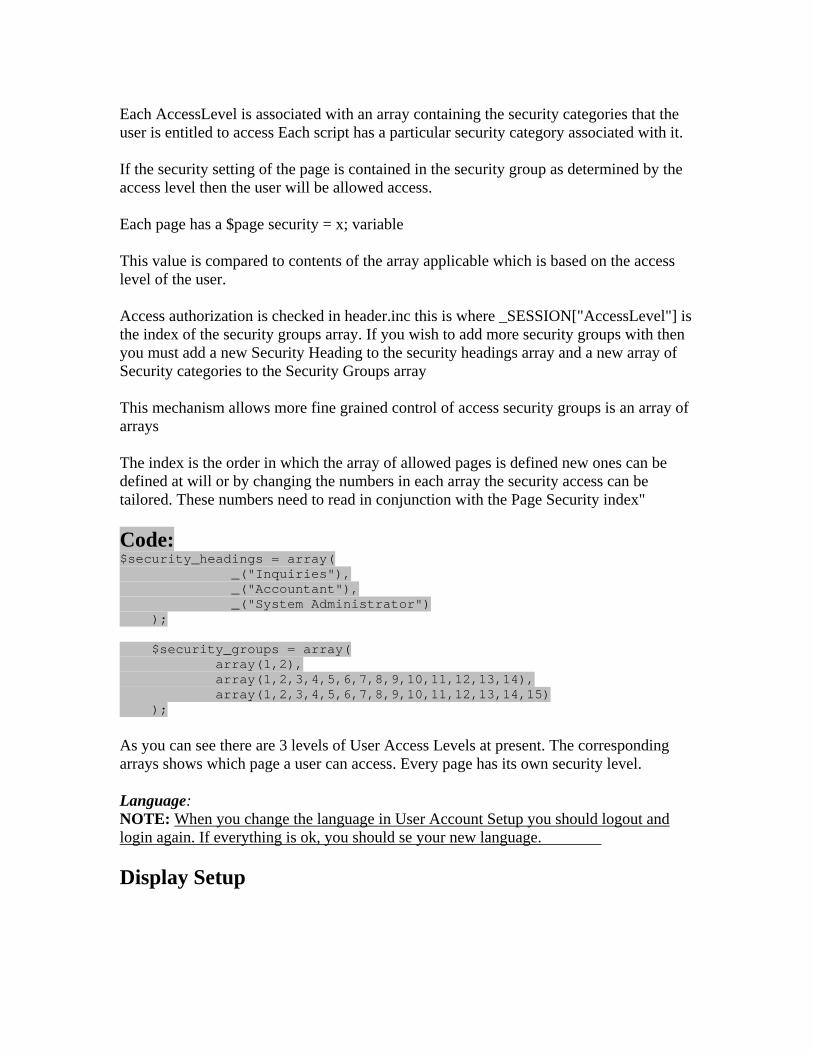
Code: $security_headings = array( _("Inquiries"), _("Accountant"), _("System Administrator") ); $security_groups = array( array(1,2), array(1,2,3,4,5,6,7,8,9,10,11,12,13,14), array(1,2,3,4,5,6,7,8,9,10,11,12,13,14,15) );
As you can see there are 3 levels of User Access Levels at present. The corresponding arrays shows which page a user can access. Every page has its own security level.
Language: NOTE: When you change the language in User Account Setup you should logout and login again. If everything is ok, you should se your new language. Display Setup
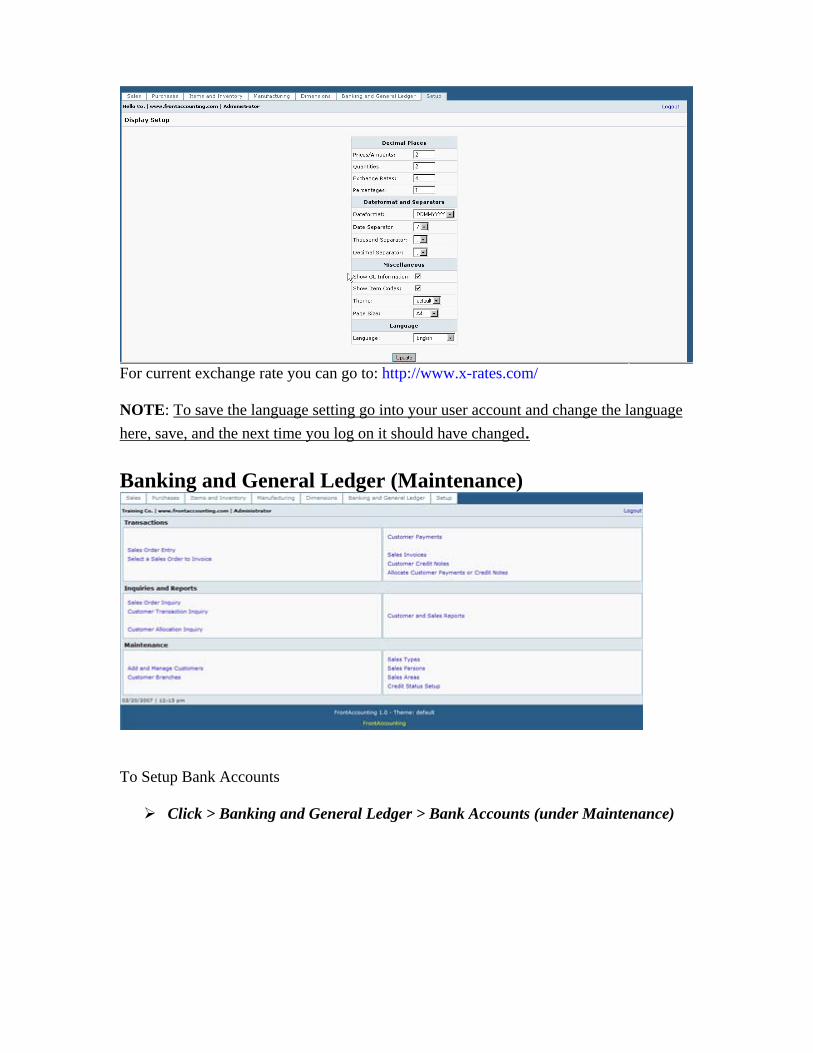
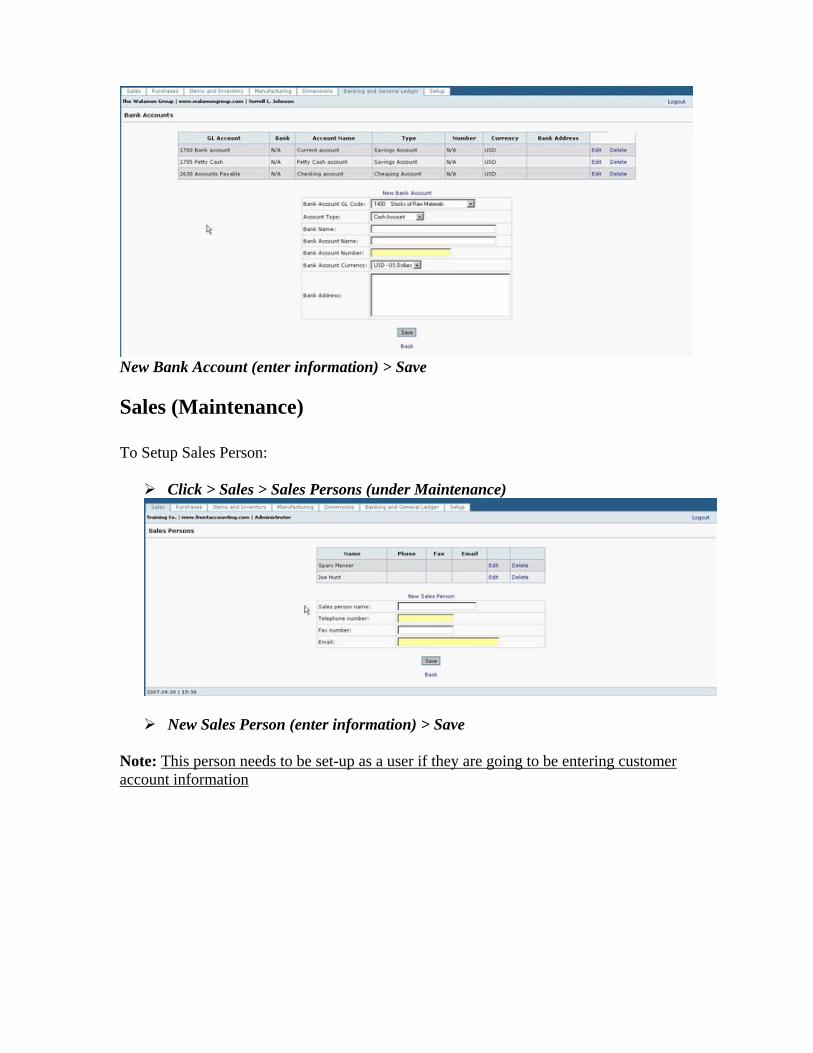
For current exchange rate you can go to: http://www.x-rates.com/ NOTE: To save the language setting go into your user account and change the language here, save, and the next time you log on it should have changed. Banking and General Ledger (Maintenance)
To Setup Bank Accounts
Click > Banking and General Ledger > Bank Accounts (under Maintenance)
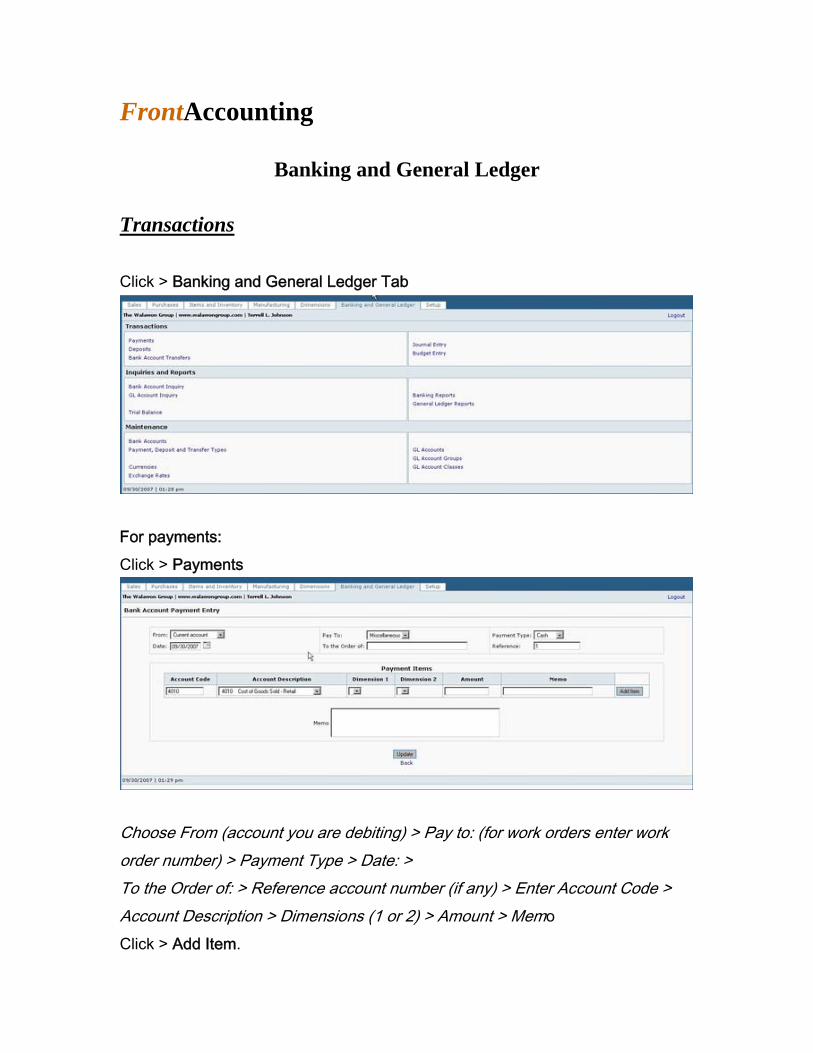
New Bank Account (enter information) > Save
Sales (Maintenance) To Setup Sales Person:
Click > Sales > Sales Persons (under Maintenance)
New Sales Person (enter information) > Save Note: This person needs to be set-up as a user if they are going to be entering customer account information
FrontAccounting
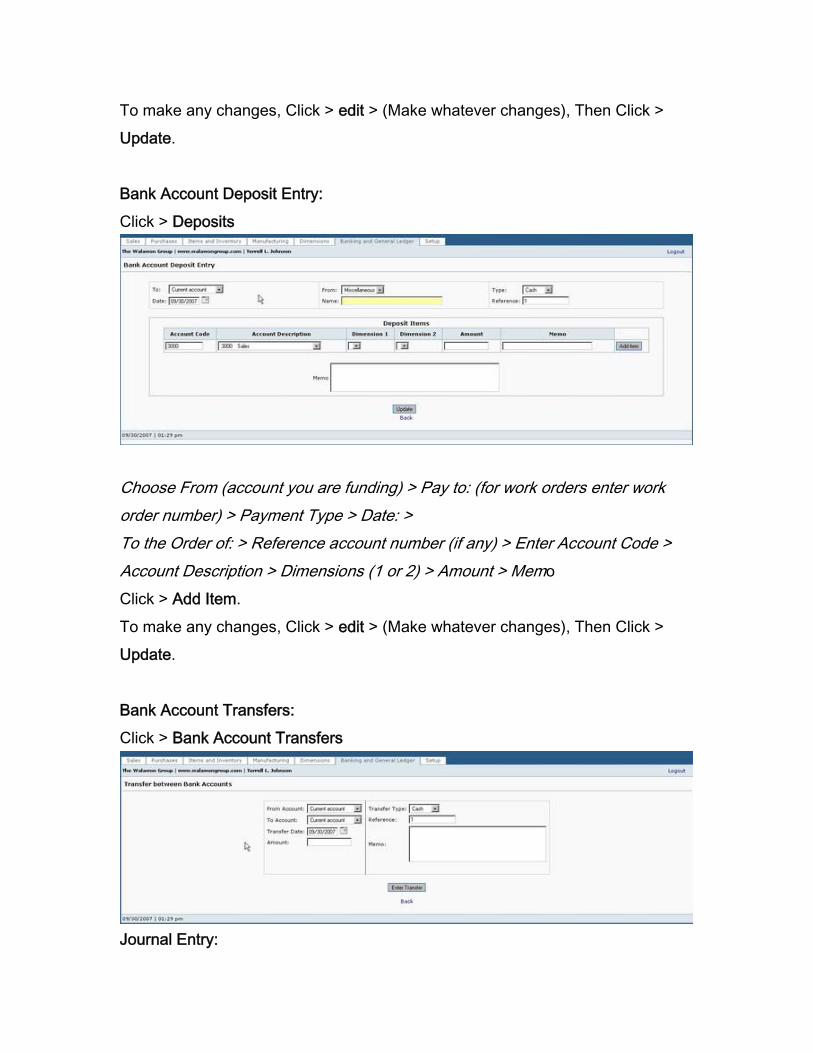
Banking and General Ledger Transactions Click > Banking and General Ledger Tab
For payments: Click > Payments
Choose From (account you are debiting) > Pay to: (for work orders enter work order number) > Payment Type > Date: > To the Order of: > Reference account number (if any) > Enter Account Code > Account Description > Dimensions (1 or 2) > Amount > Memo Click > Add Item.
To make any changes, Click > edit > (Make whatever changes), Then Click > Update. Bank Account Deposit Entry: Click > Deposits
Choose From (account you are funding) > Pay to: (for work orders enter work order number) > Payment Type > Date: > To the Order of: > Reference account number (if any) > Enter Account Code > Account Description > Dimensions (1 or 2) > Amount > Memo Click > Add Item. To make any changes, Click > edit > (Make whatever changes), Then Click > Update. Bank Account Transfers: Click > Bank Account Transfers
Journal Entry:
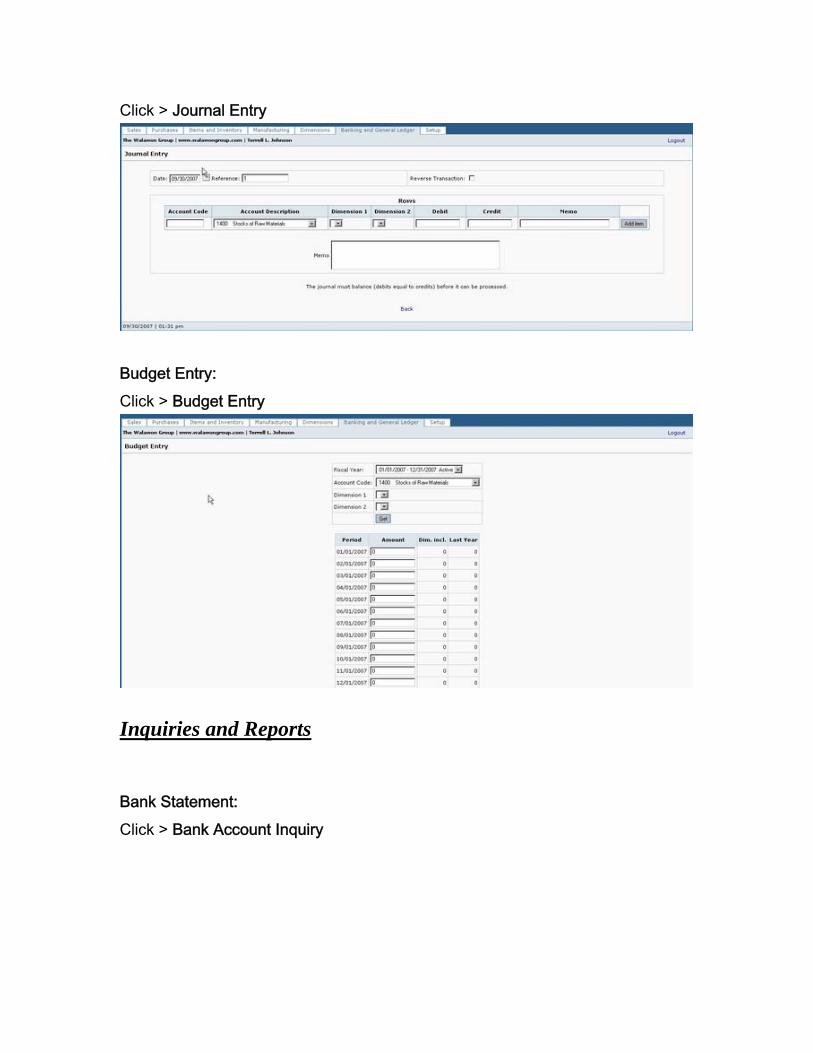
Click > Journal Entry
Budget Entry: Click > Budget Entry
Inquiries and Reports
Bank Statement: Click > Bank Account Inquiry
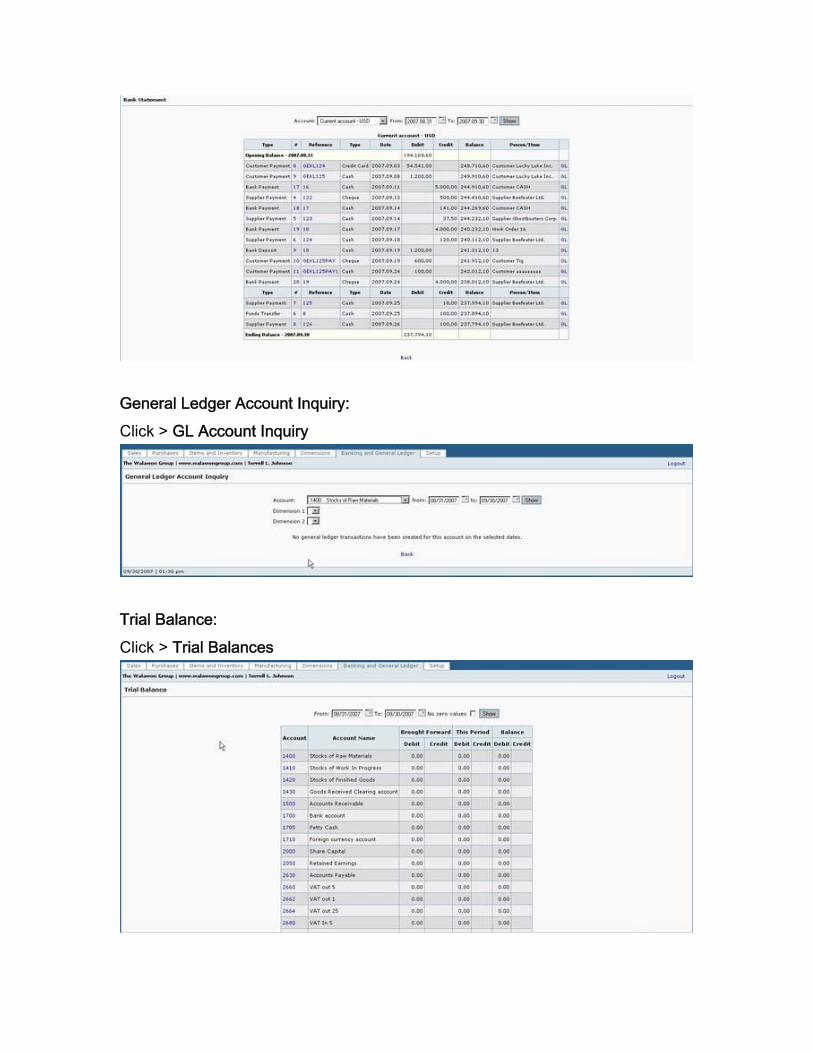
General Ledger Account Inquiry: Click > GL Account Inquiry
Trial Balance: Click > Trial Balances
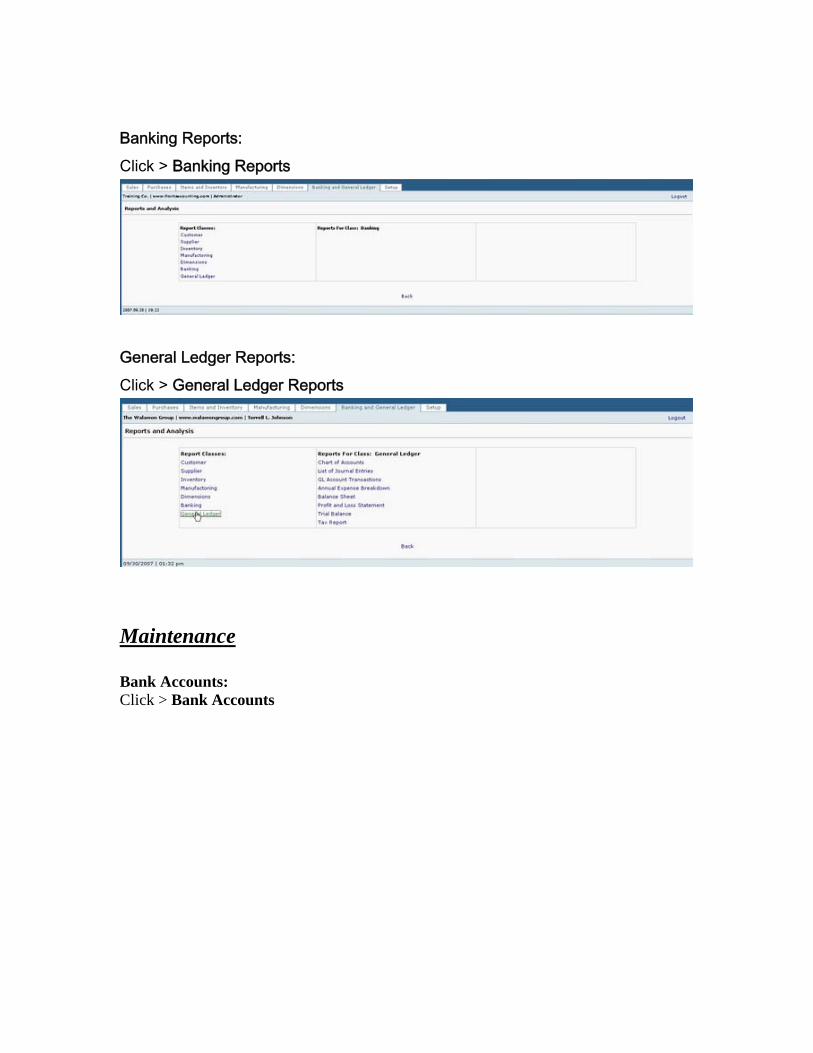
Banking Reports: Click > Banking Reports
General Ledger Reports: Click > General Ledger Reports
Maintenance Bank Accounts: Click > Bank Accounts
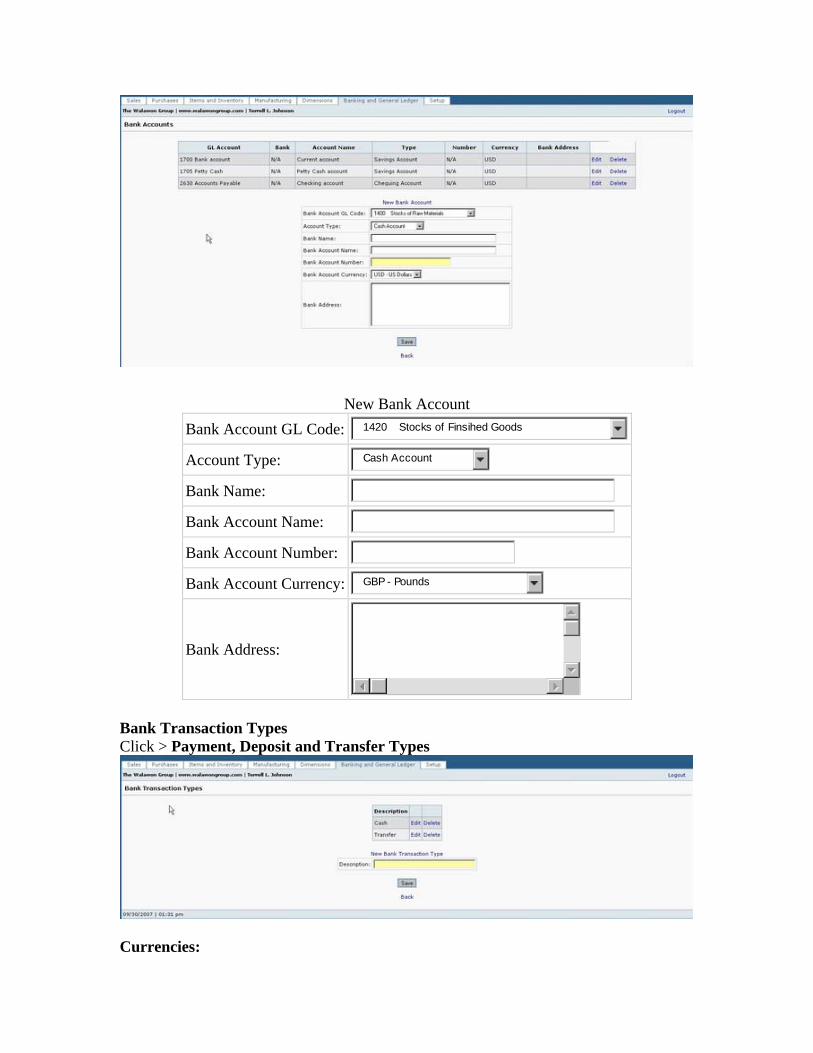
New Bank Account Bank Account GL Code: 1420 Stocks of Finsihed Goods Account Type: Cash Account Bank Name: Bank Account Name: Bank Account Number: Bank Account Currency: GBP - Pounds
Bank Address:
Bank Transaction Types Click > Payment, Deposit and Transfer Types
Currencies:
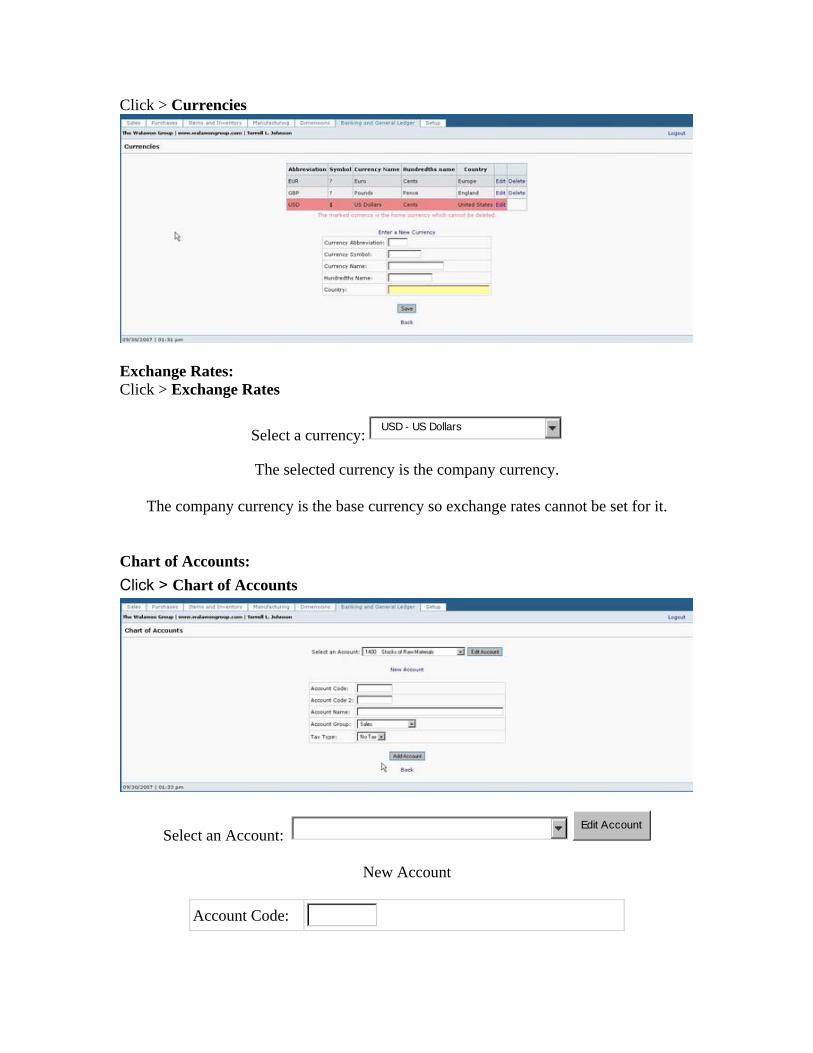
Click > Currencies
Exchange Rates: Click > Exchange Rates
Select a currency: USD - US Dollars
The selected currency is the company currency.
The company currency is the base currency so exchange rates cannot be set for it. Chart of Accounts: Click > Chart of Accounts
Select an Account: Edit Account
New Account
Account Code:

Account Code 2: Account Name: Account Group: Tax Type:
Add Account
The Chart of Accounts A default chart of accounts is set up. However, in most cases the company will wish to adopt the chart of accounts it has used traditionally. Chart of accounts maintenance - deletion of accounts and adding of new accounts is done from the General Ledger tab. This would be a starting point for data input of a new system. Where the GL integration features are to be used, setting up the chart of accounts will be a necessary first step. Once a general ledger account has a posting to it then it will not be allowed to be deleted. General Ledger - Maintenance. It is important to get the chart of accounts right before entries are made which make it difficult to modify the chart. You can't delete accounts with postings made to them. GL Account Groups: Click > GL Account Groups
Name Subgroup Of Class Type Cash/Bank Assets Edit DeleteAccounts Receivable Assets Edit DeleteFixed Assets Assets Edit DeleteInventory Assets Edit DeleteCash Account - Counter Clerks Cash/Bank Assets Edit DeleteAccounts Payable Liabilities Edit DeleteSales Income Edit DeleteCost of Sales Costs Edit DeleteExpenses Costs Edit DeleteDepreciations Costs Edit DeleteFinancials Costs Edit DeleteEquity Equity Edit DeleteStaff Fund Balances Equity Edit Delete
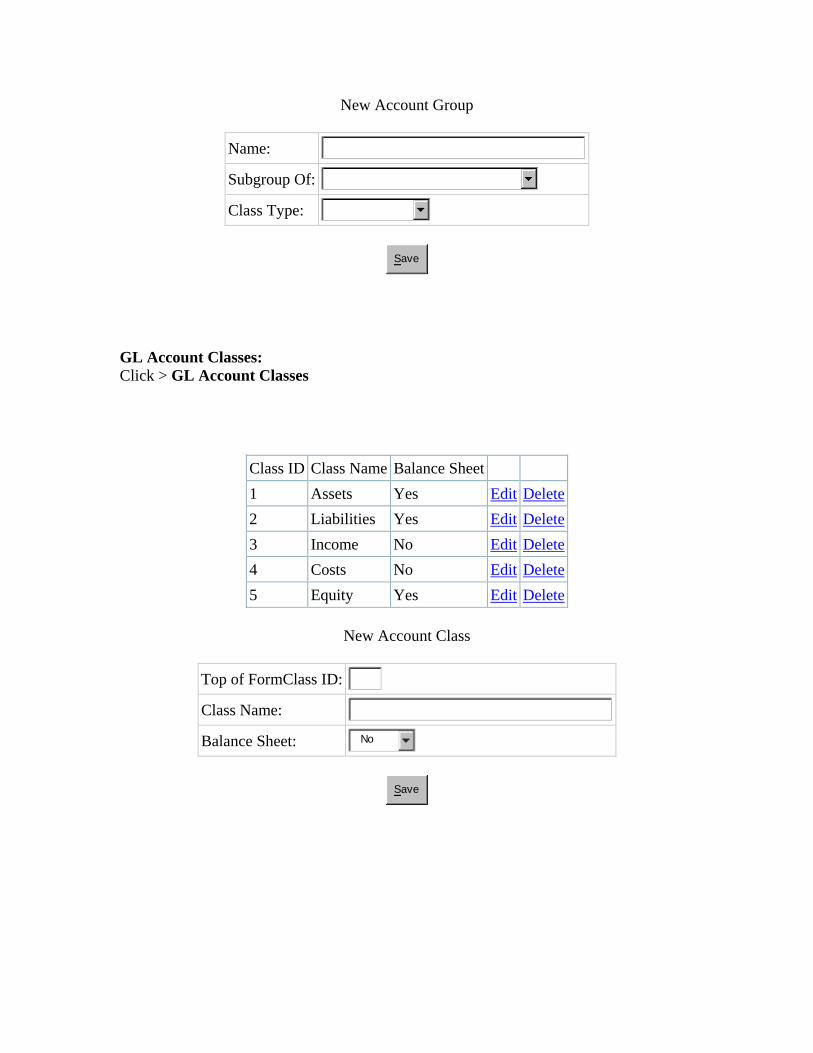
New Account Group
Name: Subgroup Of: Class Type:
Save
GL Account Classes: Click > GL Account Classes
Class ID Class Name Balance Sheet 1 Assets Yes Edit Delete2 Liabilities Yes Edit Delete3 Income No Edit Delete4 Costs No Edit Delete5 Equity Yes Edit Delete
New Account Class
Top of FormClass ID: Class Name: Balance Sheet: No
Save
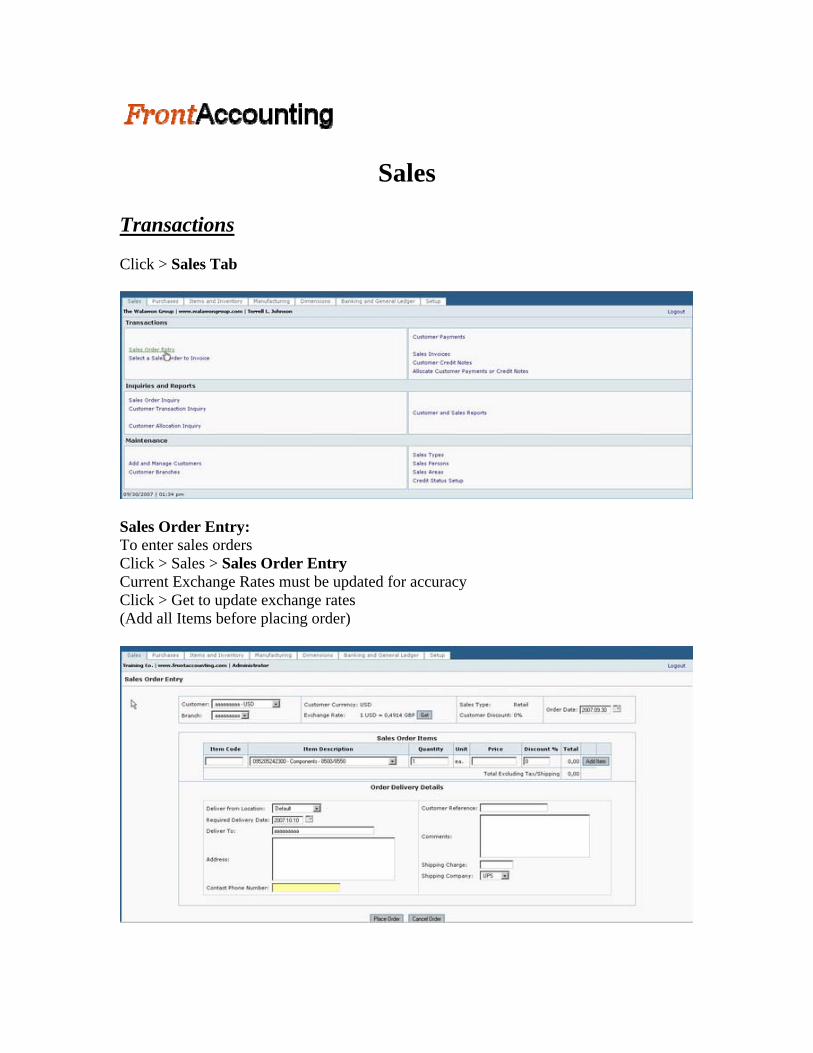
Sales Transactions Click > Sales Tab
Sales Order Entry: To enter sales orders Click > Sales > Sales Order Entry Current Exchange Rates must be updated for accuracy Click > Get to update exchange rates (Add all Items before placing order)
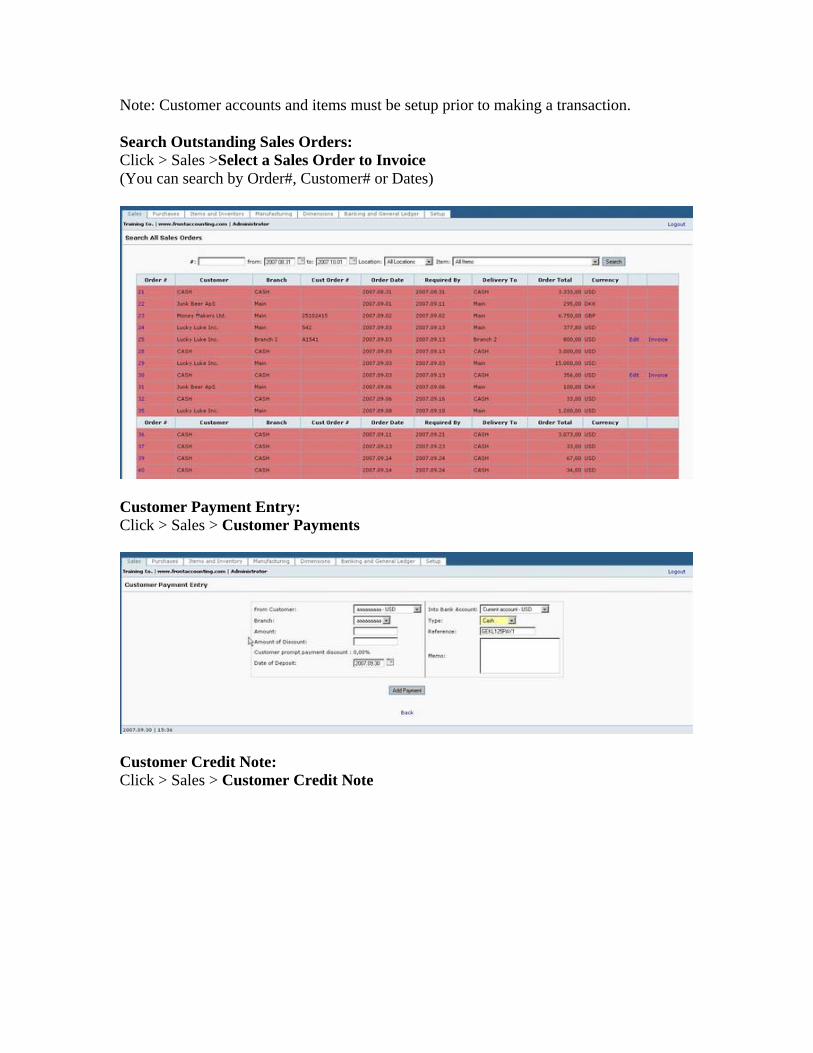
Note: Customer accounts and items must be setup prior to making a transaction. Search Outstanding Sales Orders: Click > Sales >Select a Sales Order to Invoice (You can search by Order#, Customer# or Dates)
Customer Payment Entry: Click > Sales > Customer Payments
Customer Credit Note: Click > Sales > Customer Credit Note
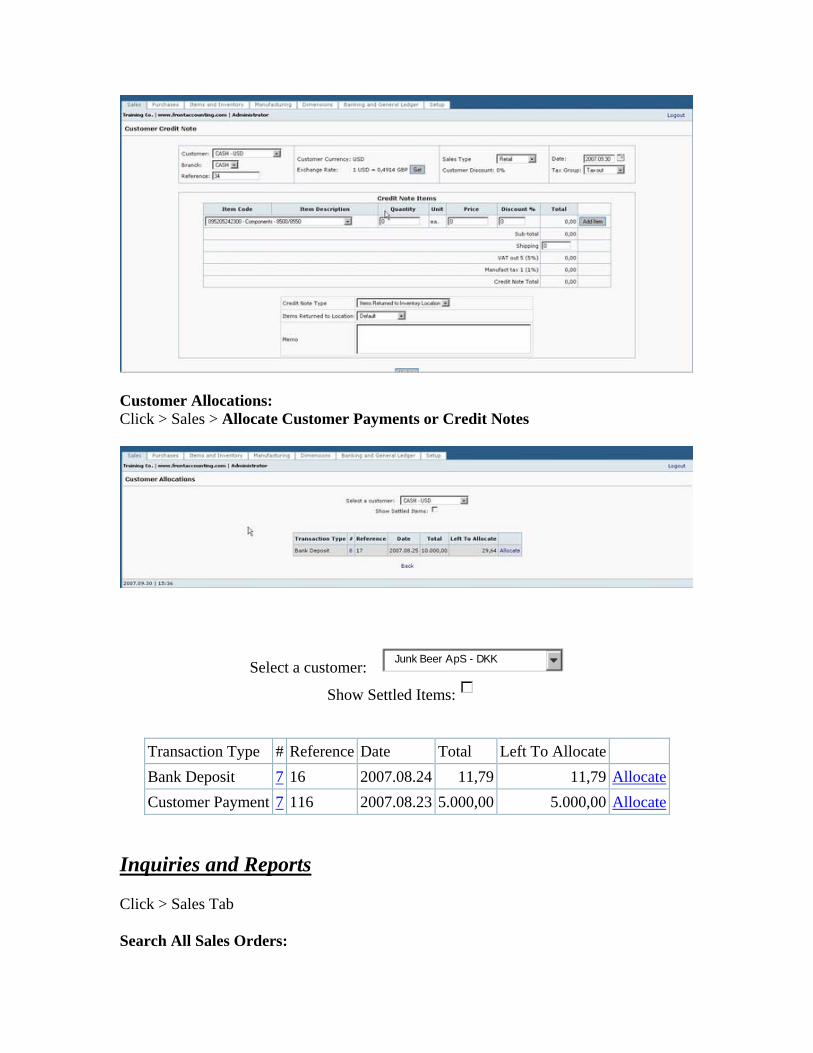
Customer Allocations: Click > Sales > Allocate Customer Payments or Credit Notes
Select a customer: Junk Beer ApS - DKK
Show Settled Items:
Transaction Type # Reference Date Total Left To Allocate Bank Deposit 7 16 2007.08.24 11,79 11,79 AllocateCustomer Payment 7 116 2007.08.23 5.000,00 5.000,00 Allocate
Inquiries and Reports Click > Sales Tab Search All Sales Orders:
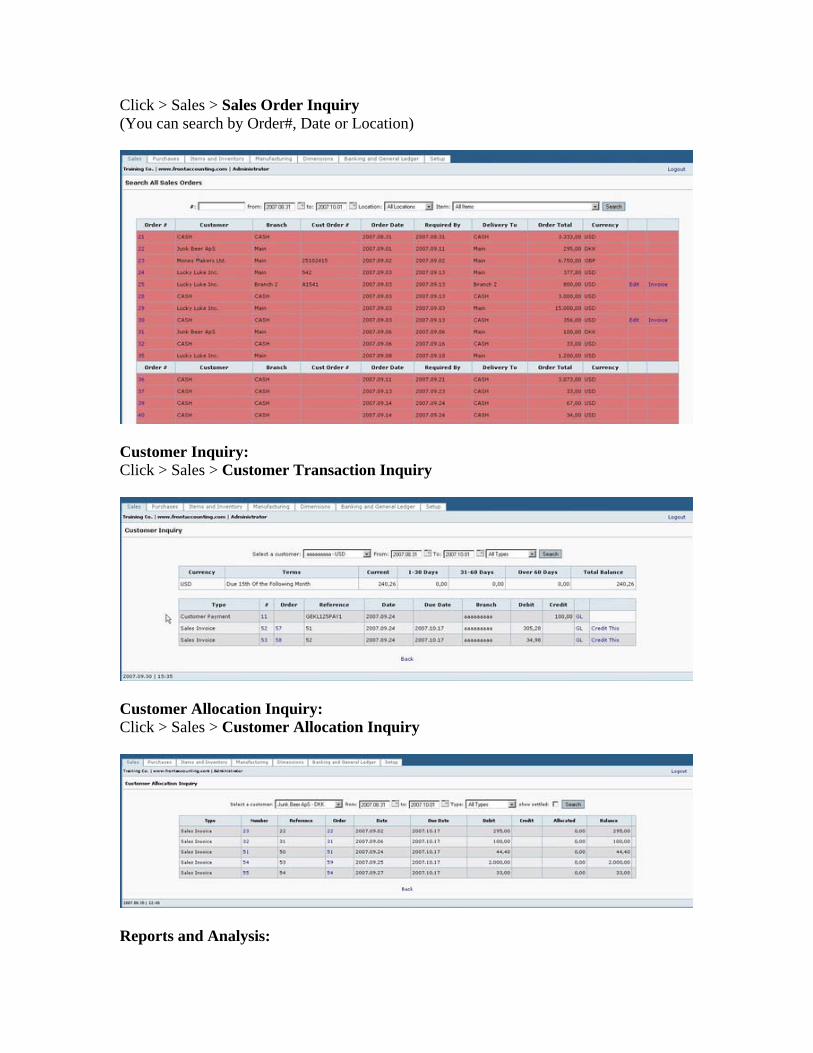
Click > Sales > Sales Order Inquiry (You can search by Order#, Date or Location)
Customer Inquiry: Click > Sales > Customer Transaction Inquiry
Customer Allocation Inquiry: Click > Sales > Customer Allocation Inquiry
Reports and Analysis:
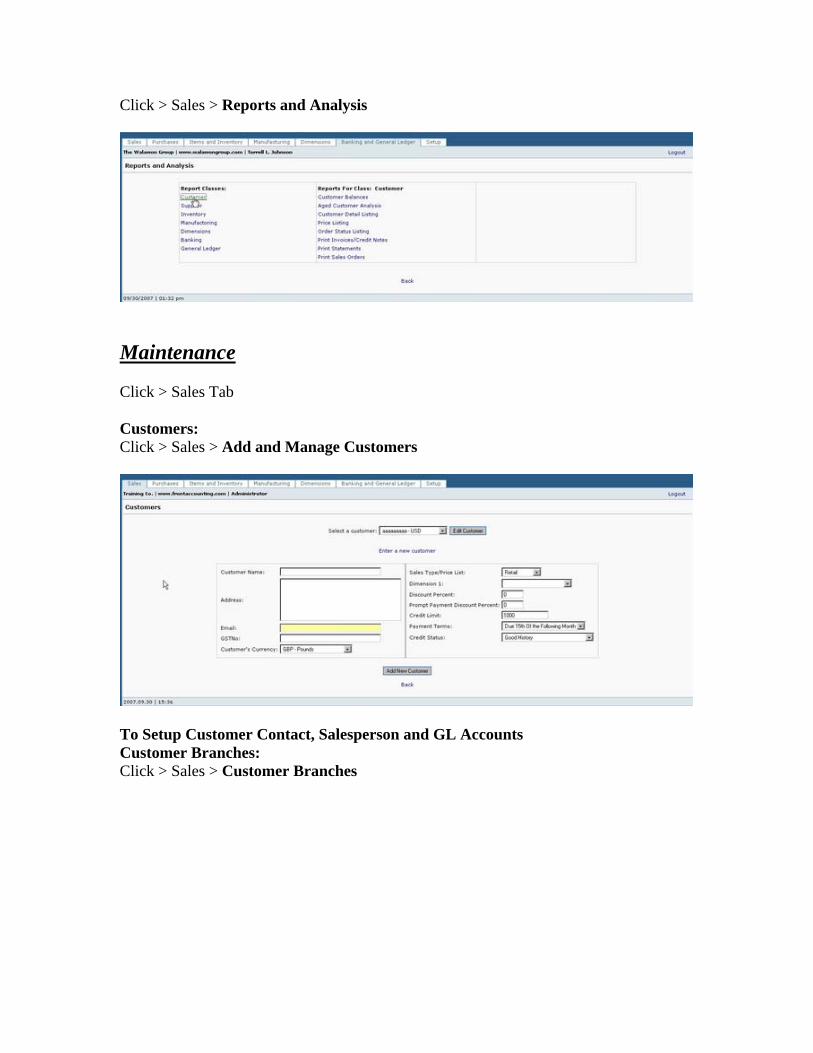
Click > Sales > Reports and Analysis
Maintenance Click > Sales Tab Customers: Click > Sales > Add and Manage Customers
To Setup Customer Contact, Salesperson and GL Accounts Customer Branches: Click > Sales > Customer Branches
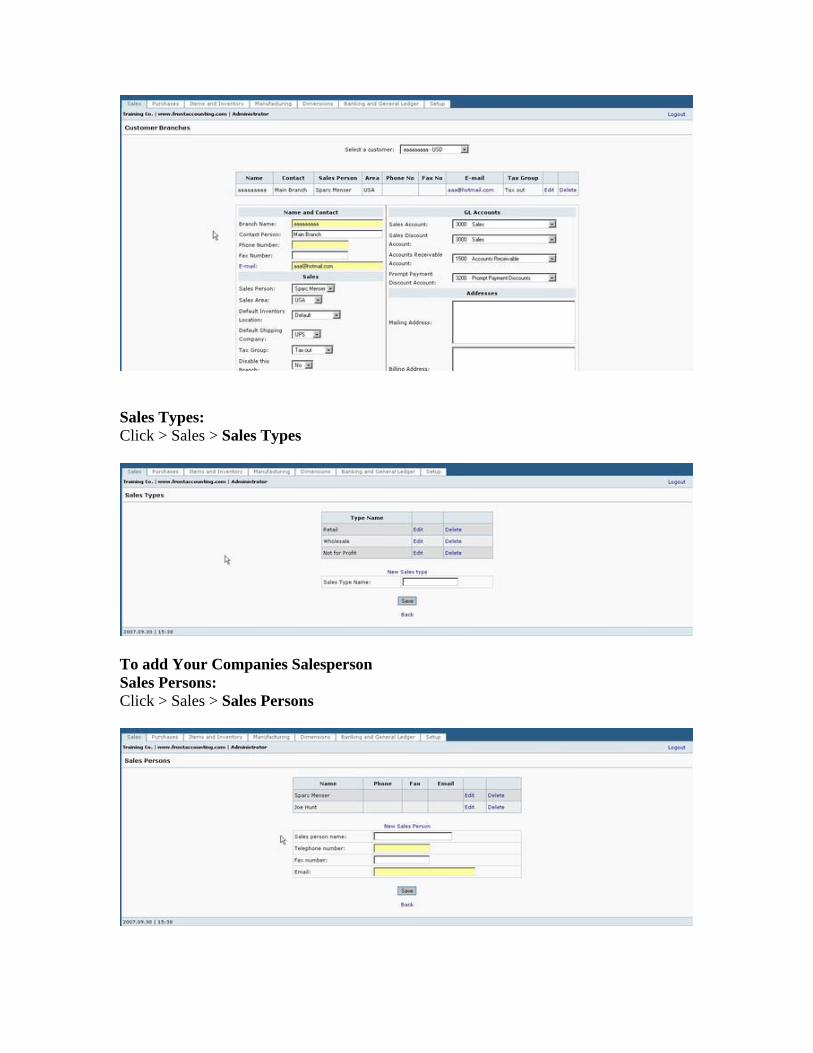
Sales Types: Click > Sales > Sales Types
To add Your Companies Salesperson Sales Persons: Click > Sales > Sales Persons
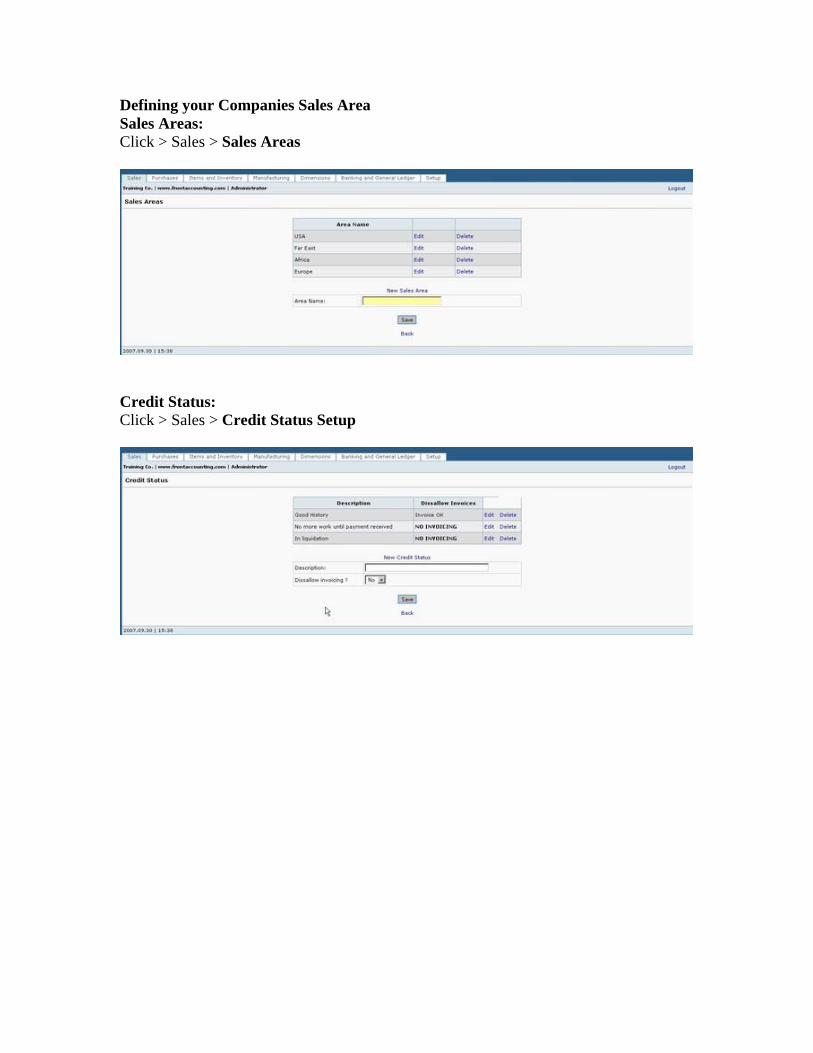
Defining your Companies Sales Area Sales Areas: Click > Sales > Sales Areas
Credit Status: Click > Sales > Credit Status Setup