Embed Size (px)
Citation preview
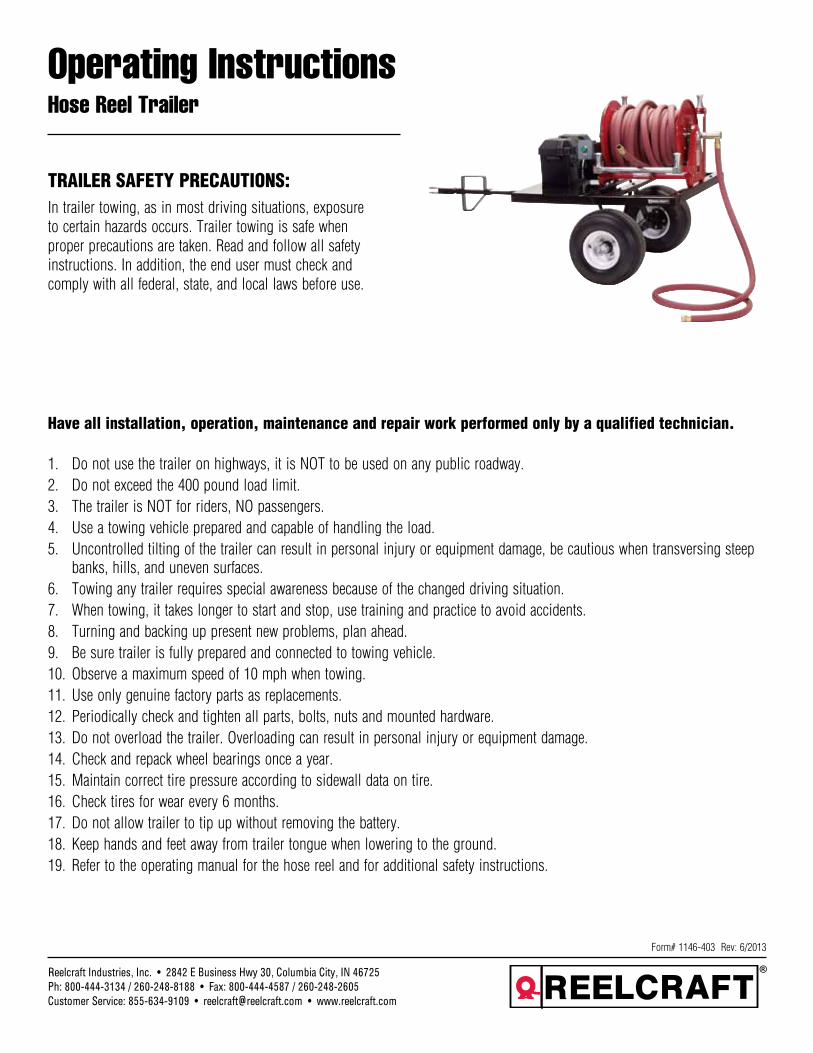
Operating Instructions
Reelcraft Industries, Inc. • 2842 E Business Hwy 30, Columbia City, IN 46725Ph: 800-444-3134 / 260-248-8188 • Fax: 800-444-4587 / 260-248-2605Customer Service: 855-634-9109 • [email protected] • www.reelcraft.com
Form# 1146-403 Rev: 6/2013
Hose Reel Trailer
Have all installation, operation, maintenance and repair work performed only by a qualified technician.
1. Do not use the trailer on highways, it is NOT to be used on any public roadway.2. Do not exceed the 400 pound load limit.3. The trailer is NOT for riders, NO passengers.4. Use a towing vehicle prepared and capable of handling the load.5. Uncontrolled tilting of the trailer can result in personal injury or equipment damage, be cautious when transversing steep
banks, hills, and uneven surfaces.6. Towing any trailer requires special awareness because of the changed driving situation.7. When towing, it takes longer to start and stop, use training and practice to avoid accidents.8. Turning and backing up present new problems, plan ahead.9. Be sure trailer is fully prepared and connected to towing vehicle.10. Observe a maximum speed of 10 mph when towing.11. Use only genuine factory parts as replacements.12. Periodically check and tighten all parts, bolts, nuts and mounted hardware.13. Do not overload the trailer. Overloading can result in personal injury or equipment damage.14. Check and repack wheel bearings once a year.15. Maintain correct tire pressure according to sidewall data on tire.16. Check tires for wear every 6 months.17. Do not allow trailer to tip up without removing the battery.18. Keep hands and feet away from trailer tongue when lowering to the ground.19. Refer to the operating manual for the hose reel and for additional safety instructions.
TRAILER SAFETY PRECAUTIONS:In trailer towing, as in most driving situations, exposure to certain hazards occurs. Trailer towing is safe when proper precautions are taken. Read and follow all safety instructions. In addition, the end user must check and comply with all federal, state, and local laws before use.

Hose Reel Trailer
Page 2 www.reelcraft.com
*Only used on motorized reel models**Included in 600813 Battery Box Assembly
***Included in 600810 Trailer Assembly
Exploded View - Trailer Accessories
Figure 1
Item Description Part Number Quantity1 Trailer Assembly 600810 12 Battery Box Assembly 600813* 13 Switch and Bracket S600808* 14 Lower Roller Assembly S602132-3 15 Chain Guard S600518* 1
612 VDC Motorized 1” Hose Reel EA37118 L12D 1Hand Crank 1” Hose Reel CA37118 L 1
7 Upper Guide Arm S602133-3 18 Trailer Tongue *** 19 Trailer Frame *** 110 Carriage Bolt, 3/8-18 x 3½” *** 211 Carriage Bolt, 3/8-16 x 1” *** 512 Axle Stabilizer *** 213 Hex Head Bolt, 3/8-16 x 2½” *** 214 Axle Bracket *** 215 Washer, 3/8 *** 1116 Lock Nut, 5/16-18 *** 917 Axle *** 118 Tire *** 219 Lug Nut *** 820 Battery Box Cover ** 121 Battery Box Bottom ** 122 Screw, 10-32 x 3/4” S20-109 423 Strap Clamp ** 224 Battery Box Support 261642-35 125 Nut, 10-32 S79-5 4
13
Exploded View - Trailer
Exploded View - Electrical Accessories
Figure 2
Hose Reel Trailer
www.reelcraft.com Page 3
Figure 5
Figure 6
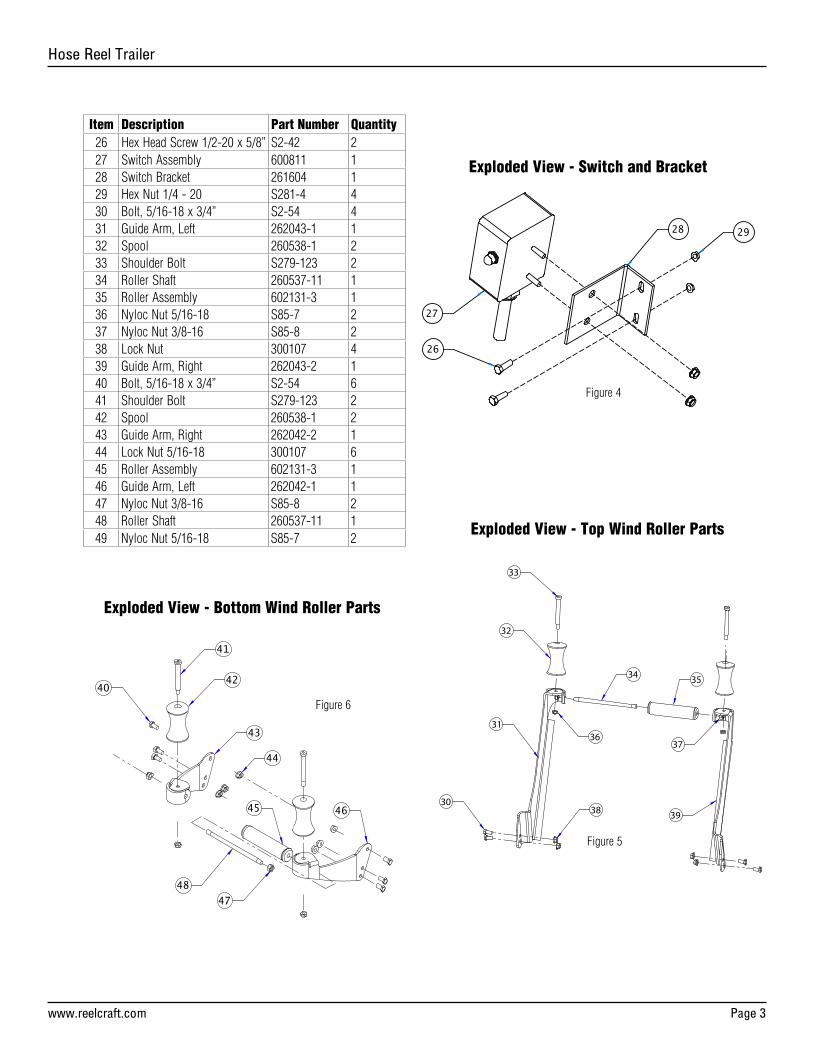
Item Description Part Number Quantity26 Hex Head Screw 1/2-20 x 5/8” S2-42 227 Switch Assembly 600811 128 Switch Bracket 261604 129 Hex Nut 1/4 - 20 S281-4 430 Bolt, 5/16-18 x 3/4” S2-54 431 Guide Arm, Left 262043-1 132 Spool 260538-1 233 Shoulder Bolt S279-123 234 Roller Shaft 260537-11 135 Roller Assembly 602131-3 136 Nyloc Nut 5/16-18 S85-7 237 Nyloc Nut 3/8-16 S85-8 238 Lock Nut 300107 439 Guide Arm, Right 262043-2 140 Bolt, 5/16-18 x 3/4” S2-54 641 Shoulder Bolt S279-123 242 Spool 260538-1 243 Guide Arm, Right 262042-2 144 Lock Nut 5/16-18 300107 645 Roller Assembly 602131-3 146 Guide Arm, Left 262042-1 147 Nyloc Nut 3/8-16 S85-8 248 Roller Shaft 260537-11 149 Nyloc Nut 5/16-18 S85-7 2
Figure 4
Exploded View - Top Wind Roller Parts
Exploded View - Bottom Wind Roller Parts
Exploded View - Switch and Bracket
Hose Reel Trailer
Page 4 www.reelcraft.com
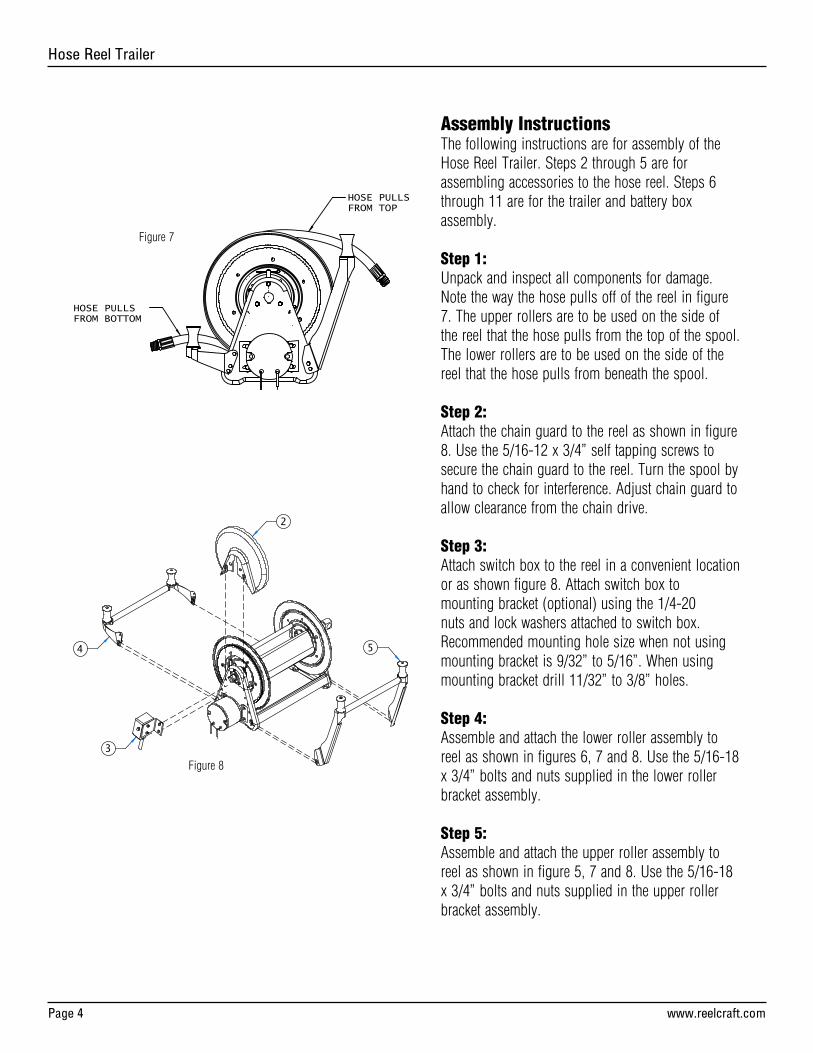
Figure 7
Assembly InstructionsThe following instructions are for assembly of the Hose Reel Trailer. Steps 2 through 5 are for assembling accessories to the hose reel. Steps 6 through 11 are for the trailer and battery box assembly.
Step 1:Unpack and inspect all components for damage. Note the way the hose pulls off of the reel in figure 7. The upper rollers are to be used on the side of the reel that the hose pulls from the top of the spool. The lower rollers are to be used on the side of the reel that the hose pulls from beneath the spool.
Step 2:Attach the chain guard to the reel as shown in figure 8. Use the 5/16-12 x 3/4” self tapping screws to secure the chain guard to the reel. Turn the spool by hand to check for interference. Adjust chain guard to allow clearance from the chain drive.
Step 3:Attach switch box to the reel in a convenient location or as shown figure 8. Attach switch box tomounting bracket (optional) using the 1/4-20 nuts and lock washers attached to switch box. Recommended mounting hole size when not using mounting bracket is 9/32” to 5/16”. When using mounting bracket drill 11/32” to 3/8” holes.
Step 4:Assemble and attach the lower roller assembly to reel as shown in figures 6, 7 and 8. Use the 5/16-18 x 3/4” bolts and nuts supplied in the lower roller bracket assembly.
Step 5:Assemble and attach the upper roller assembly to reel as shown in figure 5, 7 and 8. Use the 5/16-18 x 3/4” bolts and nuts supplied in the upper roller bracket assembly.
Figure 8
Hose Reel Trailer
www.reelcraft.com Page 5
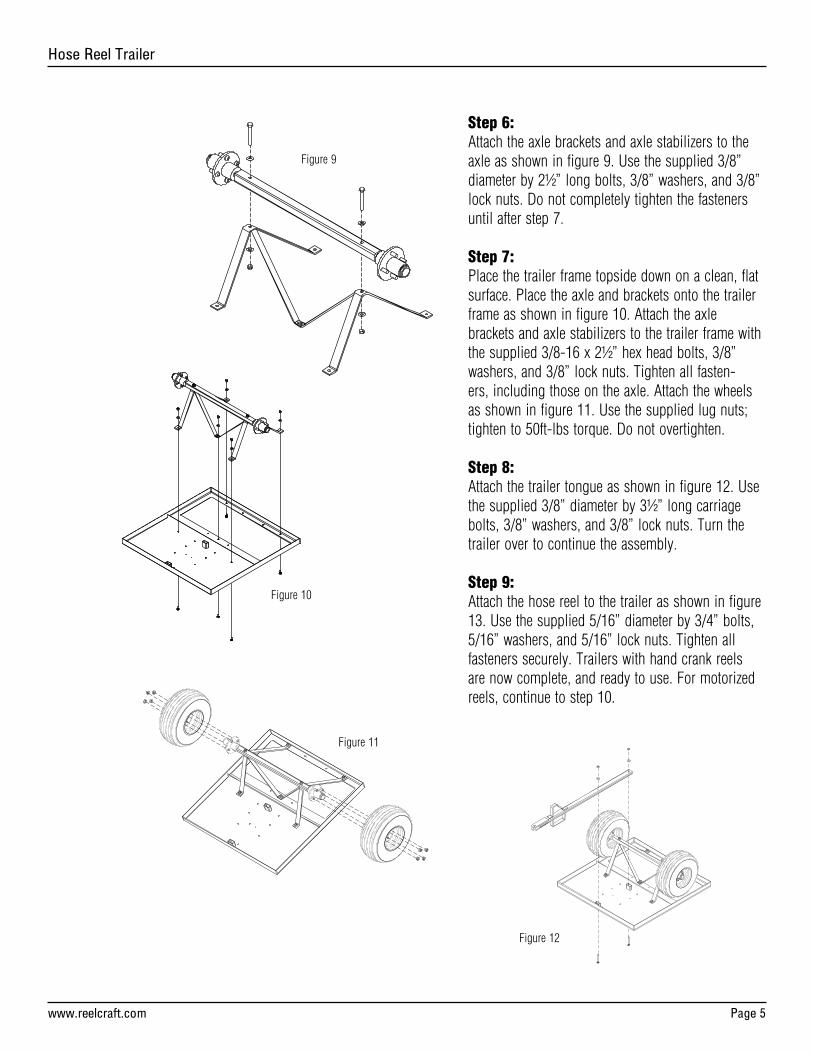
Step 6:Attach the axle brackets and axle stabilizers to the axle as shown in figure 9. Use the supplied 3/8” diameter by 2½” long bolts, 3/8” washers, and 3/8” lock nuts. Do not completely tighten the fasteners until after step 7.
Step 7:Place the trailer frame topside down on a clean, flat surface. Place the axle and brackets onto the trailer frame as shown in figure 10. Attach the axle brackets and axle stabilizers to the trailer frame with the supplied 3/8-16 x 2½” hex head bolts, 3/8” washers, and 3/8” lock nuts. Tighten all fasten-ers, including those on the axle. Attach the wheels as shown in figure 11. Use the supplied lug nuts; tighten to 50ft-lbs torque. Do not overtighten.
Step 8:Attach the trailer tongue as shown in figure 12. Use the supplied 3/8” diameter by 3½” long carriage bolts, 3/8” washers, and 3/8” lock nuts. Turn the trailer over to continue the assembly.
Step 9:Attach the hose reel to the trailer as shown in figure 13. Use the supplied 5/16” diameter by 3/4” bolts, 5/16” washers, and 5/16” lock nuts. Tighten all fasteners securely. Trailers with hand crank reels are now complete, and ready to use. For motorized reels, continue to step 10.
Figure 10
Figure 11
Figure 12
Figure 9
Hose Reel Trailer
Page 6 www.reelcraft.com
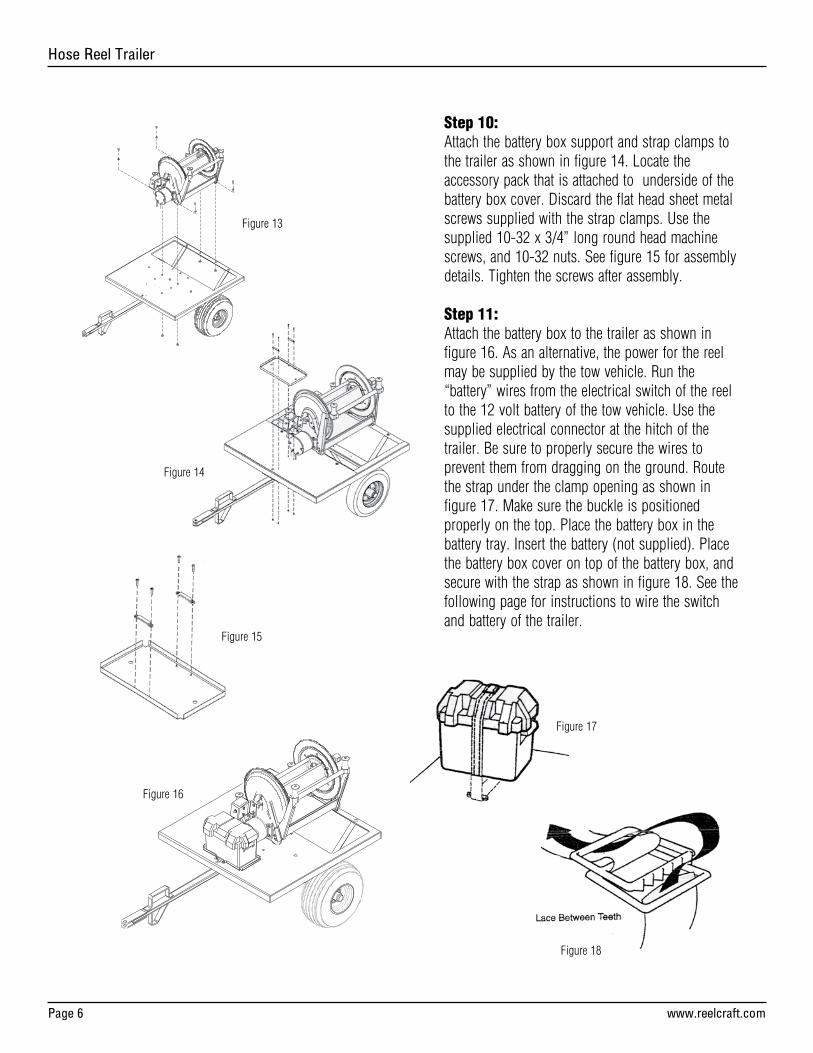
Figure 16
Figure 14
Figure 15
Figure 13
Step 10:Attach the battery box support and strap clamps to the trailer as shown in figure 14. Locate the accessory pack that is attached to underside of the battery box cover. Discard the flat head sheet metal screws supplied with the strap clamps. Use the supplied 10-32 x 3/4” long round head machine screws, and 10-32 nuts. See figure 15 for assembly details. Tighten the screws after assembly.
Step 11:Attach the battery box to the trailer as shown in figure 16. As an alternative, the power for the reel may be supplied by the tow vehicle. Run the “battery” wires from the electrical switch of the reel to the 12 volt battery of the tow vehicle. Use the supplied electrical connector at the hitch of the trailer. Be sure to properly secure the wires to prevent them from dragging on the ground. Route the strap under the clamp opening as shown in figure 17. Make sure the buckle is positioned properly on the top. Place the battery box in the battery tray. Insert the battery (not supplied). Place the battery box cover on top of the battery box, and secure with the strap as shown in figure 18. See the following page for instructions to wire the switch and battery of the trailer.
Figure 17
Figure 18
Hose Reel Trailer
www.reelcraft.com Page 7
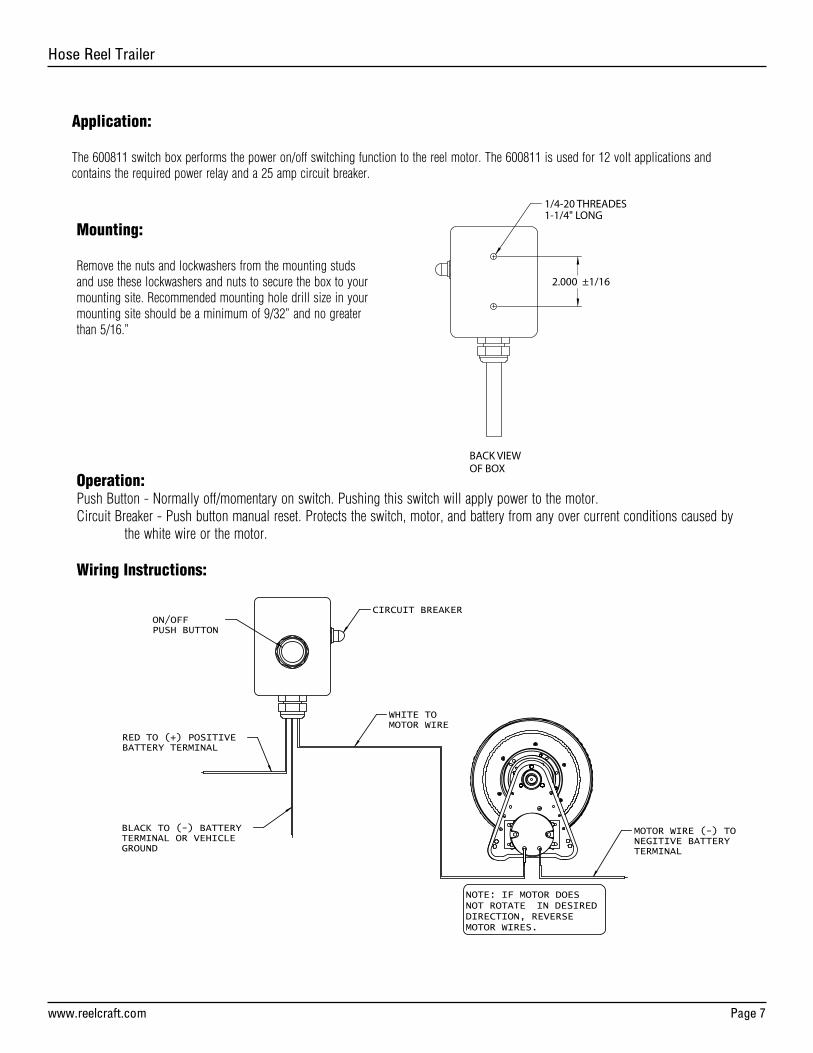
Application:
The 600811 switch box performs the power on/off switching function to the reel motor. The 600811 is used for 12 volt applications andcontains the required power relay and a 25 amp circuit breaker.
Mounting:
Remove the nuts and lockwashers from the mounting studs and use these lockwashers and nuts to secure the box to your mounting site. Recommended mounting hole drill size in your mounting site should be a minimum of 9/32” and no greater than 5/16.”
Operation:Push Button - Normally off/momentary on switch. Pushing this switch will apply power to the motor.Circuit Breaker - Push button manual reset. Protects the switch, motor, and battery from any over current conditions caused by the white wire or the motor.
Wiring Instructions:
Hose Reel Trailer
Page 8 www.reelcraft.com
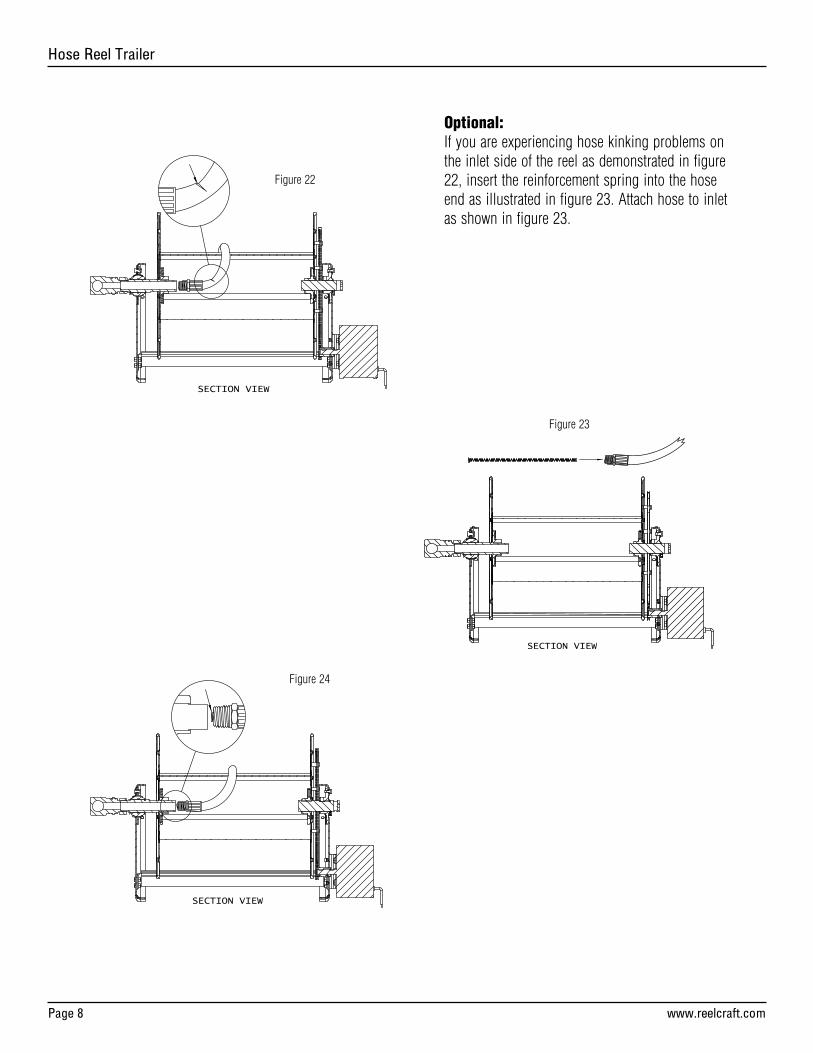
Optional:If you are experiencing hose kinking problems on the inlet side of the reel as demonstrated in figure 22, insert the reinforcement spring into the hose end as illustrated in figure 23. Attach hose to inlet as shown in figure 23.
Figure 22
Figure 23
Figure 24