Embed Size (px)
Citation preview

Ree[ 3'D) EmterBrnses'Gulde tothe Nnmsflo 3D Gamera
oooooooo
INCLUDING:
NIMSLO HISTO RYLETI ITICUTAR 3.0 PRINT TIPSMAKING & VIEWING 3.0 SLIDESMAKING ANTIOUE STYLE STEREO CARDSCLOSE.UPS WITH THE NIMSLOOTHER USES FOR THE NIMSLO CAMERANIMSTO CAMERA MO DIFICATIONSAND MORE . . . .
BY DAVID STARKMAN& SUSAN PINSKY

IABLE OF CONTENTS
Introduction. . . .
The Nissei/Nishika 3D Camera
Description of Camera. : . ...Tips for Making Better Nimslo Lenticular prints
F i l m S p e e d s . . . . .
Lenticular 3-D Close-Ups. . . .3-Dimensional Picture Suggestions
Nimslo Stereoscopic Depth-of-Field Instructions
Tricks & Uses Which Nimslo Never Intended.
Taking and Mounting Nimslo 3-D Slides
Using Reel3-D Stock No.47l6 Sl ip_in Mounts.
Advanced Mounting with the No. 4716 cardboard Slip-in Mounts
Using Sigma No. 2l l6 Masks.
Twin 2" x 2" Nimslo 3-D Slide Mounting.Other Things You Can Do With your Nimslo Camera-
5
6
7
9
9
9
10
l l
l 2
t 2
t2
t4
l 5
l6
"Stereo View Card" Prints
Smaller Print Format. . . .
Nimslo 3-D Close-Ups. . .
Using Other ASA Speed Films.
Manual Aperture Control
Flash Photography with Your Nimslo 3-D Camera
Hyperstereo Slides.
Nimslo M odifications ( for N on-Lenticular Applications).
Non-3-D Uses for the Nimslo.
C o n c l u s i o n s . . . . . . .
For More Information. . . .
Nimslo 3D Camera Operating Instructions
Nimslo Senice Department Technical Information. . . .
t7
t7
t9
20
2 l
2 l
22
22
23
25
27
27
28
32
64Additional Information.
www.orphancameras.com

DEDICATED TO wi l l iam Gruber, Kar l Kurz, seton Rochwite, & Gordon smith '
- They al l had stereoscopic Vis ions, and their invent ions have brought endless
hours of p leasure to count less mi l l ions.
'otoo
z3o
ooEo0)
o
name: "Nims/Lo".
Th i s book wou ld no t have been poss ib l e w i t hou t t he he lp and suppo r t o f many i nd i v i dua l s . Spec ia l Thonks t o :
Le roy Ba rco , John Denn i s , B i l l Duggan , Me l Ge rson , Masah i ko Kawamura , Me l Lawson APSA, James Lucas ' ca r l a
Ma lcJen , pau l M i l l i gan , cam i Ma lde "n s ta r kman , Nancy s ta r kman , M ichae l s ta r ks , Pau l w ing APSA ' Ha r rT ' zu r
K le insm iede , and espec ia l l y t o Dav id Bu rde r FRPS fo r h i s i nva luab le ed i t o r i a l ass i s tance and numerous he lp fu l
su ggestt ons.

INTRODUCTION
The dream of producing a three.dimens-ional picture that can be viewed directly without any specialviewer or 3-D glasses has existed sincethe beginning of-stereo photography in the late lg30,s. As earlyas lK72 H' Swan described and created a dwice he called the "Crystal Cube,,, which first made thispossible' (An original example of this can be seen in the Science Museum in t-ondon, England.) Thecube made use of a stereo pair and tworight-angled glass prisms. when an observer looked at the cubefrom exactly the correct position a 3-D-image"could be seen.
The next development was aflat prin!3-D imngethat could be viewed directly without any special viewingaid' The first major patent application f9l ru".h prints was by F.E. Ives in 1902. This type of print wascalled a "parallax stereogram". During this century several others have made significant contributionsin this field' Some were by H.E. Ives ir.e. Ives son, lg28-1g33), G. Lippman (lg0g), w. Hess (1912),c'w' Kanolt (1918), Dr. Estanave.and J..zafiropr"rlo (1933), Maurice Bonnet (1935) and Douglas winnek(1948)' More information on this subject is covered in'chapter 17 ofthe book..stereoscopic photo-graphy" by Arthur W. Judge (tnndon, 1950).
In early 1982 the four-lensed Nimslo 35mm 3D Camera was introduced. It provided an easy-to-usecamera yielding three dimensional prints (like the plastic 3-D postcards found at souvenir shops) thatcould be viewed without a viewer or 3-D glasses. Previous lenticular systems were designed strictlyfor commercial applications, and were not-suitable for amateur use. In many cases the equipment wascustom built, ahd prints were only available by hiring the company which owned the equipment to doa custom job.
$$$g.r.iii:.,rr'; i : i ,
)ff r'
The Nimslo is a simple four-lensed 3-D camera creating four images. All of the sophisticated technicalwork is done by the Nimslo-licensed processing lu.b. uslng a special 3-D printing system the four nega-tives are combined onto a photosensitive mate-rial coateiwitir a plastic lenticular sheet. For the firsttime, Nimslo has made lenticular 3-D prints available to the urr*tru, snapshooter.
G U I D E T O T H E N I M S L O 3 D C A M E R Awww.orphancameras.com

In order to create the Nimslo 3-D print, the images from the four lenses (now 4 negativel) ury optically
sliced into hair thin strips, alternatlng under the lenticular ridges on the surface of the print. Eachridge
is a long cylindrical leni, and serves ihe purpose of channeling and recomDosing the images at different
unlf".iuch that the right eye and lefi eye are always seeing two slightly differenl views. This is
thi basic principle of 5-p ptrotography, and why all traditional methods of presenting 3-D use
two images-one for the right eye, and one for the left eye.
By 1986, Nimslo had failed tocapture a sufficiently large market,and had already halted camera Pro-duction. In 1988 the special lentic-ular 3-D print Processing servicewas taken over bY: The Nissei CorP-oration, 3 Sunset WaY, Building E'Henderson, Nevada 89014, Phone(7O2r 451-7005. TheY were thenhonoring the old Nimslo PrePaidprocessing mailers. Film sent to anyof the old Nimslo lab addresses maybe delayed or returned.
*Nissei and Nishika are trademarks of The Nissei Corporation
Lenlicular Screen
\ \\ \\\
.,v /. a \
' . ,)
./ ,/
- \
\
Print Lmulsro
The remaining stock of original Nimslo cameras have been selling new for $30-50.00, considerably
less than their original $259b0 price. The best sources for these are the mail order camera dealers which
run ads in the pJpular photogiaphy magazines. This could be considered a real bargain by both the
beginning anO bxperienied 3lp pnotogiapher if you consider the alternate 3-D uses that the camera
miy be put to. We will explore these possibilities more later.
TIIE NISSEI/NISHIruT 3D CAMERA
As of July lggg the Nissei Corp., the only company offering le-nticular print processing for the Nimslo
camera, iru, ̂ nnounced that thiy will be introducing their own four lensed camera called the "Nishika"'
Indications are that it will have identical lens spacing and negative format as the Nin'rslo. We have heard
unofficially that it will have some plus and trrinus adjustment o-n the automatic exposure, ard will run
off Z AA batteries. It may also have an enlargeable lilm chamber to take a special larger load 35mm
film cassette, allowing m"ore shots per roll. There's also talk of a more powerful dedicated flash unit.
Any applications in this book that apply to the Nimslo camera should apply equally well to the Nishika
3-D camera.
GUIDE TO THE NIMSLO 3D CAMERA

DESCRIPTION OF CAI\,TERA
The Nimslo 3D Camera uses standard 35mm film in either ASA 100 or ASA 400 speeds. print filmmust be used for the Nimslo/Nissei prints, but slide film can be used for creating stereo pairsfor 3-D slides (see Slide Thking Section, page \2*).
The exposure is fully automatic, electronically programmed to select speeds from ll31 to l/500second, with apertures from f15.6 to f122. A green LED (light emitting diode) in the viewfinderindicates sufficient light; red gives low light warning for slow shutter sp6ed and underexposure.
Four images are exposed simultaneously side-by-side. Negative size is vertical, 22mm x l8mm.
SPEGIFICATTOlISGamera Type:Film Size/T}pe:Film Speeds:Shutter:Lenses:
FlashSynchronlzation:
Vlewflnder:Information:Film Advance:Exposure Counter:Film Rewind:Exposure Control:
Power Source:
Other Features:Dimensions:Weight:
35mm, Automatic 3-Dimensional
35mm
ASA IOO/DIN 21 ASA 4OO/D]N 27
Automatic, Electronicafly Programmed Speeds from 1/30 to 1/SO0 SecondQuadra Lens System: Four 30mm, f/S.6, Air Spaced Triplets, with Coated, High_Index, Optical Glass Elements pre-focused 6, (2m) to infinity
Dedicated Hot Shoe Contact for Cordless Flash Connection to Nimslo Opti-Lite Elec-tronic Flash (Other Types of Ftash Units May Be Used)Bright Frame, Vertical Format
Green LED sufficient light and battery OK condition; Red LED low light warning.Single-Stroke Film Advance LeverAutomatic Reset
Rewind Crank lifts clear from body
CdS Cell measures light to program shutter speed and aperture size for best combi-nation to achieve correctly exposed negativesThree (3) No. 386 Eveready or Duracell, Silver Oxide Batteries, Equivalent batteriesare: MaxellSR 43W Panasonic WL11 and Ray-O-Vac RWZ4|44Built-in Double Exposure Prevention
5W'x27/eu x1rb"
12 ounces
Th-e camera is powered by three No. 386 Eveready or Duracell Silver Oxide batteries. The camerawill not operate without batteries. (Note that without batteries, or with weak batteries, it still soundslike the shutter is firing, when, in fact, it is not! When the batteries are weak the red or green LED'salso appear dimmer than normal.) Do not use the camera anless the LED is visible in thZ viewfinder.
WARNING: Pressure on the shutter release button will drain your battery whether or not the film isadvanced, so be sure the camera is not under pressure when itored. Current consumption is a hefty60 milliamps if film is advanced, or l0 milliamps if already fired when pressure is applied to the shutterbutton. In short, any constant pressure on the shutter button will drain your Uatteiies prematurely.
G U I D E T O T H E N I M S L O 3 D C A M E R Awww.orphancameras.com

DESCRIPTIO}I OF PARTS1. Film Advance Lever2. Shutter Release Button with Cable
Release SocketDedicated Pin for Nimslo Opti-Lite FlashAccessory Shoe with AutomaticFlash ContactFilm Speed SelectorExposure MeterViewfinder WindowFrameline l l lumination WindowFilm Rewind CrankFilm Rewind Knob/BackCover ReleaseOpticalGlass LensesNeck Strap Lug and RingExposure CounterWindow
14. F i lm Guide Pins15. Viewfinder Eyeprece16. F i lm Guide Rai ls17. Fi lm Take-up Spool18. Fi lm Pressure Plate19. Camera Back Cover20. Fi lm Rewind Fork21. F i lm Chamber22.Tripod Socket23. Battery Chamber Cover24. Fi lm Sprocket Gear25. Fr lm Rewind
Release Button26. Fi lm Perforat ion
Hole Hook
3.4.
5.6.7.8.9.
10 .
1 1 .12.13 .
fF
.)
G U I D E T O T H E N ] M S L O 3 D C A M E R A

TIPS FOR MAKING BETIER NIMSLO LENTICULAR PRINTSTfrg original camera instruction manual gives good basic instructions (see pages 28 to3l ).'Becauseof the constraints of the Nimslo print system thb distance relationships of tie"subject to backgroundhave to be considered in a way that has nothing to do with the actual depth-ffield of the"lrnrrr.Supplementary instructions provided by Nimslo are shown on pages tO anO tt'.
You will note that Nimslo recommendsthat you never get closer than 6 feet from your subject. Theysay this to keep things simple, since at f15.6 this is truel and subjects closer than 6 feet will be out offocus. However, if you are outdoors on a sunny day the aperture you are getting is generally closer tof/ll. Nimslo prints may then be sharp as close as 3 to 4 feetunder sunny conditi6ns,lut you must limitthe background to be within a couple of feet of the subject. If you don't th"r" will be too much parallax,and the background of the print may be too much out of register.
I
Note thit depth-of-field (the range within which your image will be in sharp focus) and stereoscopicdepth range (the total amount of parallax between the nearest and farthest objects in your picture) arenot the same thing- For example, on a bright sunny day your aperture *uy b" smali enough to giveyou sharp focus from 4 feet to infinity. However, if a main subject at four ieet is included uiong withprominently visible subjects at infinity, this is beyond the range of the Nimslo print system to give frop",registration of both subjects. It is most likely that the print *itt Ue made wiitr the ioregrouid subjectsin near-register, with the background subjects too fai out of register for comfortable"viewing.
J
Another thing which Nimslo does not tell you is that the areo of your negative which they actually printis about Imm smaller on all 4 sides of the actual negative orii. That translates into total cropping ofabout 30% off the 99ges, so keep your main subiecls centered, or you may find arms, heads o, l-.g,unexpectedly cut off!
Nimslo seems to make all of their prints a bit on the light side, so whites tend to get washed out.Pictures with a wide range of colors throughout look the best. Nissei seems to be belter at providinggood color saturation than Nimslo was.
Finally' there is only ONE lab which does the special Nimslo printing. There are no other labs offeringthis special service. While Nimslo used to take 6-8 weeks to process and return your prints, Nisseigenerally returns your order within 2 weeks.
When your prints are returned be sure not to write on the back of them with anything but a soft leadpencil. Ink and adhesives from some stickers will bleed right through, ruining youiprints.
FILM SPEEDS
Standard lenticular pictures appeal no grainier whether 100 or 400 speed film is used, but colorsaturation is better with the 100 ASA film.
LENTICULAR 3-D CLOSE.UPS
It is possible to get closer than the distances previously indicated, if a supplementary close-up lensis used. For this method a plano-convex lens which is large enough to covei'all4 Nimslo lenses at thesame time is necessarv.
-.---
G U I D E T O T H E N I M S L O 3 D C A M E R Awww.orphancameras.com

The flat side of the lens is placed against the lens board and the user must find a method to hold the
lens in place (tape, a bracket, etc.)luring exposure. It is up to the user to determine the new focus
distances. The curvature of the singie lens compensates for the closer subject distance, so that the Nimslo
processing lab can print in its noimal fashion. In order to avoid distracting, out of register images in
itt" tu.tg"-und, it will be necessary to reduce the depth of the scene by using a close or neutral
backgrorind. photographic "plus" lenses may also be used, if you can find one large enough to cover
all four lenses at once. See "Nimslo 3-D Close-ups" Section.
3.DIMENSIONAL PICTU RE SUGG ESTIONS.The world around you is three-dimensional and it is usu- .For best results outdoors, try to keep the sun over your
ally best to take piitures of subjects and objects just the shoulder while avoiding poses that have your subject fac-
way they are naturally. ing directly into the sun.
.Look at the picture below. Scale and depth in thepicture are provided by the relationship of each object tothe others, as well as the height, width and depth of ob-jects. A variety of i tems in the picture wil l enhance the
3-Dimensional effect. Bright colorful areas in picturesalso add depth. You can achieve this by having yoursubject wear colorfulclothes or by taking pictures ofcolorfulscenes..Frame your picture to include subject and backgroundobjects..For scenic pictures, include perhaps a tree' a person'etc., so that your picture has foreground interest as wellas background and scenery. REMEMBER, KEY PIC-TURE SUBJECTS MUST BE AT LEAST 6 FEET FROMTHE CAMERA FOR BEST RESULTS.
'Posing subjects direct ly against a wall , wi l l result in f latpicturet lacking depth. Move the subject to a more in-teresting area- one with greater perspective- with morespace between the subject and background'.Pictures of scenes beyond 25 feet wi l l not appear tohave as much depth as you might anticipate' In this pic-ture taking situation, position a subject or object at ie-a.st 6feet from your camera and use the setting beyond 25 feetas your background.
l0 G U l D E T O T H E N ] M S L O 3 D C A M E R A

NIMSLO STEREOSCOPIC DEPTH-OF-FI ELD INSTRUCTIONS' Move around while looking through your camera's viewfinder untilyou see the picrure you wishto photograph.
. MAKE SUTE thETE ATE NO OBJECTS IN YOUR PICTURE WHICH ARE CLoSER THAN 6 FEETToTHE CAMERA.
Dimensionality in your photograph is created by the dis{ancebetween your subiect and the ba-ckground, below areexamples to guide you".Judge the distance from your subject to Ithe background, then | ^
. Compare this distance to the A | ^*tJ
il,:':"i3::,33itfJ"""T:[1:?""0n" \#l w.}llffI1[Hff1]::;::::. /rN- S"your home, there are many things ,bour 2,6, rbour 6,therethatwi l lhe lpyoujudge H
distance, for example ---stand anhe tmr of your bed, - I tn fie
ll"ffSJ"'dwirbeaboutTreer Nl *
W--Measure the length of your car.
Keep these comparisons rn your R+ l+)mind ro judge distance. )-_lHl I(.Everythins -LJ) {L A
around yOu iS {-rbout6'-l><-rboutE'-->3Dmens'na'
ffi f y;:#*1#' @ s w#i-,""T,- ql&rr n tffirnsffi tr Idetract fromthe quality of t-s-
+-- atrcut 10'#*-- rbout 10'-'1.
.{_--_rboutlE'- - I rbogtf2,_->
Iiri'n'"'n& f Y
ruf fy+rboul$' r'boutl5'-.-.->
MT
tolnllnlty-- F | ,r.bgst2g,-, -
To enhance the dimensionality of a distant scenic photograph add a simple subject figure atabout 20 feet from you. lf you do not wish.!o hayg a pers6n in your photolraph, iimpty movearound until you can see a tree or some other objeci in your vieMinder w-nich is about 20 feelfrom you.
l lG U I D E T O T H E N I M S L O 3 D C A M E R Awww.orphancameras.com
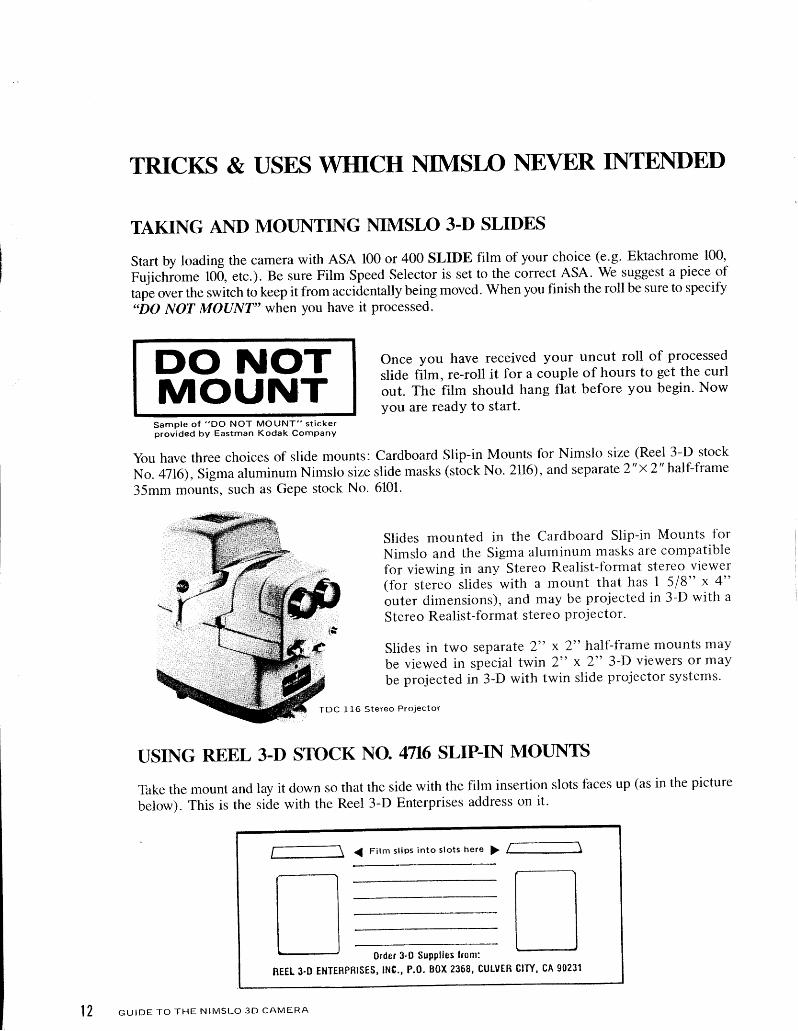
TRICKS & USES WI{ICH NIMSLO NEVER INTENDET)
TAKING AND MOT]NTING NIMSLO 3-D SLIDES
Start by loading the camera with ASA 100 or 400 SLIDE film of your choice (9.e. nnachrome 100,
Fujichiome l0d, etc.). Be sure Film Speed Selector is set to the correct ASA. We suggest a piece of
tape over the switch to keep it from accidentally being moved. When you finish the roll be sure to specify
"DO NOT MOUNT" when you have it processed-
DO NOTMOUNT
Take the mount and lay it down so thatbelow). This is the side with the Reel
once you have received your uncut roll of processed
slide film. re-roll it for a couple of hours to get the curl
out. The fllm should hang flat before you begin' Nowyou are ready to start.
the side with the film insertion slots faces up (as in the picture
3-D Enterprises address on it-
S a m p l e o f " D O N O T M O U N T " s t i c k e rprov ided bY Eastman Kodak ComPanY
you have three choices of slide mounts: Cardboard Slip-in Mounts for Nimslo size (Reel 3-D stock
No. 4716), Sigma aluminum Nimslo size slide masks (stock No. 2116), and separate 2"x2" half-frame
35mm mounts, such as Gepe stock No. 6101.
Slides mounted in the cardboard slip-in Mounts for
Nimslo and the Sigma aluminum masks are compatible
for viewing in any Stereo Realist-format stereo viewer(for stereo slides with a mount that has 1 5/8" x 4"
outer dimensions), and may be projected in 3-D with a
Stereo Realist-format stereo projector'
Slides in two separate 2" x 2" half-frame mounts may
be viewed in special twin 2" x 2" 3-D viewers or may
be projected in 3-D with twin slide projector systems.
T D C 1 1 6 S t e r e o P r o j e c t o r
USING REE,L 3.D STOCK NO. 4716 SLIP-IN MOI.]NTS
12
{ F i l m s l i P s i n t o s l o t s h e r e
0rder 3-0 Supplles hom:
ttL_l
REEL 3.0 EHTERpBtsEs, 1N0., P.0. Box 2368, CULVER GITY, gA 9C231
G U I D E T O T H E N I M S L O 3 D C A M E R A

Next, take your film and start cutting from the begin-ning of the roll. The film edge is numbered from 0 to36 (or 24), with intermediate "A" numbers, such as1A, 2A,3,A., etc. Start with the lowest edge number.Scissors may be used, but the job is much easier withan illuminated film cutter that lets you see exactlywhere you are cutting. The Nimslo slides have a smallblack frame line between each picture. cut into thecenter of this line. This is not super critical, as themount opening is smaller than the film image area,but the more careful you are the more room you willhave to adjust the images properly.
l A l l l u m i n a t e d 3 5 m m F i l m C u t t e r
For simplicity we will number the imagesof each slide group I through 4, as shownat left. Number 4 is always the one withthe red dot over it.
Now you are ready to start cutting. Cut the first film chip (#1 of the group of 4) and slip it into theslot above the left opening of the mount, with the glossy or viewing side (the side that readl correctly)facing down, and the image right side up. If the film is too wide to fit into the slot, trim the smallestamount possible from the edge which has more black showing on it. With practice you will get a betterfeel for where to visually cut the film.
Your first film chip should now be in place! Cut off frames 2,3, and,4, and insert #4 (the one withthe red dot on top) into the right hand film slot, just as you did for number 1. Note that when the filmis inserted completely into the slot that the top edge of the film seats into the slot so that it cannot slideback out (unless it is bent upward first).
For most pictures (where the subject starts about 6 or 7 feet from the camera) this completes themounting process, with an accuracy that should be fine for hand viewing.
Now turn the mount over (the side opposite the film slots is actually the '6f1sn1"-the side to finallyy_t.* from), and put it into your Stereo Realist-format stereo viewer (such as the Life Like, Stereo Realisi,Kodak or Brumberger stereo viewers). You should be lookingataproperly mounted Nimslo slide!
L i fe -L ike Stereo V iewer
G U I D E T O T H E N I M S L O 3 D C A M E R A l3
Stereo Rea l is t 3 -D
www.orphancameras.com
l4
Now you can go to the next group of 4 and repeat the process until the roll is finished.
What about frames 2 & 3? Well, using I and 4 will give the strongest stereo effect. If your subjectsare pretty close (about 4 to 6 feet), you may like to try mounting I with 3 and 2 with 4, just as previouslydescribed for I and 4. This will give you two pairs of stereo slides, but with a reduced 3-D effect.
The extra frames 2 &3 could also be saved for non-stereo use, such as mounting in 2"x2" half-framemounts for non-stereo viewing and projection, or for putting into half-frame keychain viewers.
Once your slide is finished it is a bit smaller in image size, but with the same outside dimensions asthe more common Stereo Realist-format slides. As stated before, it is compatible with all Stereo Realist-format stereo viewers or projectors.
ADVANCED MOUNTING WITH THE, No. 4716 CARDBOARI)SLIP-IN MOTJNTS
The previous instructions describe the "basic" mounting technique. It is also possible to precision mount,or "fine tune" your slide mounting in the 4716 mount. This is usually desirable when you are takingsubjects in the closer than 6 foot range, where a "flickering band" effect can result along the right andleft edges of the images. For some people difficulty in fusion of the two images might also occur.
The solution involves horizontal adjustment of the two images. Hold up the mount and look at the twoimages. Find an easily identifiable object in the picture, which you know is the closest obiect to thecamera when the shot was taken (such as a flower, a hand, etc.), and is close to the right or leftedge. Assuming that the object is a flower near the left edge, you now want to horizontally adjust thefilm chips so that more of the flower, or the distance between the flower and the left edge, is visiblein the right film chip, and slightly less is visible in the left film chip. Without getting technical, thisis a a simple way of setting the proper "stereo window". Put in a different way, the right eye sees abit more of what is on the left edge of a window, and the left eye sees a bit more of what is on the rightedge. Setting a proper window in mounting re-creates this fact of physical reality.
If there is not enough room to horizontally move the film chip, you must take it out of the mount andtrim a tiny amount of film from the edge of the direction that you want to shift the film. After doingso, insert the film again and slide it right or left as desired. Once in position view the image again.Repeat this if necessary until the horizontal adjustment you desire is achieved. Be careful not to trim
too much film, however, or the image will no longer fill the aperture and light will leak through. Tokeep the film from slipping put a piece of tape over the film slot to hold the film in place.
The same method will work for vertical alignment, by trimming from the top or bottom edge of the film.
If you want more detail on this subject, or some extra aid in mounting, we suggest that you get the Reel3-D Slide Alignment Gauge Set, stock No. 8001. The gauge labeled "5 PERF REALIST FORMAT"is the one to use with this mount. The #4716 mount is designed with 62.4mmcenter-to-center spacing,so using this gauge will set your subject right at the plane of the stereo window. For more details readthe instructions included with the gauges. Precision mounted slides are more suitable for 3-D projection.
These brief instructions are intended to help you get started, but are not a complete lesson in stereoslide mounting. For more information we highly recommend the book "The World of 3'D" (stock
No. lffil) by J.G. Ferwerda.
G U I D E T O T H E N I M S L O 3 D C A M E R A

Take the Sigma aluminumrnask, and lay it down sothat the side with thechannels faces up. Note thatthe top of the mask hasmore space above the filmopenings than the bottom.
USING SIGMA No. 2n6 MASKS
i : < F i t m g o e s u n d e r c h a n n e l s h e r e ) ! - - - - - - - 'I
f i l m o p e n i n g
S i g m a N o . 2 1 1 6 M a s k( rear v iew)
(Ac tua l S ize)
II- - - - - - - - -
Next, take your film and start cutting from the beginning of the roll. The film edge is numbered from0 to 36 (on a 36 exposure roll), with intermediate '.A' numbers, such as lA, 2A,3A, etc. Start withthe lowest edge number. Scissors may be used, but the job is much easier with an illuminated film cutterthat lets you see exactly where you are cutting. The Nimslo slides have a small black frame line betweeneach picture. Cut into the center of this line. This is not critical, as the mask opening is smaller thanthe film image area, but the more careful you are the more room you will have to adjust thJ images properly.
For reference simplicity we will number the four images of each slide group I through 4, as shownon page . Number 4 is always the one with the red dot over it.
Now you are ready to start cutting. Cut the first film chip (#l of the group of 4) and place it in the lowerchannel of the left opening of the mask, with the viewing side (the side that reads correctly) facingdown, and the image right side up.
Mask
M a s k
To get the film into the chonnel with greater ease,pick up the mask and curve it very slightly upwardby squeezing from the top and bottom edges. Thisopens up the channel. Curve the film slightly, anddo the same to get it first into the bottom andthen into the top edges of the channel. Now yourfirst film chip should be in place!
Cut off frames 2,3, and 4, and insert 4 (the onewith the red dot on top) in the right opening
M a s k c h a n n e l s , j u s t a s y o u d i d w i t h t h e f i r s t f i l m c h i p .
If the red dot is not covered by the mask, the mask is upside down. Thke the film chips out, rotate themask 180 degrees and repeat the previous steps.
Now hold the mask up to the light and look at the images. Find an easily identifiable object in thepicture, which you know is the closest subject to the camera at the time the picture was tiken (suchas a flower, a hand, etc.), and is close to the right or left edge. Assuming that the object is a flowernear the left edge, you now want to horizontaliy adjust the tilm chips so that more of the flower, orthe distance between the flower and the left edge, is visible in the right film chip, and slightly less isvisible in the left ti lm chip.
c u r D E T o r H E N r M s L o 3 D c A M E R A | 5www.orphancameras.com

Without getting technical, this is a simple way of getting the proper "stereo window". Put in a differentway, the ight eye sees tnore of what is on the left edge of a window, and the left eye sees a bit ntoreof what is on the right edge.In the mounting process this observation of physical reality is imitated.
Now turn the mask over (the side opposite the channel openings is actually the one tofinalll'vlglvfront),and put it in your Realist-format stereo viewer (such as the Life-Like, Star D, Brumberger, Stereo Realistor Kodak Stereo viewers). You should now be looking at a properly mounted 3-D slide!
The next step is opt ional . Tape one eclge of each
f i l rn chip so that i t wi l l not move in f t r ture. I fyou don' t t tse tape you can cr i tnp the top andbottom channels of the tnask to hold the f i l tnmore securely.
The f inal step is to pr"r t the mask into a card-board fo ldover (stock no.2l30). an al t t tn i t - t t t tnInask frame for Llse wi thott t g lass (stock no.2400), or to bind it in glass with atr altttrt i l tt l l l tb inder f rame (stock no.2500 binder f ratr tes wi thno.250l g lass). The choice is yot t rs.
Now yol l can go to the next grol lp of 4 andrepeat t l te process trnt i l the rol l is done.
What about frantes 2 &3'! Well , using I and 4 wil l give the strongest stereo effect. I f your subjectsare pretty close (about 5 or 6 f-eet). you may l ike to try mounting I with 3 and 2 with 4. just as dcscribedfbr I and 4. This wil l eivc you twt-r pairs of stereo sl ides, but with a reduced 3-D effect.
Once your 3-D sl ide is f inished i t is a bit smaller in image size. but with the same outside dinrensionsas the rnore common Stereo Realist-format slides. It is compatible with ALL Stereo Realist-fornrat stereoviewers or pro-jcctors.
TWIN 2,,x 2,,NIMSLO 3-D SLIDE MOI-]NTING
Because of the autonratic capabil ity and ready availabil ity of standard35mrn sl ides (such as the Kodak Carousel) , i t has been increasinglyprojection rvith a nratchcd pair of projectors.
The Nirnslo cart be used f or th is type of systern by tnottnt-
ing f ranres I and 4. as descr ibed previously. i t r to two sepa-rate 2" x 2" ntot tnts which have Nitr ts lo s ize opetr ings. Theclosest s ize avai lable is the standard l8mrtr x 24ntn hal f -f ra rne open ing (s t rch as the GE,PE no.6 l0 l ) . wh ich is abot t t2mrn tal ler than the Nirnslo s ize. On frarne I th is can beignored. let t ing the black f ihn area forrn the top nlaskedge. On frame 4 the red dot shows, so t l t is t t r t tst bernasked rv i th opaque tape. Al ternat ively, the red LED inthe carnera can be covered w i th a dab o f b lack pa in t toget r id of th is problern permanent ly.
t6
slide projectors for 2 " x2" ntountedpopular to use this fbrmat fbr stereo
P u t t i n g A l u m i n u m M a s k i n t o C a r d b o a r d F o l d o v e r
G U I D E T O T H E N I M S L O 3 D C A M E R A

When u_sing the separate2"x2't mounts, follow the same basic mounting procedures as for the Sigmamasks. 3-D hand viewers are also available for this format. 3-D projection with twin projectors requ-irespolarizers in front of the lenses, a SILVER SCREEN and poliriied 3-D glasses. See "The Woild of3-D" book by Ferwerda for more details on this subject.
OITHER THINGS YOU CAN DO WITH YOUR NIMSLO CAMERA
Due to the limitations and cost of lenticular 3-D prints, many users have been discovering (or re-discovering)some of the more "old-fashioned" possible uses for the Nimslo camera (besides doorstops, bookendi,shotputs and paper weights).
..STEREO VIEW CARD'' PRINTS
You may be familiar with antique style stereo views,3"x 3", and mounted side-by-side on a3V2,,x7,, card.stereoscope.
ictures are each printed aboutthen viewed in an old fashioned style
whereThis is
Eo
"d
3
c
]o
q)
oo)EE
o(l,
o
-c
c
L
ai
z
t
1l
oo
io,xo
€
z3oO)
ooq,
3oo,c'
oo,
o'aOl
x3OJJ
You can easily make stereo views like this with your Nimslo. Just put normal color print film (suchas ASA 100 or 400 Kodacolor or Fujicolor) into th" .ur.ra, take ybrt roll of pictures, and then takethem to almost any lab for processing and printing. Make sure they ian handle '2half-7rame,, size nega-tives. If so, you will end up with vertical 3 t/z"x 5,, prints
t :7
o . 4
G U I D E T O T H E N I M S L O 3 D C A M E R Awww.orphancameras.com

you only need TWO prints for this type of 3-D, and the best effect comes when the prints are from the
right oia Up end nigativis of each group of four. To avoid confusion, and so that the lab can easily
pr"int just those negatfues that you want, we suggest that you cover the middle two lenses before shooting'
Since there were no lens caps made to fit the Nimslo camera, one method is to tape two small wads
of black velvet over the center two lenses. Before you consider this to be a waste of money, keep in
mind that the developing and printing of the negatives is fairly cheap-it's the cost-per-print that adds
up. With this method you will get only the correct frames printed.
(If you can't stand the thought of wasted film, see the description of the "Teco-Nimslo" later on in this
book, under the "NIMSLO MODIFICATIONS" section.)
i I'\,{
Next, you wil l need to mount the i itwo 3Yz" x 5" Prints for viewing. '
The simplest method is to cut apiece of cardboard or mat board to :
5" x 7" size, and to mount the two ':
.-t$\svertical prints side-by-side, with the i-*i;.SS '{
r:#: *'Irilf;#.itHSW --,d
inverted, transpose them and seeeasily once you trY this.
an old-fashioned style print stereo-scope. With this method the top ofthe print maY not be visible in thestereoscope, so You may want totrim the height closer to the moretradition al 3/z inches.
Tlte easiest way to tell whiclt is tlte' ta'*i, '
teft vtew, and whiclt ,s the rigltt '" '""
view. is to rest the views on a blankcard in the stereoscope and view them. If the view seems strange or
if it looks more normal. You will automatically see the difference
After that you can easily check each pair before you mount them to the card. Double stick tape, rubber
cement, diy mount tissue or spray mount adhesive may be used to mount your prints'
The following are a few basic tips on mounting your prints. Since the labs have a bit of leeway on how
they comporJ your prints, it's p'ossible for on. iruge to be a bit higher than the other. [,ook along the
top or bottom .Og. of the priniand find a series of iecognizable points -(? to*, a flower or some other
small item) and sJe rheir relationship to the edge. That relatiortship shouldbe the sarnefor BOTH prints'
For example, say you look at the right print and see a single recl flower about l/8" fronr the bottotrt
near the left edge of the print, and a y.llo* flowcr at the sante distance near the right edge'
yotr should find the same relationship on the lefi print. If you found that on the left print there was
a ll4,,clistance between the two flower.s and the bottirnr edge, you should then carefully trim the bottonr
to match the right view. Now the tops of the prints won't be the same height, so lay a straight edge across
them and trimlhem evenly, also. Once this is done the views nrav then be mounted on a card. as already
G U I D E T O T H E N I M S L O 3 D C A M E R A
A M o d e r n R e p l i c a o f a n O l d - F a s h i o n e d S t e r e o s c o p e
l 8

described. Right and left edges may also be trimmed in the same way,cropping the height of the print from 5 " to 3,, to more more closelv
and you might want to considermatch the classic stvle.
.tjii6s:ah\i
*lil.*
#. sF .
LT
$N
The finer points of mounting 3-D prints (and slides) are coverecl in the book ..The World of 3-D: APractical Guide to Stereo Photography", as sold by Reel 3-D Enterprises, Inc. We highly recommendthis book.
SMALLER PRINT FORMAT
Since many labs may not be equipped to enlarge the half-frame Nimslo format negative to standardf Vz" x5 " prints, you may prefer to have them prinl on their standard setup. without further enlargement.In th is case you wi l l get a3t /z"x2t /z" image area on a3t /2, ,x 5, ,pr in i .
-o
o.E
oJ
3
-3
q)
0)
EE
0)o)
-c
c
!
o
I-1OJxo
{
z3
(^)oql
3ooro
an
o,
ll
x
iNs\'
The rest of the print area will bepart away from both the left and
black (assuming you covered the center tworight prints, and mount them side-bv-side on
lenses). Trim the blacka 3t /z" x 5" card. in the
t9G U I D E T O T H E N ] M S L O 3 D C A M E R Awww.orphancameras.com

same fashion as the previously described prints. This may then be viewed with the Folding Plastic Stereo-
scope, the Fold Flaistereo piint Viewer br the Plastic Hand Held 3-D Print Viewer-all available from
Reel 3-D Enterprises, Inc.
H a n d - H e l d 3 - D P r i n t V i e w e r
NIMSLO 3-D CLOSE UPS
In the March/April 1985 issue of "stereo World", the editor, John Dennis, described a simple method
for taking close-ups with the Nimslo. His technique is to cover !P two adjacent lenses with tape, and
to put a single t.zS aiopter lens from a pair of reading glasses in front of the remaining uncovered pair
of lenses.
Dennis says this wil l shif t focus to about 2feet-a good portrait distance. Also, the1Smm separat ion of adjacent lensesprovides close to a I /30 rat io of lens sep-aration to strbject distance. Under sl lnnyl ight condit ions the canlera's automaticexposure systetn will choose a srnall lens
aperture. yielding considerable depth of
f ield. which wil l al low yolr more lat i tude inguessing a2 foot distance.
I,f
9L
J
f
o
:l
He suggests that in low light, a two foot string can be tied to one of the strap holders for a quick check
of the [iop., distance-ev-en with hand held shots. He cautions to be careful to avoid covering the exposure
sensor with any part of the glasses frame.
L
o
o
:J
z3
{
H
N)(n
o
o
20 G U T D E T O T H E N I M S L O 3 D C A M E R A

rDavid Burder, of Great Britain, has determined that photographic "plus" lenses may also be used. Theyusually come in sets offering +I, +2,and *4 diopters. The approximate focus distances are *l :2g,,i*2 : 18"; and *4 :9", all measured from th; film plane.
Using the *l close-up lens has qrove{ very effective for head and shoulder portraits with no sign ofdepth distortion. A simple techniqug for approximately measurin g 28'is to^reach your arm out andtouch your subject's nose with your finger while you compose throrigh the viewfinder. This is also sureto give you a perfect smile for your portrait.
Technical Enterprises offers custom made lens sets for taking close-ups at 6,,, 12,,, ot 30,, for use ont!"it specially modified version of the Nimslo camera. For morJnformation see the "NIMSI,O MODIFI-CATIONS" section.
When.using supplementary lenses the subject should be placed as close to the background as possible,to avoid large and exaggerated parallax differences. The brighter the general lighiing the smaller theautomatically camera-chosen aperture will be, resulting in grealer depth-6f-field. rft"t"ior", sharp resultsforclose-ups will be much more likely in bright sunny Jond]tions. Measuring distance to subject carefullywill also help insure sharp focus.
USING OTTTER ASA SPEED FILN{S
Bill Duggan, of the Potomac Society of Stereo Photographers, has put Neutral Density (N.D.) filtersover the exposure meter sensor of the camera to "trickJ it into giving correct exposures witir filmspeedsother than the indicated ASA 100 or 400.
It follows that io- go from ASA 100 to ASA 50 or from ASA 400 to ASA 200 involves lowering the filmspeed by one full f-stop. This may be achieved in four ways. l) Use a Kodak Wratten 0.3 Neutril Densityfilter- 2) Use a Hoya No. 2 Neutral Density filter. 3) Use ilor.o No. 3402 Neurral Density filter material4) Use one or more layers of frosty Scotch tape (sellotape, if you're British) over the sensor.
The two other speeds you would most likely want to use are ASA 64 and ASA 25 for Kodachrome.y]tl the film speed selector switch set at 100 use Wratten No. 0.2 over the sensor when using ASA64 film- For ASA 25 use Wratten No. 0.6 (2 stops) over the sensor. The normal polarizers ma"de forcameras also reduce the light by about two stops, ild therefore could also be urbd to go from ASA100 to ASA 25- Again you may experiment with frosty tape or other filter material to obtiin the speedsthat you want.
Note: These suggestions are approximate, and should be tested on yourparticular camera to determinebest results- Other film speeds are obviously obtainable, but you will have to experiment to determinethe proper combinations.
VIAI\TJAL APERTLIRE CONTROL
We've already stated that both aperture and shutter speed settings are fully automatic on the Nimslocamera, however, some manual control of the aperture is possidle. By covering the Exposure MeterSensor with opaque tape you will automatically get the slowest shutter speed of tl:Ottr of a second andmaximum aperture of f/5.6. This can be useful if you are matching a particular film speed or flash unit,and these settings happen to match what you wint.
To obtain the fastest shutter speed of 1/500th second with the smallest apertu re of f l22Dr. paul Milliganof New Mexico came up with a clever solution. In an article in "The Stereo Flash", newsletter of the
eu rDE To rHE NrMsLo 3D cAMERA 21www.orphancameras.com

22
Chicago Stereo Camera Club, he wrote that all you need to do is to put a light right in front of the Exposure
Sensoi. To do this he bought a small wheat grain bulb from Radio Shack, mounted it directly in front
of the sensor, and powerEO it by a couple of AAA batteries, with a small toggle switch thrown in'
Whenever he wants a small aperture (such as for flash photography) he just turns on the switch, the
light comes on, and the camera is fooled-
David Burder achieves this by an internal electrical modification via a micro switch on the body which,
when pressed, stops the camera down to f/ll.
Michael Starks, from San Rafael, California, accomplishes time exposures (bulb setting) by reversing
the batteries in his Nimslo camera. (Reverse the direction of the batteries so that the -'s face the *
symbol direction.) He strongly suggests changing them back to their normal positions after you are
through so as not to damage your camera, or deplete the battery power prematurely.
FLASH PHOT]OGRAPHYWITH YOTJR NIMSLO 3.D CAMERA
Like the Nimslo camera, the Nimslo Opti-Lite Flash is
extremely simple to use' Whenever the light level is low
enough that the red indicator is showing in the calnera
viewfinder, the flash should be used.
The opti-Lite Flash is "dedicated" to the Nimslo in that
when the flash is charged and ready it will indicate in
the viewfinder by changing the red LE,D to green. The
flash itself does not make any automatic adjustments
to the camera, and is not dedicated in any other way(except being matched for AsA and exposl lre as
indicated).
It should be noted that any flash can be used on the Nimslo, as long as the automatic or manual exposure
settings of the flash are able to work for the film speed you are using with the camera aperture at f 15.6.
(Whenever the red LED shows in the viewfinder the camera is at f/5.6 aperture.)
When other flashes are used the red LED will not disappear, however, this simply means the camera
is at f/5.6 and pictures may still be taken if flash settings are properly made.
The Opti-Lite Flash may also be used on other cameras that have hot shoes, as long as the camera
apertuie is set to f/5.6. Read the scale on the flash for exposure information.
Our own experience with the Opti-Lite Flash when used for taking lenticular prints is that it seems
to work best with both heads always pointed directly at the subject. Using the bounce flash feature seems
to offer no advantage.
TIYPERSTEREO SLIDES
Hyperstereo slides or print pairs are 3-D images taken *lt! a wider than normal lens separation' The
result has ,.more 3-D" thun you would get wit[ the normal lens spacing of the Nimslo camera. A wider
than normal lens spacing cin make it -possible
to see things in depth that would normally be too far
G U I D E T O T H E N I M S L O 3 D C A M E R A

away to have any relief, such as a scenic view of far away mountains with no very close foregroundsubjects. The result is the photographic equivalent of what a giant might see, whose eyes arJ muchfarther apart than our own.
One way to take a Nimslo hyperstereo is to modify the camera so that it can take double exposures.See "Non 3-D Uses for the Nimslo 3-D Camera" section for how to make this modification. Whenyou compose your scene make a mental note of how all of the subjects are framed in relation to theviewfinder edges. Thke your first picture with the two left lenses covered. Move several feet to the left,uncover the two left lenses, cover the right two lenses, re-cock the shutter without advancing the film,and you re ready to take your second half of the picture. Compose the scene again exactly is you didfor the first picture. Thke your second shot. If you aligned everything properly you stroutO get ahyperstereo Nimslo image.
Hyperstereo slides can also be done without modifying the camera by taking a picture, quickly advanc-ing the film to the next frame, stepping slightly to'the right or left and taking u s.cond picture, carefullykeeping the same composition. This will give you four sets of hyperstereos by .o*bining one of theframes from the first set with one of the frames from the second set (four times)
NIMSLO MODIFICATIONS (FOR NON-LENTICI]LAR APPLICATIONS)
David Burder demonstratesone of the more v io lentsteps in the conversion of aNimslo to a two lens auto-mat ic stereo snapshotcamera - the "Burd lo " .Photo: David Starkman
The recent close-out prices of Nimslo cameras have led many people to do a bit of experimenting andtinkering to customize the camera to other-than-intended uses. Two of the most successful modificutiontthat we have seen are the "Tbco-Nimslo" by Technical Enterprises, and the "Burdlo" by David Burder.
23
T h e " T e c o - N i m s l o " 3 - D C a m e r a
G U l D E T O T H E N I M S L O 3 D C A M E R Awww.orphancameras.com

24
The Tbco-Nimslo is essentially a standard Nimslo with a modified transport mechanism, and provisionfor a special lens cap for the center two lenses. With the lens cap in place, and the advance modifiedto travel half the normal Nimslo distance, slides may be taken a pair at a time (with the outer twouncovered lenses) with nofilm wastage! Like the Stereo Realist system, this leaves room for two frames(each the half of two different stereo pairs) between each stereo pair. Thus, a 36 exposure roll of filmwill yield 36 Nimslo size (l8mm x22mm) stereo pairs. Depending on what you normally pay for filmand processing, the cost of the Teco-Nimslo camera conversion could easily be covered by the additionalpictures you would get on shooting a dozen rolls of film.
Technical Enterprises also offers three different close-up lens sets for the Tbco'Nimslo camera, eachsnapping on like the special lens cap. The first model is set to focus at 6", and utilizes the center twolenses, with a stereo base of 3/a inches. The second model is set to focus at 12", and uses the first andthird lenses for a stereo base of lt/2". A parallax-compensating viewfinder device is included for thesemodels. The third model is set to focus at 30", using a lVz" base. This is a perfect distance for 3-Dportraits. Parallax viewfinder compensation is not needed. All three sets are designed to automaticallycover the lenses not being used. For prices. more details and ordering information contact: TechnicalEnterprises, l40l Bonnie Doone, Corona del Mar, CA 92625. Telephone (714) &4-9500.
The Burdlo is a much more radical modification of the basic Nimslo 3D camera. The camera is totallystripped to the chassis, the lens board and shutter blades are completely removed, and the first and
third septums are removed from the back of the carnera, leaving only one in the center. The height is
milled open 2mm, back to the 35mm film standard of 24mm, with the final result being two adjacent
normal film frames of 24mm x 36rnm.
R e a r i n t e r i o r v i e w o f t h e B u r d l o
convers ion showing the " fac to ry
f i n i s h e d " q u a l i t y o f t h e s i d e -
by-s ide 24 x 36mm aper tu res .
The reduced lens spac ing makes
i t u n s u i t a b l e f o r g o o d s c e n i c
3 - D , b u t i d e a l f o r p e o p l e a n d
por t ra r ts .
G U l D E T O T H E N I M S L O 3 D C A M E R A

To accommodate this the lens board is modified into a two lens system with new shutter blades, anda lens base of 36mm to match the centers of the new full-frame film apertures. All of this is done whileretaining the full automatic exposure features of the original camera.
The new lens board also features the addition of 72mmfilter rings which allow the use of 72mm..plus,,lenses or filters for close-ups or special effects.
The end result is a two-lensed Nimslo, the Burdlo, which takes two normal full-frame 35mm 3-D pairsat a time, yielding 18 pairs on a 36 exposure roll. On the negative side it should be noted that for techni-cal reasons the camera vignettes increasingly at smaller u["rtu..r. At worst they still mount well intothe 24mm x 28mm "European format" stereo mounts. Also, the 36mm base of tn. two lense, !iu.,a reduced stereo effecl!1the typical scenic type of shot. It lends itself to work where the bulk of stibjectmaterial is within 6to25 feet. With a *l lens una tn. rybject at28" it is an excellenr.u-".u f- p**i,r.For more information contact: David Burder,3-D Images, Ltd.,3l The chine, l ,ondon N2l 2EA,ENGLAND. Telephone: 0l-364-0022. EAX number: ot-:o+-tsza.
A croppedBurd lo "snap-sho t o f au tho rSusan P inskyw i th a f r i end lySwiss cow,photographedi n 3 - D b yDav id Burder .
In a 1984 issue of "Ste.reoscopy", Journal of the International Stereoscopic Union, Burder covered somepossibilities in his article "l0l Uses for a Dead Nimslo". Burder has eiperimented with modificationsusing the widest and smallest possible lens bases on his two-lensed Nimsio, for normal and macro stereoeffects' He also has created a conversion to an underwater stereo camera (the Sharklo? Jawslo?), andeven a 24 lens version for lenticular prints (but not from Nissei)
We hope that the information in this section may inspire some successful adaptations by others. It hasnot been possible to supply a detailed "how-toi' on-making modifications, ho*"u.., we refer you tothe Nimslo Service Dept. Technical Information in the back of-this book for details on the internal structureof the camera.
One final modification of the camera which can be quite useful is the addition of a shutter cocking leverwhich allows the possibility of double or multiple exposures. See next section for more on this subject.
NON 3-D USES FOR TIIE NIMSI]O I
The unique format of the Nimslo_3D Camera may also be useful in many non 3-D applications. In theOctober 1987 issue of "Modern Photography" Mason Resnick suggested several .liu., possibilitiesin an article entitled "what to Do wit[ a DLad Nimslo".
25G U I D E T O T H E N I M S L O 3 D C A M E R Awww.orphancameras.com

He wrote that even if you are not interested in 3-D, why not use the unmodified Nimslo camera as a
four lensed regular (flat) camera? Since prints are often l6ss expensive at the time of original processing
than when reprints are made, this wouldprovide an easy way to get four half price copies of each image
by having the whole roll printed th" fitit time. Could be a great way to keep relatives happy!
Resnick suggests making four flip-up lens covers, so that one picture can be taken at a time' This also
requires the ability to make douLle'exposures. He indicates ihat this is possible by cutting"a small
notch about Vo,, b; j/r,, atthe lower right-hand corner of the plastic lens surround" (lower left as the
front of the.u..ri faces you). "The sh"utter cocking lever sho.iry q. easily visible extending down from
the top. Using a bent paperclip, push this lever to the right. This will re-cock the shutterl'
For multiple single shots one alternately uncovers each of the four lenses recocking the shutter for.four
successive shots before advancing. ihJ end result is that you've turned your Nimslo into a mono half-
frame camera, getting, for example,T2 pictures on a 36 shot roll'
Resnick also suggests other possibilities including in-camera collages and creating a2lmm \.7!^^panoramic imagElRefer to hii article for more details. we're sure you can come up with some additional
uses of your own.
A "Fami ly Tree" of some of the possib le modi f icat ions of the basic 4 lensed Nimslo
3D Camera at the top. i f , " t " are al l funct ional ( the one lensed model is a ioke) and
serve d i f f e ren t pu rposes fo r the i r c rea to r , Dav id Burder . Pho to : Dav id Burder
26 G U l D E T O T H E N I M S L O 3 D C A M E R A

CONCLUSIONS
The Nimslo 3D Camera is simple, but is not a mere toy. With relatively low cost and current availability,it provides an easy, focus-free, auto exposure means for taking lenticuiar 3-D prints, classic side-by-sidestereo prints, and 3-D slides. It is a good camera for the novice to enter the world of stereo photogiaphy,and may provide some extra portability and simplicity that could be attractive to the advanced stereophotographer as a second, third, or back-up stereo camera.
FOR MORE INFORMATION
The best all-around book on 3-D photography currently available is "The World of 3-D: A practicalGuide to Stereo Photography. by J.G. Ferwerda.
Other good sources are stereo clubs and organizations. Three of the largest are:
The National Stereoscopic Association (NSA), P.O. Box 14801, Columbus, OH 432l4.This organizationproduces an extremely fine bi-monthly publication called "stereo World" which contains irticles ofinterest to both collectors of vintage stereo views and to modern 3-D photographers. Side-by-side stereoviews are reproduced in every iiue. A sample copy is available for $4.00, including postage.
STEREO STEREO
International Stereoscopic Union (ISU). Devoted completely to the worldwide sharing of informationon modern 3-D photography. For more information write to: ISU, P.O. Box z3lg,Bern, S*nZERLAND.
The Photographic Society of America (PSA) is the largest amateur photographer's organizatron in theU.S.A. It publishes the monthly ,,PSA Journal" and has a Stereo Division Oevotea to 3_5 photographers.Through the Stere.o Division it provides interesting and educational mini 3-D slide seti and iomplete3-D programs available for loan to members and members clubs, individual 3-D slide critiqueingj andsponsors numerous 3-D slide competitions every year. For more information write to the Stereo Division{e_abelhip Direclor, Greg Thylor, 1005 Barkwood Court, Safery Harbor, FL34691 Telephone (gl3)826-3356. National Headquarters address: PSA, 3000 United Founders Blvd., Suite tOf. OnahomaCity, OK73ll2. Telephone (405) 843-t4y.
Ttoo
L
o:tJ
oo
f
q
G U l D E T O T H E N I M S L O 3 D C A M E R A 27www.orphancameras.com

NIMSLO 3D CAMERA OPERATING INSTRUCTIONSINSTALLING THE BATTERIES
CIIECKING THE BATTERT ES
3. Battery Insertion ProcedureInsert the batterres one on top of the other into theBattery Chamber with the plus mark (+ ) f acing into thecamera.
You may f ind i t more convenient to load the batteries byplacing the f lat plus (+ ) side of the battery against the
bottom of the camera and sl ide i t toward the opening ofthe Battery Chamber, as i l lustrated. Let each balterydrop into the Battery Chamber unti l al l three have beenloaded. Return the Battery Chamber Cover and t ighten'
FILoJ
1, The batteriesThree Eveready 386si lver oxide batterieshave been packed sePa-rately in your camerapackage.
1. Advance the FilmAdvance LeverCheck the batteries eachtime before using thecamera. Advance theFilm Advance Lever (1) tocock the shutter.
2. Opening theBattery Chamberlnser t a co in , or s imi lar ob-ject, into the groove in theBattery Chamber Cover(23) . Make a 113 turn,counter clockwise, andremove.
2. tlepress theShutter ReleaseButtonThen press the ShutterRelease Button (2) l ightlYwhile looking into theViewfinder Eyepiece (15).
FIo
LJ
lf a green dot appears at the bottom or a red dot in thecenter of the viewfinder, the batteries have enoughpower to operate Your camera.
l f neither signal appears, the batteries are eitherpositioned incorrectly or have insufficient power andmust be replaced.
3. Green dotlocation inViewfinder
3. Opening thecameraOpen the Camera BackCover (19) by pul l ing uPfirmly on the Fi lm RewindKnob (10) as far as i t wi l lgo unti l the back sPringsopen.
Avoid direct sunl ightwhen you load or unloadthe camera.
4. Red dotlocationin Viewfinder
4. Place the film intothe Film ChamberLeave the Fi lm RewindKnob (10) in the uP Post-t ion and insert the f i lmcassette with i ts l iPpointed to the r ight andthe protruding end down,into the Fi lm Chamber (21).
LOADING & ADVAIIIGING THE FIIM
1. Uses 35mm colorprint filmYour Nimslo Camera usesal l poPular brands of35mm color Print f i lm witha rat ing of either ASA 100or 400. You maY use anyb rand i n36 ,24 ,2Oor12 -exposure rolls. However,AGFA f i lm is sold withpre-Paid Processingmailers which cannot beredeemed bv Nimslo.
2 8 c u r D E T o r H E N t M S L o 3 D c A M E R A
2. Wvo 35mmframes produceone 3-DimensionalphotographThe Nimslo 3-Dimen-sional process requires agroup of four half{rame35mm negative imagestoproduce a 3-Dimensionalphotograph. Therelore,HALF THE NUMBER OFPICTURES STATED ONTHE FILM CASSETTEWILL BE PRODUCED ONANY ROLL OF FILMUSED IN YOUR NIMSLOCAMERA

LOADTNG& ADVANCNNG THE F|LM (CONT)
5. Secure the filmcassette and bringfilm to the Take-Q[SpoolPress the Fi lm RewinoKnob (10) down as i l lus-trated. You may have torotate the Film RewindKnob sl ightly for i t to re-turn to the down posit ion.Pullout just enough f i lm toreach the Take-Up Spool(17).
6. Film can beinserted into anyslot of the Take-UpSpoolInsert the end of the f i lmleader into a slot of theTake-Up Spool.
7. Attach your filmto the Take-UpSpoolLatch one of the film oer-foration holes on the bot-tom edge of the film ontothe small Film PerforationHole Hook (26) at thebase of the Take-UpSpool.
Fold out the Film RewindCrank (9) and gently turnit in the direction of thearrow totake up any slackin the f i lm. (Be careful notto "over" rewind the filmback into the cassettel)Fold back the Film Re-wind Crank to i ts originalposit ion.
'#oo
9. Engage the filmon the FilmSprocket GearMake sure the f i lm perfo-rat ion holes on the loweredge of the f i lm, latch (or"hook") onto, the Fi lmSprocket Gear (24)-located at the lower edgeof the f i lm leader to the leftof the Take-Up Spool.(The f i lm should notobscure your view of thesprocket gear teeth.)
10. Close theCamera BackClose the Camera BackCover (19) by f irmly press-ing i t into the locking posi-t ion.
11. Advancinq thefilmCock the Fi lm AdvanceLever (1) al l the way. . .andrelease. . .al lowing i t to re-turn to i ts normal posit ion.
12. Releasingthe ShutterPress the Shutter ReleaseButton (2).
13. Advance tonumber .1. for yourfirst pictureRepeat both steps unti lthe number " .1 . " appearsin the center of the Expo-sure Counter Window(13). (You may have to re-peat the sequence 1 or 2t imes. )
29
8. Tighten the fifm
G U I D E T O T H E N I M S L O 3 D C A M E R A
www.orphancameras.com
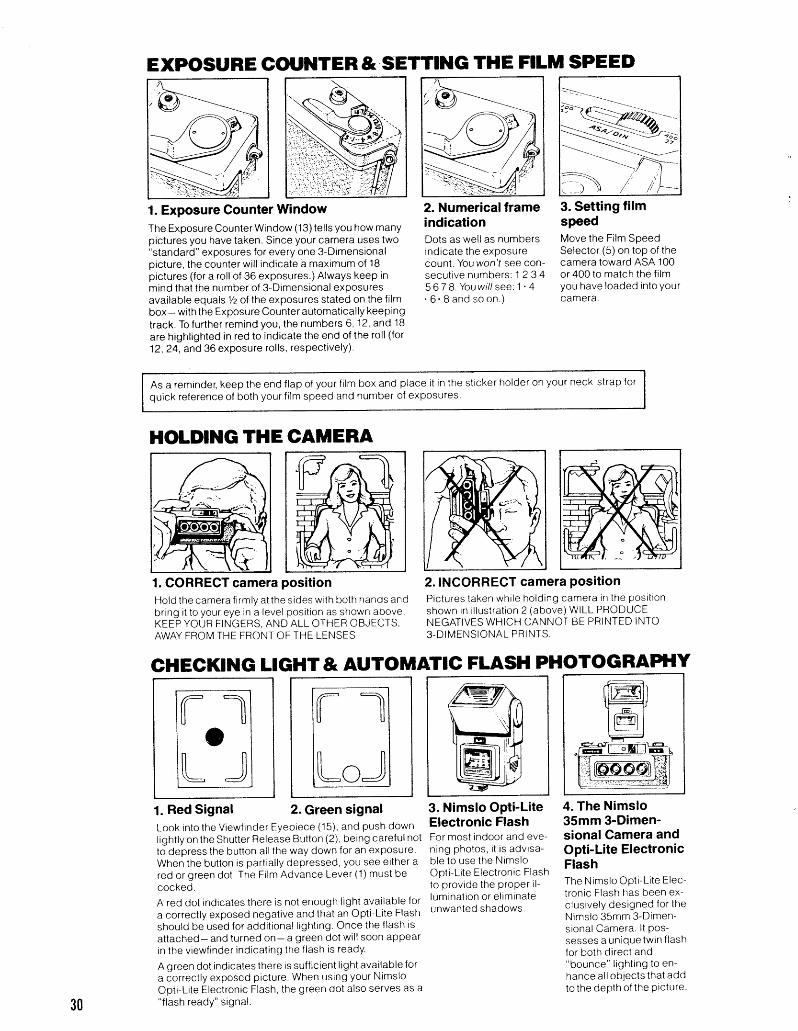
EXPOSURE GOUNTER & SETTING THE FILM SPEED
1. Exposure Counter WindowThe Exposure Counter Window (13) tells you how manypictures you have taken. Since your camera uses two"standard" exposures for every one 3-Dimensionalpicture, the counter wi l l indicate a maximum of 1Bpictures (for a rol l of 36 exposures.)Always keep inmind that the number of 3-Dimensional exposuresavailable equals 1/z of the exposures stated on the filmbox- with the Exposure Counter automatical ly keepingtrack. To further remind you, the numbers 6, 12, and 1Bare highl ighted in red to indicate the end of the rol l ( for12,24, and 36 exposure rol ls, respectively).
2. Numerical frameindicationDots as well as numbersindicate the exposurecount. You won'f see con-secut ive numbers. 123 45 6 T B . Y o u w i l l s e e : 1 ' 4' 6 . B and so on . )
3. Setting filmspeedMove the Fi lm SpeedSelector (5) on top of thecamera toward ASA 100or 400 to match the f i lmyou have loaded into yourcamera.
As a reminder, keep the end { lap of your f i lm box and place i t in the st icker holder on your neck strap for
ouick reference of both vour f i lm speed and number o{ exposures'
HOLDING THE CAMERA
CHEGI$NG LIGHT& AUTOMATIC FLASH PHOTOGRAPHY
1. CORRECT camera positionHold the camera f i rmly a t the s ides wi th both hands andbring i t to your eye in a level posit ion as shown above.KEEP YOUR FINGERS, AND ALL OTHER OBJECTS,AWAY FROM THE FRONT OF THE LENSES
1. Red Signal1. Red Signal 2. Green signalLook into the Viewf inder Eyeprece (15), and push down
l ight ly on the Shutter Release Button (2) , being careful not
to depress the but ton al l the way down for an exposure.
When the but ton is part ia l ly depressed, you see ei ther a
red or green dot . The Fi lm Advance Lever (1) must be
cocked.
A red dot indicates there is not enough l ight avai lable for
a correct ly exposed negat ive and that an Opt i -L i te Flash
should be used for addi t ional l ight ing. Once the f lash is
at tached- and turned on- a green dot wi l l soon appear
in the v iewf inder indicat ing the f lash is ready.
A green dot indicates there is suf f rc ient l ight avai lable for
a correct ly exposed picture. When using your Nimslo
Opt i -L i te Electronic Flash, the green dot a lso serves as a"f lash ready" s ignal .
2. INCORRECT camera PositionPictures taken whi le ho ld ing camera in the pos i t ionshown i r i i l lus t ra t ion 2 (above) WILL PRODUCENEGATIVES WHICH CANNOT BE PRINTED INTO3-D IMENSIONAL PRINTS.
rlLoJ
3. Nimslo Opti-LiteElectronic FlashFor most indoor and eve-n ing pho tos , i t i s adv isa -b le to use the N ims loOpt i -L i te Electronic Flashto provide the proPer i l -l um ina t ron o r e l im ina teunwanted shadows.
4. The Nimslo35mm 3-Dimen-sional Camera andOpti-Lite ElectronicFlashThe N ims lo Op t i -L i te E lec -t ronic Flash has been ex-c lus i ve l y des igned fo r theN ims lo 35mm 3-D imen-s iona lCamera . l t Pos -sesses a unique twin f lashJor both di rect and"bounce" l i gh t i ng to en -hance a l l ob jec ts tha t addto the depth of the Picture.
30

TAKING PTCTU RES AUTOMATICALLY
1. Taking picturesautomaticallySophist icated electron iccircuitry bui l t into thecamera automatical lycontrols the exposure al-lowing you to concentrateonly on framing and com-posit ion. Your camera wil lautomatical ly select thebest combination of aper-ture and shutter speedto achieve a correctlVexposed negative.
2. Framing thepictureLooking into the View-f inder Eyepiece (15) you' l lsee a bright l ineframe- an outl ine of thermage area in which youcan compose yourphotograph quickly andaccurately. l t is a guide toshow you which objects inthe scene wil l actual ly bein your 3-Dimensionalphotograph.
3. Viewing a typical3-Dimensional sceneWhen composing your pictures move around whileyou are looking through the camera's Viewfinder. Takethe photograph when you see the most pleasing ar-rangement, making sure al lyour picture is inside theBright Line Frame. WHEN COMPOSTNG YOURPICTURES YOU SHOULD AVOID SUBJECTS OROBJECTS IN THE SCENE CLOSER TO YOU THAN6 FEET. This wil l al low you to compose beauti ful3-Dimensional photographs which are in sharp, c r isp{ocus.
4. Now vou and thecamera are readytotake picturesBecause the lenses areprefocused, no manualadjustments are req u i red.Simply hold the camerasteady and press gentlydown on the Shutter Re-lease Button (2) unti lyouhear a c l ick .
5. Advance the FilmBefore you take the nextpicture, advance by mov-ing the Fi lm AdvanceLever (1) one ful l stroke(and lett ing i t return to i tsor ig ina l pos i t ion. ) Nowyou are ready to shootaga rn .
6. End of RollWhen a l l the exposuresare used, you wi l lsee ared number in the Expo-sure Counter Window (13)ano feel a resistance in-dicating the end of therol l . DO NOT FORCE THEFILM ADVANCE LEVER atthis point. l t 's t ime to re-wind and un load the f i lm.
REWTNDING AND UNLOADING FILM
1. Film RewindRelease ButtonTo disengage your f i lmwhen i t rs complete, de-press the Fi lm RewindRelease Button (25) onthe bot tom of the camera
2. Film RewindCrankFold out the Fi lm RewindCrank (9) on top of thecamera. Turn the crank inthe direct ion of the arrow(clockwise) to rewind thefi lm back rnto the cas-sette. You wrl l feel tensionwhi le rewind ing. Cont inueto turn the Fi lm RewindCrank unt i lyou fee l notens ion ind icat ing that thefi lm has been ful lyrewound.
3. Unloading theFilmPu l l up the F i lm RewindKnob (10) to open theback of the camera andremove the f i lm casset te
4. ExposureCounterThe Exposure Counter(13) automat ica l ly wi l lreturn to "S" when theCamera Back Cover is-ooeneo.
v t ) - \ J ; '\-*,/ .'//
1_,/oFT-
/t
. f l \
--ia ./
G Ur D E T o r H E N T M S L o 3 D c A M E R A 3 lwww.orphancameras.com

T y p e : G - 1 B C a m e r a
S h e e f N o . 1
I
I
tI I I H S L OServ ice Depan tnen tTechn ica l In fo rna t ion
Iear of Manufacture:Ser ia l Number :E d i t i o n r
From: Deeember 1982From: . 25000051J u I y , 1 9 8 3 .
32
Conten ts :
1 ) S p e e i f i c a t i o n s . . . . . . . . . . . . . . . . . . . . . . . . . . o . . . ' . . . . . . . . . . S h e e f N o . 1
2 ) D i s a s s e m b l y f o r I n s p e e t i o n a n d R e p a i r . . . . o o . . 1 . . . . . . . . . S h e e t N o . q
3 ) I n s p e e t i o n a n d A d j u s t n e n t . . . . . . o . . . . . . . . . . . . . . o . . . . . . . . S h e g t N o . I
4 ) T r o u b l e S h o o t L n g . , . . . . . . . . . . . . . . . . . . . . . . . . . . . . . . . . o . . . . . S h g g t N o . 1 3
5 ) L a y o u t o f C o m p o n e n t s . . . . . . . . . . . . . . . . . . . . . . . . . . . . . . . . . . . S h e e t N o . 1 5
6 ) C o n p o n e n t D e s i g n a t i o n . . . . . . . . . . . . . . . . . . . . . . . . . . . . . . . . . . S h e g t N o . 2 1
7 ) C i r c u i t D i a g r a n s . . . . . . . . o . . . . . . . . . . . . . . . . o . . . , . o . . . . . . . S h g e b N o . 2 2
8 ) W i r i n g D i a g r a m s . . . . . . . . . . o . o o . . . . . . . . . . . . . . . . o . . . . . . . . . S h g g t N o . 2 4
9 ) P . C . B . 6 0 6 A s s l f . . . . . . . . . . . . . . . . . . o . o . . . . . . . . . . . . . . . . . . S h e e t N o . 2 6
1 0 ) n 6 1 6 A s s t f . . . . . . . . . . . . . . . . . . . . . o o . . . . . . . . . . . . . . . . S h e g t N o . 2 7
1 1 ) P a r t s L i s t . . . . . . . . - . . . . . . . . . . . . . . . . . . . . . . . o . o . . . o . . . . . . . S h e e t N o . 2 8
G U I D E T O T H E N I M S L O 3 D C A M E R A

N I U S L OS e r v i e e D e p a r t n e n tT e c h n i c a l I n f o r m a t i o n
1 ) S P E C I F T C A T I O N S
1 . O b j e c t i v e L e n s e s .
N u m b e n :
F o c a } L e n g t h :M a x i m u m A p e r t u r e :T y p e :C o n s t r u c t i o n r
F o c u s C o n t r o l :D e p t h o f f i e l d :
2 . V i e w F i n d e r .
T y p e :M a g n i f i e a t i o n :
C o n s t r u e t i o n :
P a r a l l a x C o r n e c t i o n :F e a t u r e s :
3 . E x p o s u r e C o n b r o l .
T y p e :
F i l n S p e e d ;
R a n g e :
P h o b o D e t e e t o rF i e l d o f V i e w :
F i l m A d v a n c e .
T y p e :
C o u n t e r :
F i l m R e w i n d .
T y p e :
Type: G-18 Camera
S h e e t N o . z
F o u n ( 4 )
30mmf / 5 . 6T r i p l e t ( 3 E l e m e n t s i n 3 G r o u p s )C o a t e d , H i g h - I n d e x G l a s s E l e m e n t sF i x e d F o c u s , 3 . O m n o m i n a l2 . 0 m t o i n f i n i t y a t f / 5 . 6 ( w i t h 0 . 0 5 m me i r c l e o f c o n f u s i o n )
R e v e r s e G a l i l e a n0 . 6 1P l a s t i e L e n s E l e m e n t s ( 3 ) , G l a s s M i r r o r s( 2 ) , P l a s t i e F r o n t W i n d o wNoneLow-L igh t Warn ing , F lash Ready , LowB a t t e r y L . E . D . r s v i s i b l e i n V i e w F i n d e r .
Programmed, v ia eon t inuous ly va r iab lee o m b i n e d S h u t t e r I r i s b l a d e s .ISO 100 /2 ' to and ISO 4OA/Z7o v ia f i l n speeds e l e e t o rA t ISO UO} /ZTo , f rom EV9 to EV16
C i r c u l a r , 2 4 o s e m i - a n g 1 e , d i s p l a c e d 5 0b e l o w h o r i z o n t a l f o r b o t t o m - w e i g h b i n g .
M a n u a l s i n g l e - s t r o k e w i t h d o u b l e - e x p o s u r ea n d m i s s e d - e x p o s u r e p r e v e n l i o n f e a t u r e s .A u t o n a t i e _ r e s 9 ! b i n g r u p W a r d s c o u n t i n g ,w i t h e n d - o f - r o 1 1 e x p o s u n e s ( 6 , t Z r l B ) i ;c o n t r a s b i n g e o l o r .
4 .
5 .
M a n u a l v i al o e k i n g r e w i n d
p u l 1 - u p r e w i n d c r a n kr e l e a s e b u t t o n .
w i t h
33G U I D E T O T H E N I M S L O 3 D C A M E R Awww.orphancameras.com
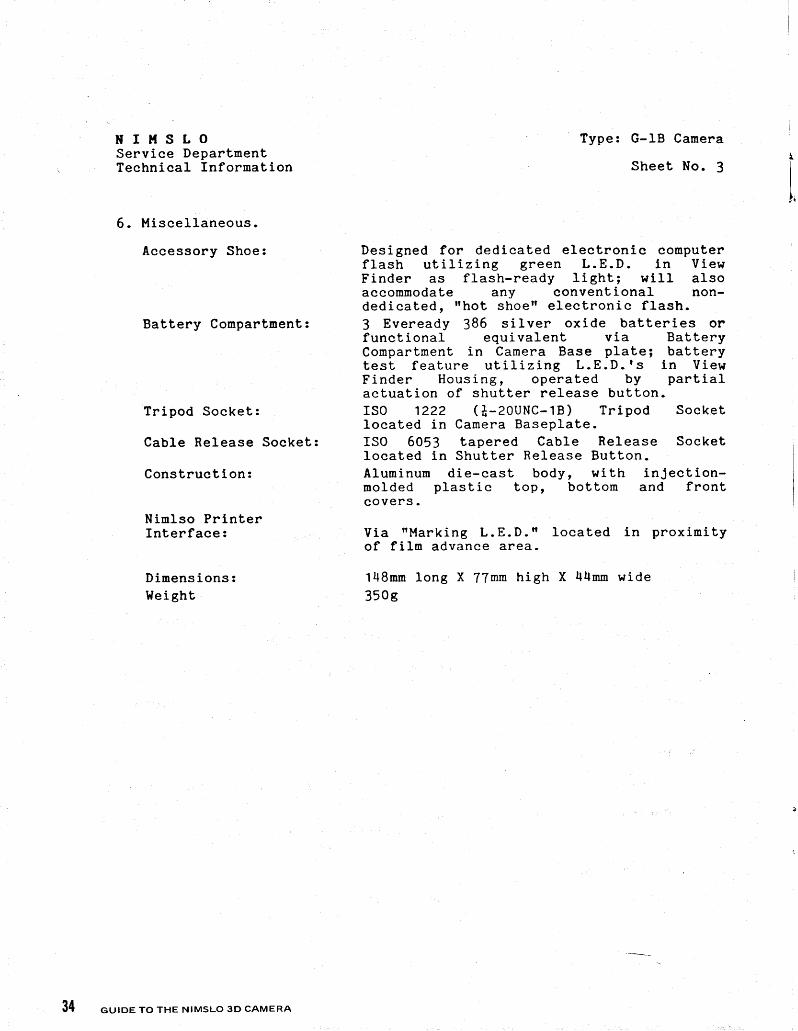
} I I H S L OServ ice Depar tnen tTeehn ica l In fo rna t ion
6 . M i s c e l l a n e o u s .
Accessory Shoe :
Bat tery Conpartment :
T r i p o d S o e k e t :
Cab le Re lease Socke t :
Construct i on :
N im lso Pr in te rI n t e r f a c e :
D imens ions :lJei ght
Type: G-18 Camera
Shee t No . 3
Des igned fo r ded ica ted e lee t ron ic eompute rf l a s h u t i l i z i n g g r e e n L . E . D . i n V i e wF i n d e r a s f l a s h - r e a d y I i g h t ; w 1 1 1 a l s oaceommodate any c o n v e n t i o n a l non-d e d i c a t e d , n h o t s h o e r f e l e e t r o n i c f l a s h .
3 E v e r e a d y 3 8 6 s i l v e r o x i d e b a t t e r i e s o rfunct i onalCompar tmen t
e q u i v a l e n t v] 'a Ba t te ryi n C a m e r a B a s e p l a f e ; b a t t e r y
t e s t f e a t u r e u t i l i z i n g L . E . D . r s i n V i e wF inder Hous ing , opera t ,ed by par t ia la c t u a t i o n o f s h u t t e r r e l e a s e b u t t o n .I S O 1 2 2 2 ( * - Z O U N C - 1 8 ) T r i p o d S o c k e tloea ted in Camera Basep la te .ISO 6053 tapered Cab le Re lease Socke tl o e a t e d i n S h u t t e r R e l e a s e B u t t o n .A l u m i n u m d i e - c a s t b o d y , w i t h i n j e c t i o n -n o l d e d p l a s t i e t o p r b o t t o n a n d f r o n tc o v e r s .
V i a n M a r k i n g L . E . D . ' r l o e a t e d i n p r o x i n i t yo f f i l n a d v a n e e a r e a .
1 4 8 n s r l o n g X 7 7 m m h i g h X 4 4 n n w i d e
3509
34 G U I D E T O T H E N I M S L O 3 D C A M E R A

I t I r { sLoServ ice Depar tmentTechn iea l In fo rmat ion
T y p e : G - 1 8 C a m e r a
S h e e t N o . 4
t h e f o l l o w i n g
2 ) D i s a s s e m b l y
Be fo re s ta r t i ngd e s e r i p t i o n s .
f o r I n s p e e t i o n a n d R e p a i r .
I I I I IMPORTANT FOR DISASSEUBLY I I I I
t h e r e p a i r o f G - 1 8 C a m e r a s , p l e a s e p e r u s e
1 . P . C . B . 6 1 5 .
T h i s P . C . B o a r d 6 1 6 h r a s d e s i g n e d a s a no p e r a t i o n - s u p p o r t i n g e i r c u i t
- f o r I C
C S 3 0 1 6 v e r s i o n n A r ' . B u t w e s u p p l y o n l y I CC S 3 0 1 6 V e r s i o n n C n f o r s p a r e p a r t s ,
- a n d
vers i on t rCr t IC does no t requ i re - theg p e r a t i o n - s u p p o r t i n g c i r c u i t r y b f p . C . B .6 1 6 . T h e r e f o r e i n c a s e I C 1 i s c h a n g e dt o n e w I C , p l e a s e t a k e o f f p . C . B . 6 1 6 i n de o n n e e t t h e w i r e s a s p e r t h e w i r i n gd i a g r a n o n s h e e t . . N o . 2 4 a n d 2 5 o f t h i ;m a n u a l .
'
F l y W h e e l S p r i n g .
T w o e o i l s p r i n g s a r e h o o k e d t o h o l e s i nL h e S h u b t e r B a s e p l a t e . T h e s e t t i n gp o s i t i o n s o f t h e s e s p r i n g s h a v e b e e na l r e a d y a d j u s t e d a t t h e f l e t o r y , s i n e ea d j u s t m e n t o f t h e s e s p r i n g s
- r e q u i r e s
p r o p e r t e s t e q u i p m e n t . T h e r e f o r e , p l e a s ep a y a t t e n t i o n n o t t o u n h o o k t h e F I y W h e e ls p r i n g d u r i n g r e p a i r s .S i n c e S h u t t e n B a s e p l a t e s s u p p l i e d a ss p a r e p a r t s h a v e a l s o b e e n a d j u s t e d a t! h " f a e t o r y , p l e a s e k e e p t h o s e s p r i n g sh o o k e d a t t h e s e t t i n g p o s i t i o n s .
L e n s A s s e m b l i e s
T h e 4 l e n s a s s e m b l i e s o n t h e S h u t t e r B a s eP I a t e h a v e b e e n p r e - m a t c h e d a n d a l i g n e dt o e l o s e t h e t o l e r a n e e s a t t h e f a e t o r y .U n d e r n o c l r e u m s a n c e s s h o u l d t h e I e n s L sb e e h a n g e d o r t h e m o u n t i n g f l a n g e sI o o s e n e d . R e p a i r t o t h e d e f e e t i v e l e n sa n d / o r S h u t t e r P a r t s r e q u i r i n g t h eI o o s e n i n g o r r e m o v i n g o f l e n s e s s h o u l d b ed o n e b y r e p l a e i n g t h e e n t i r e S h u t t e r B a s eP l a t e A s s e m b l i y .
2 .
3.
;a]\-{'.J
7os
curDE To rHE Nf MsLo 3D cAMERA 35www.orphancameras.com

N I H S L OServ ice Depar tnen tT e c h n i e a l I n f o r m a t i o n
T o p C o v e r .
1 - ' l R e m o v e s e r e w ( 4 0 ) a n d t a k eo f f C l u c h S t a n d O f f ( 3 9 ) ,A d v a n c e L e v e r ( 3 8 ) a n d K e Y(37 ) f rom F i l s l A d v a n c eR a t c h e t .
1 - 2 F i x t h e S p i n d l e ( 1 - 7 ) n o tL o r u n i d l e , t u r n t h e R e w i n dC r a n k ( 1 4 - 2 ) c o u n t e r c l o e k w i s e ,a n d r e m o v e s c r e w ( 1 4 - 5 ) . P u 1 1o u t L e a f S p r i n g ( 1 4 - 4 ) ' K n o b( t t t - 3 1 a n d R e w i n d C o l r a r ( 5 2 )f r o m S p i n d l e ( 1 - 7 ) .
1 - 3 R e m o v e t h e L e a f S p r i n g ( 4 2 )f r o m A e e e s s o r y S h o e ( 1 3 - 4 ) a n dr e m o v e t h e s c r e w ( 4 1 )u n d e r n e a t h t h e L e a f S P r i n g( q 2 ) .
1 - 4 L i f t T o p C o v e r c a r e f u l l Y s oa s n o L t o d a m a g e t h e w i r e sf r o m P i n C o n t a c t s t t 1 a n d l t 7w h i c h a r e e o n n e c t e d o n t h er e v e r s e s i d e o f t h e T o P C o v e r .
2 . B o t t o n C o v e r .
2 - 1 U n s c r e w t h e 3 s c r e w s ( 4 5 )and remove Lhe Ba t te rY Cover( 4 6 ) .
2 - 2 T a k e o f f B o t t o m C o v e r ( 4 4 ) .
Type: G-18 Camera
Shee t No . 5
ot*-fu,e/@
37
3S GUIDE TO THE NIMSLO 3D CAMERA

It
I
N I H S L OS e r v i e e D e p a r t m e n tT e c h n i e a l I n f o r m a t i o n
3 . F r o n t e o v e r .
3 - 1 P e e l o f f t h e T r i m ( 4 2 ) f r o mb o d y .
3-? Remove the 4 scre l rs ( 43 ) a tfhe co rners o f the F ron tC o v e r .
3 -3 Remove the F ron t Cover .
Rear door .
4 - 1 P e e I o f f S h i m B ( q g ) a n dr e m o v e 3 s c r e w s ( 3 3 )undernea th Sh in B .
4 - 2 R e m o v e R e a r D o o r ( t e y .
Type : G-18 Carnera
S h e e t N o . 6
',#,
#'
l l .
GUIDE To rHE NtMsLo 3D cAMERA 37www.orphancameras.com

}f I H S L OServ ice Depart rnentTeehnieal In format ion
5 . Coun te r Basep labe /F i ln Advance
Type r G-18 Camera
Sheeb No. T
B a s e p l a t e / S h u t t e r B a s e p l a t e .
5- 1 Remove 3 screws (25) andpu l l ou t Coun te r Basep la te Q)f r o m A d v a n c e R a t c h e t ( 3 ) .
5-2 Remove serew (23) and 3screws (25) on the AdvaneeB a s e p l a t e ( 6 ) .
5 -3 Take o f f Advance BaseP la te( 6 ) , S p r i n g ( 2 8 ) , G e a r ( 2 9 )a n d P i n i o n ( e 4 1 .
5 -4 Take o f f Advanee Ratehe t( 3 ) a n d - S p o o l ( 4 - 1 ) .
5-5 Remove T scre$ts (32) f romShut te r Base P la te and s low lyremove the Base Plate f rom thebody .
6 . V i e w F i n d e r a n d P . C . B . 6 0 6 .
6 - t R e m o v e 3 s e r e w s ( 3 0 r 3 1 )f r o n t h e P . C . B . 6 0 6 ( 7 ) .
6 - 2 T a k e o f f P . C . B . 6 0 6 ( 7 ) a n dV iew F inder ( 8 ) a t the samet i m e .
o
./l
{ \\ ) r
38 GUTDE TO j rHE NIMSLO 3D CAMERA

W I U S L OS e r v i c e D e p a r t m e n tTeehn ica l In fo rna t ion
Type : G-18 Camera
S h e e t N o . 8
s e q u e n e e t h e m a s t e rt h e s h u t t e r r e l e a s e
3 ) I n s p e e t i o n a n d A d j u s t m e n t .
I . F i l m a d v a n c e .
T h e f i l n a d v a n c e l e v e r s h a l l t r a n s p o r t t h e f i l m T 8 . 0 m m + 2 . 0 m m i n as ing le s t roke . The f i lm t ranspor t shou ld opera te smoot i l t y - . L ' v ru . r
w i thou t f i lm in the came.na , the to rque requ i red a t the f i l n advdncel e ve r sha r l be 816 g rams /em. a - - - r r e r r ^u c r \ ' r v ( "
wi th f i lm in the cJmera , tonque a t the f i l n advanee lever sha l l no texceed 31265 g rams/em.
2 . S h u t t e r r e l e a s e .
The shu t te r re lease bu t ton sha l r ae tua te ins w i t e h ( s 1 ) e o n t r o l r i n g t h e e r e e t r o n i c s a n dme chan i sm.
The shu t te r meehan ism sha l l eon t ro lt i m i n g s w i t c h ( 5 2 ) .
A . M a s t e r S w i t c h ( S 1 ) .
r o f f :
B e f o r e p r e s s i n g t h e s h u t t e rr e l e a s e b u t t o n , t h e m a s t e rs w i t e h ( S 1 ) c o n t a e t s h o u l dn o t t o u c h t h e p o l e ( A ) .
i n i t i a t i o n o f t h e e x p o s u r e
r O n :
W h e n p r e s s i n g b h e s h u t t e rr e l e a s e b u t t o n h a l f w d y r t h em a s t e r s w i t c h ( S 1 ) e o n t a c ts h o u l d t o u c h t h e p o t e ( A ) .
l
iII
3eJG U I D E T O T H E N I M S L O 3 D C A M E R Awww.orphancameras.com

If I H S L OServ ice Depar tnen tTechn ica l In fo rmat ion
B . E x p o s u r e t i m i n g s w i t c h ( 5 2 ) .
1 . A f L e r c o e k i n g t h e s h u t t e r :
T h e E x p o s u r e b i m i n g s w i t c h( 5 2 ) e o n t a c t s h o u l d t o u e ht h e p o l e ( B ) .
2 . A f b e r s h u t t e r r e l e a s e :
T h e e x p o s u r e t i m i n g s w i f c h( 5 2 ) c o n t a c t s h o u l d n o t f o u e ht h e p o l e ( B ) .
C . A d j u s t m e n t .A d j u s t m e n t i s n a d e b y b e n d i n gt h e s w i t e h e o n t a c t .
Type : G-18 Camera
S h e e t N o . 9
N o t e : C l e a n u p t h e s w i t e h e o n t a e t a n d p o l e s w h e n a d j u s t e d .
3 . C h e e k o f c a m e r a w a r n i n g L E D s a n d n a r k i n g L E D .
1 . W h e n e h e c k i n g t h e e a m e r a w a r n i n g L E D s a n d m a r k i n g L E D , m a s t e rs w i t e h ( S 1 ) m u s t b e i n t h e n o n ' r p o s i t i o n ( s e e I t e m 2 . A . ) a n d t h ee x p o s u r e t i m i n g s w i t c h ( 5 2 ) m u s t b e i n t h e ' r A f t e r c o c k i n g t h es h u t t e r t r p o s i f i o n ( s e e I t e m 1 . B . ) .
2 . S h o n t t h e f o l l o w i n g p o i n L s w i t h 4 0 0 o h m r e s i s t o r t o e h e e k i f a nL E D i s d e f e c t i v e .
A . R e d w i r e ( L 8 ) , e o n n e c t i n g t , o t , h e R e d L E D i n t h e f i n d e r , a n dg r o u n d ( C a m e r a d i e - c a s t b o d y ) ; t h e R e d L E D i n t h e f i n d e r m u s tl i g h t u p .
B . G r e e n w i r e t L 9 o r L 2 3 ) , c o n n e c t i n g t o t h e G r e e n L E D i n t h ef i n d e r , a n d g r o u n d ( C a m e r a d i e - c a s t b o d y ) ; t h e G r e e n L E D i nt h e f i n d e r m u s t l i g h t u p .
C . Y e l l o w w i r e ( L t l ) , e o n n e c t i n g t o t h e m a r k i n g L E D a s s ' y , a n d R e dw i r e ( L 1 ) , e o n n e c t i n g t h e b a t t e r y h o u s i n g ; t h e m a r k i n g L E Dm u s t l i g h t u p .
4 . M a r k i n g L E D .
T h e M a r k i n g L E D s h a l l e x p o s e a c i r c u l a r s p o tl o c a b e d i n p r o x i m i t y o f f i l m a d v a n c e a r e a . T h ef u n c b i o n a l r e q u i r e m e n t i s a n i m a g e d o t , i nt h i s l o c a t i o n , o f 1 . O m m + 0 . 1 m m d i a m e t e r a n dr e d d e n s i t y o f 0 . 8 5 m i n i i u m ( i n c l u d i n g b a s e )o n K o d a e o l o r I I ( I S O 1 0 0 / 2 1 o ) f i l m p r o c e s s e di n C - 4 1 c h e m i s t r y t o E a s L m a n K o d a k P r o c e s sC o n t r o l S t a n d a r d .
*
40 GUIDE TO THE NIMSLO 3D CAMERA
i A R t ( I r r i L . t . o .

ffi t r l I l t S L OServ ice Depar tmentTeehn iea l In fo rna t ion
5 . E x p o s u r e e o n t r o l :
The exposure con t ro rs o f the camera sha l r bemeasurement o f the exposure in the foear p rane .
5 -1 Check and ad jus tment o f Au to Exposure :
A . C h e e k .R e q u i r e d e q u i p e m e n t :
L i g h t F i l nL e v e l : S p e e d : L i n i t 3
ISOL L 1 0 : 1 0 0 : 0 + 1 E V :
L L 1 3 3 3 :
Type: G- lB Camera
Shee t No . 1 0
tes ted by ac tual
L i g h t m e t e r . . . . . S p e e t r o n .Power source . - . . . . 1 . C . power supp ly
s e L a t 4 V w i t h 1 5 o h m i n t l r n a limpedance .
L i g h t F i I nL e v e l : S p e e d : L i n i t :LL
rsoLL11 : 400 ,0 : l . 5EV :
LL13 : :o l? .0ev :
I S 0 4 0 0 p o s i t i o n .
s e t t h e f i l m s p e e d d i a l o f t h e
B .
1 .
2 .
A d j u s t m e n t .
Se t f i lm seLee to r o f the eamera a t
F ix the eamera to the Speetron andS p e e t r o n a t I S O 4 0 0 p o s i t i o n .
l " t L igh t Leve l o f the Spec t ron a t LL 7 and adJus t the EV e r ro rby the Neutra l Densi ty F i l ter ( B- 1 1 ) wi th in the , " "nS" 6 ' * -R.6 ' d : '
N o t e r N D f i l t e r s a r e s u p p l i e d a s a s p a r e p a r t s r a n g e o . r - 1 . 0 b y0 . 1 E V s t e p .
S e t t h e I i g h t l e v e 1 o f t h e S p e e t r o n a t L L 1 1 a n d a d j u s t t h e E ve n r o r b y t h e v R l o n P . c . B . 6 0 6 w i t h i n t h e r a n g e o ] 8 . 4 .
Return to LL?^ 4nd eheek to ensune Ev error at LL l is s t i l l w ich int h e r a n g e 0 : 8 - ' u I u - - l f S o r c o n t i n u e t o , s t e p # 6 , i f n o t , r e p e a tp roeedure f rom s tep #3 on .
' - '
Note: When check the EV error wi th Spec t ron , the Front Coverthe eamera i s a lways requ i red .
3.
4 .
5 .a F .
of
.curDE To rHE NrMsLo 3D cAMERA fl
www.orphancameras.com
} I I H S L OServ ice DePar tnen tTechn ica l In fo rmat ion
6 . S e t t h e f i l m s P e e d s e l e c t o r b o t ha t I S O 1 0 0 -
7 . Check fhe EV e r ro r o f eaeh - l i e f ' ! .I f b h e v a l u e o f N D f i l f e r ( 8 - 9 - 2 )s h o u l d m e e t w i t h t h e s p e c i f i e a f i o n '
5 -2 The Low-L igh t warn ing LED '
The Low-L igh t warn ing LED sha l leon t ro l c i reu i t r y aeeord ing to the
of the camera
Ievel a t LLi s c o r r e e t
T y p e : G - 1 8 C a m e r a
S h e e t N o . 1 1
and the SPec t ron
8 , L L 1 0 a n d L L 1 3 .( l t O O . 6 ) , E v e r r o r
b e a c t i v a t e dt a b l e b e l o w .
by the exposure
LED : Red LED must be : Green LED must be :
I S O : n o n t t , - a t - g n - b e l o w
' i l o n w , a t o r a b o v e 3
1 0 0 : 9 1 . d / ^ 2 '
ff i 56 edlmz z
The Red and Green LEDs shal lthey be ac t i va teQ un less the
F lash synchron iza t ion .
A . T h e e l e c t r o n i e f l a s h s y n e h r o n i z a t i o n d e l a y e i r e u i t s h a l l c a u s e
the f l ash to f i re when the magne t re lease command i s g i ven-
B . The Green LED sha l l over r ide the Low-L igh t__ ( led ) LED w i th an
e x t e n n a f '
; i S n a l f r o m t h e , O p t i - L i t e t t , o f + 9 V M a x ' W h e n f r O p t i -
L i f e n i s " " f O y ,
2 5 m i c r o A ! l a x . i s a p p l i e d t o t h e s i g n a l c o n t a c t
o f the f l ash connec to r .
than 0 .3V sha l t r no t
n o t b e o n s i m u l t a n e o u s l Y , n o n s h a l 1s h u t t e r m e c h a n i s m h a s b e e n c o c k e d '
6 .
C . V o l t a g e o n t h e s i g n a l - c o n t l e t o f l e s so v e r n i d e t h e L o w - L i g h t ( R e d ) L E D '
*i
*I
*
*
42 GUIDE TO THE NIMSLO 3D CAMERA

N I H S L OServ ice Depar tmentTechn iea l In fo rmat ion
Type : G-18 Camera
S h e e t N o . 1 2
T . Lens eo l l i rna t ion
r n d i v i d u a l l e n s a s s e m b l i e s s h a r l b e f o e u s e d o no b j e e t d i s t a n c e o f 3 . 0 m + 0 . 5 m a s m b a s u r e d a t t h e
A . A d j u s t m e n t o f l e n s c o l l i r n a t i o n .
N o t e r P r o v i d e w i t h a f r o n ts u r f a c e n e f l e e t i o n m i r r o rm e t a l p 1 a t e , 0 . 0 4 m . m t h i c k n e s son the bo th ends o f them i r r o r .
Open the shu t te r fu l l y and eheck
G e t t h e s h a r p e s t p o i n t b y t u r n i n ga p p l y s o m e a d h e s i v e t o t h e s c r e w .
A f t e r i n s t a l l i n g t h e F r o n t C o v e r ,
i t w i t h a 2 0 0 m m c o l l i m a t o r .
t h e l e n s e e l l , t h e n s p a r i n g l y
r e e h e e k t h e l e n s c o l l i m a t i o n .
G U I D E T O T H E N I M S L O 3 D C A M E R A
1 . R e m o v e f r o n t c o v e r .
2 - o p e n t h e R e a r D o o r a n d p u t a m i r r o r r d s s h o w n i n t h eb e l o w r o n t h e f i l m r a i r a n o e l o s e t h e r e a r d o o r .
a x i s a t af i l m p l a n e .
n o m i n a l
d r a w i n g
3.
4 .
5 .
B . H o w t o o p e n s h u t t e r .
I . C o c k t h e s h u t t e r .
2 . P u s h t h e p a r t N o . 1 t o w a r dt h e d i r e c t i o n o f t h e a r r o wm a r k , t h e n t h e I a t e h , ( p a r tN o . 2 ) w i l I b e f r e e a n d t h es h u t t e r w i l l r e m a i n o p e n .
43
www.orphancameras.com

4 )
A .
N I I { S L OServ ice Depar tmentTechn iea l In fo rmat ion
c.
T r o u b l e s h o o t i n g .
Canno t re lease the shu t te r .
1 . Ba t te ry Vo l tage Grea te r than 2 .8V whenn e a s u r L d b e t w e e n t h e m a s t e r s w i t c h ( S - 1 )a n d g r o u n d ( O i e c a s t b o d y ) w i t h s w i t c he l o s e d .
2 . C o c k i n g L e v e n S p n i n g ( 1 1 - 1 6 ) o u t o fp o s i t i o n o r b n o k e n .
3 . Ba t te ry eon tae t i n the Ba t te ry hous ingpoor con tac t o r b roken .
4 . M a s t e r S w i t c h ( S 1 ) - w e a k c o n t a c te f f i c i e n c y .
5 . E x p o s u r e t i n i n g s w i t c h ( 5 2 ) - w e a k e o n t a c te f f i e i e n c y
6 . L e a d w i r e s ( t 1 , L 2 , L 5 , L 6 ) P o o rs o l d e r i n g o r b r o k e n .
Canno t cock the shu t te r .
t C o c k i n g L e v e r L a t c h S p r i n g ( l t - 2 0 ) - o u to f p o s i t i o n o r b r o k e n .
Canno t t ranspor t the f i lm .
I S p r l n g o n t h e D r i v e C a m ( 6 - 5 ) o u t o fp o s i t i o n o r b r o k e n .
T y p e : G - 1 8 C a m e r a
S h e e t N o . 1 3
D e t e r n i n e i f t h e V i e wF i n d e r L . E . D . si l l u m i n a t e a n d c h e c ke i r c u i t r y w i t he l e e t r i c m e b e r .
H o o k o n o r r e p l a e e i t .
A d j u s t o r r e p l a c e i t .
R e f e r t o t h e i t e n ? - Ao f s h e e t N o . 8 . C l e a nu p c o n t a c t a n d p o l e .
R e f e r t o t h e i t e m 2 - Ao f s h e e t N o . 9 . C l e a nu p c o n t a c t a n d p o l e .
R e s o l d e r o r r e p l a c et h e l e a d w i r e s .
:
H o o k o n o n r e p l a c e i t .
B .
H o o k o n o r r e p l a c e i t .
D . A d v a n c e l e v e r w i l l n o t s t a y i n p o s i t i o n a f t e r e o c k i n g .
I M i s s e d E x p o s u r e P r e v e n t i o n S p r i n g o n H o o k i t o r r e p l a e e i t .( 6 - 7 ) - o u t o f P o s i t i o n o r b r o k e n .
44 G U I D E T O T H E N I M S L O 3 D C A M E R A
N I H S L OServ ice Depar tmentTechn ica l In fo rmat ion
Type: G- lB Camera
S h e e t N o . 1 4
E . T h e r e a d y l i g h t o n t h e f l a s h u n i t l i g h t s b u t O p t i - L i t e w i I I n o tf l a s h .
1 . F l a s h u n i t w i l l n o t f l a s h u s i n g t e s tbut ton even when not mounted on thecamera .
2 . S e r e w ( q 1 ) o n t h e A c e e s s a r y S h o e l o o s e .
3 . L e a d w i r e ( L t t ) - p o o r s o l d e r i n g o r b r o k e n .
4 . S C R I o n P . C . B . 6 0 6 - p o o r s o l d e r i n g o rs h o r t .
R e f e r t o t h e s e r v i e em a n u a l f o r O p t i I i t e .
R e s c r e w f i r m l y .
R e s o l d e r o r r e p l a c ei t .
Reso lder o r rep lacei t .
F . Low-L igh t Warn ing LED in the v iew f inder
1 . L e a d w i r e s ( t T , L 8 , L 9 o r L ? , p o o rso lder ing o r b r .oken .
2 . LEDs poor eonnee t ion o r b roken .
n o t f u n c t i o n i n g .
R e s o l d e r o r r e p l a e et h e l e a d w i r e s .
C h e c k s h e e t N o . 1 1 o rr e p l a e e t h e m .
w h e n f l a s h ( O p t i L i t e )
R e f e r t o t h e s e r v i e em a n u a l o f O p t i l i t e .
C l e a n u p t h e e o n t a c t .
R e s o l d e r o r r e p l a c ei t .
G - The Green LED does no t over r ide the Red LEDi s r e a d y .
1 . F l a s h u n i t n o t s u p p l y i n g t h e n e e e s s a r yex te rna l s igna l when the un i t i s ready .
2 . Con tac t p in #2-poor eon t ,ac t F lash o rCamera .
3 . L e a d w i r e ( L 1 0 ) - p o o r s o l d e r i n go r b r o k e n .
H . M a r k i n g L E D d o , e s n o t l i g h t .
1 . L e a d w i r e s ( L 4 , L 3 o r L Z 1 )s o l d e r i n g o r b r o k e n .
2 . LED-poor eo,nnect i on or
i :
poor
b r o k e n .
R e s o l d e r o r r e p l a c et h e m .
C h e e k b y t h e p r o c e d u r e( 3 - 3 - C ) r e p l a c e i fn e e e s s a r y
GUIDE TO THE NTMSLO 3D CAMERA 45www.orphancameras.com

N I H S L OS e r v i c e D e p a r t m e n tT e c h n i c a l I n f o r m a l i o n
5 ) Layou t o f Componen ts .
G e n e r a l A s s e m b l y
T y p e : G - 1 B C a m e r a
S h e e t N o . 1 5
Fa
N
(tttt O)
I
-/ /
,rnv,FI\()I
t?/
F @6 l N
rtGTE"-
4\
s-T--) \i
l ( D
\ o
?a
J l f t a. G | :
iO
46 GUIDE TO THE NIMSLO 3D CAMERA

Type: G-18 Camera
S h e e t N o . 1 6
G U I D E T O T H E N I M S L O 3 D C A M E R A
. }I I M S L OS e r v i c e D e p a r t m e n tTechn iea l In fo rmat ion
(o\rI
@ -lr
*
*
,ff @r)I
47
#il'r'#v:
.!#i.
..'Jn
;ti,www.orphancameras.com

} I I H S L OServ iee Depar tmentT e c h n i c a l I n f o r m a t i o n
S h u t t e r B a s e P l a t e ( B ) .
@fo
:
Type: G-IB Camera
S h e e t N o . 1 T
%--\ _I
l-tft
:ll!
N
:
olol
:(\l|r}:
II
N
i
/ a n
/i'\ :
-@
l'rl!
I
O)\r!
?n ', I
oqI
O)
i
48
!Ot
G U I D E T O T H E N I M S L O 3 D C A M E R A

#
#
I { I H S L OServ ice Depar tmentT e e h n i c a l I n f o r m a t i o n
A d v a n c e B a s e P l a t e .
6-l
T y p e : G - l B C a r n e r a
S h e e t N o . 1 8
/
\** t /
6-4
6-3
rr3rII
i
f , ^ \
'i
6-6
6-7
-$ g --6-8
6-9
6-2
6-5
curDE To rHE NrMsLo 3D cAMERA 49
www.orphancameras.com

N I U S L OS e r v i c e D e p a r t m e n tTechn ica l In fo rmat ion
V i e w F i n d e r ,
Type : G-18 Camera
S h e e t N o . 1 9
8-8
)
,ffi\
8-7
*
W8-5
8- l
View A
8-6
I
50 S U I D E T O T H E N I M S L O 3 D C A M E R A

N I H S L OServ ice Depar tmentTechn ica l In fo rmat ion
T o p C o v e r .
Type : G- 1B Camera
S h e e b N o . Z O
| 3 -9
GUIDE To rHE NrMsLo 3D cAMERA 5 l
r 3 -7
7*,
#
pI
www.orphancameras.com

I I H S L OServ ice Depar tnen tTechn ica l In fo rmat ion
5 ) Cornponent Des i gnat i on .
tc - l
SCR I
LED l ,? ,3
Type : G-18 Camera
S h e e b N o . Z l
r 5t 6
*-K-o
TR 2 ] 22 23
*
52
'lE
G U I D E T O T H E N I M S L O 3 D C A M E R A
I

rffi
#
r
I I I H S L OServ iee Depar tmentTeehn iea l In fo rmat ion
7 ) C i r c u i t D i a g r a m .
L 2 | (Orongr l
Type : G- IB Camera
S h e e t N o . 2 2
I , l i t h P . c . B . 6 1 6
L 2 2 t 8 l o c t !
'vt'v,
(o(oco lel( L l
L lO(Whl t . ,
wi'i
kt'.$iII .ifr
#
U',i
(oo(o
at(J
d 1
> o
! s tc)c'' ')
(l) I
o 3
tii [8-i
!ii
L 8 ( R o d l
at
@
rONJ
caO
(t
ft
L4(Y. l to : )
H:Etl ! (
4)'
=-EF
E'
l*
.--ltlrlr-G|at,
GUIDE To rHE NrMsLo 3D cAMERA 53
www.orphancameras.com

t { I H S L OServ ice Depar tmentTechn iea l In fo rna t , i on
Type : G-18 Camera
Shee t No . 23
W i t h o u t P . C . B . 6 1 6 .
ao
lrlo-(n
rfl$l
__J
0
E
o6tat
I
o
l J( ) J
q
O
tc oo N 9o a
q
Eo
E
!
E
o
a
rrS(Jci
*-Jtlrlt--*
G U I D E T O T H E N I M S L O 3 D C A M E R A

ffi,
t I I H S L OS e r v i e e D e p a r t m e n tTeehn ica l In fo rmat ion
8 ) t { i r i n g D i a g r a m .
To Mogne tV.F . FTNDER Ass 'v
6 ( BL 5 ( B l o c k )L f 3 ( B r o w n )
Type : G-18 Camera
S h e e f N o , Z u
h t i t h P . c . B . 6 1 5 .
To Bor t . HSO.
curDE To rHE NrMsLo 3D cAMERA Ss
coo!(,
l.-J
P. C .B . 606 Ass 'y
coo
Iro
-9
o
rtJ
xogq)
$JGIJ
P.C.B . 6 l6 Ass 'y-
L 2 3 ( G r e e n )
\t0gq)J
I
L4 (Ye i low)
l l ( B l u e lL I O ( W h i r e ) 2 (Grccn )L l ( R e d ) F R M S . B P L A T E
of
(D
lr)GIJ
L 4 ( Y e l t o w )
o0c0
9I(\IJ
L l 2 ( V l o l e t )
L-24(Oronge)
L 2 4 ( O r o n g e )
1)(l,
(r:J
2 l ( O r o n o e )
www.orphancameras.com

I { T H S L OServ ice Depar tmentTechn ica l In fo rmat ion
L l 3 ( 8 r o w n )
Type : G- lB Camera
Shee t No . 25
W i t h o u t P . C . B . 6 1 6 .
VF . F INDER Ass 'v
TO
E0'(ts
@J
coo
(9
oJ
oo!c0
otsJ
))
L l ( R e d )L 3 ( O r o
tVt t< t-E O a tt'V
L2 (Green)
F R M S . B . P L A T E
P.C.g. 606 Ass 'L
Eq'(r
J
'o
6arfJ
L 4 ( Y e l l o w )
L 4 ( Y e l l o w )
(Dc'cI
orftJ
L l 2 ( V l o l e i )
L l l t B l u e )L I O ( W h i f e )
56 GUIDE TO THE NIMSLO 3t) CAMERA
T o B o i l . H S G ,

i l I H S L OServ iee Depar t r ren tTechn ica l In fo rmat ion
9 ) P . c . B . 6 0 6 A s s f y .
L l 3 ( B r o w n )
L 4 ( Y e l l o w )
L 5 ( B l o c k l
L 3 ( O r o n g e )
L l l ( B l u e )
Type : G-18 Camera
S h e e t N o . 2 6
t
It .t
[:,rtL,',r''tiii
L 8 ( R e d I
L 9 ( G r e e n I
L 7 ( O r o n g e )
L 2 ( G r e e n )
L 6 ( B l o c k l
L I O ( W h i t e )
GUIDE TO THE NIMSLO 3D CAMERA
c'oL
CD
roJ
tto(E
J
5t
f,:,Ai
o:t(D=J
oo
;N
J
www.orphancameras.com

N T H S L OServ ice Depar tmentTeehn ica l In fonmat ion
1 0 ) P . C . B 6 1 6 A s s f y .
L22(B loc !< )
L25(B lu e )
Type : G- IB Camera
S h e e t N o . 2 7
L23(Green)
L24(Oronge)
58
oc'lcc'L
o
olJ
GUIDE TO THE NIMSLO 3D CAMERA

#
N T H S L OServ iee Depar tnen tT e c h n i e a l I n f o r m a t i o n
Type: G-IB Camera
S h e e t N o . Z B
IM1 1 ) P a r t s
11 - 11-21 - 31 - 41 - 51 - 61-71 - 81 - 91 - 1 01 - 1 1
2
3
44 -14-24 -3
5
66 -16-26 - l6 -46 -56-66-76 -86-9
77 -1T-27 -37-4T-5T-67-77-87 -97 - 10
L i s t .
DAZ000 1 A
cAZ000 1 BPAZ000 1 FsAZ000 1 AcAzooazccAZ0003cPAZ0002DI I t
DAZ0001D
DAZ0002A
DAZ0003A
MAZ0003csAz0005AMAZ0004A
DAZ0004A
DAZ0005ADAz00.15DAZ00 1 6Ac A Z 0 0 1 7 At t I
DAZ0006ADAZ00 1 gADAZ00 1 gAT T T
t r t
EAA OO 2 2AEYL00 1 3AESS00 1 3AEHC000 1 AE R C 5 6 3 7 JE R C 4 7 3 7 JERC 1047 . rERCa34z tERCa 347 JERC 1 027 JERC3g 1 7J
in
w
ASS ' Y BODYB O D Y ( M A C H I N E D )H O U S I N G R E W I N D S P I N D L ESTUD-DOOR LATCHDOOR LATCHSPRING-DOOR LATCHP I L L A R - D O O R L A T C HS P I N D L E - R E W I N DPLATE-LATCH COVERs c R E W - M l - . 6 X 2 . 5 LS T U D - V E R T I C A L G U I D ELABEL-FILM PROCESS
ASS I Y COUNTER BASE PLATE
A S S ' Y F I L M A D V A N C E R A T C H E T
ASS I Y SPOOLSPOOL-OUTER FILMSPR I NG- SPOO LSPOOL- INNER FILM
ASS ' Y CAM AND GEAR
ASS I Y F ILM ADVANCE BASE PLATESUB ASS ' Y F ILM ADVANCE BASE PLATES U B A S S I Y I N T E R M E D I A T E P I N I O NG E A R - 4 5 T E E T HSCREW-M2XO . 4 PHA S S I Y D R I V E C A MA S S I Y M I S S E X P O S U R EA S S I Y R E W I N D R E L E A S EI 'E ' I R INGN E n R I N G
A S S I Y P . C . B . 6 0 6r c cs3016THYRTST0R 03P4Mc D S M P Y 5 q C _ 6 7 9RESISTOR 56K ohn 1 /BW'f UTK ohm 1/8W'f t00K ohm 1/ BW' t 330K ohm 1 / 8W
" 3 3 o K o h m 1 / g wn 1 K o h m 1 / B Wn 3 9 0 o h m 1 / g w
IC- 1SCR 1P C lR 1R 3n4R5R8R9R 10
GUIDE TO THE NIMSLO 3D CAMERA 59
www.orphancameras.com

N I H S L OServ iee Depar tnen tTeehn iea l In fonmat ion
Type : G-18 Camena
S h e e t N o . 2 9
7 -117 -127 -137 - 147 -157 -167 -177 - 187 -197 -207 -217 -22
88 -18-28 -3B-q8 -5
,8-68 -78 -88 -9 - 18-9 -28 - 108 -11 -18 - 1 1 - 28 - 1 1 - 38 - 1 1 - l l8 - 1 1 - 58 -11 -68 -11 -78 -11 -88 -11 -g8 - t z
11 - 11 - 21 - 31 - 41 - 51 - 5 - 11 - 6
ERC56 1 7JERC5627 JERC 1 537 JE T C 2 2 4 3 FE T C 3 3 4 3 FE T C 2 2 4 3 FE T C 2 2 4 3 FETC2243FECT47 60AE w c 0 2 3 g DE P Z 0 6 0 6 CE R V 1 0 4 0 D
DAZ0007AMAZ00 1 0DMAZ00 1 1 BBAZ000 1 B1,14200128BAZ0002BD A Z O O 2 S AMAZ00 1 38MAZ00 1 4BMAZOO 1 5CPAZ00 1 7Bs A z 0 0 1 2 AP A Z 0 0 4 5 BP A Z 0 0 4 4 BP A Z 0 0 4 6 BP A Z 0 0 4 7 BP A Z 0 0 4 8 BP A Z 0 0 q g BP A Z 0 0 5 0 BPAZ005 1 BP A Z 0 0 5 2 BS A Z O O 2 3 A
D A Z O O O B A
D A Z 0 0 0 g A
DAZ00 1 0A
RESISTOR 560 ohm 1 /BWr r 5 . 6 K o h m l l B Wf r 15K ohm ' l / 8W
C A P A C I T O R O . 2 2 M F D 1 O Vr t 0 . 3 3 M F D 1 0 Vn 0 . 2 2 M F D 1 0 V' r 0 . 22MFD 10Vr t 0 . 2 2 M F D 1 0 Vn 4 7 M F D 6 . 3 V
LEAD WIRESP . C . B O A R D P C B 6 O 6 P C B 1VARIABLE RESISTOR 1 O0Kohm VR 1
A S S I Y V I E W F I N D E RH O U S I N G - V I E W F I N D E RL E N S - V I E W F I N D E R E Y EM I R R o R f r A ' r _ V I E W F I N D E RL E N S - V I E W F I N D E RMIRROR "B ' r_VIEt i l F INDERA S S I Y F R A M I N G M A S KL E N S - V I E W F I N D E R F R O N TT O P C O V E R - V I E W F I N D E RSELECTOR FILM SPEEDF I L T E R C A L I B R A T I O N N D 0 . 5S P R I N G - D E T E N T
R 1 1R 1 2R 1 4c1c2c3c4c5c6L
F I L T E R C A L B I R A T I O Nt f l l
N D 0 . 1N D 0 . 2N D 0 . 3N D 0 . 4N D 0 . 5N D 0 . 7N D 0 . 8N D 0 . 9N D 1 . 0
H A L F S P R I N G
A S S ' Y M A R K I N G L . E . D .
A S S I Y B A T T E R Y H O U S I N G
A S S I Y S H U T T E R B A S E P L A T ES U B A S S I Y S H U T T E R B A S E P L A T EFLANGE- 1 ST LENSF L A N G E - z N D , 3 R D , 4 T H L E N S E SA S S I Y O B J E C T I V E L E N SASS I Y } , IAGN ET LEVERK E E P E R M A G N E TA S S ' Y E L E C T R O M A G N E T
tt
tl
tf
ll
It
n
It
tl
It
l l
tf
il
It
fl
1 0
DAZ0027 AcAz0033BEI,1M00024
s0 G U I D E T O T H E N I M S L O 3 D C A M E R A

N I H S L OServ iee Depar tnen tTechn ica l In fo rma- t ion
Type: G-18 Camera
S h e e t N o . 3 0
1 1 - 71 1 - 81 1 - 91 1 - 1 0
1 - 1 11 - 1 21 - 1 31 - 1 4
1 1 - 1 51 1 - 1 61 1 - 1 71 1 - 1 81 1 - 1 91 1 - 2 41 1 - 2 11 1 - 2 21 1 - 2 31 1 - 2 4't 1-251 1 - 2 61 1 - 2 71 1 - 2 81 1 - 2 91 1 - 3 01 1 - 3 11 1 - 3 t11-321 1 - 3 31 1 - 3 41 1 - 3 51 1 - 3 61 1 - 3 71 1 - 3 81 1 - 3 91 1 - 4 01 1 - l t 11 1 - u 21 1 - l l 31 1 - l l l l
1 1 - l r 51 1 - 4 61 1 - 4 71 1 - 4 81 1 - 4 91 1 - 5 01 1 - 5 11 1 - 5 2
i 1 1 - 5 31 1 - 5 41 1 -55
NILs A z 0 0 1 3 8D A Z 0 0 2 1 ADAZO022ADAZ0023AD A Z 0 0 2 4 AN I LNILsAz00 1 4BsAz00 t5BsAz00 1 68sAz 00 1 7BNILsAz00 1 gcT T T
N I LD A Z 0 0 2 5 At * rN I LN I LN I LP A Z 0 0 3 0 BD A Z 0 0 2 6 AN I LN I LN I LN I LN I LsAz00 1 8csAz002 1 AETTO22 1 APAZ003 1 CPAZ0032CGAZ00 1 1 AI t tt r lt t tr t tl l rr t tt r t
PAZ0057AI I T
* t I
r I t
I T I
r I t
t t I
PAZ0056AI T I
SPRING-T IMING SWITCHASS ' Y FLYWHEELASS ' Y SHUTTER CLOSING LEVERASSIY MAGNET RELEASEA S S I Y C O C K I N G L E V E R
SPRING-SHUTTER CLOSING LEVERSPRING-COCKING LEVERSPRING-MAGNET RELEASE LEVERSPRING-MAGNET LEVER
SPRING-COCKING LEVER LATCHSCREW-MAGNET MOUNTING M1 .4X2L
ASS I Y FLY}IHEEL DRI VE LI NKi l E i l R I N G
SLEEVE CUSHIONASS I Y SHUTTER BLADE LINK
SPRING-FLYWHEEL DRIVE LINKSPRING-SHUTTER RELEASE SLIDESLEEVE- INSULAT IONBLADE-UPP ERBLADE-LOWERPLATE- INSULATIONN E N R I N GN E | l R I N GWASHER}IASHERWASHERWASHERWASHERWASHER-TEFLONSCREW-M1 . I IX3LscREw-M1 .4X3Ls c R E w - M 1 . 4 X 3 Ls c R E w - M 1 . 4 X 3 LscREw-M 1 . 4X3LSCREW-FLANGE MOUNTING M1 . 6X2 . 6LHOLDER MAGNET BRACKETscREw-M1 .6X3L
6lGUIDE TO THE N]MSLO 3D CAMERA
www.orphancameras.com

T f I H S L OServ ice Depar tmentTeehn ica l In fo rmat ion
Type : G- IB Camera
S h e e t N o . 3 t
1212-112-212-312-412-512-6
1313 - 1'|.3-21 3 -31 3 -41 3 -51 3 -613-71 3 -B1 3 -913 - 10
1414 - 114-21 4 -31 4 -41 4 -5
1515 - 115-2
1616 - 11 6-2
' .7
232tl25262T
DAZ00 1 1 A
zAzao l l A
DAZ00 1 2AcAz0002BGAZ000gA
DAZ00 1 3AMAZ002 1 C
PAZ0050AMAZ0022Ac A z 0 0 0 3 BG A Z 0 0 0 4 BMAZ0023CGAZ0005Bt t t
MAZ0025BDAZ00 1 4AMAZ0024AP A Z 0 0 4 3 Bc A z 0 0 5 4 A
MAZ0026DGAZ0006c
MAZ 00 208MAZ00 1 gB
EAAOO 2 4 A
NILN I LN I L
sAz000lrANIL
I I I
t lAZ0005AI T I
MAZ0005 Ac A z 0 0 0 g A
181g20
2122
ASSIY REAR DOORSUB ASS t Y REAR DOOR AND HINGEFOAM-REAR DOORRIVET-REAR DOORASSIY PRESSUNE PLATE/SPRINGTRIM REAR DOORLABEL-REAR DOOR
A S S ' Y T O P C O V E RTOP COVERPIN-CONTACT IT 1PIN-CONTACT I I2ACCESSORT SHOEWINDOW-COUNTERNAME PLATE-NNIMSLOI 'LABEL-F ILM SPEEDWINDOW-VIEW FINDERNAME PLATE_ fr 3D rfs c R E w - M 1 . 6 X 3 . 6 L
ASSIY REWIND CRANKKNOB-REWIND CRANKSUB ASS I Y REWIND CRANKKNOB-REWINDLEAF SPRING-REWIND KNOBSCREW.REWIND KNOB
ASS'Y FRONT COVERCOVER-FRONTPLATE-FRONT
ASSIY SHUTTER RELEASEPIN-CABLE RELEASEBUTTON-SHUTTER RELEASE
A S S I Y P C B 6 1 6
SPRING-ADVANCE SPINDLE
scREw-M2X3LP I N I O N - S P O O L D R I V EscREw-1,11 . 6x3LSP ROCKETSCRE}T-METERING SPROCKET
62 GUIDE TO THE NIMSLO 3D CAMERA

N I M S L OServ ice Depar tmentTeehn iea l In fo rmat ion
Type : G-18 Camera
S h e e t N o . 3 2
282g303t3233343536373B39q04142434445464748q9505152
sAz0o06AM A Z 0 0 0 7 Ar t I* * t* * rT T I
N I Ls A z 0 0 2 2 AN I LPAZ003gCH A Z O O O 4 AP A Z 0 0 4 0 AcAza052cI T I
PAZ004 1 A* t rt4420027 C* t t
H A Z 0 0 0 5 cG A Z O O O T AG A Z 0 0 1 0 AG A Z 0 0 0 8 AN I LI T I
PAZ006 1 A
SPRING-METERING SPROCKETGEAR-SPROCKET DRIVEs c R E W - M 1 . 6 X 5 . 5 Ls c R E w - M 1 . 6 X 3 . 5 LscREw-M 1 . 6X3LS C R E W - M 1 . 6 X 2 . 5 L
S P L I T R I N G - S T R A P
KEY-ADVANCE LEVERLEVER -ADVANC ECLUTCH-STAND OFFSCREW-ADVANCE LEVERs c R E W - M 1 . 6 X 6 LLEAF SPRING-ACCESSORY SHOEscREw-M 1 . 6X3LCO VER -BOTTOMS C R E W - M 1 . 6 X 4 LC A P - B A T T E R YTRIM-FRONT COVERS H I M r r B n
s H I M n A r l
SCREbI -M 1 .6X25LREWIND COLLAR
#
NOTE:
] - ! ! r_"1 you order the par ts , prease ref er to 0RDER {1 .2 ' ORDER t l fo r ' t * l l r i ! ASFbf t { :0 . A r l se rews and washers under oRDER #A S F 9 1 4 5 D w i l l b e s u p p l i e d a s r t s c n e w k i t r t . C a n n o t o r d e r s e r e w s o rw a s h e r s i n d i v i d u a l l y .3 ' canno t o IgSI - fhe -pa r ts o r assembr ies i f t he par ts o r assemb l ieshave no oRDER # . The P=a r l s w i thou t ORDER # may t " -
" t " t "o o r g luedand canno t be taken o fFFom the assemb l ies . The assemb l ies w i thou to R D E R # m a y b e e a s y t o a s s e m b 1 e a t " u " u i " " r . " i f f i 1 ; d " " t o
p reven t sh i -p -p ing damager w€ w i l r supp ly the p iece par ts fo r thes a i d a s s e m b l i e s .
63GUIDE TO THE NIMSLO 3D CAMERA
www.orphancameras.com
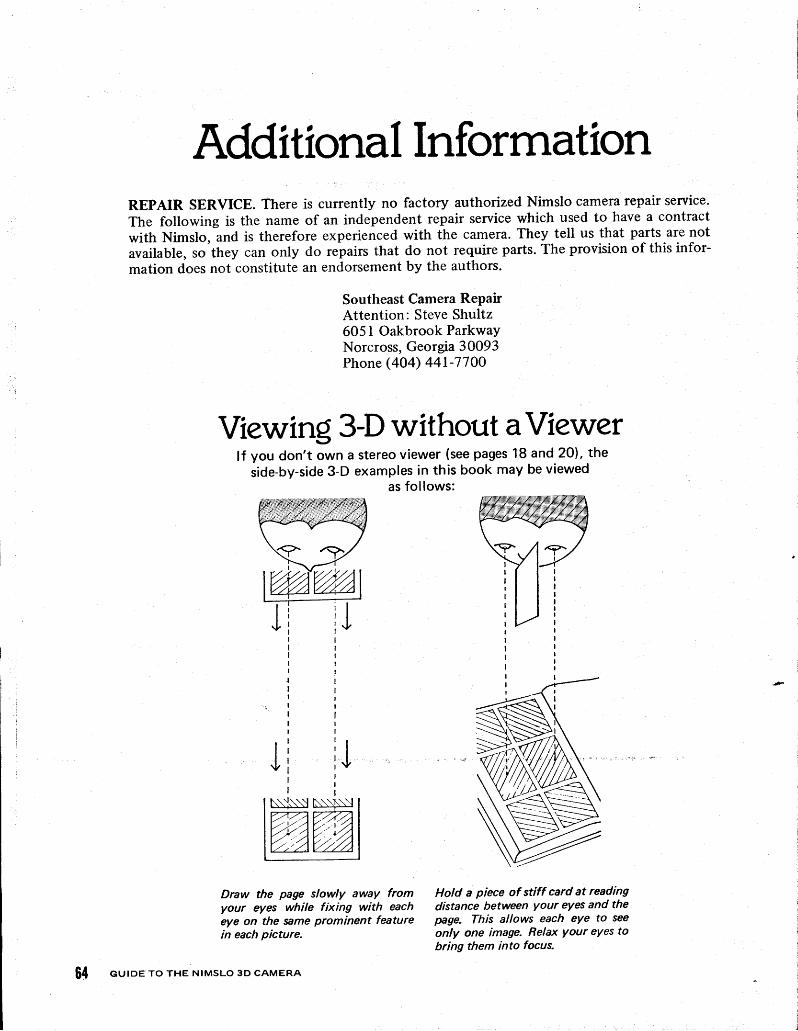
Additiona I InficrmationREPAIR SERVICE. There is currently no factory authorized Nimslo camera repair service-
The following is the name of an independent repair service which used to have a contract
with Nimslo, and is therefore experienced with the camera. They tell us that parts are not
available, so they can only do repairs that do not require parts. The provision of this infor-
mation does not constitute an endorsement by the authors.
Southeast Camera RePairAttention: Steve Shultz6051 Oakbrook ParkwaYNorcross, Georgia 30093Phone (4O4) 441-7700
Viewing 3-D without a Viewerlf you don't own a stereo viewer (see pages 18 and 20), the
side-by-side 3-D examples in this book may be viewedas fol lows:
04
Draw the page slowly awaY fromyour eyes while fixing with eacheye on the sme prominent featurein each picture.
G U I D E T O T H E N I M S L O 3 D C A M E R A
Hold a piece of stiff card at readingdistance between Your eYes and thepge. This allows each eYe to seeonly one image. Relax Your eYes tobring them into focus.

$1 1.e5
Ree[ 3-DtrmterprnsesoGunnde tothe Nnmnsflo 3D Gamileva
This book gives t ips on using the Nimslo 3D Camera to shoot the or iginal lyintended lent icular 3-D pr ints, but goes beyond that to explain in sirnpleterms how to use it for other 3-D formats. Topics covered include 3-D slidpmaking, making classic style 3-D pr int pairs, shoot ing N imslo close-ups,using al ternate f i lm speeds, Nimslo camera modif icat ions, and non 3-D usesfor the N imslo. Taking and mount ing techniques are both covered.Technical Service Information and drawings are also included.
A VALUABLE REFERENCE FOR ANY NIMSLO 3D CAMERA USER!
About the authors:
Susan Pinsky APSA and David Starkman APSA have been known as a "stereo pair" sincethey published the 3-D hobbyist newsletter "Reel 3-D News" trom 1978 to 1980. Requestsfrom subscribers unable to find the necessary supplies for the pursuit of 3-D photography ledto their producing a "3-D Catalog" offering a wide range of 3-D supplies and literature.
This 3-D duo are also active 3-D photographers, each having attained the status of 3-StarExhibitor in international 3-D slide competitions sponsored by the Photographic Society ofAmerica. They are also members of the National Stereoscopic Association, The StereoscopicSociety, and the Stereo Club of Southern California, where Pinsky serves as MembershipDirector, and Starkman is a past President and current Equipment Director.
Pinsky is currently on the Board of Directors of the National Stereoscopic Association, and
is the former Stereo Division Feature Editor for the Photographic Society of America "PSA
Journal". Starkman is the Contemporary Stereo Editor for the National Stereoscopic Associ-
ation's publication "Stereo W orld".
Both have offered editorial assistance and 3-D source materials for other books on 3-D,
incf uding "The Wortd of 3-D" by J.G. Ferwerda, "Amazing 3-D" by Morgan & Symmes,
"3-D Past & Present"bv Wim van Keulen, "stereo Photography" by Fritz Waack, and
"Fantastic 3-D" by David Hutchison.
ISBN: 0-939617-00-5
www.orphancameras.com