Embed Size (px)
Citation preview

10 Nov/Dec 2006
161 Center RdShirley, MA [email protected]
Rectangular Waveguide toCoax Transition Design
Paul Wade, W1GHZ
Learn how to find the optimum dimensions for a waveguide tocoax transition using an empirical approach that relies on a setof impedance measurements and a few calculations.
question I am frequently asked is,“Why do the antenna dimensionsin the W1GHZ Microwave Antenna
Book — Online not include the probedimensions (for the transition fromwaveguide to coaxial transmission line)?”1
The answer is that the transition is part ofthe transmission line, not the antenna, anddoes not directly affect the performance ofan antenna. The transition may be right atthe antenna, seemingly part of it, or at theother end of a run of waveguide transmissionline, many meters away.
The transition is an important part of mostmicrowave systems, however, since solid-state components are usually constructed onmicrostrip transmission lines and intercon-nected with coax, while microwave anten-nas normally use waveguide techniques.
A typical transition consists of a coaxialconnector on the broad side of a rectangularwaveguide with the center conductor ex-tended as a probe into the waveguide, withone end of the guide ending in a short cir-cuit, like Figure 1. Since the structure is well-known, design may be too ambitious a term,but the correct dimensions are far from obvi-ous and are difficult to calculate. A numberof sets of dimensions have been published,but there is little agreement between them,so it is difficult to tell which are right. Also,many of the published transitions are part ofan antenna, so the dimensions may have beenchosen to compensate for a poorly matchedantenna impedance.
Therefore, I chose an empirical approach:making a comprehensive set of measurementsfrom which the optimum dimensions may bereached. I had previously used this technique
to determine probe dimensions for circularwaveguide made from copper water pipe.2 Itis easier to determine the dimensions for rect-angular waveguide, since commercial guideand components are readily available fromsurplus sources.
Characteristics of a transition are bestviewed by measuring the complex imped-ance (magnitude and phase) in thewaveguide, using a waveguide slotted line.Figure 2 shows a typical X-band slottedline — the precision impedance measure-ment instrument of a few years ago, and,for waveguide, still more accurate thanmost network analyzer measurements.Since all professional microwave worktoday uses automatic network analyzersand computers, and few remember how touse a slotted line, slotted lines are almostgiven away today. I have paid as little as$2 for one at a hamfest.
To find the optimum dimensions for a tran-sition, I needed to make measurements over arange of transition dimensions, so an adjust-
able transition was desirable. The probe dimen-sions are readily varied by unscrewing the coaxconnector and trimming the probe, but the dis-tance to the shorted end of the waveguide, orbackshort, must also be varied. I machined asliding plug to fit inside the guide, with alter-nating quarter-wave sections of high and lowimpedance to form an electrical short circuit,so that the performance of the short does notdepend on intimate contact with the waveguidewalls. Figure 3 is a photograph of adjustabletransitions for two common sizes of X-bandwaveguide, WR-90 and WR-75, as well as onefor circular waveguide.
Measurement Technique
The first measurement is with a short cir-cuit (flat metal plate) closing the end of theslotted line. The short provides a clear stand-ing-wave pattern with sharp nulls at half-wavelength intervals, so we can measure theguide wavelength, and make any adjustmentsto the slotted line measuring probe.
The next measurement is of the sliding tran-
1Notes appear on page 16.
Figure 1 — WR-75 waveguide to coax transition for 10 GHz.
A
wade.pmd 10/03/2006, 2:16 PM10

Nov/Dec 2006 11
Figure 2 — A surplus waveguide slottedline.
Figure 3 — Adjustable transitions for WR-90, WR-75 and circular waveguide.
sition with no transition probe installed, withthe face of the sliding short at the centerline ofthe coax connector. The location of thestanding-wave nulls is recorded as the phasereference for the impedance measurements.
Finally, we are ready to measure thetransition. A probe is installed in thetransition, and a precision 50-Ω terminationinstalled on the coax connector. Then thesliding short is moved to a series of locationsand the impedance recorded at each location.(Actually, the SWR and the location of a nullare recorded, and the complex impedancecalculated later, using either a Smith Chartor a computer.) Then the probe is removedand replaced with a different one, and themeasurement sequence repeated.
In my previous experiments with circularwaveguide, I had found that the diameter ofan SMA inner conductor, 1.27 mm, was inthe optimum diameter range for X-band tran-sitions, so I chose to limit the number ofmeasurements by using only this diameterfor rectangular waveguide at 10 GHz. Witha single probe diameter, only the probe lengthis varied, so changes are easy, starting with along probe and cutting off various increments.
Many commercial transitions have theprobe surrounded by a cylinder of dielectric,so that the Teflon dielectric of the SMA con-nector continues for the full height of thewaveguide. Since it is difficult to shorten theprobe length inside the dielectric, my pre-ferred transitions have the Teflon dielectricof the SMA connector ending at the innerwall of the waveguide and only a bare probeextending into the guide. I did, however, wantto compare the performance of bare-probetransitions with full-height-dielectric ones, so
I carefully sliced the protruding dielectricfrom a connector, and then fit it back togetherfor the measurements after each adjustmentof the probe length.
Measurement Results
Without the slotted line or an expensivenetwork analyzer, only SWR could be easilymeasured. Figure 4 shows a plot of the SWRversus probe position and diameter in WR-90 waveguide at 10.368 GHz. We see thatthere is a set of dimensions that produce anexcellent SWR, and a number of other com-binations that produce a usable SWR < 2:1.What isn’t clear is how we reached the ex-cellent dimensions, or whether there are otherexcellent combinations that we did not find.
A plot of complex impedance on a Smith
Chart is much more meaningful. Each curvein Figure 5 is for a constant probe length,with varying backshort distance. Thebackshort forms a section of shorted trans-mission line behind the probe, creating a re-actance at the probe that varies with the lengthof the line to the backshort. At some distance,this reactance is equal to the reactance of theprobe but with conjugate phase, canceling thereactance so that only the resistive compo-nent of the impedance remains. This is wherethe curves cross the horizontal centerline, orreal axis, of the Smith Chart.
The resistive component where eachcurve crosses the real axis varies with probelength — we can see that the curve for a shortprobe crosses the real axis to the right ofcenter, at a higher resistive impedance than
Figure 4 — WR-90 to coax transition, SWR versus backshort distance at 10.368 GHz.
wade.pmd 10/02/2006, 4:58 PM11

12 Nov/Dec 2006
Z0. Conversely, a longer probe crosses to theleft of center, so the resistive impedance islower than Z0. The relationship is clear andmonotonic, so we can be confident that thereis a single optimum set of dimensions thatproduces the best impedance match, whichis in the center of the Smith Chart. Once wehave a set of curves that bracket the center,we can interpolate to estimate the optimumprobe length, then make more measurementsto locate the backshort position for a perfectmatch — see the data point in Figure 5marked 0.146 λ.
Discussion
The probe in the waveguide acts as animpedance transformer from the lowimpedance of the coaxial line, typically50 Ω, to the high impedance of the waveguide,typically greater than the impedance of freespace = 377 Ω. Since there is no loop forcurrent to flow in and create a magnetic field,the probe must be an electric field transformer.The maximum electric field is at the centerof the wide dimension of the waveguide,where we have placed the probe. Intuitively,we suspect that a longer probe intersects moreof the electric field and thus couples moretightly. We saw this in Figure 5 — the longerprobe produces a lower impedance in thewaveguide, because it is coupled more tightlyto the low impedance in the coax.
Adding a dielectric around the probewould tend to concentrate the electric fieldnear the probe and increase coupling, so ashorter probe would be required. We can seethis in Figure 6 — the same WR-90waveguide as Figure 5, but with the Teflondielectric of the SMA connector extended tothe far wall of the guide. We see the samefamily of curves, but the impedance ismatched with a shorter probe length.
There seems to be a persistent myth,found in older microwave books, that thebackshort should be exactly λ/4 from theprobe. We know that a shorted quarter-wavelength of transmission line acts an opencircuit, so this distance would add noreactance at the probe; this distance wouldonly work for an ideal probe, with noinductance or capacitance of its own. Theprobe is a wire, however, so it must haveinductance, in addition to capacitance to thewaveguide walls. We can see in the SmithCharts that the backshort distance requiredto achieve a pure resistive impedance variesslightly with probe length, as we wouldexpect if it were tuning out the reactance ofthe probe. More to the point, Figure 4 showsthat with the backshort λ/4 from the probe,the best SWR achieved is 2:1.
Since the backshort distance is a reactivephenomenon, it must be frequency dependent.We can see how critical by measuring the SWRversus frequency. I fabricated fixed transitions
Figure 5 — Smith Chart plot of impedance as dimensions are adjusted for WR-90 to coaxtransition.
to the best dimensions, one with a bare probeand the other with extended Teflon dielectric.In Figure 7, we can see that the WR-90 transi-tions have good bandwidth, with excellentSWR from 10 to 11 GHz, and pretty good from9.7 to 13 GHz. The transition with the Teflondielectric shows slightly better bandwidth thanthe one with a bare probe, but not a significantimprovement — both are more than adequateto cover the whole amateur band. Figure 8shows the performance of the two WR-90 tran-sitions connected together, with extremely lowinsertion loss from 10 to 13 GHz.
of the guide wavelength:
(Eq 1)
Other Waveguides
Scaling the WR-90 transition dimensionsto other frequencies and waveguide sizes ismore difficult in rectangular waveguide thanit was with circular waveguide, since otherstandard waveguides have different rectan-gular aspect ratios. In circular waveguide,the characteristic impedance is a function
0
0
377g
Z
while in rectangular waveguide, the charac-teristic impedance is modified by the aspectratio:
(Eq 2)0
0
2377
g bZ
a
where a and b are the large and small innerdimensions, respectively. The guidewavelength, λg, is easily measured with theslotted line, but it can also be calculated:
(Eq 3)2
1
c
g
wade.pmd 10/03/2006, 9:55 AM12

Nov/Dec 2006 13
where the cutoff wavelength, λc = 2a, ortwice the large inner dimension of thewaveguide.
Thus, in different size waveguides, weare transforming to different waveguidecharacteristic impedances. Another goodX-band waveguide is WR-75; the aspectratio b/a is 0.5, while for WR-90 the as-pect ratio is 0.444.
Since λg is larger in the smaller guideas well, the characteristic impedance ofWR-75 at 10.368 GHz is significantlyhigher than the Z0 of WR-90.
Thus, we would expect the transition di-mensions for WR-75 to also be different.In Figure 9, the impedance curves measuredfor an adjustable transition are shown; wesee the same family of curves as previously,but a shorter probe is required to match thehigher impedance. I did not take a full setof measurements with the extended Teflondielectric in WR-75, just enough to find ap-proximate matched dimensions. InFigure 10, we can see that this shortcut wasa mistake — the best probe length wouldbe slightly shorter than the one measured.This is a problem with making a lot of mea-surements before doing the calculationsnecessary to review the results.
I fabricated two WR-75 fixed transi-tions, one with a bare probe and the otherwith extended Teflon dielectric. Figure 11shows that there is no appreciable differ-ence in bandwidth — both have good SWRfrom 10 to 10.5 GHz — but narrowerbandwidth than the WR-90 transitions.In Figure 12, the insertion loss is verysmall from 10 to 11 GHz, and low from 9to 16 GHz.
The recommended operating range forWR-75 is 10 to 15 GHz, while the rangefor WR-90 is 8 to 12.4 GHz. It is probablethat if we were to find WR-75 transition di-mensions at a frequency near the center ofthe recommended range, it would have awider bandwidth. It would probably not beas good in the 10 GHz amateur band, how-ever. Many surplus WR-75 transitions suf-fer from this deficiency — they work bestaround 12 to 14 GHz — so we are probablybetter off fabricating our own transitionsoptimized for 10 GHz.
Other Frequencies
We have determined optimum waveguideto coax transition dimensions for 10 GHzempirically. These dimensions are listed inTable 1, and a sketch of a transition is shownin Figure 13. The 10 GHz dimensions arenot directly scalable to other waveguide sizesand frequencies, but we have demonstrateda technique applicable to other waveguidesizes and frequencies.
What can we do if we do not have awaveguide slotted line suitable for the target
Figure 6 — Smith Chart plot of impedance as dimensions are adjusted for WR-90 to coaxtransition with full height Teflon.
Figure 7 — SWR versus frequency of WR-90 to coax transition.
wade.pmd 10/02/2006, 4:58 PM13

14 Nov/Dec 2006
frequency? Can we make a transition if allwe can measure is SWR or return loss? I thinkwe can come pretty close, even without asliding short. Since we have to drill a hole forthe coax connector, we must first estimatethe backshort distance, from the hole to theshorted end. For the WR-90 transitions, thebackshort distance is 0.146 λg, while for theWR-75 transitions, the distance is 0.118 λg.Looking at Figures 5, 6, 9, and 10, we cansee that a compromise distance of 0.125 λg,splitting the difference, will give us an SWRof 1.3 or better with the right probe length.So, if we put the coax connector about one-eighth of a guide wavelength from theshorted end and trim the probe length forbest SWR, we can probably get a prettydecent transition in any size rectangularwaveguide.
Figure 14 is a plot of SWR versus probelength for different backshort spacings, in1/16 λg increments, for the WR-90 transitionwith the Teflon dielectric extending the fullheight of the waveguide. The 0.125 λg
spacing gives the best SWR. If we start witha long probe and trim, the SWR willdecrease slowly, then increase rapidly whenwe pass the optimum length. Therefore, weshould stop shortening as soon as we seean increase in SWR. One final note: theSWR for the λ/4 spacing recommended inthe old books never gets below about 2 —still usable, but not very good.
Figure 14 shows that a fairly wide rangeof dimensions will result in a reasonableSWR, less than 2 or 3, which can be eas-ily tuned out with some screws in thewaveguide. Perhaps this is why some pub-lished transitions include tuning screws.Without good test equipment, though, itis just as easy to make it worse as it is tomake it better. Many microwave operatorsare able to get on the air successfully withminimal test equipment, so any necessityfor tuning creates an additional hurdle forbeginners.
Software
Sometime after I finished the WR-90and WR-75 transitions, I started a new job.Part of the new job involves electromag-netic simulations, and I had to learn to usesome new software. One of the simulationprograms, Ansoft HFSS, is well suited towaveguide calculations.3 Since I neededsome simple problems as learning exer-cises, I tried simulating some transitions,using the same empirical technique, butcalculating the impedance with the softwarerather than measuring it.
After simulating my WR-90 and WR-75dimensions to make sure the two techniquesyield the same results, I moved to WR-42waveguide at 24.192 GHz. The impedanceswere plotted on a Smith Chart until they
Figure 9 — Smith Chart plot of impedance as dimensions are adjusted for WR-75 to coaxtransition.
Figure 8 — Insertion loss and SWR of two WR-90 to coax transitions back-to-back.
wade.pmd 10/02/2006, 4:59 PM14

Nov/Dec 2006 15
converged on optimum dimensions. Sincethe software calculated the impedance di-rectly, it was easy to plot each point imme-diately and move quickly toward the opti-mum with fewer trials.
Once I had the optimum dimensions, Ibuilt a WR-42 transition, shown in Figure15, and measured it with another surplusslotted line. The results were encouraging,with an SWR of 1.02. I quickly made sev-eral more, with similar results, so that Icould finish my 24 GHz transverter.
Other Frequencies and Waveguides
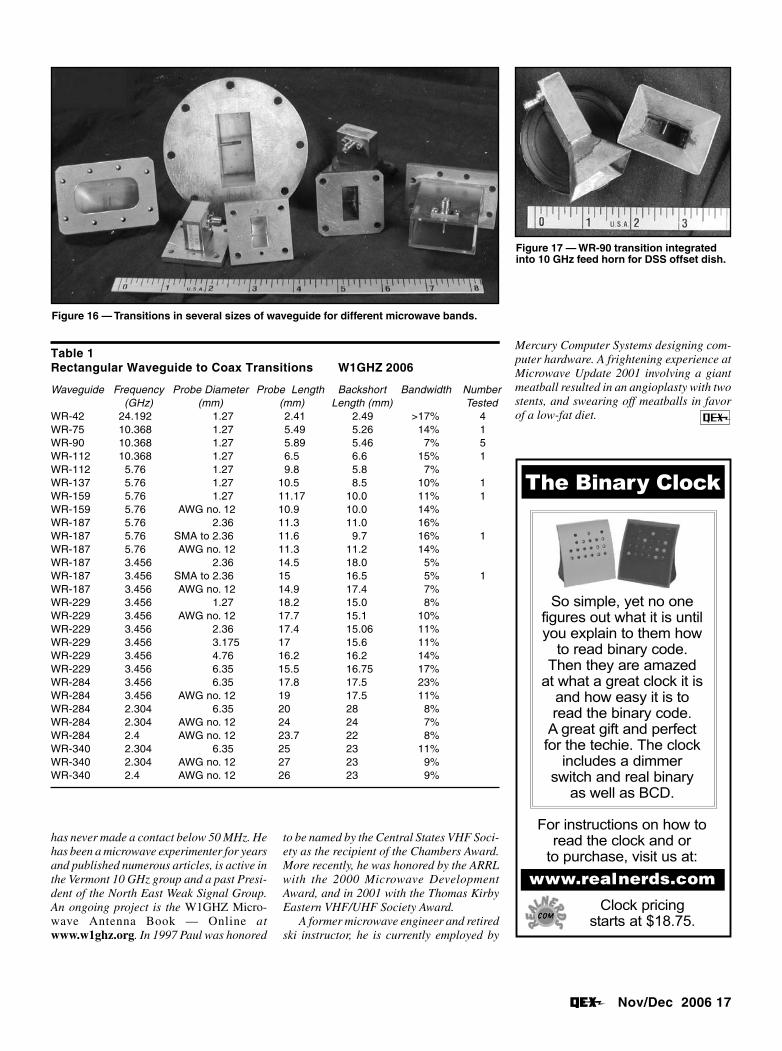
To round out the results, in off-hourswhen the software was not being used, Icalculated optimum dimensions for someof the lower microwave ham bands in vari-ous sizes of waveguides. These dimensionsare listed in Table 1. Not all the dimen-sions have been verified experimentally,but I have built and tested a number ofthem in different sizes — many of themare shown in Figure 16. The one at the farright, in WR-159 waveguide for 5.76 GHz,has not had the backshort installed yet.
The bandwidths shown in Table 1 are fora Return Loss > 20 dB, equivalent to anSWR < 1.2:1. Larger diameter probes gen-erally provide a wider bandwidth. For mostamateur work, wide bandwidth is notimportant, but a very narrow bandwidthoften makes the dimensions more critical.I found that the required tolerance onthe probe and backshort dimensions isroughly 0.1 mm (0.005 inch) at 10 GHz,0.05 mm (0.002 inch) at 24 GHz, and pro-portionally larger at the lower frequencies.
Some of the probe diameters were cho-sen to ease fabrication. The higher fre-quency probes are 1.27 mm diameter —the center pin diameter of an SMA con-nector — making fabrication a simplematter of trimming the Teflon, then cut-ting and filing the probe to length. At lowerfrequencies, the SMA pin diameter is toosmall to make an effective probe, but AWGno. 12 copper wire fits neatly into the sol-der end of a female N connector with littlediscontinuity. The alternative is to slip alarger diameter probe over the SMA pin— I tried this with WR-187 transitions at3.456 and 5.76 GHz, and found that thediscontinuity from the step in diametersrequired a change in probe dimensions tocompensate. Table 1 shows dimensionscalculated for a 2.36 mm diameter probeand the modified dimensions for thesame probe diameter extending from anSMA pin.
Integrated Transitions
In general, it is a good idea to keep thetransition separate from the antenna, so thateach may be tested individually and tuned
Figure 10 — Smith Chart plot of impedance as dimensions are adjusted for WR-75 tocoax transition with full height Teflon.
Figure 11 — SWR versus frequency of WR-75 to coax transition.
wade.pmd 10/02/2006, 4:59 PM15

16 Nov/Dec 2006
if necessary. The length of waveguide be-tween the transition and the antenna doesnot matter if it is simply a matched trans-mission line. For simple, foolproof anten-nas like a rectangular horn, however, it maybe convenient to integrate them into onepiece, with the horn soldered to one end of ascrap of waveguide and the transition at theother. Figure 17 is a photograph of two10 GHz integrated rectangular feed horns fora common offset dish.4
Summary
By measuring impedance from thewaveguide side of a transition, we are able topredictably adjust and optimize dimensions.The impedance may be found using eithercheap surplus hardware or expensive software.
For common waveguide sizes, the opti-mum dimensions are listed in Table 1 formost of the amateur microwave bands.Armed with this data, only some simple met-alwork is required to turn a bit of surpluswaveguide into a working transition with nofurther tuning required.
Notes1P. Wade, W1GHZ, The W1GHZ Microwave
Antenna Book — Online at www.w1ghz.org.
2P. Wade, W1GHZ, “Understanding CircularWaveguide — Experimentally,” QEX,Jan/Feb 2001, pp 37-48. (Reprinted withARRL permission at www.w1ghz.org/QEX/circular_wg.pdf).
3www.ansoft.co.4The ARRL UHF/Microwave Projects
Manual, Volume 2, ARRL, 1997, p 1-34.Also “Microwavelengths,” QST, Aug 2005,pp 75-76.
Paul Wade, W1GHZ, previously N1BWT andWA2ZZF, has been licensed since 1962 and
Figure 12 — Insertion loss and SWR of two WR-75 to coax transitions back-to-back.
Figure 13 — Sketch of rectangular waveguide to coax transition, showing dimensions.
Figure 14 — WR-90 to coax transition, SWR versus probe length at 10.368 GHz. Figure 15 — WR-42 to coax transition for24 GHz in milled aluminum block.
wade.pmd 10/02/2006, 4:59 PM16
Nov/Dec 2006 17
Table 1Rectangular Waveguide to Coax Transitions W1GHZ 2006
Waveguide Frequency Probe Diameter Probe Length Backshort Bandwidth Number(GHz) (mm) (mm) Length (mm) Tested
WR-42 24.192 1.27 2.41 2.49 >17% 4WR-75 10.368 1.27 5.49 5.26 14% 1WR-90 10.368 1.27 5.89 5.46 7% 5WR-112 10.368 1.27 6.5 6.6 15% 1WR-112 5.76 1.27 9.8 5.8 7%WR-137 5.76 1.27 10.5 8.5 10% 1WR-159 5.76 1.27 11.17 10.0 11% 1WR-159 5.76 AWG no. 12 10.9 10.0 14%WR-187 5.76 2.36 11.3 11.0 16%WR-187 5.76 SMA to 2.36 11.6 9.7 16% 1WR-187 5.76 AWG no. 12 11.3 11.2 14%WR-187 3.456 2.36 14.5 18.0 5%WR-187 3.456 SMA to 2.36 15 16.5 5% 1WR-187 3.456 AWG no. 12 14.9 17.4 7%WR-229 3.456 1.27 18.2 15.0 8%WR-229 3.456 AWG no. 12 17.7 15.1 10%WR-229 3.456 2.36 17.4 15.06 11%WR-229 3.456 3.175 17 15.6 11%WR-229 3.456 4.76 16.2 16.2 14%WR-229 3.456 6.35 15.5 16.75 17%WR-284 3.456 6.35 17.8 17.5 23%WR-284 3.456 AWG no. 12 19 17.5 11%WR-284 2.304 6.35 20 28 8%WR-284 2.304 AWG no. 12 24 24 7%WR-284 2.4 AWG no. 12 23.7 22 8%WR-340 2.304 6.35 25 23 11%WR-340 2.304 AWG no. 12 27 23 9%WR-340 2.4 AWG no. 12 26 23 9%
Figure 16 — Transitions in several sizes of waveguide for different microwave bands.
Figure 17 — WR-90 transition integratedinto 10 GHz feed horn for DSS offset dish.
has never made a contact below 50 MHz. Hehas been a microwave experimenter for yearsand published numerous articles, is active inthe Vermont 10 GHz group and a past Presi-dent of the North East Weak Signal Group.An ongoing project is the W1GHZ Micro-wave Antenna Book — Online atwww.w1ghz.org. In 1997 Paul was honored
So simple, yet no one
figures out what it is until
you explain to them how
to read binary code.
Then they are amazed
at what a great clock it is
and how easy it is to
read the binary code.
A great gift and perfect
for the techie. The clock
includes a dimmer
switch and real binary
as well as BCD.
The Binary Clock
For instructions on how to
read the clock and or
to purchase, visit us at:
www.realnerds.com
Clock pricing
starts at $18.75.
to be named by the Central States VHF Soci-ety as the recipient of the Chambers Award.More recently, he was honored by the ARRLwith the 2000 Microwave DevelopmentAward, and in 2001 with the Thomas KirbyEastern VHF/UHF Society Award.
A former microwave engineer and retiredski instructor, he is currently employed by
Mercury Computer Systems designing com-puter hardware. A frightening experience atMicrowave Update 2001 involving a giantmeatball resulted in an angioplasty with twostents, and swearing off meatballs in favorof a low-fat diet.
wade.pmd 10/02/2006, 5:00 PM17


![What is New What is Working Well - ard-satcom.ru dubna satellite... · WAVEGUIDE –COAX Adapter Rectangular WR Right Angle •WR975 to WR22 [ 0.75 to 50GHz] COAX Connectors SMA,](https://img.pdfslide.us/doc/110x75/604a2c7c3ff5a57b9b2bfc4e/what-is-new-what-is-working-well-ard-dubna-satellite-waveguide-acoax-adapter.jpg)