Embed Size (px)
Citation preview

Project Capo DocumentationWydanie 1.0
CAPO Team
20 maj 2017

Spis tresci
1 Panda 31.1 Requirements . . . . . . . . . . . . . . . . . . . . . . . . . . . . . . . . . . . . . . . . . . . . . . . 31.2 Prepare to run . . . . . . . . . . . . . . . . . . . . . . . . . . . . . . . . . . . . . . . . . . . . . . 41.3 Installation and system configuration . . . . . . . . . . . . . . . . . . . . . . . . . . . . . . . . . . 51.4 Additional information . . . . . . . . . . . . . . . . . . . . . . . . . . . . . . . . . . . . . . . . . . 26
2 Amber 292.1 Installation and running . . . . . . . . . . . . . . . . . . . . . . . . . . . . . . . . . . . . . . . . . 292.2 Settings . . . . . . . . . . . . . . . . . . . . . . . . . . . . . . . . . . . . . . . . . . . . . . . . . . 322.3 Device types . . . . . . . . . . . . . . . . . . . . . . . . . . . . . . . . . . . . . . . . . . . . . . . 332.4 Drivers . . . . . . . . . . . . . . . . . . . . . . . . . . . . . . . . . . . . . . . . . . . . . . . . . . 342.5 Clients . . . . . . . . . . . . . . . . . . . . . . . . . . . . . . . . . . . . . . . . . . . . . . . . . . 362.6 Communication . . . . . . . . . . . . . . . . . . . . . . . . . . . . . . . . . . . . . . . . . . . . . 37
i

ii

Project Capo Documentation, Wydanie 1.0
Following documentation provides information about preparing robot to use it in laboratory.
Spis tresci 1

Project Capo Documentation, Wydanie 1.0
2 Spis tresci
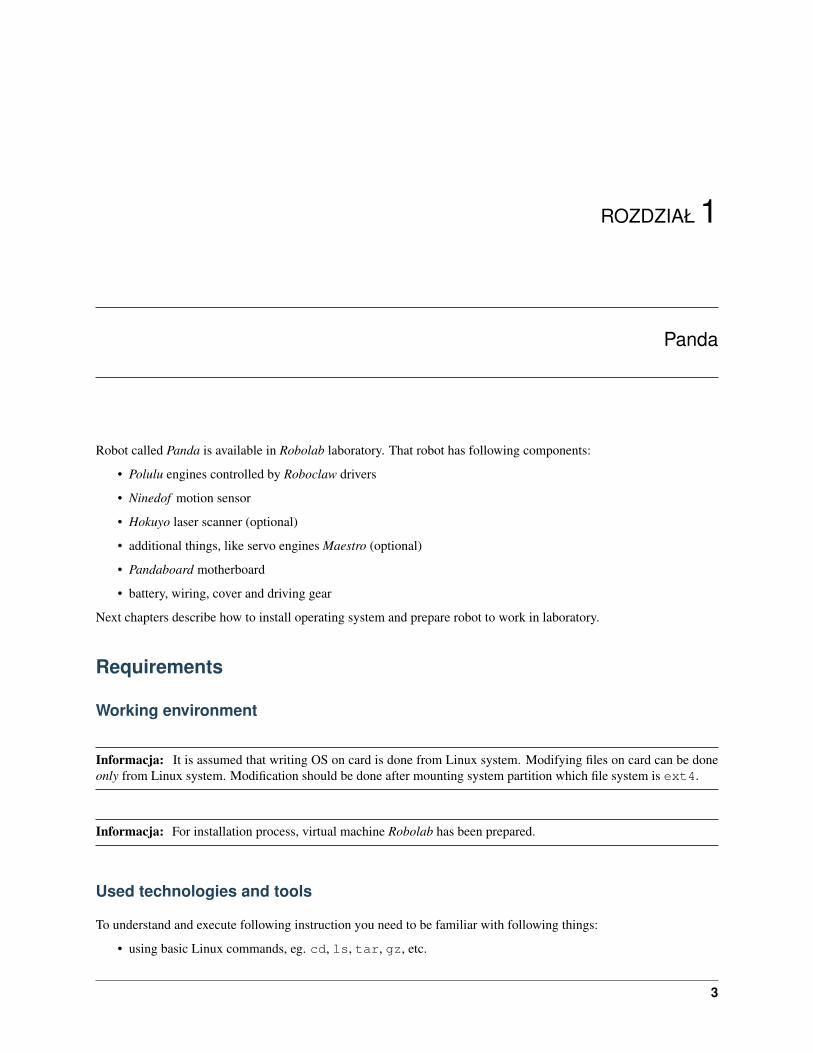
ROZDZIAŁ 1
Panda
Robot called Panda is available in Robolab laboratory. That robot has following components:
• Polulu engines controlled by Roboclaw drivers
• Ninedof motion sensor
• Hokuyo laser scanner (optional)
• additional things, like servo engines Maestro (optional)
• Pandaboard motherboard
• battery, wiring, cover and driving gear
Next chapters describe how to install operating system and prepare robot to work in laboratory.
Requirements
Working environment
Informacja: It is assumed that writing OS on card is done from Linux system. Modifying files on card can be doneonly from Linux system. Modification should be done after mounting system partition which file system is ext4.
Informacja: For installation process, virtual machine Robolab has been prepared.
Used technologies and tools
To understand and execute following instruction you need to be familiar with following things:
• using basic Linux commands, eg. cd, ls, tar, gz, etc.
3
Project Capo Documentation, Wydanie 1.0
• using console text editore, eg. vim or nano
• using package manager used in Ubuntu eg. aptitude or apt-get
• using console serial port application used in communication with PandaBoard eg. minicom
• using SSH remote console and generating SSH keys eg. Putty (windows) or ssh (Linux)
To follow the operating system installation process following things are required:
• SD card size 8 GB or bigger
• SD card reader
• if you are using virtual machine Robolab you need to have USD card reader
• serial port (there is ability to install system without using serial port)
• if you are using virtual machine Robolab required is USB serial port conventer
• board PandaBoard with power supply with DC voltage 5 V and current ca. 2.5 A
• WiFi network router
• display with HDMI input and keyboard on USB or serial port communication cable RS-232 DE-9 (optional)
• other required network cables
Ostrzezenie: Please check PandaBoard board version. You should find this on label which can be found at thebottom of board. Following instruction describes installation process on boards ES Rev B2 and ES Rev B3.
Prepare to run
Write OS image to SD card
• Download Ubuntu Server 12.04 amrhf+omap4 image for PandaBoard from website Ubuntu.
Zobacz takze:
More information about Ubuntu support for board based on OMAP are available on website ARM/OMAP.
• Check md5 sums with sums which are available on server.
• Check if SD card is in write mode.
Informacja: Write switch on card should be in up position, closed to contacts.
• Insert card in computer card reader.
• Execute one of following commands sets:
gunzip -c ubuntu-12.04-preinstalled-server-armhf+omap4.img.gz | sudo dd bs=1M of=/dev/→˓<device name>sync
or:
4 Rozdział 1. Panda
Project Capo Documentation, Wydanie 1.0
sudo sh -c 'zcat ubuntu-12.04-preinstalled-server-armhf+omap4.img.gz > /dev/<device→˓name>'sync
<device name> should be replaced with the block device name.
• Pull card from card reader.
• Insert card PandaBoard card reader.
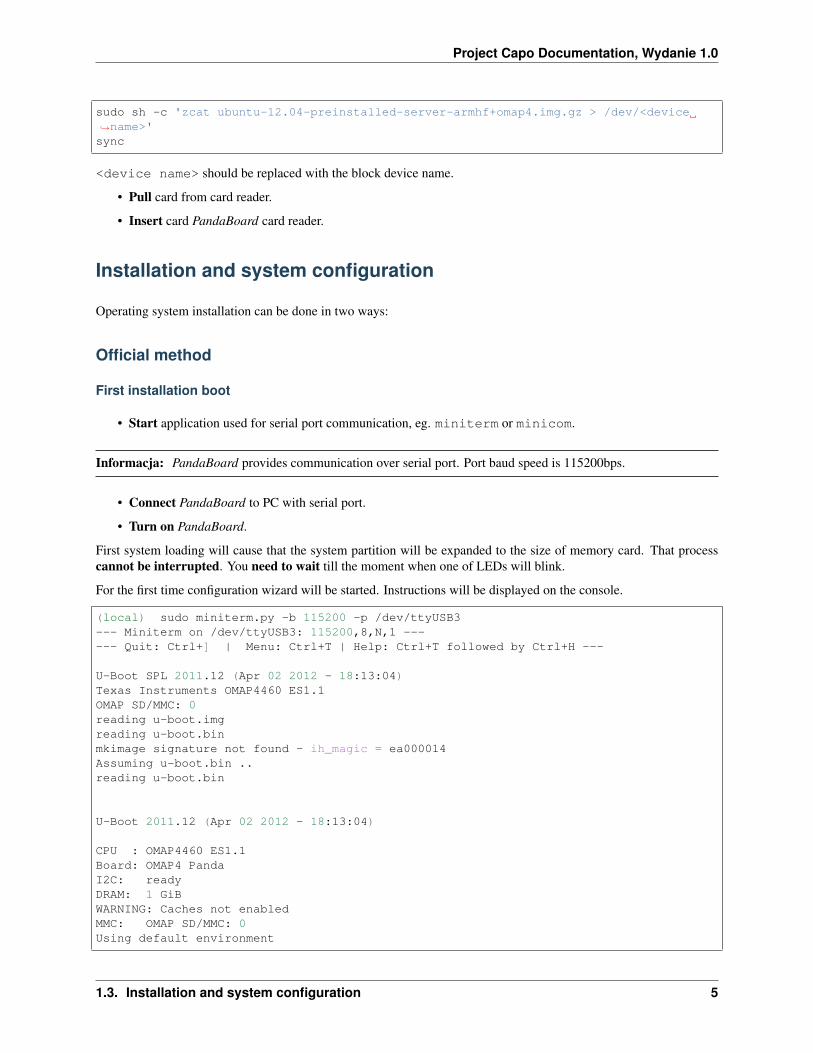
Installation and system configuration
Operating system installation can be done in two ways:
Official method
First installation boot
• Start application used for serial port communication, eg. miniterm or minicom.
Informacja: PandaBoard provides communication over serial port. Port baud speed is 115200bps.
• Connect PandaBoard to PC with serial port.
• Turn on PandaBoard.
First system loading will cause that the system partition will be expanded to the size of memory card. That processcannot be interrupted. You need to wait till the moment when one of LEDs will blink.
For the first time configuration wizard will be started. Instructions will be displayed on the console.
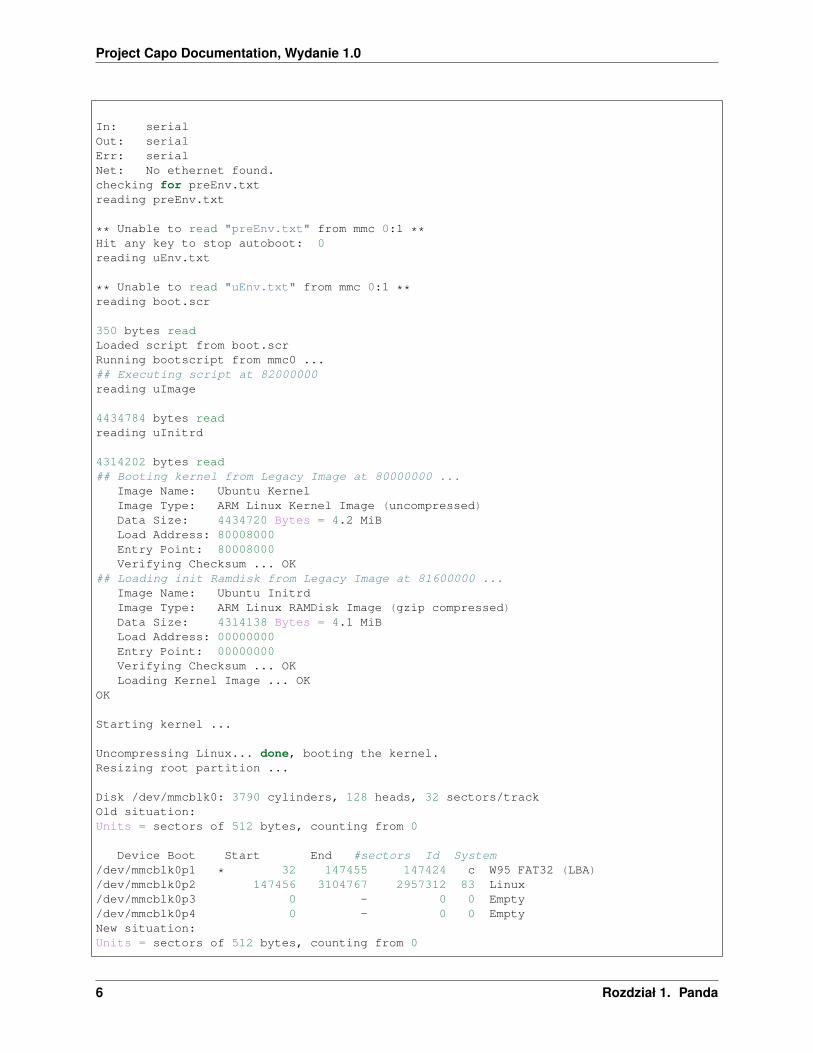
(local) sudo miniterm.py -b 115200 -p /dev/ttyUSB3--- Miniterm on /dev/ttyUSB3: 115200,8,N,1 ------ Quit: Ctrl+] | Menu: Ctrl+T | Help: Ctrl+T followed by Ctrl+H ---
U-Boot SPL 2011.12 (Apr 02 2012 - 18:13:04)Texas Instruments OMAP4460 ES1.1OMAP SD/MMC: 0reading u-boot.imgreading u-boot.binmkimage signature not found - ih_magic = ea000014Assuming u-boot.bin ..reading u-boot.bin
U-Boot 2011.12 (Apr 02 2012 - 18:13:04)
CPU : OMAP4460 ES1.1Board: OMAP4 PandaI2C: readyDRAM: 1 GiBWARNING: Caches not enabledMMC: OMAP SD/MMC: 0Using default environment
1.3. Installation and system configuration 5
Project Capo Documentation, Wydanie 1.0
In: serialOut: serialErr: serialNet: No ethernet found.checking for preEnv.txtreading preEnv.txt
** Unable to read "preEnv.txt" from mmc 0:1 **Hit any key to stop autoboot: 0reading uEnv.txt
** Unable to read "uEnv.txt" from mmc 0:1 **reading boot.scr
350 bytes readLoaded script from boot.scrRunning bootscript from mmc0 ...## Executing script at 82000000reading uImage
4434784 bytes readreading uInitrd
4314202 bytes read## Booting kernel from Legacy Image at 80000000 ...
Image Name: Ubuntu KernelImage Type: ARM Linux Kernel Image (uncompressed)Data Size: 4434720 Bytes = 4.2 MiBLoad Address: 80008000Entry Point: 80008000Verifying Checksum ... OK
## Loading init Ramdisk from Legacy Image at 81600000 ...Image Name: Ubuntu InitrdImage Type: ARM Linux RAMDisk Image (gzip compressed)Data Size: 4314138 Bytes = 4.1 MiBLoad Address: 00000000Entry Point: 00000000Verifying Checksum ... OKLoading Kernel Image ... OK
OK
Starting kernel ...
Uncompressing Linux... done, booting the kernel.Resizing root partition ...
Disk /dev/mmcblk0: 3790 cylinders, 128 heads, 32 sectors/trackOld situation:Units = sectors of 512 bytes, counting from 0
Device Boot Start End #sectors Id System/dev/mmcblk0p1 * 32 147455 147424 c W95 FAT32 (LBA)/dev/mmcblk0p2 147456 3104767 2957312 83 Linux/dev/mmcblk0p3 0 - 0 0 Empty/dev/mmcblk0p4 0 - 0 0 EmptyNew situation:Units = sectors of 512 bytes, counting from 0
6 Rozdział 1. Panda
Project Capo Documentation, Wydanie 1.0
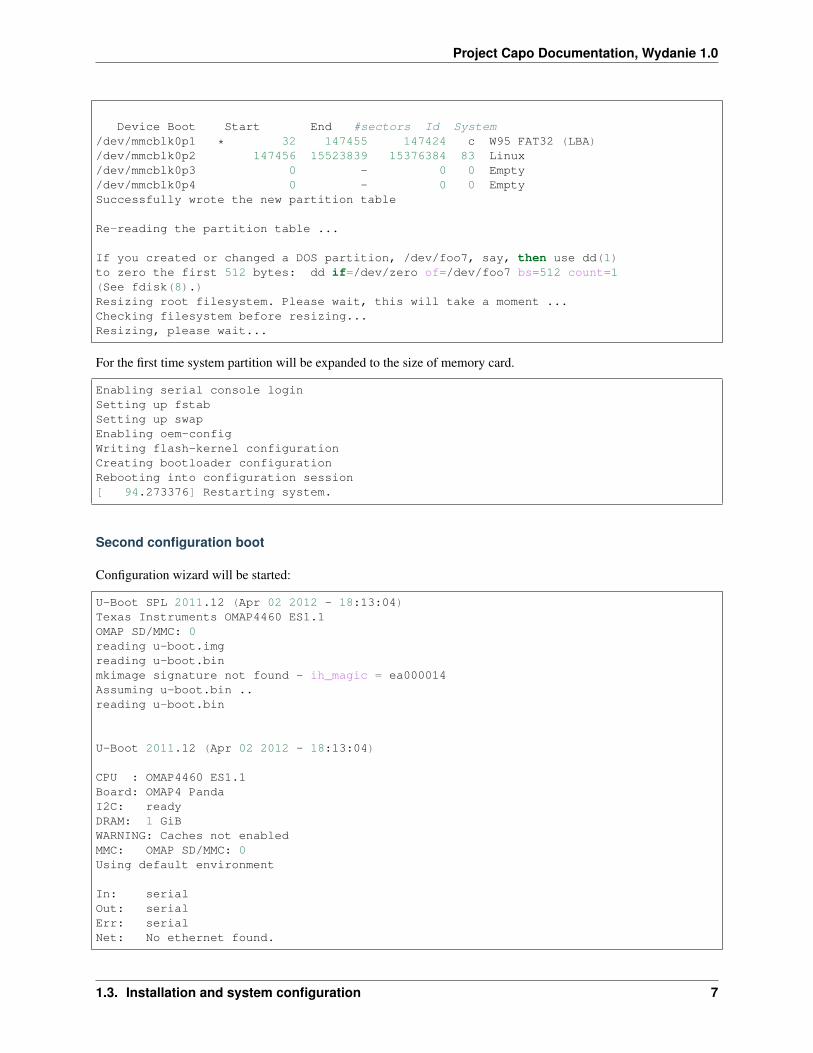
Device Boot Start End #sectors Id System/dev/mmcblk0p1 * 32 147455 147424 c W95 FAT32 (LBA)/dev/mmcblk0p2 147456 15523839 15376384 83 Linux/dev/mmcblk0p3 0 - 0 0 Empty/dev/mmcblk0p4 0 - 0 0 EmptySuccessfully wrote the new partition table
Re-reading the partition table ...
If you created or changed a DOS partition, /dev/foo7, say, then use dd(1)to zero the first 512 bytes: dd if=/dev/zero of=/dev/foo7 bs=512 count=1(See fdisk(8).)Resizing root filesystem. Please wait, this will take a moment ...Checking filesystem before resizing...Resizing, please wait...
For the first time system partition will be expanded to the size of memory card.
Enabling serial console loginSetting up fstabSetting up swapEnabling oem-configWriting flash-kernel configurationCreating bootloader configurationRebooting into configuration session[ 94.273376] Restarting system.
Second configuration boot
Configuration wizard will be started:
U-Boot SPL 2011.12 (Apr 02 2012 - 18:13:04)Texas Instruments OMAP4460 ES1.1OMAP SD/MMC: 0reading u-boot.imgreading u-boot.binmkimage signature not found - ih_magic = ea000014Assuming u-boot.bin ..reading u-boot.bin
U-Boot 2011.12 (Apr 02 2012 - 18:13:04)
CPU : OMAP4460 ES1.1Board: OMAP4 PandaI2C: readyDRAM: 1 GiBWARNING: Caches not enabledMMC: OMAP SD/MMC: 0Using default environment
In: serialOut: serialErr: serialNet: No ethernet found.
1.3. Installation and system configuration 7
Project Capo Documentation, Wydanie 1.0
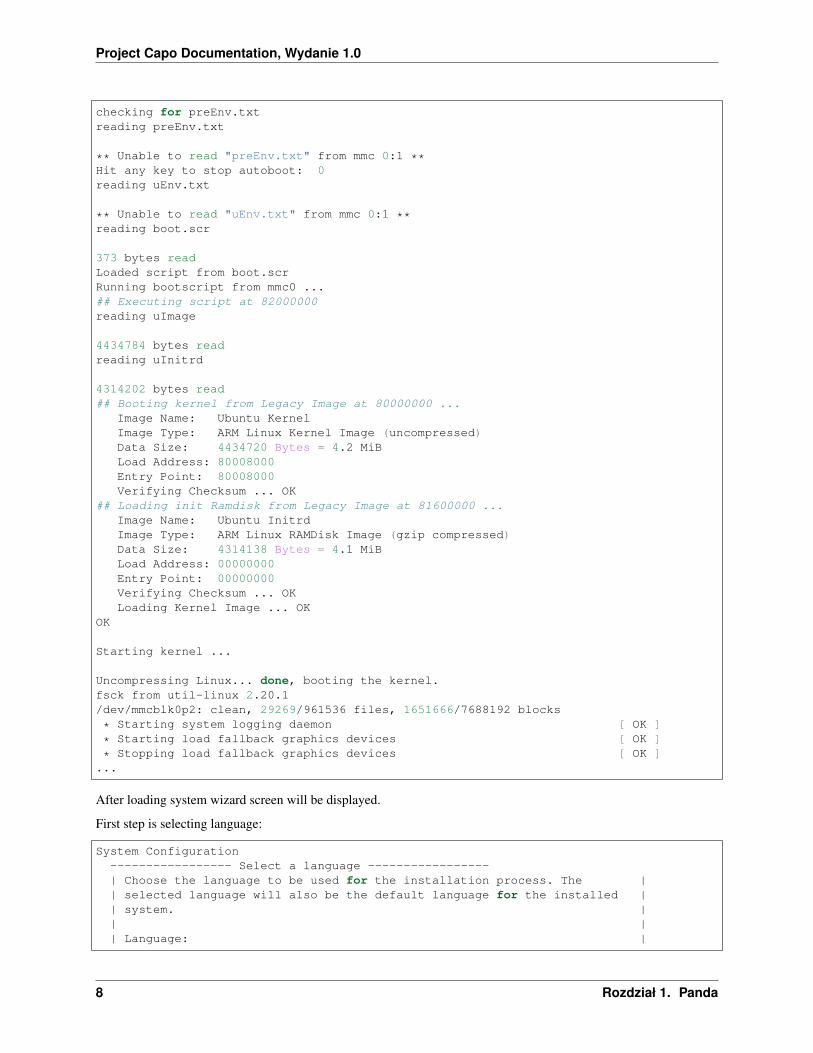
checking for preEnv.txtreading preEnv.txt
** Unable to read "preEnv.txt" from mmc 0:1 **Hit any key to stop autoboot: 0reading uEnv.txt
** Unable to read "uEnv.txt" from mmc 0:1 **reading boot.scr
373 bytes readLoaded script from boot.scrRunning bootscript from mmc0 ...## Executing script at 82000000reading uImage
4434784 bytes readreading uInitrd
4314202 bytes read## Booting kernel from Legacy Image at 80000000 ...
Image Name: Ubuntu KernelImage Type: ARM Linux Kernel Image (uncompressed)Data Size: 4434720 Bytes = 4.2 MiBLoad Address: 80008000Entry Point: 80008000Verifying Checksum ... OK
## Loading init Ramdisk from Legacy Image at 81600000 ...Image Name: Ubuntu InitrdImage Type: ARM Linux RAMDisk Image (gzip compressed)Data Size: 4314138 Bytes = 4.1 MiBLoad Address: 00000000Entry Point: 00000000Verifying Checksum ... OKLoading Kernel Image ... OK
OK
Starting kernel ...
Uncompressing Linux... done, booting the kernel.fsck from util-linux 2.20.1/dev/mmcblk0p2: clean, 29269/961536 files, 1651666/7688192 blocks
* Starting system logging daemon [ OK ]
* Starting load fallback graphics devices [ OK ]
* Stopping load fallback graphics devices [ OK ]...
After loading system wizard screen will be displayed.
First step is selecting language:
System Configuration----------------- Select a language -----------------| Choose the language to be used for the installation process. The || selected language will also be the default language for the installed || system. || || Language: |
8 Rozdział 1. Panda
Project Capo Documentation, Wydanie 1.0
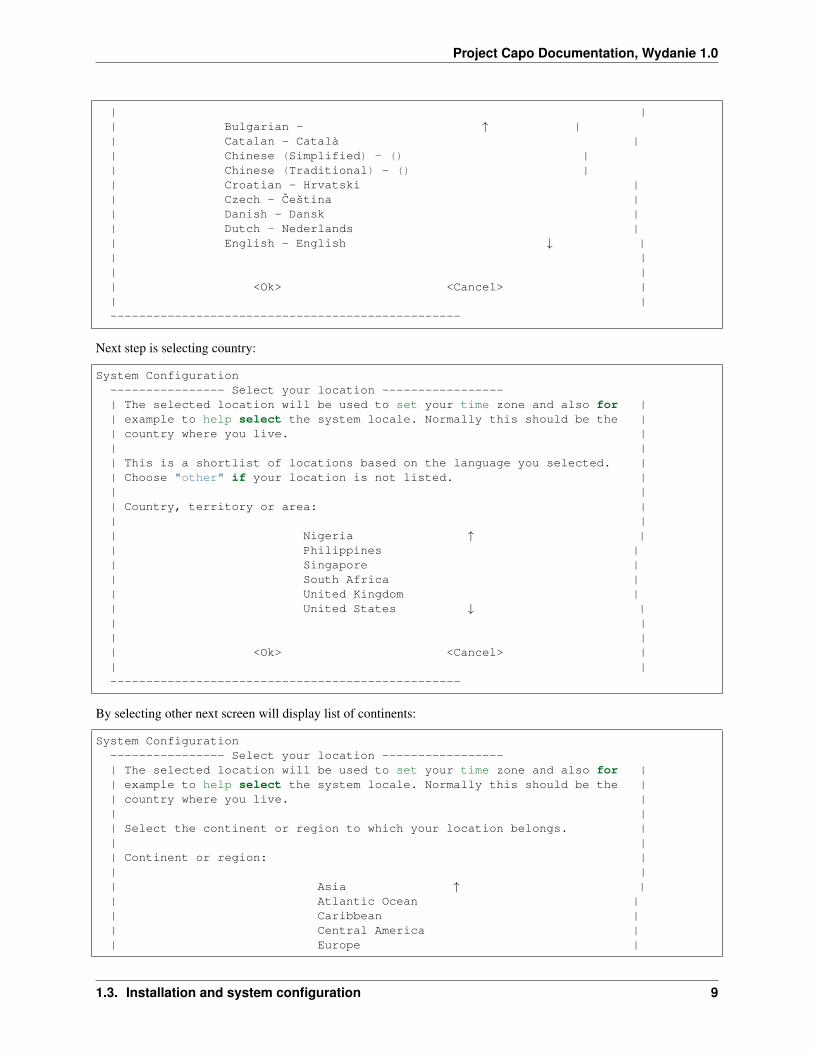
| || Bulgarian - ↑ || Catalan - Català || Chinese (Simplified) - () || Chinese (Traditional) - () || Croatian - Hrvatski || Czech - Ceština || Danish - Dansk || Dutch - Nederlands || English - English ↓ || || || <Ok> <Cancel> || |-------------------------------------------------
Next step is selecting country:
System Configuration---------------- Select your location -----------------| The selected location will be used to set your time zone and also for || example to help select the system locale. Normally this should be the || country where you live. || || This is a shortlist of locations based on the language you selected. || Choose "other" if your location is not listed. || || Country, territory or area: || || Nigeria ↑ || Philippines || Singapore || South Africa || United Kingdom || United States ↓ || || || <Ok> <Cancel> || |-------------------------------------------------
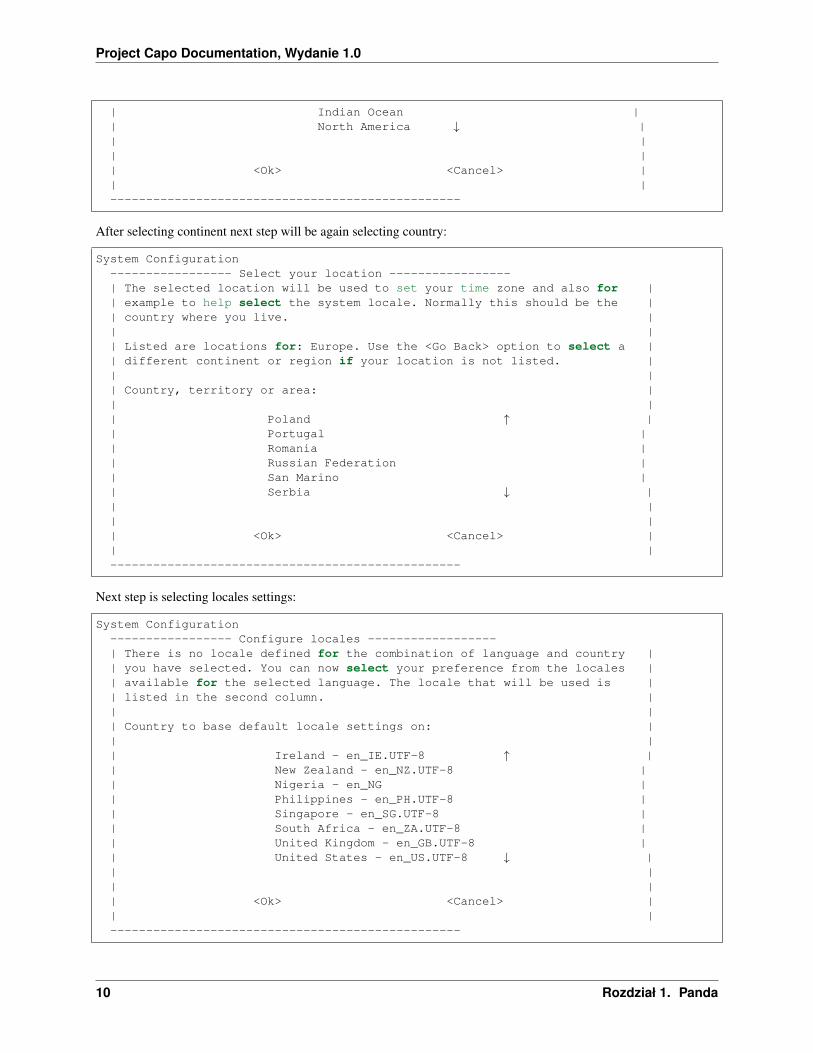
By selecting other next screen will display list of continents:
System Configuration---------------- Select your location -----------------| The selected location will be used to set your time zone and also for || example to help select the system locale. Normally this should be the || country where you live. || || Select the continent or region to which your location belongs. || || Continent or region: || || Asia ↑ || Atlantic Ocean || Caribbean || Central America || Europe |
1.3. Installation and system configuration 9
Project Capo Documentation, Wydanie 1.0
| Indian Ocean || North America ↓ || || || <Ok> <Cancel> || |-------------------------------------------------
After selecting continent next step will be again selecting country:
System Configuration----------------- Select your location -----------------| The selected location will be used to set your time zone and also for || example to help select the system locale. Normally this should be the || country where you live. || || Listed are locations for: Europe. Use the <Go Back> option to select a || different continent or region if your location is not listed. || || Country, territory or area: || || Poland ↑ || Portugal || Romania || Russian Federation || San Marino || Serbia ↓ || || || <Ok> <Cancel> || |-------------------------------------------------
Next step is selecting locales settings:
System Configuration----------------- Configure locales ------------------| There is no locale defined for the combination of language and country || you have selected. You can now select your preference from the locales || available for the selected language. The locale that will be used is || listed in the second column. || || Country to base default locale settings on: || || Ireland - en_IE.UTF-8 ↑ || New Zealand - en_NZ.UTF-8 || Nigeria - en_NG || Philippines - en_PH.UTF-8 || Singapore - en_SG.UTF-8 || South Africa - en_ZA.UTF-8 || United Kingdom - en_GB.UTF-8 || United States - en_US.UTF-8 ↓ || || || <Ok> <Cancel> || |-------------------------------------------------
10 Rozdział 1. Panda
Project Capo Documentation, Wydanie 1.0
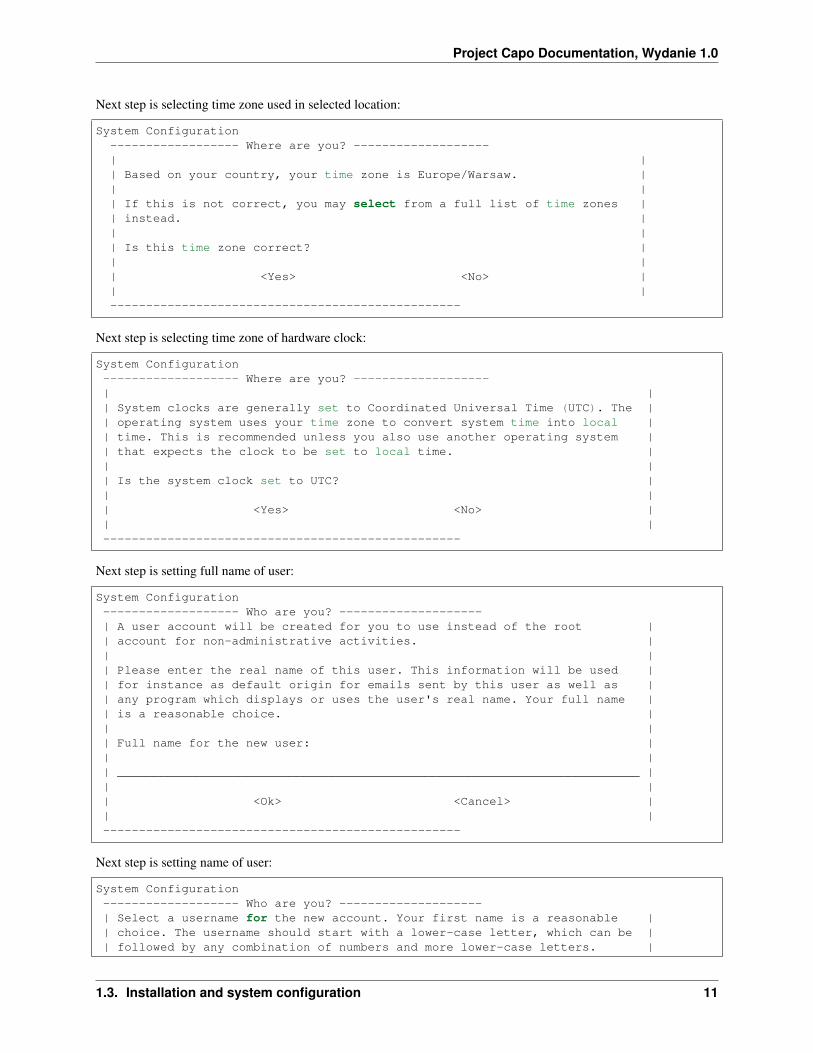
Next step is selecting time zone used in selected location:
System Configuration------------------ Where are you? -------------------| || Based on your country, your time zone is Europe/Warsaw. || || If this is not correct, you may select from a full list of time zones || instead. || || Is this time zone correct? || || <Yes> <No> || |-------------------------------------------------
Next step is selecting time zone of hardware clock:
System Configuration------------------- Where are you? -------------------| || System clocks are generally set to Coordinated Universal Time (UTC). The || operating system uses your time zone to convert system time into local || time. This is recommended unless you also use another operating system || that expects the clock to be set to local time. || || Is the system clock set to UTC? || || <Yes> <No> || |--------------------------------------------------
Next step is setting full name of user:
System Configuration------------------- Who are you? --------------------| A user account will be created for you to use instead of the root || account for non-administrative activities. || || Please enter the real name of this user. This information will be used || for instance as default origin for emails sent by this user as well as || any program which displays or uses the user's real name. Your full name || is a reasonable choice. || || Full name for the new user: || || _________________________________________________________________________ || || <Ok> <Cancel> || |--------------------------------------------------
Next step is setting name of user:
System Configuration------------------- Who are you? --------------------| Select a username for the new account. Your first name is a reasonable || choice. The username should start with a lower-case letter, which can be || followed by any combination of numbers and more lower-case letters. |
1.3. Installation and system configuration 11
Project Capo Documentation, Wydanie 1.0
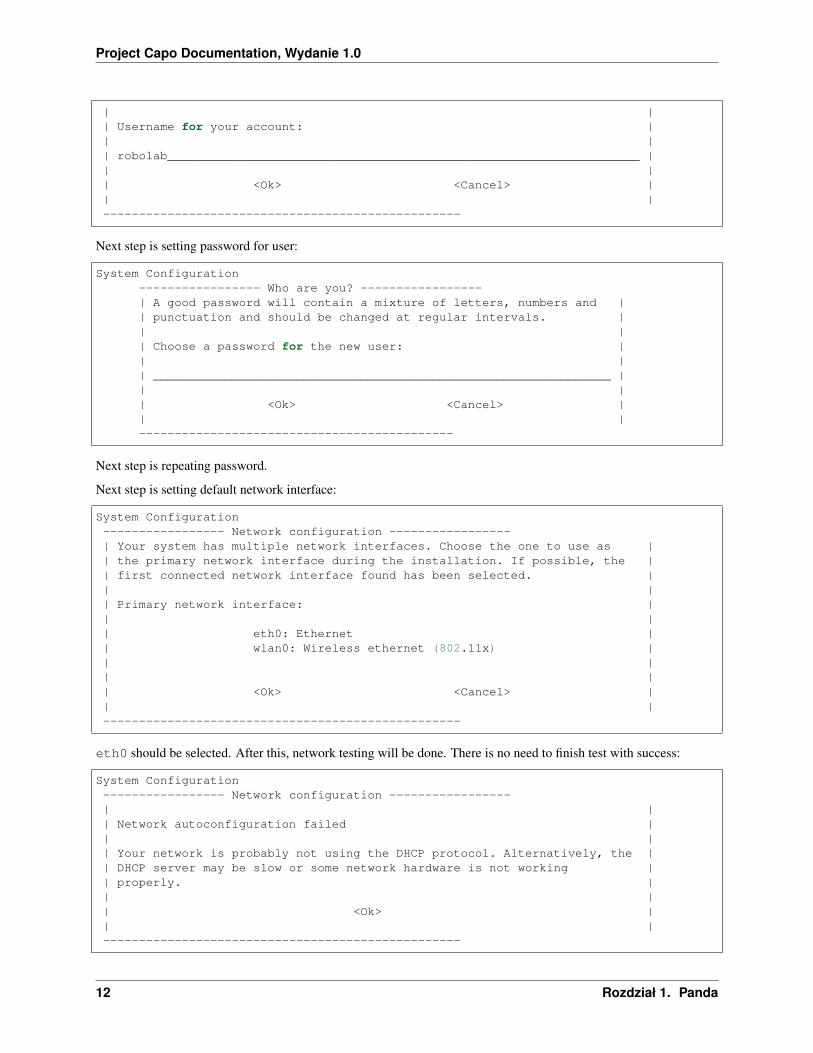
| || Username for your account: || || robolab__________________________________________________________________ || || <Ok> <Cancel> || |--------------------------------------------------
Next step is setting password for user:
System Configuration----------------- Who are you? -----------------| A good password will contain a mixture of letters, numbers and || punctuation and should be changed at regular intervals. || || Choose a password for the new user: || || ________________________________________________________________ || || <Ok> <Cancel> || |--------------------------------------------
Next step is repeating password.
Next step is setting default network interface:
System Configuration----------------- Network configuration -----------------| Your system has multiple network interfaces. Choose the one to use as || the primary network interface during the installation. If possible, the || first connected network interface found has been selected. || || Primary network interface: || || eth0: Ethernet || wlan0: Wireless ethernet (802.11x) || || || <Ok> <Cancel> || |--------------------------------------------------
eth0 should be selected. After this, network testing will be done. There is no need to finish test with success:
System Configuration----------------- Network configuration -----------------| || Network autoconfiguration failed || || Your network is probably not using the DHCP protocol. Alternatively, the || DHCP server may be slow or some network hardware is not working || properly. || || <Ok> || |--------------------------------------------------
12 Rozdział 1. Panda
Project Capo Documentation, Wydanie 1.0
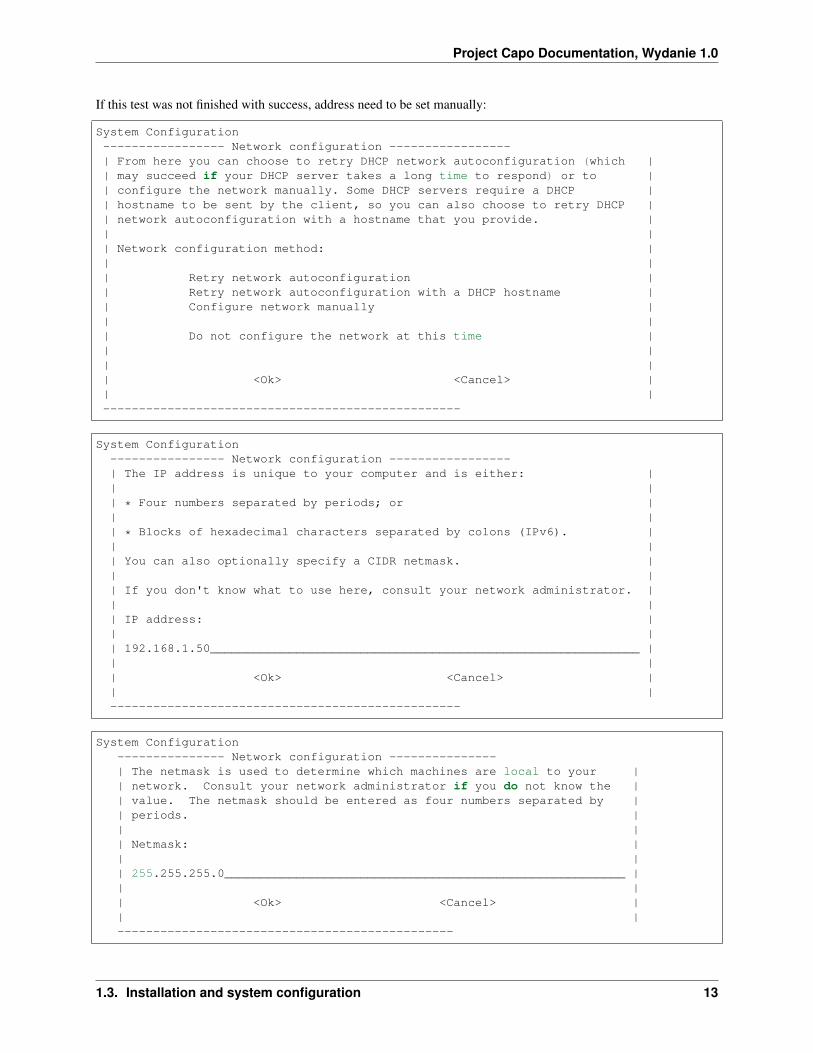
If this test was not finished with success, address need to be set manually:
System Configuration----------------- Network configuration -----------------| From here you can choose to retry DHCP network autoconfiguration (which || may succeed if your DHCP server takes a long time to respond) or to || configure the network manually. Some DHCP servers require a DHCP || hostname to be sent by the client, so you can also choose to retry DHCP || network autoconfiguration with a hostname that you provide. || || Network configuration method: || || Retry network autoconfiguration || Retry network autoconfiguration with a DHCP hostname || Configure network manually || || Do not configure the network at this time || || || <Ok> <Cancel> || |--------------------------------------------------
System Configuration---------------- Network configuration -----------------| The IP address is unique to your computer and is either: || || * Four numbers separated by periods; or || || * Blocks of hexadecimal characters separated by colons (IPv6). || || You can also optionally specify a CIDR netmask. || || If you don't know what to use here, consult your network administrator. || || IP address: || || 192.168.1.50____________________________________________________________ || || <Ok> <Cancel> || |-------------------------------------------------
System Configuration--------------- Network configuration ---------------| The netmask is used to determine which machines are local to your || network. Consult your network administrator if you do not know the || value. The netmask should be entered as four numbers separated by || periods. || || Netmask: || || 255.255.255.0________________________________________________________ || || <Ok> <Cancel> || |-----------------------------------------------
1.3. Installation and system configuration 13
Project Capo Documentation, Wydanie 1.0
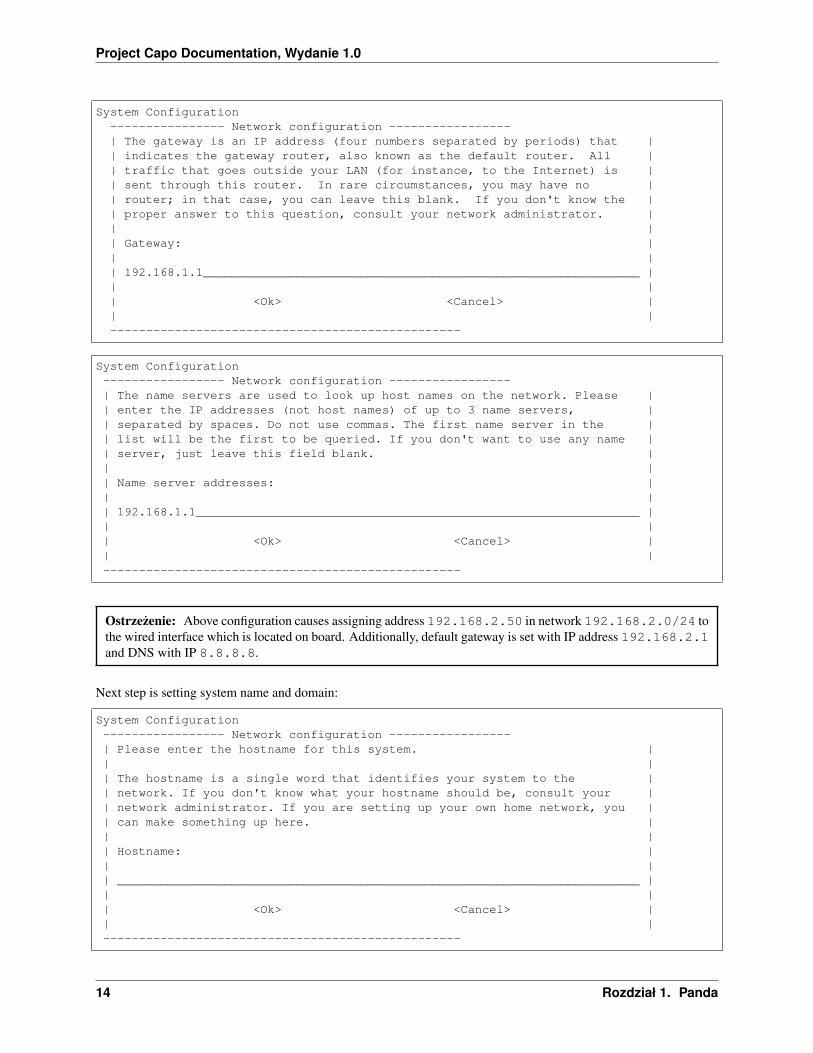
System Configuration---------------- Network configuration -----------------| The gateway is an IP address (four numbers separated by periods) that || indicates the gateway router, also known as the default router. All || traffic that goes outside your LAN (for instance, to the Internet) is || sent through this router. In rare circumstances, you may have no || router; in that case, you can leave this blank. If you don't know the || proper answer to this question, consult your network administrator. || || Gateway: || || 192.168.1.1_____________________________________________________________ || || <Ok> <Cancel> || |-------------------------------------------------
System Configuration----------------- Network configuration -----------------| The name servers are used to look up host names on the network. Please || enter the IP addresses (not host names) of up to 3 name servers, || separated by spaces. Do not use commas. The first name server in the || list will be the first to be queried. If you don't want to use any name || server, just leave this field blank. || || Name server addresses: || || 192.168.1.1______________________________________________________________ || || <Ok> <Cancel> || |--------------------------------------------------
Ostrzezenie: Above configuration causes assigning address 192.168.2.50 in network 192.168.2.0/24 tothe wired interface which is located on board. Additionally, default gateway is set with IP address 192.168.2.1and DNS with IP 8.8.8.8.
Next step is setting system name and domain:
System Configuration----------------- Network configuration -----------------| Please enter the hostname for this system. || || The hostname is a single word that identifies your system to the || network. If you don't know what your hostname should be, consult your || network administrator. If you are setting up your own home network, you || can make something up here. || || Hostname: || || _________________________________________________________________________ || || <Ok> <Cancel> || |--------------------------------------------------
14 Rozdział 1. Panda

Project Capo Documentation, Wydanie 1.0
System Configuration----------------- Network configuration -----------------| The domain name is the part of your Internet address to the right of || your host name. It is often something that ends in .com, .net, .edu, or || .org. If you are setting up a home network, you can make something up, || but make sure you use the same domain name on all your computers. || || Domain name: || || _________________________________________________________________________ || || <Ok> <Cancel> || |--------------------------------------------------
Next step is selecting basic system functions:
System Configuration--------------- Software selection ----------------| You can choose to install one or more of the following predefined || collections of software. || || Choose software to install: || || [ ] Basic Ubuntu server || [*] OpenSSH server || [ ] DNS server || [ ] LAMP server || [ ] Mail server || [ ] PostgreSQL database || [ ] Print server || [ ] Samba file server || [ ] Tomcat Java server || [ ] Virtual Machine host || || || <Ok> <Cancel> || |----------------------------------------------
OpenSSH server need to be selected. After this, SSH server will be installed, additional parameters will be setand unused packages will be removed. After this, there will be login prompt displayed:
Ubuntu 12.04 LTS hostname ttyO2
hostname login: usernamePassword:Welcome to Ubuntu 12.04 LTS (GNU/Linux 3.2.0-1412-omap4 armv7l)
* Documentation: https://help.ubuntu.com/
The programs included with the Ubuntu system are free software;the exact distribution terms for each program are described in theindividual files in /usr/share/doc/*/copyright.
Ubuntu comes with ABSOLUTELY NO WARRANTY, to the extent permitted byapplicable law.
1.3. Installation and system configuration 15
Project Capo Documentation, Wydanie 1.0
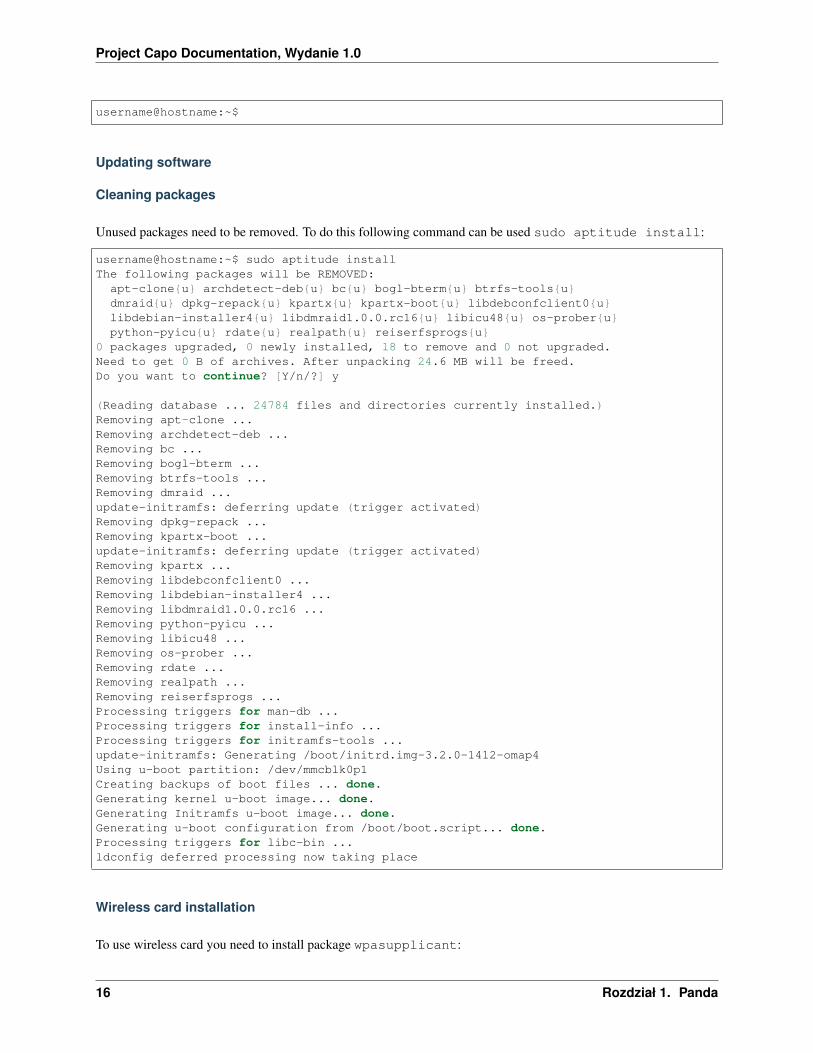
username@hostname:~$
Updating software
Cleaning packages
Unused packages need to be removed. To do this following command can be used sudo aptitude install:
username@hostname:~$ sudo aptitude installThe following packages will be REMOVED:
apt-clone{u} archdetect-deb{u} bc{u} bogl-bterm{u} btrfs-tools{u}dmraid{u} dpkg-repack{u} kpartx{u} kpartx-boot{u} libdebconfclient0{u}libdebian-installer4{u} libdmraid1.0.0.rc16{u} libicu48{u} os-prober{u}python-pyicu{u} rdate{u} realpath{u} reiserfsprogs{u}
0 packages upgraded, 0 newly installed, 18 to remove and 0 not upgraded.Need to get 0 B of archives. After unpacking 24.6 MB will be freed.Do you want to continue? [Y/n/?] y
(Reading database ... 24784 files and directories currently installed.)Removing apt-clone ...Removing archdetect-deb ...Removing bc ...Removing bogl-bterm ...Removing btrfs-tools ...Removing dmraid ...update-initramfs: deferring update (trigger activated)Removing dpkg-repack ...Removing kpartx-boot ...update-initramfs: deferring update (trigger activated)Removing kpartx ...Removing libdebconfclient0 ...Removing libdebian-installer4 ...Removing libdmraid1.0.0.rc16 ...Removing python-pyicu ...Removing libicu48 ...Removing os-prober ...Removing rdate ...Removing realpath ...Removing reiserfsprogs ...Processing triggers for man-db ...Processing triggers for install-info ...Processing triggers for initramfs-tools ...update-initramfs: Generating /boot/initrd.img-3.2.0-1412-omap4Using u-boot partition: /dev/mmcblk0p1Creating backups of boot files ... done.Generating kernel u-boot image... done.Generating Initramfs u-boot image... done.Generating u-boot configuration from /boot/boot.script... done.Processing triggers for libc-bin ...ldconfig deferred processing now taking place
Wireless card installation
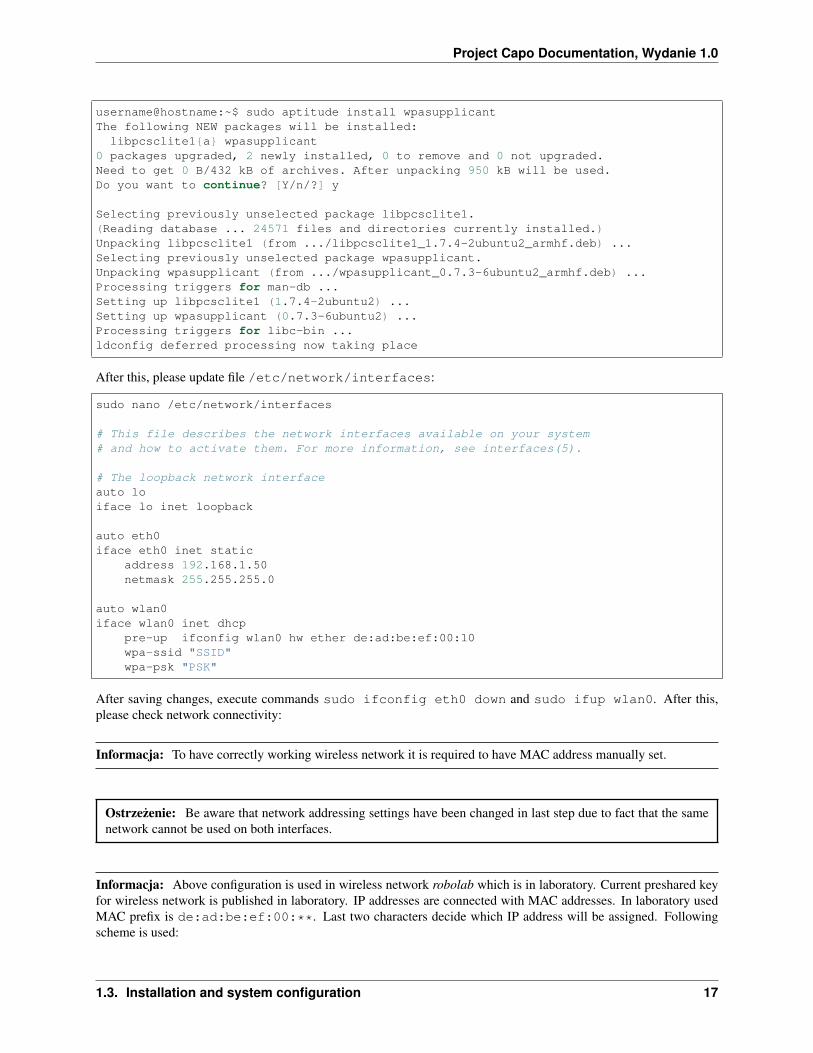
To use wireless card you need to install package wpasupplicant:
16 Rozdział 1. Panda
Project Capo Documentation, Wydanie 1.0
username@hostname:~$ sudo aptitude install wpasupplicantThe following NEW packages will be installed:
libpcsclite1{a} wpasupplicant0 packages upgraded, 2 newly installed, 0 to remove and 0 not upgraded.Need to get 0 B/432 kB of archives. After unpacking 950 kB will be used.Do you want to continue? [Y/n/?] y
Selecting previously unselected package libpcsclite1.(Reading database ... 24571 files and directories currently installed.)Unpacking libpcsclite1 (from .../libpcsclite1_1.7.4-2ubuntu2_armhf.deb) ...Selecting previously unselected package wpasupplicant.Unpacking wpasupplicant (from .../wpasupplicant_0.7.3-6ubuntu2_armhf.deb) ...Processing triggers for man-db ...Setting up libpcsclite1 (1.7.4-2ubuntu2) ...Setting up wpasupplicant (0.7.3-6ubuntu2) ...Processing triggers for libc-bin ...ldconfig deferred processing now taking place
After this, please update file /etc/network/interfaces:
sudo nano /etc/network/interfaces
# This file describes the network interfaces available on your system# and how to activate them. For more information, see interfaces(5).
# The loopback network interfaceauto loiface lo inet loopback
auto eth0iface eth0 inet static
address 192.168.1.50netmask 255.255.255.0
auto wlan0iface wlan0 inet dhcp
pre-up ifconfig wlan0 hw ether de:ad:be:ef:00:10wpa-ssid "SSID"wpa-psk "PSK"
After saving changes, execute commands sudo ifconfig eth0 down and sudo ifup wlan0. After this,please check network connectivity:
Informacja: To have correctly working wireless network it is required to have MAC address manually set.
Ostrzezenie: Be aware that network addressing settings have been changed in last step due to fact that the samenetwork cannot be used on both interfaces.
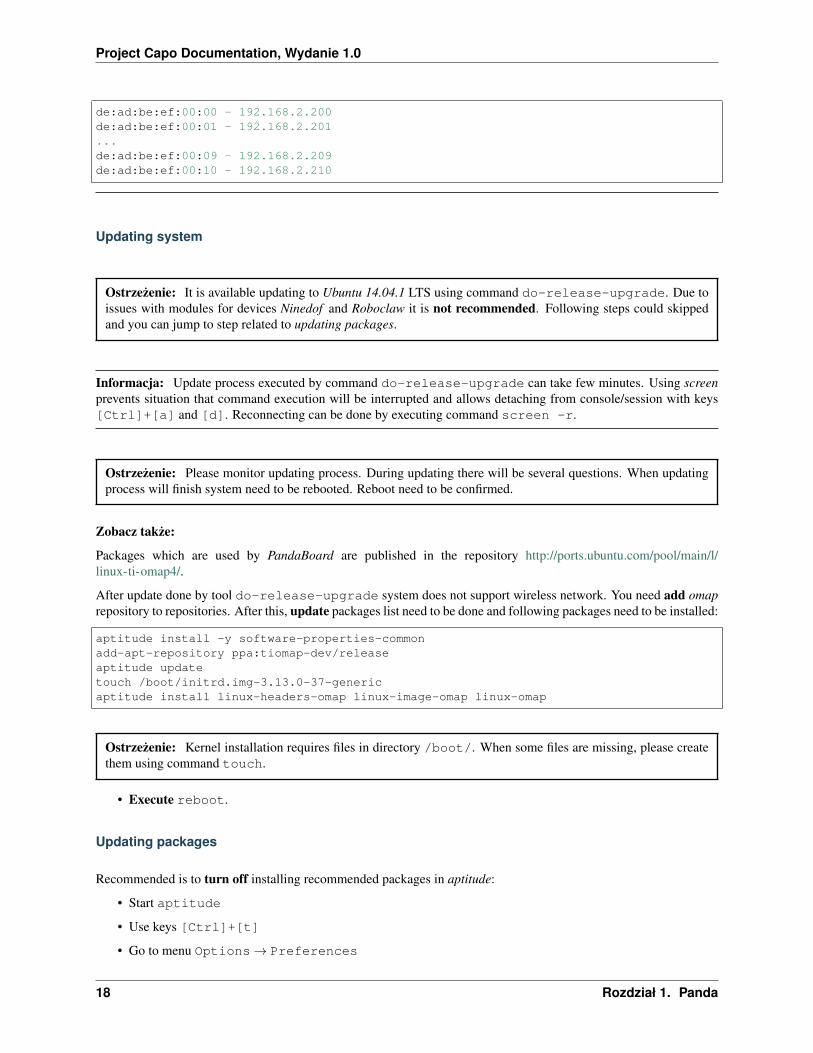
Informacja: Above configuration is used in wireless network robolab which is in laboratory. Current preshared keyfor wireless network is published in laboratory. IP addresses are connected with MAC addresses. In laboratory usedMAC prefix is de:ad:be:ef:00:**. Last two characters decide which IP address will be assigned. Followingscheme is used:
1.3. Installation and system configuration 17
Project Capo Documentation, Wydanie 1.0
de:ad:be:ef:00:00 - 192.168.2.200de:ad:be:ef:00:01 - 192.168.2.201...de:ad:be:ef:00:09 - 192.168.2.209de:ad:be:ef:00:10 - 192.168.2.210
Updating system
Ostrzezenie: It is available updating to Ubuntu 14.04.1 LTS using command do-release-upgrade. Due toissues with modules for devices Ninedof and Roboclaw it is not recommended. Following steps could skippedand you can jump to step related to updating packages.
Informacja: Update process executed by command do-release-upgrade can take few minutes. Using screenprevents situation that command execution will be interrupted and allows detaching from console/session with keys[Ctrl]+[a] and [d]. Reconnecting can be done by executing command screen -r.
Ostrzezenie: Please monitor updating process. During updating there will be several questions. When updatingprocess will finish system need to be rebooted. Reboot need to be confirmed.
Zobacz takze:
Packages which are used by PandaBoard are published in the repository http://ports.ubuntu.com/pool/main/l/linux-ti-omap4/.
After update done by tool do-release-upgrade system does not support wireless network. You need add omaprepository to repositories. After this, update packages list need to be done and following packages need to be installed:
aptitude install -y software-properties-commonadd-apt-repository ppa:tiomap-dev/releaseaptitude updatetouch /boot/initrd.img-3.13.0-37-genericaptitude install linux-headers-omap linux-image-omap linux-omap
Ostrzezenie: Kernel installation requires files in directory /boot/. When some files are missing, please createthem using command touch.
• Execute reboot.
Updating packages
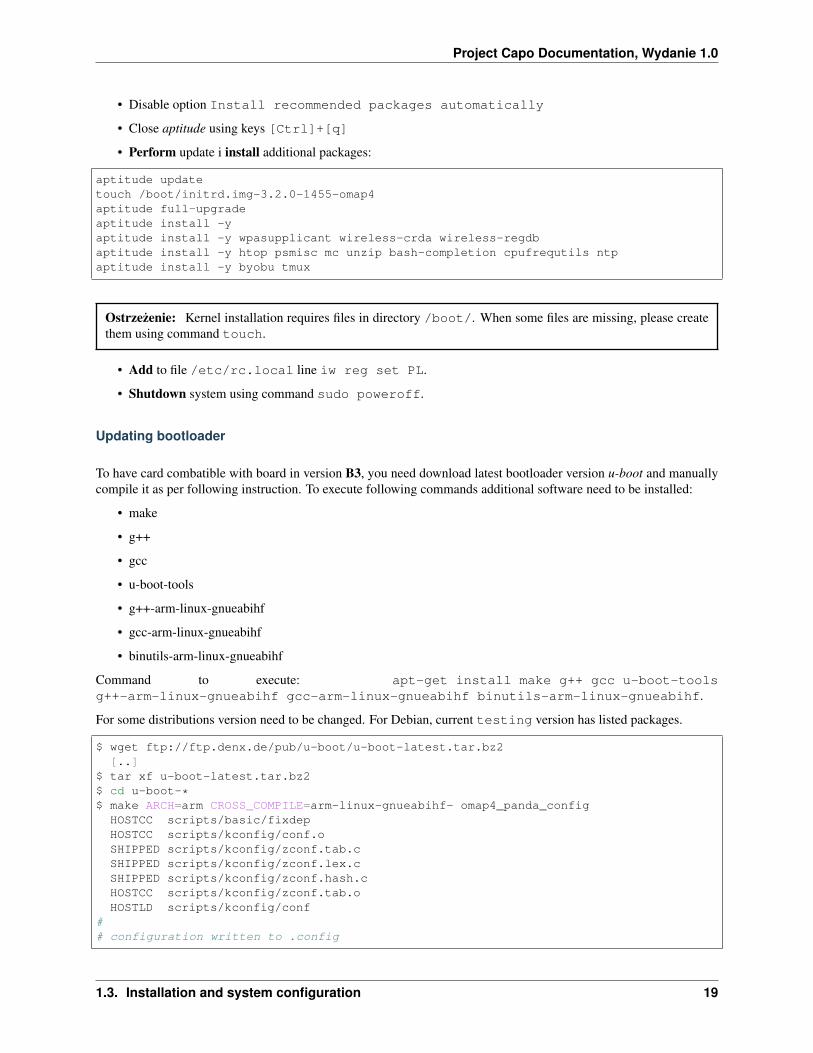
Recommended is to turn off installing recommended packages in aptitude:
• Start aptitude
• Use keys [Ctrl]+[t]
• Go to menu Options→ Preferences
18 Rozdział 1. Panda
Project Capo Documentation, Wydanie 1.0
• Disable option Install recommended packages automatically
• Close aptitude using keys [Ctrl]+[q]
• Perform update i install additional packages:
aptitude updatetouch /boot/initrd.img-3.2.0-1455-omap4aptitude full-upgradeaptitude install -yaptitude install -y wpasupplicant wireless-crda wireless-regdbaptitude install -y htop psmisc mc unzip bash-completion cpufrequtils ntpaptitude install -y byobu tmux
Ostrzezenie: Kernel installation requires files in directory /boot/. When some files are missing, please createthem using command touch.
• Add to file /etc/rc.local line iw reg set PL.
• Shutdown system using command sudo poweroff.
Updating bootloader
To have card combatible with board in version B3, you need download latest bootloader version u-boot and manuallycompile it as per following instruction. To execute following commands additional software need to be installed:
• make
• g++
• gcc
• u-boot-tools
• g++-arm-linux-gnueabihf
• gcc-arm-linux-gnueabihf
• binutils-arm-linux-gnueabihf
Command to execute: apt-get install make g++ gcc u-boot-toolsg++-arm-linux-gnueabihf gcc-arm-linux-gnueabihf binutils-arm-linux-gnueabihf.
For some distributions version need to be changed. For Debian, current testing version has listed packages.
$ wget ftp://ftp.denx.de/pub/u-boot/u-boot-latest.tar.bz2[..]
$ tar xf u-boot-latest.tar.bz2$ cd u-boot-*$ make ARCH=arm CROSS_COMPILE=arm-linux-gnueabihf- omap4_panda_config
HOSTCC scripts/basic/fixdepHOSTCC scripts/kconfig/conf.oSHIPPED scripts/kconfig/zconf.tab.cSHIPPED scripts/kconfig/zconf.lex.cSHIPPED scripts/kconfig/zconf.hash.cHOSTCC scripts/kconfig/zconf.tab.oHOSTLD scripts/kconfig/conf
## configuration written to .config
1.3. Installation and system configuration 19
Project Capo Documentation, Wydanie 1.0
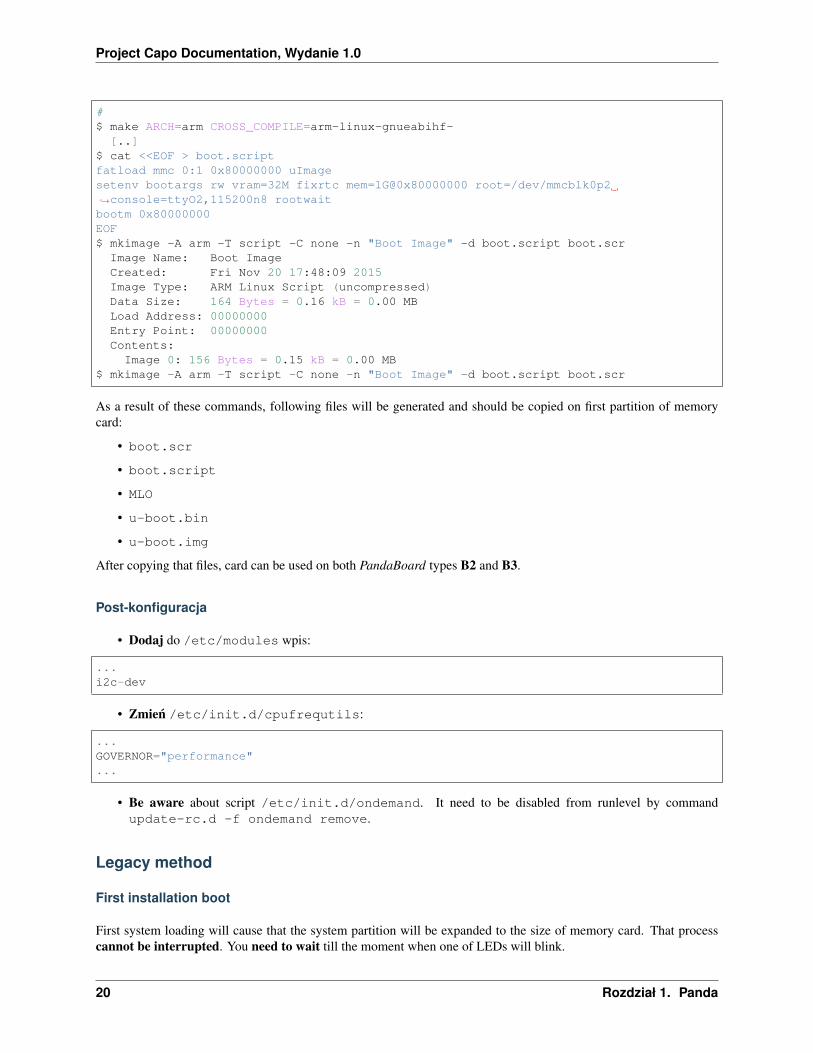
#$ make ARCH=arm CROSS_COMPILE=arm-linux-gnueabihf-
[..]$ cat <<EOF > boot.scriptfatload mmc 0:1 0x80000000 uImagesetenv bootargs rw vram=32M fixrtc mem=1G@0x80000000 root=/dev/mmcblk0p2→˓console=ttyO2,115200n8 rootwaitbootm 0x80000000EOF$ mkimage -A arm -T script -C none -n "Boot Image" -d boot.script boot.scr
Image Name: Boot ImageCreated: Fri Nov 20 17:48:09 2015Image Type: ARM Linux Script (uncompressed)Data Size: 164 Bytes = 0.16 kB = 0.00 MBLoad Address: 00000000Entry Point: 00000000Contents:Image 0: 156 Bytes = 0.15 kB = 0.00 MB
$ mkimage -A arm -T script -C none -n "Boot Image" -d boot.script boot.scr
As a result of these commands, following files will be generated and should be copied on first partition of memorycard:
• boot.scr
• boot.script
• MLO
• u-boot.bin
• u-boot.img
After copying that files, card can be used on both PandaBoard types B2 and B3.
Post-konfiguracja
• Dodaj do /etc/modules wpis:
...i2c-dev
• Zmien /etc/init.d/cpufrequtils:
...GOVERNOR="performance"...
• Be aware about script /etc/init.d/ondemand. It need to be disabled from runlevel by commandupdate-rc.d -f ondemand remove.
Legacy method
First installation boot
First system loading will cause that the system partition will be expanded to the size of memory card. That processcannot be interrupted. You need to wait till the moment when one of LEDs will blink.
20 Rozdział 1. Panda
Project Capo Documentation, Wydanie 1.0
Informacja: If you have display with HDMI input and keyboard or serial port in your PC, you are able to followinstructions which will be displayed on console (official method). If you do not have it, it is able to finish systeminstallation as per this instruction.
• Turn on PandaBoard.
• Wait till the moment when on of LEDs will blink.
• Turn off PandaBoard.
• Pull out memory card from PandaBoard card reader.
• Put memory card in computer card reader.
Prepare system to configuration
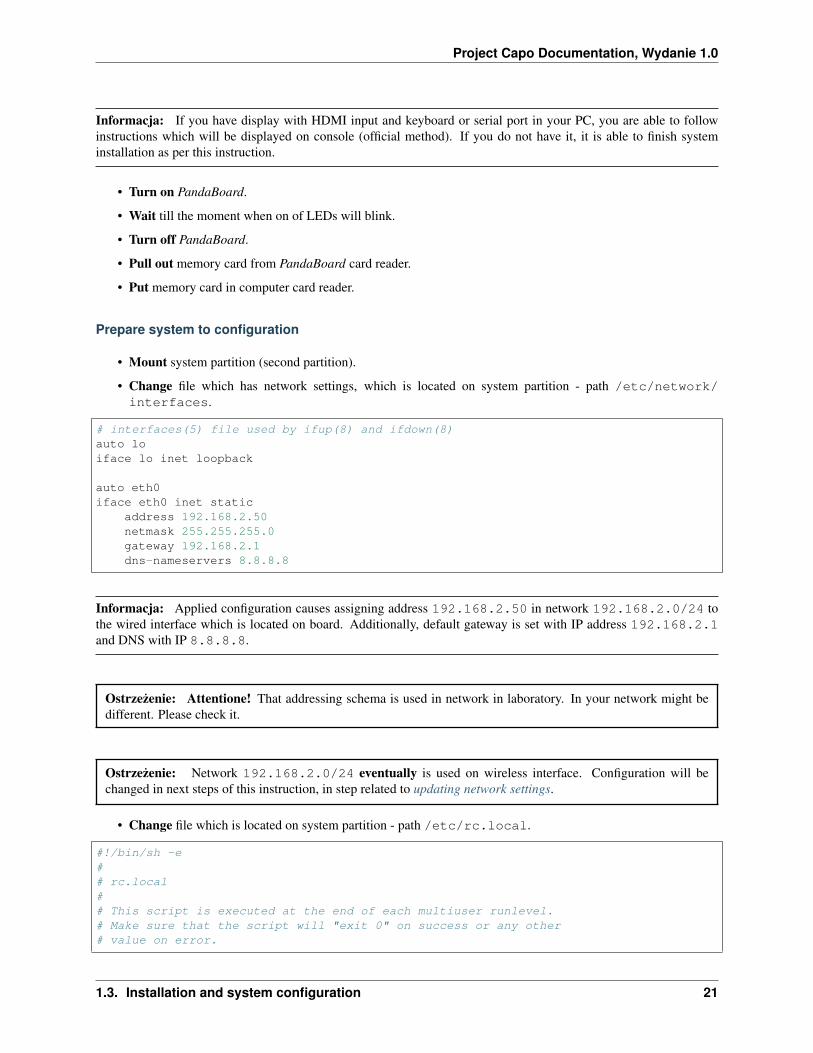
• Mount system partition (second partition).
• Change file which has network settings, which is located on system partition - path /etc/network/interfaces.
# interfaces(5) file used by ifup(8) and ifdown(8)auto loiface lo inet loopback
auto eth0iface eth0 inet static
address 192.168.2.50netmask 255.255.255.0gateway 192.168.2.1dns-nameservers 8.8.8.8
Informacja: Applied configuration causes assigning address 192.168.2.50 in network 192.168.2.0/24 tothe wired interface which is located on board. Additionally, default gateway is set with IP address 192.168.2.1and DNS with IP 8.8.8.8.
Ostrzezenie: Attentione! That addressing schema is used in network in laboratory. In your network might bedifferent. Please check it.
Ostrzezenie: Network 192.168.2.0/24 eventually is used on wireless interface. Configuration will bechanged in next steps of this instruction, in step related to updating network settings.
• Change file which is located on system partition - path /etc/rc.local.
#!/bin/sh -e## rc.local## This script is executed at the end of each multiuser runlevel.# Make sure that the script will "exit 0" on success or any other# value on error.
1.3. Installation and system configuration 21
Project Capo Documentation, Wydanie 1.0
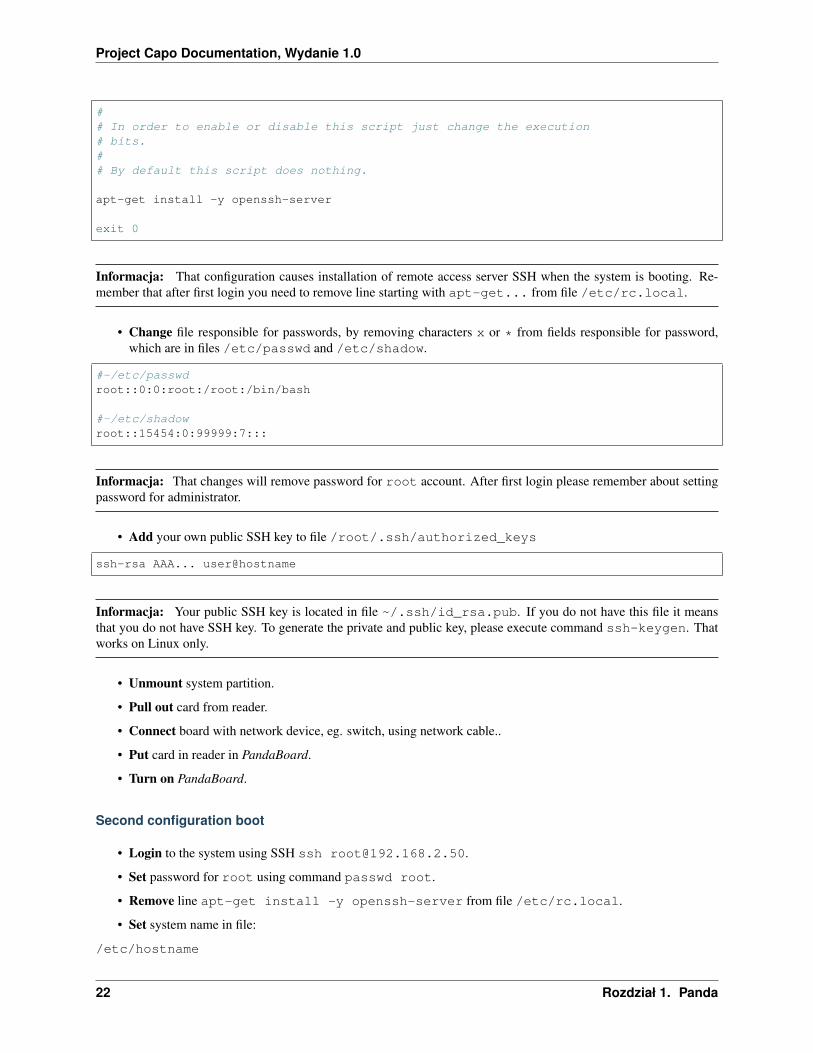
## In order to enable or disable this script just change the execution# bits.## By default this script does nothing.
apt-get install -y openssh-server
exit 0
Informacja: That configuration causes installation of remote access server SSH when the system is booting. Re-member that after first login you need to remove line starting with apt-get... from file /etc/rc.local.
• Change file responsible for passwords, by removing characters x or * from fields responsible for password,which are in files /etc/passwd and /etc/shadow.
#-/etc/passwdroot::0:0:root:/root:/bin/bash
#-/etc/shadowroot::15454:0:99999:7:::
Informacja: That changes will remove password for root account. After first login please remember about settingpassword for administrator.
• Add your own public SSH key to file /root/.ssh/authorized_keys
ssh-rsa AAA... user@hostname
Informacja: Your public SSH key is located in file ~/.ssh/id_rsa.pub. If you do not have this file it meansthat you do not have SSH key. To generate the private and public key, please execute command ssh-keygen. Thatworks on Linux only.
• Unmount system partition.
• Pull out card from reader.
• Connect board with network device, eg. switch, using network cable..
• Put card in reader in PandaBoard.
• Turn on PandaBoard.
Second configuration boot
• Login to the system using SSH ssh [email protected].
• Set password for root using command passwd root.
• Remove line apt-get install -y openssh-server from file /etc/rc.local.
• Set system name in file:
/etc/hostname
22 Rozdział 1. Panda
Project Capo Documentation, Wydanie 1.0
panda.robonet
/etc/hosts
127.0.0.1 localhost127.0.1.1 panda panda.robonet
Ostrzezenie: Interrupt board wizard configuration which is running on the console (available when serial portis used).
• Execute command fuser -k /var/cache/debconf/config.dat sevaral times.
• Remove package oem-config (using aptitude - aptitude purge oem-config) and directory /var/lib/oem-config.
• Restart system using command reboot.
Updating software
Updating system
• Install screen using aptitude install screen.
• Start screen using screen.
Ostrzezenie: It is available updating to Ubuntu 14.04.1 LTS using command do-release-upgrade. Due toissues with modules for devices Ninedof and Roboclaw it is not recommended. Following steps could skippedand you can jump to step related to updating packages.
Informacja: Update process executed by command do-release-upgrade can take few minutes. Using screenprevents situation that command execution will be interrupted and allows detaching from console/session with keys[Ctrl]+[a] and [d]. Reconnecting can be done by executing command screen -r.
Ostrzezenie: Please monitor updating process. During updating there will be several questions. When updatingprocess will finish system need to be rebooted. Reboot need to be confirmed.
Zobacz takze:
Packages which are used by PandaBoard are published in the repository http://ports.ubuntu.com/pool/main/l/linux-ti-omap4/.
After finished update by tool do-release-upgrade system does not support wireless network. You need addomap repository to repositories. After this, update packages list need to be done and following packages need to beinstalled:
aptitude install -y software-properties-commonadd-apt-repository ppa:tiomap-dev/releaseaptitude updatetouch /boot/initrd.img-3.13.0-37-genericaptitude install linux-headers-omap linux-image-omap linux-omap
1.3. Installation and system configuration 23
Project Capo Documentation, Wydanie 1.0
Ostrzezenie: Kernel installation requires files in directory /boot/. When some files are missing, please createthem using command touch.
• Execute reboot.
Updating packages
Recommended is to turn off installing recommended packages in aptitude:
• Start aptitude
• Use keys [Ctrl]+[t]
• Go to menu Options→ Preferences
• Disable option Install recommended packages automatically
• Close aptitude using keys [Ctrl]+[q]
• Perform update i install additional packages:
aptitude updatetouch /boot/initrd.img-3.2.0-1455-omap4aptitude full-upgradeaptitude install -yaptitude install -y wpasupplicant wireless-crda wireless-regdbaptitude install -y htop psmisc mc unzip bash-completion cpufrequtils ntpaptitude install -y byobu tmux
Ostrzezenie: Kernel installation requires files in directory /boot/. When some files are missing, please createthem using command touch.
• Add to file /etc/rc.local line iw reg set PL.
• Change network settings: to file /etc/network/interfaces add settings related to wireless network:
# interfaces(5) file used by ifup(8) and ifdown(8)auto loiface lo inet loopback
auto eth0iface eth0 inet static
address 192.168.1.50netmask 255.255.255.0
auto wlan0iface wlan0 inet dhcp
pre-up ifconfig wlan0 hw ether de:ad:be:ef:00:10wpa-ssid "SSID"wpa-psk "PSK"
Informacja: To have correctly working wireless network MAC address need to be setup manually.
24 Rozdział 1. Panda
Project Capo Documentation, Wydanie 1.0
Ostrzezenie: Be aware that network addressing settings have been changed in last step due to fact that the samenetwork cannot be used on both interfaces.
Informacja: Above configuration is used in wireless network robolab which is in laboratory. Current preshared keyfor wireless network is published in laboratory. IP addresses are connected with MAC addresses. In laboratory usedMAC prefix is de:ad:be:ef:00:**. Last two characters decide which IP address will be assigned. Followingscheme is used:
de:ad:be:ef:00:00 - 192.168.2.200de:ad:be:ef:00:01 - 192.168.2.201...de:ad:be:ef:00:09 - 192.168.2.209de:ad:be:ef:00:10 - 192.168.2.210
• Reboot system.
• Connect to the system using IP address assigned by router. You can check it via administrative portal.
Updating bootloader
To have card combatible with board in version B3, you need download latest bootloader version u-boot and manuallycompile it as per following instruction. To execute following commands additional software need to be installed:
• make
• g++
• gcc
• u-boot-tools
• g++-arm-linux-gnueabihf
• gcc-arm-linux-gnueabihf
• binutils-arm-linux-gnueabihf
Command to execute: apt-get install make g++ gcc u-boot-toolsg++-arm-linux-gnueabihf gcc-arm-linux-gnueabihf binutils-arm-linux-gnueabihf.
For some distributions version need to be changed. For Debian, current testing version has listed packages.
$ wget ftp://ftp.denx.de/pub/u-boot/u-boot-latest.tar.bz2[..]
$ tar xf u-boot-latest.tar.bz2$ cd u-boot-*$ make ARCH=arm CROSS_COMPILE=arm-linux-gnueabihf- omap4_panda_config
HOSTCC scripts/basic/fixdepHOSTCC scripts/kconfig/conf.oSHIPPED scripts/kconfig/zconf.tab.cSHIPPED scripts/kconfig/zconf.lex.cSHIPPED scripts/kconfig/zconf.hash.cHOSTCC scripts/kconfig/zconf.tab.oHOSTLD scripts/kconfig/conf
## configuration written to .config#
1.3. Installation and system configuration 25
Project Capo Documentation, Wydanie 1.0
$ make ARCH=arm CROSS_COMPILE=arm-linux-gnueabihf-[..]
$ cat <<EOF > boot.scriptfatload mmc 0:1 0x80000000 uImagesetenv bootargs rw vram=32M fixrtc mem=1G@0x80000000 root=/dev/mmcblk0p2→˓console=ttyO2,115200n8 rootwaitbootm 0x80000000EOF$ mkimage -A arm -T script -C none -n "Boot Image" -d boot.script boot.scr
Image Name: Boot ImageCreated: Fri Nov 20 17:48:09 2015Image Type: ARM Linux Script (uncompressed)Data Size: 164 Bytes = 0.16 kB = 0.00 MBLoad Address: 00000000Entry Point: 00000000Contents:Image 0: 156 Bytes = 0.15 kB = 0.00 MB
$ mkimage -A arm -T script -C none -n "Boot Image" -d boot.script boot.scr
As a result of these commands, following files will be generated and should be copied on first partition of memorycard:
• boot.scr
• boot.script
• MLO
• u-boot.bin
• u-boot.img
After copying that files, card can be used on both PandaBoard types B2 and B3.
Post-configuration
• Add to /etc/modules line:
...i2c-dev
• Update /etc/init.d/cpufrequtils:
...GOVERNOR="performance"...
• Be aware about script /etc/init.d/ondemand. It need to be disabled from runlevel by commandupdate-rc.d -f ondemand remove.
Additional information
More information you can find on:
• Wiki/ARM/OMAP
• Wiki/ARM/Server/Install
26 Rozdział 1. Panda

Project Capo Documentation, Wydanie 1.0
• Gentoo/PandaBoard
1.4. Additional information 27

Project Capo Documentation, Wydanie 1.0
28 Rozdział 1. Panda
ROZDZIAŁ 2
Amber
Amber installation begins from amber-erlang-mediator. It is a mediator, which is used in comunication between driversand clients.
In a normal scenario, there are following components:
• there is only one mediator
• there are different multiple drivers, which are communicating with different devices, there is no duplicateddrivers
• there are multiple clients connected to mediator, which they use available devices
Installation and running
Installation can be done on any Linux system.
Informacja: Provided features are only available on robots which are in laboratory.
Prepare environment
Additional software installation
Informacja: For Ubuntu 12.04.5 LTS need to add additional repository used to install supported by Amber Erlangverion. Following line need to be added to /etc/apt/sources.list:
deb http://packages.erlang-solutions.com/debian wheezy contrib
After adding this entry aptitude update need to be executed. If there will be some issues with downloadingpackages list key need to be added with following command:
29
Project Capo Documentation, Wydanie 1.0
apt-key adv --recv-keys --keyserver keyserver.ubuntu.com D208507CA14F4FCA
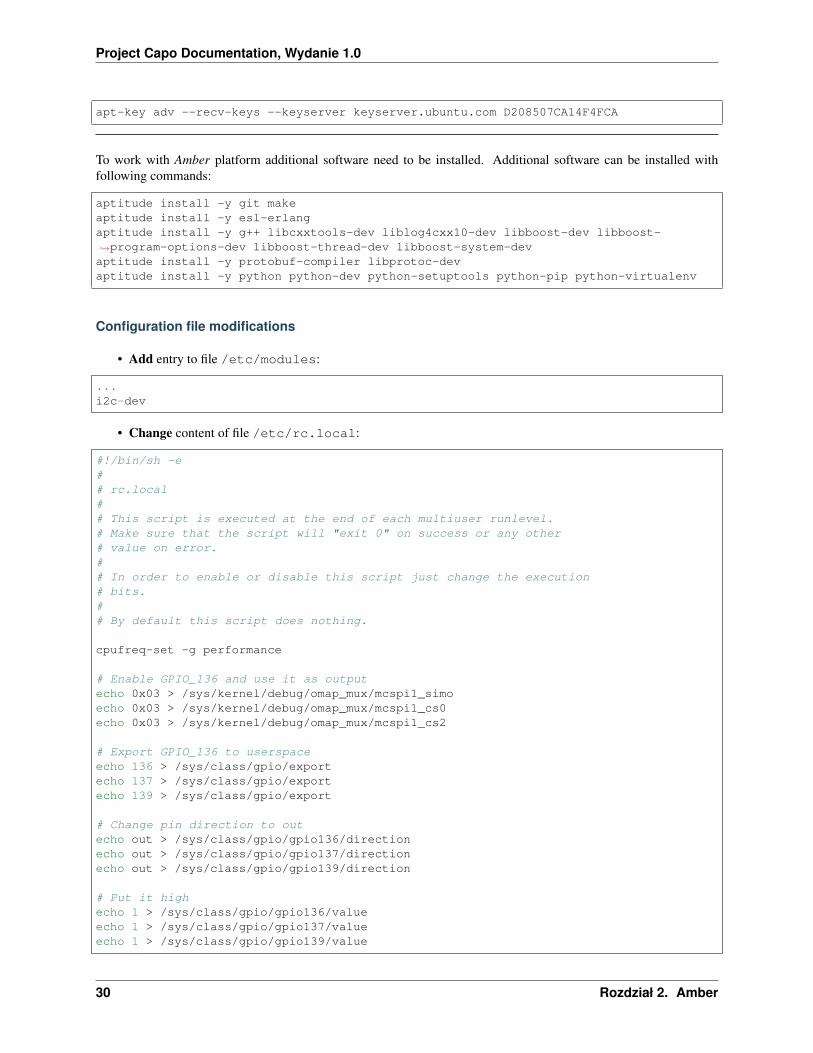
To work with Amber platform additional software need to be installed. Additional software can be installed withfollowing commands:
aptitude install -y git makeaptitude install -y esl-erlangaptitude install -y g++ libcxxtools-dev liblog4cxx10-dev libboost-dev libboost-→˓program-options-dev libboost-thread-dev libboost-system-devaptitude install -y protobuf-compiler libprotoc-devaptitude install -y python python-dev python-setuptools python-pip python-virtualenv
Configuration file modifications
• Add entry to file /etc/modules:
...i2c-dev
• Change content of file /etc/rc.local:
#!/bin/sh -e## rc.local## This script is executed at the end of each multiuser runlevel.# Make sure that the script will "exit 0" on success or any other# value on error.## In order to enable or disable this script just change the execution# bits.## By default this script does nothing.
cpufreq-set -g performance
# Enable GPIO_136 and use it as outputecho 0x03 > /sys/kernel/debug/omap_mux/mcspi1_simoecho 0x03 > /sys/kernel/debug/omap_mux/mcspi1_cs0echo 0x03 > /sys/kernel/debug/omap_mux/mcspi1_cs2
# Export GPIO_136 to userspaceecho 136 > /sys/class/gpio/exportecho 137 > /sys/class/gpio/exportecho 139 > /sys/class/gpio/export
# Change pin direction to outecho out > /sys/class/gpio/gpio136/directionecho out > /sys/class/gpio/gpio137/directionecho out > /sys/class/gpio/gpio139/direction
# Put it highecho 1 > /sys/class/gpio/gpio136/valueecho 1 > /sys/class/gpio/gpio137/valueecho 1 > /sys/class/gpio/gpio139/value
30 Rozdział 2. Amber
Project Capo Documentation, Wydanie 1.0
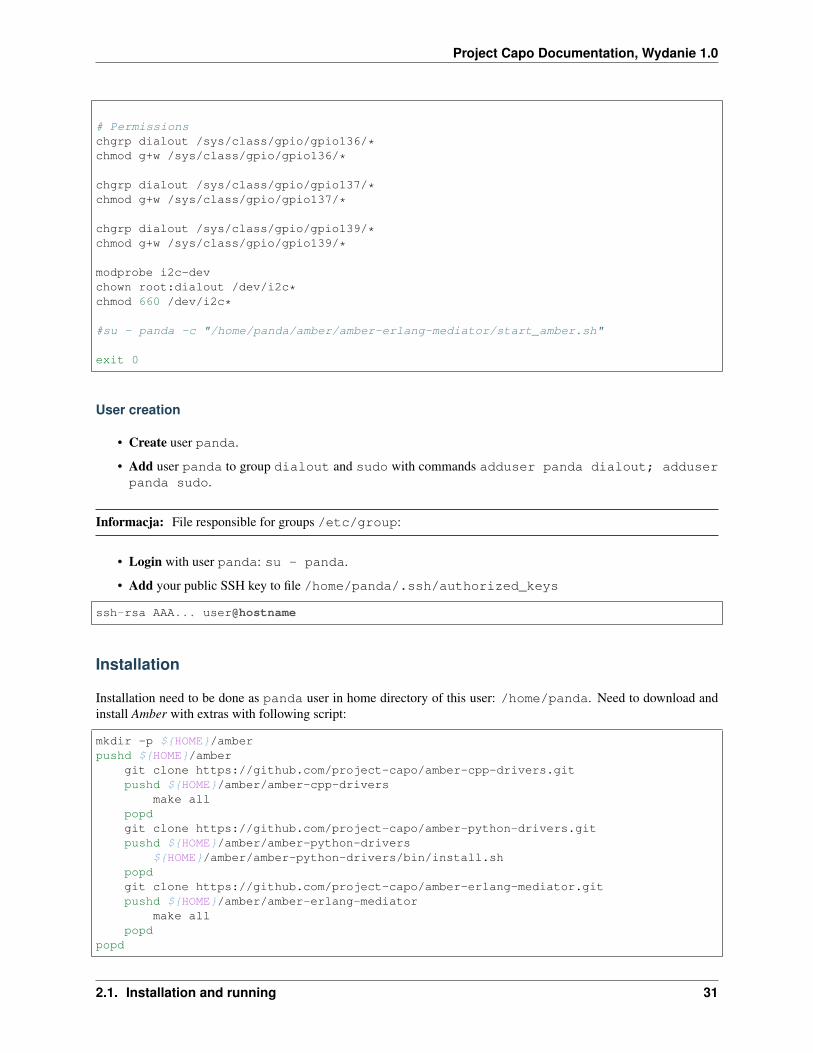
# Permissionschgrp dialout /sys/class/gpio/gpio136/*chmod g+w /sys/class/gpio/gpio136/*
chgrp dialout /sys/class/gpio/gpio137/*chmod g+w /sys/class/gpio/gpio137/*
chgrp dialout /sys/class/gpio/gpio139/*chmod g+w /sys/class/gpio/gpio139/*
modprobe i2c-devchown root:dialout /dev/i2c*chmod 660 /dev/i2c*
#su - panda -c "/home/panda/amber/amber-erlang-mediator/start_amber.sh"
exit 0
User creation
• Create user panda.
• Add user panda to group dialout and sudo with commands adduser panda dialout; adduserpanda sudo.
Informacja: File responsible for groups /etc/group:
• Login with user panda: su - panda.
• Add your public SSH key to file /home/panda/.ssh/authorized_keys
ssh-rsa AAA... user@hostname
Installation
Installation need to be done as panda user in home directory of this user: /home/panda. Need to download andinstall Amber with extras with following script:
mkdir -p ${HOME}/amberpushd ${HOME}/amber
git clone https://github.com/project-capo/amber-cpp-drivers.gitpushd ${HOME}/amber/amber-cpp-drivers
make allpopdgit clone https://github.com/project-capo/amber-python-drivers.gitpushd ${HOME}/amber/amber-python-drivers
${HOME}/amber/amber-python-drivers/bin/install.shpopdgit clone https://github.com/project-capo/amber-erlang-mediator.gitpushd ${HOME}/amber/amber-erlang-mediator
make allpopd
popd
2.1. Installation and running 31
Project Capo Documentation, Wydanie 1.0
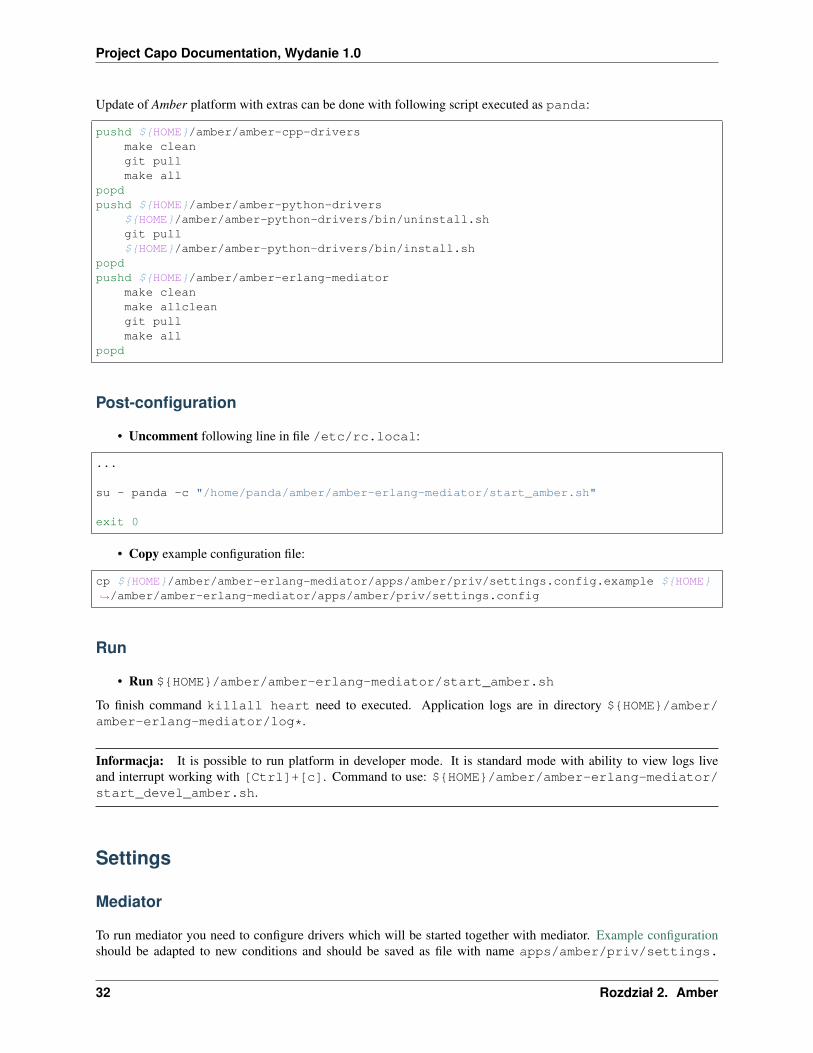
Update of Amber platform with extras can be done with following script executed as panda:
pushd ${HOME}/amber/amber-cpp-driversmake cleangit pullmake all
popdpushd ${HOME}/amber/amber-python-drivers
${HOME}/amber/amber-python-drivers/bin/uninstall.shgit pull${HOME}/amber/amber-python-drivers/bin/install.sh
popdpushd ${HOME}/amber/amber-erlang-mediator
make cleanmake allcleangit pullmake all
popd
Post-configuration
• Uncomment following line in file /etc/rc.local:
...
su - panda -c "/home/panda/amber/amber-erlang-mediator/start_amber.sh"
exit 0
• Copy example configuration file:
cp ${HOME}/amber/amber-erlang-mediator/apps/amber/priv/settings.config.example ${HOME}→˓/amber/amber-erlang-mediator/apps/amber/priv/settings.config
Run
• Run ${HOME}/amber/amber-erlang-mediator/start_amber.sh
To finish command killall heart need to executed. Application logs are in directory ${HOME}/amber/amber-erlang-mediator/log*.
Informacja: It is possible to run platform in developer mode. It is standard mode with ability to view logs liveand interrupt working with [Ctrl]+[c]. Command to use: ${HOME}/amber/amber-erlang-mediator/start_devel_amber.sh.
Settings
Mediator
To run mediator you need to configure drivers which will be started together with mediator. Example configurationshould be adapted to new conditions and should be saved as file with name apps/amber/priv/settings.
32 Rozdział 2. Amber
Project Capo Documentation, Wydanie 1.0
config.
Informacja: Currently fully supported are drivers for devices Roboclaw, Ninedof, Hokuyo and Location. Thesedrivers can be uncommented in configuration filer apps/amber/priv/settings.config.
Drivers
Drivers and their configuration are managed by developers. Configuration is provided with drivers.
Klienci
Clients and their configuration are managed by developers. Configuration is provided with clients.
Device types
Currently supported devices:
• Ninedof - read values from motion sensor: accelerometer, gyroscope, compass
• Roboclaw - managing engines and reading current speed of each engine
• DriveSupport - managing engines with support from laser scanner and motion sensor (depends on Hokuyo andNinedof)
• DriveToPoint - moving robot from point to point as per provided list of points, additional information aboutenvironment is used like location and view of visible area (depends on Roboclaw or DriveSupport and Loca-tion)
• Hokuyo - used to read values about distance between robot and obstacles located around robot
• Location - provides information about approximate location of robot in closed area (depends on Hokuyo andRoboclaw)
• Maestro - managing controller for servo motors (eg. used in arm)
• PidFollowTrajectory - moving robot by following line (depends on Roboclaw or DriveSupport and Location)
Ninedof
Main functions provided by this driver are following:
• one-time read data from accelerometer, gyroscope, compass
• all-time read data from sensors
It is possible to decide which data will be read from sensors. It is possible to set this for one-time and all-timeoperations.
Roboclaw
Main function which can be done with engines are following:
• set speed for each engine
2.3. Device types 33
Project Capo Documentation, Wydanie 1.0
• read current speed from engines encoders
Used unit for speed is mm/s.
DriveSupport
That driver provides identical operations as Roboclaw driver. Used client is the same as for Roboclaw.
DriveToPoint
That driver allow to do following operations:
• set list of points which should be reached
• read list of points which were reached
• read last reached point
• read list of points which should be reached
• read point which should be reached as next
Hokuyo
Main functions which are provided by this device are following:
• one-time read data from scanner
• all-time read data from scanner
Scan is a set of data combined in tuples which are having angle and distance.
Scanner has a range of activity in which the distance is correctly measured. In our case it is between 50 mm and 5 m.When the distance is higher than 5 m it is marked as zero. When the distance is lower than 50 mm or close to zeroit means that is almost zero and it should be treated as too close.
Location
Main function of this driver is provinding information about location. That driver depends on Hokuyo and Roboclawdrivers.
Drivers
Supported drivers
• amber-cpp-drivers is a project which contains drivers written in C/C++. Supported drivers are following:
– Ninedof - reading information from sensor located on robot which provides information about motionfrom sensors accelerometer, gyroscope and compass
– Roboclaw - controlling engines
– Stargazer - provides ability to localize robot using camera and markers
– Location - software computed location based on information from Roboclaw and Hokuyo
34 Rozdział 2. Amber
Project Capo Documentation, Wydanie 1.0
– Maestro - servo-motors used in arm
• amber-python-drivers is a project which contains drivers written in python. Supported drivers are following:
– Hokuyo - reading information from scanner about environment
– DriveSupport - used to control engines, additional data are used like scans and motion data
– DriveToPoint - allow to drive the route by list of points
– Roboclaw - used to control engines without any additional support
Mediator configuration
Each driver has device type and number assigned. That values are set in Amber configuration. Configuration sould besaved in file apps/amber/priv/settings.config.
Example configuration:
{supervised_driver,{driver,{driver_name}
},{driver_type_number, driver_nummber},[{cdriver, "path/to/driver"},{config_file, "path/to/driver/configuration"},{log_config_file, "path/to/log/configuration"}
]}.
Paths to configuration are not required. Required is path to executable file used to start the driver.
Driver features
Driver is:
• an application which is running on robot
• an app. which is communicating with device connect to robot
• an app. which is communicating with mediator using pipes
Driver is responsible for:
• setting device parameters
• supporting simultaneous and parallel access to device
• monitoring clients presence and activity
• sending messages to clients which are registered as subscribers for specific type of messages
• receiving messages, servicing that messages and replying if it is needed
2.4. Drivers 35
Project Capo Documentation, Wydanie 1.0
How it work
Ostrzezenie: Following guidelines are as a consequence of common part in messages sent between clients anddrivers. Using DriverMsg is not required. Message format can be manully definded, but so far drivers and clientsdoes not support it.
Driver should support following features:
• handling received messages:
– DATA - contains data which should be processed by driver
– PING - echo request sent by mediator to check if driver is still alive, current not used, as a result drivershould reply from PONG
– SUBSCRIBE i UNSUBSCRIBE - used for client registration
– CLIENT_DIED - used to inform driver about closed client, as a result client should be removed fromsubscribers list similar to UNSUBSCRIBE
Additionally it is recommended that driver should sent DRIVER_DIED to mediator when it is closing correctly.
Also driver should support:
• initialize device
• set device parameters
• buffer data from device
• synchronous access to device
Example
Example of driver can be DummyDriver. Drivers use common parts.
Clients
Supported clients
• amber-java-clients - it is a project which contains clients written in Java. Following devices are supported:
– Ninedof
– Roboclaw
– Hokuyo
– Location
– Maestro
– DriveToPoint
• amber-python-clients - it is a project which contains clients written in python. Following devices are supported:
– Ninedof
– Roboclaw
36 Rozdział 2. Amber
Project Capo Documentation, Wydanie 1.0
– Hokuyo
– Location
– DriveToPoint
Client features
Client:
• is library used in client application
• provides ability to communicate with devices located on robot
• communicates with mediator over network
Client is responsible for:
• setting connection with mediator over UDP
• sending messages to mediator with correct type and number of device
• handling messages which are coming from mediator
Example
Example of driver can be DummyClient. Drivers use common parts.
Communication
Participants
In communication participate:
• one mediator
• one or more client(s)
• one or more driver(s)
Mediator features:
• is responsible for routing messages between clients and drivers
• does not modify message which is known only for driver and client
• processes message headers:
– updates information about clients
– updates information about type and number of device
Protocol
Driver communicates with mediator using pipes - standard input and output. It is required that driver will wait for dataon standard input and will send data using standard output. Client communicates with mediator using UDP. Mediatoris listening on port 26233.
Format of message used in communication with mediator:
2.6. Communication 37
Project Capo Documentation, Wydanie 1.0
• 2 bytes which contain information about header length
• header data
• 2 bytes which contain information about message length
• message data
Length value should be sent in big-endian format (used in network). Be aware if used data are signed orunsigned. Due to fact that Java signed should be used.
Header and message data are binary data. Be aware how driver is communicating with mediator, what are the settingsfor pipes. For example in python interpreter should be started with option -u which allow using standard input andoutput in binary mode.
For serialization Google Protobuf is used. It is required that header will be combatible with used by mediator. Mes-sages are not touched by mediator. It is recommended to use protobuf for message and to have message in formatcombatible with used in Amber project. Current header and message format is published in file project-capo/amber-common/drivermsg.proto.
Messages
Messages sent between clients and drivers contain:
• header DriverHdr
– deviceType - device type
– deviceID - device number
– clientIDs - clients numbers
• message DriverMsg
– type - message type
– synNum - request number, set by client
– ackNum - reply number, set by driver
– listenerNum - listener number
– additional fields (extensions)
Current device types DeviceType:
• 0 - unknown, not used
• 1 - NineDof (motion sensor)
• 2 - Roboclaw (engines)
• 3 - Stargazer (robot location based on markers)
• 4 - Hokuyo (laser scanner)
• 5 - Dummy (testing)
• 6 - Location (computed robot location)
• 7 - Maestro (servo-motors)
• 8 - DriveToPoint (following list of points)
• 9 - CollisionAvoidance (not used)
• 10 - PidFollowTrajectory (following line)
38 Rozdział 2. Amber

Project Capo Documentation, Wydanie 1.0
Current driver type messages DriverMsg:
• DATA - data sent between clients and drivers
• PING - echo request sent by mediator, currently not used
• PONG - echo reply sent by driver or client, currently not used
• CLIENT_DIED - information sent by client when client was correctly closed
• DRIVER_DIED - information sent by driver when driver was correctly closed
• SUBSCRIBE - subcribe messages sent by client
• UNSUBSCRIBE - closing subscribtion
2.6. Communication 39