Embed Size (px)
Citation preview

DATA MANAGEMENT
Version 1.3
ADMINISTRATOR’S GUIDE
PRISM-FHF The Fred Hollows Foundation
1
INTEGRATED CRIMINAL JUSTICE INFORMATION SYSTEM OF IRAQ | Personal Information | User Manual FHF-PRISM | Data Management | Administrator’s Guide
TABLE OF CONTENTS
INTRODUCTION .................................................................................................................................................... 4
OVERVIEW ........................................................................................................................................................... 4
DATA MANAGEMENT CONSOLE ........................................................................................................................... 6
ACCESSING THE DATA MANAGEMENT CONSOLE ........................................................................................................ 6
MANAGING CATEGORIES ..................................................................................................................................... 8
ACCESSING THE CATEGORIES SUB-SECTION ............................................................................................................... 8 SEARCHING FOR A CATEGORY / CATEGORY ITEM ...................................................................................................... 10 SORTING CATEGORIES / CATEGORY ITEMS .............................................................................................................. 10 MANAGING CATEGORY ITEMS .............................................................................................................................. 11
Viewing Category Items ............................................................................................................................ 11 Adding a Category Item ............................................................................................................................ 12 Editing Category Items .............................................................................................................................. 13 Deleting Category Items ............................................................................................................................ 13
MANAGING WORKFLOW ACTION CATEGORY ITEMS ................................................................................................. 14 Viewing Workflow Action Category Items ................................................................................................. 14 Adding a Workflow Action Category Item ................................................................................................. 14 Editing Workflow Action Category Items .................................................................................................. 17 Deleting Workflow Action Category Items ................................................................................................ 17
MANAGING CURRENCY RATES ........................................................................................................................... 19
ACCESSING THE CURRENCY RATES SUB-SECTION...................................................................................................... 20 ADDING A CURRENCY RATE ................................................................................................................................. 21 EDITING CURRENCY RATES .................................................................................................................................. 23 SEARCHING FOR A CURRENCY RATE ....................................................................................................................... 24 EXPANDING / COLLAPSING CURRENCY YEAR GROUP ................................................................................................ 24
MANAGING INDICATORS .................................................................................................................................... 26
ACCESSING THE INDICATORS SUB-SECTION ............................................................................................................. 27 SEARCHING FOR AN INDICATOR ............................................................................................................................ 28 SORTING INDICATORS ......................................................................................................................................... 29 MANAGING INDICATOR RECORDS ......................................................................................................................... 29
Adding an Indicator ................................................................................................................................... 30 Editing Indicators ...................................................................................................................................... 47
MANAGING COMPOSITE INDICATORS ................................................................................................................ 48
ACCESSING THE COMPOSITE INDICATORS SUB-SECTION ............................................................................................ 48
2
INTEGRATED CRIMINAL JUSTICE INFORMATION SYSTEM OF IRAQ | Personal Information | User Manual FHF-PRISM | Data Management | Administrator’s Guide
SEARCHING FOR A COMPOSITE INDICATOR ............................................................................................................. 49 SORTING COMPOSITE INDICATORS ........................................................................................................................ 50 MANAGING COMPOSITE INDICATOR RECORDS ........................................................................................................ 51
Adding a Composite Indicator ................................................................................................................... 51 Editing Composite Indicators .................................................................................................................... 60
REFERENCES ....................................................................................................................................................... 61
APPENDIX A: SAMPLE INDICATORS ..................................................................................................................... 62

3
INTEGRATED CRIMINAL JUSTICE INFORMATION SYSTEM OF IRAQ | Personal Information | User Manual FHF-PRISM | Data Management | Administrator’s Guide
TABLE OF FIGURES FIGURE 1: DATA MANAGEMENT CONSOLE ................................................................................................................. 6 FIGURE 2: CATEGORIES SUB-SECTION ......................................................................................................................... 9 FIGURE 3: SEARCHING FOR A CATEGORY .................................................................................................................. 10 FIGURE 4: SORTING CATEGORIES / CATEGORY ITEMS ............................................................................................... 11 FIGURE 5: VIEWING CATEGORY ITEMS ...................................................................................................................... 12 FIGURE 6: SELECTING AN ACTION TO PERFORM ....................................................................................................... 12 FIGURE 7: ADDING A CATEGORY ITEM ...................................................................................................................... 13 FIGURE 8: VIEWING WORKFLOW ACTION CATEGORY ITEMS .................................................................................... 14 FIGURE 9: SELECTING AN ACTION TO PERFORM FOR WORKFLOW ACTIONS ............................................................ 15 FIGURE 10: ADDING A CATEGORY ITEM FOR WORKFLOW ACTIONS ......................................................................... 17 FIGURE 11: CURRENCY RATES SECTION .................................................................................................................... 20 FIGURE 12: NEW BUTTON IN THE CURRENCY RATES SECTION ................................................................................. 22 FIGURE 13: ADDING CURRENCY RATES ..................................................................................................................... 23 FIGURE 14: EDITING CURRENCY RATES ..................................................................................................................... 24 FIGURE 15: EXPANDING / COLLAPSING YEAR GROUPS ............................................................................................. 25 FIGURE 16: INDICATORS SUB-SECTION ..................................................................................................................... 27 FIGURE 17: SEARCHING FOR AN INDICATOR ............................................................................................................. 28 FIGURE 18: SORTING INDICATORS ............................................................................................................................ 29 FIGURE 19: ADD NEW BUTTON IN THE INDICATORS SUB-SECTION .......................................................................... 30 FIGURE 20: ADDING AN INDICATOR (PART 1) ........................................................................................................... 31 FIGURE 21: ADDING AN INDICATOR (PART 2) ........................................................................................................... 32 FIGURE 22: CALENDAR .............................................................................................................................................. 38 FIGURE 23: DISAGGREGATIONS TAB ......................................................................................................................... 39 FIGURE 24: ADDING A DISAGGREGATION / DISAGGREGATION GROUP .................................................................... 40 FIGURE 25: ADDING A DATA POINT ........................................................................................................................... 41 FIGURE 26: AGGREGATION RULES TAB ..................................................................................................................... 43 FIGURE 27: ADDING AN AGGREGATION RULE ........................................................................................................... 44 FIGURE 28: ADDING AN AGGREGATION RULE (SAMPLE) – GENERAL TAB ................................................................ 46 FIGURE 29: ADDING AN AGGREGATION RULE (SAMPLE) – DISAGGREGATIONS TAB ................................................ 46 FIGURE 30: ADDING AN AGGREGATION RULE (SAMPLE) – AGGREGATION RULES TAB ............................................ 47 FIGURE 31: COMPOSITE INDICATORS SUB-SECTION ................................................................................................. 49 FIGURE 32: SEARCHING FOR A COMPOSITE INDICATOR ........................................................................................... 50 FIGURE 33: SORTING COMPOSITE INDICATORS ........................................................................................................ 51 FIGURE 34: ADD NEW BUTTON IN THE COMPOSITE INDICATORS SUB-SECTION ...................................................... 52 FIGURE 35: ADDING A COMPOSITE INDICATOR (INITIAL SCREEN) ............................................................................ 52 FIGURE 36: ADDING A COMPOSITE INDICATOR (PART 1) .......................................................................................... 53 FIGURE 37: ADDING A COMPOSITE INDICATOR (PART 2) .......................................................................................... 54 FIGURE 38: DISAGGREGATIONS TAB IN THE COMPOSITE INDICATORS SUB-SECTION .............................................. 59 FIGURE 39: ADDING A DATA POINT FOR A COMPOSITE INDICATOR ......................................................................... 59

4
INTEGRATED CRIMINAL JUSTICE INFORMATION SYSTEM OF IRAQ | Personal Information | User Manual FHF-PRISM | Data Management | Administrator’s Guide
INTRODUCTION This document describes the Data Management console in the FHF-PRISM application developed for the Fred Hollows Foundation (FHF) to improve the disciplined and effective management of its global programs and projects. It provides the necessary instructions that the administrators and/or users granted with administrative rights should follow in order to ensure successful application data management. Use of this document and compliance with the standards specified herein is mandatory for anyone working with the mentioned application.
OVERVIEW The FHF-PRISM is an enterprise-level management information system that has been developed for the Fred Hollows Foundation (FNF) with the aim of addressing the cross-cutting challenges that the foundation currently faces and that impede the disciplined and effective management of its global programs and projects. The overall objective of the management information system is to centralize and streamline project data to enable efficiencies in collation, extraction, and manipulation of project information in a logical manner. Another objective that the system aims to achieve is supporting improved governance and accountability across programs through the administration of user roles and responsibilities defined by organisational hierarchies. Being a user-friendly, flexible, interoperable, and scalable solution, the FHF-PRISM increases visibility, transparency and accessibility of project information through the implementation of a web-based solution, contributing to improved collaboration and knowledge sharing between geographically dispersed personnel, such as field or other non-HQ based staff. Moreover, the system reduces manual processing of project information through integration with other core FHF systems and facilitates automation of some project processes, thereby, ensuring consistency of data across functions. Serving as a strategic enabler for the organisation’s goals for ambitious growth and greater impact in treating and preventing blindness and other vision problems, the FHF-PRISM facilitates complete project cycle management of FHF programs from performance monitoring and reporting to work planning and resource allocation tasks, as well as organisational decision making and reporting. With the FHF-PRISM, all stakeholders involved in the program and project implementation can easily obtain real-time information on its global projects and results and use insights derived from that information for decision making, learning, programming, and advocacy. Moreover, they can
5
INTEGRATED CRIMINAL JUSTICE INFORMATION SYSTEM OF IRAQ | Personal Information | User Manual FHF-PRISM | Data Management | Administrator’s Guide
overcome the challenges that poor visibility, transparency, and accessibility of timely project progress information can pose, thus, avoiding duplication of work, missed opportunities, and impact on collaboration. The FHF-PRISM incorporates business intelligence and data management solutions with comprehensive application administration functions. As such, it is equipped with a number of administrative tools, which aim at providing the application administrators with the possibility of performing their daily assignments in an easily manageable way. One of the administrative tools that the FHF-PRISM is incorporated with is the Data Management console. The Data Management console is a space within the FHF-PRISM application that allows organising the user-defined categories used in the application as well as their items. Through the Data Management console, the application administrator can manage the collection of categories present in FHF-PRISM. They can view the categories used in the application, add new items to existing categories, etc. The administrator can, also, define the currency rates that will be used to convert amounts from one currency and into another. Moreover, administrators and advanced users can take advantage of this tool to manage the indicators and composite indicators that will serve as metrics for assessing the project achievements. The FHF-PRISM provides a web-based user interface and requires the end user to have a web browser pre-installed.

6
INTEGRATED CRIMINAL JUSTICE INFORMATION SYSTEM OF IRAQ | Personal Information | User Manual FHF-PRISM | Data Management | Administrator’s Guide
DATA MANAGEMENT CONSOLE This chapter describes the Data Management console under the Settings section, where you can manage the user-defined categories and their items. This way, you may organise the categories present in the system, view their items, add new items to them, edit the existing items, etc. You can also update the currency rates that will be used during currency exchange. Moreover, you can manage the indicators and composite indicators that will be used to measure the project progress towards the goals set.
Accessing the Data Management Console For accessing the Data Management console, go to Settings Data Management (Figure 1).
Figure 1: Data Management Console
The Data Management console consists of the following sub-sections:
• Categories – to manage the user-defined categories existing in the system (see MANAGING CATEGORIES).

7
INTEGRATED CRIMINAL JUSTICE INFORMATION SYSTEM OF IRAQ | Personal Information | User Manual FHF-PRISM | Data Management | Administrator’s Guide
• Currency Rates – to manage the rates of the currencies that are used in the application (see MANAGING CURRENCY RATES).
• Indicators – to manage the indicators existing in the system (see • MANAGING INDICATORS). • Composite Indicators – to manage the composite indicators existing in the system (see
MANAGING COMPOSITE INDICATORS).

8
INTEGRATED CRIMINAL JUSTICE INFORMATION SYSTEM OF IRAQ | Personal Information | User Manual FHF-PRISM | Data Management | Administrator’s Guide
MANAGING CATEGORIES Categories are logical grouping of classified items sharing a common attribute. The Ethnicity, Gender, Location, and Funding Source are examples of categories. Categories usually represent Data Entry fields with pre-defined value sets (e.g. drop-down lists). In the analytical reports, categories are represented as the report rows. They can also be used to group rows, columns, and report tables. This chapter outlines how you can manage categories listed in the Data Management console of the FHF-PRISM application. More specifically, it describes how you can:
• Access the categories sub-section • Search for a category or category item • View existing category items • Create, edit and delete category items
Accessing the Categories Sub-section The Categories sub-section can be accessed at Settings Data Management Categories (Figure 1). Please, note that access to this sub-section is defined by the permissions your role has been granted with. To configure access permissions for this sub-section, see the FHF-PRISM Security Administrator’s Guide in REFERENCES. Once you access the Categories sub-section, you will be presented with the list of all categories recorded in the application (Figure 2).
9
INTEGRATED CRIMINAL JUSTICE INFORMATION SYSTEM OF IRAQ | Personal Information | User Manual FHF-PRISM | Data Management | Administrator’s Guide
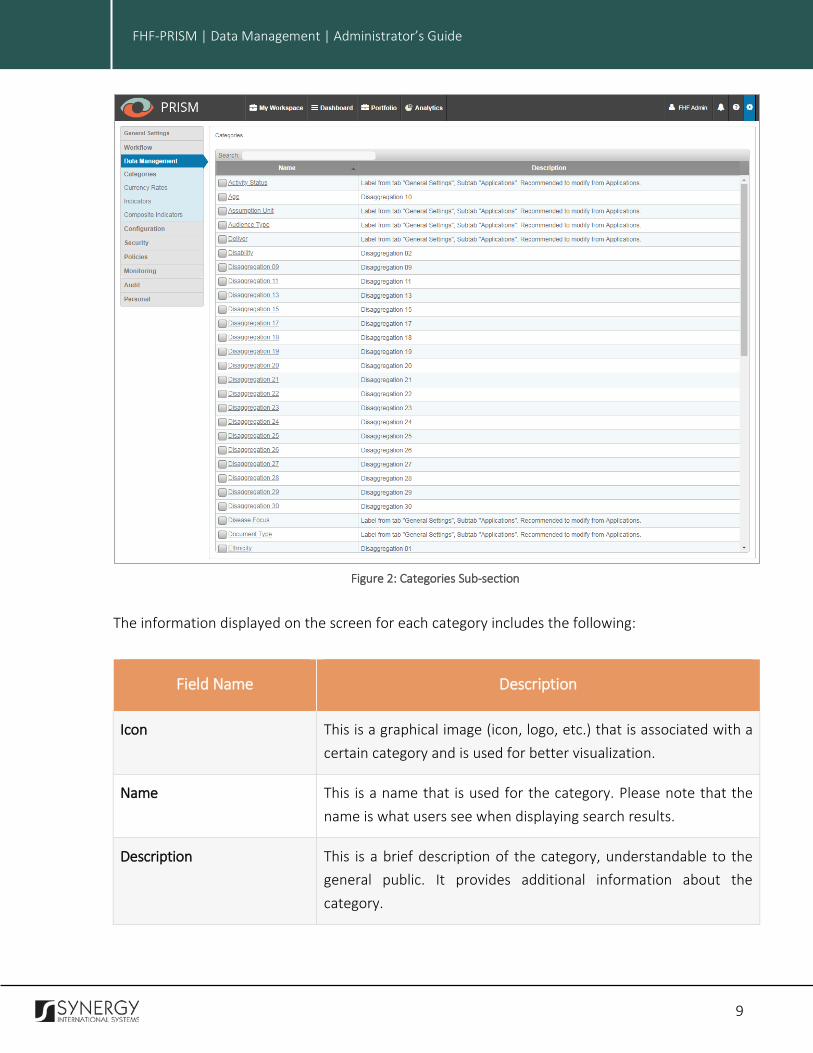
Figure 2: Categories Sub-section
The information displayed on the screen for each category includes the following:
Field Name Description
Icon This is a graphical image (icon, logo, etc.) that is associated with a certain category and is used for better visualization.
Name This is a name that is used for the category. Please note that the name is what users see when displaying search results.
Description This is a brief description of the category, understandable to the general public. It provides additional information about the category.
10
INTEGRATED CRIMINAL JUSTICE INFORMATION SYSTEM OF IRAQ | Personal Information | User Manual FHF-PRISM | Data Management | Administrator’s Guide
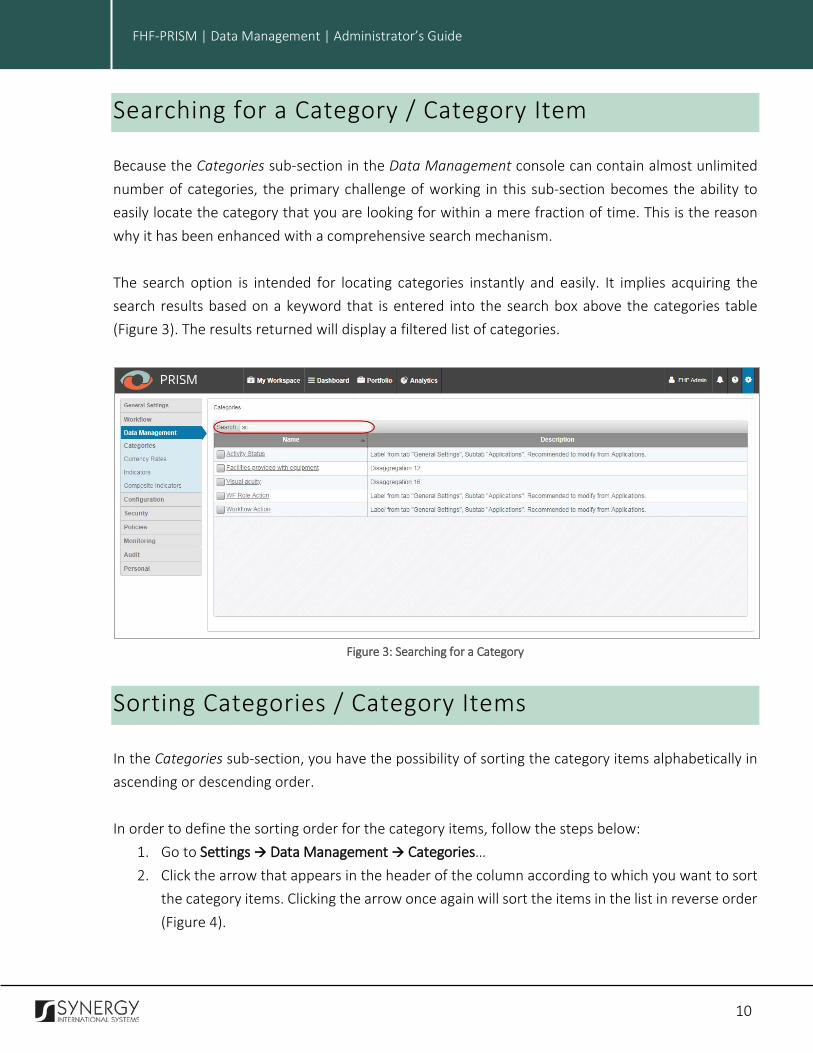
Searching for a Category / Category Item Because the Categories sub-section in the Data Management console can contain almost unlimited number of categories, the primary challenge of working in this sub-section becomes the ability to easily locate the category that you are looking for within a mere fraction of time. This is the reason why it has been enhanced with a comprehensive search mechanism. The search option is intended for locating categories instantly and easily. It implies acquiring the search results based on a keyword that is entered into the search box above the categories table (Figure 3). The results returned will display a filtered list of categories.
Figure 3: Searching for a Category
Sorting Categories / Category Items In the Categories sub-section, you have the possibility of sorting the category items alphabetically in ascending or descending order. In order to define the sorting order for the category items, follow the steps below:
1. Go to Settings Data Management Categories… 2. Click the arrow that appears in the header of the column according to which you want to sort
the category items. Clicking the arrow once again will sort the items in the list in reverse order (Figure 4).

11
INTEGRATED CRIMINAL JUSTICE INFORMATION SYSTEM OF IRAQ | Personal Information | User Manual FHF-PRISM | Data Management | Administrator’s Guide
Figure 4: Sorting Categories / Category Items
Managing Category Items This chapter outlines how you can:
• View category items • Add, edit, and delete category items
Viewing Category Items The categories listed in the Categories sub-section of the Data Management console consist of a number of items that comprise category instances. In order to view the items of a specific category, click the category name. The list of the items that comprise the selected category will be displayed (Figure 5).

12
INTEGRATED CRIMINAL JUSTICE INFORMATION SYSTEM OF IRAQ | Personal Information | User Manual FHF-PRISM | Data Management | Administrator’s Guide
Figure 5: Viewing Category Items
To go back to the list of categories, you can make use of the navigation control (breadcrumb trail) found at the top of the screen (Figure 5).
Adding a Category Item In order to add an item to a category, follow the steps below:
1. Click the name of the category that you want to add an item for. All existing items of the selected category will be displayed (Figure 5).
Figure 6: Selecting an Action to Perform
13
INTEGRATED CRIMINAL JUSTICE INFORMATION SYSTEM OF IRAQ | Personal Information | User Manual FHF-PRISM | Data Management | Administrator’s Guide
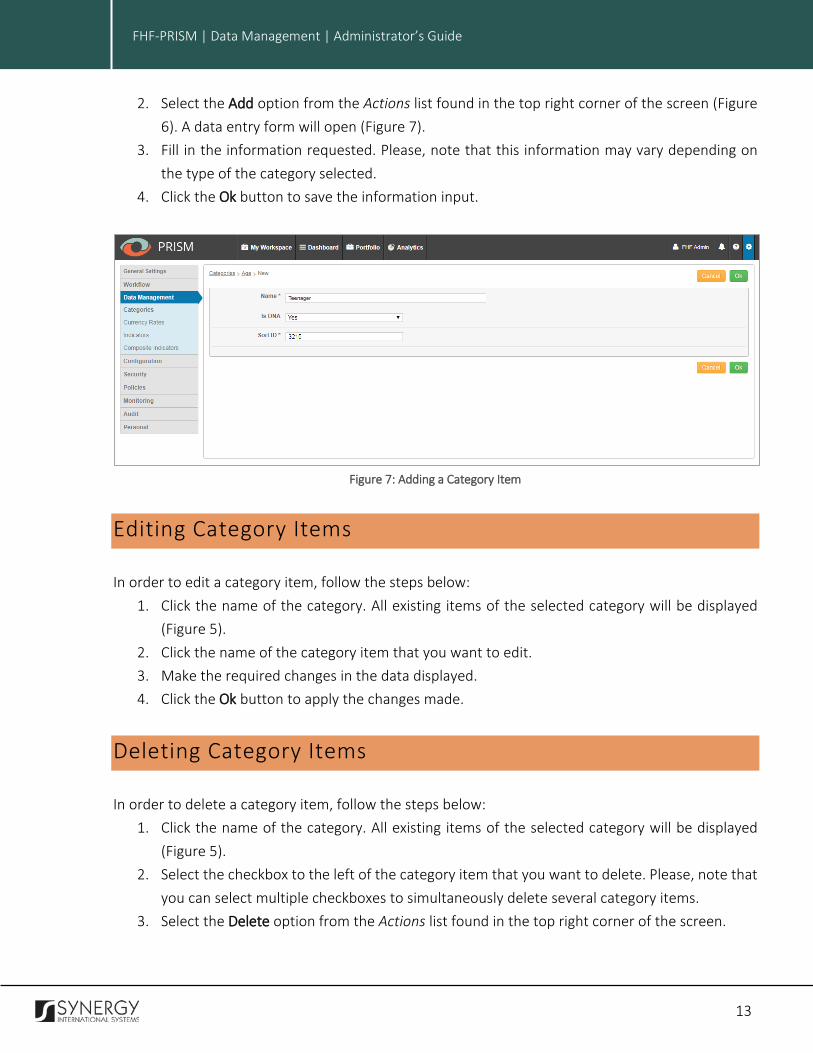
2. Select the Add option from the Actions list found in the top right corner of the screen (Figure 6). A data entry form will open (Figure 7).
3. Fill in the information requested. Please, note that this information may vary depending on the type of the category selected.
4. Click the Ok button to save the information input.
Figure 7: Adding a Category Item
Editing Category Items In order to edit a category item, follow the steps below:
1. Click the name of the category. All existing items of the selected category will be displayed (Figure 5).
2. Click the name of the category item that you want to edit. 3. Make the required changes in the data displayed. 4. Click the Ok button to apply the changes made.
Deleting Category Items In order to delete a category item, follow the steps below:
1. Click the name of the category. All existing items of the selected category will be displayed (Figure 5).
2. Select the checkbox to the left of the category item that you want to delete. Please, note that you can select multiple checkboxes to simultaneously delete several category items.
3. Select the Delete option from the Actions list found in the top right corner of the screen.
14
INTEGRATED CRIMINAL JUSTICE INFORMATION SYSTEM OF IRAQ | Personal Information | User Manual FHF-PRISM | Data Management | Administrator’s Guide
Managing Workflow Action Category Items This chapter outlines how you can:
• View workflow action category items • Add, edit, and delete workflow action category items
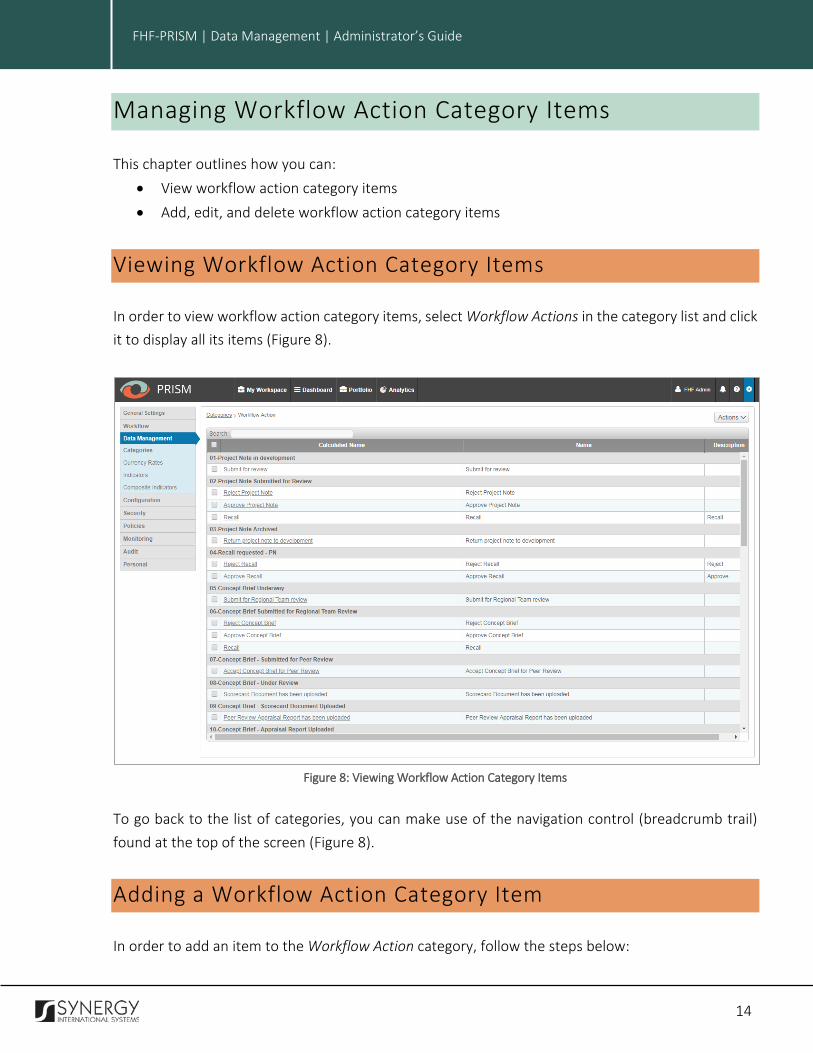
Viewing Workflow Action Category Items In order to view workflow action category items, select Workflow Actions in the category list and click it to display all its items (Figure 8).
Figure 8: Viewing Workflow Action Category Items
To go back to the list of categories, you can make use of the navigation control (breadcrumb trail) found at the top of the screen (Figure 8).
Adding a Workflow Action Category Item In order to add an item to the Workflow Action category, follow the steps below:

15
INTEGRATED CRIMINAL JUSTICE INFORMATION SYSTEM OF IRAQ | Personal Information | User Manual FHF-PRISM | Data Management | Administrator’s Guide
1. Click the Workflow Actions category to display all existing items of the selected category (Figure 8).
Figure 9: Selecting an Action to Perform for Workflow Actions
2. Select the Add option from the Actions list found in the top right corner of the screen (Figure
9). A data entry form will open (Figure 10). 3. Fill in the information requested in the form as described in the table below:
Column Name Field Type Description
Workflow State Reference List Select the workflow state from the drop-down list. This field is mandatory.
Calculated Name Free text Enter the Calculated Name of the workflow action. This field is mandatory.
Action Reference List Indicate what Action the category items will denote. To do this, select one of the available option from the drop-down list.

16
INTEGRATED CRIMINAL JUSTICE INFORMATION SYSTEM OF IRAQ | Personal Information | User Manual FHF-PRISM | Data Management | Administrator’s Guide
Name Free Text Enter the Name of the category item. This field is mandatory.
Description Free Text Enter a short description of the category item.
Notification Roles – Section: To
Multi-select field
Specify the user roles to be notified when the given action is taken. To do that, select the appropriate role in
the list on the left and click the (Select) button. The selected role will appear in the list on the right. Please,
note that clicking the (Select All) button will select all available roles.
To remove a selected role, mark it in the list on the right
and click the (Deselect) button. The selected role will appear in the list on the left. Please, note that clicking
the (Deselect All) button will remove all selected roles.
Note: You may select multiple roles to move from one list to the other by pressing and holding the CTRL button on your keyboard.
Notification Roles – Section: CC
Multi-select field
Specify the role to be sent a notification copy when the given action is taken. For this, select the appropriate
role in the list on the left and click the (Select) button. The selected role will appear in the list on the
right. Please, note that clicking the (Select All) button will select all available roles.
To remove a selected role, mark it in the list on the right
and click the (Deselect) button. The selected role will appear in the list on the left. Please, note that clicking
the (Deselect All) button will remove all selected roles.
Note: You may select multiple roles to move from one list to the other by pressing and holding the CTRL button on your keyboard.

17
INTEGRATED CRIMINAL JUSTICE INFORMATION SYSTEM OF IRAQ | Personal Information | User Manual FHF-PRISM | Data Management | Administrator’s Guide
4. Click the Ok button to save the information input.
Figure 10: Adding a Category Item for Workflow Actions
Editing Workflow Action Category Items In order to edit a workflow action category item, follow the steps below:
1. Click the Workflow Actions category to display all existing items of the selected category (Figure 8).
2. Click the name of the category item that you want to edit. 3. Make the required changes in the data displayed. 4. Click the Ok button to apply the changes made.
Deleting Workflow Action Category Items In order to delete a workflow action category item, follow the steps below:
1. Click the Workflow Actions category to display all existing items of the selected category (Figure 8).

18
INTEGRATED CRIMINAL JUSTICE INFORMATION SYSTEM OF IRAQ | Personal Information | User Manual FHF-PRISM | Data Management | Administrator’s Guide
2. Select the checkbox to the left of the category item that you want to delete. Please, note that you can select multiple checkboxes to simultaneously delete several category items.
3. Select the Delete option from the Actions list found in the top right corner of the screen.

19
INTEGRATED CRIMINAL JUSTICE INFORMATION SYSTEM OF IRAQ | Personal Information | User Manual FHF-PRISM | Data Management | Administrator’s Guide
MANAGING CURRENCY RATES Synergy Indicata M&E Engine based systems are capable of supporting and working with multiple currencies. For user’s convenience, all financial amounts may be entered in Local Currency, as well as any other currency that the funds may be recorded in the original project contract (Reporting Currency, Funding Currency, Transaction Currency, etc.). The currencies are used in all financial tables (Project Budget, Financial Summaries, Financial Planning, etc.), and the currency rates are used by the systems to automatically perform currency conversions while saving project data. Two-way currency conversion is supported by Synergy Indicata M&E Engine. This way,
• All amounts recorded in different currencies can be converted into the Australian dollars (AUD) using the following formula: Amount AUD = Amount (Other Currency) / Rate to AUD
• All amounts recorded in Australian dollars (AUD) can be converted into the Local Currency (LC) using the following formula: Amount LC = AUD x Rate (LC) to AUD
The currency exchange rates are stored and managed in the system on the quarterly basis. The appropriate exchange rates are identified based on a time pointer. The exchange rate for the nearest quarter is used when the appropriate exchange rate is missing from the system. The default rates (i.e. for the nearest quarter) are used unless the data entry user manually provides the exchange rate. The provided rate will only be associated with the particular amount value within the scope of the project and will be stored along with it. However, it will not impact the values in other projects. For more details on how you can manage the currencies rates used in the FHF-PRISM application for converting amounts in the source (original) currency into the target one, see the chapter below. More specifically, it outlines how you can:
• Access the currencies rates sub-section • Add new currency exchange rates • Edit and delete existing rates • Search for a currency rate • Expand / collapse currency year group

20
INTEGRATED CRIMINAL JUSTICE INFORMATION SYSTEM OF IRAQ | Personal Information | User Manual FHF-PRISM | Data Management | Administrator’s Guide
Accessing the Currency Rates Sub-section The Currency Rates sub-section can be accessed at Settings Data Management Currency Rates (Figure 1). Please, note that access to this sub-section is defined by the permissions your role has been granted with. To configure access permissions for this sub-section, see the FHF-PRISM Security Administrator’s Guide in REFERENCES.
Figure 11: Currency Rates Section
Once you access the Currency Rates sub-section, you will be presented with the list of all currency exchange rates recorded for the application (Figure 11). The currency exchange rates displayed on the screen are organised into groups according to the year/month that they denote. Note: All amounts in this section quote the currency exchange rates to 1 AU Dollar. The information displayed for each currency rate includes the following:
21
INTEGRATED CRIMINAL JUSTICE INFORMATION SYSTEM OF IRAQ | Personal Information | User Manual FHF-PRISM | Data Management | Administrator’s Guide
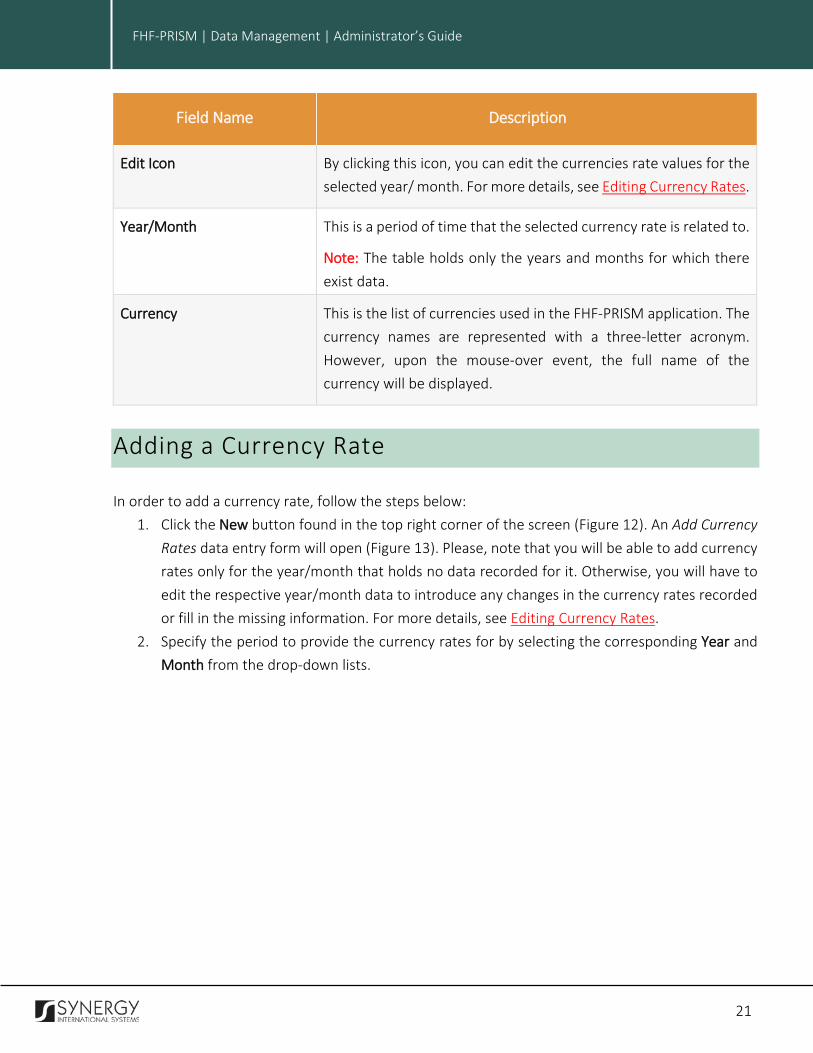
Field Name Description
Edit Icon By clicking this icon, you can edit the currencies rate values for the selected year/ month. For more details, see Editing Currency Rates.
Year/Month This is a period of time that the selected currency rate is related to.
Note: The table holds only the years and months for which there exist data.
Currency This is the list of currencies used in the FHF-PRISM application. The currency names are represented with a three-letter acronym. However, upon the mouse-over event, the full name of the currency will be displayed.
Adding a Currency Rate In order to add a currency rate, follow the steps below:
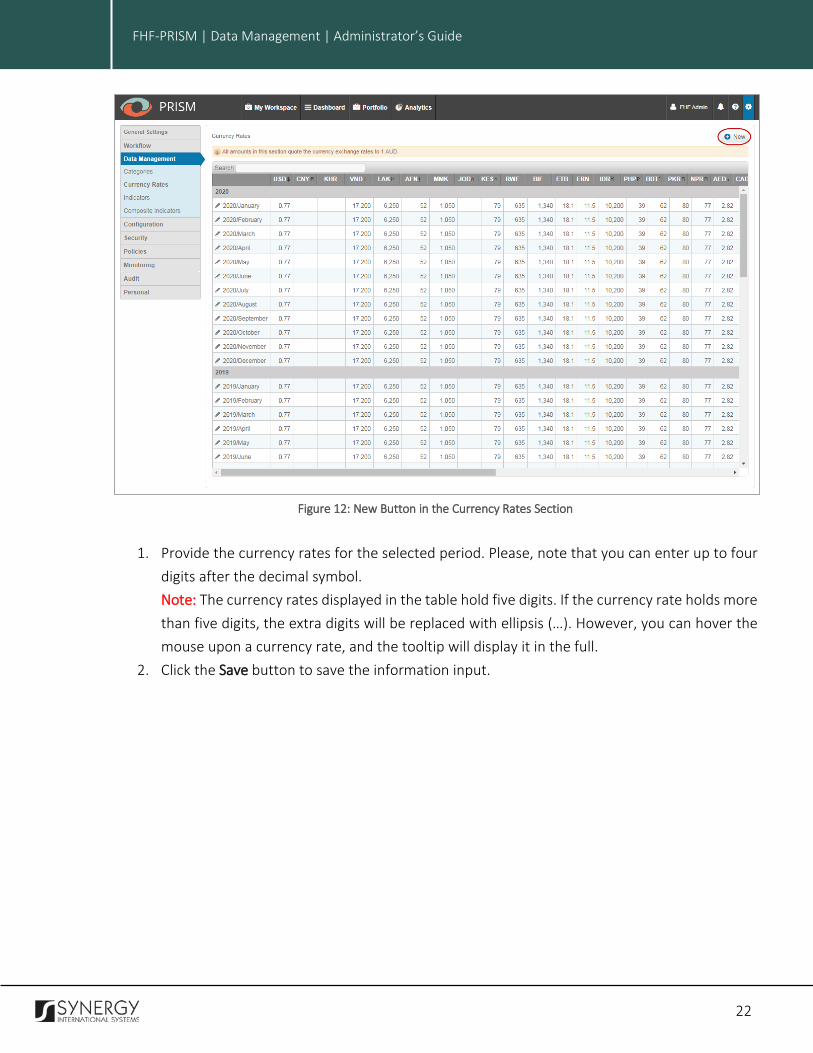
1. Click the New button found in the top right corner of the screen (Figure 12). An Add Currency Rates data entry form will open (Figure 13). Please, note that you will be able to add currency rates only for the year/month that holds no data recorded for it. Otherwise, you will have to edit the respective year/month data to introduce any changes in the currency rates recorded or fill in the missing information. For more details, see Editing Currency Rates.
2. Specify the period to provide the currency rates for by selecting the corresponding Year and Month from the drop-down lists.
22
INTEGRATED CRIMINAL JUSTICE INFORMATION SYSTEM OF IRAQ | Personal Information | User Manual FHF-PRISM | Data Management | Administrator’s Guide
Figure 12: New Button in the Currency Rates Section
1. Provide the currency rates for the selected period. Please, note that you can enter up to four
digits after the decimal symbol. Note: The currency rates displayed in the table hold five digits. If the currency rate holds more than five digits, the extra digits will be replaced with ellipsis (…). However, you can hover the mouse upon a currency rate, and the tooltip will display it in the full.
2. Click the Save button to save the information input.

23
INTEGRATED CRIMINAL JUSTICE INFORMATION SYSTEM OF IRAQ | Personal Information | User Manual FHF-PRISM | Data Management | Administrator’s Guide
Figure 13: Adding Currency Rates
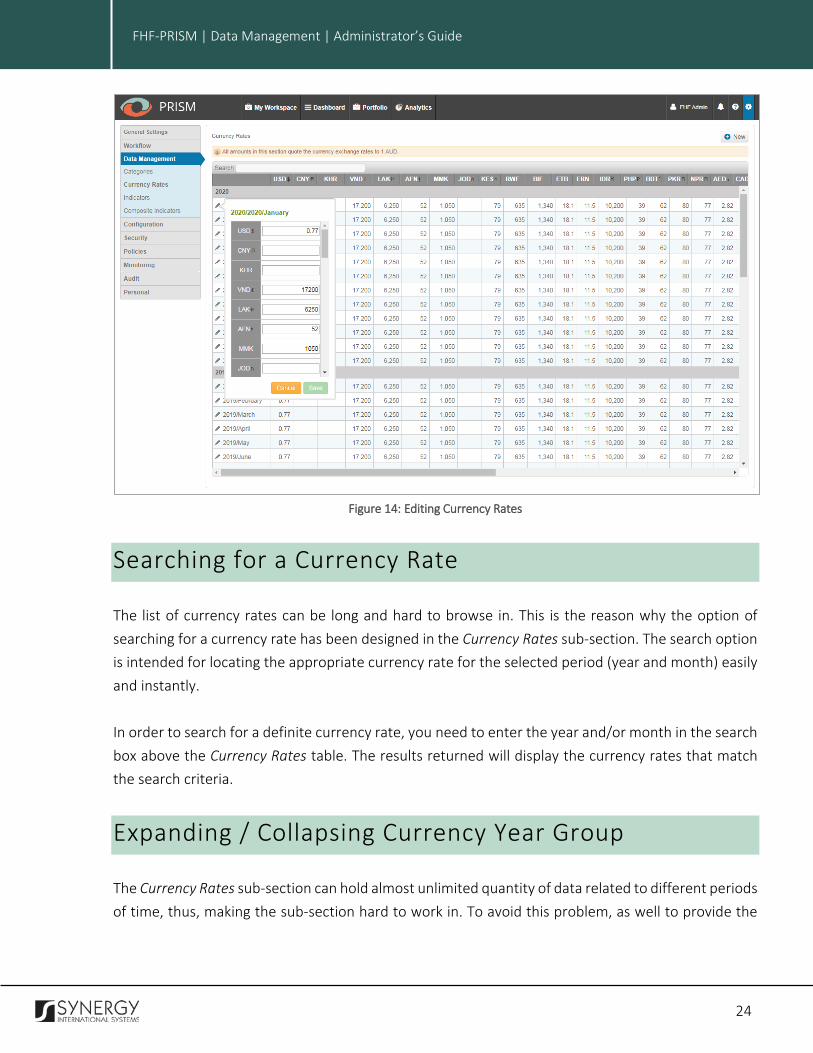
Editing Currency Rates In order to edit the currency rates already recorded for a definite period, follow the steps below:
1. Select the year/month to edit the currency rates for. 2. Click the Edit icon to the left of the selected year/month (Figure 14). 3. Make the required changes in the data displayed. 4. Click the Save button to apply the changes made.
24
INTEGRATED CRIMINAL JUSTICE INFORMATION SYSTEM OF IRAQ | Personal Information | User Manual FHF-PRISM | Data Management | Administrator’s Guide
Figure 14: Editing Currency Rates
Searching for a Currency Rate The list of currency rates can be long and hard to browse in. This is the reason why the option of searching for a currency rate has been designed in the Currency Rates sub-section. The search option is intended for locating the appropriate currency rate for the selected period (year and month) easily and instantly. In order to search for a definite currency rate, you need to enter the year and/or month in the search box above the Currency Rates table. The results returned will display the currency rates that match the search criteria.
Expanding / Collapsing Currency Year Group The Currency Rates sub-section can hold almost unlimited quantity of data related to different periods of time, thus, making the sub-section hard to work in. To avoid this problem, as well to provide the

25
INTEGRATED CRIMINAL JUSTICE INFORMATION SYSTEM OF IRAQ | Personal Information | User Manual FHF-PRISM | Data Management | Administrator’s Guide
users with an environment where they can easily drill down the wealth of information to focus on the data that they are looking for, the option for collapsing/expanding the year groups has been designed. In order to expand/collapse a definite year group, i.e. to show/hide the data (month) rows associated with the group, you need to scroll right to the end of the year row and click the Expand/Collapse icon (Figure 15). The selected year group will be shown/hidden.
Figure 15: Expanding / Collapsing Year Groups

26
INTEGRATED CRIMINAL JUSTICE INFORMATION SYSTEM OF IRAQ | Personal Information | User Manual FHF-PRISM | Data Management | Administrator’s Guide
MANAGING INDICATORS Indicators are presented in IDM7 platform as system categories (Figure 16). Compared with other categories in the system, an indicator is an unstructured entity, as each indicator is marked with a unique structure. This is the reason why in the Indicata’s M&E Engine, each indicator record derives information from two sources: Data and Metadata. The Data source provides such information about an indicator as the indicator name, description, start date, end date, etc. This is the general information that comprises an essential part of the indicator profile and is provided in the General tab of the Indicator data entry form. These data are usually used to search for or refine the list of indicators in the analytical and reporting modules of the FHF-PRISM application. The Metadata source provides such information about an indicator as the indicator disaggregation, data points, and aggregation rules, i.e. the indicator properties that are used to calculate values for definite measurement indices. Every indicator in the system has a unique calculation business logic. These metadata are then used in data entry forms and during data analysis. Based on them, the forms draw the indicator table and calculate the agreeable values for activities and sub-activities, if any. Also, based on the metadata, the analytics and reporting modules draw reports with disaggregates and their aggregated values. The tables both in data entry forms and in reports are based on disaggregates defined for an indicator in a definite order. However, the major different between the way the indicator metadata is used in the data entry forms and in analytical reports is that reports show the disaggregate values and their actual values (often consisting of a numerator and denominator) calculated based on the aggregation rules, whereas data entry forms show the calculated values as a single Actual measure. For more details on how indicators are managed in the FHF-PRISM application, see the chapter below. More specifically, it outlines how you can:
• Access the Indicators sub-section • Search for an indicator • Define the sorting order for indicators • Create and edit indicators

27
INTEGRATED CRIMINAL JUSTICE INFORMATION SYSTEM OF IRAQ | Personal Information | User Manual FHF-PRISM | Data Management | Administrator’s Guide
Accessing the Indicators Sub-section The Indicators sub-section can be accessed at Settings Data Management Indicators (Figure 1). Please, note that access to this sub-section is defined by the permissions your role has been granted with. To configure access permissions for this sub-section, see the FHF-PRISM Security Administrator’s Guide in REFERENCES. Once you access the Indicators sub-section, you will be presented with the list of all indicators existing in the system (Figure 16).
Figure 16: Indicators Sub-section
The information displayed for each indicator includes the following:
Column Name Description
Display Name This is the name of the indicator.
28
INTEGRATED CRIMINAL JUSTICE INFORMATION SYSTEM OF IRAQ | Personal Information | User Manual FHF-PRISM | Data Management | Administrator’s Guide
Indictor Status This presents the indicator status (Active or Archived).
Indicator Type This presents the indicator category (Outcome, Output, or Impact).
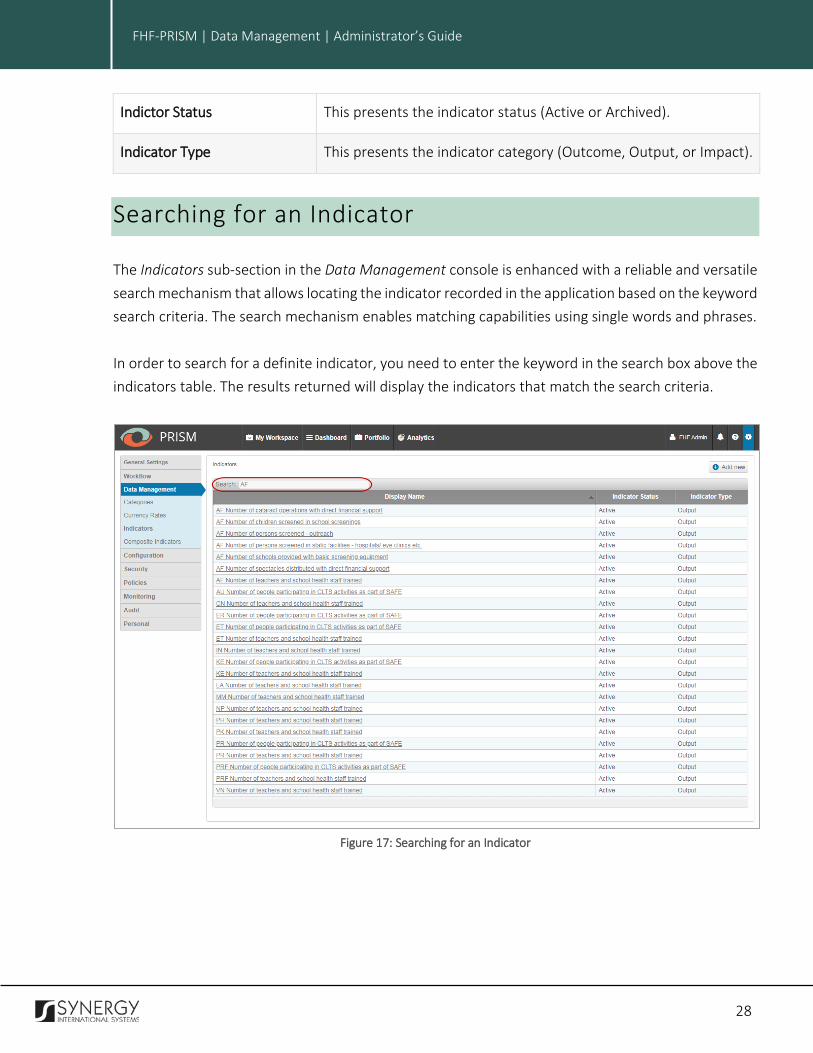
Searching for an Indicator The Indicators sub-section in the Data Management console is enhanced with a reliable and versatile search mechanism that allows locating the indicator recorded in the application based on the keyword search criteria. The search mechanism enables matching capabilities using single words and phrases. In order to search for a definite indicator, you need to enter the keyword in the search box above the indicators table. The results returned will display the indicators that match the search criteria.
Figure 17: Searching for an Indicator
29
INTEGRATED CRIMINAL JUSTICE INFORMATION SYSTEM OF IRAQ | Personal Information | User Manual FHF-PRISM | Data Management | Administrator’s Guide
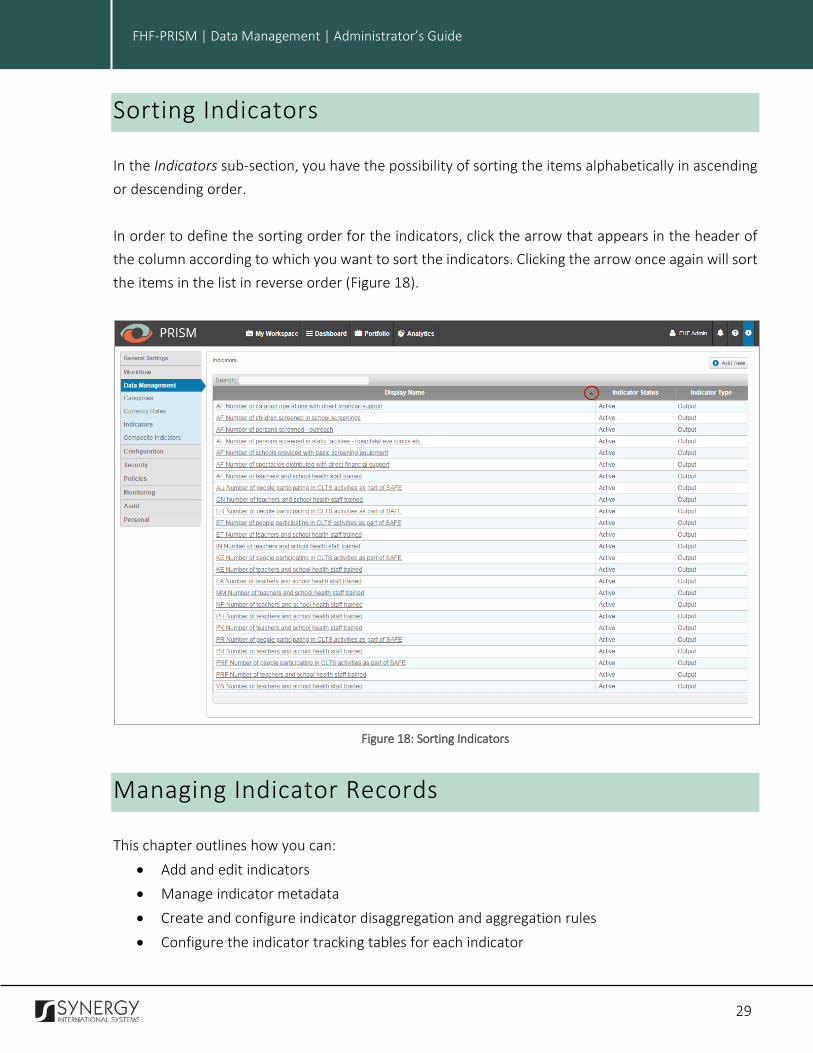
Sorting Indicators In the Indicators sub-section, you have the possibility of sorting the items alphabetically in ascending or descending order. In order to define the sorting order for the indicators, click the arrow that appears in the header of the column according to which you want to sort the indicators. Clicking the arrow once again will sort the items in the list in reverse order (Figure 18).
Figure 18: Sorting Indicators
Managing Indicator Records This chapter outlines how you can:
• Add and edit indicators • Manage indicator metadata • Create and configure indicator disaggregation and aggregation rules • Configure the indicator tracking tables for each indicator
30
INTEGRATED CRIMINAL JUSTICE INFORMATION SYSTEM OF IRAQ | Personal Information | User Manual FHF-PRISM | Data Management | Administrator’s Guide
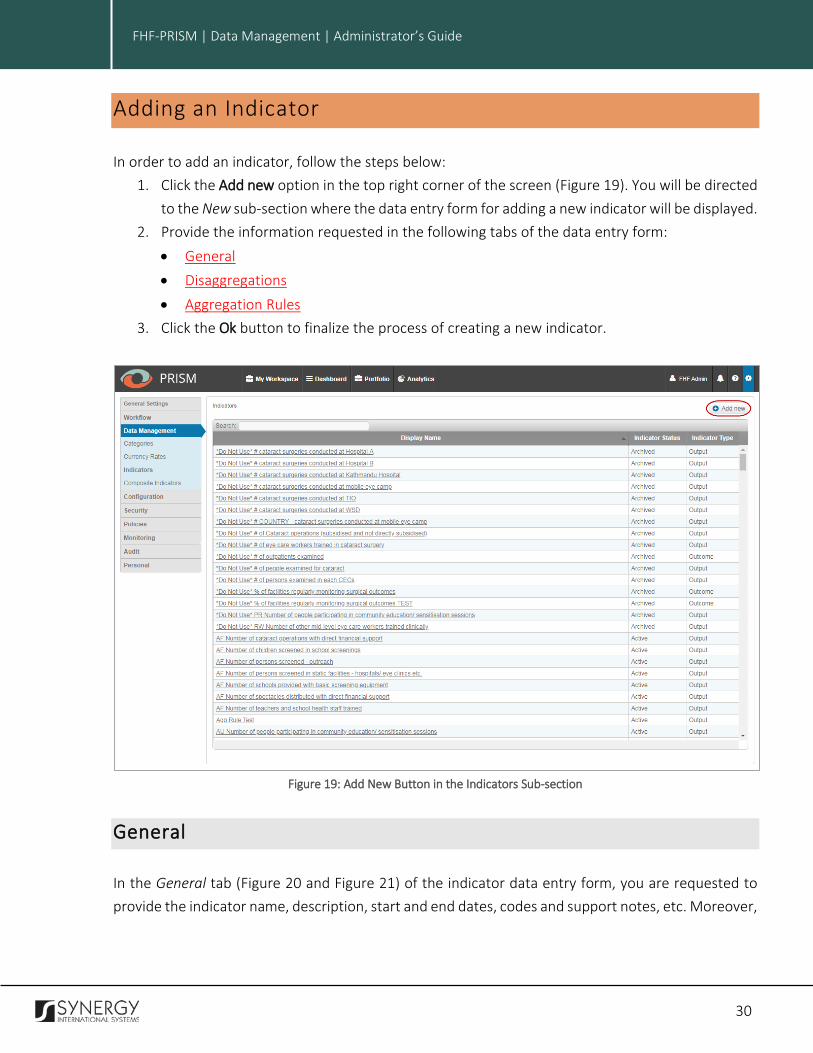
Adding an Indicator In order to add an indicator, follow the steps below:
1. Click the Add new option in the top right corner of the screen (Figure 19). You will be directed to the New sub-section where the data entry form for adding a new indicator will be displayed.
2. Provide the information requested in the following tabs of the data entry form: • General • Disaggregations • Aggregation Rules
3. Click the Ok button to finalize the process of creating a new indicator.
Figure 19: Add New Button in the Indicators Sub-section
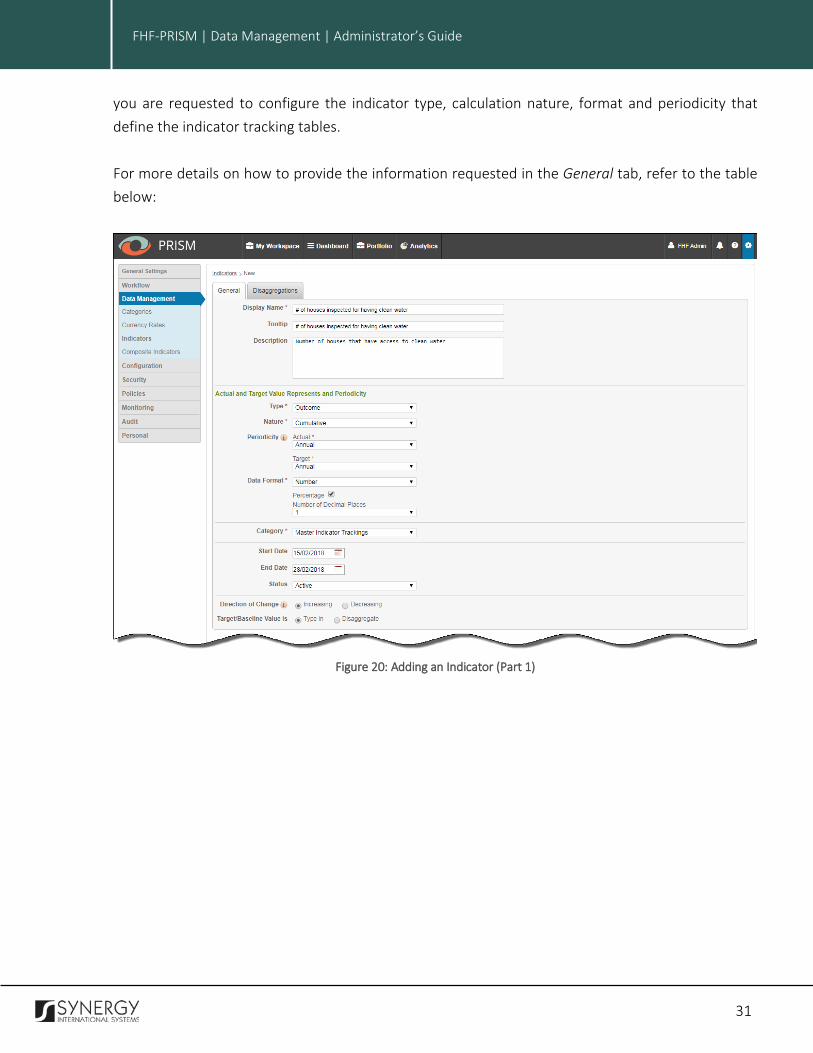
General In the General tab (Figure 20 and Figure 21) of the indicator data entry form, you are requested to provide the indicator name, description, start and end dates, codes and support notes, etc. Moreover,
31
INTEGRATED CRIMINAL JUSTICE INFORMATION SYSTEM OF IRAQ | Personal Information | User Manual FHF-PRISM | Data Management | Administrator’s Guide
you are requested to configure the indicator type, calculation nature, format and periodicity that define the indicator tracking tables. For more details on how to provide the information requested in the General tab, refer to the table below:
Figure 20: Adding an Indicator (Part 1)
32
INTEGRATED CRIMINAL JUSTICE INFORMATION SYSTEM OF IRAQ | Personal Information | User Manual FHF-PRISM | Data Management | Administrator’s Guide
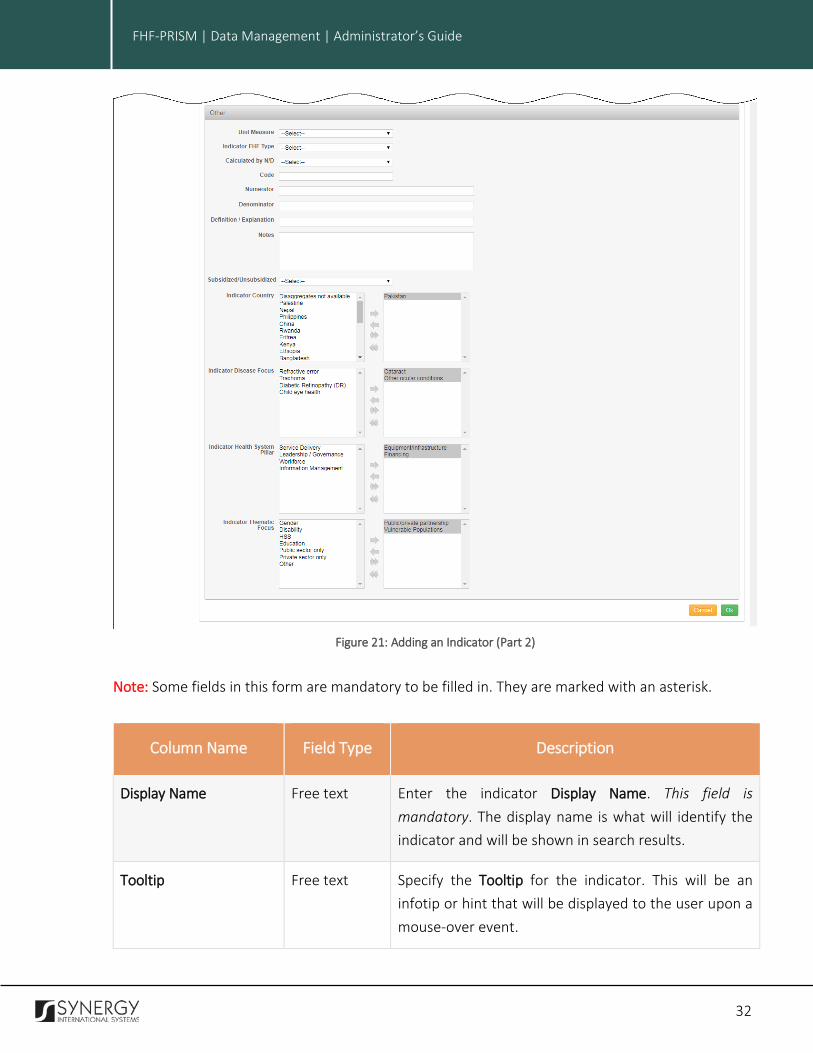
Figure 21: Adding an Indicator (Part 2)
Note: Some fields in this form are mandatory to be filled in. They are marked with an asterisk.
Column Name Field Type Description
Display Name Free text Enter the indicator Display Name. This field is mandatory. The display name is what will identify the indicator and will be shown in search results.
Tooltip Free text Specify the Tooltip for the indicator. This will be an infotip or hint that will be displayed to the user upon a mouse-over event.
33
INTEGRATED CRIMINAL JUSTICE INFORMATION SYSTEM OF IRAQ | Personal Information | User Manual FHF-PRISM | Data Management | Administrator’s Guide
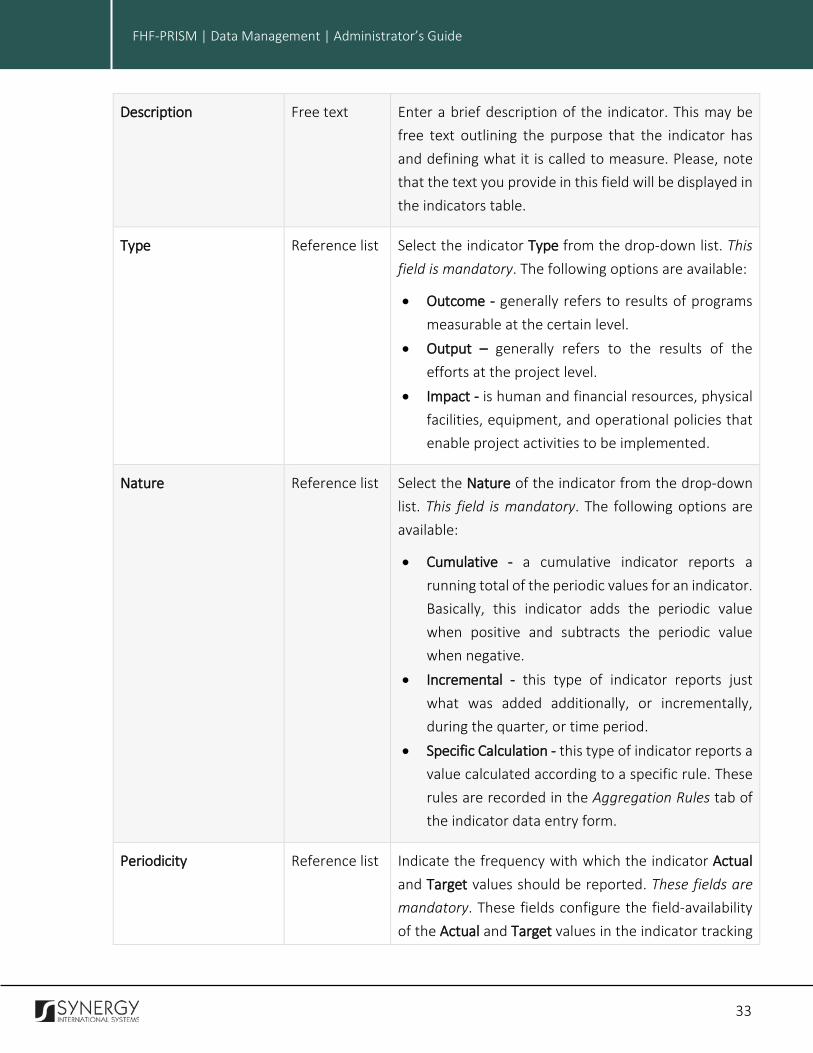
Description Free text Enter a brief description of the indicator. This may be free text outlining the purpose that the indicator has and defining what it is called to measure. Please, note that the text you provide in this field will be displayed in the indicators table.
Type Reference list Select the indicator Type from the drop-down list. This field is mandatory. The following options are available:
• Outcome - generally refers to results of programs measurable at the certain level.
• Output – generally refers to the results of the efforts at the project level.
• Impact - is human and financial resources, physical facilities, equipment, and operational policies that enable project activities to be implemented.
Nature Reference list Select the Nature of the indicator from the drop-down list. This field is mandatory. The following options are available:
• Cumulative - a cumulative indicator reports a running total of the periodic values for an indicator. Basically, this indicator adds the periodic value when positive and subtracts the periodic value when negative.
• Incremental - this type of indicator reports just what was added additionally, or incrementally, during the quarter, or time period.
• Specific Calculation - this type of indicator reports a value calculated according to a specific rule. These rules are recorded in the Aggregation Rules tab of the indicator data entry form.
Periodicity Reference list Indicate the frequency with which the indicator Actual and Target values should be reported. These fields are mandatory. These fields configure the field-availability of the Actual and Target values in the indicator tracking

34
INTEGRATED CRIMINAL JUSTICE INFORMATION SYSTEM OF IRAQ | Personal Information | User Manual FHF-PRISM | Data Management | Administrator’s Guide
tables within a project record. The following options are available:
• Annual – this is the indicator progress measure after 12 months of the project start date.
• Quarterly – this is the indicator progress measure after 3 months of the project start date.
• Monthly – this is the report of the indicator progress each month starting by the project start date.
• Milestone - this is the report of the indicator progress for each milestone.
Note: Target and actual values can be set at different periodicities. So When defining the periodicity of reporting the Actual and Target values, please, consider reporting the Target values with less frequency.
Data Format Reference list Specify the Data Format for the indicator values. This field is mandatory. The following options are available:
• Number – this implies that the data input is figures. • Text – this implies that the data input is simple
text.
Note: If the Number option is selected, you should define whether the number will indicate percentage by ticking the respective checkbox. Also, indicate the number of decimal places.
Category Reference list Select a Category the indicator tracking will be based on from the drop-down list. This field is mandatory. An indicator must be connected to some entity which tracks values. Here, the Master Indicator Tracking determinates the tracking entity that defines the list of disaggregates list in the Disaggregation tab of the indicator data entry form.

35
INTEGRATED CRIMINAL JUSTICE INFORMATION SYSTEM OF IRAQ | Personal Information | User Manual FHF-PRISM | Data Management | Administrator’s Guide
Start Date Calendar control
Indicate the date starting from which the indicator data should be collected and reported. A calendar popup is available for this field, see Figure 22: Calendar.
End Date Calendar control
Indicate the date till when the indicator data should be collected and reported. A calendar popup is available for this field, see Figure 22: Calendar.
Status Reference list Select the indicator Status from the drop-down list. The following options are available:
• Active – this indicates that the indicator is in the active state.
• Archived – this indicates that the indicator is archived.
Direction of Change Radio button Indicate whether increase or decrease in the indicator values should be considered a positive change by specifying the Direction of Change for the indicator.
Target / Baseline
Value is
Radio button Specify whether the indicator Target / Baseline Value is of the type-in or disaggregate type by activating the respective radio button Please, note that this indicator property determines whether the Target and Baseline values are disagreeable by the disaggregation list defined in the Disaggregation tab of the indicator data entry form.
Unit Measure Reference list Select a Unit Measure for the indicator from the drop-down list. This is the unit measure by which the indicator is measured.
Indicator FHF Type Reference list Specify whether the indicator is of the common or FHF indicator type. To do this, select one of the available options from the drop-down list.
Calculated by N/D Reference list Specify if the indicator is calculated by dividing the Numerator by the Denominator.

36
INTEGRATED CRIMINAL JUSTICE INFORMATION SYSTEM OF IRAQ | Personal Information | User Manual FHF-PRISM | Data Management | Administrator’s Guide
Code Free text Define the indicator Code to be used for future reference.
Numerator Free text Specify the Numerator used for indicator calculation.
Denominator Free text Specify the Denominator used for indicator calculation.
Definition/Explanation Free text Enter the Description/Explanation of the indicator, e.g. the purpose of the indicator, what it will measure and / or improve, etc.
Notes Free text Provide any relevant Notes on the indicator.
Subsidized /
Unsubsidized
Reference list Specify whether the indicator is subsidized by selecting the corresponding option from the drop-down list. The following options are available:
• Subsidized – this indicates that the indicator has financial support.
• Unsubsidized – this indicates that the indicator does not have financial support.
Indicator Country Multi-select field
Specify the Indicator Country. This is the country or countries where the indicator will be used to measure the project performance.
To specify an indicator country, select the appropriate
instance in the list on the left and click the (Select) button. The selected instance will appear in the list on
the right. Please, note that clicking the (Select All) button will select all available indicator country instances.
To remove a selected instance, mark it in the list on the
right and click the (Deselect) button. The selected instance will appear in the list on the left. Please, note
that clicking the (Deselect All) button will remove all selected indicator country instances.

37
INTEGRATED CRIMINAL JUSTICE INFORMATION SYSTEM OF IRAQ | Personal Information | User Manual FHF-PRISM | Data Management | Administrator’s Guide
Note: You may select multiple indicator country instances to move from one list to the other by pressing and holding the CTRL button on your keyboard.
Indicator Disease Focus Multi-select field
Specify the Indicator Disease Focus. For this, select the appropriate instance in the list on the left and click the
(Select) button. The selected instance will appear in
the list on the right. Please, note that clicking the (Select All) button will select all available indicator disease focus instances.
To remove a selected instance, mark it in the list on the
right and click the (Deselect) button. The selected instance will appear in the list on the left. Please, note
that clicking the (Deselect All) button will remove all selected instances.
Note: You may select multiple indicator disease focus instances to move from one list to the other by pressing and holding the CTRL button on your keyboard.
Indicator Health System Pillar
Multi-select field
Specify the Indicator Health System Pillars. For this, select the appropriate instance in the list on the left and
click the (Select) button. The selected instance will appear in the list on the right. Please, note that clicking
the (Select All) button will select all available indicator health system pillar instances.
To remove a selected instance, mark it in the list on the
right and click the (Deselect) button. The selected instance will appear in the list on the left. Please, note
that clicking the (Deselect All) button will remove all selected instances.
Note: You may select multiple indicator health system pillar instances to move from one list to the other by pressing and holding the CTRL button on your keyboard.

38
INTEGRATED CRIMINAL JUSTICE INFORMATION SYSTEM OF IRAQ | Personal Information | User Manual FHF-PRISM | Data Management | Administrator’s Guide
Indicator Thematic Focus
Multi-select field
Specify the Indicator Thematic Focus. For this, select the appropriate instance in the list on the left and click the
(Select) button. The selected instance will appear in
the list on the right. Please, note that clicking the (Select All) button will select all available indicator thematic focus instances.
To remove a selected instance, mark it in the list on the
right and click the (Deselect) button. The selected instance will appear in the list on the left. Please, note
that clicking the (Deselect All) button will remove all selected instances.
Note: You may select multiple indicator thematic focus instances to move from one list to the other by pressing and holding the CTRL button on your keyboard.
Note: To get more information about any field, you may click the icon available next to them.
Figure 22: Calendar
Disaggregations In the Disaggregations tab of the indicator data entry form (Figure 23), you are requested to provide such information about the indicator as the indicator disaggregates and data points.

39
INTEGRATED CRIMINAL JUSTICE INFORMATION SYSTEM OF IRAQ | Personal Information | User Manual FHF-PRISM | Data Management | Administrator’s Guide
Figure 23: Disaggregations Tab
Adding a Disaggregation Record In order to add a disaggregation / disaggregation group, follow the steps below:
1. Hover the mouse over the Add Disaggregation actions menu and select the respective option (Figure 23). An Add Disaggregation / Add Disaggregation Group data entry form will appear (Figure 24). Note: If you select to add a Disaggregation Group, the selected indicator will automatically become delayered, i.e. all disaggregates associated with it will be placed on the same level of hierarchy. If you select to add Disaggregation, the indicator will be layered, i.e. all disaggregates associated with it will be organized in the hierarchical order.
2. Select the appropriate disaggregate from the drop-down list. 3. Specify the order in which the record should appear in the list by selecting the respective
number from the drop-down list. 4. Click the Save button to save the information input.
Note: Adding disaggregation for an existing layered indicator will result in deleting the entire scope of the data associated with the indicator.

40
INTEGRATED CRIMINAL JUSTICE INFORMATION SYSTEM OF IRAQ | Personal Information | User Manual FHF-PRISM | Data Management | Administrator’s Guide
Figure 24: Adding a Disaggregation / Disaggregation Group
Editing Disaggregation Records In order to edit an existing disaggregation / disaggregation group, follow the steps below:
1. Click the (Edit) button to the left of the record that you want to edit (Figure 23). The Edit Disaggregation data entry form will appear.
2. Make the required changes in the data displayed. Note: You can modify the name of the disaggregation / disaggregation group of the selected record. You can also change the order in which the disaggregation / disaggregation group appears in the list. If you want to change the order of a definite record, use the combo box found in the furthermost right column of the disaggregation table.
3. Click the Save button to save the changes made. Note: Editing disaggregation for existing delayered or layered indicators will result in deleting the entire scope of the data associated with the indicators.
Deleting Disaggregation Records In order to delete an existing disaggregation / disaggregation group, follow the steps below:
1. Click the (Delete) button to the left of the selected record. 2. Confirm deletion by clicking the Ok button.
Note: Deleting disaggregation for a delayered indicator will result in removing all the aggregation rules linked to it. Deleting disaggregation for a layered indicator will result in deleting both the entire scope of the data and aggregation rules associated with the indicator.

41
INTEGRATED CRIMINAL JUSTICE INFORMATION SYSTEM OF IRAQ | Personal Information | User Manual FHF-PRISM | Data Management | Administrator’s Guide
Data Points A data point is a measure associated with an indicator. It carries a value that is either dependent or not on the defined disaggregation, reporting periodicity, and other parameters. This chapter outlines how you can add, edit, and delete data points for indicators.
Adding a Data Point Record In order to add a data point record, follow the steps below:
1. Click the Add Data Point button (Figure 23). An Add Data Point data entry form will appear (Figure 25).
Figure 25: Adding a Data Point
2. Select a data point name from the drop-down list. 3. Specify the data point type. The following options are available:
• Actual • Target • Baseline • None
4. Define disaggregation by selecting the respective checkboxes. Please, note that the Disaggregation list will contain only those disaggregates that are specified in the Disaggregation table.

42
INTEGRATED CRIMINAL JUSTICE INFORMATION SYSTEM OF IRAQ | Personal Information | User Manual FHF-PRISM | Data Management | Administrator’s Guide
5. Specify the order in which the record should appear in the list by selecting the respective number from the drop-down list.
6. Click the Save button to save the information input.
Editing Data Point Records In order to edit an existing data point record, follow the steps below:
1. Click the (Edit) button to the left of the record that you want to edit (Figure 23). The Edit Data Point data entry form will appear.
2. Make the required changes in the data displayed. Note: You can modify the name and type of the data point as well as select or deselect the disaggregation it is related to. You can also change the order in which the data points appear in the list. If you want to change the order of a definite record, use the combo box found in the furthermost right column of the data points table.
3. Click the Save button to save the changes made.
Deleting Data Point Records In order to delete an existing data point record, follow the steps below:
1. Click the (Delete) button to the left of the selected record. 2. Confirm deletion by clicking the Ok button.
Aggregation Rules In the Aggregation Rules tab of the indicator data entry form (Figure 26), you are requested to provide aggregation rules / limitations applicable to the indicator. Aggregation rules define how the indicator data will be grouped and calculated (for example, total number of surgeries made during the year is equal to the sum of surgeries made in each month of the year). They can be used for measuring the indicator progress by calculating the difference of target and initial/baseline values. It should be noted that the Aggregation Rules tab is displayed for the indicators with the specific calculation nature set for them. For the indicators with the incremental and cumulative nature, calculations are automatically made by the system.
43
INTEGRATED CRIMINAL JUSTICE INFORMATION SYSTEM OF IRAQ | Personal Information | User Manual FHF-PRISM | Data Management | Administrator’s Guide
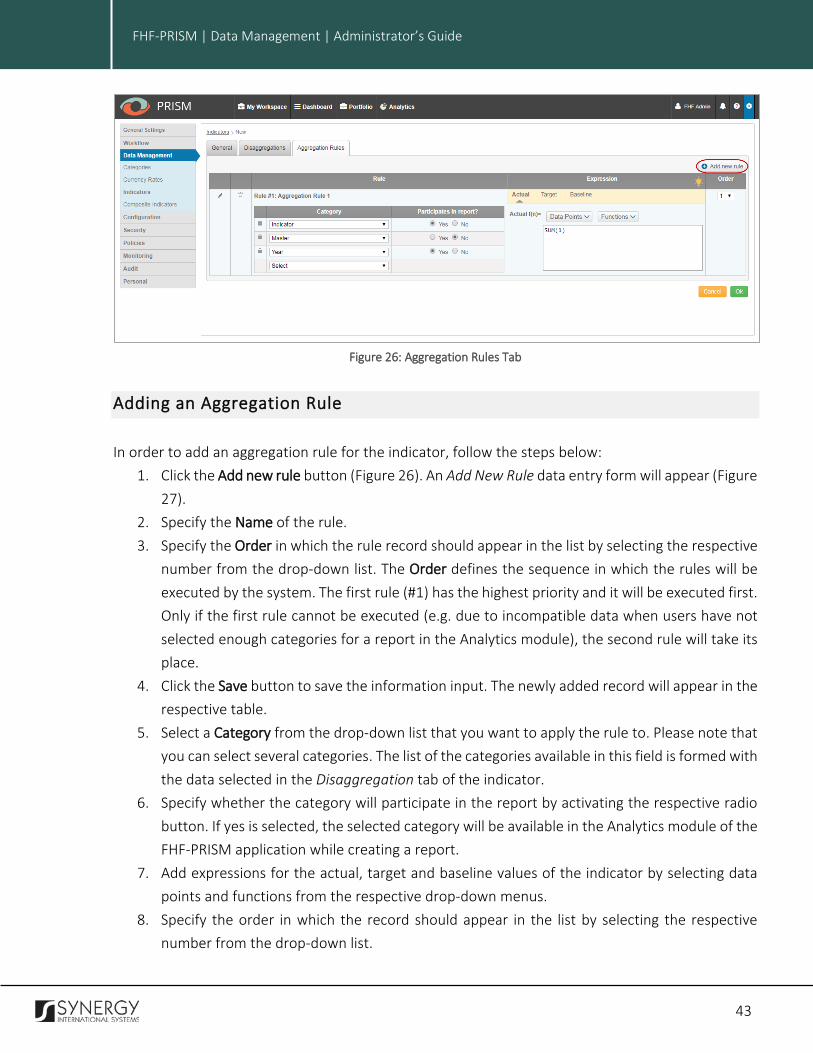
Figure 26: Aggregation Rules Tab
Adding an Aggregation Rule In order to add an aggregation rule for the indicator, follow the steps below:
1. Click the Add new rule button (Figure 26). An Add New Rule data entry form will appear (Figure 27).
2. Specify the Name of the rule. 3. Specify the Order in which the rule record should appear in the list by selecting the respective
number from the drop-down list. The Order defines the sequence in which the rules will be executed by the system. The first rule (#1) has the highest priority and it will be executed first. Only if the first rule cannot be executed (e.g. due to incompatible data when users have not selected enough categories for a report in the Analytics module), the second rule will take its place.
4. Click the Save button to save the information input. The newly added record will appear in the respective table.
5. Select a Category from the drop-down list that you want to apply the rule to. Please note that you can select several categories. The list of the categories available in this field is formed with the data selected in the Disaggregation tab of the indicator.
6. Specify whether the category will participate in the report by activating the respective radio button. If yes is selected, the selected category will be available in the Analytics module of the FHF-PRISM application while creating a report.
7. Add expressions for the actual, target and baseline values of the indicator by selecting data points and functions from the respective drop-down menus.
8. Specify the order in which the record should appear in the list by selecting the respective number from the drop-down list.

44
INTEGRATED CRIMINAL JUSTICE INFORMATION SYSTEM OF IRAQ | Personal Information | User Manual FHF-PRISM | Data Management | Administrator’s Guide
9. Tick the Last Reporting Period checkbox if you want the system to perform the aggregation operation with only the last reporting period values. Note: This checkbox is available for all indicator types provided two timeline categories are used in the aggregation rule and at least one of them has less frequency than the indicator periodicity specified in the General tab. Please, also note that the checkbox will not be available if the timeline category in the aggregation rule has the same or higher reporting frequency as compared with the periodicity of the selected tab and if the Yes option is selected in the Participates in report? field.
10. Click the Ok button to save the rule.
Figure 27: Adding an Aggregation Rule
Note: You can click the icon to view the compatibility of functions and data points to be used in the expressions. In the pop-up window that appears, you will be presented with the main rules and hits to compose expressions. For instance, the Sum, Average, and Count functions should contain only numeric values. Or, in order to calculate some data point sum values, it is required to primarily calculate the sum of lower level data points and then manually add the value of a greater level data point by entering the '+' sign in the function.
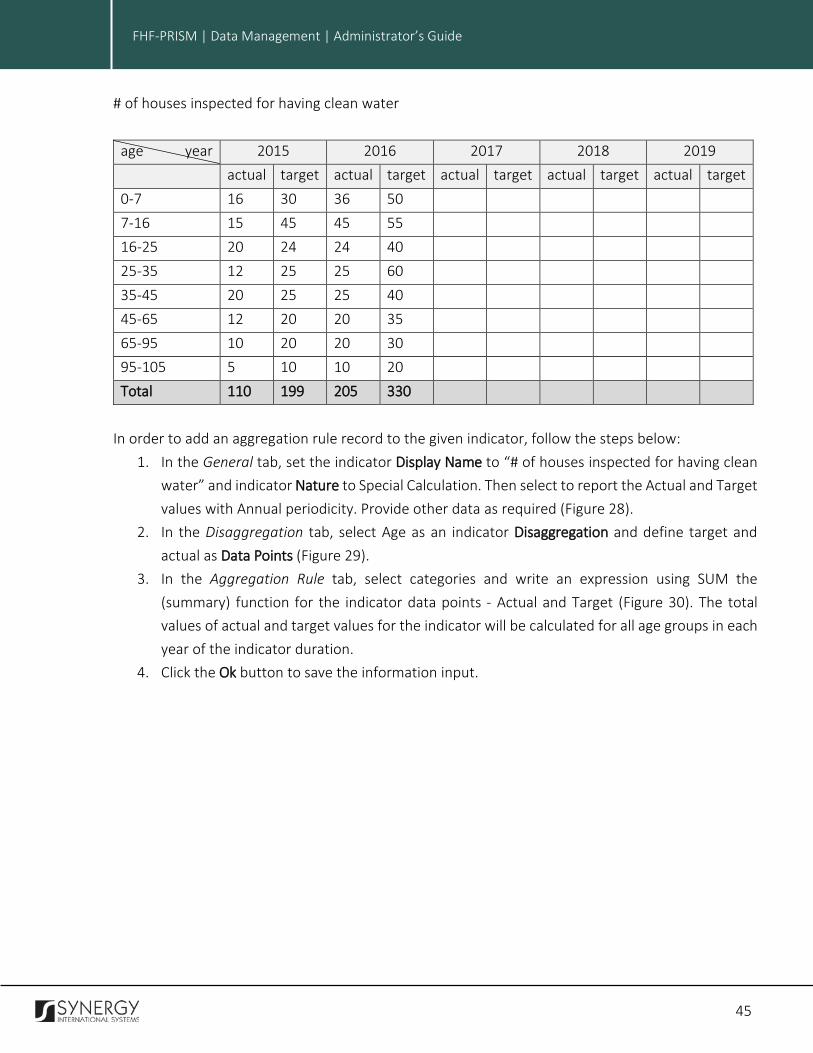
Aggregation Rule Example For example, we set a goal of making clean water available to more people. For preliminary research, we set an indicator ‘# of houses inspected for having clean water’. Let’s create a report where we want to see the progress of this indicator by age groups in some region. So, our aim is to have the following table:
45
INTEGRATED CRIMINAL JUSTICE INFORMATION SYSTEM OF IRAQ | Personal Information | User Manual FHF-PRISM | Data Management | Administrator’s Guide
# of houses inspected for having clean water
age year 2015 2016 2017 2018 2019 actual target actual target actual target actual target actual target 0-7 16 30 36 50 7-16 15 45 45 55 16-25 20 24 24 40 25-35 12 25 25 60 35-45 20 25 25 40 45-65 12 20 20 35 65-95 10 20 20 30 95-105 5 10 10 20 Total 110 199 205 330
In order to add an aggregation rule record to the given indicator, follow the steps below:
1. In the General tab, set the indicator Display Name to “# of houses inspected for having clean water” and indicator Nature to Special Calculation. Then select to report the Actual and Target values with Annual periodicity. Provide other data as required (Figure 28).
2. In the Disaggregation tab, select Age as an indicator Disaggregation and define target and actual as Data Points (Figure 29).
3. In the Aggregation Rule tab, select categories and write an expression using SUM the (summary) function for the indicator data points - Actual and Target (Figure 30). The total values of actual and target values for the indicator will be calculated for all age groups in each year of the indicator duration.
4. Click the Ok button to save the information input.

46
INTEGRATED CRIMINAL JUSTICE INFORMATION SYSTEM OF IRAQ | Personal Information | User Manual FHF-PRISM | Data Management | Administrator’s Guide
Figure 28: Adding an Aggregation Rule (Sample) – General Tab
Figure 29: Adding an Aggregation Rule (Sample) – Disaggregations Tab
47
INTEGRATED CRIMINAL JUSTICE INFORMATION SYSTEM OF IRAQ | Personal Information | User Manual FHF-PRISM | Data Management | Administrator’s Guide
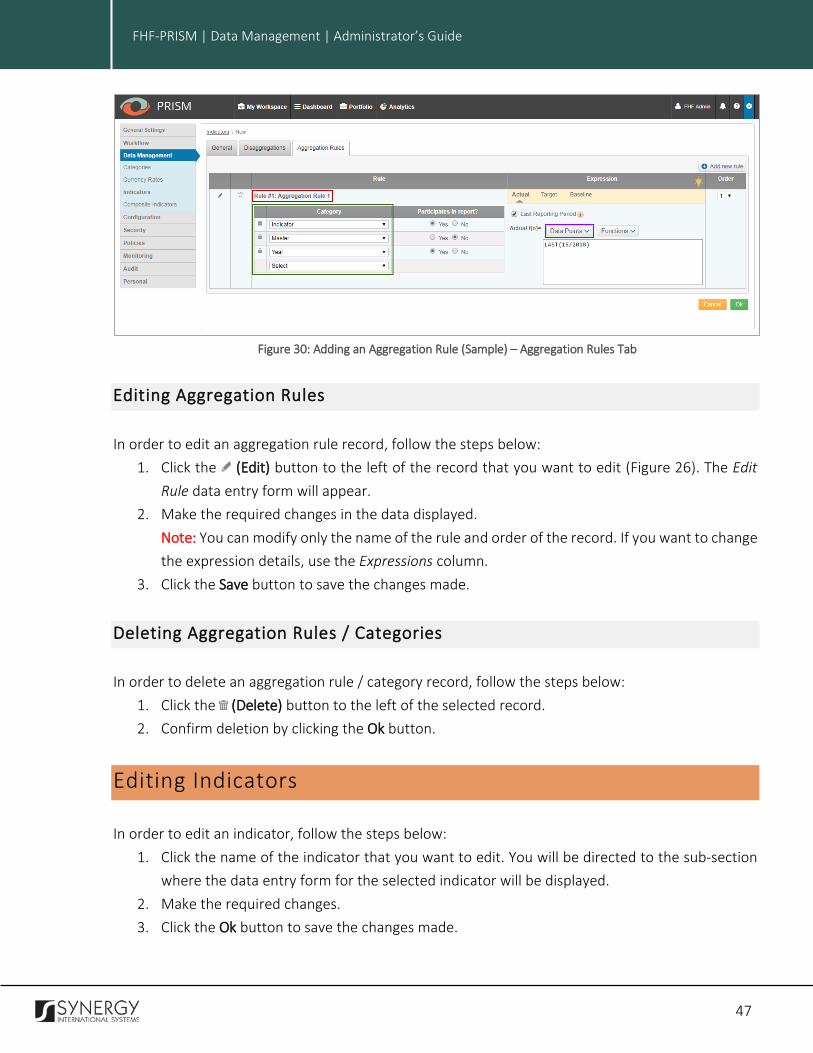
Figure 30: Adding an Aggregation Rule (Sample) – Aggregation Rules Tab
Editing Aggregation Rules In order to edit an aggregation rule record, follow the steps below:
1. Click the (Edit) button to the left of the record that you want to edit (Figure 26). The Edit Rule data entry form will appear.
2. Make the required changes in the data displayed. Note: You can modify only the name of the rule and order of the record. If you want to change the expression details, use the Expressions column.
3. Click the Save button to save the changes made.
Deleting Aggregation Rules / Categories In order to delete an aggregation rule / category record, follow the steps below:
1. Click the (Delete) button to the left of the selected record. 2. Confirm deletion by clicking the Ok button.
Editing Indicators In order to edit an indicator, follow the steps below:
1. Click the name of the indicator that you want to edit. You will be directed to the sub-section where the data entry form for the selected indicator will be displayed.
2. Make the required changes. 3. Click the Ok button to save the changes made.
48
INTEGRATED CRIMINAL JUSTICE INFORMATION SYSTEM OF IRAQ | Personal Information | User Manual FHF-PRISM | Data Management | Administrator’s Guide
MANAGING COMPOSITE INDICATORS This chapter outlines how you can manage the composite indicators existing in the FHF-PRISM application. The composite indicators are a special type of indicators that use other indicators in their calculation formula. That is, a composite indicator is created when individual indicators are compiled into a single index. A composite indicator measures multi-dimensional concepts that cannot be captured by a single indicator. Composite indicators are useful as a tool for conveying summary performance information and signalling policy priorities. They have a number of advantages, such as focusing attention on important policy issues, offering a more rounded assessment of performance and presenting the ‘big picture’ in a way in which the public can understand. In the FHF-PRISM, composite indicators and created and maintained in the Composite Indicators sub-section of the Data Management console. For more details on how composite indicators are managed in the FHF-PRISM application, see the chapter below. More specifically, it outlines how you can:
• Access the Composite Indicators sub-section • Search for a composite indicator • Define the sorting order for composite indicators • Create and edit composite indicators
Accessing the Composite Indicators Sub-section The Composite Indicators sub-section can be accessed at Settings Data Management Composite Indicators (Figure 31). Please note that access to this sub-section is defined by the permissions your role has been granted with. To configure access permissions for this sub-section, see the FHF-PRISM Security Administrator’s Guide in REFERENCES.

49
INTEGRATED CRIMINAL JUSTICE INFORMATION SYSTEM OF IRAQ | Personal Information | User Manual FHF-PRISM | Data Management | Administrator’s Guide
Figure 31: Composite Indicators Sub-section
Once you access the Composite Indicators sub-section, you will be presented with the list of all multi-dimensional indices existing in the system (Figure 31). The information displayed for each composite indicator includes the following:
Column Name Description
Display Name This is the name of the composite indicator.
Indictor Status This presents the composite indicator status (Active or Archived).
Indicator Type This presents the composite indicator category (Outcome, Output, or Impact).
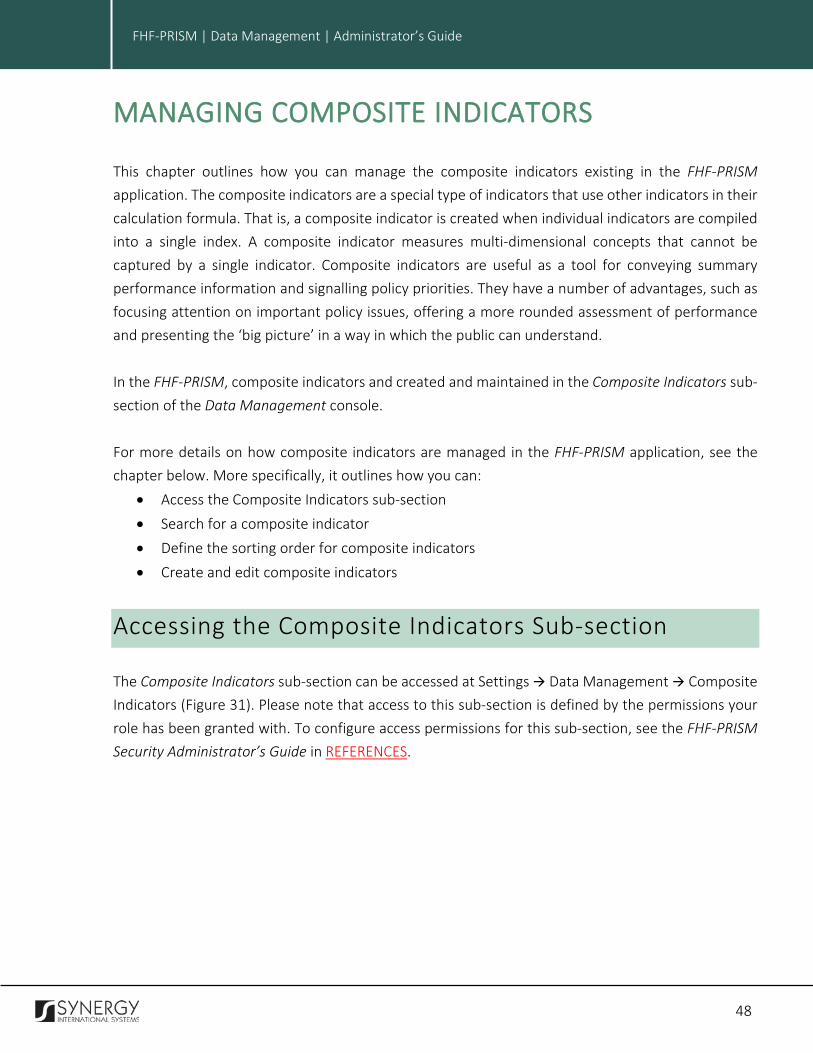
Searching for a Composite Indicator The Composite Indicators sub-section in the Data Management console is enhanced with a flexible search mechanism. Using the search mechanism, you can easily find the indicator that you are looking for from the multitude of indicator records that may be displayed to you. When creating search criteria, you can enter a keyword or any combination of them to define your query. The search mechanism will return all indicators the names of which have matches to the keywords specified in the search criteria.
50
INTEGRATED CRIMINAL JUSTICE INFORMATION SYSTEM OF IRAQ | Personal Information | User Manual FHF-PRISM | Data Management | Administrator’s Guide
Figure 32: Searching for a Composite Indicator
In order to search for a definite composite indicator, you need to enter the keyword in the search box above the composite indicators table. The results returned will display the composite indicators that match the search criteria.
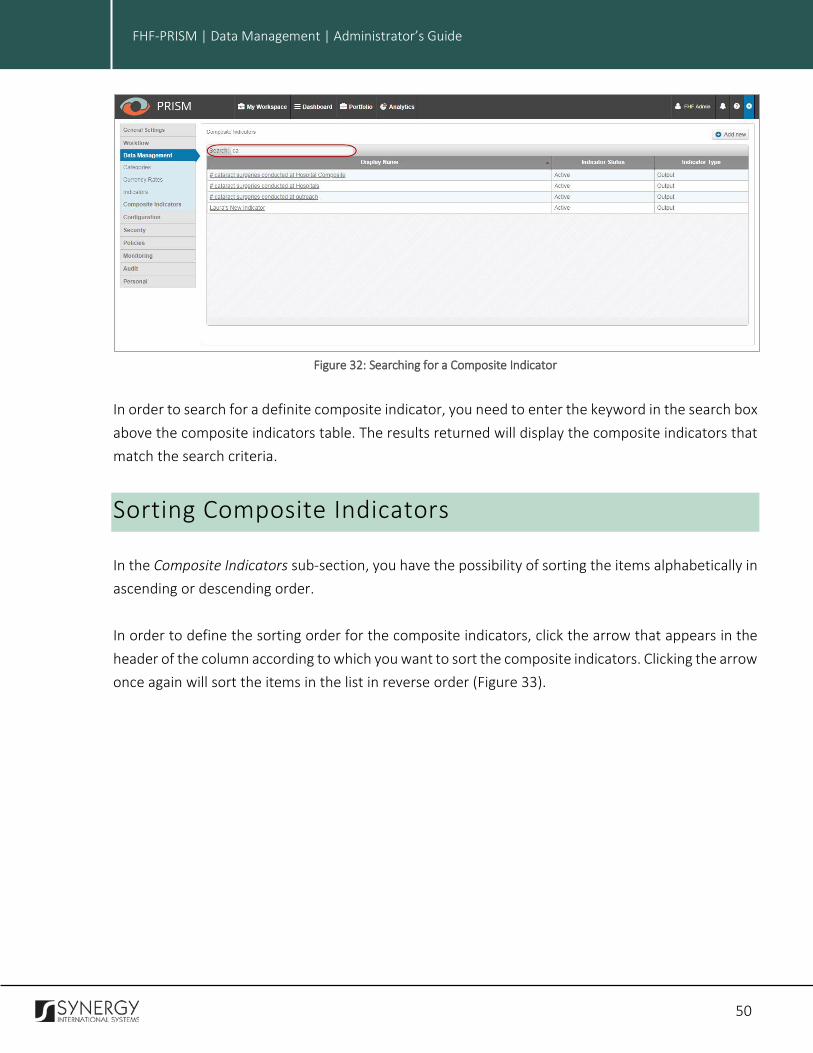
Sorting Composite Indicators In the Composite Indicators sub-section, you have the possibility of sorting the items alphabetically in ascending or descending order. In order to define the sorting order for the composite indicators, click the arrow that appears in the header of the column according to which you want to sort the composite indicators. Clicking the arrow once again will sort the items in the list in reverse order (Figure 33).

51
INTEGRATED CRIMINAL JUSTICE INFORMATION SYSTEM OF IRAQ | Personal Information | User Manual FHF-PRISM | Data Management | Administrator’s Guide
Figure 33: Sorting Composite Indicators
Managing Composite Indicator Records This chapter outlines how you can:
• Add and edit composite indicators • Manage composite indicator metadata • Create and configure composite indicator disaggregation rules • Configure the composite indicator tracking tables for each indicator
Adding a Composite Indicator In order to add a composite indicator, follow the steps below:
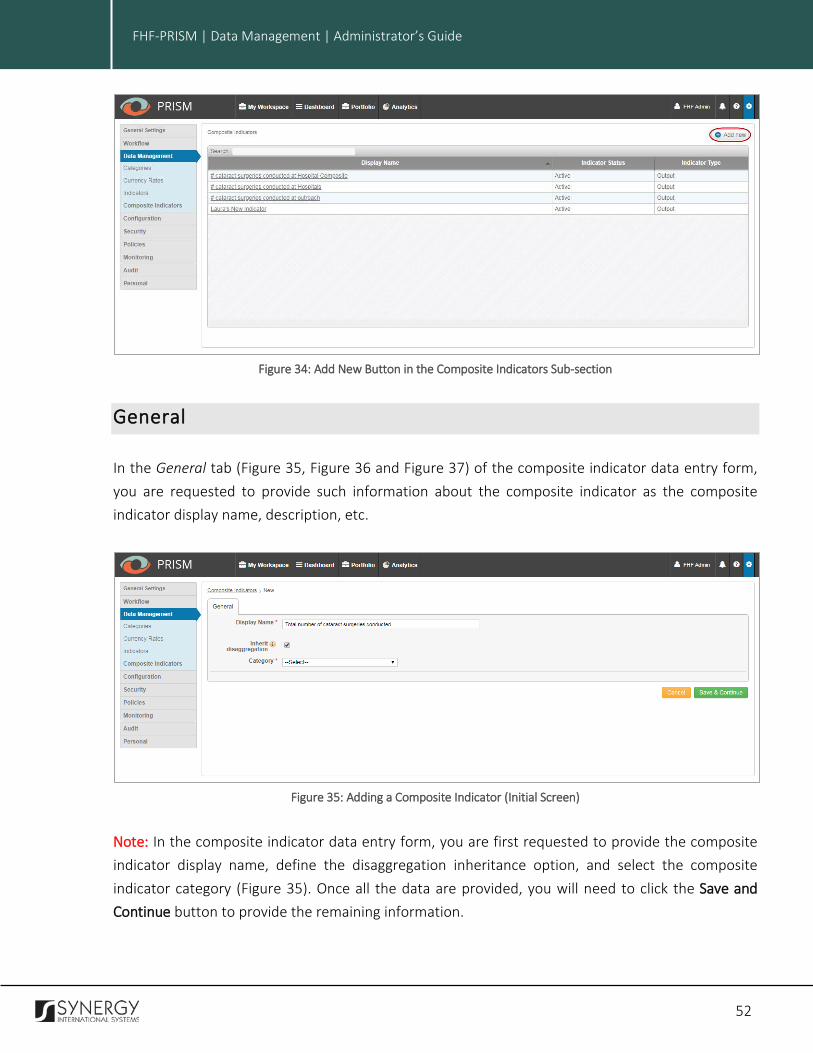
1. Click the Add new option in the top right corner of the screen (Figure 34). You will be directed to the New sub-section where a data entry form for adding a new composite indicator will be displayed.
2. Provide the information requested in the following tabs of the data entry form: • General • Disaggregations
3. Click the Ok button to finalize the process of creating a new composite indicator.
52
INTEGRATED CRIMINAL JUSTICE INFORMATION SYSTEM OF IRAQ | Personal Information | User Manual FHF-PRISM | Data Management | Administrator’s Guide
Figure 34: Add New Button in the Composite Indicators Sub-section
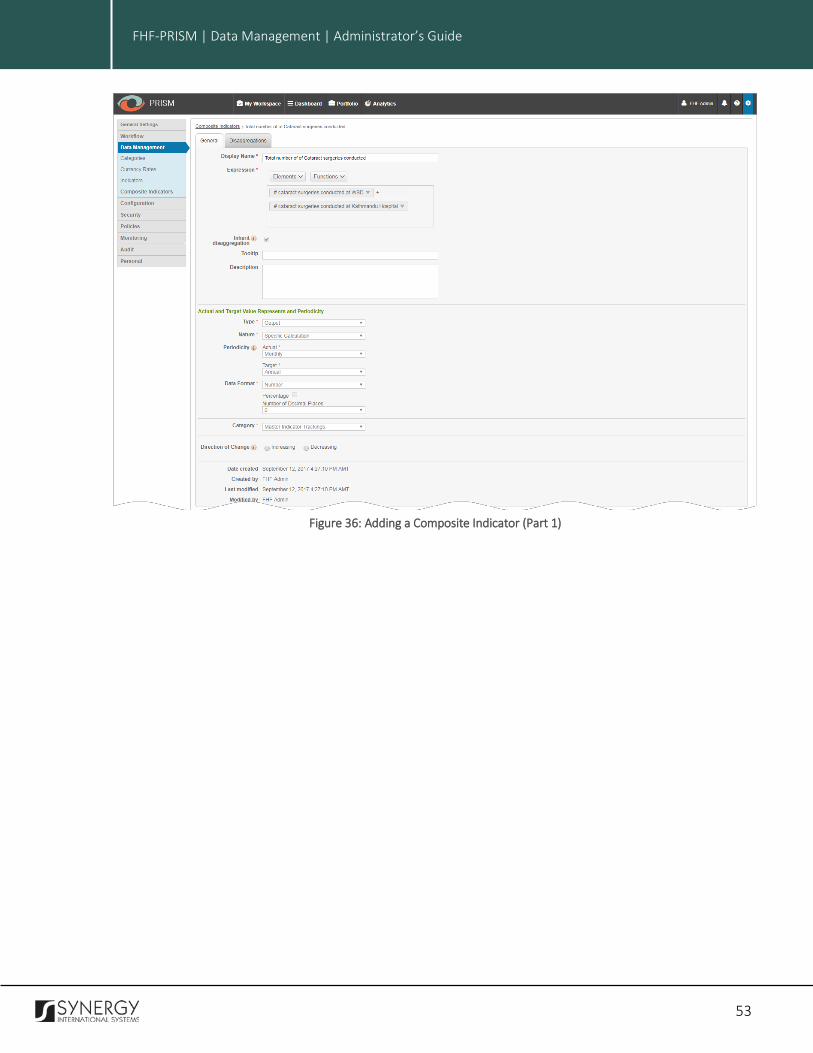
General In the General tab (Figure 35, Figure 36 and Figure 37) of the composite indicator data entry form, you are requested to provide such information about the composite indicator as the composite indicator display name, description, etc.
Figure 35: Adding a Composite Indicator (Initial Screen)
Note: In the composite indicator data entry form, you are first requested to provide the composite indicator display name, define the disaggregation inheritance option, and select the composite indicator category (Figure 35). Once all the data are provided, you will need to click the Save and Continue button to provide the remaining information.
53
INTEGRATED CRIMINAL JUSTICE INFORMATION SYSTEM OF IRAQ | Personal Information | User Manual FHF-PRISM | Data Management | Administrator’s Guide
Figure 36: Adding a Composite Indicator (Part 1)
54
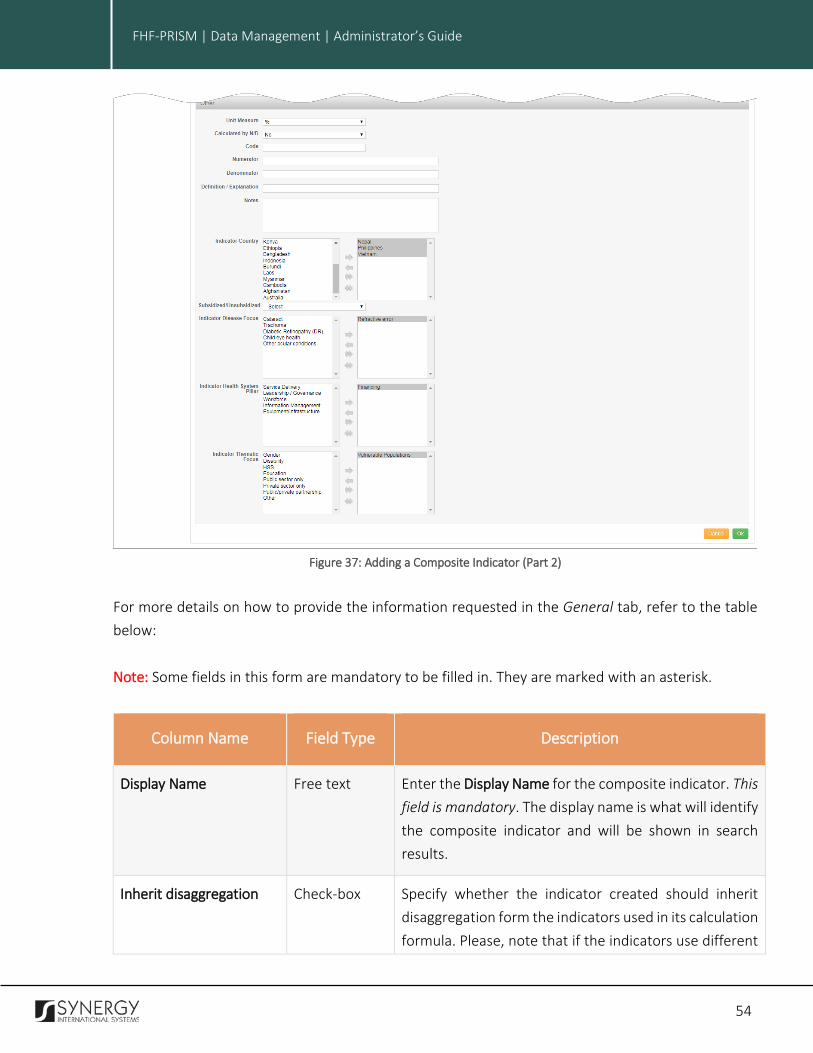
INTEGRATED CRIMINAL JUSTICE INFORMATION SYSTEM OF IRAQ | Personal Information | User Manual FHF-PRISM | Data Management | Administrator’s Guide
Figure 37: Adding a Composite Indicator (Part 2)
For more details on how to provide the information requested in the General tab, refer to the table below: Note: Some fields in this form are mandatory to be filled in. They are marked with an asterisk.
Column Name Field Type Description
Display Name Free text Enter the Display Name for the composite indicator. This field is mandatory. The display name is what will identify the composite indicator and will be shown in search results.
Inherit disaggregation Check-box Specify whether the indicator created should inherit disaggregation form the indicators used in its calculation formula. Please, note that if the indicators use different

55
INTEGRATED CRIMINAL JUSTICE INFORMATION SYSTEM OF IRAQ | Personal Information | User Manual FHF-PRISM | Data Management | Administrator’s Guide
types of disaggregation, the composite indicator will only inherit the disaggregation that is common to all the indicators in its structure.
Category Reference list Select the Category the composite indicator tracking will be based on from the drop-down list.
Expression Expression Add an Expression that will be used to calculate the actual, target, and baseline values of the composite indicator by selecting data points and functions from the respective Elements and Functions menus.
Tooltip Free text Specify the Tooltip for the composite indicator. This will be the info tip or hint that will be displayed to the user upon a mouse-over event.
Description Free text Enter a brief description of the composite indicator. This may be free text outlining the purpose that the composite indicator has and defining what it is called to measure. Please, note that the text you provide in this field will be displayed in the indicators table.
Direction of Change Radio button Indicate whether increase or decrease in the composite indicator values should be considered a positive change by specifying the Direction of Change for the composite indicator.
Unit Measure Reference list Select a Unit Measure for the composite indicator from the drop-down list. This is the unit measure by which the indicator is measured.
Indicator FHF Type Reference List Specify whether the indicator is of the common or FHF indicator type. To do this, select one of the available options from the drop-down list.
Calculated by N/D Reference list Specify if the composite indicator is calculated by dividing the Numerator by the Denominator.

56
INTEGRATED CRIMINAL JUSTICE INFORMATION SYSTEM OF IRAQ | Personal Information | User Manual FHF-PRISM | Data Management | Administrator’s Guide
Code Free text Define the composite indicator Code to be used for future reference.
Numerator Free text Specify the Numerator used for composite indicator calculation.
Denominator Free text Specify the Denominator used for composite indicator calculation.
Definition/Explanation Free text Enter the Description/Explanation of the composite indicator, e.g. the purpose of the composite indicator, what it will measure and / or improve, etc.
Notes Free text Provide any relevant Notes on the composite indicator.
Subsidized / Unsubsidized
Reference list Specify whether the composite indicator subsidized or not by selecting the corresponding option from the drop-down list. The following options are available:
• Subsidized – this indicates that the composite indicator has financial support.
• Unsubsidized – this indicates that the composite
indicator does not have financial support.
Indicator Country Multi-select field
Specify the Indicator Country. This is the country or countries where the composite indicator will be used to measure the project performance.
To specify a composite indicator country, select the appropriate instance in the list on the left and click the
(Select) button. The selected instance will appear in
the list on the right. Please, note that clicking the (Select All) button will select all available indicator country instances.
To remove a selected instance, mark it in the list on the
right and click the (Deselect) button. The selected instance will appear in the list on the left. Please, note

57
INTEGRATED CRIMINAL JUSTICE INFORMATION SYSTEM OF IRAQ | Personal Information | User Manual FHF-PRISM | Data Management | Administrator’s Guide
that clicking the (Deselect All) button will remove all selected indicator country instances.
Note: You may select multiple indicator country instances to move from one list to the other by pressing and holding the CTRL button on your keyboard.
Indicator Disease Focus Multi-select field
Specify the composite Indicator Disease Focus. For this, select the appropriate instance in the list on the left and
click the (Select) button. The selected instance will appear in the list on the right. Please, note that clicking
the (Select All) button will select all available composite indicator disease focus instances.
To remove a selected instance, mark it in the list on the
right and click the (Deselect) button. The selected instance will appear in the list on the left. Please, note
that clicking the (Deselect All) button will remove all selected instances.
Note: You may select multiple composite indicator disease focus instances to move from one list to the other by pressing and holding the CTRL button on your keyboard.
Indicator Health System Pillar
Multi-select field
Specify the composite Indicator Health System Pillars. For this, select the appropriate instance in the list on the
left and click the (Select) button. The selected instance will appear in the list on the right. Please, note
that clicking the (Select All) button will select all available composite indicator health system pillar instances.
To remove a selected instance, mark it in the list on the
right and click the (Deselect) button. The selected instance will appear in the list on the left. Please, note
that clicking the (Deselect All) button will remove all selected instances.
58
INTEGRATED CRIMINAL JUSTICE INFORMATION SYSTEM OF IRAQ | Personal Information | User Manual FHF-PRISM | Data Management | Administrator’s Guide
Note: You may select multiple composite indicator health system pillar instances to move from one list to the other by pressing and holding the CTRL button on your keyboard.
Indicator Thematic Focus Multi-select field
Specify the composite Indicator Thematic Focus. For this, select the appropriate instance in the list on the left and
click the (Select) button. The selected instance will appear in the list on the right. Please, note that clicking
the (Select All) button will select all available composite indicator thematic focus instances.
To remove a selected instance, mark it in the list on the
right and click the (Deselect) button. The selected instance will appear in the list on the left. Please, note
that clicking the (Deselect All) button will remove all selected instances.
Note: You may select multiple composite indicator thematic focus instances to move from one list to the other by pressing and holding the CTRL button on your keyboard.
Note: Please, take into account that the composite indicator actual and target value representation and periodicity related fields are automatically generated based on the indicators included in the composite indicator structure and cannot be changed. This means that the single indicators comprising the composite indicator should have the same target and actual value representation settings and should have the same reporting periodicity. If the indicators have different disaggregation, the resulting composite indicator will use only the values where the single indicators intersect.
Disaggregations In the Disaggregations tab of the composite indicator data entry form (Figure 38), you are requested to provide such information about the composite indicator as the composite indicator data points. As for the disaggregates that are displayed in this tab, the composite indicator inherits them from the single indicators in its structure.
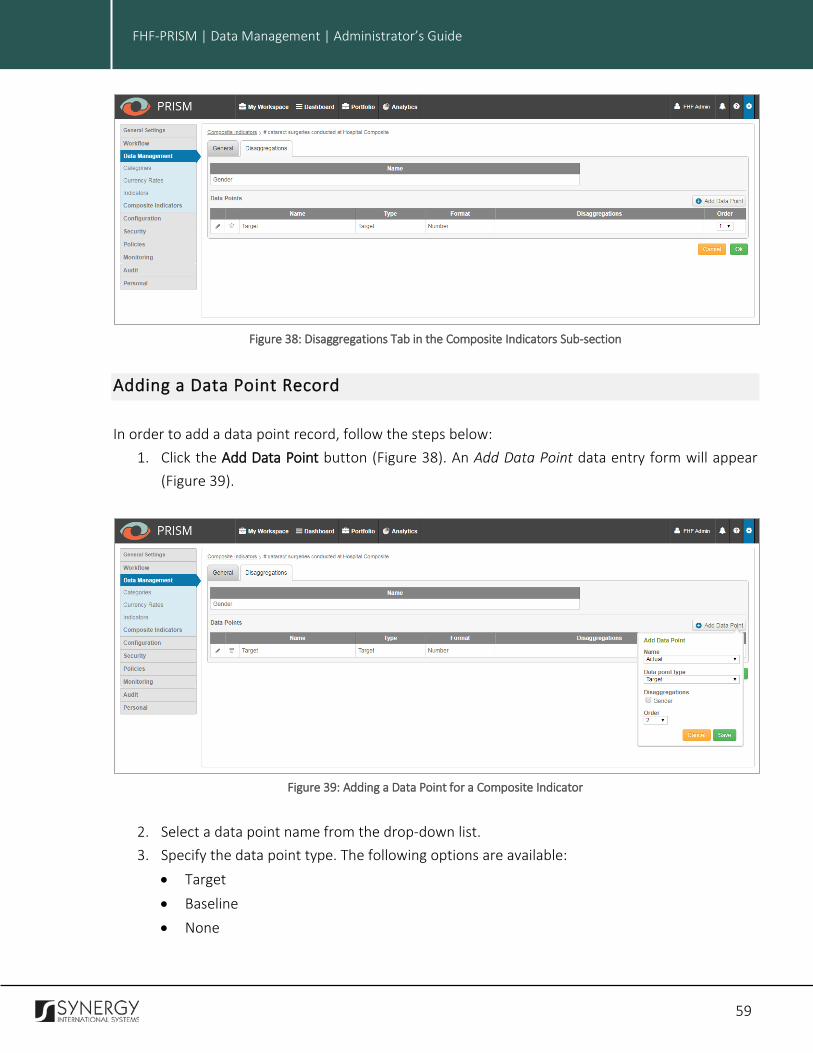
59
INTEGRATED CRIMINAL JUSTICE INFORMATION SYSTEM OF IRAQ | Personal Information | User Manual FHF-PRISM | Data Management | Administrator’s Guide
Figure 38: Disaggregations Tab in the Composite Indicators Sub-section
Adding a Data Point Record In order to add a data point record, follow the steps below:
1. Click the Add Data Point button (Figure 38). An Add Data Point data entry form will appear (Figure 39).
Figure 39: Adding a Data Point for a Composite Indicator
2. Select a data point name from the drop-down list. 3. Specify the data point type. The following options are available:
• Target • Baseline • None
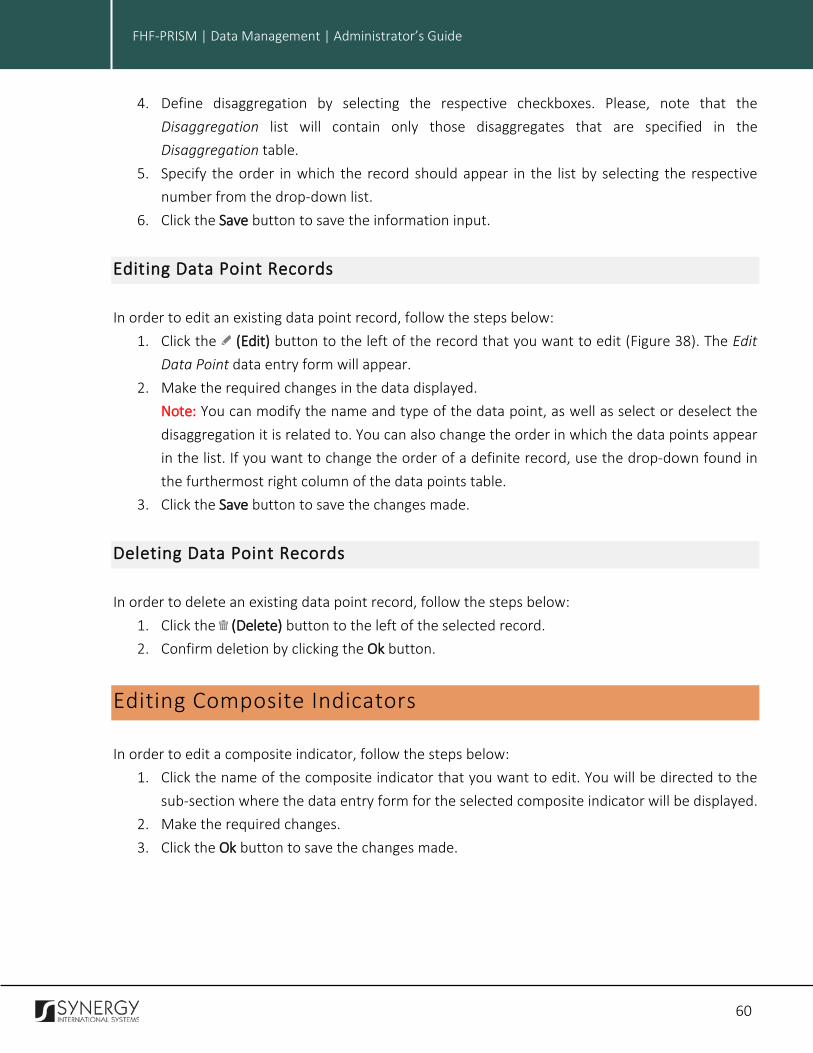
60
INTEGRATED CRIMINAL JUSTICE INFORMATION SYSTEM OF IRAQ | Personal Information | User Manual FHF-PRISM | Data Management | Administrator’s Guide
4. Define disaggregation by selecting the respective checkboxes. Please, note that the Disaggregation list will contain only those disaggregates that are specified in the Disaggregation table.
5. Specify the order in which the record should appear in the list by selecting the respective number from the drop-down list.
6. Click the Save button to save the information input.
Editing Data Point Records In order to edit an existing data point record, follow the steps below:
1. Click the (Edit) button to the left of the record that you want to edit (Figure 38). The Edit Data Point data entry form will appear.
2. Make the required changes in the data displayed. Note: You can modify the name and type of the data point, as well as select or deselect the disaggregation it is related to. You can also change the order in which the data points appear in the list. If you want to change the order of a definite record, use the drop-down found in the furthermost right column of the data points table.
3. Click the Save button to save the changes made.
Deleting Data Point Records In order to delete an existing data point record, follow the steps below:
1. Click the (Delete) button to the left of the selected record. 2. Confirm deletion by clicking the Ok button.
Editing Composite Indicators In order to edit a composite indicator, follow the steps below:
1. Click the name of the composite indicator that you want to edit. You will be directed to the sub-section where the data entry form for the selected composite indicator will be displayed.
2. Make the required changes. 3. Click the Ok button to save the changes made.
61
INTEGRATED CRIMINAL JUSTICE INFORMATION SYSTEM OF IRAQ | Personal Information | User Manual FHF-PRISM | Data Management | Administrator’s Guide
REFERENCES Please, refer to the following FHF-PRISM related documents to obtain more information about the system and how it functions:
• FHF-PRISM Analytical Interface User Manual • FHF-PRISM My Workspace User Manual • FHF-PRISM Dashboard User Manual • FHF-PRISM Portfolio User Manual • FHF-PRISM Project Data Entry User Manual • FHF-PRISM Activity Data Entry User Manual • FHF-PRISM Sub-activity Data Entry User Manual • FHF-PRISM Indicator Data Entry User Manual • FHF-PRISM Partner Organisation Data Entry User Manual • FHF-PRISM Settings Administrator’s Guide • FHF-PRISM Workflow Administrator’s Guide • FHF-PRISM Security Administrator’s Guide
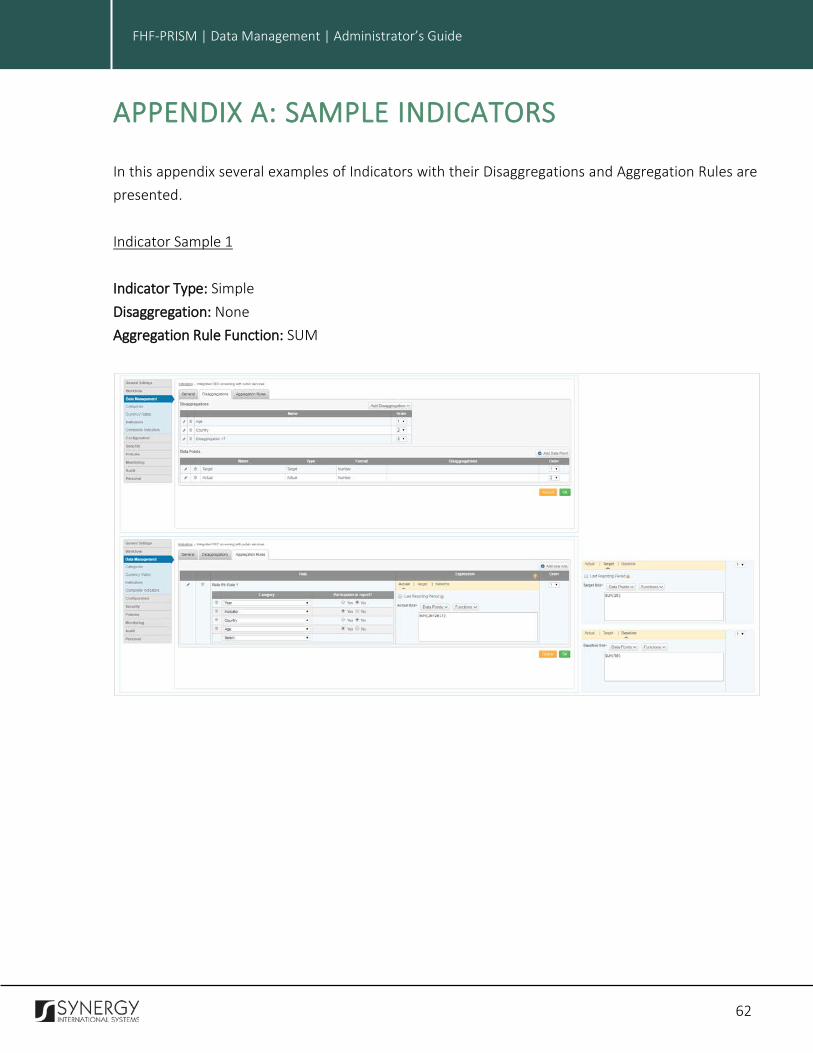
62
INTEGRATED CRIMINAL JUSTICE INFORMATION SYSTEM OF IRAQ | Personal Information | User Manual FHF-PRISM | Data Management | Administrator’s Guide
APPENDIX A: SAMPLE INDICATORS In this appendix several examples of Indicators with their Disaggregations and Aggregation Rules are presented. Indicator Sample 1 Indicator Type: Simple Disaggregation: None Aggregation Rule Function: SUM

63
INTEGRATED CRIMINAL JUSTICE INFORMATION SYSTEM OF IRAQ | Personal Information | User Manual FHF-PRISM | Data Management | Administrator’s Guide
Indicator Sample 2 Indicator Type: Simple Disaggregation: None Aggregation Rule Formula: MAX

64
INTEGRATED CRIMINAL JUSTICE INFORMATION SYSTEM OF IRAQ | Personal Information | User Manual FHF-PRISM | Data Management | Administrator’s Guide
Indicator Sample 3 Indicator Type: Delayered Disaggregation: Age Aggregation Rule Formula: LAST


![HWZVSXe jdRfZe - BSH Hausgeräte *@?450>59B 1@JCEAC7B ˇ@JCEAC7 D7B CEC:5E1C01B A fhf]XhTfST cdbfgTgXoX\ gZ fhf]XhR fTe Tcn YZ_\Qe ]TgP gZ _XgTibdP;^T gT jdZf\_bcb\bo_X`T h^\]P fhf]XhTfSTe](https://img.pdfslide.us/doc/110x75/5aab9a517f8b9a693f8c1c7b/hwzvsxe-jdrfze-bsh-hausgerte-45059b-1jceac7b-jceac7-d7b-cec5e1c01b-a-fhfxhtfst.jpg)